- Prerequisites
- Step 1: Create a bundle in the Mobile center
- Step 2. [Optional] Configure push notifications
- Step 3. [Optional] Build and release mobile application
- Troubleshooting
- Next steps
Welcome! This guide walks you through creating and configuring your own ThingsBoard PE mobile application from scratch for your ThingsBoard PE instance.
Before you begin, choose the mobile app version that matches your ThingsBoard platform using the compatibility matrix. Using incompatible versions is the most common cause of sign‑in issues or unexpected behavior.
Prerequisites
- Access to a ThingsBoard PE instance. The easiest way is to use ThingsBoard Cloud. Alternatively, install ThingsBoard PE using the official installation guide.
- Prepare the environment for building the ThingsBoard PE mobile application:
- Install the Flutter SDK version that corresponds to your app version (see the compatibility matrix).
- (Recommended) Configure your IDE (e.g., Visual Studio Code) for Flutter development.
- If you're new to Flutter, review the “Write your first Flutter app” tutorial.
Step 1: Create a bundle in the Mobile center
The Mobile center is your control hub to create, configure, and manage mobile apps. It lets you quickly launch a mobile app tailored to your ThingsBoard PE platform.
Create a new bundle
A bundle contains both your Android and/or iOS app configurations — including OAuth 2.0 settings , layout preferences, and self registration options — all in one place for easier setup.
Add a new bundle:
- Go to the “Mobile center” page.
- On the “Bundle” tab, click the “+ Add bundle” button in the top-right corner.
The create bundle dialog opens.

Go to the “Mobile center” page → “Bundle” tab, then click “+ Add bundle” in the upper-right corner.
Basic settings
- Enter a bundle title.
- Click “Create new” next to your target mobile platform (Android or iOS).
This opens the Add application dialog:- Enter the application package name.
- An Application Secret will be generated automatically (you can also set your own).
- Set the Published application status – application is ready for release.
- (Optional) Specify minimum and latest app versions + release notes.
- Add store information:
- for Android:
- Google Play Store link.
- SHA256 certificate fingerprints.
- for iOS:
- App Store link.
- App ID.
- for Android:
- Click “Add” to save and continue.
- Then click “Next”.

Click “Create new” in the appropriate section (Android Application or iOS Application).

Android Application. Enter the application package name. Remember autogenerated “Application Secret” or input your own. Specify application statuses. Optionally, specify the minimum and latest application versions along with release notes for each. Specify store information: link to the ThingsBoard PE Mobile Application in the Google Play Store, and SHA256 certificate fingerprints. Click “Add”.

iOS Application. Enter the application package name. Remember autogenerated “Application Secret” or input your own. Specify application statuses. Optionally, specify the minimum and latest application versions along with release notes for each. Specify store information: link to the ThingsBoard PE Mobile Application in the App Store, and App ID. Click “Add”.

Click “Next”.
Optional: Authentication & Layout
-
OAuth 2.0 providers — Configure external OAuth for the ThingsBoard PE mobile app if required. Click “Next” when done.
-
Configure layout — Customize the navigation menu for quick access to features and dashboards. Add menu items, set icons/labels, and reorder entries. Click “Add” to finish creating the package.
-
Self registration - Customize the self registration page for your new customers.
Configure authentication in the ThingsBoard PE mobile app using external OAuth 2.0 providers, , configure the layout for quick access to the features and dashboards you use most frequently and customize the self registration page for your new customers.

Configure authentication in the {{appPrefix}} mobile app using external OAuth 2.0 providers. Then click “Next” to continue.

Configure the layout for quick access to the features and dashboards you use most often. Add new menu items, customize icons and labels, and reorganize the navigation menu of the ThingsBoard PE mobile app to fit your needs. Click “Next” to continue.

Customize the self registration page for your new customers. Click “Add” to finalize adding the bundle.
Click “Add” to finalize adding the bundle.
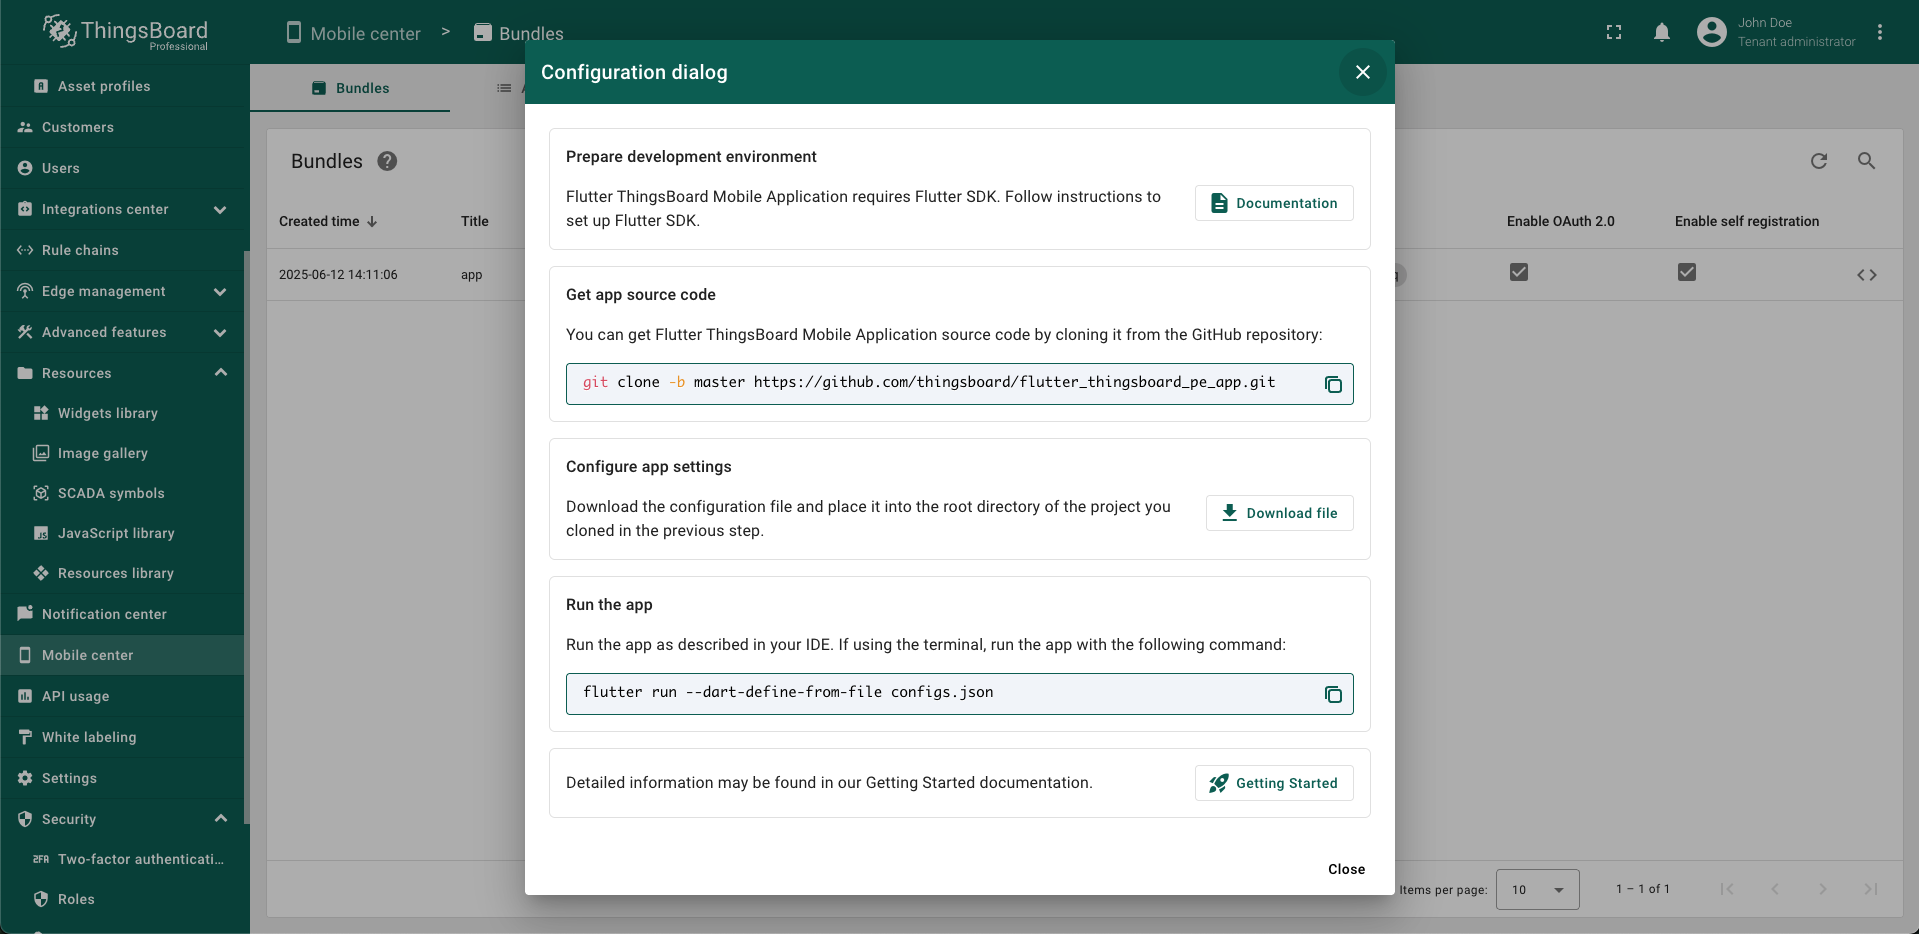
Configuration dialog
After adding the bundle, a step-by-step dialog appears to guide you through the remaining setup and deployment steps. Follow it carefully to complete ThingsBoard PE mobile application configuration.
Available since ThingsBoard PE 4.2 and mobile app 1.7
Starting with ThingsBoard PE 4.2 and mobile app 1.7, the app configuration flow has been significantly improved. You can now download a configuration file directly from the platform and place it in the root of app's codebase — no manual edits required.
When using 1.7 app version with pre 4.2 platform version, config file must be created manually, please follow this github ticket for the instructions.
Important:
When building or running the app, include the Dart define flag:
1
flutter run --dart-define-from-file configs.json
You can maintain multiple configuration files by using different names. Pass the appropriate filename to --dart-define-from-file flag.
Finnally, depending on your mobile platform (Android or iOS), you should see a result similar to the following:
 Android
 iOS
iOS
Tip: On first launch on a physical device, startup can take a while. After that, use hot reload for quick updates.
If launching from the console with flutter run, press r to hot reload.
Step 2. [Optional] Configure push notifications
Our system leverages Firebase to send notifications from ThingsBoard instance directly to mobile application. This setup requires each platform tenant to configure Firebase specifically for their account to begin the distribution of notifications to their mobile app.
Step 2.1 Create Firebase project
Next, we will walk through step-by-step how to create a Firebase project, and within it, we will generate a private key. This key is required for securely connecting your ThingsBoard instance to Firebase services.
Please note: for ThingsBoard CE, only the system administrator can configure mobile settings. For ThingsBoard PE - the tenant can use the system administrator's configuration or specify their own.
So let's get started:
-
Sign in to your Firebase account. Once you're in, click the “Create a project” button;
-
Enter your desired project name in the field provided, then click “Continue”;
-
Next up is deciding on Google Analytics for your project. You have the option to keep it enabled or disable it if you prefer not to use it. Once you've made your choice, click “Continue”;
-
After setting up Google Analytics, confirm your project creation by clicking the “Create project” button;
-
Your Firebase project is now ready. Click “Continue” to open the Firebase project control panel;
-
In the menu on the left, go to “Project Overview” -> “Project settings” page;
-
In the “Project settings” page, switch over to the “Cloud Messaging” tab. Here, ensure the Firebase Cloud Messaging API is enabled to use messaging features;
-
Head over to the “Service accounts” tab next. Within the “Admin SDK configuration snippet”, select the “Java” section. Then, click on the “Generate new private key” button. This action will generate a private key for your service account - crucial for secure server communication;
-
Confirm the generation of your private key by clicking on the “Generate key” button. Keep this key safe, as you'll need it for the ThingsBoard server-side operations;
-
Sign in to your ThingsBoard instance and open the “Settings” page. Navigate to the “Notifications” tab, and uncheck the “Use system mobile settings” box (if you log in as a tenant) in the “Mobile settings” section. Here, upload the private key file you generated in the Firebase project and click “Save” to finalize the configuration.
{:target="_blank"} account. Once you're in, click the "Create a project" button;](https://img.thingsboard.io/mobile/pe/firebase-new-project-1-pe.png)
Sign in to your Firebase account. Once you're in, click the “Create a project” button;

Enter your desired project name in the field provided, then click “Continue”;

Next up is deciding on Google Analytics for your project. You have the option to keep it enabled or disable it if you prefer not to use it. Once you've made your choice, click “Continue”;

After setting up Google Analytics, confirm your project creation by clicking the “Create project” button;

Your Firebase project is now ready. Click “Continue” to open the Firebase project control panel;

In the menu on the left, go to “Project Overview” -> “Project settings” page;

In the “Project settings” page, switch over to the “Cloud Messaging” tab. Here, ensure the Firebase Cloud Messaging API is enabled to use messaging features;

Head over to the “Service accounts” tab next. Within the “Admin SDK configuration snippet”, select the “Java” section. Then, click on the “Generate new private key” button. This action will generate a private key for your service account - crucial for secure server communication;

Confirm the generation of your private key by clicking on the “Generate key” button. Keep this key safe, as you'll need it for the ThingsBoard server-side operations;

Sign in to your ThingsBoard instance and open the “Settings” page. Navigate to the “Notifications” tab, and uncheck the “Use system mobile settings” box (if you log in as a tenant) in the “Mobile settings” section. Here, upload the private key file you generated in the Firebase project and click “Save” to finalize the configuration.
Step 2.2 Add Firebase to your mobile application
To integrate Firebase into the mobile application, you'll need to complete the initial two steps outlined in the “Add Firebase to your Flutter app” guide available at Firebase’s official documentation.
[Only for IOS] Apple app configuration
Upload APNs authentication key to Firebase.
- First, create APNs authentication key in the Apple Developer Member Center using Apple's official documentation;
- Inside your Firebase project, go to the “Cloud Messaging” tab of the “Project Settings” page. Scroll down and found “Apple app configuration” section;
- In “APNs authentication key” click the “Upload” button;
- Add APNs authentication key and enter “Key ID” and “Team ID” in the corresponding fields;
- Then click “Upload” button.
The APNs authentication key is uploaded.
{:target="_blank"} project, go to the "Cloud Messaging" tab of the "Project Settings" page. Scroll down and found "Apple app configuration" section;](https://img.thingsboard.io/mobile/apple-app-configuration-1.png)
Inside your Firebase project, go to the “Cloud Messaging” tab of the “Project Settings” page. Scroll down and found “Apple app configuration” section;

In “APNs authentication key” section, click the “Upload” button;
{:target="_blank"} using [Apple's official documentation](https://developer.apple.com/help/account/manage-keys/create-a-private-key/){:target="_blank"}. Now add this key and enter "Key ID" and "Team ID" in the corresponding fields. Then click "Upload" button;](https://img.thingsboard.io/mobile/apple-app-configuration-3.png)
Create “APNs authentication key” in the Apple Developer Member Center using Apple's official documentation. Now add this key and enter “Key ID” and “Team ID” in the corresponding fields. Then click “Upload” button;

APNs authentication key is uploaded.
Step 2.3 Check project configuration
After successfully completing these steps, make sure that your project contains the following file:
- If your ThingsBoard mobile application is intended for iOS:
1
ios/Runner/GoogleService-Info.plist
- If your ThingsBoard mobile application is intended for Android:
1
android/app/google-services.json
Please note: if the flutter_thingsboard_pe_app project is currently running, please stop it and proceed with a rebuild.
To confirm that Firebase has been integrated properly, run your application.
1
flutter run --dart-define-from-file configs.json
If everything is configured correctly, the notifications menu in your mobile application should be active, as shown in the screenshot below.
Learn more about notifications and how to configure them here.
Step 3. [Optional] Build and release mobile application
If you need to build and release ThingsBoard PE mobile application for iOS or Android, please refer to this guide.
Troubleshooting
If you’re running into issues while building or running your mobile application, here’s a detailed guide to help you resolve the most common problems.
App won't build
ThingsBoard PE mobile app supports specific Flutter versions. Our release isn't always aligned with Flutter's official releases, so a newer Flutter version may not yet be compatible.
Always use the exact Flutter version specified for your app version. Otherwise, builds might fail or behave unexpectedly.
How to check the required Flutter version?
- Check the release notes at the following link.
Example:
2. Check the .fvmrc file in the project root:
You'll find a file like this:
1
2
3
{
  "flutter": "3.24.4"
}
That means we're currently using Flutter 3.24.4.
Installing the correct flutter version
Option 1: Use FVM (Flutter version manager) [Recommended]
What is FVM?
FVM helps you manage multiple Flutter versions across projects. It lets you manage multiple versions of Flutter and easily switch between them per project. This is super useful when testing new Flutter releases or contributing to different projects.
To install FVM follow the official installation guide.
Usage: Use Flutter commands prefixed with fvm, like this:
Examples:
1
2
fvm flutter run --dart-define-from-file configs.json
fvm flutter build apk --dart-define-from-file configs.json
Option 2: Manually set the global Flutter version [Not recommended]
If you only work on one project, you can manually set the global Flutter version:
1
2
cd ~/dev/flutter
git checkout 3.24.4
Warning “Push notifications are not configured”
If you see a warning like:
“Push notifications are not configured”
This usually means Firebase wasn't set up correctly.
Fix:
Note: You must have completed Step 2 in the setup guide first.
1. Delete the file: lib/firebase_options.dart
2. Re-run the FlutterFire CLI:
1
flutterfire configure
3. Ensure the firebase_options.dart file is regenerated and contains configuration for Android and iOS, or both.
Dashboard not loads
The mobile app doesn't really load the dashboard itself — the ThingsBoard platform handles all the real loading. The mobile app simply opens a WebView, but the app and the platform must be able to communicate with each other.
First, check the log. Look for this log message:
1
Invoked tbMobileReadyHandler
-
If it's missing, the platform isn't signaling the app that it's ready: In that case, open an issue in the ThingsBoard platform repository.
-
If you see the log but the dashboard still won't load:In that case, open an issue in the PE mobile repository.
Be as detailed as possible and include credentials to your instance privately via ThingsBoard Support (never post publicly).
Can't sign in?
Check the compatibility matrix between your platform and mobile app versions. Mismatches here are the most common cause of sign-in issues.
If versions are aligned and you're still stuck:
-
Include:
- Platform version
- Mobile app version
- Logs/screenshots
- Device details (OS, version)
There's a compatibility matrix between the TB platform and mobile app versions: Check it here
It's the most common reason for sign-in issues.
If your versions are aligned and it still doesn't work — open a GitHub issue and include all the relevant details.
Anything else?
These are the most frequent issues — but if you're facing something new:
Open a GitHub issue. Include all the context you can (screenshots, logs, versions, platform setup, etc.)
We'll do our best to help!
Next steps
- Customize your app - Learn how to customize your ThingsBoard PE Mobile Application to meet your requirements.
- Build and release ThingsBoard PE Mobile Application - Learn how to build release and publish your version of ThingsBoard PE Mobile Application to Google Play or App Store.