Badge Tracker
Badge Tracker
Lansitec
- Platform
- ThingsBoard
- Hardware Type
- Trackers
- Connectivity
- LoRaWAN
- Industry
- Security, Smart Buildings
- Use Case
- Fleet Tracking, Health Care
Badge Tracker achieve seamless personnel and asset tracking with the Lansitec Badge Tracker.
Combining GNSS, Bluetooth 5.0, and LoRaWAN technology, this sleek device provides accurate real-time positioning both indoors and outdoors—perfect for managing workforce, visitors, and critical assets across large facilities.
The built-in 3-axis accelerometer intelligently detects movement or falls, conserving battery when the device is idle and alerting you to unauthorized or emergency situations.
With a maximum of five months standby time and no additional network fees, the Badge Tracker offers a cost-effective, high-precision solution for securing sensitive areas, optimizing resource usage, and improving operational workflows.
Prerequisites
To continue with this guide we will need the following:
- Badge Tracker
- LoRaWAN Gateway
- Bluetooth Beacon
- Network Server account
-
ThingsBoard account at
YOUR_TB_HOST
Configuration
Only ThingsBoard Cloud works when using direct communication from this device to ThingsBoard via MQTT.
You may use ThingsBoard PE on-premises or ThingsBoard Cloud when using ThingsBoard Integrations.
To create an integration with a network server please choose first one of the supported network servers:
Add a gateway on the Chirpstack
We need to add a gateway on the Chirpstack.
To add a gateway, follow next steps:
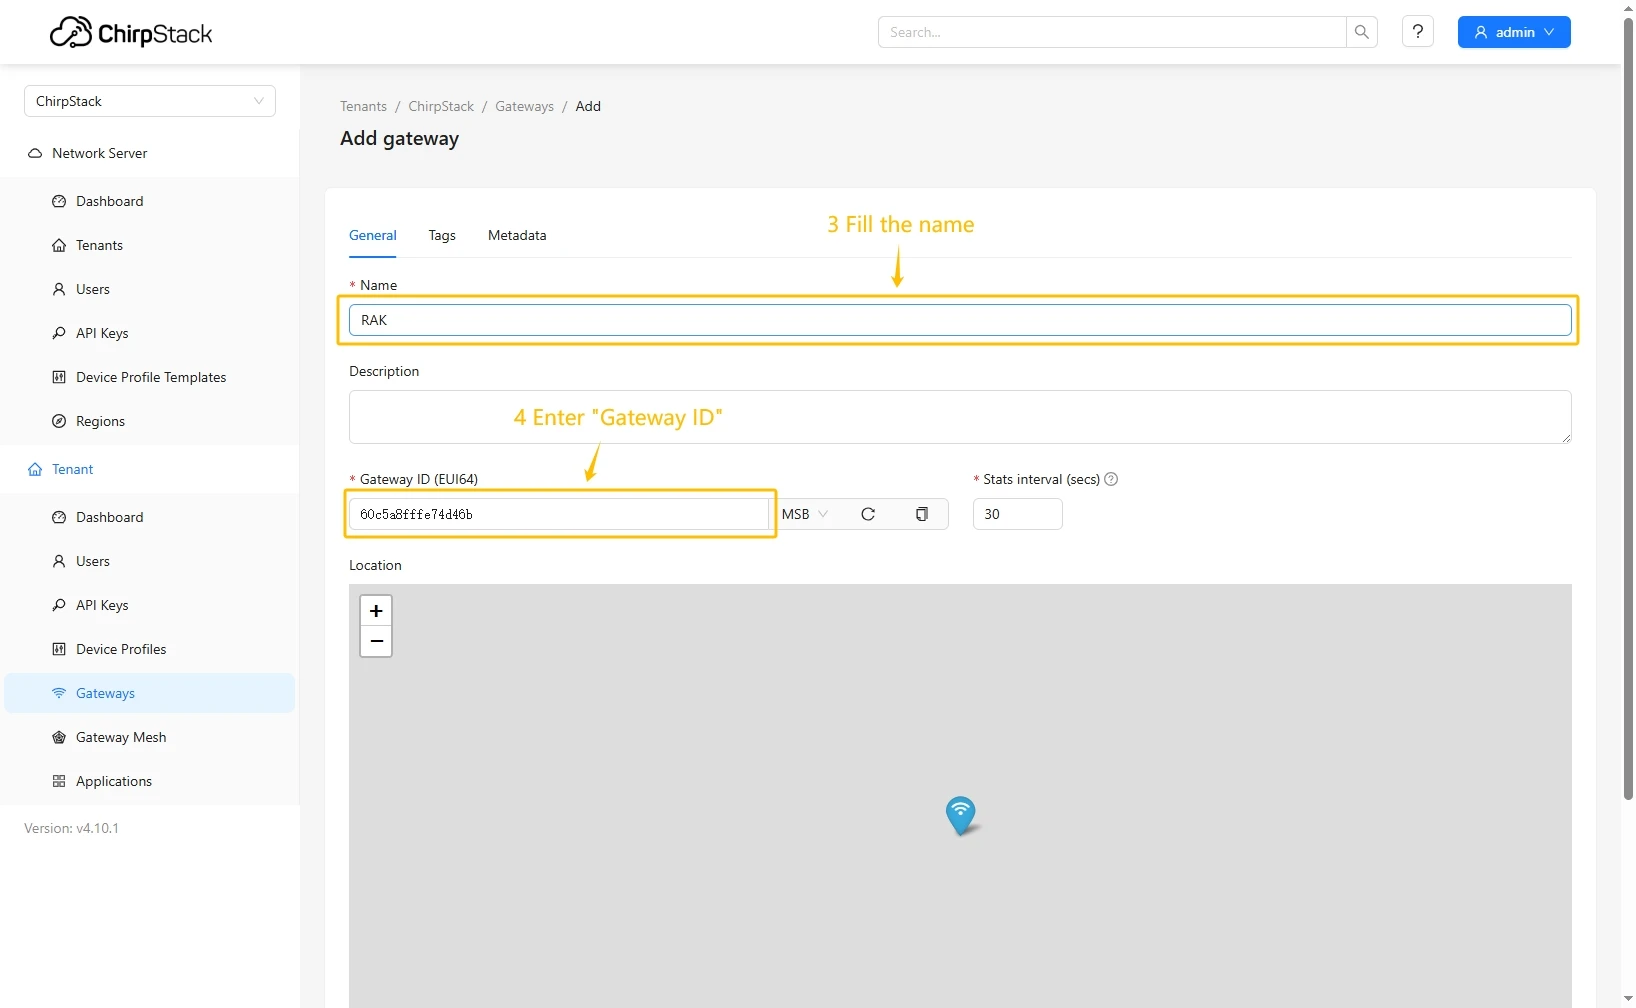
- Login to Chirpstack server. Go to the “Gateways” page and click on the “Add gateway” button.
- Fill name, Gateway ID (It will be different, you can find it on the gateway control panel) with your data, scroll down and click on the “Submit” button.
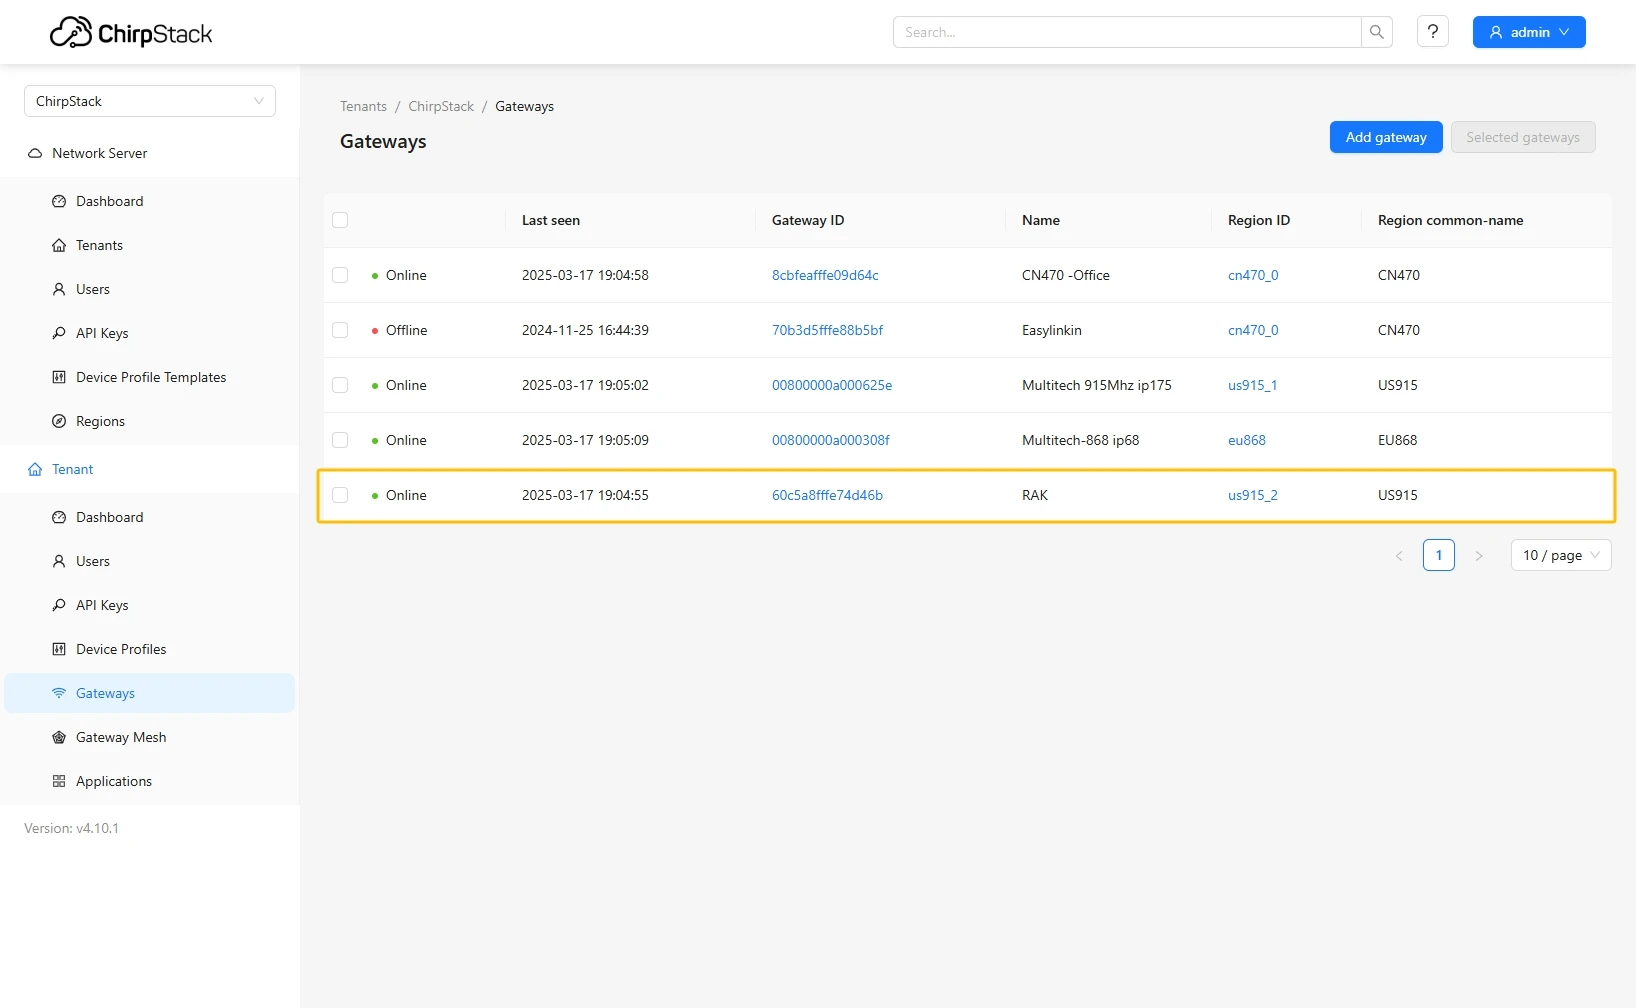
- The gateway is added. In gateways tab you can see its status.

Add device profile on the Chirpstack
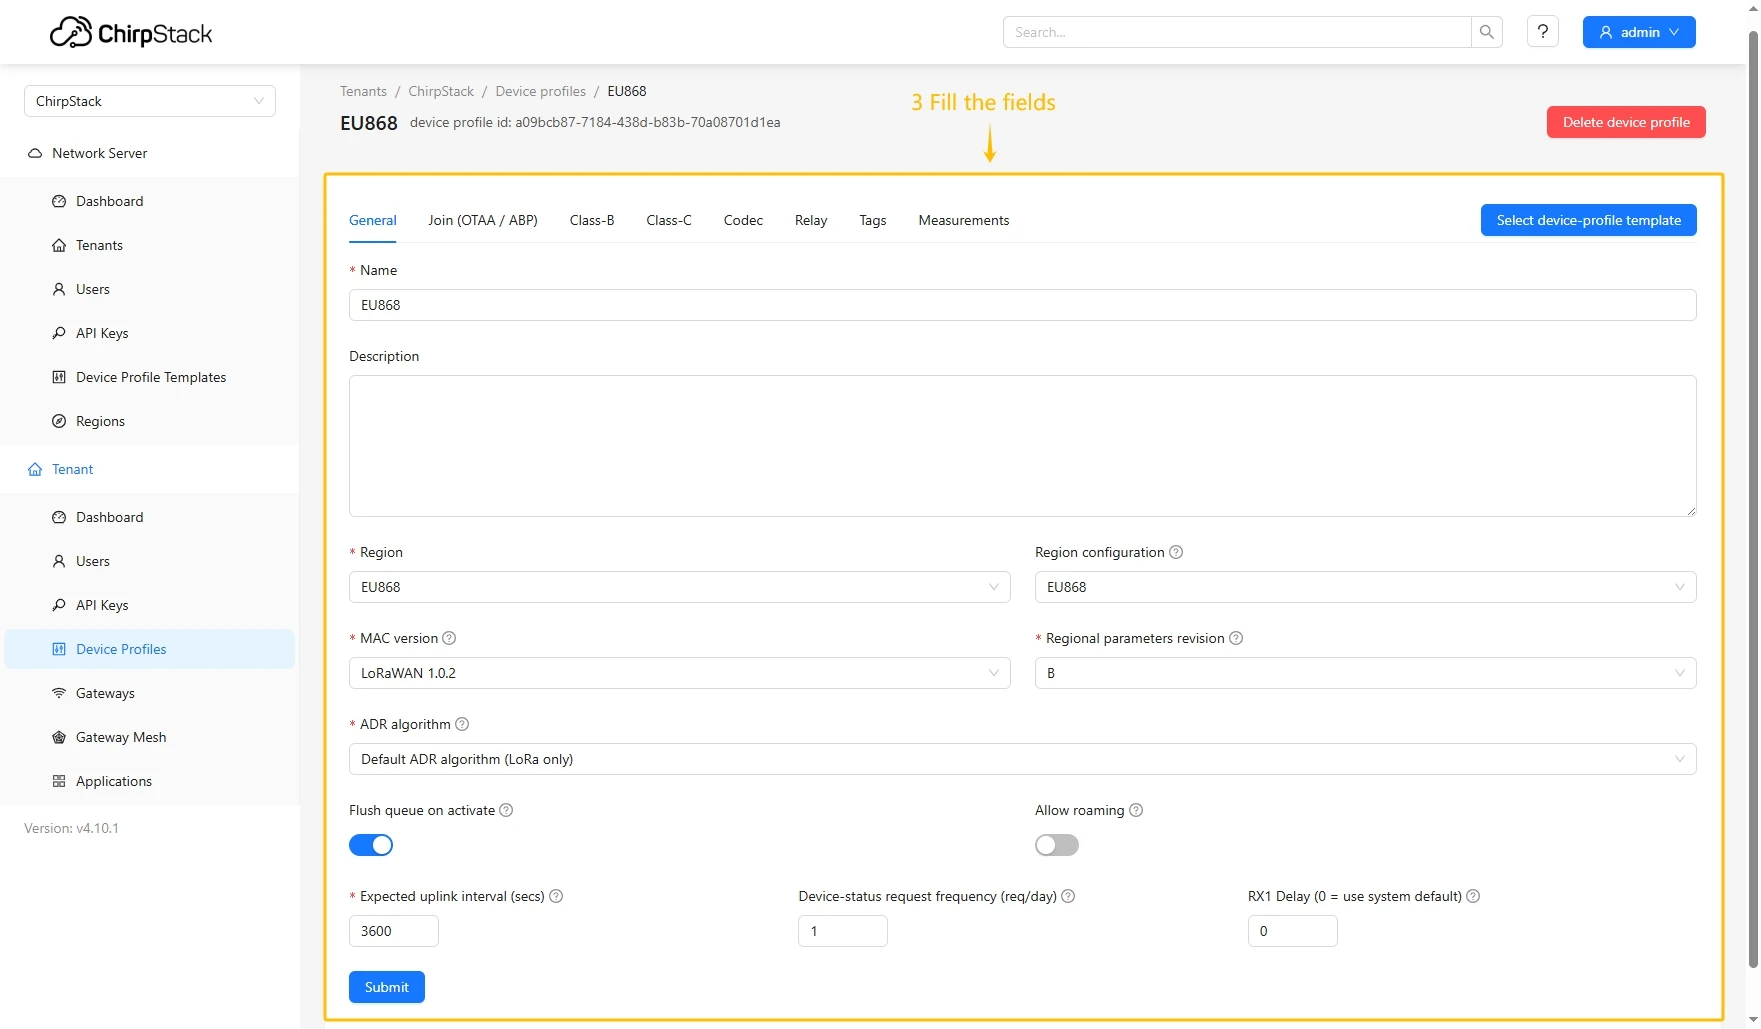
- Login to Chirpstack server. Go to the “Device profiles” page and click on Add device profile button.
- Fill in the required fields.
- Go to the Codec tab, select JavaScript functions from the Payload codec dropdown menu, and paste the decoder function. Then click the Submit button.

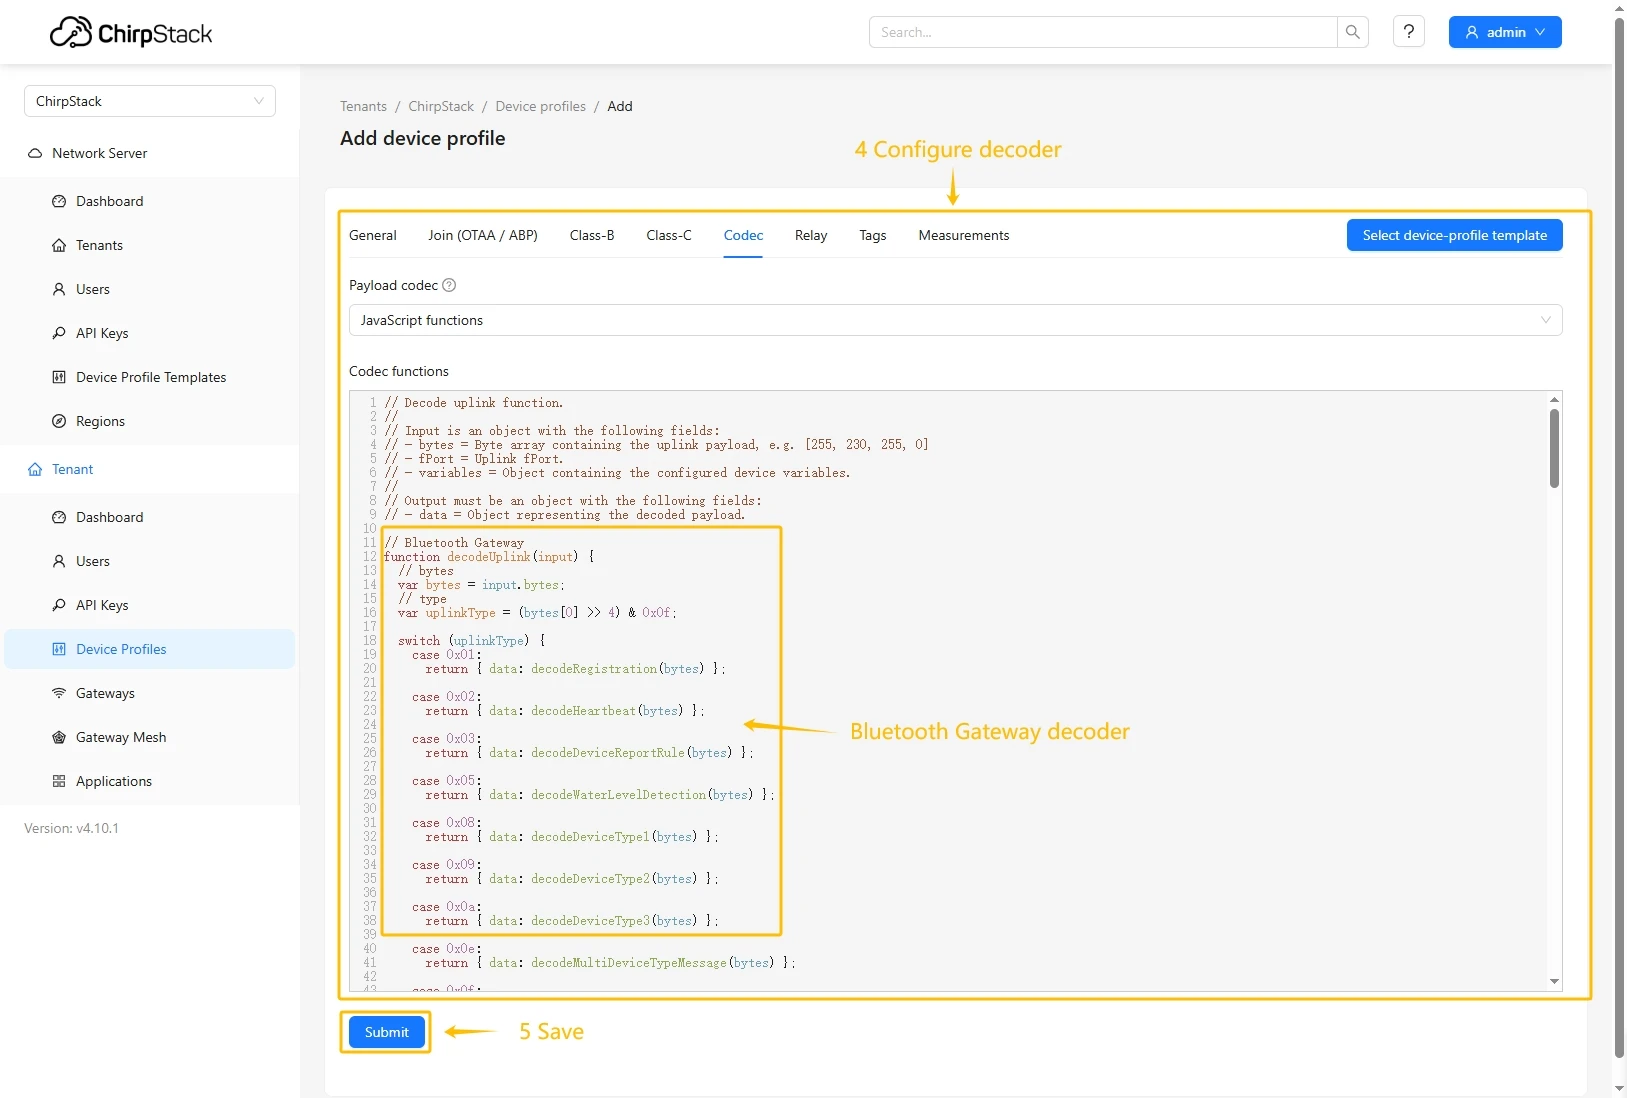
Decode function:
// Decode uplink function.//// Input is an object with the following fields:// - bytes = Byte array containing the uplink payload, e.g. [255, 230, 255, 0]// - fPort = Uplink fPort.// - variables = Object containing the configured device variables.//// Output must be an object with the following fields:// - data = Object representing the decoded payload.// Badge Tracker decoderfunction decodeUplink(input) {// bytes    var bytes = input.bytes;// type    var uplinkType = (bytes[0] >> 4) & 0x0f;    switch (uplinkType) {        case 0x01:            return {data: decodeRegistration(bytes)};        case 0x02:            return {data: decodeHeartbeat(bytes)};        case 0x03:            return {data: decodeGNSSPosition(bytes)};        case 0x07:            return {data: decodeBeacon(bytes)};        case 0x08:            return {data: decodeAlarm(bytes)};        default:            return null;    }}
// type: 0x01 Registrationfunction decodeRegistration(bytes) {    var data = {};    data.type = "Registration";    data.adr = ((bytes[0] >> 3) & 0x1) == 0 ? "OFF" : "ON";    data.power = ((bytes[2] >> 3) & 0x1f) + "dBm";    data.dr = (bytes[3] >> 4) & 0x0f;    data.gnssEnable = ((bytes[3] >> 3) & 0x01) == 0 ? "Disable" : "Enable";    var positionModeValue = (bytes[3] >> 1) & 0x03;    if (positionModeValue == 0) {        data.positionMode = "Period";    } else if (positionModeValue == 1) {        data.positionMode = "Autonomous";    } else if (positionModeValue == 2) {        data.positionMode = "Demand";    }    data.bleEnable = (bytes[3] & 0x01) == 0 ? "Disable" : "Enable";    data.blePositionReportInterval =        (((bytes[4] << 8) & 0xff00) | (bytes[5] & 0xff)) * 5 + "s";    data.gnssPositionReportInterval =        (((bytes[6] << 8) & 0xff00) | (bytes[7] & 0xff)) * 5 + "s";    data.heartbeatReportInterval = (bytes[8] & 0xff) * 30 + "s";    data.version =        (bytes[9] & 0xff).toString(16).toUpperCase() +        "." +        (bytes[10] & 0xff).toString(16).toUpperCase();    data.cfmsg = "1 Confirmed every " + (bytes[11] & 0xff) + " Heartbeat";    data.hbCount = "Disconnect Judgement " + (bytes[12] & 0xff);    data.fallDetection = (bytes[13] & 0xff) * 0.5 + " meters";    return data;}
// type: 0x02 Heartbeatfunction decodeHeartbeat(bytes) {    var data = {};    data.type = "Heartbeat";    data.battery = bytes[1] + "%";    data.rssi = bytes[2] * -1 + "dBm";    data.snr = (((bytes[3] << 8) & 0xff00) | (bytes[4] & 0xff)) / 100 + "dB";    var gnssStateValue = (bytes[5] >> 4) & 0x0f;    if (gnssStateValue == 0) {        data.gnssState = "Off";    } else if (gnssStateValue == 1) {        data.gnssState = "Boot GNSS";    } else if (gnssStateValue == 2) {        data.gnssState = "Locating";    } else if (gnssStateValue == 3) {        data.gnssState = "Located";    } else if (gnssStateValue == 9) {        data.gnssState = "No signal";    }    data.moveState = bytes[5] & 0x0f;    var chargeStateValue = (bytes[6] >> 4) & 0x0f;    if (chargeStateValue == 0) {        data.chargeState = "Power cable disconnected";    } else if (chargeStateValue == 5) {        data.chargeState = "Charging";    } else if (chargeStateValue == 6) {        data.chargeState = "Charge complete";    }    return data;}
// type: 0x03 GNSSPositionfunction decodeGNSSPosition(bytes) {    var data = {};    data.type = "GNSSPosition";// longitude    let longitude =        (bytes[1] << 24) | (bytes[2] << 16) | (bytes[3] << 8) | bytes[4];    data.longitude = hex2float(longitude);// latitude    let latitude =        (bytes[5] << 24) | (bytes[6] << 16) | (bytes[7] << 8) | bytes[8];    data.latitude = hex2float(latitude);// time    let time =        (bytes[9] << 24) | (bytes[10] << 16) | (bytes[11] << 8) | bytes[12];    data.time = timestampToTime((time + 8 * 60 * 60) * 1000);    return data;}
// type: 0x07 Beaconfunction decodeBeacon(bytes) {    const data = {        type: "Beacon",        length: bytes[0] & 0x0f,    };    for (let i = 0; i < data.length; i++) {        const index = 6 + 5 * i;        const major = ((bytes[index] << 8) | bytes[index + 1])            .toString(16)            .toUpperCase()            .padStart(4, "0");        const minor = ((bytes[index + 2] << 8) | bytes[index + 3])            .toString(16)            .toUpperCase()            .padStart(4, "0");        const rssi = bytes[index + 4] - 256 + "dBm";        data["beacon" + (i + 1)] = major + minor;        data["rssi" + (i + 1)] = rssi;    }    return data;}
// type: 0x08 Alarmfunction decodeAlarm(bytes) {    var data = {};    data.type = "Alarm";    var alarmValue = bytes[1] & 0xff;    if (alarmValue === 1) {        data.alarm = "SOS";    } else if (alarmValue === 2) {        data.alarm = "Fall";    } else {        data.alarm = "Unknown";    }    return data;}
function hex2float(num) {    var sign = num & 0x80000000 ? -1 : 1;    var exponent = ((num >> 23) & 0xff) - 127;    var mantissa = 1 + (num & 0x7fffff) / 0x7fffff;    return sign * mantissa * Math.pow(2, exponent);}
function timestampToTime(timestamp) {    const date = new Date(timestamp);    const year = date.getFullYear();    const month = (date.getMonth() + 1).toString().padStart(2, "0");    const day = date.getDate().toString().padStart(2, "0");    const hour = date.getHours().toString().padStart(2, "0");    const minute = date.getMinutes().toString().padStart(2, "0");    const second = date.getSeconds().toString().padStart(2, "0");    return `${year}-${month}-${day} ${hour}:${minute}:${second}`;}
Add a device on the Chirpstack
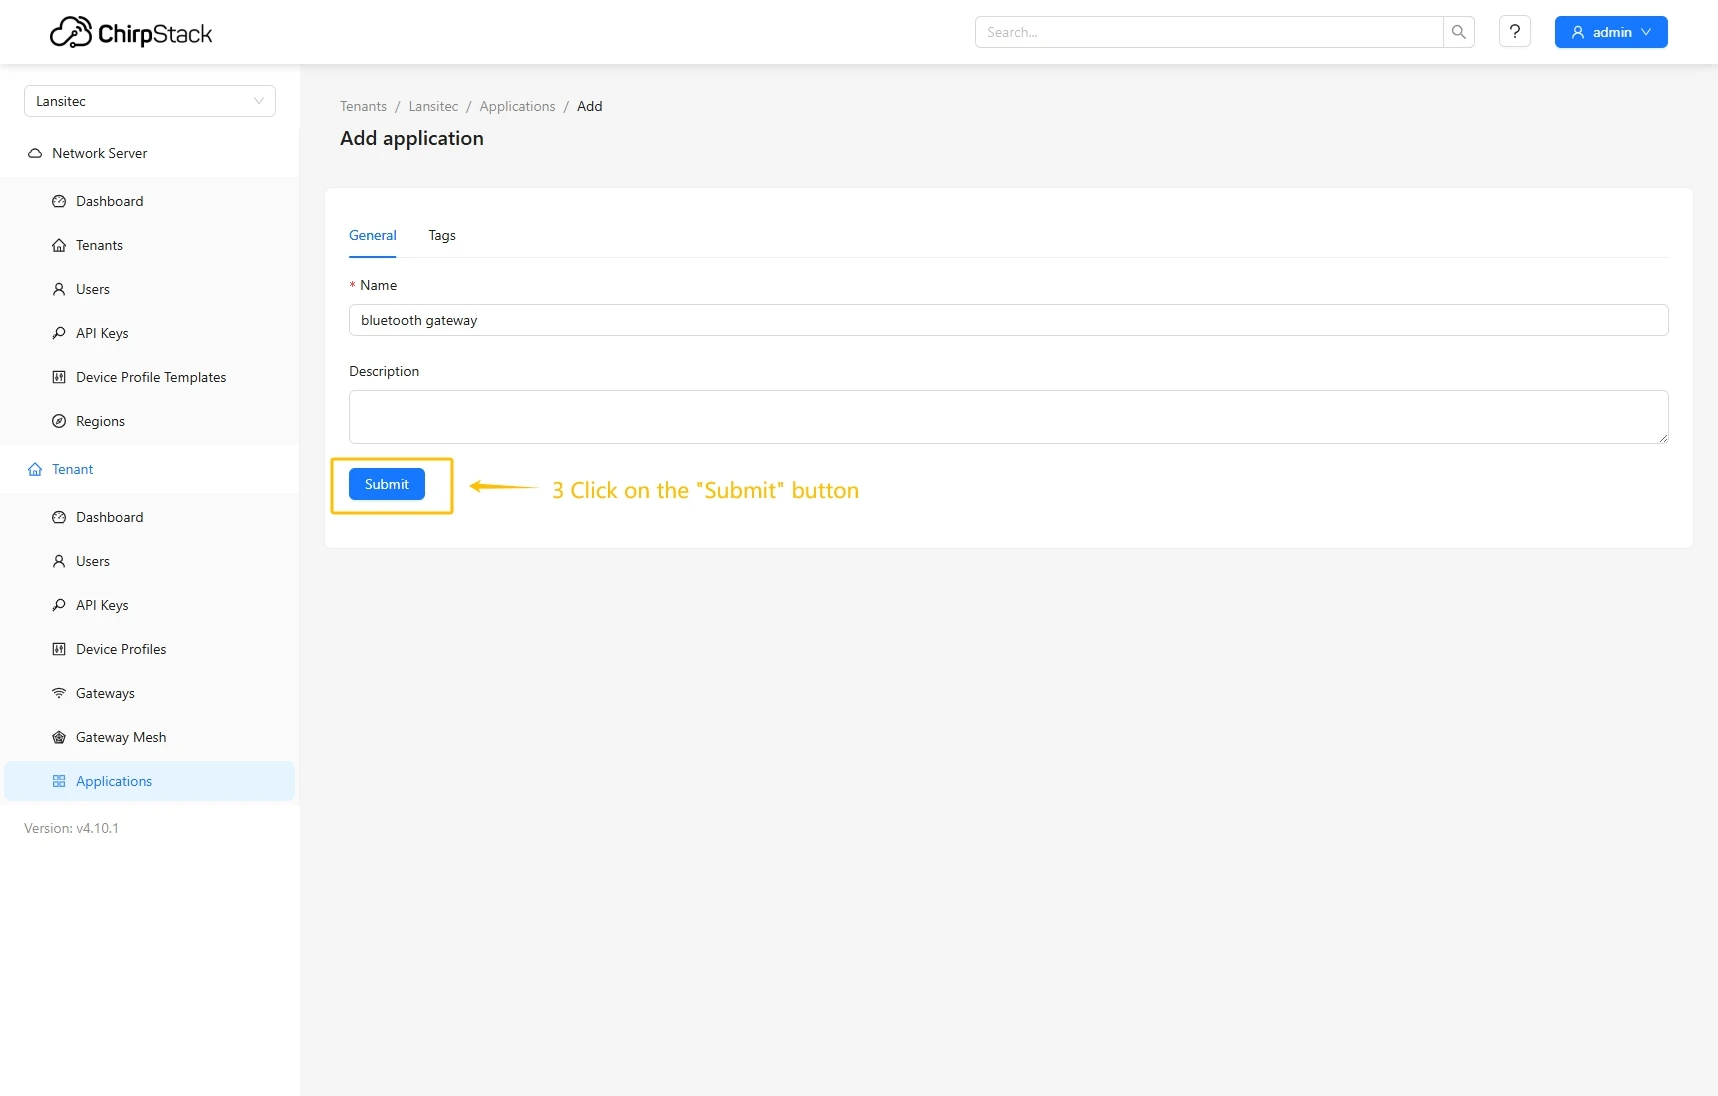
- Go to the Applications page and click on Add application button.
- Enter name and click Submit button.
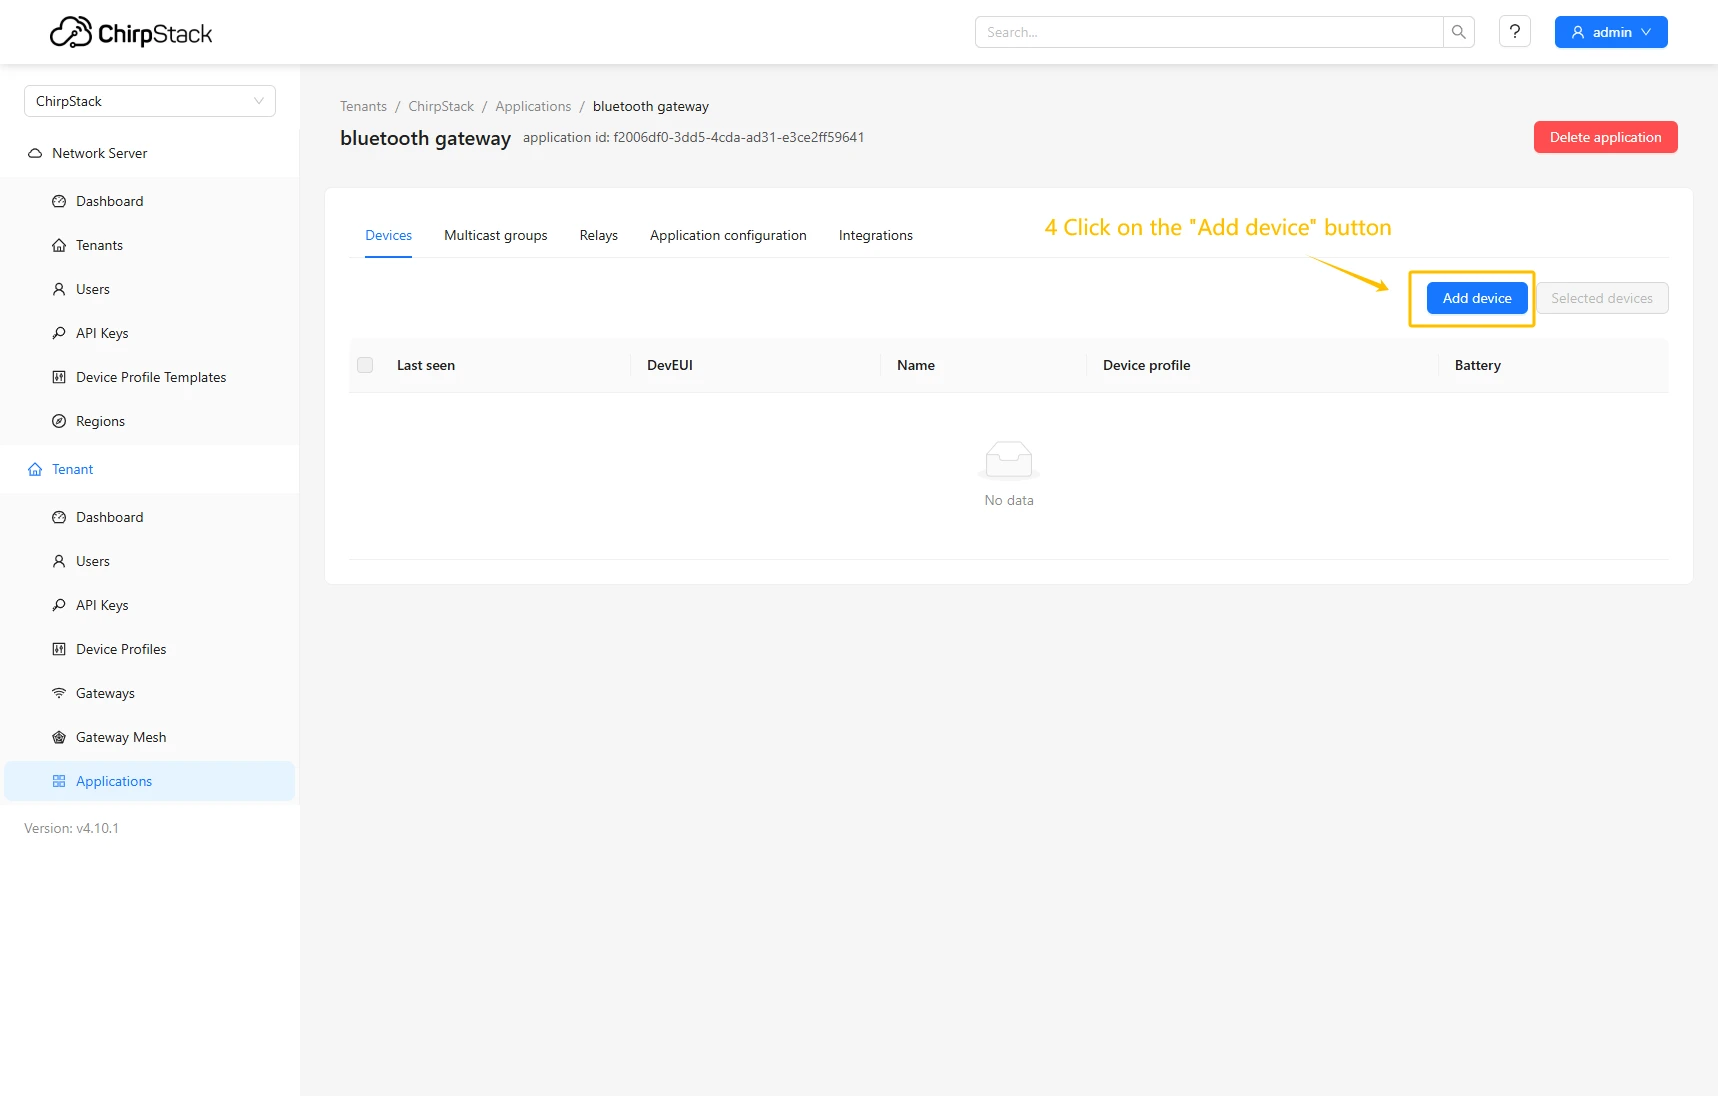
- Click Add device.
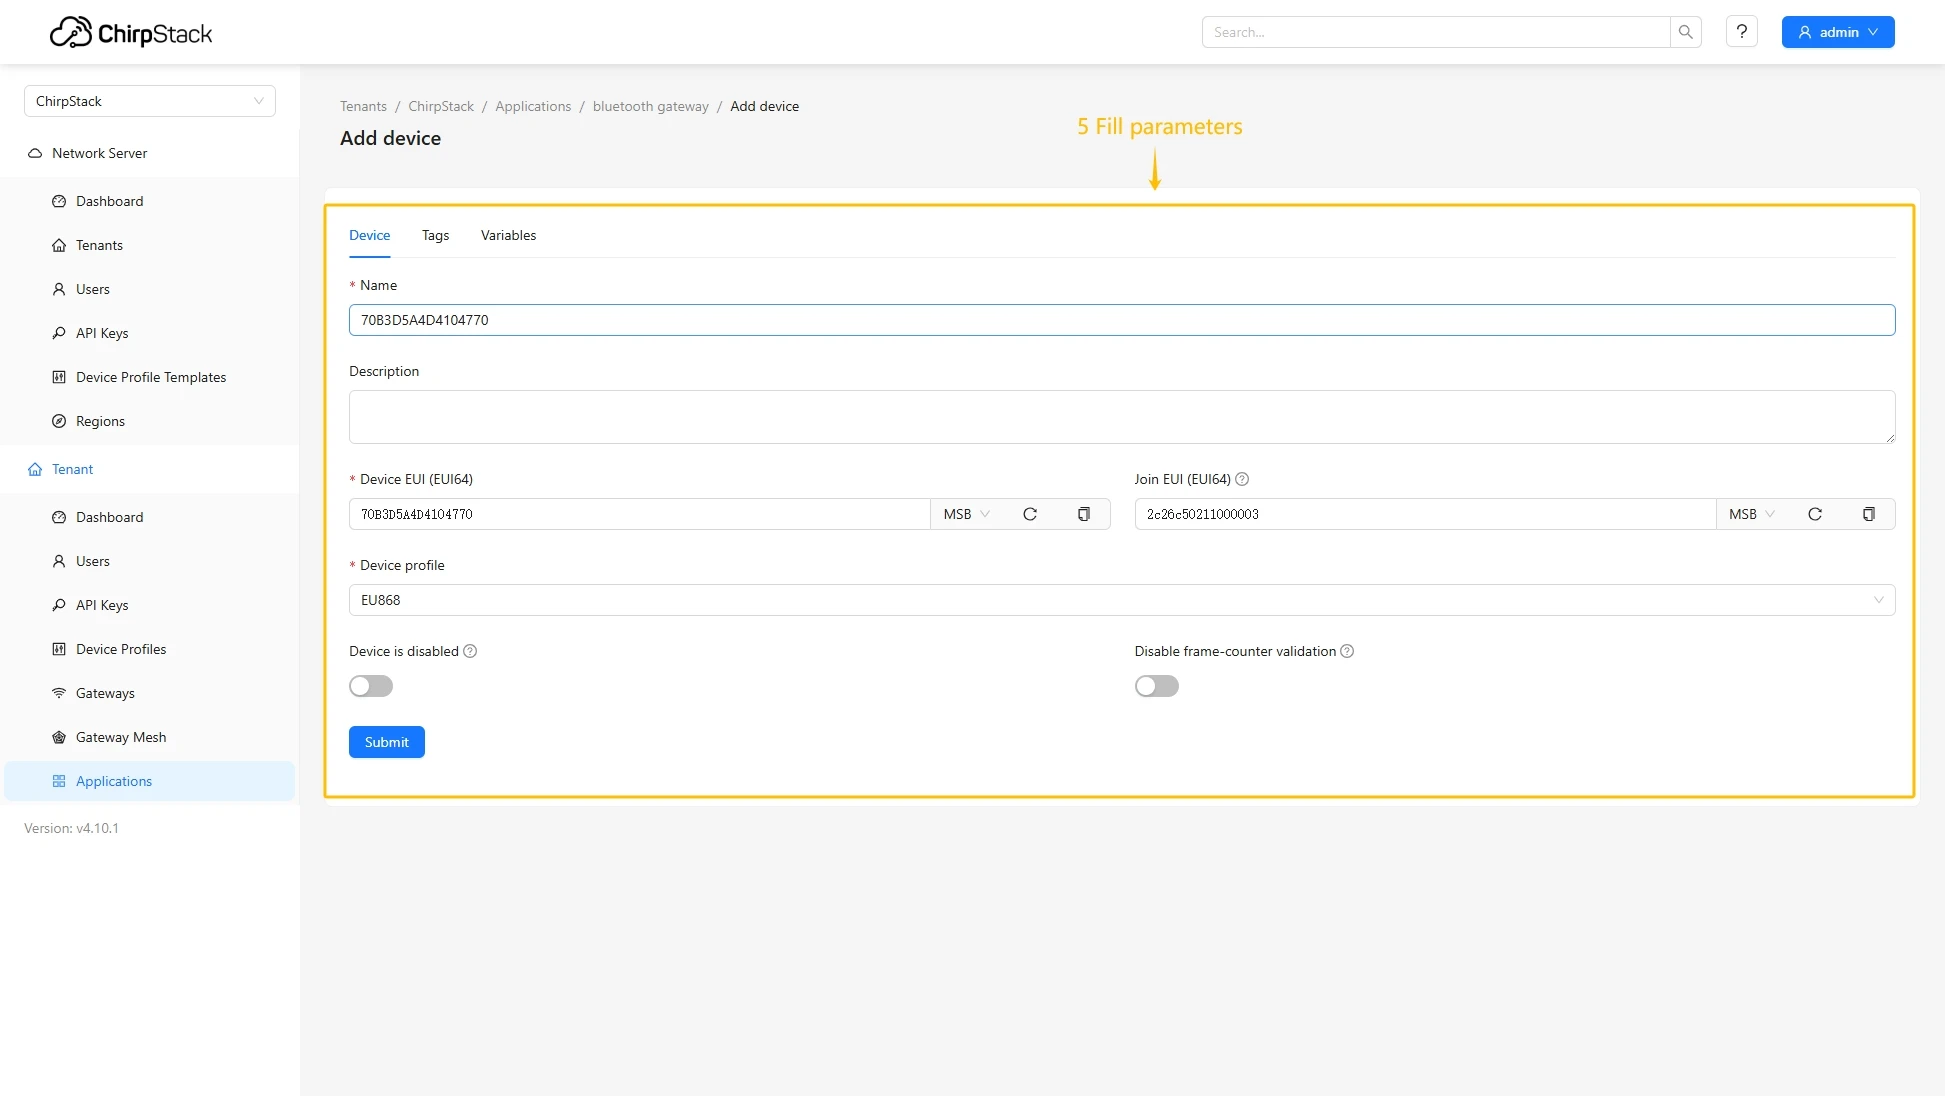
- Fill in the required fields with your device information and specify the previously created device profile.
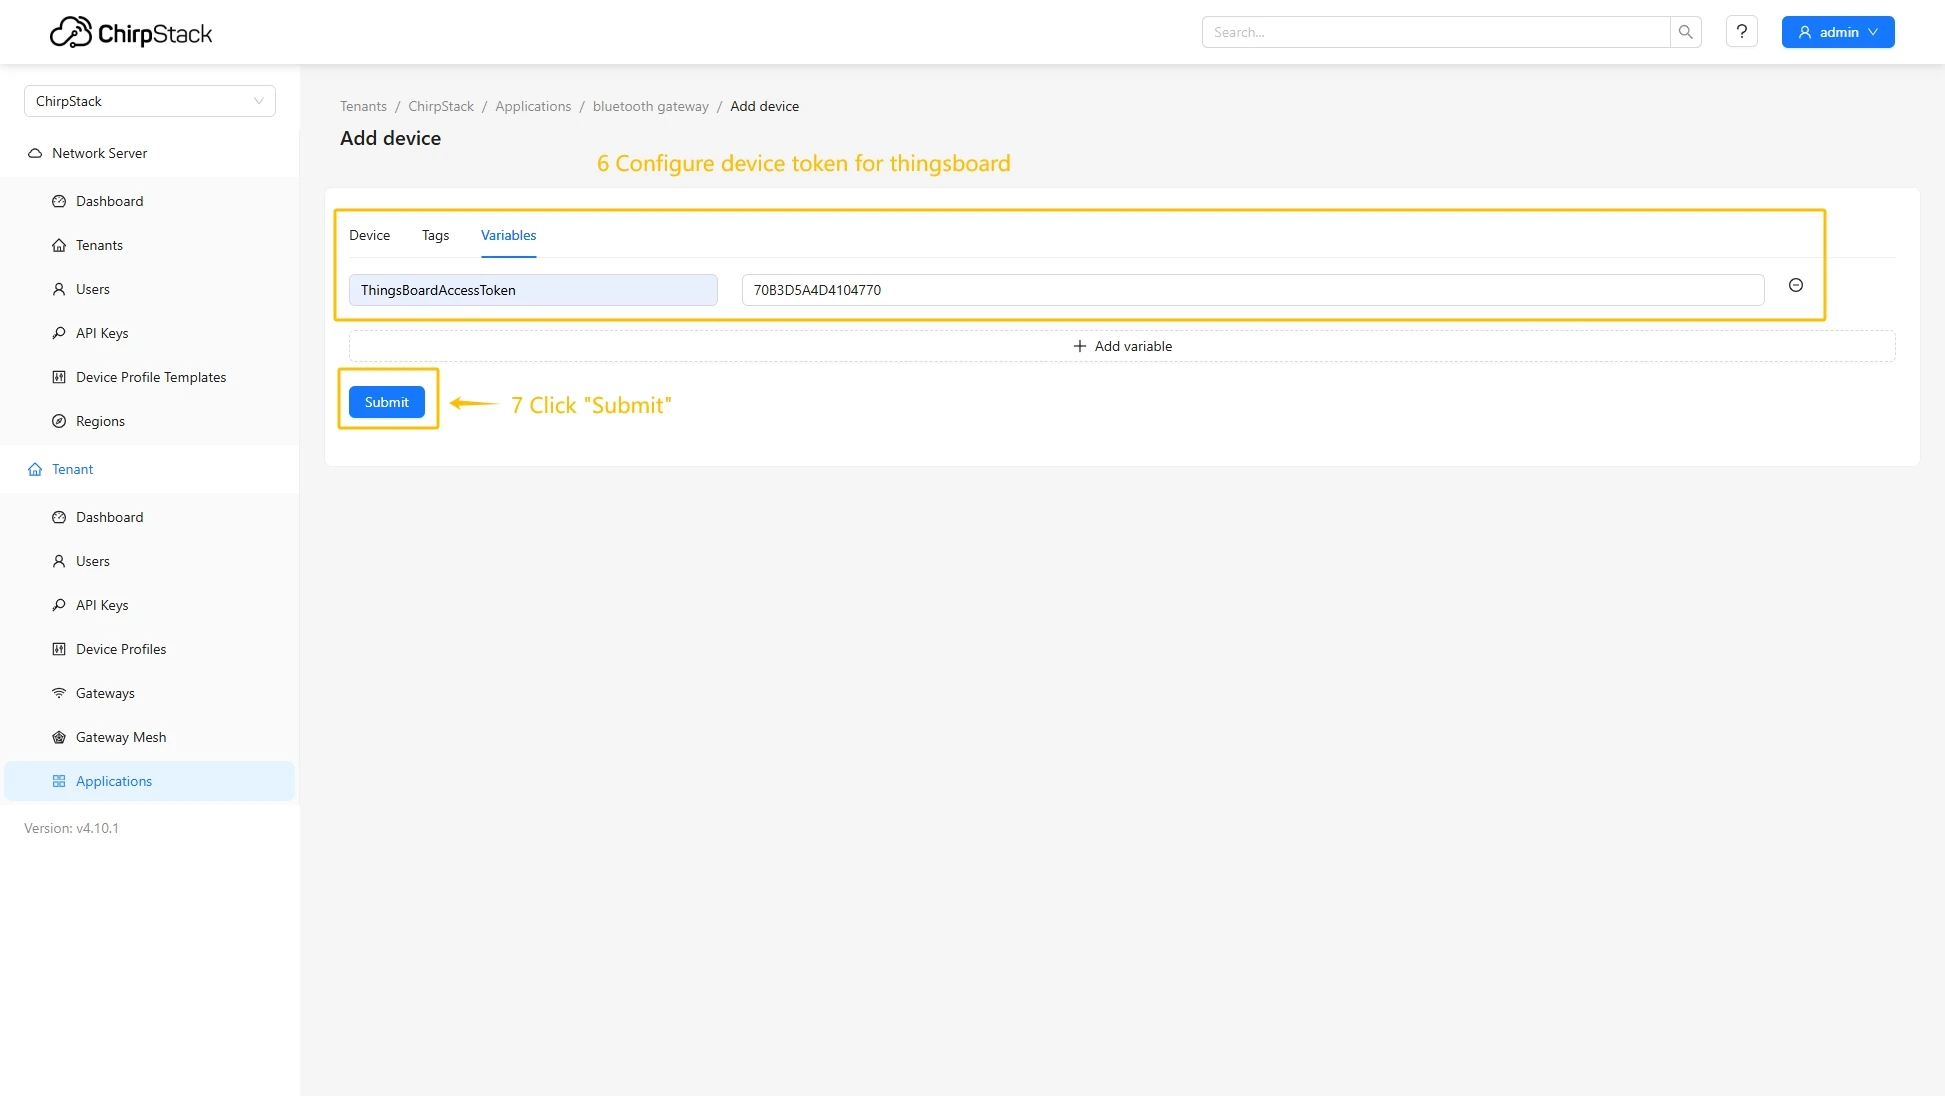
- Go to the Variables tab, enter the value for ThingsBoardAccessToken, and click the Submit button.
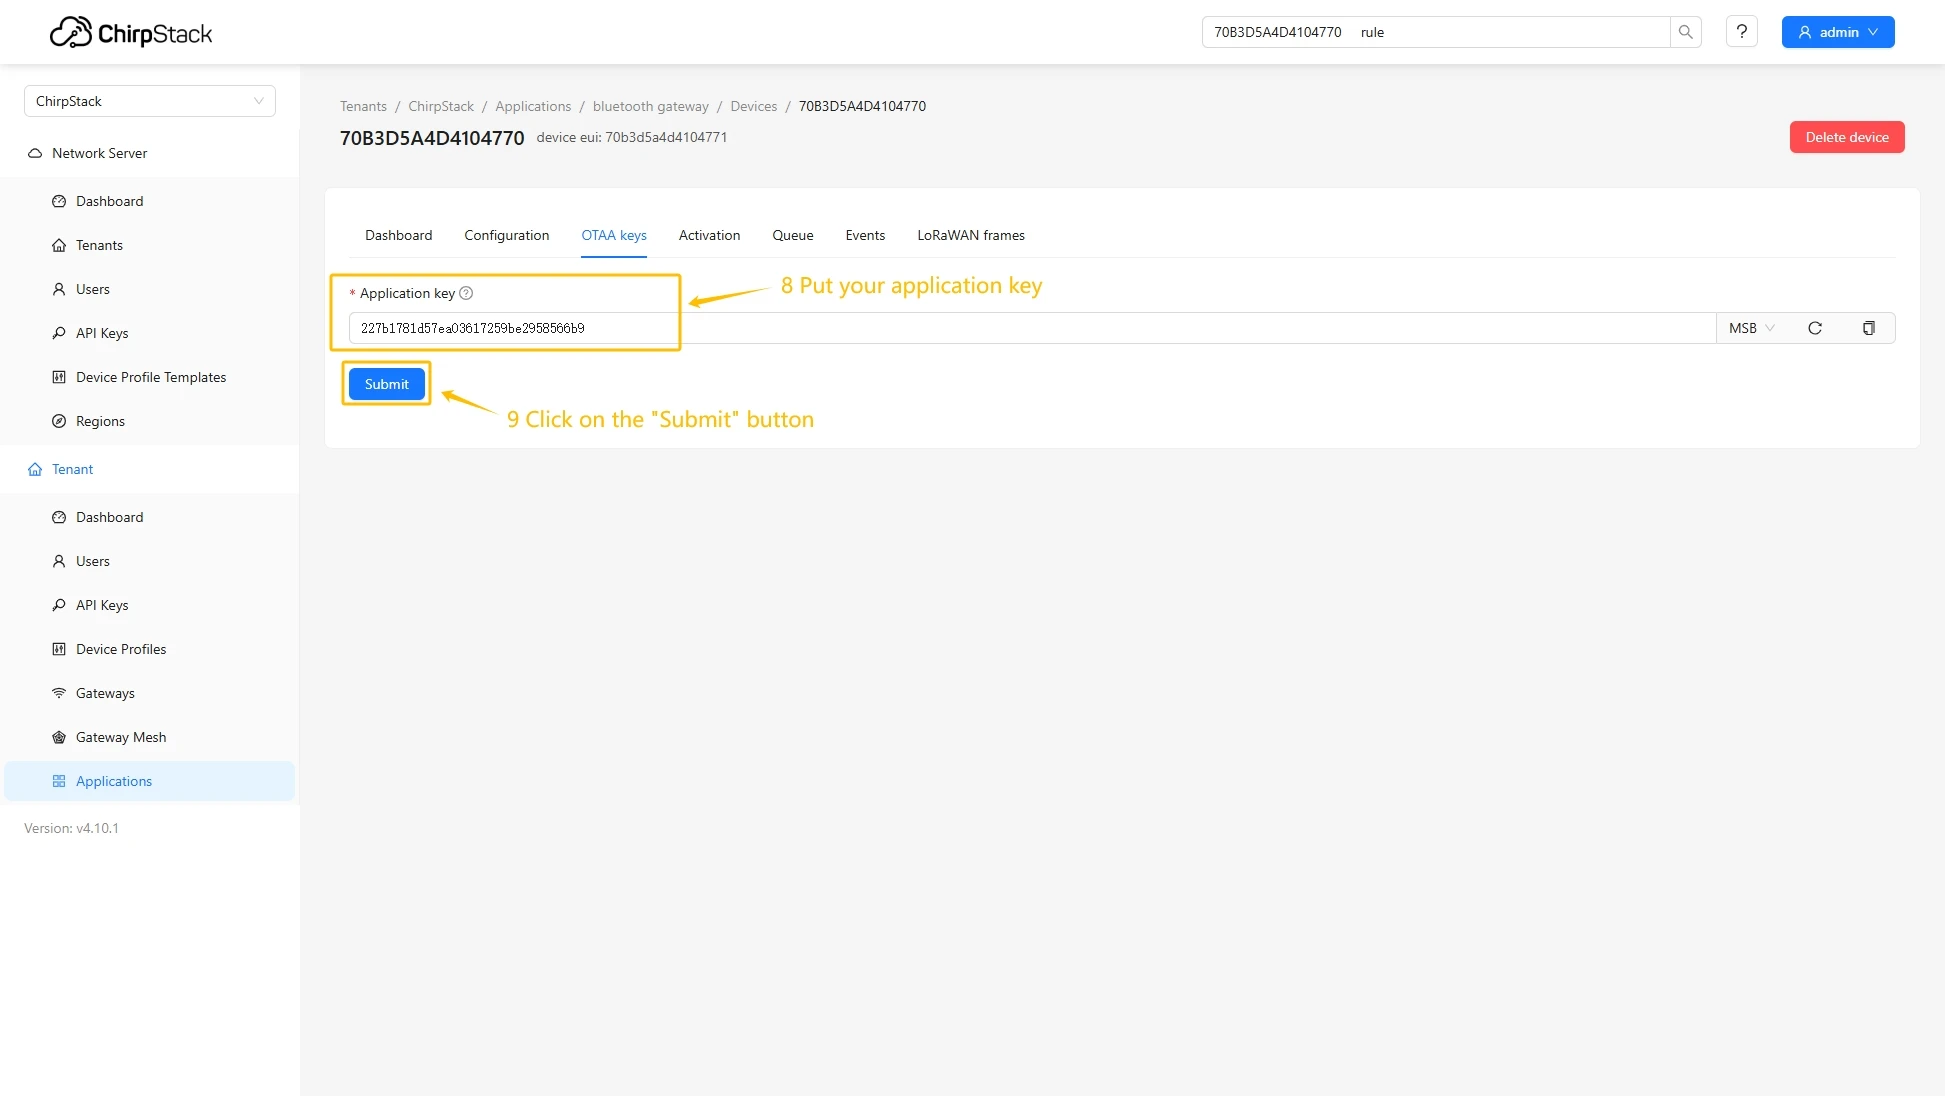
- Put your Application key to the field and click on Submit button to save the device.

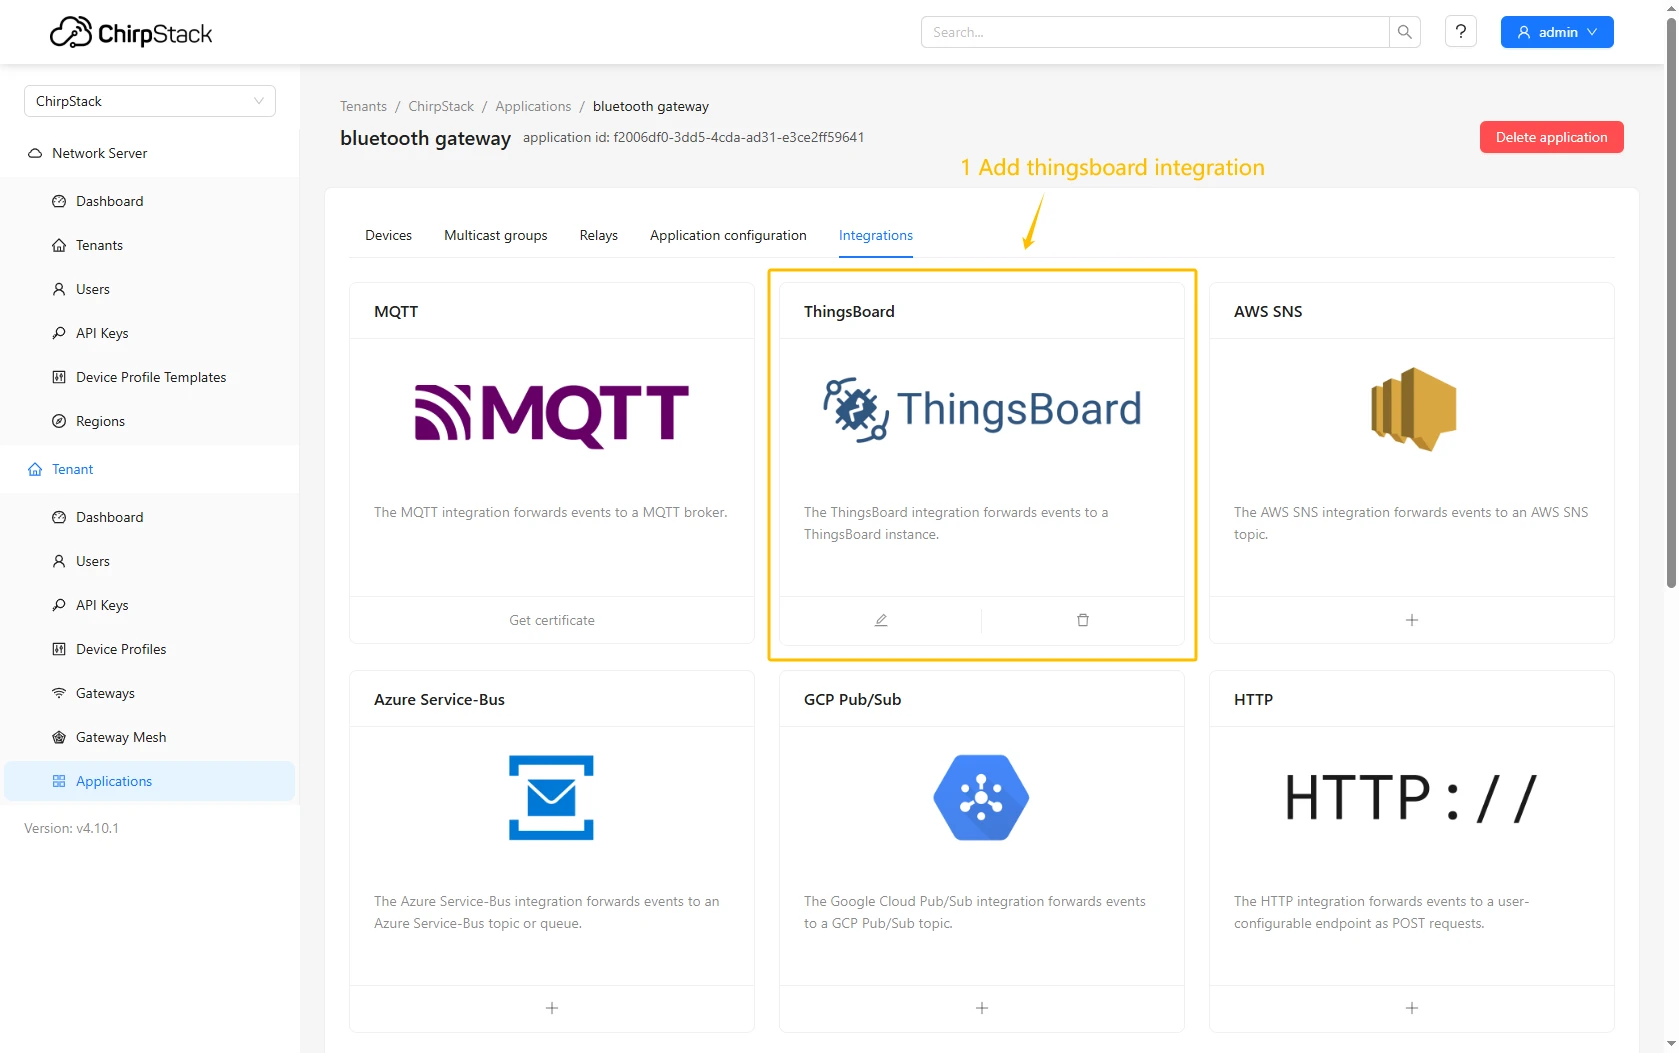
Configure application integration with ThingsBoard
- Go to the Integrations page, find and select the ThingsBoard.
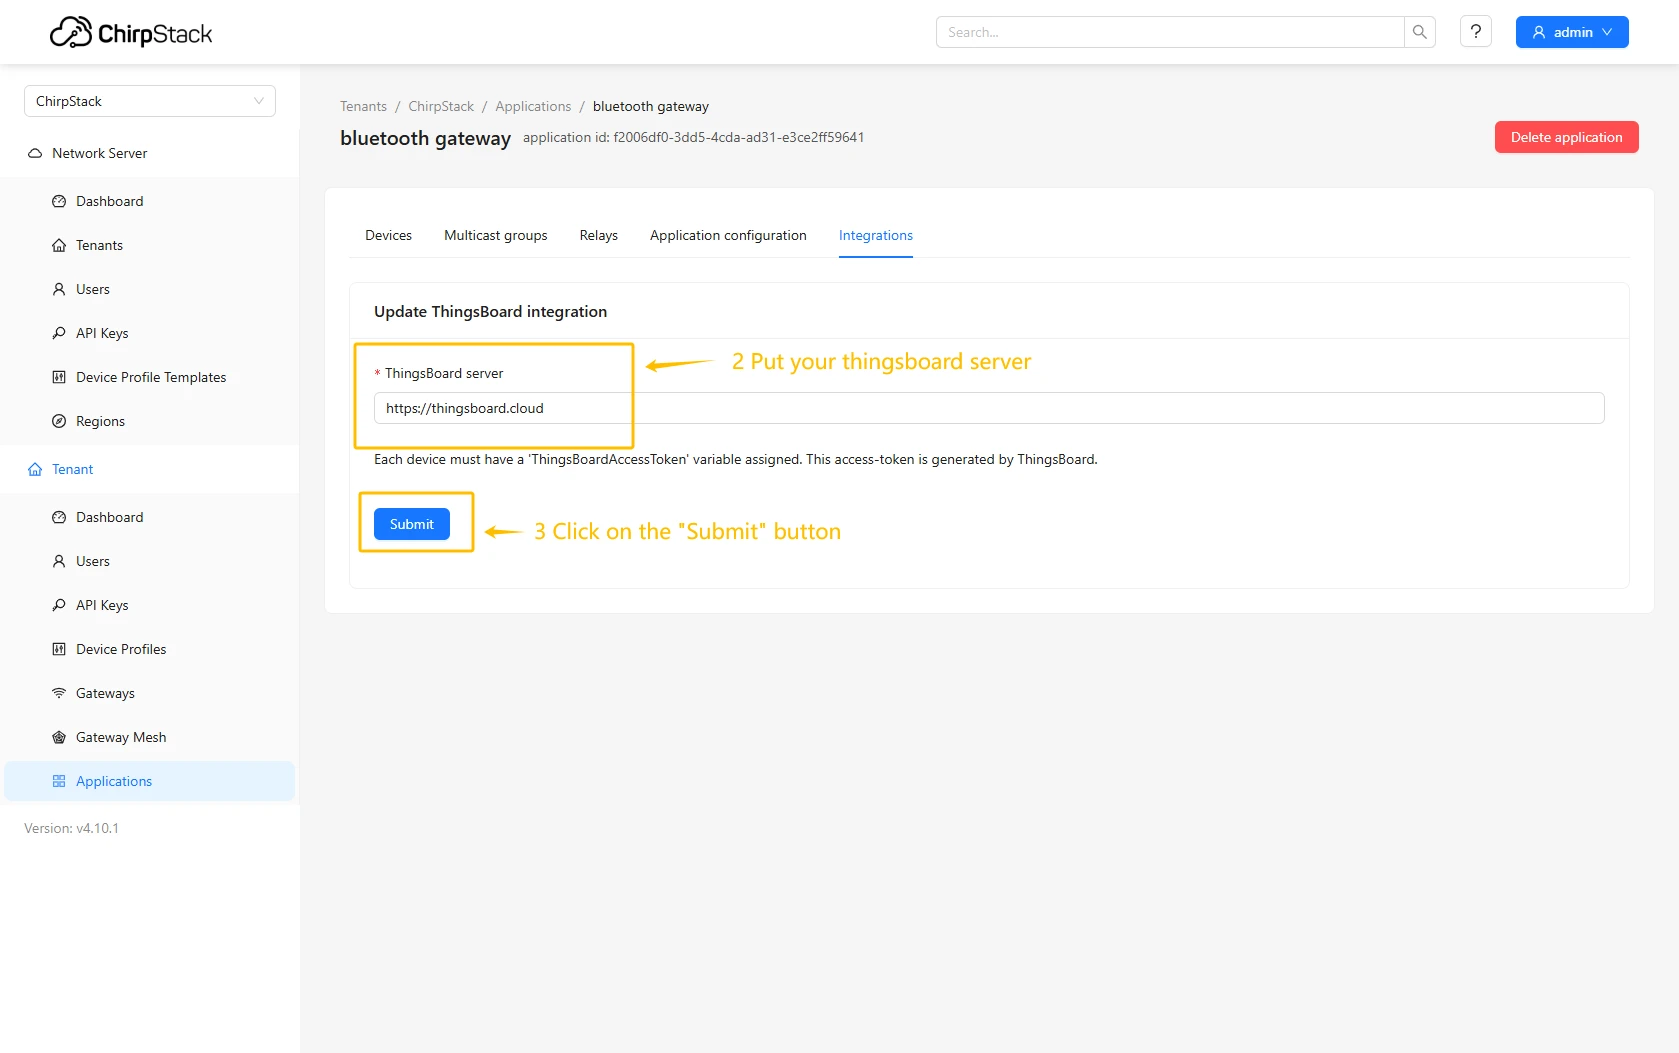
- Enter the URL of your ThingsBoard server and click Submit button.
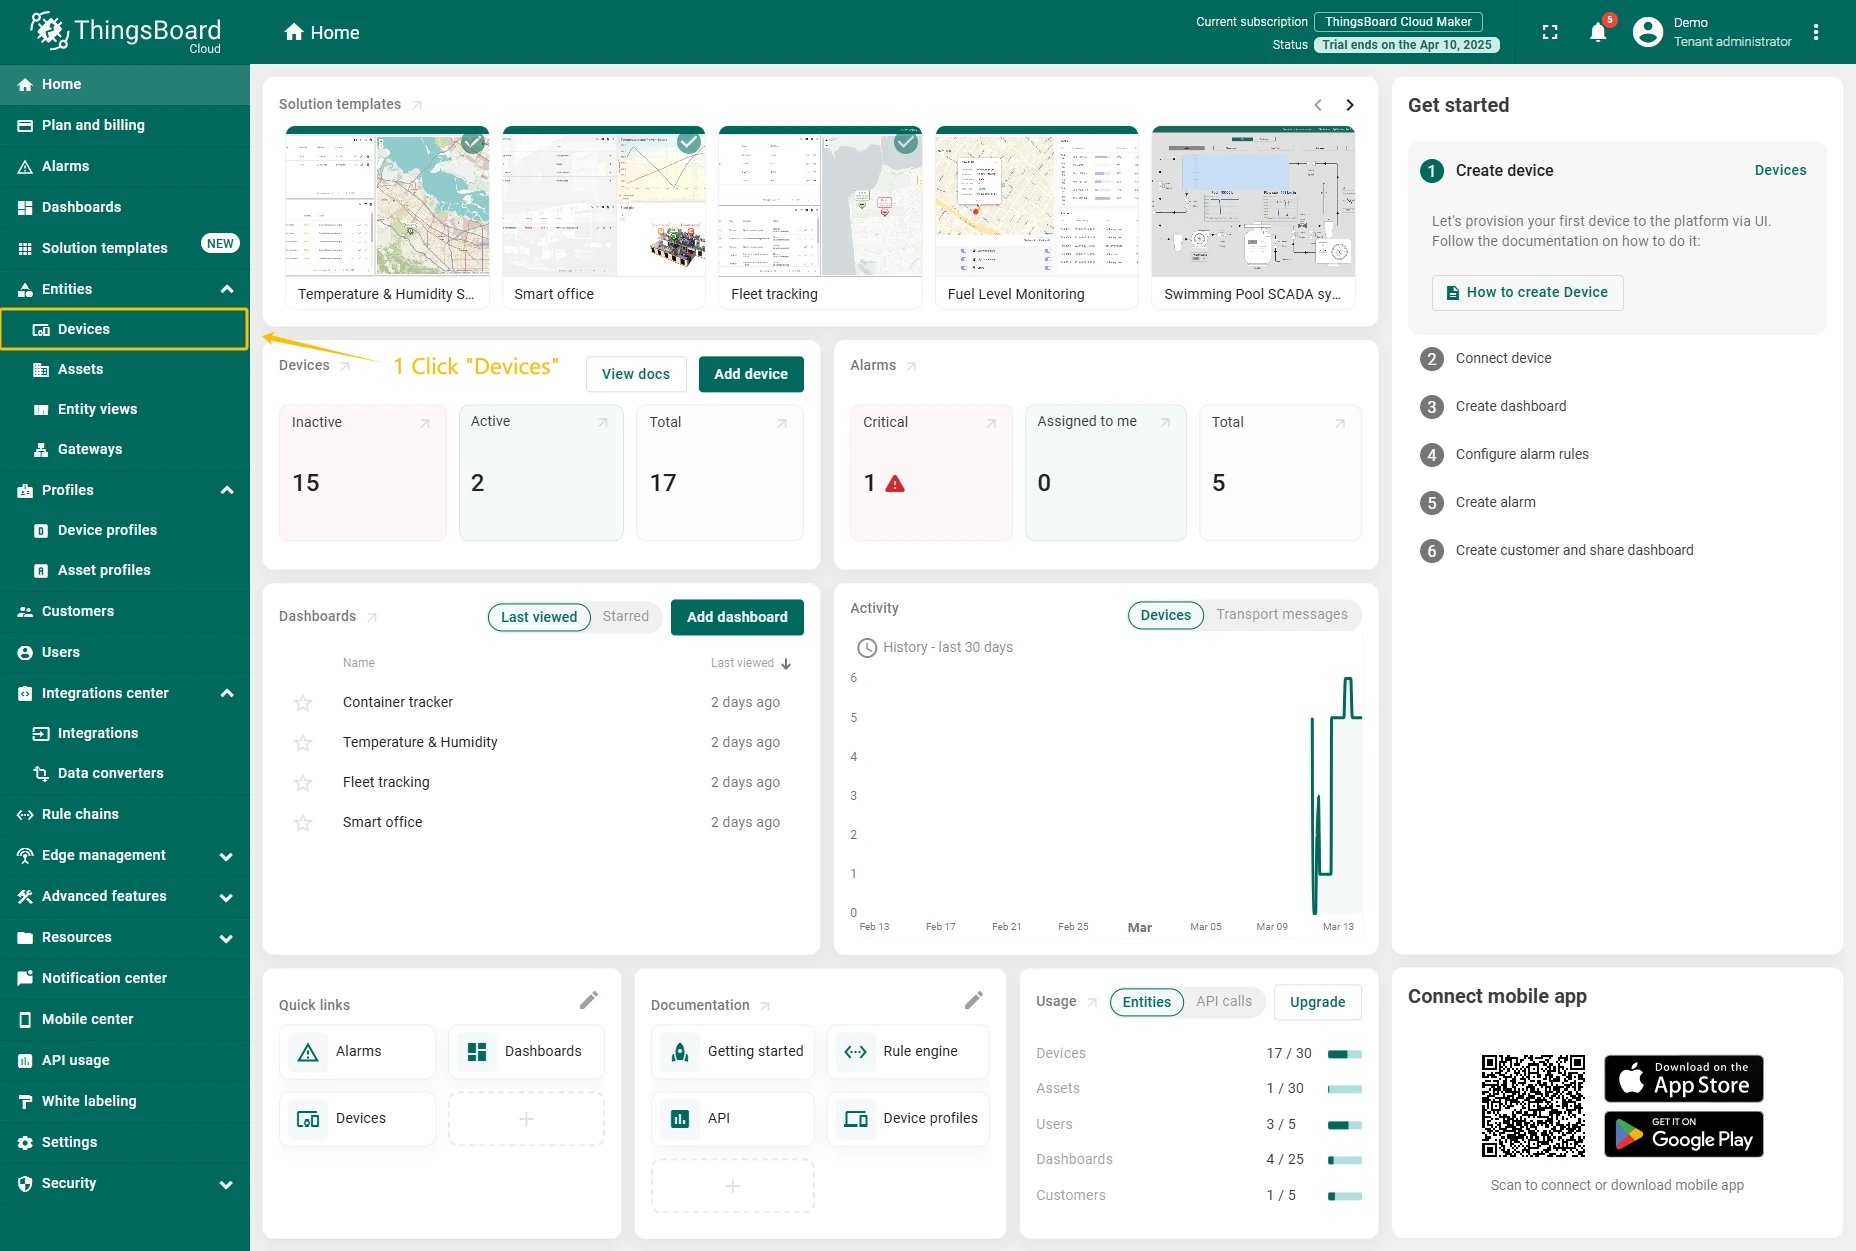
Create device on ThingsBoard
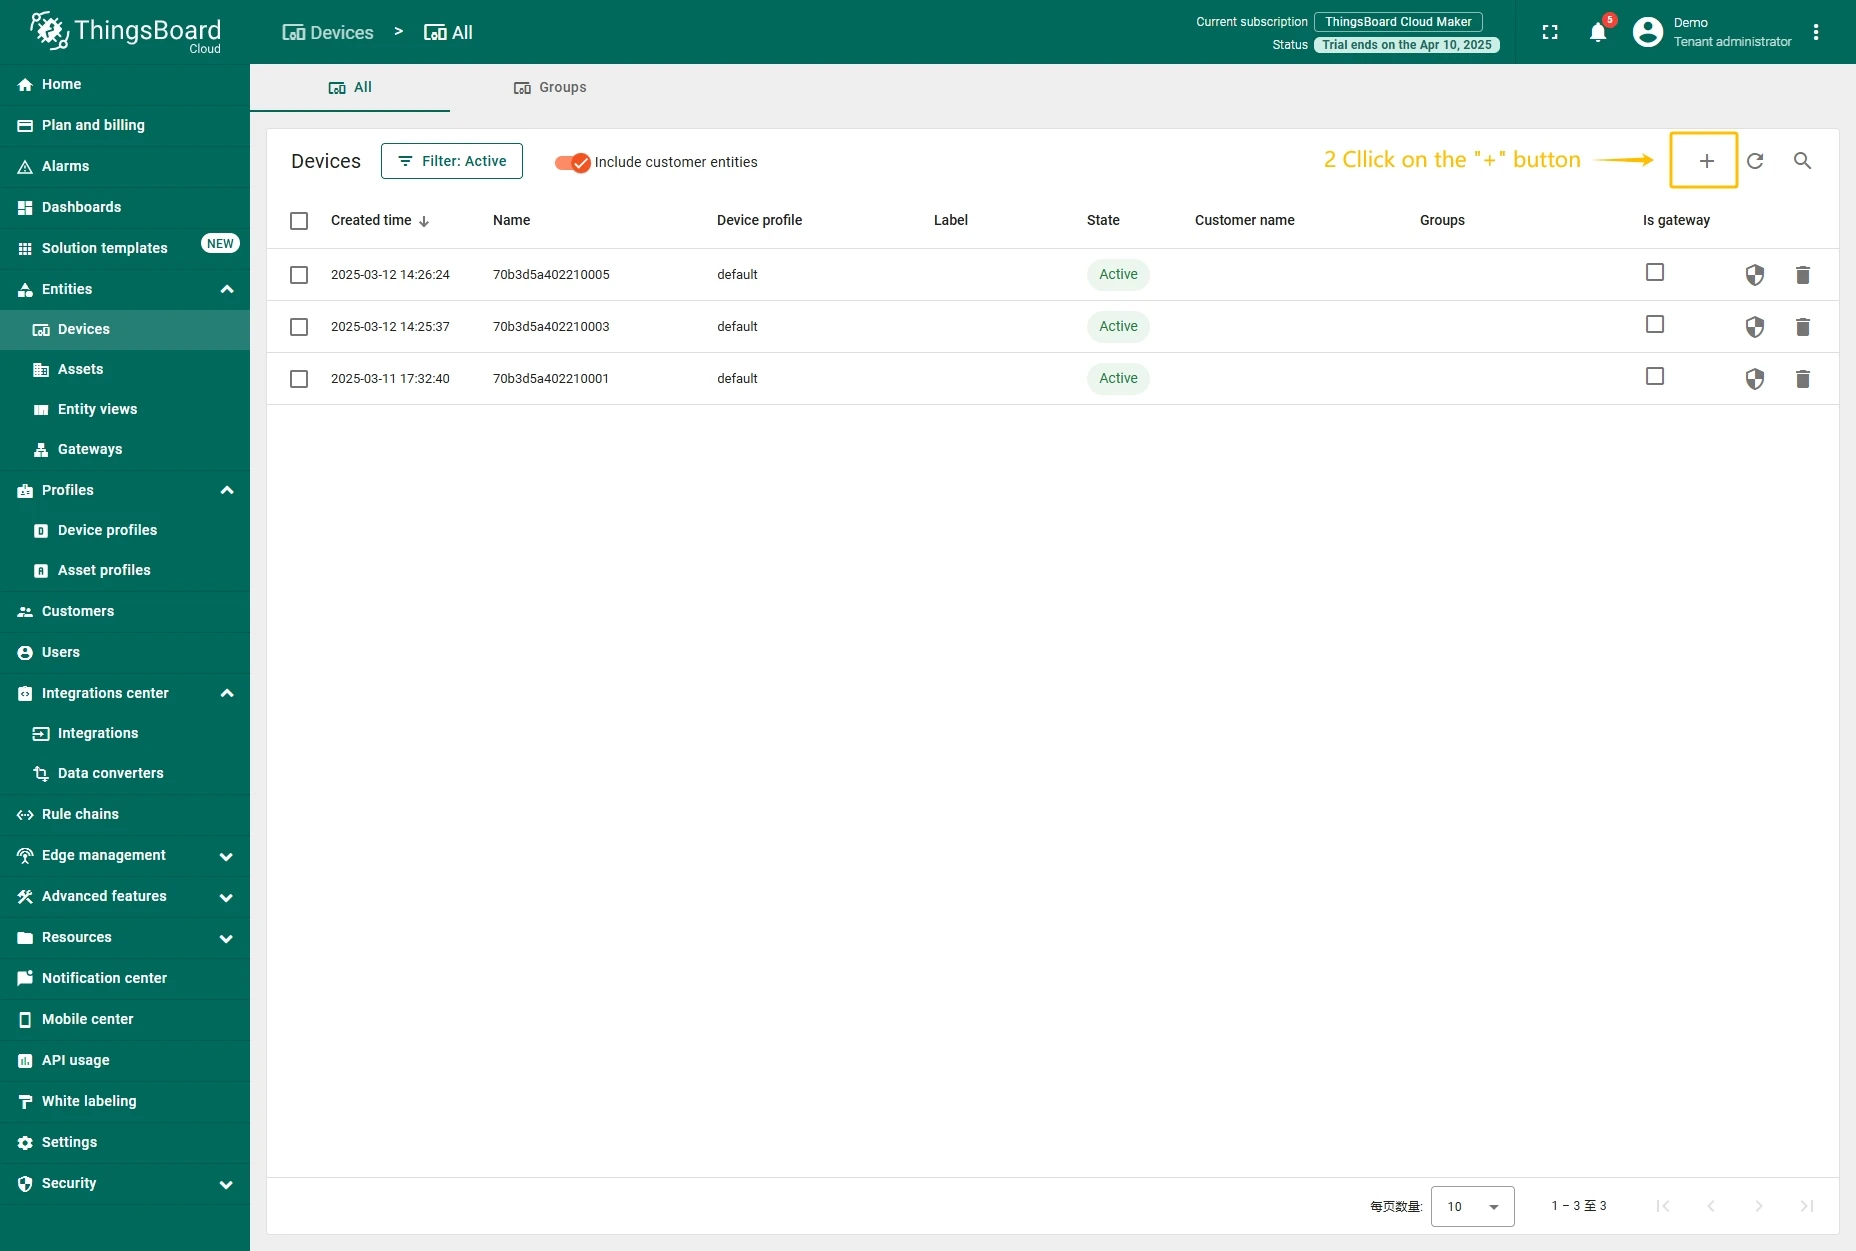
- Go to the Devices page.
- Click on Add device button.
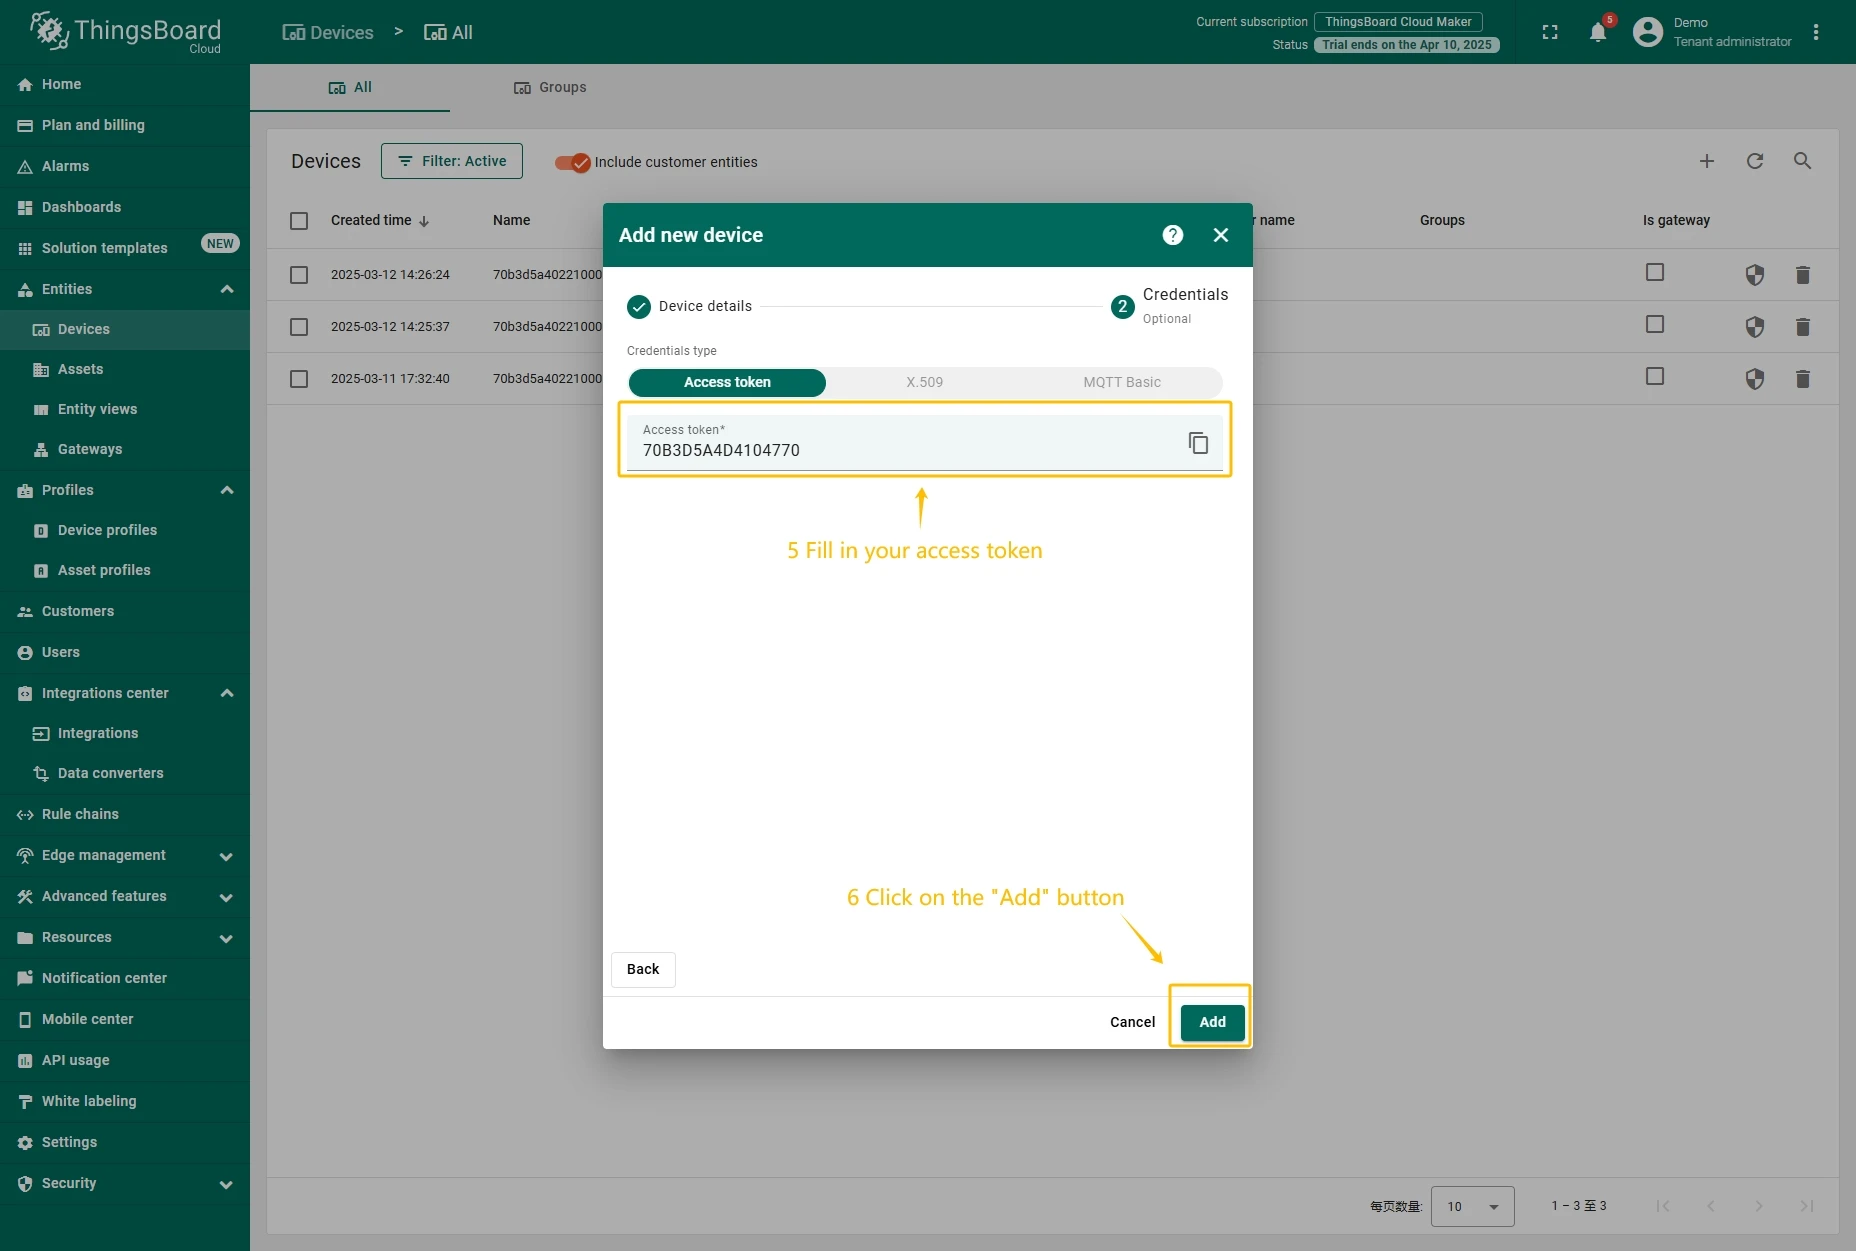
- Fill in the device name and click the Next: Credentials button.
- Enter the device Access token (previously copied Device EUI value) and click the Add button.
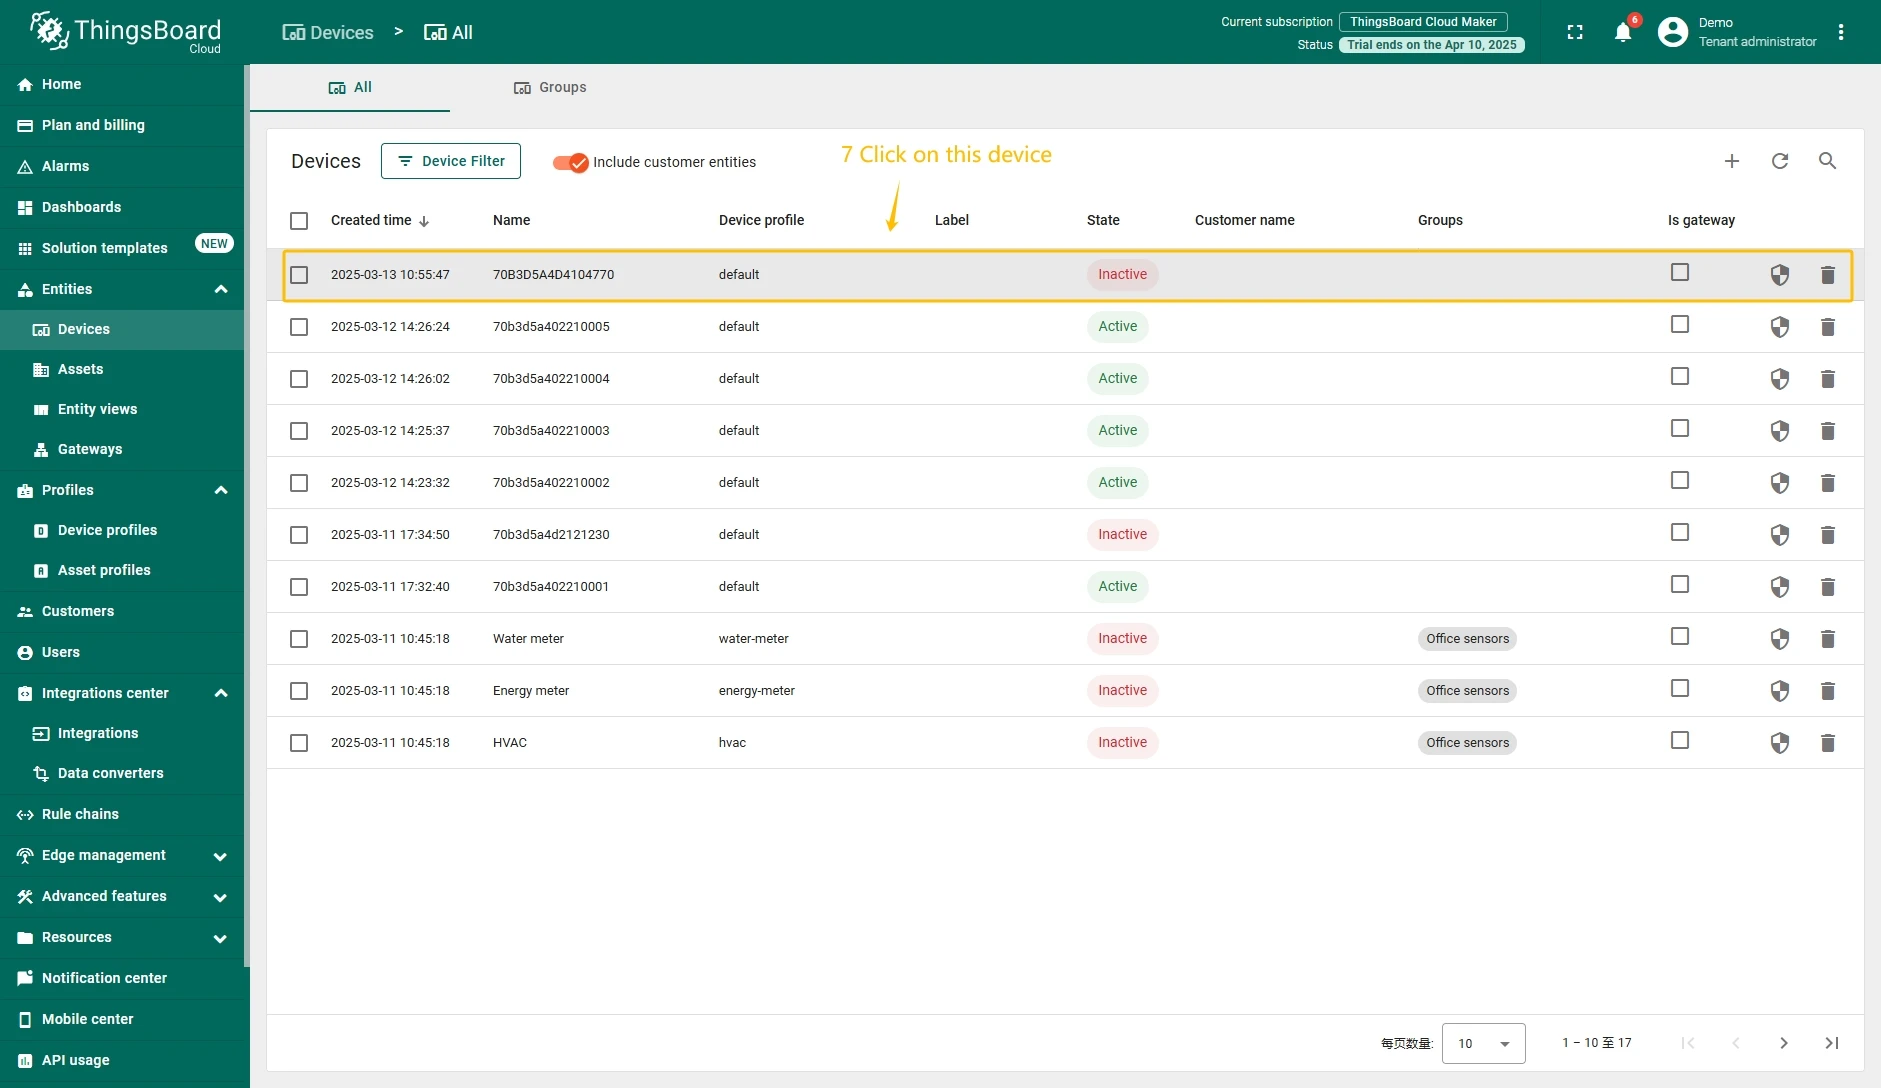
- Click on the device to open device information window.
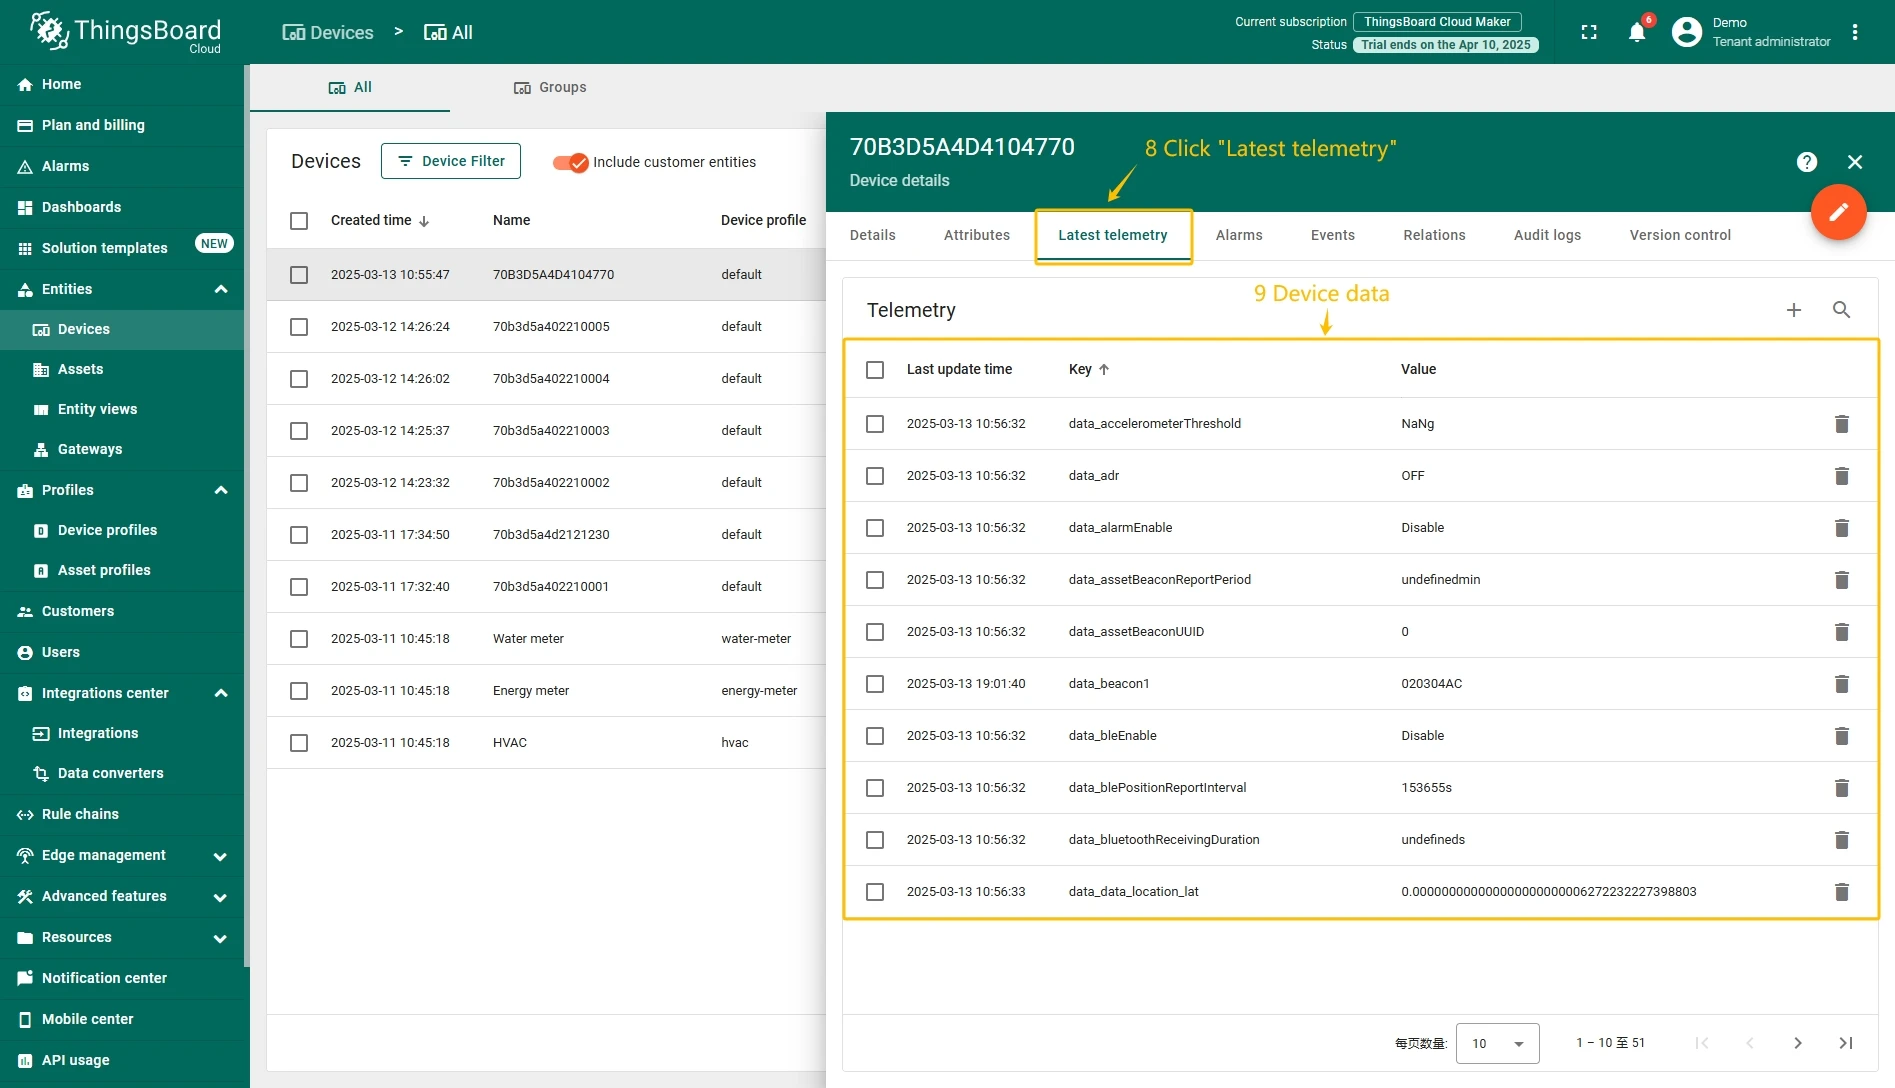
- Go to the Latest telemetry tab to view device reported data.

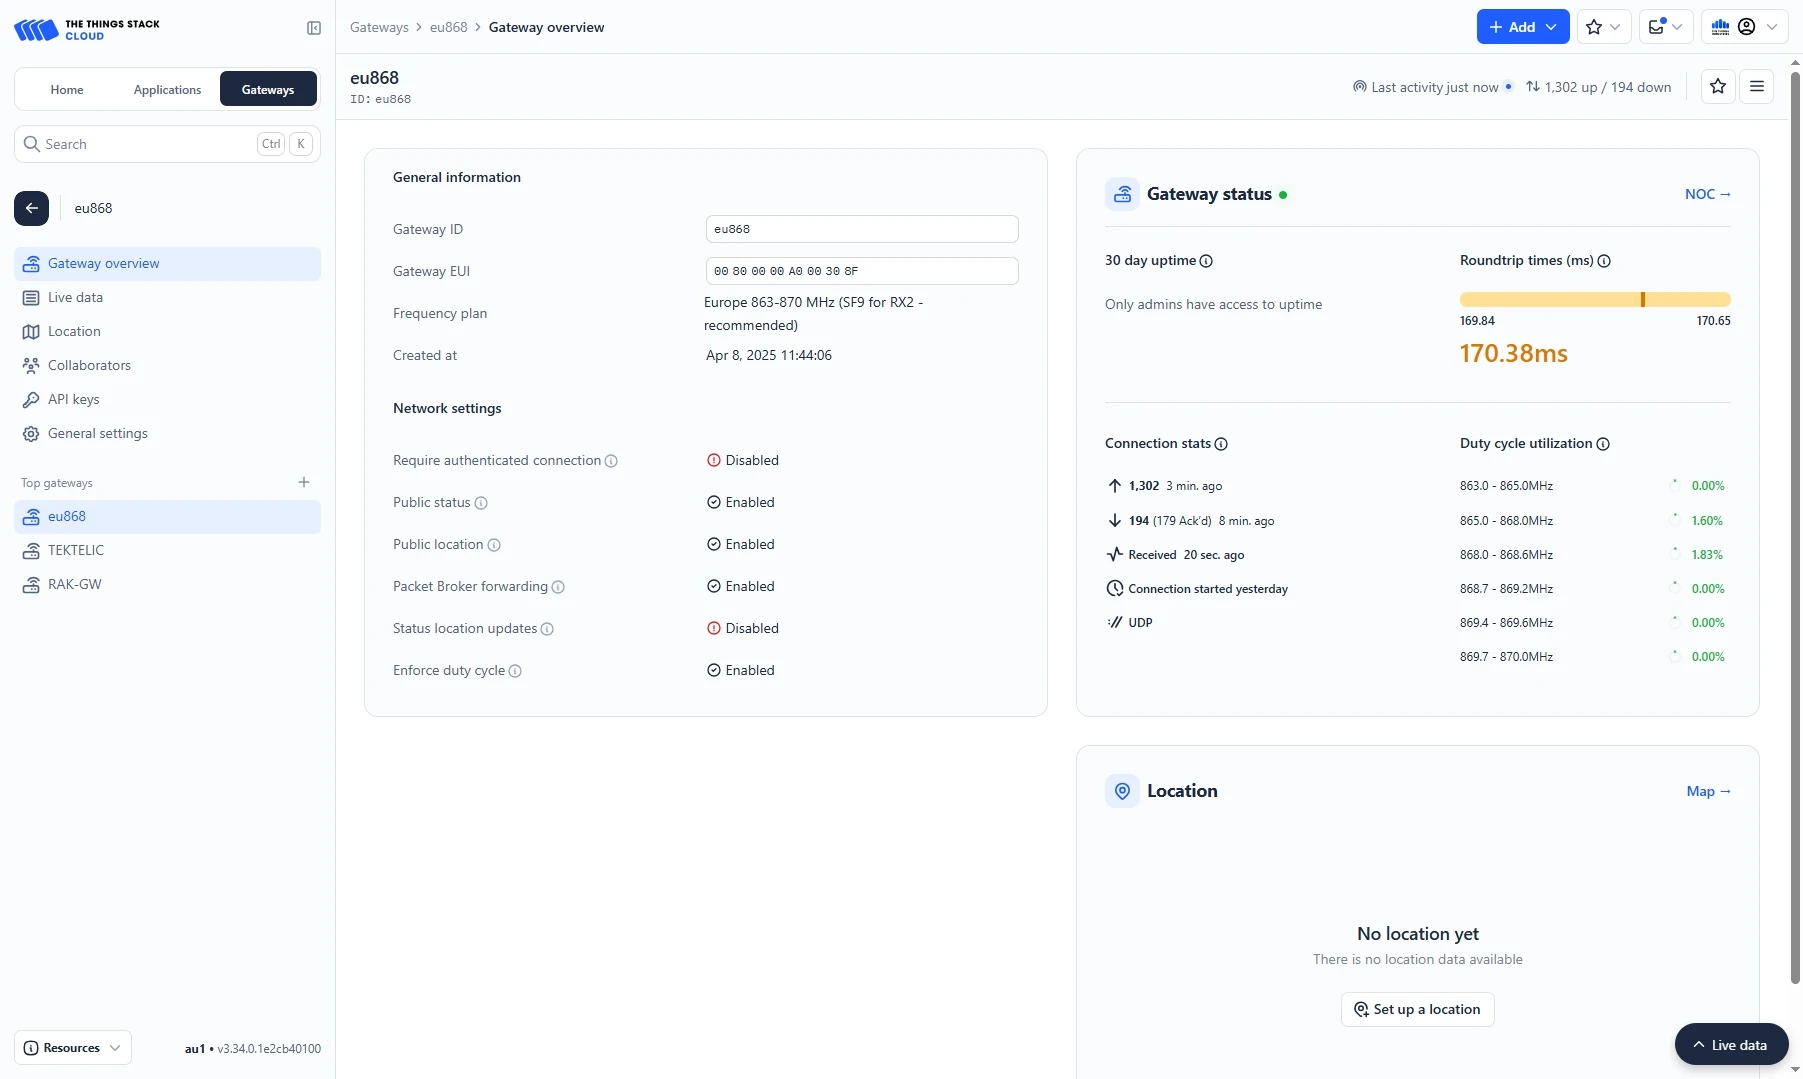
Add a gateway on The Things Stack Community Edition
We need to add a gateway on The Things Stack Community Edition.
To add a gateway, you can follow next steps:
- Login to the cloud and open your console.
- Go to the Home page press the “Register gateway” button.
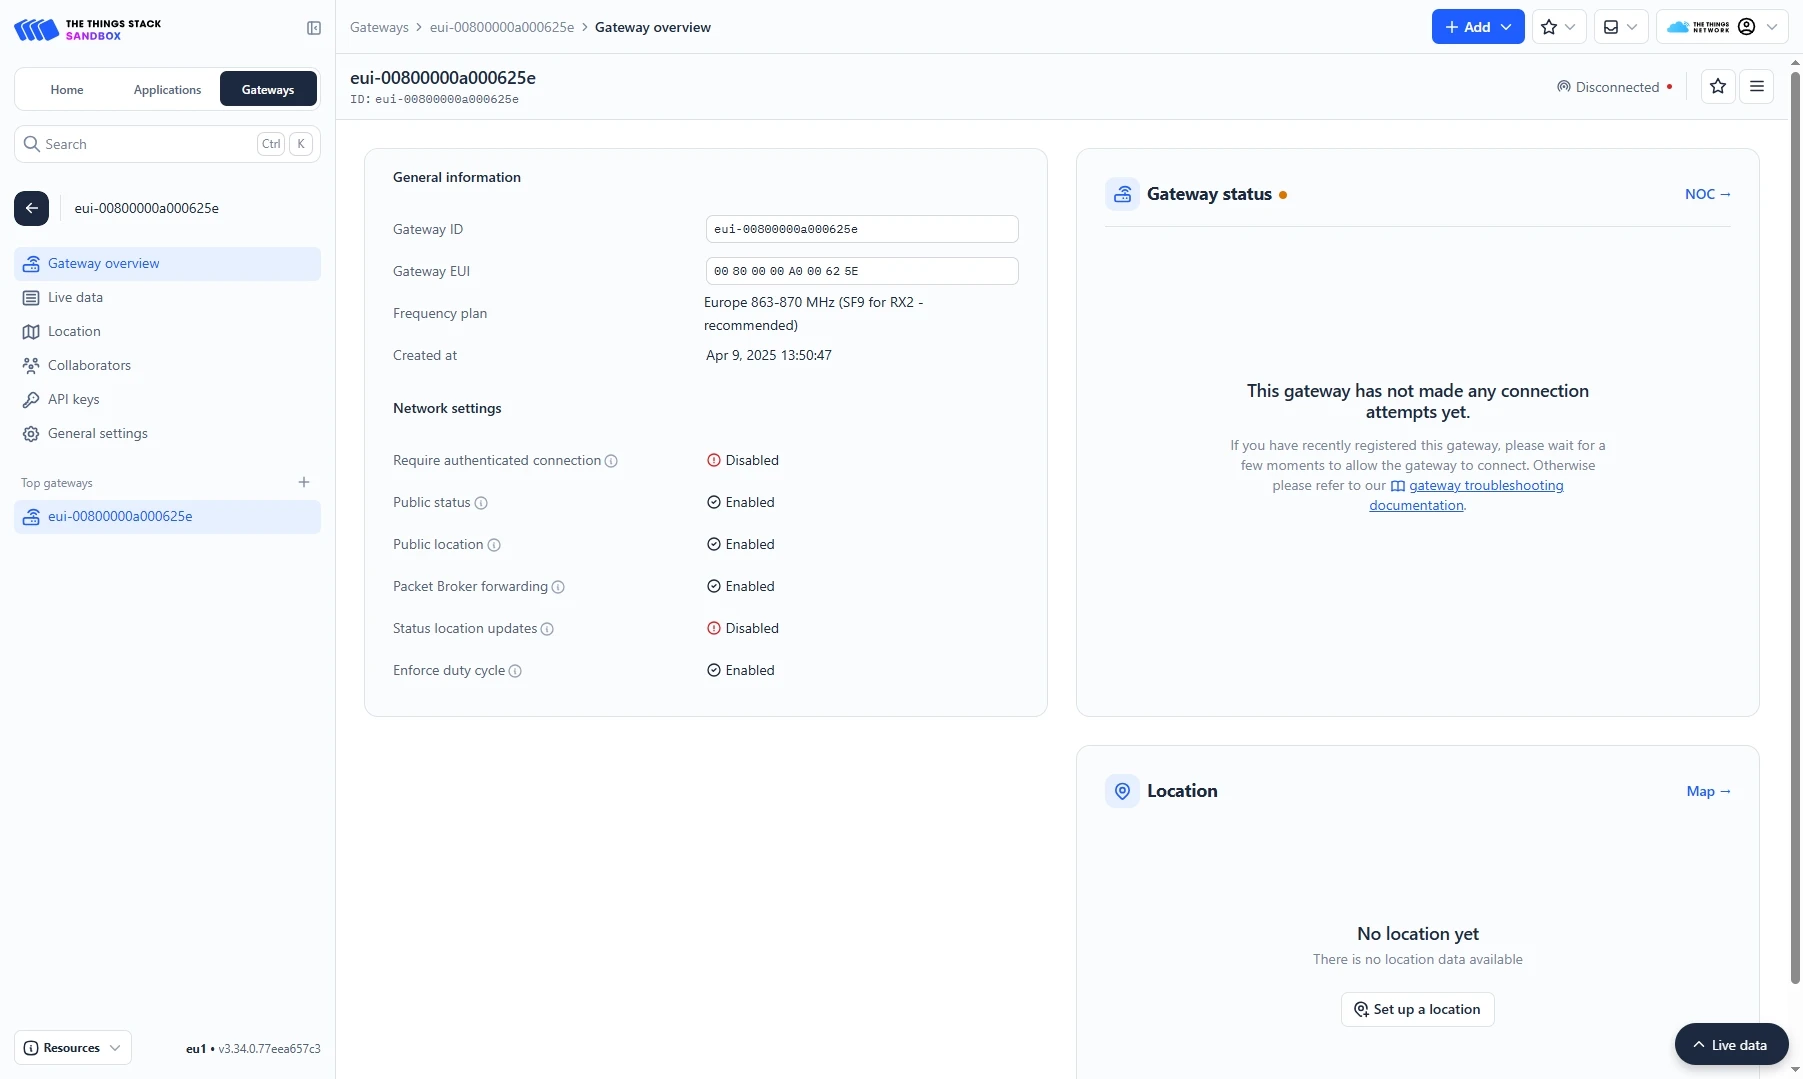
- Put information about the gateway (gateway EUI) and click the “Register gateway”button.
- The gateway is added. You can see its status - disconnected.


Add a device on The Things Stack Community Edition
We need to add a device on The Things Stack Community Edition.
To add a device, you can follow next steps:
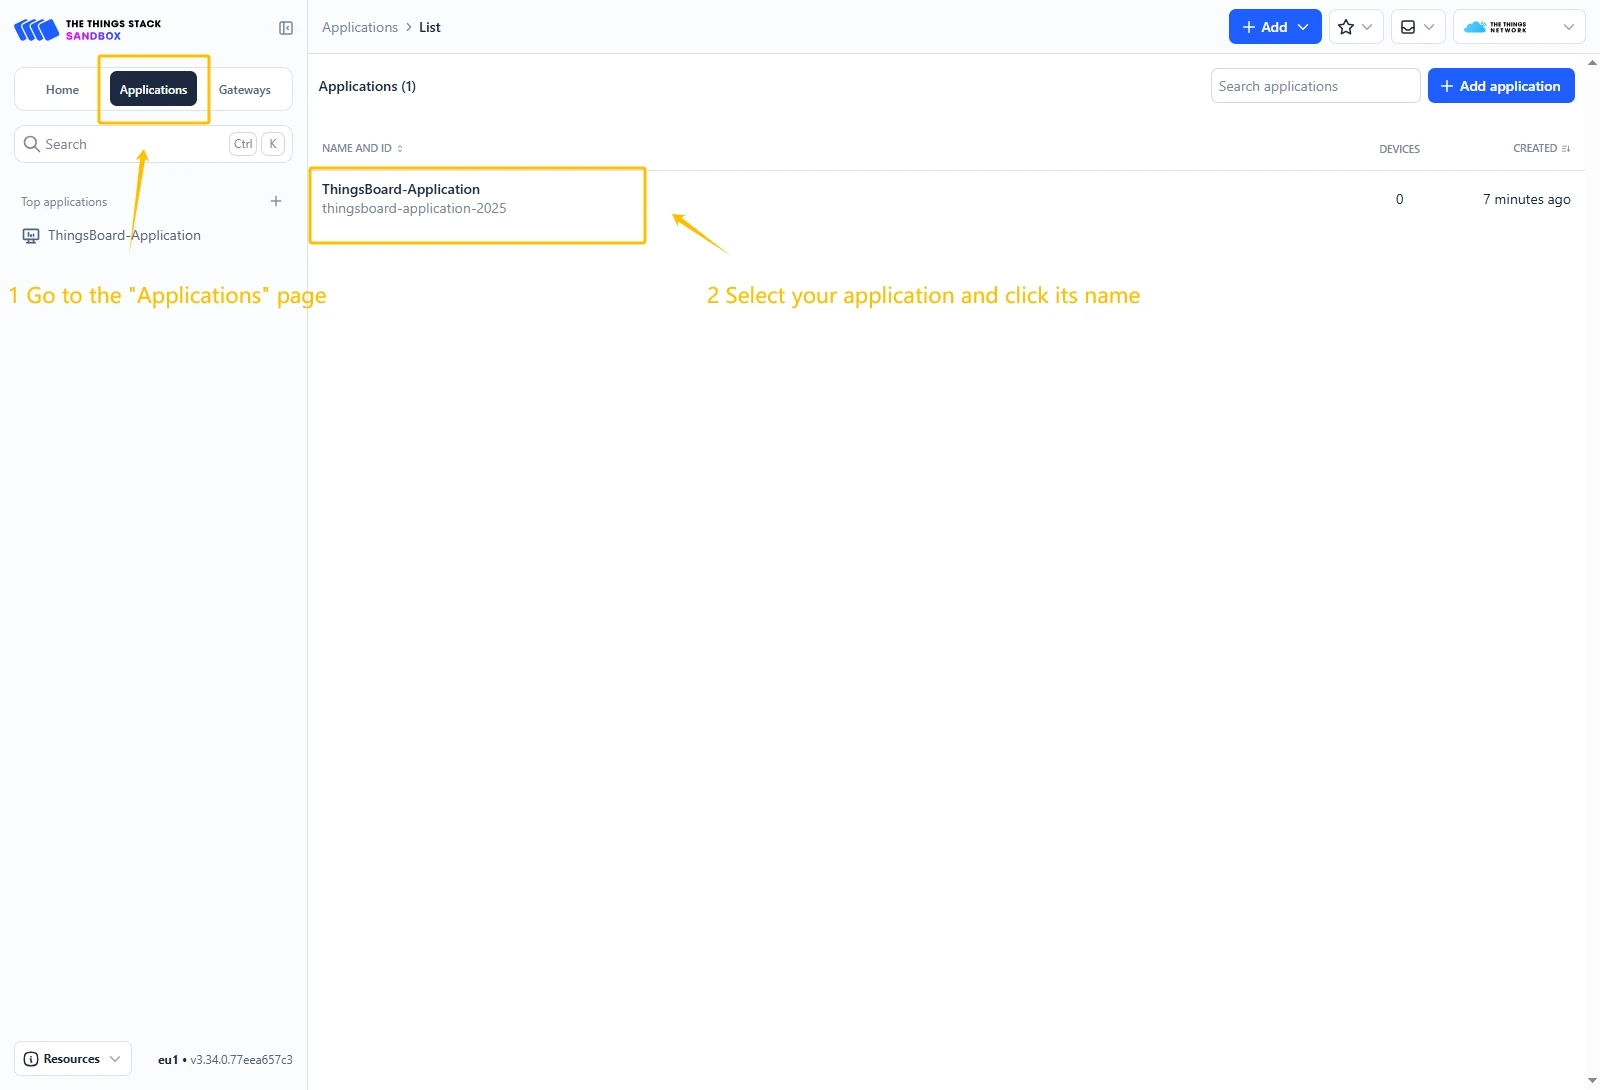
- Go to the Applications page. Then select your application and click on its name.
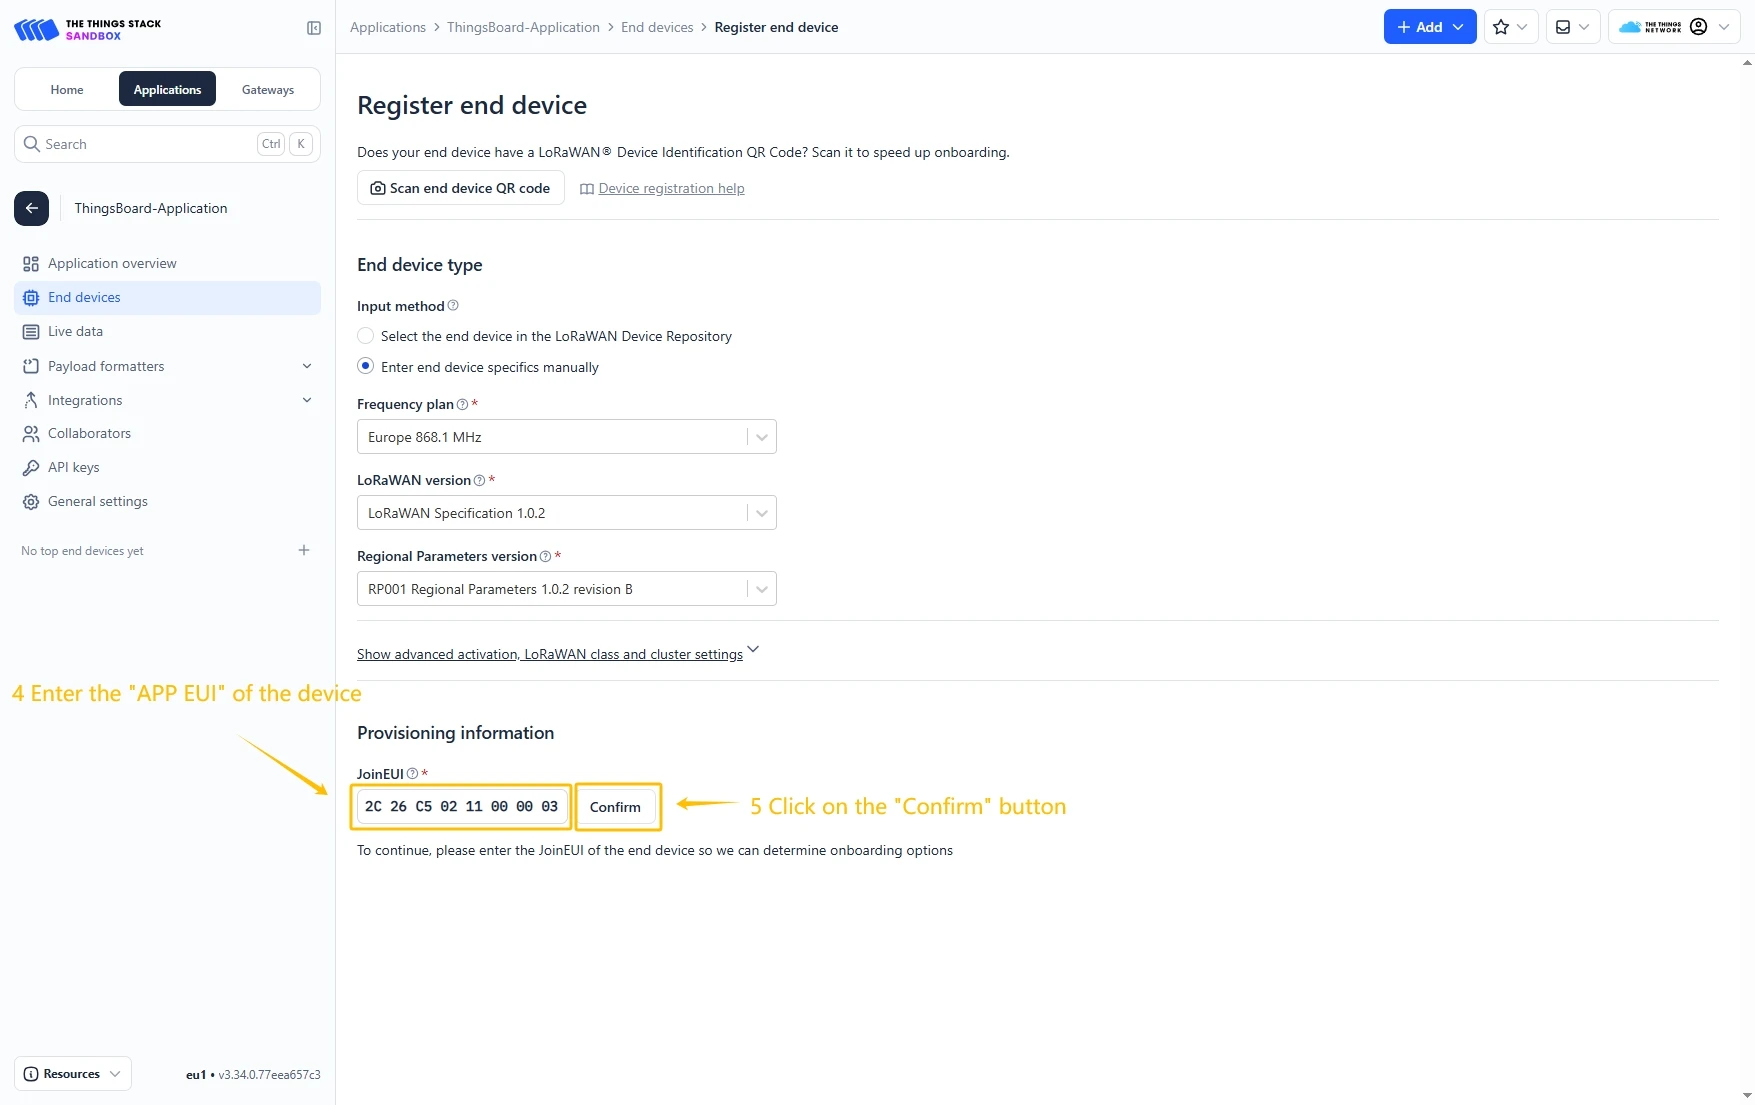
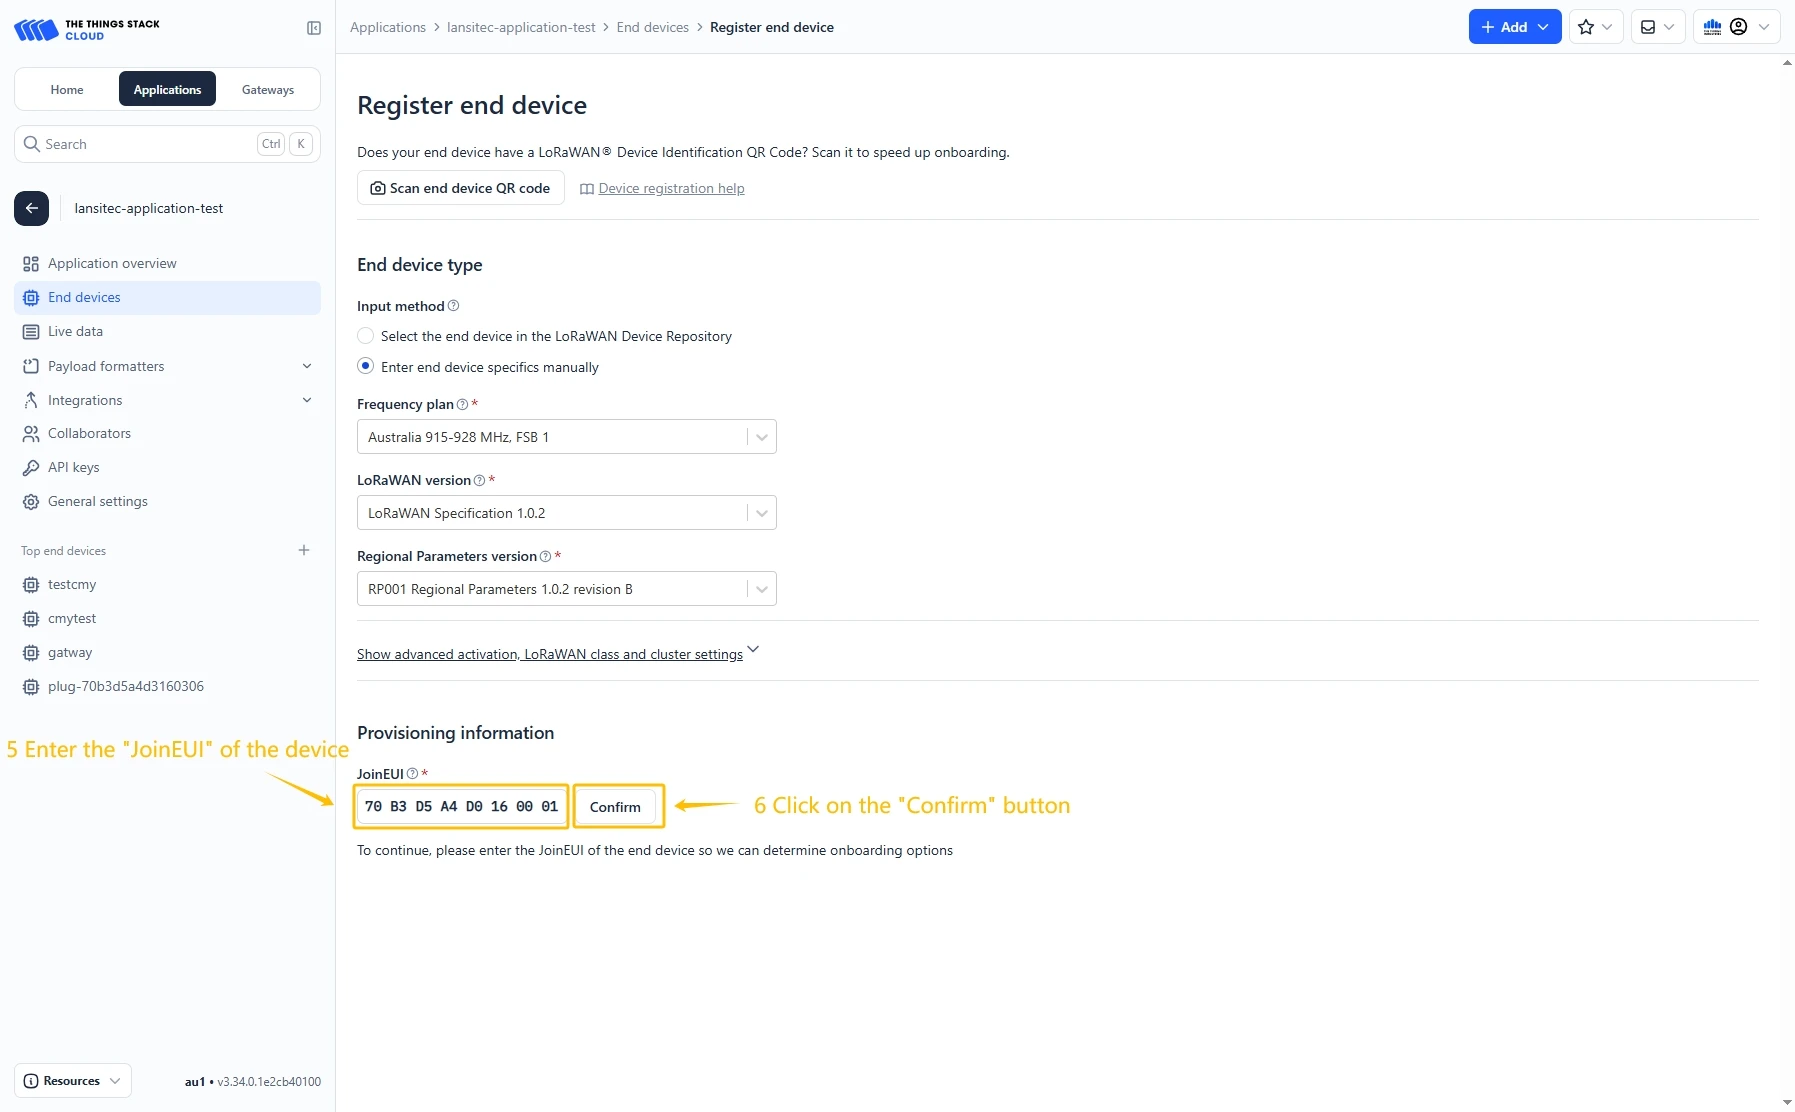
- Click on the Register end device button.
- Put the APP EUI value to the JoinEUI field. Then, press the Confirm button.
- Fill the rest parameters and press Register end device button.


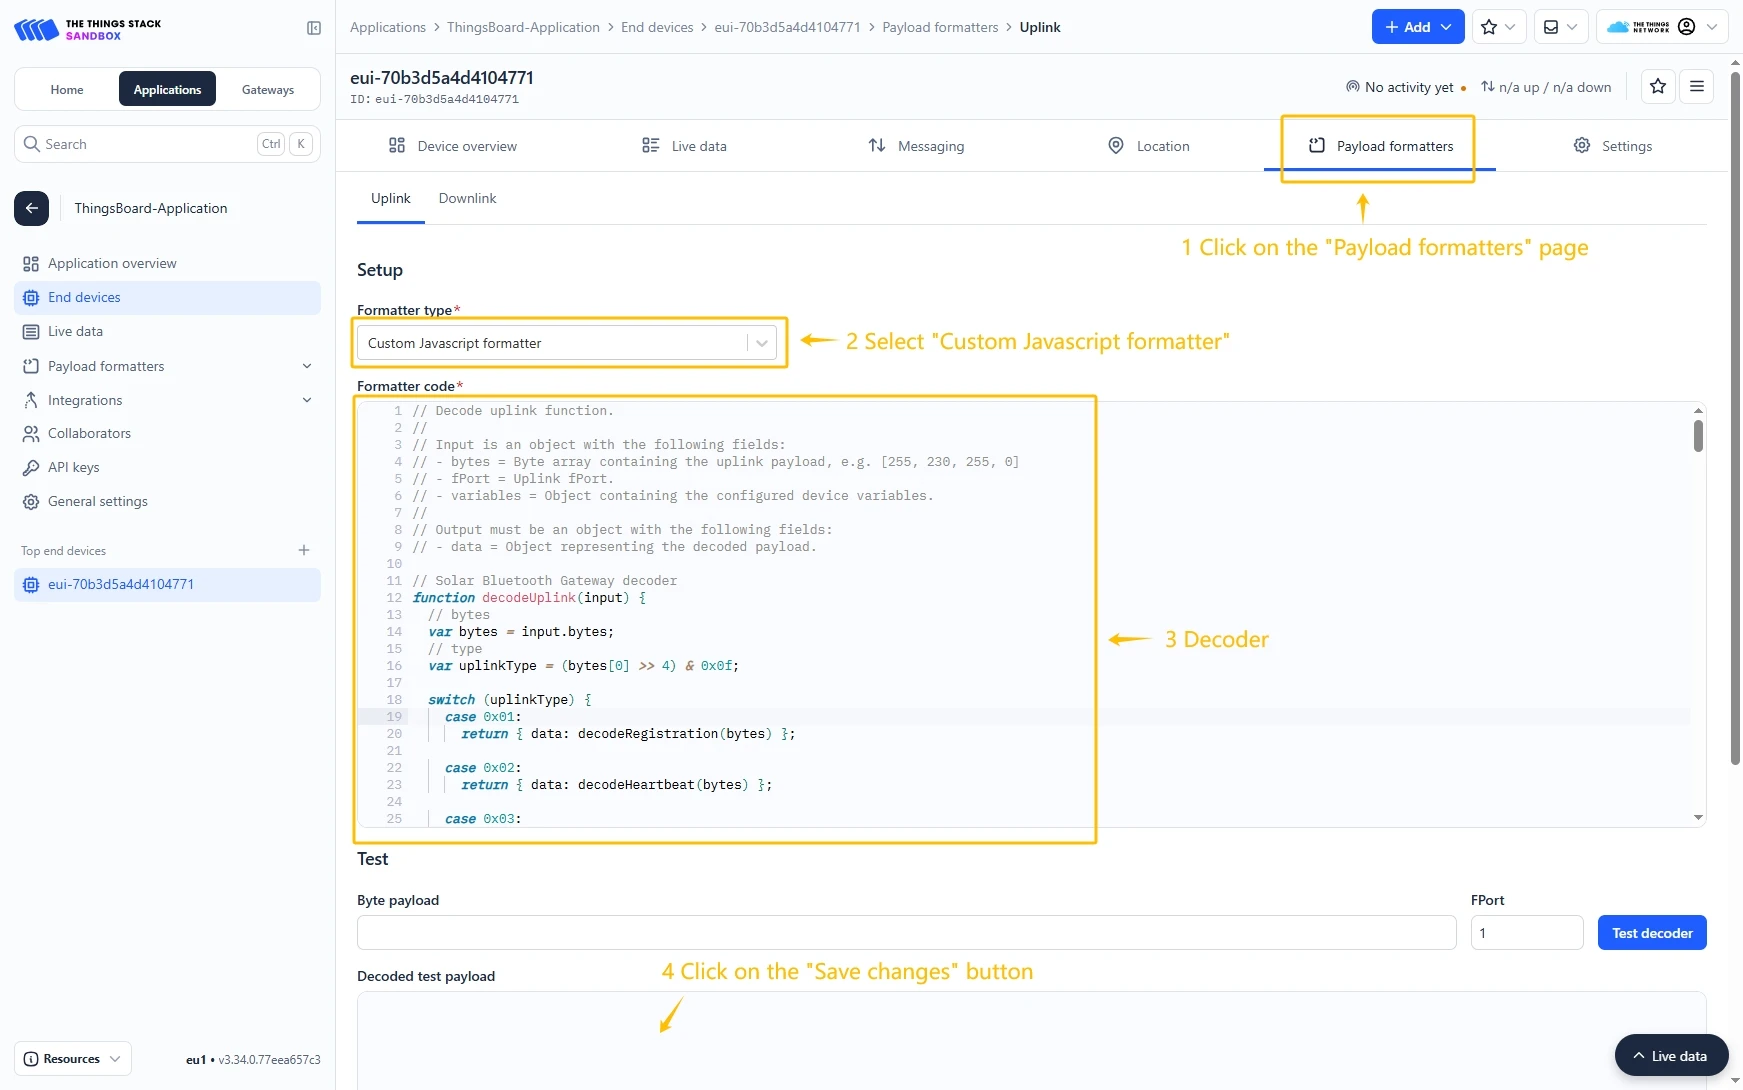
Configure Payload Formatter
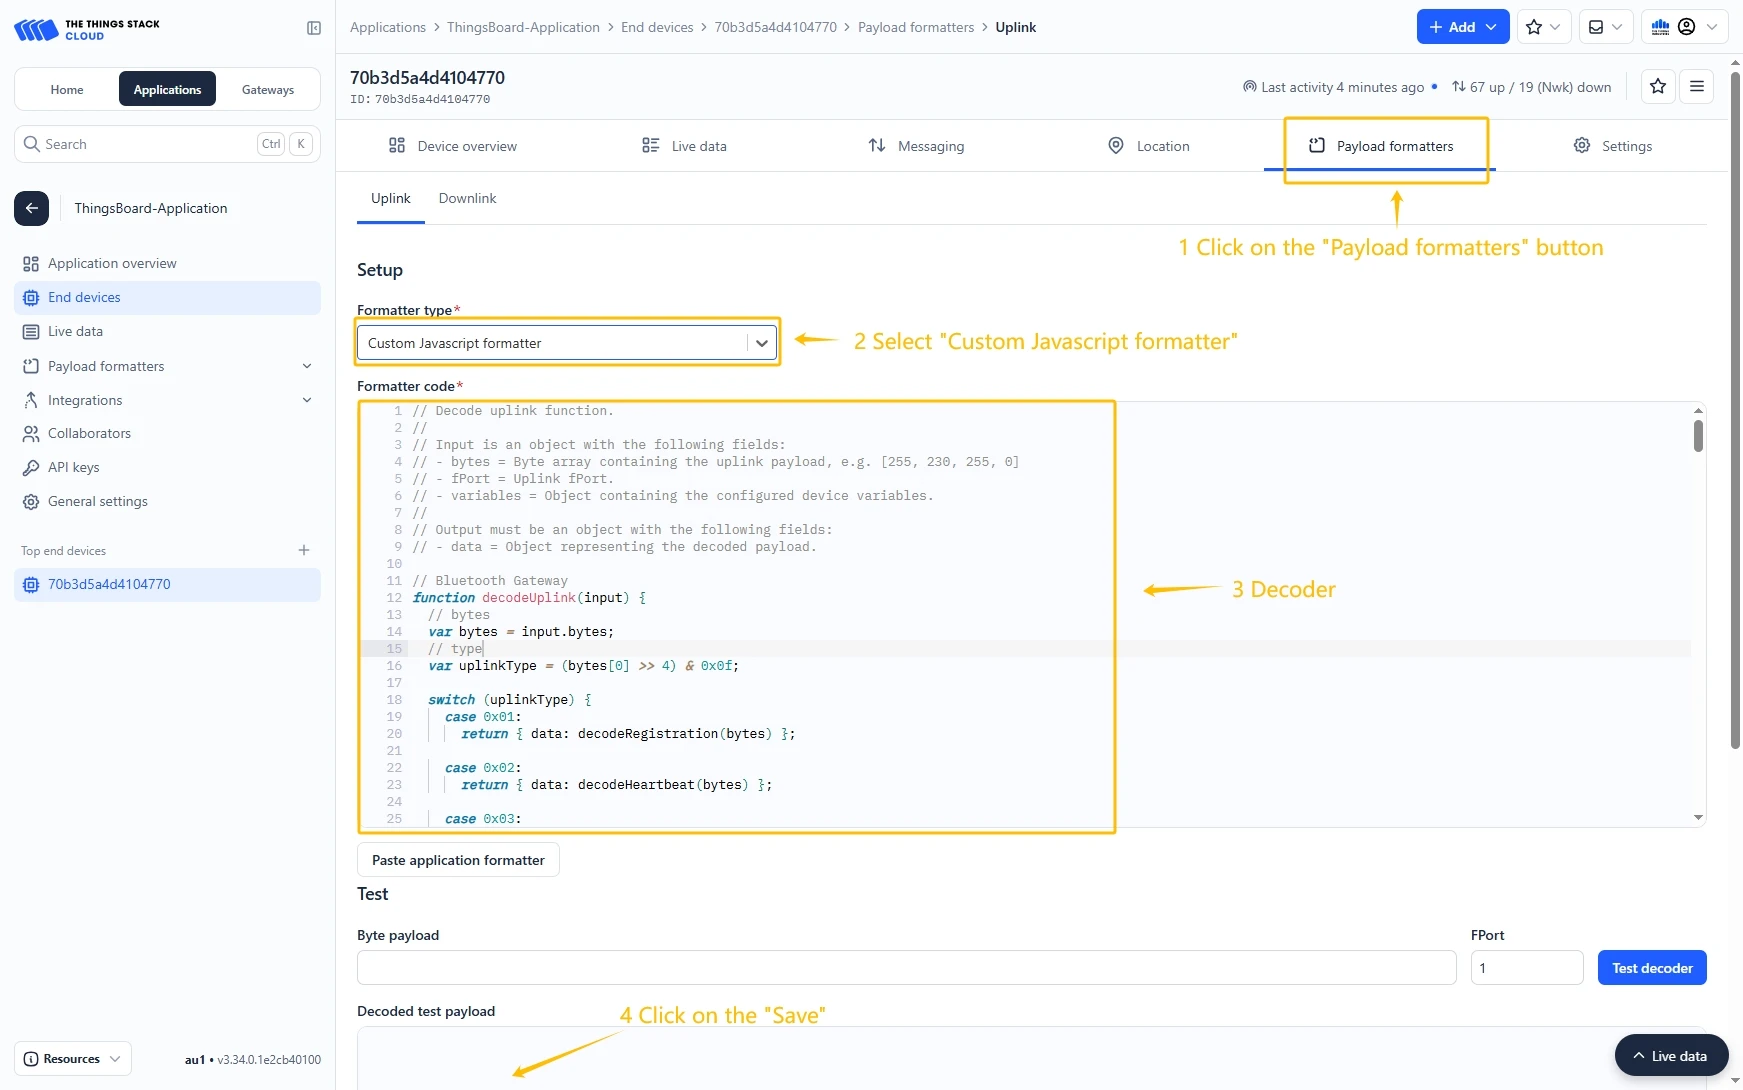
Go to the Payload formatters page and select Custom Javascript formatter for Formatter type. Paste the decode function and click Save changes button.
Decode function:
// Decode uplink function.//// Input is an object with the following fields:// - bytes = Byte array containing the uplink payload, e.g. [255, 230, 255, 0]// - fPort = Uplink fPort.// - variables = Object containing the configured device variables.//// Output must be an object with the following fields:// - data = Object representing the decoded payload.// Badge Tracker decoderfunction decodeUplink(input) {// bytes    var bytes = input.bytes;// type    var uplinkType = (bytes[0] >> 4) & 0x0f;    switch (uplinkType) {        case 0x01:            return {data: decodeRegistration(bytes)};        case 0x02:            return {data: decodeHeartbeat(bytes)};        case 0x03:            return {data: decodeGNSSPosition(bytes)};        case 0x07:            return {data: decodeBeacon(bytes)};        case 0x08:            return {data: decodeAlarm(bytes)};        default:            return null;    }}
// type: 0x01 Registrationfunction decodeRegistration(bytes) {    var data = {};    data.type = "Registration";    data.adr = ((bytes[0] >> 3) & 0x1) == 0 ? "OFF" : "ON";    data.power = ((bytes[2] >> 3) & 0x1f) + "dBm";    data.dr = (bytes[3] >> 4) & 0x0f;    data.gnssEnable = ((bytes[3] >> 3) & 0x01) == 0 ? "Disable" : "Enable";    var positionModeValue = (bytes[3] >> 1) & 0x03;    if (positionModeValue == 0) {        data.positionMode = "Period";    } else if (positionModeValue == 1) {        data.positionMode = "Autonomous";    } else if (positionModeValue == 2) {        data.positionMode = "Demand";    }    data.bleEnable = (bytes[3] & 0x01) == 0 ? "Disable" : "Enable";    data.blePositionReportInterval =        (((bytes[4] << 8) & 0xff00) | (bytes[5] & 0xff)) * 5 + "s";    data.gnssPositionReportInterval =        (((bytes[6] << 8) & 0xff00) | (bytes[7] & 0xff)) * 5 + "s";    data.heartbeatReportInterval = (bytes[8] & 0xff) * 30 + "s";    data.version =        (bytes[9] & 0xff).toString(16).toUpperCase() +        "." +        (bytes[10] & 0xff).toString(16).toUpperCase();    data.cfmsg = "1 Confirmed every " + (bytes[11] & 0xff) + " Heartbeat";    data.hbCount = "Disconnect Judgement " + (bytes[12] & 0xff);    data.fallDetection = (bytes[13] & 0xff) * 0.5 + " meters";    return data;}
// type: 0x02 Heartbeatfunction decodeHeartbeat(bytes) {    var data = {};    data.type = "Heartbeat";    data.battery = bytes[1] + "%";    data.rssi = bytes[2] * -1 + "dBm";    data.snr = (((bytes[3] << 8) & 0xff00) | (bytes[4] & 0xff)) / 100 + "dB";    var gnssStateValue = (bytes[5] >> 4) & 0x0f;    if (gnssStateValue == 0) {        data.gnssState = "Off";    } else if (gnssStateValue == 1) {        data.gnssState = "Boot GNSS";    } else if (gnssStateValue == 2) {        data.gnssState = "Locating";    } else if (gnssStateValue == 3) {        data.gnssState = "Located";    } else if (gnssStateValue == 9) {        data.gnssState = "No signal";    }    data.moveState = bytes[5] & 0x0f;    var chargeStateValue = (bytes[6] >> 4) & 0x0f;    if (chargeStateValue == 0) {        data.chargeState = "Power cable disconnected";    } else if (chargeStateValue == 5) {        data.chargeState = "Charging";    } else if (chargeStateValue == 6) {        data.chargeState = "Charge complete";    }    return data;}
// type: 0x03 GNSSPositionfunction decodeGNSSPosition(bytes) {    var data = {};    data.type = "GNSSPosition";// longitude    let longitude =        (bytes[1] << 24) | (bytes[2] << 16) | (bytes[3] << 8) | bytes[4];    data.longitude = hex2float(longitude);// latitude    let latitude =        (bytes[5] << 24) | (bytes[6] << 16) | (bytes[7] << 8) | bytes[8];    data.latitude = hex2float(latitude);// time    let time =        (bytes[9] << 24) | (bytes[10] << 16) | (bytes[11] << 8) | bytes[12];    data.time = timestampToTime((time + 8 * 60 * 60) * 1000);    return data;}
// type: 0x07 Beaconfunction decodeBeacon(bytes) {    const data = {        type: "Beacon",        length: bytes[0] & 0x0f,    };    for (let i = 0; i < data.length; i++) {        const index = 6 + 5 * i;        const major = ((bytes[index] << 8) | bytes[index + 1])            .toString(16)            .toUpperCase()            .padStart(4, "0");        const minor = ((bytes[index + 2] << 8) | bytes[index + 3])            .toString(16)            .toUpperCase()            .padStart(4, "0");        const rssi = bytes[index + 4] - 256 + "dBm";        data["beacon" + (i + 1)] = major + minor;        data["rssi" + (i + 1)] = rssi;    }    return data;}
// type: 0x08 Alarmfunction decodeAlarm(bytes) {    var data = {};    data.type = "Alarm";    var alarmValue = bytes[1] & 0xff;    if (alarmValue === 1) {        data.alarm = "SOS";    } else if (alarmValue === 2) {        data.alarm = "Fall";    } else {        data.alarm = "Unknown";    }    return data;}
function hex2float(num) {    var sign = num & 0x80000000 ? -1 : 1;    var exponent = ((num >> 23) & 0xff) - 127;    var mantissa = 1 + (num & 0x7fffff) / 0x7fffff;    return sign * mantissa * Math.pow(2, exponent);}
function timestampToTime(timestamp) {    const date = new Date(timestamp);    const year = date.getFullYear();    const month = (date.getMonth() + 1).toString().padStart(2, "0");    const day = date.getDate().toString().padStart(2, "0");    const hour = date.getHours().toString().padStart(2, "0");    const minute = date.getMinutes().toString().padStart(2, "0");    const second = date.getSeconds().toString().padStart(2, "0");    return `${year}-${month}-${day} ${hour}:${minute}:${second}`;}
Create integration in ThingsBoard
Next we will create “The Things Stack” (TTS) integration inside the ThingsBoard.
At first, copy the code, we will need it to create the uplink converter:
var data = decodeToJson(payload);var deviceName = data.end_device_ids.device_id;var deviceType = data.end_device_ids.application_ids.application_id;
var result = {  deviceName: deviceName,  deviceType: deviceType,  telemetry: data.uplink_message.decoded_payload};
return result;
In the “Connect”step, you will need the following parameters:
- Region: eu1 (region where your application was registered inside The Things Stack Community)
- Username: thingsboard-application-2025-06@ttn (use Username from integration on TTS)
- Password: use Password from integration on The Things Stack Community
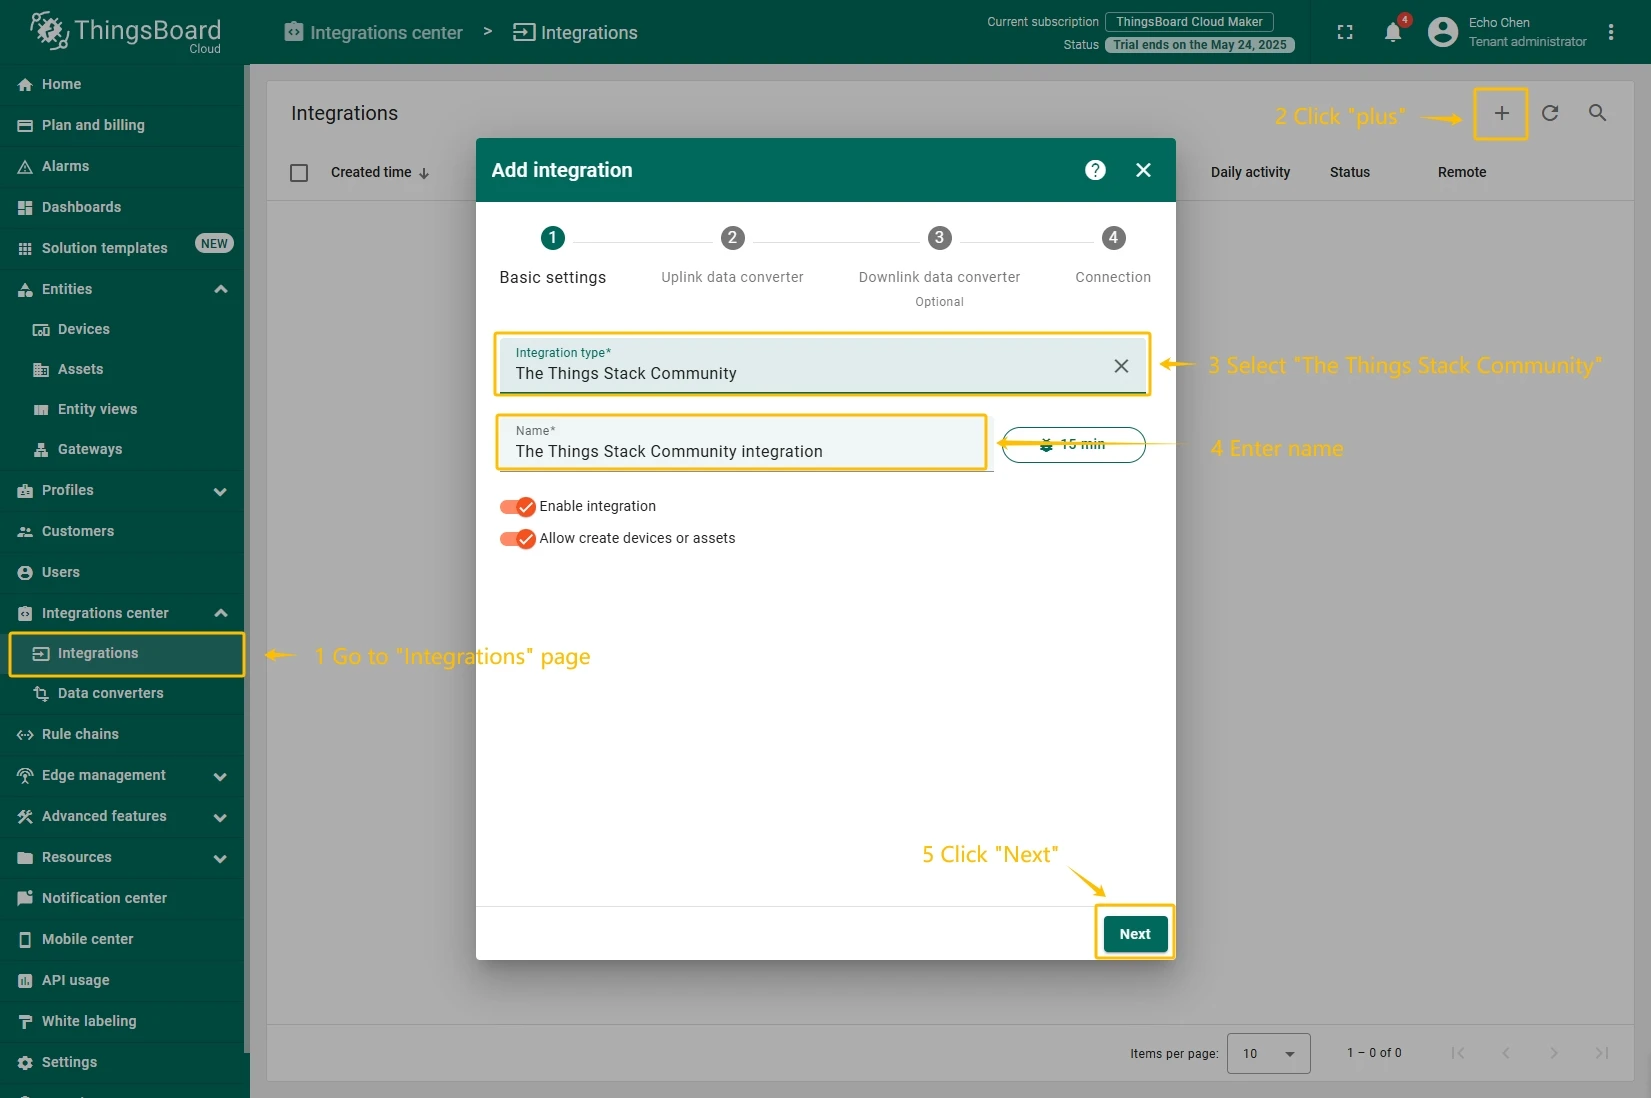
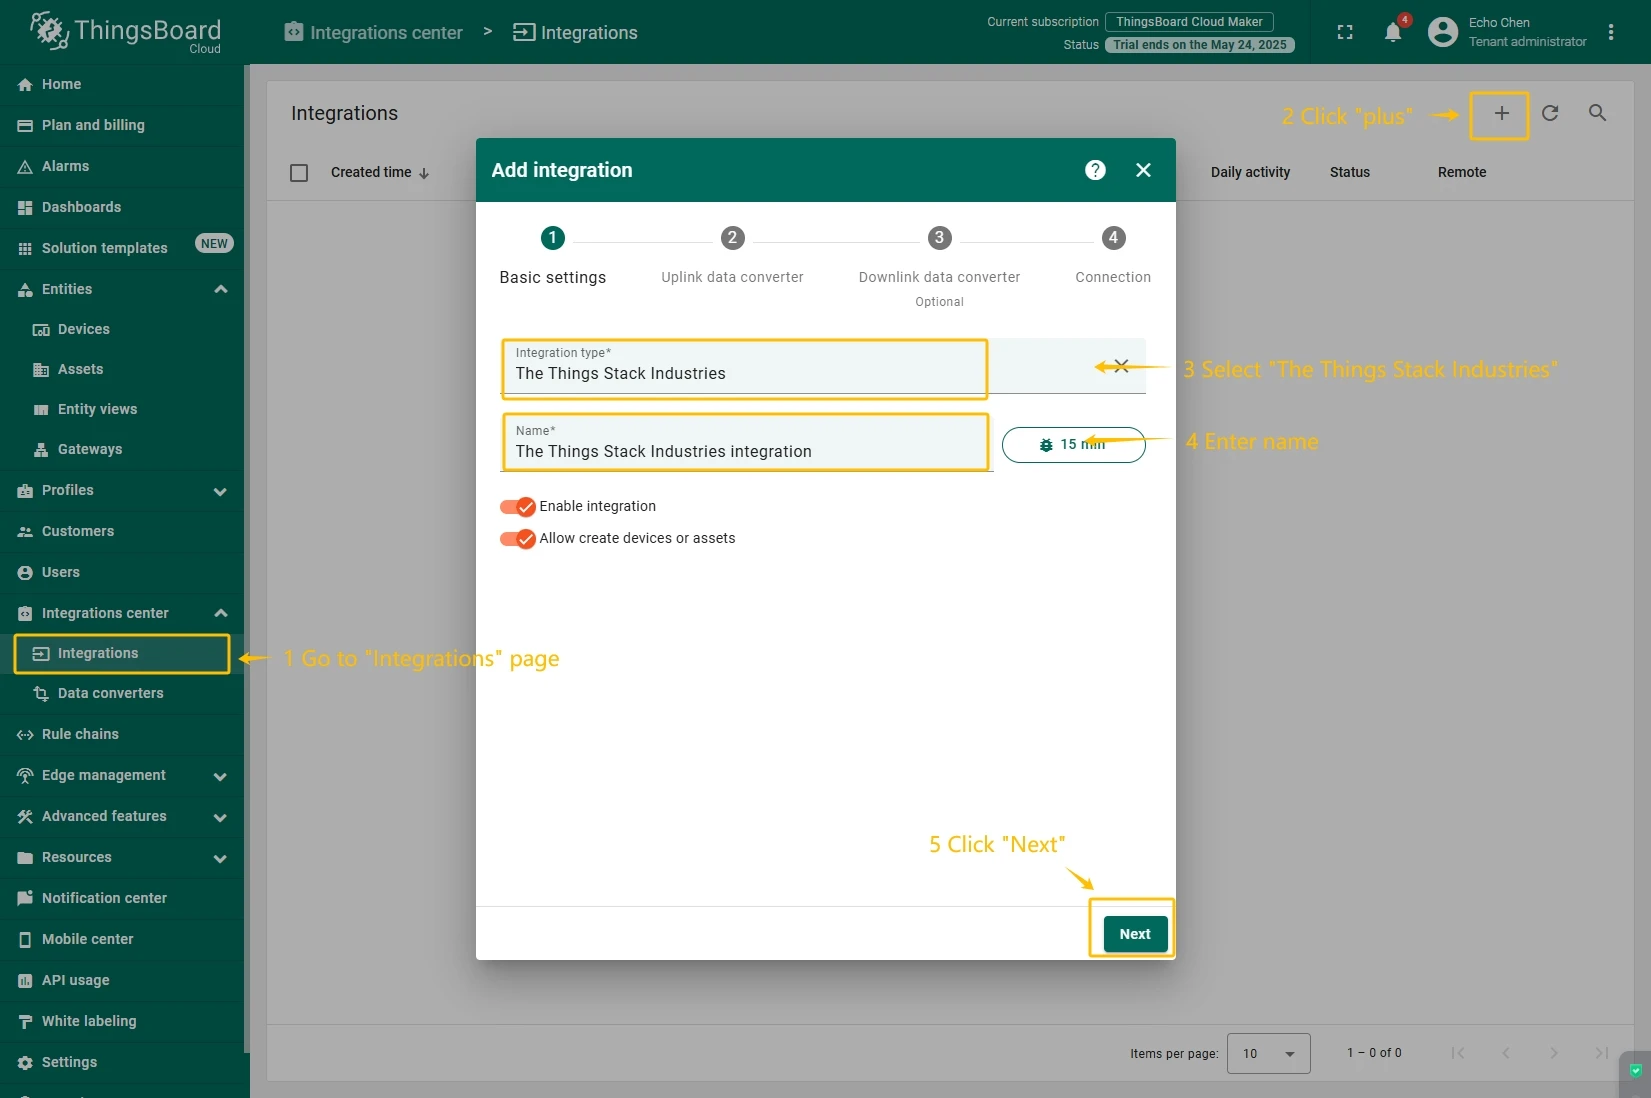
Now, navigate to the “Integrations” page under the “Integrations center” section and follow this steps:
- Click “plus” icon in the upper right corner to add new integration. Select type “The Things Stack Community”. Then, click “Next” button.
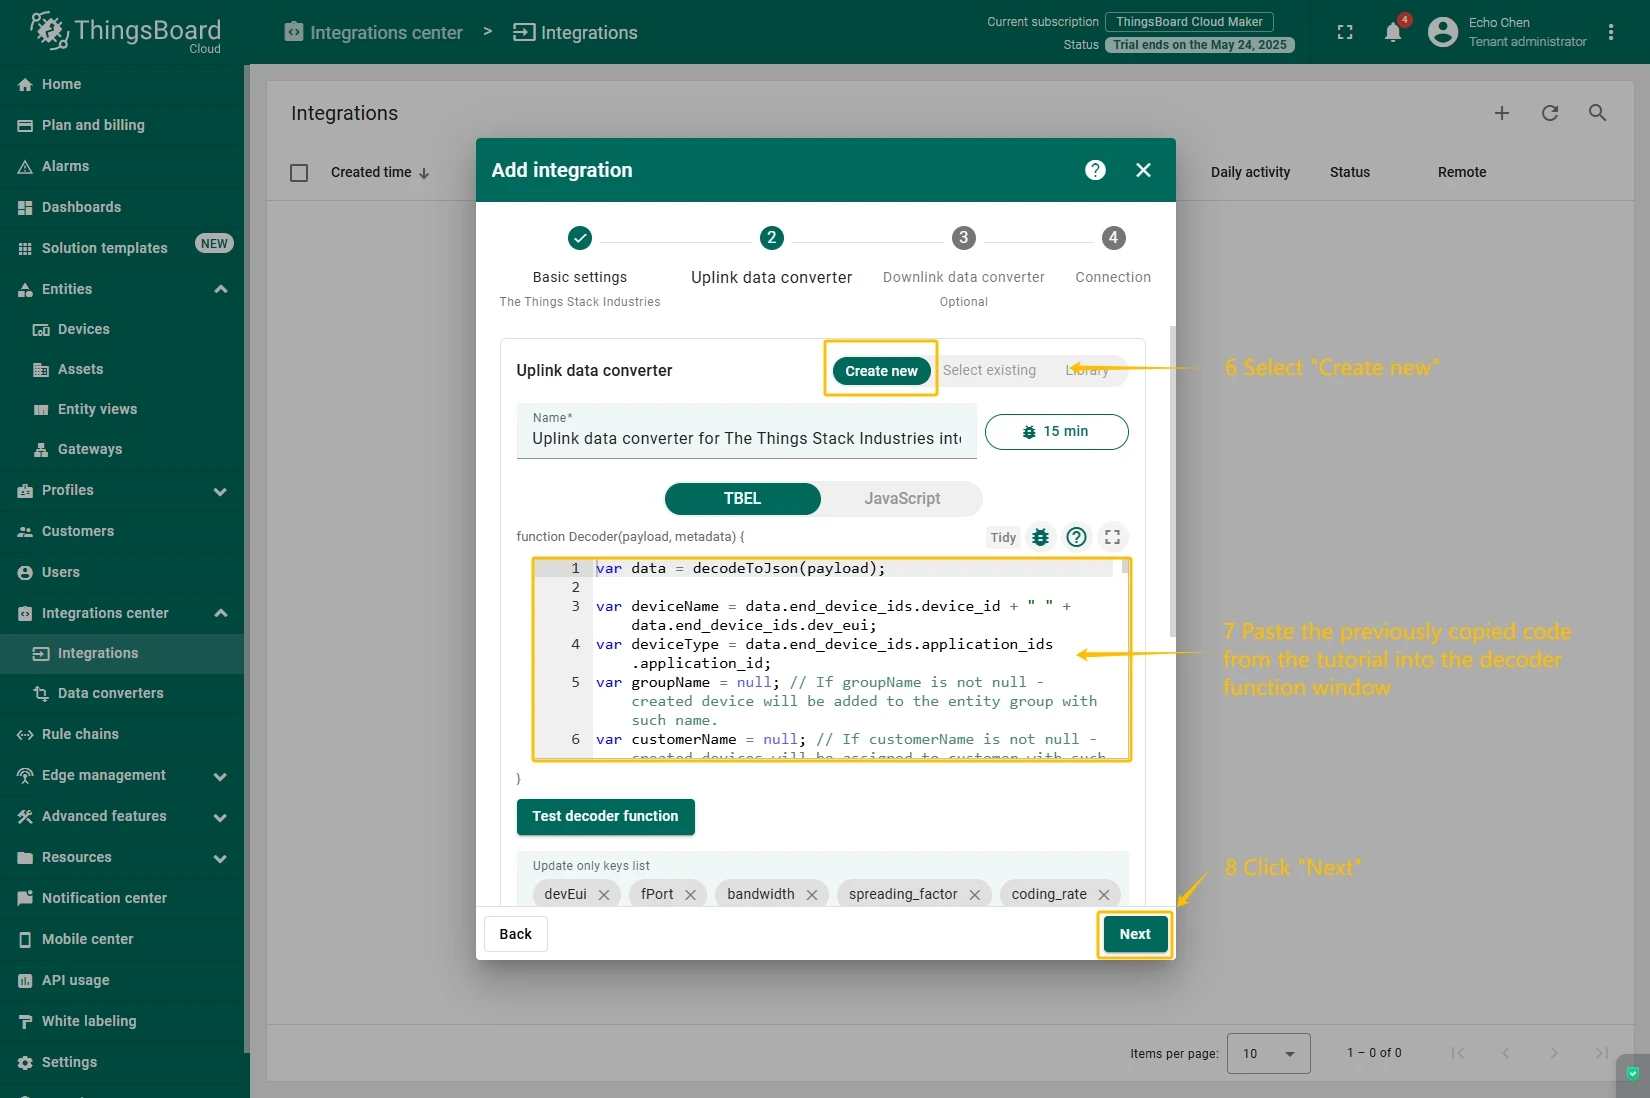
- Paste the previously copied script to the Decoder function section. Click “Next” button.
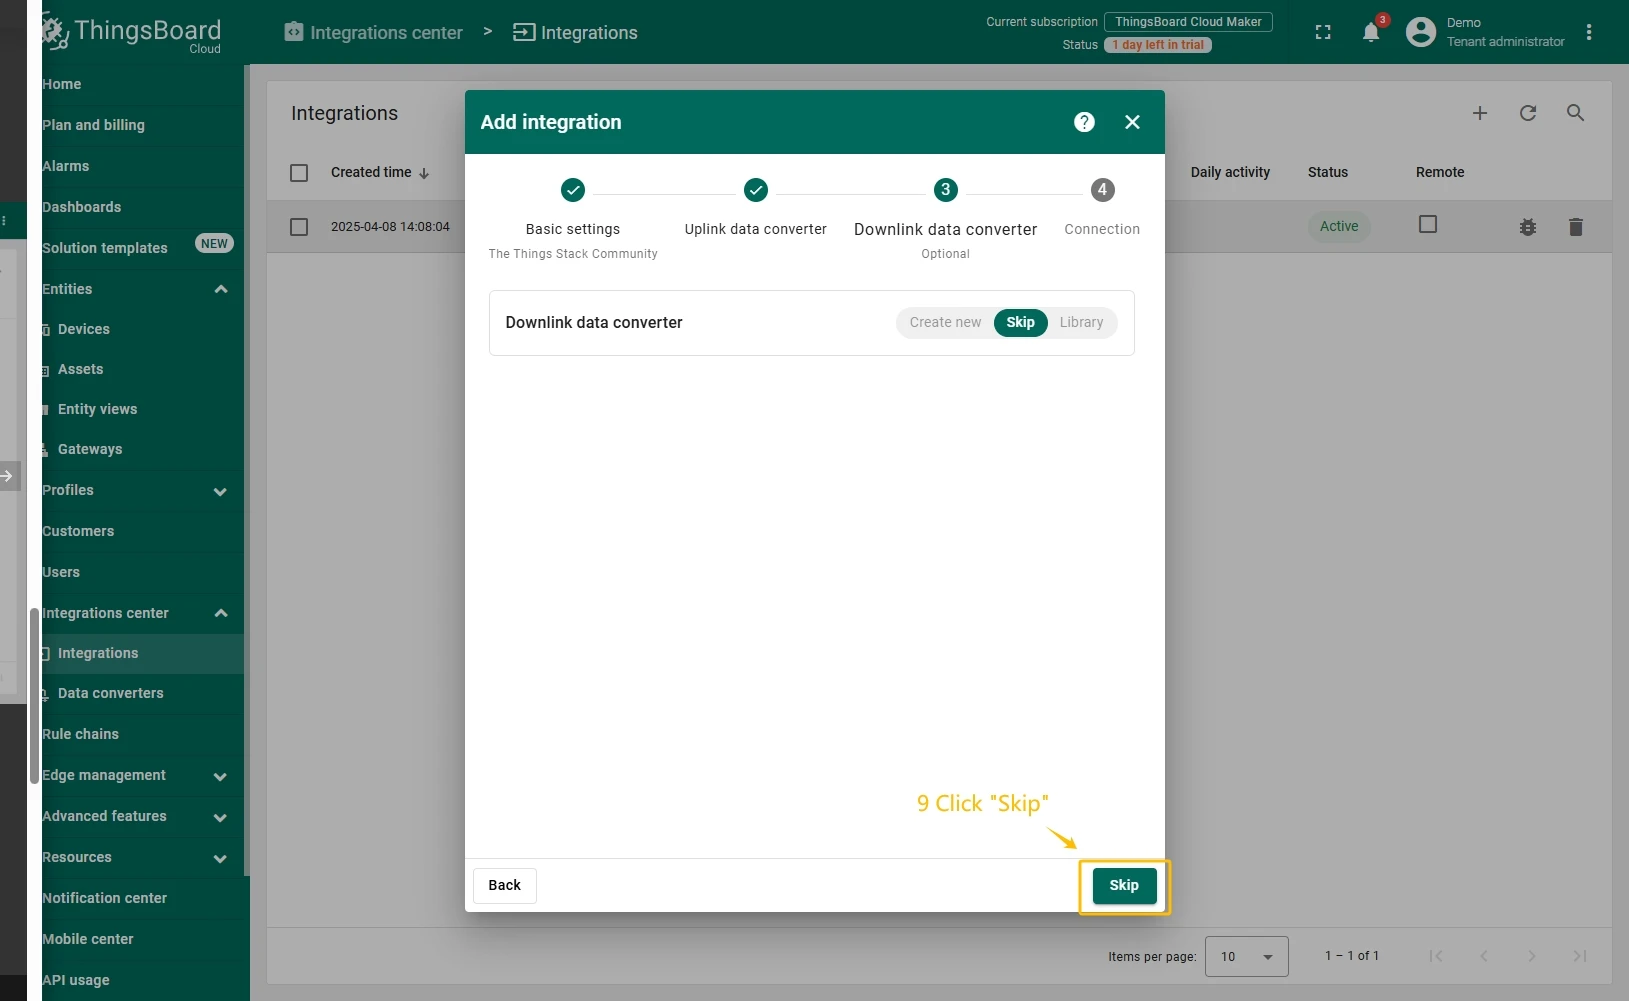
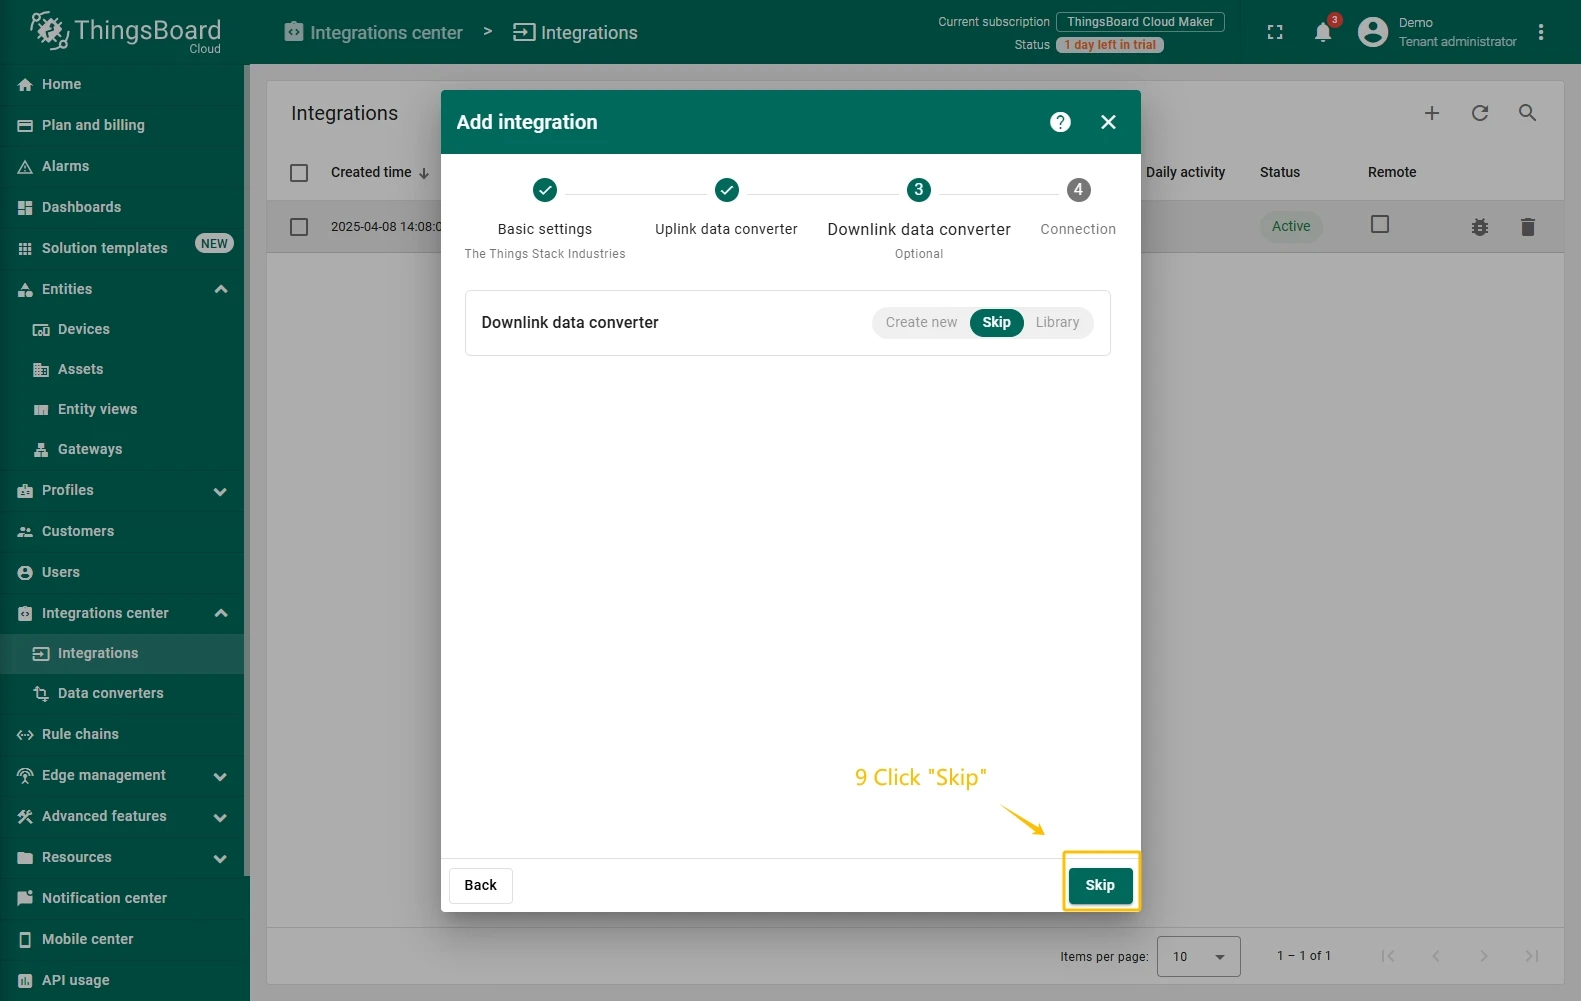
- Leave the “Downlink data converter” field empty. Click on “Skip” button.
- Next, fill in the fields with your parameters. After, press “Add” button.


Add a gateway on The Things Industries
We need to add a gateway on The Things Industries cloud.
To add a gateway, you can follow next steps:
- Login to the cloud and open your console.
- Go to the Home page press the “Register gateway” button.
- Put information about the gateway (gateway EUI) and click the “Register gateway”button.
- The gateway is added. You can see its status - disconnected.


Add a device on The Things Industries
We need to add a device on The Things Industries cloud.
To add a device, you can follow next steps:
- Go to the Applications page. Then select your application and click on its name.
- Click on the Register end device button.
- Put the APP EUI value to the JoinEUI field. Then, press the Confirm button.
- Fill the rest parameters and press Register end device button.


Configure Payload Formatter
Go to the Payload formatters page and select Custom JavaScript formatter as the Formatter type. Paste the decode function into the editor and click the Save changes button.
Decode function:
// Decode uplink function.//// Input is an object with the following fields:// - bytes = Byte array containing the uplink payload, e.g. [255, 230, 255, 0]// - fPort = Uplink fPort.// - variables = Object containing the configured device variables.//// Output must be an object with the following fields:// - data = Object representing the decoded payload.// Badge Tracker decoderfunction decodeUplink(input) {// bytes    var bytes = input.bytes;// type    var uplinkType = (bytes[0] >> 4) & 0x0f;    switch (uplinkType) {        case 0x01:            return {data: decodeRegistration(bytes)};        case 0x02:            return {data: decodeHeartbeat(bytes)};        case 0x03:            return {data: decodeGNSSPosition(bytes)};        case 0x07:            return {data: decodeBeacon(bytes)};        case 0x08:            return {data: decodeAlarm(bytes)};        default:            return null;    }}
// type: 0x01 Registrationfunction decodeRegistration(bytes) {    var data = {};    data.type = "Registration";    data.adr = ((bytes[0] >> 3) & 0x1) == 0 ? "OFF" : "ON";    data.power = ((bytes[2] >> 3) & 0x1f) + "dBm";    data.dr = (bytes[3] >> 4) & 0x0f;    data.gnssEnable = ((bytes[3] >> 3) & 0x01) == 0 ? "Disable" : "Enable";    var positionModeValue = (bytes[3] >> 1) & 0x03;    if (positionModeValue == 0) {        data.positionMode = "Period";    } else if (positionModeValue == 1) {        data.positionMode = "Autonomous";    } else if (positionModeValue == 2) {        data.positionMode = "Demand";    }    data.bleEnable = (bytes[3] & 0x01) == 0 ? "Disable" : "Enable";    data.blePositionReportInterval =        (((bytes[4] << 8) & 0xff00) | (bytes[5] & 0xff)) * 5 + "s";    data.gnssPositionReportInterval =        (((bytes[6] << 8) & 0xff00) | (bytes[7] & 0xff)) * 5 + "s";    data.heartbeatReportInterval = (bytes[8] & 0xff) * 30 + "s";    data.version =        (bytes[9] & 0xff).toString(16).toUpperCase() +        "." +        (bytes[10] & 0xff).toString(16).toUpperCase();    data.cfmsg = "1 Confirmed every " + (bytes[11] & 0xff) + " Heartbeat";    data.hbCount = "Disconnect Judgement " + (bytes[12] & 0xff);    data.fallDetection = (bytes[13] & 0xff) * 0.5 + " meters";    return data;}
// type: 0x02 Heartbeatfunction decodeHeartbeat(bytes) {    var data = {};    data.type = "Heartbeat";    data.battery = bytes[1] + "%";    data.rssi = bytes[2] * -1 + "dBm";    data.snr = (((bytes[3] << 8) & 0xff00) | (bytes[4] & 0xff)) / 100 + "dB";    var gnssStateValue = (bytes[5] >> 4) & 0x0f;    if (gnssStateValue == 0) {        data.gnssState = "Off";    } else if (gnssStateValue == 1) {        data.gnssState = "Boot GNSS";    } else if (gnssStateValue == 2) {        data.gnssState = "Locating";    } else if (gnssStateValue == 3) {        data.gnssState = "Located";    } else if (gnssStateValue == 9) {        data.gnssState = "No signal";    }    data.moveState = bytes[5] & 0x0f;    var chargeStateValue = (bytes[6] >> 4) & 0x0f;    if (chargeStateValue == 0) {        data.chargeState = "Power cable disconnected";    } else if (chargeStateValue == 5) {        data.chargeState = "Charging";    } else if (chargeStateValue == 6) {        data.chargeState = "Charge complete";    }    return data;}
// type: 0x03 GNSSPositionfunction decodeGNSSPosition(bytes) {    var data = {};    data.type = "GNSSPosition";// longitude    let longitude =        (bytes[1] << 24) | (bytes[2] << 16) | (bytes[3] << 8) | bytes[4];    data.longitude = hex2float(longitude);// latitude    let latitude =        (bytes[5] << 24) | (bytes[6] << 16) | (bytes[7] << 8) | bytes[8];    data.latitude = hex2float(latitude);// time    let time =        (bytes[9] << 24) | (bytes[10] << 16) | (bytes[11] << 8) | bytes[12];    data.time = timestampToTime((time + 8 * 60 * 60) * 1000);    return data;}
// type: 0x07 Beaconfunction decodeBeacon(bytes) {    const data = {        type: "Beacon",        length: bytes[0] & 0x0f,    };    for (let i = 0; i < data.length; i++) {        const index = 6 + 5 * i;        const major = ((bytes[index] << 8) | bytes[index + 1])            .toString(16)            .toUpperCase()            .padStart(4, "0");        const minor = ((bytes[index + 2] << 8) | bytes[index + 3])            .toString(16)            .toUpperCase()            .padStart(4, "0");        const rssi = bytes[index + 4] - 256 + "dBm";        data["beacon" + (i + 1)] = major + minor;        data["rssi" + (i + 1)] = rssi;    }    return data;}
// type: 0x08 Alarmfunction decodeAlarm(bytes) {    var data = {};    data.type = "Alarm";    var alarmValue = bytes[1] & 0xff;    if (alarmValue === 1) {        data.alarm = "SOS";    } else if (alarmValue === 2) {        data.alarm = "Fall";    } else {        data.alarm = "Unknown";    }    return data;}
function hex2float(num) {    var sign = num & 0x80000000 ? -1 : 1;    var exponent = ((num >> 23) & 0xff) - 127;    var mantissa = 1 + (num & 0x7fffff) / 0x7fffff;    return sign * mantissa * Math.pow(2, exponent);}
function timestampToTime(timestamp) {    const date = new Date(timestamp);    const year = date.getFullYear();    const month = (date.getMonth() + 1).toString().padStart(2, "0");    const day = date.getDate().toString().padStart(2, "0");    const hour = date.getHours().toString().padStart(2, "0");    const minute = date.getMinutes().toString().padStart(2, "0");    const second = date.getSeconds().toString().padStart(2, "0");    return `${year}-${month}-${day} ${hour}:${minute}:${second}`;}
Create integration in ThingsBoard
Next, we will create the “TheThingsIndustries” integration inside the ThingsBoard.
At first, copy the code, we will need it to create the uplink converter:
var data = decodeToJson(payload);var deviceName = data.end_device_ids.device_id;var deviceType = data.end_device_ids.application_ids.application_id;
var result = { deviceName: deviceName, deviceType: deviceType, telemetry: data.uplink_message.decoded_payload};
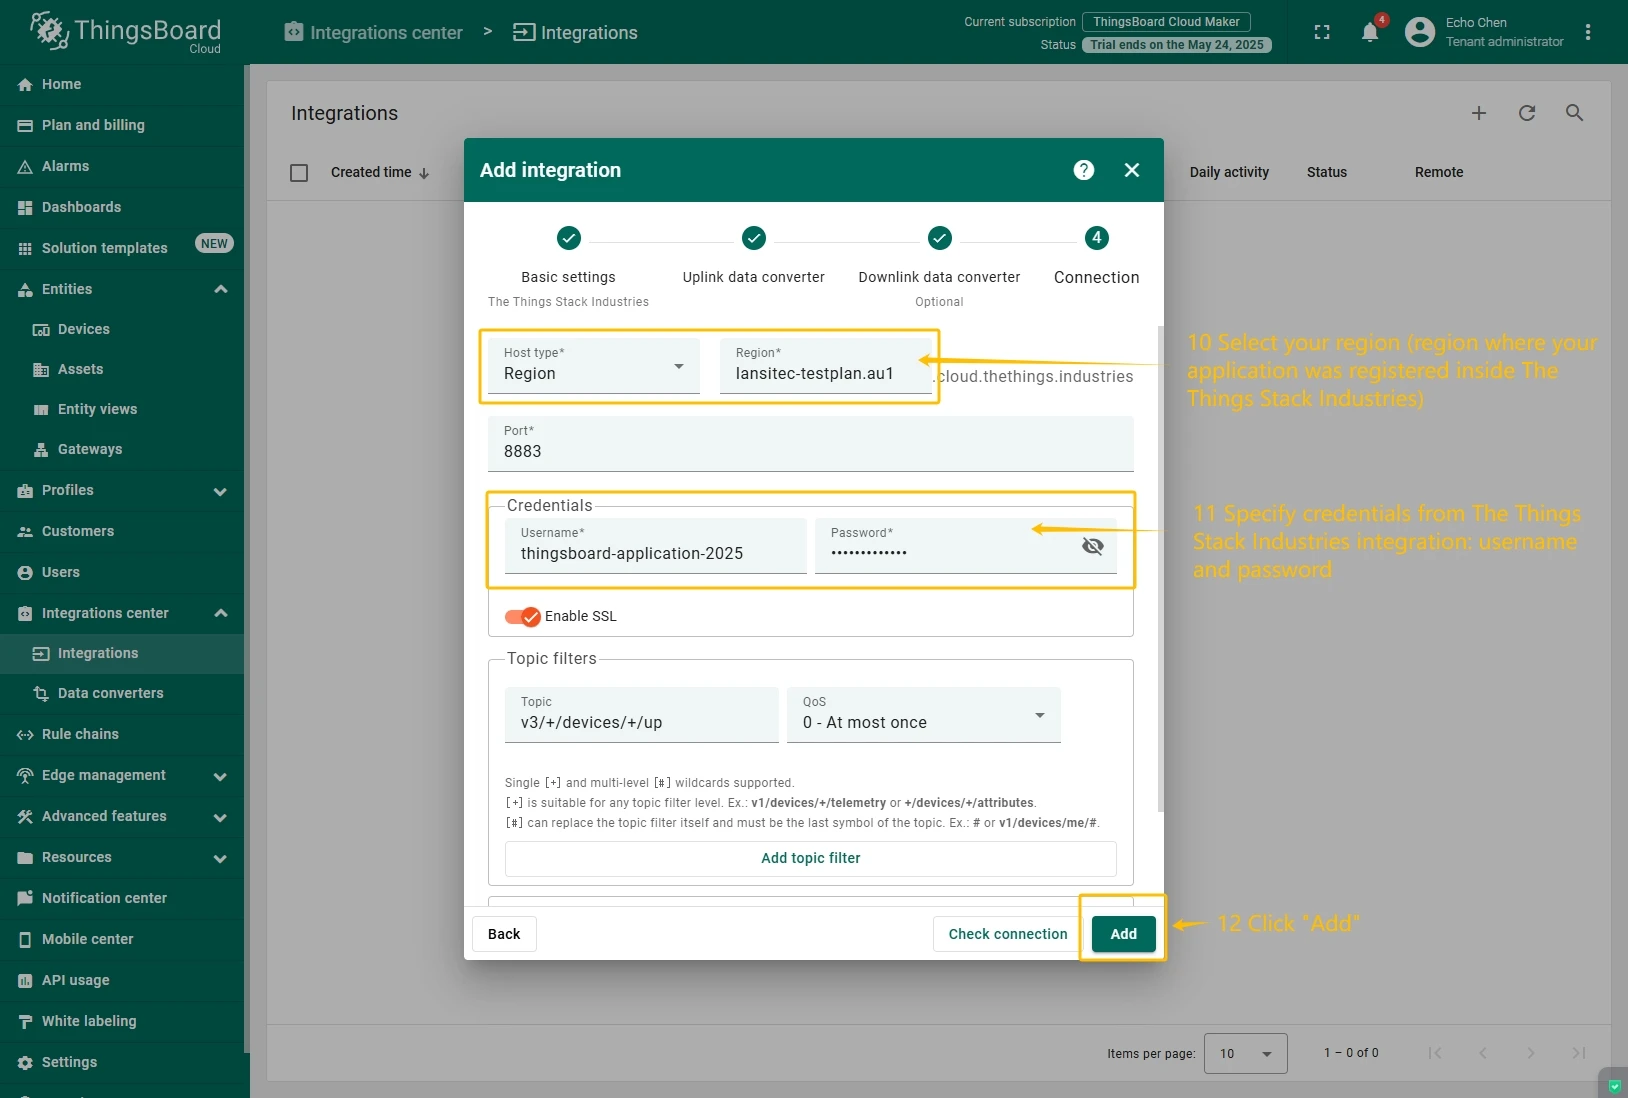
return result;In the “Connect”step, you will need the following parameters:
- Region: eu1 (region where your application was registered inside The Things Industries Console);
- Username: thingsboard-application-2025-05@lansitec-testplan (use Username from integration on The Things Stack Industries);
- Password: use Password from integration on The Things Industries.
Now, navigate to the “Integrations” page under the “Integrations center” section and follow this steps:
- Click “plus”icon in the upper right corner to add new integration. Select type “The Things Industries Integration”. Then, click “Next” button.
- Paste the previously copied script to the Decoder function section. Click “Next” button.
- Leave the “Downlink data converter”field empty. Click on “Skip”button.
- Next, fill in the fields with your parameters. After, press “Add” button.
Add a gateway on the Loriot
We need to add a gateway on the Loriot.
To add a gateway, you can follow next steps:
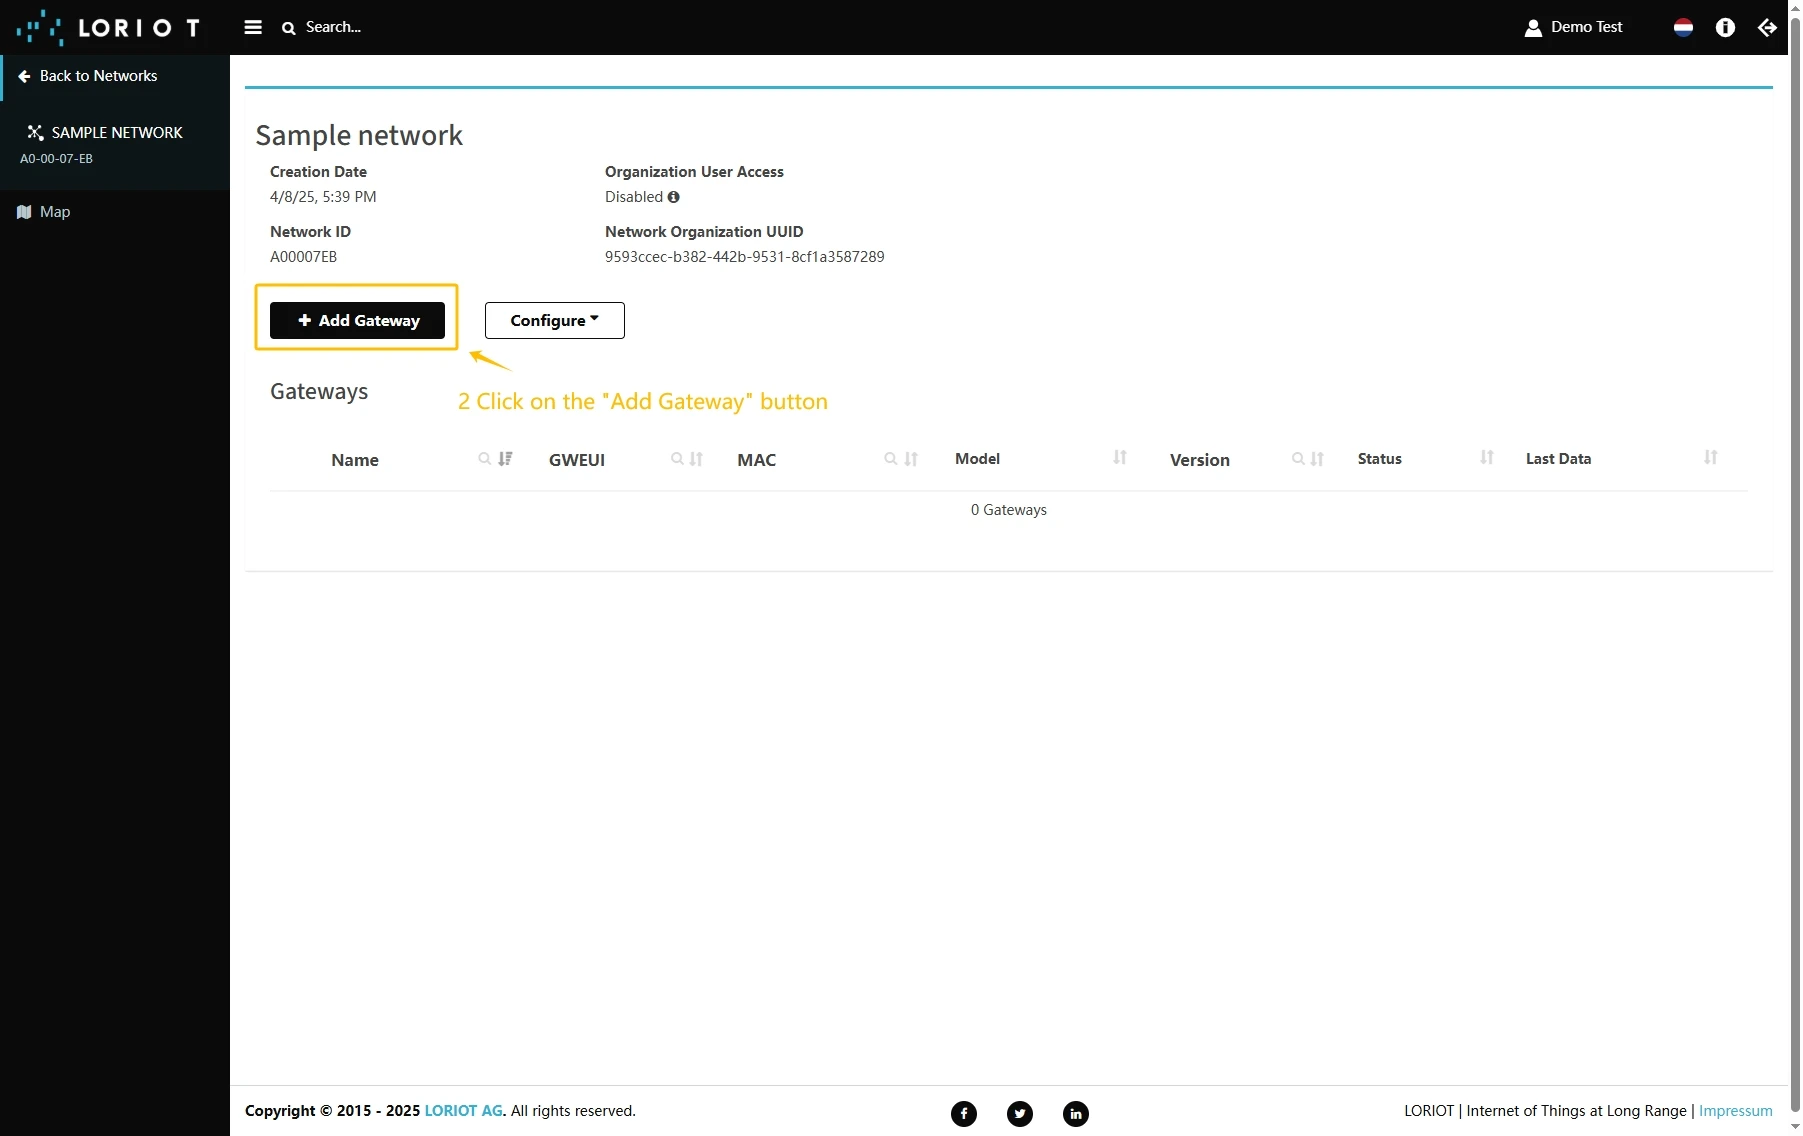
- Login to Loriot server. Open the “Sample network” or create a new one in the “Networks” section.
- Click on the “Add Gateway” button.
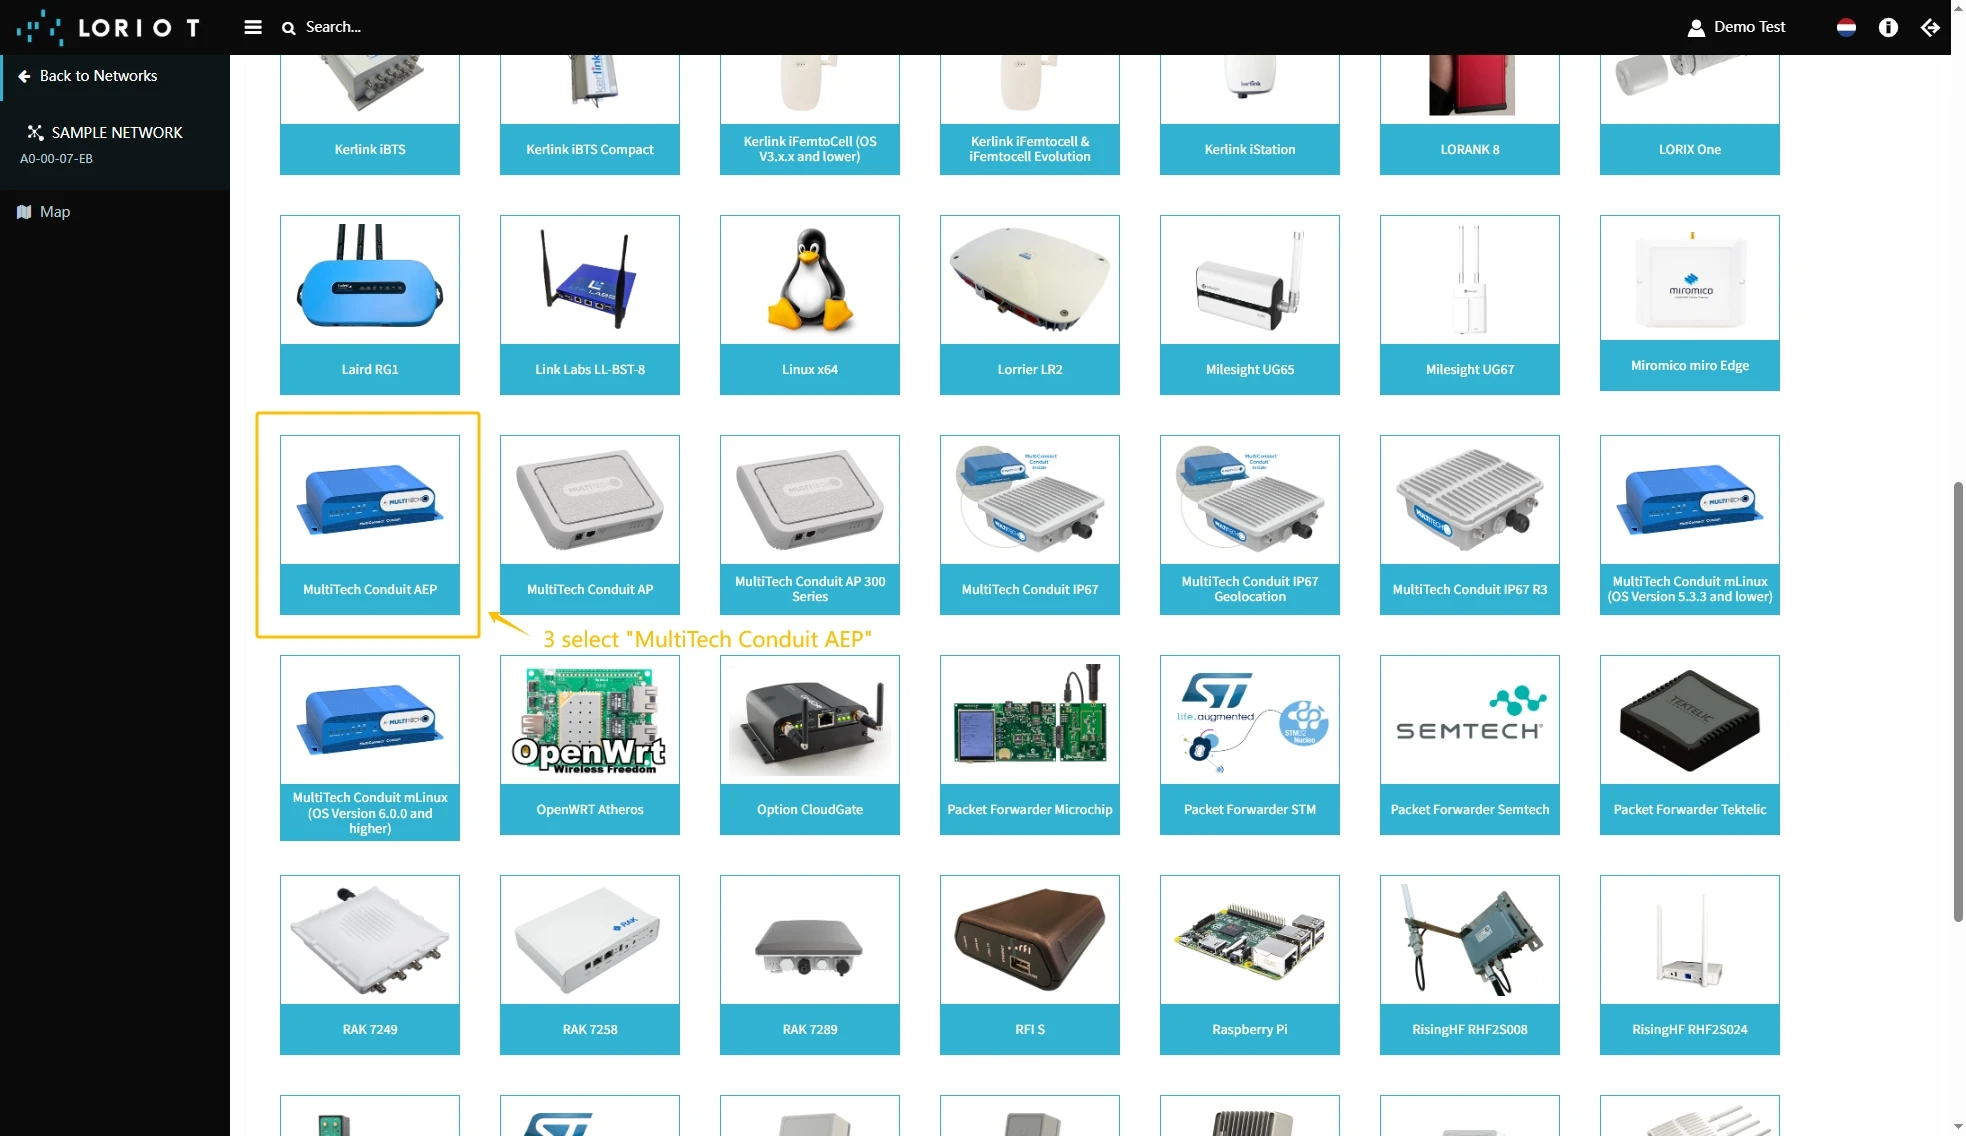
- Scroll down and select “MultiTech Conduit AEP”.
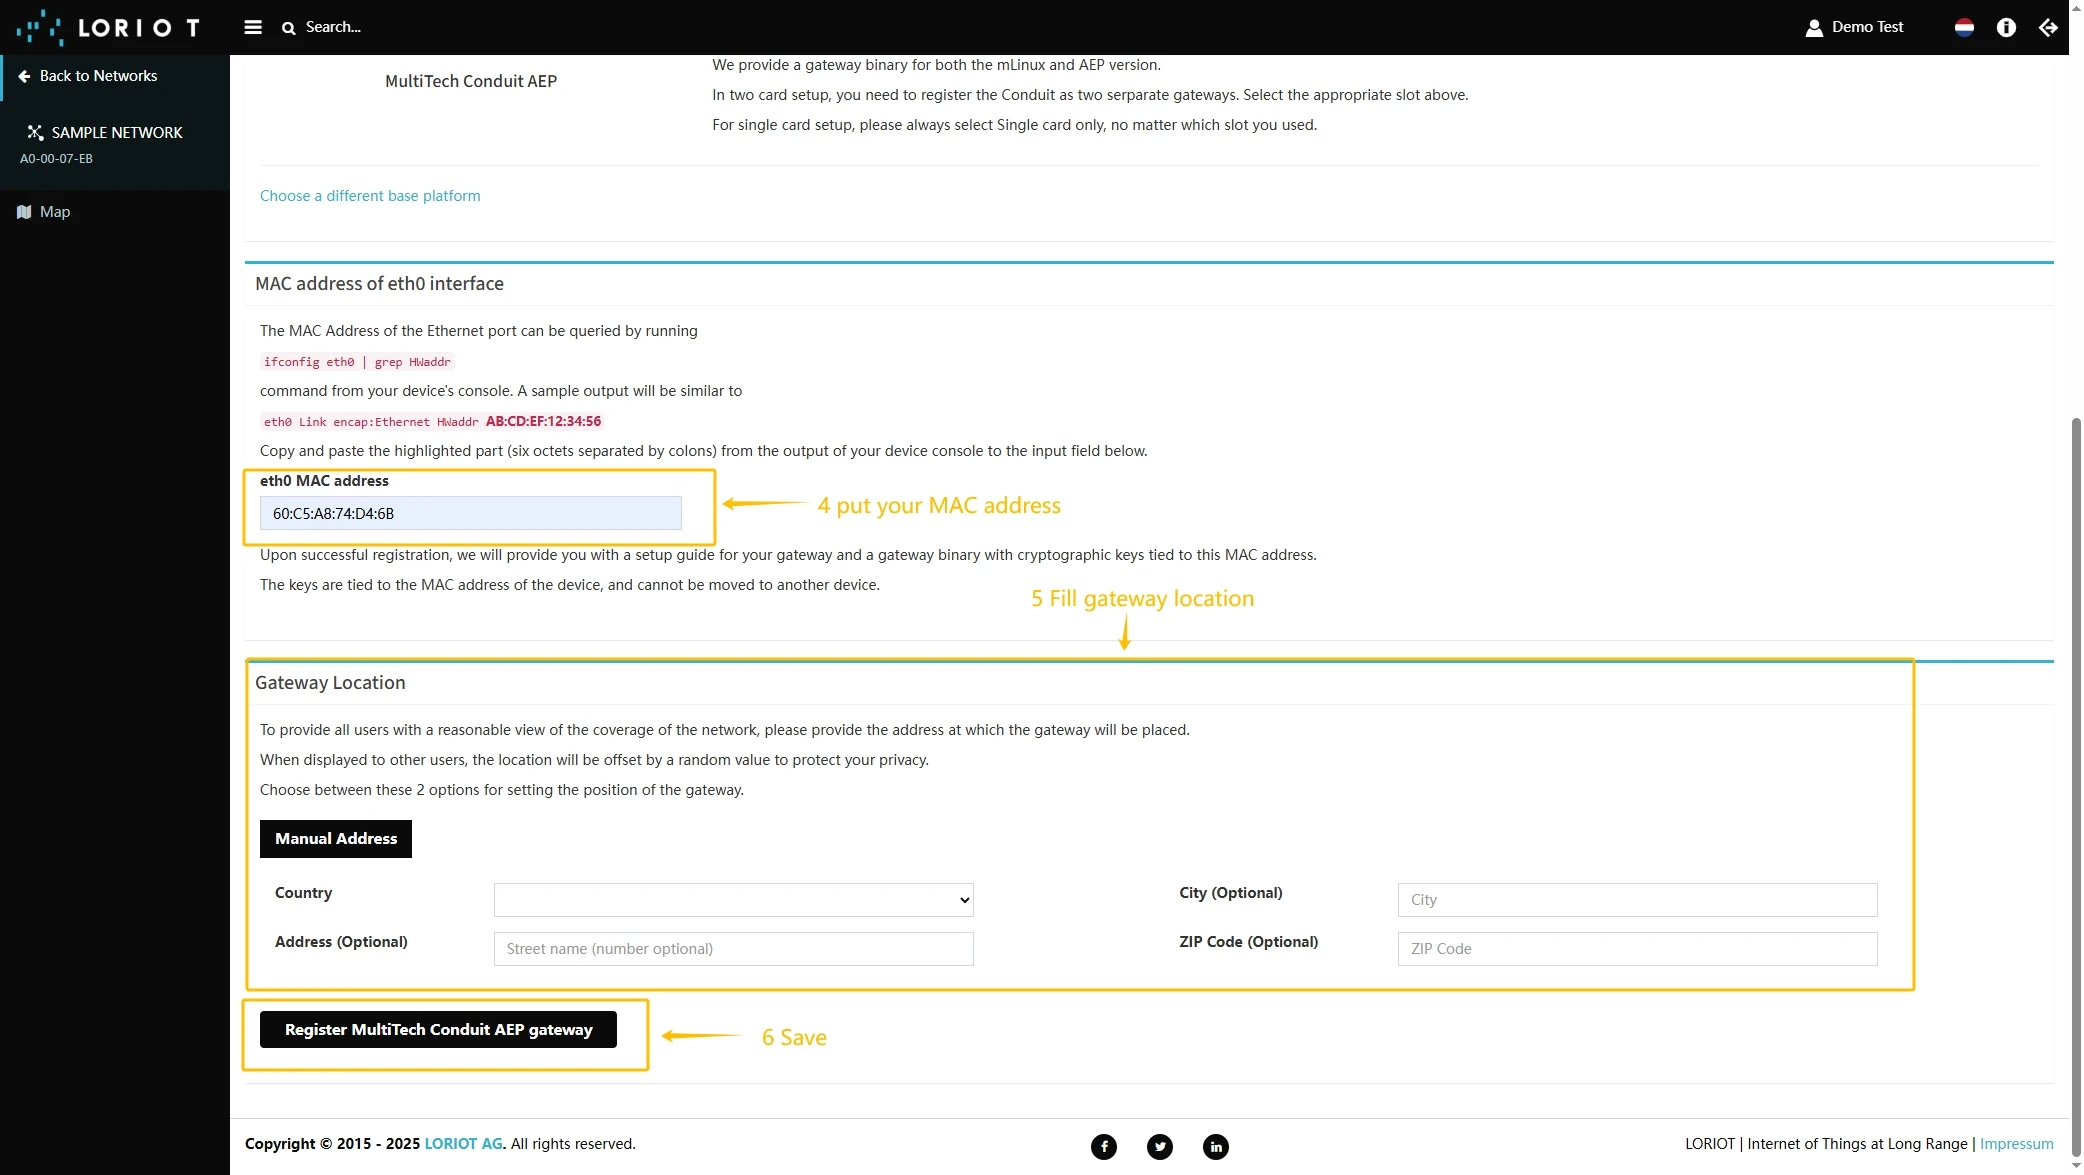
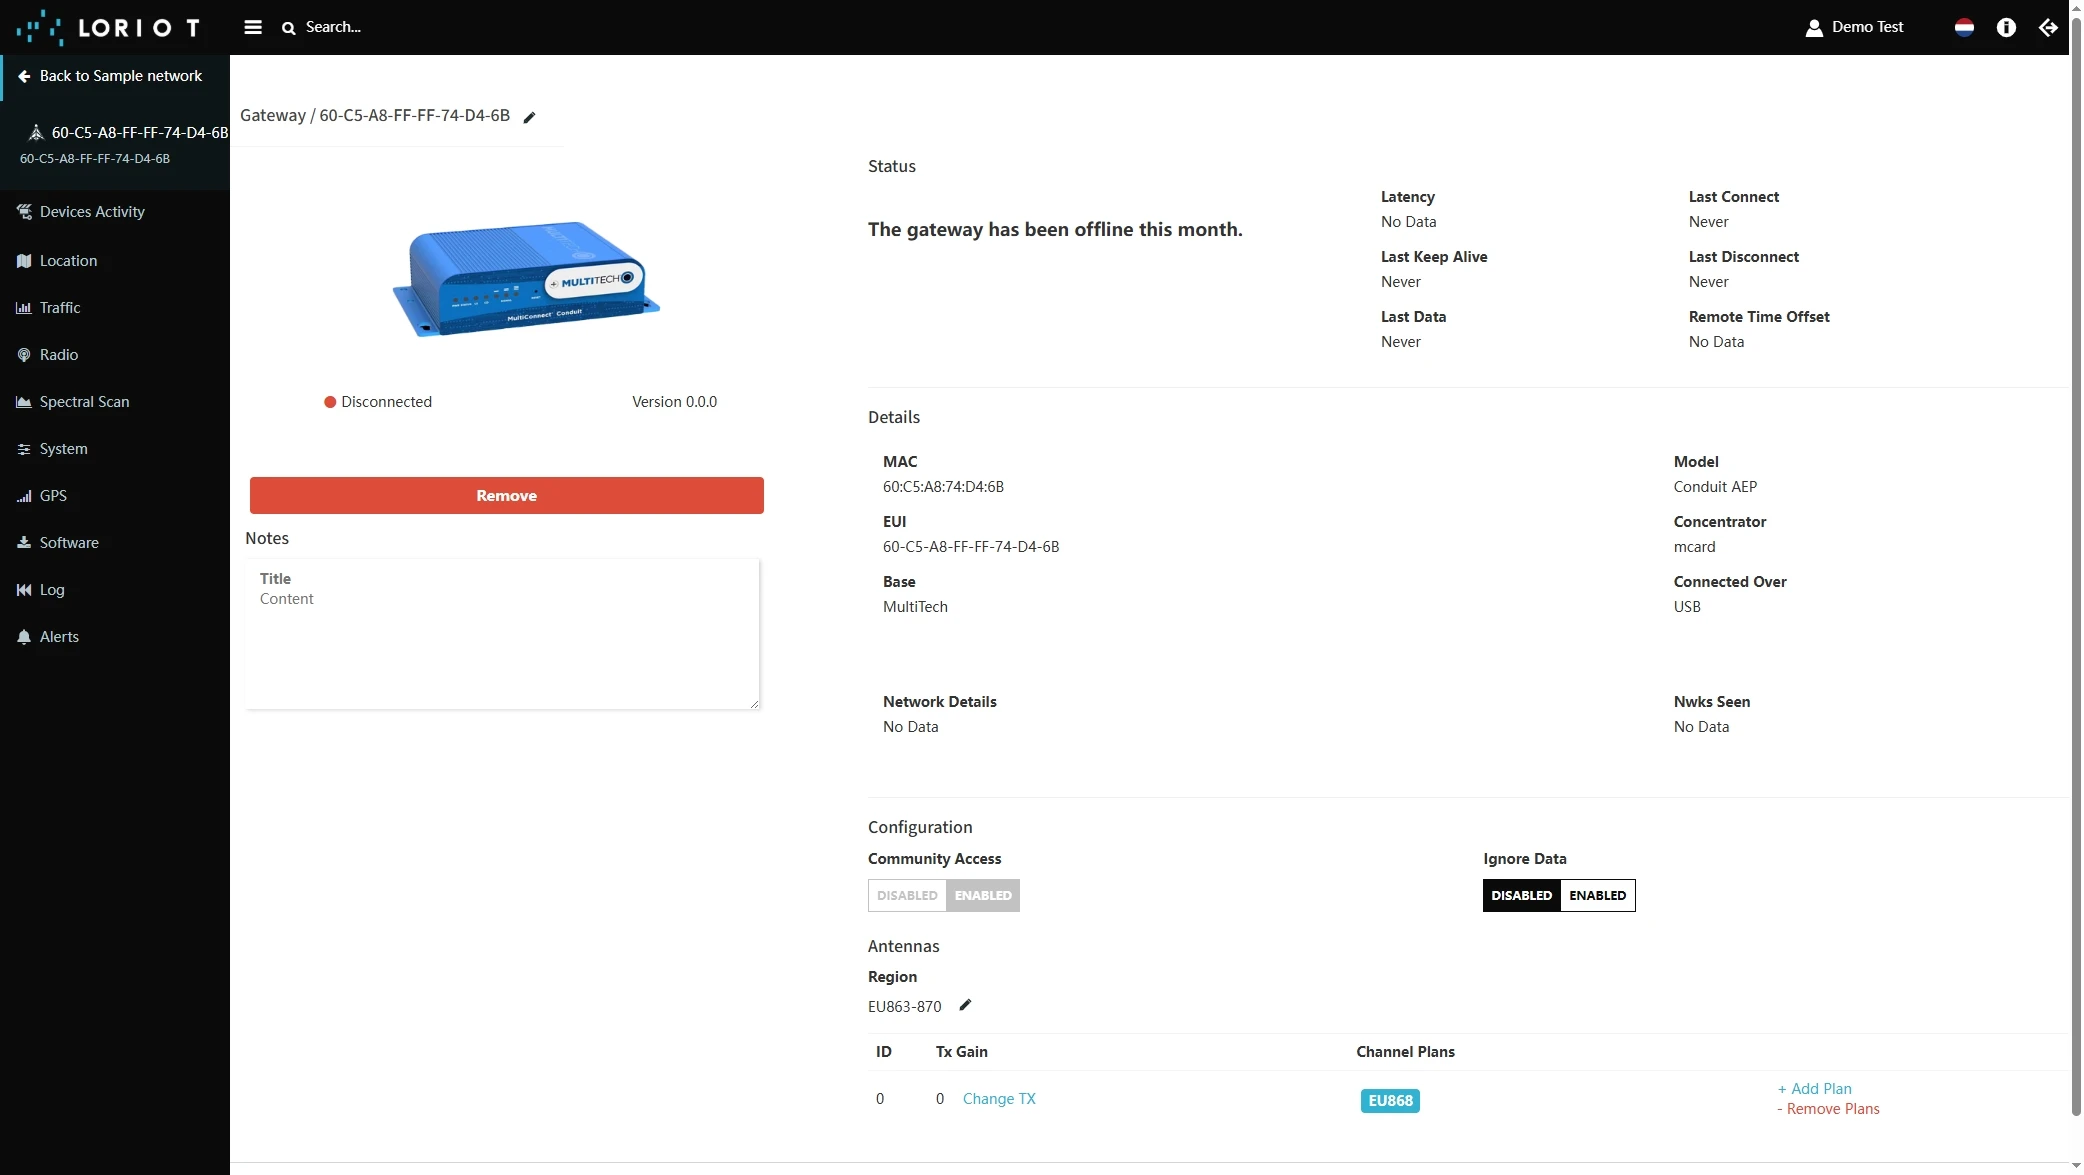
- Scroll up and put information about the gateway MAC Address (Just remove FFFF or FFFE in the middle of gateway EUI) into eth0 MAC address and gateway EUI to Custom EUI field.
- The gateway is added. You can see its status - disconnected.

Add a device on the Loriot
We need to add a device on the Loriot.
To add a device, you can follow next steps:
- Login to Loriot server. We use eu2.loriot.io, but it depends on chosen region during registration.
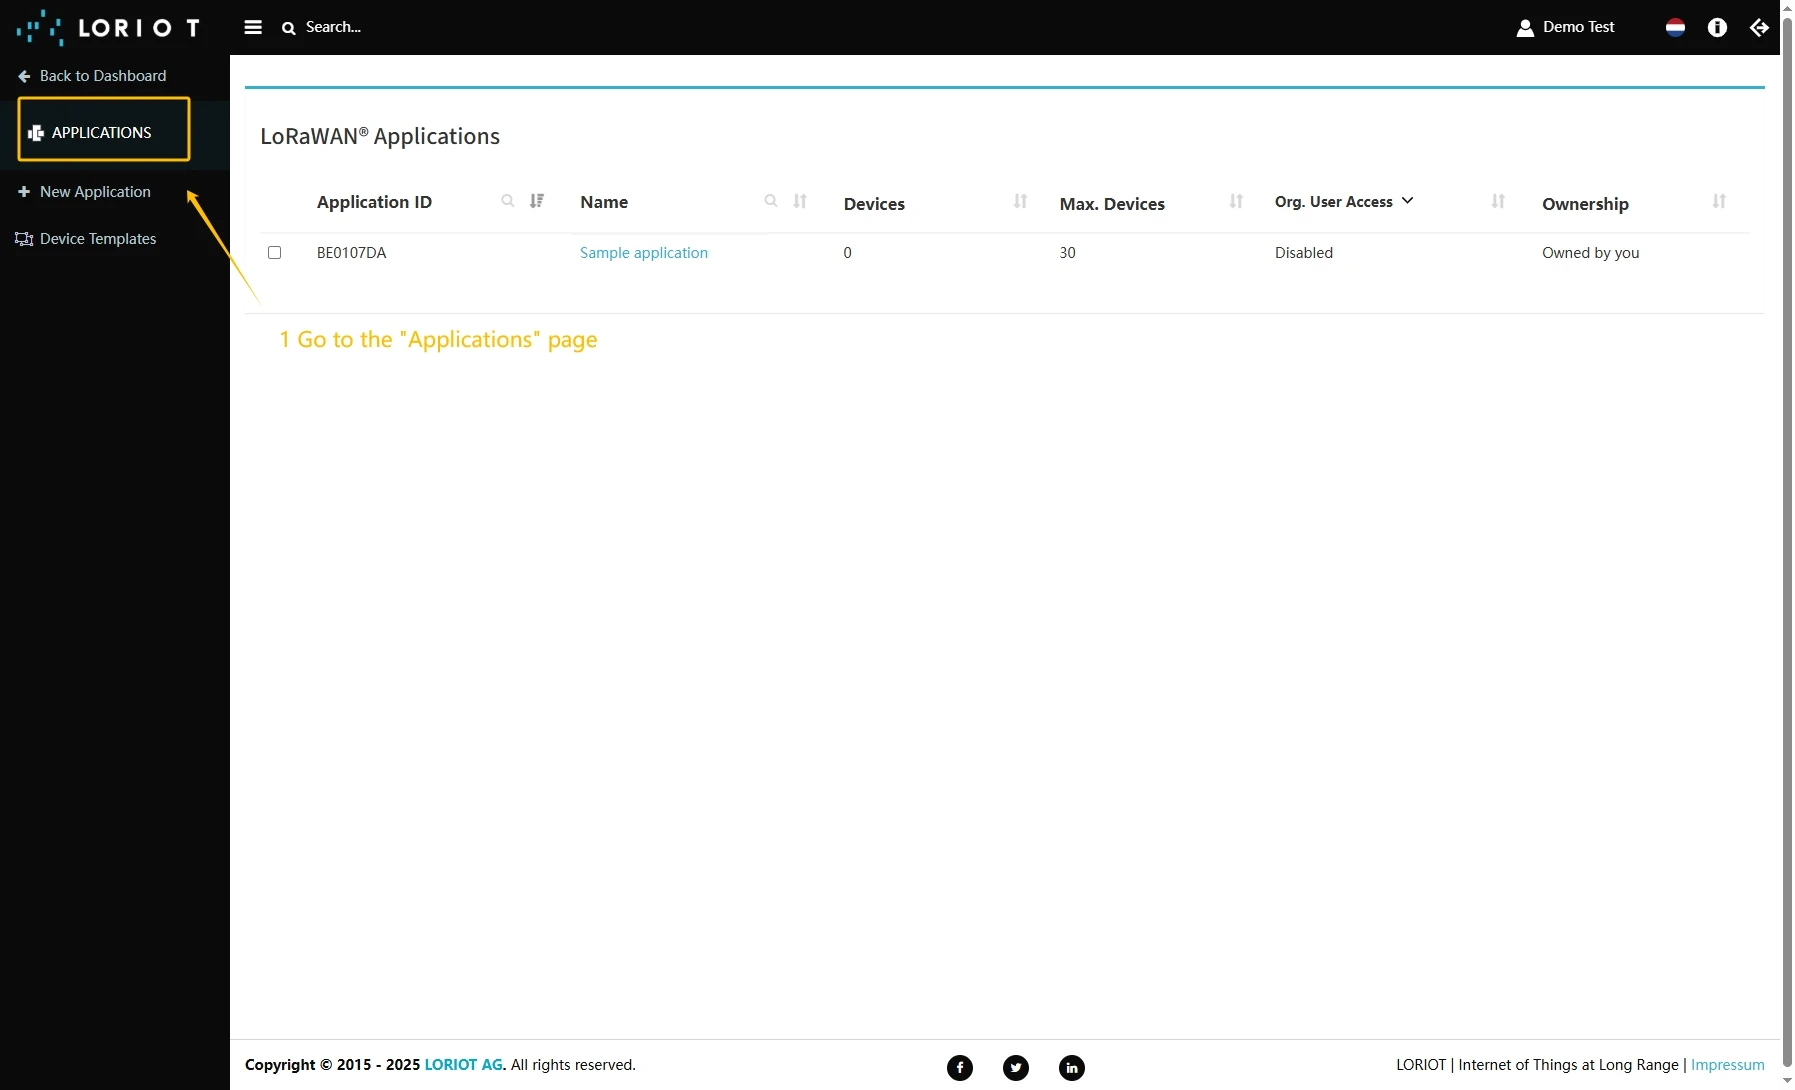
- Go to the “Applications” page in left menu.
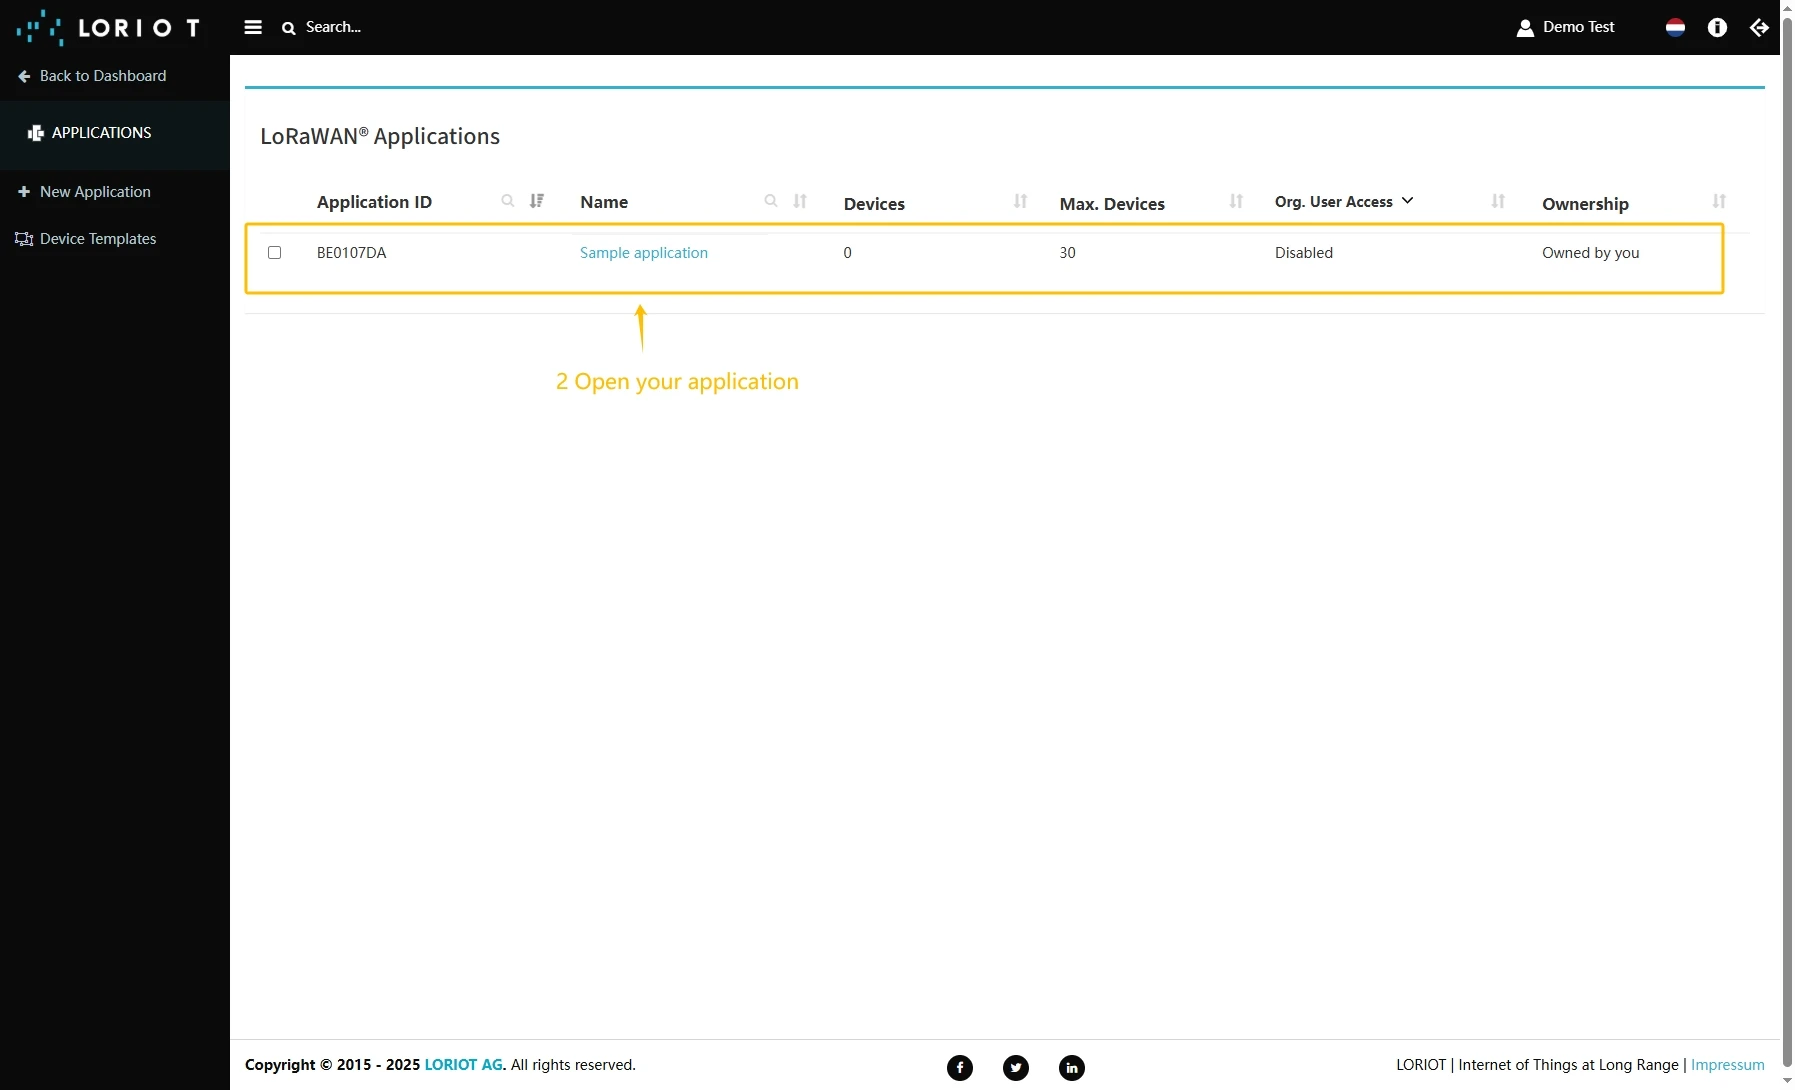
- Open your application, in our case it is “SampleApp”.
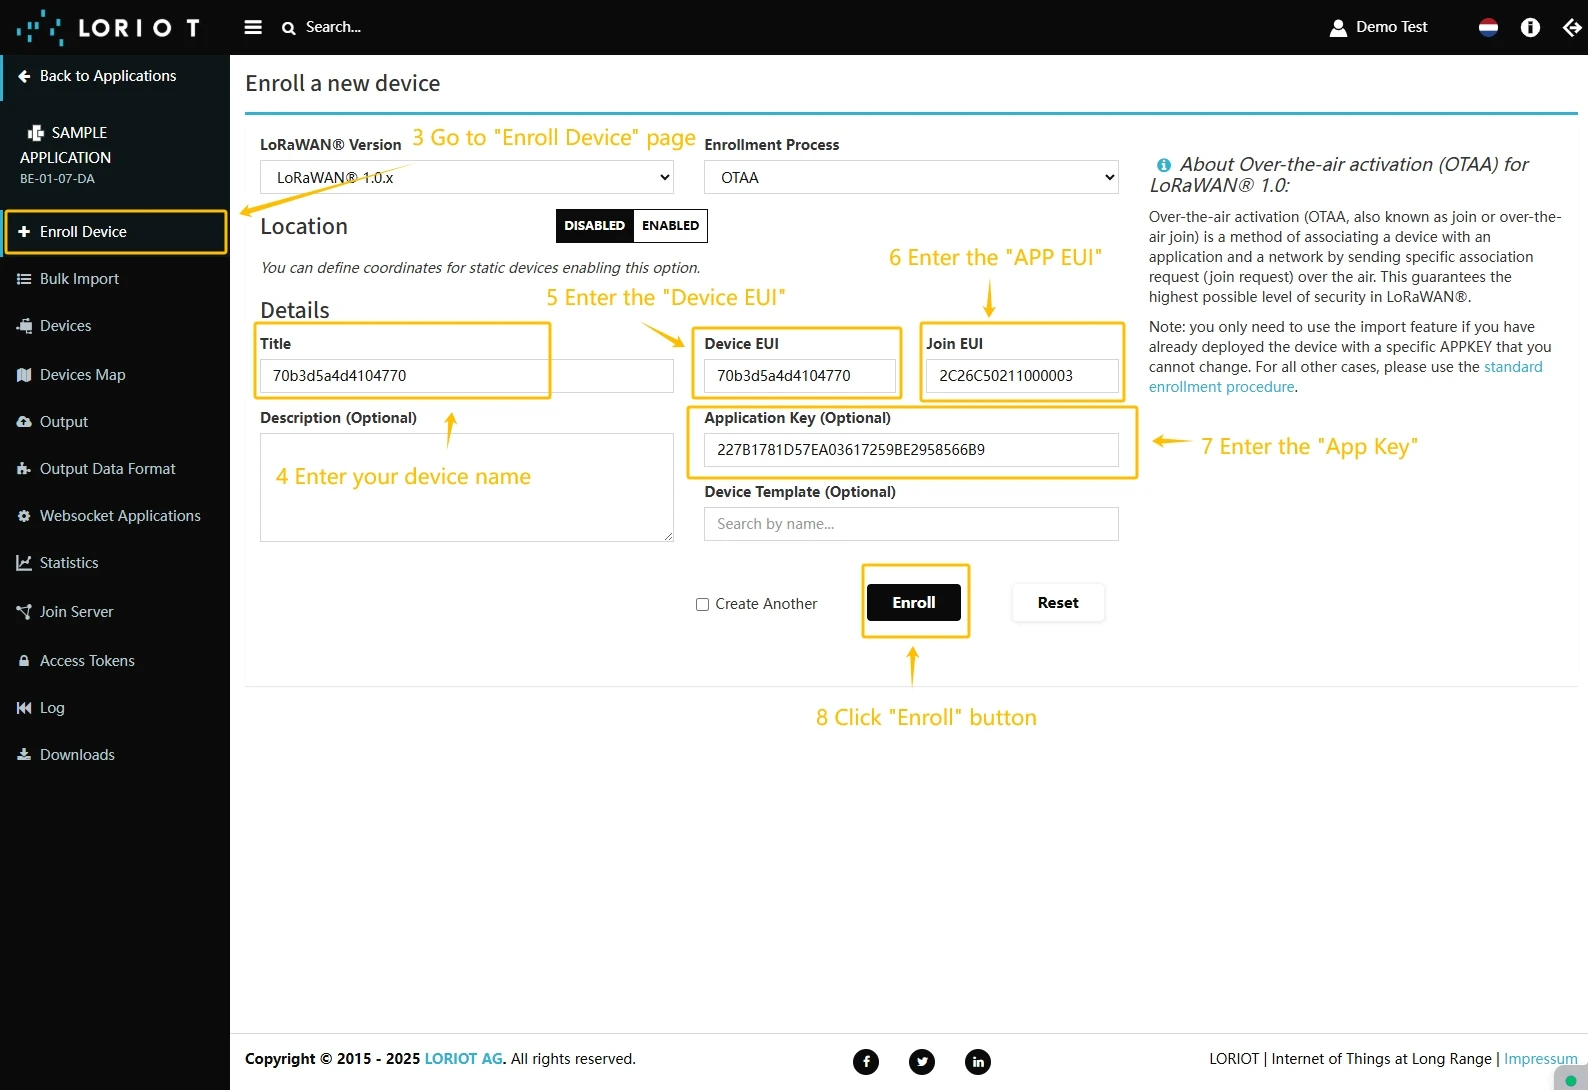
- Go to the “Enroll Device” page. Fill in the fields, with a configuration from your device. Then click the “Enroll” button.

Create integration in ThingsBoard
Next we will create an integration with Loriot inside the ThingsBoard.
At first, copy the code, we will need it to create the uplink converter:
var data = decodeToJson(payload);var deviceName = data.end_device_ids.device_id;var deviceType = data.end_device_ids.application_ids.application_id;
var result = { deviceName: deviceName, deviceType: deviceType, telemetry: data.uplink_message.decoded_payload};
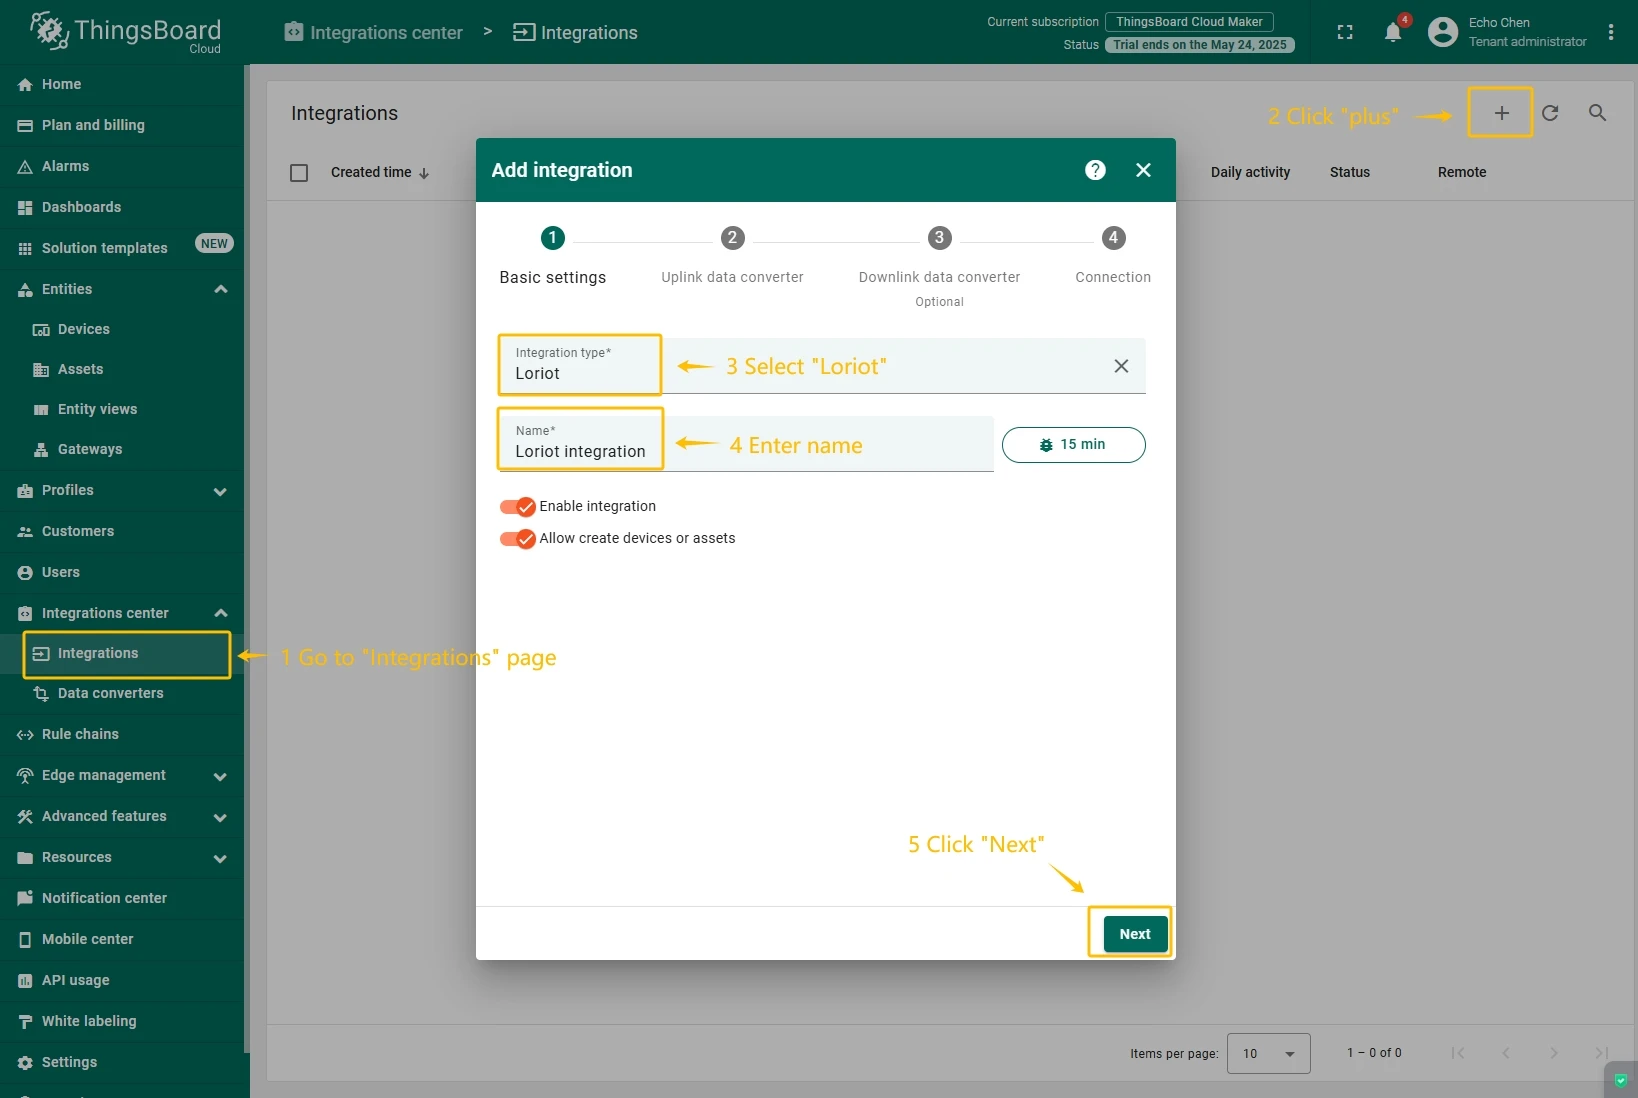
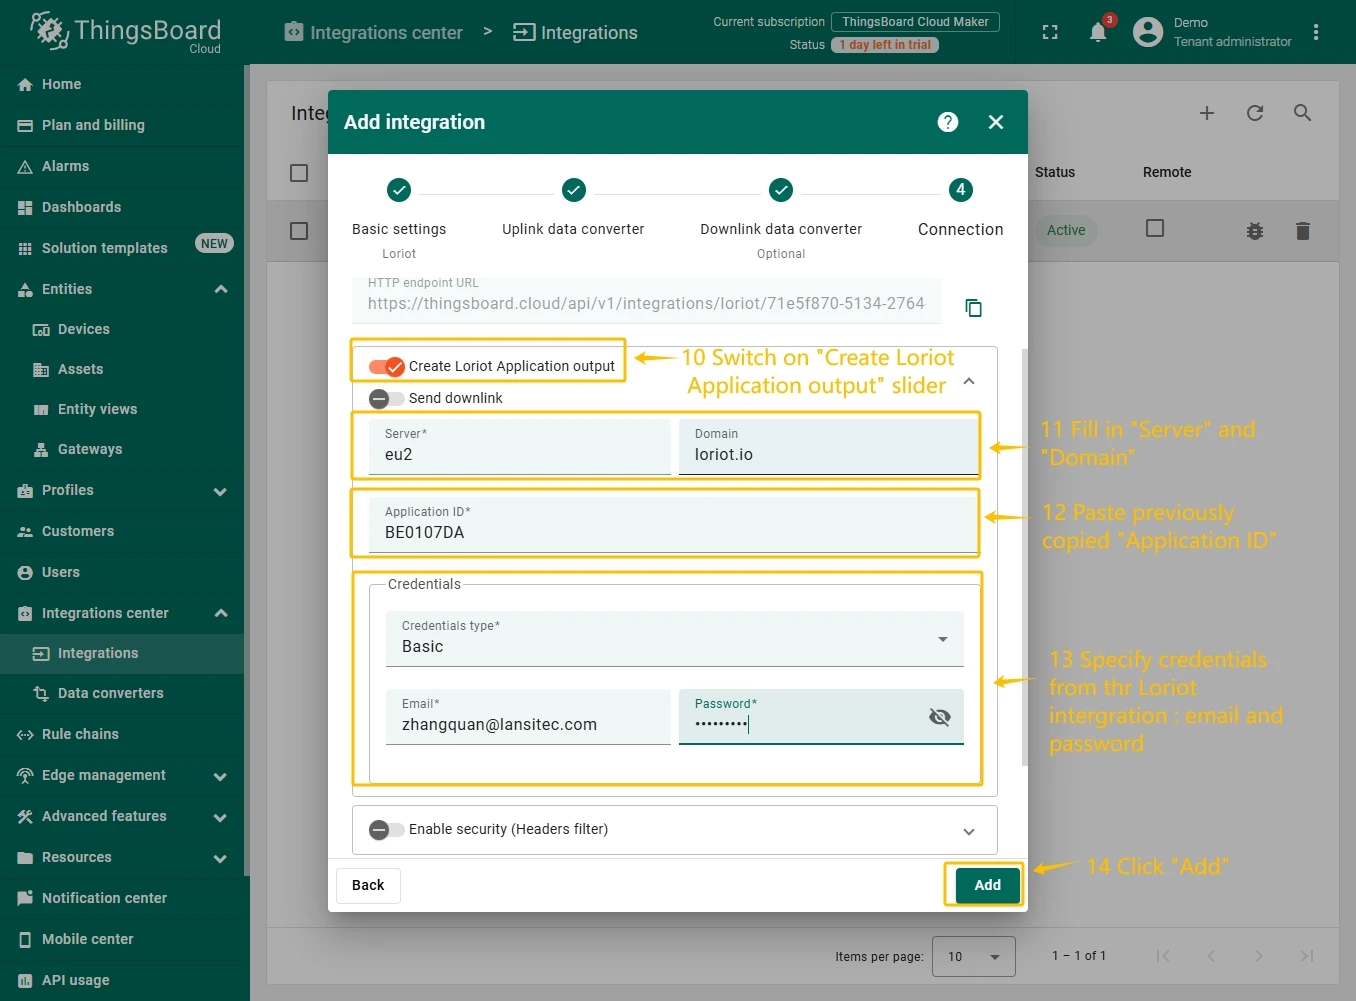
return result;Now, navigate to the “Integrations” page under the “Integrations center” section and follow this steps:
- Click “plus” icon button in the upper right corner to add new integration. Select type “Loriot”. Then, click “Next” button.
- Paste the previously copied script to the Decoder function section. Click “Next” button.
- Leave the “Downlink data converter” field empty. Click on “Skip”button.
- Next, fill in the fields with your parameters. After, press “Add” button.


Check data on ThingsBoard
So, the device was added and if it sends any data - it should appear in the devices. To check it you may open Devices page in Entities section. The device should be in devices list. You can check the data by click on it and open tab Attributes or Latest telemetry.
In order to get more user-friendly view - you can use dashboards. You can download a simple dashboard for this device, it is configured to display a data from “latitude” and “longitude” telemetry keys for device with name “Devices”.
ThingsBoard provides the ability to create and customize interactive visualizations (dashboards) for monitoring and managing data and devices. Through ThingsBoard dashboards, you can efficiently manage and monitor your IoT devices and data. So, we will create the dashboard, for our device.
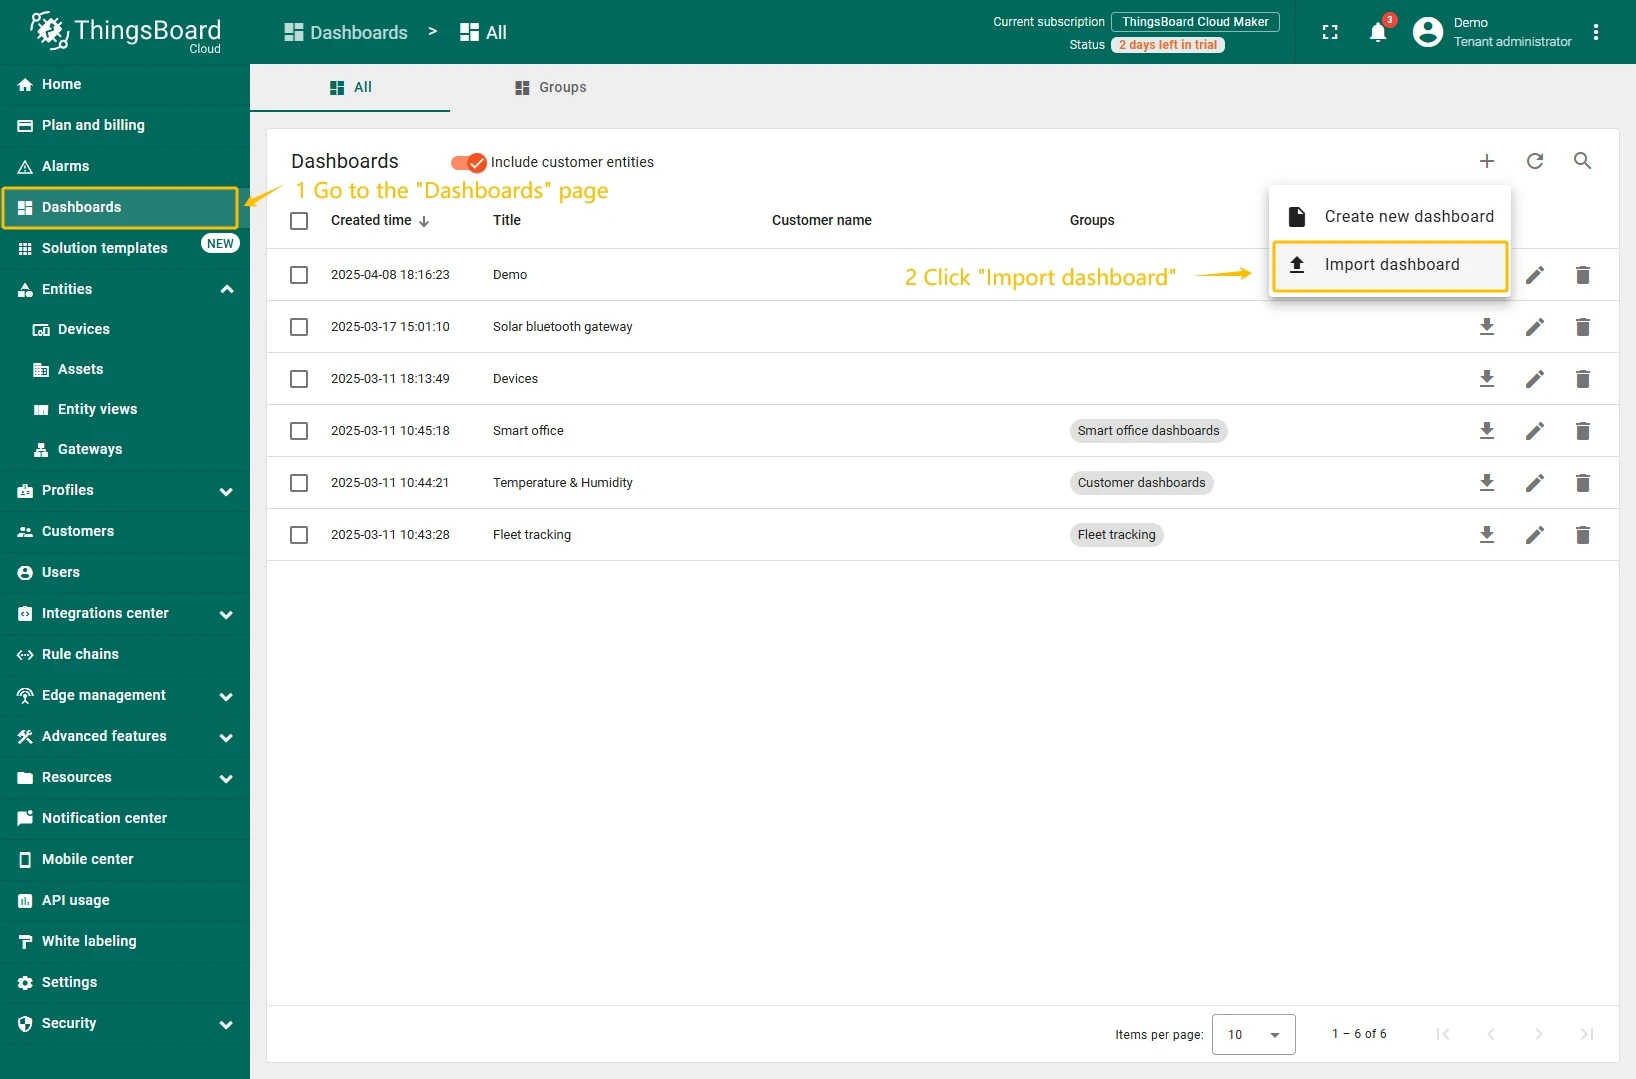
To add the dashboard to ThingsBoard, we need to import it. To import a dashboard, follow these steps:
- First download the Check and control device data dashboard file.
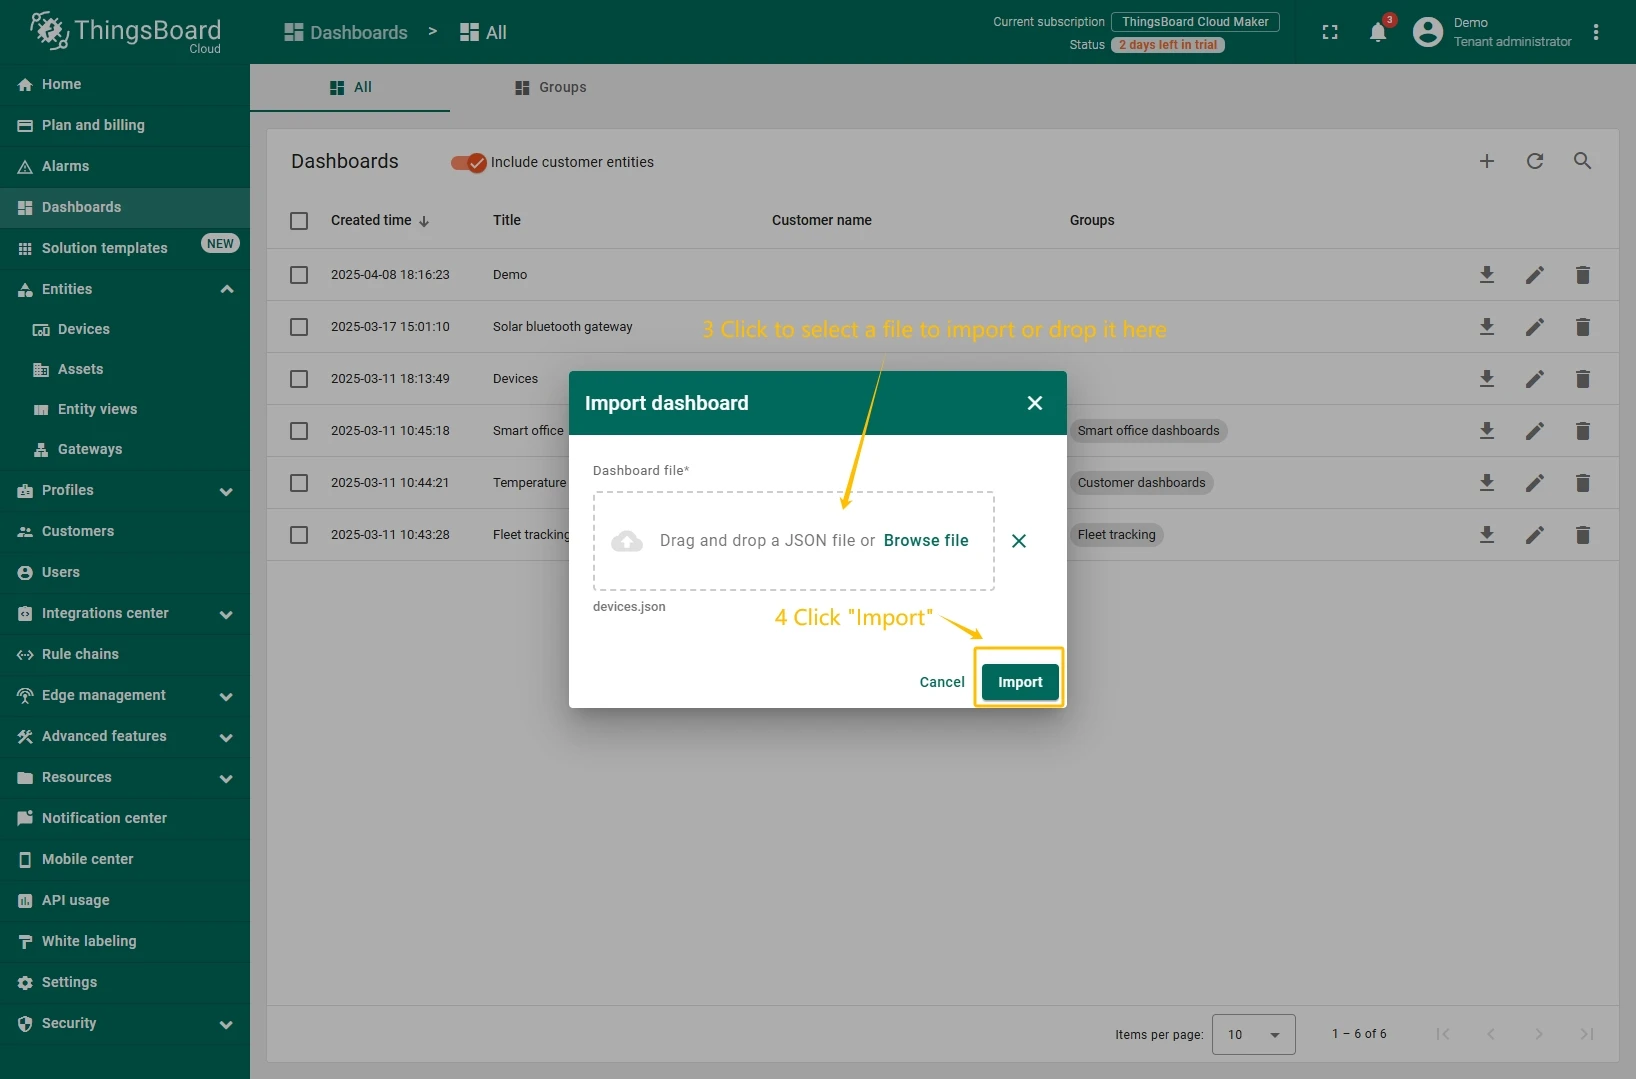
- Navigate to the “Dashboards” page. By default, you navigate to the dashboard group “All”. Click on the “plus” icon in the top right corner. Select “Import dashboard”.
- In the dashboard import window, upload the JSON file and click “Import” button.
- Dashboard has been imported.
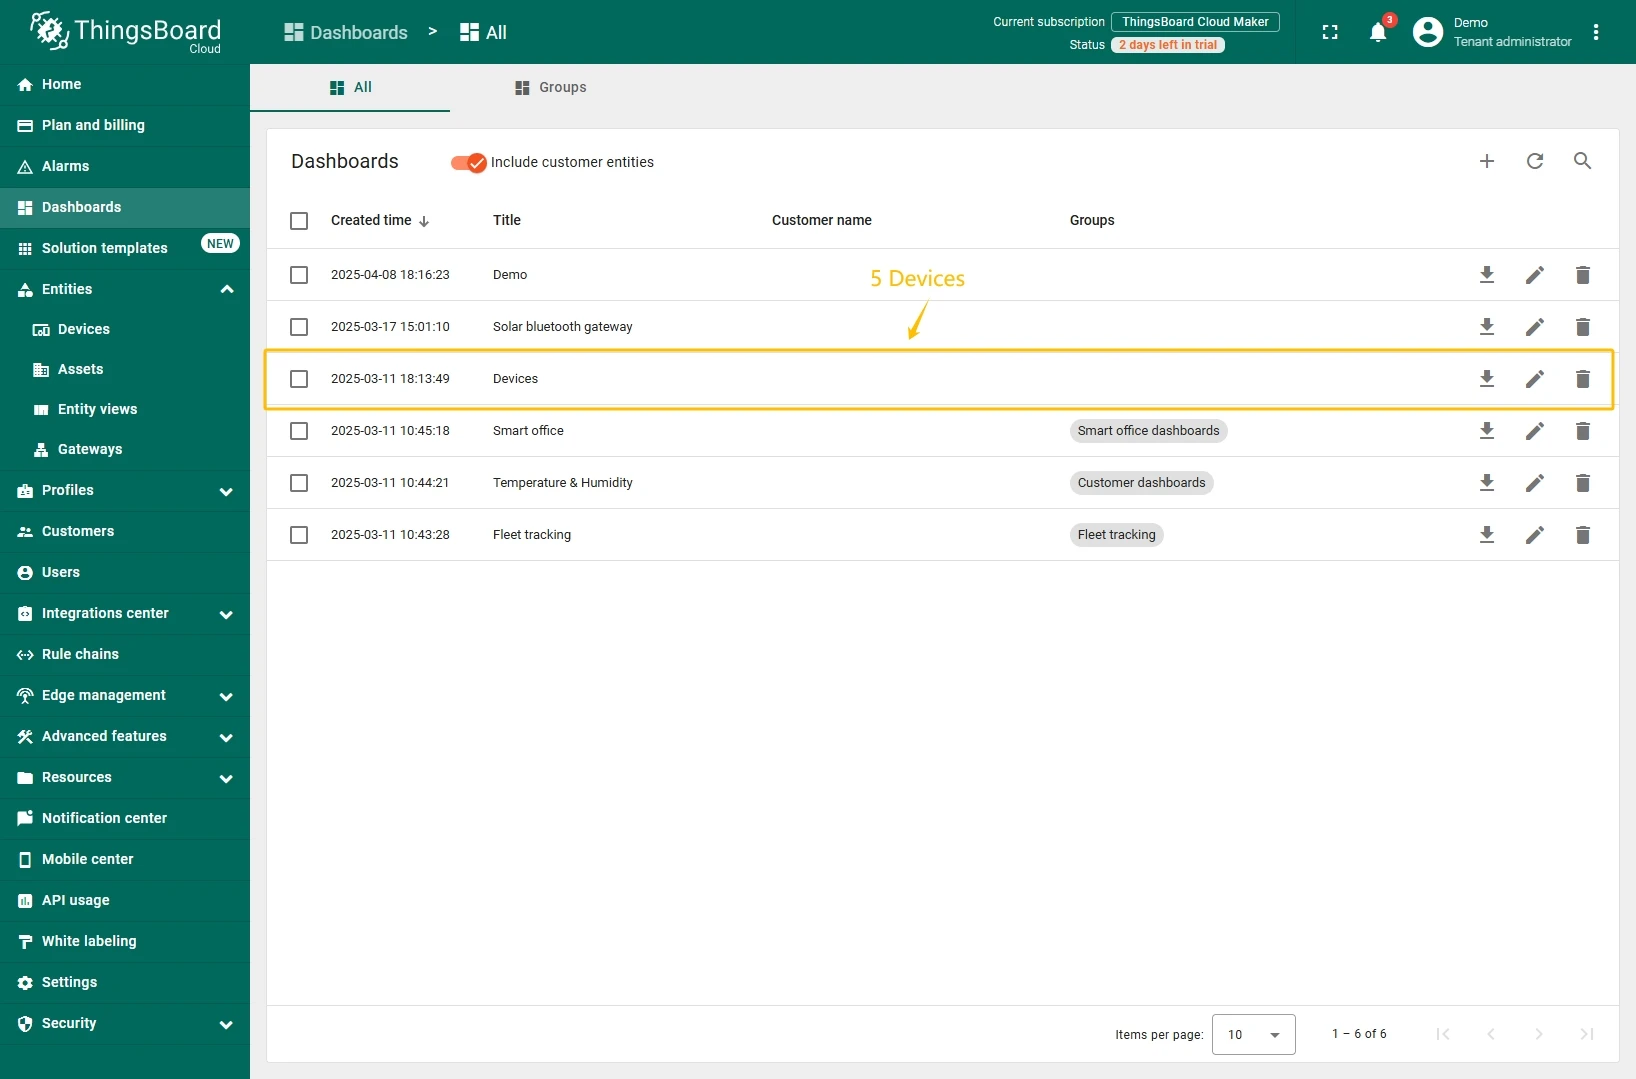
To open the imported dashboard, click on it. Then you should specify your device in entity alias of the dashboard.
To do this, follow these steps:
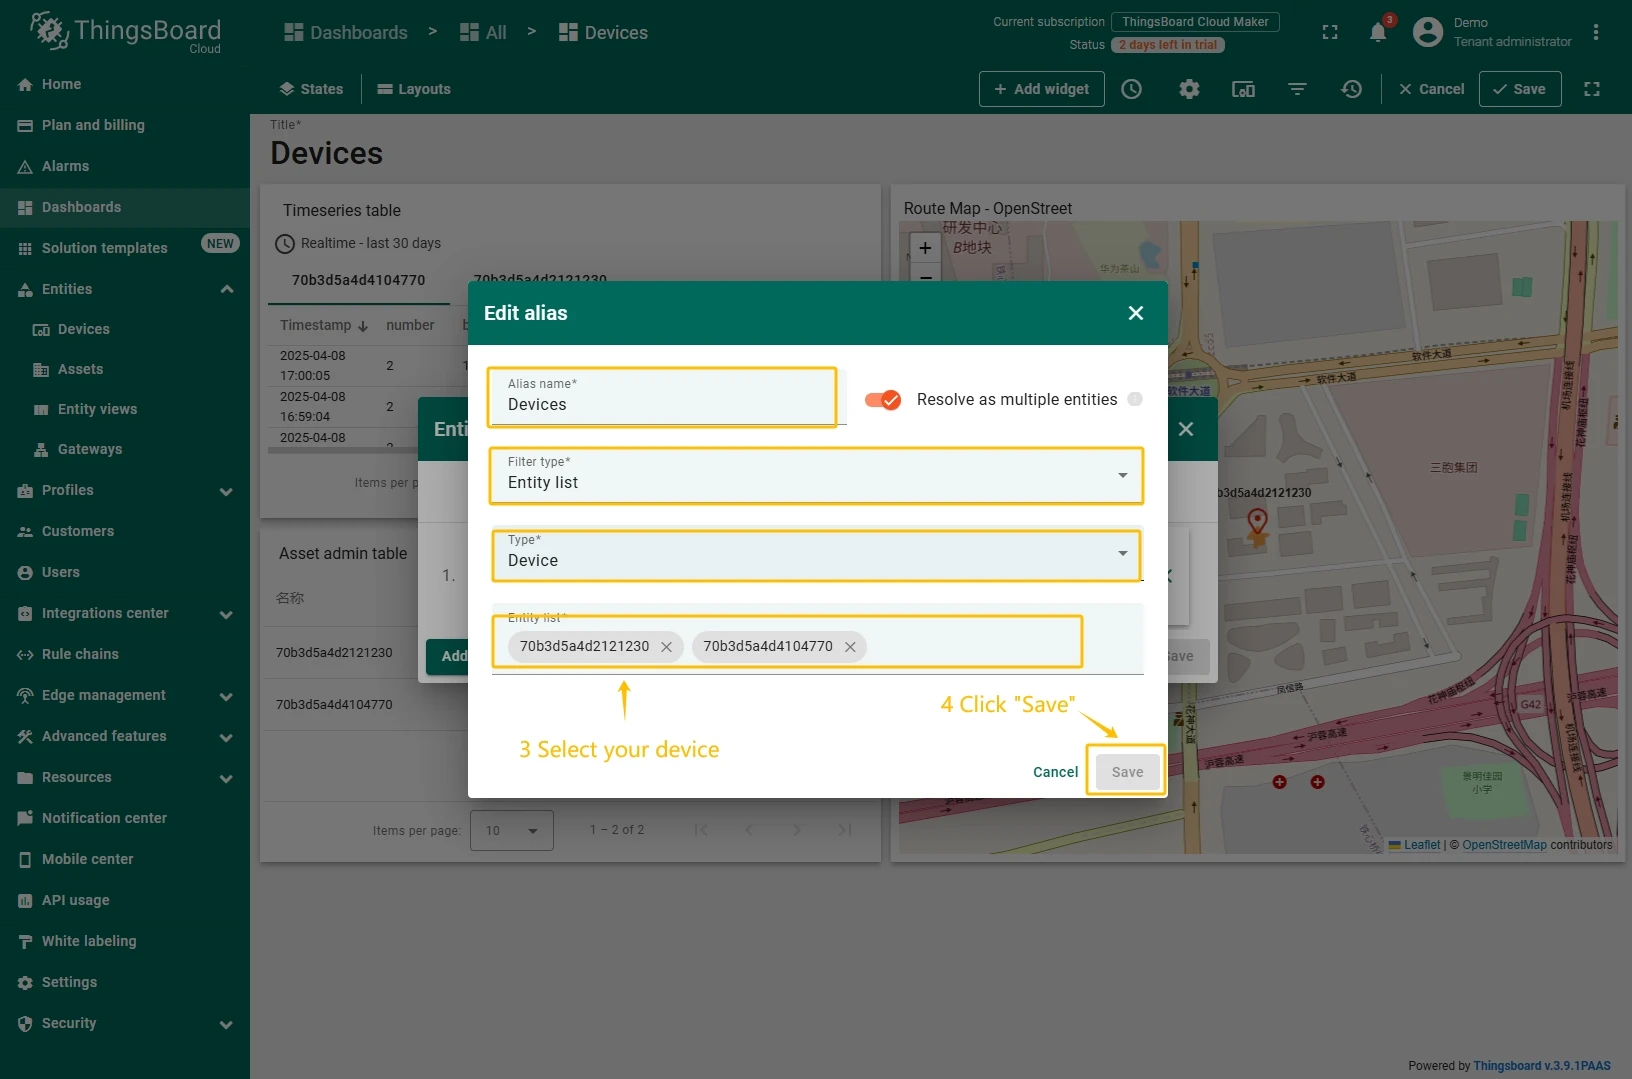
- Open the dashboard and enter edit mode. Click the “Entity aliases” icon, then in the pop-up window click the “Edit alias” icon next to the alias.
- In edit alias window select your device from dropdown list and save entity alias.
- Apply all changes.


You should now see data from the device.
Example of the dashboard with data:
Conclusion
With the knowledge outlined in this guide, you can easily connect your Asset Management Tracker and send data to ThingsBoard.
Explore the platform documentation to learn more about key concepts and features. For example, configure alarm rules or dashboards.