LW001-BG PRO LoRaWAN Tracker
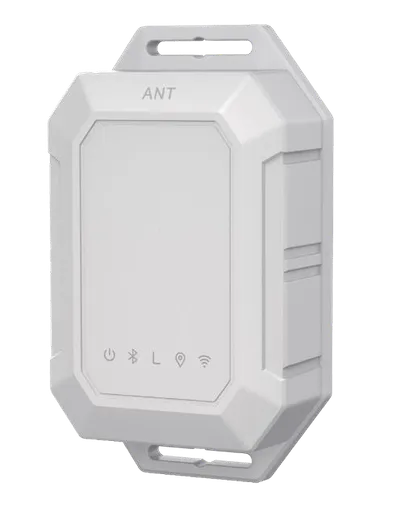
LW001-BG PRO LoRaWAN Tracker
MOKO SMART
- Platform
- ThingsBoard
- Hardware Type
- Other devices
- Connectivity
- LoRaWAN®
Introduction
The LW001-BG PRO is a wireless, smart, ultra–low-power indoor and outdoor LoRaWAN tracker.
It integrates GPS, Bluetooth, and WiFi positioning, supports multiple operating modes, and is suitable for a wide range of tracking applications.
It supports two LoRaWAN network access modes: ABP and OTAA, and can be easily configured or updated through the MKLoRa app.
This device is ideal for optimizing logistics processes, asset management, warehouse and inventory scenarios, outdoor tracking, theft protection, livestock tracking and much more.
Prerequisites
To continue with this guide we will need the following:
- LW001-BG PRO LoRaWAN Tracker
- LW001-BG PRO user manual
-
ThingsBoard account at
YOUR_TB_HOST
Configuration
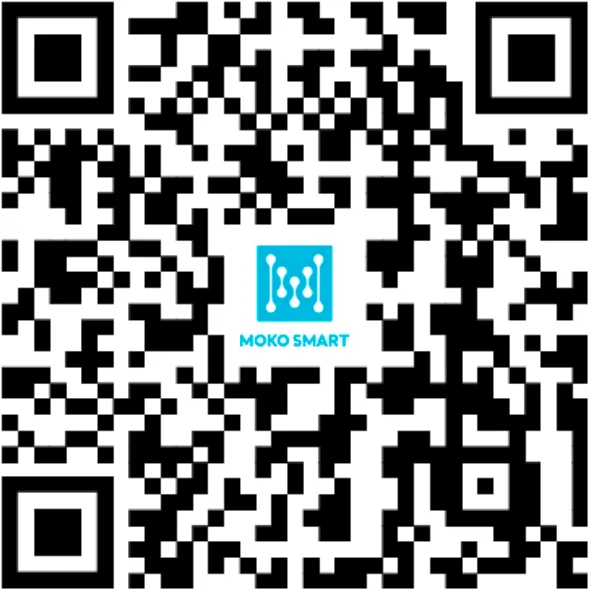
To connect the device and start sending data, both the device and the network server must be configured. Users can configure the device using the MKLora application. To download the MKLora app, scan the QR code on the left or follow the provided link.
After the MKLora APP is installed, users can start the configuration.
First, we will configure the device and save the required information that will be used later for the network server configuration. To add a device to network server and get information from it, we will need the following device parameters:
- Device EUI - device identifier
- Application EUI - Application identifier
- Application Key - Application key to identify device. We recommend to use a generated key, not from the example!
The parameters above are required for connection.
Depending on the network server, you may also need to provide join type (OTAA), LoRaWAN version.
After the device is turned on, the device Bluetooth will start broadcasting. Open the MKLoRa APP and choose LW001, then you can search the LW001-BG PRO device by click the refresh icon. The default broadcast name of the device: LW001-BG -XXXX.
Then click “Connect” button, the default login password is Moko4321.
Go to “Lora” and check the “Connection Settings”, you can configure/read the Device EUI, APP EUI and APPkey.
ThingsBoard supports various network servers. To create an integration with a network server, please choose one of the supported network servers:
Add a device on the Chirpstack
To add a device, you can follow next steps:
- Download the JSON file with the uplink converter settings.
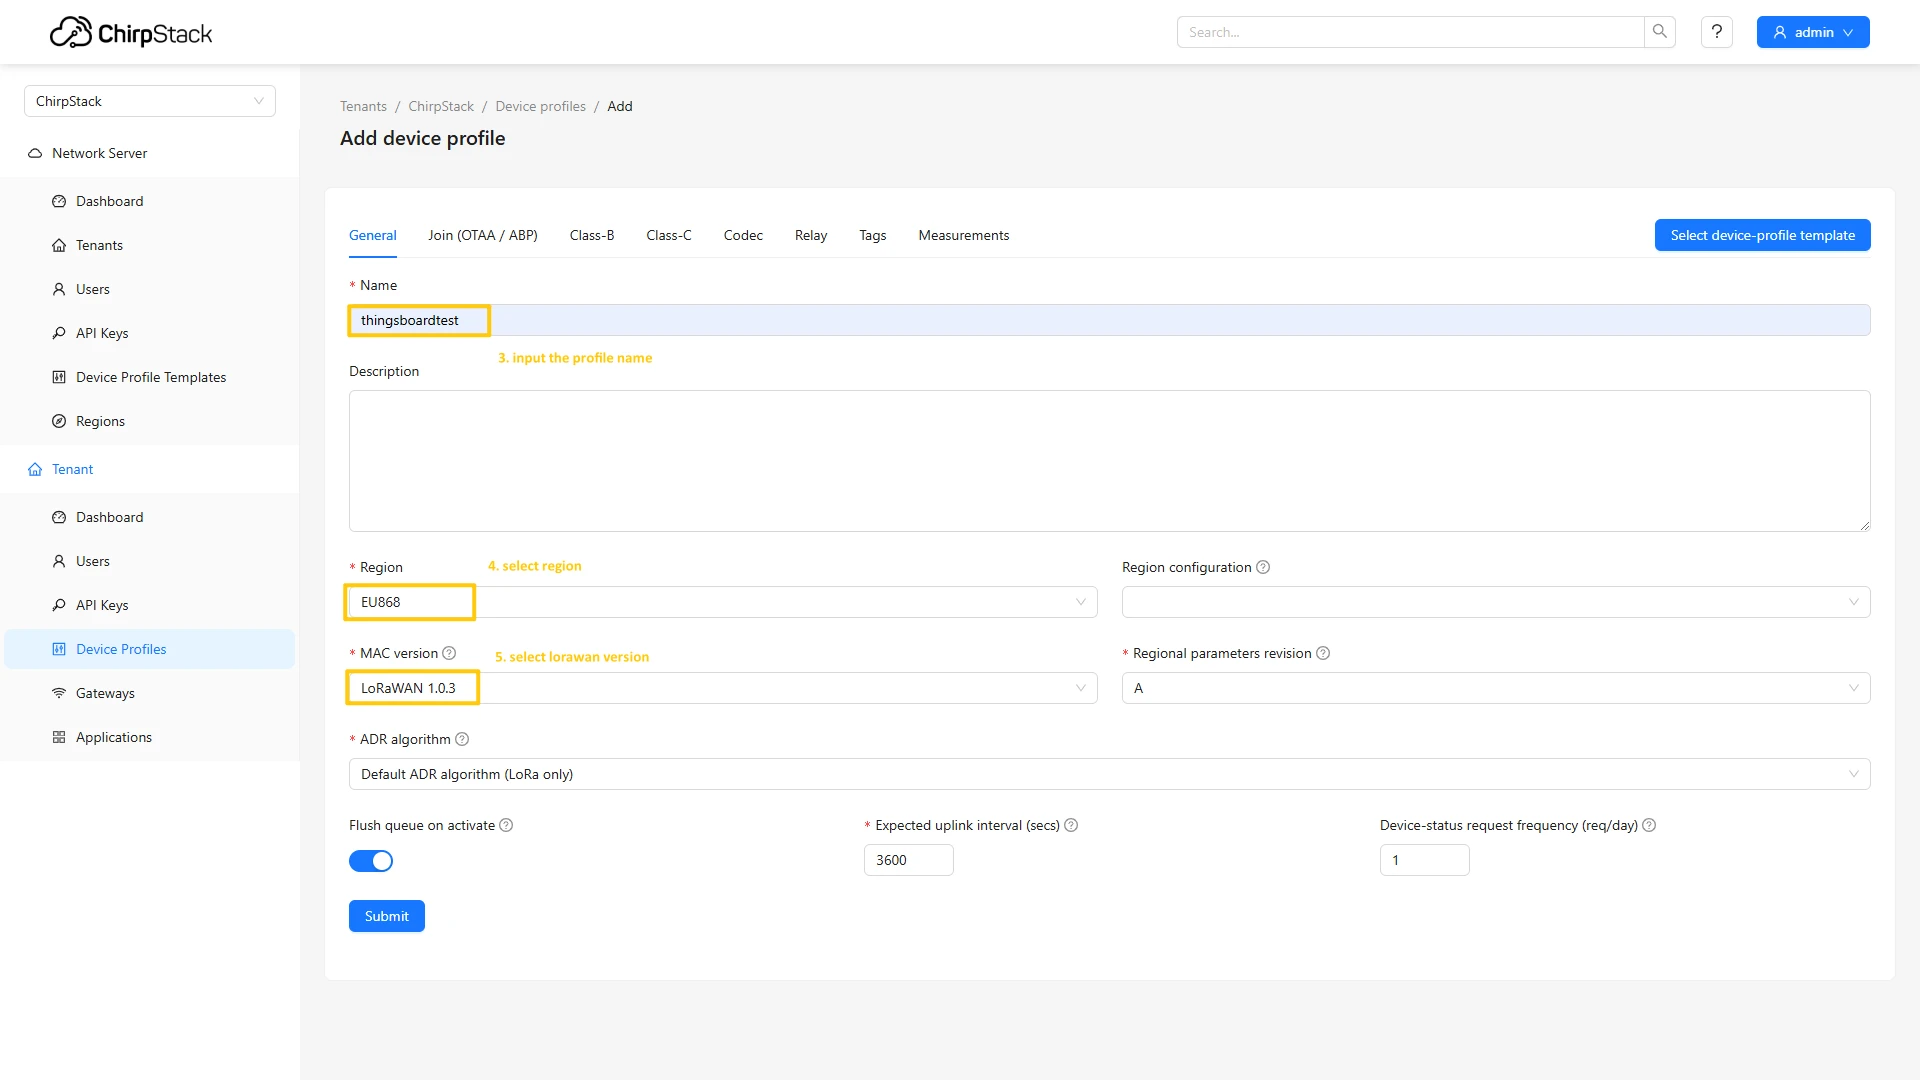
- Login to ChirpStack server. Go to the Device profiles page and click on Add device profile button.
- Fill the fields.
- Go to the Codec page and paste the script just copied. Click Submit button.
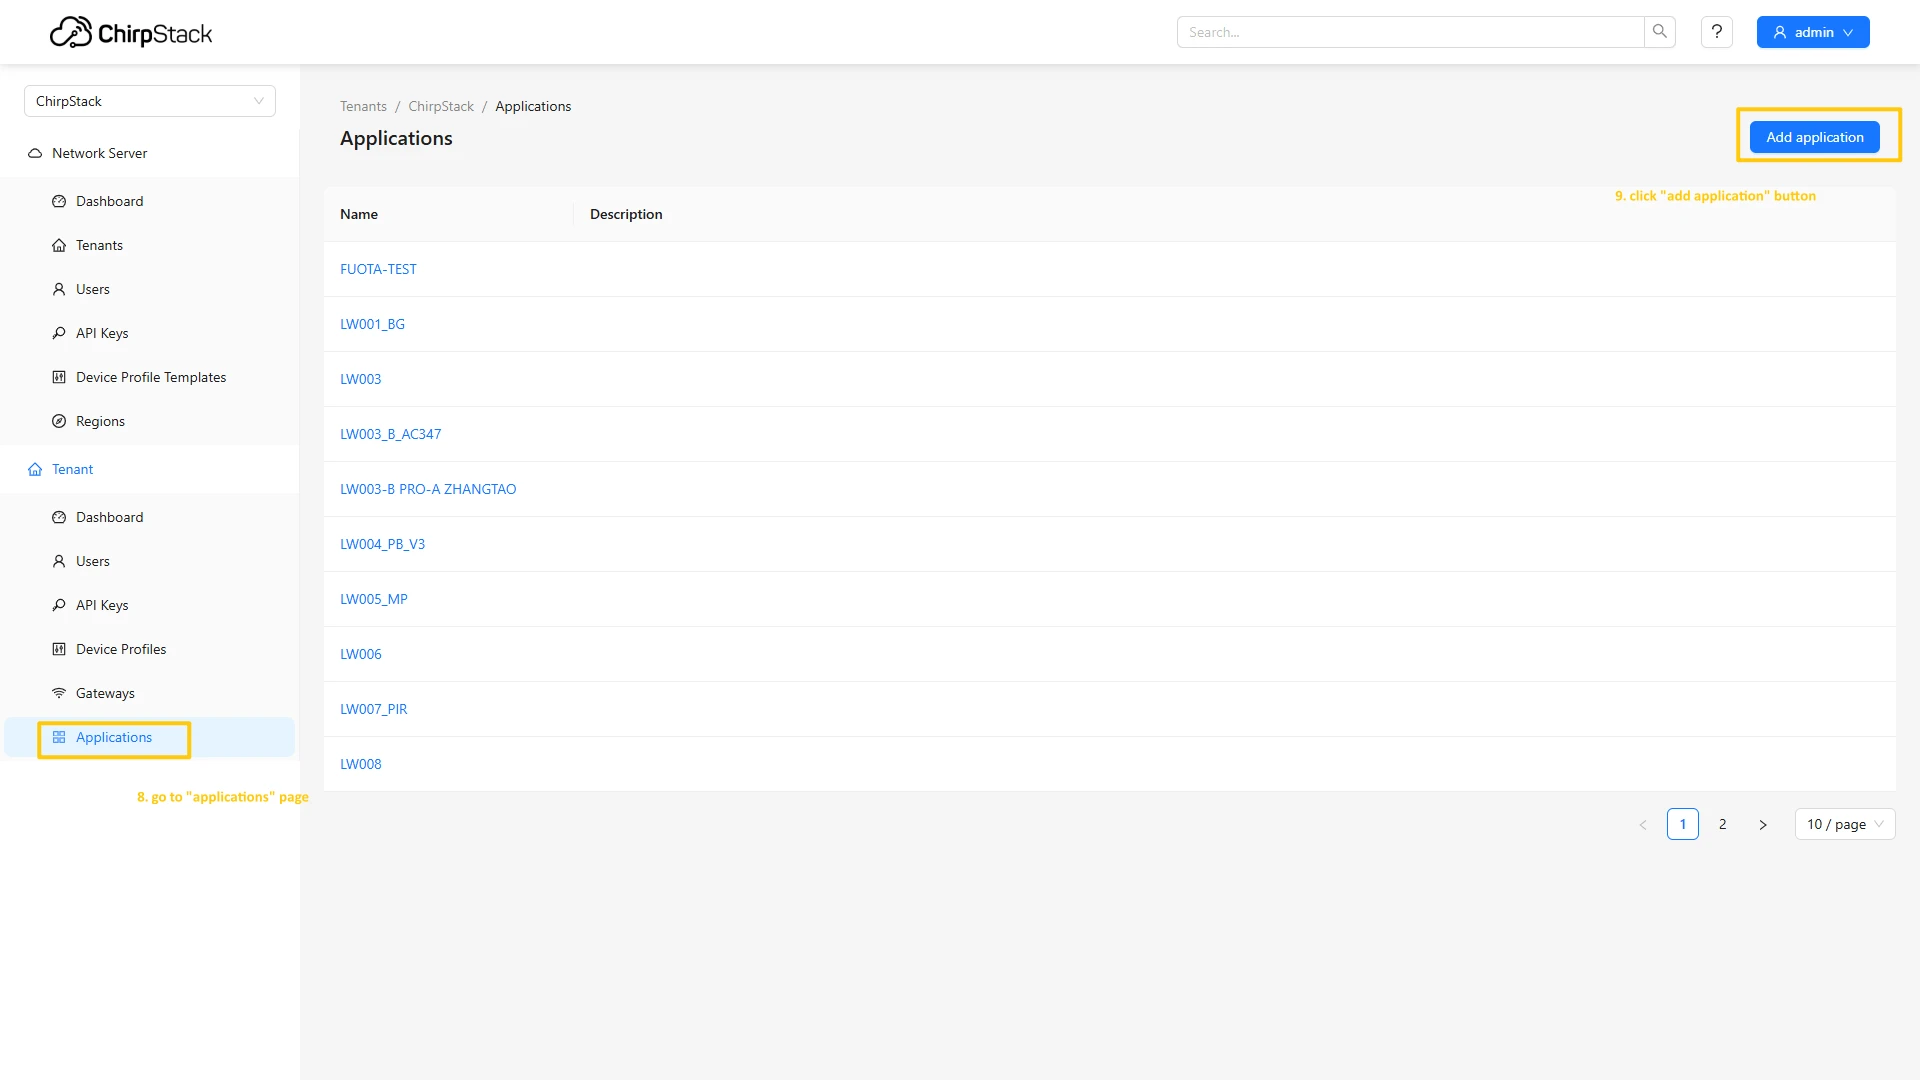
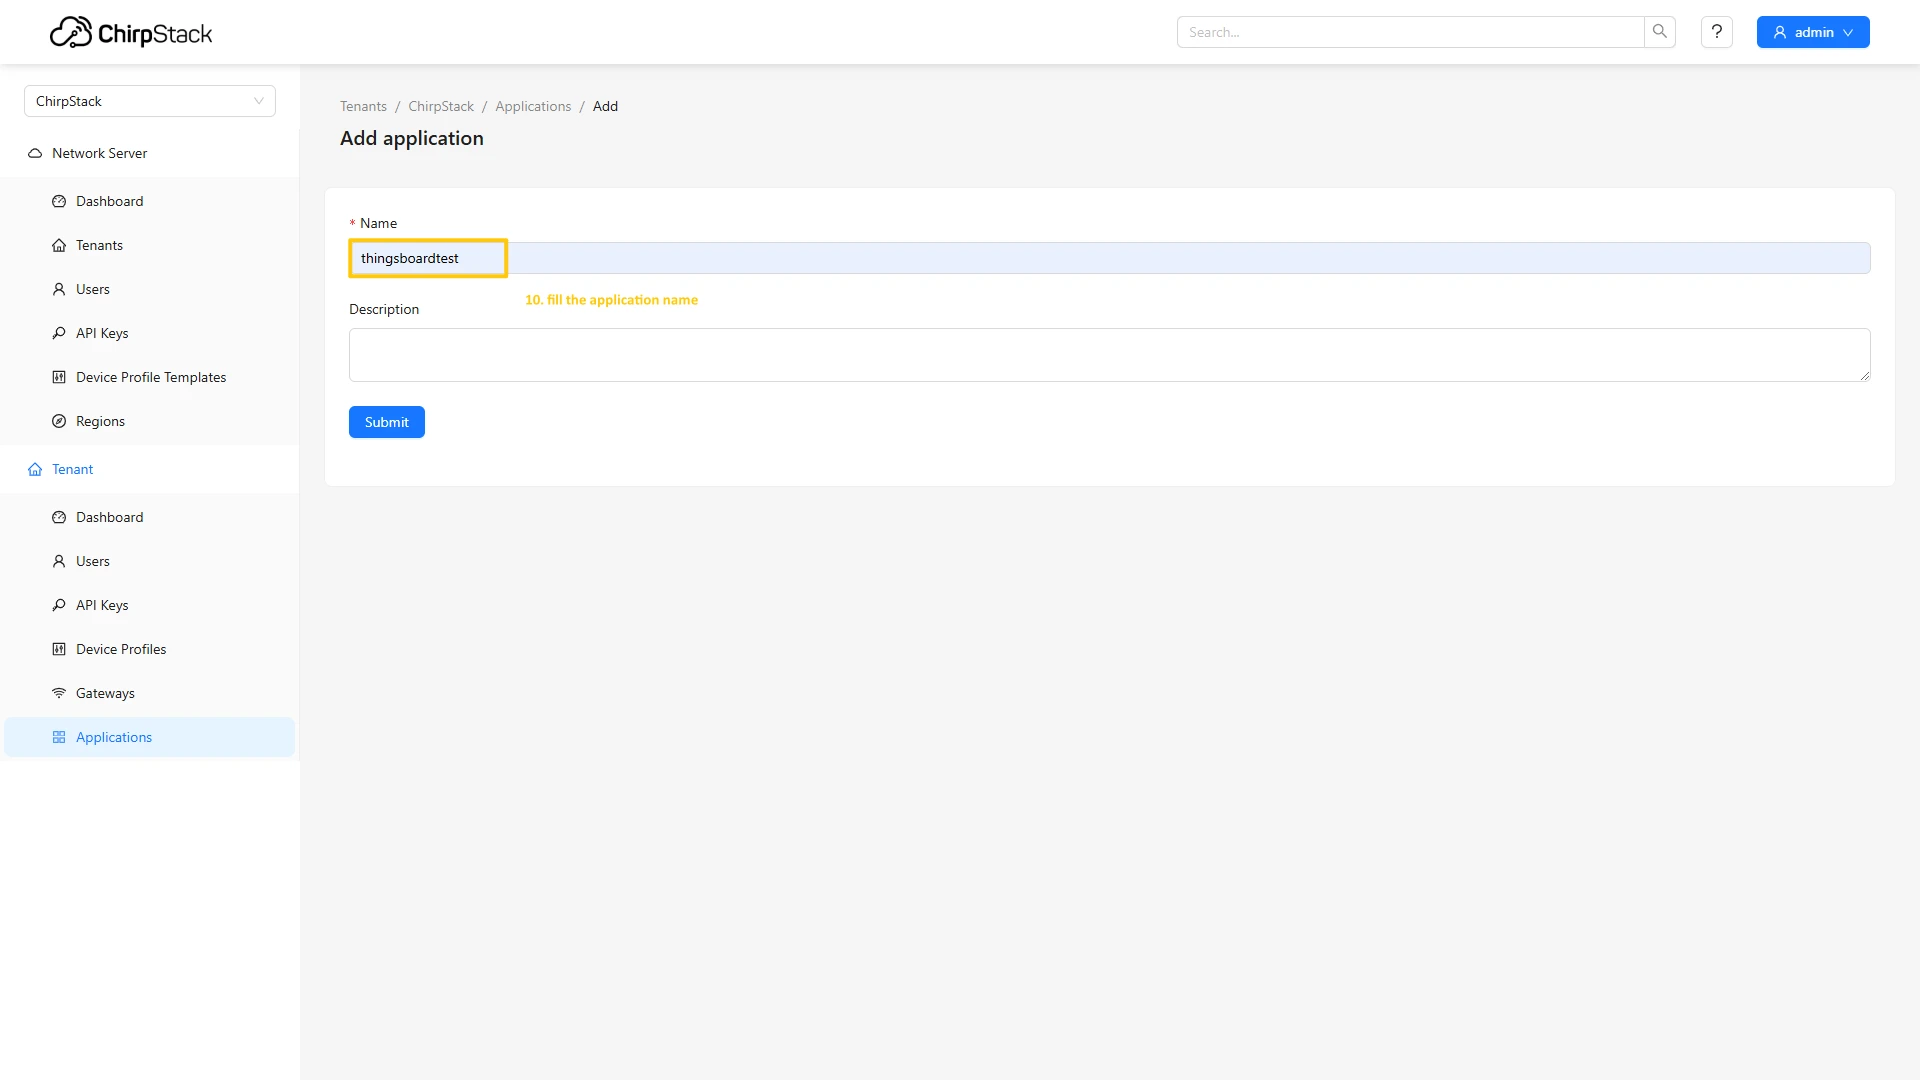
- Go to the Applications page, and click on “Add application”.
- Named your application. Click Submit.
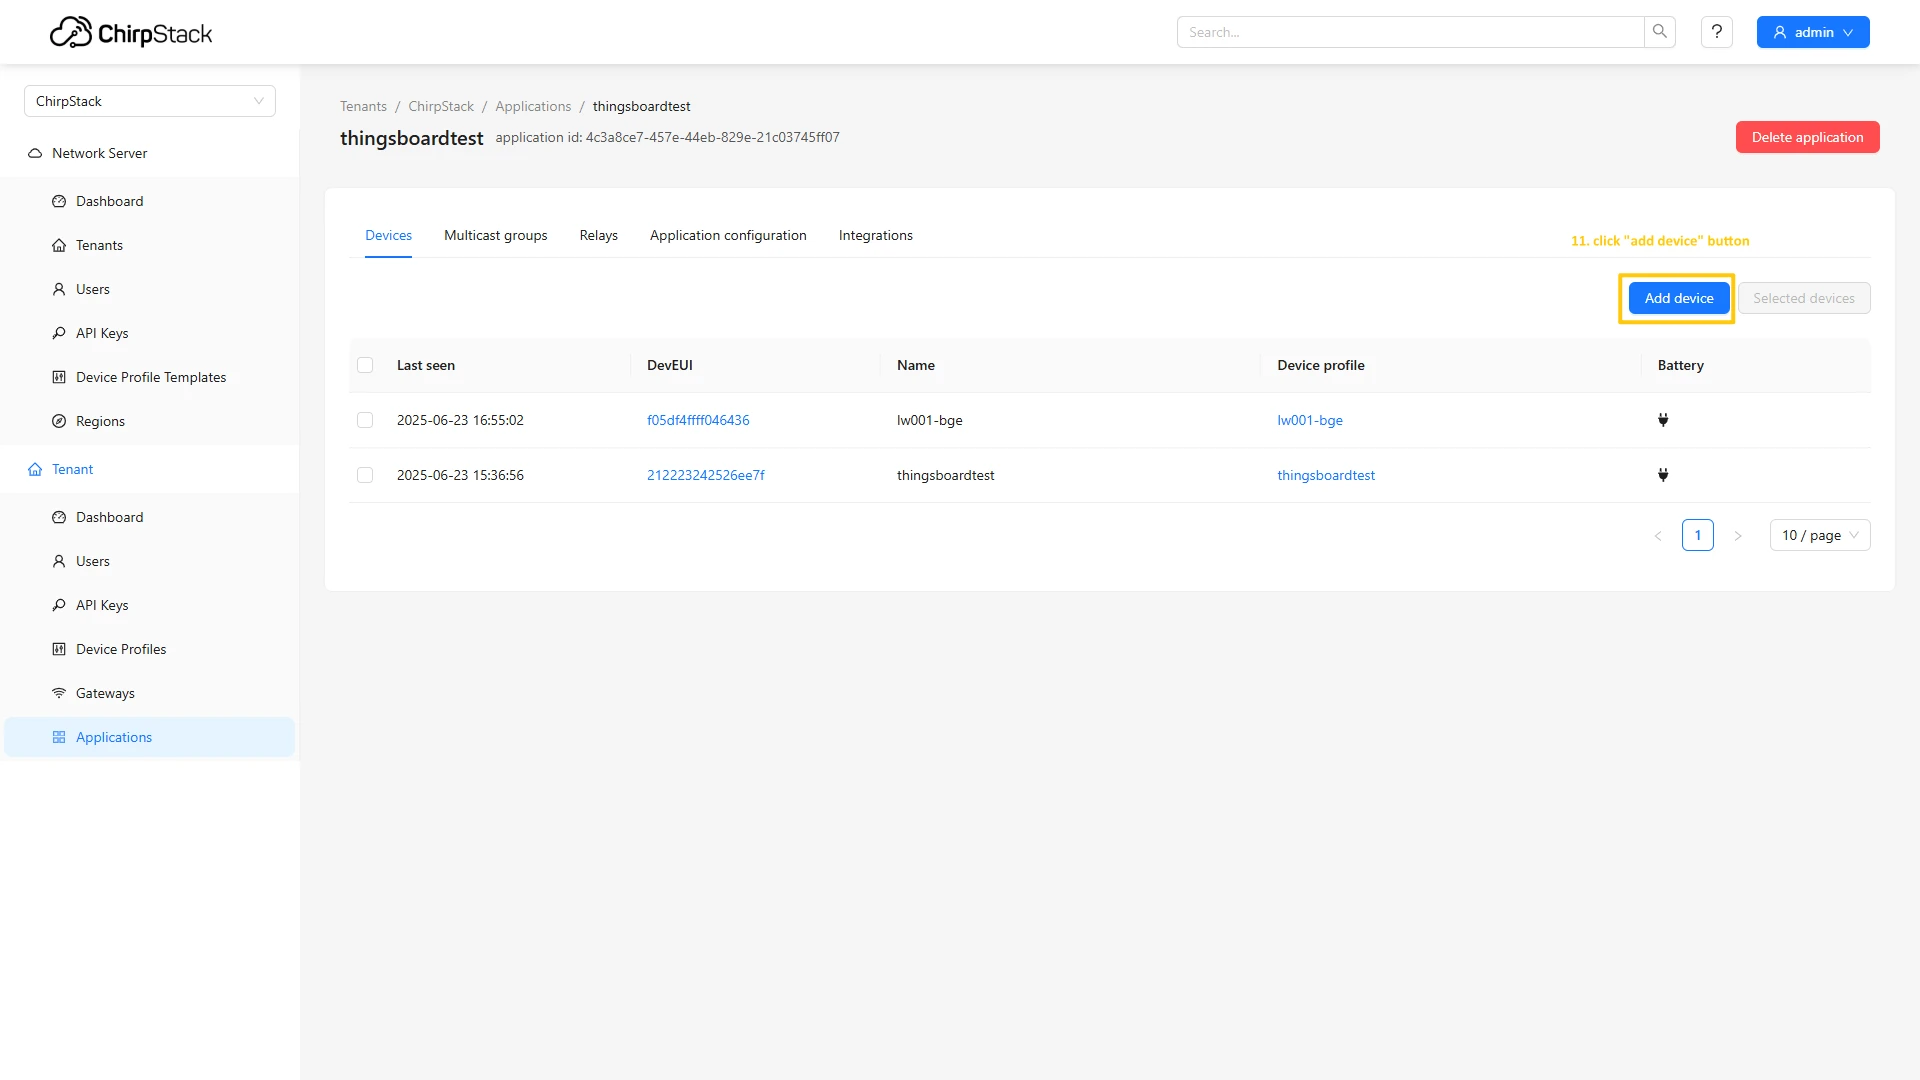
- Open created application and press Add device button.
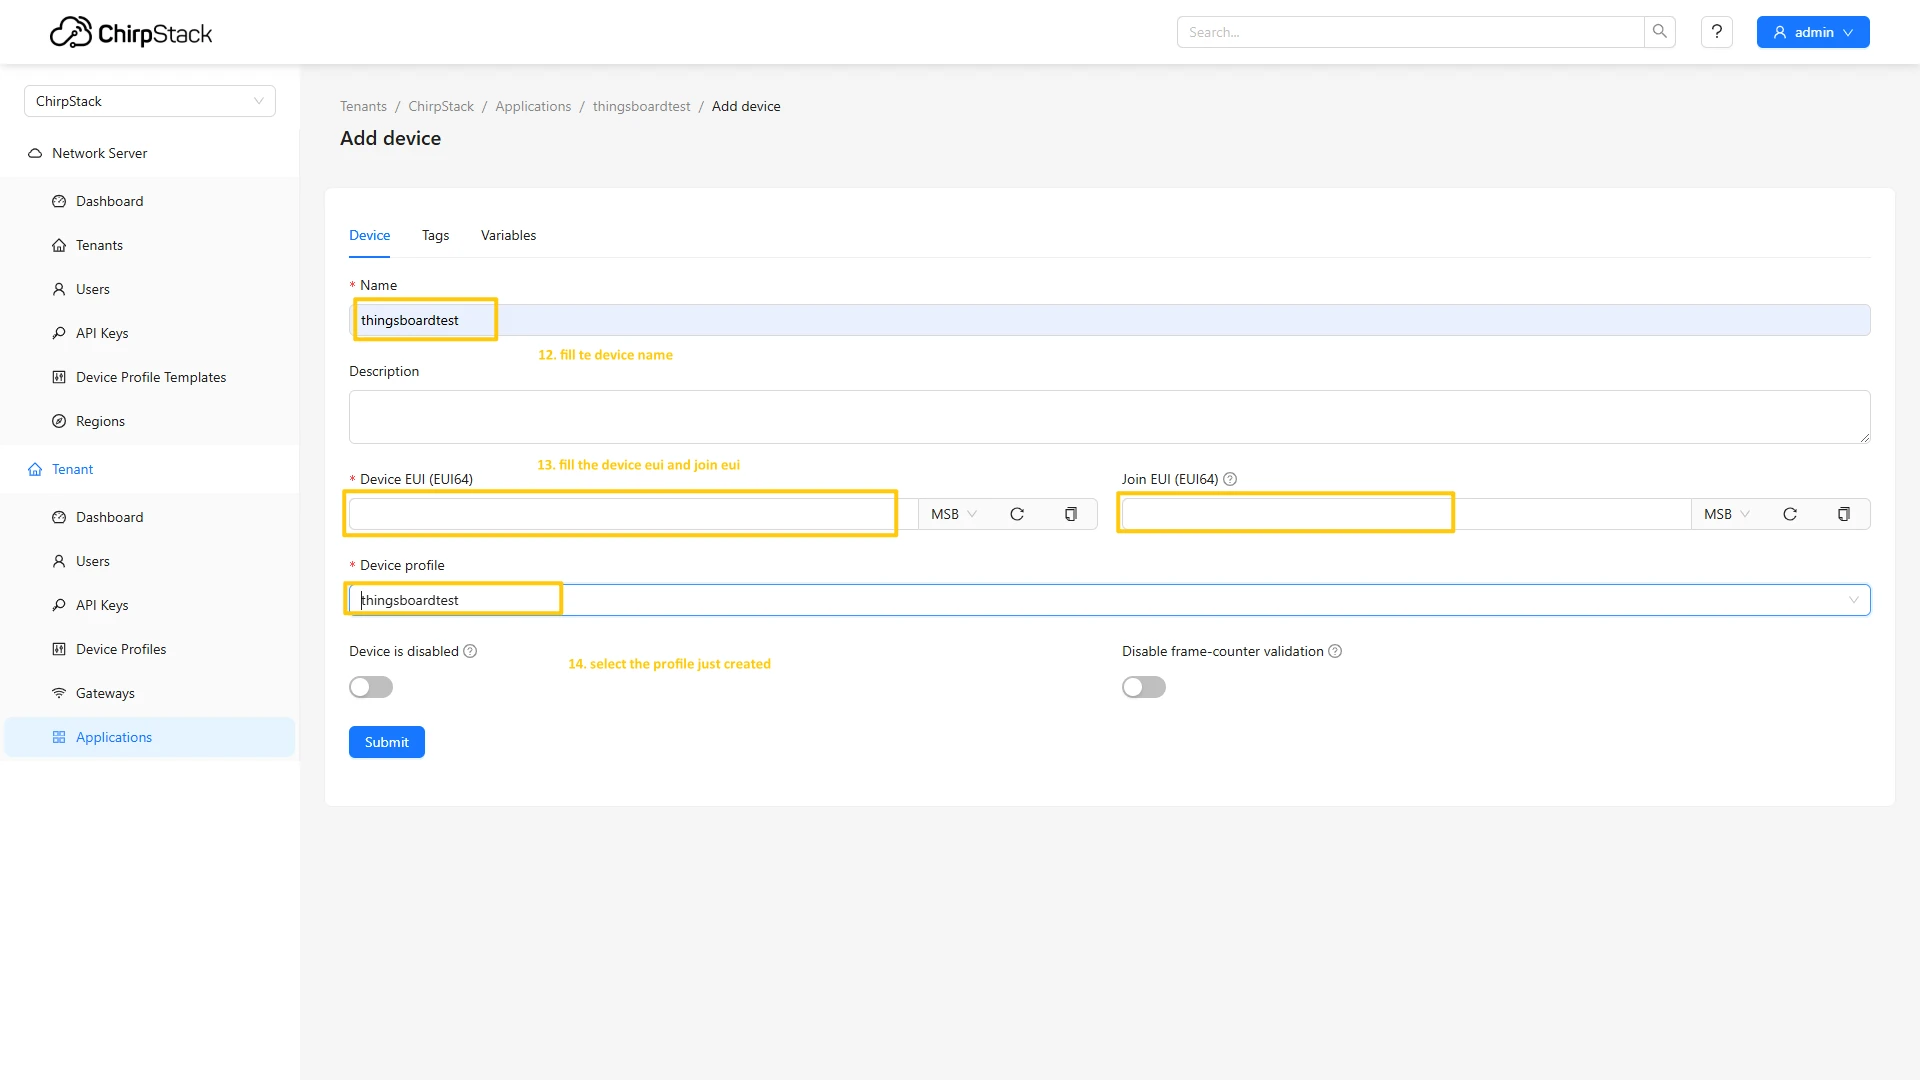
- Fill the parameters with values from the device configuration, then choose previously created device profile and click on Submit button
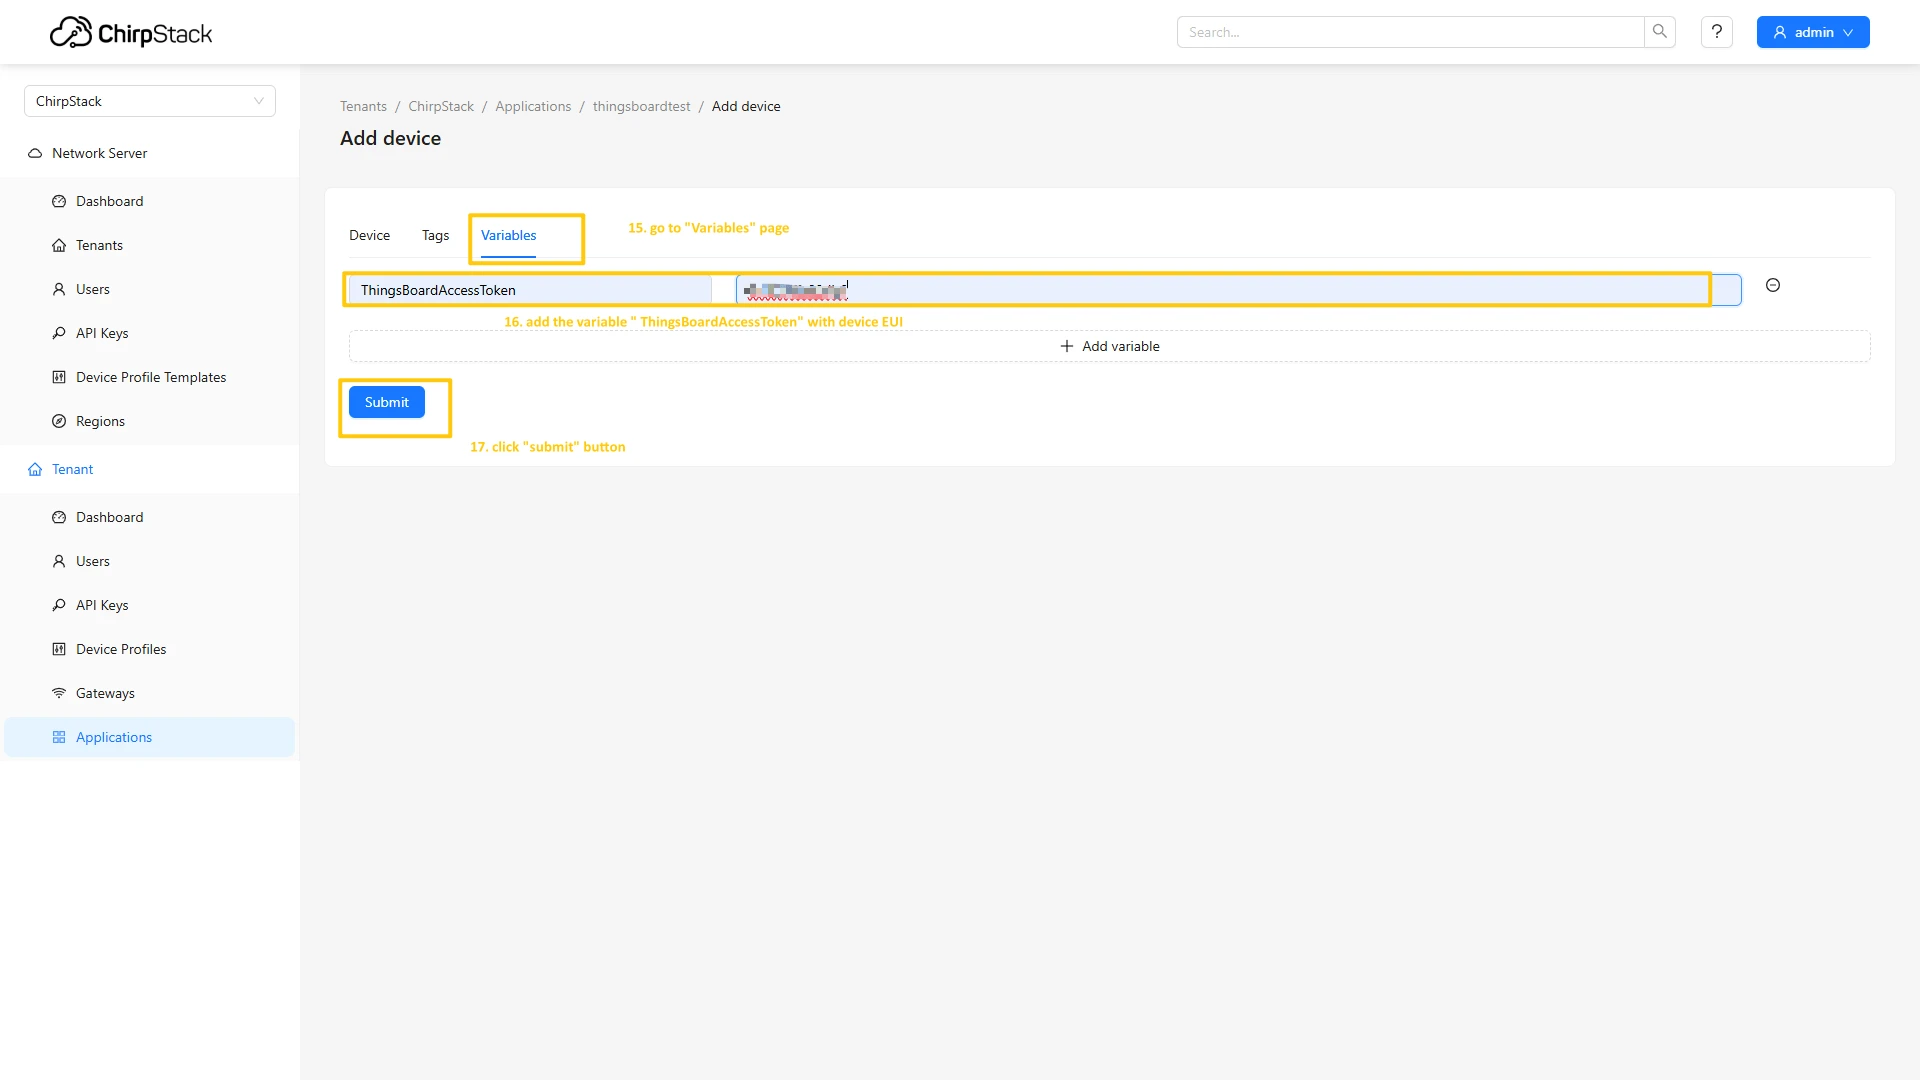
- Go to the Variables tab, put your Application key to the field and click on Submit button to save the device.


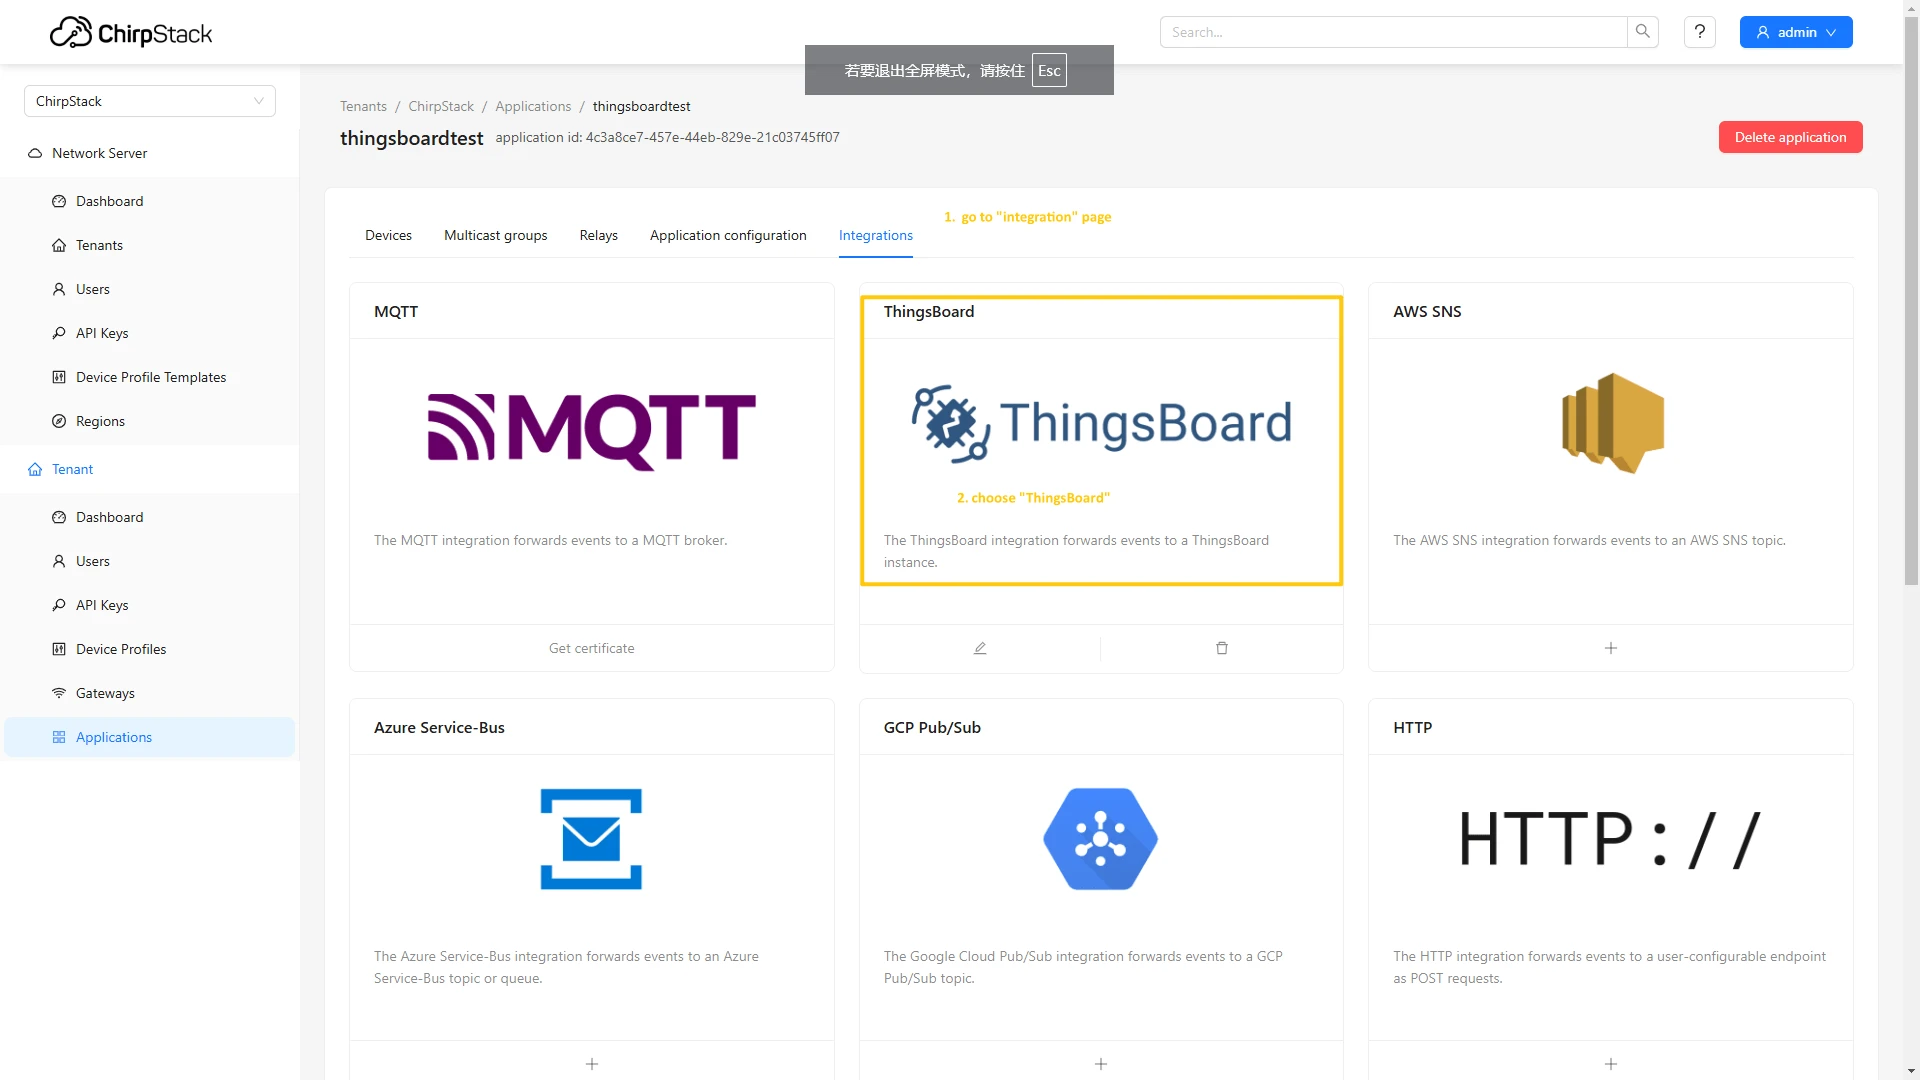
Configure application integration with ThingsBoard
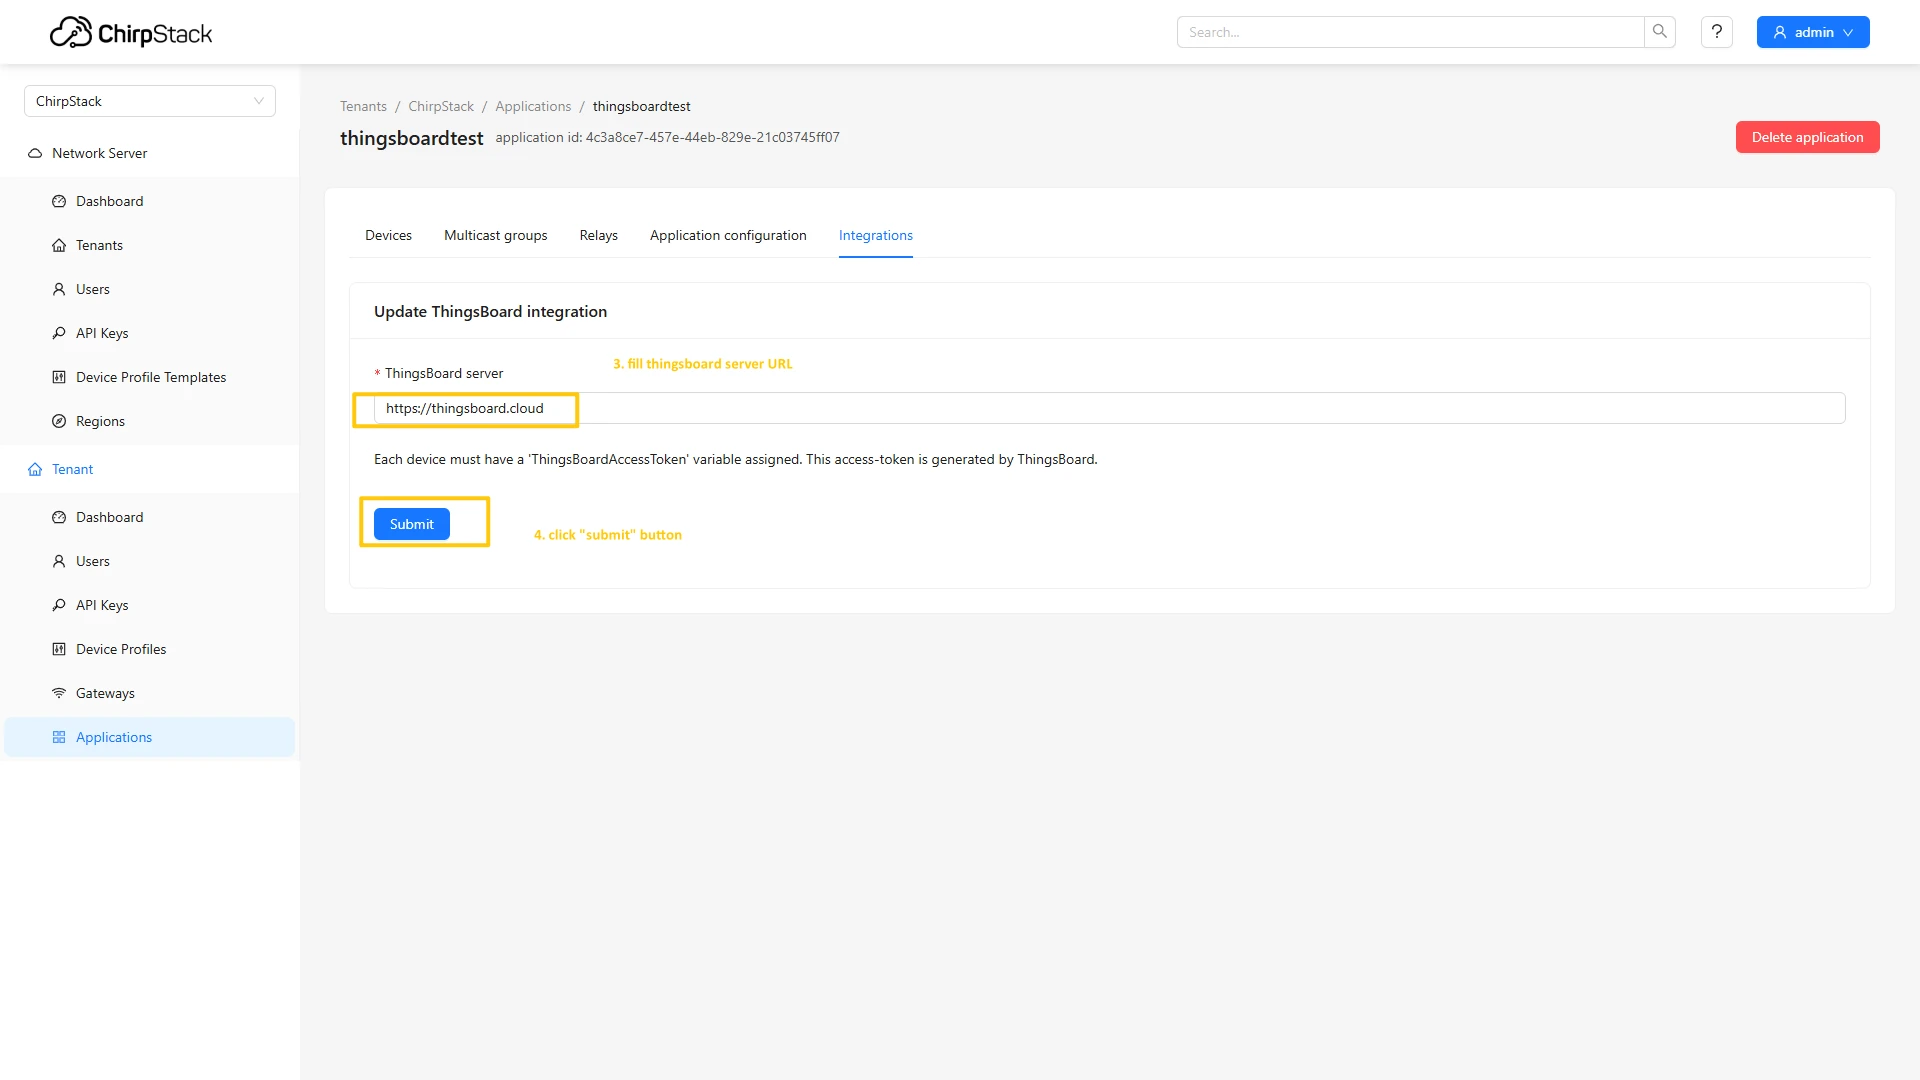
- Go to the “Integrations” page, find and select the ThingsBoard.
- Enter the URL of your ThingsBoard server and click Submit button.
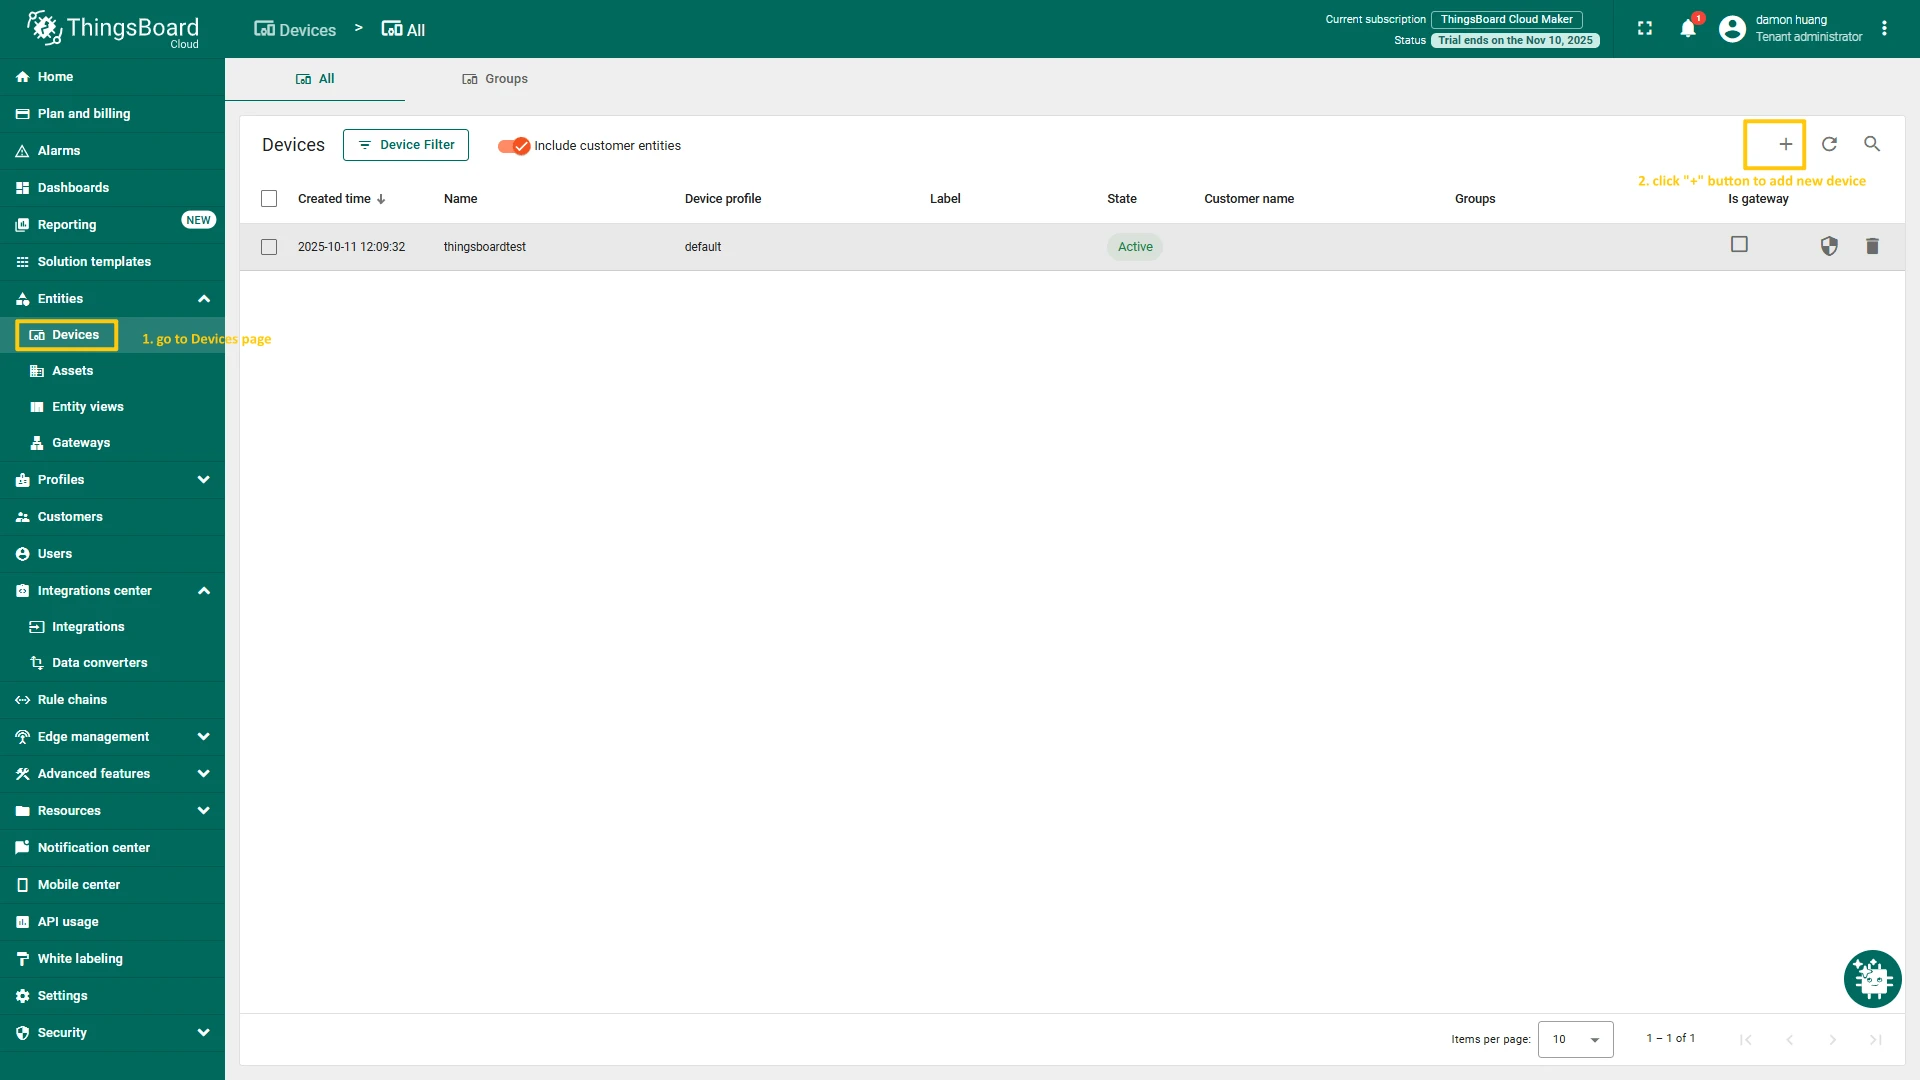
Create device on ThingsBoard
To create device on ThingsBoard, follow the next steps:
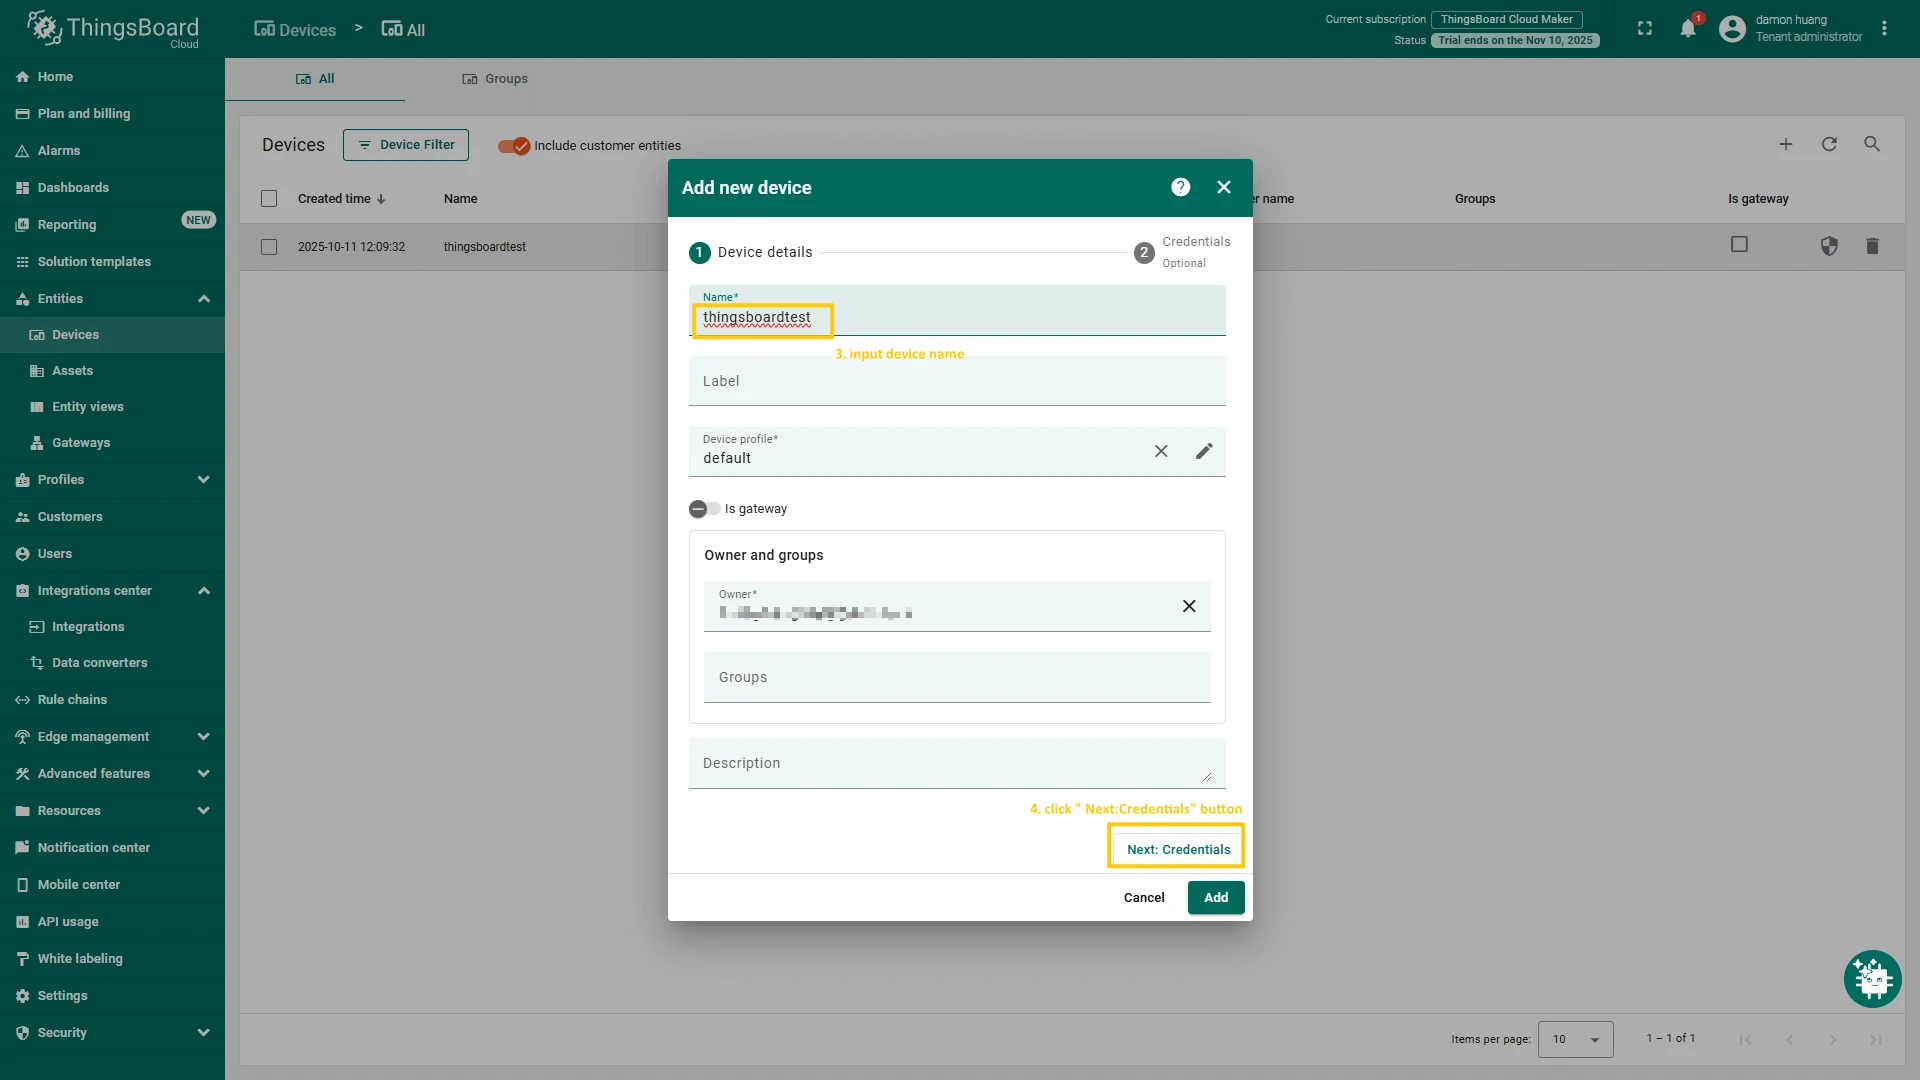
- Log in to your ThingsBoard account. Navigate to the Devices page and click the ”+” button to add a new device.
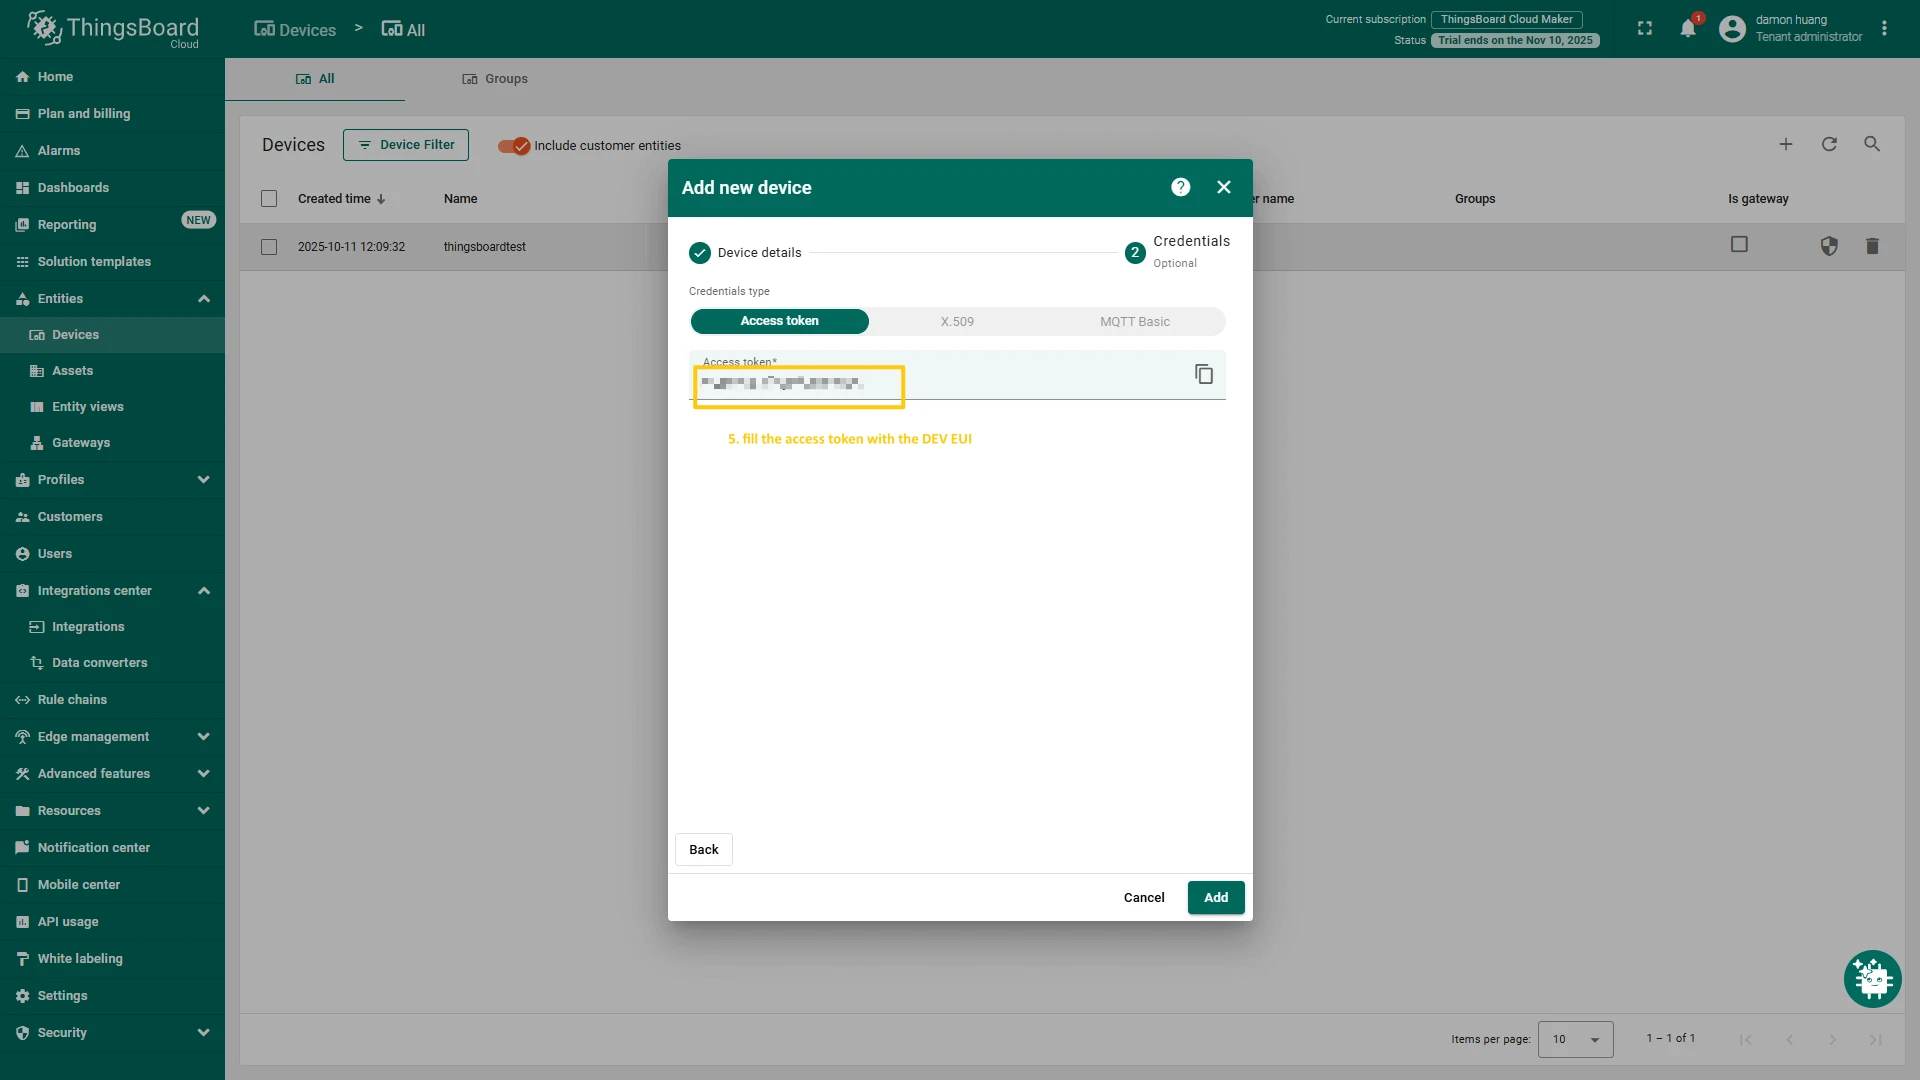
- Enter the device name and click Next: Credentials.
- In the Credentials step, specify the device’s Access token (use the previously copied Device EUI value), then click Add.
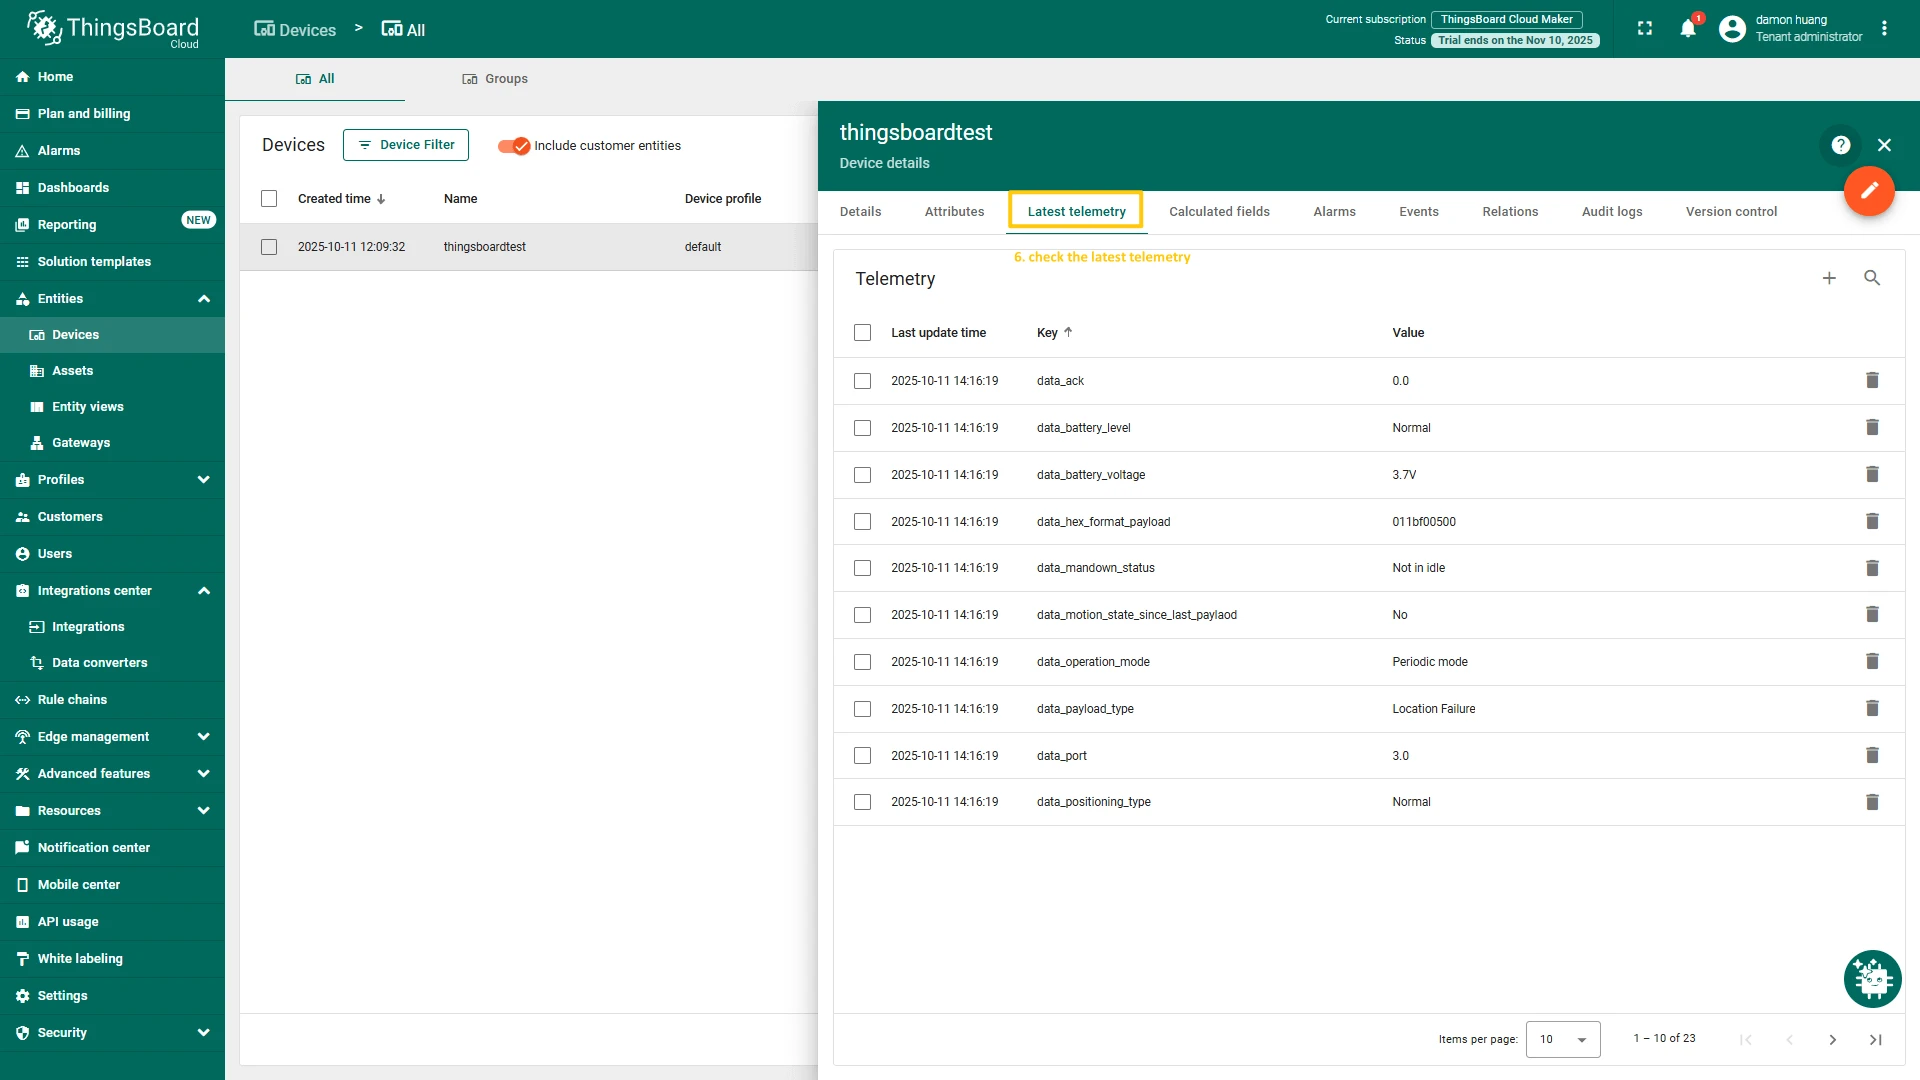
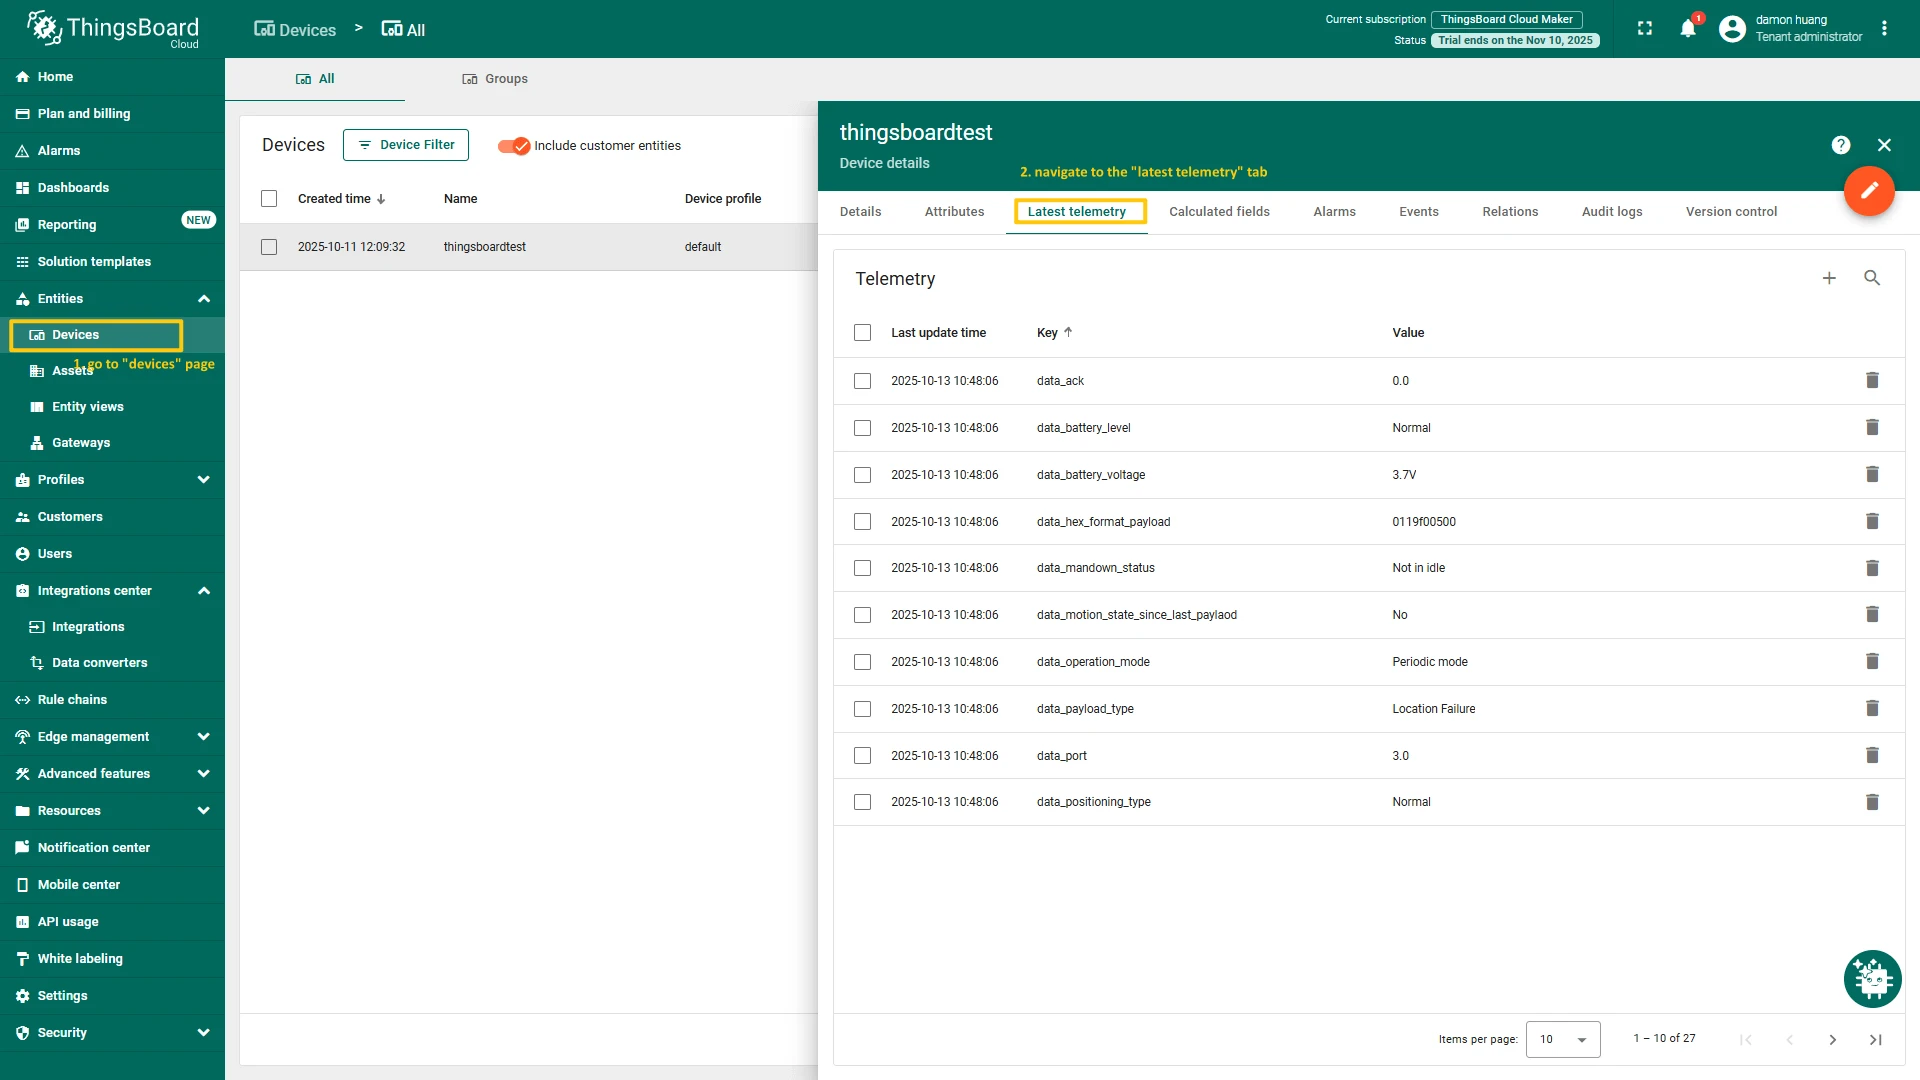
- The device is now created. Click on the device to open its details page. Navigate to the Latest telemetry tab to view the data reported by the device.
Add a device on The Things Stack
To add a device, you can follow next steps:
- Login to the cloud and open your console.
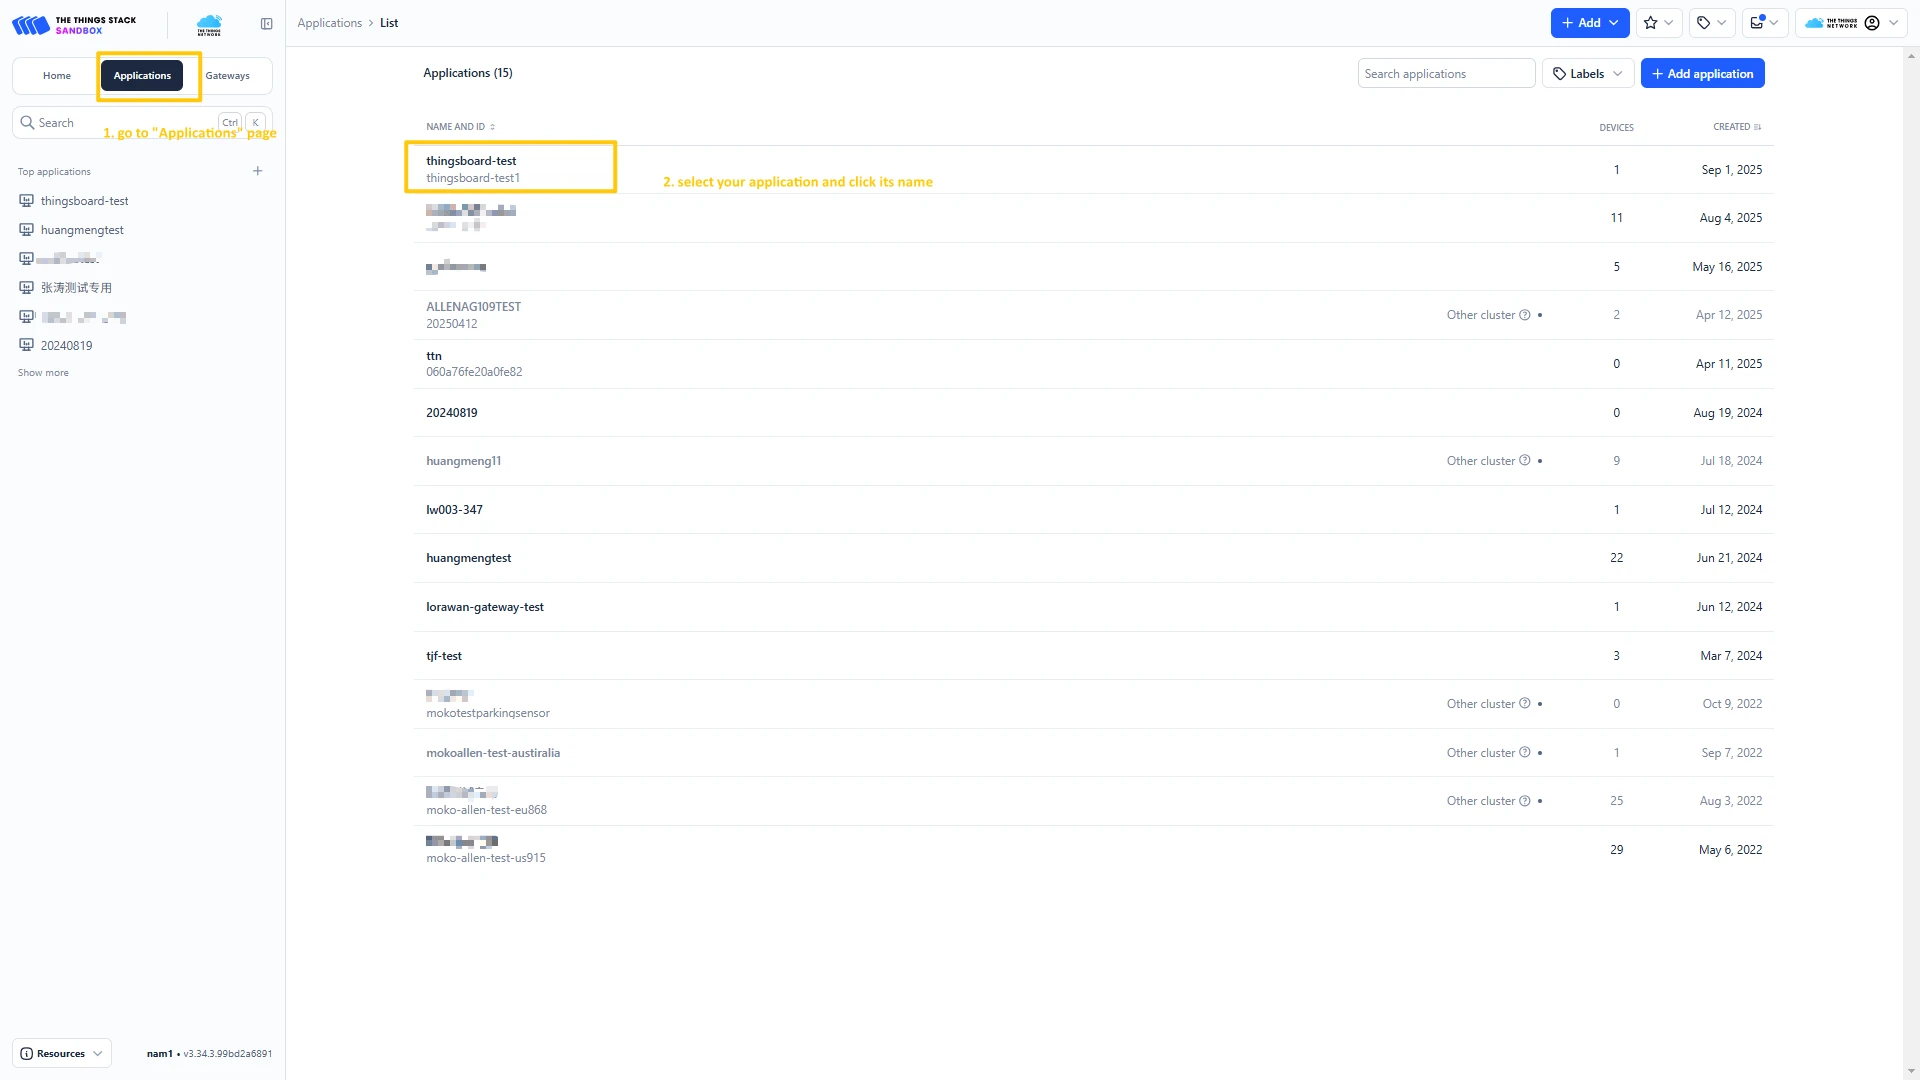
- Go to the Applications page. Then select your application and click on its name.
- Click on the + Register end device button.
- Choose “Enter end device specifics manually”. Then, put the APP EUI value to the JoinEUI field. Press the Confirm button.
- Fill the rest parameters and press Register end device button.


Configure Payload Formatter
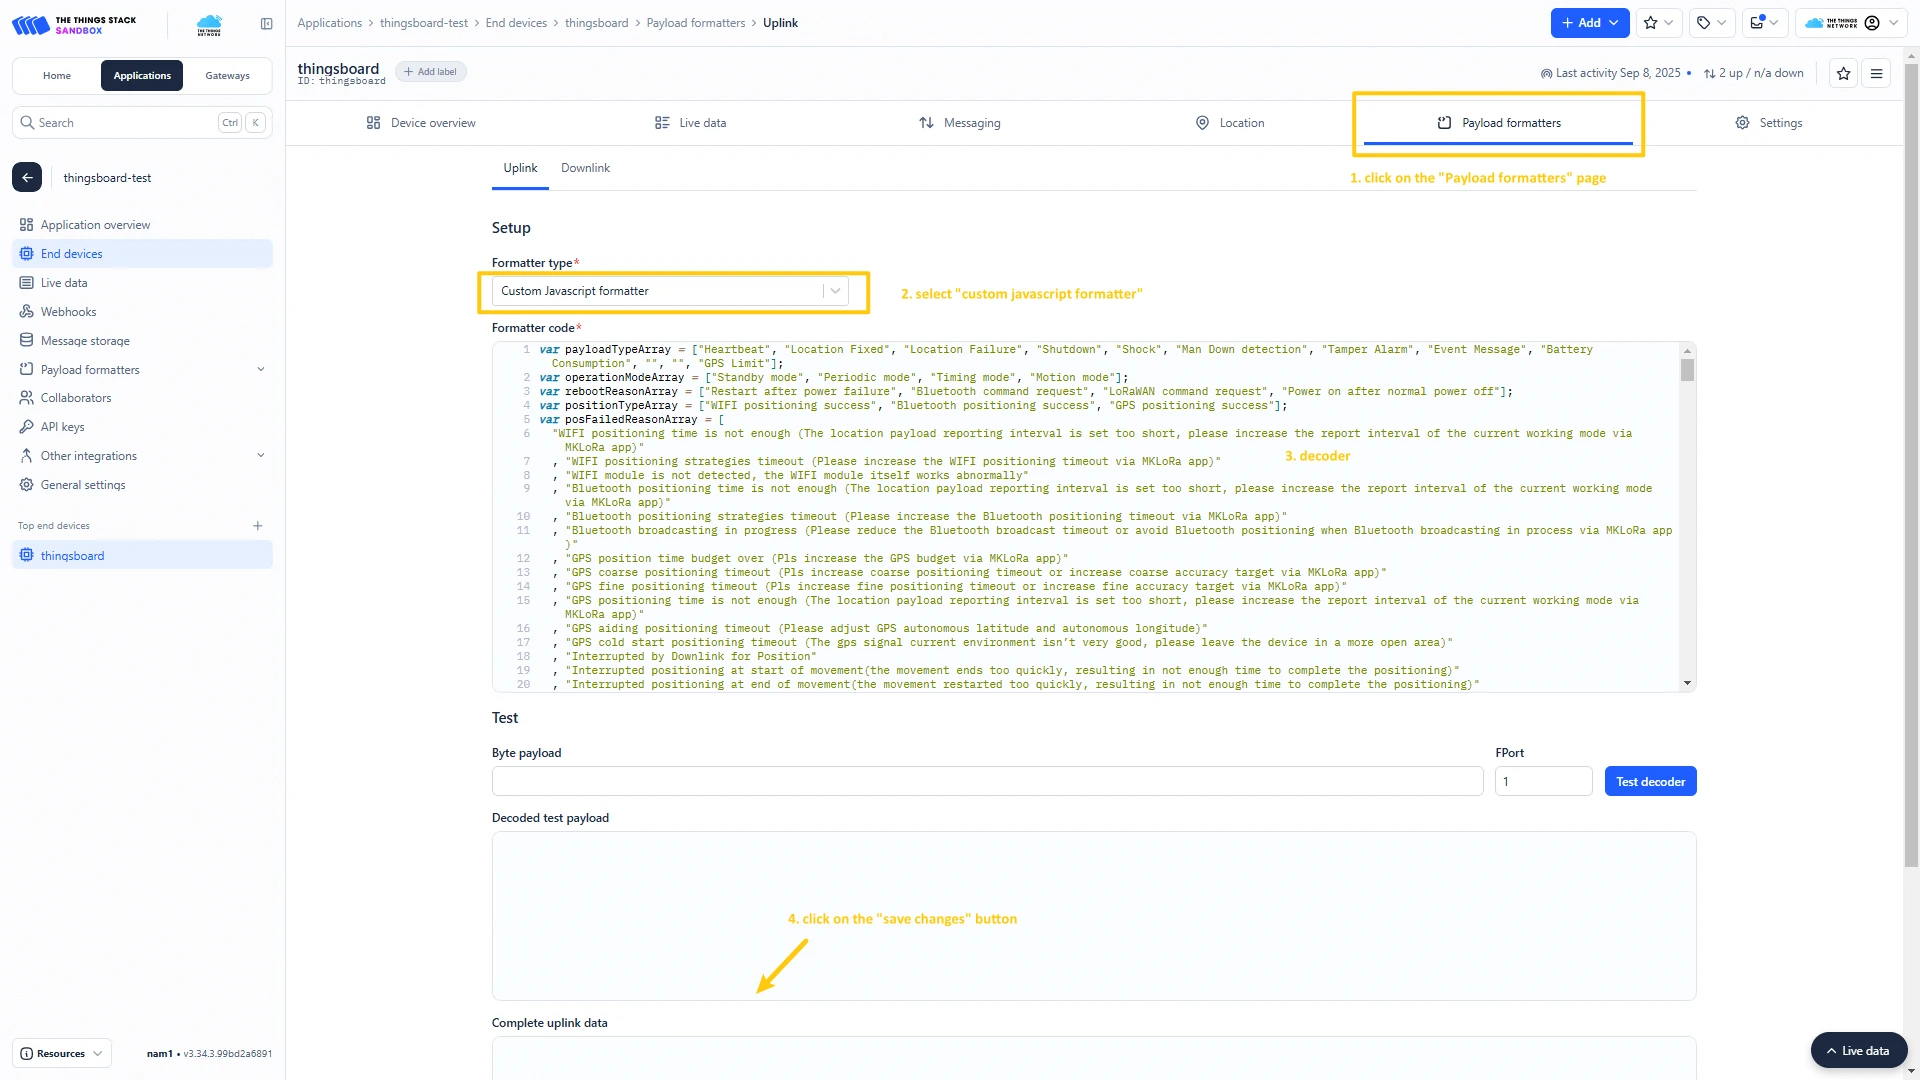
- Download the JSON file with the uplink converter settings.
- Go to the Payload formatters page and select Custom Javascript formatter for Formatter type. Paste the decode function and click Save changes button.
Create integration in ThingsBoard
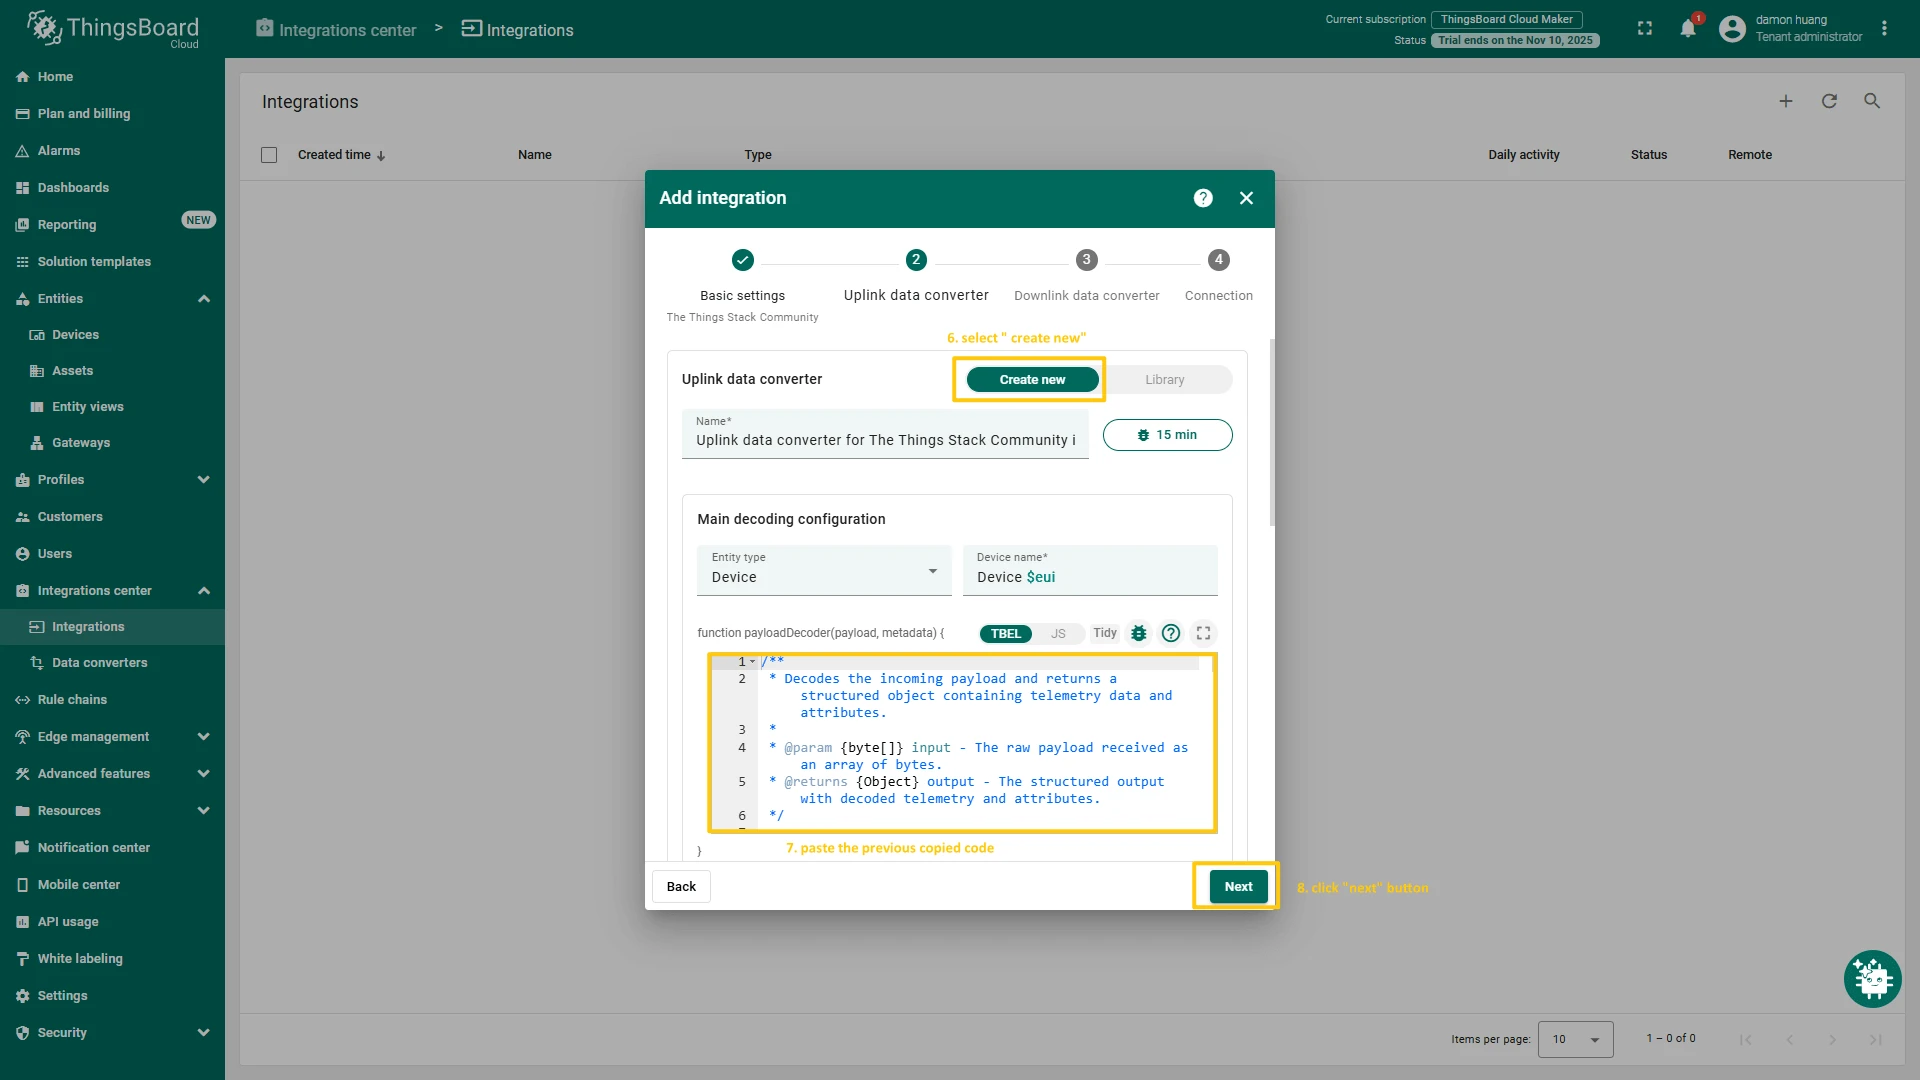
At first, copy the code, we will need it to create the uplink converter:
var data = decodeToJson(payload);var deviceName = data.end_device_ids.device_id;var deviceType = data.end_device_ids.application_ids.application_id;var result = { deviceName: deviceName, deviceType: deviceType, telemetry: data.uplink_message.decoded_payload};return result;In the “Connect” step, you will need the following parameters:
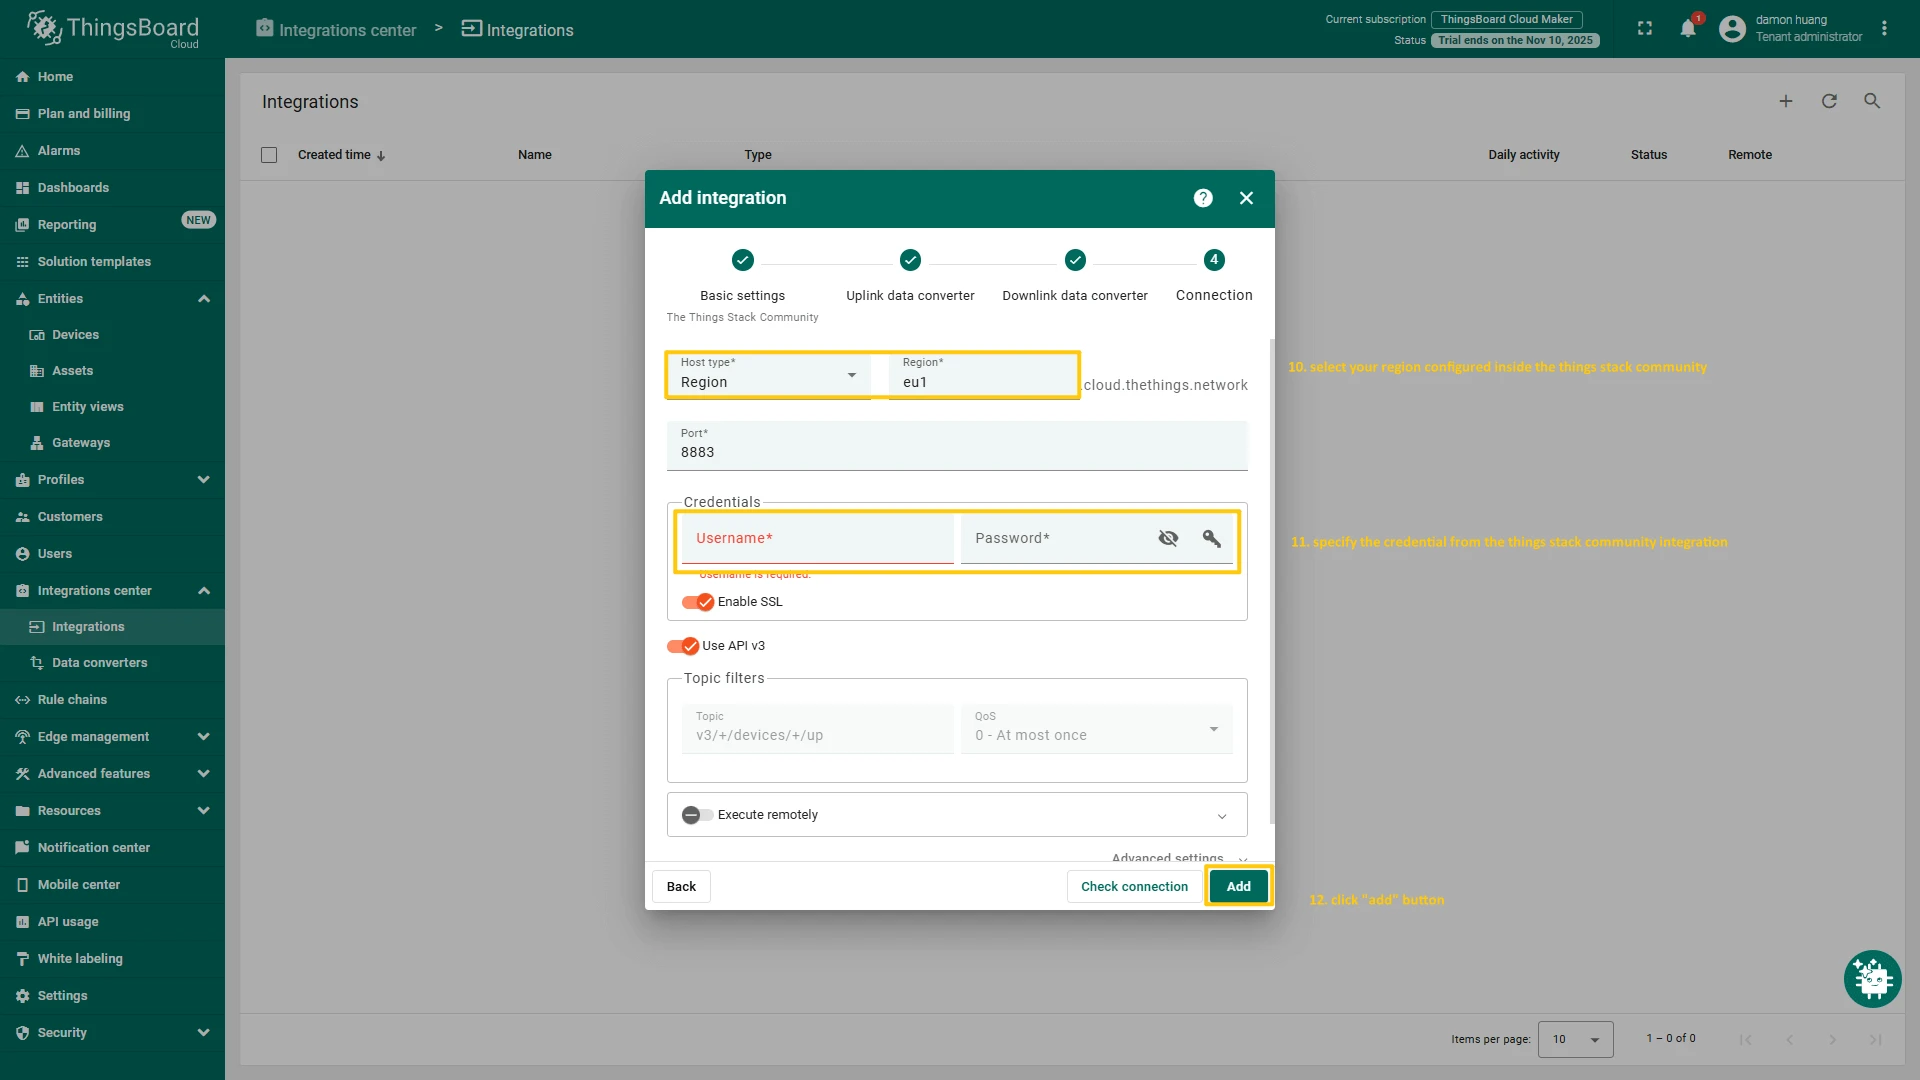
- Region: eu1 (region where your application was registered inside The Things Stack Community)
- Username: thingsboard-application-2025-06@ttn (use Username from integration on TTS)
- Password: use Password from integration on The Things Stack Community
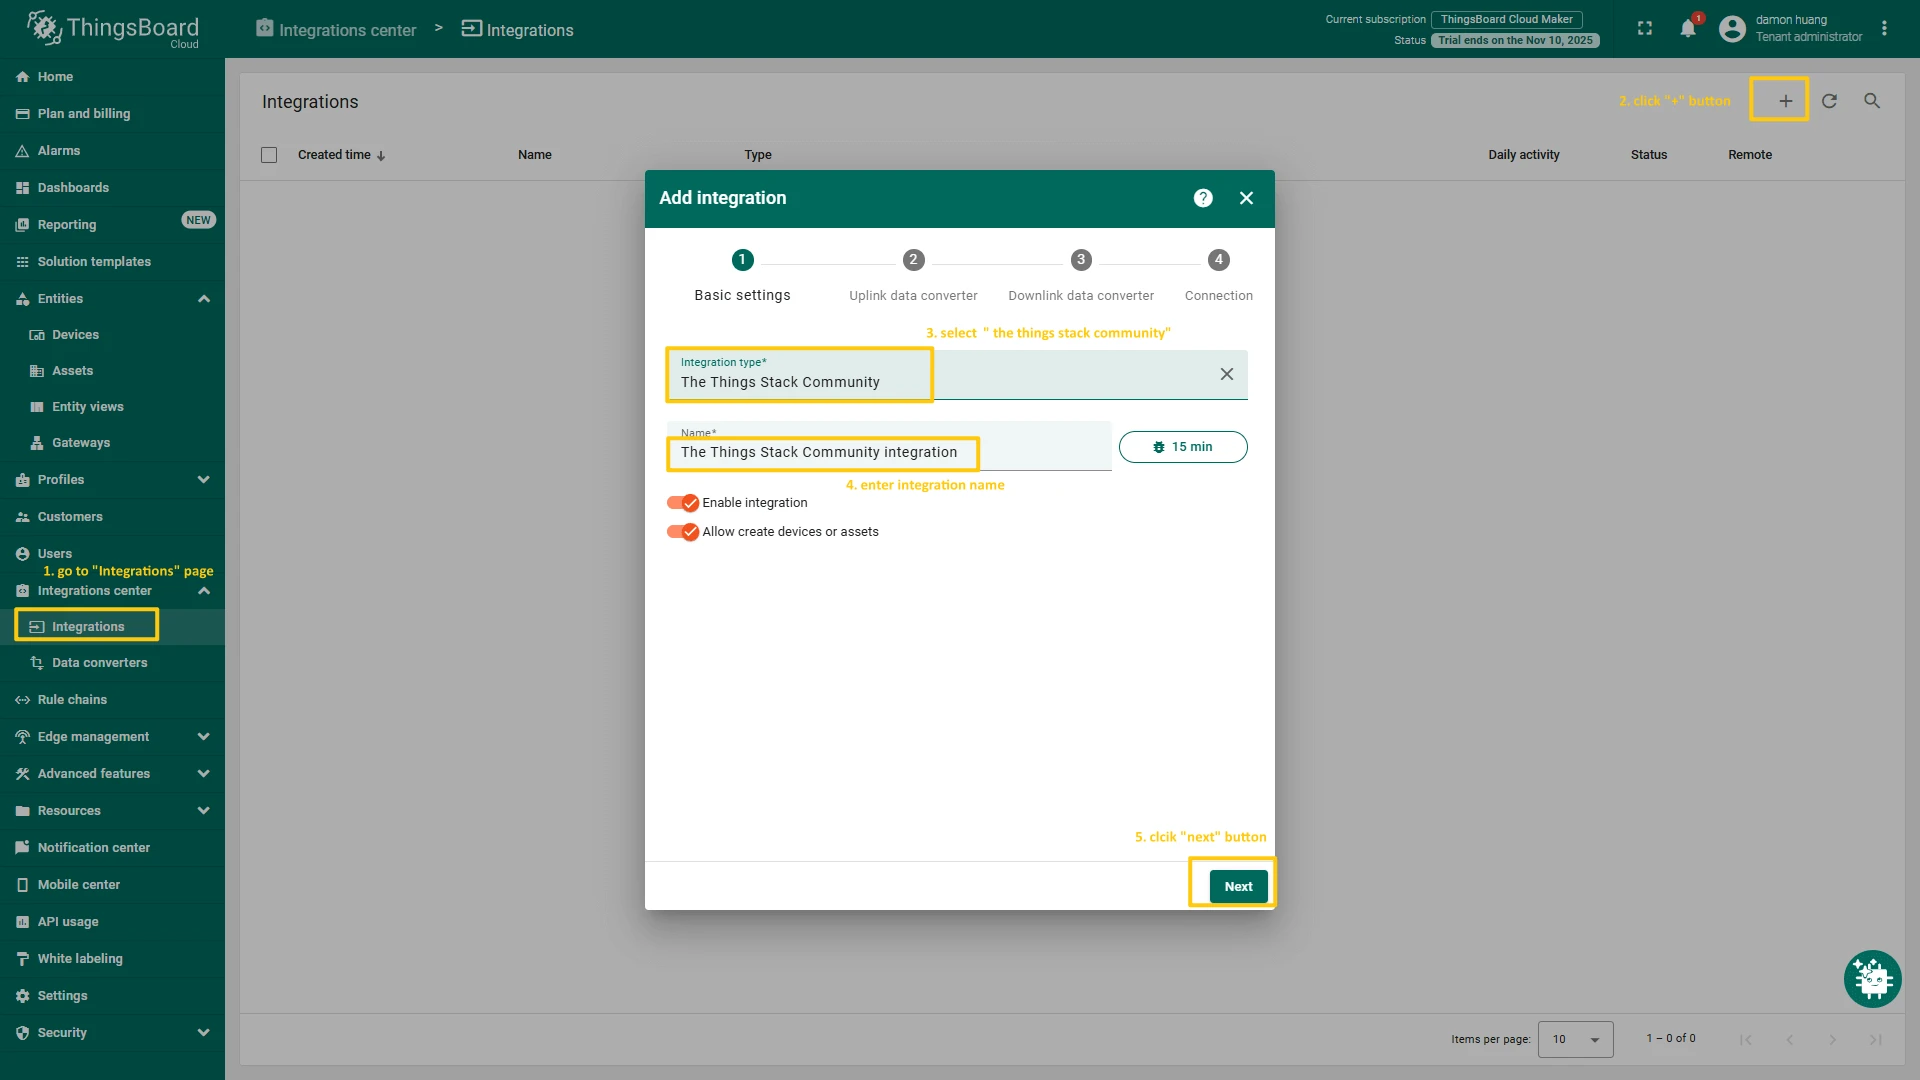
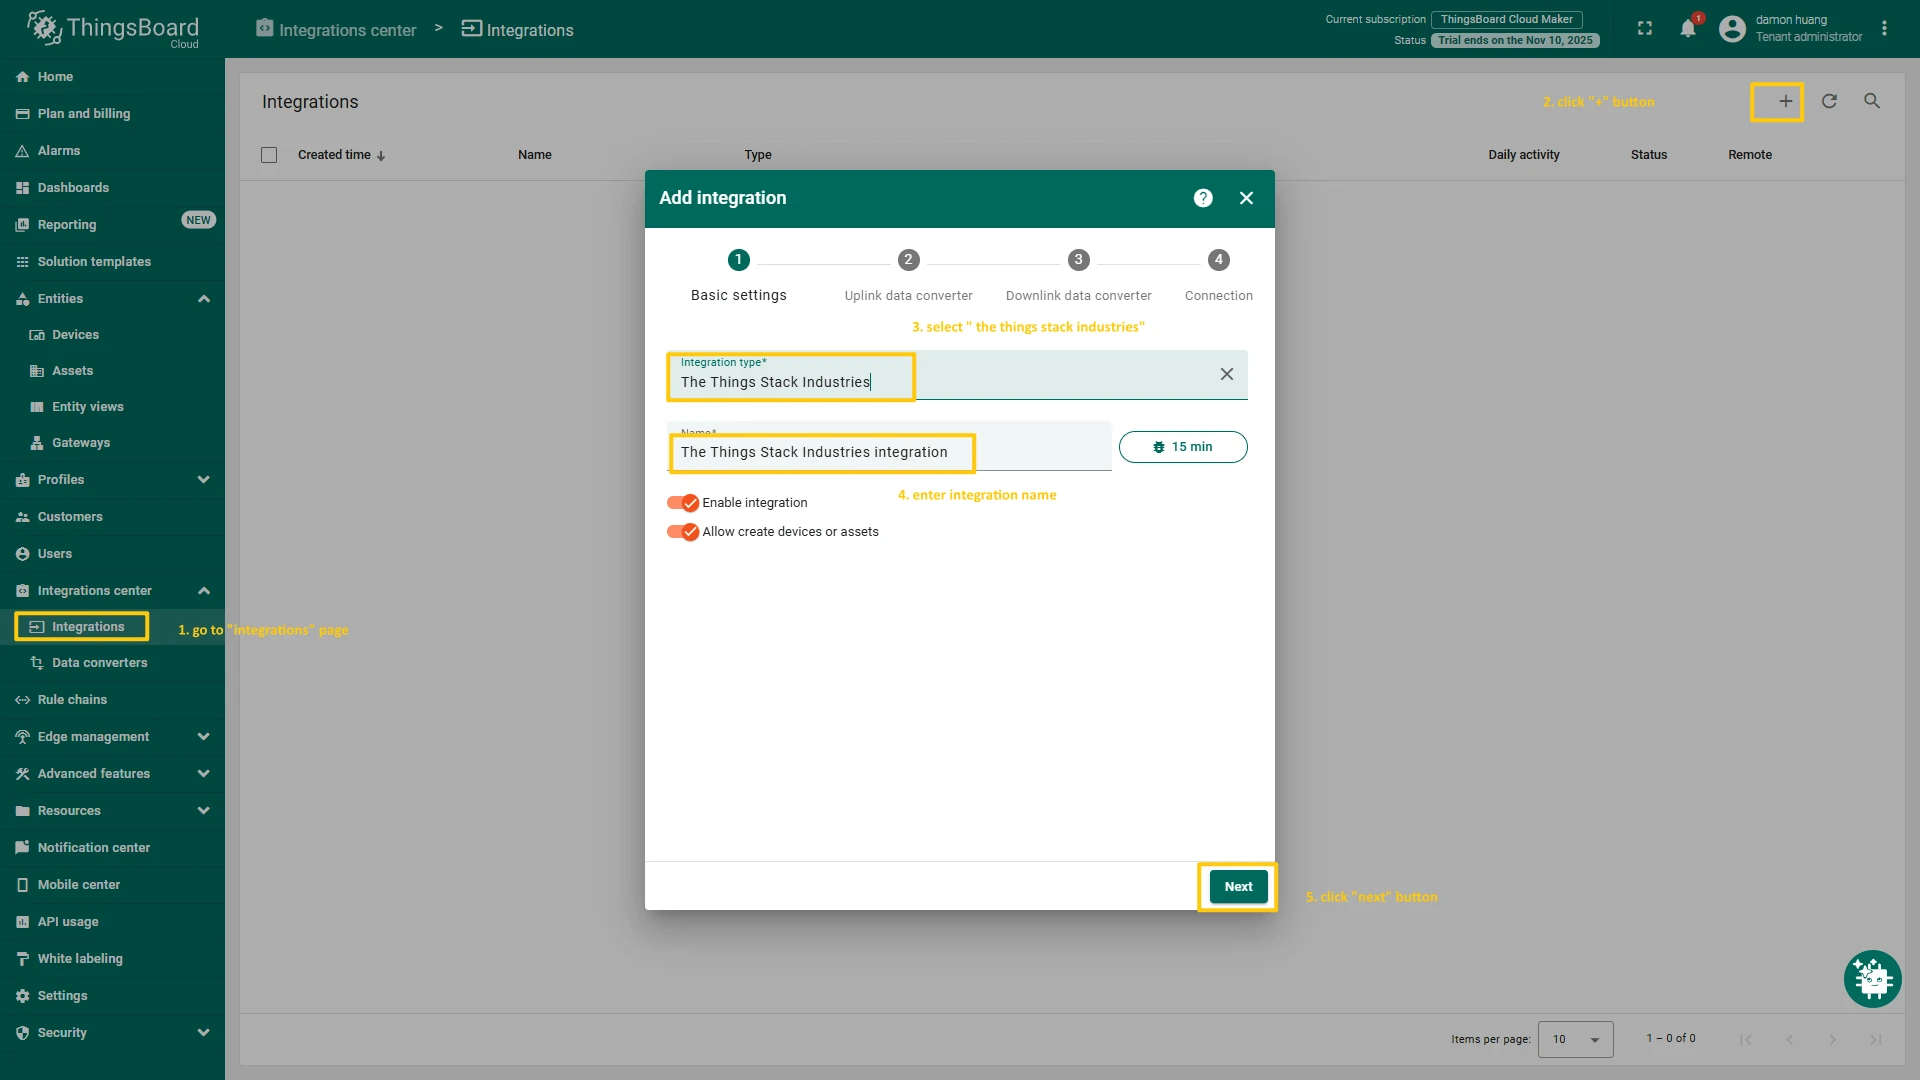
Now, navigate to the Integrations page under the Integrations center section of your ThingsBoard instance and follow these steps:
- Click “plus” icon in the upper right corner to add new integration. Select “The Things Stack Community” integration type. Then, click “Next” button.
- Paste the previously copied script to the Decoder function section. Click “Next” button.
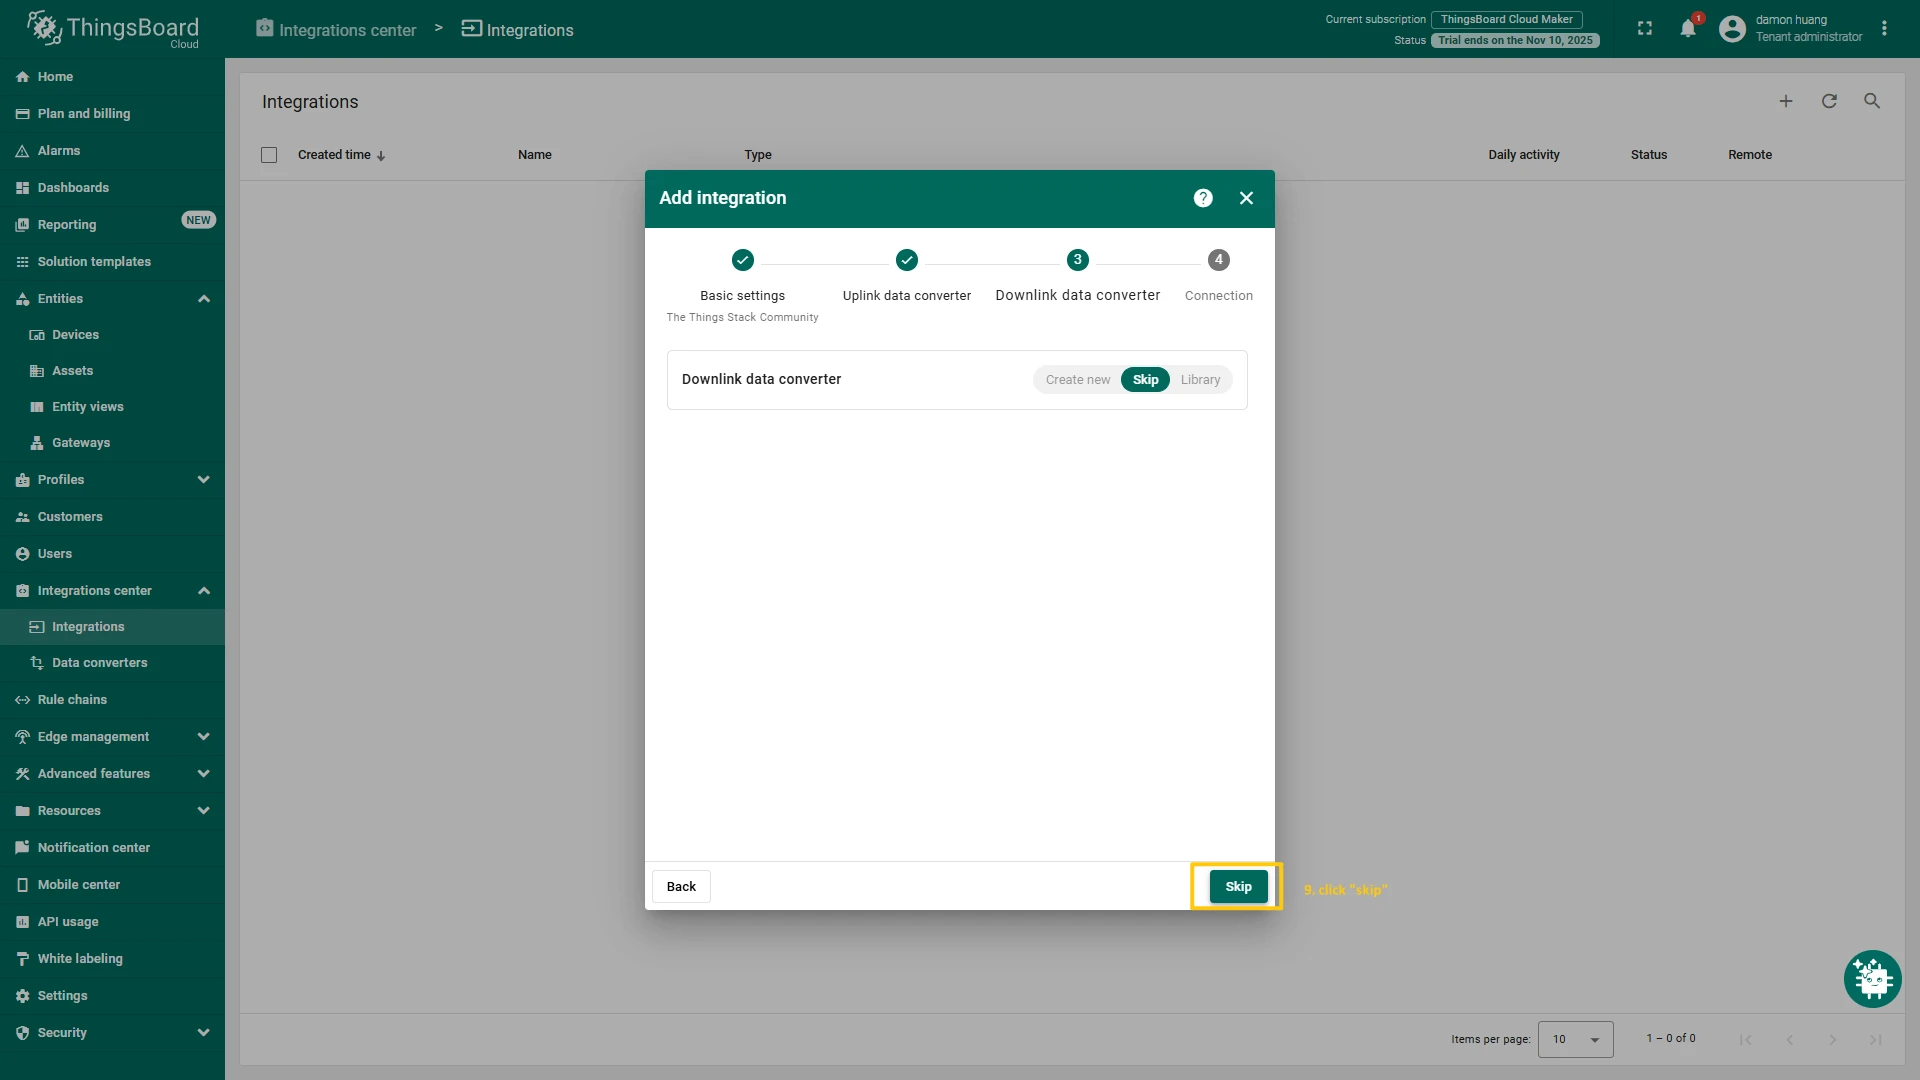
- Leave the “Downlink data converter” field empty. Click on “Skip” button.
- Next, fill in the fields with your parameters. After, press “Add” button.
Check data on ThingsBoard
So, the device was added and if it sends any data - it should appear in the devices.. To check it you may open Devices page in Entities section. The device should be in devices list. You can check the data by click on it and open tab Attributes or Latest telemetry.
Add a device on The Things Industries
To add a device, you can follow next steps:
- Go to the Applications page. Then select your application and click on its name.
- Click on the + Register end device button.
- Choose “Enter end device specifics manually”. Then, put the APP EUI value to the JoinEUI field. Press the Confirm button.
- Fill the rest parameters and press Register end device button.
Configure Payload Formatter
- Download the JSON file with the uplink converter settings.
- Go to the Payload formatters page and select Custom Javascript formatter for Formatter type. Paste the decode function and click Save changes button.
Create integration in ThingsBoard
At first, copy the code, we will need it to create the uplink converter:
var data = decodeToJson(payload);var deviceName = data.end_device_ids.device_id;var deviceType = data.end_device_ids.application_ids.application_id;var result = { deviceName: deviceName, deviceType: deviceType, telemetry: data.uplink_message.decoded_payload};return result;In the “Connect” step, you will need the following parameters:
- Region: eu1 (region where your application was registered inside The Things Industries Console);
- Username: thingsboard-application-2025-05@lansitec-testplan (use Username from integration on The Things Stack Industries);
- Password: use Password from integration on The Things Industries.
Now, navigate to the Integrations page under the Integrations center section of your ThingsBoard instance and follow these steps:
- Click “plus” icon in the upper right corner to add new integration. Select “The Things Stack Industries” integration type. Then, click “Next” button.
- Paste the previously copied script to the Decoder function section. Click “Next” button.
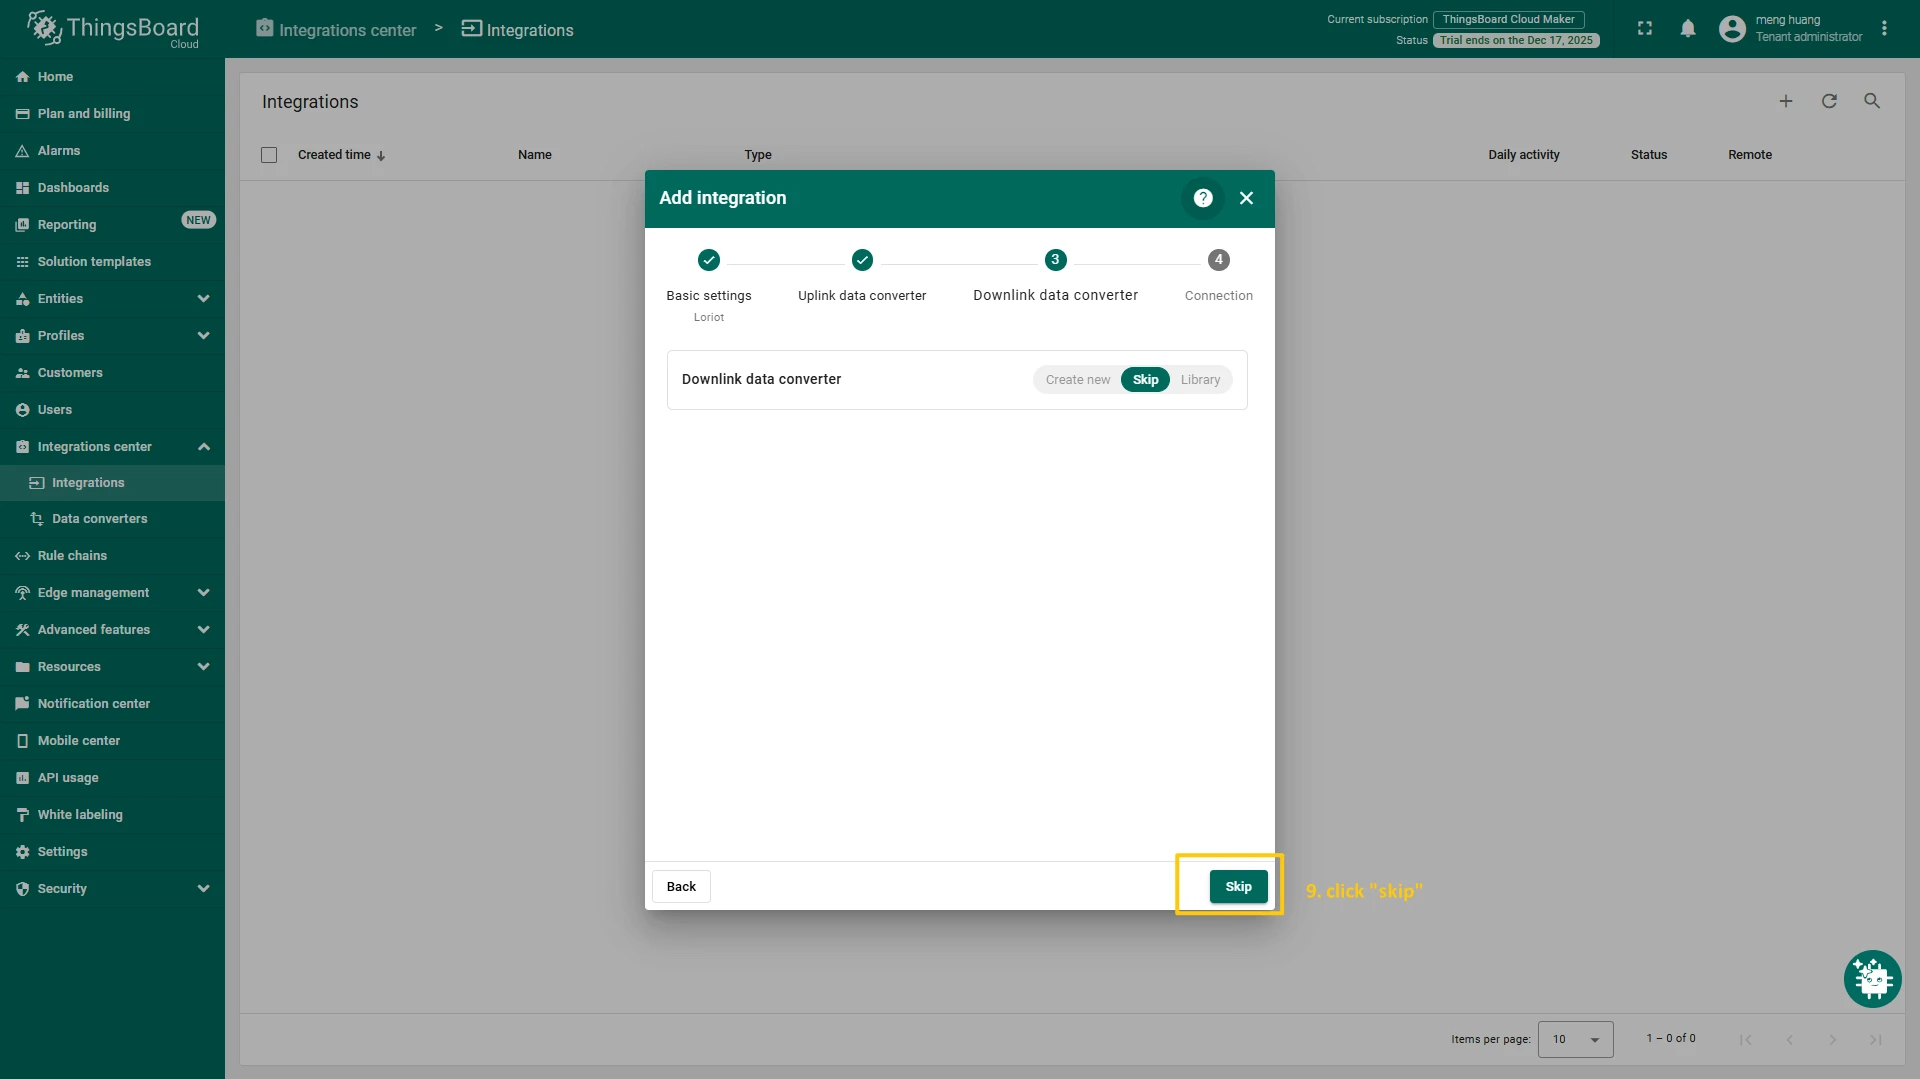
- Leave the “Downlink data converter” field empty. Click on “Skip” button.
- Next, fill in the fields with your parameters. After, press “Add” button.
Check data on ThingsBoard
So, the device was added and if it sends any data - it should appear in the devices. To check it you may open Devices page in Entities section. The device should be in devices list. You can check the data by click on it and open tab Attributes or Latest telemetry.
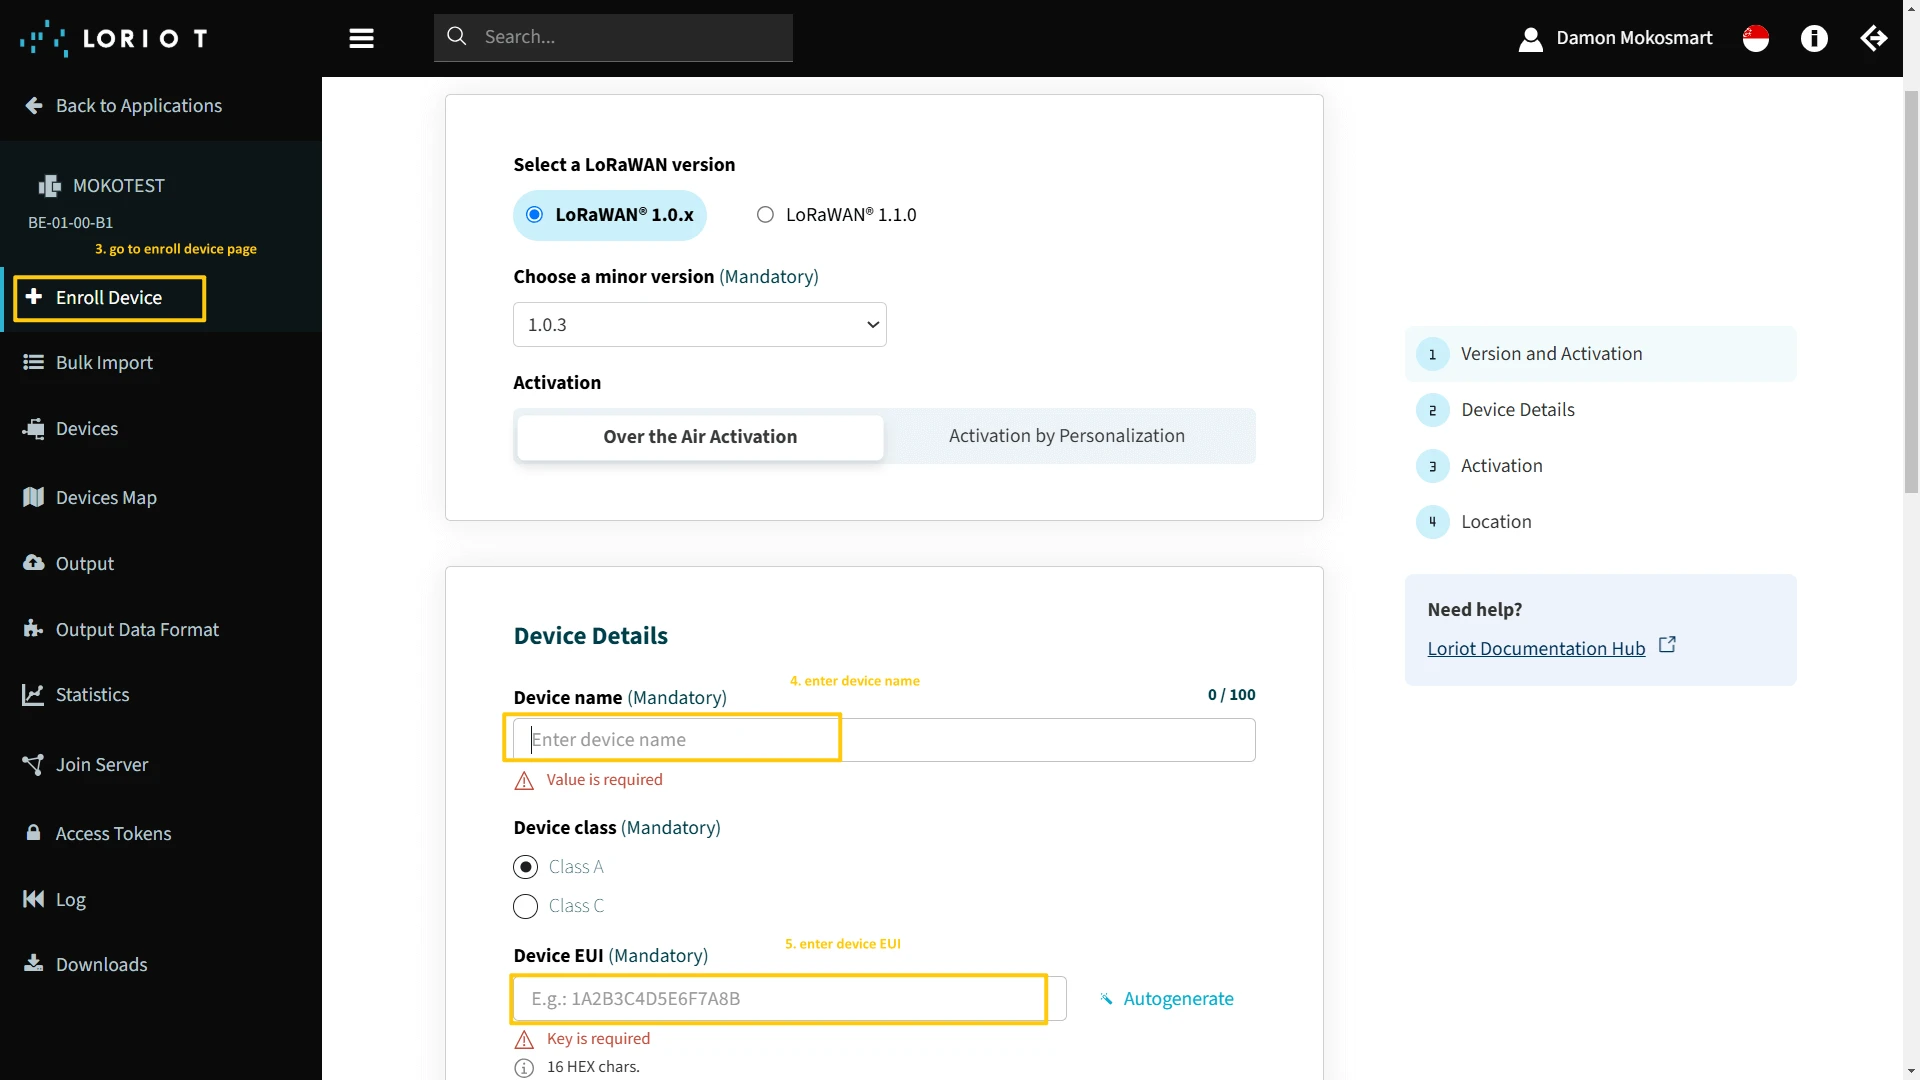
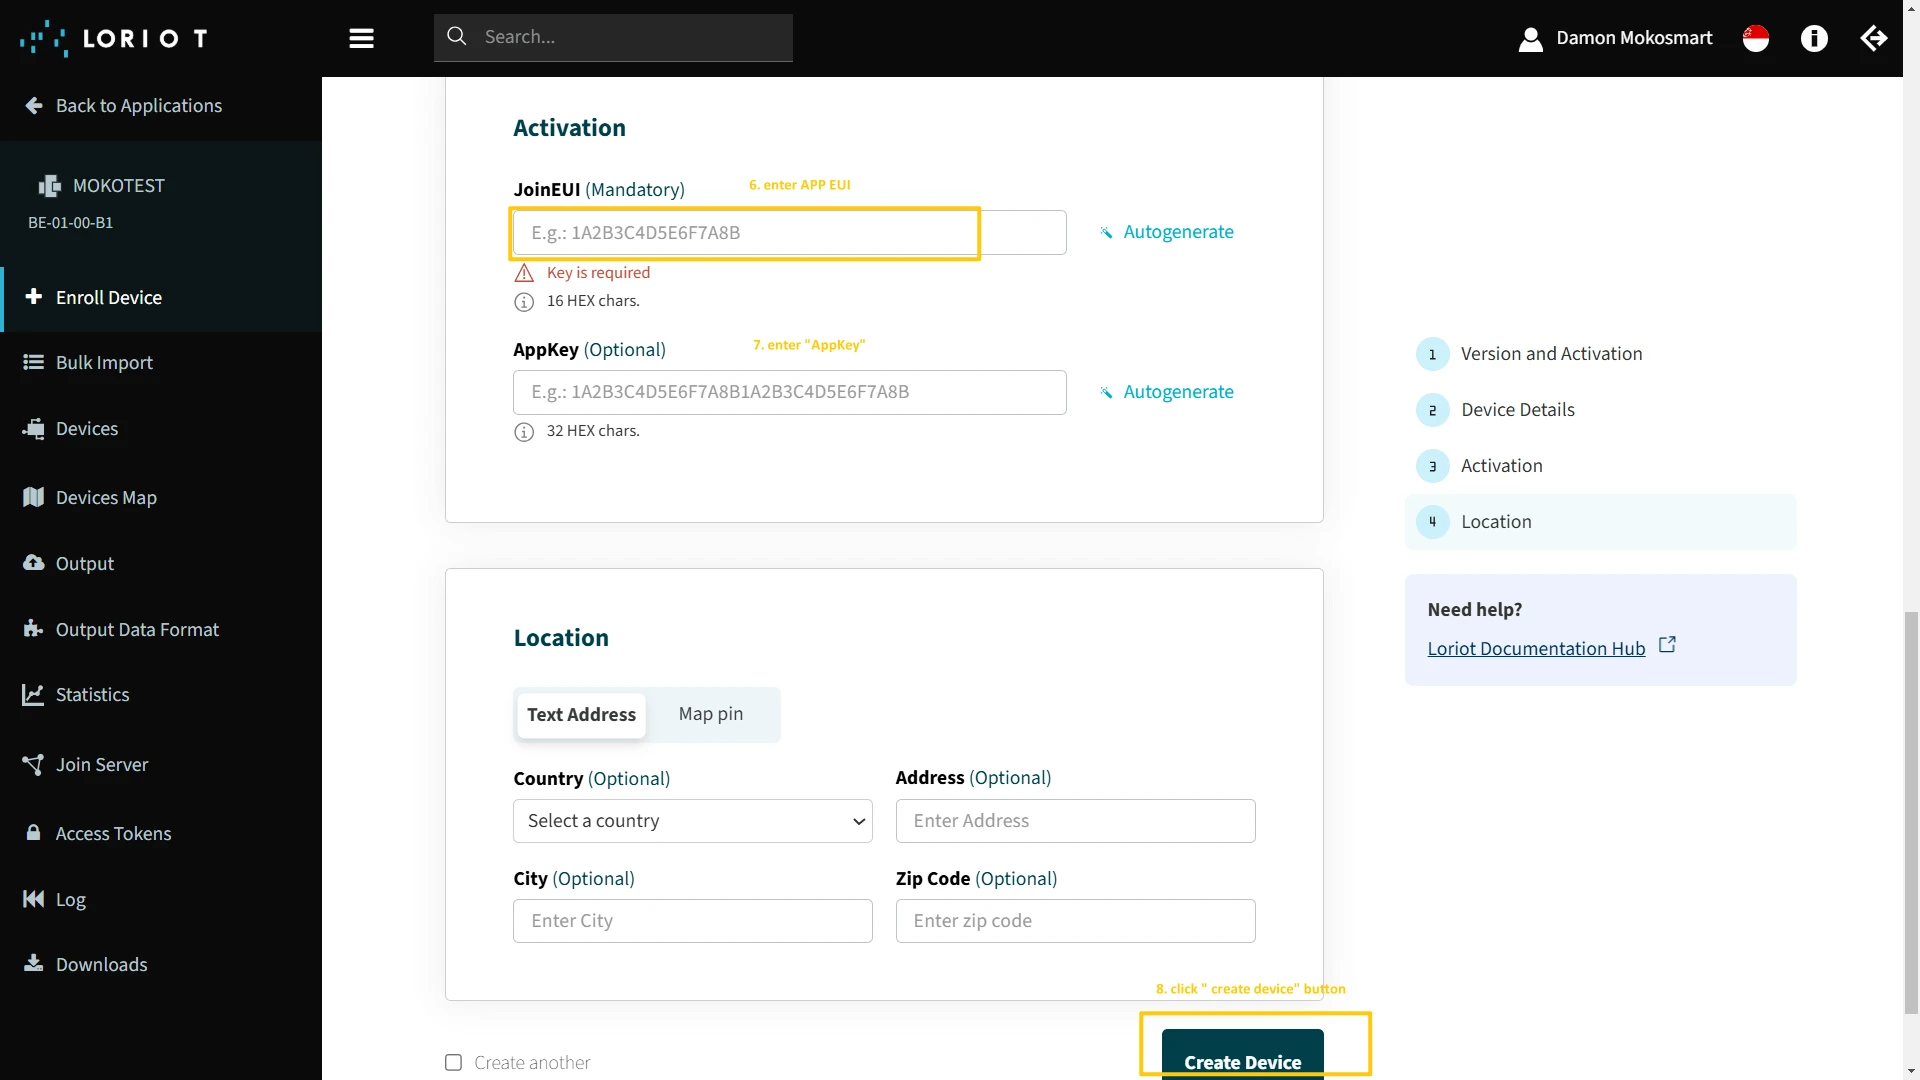
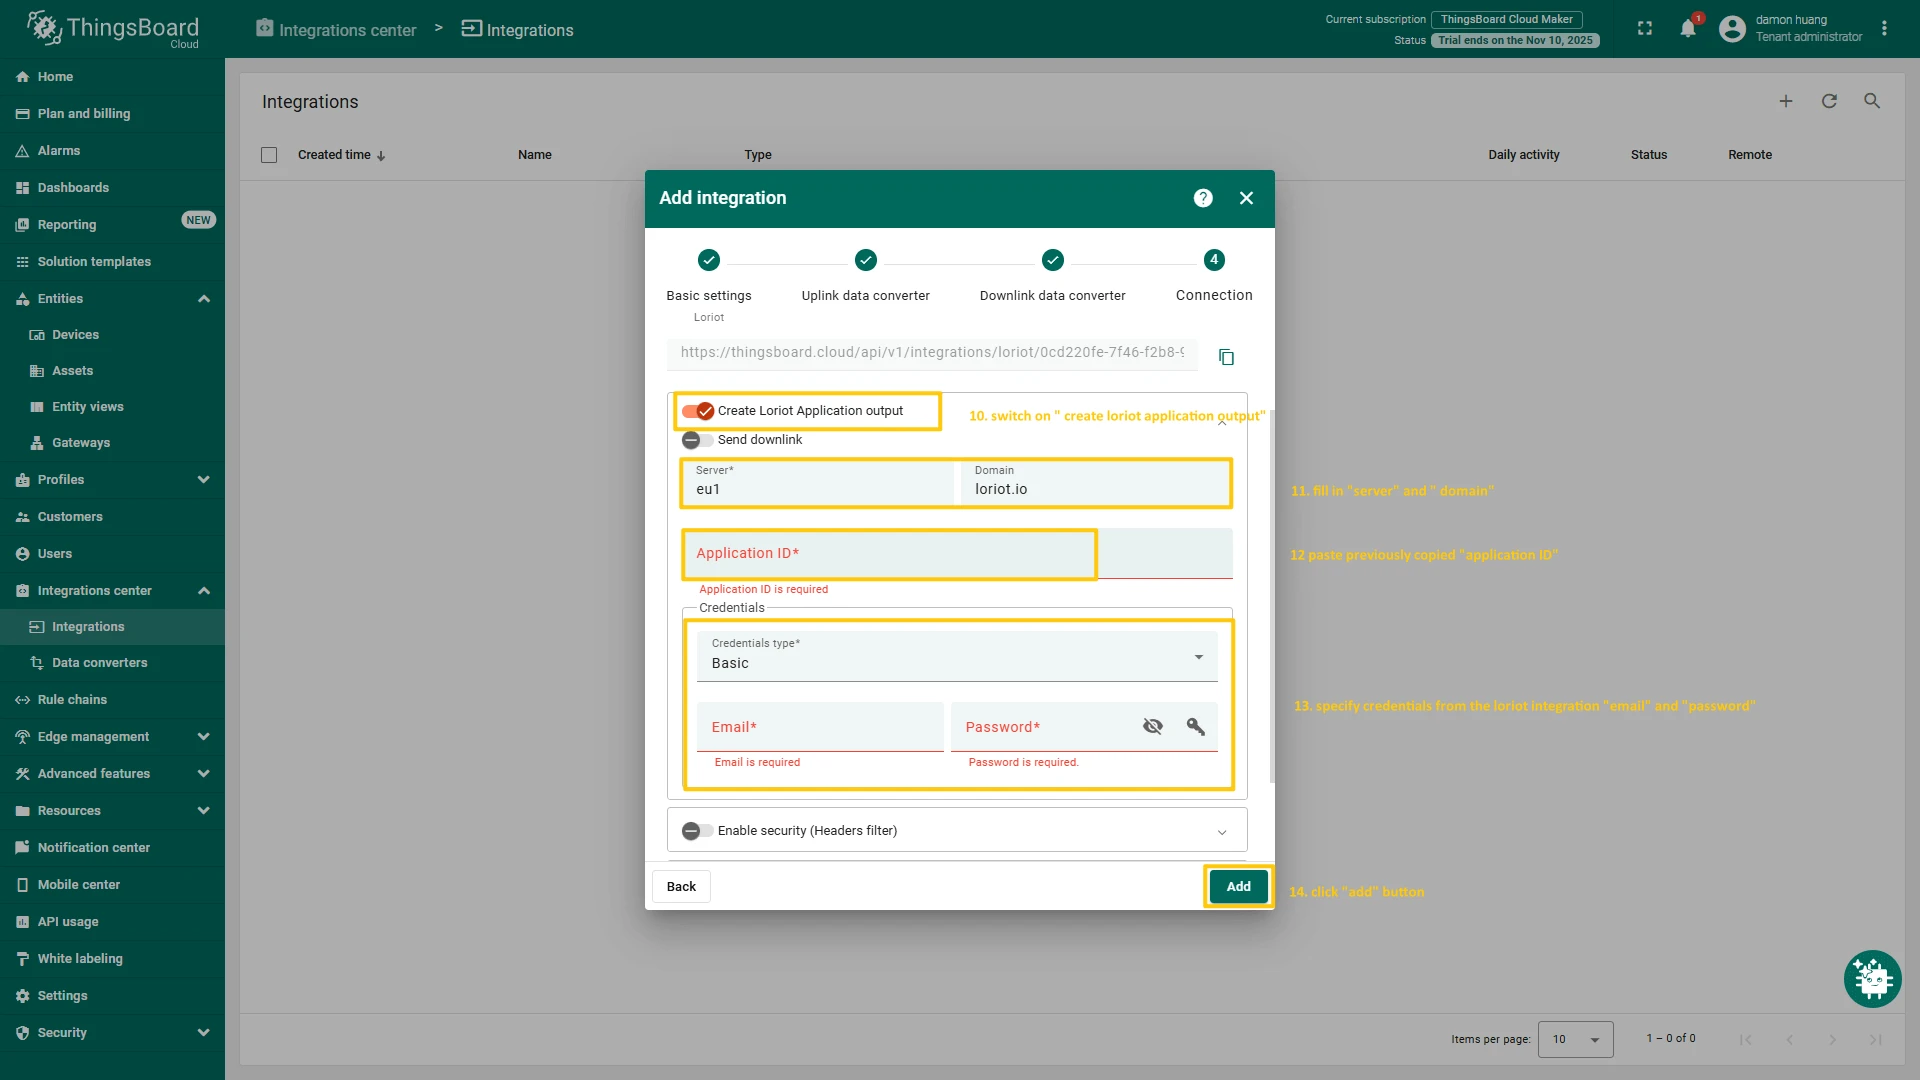
Add a device on the Loriot
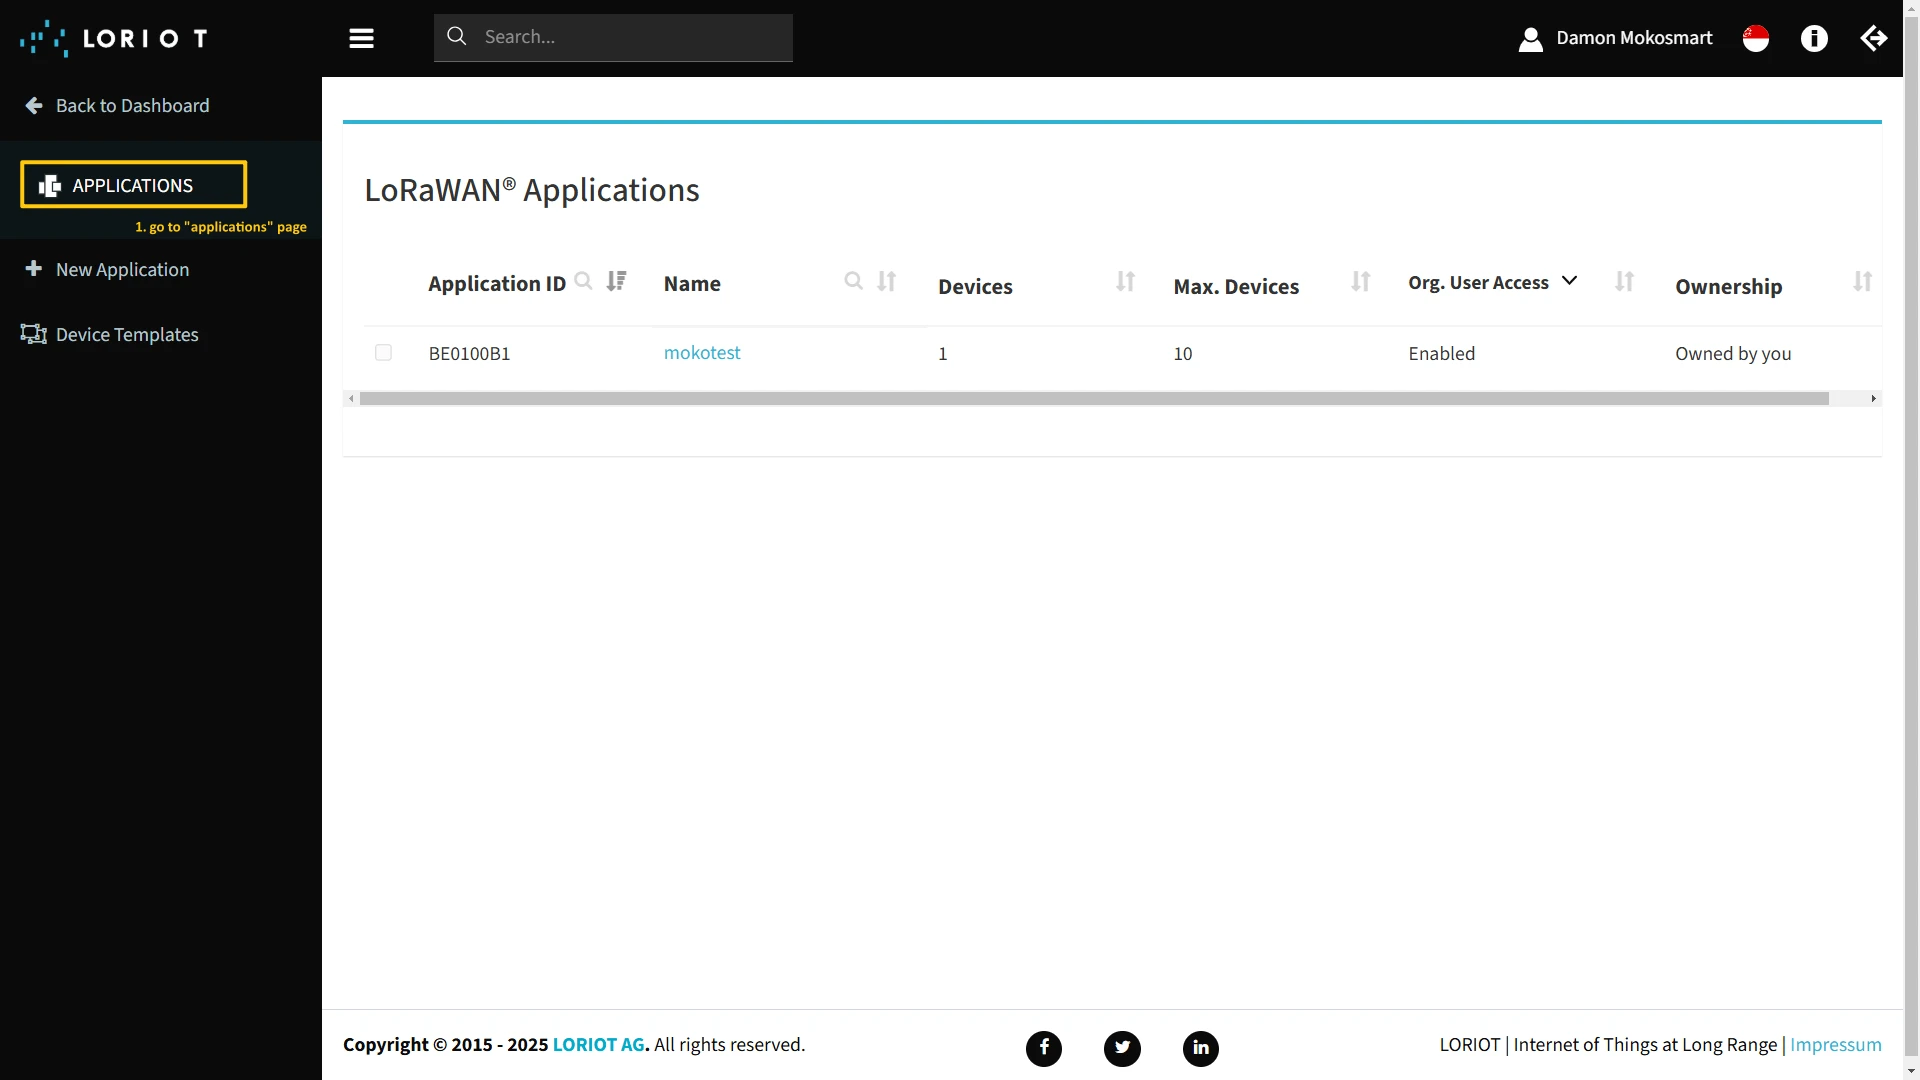
To add a device, you can follow next steps:
- Login to Loriot server. We use eu2.loriot.io, but it depends on chosen region during registration.
- Go to the Applications page in left menu.
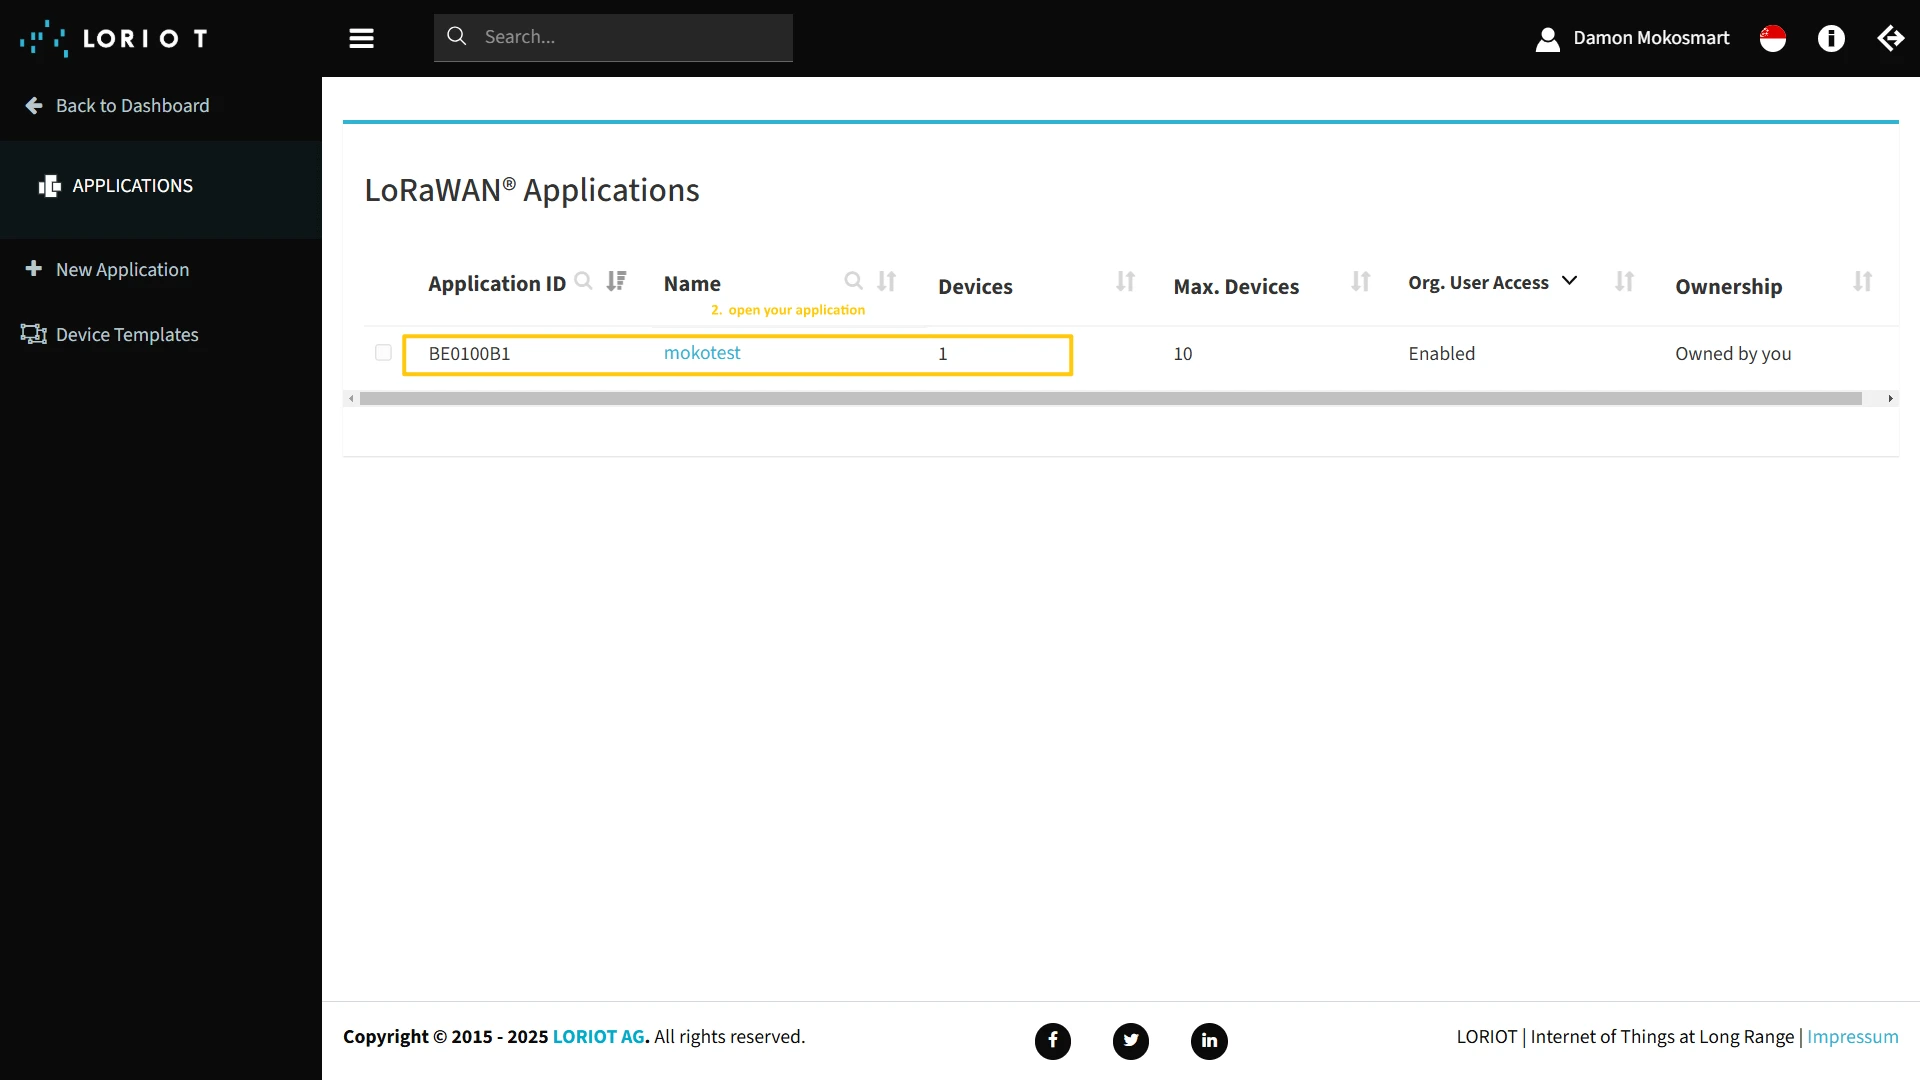
- Open your application.
- Go to the “Enroll Device” page. Fill in the fields, with a configuration from your device.
- Then click the “Create Device” button.

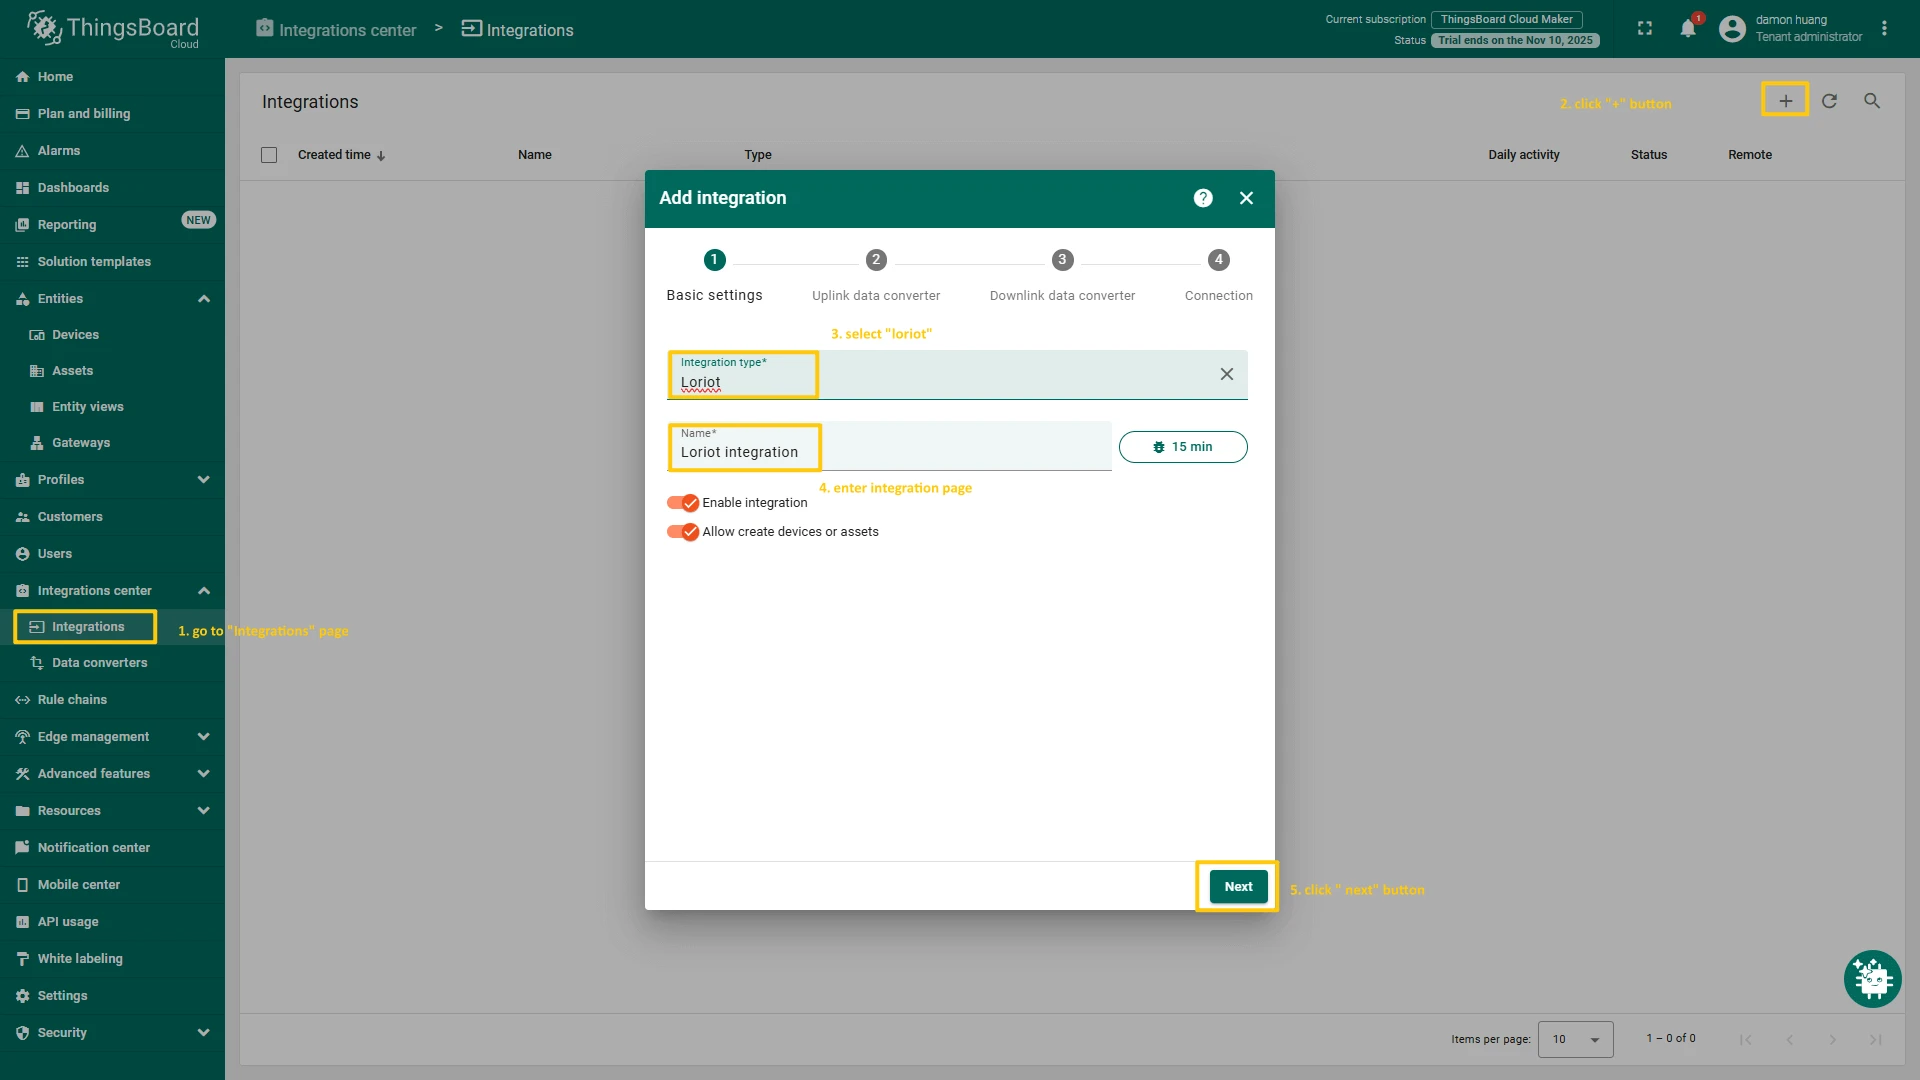
Create integration in ThingsBoard
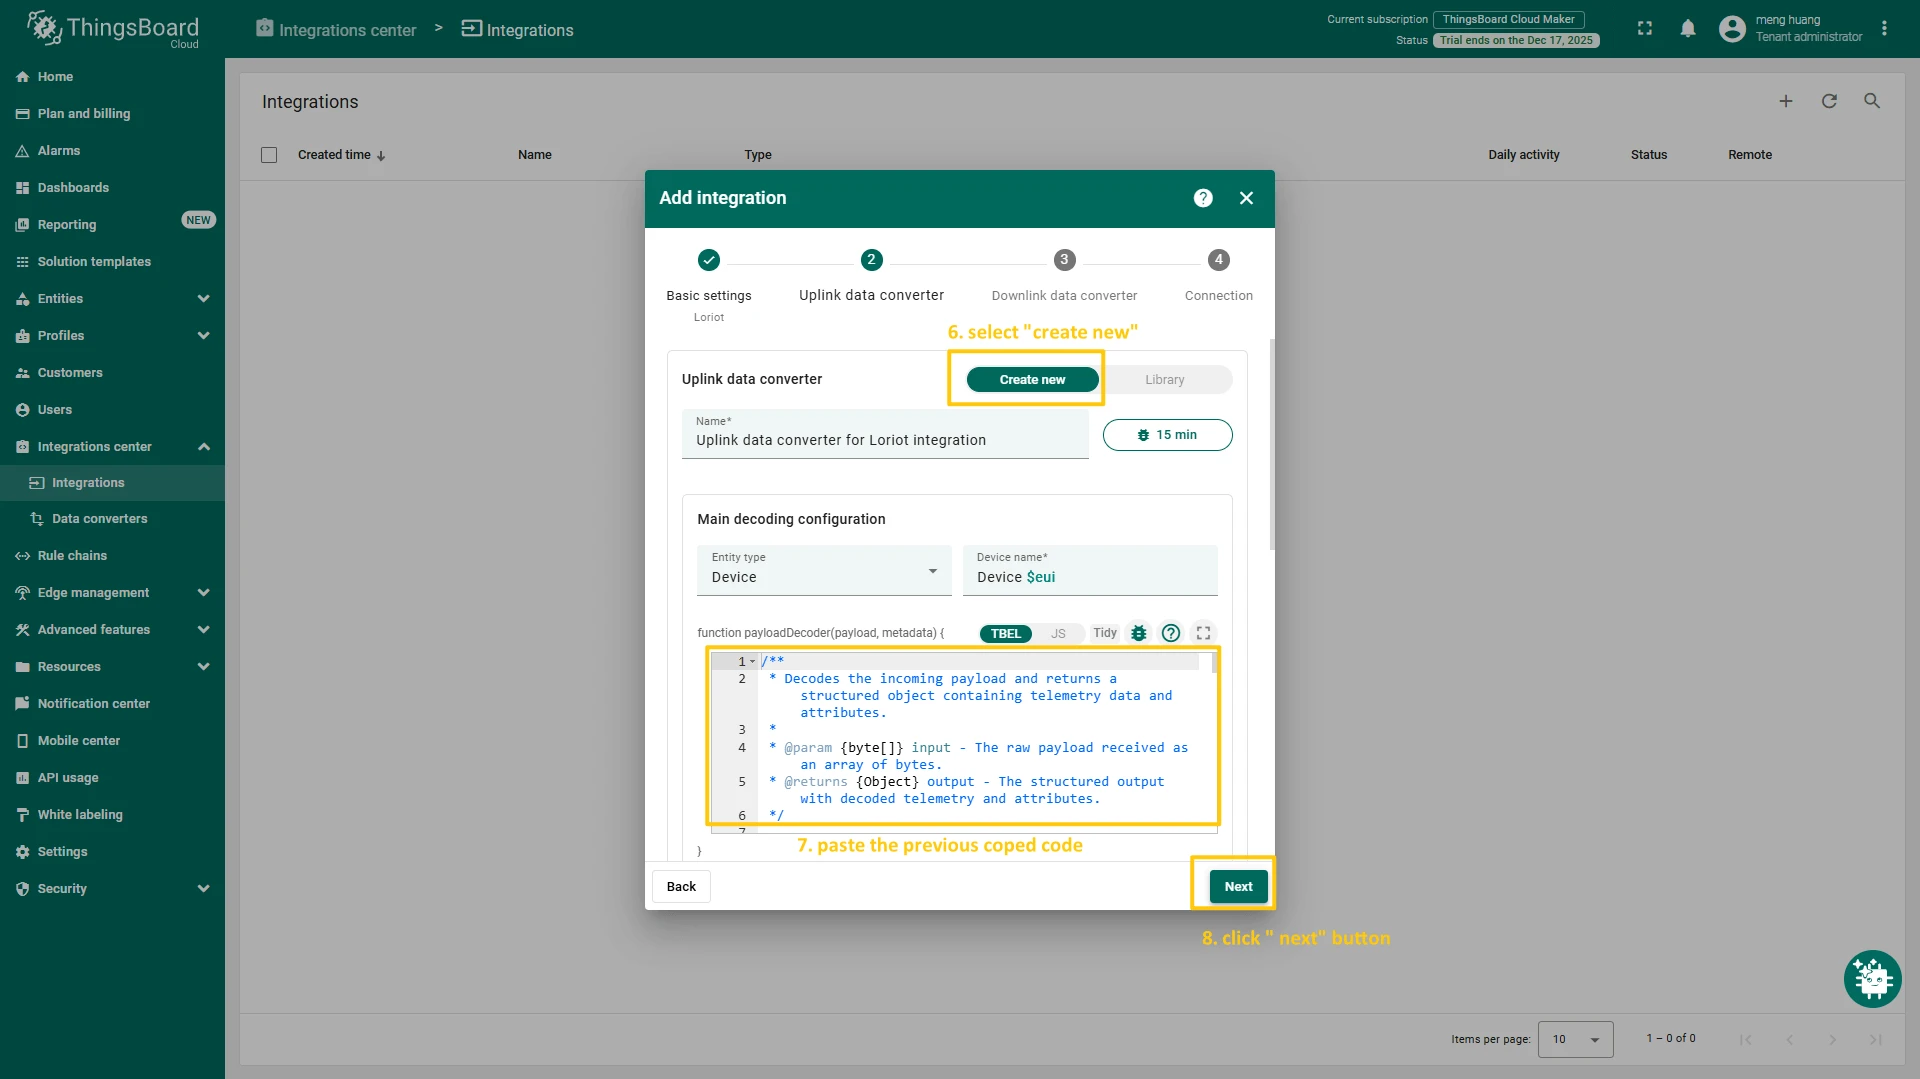
At first, copy the code, we will need it to create the uplink converter:
var data = decodeToJson(payload);var deviceName = data.end_device_ids.device_id;var deviceType = data.end_device_ids.application_ids.application_id;var result = { deviceName: deviceName, deviceType: deviceType, telemetry: data.uplink_message.decoded_payload};return result;Now, navigate to the Integrations page under the Integrations center section of your ThingsBoard instance and follow these steps:
- Click “plus” icon in the upper right corner to add new integration. Select “Loriot” integration type. Then, click “Next” button.
- Paste the previously copied script to the Decoder function section. Click “Next” button.
- Leave the “Downlink data converter” field empty. Click on “Skip” button.
- Next, fill in the fields with your parameters. After, press “Add” button.
Check data on ThingsBoard
So, the device was added and if it sends any data - it should appear in the devices. To check it you may open Devices page in Entities section. The device should be in devices list. You can check the data by click on it and open tab Attributes or Latest telemetry.
Create Dashboard on ThingsBoard
In order to get more user-friendly view - you can use dashboards.
To add the dashboard to ThingsBoard, follow the next steps:
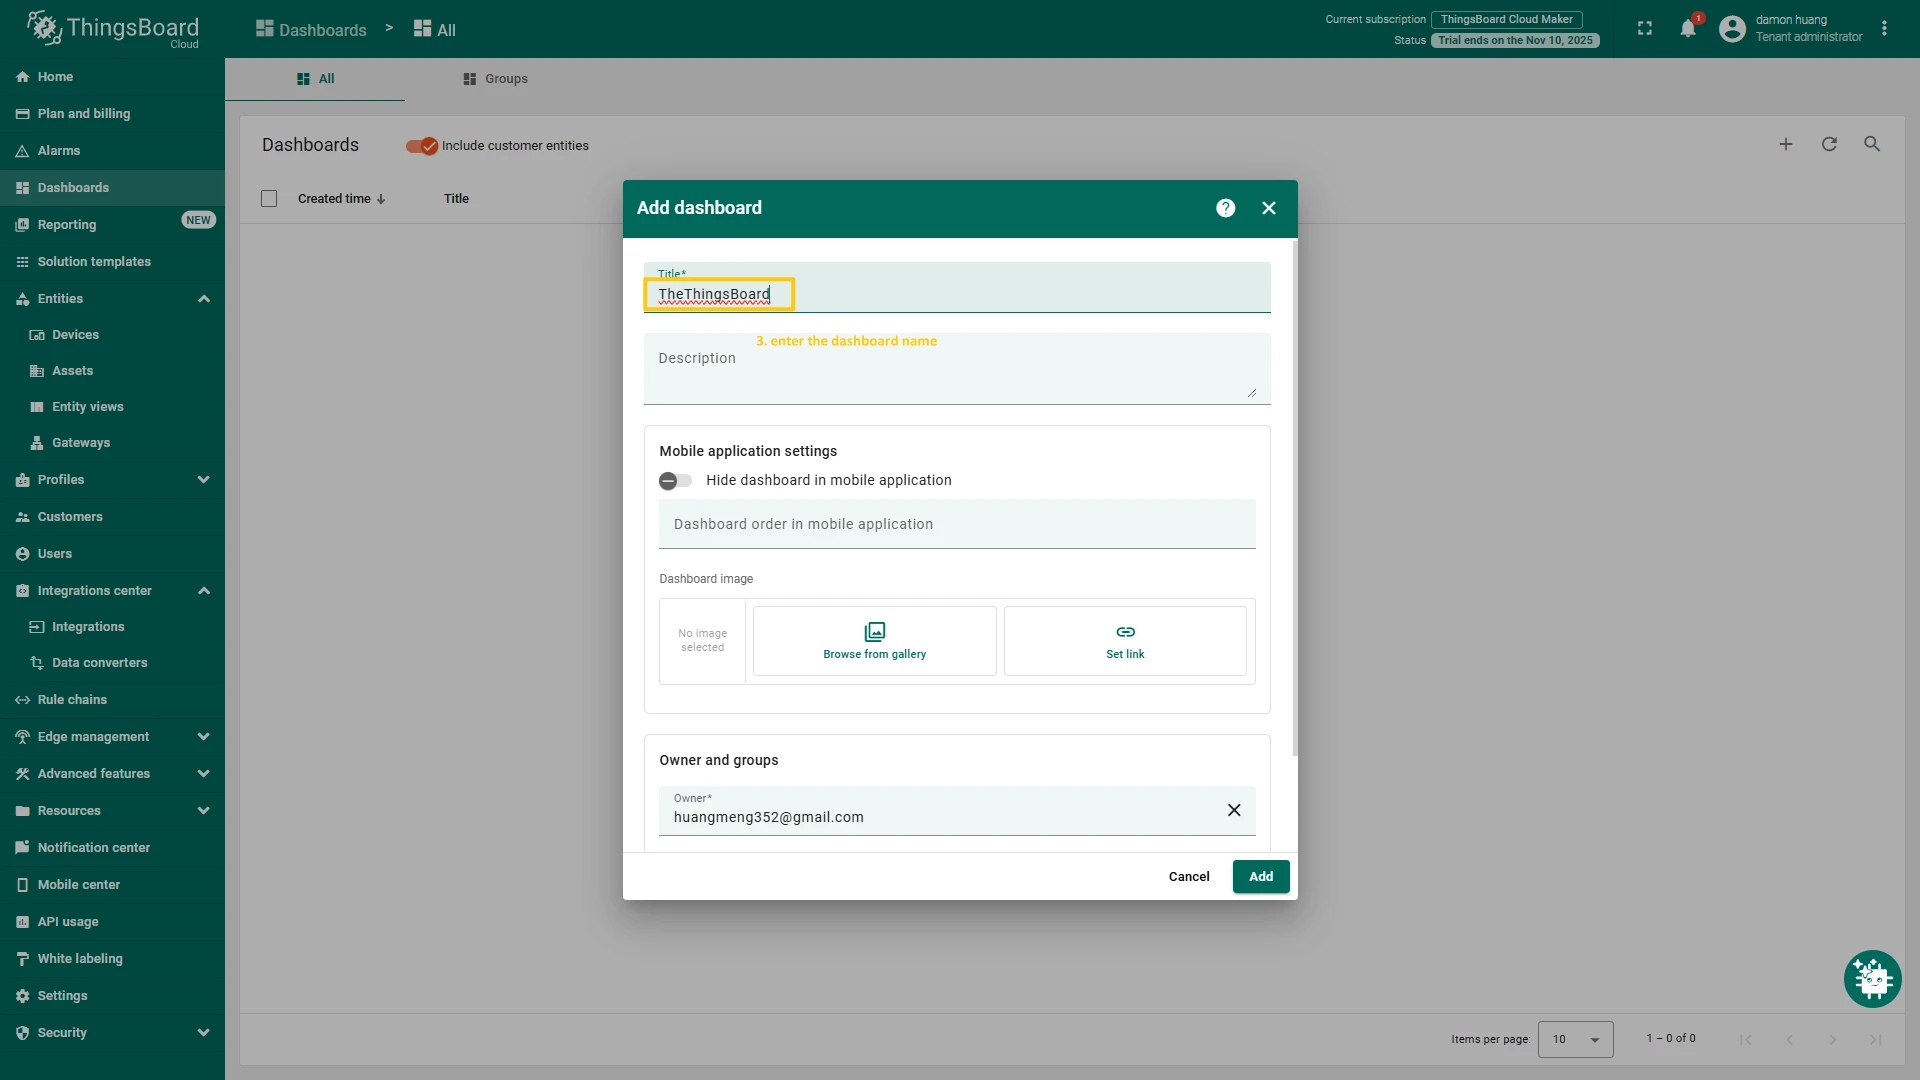
- Fill the dashboard title and click Add button
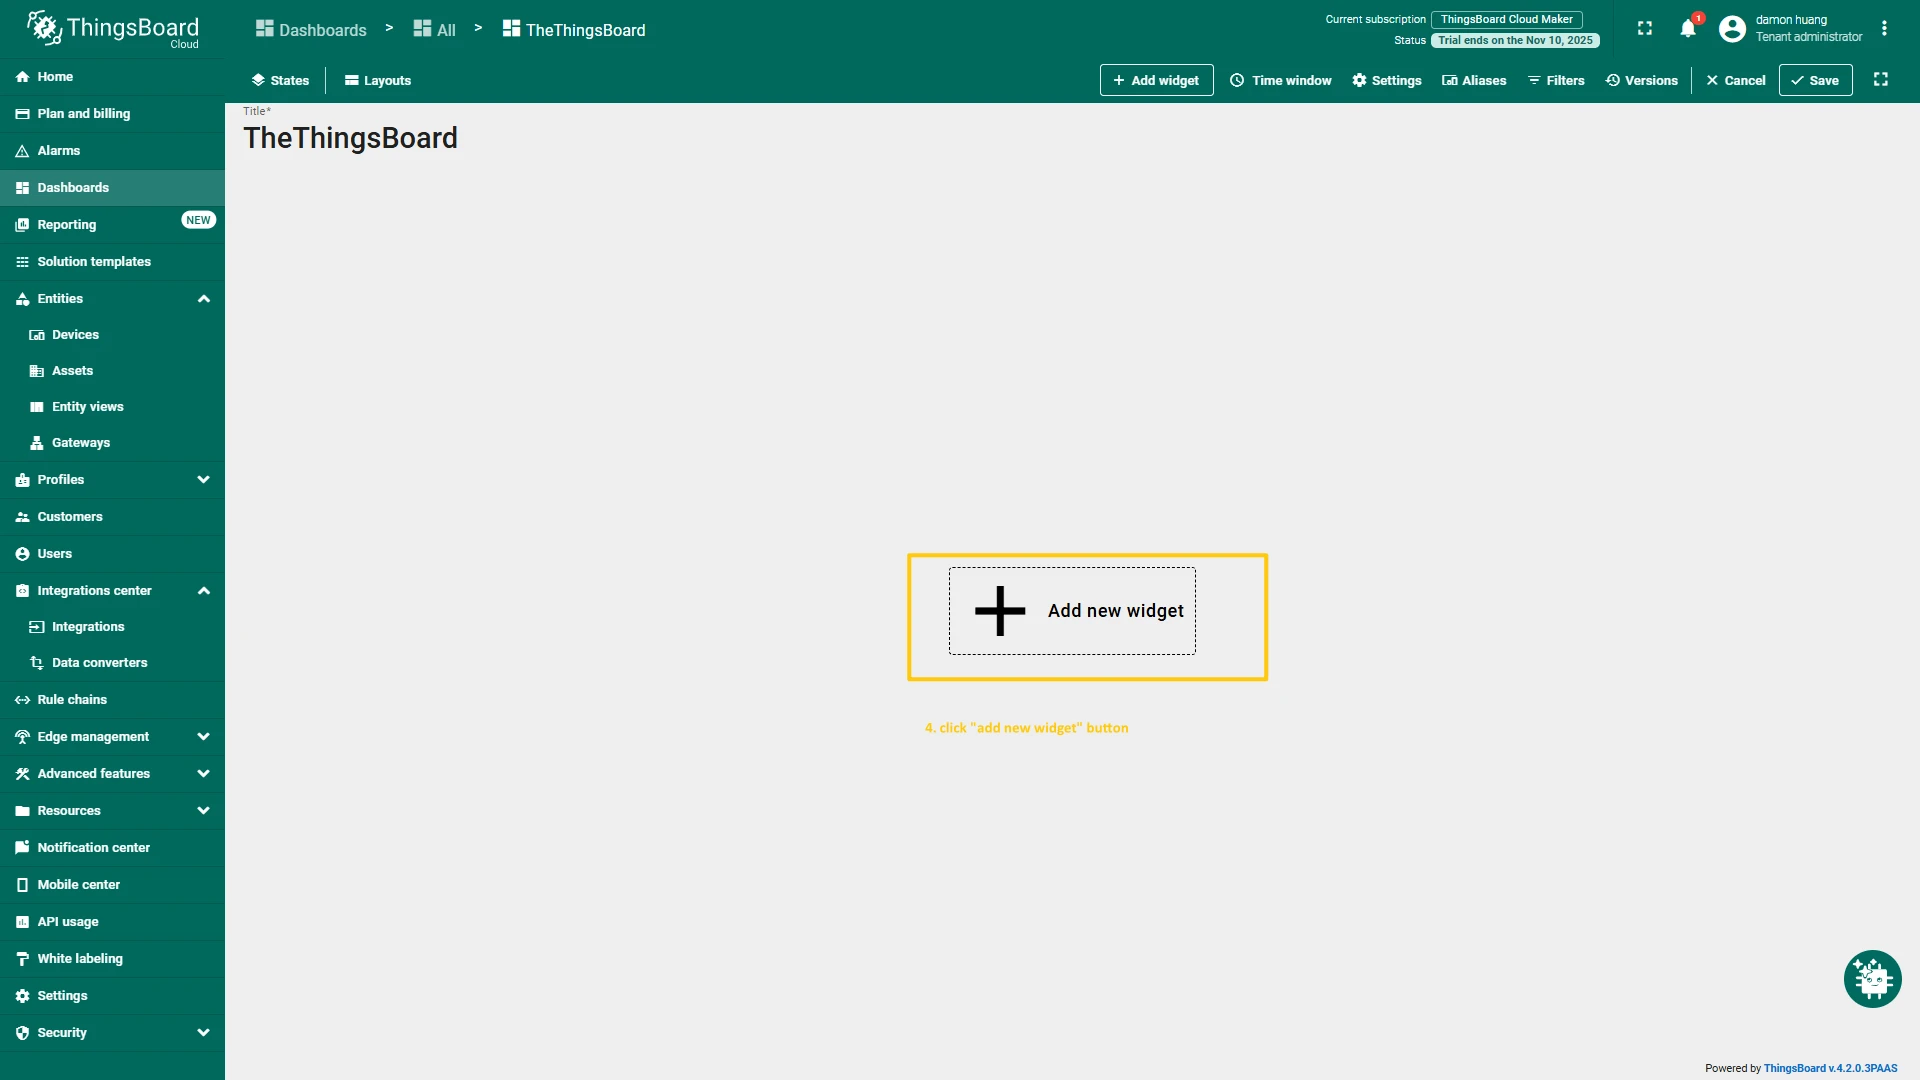
- Click Add widget button to add widget in dashboard
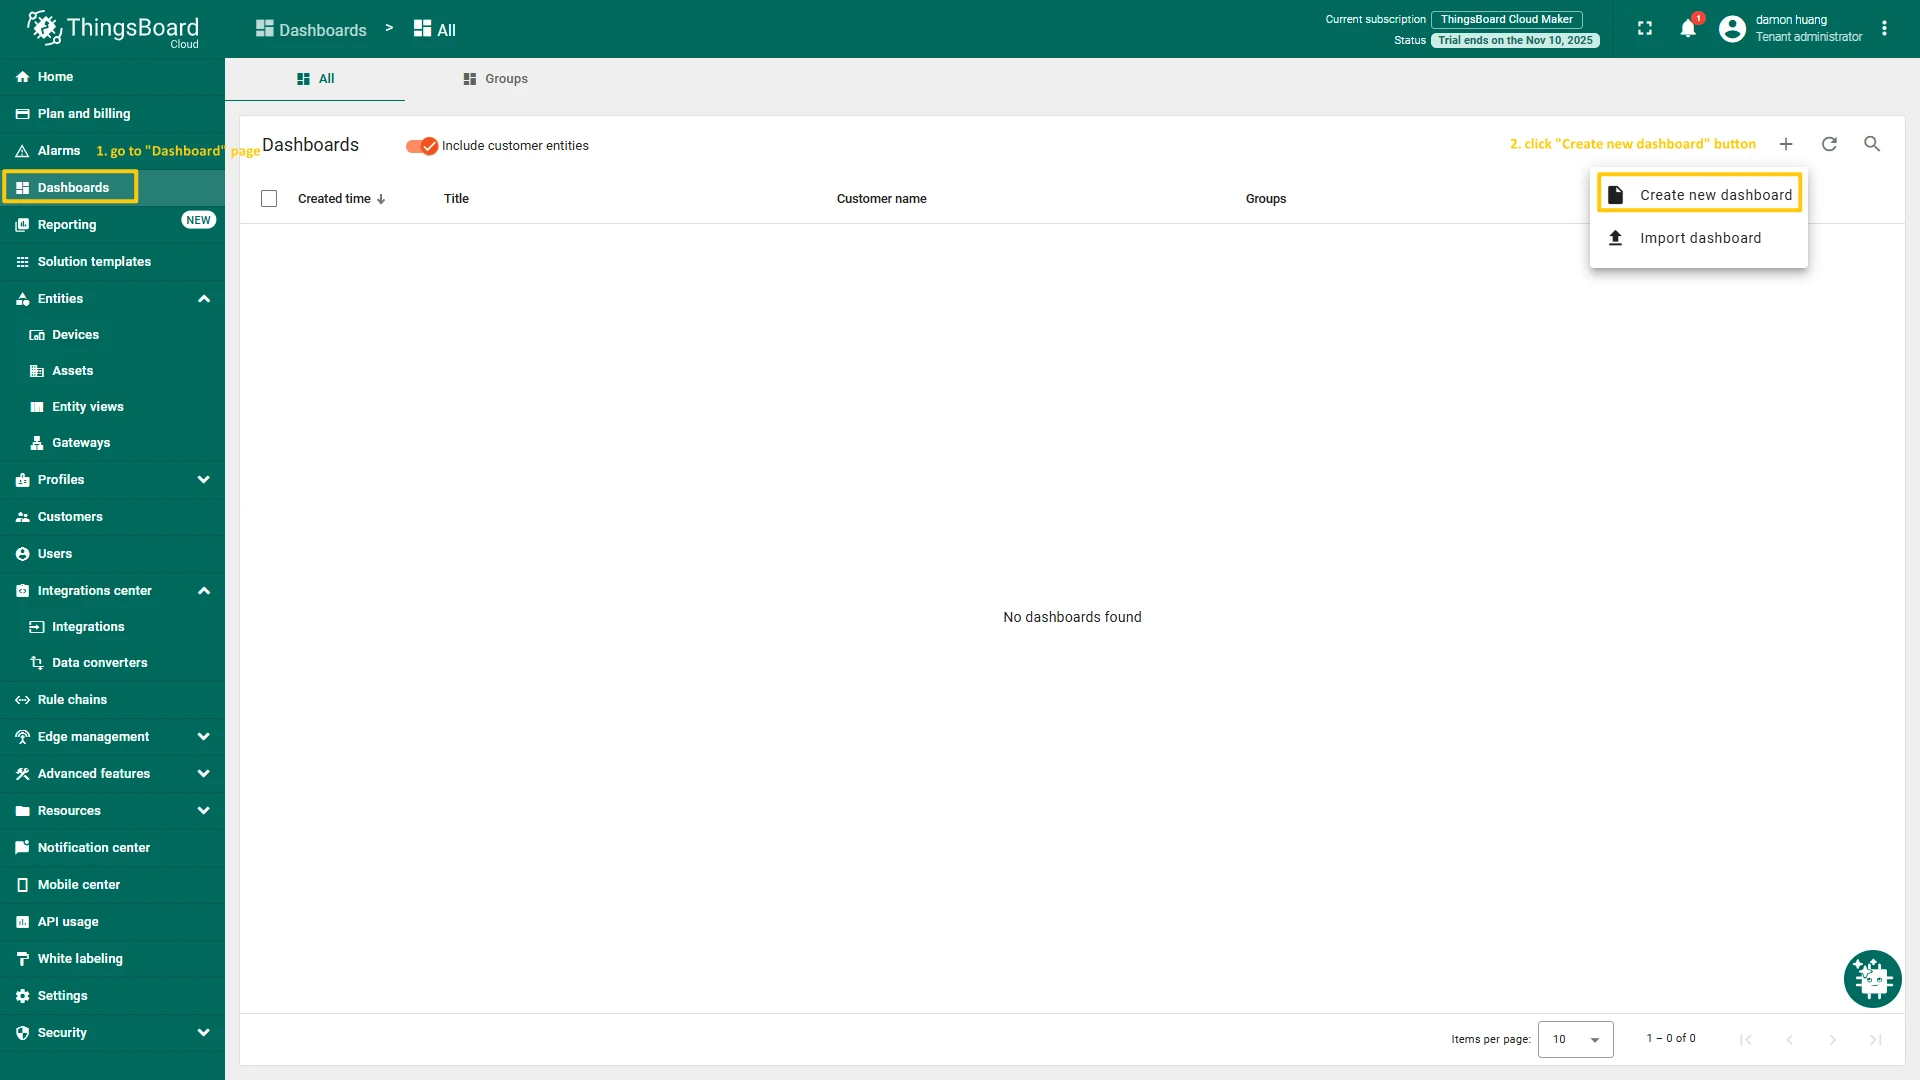
- Navigate to the Dashboards page. By default, you navigate to the dashboard group All. Click on the “plus” icon in the top right corner. Select Create new dashboard.
- Fill the dashboard title and click Add button.
- The dashboard will opened. Click Add widget button to add new widget.
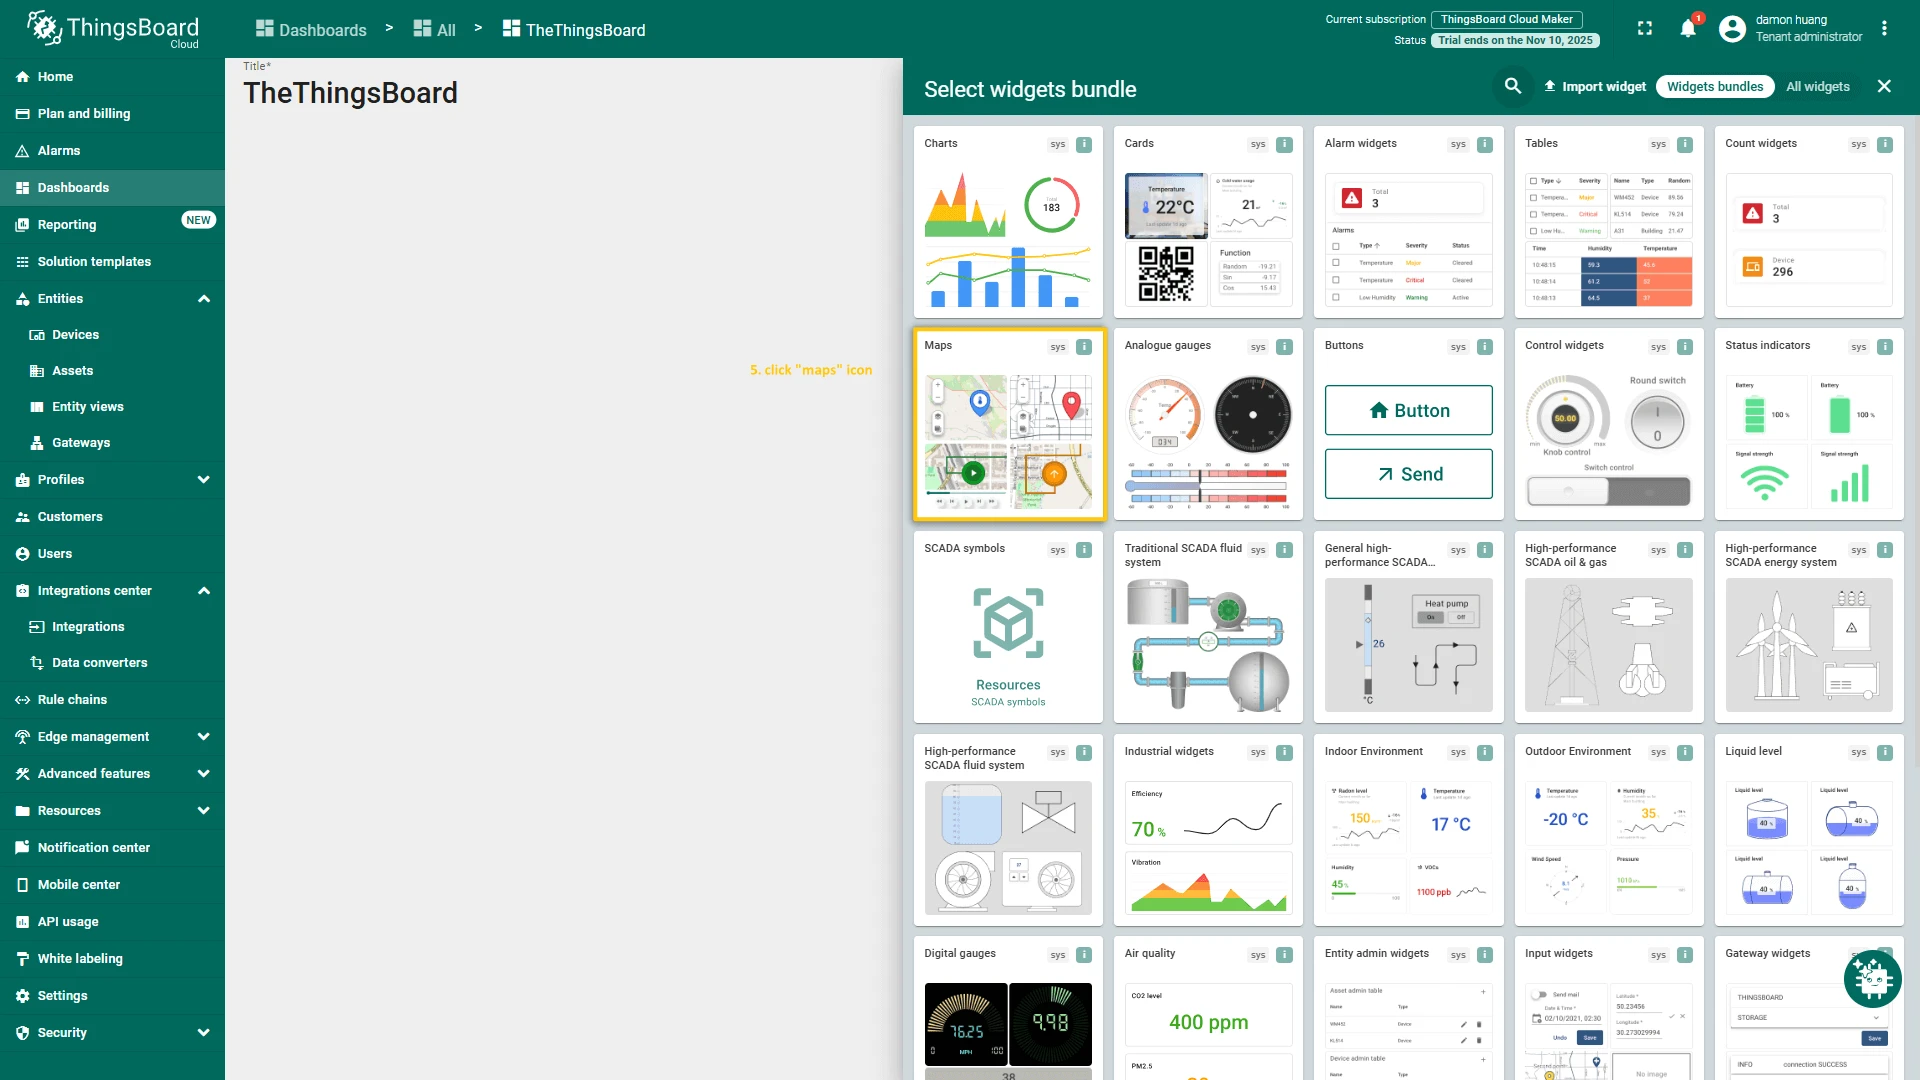
- For example, for the location info, the Maps widget is suitable.
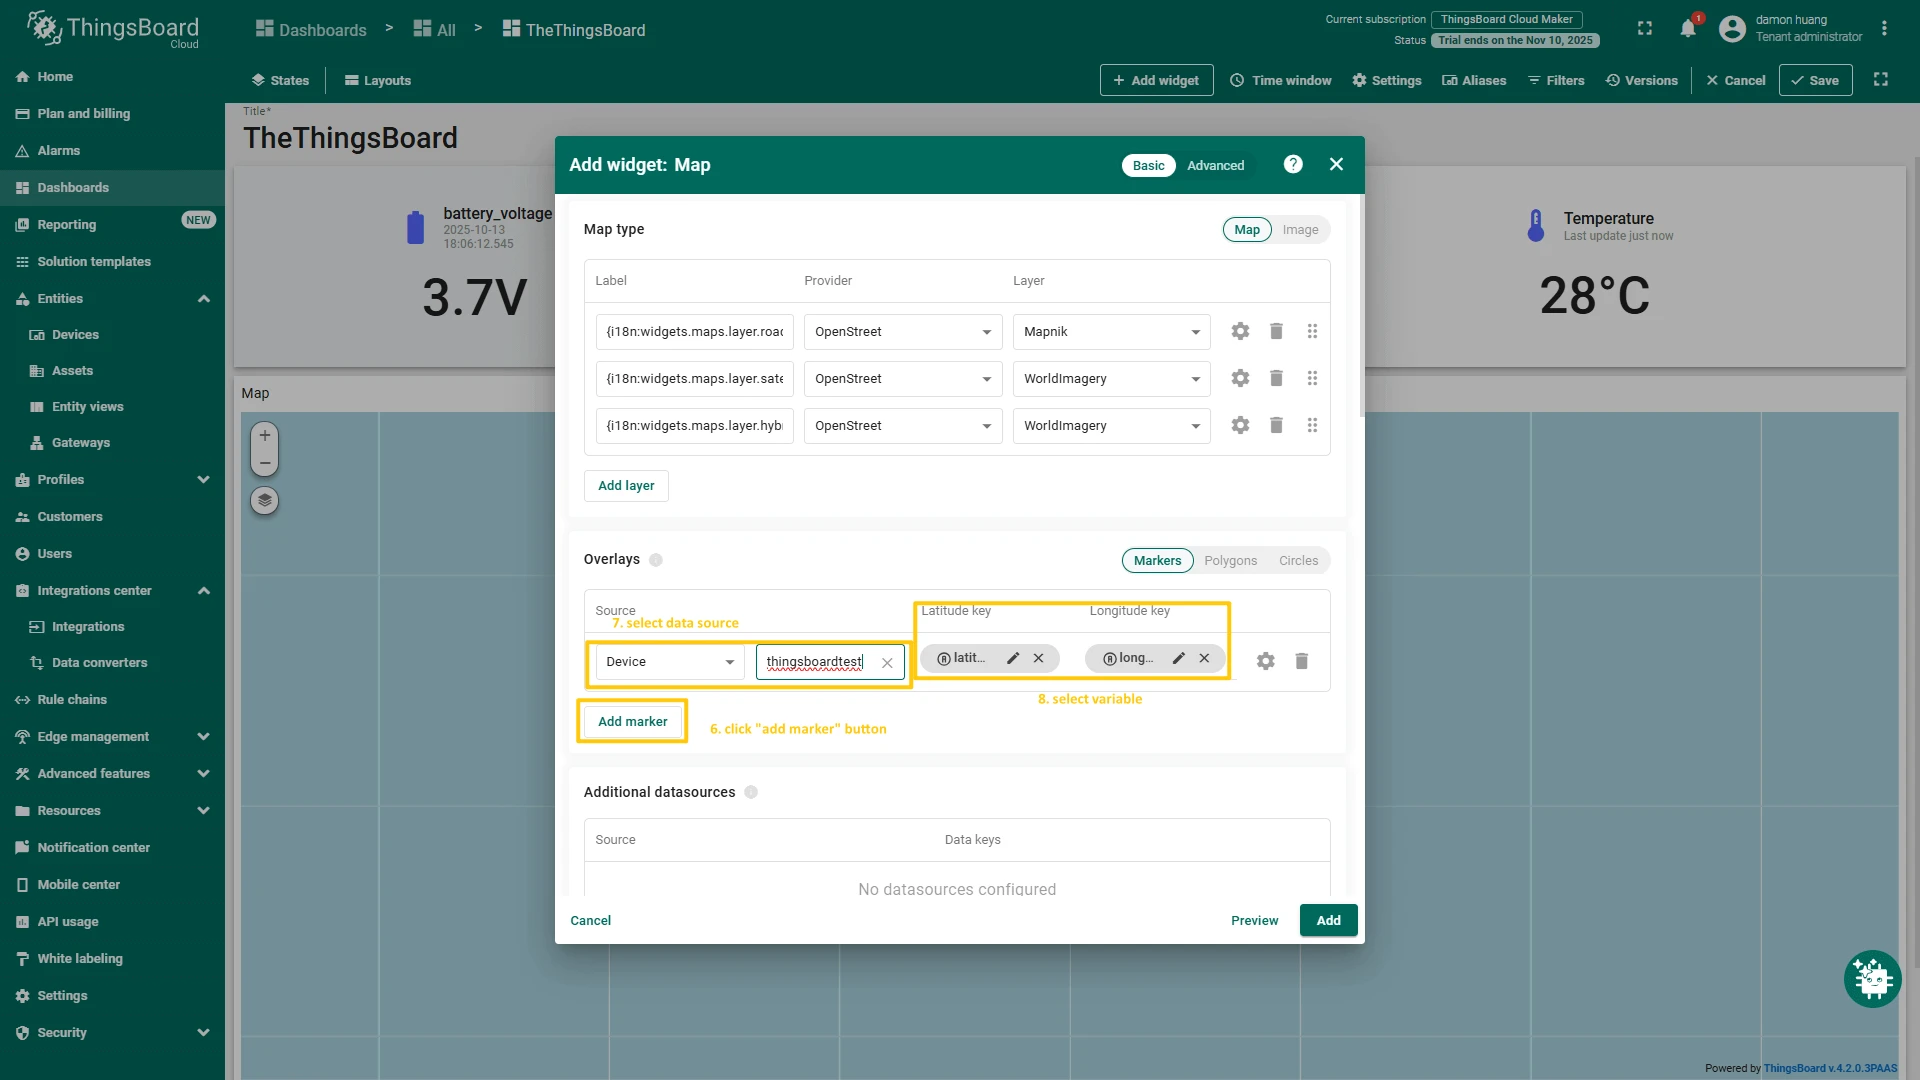
- And then select the data source as the device that just created, and choose the variable that you want to display.
Import Dashboard
You can download this example dashboard in JSON format and import it into your ThingsBoard instance.