RN-320 BTH LoRaWAN Temperature and Humidity sensor
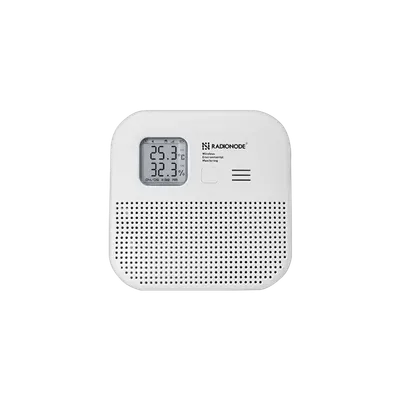
RN-320 BTH LoRaWAN Temperature and Humidity sensor
Radionode
- Platform
- ThingsBoard
- Hardware Type
- Sensors
- Connectivity
- LoRaWAN
- Industry
- Smart Cities, Smart Buildings, Environmental Monitoring, Industrial Manufacturing
- Use Case
- Environment Monitoring, Smart Office, Health Care, Air Quality Monitoring
Introduction
The Radionode RN320 series is a battery-powered LoRaWAN® environmental sensor designed for long-term, low-maintenance deployments. The RN320-BTH model features a high-capacity 17,000 mAh battery, enabling up to 10 years of operation under typical conditions.
The device integrates a high-accuracy temperature and humidity sensor and supports data reliability mechanisms, including retransmission to prevent sample loss. Measurements can also be stored locally on a microSD card for redundancy and offline access.
User interaction is provided via an E-paper display, audible buzzer, and LED status indicator. The device supports simplified onboarding and remote monitoring through QR-code-based registration with the Radionode365 service.
Features of RN-320 BTH device
- LoRaWAN® long-range wireless communication
- High-accuracy temperature and humidity sensor
- E-paper display
- Loud buzzer (97 dBA)
- 3-color LED indicator (Best / Moderate / Bad)
- Long battery life (17,000 mAh, up to 10 years)
- MicroSD card for local data storage
- Magnetic and wall-mount installation options
Prerequisites
Before starting, ensure the following requirements are met:
Hardware
- RN-320 BTH LoRaWAN Temperature and Humidity sensor
- LoRaWAN gateway registered and online in The Things Stack (in our case Radionode LoRaWAN Gateway)
Accounts & Access
-
The Things Stack account
-
ThingsBoard account at
YOUR_TB_HOST
Device Information
- DevEUI (from device label)
- JoinEUI and AppKey (for OTAA activation)
- LoRaWAN region (e.g. EU868, US915)
The Things Stack Configuration
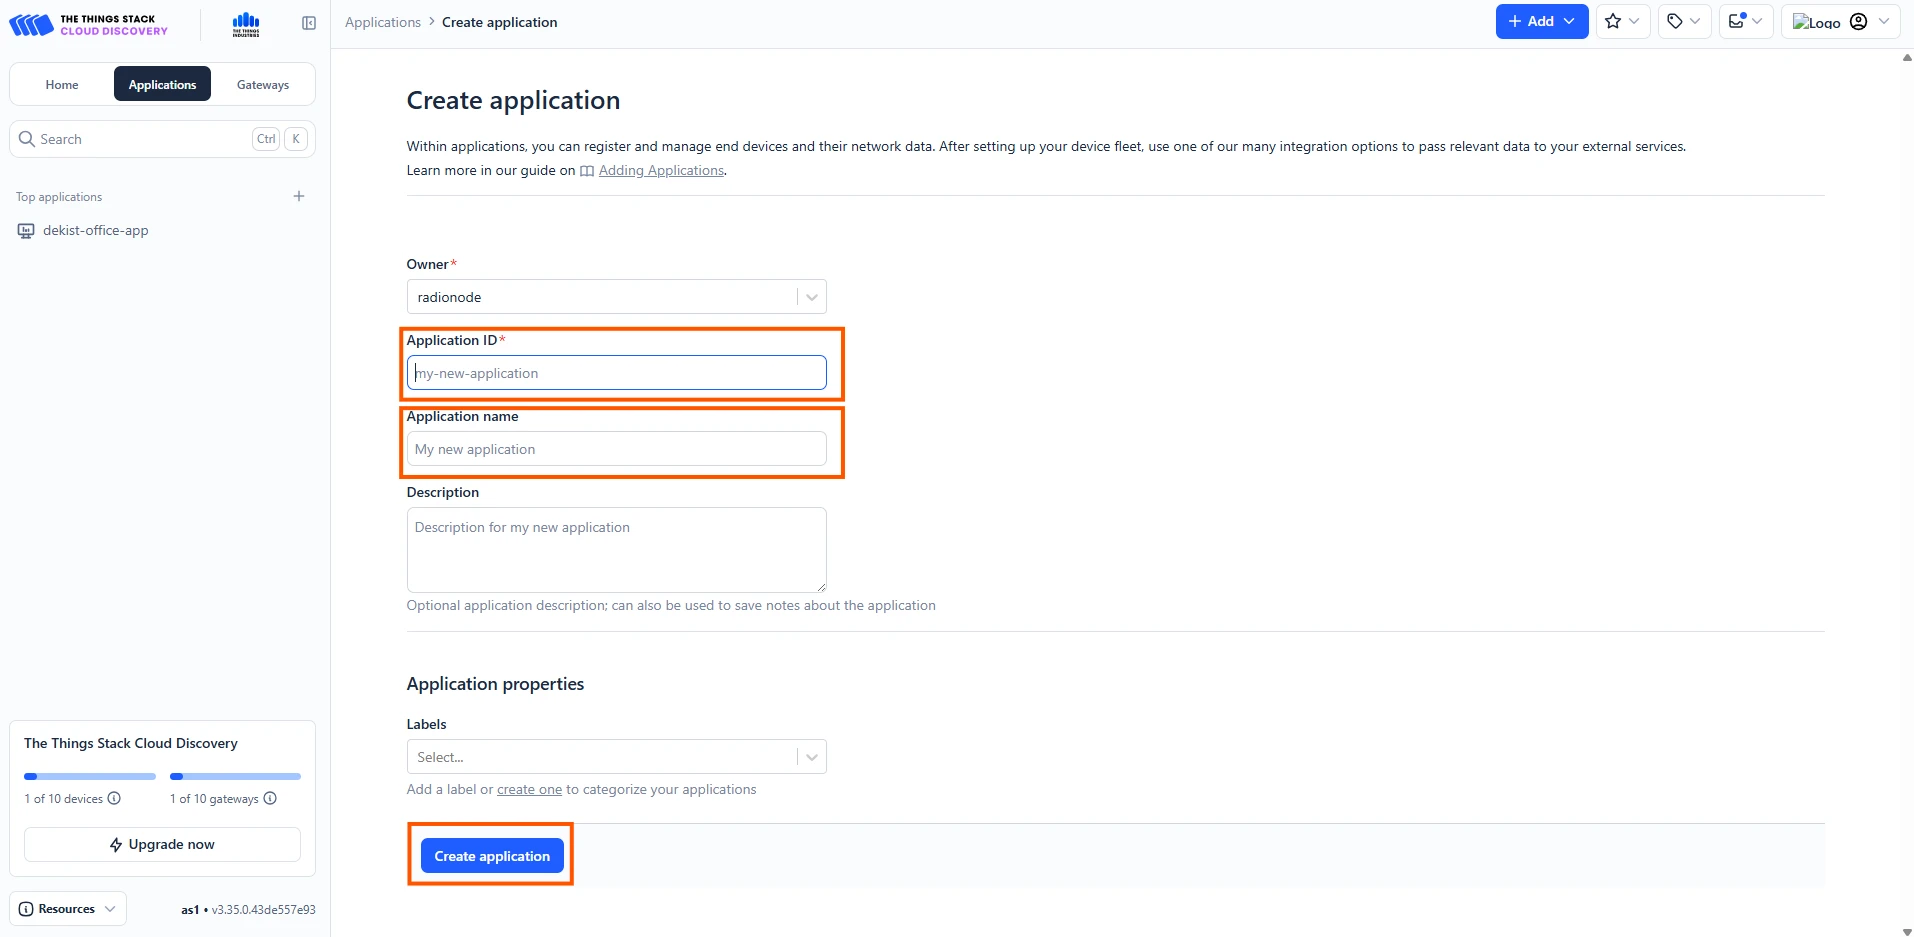
Create an Application
- Log in to The Things Stack Console.
- Create an application in TheThingsStack console.
- Go to the console, open Applications section, press the Add application tab.
- Fill the application ID, application name
- Click create the application.
Configure Payload Formatter (Uplink Decoder)
RN320-BTH transmits sensor data in binary format. Decoding must be performed before forwarding data to ThingsBoard.
- Open your application in TTS.
- Navigate to Payload formatters → Uplink.
- Paste the following decoder:
function decodeUplink(input) {    const res = Decoder(input.bytes, input.fPort);    if (res.error) {      return { errors: [res.error] };    }    return { data: res };  }
function Decoder(bytes, port) {    const readUInt8 = b => b & 0xFF;    const readUInt16LE = b => (b[1] << 8) + b[0];    const readInt16LE = b => {      const ret = readUInt16LE(b);      return (ret > 0x7ffff) ? ret - 0x10000 : ret;    }    const readUInt32LE = b => (b[3] << 24) + (b[2] << 16) + (b[1] << 8) + b[0];    const readInt32LE = b => {      const ret = readUInt32LE(b);      return (ret > 0x7FFFFFFF) ? ret - 0x100000000 : ret;    }    const readFloatLE = b => {      const buf = new ArrayBuffer(4);      const view = new DataView(buf);      for (let i = 0; i < 4; i++) view.setUint8(i, b[i]);      return view.getFloat32(0, true); // ieee754 float    };
    const head = readUInt8(bytes[0]);    const model = readUInt8(bytes[1]);
    if (head === 11) {      // Check-in frame      const timestamp = readUInt32LE(bytes.slice(2, 6));      const date = new Date(timestamp * 1000);      const yyyy = date.getUTCFullYear();      const mm = (date.getUTCMonth() + 1).toString().padStart(2, '0');      const dd = date.getUTCDate().toString().padStart(2, '0');      const verFormatted = parseInt(`${yyyy}${mm}${dd}`);
      const interval = readUInt16LE(bytes.slice(6, 8));      const splrate = interval;      const bat = readUInt8(bytes[8]);      const millivolt = readUInt16LE(bytes.slice(9, 11));      const volt = (millivolt / 1000).toFixed(3);      const freqband = readUInt8(bytes[11]);      const subband = readUInt8(bytes[12]);
      return {        head,        ver: verFormatted,        interval,        splrate,        bat,        volt,        freqband,        subband      };    }
    else if (head === 12 || head === 13) {      // Sensor / Hold      const tsmode = readUInt8(bytes[2]);      const timestamp = readUInt32LE(bytes.slice(3, 7));      const splfmt = readUInt8(bytes[7]);
      if (splfmt !== 2) {        return { error: "Unsupported Sensor Data Format: " + splfmt };      }
      const raw_size = 4;      const data = bytes.slice(8);      const ch_count = data.length / raw_size;      const data_size = data.length;
      let offset = 0;      let temperature = null, humidity = null;
      if (ch_count < 2) {        return { error: "Unsupported Sensor Data Size: " + ch_count };      }
      temperature = parseFloat(readFloatLE(data.slice(offset, offset + raw_size)).toFixed(2));      if (temperature <= -9999.0) temperature = null;      offset += raw_size;
      humidity = parseFloat(readFloatLE(data.slice(offset, offset + raw_size)).toFixed(2));      if (humidity <= -9999.0) humidity = null;
      return {        head,        model,        tsmode,        timestamp,        splfmt,        data_size,        temperature,        humidity      };
    }
    return { error: "Unsupported head frame: " + head };}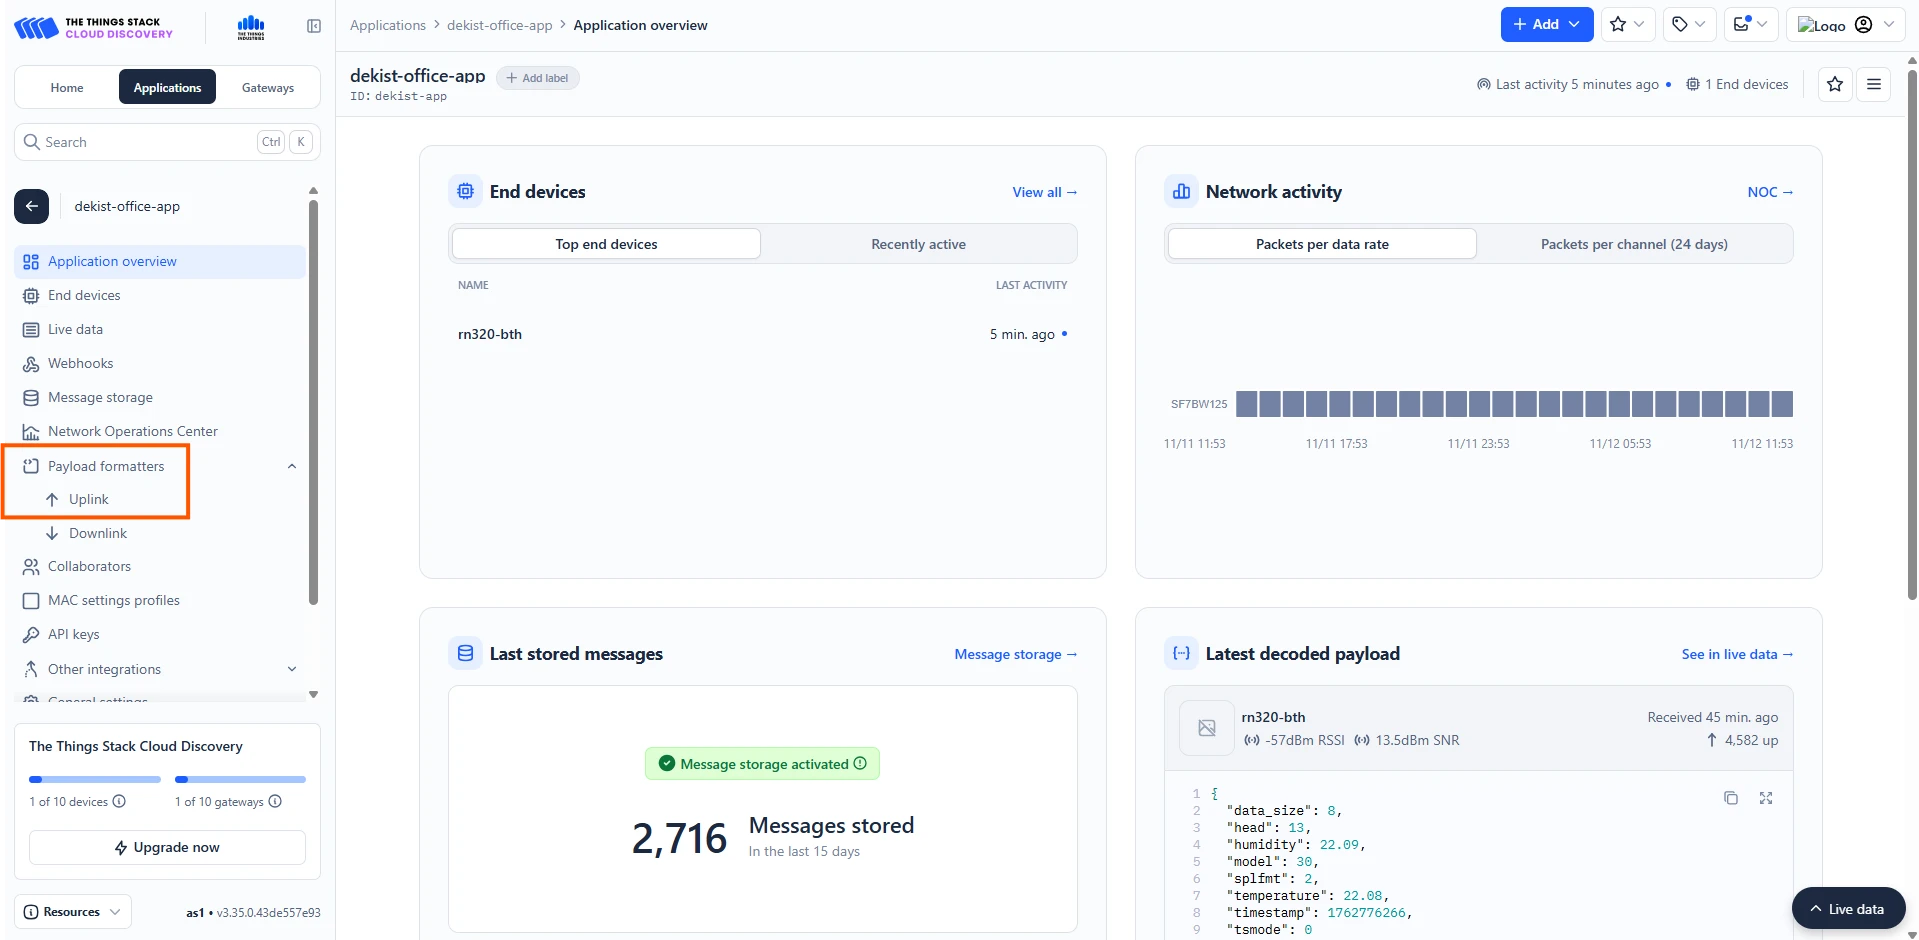
Register the End Device
Next step is an End Device creation in the TTS. Navigate to End devices → Register end device.
To register the end Device enter these details as shown in the image below:
- Select From The LoRaWAN Device Repository.
- Input method: Select the end device in the LoRaWAN Device Repository (Radionode devices are already registered in the Thing stack platform).
- End device brand: choose:
- Brand: Dekist Co., Ltd
- Model: RN320-BTH
- Select the correct frequency plan.
- Enter the DevEUI correctly in the slot provided there. You can find DevEUI on the sticker on the side of the device.
- Add an End device ID in the slot given.
- Click Register end device to complete the end device registration.


ThingsBoard configuration
- Log in to ThingsBoard.
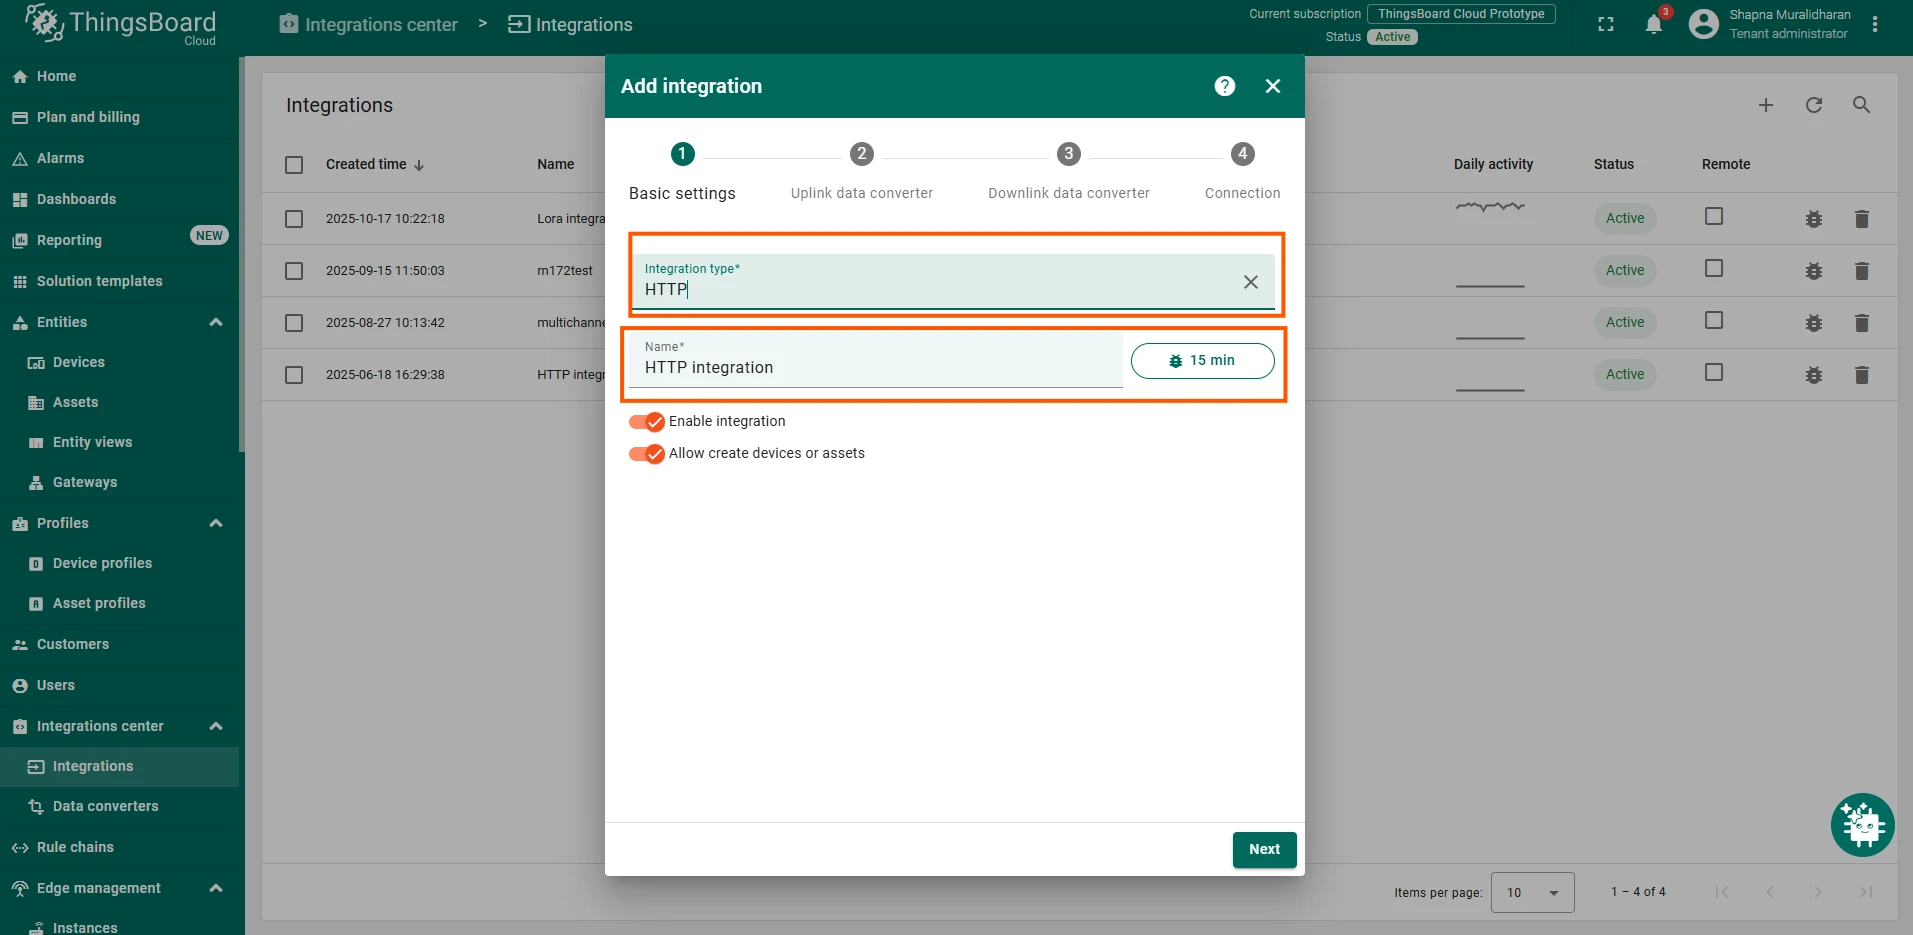
- Navigate to Integrations ⇾ Add integration.
- Select HTTP Integration as we will be receiving data from the webhooks created in TTS (Webhook configuration we will explain later in this documentation) .
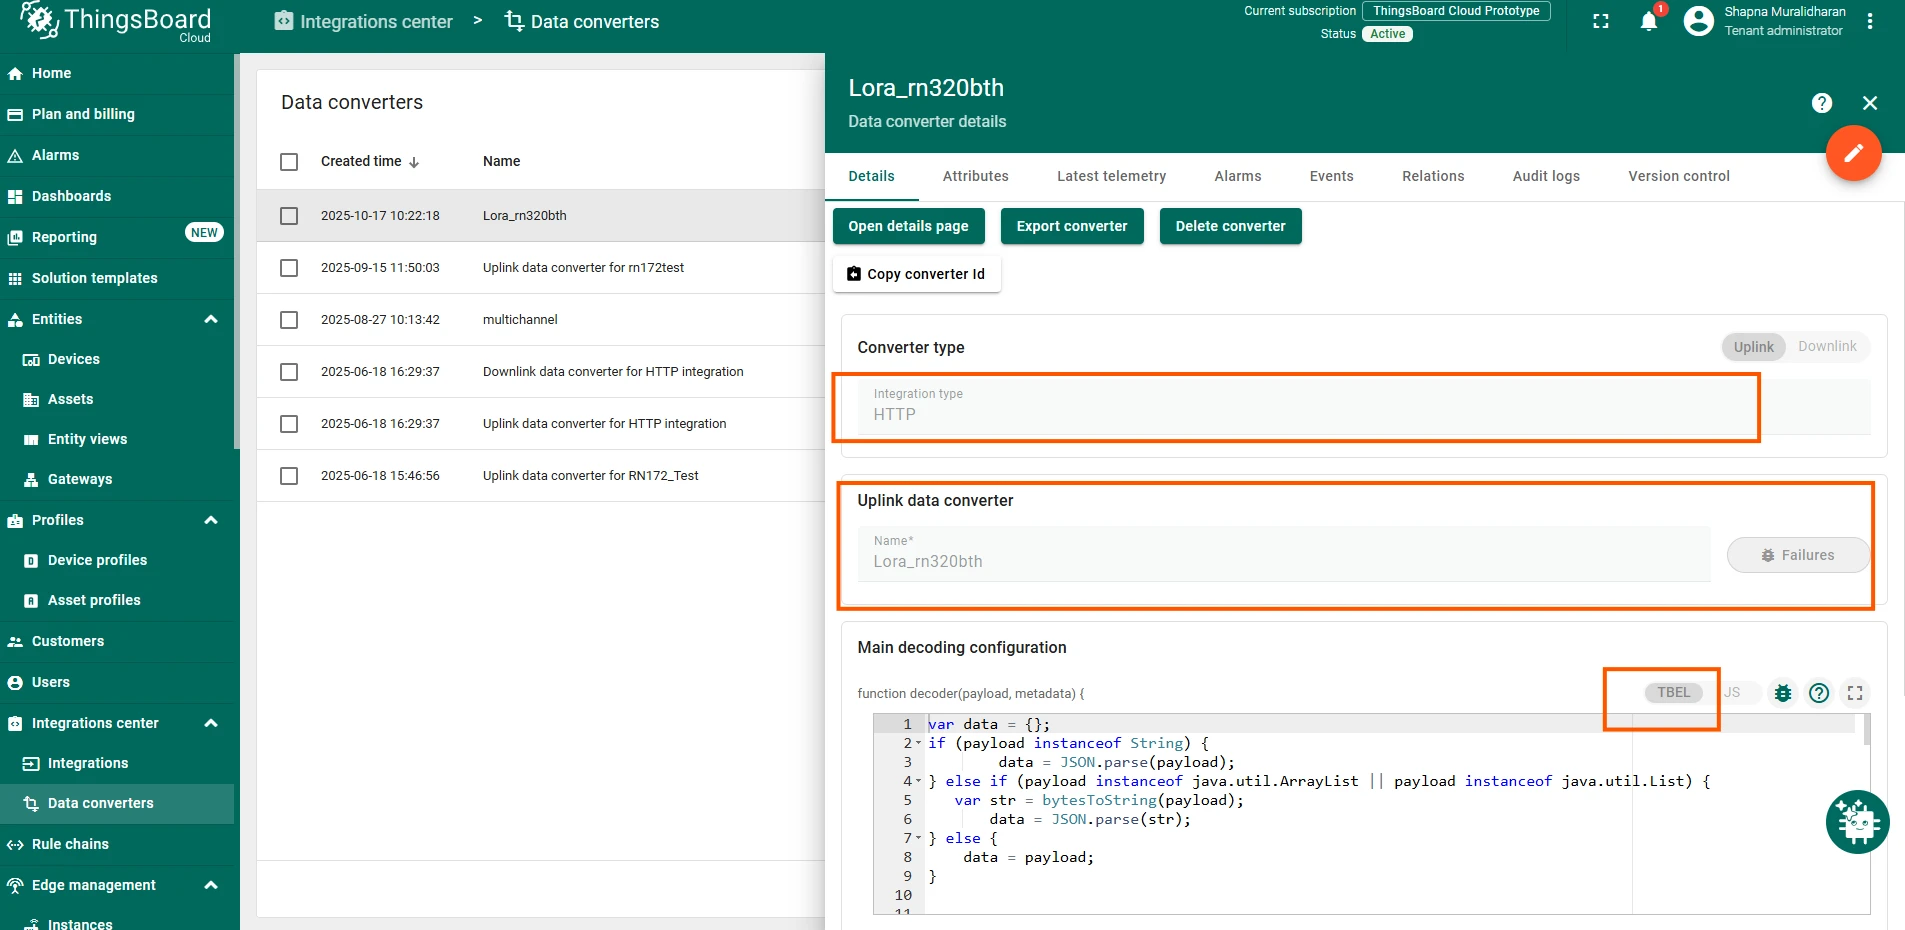
- In the payload decoder for the message received from the network server, copy and paste the following TBEL decoder code:
var data = {};if (payload instanceof String) {        data = JSON.parse(payload);} else if (payload instanceof java.util.ArrayList || payload instanceof java.util.List) {   var str = bytesToString(payload);       data = JSON.parse(str);} else {    data = payload;}
var deviceName = data.?end_device_ids.?device_id;if (deviceName == null){    deviceName = "Unknown_Device";}
var applicationId = data.?end_device_ids.?application_ids.?application_id;if (applicationId == null) applicationId = "Unknown_App";
var uplink = data.?uplink_message;var decoded = {};if (uplink != null && uplink.decoded_payload != null) {    decoded = uplink.decoded_payload;}
var rx = {};if (uplink != null && uplink.rx_metadata != null && uplink.rx_metadata.size() > 0) {    rx = uplink.rx_metadata[0];}
var telemetry = {};
if (decoded.?temperature != null) telemetry.temperature = decoded.temperature;if (decoded.?humidity != null) telemetry.humidity = decoded.humidity;if (decoded.?model != null) telemetry.model = decoded.model;if (decoded.?timestamp != null) telemetry.timestamp = decoded.timestamp;
if (rx.?rssi != null) telemetry.rssi = rx.rssi;if (rx.?snr != null) telemetry.snr = rx.snr;
var tsString = uplink.?received_at;var tsMillis = new Date().getTime();
if (tsString != null) {    tsMillis = new Date(tsString).getTime();}
var attributes = {    "app_id": applicationId,    "f_port": uplink.?f_port,    "frequency": uplink.?settings.?frequency,    "spreading_factor": uplink.?settings.?data_rate.?lora.?spreading_factor,    "gateway_id": rx.?gateway_ids.?gateway_id,    "dev_eui": data.?end_device_ids.?dev_eui};
var result = {    "deviceName": deviceName,    "deviceType": "RN320-BTH",    "telemetry": {        "ts": tsMillis,        "values": telemetry    },    "attributes": attributes};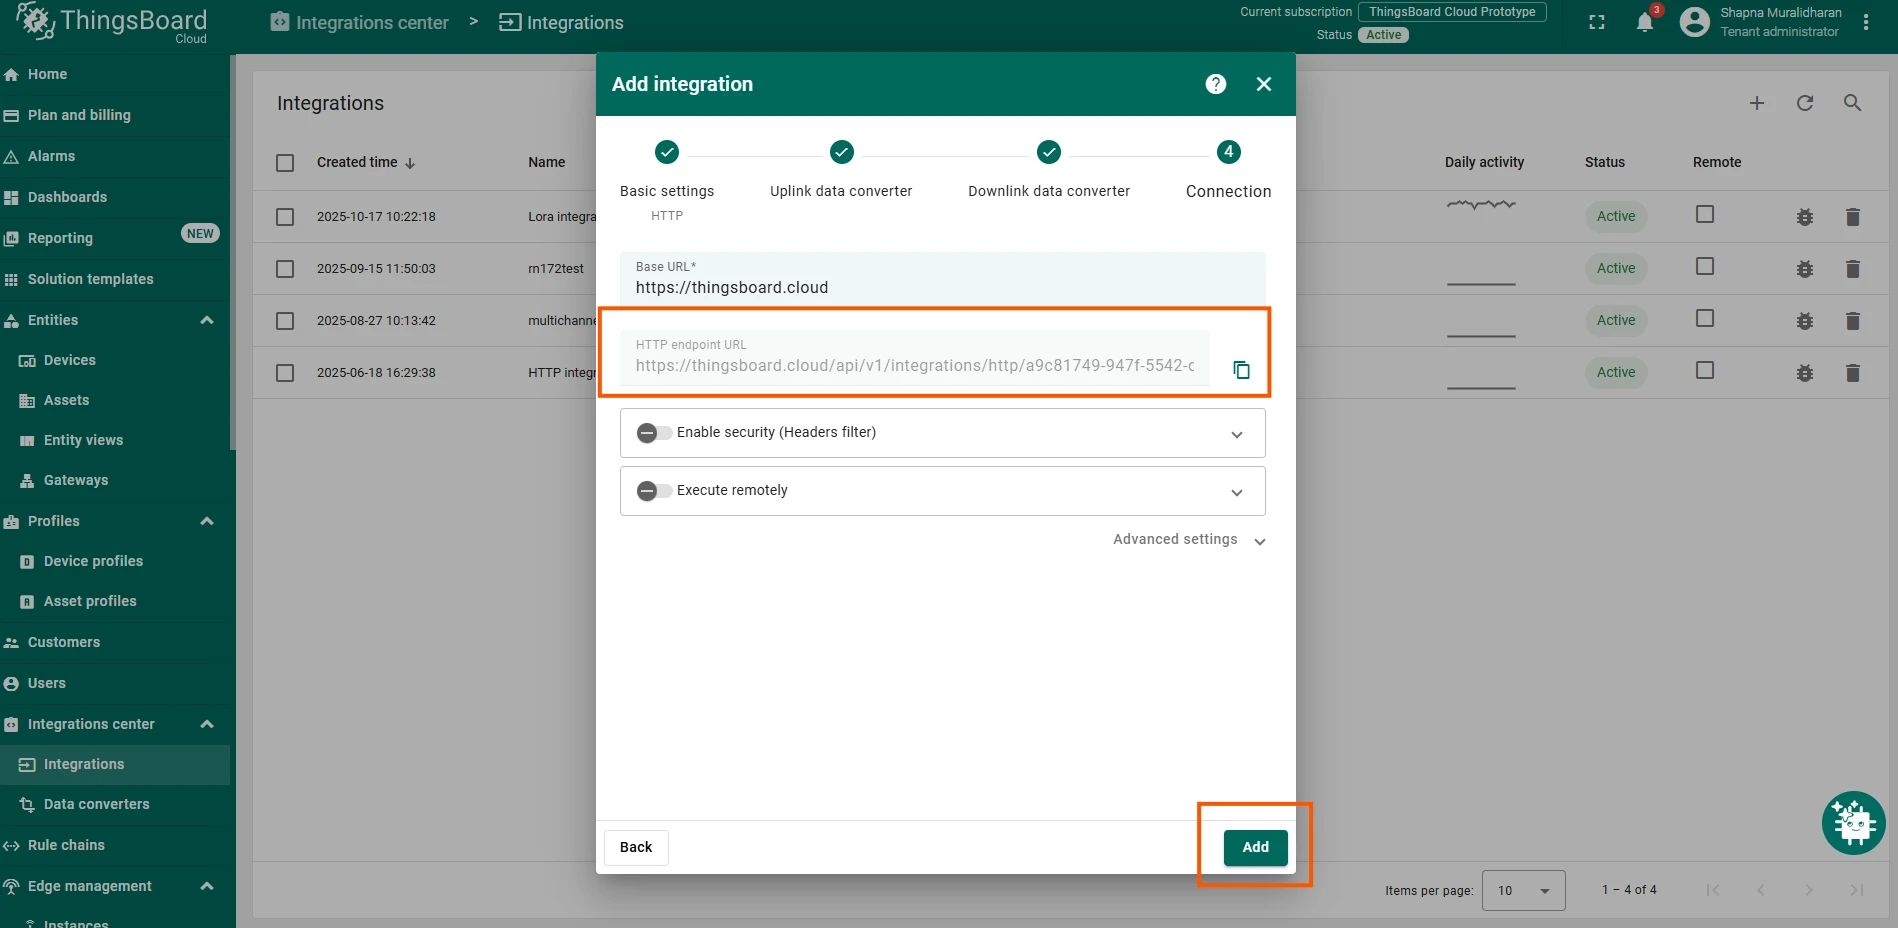
return result;- Copy and save the generated HTTP endpoint URL.
- Click Add to create the integration.
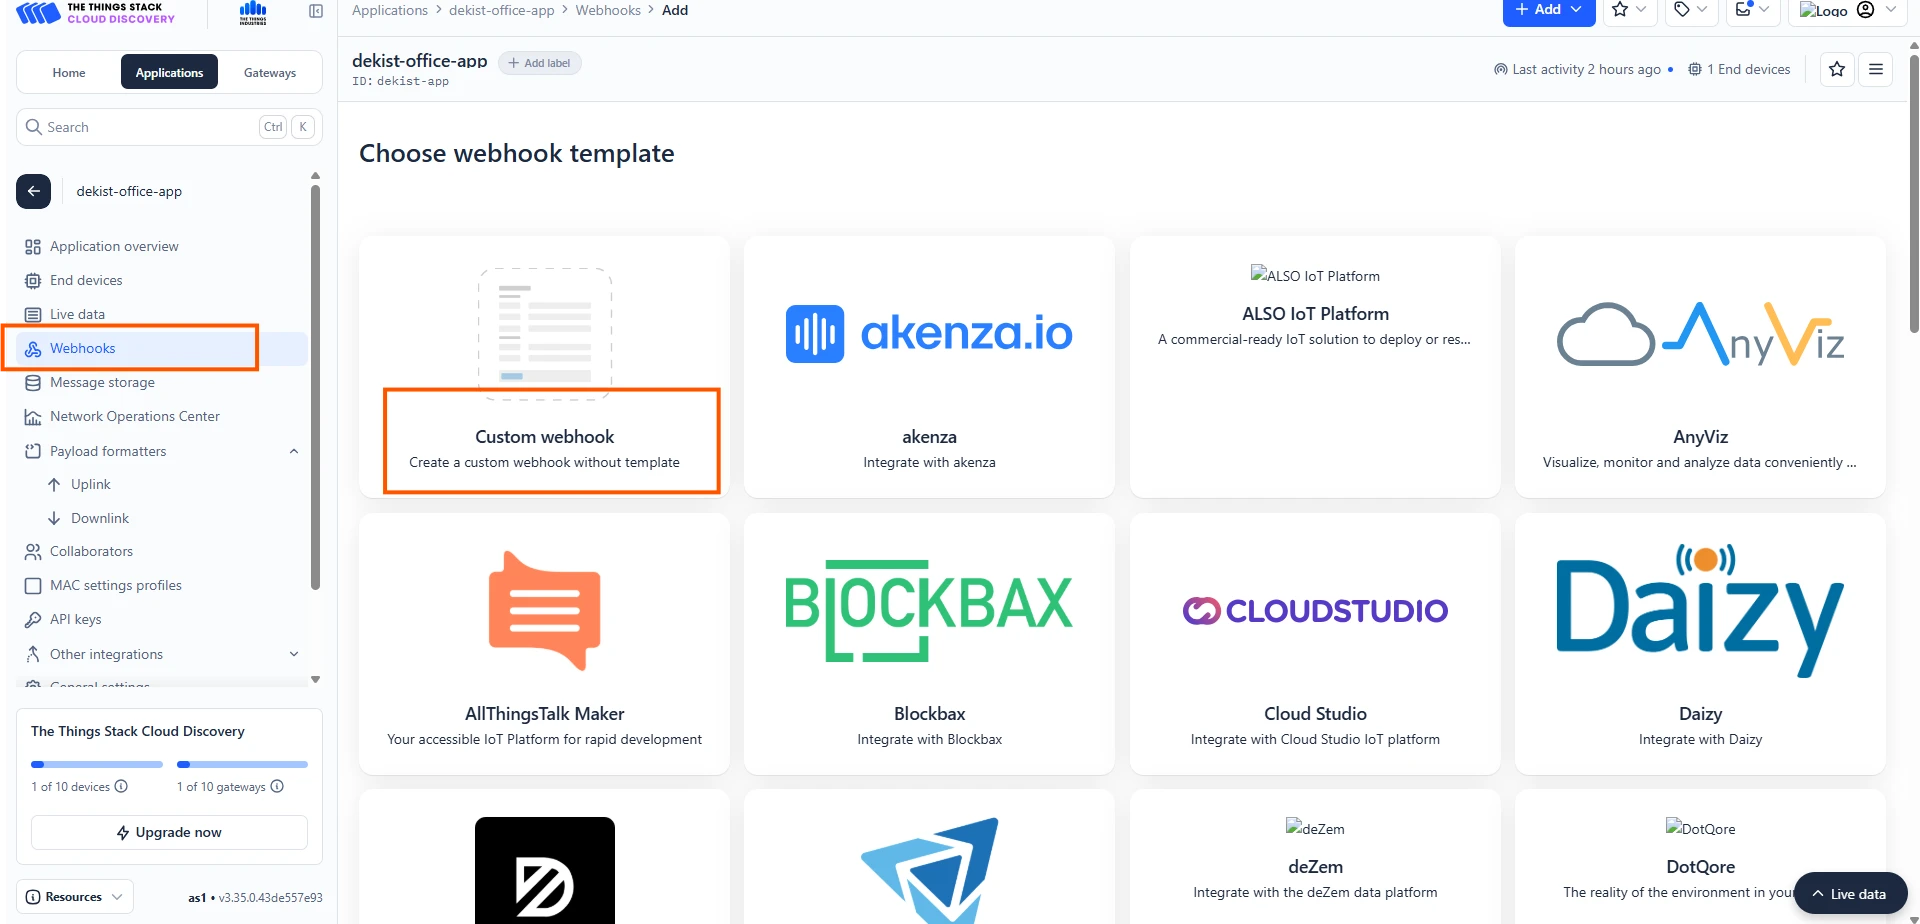
Create Webhook in The Things Stack
To create a webhook in the TTS platform:
- Open your application in TTS.
- Navigate to Webhooks.
- Select Custom webhook.
General settings
- Add a webhook ID - name for your webhook.
- In the Base URL add the endpoint URL you copied from the ThingsBoard platform.
- In the Additional header option add application/json
- Save the webhook.
Now the communication will start between the network server and the ThingsBoard platform to send data from your LoRaWAN devices to the ThingsBoard.

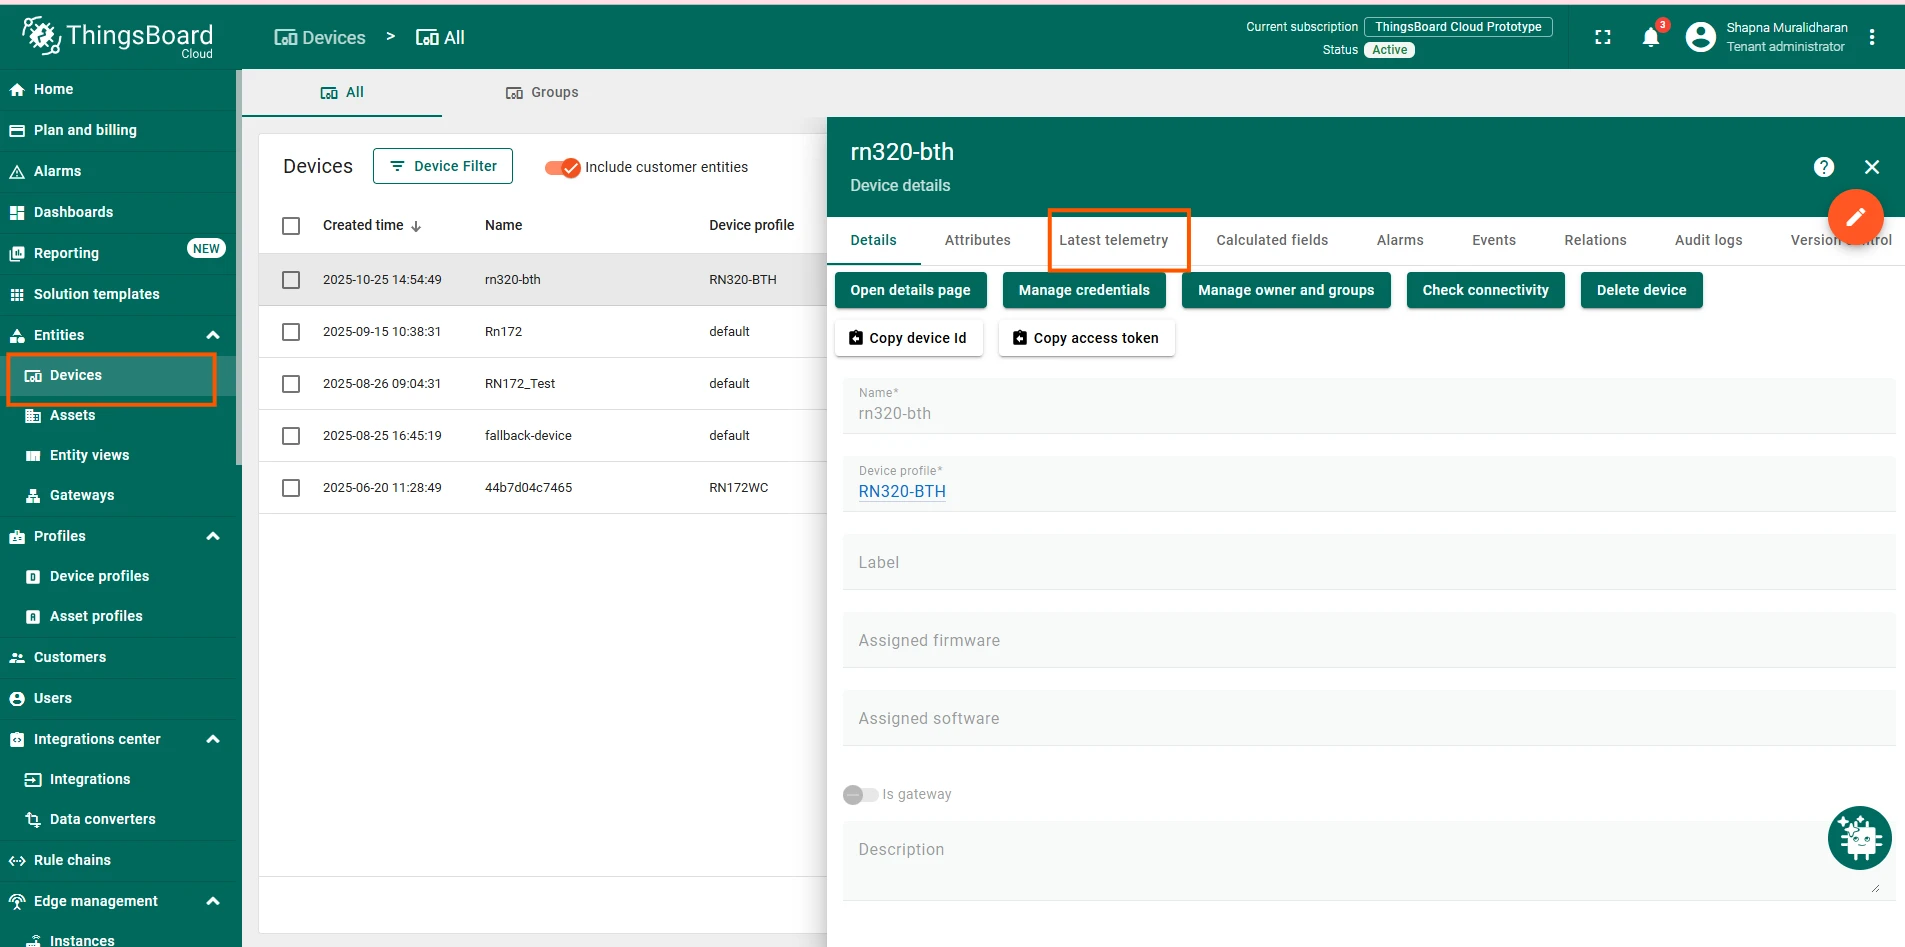
Check data on ThingsBoard
- Navigate to Devices.
- Confirm the rn320-bth device is created automatically.
- Check Latest Telemetry for temperature and humidity values.
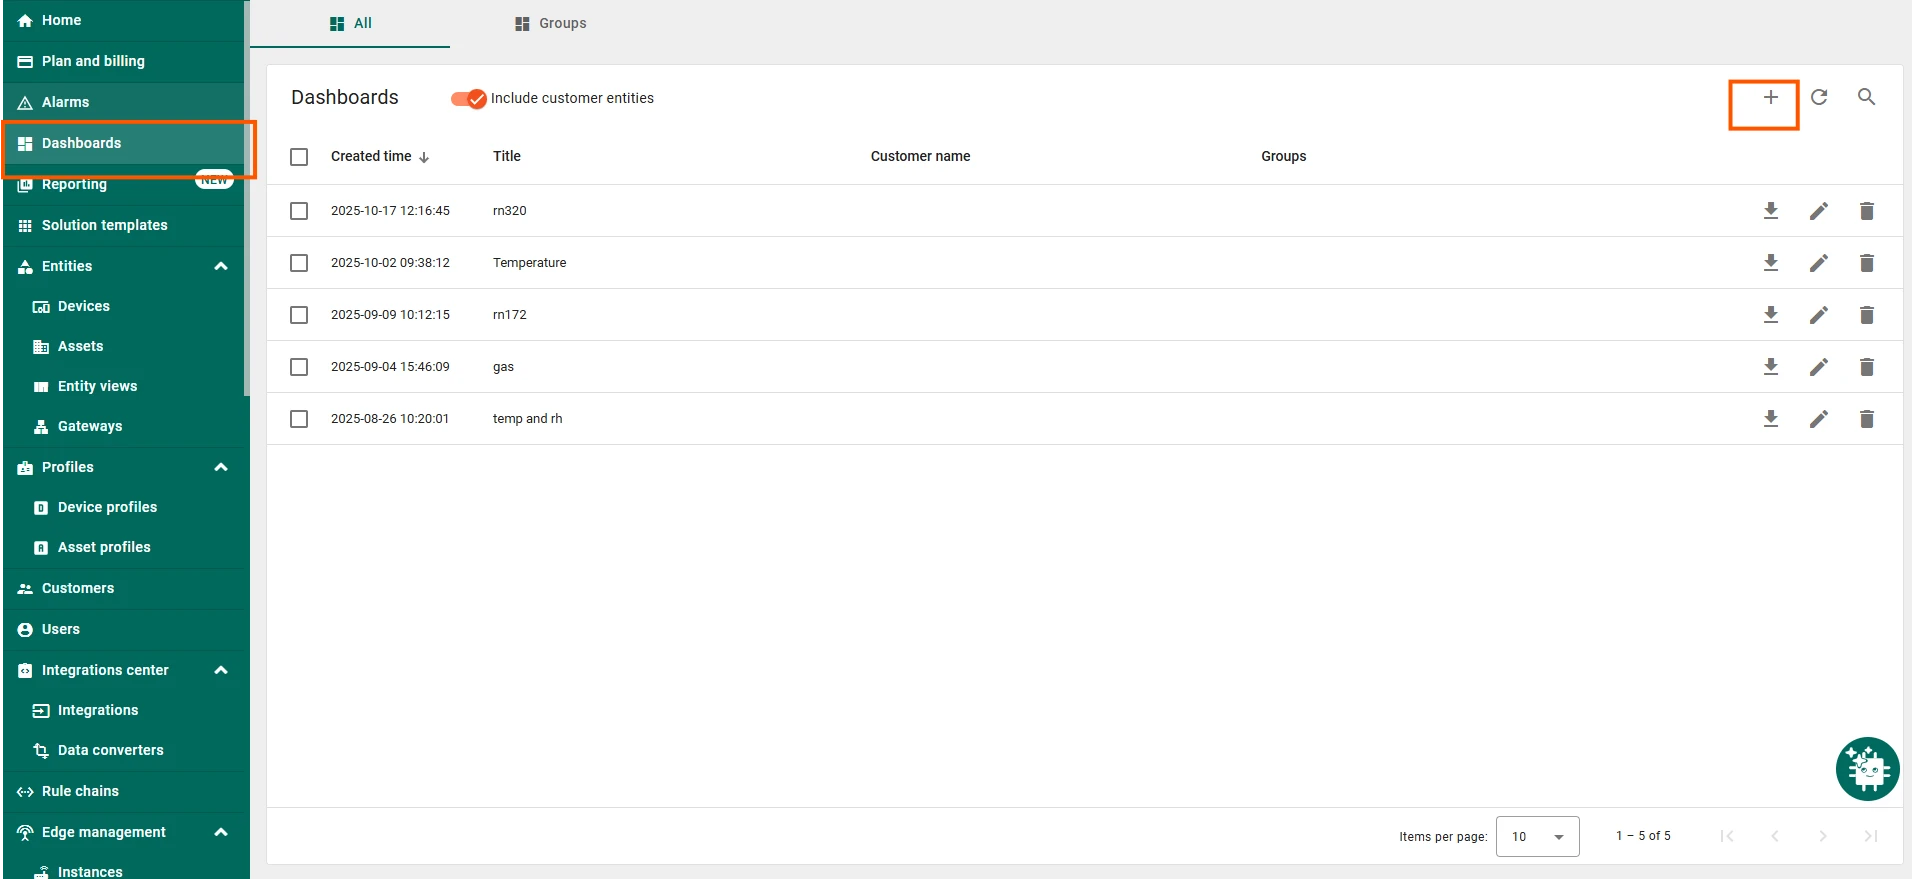
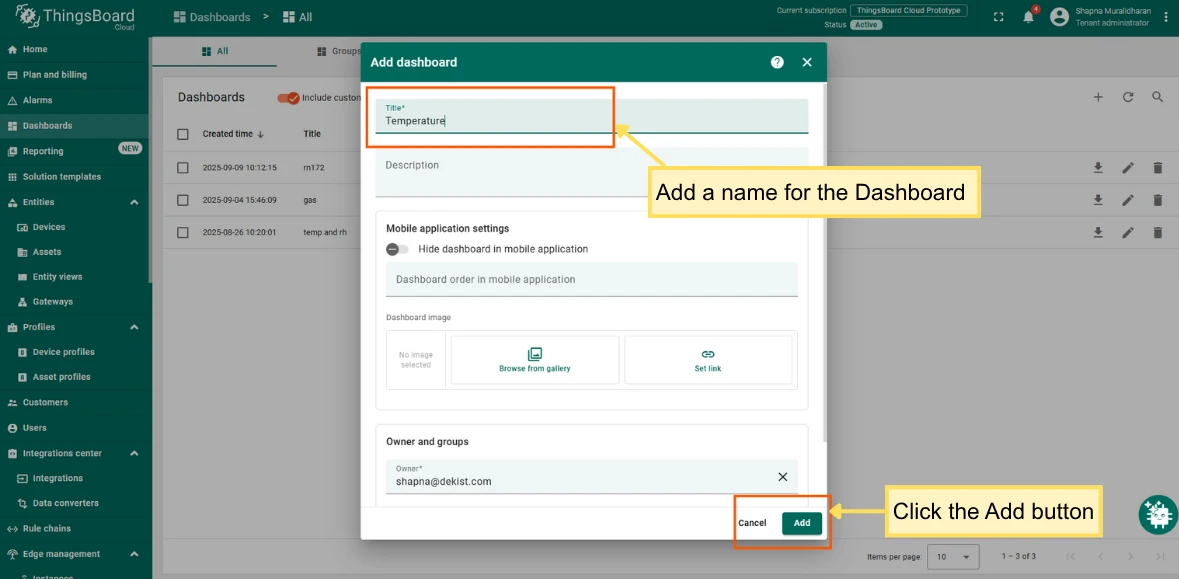
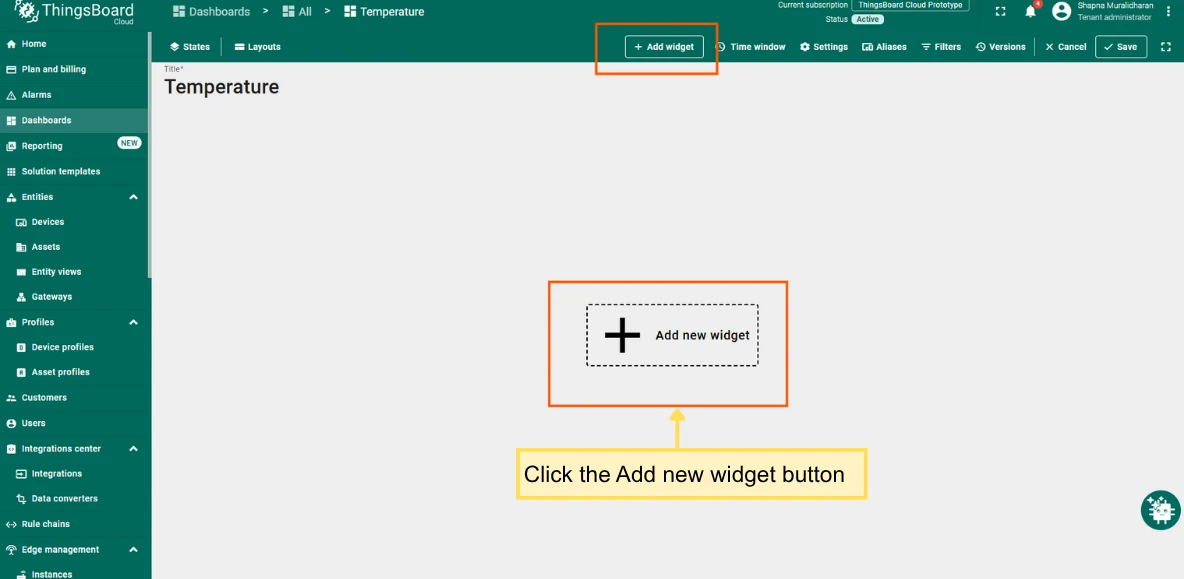
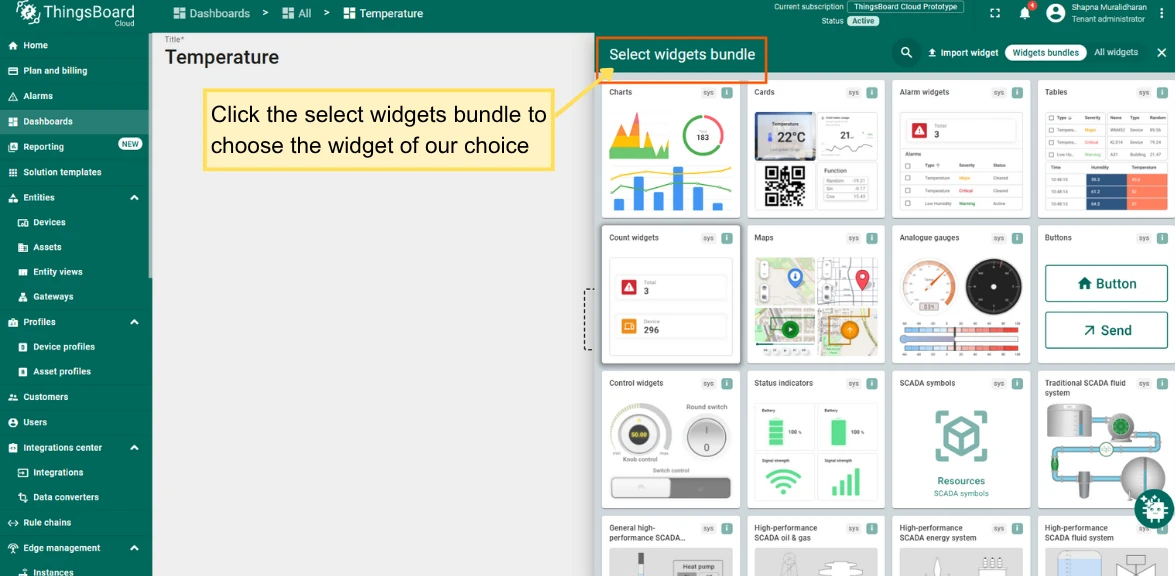
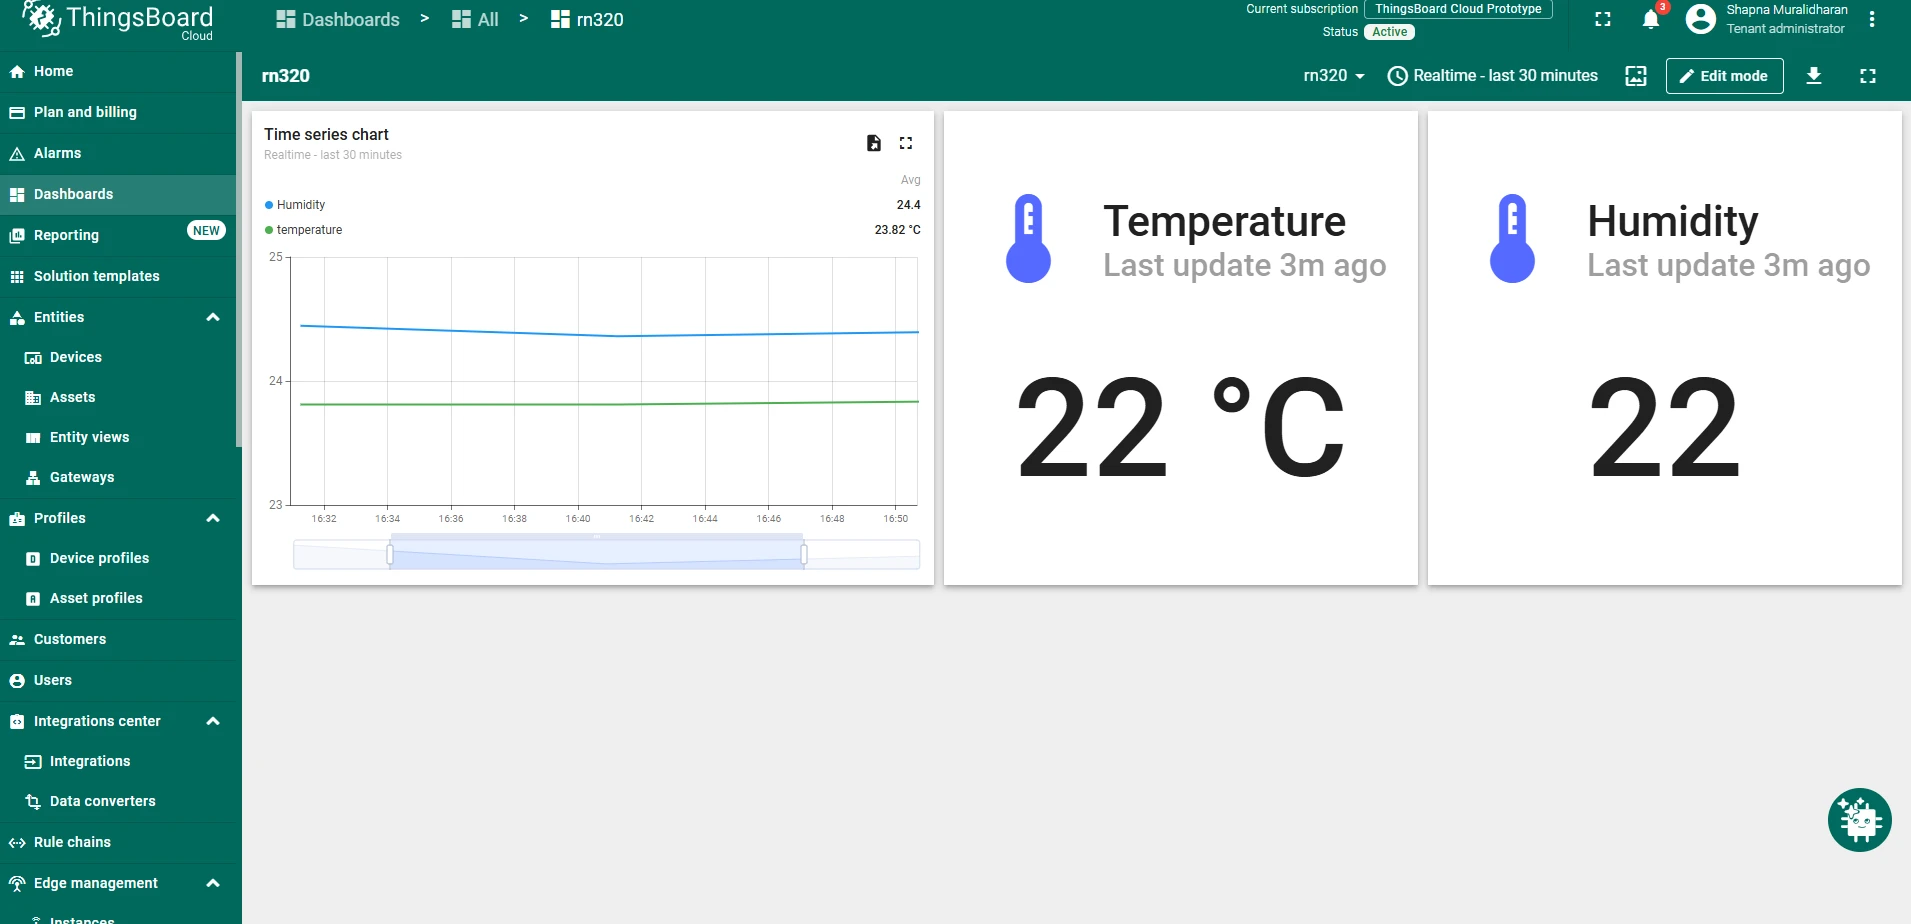
Dashboard (Optional)
- Navigate to Dashboards → Create new dashboard.
- Add widgets for:
- Temperature
- Humidity
- RSSI / SNR
- Bind widgets to the RN320-BTH device.
A sample of the dashboard created is shown in the pictures below.