Temperature and Humidity Sensor
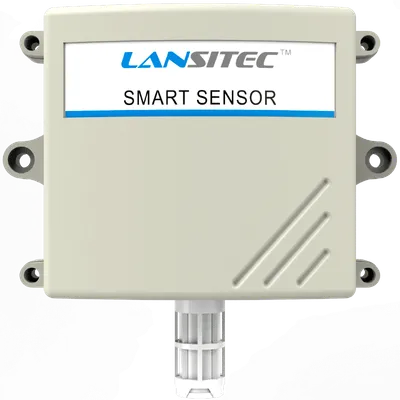
Temperature and Humidity Sensor
Lansitec
- Platform
- ThingsBoard
- Hardware Type
- Sensors
- Connectivity
- LoRaWAN
- Industry
- Smart Cities, Smart Buildings, Environmental Monitoring, Healthcare, Industrial Manufacturing
- Use Case
- Environment Monitoring, Smart Office, Smart Farming, Health Care, Air Quality Monitoring, Smart Irrigation, Waste Management
Temperature & Humidity Sensor is designed based on the advanced LoRa modulation and powered by a lithium battery with a 5-year operation time. It offers a cost-effective LoRaWAN end device for a variety of applications.
Its IP65 enclosure and long operation time offer the benefit of low maintenance cost. Therefore, it is ideal for outdoor use. The sensor operation mode can be adjusted via LoRaWAN Network.
Lansitec sensor family is fully compatible and plug-andplay for LoRaWAN network operation. It can also work with the Lansitec wireless data transfer unit for the low-cost deployment.
Prerequisites
To continue with this guide we will need the following:
- Temperature and Humidity Sensor
- LoRaWAN Gateway
- Bluetooth Beacon
- Network Server account
-
ThingsBoard account at
YOUR_TB_HOST
Configuration
Only ThingsBoard Cloud works when using direct communication from this device to ThingsBoard via MQTT.
You may use ThingsBoard PE on-premises or ThingsBoard Cloud when using ThingsBoard Integrations.
To create an integration with a network server please choose first one of the supported network servers:
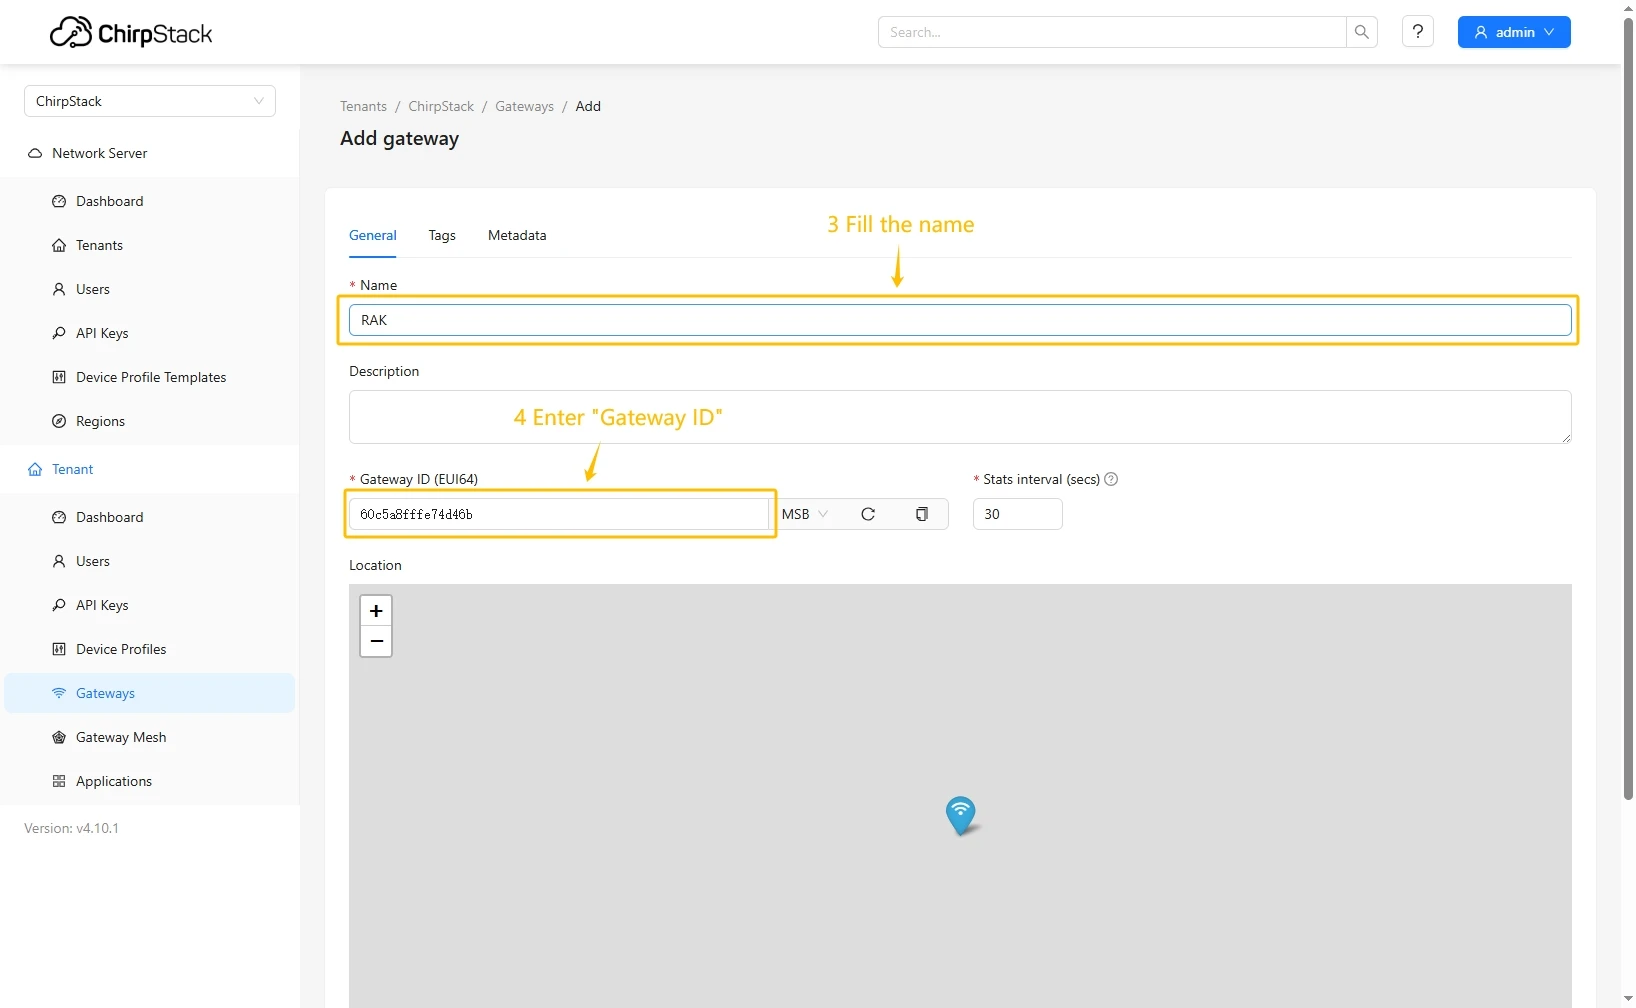
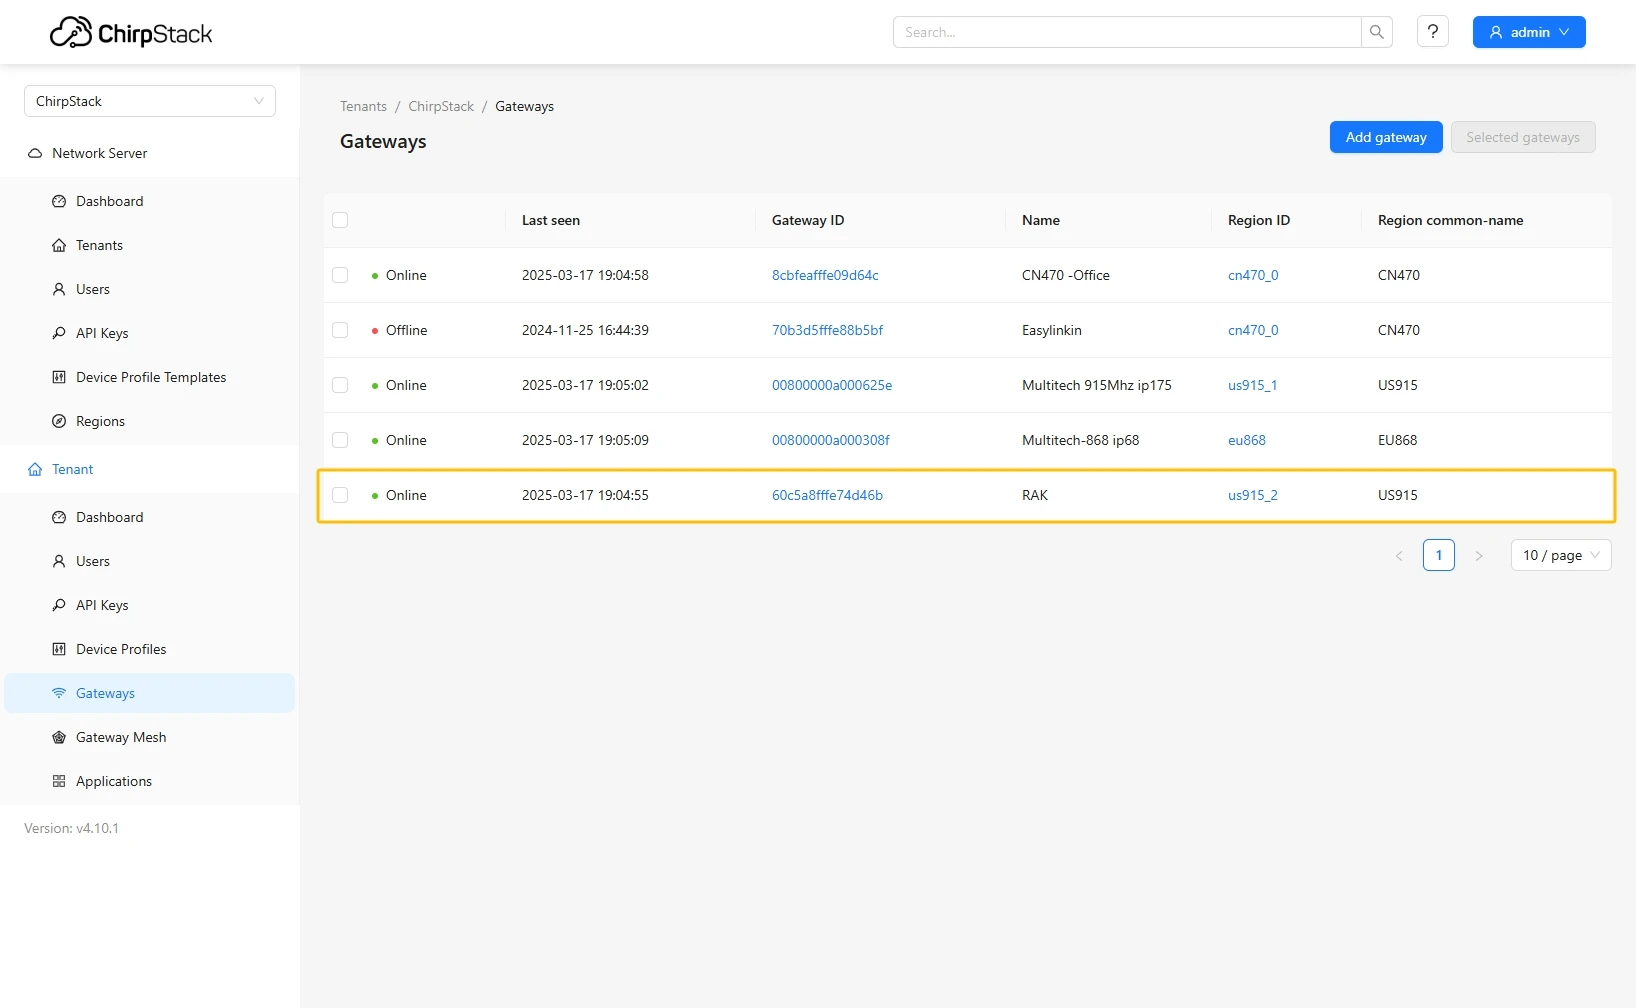
Add a gateway on the Chirpstack
We need to add a gateway on the Chirpstack.
To add a gateway, follow next steps:
- Login to Chirpstack server. Go to the “Gateways” page and click on the “Add gateway” button.
- Fill name, Gateway ID (It will be different, you can find it on the gateway control panel) with your data, scroll down and click on the “Submit” button.
- The gateway is added. In gateways tab you can see its status.

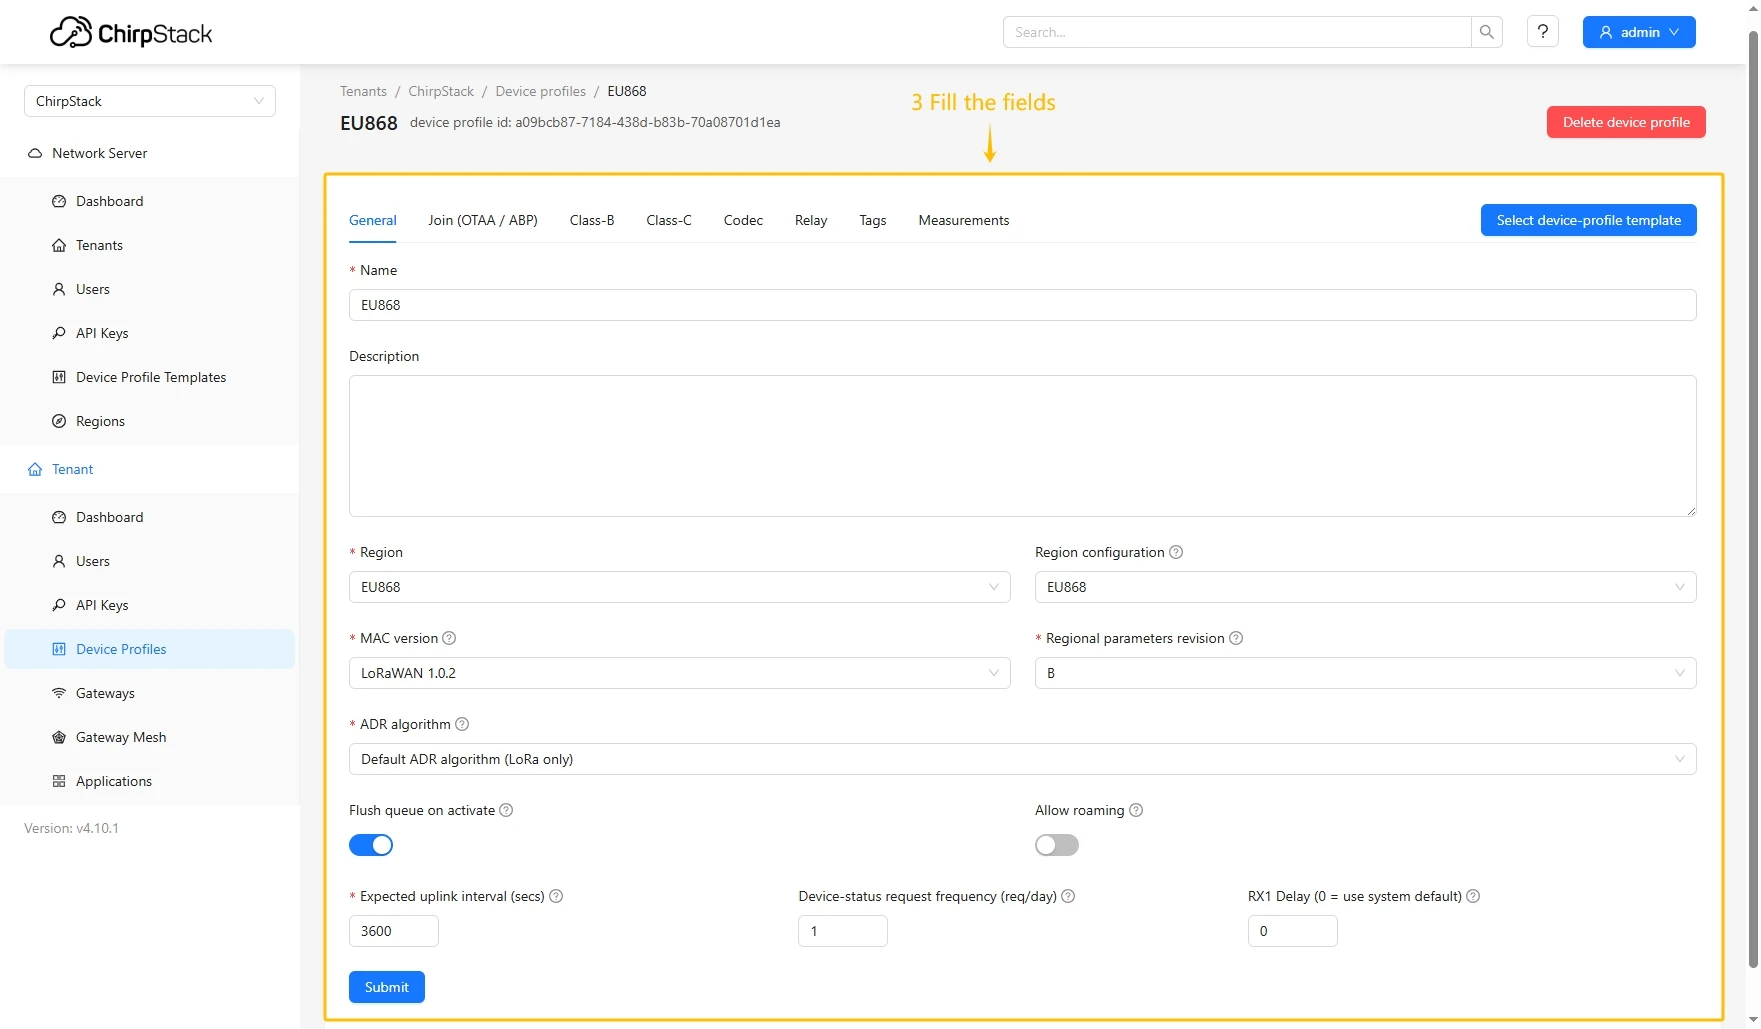
Add device profile on the Chirpstack
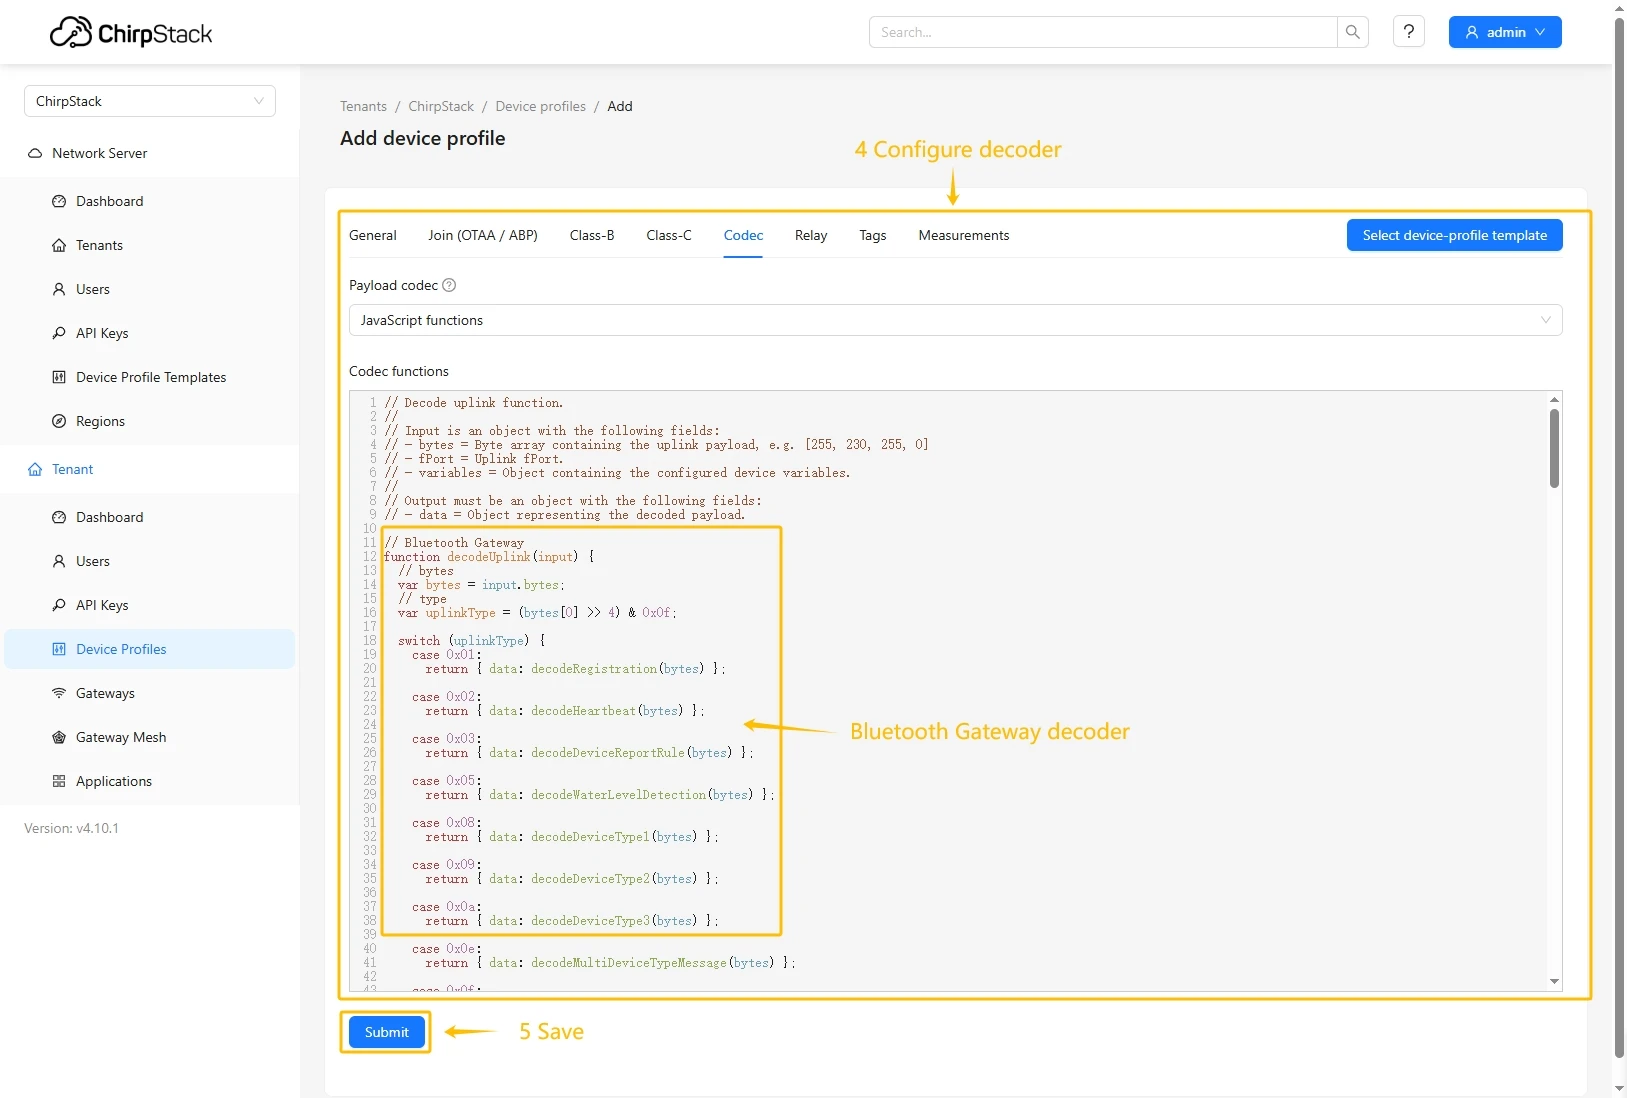
- Login to Chirpstack server. Go to the “Device profiles” page and click on Add device profile button.
- Fill in the required fields.
- Go to the Codec tab, select JavaScript functions from the Payload codec dropdown menu, and paste the decoder function. Then click the Submit button.

Decode function:
// Decode decodes an array of bytes into an object.// - fPort contains the LoRaWAN fPort number// - bytes is an array of bytes, e.g. [225, 230, 255, 0]// - variables contains the device variables e.g. {"calibration": "3.5"} (both the key / value are of type string)// The function must return an object, e.g. {"temperature": 22.5}// Temperature & Humidity Sensor decoderfunction decodeUplink(input) {// bytes    var bytes = input.bytes;// type    var uplinkType = (bytes[0] >> 4) & 0x0f;    switch (uplinkType) {        case 0x01:            return {data: decodeRegistration(bytes)};        case 0x02:            return {data: decodeHeartbeat(bytes)};        case 0x0f:            return {data: decodeAcknowledgment(bytes)};        default:            return null;    }}
// type: 0x1 Registrationfunction decodeRegistration(bytes) {    var data = {};    data.type = "Registration";// adr    data.adr = ((bytes[0] >> 3) & 0x1) == 0 ? "OFF" : "ON";// mode    var modeValue = bytes[0] & 0x07;    if (modeValue == 0x01) {        data.mode = "AU920";    } else if (modeValue == 0x02) {        data.mode = "CLAA";    } else if (modeValue == 0x03) {        data.mode = "CN470";    } else if (modeValue == 0x04) {        data.mode = "AS923";    } else if (modeValue == 0x05) {        data.mode = "EU433";    } else if (modeValue == 0x06) {        data.mode = "EU868";    } else if (modeValue == 0x07) {        data.mode = "US915";    }// smode    var smodeValue = bytes[1];    if (smodeValue == 0x01) {        data.smode = "AU920";    } else if (smodeValue == 0x02) {        data.smode = "CLAA";    } else if (smodeValue == 0x04) {        data.smode = "CN470";    } else if (smodeValue == 0x08) {        data.smode = "AS923";    } else if (smodeValue == 0x10) {        data.smode = "EU433";    } else if (smodeValue == 0x20) {        data.smode = "EU868";    } else if (smodeValue == 0x40) {        data.smode = "US915";    }// power    data.power = ((bytes[2] >> 3) & 0x1f) + "dBm";// reserved    var reservedValue = bytes[2] & 0x07;    if (reservedValue == 1) {        data.frequencySweepMode = "A mode";    } else if (reservedValue == 2) {        data.frequencySweepMode = "B mode";    } else if (reservedValue == 3) {        data.frequencySweepMode = "C mode";    } else if (reservedValue == 4) {        data.frequencySweepMode = "D mode";    } else if (reservedValue == 5) {        data.frequencySweepMode = "E mode";    } else if (reservedValue == 6) {        data.frequencySweepMode = "All frequency sweep";    }// dr    data.dr = (bytes[3] >> 4) & 0x0f;// repting    data.repting = ((bytes[3] >> 3) & 0x01) == 0 ? "false" : "true";// temperatureReportPeriod    data.temperatureReportPeriod =        (((bytes[4] << 8) & 0xff00) | (bytes[5] & 0xff)) * 10 + "s";// crc    data.crc = ((bytes[6] << 8) & 0xff00) | (bytes[7] & 0xff);    return data;}
// type: 0x2 Heartbeatfunction decodeHeartbeat(bytes) {    var data = {};// type    data.type = "Heartbeat";// version    data.version = bytes[0] & 0x0f;// battery    data.battery = bytes[1] + "%";// rssi    data.rssi = bytes[2] * -1 + "dBm";// snr    data.snr = (((bytes[3] << 8) & 0xff00) | (bytes[4] & 0xff)) / 100;// temperature    if (0 == ((bytes[5] >> 7) & 0x01)) {        var tempInt = bytes[5] & 0x7f;        var tempFra = bytes[6];        data.temperature = tempInt + "." + tempFra + "℃";    } else {        var tempInt = (bytes[5] & 0x7f) * -1;        var tempFra = bytes[6];        data.temperature = tempInt + "." + tempFra + "℃";    }// humidity    data.humidity = bytes[7] + "%";// crc    data.crc = ((bytes[8] << 8) & 0xff00) | (bytes[9] & 0xff);    return data;}
// type: 0xf Acknowledgmentfunction decodeAcknowledgment(bytes) {    var data = {};    data.type = "Acknowledgment";    data.result = (bytes[0] & 0x0f) == 0 ? "Success" : "Failure";    data.msgId = (bytes[1] & 0xff).toString(16).toUpperCase();    return data;}
Add a device on the Chirpstack
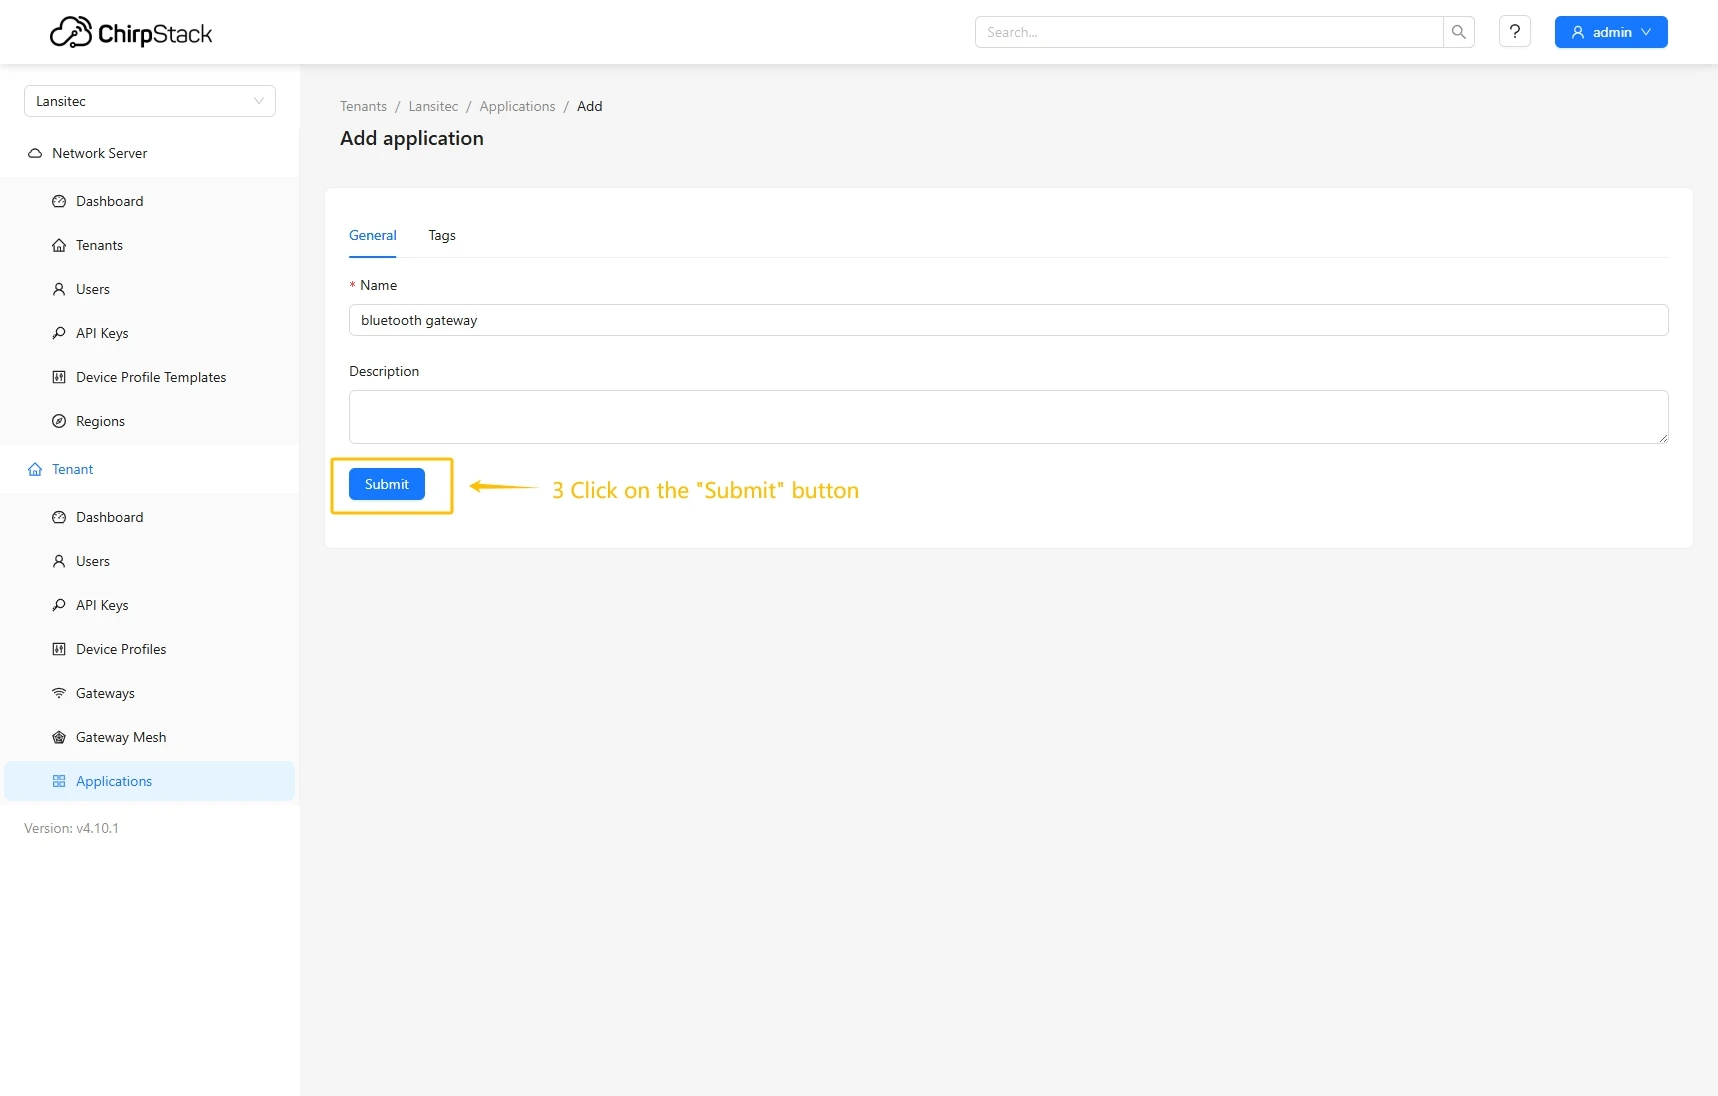
- Go to the Applications page and click on Add application button.
- Enter name and click Submit button.
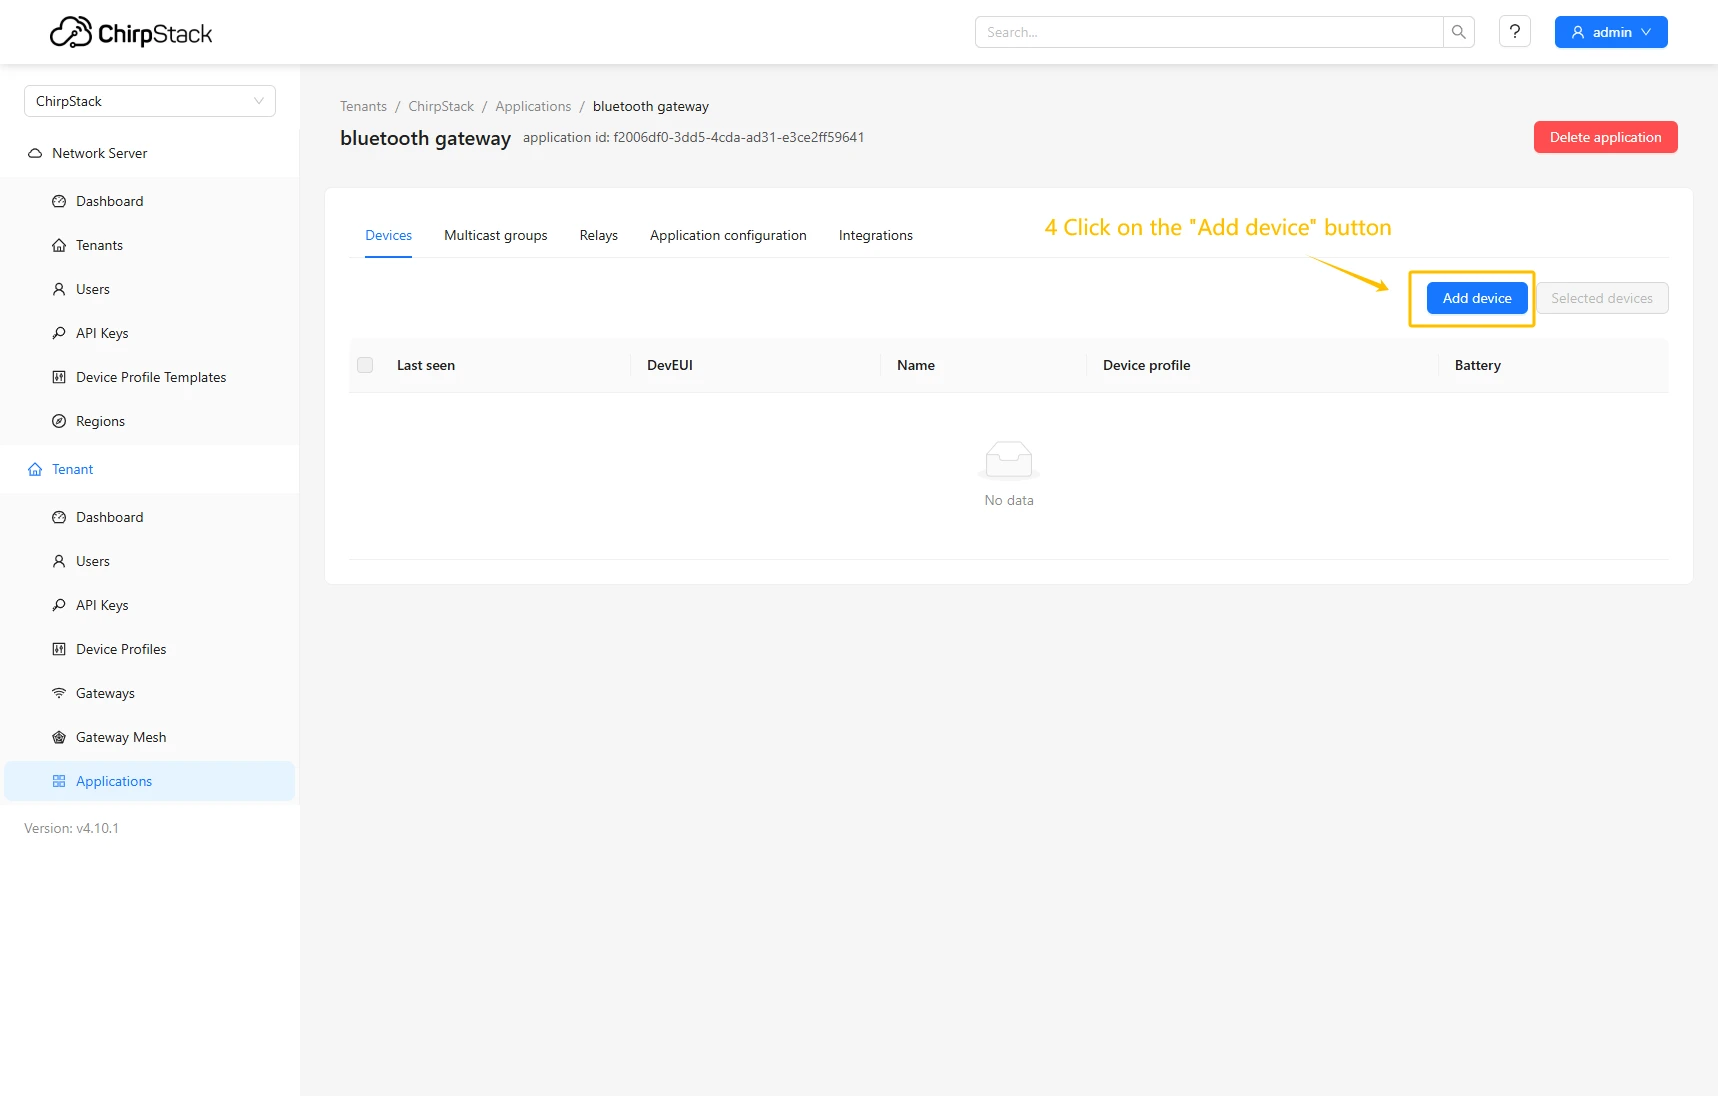
- Click Add device.
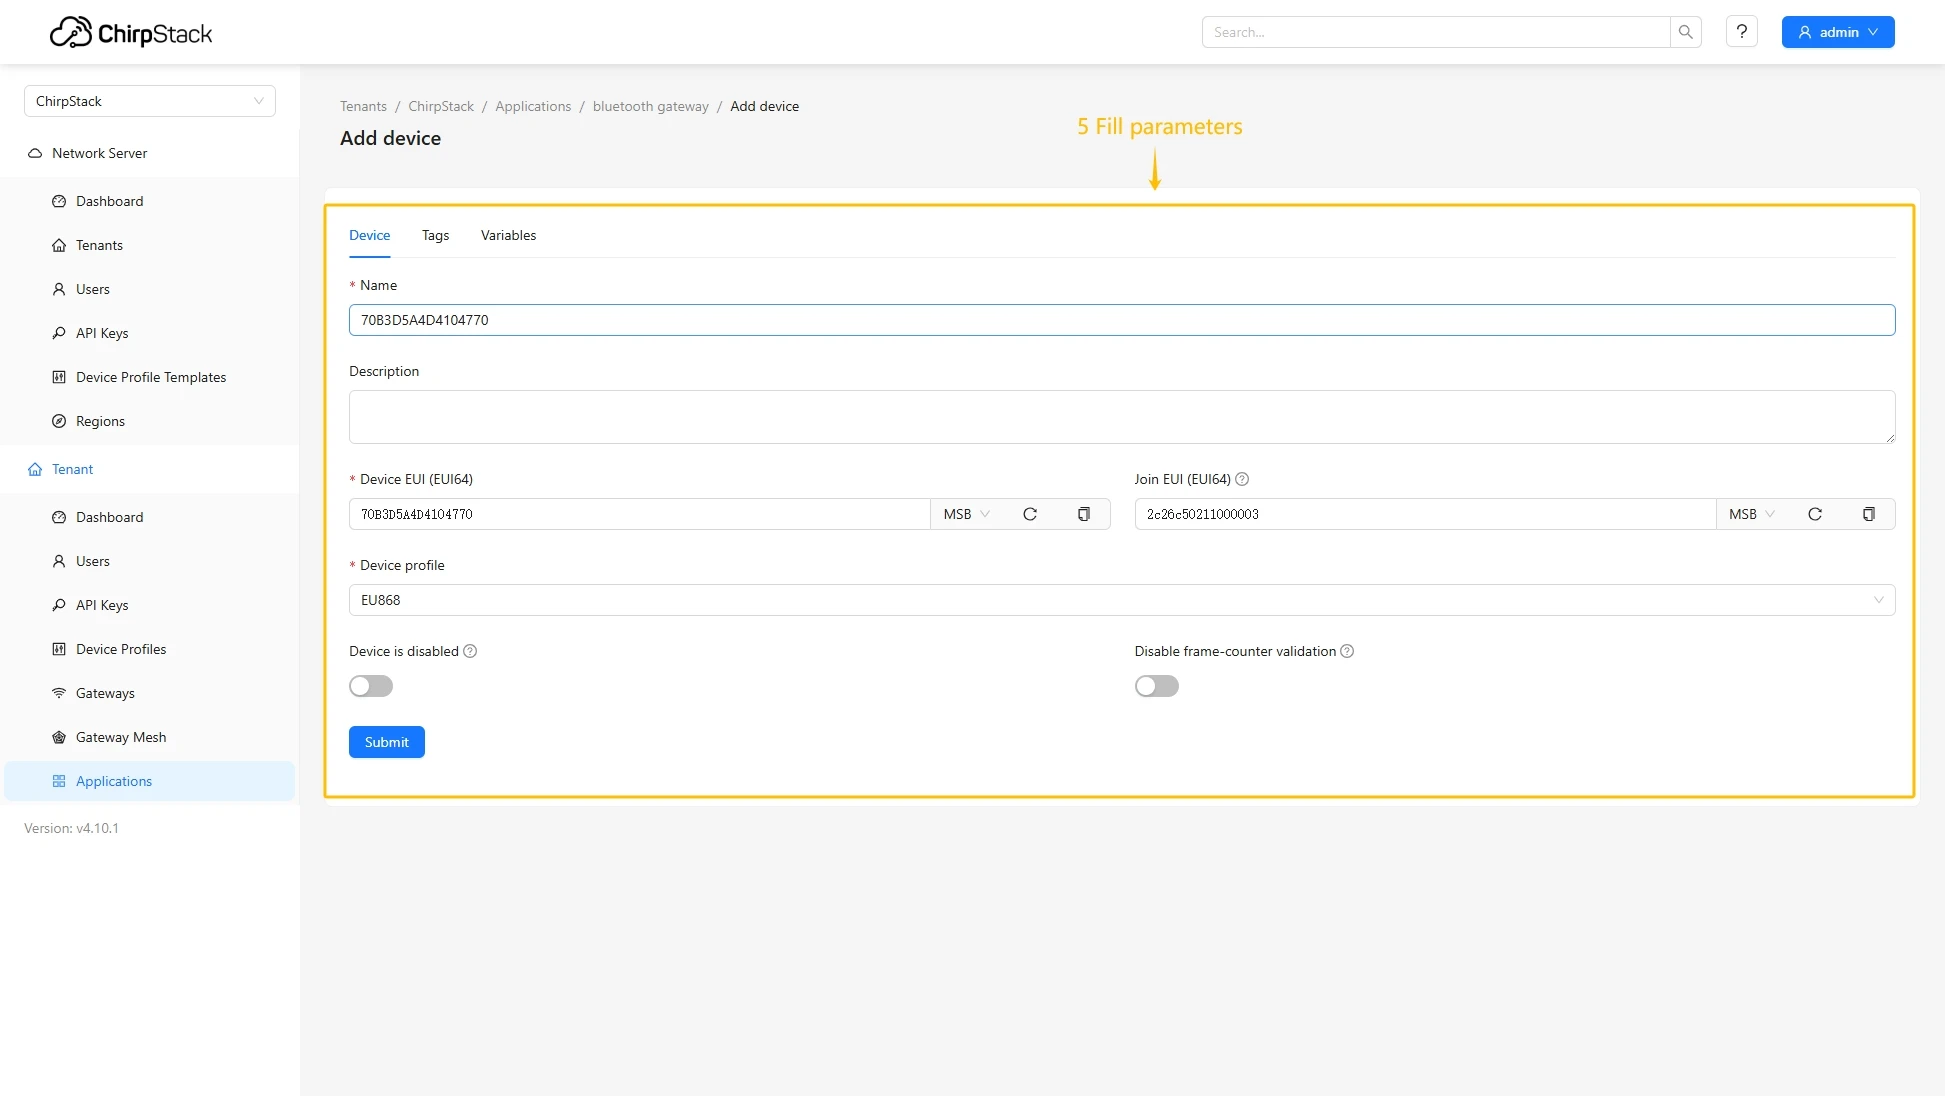
- Fill in the required fields with your device information and specify the previously created device profile.
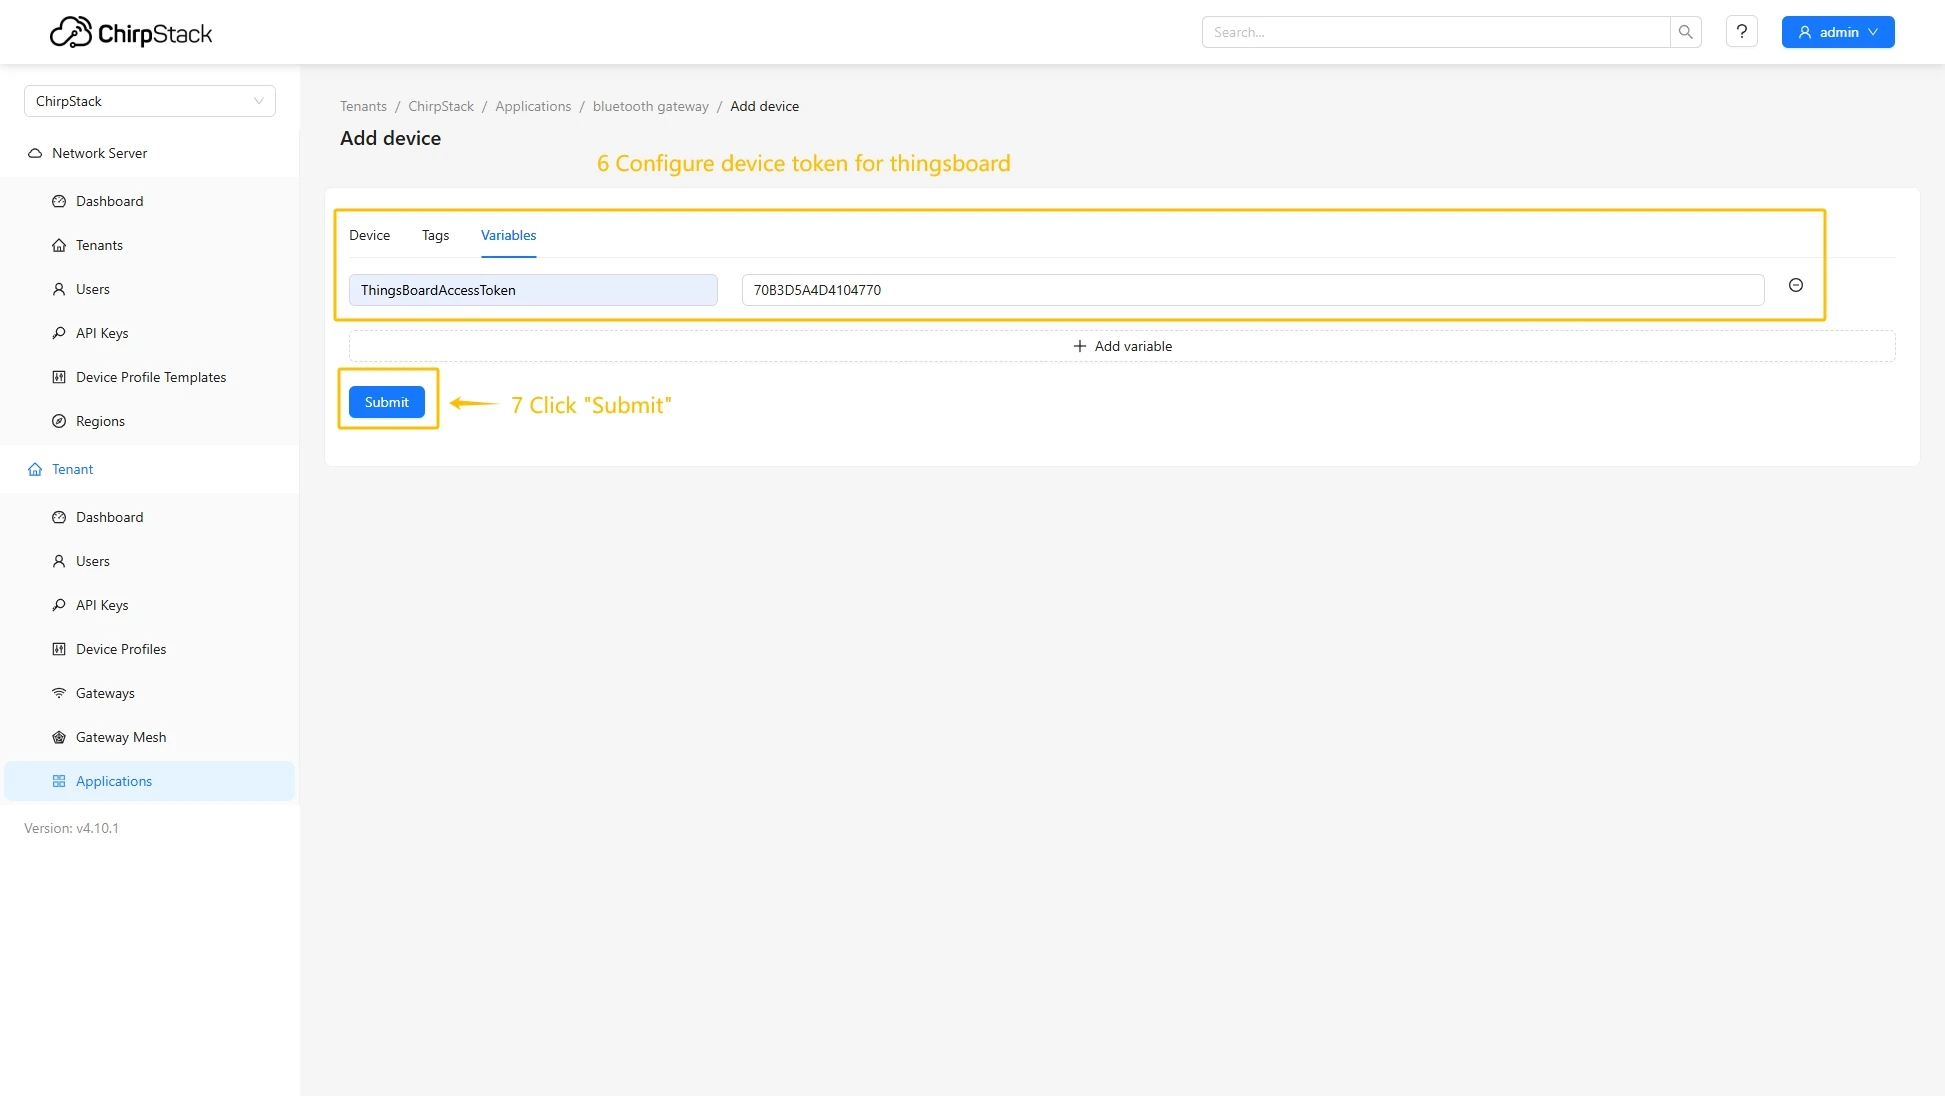
- Go to the Variables tab, enter the value for ThingsBoardAccessToken, and click the Submit button.
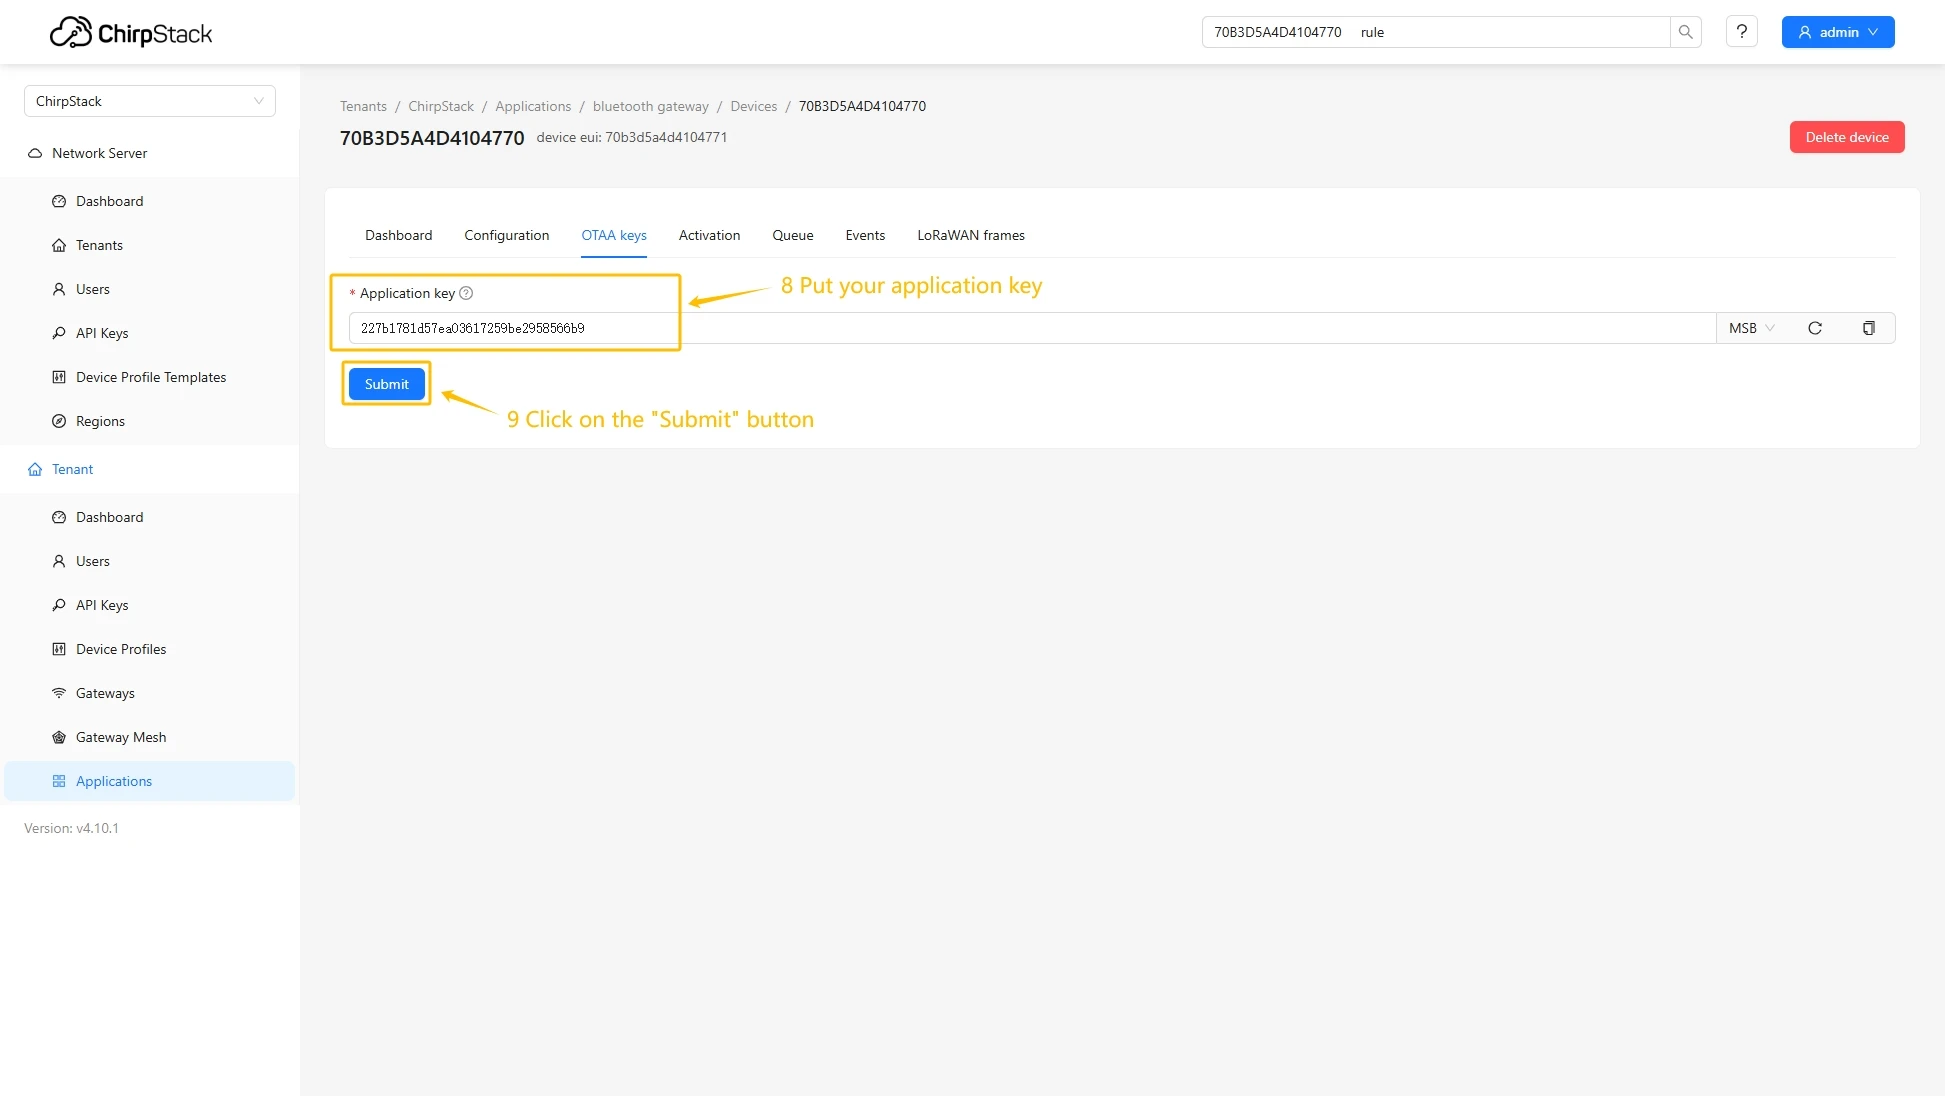
- Put your Application key to the field and click on Submit button to save the device.

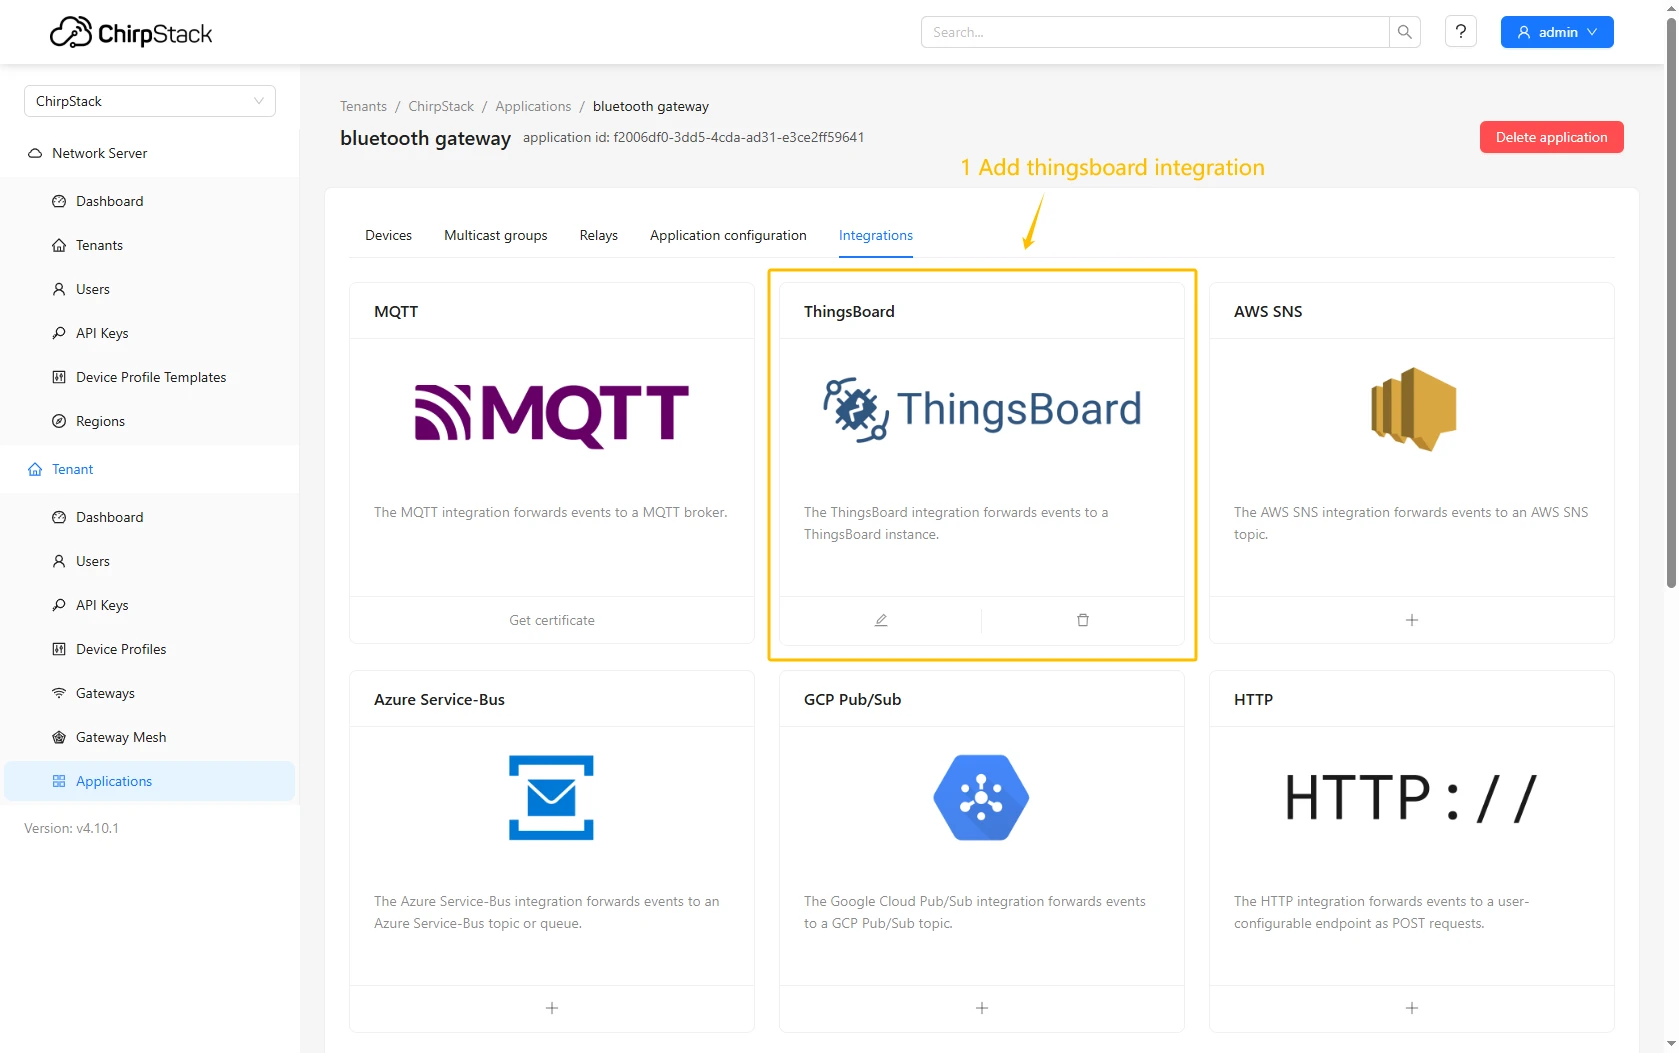
Configure application integration with ThingsBoard
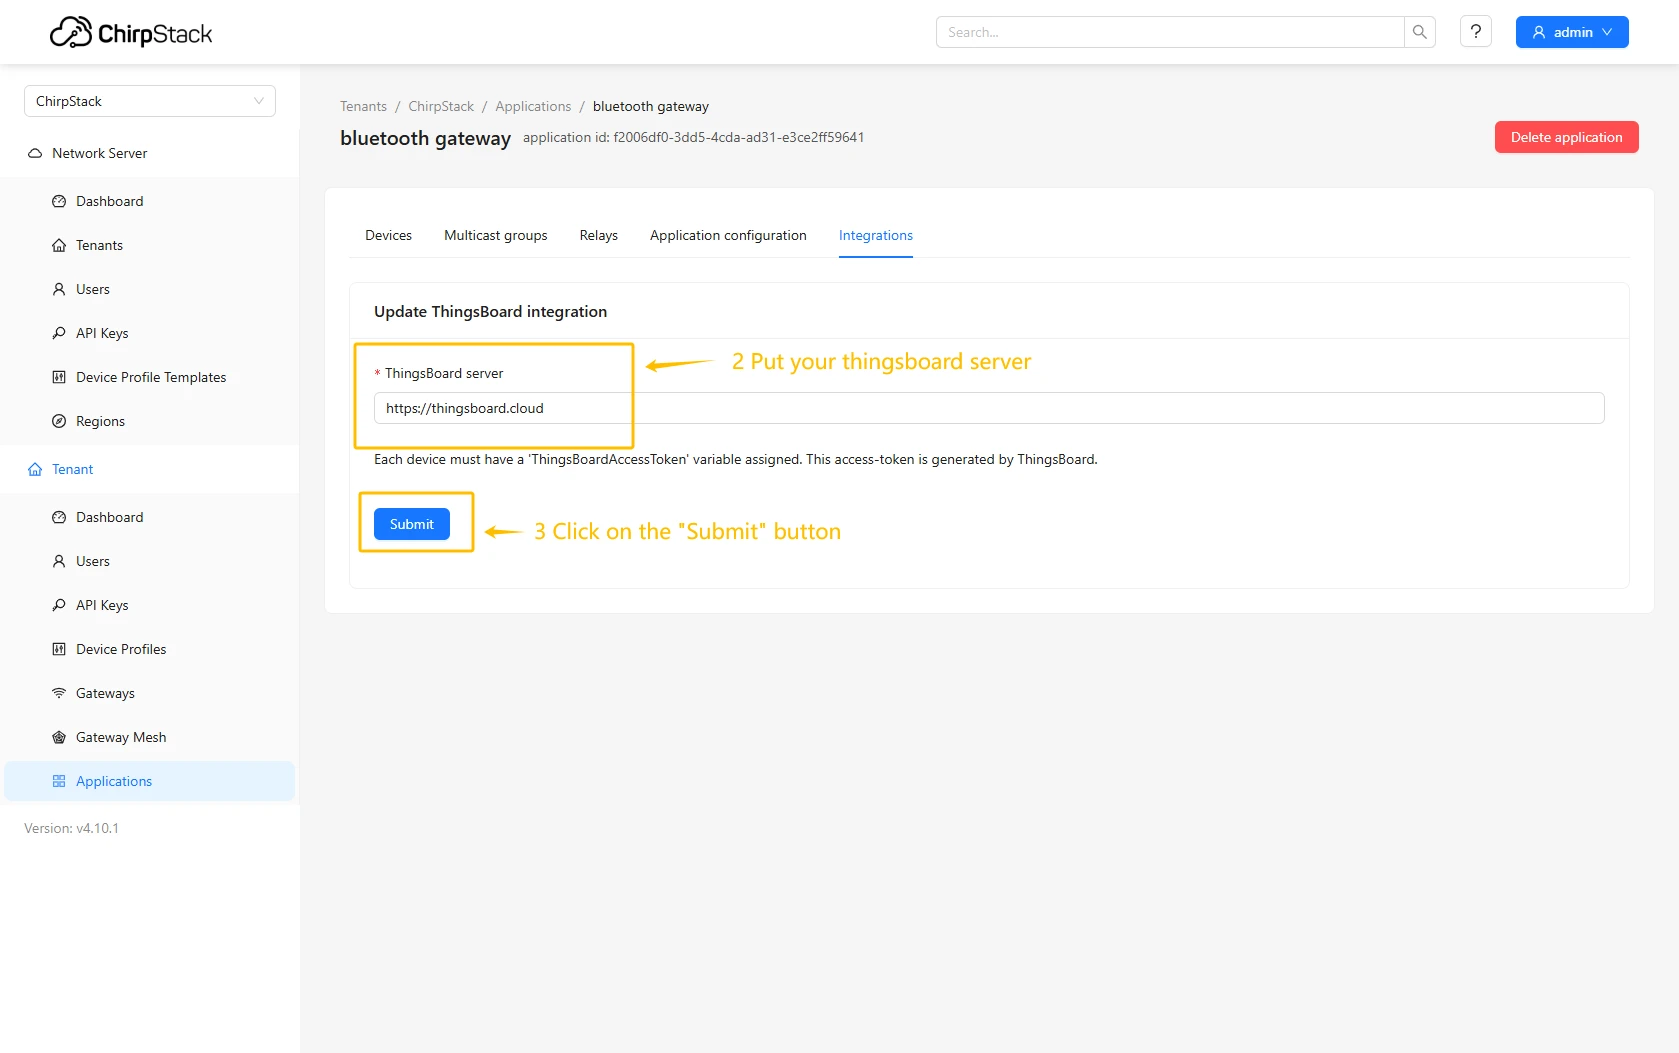
- Go to the Integrations page, find and select the ThingsBoard.
- Enter the URL of your ThingsBoard server and click Submit button.
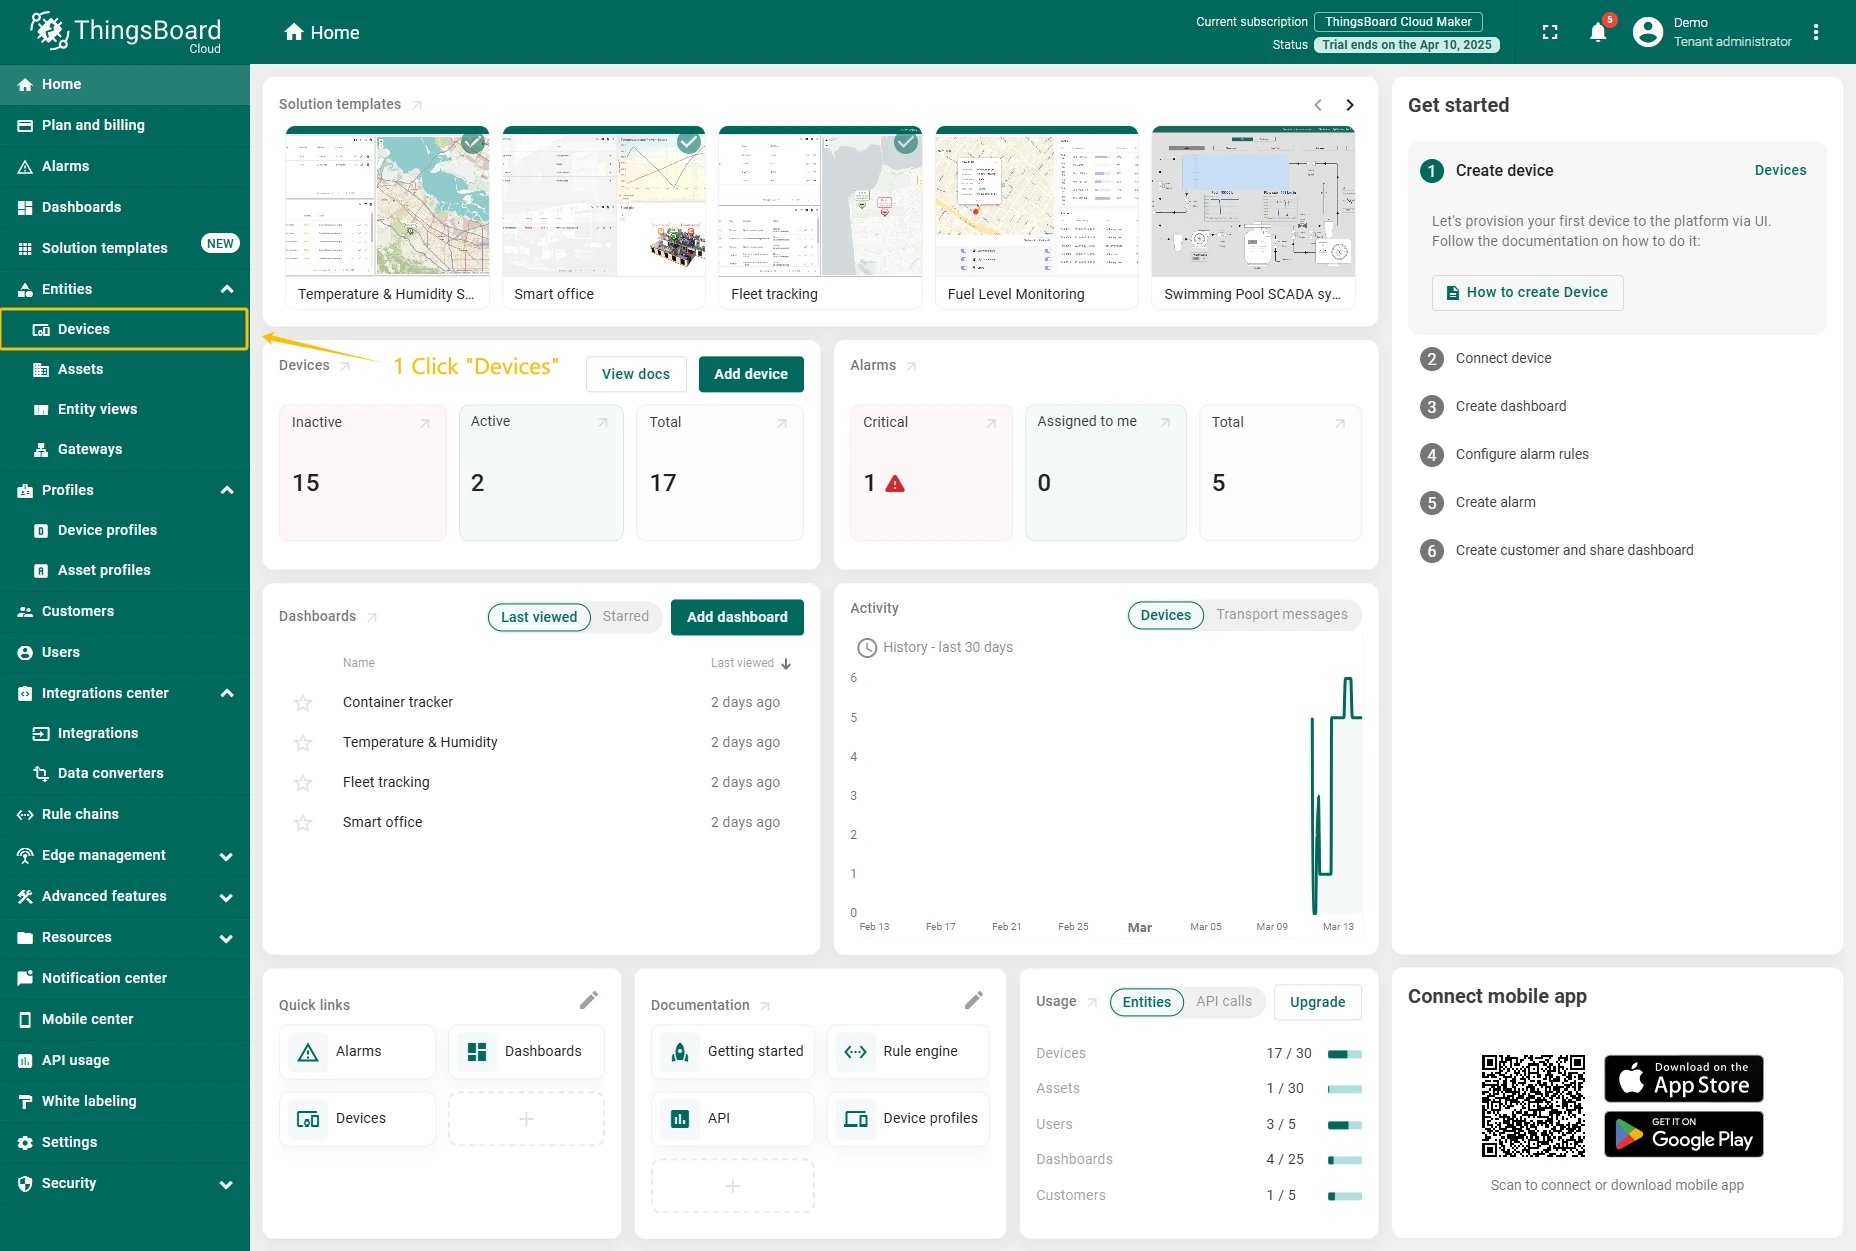
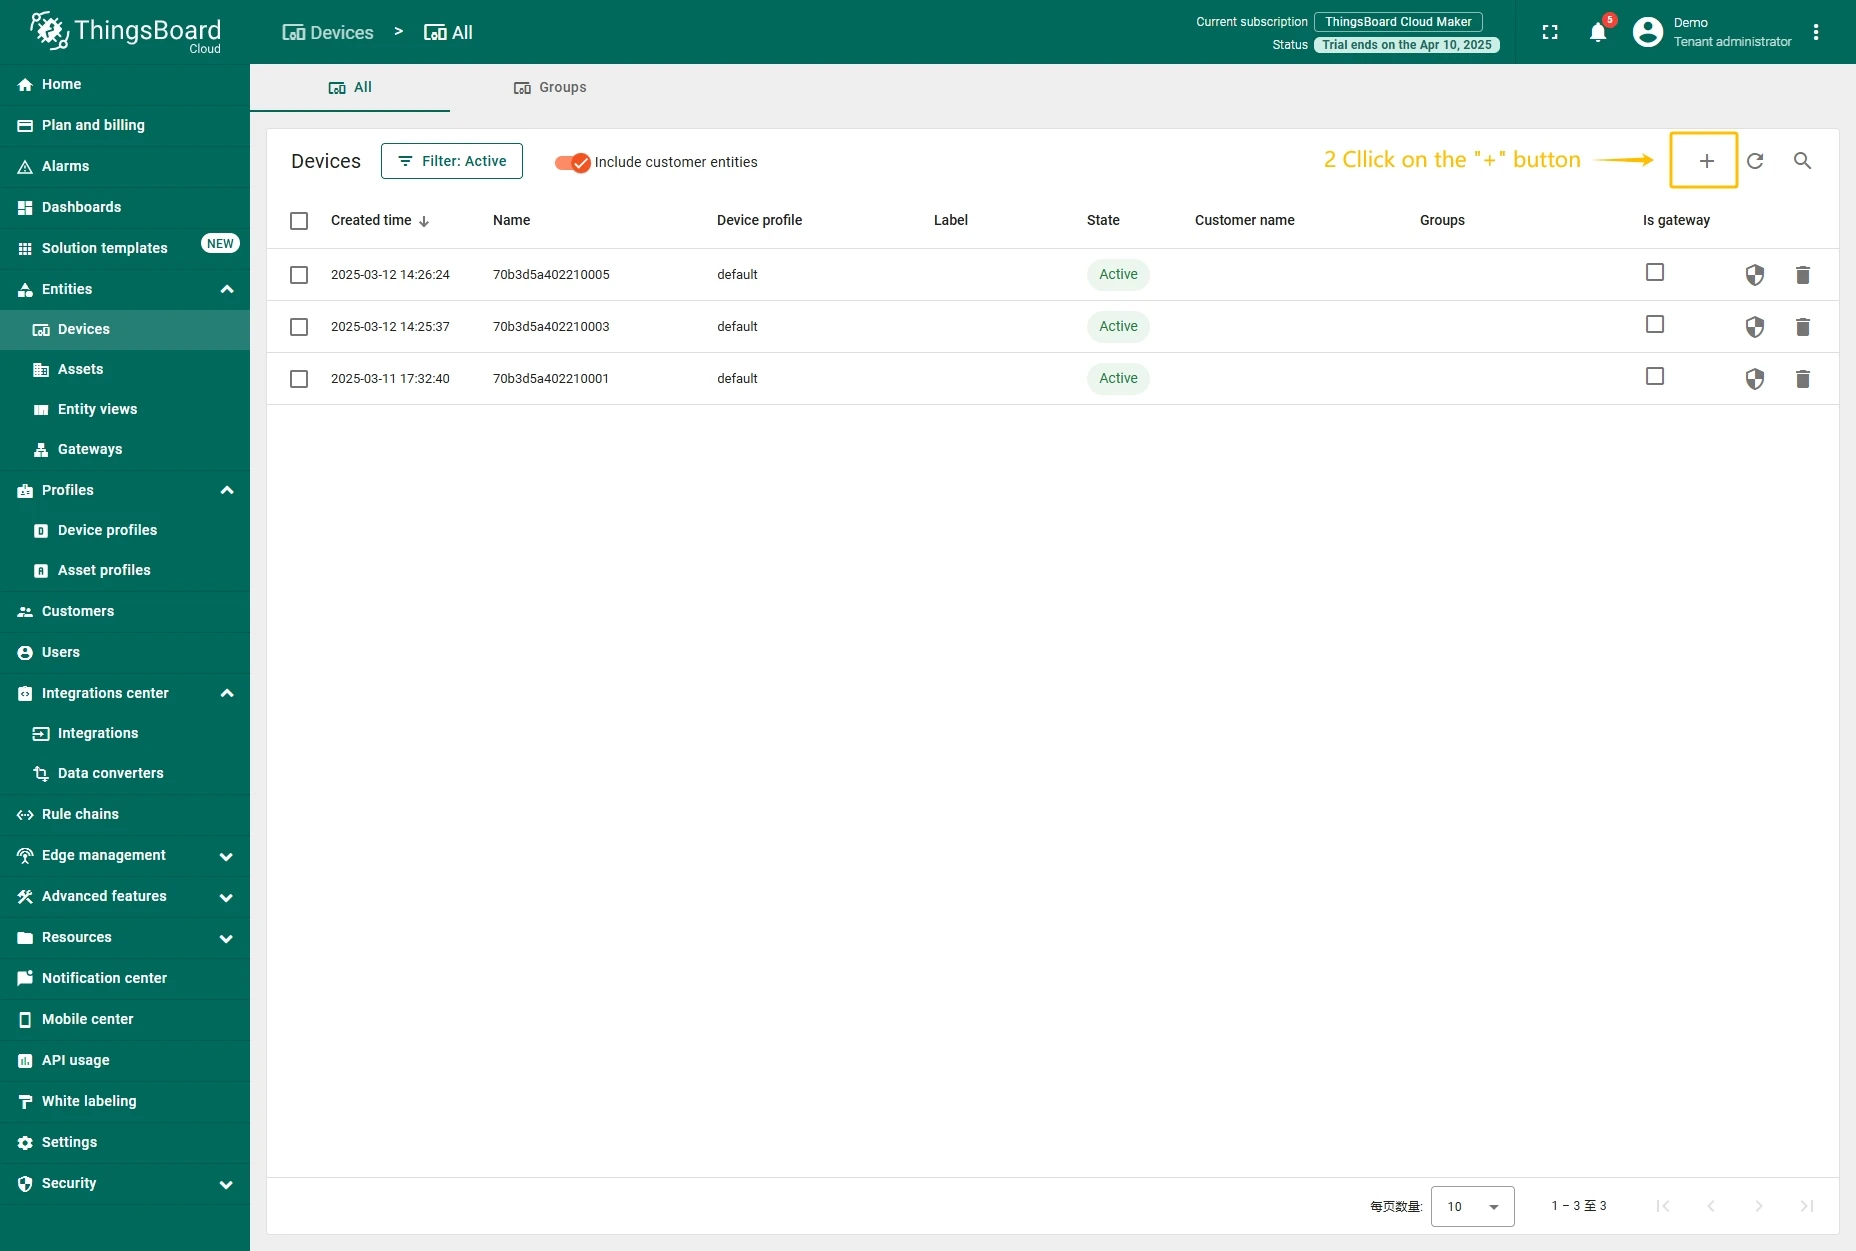
Create device on ThingsBoard
- Go to the Devices page.
- Click on Add device button.
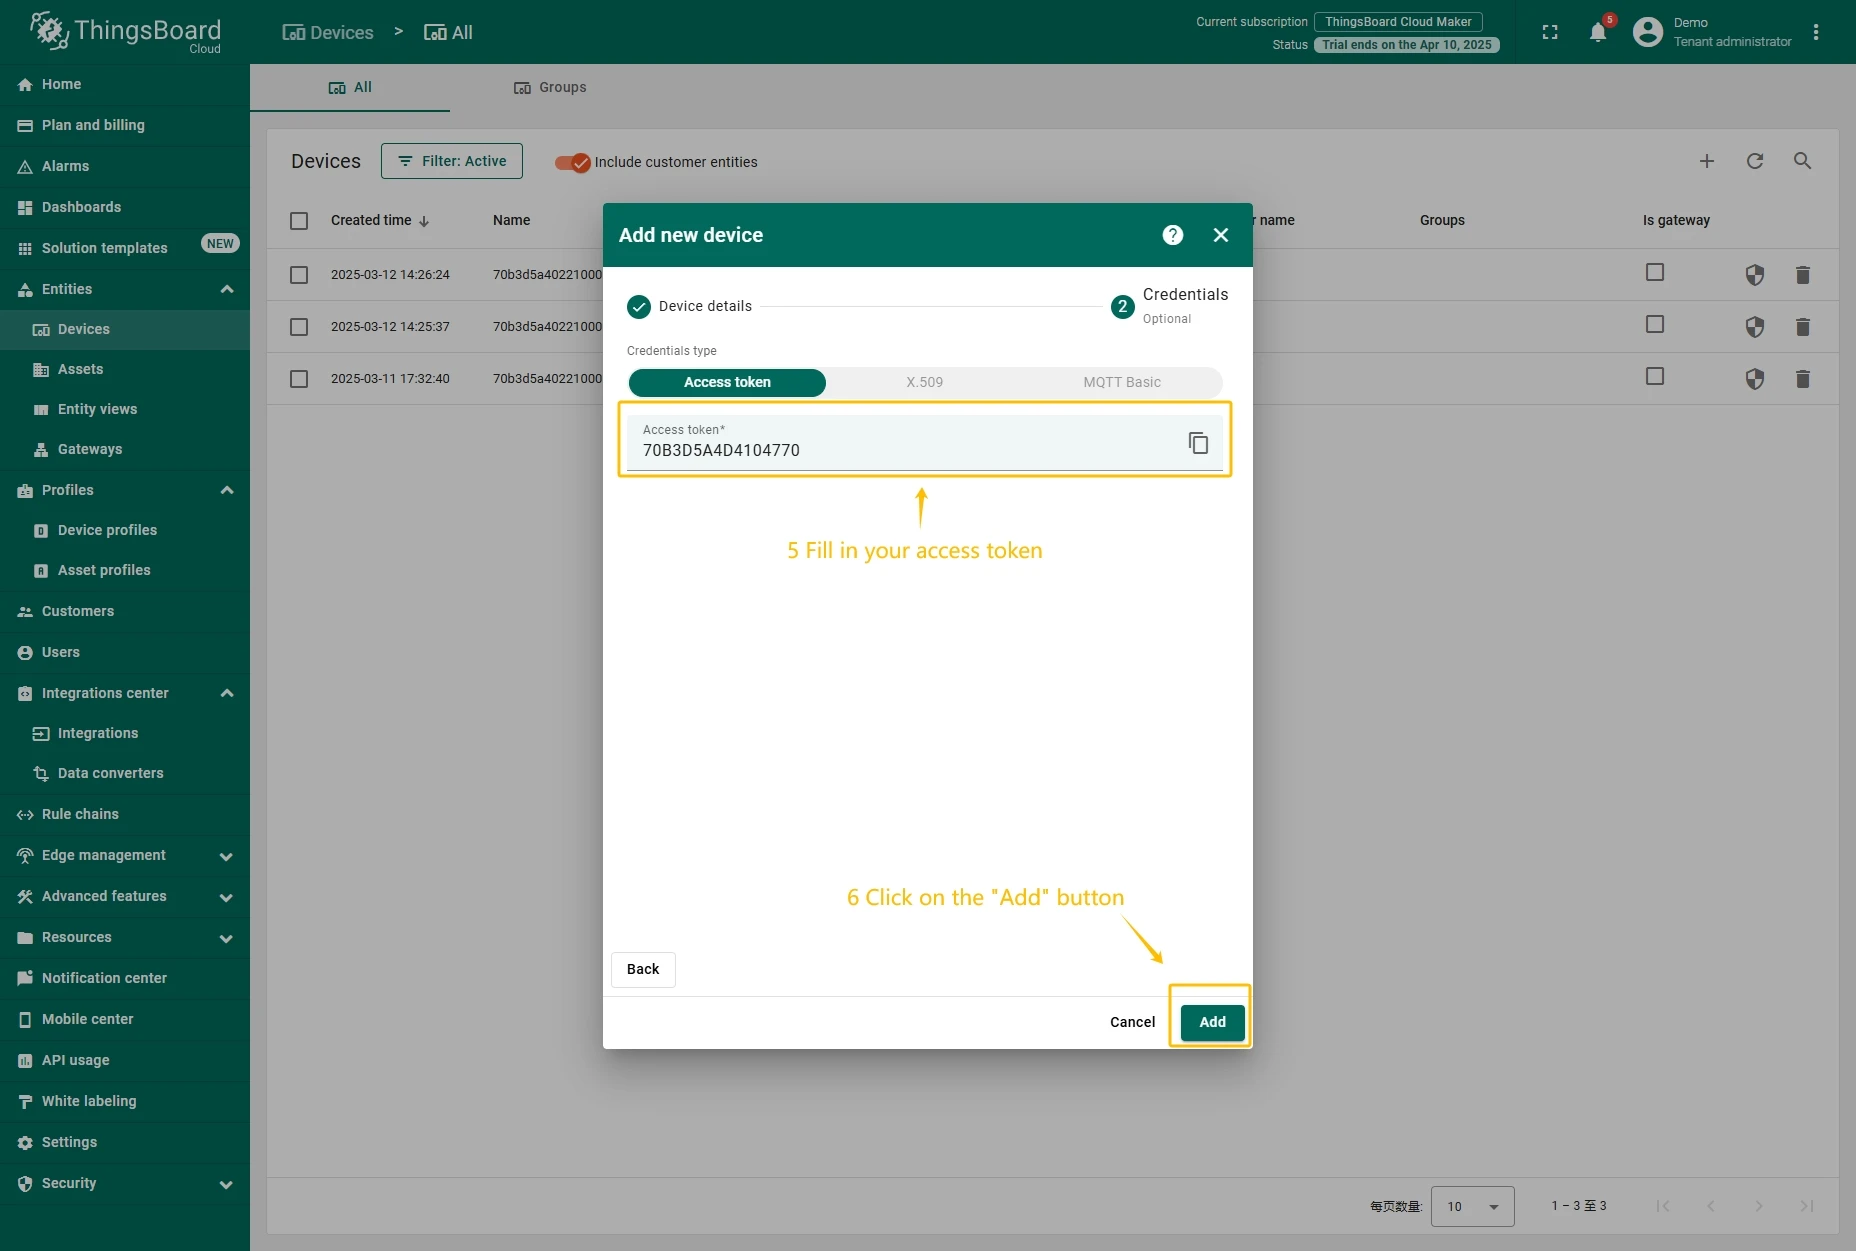
- Fill in the device name and click the Next: Credentials button.
- Enter the device Access token (previously copied Device EUI value) and click the Add button.
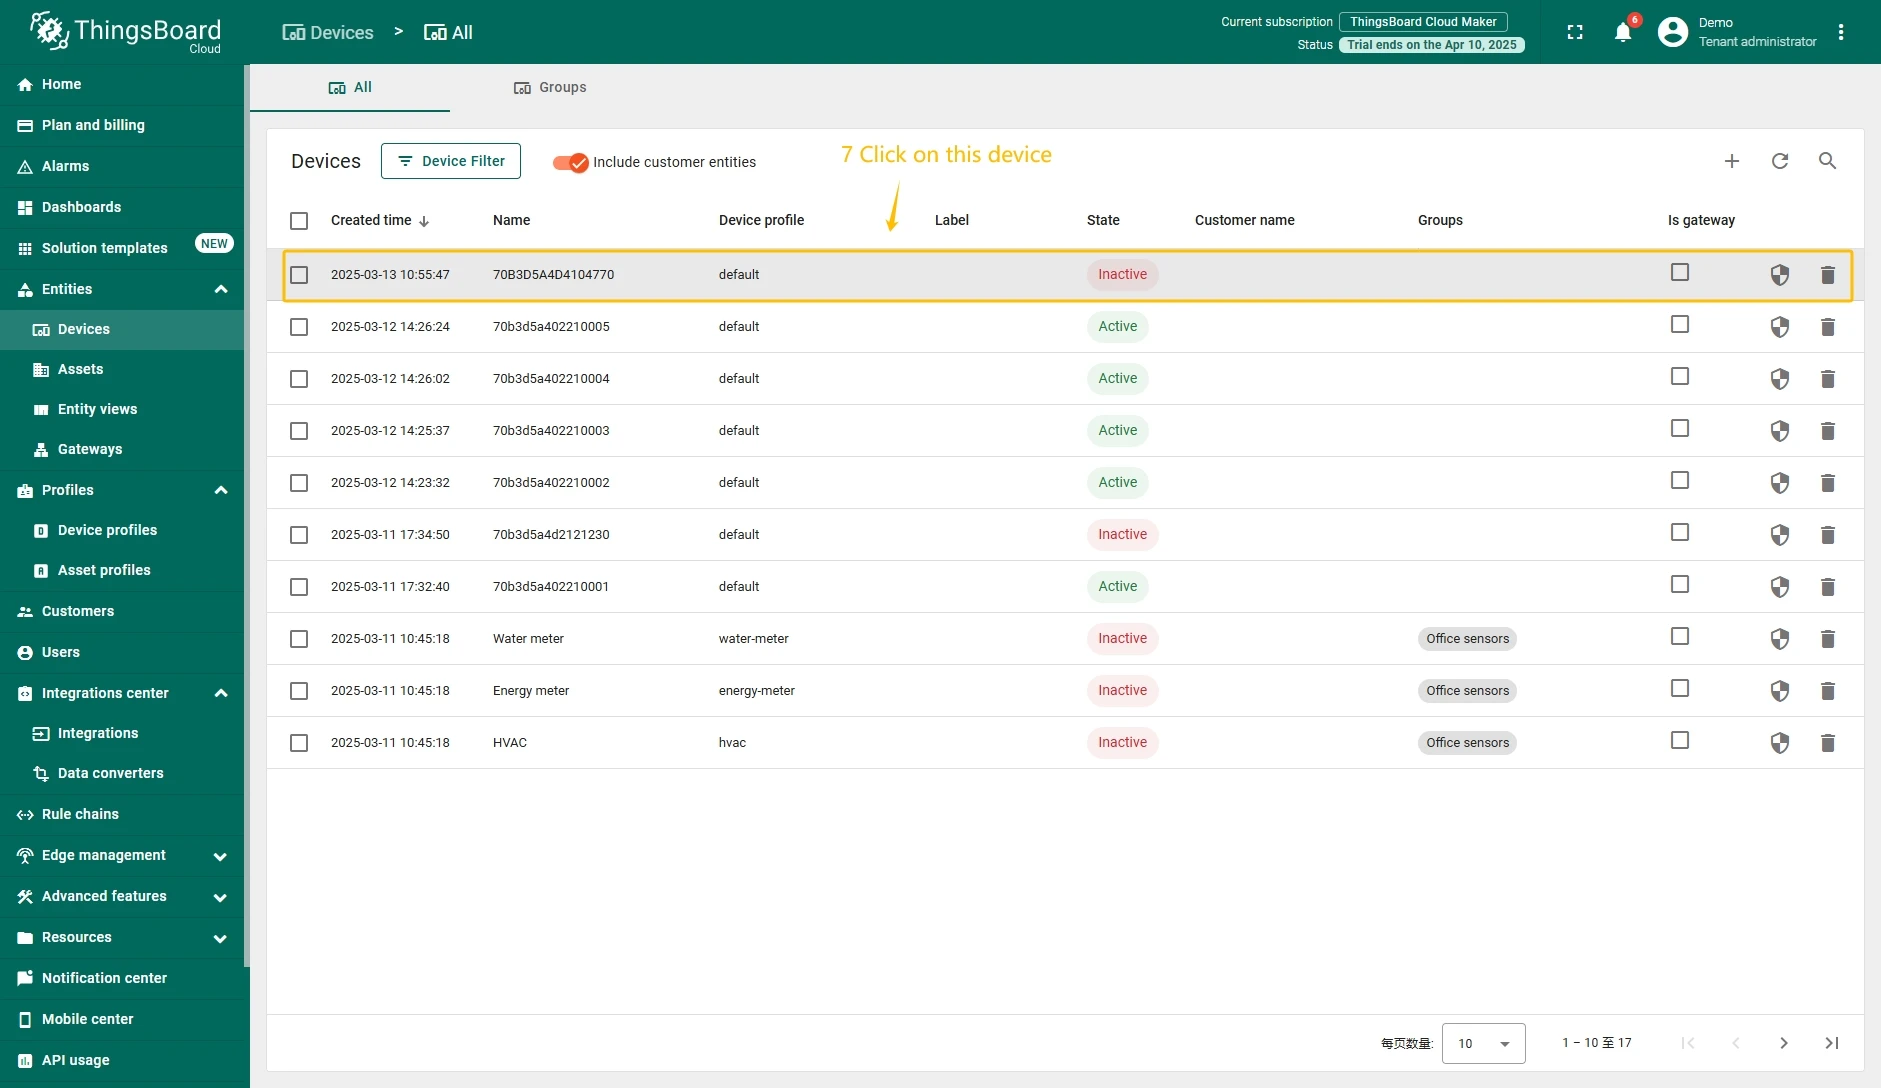
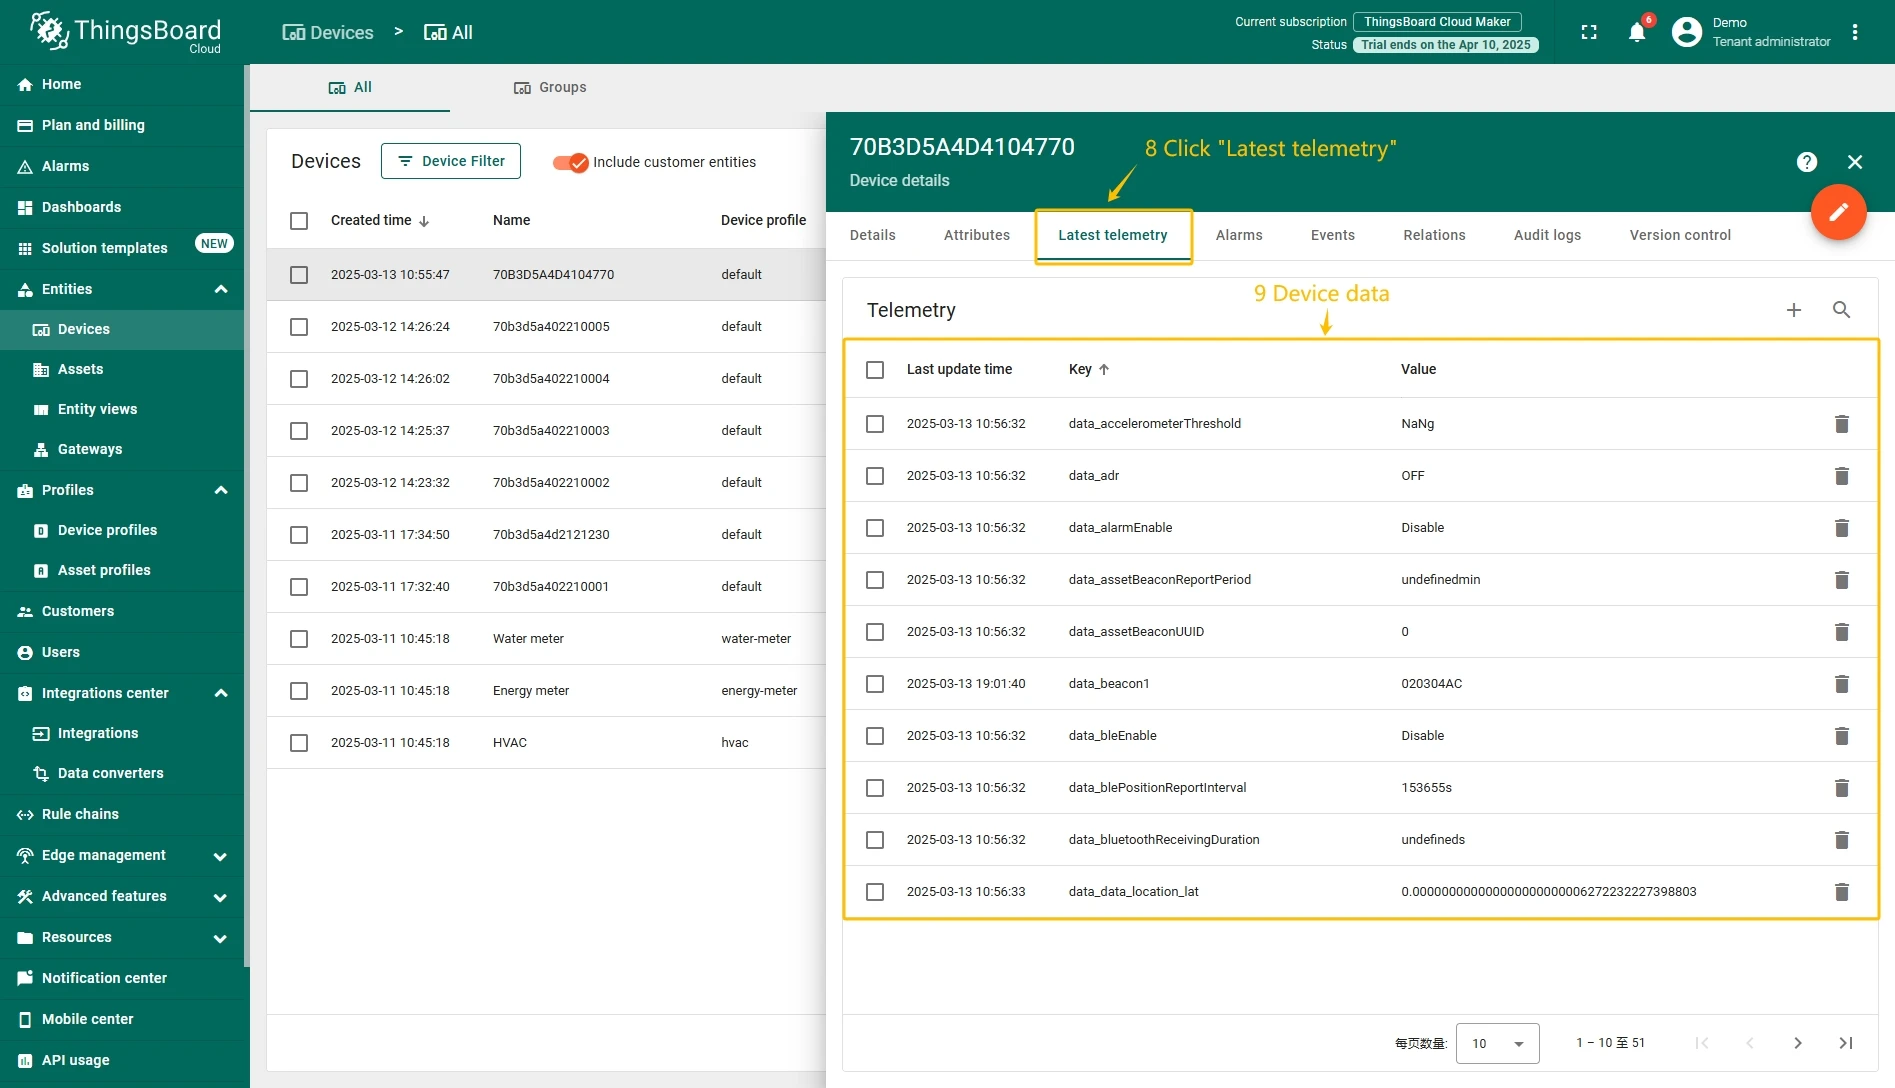
- Click on the device to open device information window.
- Go to the Latest telemetry tab to view device reported data.

Add a gateway on The Things Stack Community Edition
We need to add a gateway on The Things Stack Community Edition.
To add a gateway, you can follow next steps:
- Login to the cloud and open your console.
- Go to the Home page press the “Register gateway” button.
- Put information about the gateway (gateway EUI) and click the “Register gateway”button.
- The gateway is added. You can see its status - disconnected.


Add a device on The Things Stack Community Edition
We need to add a device on The Things Stack Community Edition.
To add a device, you can follow next steps:
- Go to the Applications page. Then select your application and click on its name.
- Click on the Register end device button.
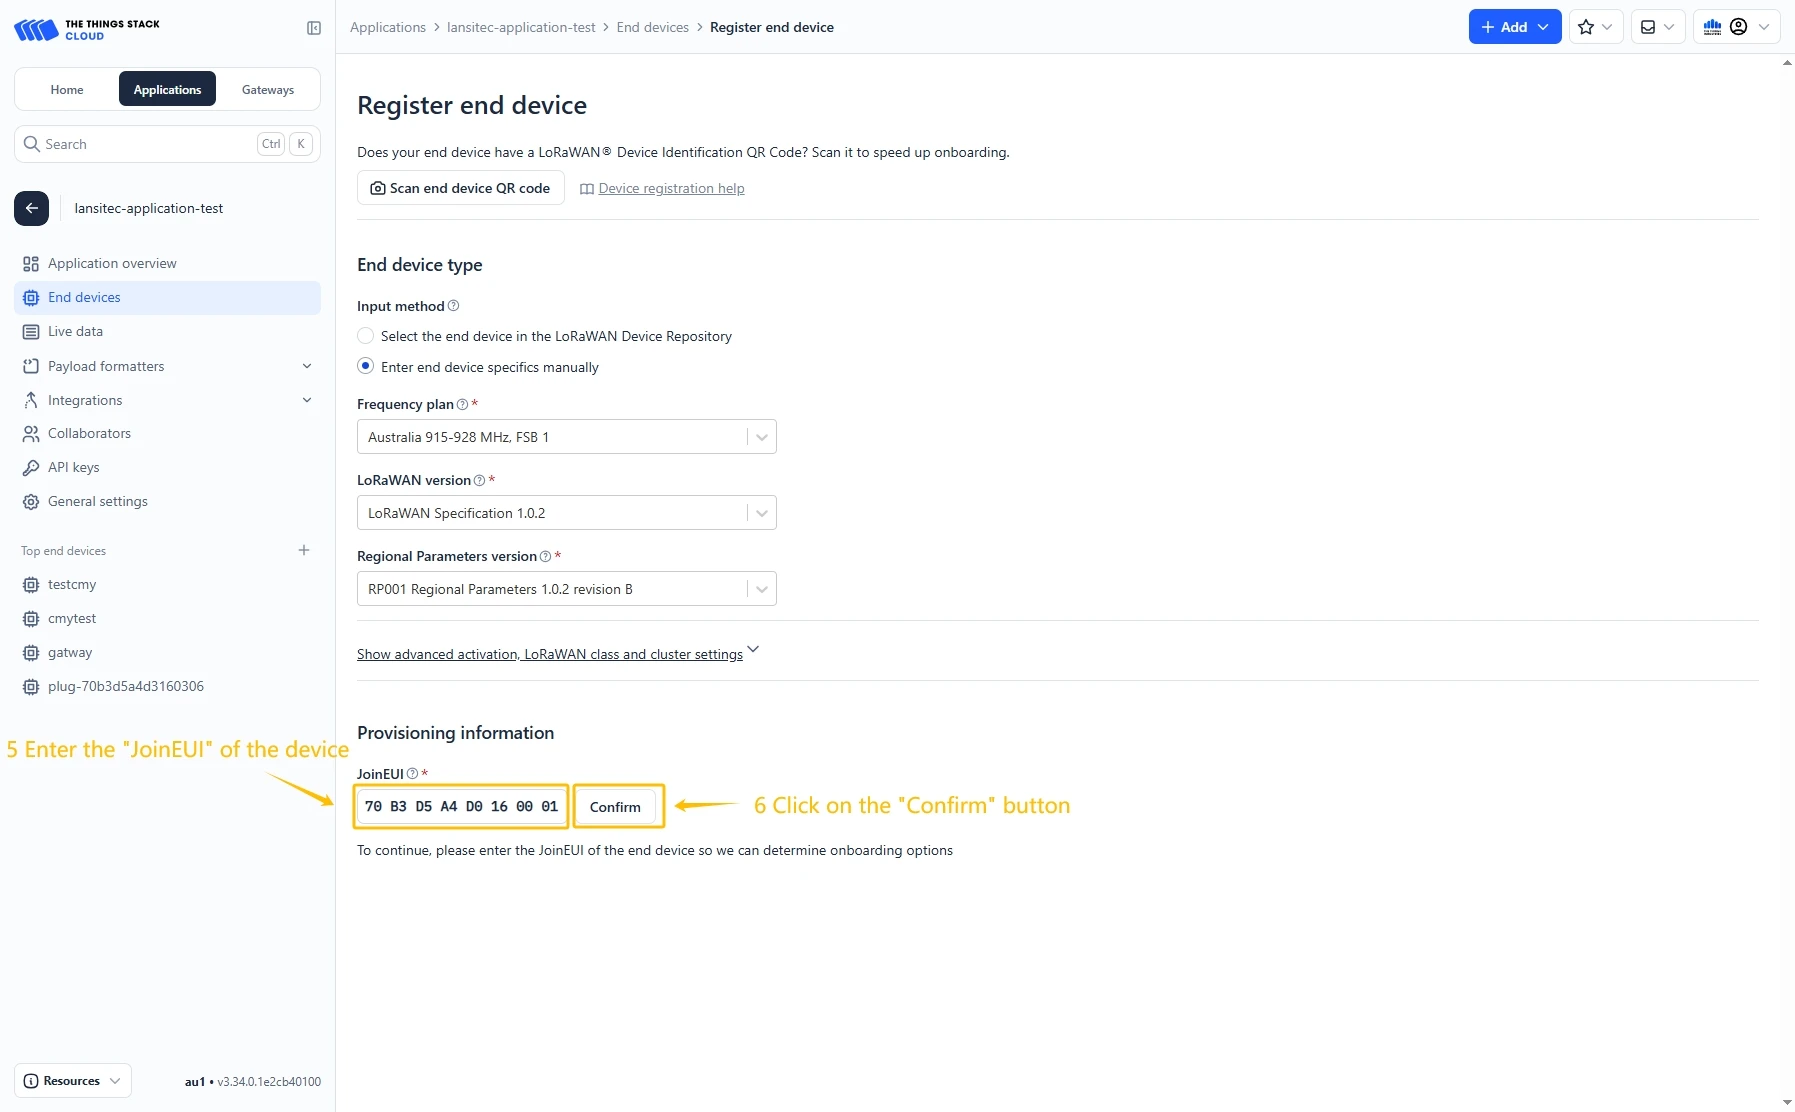
- Put the APP EUI value to the JoinEUI field. Then, press the Confirm button.
- Fill the rest parameters and press Register end device button.


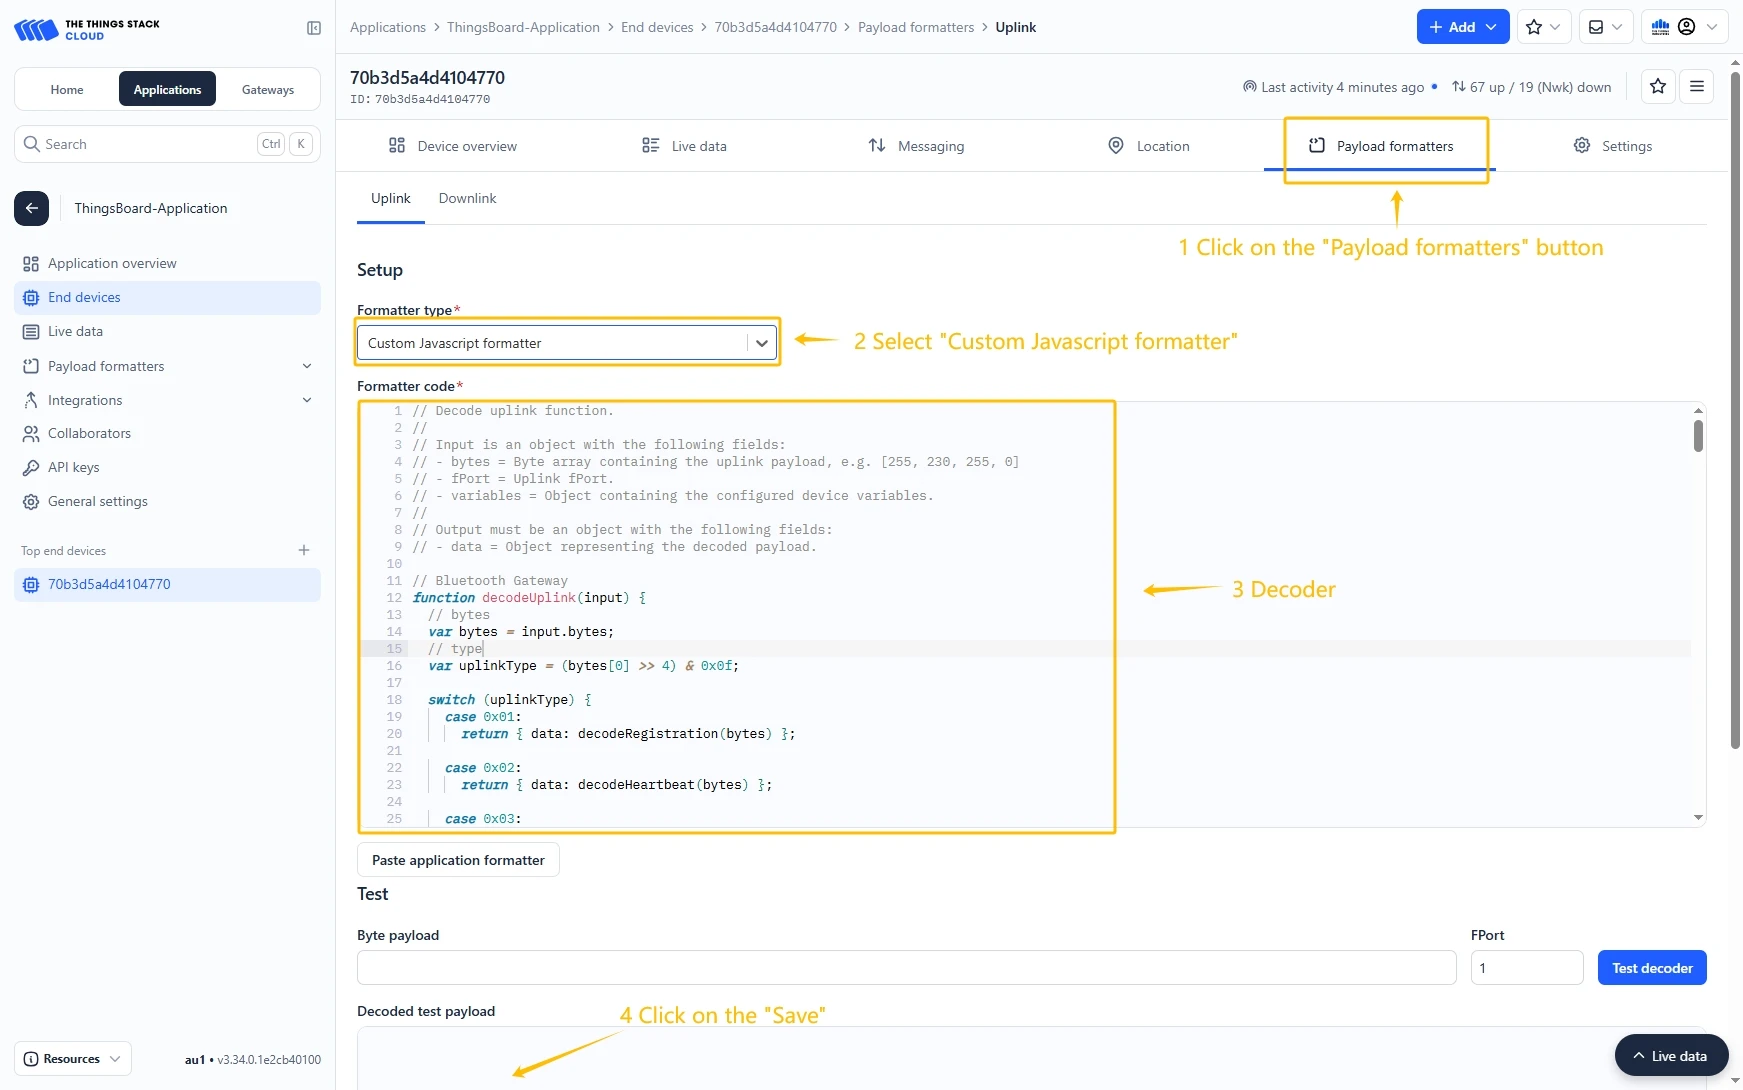
Configure Payload Formatter
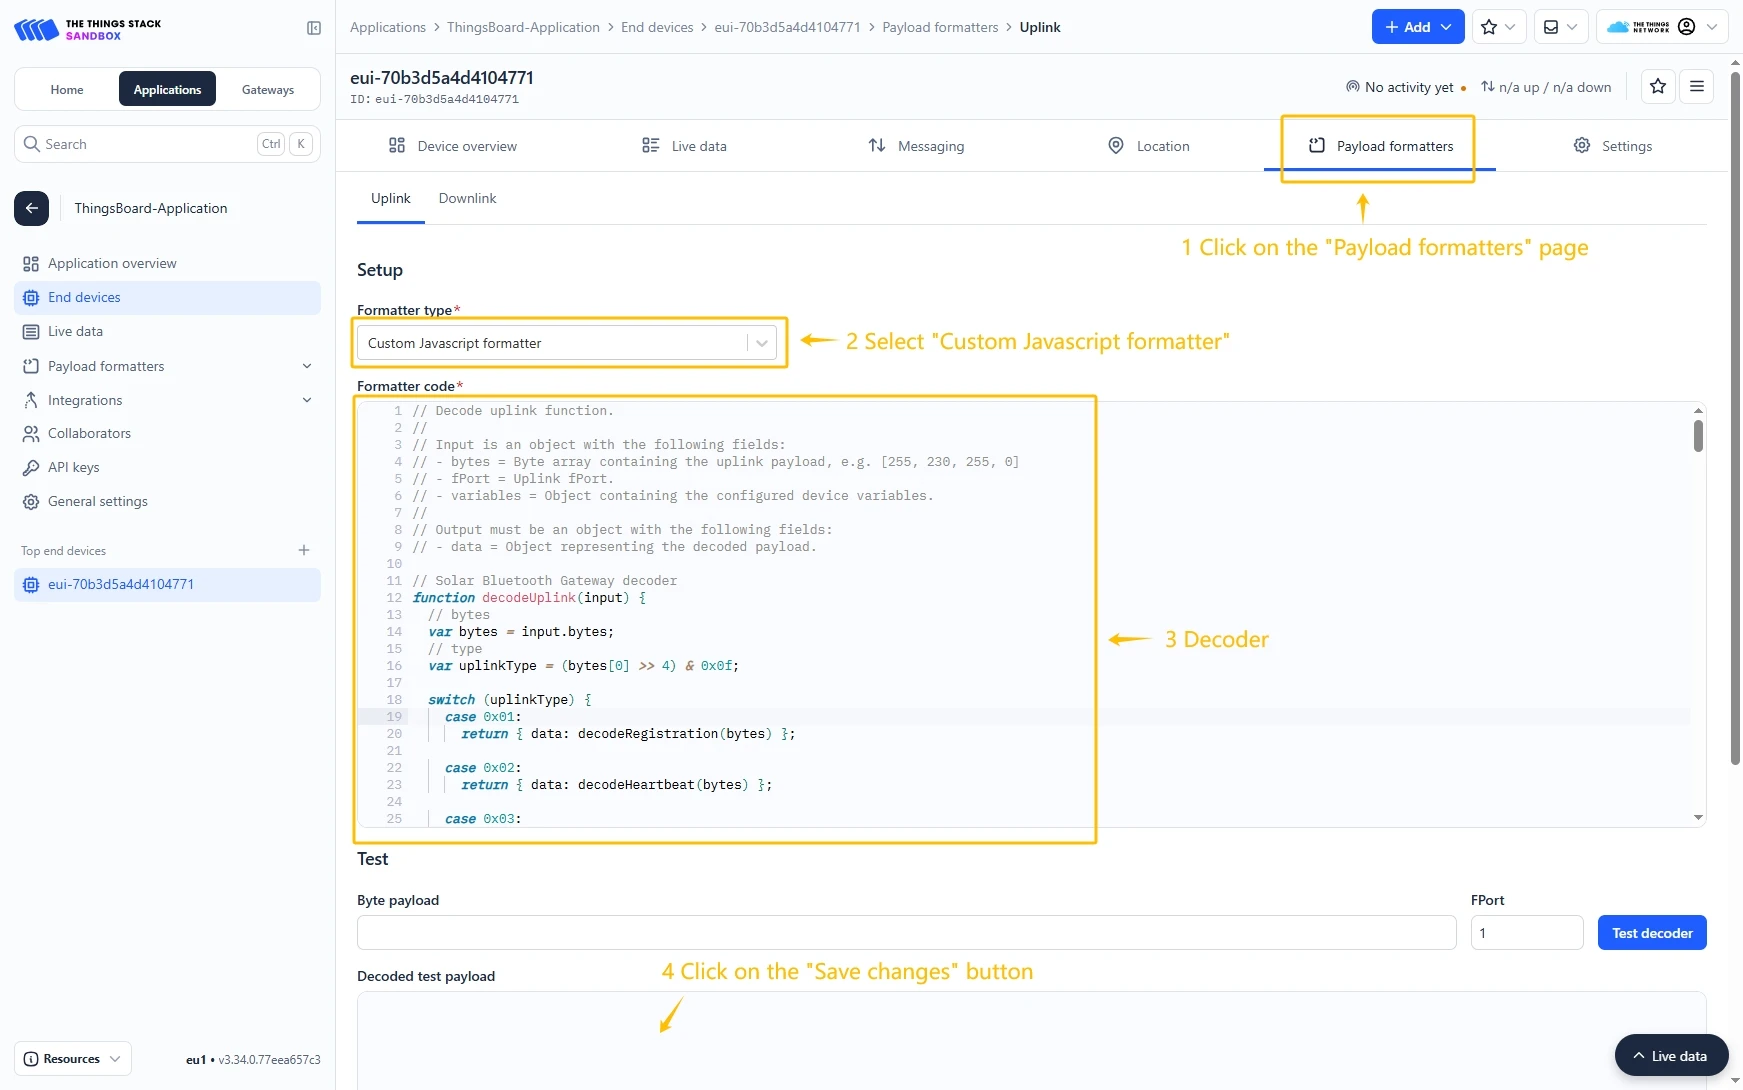
Go to the Payload formatters page and select Custom Javascript formatter for Formatter type. Paste the decode function and click Save changes button.
Decode function:
// Decode decodes an array of bytes into an object.// - fPort contains the LoRaWAN fPort number// - bytes is an array of bytes, e.g. [225, 230, 255, 0]// - variables contains the device variables e.g. {"calibration": "3.5"} (both the key / valueare of type string)// The function must return an object, e.g. {"temperature": 22.5}// Temperature & Humidity Sensor decoderfunction decodeUplink(input) {// bytes    var bytes = input.bytes;// type    var uplinkType = (bytes[0] >> 4) & 0x0f;    switch (uplinkType) {        case 0x01:            return {data: decodeRegistration(bytes)};        case 0x02:            return {data: decodeHeartbeat(bytes)};        case 0x0f:            return {data: decodeAcknowledgment(bytes)};        default:            return null;    }}
// type: 0x1 Registrationfunction decodeRegistration(bytes) {    var data = {};    data.type = "Registration";// adr    data.adr = ((bytes[0] >> 3) & 0x1) == 0 ? "OFF" : "ON";// mode    var modeValue = bytes[0] & 0x07;    if (modeValue == 0x01) {        data.mode = "AU920";    } else if (modeValue == 0x02) {        data.mode = "CLAA";    } else if (modeValue == 0x03) {        data.mode = "CN470";    } else if (modeValue == 0x04) {        data.mode = "AS923";    } else if (modeValue == 0x05) {        data.mode = "EU433";    } else if (modeValue == 0x06) {        data.mode = "EU868";    } else if (modeValue == 0x07) {        data.mode = "US915";    }// smode    var smodeValue = bytes[1];    if (smodeValue == 0x01) {        data.smode = "AU920";    } else if (smodeValue == 0x02) {        data.smode = "CLAA";    } else if (smodeValue == 0x04) {        data.smode = "CN470";    } else if (smodeValue == 0x08) {        data.smode = "AS923";    } else if (smodeValue == 0x10) {        data.smode = "EU433";    } else if (smodeValue == 0x20) {        data.smode = "EU868";    } else if (smodeValue == 0x40) {        data.smode = "US915";    }// power    data.power = ((bytes[2] >> 3) & 0x1f) + "dBm";// reserved    var reservedValue = bytes[2] & 0x07;    if (reservedValue == 1) {        data.frequencySweepMode = "A mode";    } else if (reservedValue == 2) {        data.frequencySweepMode = "B mode";    } else if (reservedValue == 3) {        data.frequencySweepMode = "C mode";    } else if (reservedValue == 4) {        data.frequencySweepMode = "D mode";    } else if (reservedValue == 5) {        data.frequencySweepMode = "E mode";    } else if (reservedValue == 6) {        data.frequencySweepMode = "All frequency sweep";    }// dr    data.dr = (bytes[3] >> 4) & 0x0f;// reptingdata.repting = ((bytes[3] >> 3) & 0x01) == 0 ? "false" : "true";// temperatureReportPeriod    data.temperatureReportPeriod =        (((bytes[4] << 8) & 0xff00) | (bytes[5] & 0xff)) * 10 + "s";// crc    data.crc = ((bytes[6] << 8) & 0xff00) | (bytes[7] & 0xff);    return data;}
// type: 0x2 Heartbeatfunction decodeHeartbeat(bytes) {    var data = {};// type    data.type = "Heartbeat";// version    data.version = bytes[0] & 0x0f;// battery    data.battery = bytes[1] + "%";// rssi    data.rssi = bytes[2] * -1 + "dBm";// snr    data.snr = (((bytes[3] << 8) & 0xff00) | (bytes[4] & 0xff)) / 100;// temperature    if (0 == ((bytes[5] >> 7) & 0x01)) {        var tempInt = bytes[5] & 0x7f;        var tempFra = bytes[6];        data.temperature = tempInt + "." + tempFra + "℃";    } else {        var tempInt = (bytes[5] & 0x7f) * -1;        var tempFra = bytes[6];        data.temperature = tempInt + "." + tempFra + "℃";    }// humidity    data.humidity = bytes[7] + "%";// crc    data.crc = ((bytes[8] << 8) & 0xff00) | (bytes[9] & 0xff);    return data;}
// type: 0xf Acknowledgmentfunction decodeAcknowledgment(bytes) {    var data = {};    data.type = "Acknowledgment";    data.result = (bytes[0] & 0x0f) == 0 ? "Success" : "Failure";    data.msgId = (bytes[1] & 0xff).toString(16).toUpperCase();    return data;}
Create integration in ThingsBoard
Next we will create “The Things Stack” (TTS) integration inside the ThingsBoard.
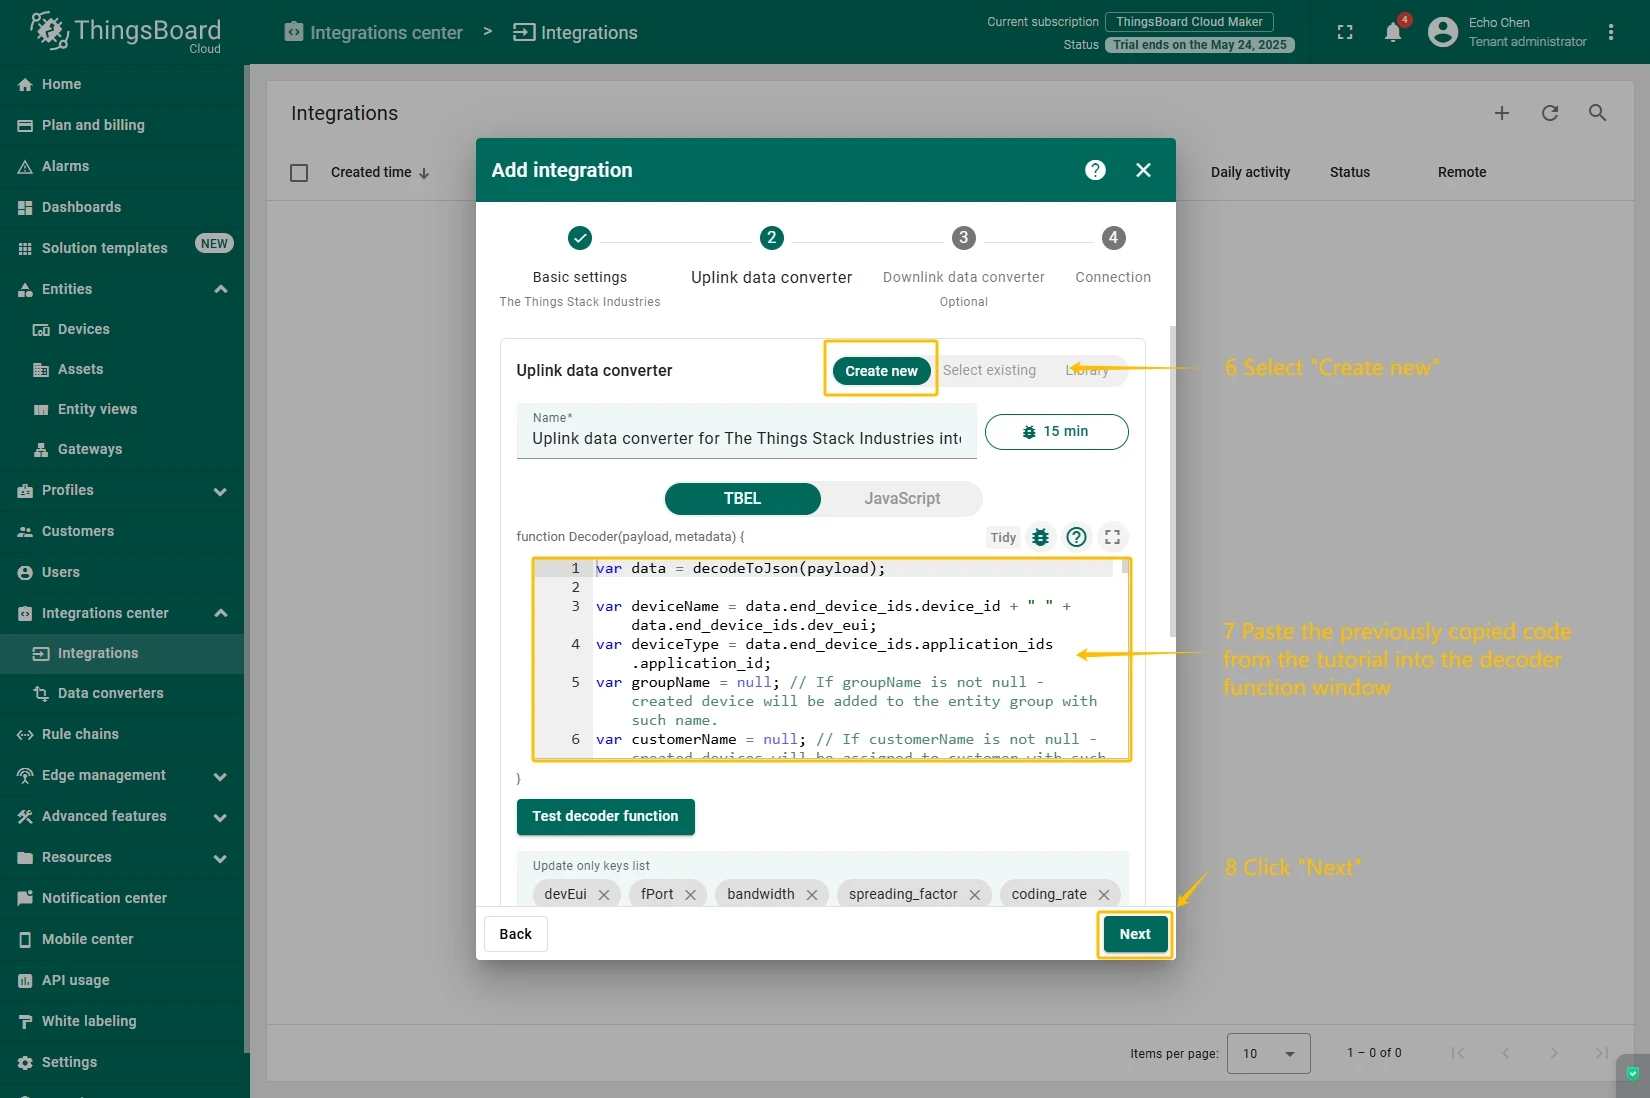
At first, copy the code, we will need it to create the uplink converter:
var data = decodeToJson(payload);var deviceName = data.end_device_ids.device_id;var deviceType = data.end_device_ids.application_ids.application_id;
var result = { deviceName: deviceName, deviceType: deviceType, telemetry: data.uplink_message.decoded_payload};
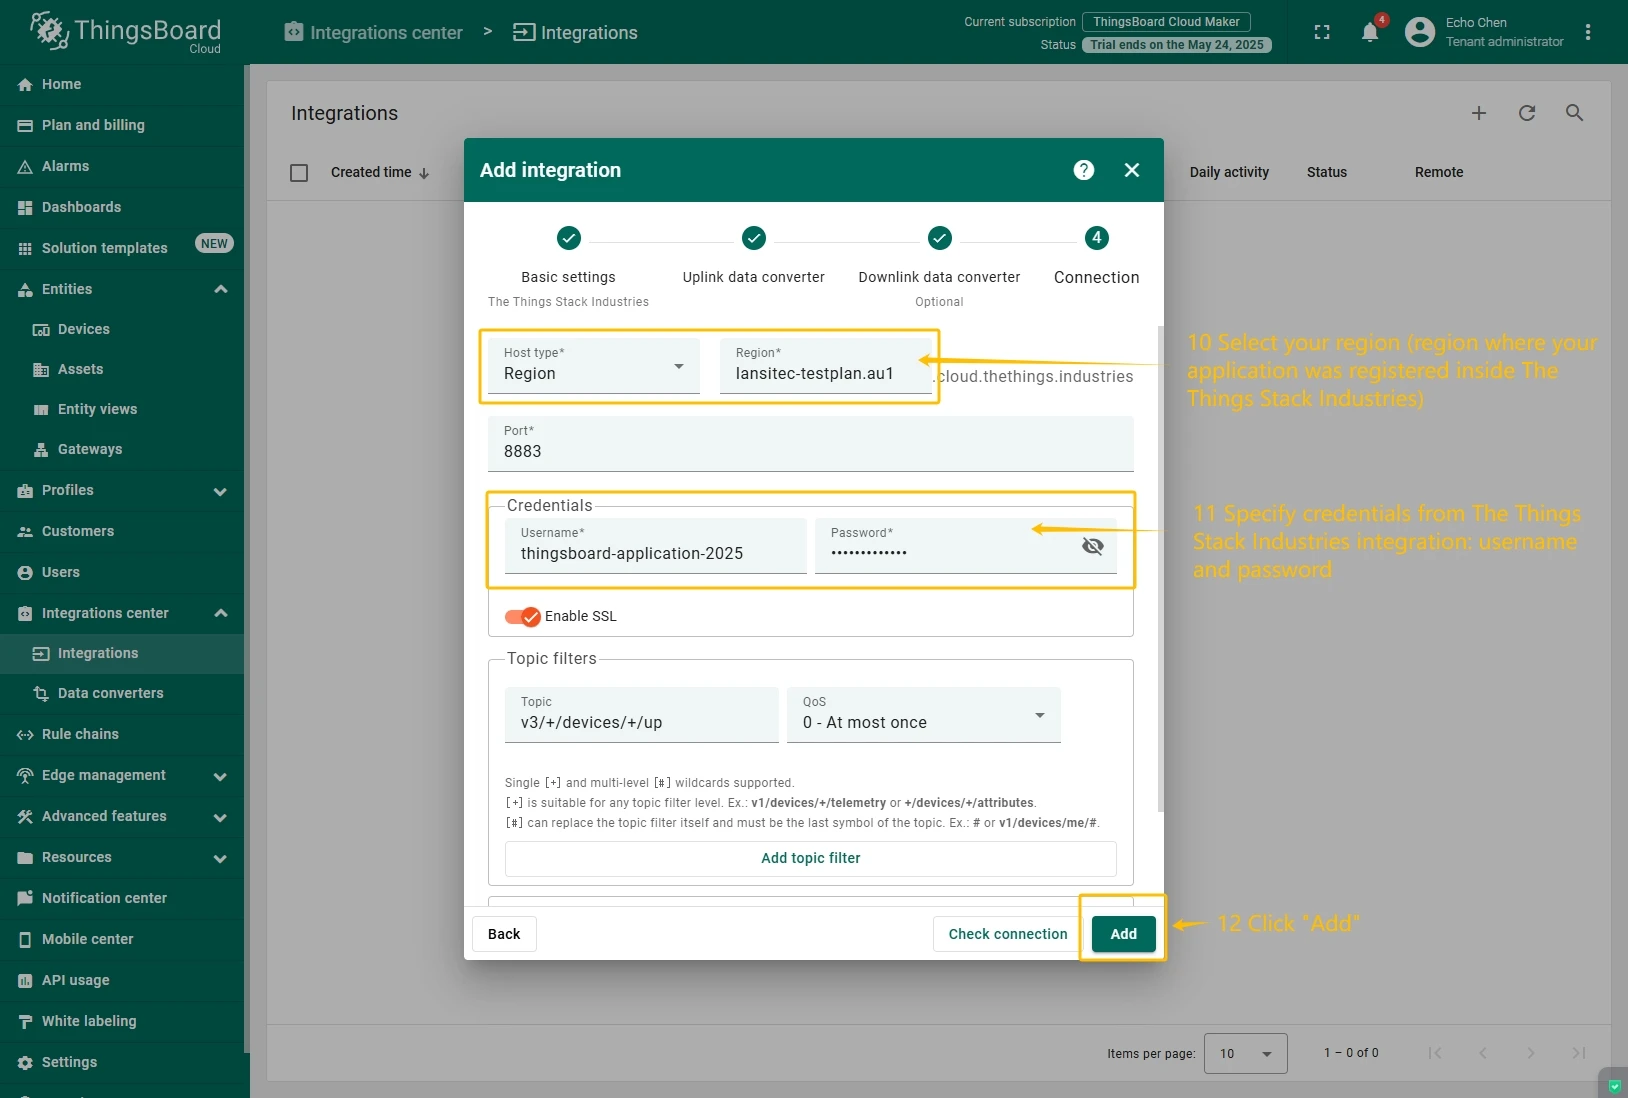
return result;In the “Connect”step, you will need the following parameters:
- Region: eu1 (region where your application was registered inside The Things Stack Community)
- Username: thingsboard-application-2025-06@ttn (use Username from integration on TTS)
- Password: use Password from integration on The Things Stack Community
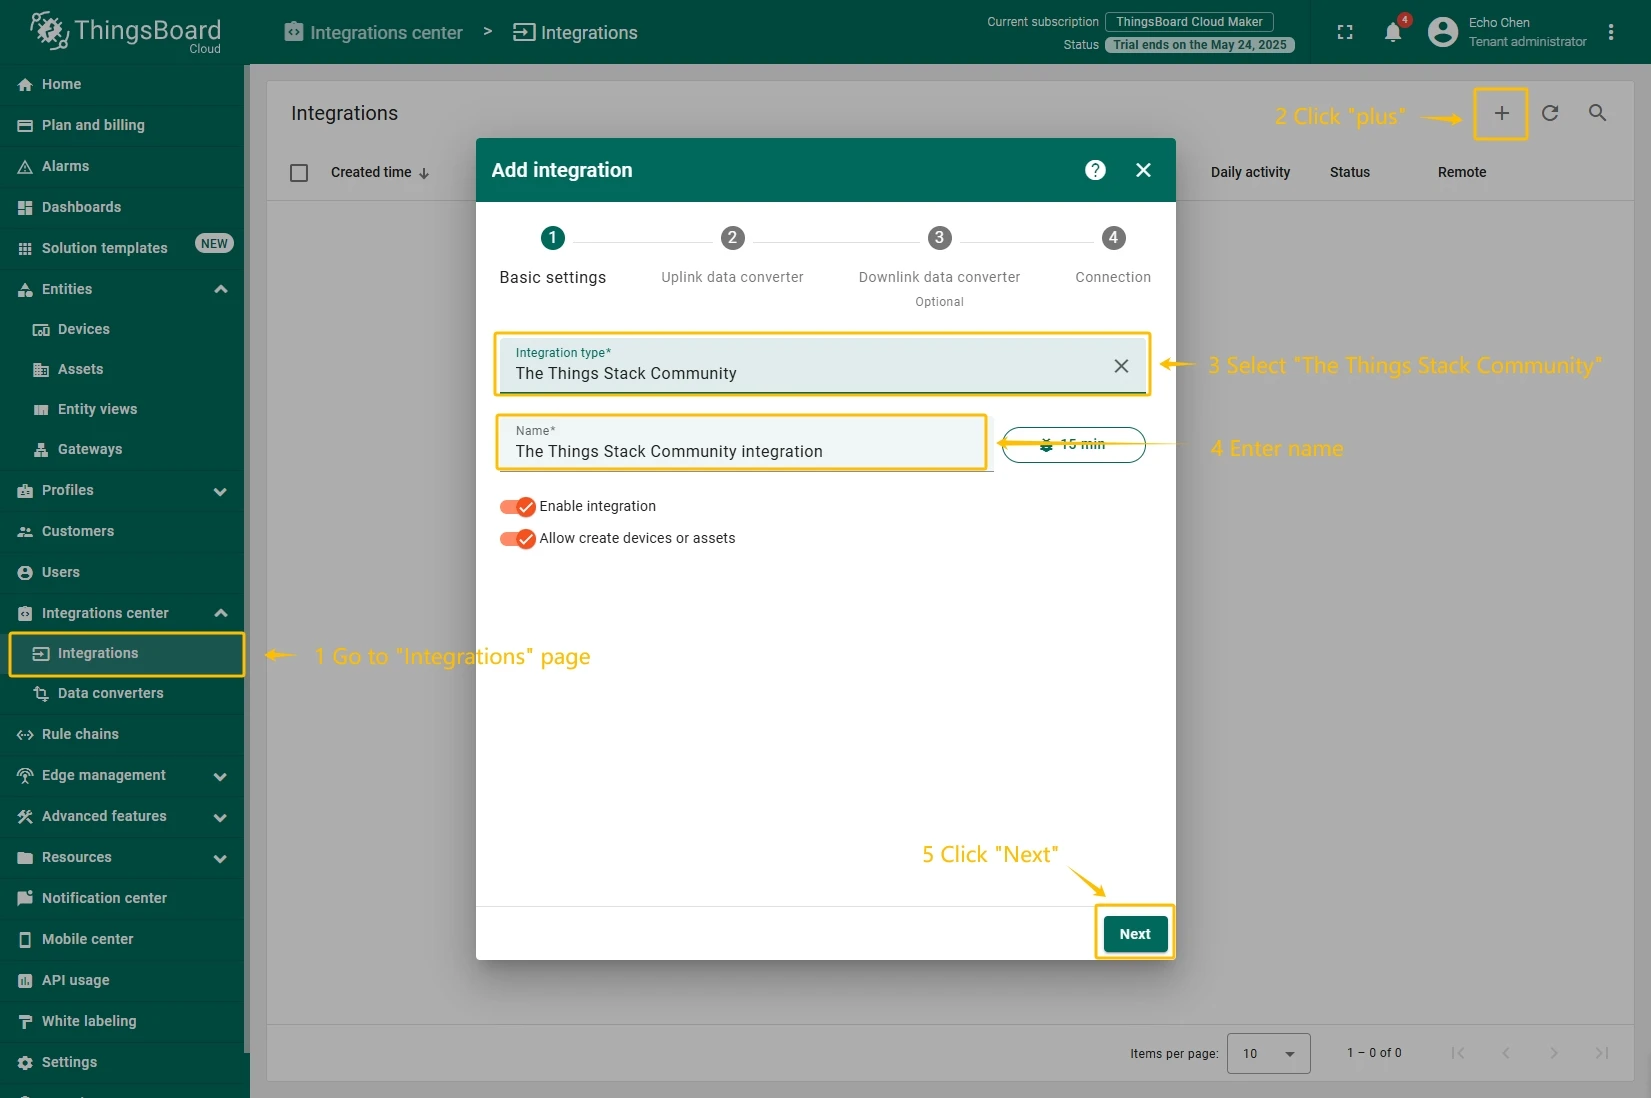
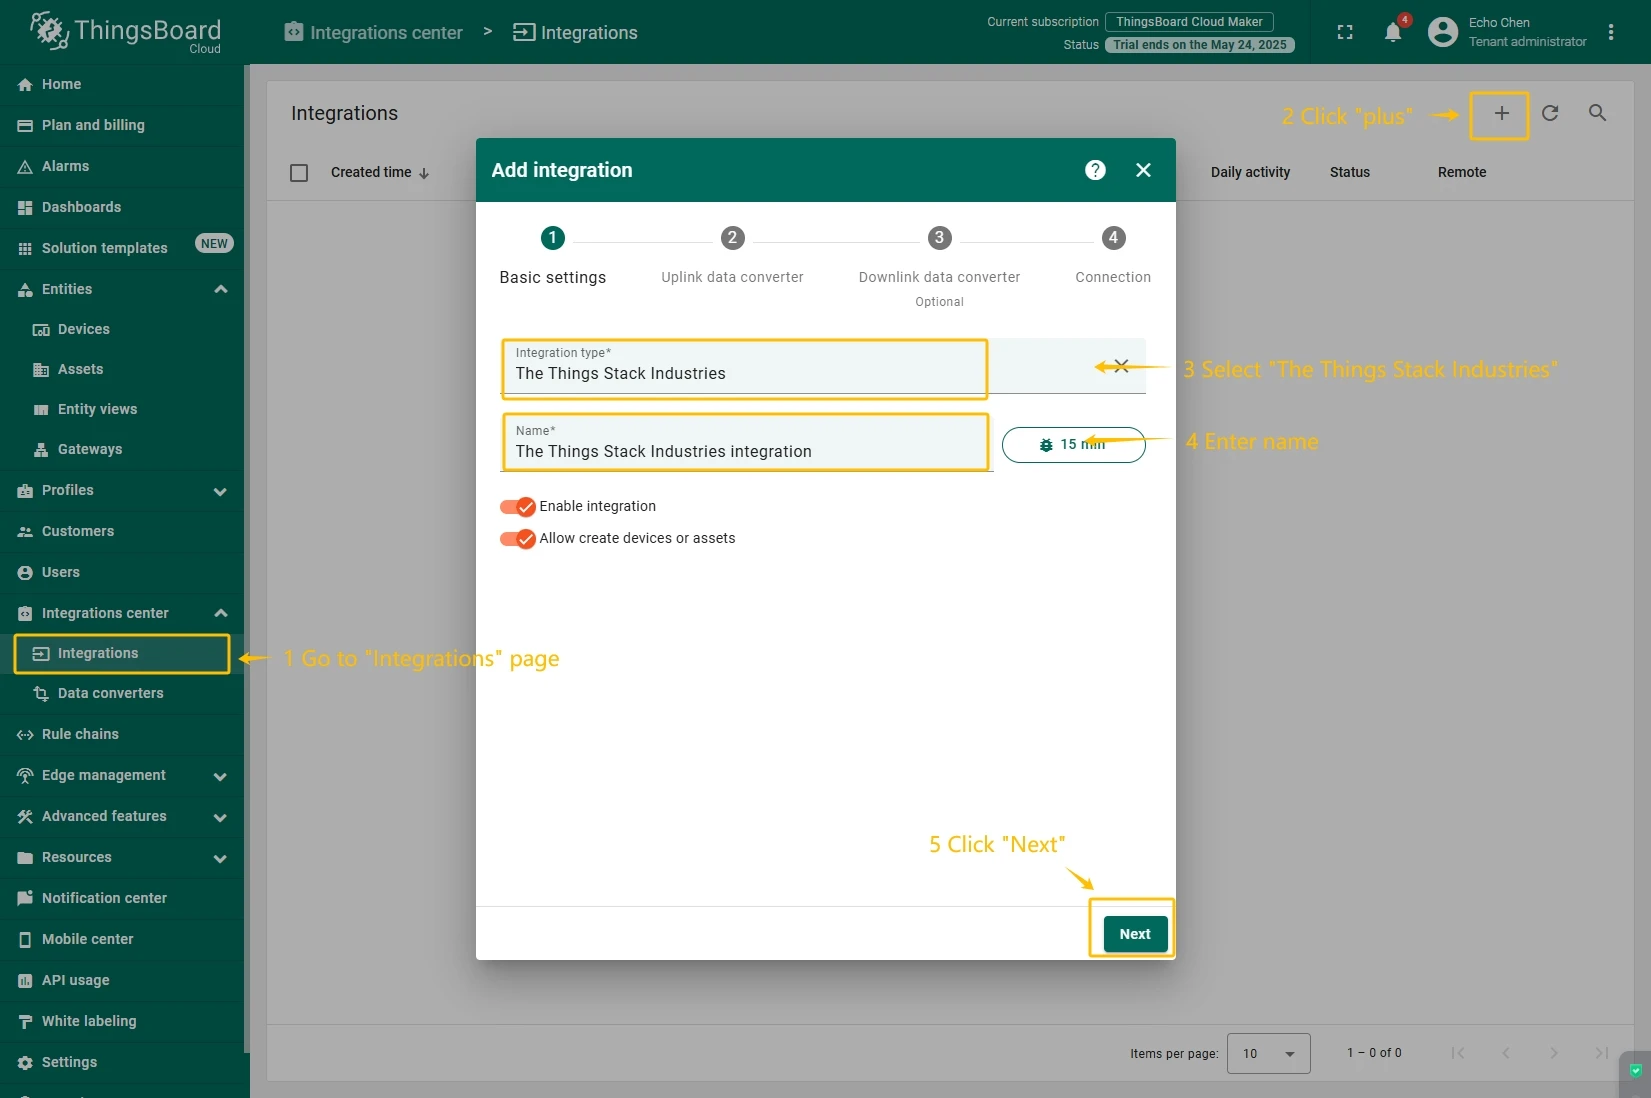
Now, navigate to the “Integrations” page under the “Integrations center” section and follow this steps:
- Click “plus” icon in the upper right corner to add new integration. Select type “The Things Stack Community”. Then, click “Next” button.
- Paste the previously copied script to the Decoder function section. Click “Next” button.
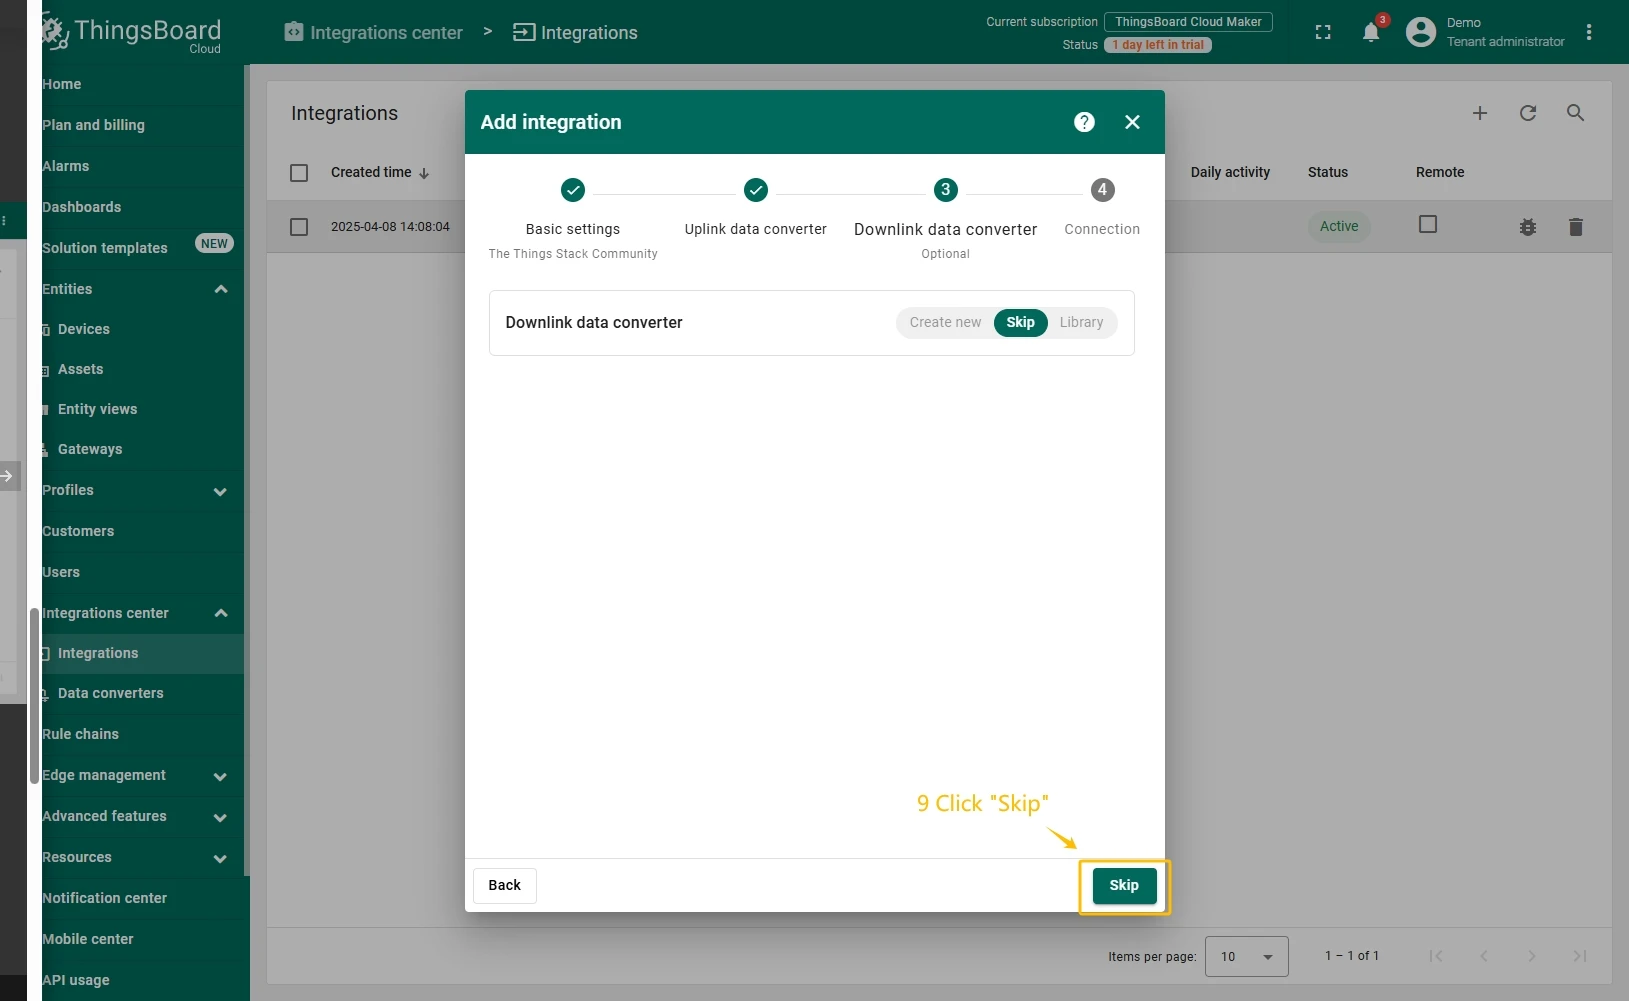
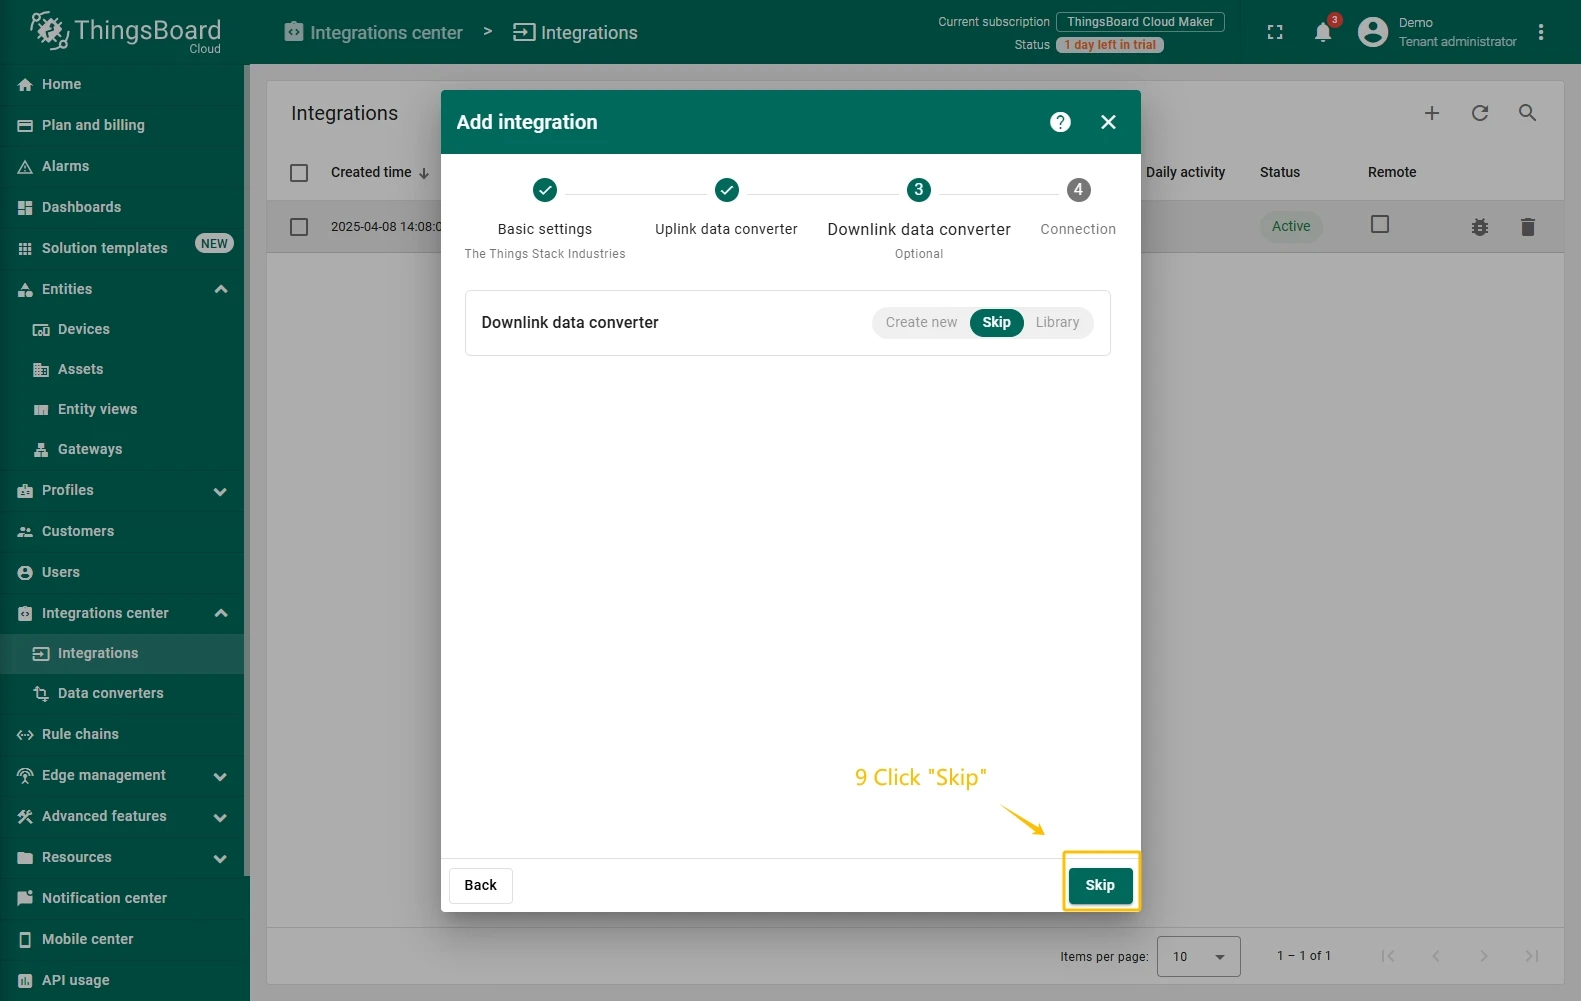
- Leave the “Downlink data converter” field empty. Click on “Skip” button.
- Next, fill in the fields with your parameters. After, press “Add” button.


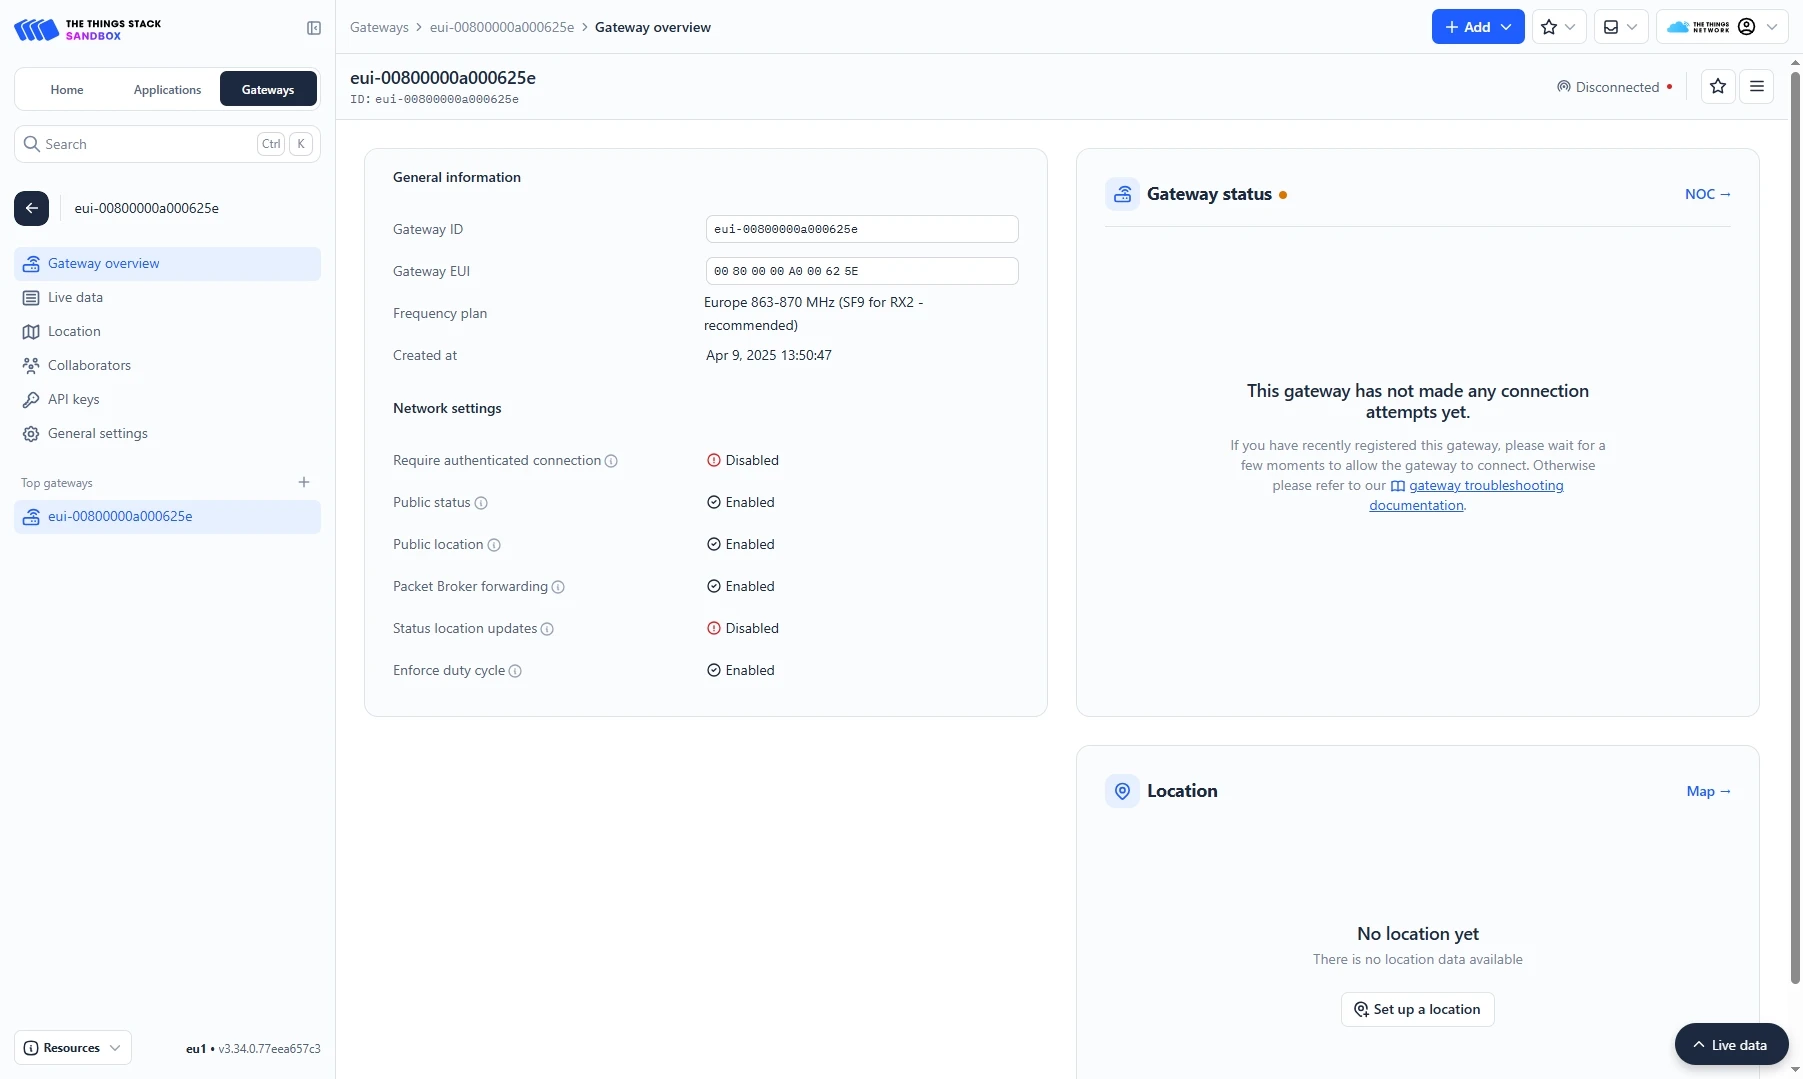
Add a gateway on The Things Industries
We need to add a gateway on The Things Industries cloud.
To add a gateway, you can follow next steps:
- Login to the cloud and open your console.
- Go to the Home page press the “Register gateway” button.
- Put information about the gateway (gateway EUI) and click the “Register gateway”button.
- The gateway is added. You can see its status - disconnected.


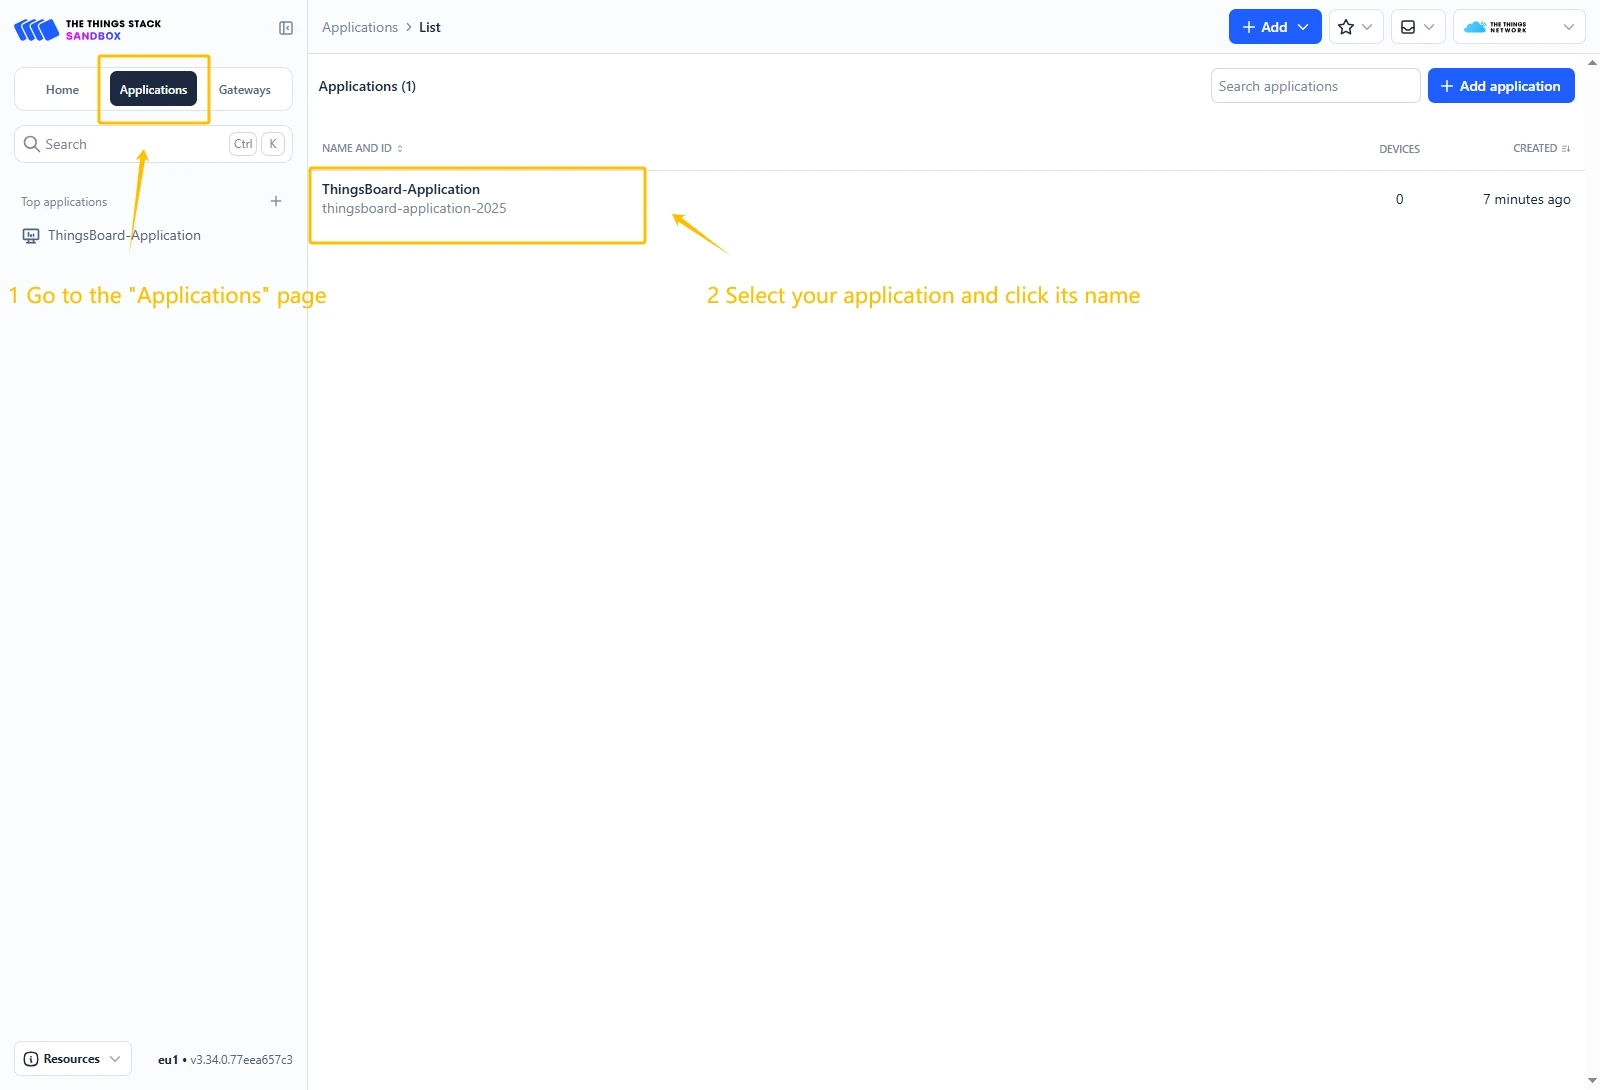
Add a device on The Things Industries
We need to add a device on The Things Industries cloud.
To add a device, you can follow next steps:
- Go to the Applications page. Then select your application and click on its name.
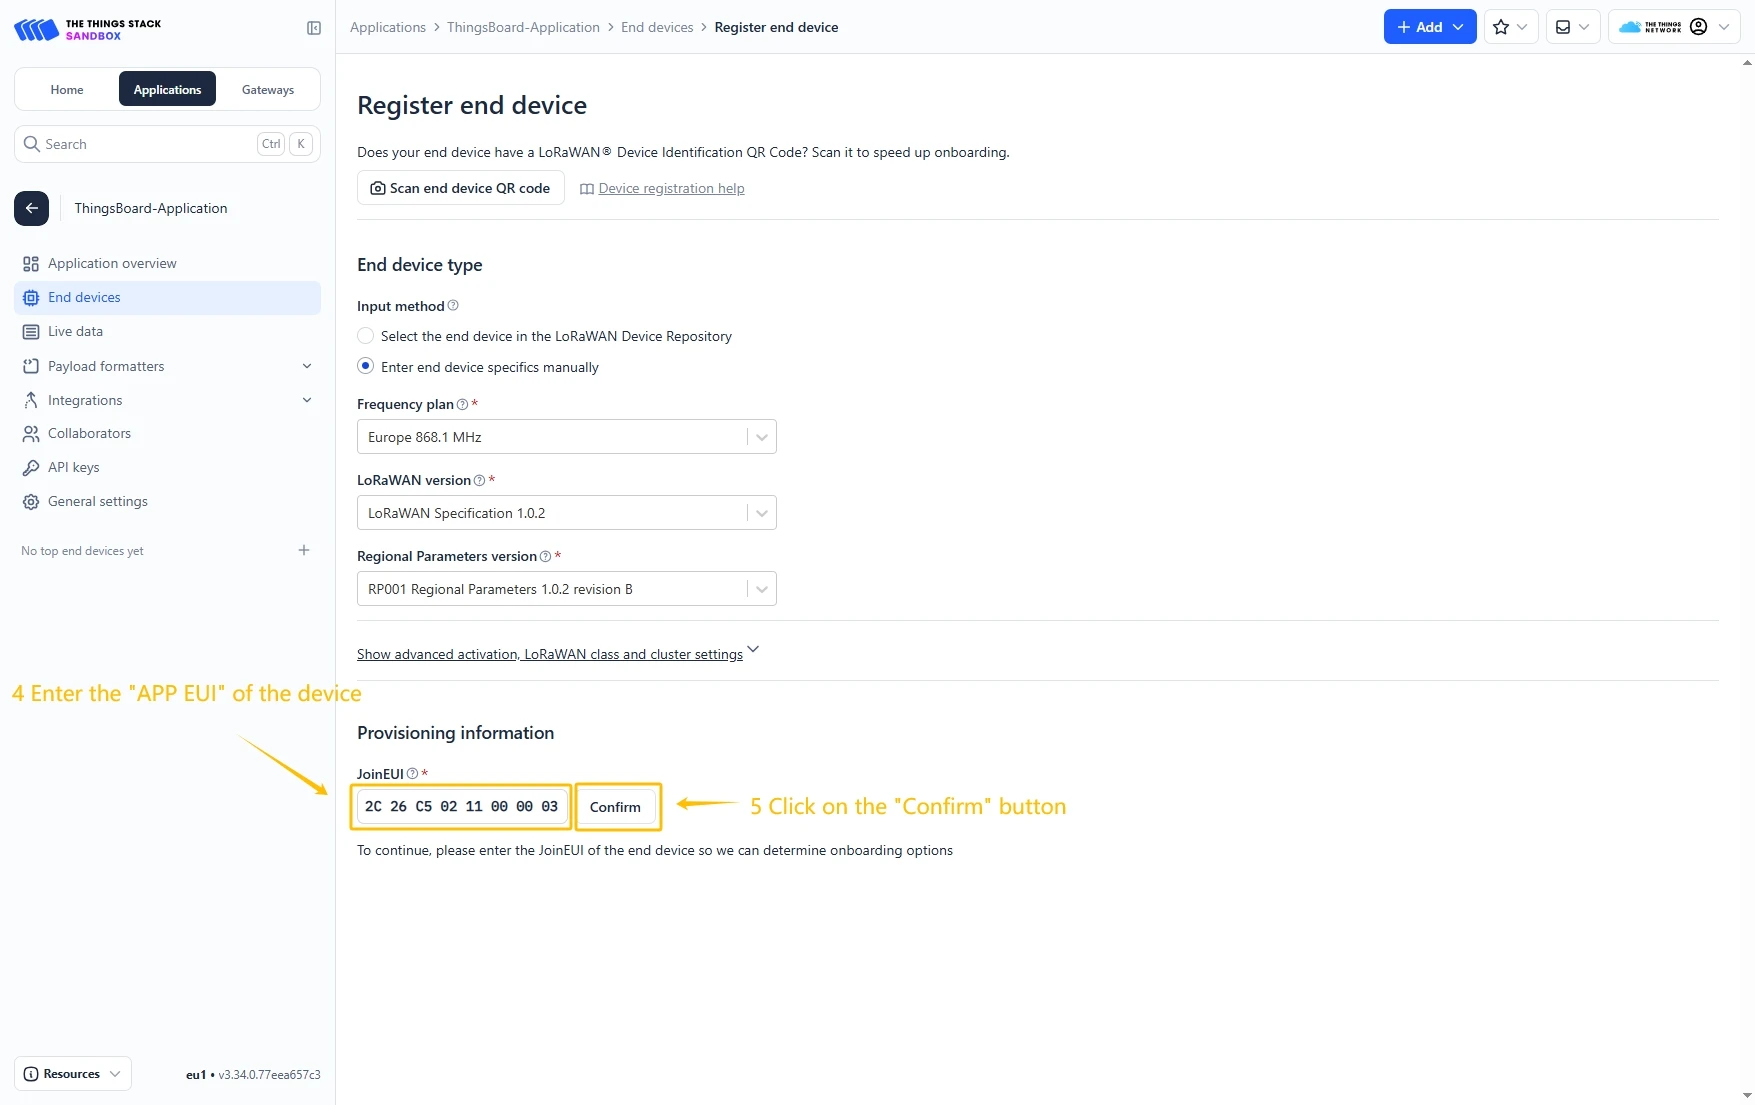
- Click on the Register end device button.
- Put the APP EUI value to the JoinEUI field. Then, press the Confirm button.
- Fill the rest parameters and press Register end device button.


Configure Payload Formatter
Go to the Payload formatters page and select Custom JavaScript formatter as the Formatter type. Paste the decode function into the editor and click the Save changes button.
Decode function:
// Decode decodes an array of bytes into an object.// - fPort contains the LoRaWAN fPort number// - bytes is an array of bytes, e.g. [225, 230, 255, 0]// - variables contains the device variables e.g. {"calibration": "3.5"} (both the key / value are of type string)// The function must return an object, e.g. {"temperature": 22.5}// Temperature & Humidity Sensor decoderfunction decodeUplink(input) {// bytes    var bytes = input.bytes;// type    var uplinkType = (bytes[0] >> 4) & 0x0f;    switch (uplinkType) {        case 0x01:            return {data: decodeRegistration(bytes)};        case 0x02:            return {data: decodeHeartbeat(bytes)};        case 0x0f:            return {data: decodeAcknowledgment(bytes)};        default:            return null;    }}
// type: 0x1 Registrationfunction decodeRegistration(bytes) {    var data = {};    data.type = "Registration";// adrdata.adr = ((bytes[0] >> 3) & 0x1) == 0 ? "OFF" : "ON";// mode    var modeValue = bytes[0] & 0x07;    if (modeValue == 0x01) {        data.mode = "AU920";    } else if (modeValue == 0x02) {        data.mode = "CLAA";    } else if (modeValue == 0x03) {        data.mode = "CN470";    } else if (modeValue == 0x04) {        data.mode = "AS923";    } else if (modeValue == 0x05) {        data.mode = "EU433";    } else if (modeValue == 0x06) {        data.mode = "EU868";    } else if (modeValue == 0x07) {        data.mode = "US915";    }// smode    var smodeValue = bytes[1];    if (smodeValue == 0x01) {        data.smode = "AU920";    } else if (smodeValue == 0x02) {        data.smode = "CLAA";    } else if (smodeValue == 0x04) {        data.smode = "CN470";    } else if (smodeValue == 0x08) {        data.smode = "AS923";    } else if (smodeValue == 0x10) {        data.smode = "EU433";    } else if (smodeValue == 0x20) {        data.smode = "EU868";    } else if (smodeValue == 0x40) {        data.smode = "US915";    }// power    data.power = ((bytes[2] >> 3) & 0x1f) + "dBm";// reserved    var reservedValue = bytes[2] & 0x07;    if (reservedValue == 1) {        data.frequencySweepMode = "A mode";    } else if (reservedValue == 2) {        data.frequencySweepMode = "B mode";    } else if (reservedValue == 3) {        data.frequencySweepMode = "C mode";    } else if (reservedValue == 4) {        data.frequencySweepMode = "D mode";    } else if (reservedValue == 5) {        data.frequencySweepMode = "E mode";    } else if (reservedValue == 6) {        data.frequencySweepMode = "All frequency sweep";    }// dr    data.dr = (bytes[3] >> 4) & 0x0f;// repting    data.repting = ((bytes[3] >> 3) & 0x01) == 0 ? "false" : "true";// temperatureReportPeriod    data.temperatureReportPeriod =        (((bytes[4] << 8) & 0xff00) | (bytes[5] & 0xff)) * 10 + "s";// crc    data.crc = ((bytes[6] << 8) & 0xff00) | (bytes[7] & 0xff);    return data;}
// type: 0x2 Heartbeatfunction decodeHeartbeat(bytes) {    var data = {};// type    data.type = "Heartbeat";// version    data.version = bytes[0] & 0x0f;// battery    data.battery = bytes[1] + "%";// rssi    data.rssi = bytes[2] * -1 + "dBm";// snr    data.snr = (((bytes[3] << 8) & 0xff00) | (bytes[4] & 0xff)) / 100;// temperature    if (0 == ((bytes[5] >> 7) & 0x01)) {        var tempInt = bytes[5] & 0x7f;        var tempFra = bytes[6];        data.temperature = tempInt + "." + tempFra + "℃";    } else {        var tempInt = (bytes[5] & 0x7f) * -1;        var tempFra = bytes[6];        data.temperature = tempInt + "." + tempFra + "℃";    }// humidity    data.humidity = bytes[7] + "%";// crc    data.crc = ((bytes[8] << 8) & 0xff00) | (bytes[9] & 0xff);    return data;}
// type: 0xf Acknowledgmentfunction decodeAcknowledgment(bytes) {    var data = {};    data.type = "Acknowledgment";    data.result = (bytes[0] & 0x0f) == 0 ? "Success" : "Failure";    data.msgId = (bytes[1] & 0xff).toString(16).toUpperCase();    return data;}
Create integration in ThingsBoard
Next, we will create the “TheThingsIndustries” integration inside the ThingsBoard.
At first, copy the code, we will need it to create the uplink converter:
var data = decodeToJson(payload);var deviceName = data.end_device_ids.device_id;var deviceType = data.end_device_ids.application_ids.application_id;
var result = {  deviceName: deviceName,  deviceType: deviceType,  telemetry: data.uplink_message.decoded_payload};
return result;
In the “Connect”step, you will need the following parameters:
- Region: eu1 (region where your application was registered inside The Things Industries Console);
- Username: thingsboard-application-2025-05@lansitec-testplan (use Username from integration on The Things Stack Industries);
- Password: use Password from integration on The Things Industries.
Now, navigate to the “Integrations” page under the “Integrations center” section and follow this steps:
- Click “plus”icon in the upper right corner to add new integration. Select type “The Things Industries Integration”. Then, click “Next” button.
- Paste the previously copied script to the Decoder function section. Click “Next” button.
- Leave the “Downlink data converter”field empty. Click on “Skip”button.
- Next, fill in the fields with your parameters. After, press “Add” button.
Add a gateway on the Loriot
We need to add a gateway on the Loriot.
To add a gateway, you can follow next steps:
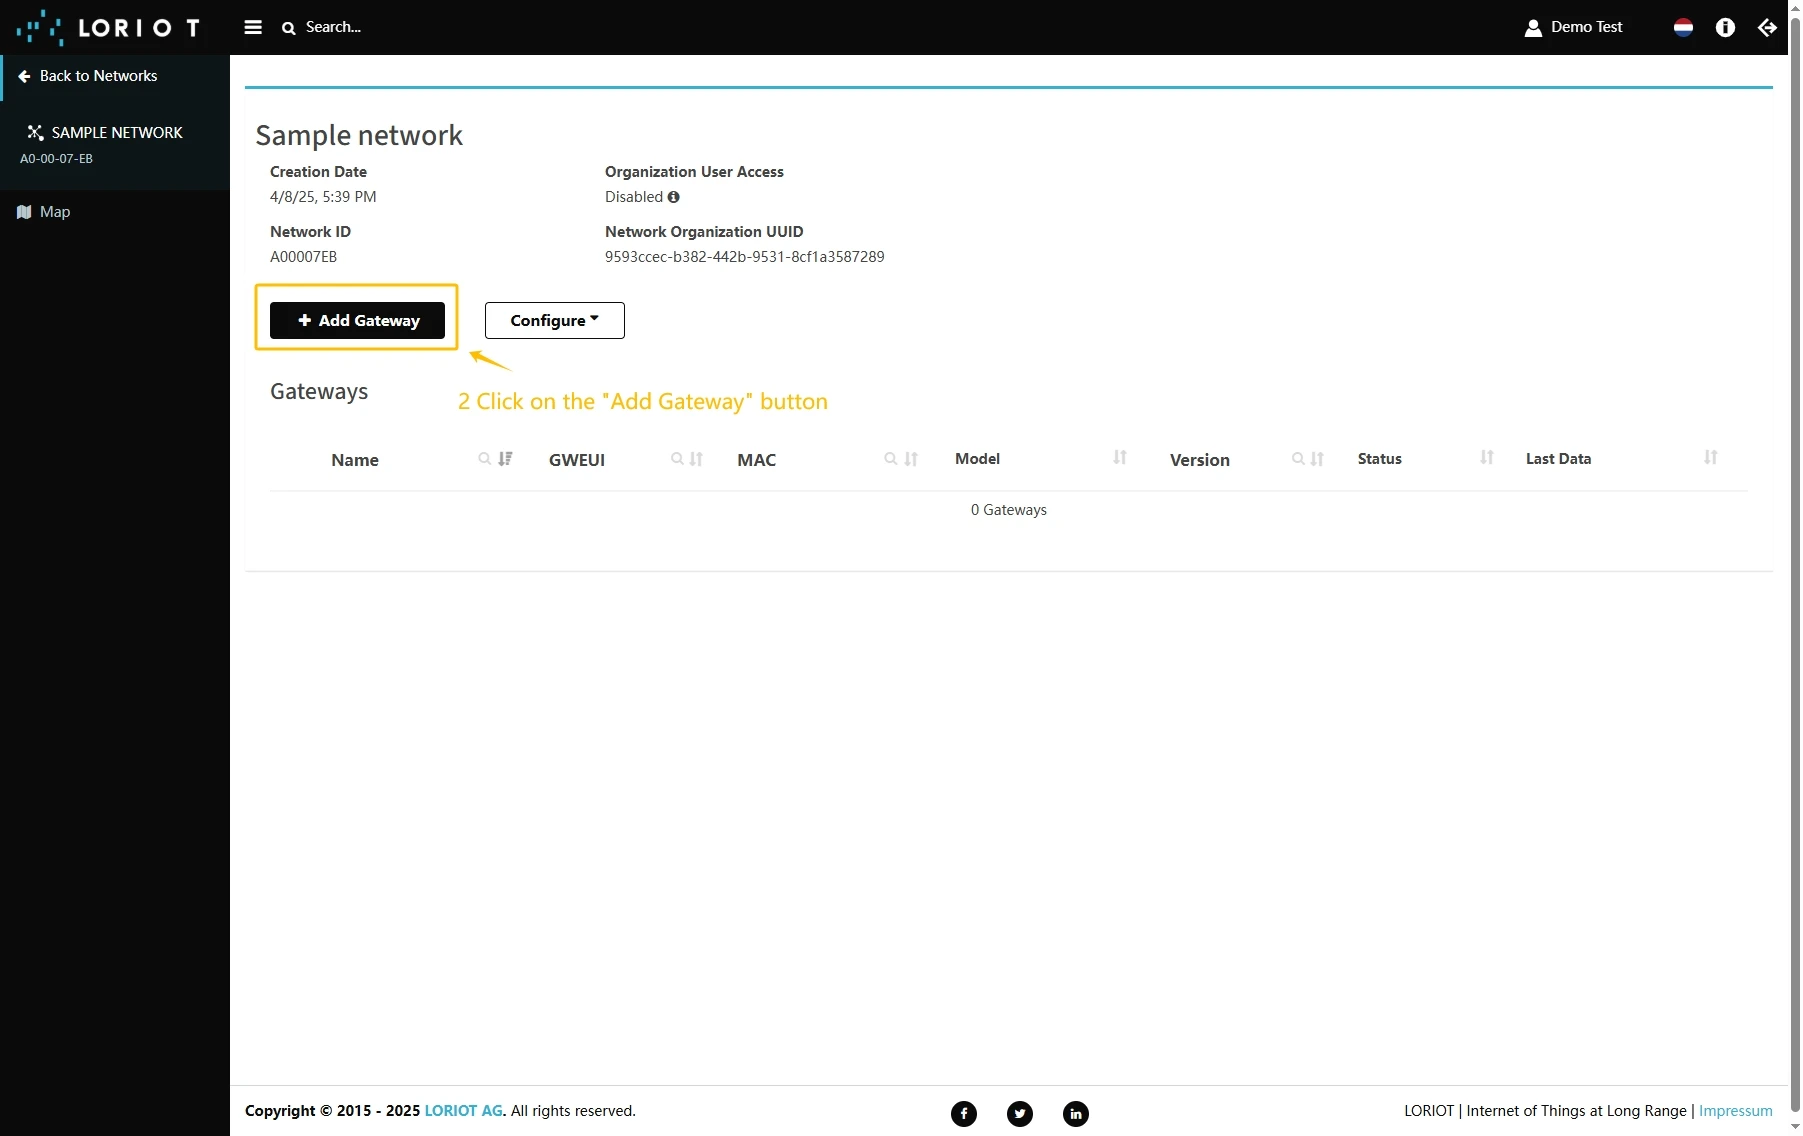
- Login to Loriot server. Open the “Sample network” or create a new one in the “Networks” section.
- Click on the “Add Gateway” button.
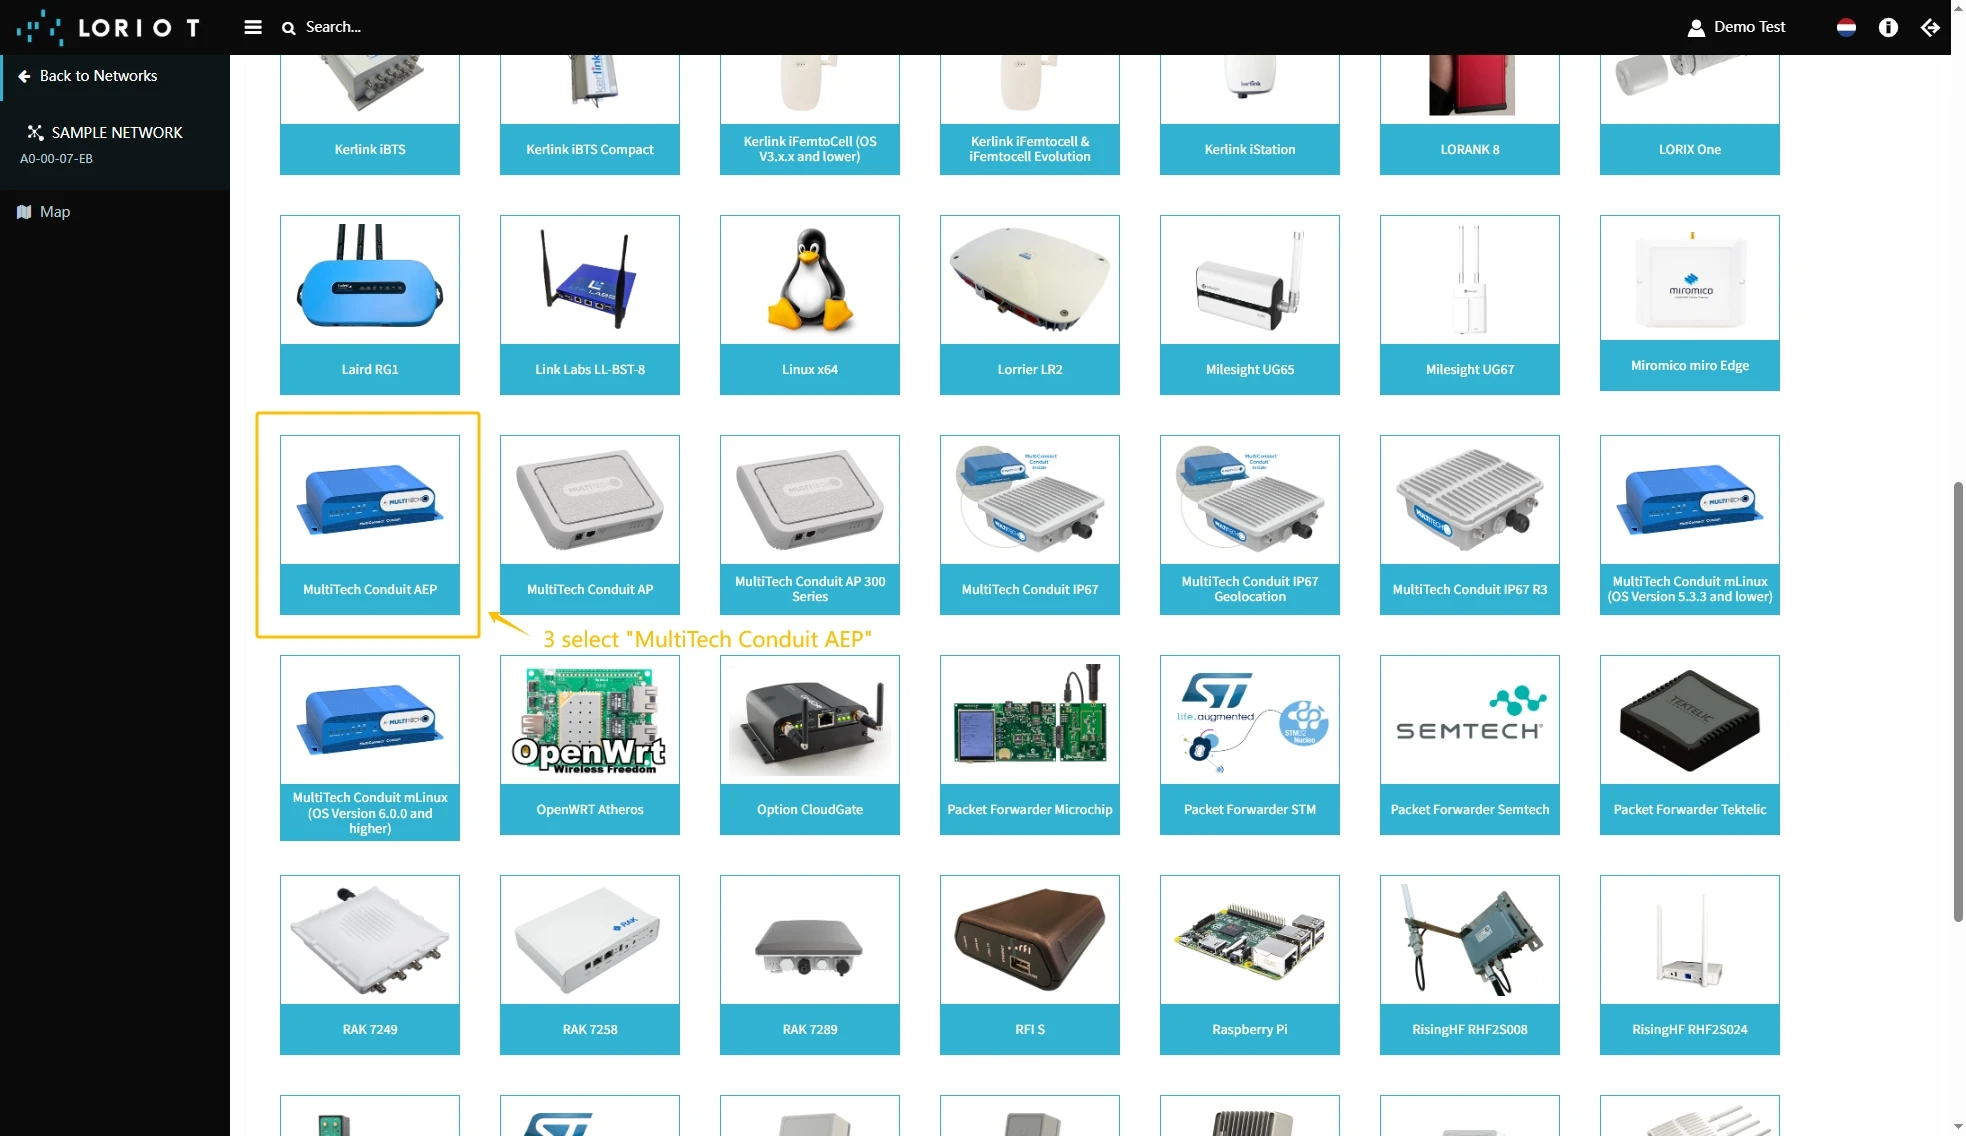
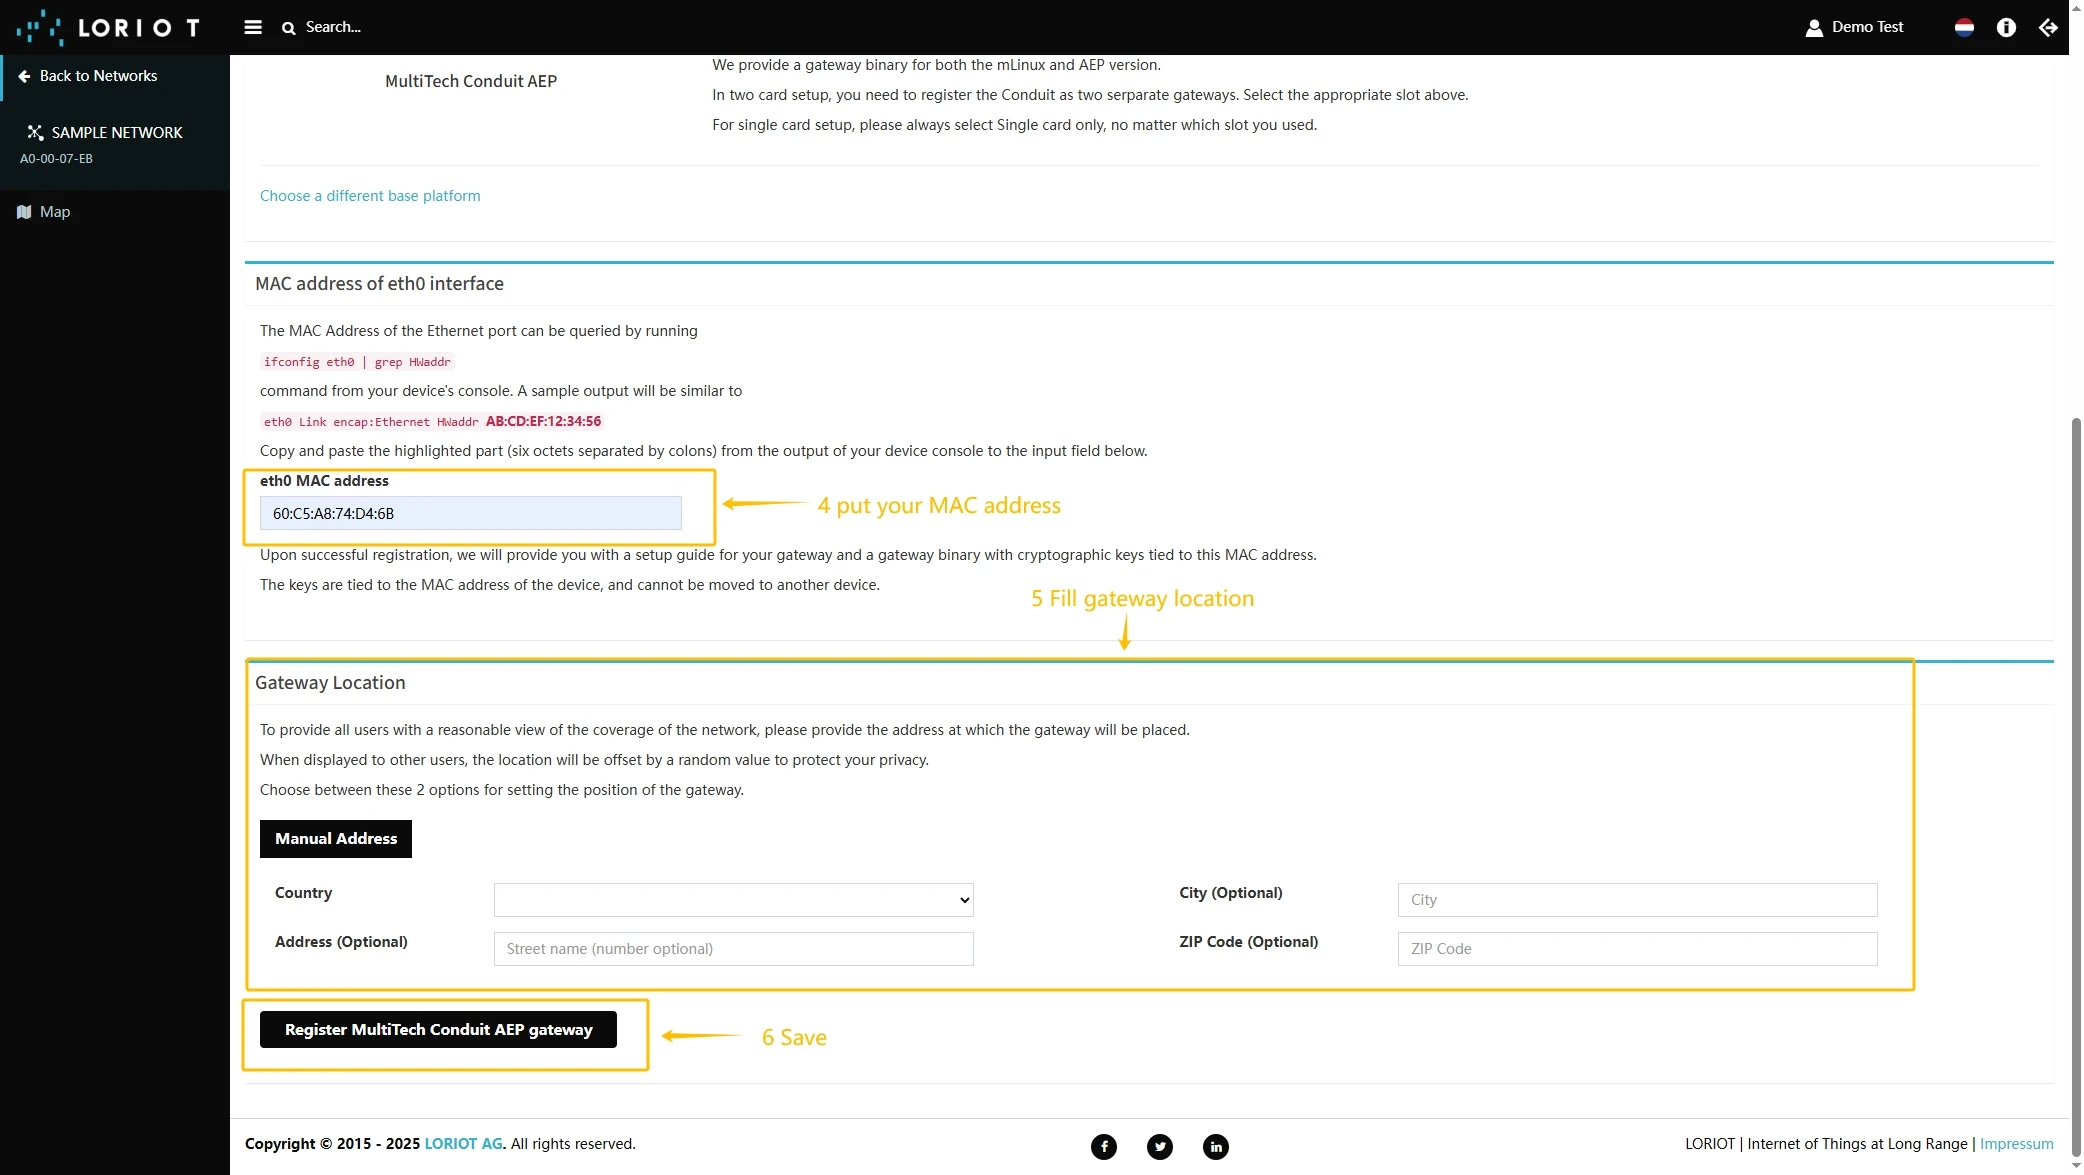
- Scroll down and select “MultiTech Conduit AEP”.
- Scroll up and put information about the gateway MAC Address (Just remove FFFF or FFFE in the middle of gateway EUI) into eth0 MAC address and gateway EUI to Custom EUI field.
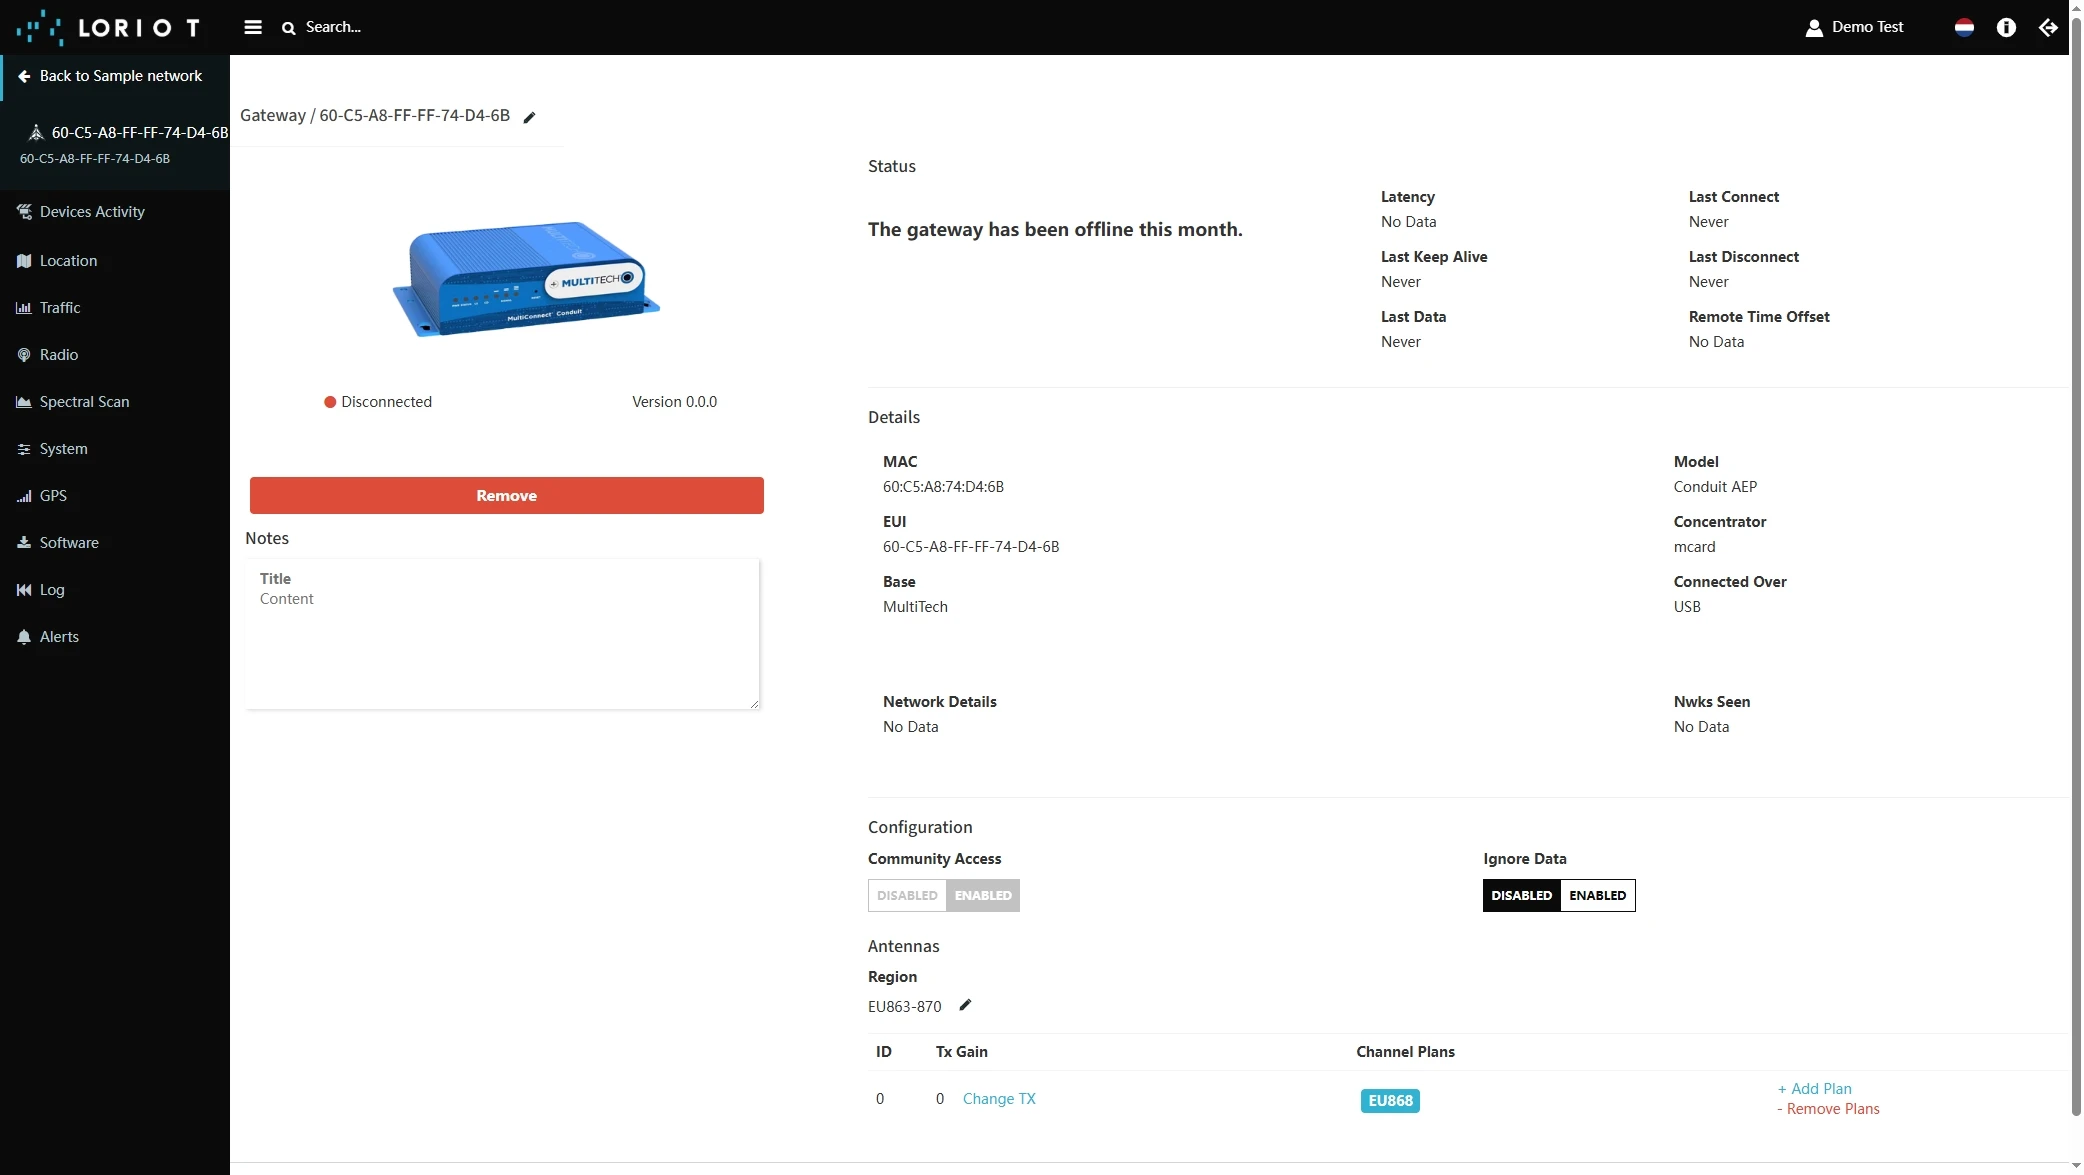
- The gateway is added. You can see its status - disconnected.

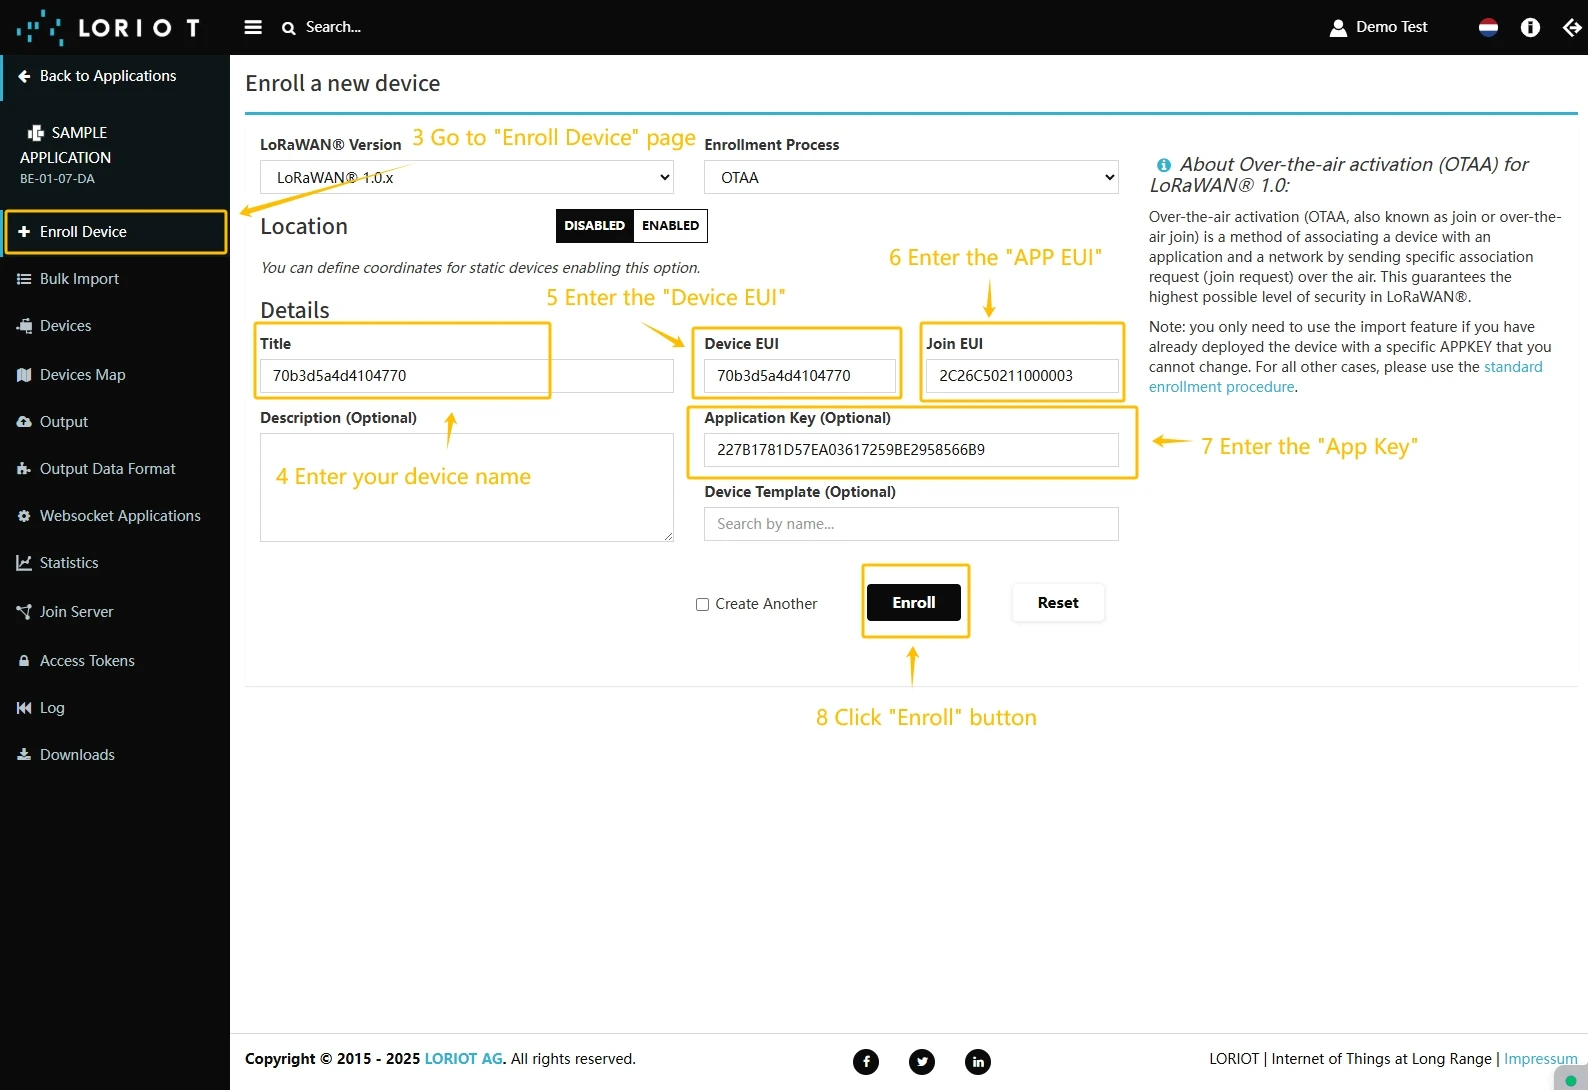
Add a device on the Loriot
We need to add a device on the Loriot.
To add a device, you can follow next steps:
- Login to Loriot server. We use eu2.loriot.io, but it depends on chosen region during registration.
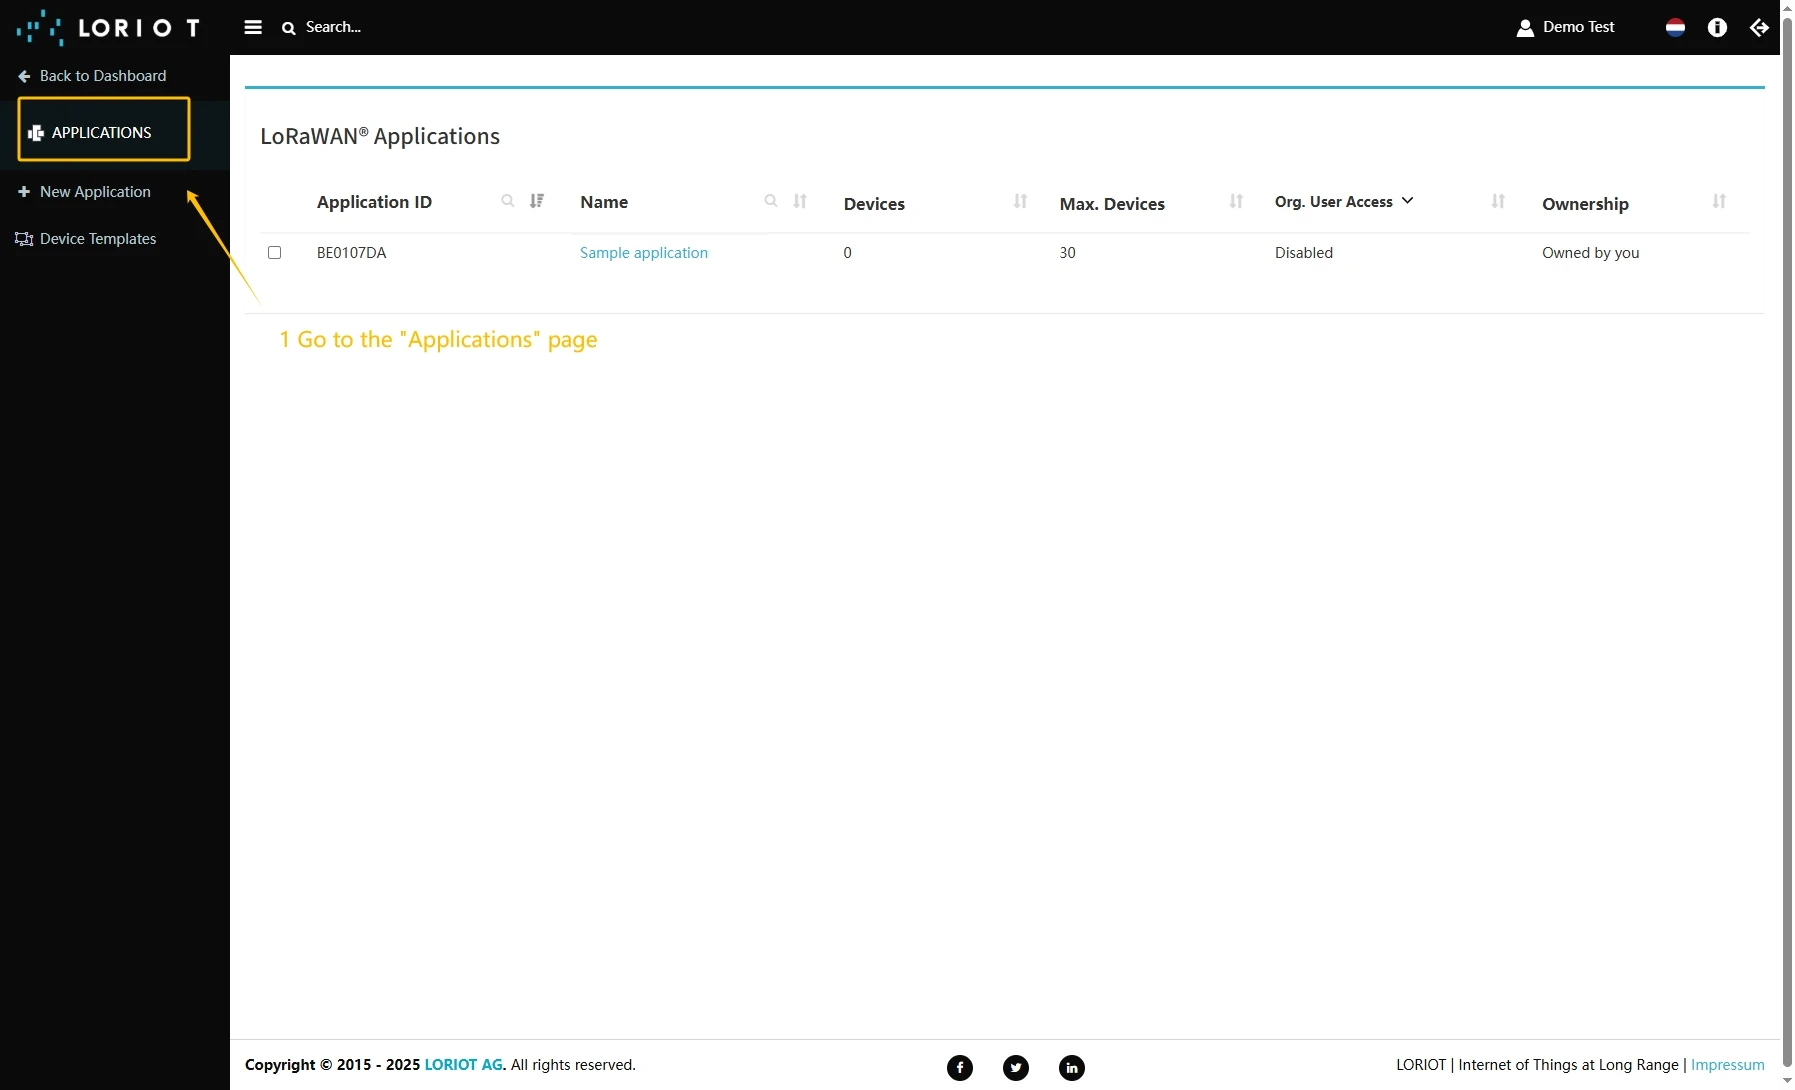
- Go to the “Applications” page in left menu.
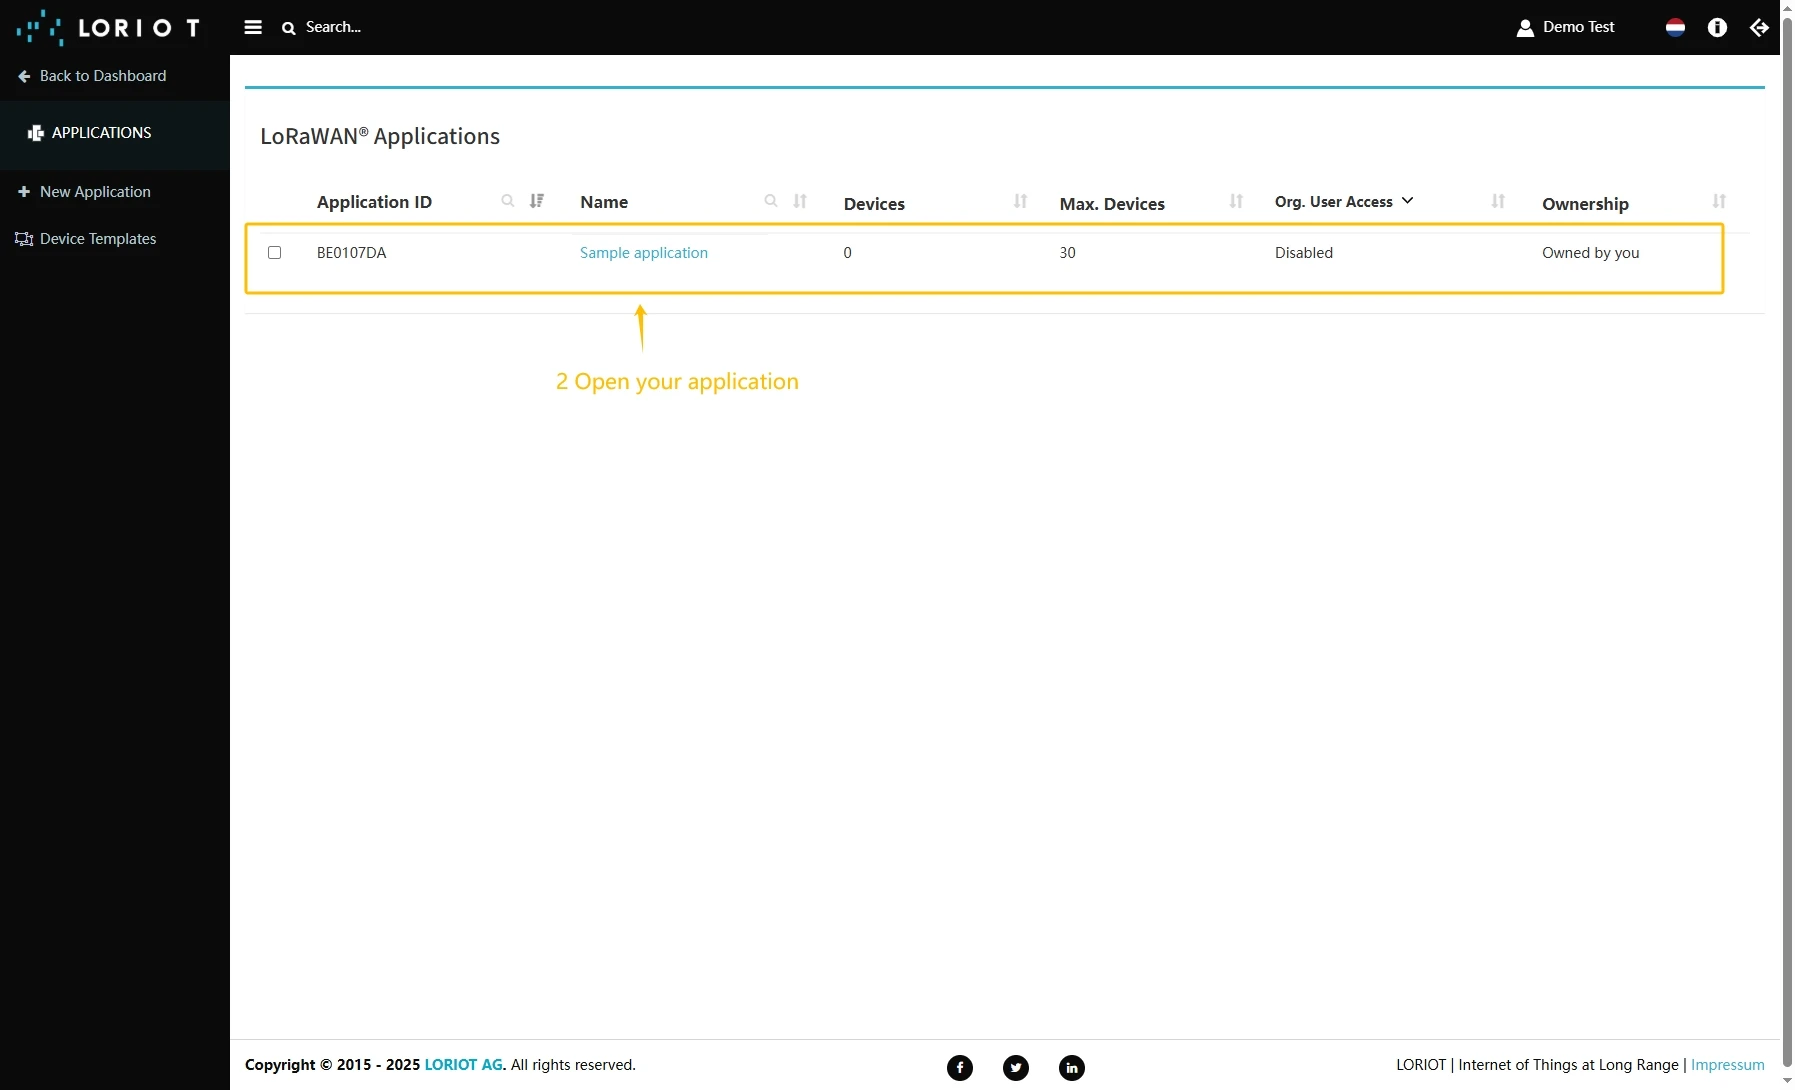
- Open your application, in our case it is “SampleApp”.
- Go to the “Enroll Device” page. Fill in the fields, with a configuration from your device. Then click the “Enroll” button.

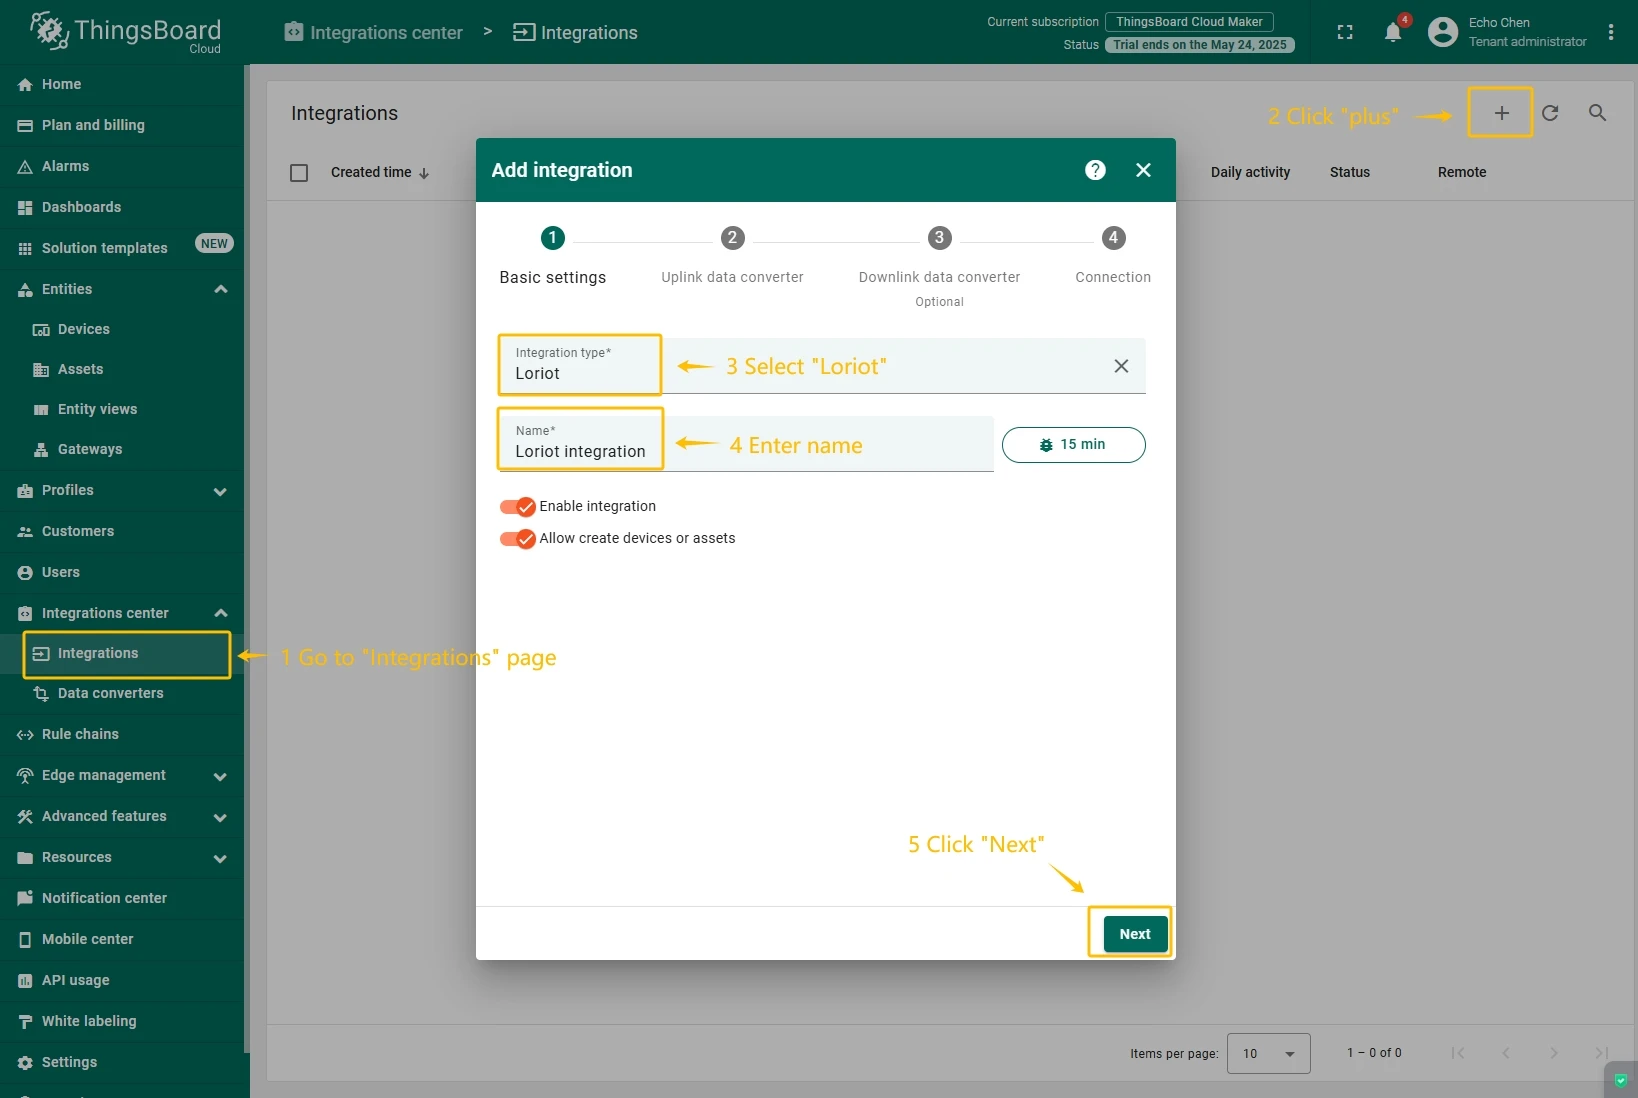
Create integration in ThingsBoard
Next we will create an integration with Loriot inside the ThingsBoard.
At first, copy the code, we will need it to create the uplink converter:
var data = decodeToJson(payload);var deviceName = data.end_device_ids.device_id;var deviceType = data.end_device_ids.application_ids.application_id;
var result = {  deviceName: deviceName,  deviceType: deviceType,  telemetry: data.uplink_message.decoded_payload};
return result;
Now, navigate to the “Integrations” page under the “Integrations center” section and follow this steps:
- Click “plus” icon button in the upper right corner to add new integration. Select type “Loriot”. Then, click “Next” button.
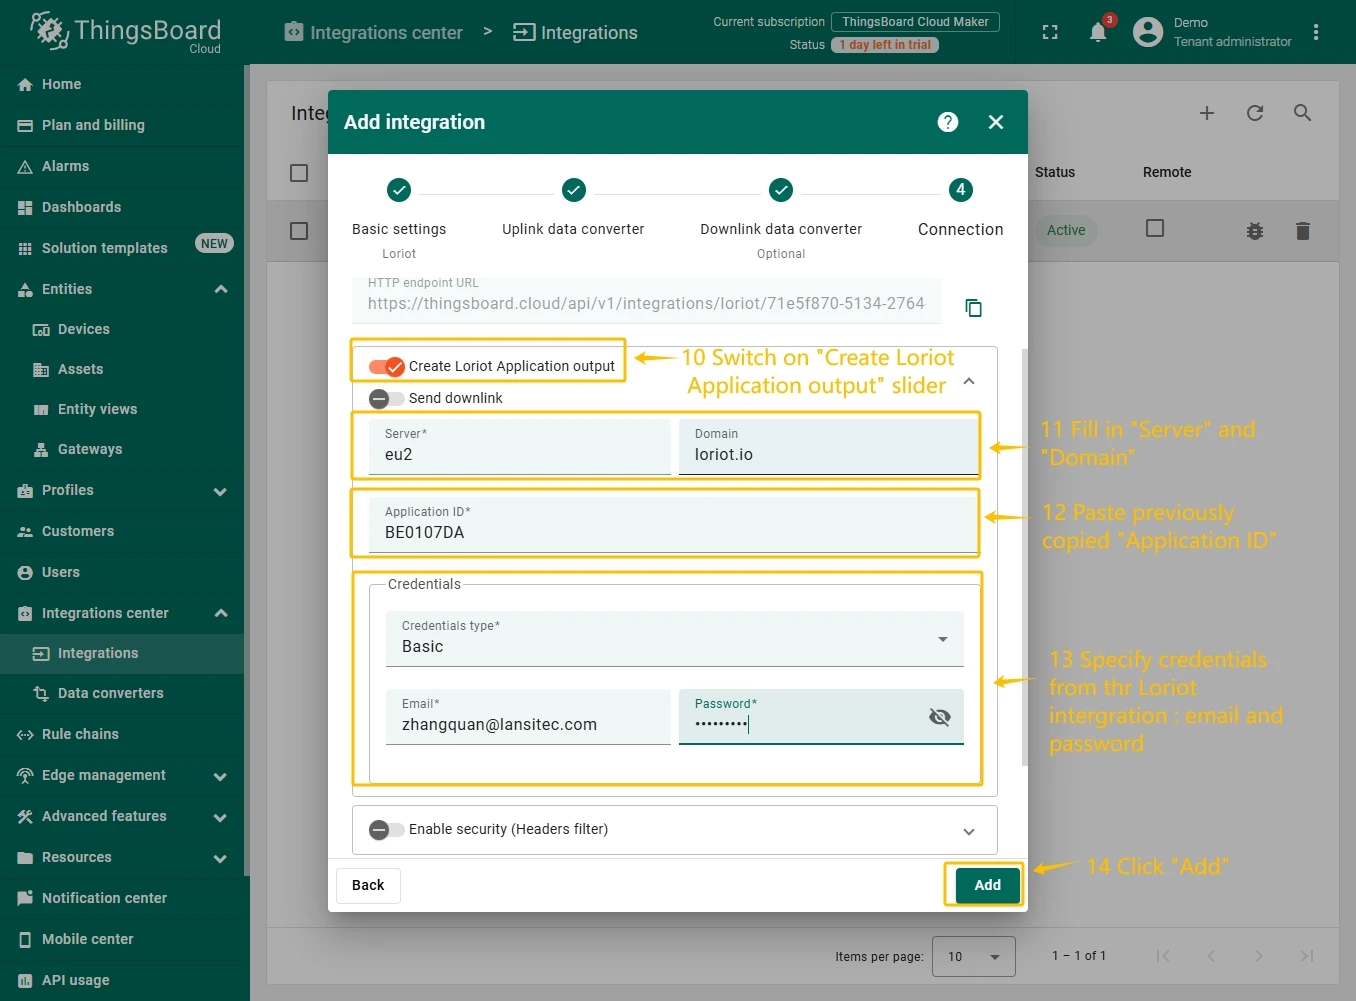
- Paste the previously copied script to the Decoder function section. Click “Next” button.
- Leave the “Downlink data converter” field empty. Click on “Skip”button.
- Next, fill in the fields with your parameters. After, press “Add” button.


Check data on ThingsBoard
So, the device was added and if it sends any data - it should appear in the devices. To check it you may open Devices page in Entities section. The device should be in devices list. You can check the data by click on it and open tab Attributes or Latest telemetry.
In order to get more user-friendly view - you can use dashboards. You can download a simple dashboard for this device, it is configured to display a data from “latitude” and “longitude” telemetry keys for device with name “Devices”.
ThingsBoard provides the ability to create and customize interactive visualizations (dashboards) for monitoring and managing data and devices. Through ThingsBoard dashboards, you can efficiently manage and monitor your IoT devices and data. So, we will create the dashboard, for our device.
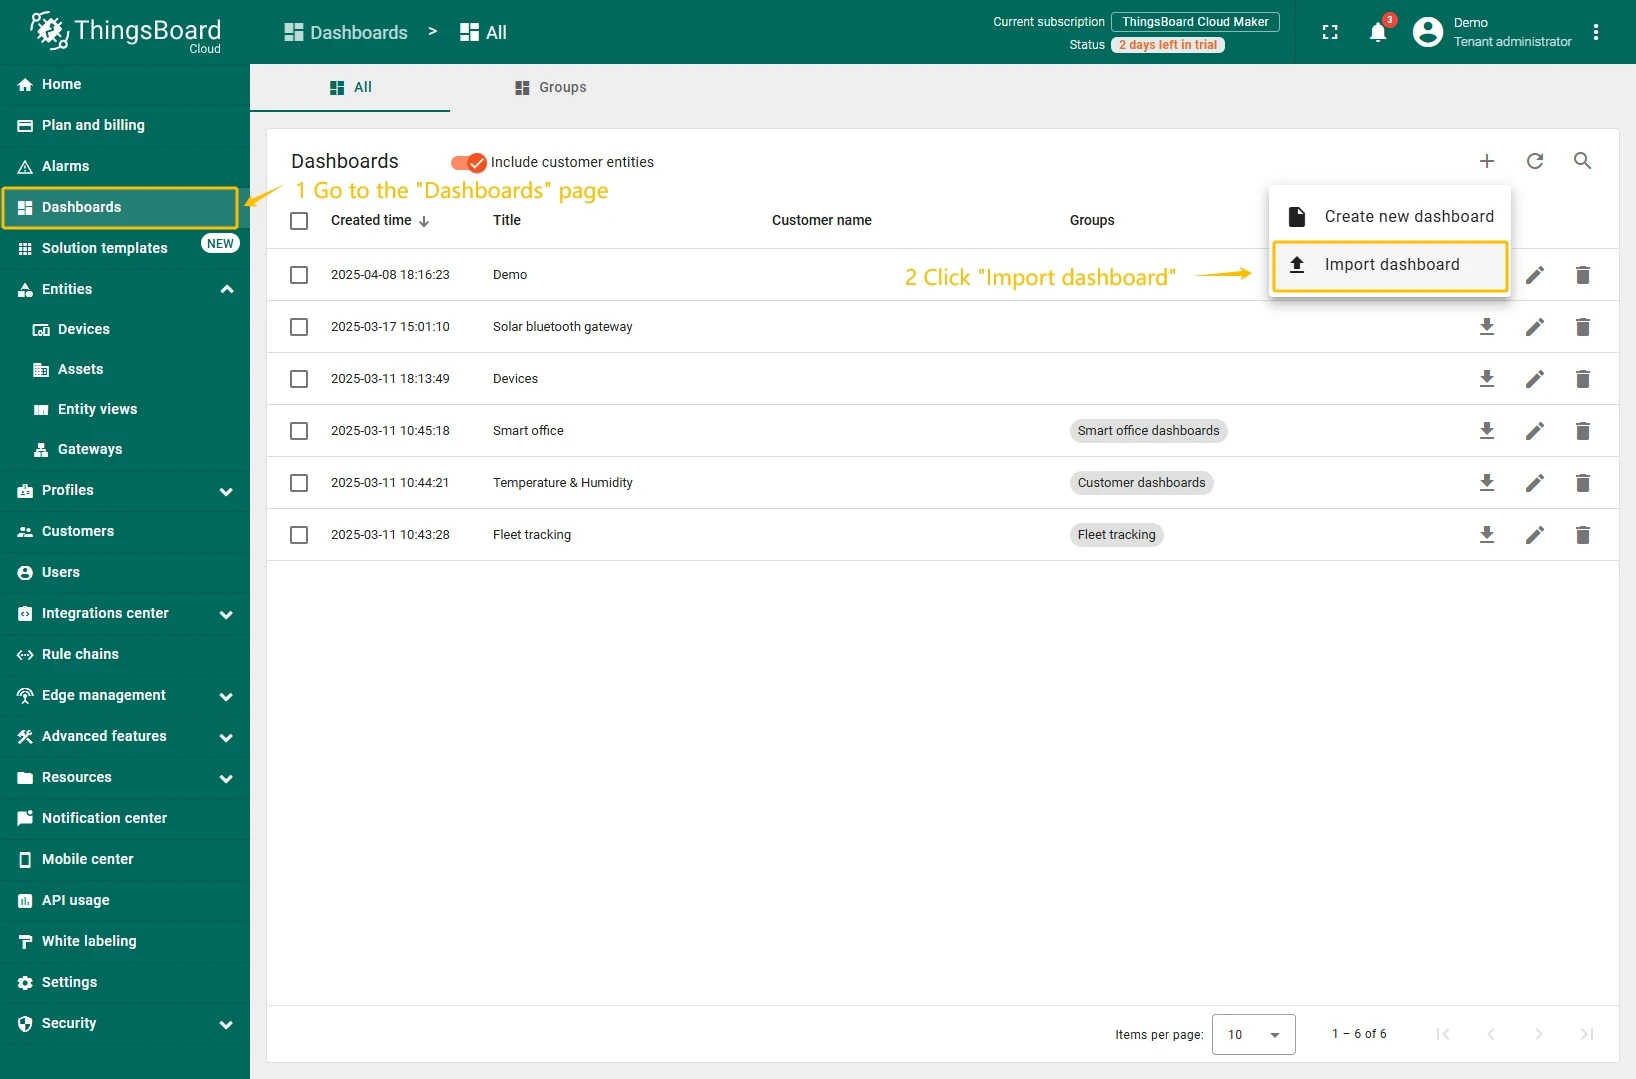
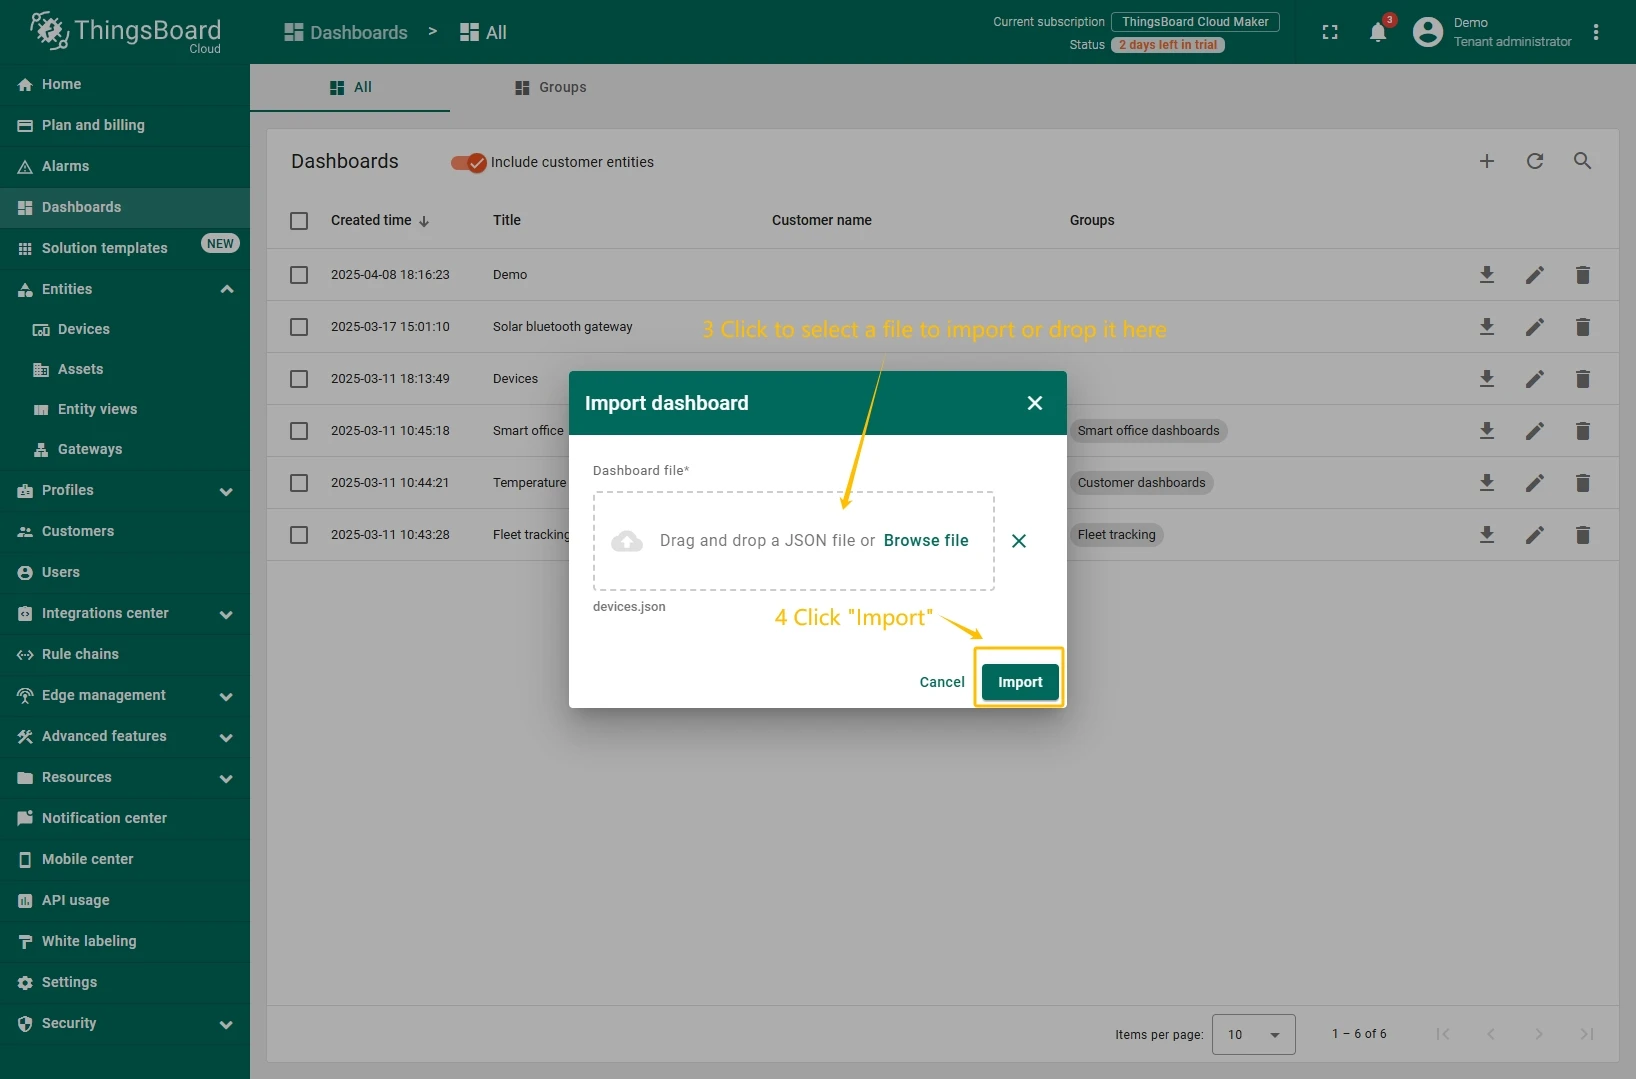
To add the dashboard to ThingsBoard, we need to import it. To import a dashboard, follow these steps:
- First download the Check and control device data dashboard file.
- Navigate to the “Dashboards” page. By default, you navigate to the dashboard group “All”. Click on the “plus” icon in the top right corner. Select “Import dashboard”.
- In the dashboard import window, upload the JSON file and click “Import” button.
- Dashboard has been imported.
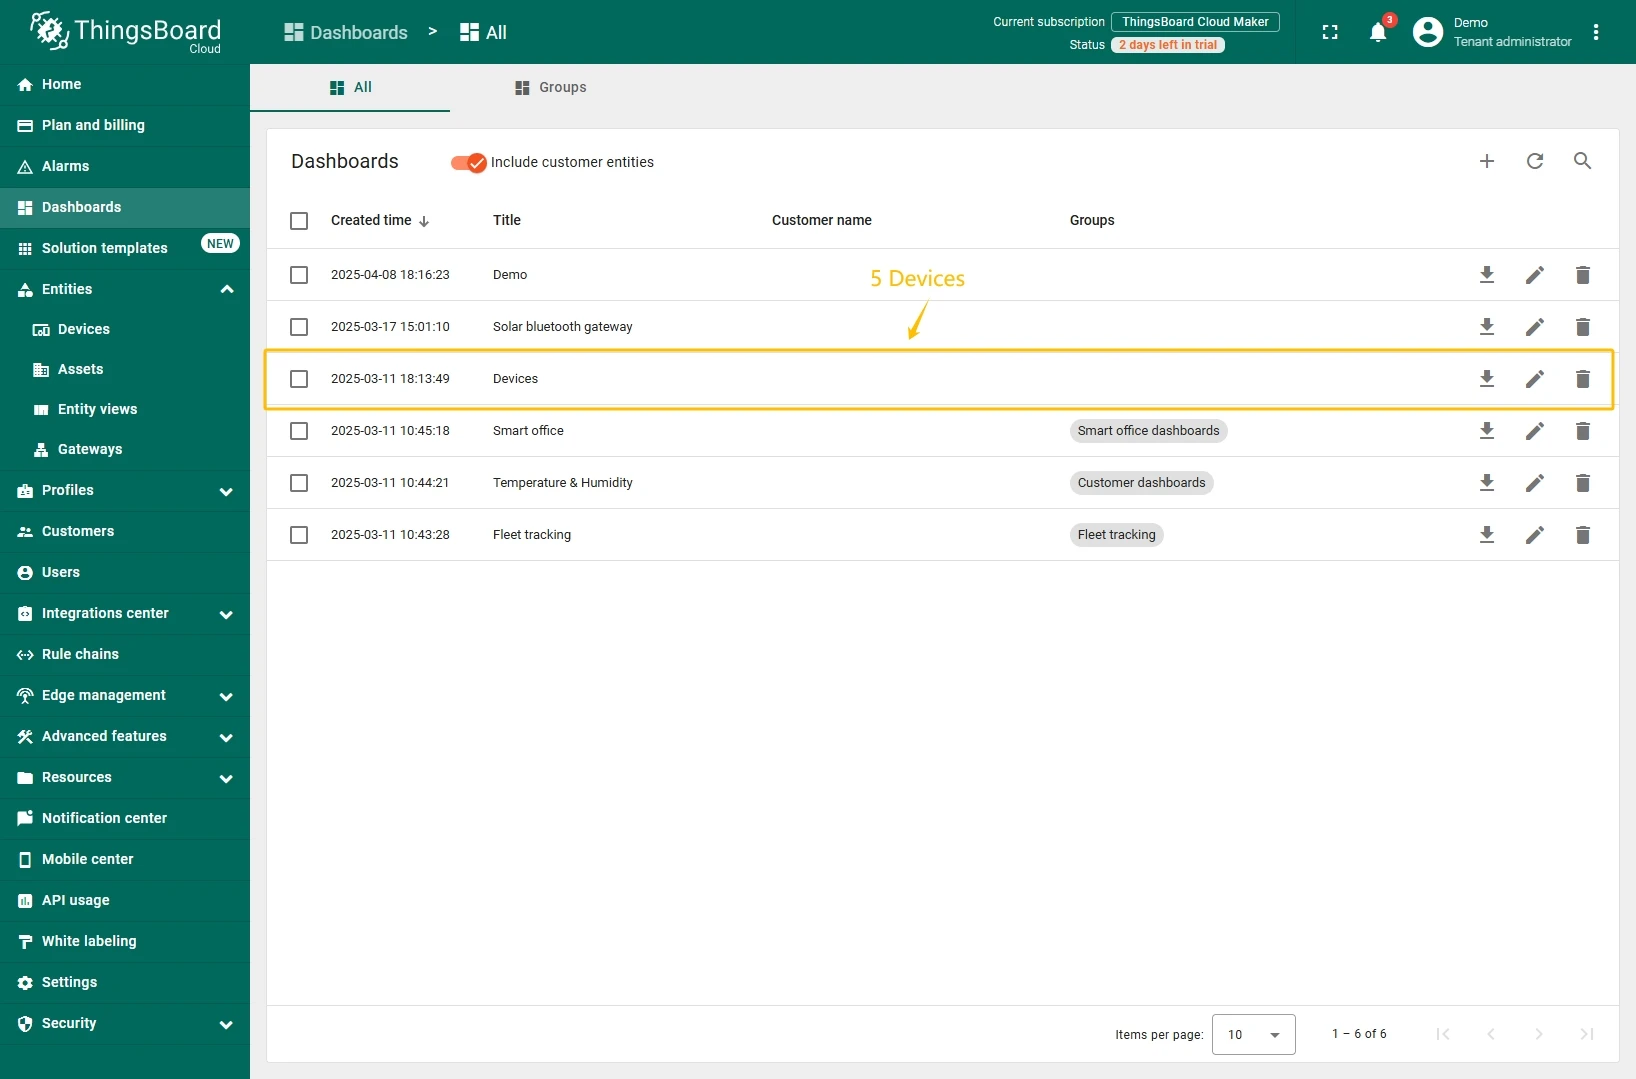
To open the imported dashboard, click on it. Then you should specify your device in entity alias of the dashboard.
To do this, follow these steps:
- Open the dashboard and enter edit mode. Click the “Entity aliases” icon, then in the pop-up window click the “Edit alias” icon next to the alias.
- In edit alias window select your device from dropdown list and save entity alias.
- Apply all changes.

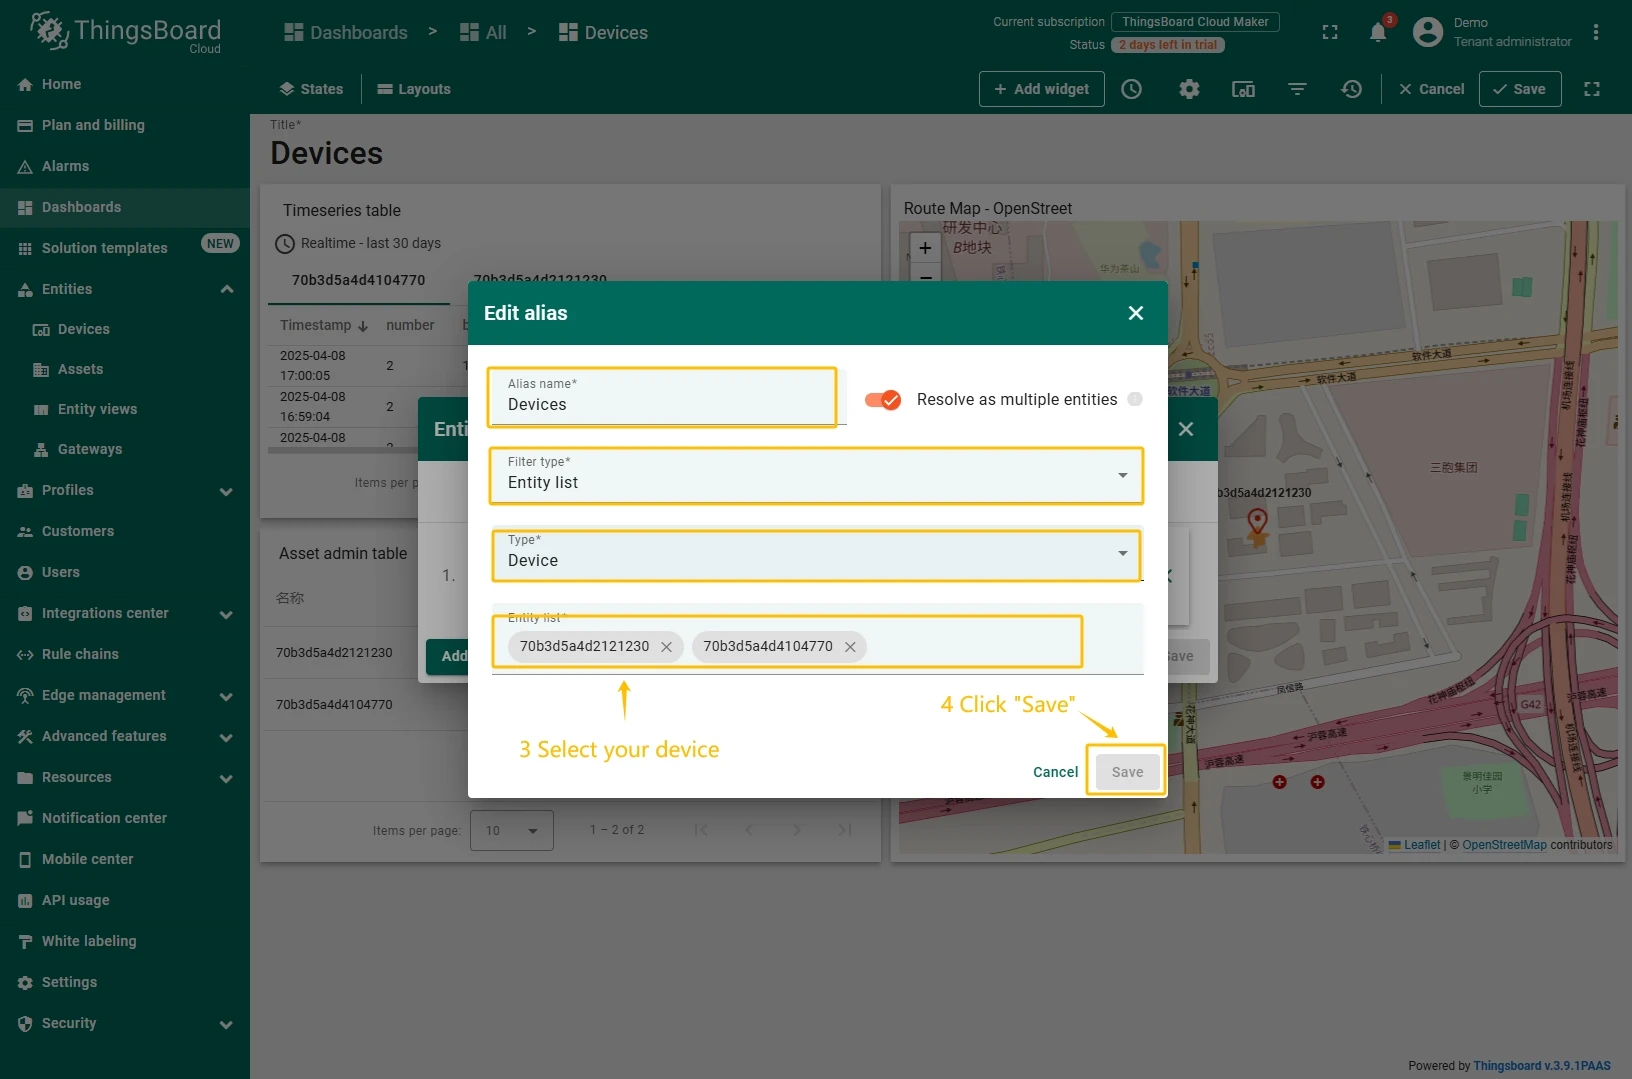

You should now see data from the device.
Example of the dashboard with data:
Conclusion
With the knowledge outlined in this guide, you can easily connect your Asset Management Tracker and send data to ThingsBoard.
Explore the platform documentation to learn more about key concepts and features. For example, configure alarm rules or dashboards.