UG65 LoRaWAN® Semi-Industrial Gateway
UG65 LoRaWAN® Semi-Industrial Gateway
Milesight
- Platform
- ThingsBoard
- Hardware Type
- Gateways
- Connectivity
- LoRaWAN, HTTP, MQTT, LTE, UDP, 3G
- Industry
- Smart Cities, Industrial Manufacturing
- Use Case
- Smart energy, Environment Monitoring, Smart Office, Smart Retail, Smart Farming, Fleet Tracking, Health Care, Air Quality Monitoring, Waste Management, Tank Level Monitoring
Introduction
UG65 LoRaWAN® Gateway is a robust 8-channel indoor LoRaWAN® gateway. Adopting SX1302 LoRa chip and high-performance quad-core CPU, UG65 supports connection with more than 2000 nodes.
Key features:
- Quad-core industrial processor with big memory
- Equip with SX1302 chip, handling a higher amount of traffic with lower consumption
- 8 half/full-duplex channels
- IP65 enclosure and industrial design for parts of outdoor environment applications like eaves
- Desktop, wall, or pole mounting
- Multi-backhaul backups with Ethernet, cellular (4G/3G), and Wi-Fi
- DeviceHub and Milesight IoT Cloud provide easy and centralized management of remote devices
- Enable security communication with multiple VPNs like IPsec/OpenVPN/L2TP/PPTP/DMVPN
- Compatible with mainstream network servers like The Things Industries, ChirpStack, etc.
- Detect and analyze the noise level and provide an intuitive diagram for deployment
- Built-in network server and MQTT/HTTP/HTTPS API for easy integration
- Embedded Python SDK for users’ secondary development
- Fast and user-friendly programming by Node-RED development tool
After doing steps described in this guide you will have a connected and configured gateway on a network server and integration on ThingsBoard, it will allow you to add devices, receive data from them and process a data.
Prerequisites
To continue with this guide we will need the following:
- UG65 LoRaWAN® Semi-Industrial Gateway
- UG65 gateway user manual
-
ThingsBoard account at
YOUR_TB_HOST
Gateway connection
According to the official user manual and this guide you can connect the gateway to the network and get access to the WebUI in two ways:
-
Wireless connection:
- Enable Wireless Network Connection on your computer and search for access point “Gateway_******” to connect it.
- Open a Web browser on your PC and type in the IP address 192.168.1.1 to access the web GUI.
- Enter the username(Default: admin) and password(Default: password), click Login.
-
Wired connection: Connect PC to UG65 Ethernet port directly or through PoE injector to access the web GUI of gateway. The following steps are based on Windows 10 system for your reference.
- Go to “Control Panel” → “Network and Internet” → “Network and Sharing Center”, then click “Ethernet” (May have different names).
- Go to “Properties” → “Internet Protocol Version 4(TCP/IPv4)” and select “Use the following IP address”, then assign a static IP manually within the same subnet of the gateway.
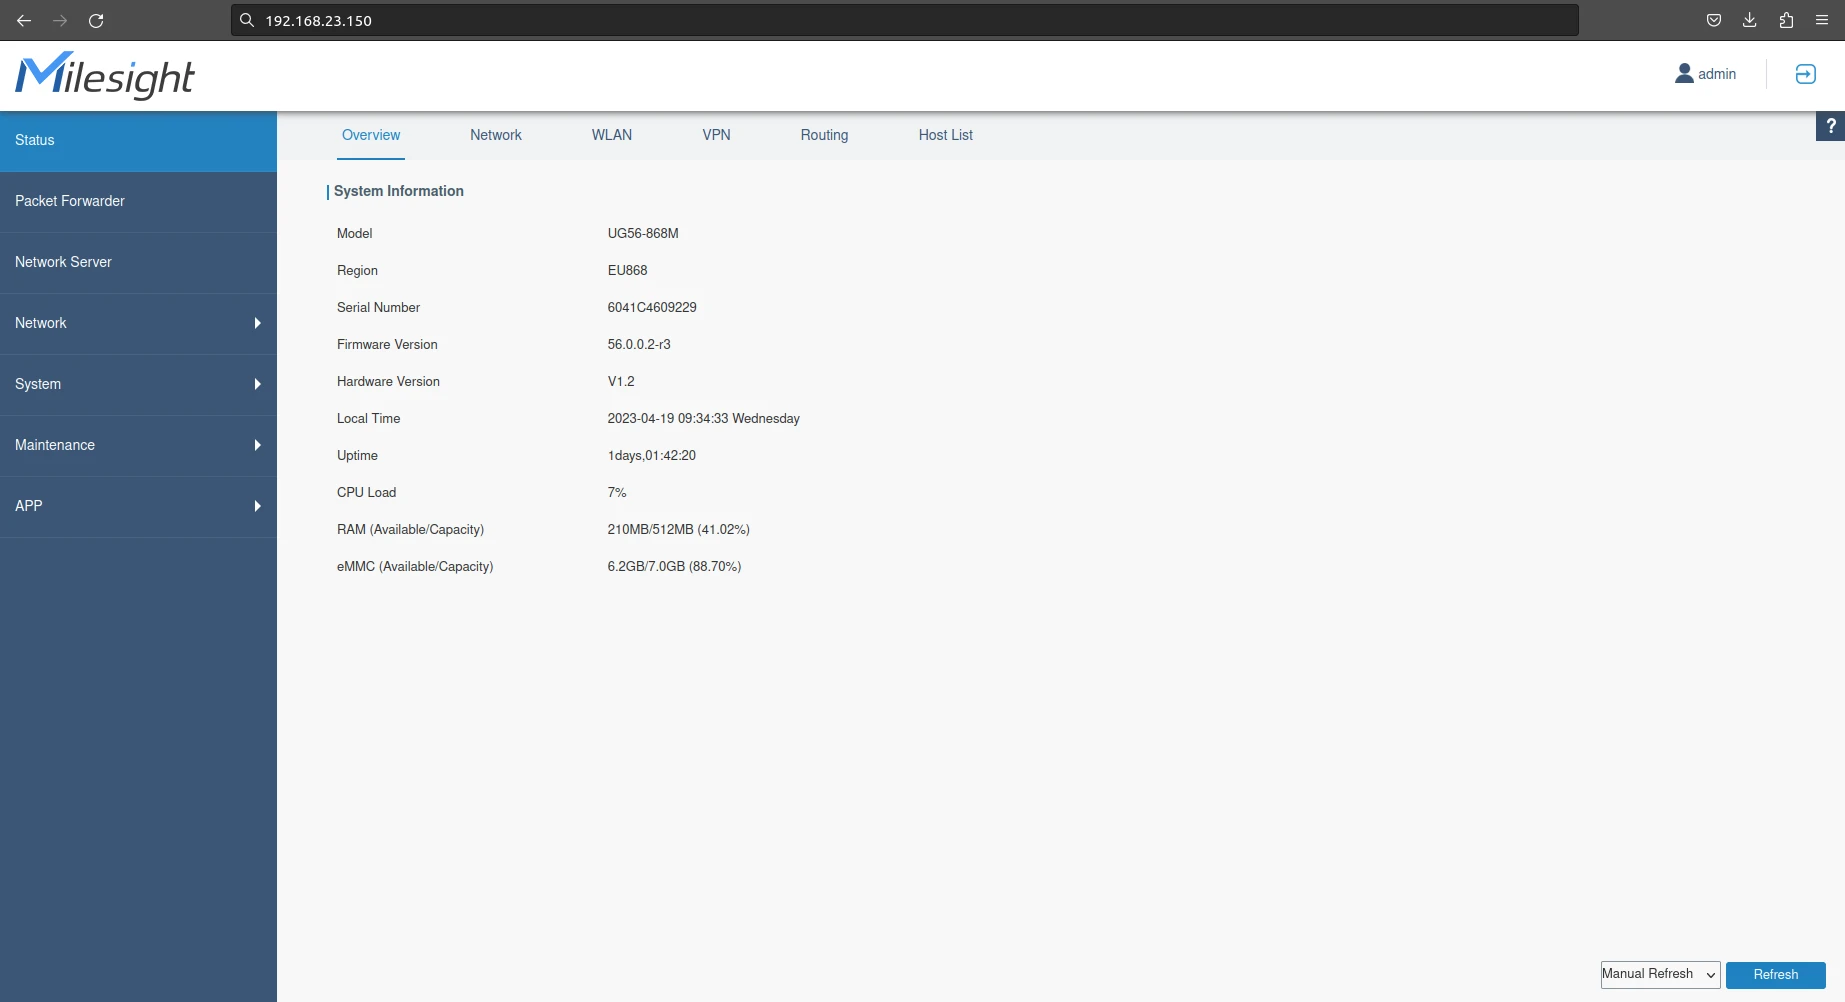
- Open a Web browser on your PC and type in the IP address 192.168.23.150 to access the web GUI.
- Enter the username and password, click “Login”.
- Now you have ability to configure the gateway.
- Open Packet Forwarder in the left menu and save Gateway EUI and Gateway ID, we will need them to create a gateway on network server.
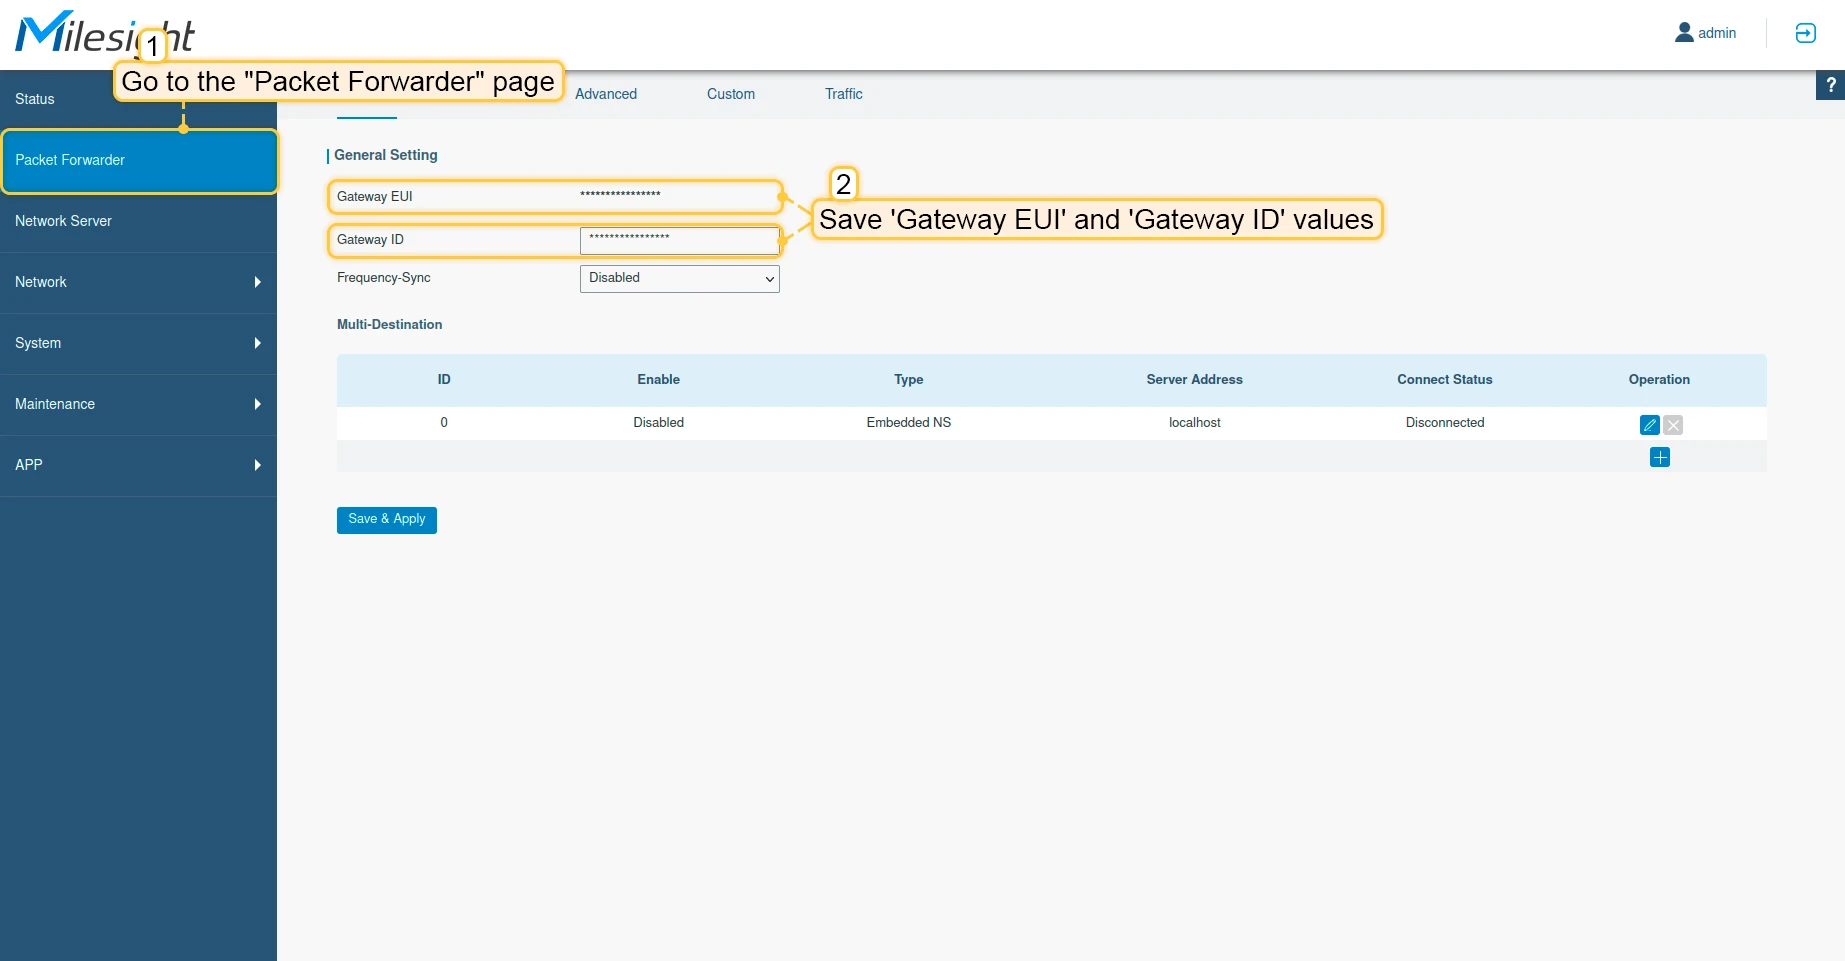
By default, Gateway EUI and Gateway ID are the same.
Next steps will describe how to connect the gateway to network server.
Configuration
To create an integration with a network server please choose first one of the supported network servers:
Add a gateway on the Chirpstack
We need to add a gateway on the Chirpstack.
To add a gateway, follow next steps:
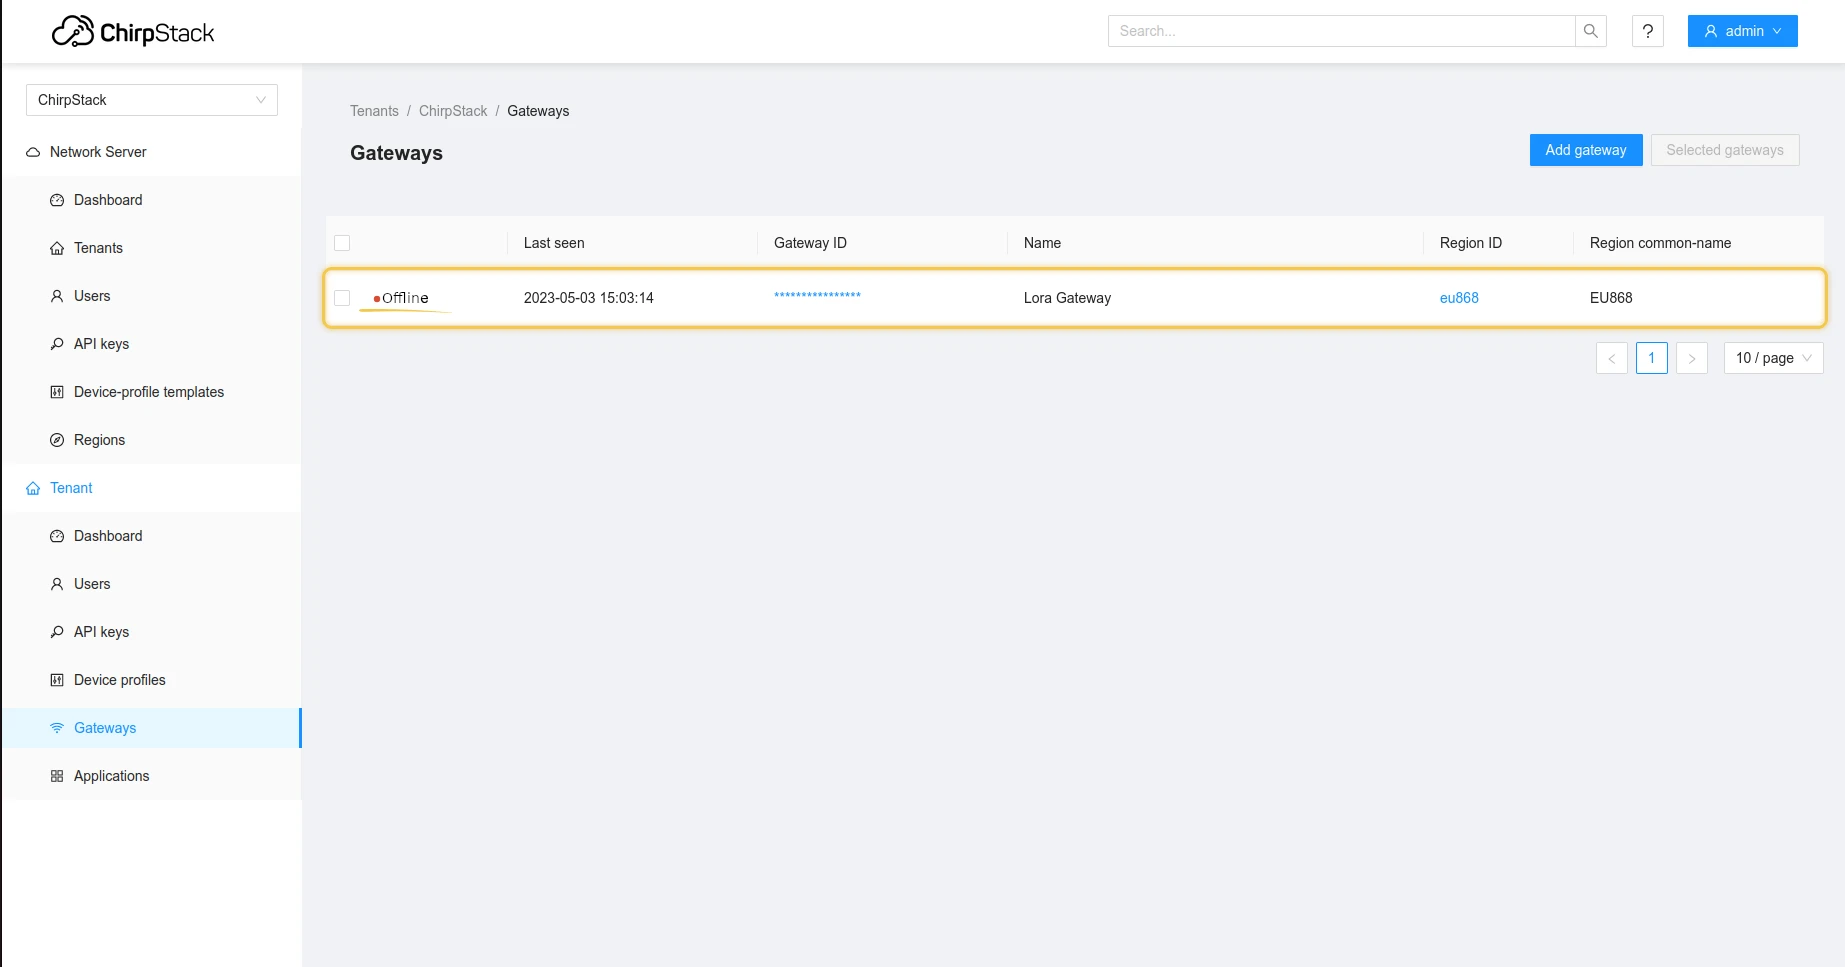
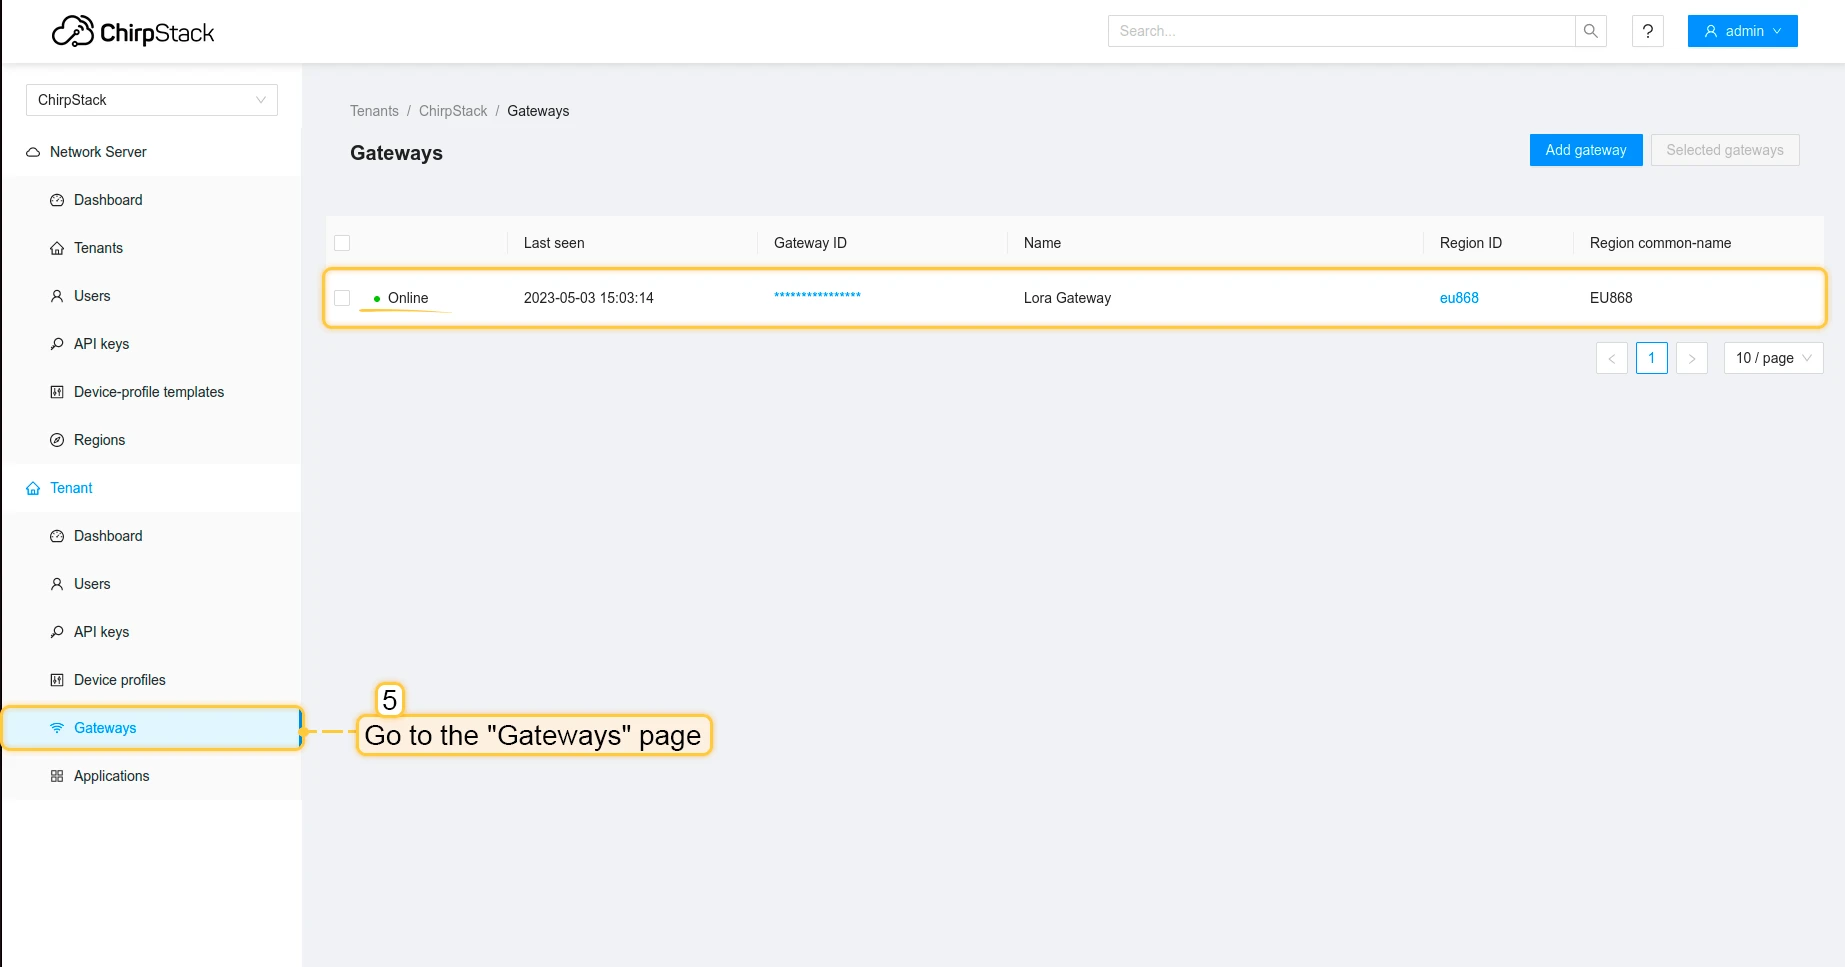
- Login to Chirpstack server. Go to the “Gateways” page and click on the “Add gateway” button.
- Fill name, gateway EUI (It will be different, you can find it on the gateway control panel) with your data, scroll down and click on the “Submit” button.
- The gateway is added. In gateways tab you can see its status.


Configure the gateway to send data
To connect and send data to the Chirpstack we should configure the gateway. To do this please follow next steps:
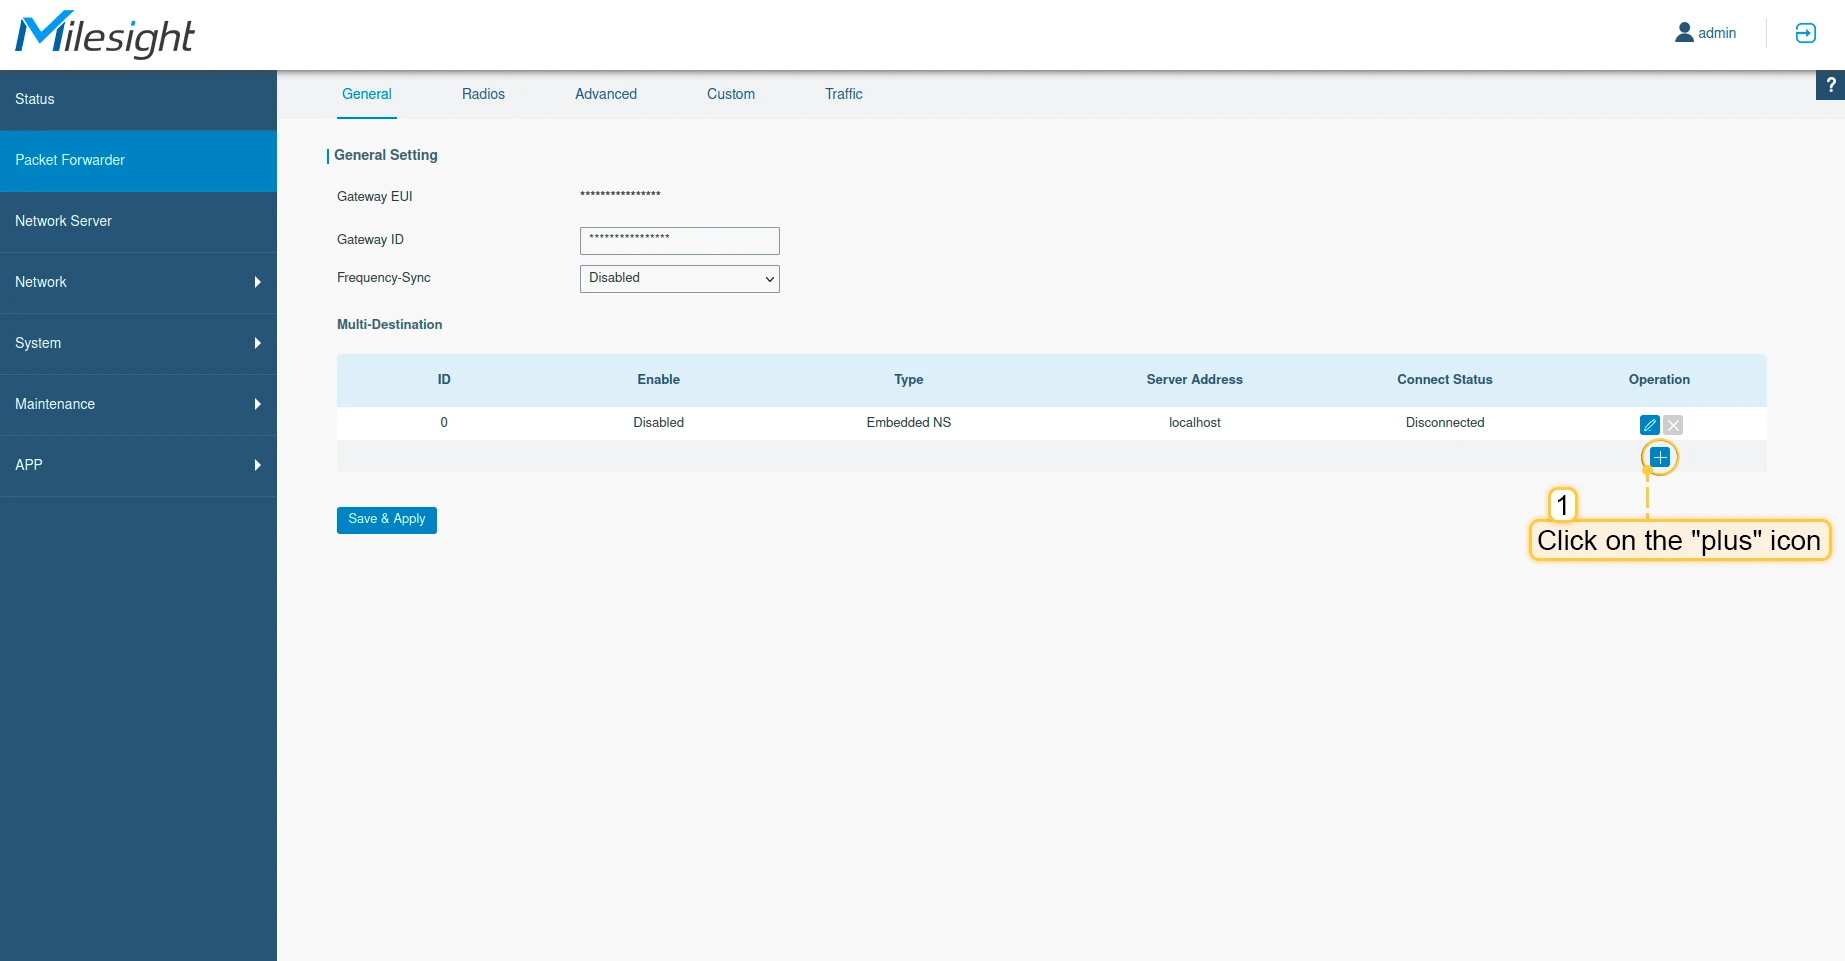
- Open gateway control panel. Go to the “Packet Forwarder” page and click on “plus” button, to add a new forwarder.
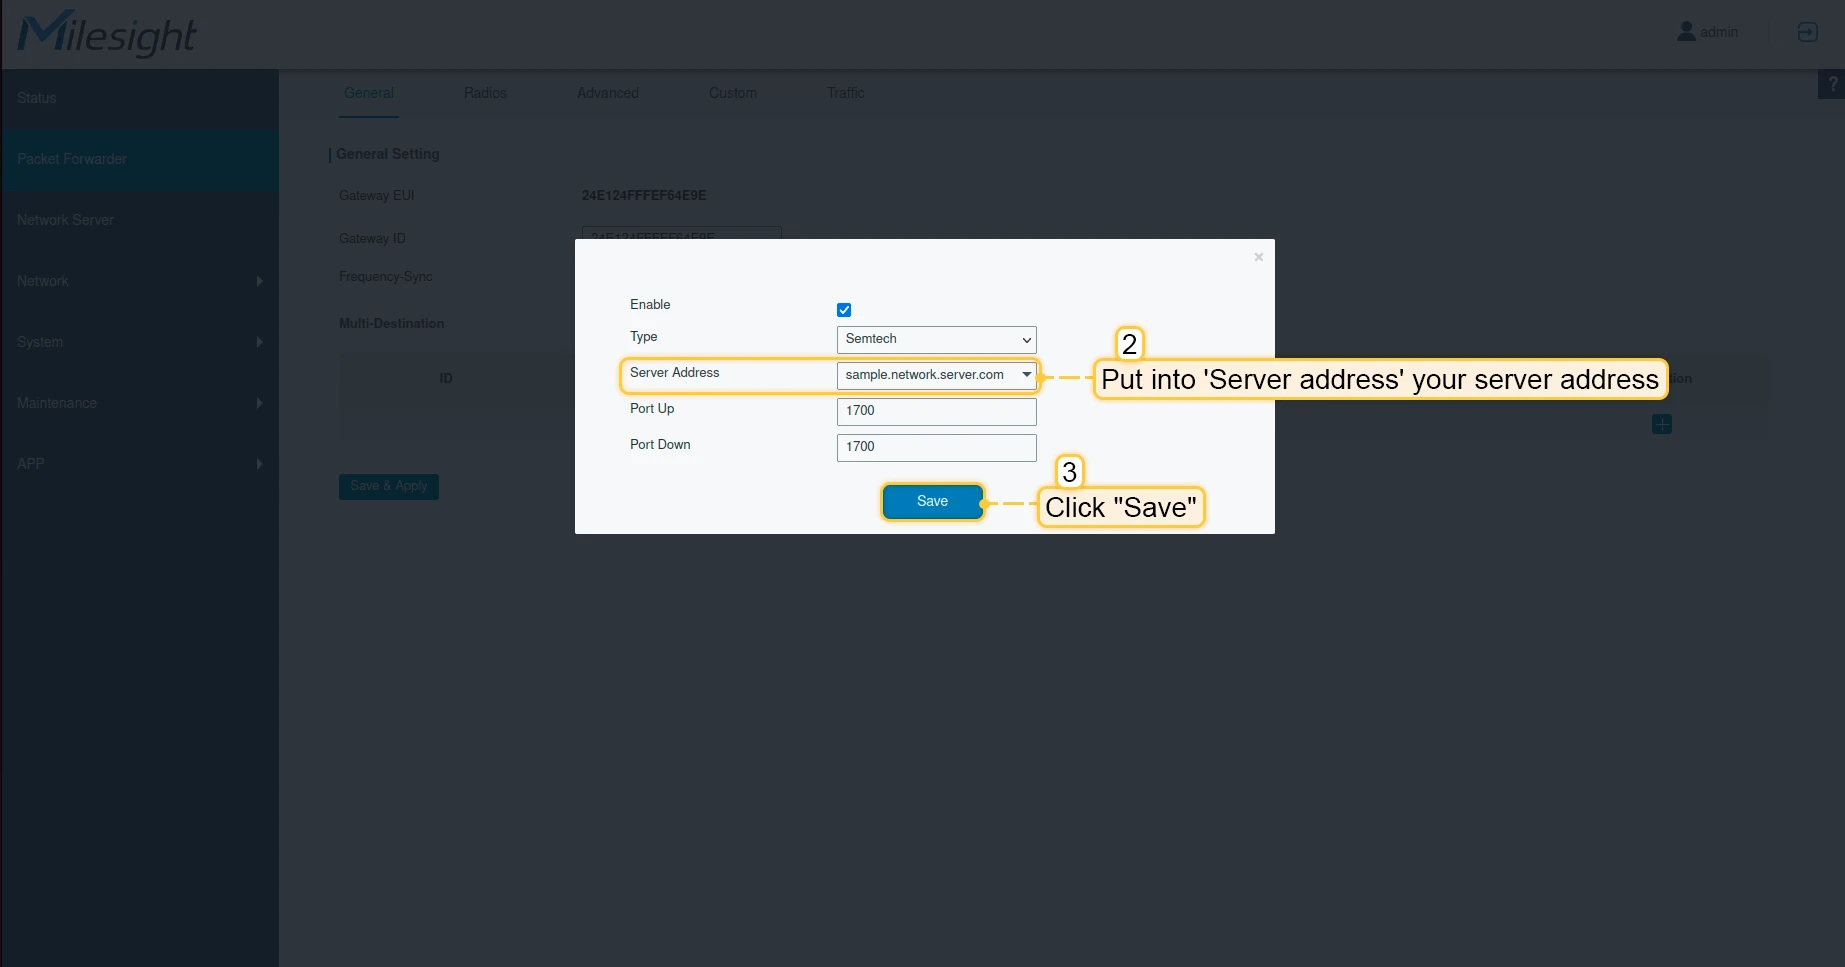
- Put into “Server address” your server address, in our case it is sample.network.server.com. Click “Save” button.
- Click “Save & Apply” button.
- Now you can check the status of the gateway on Chirpstack, it should be online.

Now, the gateway is able to send a data to the network server.
Configure application on the Chirpstack
Now we need to configure application on the Chirpstack. To do this please follow next steps:
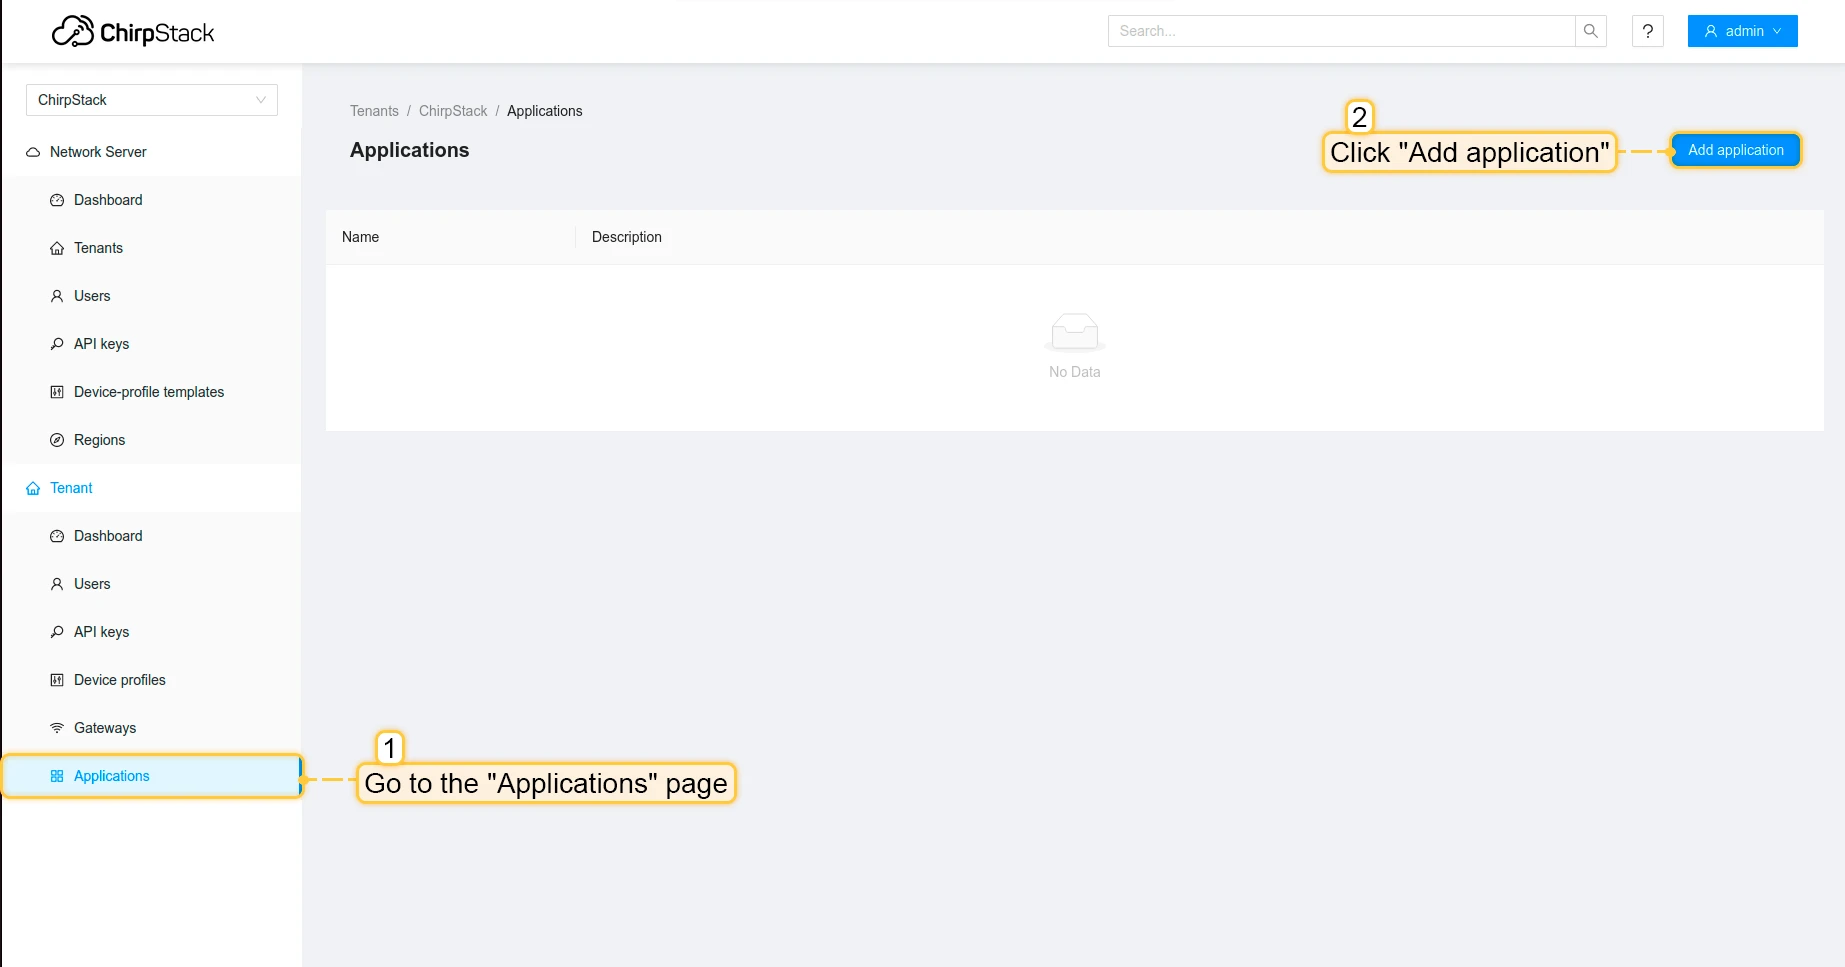
- Go to the “Applications” page in the left menu and click on the “Add application” button.
- Fill application name and click on the “Submit” button.
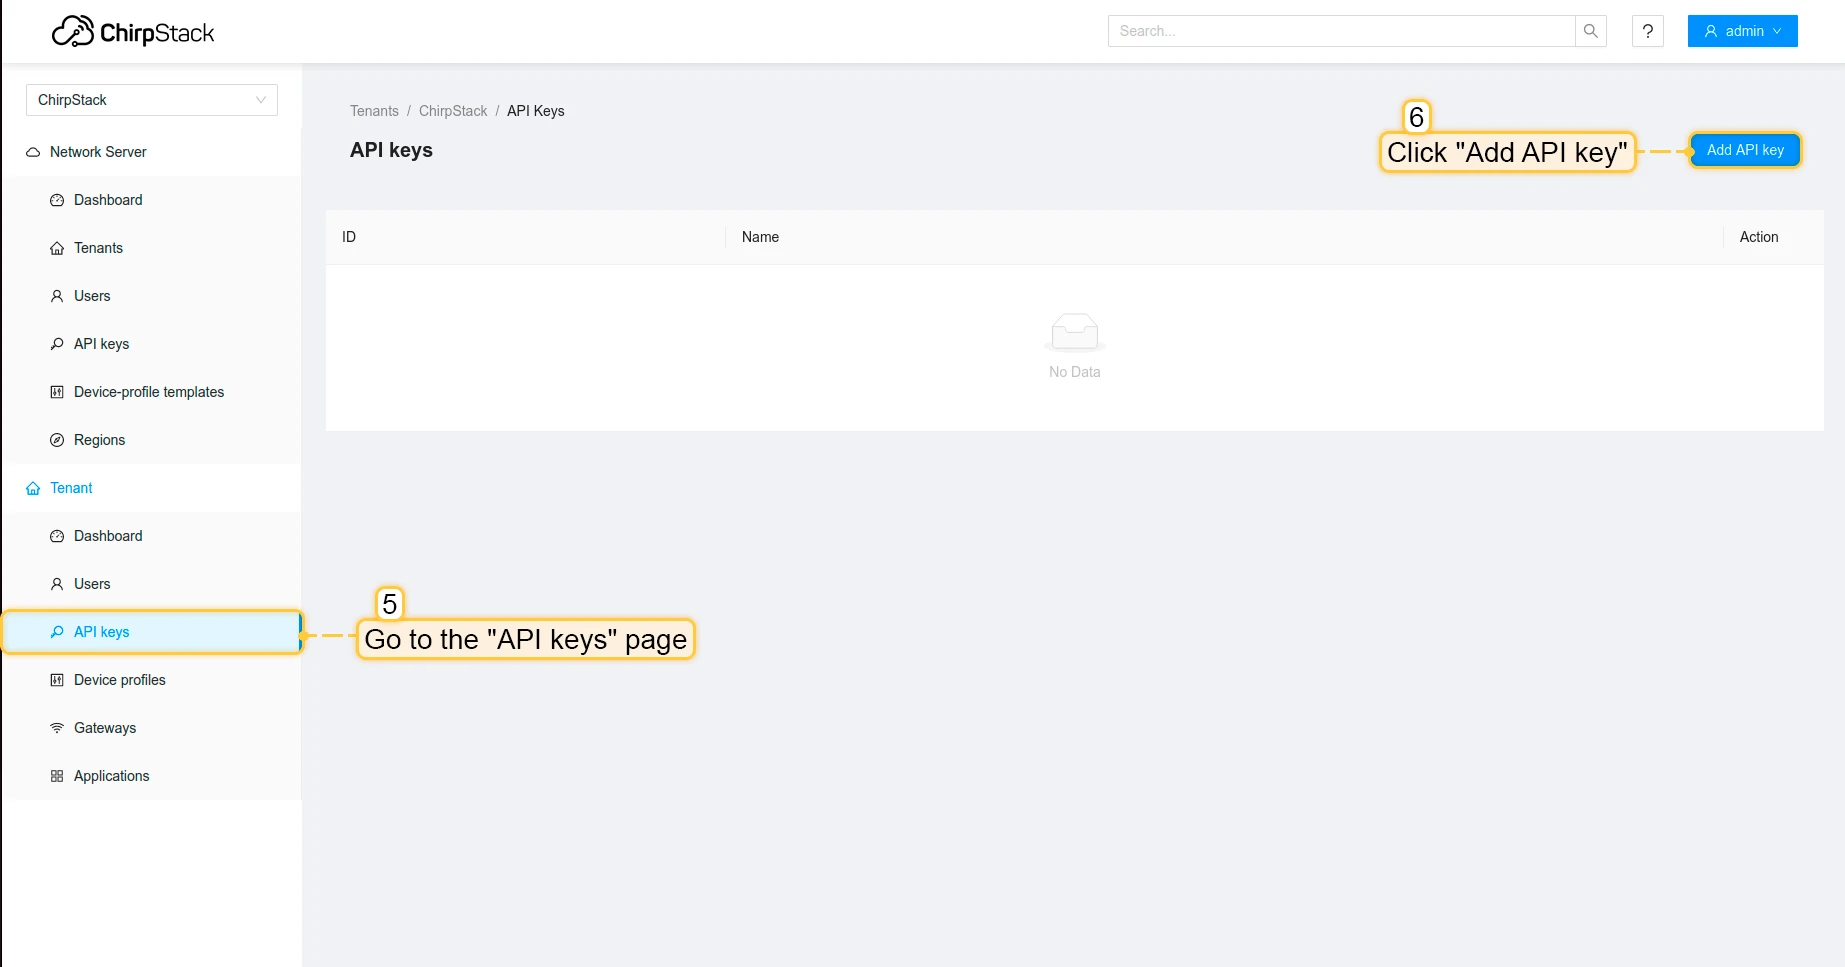
- Go to the API keys page in the left menu and click on the “Add API key” button.
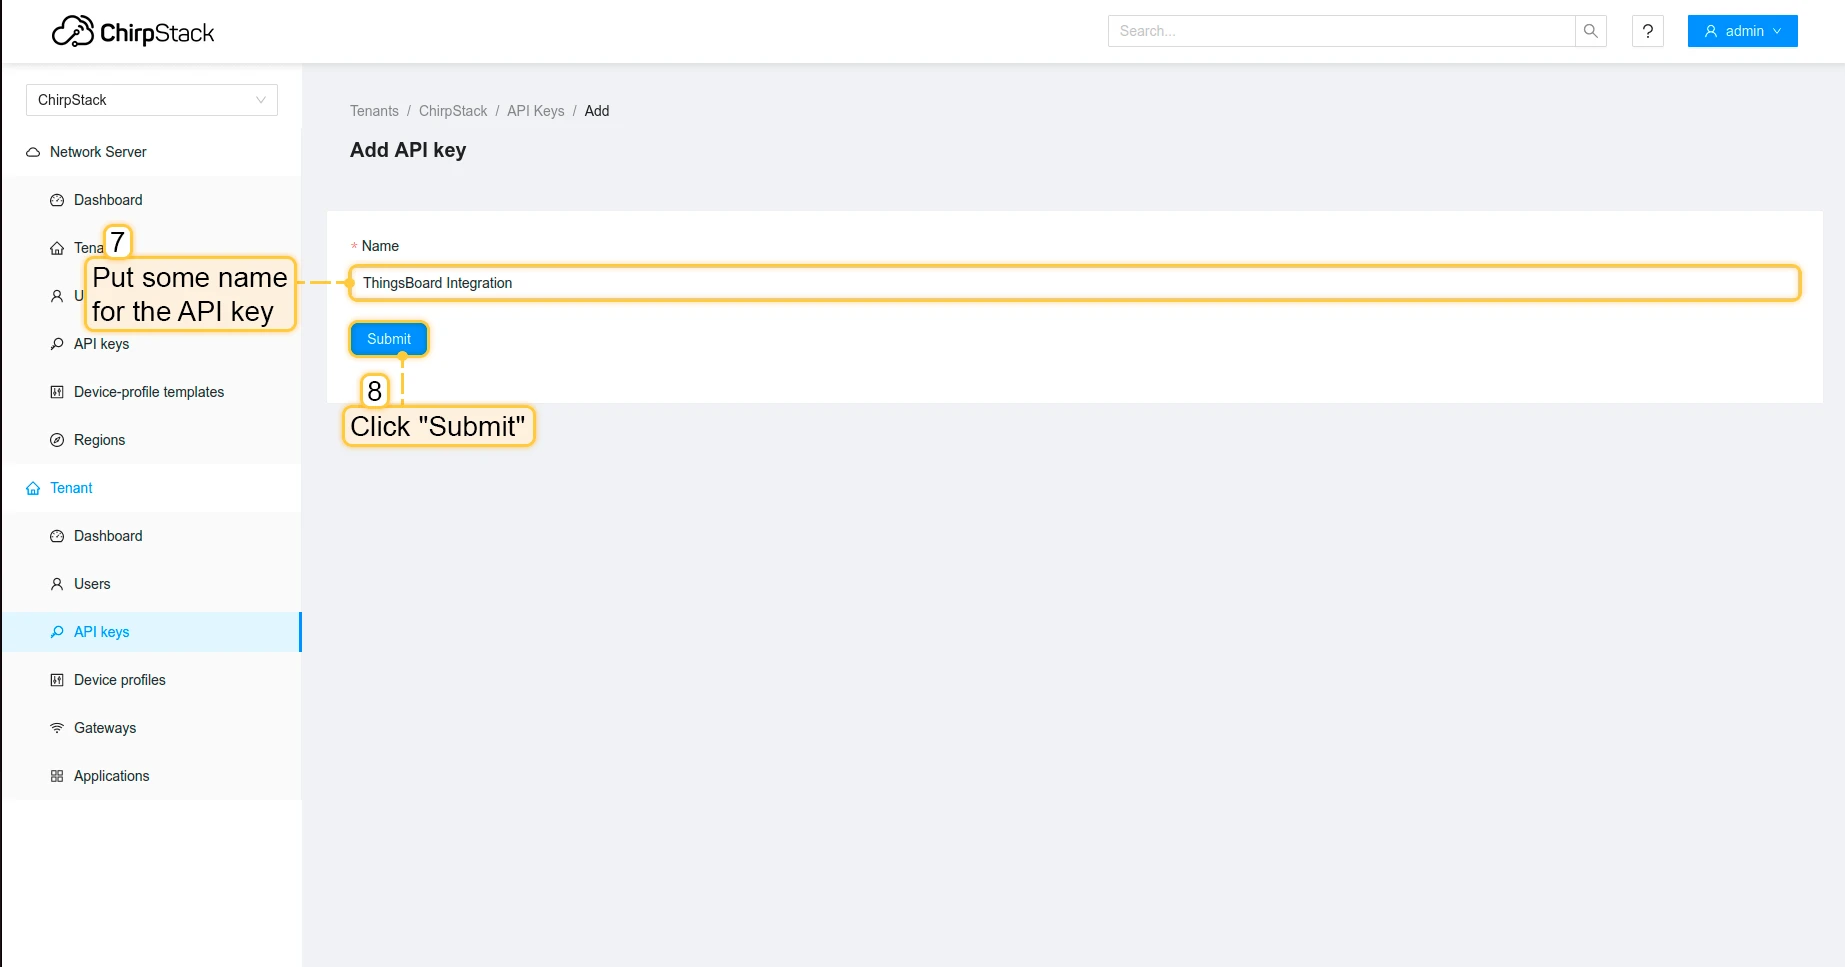
- Put some name for the API key and click on the “Submit” button.
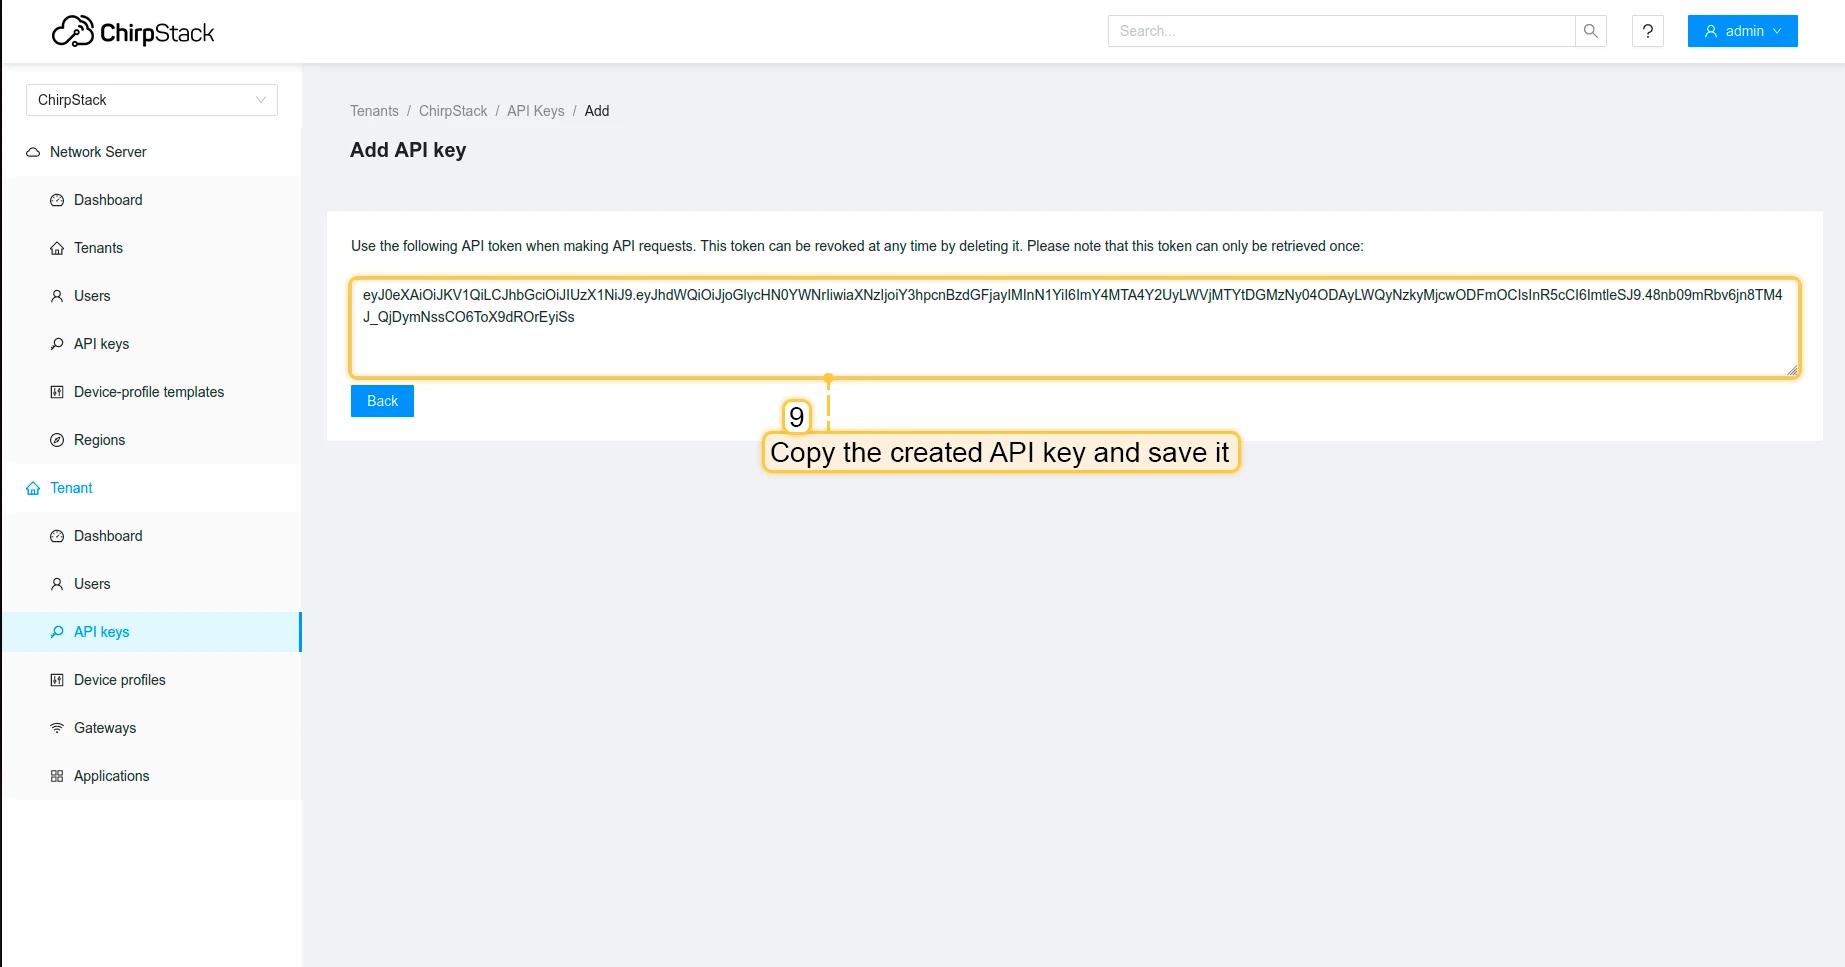
- Copy the created API key and save it, we will need it for integration on ThingsBoard.

Now we can move to ThingsBoard to configure integration.
Create integration in ThingsBoard
Next, we will create an integration with Chirpstack inside the ThingsBoard and configure the integration on Chirpstack.
At first, copy the code, we will need it to create the uplink converter:
var data = decodeToJson(payload);var deviceName = data.deviceInfo.deviceName;var deviceType = data.deviceInfo.deviceProfileName;
// If you want to parse incoming data somehow, you can add your code to this function.// input: bytes// expected output:// {// "attributes": {"attributeKey": "attributeValue"},// "telemetry": {"telemetryKey": "telemetryValue"}// }// default functionality - convert bytes to HEX string with telemetry key "HEX_bytes"
function decodePayload(input) { var output = { attributes:{}, telemetry: {} }; // --- Decoding code --- //
output.telemetry.HEX_bytes = bytesToHex(input);
// --- Decoding code --- // return output;}
// --- attributes and telemetry objects ---var telemetry = {};var attributes = {};// --- attributes and telemetry objects ---
// --- Timestamp parsingvar dateString = data.time.substring(0, data.time.lastIndexOf('+')-3) + "Z";var timestamp = new Date(dateString).getTime();// --- Timestamp parsing
// You can add some keys manually to attributes or telemetryattributes.fPort = data.port;attributes.encodedData = data.data;
// You can exclude some keys from the resultvar excludeFromAttributesList = ["deviceName", "rxInfo", "txInfo", "deduplicationId", "time", "dr", "fCnt", "fPort"];var excludeFromTelemetryList = ["data", "deviceInfo", "devAddr", "adr"];
// Message parsing// To avoid paths in the decoded objects we passing false value to function as "pathInKey" argument.// Warning: pathInKey can cause already found fields to be overwritten with the last value found.
var telemetryData = toFlatMap(data, excludeFromTelemetryList, false);var attributesData = toFlatMap(data, excludeFromAttributesList, false);
var uplinkDataList = [];
// Passing incoming bytes to decodePayload function, to get custom decodingvar customDecoding = decodePayload(hexToBytes(data.data));
// Collecting data to resultif (customDecoding.?telemetry.size() > 0) { telemetry.putAll(customDecoding.telemetry);}
if (customDecoding.?attributes.size() > 0) { attributes.putAll(customDecoding.attributes);}
telemetry.putAll(telemetryData);attributes.putAll(attributesData);
var deviceInfo = { deviceName: deviceName, deviceType: deviceType, telemetry: { ts: timestamp, values: telemetry }, attributes: attributes};
uplinkDataList.add(deviceInfo);
if (data.cmd == "gw") { foreach( gatewayInfo : data.gws ) { var gatewayInfoMsg = { deviceName: gatewayInfo.gweui, deviceType: "LoraGateway", attributes: {}, telemetry: { "ts": gatewayInfo.ts, "values": toFlatMap(gatewayInfo, ["ts", "time", "gweui"], false) } }; uplinkDataList.add(gatewayInfoMsg); }}
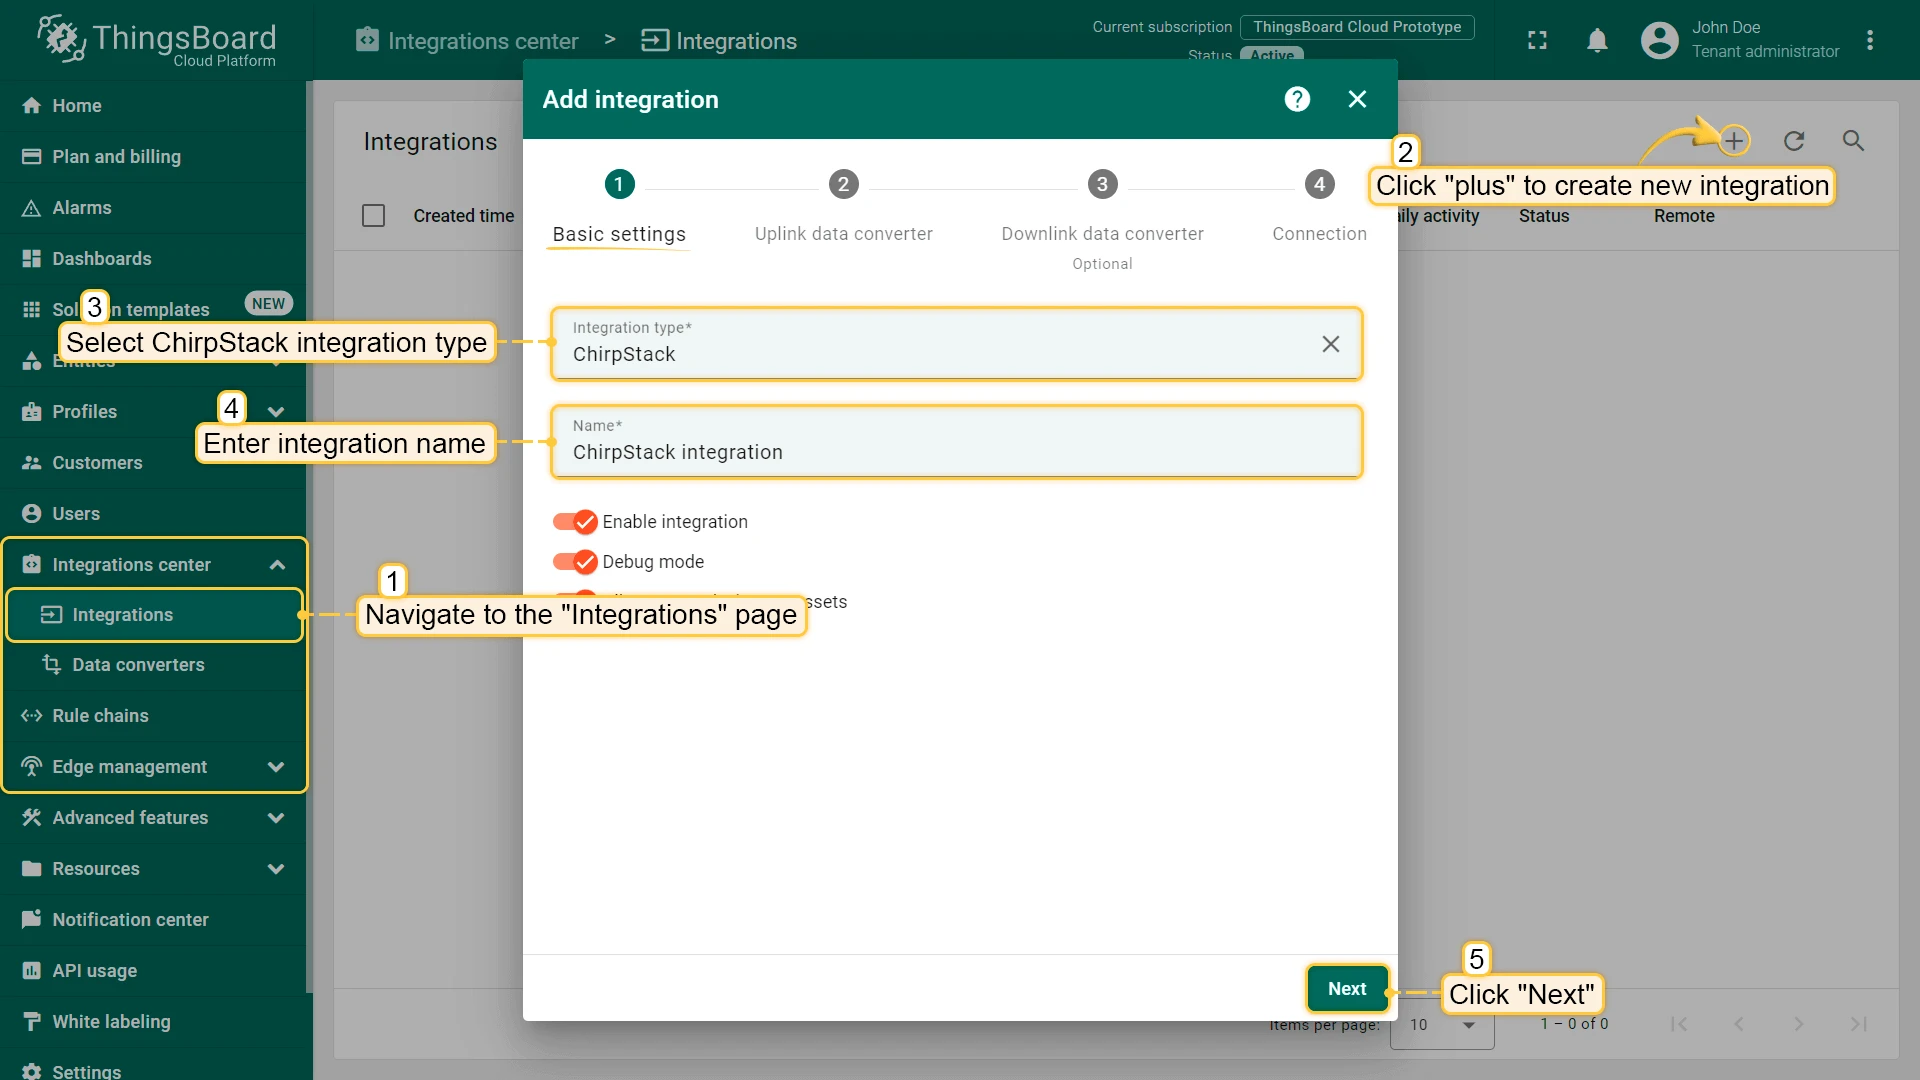
return uplinkDataList;To add integration follow the next steps:
- Go to the “Integration center” section, “Integrations” page and click “plus” button to add new integration. Select type “Chirpstack”. Then, click “Next”.
- Paste the previously copied script to the Decoder function section. Click “Next”.
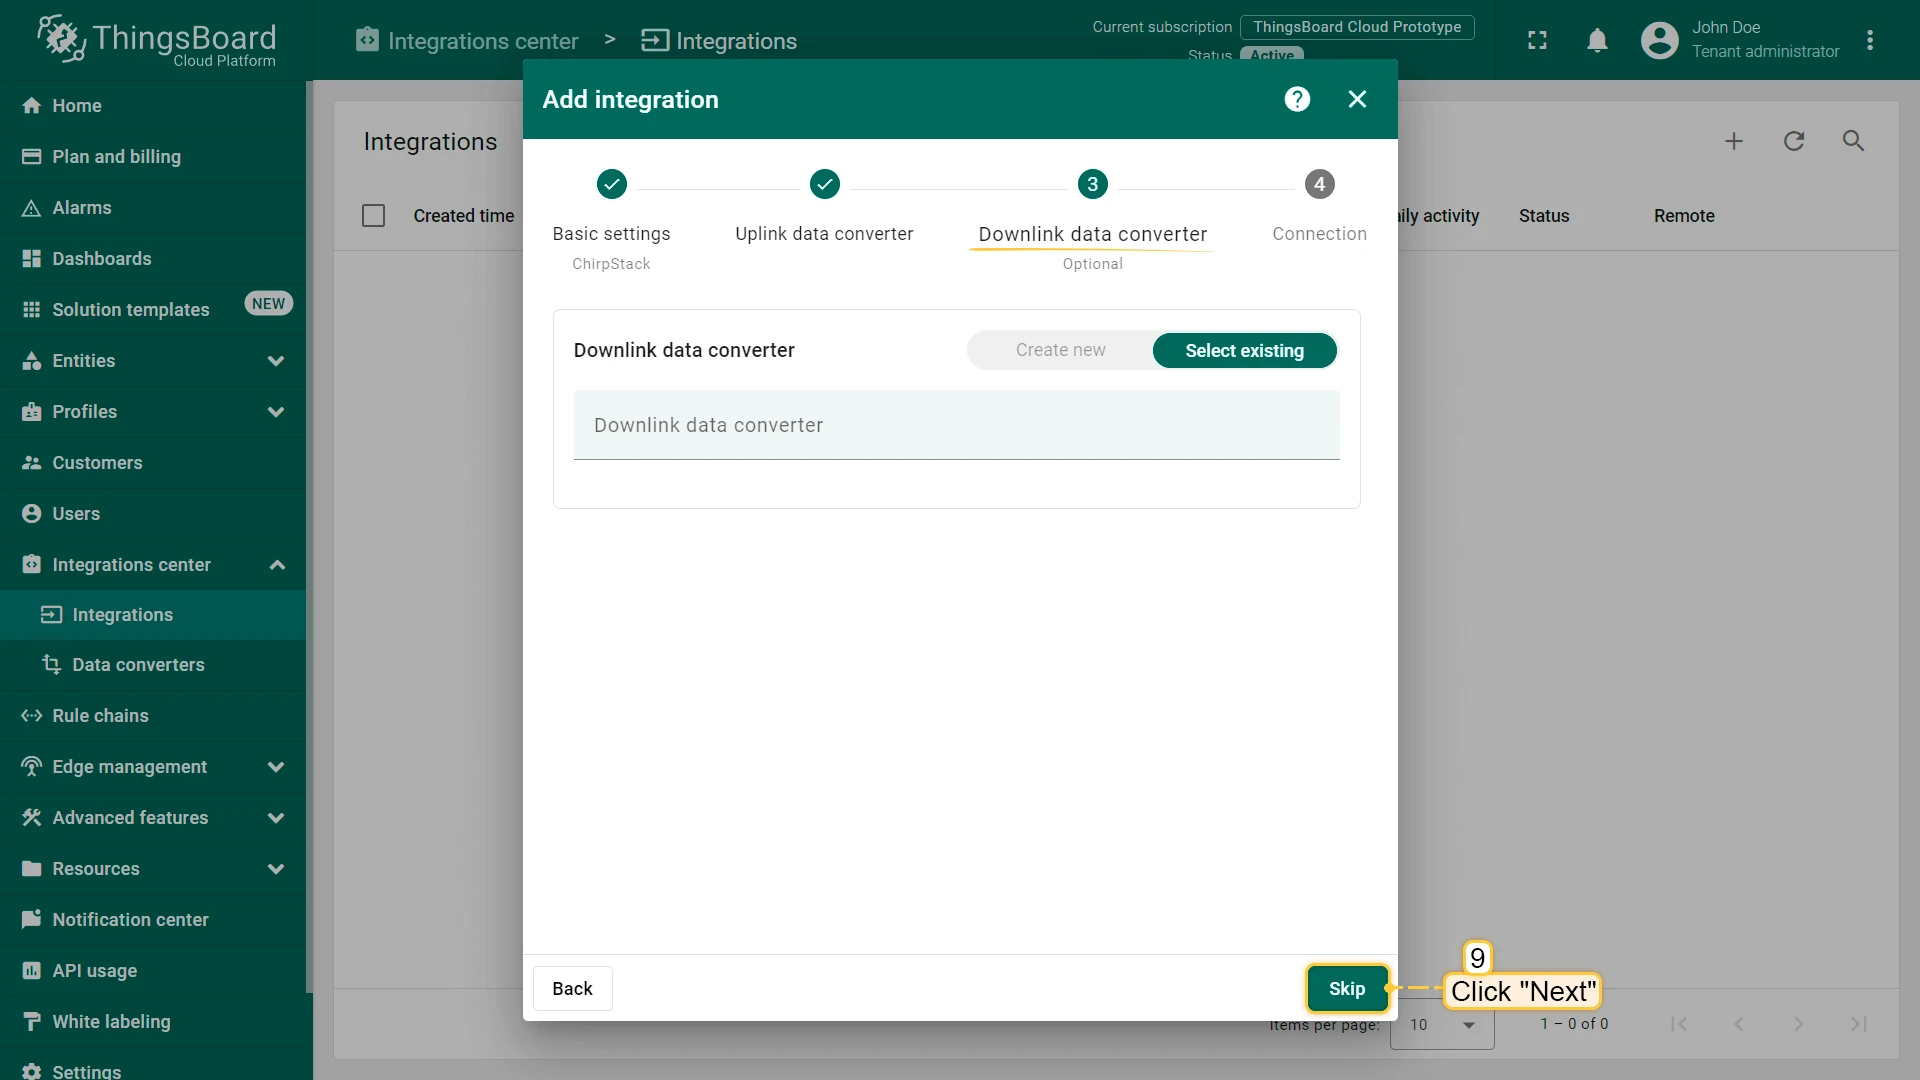
- Leave the “Downlink data converter” field empty. Click on “Skip” button.
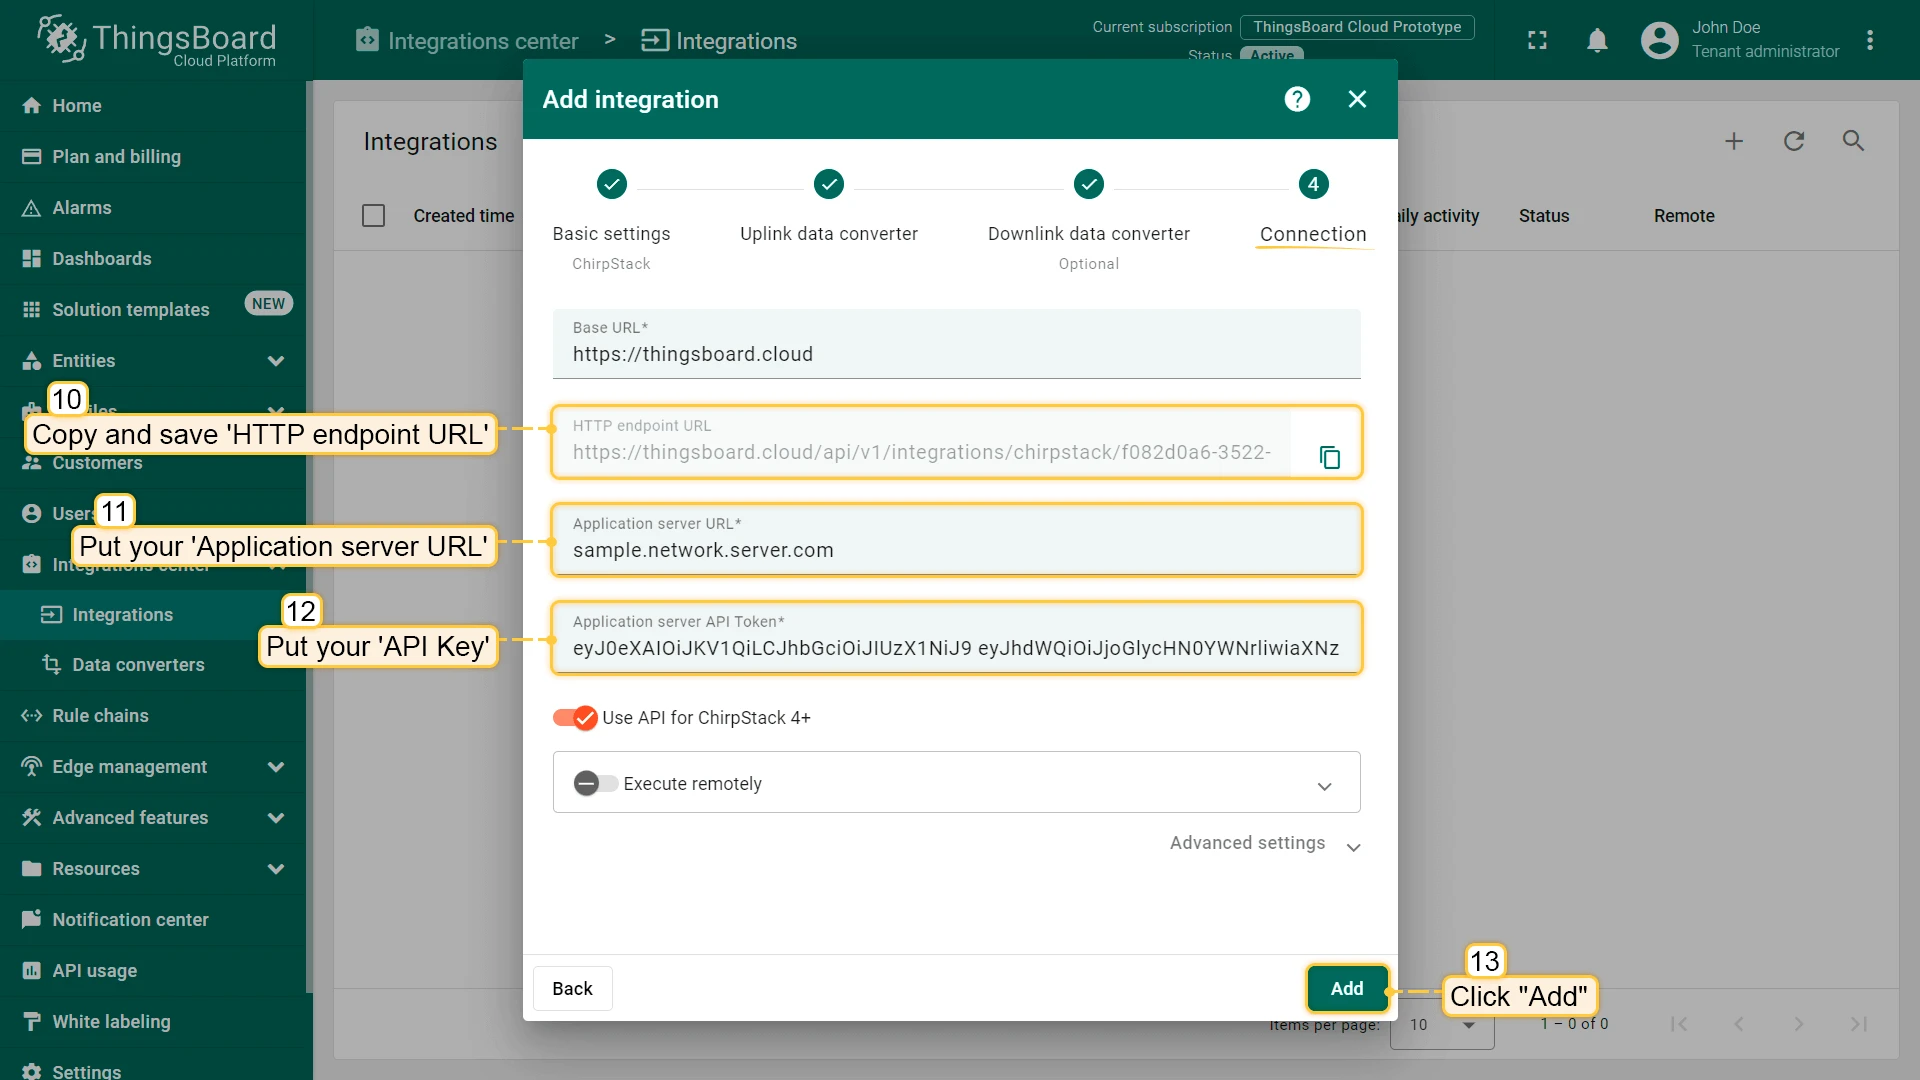
- Put your “Application server URL” and “API Key” from Chirpstack and copy “HTTP endpoint URL”, Click on “Add” button.
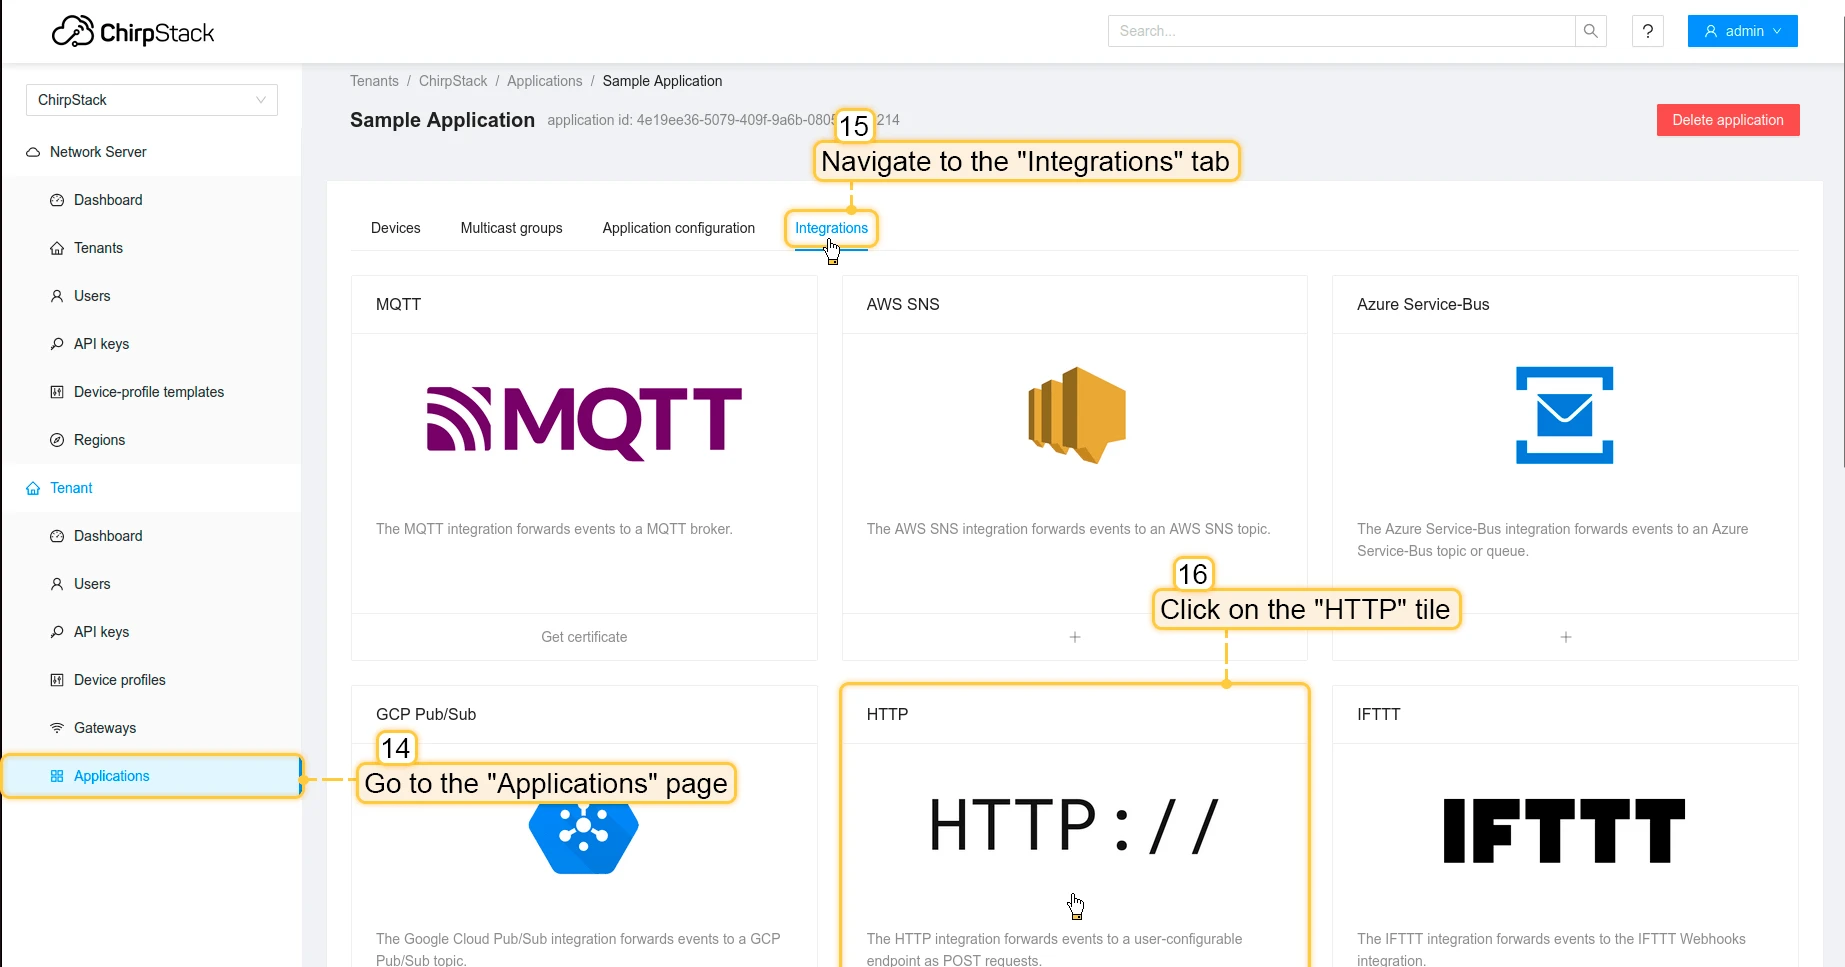
- Now, open your Chirpstack, go to the “Applications” page -> Your application -> “Integrations” tab, Find and click on the HTTP tile.
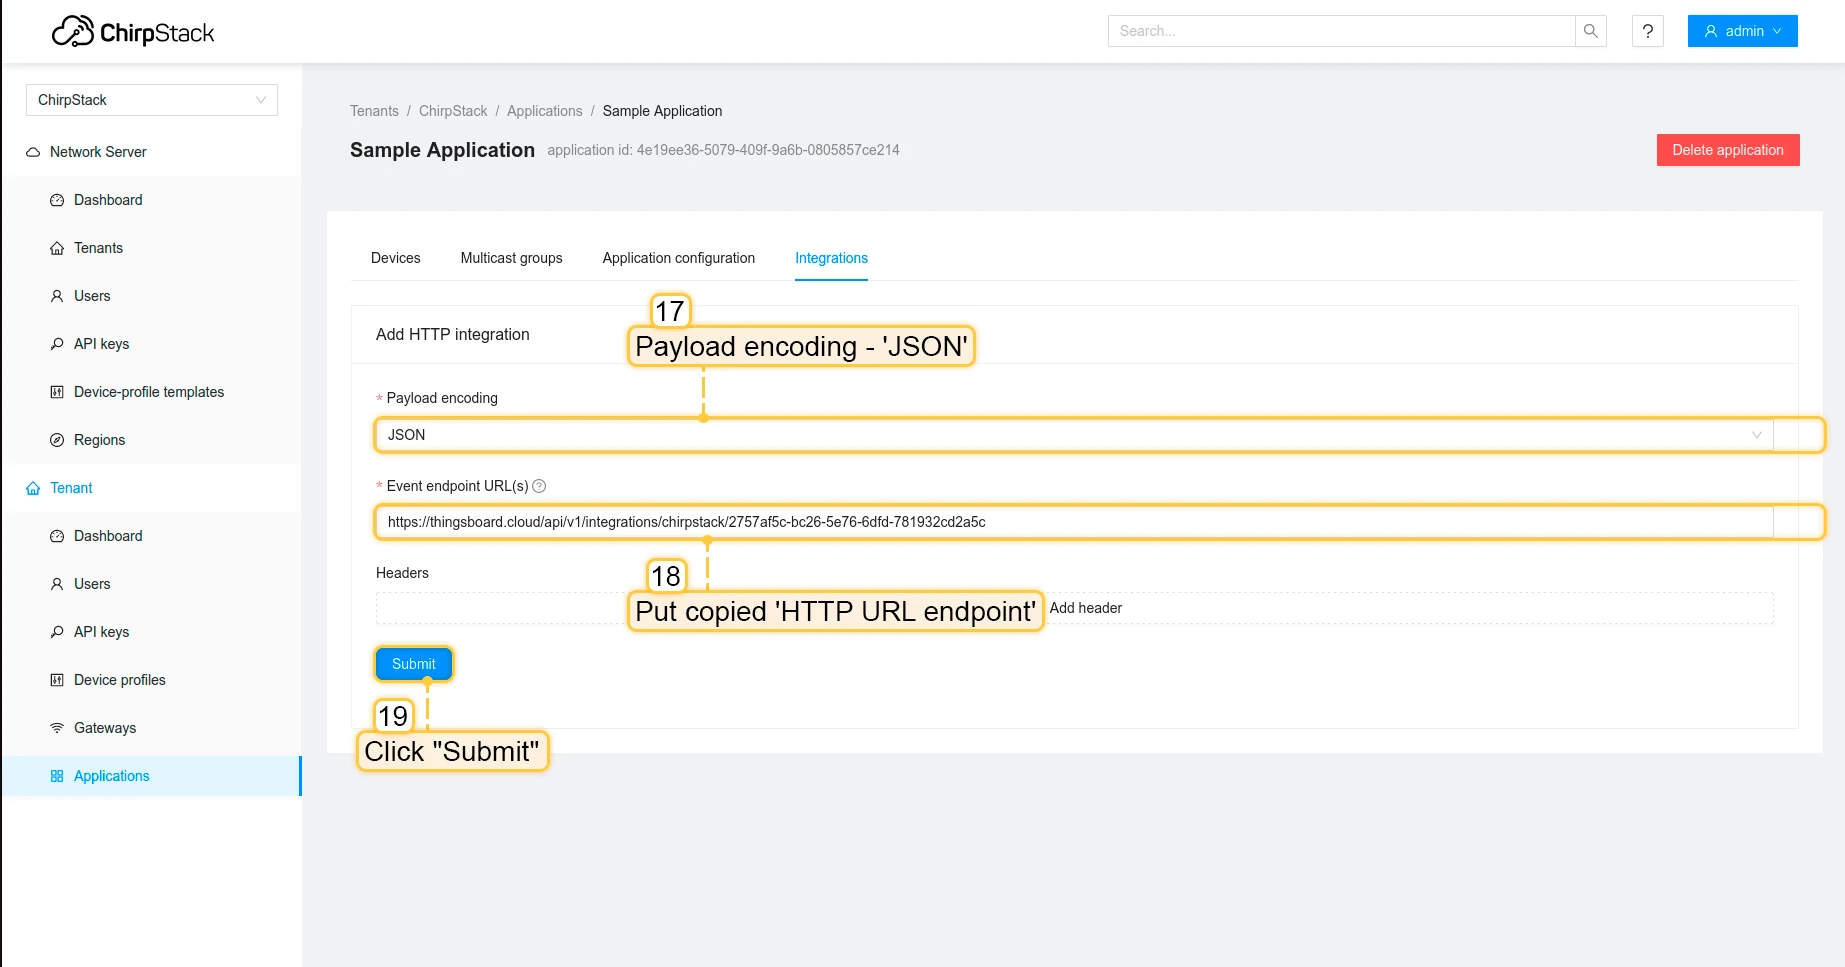
- Put “HTTP URL endpoint” into “Event Endpoint URL(s)” field and click on “Submit” button.

Integration is created.
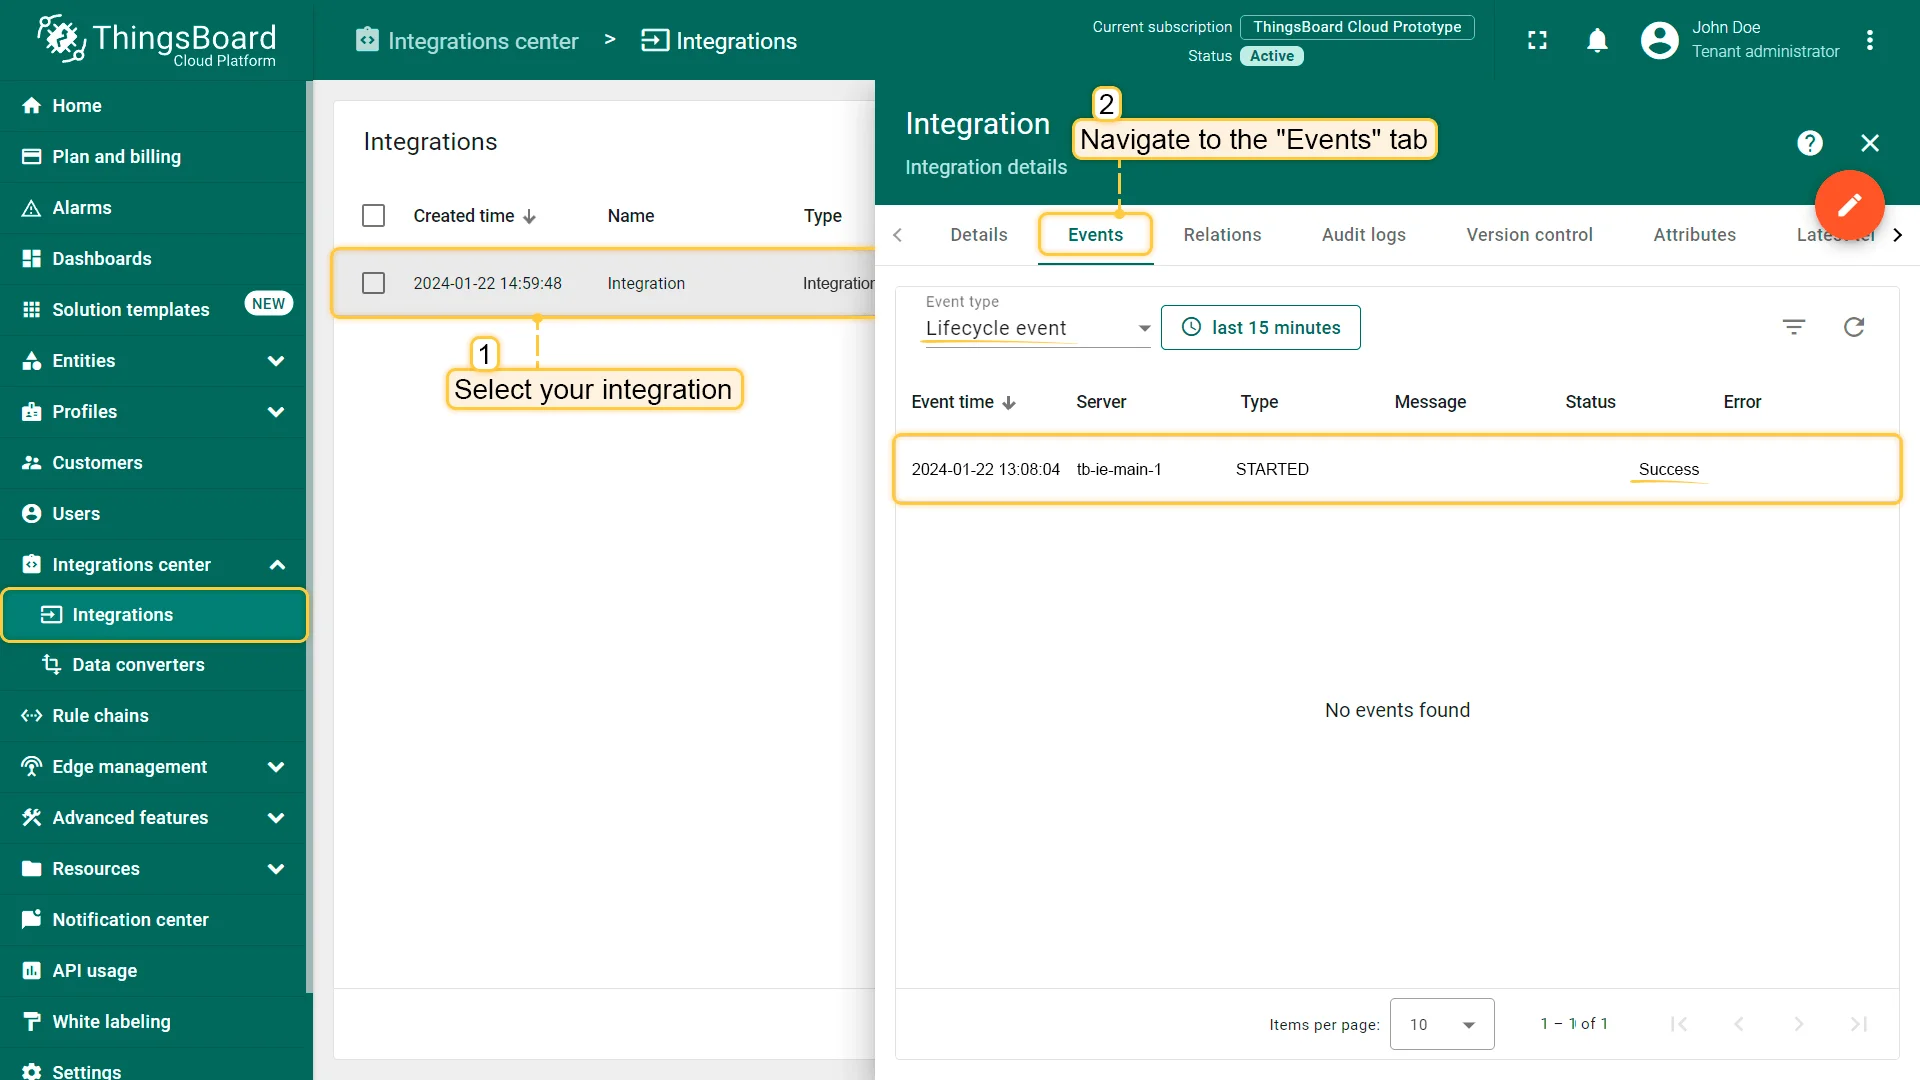
To check integration connection you can do the following:
- Click on integration row in the list;
- Go to the “Events” tab;
- Select “Lifecycle events” from Event type dropdown list.
If you see event STARTED and status Success it means that integration is successfully started and ready to receive messages.
Add a gateway on The Things Stack Community Edition
We need to add a gateway on The Things Stack Community Edition.
To add a gateway, you can follow next steps:
- Login to the cloud and open your console.
- Select the “Register a gateway”.
- Press the “Register gateway” button.
- Put information about the gateway (gateway EUI) and click the “Register gateway” button.
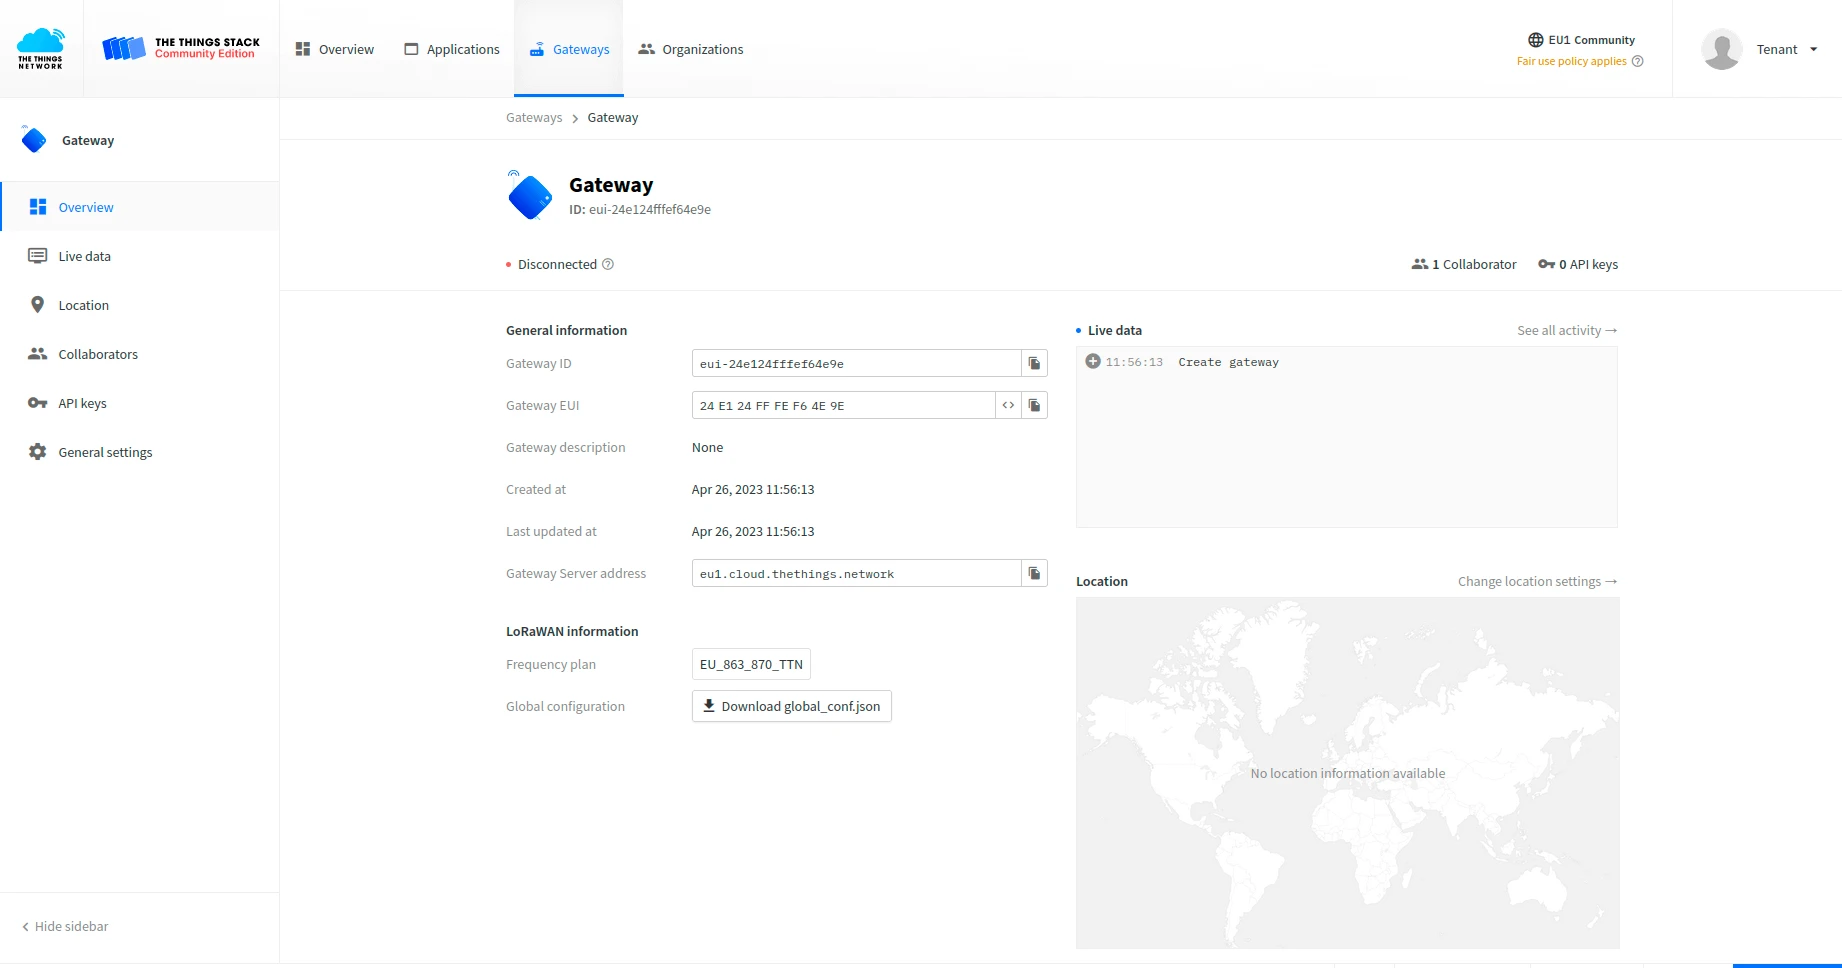
- The gateway is added. You can see its status - disconnected.


Configure the gateway to send data
To connect and send data to The Things Stack Community Edition we should configure the gateway. To do this please follow next steps:
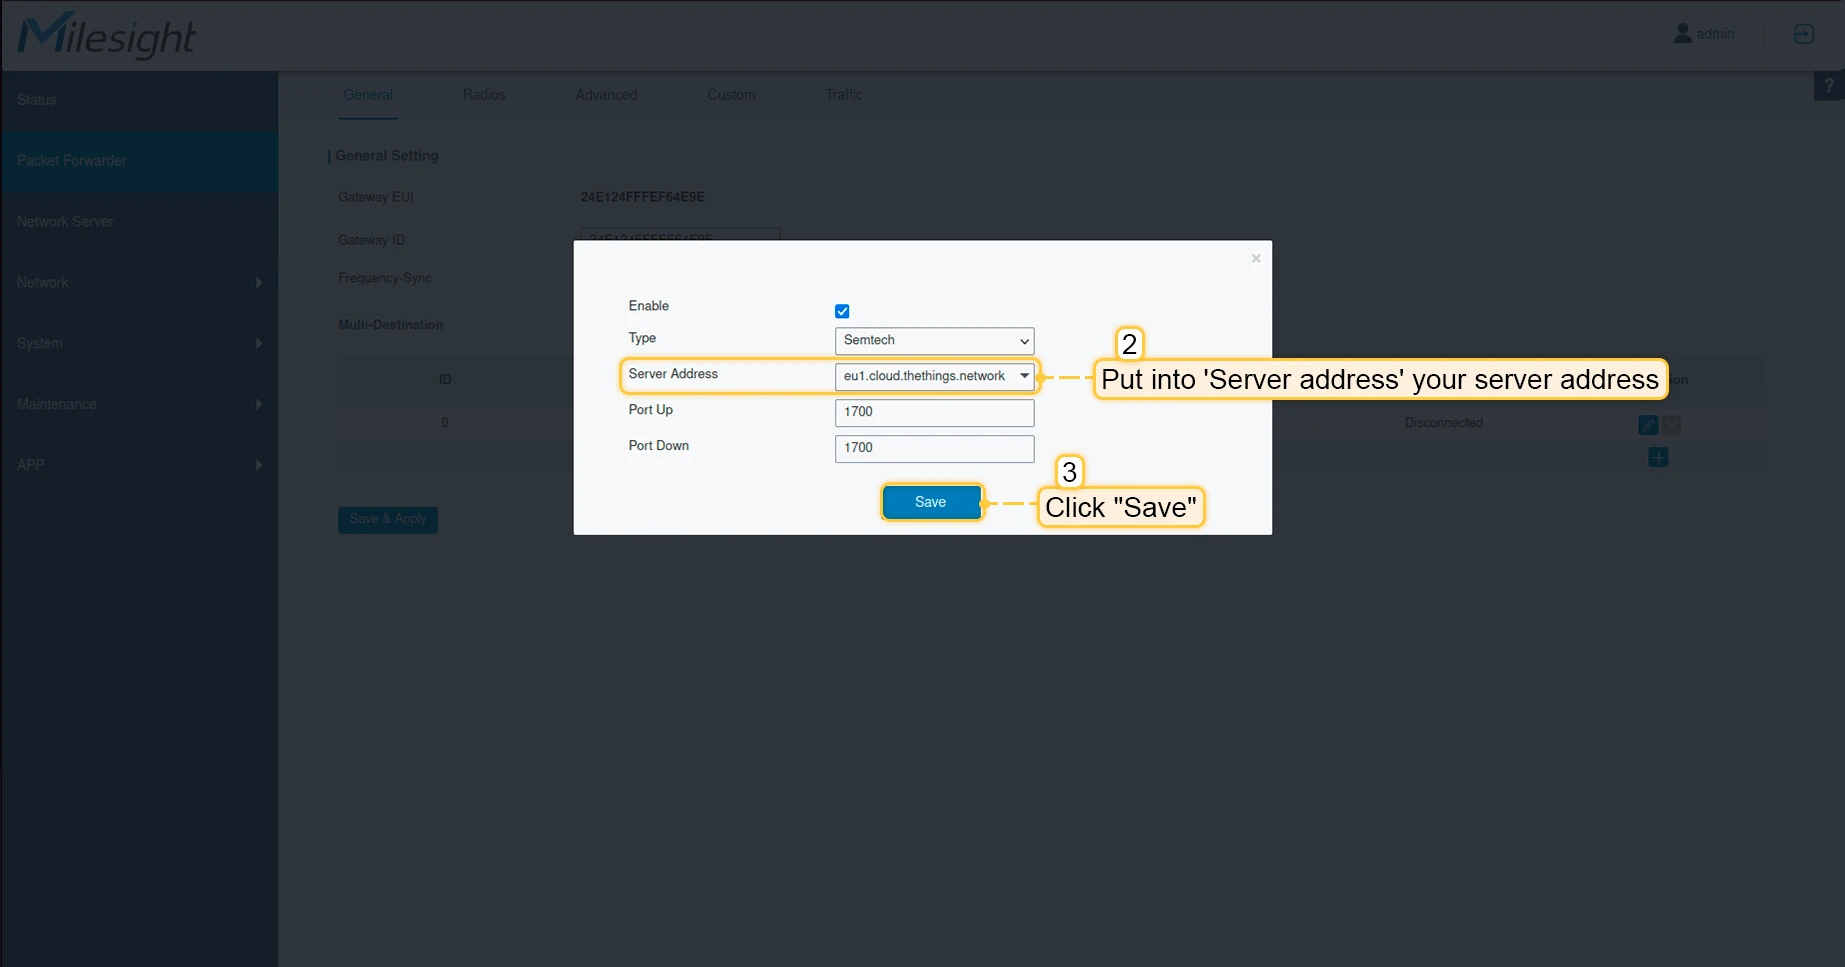
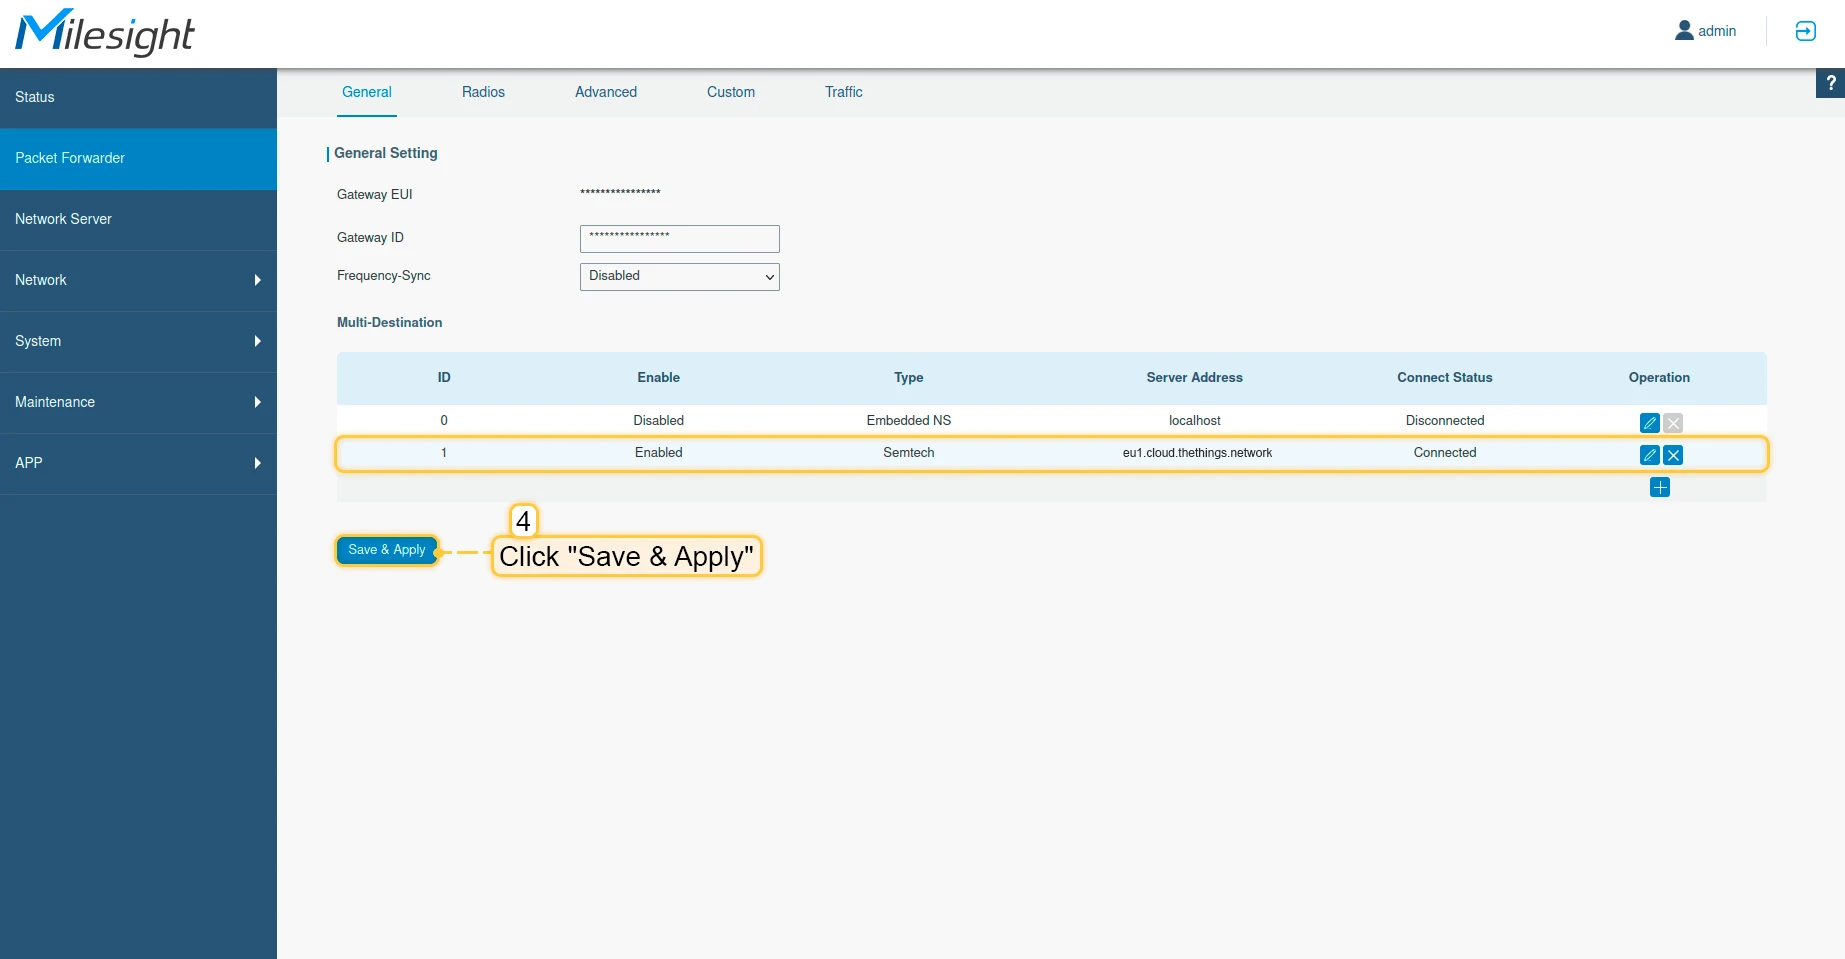
- Open gateway control panel. Go to the “Packet Forwarder” page and click on “plus” button, to add a new forwarder.
- Put into Server address your server address, in our case it is eu1.cloud.thethings.network. Click “Save” button.
- Click “Save & Apply” button.
Now, the gateway is able to send a data to the network server.
Configure application on The Things Stack Community Edition
Now we need to configure application on The Things Stack. To do this please follow next steps:
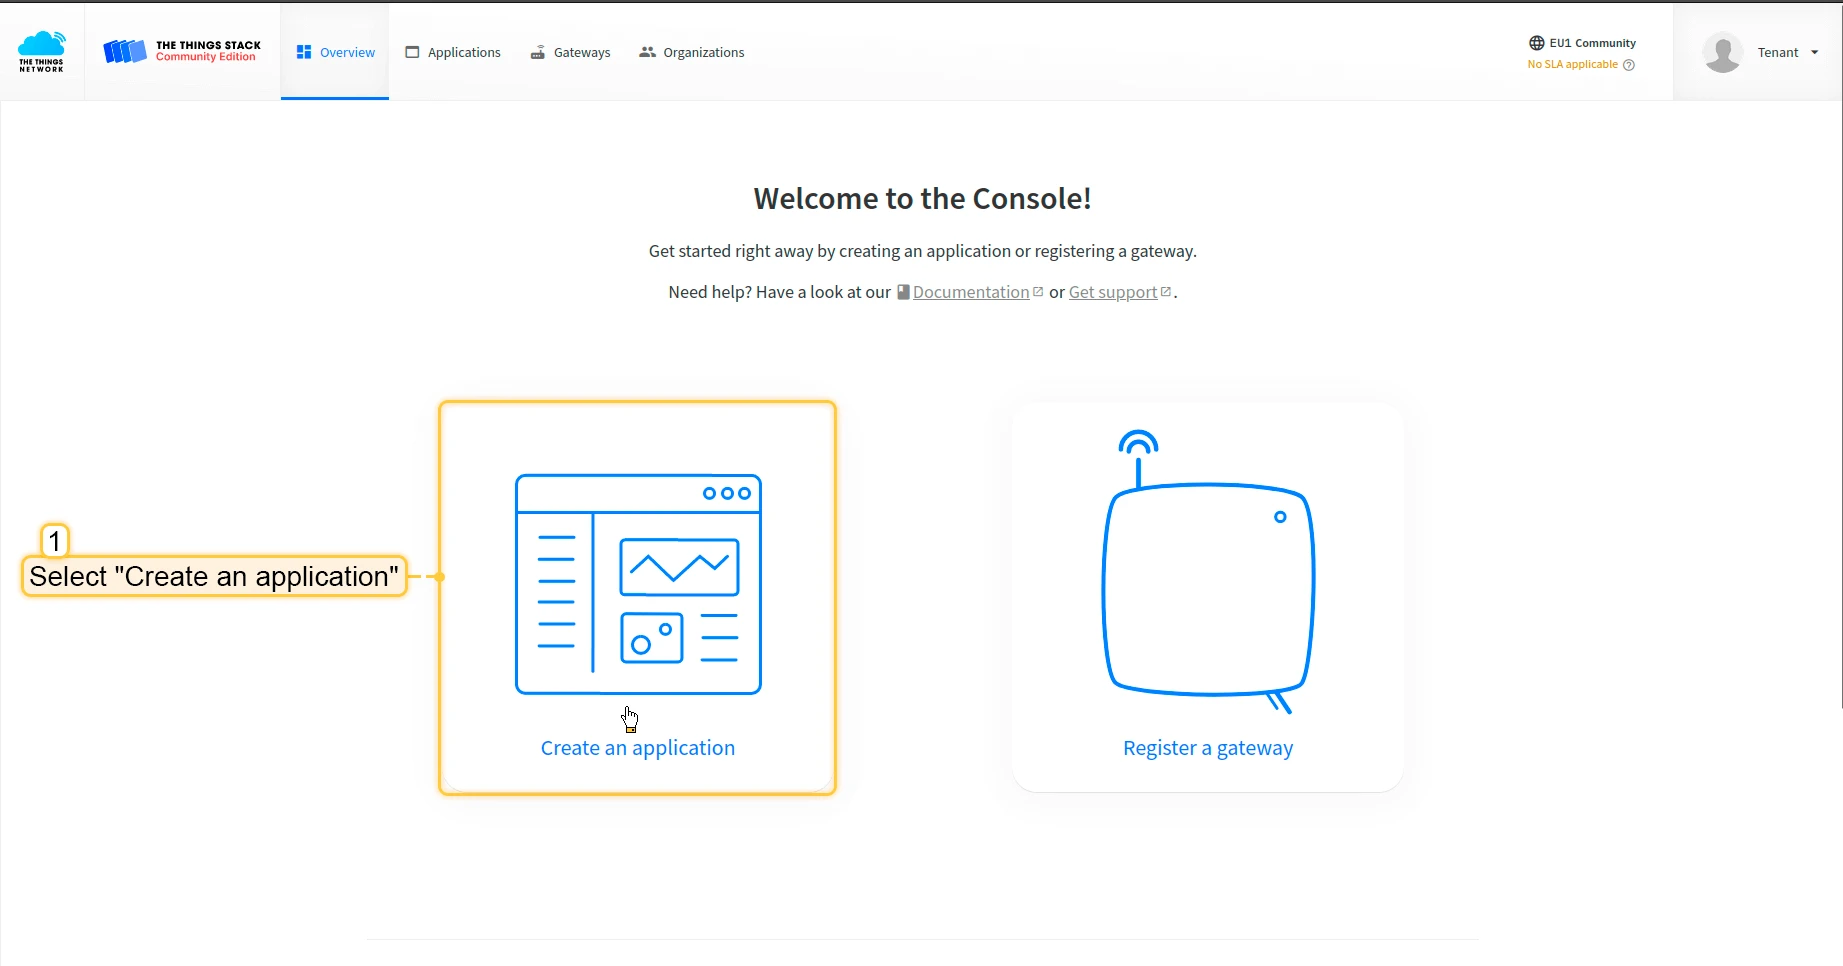
- Open your console and click on the “Create an application”.
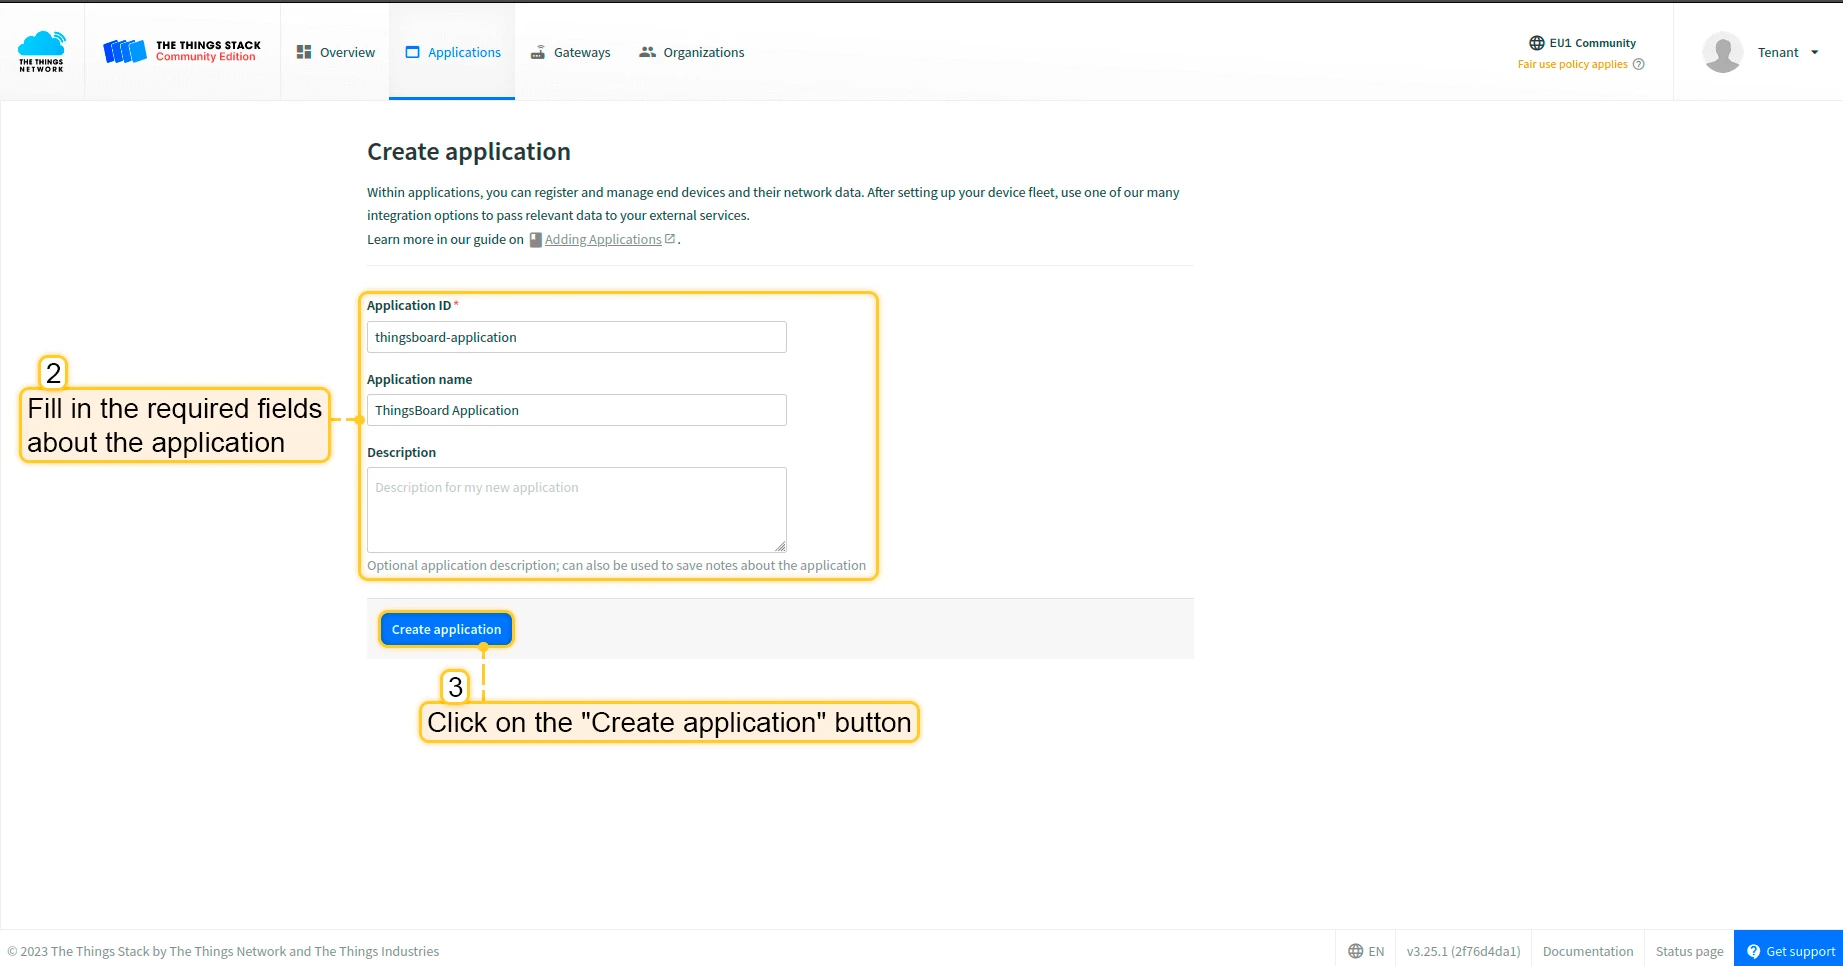
- Fill in the required fields about the application. Then click “Create application” button.
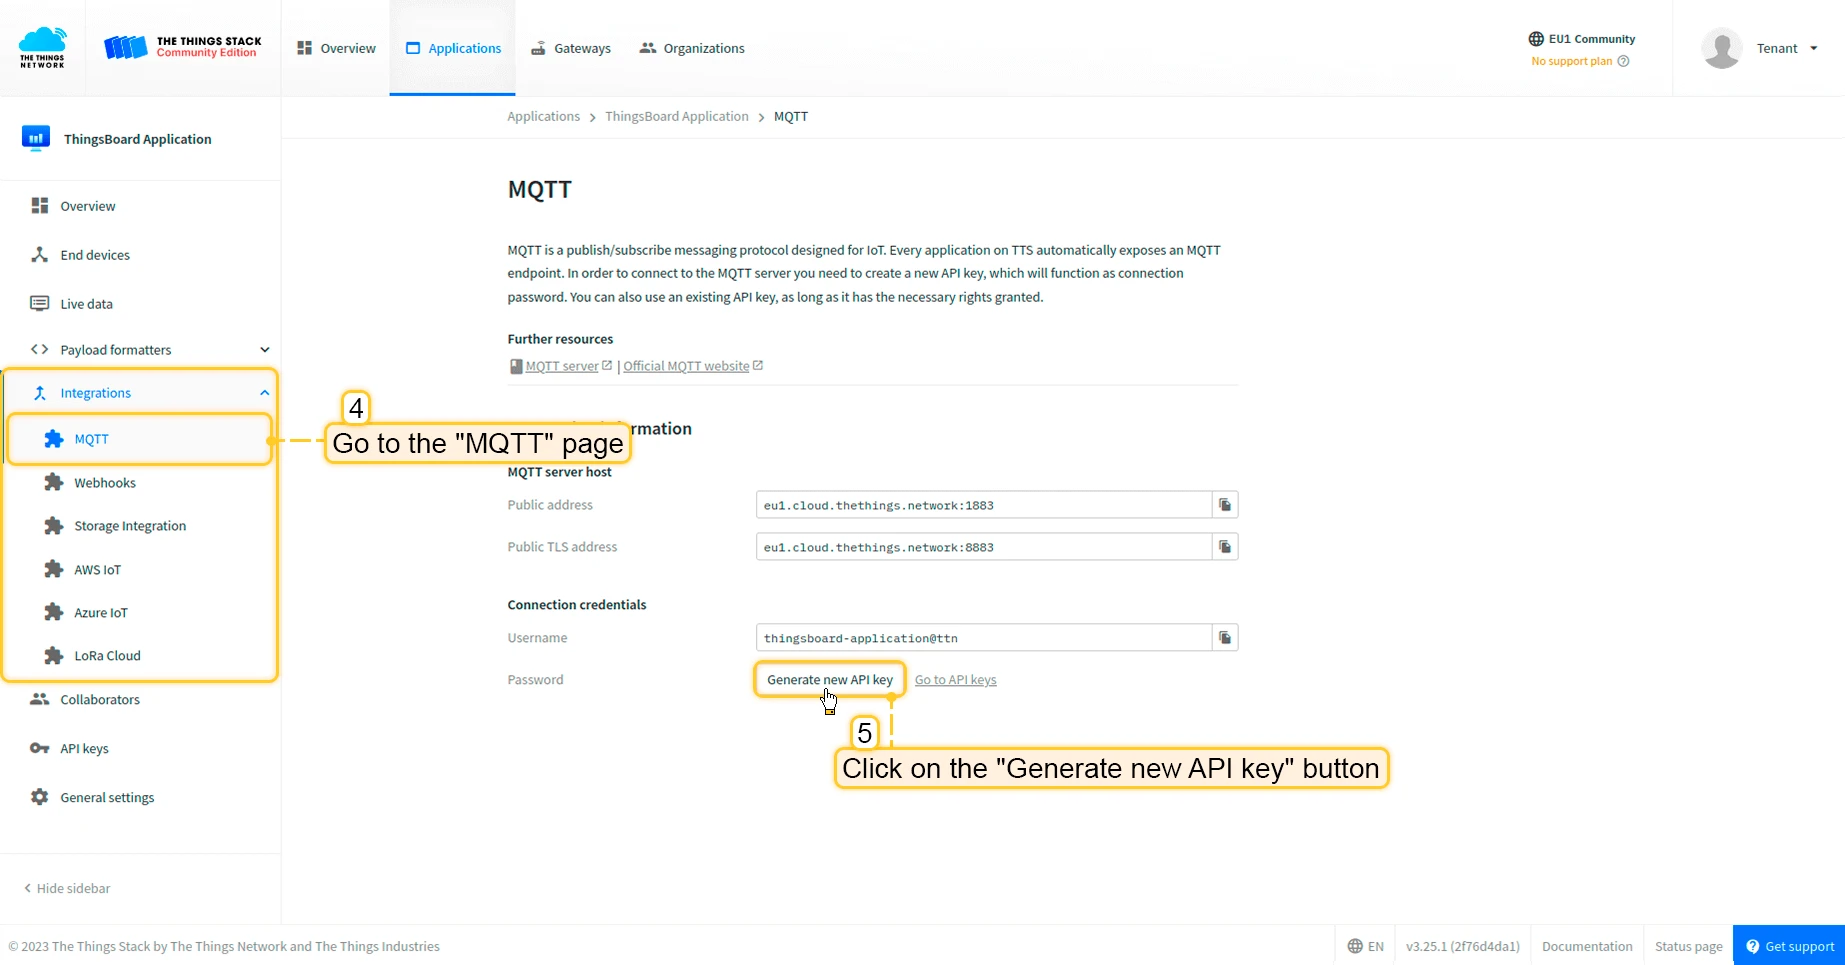
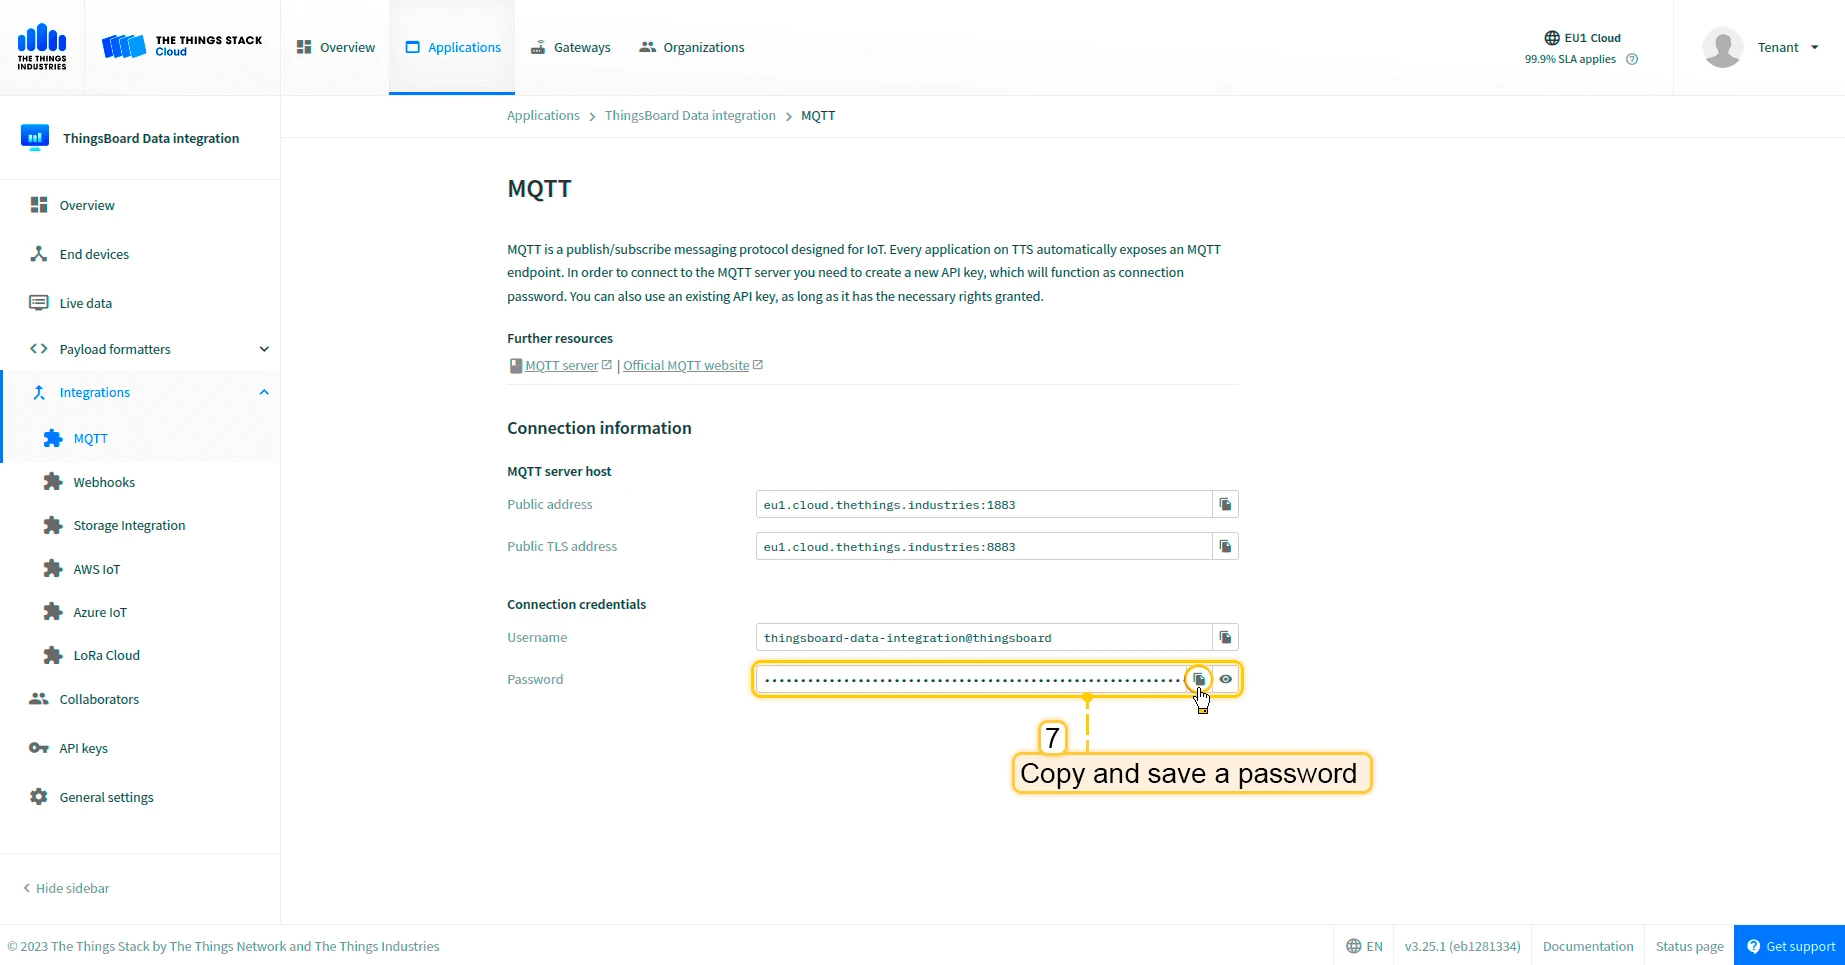
- Go to the “Integrations” -> open the “MQTT” page in the left menu. Then, click on the “Generate new API key” button.
- Copy and save the password (API key) (after leaving the page it won’t be displayed).

Now we can move to ThingsBoard to configure integration.
Create integration in ThingsBoard
Next we will create “The Things Stack” (TTS) integration inside the ThingsBoard.
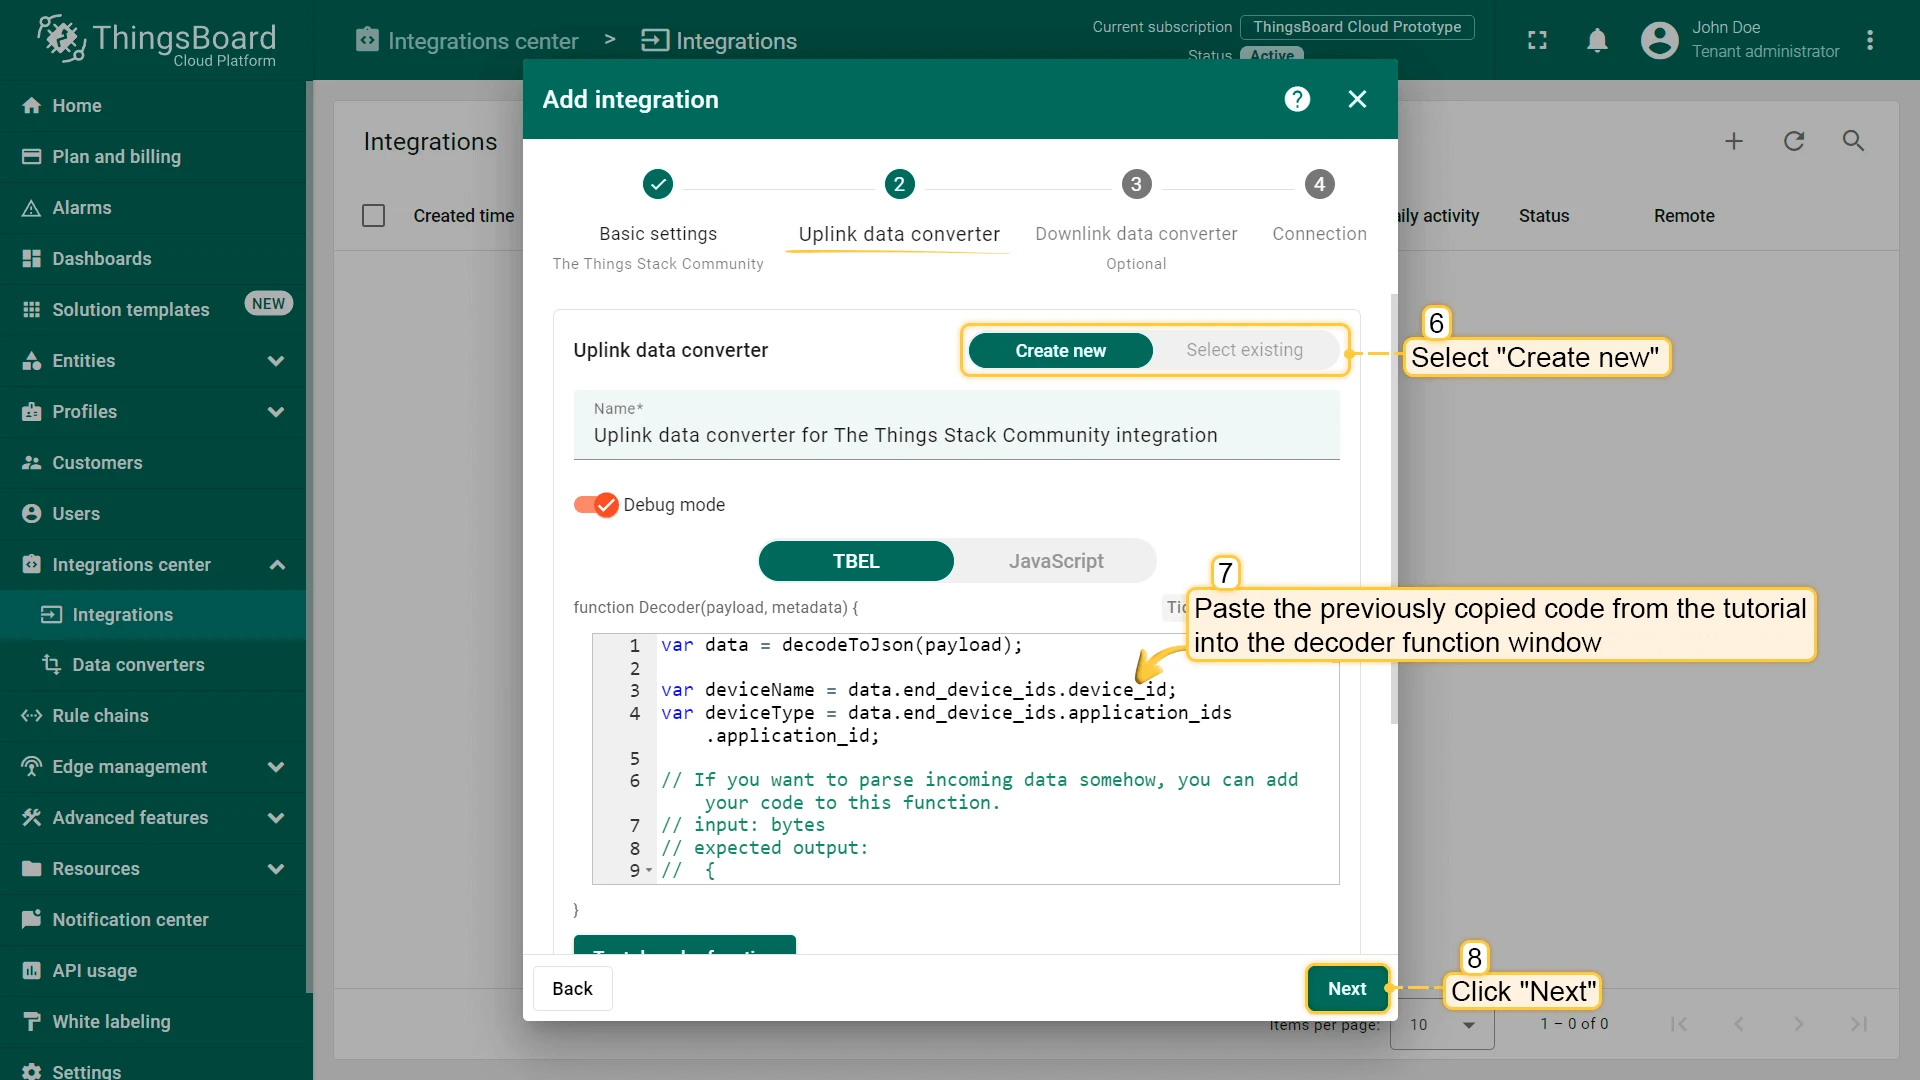
At first, copy the code, we will need it to create the uplink converter:
var data = decodeToJson(payload);
var deviceName = data.end_device_ids.device_id;var deviceType = data.end_device_ids.application_ids.application_id;
// If you want to parse incoming data somehow, you can add your code to this function.// input: bytes// expected output:// {// "attributes": {"attributeKey": "attributeValue"},// "telemetry": {"telemetryKey": "telemetryValue"}// }// default functionality - convert bytes to HEX string with telemetry key "HEX_bytes"
function decodeFrmPayload(input) { var output = { attributes:{}, telemetry: {} }; // --- Decoding code --- //
output.telemetry.HEX_bytes = bytesToHex(input);
// --- Decoding code --- // return output;}
// --- attributes and telemetry objects ---var telemetry = {};var attributes = {};// --- attributes and telemetry objects ---
// --- Timestamp parsingvar incomingDateString = data.uplink_message.received_at;var dateString = incomingDateString.substring(0, incomingDateString.lastIndexOf(".")+3) + "Z";var timestamp = new Date(dateString).getTime();// --- Timestamp parsing
// You can add some keys manually to attributes or telemetryattributes.f_port = data.uplink_message.f_port;attributes.settings = data.uplink_message.settings;// We want to save correlation ids as single object, so we are excluding them from attributes parse and add manuallyattributes.correlation_ids = data.correlation_ids;
// You can exclude some keys from the resultvar excludeFromAttributesList = ["device_id", "application_id", "uplink_message", "correlation_ids"];var excludeFromTelemetryList = ["uplink_token", "gateway_id", "settings"];
// Message parsing// To avoid paths in the decoded objects we passing false value to function as "pathInKey" argument.// Warning: pathInKey can cause already found fields to be overwritten with the last value found, e.g. receive_at from uplink_message will be written receive_at in the root.var telemetryData = toFlatMap(data.uplink_message, excludeFromTelemetryList, false);var attributesData = toFlatMap(data, excludeFromAttributesList, false);
// Passing incoming bytes to decodeFrmPayload function, to get custom decodingvar customDecoding = {};if (data.uplink_message.get("frm_payload") != null) { customDecoding = decodeFrmPayload(base64ToBytes(data.uplink_message.frm_payload));}
// Collecting data to resultif (customDecoding.?telemetry.size() > 0) { telemetry.putAll(customDecoding.telemetry);}
if (customDecoding.?attributes.size() > 0) { attributes.putAll(customDecoding.attributes);}
telemetry.putAll(telemetryData);attributes.putAll(attributesData);
var result = { deviceName: deviceName, deviceType: deviceType, telemetry: { ts: timestamp, values: telemetry }, attributes: attributes};
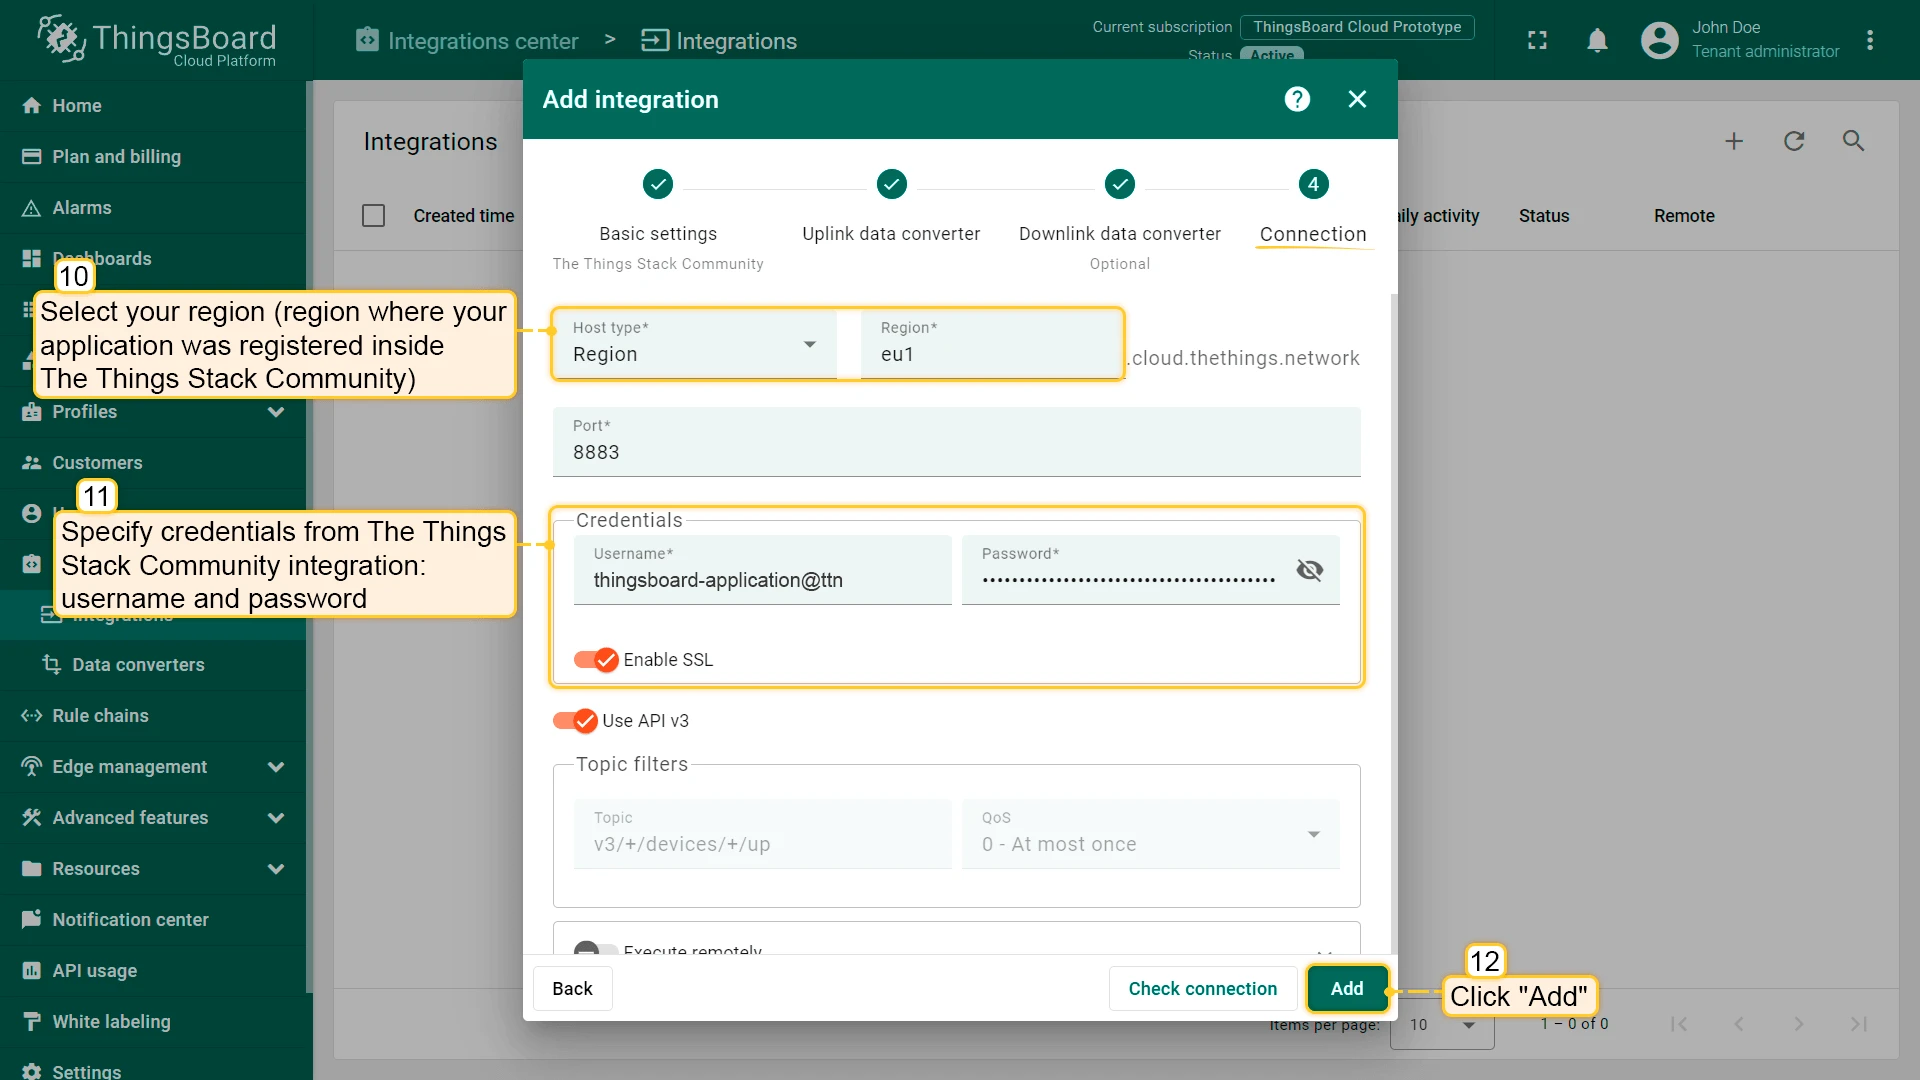
return result;In the “Connect” step, you will need the following parameters:
- Region: eu1 (region where your application was registered inside The Things Stack Community)
- Username: thingsboard-application@ttn (use Username from integration on TTS)
- Password: use Password from integration on The Things Stack Community
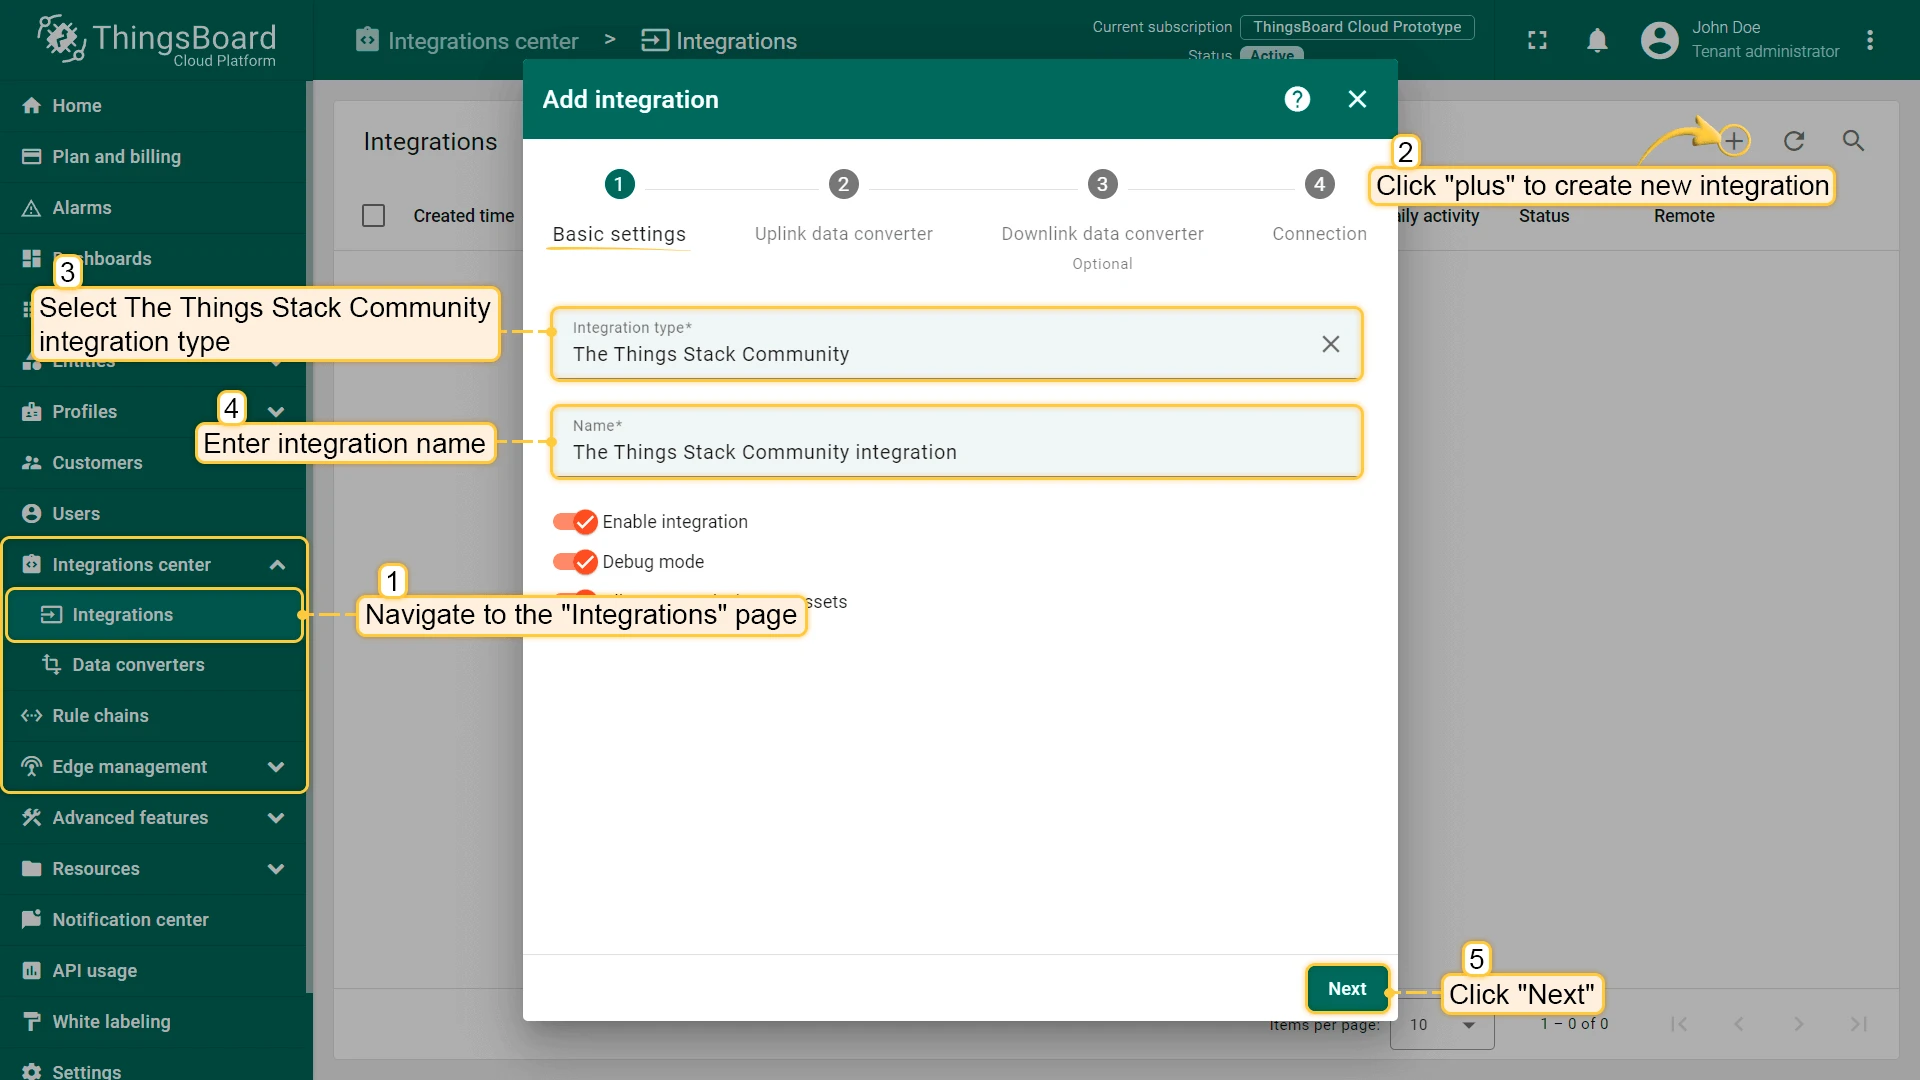
Now, open the “Integration center” section -> “Integrations” page and follow this steps:
- Click “plus” icon in the upper right corner to add new integration. Select type “The Things Stack Community”. Then, click “Next”.
- Paste the previously copied script to the Decoder function section. Click “Next”.
- Leave the “Downlink data converter” field empty. Click on “Skip” button.
- Next, fill in the fields with your parameters. After, press “Add” button.

Integration is created.
To check integration connection you can do the following:
- Click on integration row in the list;
- Go to the “Events” tab;
- Select “Lifecycle events” from Event type dropdown list.
If you see event STARTED and status Success it means that integration is successfully started and ready to receive messages.
Add a gateway on The Things Industries
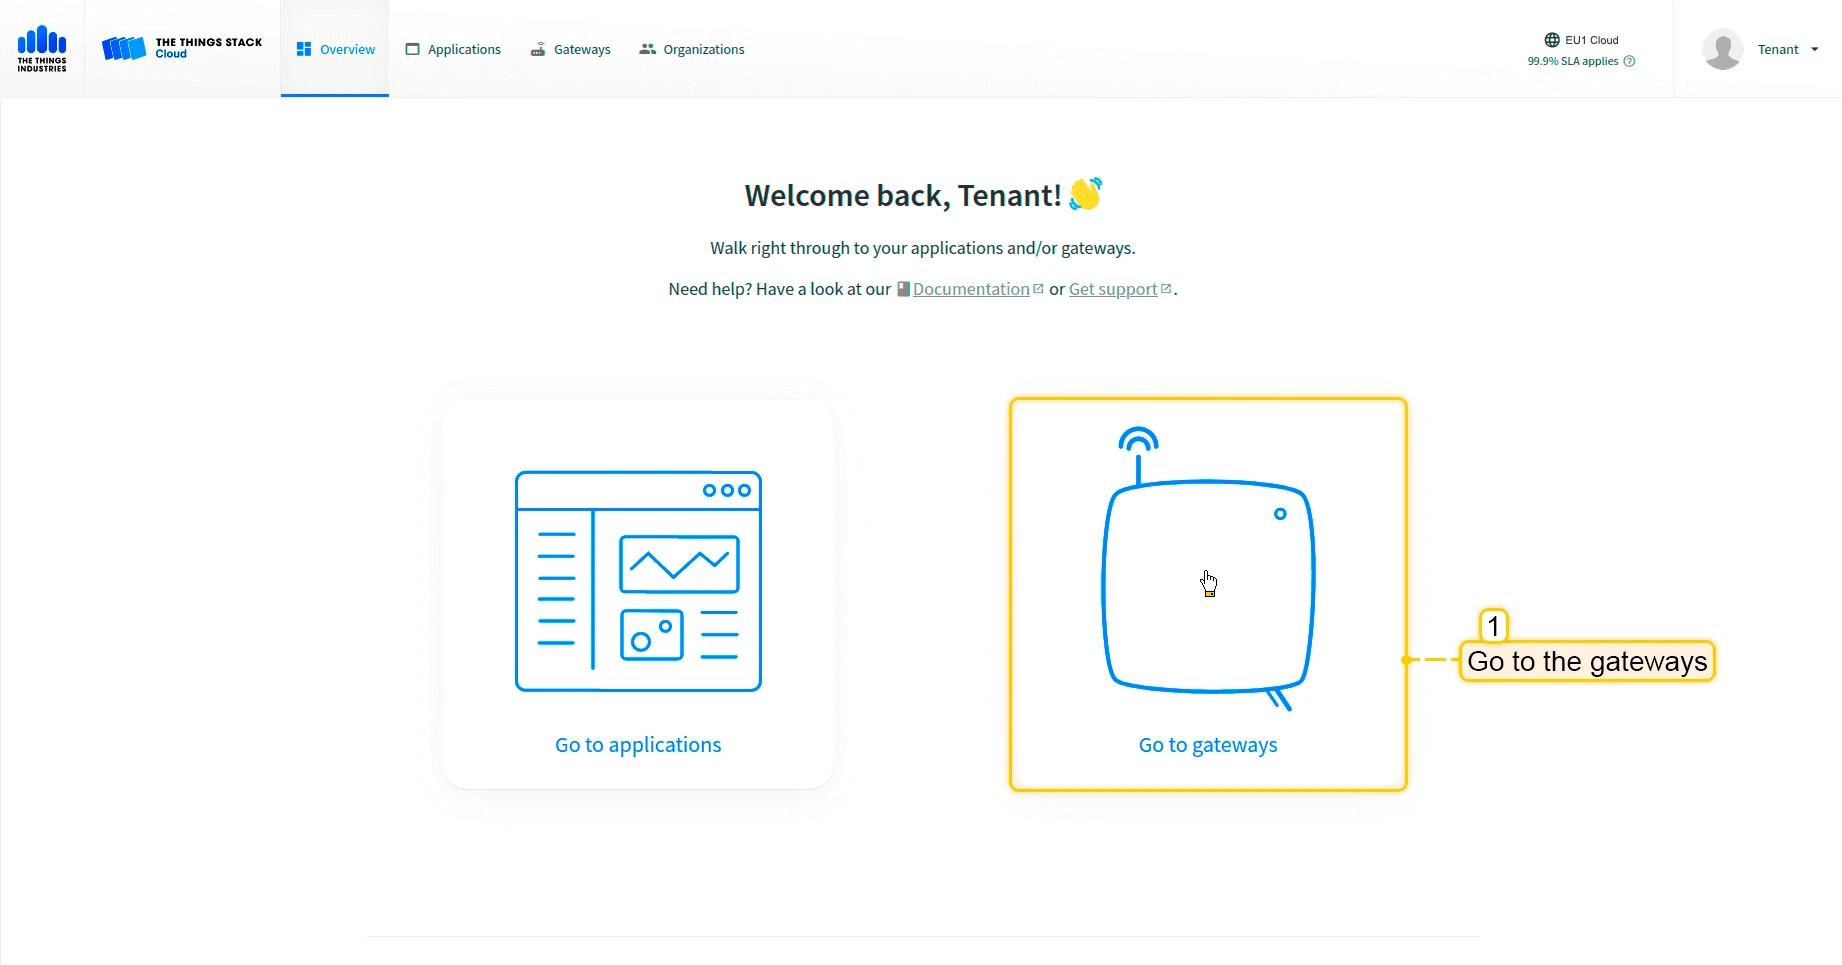
We need to add a gateway on The Things Industries cloud.
To add a gateway, you can follow next steps:
- Login to the cloud and open your console.
- Select the “Go to gateways”.
- Press the “Register gateway” button.
- Put information about the gateway (gateway EUI) and click the “Register gateway” button.
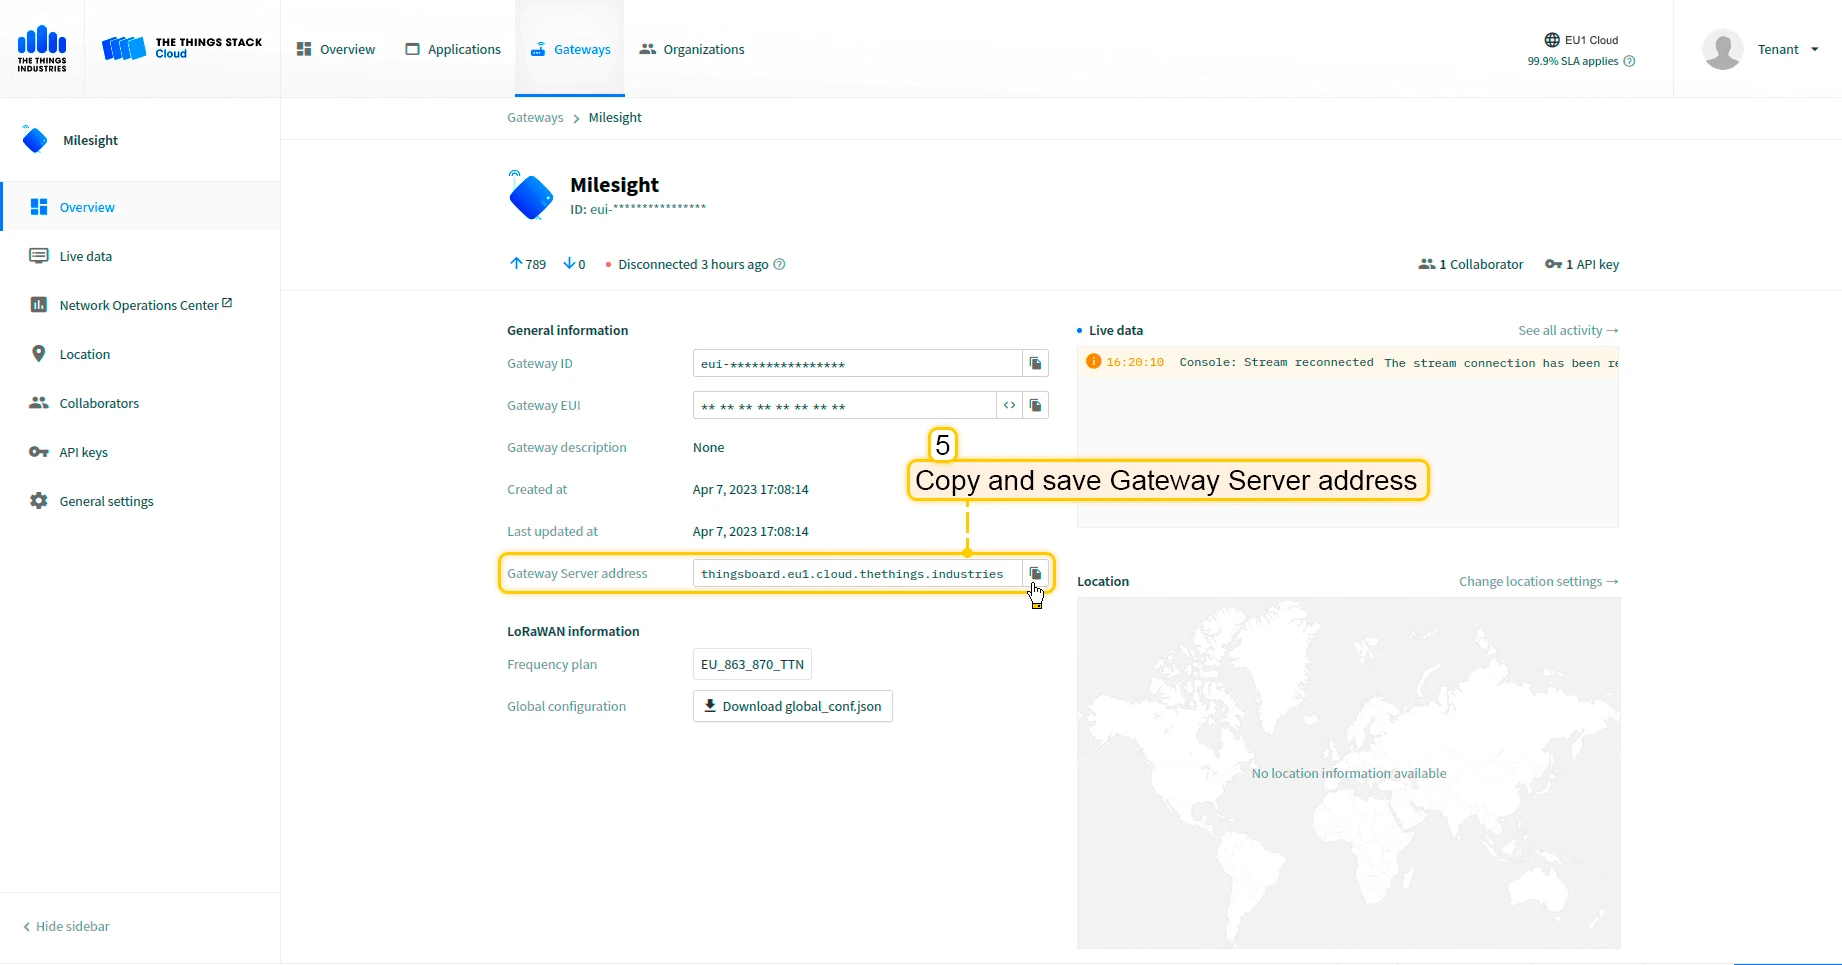
- The gateway is added. Copy and save “Gateway Server address”, we will need it later.


Configure the gateway to send data
To connect and send data to The Things Industries cloud we should configure the gateway. To do this please follow next steps:
- Open gateway control panel. Go to the “Packet Forwarder” page and click on “plus” button, to add a new forwarder.
- Put into “Server address” from the network server. Click “Save” button.
- Click “Save & Apply” button.
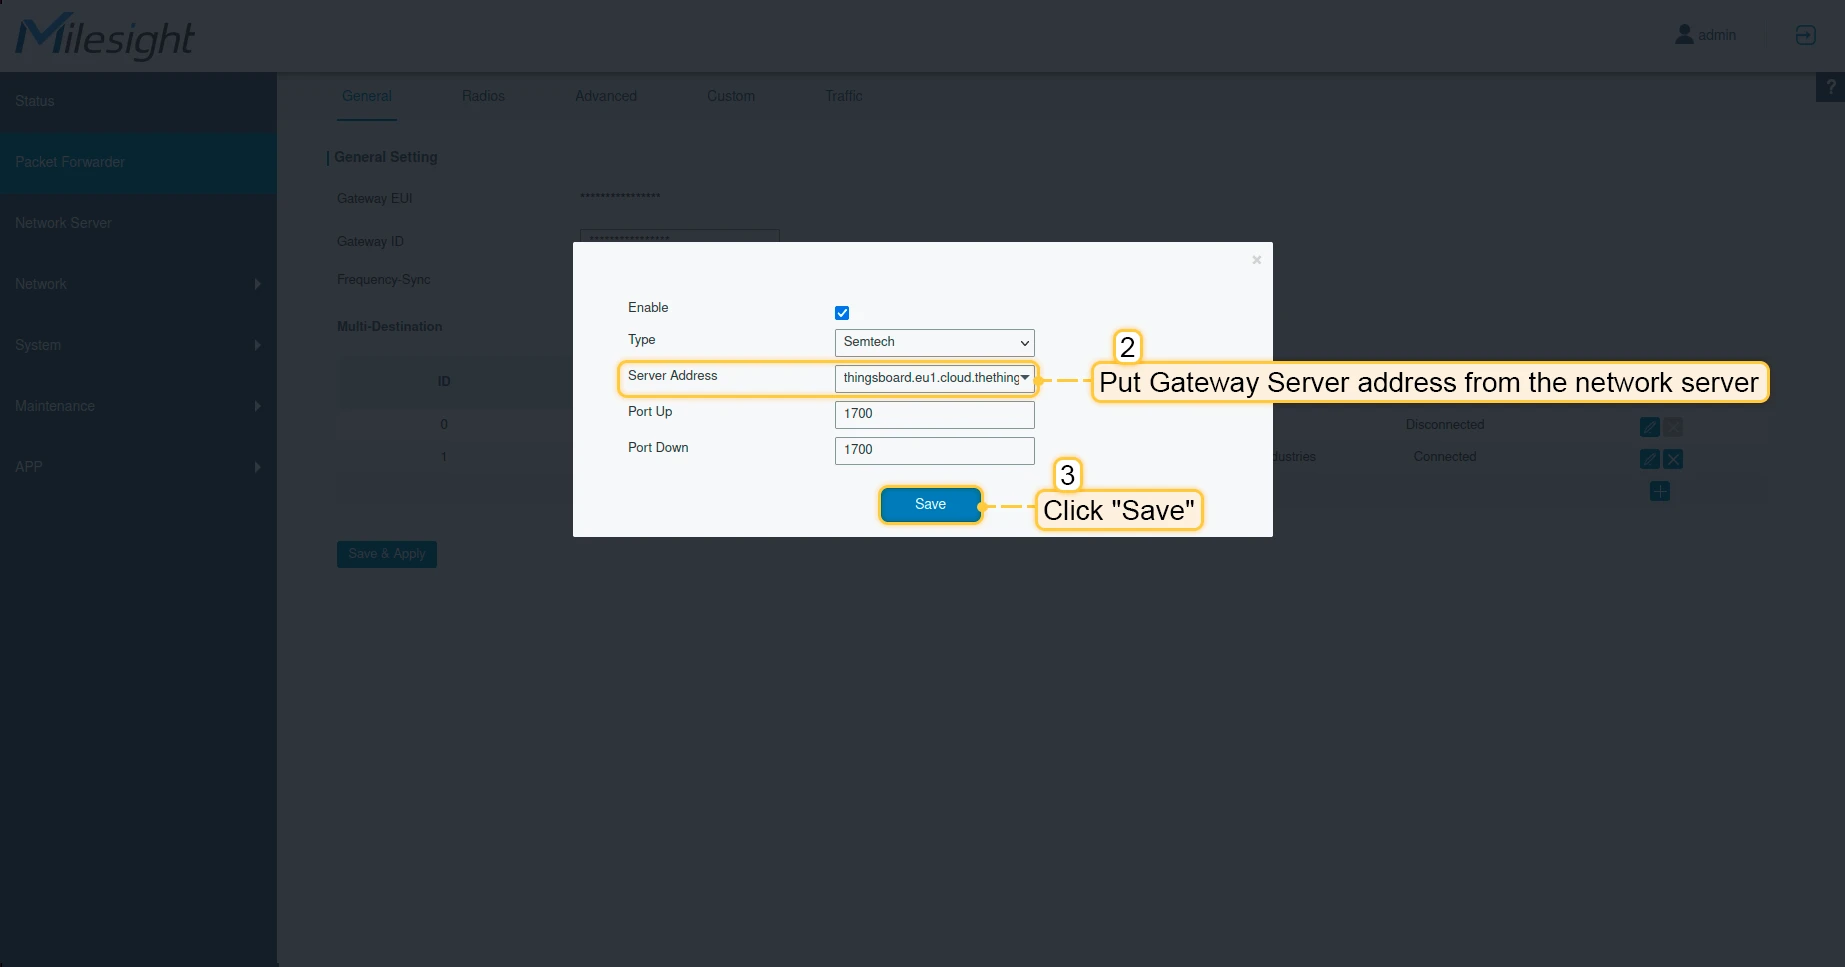

Now, the gateway is able to send a data to the network server.
Configure application on The Things Industries cloud
Now we need to configure integration on The Things Industries. to do this please follow next steps:
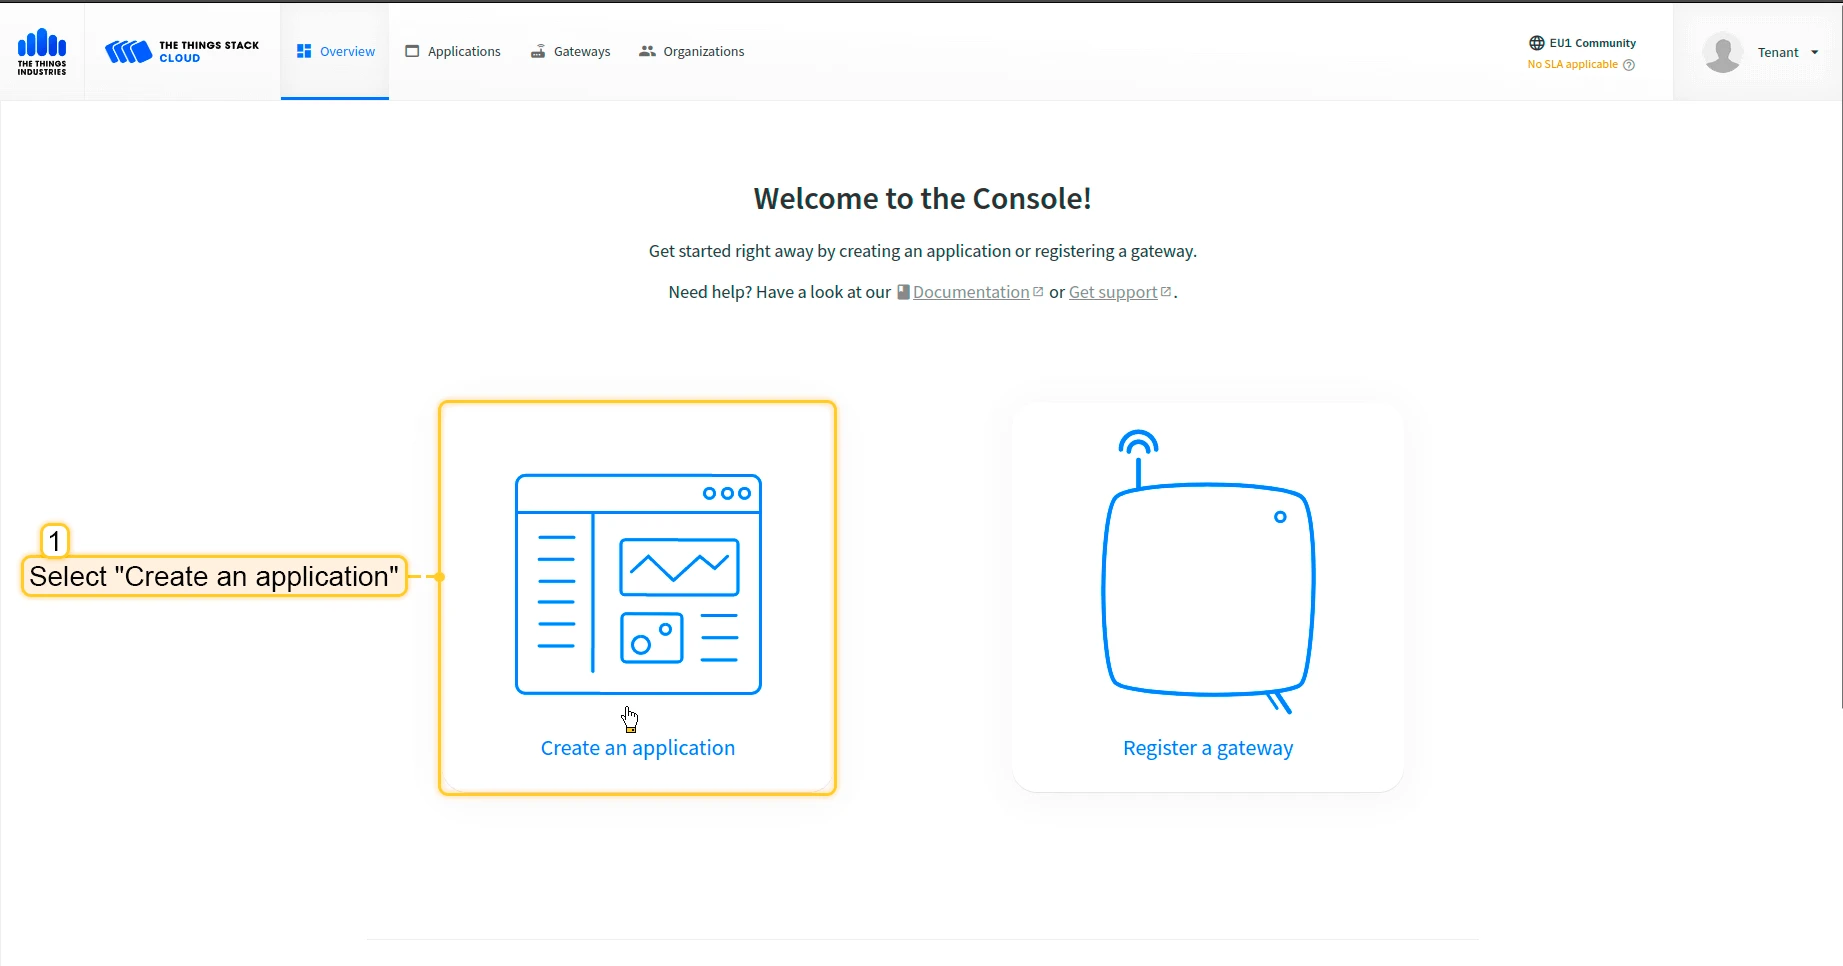
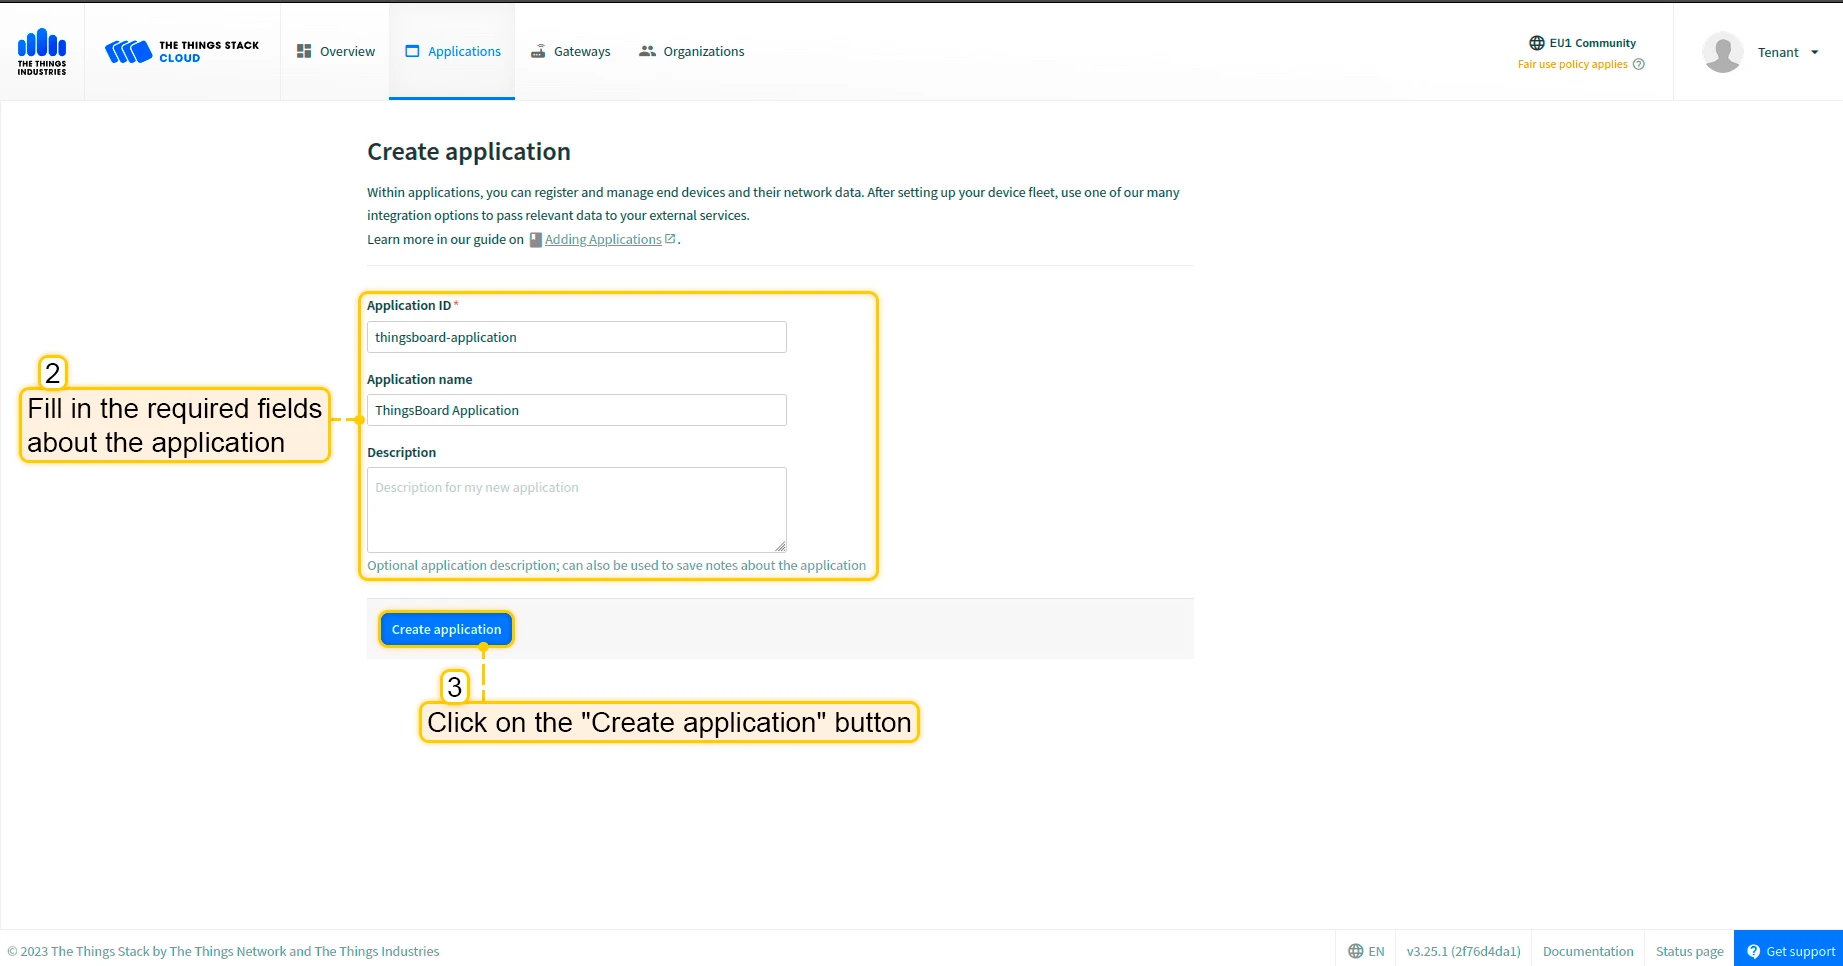
- Open your console and click on the “Create an application”.
- Fill in the required fields about the application. Then click “Create application” button.
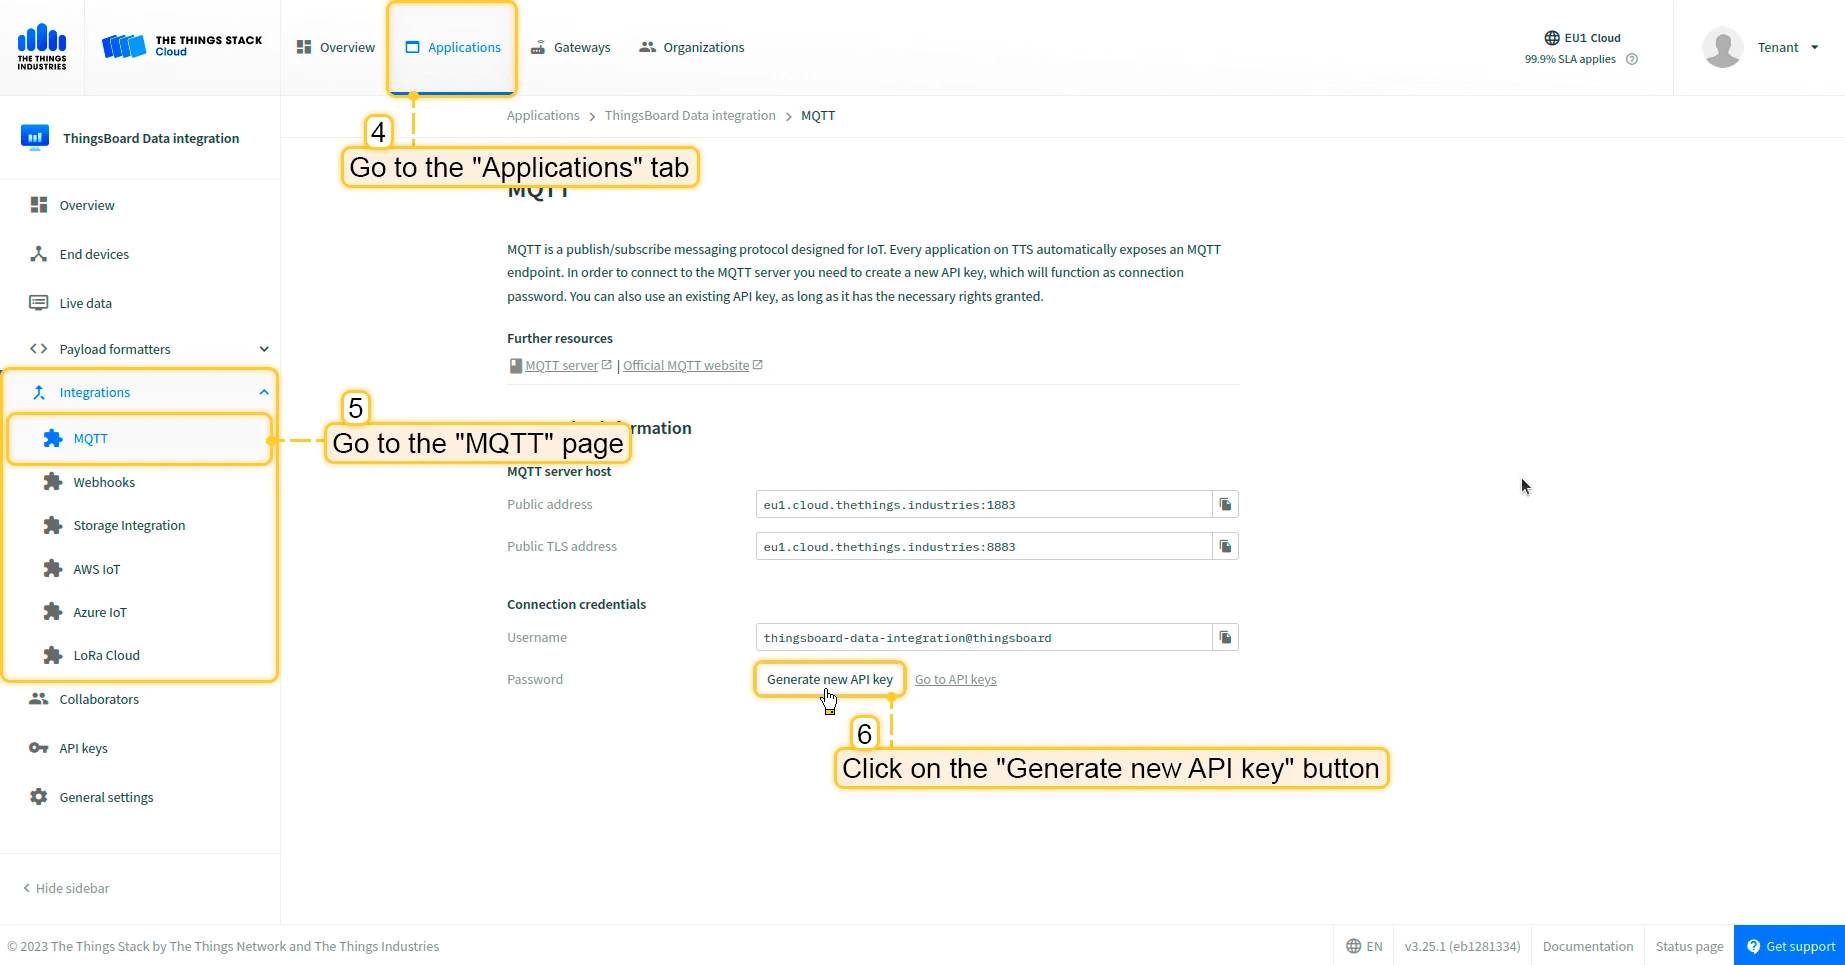
- Go to the “Integrations” -> open the “MQTT” page in the left menu. Then, click on the “Generate new API key” button.
- Copy and save the password (API key) (after leaving the page it won’t be displayed).
Now we can move to ThingsBoard to configure integration.
Create integration in ThingsBoard
Next, we will create the “TheThingsIndustries” integration inside the ThingsBoard.
At first, copy the code, we will need it to create the uplink converter:
var data = decodeToJson(payload);
var deviceName = data.end_device_ids.device_id;var deviceType = data.end_device_ids.application_ids.application_id;
// If you want to parse incoming data somehow, you can add your code to this function.// input: bytes// expected output://  {//    "attributes": {"attributeKey": "attributeValue"},//    "telemetry": {"telemetryKey": "telemetryValue"}//  }// default functionality - convert bytes to HEX string with telemetry key "HEX_bytes"
function decodeFrmPayload(input) {    var output = { attributes:{}, telemetry: {} };    // --- Decoding code --- //
    output.telemetry.HEX_bytes = bytesToHex(input);
    // --- Decoding code --- //    return output;}
// --- attributes and telemetry objects ---var telemetry = {};var attributes = {};// --- attributes and telemetry objects ---
// --- Timestamp parsingvar incomingDateString = data.uplink_message.received_at;var dateString = incomingDateString.substring(0, incomingDateString.lastIndexOf(".")+3) + "Z";var timestamp = new Date(dateString).getTime();// --- Timestamp parsing
// You can add some keys manually to attributes or telemetryattributes.f_port = data.uplink_message.f_port;attributes.settings = data.uplink_message.settings;// We want to save correlation ids as single object, so we are excluding them from attributes parse and add manuallyattributes.correlation_ids = data.correlation_ids;
// You can exclude some keys from the resultvar excludeFromAttributesList = ["device_id", "application_id", "uplink_message", "correlation_ids"];var excludeFromTelemetryList = ["uplink_token", "gateway_id", "settings"];
// Message parsing// To avoid paths in the decoded objects we passing false value to function as "pathInKey" argument.// Warning: pathInKey can cause already found fields to be overwritten with the last value found, e.g. receive_at from uplink_message will be written receive_at in the root.var telemetryData = toFlatMap(data.uplink_message, excludeFromTelemetryList, false);var attributesData = toFlatMap(data, excludeFromAttributesList, false);
// Passing incoming bytes to decodeFrmPayload function, to get custom decodingvar customDecoding = {};if (data.uplink_message.get("frm_payload") != null) {    customDecoding = decodeFrmPayload(base64ToBytes(data.uplink_message.frm_payload));}
// Collecting data to resultif (customDecoding.?telemetry.size() > 0) {    telemetry.putAll(customDecoding.telemetry);}
if (customDecoding.?attributes.size() > 0) {    attributes.putAll(customDecoding.attributes);}
telemetry.putAll(telemetryData);attributes.putAll(attributesData);
var result = {    deviceName: deviceName,    deviceType: deviceType,    telemetry: {        ts: timestamp,        values: telemetry    },    attributes: attributes};
return result;
In the “Connect” step, you will need the following parameters:
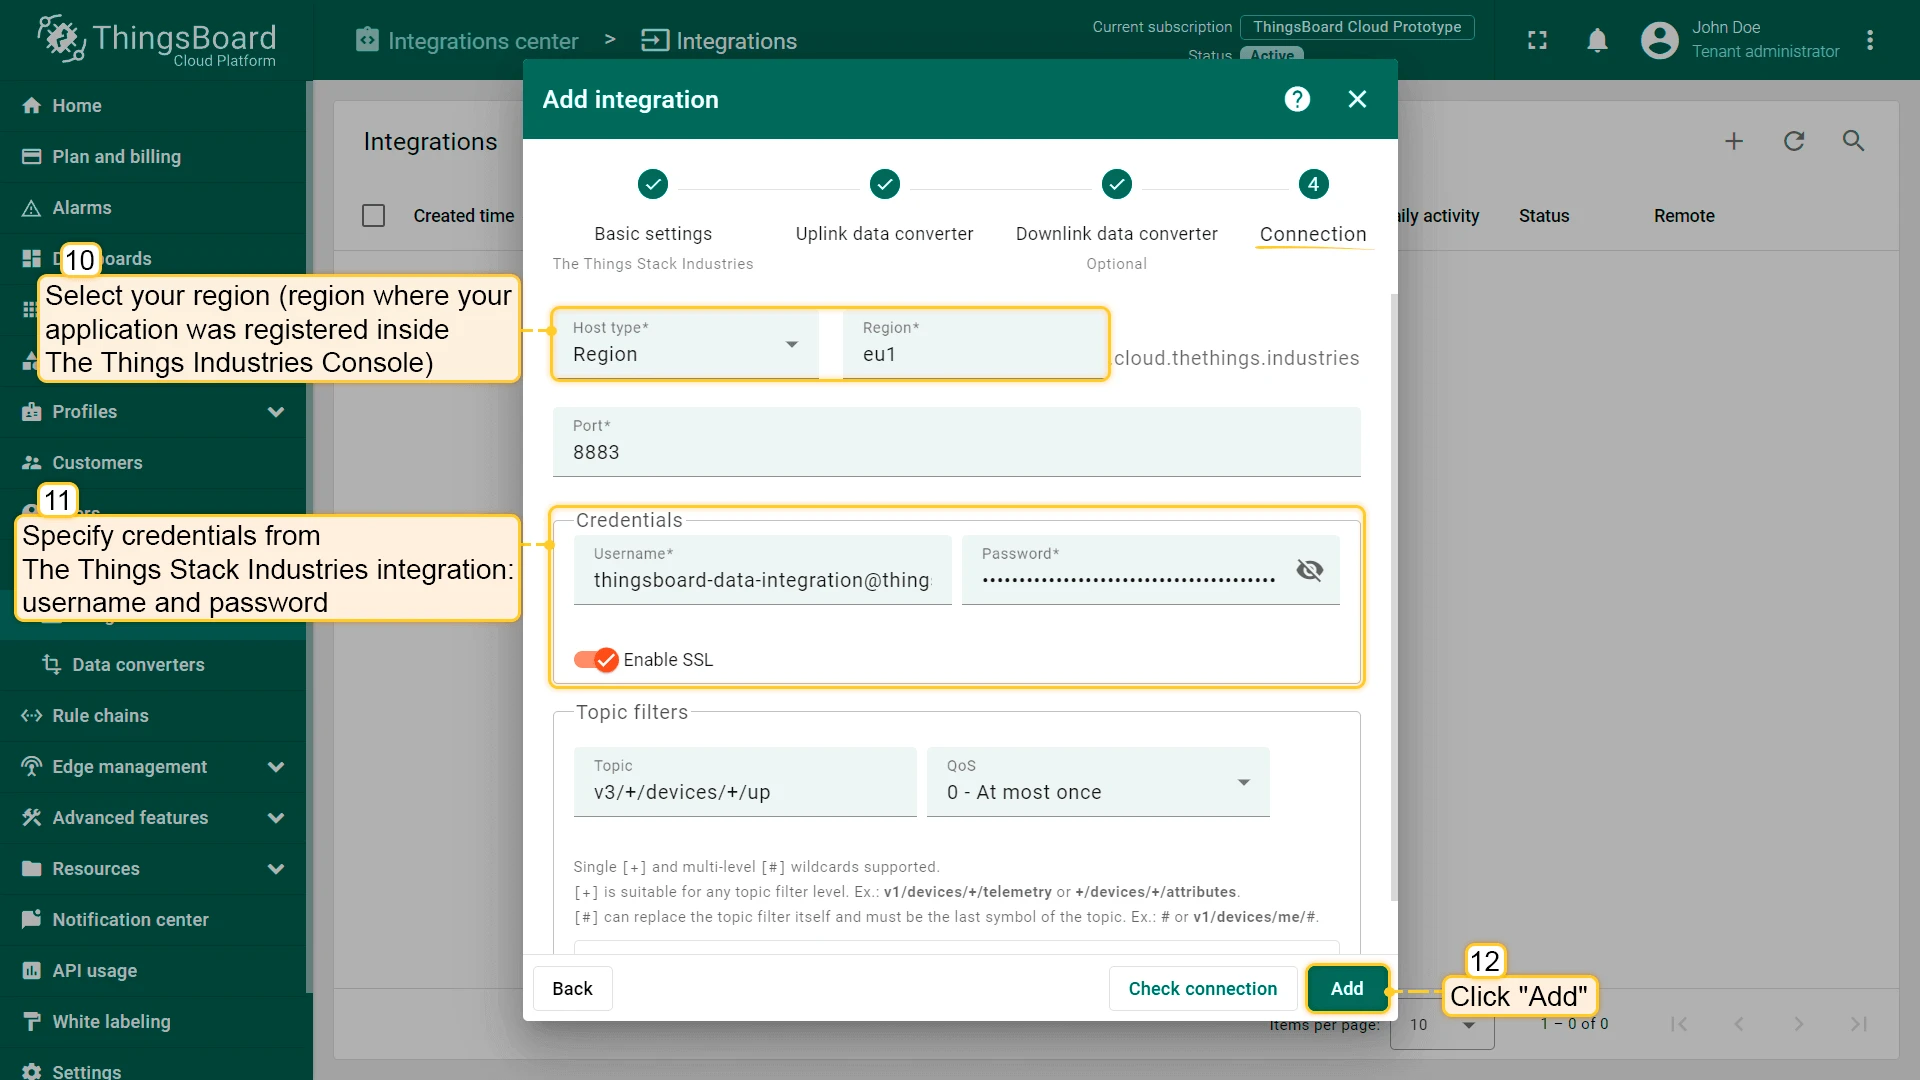
- Region: eu1 (region where your application was registered inside The Things Industries Console);
- Username: thingsboard-data-integration@thingsboard (use Username from integration on The Things Stack Industries);
- Password: use Password from integration on The Things Industries.
Now, open the “Integration center” section -> “Integrations” page and follow this steps:
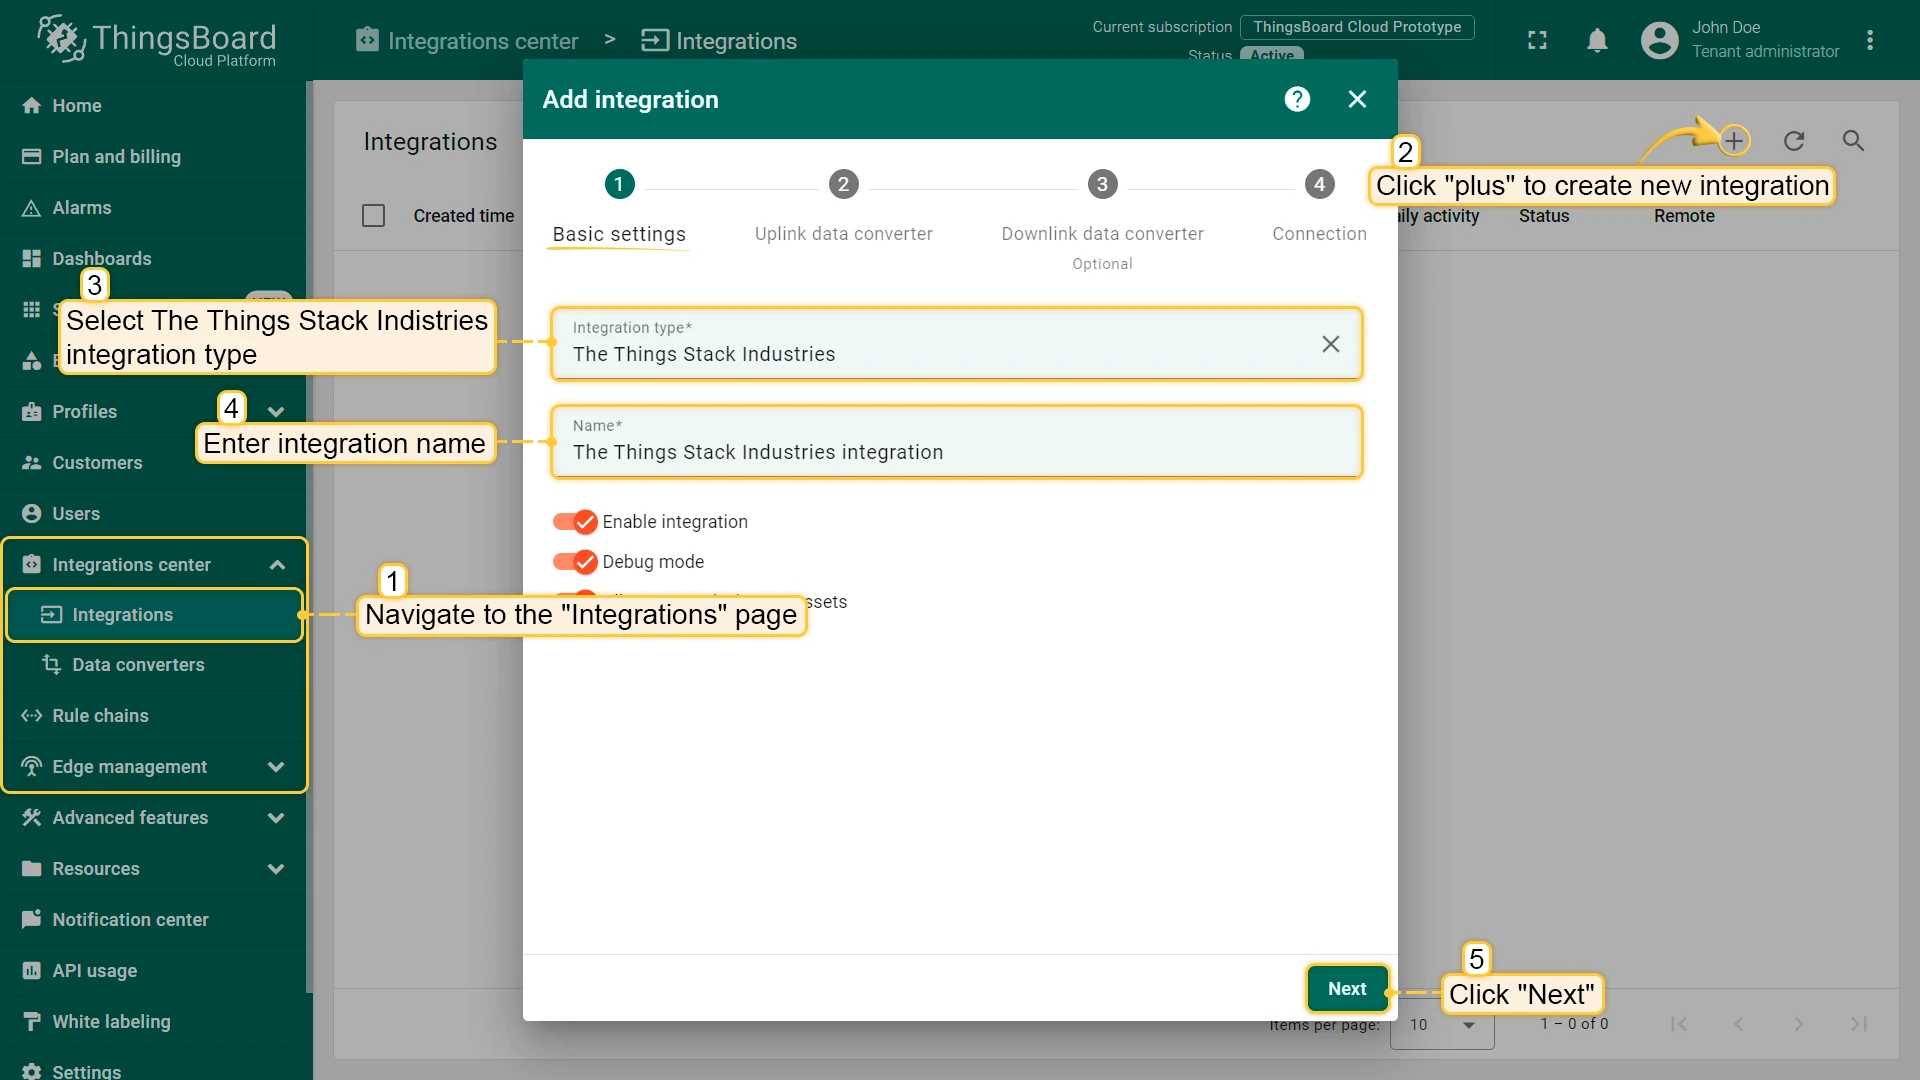
- Click “plus” icon in the upper right corner to add new integration. Select type “The Things Industries Integration”. Then, click “Next”.
- Paste the previously copied script to the Decoder function section. Click “Next”.
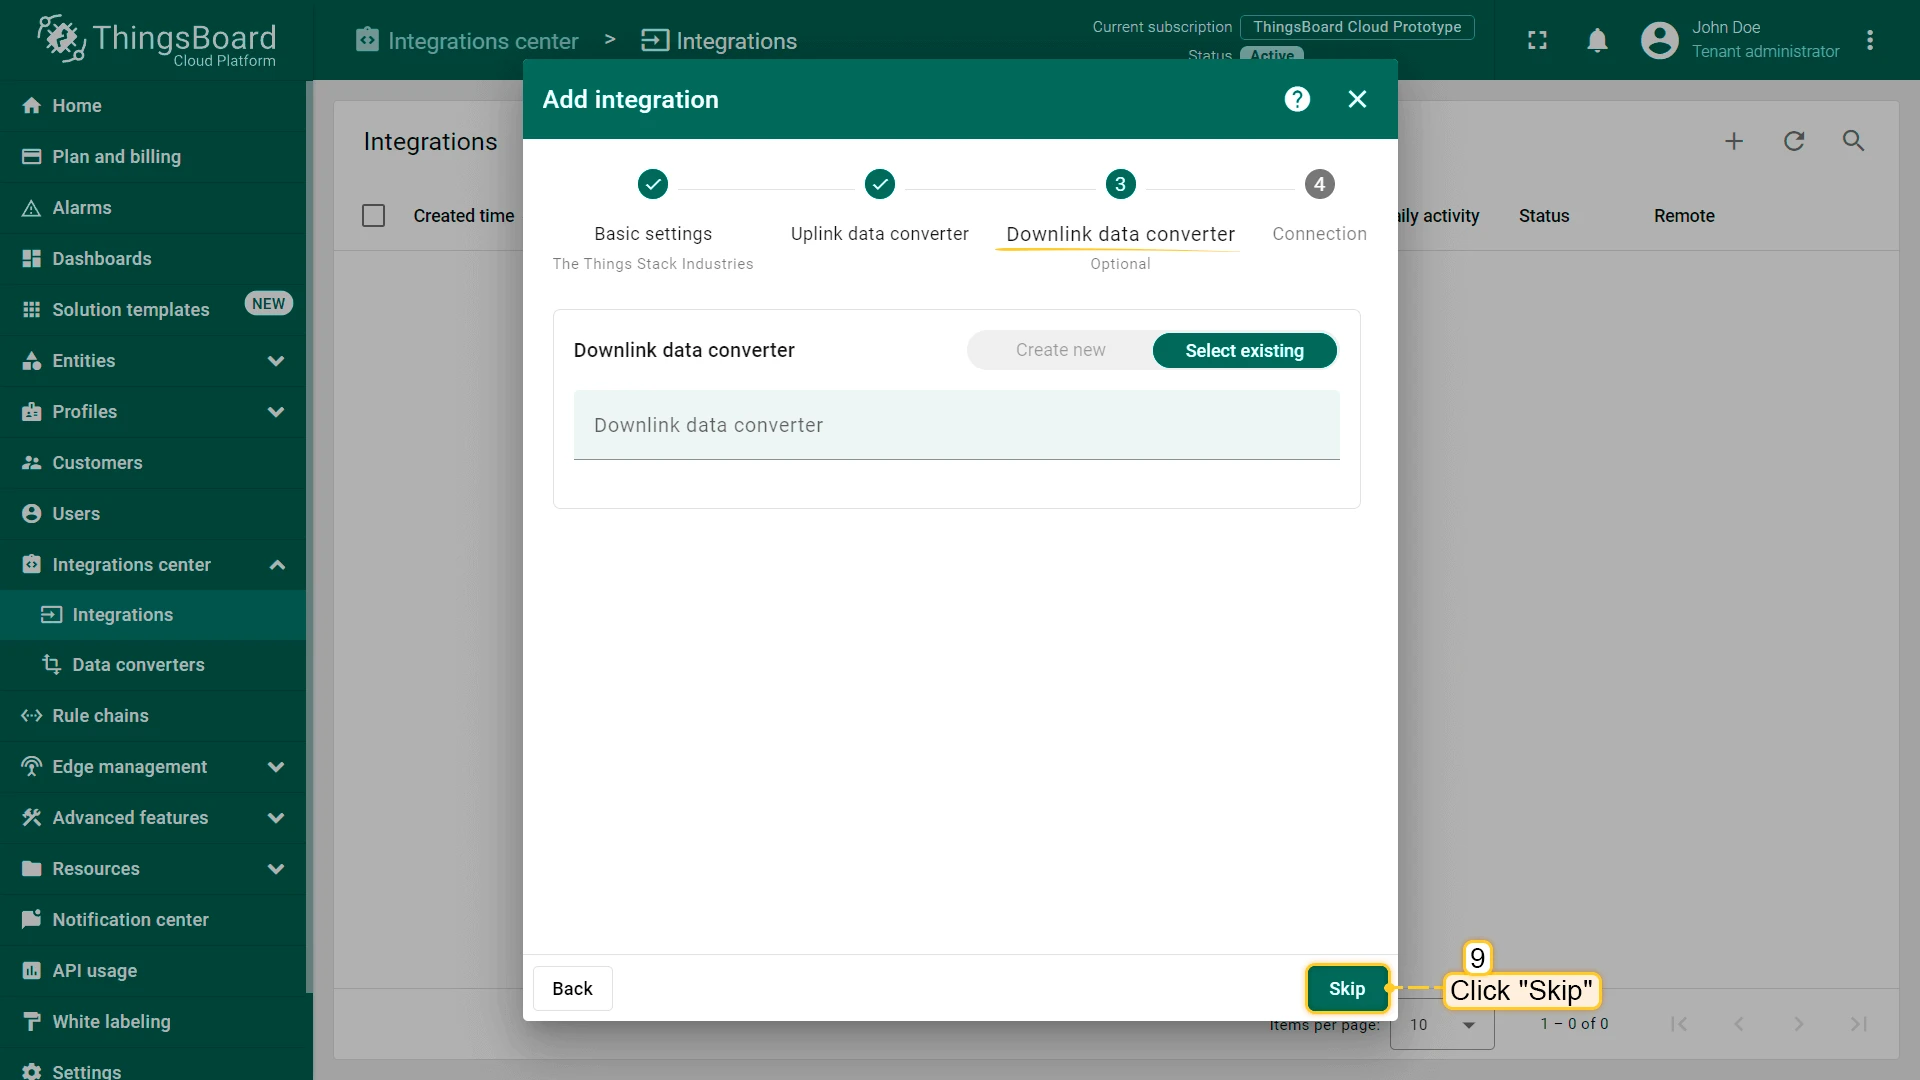
- Leave the “Downlink data converter” field empty. Click on “Skip” button.
- Next, fill in the fields with your parameters. After, press “Add” button.

Integration is created.
To check integration connection you can do the following:
- Click on integration row in the list;
- Go to the “Events” tab;
- Select “Lifecycle events” from Event type dropdown list.
If you see event STARTED and status Success it means that integration is successfully started and ready to receive messages.
Add a gateway on the Loriot
We need to add a gateway on the Loriot.
To add a gateway, you can follow next steps:
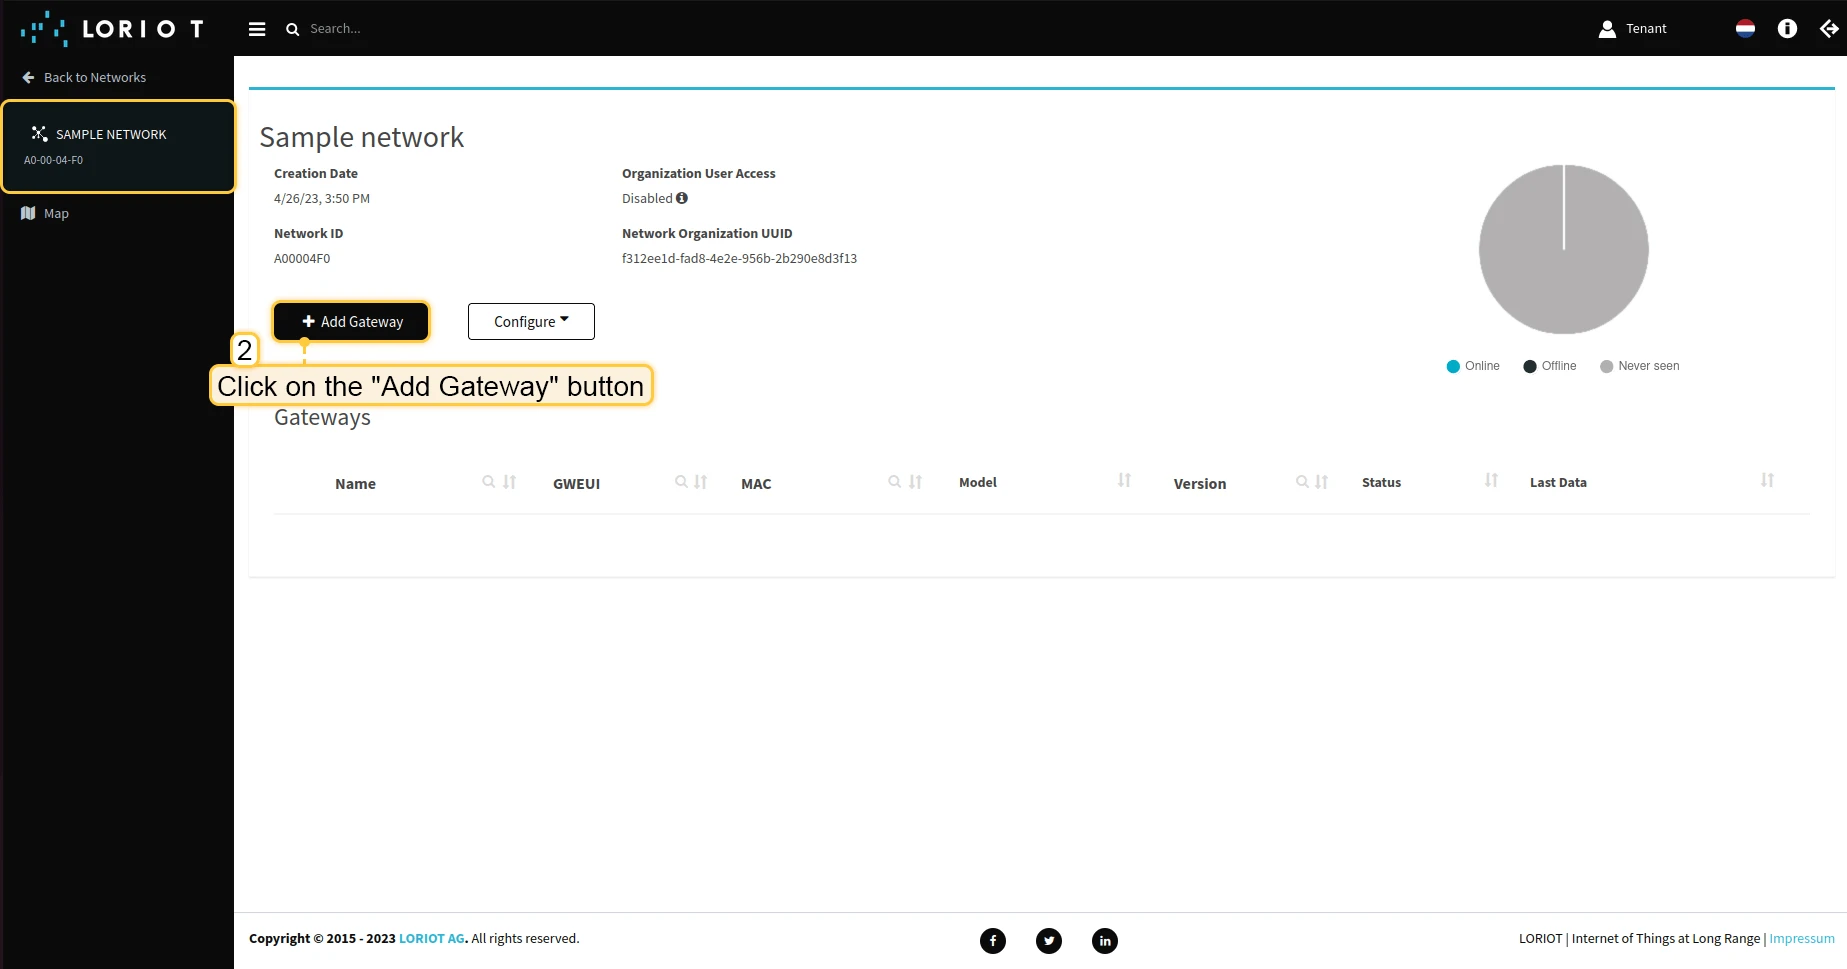
- Login to Loriot server. Open the “Sample network” or create a new one in the “Networks” section
- Click on the “Add Gateway” button.
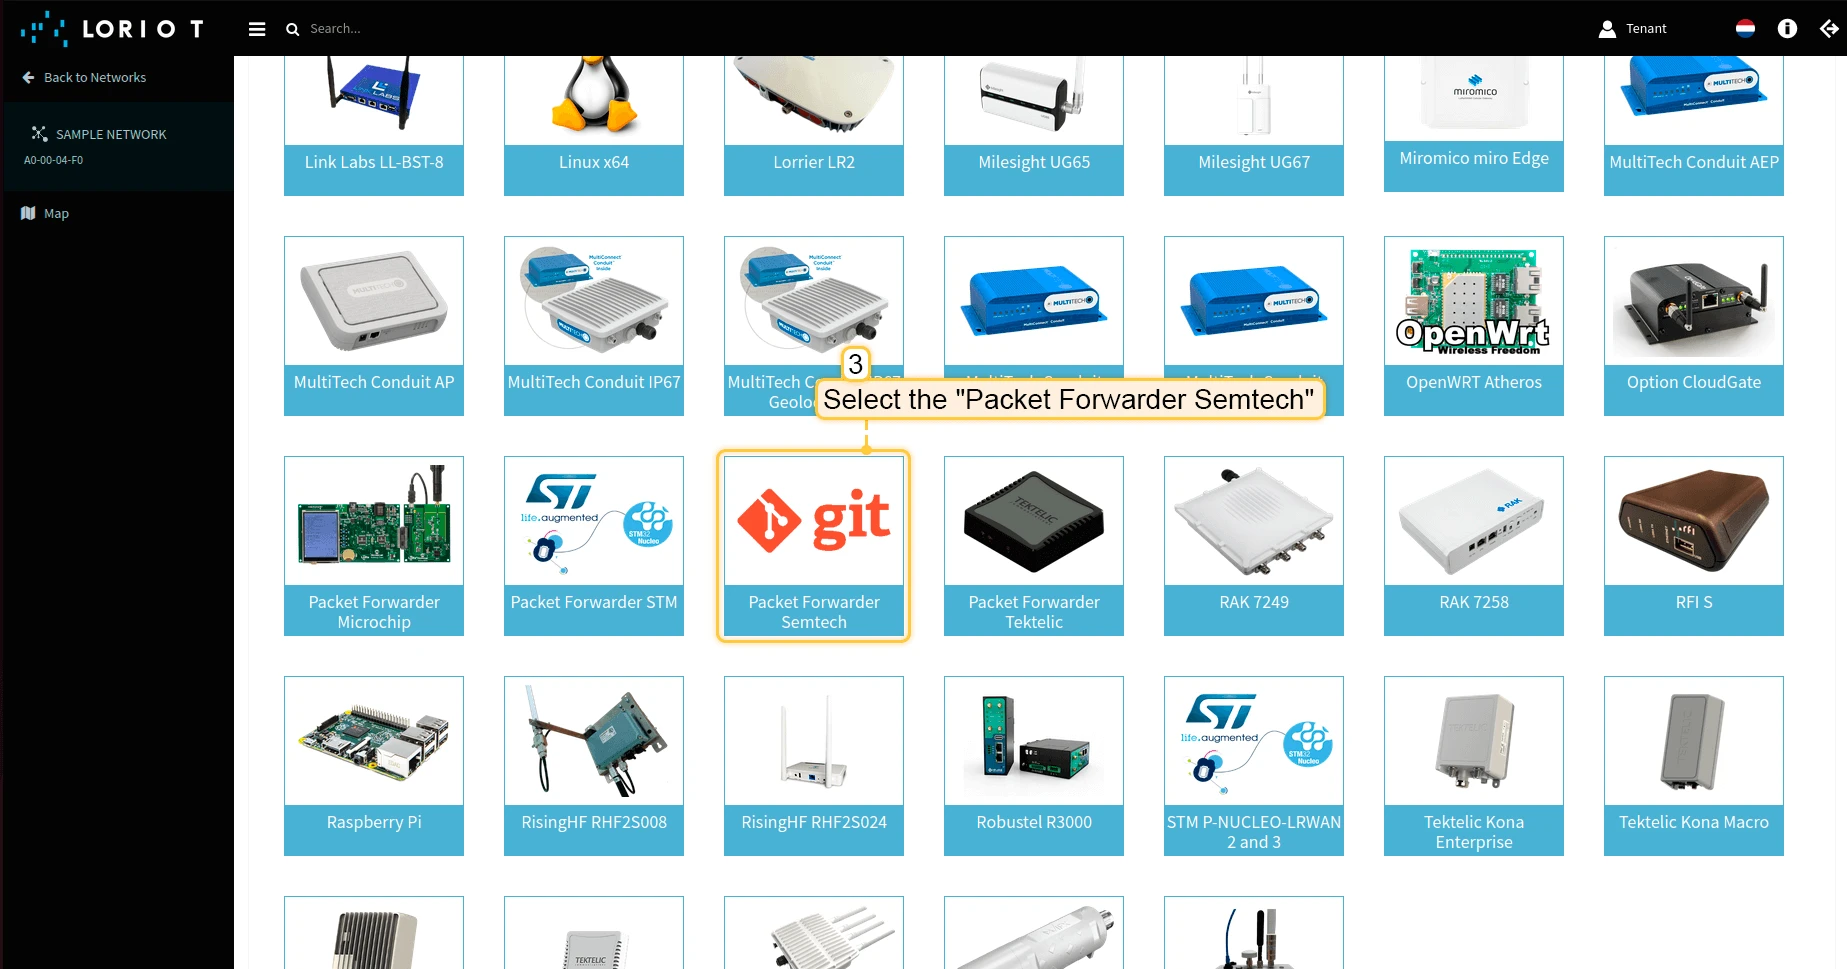
- Scroll down and select “Packet Forwarder Semtech”.
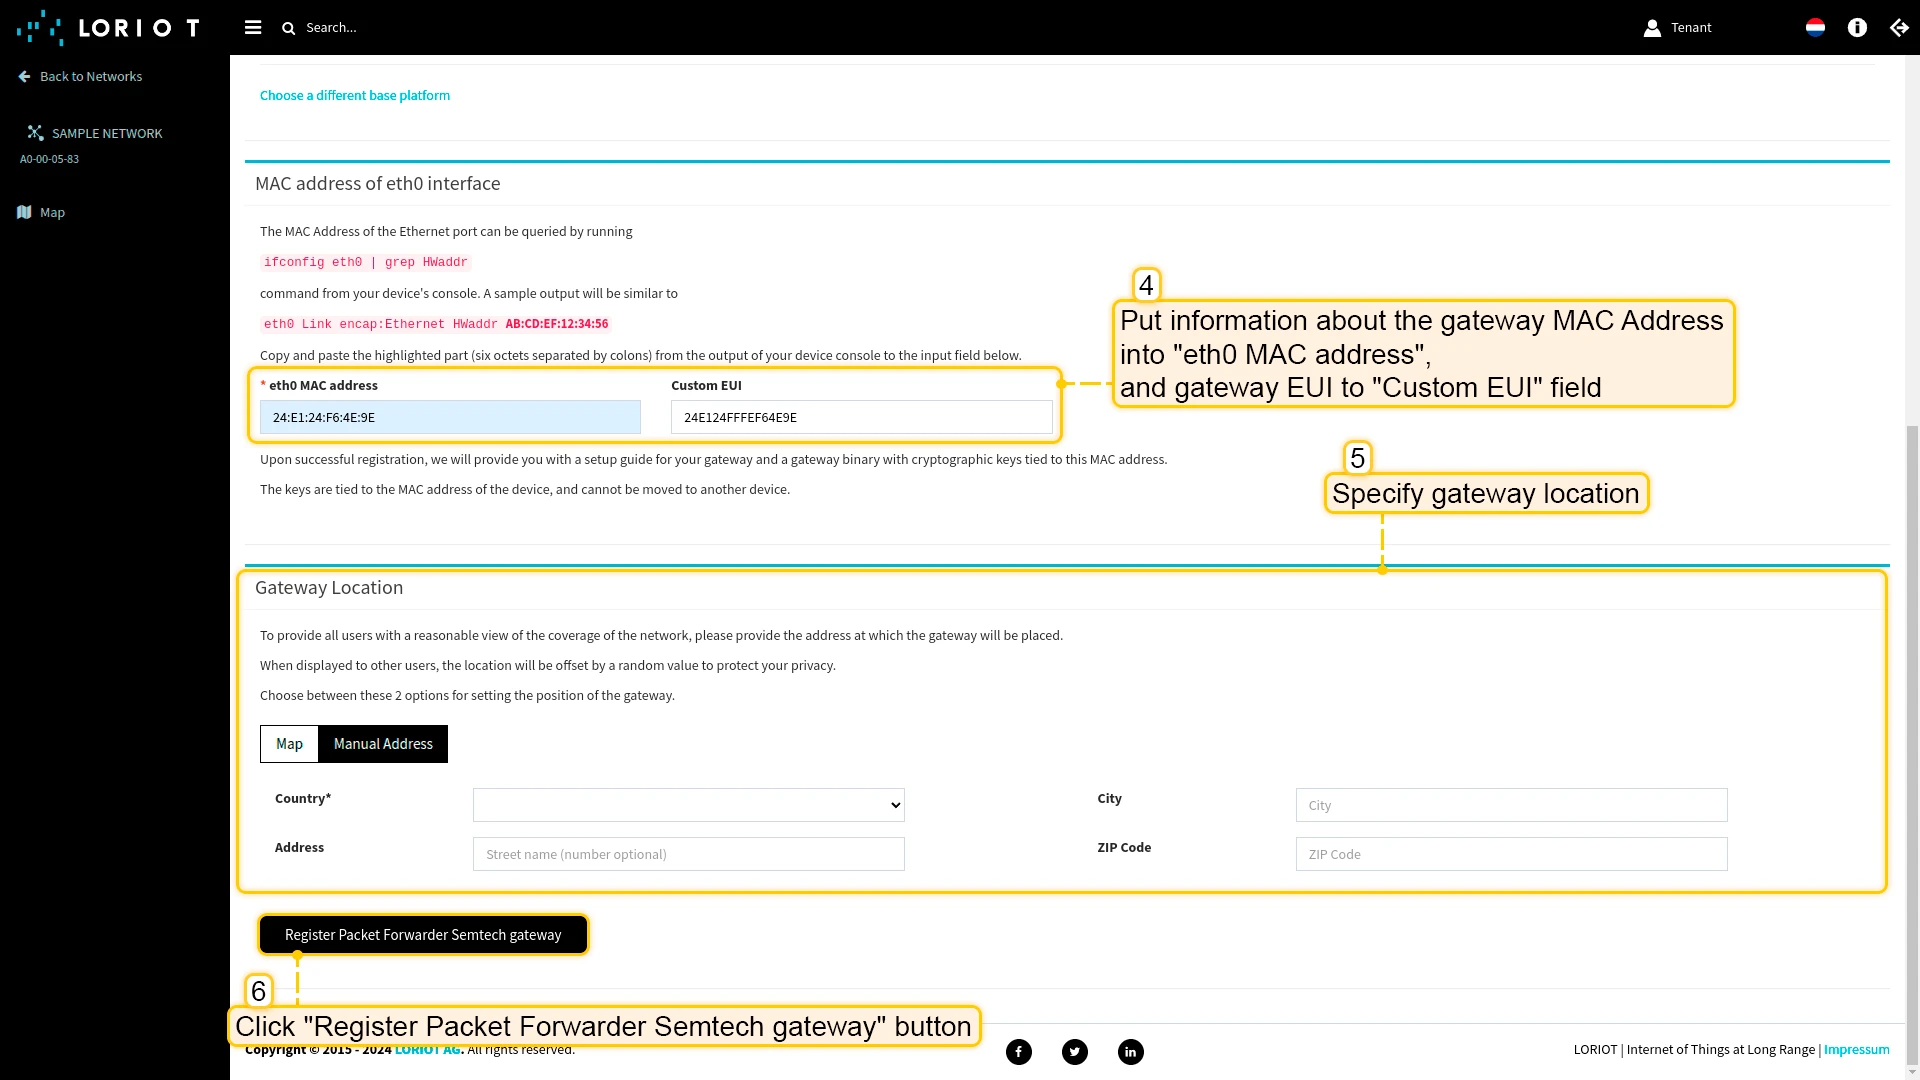
- Scroll up and put information about the gateway MAC Address (Just remove FFFF or FFFE in the middle of gateway EUI) into eth0 MAC address and gateway EUI to Custom EUI field.
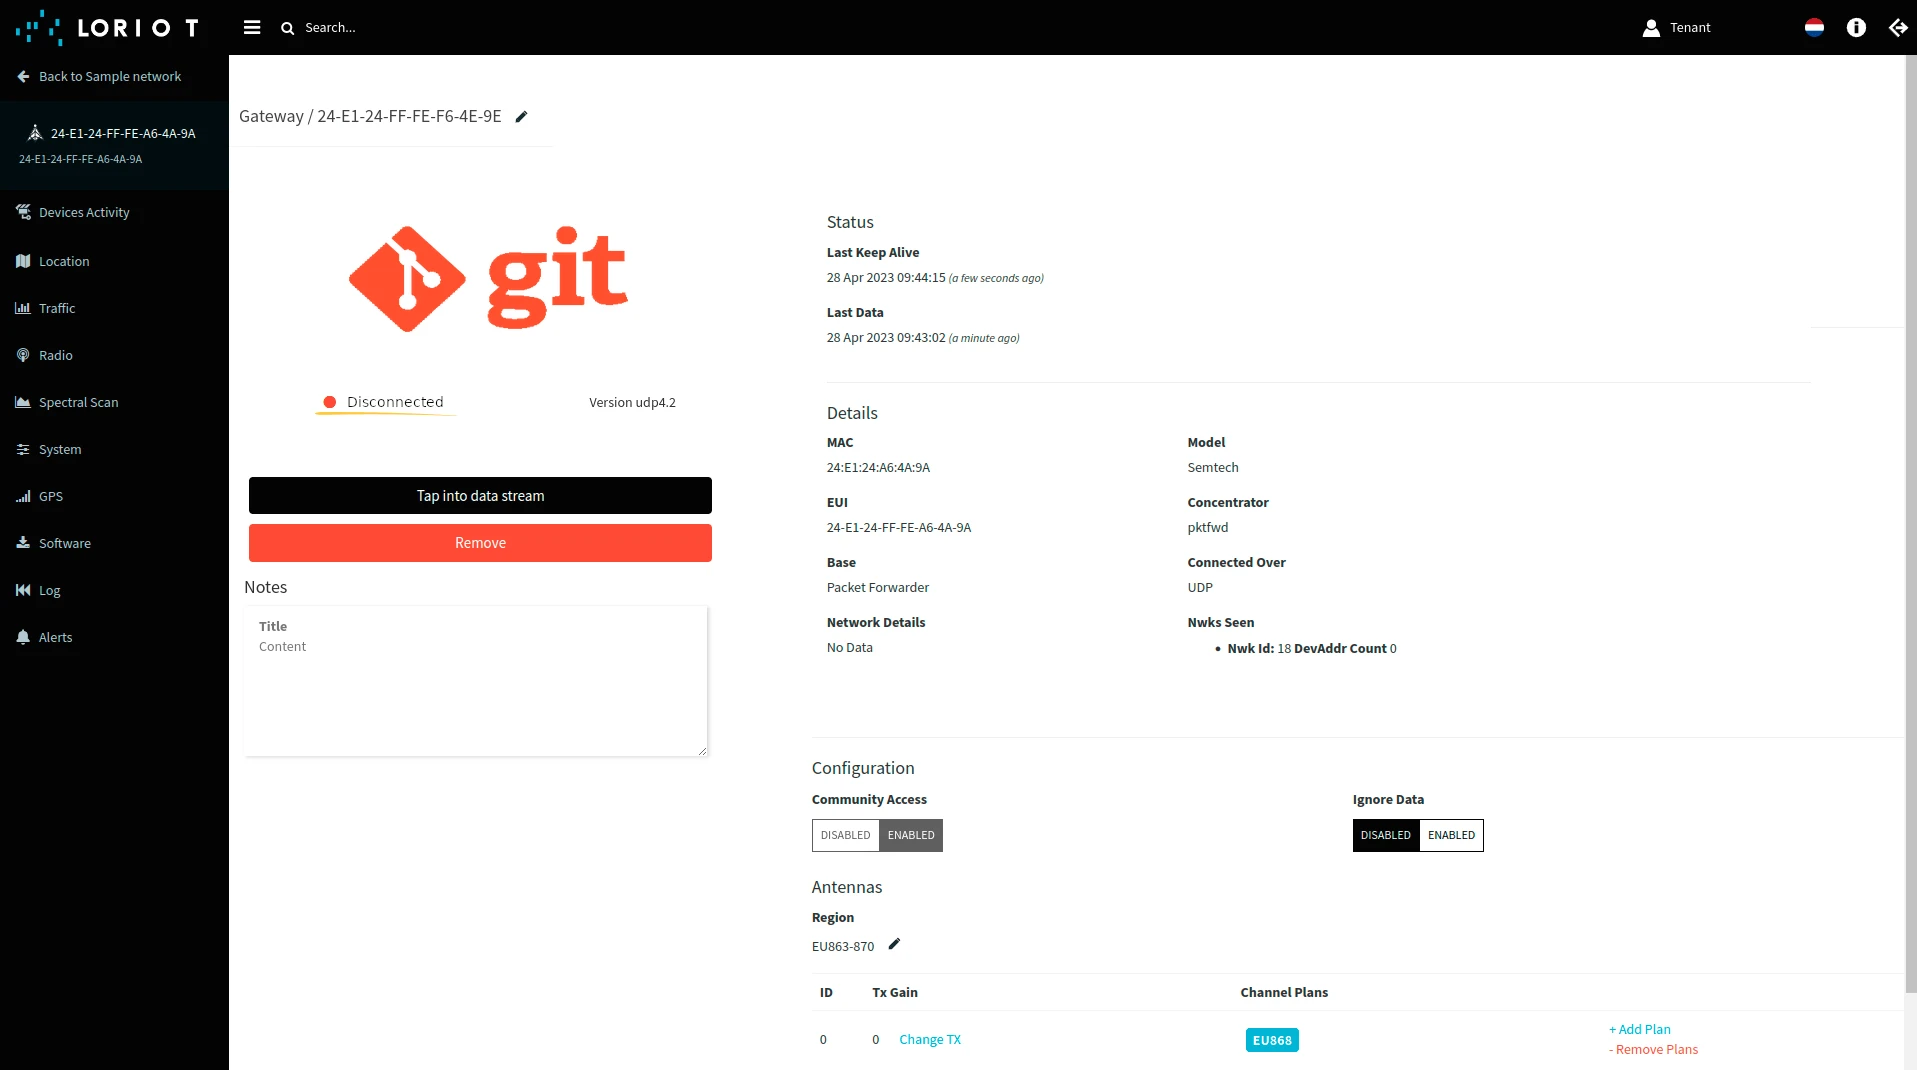
- The gateway is added. You can see its status - disconnected.

Configure the gateway to send data
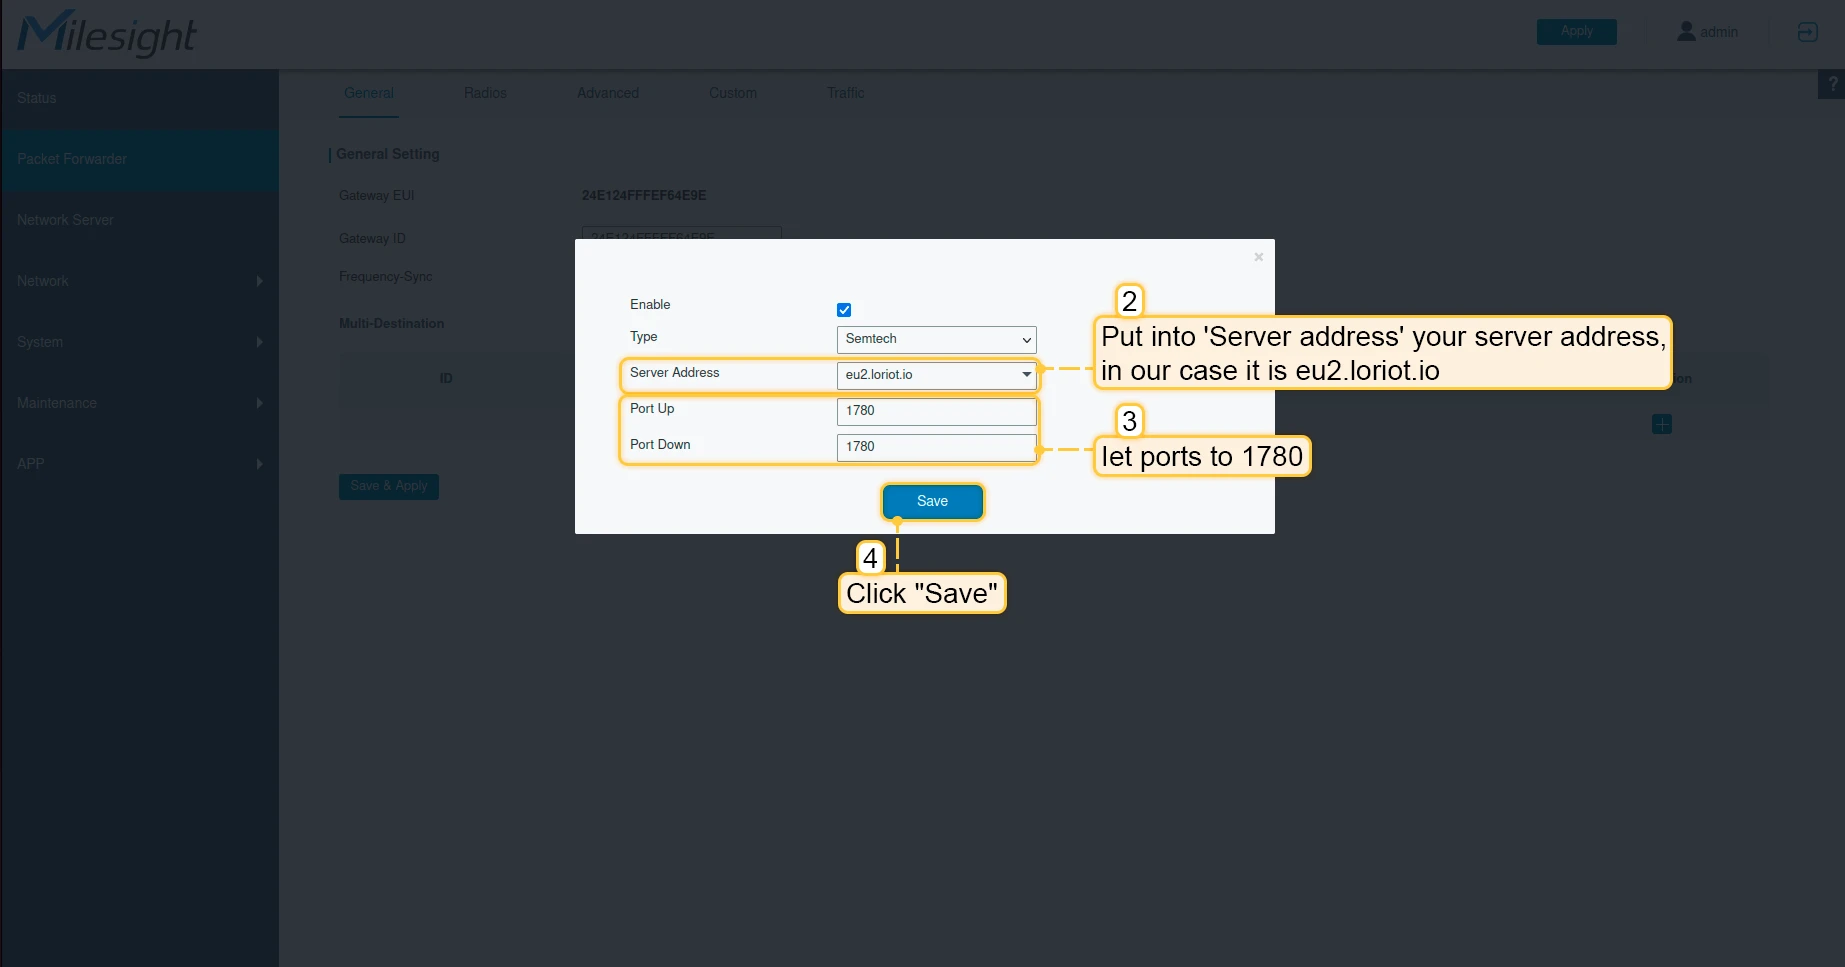
To connect and send data to the Loriot we should configure the gateway. To do this please follow next steps:
- Open gateway control panel. Go to the “Packet Forwarder” page and click on “plus” button, to add a new forwarder.
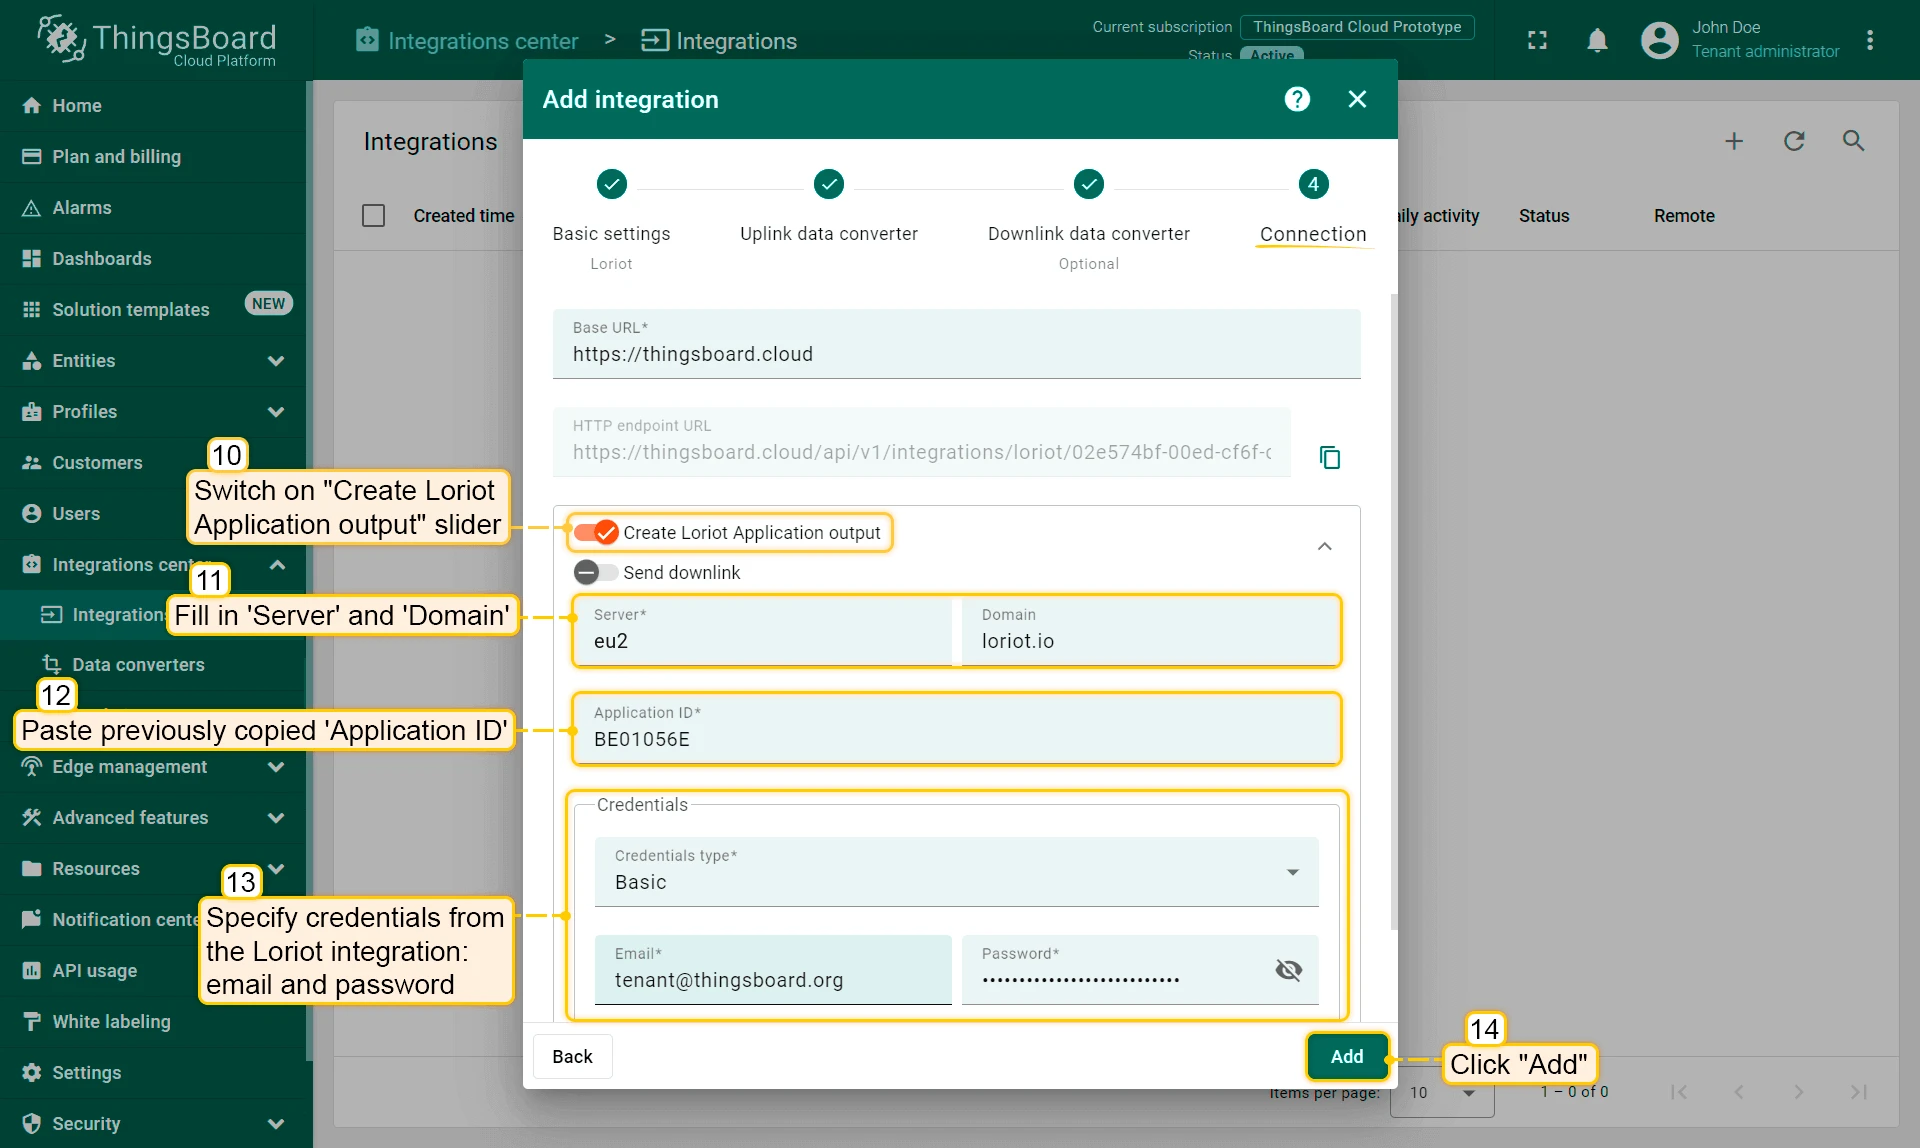
- Put into Server address your server address, in our case it is eu2.loriot.io. And set ports to 1780. Click “Save” button.
- Click “Save & Apply” button.
- Now you can check the status of the gateway on the Loriot, it should be connected.
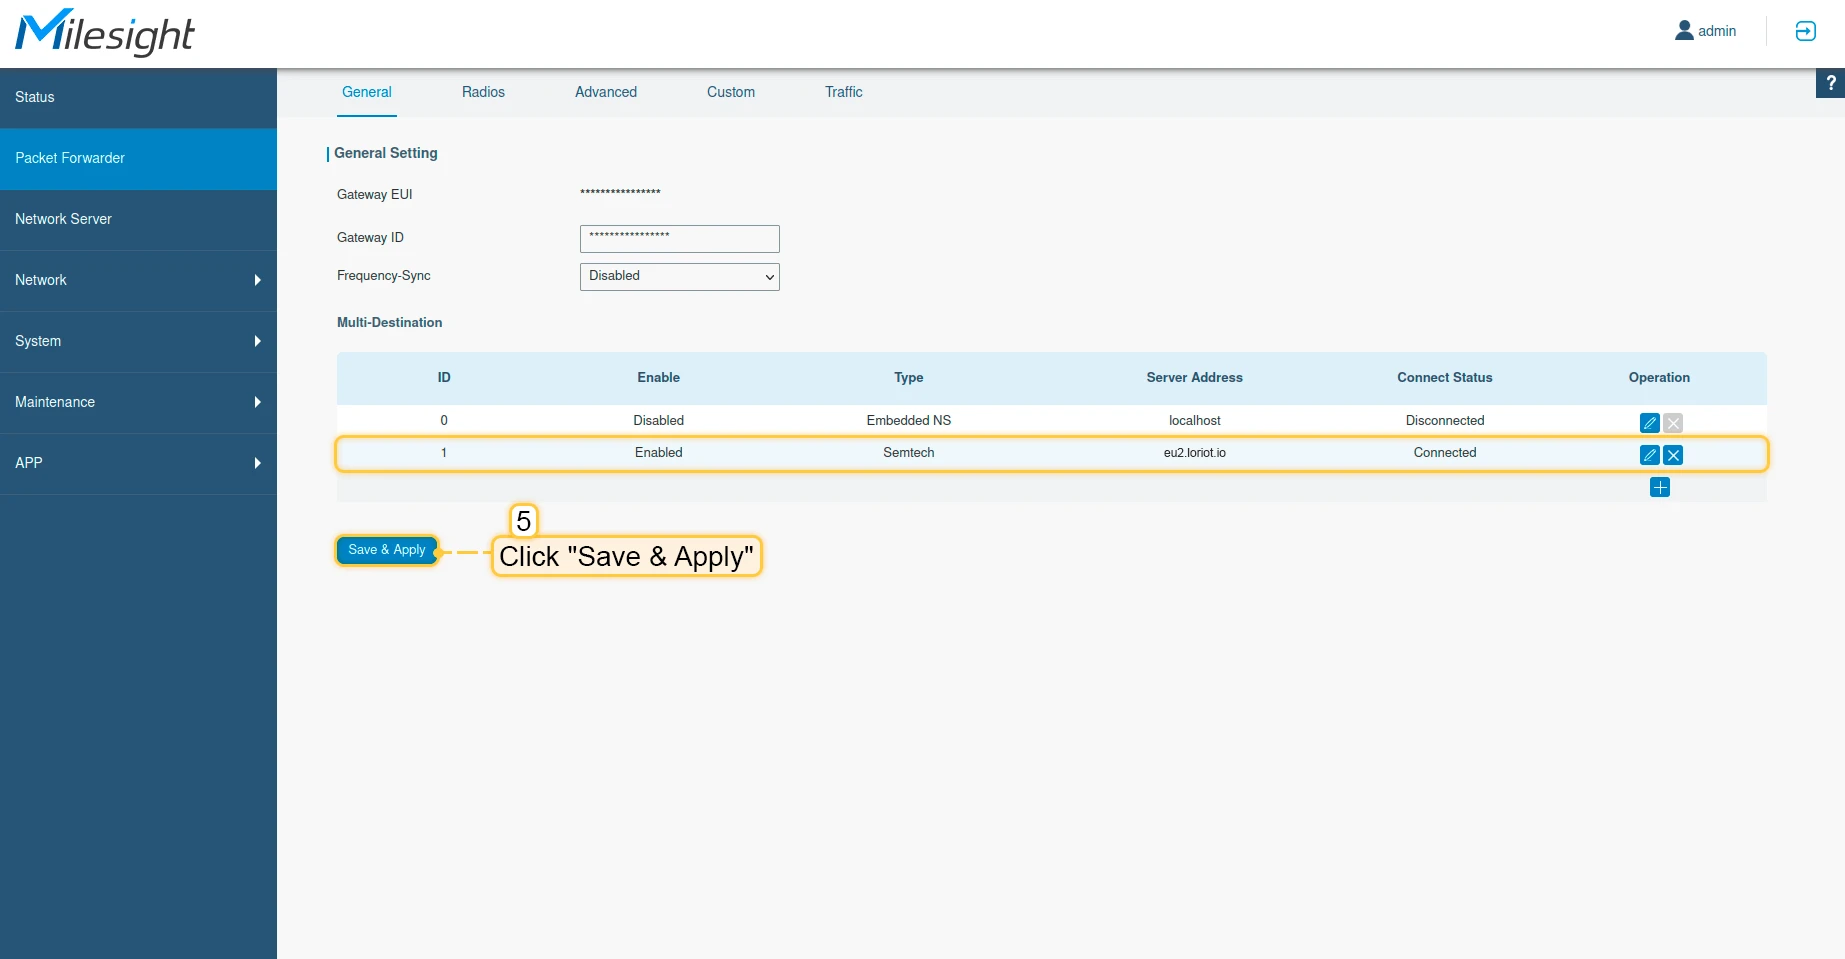

Now, the gateway is able to send a data to the network server.
Configure application on the Loriot
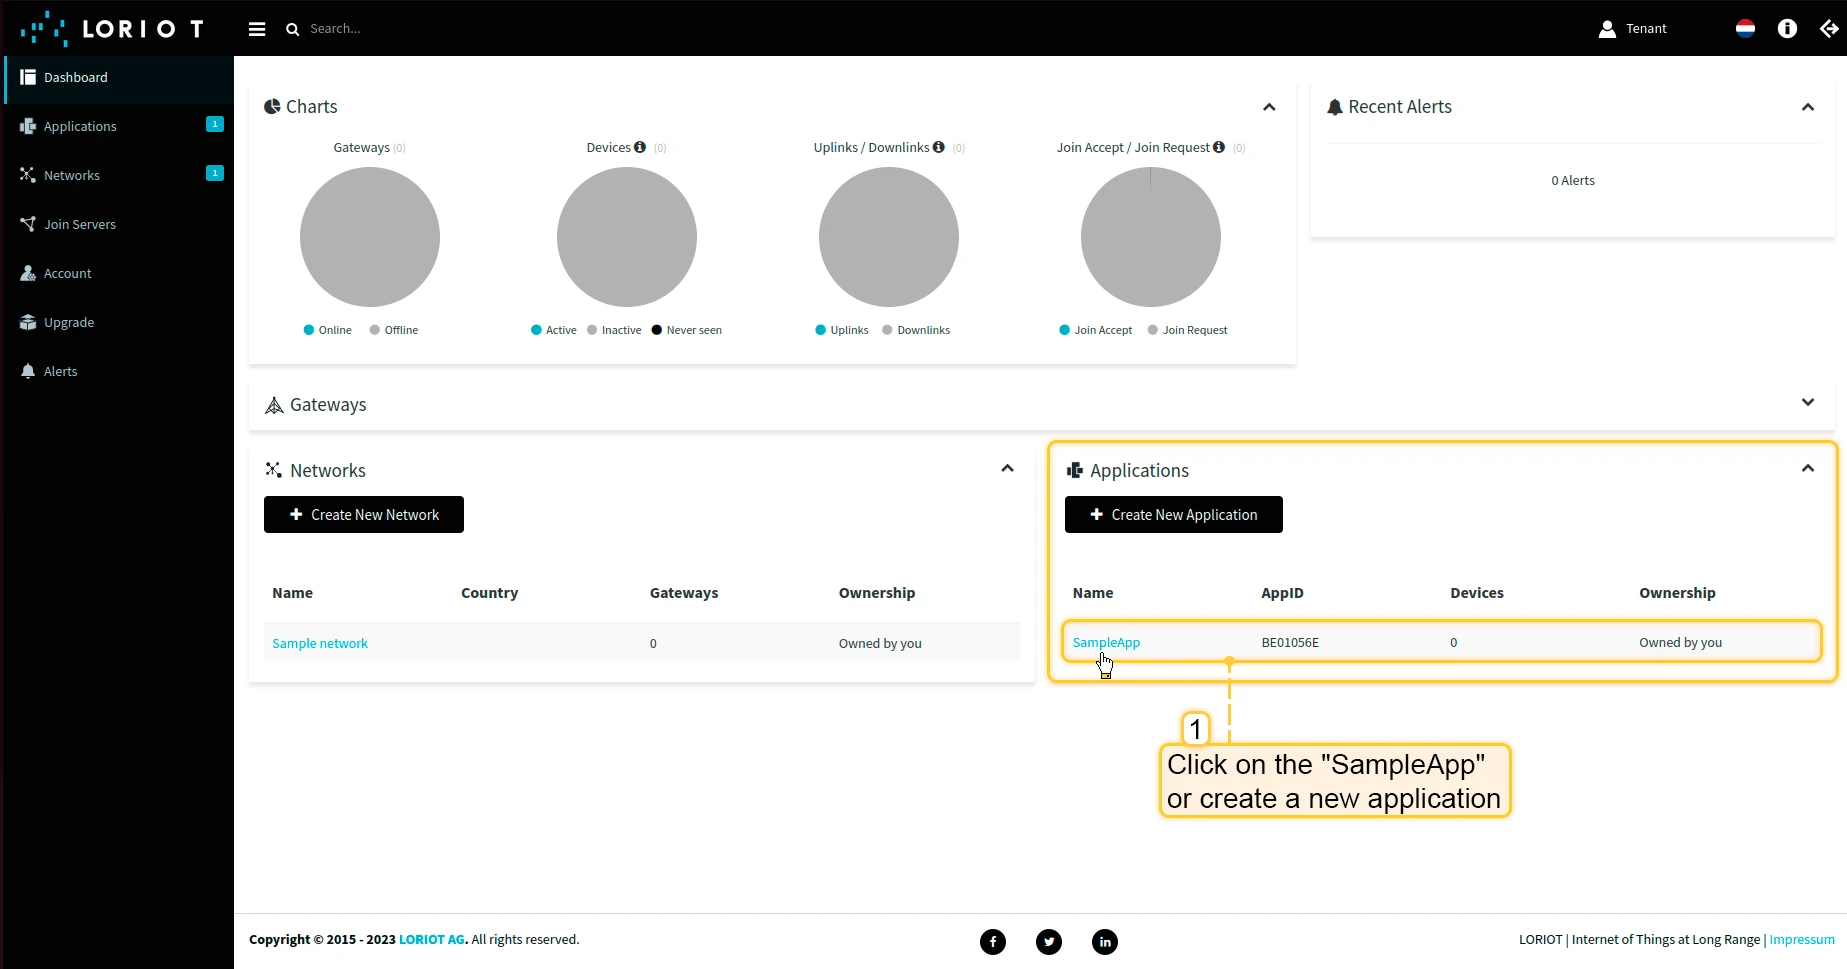
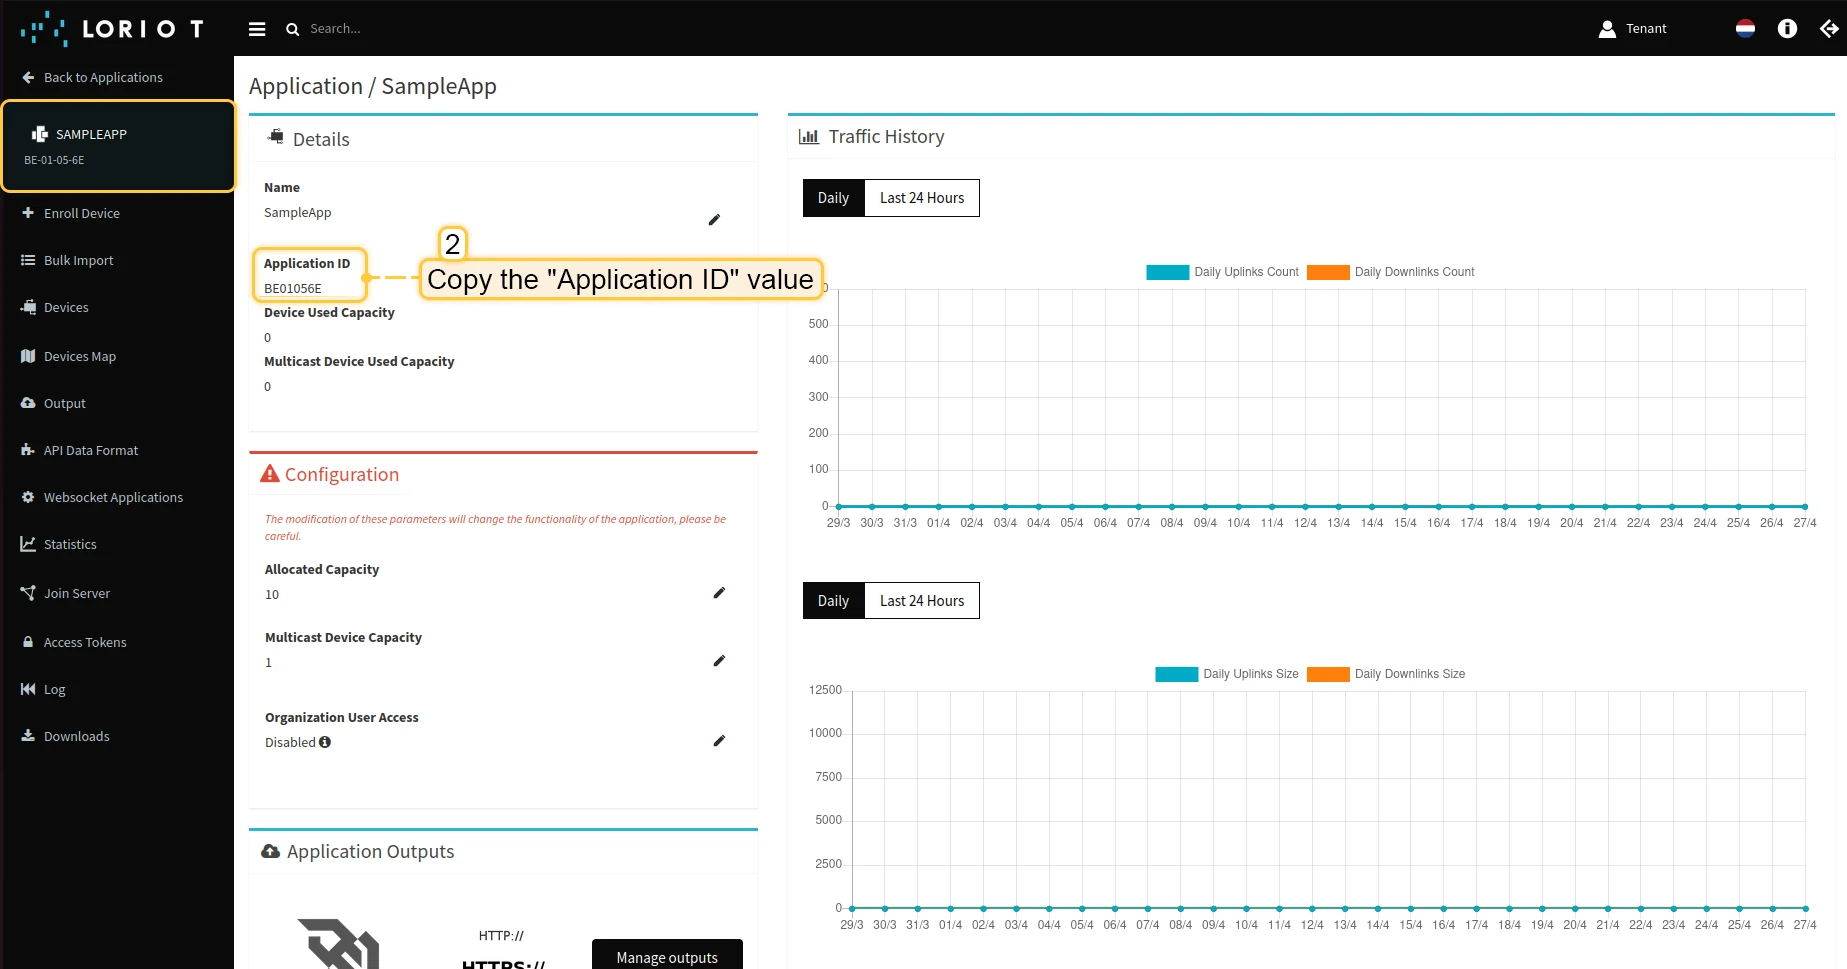
Now we need to copy the “Application ID” in the Loriot. It is required for configuring the integration in ThingsBoard.
To do this please follow next steps:
- Go to the “Applications” in the left menu and choose “SampleApp” or create a new one.
- Copy “Application ID” value and save it.
Now we can move to ThingsBoard to configure integration.
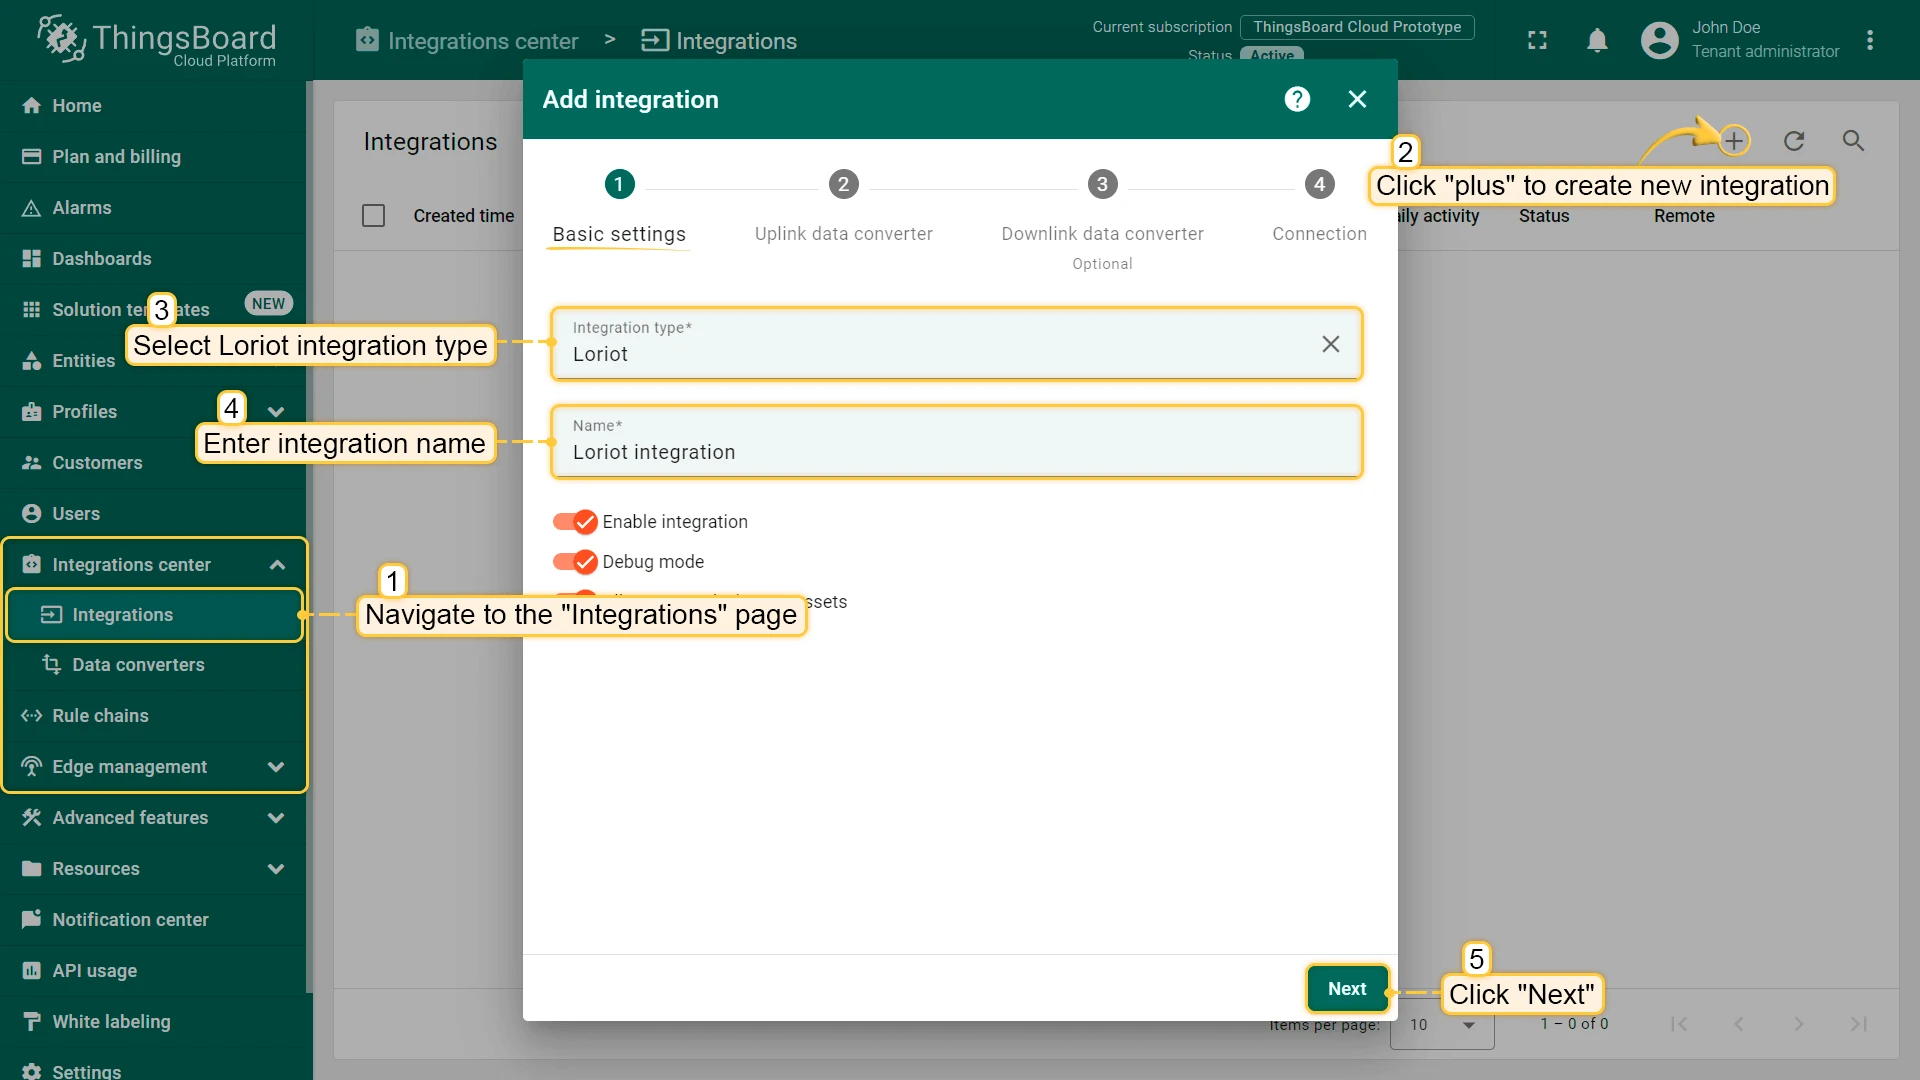
Create integration in ThingsBoard
Next we will create an integration with Loriot inside the ThingsBoard.
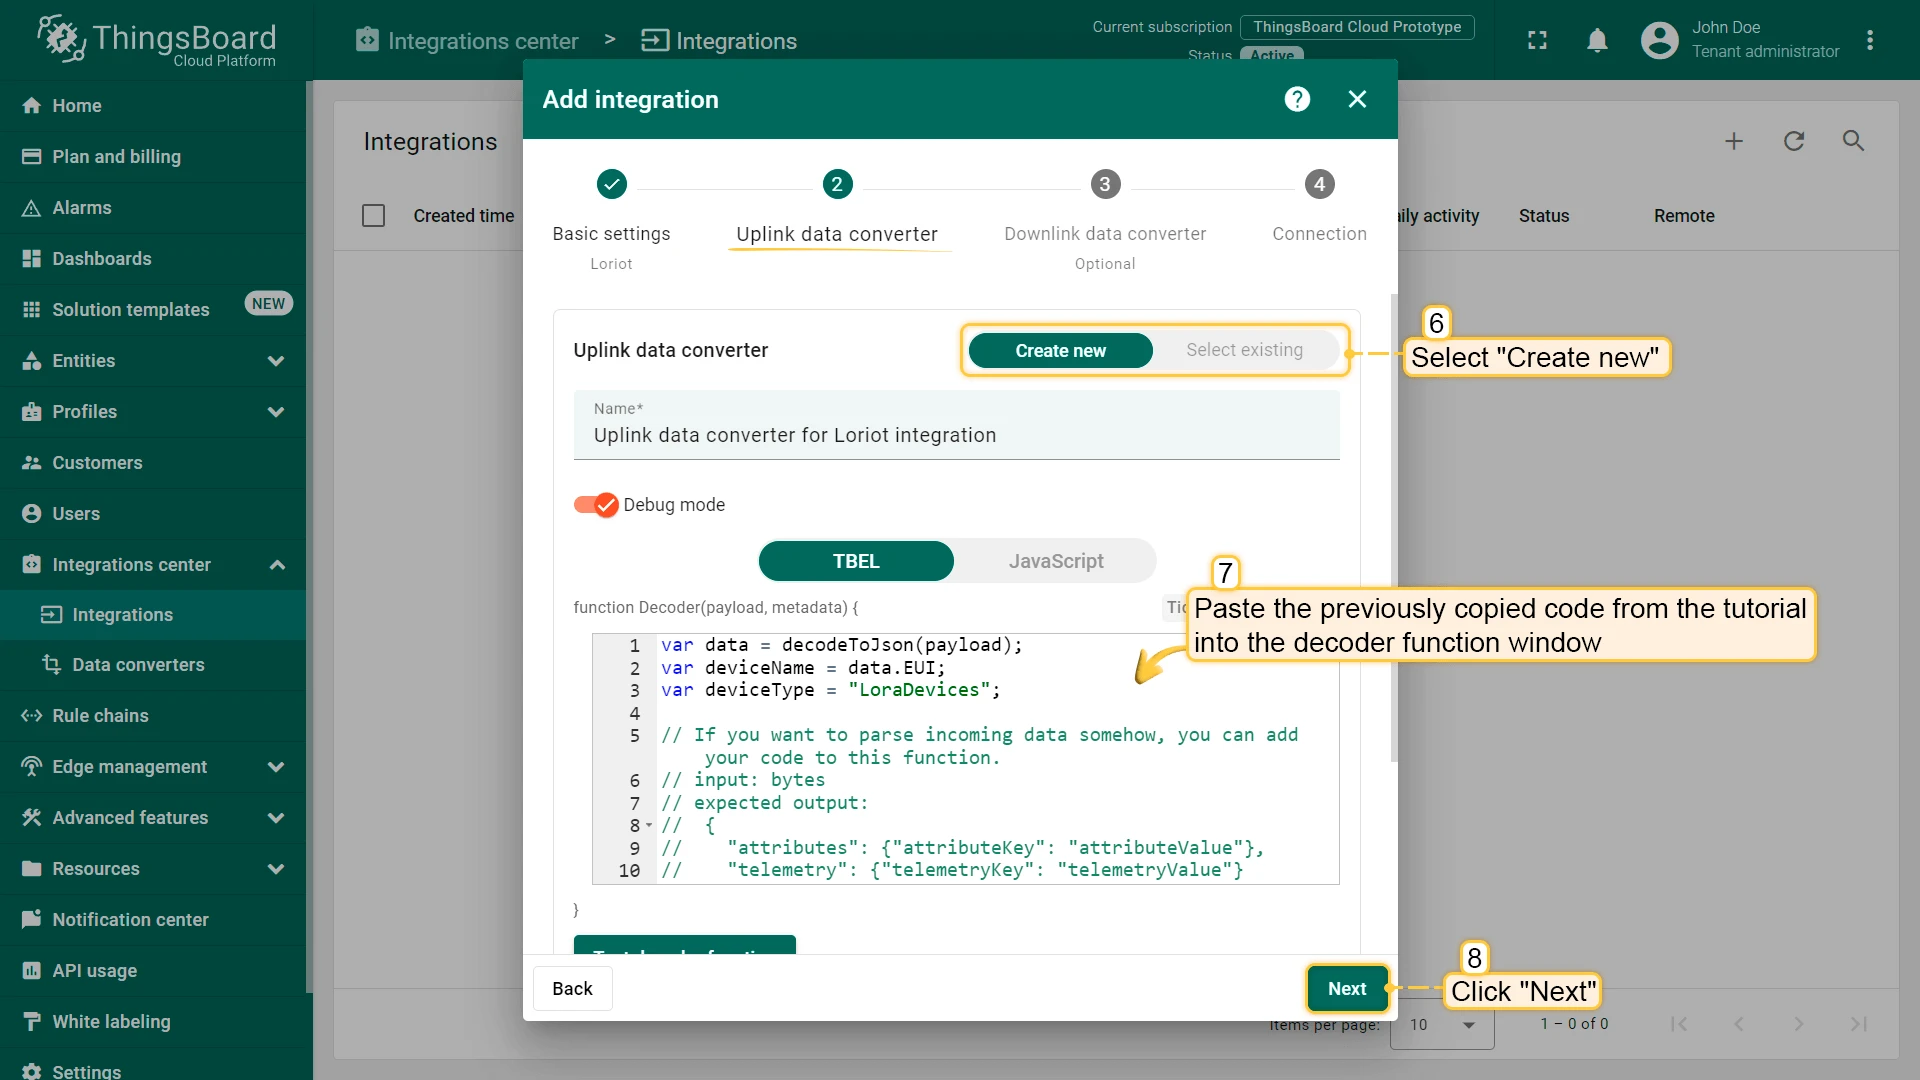
At first, copy the code, we will need it to create the uplink converter:
var data = decodeToJson(payload);var deviceName = data.EUI;var deviceType = "LoraDevices";
// If you want to parse incoming data somehow, you can add your code to this function.// input: bytes// expected output://  {//    "attributes": {"attributeKey": "attributeValue"},//    "telemetry": {"telemetryKey": "telemetryValue"}//  }// default functionality - convert bytes to HEX string with telemetry key "HEX_bytes"
function decodePayload(input) {    var output = { attributes:{}, telemetry: {} };    // --- Decoding code --- //
    output.telemetry.HEX_bytes = bytesToHex(input);
    // --- Decoding code --- //    return output;}
// --- attributes and telemetry objects ---var telemetry = {};var attributes = {};// --- attributes and telemetry objects ---
// --- Timestamp parsingvar timestamp = data.ts;// --- Timestamp parsing
// You can add some keys manually to attributes or telemetryattributes.fPort = data.port;attributes.battery = data.bat;
// You can exclude some keys from the resultvar excludeFromAttributesList = ["data", "gws", "EUI", "ts", "cmd", "port", "seqno", "fcnt", "toa", "ack", "bat", "snr", "rssi"];var excludeFromTelemetryList = ["gws", "EUI", "ts", "freq", "port", "data", "cmd", "dr", "offline"];
// Message parsing// To avoid paths in the decoded objects we passing false value to function as "pathInKey" argument.// Warning: pathInKey can cause already found fields to be overwritten with the last value found.
var telemetryData = toFlatMap(data, excludeFromTelemetryList, false);var attributesData = toFlatMap(data, excludeFromAttributesList, false);
var uplinkDataList = [];
// Passing incoming bytes to decodePayload function, to get custom decodingvar customDecoding = decodePayload(hexToBytes(data.data));
// Collecting data to resultif (customDecoding.?telemetry.size() > 0) {    telemetry.putAll(customDecoding.telemetry);}
if (customDecoding.?attributes.size() > 0) {    attributes.putAll(customDecoding.attributes);}
telemetry.putAll(telemetryData);attributes.putAll(attributesData);
var deviceInfo = {deviceName: deviceName,deviceType: deviceType,telemetry: {ts: timestamp,values: telemetry},attributes: attributes};
uplinkDataList.add(deviceInfo);
if (data.cmd == "gw") {    foreach( gatewayInfo : data.gws ) {        var gatewayInfoMsg = {            deviceName: gatewayInfo.gweui,            deviceType: "LoraGateway",            attributes: {},            telemetry: {                "ts": gatewayInfo.ts,                "values": toFlatMap(gatewayInfo, ["ts", "time", "gweui"], false)            }        };        uplinkDataList.add(gatewayInfoMsg);    }}
return uplinkDataList;
Now, open the “Integration center” section -> “Integrations” page and follow this steps:
- Click “plus” button to add new integration. Select type “Loriot”. Then, click “Next”.
- Paste the previously copied script to the Decoder function section. Click “Next”.
- Leave the “Downlink data converter” field empty. Click on “Skip” button.
- Next, fill in the fields with your parameters. After, press “Add” button.

Integration is created.
To check integration connection you can do the following:
- Click on integration row in the list;
- Go to the “Events” tab;
- Select “Lifecycle events” from Event type dropdown list.
If you see event STARTED and status Success it means that integration is successfully started and ready to receive messages.
Troubleshooting
If you see the next error message, that means the output was not created automatically.
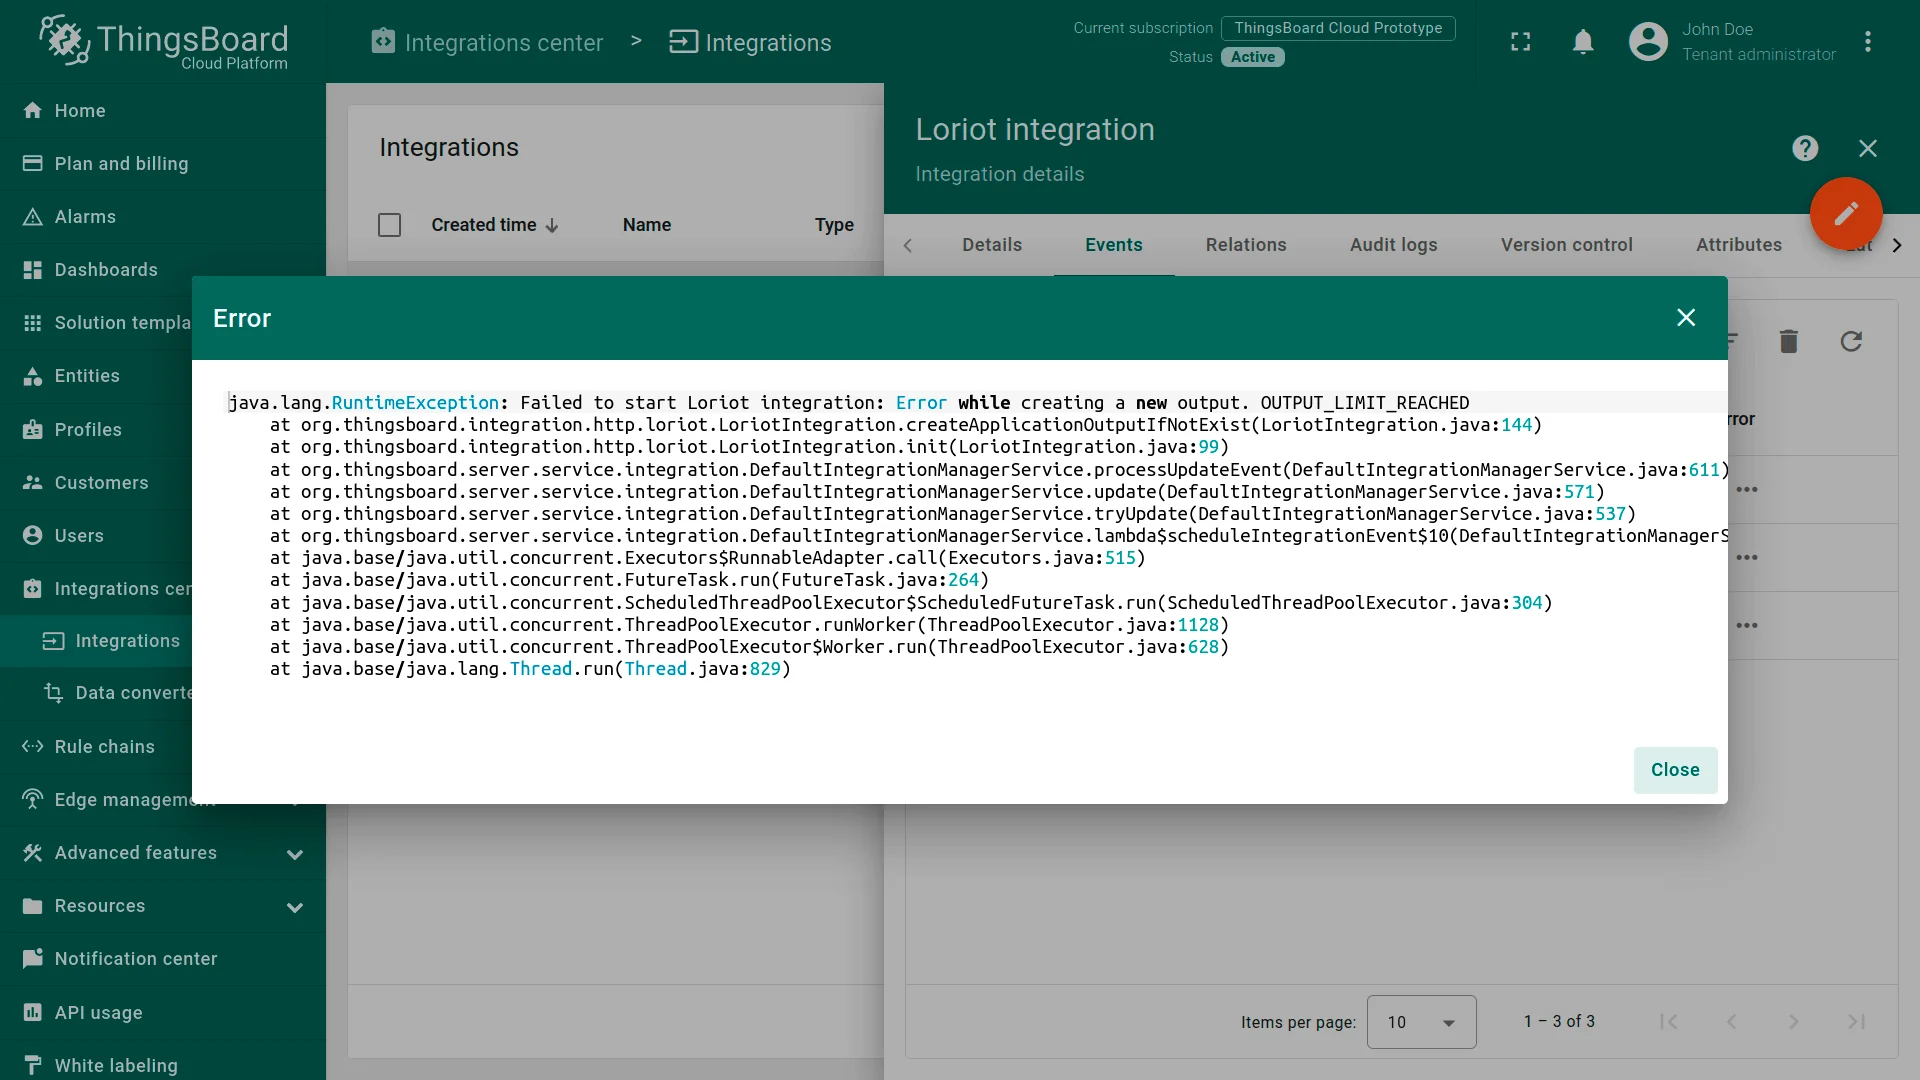
You can configure it manually:
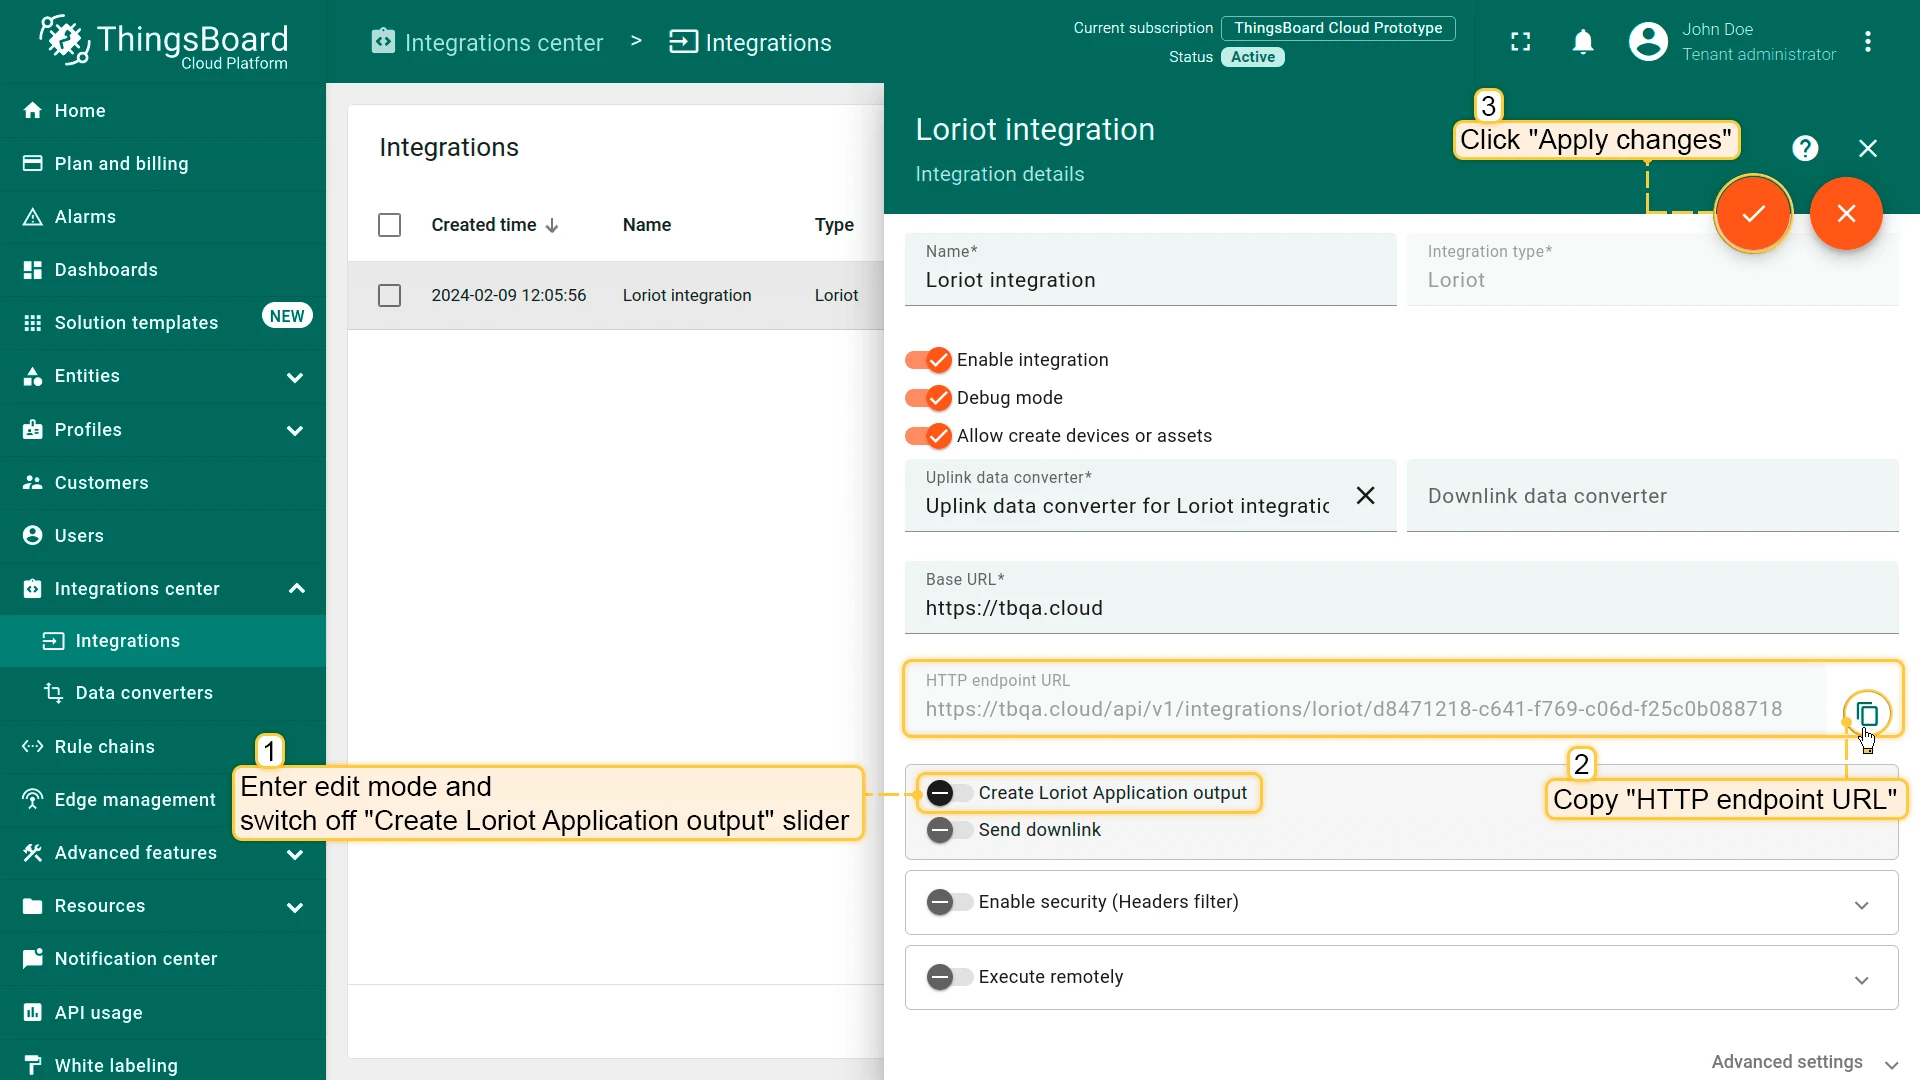
- Go to edit mode ThingsBoard Loriot integration, switch off “Create Loriot Application output” slider and copy “HTTP endpoint URL”. Then, apply changes
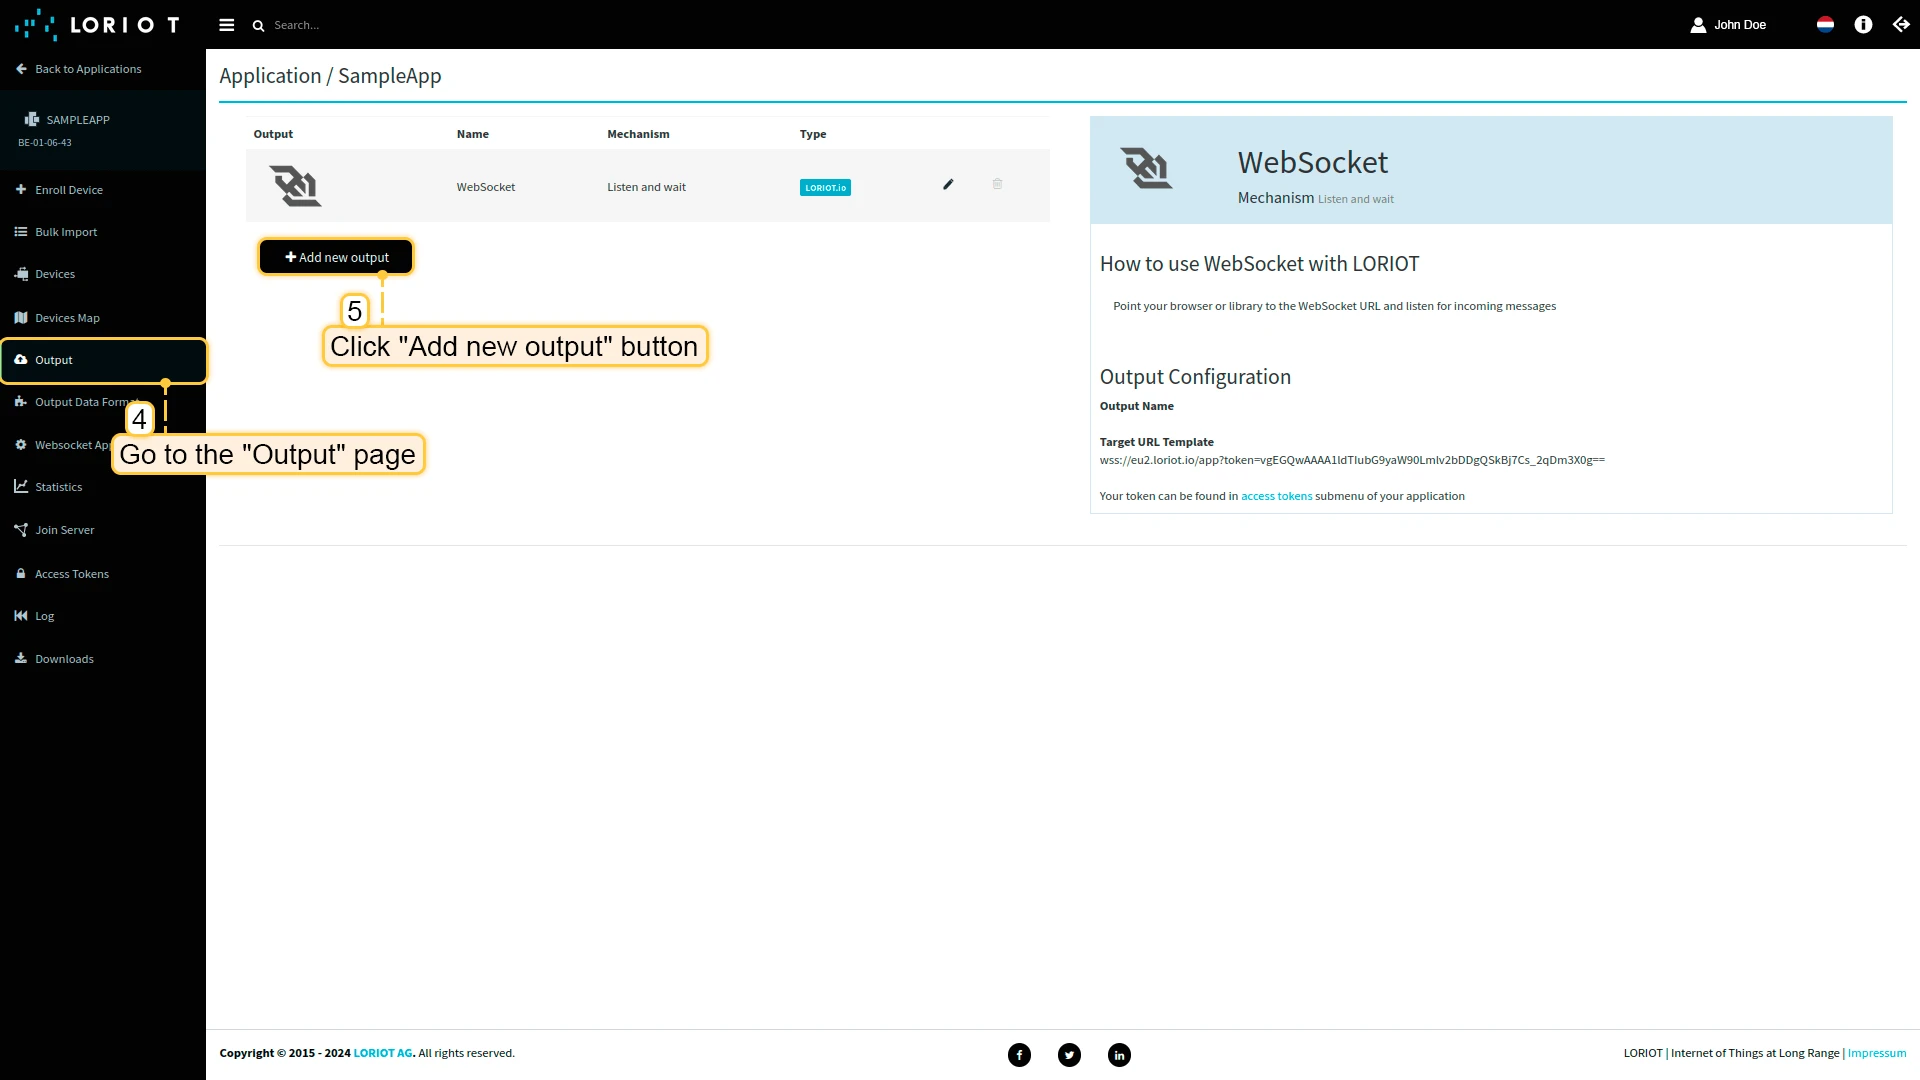
- Now, go to eu2.loriot.io than navigate to the “Output” page in left panel. Click on “Add new output” button
- Select “HTTP Push”. Paste “HTTP endpoint URL” in “Target URL for POSTs” field. Press “Add Output” button
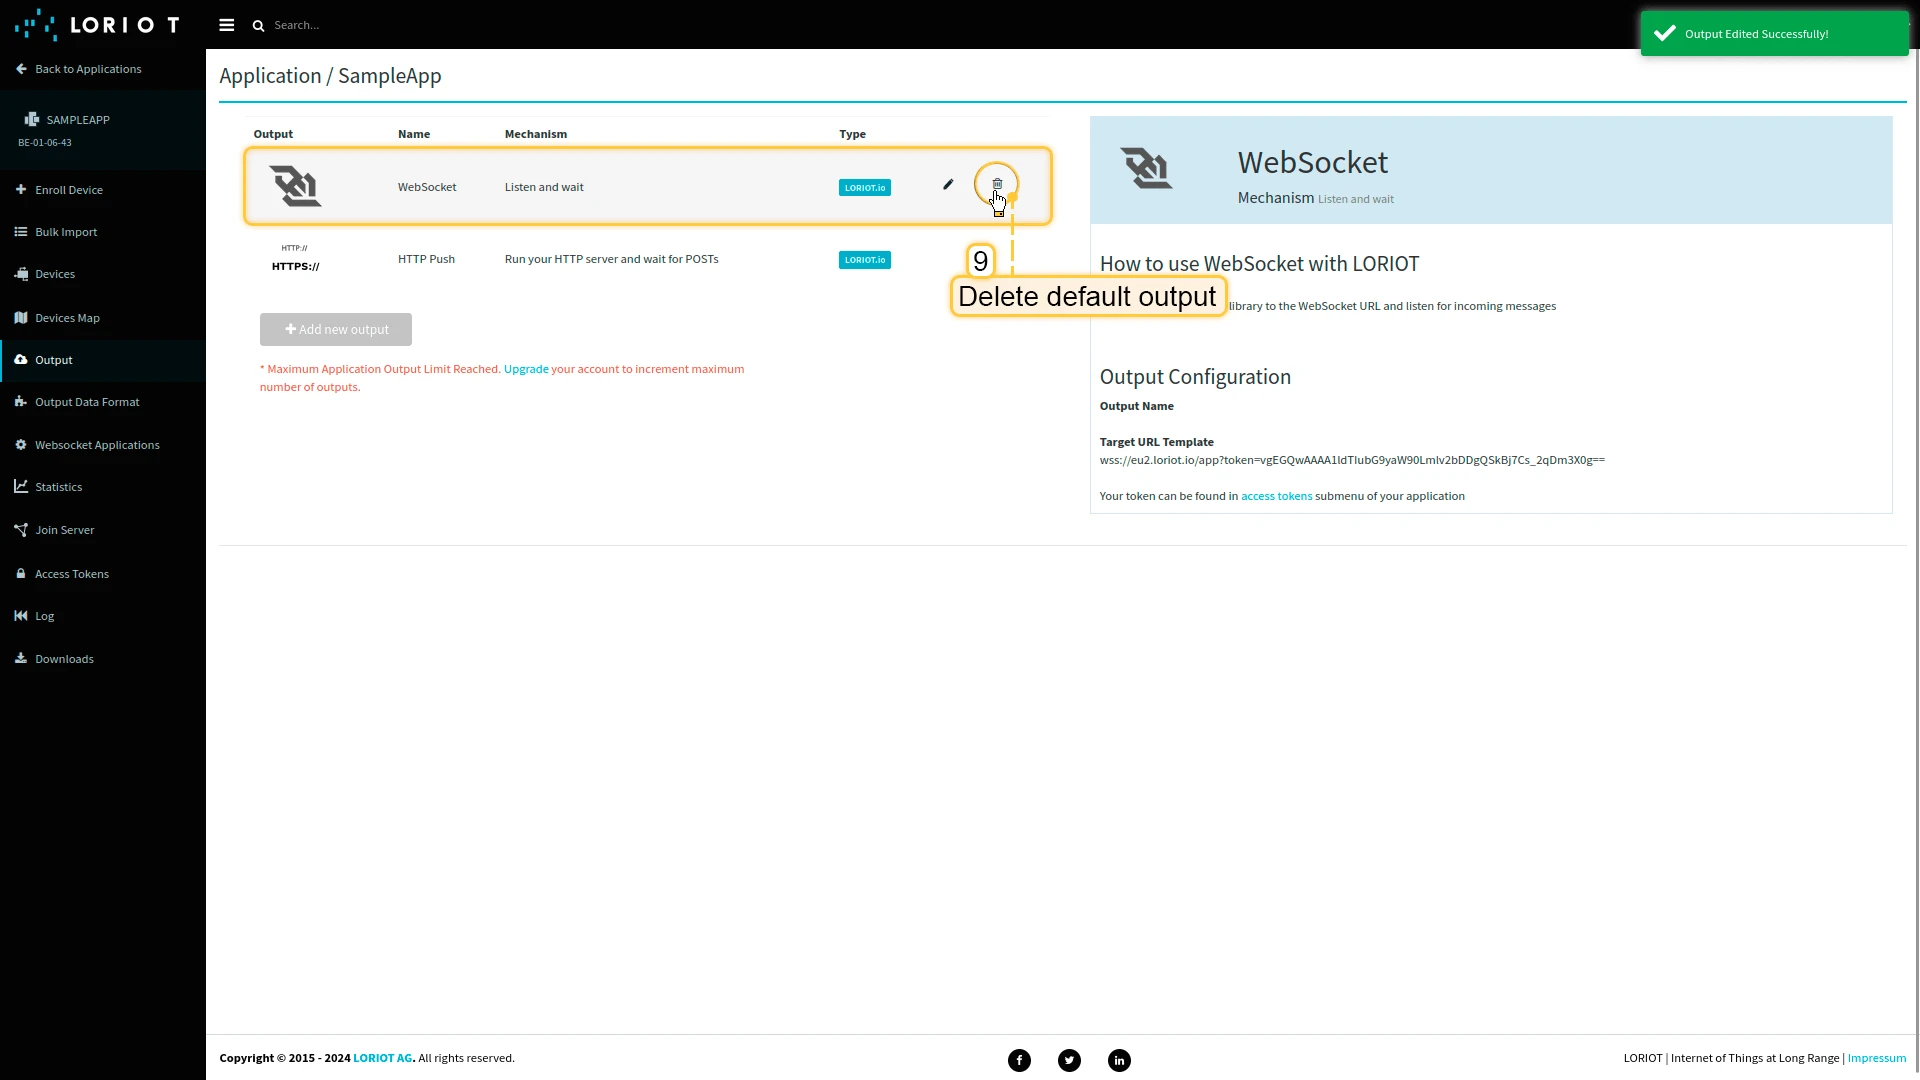
- Delete default output
- Go to the cloud and check the connection.

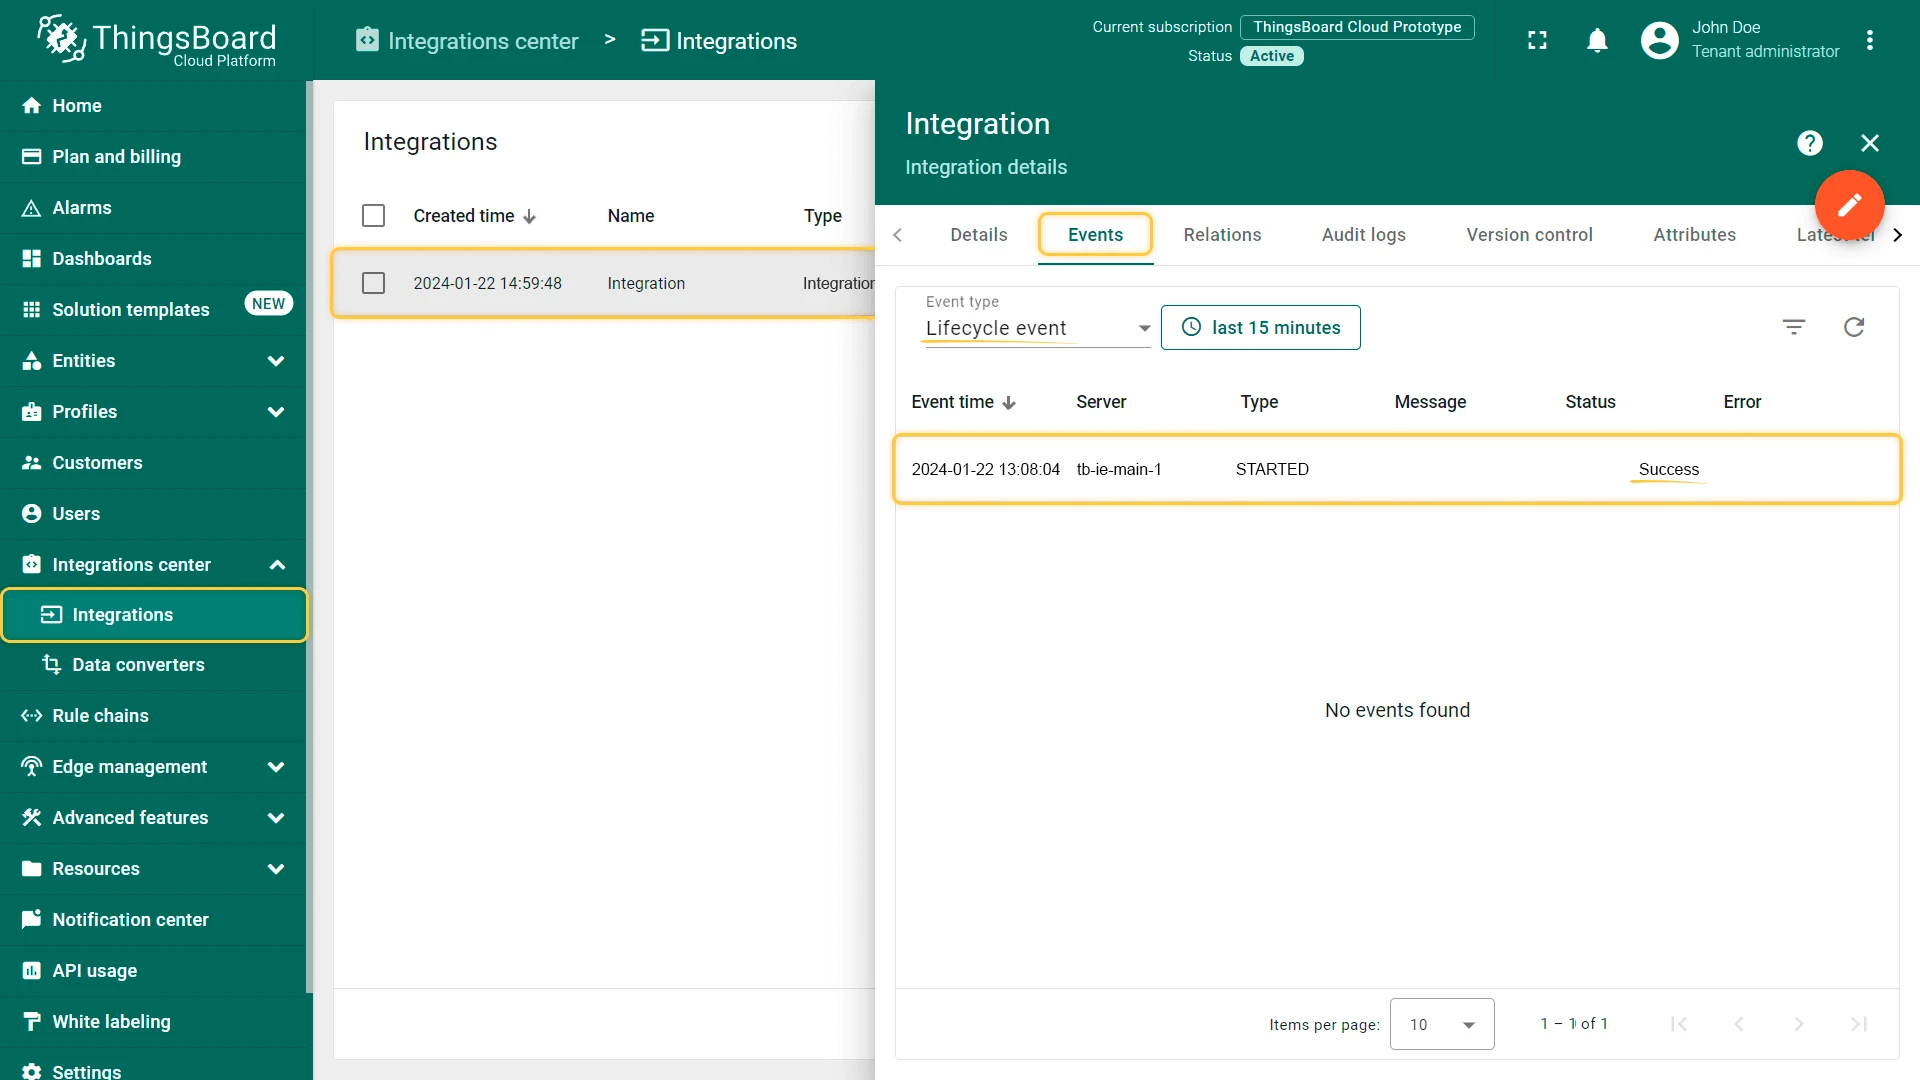
To check integration connection you can do the following:
- Click on integration row in the list;
- Go to the “Events” tab;
- Select “Lifecycle events” from Event type dropdown list.
If you see event STARTED and status Success it means that integration is successfully started and ready to receive messages.
Conclusion
With the knowledge in this guide, you can easily connect your UG65 LoRaWAN® Semi-Industrial Gateway and use the built-in integration to retrieve data from devices connected to UG65 LoRaWAN® Semi-Industrial Gateway .
You can find some LoRaWAN devices in our device library and connect them or any other devices through a gateway on a network server.
After connecting the devices to the gateway, you will be able to see and process the data coming from the devices on the ThingsBoard.
Explore the platform documentation to learn more about key concepts and features.