WS101 LoRaWAN® Smart Button
WS101 LoRaWAN® Smart Button
Milesight
- Platform
- ThingsBoard
- Hardware Type
- Other devices
- Connectivity
- LoRaWAN
- Industry
- Smart Buildings, Smart Cities, Retail, Healthcare
- Use Case
- Smart Office, Health Care
Introduction
WS101 Smart Button is a LoRaWAN®-based smart button for wireless controls, triggers and alarms. WS101 supports multiple press actions, all of which can be defined by the user to control devices or trigger scenes. WS101 can be widely used in smart homes, smart offices, schools, warehouses, etc. Sensor data are transmitted in real-time using the standard LoRaWAN® protocol. LoRaWAN® enables encrypted radio transmissions over long distances while consuming very little power.
Prerequisites
To continue with this guide we will need the following:
- WS101 LoRaWAN® Smart Button
- WS101 Smart Button user manual
-
Smartphone with NFC-enabled and Milesight ToolBox application (Android/iOS)
-
LoRaWAN® gateway (in our case UG56 LoRaWAN® Gateway)
-
Configured integration on networks server and ThingsBoard
-
ThingsBoard account at
YOUR_TB_HOST
Device connection
According to the official user manual, we need a smartphone with NFC enabled and the ToolBox application to connect the sensor. Since this device can only be operated using a LoRaWAN® gateway, we must first connect it to a network server that has an integration configured with ThingsBoard. Afterward, it can be provisioned to ThingsBoard.
Device configuration
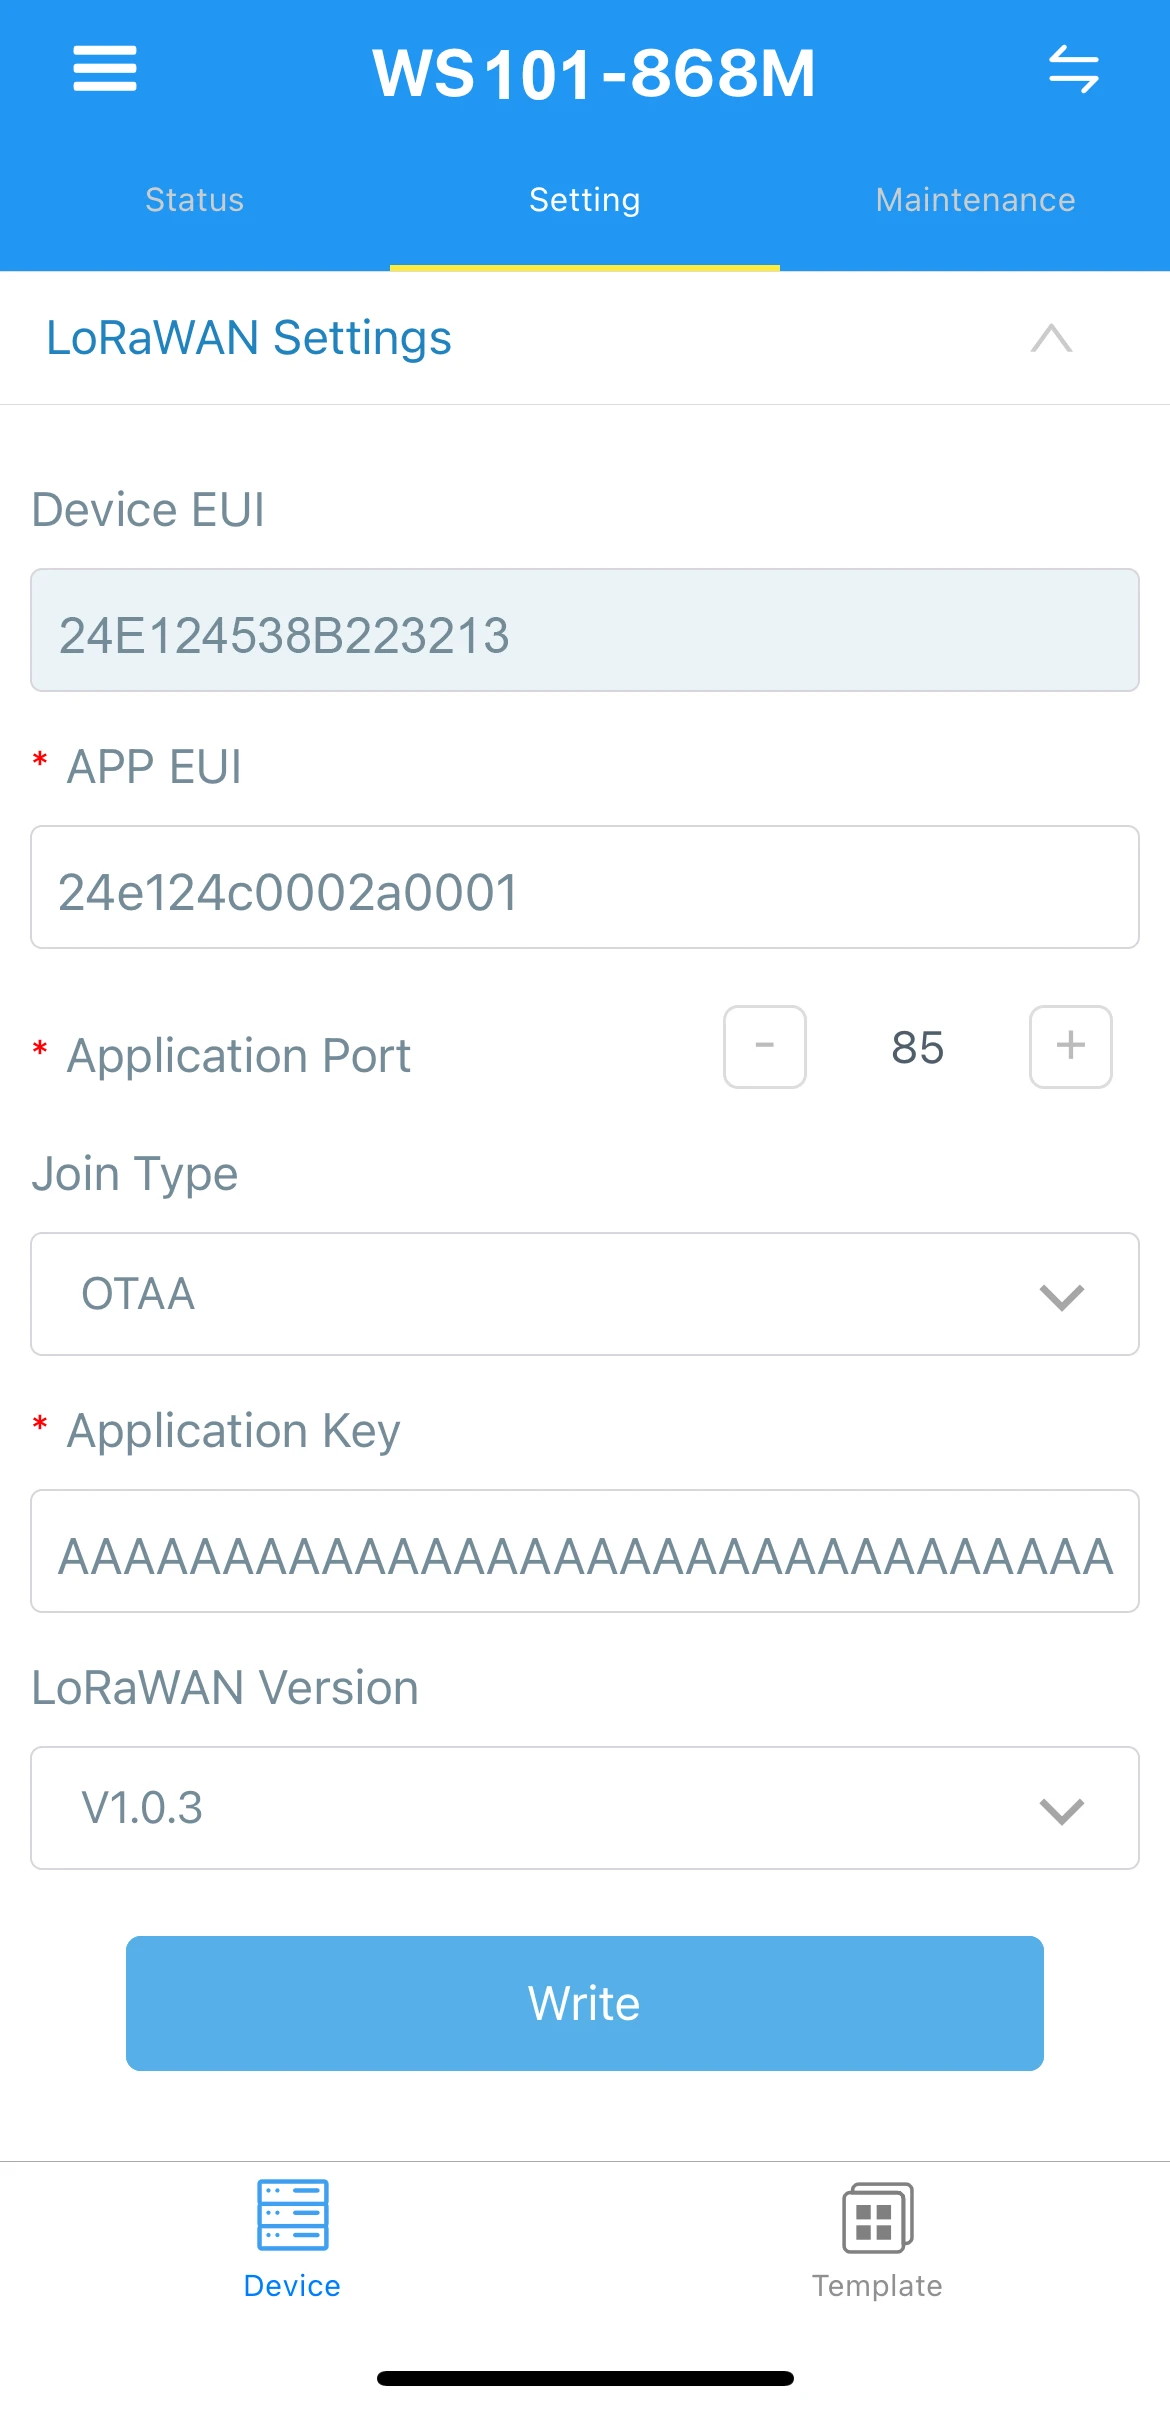
To connect and send data we should configure the device and network server. At first we are going to configure the device, and save required information for network server configuration. To add a device to network server and get information from it, we will need the following device parameters:
- Device EUI - device identifier
- Application EUI - Application identifier
- Application Key - Application key to identify device. We recommend to use a generated key, not from the example!
The parameters above are required for connection.
Depending on the network server, you may also need to provide join type (OTAA), LoRaWAN version.
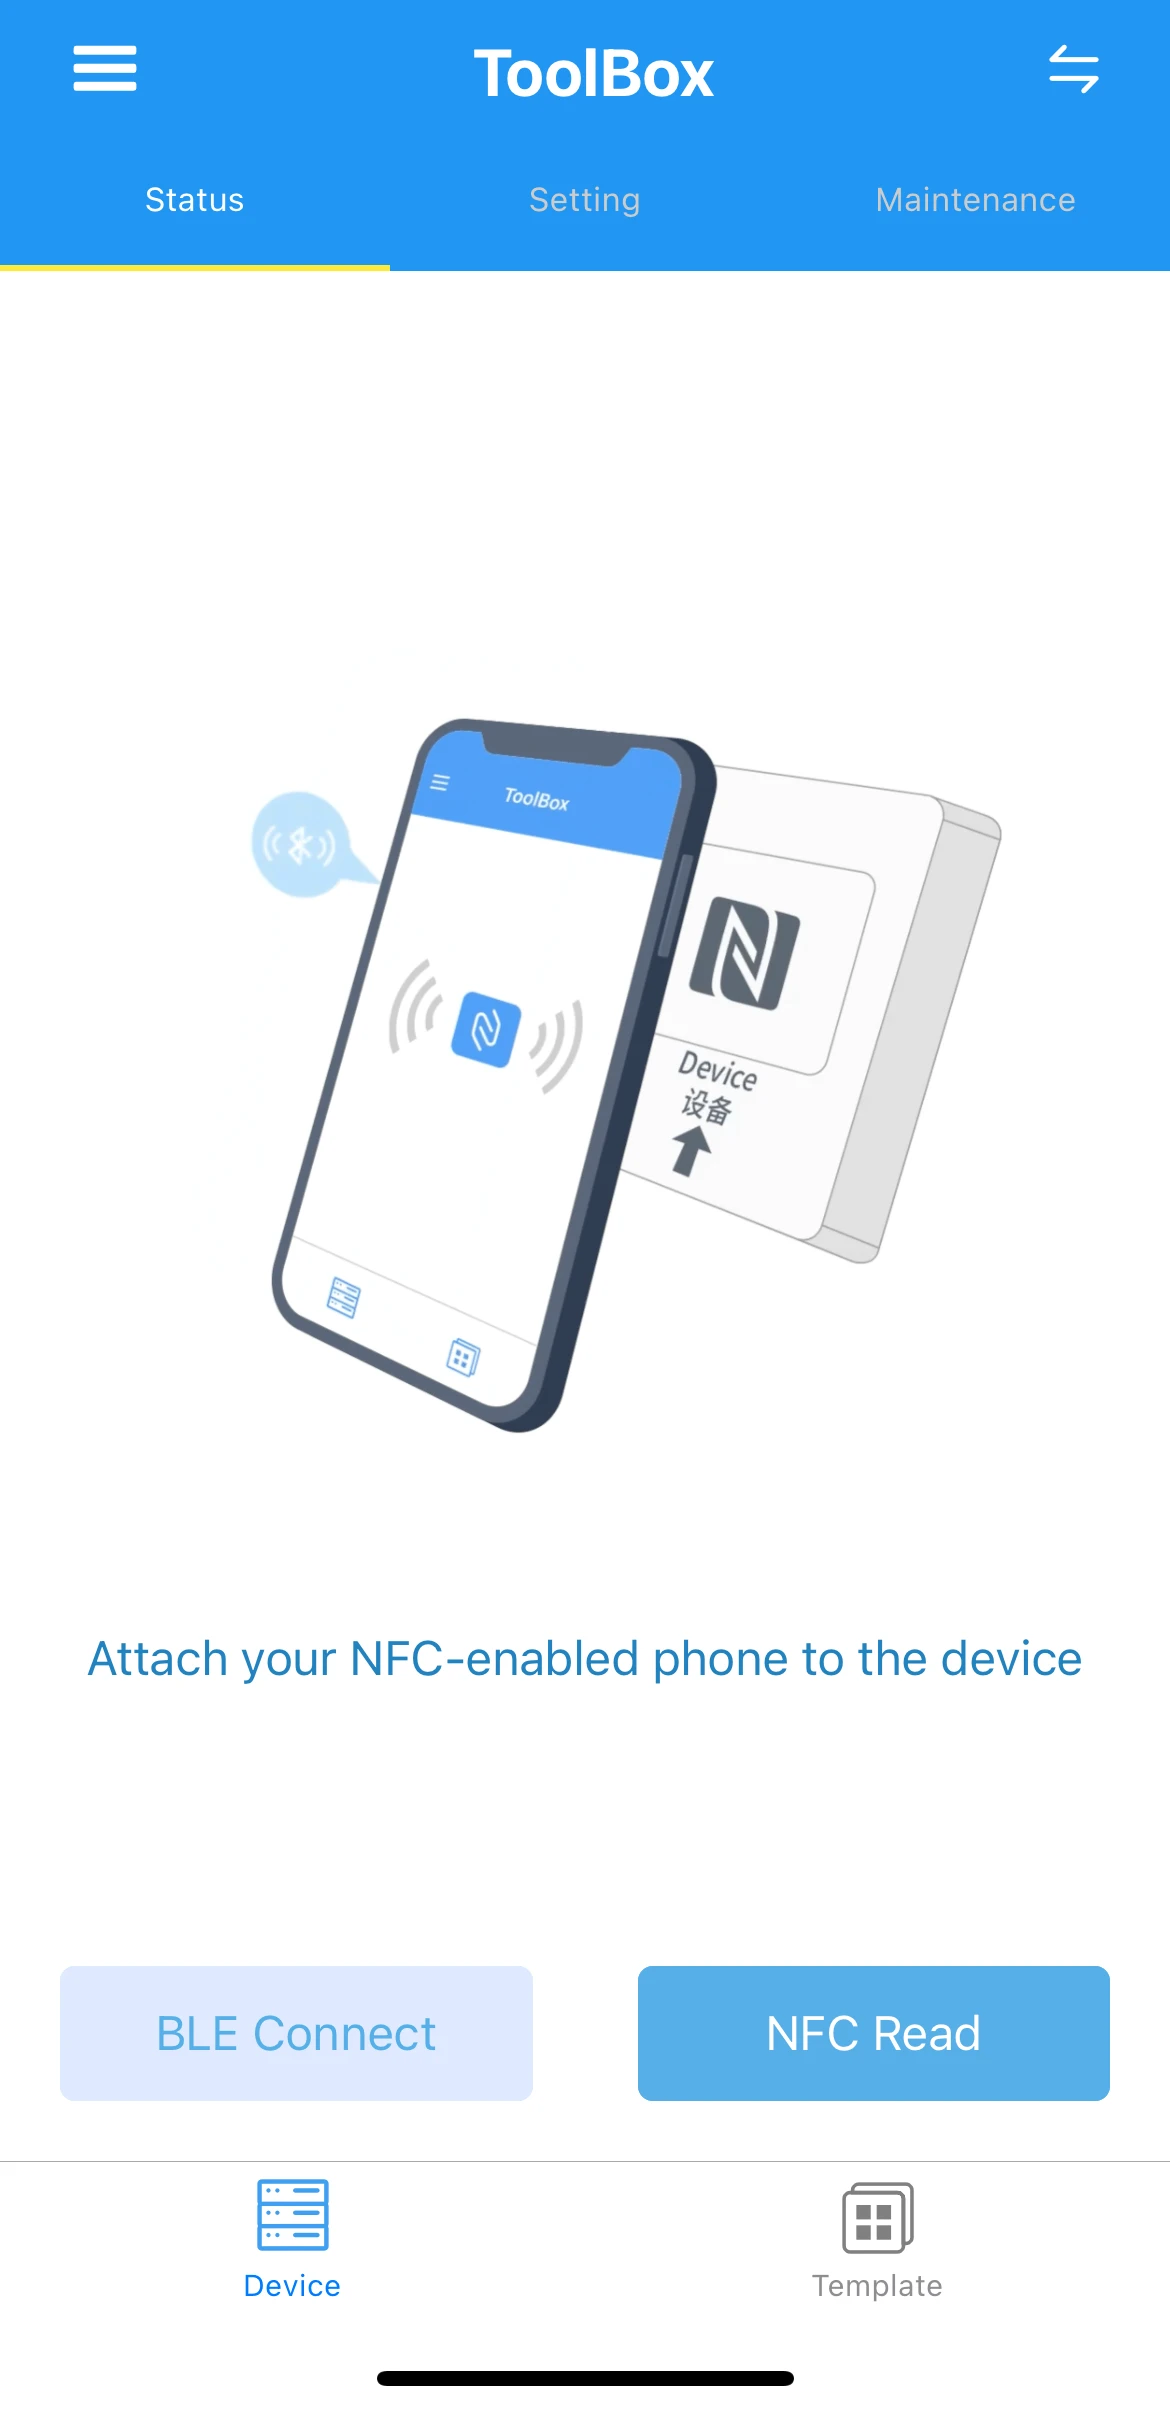
To configure device via NFC, you will need to hold your smartphone like on the picture below:

To read and write configuration on the device you may follow next steps on your smartphone:
- Open ToolBox application.
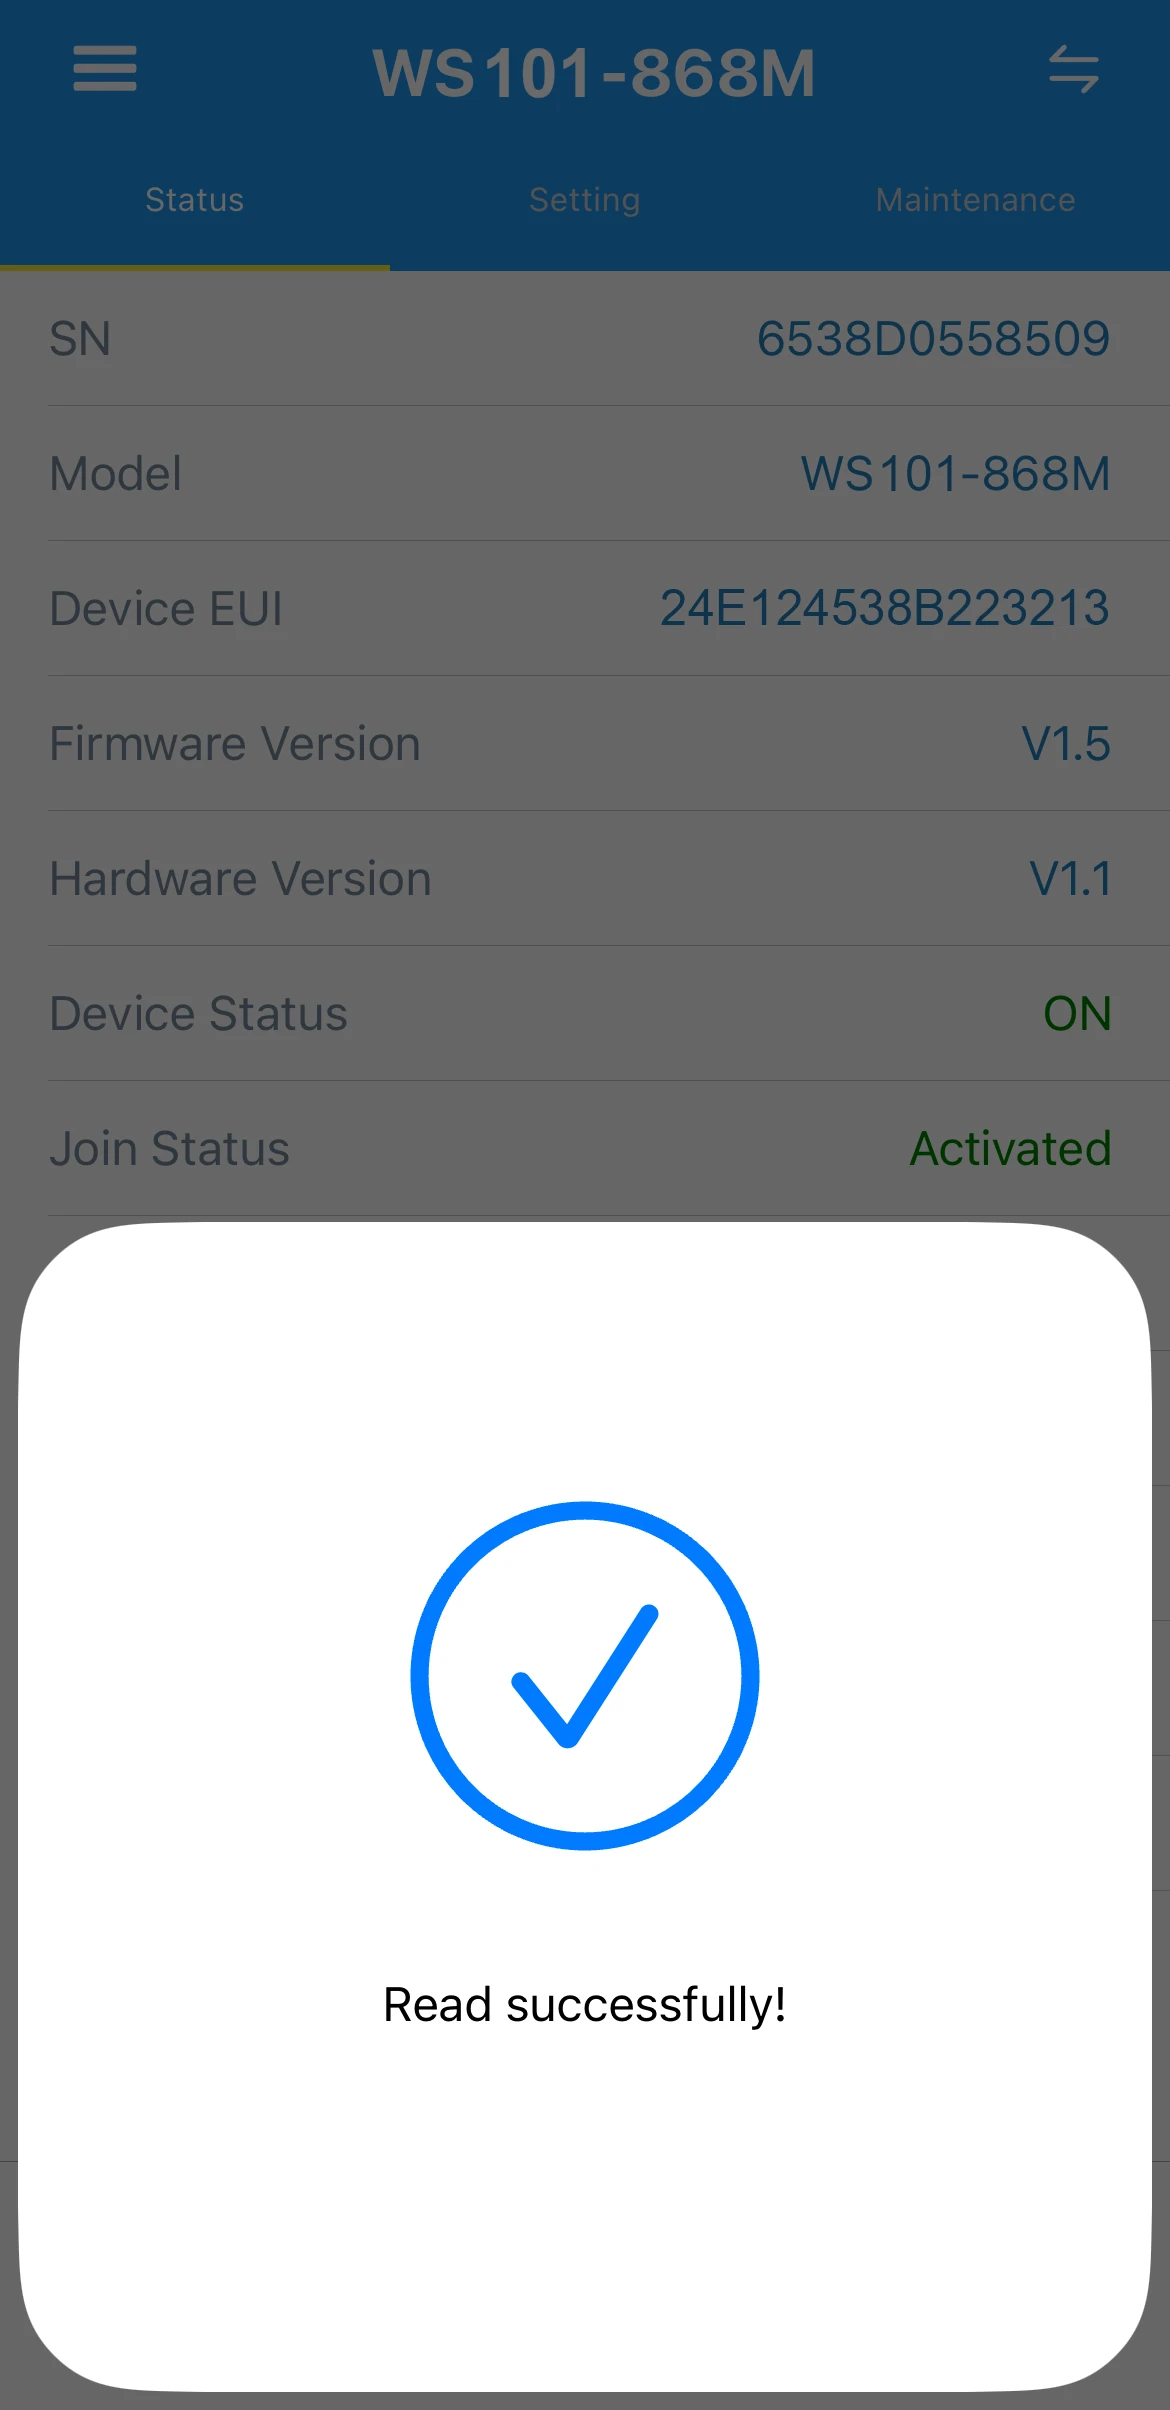
- Click on NFC Read button and hold your smartphone near the device.
- Go to tab Setting, set and save required fields and any other configuration that you need.
- Press Write button and hold your smartphone near the device.
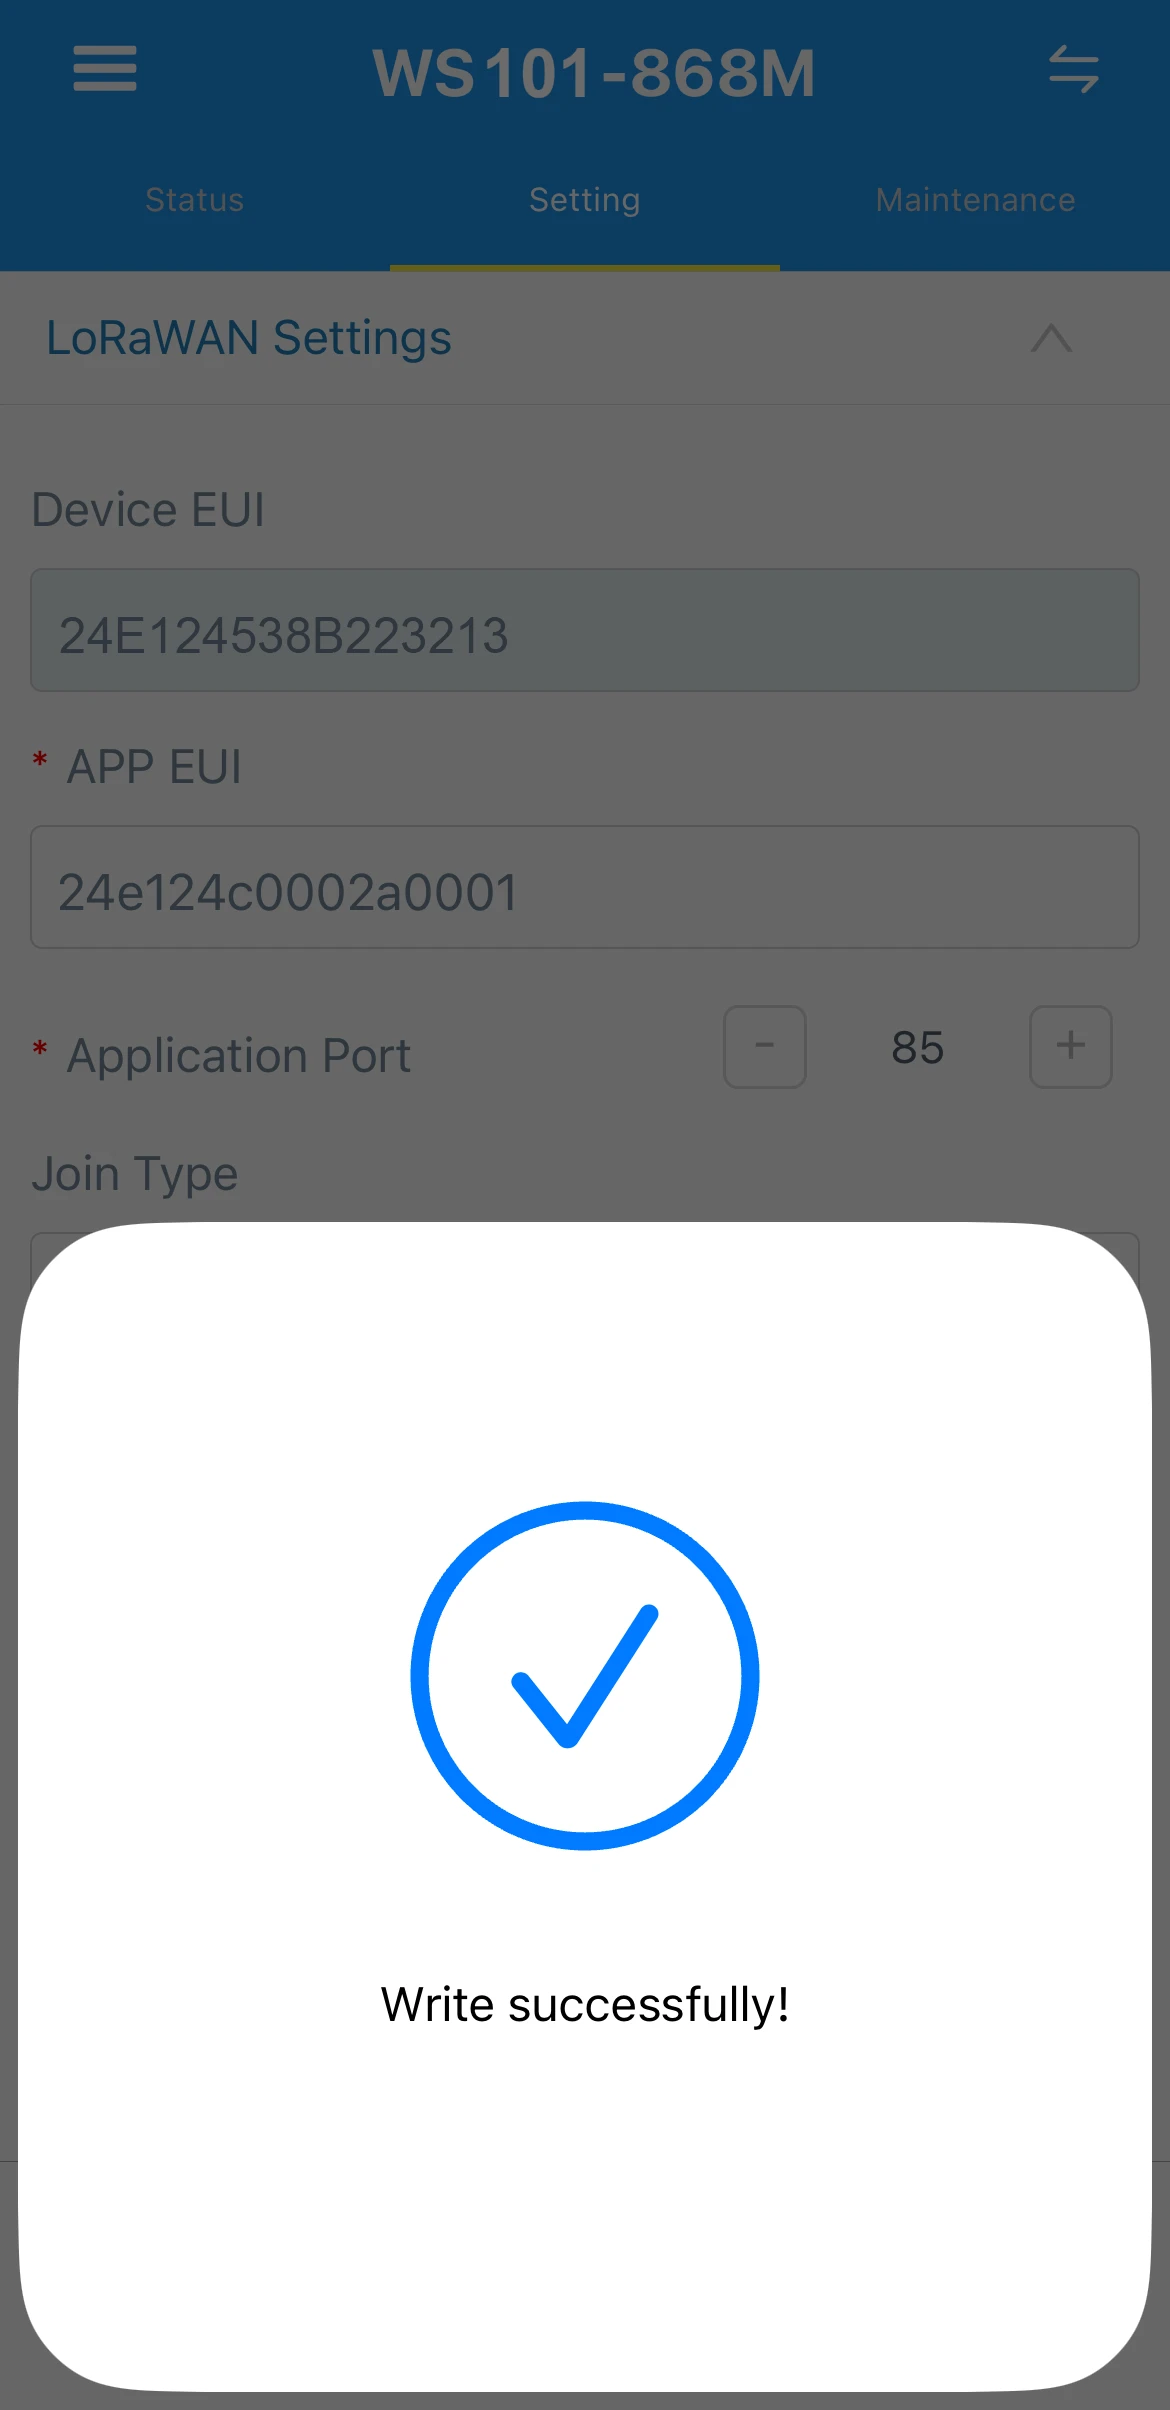
If you have some issues with configuring the device and your smartphone in the case - it is recommended by vendor to try to configure the smartphone without case.
Now, the device is able to send a data to the network server.
To configure the device we also need to add it to a network server, so select the network server your gateway is connected to:
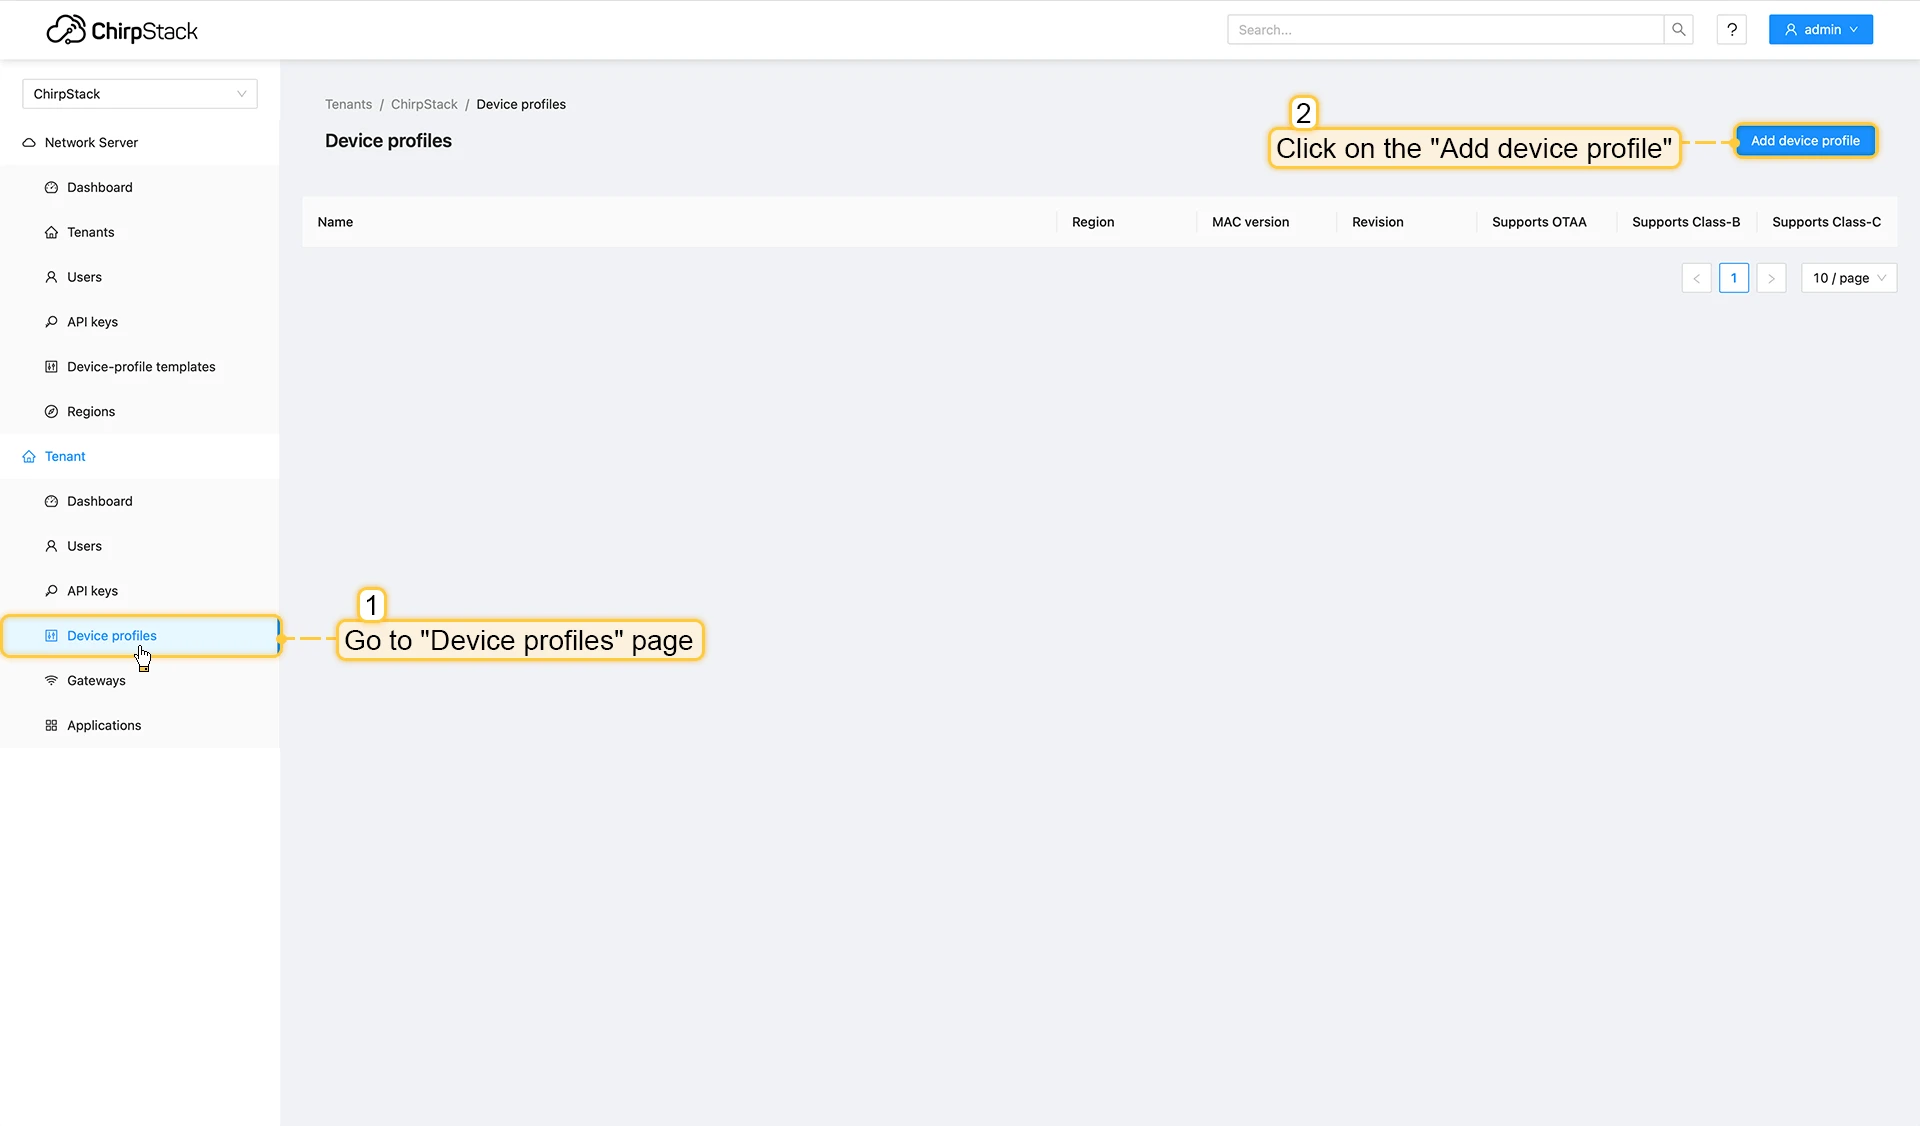
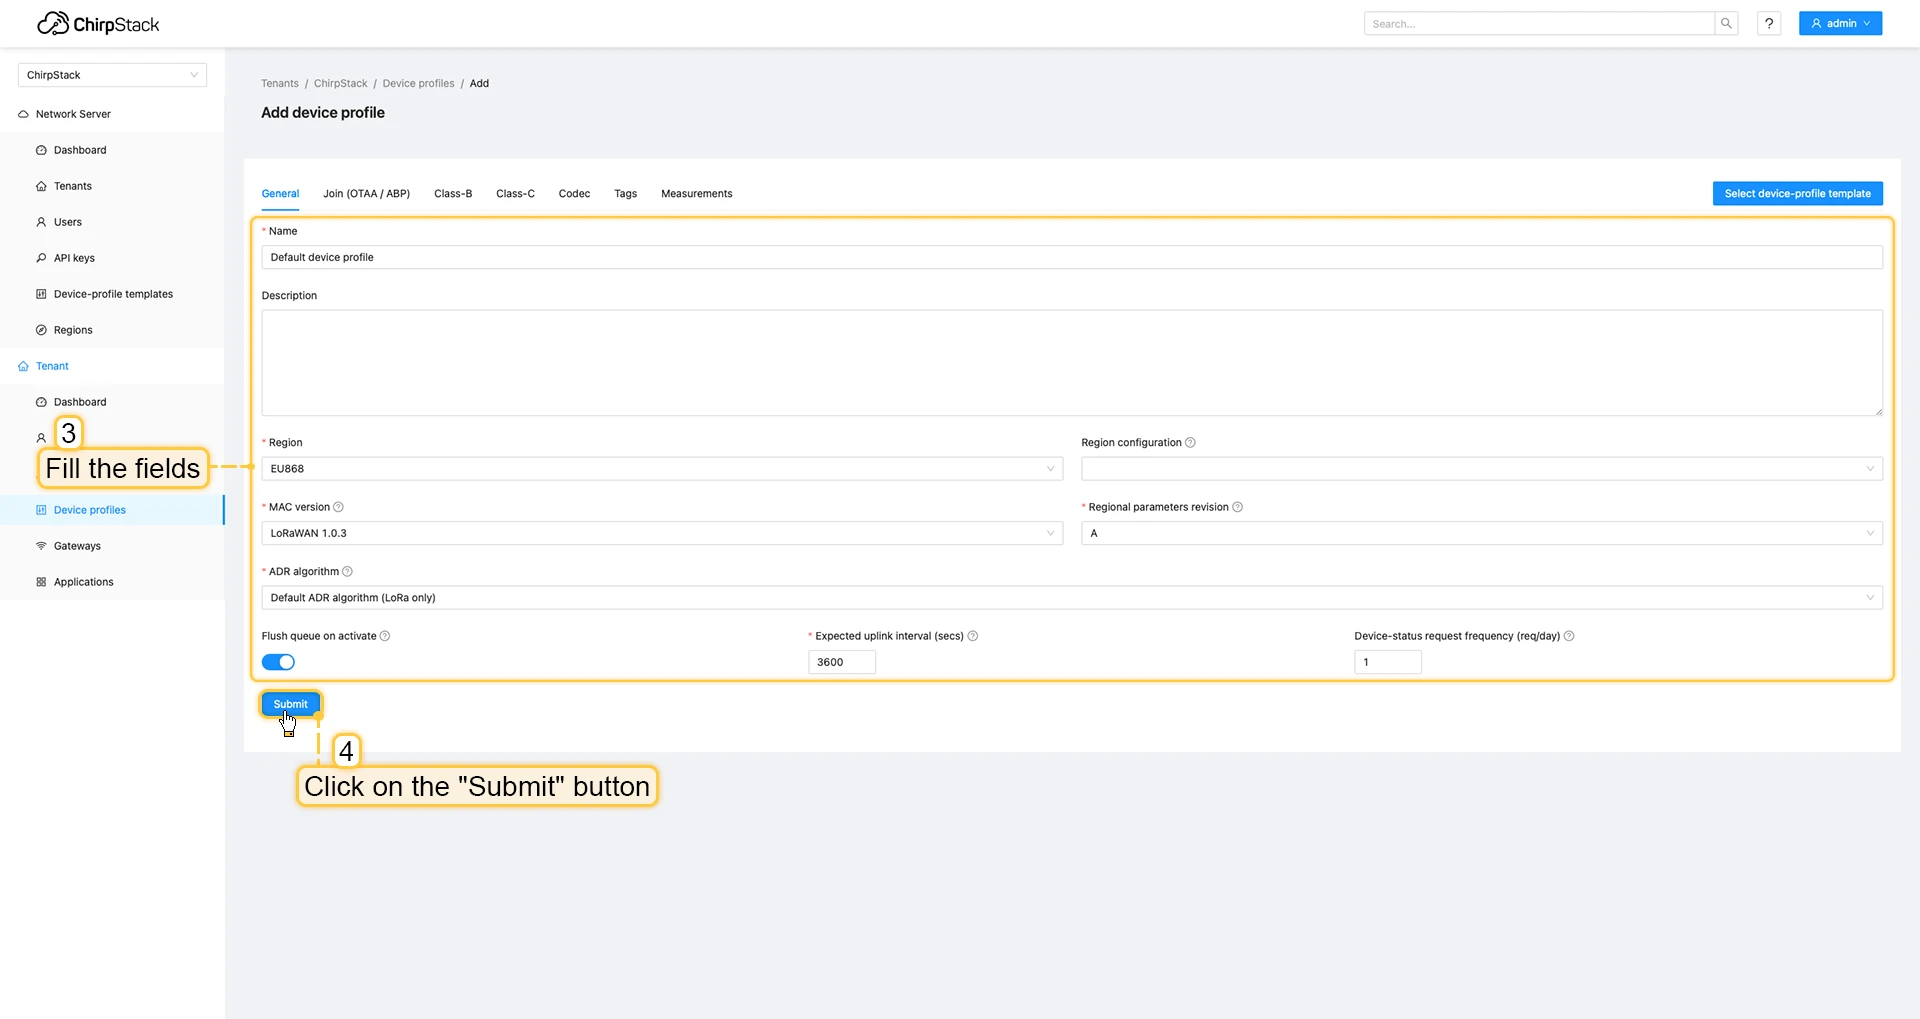
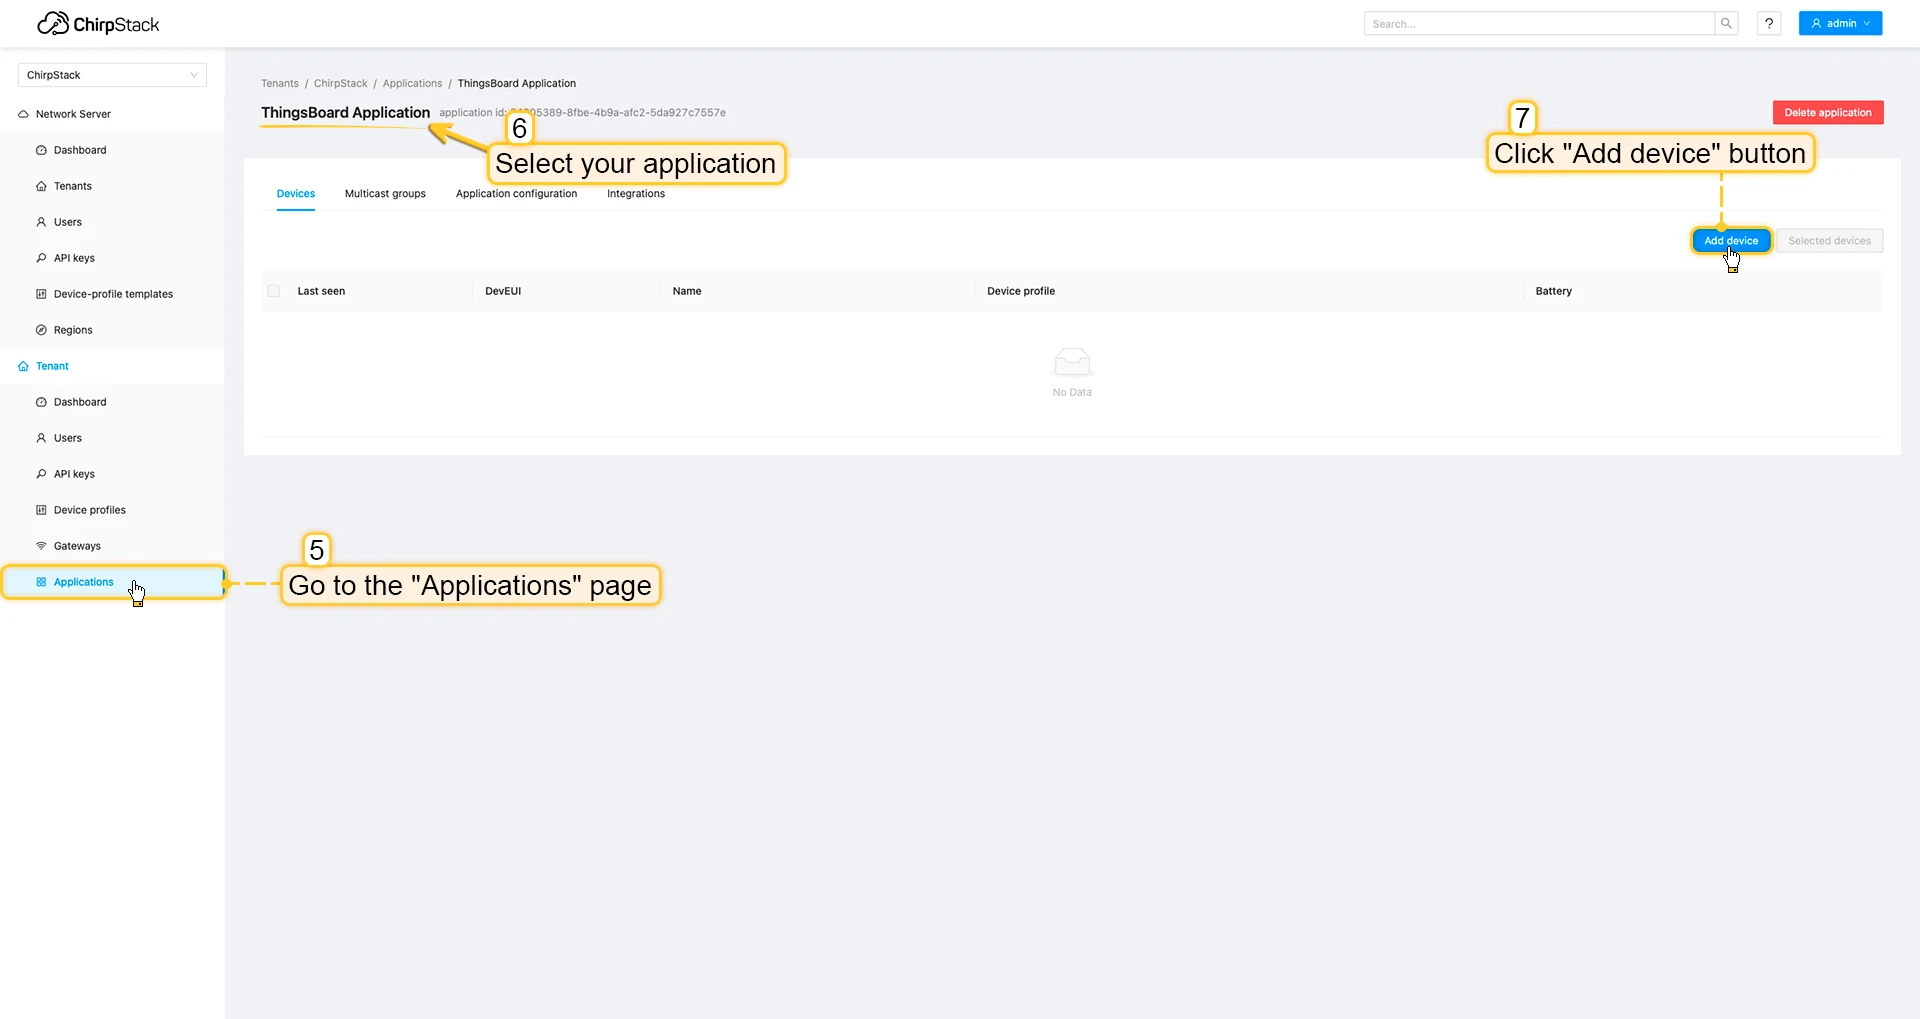
Add a device on the Chirpstack
We need to add a device on the Chirpstack.
To add a device, you can follow next steps:
- Login to Chirpstack server.
- Go to the Device profiles page and click on Add device profile button.
- Fill the fields and click on Submit button.
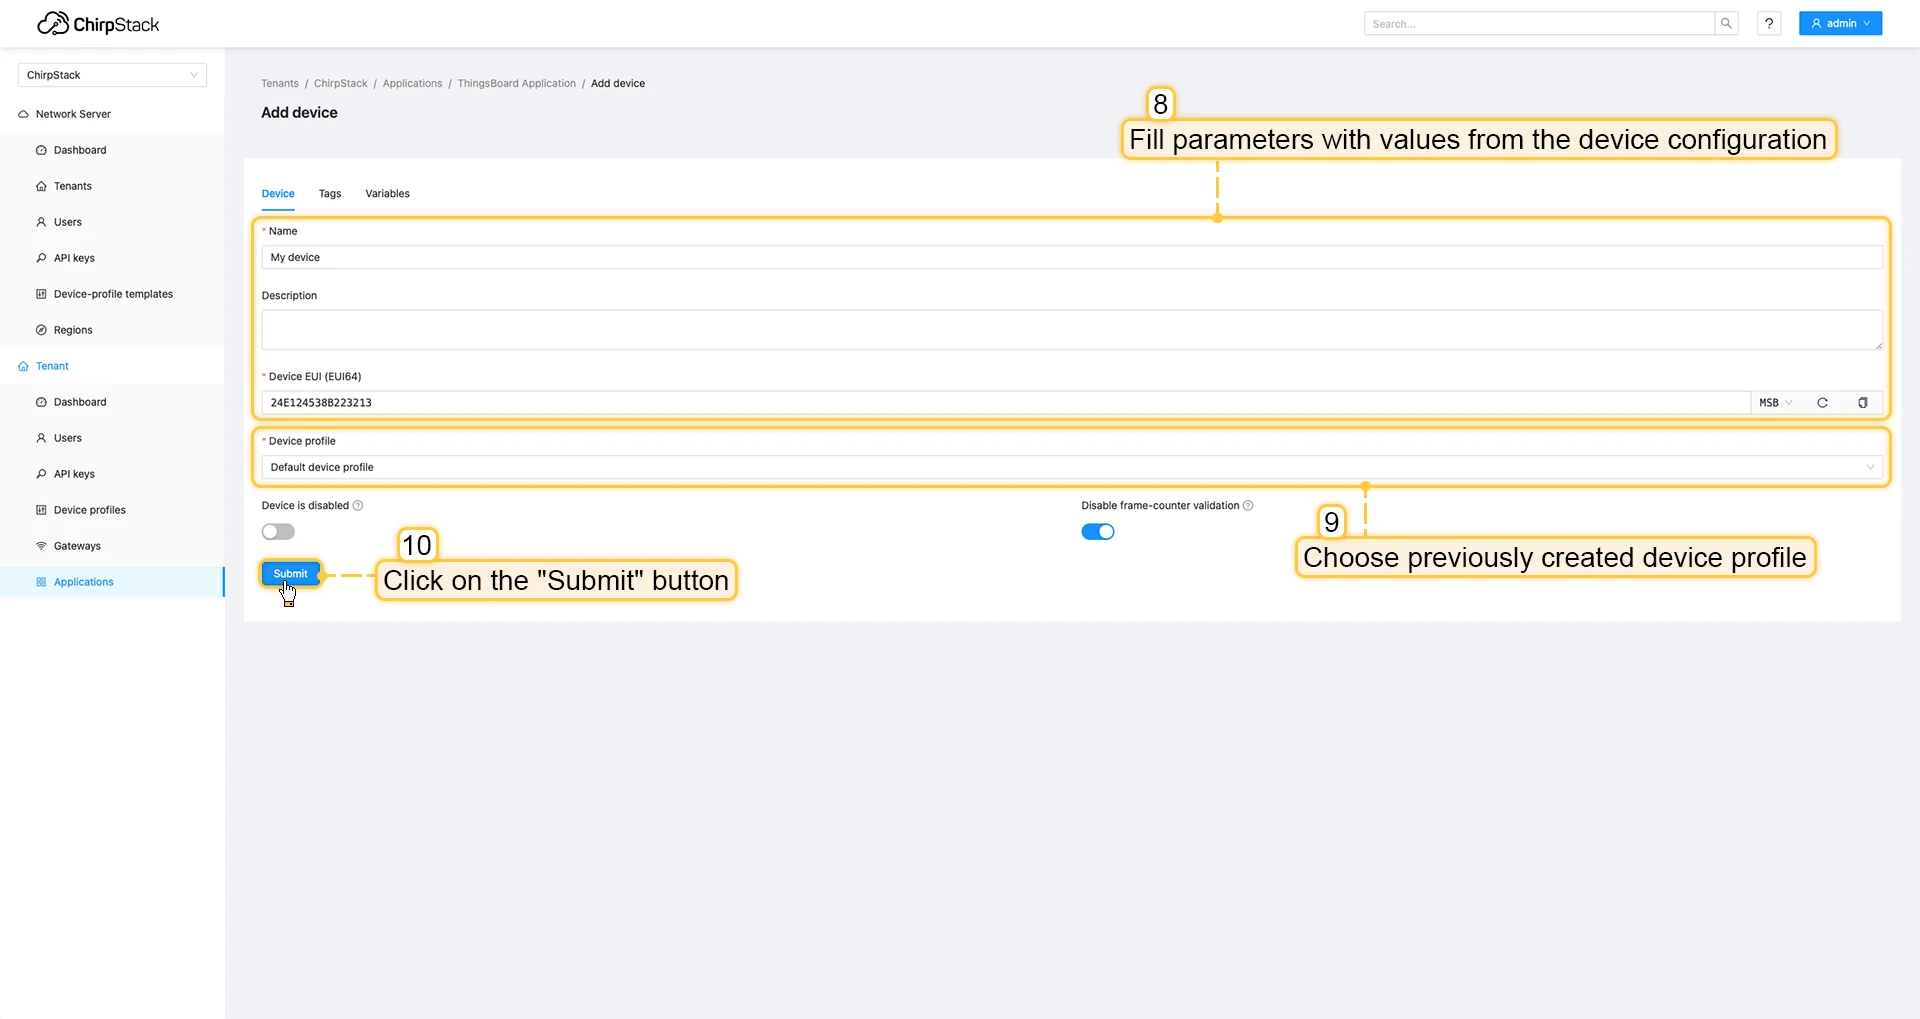
- Go to the Applications page, click on your application and press Add device button.
- Fill parameters with values from the device configuration. Then choose previously created device profile and click on Submit button.
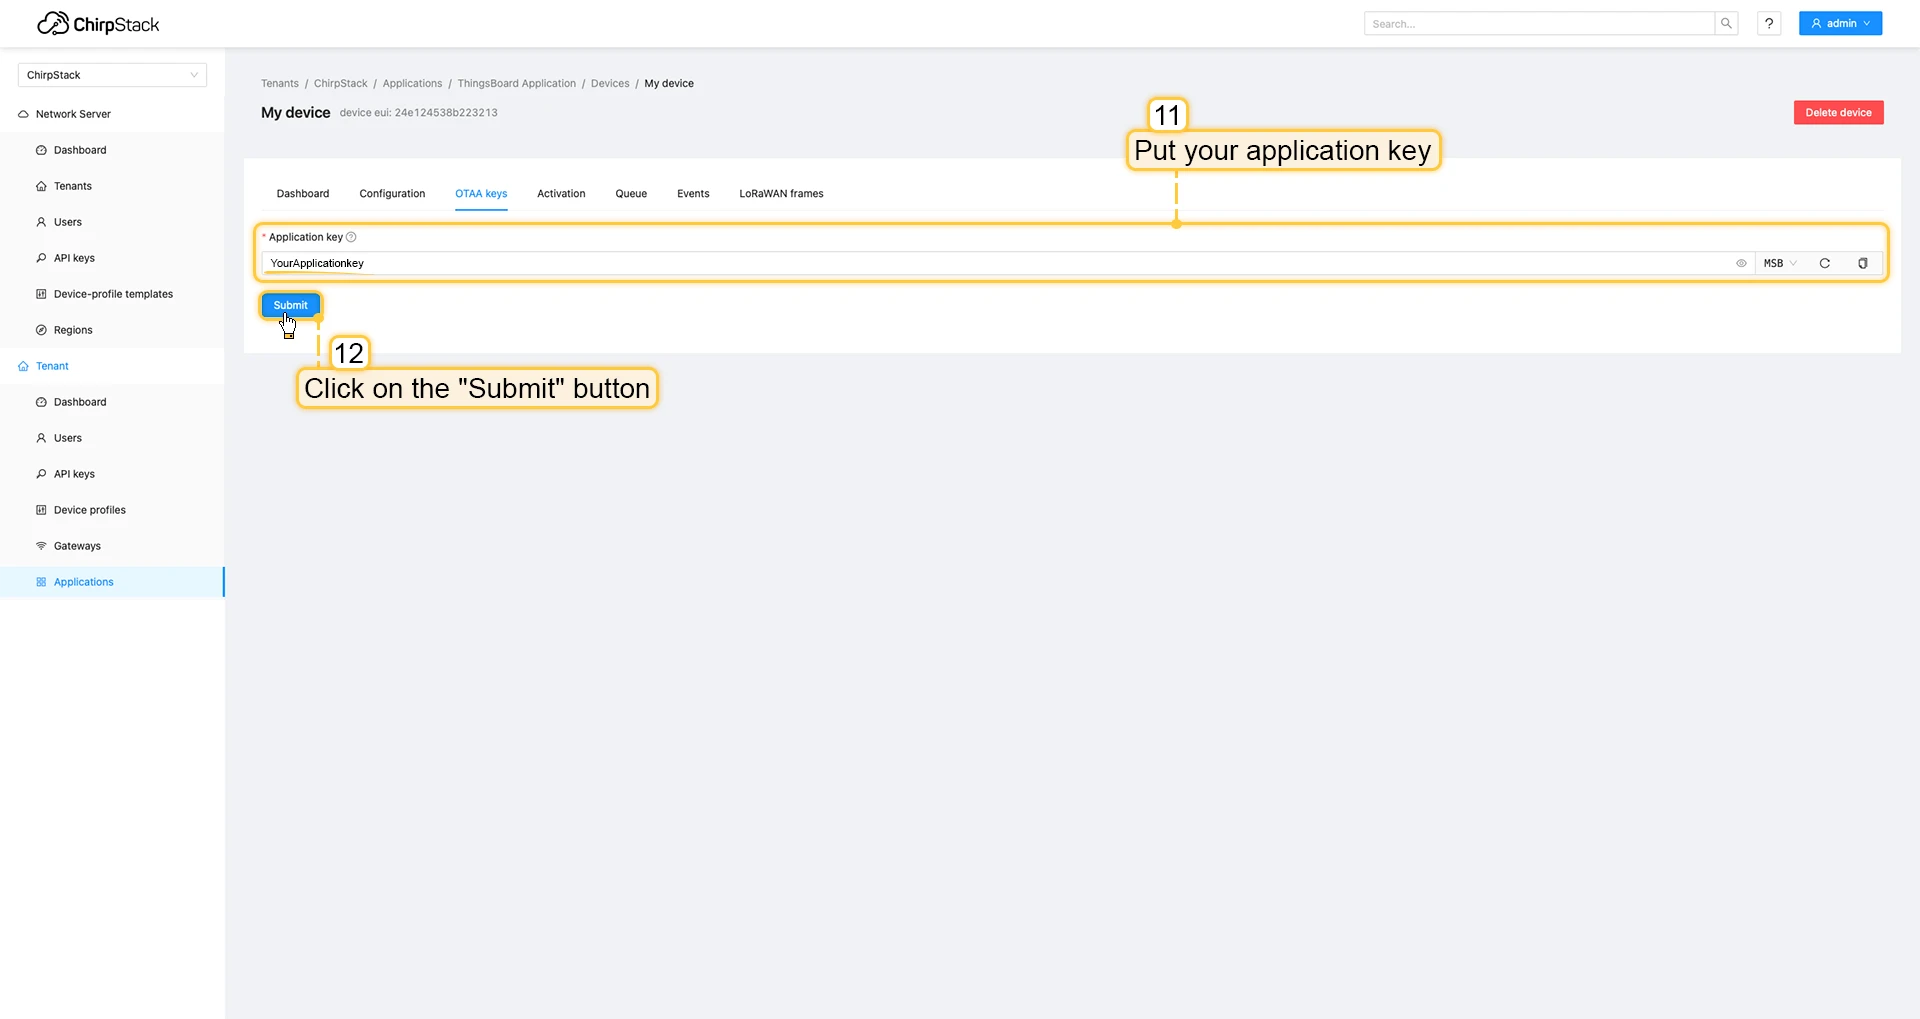
- Put your Application key to the field and click on Submit button to save the device.

Uplink converter in ThingsBoard integration
Such as we have already connected gateway and configured integration - we will need to modify the converter and add an ability to parse incoming payload from the device.
To do this you can add code to “Decoding block”, it locates between comments ”// --- Decoding code --- //” in your converter, if you are using the default converters (for ThingsBoard v3.5.2 or above).
if (input.length > 0) { for (var i = 0; i < input.length; ) { var channel_id = bytes[i++]; if (i < input.length) { var channel_type = bytes[i++]; // BATTERY if (channel_id === 0x01 && channel_type === 0x75) { output.telemetry.battery = bytes[i]; i += 1; } // PRESS STATE else if (channel_id === 0xff && channel_type === 0x2e) { switch (bytes[i]) { case 1: output.telemetry.press = "short"; break; case 2: output.telemetry.press = "long"; break; case 3: output.telemetry.press = "double"; break; } i += 1; } } } }Or you can copy the whole code of the converter and paste it to your converter:
var data = decodeToJson(payload);var deviceName = data.deviceInfo.deviceName;var deviceType = data.deviceInfo.deviceProfileName;// var groupName = 'IAQ devices';// var customerName = 'Customer A';// use assetName and assetType instead of deviceName and deviceType// to automatically create assets instead of devices.// var assetName = 'Asset A';// var assetType = 'building';
// If you want to parse incoming data somehow, you can add your code to this function.// input: bytes// expected output://  {//    "attributes": {"attributeKey": "attributeValue"},//    "telemetry": {"telemetryKey": "telemetryValue"}//  }//// In the example - bytes will be saved as HEX string and also parsed as light level, battery level and PIR sensor value.//
function decodePayload(input) {    var output = { attributes:{}, telemetry: {} };    // --- Decoding code --- //
    output.telemetry.HEX_bytes = bytesToHex(input);
    if (input.length > 0) {        for (var i = 0; i < input.length; ) {            var channel_id = bytes[i++];            if (i < input.length) {                var channel_type = bytes[i++];                // BATTERY                if (channel_id === 0x01 && channel_type === 0x75) {                    output.telemetry.battery = bytes[i];                    i += 1;                }                // PRESS STATE                else if (channel_id === 0xff && channel_type === 0x2e) {                    switch (bytes[i]) {                        case 1:                            output.telemetry.press = "short";                            break;                        case 2:                            output.telemetry.press = "long";                            break;                        case 3:                            output.telemetry.press = "double";                            break;                    }                    i += 1;                }            }        }    }
    // --- Decoding code --- //    return output;}
// --- attributes and telemetry objects ---var telemetry = {};var attributes = {};// --- attributes and telemetry objects ---
// --- Timestamp parsingvar dateString = data.time;var timestamp = -1;if (dateString != null) {    timestamp = new Date(dateString).getTime();    if (timestamp == -1) {        var secondsSeparatorIndex = dateString.lastIndexOf('.') + 1;        var millisecondsEndIndex = dateString.lastIndexOf('+');        if (millisecondsEndIndex == -1) {            millisecondsEndIndex = dateString.lastIndexOf('Z');        }        if (millisecondsEndIndex == -1) {            millisecondsEndIndex = dateString.lastIndexOf('-');        }        if (millisecondsEndIndex == -1) {        if (dateString.length >= secondsSeparatorIndex + 3) {            dateString = dateString.substring(0, secondsSeparatorIndex + 3);        }    } else {        dateString = dateString.substring(0, secondsSeparatorIndex + 3) +        dateString.substring(millisecondsEndIndex, dateString.length);    }    timestamp = new Date(dateString).getTime();    }}// If we cannot parse timestamp - we will use the current timestampif (timestamp == -1) {    timestamp = Date.now();}// --- Timestamp parsing
// You can add some keys manually to attributes or telemetryattributes.deduplicationId = data.deduplicationId;
// You can exclude some keys from the resultvar excludeFromAttributesList = ["deviceName", "rxInfo", "confirmed", "data", "deduplicationId","time", "adr", "dr", "fCnt"];var excludeFromTelemetryList = ["data", "deviceInfo", "txInfo", "devAddr", "adr", "time", "fPort", "region_common_name", "region_config_id", "deduplicationId"];
// Message parsing// To avoid paths in the decoded objects we passing false value to function as "pathInKey" argument.// Warning: pathInKey can cause already found fields to be overwritten with the last value found.
var telemetryData = toFlatMap(data, excludeFromTelemetryList, false);var attributesData = toFlatMap(data, excludeFromAttributesList, false);
var uplinkDataList = [];
// Passing incoming bytes to decodePayload function, to get custom decodingvar customDecoding = decodePayload(base64ToBytes(data.data));
// Collecting data to resultif (customDecoding.?telemetry.size() > 0) {    telemetry.putAll(customDecoding.telemetry);}
if (customDecoding.?attributes.size() > 0) {    attributes.putAll(customDecoding.attributes);}
telemetry.putAll(telemetryData);attributes.putAll(attributesData);
var result = {    deviceName: deviceName,    deviceType: deviceType,//  assetName: assetName,//  assetType: assetType,//  customerName: customerName,//  groupName: groupName,    attributes: attributes,    telemetry: {        ts: timestamp,        values: telemetry    }};
return result;
Add a device on The Things Stack Community Edition
We need to add a device on The Things Stack Community Edition.
To add a device, you can follow next steps:
- Login to the cloud and open your console.
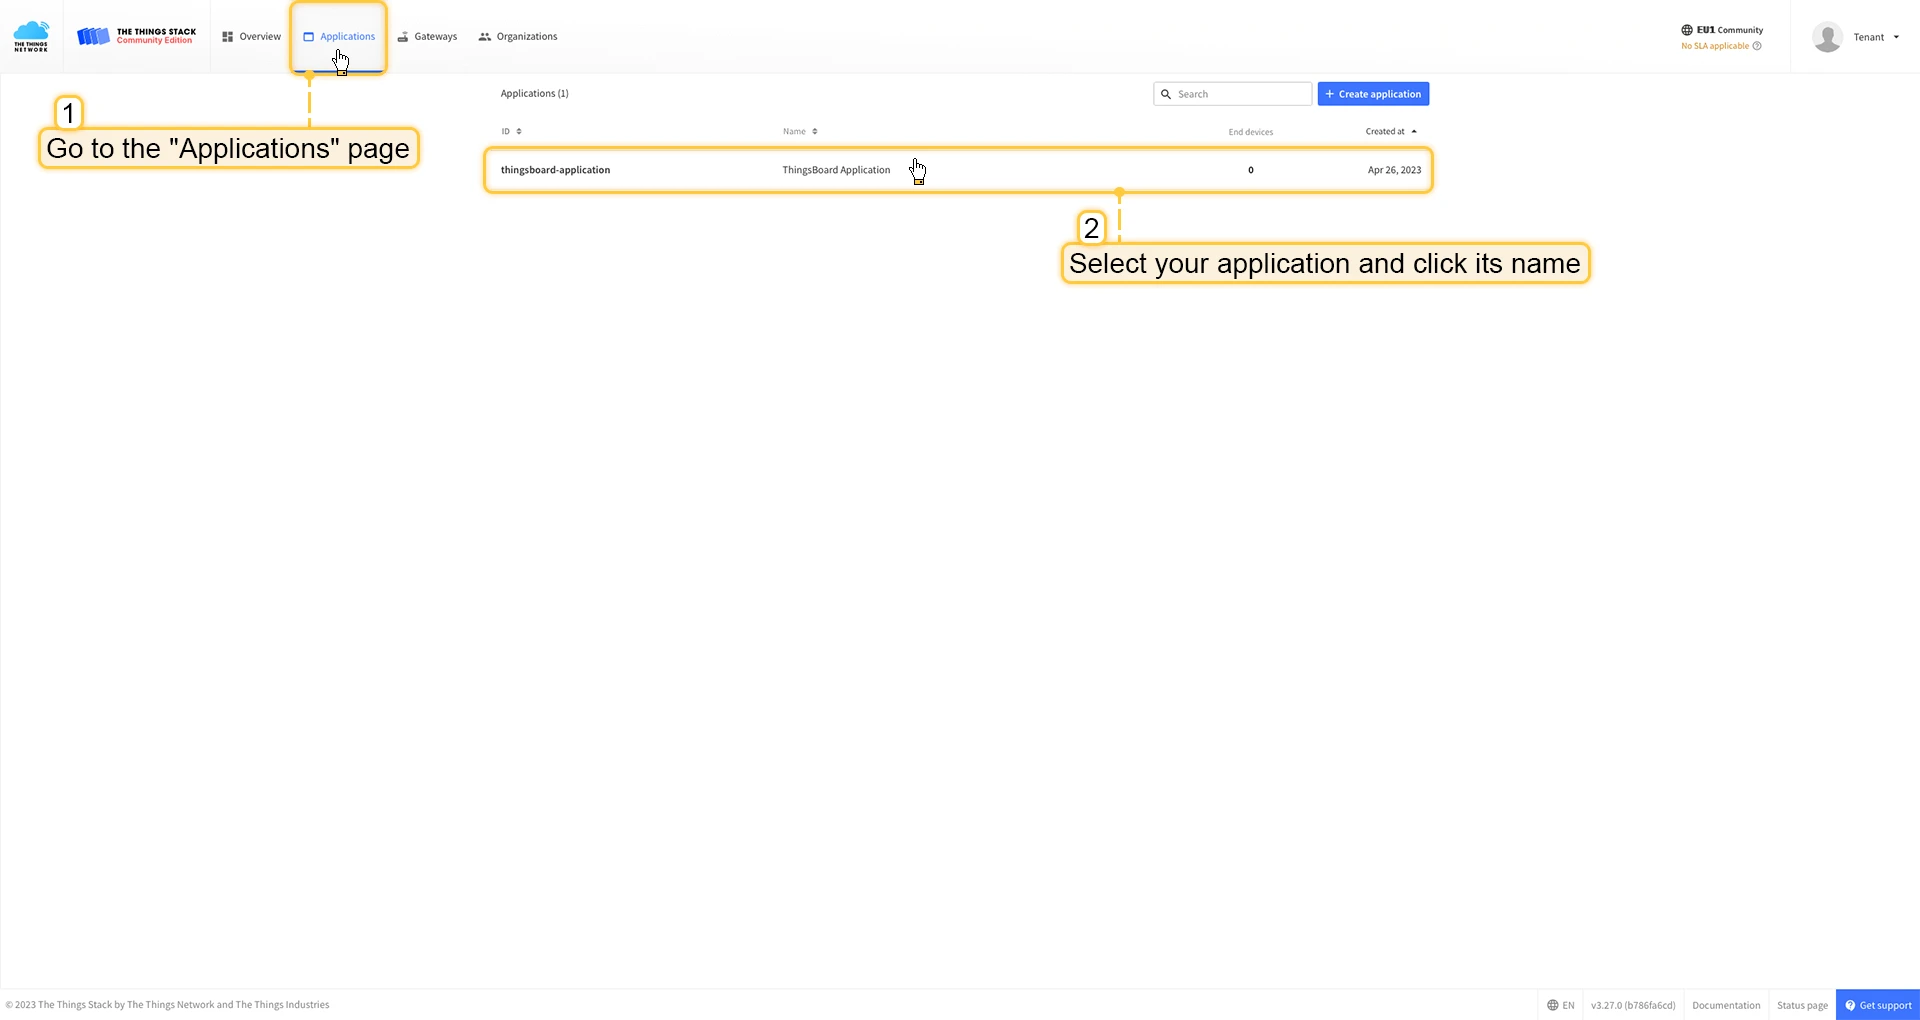
- Go to the Applications page. Then select your application and click on its name.
- Click on the Register end device button.
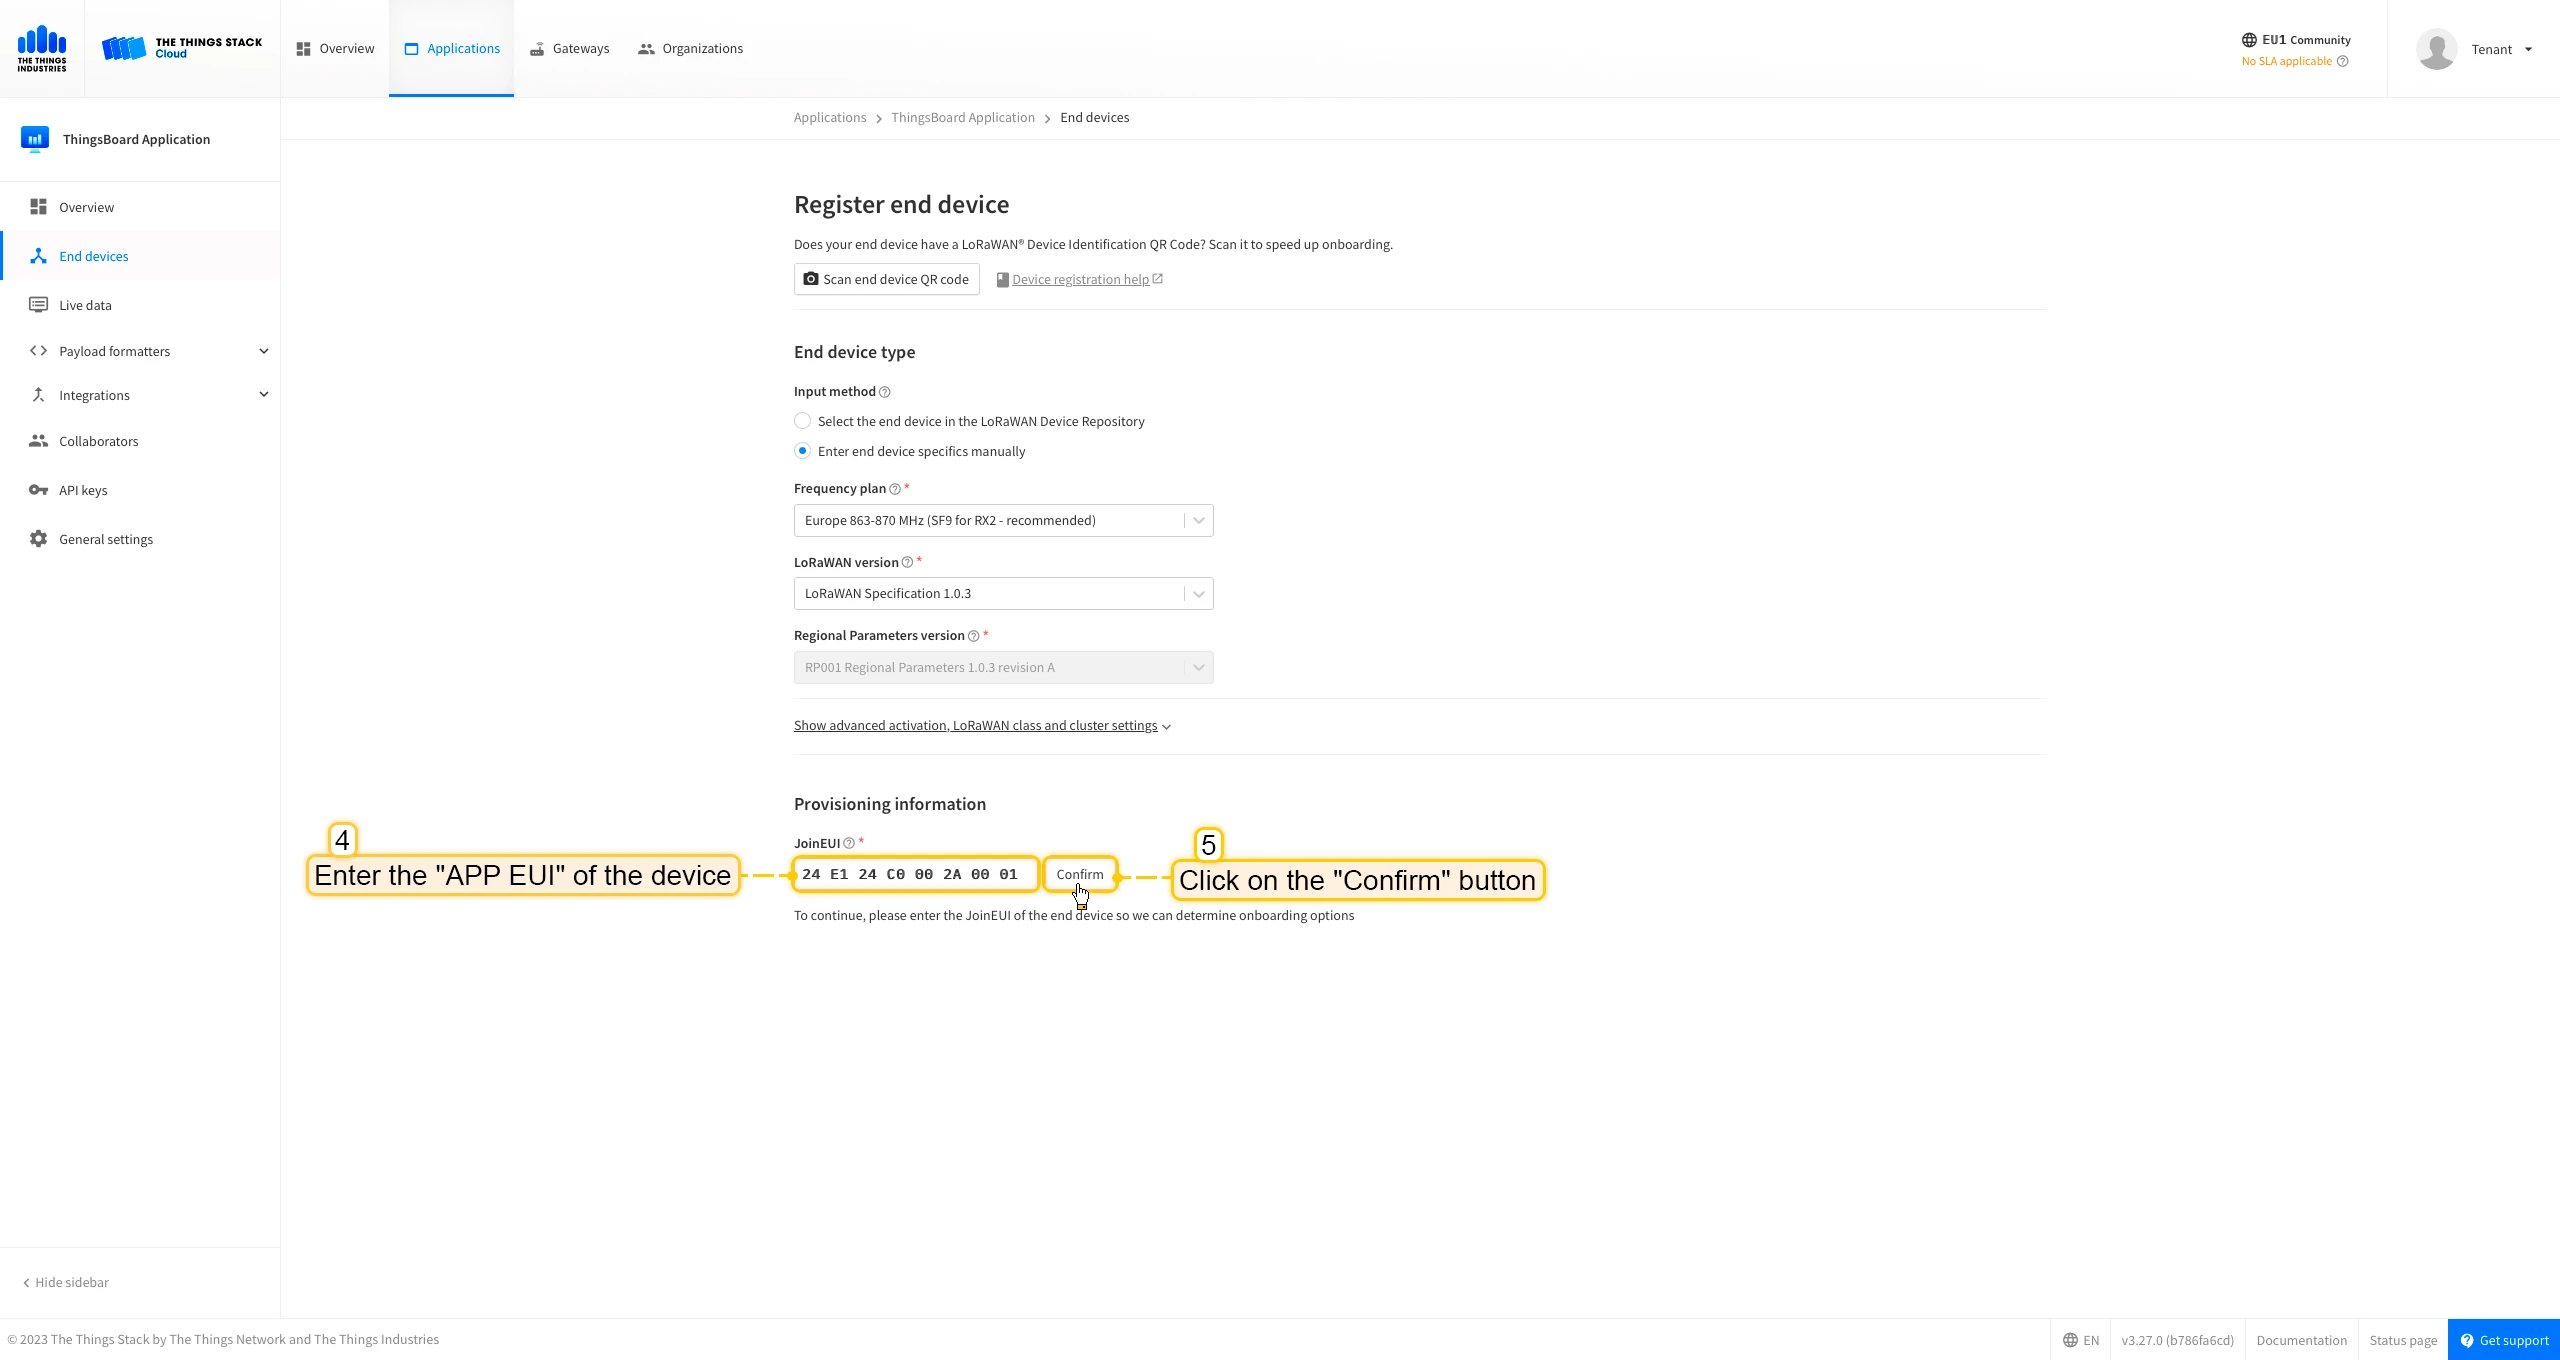
- Put the APP EUI value to the JoinEUI field. Press the Confirm button.
- Fill the rest parameters and press Register end device button.


Uplink converter in ThingsBoard integration
Such as we have already connected gateway and configured integration - we will need to modify the converter and add an ability to parse incoming payload from the device.
To do this you can add code to “Decoding block”, it locates between comments ”// --- Decoding code --- //” in your converter, if you are using the default converters (for ThingsBoard v3.5.2 or above).
if (input.length > 0) { for (var i = 0; i < input.length; ) { var channel_id = bytes[i++]; if (i < input.length) { var channel_type = bytes[i++]; // BATTERY if (channel_id === 0x01 && channel_type === 0x75) { output.telemetry.battery = bytes[i]; i += 1; } // PRESS STATE else if (channel_id === 0xff && channel_type === 0x2e) { switch (bytes[i]) { case 1: output.telemetry.press = "short"; break; case 2: output.telemetry.press = "long"; break; case 3: output.telemetry.press = "double"; break; } i += 1; } } } }Or you can copy the whole code of the converter and paste it to your converter:
var data = decodeToJson(payload);
var deviceName = data.end_device_ids.device_id;var deviceType = data.end_device_ids.application_ids.application_id;// var groupName = 'IAQ devices';// var customerName = 'Customer A';// use assetName and assetType instead of deviceName and deviceType// to automatically create assets instead of devices.// var assetName = 'Asset A';// var assetType = 'building';
// If you want to parse incoming data somehow, you can add your code to this function.// input: bytes// expected output://  {//    "attributes": {"attributeKey": "attributeValue"},//    "telemetry": {"telemetryKey": "telemetryValue"}//  }//// In the example - bytes will be saved as HEX string and also parsed as light level, battery level and PIR sensor value.//
function decodeFrmPayload(input) {    var output = {        attributes: {}, telemetry: {}    };    // --- Decoding code --- //
    output.telemetry.HEX_bytes = bytesToHex(input);
    if (input.length > 0) {        for (var i = 0; i < input.length; ) {            var channel_id = bytes[i++];            if (i < input.length) {                var channel_type = bytes[i++];                // BATTERY                if (channel_id === 0x01 && channel_type === 0x75) {                    output.telemetry.battery = bytes[i];                    i += 1;                }                // PRESS STATE                else if (channel_id === 0xff && channel_type === 0x2e) {                    switch (bytes[i]) {                        case 1:                            output.telemetry.press = "short";                            break;                        case 2:                            output.telemetry.press = "long";                            break;                        case 3:                            output.telemetry.press = "double";                            break;                    }                    i += 1;                }            }        }    }
    // --- Decoding code --- //    return output;}
// --- attributes and telemetry objects ---var telemetry = {};var attributes = {};// --- attributes and telemetry objects ---
// --- Timestamp parsingvar dateString = data.uplink_message.received_at;// If data is simulated or device doesn't send his own date string - we will use date from upcoming message, set by network serverif ((data.simulated != null && data.simulated) || dateString == null) {    dateString = data.received_at;}var timestamp = new Date(dateString).getTime();var timestamp = -1;if (dateString != null) {    timestamp = new Date(dateString).getTime();    if (timestamp == -1) {        var secondsSeparatorIndex = dateString.lastIndexOf('.') + 1;        var millisecondsEndIndex = dateString.lastIndexOf('+');        if (millisecondsEndIndex == -1) {            millisecondsEndIndex = dateString.lastIndexOf('Z');        }        if (millisecondsEndIndex == -1) {            millisecondsEndIndex = dateString.lastIndexOf('-');        }        if (millisecondsEndIndex == -1) {            if (dateString.length >= secondsSeparatorIndex + 3) {                dateString = dateString.substring(0, secondsSeparatorIndex + 3);            }        } else {            dateString = dateString.substring(0, secondsSeparatorIndex + 3) +                dateString.substring(millisecondsEndIndex, dateString.length);        }        timestamp = new Date(dateString).getTime();    }}// If we cannot parse timestamp - we will use the current timestampif (timestamp == -1) {    timestamp = Date.now();}// --- Timestamp parsing
// You can add some keys manually to attributes or telemetryattributes.devEui = data.end_device_ids.dev_eui;attributes.fPort = data.uplink_message.f_port;// We want to save correlation ids as single object, so we are excluding them from attributes parse and add manuallyattributes.correlation_ids = data.correlation_ids;
// You can exclude some keys from the resultvar excludeFromTelemetryList = ["uplink_token", "gateway_id", "settings", "f_port", "time", "timestamp", "received_at", "network_ids"];var excludeFromAttributesList = ["uplink_token", "gateway_id", "f_port", "time", "timestamp", "received_at", "session_key_id", "dev_eui"];
// Message parsing// To avoid paths in the decoded objects we passing false value to function as "pathInKey" argument.// Warning: pathInKey can cause already found fields to be overwritten with the last value found, e.g. receive_at from uplink_message will be written receive_at in the root.var telemetryData = toFlatMap(data.uplink_message, excludeFromTelemetryList, false);var attributesData = {};attributesData.putAll(toFlatMap(data.uplink_message.settings, excludeFromAttributesList, false));attributesData.putAll(toFlatMap(data.uplink_message.network_ids, excludeFromAttributesList, false));attributesData.putAll(toFlatMap(data.end_device_ids, excludeFromAttributesList, false));
// Passing incoming bytes to decodeFrmPayload function, to get custom decodingvar customDecoding = {};if (data.uplink_message.get("frm_payload") != null) {    customDecoding = decodeFrmPayload(base64ToBytes(data.uplink_message.frm_payload));}
// Collecting data to resultif (customDecoding.?telemetry.size() > 0) {    telemetry.putAll(customDecoding.telemetry);}
if (customDecoding.?attributes.size() > 0) {    attributes.putAll(customDecoding.attributes);}
telemetry.putAll(telemetryData);attributes.putAll(attributesData);
var result = {    deviceName: deviceName,    deviceType: deviceType,//  assetName: assetName,//  assetType: assetType,//  customerName: customerName//  groupName: groupName,    attributes: attributes,    telemetry: {        ts: timestamp,        values: telemetry    }};
return result;
Add a device on The Things Industries
We need to add a device on The Things Industries cloud.
To add a device, you can follow next steps:
- Login to the cloud and open your console.
- Go to the Applications page. Then select your application and click on its name.
- Click on the Register end device button.
- Put the APP EUI value to the JoinEUI field. Press the Confirm button.
- Fill the rest parameters and press Register end device button.


Uplink converter in ThingsBoard integration
Such as we have already connected gateway and configured integration - we will need to modify the converter and add an ability to parse incoming payload from the device.
To do this you can add code to “Decoding block”, it locates between comments ”// --- Decoding code --- //” in your converter, if you are using the default converters (for ThingsBoard v3.5.2 or above).
if (input.length > 0) { for (var i = 0; i < input.length; ) { var channel_id = bytes[i++]; if (i < input.length) { var channel_type = bytes[i++]; // BATTERY if (channel_id === 0x01 && channel_type === 0x75) { output.telemetry.battery = bytes[i]; i += 1; } // PRESS STATE else if (channel_id === 0xff && channel_type === 0x2e) { switch (bytes[i]) { case 1: output.telemetry.press = "short"; break; case 2: output.telemetry.press = "long"; break; case 3: output.telemetry.press = "double"; break; } i += 1; } } } }Or you can copy the whole code of the converter and paste it to your converter:
var data = decodeToJson(payload);
var deviceName = data.end_device_ids.device_id;var deviceType = data.end_device_ids.application_ids.application_id;// var groupName = 'IAQ devices';// var customerName = 'Customer A';// use assetName and assetType instead of deviceName and deviceType// to automatically create assets instead of devices.// var assetName = 'Asset A';// var assetType = 'building';
// If you want to parse incoming data somehow, you can add your code to this function.// input: bytes// expected output://  {//    "attributes": {"attributeKey": "attributeValue"},//    "telemetry": {"telemetryKey": "telemetryValue"}//  }//// In the example - bytes will be saved as HEX string and also parsed as light level, battery level and PIR sensor value.//
function decodeFrmPayload(input) {    var output = { attributes:{}, telemetry: {}};    // --- Decoding code --- //
    output.telemetry.HEX_bytes = bytesToHex(input);
    if (input.length > 0) {        for (var i = 0; i < input.length; ) {            var channel_id = bytes[i++];            if (i < input.length) {                var channel_type = bytes[i++];                // BATTERY                if (channel_id === 0x01 && channel_type === 0x75) {                    output.telemetry.battery = bytes[i];                    i += 1;                }                // PRESS STATE                else if (channel_id === 0xff && channel_type === 0x2e) {                    switch (bytes[i]) {                        case 1:                            output.telemetry.press = "short";                            break;                        case 2:                            output.telemetry.press = "long";                            break;                        case 3:                            output.telemetry.press = "double";                            break;                    }                    i += 1;                }            }        }    }
    // --- Decoding code --- //    return output;}
// --- attributes and telemetry objects ---var telemetry = {};var attributes = {};// --- attributes and telemetry objects ---
// --- Timestamp parsingvar dateString = data.uplink_message.received_at;// If data is simulated or device doesn't send his own date string - we will use date from upcoming message, set by network serverif ((data.simulated != null && data.simulated) || dateString == null) {    dateString = data.received_at;}var timestamp = -1;if (dateString != null) {    timestamp = new Date(dateString).getTime();    if (timestamp == -1) {        var secondsSeparatorIndex = dateString.lastIndexOf('.') + 1;        var millisecondsEndIndex = dateString.lastIndexOf('+');        if (millisecondsEndIndex == -1) {            millisecondsEndIndex = dateString.lastIndexOf('Z');        }        if (millisecondsEndIndex == -1) {            millisecondsEndIndex = dateString.lastIndexOf('-');        }        if (millisecondsEndIndex == -1) {            if (dateString.length >= secondsSeparatorIndex + 3) {                dateString = dateString.substring(0, secondsSeparatorIndex + 3);            }        } else {            dateString = dateString.substring(0, secondsSeparatorIndex + 3) +                dateString.substring(millisecondsEndIndex, dateString.length);        }        timestamp = new Date(dateString).getTime();    }}// If we cannot parse timestamp - we will use the current timestampif (timestamp == -1) {    timestamp = Date.now();}// --- Timestamp parsing
// You can add some keys manually to attributes or telemetryattributes.devEui = data.end_device_ids.dev_eui;attributes.fPort = data.uplink_message.f_port;// We want to save correlation ids as single object, so we are excluding them from attributes parse and add manuallyattributes.correlation_ids = data.correlation_ids;
// You can exclude some keys from the resultvar excludeFromTelemetryList = ["uplink_token", "gateway_id", "settings", "f_port", "time", "timestamp", "received_at", "network_ids"];var excludeFromAttributesList = ["uplink_token", "gateway_id", "f_port", "time", "timestamp", "received_at", "session_key_id", "dev_eui"];
// Message parsing// To avoid paths in the decoded objects we passing false value to function as "pathInKey" argument.// Warning: pathInKey can cause already found fields to be overwritten with the last value found, e.g. receive_at from uplink_message will be written receive_at in the root.var telemetryData = toFlatMap(data.uplink_message, excludeFromTelemetryList, false);var attributesData = {};attributesData.putAll(toFlatMap(data.uplink_message.settings, excludeFromAttributesList, false));attributesData.putAll(toFlatMap(data.uplink_message.network_ids, excludeFromAttributesList, false));attributesData.putAll(toFlatMap(data.end_device_ids, excludeFromAttributesList, false));
// Passing incoming bytes to decodeFrmPayload function, to get custom decodingvar customDecoding = {};if (data.uplink_message.get("frm_payload") != null) {    customDecoding = decodeFrmPayload(base64ToBytes(data.uplink_message.frm_payload));}
// Collecting data to resultif (customDecoding.?telemetry.size() > 0) {    telemetry.putAll(customDecoding.telemetry);}
if (customDecoding.?attributes.size() > 0) {    attributes.putAll(customDecoding.attributes);}
telemetry.putAll(telemetryData);attributes.putAll(attributesData);
var result = {    deviceName: deviceName,    deviceType: deviceType,//  assetName: assetName,//  assetType: assetType,//  customerName: customerName,//  groupName: groupName,    attributes: attributes,    telemetry: {        ts: timestamp,        values: telemetry    }};
return result;
Add a device on the Loriot
We need to add a device on the Loriot.
To add a device, you can follow next steps:
- Login to Loriot server. We use eu2.loriot.io, but it depends on chosen region during registration.
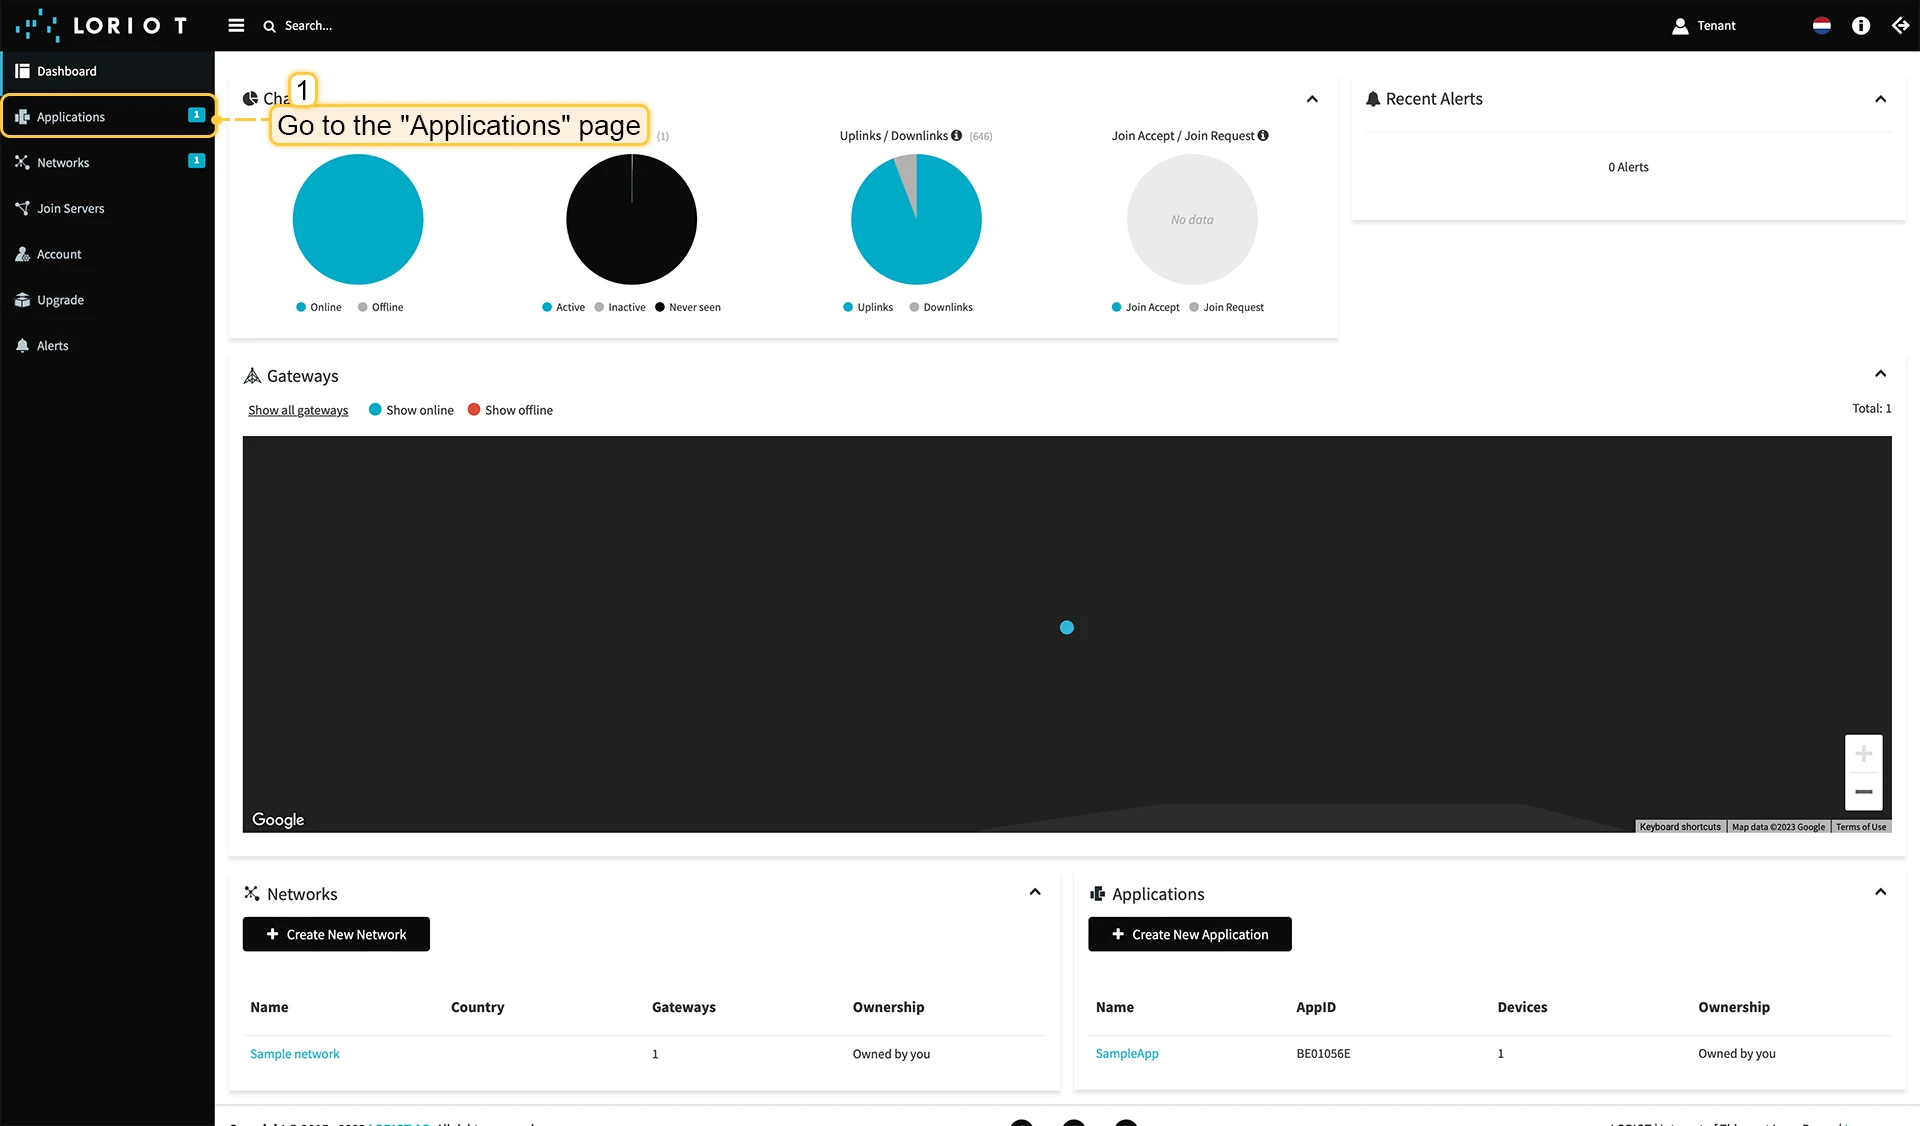
- Go to the “Applications” page in left menu.
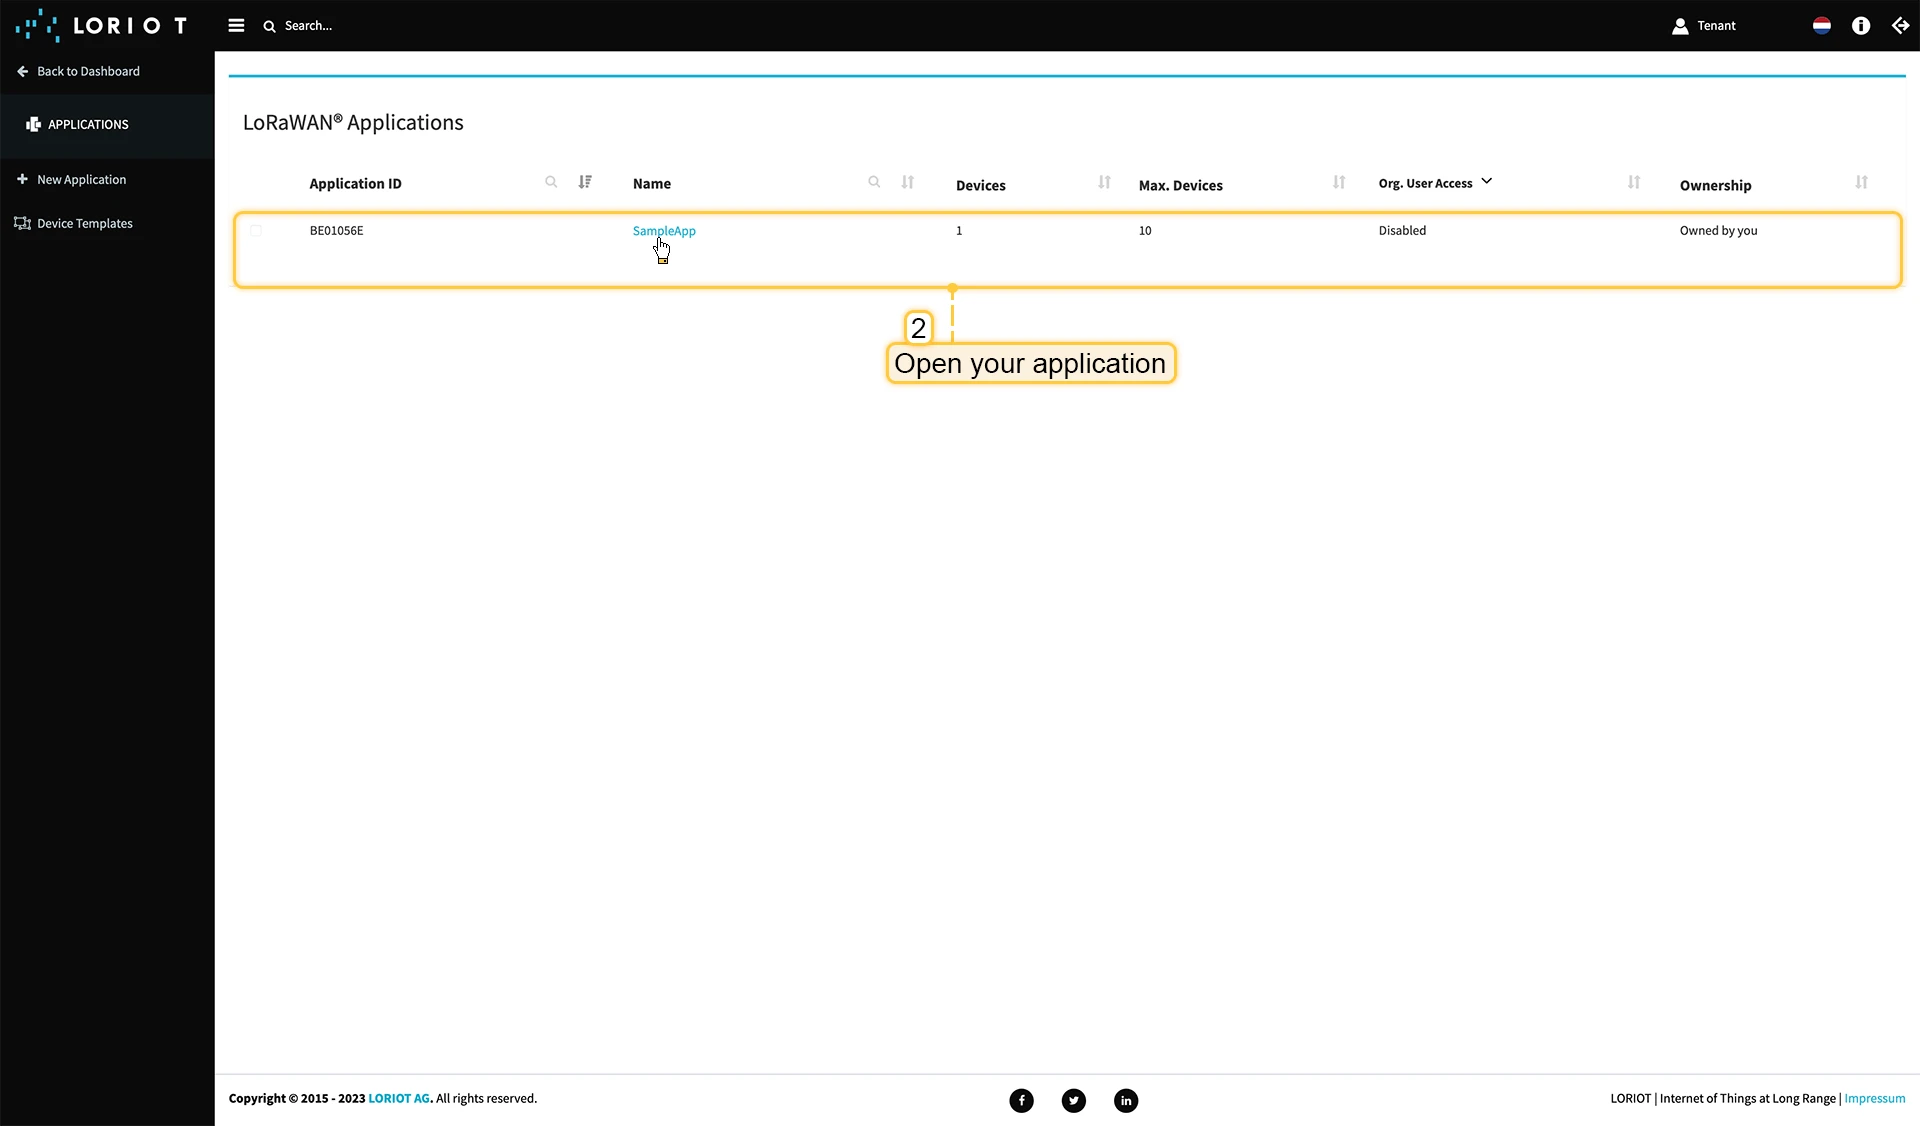
- Open your application, in our case it is “SampleApp”.
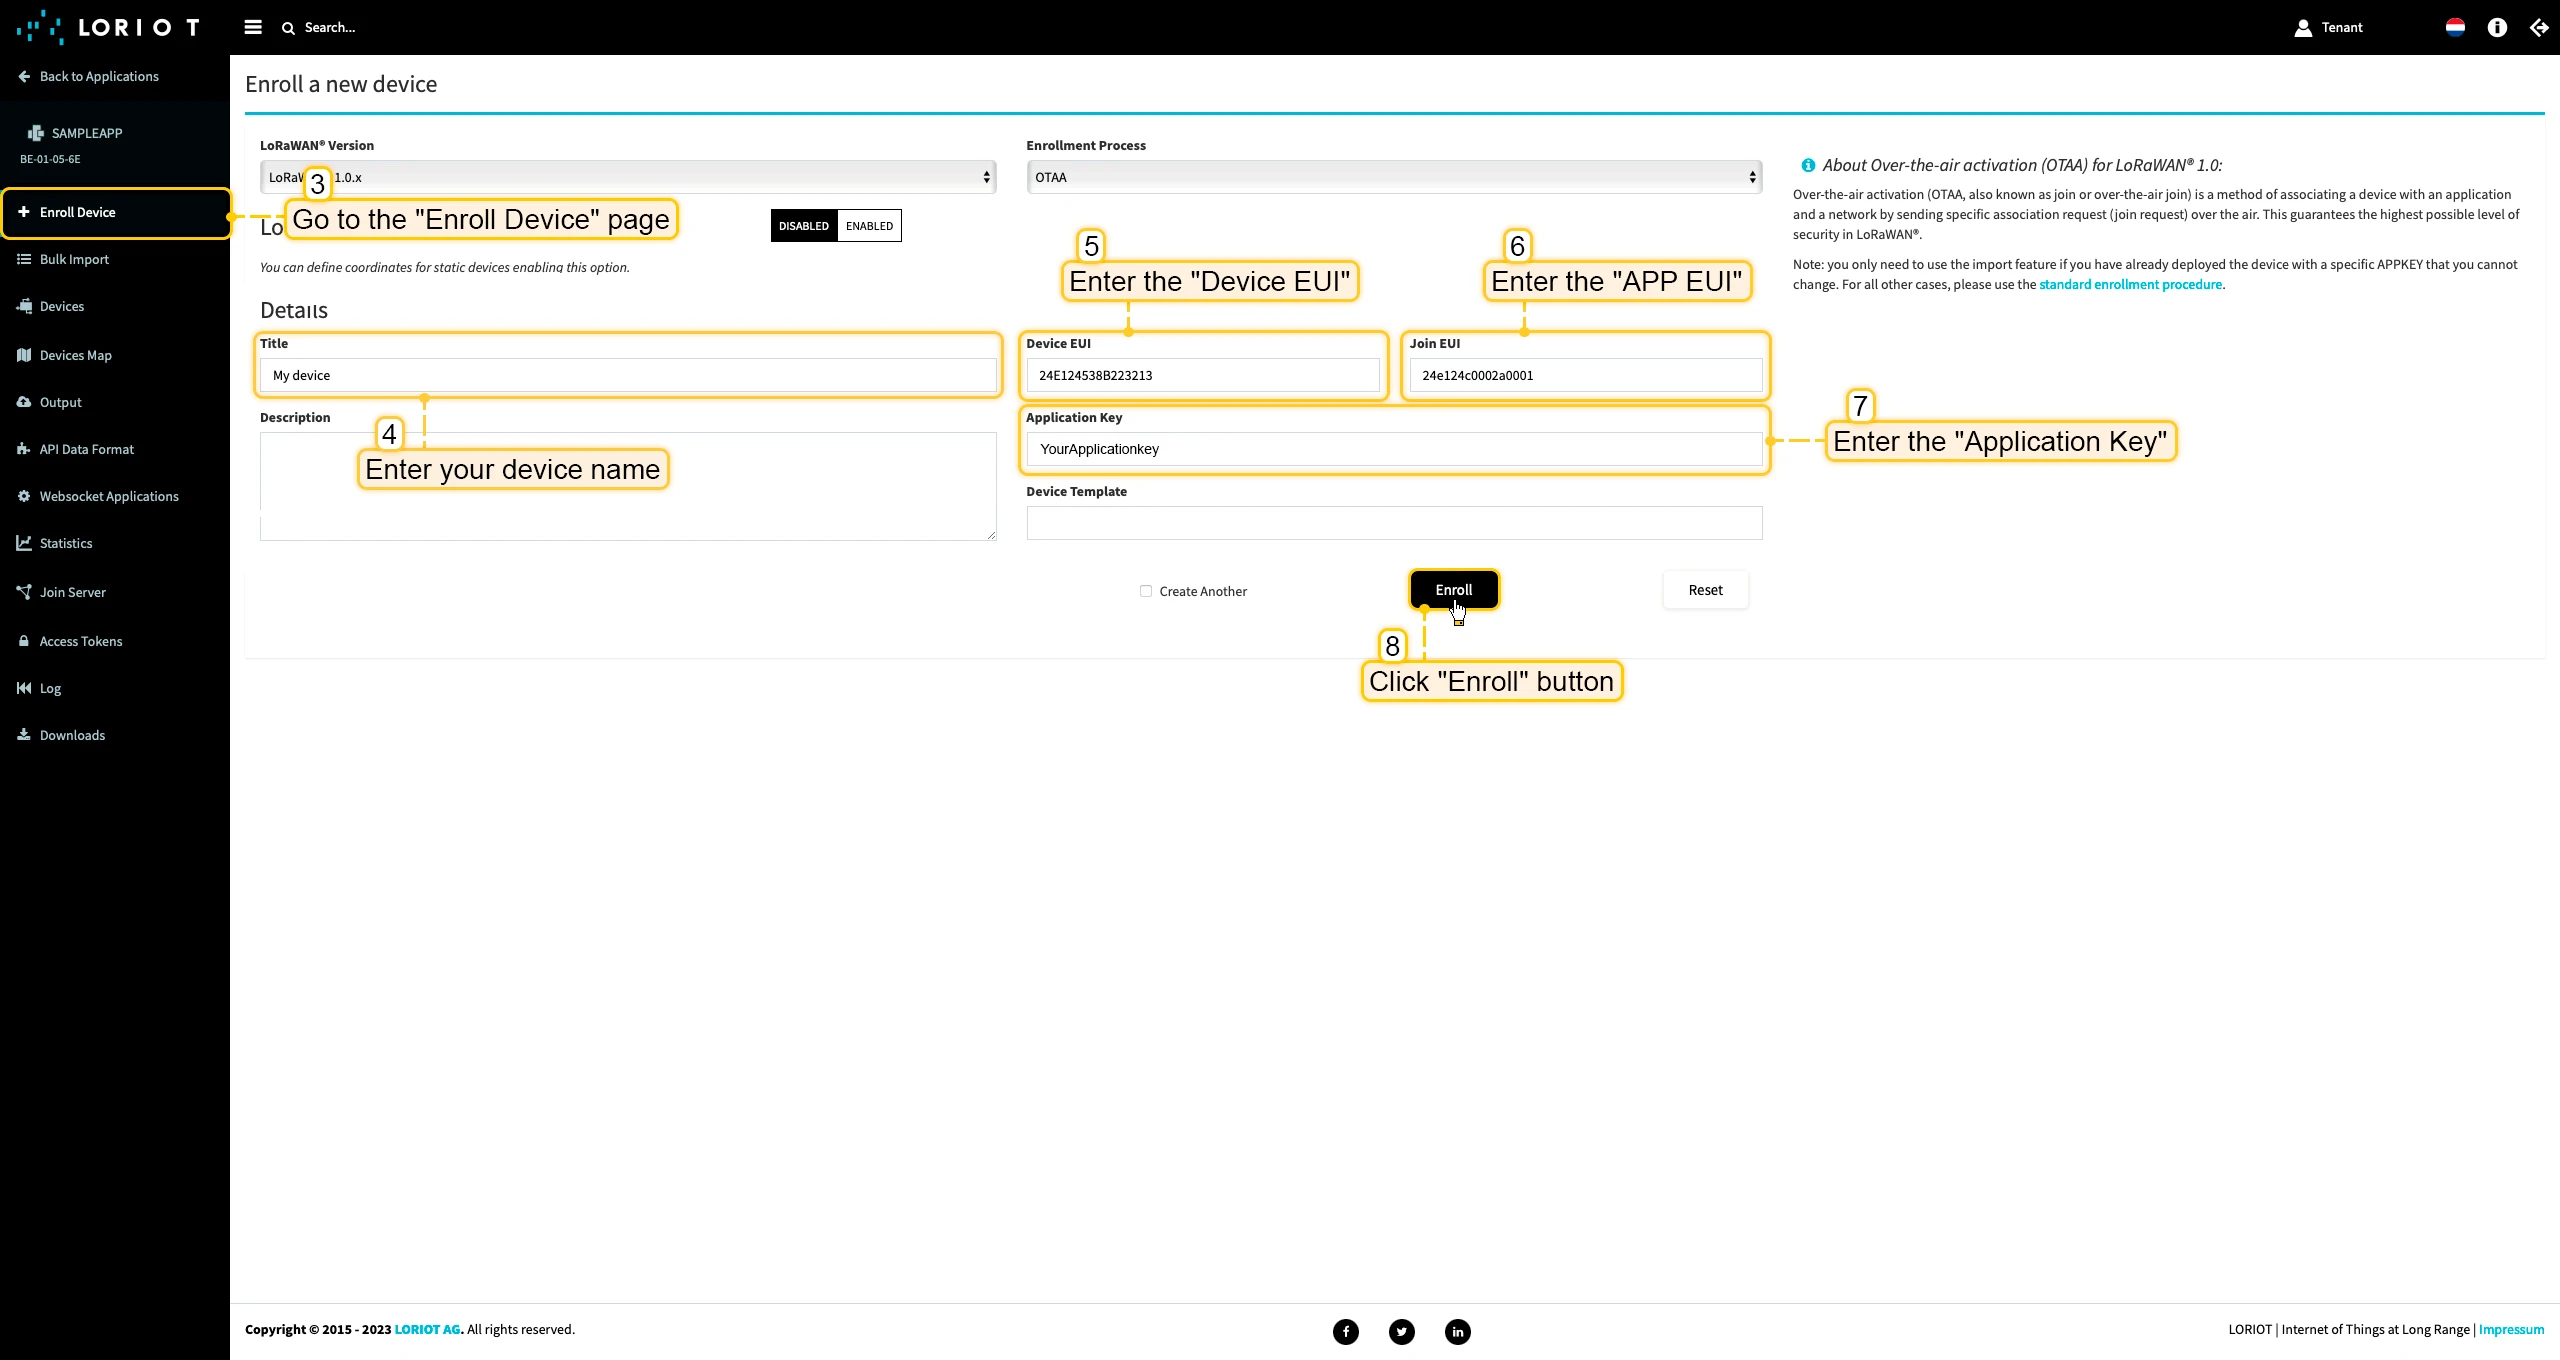
- Go to the “Enroll Device” page. Fill in the fields, with a configuration from your device. Then click the “Enroll” button.

Uplink converter in ThingsBoard integration
Such as we have already connected gateway and configured integration - we will need to modify the converter and add an ability to parse incoming payload from the device.
To do this you can add code to “Decoding block”, it locates between comments ”// --- Decoding code --- //” in your converter, if you are using the default converters (for ThingsBoard v3.5.2 or above).
if (input.length > 0) { for (var i = 0; i < input.length; ) { var channel_id = bytes[i++]; if (i < input.length) { var channel_type = bytes[i++]; // BATTERY if (channel_id === 0x01 && channel_type === 0x75) { output.telemetry.battery = bytes[i]; i += 1; } // PRESS STATE else if (channel_id === 0xff && channel_type === 0x2e) { switch (bytes[i]) { case 1: output.telemetry.press = "short"; break; case 2: output.telemetry.press = "long"; break; case 3: output.telemetry.press = "double"; break; } i += 1; } } } }Or you can copy the whole code of the converter and paste it to your converter:
var data = decodeToJson(payload);var deviceName = data.EUI;var deviceType = "LoraDevices";// groupName = 'IAQ devices';// var customerName = 'Customer A';// use assetName and assetType instead of deviceName and deviceType// to automatically create assets instead of devices.// var assetName = 'Asset A';// var assetType = 'building';var gatewayDeviceType = "LoraGateway";
// If you want to parse incoming data somehow, you can add your code to this function.// input: bytes// expected output://  {//    "attributes": {"attributeKey": "attributeValue"},//    "telemetry": {"telemetryKey": "telemetryValue"}//  }//// In the example - bytes will be saved as HEX string and also parsed as light level, battery level and PIR sensor value.//
function decodePayload(input) {    var output = { attributes:{}, telemetry: {} };    // --- Decoding code --- //
    output.telemetry.HEX_bytes = bytesToHex(input);
    if (input.length > 0) {        for (var i = 0; i < input.length; ) {            var channel_id = bytes[i++];            if (i < input.length) {                var channel_type = bytes[i++];                // BATTERY                if (channel_id === 0x01 && channel_type === 0x75) {                    output.telemetry.battery = bytes[i];                    i += 1;                }                // PRESS STATE                else if (channel_id === 0xff && channel_type === 0x2e) {                    switch (bytes[i]) {                        case 1:                            output.telemetry.press = "short";                            break;                        case 2:                            output.telemetry.press = "long";                            break;                        case 3:                            output.telemetry.press = "double";                            break;                    }                    i += 1;                }            }        }    }
    // --- Decoding code --- //    return output;}
// --- attributes and telemetry objects ---var telemetry = {};var attributes = {};// --- attributes and telemetry objects ---
// --- Timestamp parsingvar timestamp = data.ts;// If we cannot parse timestamp - we will use the current timestampif (timestamp == -1) {    timestamp = Date.now();}// --- Timestamp parsing
// You can add some keys manually to attributes or telemetryattributes.fPort = data.port;attributes.dataRange = data.dr;
// You can exclude some keys from the resultvar excludeFromAttributesList = ["data", "gws", "EUI", "ts", "cmd", "port", "seqno", "fcnt", "toa", "dr", "ack", "bat", "snr", "rssi"];var excludeFromTelemetryList = ["gws", "EUI", "ts", "freq", "port", "data", "cmd", "dr", "offline"];
// Message parsing// To avoid paths in the decoded objects we passing false value to function as "pathInKey" argument.// Warning: pathInKey can cause already found fields to be overwritten with the last value found.
var telemetryData = toFlatMap(data, excludeFromTelemetryList, false);var attributesData = toFlatMap(data, excludeFromAttributesList, false);
var uplinkDataList = [];
// Passing incoming bytes to decodePayload function, to get custom decodingvar customDecoding = decodePayload(hexToBytes(data.data));
// Collecting data to resultif (customDecoding.?telemetry.size() > 0) {    telemetry.putAll(customDecoding.telemetry);}
if (customDecoding.?attributes.size() > 0) {    attributes.putAll(customDecoding.attributes);}
telemetry.putAll(telemetryData);attributes.putAll(attributesData);
var deviceInfo = {    deviceName: deviceName,    deviceType: deviceType,//  assetName: assetName,//  assetType: assetType,//  customerName: customerName,//  groupName: groupName,    attributes: attributes,    telemetry: {        ts: timestamp,        values: telemetry    }};
uplinkDataList.add(deviceInfo);
if (data.cmd == "gw") {    foreach( gatewayInfo : data.gws ) {        var gatewayInfoMsg = {            deviceName: gatewayInfo.gweui,            deviceType: gatewayDeviceType,            attributes: {},            telemetry: {                "ts": gatewayInfo.ts,                "values": toFlatMap(gatewayInfo, ["ts", "time", "gweui"], false)            }        };        uplinkDataList.add(gatewayInfoMsg);    }}
return uplinkDataList;
Check data on ThingsBoard
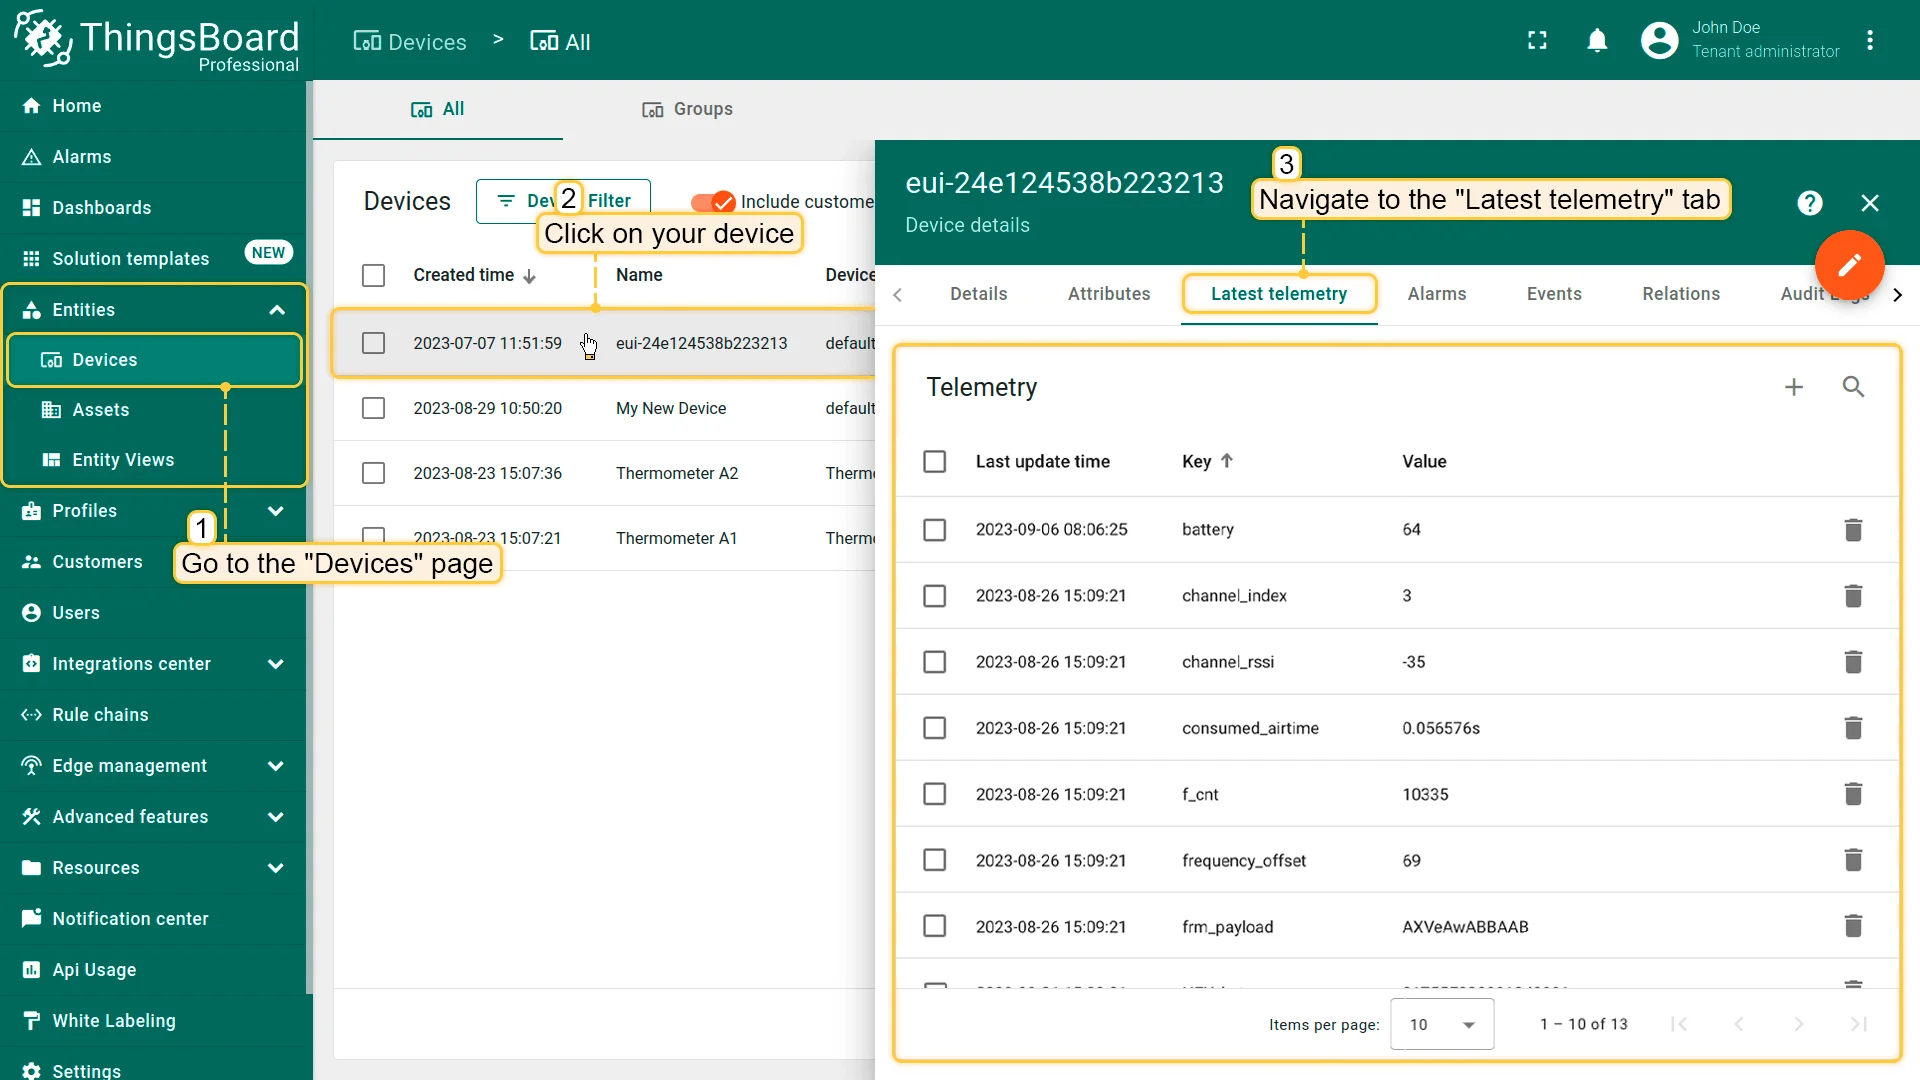
So, the device was added and if it sends any data - it should appear in Devices. To check it you may open Devices page in Entities section. The device should be in devices list. You can check the data by click on it and open tab Attributes or Latest telemetry.
In order to get more user-friendly view - you can use dashboards. You can download a simple dashboard for this device, it is configured to display a data from “press” and “battery” telemetry keys for device with name “eui-24e124538b223213”.
ThingsBoard provides the ability to create and customize interactive visualizations (dashboards) for monitoring and managing data and devices. Through ThingsBoard dashboards, you can efficiently manage and monitor your IoT devices and data. So, we will create the dashboard, for our device.
To add the dashboard to ThingsBoard, we need to import it. To import a dashboard, follow these steps:
- First download the Check and control device data dashboard file.
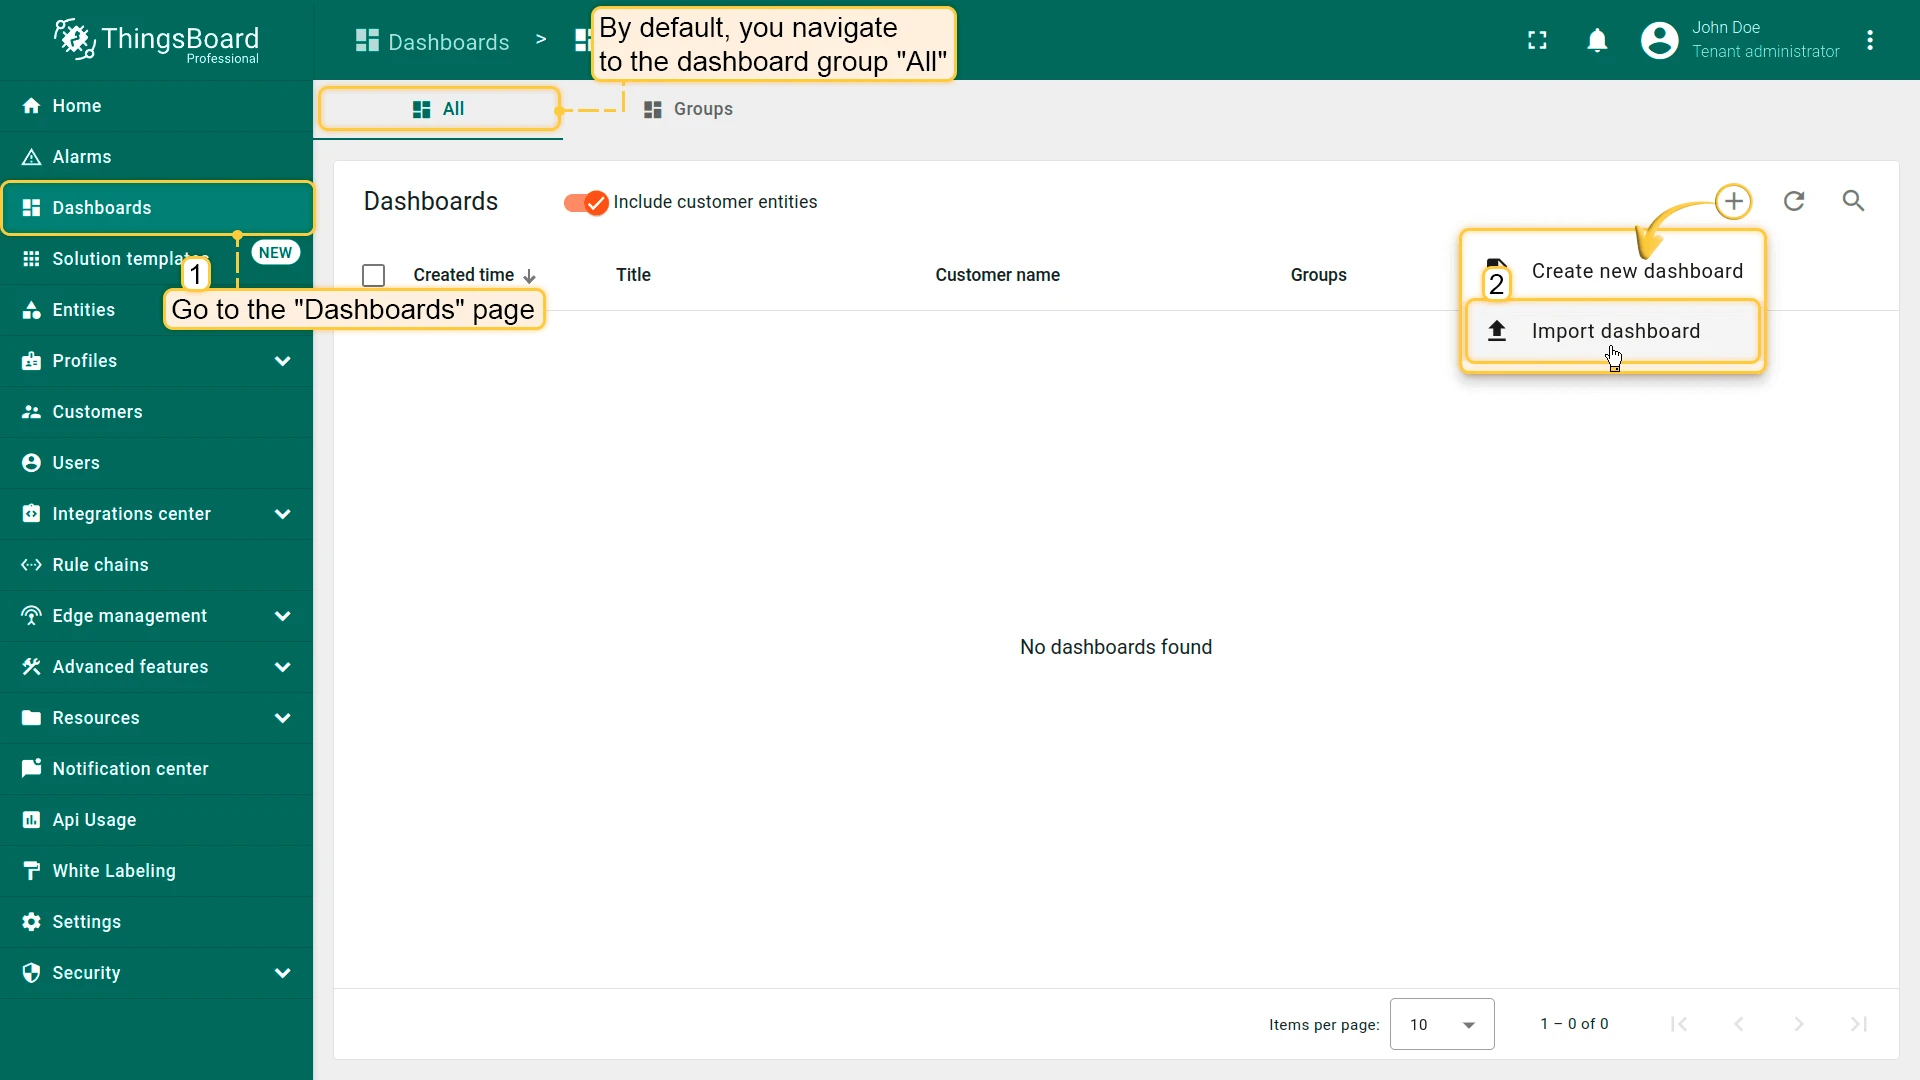
- Navigate to the “Dashboards” page. By default, you navigate to the dashboard group “All”. Click on the ”+” icon in the top right corner. Select “Import dashboard”.
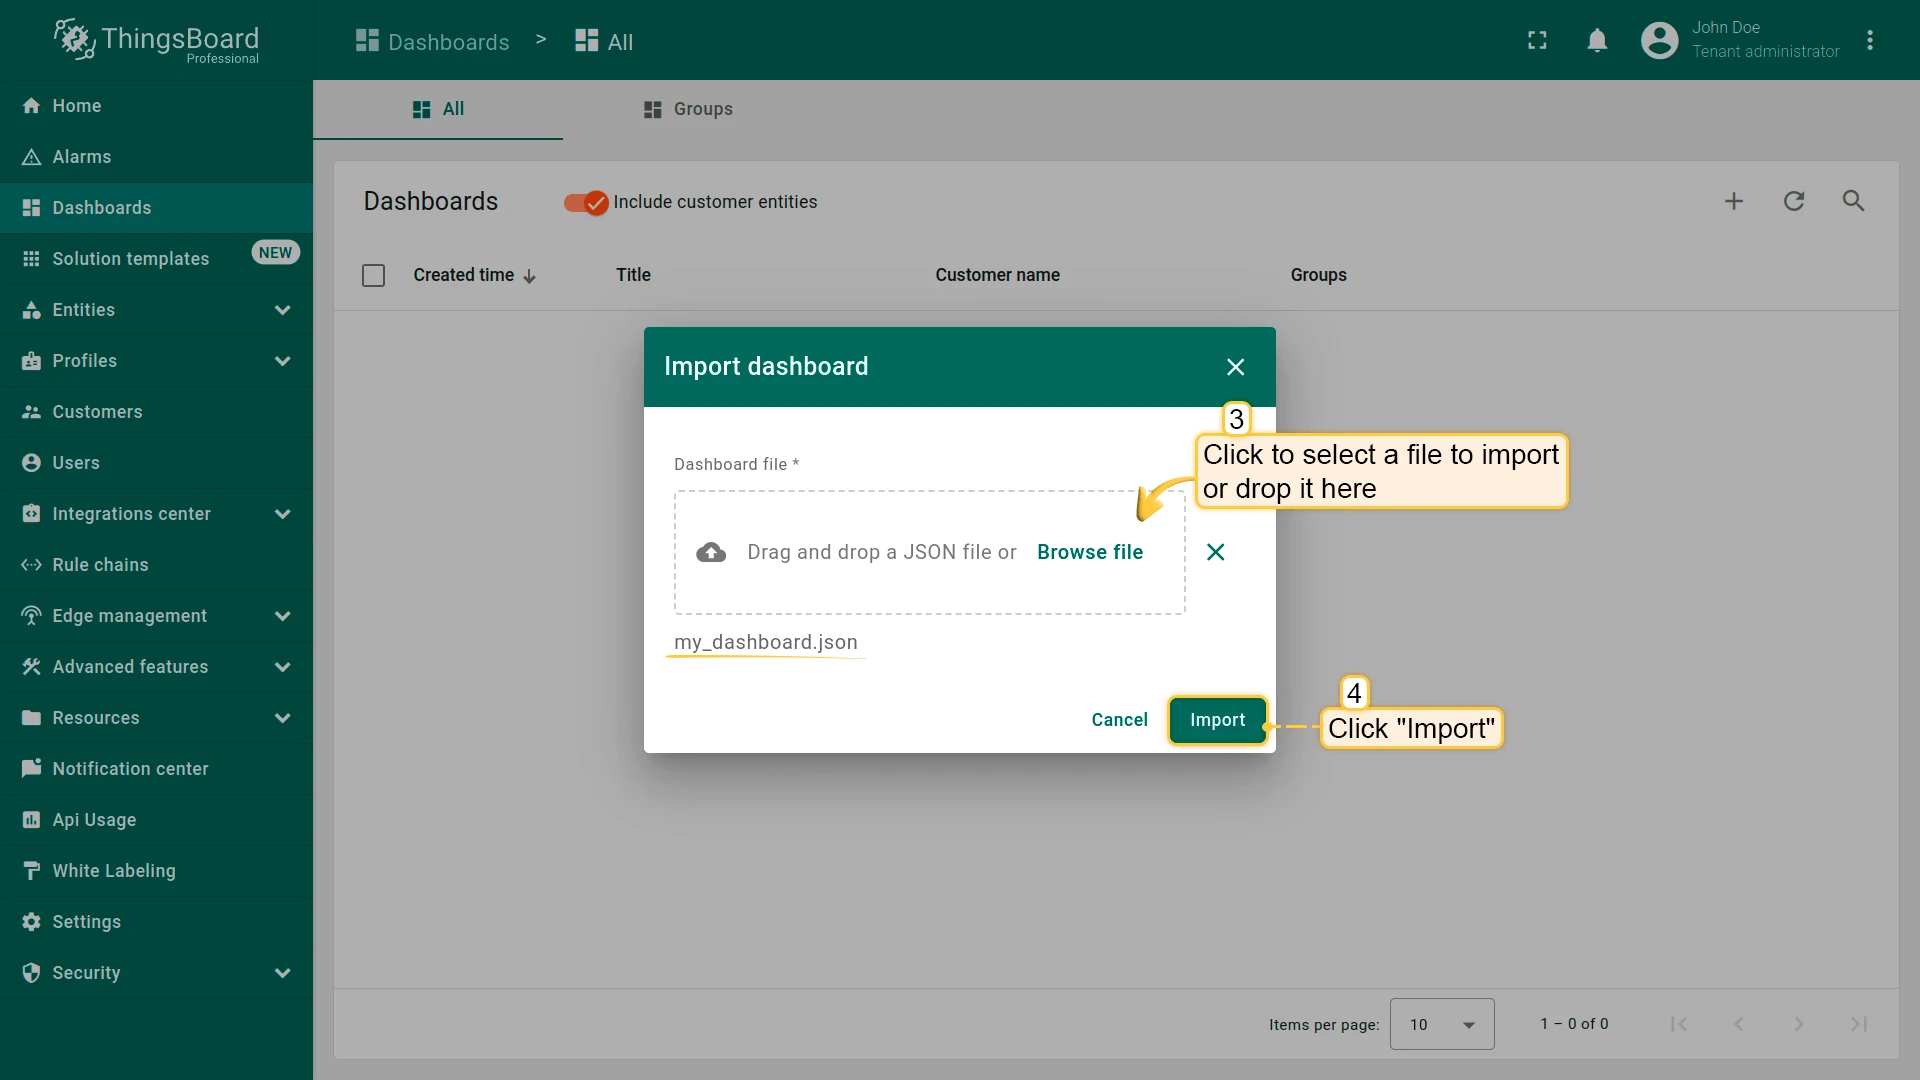
- In the dashboard import window, upload the JSON file and click “Import” button.
- Dashboard has been imported.
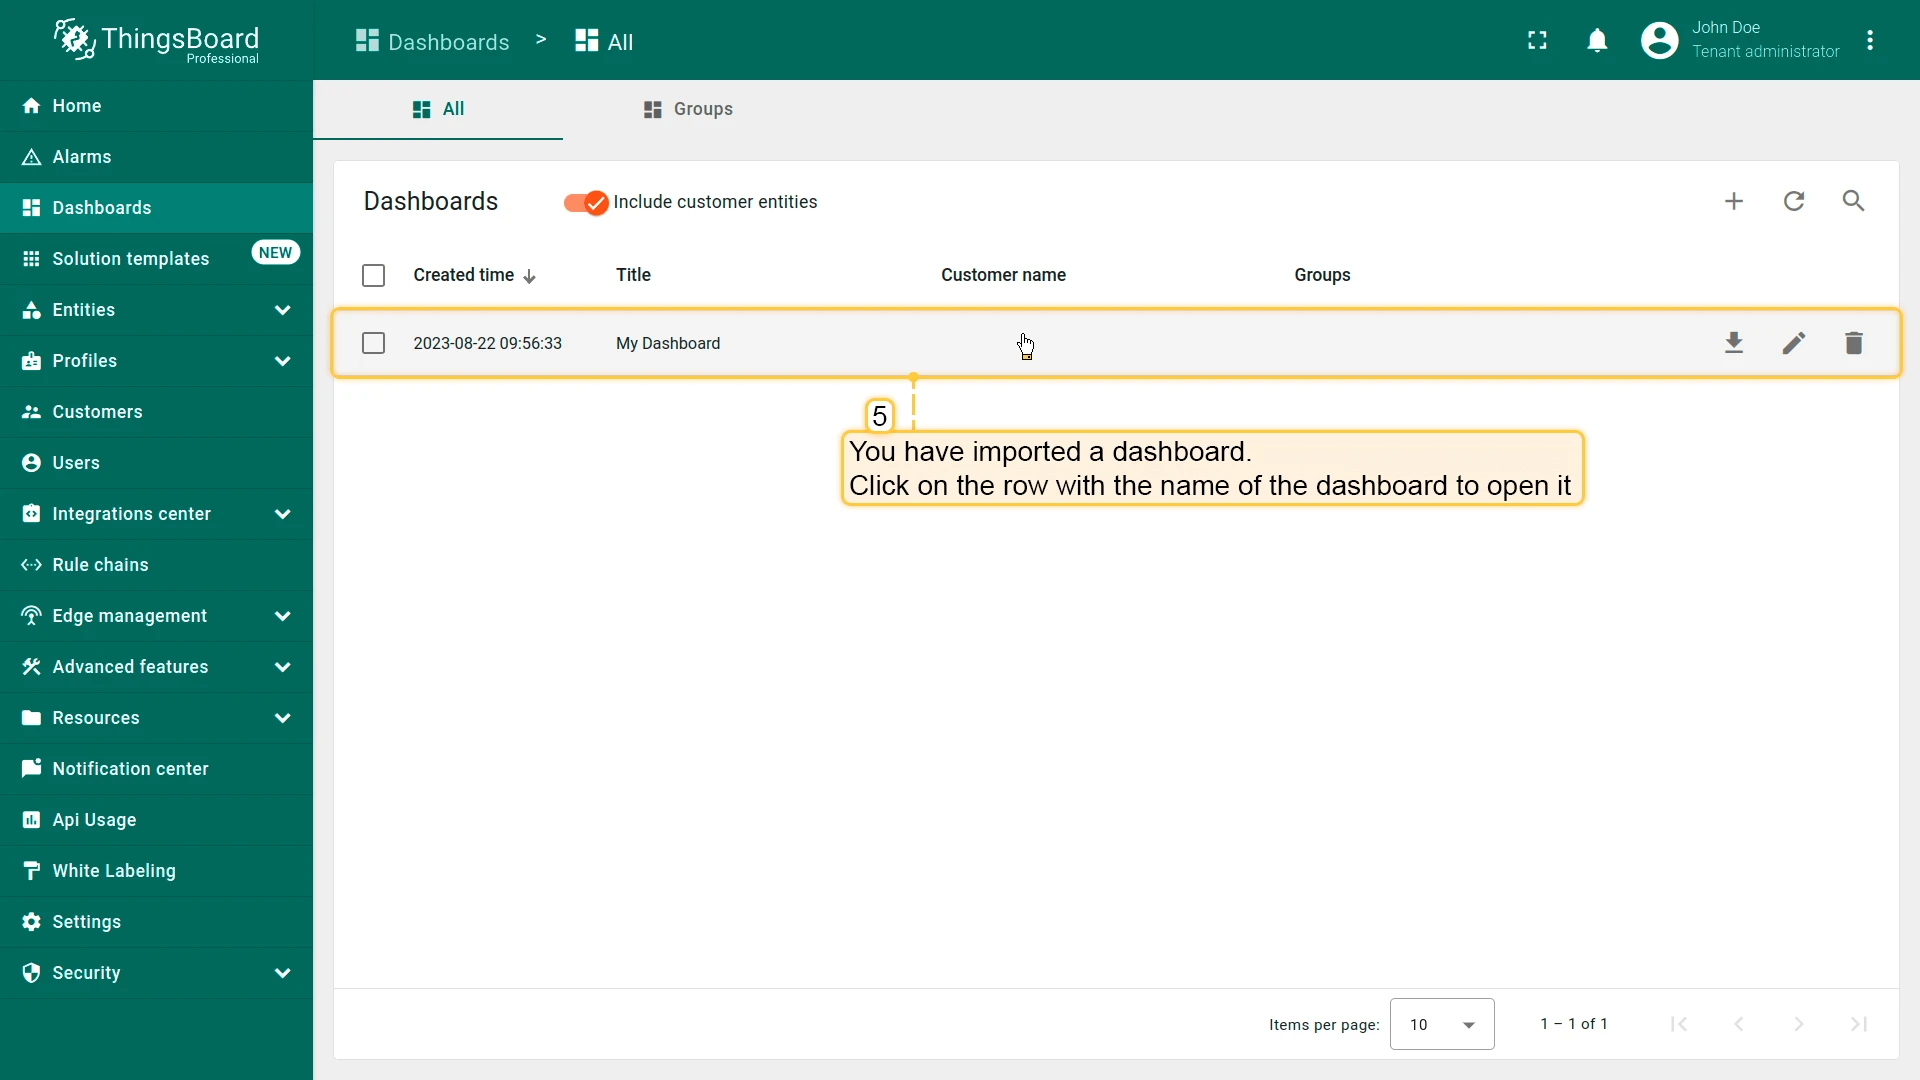
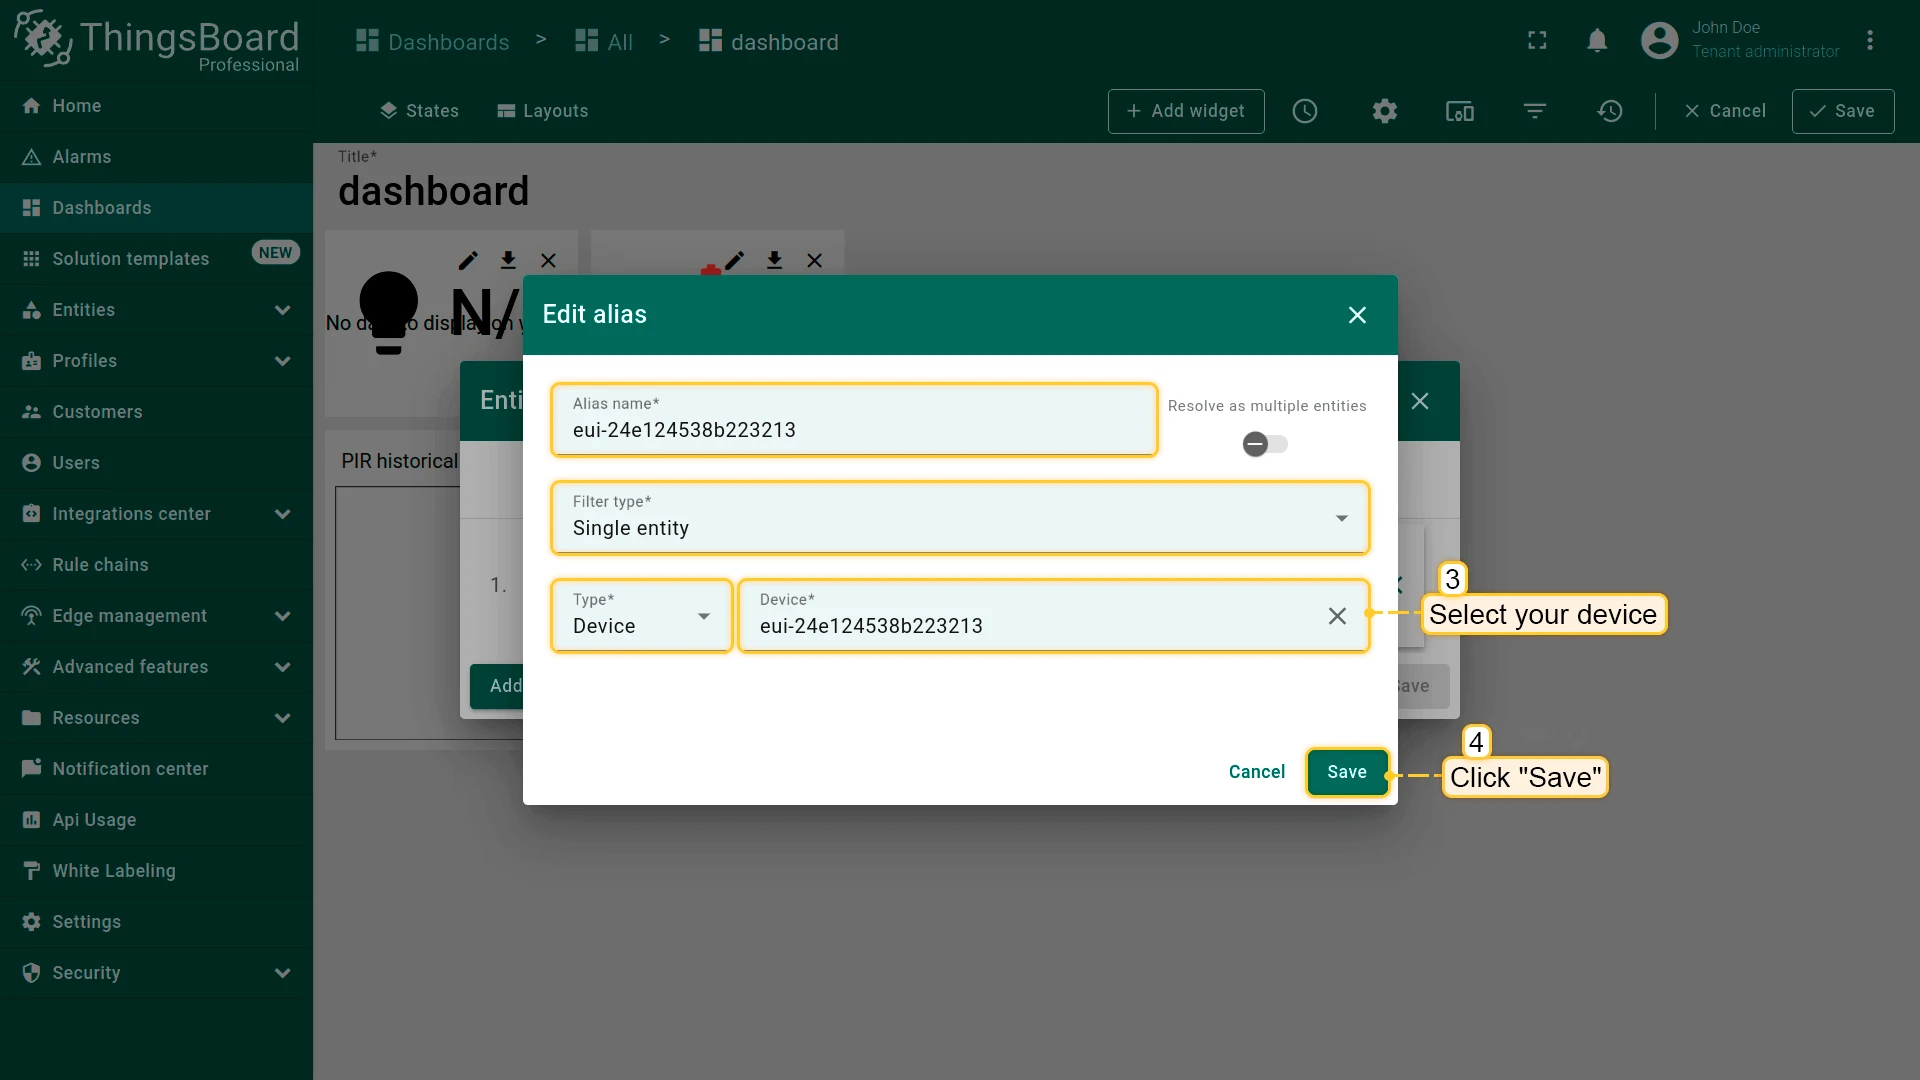
To open the imported dashboard, click on it. Then you should specify your device in entity alias of the dashboard.
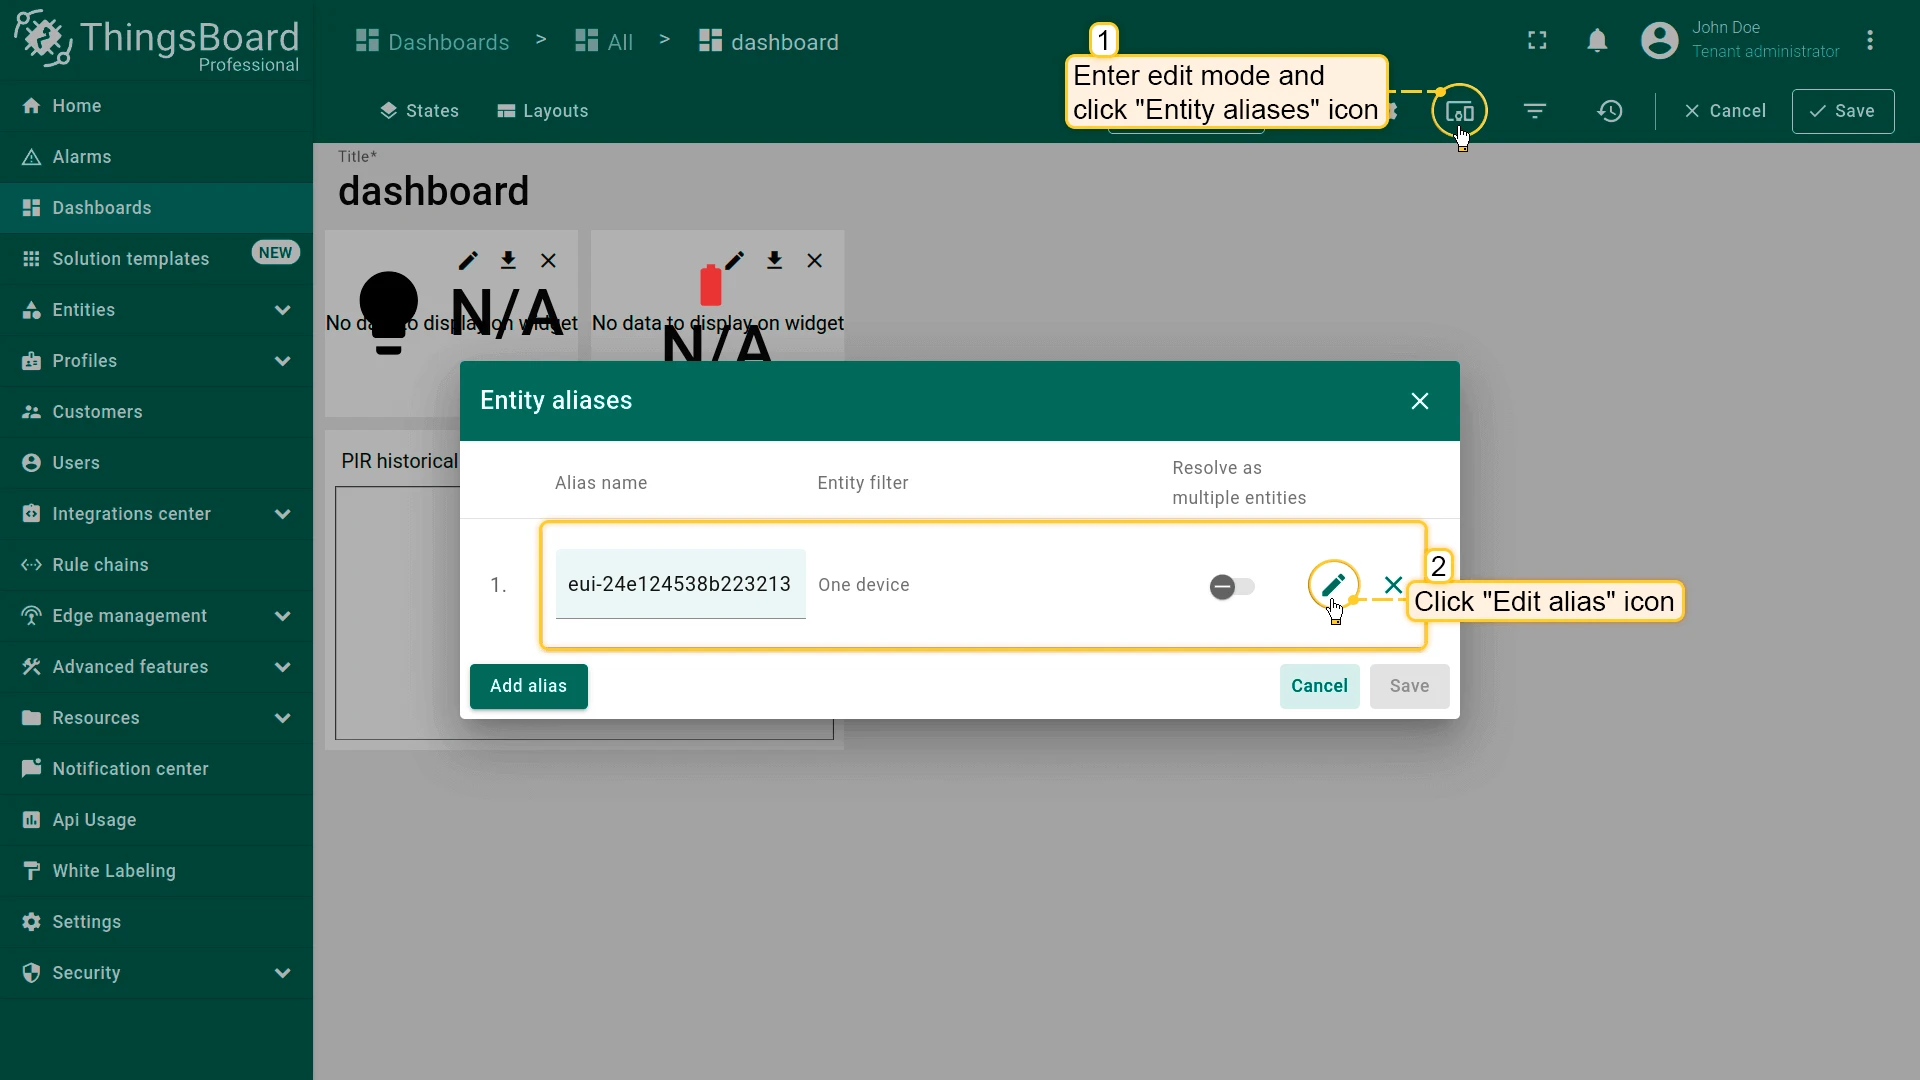
To do this, follow these steps:
- Open the dashboard and enter edit mode. Click the “Entity aliases” icon, then in the pop-up window click the “Edit alias” icon next to the alias.
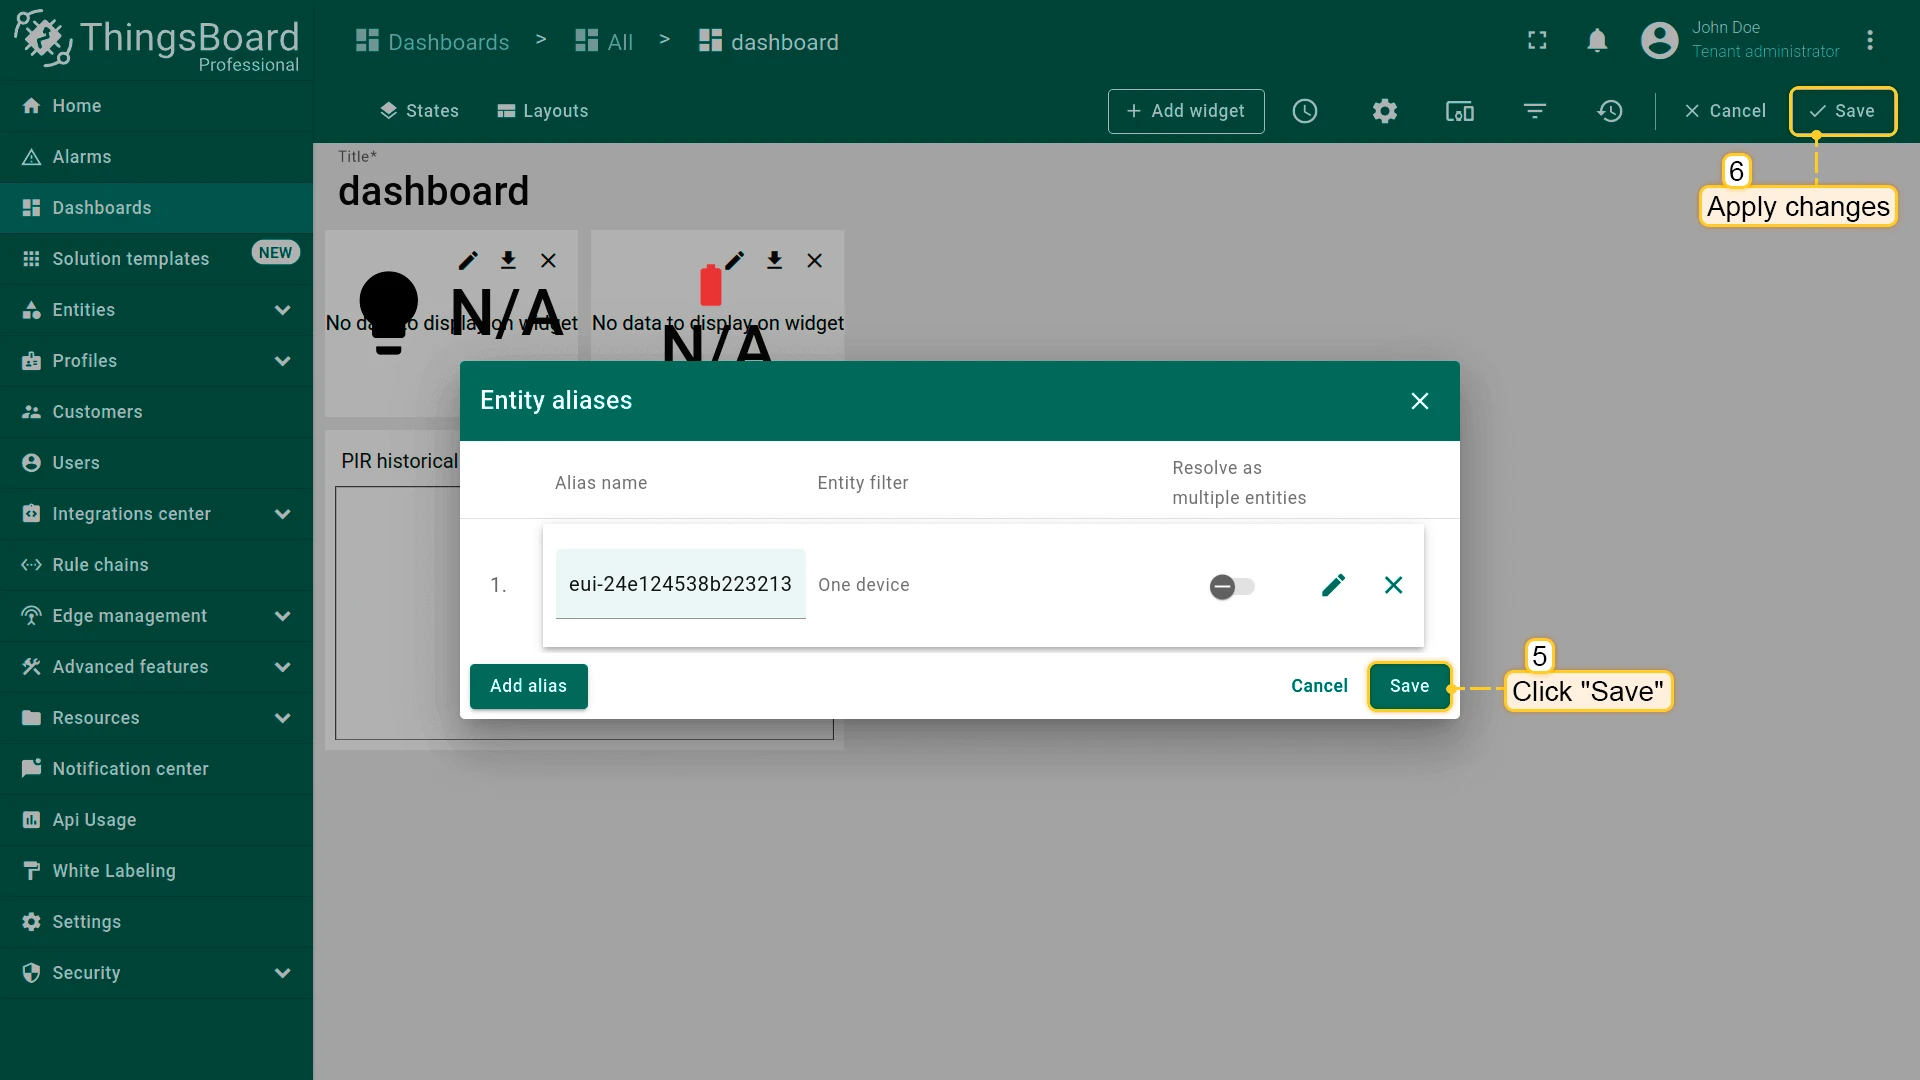
- In edit alias window select your device from dropdown list and save entity alias.
- Apply all changes.
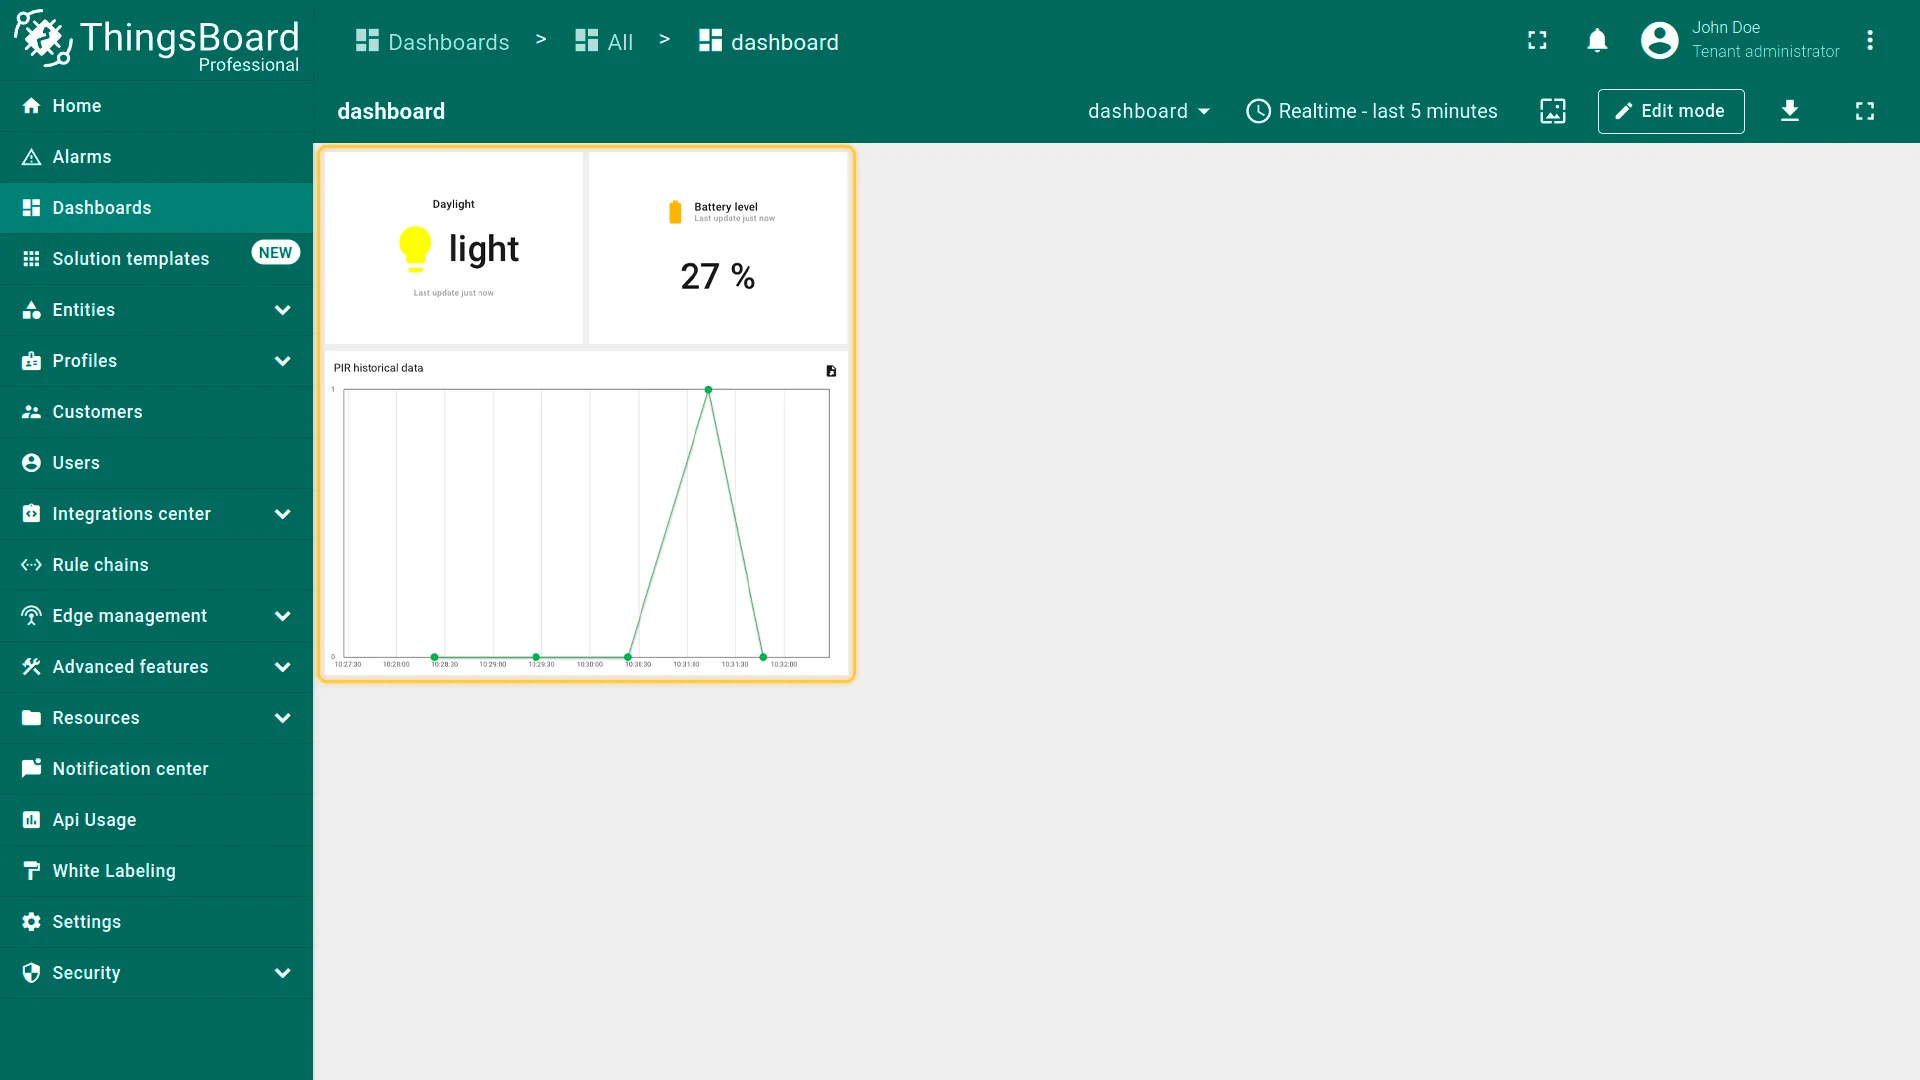
Now you should be able to see the data from the device.
Example of the dashboard with data:
Conclusion
Now you can easily connect your WS101 LoRaWAN® Smart Button and start sending data to ThingsBoard.
To go further, explore the ThingsBoard documentation to learn more about key features, such as creating dashboards to visualize your telemetry, or setting up alarm rules to monitor device behavior in real time.