Only Professional Edition supports Platform Integrations feature.
Use ThingsBoard Cloud or install your own platform instance.
This guide provides step-by-step instructions for connecting the Abeeway Micro Tracker and Abeeway Industrial Tracker to ThingsBoard Professional Edition (PE). The connection is through the IoT network in the new global standard LoRaWAN and ThingPark Wireless OSS intelligent logger (Actility). In this guide, we will use the free ThingsBoard PE demo server thingsboard.cloud in this guide. This guide will be useful to anyone who wants to connect their trackers manufactured by Abeeway or another industrial IoT application to the LoRaWAN network.

- Prerequisites
- Integration overview
- Step 1. Checking the registration for the platform ThingPark Wireless company Actility
- Step 2. Creation UpLink and DownLink DATA Converters
- Step 3. Uplink Data Converter configuration
- Step 4. Downlink Data Converter configuration
- Step 5. Integration configuration
- Step 6. Verifying devices connectivity after the creation and configuration of the Integration.
- Step 7. Creation and configuration of the Dashboard
- Step 8: Post telemetry and verify the Integration configuration
- Step 9: Configuration the Root Rule Chain (Root)
- Step 10: Create and Sent Downlink messages
- Next steps
Prerequisites
We assume:
- You are registered on the Actility website.
- You have at least one Abeeway Micro Tracker or Abeeway Industrial Tracker that is already connected with ACTILITY THINGPARK IoT NETWORK and is active.
- We also assume you already have a ThingsBoard PE server or free demo account. Otherwise, you can register for a 30-days free demo account here: thingsboard.cloud. We expect you to have at least a basic knowledge about ThingsBoard, so we do recommend to complete the Getting Started guide.
Integration overview
ThingsBoard Platform Integrations feature allows to push data from various platforms and connectivity solutions to ThingsBoard. We will use platform ThingPark Wireless company Actility to consume data from LoRaWAN networks and automatically register devices in ThingsBoard. Besides configuring the integration, we will also set ThingsBoard up to decode incoming data, store it in the database, visualize on the dashboard and generate alarms based on configurable thresholds.
Step 1. Checking the registration for the platform ThingPark Wireless company Actility
- Registration and condition of devices
Few things to notice:
The DevEUI from the incoming message will become the Device Name in ThingsBoard;
ThingsBoard will automatically create device with type “tracker” and name equal to DevEUI;
Therefore, when creating a new device, in the Name field, enter the value DevEUI: from the Device Information (ThingPark Wireless OSS intelligent logger (Actility)) section
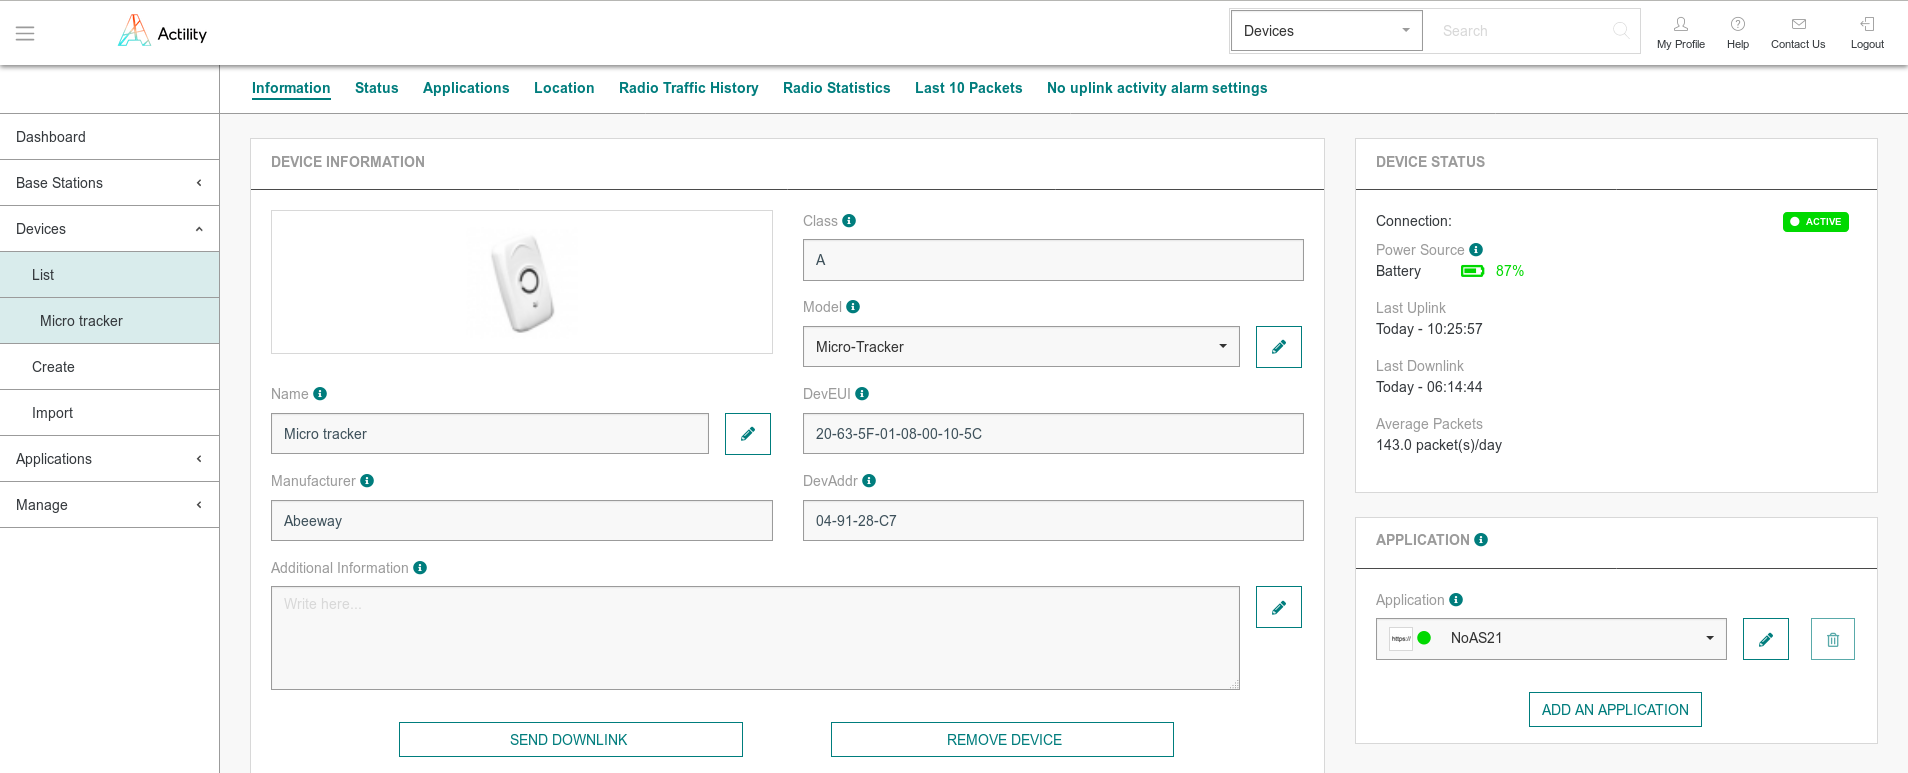
An example of a device registered to the platform ThingPark Wireless company Actility (click to open expanded view)
The device must be active!!! In the example, DevUi = "20635F010800105C"
The device must be attached to the application.In our example: to Application "NoAS21"
Photo of the example of a device registered to the platform ThingPark Wireless company Actility (click to open expanded view)
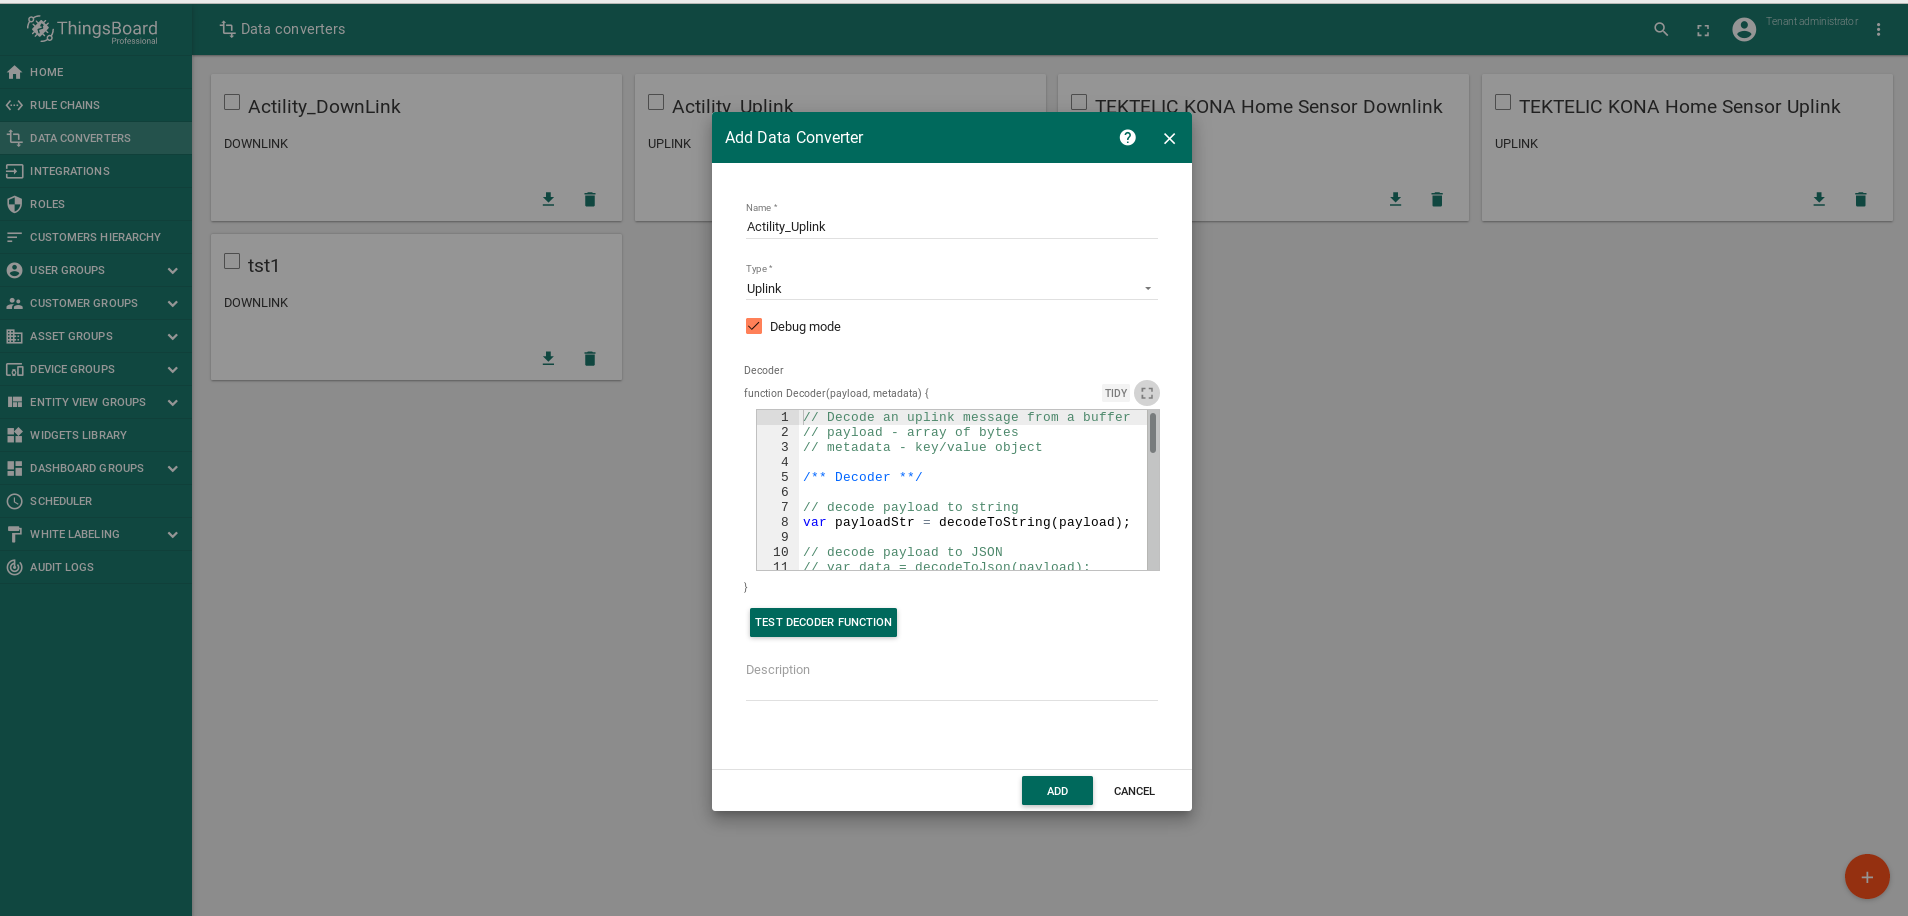
Step 2. Creation UpLink and DownLink DATA Converters
In order to create an Integration, we should create the Uplink Data Converter and the Downlink Data Converter first. The converters will decode incoming telemetry payload data from global standard LoRaWAN that contains in encoded hex string to human readable, simplified ThingsBoard data format.
Screenshot of how to create Uplink converter (click to open expanded view)
Screenshot of how to create Downlink converter (click to open expanded view)
Step 3. Uplink Data Converter configuration
When creating an Uplink Converter, a default decoder is added to the Decoder section.
After creating the Uplink Converter to the Decoder section, you need to update the Decoder code to the following code.
It is necessary to edit the Uplink decoder
Open Uplink Converter, editor mode, click "test decoder function" and replace the default code with a new code:
(click to open expanded view)
- This section describes the payload messages supported by the tracke
- Unless otherwise specified, all values are transmitted in network byte order (MSB first).
- Each message is composed by:
- A common header
- A specific data part
- (1) Activity status message and configuration message share the same identifier. They are differentiated by another field.
- (2) Only available on FW 1.7-3. Configurable via the config_flag parameter
Screenshot of editing the UpLink decoder (click to open expanded view)
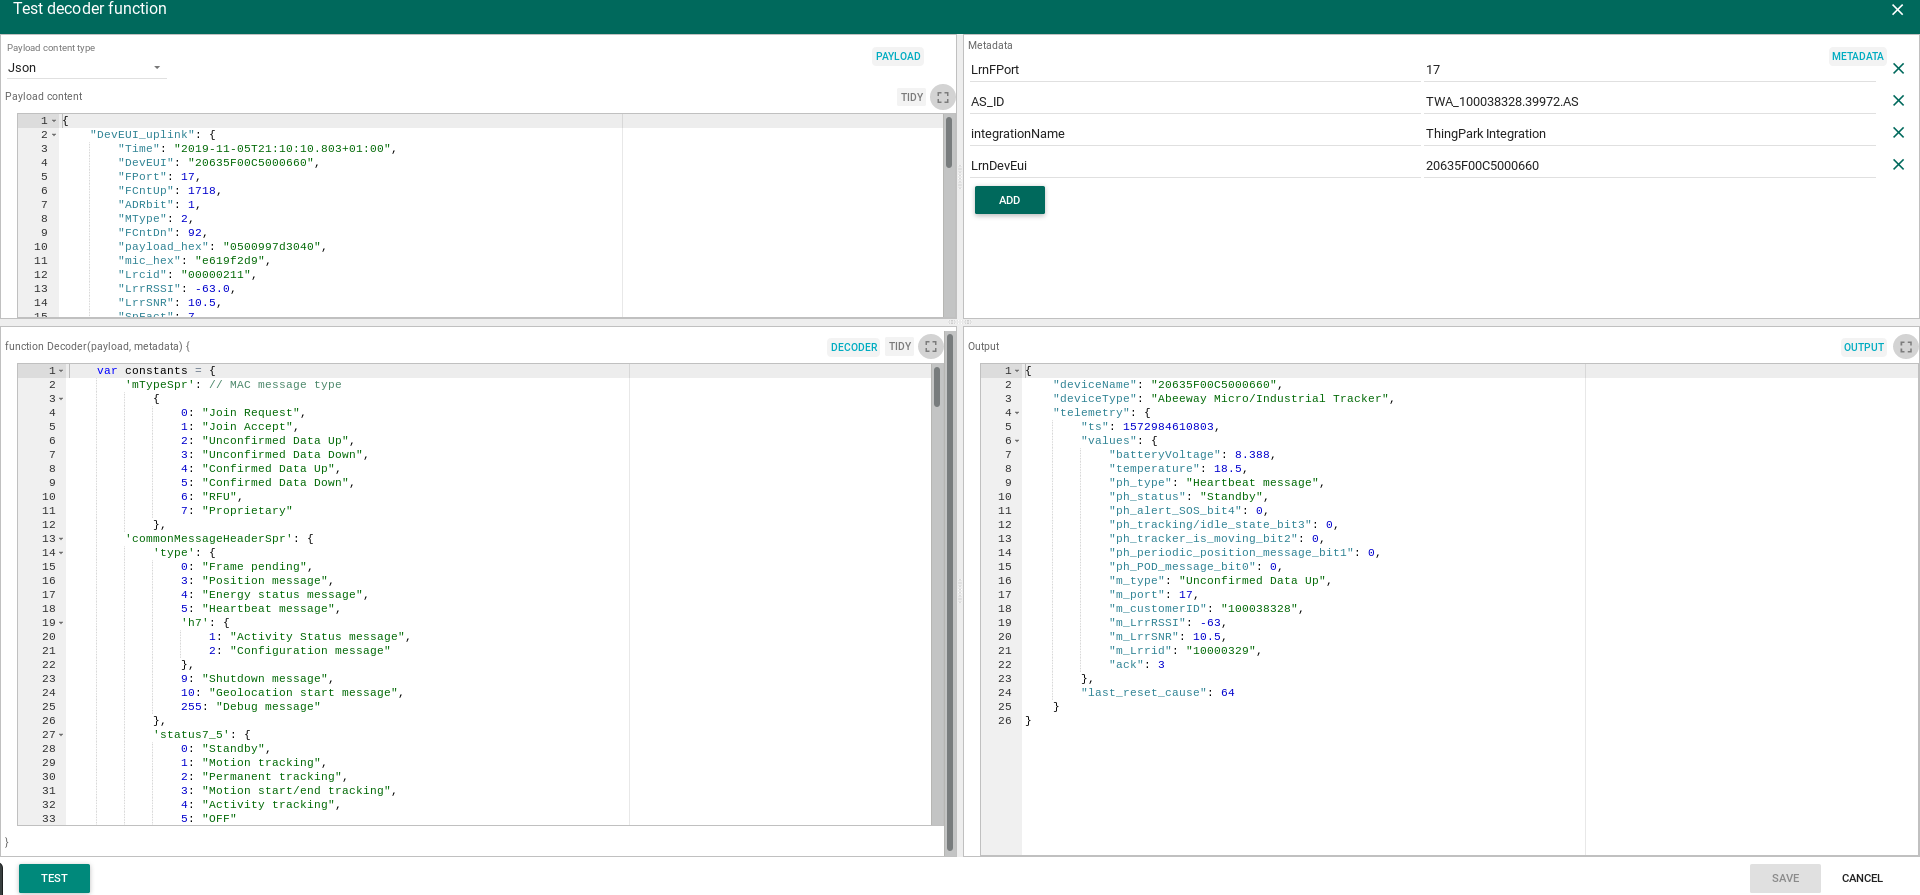
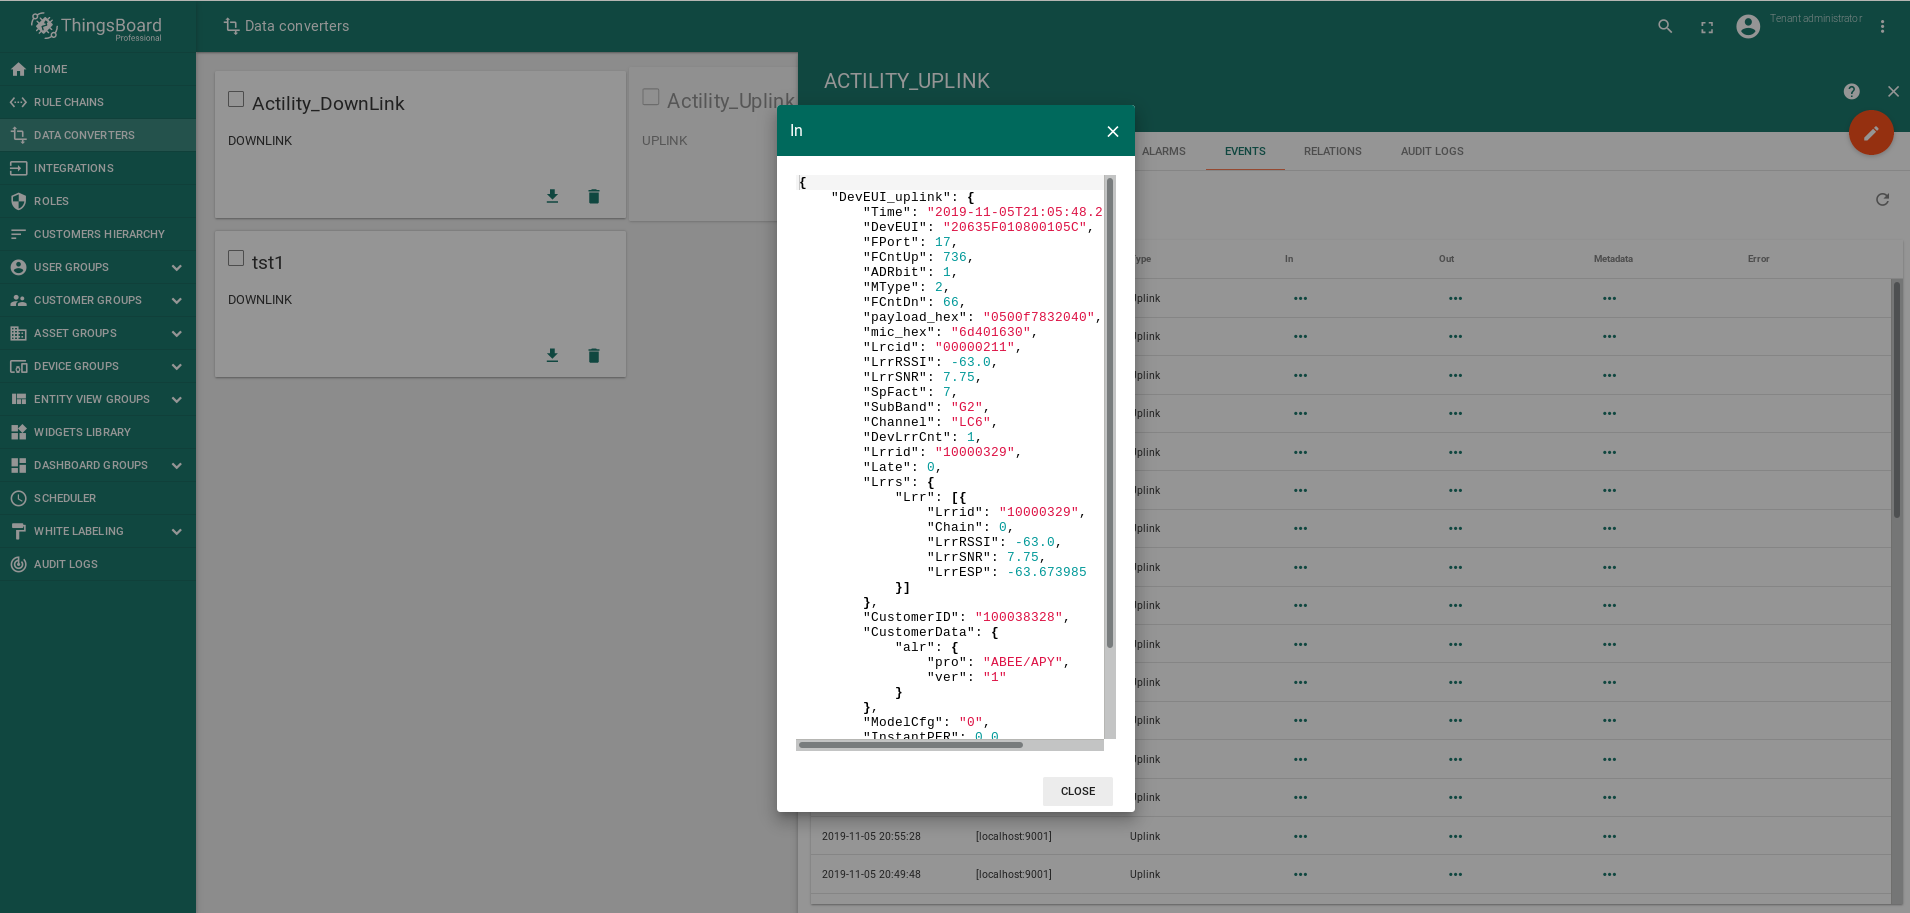
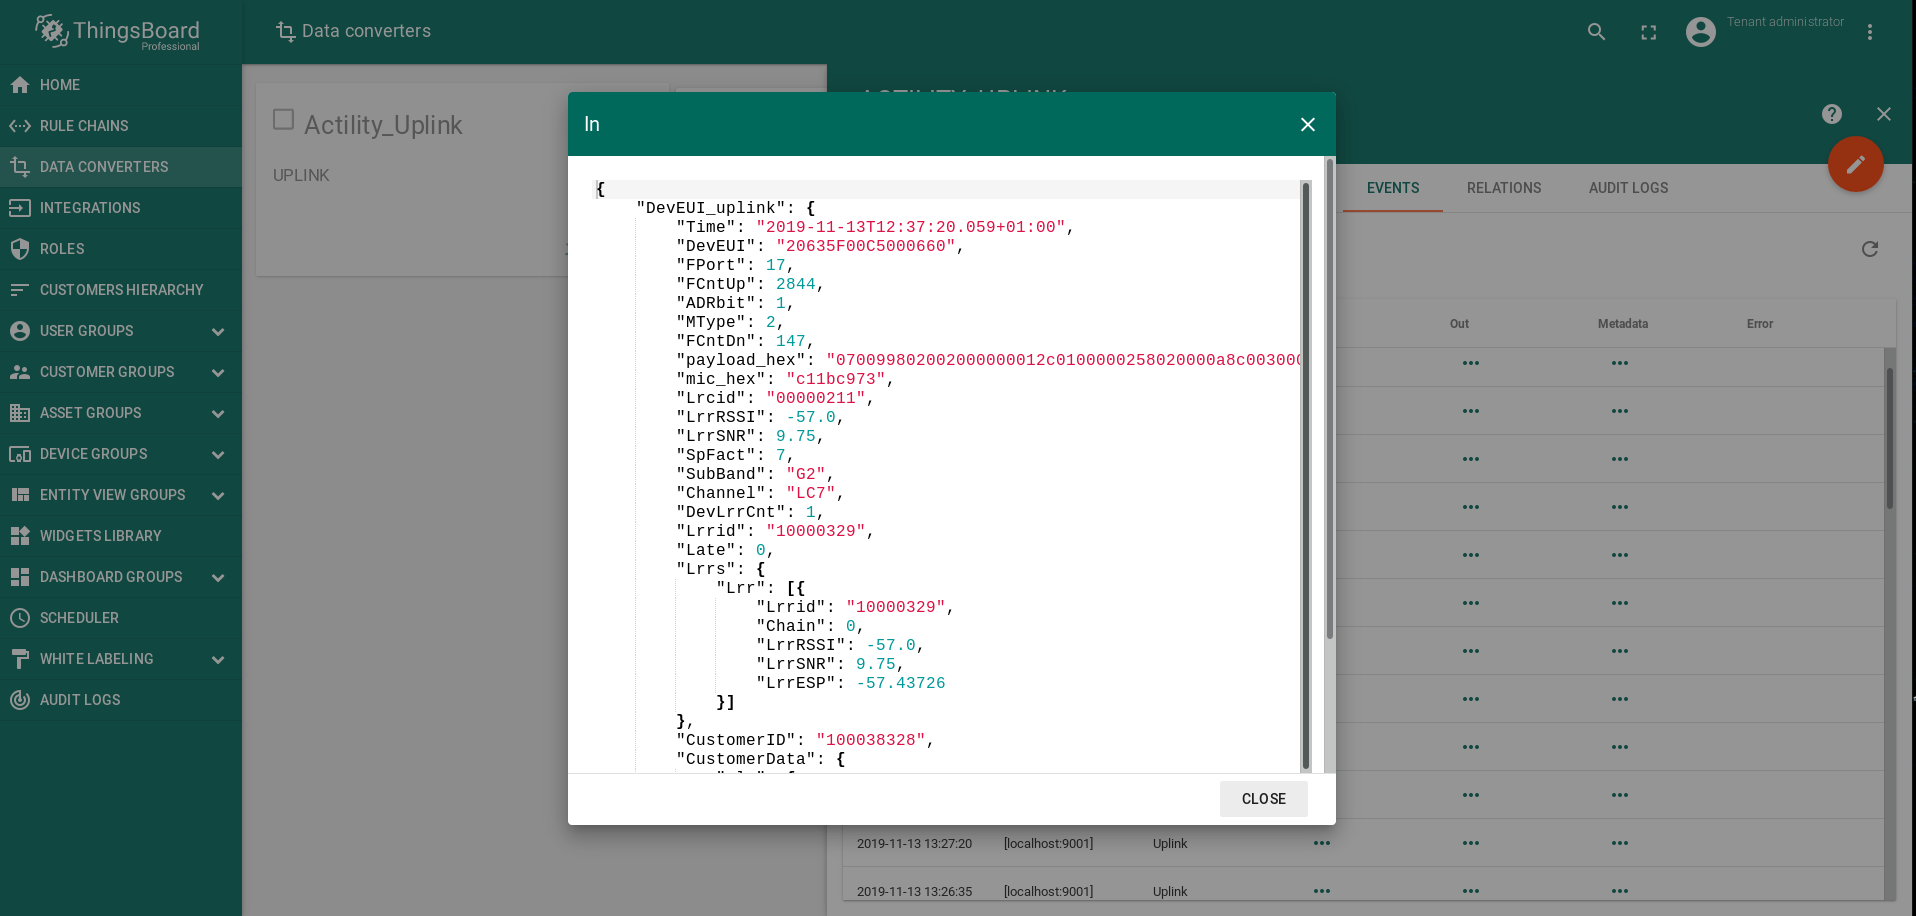
Input data from ThingPark Wireless OSS intelligent logger (Actility) Platform looks like this: (click to open expanded view)
JSON: input data from ThingPark Wireless OSS intelligent logger (Actility) Platform looks like this:
(click to open expanded view)
1
2
3
4
5
6
7
8
9
10
11
12
13
14
15
16
17
18
19
20
21
22
23
24
25
26
27
28
29
30
31
32
33
34
35
36
37
38
39
40
41
42
43
44
45
                 {
                     "DevEUI_uplink": {
                         "Time": "2019-11-06T09:54:46.342+01:00",
                         "DevEUI": "20635F00C5000660",
                         "FPort": 17,
                         "FCntUp": 1796,
                         "ADRbit": 1,
                         "MType": 2,
                         "FCntDn": 94,
                         "payload_hex": "0500997d3040",
                         "mic_hex": "304d48f9",
                         "Lrcid": "00000211",
                         "LrrRSSI": -63.0,
                         "LrrSNR": 7.5,
                         "SpFact": 7,
                         "SubBand": "G1",
                         "Channel": "LC2",
                         "DevLrrCnt": 1,
                         "Lrrid": "10000329",
                         "Late": 0,
                         "Lrrs": {
                             "Lrr": [{
                                 "Lrrid": "10000329",
                                 "Chain": 0,
                                 "LrrRSSI": -63.0,
                                 "LrrSNR": 7.5,
                                 "LrrESP": -63.710819
                             }]
                         },
                         "CustomerID": "100038328",
                         "CustomerData": {
                             "alr": {
                                 "pro": "ABEE/APY",
                                 "ver": "1"
                             }
                         },
                         "ModelCfg": "0",
                         "InstantPER": 0.0,
                         "MeanPER": 0.001706,
                         "DevAddr": "05C1704A",
                         "TxPower": 9.5,
                         "NbTrans": 1
                     }
                 }
Screenshot of the input data from ThingPark Wireless OSS intelligent logger (Actility) Platform looks like this:
(click to open expanded view)
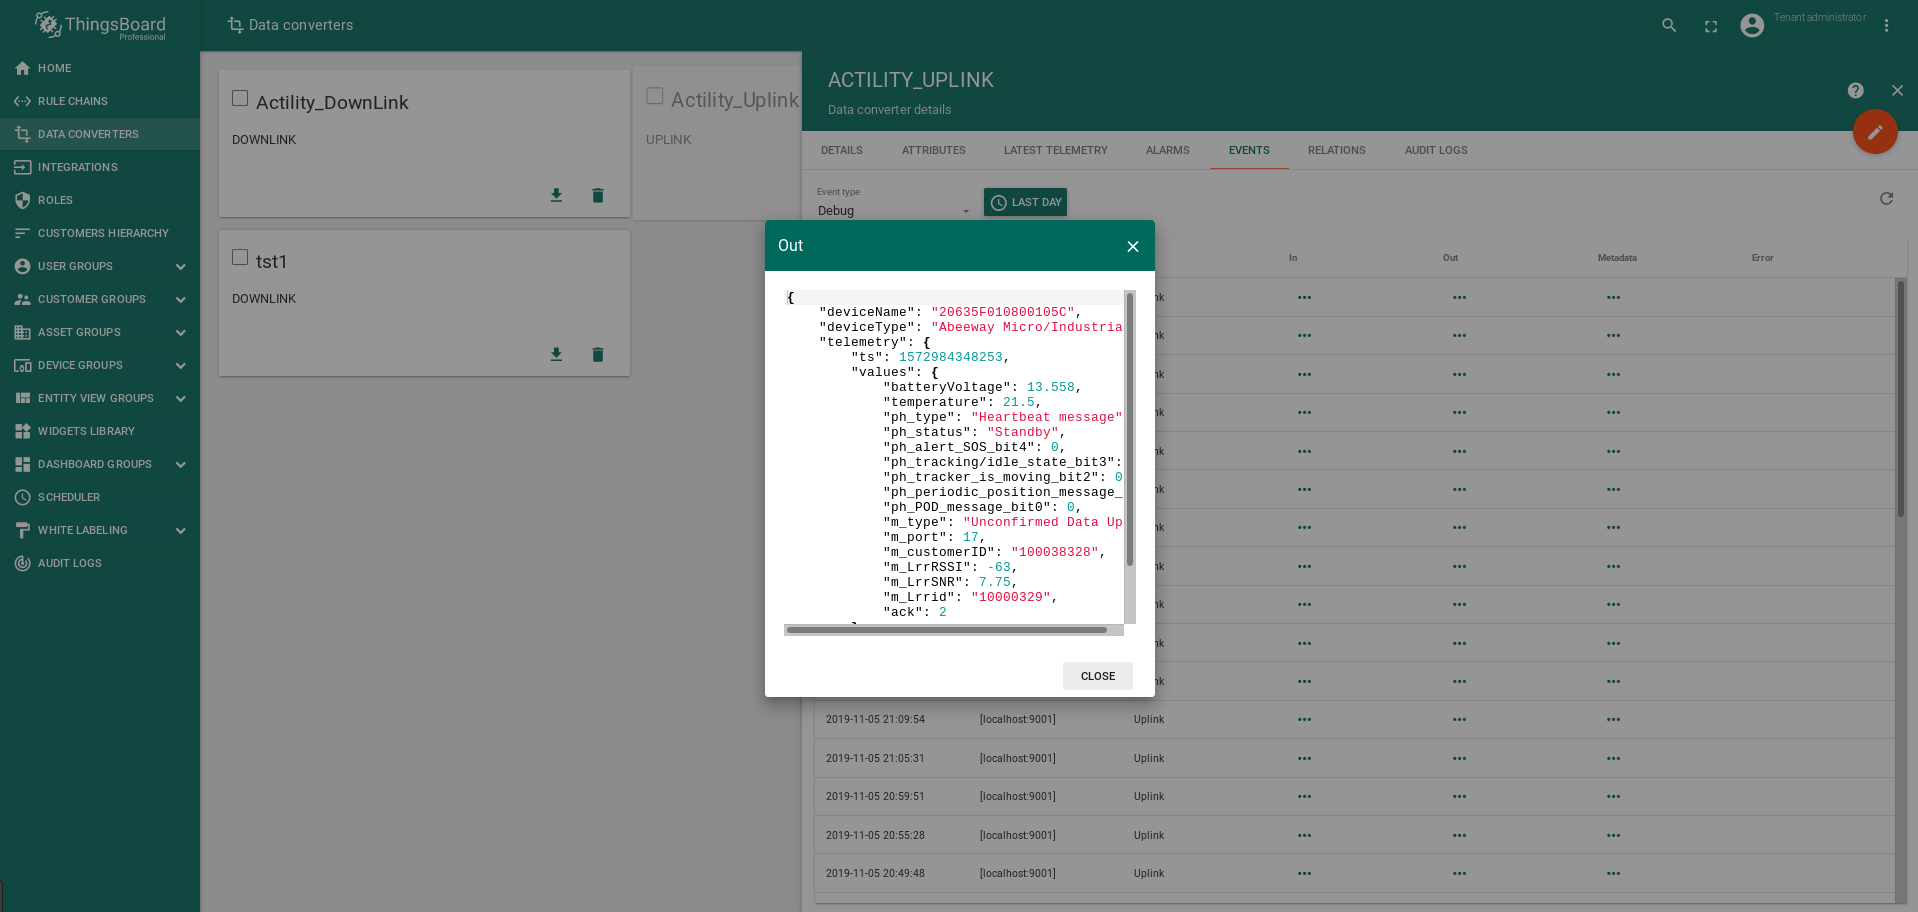
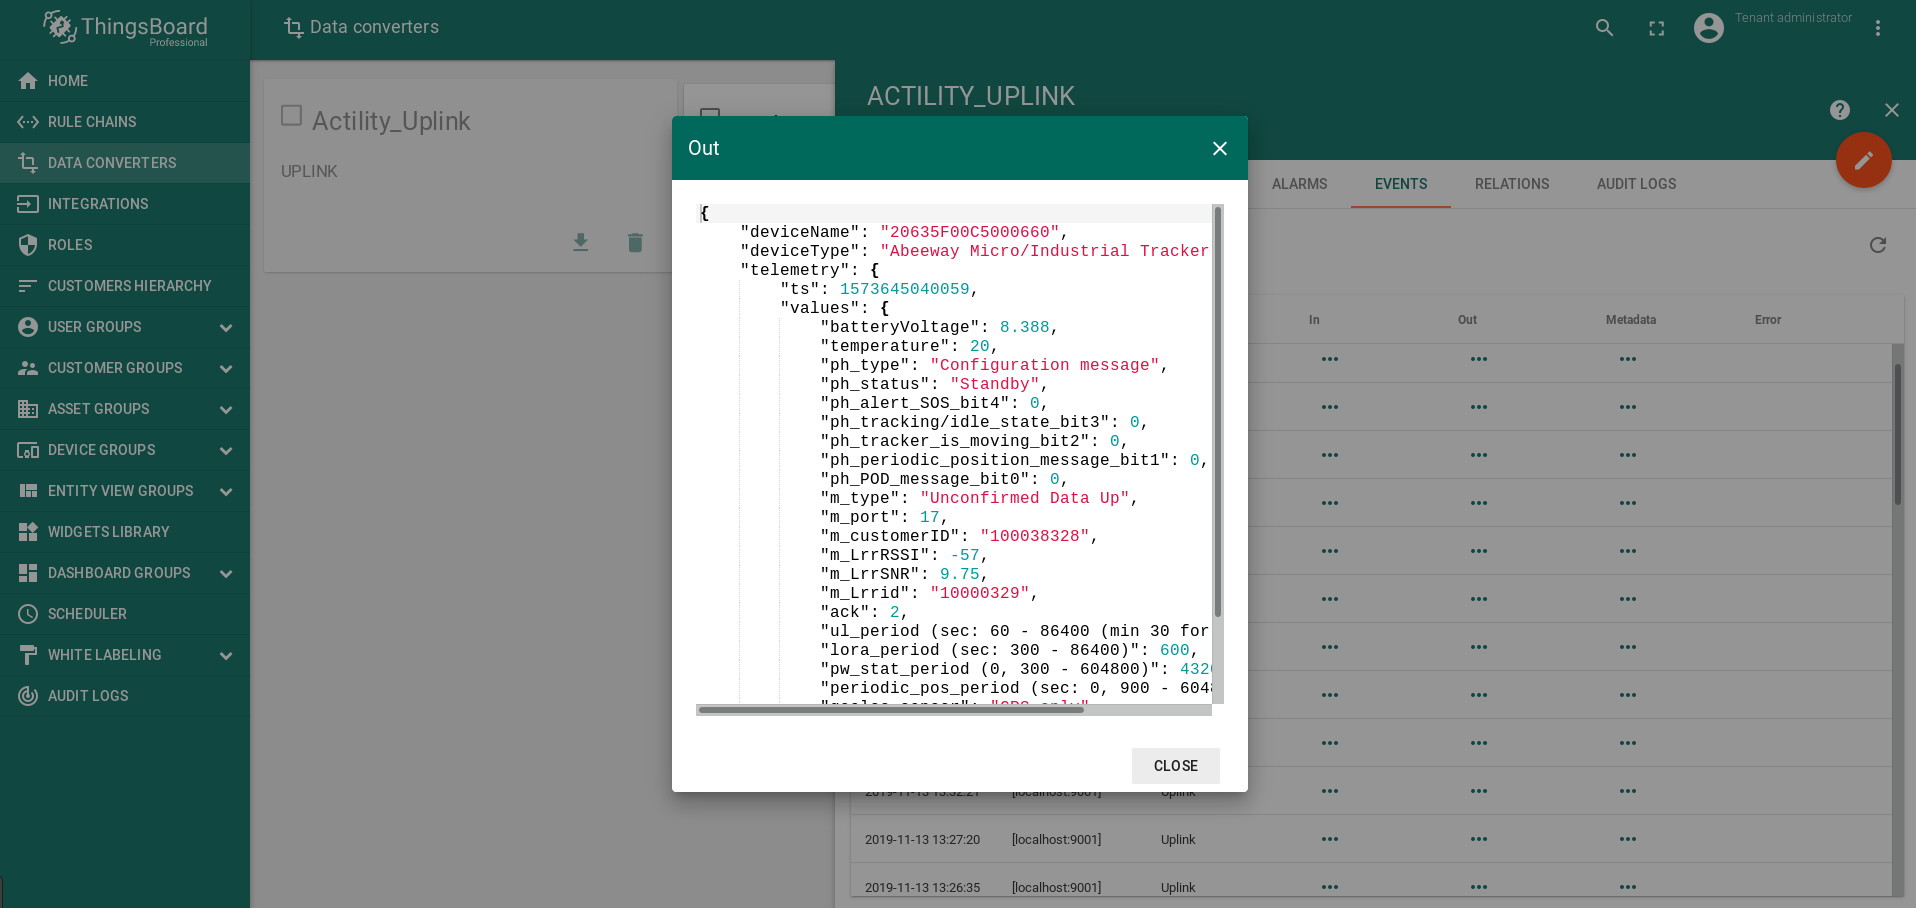
Output data after decoding will look like this: (click to open expanded view)
JSON: output data from ThingPark Wireless OSS intelligent logger (Actility) Platform looks like this:
(click to open expanded view)
1
2
3
4
5
6
7
8
9
10
11
12
13
14
15
16
17
18
19
20
21
22
23
24
25
26
27
                    {
                     "deviceName": "20635F00C5000660",
                     "deviceType": "Abeeway Micro/Industrial Tracker",
                     "telemetry": {
                         "ts": 1573030486342,
                         "values": {
                             "batteryVoltage": 8.388,
                             "temperature": 18.5,
                             "ph_type": "Heartbeat message",
                             "ph_status": "Standby",
                             "ph_alert_SOS_bit4": 0,
                             "ph_tracking/idle_state_bit3": 0,
                             "ph_tracker_is_moving_bit2": 0,
                             "ph_periodic_position_message_bit1": 0,
                             "ph_POD_message_bit0": 0,
                             "m_type": "Unconfirmed Data Up",
                             "m_port": 17,
                             "m_customerID": "100038328",
                             "m_LrrRSSI": -63,
                             "m_LrrSNR": 7.5,
                             "m_Lrrid": "10000329",
                             "ack": 3
                         },
                         "last_reset_cause": 64
                     }
                    }
Screenshot: output data from ThingPark Wireless OSS intelligent logger (Actility) Platform looks like this:
(click to open expanded view)
Payload_hex: example to decoder
(click to open expanded view)
Common message header | Byte 0 | Byte 1 | Byte 2 | Byte 3 | Byte 4 | Data Variable |
| Type | Status | Battery | Temperature | Ack/opt | Data |
| Field | First Byte | Byte length | Value | Description |
| Type | 0 | 1 | 0x05 | Heartbeat message |
| Status | 1 | 1 | 0x00 | Standby |
| Battery | 2 | 1 | 0x99 | 8.388 |
| Temperature | 3 | 1 | 0x7d | 18.5 |
| Ack/opt | 4 | 1 | 0x30 | 3/Optional data (depending on message type. Currently used only for position messages) |
| Data | 5 | 1-22 | 0x40 | last_reset_cause |
Info: The tracker supports different types of uplink messages, that are described in following sections:
| Message type | Id | Content |
| Frame pending | 0x00 | This uplink message is sent to trigger the sending. (and speed up the configuration of the tracker) if downlink messages are available on gateway and no other uplink message is on the queue |
| Position message | 0x03 | GPS, low power GPS, WIFI or BLE position data |
| Energy status message | 0x04 | Used by the server to estimate the battery level. Contain information related to the power consumption |
| Heartbeat message | 0x05 | Notify the server the tracker is operational and under LoRa coverage |
| Activity Status message (1) | 0x07 | Reports the activity counter. Used only by the activity tracking operating mode |
| Configuration message (1) | 0x07 | Reports the partial or whole configuration of the trackers |
| Shutdown message | 0x09 | Sent when the tracker is set off |
| Geolocation start message (2) | 0x0A | Sent when the tracker starts a geolocation |
| Debug message | 0xFF | Internal use only |
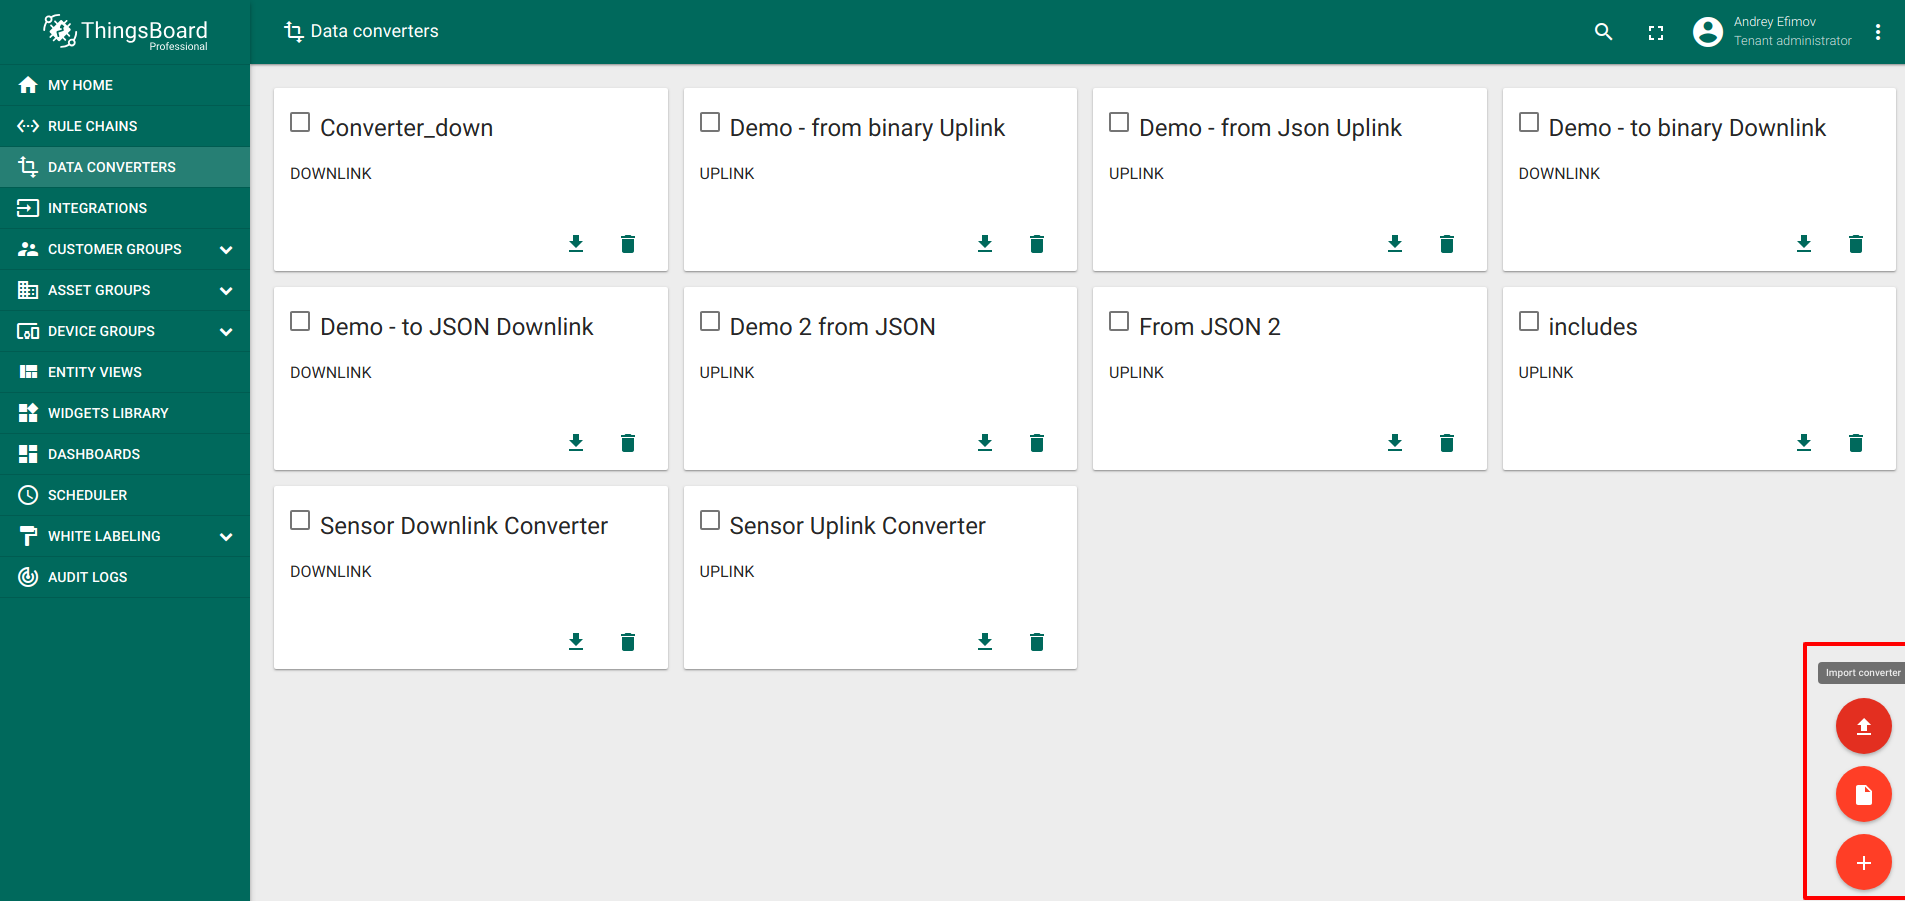
Alternatively, you can import it from this file
the following way: Go to Data Converters -> Add new Data Converter -> Import Converter (click to open expanded view)
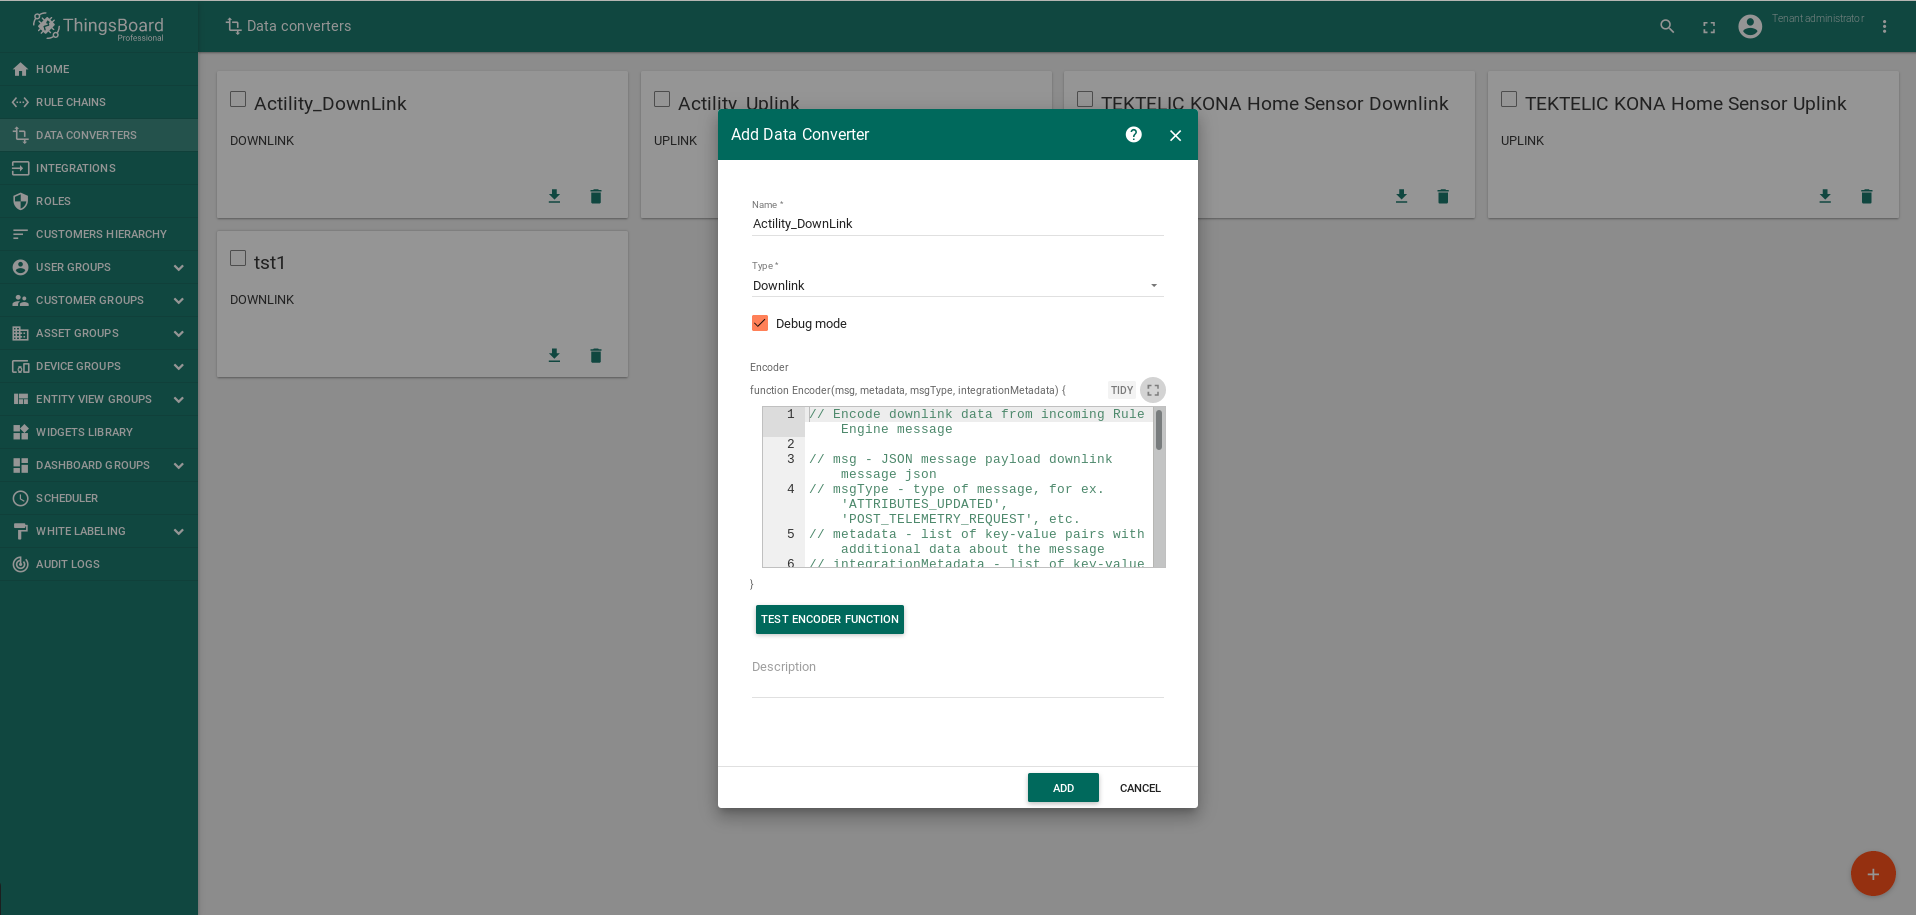
Step 4. Downlink Data Converter configuration
When creating an Downlink Converter, a default decoder is added to the Decoder section.
After creating the Downlink Converter to the Decoder section, you need to update the Decoder code to the following code.
It is necessary to edit the Downlink decoder
Open Downlink Converter, editor mode, click “test decoder function” and replace the default code with a new code:
Screenshot edit the DownLink decoder (click to open expanded view)
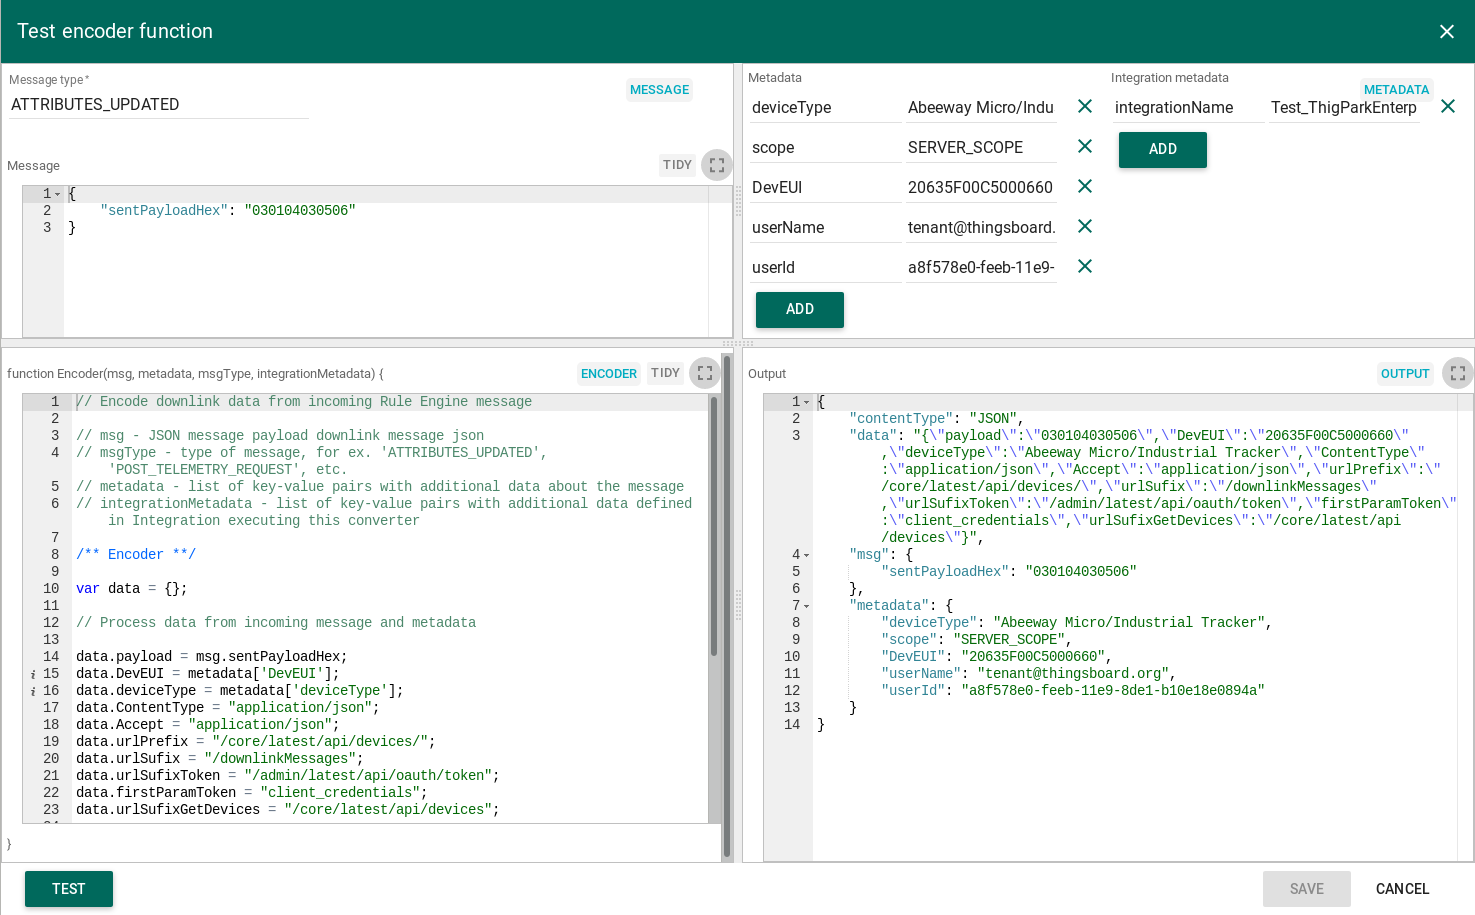
JSON: output data after DownLink Data Converter looks like this:
(click to open expanded view)
1
2
3
4
5
6
7
8
9
10
11
12
13
14
15
16
17
18
19
20
21
22
23
24
25
26
27
28
             {
                 {
                    /** Encoder **/
                    var data = {};
                    // Process data from incoming message and metadata
                    data.payload = msg.sentPayloadHex;
                    data.DevEUI = metadata['DevEUI'];
                    data.deviceType = metadata['deviceType'];
                    data.ContentType = "application/json";
                    data.Accept = "application/json";
                    data.urlPrefix = "/core/latest/api/devices/";
                    data.urlSufix = "/downlinkMessages";
                    data.urlSufixToken = "/admin/latest/api/oauth/token";
                    data.firstParamToken = "client_credentials";
                    data.urlSufixGetDevices = "/core/latest/api/devices";
                    // Result object with encoded downlink payload
                    var result = {
                        // downlink data content type: JSON, TEXT or BINARY (base64 format)
                        contentType: "JSON",
                        // downlink data
                        data: JSON.stringify(data),
                        msg: msg,
                        metadata:  metadata
                    };
                    return result;
                 }
             }
Alternatively, you can import it from this file
the following way: Go to Data Converters -> Add new Data Converter -> Import Converter (click to open expanded view)
Step 5. Integration configuration
Screenshot of creating integration on the ThingsBoard platform
(click to open expanded view)
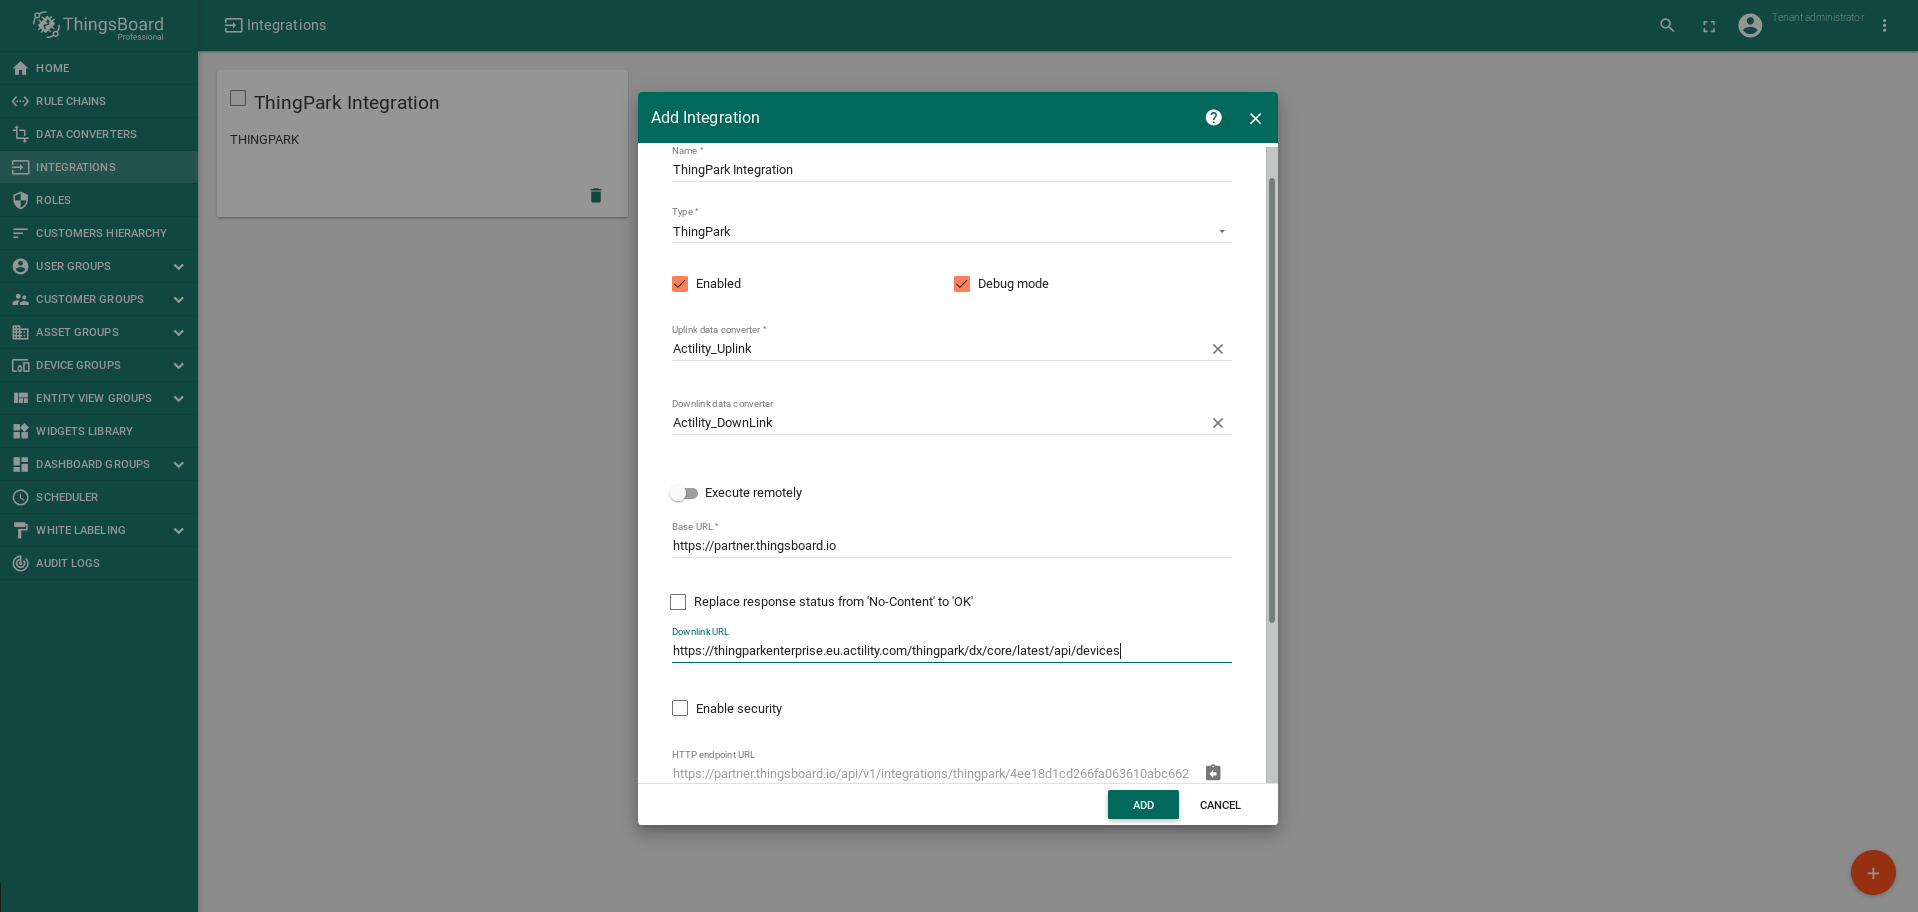
WARNING !!! After creation of the Integration…
- check of the base URL,
- check downLink URL in order to:
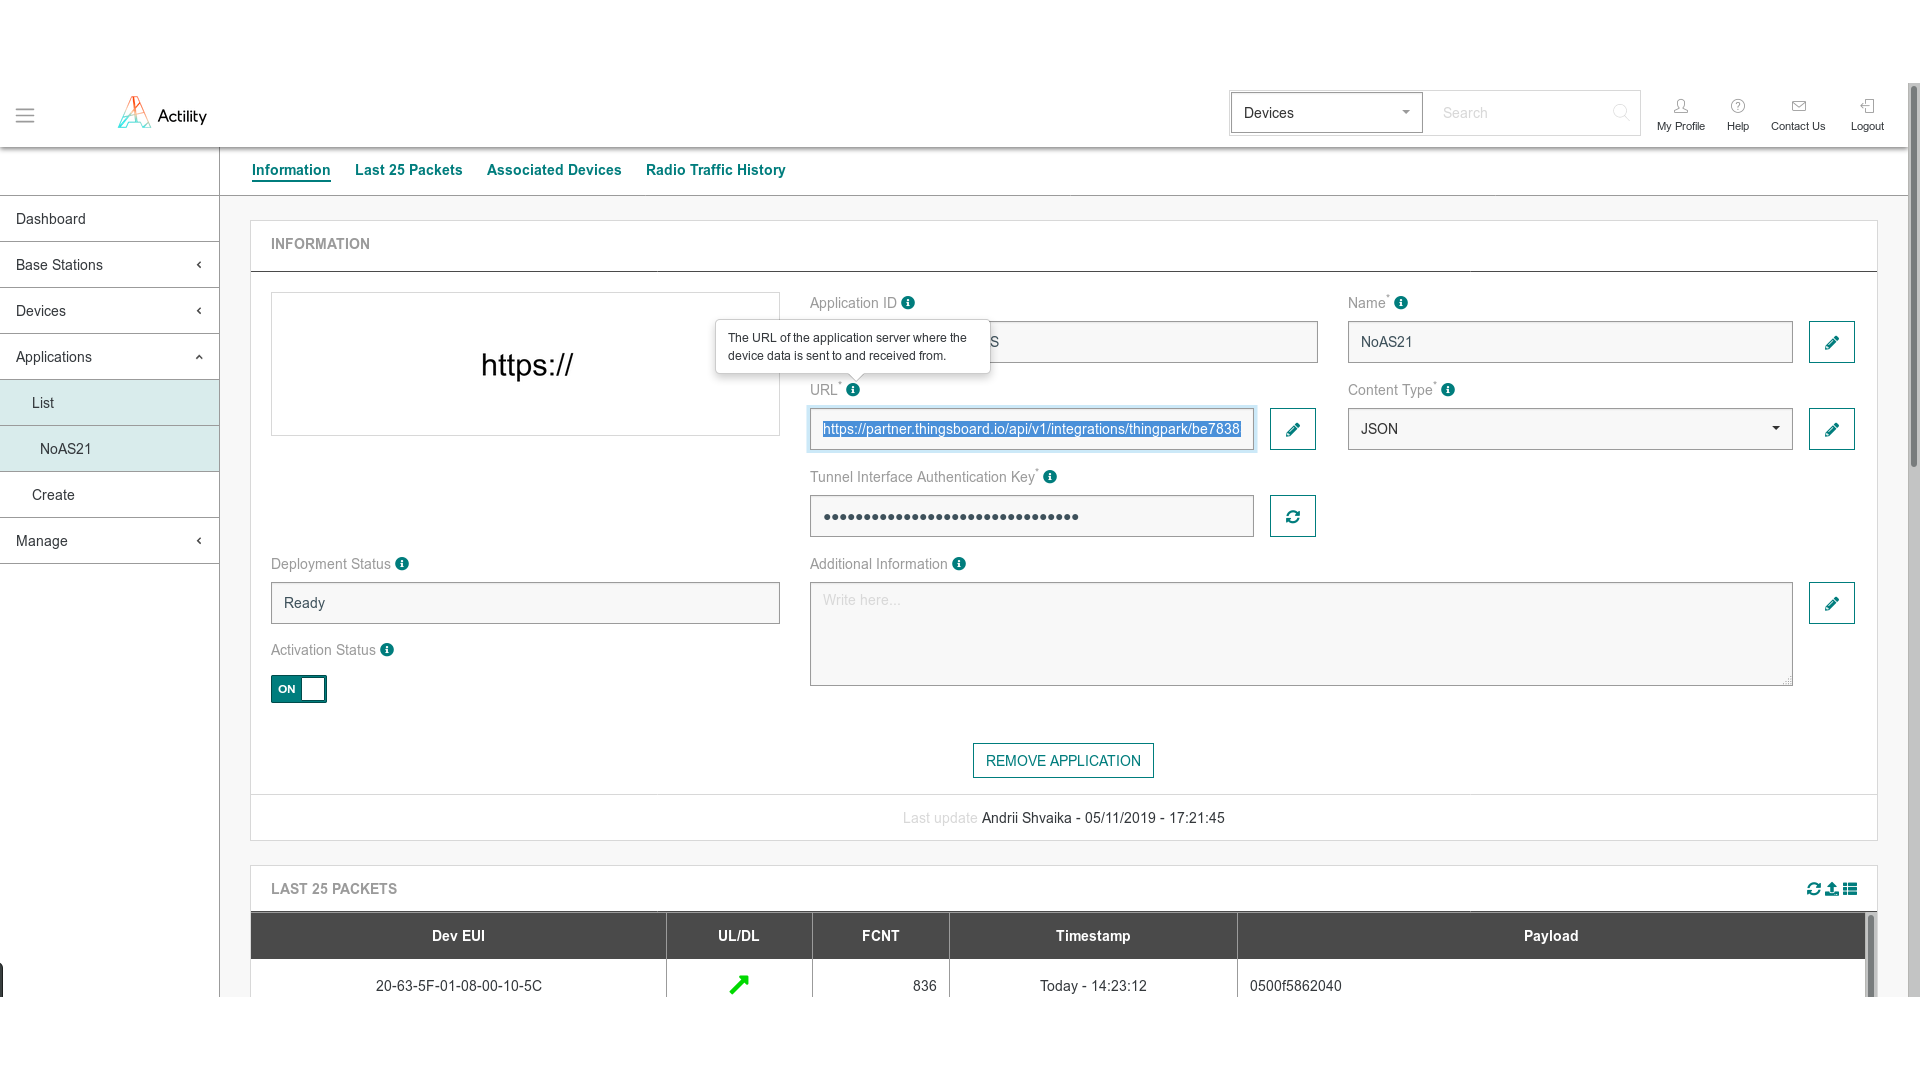
- copy downLink URL - the HTTP Endpoint URL from the integration window (Example: https://thingparkenterprise.eu.actility.com/thingpark/dx/core/latest/api/devices)
- paste this downLink URL to the URL of the Application server Actility where the device data is sent to and received from.
Screenshot of page ThingPark Wireless OSS intelligent logger (Actility), where you need to copy the downLink URL
(click to open expanded view)
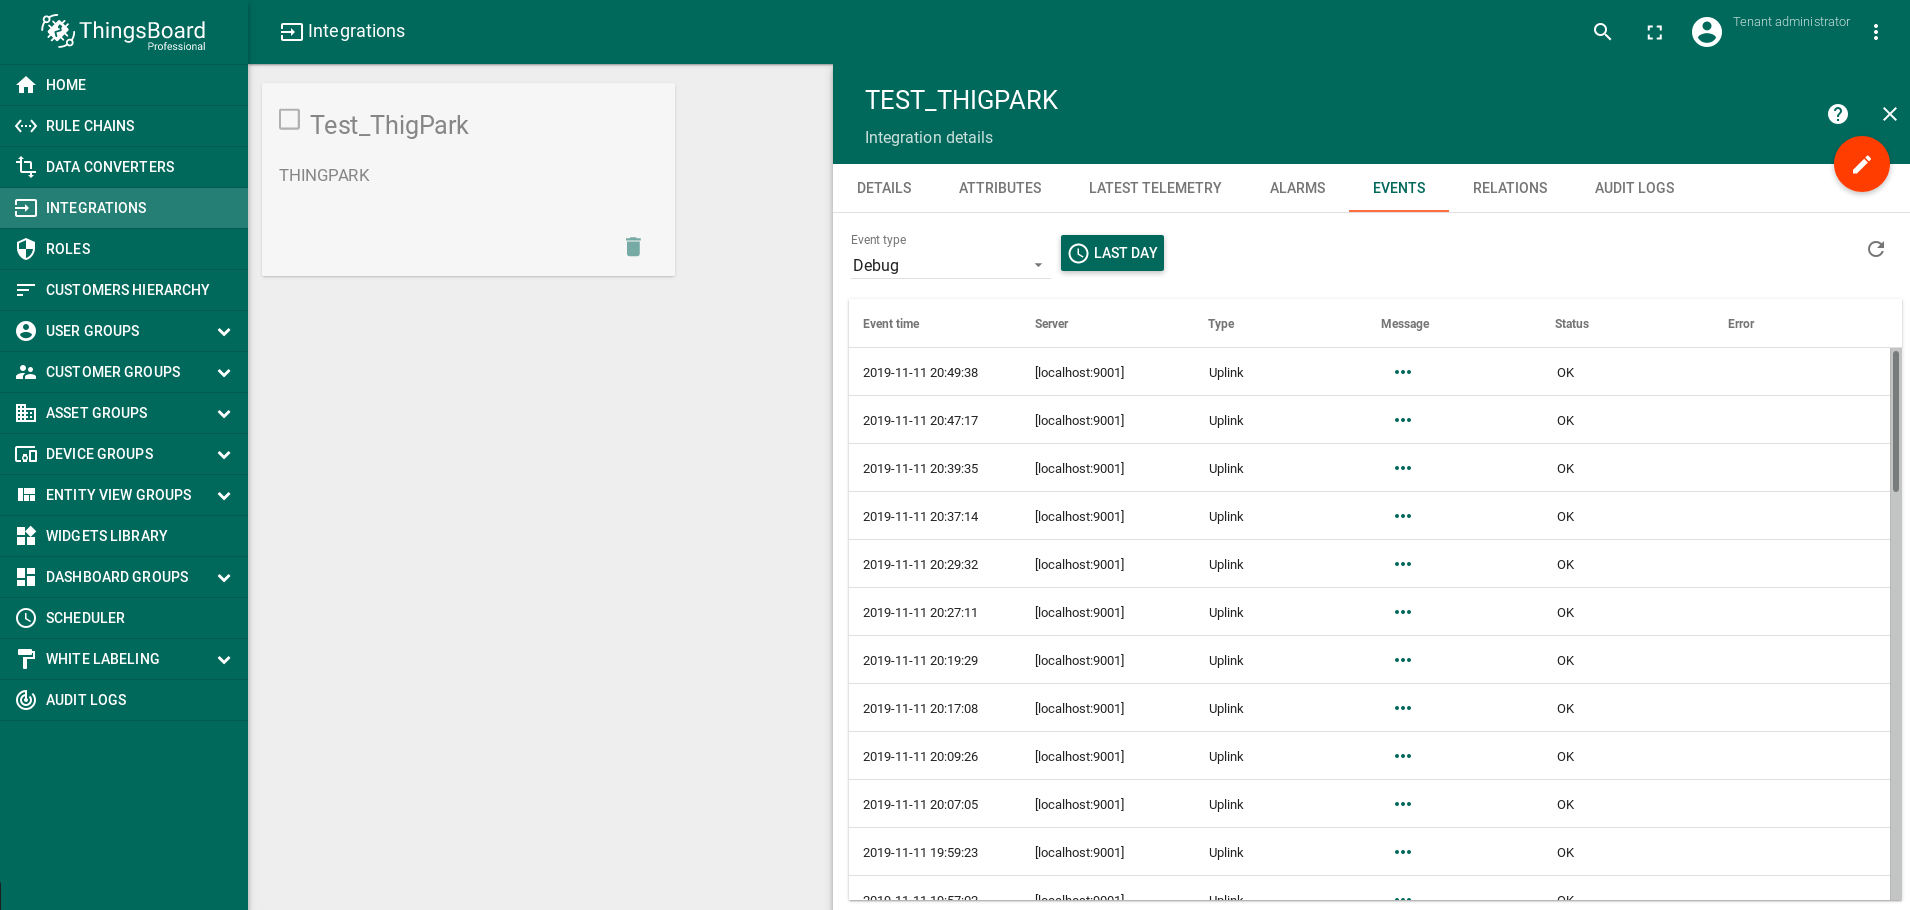
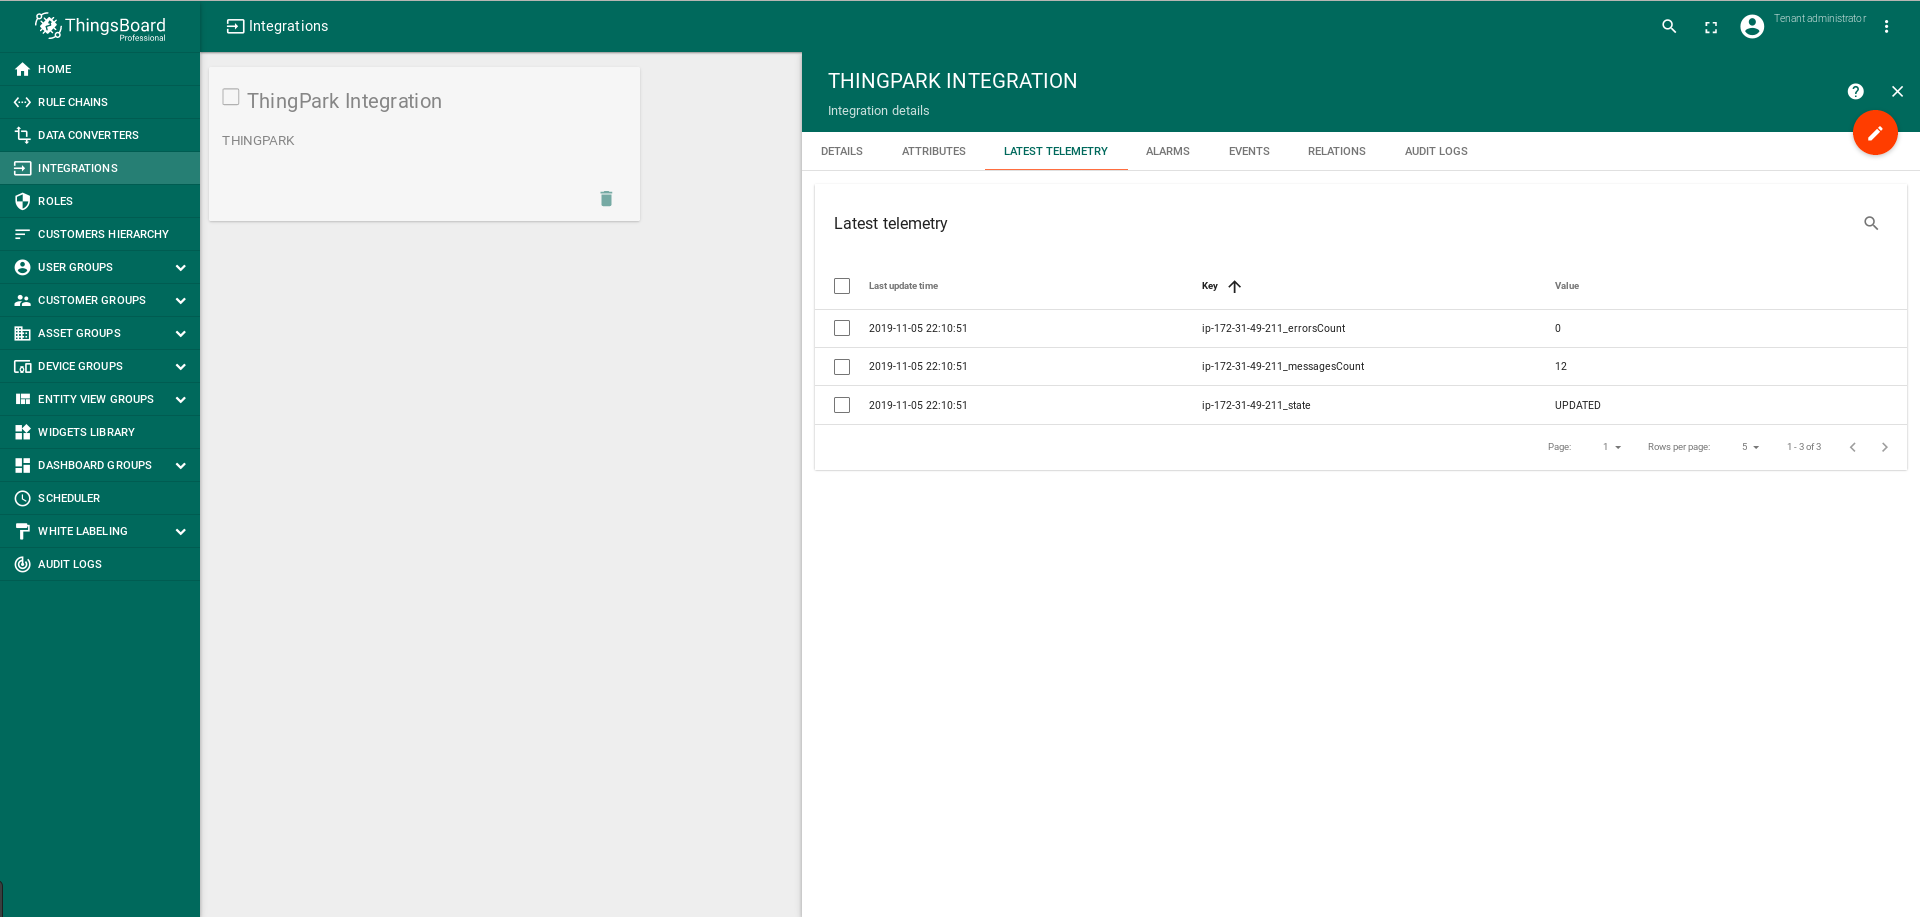
Step 6. Verifying devices connectivity after the creation and configuration of the Integration.
After creating and configuring the integration and connecting it to platform ThingPark Wireless company Actility, ThingsBoard will begin receiving the first reports of the telemetry from your devices.
Screenshot of receiving the first reports of the telemetry (click to open expanded view)
On the basis of these first messages ThingsBoard system will automatically create devices with type and name under which devices were registered in the ThingPark Actility Enterprise.
Screenshot of how ThingsBoard system will automatically create devices (click to open expanded view)
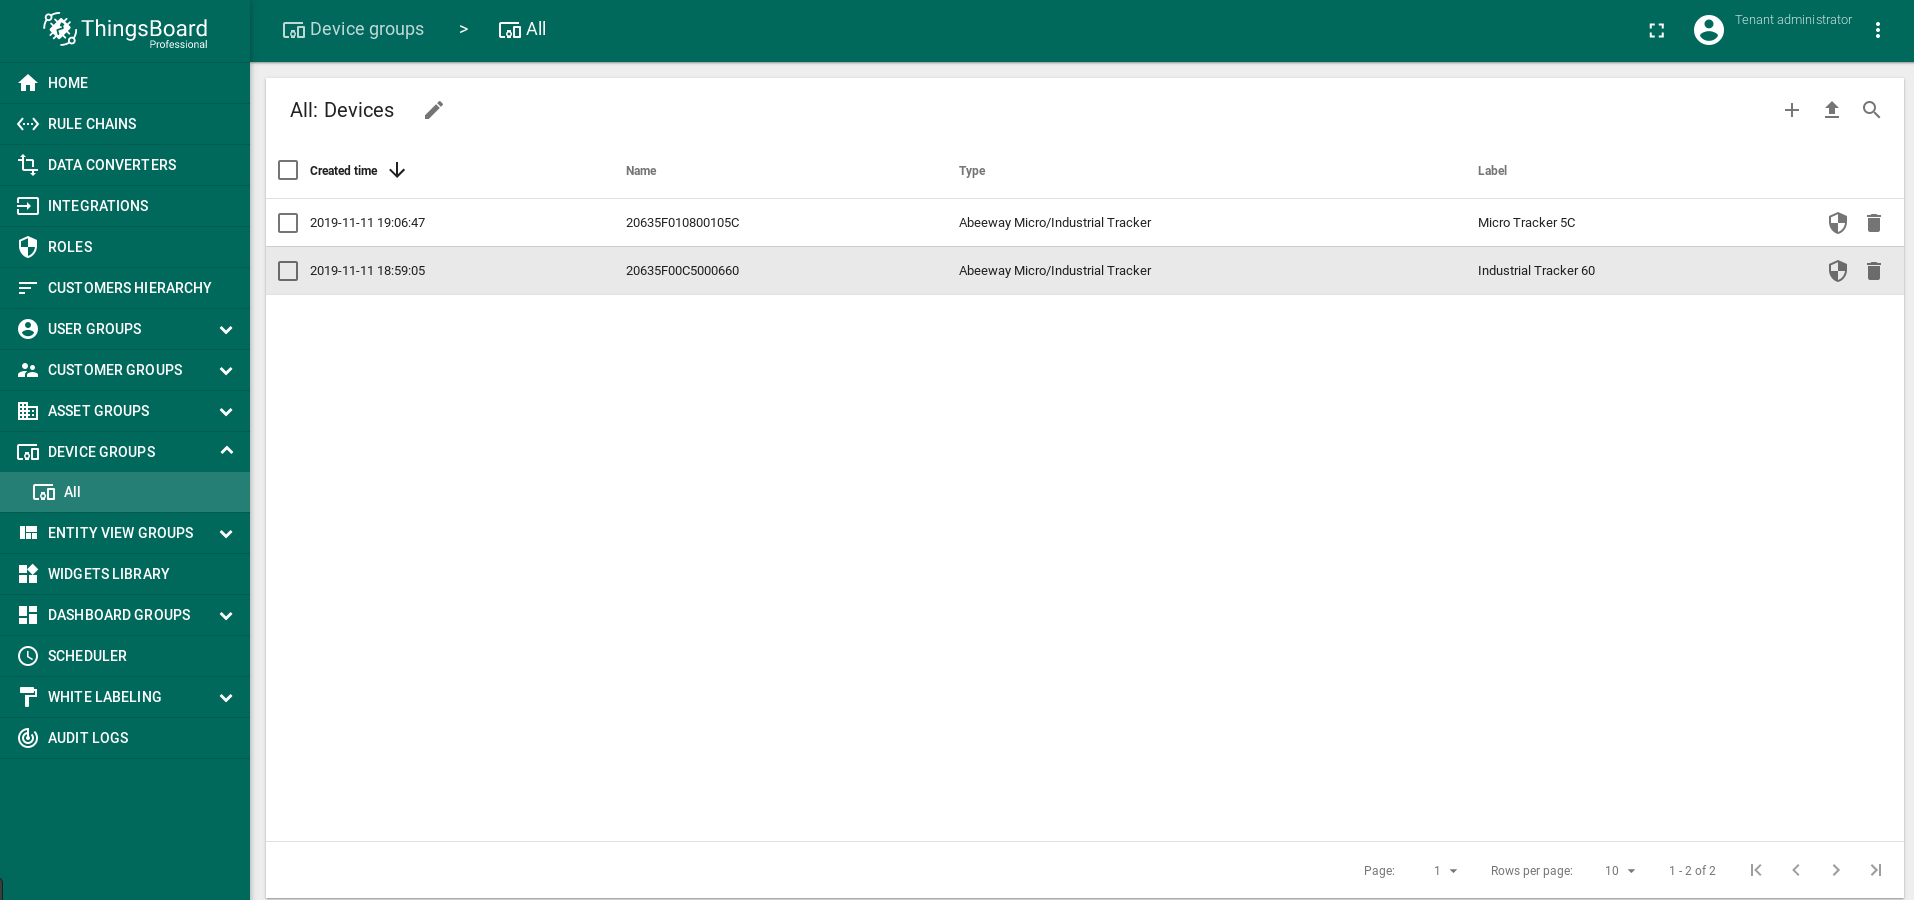
That’s why after creating and configuring the integration and before starting the Dashboard setup you need to check that all your devices are detected and visible in ThingsBoard.
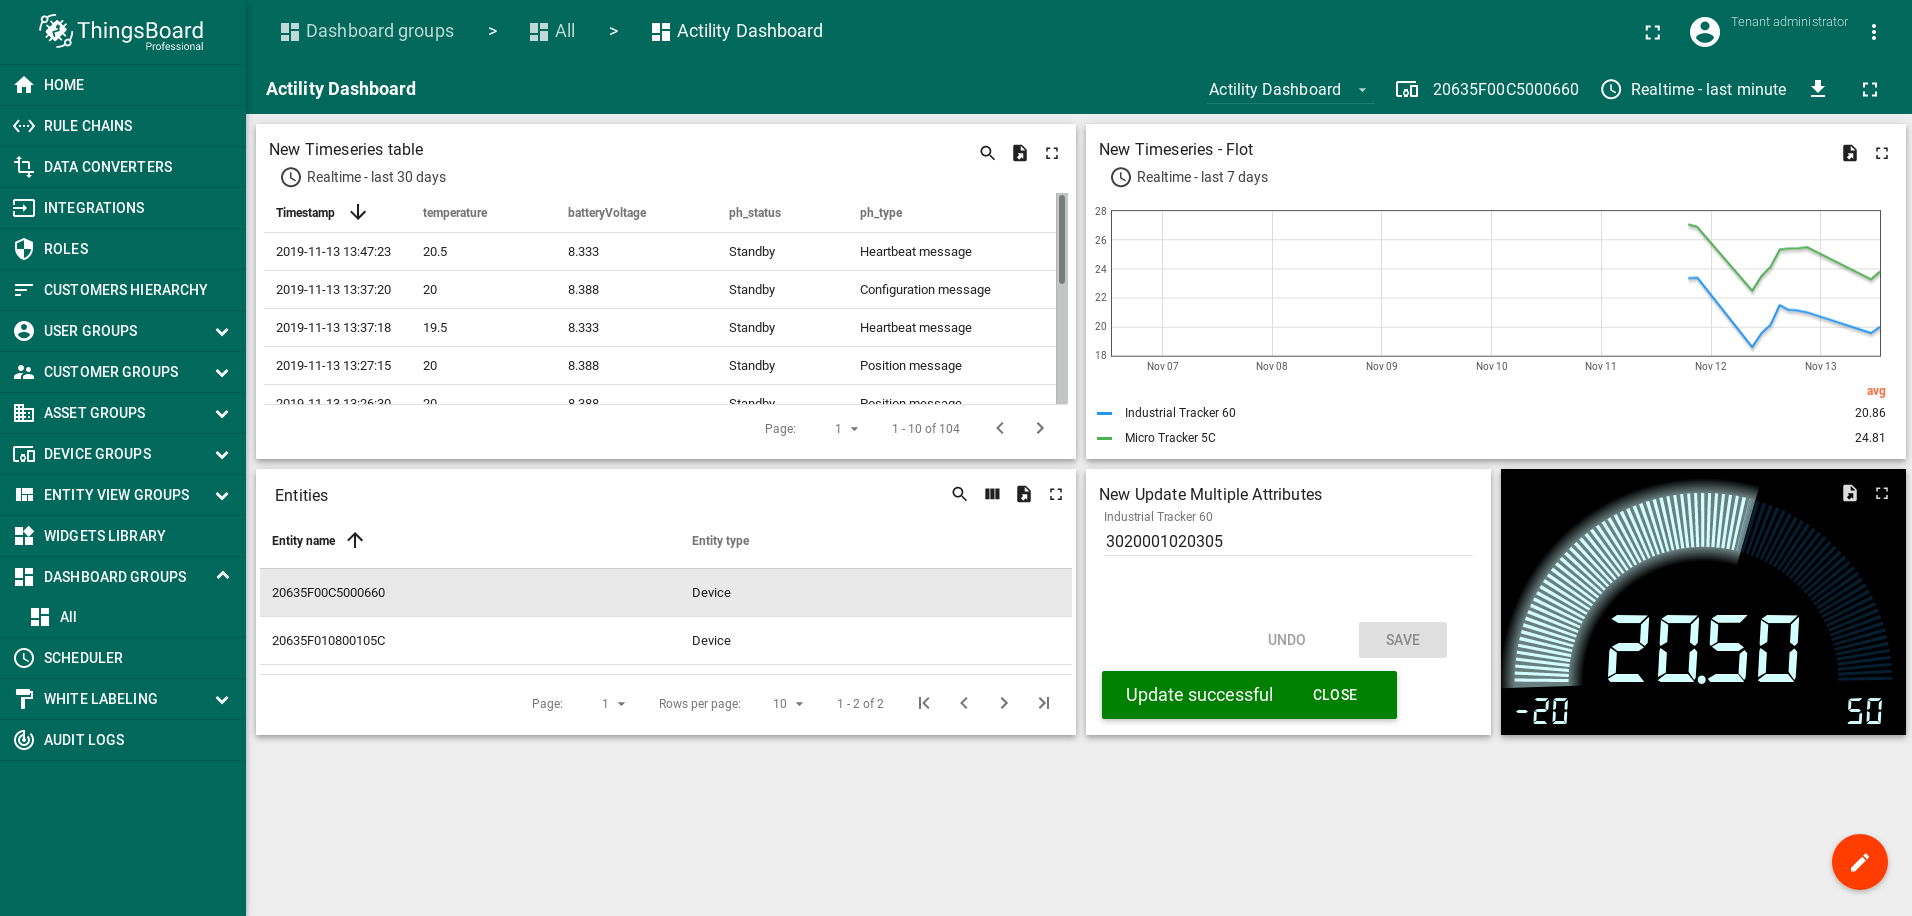
Step 7. Creation and configuration of the Dashboard
Screenshot of the Dashboard after finishing its creation (click to open expanded view)
Example: Dashboard in json format
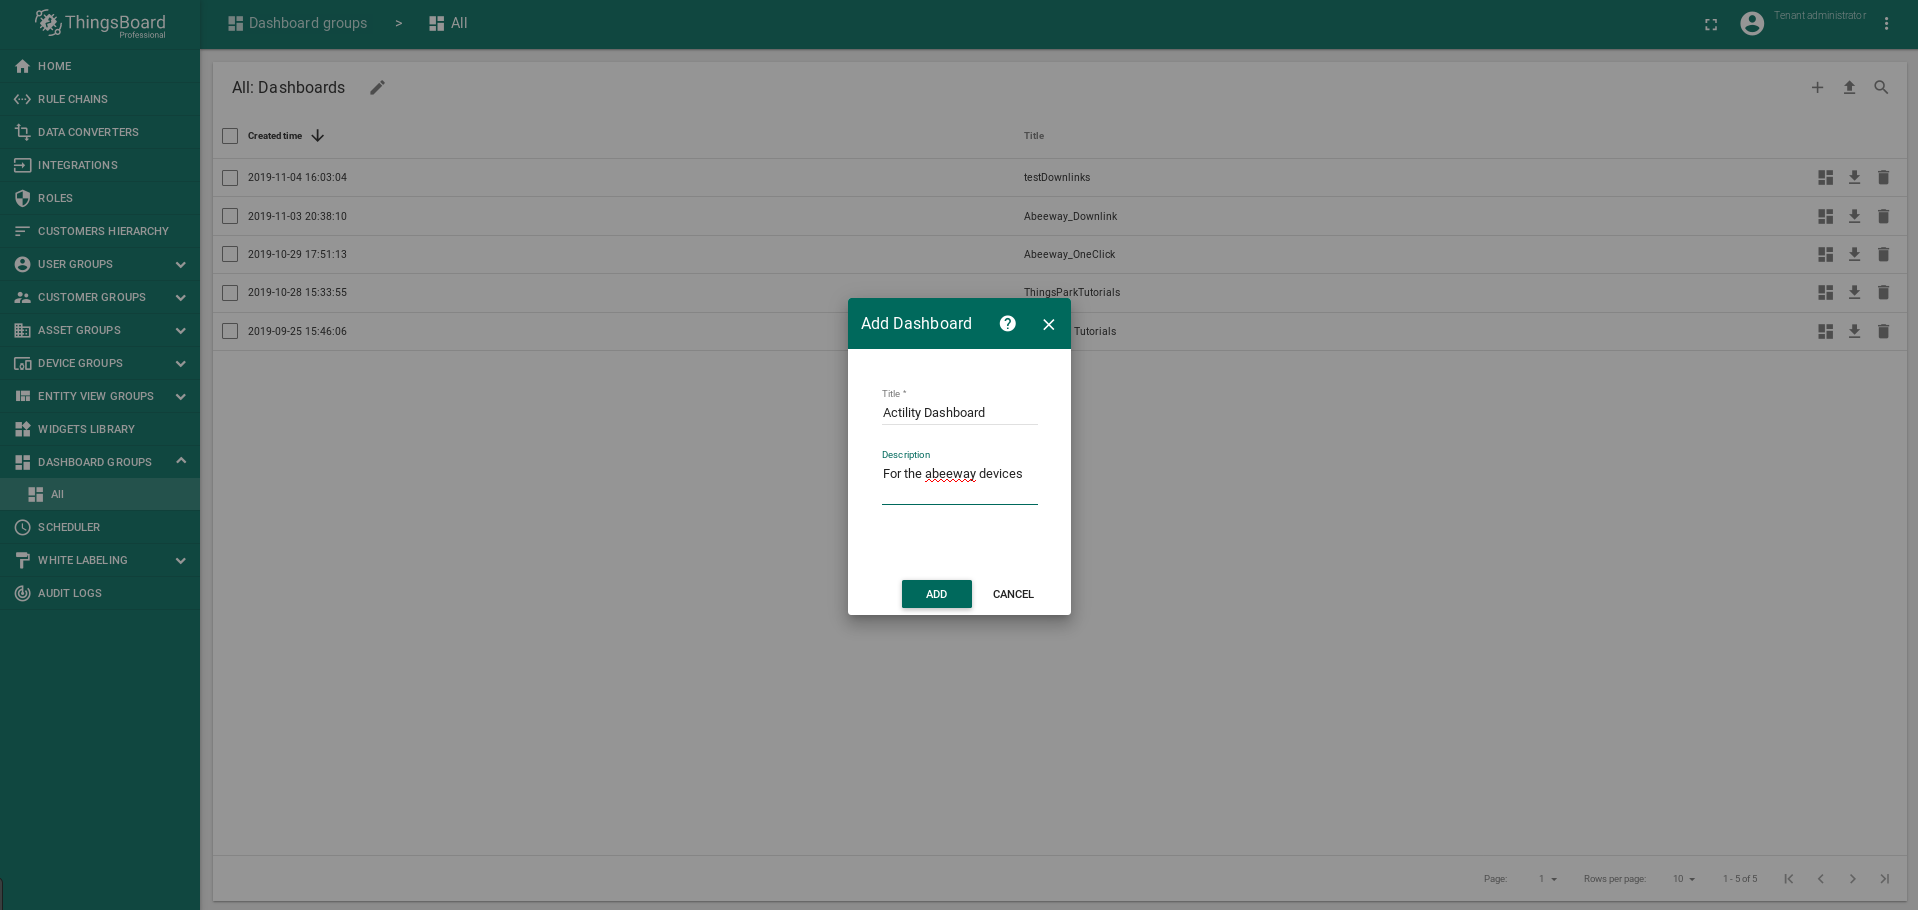
- Creation of the Dashboard
Screenshot of the creation of the Dashboard (click to open expanded view)
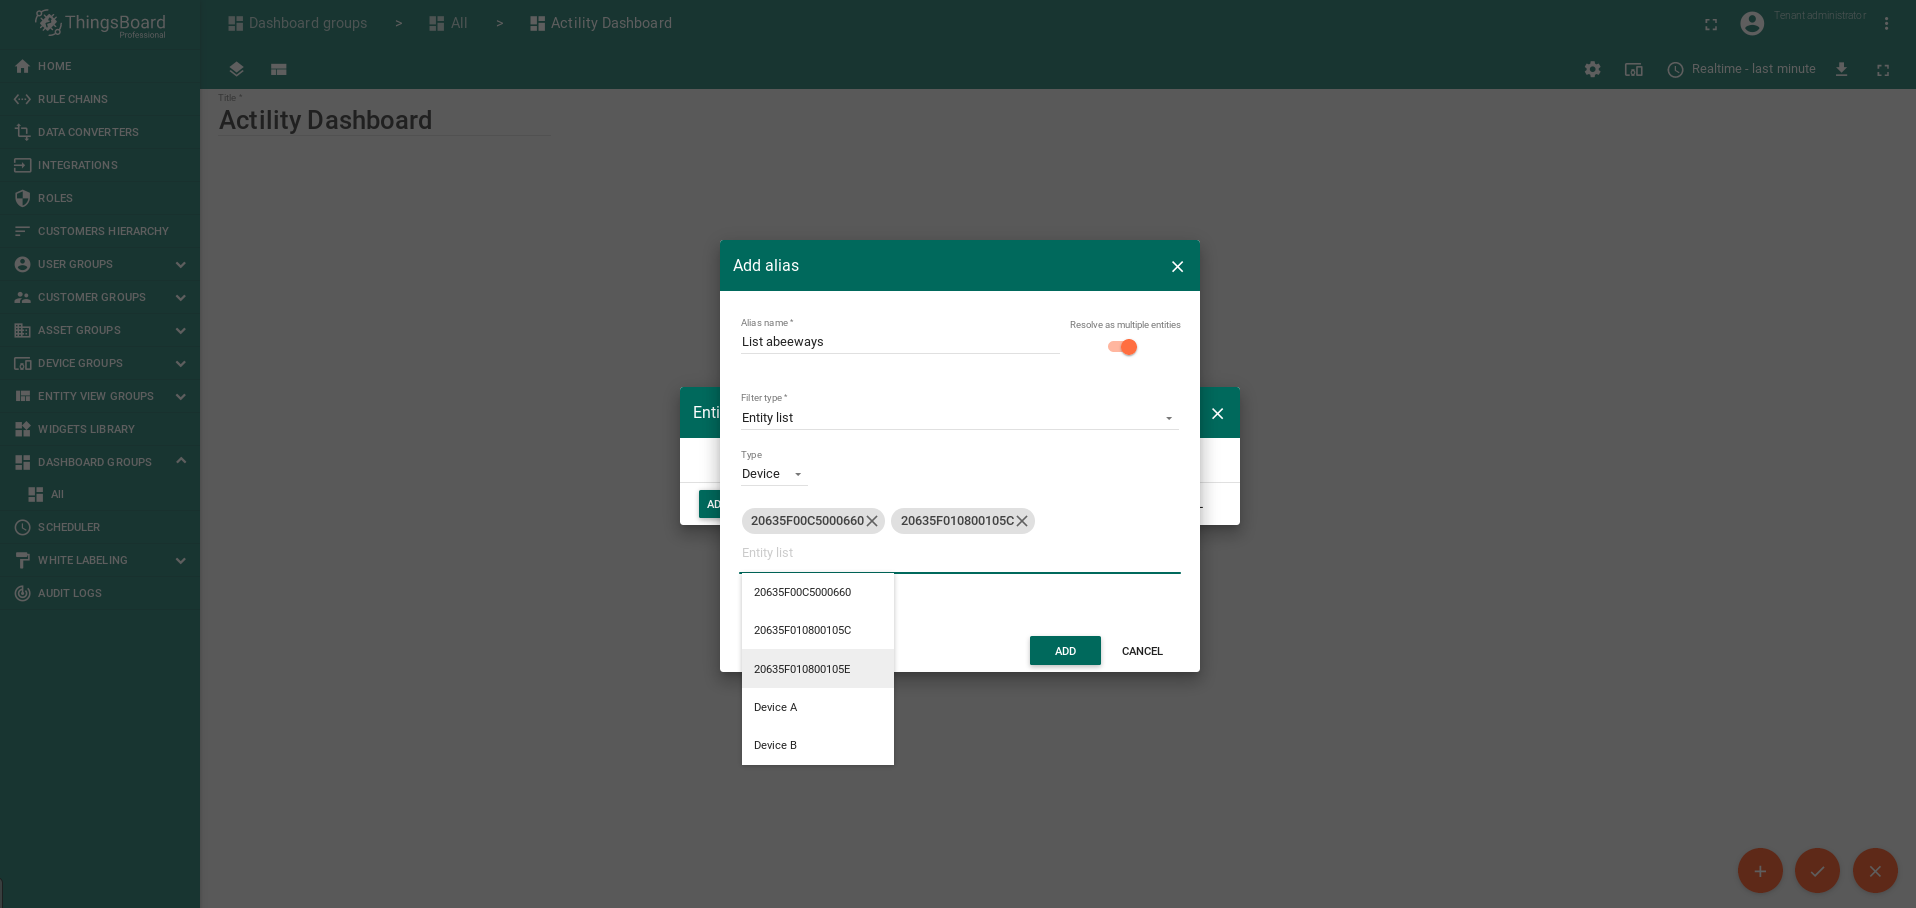
- Open Dashboard and add to:
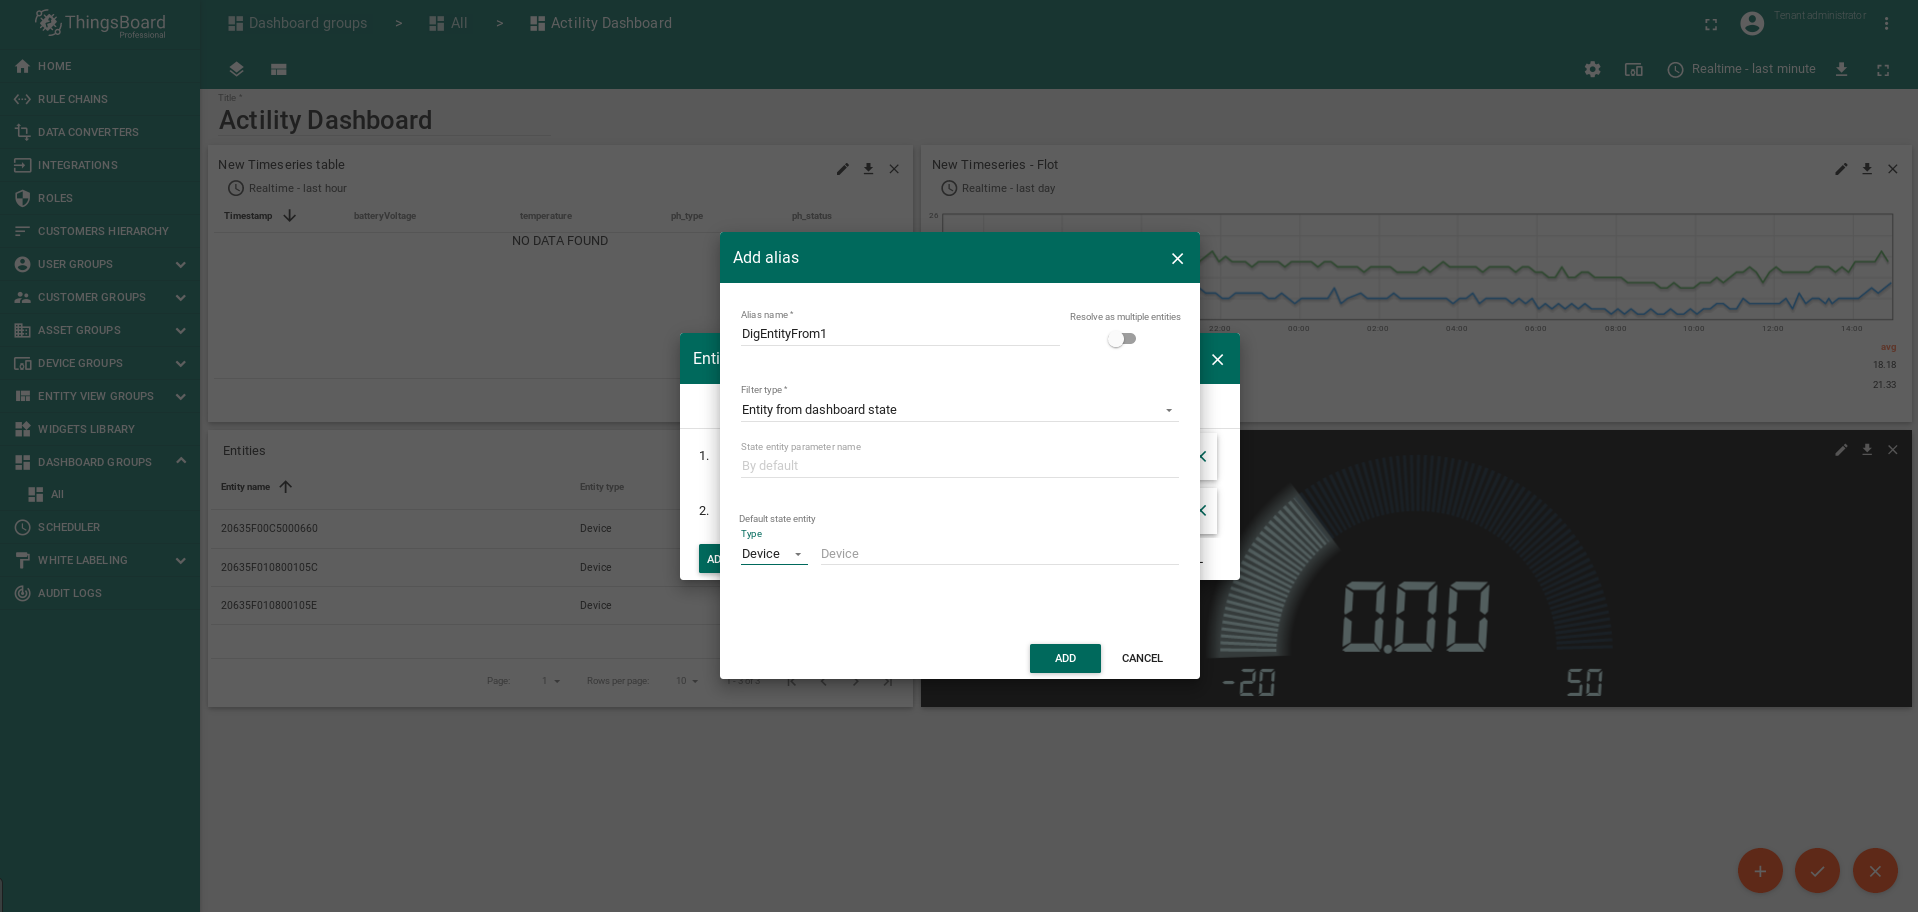
alias (List abeeways): filter_type: Entity_list, type: Device, device_names: DevEUI_1_, DevEUI_2_, DevEUI_3_... - Open Dashboard and add to: alias (DigEntityFrom): type: Entity from dashboard state, type: Device
Screenshot: open Dashboard and add to: alias (List abeeways): filter_type: Entity_list, type: Device, device_names: DevEUI_1_, DevEUI_2_, DevEUI_3_...
(click to open expanded view)
Screenshot: open Dashboard and add to: alias (DigEntityFrom): type: Entity from dashboard state, type: Device
(click to open expanded view)
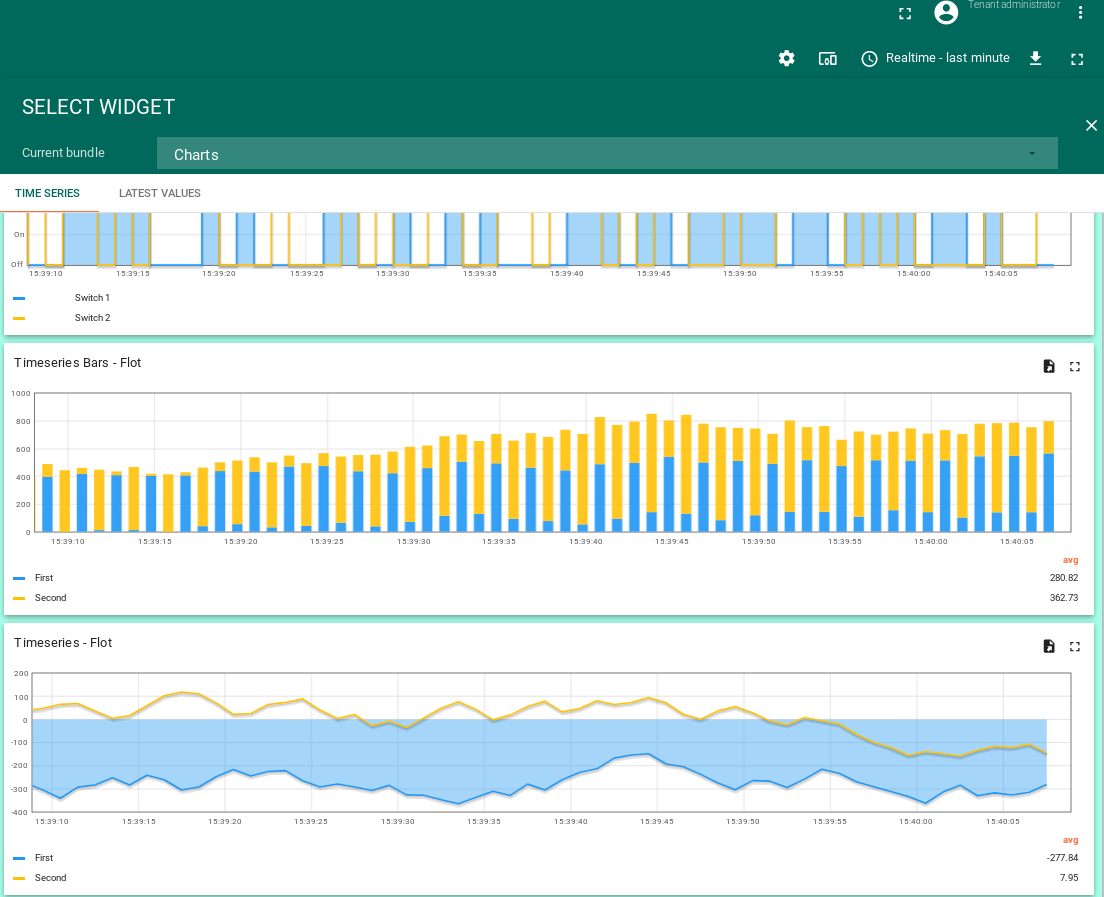
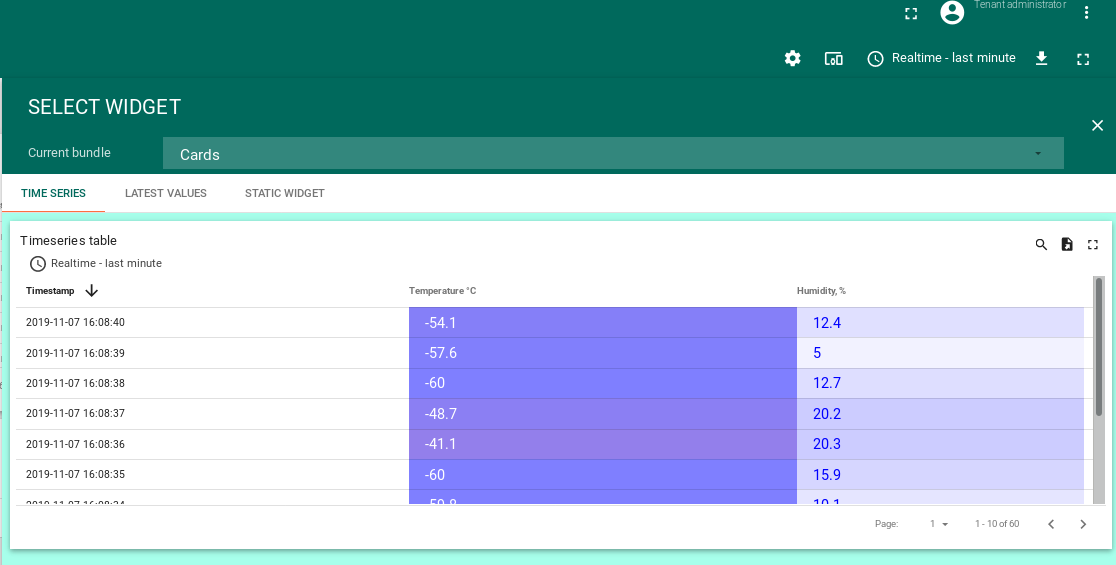
- Add to the Dashboard new widgets:
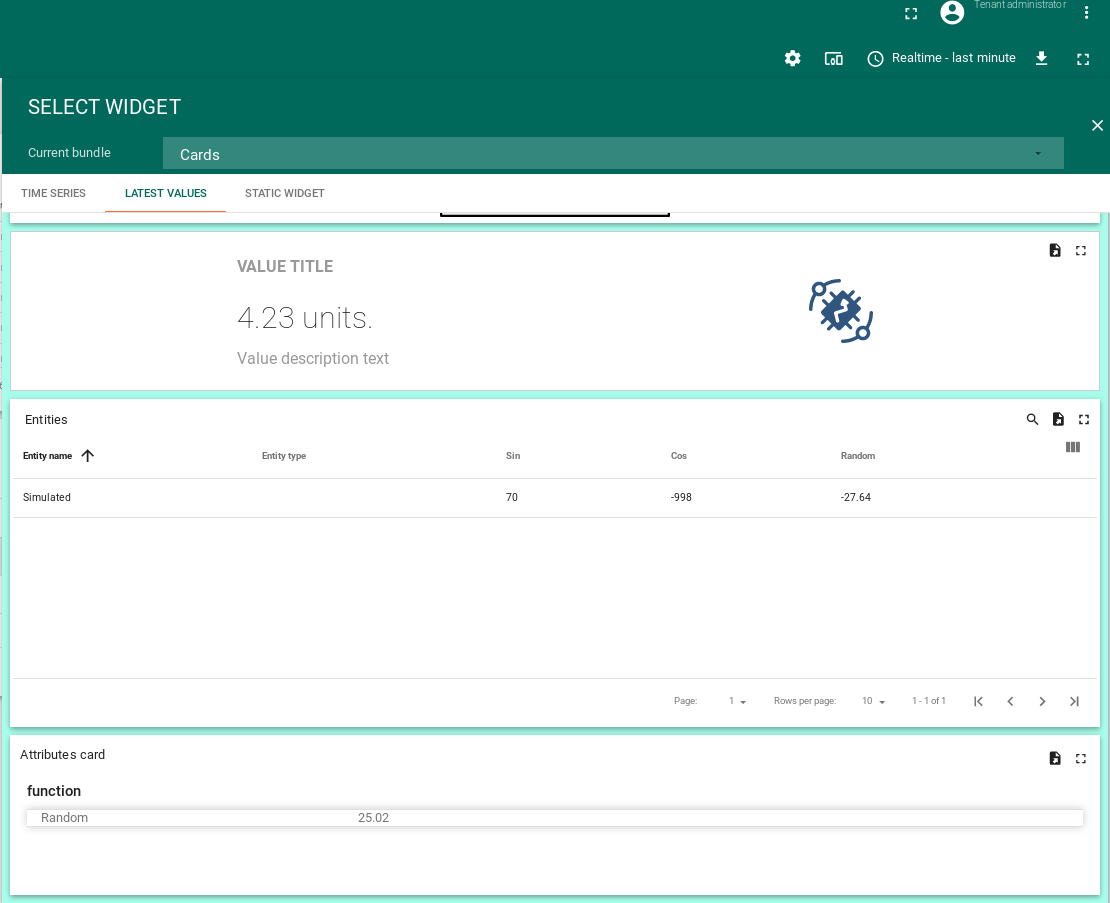
- widget number 1:
- Current_bundle: Cards -> latest_values -> Entities:
- Datasources: type: Entity, parameters: List abeeways
- Action: action sources: on row click, Name: ${entityName}, type: Update_current_dashboard_state, Set_entity_from_widget
- widget number 2:
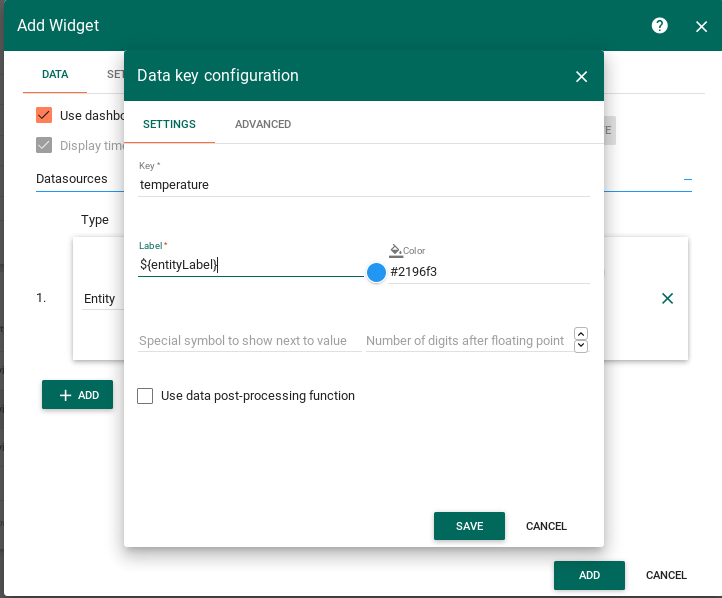
- Current_bundle: Charts -> time_series: Timeseries_Float:
- Data_Source: type: Entity, parameters: List_abeeways, key:temperature, label: ${entityLabel}
- widget number 3:
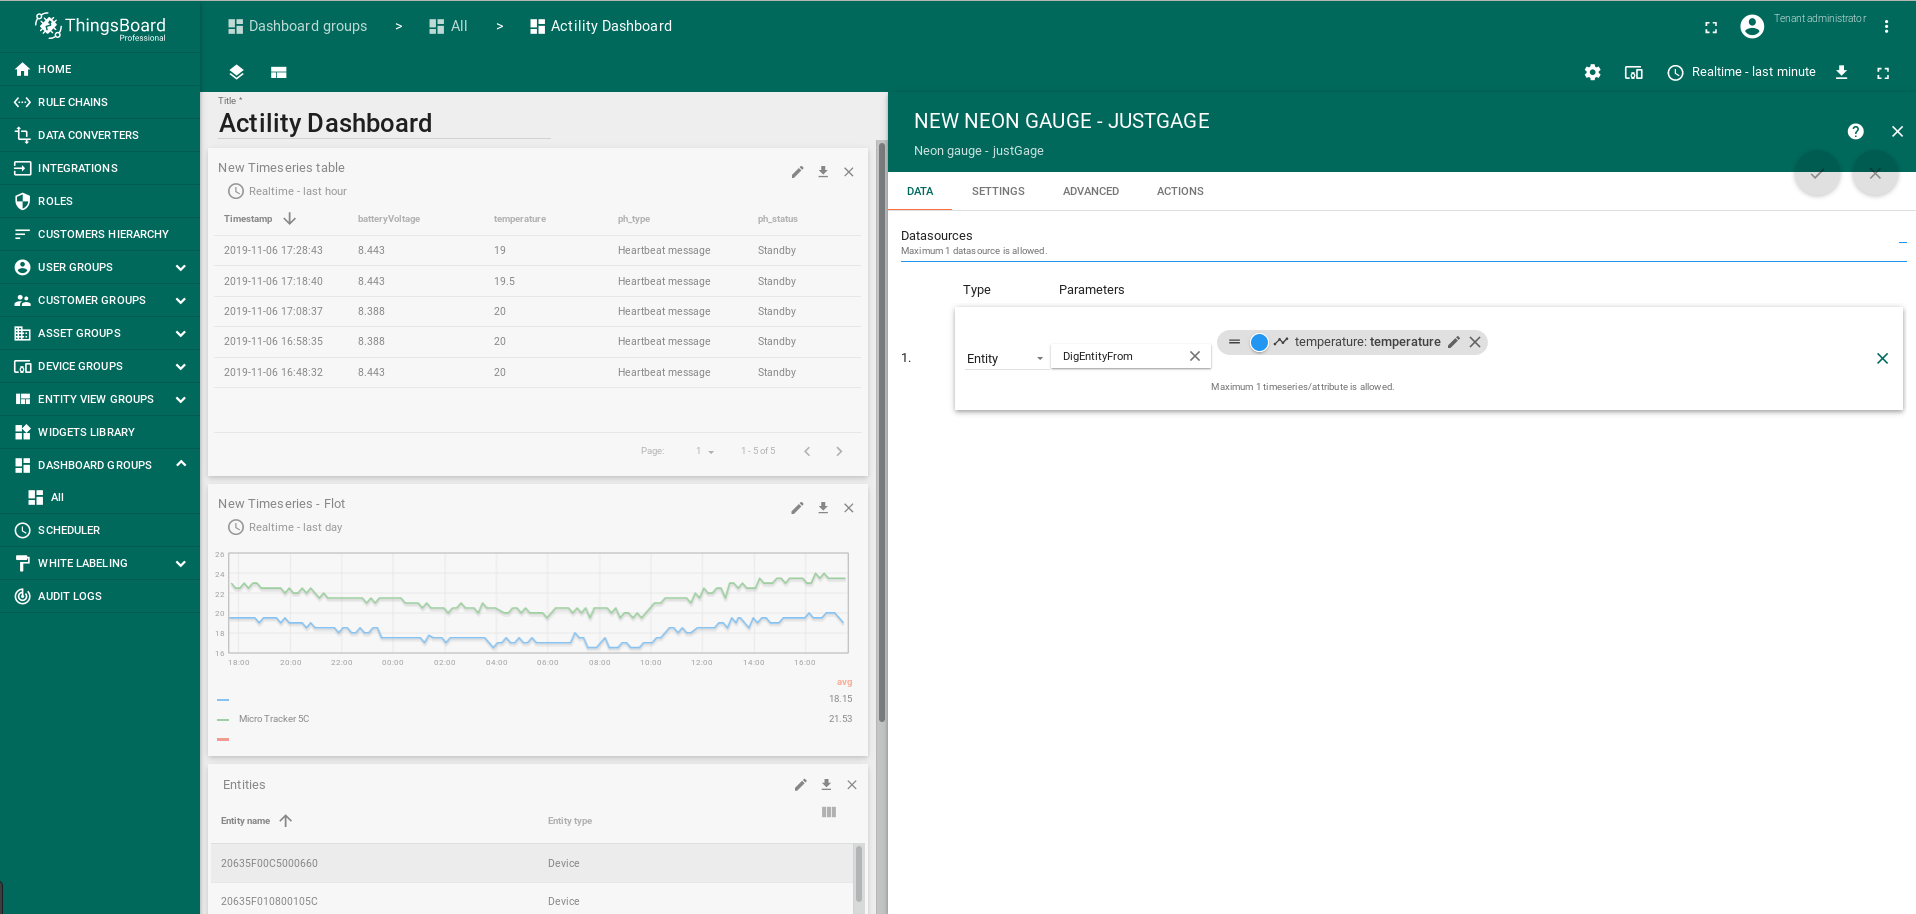
- Current_bundle: Digital_guages
- Data_Source: type: Entity, parameters: DigEntityFrom, key:temperature, label: temperature
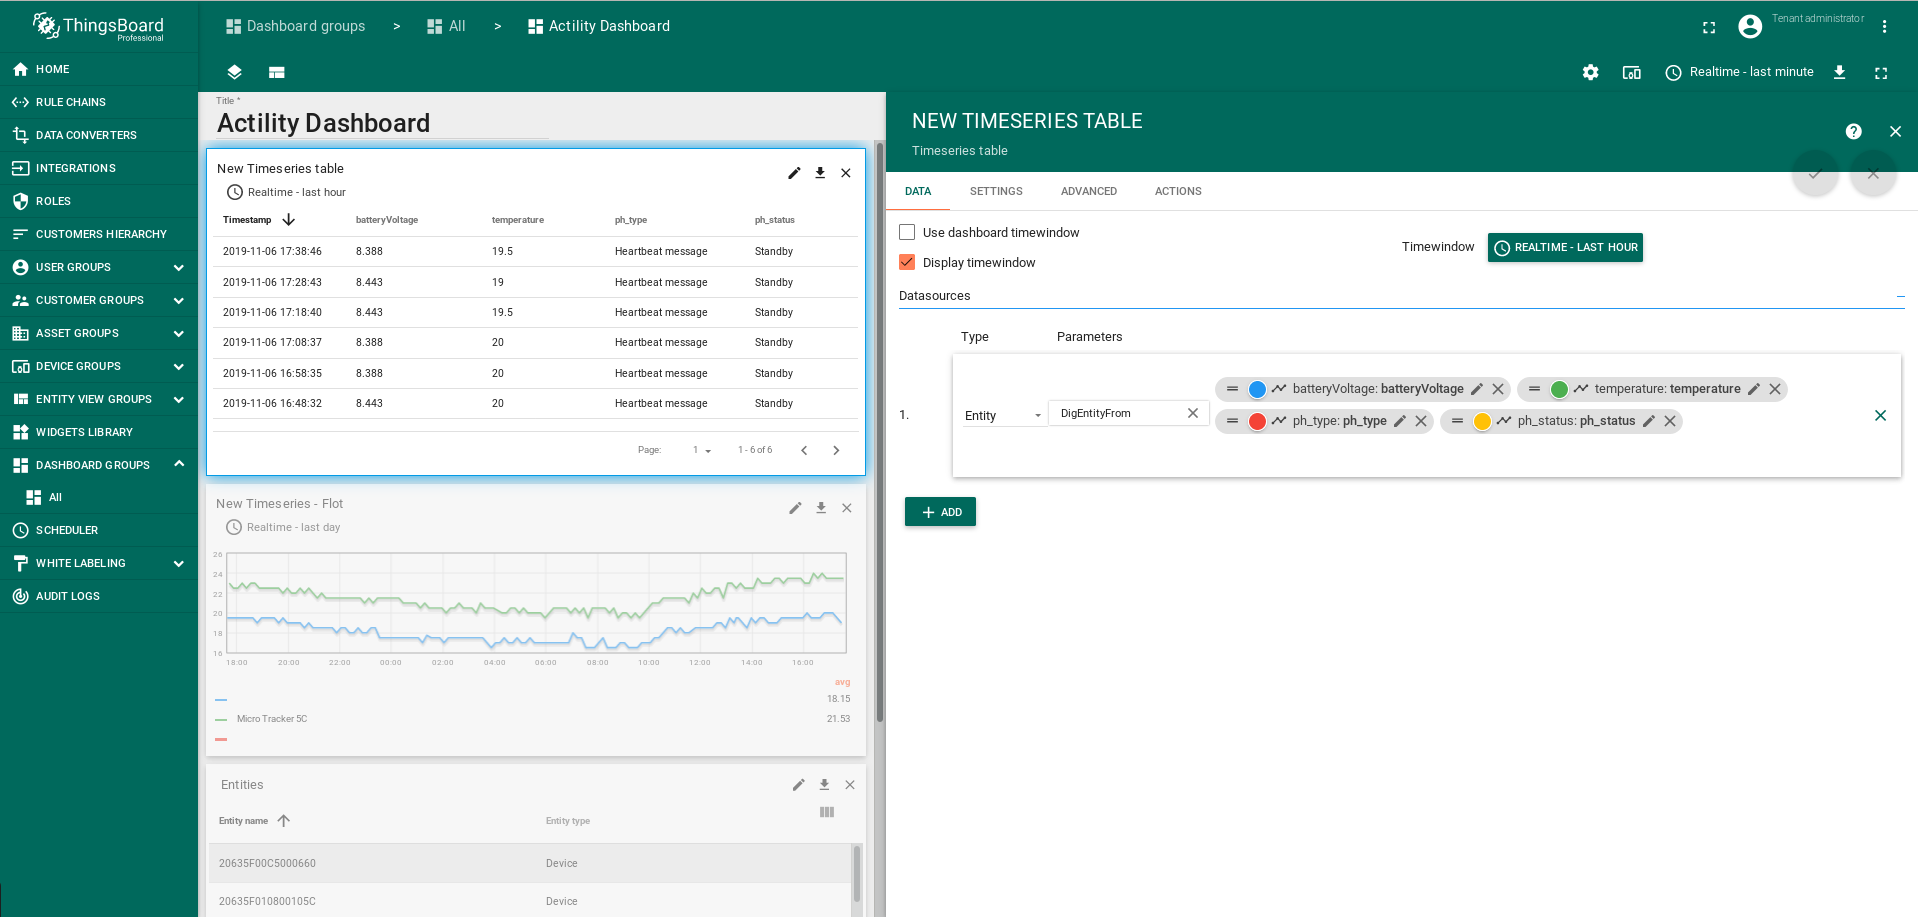
- widget number 4:
- Current_bundle: Cards ->Timeseries
- Data_Source: type: Entity, parameters: DigEntityFrom
- keys:temperature, label: temperature
- keys:batteryVoltage, label: batteryVoltage ...
- widget number 5:
- Current_bundle: Input widgets ->Update Multiple Attributes
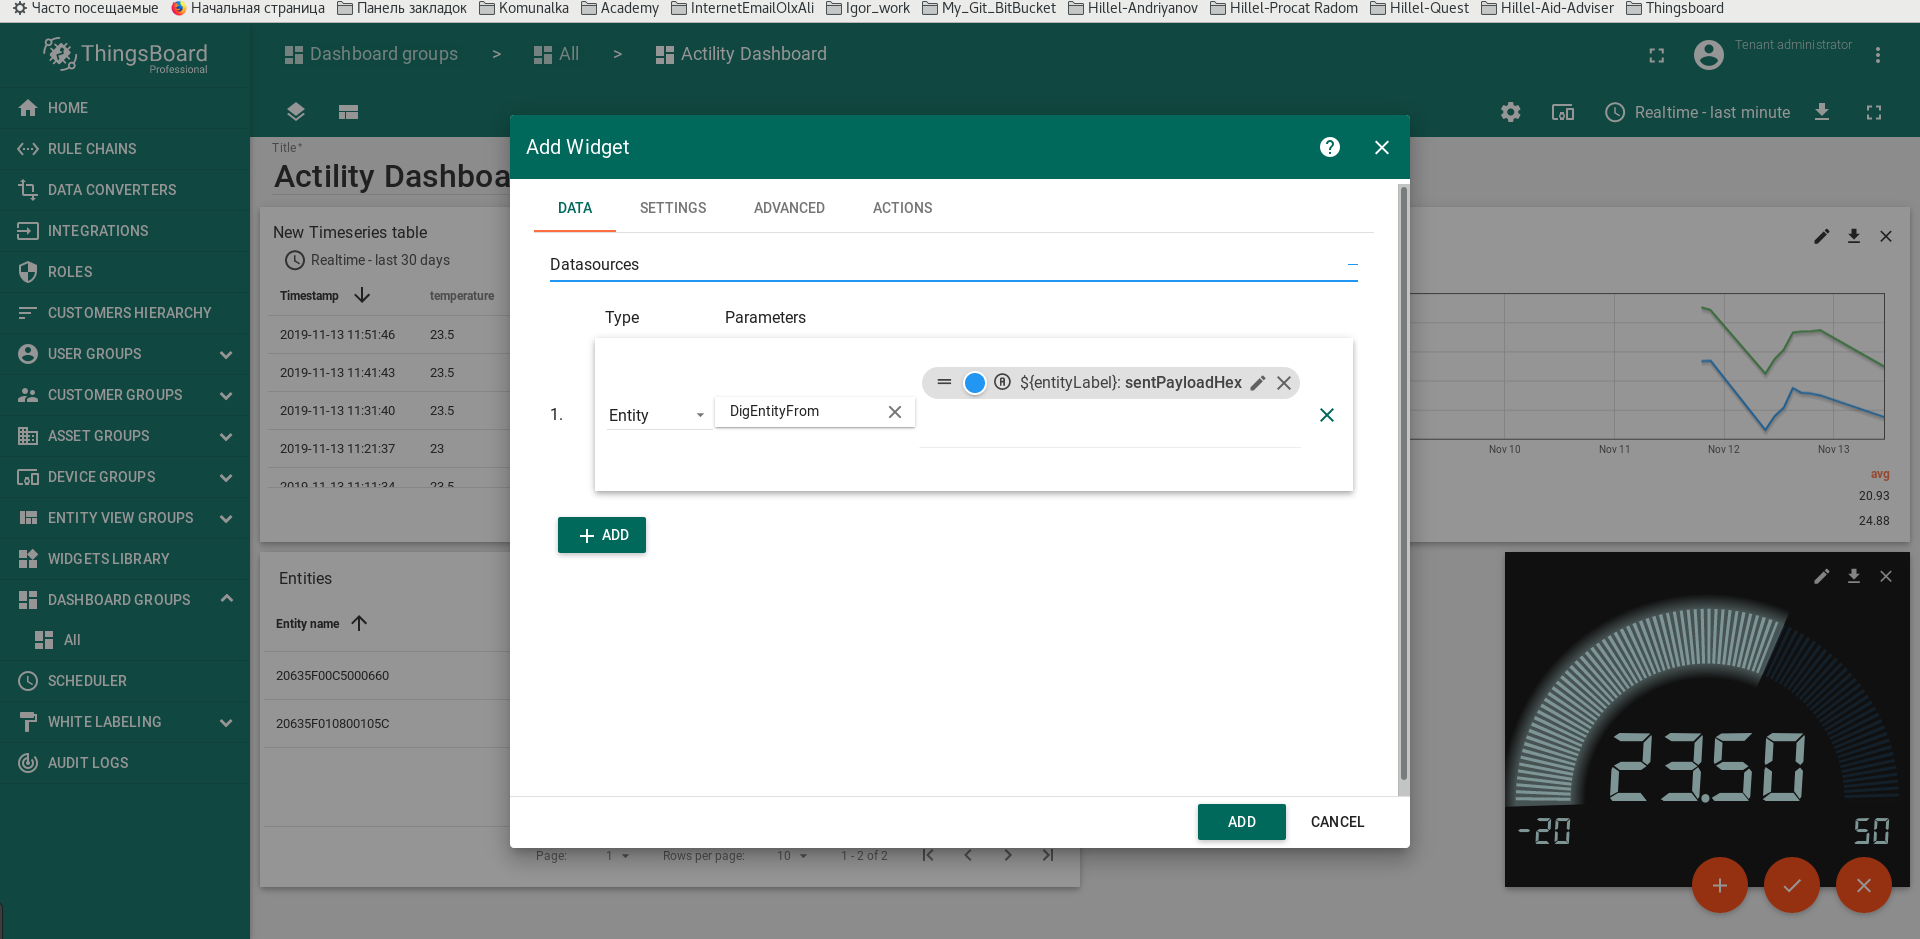
- Data_Source: type: Entity, parameters: DigEntityFrom
- keys:sentPayloadHex, label: ${entityLabel}
Screenshot of creation of the widget number 1 (click to open expanded view)
Screenshot of widget settings - action sources: on row click to widget number 1 (click to open expanded view)

Screenshot of creation of the widget number 2 (click to open expanded view)
Screenshot of adding datasource to widget number 2 (part 1) (click to open expanded view)
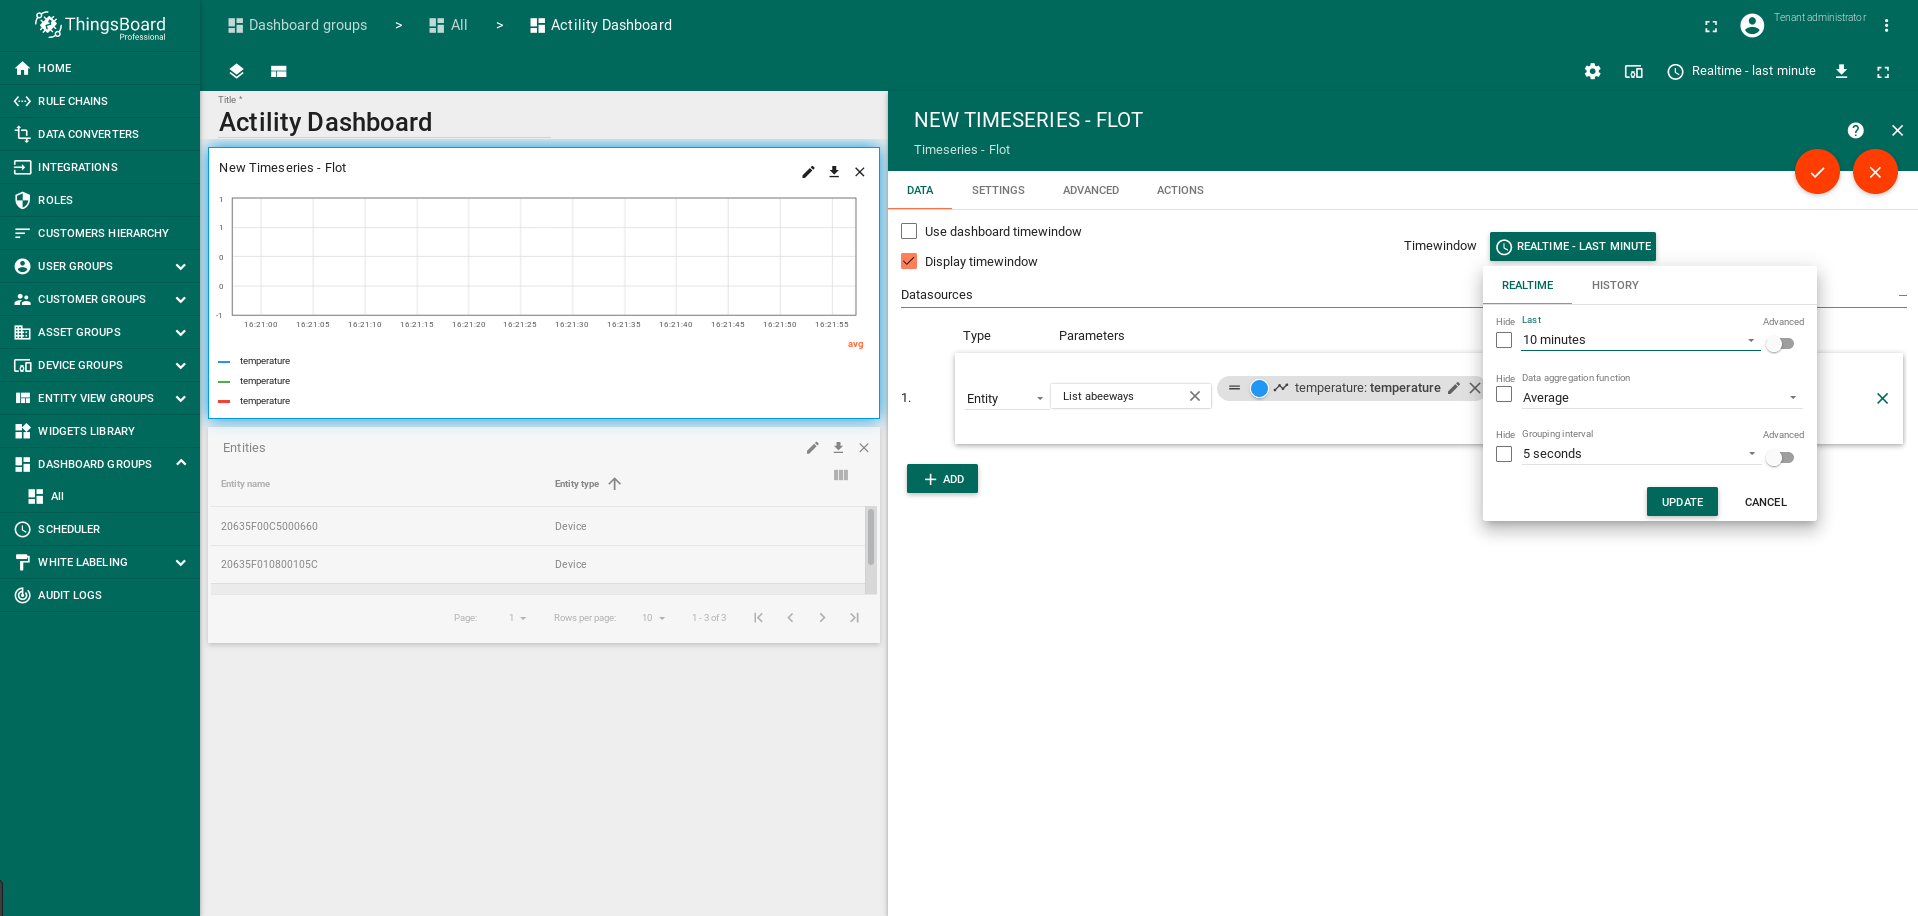
Screenshot of adding datasource to widget number 2 (part 2) (click to open expanded view)
Screenshot of creation of the widget number 3 (click to open expanded view)
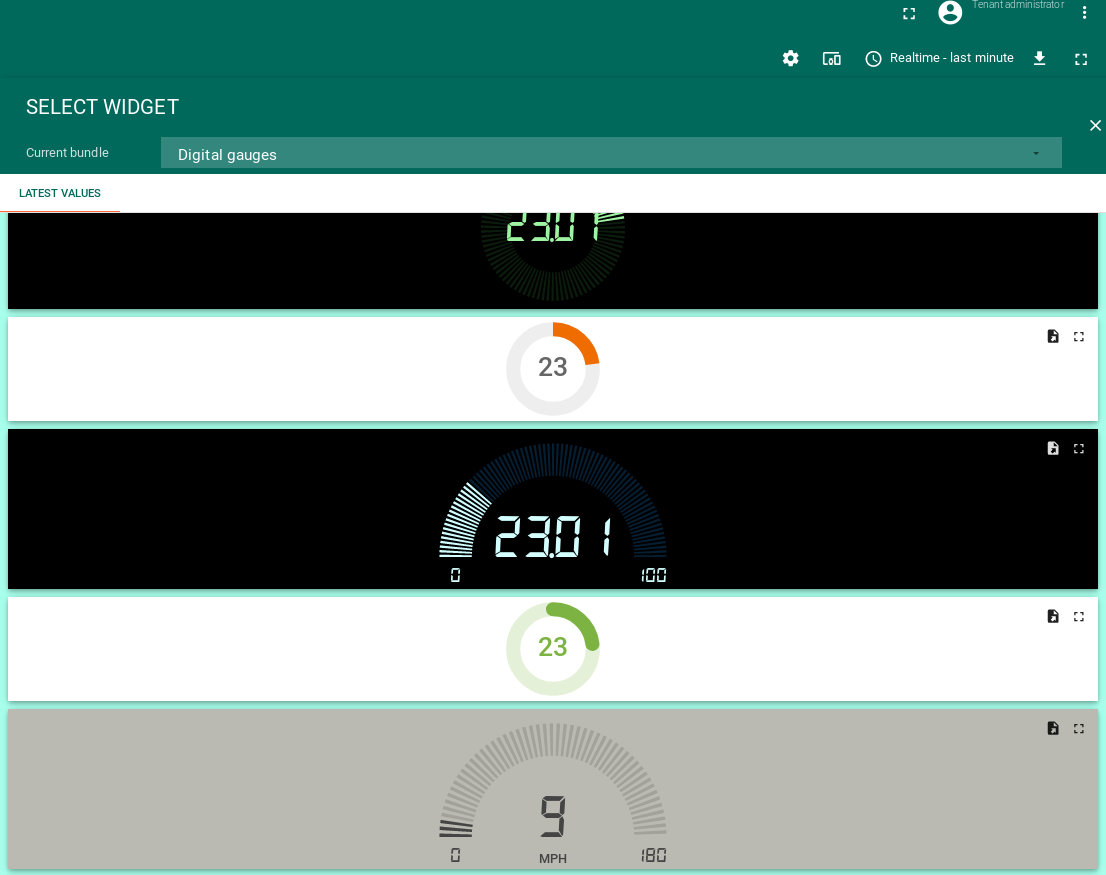
Screenshot of adding datasource to widget number 3 click to open expanded view)
Screenshot of creation widget number 4 (click to open expanded view)
Screenshot of adding datasource to widget number 4 (click to open expanded view)
Screenshot of creation of the widget number 5 (click to open expanded view)
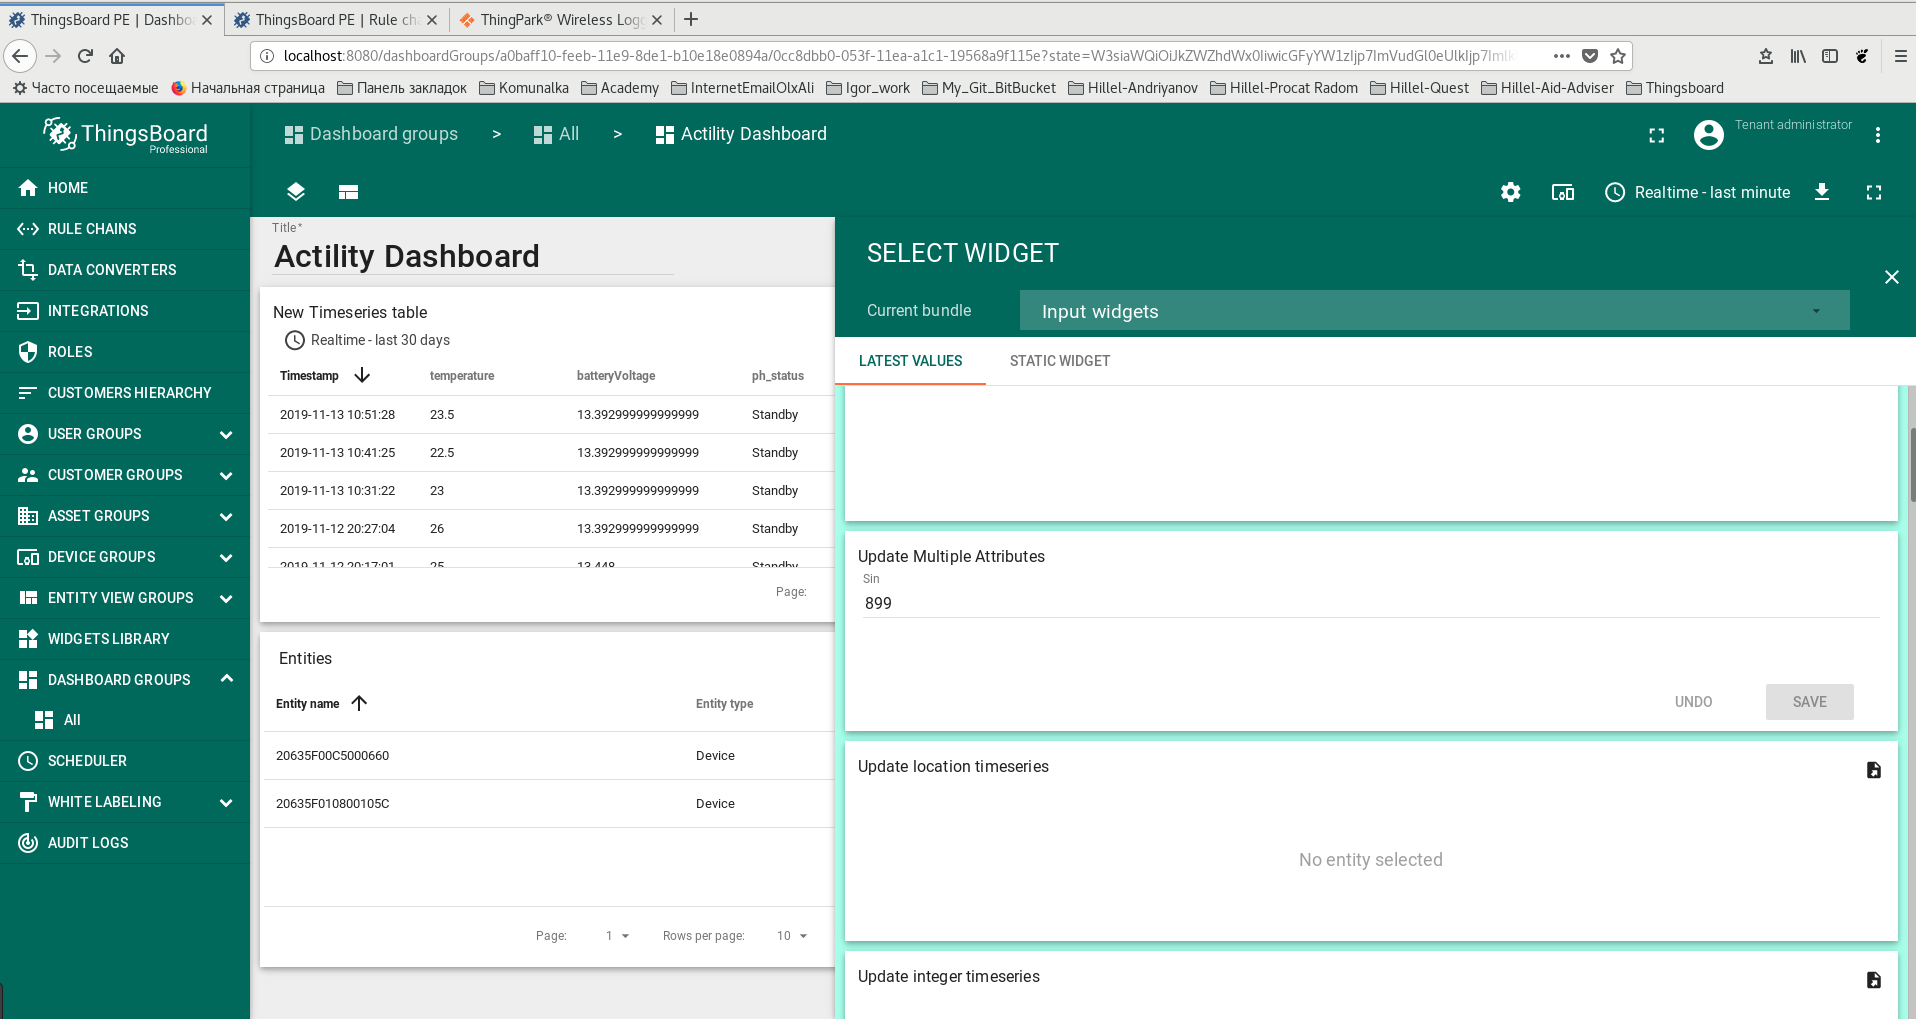
Screenshot of adding datasource to the widget number 5 (click to open expanded view)
-Note:
- Widgets Number 1 and Number 2 with alias Entity_list.Device.
- Widgets Number 3 and Number 4 with alias DigEntityFrom.
Step 8: Post telemetry and verify the Integration configuration
Screenshot of Integration settings change log see here (click to open expanded view)
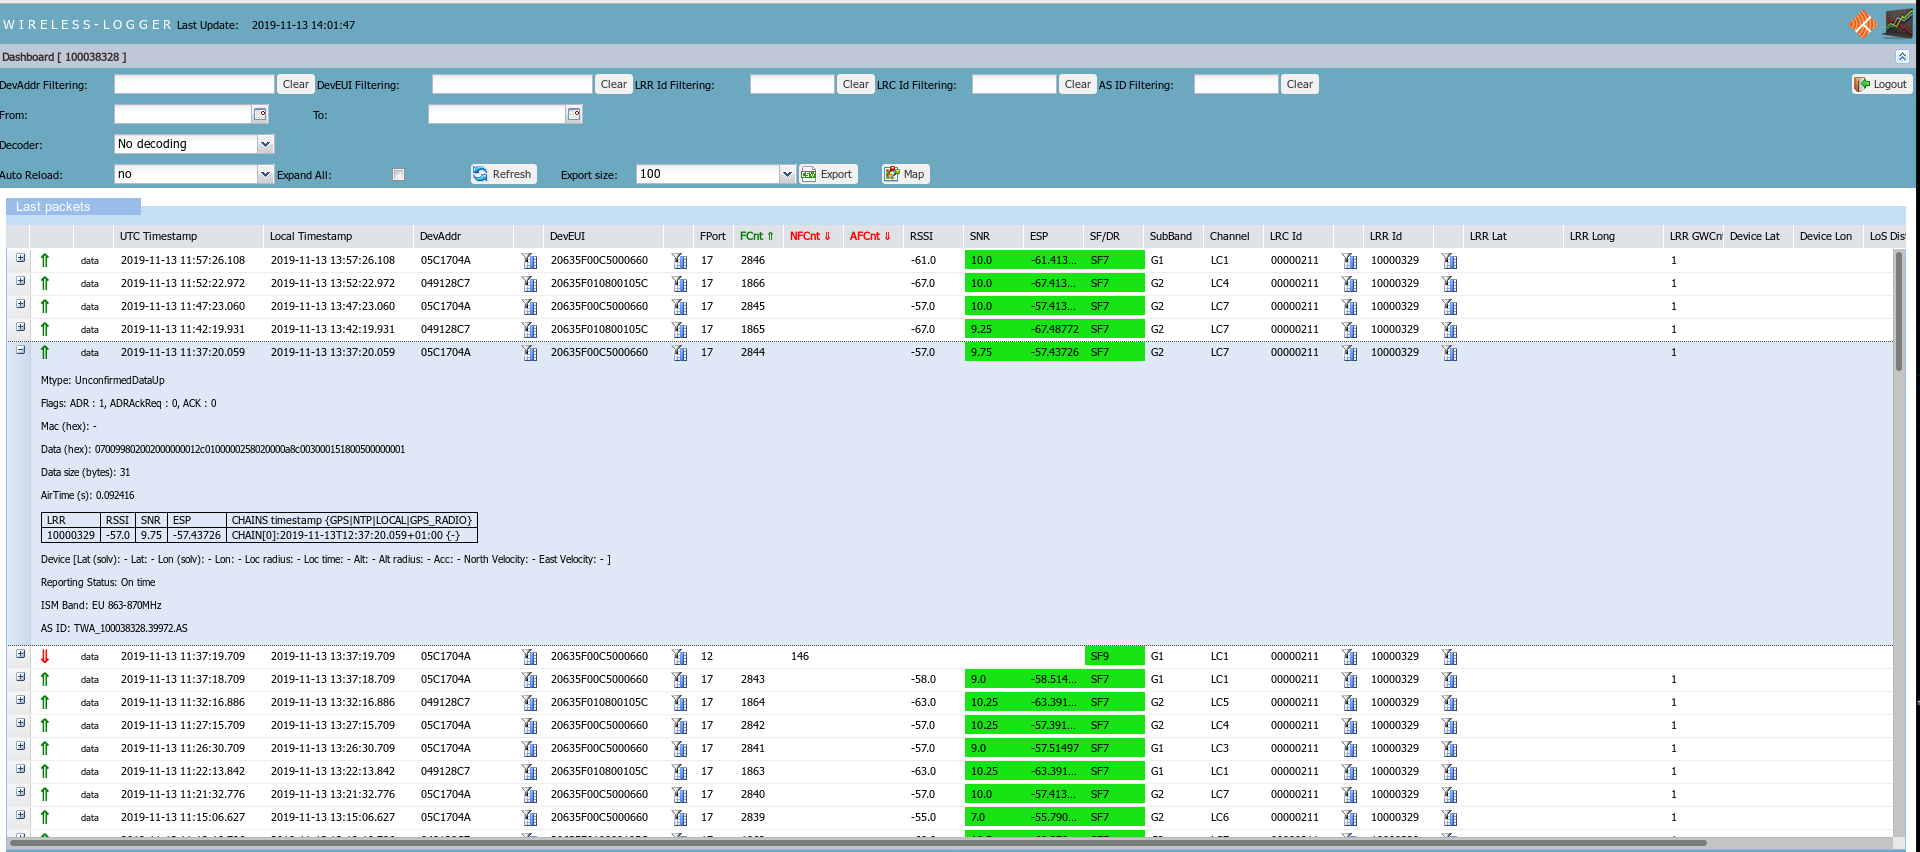
Screenshot of a log of incoming messages from from ThingPark Wireless OSS intelligent logger (Actility) Platform:
(click to open expanded view)
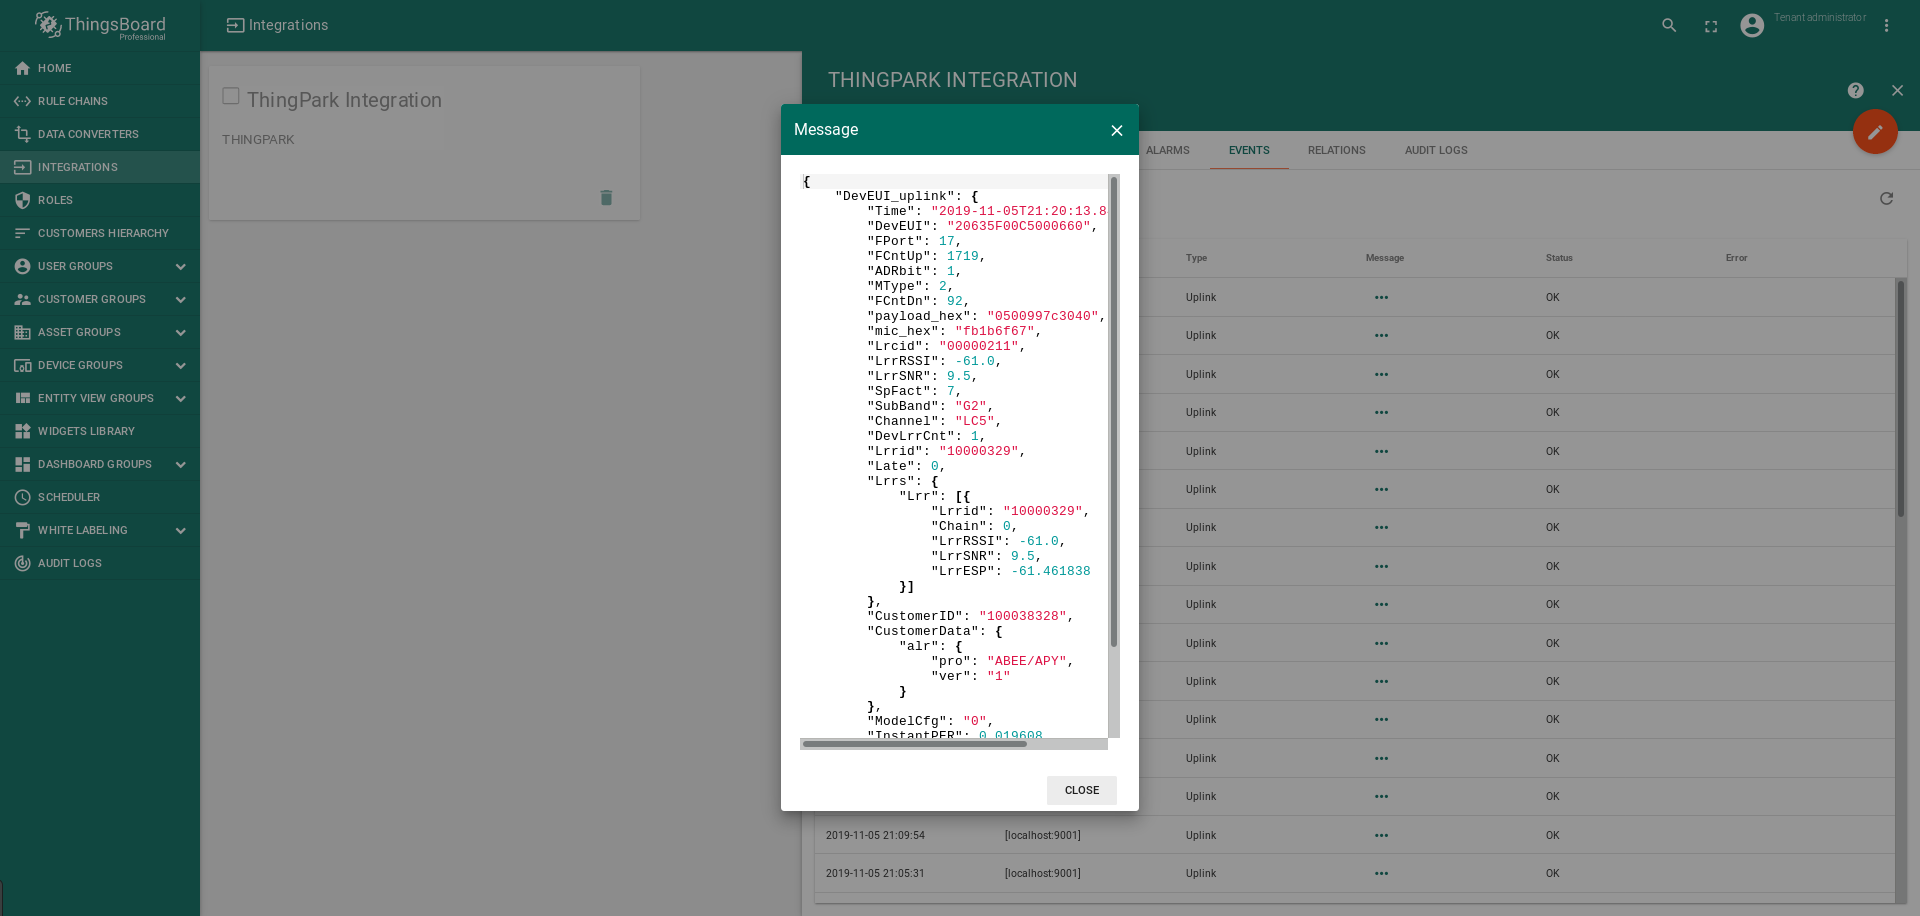
If your devices are active and you do everything correctly when you connect the ThingPark Wireless OSS intelligent
logger (Actility) Platform, then you will see incoming messages on the dashboard you created.
Screenshot of incoming messages to the dashboard you created (click to open expanded view)
Step 9: Configuration the Root Rule Chain (Root)
After adding widget number 5, it must be associated with the downlink decoder.
To do this, go to the “Rule Chain” tab and open the “Root Rule Chain”.
Screenshot of configuration of the Root Rule Chain for the message to be sent to device (click to open expanded view)
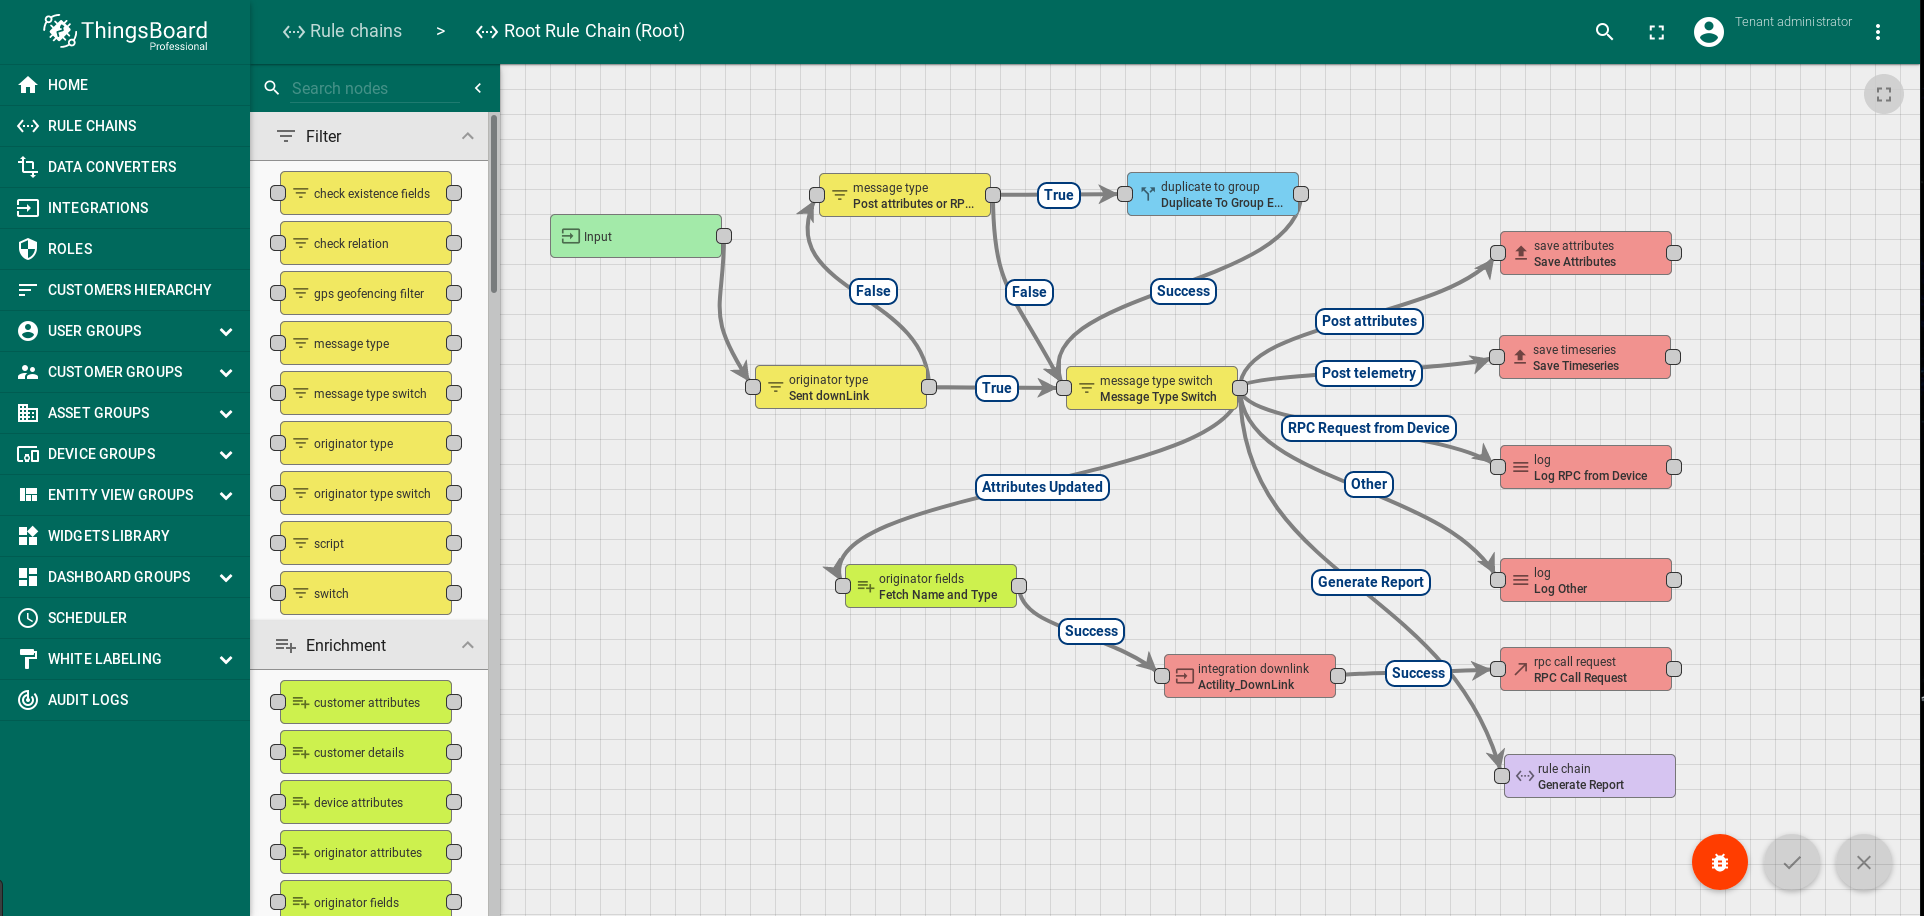
Editing the “Root Rule Chain”:
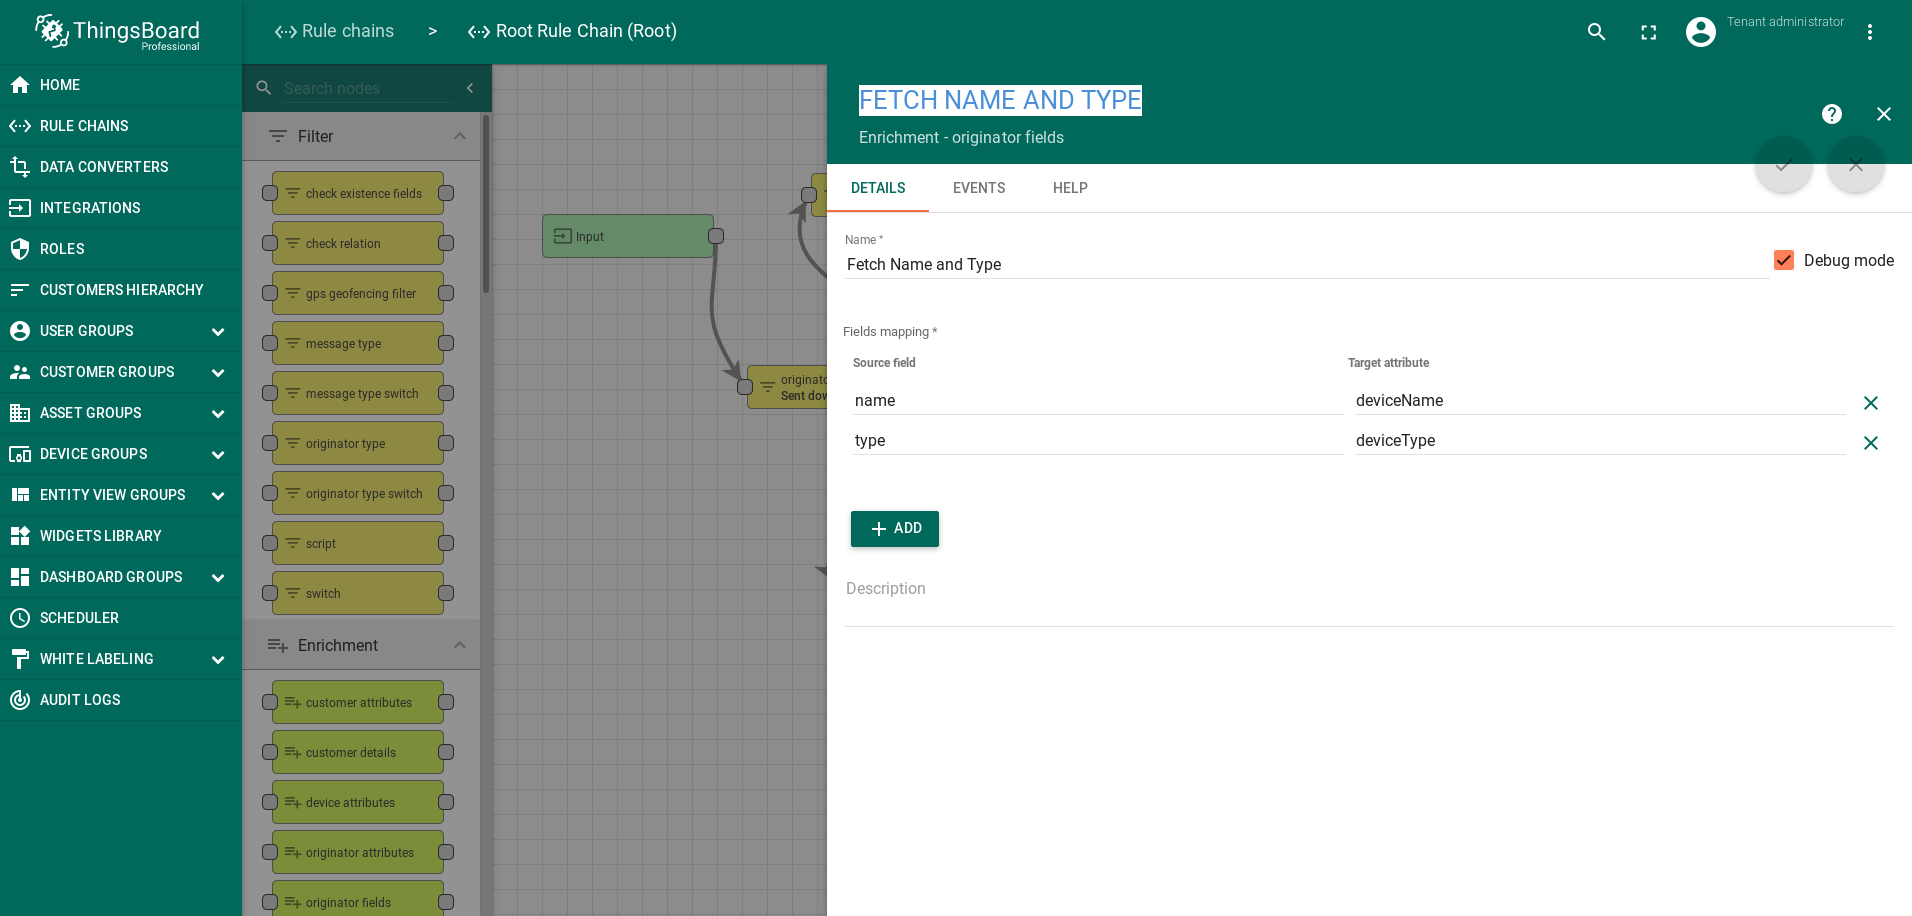
- To get the original name of the device via metadata After "Message Type Switch" add Enrichment node: "originator fields" with the name "Fetch Name and Type":
- name: deviceName
- type: deviceType
- The relationship between "Message Type Switch" and "Fetch Name and Type":
- "Rule node link details": "Attributes Update"
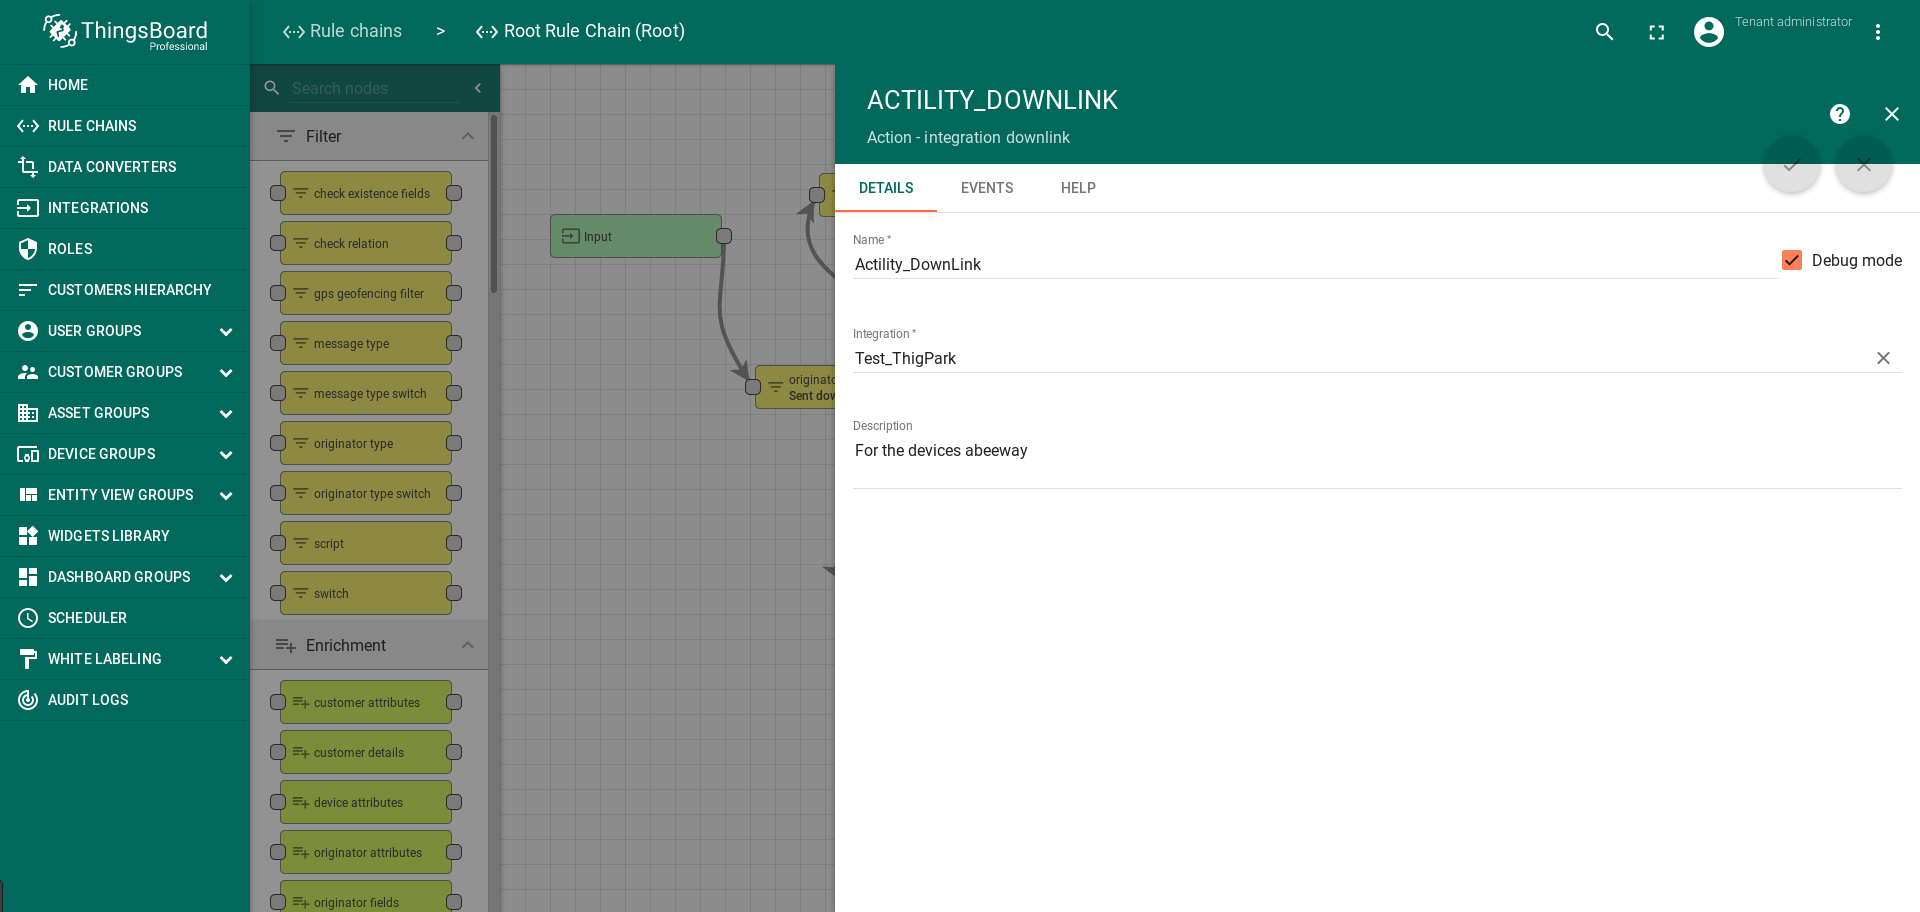
- To receive downlink data by a decoder and transmit decoded data to "Action - rpc call request":
- between "Fetch Name and Type" and "Action - rpc call request"
- add: Action: "integration downlink": name: Actility_DownLink, integration: Test_ThigPark
- The relationship between "Fetch Name and Type" and "Actility_DownLink":
- "Rule node link details": "Success"
- The relationship between "Actility_DownLink" and "Action - rpc call request":
- "Rule node link details": "Success"
Screenshot of the created Enrichment node: "originator fields" (click to open expanded view)
Screenshot of the created Action: "integration downlink" (click to open expanded view)
Step 10: Create and Sent Downlink messages
Before sending a message:
- you must create a heading in which the type of request is determined (information about the configuration, or about the status of the device, or about the new configuration)
and also the content of the data itself (a detailed description of the data).
Information to create Downlink messages (click to open expanded view)
- These messages are sent from the server to the tracker through the LoRa network. They are used to either configure or manage the tracker. Each message contains a header including:
- A message type
- An acknowledgement token
- Operational mode configuration
- Request device configuration
- Parameters configuration
The remainder of the message depends on the message type described in the following table.
(click to open expanded view)
| Message type | ID | Description |
| POD | 0x01 | Position on demand |
| Set Mode | 0x02 | hange the tracker operational mode |
| Request configuration | 0x03 | Request the actual configuration of the tracker |
| Start SOS mode | 0x04 | Turn on SOS mode |
| Stop SOS mode | 0x05 | Turn off SOS mode |
| Set Param | 0x0B | Modify parameter(s) |
| Debug command | 0xFF | Remove BLE bonding. Reset the tracker |
Create request: Position on demand (click to open expanded view)
Create request: Position on demand -> Mode: operating modes. Acceptable values are: (click to open expanded view)
| Mode | Value |
| Standby | 0 |
| Motion tracking | 1 |
| Permanent tracking | 2 |
| Motion start/end tracking | 3 |
| Activity tracking | 4 |
| Off mode | 5 |
1
2
3
4
                    {...
                          payloadHex: "0203", ...
                    }
1
2
3
4
5
6
7
8
9
10
11
                    {...
                        payloadHex: "030605090C01", ...
                        * "05" - geoloc_sensor,
                        * "09" - gps_timeout,
                        * "0C" - gps_convergence,
                        * "01" - lora_period,
                        Special parameter Id:
                        * "0xFD": get the BLE version.
                        * "0xFE": get the firmware version.
                    }
1
2
3
4
5
6
                    {...
                          payloadHex: "0B 0A 0C00000078 1100000E10", ...
                         * "0C00000078" - 0C - gps_convergence, 0x78 - value (sec),
                         * 1100000E10 - 11 - gps_standby_timeout. 0xE10 - value (sec).
                    }
Sending Downlink messages (click to open expanded view)
- Messages to devices are sent from widget number 5:
Screenshot of the sent message from widget number 5 (click to open expanded view)
Example of the creation message (click to open expanded view)
1
2
3
4
                {...
                      payloadHex: "03020001020305",
                ...}
1
2
3
4
5
6
7
8
9
10
11
                {...
                    Byte 0 Byte 1 Byte 2-21
                    "0x03" "ACK" Byte "2-21" Parameter ID list (optional)
                    Special parameter Id:
                    ➢ 0xFD: get the BLE version.
                    ➢ 0xFE: get the firmware version.
                    Byte 2-21 00 01 02 03 04 05 06 07 08 09 0a 0b 0c 0d 0e 0f 10 11 12
                    13 fd fe
                    00 01 02 03 05 06 08 09 0a 0b 0c 0d 0e 0f 10 11 12 13 fe
                ...}
Screenshot of receiving / sending messages to the device ThingPark Wireless OSS intelligent logger (Actility) (click to open expanded view)
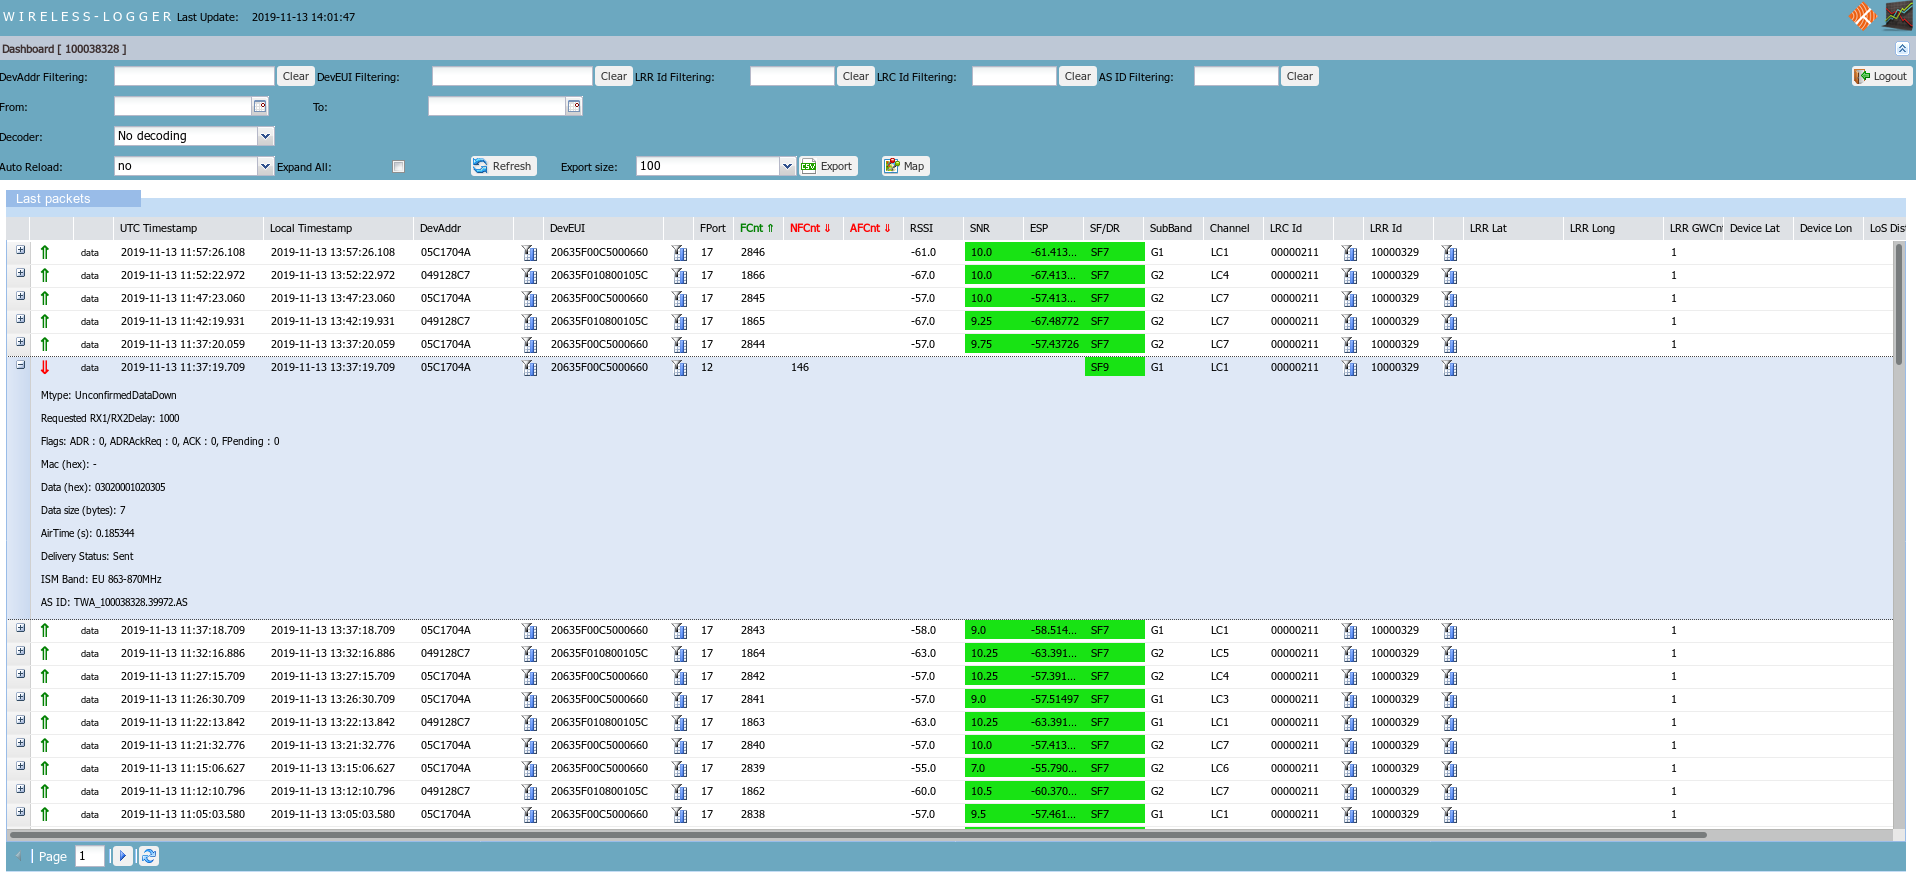
Screenshot of receiving messages from the device ThingPark Wireless OSS intelligent logger (Actility) (click to open expanded view)
Screenshot of receiving confirmation from the ThingPark Wireless to ThingsBoardabout sending a message to the device (click to open expanded view)
Screenshot of decoding device response by Thingsboard UpLink decoder (click to open expanded view)
Next steps
-
Getting started guides - These guides provide quick overview of main ThingsBoard features. Designed to be completed in 15-30 minutes.
-
Installation guides - Learn how to set up ThingsBoard on various available operating systems.
-
Connect your device - Learn how to connect devices based on your connectivity technology or solution.
-
Data visualization - These guides contain instructions on how to configure complex ThingsBoard dashboards.
-
Data processing & actions - Learn how to use ThingsBoard Rule Engine.
-
IoT Data analytics - Learn how to use rule engine to perform basic analytics tasks.
-
Advanced features - Learn about advanced ThingsBoard features.