- Overview
- Prerequisites
- Modbus Device Structure Overview
- Step 1. Create a new gateway device on ThingsBoard
- Step 2. Add new Modbus connector
- Step 3. Check device data
- Conclusion
- Next steps
Overview
In this guide, we will describe how to connect an Modbus device to ThingsBoard CE using ThingsBoard IoT Gateway. Whether you are just starting with Modbus protocol or looking to streamline your existing setup, this guide will provide you with the essential knowledge to get up and running quickly.
What is ThingsBoard IoT Gateway?
The ThingsBoard IoT Gateway is an open-source solution that serves as a bridge between IoT devices connected to legacy or third-party systems and the ThingsBoard platform. It enables seamless integration of devices that cannot communicate with ThingsBoard directly, ensuring data can be collected, processed, and visualized in real time. With the IoT Gateway, you can connect multiple devices, aggregate telemetry, and manage configurations centrally. It supports flexible deployment scenarios, making it especially suitable for industrial automation, monitoring, and smart energy systems where Modbus is widely used.
What is Modbus?
Modbus supports different communication modes, including serial (Modbus RTU and ASCII) and network-based (Modbus TCP/IP), making it adaptable to a wide range of industrial environments. Its simplicity and open standard have contributed to its widespread adoption, allowing devices from different manufacturers to communicate seamlessly. Despite being decades old, Modbus remains relevant today due to its reliability, ease of implementation, and compatibility with modern industrial systems. Additionally, it is often used as a backbone protocol for data acquisition, process monitoring, and control in applications ranging from manufacturing plants to building automation.
What will You Learn?
In this guide, we will walk you through the steps to connect a Modbus device to ThingsBoard CE using the ThingsBoard IoT Gateway. You will learn how to configure the gateway, set up the Modbus connector and map data points and send them to ThingsBoard. By the end of this guide, you will have a solid understanding of how to leverage the power of ThingsBoard IoT Gateway to integrate Modbus devices into your IoT ecosystem. By the end of this guide, you will have a working setup that allows you to seamlessly monitor and analyze your Modbus device data in ThingsBoard CE.
Prerequisites
- Before initiating the Gateway setup, ensure that the ThingsBoard server is up and running. You can install ThingsBoard CE manually by following the steps outlined in the Installation Guide.
- Before moving forward, ensure Docker is installed and properly configured on your machine. If you haven’t installed Docker yet, you can download it from the official Docker website and follow their installation guide for your specific operating system.
Modbus Device Structure Overview
For this guide, we will use a ThingsBoard Modbus Demo Device, which simulates a Modbus device and provides a convenient way to test and demonstrate Modbus communication with ThingsBoard. The demo device is pre-configured with a set of registers and data points that mimic the behavior of a real Modbus device. It allows users to interact with the device, read and write data, and observe how the data is processed and visualized in ThingsBoard.
The ThingsBoard Modbus Demo Device is designed to help users understand the Modbus protocol and how to integrate Modbus devices into their IoT solutions using ThingsBoard. It provides a practical and hands-on way to explore the capabilities of ThingsBoard in the context of Modbus communication.
The Modbus Demo Device has the following structure:
| Variable Name | Register Type | Data Type | Address |
|---|---|---|---|
| Temperature | Holding | 16int | 0 |
| Humidity | Holding | 16int | 1 |
| Power | Holding | 16int | 2 |
| Pressure | Holding | 16int | 3 |
| Relay | Coil | bits | 1 |
To up and run the Modbus Demo Device, you can use Docker and the following command:
1
docker run -it -p 5021:5021 thingsboard/tb-gw-modbus-server:latest
The server will be available at 0.0.0.0:5021.
By working with the Demo Device and its registers, you’ll see how to extract real-time telemetry data and then forward it to ThingsBoard for monitoring and analysis.
Step 1. Create a new gateway device on ThingsBoard
First, add a gateway device to your ThingsBoard instance by following these steps:
-
Go to “Entities” > “Gateways” tab.
-
Click the “+” button, enter the gateway device name (e.g., “My Gateway”), and select the device profile. Click on “Create” button.
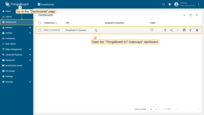
Go to “Entities” > “Gateways” tab.
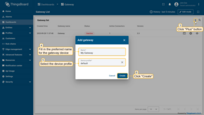
Click the “+” button, enter the gateway device name (e.g., “My Gateway”), and select the device profile. Click on “Create” button.
To launch the gateway, use the following steps:
-
Select and click on newly created gateway, click on “Launch command” button in the top right corner.
-
Click to download
docker-compose.ymlfile to your PC, copy command and execute it in your terminal.
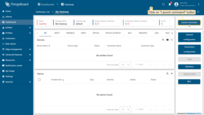
Select and click on newly created gateway, click on “Launch command” button in the top right corner.
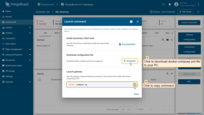
Click to download docker-compose.yml file to your PC, copy command and execute it in your terminal.
After running gateway docker image, you can see the following logs in your terminal:

Step 2. Add new Modbus connector
Let’s add a Modbus connector, which will read described before data from a simulated Modbus device to the created gateway. To create a connector, follow these steps:
-
Click on “Connectors configuration” button on the right panel;
-
Click the “+ Add connector” button;
-
Choose “Modbus” connector type from the dropdown, fill in “Name” field, choose “Logging level” to “INFO”, turn off the “Fill configuration with default values” option and click on “Add” button;
-
Choose “Advanced” configuration mode, click on “Configuration” tab and paste connector configuration (you can find it under these steps).
-
Click on “Save” button to apply changes.

Click on “Connectors configuration” button on the right panel;

Click the “+ Add connector” button;

Choose “Modbus” connector type from the dropdown, fill in “Name” field, choose “Logging level” to “INFO”, turn off the “Fill configuration with default values” option and click on “Add” button;
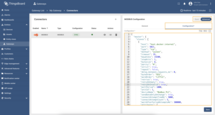
Choose “Advanced” configuration mode, click on “Configuration” tab and paste connector configuration (you can find it under these steps).
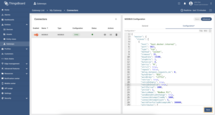
Click on “Save” button to apply changes.
Modbus connector configuration:
Let’s break our connector configuration into smaller pieces and provide an explanation:
master.slaves- a list of Modbus “devices” the gateway will talk to. We have just one.host: "host.docker.internal"– the IP/hostname of the Modbus server. This value makes a Dockerized gateway reach your host machine.pollPeriod: 1000– poll the device every 1000 ms (1 second).unitId: 1– the Modbus unit/slave ID on the target (for TCP, this is still used by many gateways).deviceName: "Modbus PLC"– the ThingsBoard device name that will receive the data.attributes- a list of Modbus registers that will be read as device attributes in ThingsBoard.timeseries- a list of Modbus registers that will be read as device telemetry in ThingsBoard.tag- the key name that appears in ThingsBoard.type- how to decode the raw data (e.g., 16int is a signed 16-bit integer; bits is a coil/bitfield).functionCode- the Modbus function code to use when reading the data (e.g., 3 is for holding registers, 1 is for coils).address- the Modbus address to read from (e.g., 0 for temperature, 1 for humidity, etc.).divider- a modifier that divides the read value by 10 to get the actual value.
Step 3. Check device data
To review the data uploaded from your gateway, use the following step:
-
Navigate to the Entities > Devices page and click on the created device “Modbus PLC” as we named it in the “deviceName” field . This will open the device details page. From there, switch to the “Latest telemetry” tab to view the real-time data that were configured in the connector.

Navigate to the Entities > Devices page and click on the created device “Modbus PLC” as we named it in the “deviceName” field . This will open the device details page. From there, switch to the “Latest telemetry” tab to view the real-time data that were configured in the connector.
Conclusion
In this guide, we have walked you through the process of connecting a Modbus device to ThingsBoard CE using the ThingsBoard IoT Gateway. By following the steps outlined in this guide, you have successfully set up the gateway, configured the Modbus connector, and mapped data points to send telemetry and attributes to ThingsBoard. You have also learned how to monitor and visualize the data from your Modbus device in ThingsBoard CE. With the ThingsBoard IoT Gateway acting as a bridge between your Modbus device and ThingsBoard, you can now leverage the powerful features of ThingsBoard to analyze and manage your device data effectively. Whether you are monitoring environmental conditions, tracking energy consumption, or managing industrial processes, the integration of Modbus devices with ThingsBoard opens up new possibilities for data-driven decision-making and automation.
As you continue to explore the capabilities of ThingsBoard and the ThingsBoard IoT Gateway, you can further enhance your IoT solutions by adding more devices, implementing advanced data processing, and creating custom dashboards to visualize your data. The flexibility and scalability of ThingsBoard make it an ideal platform for building robust IoT applications.
We encourage you to experiment with different configurations, explore additional features of ThingsBoard IoT Gateway, and leverage the power of Modbus devices in your IoT projects. With the knowledge gained from this guide, you are well-equipped to take your IoT initiatives to the next level.
Next steps
Explore guides related to main ThingsBoard features:
- Data Visualization - how to visualize collected data.
- Device attributes - how to use device attributes.
- Telemetry data collection - how to collect telemetry data.
- Using RPC capabilities - how to send commands to/from devices.
- Rule Engine - how to use rule engine to analyze data from devices.