- Creating device on ThingsBoard
- Launching demo OPC-UA server
- Setup SIA Connect
- Adding instances
- Check data on ThingsBoard
- Change OPC-UA node values using shared attributes
- Visualize data on ThingsBoard
- Conclusion
In this comprehensive guide, we will walk you through the process of connecting an OPC-UA device to the ThingsBoard platform via SIA Connect.
The SIA Connect is a tool that enables this process. By connecting your OPC-UA device to the ThingsBoard platform, you can monitor, control, and automate your devices in a highly scalable and flexible way. Stay tuned as we guide you step by step through this process.
Creating device on ThingsBoard
For simplicity, we will provide the device manually using the UI:
-
Login to your ThingsBoard instance, and navigate to the “Devices” page of the “Entities” section. By default, will be redirected to the “All” device group. Click on the “plus” icon in the top right corner of the table and then select “Add new device” from drop-down menu;
-
Input device name. For example,”OPC-UA Device”. Use the default device profile. Now, click the “Credentials” button;
-
Select “MQTT Basic” credentials type. Set “opcua_device” as a client ID, “sia_connect” as a user name and use your own password. Click “Add”;
-
A window will open where you can check the device's connection to ThingsBoard. Close this window by clicking “Close” button;
-
Congratulations on adding the device!
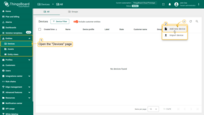
Login to your ThingsBoard instance, and navigate to the “Devices” page of the “Entities” section. By default, will be redirected to the “All” device group. Click on the “plus” icon in the top right corner of the table and then select “Add new device” from drop-down menu;
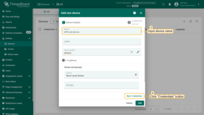
Input device name. For example,”OPC-UA Device”. Use the default device profile. Now, click the “Credentials” button;
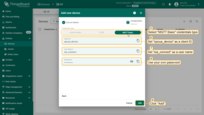
Select “MQTT Basic” credentials type. Set “opcua_device” as a client ID, “sia_connect” as a user name and use your own password. Click “Add”;
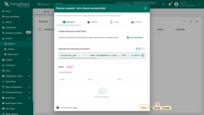
A window will open where you can check the device's connection to ThingsBoard. Close this window by clicking “Close” button;
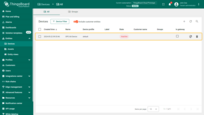
Congratulations on adding the device!
Launching demo OPC-UA server
We will use docker image as a demo OPC-UA server, which can be installed and run using the following command:
1
docker run -it -p 4840:4840 thingsboard/tb-gw-opcua-server:latest
After running the docker image, you will see the following logs in your terminal:

Setup SIA Connect
Installing SIA Connect
In our case, we installed SIA Connect as a .deb package. You can find the official installation guide here. Additionally, you can install SIA Connect as a Docker image here. After successful installation, navigate to the default host 127.0.0.1:80 where the Web UI is running (host might differ, depending on your settings).
You need to log in and provide your LICENSE key. Alternatively, you can use the demo version, which has a 30-minute session limit.
Installing OPC-UA connector
Now, we have to download OPC-UA connector. For this purpose, follow these steps:
- Navigate to “Connectors” page in the side menu;
- Click on “Search for Connector to download & install” input field, and start typing the connector name - “OPC-UA”;
- Find “OPC-UA Client”, and download it by clicking the appropriate button.
OPC-UA connector installed.
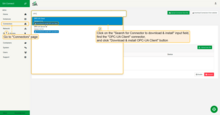
Go to “Connectors” page in the side menu. Click on “Search for Connector to download & install” input field, and start typing the connector name - “OPC-UA”. Find “OPC-UA Client”, and download it by clicking the appropriate button. OPC-UA connector installed.
Installing MQTT connector
Also, we need to download MQTT connector to establish connection with ThingsBoard. The steps are as for downloading MQTT connector:
- Go to “Connectors” page in the side menu;
- Click on “Search for Connector to download & install” input field and type “MQTT”;
- Find “MQTT”, and download it by clicking the appropriate button.
MQTT connector installed.
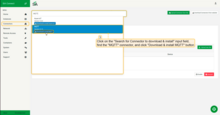
Go to “Connectors” page in the side menu. Click on “Search for Connector to download & install” input field and type “MQTT”. Find “MQTT”, and download it by clicking the appropriate button. MQTT connector installed.
Adding instances
To connect our test device, we need to create two instances:
- One for the device - this instance will connect to the demo OPC-UA server and receive data from it;
- One for ThingsBoard - this instance will map data from the device instance, convert it to a suitable format, and send data to ThingsBoard.
Adding OPC-UA Device instance
First of all, we need to create OPC-UA Device instance, for this purpose, follow the steps below:
- Go to “Instance” tab in the side menu and click “+ Add new instance” button;
- Fill in the input fields:
- “Name” - “OPC-UA Device”;
- “Address” - “opc.tcp://127.0.0.1:4840/freeopcua/server/”;
- Disable security settings;
- Click the “Save instance” button.
OPC-UA Device instance added.
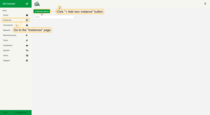
Go to “Instance” tab in the side menu and click “+ Add new instance” button;
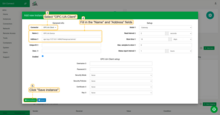
Fill in the “Name” field by “OPC-UA Device” value, and ““Address” field by “opc.tcp://127.0.0.1:4840/freeopcua/server/” value. Also, don’t forget to disable security settings. Then, click the “Save instance” button;
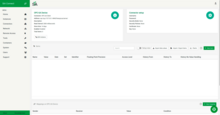
OPC-UA Device instance added.
Also, we need to create an item. An item represents a data point inside the instance. E.g a tag in a PLC, a topic on MQTT broker, an endpoint on REST API, or a query in database. Follow the steps below to add a new item to OPC-UA Device instance:
- Click on “+ New item” in the “Items” section;’
- Fill in the input fields:
- “Name” - “Temperature”;
- Set the “Read write” field to “Read only” option;
- “Identifier” - “ns=2;i=13”;
- Click the “Save item” button.
You will now see the “Temperature” item added.
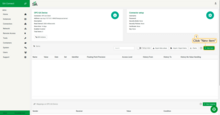
Click on “+ New item” in the “Items” section;
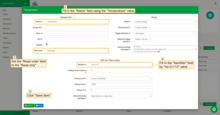
Fill in the “Name” field using the “Temperature” value, set the “Read write” field to “Read only” option, and fill in the “Identifier” field by “ns=2;i=13” value. Then, click the “Save item” button;
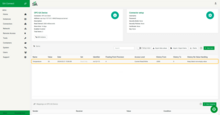
You will now see the “Temperature” item added.
Add other items, such as “Power” and “Humidity”, by following the steps described above.
| Item Name | Identifier |
|---|---|
| Power | ns=2;i=14 |
| Humidity | ns=2;i=15 |
So, in the final result, you will have the following list of items:
Adding ThingsBoard instance
This instance will map data from the device instance, convert it to a suitable format, and send data to ThingsBoard. To add a new instance, use follow these steps:
- Go to the “Instance” tab in the side menu and click ”+ Add new instance” button;
- Fill in the input fields:
- “Name” - “ThingsBoard”;
- “Address” - “your ThingsBoard host”. In our case - thingsboard.cloud;
- “Port” - “1883”;
- Fill in the values specified in your device credentials for the “Username”, “Device id”, and “Password” fields]
- Click “Save instance” button.
ThingsBoard instance has been added.
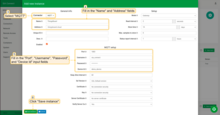
Go to the “Instance” tab in the side menu and click “+ Add new instance” button. Fill in the input fields “Name”, “Address”, “Port”, “Username”, “Device id”, “Password” with the values shown in the screenshot below. Click “Save instance” button;
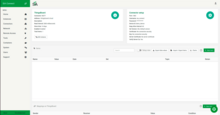
ThingsBoard instance has been added.
Now, we have to add new item. For this purpose, follow these steps:
- Click on the ”+ New item” in the “Items” section;
- Fill in the input fields:
- “Name” - “Publish data”;
- Set “Read write” field to “Write only” option;
- “Topic” - “v1/devices/me/telemetry”;
- “Input template” - “{%ITEM.NAME%: %VALUE%}”;
- Click on “Save item” button.
Publish data item has been added.
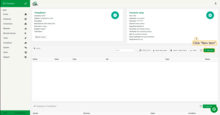
Click on the “+ New item” in the “Items” section;
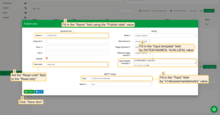
Set “Read write” select field to “Write only” option, fill in “Topic” field by “v1/devices/me/telemetry” value and “Input template” field by “{%ITEM.NAME%: %VALUE%}” value. Click on “Save item” button. Publish data item has been added.
And finally, we have to add mapping. A mapping is a virtual connection between two items which will handle data transmission between the two (e.g. a mapping from a PLC item to a MQTT item). For this purpose, follow these steps:
- Click on the ”+ New mapping” in the “Mappings on ThingsBoard” section;
- For “Sender Item” select “OPC-UA Device” as instance and “Temperature” as “Item”;
- For “Receiver item” select “ThingsBoard” as “Instance” and “Publish data” as “Item”;
- Click on “Save mapping” button.
Mapping has been added.
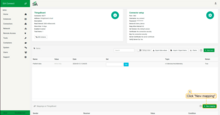
Click on the “+ New mapping” in the “Mappings on ThingsBoard” section;
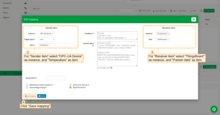
For “Sender Item” select “OPC-UA Device” as instance and “Temperature” as “Item”. For “Receiver item” select “ThingsBoard” as “Instance” and “Publish data” as “Item”. Click on “Save mapping” button. Mapping has been added.
Add other mappings, such as “Power” and “Humidity”, by following the steps described above.
After completing these steps, you will have the following list of mappings:
Check data on ThingsBoard
Once you have successfully done all the steps above and SIA Connect has sent data, you can view it in the “Latest telemetry” tab of the device in your ThingsBoard instance:
- Navigate to the “Devices” page of the “Entities” section of your ThingsBoard instance;
- Click on the OPC-UA Device row in the table to open device details;
- Navigate to the “Latest telemetry” tab.
You should see incoming data displayed.
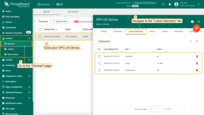
Navigate to the “Devices” page of the “Entities” section of your ThingsBoard instance, and click on the OPC-UA Device row in the table to open device details. Navigate to the “Latest telemetry” tab. You must see incoming data.
Change OPC-UA node values using shared attributes
In this section, we will configure SIA Connect to modify the value of an OPC-UA node. Specifically, we will be changing the device status node.
For this purpose we need to create one more item in ThingsBoard instance of the SIA Connect, like the following:
- Go to the “Instance” tab in the side menu and select “ThingsBoard”;
- Click on the “+ New item” in the “Items” section;
- Fill in the input fields:
- “Name” - “Shared attribute update”;
- Set “Read write” select field to “Read only” option;
- “Topic” - “v1/devices/me/attributes”;
- Click on “Save item” button.
Item has been added.
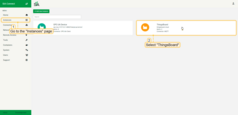
Go to the “Instance” tab in the side menu and select “ThingsBoard”;
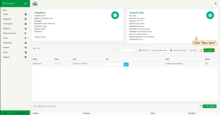
Click on the “+ New item” in the “Items” section;
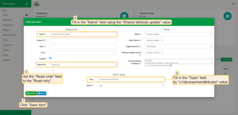
Fill the “Name” field by “Shared attribute update” value, set “Read write” select field to “Read only” option, and fill in “Topic” field by “v1/devices/me/attributes” value. Click on “Save item” button. Item has been added.
Also, we need to create item on OPC-UA Device instance, for this purpose, follow these steps:
- Go to the “Instance” tab in the side menu and select OPC-UA Device;
- Click on the “+ New item” in the “Items” section;
- Fill in the input fields:
- “Name” - “Status”;
- Set “Read write” select field to “Read and Write”;
- “Post-processing (reading)” - “%VALUE%”;
- “Identifier” - “ns=4;s=Status_s”;
- Click on “Save item” button.
Item added.
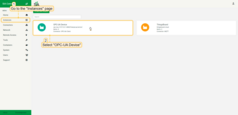
Go to the “Instance” tab in the side menu and select OPC-UA Device;
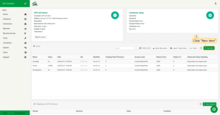
Click on the “+ New item” in the “Items” section;
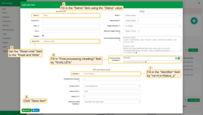
Fill in “Name” field with “Status” value, set “Read write” select field to “Read and Write”, fill in “Post-processing (reading)” field by “%VALUE%”, and fill in “Identifier” field by “ns=4;s=Status_s”. Click on “Save item” button. Item added.
The next step is to create another mapping for data transmission between the ThingsBoard instance and the OPC-UA Device. For this purpose, follow the steps below:
- On the ThingsBoard instance, scroll down to “Mappings” section and click on “+ New Mapping” button;
- For “Sender Item” select “ThingsBoard” as instance and “Shared attribute update” as “Item”;
- For “Receiver item” select “OPC-UA Device” as instance and “Status” as “Item”;
- Paste “%VALUE.status%” to the “Custom value” field;
- Click on “Save mapping” button.
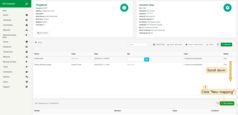
On the ThingsBoard instance, scroll down to “Mappings” section and click on “+ New Mapping” button;
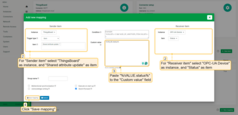
For “Sender Item” select “ThingsBoard” as instance and “Shared attribute update” as “Item”. For “Receiver item” select “OPC-UA Device” as instance and “Status” as “Item”. Paste “%VALUE.status%” to the “Custom value” field. Click on “Save mapping” button;
Finally, we need to create shared attribute on the device on ThingsBoard platform. For this purpose, follow these steps:
- Go to the “Devices” page of the “Entities” section of your ThingsBoard instance;
- Click on “OPC-UA Device”, and navigate to the “Attributes” tab;
- Select “Shared attributes” from dropdown field and click on “plus” button to create a new one;
- Fill in “Key” field with “status” value and select “Boolean” data type from dropdown field;
- Click on “Add” button.
Shared attribute has been added.
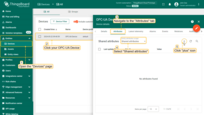
Go to the “Devices” tab on the left side menu bar. Click on “OPC-UA Device”, and navigate to the “Attributes” tab. Select “Shared attributes” from dropdown field, and click on “plus” button for create new one;
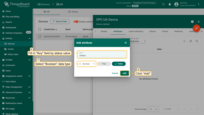
Fill in “Key” field by “status” value, and select “Boolean” data type from dropdown field. Then, click on “Add”;
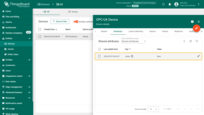
Shared attribute has been added.
Visualize data on ThingsBoard
To visualize data from Sia Connect, we will create the dashboard:
- First, download the sia_connect.json file;
-
Go to the “Dashboard” page of your “ThingsBoard” instance. will be redirected to the “All” device group. Click on the “plus” icon in the top right corner of the table and then select “Import dashboard” from drop-down menu;
-
In the import dashboard window, upload the previously downloaded dashboard configuration JSON file, and click “Import”;
-
You have successfully imported a dashboard. You should open it.
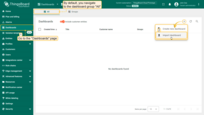
Go to the “Dashboard” page of your “ThingsBoard” instance. will be redirected to the “All” device group. Click on the “plus” icon in the top right corner of the table and then select “Import dashboard” from drop-down menu;
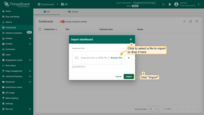
In the import dashboard window, upload the previously downloaded dashboard configuration JSON file, and click “Import”;
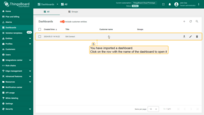
You have successfully imported a dashboard. You should open it.
After importing the dashboard, verify that your OPC-UA Device is specified in the entity alias. This ensures that the data will be displayed correctly.
-
Enter dashboard editing mode;
-
Click the “Entity aliases” icon;
-
In the opened “Entity aliases” window click the “Edit alias” icon opposite the “OPC-UA Device” alias;
-
In the opened “Edit alias” dialog, specify your OPC-UA Device. A filter type should be “Single entity”. Click the “Save” button;
-
Click “Save” in the lower right corner of the dialog box;
-
Save the dashboard.
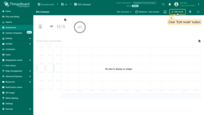
Enter dashboard editing mode;
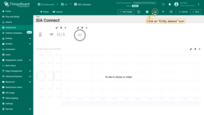
Click the “Entity aliases” icon;
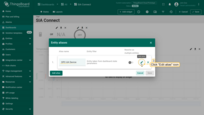
In the opened “Entity aliases” window click the “Edit alias” icon opposite the “OPC-UA Device” alias;
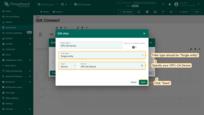
In the opened “Edit alias” dialog, specify your OPC-UA Device. A filter type should be “Single entity”. Click the “Save” button;
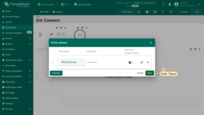
Click “Save” in the lower right corner of the dialog box;
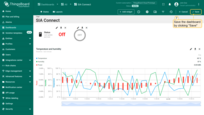
Save the dashboard.
If you have followed these steps correctly, you should now see this dashboard populated with data from the OPC-UA Device.
Conclusion
By following the instructions provided in this guide, you’ll be able to effortlessly establish a connection between your OPC-UA device and the ThingsBoard platform using SIA Connect. This comprehensive guide has been carefully designed to provide you with all the necessary information and steps needed to successfully set up this connection. So whether you’re a seasoned expert or a beginner, this guide will make the process simple and straightforward.


