- Overview
- OAuth 2.0 authentication flow
- Setting up authentication via an external provider
- Login with Google
- Login with Auth0
- Login with Keycloak
- Mapping of the external user into the TBMQ internal user structure
- HAProxy configuration
Overview
TBMQ Professional Edition allows you to provide Single Sign-On (SSO) functionality for your users and automatically create Administrators or Viewers using external user management platforms that support the OAuth 2.0 protocol. Examples of platforms that support OAuth 2.0 include: Google, Auth0, Keycloak, Okta, Azure, etc.
OAuth 2.0 authentication flow
TBMQ supports the Authorization Code grant type to exchange an authorization code for an access token. Once the user is redirected back to the TBMQ client, the platform retrieves the authorization code from the URL and uses it to request an access token from the external user management platform. Using the basic mapper or custom mapper, the external user info object is converted from the external platform into a TBMQ internal OAuth 2.0 user. After this, the regular TBMQ authorization flow takes place.
Setting up authentication via an external provider
OAuth 2.0 clients are configured separately from domains, allowing reuse of the configured client and making the settings clearer. To use authentication through an external provider, first configure an OAuth 2.0 client with the necessary credentials. Then, either add a new domain or use an existing one, and update the OAuth 2.0 client list with the new client.
Operations with domain
Adding a domain
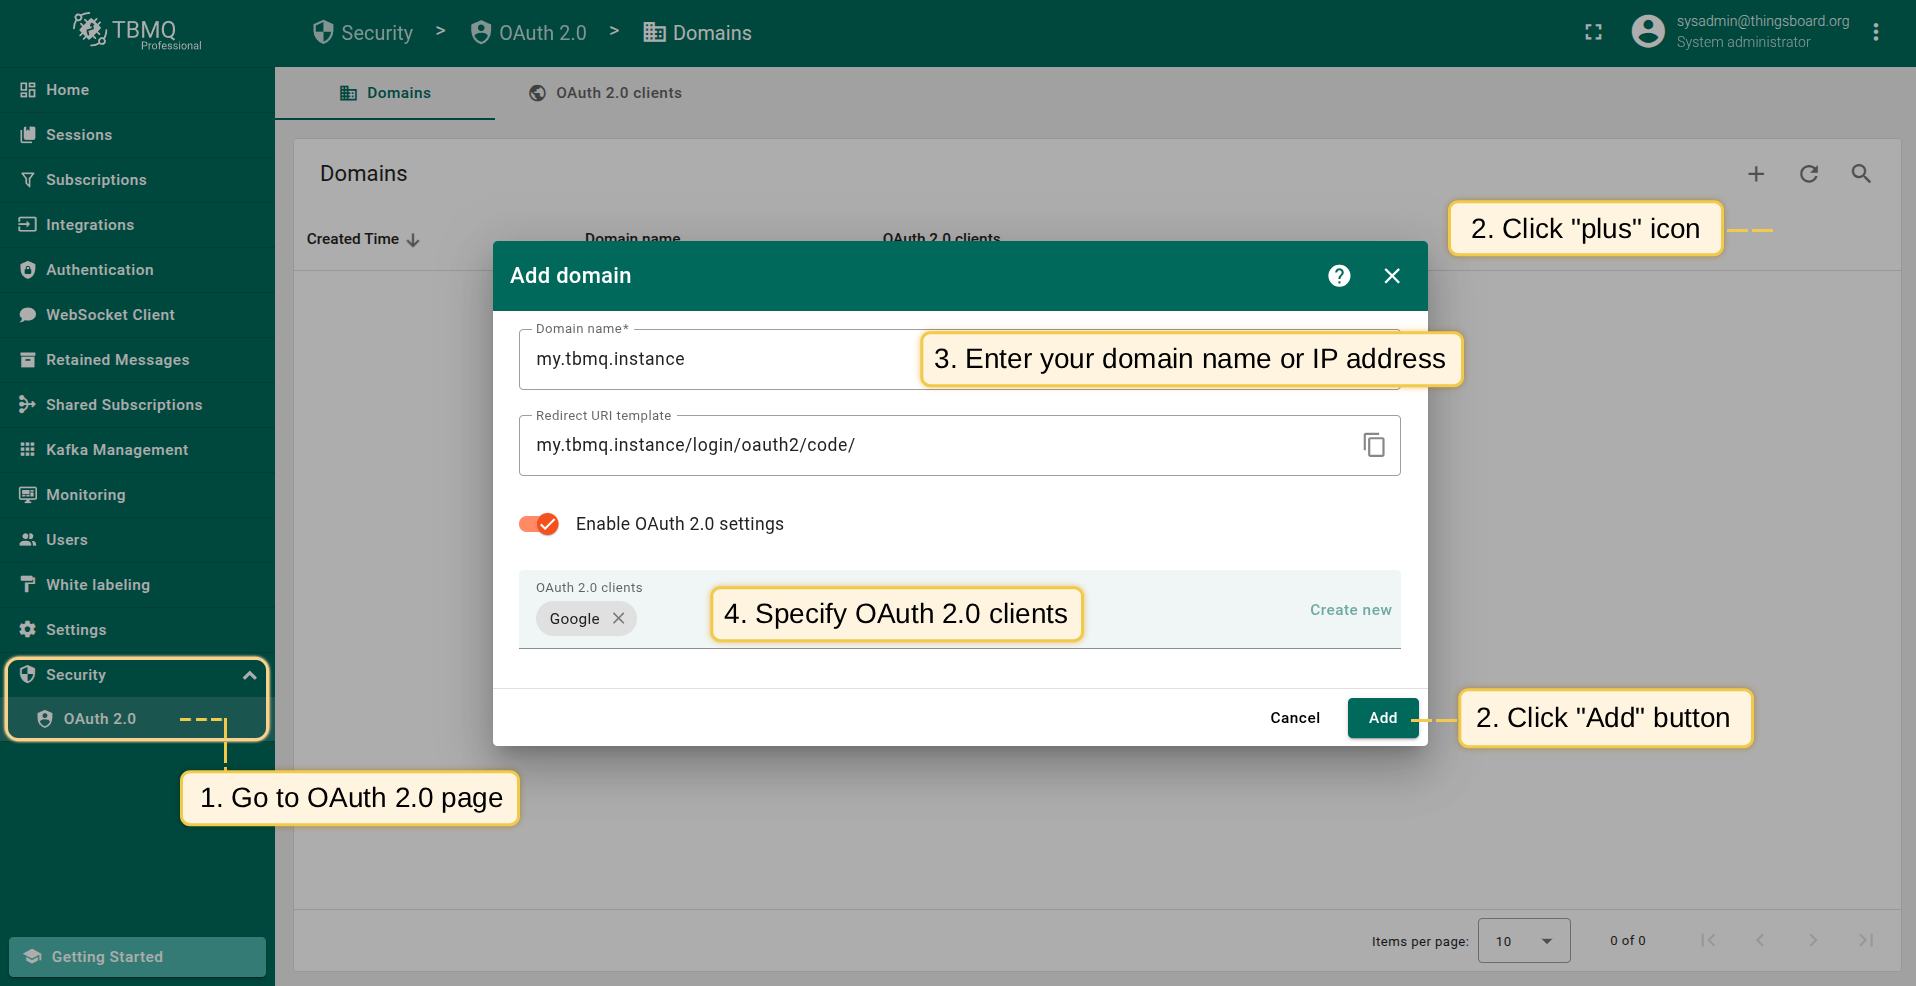
Follow these steps to add a new domain:
- On the “Domains” tab of the “OAuth 2.0” page, click the “plus” icon to add a new domain;
- Provide your domain name and OAuth 2.0 client;
- Click “Add” to finalize.
Editing a domain
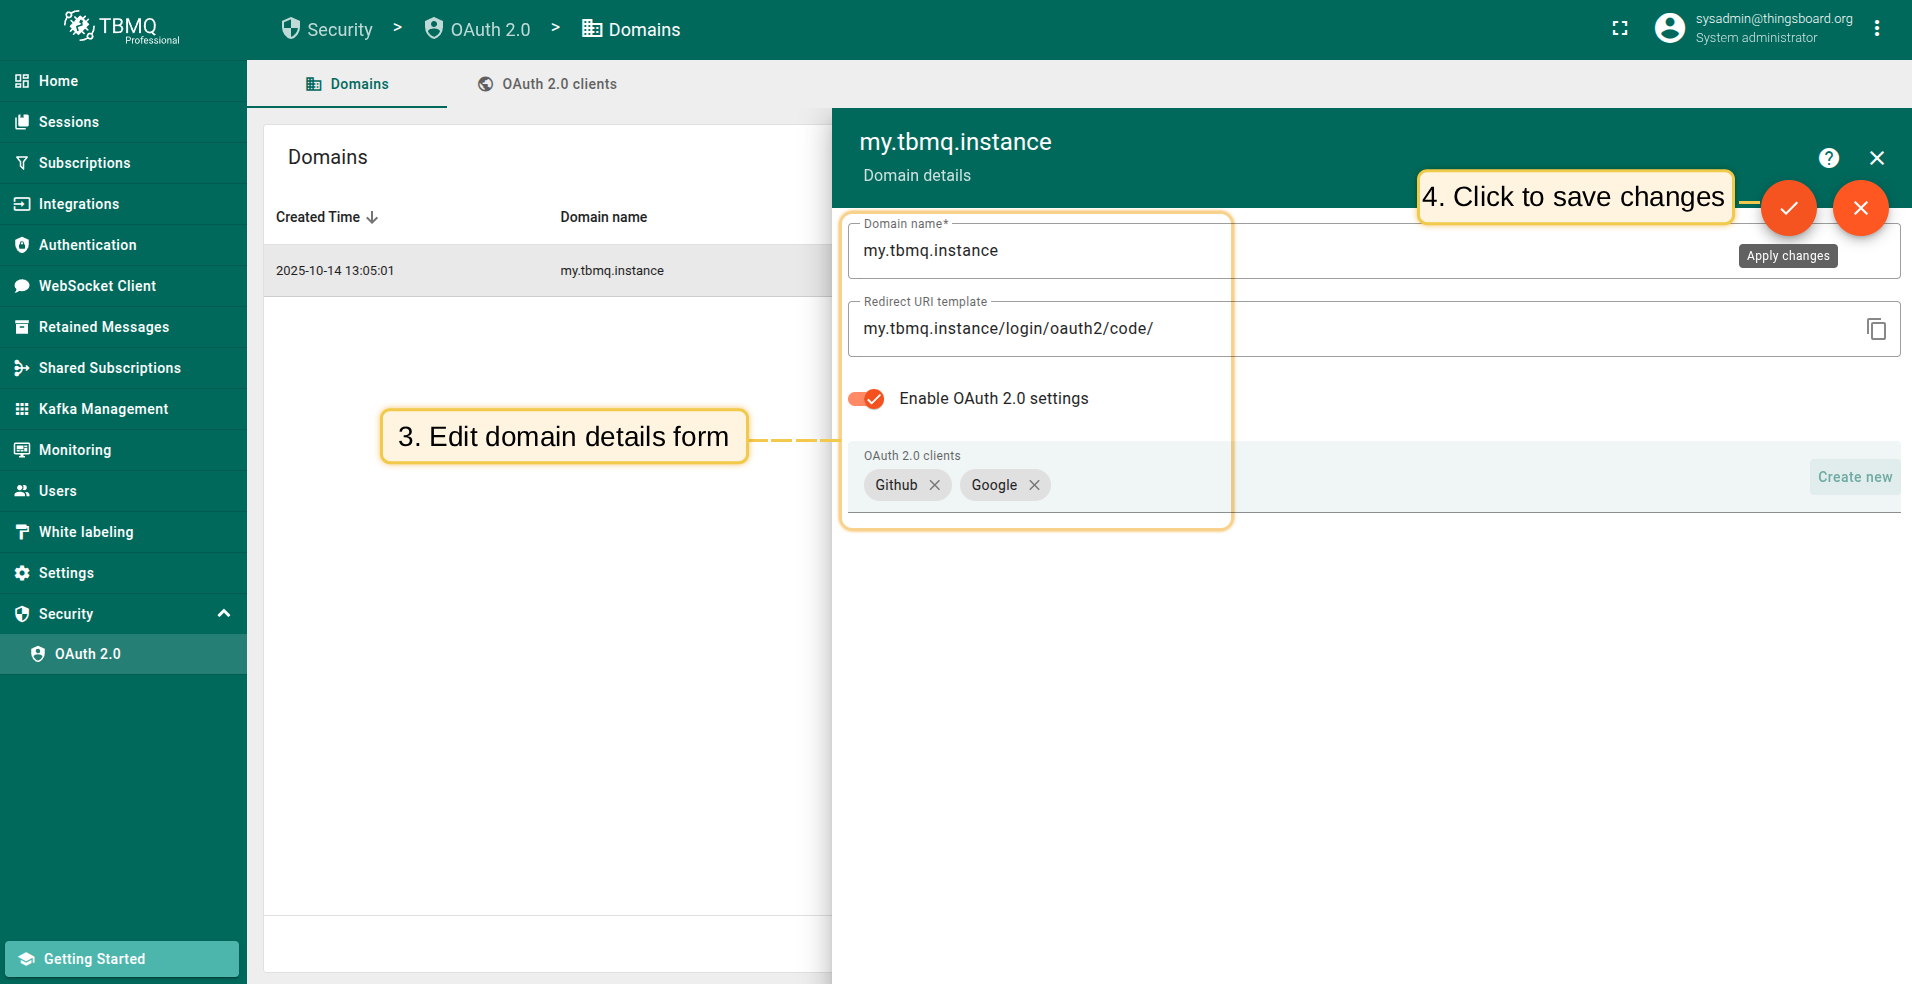
To update the settings for an existing domain, follow these steps:
- Click on the domain to view its details;
- Switch to editing mode by clicking the large orange button;
- Make the required modifications;
- Save your changes by clicking the “Apply changes” button.

Deleting a domain
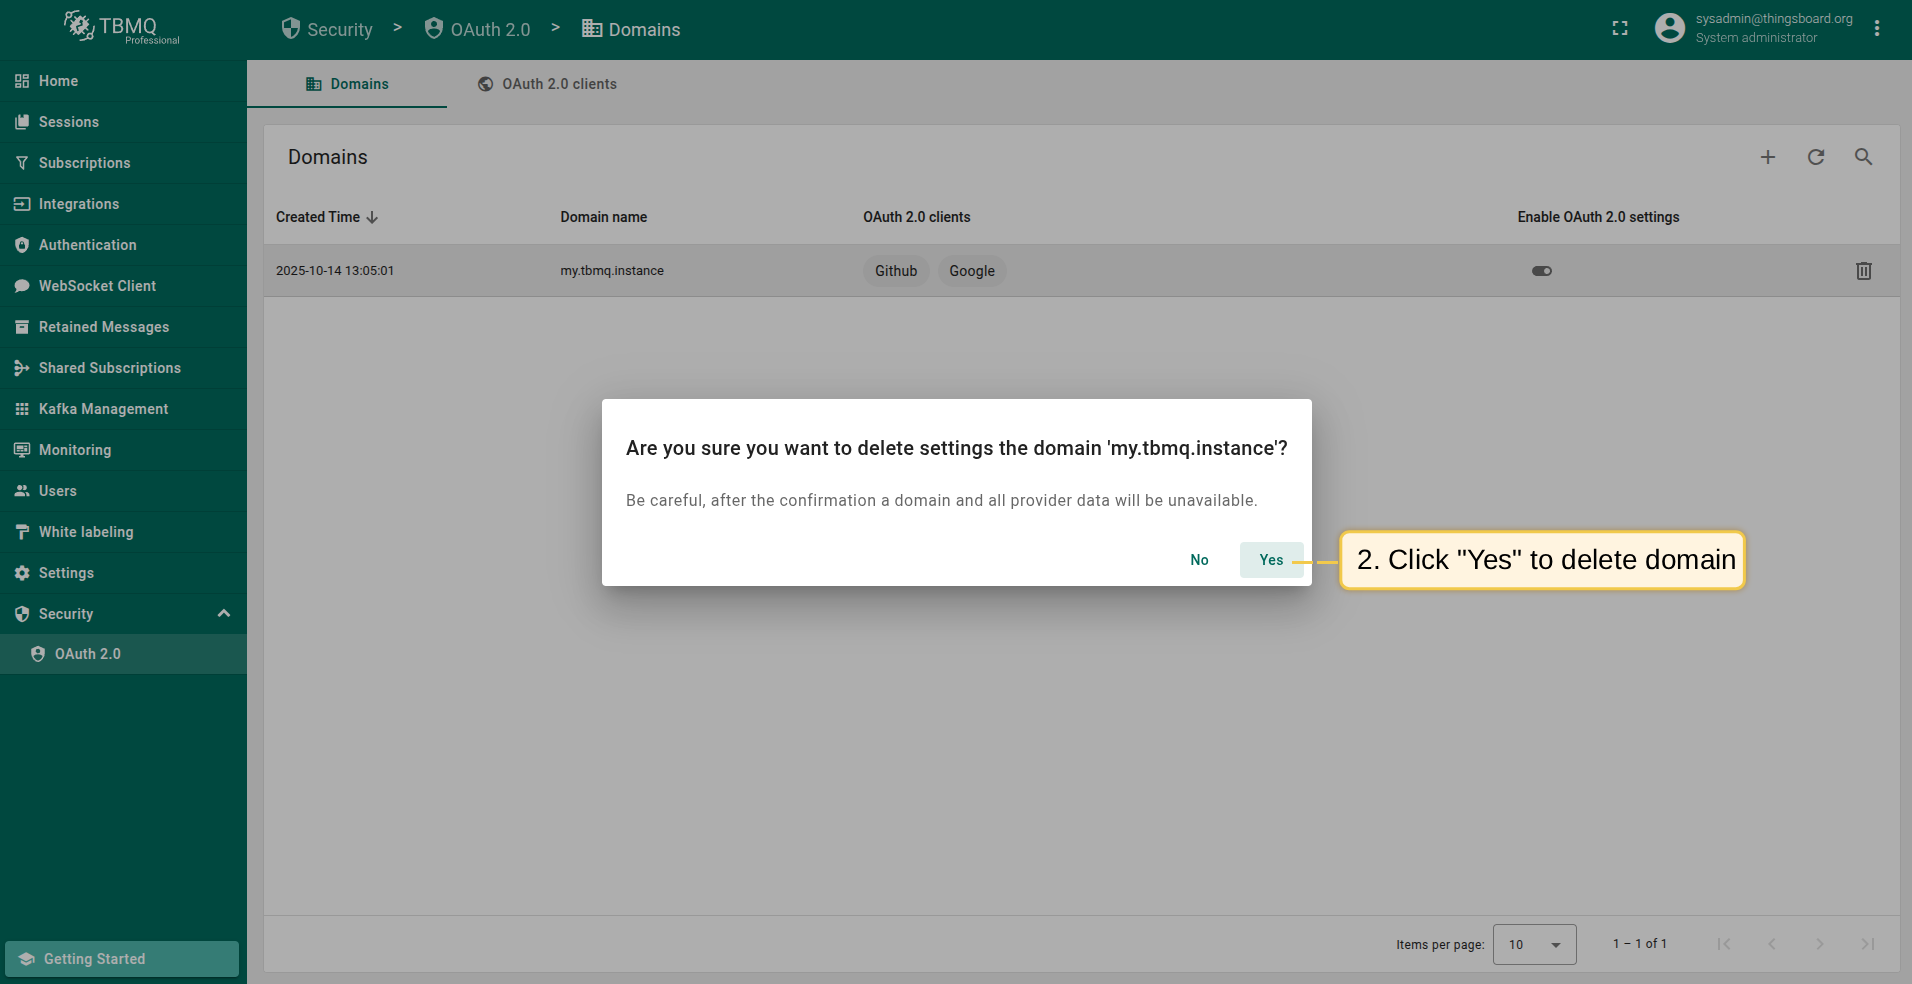
To remove a domain, follow these steps:
- Click the “trash” icon in the row of the domain you wish to remove;
- Confirm the deletion by clicking “Yes”.

Operations with OAuth 2.0 client
Adding an OAuth 2.0 client
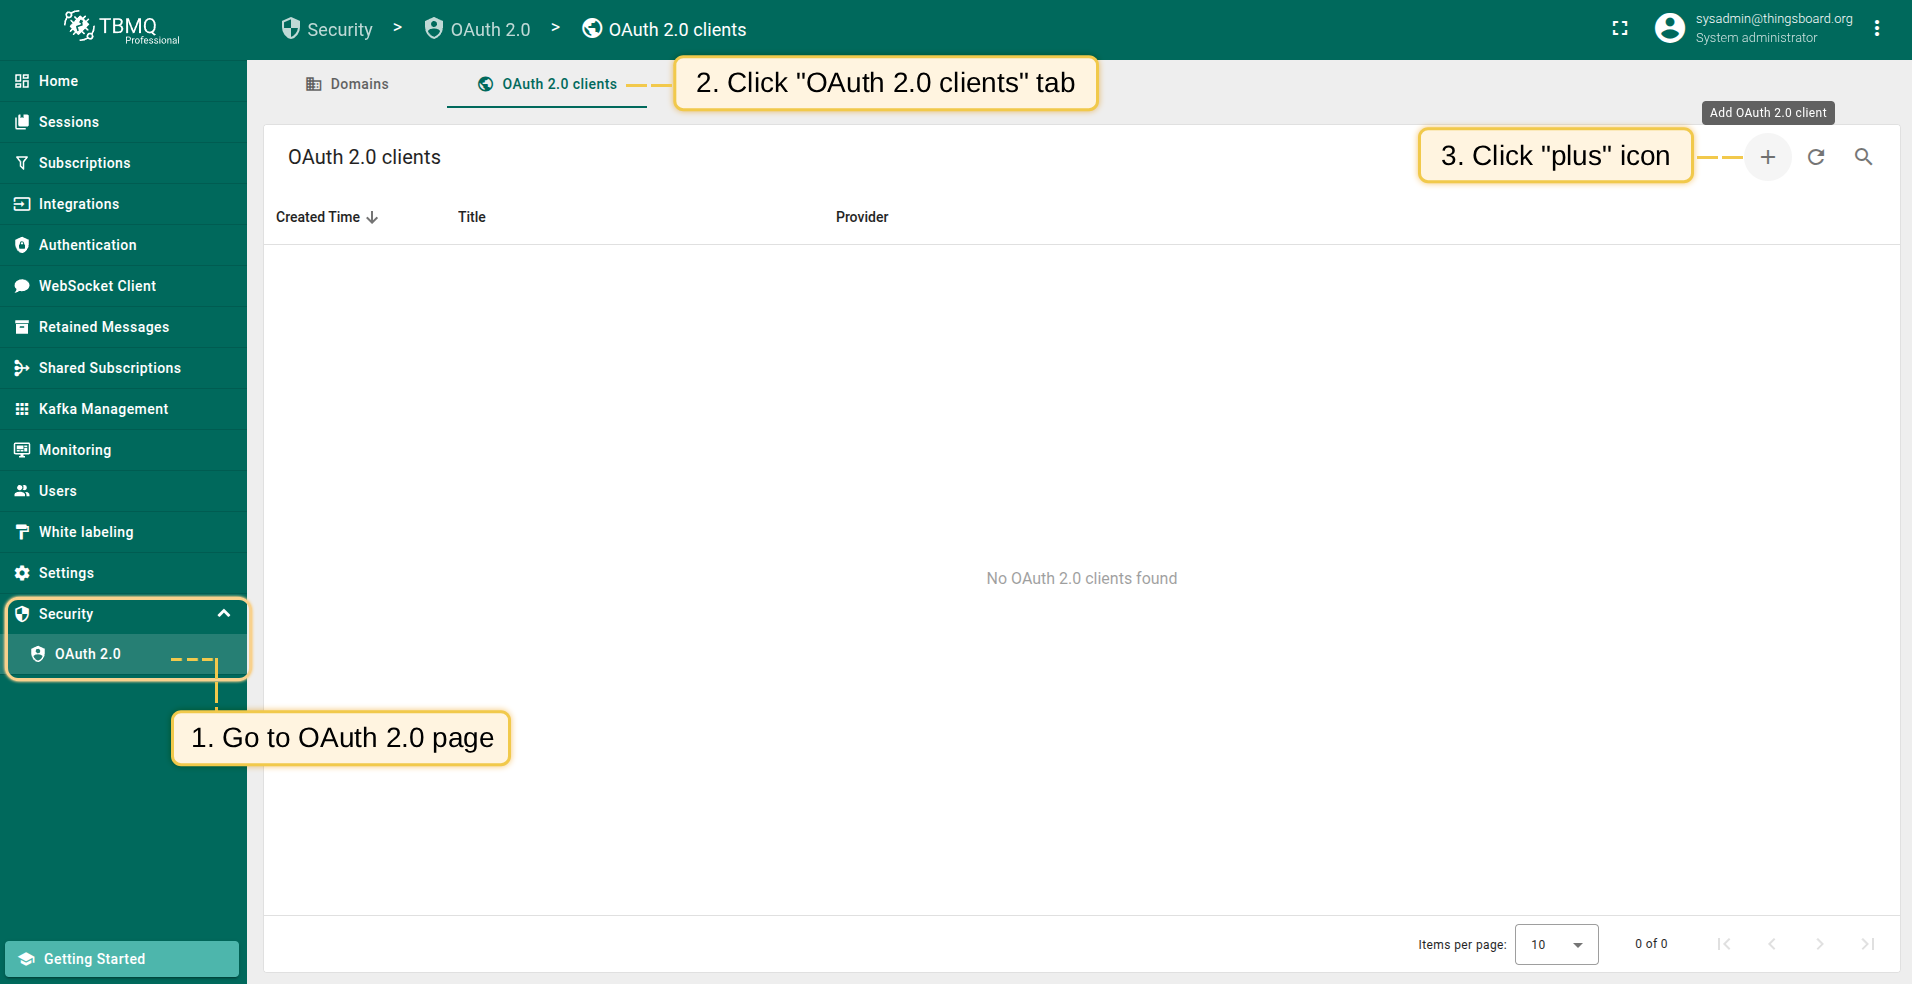
Follow these steps to add a new OAuth 2.0 client to TBMQ:
- Navigate to the “OAuth 2.0 clients” tab on the “OAuth 2.0” page, and click the “plus” icon;
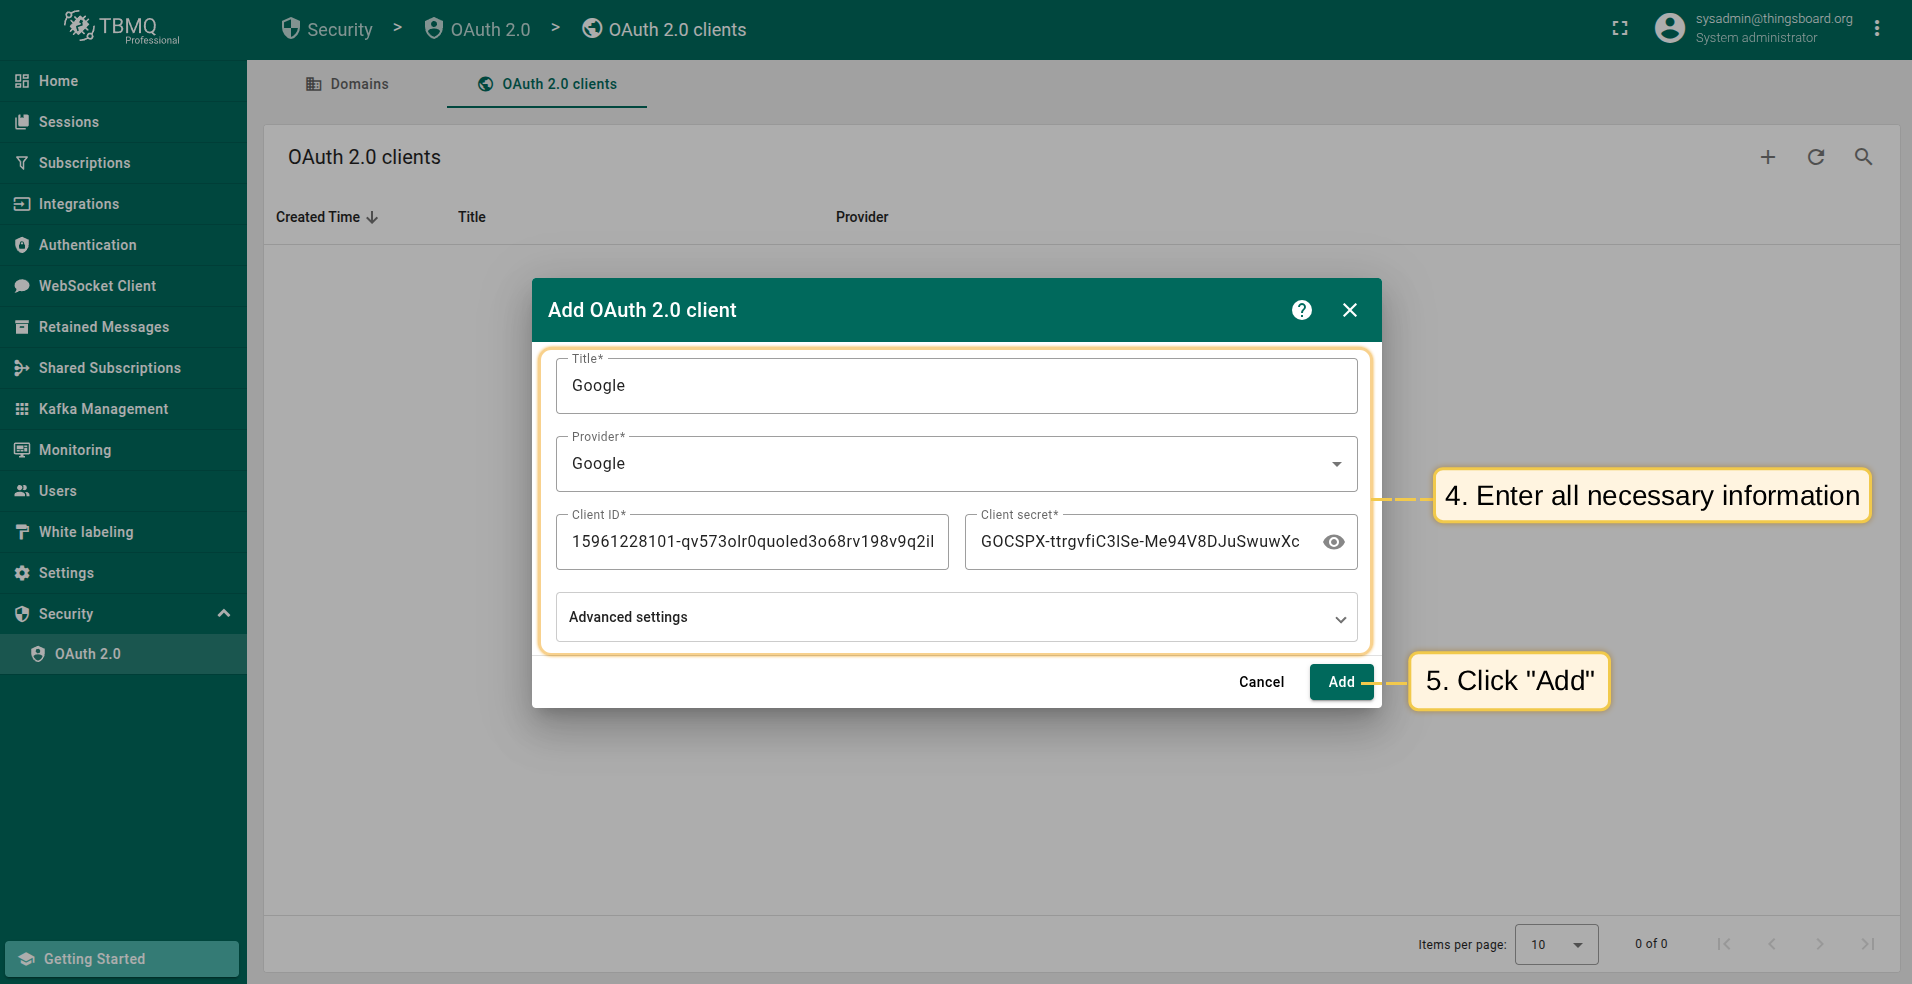
- Enter a descriptive title for the client;
- Select the authentication provider from the dropdown menu;
- Provide the Client ID and Client Secret obtained from your authentication provider;
- Configure advanced settings as necessary;
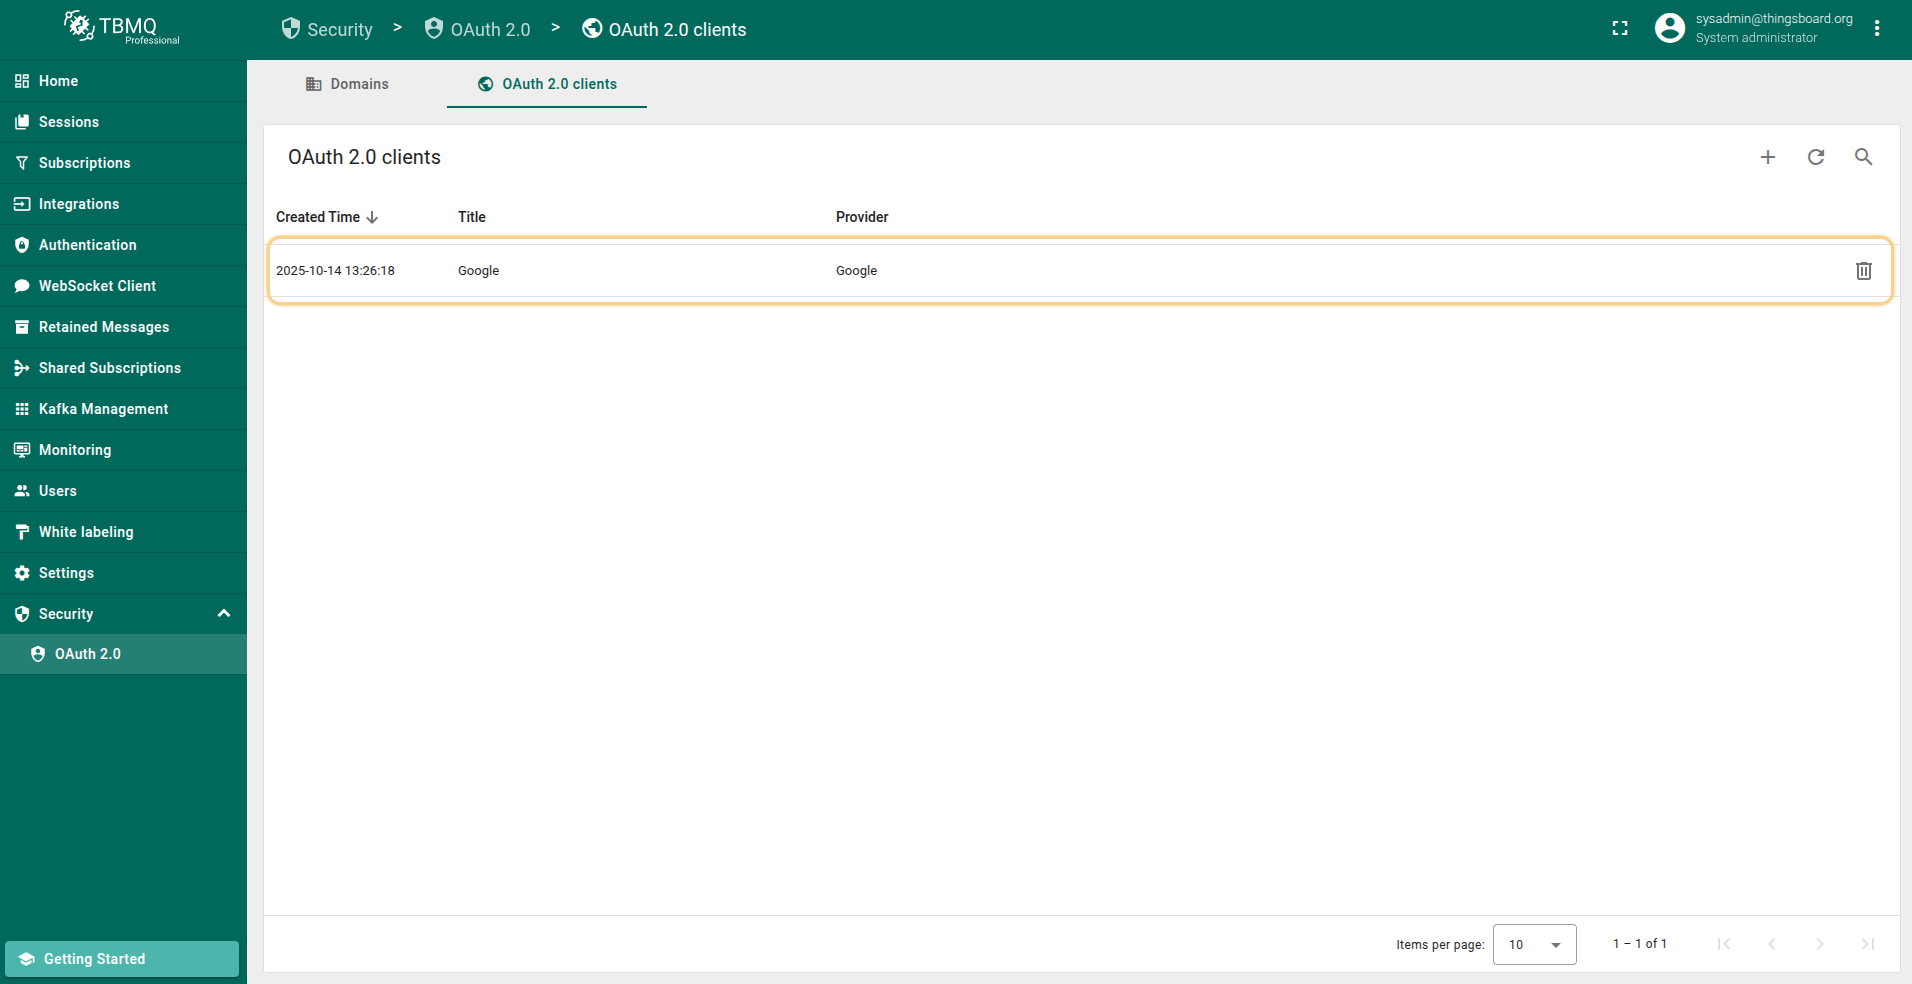
- Click “Add” to finalize.
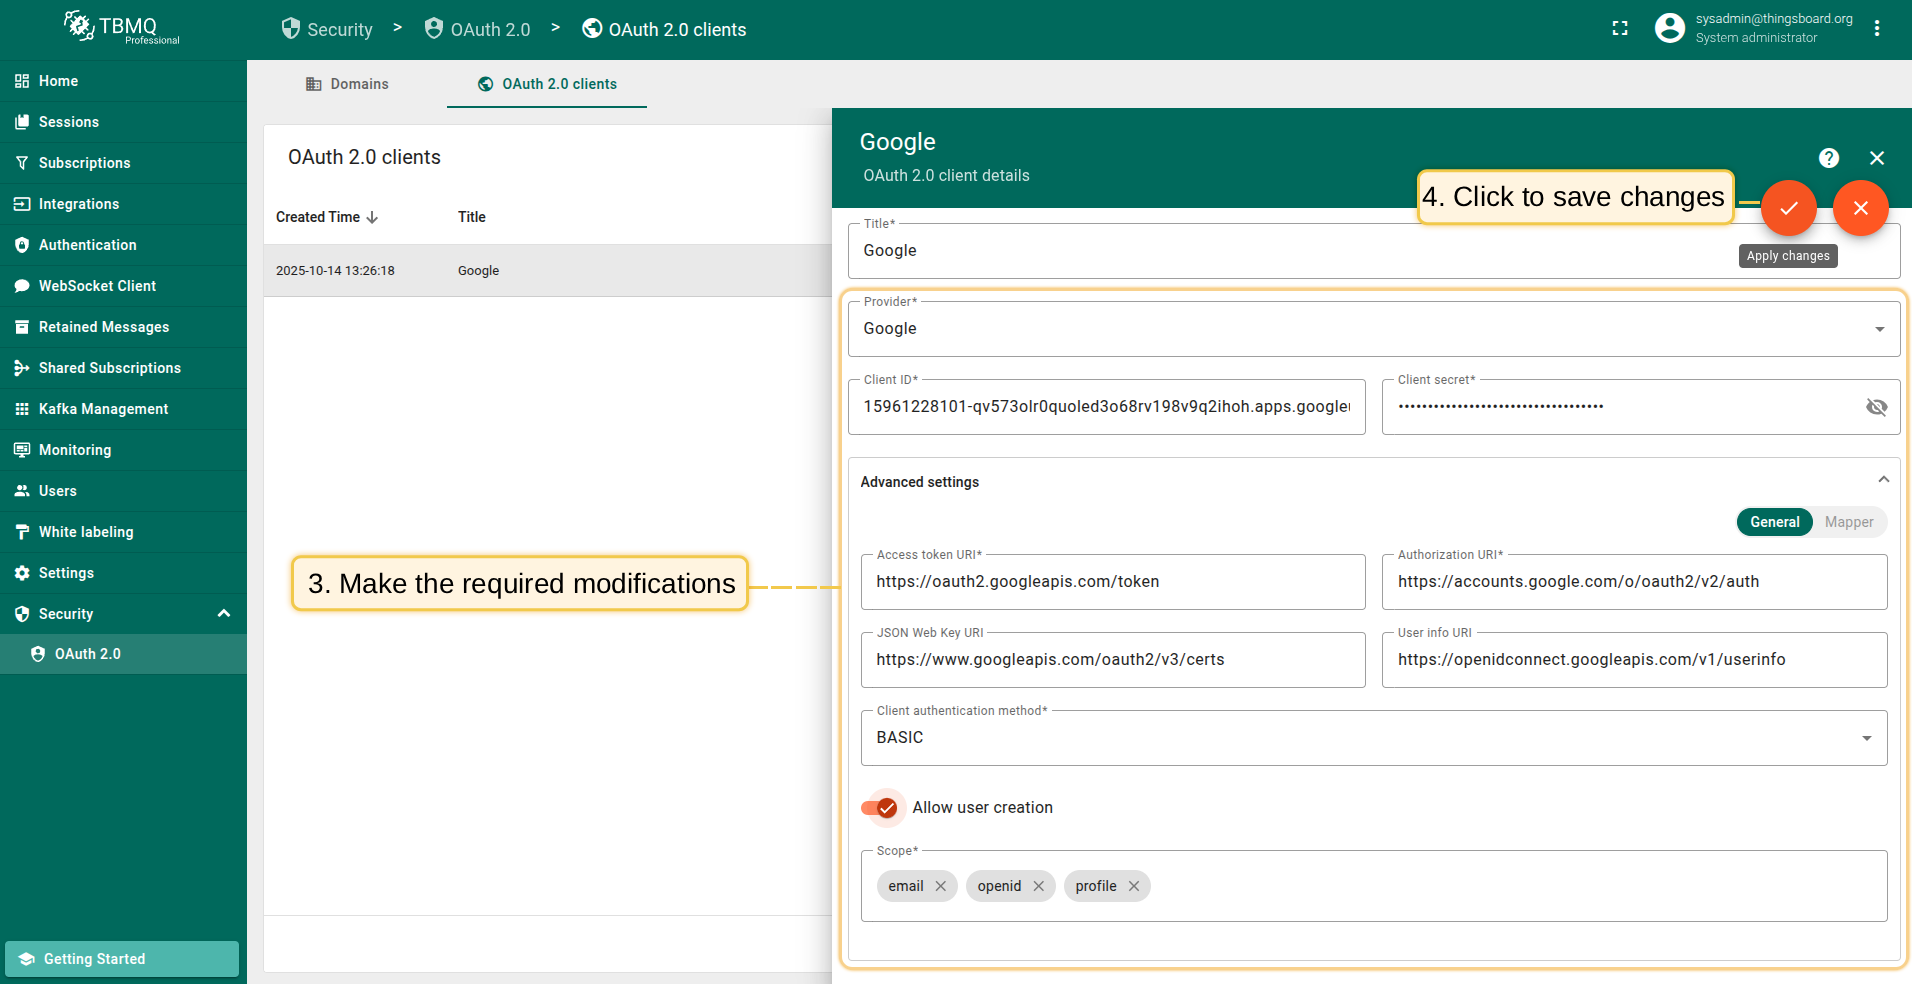
Editing an OAuth 2.0 client
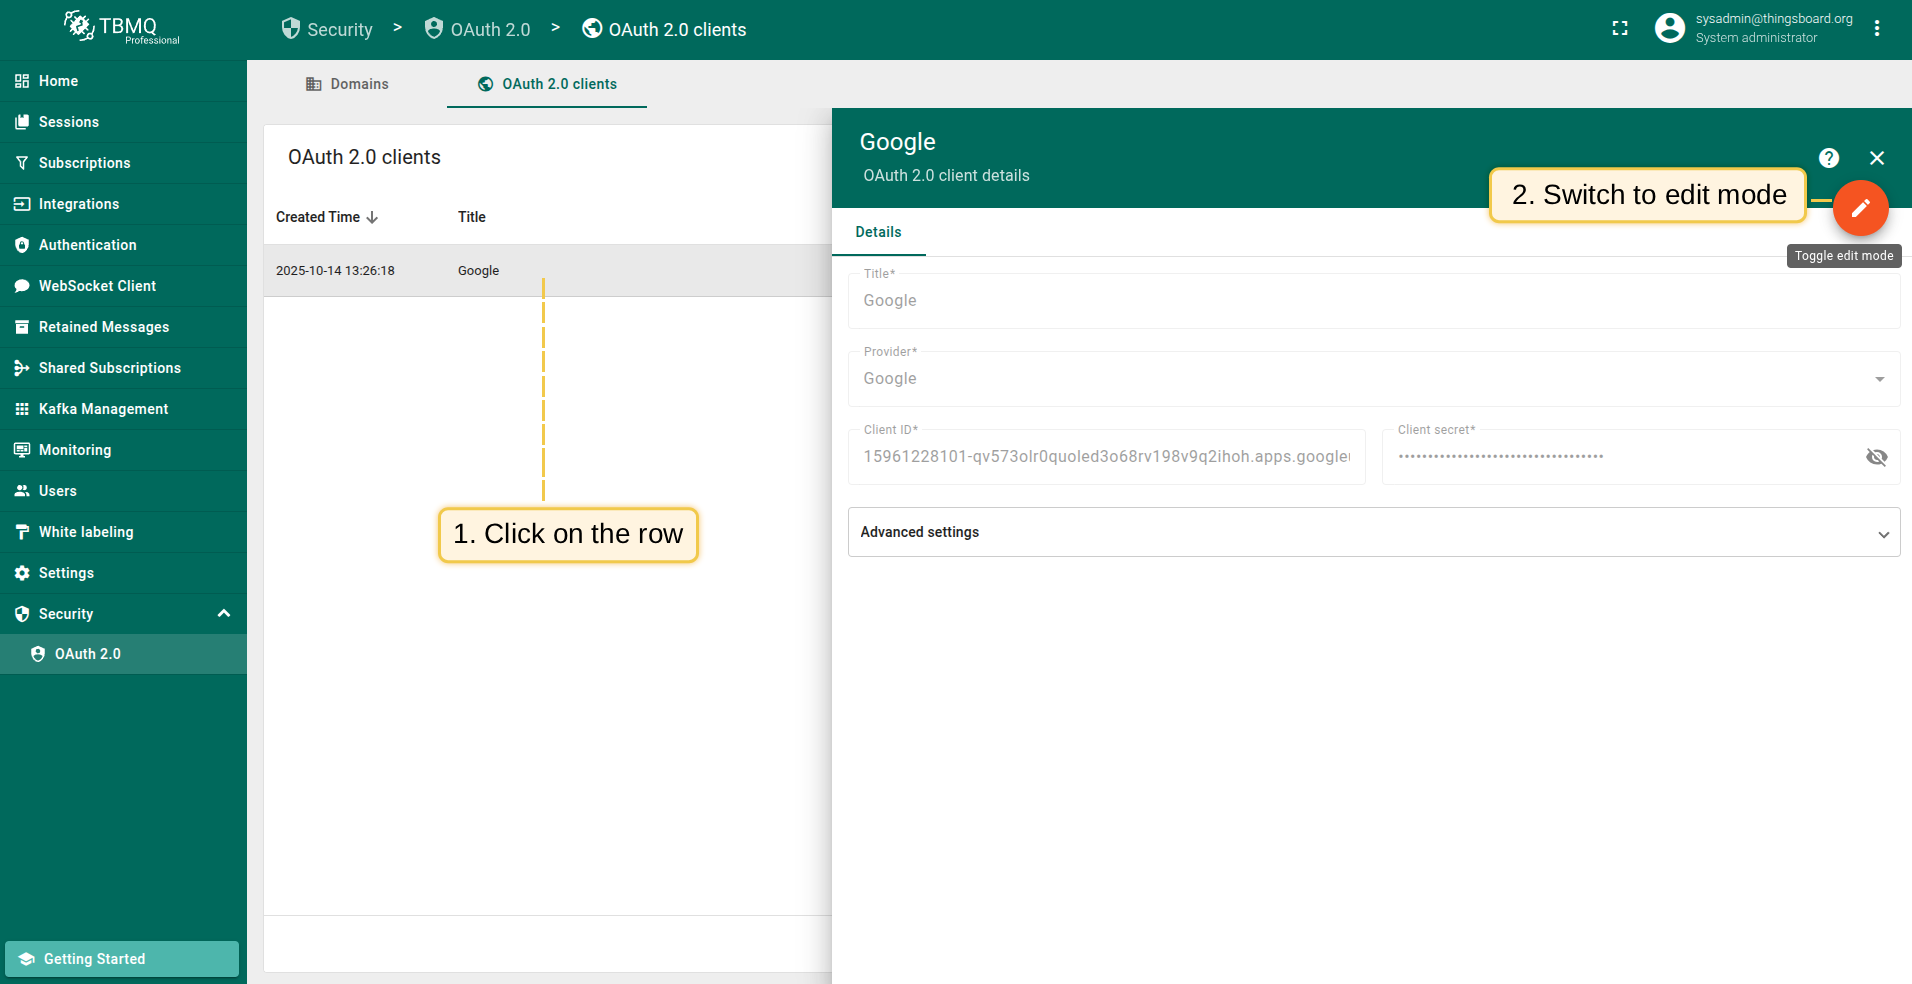
To update an existing OAuth 2.0 client:
- Click on the client to view its details;
- Switch to editing mode by clicking the large orange button;
- Make the required modifications;
- Save your changes by clicking the “Apply changes” button.
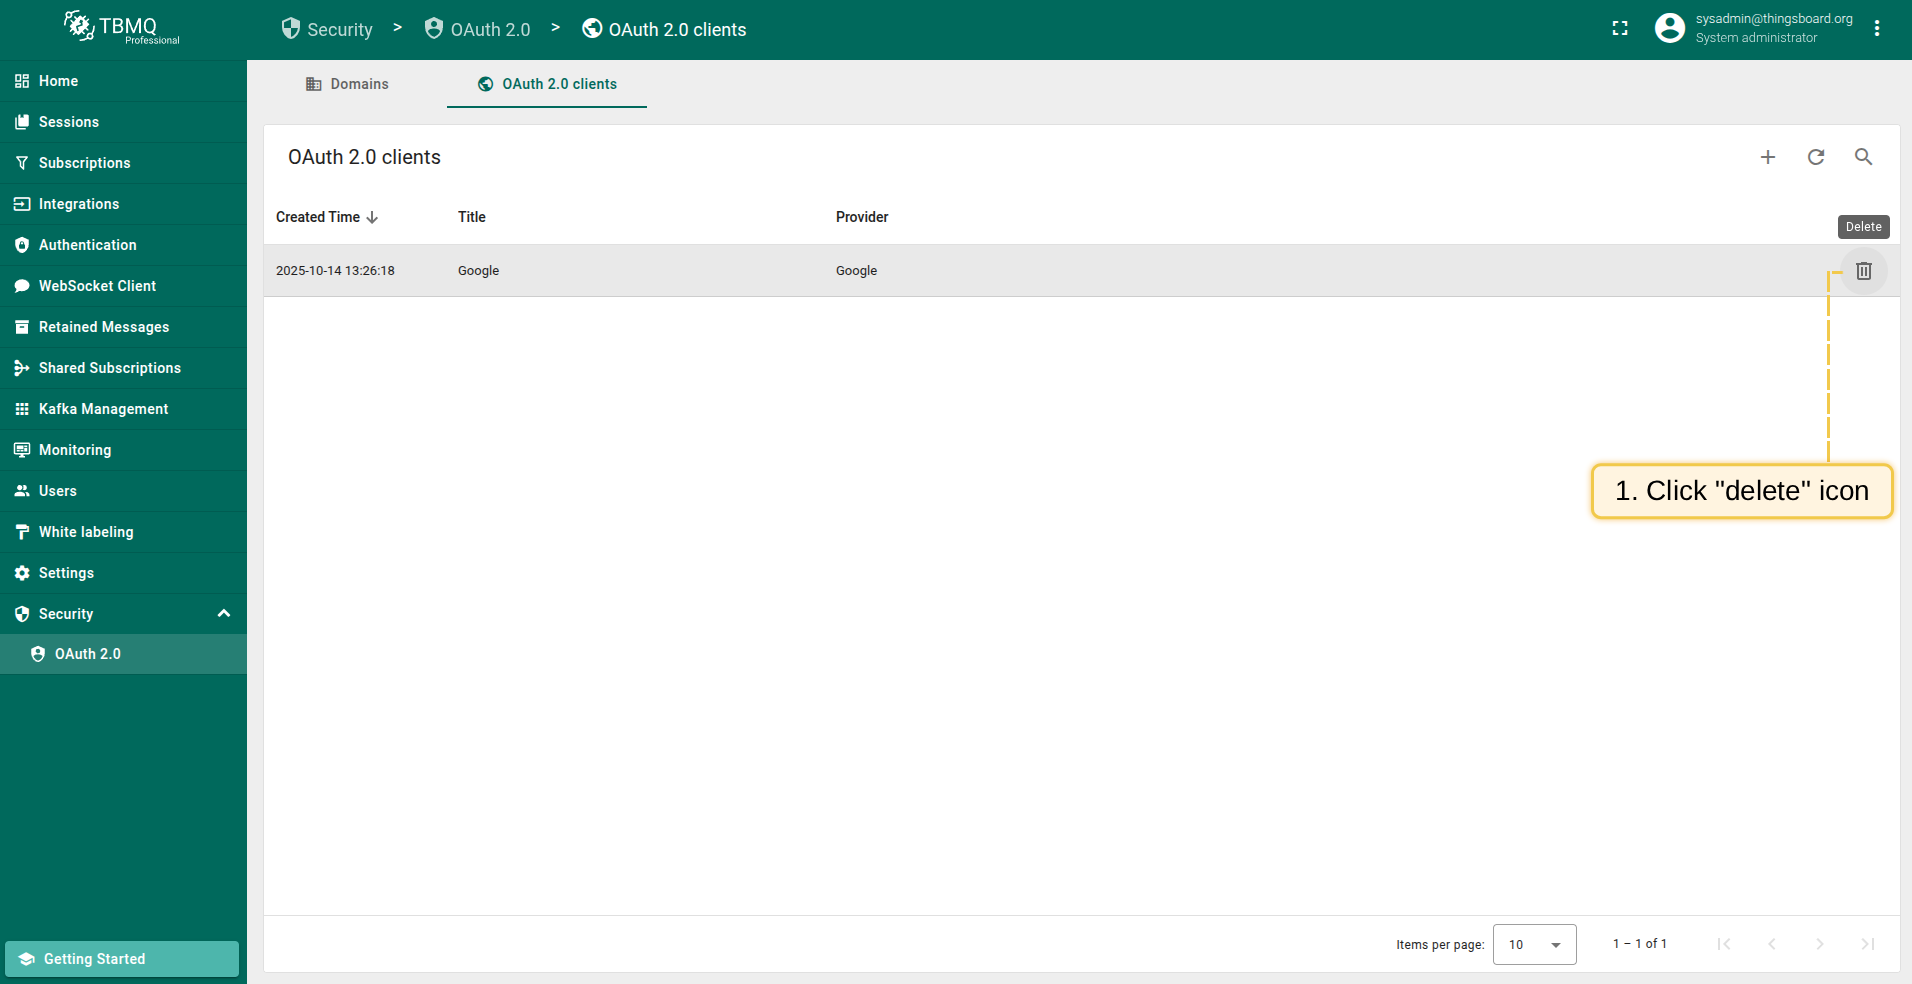
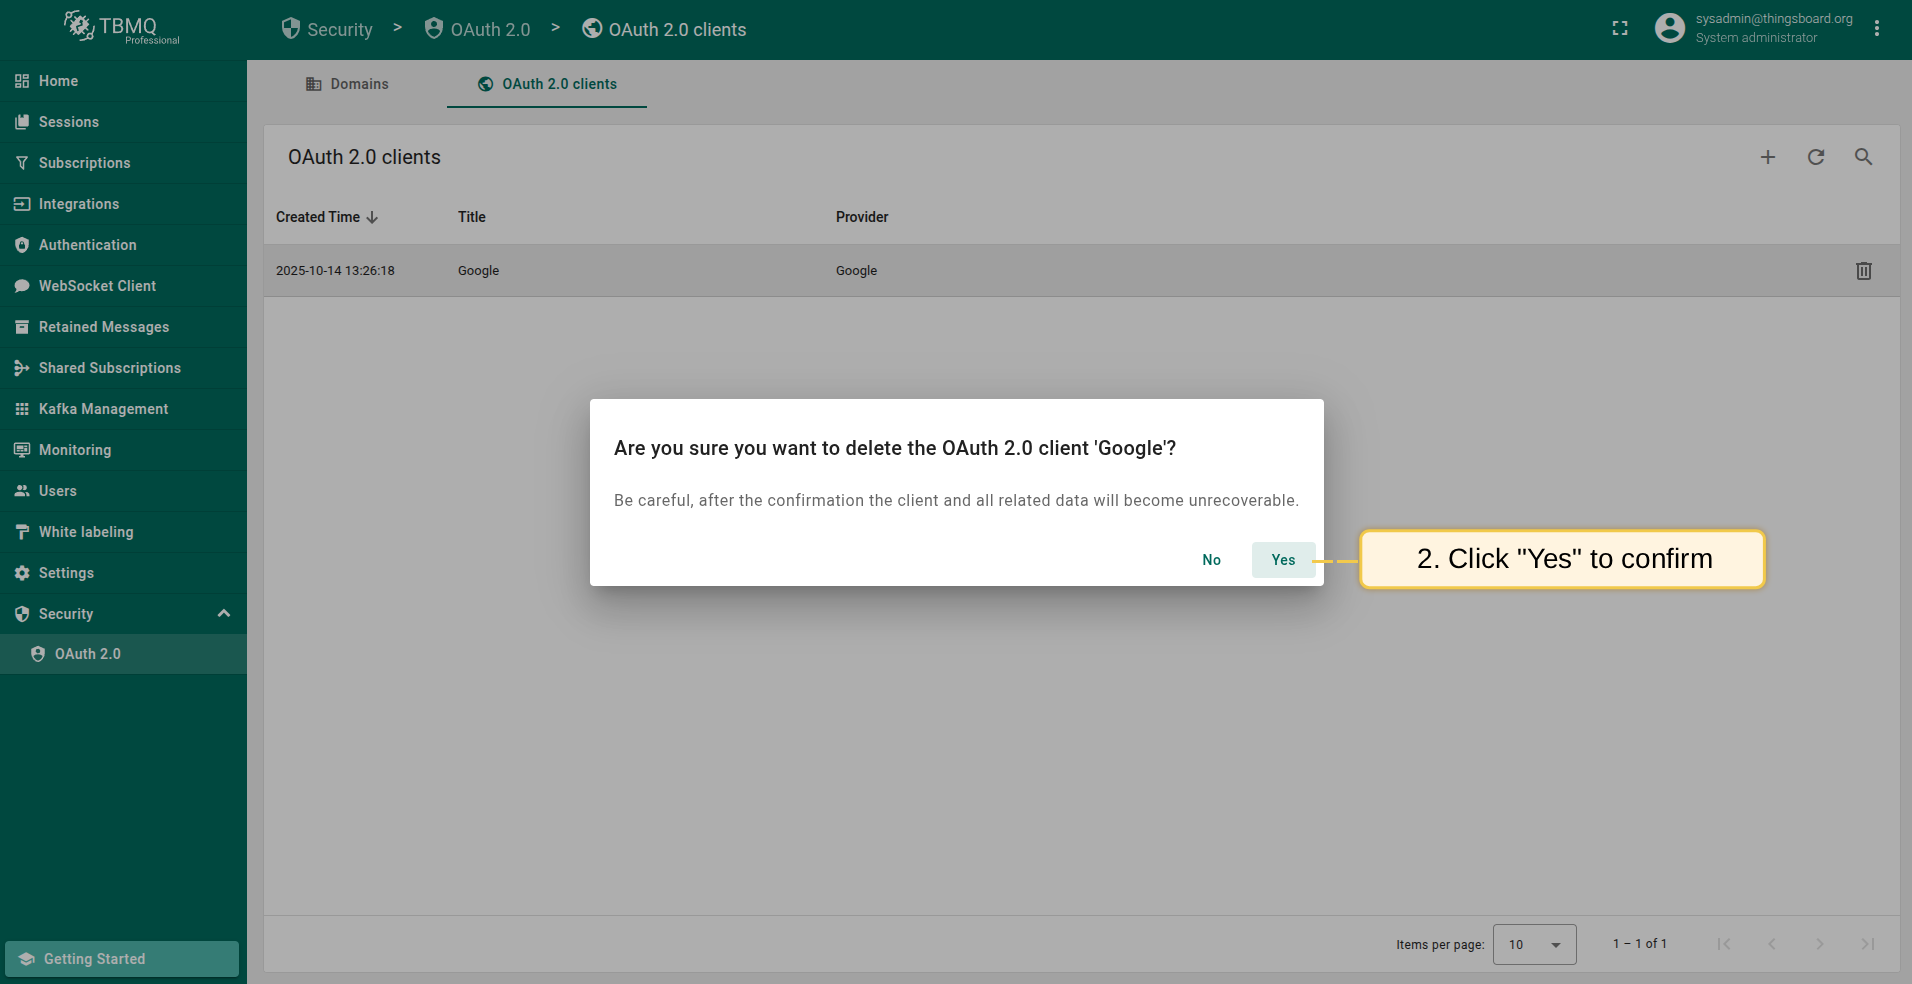
Deleting an OAuth 2.0 client
To remove obsolete or unused clients:
- Click the “trash” icon in the row of the client you wish to remove;
- Confirm the deletion by clicking “Yes”.
Login with Google
In this example, we will use Google for authentication.
To map external user information from Google to the OAuth platform, use the built-in basic mapper. If the basic mapper does not fit your business needs, you can configure a custom mapper for more flexibility.
Preparations
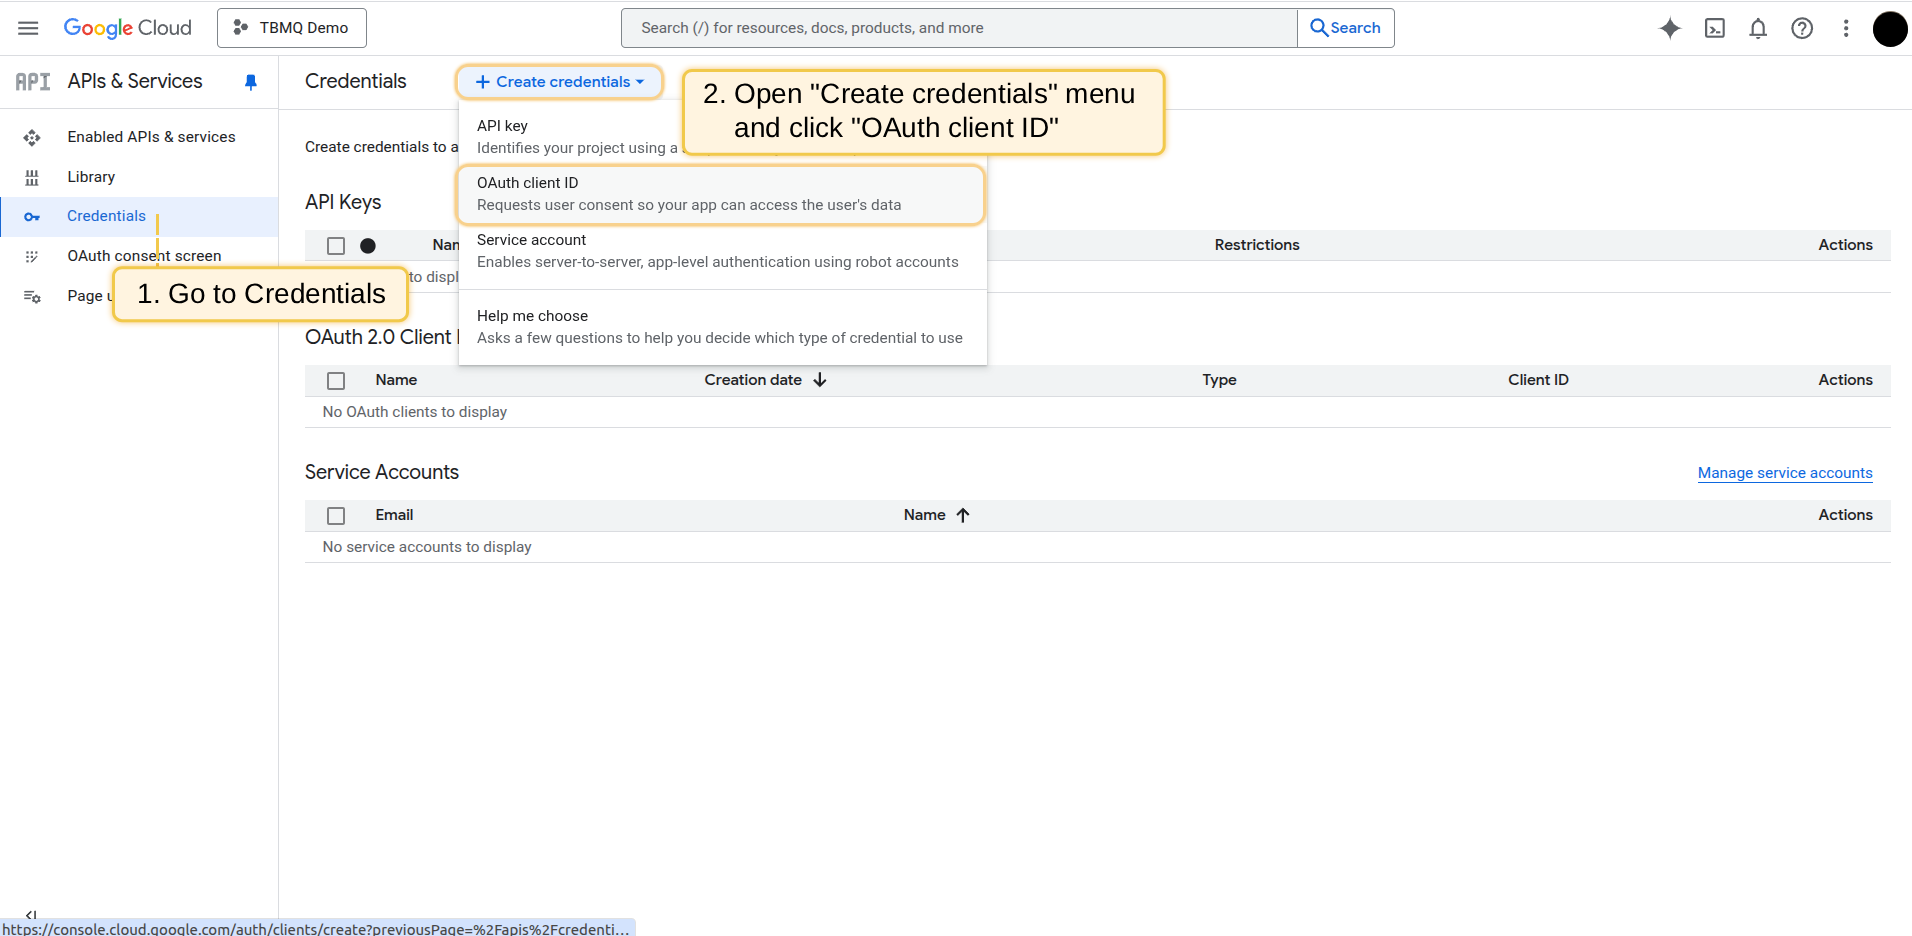
To use Google OAuth 2.0 authentication, you must set up a project in the Google API Console to obtain OAuth 2.0 credentials.
Follow the instructions on the OpenID Connect page or the steps below to configure the OAuth 2.0 client. After completing this setup, you will have a Client ID and a Client Secret.
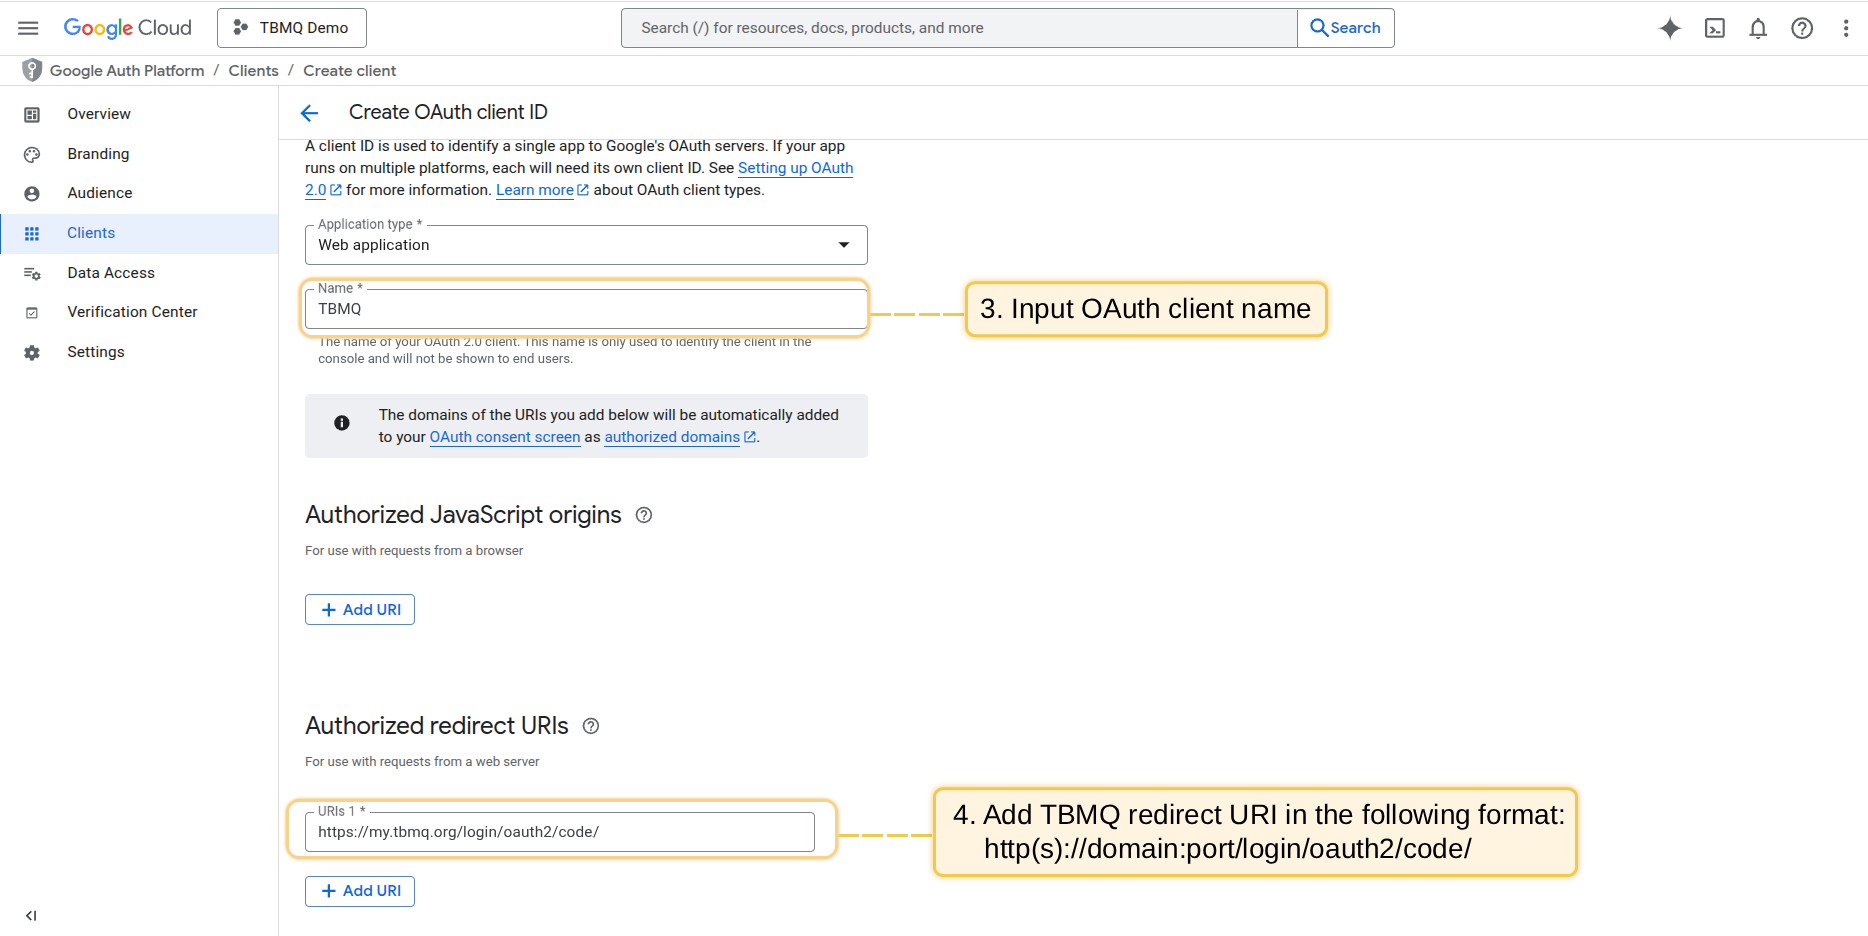
- Go to the “Credentials” page in the left menu and select “OAuth client ID” from the “Create credentials” dropdown;
- Enter an OAuth client name and add the TBMQ redirect URI in the “Authorized Redirect URIs” section using the format:
1
http(s)://domain:port/login/oauth2/code/
- Replace
domainwith your TBMQ domain and specify the port used for HTTP access. For example, if your domain is my.tbmq.org:
1
https://my.tbmq.org/login/oauth2/code/
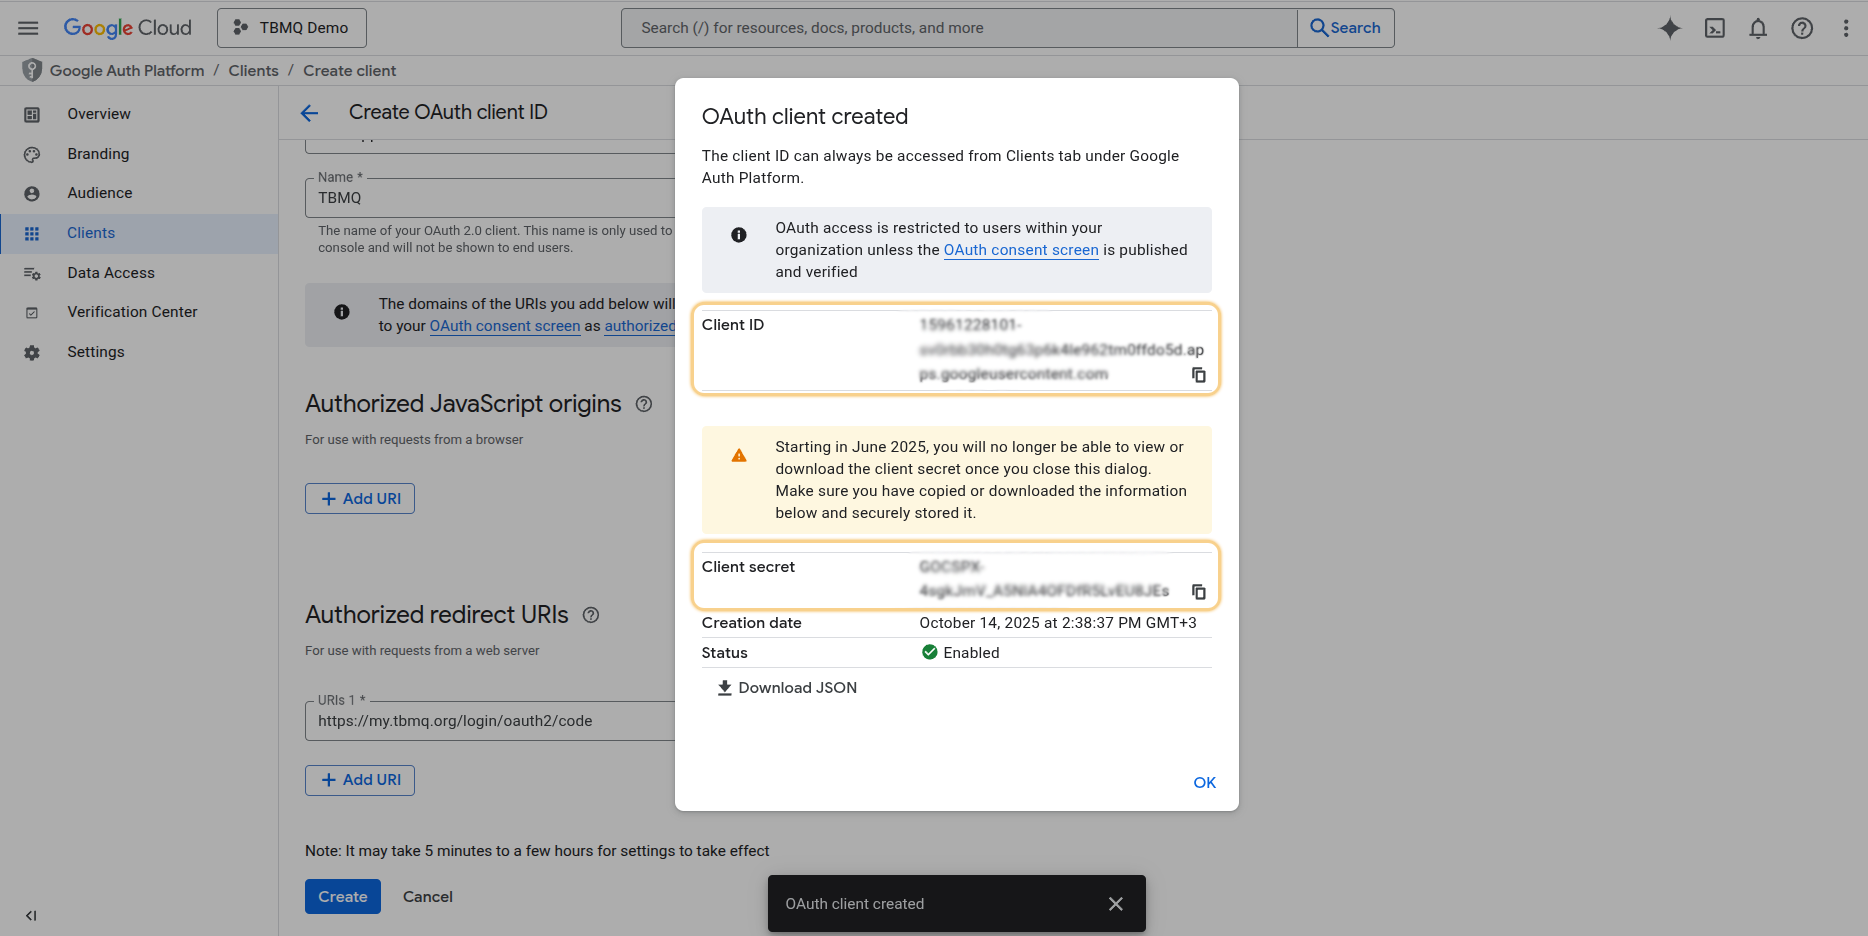
- Click “Create”.
The OAuth client is now created. You have credentials consisting of a Client ID and a Client Secret.
Configuring Google as an OAuth 2.0 authentication provider in TBMQ
To configure OAuth 2.0 authentication in TBMQ via Google, follow these steps:
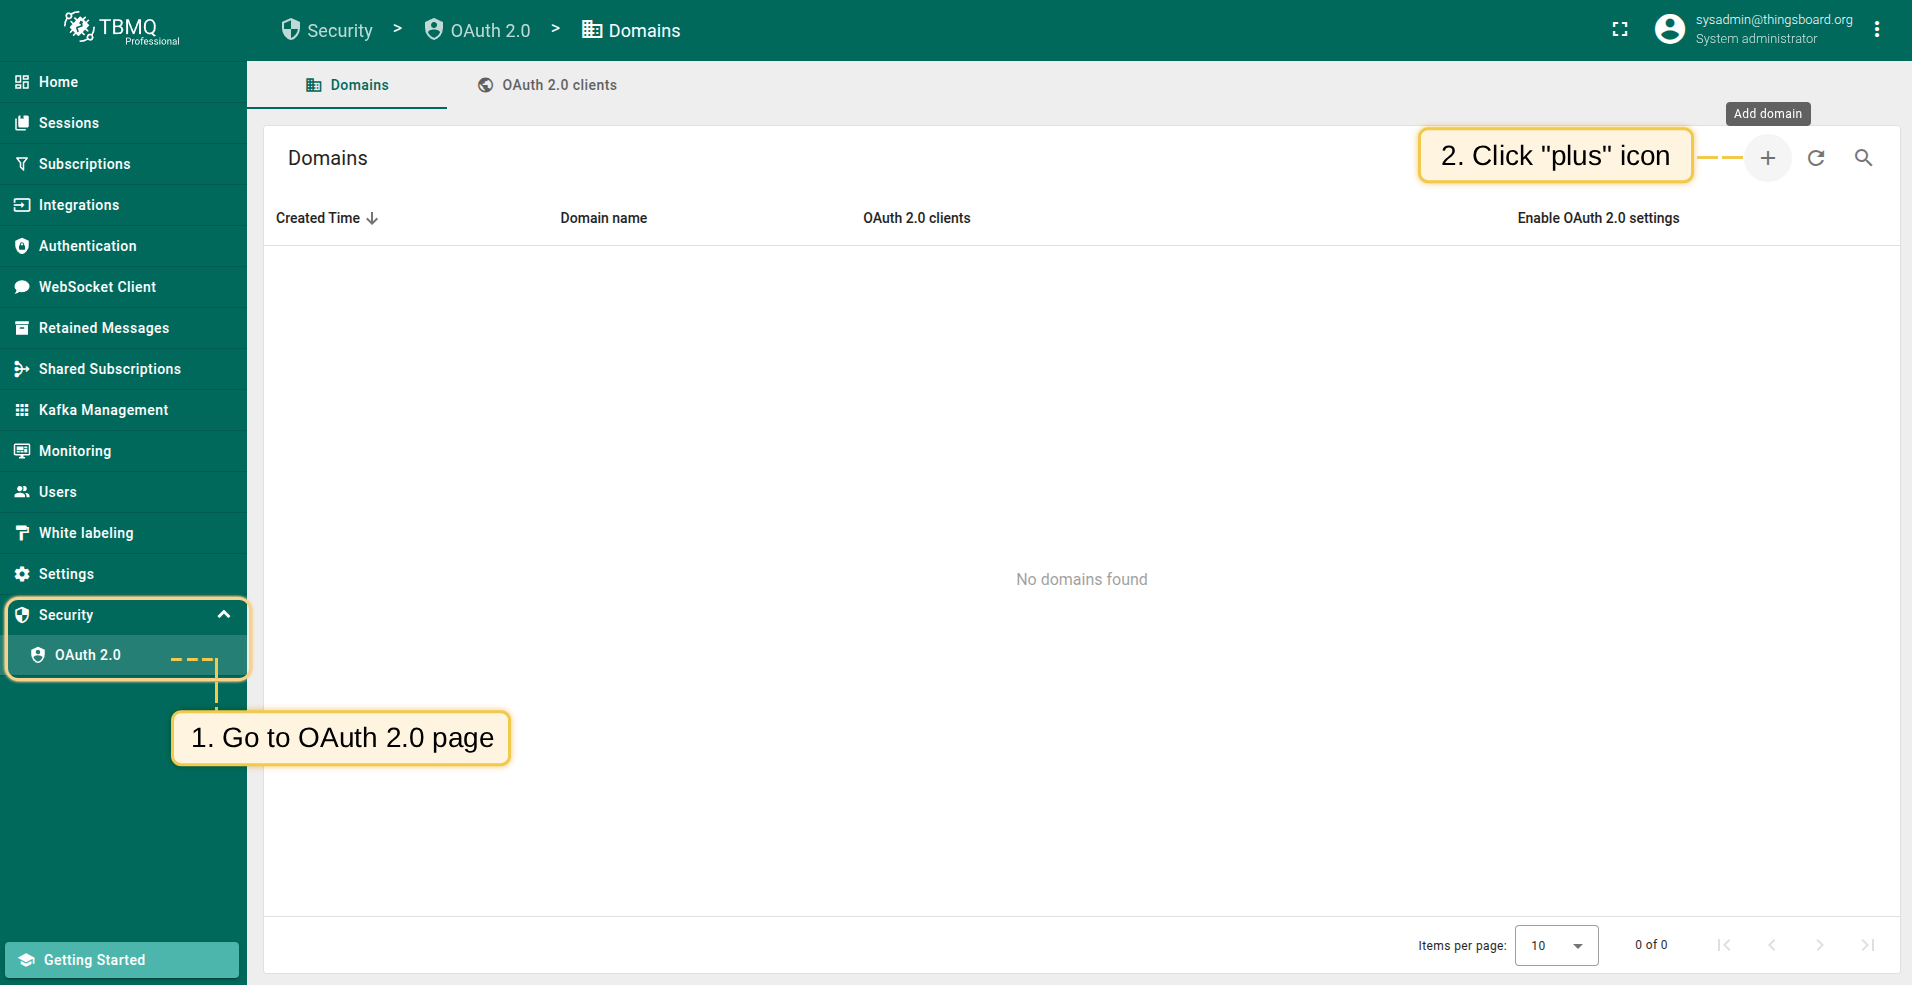
- Log in to your TBMQ instance;
- Go to the “OAuth 2.0” page in the “Security” section;
- On the “Domains” tab, click the “plus” icon;
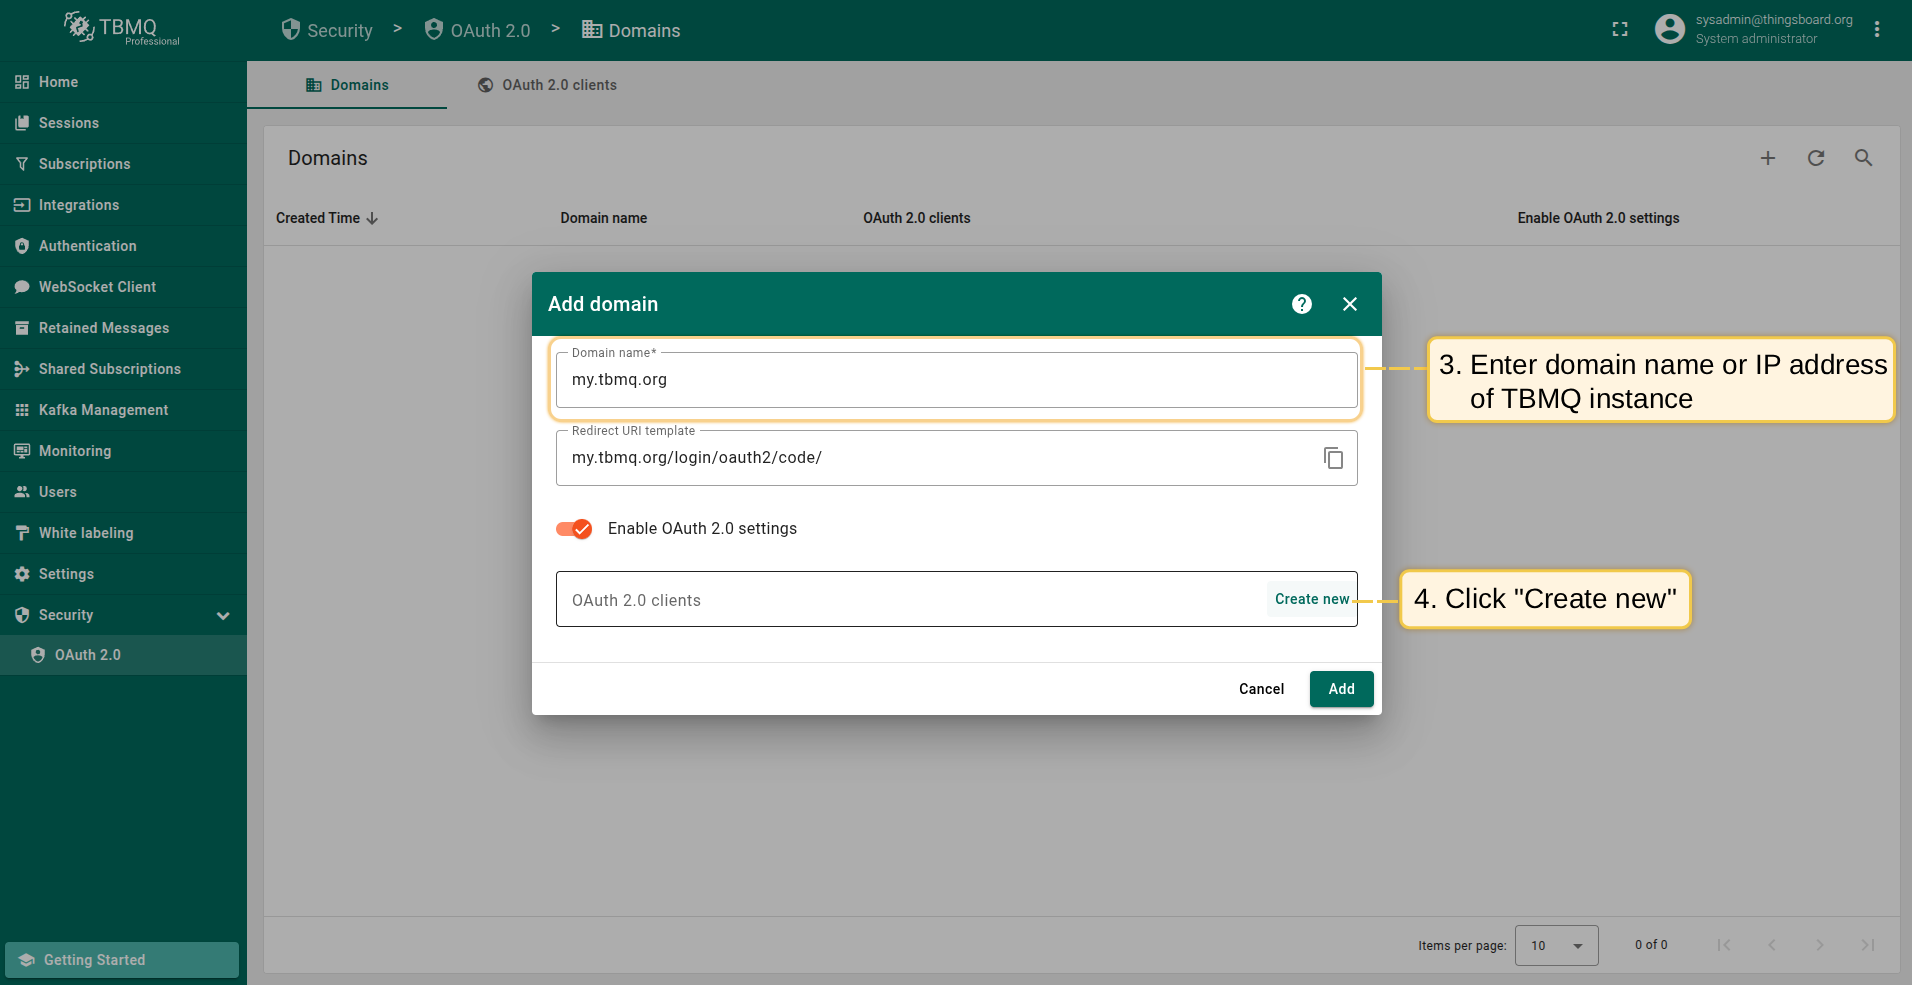
- Enter your domain name or IP address of your TBMQ instance;
- Click “Create new” in the “OAuth 2.0 clients” section to add one.
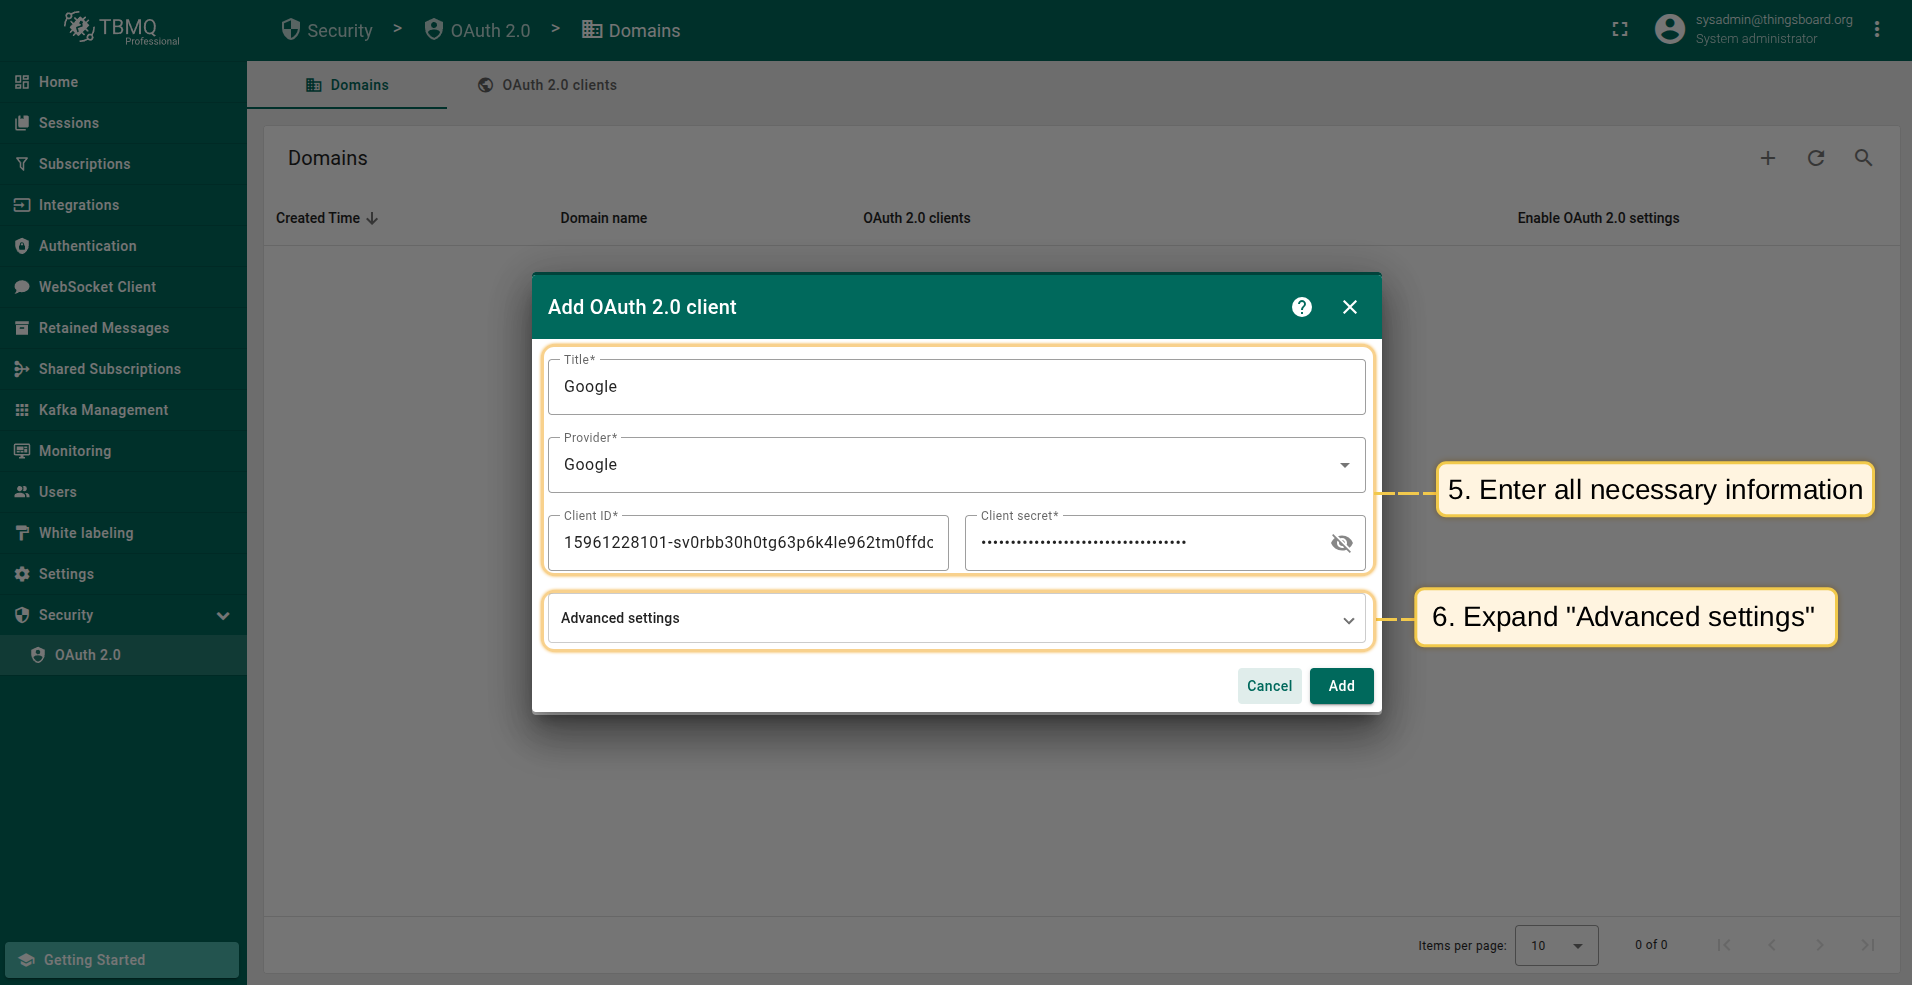
Adding a new OAuth 2.0 client:
- Enter “Google” as the title;
- Set the provider to “Google”;
- Enter the Client ID and Client Secret from the Google API Console.
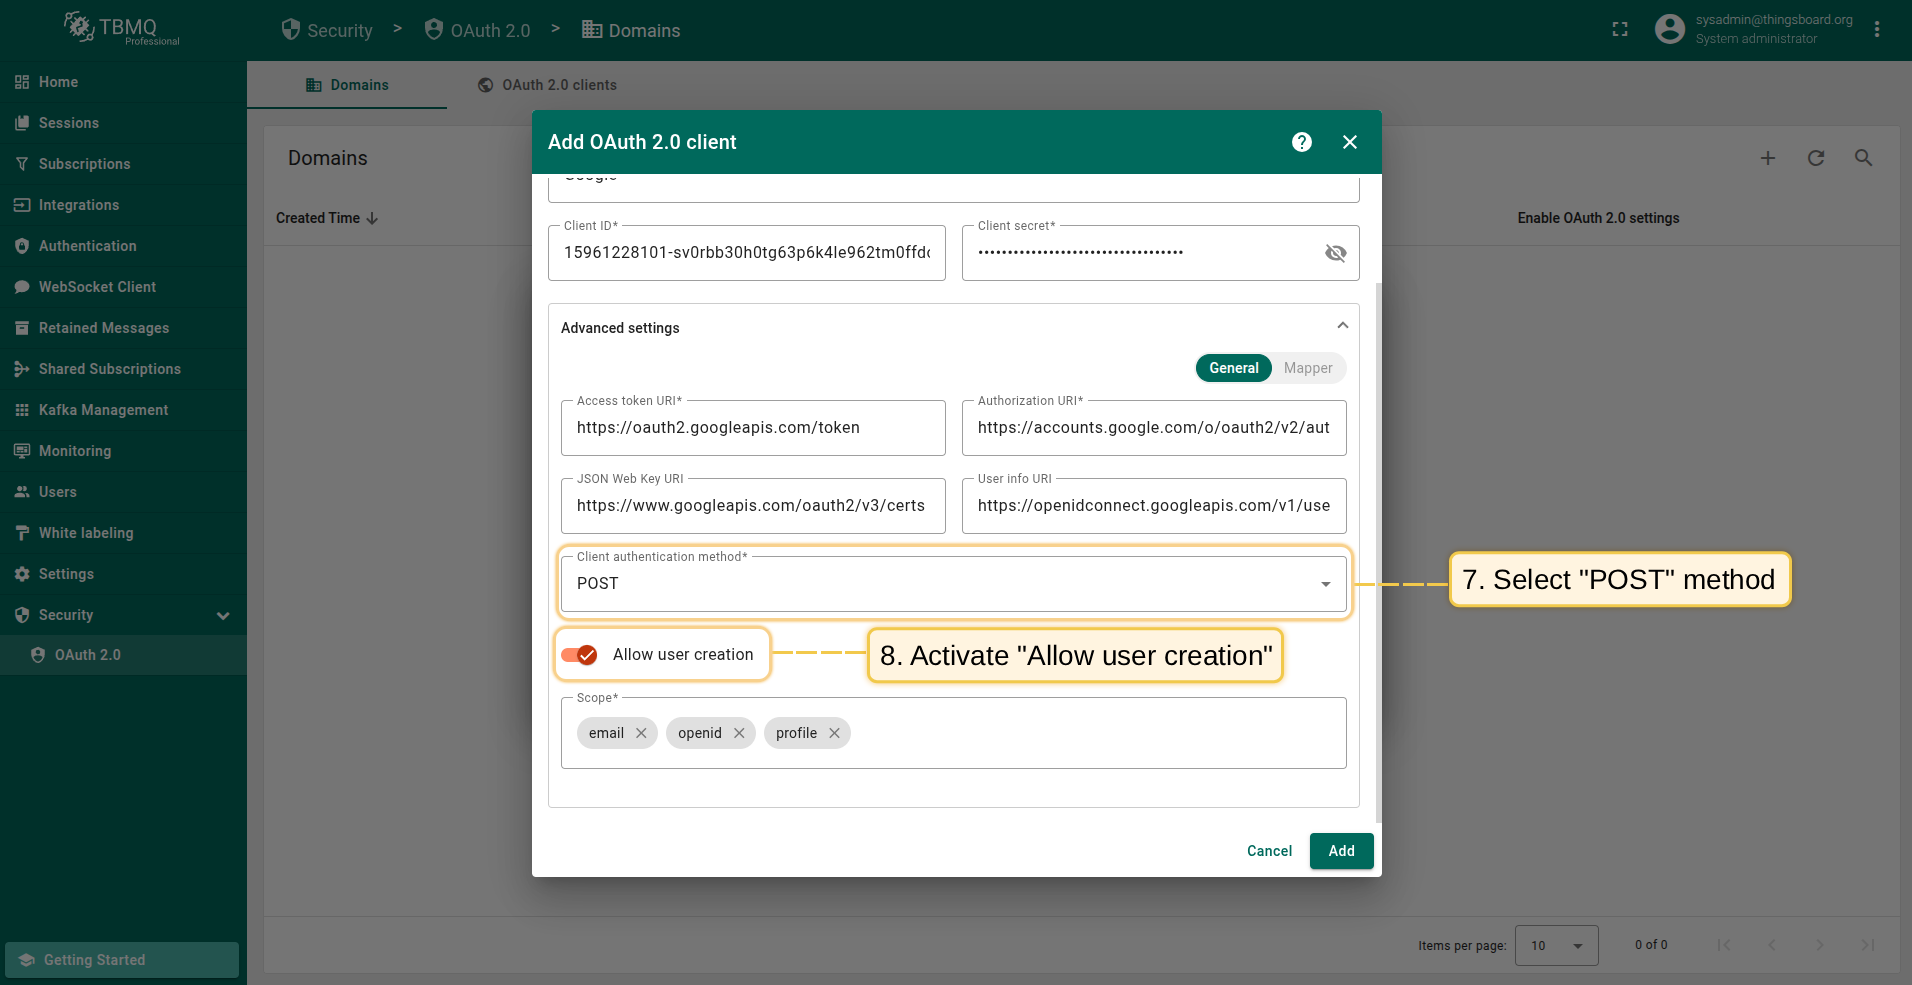
Then expand the “Advanced settings” section and configure the “General” block:
- Use this link to see the latest URLs such as “Access Token URI” and “Authorization URI”;
- Select “POST” as the client authentication method;
- Enable the “Allow user creation” option;
- Add the following to the scope field:
email,openid,profile.
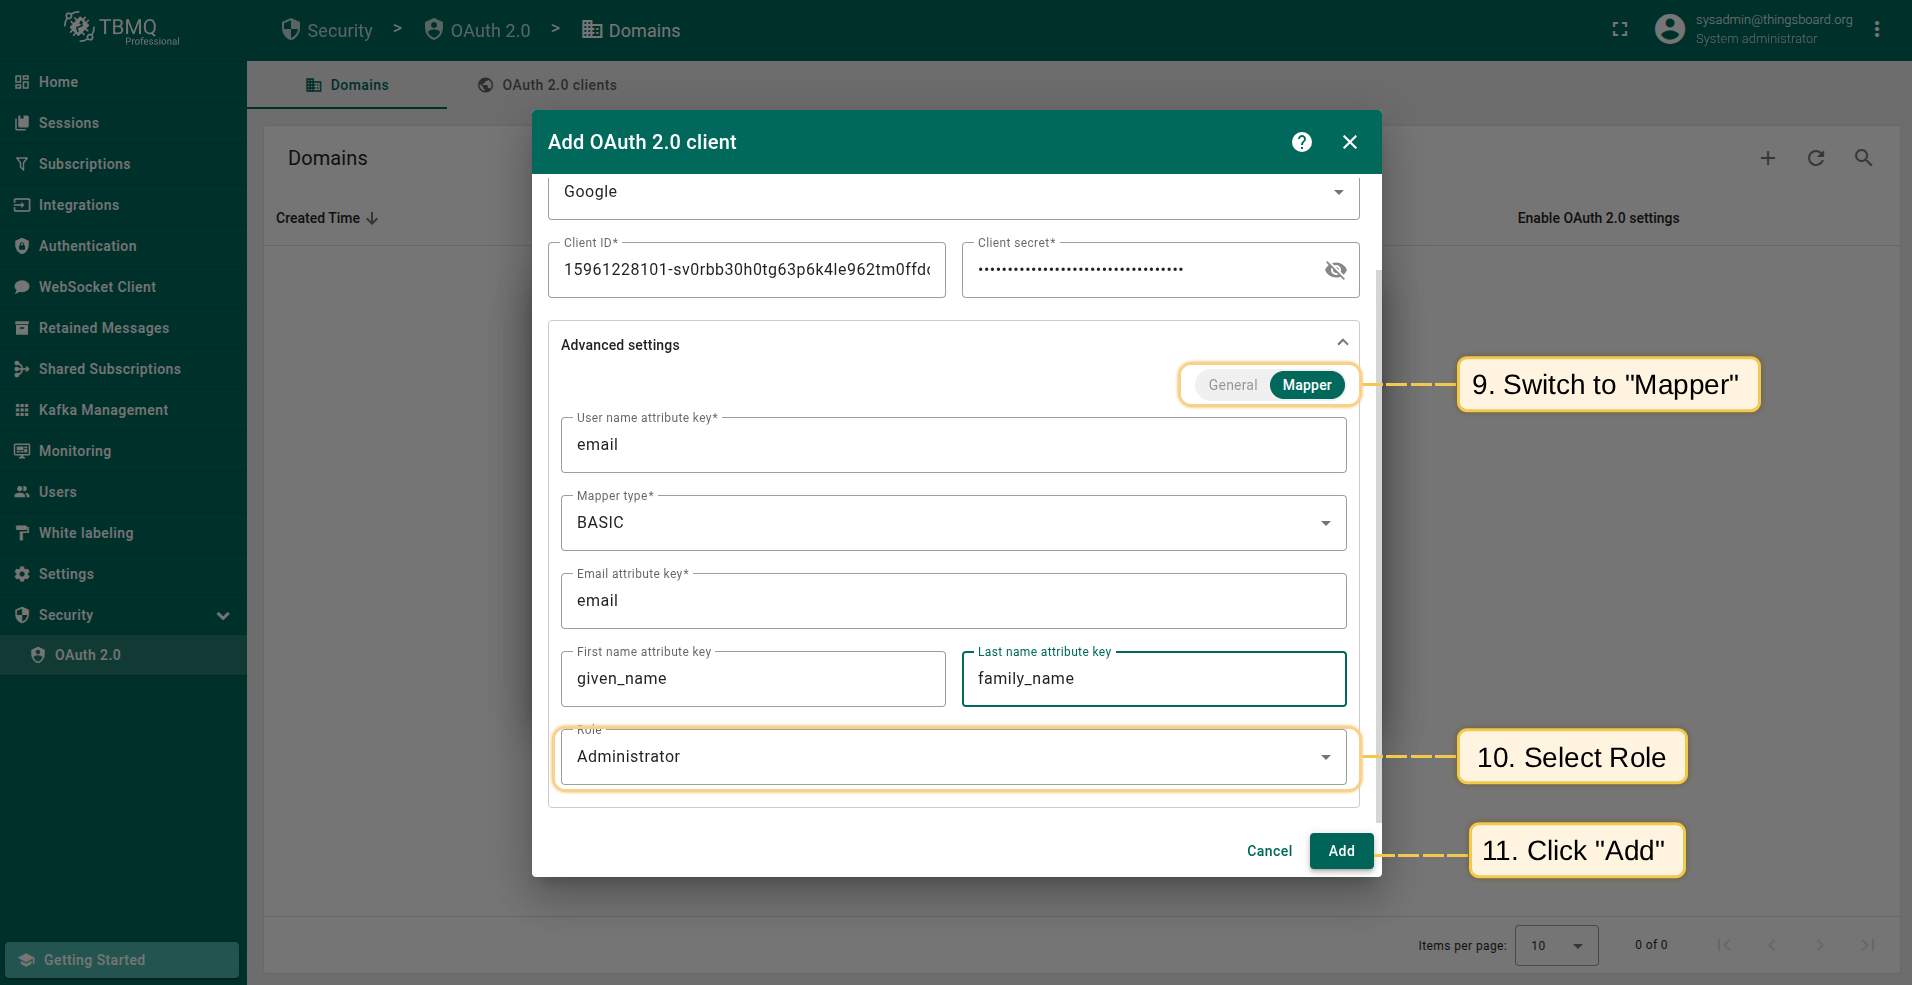
Go to the “Mapper” block:
- Keep the mapper type as “BASIC”;
- Specify the role to be assigned;
- Click “Add”.
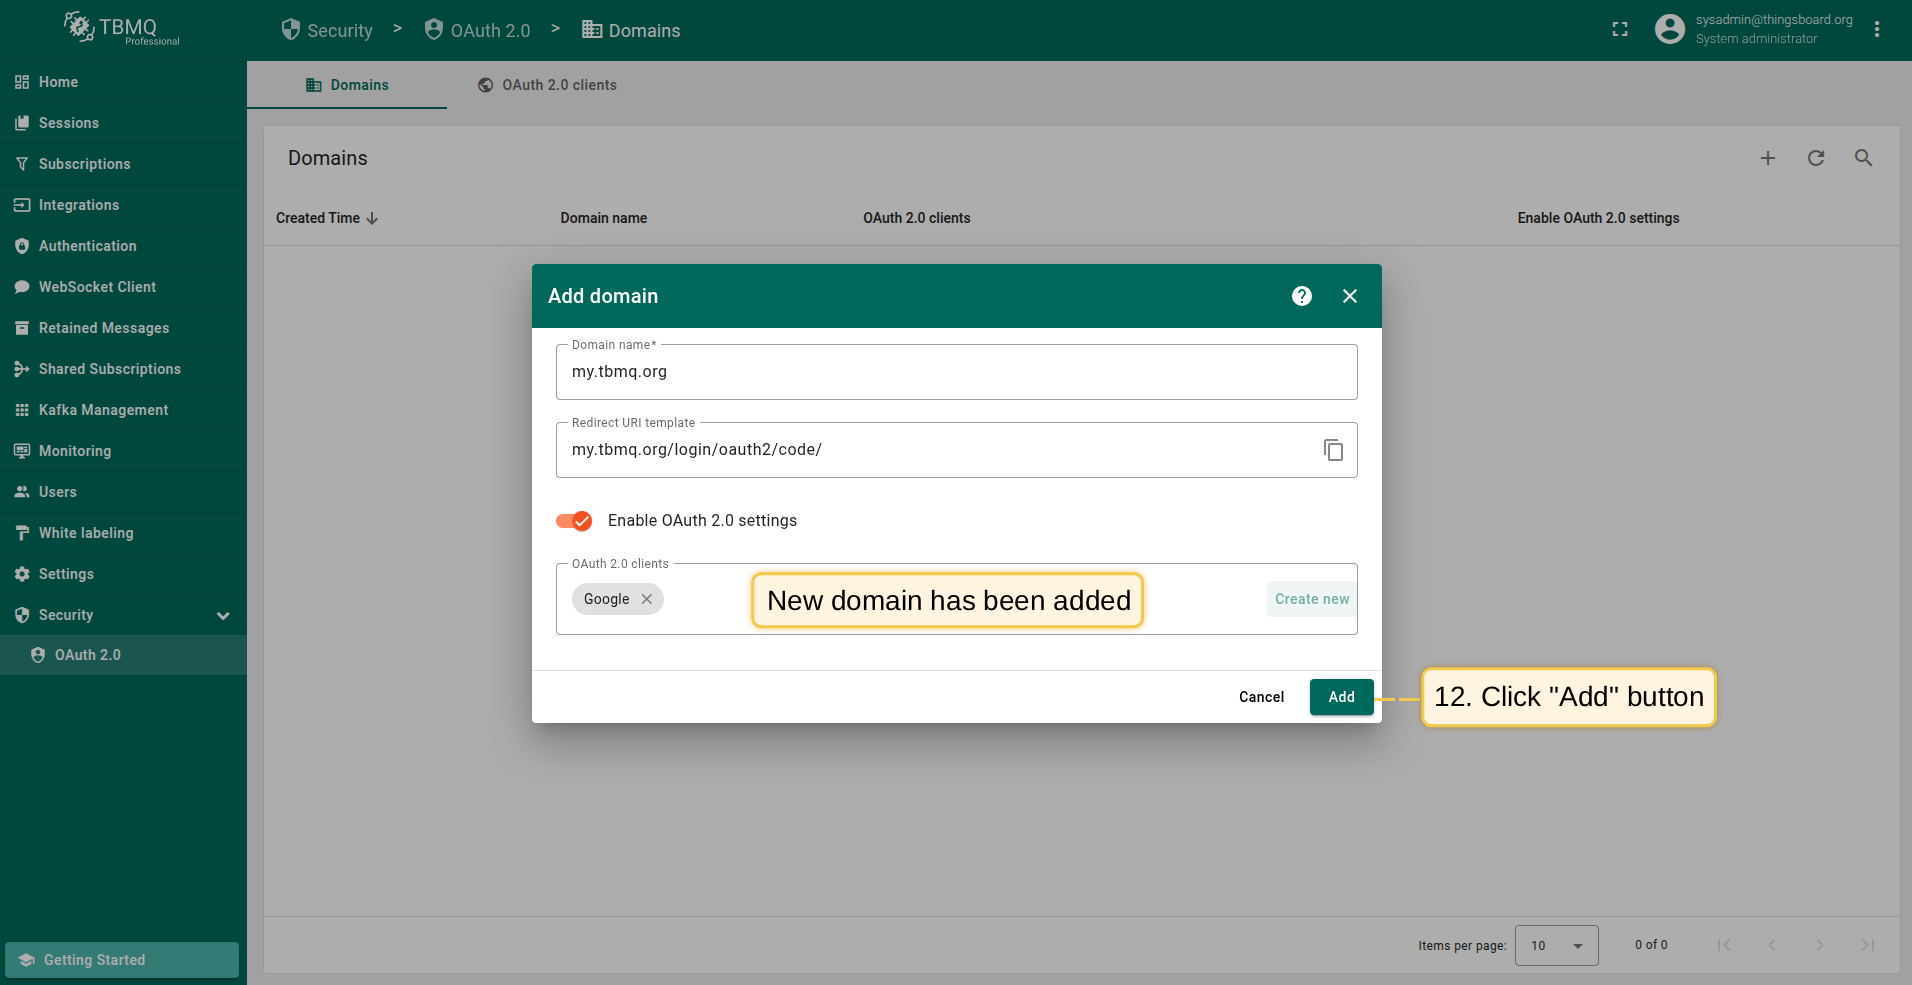
- The OAuth client has been added successfully. Click “Add” again to confirm the addition of the domain.
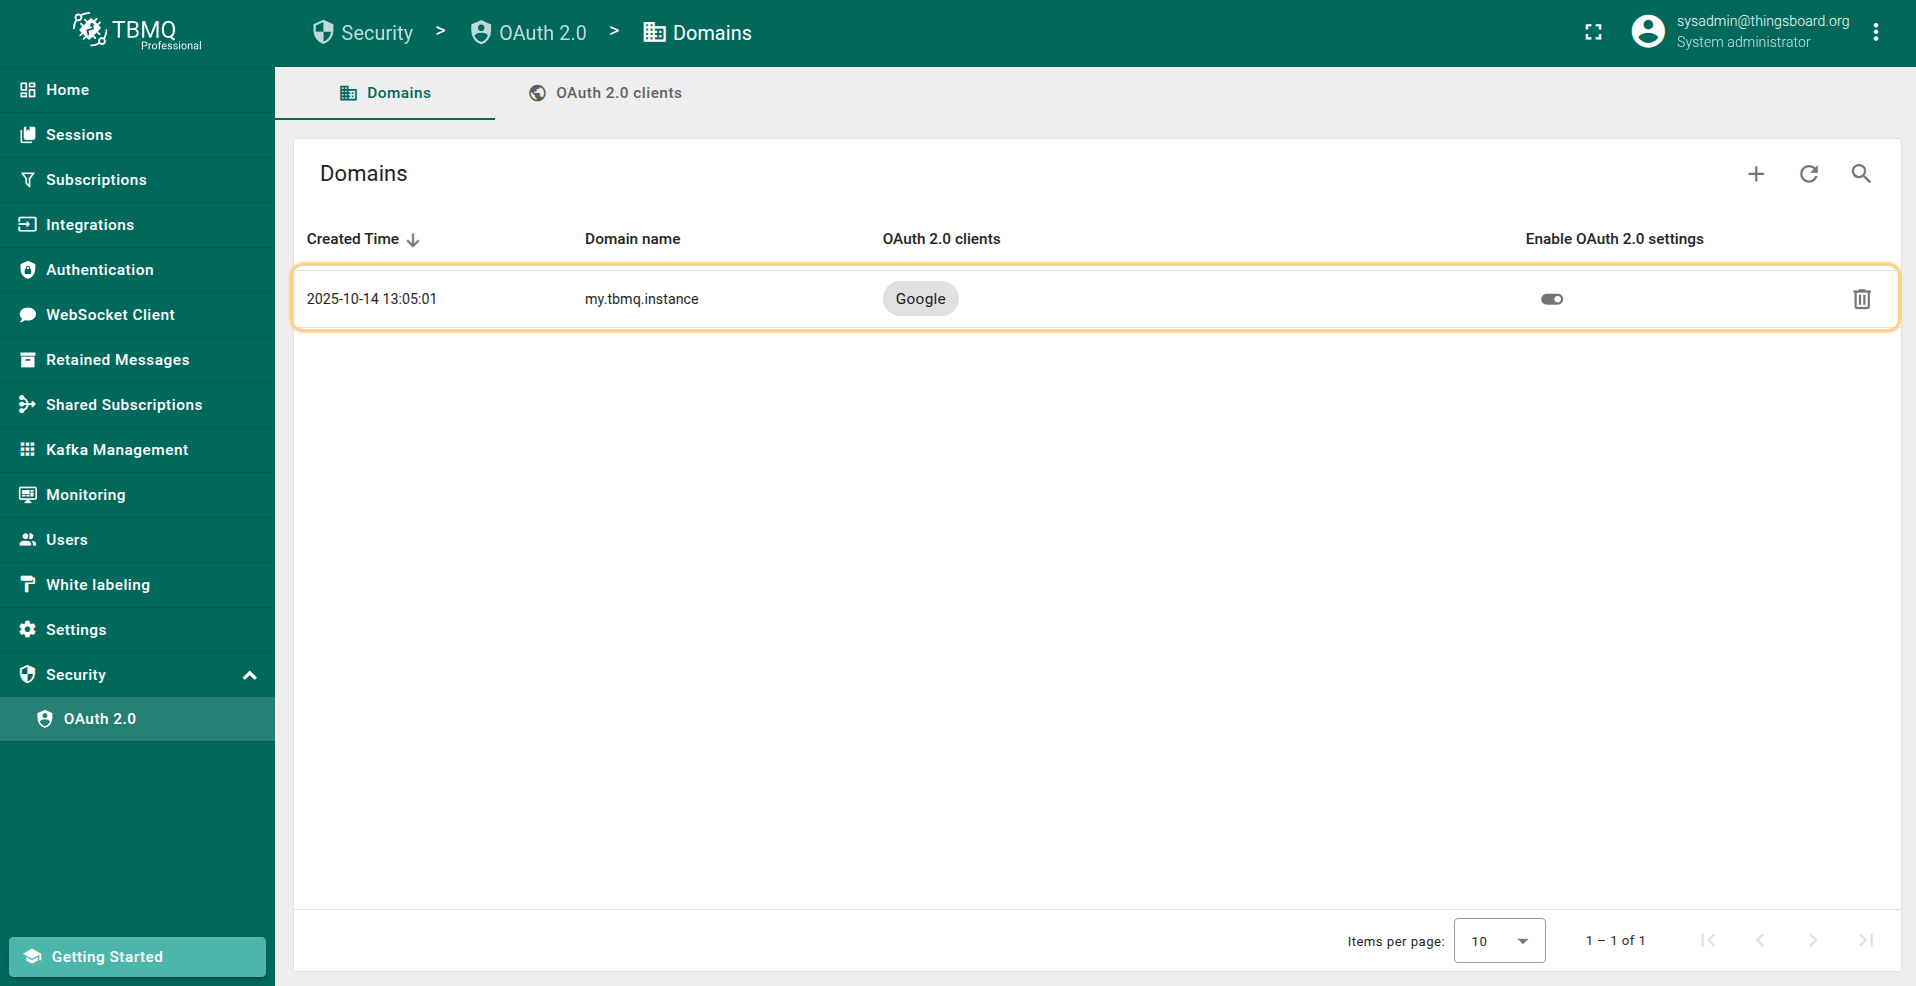
A new domain has now been added.
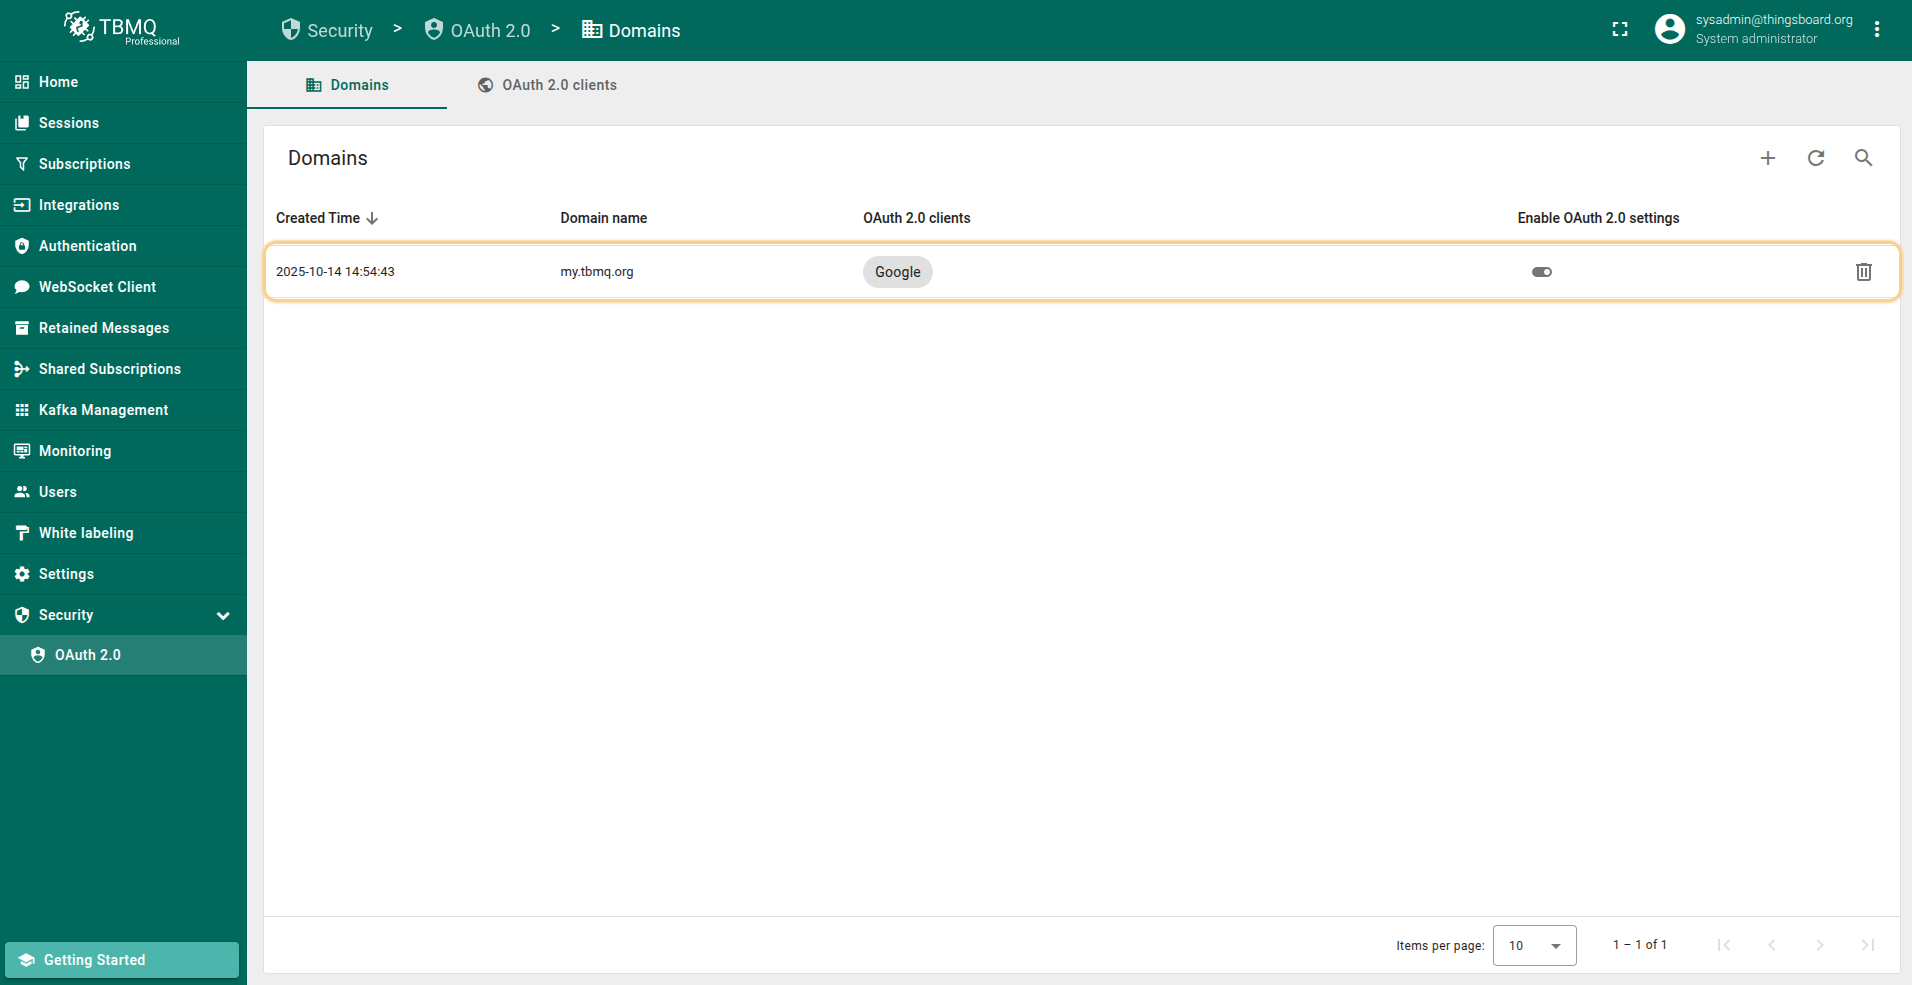
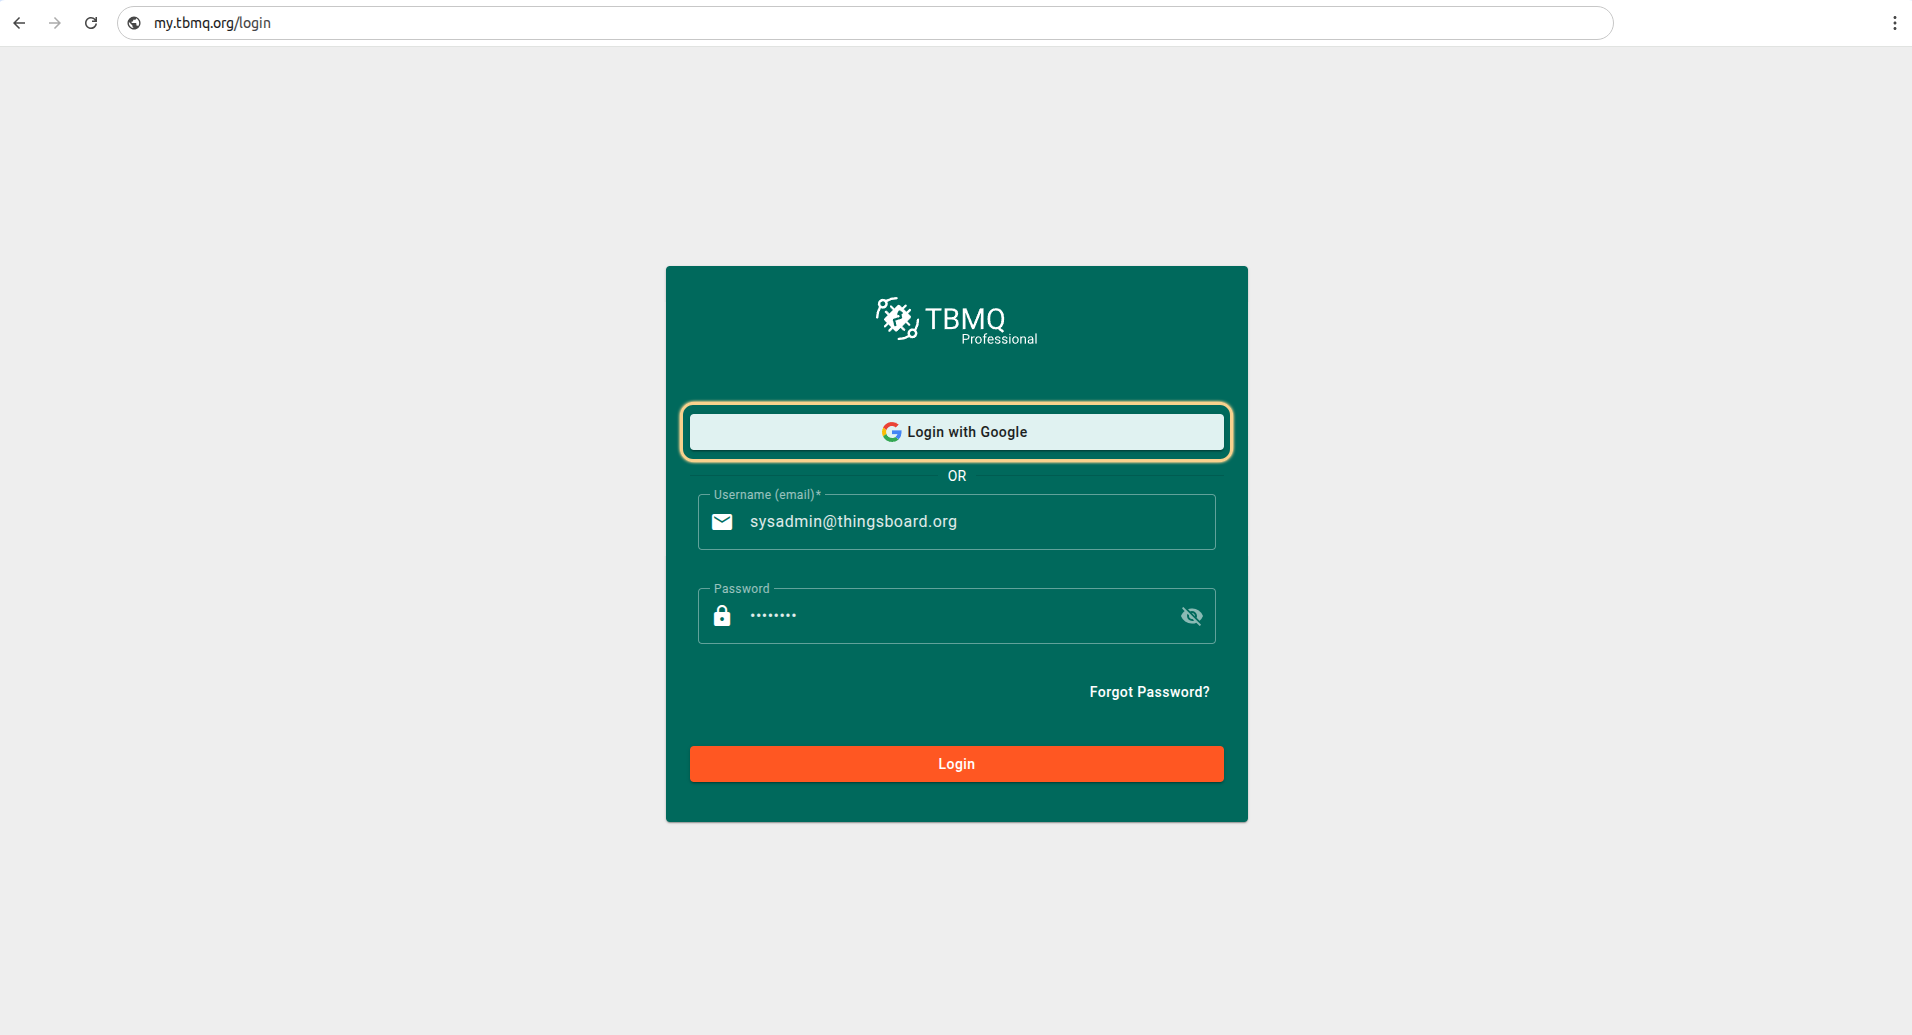
Sign in
Now, go to the TBMQ login screen. You will see a new “Login with Google” option. Select one of your Google accounts, and you will be logged into TBMQ using your Google email.
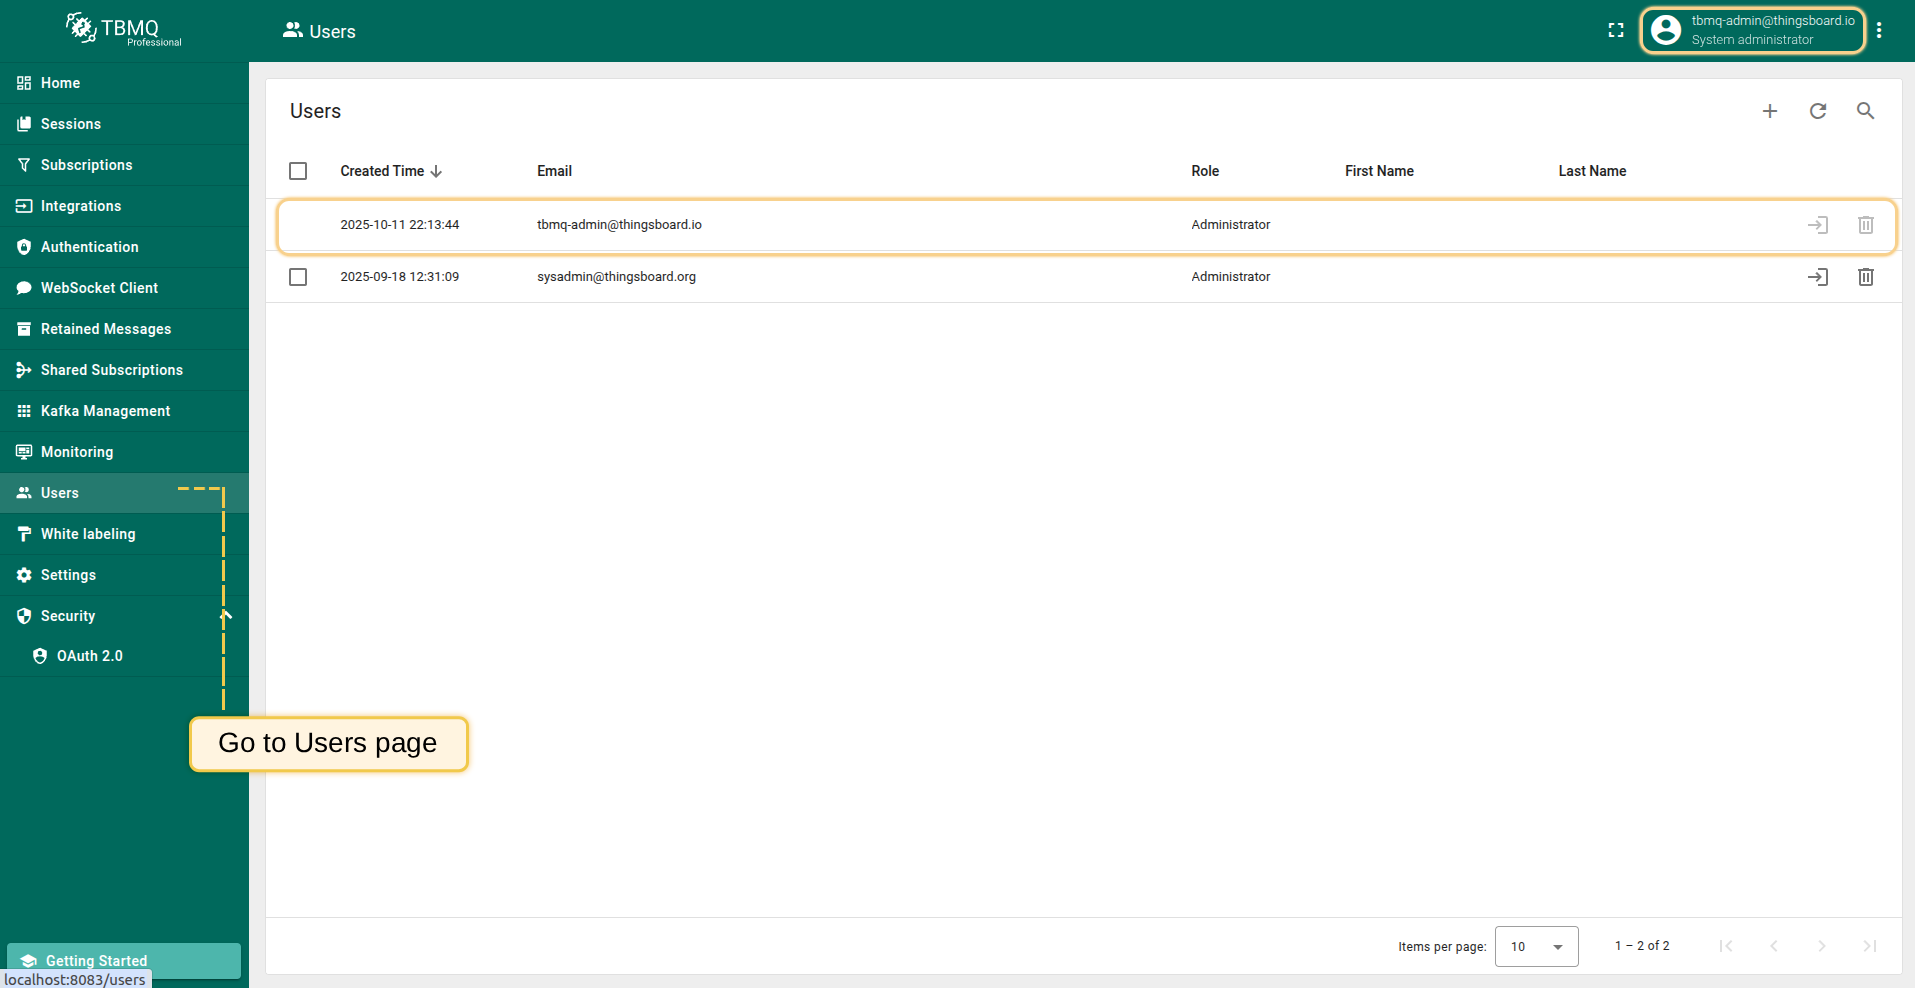
Go to the “Users” page to find the newly created user.
Login with Auth0
In this sample, we will configure OAuth authentication using an external provider – Auth0.
To map external user information from Auth0 to the OAuth platform, we use the built-in basic mapper.
If the basic mapper does not fit your business needs, you can configure the custom mapper to implement mapping that suits your requirements.
Preparations
Now let’s add another provider to our list – Auth0.
To apply the configuration properly, we first need to obtain OAuth 2.0 credentials:
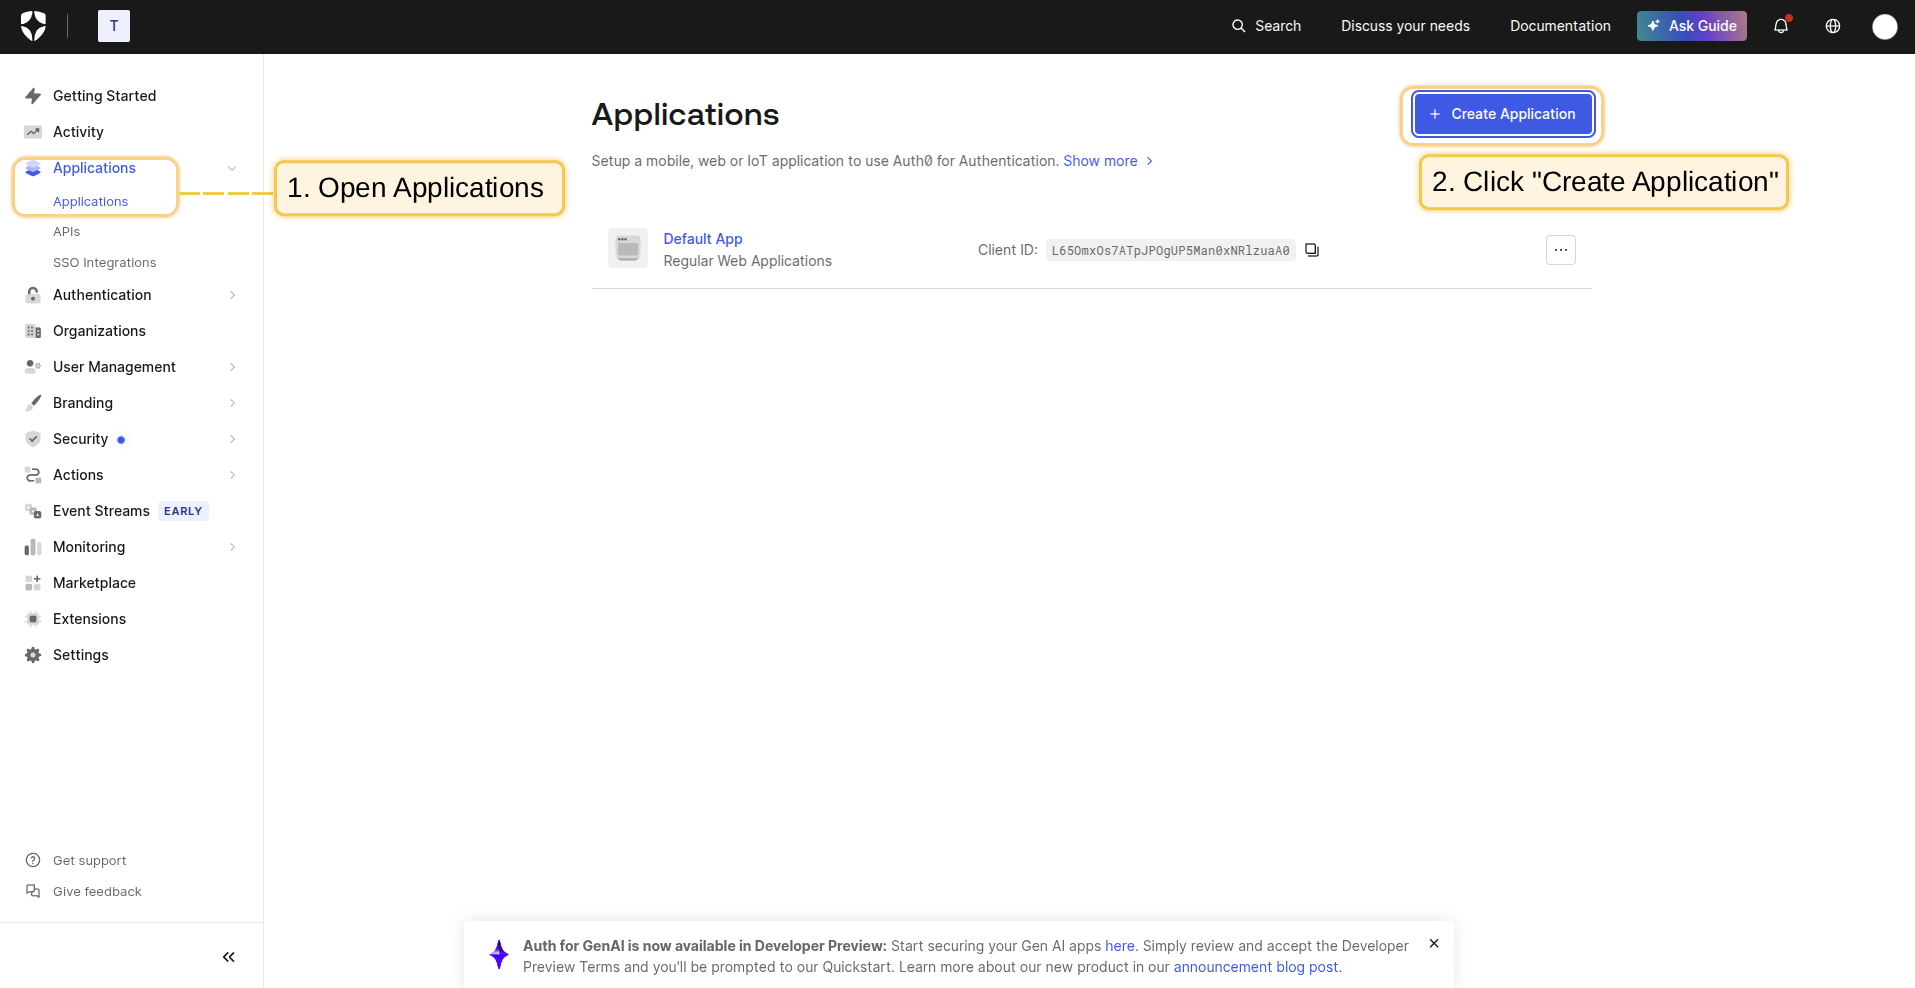
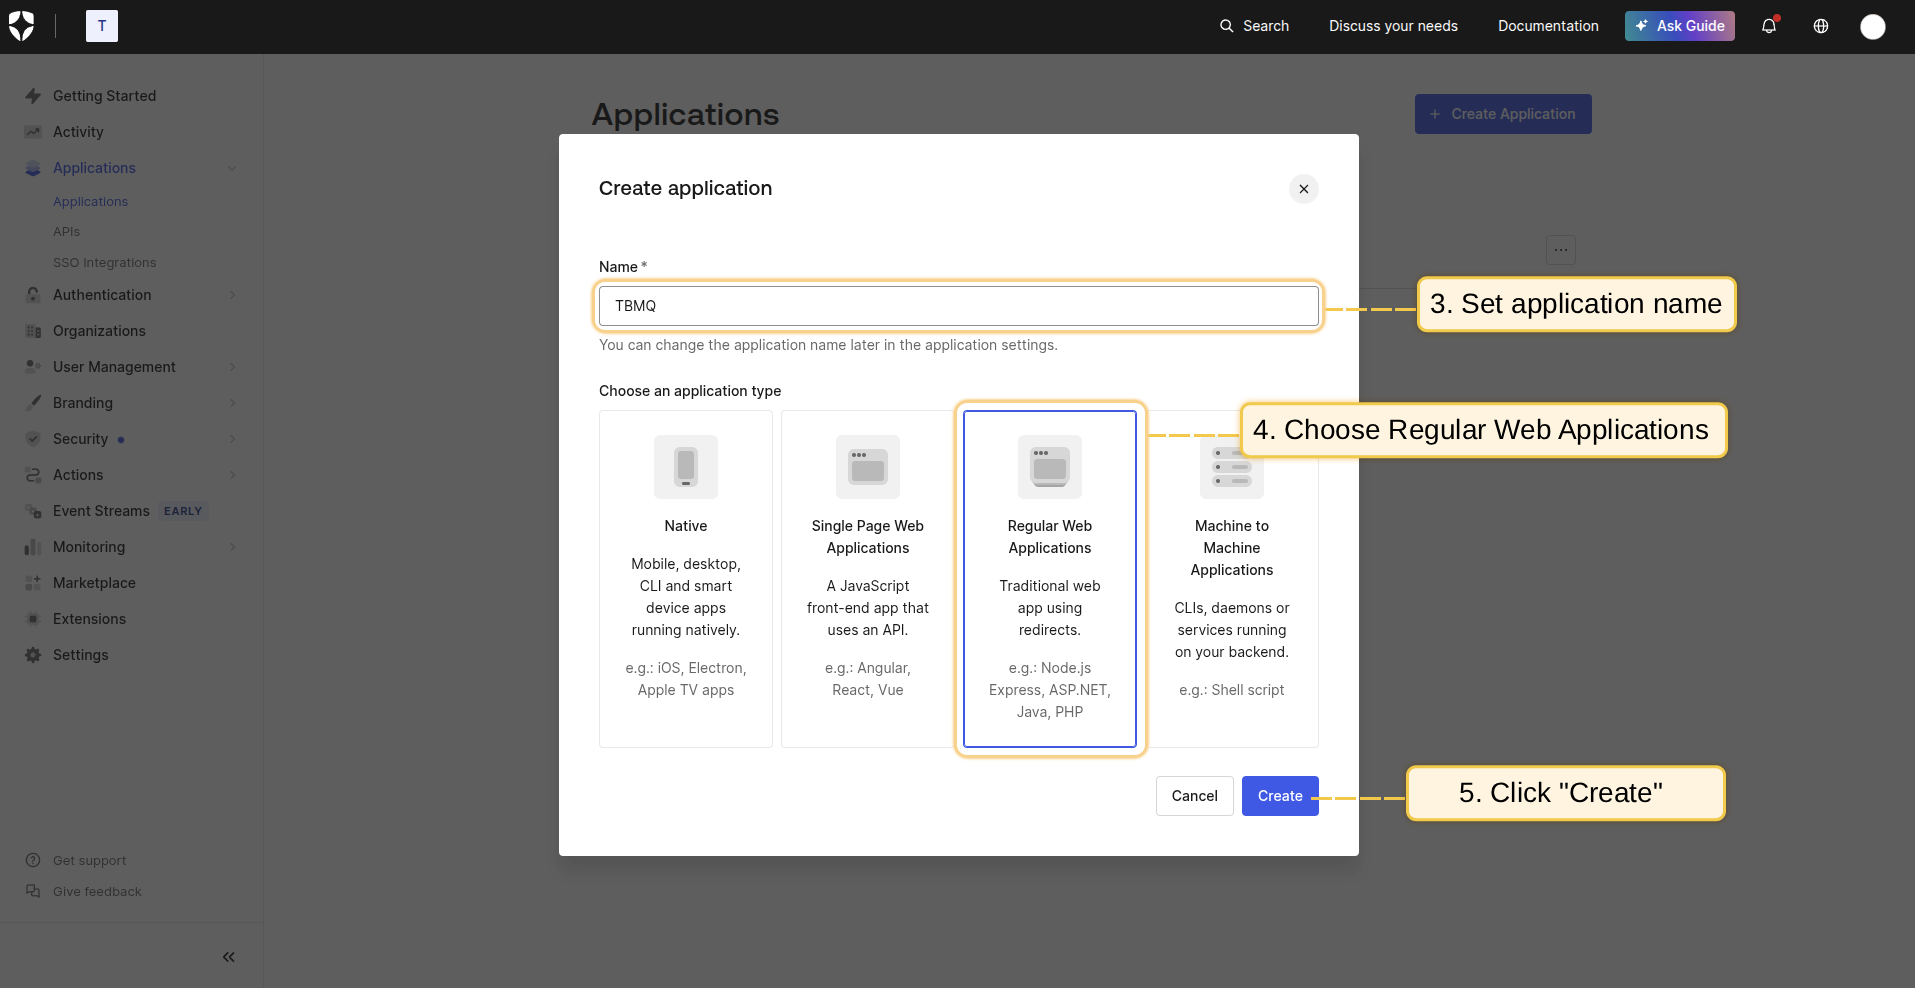
- Go to the Auth0 management console. Open the “Applications” page, and click the “+ Create Application” button;
- Name your application “TBMQ” and choose the application type Regular Web Applications;
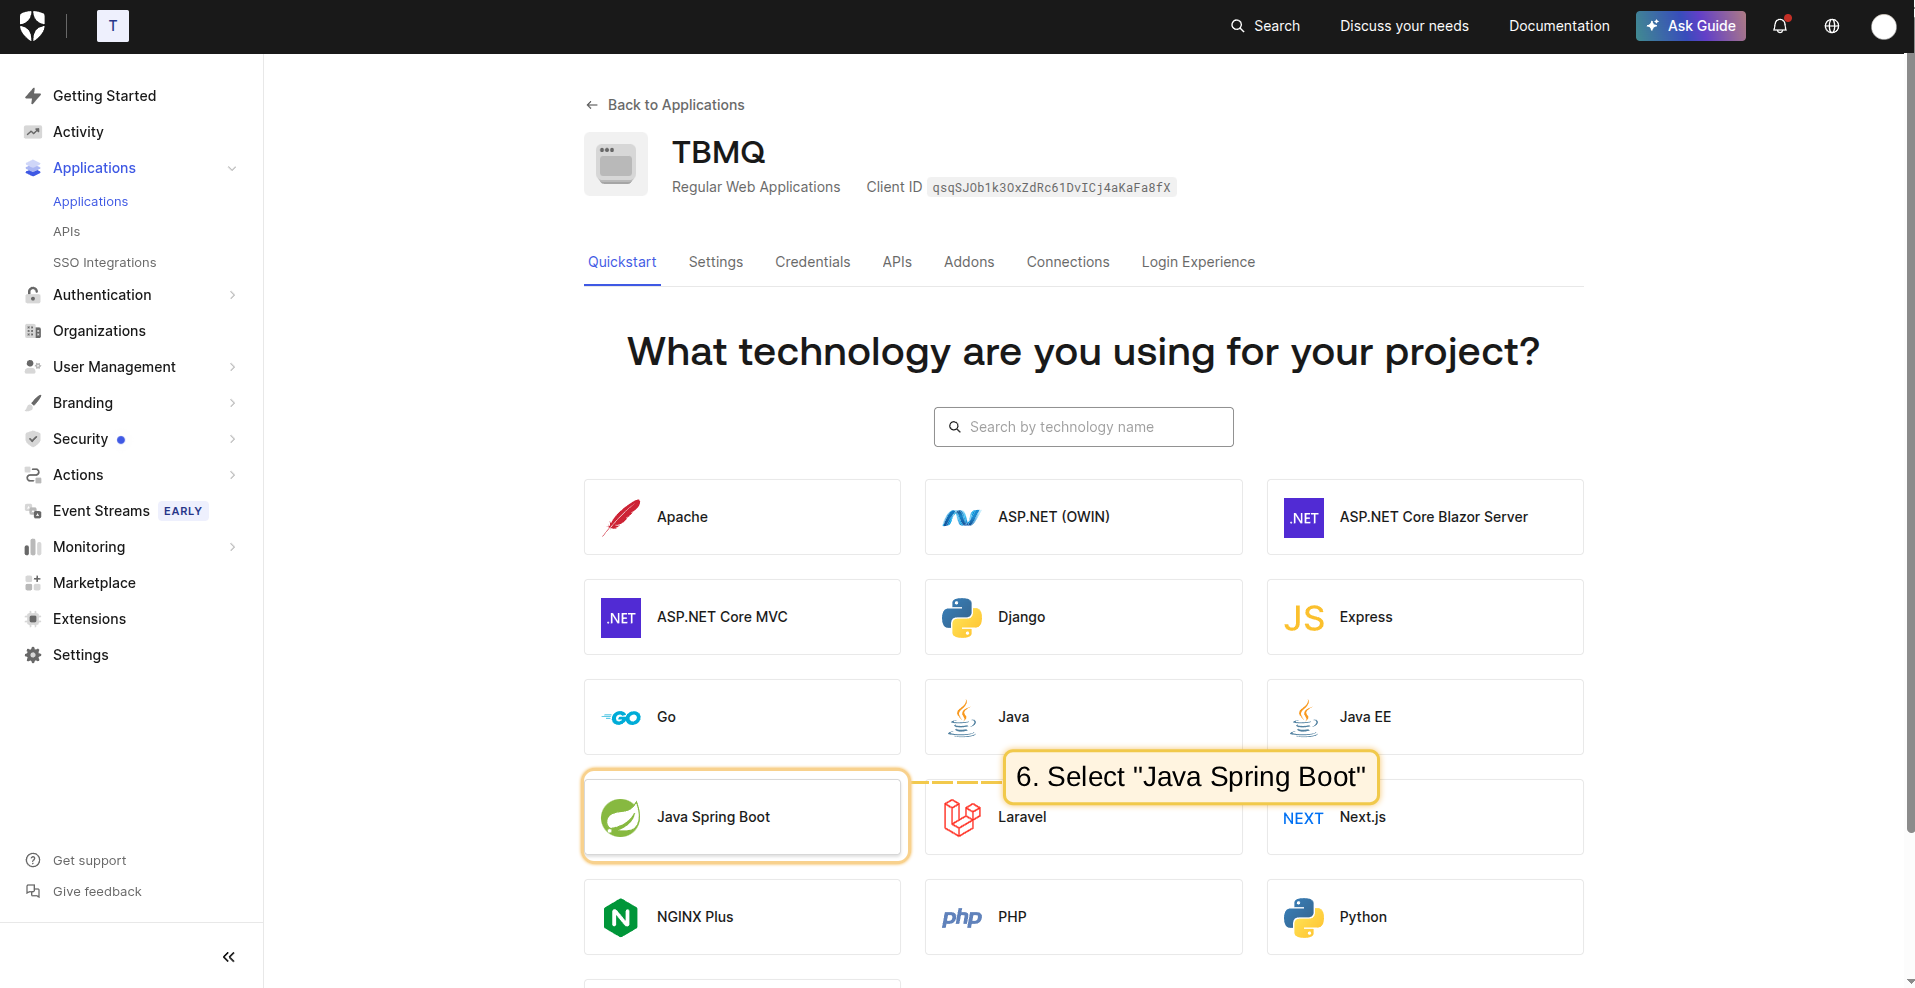
- Next, choose the technology being used. Please select Java Spring Boot;
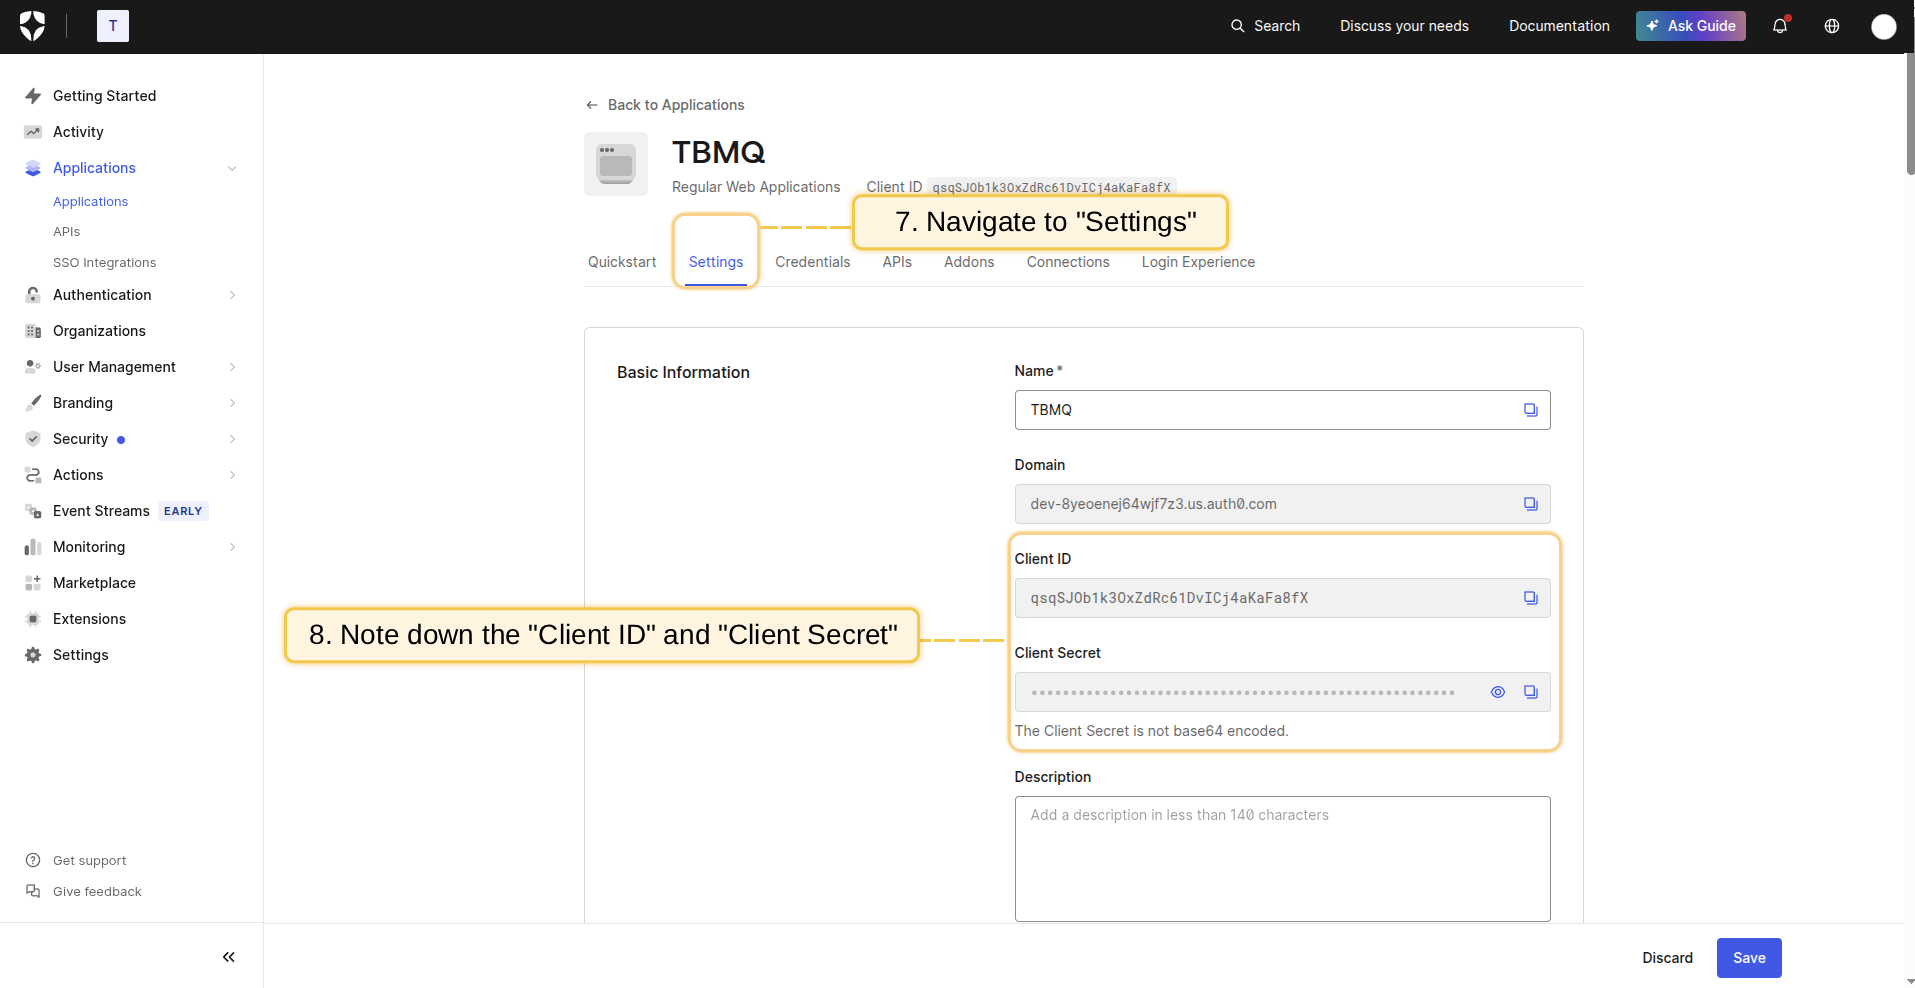
- Once your application is created, you are redirected to the application details page. Navigate to the Settings tab to find the Client ID and Client Secret;
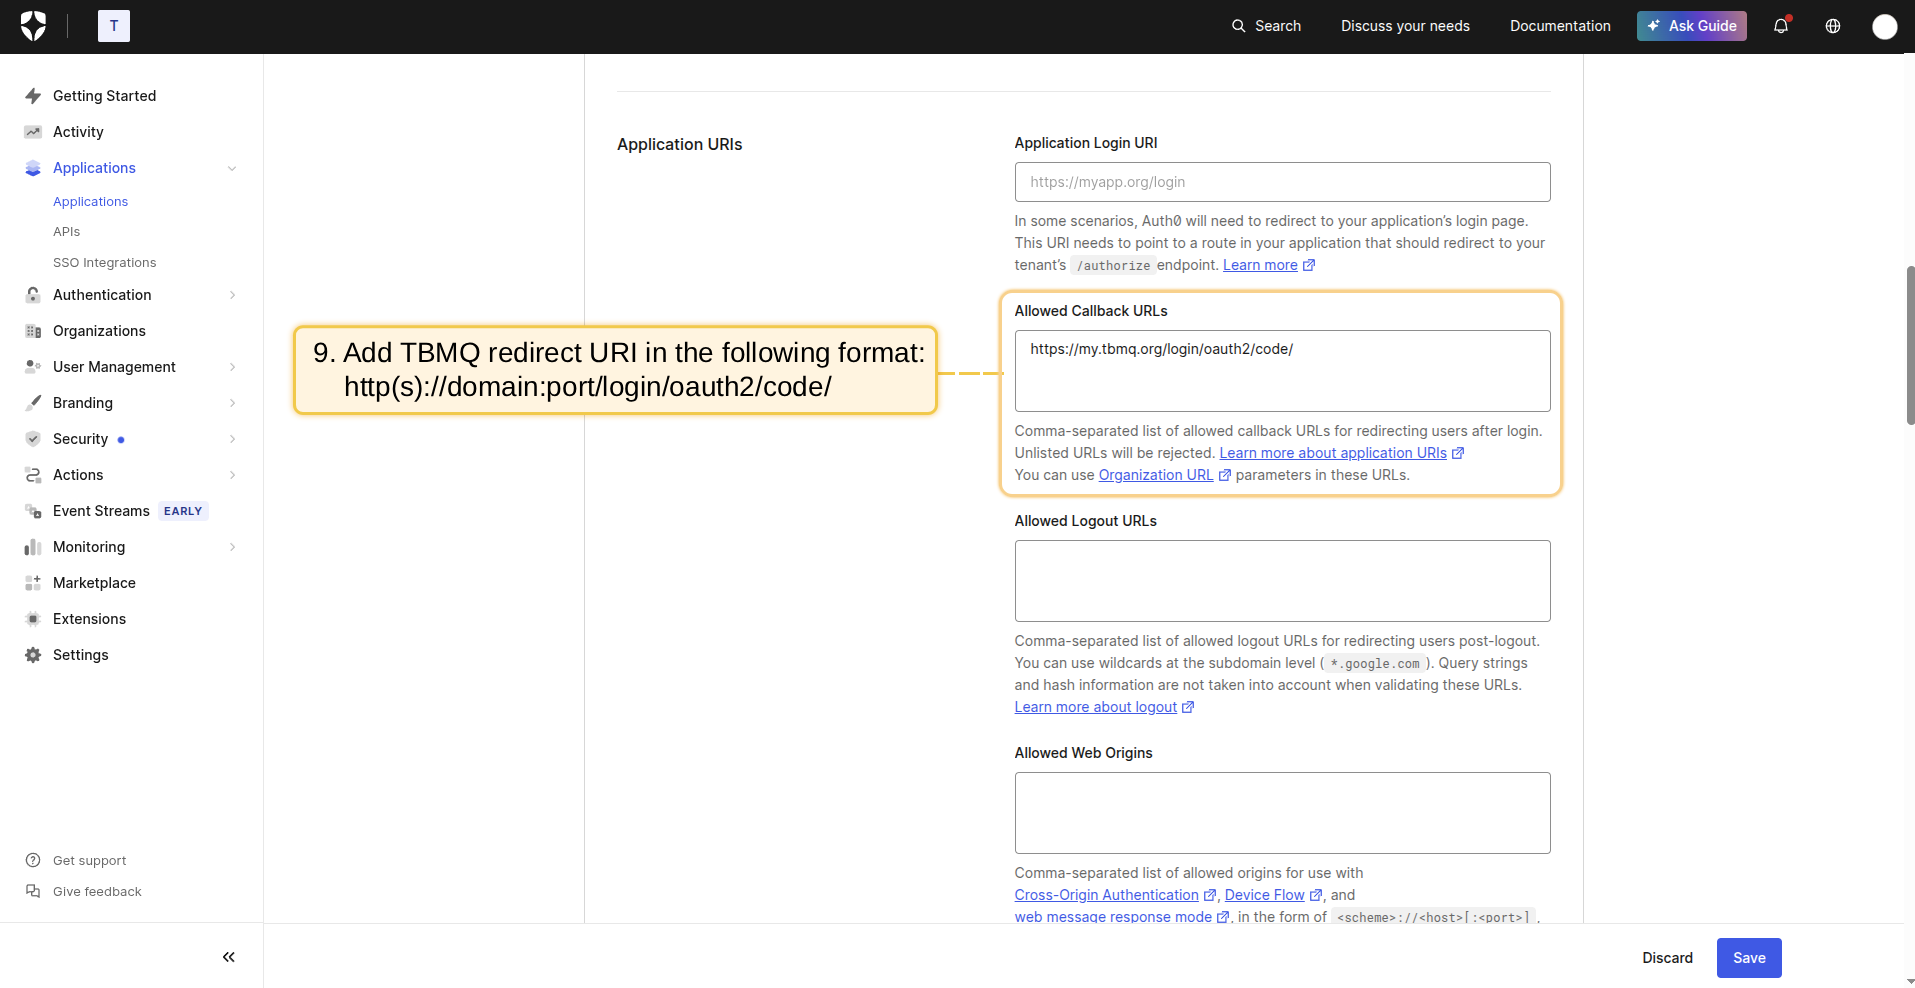
- In the Allowed Callback URLs field, update the redirect URI using the format:
1
http(s)://domain:port/login/oauth2/code/
- Replace
domainwith your TBMQ domain and specify the port used for HTTP access. For example, if your domain is my.tbmq.org:
1
https://my.tbmq.org/login/oauth2/code/
Please note that it is not necessary to update the Application Login URI.
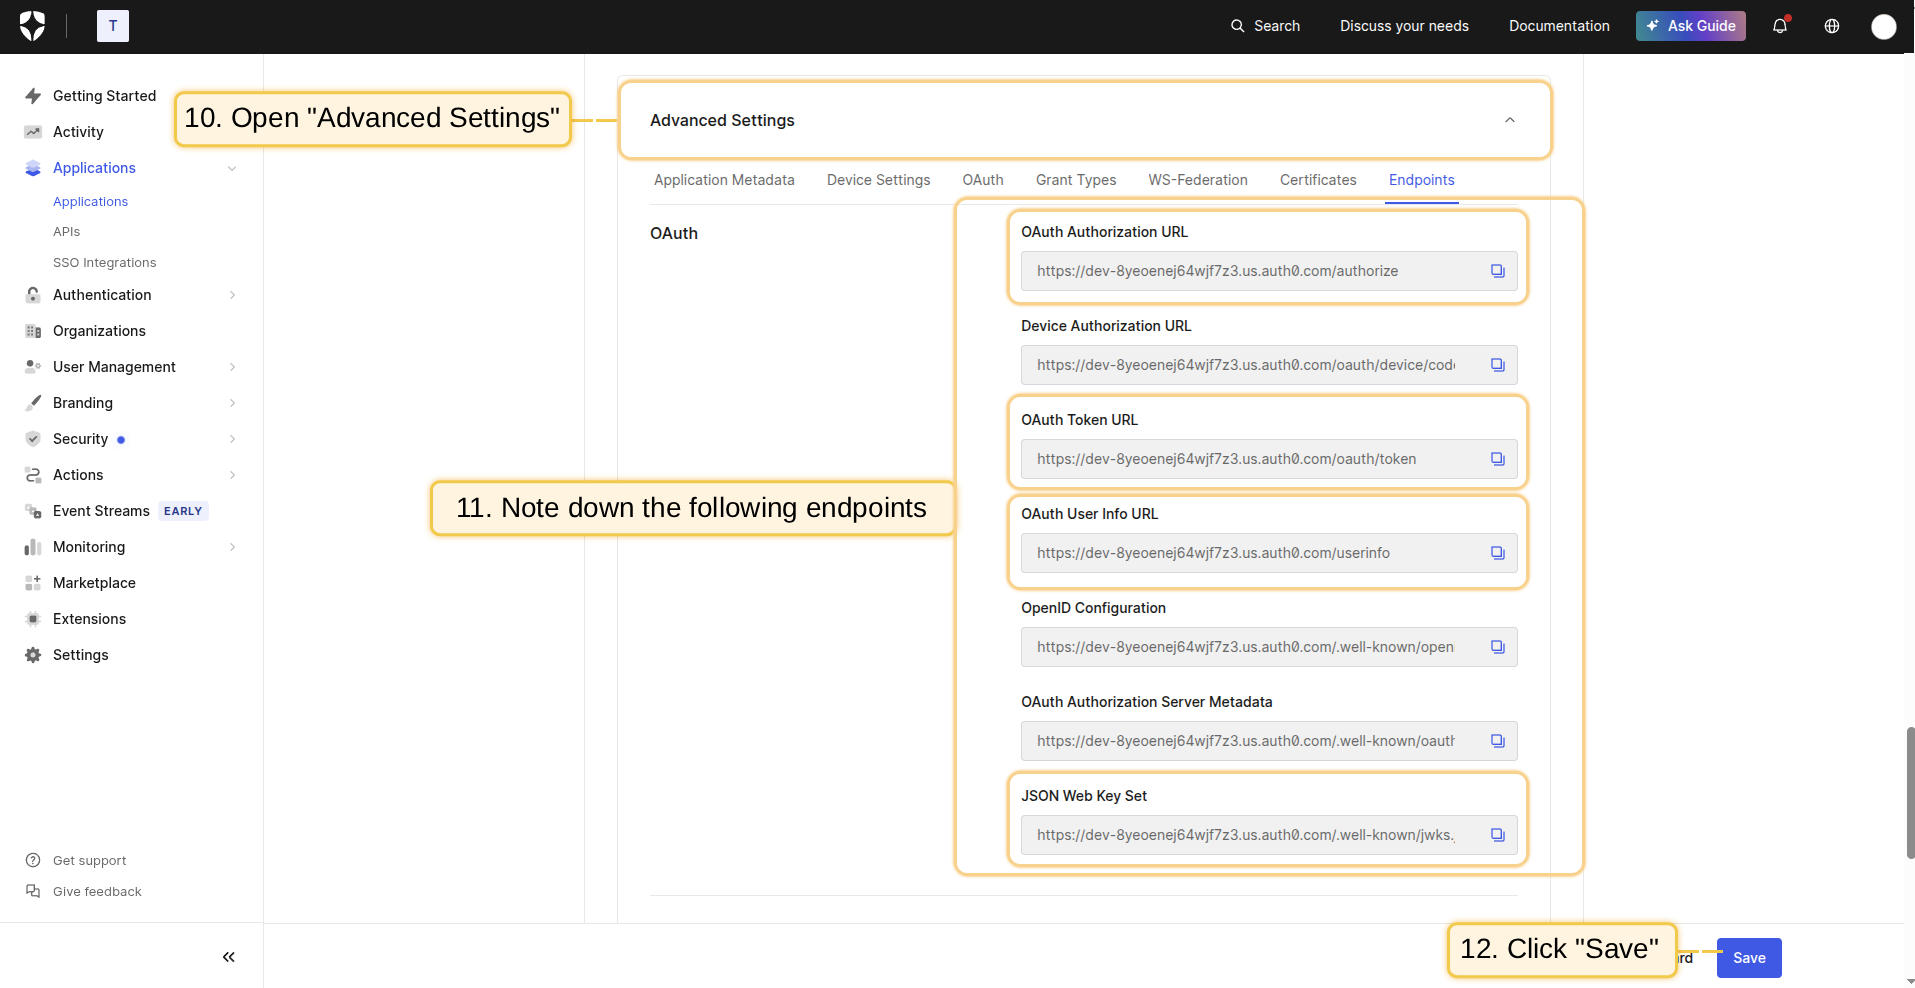
- In the Advanced Settings section, you will find all the necessary URLs (endpoints) required for configuring OAuth 2.0;
- Click the Save Changes button.
Configuring Auth0 as an OAuth 2.0 authentication provider in TBMQ
To configure OAuth 2.0 authentication in TBMQ via Auth0, follow these steps:
- Log in to your TBMQ instance;
- Go to the “OAuth 2.0” page in the “Security” section;
- On the “Domains” tab, click the “plus” icon;
- Enter your domain name or IP address of your TBMQ instance;
- Click “Create new” in the “OAuth 2.0 clients” section to add a new one.
Adding a new OAuth 2.0 client:
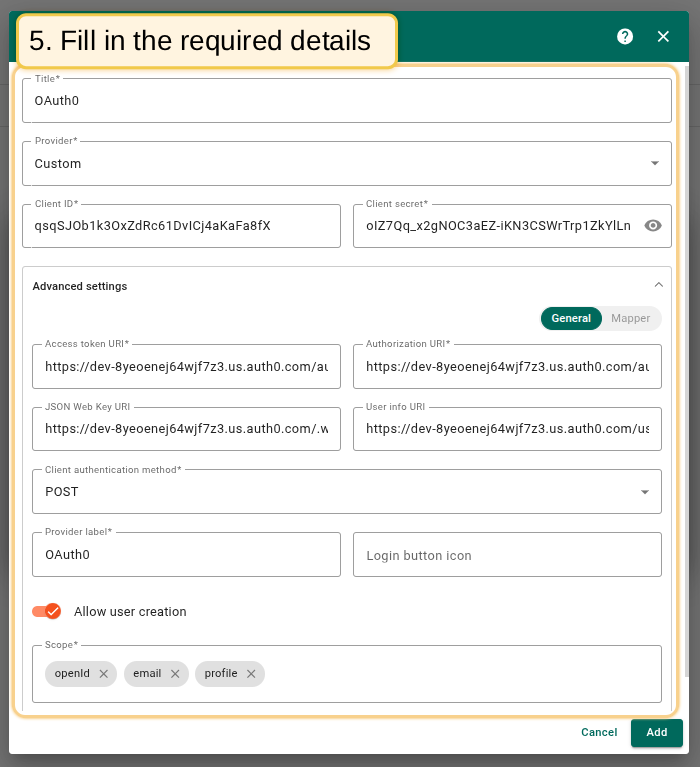
- In the opened window, enter Auth0 as the title for the client;
- Select Custom as the provider from the dropdown;
- Enter the Client ID and Client Secret obtained from the Auth0 management console.
In the General block of the “Advanced settings” section:
- Fill in all the required URLs using the values obtained from the Auth0 management console;
- Select POST as the client authentication method;
- Enter Auth0 as the provider label;
- Add the following scopes to the scope field:
openid,email,profile.
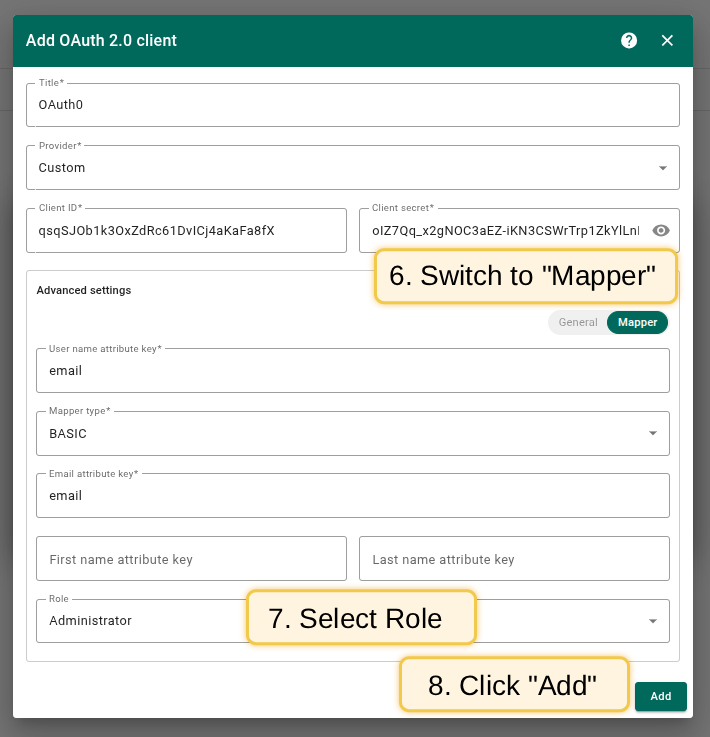
Proceed to the “Mapper” block:
- Leave the mapper type as BASIC;
- Specify the role to be used;
- Click Add to complete the addition of the new OAuth 2.0 client.
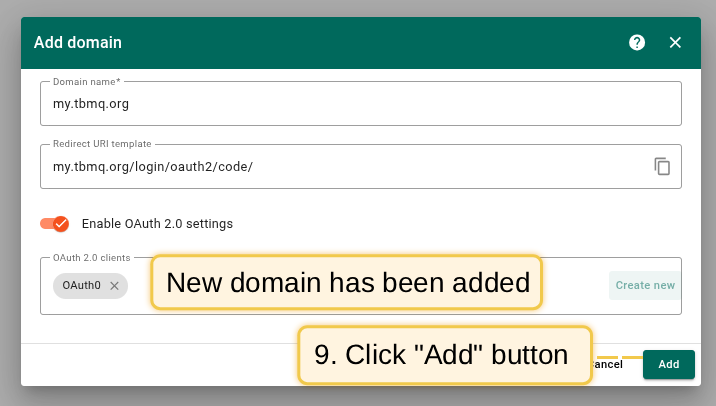
- The Auth0 client has been successfully added. Click Add again to confirm the addition of the domain.
Sign in
Navigate to the login screen. You will now find the login method Auth0. Click the “Login with Auth0” button.

Go to the “Users” page. There you will find that a new user has been created.
Login with Keycloak
In this sample, we will use Keycloak for authentication.
To map external user information from Keycloak to the OAuth platform, we use the built-in basic mapper.
If the basic mapper does not fit your business needs, you can configure the custom mapper to implement a mapping that fits your requirements.
Preparations
To use Keycloak for authentication, you need to set up a project in Keycloak to obtain OAuth 2.0 credentials. Follow the official instructions or the steps below. By the end, you should have a new Keycloak client with credentials consisting of a Client ID and a Client Secret.
Start Keycloak
Get started with Keycloak using your preferred method. In this example, we will run a test Keycloak server on Docker.
- Make sure you have Docker installed;
- Run the command below to start Keycloak locally on port 8081 and create an initial admin user with the username admin and password admin:
1
docker run -p 8081:8080 -e KC_BOOTSTRAP_ADMIN_USERNAME=admin -e KC_BOOTSTRAP_ADMIN_PASSWORD=admin quay.io/keycloak/keycloak:26.0.5 start-dev


Log in to the admin console
- Log in to the Keycloak Admin Console using admin as username and password.


Create a realm
- Click “Keycloak” next to the master realm, then click the “Create realm” button;
- Enter ThingsBoard in the realm name field, and click “Create”.
The new realm has been created.


Create a new client
A client represents an application or service that requests user authentication.
- Go to the “Clients” page in the left-hand menu, and click the “Create client” button;
- Enter thingsboard as the client ID. Leave the client type as OpenID Connect. Click “Next”;
- Enable the Client authentication option. Confirm that Standard flow is enabled. Click “Next”;
- In the “Login settings” section, add the TBMQ redirect URI in the Authorized Redirect URIs section using the format:
1
http(s)://domain:port/login/oauth2/code/
- Replace
domainwith your TBMQ domain and specify the port used for HTTP access. For example, if your domain is my.thingsboard.instance:
1
https://my.thingsboard.instance/login/oauth2/code/
- Click “Save”.
Client created successfully.


You now have credentials consisting of a Client ID and a Client Secret.
The Client ID is available on the “Settings” tab. The Client Secret is located on the “Credentials” tab.


Endpoints
As a fully compliant OpenID Connect Provider, Keycloak exposes a set of endpoints that applications and services can use for authentication and authorization.
- Go to the “Realm settings” page;
- Scroll down and locate the “OpenID Endpoint Configuration” link, then click it;
- A new window will open with the configuration. Check the “Pretty-print” option for easier reading.
Here you can find values such as Access Token URI, Authorization URI, JSON Web Key URI, and User Info URI, which are required for configuring the OAuth 2.0 client in TBMQ. A description of the available endpoints is provided here.


Create a user
Now add a user. Only added users will be able to authenticate via Keycloak.
- Go to the “Users” page in the left-hand menu;
- Click “Create new user”;
- Enter the username and email address. First name and last name are optional;
- Click “Create”.
The user has been created.


Set a password for this user:
- Navigate to the “Credentials” tab and click Set password;
- Fill in the password form. Toggle Temporary to Off so that the user is not forced to change the password on first login;
- Click Save password.
The password has been set successfully.


Configuring Keycloak as an OAuth 2.0 authentication provider in TBMQ
To configure OAuth 2.0 authentication in TBMQ via Keycloak, follow the steps below:
- Log in to your TBMQ instance;
- Go to the “OAuth 2.0” page of the “Security” section;
- Navigate to the “OAuth 2.0 clients” tab, and click the “plus” icon;
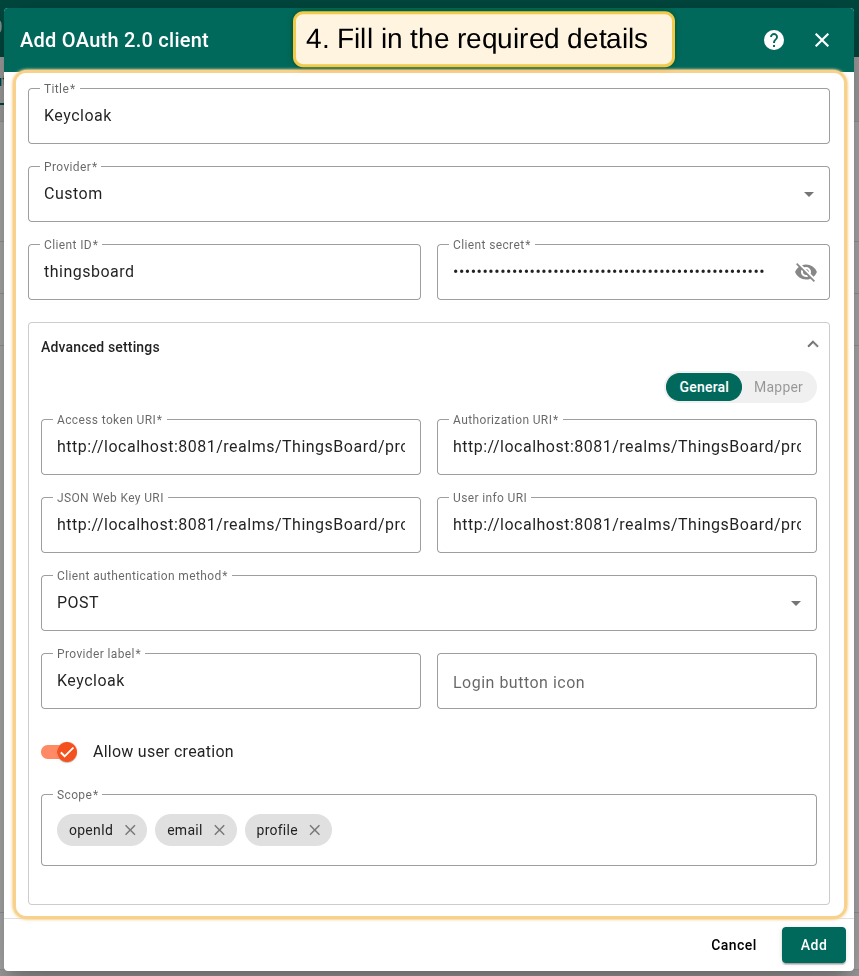
- Enter Keycloak as the title;
- Select Custom as the provider from the dropdown menu;
- Enter the Client ID and Client Secret retrieved from the Keycloak console.
Then expand the “Advanced settings” menu and configure the “General” block:
- Use the endpoint configuration file to find the current values for Access Token URI, Authorization URI, JSON Web Key URI, and User Info URI. Fill in the corresponding fields;
- Set the client authentication method to POST;
- Enter Keycloak as the provider label;
- Add the following scopes:
email,openid,profile.
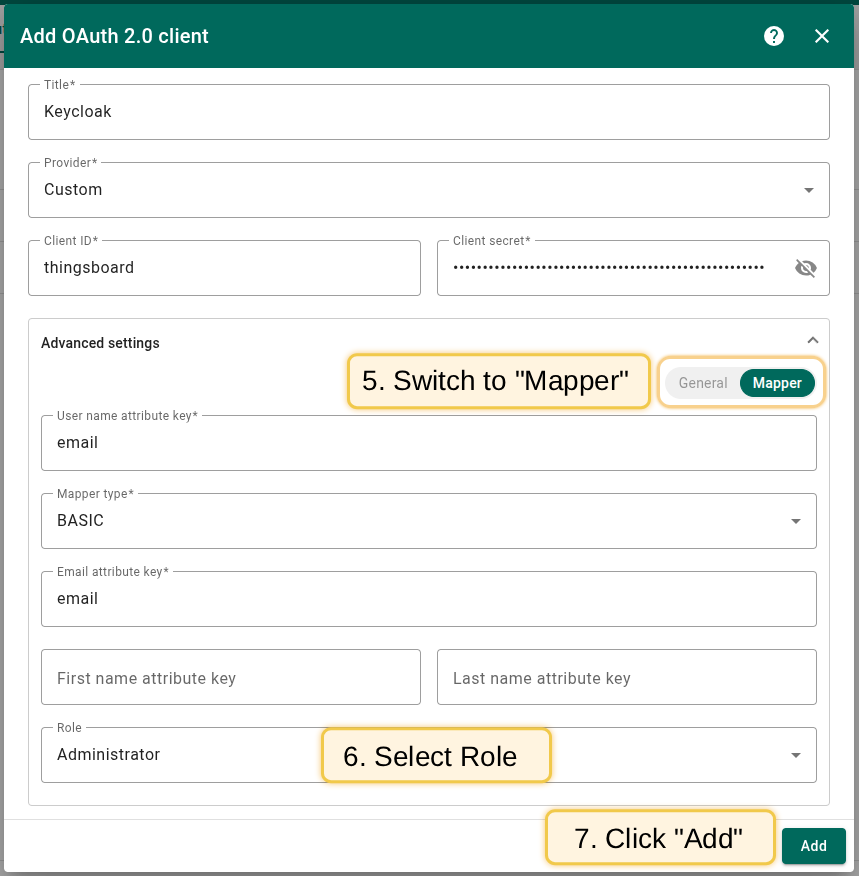
Go to the “Mapper” block:
- Leave the mapper type as BASIC;
- Specify the role to be used;
- Click Add to confirm.
A new OAuth 2.0 client has been added.

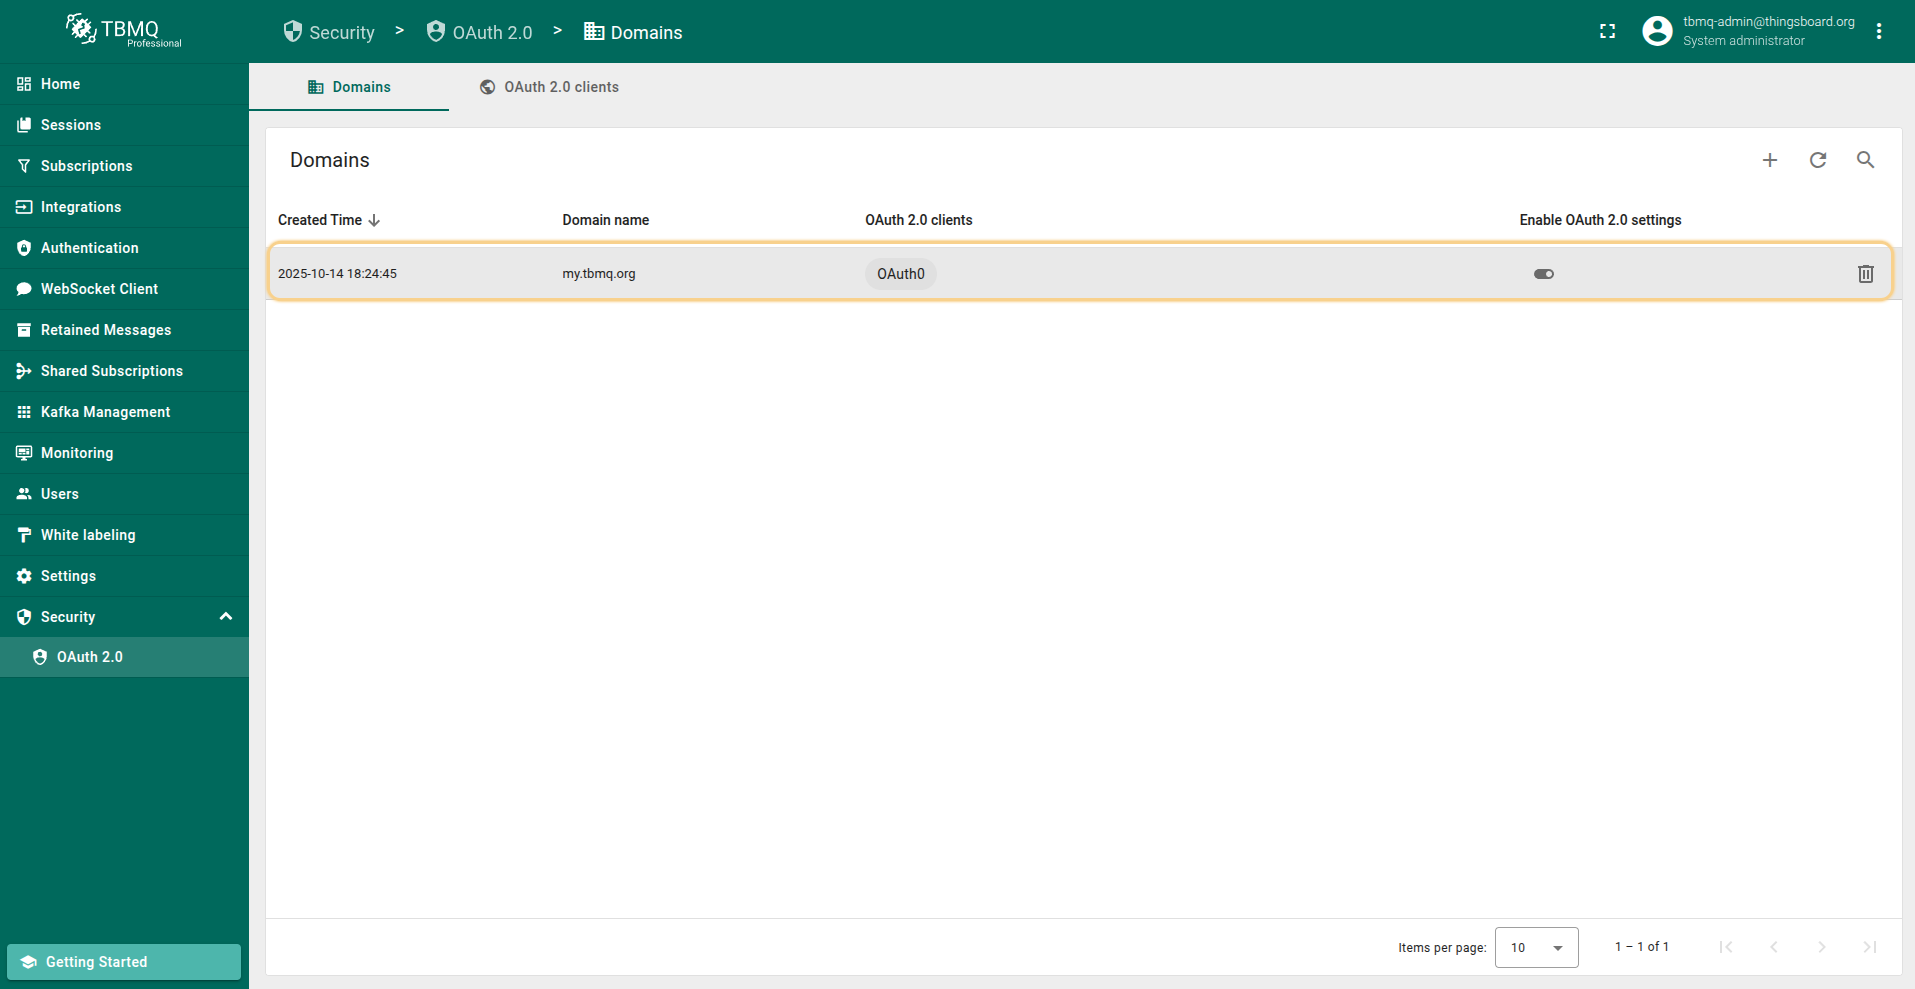
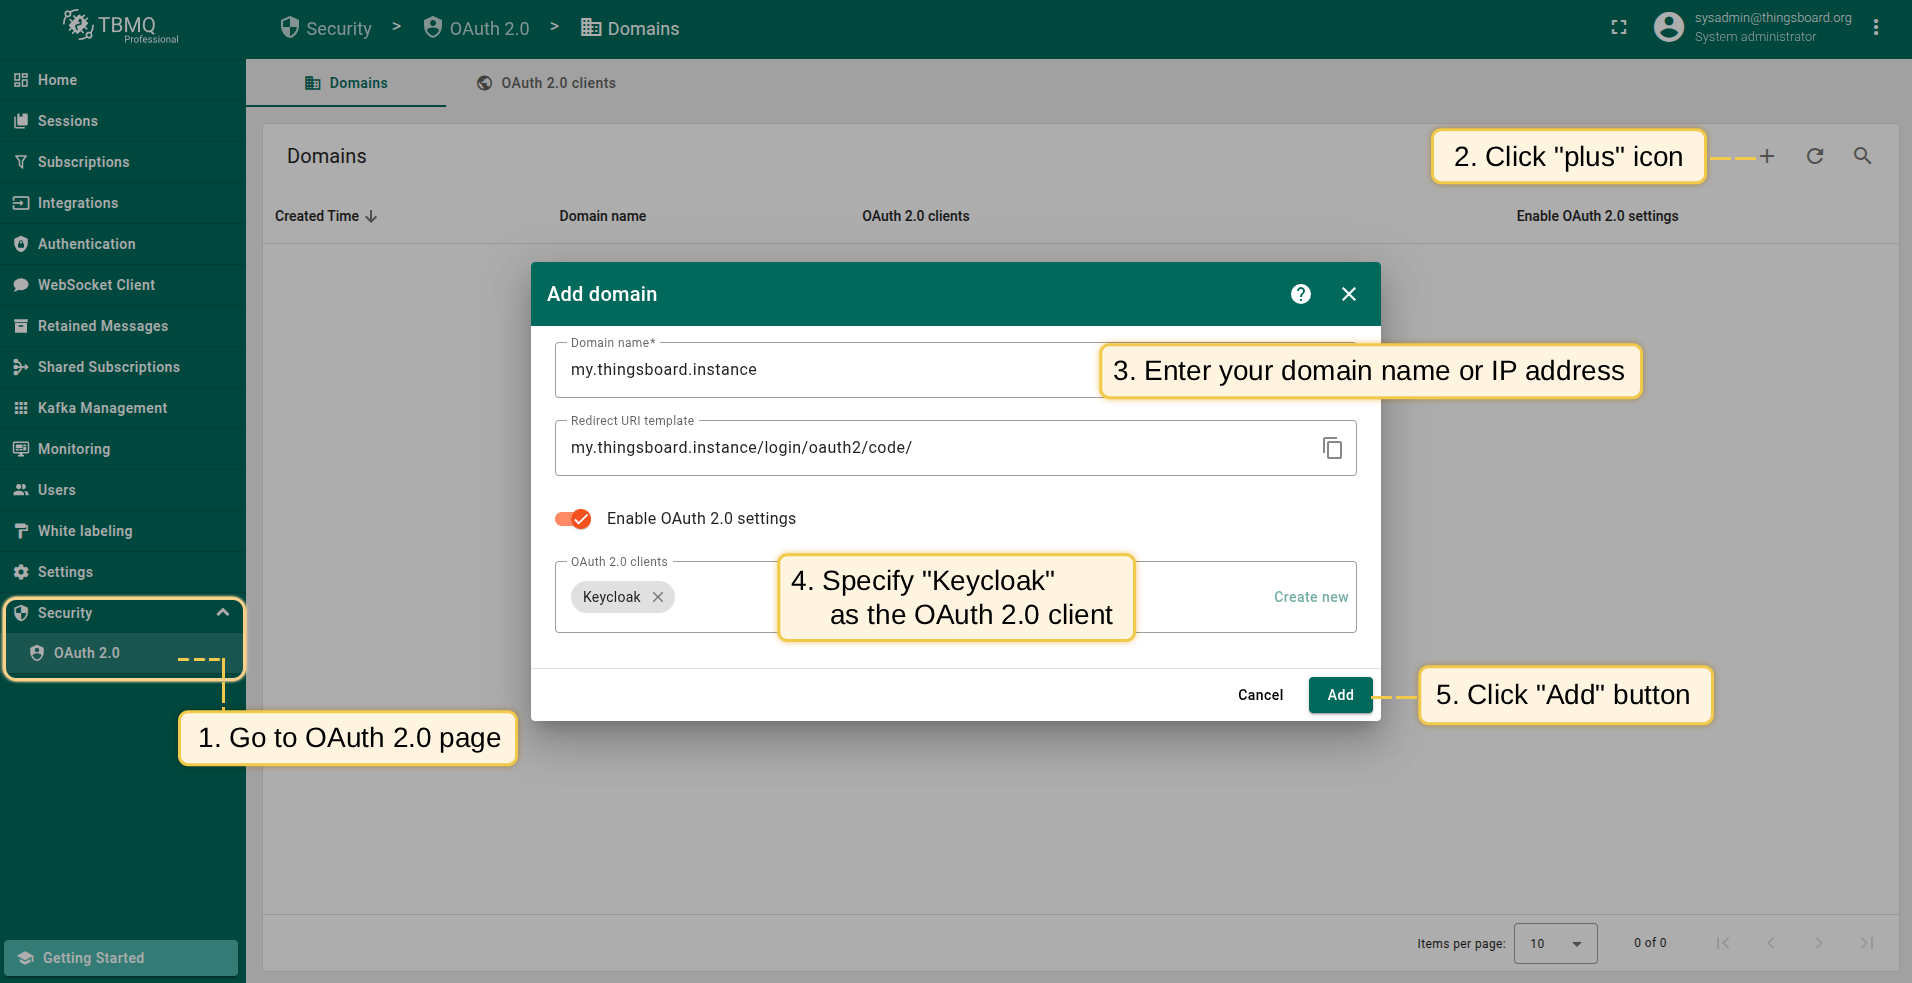
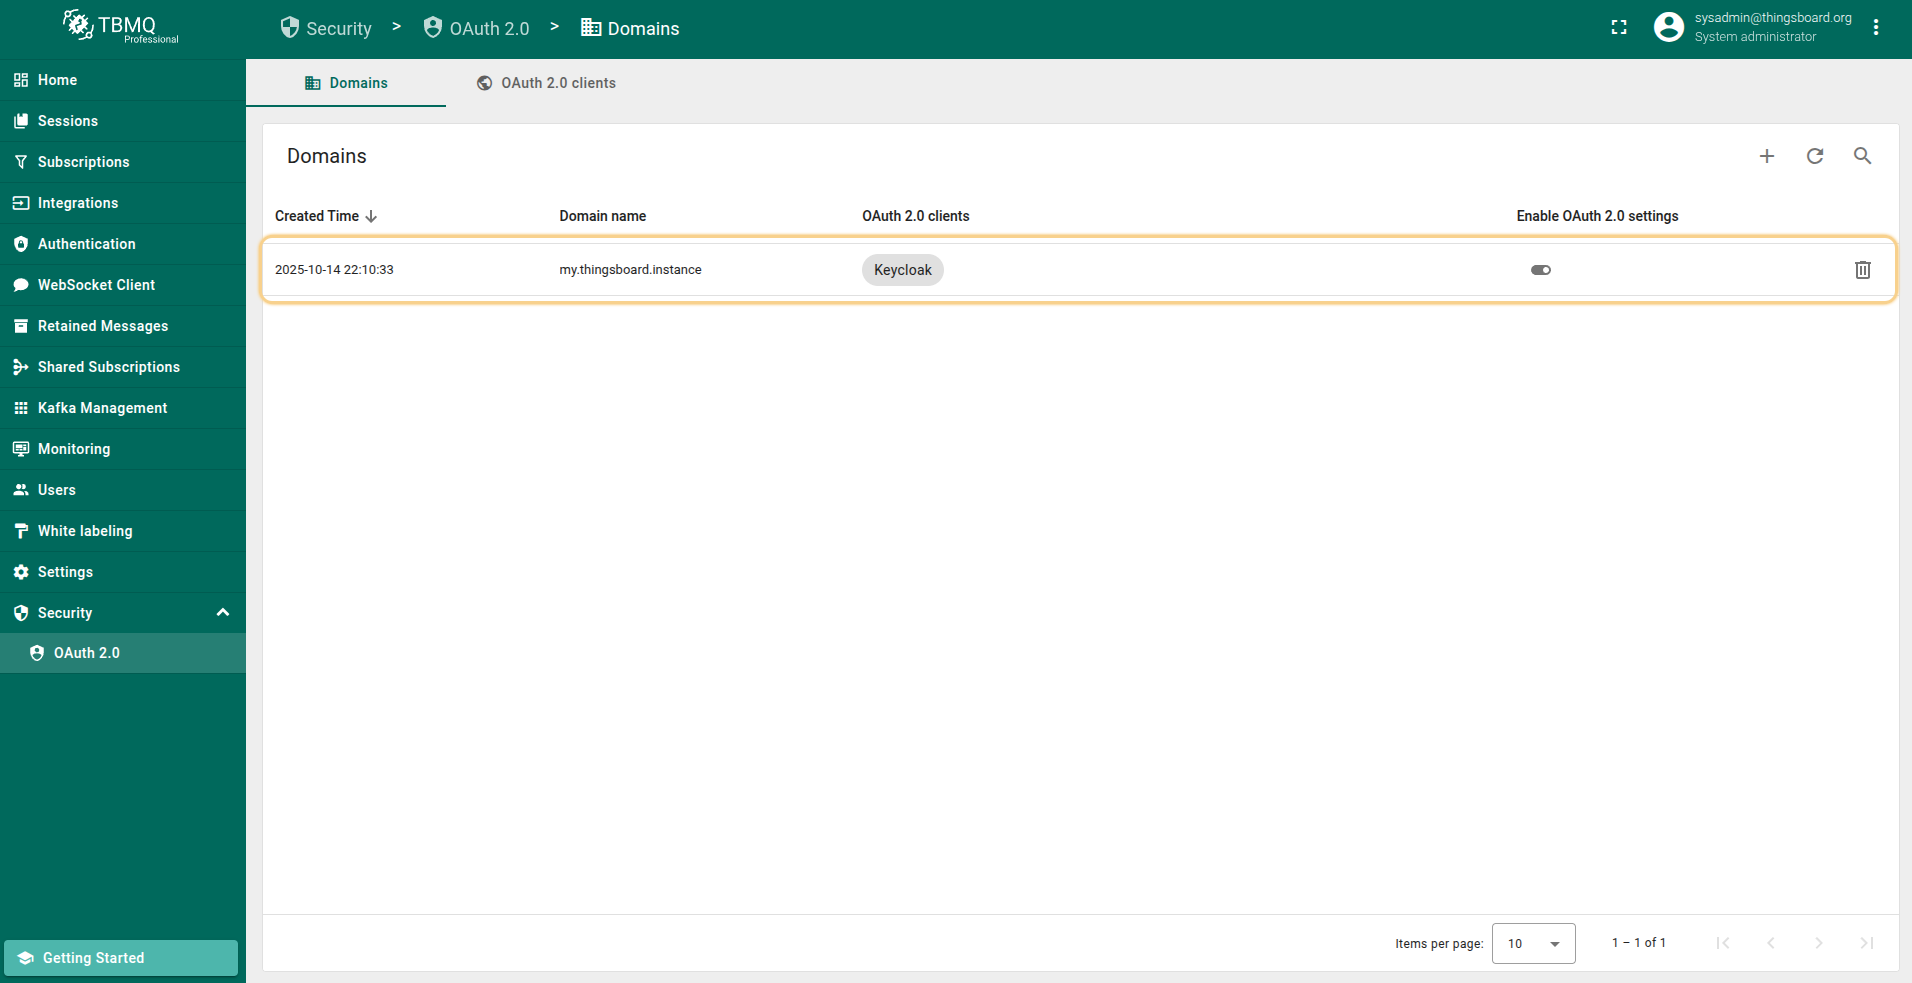
Now, add a new domain:
- Go to the “Domains” tab of the “OAuth 2.0” page, and click the “plus” icon;
- Enter your domain name or IP address of your TBMQ instance;
- Specify Keycloak as the OAuth 2.0 client;
- Click Add again to confirm.
A new domain has been added.
Sign in
Go to the TBMQ login screen. You will now see the option Login with Keycloak. Click this button. A window will open prompting you to sign in to your Keycloak account. Enter your Keycloak credentials and click Sign In. You are now logged into TBMQ using Keycloak.

Go to the “Users” page. There you will find that a new user has been created.
Mapping of the external user into the TBMQ internal user structure
Mapping an external user info object into a TBMQ user can be achieved using the Basic, Custom, GitHub, and Apple mappers.
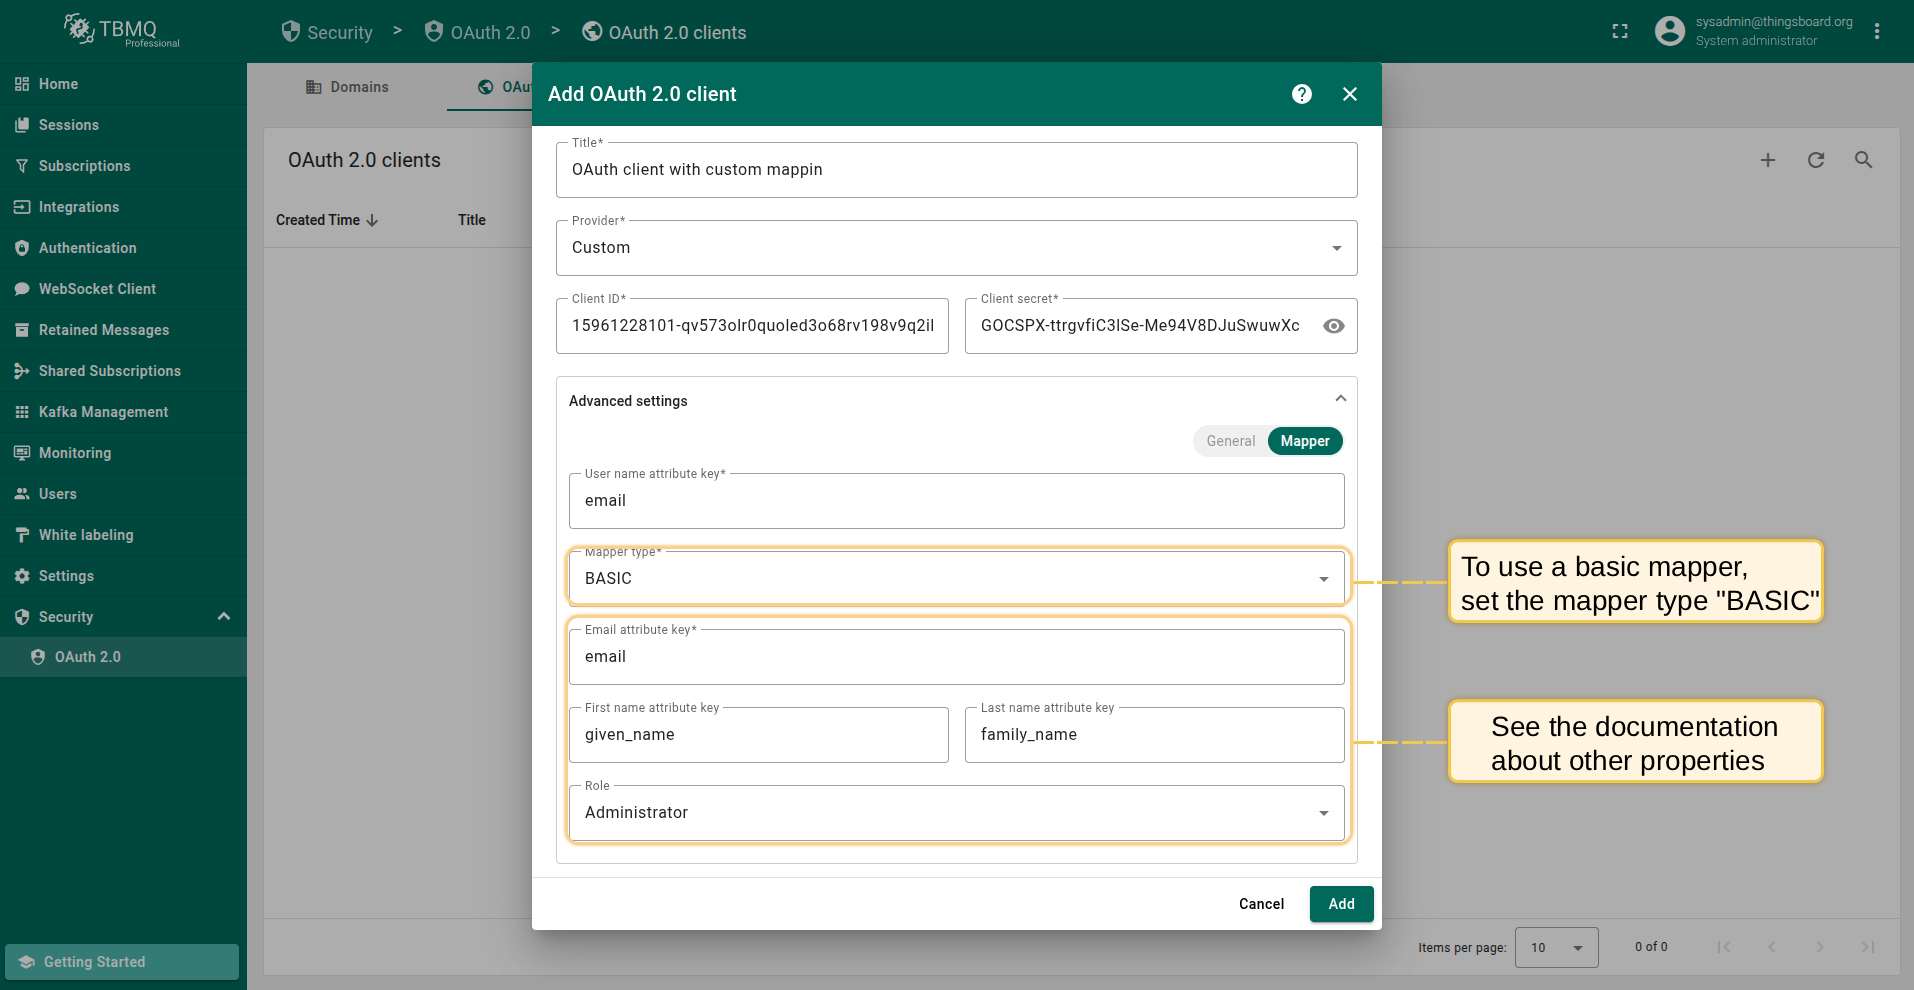
Basic mapper
The basic mapper merges an external OAuth 2.0 user info object into the TBMQ OAuth 2.0 user with a predefined set of rules.
To use the basic mapper, set the mapper type to Basic.
Details of the available properties:
-
Allow user creation – If enabled, and the user account does not yet exist in TBMQ, it will be created automatically. If disabled, the user will receive an access denied error when trying to log in with an external OAuth 2.0 provider, if no corresponding TBMQ user exists.
-
Email attribute key – The attribute key from the external OAuth 2.0 user info that will be used for the TBMQ user email property.
-
First name attribute key – The attribute key from the external OAuth 2.0 user info that will be used for the TBMQ user first name property.
-
Last name attribute key – The attribute key from the external OAuth 2.0 user info that will be used for the TBMQ user last name property.
-
Role – Choose from the predefined roles to be assigned to the user.
If a user signs in using OAuth 2.0 while the Allow user creation option is enabled, the user account is automatically created in the system. These users are created without a password set and can continue using Single Sign-On (SSO) to log in. If the user wants to log in using a regular username/password flow, they should go to Account → Security and set a new password. When changing the password, leave the Current password field empty.
Custom mapper
If the basic mapper functionality does not meet your business needs, you can configure a custom mapper to implement logic that fits your specific goals.
A custom mapper is designed as a separate microservice running alongside the TBMQ microservice. TBMQ forwards all mapping requests to this microservice and expects a TBMQ OAuth 2.0 user object in response.
Refer to this base implementation as a starting point for your custom mapper.
To use the custom mapper, set the mapper type to Custom.
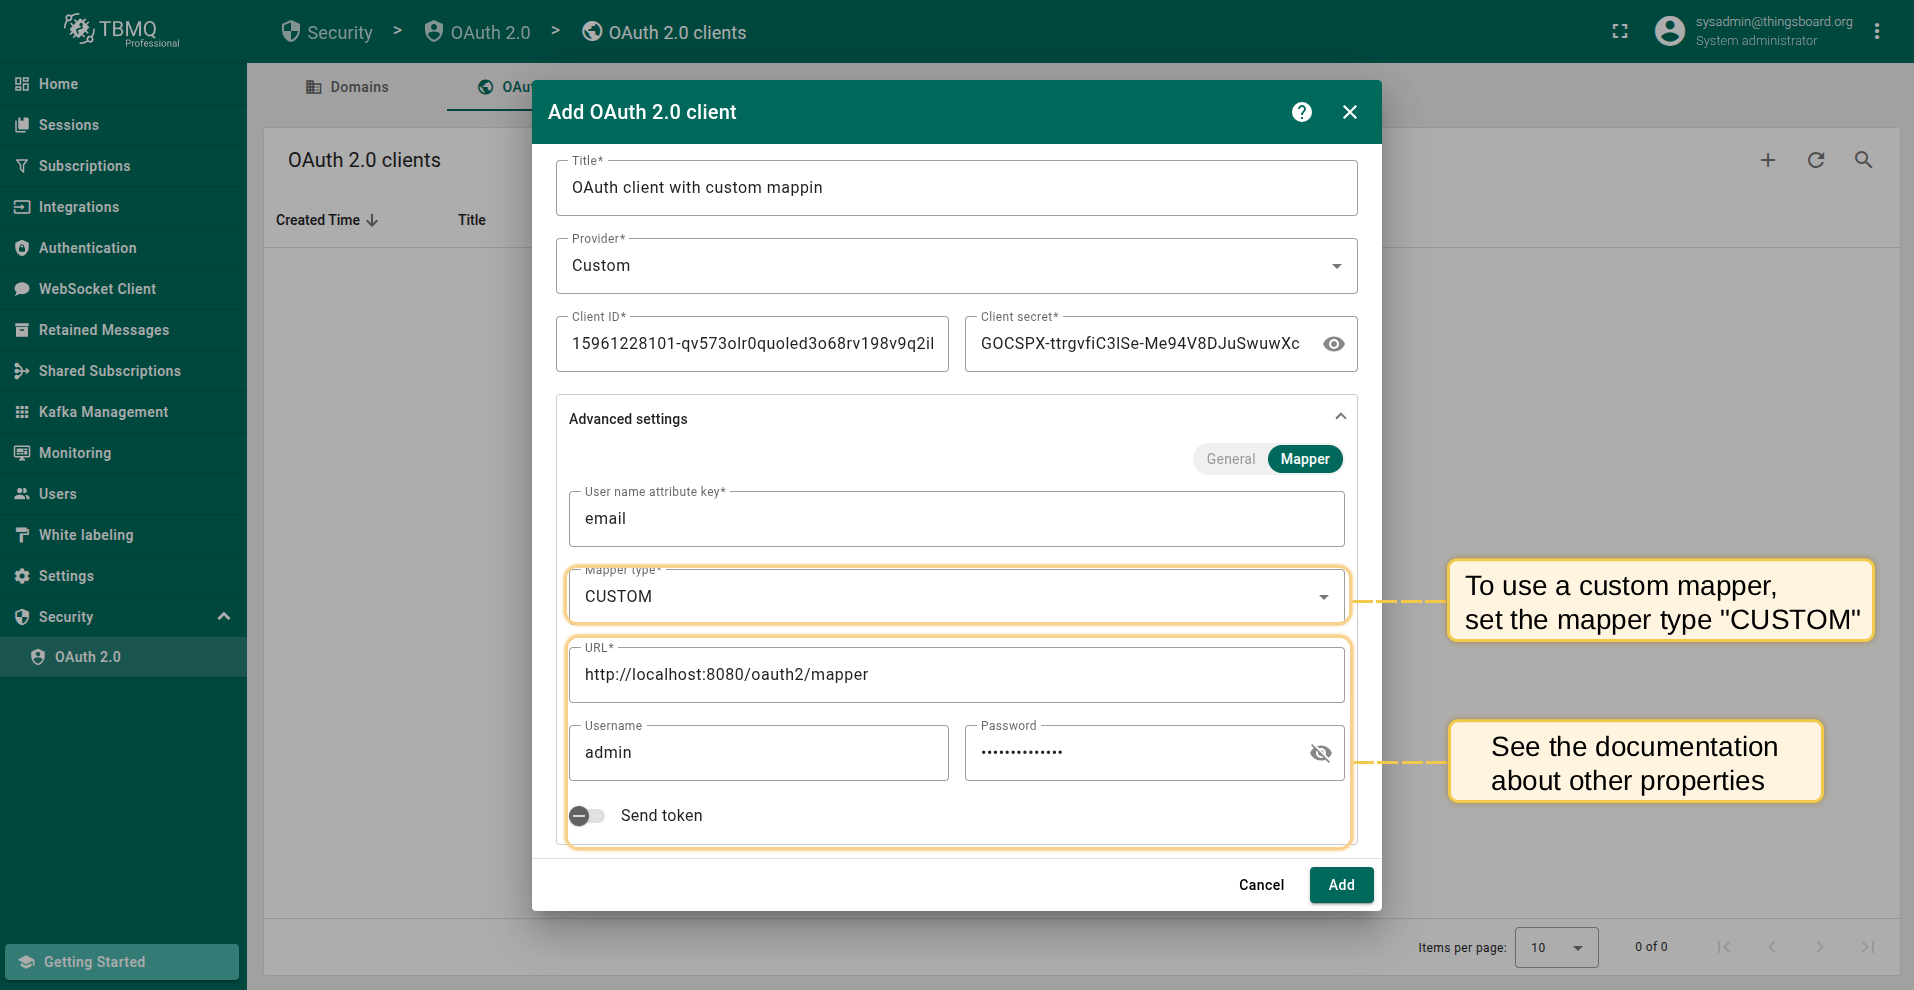
Details of the available properties:
- URL – The URL of the custom mapper endpoint;
- username – If the custom mapper endpoint is configured with basic authentication, specify the username here;
- password – If the custom mapper endpoint is configured with basic authentication, specify the password here.
HAProxy configuration
If TBMQ is running behind a load balancer such as HAProxy, configure the balancing algorithm properly to ensure that the correct session is maintained on the TBMQ instance:
1
2
3
4
backend tbmq-api-backend
  ...
  balance source # balance must be set to 'source'
  ...
Also, configure ACL mapping for HTTP and HTTPS requests:
1
2
3
4
frontend http-in
  ...
  acl tbmq_api_acl path_beg /api/ /swagger /webjars /v2/ /oauth2/ /login/oauth2/ # '/oauth2/ /login/oauth2/' added
  ...
1
2
3
4
frontend https_in
  ...
  acl tbmq_api_acl path_beg /api/ /swagger /webjars /v2/ /oauth2/ /login/oauth2/ # '/oauth2/ /login/oauth2/' added
  ...