Smartico L2-LR
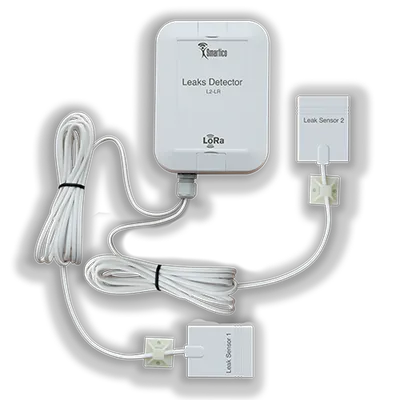
Smartico L2-LR
Smartico
- Platform
- ThingsBoard
- Hardware Type
- Sensors
- Connectivity
- LoRaWAN
- Industry
- Energy Management, Smart Cities, Smart Buildings
- Use Case
- Smart Energy, Smart Metering
Introduction
The Smartico L2-LR is a leaks detector used in industry, utilities, and automation for remote data collection and leak detection via LoRaWAN networks. It implements two-zone control using passive leak sensors, providing high energy efficiency. The waterproof housing allows outdoor installation. Data is transmitted wirelessly over LoRaWAN in the license-free frequency range.
This guide describes how to receive telemetry from the Smartico L2-LR over LoRaWAN using ChirpStack and a ThingsBoard MQTT integration, and visualize the data on a dashboard.
Prerequisites
- Smartico L2-LR — 1×
- ChirpStack LoRaWAN Network Server with the device registered and connected
- ChirpStack MQTT integration configured with a Mosquitto MQTT broker
- ThingsBoard PE instance: use ThingsBoard Cloud or install a local PE server
Configure ChirpStack
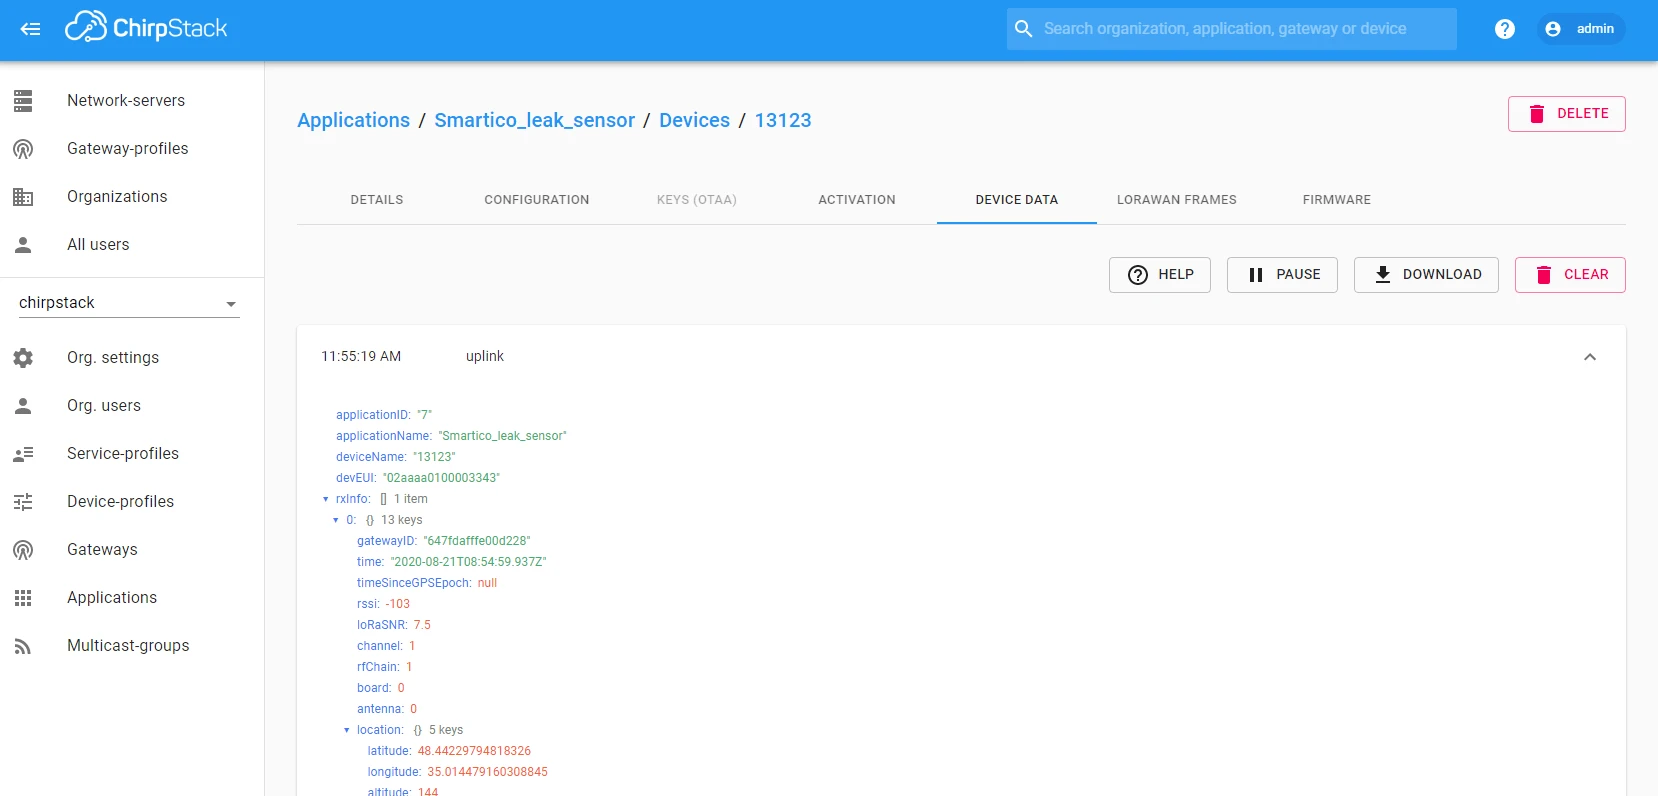
Register the Smartico L2-LR in ChirpStack and verify the device is transmitting. The device should appear on the Applications page with its serial number (like 13123).

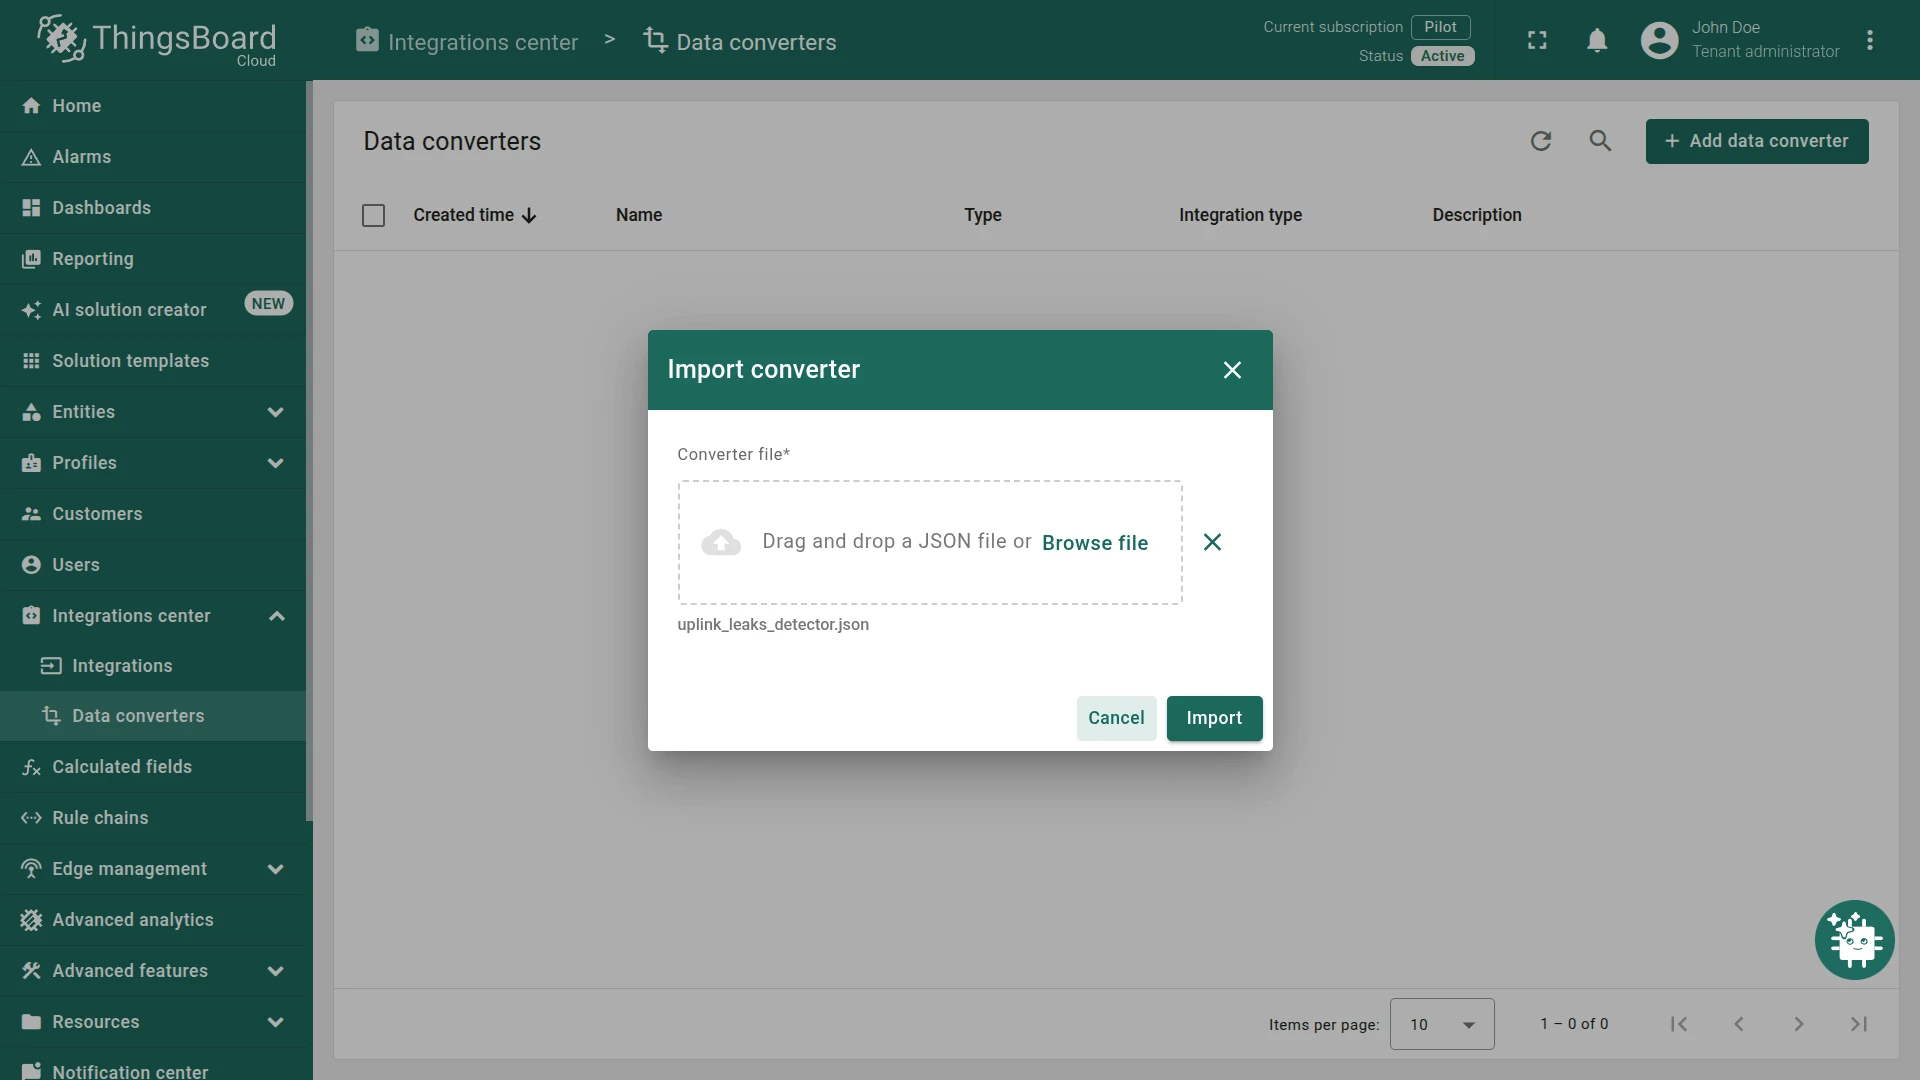
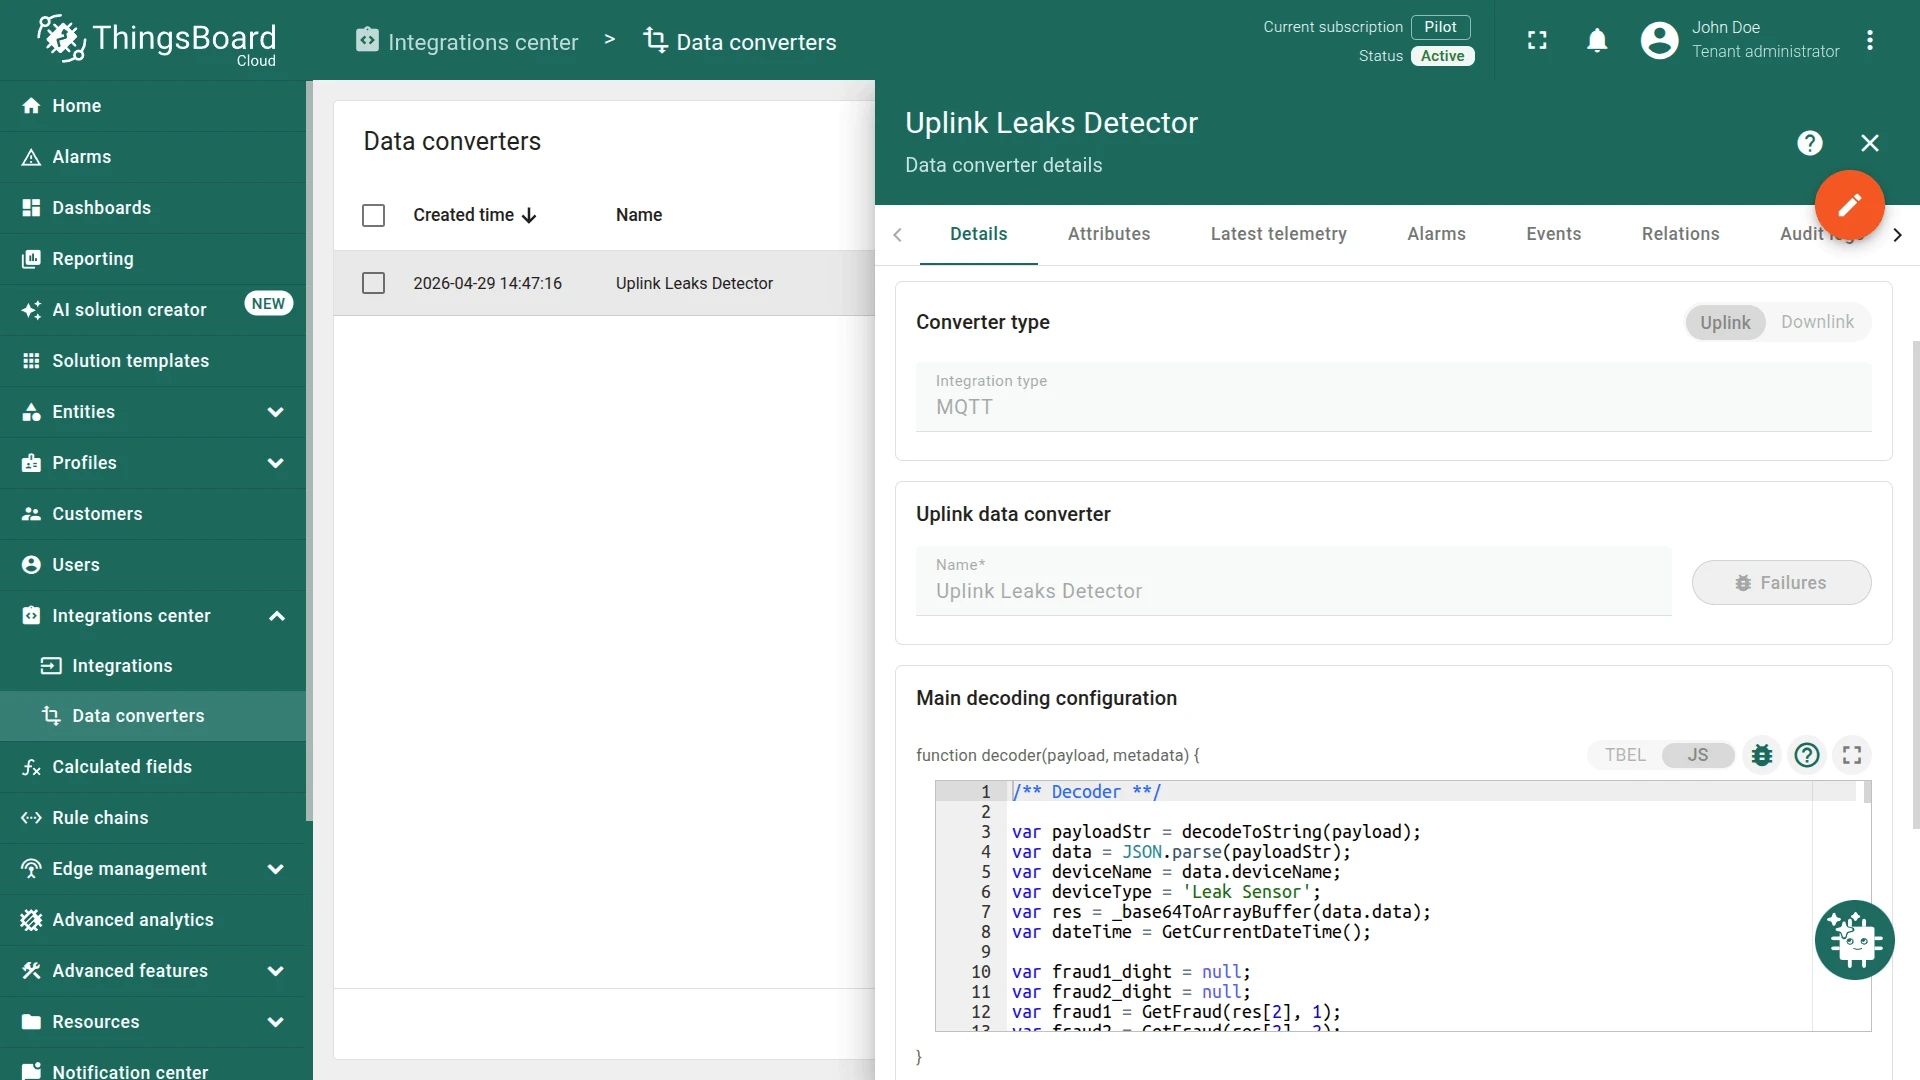
Create the uplink data converter
The uplink data converter decodes the Base64-encoded payload from the L2-LR into ThingsBoard telemetry format.
- Download uplink_leaks_detector.json.
- Go to Integrations center ⇾ Data converters and click + Add data converter > Import converter.
- Drag and drop the downloaded
uplink_leaks_detector.jsonfile. - Click Import.
/** Decoder **/
var payloadStr = decodeToString(payload);var data = JSON.parse(payloadStr);var deviceName = data.deviceName;var deviceType = 'Leak Sensor';var res = _base64ToArrayBuffer(data.data);var dateTime = GetCurrentDateTime();
var fraud1_dight = null;var fraud2_dight = null;var fraud1 = GetFraud(res[2], 1);var fraud2 = GetFraud(res[2], 2);
var flg_err_pulse1 = GetErrPulse(res[2], 1);var flg_err_pulse2 = GetErrPulse(res[2], 2);var low_bat = GetFlagError(res[0], 1);var motion_detect = GetFlagError(res[0], 2);var magnet_detect = GetFlagError(res[0], 3);var tamper_detect = GetFlagError(res[0], 4);var power_on = GetFlagError(res[0], 5);var power_bat = GetFlagError(res[0], 6);var err_time = GetFlagError(res[0], 7);var cfg_done = GetFlagError(res[0], 8);
var result = {   deviceName: deviceName,   deviceType: deviceType,   attributes: {       integrationName: metadata['integrationName'],   },   telemetry: {       NAME_DEV: "Leaks Detector LoRaWAN 'Smartico L2-LR'",       SN: data.deviceName,       REAL_TIME: dateTime,       FRAUD_1: fraud1,       FRAUD_2: fraud2,       FRAUD_1D: fraud1_dight,       FRAUD_2D: fraud2_dight,       FLG_ERR_PULSE_1: flg_err_pulse1,       FLG_ERR_PULSE_2: flg_err_pulse2,       FLG_LOW_BAT: low_bat,       FLG_MOTION_DETECT: motion_detect,       FLG_MAGNET_DETECT: magnet_detect,       FLG_TAMPER_DETECT: tamper_detect,       FLG_POWER_ON: power_on,       FLG_POWER_BAT: power_bat,       FLG_ERR_TIME: err_time,       FLG_CFG_DONE: cfg_done   }};
/** Helper functions **/
function decodeToString(payload) {   return String.fromCharCode.apply(String, payload);}
function decodeToJson(payload) {   var str = decodeToString(payload);   var data = JSON.parse(str);   return data;}
function _base64ToArrayBuffer(base64) {    var binary_string = atob(base64);    var len = binary_string.length;    var bytes = new Uint8Array(len);    for (var i = 0; i < len; i++) {        bytes[i] = binary_string.charCodeAt(i);    }    return bytes;}
function GetCurrentDateTime(){    var a = new Date();    var year = a.getFullYear().toString();    var month = (a.getMonth()+1).toString();    if(month.length==1) month="0"+month;    var date = a.getDate().toString();    if(date.length==1) date="0"+date;    var hour = a.getHours().toString();    if(hour.length==1) hour="0"+hour;    var min = a.getMinutes().toString();    if(min.length==1) min="0"+min;    var sec = a.getSeconds().toString();    if(sec.length==1) sec="0"+sec;    return date + '.' + month + '.' + year + ' ' + hour + ':' + min + ':' + sec;}
function GetFraud(byte1, num) {    var value1 = parseInt(byte1, 10).toString(2);    while(value1.length<8){value1='0'+value1;}
    if(num==1) {        var res = value1[5]+value1[6]+value1[7];        if(parseInt(res,2)===6) {            fraud1_dight = 2;            return "Discovered";        } else {            fraud1_dight = 1;            return "Not discovered";        }    }
    if(num==2) {        var res1 = value1[2]+value1[3]+value1[4];        if(parseInt(res1,2)===6) {            fraud2_dight = 2;            return "Discovered";        } else {            fraud2_dight = 1;            return "Not discovered";        }    }
    return null;}
function GetErrPulse(byte1, num) {    var value1 = parseInt(byte1, 10).toString(2);    while(value1.length<8){value1='0'+value1;}    if(num==1) return parseInt(value1[1],2);    if(num==2) return parseInt(value1[0],2);    return null;}
function GetFlagError(byte1, num) {    var value = parseInt(byte1, 10).toString(2);    while(value.length<8){value='0'+value;}
    if(num==1) return Number(value[7]);    if(num==2) return Number(value[6]);    if(num==3) return Number(value[5]);    if(num==4) return Number(value[4]);    if(num==5) return Number(value[3]);    if(num==6) return Number(value[2]);    if(num==7) return Number(value[1]);    if(num==8) return Number(value[0]);
    return null;}
return result;
You can test the converter before connecting the device. Open the Uplink Leaks Detector converter, enter edit mode and click the Test decoder function tab. Paste the sample input below into the Payload content field and press Test.
Sample input payload (Base64-encoded)
{ "applicationID": "7", "applicationName": "Smartico_leak_sensor", "deviceName": "13123", "devEUI": "02aaaa0100003343", "rxInfo": [{ "gatewayID": "647fdafffe00d228", "uplinkID": "4e9ed6ae-b658-4e11-b686-1ecae882c807", "name": "tectelic_micro_lite_TECH", "rssi": -68, "loRaSNR": 4.8, "location": { "latitude": 48.44229794818326, "longitude": 35.014479160308845, "altitude": 144 } }], "txInfo": { "frequency": 868500000, "dr": 0 }, "adr": true, "fCnt": 2220, "fPort": 7, "data": "YgAtAAAAAAAAAAA="}Expected decoded output
{ "deviceName": "13123", "deviceType": "Leak Sensor", "attributes": { "integrationName": "Leaks Detector" }, "telemetry": { "NAME_DEV": "Leaks Detector LoRaWAN 'Smartico L2-LR'", "SN": "13123", "REAL_TIME": "27.08.2020 10:46:25", "FRAUD_1": "Not discovered", "FRAUD_2": "Not discovered", "FRAUD_1D": 1, "FRAUD_2D": 1, "FLG_ERR_PULSE_1": 0, "FLG_ERR_PULSE_2": 0, "FLG_LOW_BAT": 0, "FLG_MOTION_DETECT": 1, "FLG_MAGNET_DETECT": 0, "FLG_TAMPER_DETECT": 0, "FLG_POWER_ON": 0, "FLG_POWER_BAT": 1, "FLG_ERR_TIME": 1, "FLG_CFG_DONE": 0 }}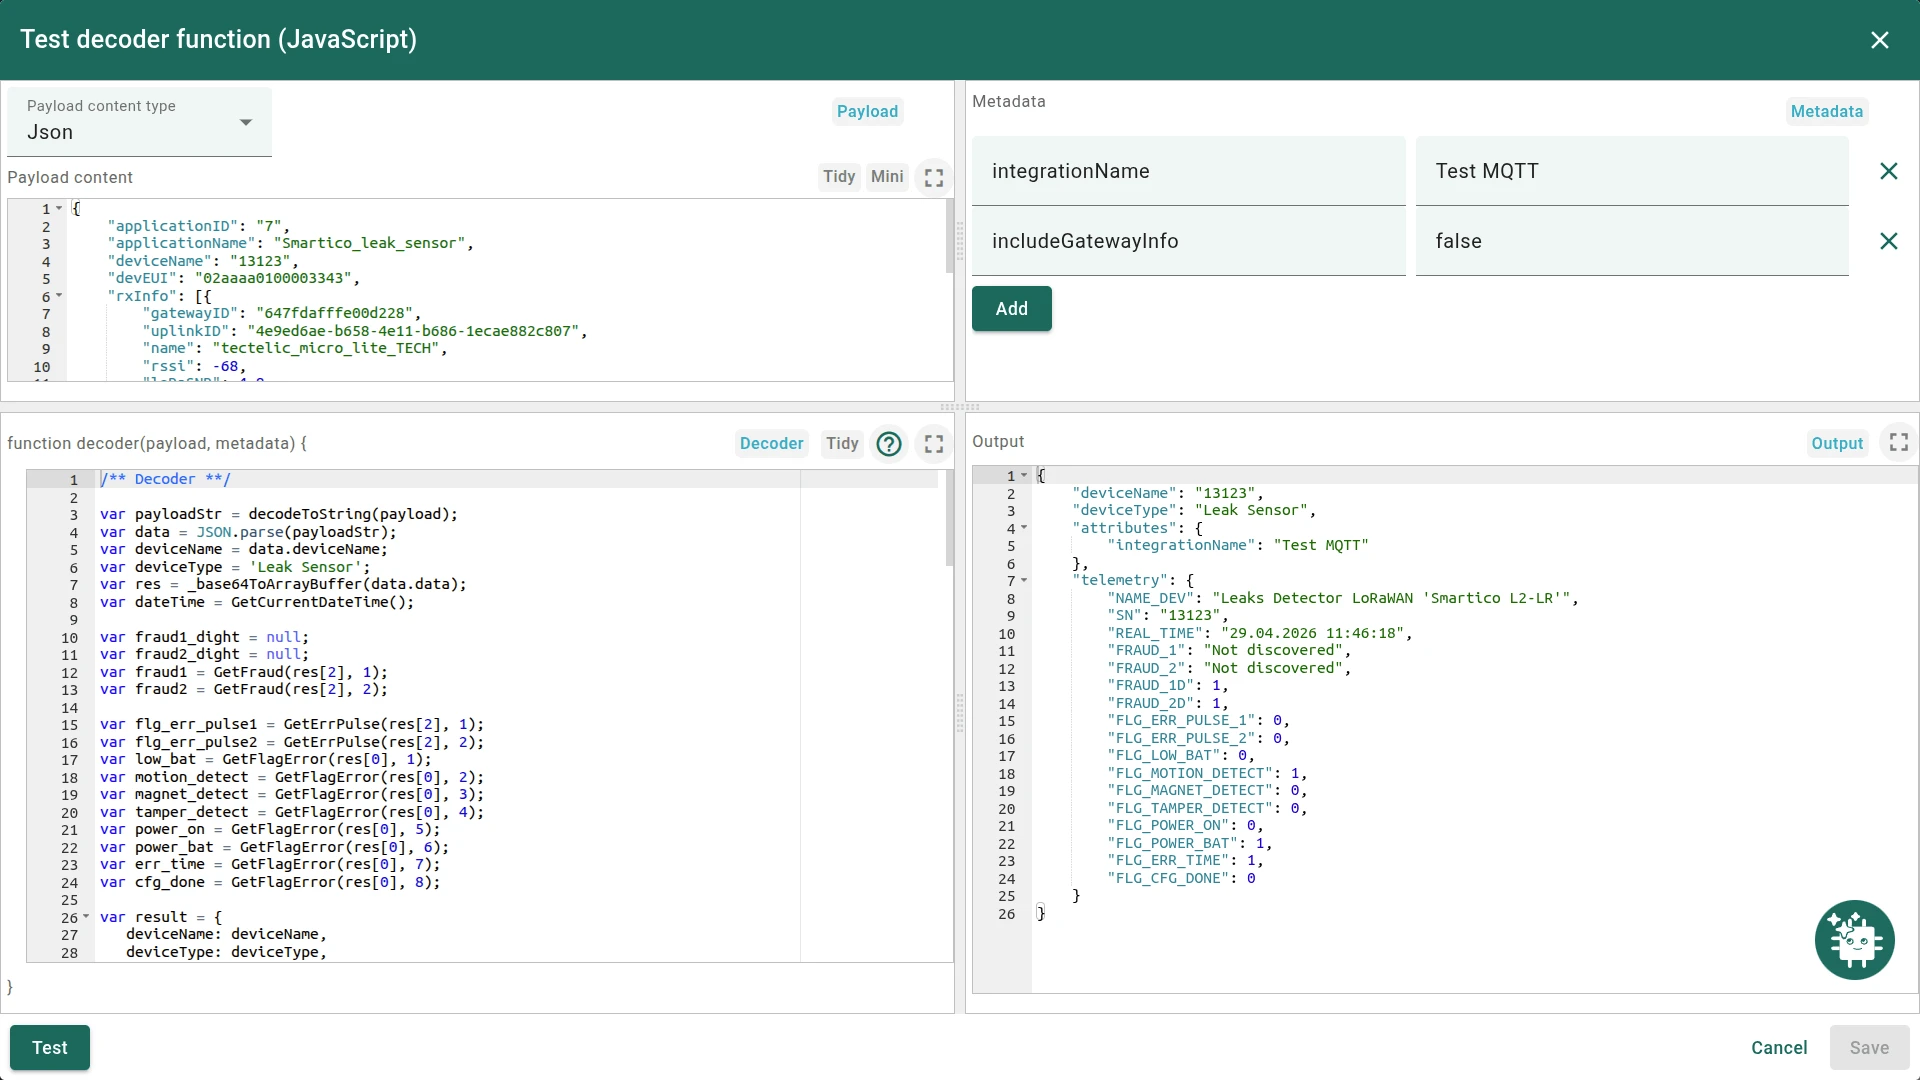
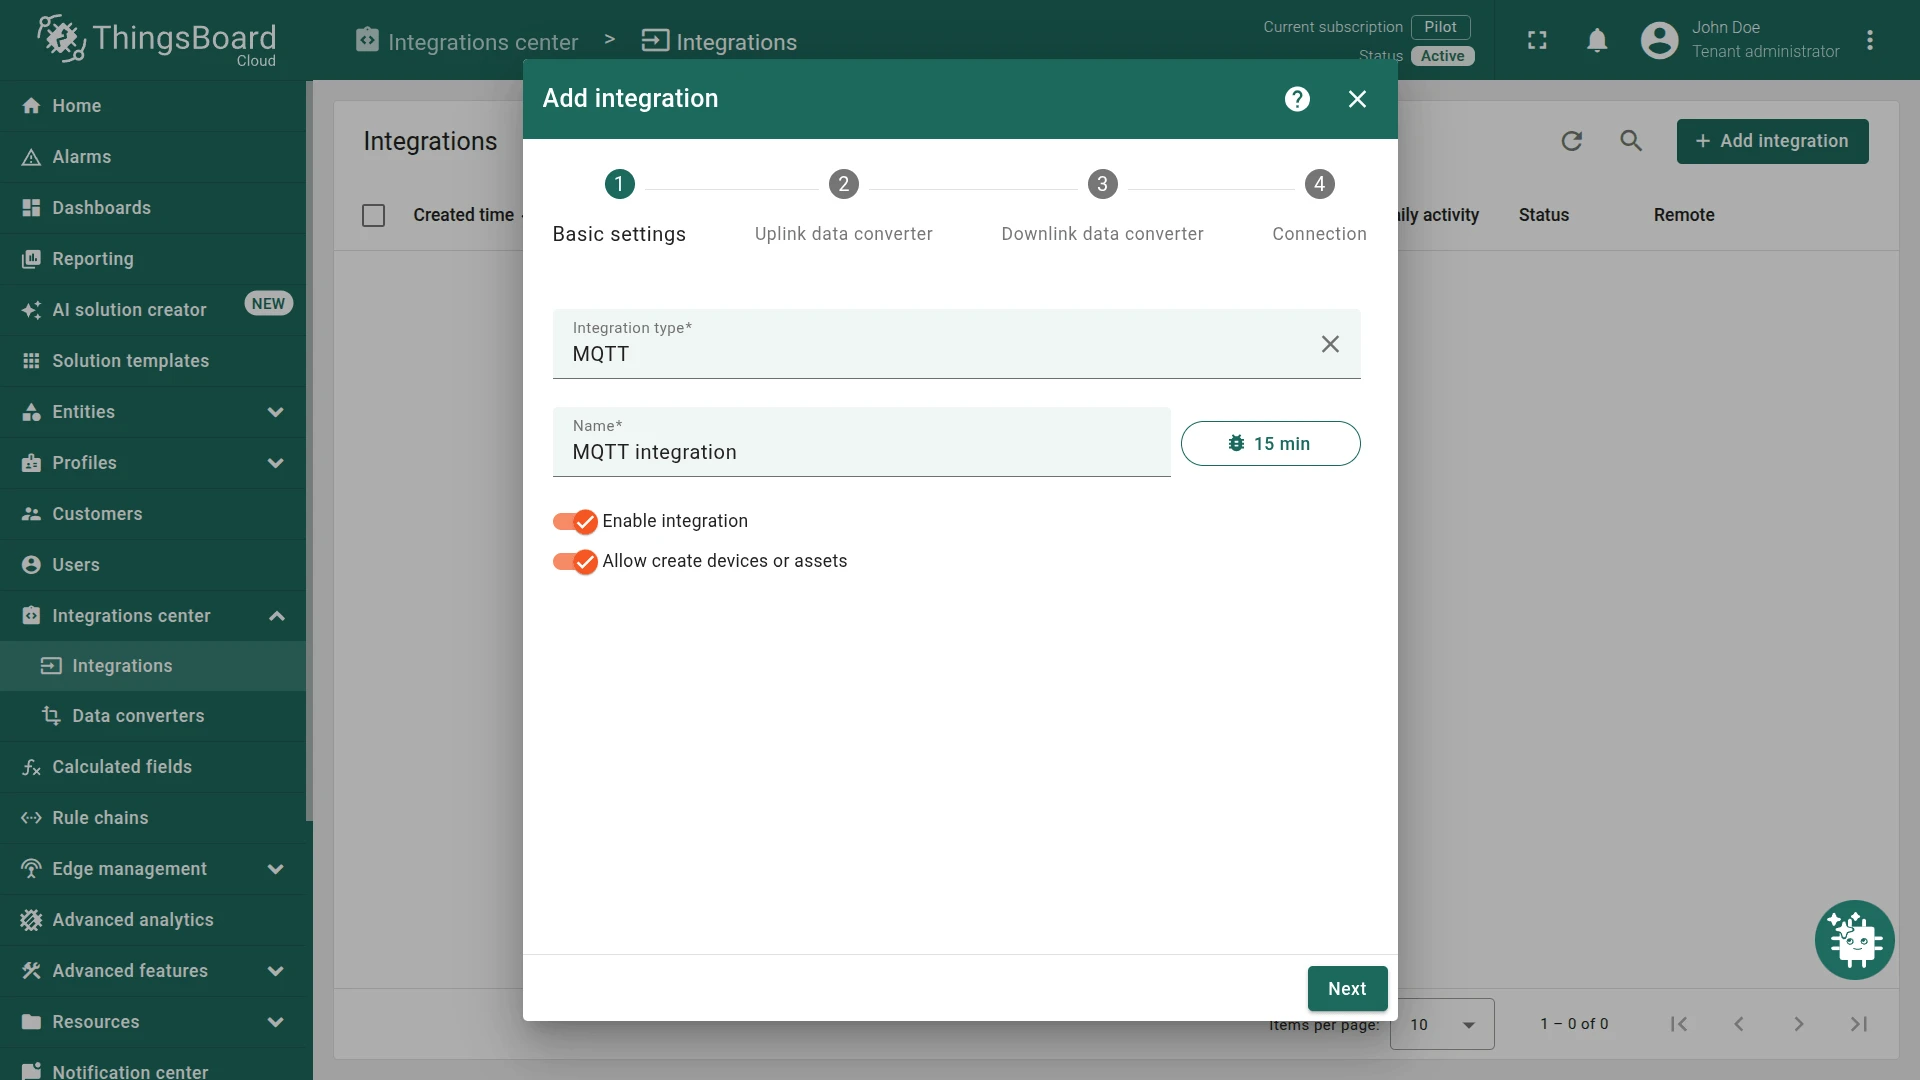
Create the integration
For more information about MQTT integrations in ThingsBoard, see the MQTT integration documentation.
- Go to Integrations center ⇾ Integrations and click + Add integration.
- Basic settings:
- Set Integration type to MQTT.
- Enable integration and Allow create devices or assets are on by default.
- Click Next.
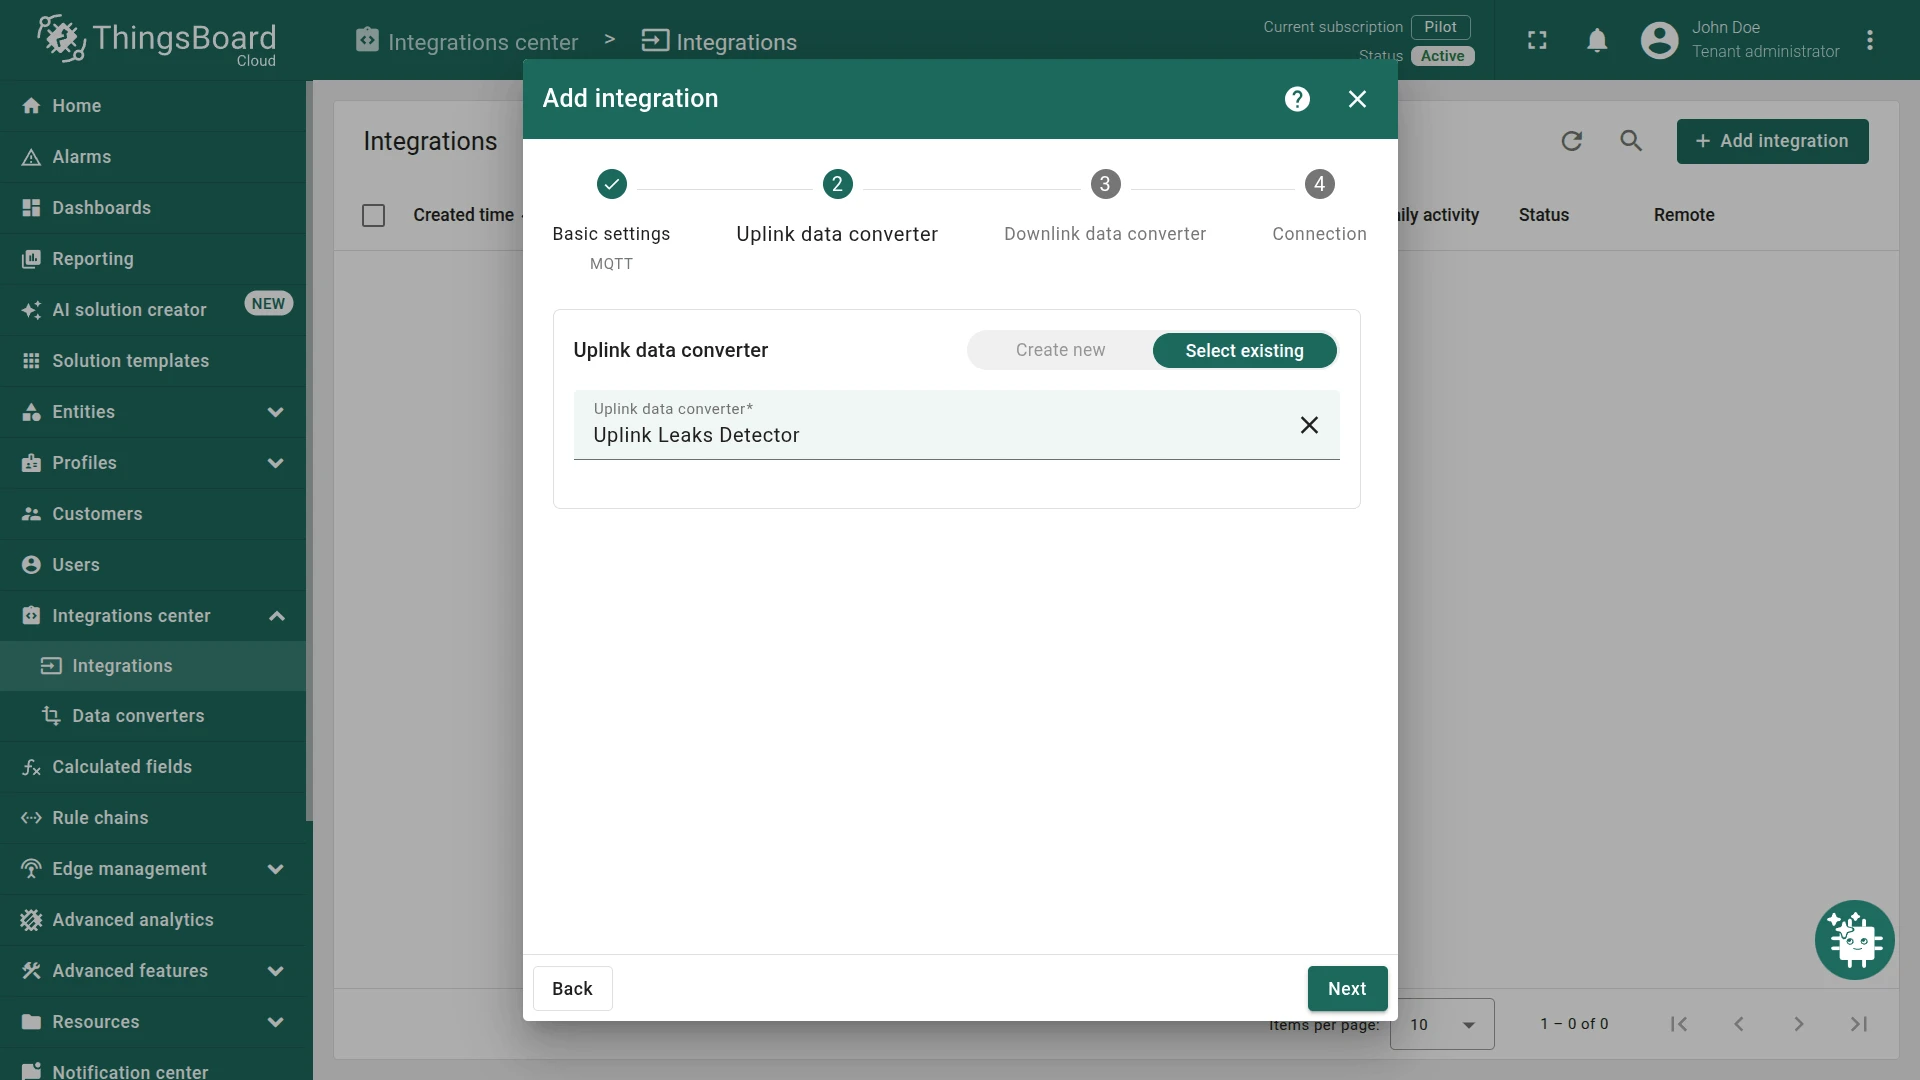
- Uplink data converter:
- Select existing — choose the previously created
Uplink Leaks Detectorfrom the list. - Click Next.
- Select existing — choose the previously created
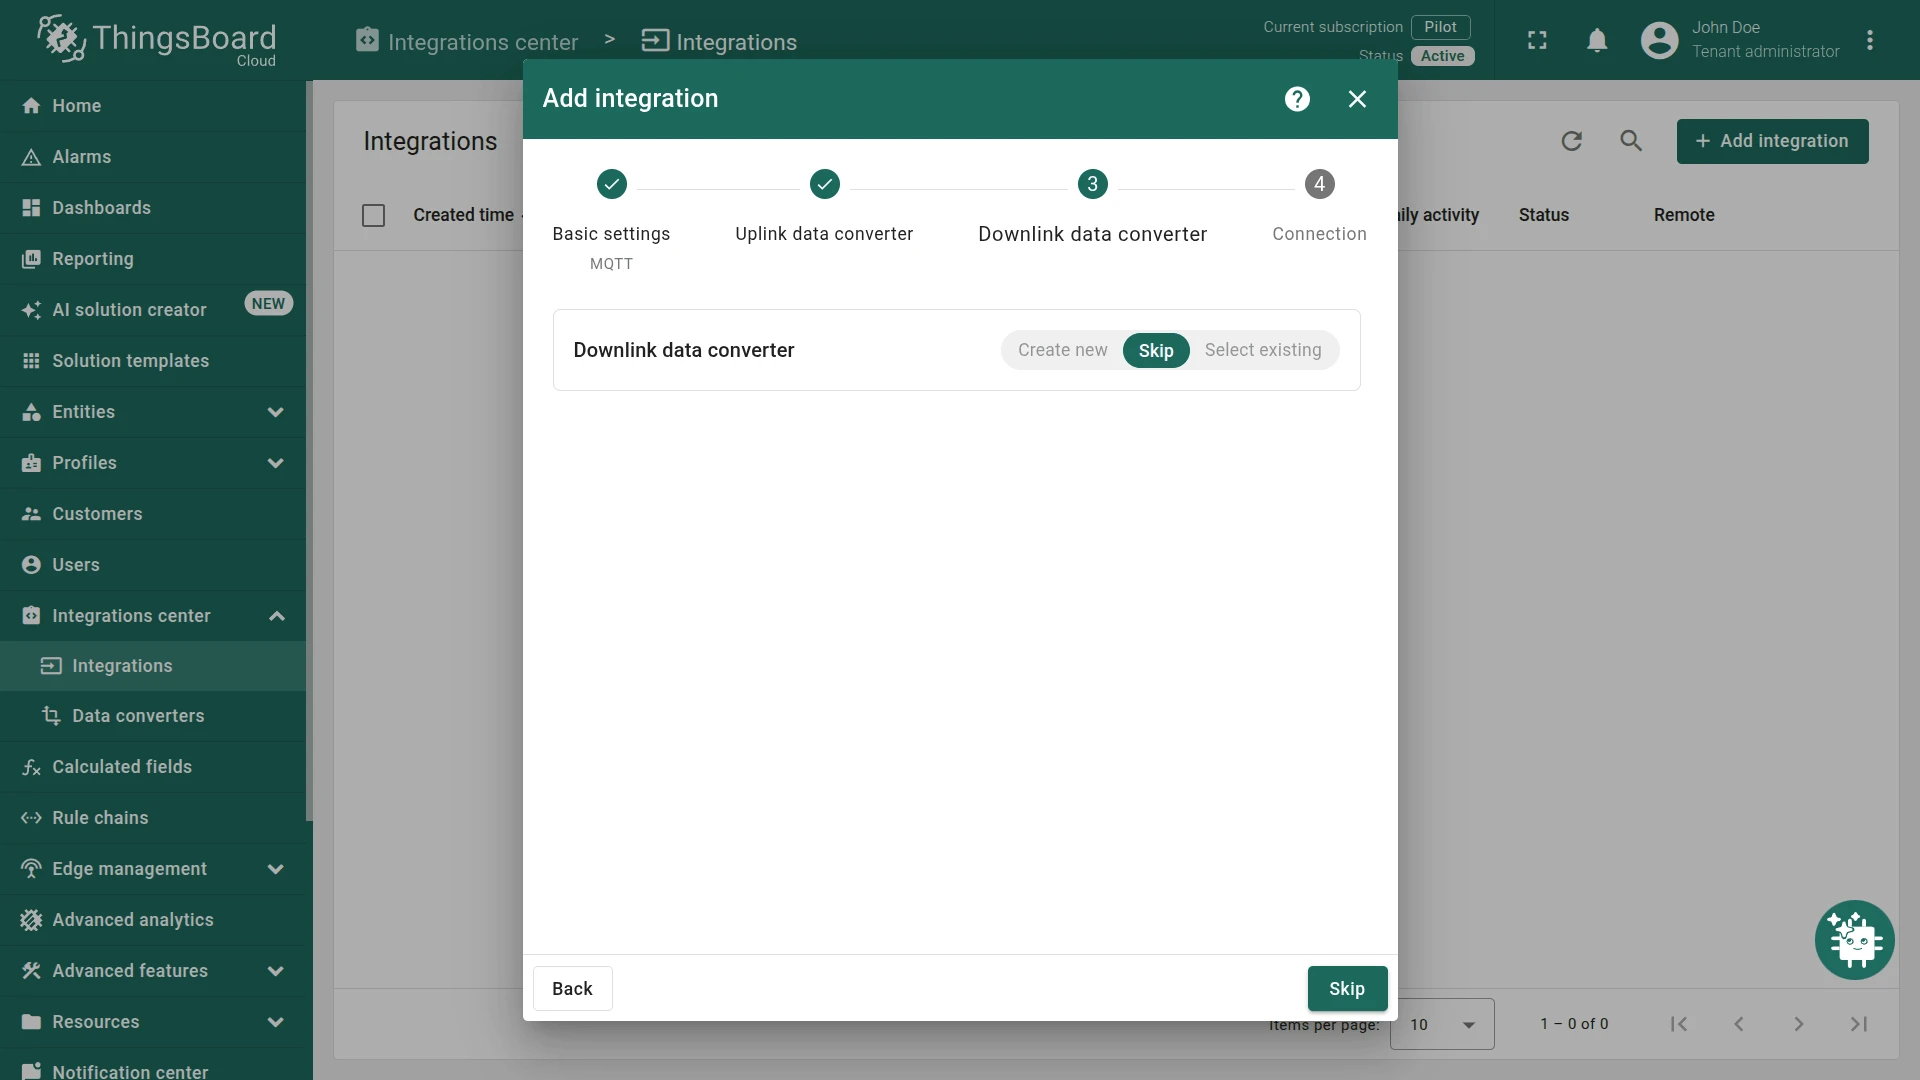
- Downlink data converter:
- Click Skip — only needed for RPC; can be added later.
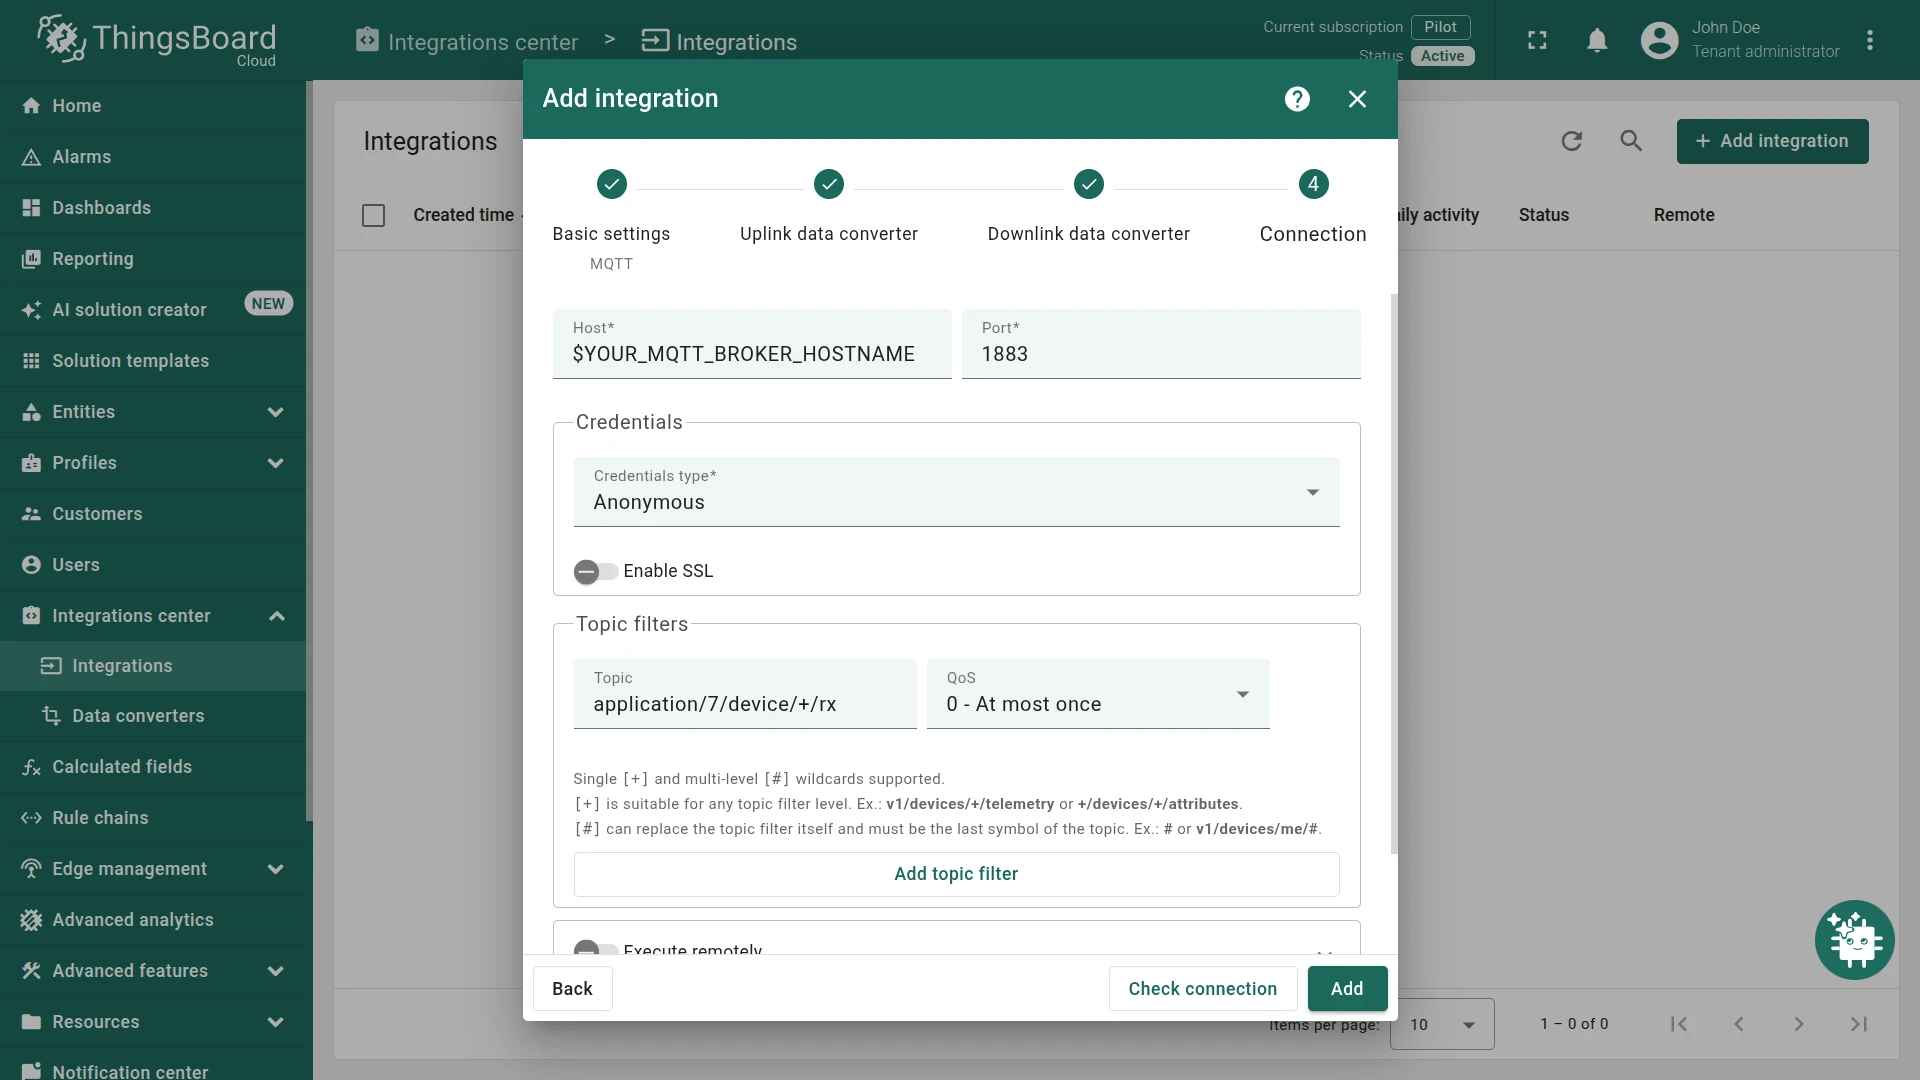
- Connection:
- Set your MQTT broker Host and Port.
- Select the Credentials type (e.g. Anonymous).
- Add at least one topic filter with QoS (e.g.
application/7/device/+/rx, QoS0 — At most once).
- Click Add to complete the integration setup.
Verify data
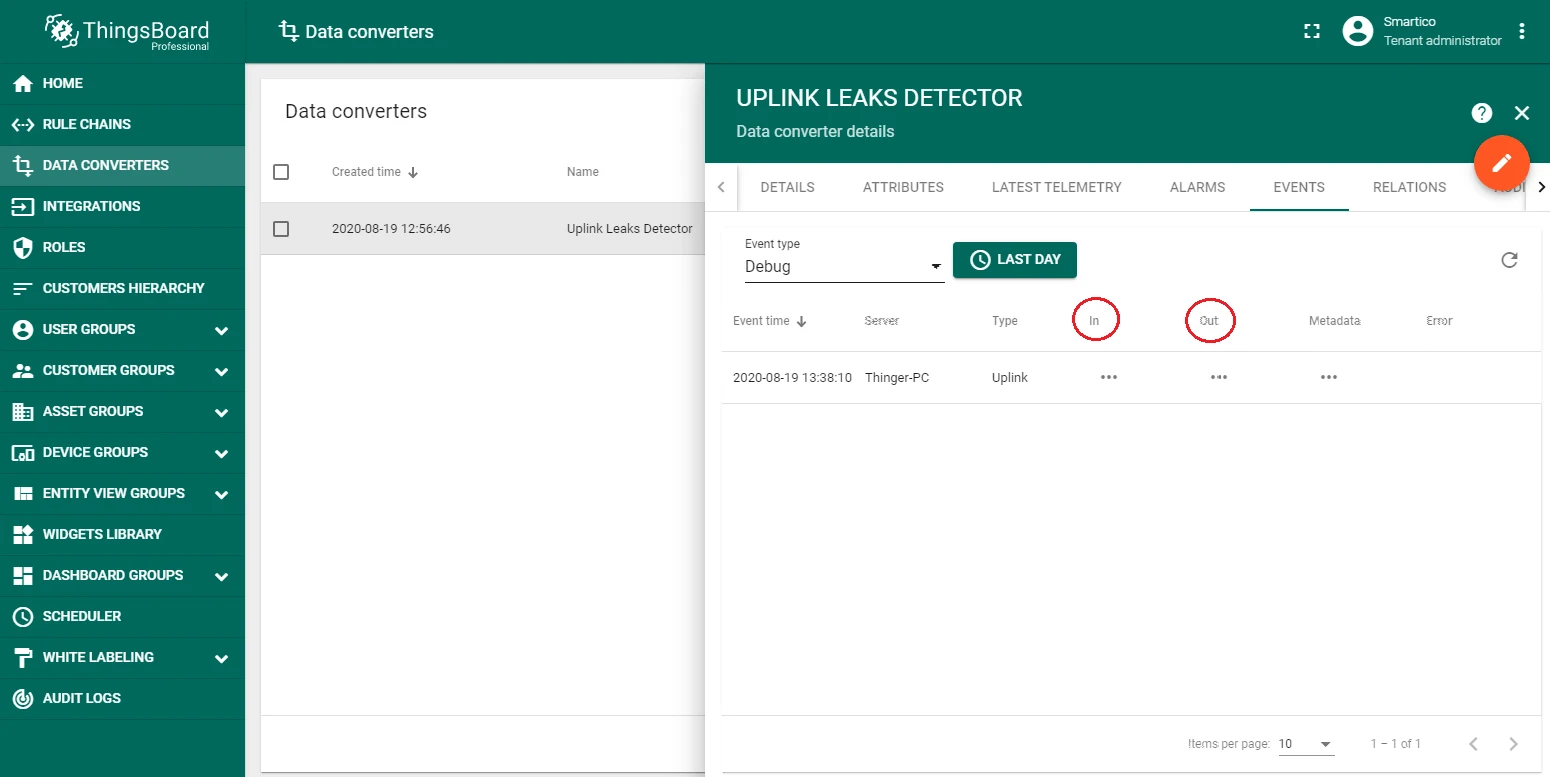
After the L2-LR transmits its first packet, a new device named after its serial number (like 13123) appears automatically in Entities > Devices. You can also verify input and output data in Data converters > Uplink Leaks Detector > Events.
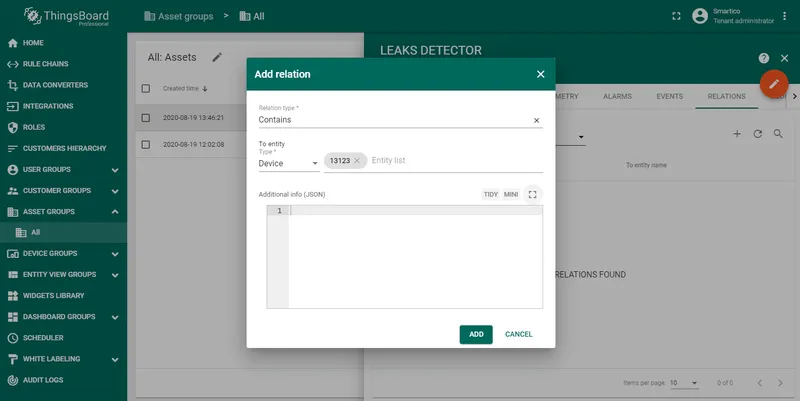
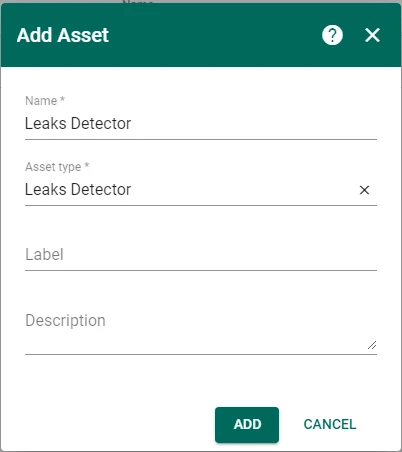
Create an asset
To display data on the dashboard, create an asset and add the device as a relation.
-
Go to Entities ⇾ Assets and create a new asset named
Leaks Detectorwith asset typeleaks-detector.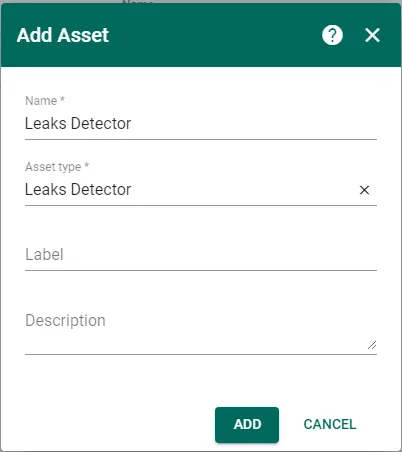
-
Open the asset, go to the Relations tab, and add a relation to the device.

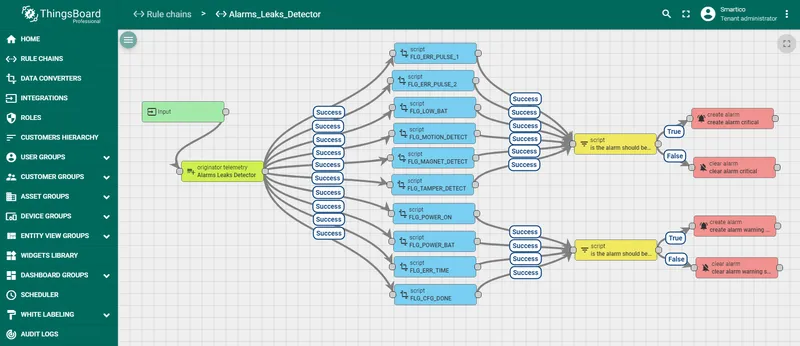
Import the rule chain
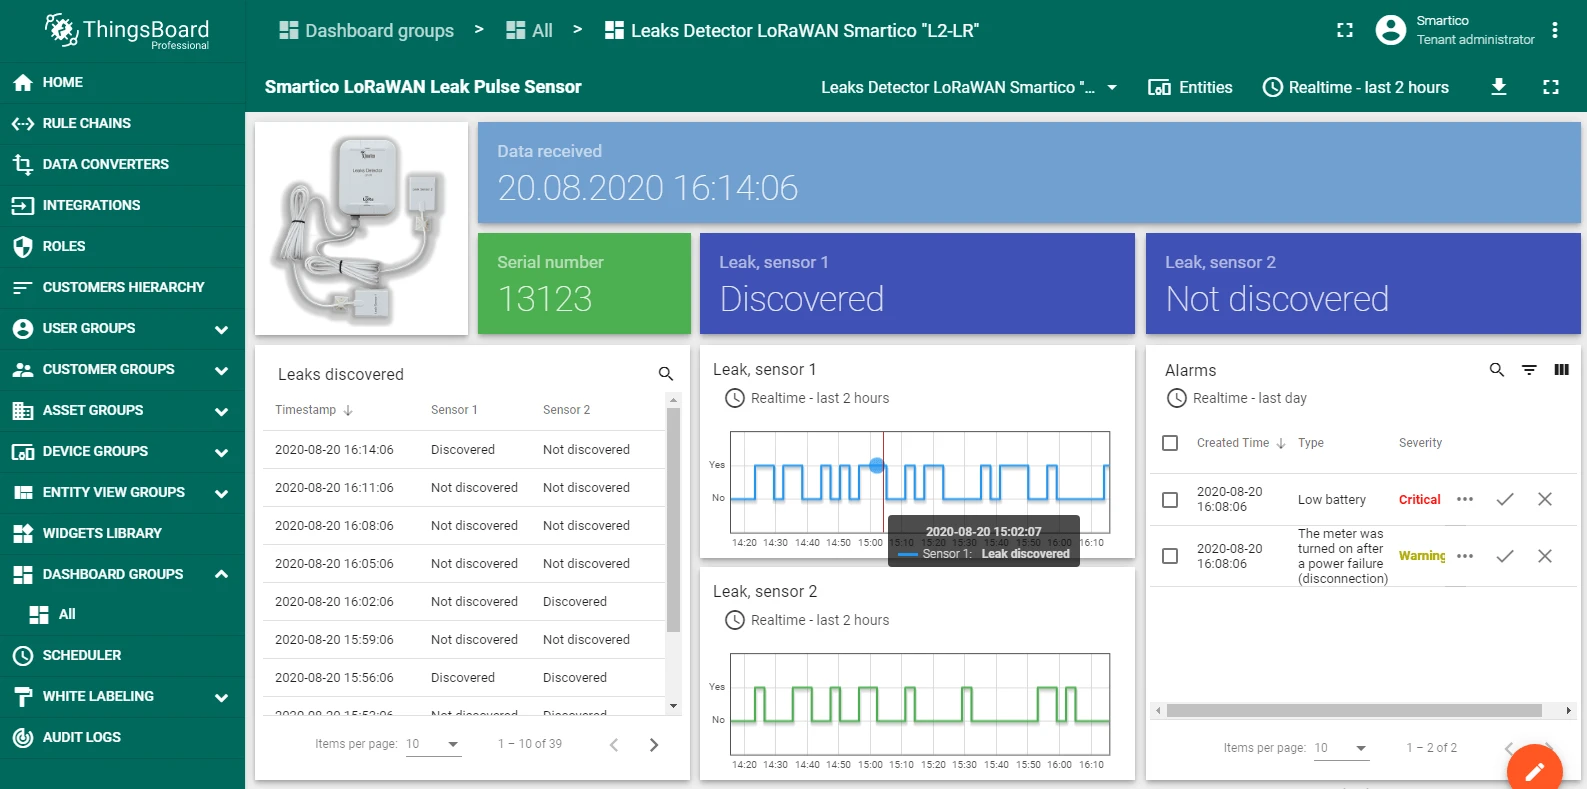
In addition to leak status, the device reports flags for low battery, tamper detection, and magnetic field exposure. These are displayed in an Alarm widget. Import the rule chain first to enable alarm processing.
-
Download alarms_leaks_detector.json and import it in Rule chains.
-
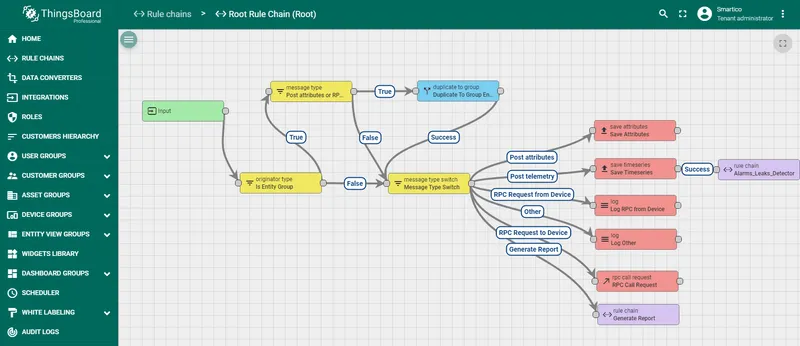
Open the Root Rule Chain, add a link to the imported Alarms Leaks Detector rule chain, and save.


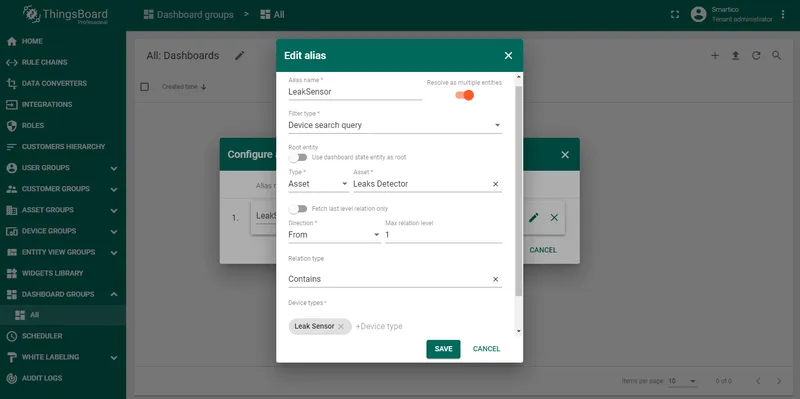
Import the dashboard
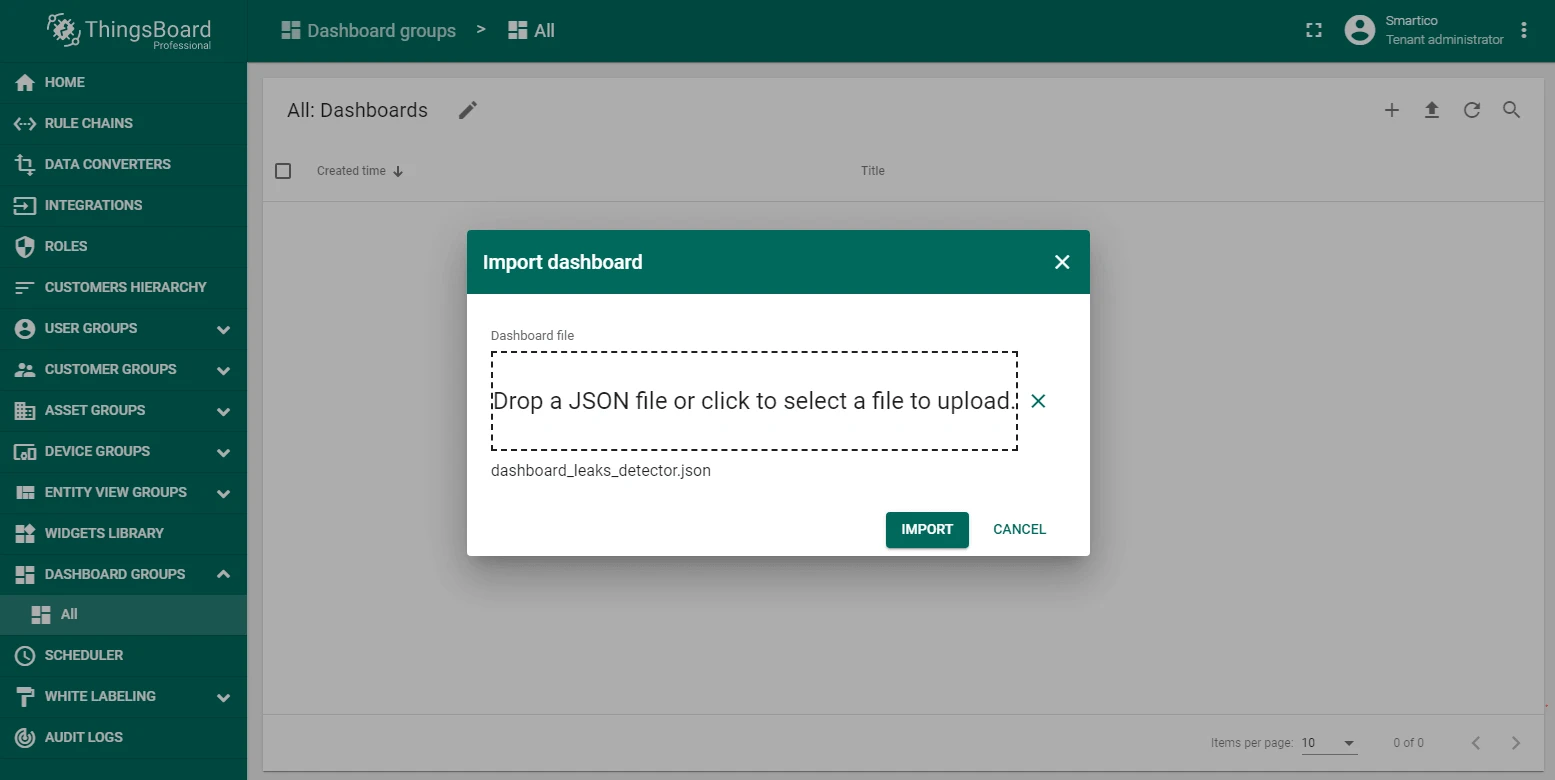
-
Download dashboard_leaks_detector.json and import it in Dashboards. See the dashboard import instructions.

-
After importing, edit the dashboard alias and set it to the Leaks Detector asset created in the previous step.

The dashboard now displays live leak status and device health data from the Smartico L2-LR.