- Introduction
- Create device on ThingsBoard
- Connect device to ThingsBoard
- Check data on ThingsBoard
- Conclusion
Introduction

The FDQ-99900 MI-8 is a compact, 24-bit data acquisition system (DAQ) designed to measure up to ten external sensors then log values locally to an SD card or push data to the cloud over a cellular data connection.
Advanced triggering functionality allows the MI-8 to conserve storage space and network data by only transmitting events of interest.
The low power consumption and wide operating temperature range are designed to allow outdoor and remote installations.
The MI-8 is available with and without an enclosure to support custom packaging solutions. For example, the enclosureless (OEM) configuration is often mounted into an IP-67 rated NEMA enclosure along with supporting sensors and hardware.
In this guide, we will learn how to create device on Thingsboard.
After this we will configure and connect the device, and check the data on ThingsBoard.
Prerequisites
To continue with this guide we will need the following:
Create device on ThingsBoard
For simplicity, we will provide the device manually using the UI.
-
Log in to your ThingsBoard instance and open the Devices page.
-
By default, you navigate to the device group “All”. Click on the “+” icon in the top right corner of the table and then select “Add new device”.
-
Input device name. For example, “My Device”. No other changes are required at this time. Click “Add” to add the device.
-
Your first device has been added.
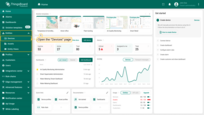
Log in to your ThingsBoard instance and open the Devices page.
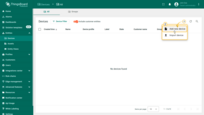
By default, you navigate to the device group “All”. Click on the “+” icon in the top right corner of the table and then select “Add new device”.
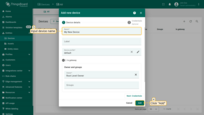
Input device name. For example, “My Device”. No other changes are required at this time. Click “Add” to add the device.
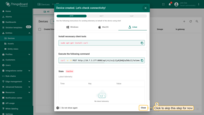
Your first device has been added.
Connect device to ThingsBoard
To connect your device, you’ll first need to get its credentials. While ThingsBoard supports a variety of device credentials, for this guide, we will use the default auto-generated credentials, which is an access token.
-
Click on the device row in the table to open device details.
-
Click “Copy access token”. The token will be copied to your clipboard. Please save it in a safe place.
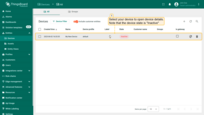
Click on the device row in the table to open device details.
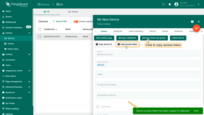
Click “Copy access token”. The token will be copied to your clipboard. Please save it in a safe place.
Once we have an access token we can configure the MI-8.
All MI-8 DAQs are configured through a file in the root directory of their SD card named config.json.
The MI-8 User manual contains detailed information for making changes to this file, but for this example we will focus on the name and push fields.
These are the fields which are present in configuration file.
1
2
3
4
5
6
7
8
9
10
11
12
13
14
15
16
17
18
19
20
21
22
23
24
25
26
27
28
29
30
31
32
33
34
35
36
37
38
39
40
41
42
43
44
45
46
47
48
49
50
{
   "name":"My MI-8 DAQ",
   "thermo_type":["k","k","k","k","k","k"],
   "num_thermo":3,
   "num_rtd":2,
   "ref_resistance":4000,
   "rtd_type":["pt100","pt100","pt100","pt100"],
   "rtd_connection":[4,4,4,4],
   "dig_in_mode":["pulldown","pulldown","pulldown"],
   "use_aux_header":false,
   "debug_level":255,
   "usb_mass_storage":true,
   "sleep_voltage":9.9,
   "wake_voltage":10.5,
   "display_sleep":10,
   "gnss_period":60,
   "flip_display":false,
   "network": {
      "apn":"hologram",
      "username":"",
      "password":""
   },
   "push": {
      "mode":"post",
      "path":"api/v1/YOUR_ACCESS_TOKEN/telemetry",
      "attributes_path":"api/v1/YOUR_ACCESS_TOKEN/attributes",
      "server": "thingsboard.cloud",
      "port":80,
      "username":"",
      "password":"",
      "use_ssl":false,
      "use_json":true,
      "push_attributes":true,
      "include_name":false,
      "include_imei":false,
      "include_iccid":false,
      "track_min_max":false,
      "use_headers":false
   },
   "trigger":[ {
      "name":"Default",
      "channels":"ambient,tc0,tc1,tc2,rtd0,rtd1,an0,lat,lon,alt,vbat,rssi",
      "log_period":60,
      "push_period":300,
      "start_delay":0,
      "stop_delay":0,
      "condition":"1",
	  "append_log":true
   }]
}
Necessary parameters to change for connection:
| Parameter | Default value | Description |
|---|---|---|
| path | api/v1/YOUR_ACCESS_TOKEN/telemetry | Replace YOUR_ACCESS_TOKEN with your access token for the device on ThingsBoard. |
| attributes_path | api/v1/YOUR_ACCESS_TOKEN/attributes | Replace YOUR_ACCESS_TOKEN with your access token for the device on ThingsBoard. |
| server | thingsboard.cloud | Your ThingsBoard instance address. |
| port | 80 | Your ThingsBoard instance HTTP port. You can Set port equal to 443 and use_ssl equal to true to use SSL encryption (HTTPS). Either protocol is supported, but HTTPS will consume more cellular data each time data is pushed to the server. |
Other configuration parameters:
- The name field is optional in this file. This name is displayed on the MI-8 OLED screen and is sent to ThingsBoard as a device attribute. Best practice is for the name in config.json to match the name of the device in ThingsBoard, but this doesn’t have to be the case. The name field isn’t used to associate telemetry data between the MI-8 and ThingsBoard. It is only meant as an aid for the user.
- The push field describes the connection to the ThingsBoard servers. In this example we use HTTP POST requests (“mode”:”post”). MQTT is also supported, but POST consumes less cellular data. The HTTP request URL is built up through the server, port, use_ssl, and path/attributes_path fields.
- The use_ssl field describes whether HTTP or HTTPS is used. The server field is everything between the double slashes ‘//’ and the colon. Next comes the port and one additional slash. Everything beyond that is the path.
- Set push_attributes equal to true so that attributes (things such as the MI-8 IMEI number which don’t change frequently) are sent once each power up.
- Set use_json equal to true. All data sent to ThingsBoard should be formatted as JSON.
- Set use_headers false. HTTP headers are not required by ThingsBoard, but require additional cellular data each push.
- You can set include_name, include_imei, and include_iccid to false. These fields cause the ICCID, IMEI, and MI-8 name to be included in the telemetry pushes which would consume additional cellular data. They do not need included here since they are already sent to ThingsBoard in a separate attributes HTTP request once per MI-8 power cycle.
After adding or changing configuration file do the following steps:
- Save config.json
- Disconnect the PC from the MI-8 USB port (if connected and mass-storage enabled)
- Power cycle the MI-8 so new settings take effect.
Check data on ThingsBoard
At this point the MI-8 should be configured and ready to communicate with ThingsBoard.
To check the incoming data you can do the following steps:
- Open ThingsBoard and then navigate to Device Groups and then All.
- Click on the device that was just associated with the MI-8 and then navigate to the Latest Telemetry tab.

- Also you can check attributes, received from device.
To do this, navigate to the Attributes tab.
Attributes are additional data sent from the MI-8 to ThingsBoard that are more or less fixed and do not change such as the modem IMEI, the SIM ID (ICCID), and the MI-8 firmware version.

All sensor values configured in the active MI-8 trigger should be present once the MI-8 powers up and is able to establish a cellular connection.
Note that GPS values are only transmitted after the first GPS fix, which could take several minutes depending on how long it has been and how far the MI-8 has moved since the last fix.
GPS values (lat, lon and alt) will only appear in the telemetry window after they have been transmitted at least once.
Conclusion
With the knowledge outlined in this guide, you can easily connect your Mixed Input, 8-Channel Analog Cellular Logger and send data to ThingsBoard.
Explore the platform documentation to learn more about key concepts and features. For example, configure alarm rules or dashboards.