- Getting started
- Key-value format
- Telemetry upload API
- Attributes API
- JSON value support
- RPC API
- Claiming devices
- Device provisioning
- Firmware API
- Protocol customization
- Next steps
Getting started
HTTP basics
HTTP is a general-purpose network protocol that can be used in IoT applications. You can find more information about HTTP here. HTTP protocol is TCP based and uses request-response model.
ThingsBoard server nodes act as an HTTP Server that supports both HTTP and HTTPS protocols.
Client libraries setup
You can find HTTP client libraries for different programming languages on the web. The examples in this article will be based on curl. In order to setup this tool, you can use instructions in our Hello World guide.
HTTP Authentication and error codes
In this article, we will use access token device credentials in this article and they will be referred to later as $ACCESS_TOKEN. The application needs to include $ACCESS_TOKEN as a path parameter in each HTTP request. Possible error codes and their reasons:
- 400 Bad Request - Invalid URL, request parameters or body.
- 401 Unauthorized - Invalid $ACCESS_TOKEN.
- 404 Not Found - Resource not found.
Key-value format
By default, ThingsBoard supports key-value content in JSON. Key is always a string, while value can be either string, boolean, double, long or JSON. For example:
1
2
3
4
5
6
7
8
9
10
11
{
 "stringKey":"value1",
 "booleanKey":true,
 "doubleKey":42.0,
 "longKey":73,
 "jsonKey": {
    "someNumber": 42,
    "someArray": [1,2,3],
    "someNestedObject": {"key": "value"}
 }
}
Using custom binary format or some serialization framework is also possible. See protocol customization for more details.
Telemetry upload API
In order to publish telemetry data to ThingsBoard server node, send POST request to the following URL:
1
http(s)://$THINGSBOARD_HOST_NAME/api/v1/$ACCESS_TOKEN/telemetry
Where
- $THINGSBOARD_HOST_NAME - the hostname or IP address your platform is running on;
- $ACCESS_TOKEN - device access token.
If you use live demo server, the command will look like this:
1
https://demo.thingsboard.io/api/v1/$ACCESS_TOKEN/telemetry
The simplest supported data formats are:
1
{"key1":"value1", "key2":"value2"}
or
1
[{"key1":"value1"}, {"key2":"value2"}]
In this case, the server-side timestamp will be assigned to uploaded data!
In case your device is able to get the client-side timestamp, you can use following format:
1
{"ts":1451649600512, "values":{"key1":"value1", "key2":"value2"}}
Where 1451649600512 is a unix timestamp with milliseconds precision. For example, the value ‘1451649600512’ corresponds to ‘Fri, 01 Jan 2016 12:00:00.512 GMT’
Below are the examples of commands for publishing different types of telemetry data.
Don’t forget to replace demo.thingsboard.io with your host and $ACCESS_TOKEN with your device’s access token. In this example, the hostname references live demo server.
Example 1. Publish data as an object without timestamp (server-side timestamp will be used).
Execute the command:
1
curl -v -X POST --data "{"temperature":42,"humidity":73}" https://demo.thingsboard.io/api/v1/$ACCESS_TOKEN/telemetry --header "Content-Type:application/json"
Telemetry data:
1
{"temperature":42,"humidity":73}
Example 2. Publish data as an object without timestamp (server-side timestamp will be used) using data from telemetry-data-as-object.json file.
Execute the command:
1
curl -v -X POST -d @telemetry-data-as-object.json https://demo.thingsboard.io/api/v1/$ACCESS_TOKEN/telemetry --header "Content-Type:application/json"
The content of the JSON file:
1
2
3
4
5
6
7
8
9
10
11
{
  "stringKey": "value1",
  "booleanKey": true,
  "doubleKey": 42.0,
  "longKey": 73,
  "jsonKey": {
    "someNumber": 42,
    "someArray": [1,2,3],
    "someNestedObject": {"key": "value"}
  }
}
Example 3. Publish data as an array of objects without timestamp (server-side timestamp will be used) using data from telemetry-data-as-array.json file.
Execute the command:
1
curl -v -X POST -d @telemetry-data-as-array.json https://demo.thingsboard.io/api/v1/$ACCESS_TOKEN/telemetry --header "Content-Type:application/json"
The content of the JSON file:
1
[{"key1":"value1"}, {"key2":true}]
Example 4. Publish data as an object with timestamp (telemetry timestamp will be used) using data from telemetry-data-with-ts.json file.
Execute the command:
1
curl -v -X POST -d @telemetry-data-with-ts.json https://demo.thingsboard.io/api/v1/$ACCESS_TOKEN/telemetry --header "Content-Type:application/json"
The content of the JSON file:
1
2
3
4
5
6
7
8
9
10
11
12
13
14
15
16
{
  "ts": 1451649600512,
  "values": {
    "stringKey": "value1",
    "booleanKey": true,
    "doubleKey": 42.0,
    "longKey": 73,
    "jsonKey": {
      "someNumber": 42,
      "someArray": [1, 2, 3],
      "someNestedObject": {
        "key": "value"
      }
    }
  }
}
Attributes API
ThingsBoard attributes API allows devices to
- Upload client-side device attributes to the server.
- Request client-side and shared device attributes from the server.
- Subscribe to shared device attributes from the server.
Publish attribute update to the server
In order to publish client-side device attributes to ThingsBoard server node, send POST request to the following URL:
1
http(s)://$THINGSBOARD_HOST_NAME/api/v1/$ACCESS_TOKEN/attributes
Where
- $THINGSBOARD_HOST_NAME - the hostname or IP address your platform is running on;
- $ACCESS_TOKEN - device access token.
If you use live demo server, the command will look like this:
1
https://demo.thingsboard.io/api/v1/$ACCESS_TOKEN/attributes
Below are the examples of commands for publishing different types of telemetry data.
Don’t forget to replace demo.thingsboard.io with your host and $ACCESS_TOKEN with your device’s access token. In this example, the hostname references live demo server.
Example 1. Publish client-side attributes update
1
curl -v -X POST --data "{"attribute1": "value1", "attribute2":true, "attribute3": 43.0}" https://demo.thingsboard.io/api/v1/$ACCESS_TOKEN/attributes --header "Content-Type:application/json"
Example 2. Publish client-side attributes update from the new-attributes-values.json file.
1
curl -v -X POST -d @new-attributes-values.json https://demo.thingsboard.io/api/v1/$ACCESS_TOKEN/attributes --header "Content-Type:application/json"
The content of the JSON file:
1
2
3
4
5
6
7
8
9
10
11
{
  "attribute1": "value1",
  "attribute2": true,
  "attribute3": 42.0,
  "attribute4": 73,
  "attribute5": {
    "someNumber": 42,
    "someArray": [1,2,3],
    "someNestedObject": {"key": "value"}
  }
}
Request attribute values from the server
In order to request client-side or shared device attributes to ThingsBoard server node, send GET request to the following URL:
1
http(s)://$THINGSBOARD_HOST_NAME/api/v1/$ACCESS_TOKEN/attributes?clientKeys=attribute1,attribute2&sharedKeys=shared1,shared2
Where
- $THINGSBOARD_HOST_NAME - the hostname or IP address your platform is running on;
- $ACCESS_TOKEN - device access token.
If you use live demo server, the command will look like this:
1
https://demo.thingsboard.io/api/v1/$ACCESS_TOKEN/attributes?clientKeys=attribute1,attribute2&sharedKeys=shared1,shared2
Execute the command. Don’t forget to replace demo.thingsboard.io with your host and $ACCESS_TOKEN with your device’s access token. In this example, the hostname references live demo server.
1
curl -v -X GET "https://demo.thingsboard.io/api/v1/$ACCESS_TOKEN/attributes?clientKeys=attribute1,attribute2&sharedKeys=shared1,shared2"
Result:
1
{"client":{"attribute1":"value1","attribute2":true}}
Subscribe to attribute updates from the server
In order to subscribe to shared device attribute changes, send GET request with optional “timeout” request parameter to the following URL:
1
http(s)://$THINGSBOARD_HOST_NAME/api/v1/$ACCESS_TOKEN/attributes/updates
Where
- $THINGSBOARD_HOST_NAME - the hostname or IP address your platform is running on;
- $ACCESS_TOKEN - device access token.
If you use live demo server, the command will look like this:
1
https://demo.thingsboard.io/api/v1/$ACCESS_TOKEN/attributes/updates
Once shared attribute will be changed by one of the server-side components (REST API or Rule Chain) the client will receive the following update:
Execute the command. Don’t forget to replace demo.thingsboard.io with your host and $ACCESS_TOKEN with your device’s access token. In this example, the hostname references live demo server.
1
curl -v -X GET https://demo.thingsboard.io/api/v1/$ACCESS_TOKEN/attributes/updates?timeout=20000
Result:
1
{"client":{"attribute1":"value1","attribute2":true}}
JSON value support
We have added support of JSON data structures to telemetry and attributes API to simplify work with device configuration. JSON support allows you to both upload from the device, and push nested objects to the device. You can store one configuration JSON as a shared attribute and push it to the device. You can also process the JSON data in the rule engine and raise alarms, etc.
Therefore, this improvement minimizes the number of Database operations when ThingsBoard stores the data. For example, “temperature” and “humidity” would be stored as separate rows in SQL or NoSQL databases in order to efficiently aggregate this data for visualization. Since there is no need to aggregate JSON data, we can store all the content as one row instead of separate rows for each configuration item. In some of our environments, it is possible to decrease the number of database operations more than 10 times by aggregating multiple parameters within one JSON.
Learn more about JSON value support with the video.
RPC API
Server-side RPC
In order to subscribe to RPC commands from the server, send GET request with optional “timeout” request parameter to the following URL:
1
http(s)://$THINGSBOARD_HOST_NAME/api/v1/$ACCESS_TOKEN/rpc
Where
- $THINGSBOARD_HOST_NAME - the hostname or IP address your platform is running on;
- $ACCESS_TOKEN - device access token.
If you use live demo server, the command will look like this:
1
https://demo.thingsboard.io/api/v1/$ACCESS_TOKEN/rpc
Once subscribed, a client may receive rpc request or a timeout message if there are no requests to a particular device. An example of RPC request body is shown below:
1
2
3
4
5
6
7
8
{
  "id": "1",
  "method": "setGpio",
  "params": {
    "pin": "23",
    "value": 1
  }
}
where
- id - request id, integer request identifier
- method - RPC method name, string
- params - RPC method params, custom json object
It is possible to reply to them using POST request to the following URL:
1
http(s)://$THINGSBOARD_HOST_NAME/api/v1/$ACCESS_TOKEN/rpc/{$id}
If you use live demo server, the command will look like this:
1
https://demo.thingsboard.io/api/v1/$ACCESS_TOKEN/rpc/{$id}
Where
- $id is an integer request identifier.
Let’s look at an example:
-
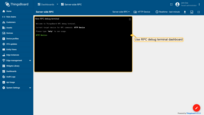
Use RPC debug terminal widget in your ThingsBoard instance;
-
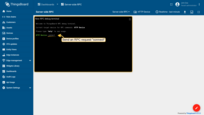
Subscribe to RPC commands from the server using the command below. To do this, in the first terminal window send GET request with observe flag. Don’t forget to replace
$THINGSBOARD_HOST_NAMEwith your host and$ACCESS_TOKENwith your device’s access token:
1
curl -v -X GET http://$THINGSBOARD_HOST_NAME/api/v1/$ACCESS_TOKEN/rpc?timeout=20000
-
Send an RPC request “connect” to the device using RPC debug terminal widget;
-
Save the “rpc-response.json” file to your PC;
-
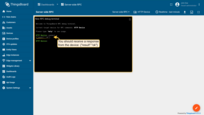
In the second terminal window simulate sending a response from the device to the server:
1
curl -v -X POST -d @rpc-response.json http://$THINGSBOARD_HOST_NAME/api/v1/$ACCESS_TOKEN/rpc/1 --header "Content-Type:application/json"
- You should receive a response from the device:
1
{"result":"ok"}


Client-side RPC
In order to send RPC commands to the server, send POST request to the following URL:
1
http(s)://$THINGSBOARD_HOST_NAME/api/v1/$ACCESS_TOKEN/rpc
Where
- $THINGSBOARD_HOST_NAME - the hostname or IP address your platform is running on;
- $ACCESS_TOKEN - device access token.
If you use live demo server, the command will look like this:
1
https://demo.thingsboard.io/api/v1/$ACCESS_TOKEN/rpc
Both request and response body should be valid JSON documents. The content of the documents is specific to the rule node that will handle your request.
Let’s look at an example:
-
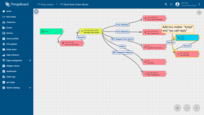
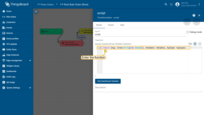
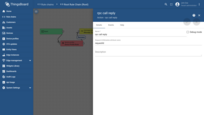
Add two nodes to the Rule Chain: “script” and “rpc call reply”;
-
In the script node enter the function:
1
return {msg: {time:String(new Date())}, metadata: metadata, msgType: msgType};
-
Save the “rpc-client-request.json” file to your PC;
-
Now, send request to the server using the command below. Don’t forget to replace
$THINGSBOARD_HOST_NAMEwith your host and$ACCESS_TOKENwith your device’s access token:
1
curl -X POST -d @rpc-client-request.json http://$THINGSBOARD_HOST_NAME/api/v1/$ACCESS_TOKEN/rpc --header "Content-Type:application/json"
- You should receive a response from the server:
1
{"time":"2016 11 21 12:54:44.287"}


Claiming devices
Please see the corresponding article to get more information about the Claiming devices feature.
In order to initiate claiming device, send POST request to the following URL:
1
http(s)://$THINGSBOARD_HOST_NAME/api/v1/$ACCESS_TOKEN/claim
Where
- $THINGSBOARD_HOST_NAME - the hostname or IP address your platform is running on;
- $ACCESS_TOKEN - device access token.
If you use live demo server, the command will look like this:
1
https://demo.thingsboard.io/api/v1/$ACCESS_TOKEN/claim
The supported data format is:
1
{"secretKey":"value", "durationMs":60000}
Device provisioning
Please see the corresponding article to get more information about the Device provisioning feature.
In order to initiate device provisioning, send POST request to the following URL:
1
http(s)://$THINGSBOARD_HOST_NAME/api/v1/provision
Where $THINGSBOARD_HOST_NAME - the hostname or IP address your platform is running on;
If you use live demo server, the command will look like this:
1
https://demo.thingsboard.io/api/v1/provision
The supported data format is:
1
2
3
4
5
{
  "deviceName": "DEVICE_NAME",
  "provisionDeviceKey": "u7piawkboq8v32dmcmpp",
  "provisionDeviceSecret": "jpmwdn8ptlswmf4m29bw"
}
Firmware API
When ThingsBoard initiates the firmware update over HTTP it sets the fw_title, fw_version, fw_checksum, fw_checksum_algorithm shared attributes. To receive the shared attribute updates, the device has to GET request
1
http(s)://$THINGSBOARD_HOST_NAME/api/v1/$ACCESS_TOKEN/firmware?title=$TITLE&version=$VERSION
Where
- $THINGSBOARD_HOST_NAME - the hostname or IP address your platform is running on;
- $ACCESS_TOKEN - the device access token;
- $TITLE - the firmware title;
- $VERSION - the version of the target firmware.
If you use live demo server, the command will look like this:
1
https://demo.thingsboard.io/api/v1/$ACCESS_TOKEN/firmware?title=$TITLE&version=$VERSION
Protocol customization
HTTP transport can be fully customized for specific use-case by changing the corresponding module.
Next steps
-
Getting started guides - These guides provide quick overview of main ThingsBoard features. Designed to be completed in 15-30 minutes.
-
Data visualization - These guides contain instructions on how to configure complex ThingsBoard dashboards.
-
Data processing & actions - Learn how to use ThingsBoard Rule Engine.
-
IoT Data analytics - Learn how to use rule engine to perform basic analytics tasks.
-
Hardware samples - Learn how to connect various hardware platforms to ThingsBoard.
-
Advanced features - Learn about advanced ThingsBoard features.
-
Contribution and Development - Learn about contribution and development in ThingsBoard.