SODAQ Universal Tracker with T-Mobile NB-IoT and ThingsBoard
Introduction
Section titled “Introduction”SODAQ NB-IoT Trackers collect GPS location and sensor data and transmit it over the T-Mobile NB-IoT network. This guide walks through connecting a SODAQ NB-IoT Tracker to ThingsBoard PE using the T-Mobile IoT CDP integration, setting up a data converter, importing alarm rule chains, and visualizing data on a dashboard.
Prerequisites
Section titled “Prerequisites”- SODAQ NB-IoT Tracker connected to the T-Mobile NB-IoT network
- ThingsBoard PE server or a free ThingsBoard Cloud account
- Basic ThingsBoard knowledge — complete the Getting Started guide before proceeding
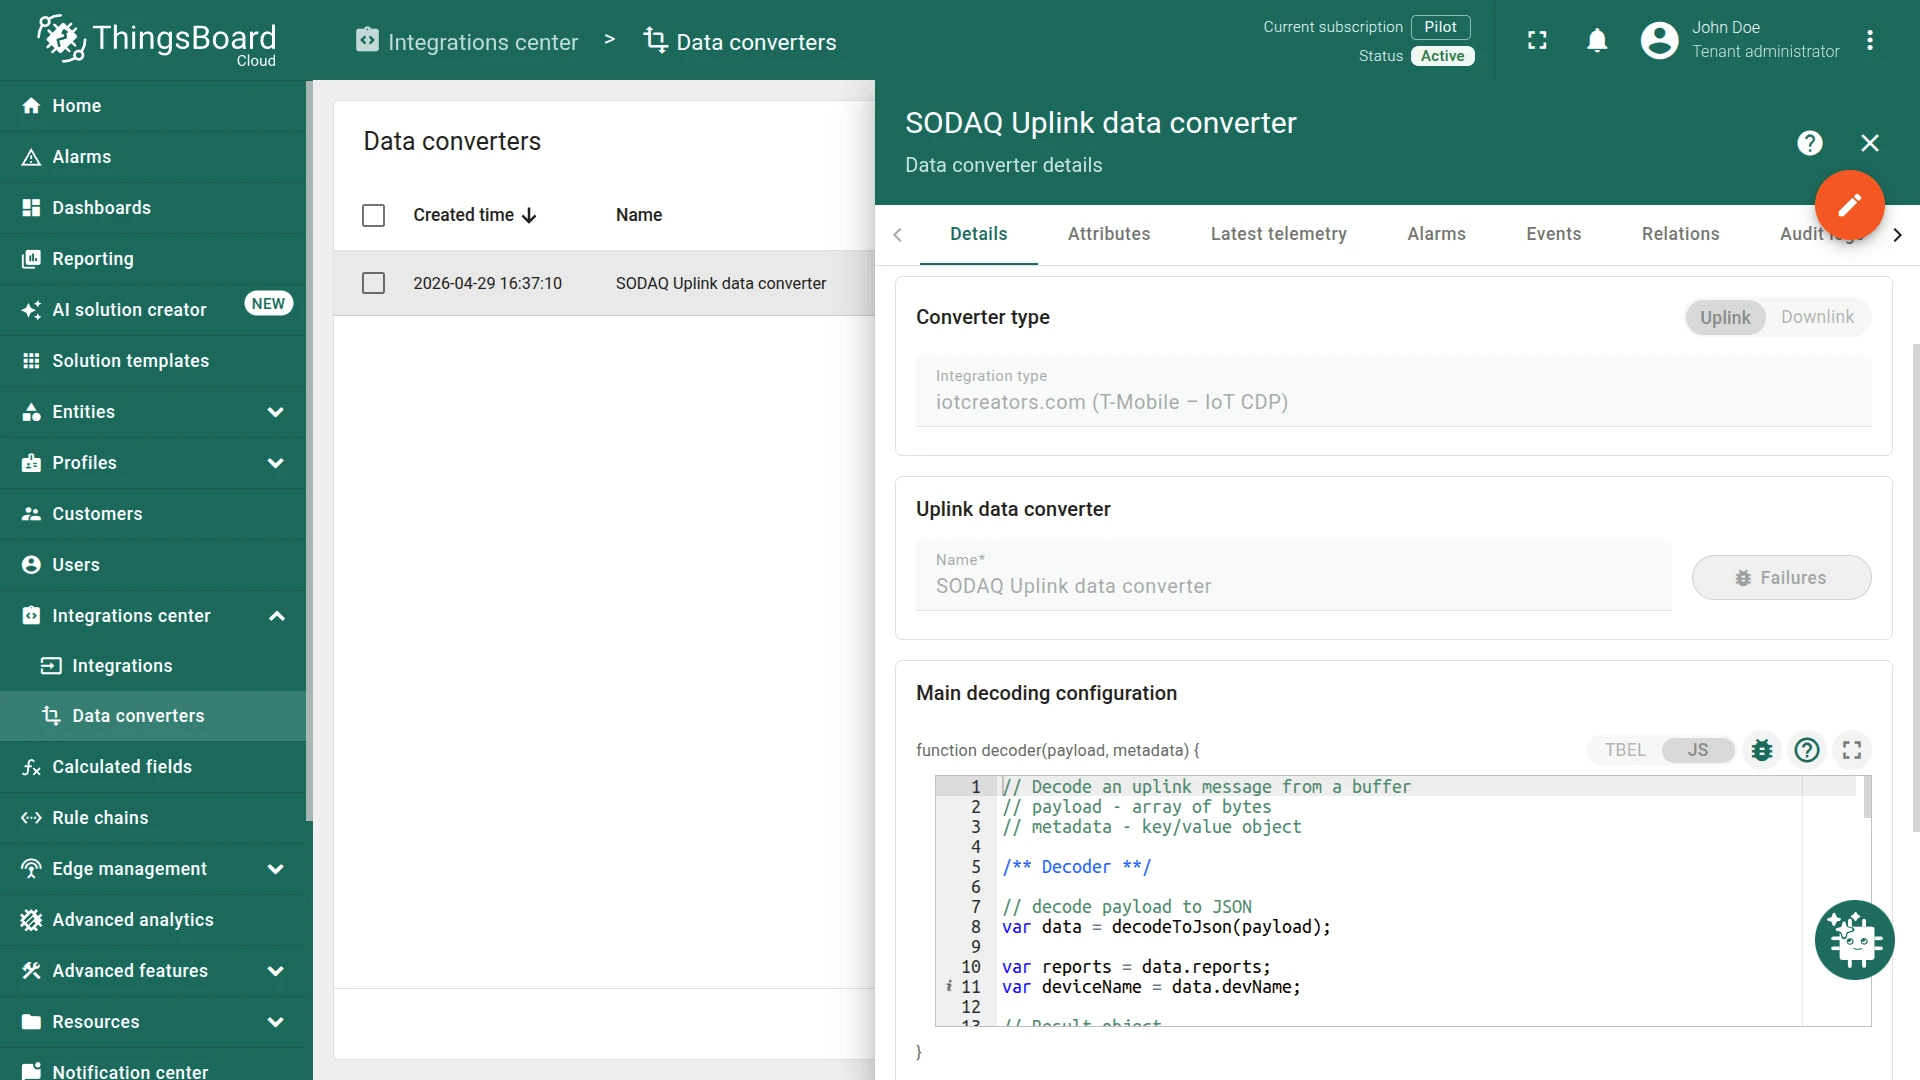
Step 1. Data converter configuration
Section titled “Step 1. Data converter configuration”The uplink data converter decodes the incoming hex-encoded payload from T-Mobile NB-IoT into the ThingsBoard telemetry format.
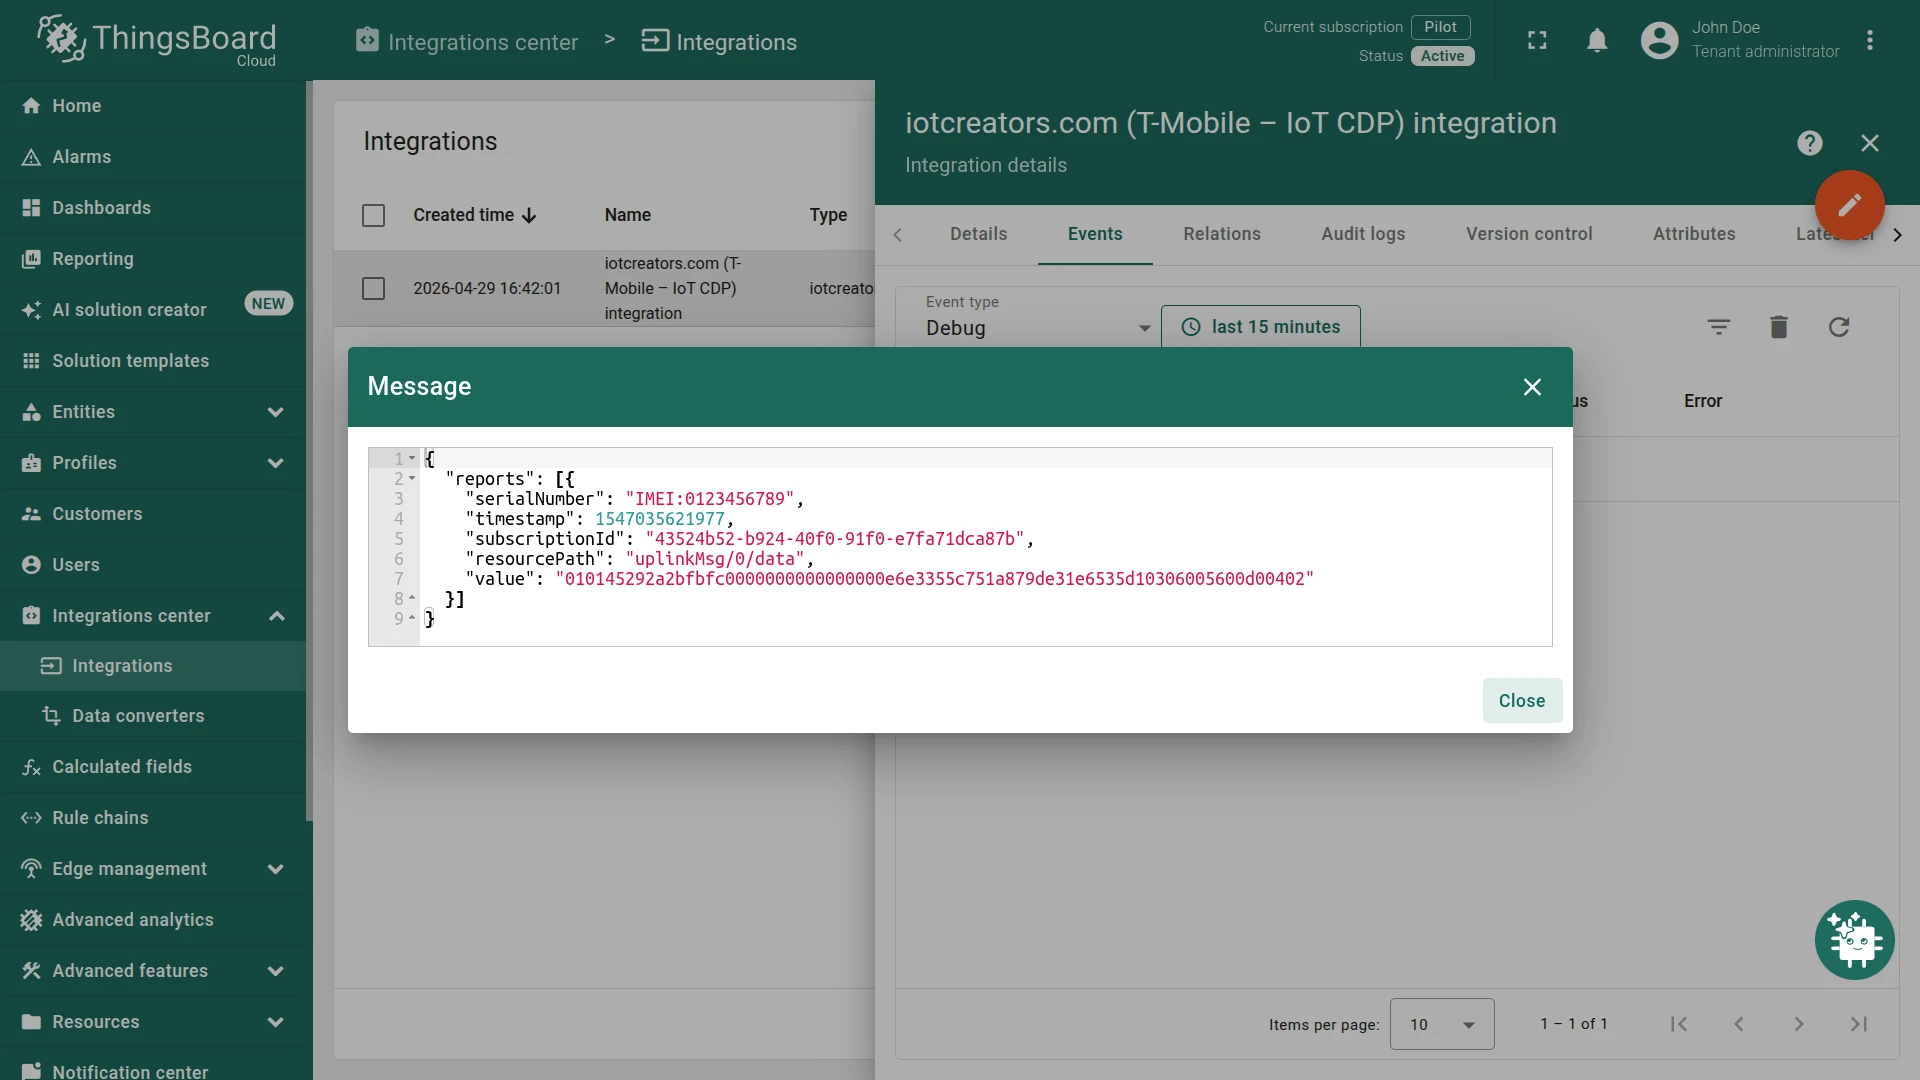
Input payload from T-Mobile NB-IoT platform:
{ "reports": [{ "serialNumber": "IMEI:0123456789", "timestamp": 1547035621977, "subscriptionId": "43524b52-b924-40f0-91f0-e7fa71dca87b", "resourcePath": "uplinkMsg/0/data", "value": "010145292a2bfbfc0000000000000000e6e3355c751a879de31e6535d10306005600d00402" }]}Decoded output:
{ "deviceName": "0123456789", "deviceType": "tracker", "telemetry": [{ "ts": 1547035622000, "values": { "batteryVoltage": 4.17, "temperature": 26, "latitude": 51.8233479, "longitude": 6.4042341, "altitude": 6, "speed": 86, "satellitesObserved": 208, "timetToFirstFix": 4 } }]}Key points:
- The IMEI from the incoming message becomes the device name in ThingsBoard.
- ThingsBoard automatically creates a device with type
trackerand a name equal to the IMEI. - Timestamp and sensor readings are decoded from the incoming hex string.
The following table shows each encoded field’s position and byte length in the hex string:
| Field | First byte | Byte length |
|---|---|---|
| ts | 16 | 4 |
| batteryVoltage | 20 | 1 |
| temperature | 21 | 1 |
| latitude | 22 | 4 |
| longitude | 26 | 4 |
| altitude | 30 | 2 |
| speed | 32 | 2 |
| satellitesObserved | 35 | 1 |
| timetToFirstFix | 36 | 1 |
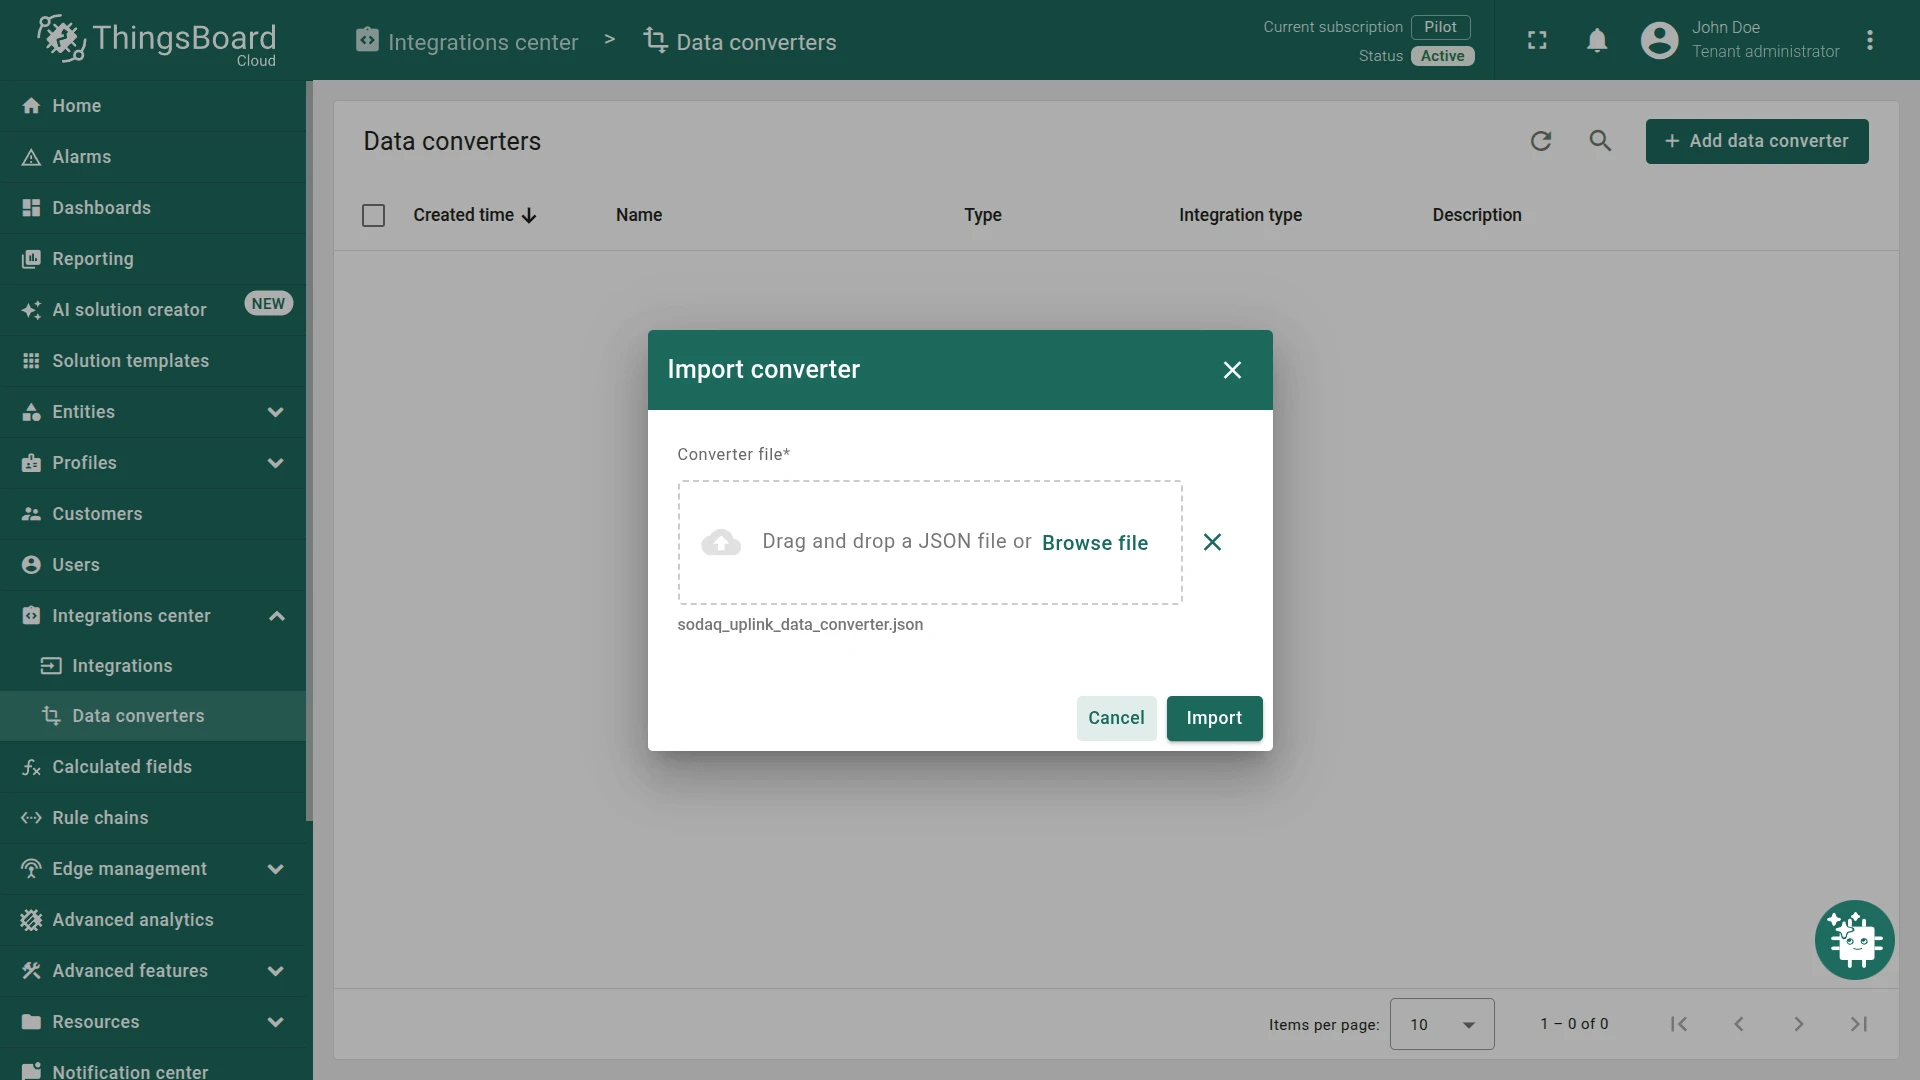
Import uplink converter
Section titled “Import uplink converter”- Download sodaq_uplink_data_converter.json.
- Go to Integrations center ⇾ Data converters and click + Add data converter > Import converter.
- Drag and drop the downloaded
sodaq_uplink_data_converter.jsonfile. - Click Import.
Decoder function:
// Decode an uplink message from a buffer// payload - array of bytes// metadata - key/value object
/** Decoder **/
// decode payload to JSONvar data = decodeToJson(payload);
var reports = data.reports;var deviceName = data.devName;
// Result objectvar result = { deviceName: {}, deviceType: "tracker", telemetry: []};
for (var i = 0; i < reports.length; i++) {
result.deviceName = reports[i].serialNumber.replace("IMEI:", "");
var telemetryObj = { ts: {}, values: {} };
var timestamp = stringToInt(reports[i].value.substring(32, 40)) * 1000; var v = stringToInt(reports[i].value.substring(40, 42)) / 100 + 3; var t = stringToInt(reports[i].value.substring(42, 44)); var lat = stringToInt(reports[i].value.substring(44, 52)) / 10000000; var lon = stringToInt(reports[i].value.substring(52, 60)) / 10000000; var alt = stringToInt(reports[i].value.substring(60, 64)); var speed = stringToInt(reports[i].value.substring(64, 68)); var sat = stringToInt(reports[i].value.substring(68, 70)); var ttf = stringToInt(reports[i].value.substring(70, 72));
telemetryObj.ts = timestamp; telemetryObj.values.batteryVoltage = v; telemetryObj.values.temperature = t;
if (lat !== 0) { telemetryObj.values.latitude = lat; } if (lon !== 0) { telemetryObj.values.longitude = lon; } if (alt !== 0) { telemetryObj.values.altitude = alt; }
telemetryObj.values.speed = speed; telemetryObj.values.satellitesObserved = sat; telemetryObj.values.timetToFirstFix = ttf;
result.telemetry.push(telemetryObj);}
/** Helper functions **/
function stringToInt(hex) { return parseInt('0x' + hex.match(/../g).reverse().join(''));}
function decodeToString(payload) { return String.fromCharCode.apply(String, payload);}
function decodeToJson(payload) { var str = decodeToString(payload); return JSON.parse(str);}
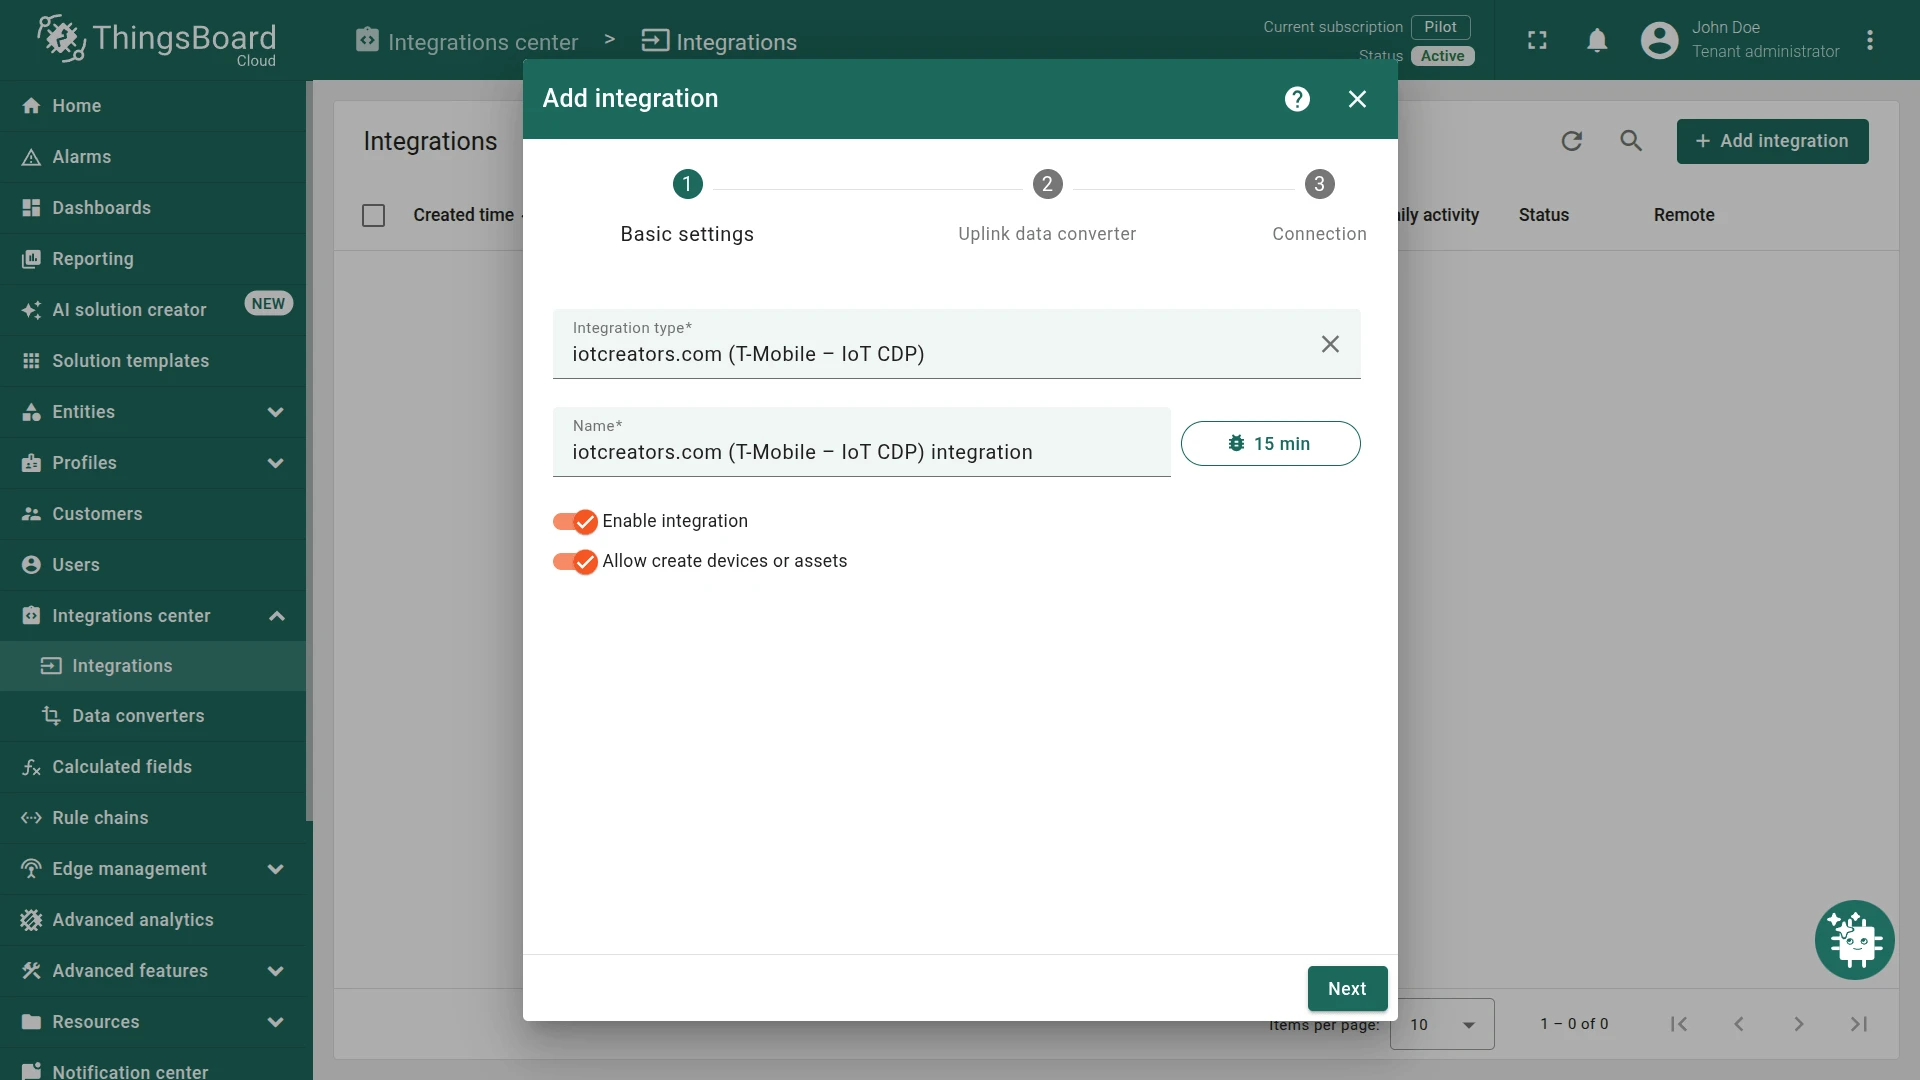
return result;Step 2. Integration configuration
Section titled “Step 2. Integration configuration”- Go to Integrations center ⇾ Integrations and click + Add integration.
-
Basic settings:
- Set Integration type to iotcreators.com (T-Mobile – IoT CDP).
- Enable integration and Allow create devices or assets are on by default.
- Click Next.
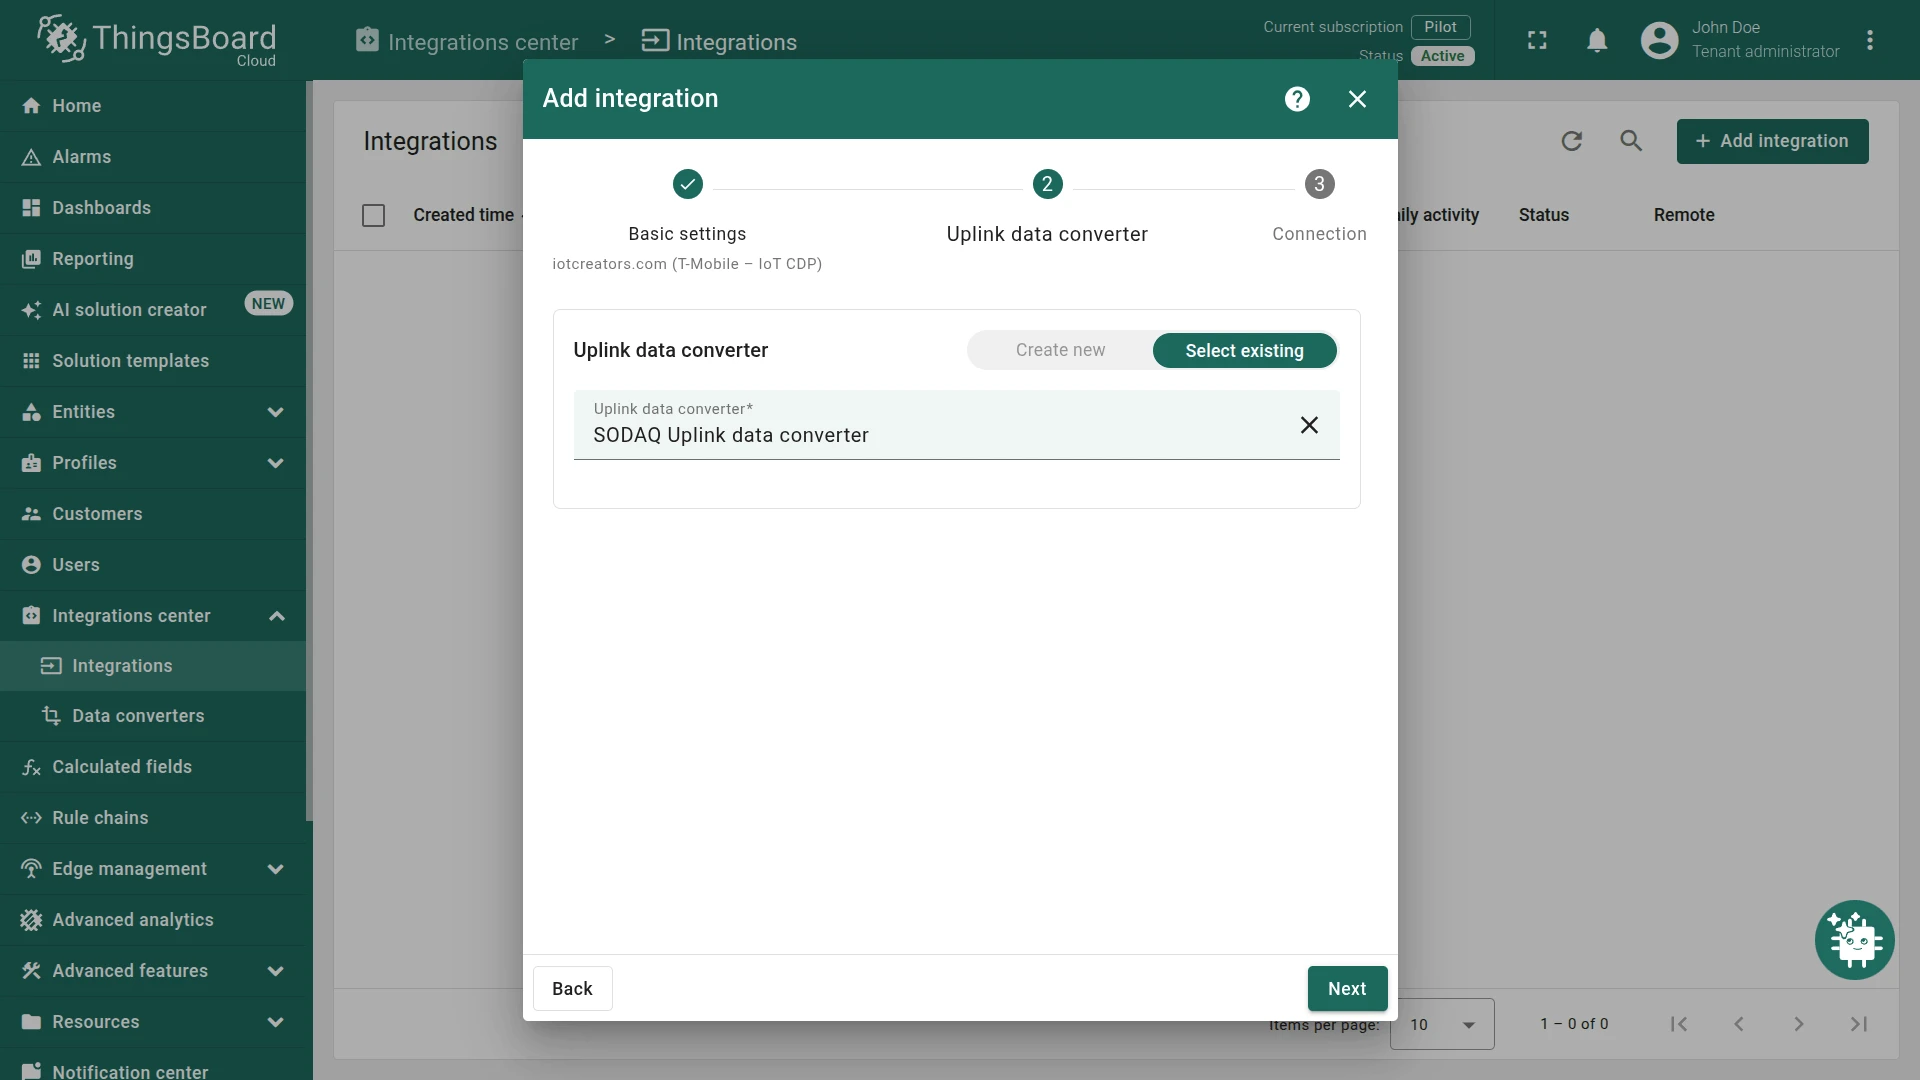
-
Uplink data converter:
- Select existing — choose the previously created
SODAQ Uplink data converterfrom the list. - Click Next.
- Select existing — choose the previously created
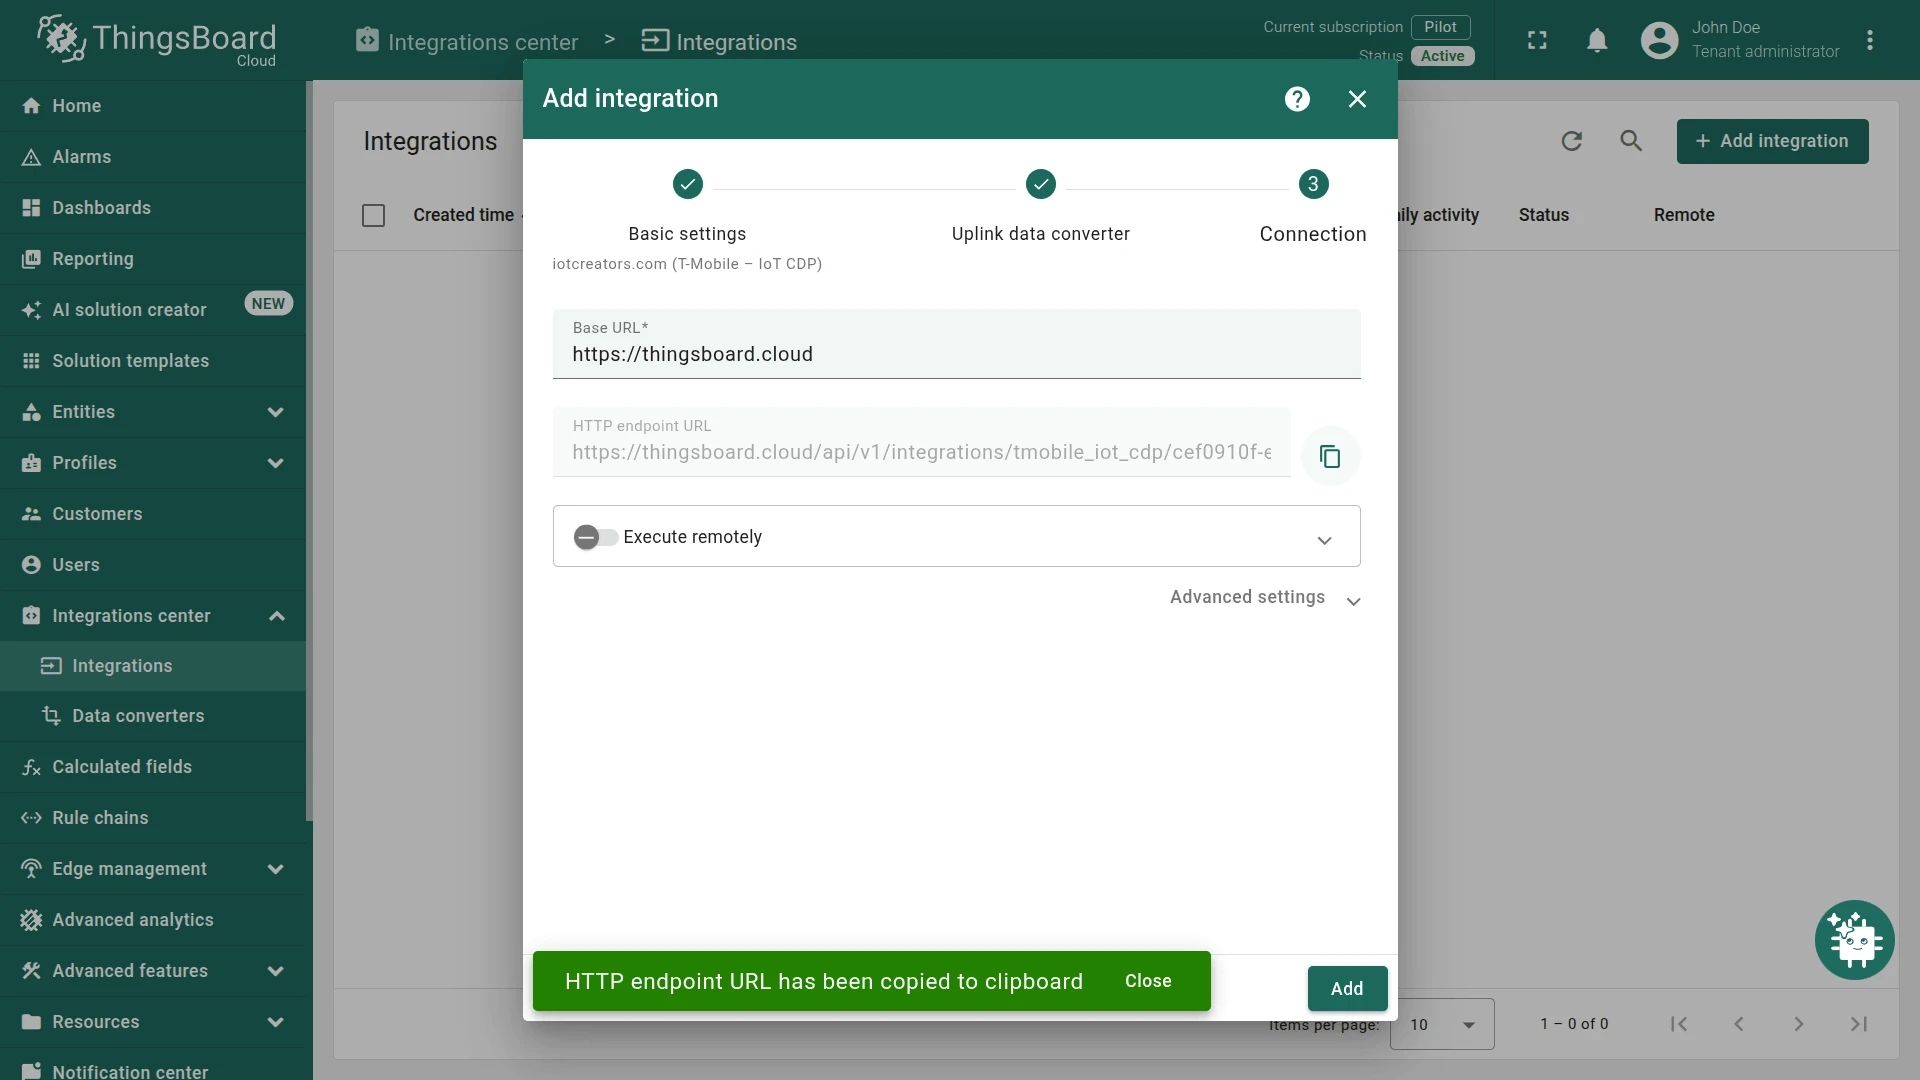
-
Connection:
- Base URL is pre-filled with your ThingsBoard instance URL.
- Copy the generated HTTP export URL — you will configure IoT Creators to POST to this address.
- Click Add to save the integration.
For more information about MQTT integrations in ThingsBoard, see the IoT Creators integration documentation.
Step 3. Post telemetry and verify the integration
Section titled “Step 3. Post telemetry and verify the integration”Before configuring the T-Mobile platform, verify that ThingsBoard is correctly configured by sending a test message with cURL.
-
Download the test data file: telemetry-data.json.
-
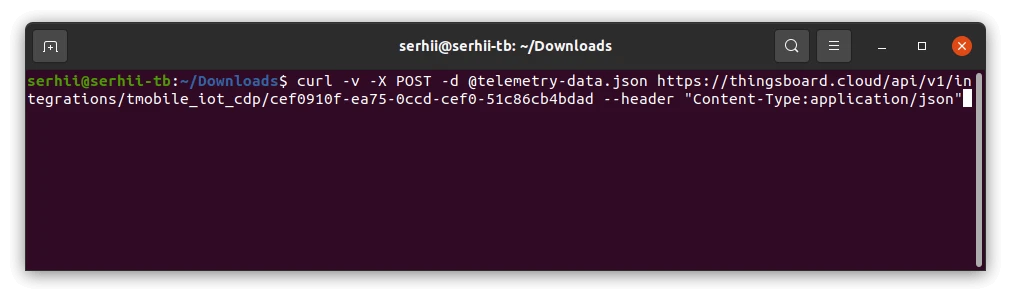
Run the following command, replacing
$HTTP_ENDPOINT_URLwith the copied endpoint URL from the integration:Terminal window curl -v -X POST -d @telemetry-data.json $HTTP_ENDPOINT_URL --header "Content-Type:application/json"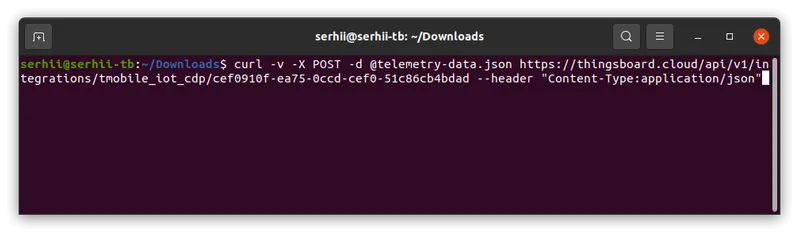
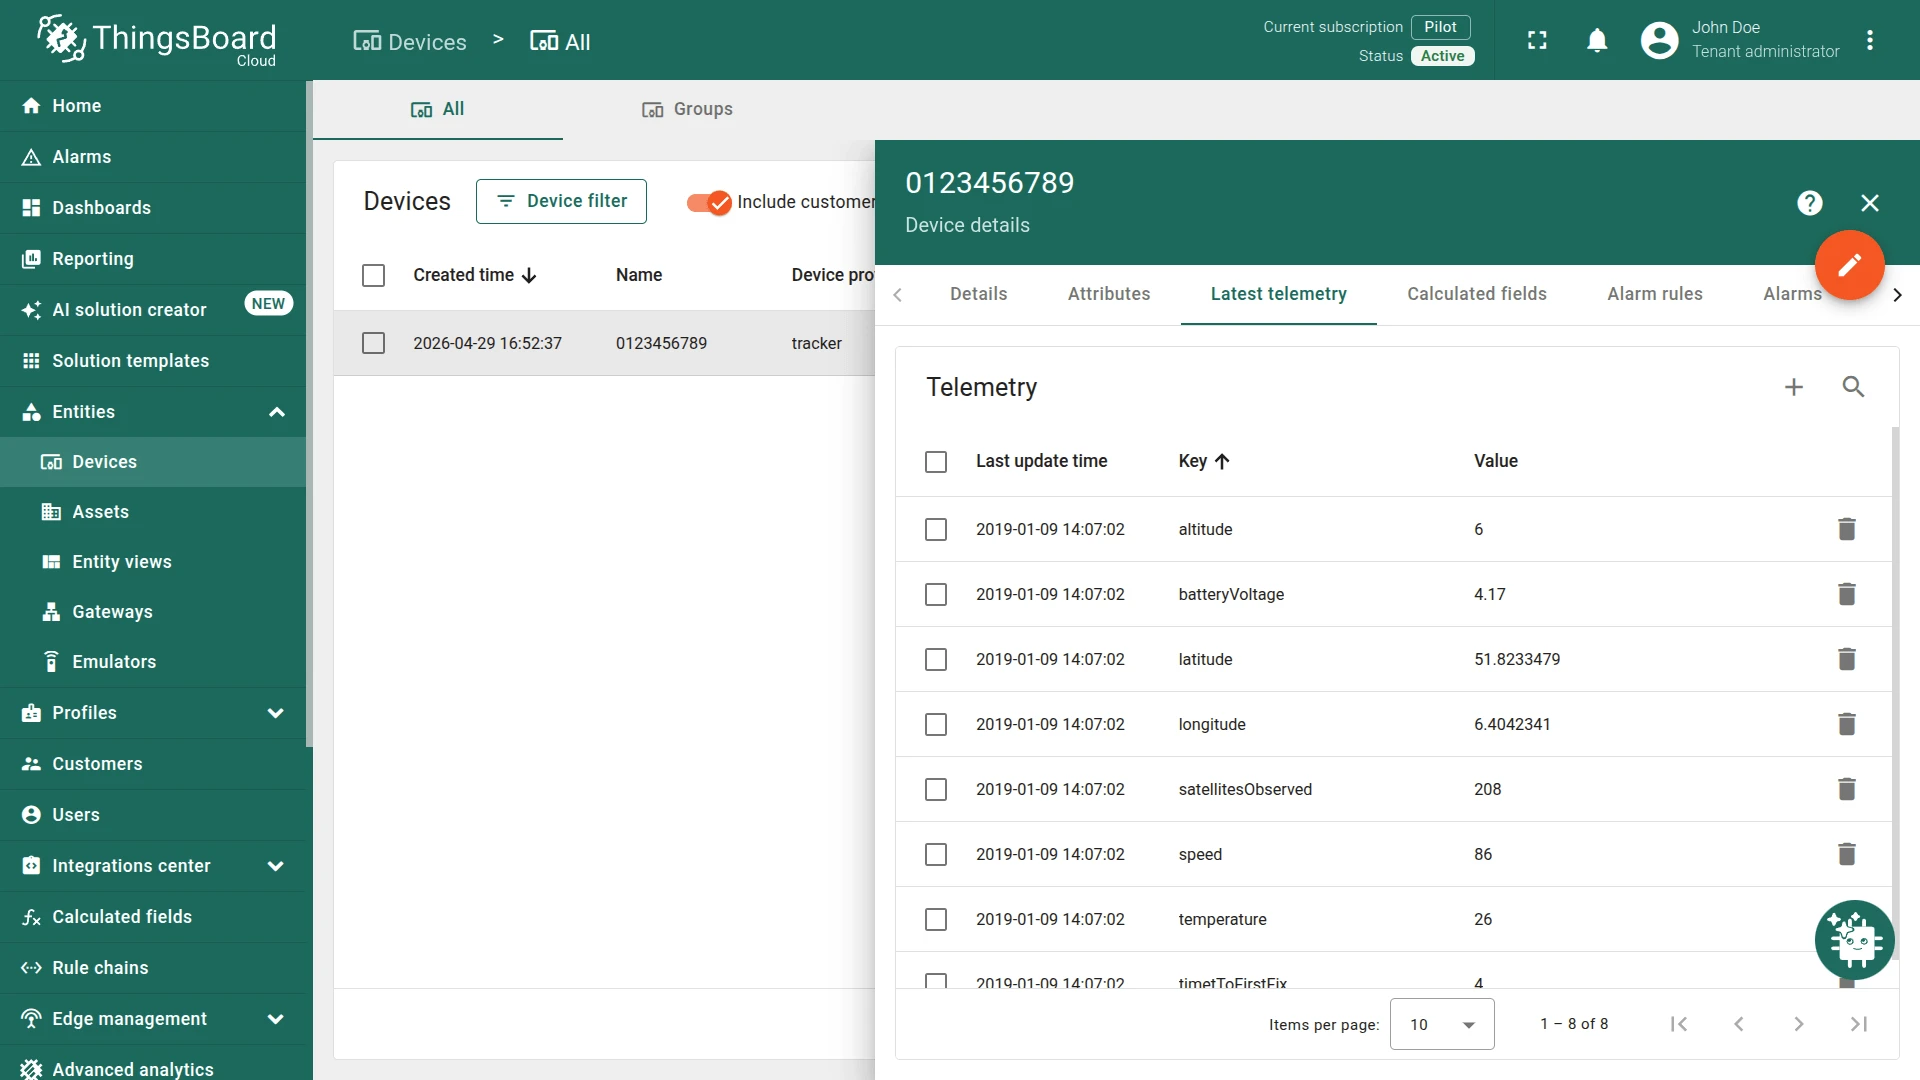
A new device should be created in ThingsBoard:
Go to Entities ⇾ Devices — device 0123456789 is provisioned automatically on the first uplink. Open the Latest telemetry tab to verify decoded data such as location, battery voltage, and other sensor values.
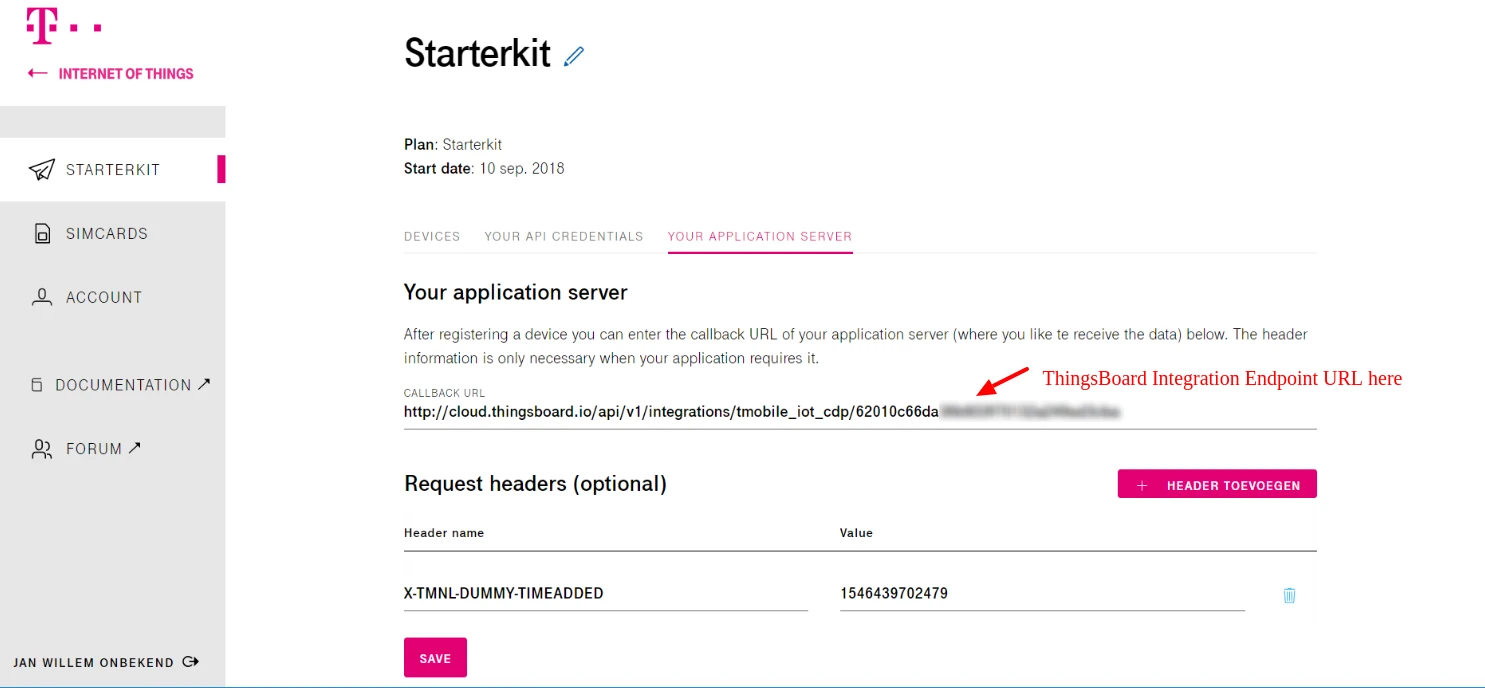
Step 4. T-Mobile NB-IoT platform callback configuration
Section titled “Step 4. T-Mobile NB-IoT platform callback configuration”In the T-Mobile IoT CDP platform, configure the callback URL to the HTTP endpoint URL from Step 2. Use the image below as a reference:
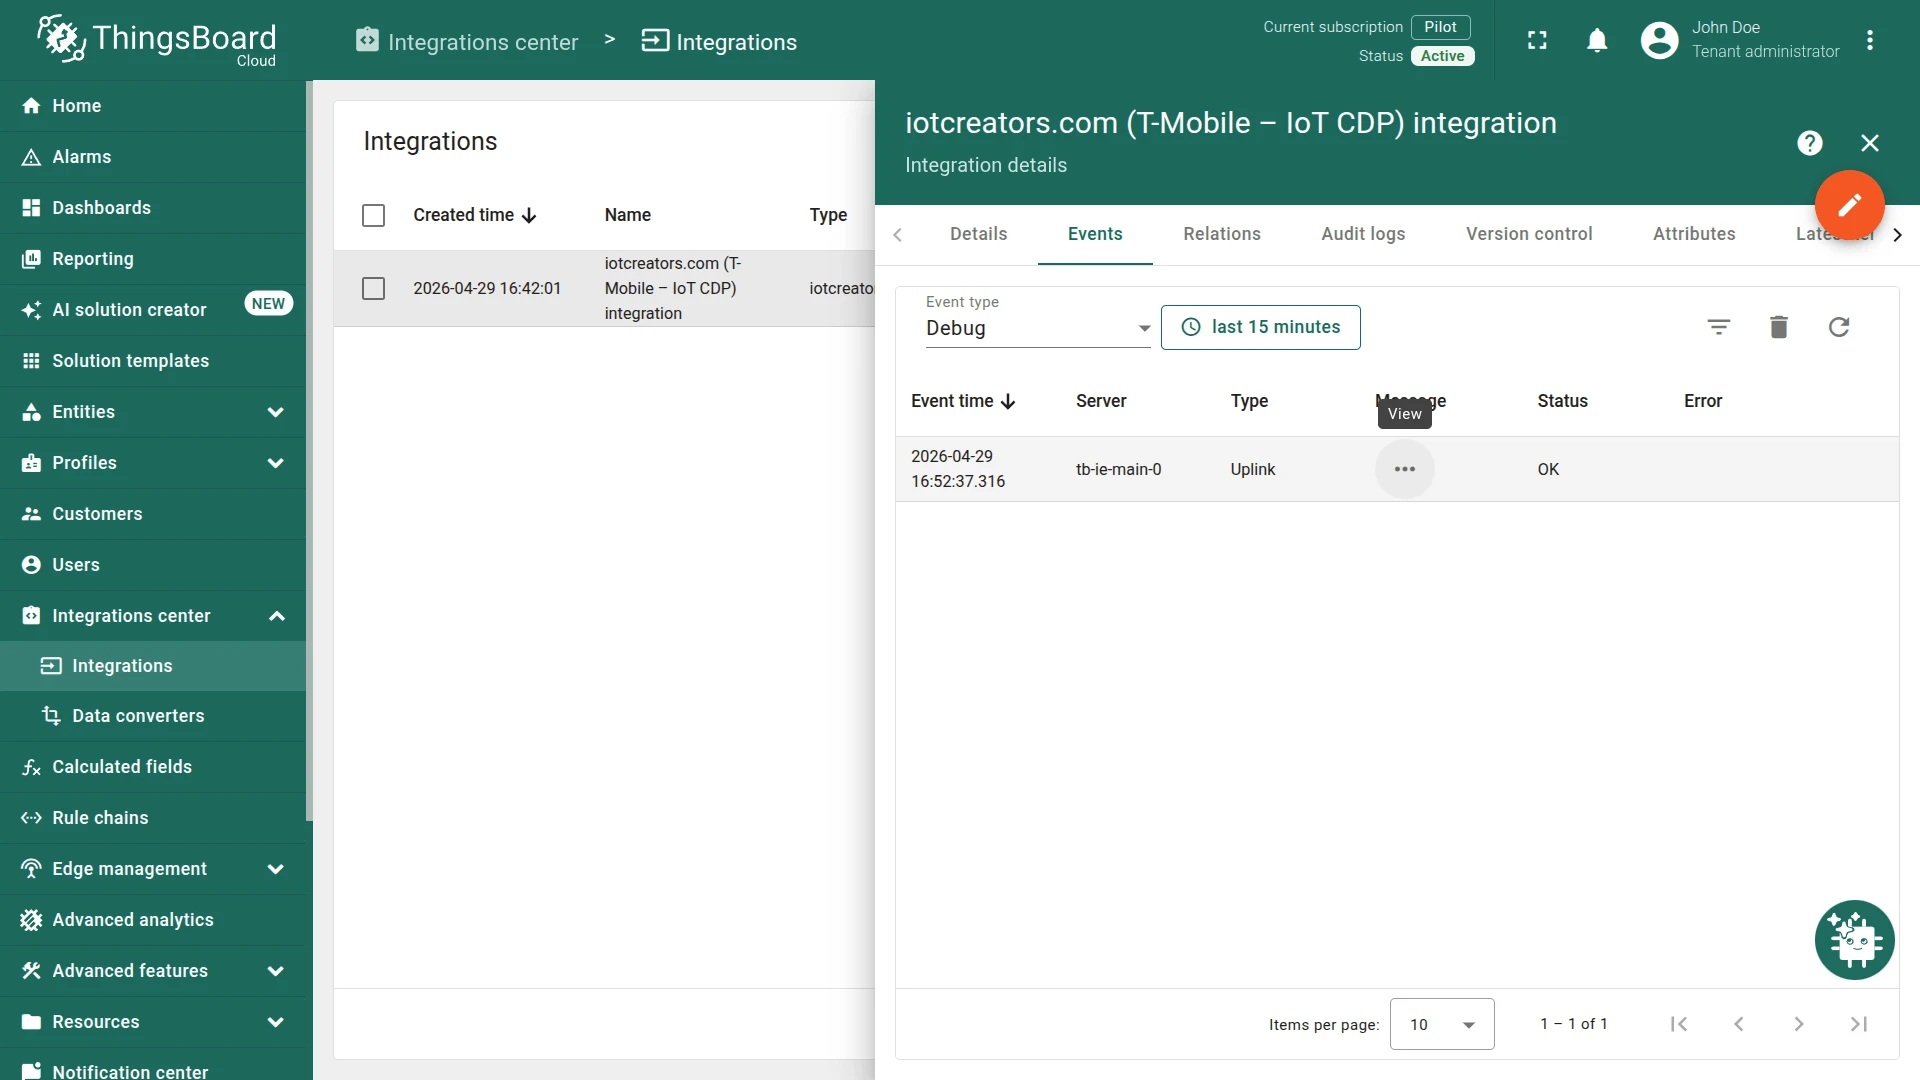
Step 5. Check integration debug events
Section titled “Step 5. Check integration debug events”To trace the message through the integration, go to Integrations center ⇾ Integrations, click iotcreators.com (T-Mobile – IoT CDP) integration, open the Events tab, and set Event type to Debug. Click … in the Message column to see the reports received by the integration.
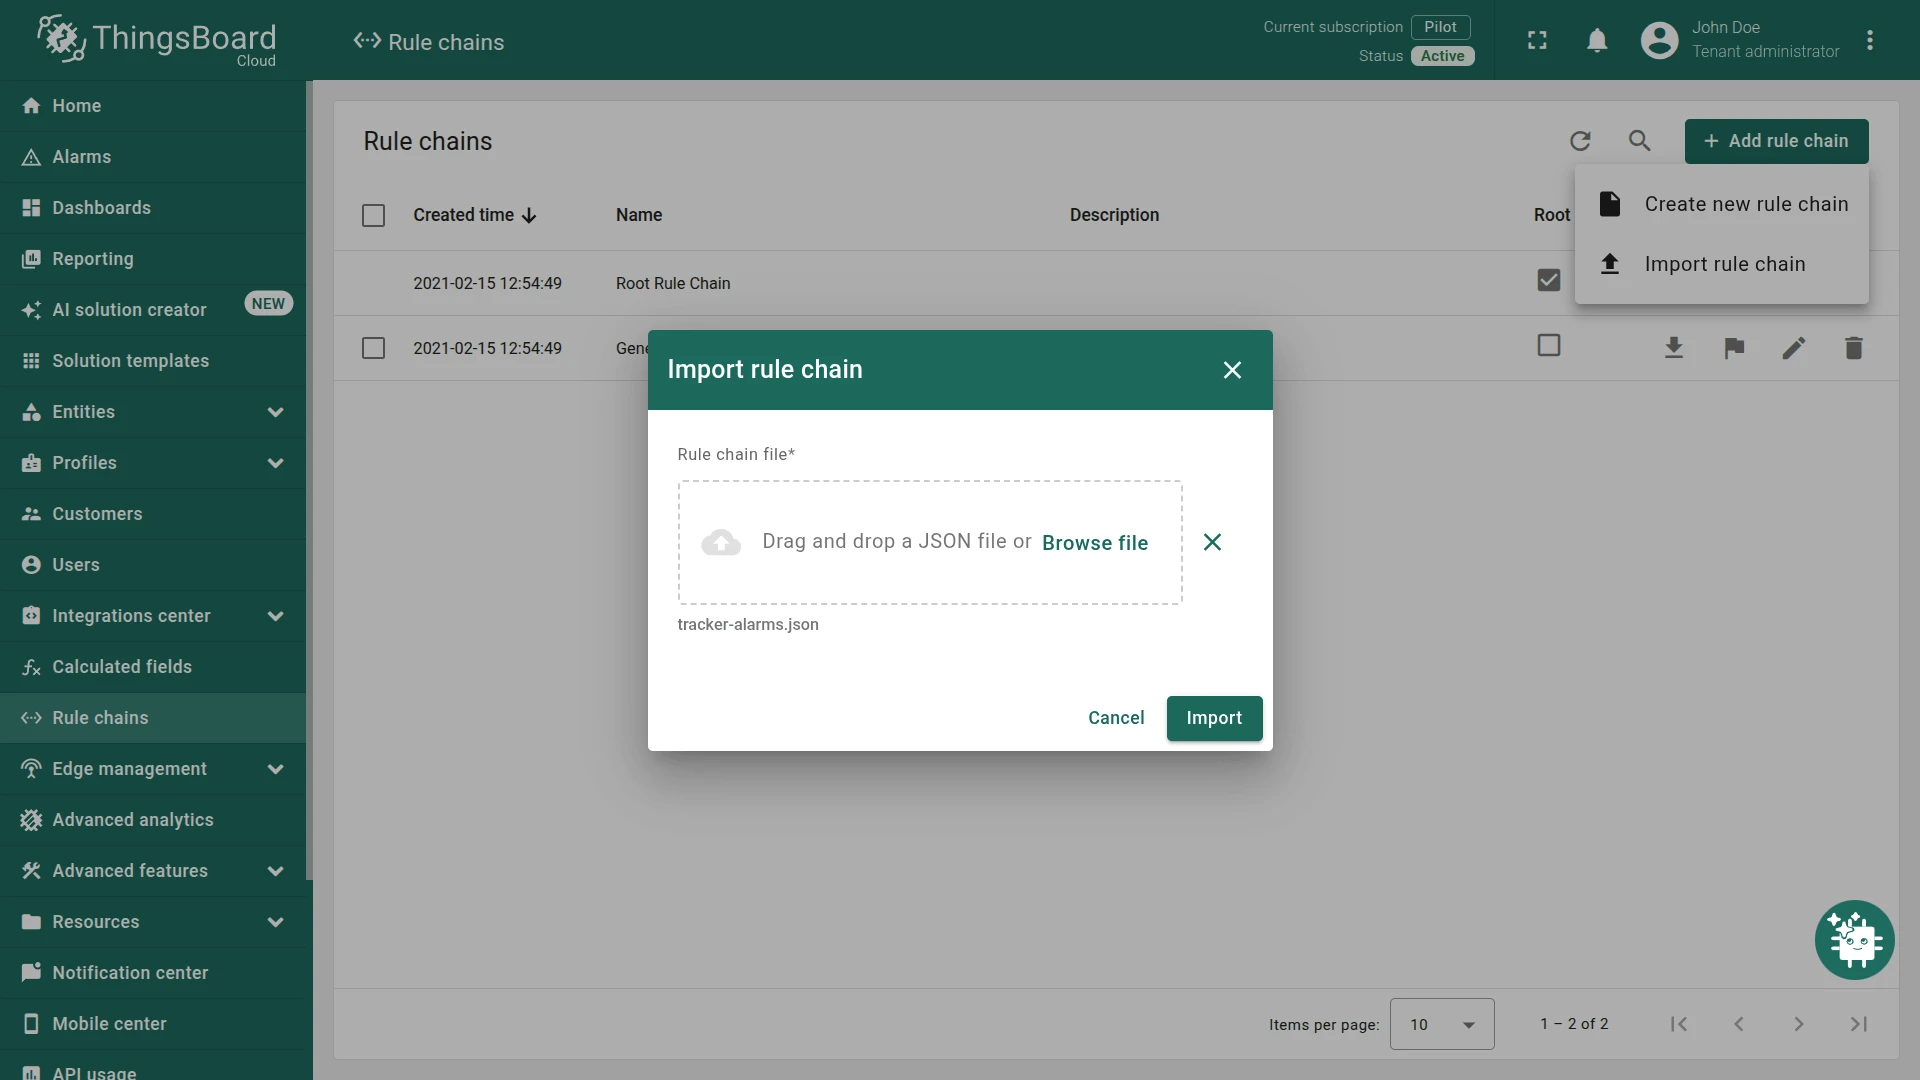
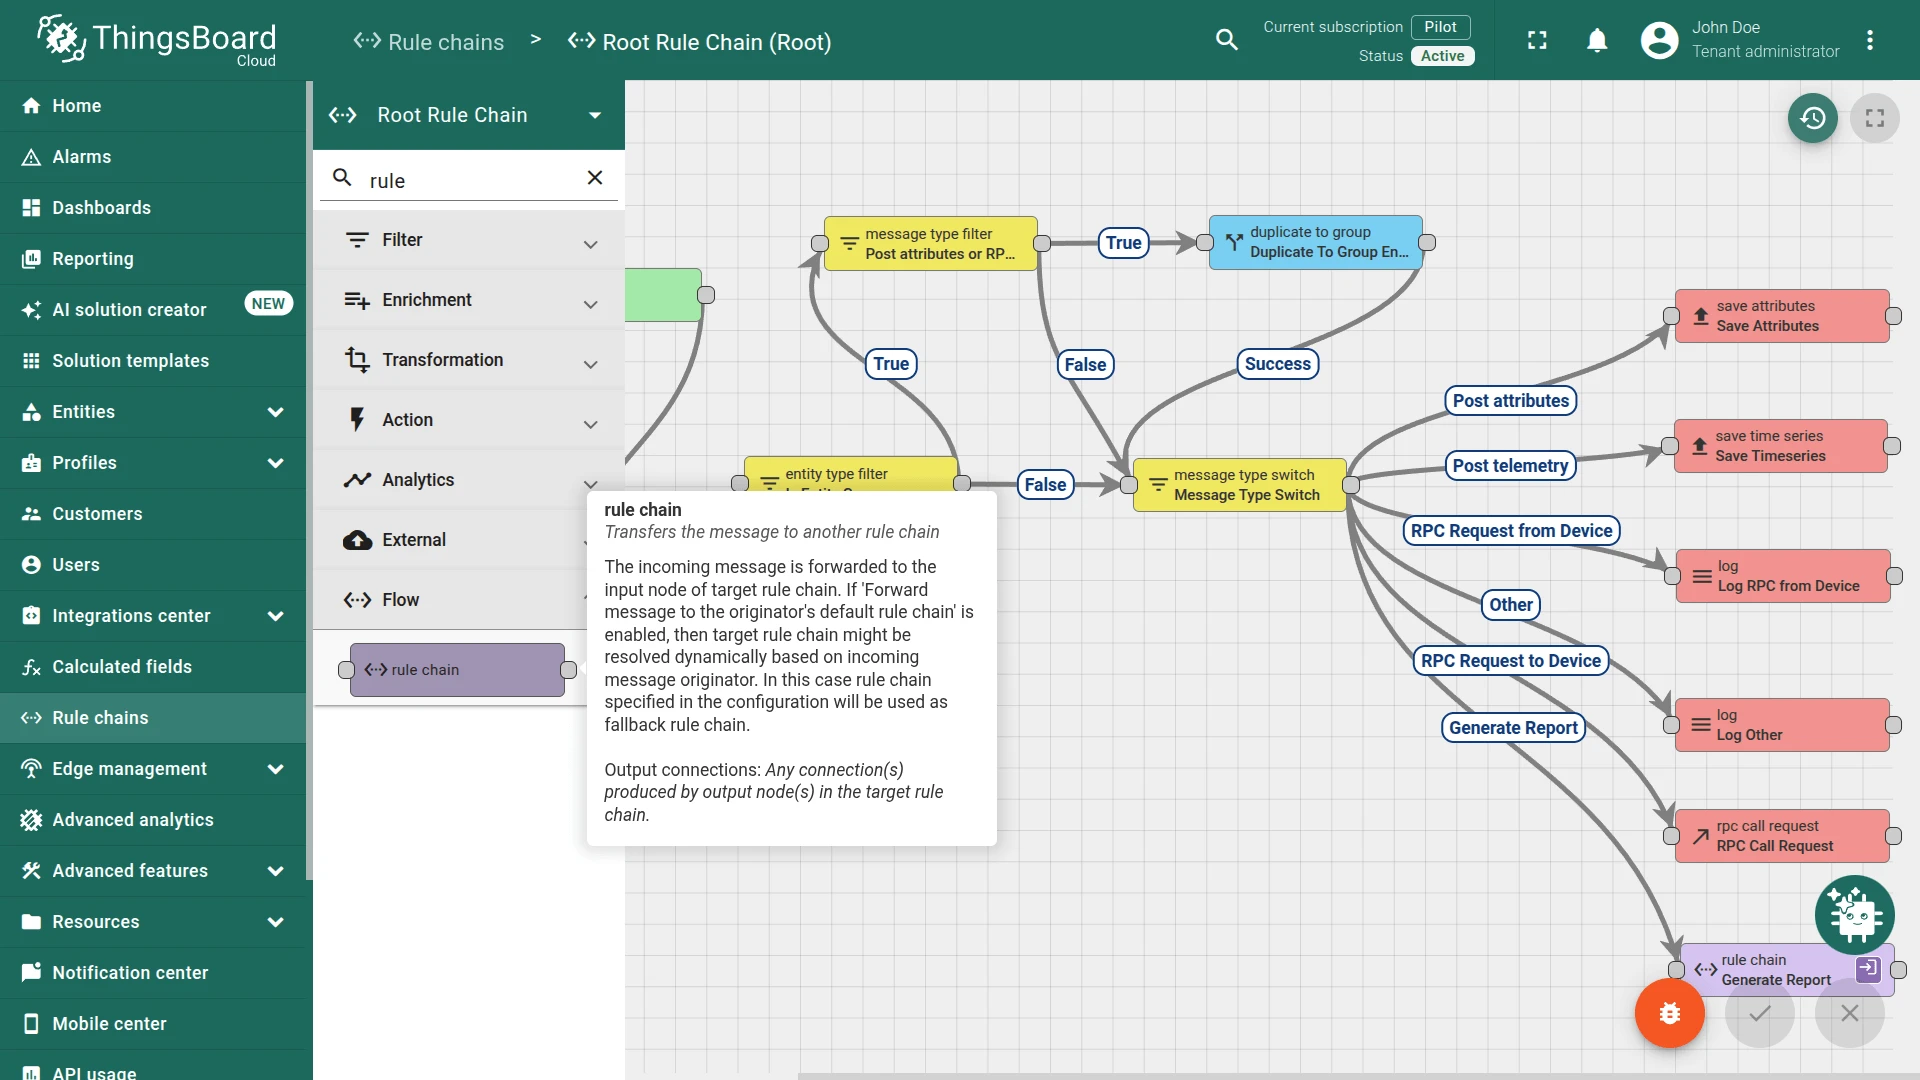
Step 6. Rule chain import
Section titled “Step 6. Rule chain import”This guide uses a modified Root Rule Chain and a new Tracker Alarms rule chain. The rule chain forwards telemetry to the Tracker Alarms chain, which evaluates individual alarm threshold parameters configured in the dashboard.
Download and import the Tracker Alarms rule chain: tracker-alarms.json.
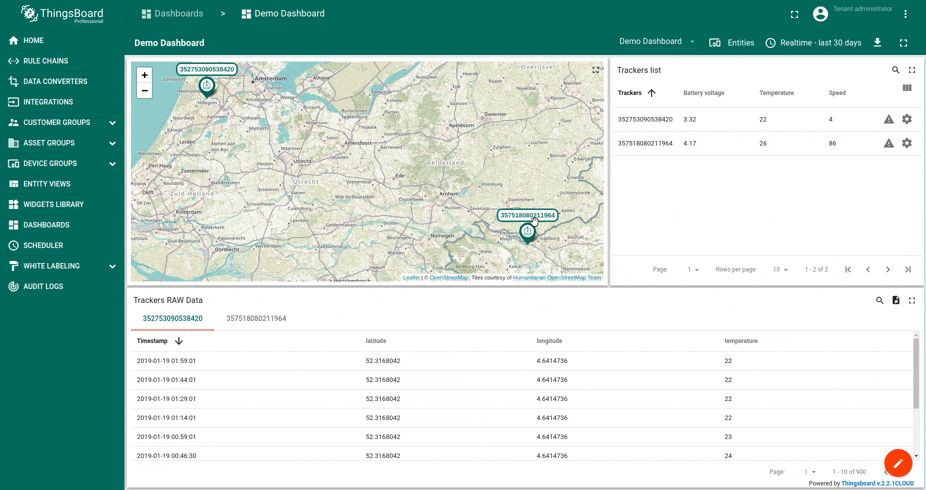
Step 7. Dashboard import
Section titled “Step 7. Dashboard import”Download sodaq-dashboard.json and import it in Dashboards. See the dashboard import instructions.
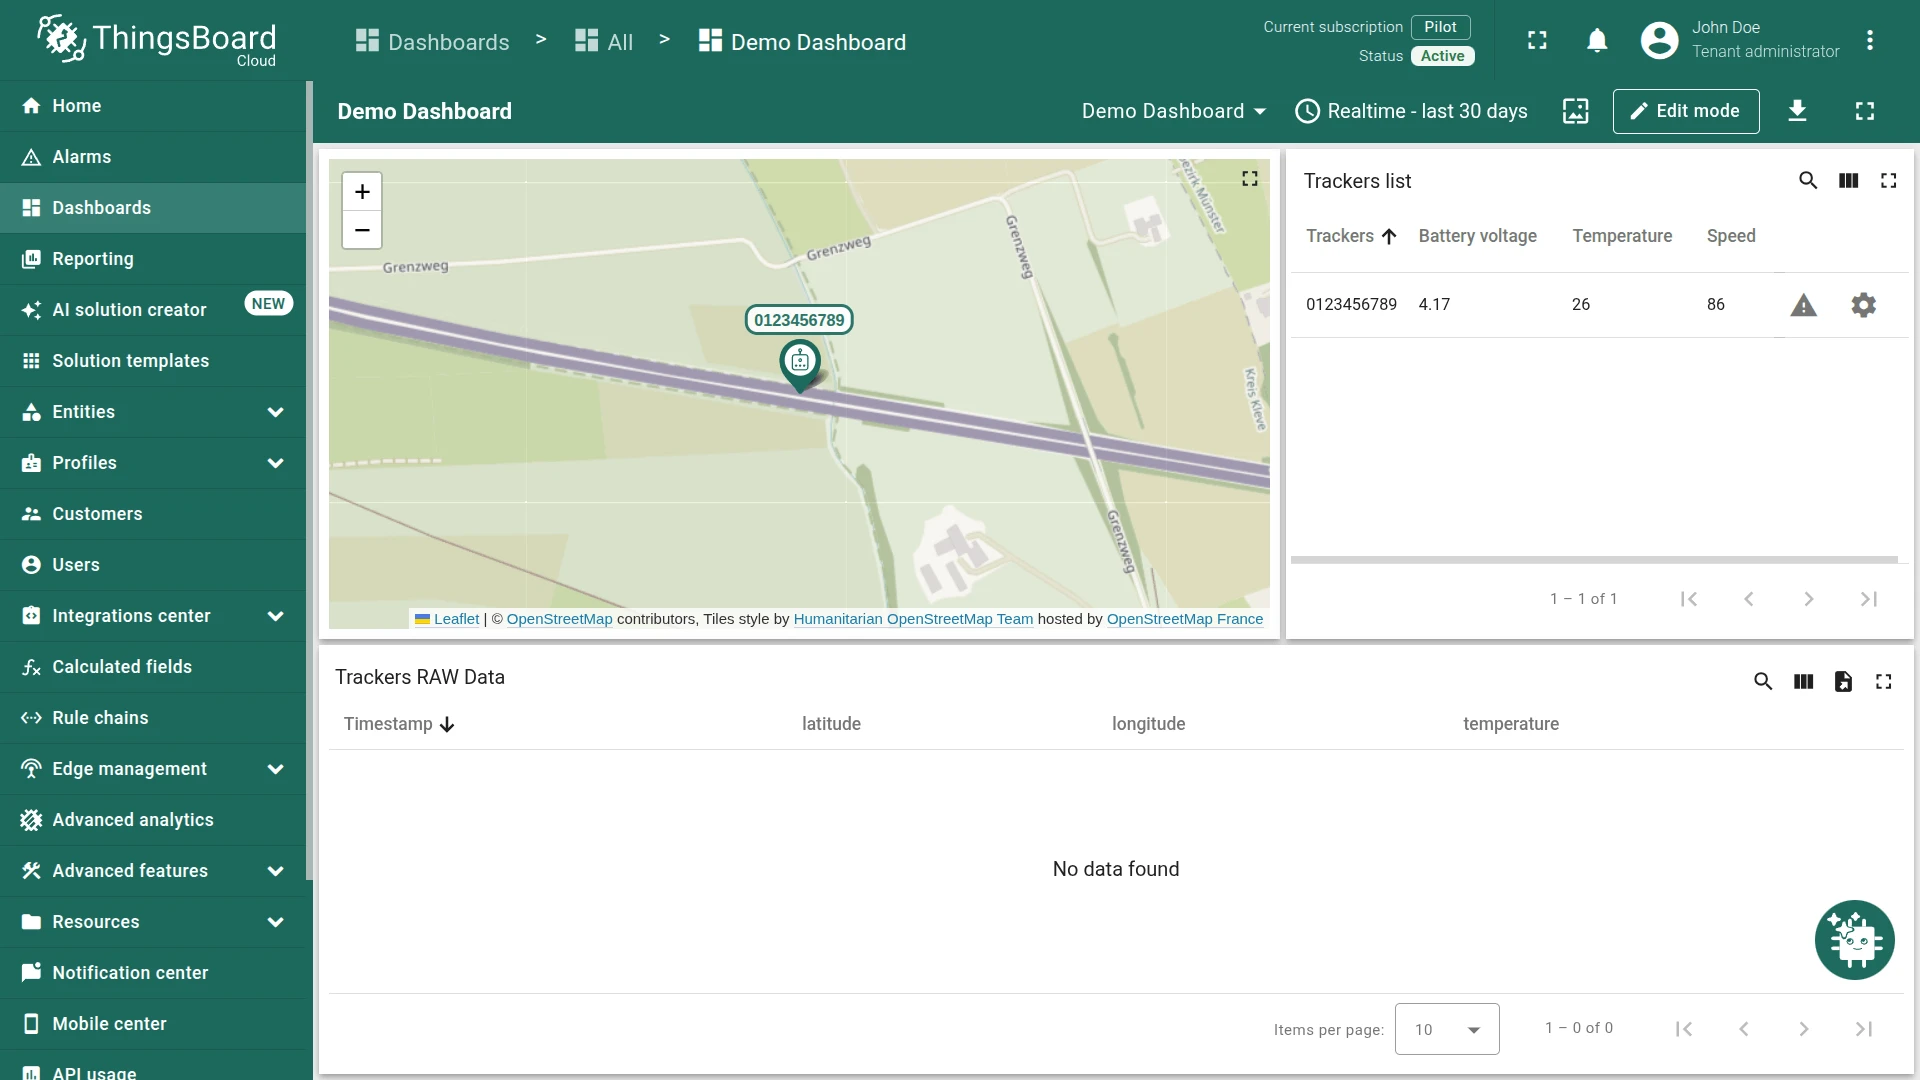
After importing the dashboard, navigate to the Tracker details state and set the alarm threshold values:
- Max Speed
- Min Voltage
- Min Temperature
- Max Temperature
Once the rule chains and dashboard are configured, trigger the device to post real data and verify that the integration and rule chains work as expected.
Advanced configuration (optional)
Section titled “Advanced configuration (optional)”The following sections explain how the rule chains work and how to recreate them from scratch. These steps are optional — beginners can skip this section.
Security
Section titled “Security”You can add additional HTTP headers with unique parameters to secure the integration. Add a custom header (like MY-INTEGRATION-AUTH-HEADER with a random string value) to both the integration configuration (Step 2) and the T-Mobile platform configuration (Step 4). The header values must match for data to flow correctly.
Message flow
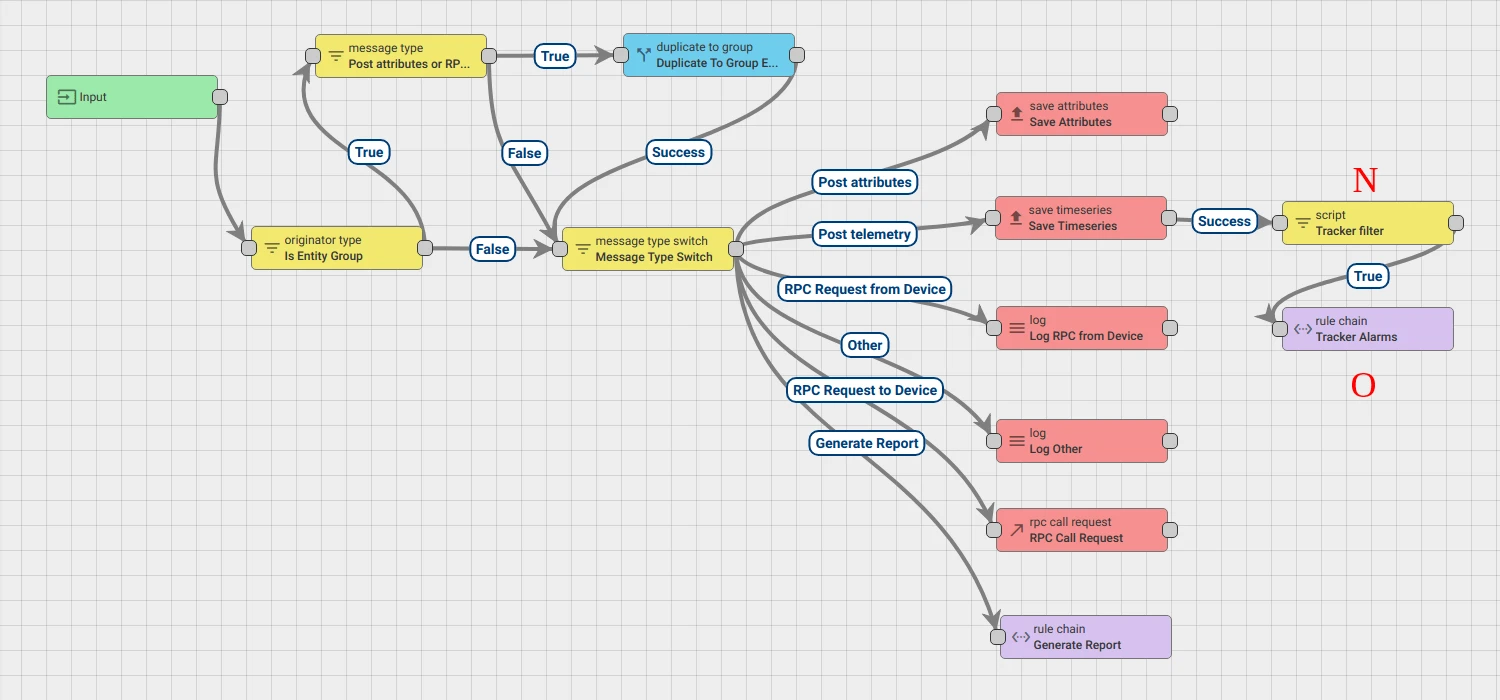
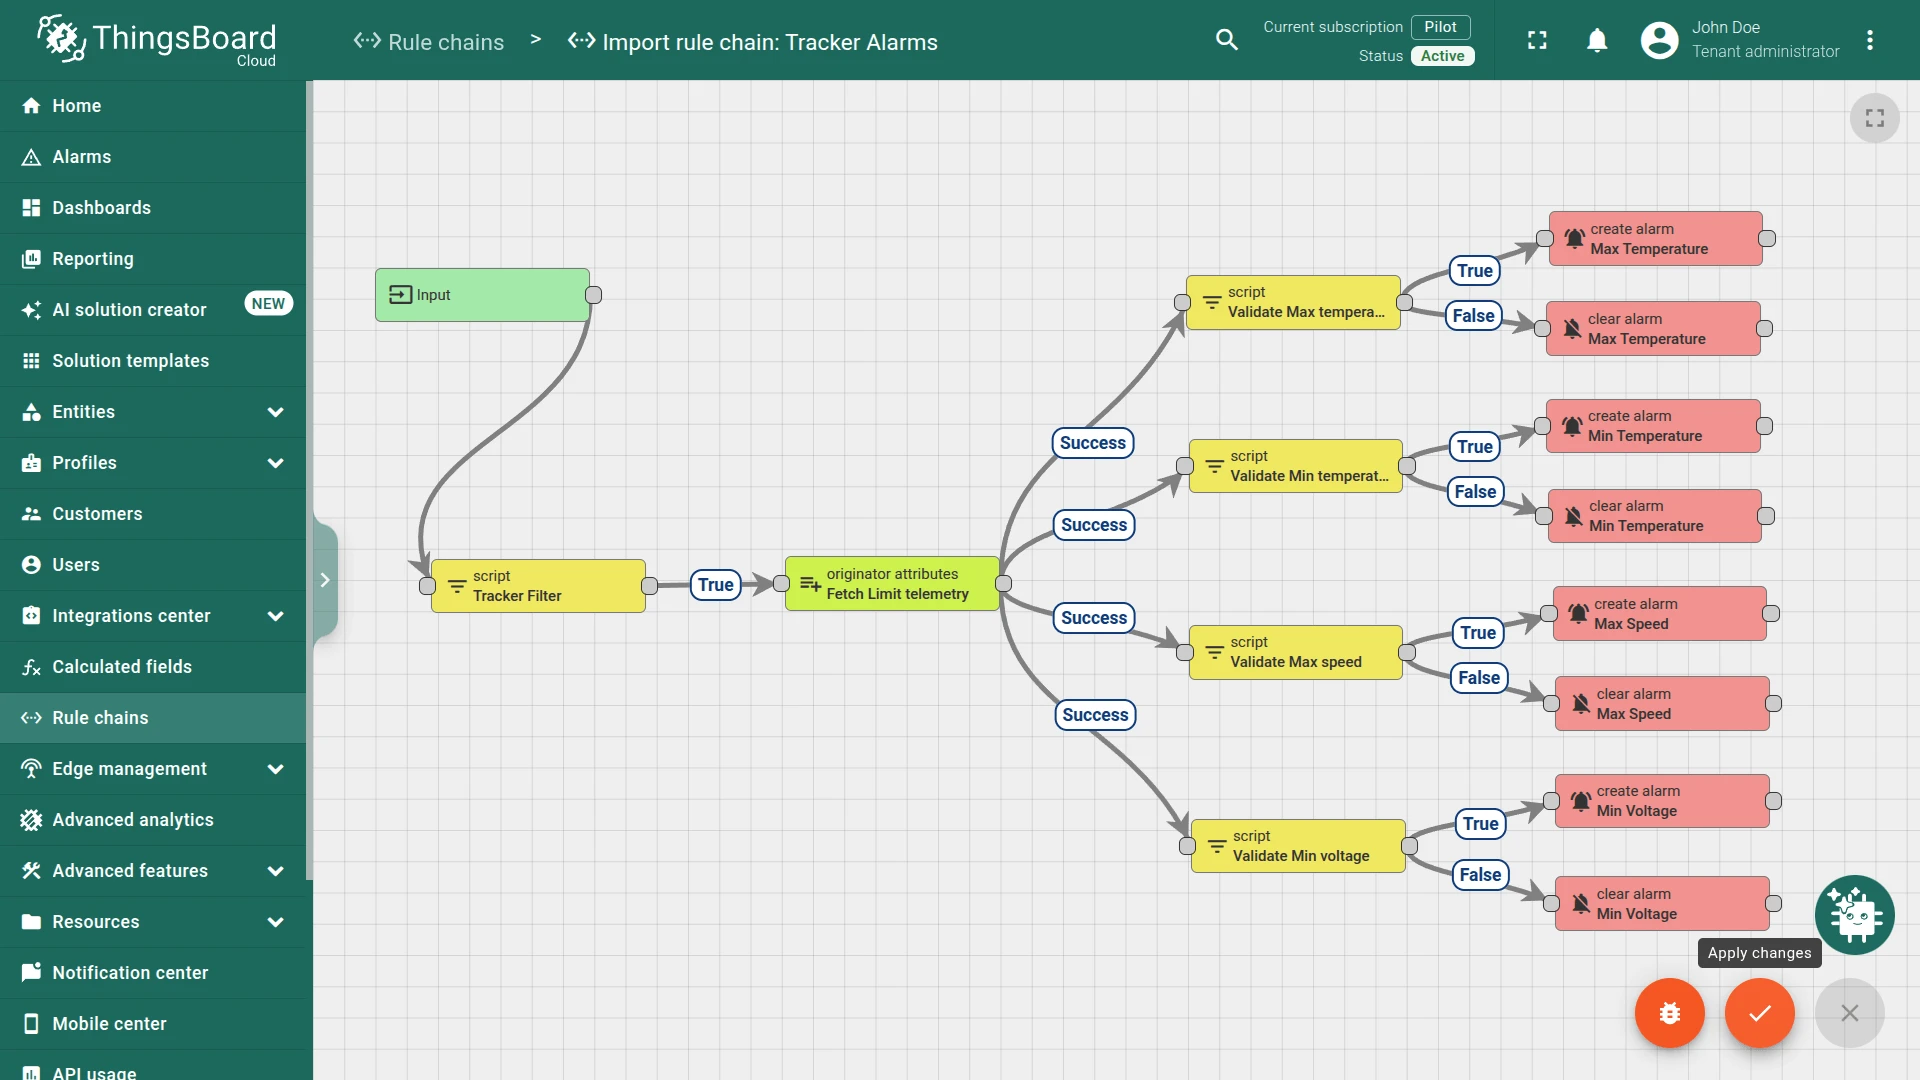
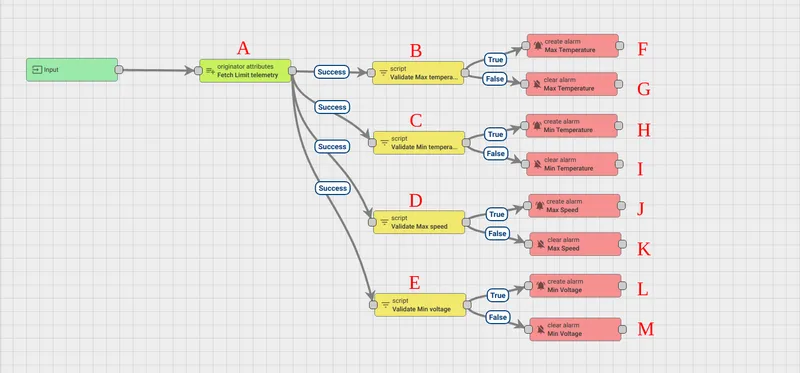
Section titled “Message flow”The Tracker Alarms rule chain uses the following nodes:
- Node A: Originator attributes — adds Message Originator Attributes (client, shared, and server scope) and the latest telemetry values into message metadata.
- Nodes B, C, D, E: Filter Script — evaluate threshold conditions. Return
trueif the condition is met,falseotherwise. - Nodes F, H, J, L: Create alarm — create or update an alarm when the corresponding filter script returns
true. - Nodes G, I, K, M: Clear alarm — clear the alarm when the corresponding filter script returns
false. - Node O: Rule Chain — forwards incoming messages to the Tracker Alarms rule chain.
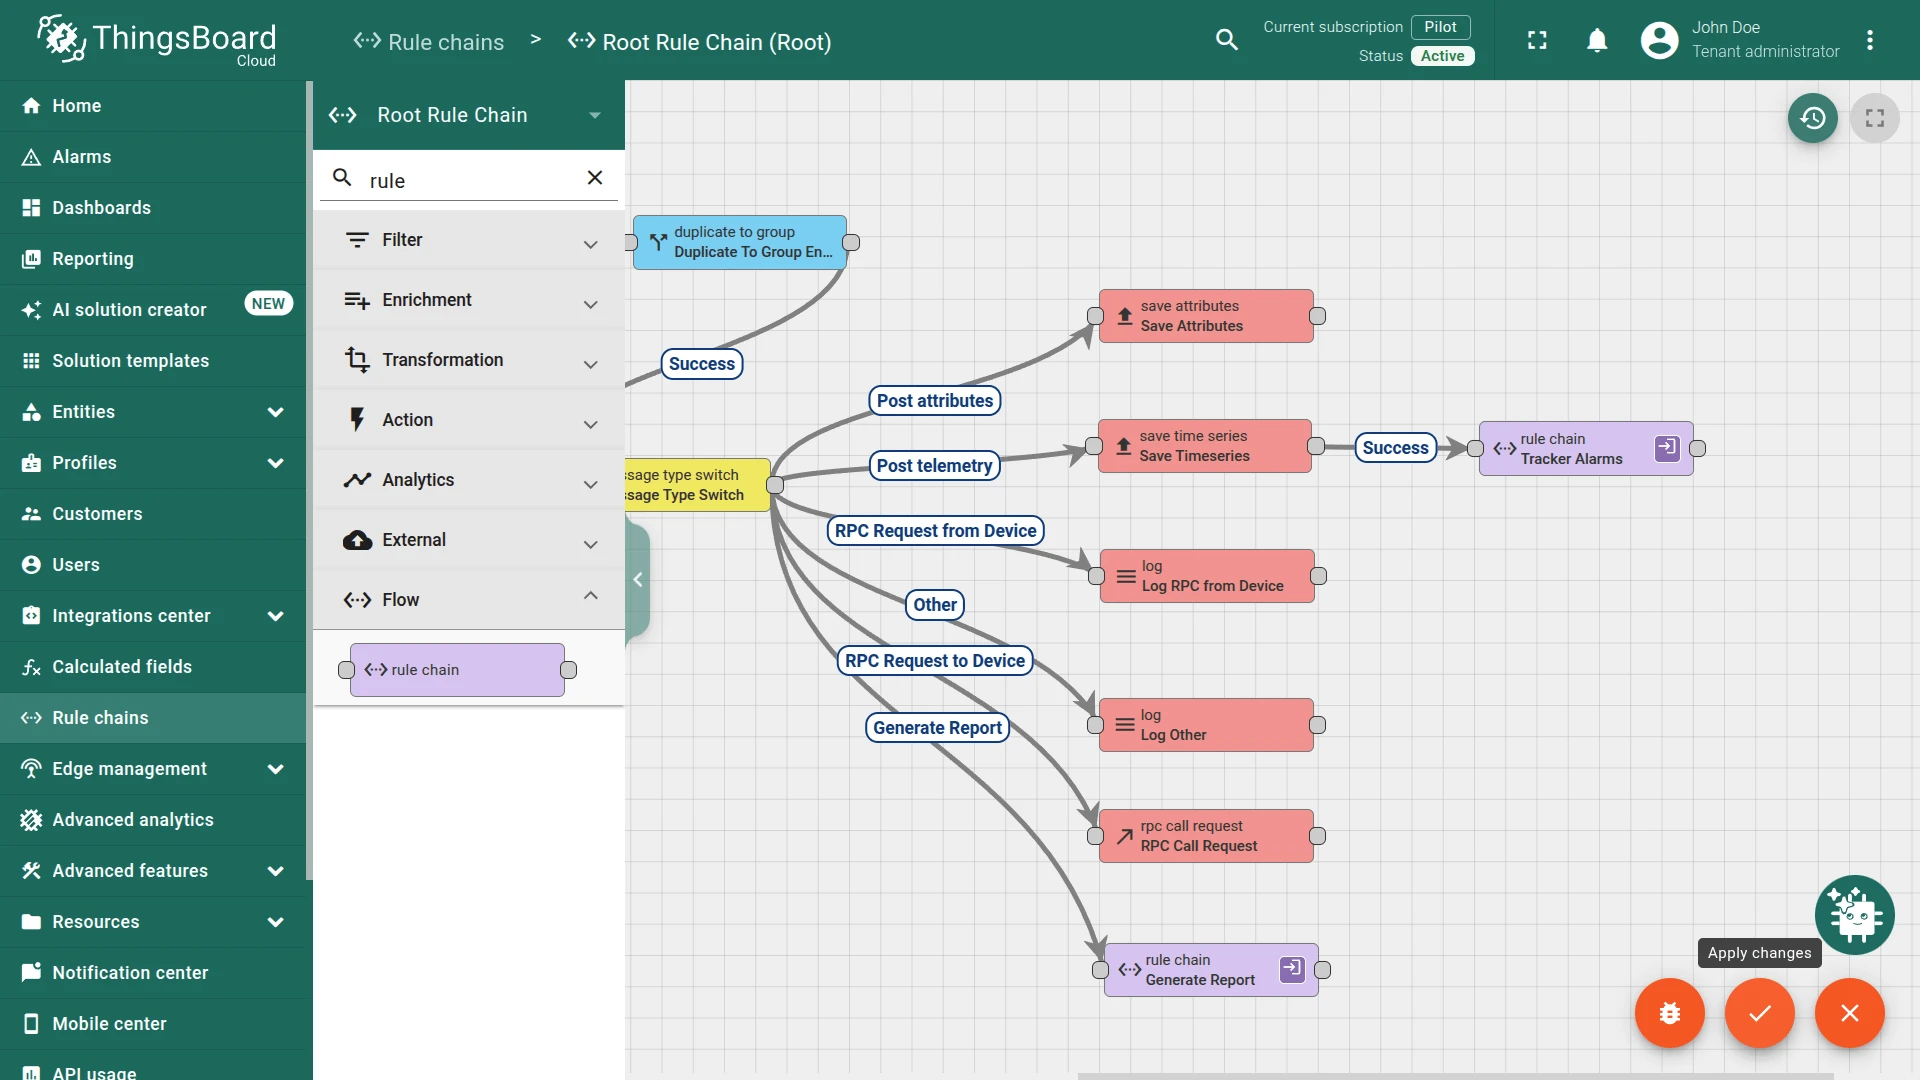
Create the Tracker Alarms rule chain
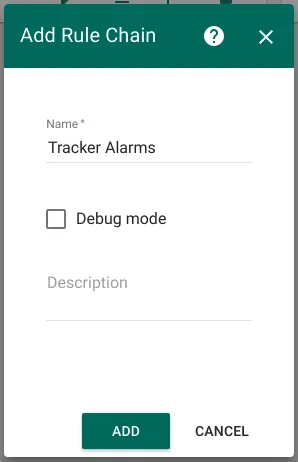
Section titled “Create the Tracker Alarms rule chain”-
Go to Rule Chains → Add new Rule Chain. Enter the name Tracker Alarms and click Add.
-
Open the rule chain and click Edit. Add 13 nodes as described below.
-
Add Node A: Originator attributes and connect it to the Input node. This node fetches shared scope attributes set from the dashboard.
Configure it with the following shared attributes:
maxTemperature,minTemperature,maxSpeed,minVoltage. Set the name to Fetch Limit telemetry. -
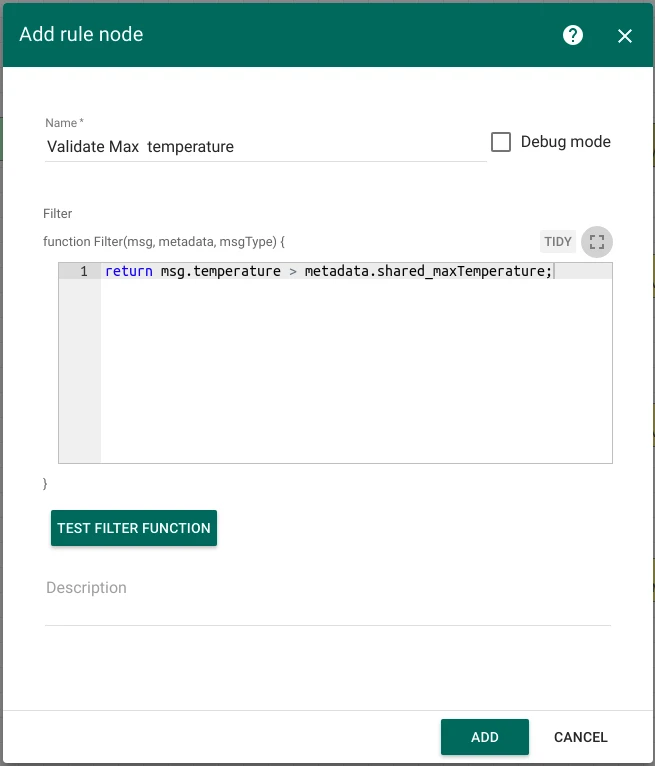
Add four Filter Script nodes (B, C, D, E) and connect each to Node A with relation type Success:
Node Name Script B Validate Max temperature return msg.temperature > metadata.shared_maxTemperature;C Validate Min temperature return msg.temperature < metadata.shared_minTemperature;D Validate Max speed return msg.speed > metadata.shared_maxSpeed;E Validate Min voltage return msg.batteryVoltage < metadata.shared_minVoltage;
-
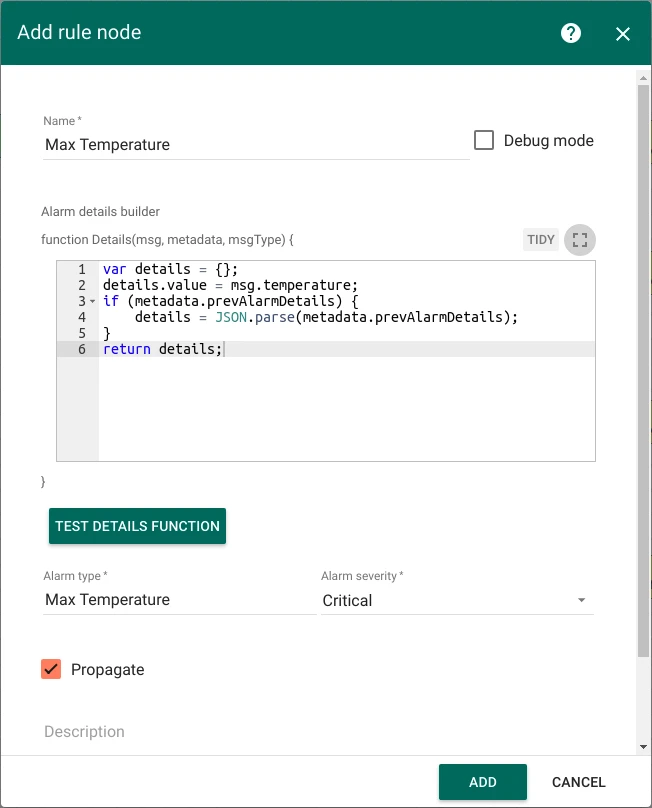
Add four Create alarm nodes (F, H, J, L) and connect each to the corresponding Filter Script node with relation type True:
Node Name Alarm type Details function F Max Temperature Max Temperature var details = {}; details.value = msg.temperature; if (metadata.prevAlarmDetails) { details = JSON.parse(metadata.prevAlarmDetails); } return details;H Min temperature Min temperature var details = {}; details.value = msg.temperature; if (metadata.prevAlarmDetails) { details = JSON.parse(metadata.prevAlarmDetails); } return details;J Max Speed Max Speed var details = {}; details.value = msg.speed; if (metadata.prevAlarmDetails) { details = JSON.parse(metadata.prevAlarmDetails); } return details;L Min Voltage Min Voltage var details = {}; details.value = msg.batteryVoltage; if (metadata.prevAlarmDetails) { details = JSON.parse(metadata.prevAlarmDetails); } return details;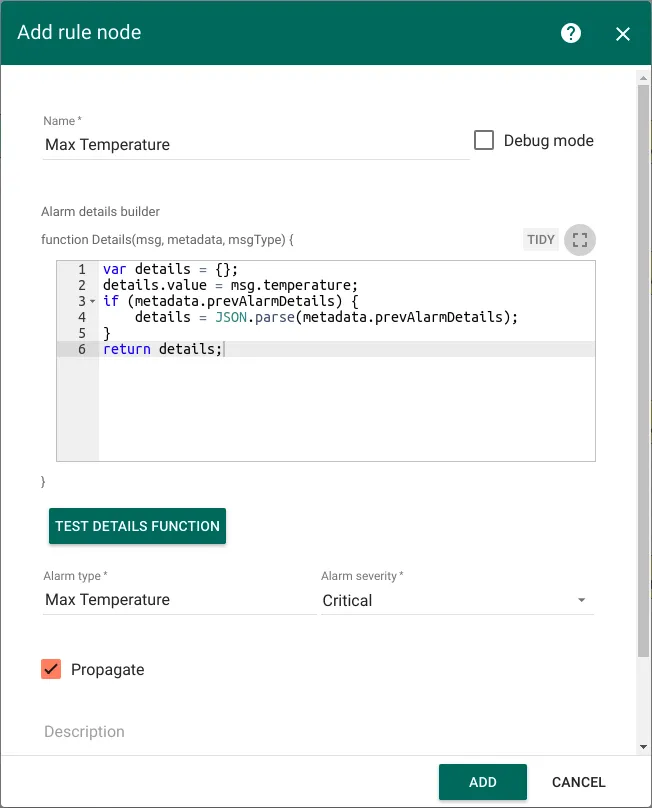
-
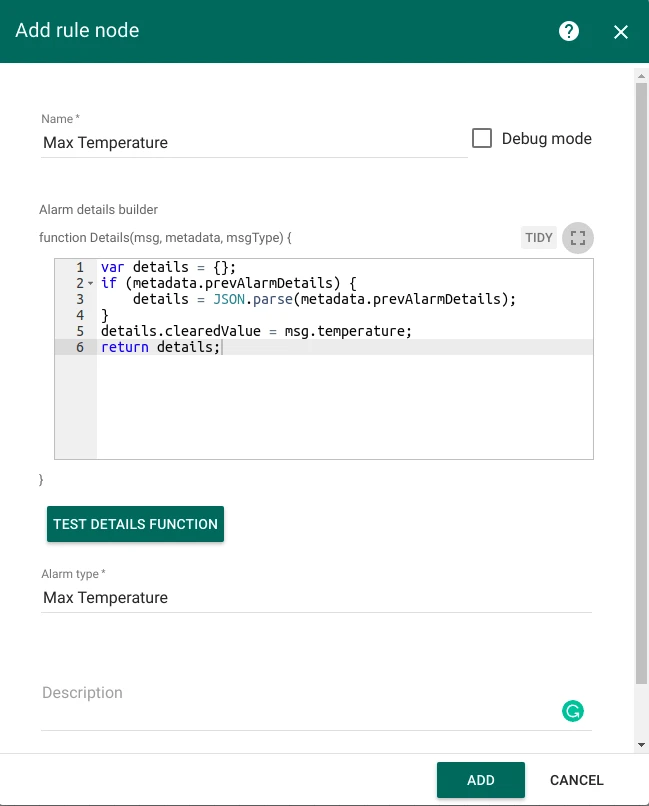
Add four Clear alarm nodes (G, I, K, M) and connect each to the corresponding Filter Script node with relation type False:
Node Name Alarm type Details function G Clear Max Temperature Max Temperature var details = {}; if (metadata.prevAlarmDetails) { details = JSON.parse(metadata.prevAlarmDetails); } details.clearedValue = msg.temperature; return details;I Clear Min temperature Min temperature var details = {}; if (metadata.prevAlarmDetails) { details = JSON.parse(metadata.prevAlarmDetails); } details.clearedValue = msg.temperature; return details;K Clear Max Speed Max Speed var details = {}; if (metadata.prevAlarmDetails) { details = JSON.parse(metadata.prevAlarmDetails); } details.clearedValue = msg.speed; return details;M Clear Min Voltage Min Voltage var details = {}; if (metadata.prevAlarmDetails) { details = JSON.parse(metadata.prevAlarmDetails); } details.clearedValue = msg.batteryVoltage; return details;
-
The completed Tracker Alarms rule chain:

Modify the root rule chain
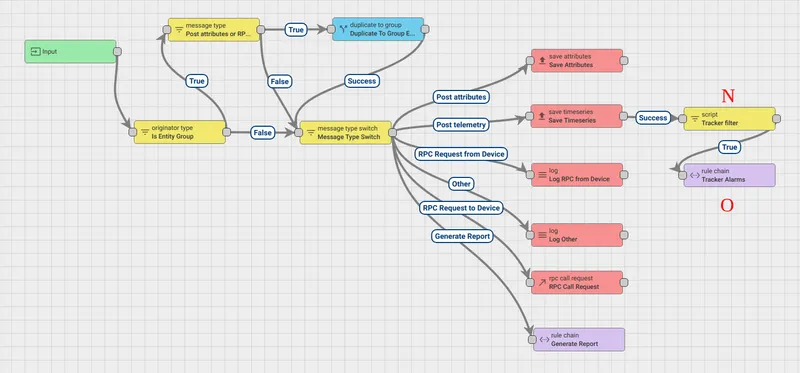
Section titled “Modify the root rule chain”Add two nodes to the existing Root Rule Chain:
-
Add a Filter Script node and connect it to the Save Timeseries node with relation type Success. Set the name to Tracker filter and enter the following script:
return metadata.deviceType === 'tracker';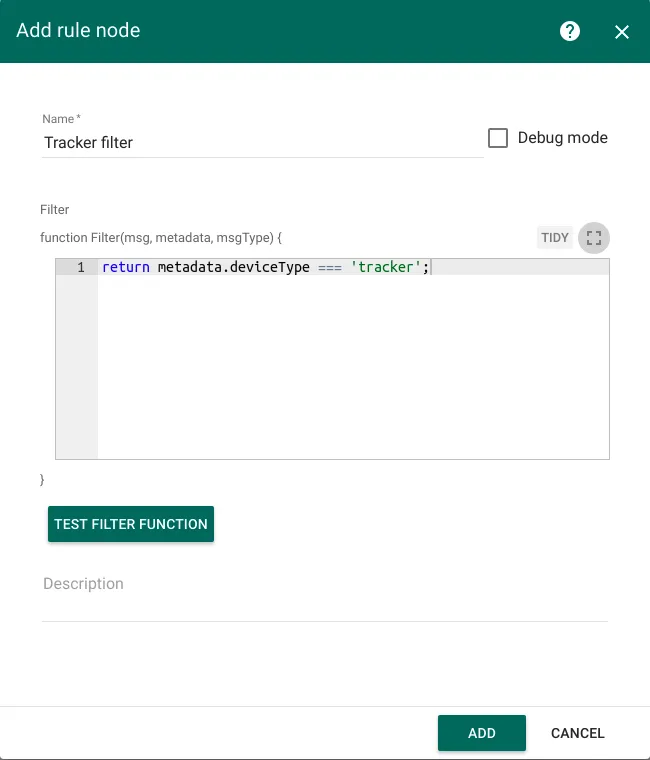
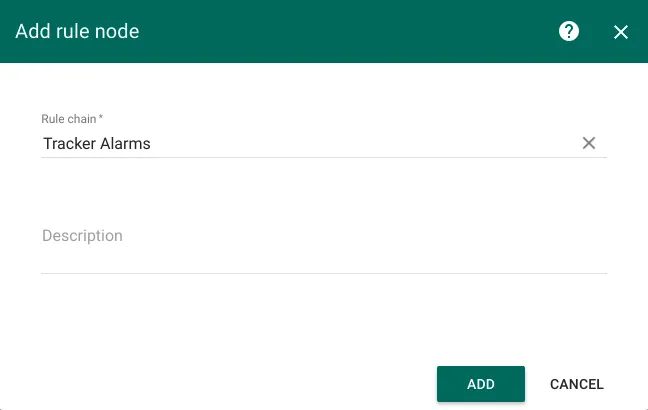
-
Add a Rule Chain node and connect it to the Filter Script node with relation type True. Set the name to Tracker Alarms and point it to the Tracker Alarms rule chain.
-
The completed Root Rule Chain: