- Overview
- Prerequisites
- OPC-UA Server Structure Overview
- Step 1. Create a new gateway device on ThingsBoard
- Step 2. Add new OPC-UA connector
- Step 3. Check device data
- Conclusion
- Next steps
Overview
In this guide, we will describe how to connect an OPC-UA device to ThingsBoard CE using ThingsBoard IoT Gateway. Whether you are just starting with OPC-UA integration or looking to streamline your existing setup, this guide will provide you with the essential knowledge to get up and running quickly.
What is ThingsBoard IoT Gateway?
The ThingsBoard IoT Gateway is an open-source solution that serves as a bridge between IoT devices connected to legacy or third-party systems and the ThingsBoard platform. It enables seamless integration of devices that cannot communicate with ThingsBoard directly, ensuring data can be collected, processed, and visualized in real time. With the IoT Gateway, you can connect multiple devices, aggregate telemetry, and manage configurations centrally. It supports flexible deployment scenarios, making it especially suitable for industrial automation, monitoring, and smart energy systems where OPC-UA is widely used.
What is OPC-UA?
OPC Unified Architecture (OPC-UA) is a machine-to-machine communication protocol widely adopted in industrial automation. It provides a platform-independent, secure, and reliable framework for exchanging data between devices, servers, and applications. Unlike older OPC standards, OPC-UA supports modern technologies, allows structured data modeling, and is designed for scalability across different platforms and networks. Its robustness and interoperability make it a standard choice for industries that require consistent, real-time, and vendor-neutral communication.
What will You Learn?
In this guide, we will walk step by step through the process of integrating an OPC-UA device with ThingsBoard CE. You will learn how to install and configure the ThingsBoard IoT Gateway, set up the OPC-UA connector, and establish a connection to your OPC-UA server. We will also demonstrate how to map data points, send telemetry to ThingsBoard. By the end of this guide, you will have a working setup that allows you to seamlessly monitor and analyze your OPC-UA device data in ThingsBoard CE.
Prerequisites
- Before initiating the Gateway setup, ensure that the ThingsBoard server is up and running. You can install ThingsBoard CE manually by following the steps outlined in the Installation Guide.
- Before moving forward, ensure Docker is installed and properly configured on your machine. If you haven’t installed Docker yet, you can download it from the official Docker website and follow their installation guide for your specific operating system.
OPC-UA Server Structure Overview
For this guide, we’ll use the Prosys OPC-UA Simulation Server as our example OPC-UA device. It’s available at:
1
opc.tcp://0.0.0.0:53530/OPCUA/SimulationServer
We will use host.docker.internal instead of 0.0.0.0 in our Gateway connector configuration to allow the Docker container to access the host machine’s network.
This simulation server provides a predefined set of nodes that we can use to mimic a real industrial device. Its structure looks like this:
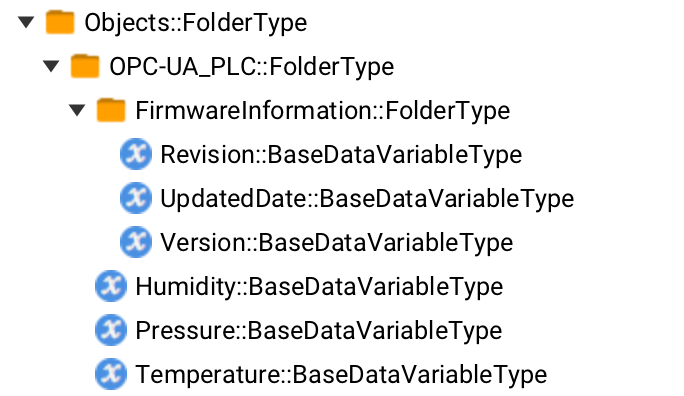
In our example, we’ll focus on the following nodes:
Root.Objects.OPC-UA_PLC- the parent device node that contains all related data points:- Root.Objects.OPC-UA_PLC.
Humidity- represents humidity value. We’ll map this node to ThingsBoard CE as a time-series value. - Root.Objects.OPC-UA_PLC.
Temperature- represents temperature value. We’ll also send this value to ThingsBoard CE as a time-series value. - Root.Objects.OPC-UA_PLC.
Pressure- represents pressure measurements, which will be stored in ThingsBoard CE as a time-series value. - Root.Objects.OPC-UA_PLC.
FirmwareInformation- a child node that holds metadata about the device firmware:- Root.Objects.OPC-UA_PLC.FirmwareInformation.
Version- the firmware version number. We’ll map this to ThingsBoard CE as a device attribute. - Root.Objects.OPC-UA_PLC.FirmwareInformation.
UpdatedDate- the last time the firmware was updated. This will also be sent to ThingsBoard CE as a device attribute.
- Root.Objects.OPC-UA_PLC.FirmwareInformation.
- Root.Objects.OPC-UA_PLC.
By working with these nodes, you’ll see how to extract both real-time telemetry data (Humidity, Temperature, Pressure) and static attributes (firmware details) from an OPC-UA device, and then forward them into ThingsBoard CE for monitoring and visualization.
Step 1. Create a new gateway device on ThingsBoard
First, add a gateway device to your ThingsBoard instance by following these steps:
-
Go to “Entities” > “Gateways” tab.
-
Click the “+” button, enter the gateway device name (e.g., “My Gateway”), and select the device profile. Click on “Create” button.

Go to “Entities” > “Gateways” tab.

Click the “+” button, enter the gateway device name (e.g., “My Gateway”), and select the device profile. Click on “Create” button.
To launch the gateway, use the following steps:
-
Select and click on newly created gateway, click on “Launch command” button in the top right corner.
-
Click to download
docker-compose.ymlfile to your PC, copy command and execute it in your terminal.

Select and click on newly created gateway, click on “Launch command” button in the top right corner.

Click to download docker-compose.yml file to your PC, copy command and execute it in your terminal.
After running gateway docker image, you can see the following logs in your terminal:

Step 2. Add new OPC-UA connector
Let’s add an OPC-UA connector, which will read described before data from a simulated OPC-UA device to the created gateway. To create a connector, follow these steps:
-
Click on “Connectors configuration” button on the right panel;
-
Click the “+ Add connector” button;
-
Choose “OPCUA” connector type from the dropdown, fill in “Name” field, choose “Logging level” to “INFO”, turn off the “Fill configuration with default values” option and click on “Add” button;
-
Choose “Advanced” configuration mode, click on “Configuration” tab and paste connector configuration (you can find it under these steps).
-
Click on “Save” button to apply changes.

Click on “Connectors configuration” button on the right panel;

Click the “+ Add connector” button;

Choose “OPCUA” connector type from the dropdown, fill in “Name” field, choose “Logging level” to “INFO”, turn off the “Fill configuration with default values” option and click on “Add” button;
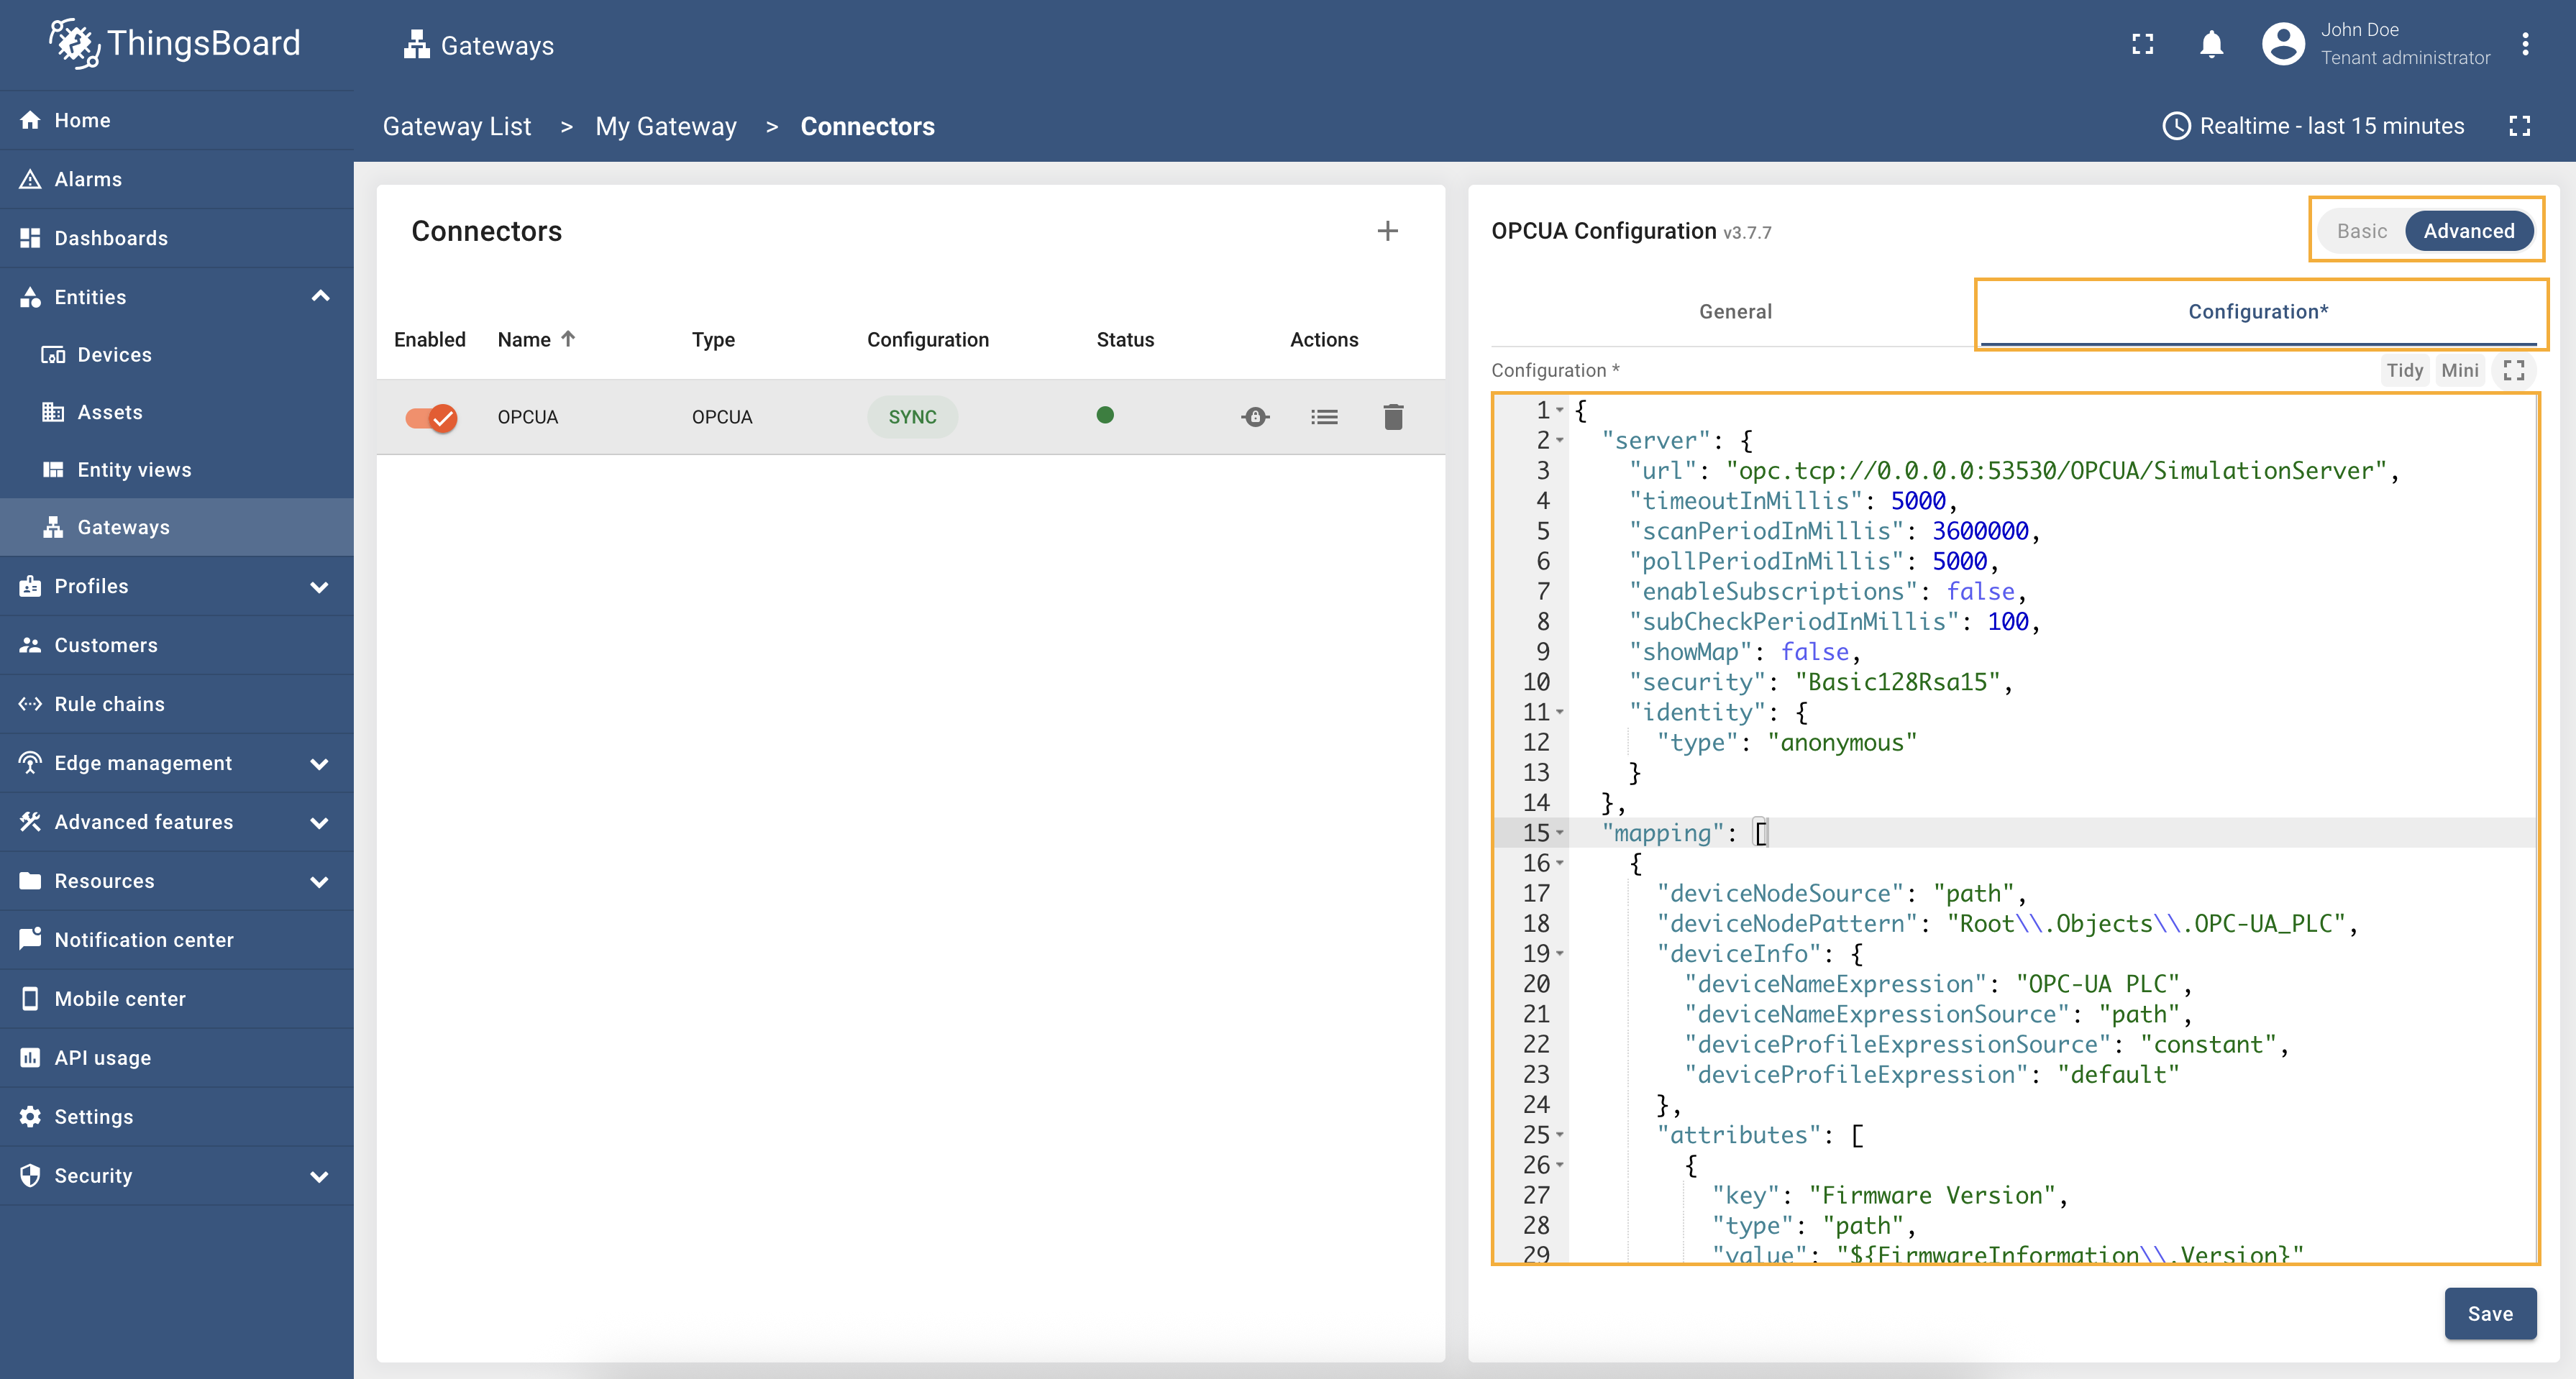
Choose “Advanced” configuration mode, click on “Configuration” tab and paste connector configuration (you can find it under these steps).

Click on “Save” button to apply changes.
OPC-UA configuration:
Let’s break our connector configuration into smaller pieces and provide an explanation:
Server - defines how the gateway connects and interacts with your OPC-UA server. From all parameters for us the following is important:
url- specifies the server’s TCP endpoint. In this case, it’s pointing to a local Prosys simulation atopc.tcp://host.docker.internal:53530/OPCUA/SimulationServer.pollPeriodInMillis- sets the interval for polling node values when subscriptions aren’t used (every 5 seconds in our example).security- sets the OPC-UA security policy. Options includeBasic128Rsa15,Basic256, andBasic256Sha256. Depends on your OPC-UA server settings.identity- defines how the gateway authenticates to the server: here, anonymous for simplicity.
Mapping - defines how node data from the OPC-UA server maps to ThingsBoard devices:
deviceNodeSource&deviceNodePattern- the source type is path, and the pattern matches the root node (Root.Objects.OPC-UA_PLC) that represents our device.deviceInfo- define ThingsBoard device name and device profile. In our example, we use constant values for this purpose.attributes- these values are pushed to ThingsBoard attributes and are typically static or change infrequently. We use a relative path for configuring attributes data mapping.timeseries- these gauge readings will appear under the “Latest Telemetry” tab in the device’s page. We use a relative path for configuring time series data mapping too.
Additional information about the OPC-UA connector can be found here.
Step 3. Check device data
To review the data uploaded from your gateway, use the following steps:
-
Navigate to the Entities > Devices page and click on the created device “OPC-UA PLC” as we named it in the “deviceNameExpression” field . This will open the device details page. From there, switch to the “Attributes” tab to view the attributes that were configured in the connector.
-
To view real-time telemetry data from the device, navigate to the “Latest Telemetry” tab. Here, you will find the telemetry data being sent by the device, including metrics like “humidity”, “temperature” and “pressure”. This tab provides real-time device telemetry updates.
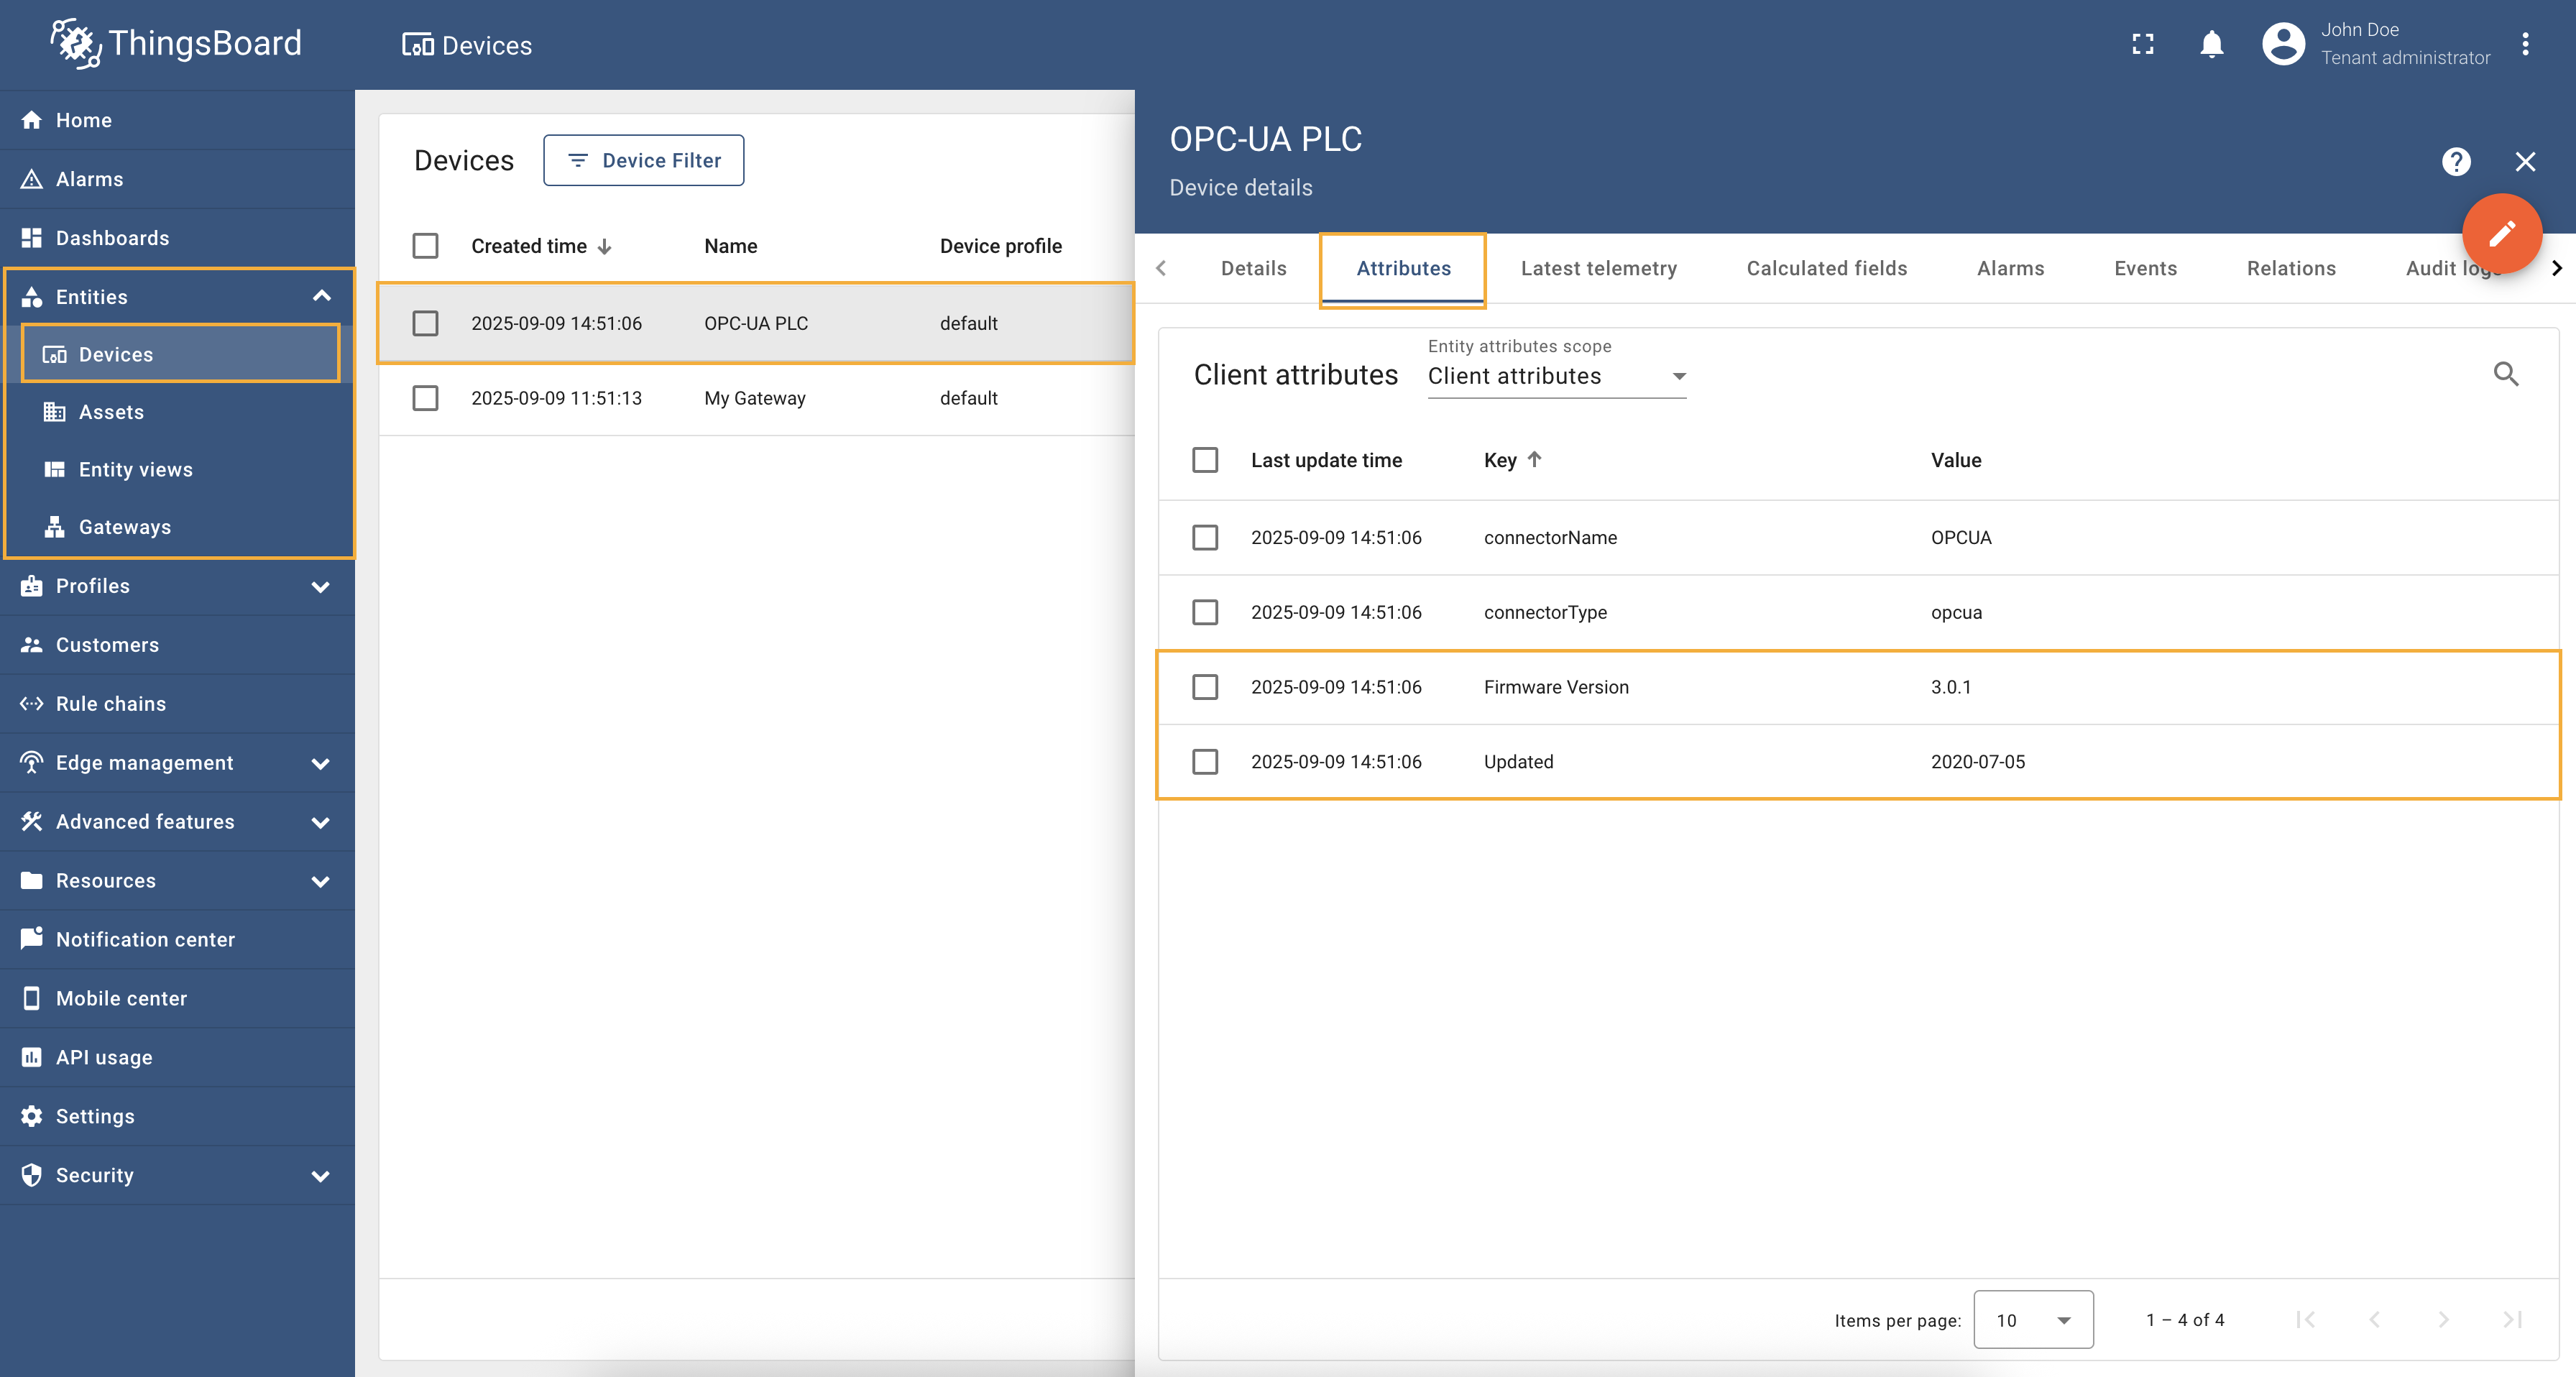
Navigate to the Entities > Devices page and click on the created device “OPC-UA PLC” as we named it in the “deviceNameExpression” field . This will open the device details page. From there, switch to the “Attributes” tab to view the attributes that were configured in the connector.
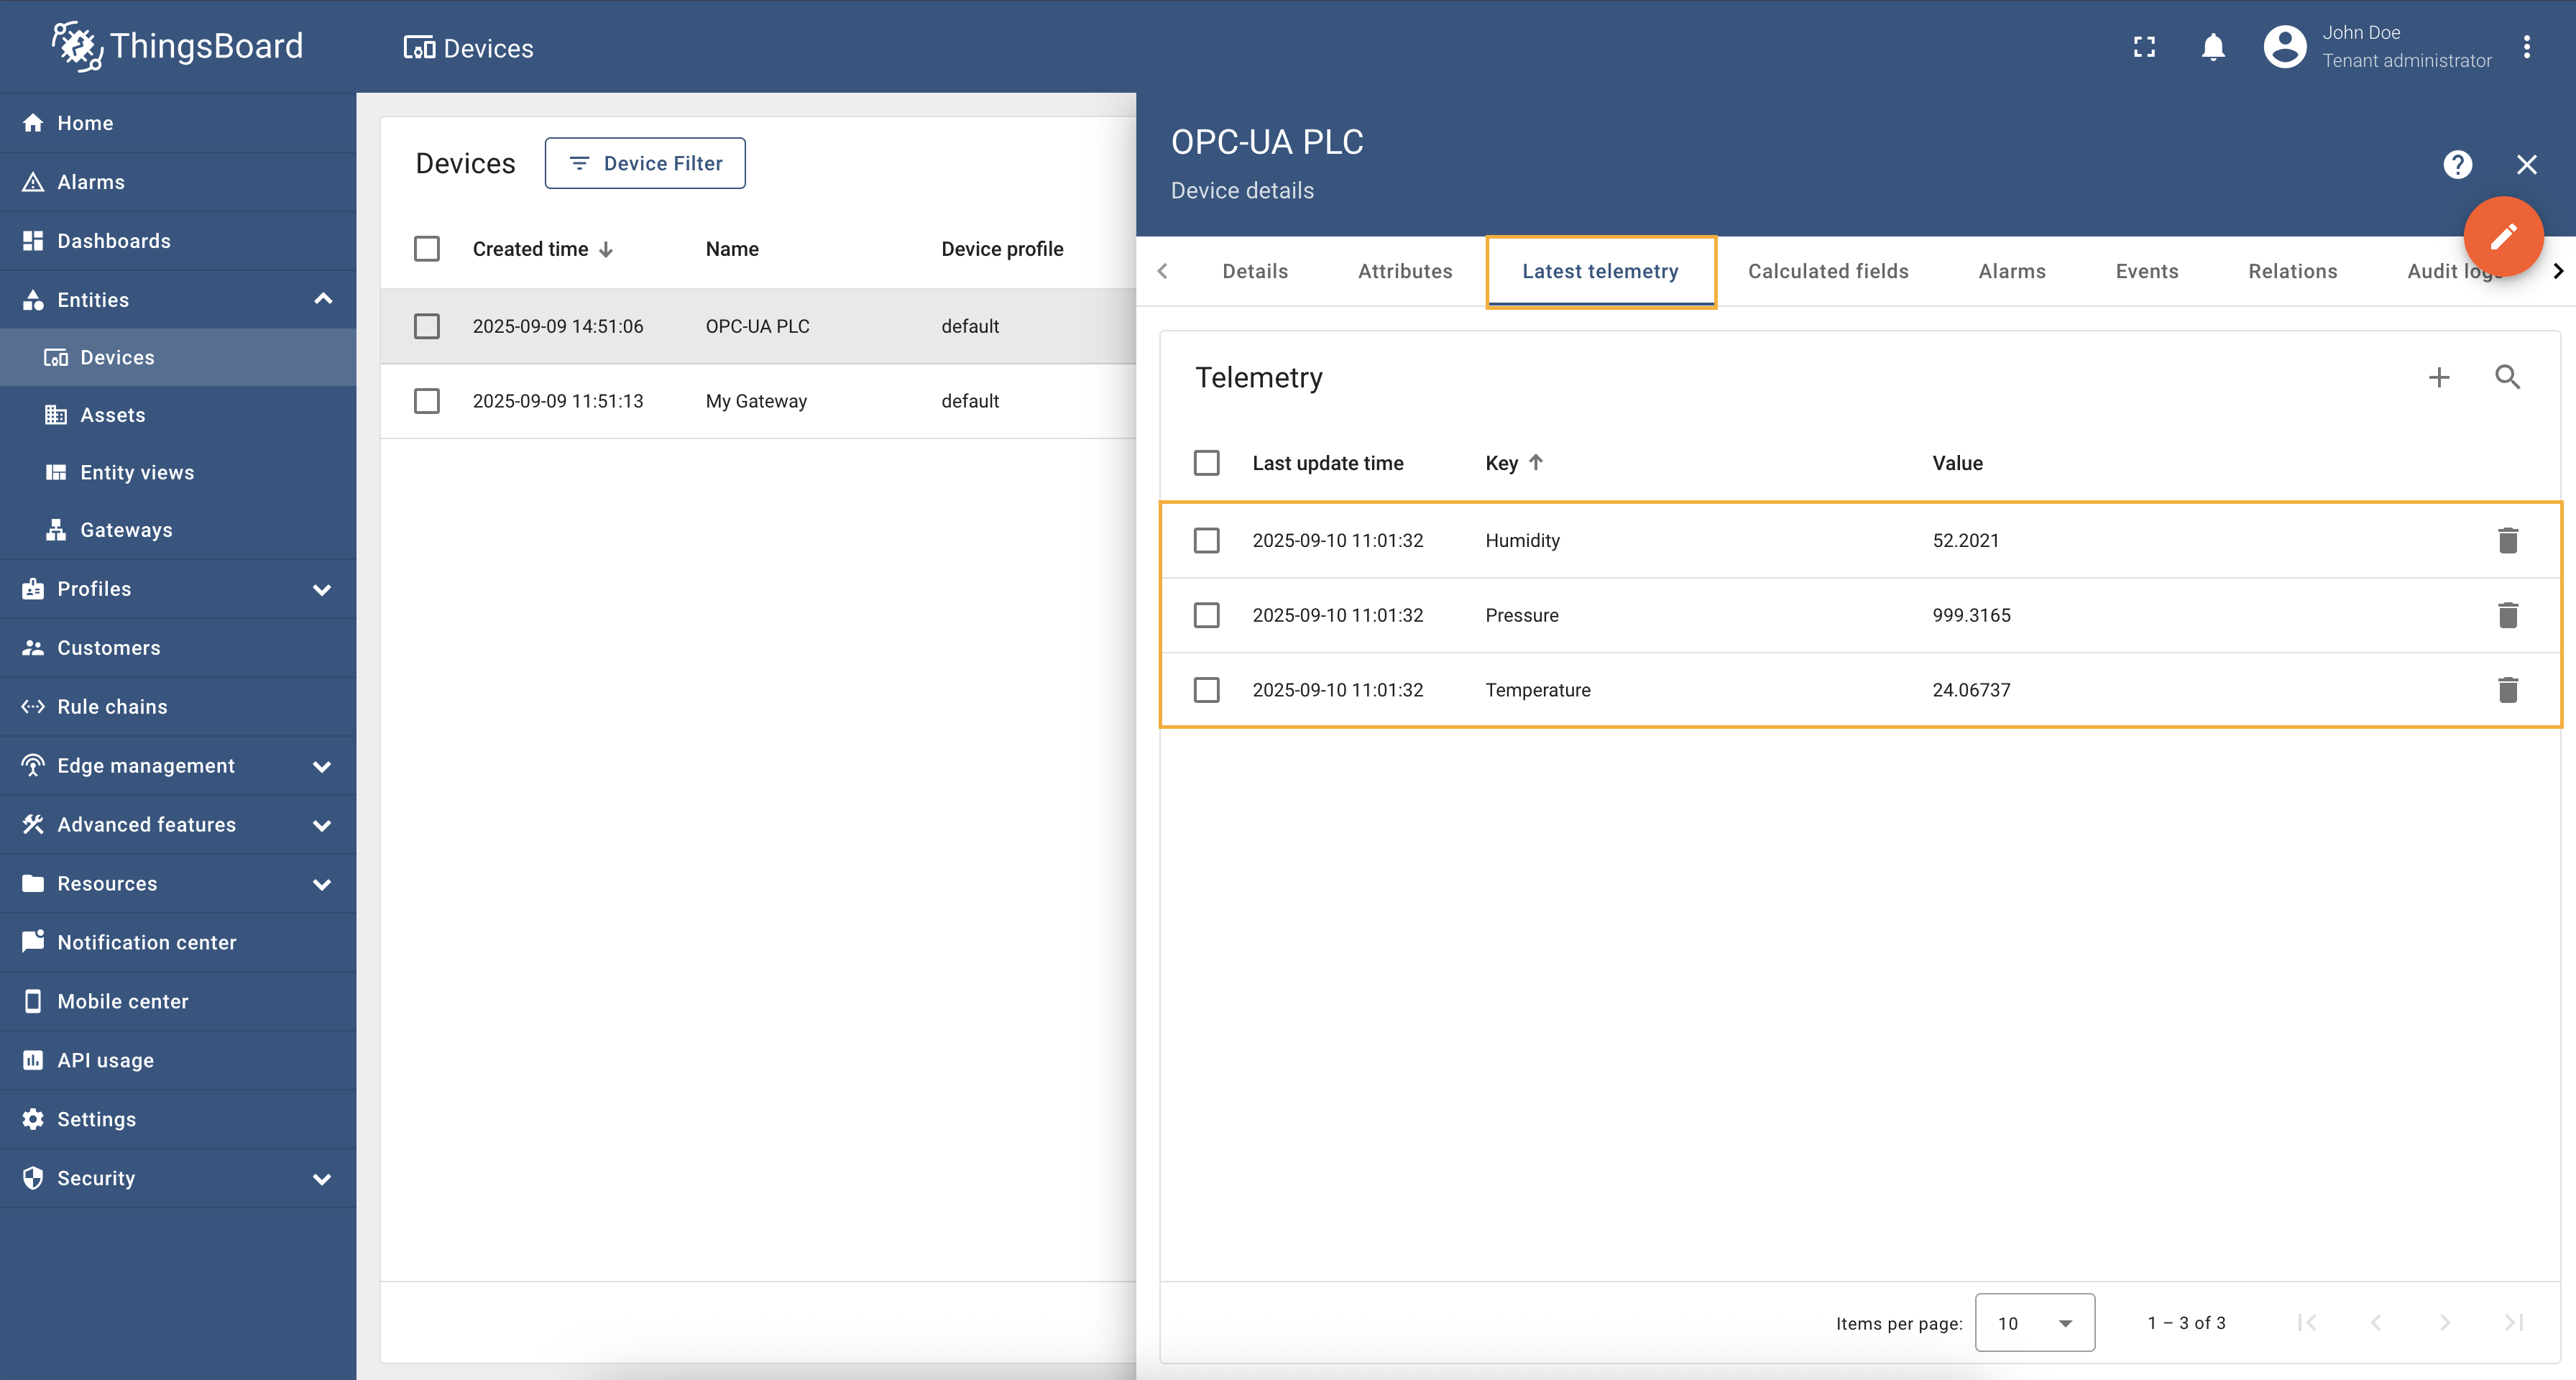
To view real-time telemetry data from the device, navigate to the “Latest Telemetry” tab. Here, you will find the telemetry data being sent by the device, including metrics like “humidity”, “temperature” and “pressure”. This tab provides real-time device telemetry updates.
Conclusion
In this guide, we demonstrated how to connect an OPC-UA device to ThingsBoard CE using the ThingsBoard IoT Gateway. By configuring the gateway, setting up the OPC-UA connector, and mapping both telemetry data (such as humidity, temperature, and pressure) and device attributes (like firmware version and update date), we established a complete data flow from the OPC-UA server into ThingsBoard.
With this setup, you can now monitor your device data in real time, visualize it on dashboards, and use ThingsBoard’s powerful features—such as alarms, rule chains—to build advanced IoT solutions. The same approach can be extended to real industrial OPC-UA devices, enabling seamless integration of systems into modern IoT platforms.
This example using the Prosys Simulation Server is just the beginning. You can now adapt the configuration to your own devices, scale up to multiple servers, and customize data mappings based on your project’s needs.
Next steps
Explore guides related to main ThingsBoard features:
- Data Visualization - how to visualize collected data.
- Device attributes - how to use device attributes.
- Telemetry data collection - how to collect telemetry data.
- Using RPC capabilities - how to send commands to/from devices.
- Rule Engine - how to use rule engine to analyze data from devices.