- Sparkplug basics
- Getting started
- Next steps
Before proceeding, we recommend reviewing the general Getting Started guide to become familiar with ThingsBoard basics. Additionally, it is advisable to explore the Device profiles documentation.
Sparkplug basics
Sparkplug is an open-source software specification that provides MQTT clients the framework to seamlessly integrate data from their applications, sensors, devices, and gateways within the MQTT Infrastructure, and is implemented up to Sparkplug version 3.0.
Sparkplug B Edge Node
ThingsBoard acts as an MQTT Server which support the SparkPlug payload and topic structure and allows connections from the MQTT Edge of Network (EoN) Node.
The EoN Node is any v3.1.1 or v5.0 compliant MQTT Client application that manages an MQTT Session and provides the physical and/or logical gateway functions required to participate in the Topic Namespace and Payload definitions described in this document. The Edge Node is responsible for any local protocol interface to existing devices (PLCs, RTUs, Flow Computers, Sensors, etc.) and/or any local discrete I/O, and/or any logical internal process variables (PVs).
The protocol specification defines both MQTT topic and message structure for the EoN Nodes to communicate with the MQTT Server.
Sparkplug B Device
Single EoN Node may represent multiple physical devices and sensors and upload device metrics for each of those devices. ThingsBoard decodes the device metrics from the Sparkplug payload and stores it as a corresponding device attributes or time series data. You may also issue an update to the Sparkplug device using shared attributes update or rpc command.
Sparkplug B topic and type messages
Sparkplug B payloads in conjunction with the Sparkplug topic namespace result in hierarchical data structures that can be represented in folder structures with metrics which are often called tags.
1
spBv1.0/Sparkplug Group 1/NBIRTH /Sparkplug Node 1/Sparkplug Device 1
Sparkplug B Message Type in The Thingsboard
| Type | Description |
|---|---|
| NBIRTH | Birth certificate for MQTT Edge of Network (EoN) Nodes |
| NDEATH | Death certificate for MQTT Edge of Network (EoN) Nodes |
| DBIRTH | Birth certificate for MQTT Devices |
| DDEATH | Death certificate for MQTT Devices |
| NDATA | Edge of Network (EoN) Node data message |
| DDATA | Device data message |
| NCMD | Edge of Network (EoN) Node command message |
| DCMD | Device command message |
| STATE | Device online/offline status (activity) |
| DRECORD | Device record message |
| NRECORD | Edge of Network (EoN) Node record message |
The format of the Group ID, the edge_node_id, device_id MUST be a valid UTF-8 string with the exception of the reserved characters of + (plus), / (forward slash), and # (number sign). BIRTH MQTT QoS MUST be 0. -dcmd-subscribe MUST subscribe on this topic with a QoS of 1, The MQTT Will Message’s MQTT QoS MUST be 1 (at least once) ACLs can be defined for Sparkplug clients to restrict each Edge Node to a specific set of topics it can publish and subscribe on. (Edge Nodes publishing NBIRTH, device publishing DBIRTH).
- Example topic with Message Type
1
2
3
4
5
6
    $sparkplug/certificates:  spBv1.0/group_id/NBIRTH/edge_node_id
    Subscribe:  spBv1.0/group_id/NBIRTH/edge_node_id/#
    $sparkplug/certificates: spBv1.0/group_id/DBIRTH/edge_node_id/device_id
    Subscribe: spBv1.0/group_id/DBIRTH/edge_node_id/device_id/#
    $sparkplug/state: spBv1.0/STATE/sparkplug_host_id
- validate Topic Data Subscribe
1
2
3
4
5
6
    Subscribe: spBv1.0/G1/DDATA/E1
    Subscribe: spBv1.0/G1/DDATA/E1/#
    Subscribe: spBv1.0/G1/DDATA/E1/+
    Subscribe: spBv1.0/G1/DDATA/E1/D1
    Subscribe: spBv1.0/G1/DDATA/E1/D1/#
    Subscribe: spBv1.0/G1/DDATA/E1/D1/+
Persistent vs Non-Persistent Connections for Edge Nodes
Persistent Connections
- Remain connected at all times
- Never send MQTT DISCONNECT during normal operation
- Allow Host Applications to track real-time status via BIRTH/DEATH messages within the Keep Alive period
Non-Persistent Connections (e.g., GPS trackers or periodic sensor updates)
- Connect temporarily and send data periodically
- Should send MQTT DISCONNECT before going offline to disconnect gracefully
- Do not send DEATH messages — Host Applications only see the Last Known Good data with a timestamp, not the real-time state
Recommendation for Non-Persistent Devices:
- Upon reconnecting, send a DEATH Certificate before disconnecting again
- This helps the Host Application maintain accurate state tracking
MQTT Protocol Requirements:
MQTT 3.1.1 → Clean Session = true MQTT 5.0 → Clean Start = true and Session Expiry Interval = 0
Alias Usage in Sparkplug B Payloads
- Alias is an optional unsigned 64-bit integer used to identify a metric, helping reduce payload size.
- If no alias is used, the metric Name MUST be included in every message.
- Aliases are optional, but when used, the following rules apply:
Rules for Using Aliases
-
[tck-id-payloads-alias-uniqueness]
If an alias is provided in an NBIRTH or DBIRTH, it MUST be unique across all metrics of the Edge Node.
▪ No two metrics of the same node can share the same alias. -
Once defined in NBIRTH/DBIRTH, subsequent messages (NDATA, DDATA, etc.) can use only the alias instead of the full metric name.
-
[tck-id-payloads-alias-birth-requirement]
NBIRTH and DBIRTH messages MUST include both the metric name and its alias. -
[tck-id-payloads-alias-data-cmd-requirement]
NDATA, DDATA, NCMD, and DCMD messages MUST include only the alias, and the metric name MUST be omitted.
Getting started
This guide will teach us how to: connect Sparkplug EoN node to ThingsBoard, collect device metrics and store them as ThingsBoard time series data, and push commands back to devices.
Step 1. Create device profile
First you need to create MQTT device profile for Sparkplug devices:
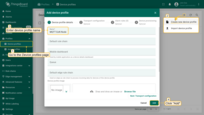
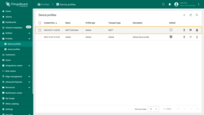
- Navigate to Profiles -> Device profiles page and click on the “+” icon in the device profile table header to open the Add device profile dialog;
- Use MQTT EoN Node as profile name or any other meaningful value;
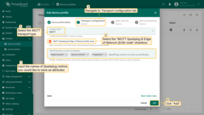
- Navigate to Transport configuration tab and select the MQTT transport type;
- Make sure you have selected the “MQTT Sparkplug B Edge of Network (EoN) node” checkbox;
- Input the names of Sparkplug metrics you would like to store as attributes instead of time series data. This list should also include metrics you may want to update from the server side and push to the device. Simple asterisk suffix is supported as a wildcard. For example: “Node Control/*", “Device Control/*", “Properties/*".
Step 2. Configure the EoN node credentials
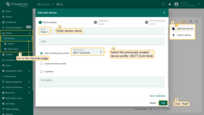
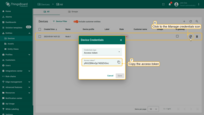
- Navigate to Entities -> Devices page and click on the “+” icon in the device table header to open the Add new device dialog;
- Input your EoN node device name (e.g. Node 1) and select the existing device profile: MQTT EoN Node.
- Create device and navigate to the device details. Copy the access token. We will use it in the next step. Note that you may use other types of credentials as well.
Step 3. Launch the EoN node emulator
We have prepared sparkplug node emulator for the testing purposes. Let’s launch it and connect to our platform instance. We will use access token credentials from the previous step:
1
docker run -e SPARKPLUG_SERVER_URL='tcp://thingsboard.cloud:1883' -e SPARKPLUG_CLIENT_MQTT_USERNAME='YOUR_THINGSBOARD_DEVICE_TOKEN' thingsboard/tb-sparkplug-emulator:latest
Don’t forget to replace YOUR_THINGSBOARD_DEVICE_TOKEN with the actual value of the token.
You should also replace thingsboard.cloud with your server hostname.

Once the emulator will launch successfully, you should see the following messages:
1
2
3
2023-05-04 13:40:42,787 [pool-2-thread-1] INFO  o.t.sparkplug.SparkplugEmulation - Publishing [Sparkplug Node 1] NBIRTH
2023-05-04 13:40:42,815 [pool-2-thread-1] INFO  o.t.sparkplug.SparkplugEmulation - Publishing [Sparkplug Device 1] DBIRTH
2023-05-04 13:40:42,816 [pool-2-thread-1] INFO  o.t.sparkplug.SparkplugEmulation - Publishing [Sparkplug Device 2] DBIRTH
Step 4. Observe device metrics as attributes and telemetry
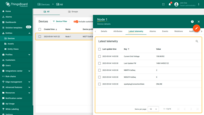
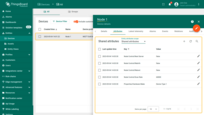
Navigate to the details of the EoN node device (e.g. Node 1) and open the Latest telemetry tab. You should see the device metrics, for example Current Grid Voltage. Navigate to the Attributes tab and select Shared attributes scope. You will see metrics that you have previously configured in the Step 1 (item 5).
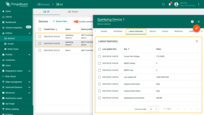
Refresh the Devices page and note that two new Sparkplug devices are created by the emulator: “Sparkplug Device 1” and “Sparkplug Device 2”. Both devices have their own attributes and telemetry values that are generated by the emulator.
Additionally, a separate device profile is created for the two new devices with a name consisting of your Sparkplug node’s name + “device”.
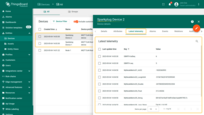
Step 5. Push updates to Sparkplug metrics from Thingsboard server to MQTT EON and Device
You may push update to Sparkplug node/device metric from ThingsBoard via shared attribute update or RPC command.
Update Metrics using shared attributes
ThingsBoard Shared Attributes are used to deliver metric value updates to the device. You may change the shared attribute in multiple ways - via administration UI, dashboard widget, REST API, or rule engine node.
Let’s manually change the values of the attributes “Outputs/LEDs/Green” and “Device Control/Scan Rate”.
To change the value of the attribute “Outputs/LEDs/Green”, you first need to add a particular metric to the MQTT EoN Node device profile to store it as a shared attribute instead of telemetry. In the Transport сonfiguration tab, add a new Sparkplug metric name — “Outputs/*".
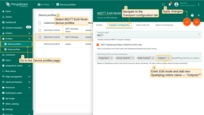
Go back to the Devices page and select the Sparkplug Device 1. On the Shared attributes tab, you will see two new attributes: “Outputs/LEDs/Green” with the value “true” and “Outputs/LEDs/Yellow” with the value “false”. These are metrics that are stored as attributes, and we can modify and send their values to the device.
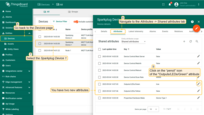
Click on the “pencil” icon and change the value of the attribute “Outputs/LEDs/Green” from “true” to “false” by unchecking the corresponding box. Then, click Update. An attribute with the name “Outputs/LEDs/Green” and the value “false” is sent from the server to the device “Sparkplug Device 1”.
In the Terminal where the emulator is running, you should see the following messages:
1
2
3
2023-05-04 14:09:00,417 [MQTT Call: Sparkplug Node 1] INFO  o.t.sparkplug.SparkplugMqttCallback - Message Arrived on topic spBv1.0/Sparkplug Group 1/DCMD/Sparkplug Node 1/Sparkplug Device 1
2023-05-04 14:09:00,417 [MQTT Call: Sparkplug Node 1] INFO  o.t.sparkplug.SparkplugMqttCallback - Command: [DCMD]  nodeDeviceId: [Sparkplug Device 1]
2023-05-04 14:09:00,417 [MQTT Call: Sparkplug Node 1] INFO  o.t.sparkplug.SparkplugMqttCallback - Metric [Outputs/LEDs/Green] value [false]
As you can see, the new attribute value for “Outputs/LEDs/Green” has been successfully sent to the device.
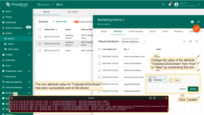
Now let’s change the value of the “Device Control/Scan Rate” attribute. Click on the “pencil” icon and change the value from “60000” to “30000”. Click Update.
When the new value for the “Device Control/Scan Rate” attribute is sent to the “Sparkplug Device 1” device, you will see the following messages in the Terminal:
1
2
3
2023-05-04 14:16:51,715 [MQTT Call: Sparkplug Node 1] INFO  o.t.sparkplug.SparkplugMqttCallback - Message Arrived on topic spBv1.0/Sparkplug Group 1/DCMD/Sparkplug Node 1/Sparkplug Device 1
2023-05-04 14:16:51,715 [MQTT Call: Sparkplug Node 1] INFO  o.t.sparkplug.SparkplugMqttCallback - Command: [DCMD]  nodeDeviceId: [Sparkplug Device 1]
2023-05-04 14:16:51,715 [MQTT Call: Sparkplug Node 1] INFO  o.t.sparkplug.SparkplugMqttCallback - Metric [Device Control/Scan Rate] value [30000]
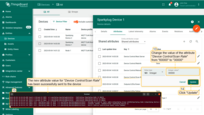
The attribute values for “Outputs/LEDs/Green” and “Device Control/Scan Rate” have been changed and sent to the “Sparkplug Device 1” device.
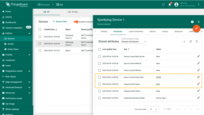
- the ability to send CMD, DATA, DCM, DATA commands both via the shared attributes and rom the RPC terminal(Json):
1
{"NCMD":{"MyFloat":123.345}}
1
{"NDATA":{"MyFloat":123.345}}
1
{"DCMD":{"MyFloat":123.345}}
1
{"DDATA":{"MyFloat":123.345}}
- if send from the shared attributes (ts/kv):
1
2
{"MyFloat":123.345}      // by default if from Edge Node "NCMD"  will be added
{"MyFloat":123.345}      // by default if from Device "DCMD"  will be added
Update Metrics using the ThingsBoard RPC command from server to MQTT EON/Device
ThingsBoard supports on-demand update to metrics of the Sparkplug EoN Node or Device using RPC(Remote Procedure Call) feature. We also use term “command” instead of RPC for simplicity. You can send the command using REST API, dashboard widget, rule engine, or custom script. See the structure of the command is documented here.
Key properties of the command are method and params. The method defines the Sparkplug operation and is one of the following:
- NCMD - command to the EoN Node;
- DCMD - command to the EoN Device;
The params is a JSON that defines the metric and the value.
For example, to reboot the Sparkplug EoN Node, you should send the following command:
1
2
3
4
  {
    "method": "NCMD",
    "params": {"metricName": "Node Control/Reboot", "value": true}
  }
To reboot the Sparkplug EoN Device, you should send the following command:
1
2
3
4
  {
    "method": "DCMD",
    "params": {"metricName": "Device Control/Reboot", "value": true}
  }
In this example, we will use the “RPC Button” widget to reboot Sparkplug EoN Node. See the step-by-step guide with screenshots below.
Go to the Dashboards page and create a new dashboard named Sparkplug. Open the dashboard and add new alias by clicking on Entity aliases icon. Name the alias (EoN Node, for example), select filter type “Single Entity”, type “Device” and choose Node 1. Press Add and then Save.

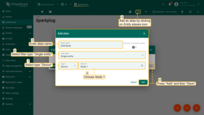
Now create a new widget. Click “Add new widget”, select the Control widgets bundle from the drop-down menu and select the RPC Button widget. On the Data field select created alias (EoN Node). Go to Advanced tab and enter button label - REBOOT NODE. In the RPC settings enter RPC method - “NCMD” (command to the EoN Node) and RPC method params - “{“metricName”: “Node Control/Reboot”, “value”: true}”. Click Add and save changes.
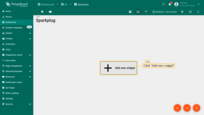
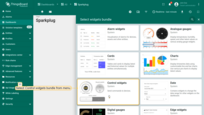
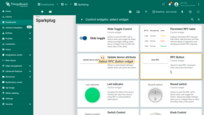
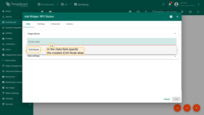
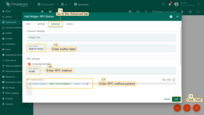

Now click “REBOOT NODE” button on the widget. RPC command with name “Node Control/Reboot” and value “true” is sent from the server to the node “Sparkplug Node 1”.
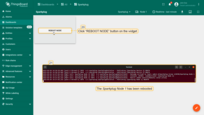
In the Terminal where the emulator is running, you should see the following messages:
1
2
3
2023-05-04 14:27:02,215 [MQTT Call: Sparkplug Node 1] INFO  o.t.sparkplug.SparkplugMqttCallback - Message Arrived on topic spBv1.0/Sparkplug Group 1/NCMD/Sparkplug Node 1
2023-05-04 14:27:02,215 [MQTT Call: Sparkplug Node 1] INFO  o.t.sparkplug.SparkplugMqttCallback - Command: [NCMD]  nodeDeviceId: [Sparkplug Node 1]
2023-05-04 14:27:02,215 [MQTT Call: Sparkplug Node 1] INFO  o.t.sparkplug.SparkplugMqttCallback - Metric [Node Control/Reboot] value [true]
The Sparkplug EoN Node 1 has been rebooted.
Next steps
-
Getting started guides - These guides provide quick overview of main ThingsBoard features. Designed to be completed in 15-30 minutes.
-
Data visualization - These guides contain instructions on how to configure complex ThingsBoard dashboards.
-
Data processing & actions - Learn how to use ThingsBoard Rule Engine.
-
IoT Data analytics - Learn how to use rule engine to perform basic analytics tasks.
-
Hardware samples - Learn how to connect various hardware platforms to ThingsBoard.
-
Advanced features - Learn about advanced ThingsBoard features.