The Geofencing calculated field monitors entity movement in real time by evaluating incoming GPS coordinates against configured geofence zones.
It lets you express spatial logic through configuration and automatically detect whether an entity (vehicle, container, tracker, etc.) is located inside specific areas such as restricted zones, parking lots, or operational boundaries.
Use Geofencing calculated fields when you need to:
- Track presence status in operational zones (e.g., “Is the truck inside the warehouse perimeter?”).
- Detect entry/exit transitions and record boundary-crossing events (ENTERED / LEFT).
- Monitor multiple independent zones at the same time (e.g., Safe Area + Restricted Area).
- Avoid false transitions when a logical area is represented by multiple adjacent polygons.
- Generate alarm-ready outputs (status + event keys) that can be used directly in alarms, dashboards, automation, or analytics
- Support dynamic zone assignment via relationships (zones can be added/removed without per-device reconfiguration)
Why use the Geofencing calculated field?
Geofencing calculated fields introduce Zone Groups, which eliminate state conflicts and improve scalability:
Independent state per zone group
Each zone group maintains its own INSIDE/OUTSIDE state. This enables simultaneous tracking of multiple zone categories (e.g., INSIDE safeArea while OUTSIDE restrictedArea) without overwriting or incorrect transitions.
Logical zone grouping (prevents false transitions)
When zones are discovered dynamically, multiple physical polygons can be treated as one logical group. If an entity moves between adjacent zones within the same group, the field preserves a continuous INSIDE status and does not generate false ENTERED/LEFT events.
Standardized outputs for alarms and dashboards
For each zone group, the field produces consistent output keys (<zoneGroupName>Status and <zoneGroupName>Event) that can be used directly in alarm rules, dashboards, automation, or analytics.
Configuration
Open the create calculated field dialog and specify:
- the calculated field title,
- the entity or entity profile to which the calculated field will be applied,
- Select “Geofencing” as a calculated field type.
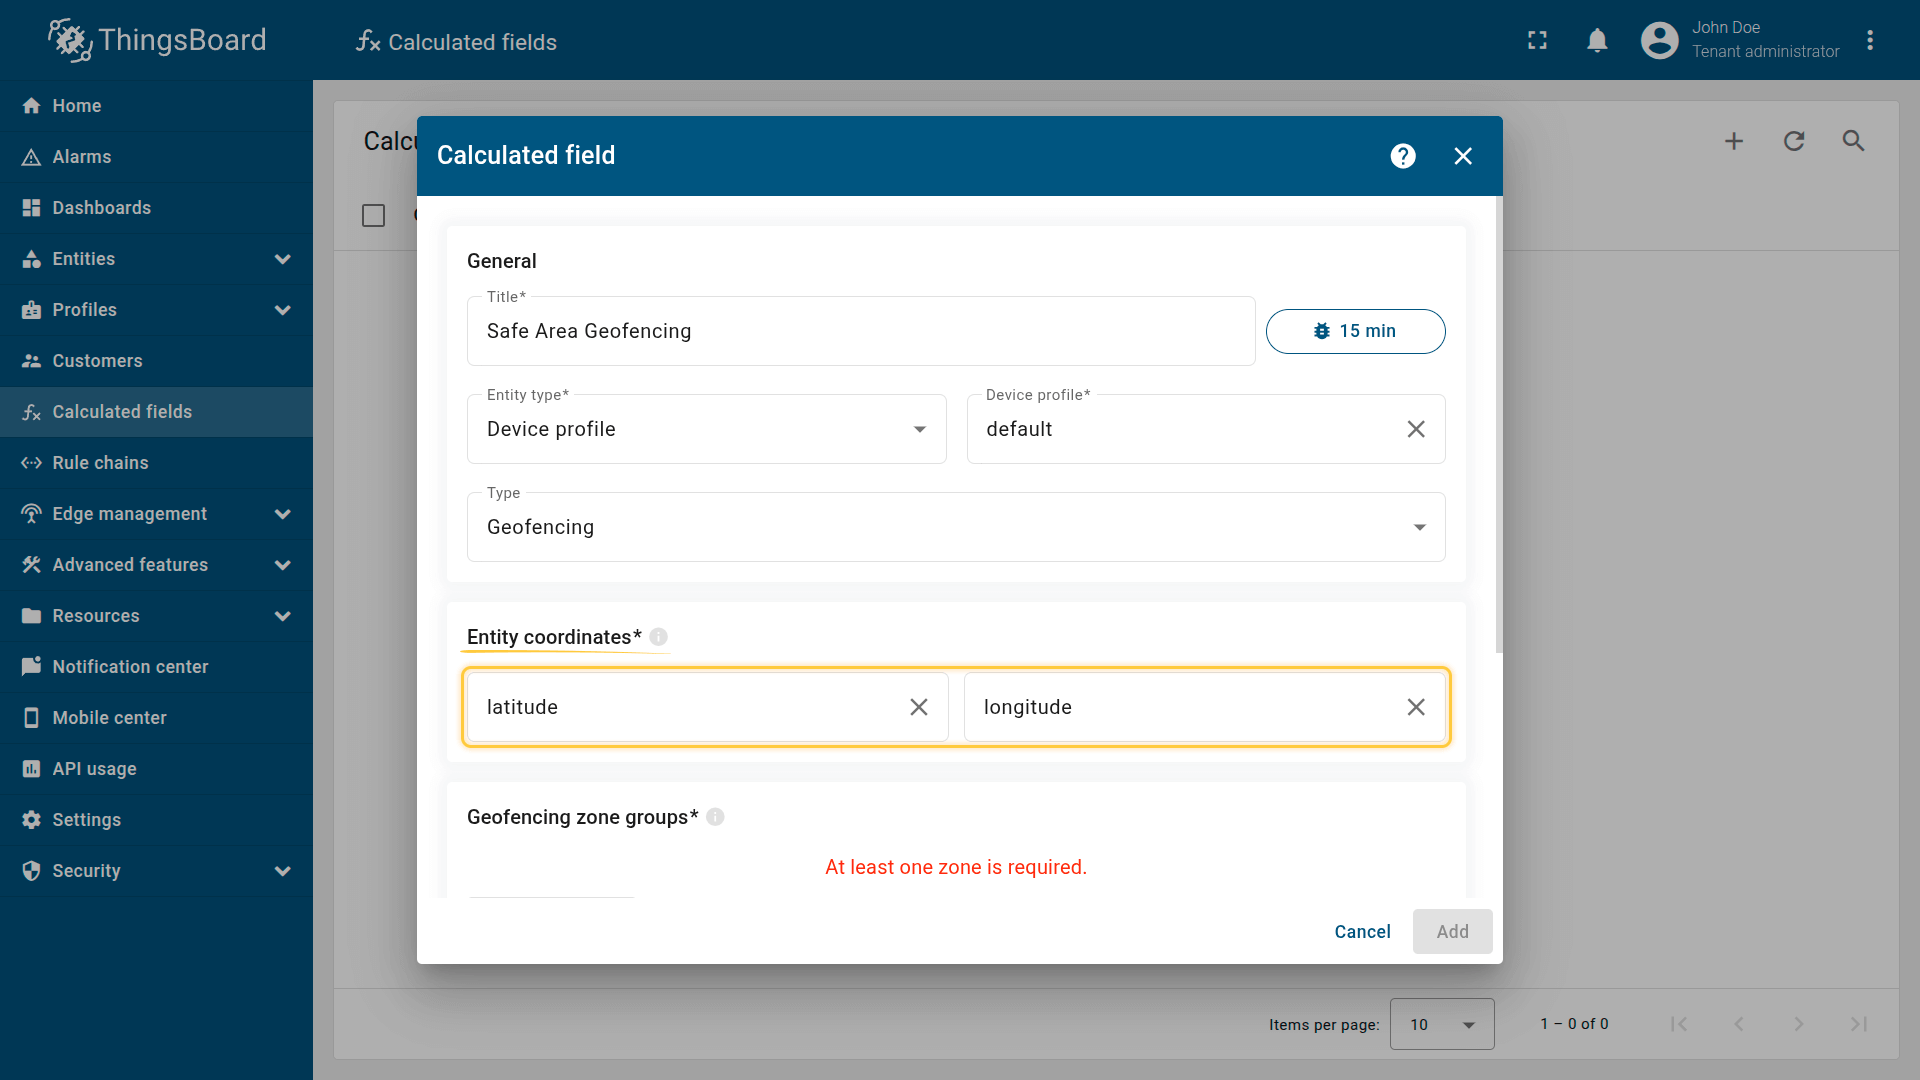
Entity coordinates
Map the incoming telemetry keys that represent the entity's GPS position.
- Latitude time series key — e.g., latitude or lat
- Longitude time series key — e.g., longitude or lng
Requirements
- Values must be numeric.
- If either coordinate is missing or invalid, the calculation is skipped.
Specifies the input data for the calculation. You must map the timeseries keys from the incoming telemetry that represent the entity's GPS location.
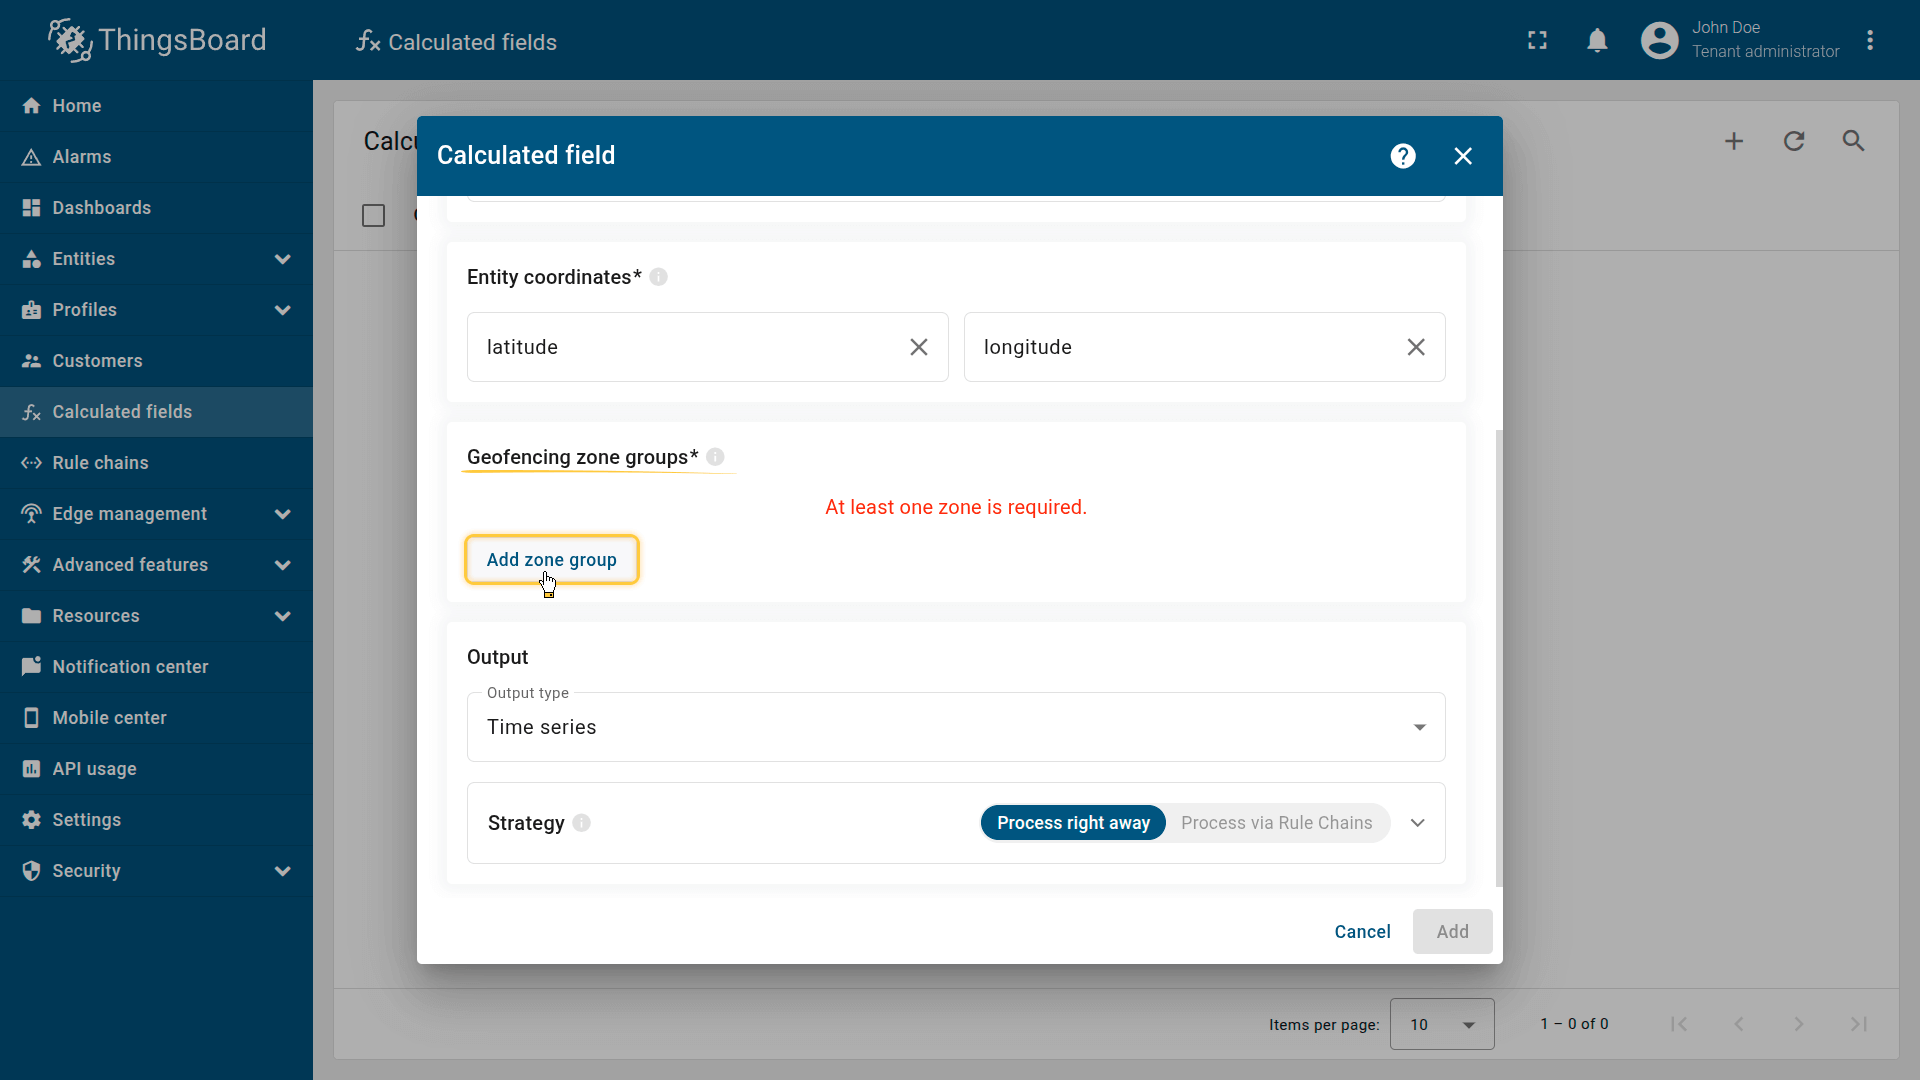
Geofencing zone groups
A Zone Group is a logical container that bundles one or more physical zones (polygons/circles) into a single evaluation.
The calculated field checks all zones within the group and determines the entity's state:
- INSIDE - the entity is inside at least one zone in the group
- OUTSIDE - the entity is not located inside any zone in the group.
Click Add zone group to configure a new group.
A Zone Group is a logical container that bundles one or more physical zones (polygons/circles) into a single evaluation.
Click Add zone group to configure a new group.
In the zone group configuration dialog, configure the following settings:
Zone group settings
Name
The zone group name is used as a prefix for generated geofencing keys:
- <name>Status
- <name>Event
Best practice: use camelCase (e.g., restrictedArea) to keep keys consistent:
- restrictedAreaStatus
- restrictedAreaEvent
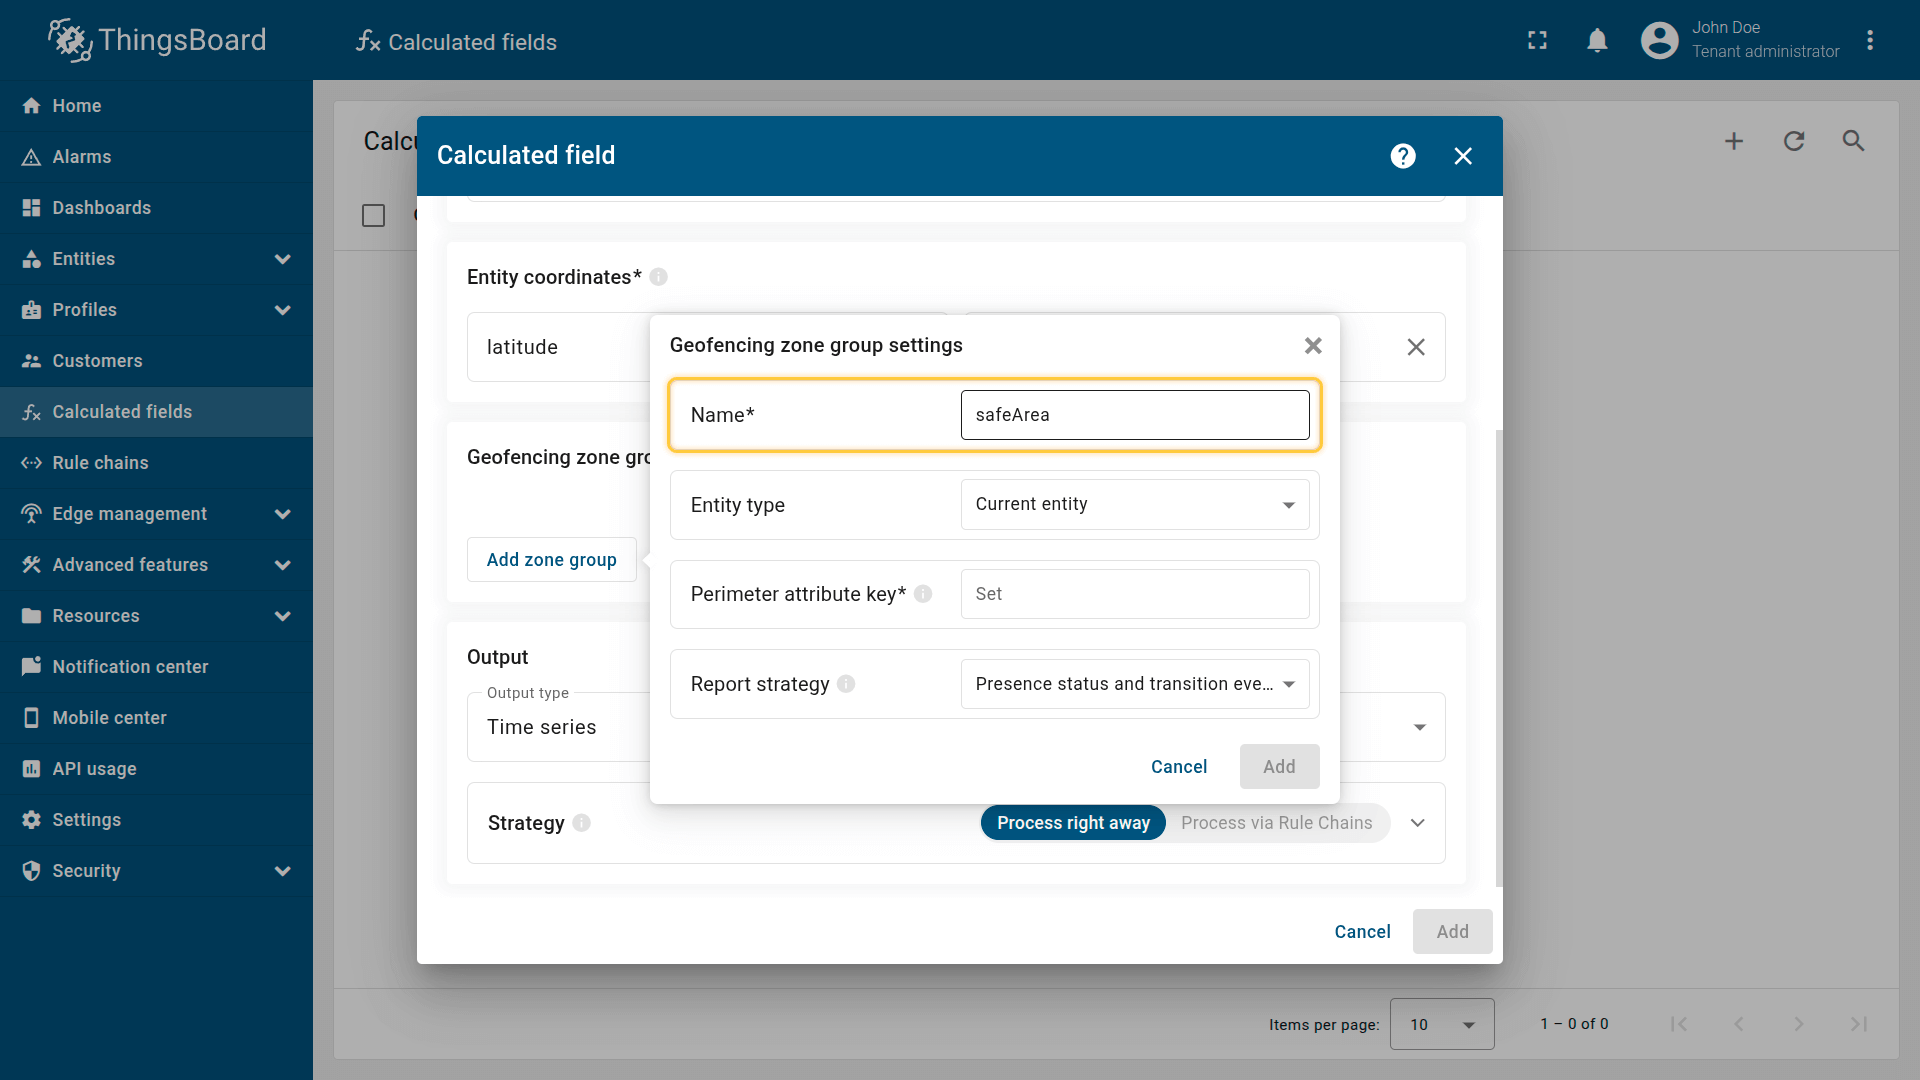
The zone group Name is used as a prefix for the generated geofencing telemetry keys (for example, Name + Status and Name + Event).
Entity type
Choose where zone geometry definitions (polygons/circles) are stored:
- Current entity - the current entity to which the calculated field is applied.
If the field is created at the Device profile or Asset profile level, the calculation is performed for each entity associated with that profile. - Another Device or Asset — another entity from which data is read.
- Customer — the associated customer.
- Current tenant — the current tenant.
- Current owner — the owner of the current entity.
⚠️ Note on static sources: selecting a specific device/asset/customer hardcodes the reference and reduces reusability. Prefer profile-level configuration
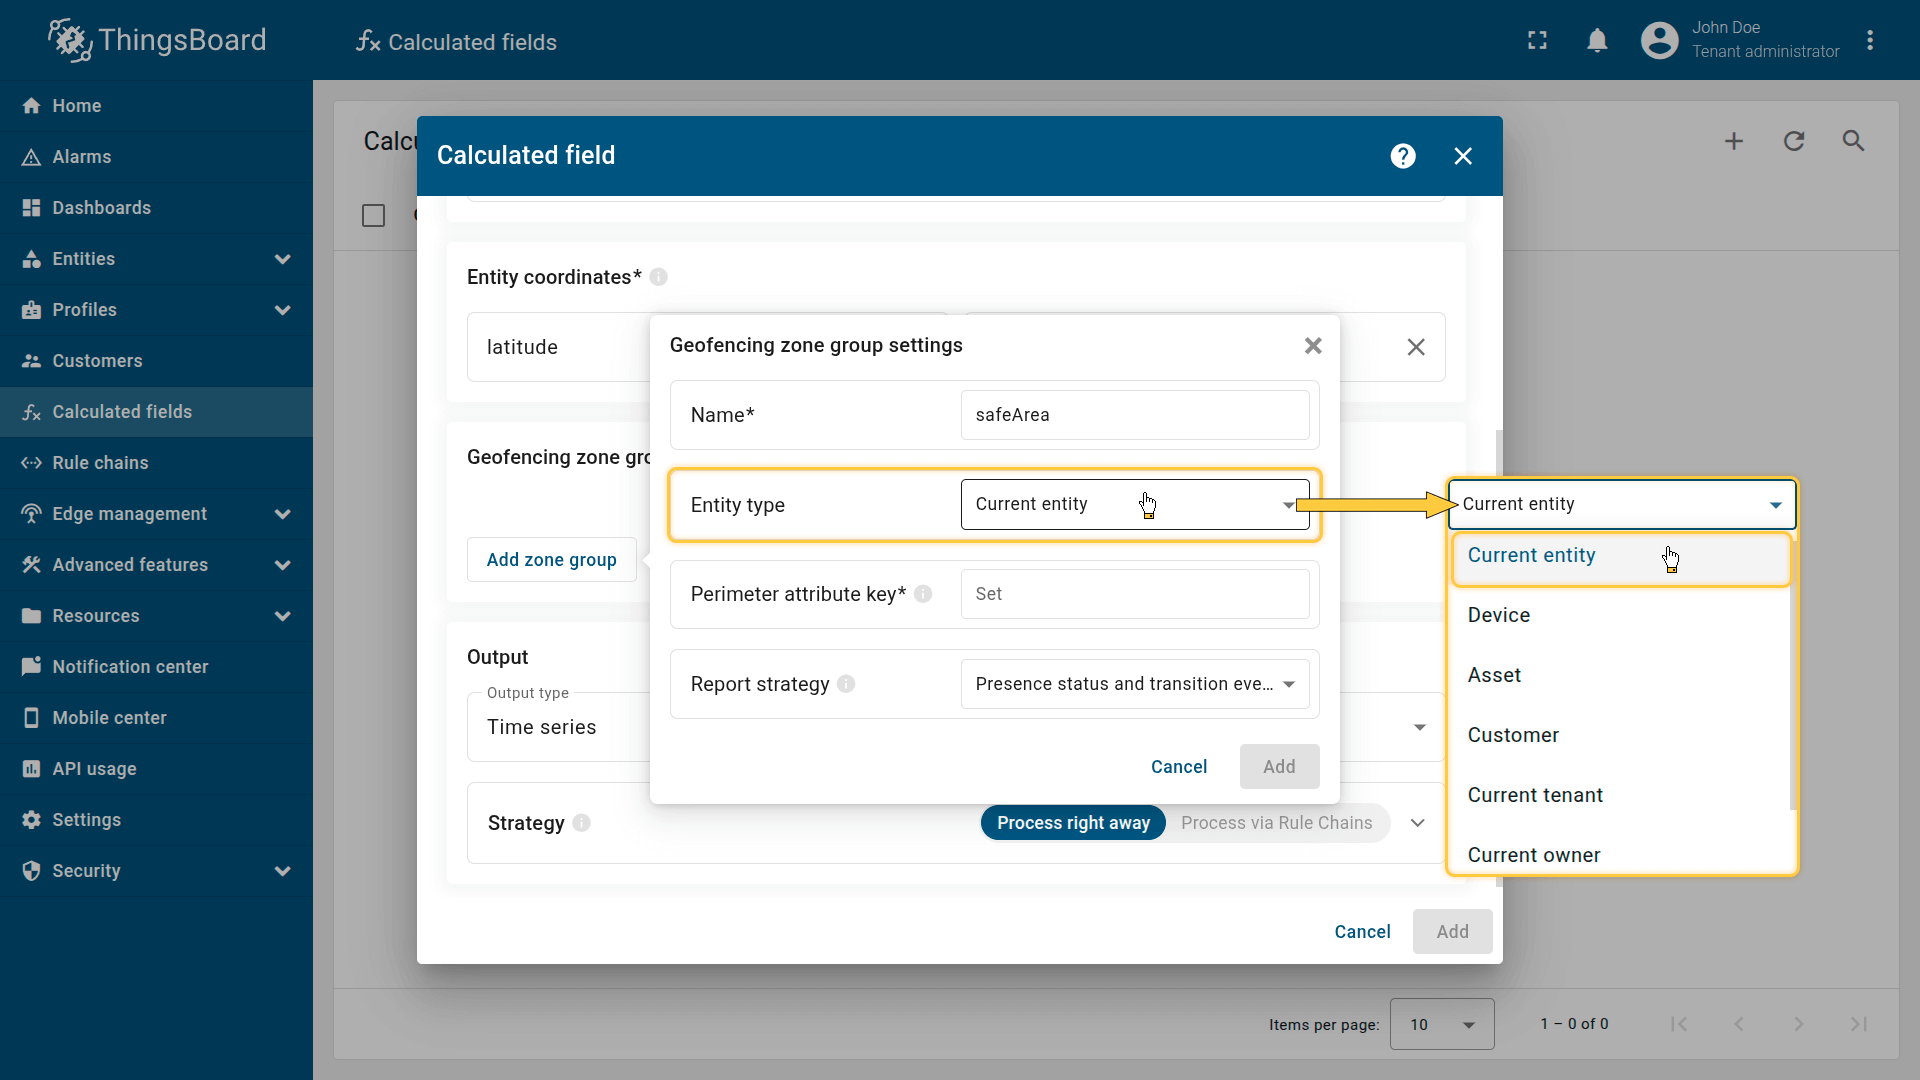
When you configure a group, the system needs to know where the zone definitions (the polygons) are stored. This is determined by the Entity Type (Source) setting.
Tips
To choose the correct source, consider the following common patterns:
1) Self-geofencing (each entity has its own zone)
Question: Does each tracker have a unique zone stored on itself (e.g., a personal Home Zone)?
Answer: Yes.
Action: Select Current entity.
How it works: The calculated field reads the perimeter attribute directly from the entity where the field is applied. This is ideal for device-specific zones such as Home or custom Safe Areas.
2) Dynamic zone lists (zones added/removed via relations)
Question: Will the zone group contain multiple zones, or will zones change dynamically over time?
Answer: Yes.
Action: Select Related entities and configure a Path from the entity to the zone.
How it works: The calculated field discovers zones by traversing the configured relation path starting from the source entity. The path can include multiple steps and directions (UP/DOWN), allowing you to reach zone assets through hierarchy relations.
Example path:
- Go UP from Vehicle to Fleet using relation type FleetToVehicle
- Then go DOWN from Fleet to Zone using relation type FleetToRestrictedZone
Best practice:
This approach scales best. You can store all geometries in a single Zone asset profile and use relation types (e.g., FleetToParking, FleetToRestricted) to build multiple logical zone groups without duplicating configuration.
3) Organization-level zones (inherited from Tenant/Owner)
Question: Is the zone defined at an organizational level for an entire hierarchy (e.g., per Tenant or per Customer/Owner)?
Answer: Yes.
Action: Select Current tenant or Current owner.
How it works: The calculated field retrieves the perimeter attribute from the Tenant or Customer that owns the entity. The device effectively inherits a zone defined at the business level.
Best practice:
This is ideal for high-level policies. For example, in a multi-customer solution, each Customer can define its own global Service Area polygon, and all devices under that customer automatically apply it without per-device configuration.
Path from Entity to Zones
| * only for the "Related Entities" entity type |
This section defines the precise “road map” the system follows to find the zone entities. The path starts from the source entity (the Device or Asset running this Calculated Field) and follows the relations you specify.
Level
The sequence number indicating the depth of the relation step.
⚠️ Note: The minimum level is 1. The maximum allowed depth is determined by the “Maximum relation level per ‘Related entities’ argument” in your Tenant Profile configuration.
Direction
- Up: Looks for parent entities (e.g., from Device up to Fleet).
- Down: Looks for child entities (e.g., from Fleet down to Zone).
Relation type
The specific connection name to follow for each step (e.g., “FleetToVehicle”, “FleetToRestrictedZone”, “FleetToNoParkingZone”).
💡 Configuration flexibility: You are not restricted to a specific topology. You can configure a single-level path (e.g., just one Up step if the zone is directly related to the source entity) or a complex multi-level path (mixing Up and Down) depending on your entities hierarchy.
Example configuration
To find zones for a vehicle (Source Entity) that belongs to a fleet:
- Level 1: Direction: “Up”, Relation type: VehicleToFleet (Finds the Fleet).
- Level 2: Direction: “Down”, Relation type: “FleetToRestrictedZone” (Finds all zone entities linked to that Fleet with the “FleetToRestrictedZone” relation type).
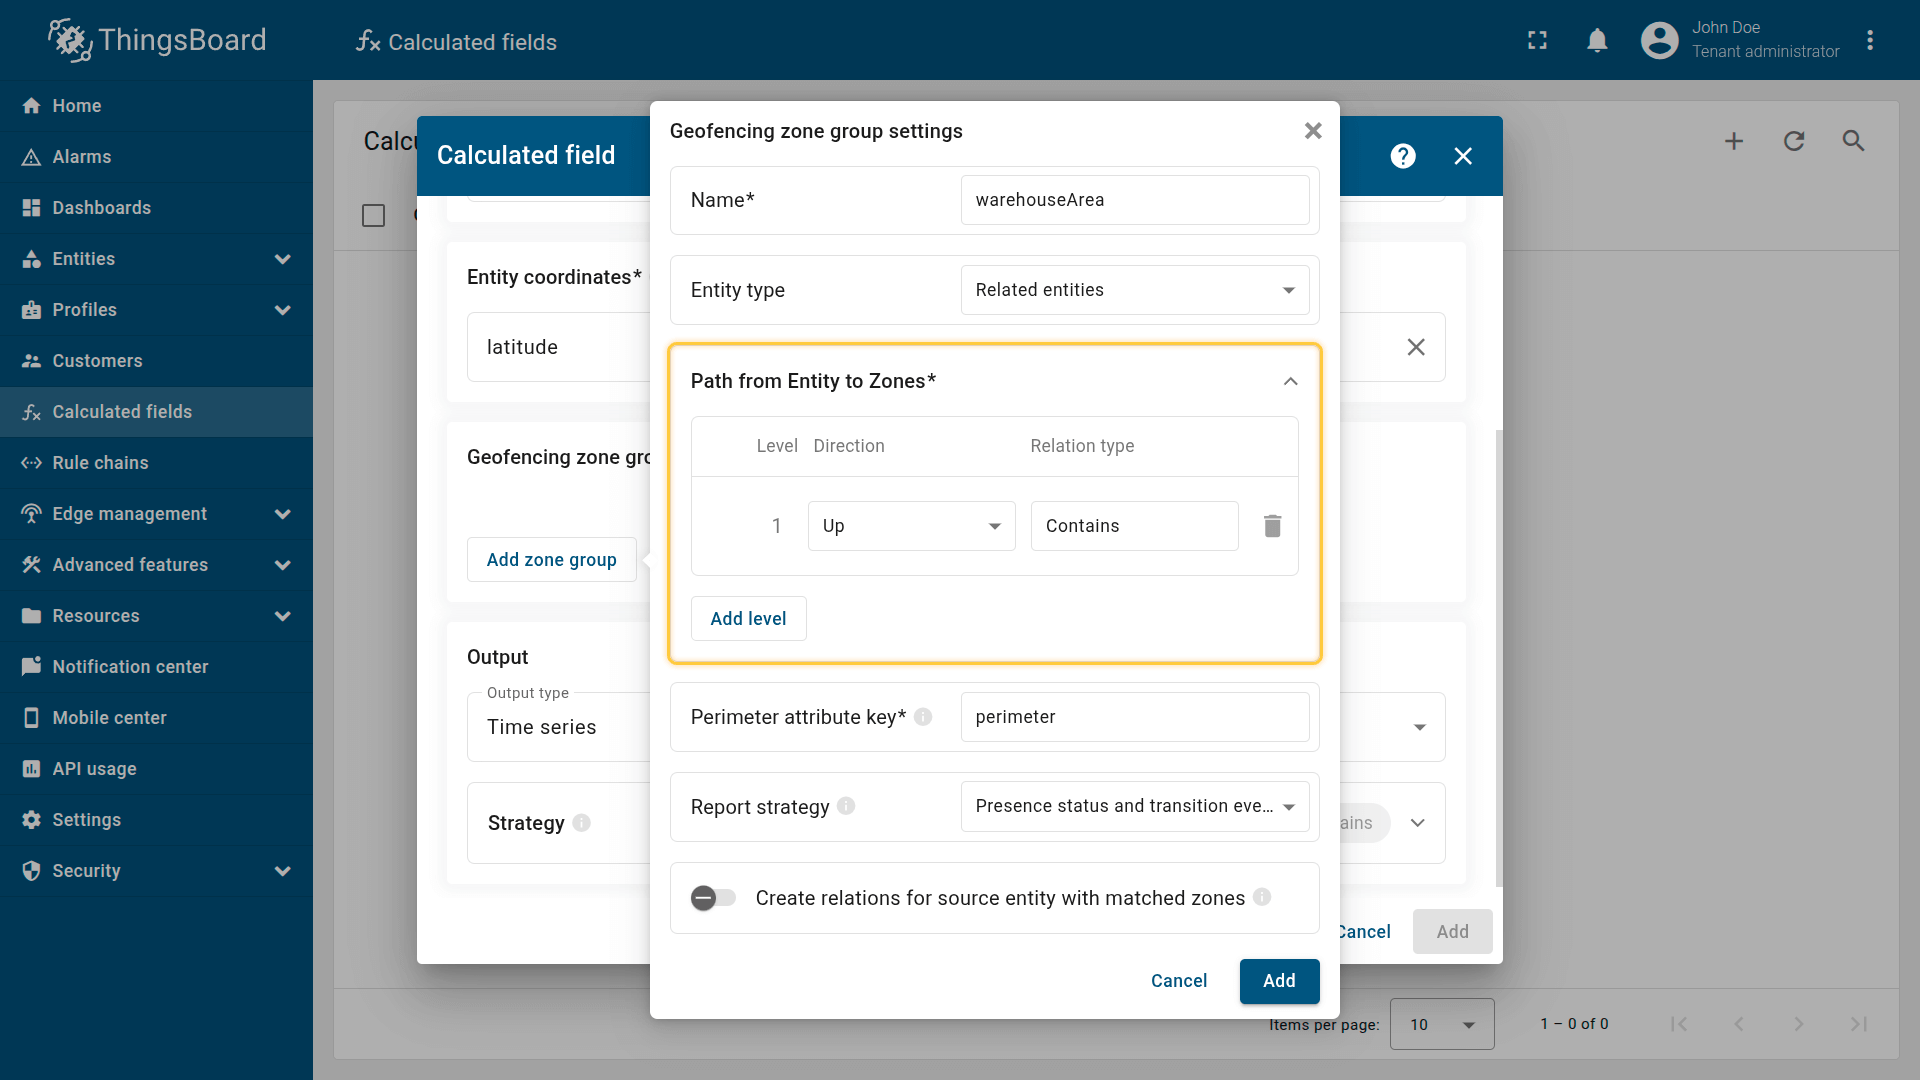
This section defines the precise “road map” the system follows to find the zone entities.
The path starts from the Source Entity (the Device or Asset running this Calculated Field) and follows the relations you specify.
Perimeter attribute key
Specify the server-side attribute key on zone entities that stores the geometry. Supports polygons and circles.
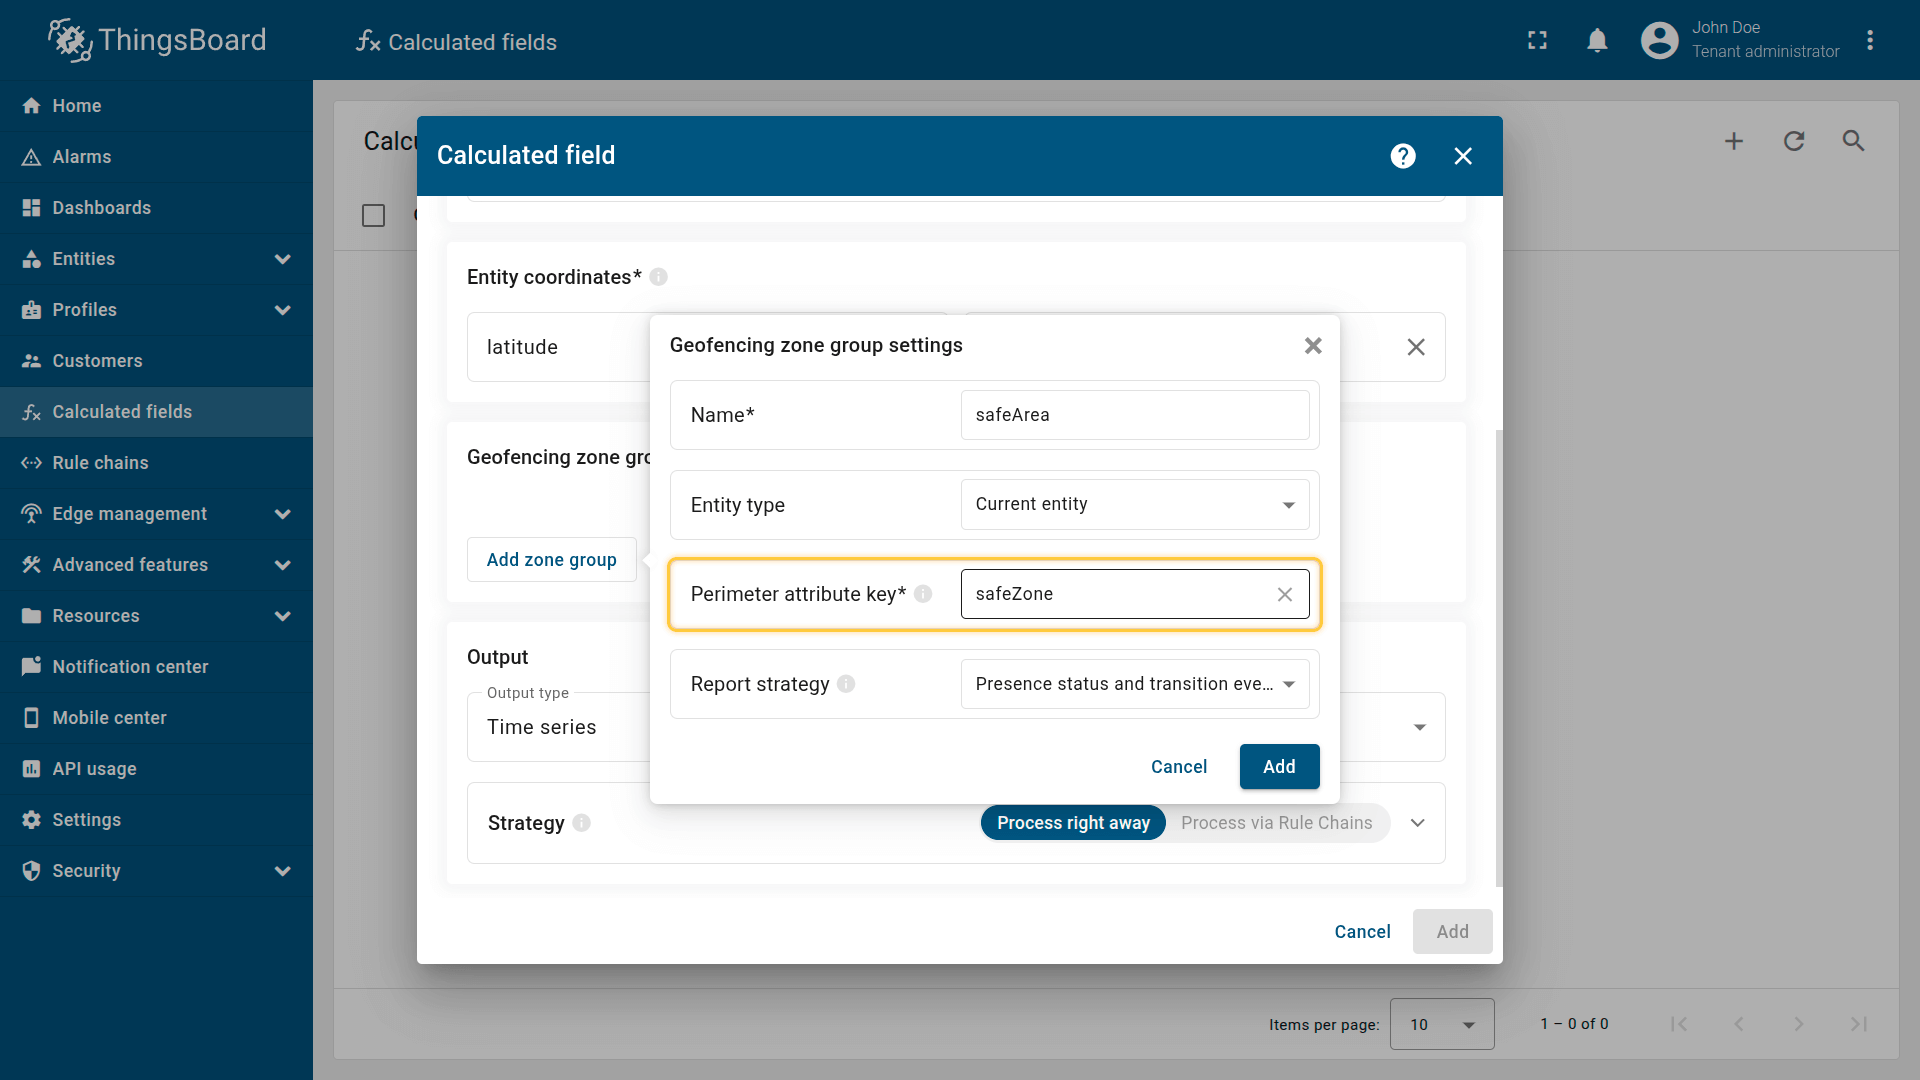
Specify the server-side attribute key on zone entities that stores the geometry.
Report strategy
Controls what telemetry the zone group generates:
Transition events only
Presence status only
Presence status and transition events
This setting controls which telemetry the calculated field generates for the zone group. Choose the option that best matches your monitoring requirements:
Transition events only
- Generates only transition events (ENTERED / LEFT) when the status changes.
- Event-driven workflows and minimal storage. Use this when you only care about boundary crossings (for example, counting how many times a vehicle entered a site).
Presence status only
- Generates only the current status (INSIDE / OUTSIDE).
- Simple state monitoring. Use this when you only need the current location state (for example, “Is the truck in the garage?”) without keeping an event history.
Presence status and transition events
- Generates both status (INSIDE / OUTSIDE) and transition events (ENTERED / LEFT).
- Full monitoring and automation. This option supports dashboards (current state) and real-time alerts/notifications based on entry/exit events.
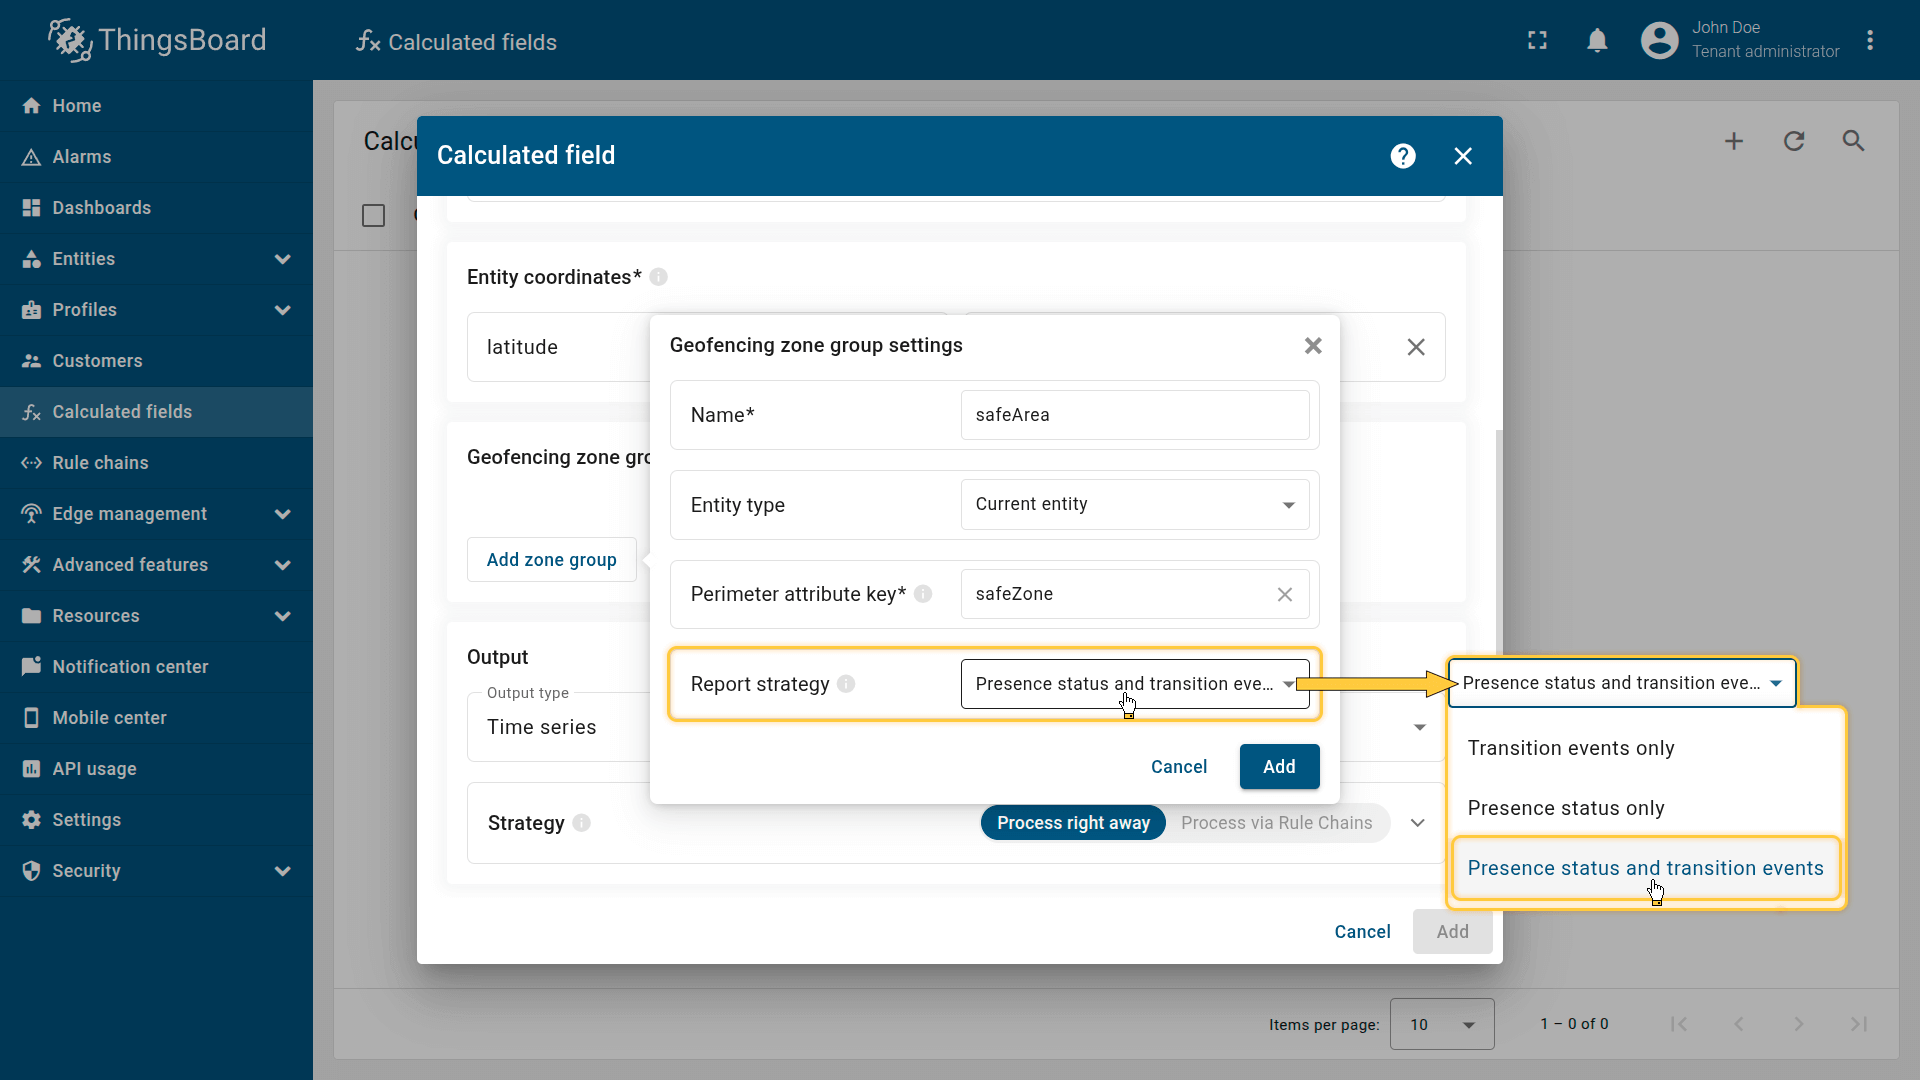
This setting controls what telemetry data the calculated field generates for the group.
Create relations with matched zones
| * only for the "Related entities" entity type |
When enabled, the calculated field automatically creates/removes relations between the source entity and zones the entity is currently inside.
Lifecycle:
Relations are managed dynamically based on movement:
- On Enter: A relation is created immediately when the entity enters a zone.
- On Leave: The relation is removed immediately when the entity leaves the zone.
Configuration
Relation direction:
- From zone to entity — the Zone is treated as the parent, and the Source Entity as the child.
- From entity to zone — the Source Entity is treated as the parent, and the Zone as the child.
Relation type
Defines the relation type name to create (for example, currentlyInside).
Use case
List which entities are currently inside a specific zone.
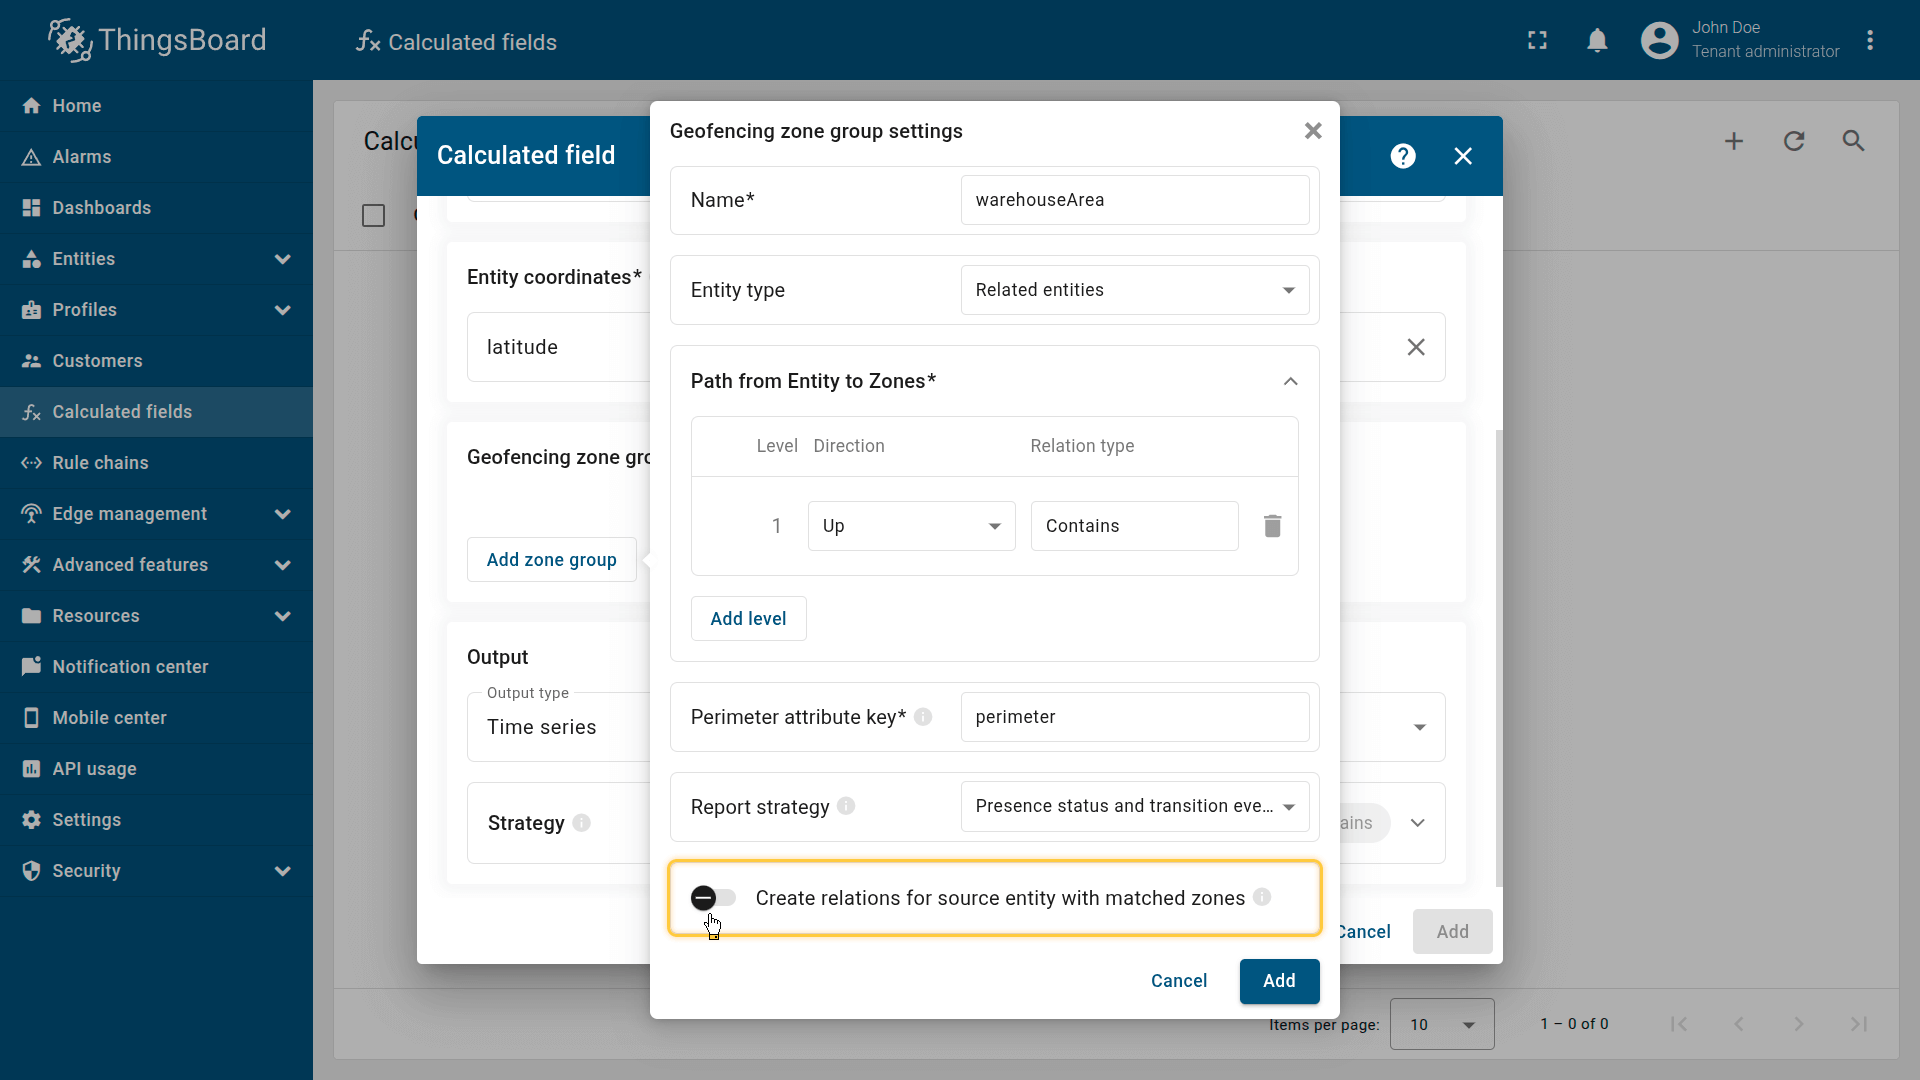
When enabled, the calculated field automatically creates/removes relations between the source entity and zones the entity is currently inside.
Zone groups refresh interval
| * available when at least one group uses "Related entities" entity type |
Controls how often ThingsBoard refreshes the cached list of discovered zones:
- Disabled: Zone relations are fetched once and never refreshed. Use this only when entity relations are permanent and will not change at runtime (for example, static infrastructure).
- Enabled: Zone relations are refreshed periodically based on the configured interval (in seconds).
Tuning guidelines
- Low interval (e.g., 60s): if relations change often. The system detects reassignment sooner and applies the latest zones with minimal delay.
- High interval (e.g., 3600s): if relations rarely change. This reduces database load by caching relations longer and improves overall performance.
⚠️ Minimum allowed value is controlled by tenant profile setting “Min allowed update interval for ‘Related entities’ arguments”.
Controls how often ThingsBoard refreshes the cached list of discovered zones.
Output
For each zone group, ThingsBoard generates internal variables:
- <zoneGroupName>Status -> INSIDE / OUTSIDE
- <zoneGroupName>Event -> ENTERED / LEFT
Example for a group named restrictedArea:
- restrictedAreaStatus
- restrictedAreaEvent
In the Output section, map these variables to the target output keys and save them as telemetry (recommended) or attributes.
Best practice: store the output data as telemetry, as this provides the greatest flexibility for dashboards, analytics, and alarms.
Examples
To help you get started, here are three common configuration patterns applied to real-world scenarios.
Example 1: Pet Tracker (Self-Geofencing)
Scenario
You are building a pet tracking solution. Each dog collar tracker sends GPS coordinates (latitude, longitude) and stores its own “Home Zone” geometry (a circle) in a server-side attribute safeZone.
Each dog has a unique zone (e.g., Buddy and Rex live in different locations), so the geofence geometry must be stored on the device itself.
You are building a pet tracking solution. Each dog collar has a unique “Home Zone” defined by the owner (e.g., a 40-meter radius around their specific house).
Goal
Detect when the dog enters/leaves its safe zone and generate:
- presence status (INSIDE / OUTSIDE)
- transition events (ENTERED / LEFT)
Calculated field configuration
Download the “Pet Tracker” calculated field configuration (JSON).
Configuration steps
1. Import demo devices
Import two devices — each device represents a tracker built into a dog collar. These devices will publish GPS coordinates as telemetry and a server-side safeZone attribute that contains the home zone coordinates in the form of a circle.
- Download the CSV file containing device configurations.
- Go to the Devices and import the CSV file.
CSV includes:
- Name: Buddy, Rex
- Type: pet-tracking
- Time series: latitude, longitude
- Server attribute: safeZone
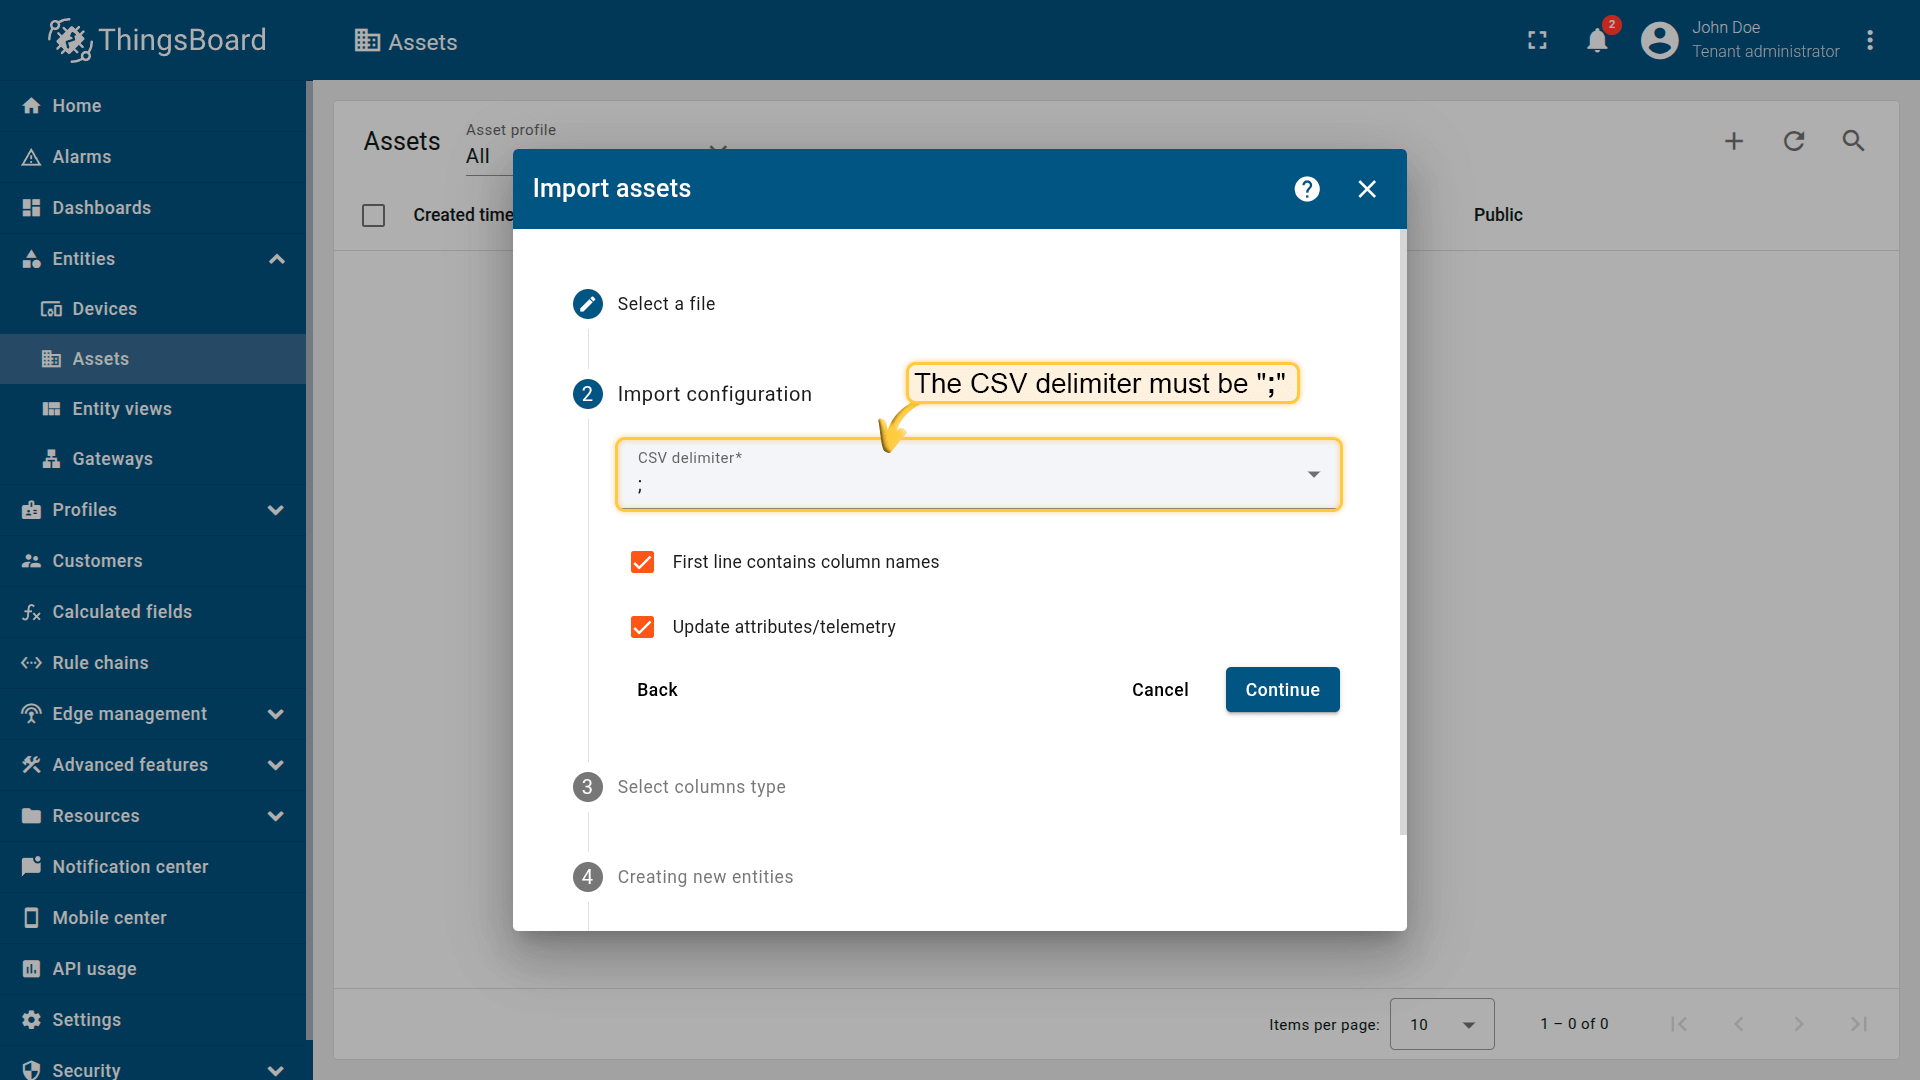
Important notes about the CSV:
- The CSV delimiter must be ;.
- latitude and longitude are time series keys that define the dog's current coordinates.
- safeZone is a server-side attribute that defines the zone perimeter as a circle.

Go to the Devices and import device configurations from a CSV file.
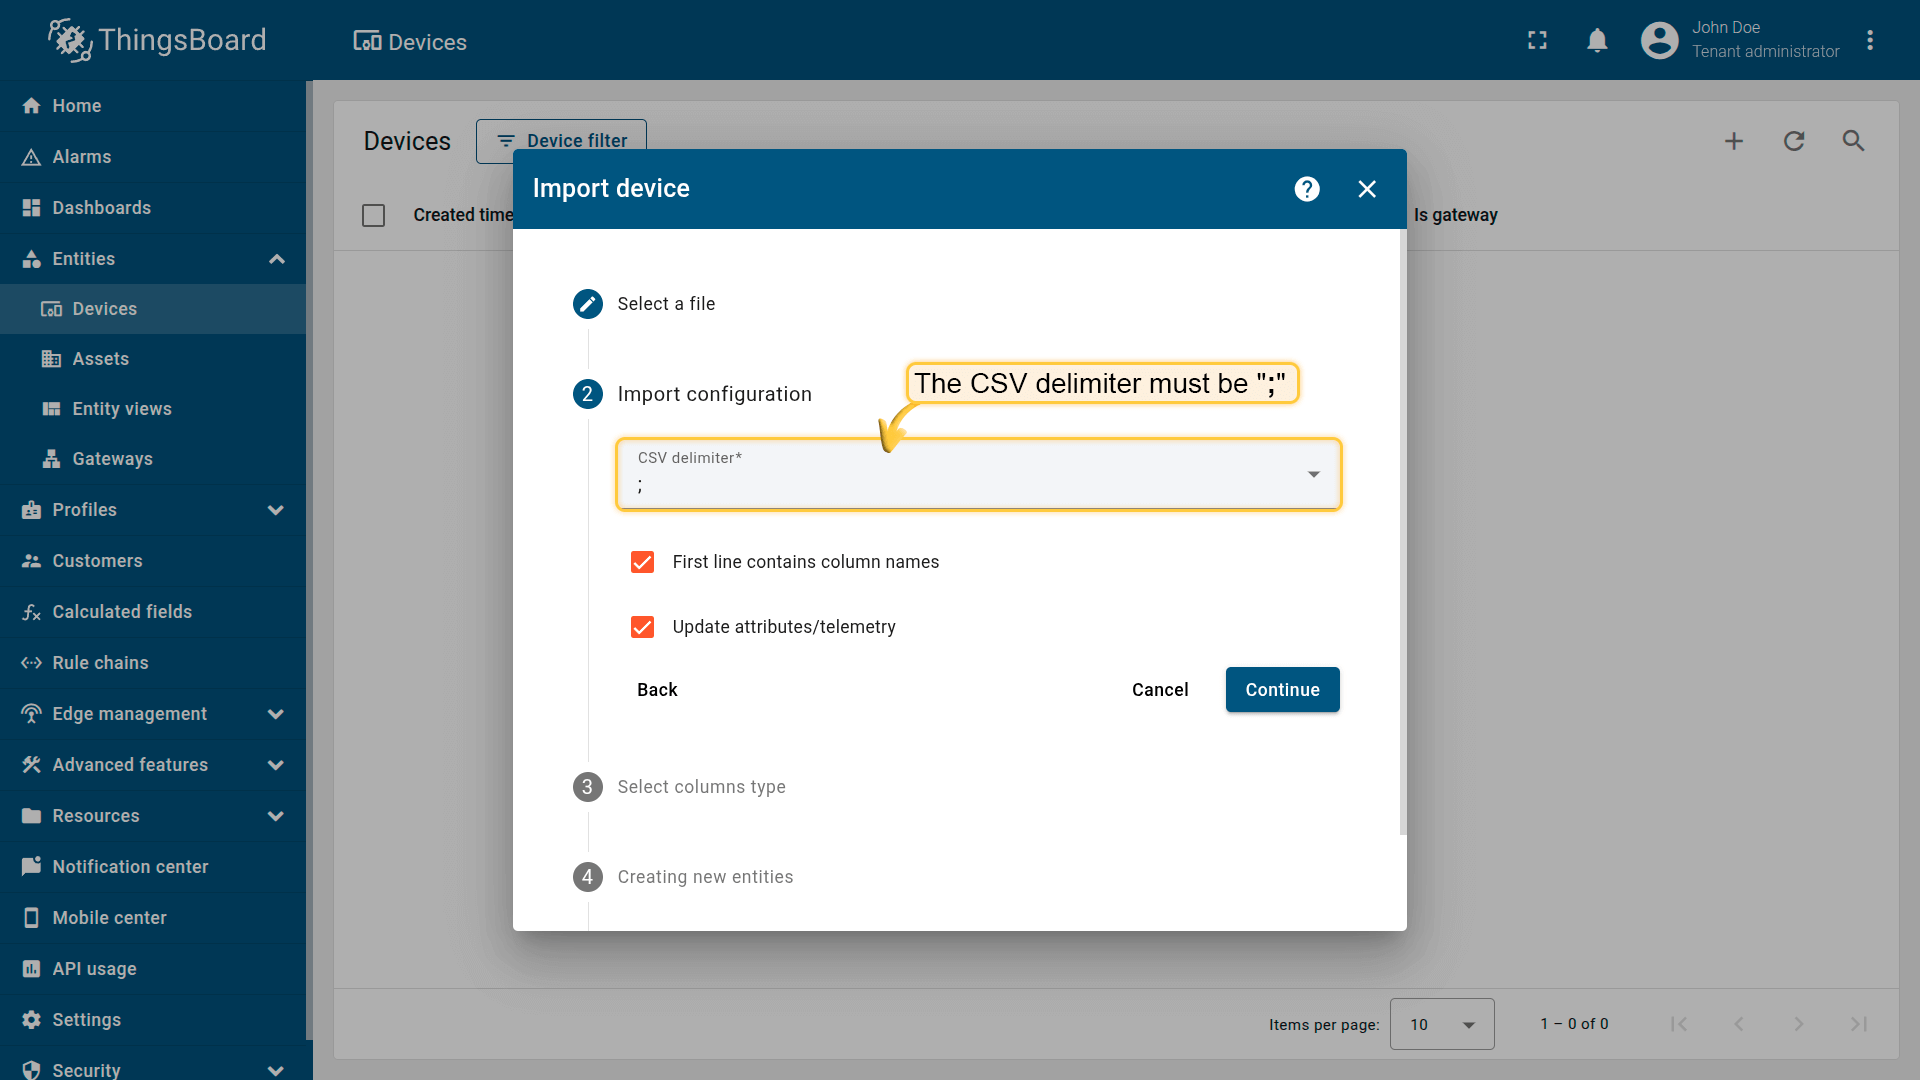
The CSV delimiter must be ;
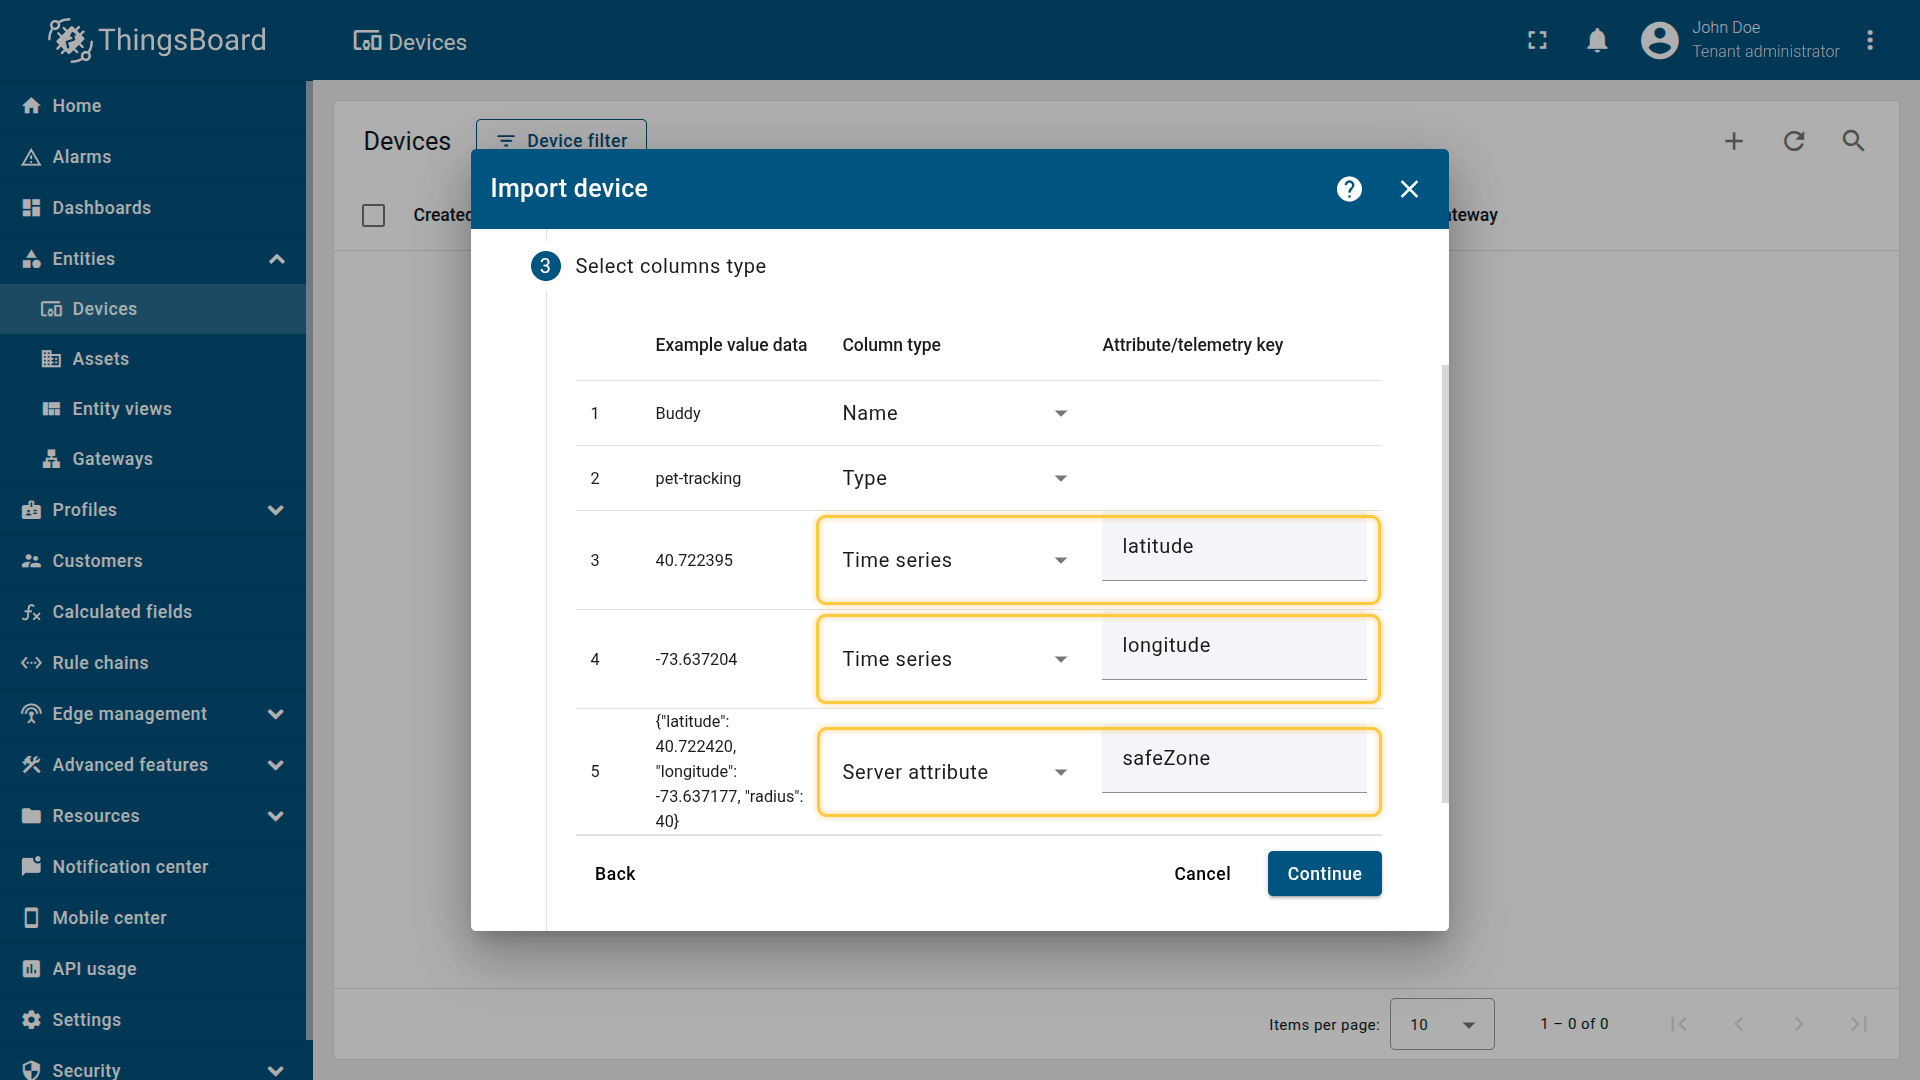
Time series: latitude, longitude, Server attribute: safeZone

Imported devices that publish GPS coordinates as telemetry.
2. Apply the calculated field to the device profile
When importing the devices, the “pet-tracking” profile is created automatically and assigned to them.
Apply the calculated field to this profile so it runs for all devices using it.
- Download the calculated field configuration file.
- Go to the “Calculated fields” tab and import the configuration.
This calculated field evaluates whether each dog is inside its own safeZone and generates status/events accordingly.
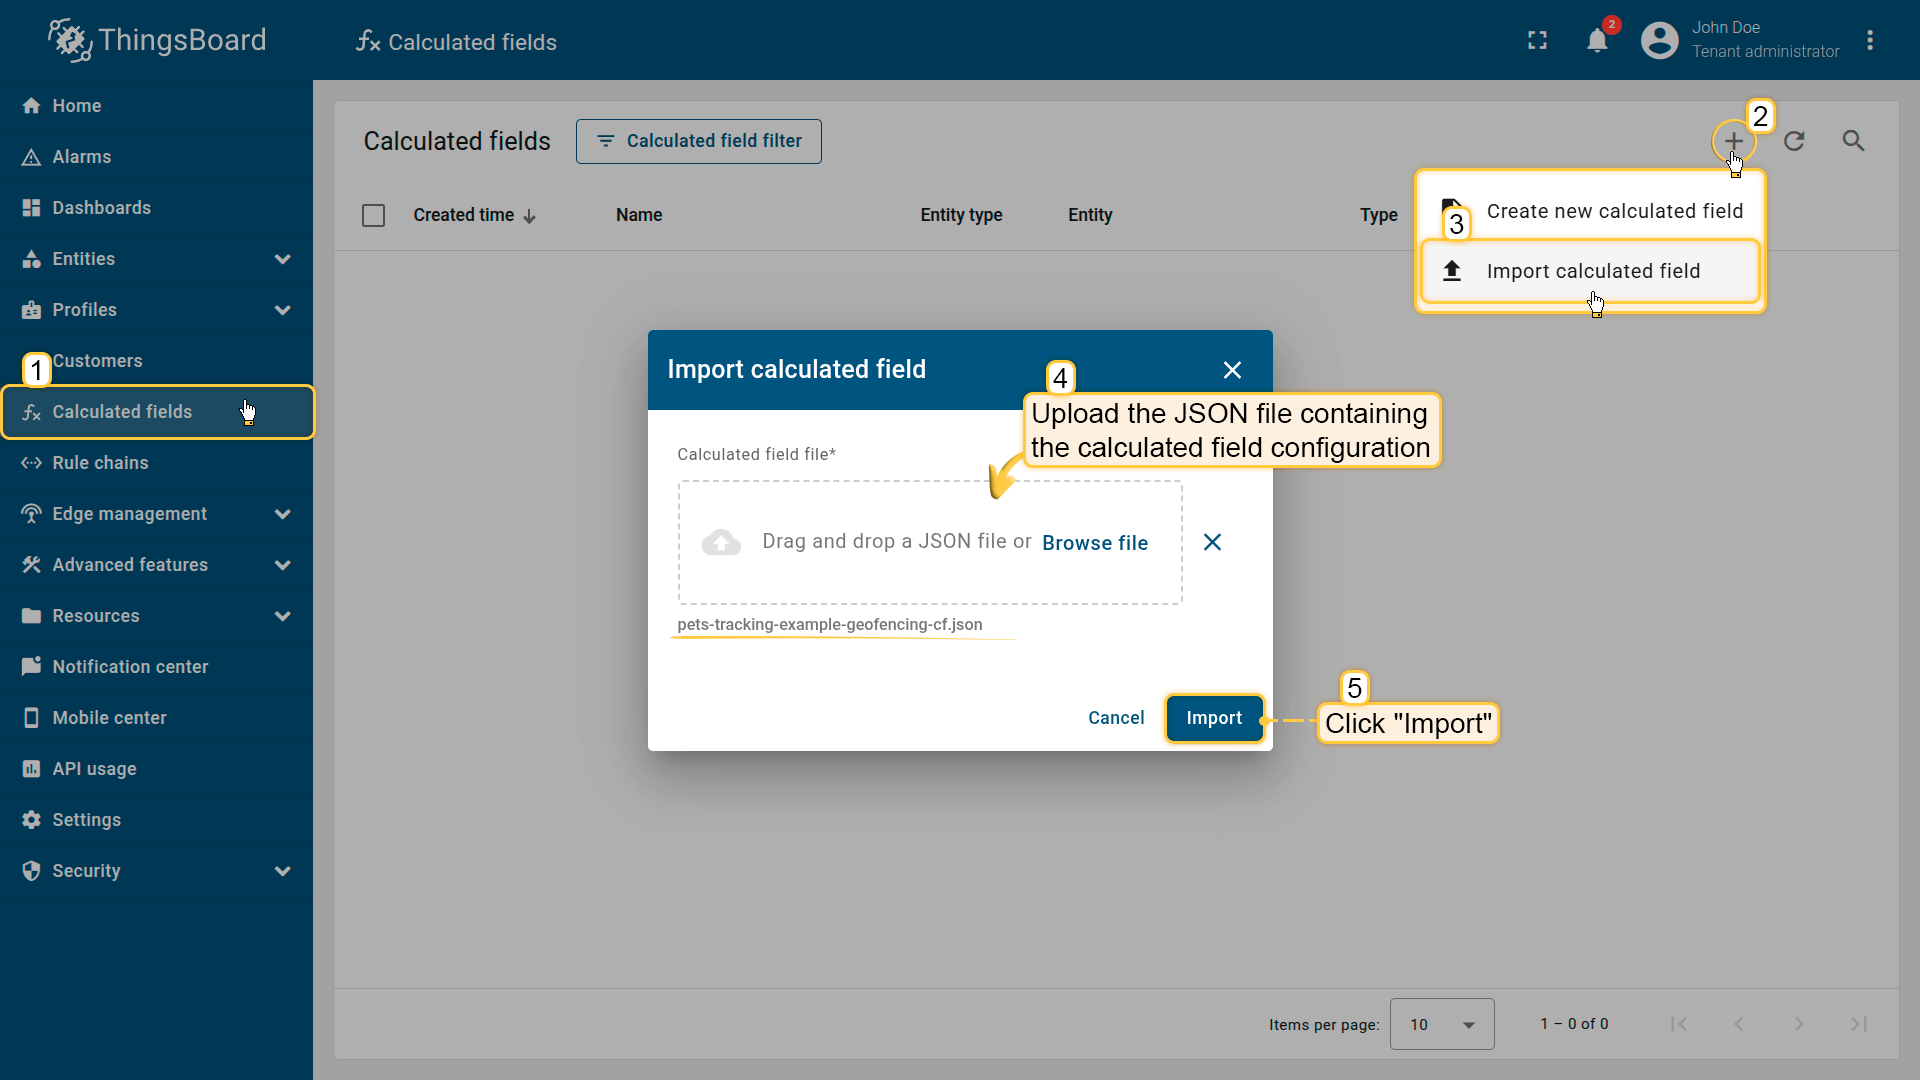
Go to the Calculated fields tab and import the calculated field configuration.
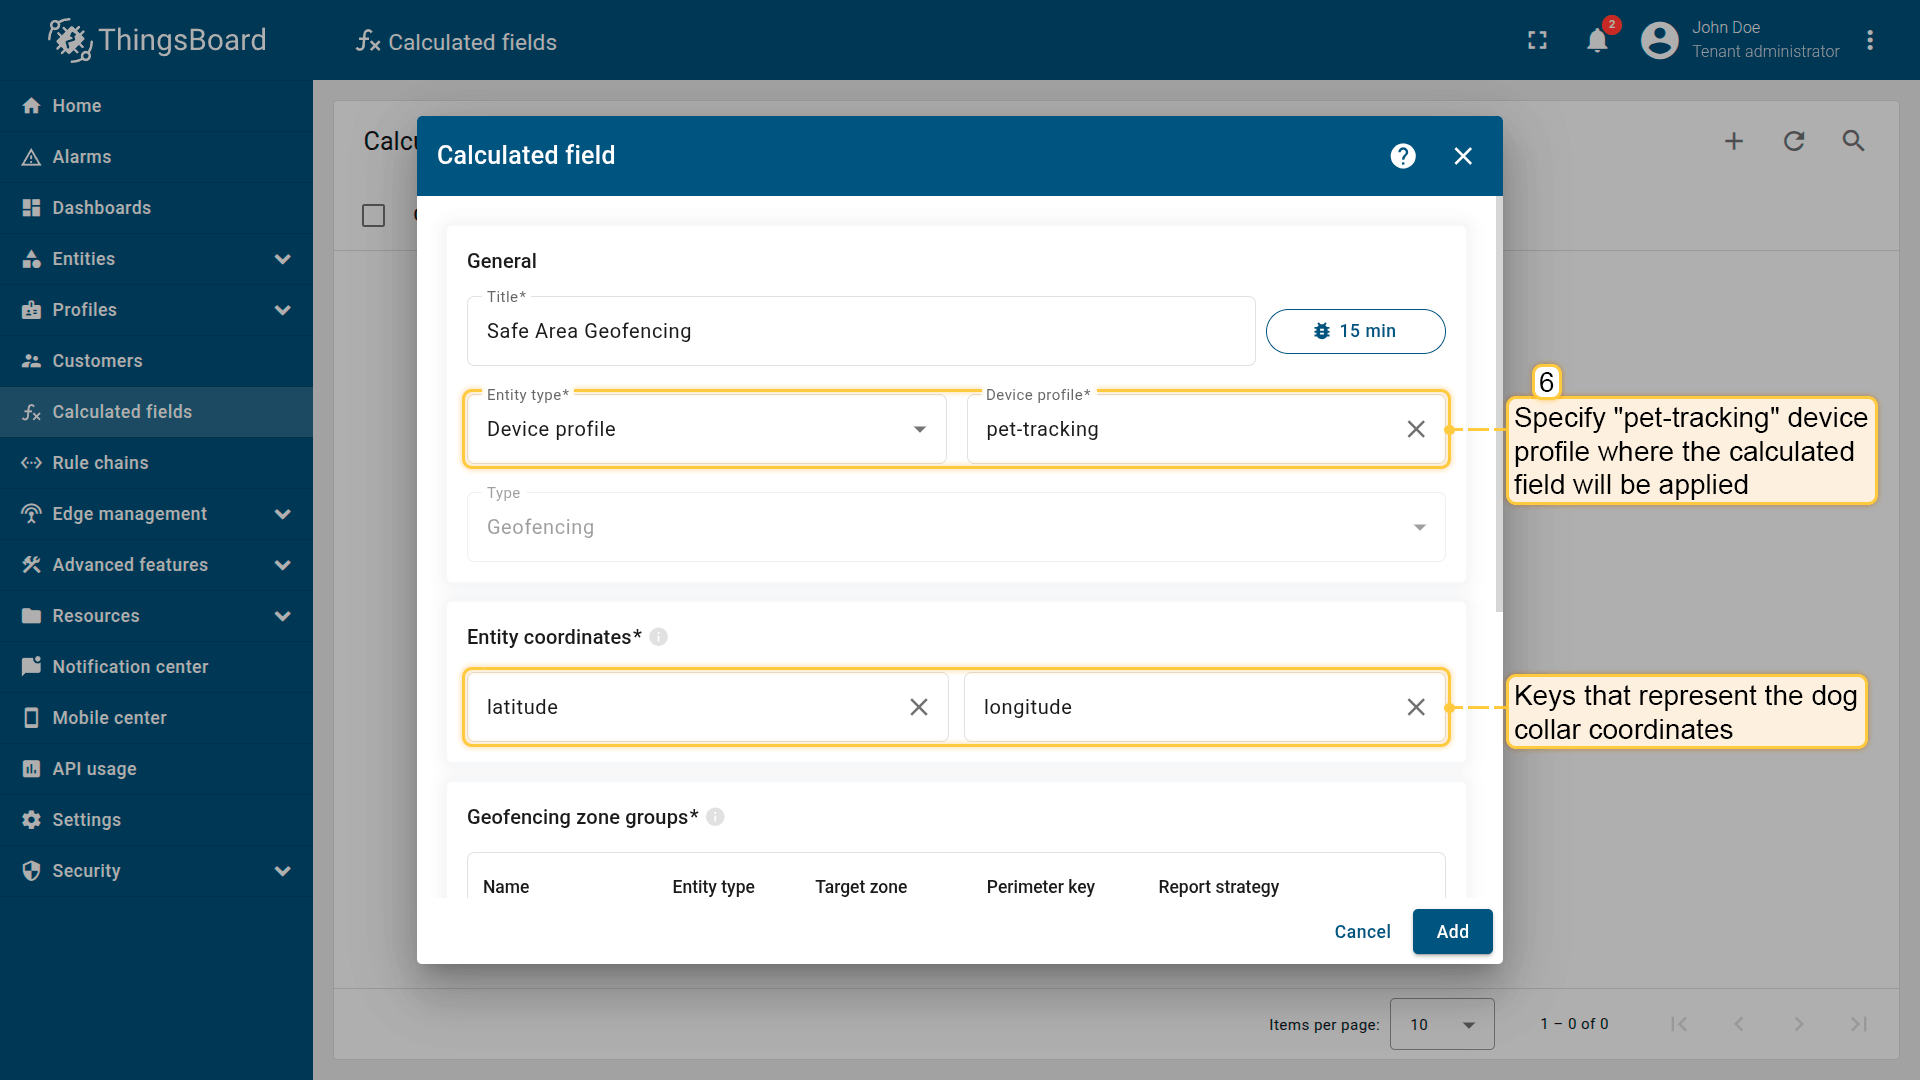
Apply the calculated field to the pet-tracking profile so it runs for all devices using it.
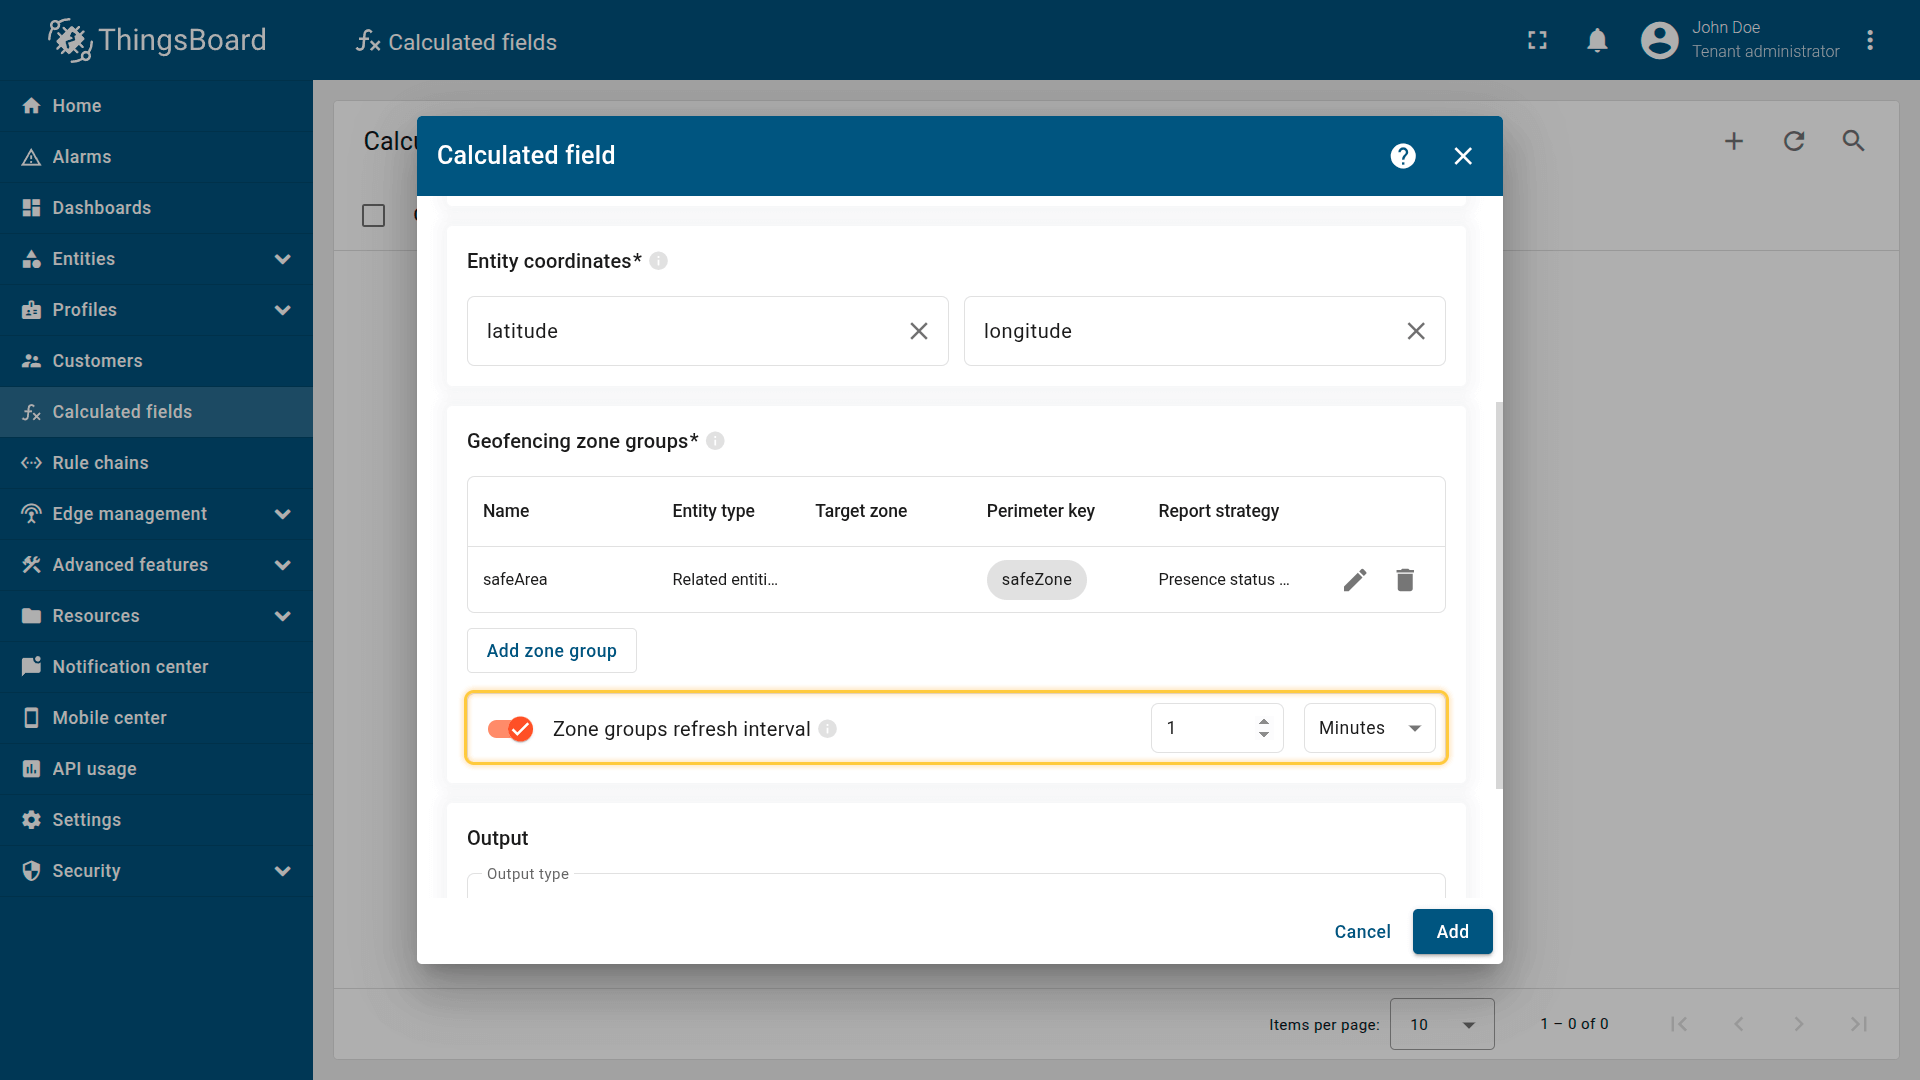
Entity coordinates: latitude, longitude
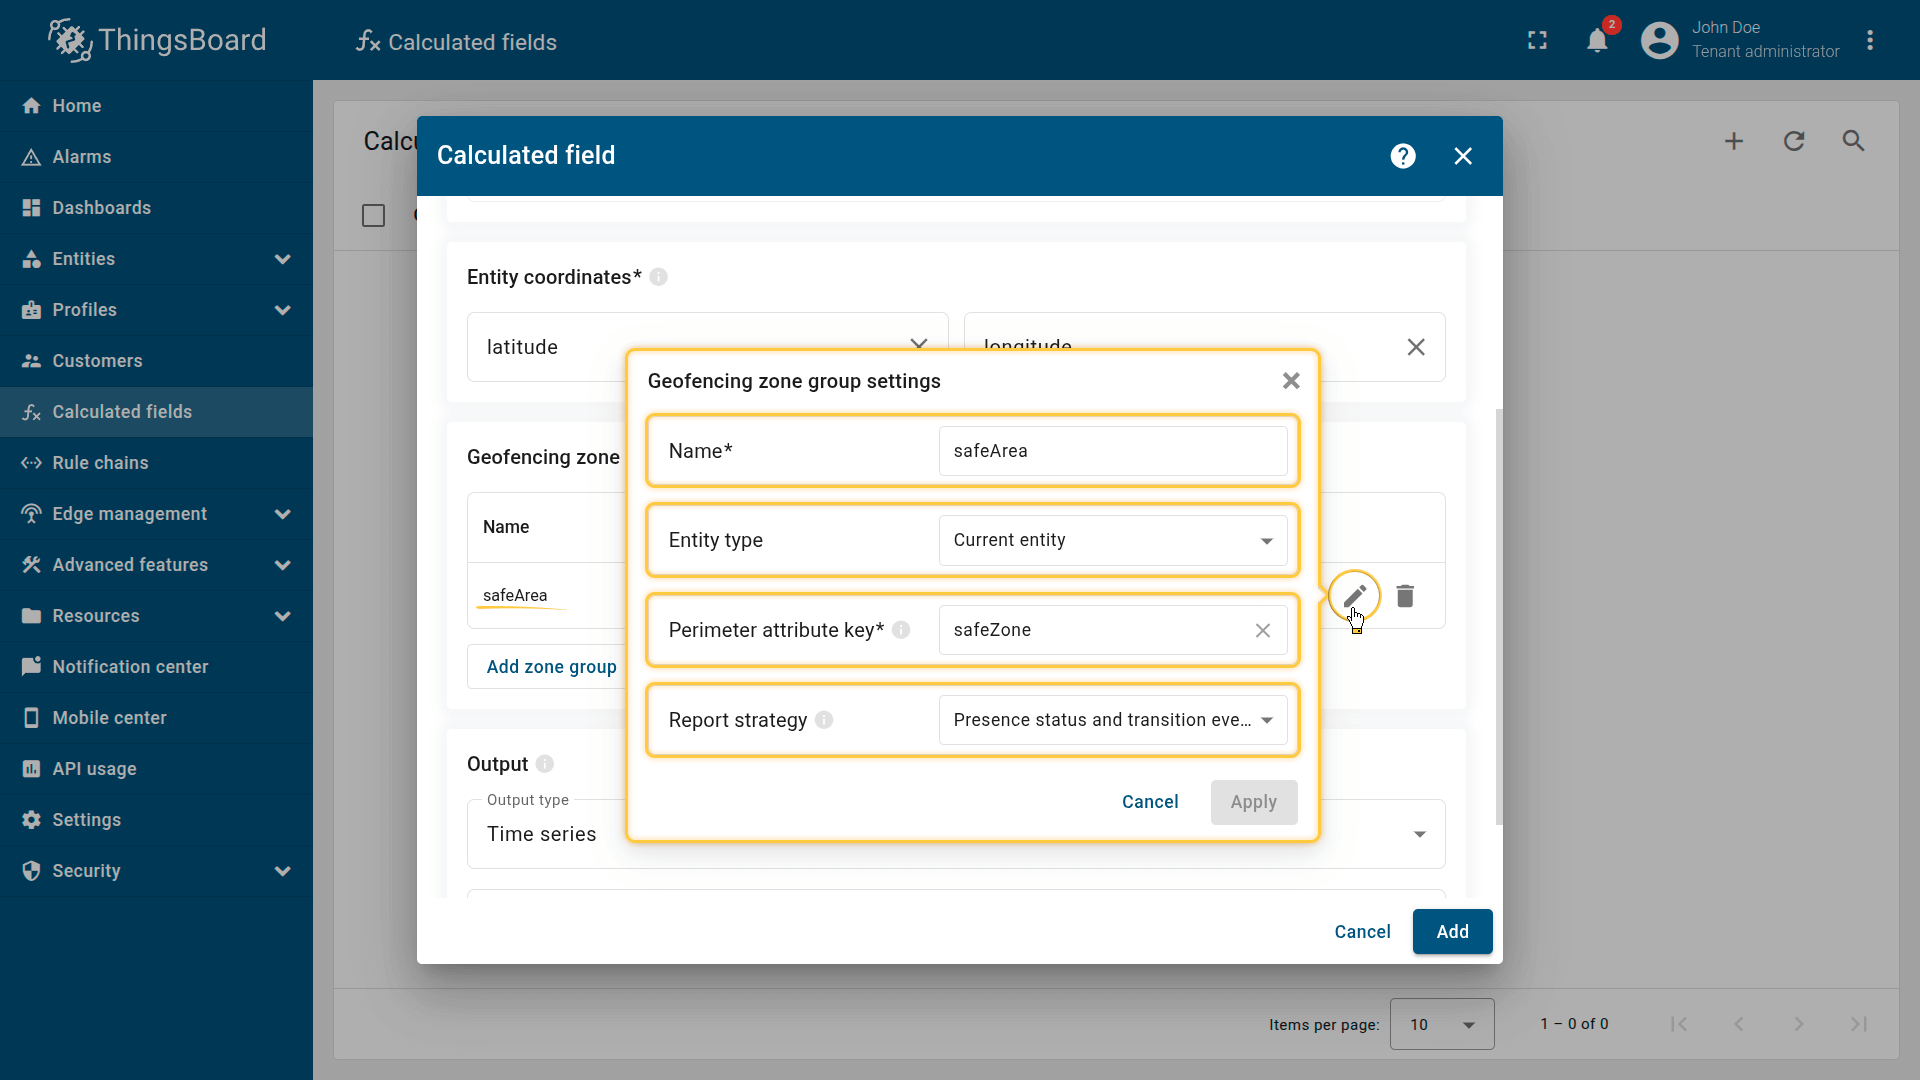
Geofencing zone group settings.
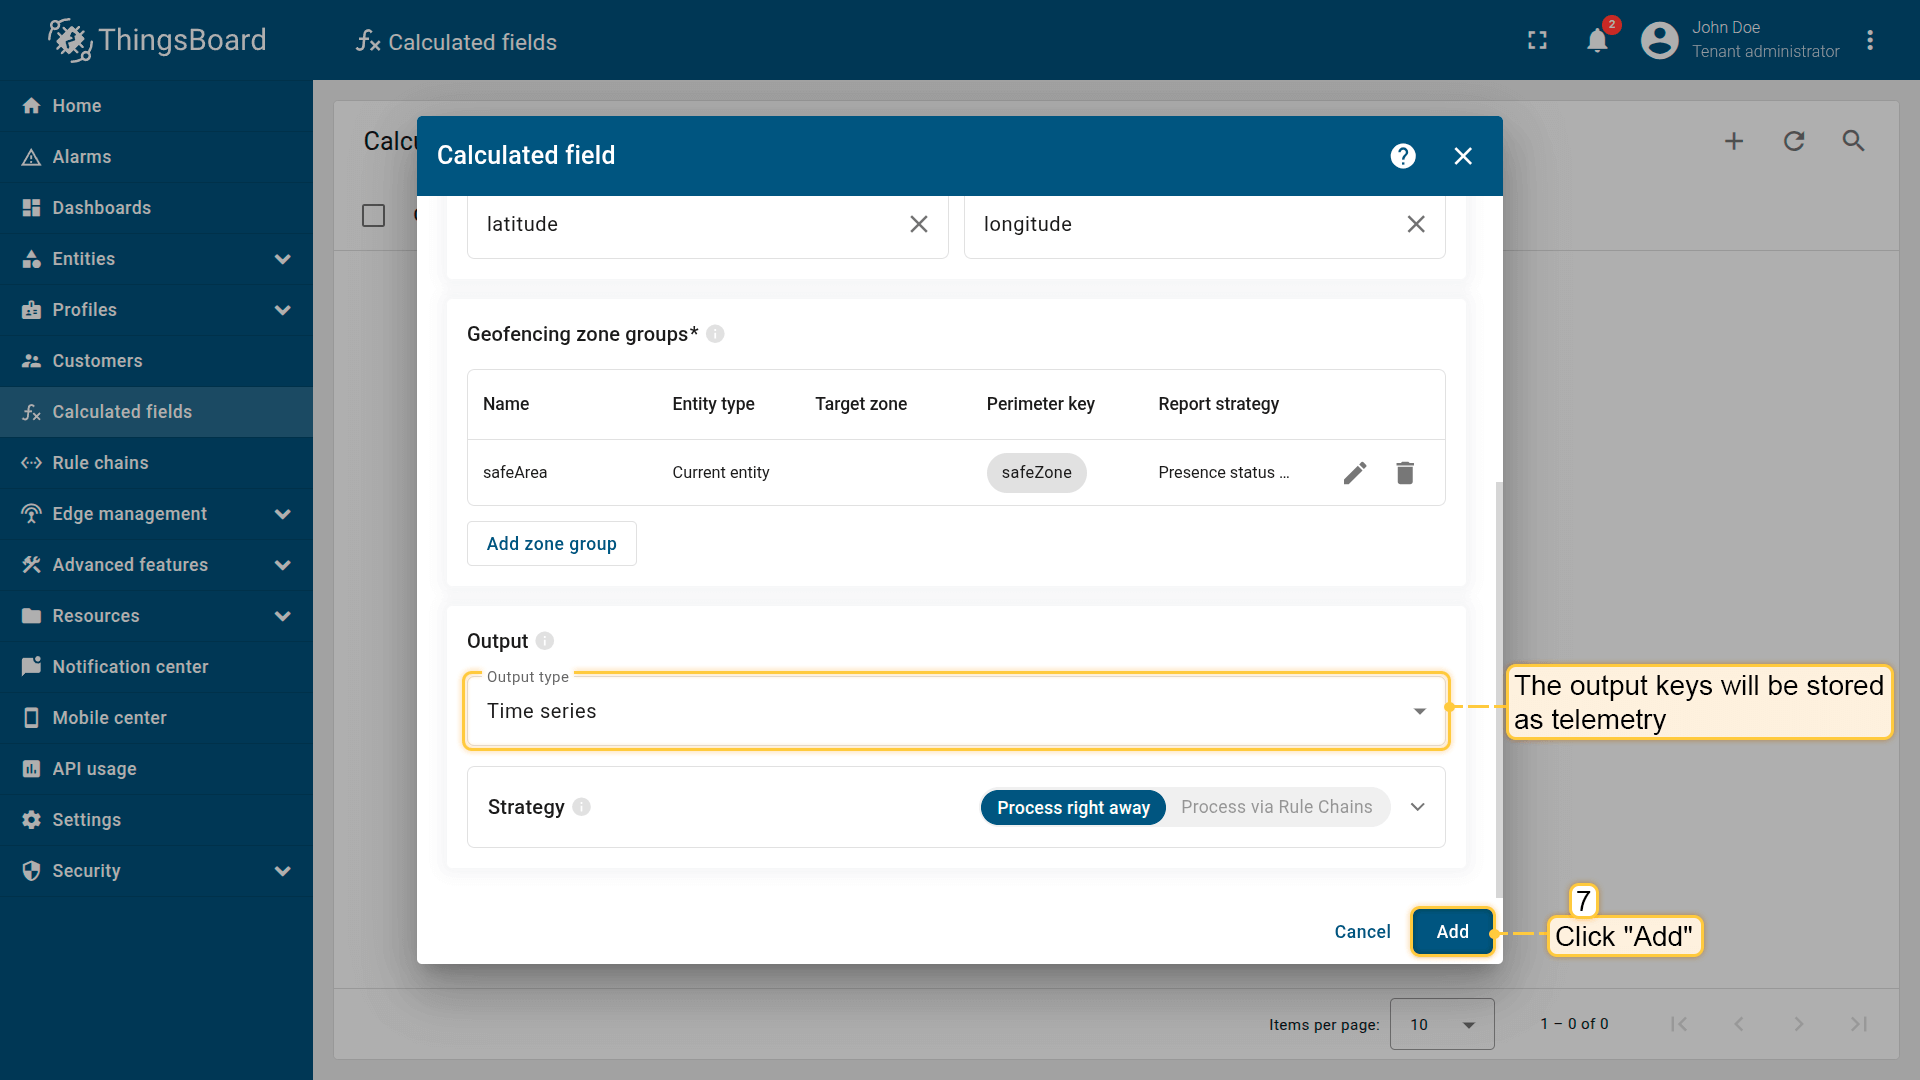
The output values must be saved as telemetry.
(Optional) Enable Debug mode and inspect execution via the Events button.
3. Import the demo dashboard
Import the dashboard JSON to monitor devices:
- Download the dashboard configuration file.
- Go to the Dashboards page and import the JSON file with dashboard configuration.
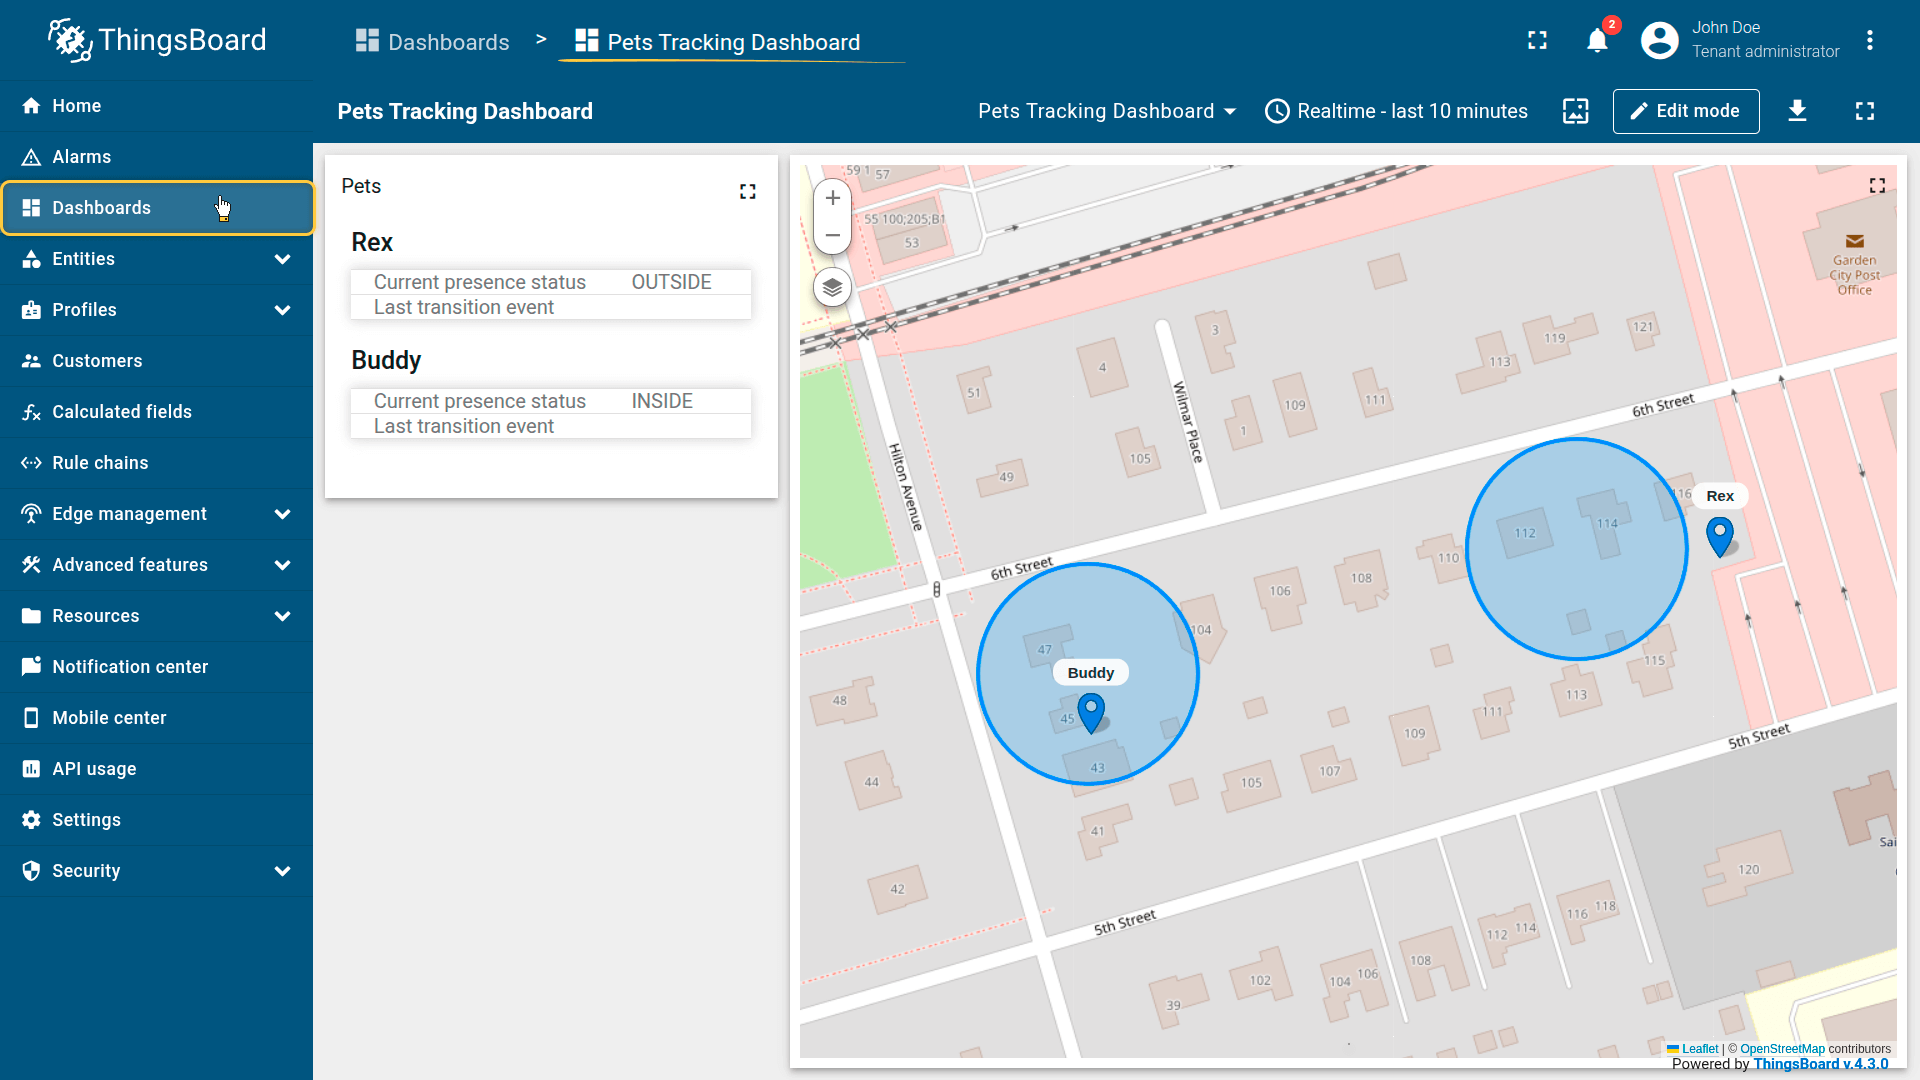
The dashboard includes:
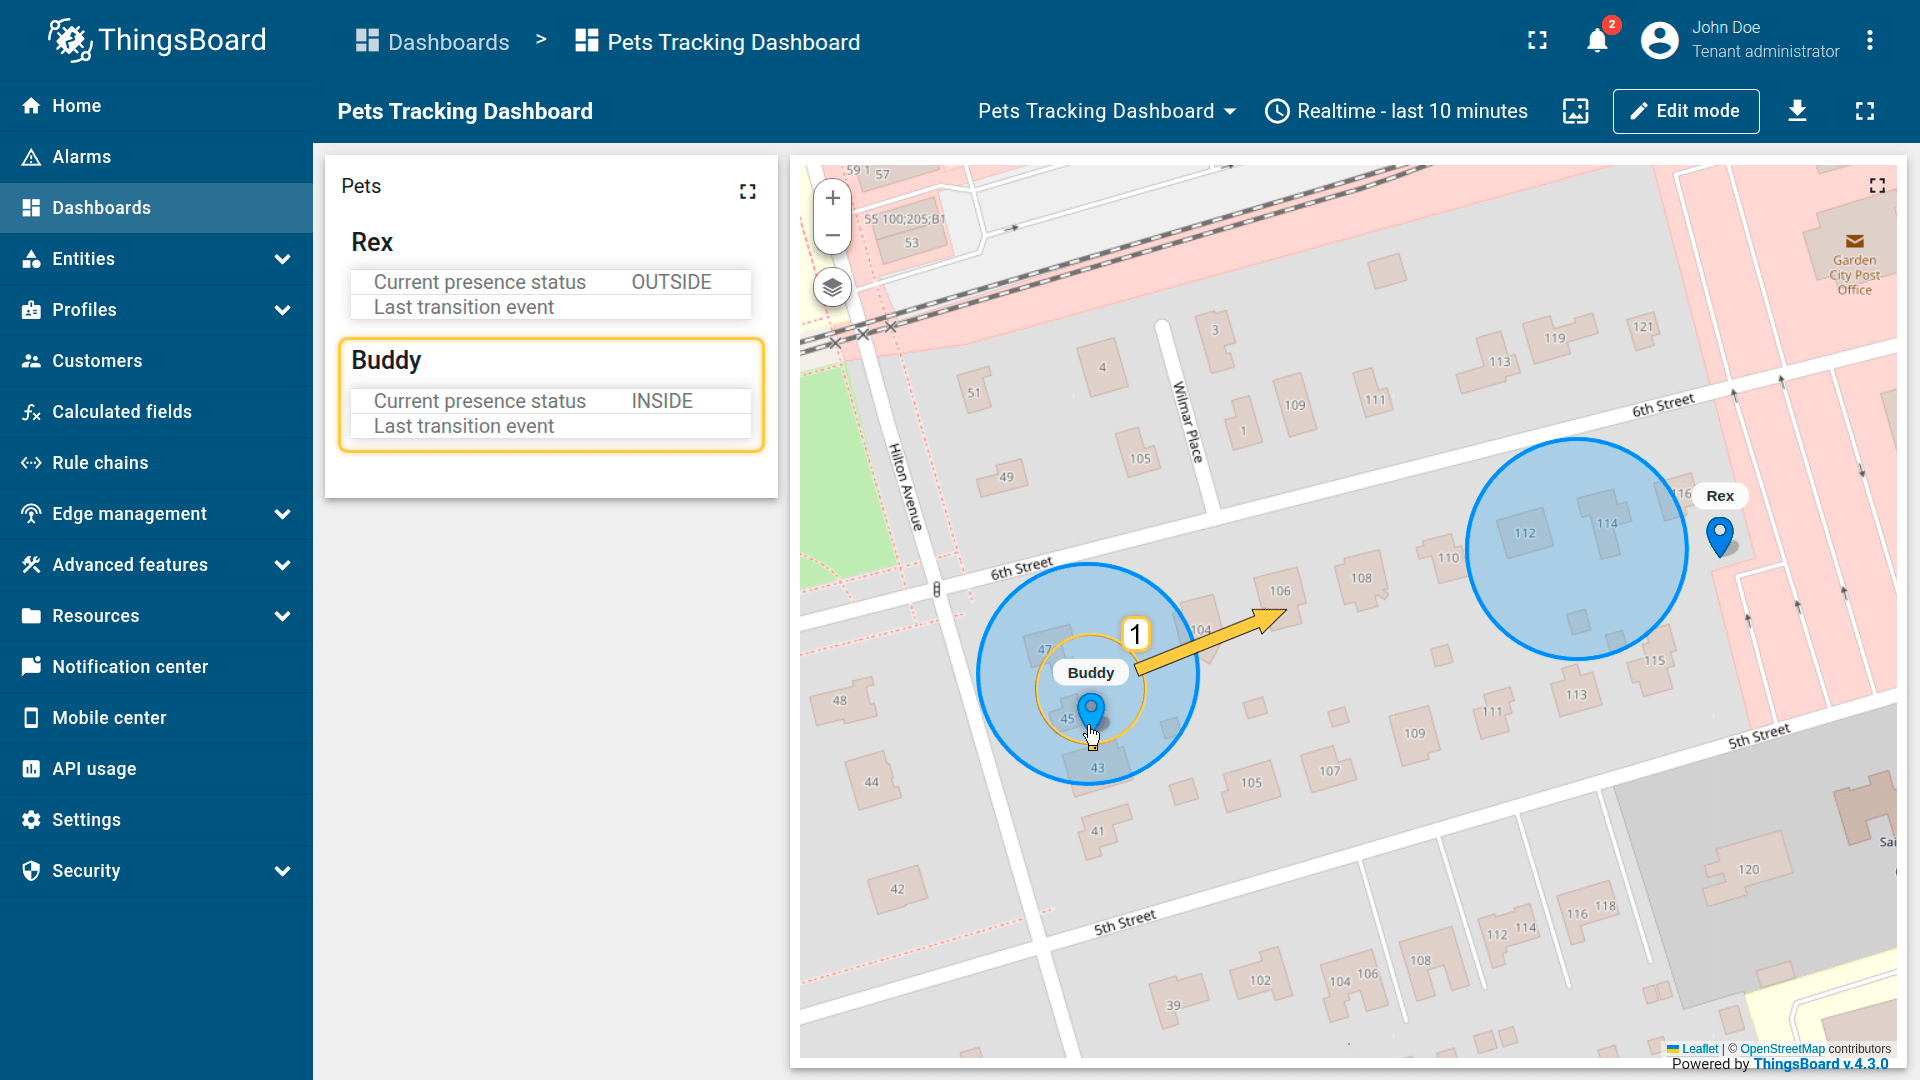
- A map widget showing dog locations.
- An attribute card widget that displays:
- The dog's current presence status relative to its safe zone (INSIDE / OUTSIDE)
- The most recent safe zone transition event (ENTERED / LEFT)
Import the demo dashboard.
Result
As you move the dogs' markers outside of or back into the home zone:
- status updates (INSIDE / OUTSIDE)
- event updates (ENTERED / LEFT)
As you move the dogs' markers outside of or back into the home zone:
- status updates (INSIDE / OUTSIDE)
- event updates (ENTERED / LEFT)


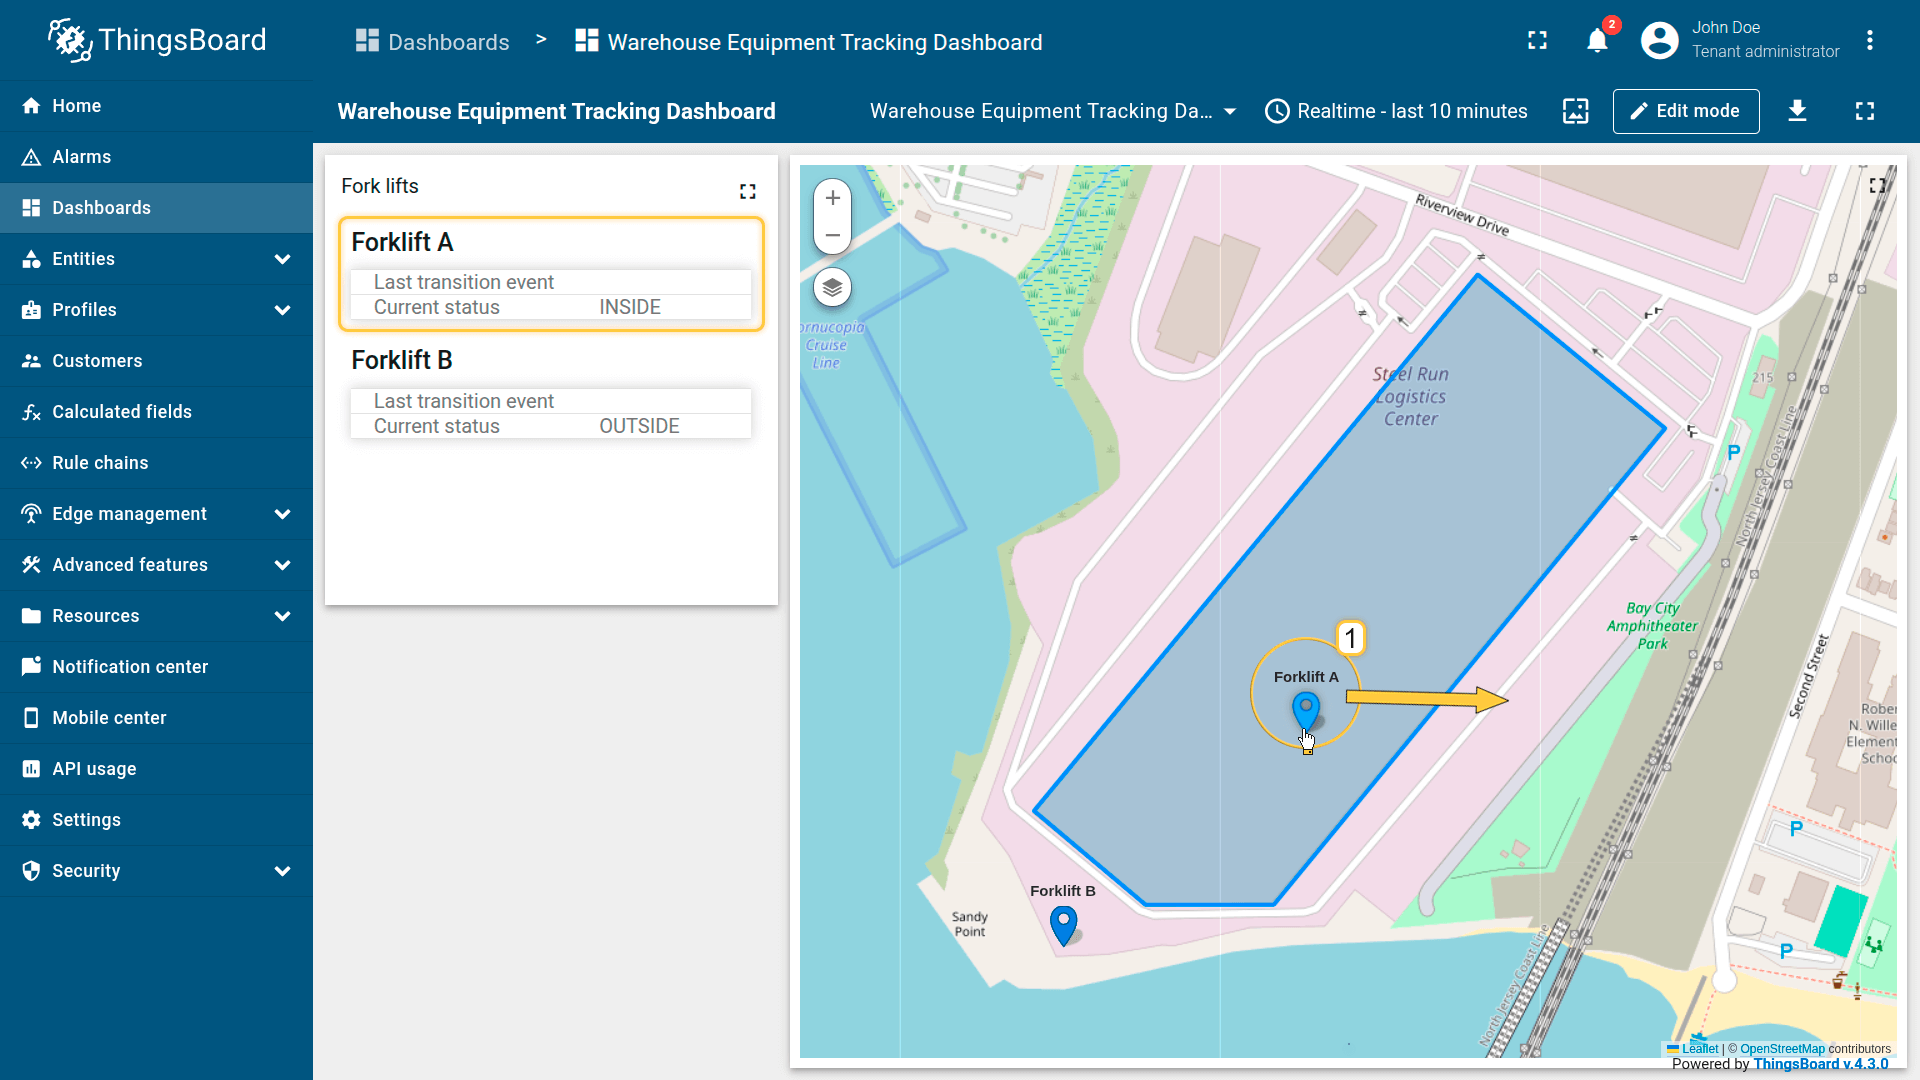
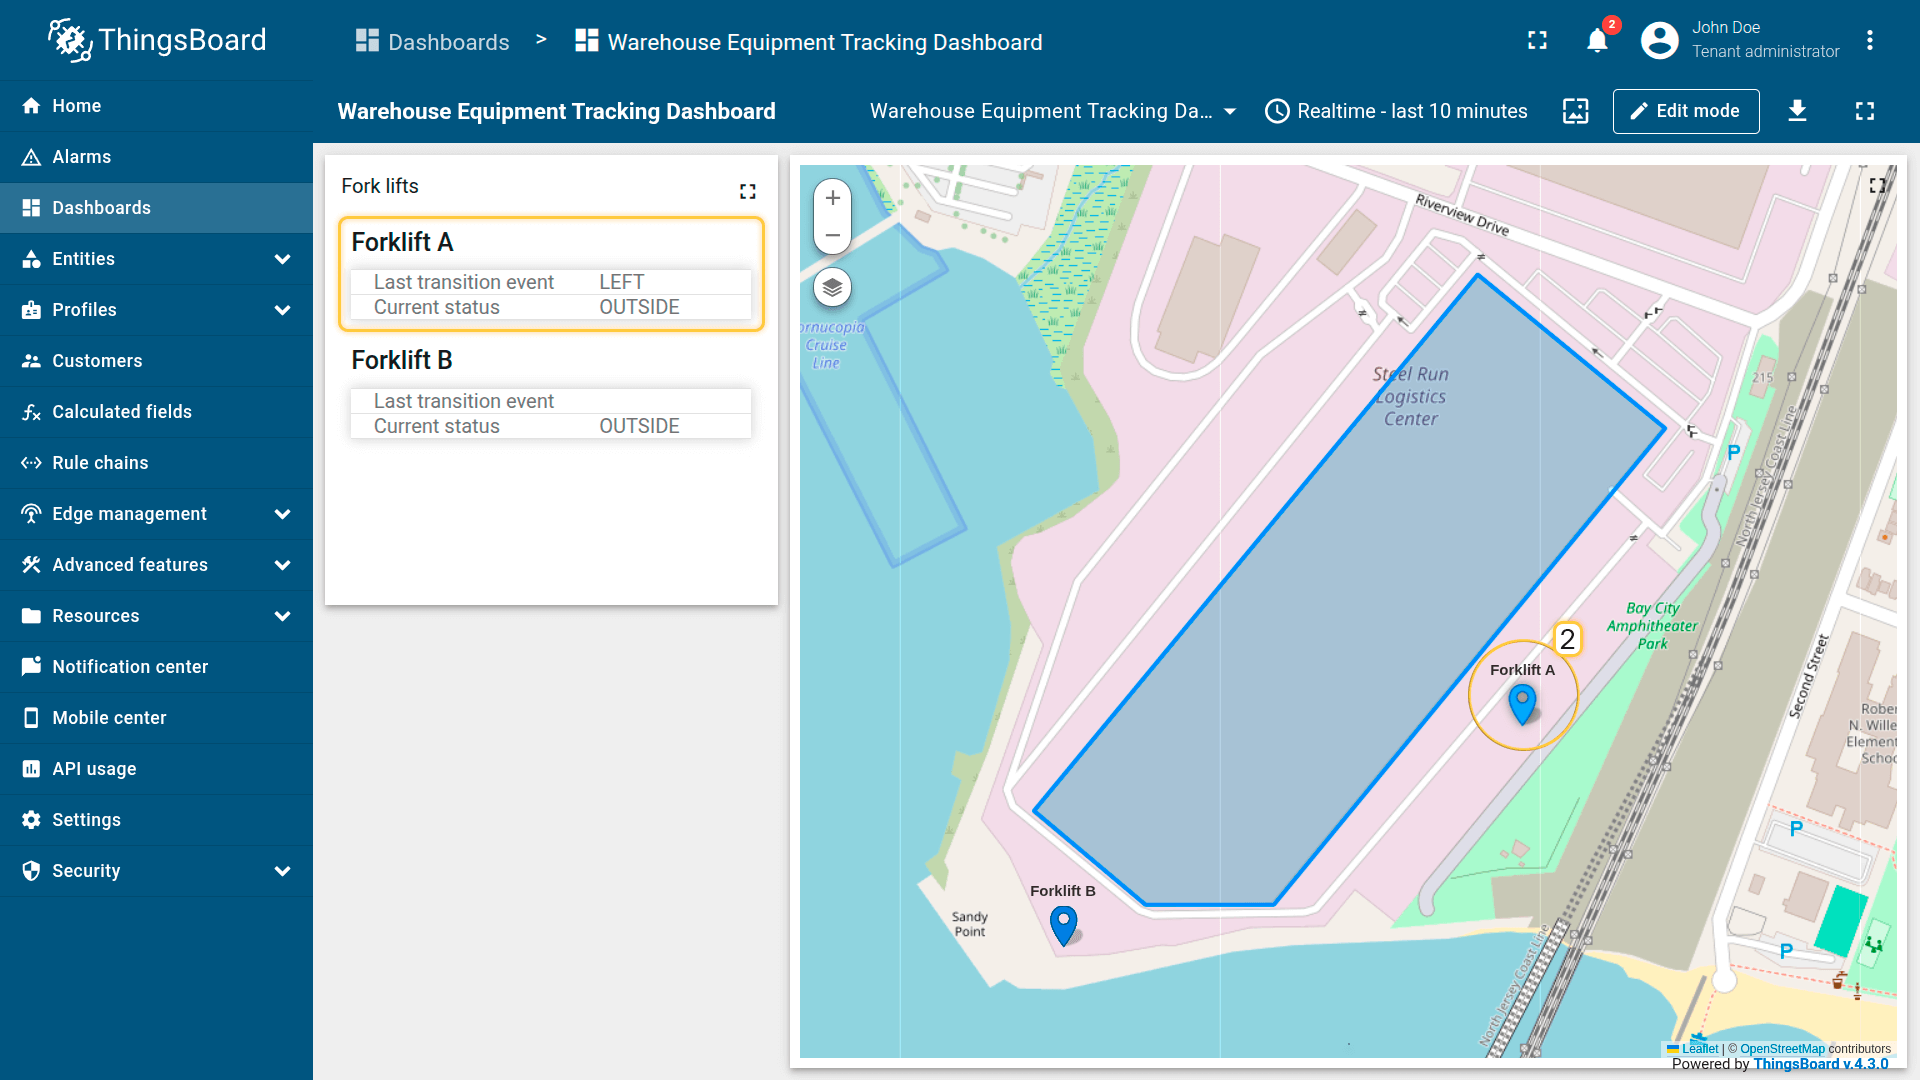
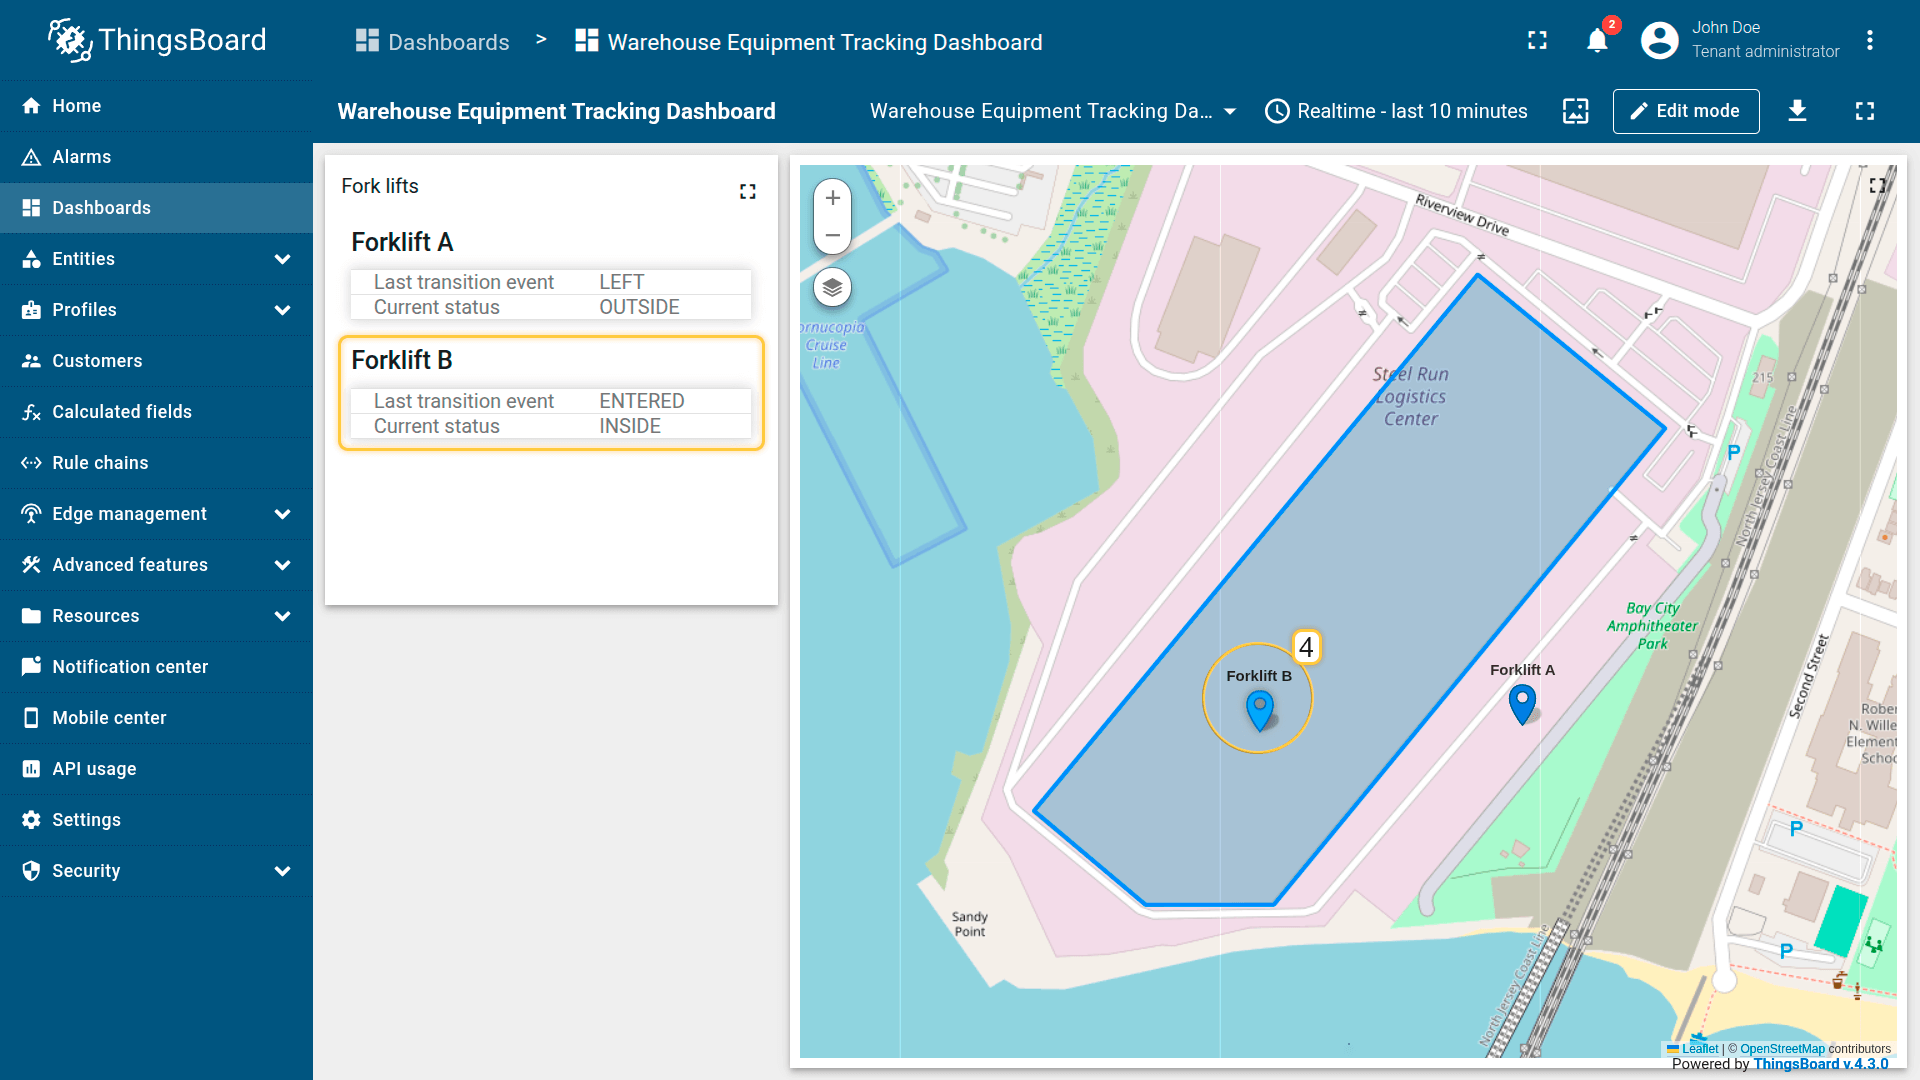
Example 2: Warehouse equipment (Direct Association)
Scenario
You manage a large distribution center. You have two forklifts. Each forklift tracker publishes GPS telemetry (latitude, longitude).
The warehouse asset publishes the geofence perimeter as an attribute.
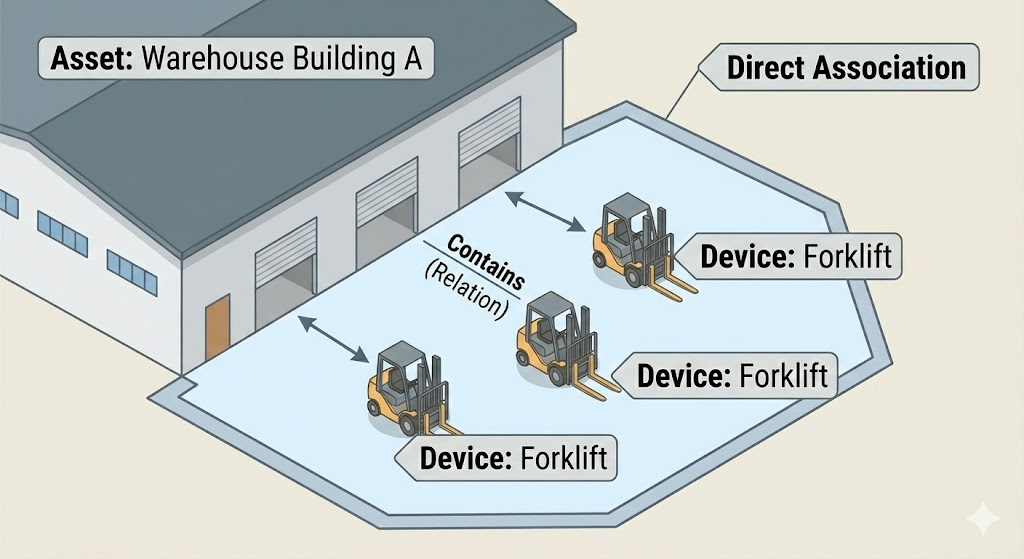
You manage a large distribution center. You have 2 forklifts, and each forklift is assigned to a specific “Warehouse Building” asset.
Goal
Detect when a forklift leaves the perimeter of its assigned building, and generate:
- the current presence status (INSIDE / OUTSIDE)
- transition events (ENTERED / LEFT)
Calculated field configuration
Download the “Warehouse equipment” calculated field configuration (JSON)..
Configuration steps
1. Import demo devices
Import two devices — each device represents a tracker installed in a forklift. The devices publish GPS coordinates as telemetry.
- Download the CSV file containing device configurations.
- Go to the Devices page and import the CSV file.
CSV includes:
- Name: Forklift A, Forklift B
- Type: forklift
- Time series: latitude, longitude
Important notes about the CSV:
- the CSV delimiter must be ;.
- the column type for the latitude and longitude keys must be set to “Time series”.

Go to the Devices and import device configurations from a CSV file.
The CSV delimiter must be ;
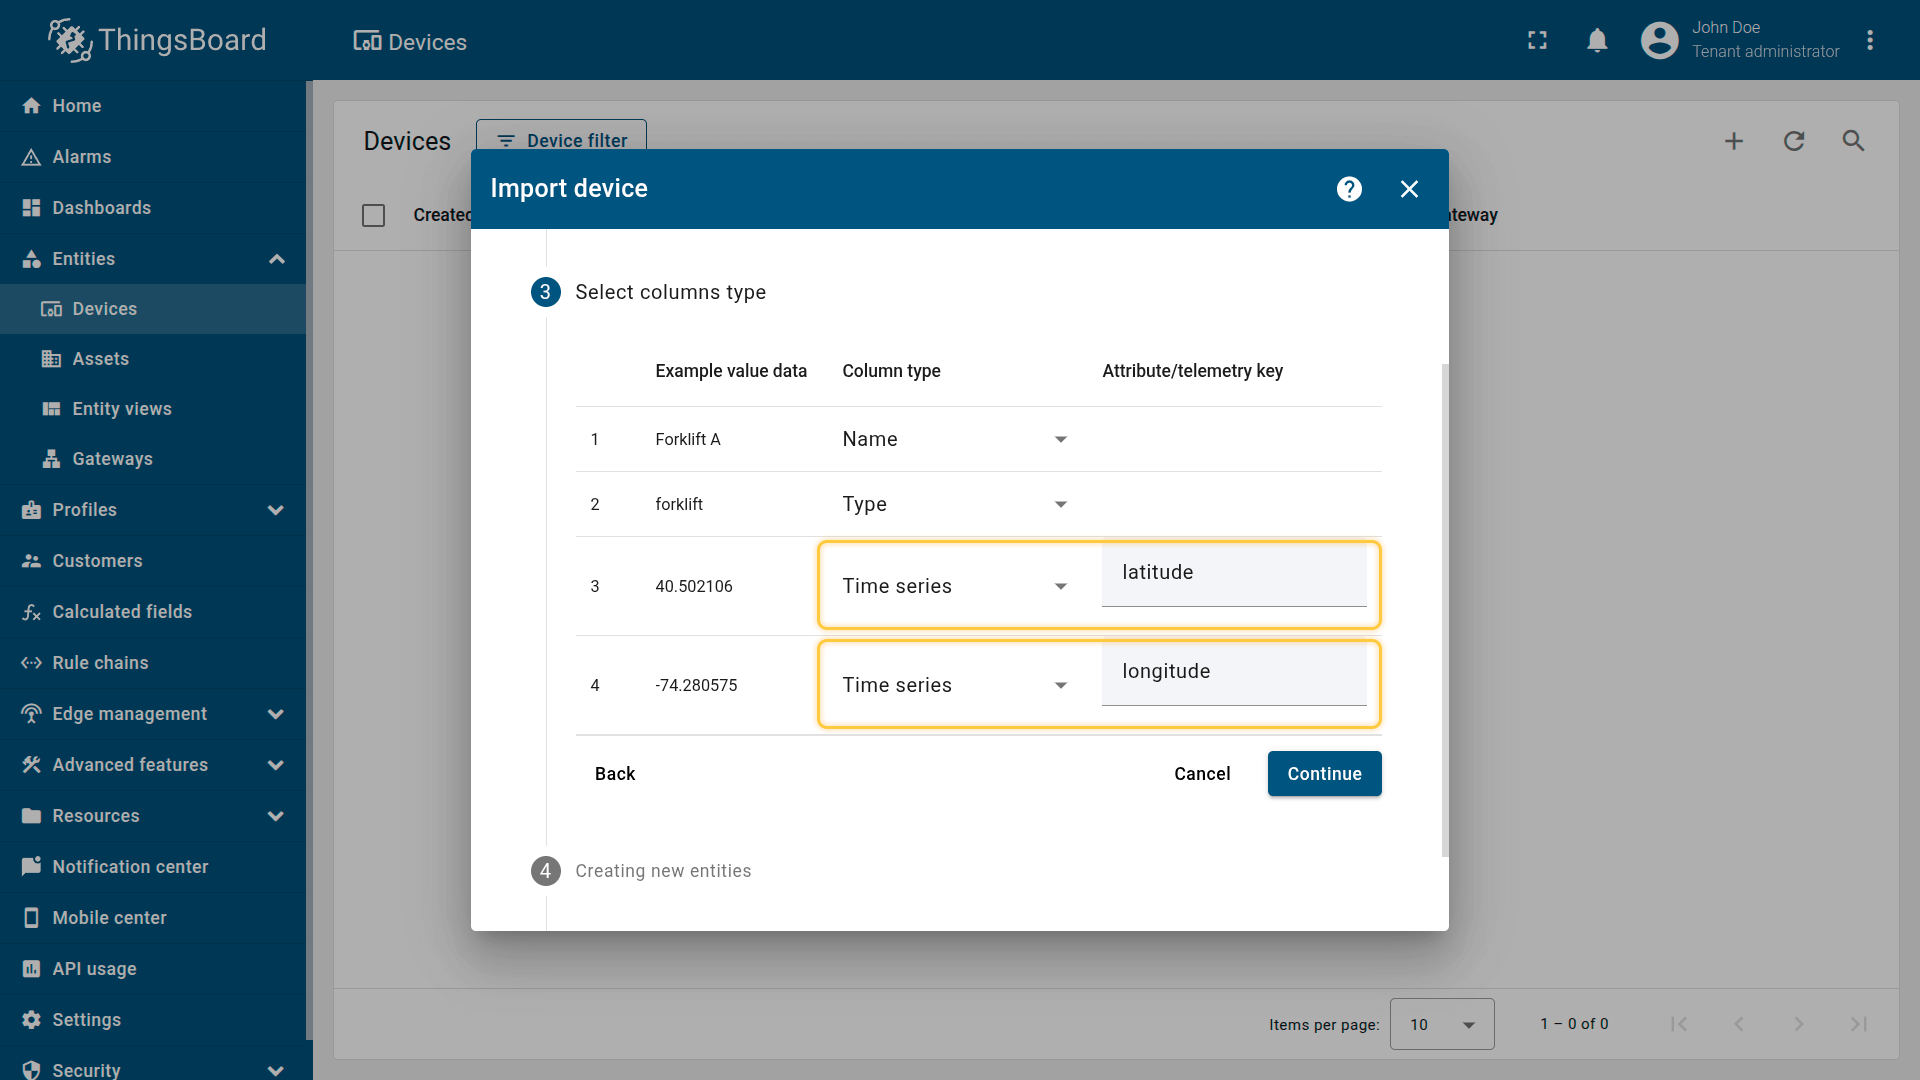
Time series: latitude, longitude

Imported devices that publish GPS coordinates as telemetry.
2. Import demo asset
- Download the CSV file: warehouse-equipment-example-asset-data.csv
- Go to the Assets page and import the CSV file into your ThingsBoard instance:
CSV includes:
- Name: Warehouse A
- Type: warehouse
- Server attribute: perimeter
Important notes about the CSV:
- the CSV delimiter must be ;.
- the column type for the perimeter key must be set to “Server attribute”.
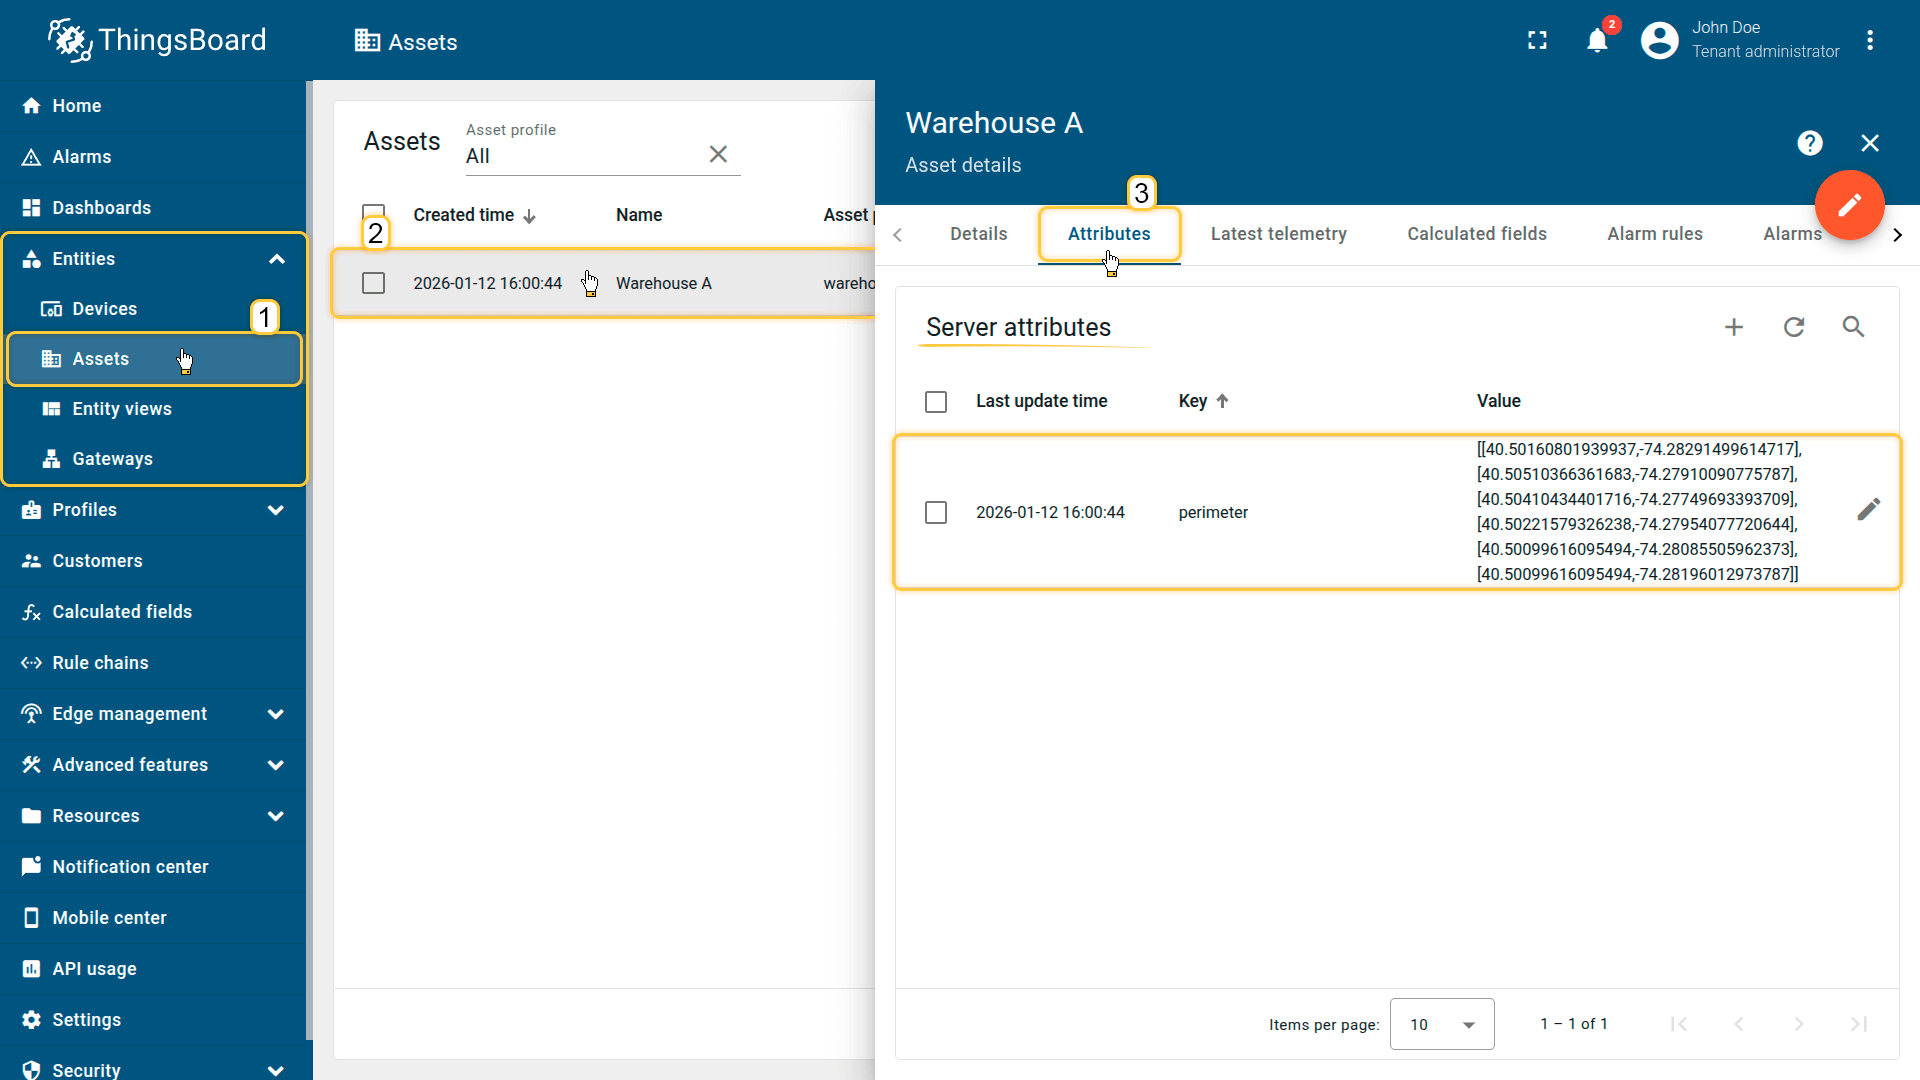
The Warehouse A asset publishes the geofence perimeter as an attribute.
3. Create relations
Create a relationship between the Warehouse Building A asset and the Forklift A and Forklift B devices:
- Relation direction: From
- Relation type: Contains
This relation is used by the calculated field to resolve the assigned building zone for each forklift.
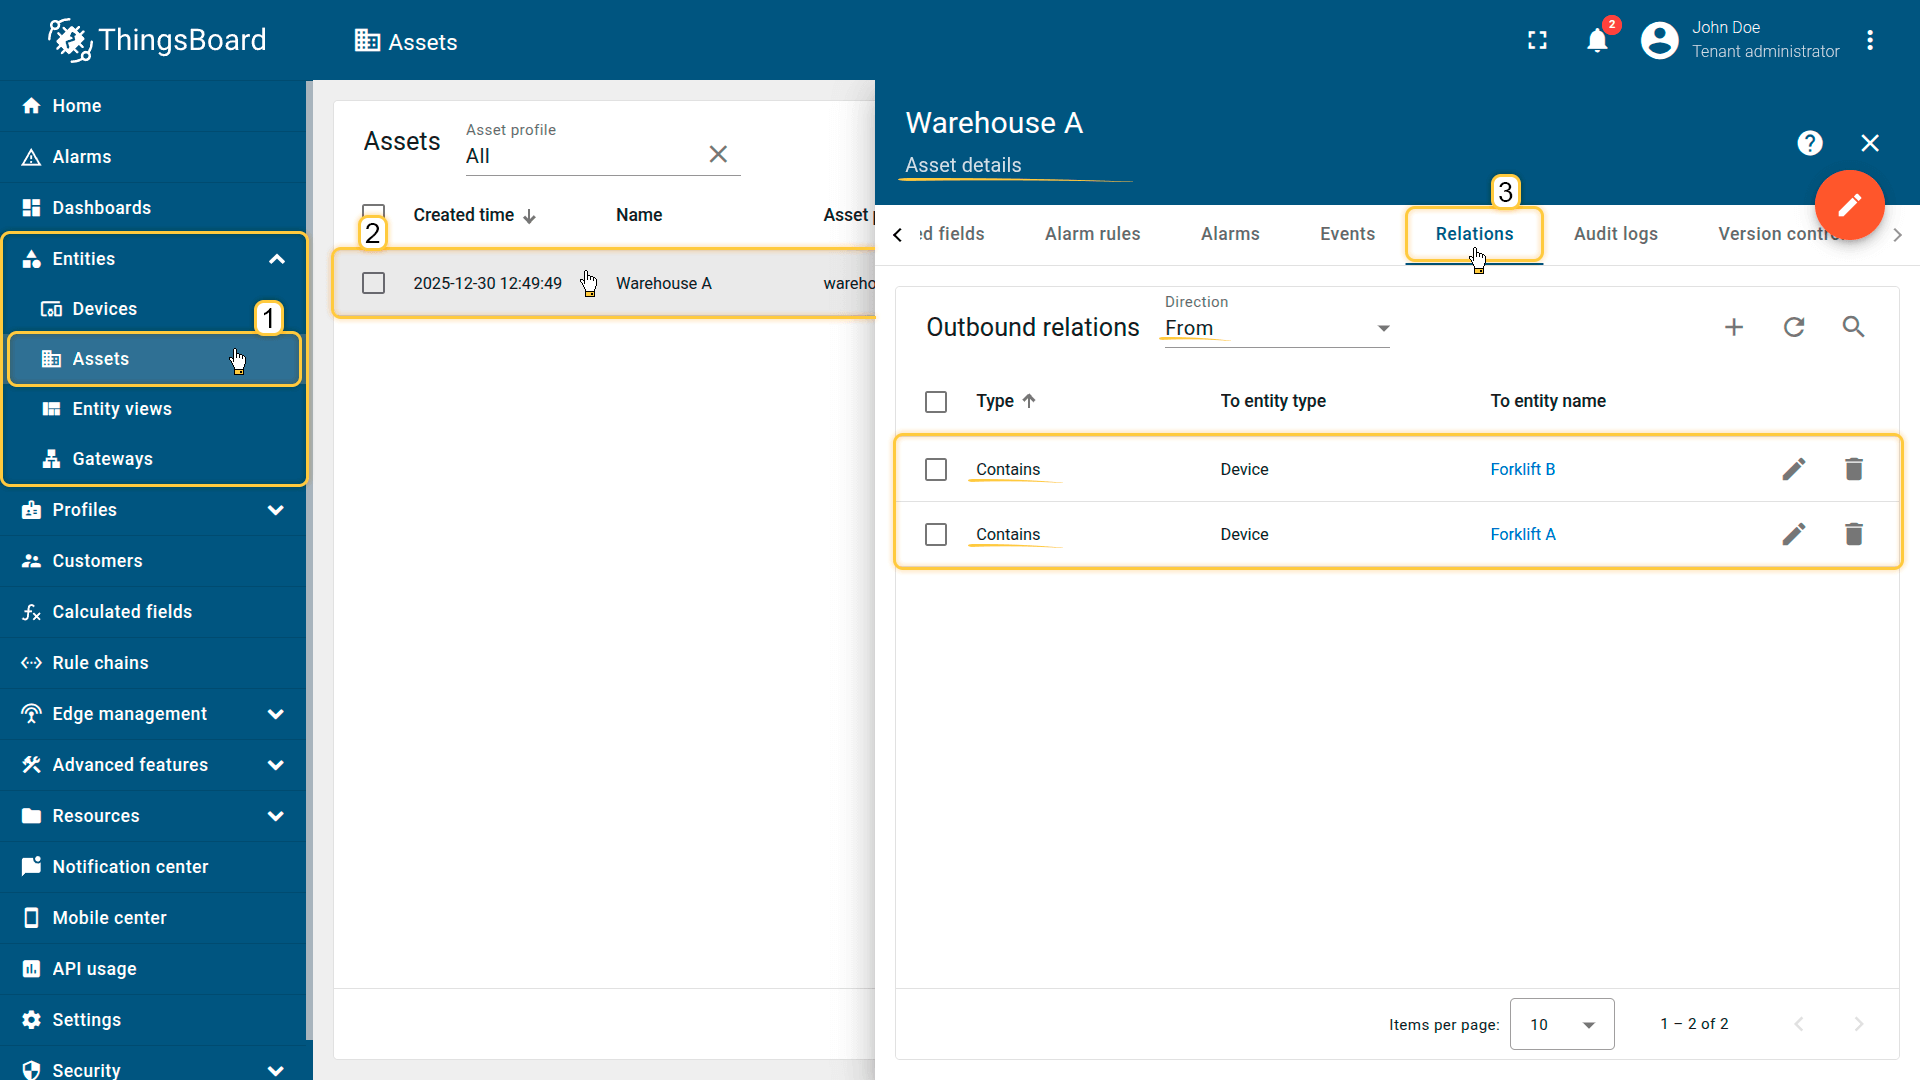
Create a relationship between the Warehouse Building A asset and the Forklift A and Forklift B devices.
4. Apply the calculated field to the device profile
When importing the devices, the “forklift” profile is created automatically and assigned to them.
Apply the calculated field to this profile so it runs for all devices using it.
- Download the calculated field configuration file.
- Go to the “Calculated fields” tab and import the configuration.
This calculated field resolves the warehouse zone via relations and generates status/events.

Go to the “Calculated fields” tab and import the configuration.
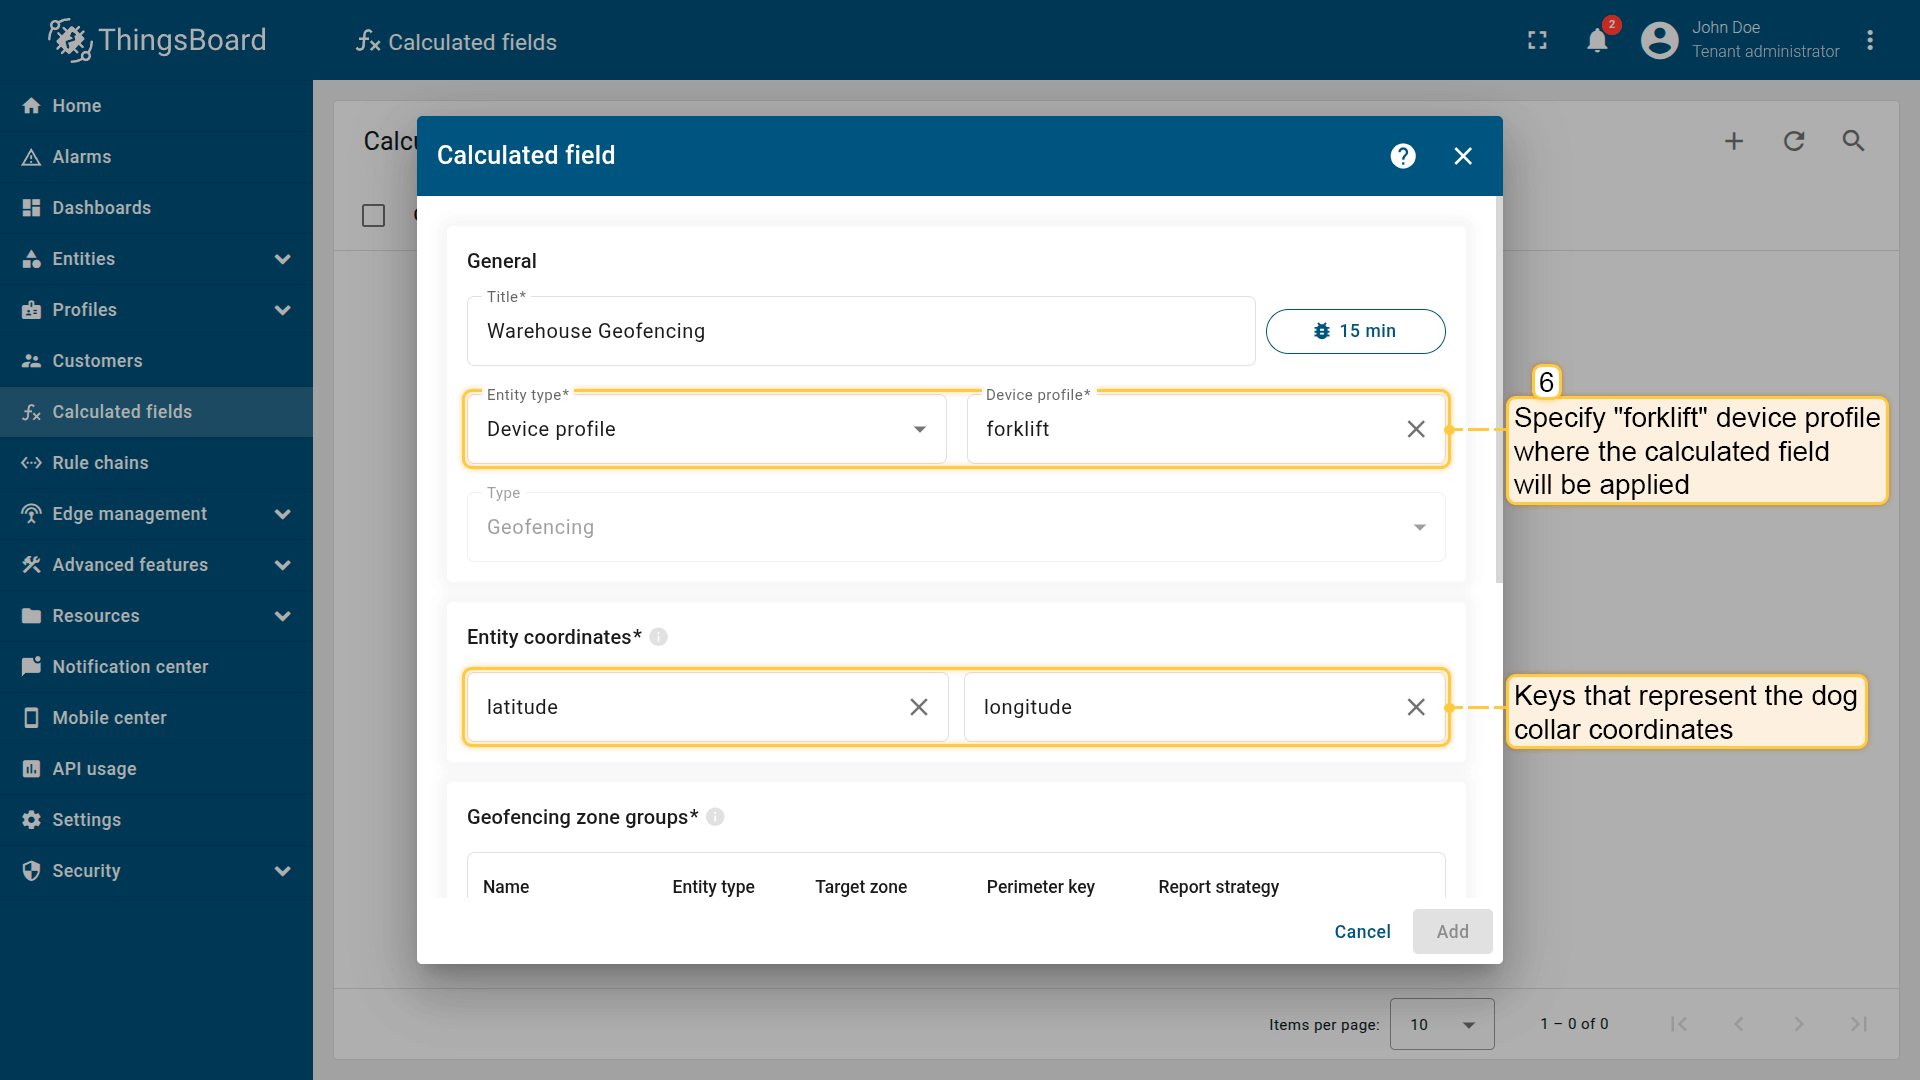
Apply the calculated field to the forklift device profile so it runs for all devices using it.
Entity coordinates: latitude, longitude
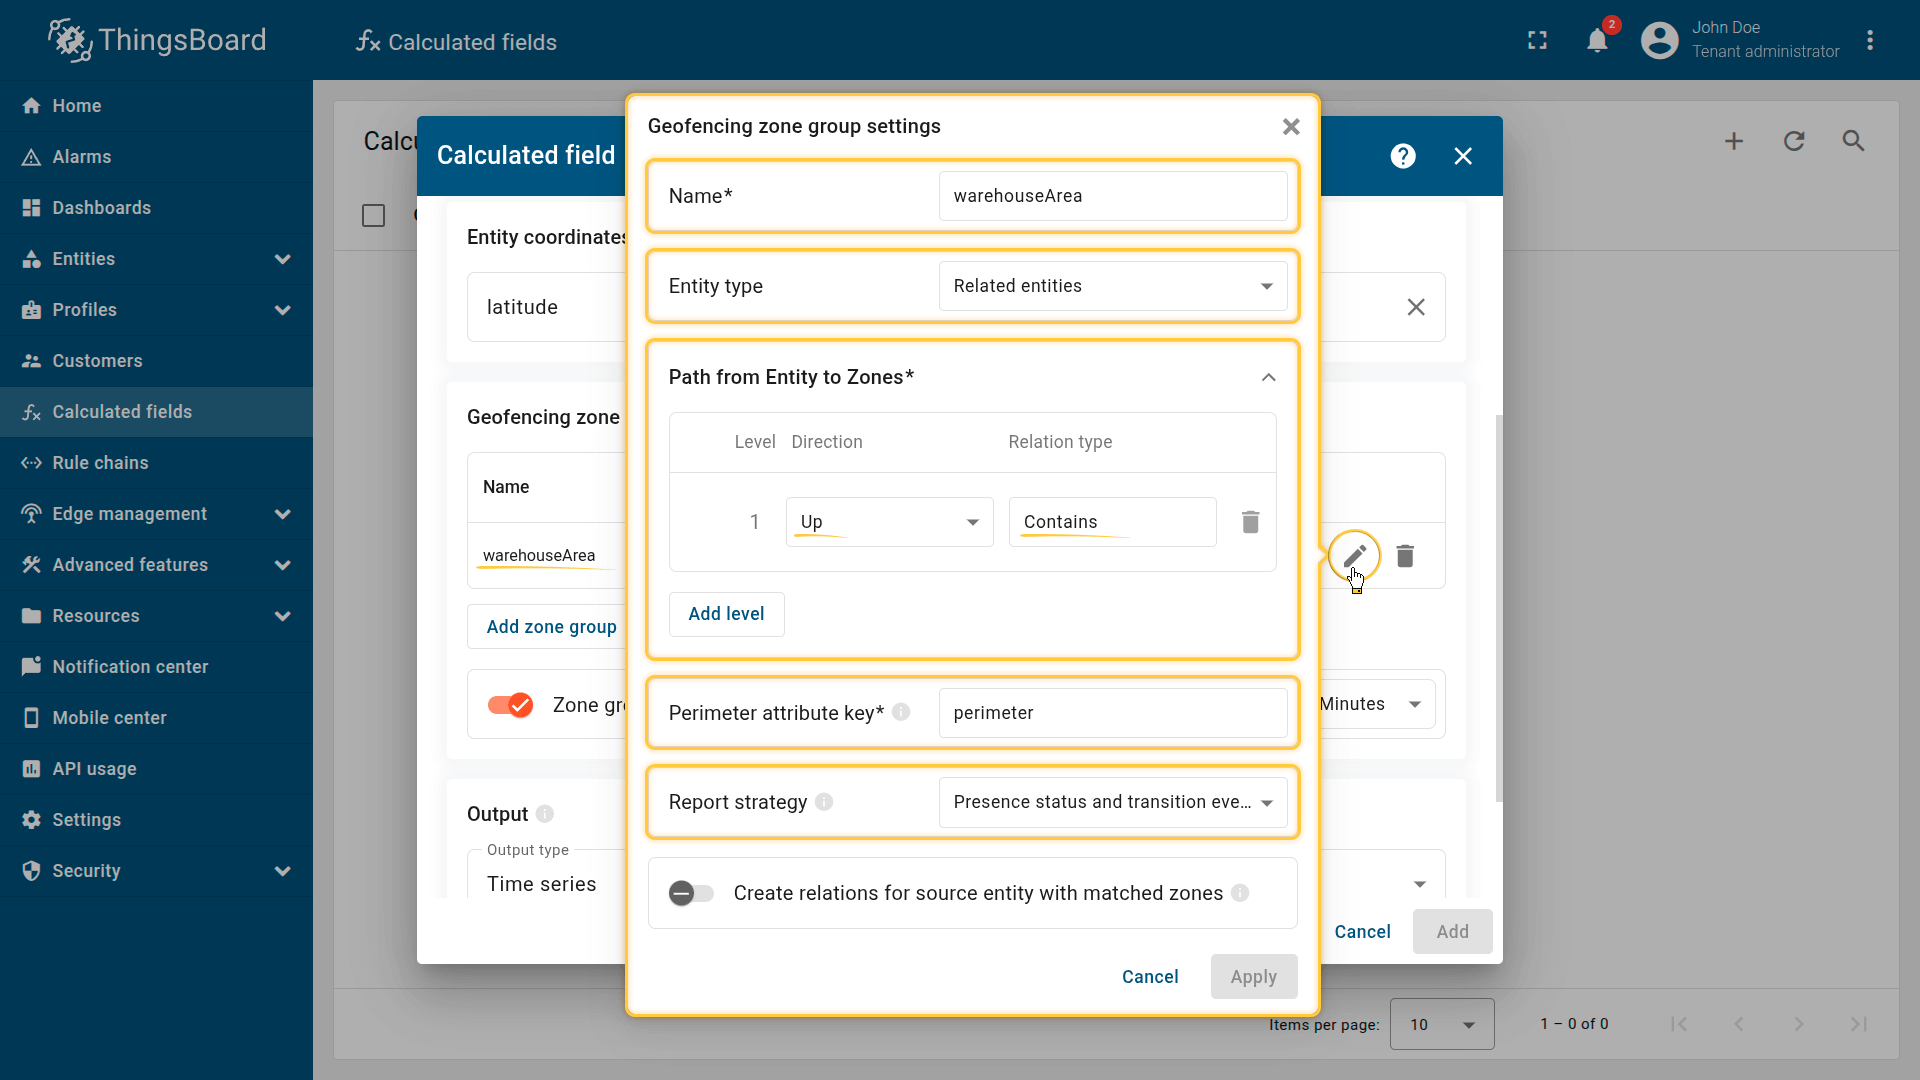
Geofencing zone group settings.

The output values must be saved as telemetry.
5. Import the dashboard
Import the dashboard to monitor forklifts in real time.
- Download the dashboard configuration file.
- Go to the Dashboards page and import the JSON file with dashboard configuration.
The dashboard includes:
- a Map widget showing the current position of each fork lift
- an Attributes card widget showing:
- current presence state (INSIDE / OUTSIDE)
- the last transition event (ENTERED / LEFT)
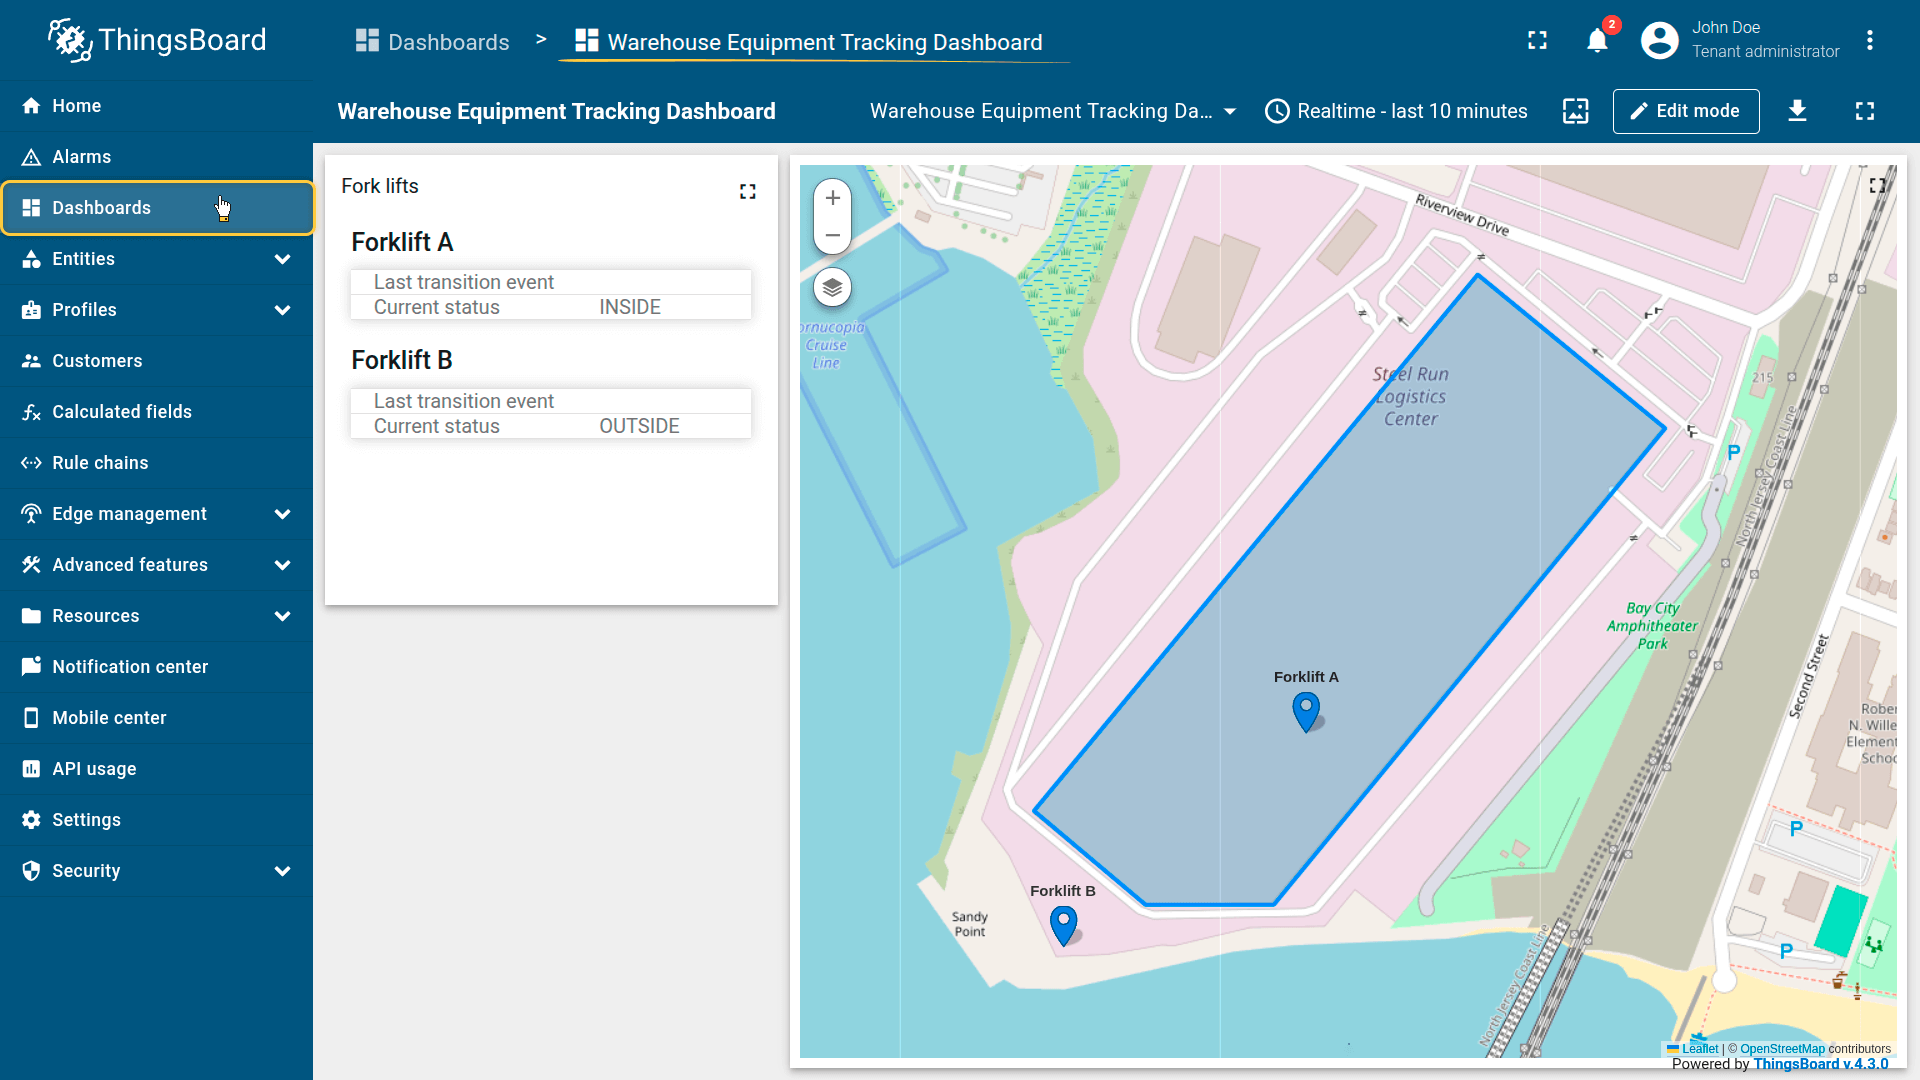
Import the dashboard to monitor forklifts in real time.
Result
When you move the forklift markers outside of or back into the perimeter of Warehouse Building A, the Forklifts widget is updated automatically:
- the presence status is updated,
- transition events are generated when boundary crossings occur.
This confirms that geofencing based on a direct device-to-asset association is working correctly.
When you move the forklift markers outside of or back into the perimeter of Warehouse Building A, the Forklifts widget is updated automatically:
- the presence status is updated,
- transition events are generated when boundary crossings occur.

Example 3: Complex Fleet Management (Multiple Zone Types)
Scenario
A logistics company operates a fleet of trucks. Each truck must be monitored against multiple zone categories at the same time, such as a designated service area and restricted “no-go” areas.
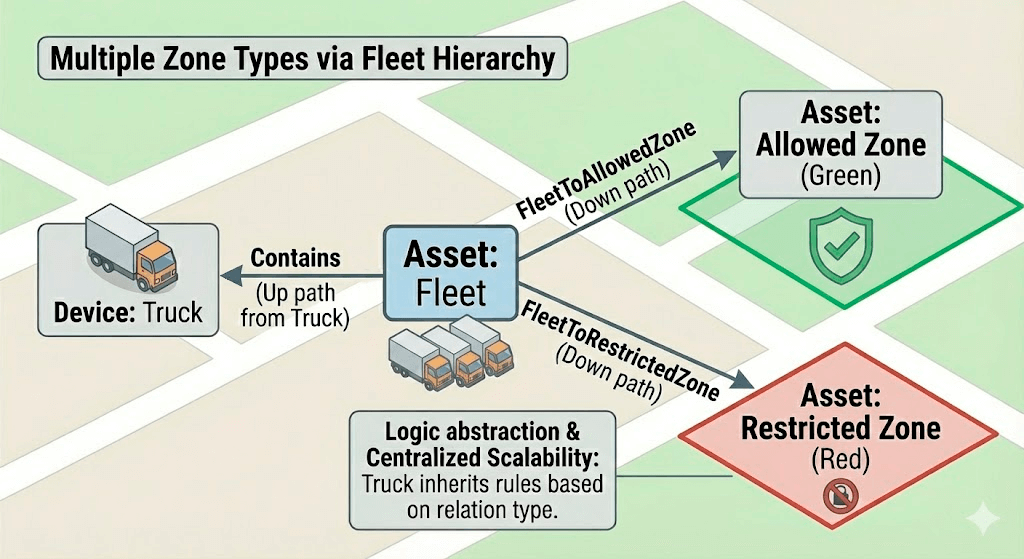
A logistics company manages a fleet of trucks. Each fleet must comply with complex rules involving multiple different types of areas simultaneously.
Goal
Track two independent conditions for each truck simultaneously:
- Service area — whether the truck is currently INSIDE/OUTSIDE its assigned service zone.
- Restricted area — detect if the truck ENTERED/LEFT any no-go zone.
This example uses two Zone Groups inside a single Geofencing calculated field. Both groups discover zones dynamically через Fleet relations, but use different relation types to separate logic:
- serviceArea group: UP to fleet (Contains) → DOWN to zone (FleetToAllowedZone)
- restrictedArea group: UP to fleet (Contains) → DOWN to zone (FleetToRestrictedZone)
Note (visualization only): Zone assets may include a zoneType server attribute (for example, allowed / restricted) used only for map color-coding. The calculated field logic relies on relation types, not on zoneType.
Calculated field configuration
Download the “Fleet Geofencing” calculated field configuration (JSON).
Configuration steps
1. Import demo devices
Import two devices — each represents a tracker installed in a truck. Devices publish GPS coordinates as telemetry.
- Download the CSV file containing device configurations.
- Go to the Devices page and import the CSV file.
CSV includes:
- Name: Truck 101, Truck 102
- Type: truck
- Time series: latitude, longitude
Important notes about the CSV:
- the CSV delimiter must be ;.
- the column type for the latitude and longitude keys must be set to “Time series”.

Go to the Devices and import device configurations from a CSV file.
The CSV delimiter must be ;

Time series: latitude, longitude

Imported devices that publish GPS coordinates as telemetry.
2. Import demo asset
Import assets representing the fleet and zones.
- Download the CSV file: complex-fleet-management-example-assets-data.csv
- Go to the “Assets” page and import the CSV file into your ThingsBoard instance:
CSV includes:
- Name: No-Go Zone A, Service Zone A, North East Fleet
- Type: zone, fleet
- Server attribute: perimeter, zoneType
Important notes about the CSV:
- the CSV delimiter must be ;.
- the column type for the perimeter and zoneType keys must be set to “Server attribute”.

Go to the Assets and import asset configurations from a CSV file.
The CSV delimiter must be ;
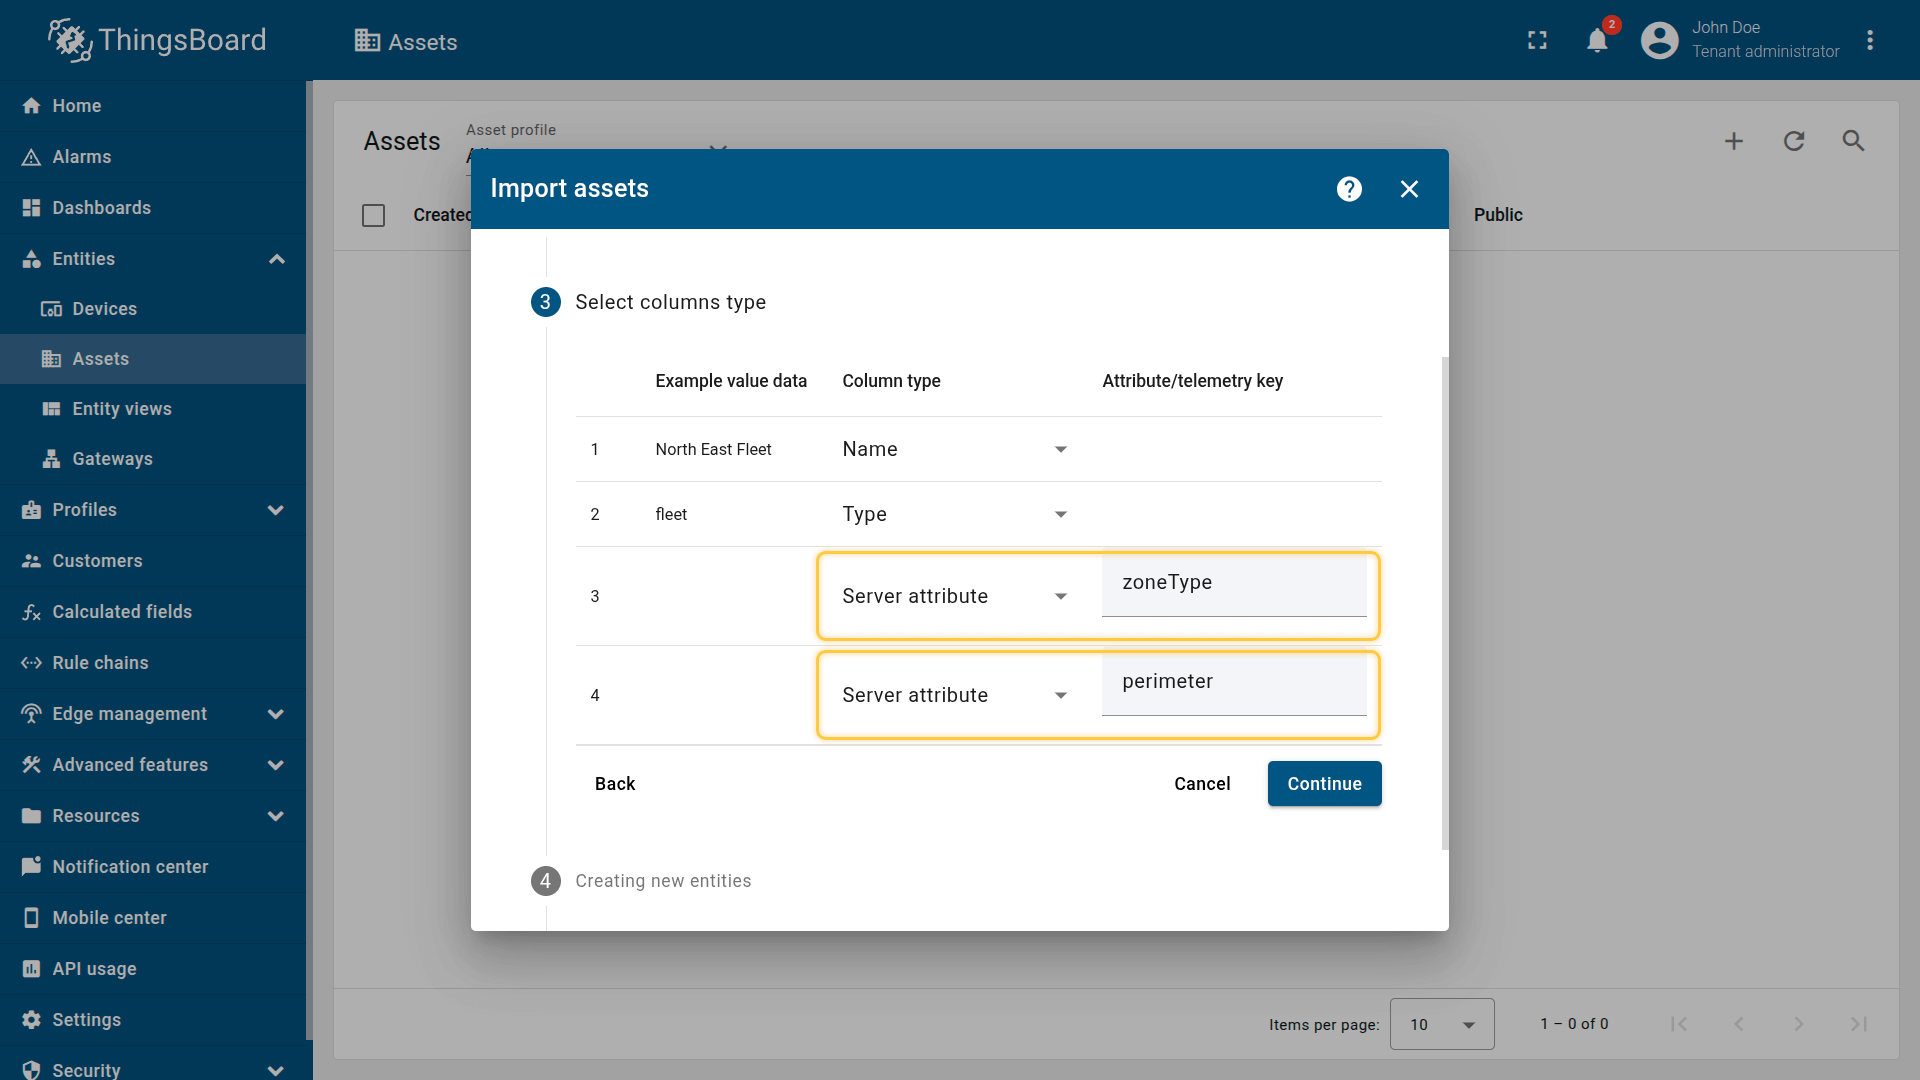
Server attribute: zoneType, perimeter
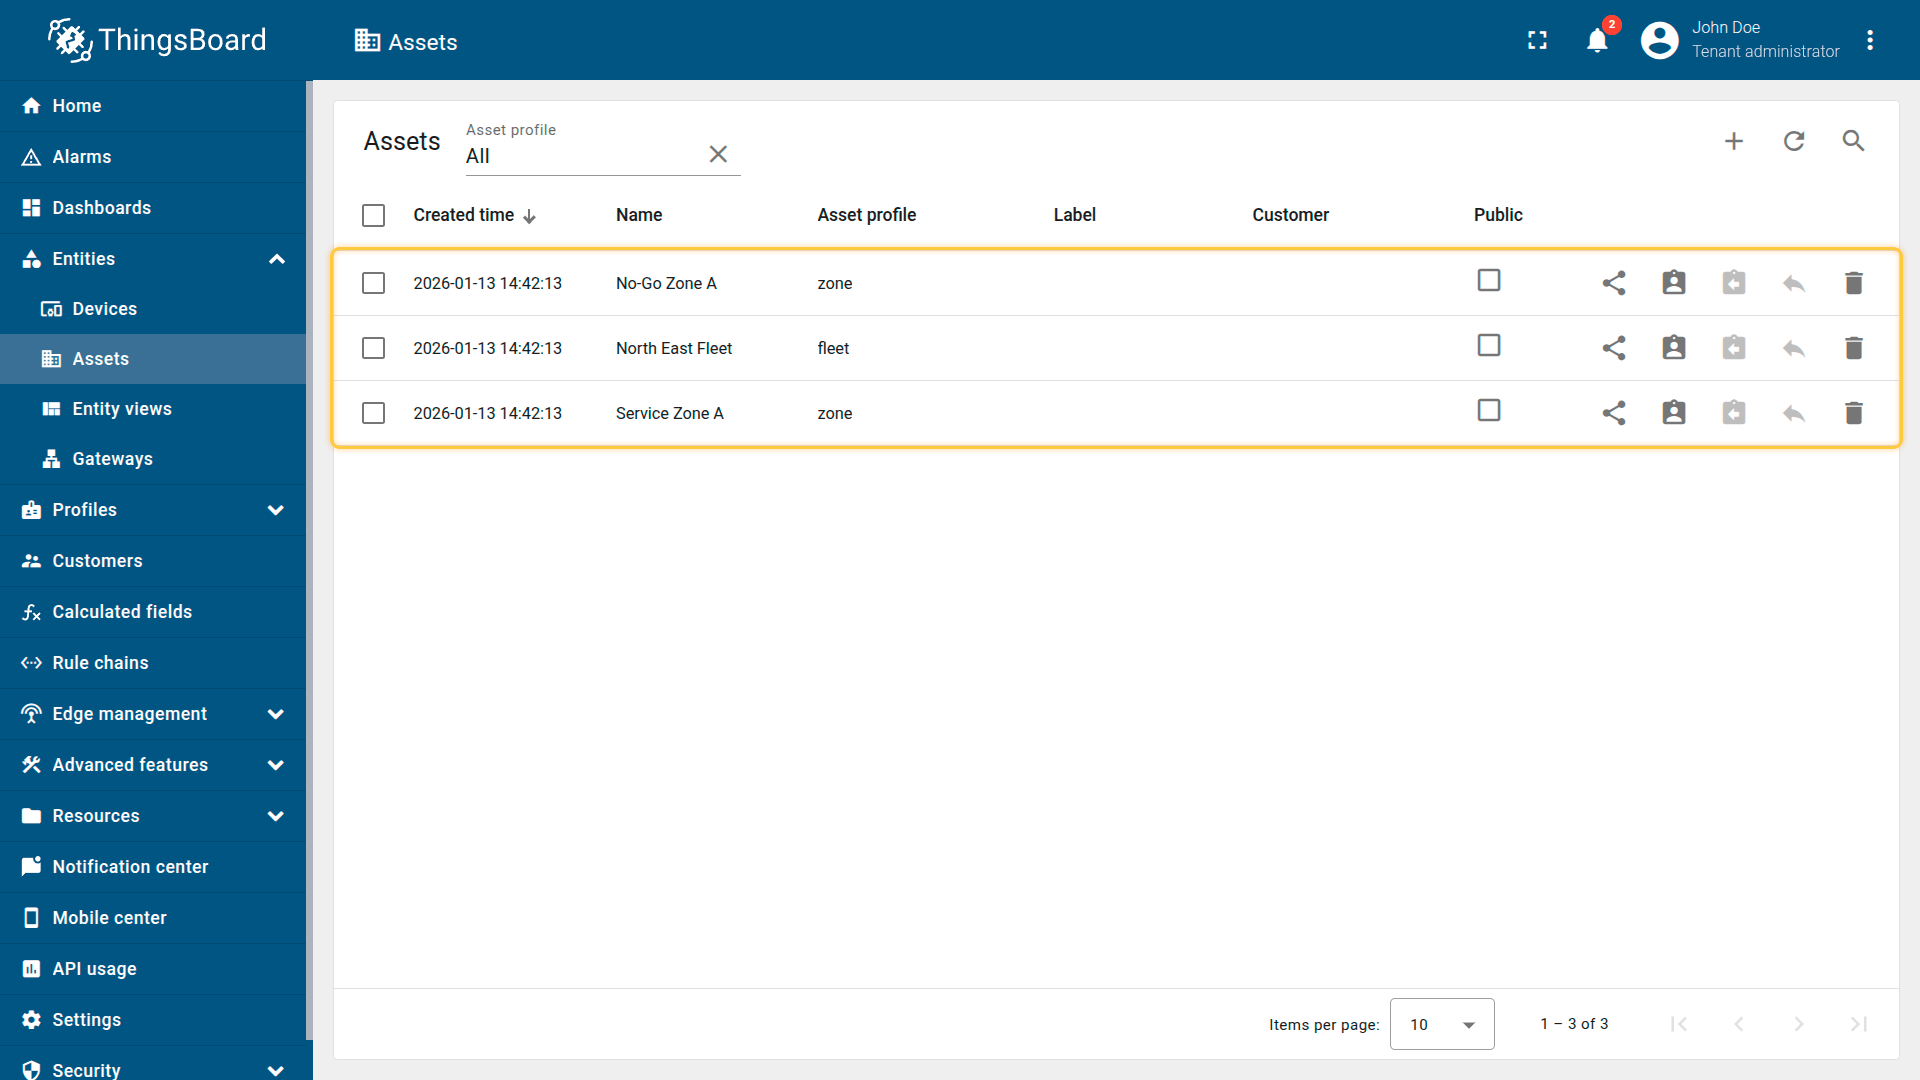
Imported assets.
3. Create relations
Create the relations used by the calculated field to discover the fleet and its zones.
- Link trucks to the fleet:
- North East Fleet ⇾ Truck 101 and Truck 102
- Relation direction: From
- Relation type: Contains
- North East Fleet ⇾ Truck 101 and Truck 102
- Link the fleet to service zones:
- North East Fleet ⇾ Service Zone A
- Relation direction: From
- Relation type: FleetToAllowedZone
- North East Fleet ⇾ Service Zone A
- Link the fleet to restricted zones:
- North East Fleet ⇾ No-Go Zone A
- Relation direction: From
- Relation type: FleetToRestrictedZone
- North East Fleet ⇾ No-Go Zone A
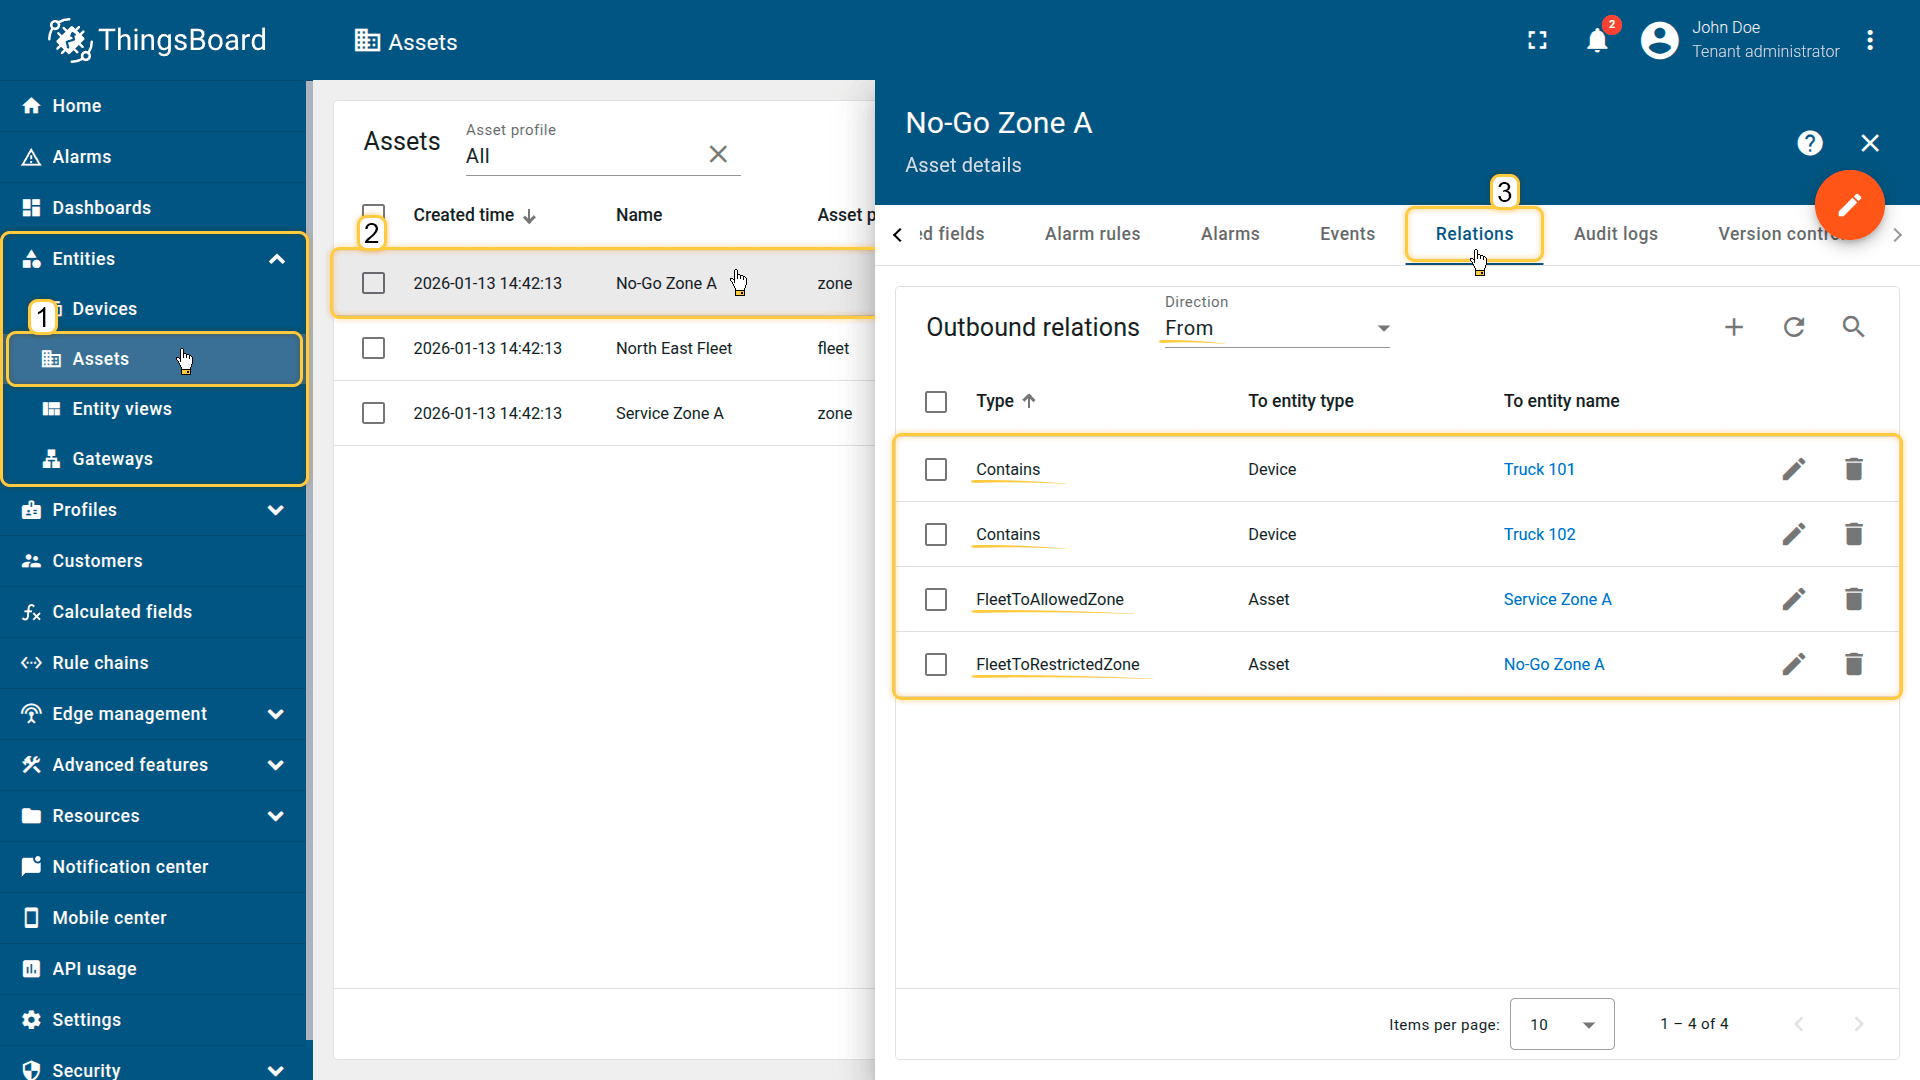
Create a relationship.
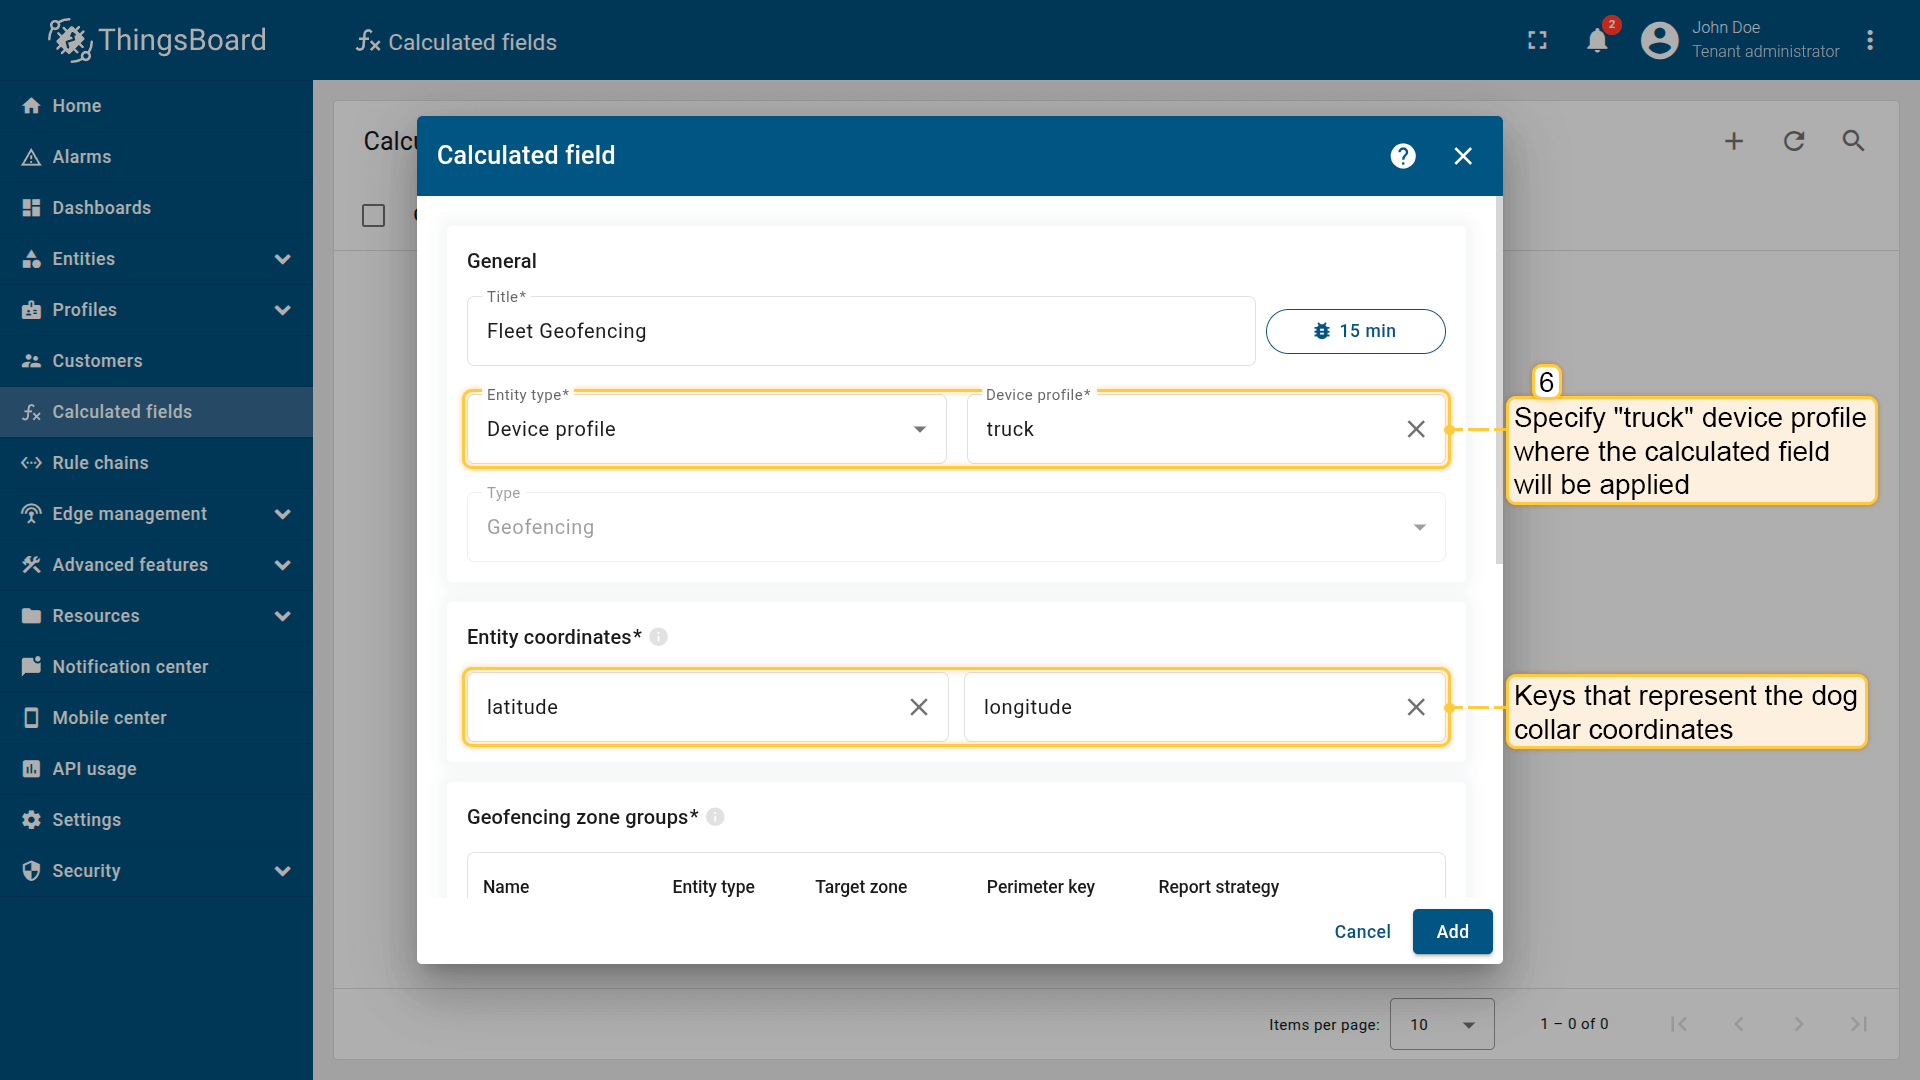
4. Apply the calculated field to the device profile
When importing the devices, the “truck” device profile is created automatically and assigned to them.
Apply the calculated field to this profile so it runs for all trucks using it.
- Download the calculated field configuration file
- Go to the “Calculated fields” tab and import the configuration.

Go to the “Calculated fields” tab and import the configuration.
Apply the calculated field to the forklift device profile so it runs for all devices using it.
Entity coordinates: latitude, longitude

Geofencing zone group settings.
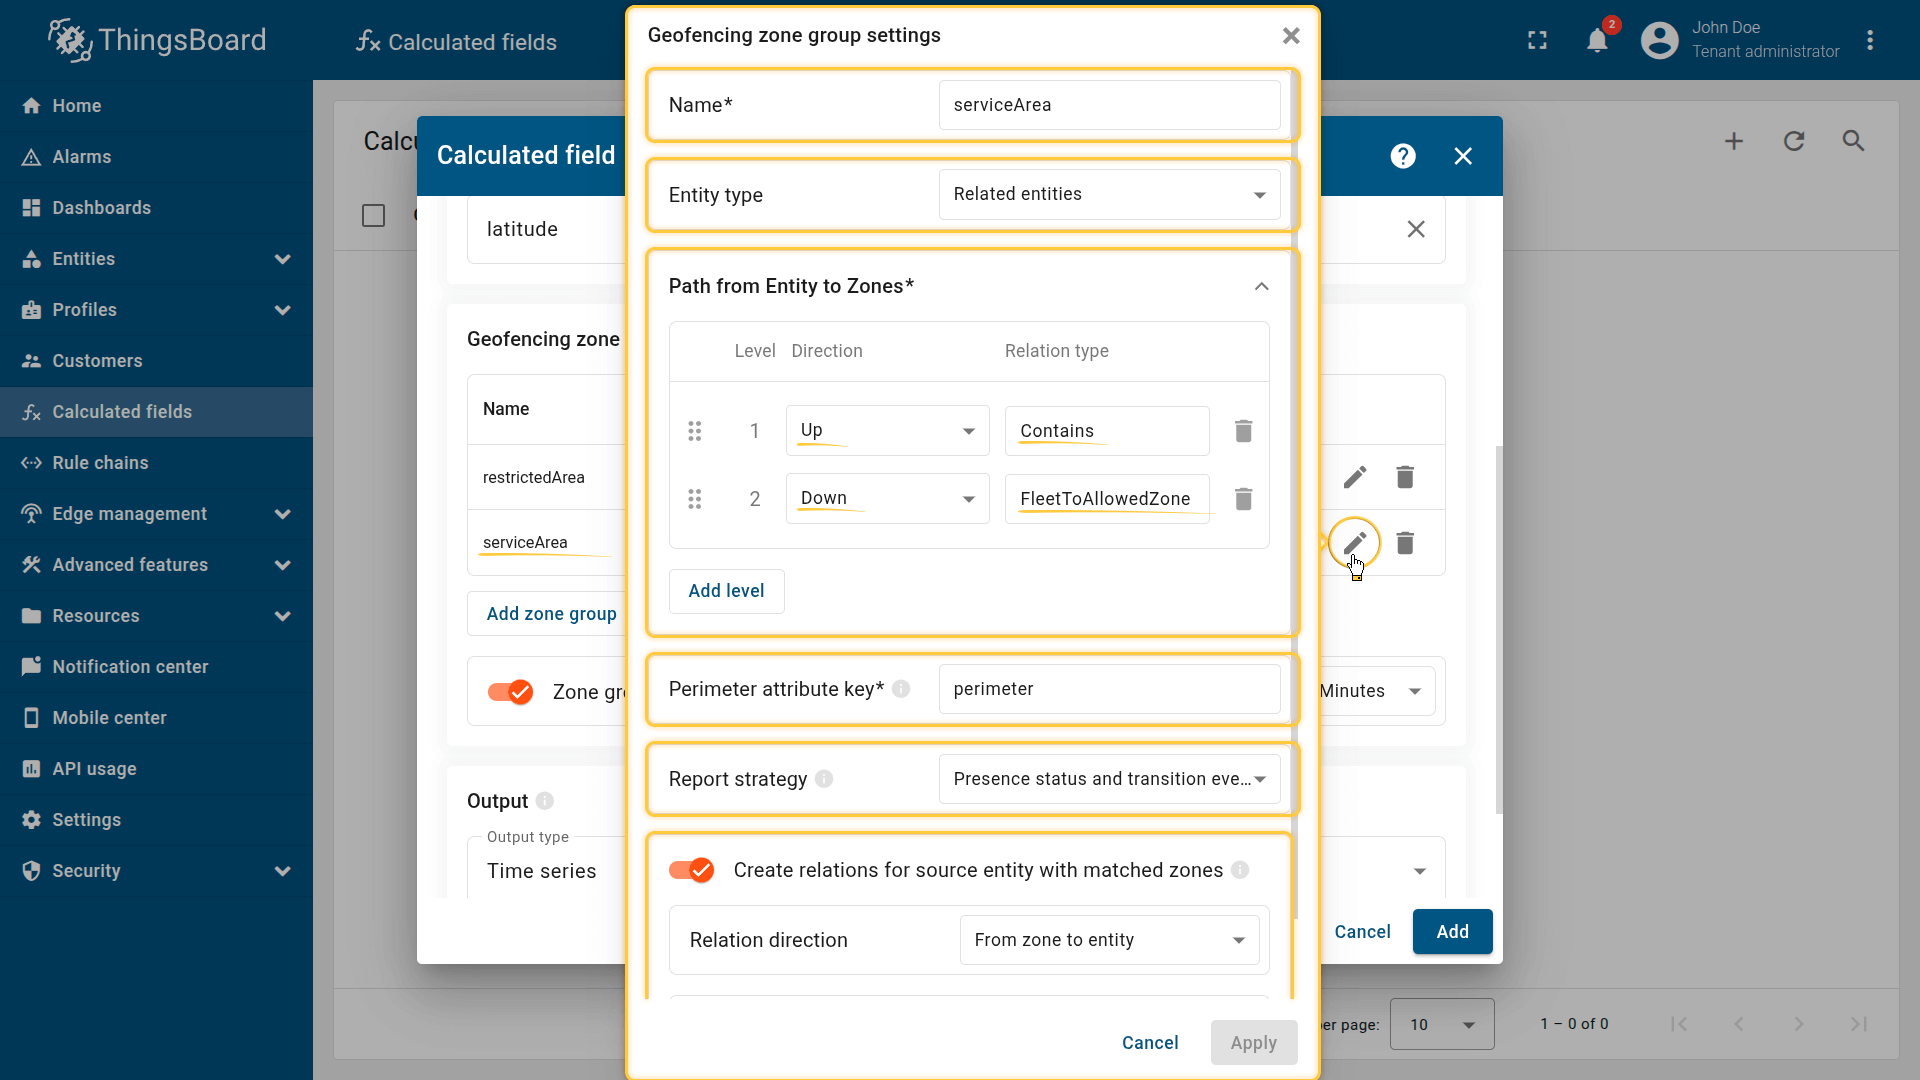
Geofencing zone group settings.

The output values must be saved as telemetry.
Click Add to save the calculation field.
5. Import the dashboard
Import the dashboard for real-time monitoring.
- Download the dashboard configuration file.
- Go to the “Dashboards” page and import the JSON file with dashboard configuration.
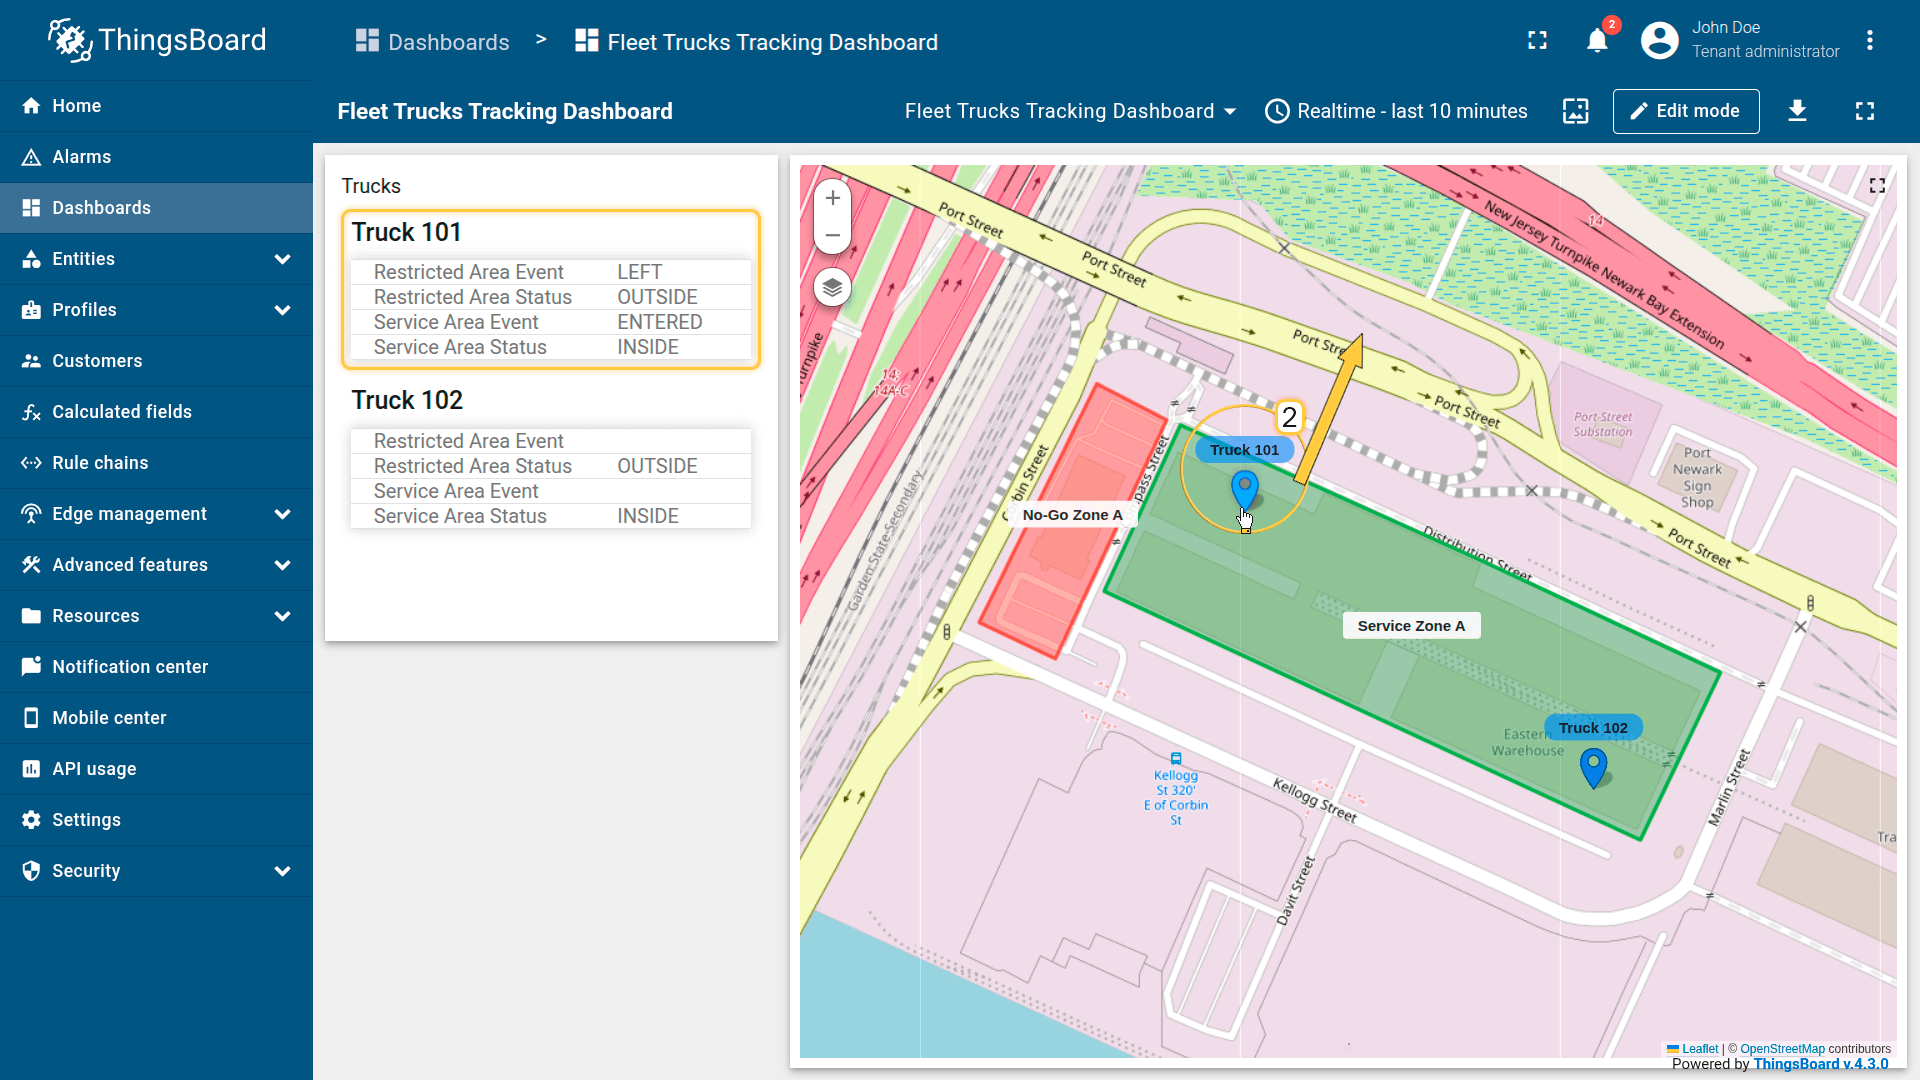
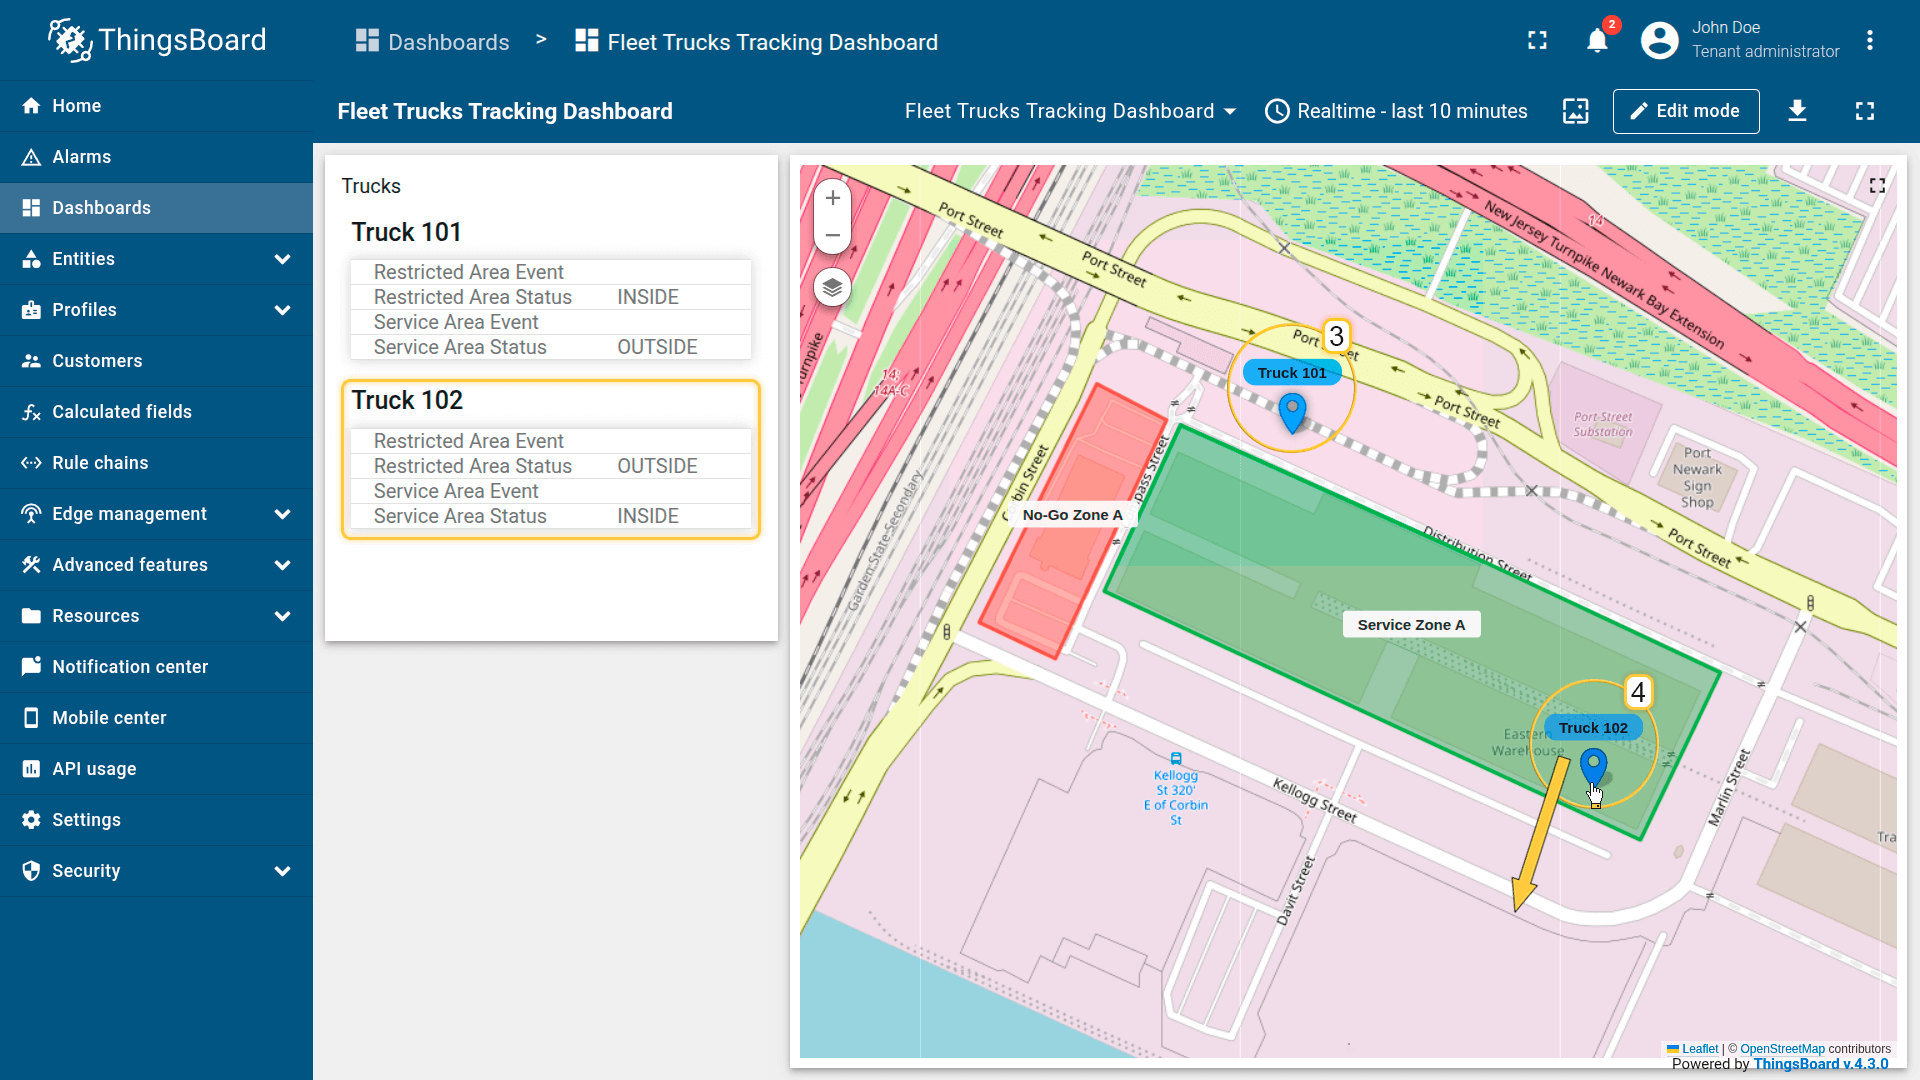
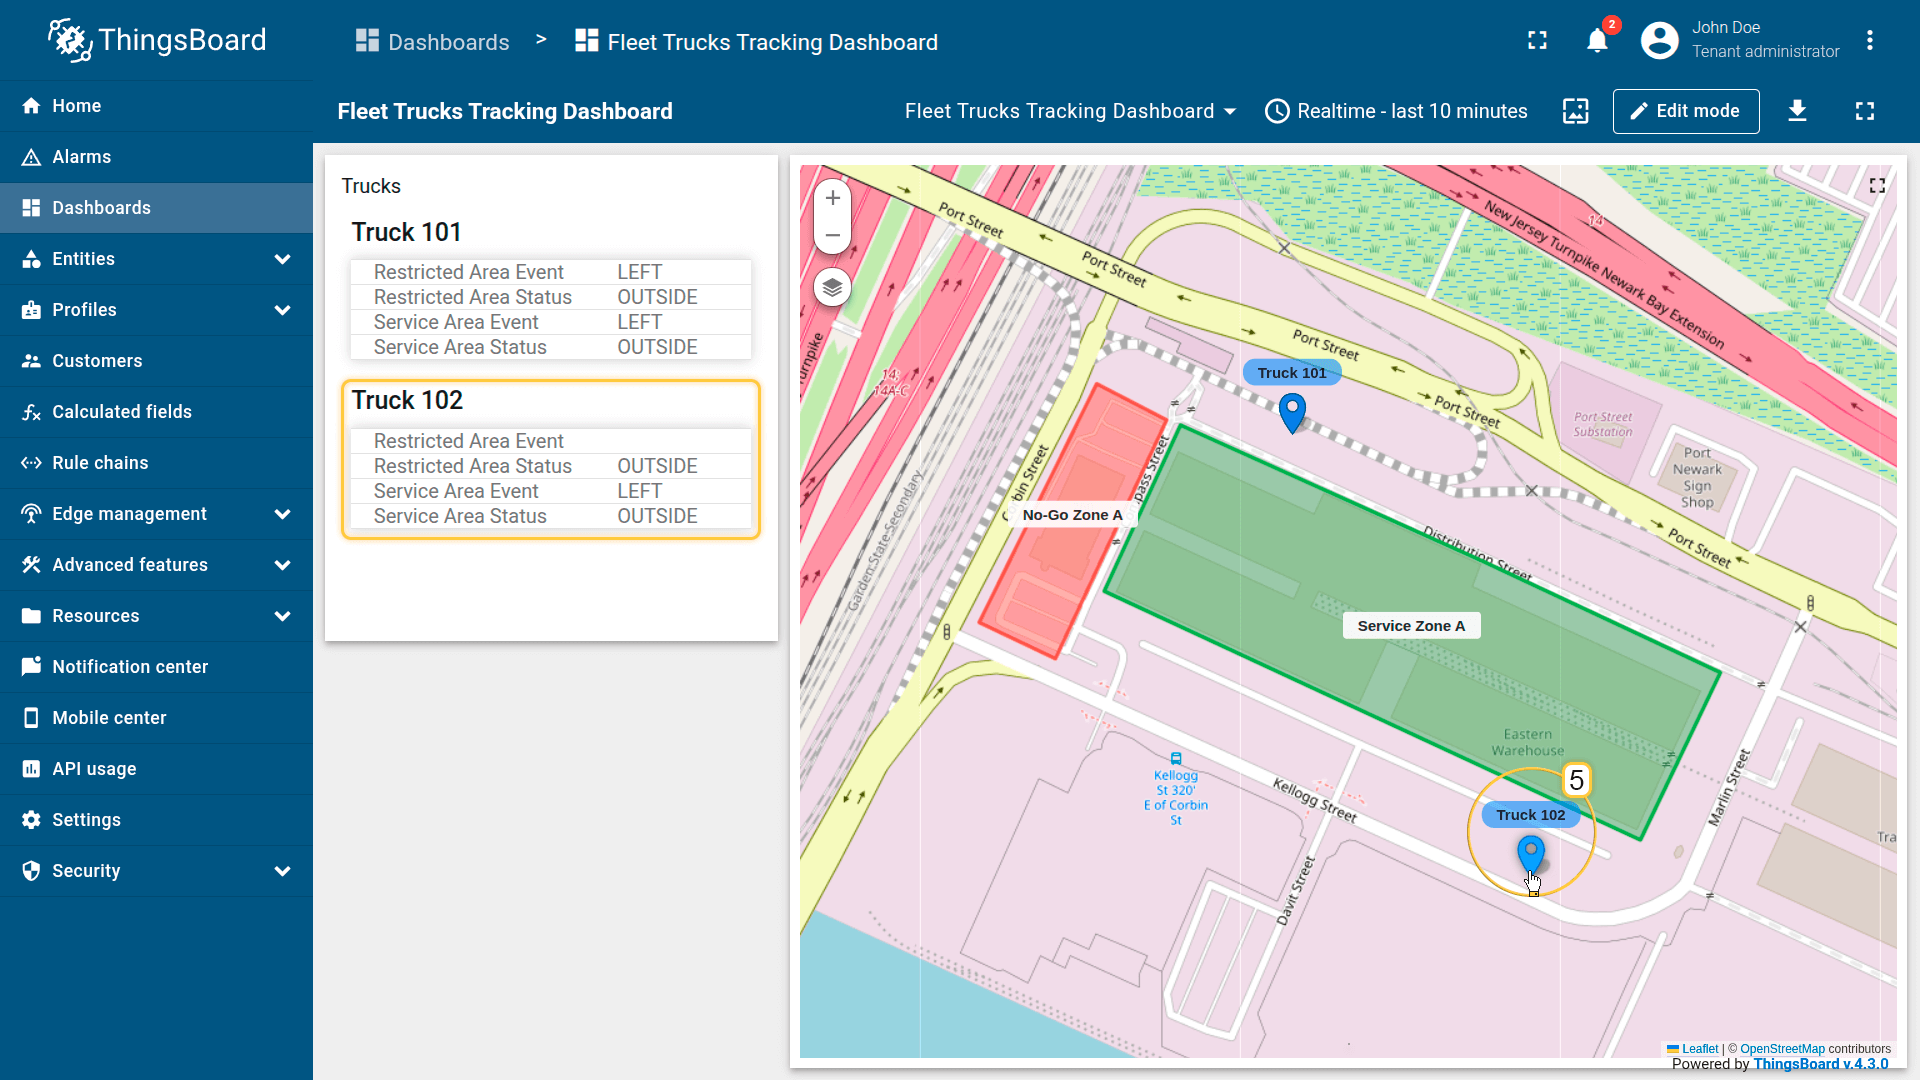
The dashboard includes:
- Map widget showing truck positions and zone overlays
- an attributes card widget showing:
- current serviceAreaStatus
- current restrictedAreaStatus
- last restrictedAreaEvent (ENTERED / LEFT)

Import the dashboard to monitor truck in real time.
Result
As you move truck markers across zone boundaries:
- serviceAreaStatus updates as INSIDE / OUTSIDE
- restrictedAreaEvent is generated on transitions (ENTERED / LEFT)
- both conditions are tracked independently for the same truck at the same time, without state conflicts.

As you move truck markers across zone boundaries:
- serviceAreaStatus updates as INSIDE / OUTSIDE
- restrictedAreaEvent is generated on transitions (ENTERED / LEFT)
- both conditions are tracked independently for the same truck at the same time, without state conflicts.

Your feedback
Don't hesitate to star ThingsBoard on github to help us spread the word. If you have any questions about this sample, please contact us.