Alarm Rules
Alarm rules define when alarms are created, updated, and cleared. Each rule specifies the data sources to monitor, the conditions that trigger or clear an alarm, the severity level, and how the alarm propagates through the entity hierarchy.
Alarm rules can only be created and managed by Tenant Administrators. Customer-level users do not have access.
How Alarm Rules Work
Section titled “How Alarm Rules Work”When a message arrives (telemetry update, attribute change, or inactivity event), ThingsBoard evaluates every alarm rule whose arguments match the incoming data:

Create Alarm Rule
Section titled “Create Alarm Rule”The Alarm rules page lets you manage all alarm rules in the system — for individual entities and for profiles.
Alarm rules can be created for Devices, Assets, their profiles, or Customers — the process is the same for all entity types. For an overview of alarm concepts, states, and severity levels, see Alarms.
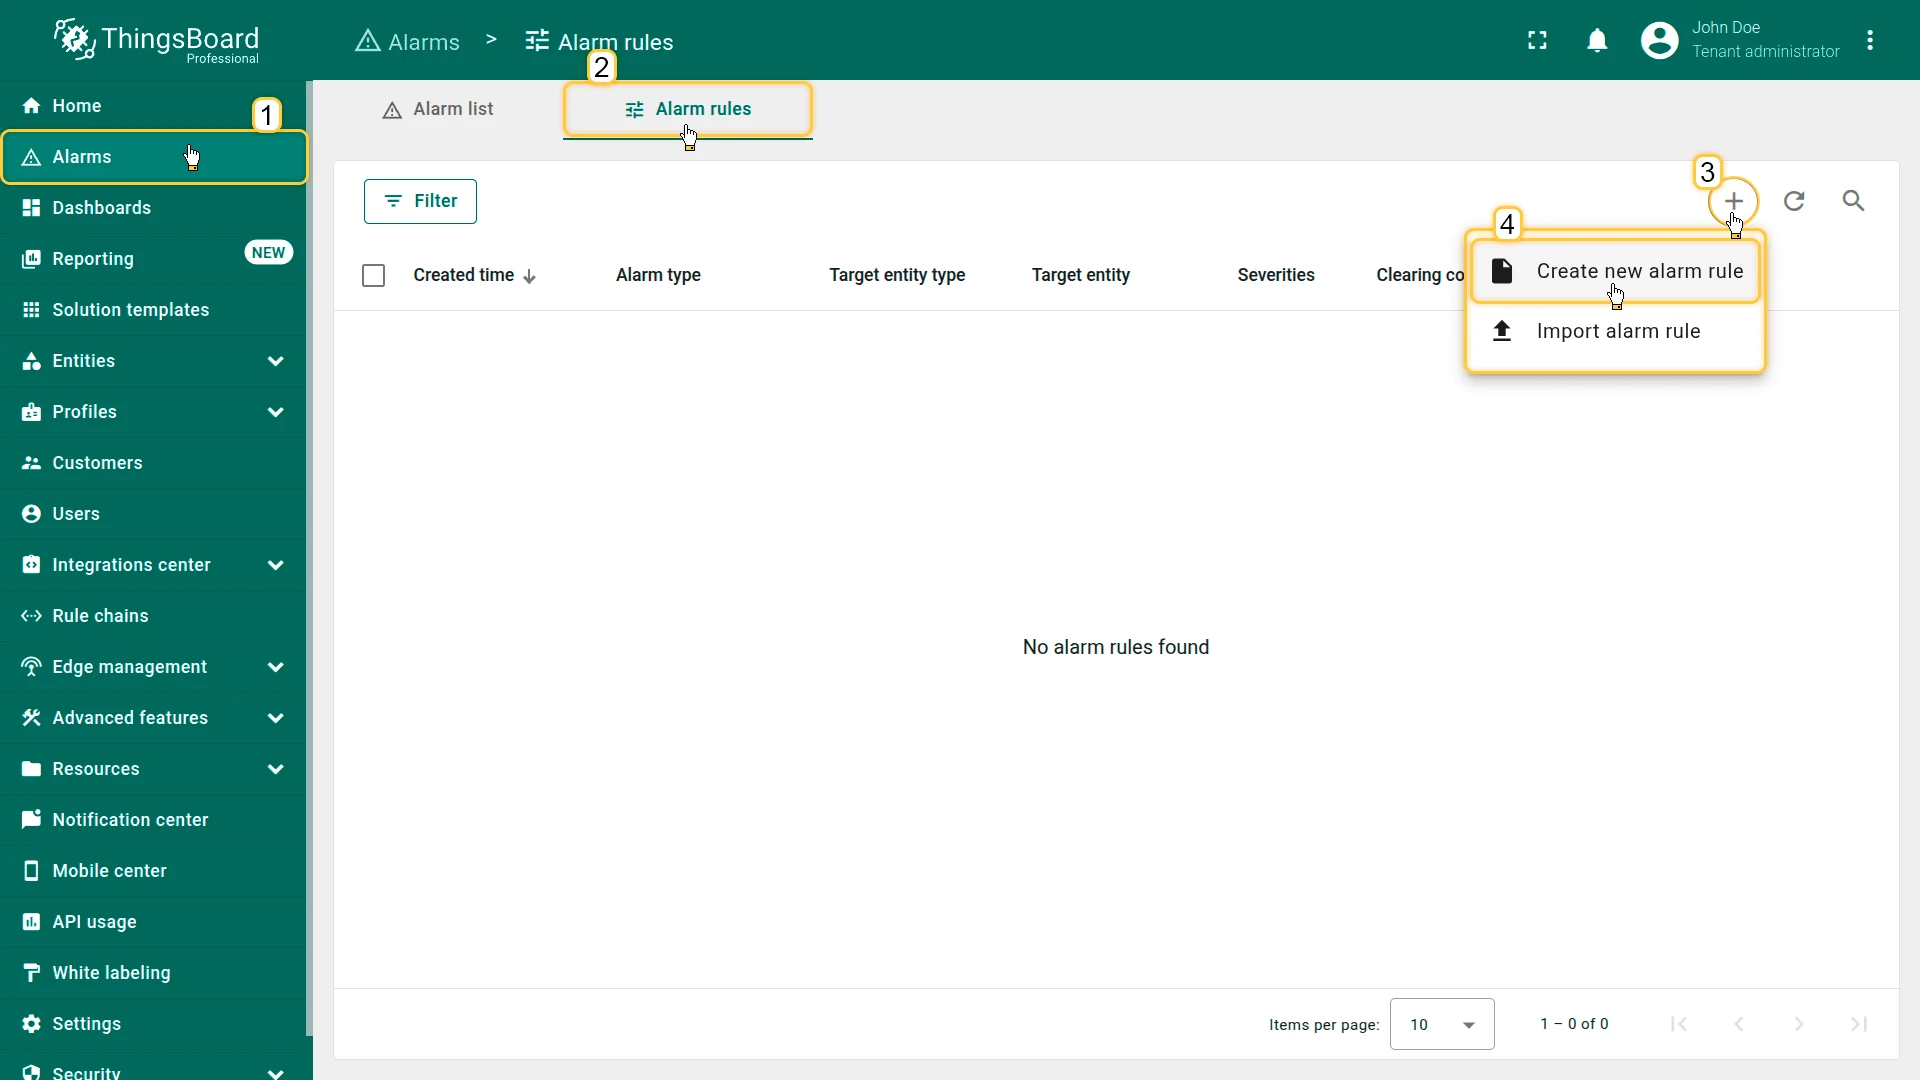
- Open the Alarms page from the left-hand menu.
- Go to the Alarm rules tab.
- Click the + Add alarm rule button in the top-right corner.
- Select Create new alarm rule from the dropdown menu.
General
Section titled “General”The General section sets the basic identity of the alarm rule:
- Alarm type: The name and unique identifier of the alarm, like High Temperature. ThingsBoard uses the alarm type to decide whether to create a new alarm or update an existing active one.
- Entity type: The target entity or entity profile where the rule applies.
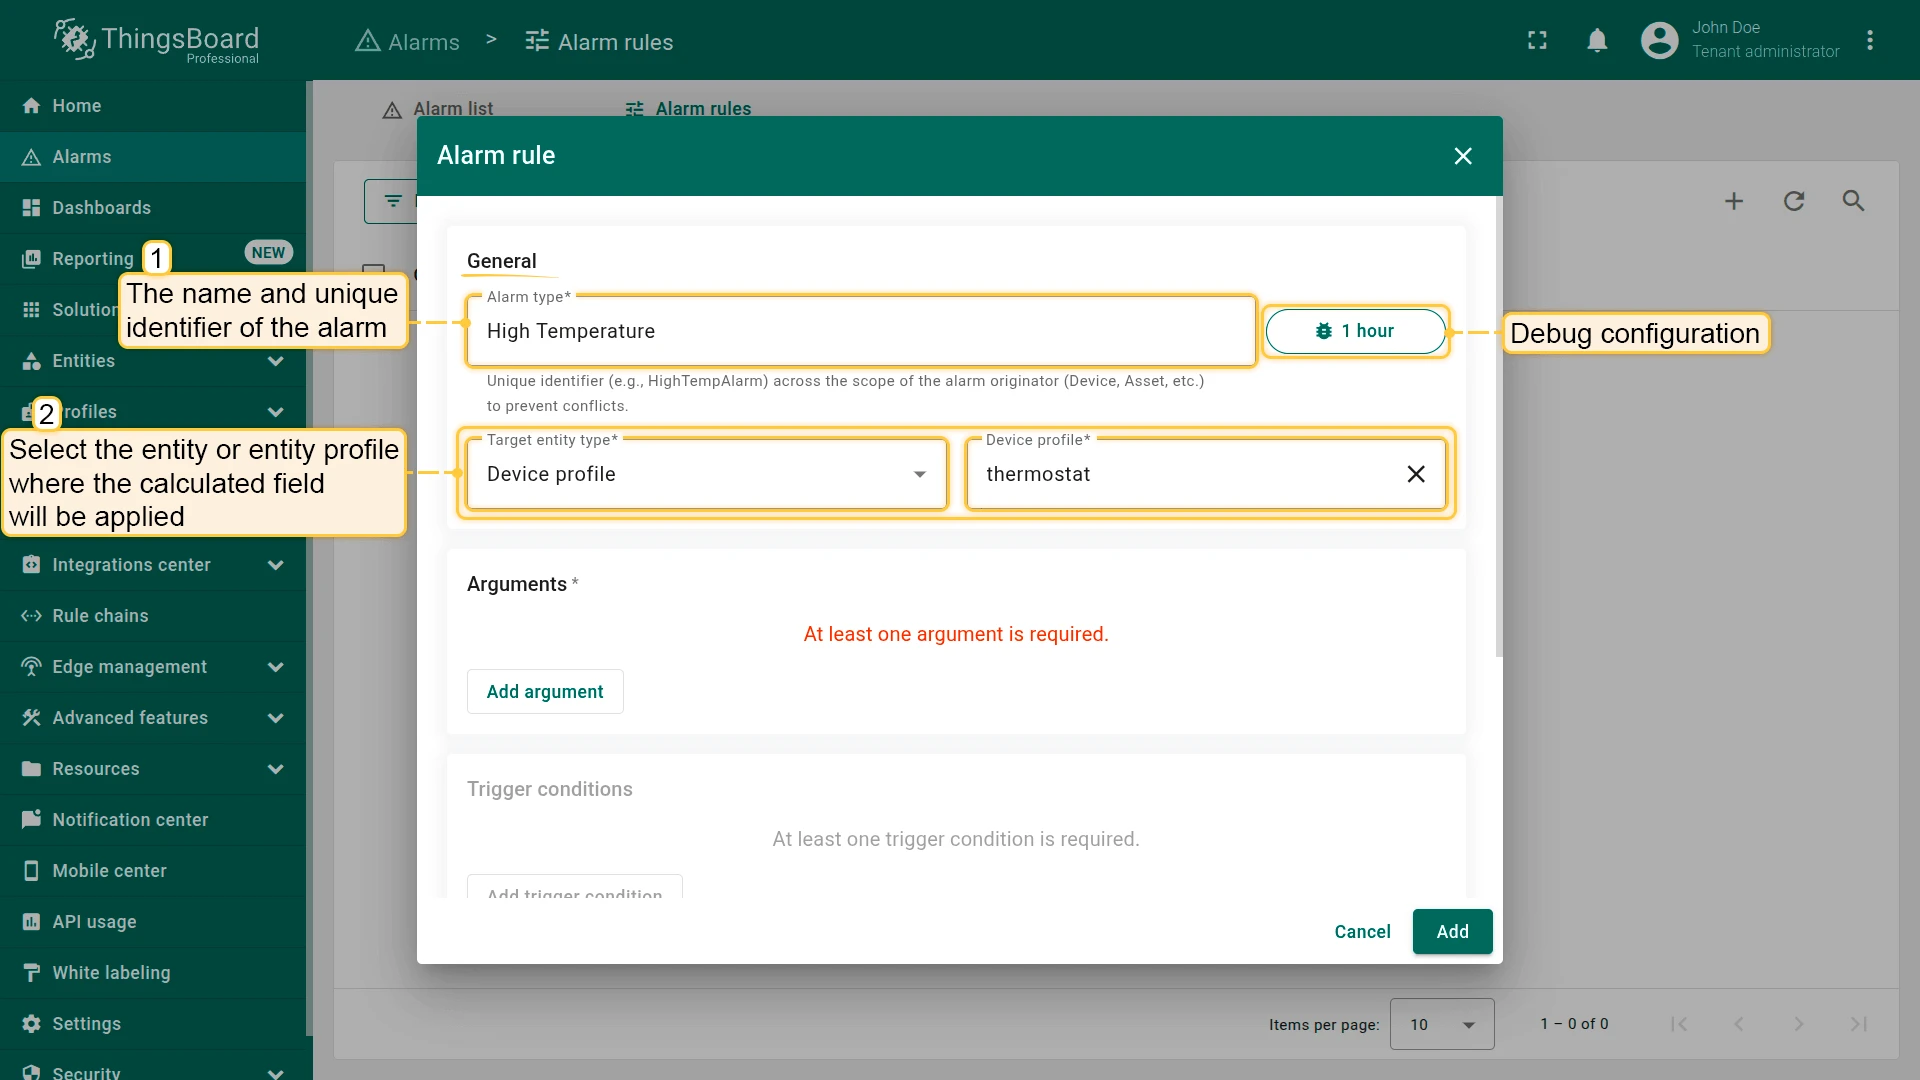
Debug Mode
Section titled “Debug Mode”Enabling debug mode lets you track events, states, and errors during rule execution.
Arguments
Section titled “Arguments”Before defining alarm conditions, add at least one argument — a data source the rule evaluates.
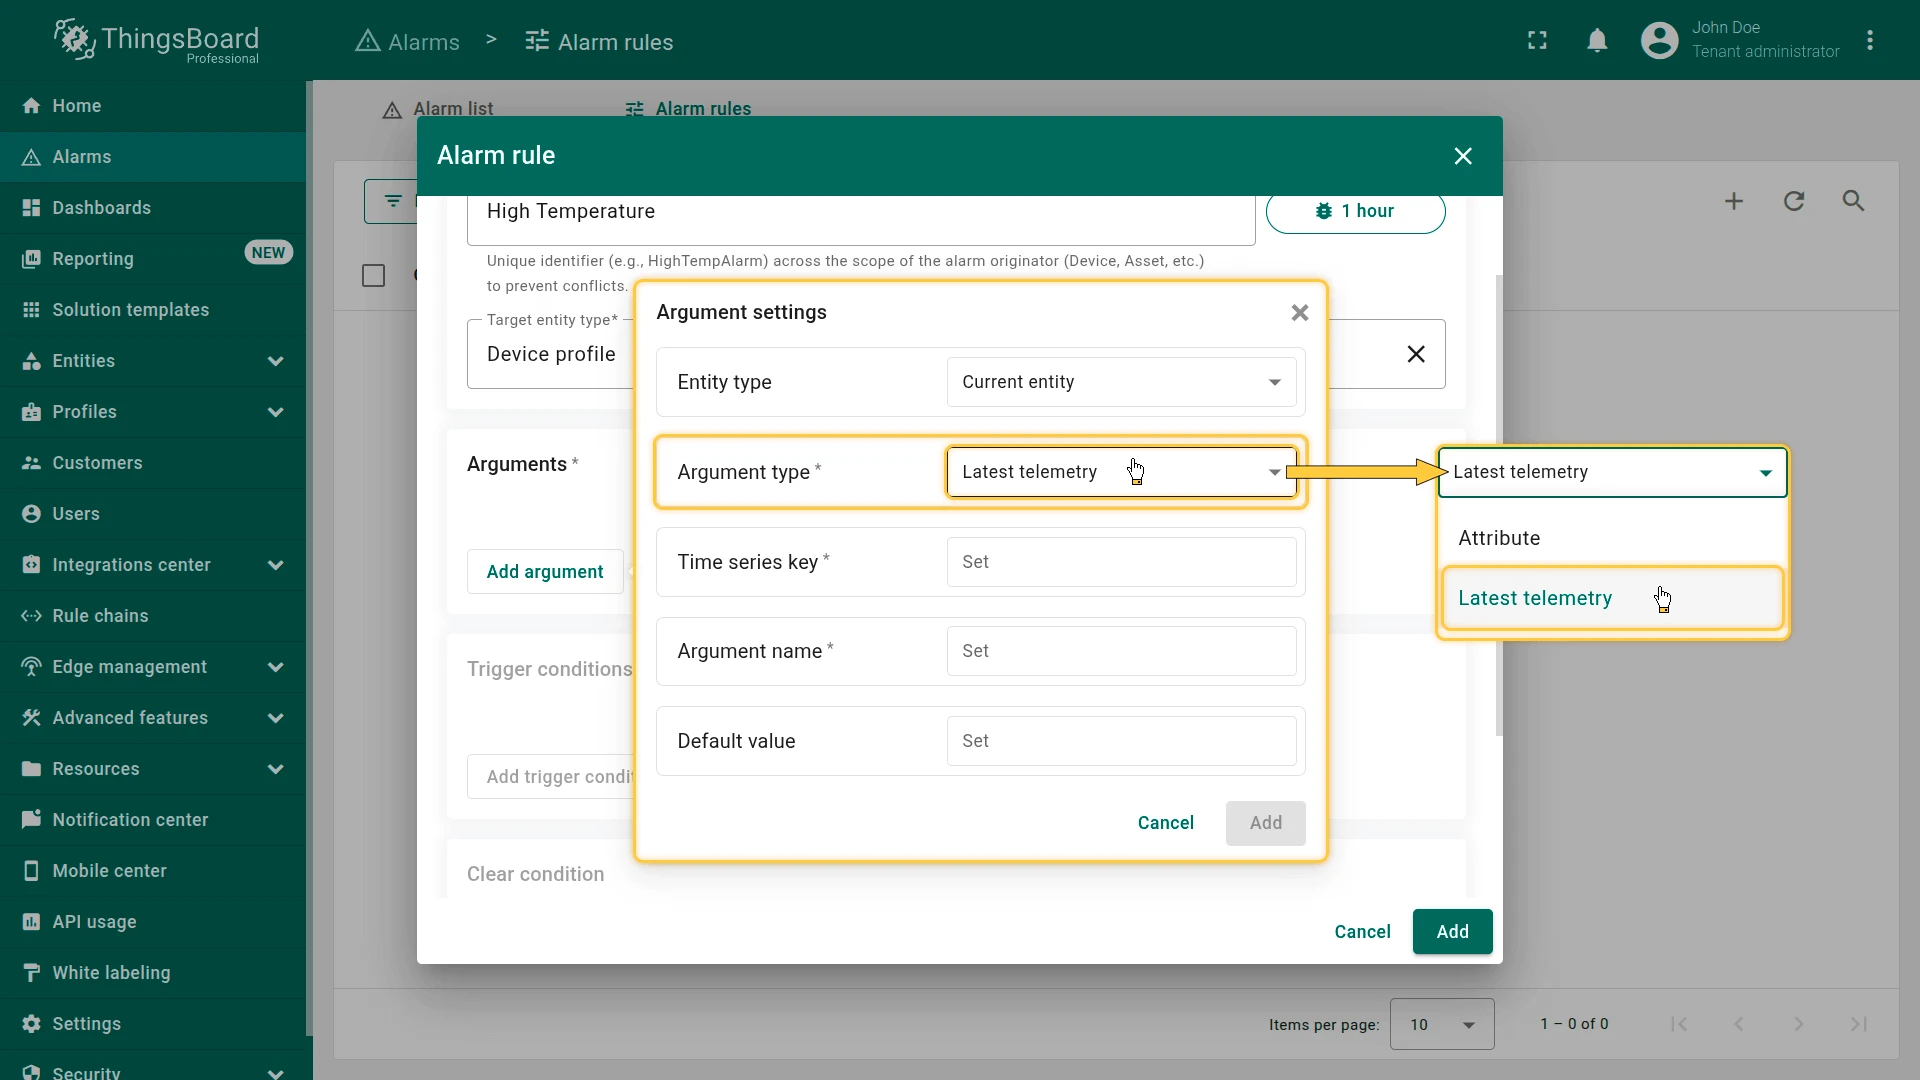
Click Add argument and configure:
Entity type determines where the argument value comes from:
| Value | Description |
|---|---|
| Current entity | The entity being configured. For profile-level rules, it applies to all entities using that profile. |
| Device or Asset | Retrieves telemetry or attributes from a different Device or Asset. |
| Customer | Retrieves data from the associated Customer entity. |
| Current tenant | Retrieves data from the Tenant entity. |
| Current owner | Retrieves data from the owner of the current entity. |
Argument type determines what kind of data the argument represents:
| Type | Required fields |
|---|---|
| Attribute | Attribute scope (Server / Client / Shared), Attribute key, optional Default value |
| Latest telemetry | Time series key, optional Default value |
Argument name is the identifier used in conditions and formulas, like temperature or maxThreshold.
After filling in all fields, click Add.
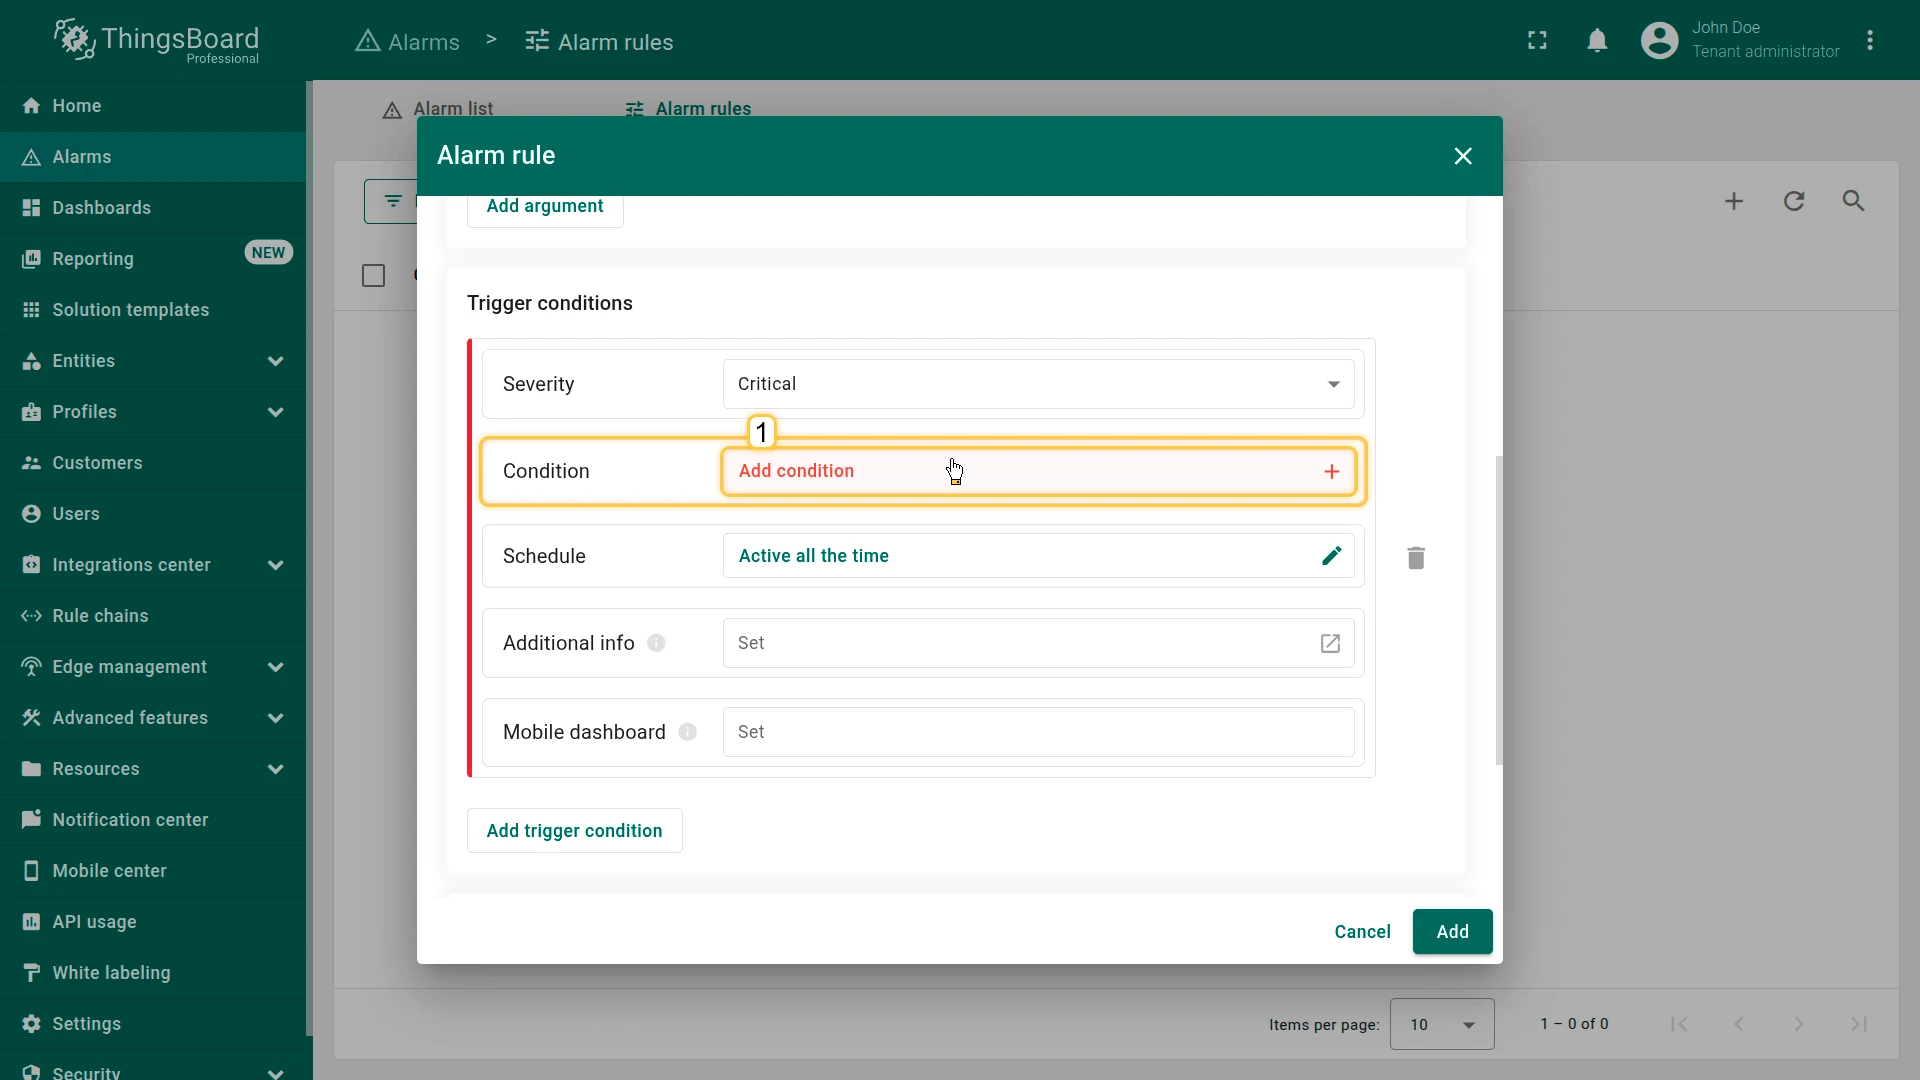
Trigger Conditions
Section titled “Trigger Conditions”Trigger conditions define when an alarm is created and at what severity. Click Add trigger condition.
Severity
Section titled “Severity”Select the severity level for this trigger condition. For level descriptions, see Alarm Severity.
If an alarm is already active and a new trigger fires at a higher severity, ThingsBoard upgrades the existing alarm’s severity instead of creating a new one.
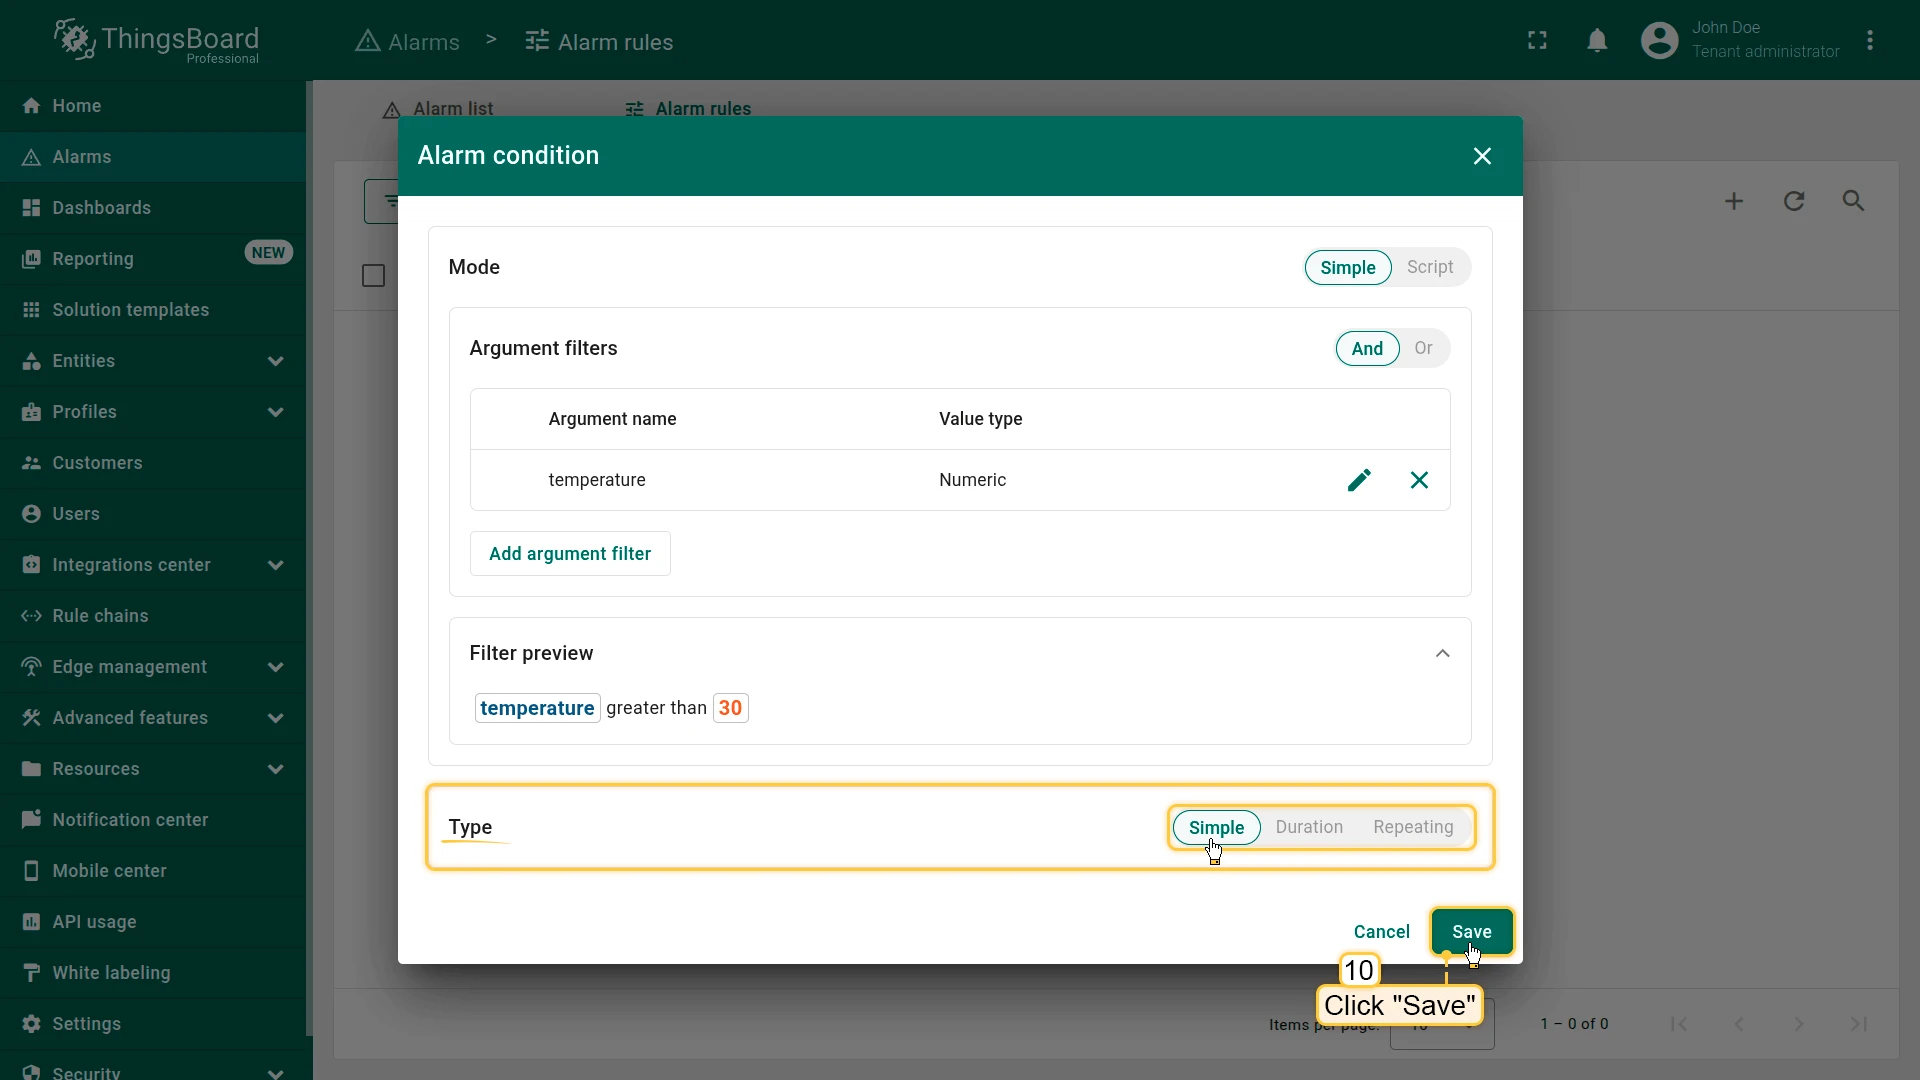
Condition
Section titled “Condition”The condition is the logical expression that determines whether an alarm is created or updated.
Click Add condition, then click Add argument filter and configure:
- Argument: The variable to compare, like
temperature. - Value type: The data type: Numeric, Boolean, String, etc.
- Filters: One or more comparisons. For each filter, set:
- Operation:
equal,not equal,greater than,less than,missing for, and others. - Value source: Static for a fixed value, or Dynamic to use the value of another argument.
- Value: The value to compare against.
- Operation:
When multiple filters are present, combine them with AND (all must be true) or OR (at least one must be true).
Conditions can be written manually or as TBEL script functions for advanced expressions.
Condition Types
Section titled “Condition Types”| Type | Behavior |
|---|---|
| Simple | Triggers immediately when the expression becomes true. |
| Duration | The condition must remain true continuously for a defined period, reducing false positives from short data spikes. |
| Repeating | Triggers only after the condition occurs a specified number of times in a row. |
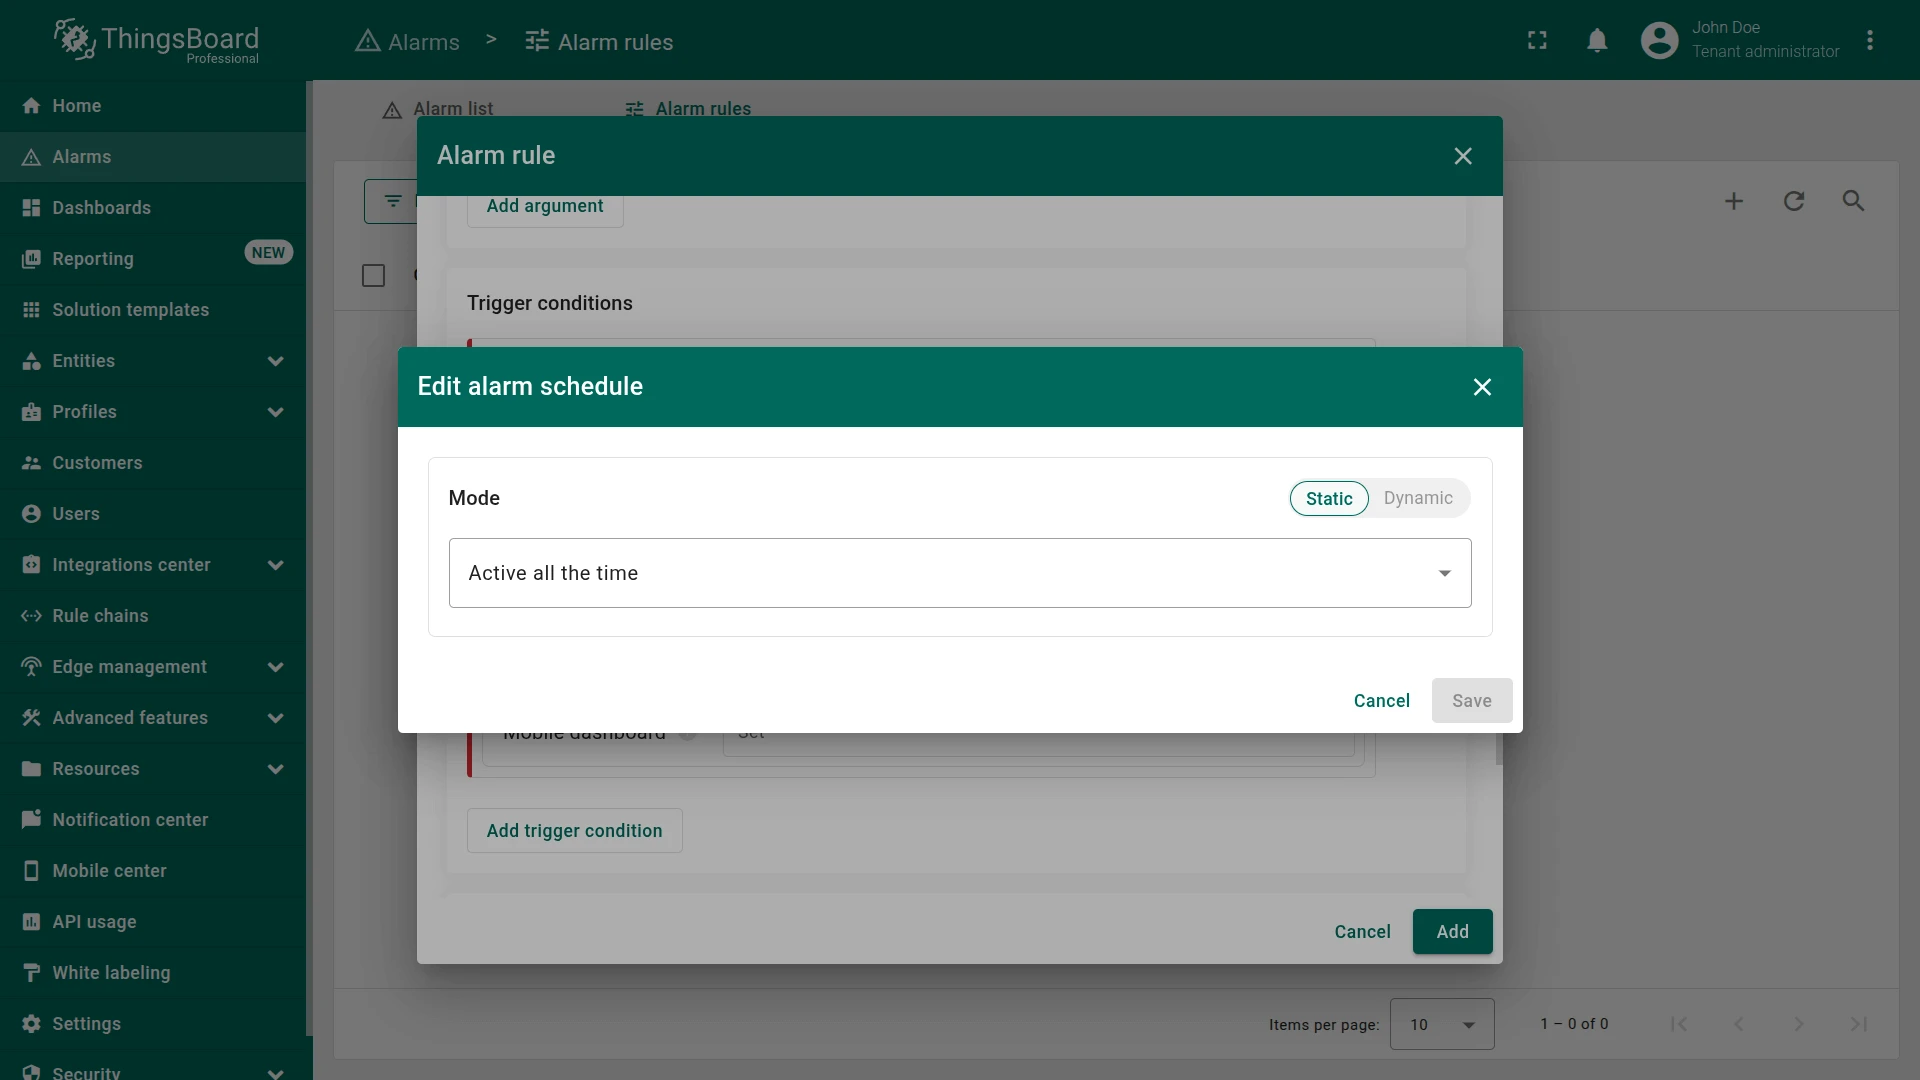
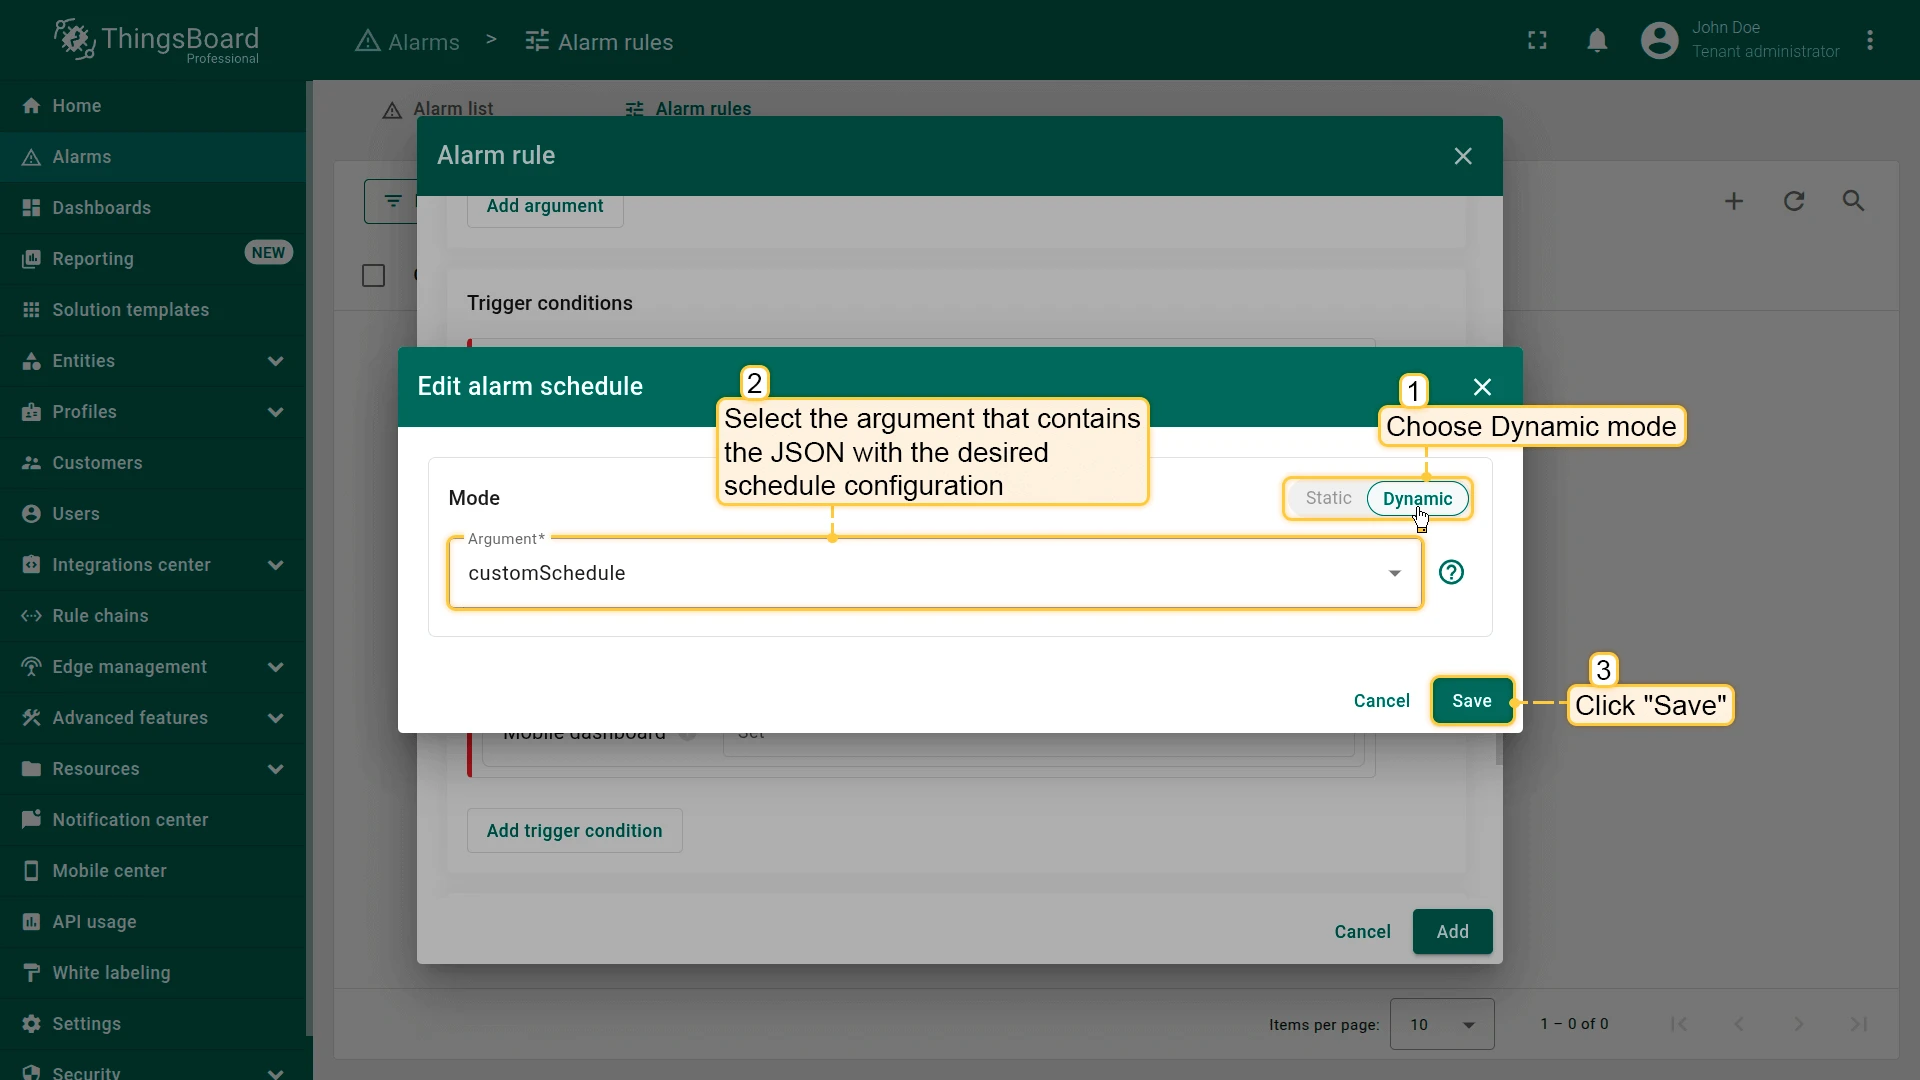
Schedule
Section titled “Schedule”The schedule defines when a trigger condition is allowed to fire. If the condition becomes true outside the allowed window, no alarm is created.
Static schedule offers three modes:
| Mode | Description |
|---|---|
| Active all time | The rule is always active. |
| Active at a specific time range | Active on selected days within a time range, like Mon–Fri, 09:00–18:00. |
| Custom schedule | Supports different intervals for each day of the week. |
Dynamic schedule lets you supply the schedule as a JSON object via an attribute or telemetry key instead of a fixed configuration. This is useful when the schedule varies between devices or customers. To use dynamic mode, go to Schedule, choose Dynamic mode, and select the argument that contains the schedule JSON.
Schedule JSON examples:
Active all time:
{ "type": "ANY_TIME" }Active on Tuesday and Thursday, full day, Europe/Kiev timezone:
{ "type": "SPECIFIC_TIME", "daysOfWeek": [2, 4], "startsOn": 0, "endsOn": 0, "timezone": "Europe/Kiev"}Custom schedule, every day, full 24 hours:
{ "type": "CUSTOM", "timezone": "Europe/Kiev", "items": [ { "dayOfWeek": 1, "enabled": true, "startsOn": 0, "endsOn": 0 }, { "dayOfWeek": 2, "enabled": true, "startsOn": 0, "endsOn": 0 }, { "dayOfWeek": 3, "enabled": true, "startsOn": 0, "endsOn": 0 }, { "dayOfWeek": 4, "enabled": true, "startsOn": 0, "endsOn": 0 }, { "dayOfWeek": 5, "enabled": true, "startsOn": 0, "endsOn": 0 }, { "dayOfWeek": 6, "enabled": true, "startsOn": 0, "endsOn": 0 }, { "dayOfWeek": 7, "enabled": true, "startsOn": 0, "endsOn": 0 } ]}Field reference:
timezone: Time zone for interpreting the schedule.daysOfWeek: Days in numeric format (1 = Monday, 7 = Sunday).startsOn/endsOn: Milliseconds from the start of the day. Setting both to0means the full day.
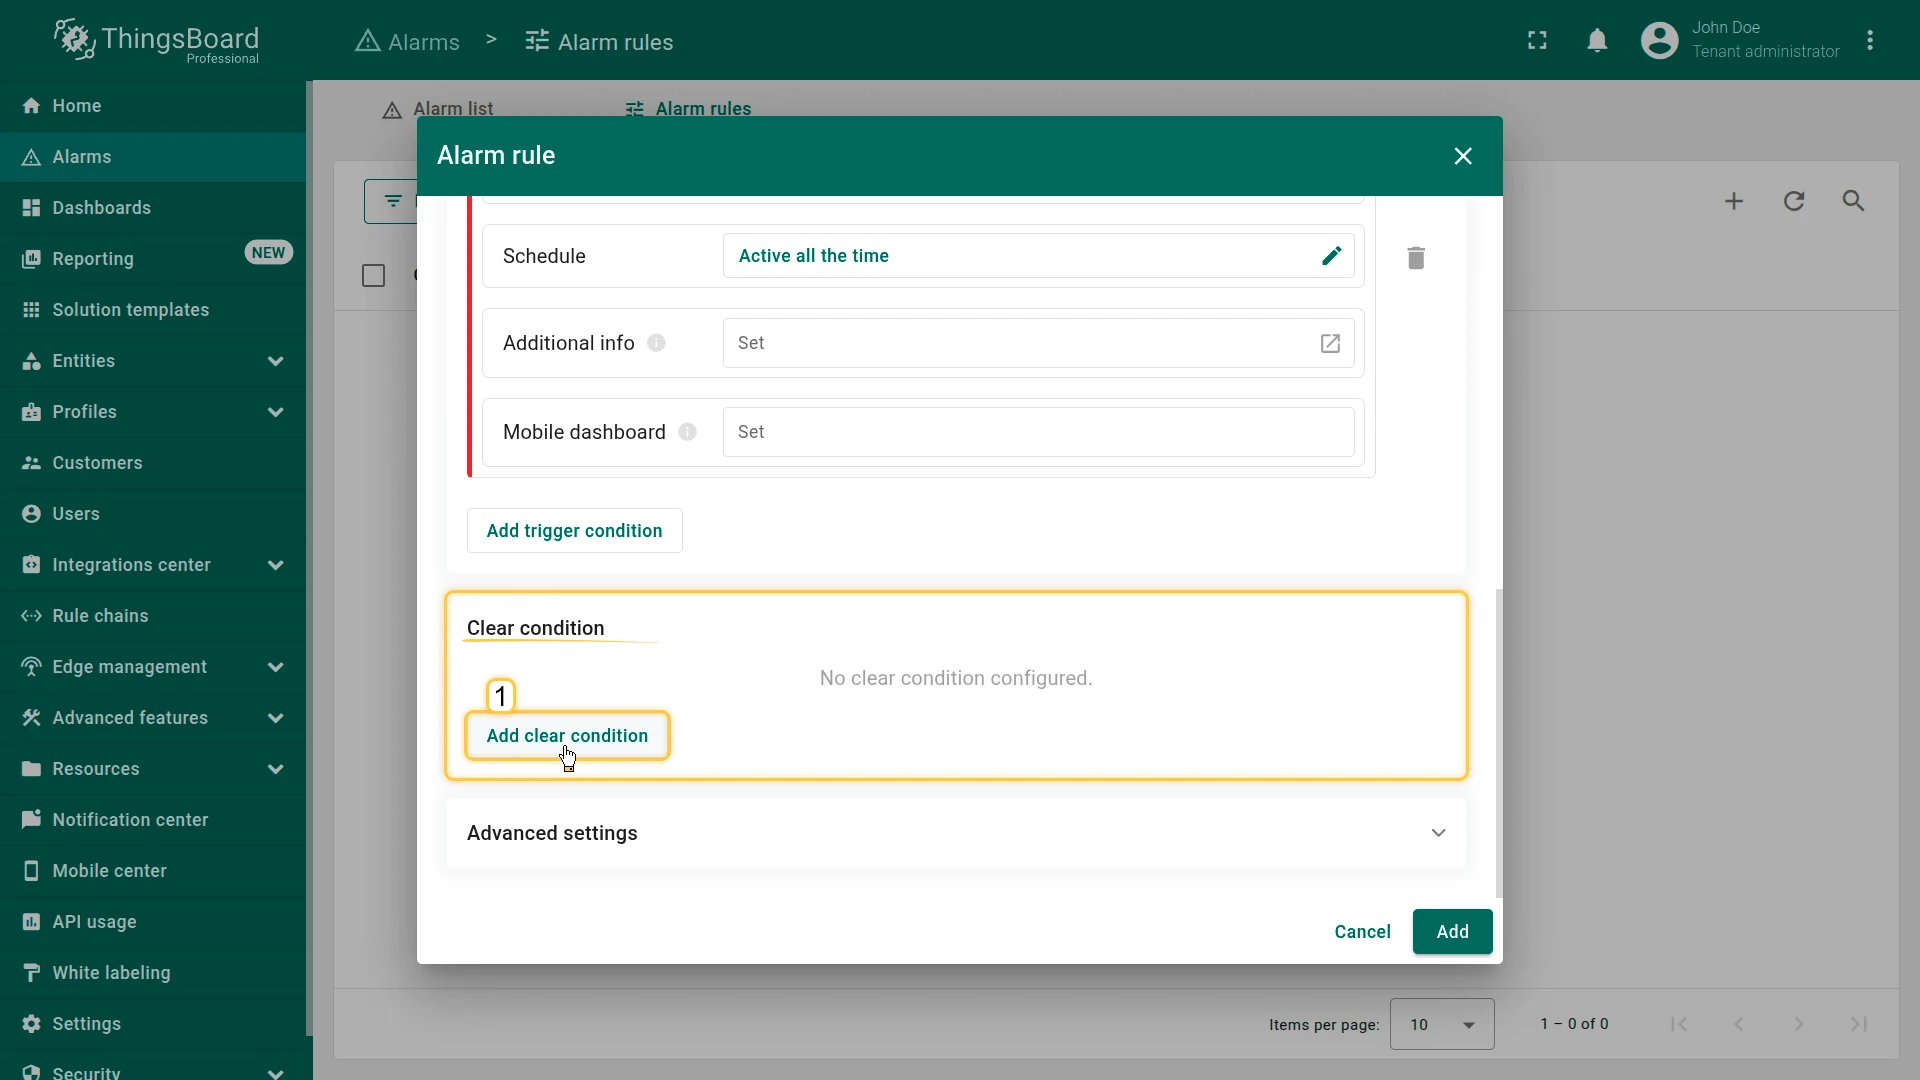
Clear Condition
Section titled “Clear Condition”The clear condition defines when ThingsBoard automatically transitions an alarm to the Cleared state.
Without a clear condition, the alarm never clears automatically and can only be cleared manually via the UI or API.
Click Add clear condition and configure:
- Condition: The expression that determines when the alarm is resolved, like
temperature ≤ 30. Uses the same filter and argument configuration as trigger conditions. - Condition type: Simple, Duration, or Repeating. See Condition Types for behavior details.
- Schedule: When the clear condition is allowed to fire. The alarm is not cleared if the condition is met outside the allowed window.
- Additional info: Extra data stored in Alarm Details at the moment of clearing. Supports
${attributeName}placeholders. - Mobile dashboard: The dashboard that opens when viewing a cleared alarm in the mobile app.
Advanced Settings
Section titled “Advanced Settings”Additional Info
Section titled “Additional Info”The Additional info field stores extra contextual data alongside the alarm, visible in the alarm details view. It supports dynamic placeholders using ${attributeName}.
Use it for data like operator notes, troubleshooting steps, documentation links, or a zone ID.
Mobile Dashboard
Section titled “Mobile Dashboard”The Mobile dashboard field specifies which dashboard opens in the ThingsBoard mobile app when a user navigates to the alarm. This gives field engineers immediate access to relevant widgets and diagnostics on-site.
Configure Alarm Rules with AI
Section titled “Configure Alarm Rules with AI”Configure with AI lets you create and manage alarm rules by describing what you want in plain language, instead of manually filling in arguments, trigger conditions, and severities. It’s powered by the AI Assistant available throughout ThingsBoard — see that guide for how to write effective prompts and how the Assistant works in general.
It’s useful whenever you know what condition should raise an alarm but don’t want to configure the trigger logic by hand — for example:
- Creating a new alarm rule for a device or asset profile from a plain description of the condition
- Setting up a device or asset inactivity alarm
- Adjusting an existing rule’s thresholds, severity, or clear condition
- Getting suggestions for alarm rules that make sense for a given profile
Workflow
- On the Alarms ⇾ Alarm rules page, click Configure with AI to open the AI Assistant panel.
- Describe the alarm rule you want in the chat — the condition, the entity or profile it applies to, and the severity, e.g. “Create an alarm rule that triggers a warning when a device stops sending telemetry for more than 10 minutes.” Use the suggested prompts if you’re not sure where to start.
- The Assistant explains its plan, then proposes the change — such as creating, updating, or deleting an alarm rule — as an approval card describing exactly what will happen.
- Click Approve to apply it, Deny to reject it, or Approve all further actions to apply the rest of the plan without confirming each step individually.
- Keep the conversation open to refine the result — reply with follow-up instructions to adjust the condition, severity, or target profile instead of starting over.
Best Practices
- Describe the condition and the outcome you want, not the specific arguments or trigger mode — the Assistant picks the right configuration.
- Name the device, asset, or profile clearly so the Assistant applies the rule to the right target.
- Include thresholds, durations, and severities upfront to skip a round of clarifying questions.
- Review each proposed rule before approving, especially before using Approve all further actions.
Limitations
- Changes are proposed, not applied silently: each one needs your approval, unless you approve all further actions in that chat.
- The Assistant’s summary states exactly which entity, telemetry key, condition, and severity the rule uses — review it before approving to confirm it matches what you intended.
Propagation
Section titled “Propagation”Propagation controls at which level of the entity hierarchy the alarm becomes visible. For a conceptual overview, see Alarm propagation.
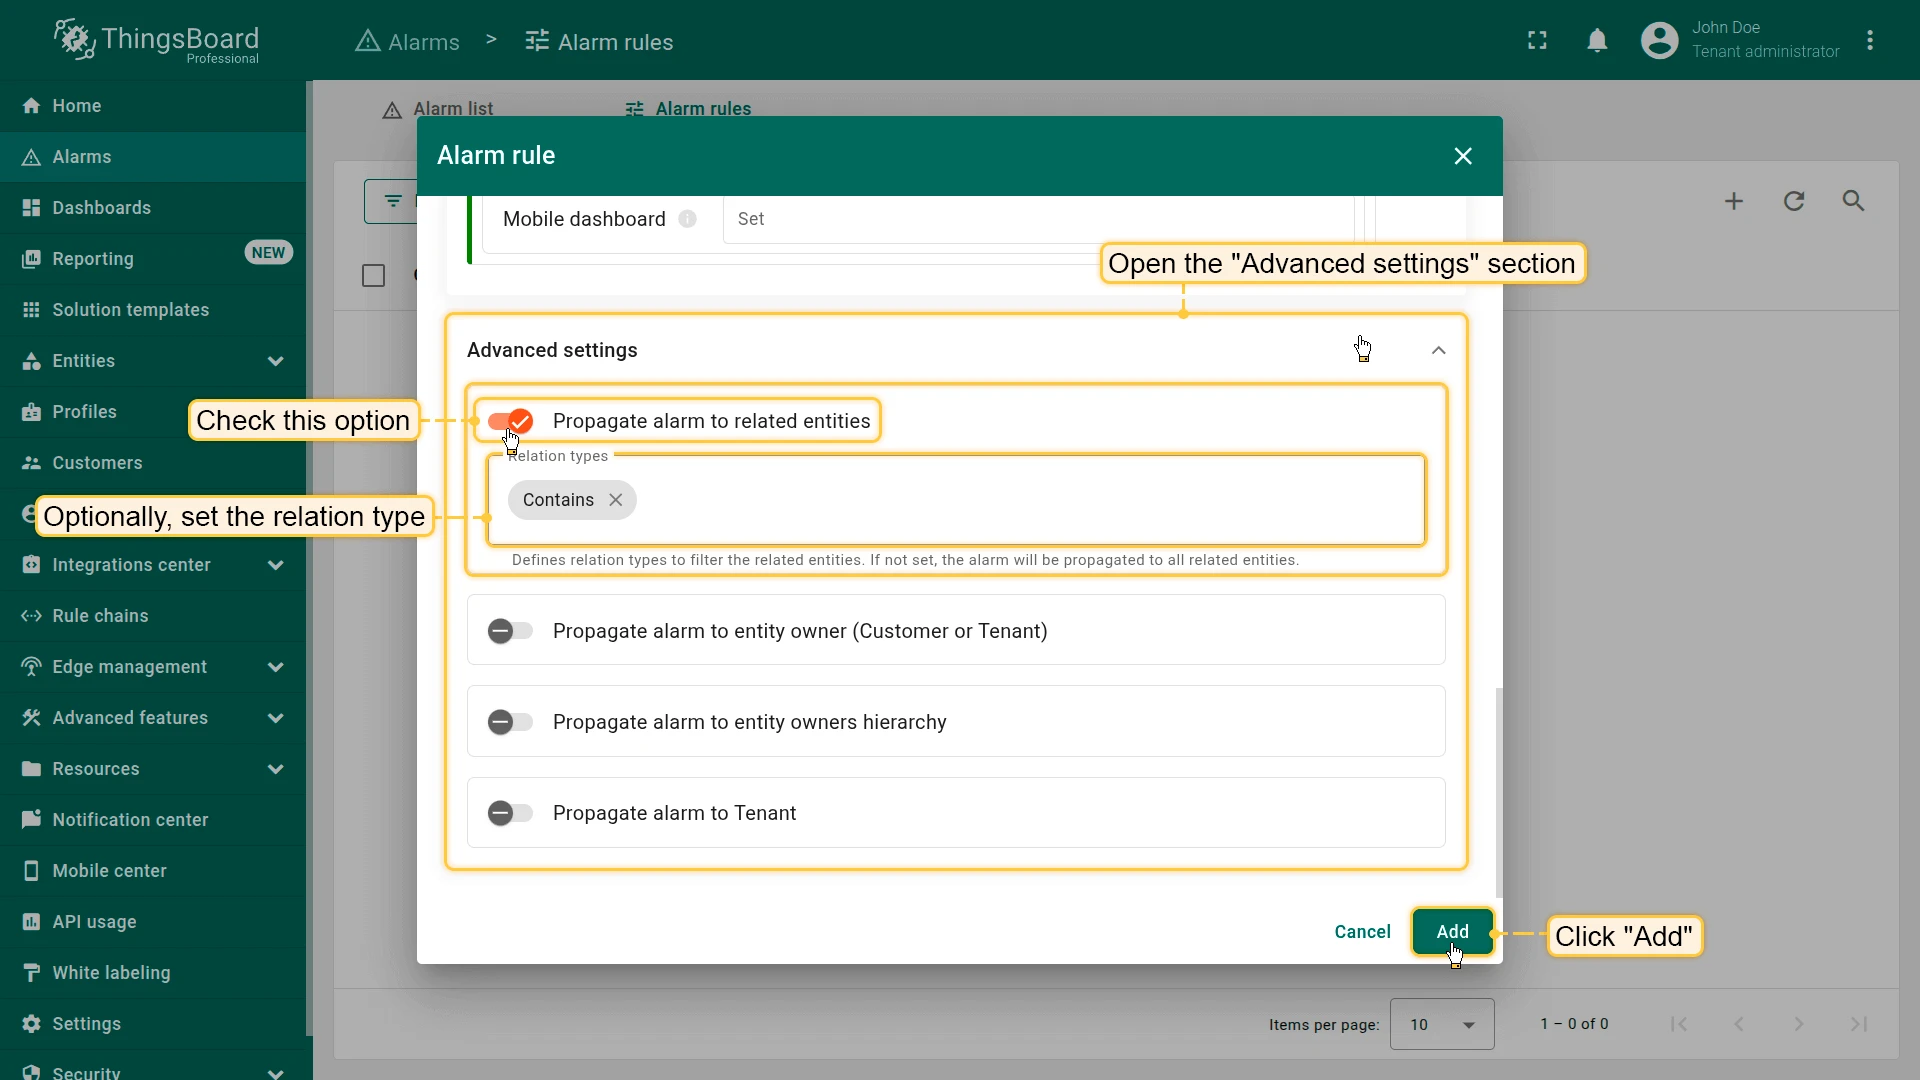
Propagate to related entities: The alarm becomes visible to all entities related to the originator, regardless of relation type. In a Device ⇾ Office ⇾ Building chain, all three entities see the alarm.
Propagate to the owner (Customer / Tenant): Makes the alarm visible to the direct owner of the originator without requiring explicit relations.
**Propagate to entity owners hierarchy:** Propagates the alarm up the entire ownership chain: Asset ⇾ Customer ⇾ Tenant. All higher-level owners see the alarm even without a direct relation to the originator. Useful for B2B platforms with nested customer structures and MSP deployments.Propagate to Tenant: Makes the alarm visible at the Tenant level regardless of ownership or relations. Use this when the Tenant Administrator needs visibility into all alarms across the infrastructure.
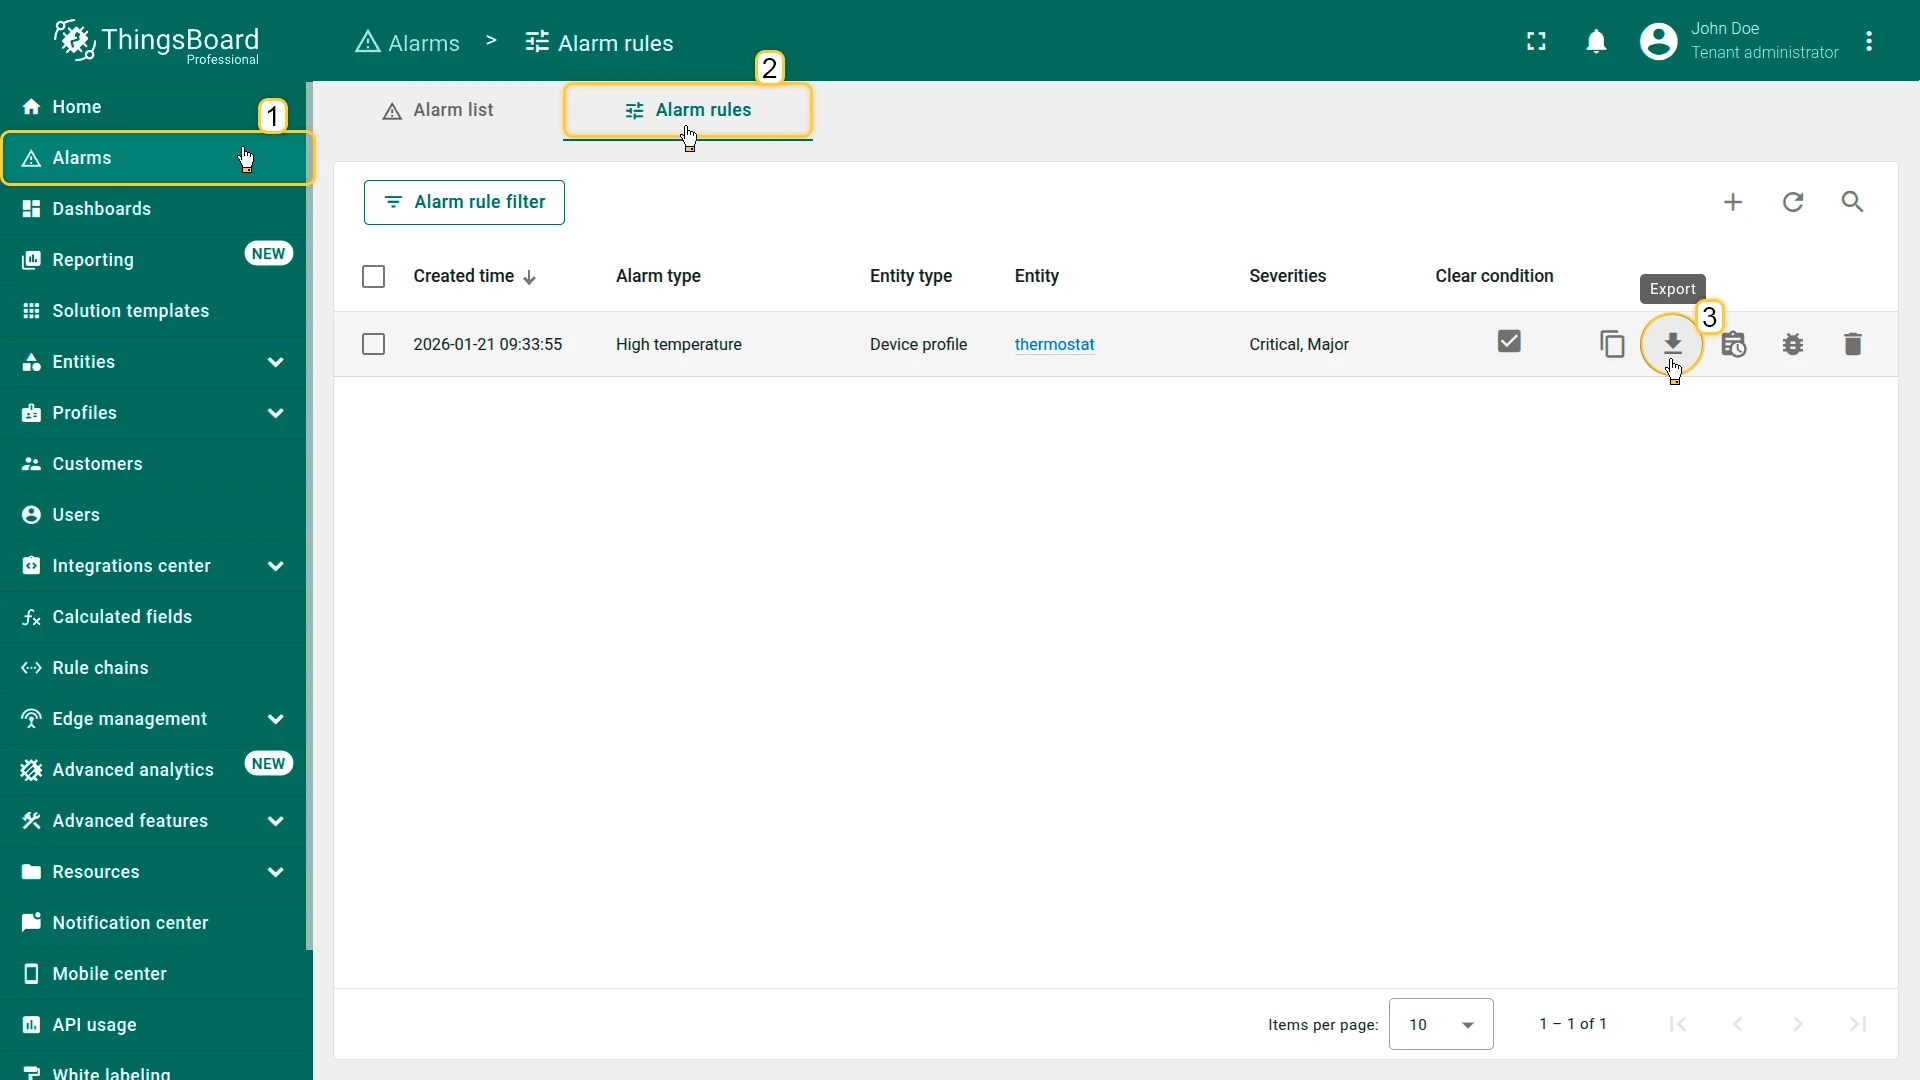
Managing Alarm Rules
Section titled “Managing Alarm Rules”Alarm rules are listed on the Alarms ⇾ Alarm rules page. The table shows alarm type, target entity, severity levels, and whether a clear condition is configured.
Each rule row has an action bar:
| Action | Description |
|---|---|
| Copy | Copies the rule configuration for quick creation of a new rule. |
| Export | Exports the rule as a JSON file for backup or migration. |
| Events | Opens the event log for triggers, clears, state changes, and errors. |
| Debug | Enables debug mode and shows detailed execution information. |
| Edit | Opens the rule editor. |
| Delete | Removes the alarm rule. |
Click a rule row to view its full details. To edit a rule, click Edit (pencil) in the details panel, make your changes, then click Apply (checkmark) to save.
Export / Import
Section titled “Export / Import”To export a rule:
- Go to Alarms ⇾ Alarm rules.
- Click Export (download icon) in the rule’s row.
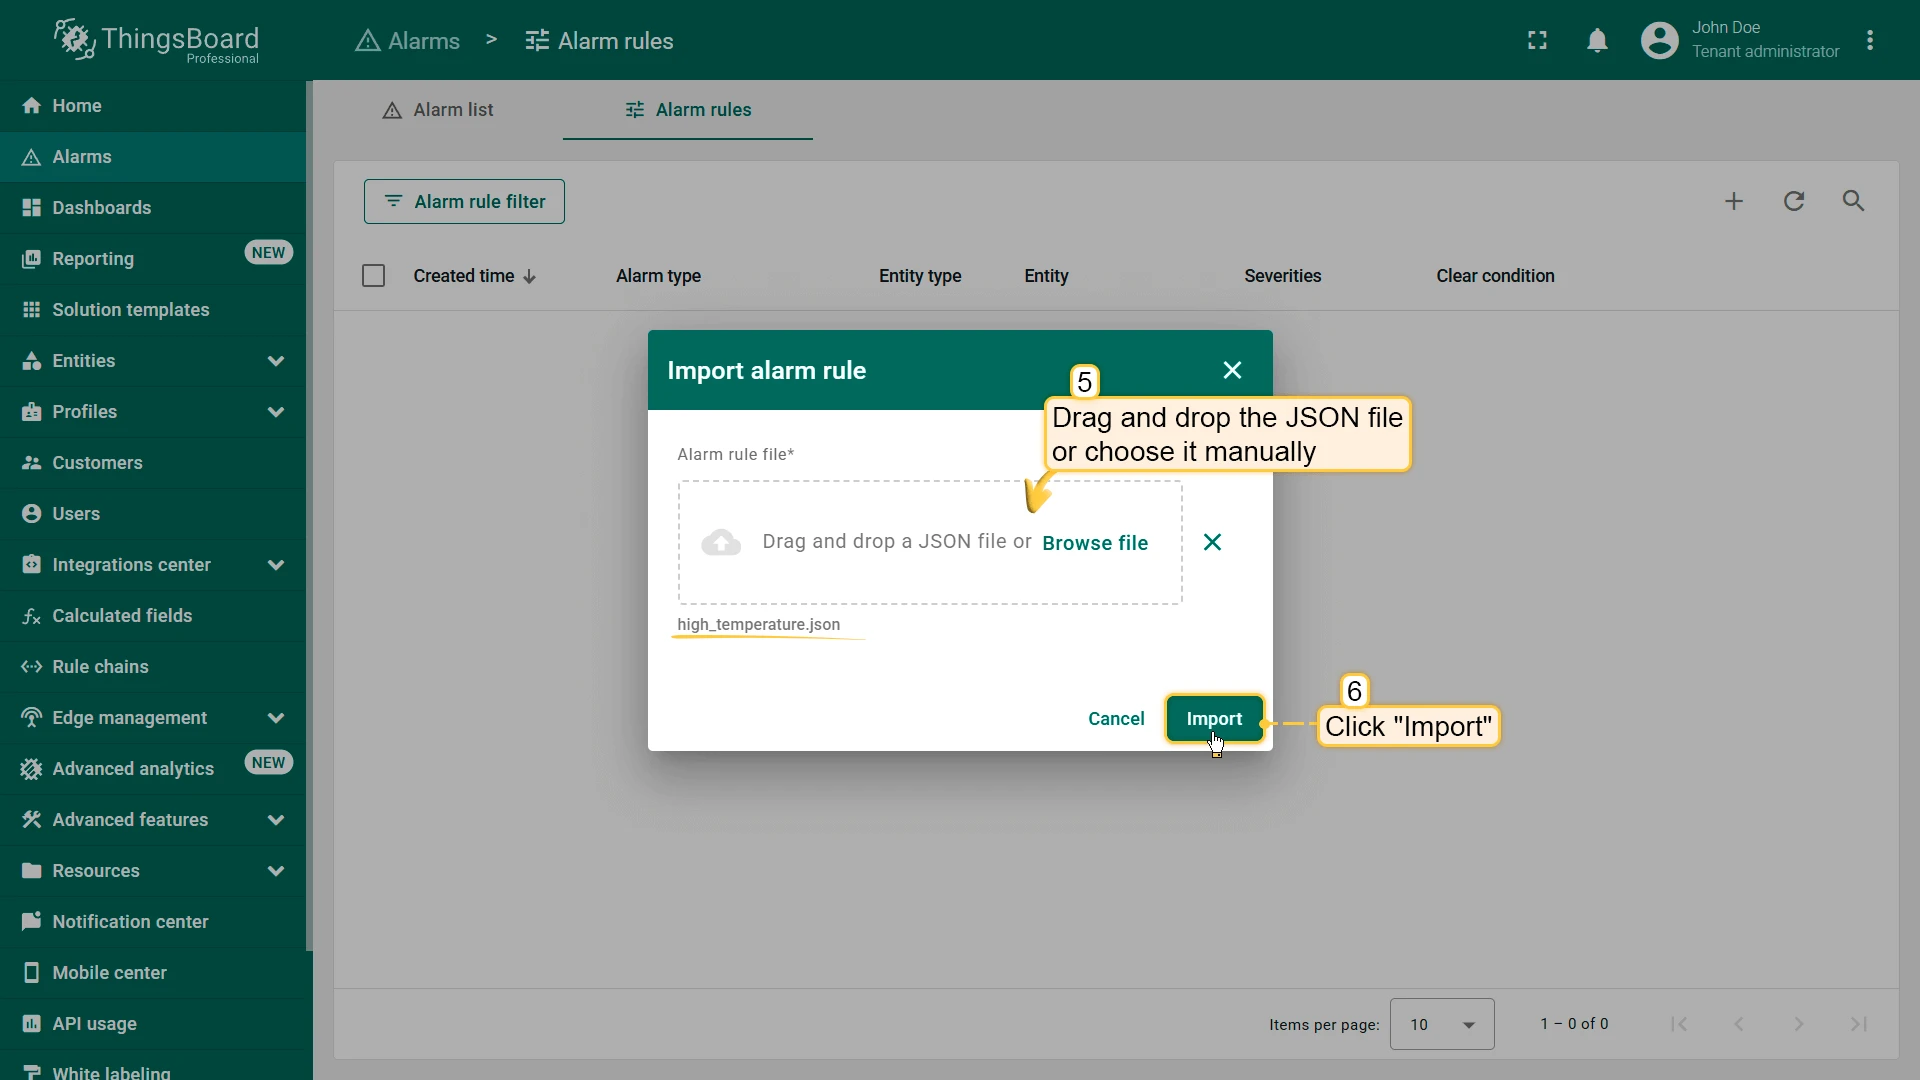
To import a rule:
- Go to Alarms ⇾ Alarm rules.
- Click + Add alarm rule ⇾ Import alarm rule.
- Drop the JSON file into the import dialog or select it manually.
- Click Import.
- Specify the entity or profile the rule applies to.
- Click Add.
The rule becomes active immediately after saving.
Examples
Section titled “Examples”The following tutorials walk through common alarm rule configurations, from basic thresholds to dynamic schedules. Each example builds on the previous one using a Thermometer device.
| Example | What you learn | Tutorial |
|---|---|---|
| Temperature threshold | Basic trigger: alarm when temperature > 10 | Example 1 |
| Clear condition | Auto-clear alarm when temperature ≤ 4 | Example 2 |
| Duration condition | Trigger only when threshold is exceeded continuously for 1 minute | Example 3 |
| Dynamic duration | Drive the duration threshold from a device attribute | Example 4 |
| Repeating condition | Trigger after the condition occurs 3 times in a row | Example 5 |
| Schedule | Restrict alarm triggering to weekdays 10:00–19:00 | Example 6 |
| Enable/disable flag | Use a boolean attribute to toggle the alarm per device | Example 7 |
For full step-by-step instructions, see Alarm rule tutorials.
Was this helpful?