CoAP Integration
CoAP Integration streams data from CoAP-enabled devices into ThingsBoard Edge and converts device payloads into ThingsBoard telemetry.

Prerequisites
Section titled “Prerequisites”This guide covers the NO SECURE security mode. To simulate a CoAP device, install the coap-client utility:
sudo apt updatesudo apt install libcoap2-binVerify the installation:
coap-client --versionThe examples use a sensor SN-001 that publishes temperature and humidity to the CoAP integration at coap://10.7.3.0 (the Edge IP address on the local network). Replace this with the actual IP of your Edge instance.
The device supports three payload formats:
SN-001,default,temperature,25.7,humidity,69{ "deviceName": "SN-001", "deviceType": "default", "temperature": 25.7, "humidity": 69}\x53\x4e\x2d\x30\x30\x31\x64\x65\x66\x61\x75\x6c\x74\x32\x35\x2e\x37\x36\x39Byte breakdown:
- Bytes 0–5 (
\x53\x4e\x2d\x30\x30\x31): device name — SN-001 - Bytes 6–12 (
\x64\x65\x66\x61\x75\x6c\x74): device type — default - Bytes 13–16 (
\x32\x35\x2e\x37): temperature — 25.7 - Bytes 17–18 (
\x36\x39): humidity — 69
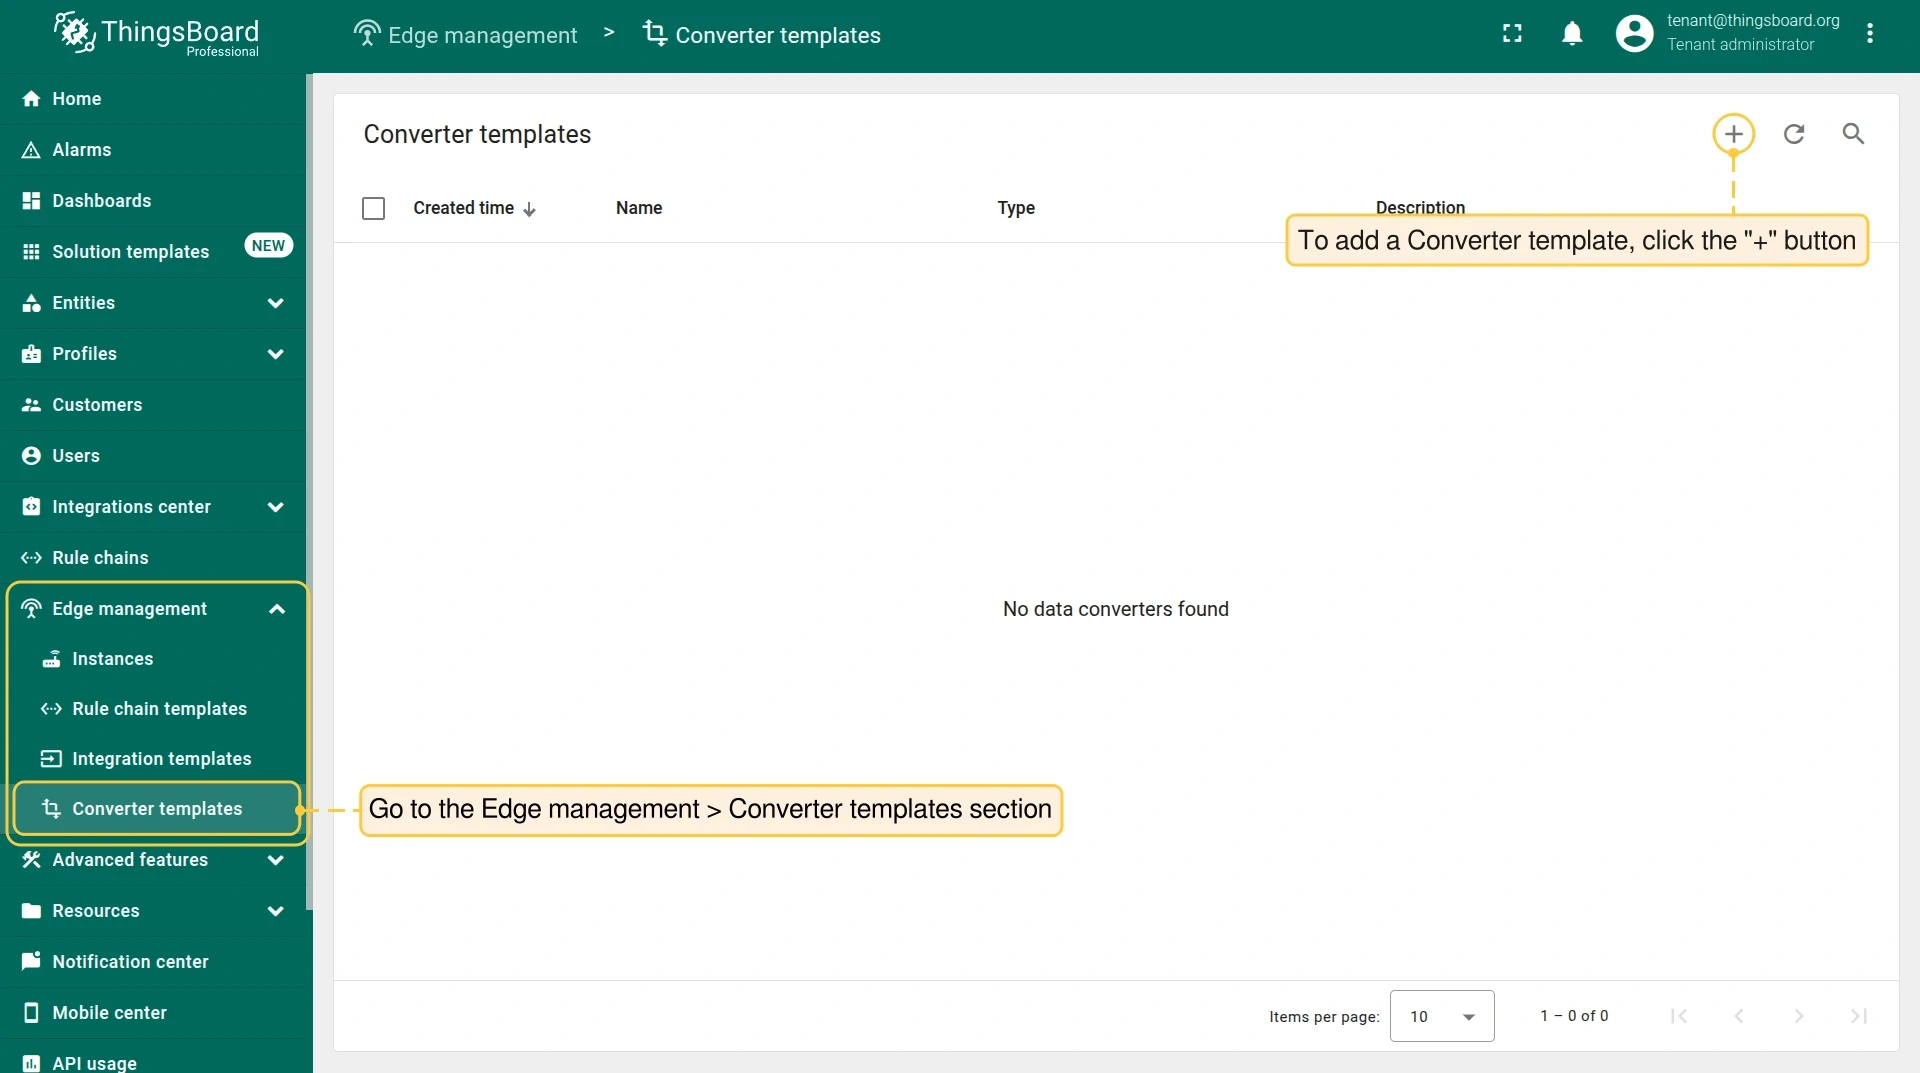
Create converter and integration templates
Section titled “Create converter and integration templates”Integration and Converter templates are created in the Cloud (ThingsBoard PE server) and then assigned to Edge instances.
-
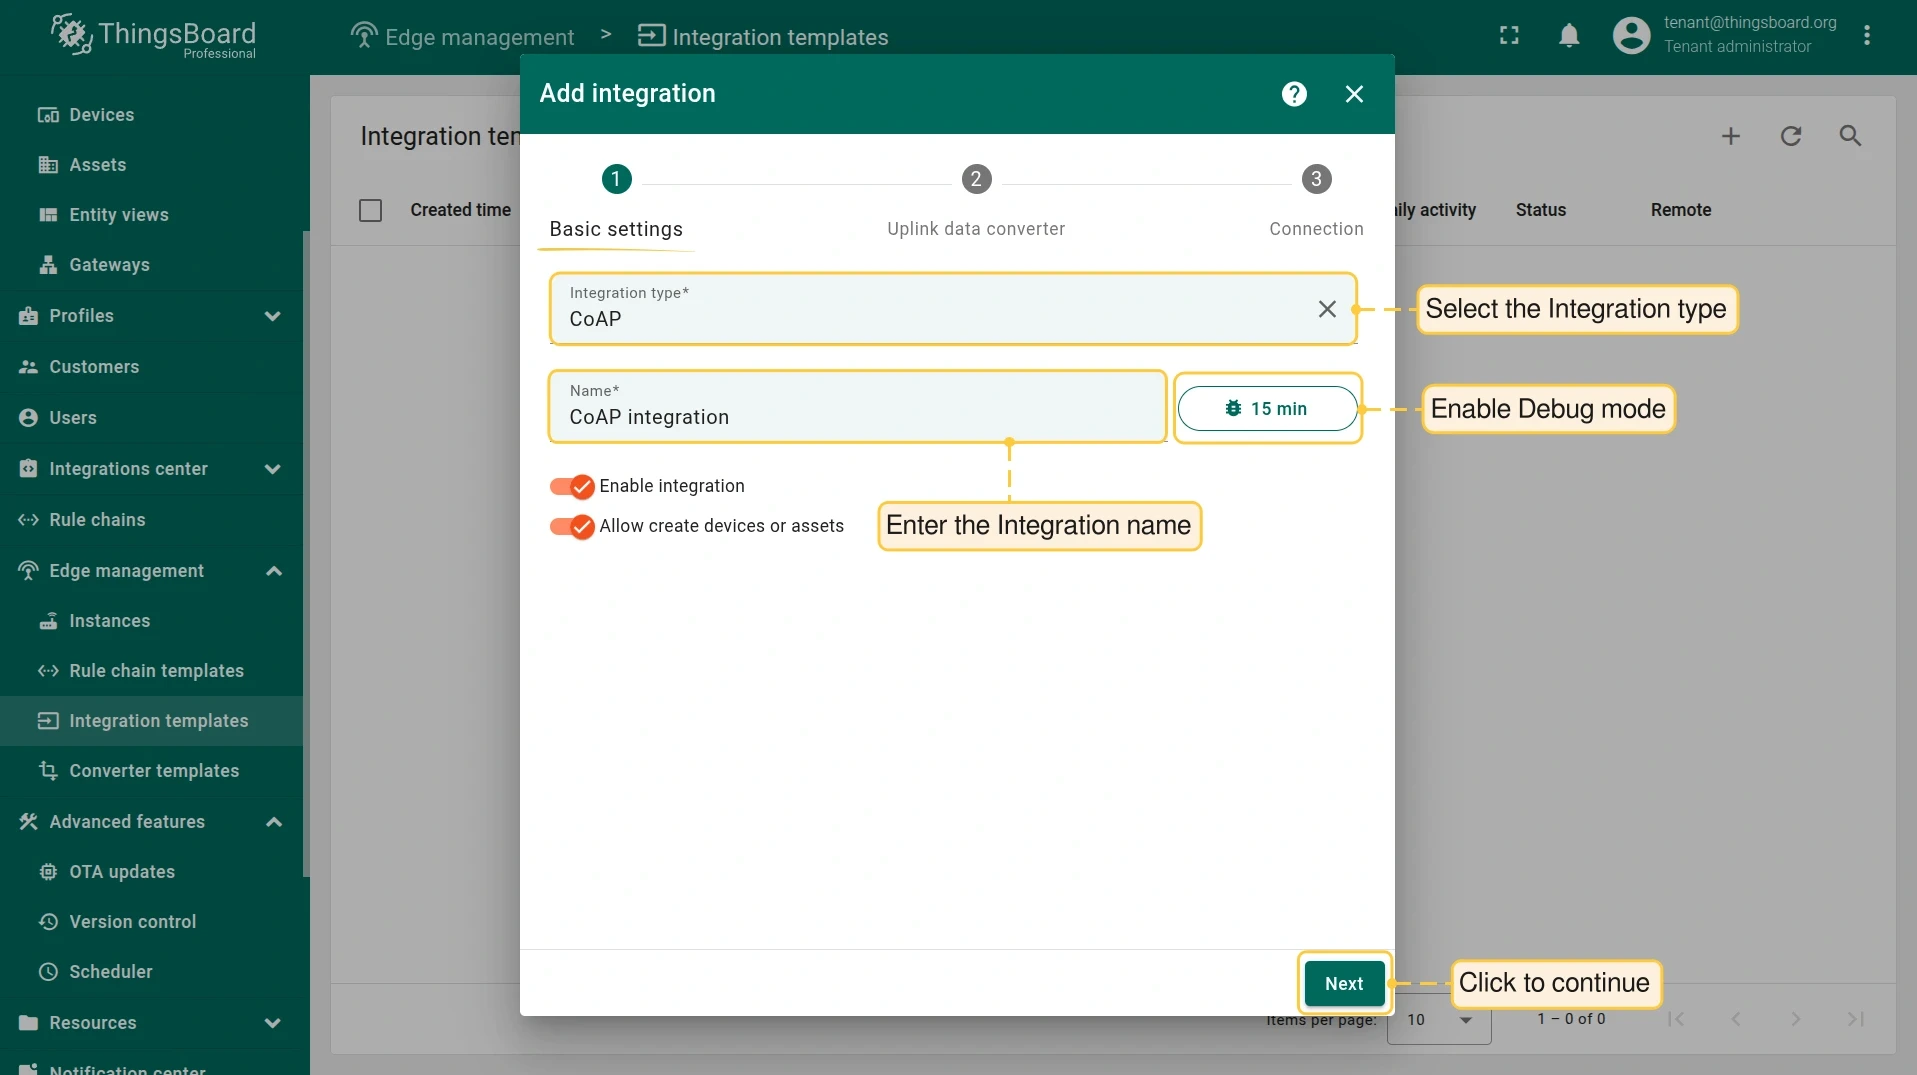
In the Cloud, go to Edge management > Integration templates and click +. Select CoAP as the integration type, enter a name, enable Debug mode, and click Next.
-
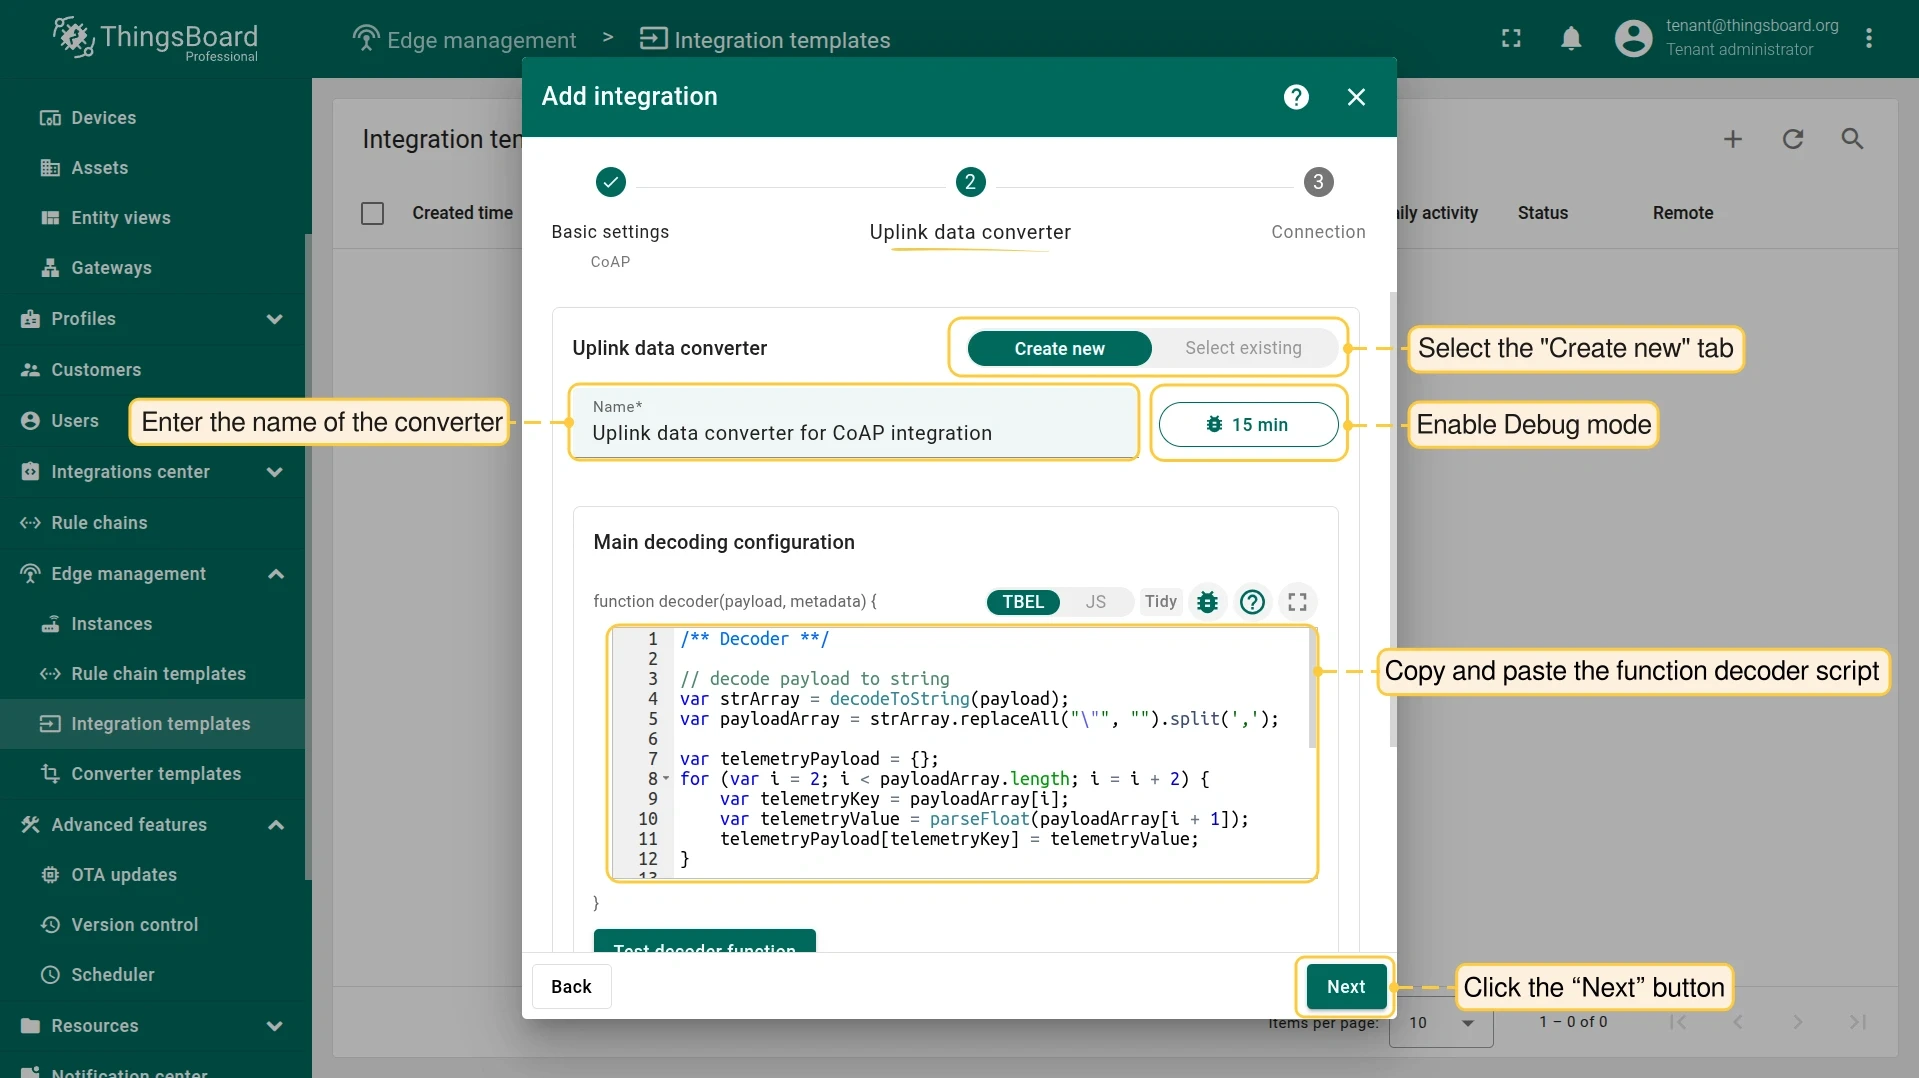
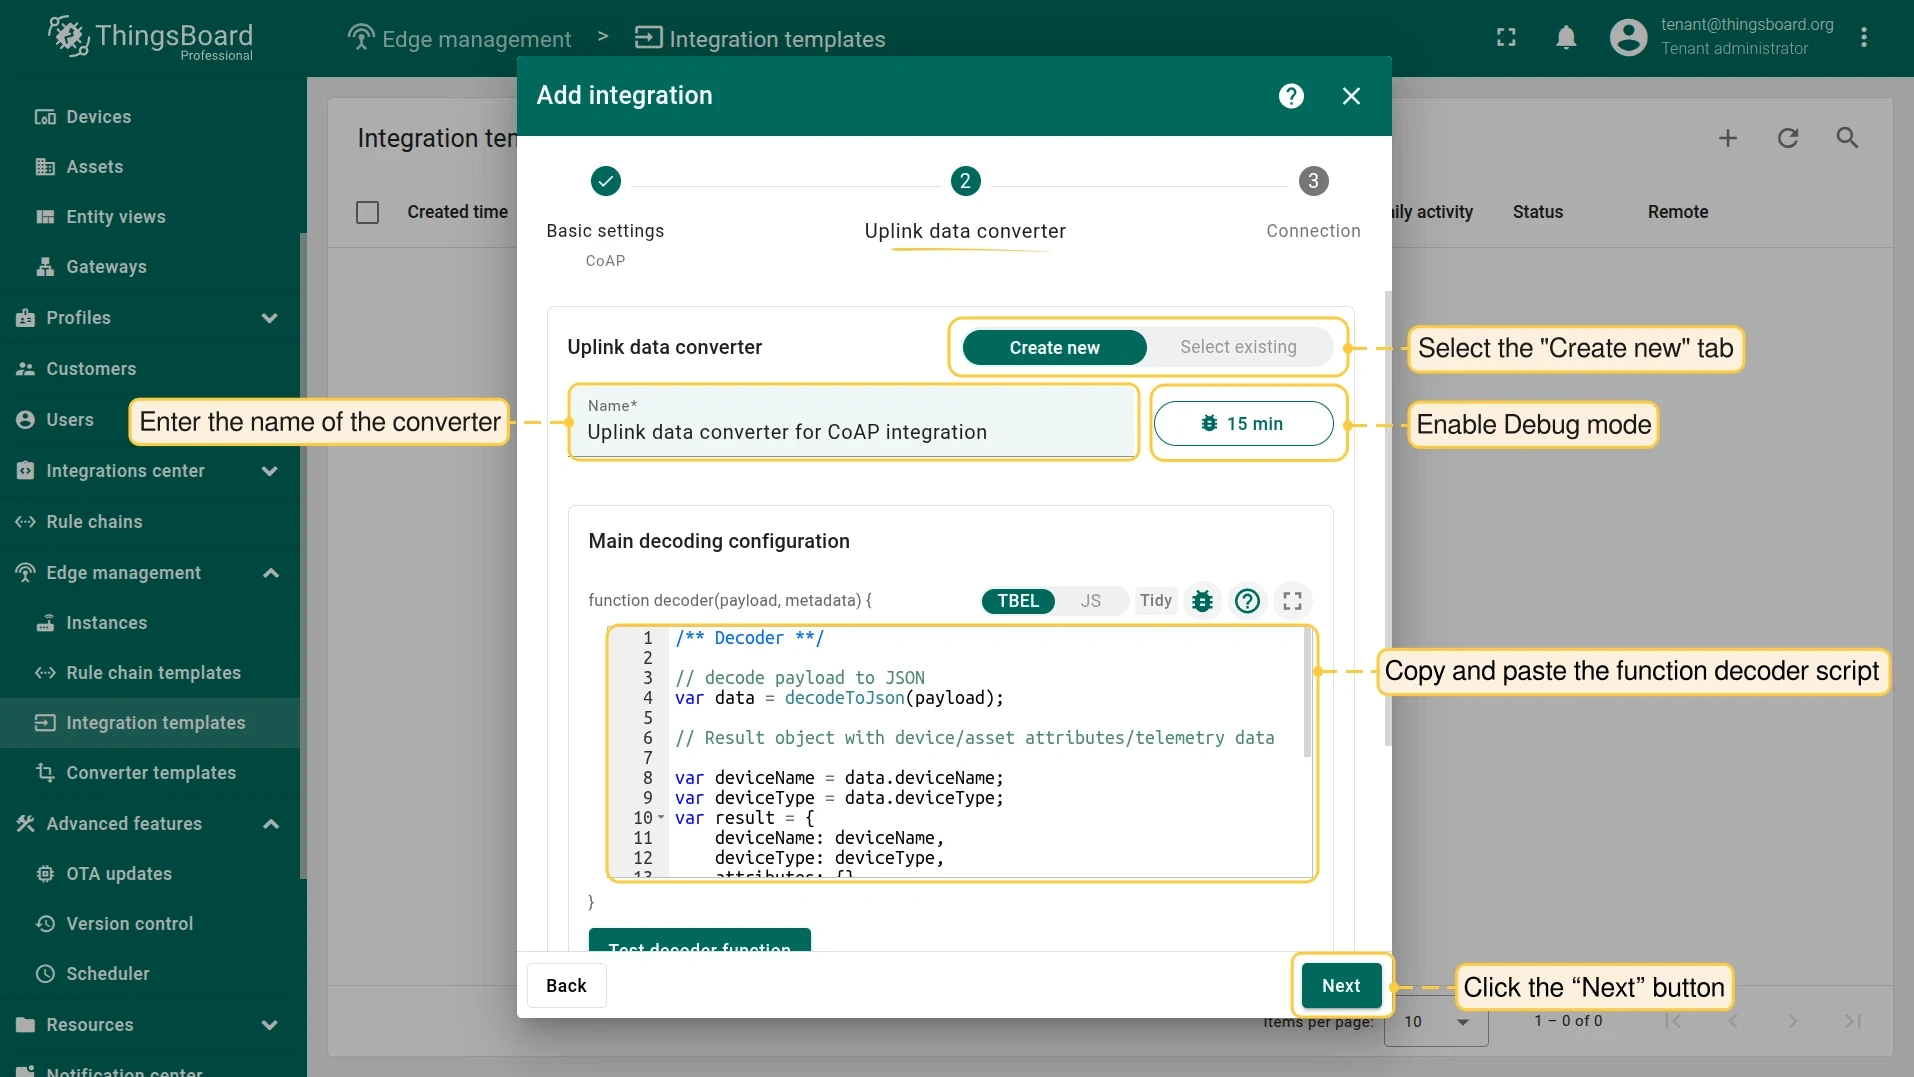
Create the Uplink converter. The decoder function parses the device payload into ThingsBoard telemetry. Select the tab matching your device’s payload format:
/** Decoder **/// decode payload to stringvar strArray = decodeToString(payload);var payloadArray = strArray.replaceAll("\"", "").split(',');var telemetryPayload = {};for (var i = 2; i < payloadArray.length; i = i + 2) {var telemetryKey = payloadArray[i];var telemetryValue = parseFloat(payloadArray[i + 1]);telemetryPayload[telemetryKey] = telemetryValue;}// Result object with device attributes/telemetry datavar result = {deviceName: payloadArray[0],deviceType: payloadArray[1],telemetry: telemetryPayload,attributes: {}};/** Helper functions 'decodeToString' and 'decodeToJson' are already built-in **/return result;/** Decoder **/// decode payload to JSONvar data = decodeToJson(payload);var deviceName = data.deviceName;var deviceType = data.deviceType;var result = {deviceName: deviceName,deviceType: deviceType,attributes: {},telemetry: {temperature: data.temperature,humidity: data.humidity}};/** Helper functions 'decodeToString' and 'decodeToJson' are already built-in **/return result;/** Decoder **/// decode payload to stringvar payloadStr = decodeToString(payload);var deviceName = payloadStr.substring(0, 6);var deviceType = payloadStr.substring(6, 13);// Result object with device/asset attributes/telemetry datavar result = {deviceName: deviceName,deviceType: deviceType,attributes: {},telemetry: {temperature: parseFloat(payloadStr.substring(13, 17)),humidity: parseFloat(payloadStr.substring(17, 19))}};/** Helper functions 'decodeToString' and 'decodeToJson' are already built-in **/return result; -
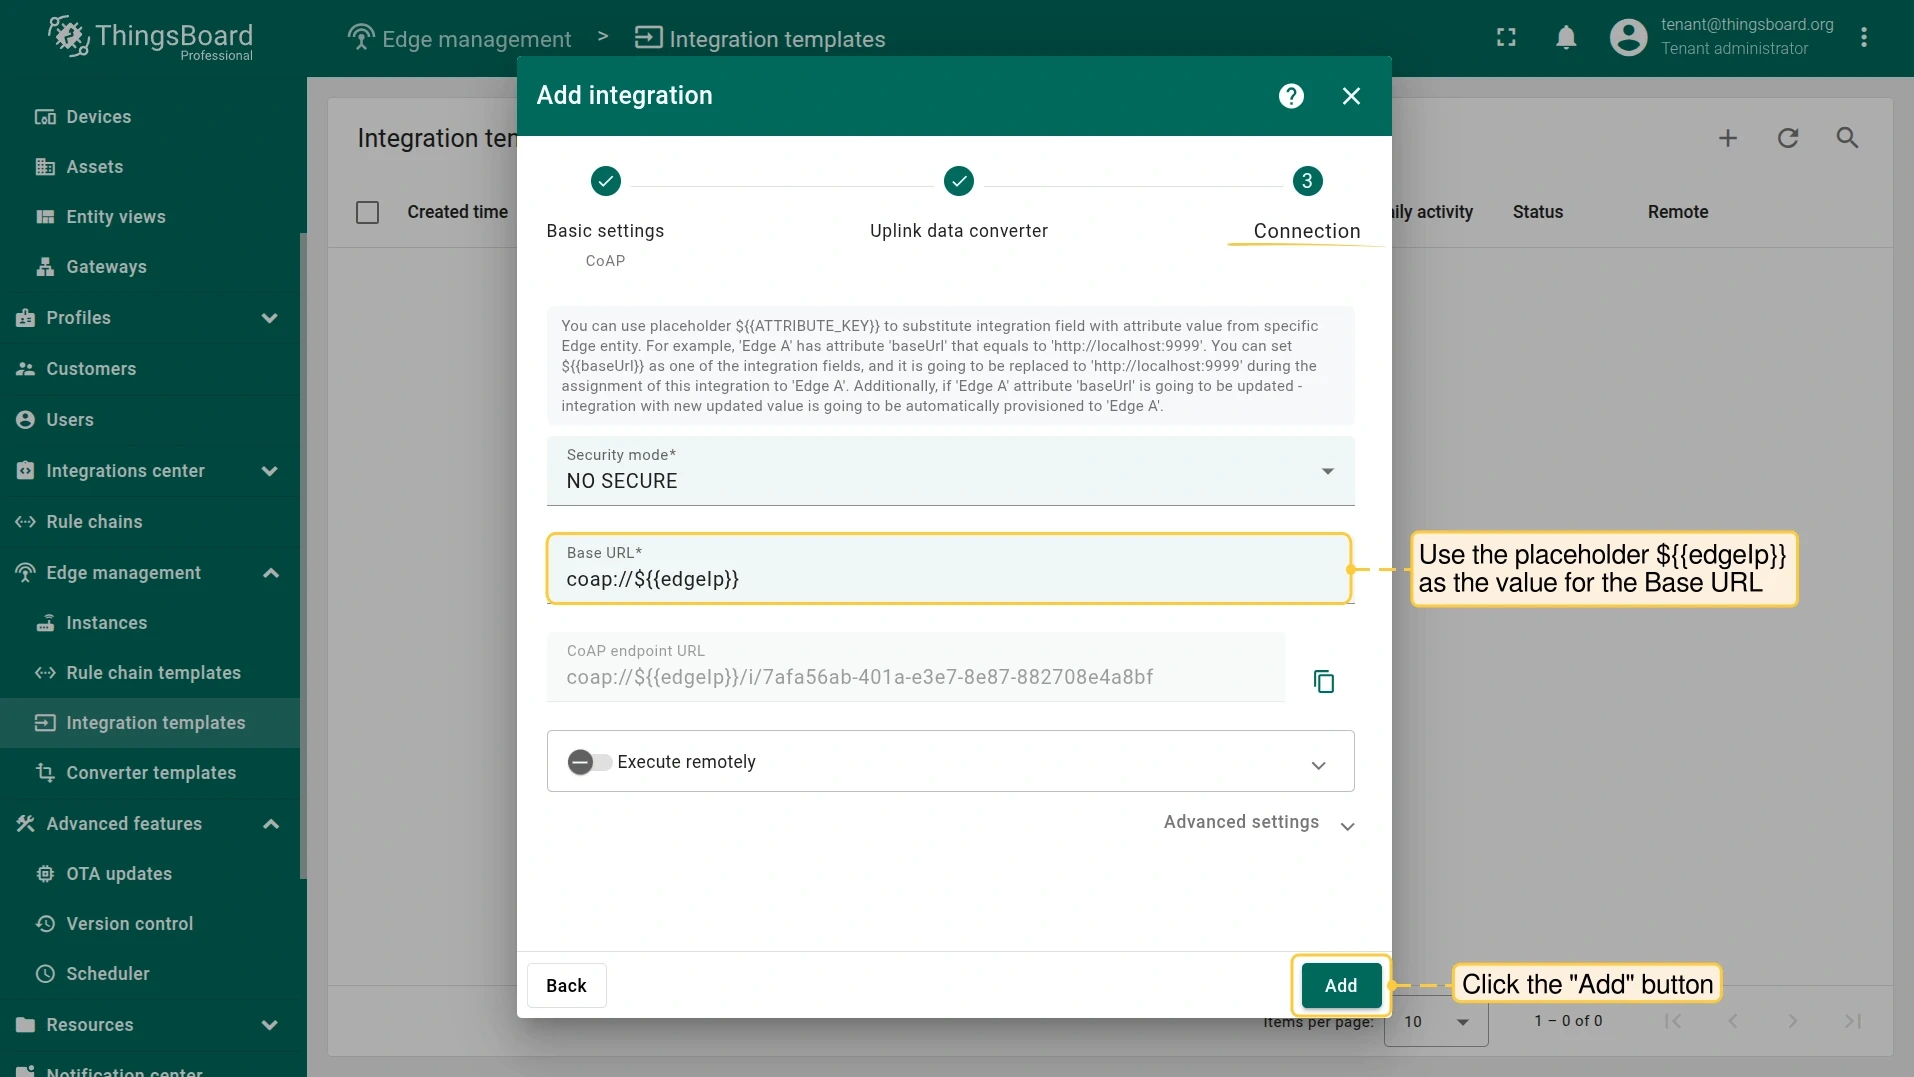
On the Connection step, enter the IP address and CoAP binding port of your Edge instance as the Base URL in
host:portformat.To reuse this template across multiple Edge instances with different addresses, use the placeholder
${{edgeIp}}instead of a hardcoded value. The placeholder is replaced at assignment time by theedgeIpattribute value set on each Edge instance.Click Add to save the integration template.

Add attribute to Edge
Section titled “Add attribute to Edge”Since the ${{edgeIp}} placeholder is used in the integration configuration, add the edgeIp server attribute to the Edge instance before assigning the integration. Set its value to the Edge IP address and CoAP binding port (e.g. 10.7.3.0:15683).
-
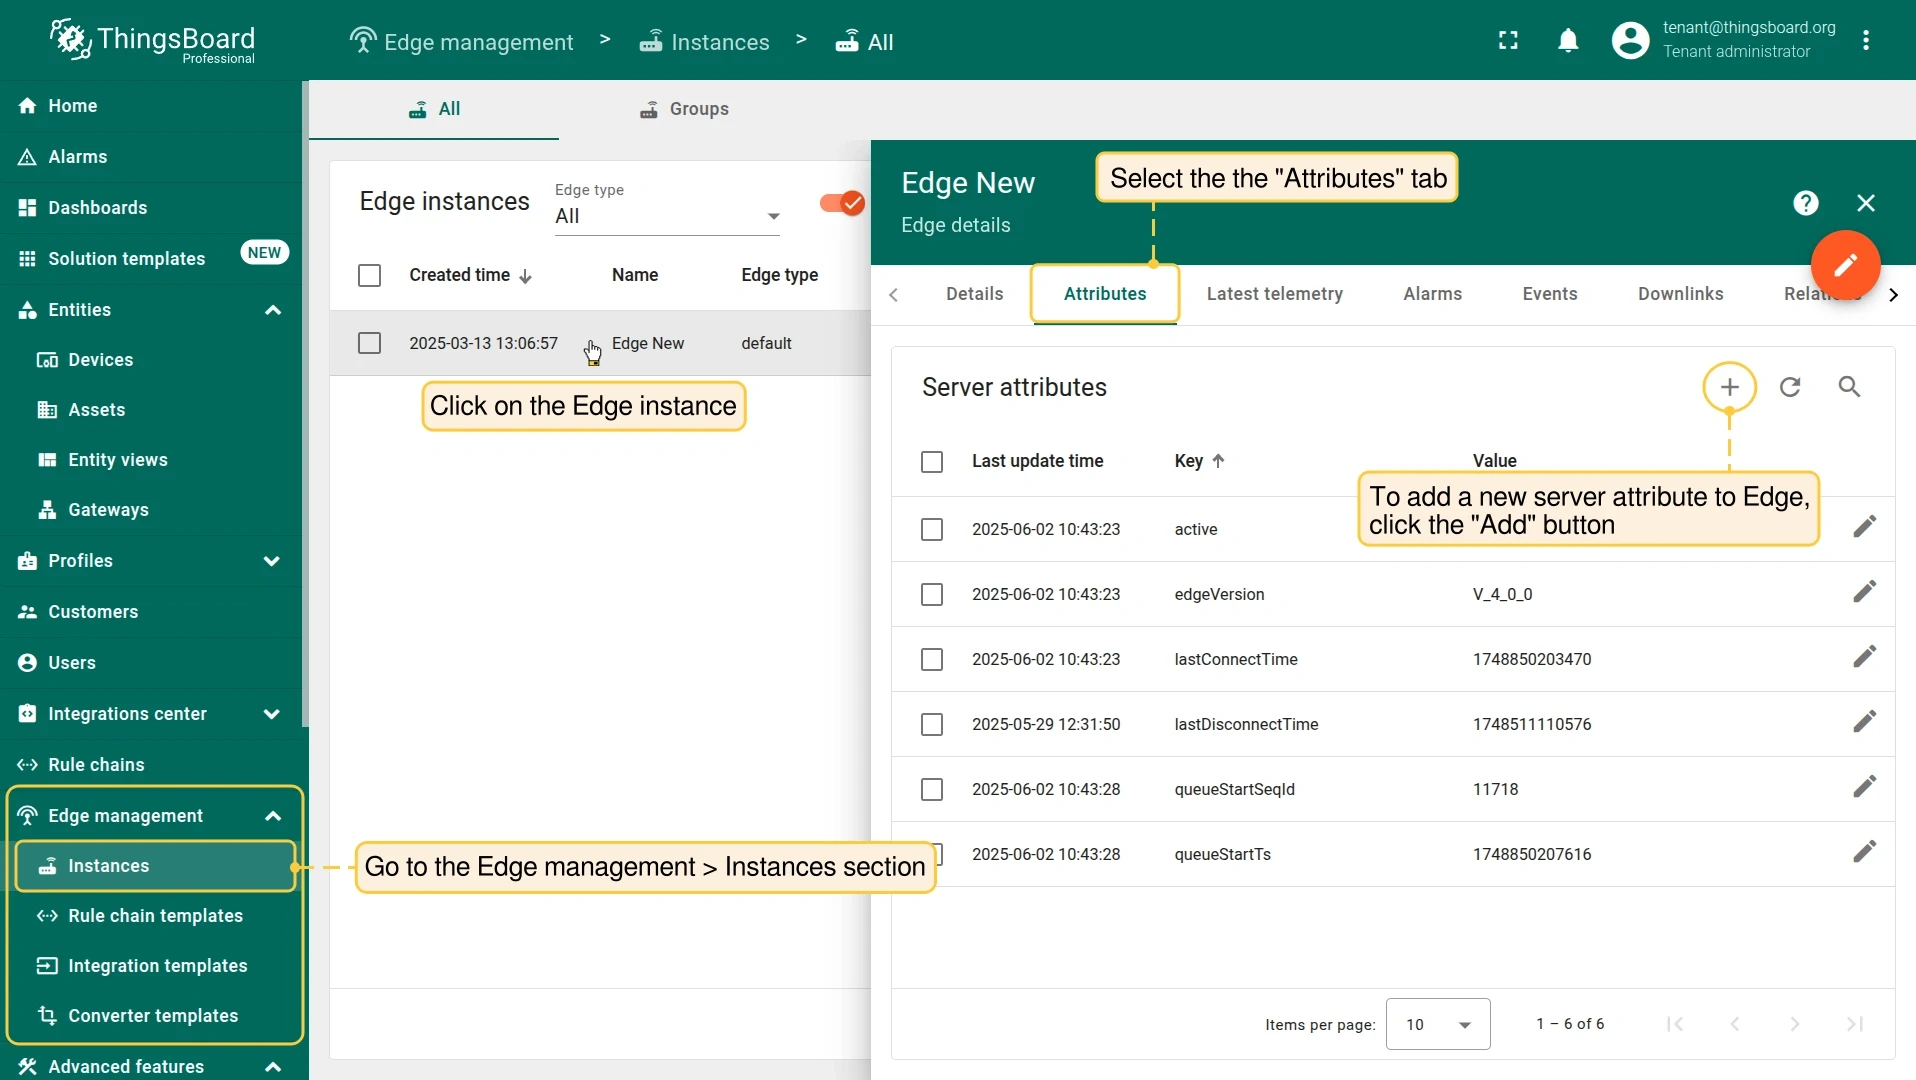
Go to Edge management > Instances, click the Edge instance to open its details, and select the Attributes tab. Click + to add a new server attribute.
-
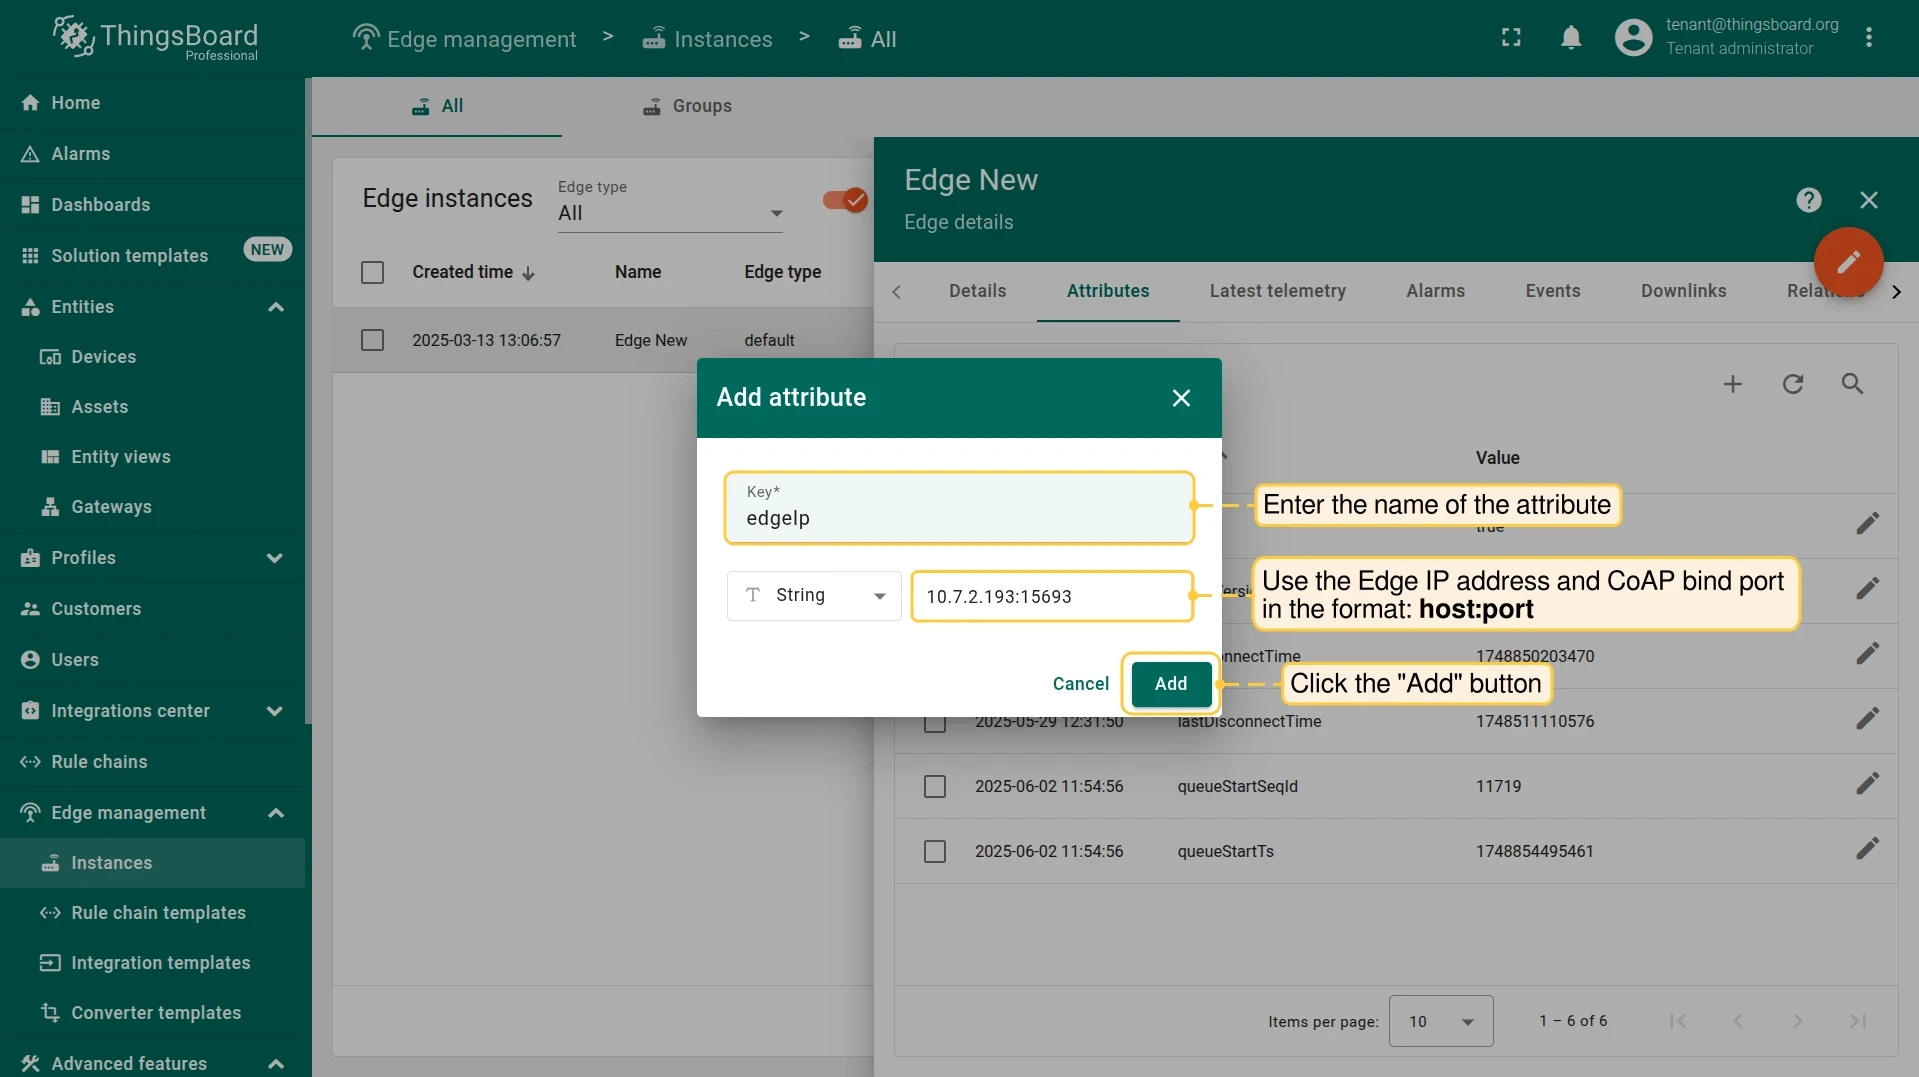
Enter
edgeIpas the attribute name and the Edge IP address with CoAP port as the value (e.g.10.7.3.0:15683). Click Add. -
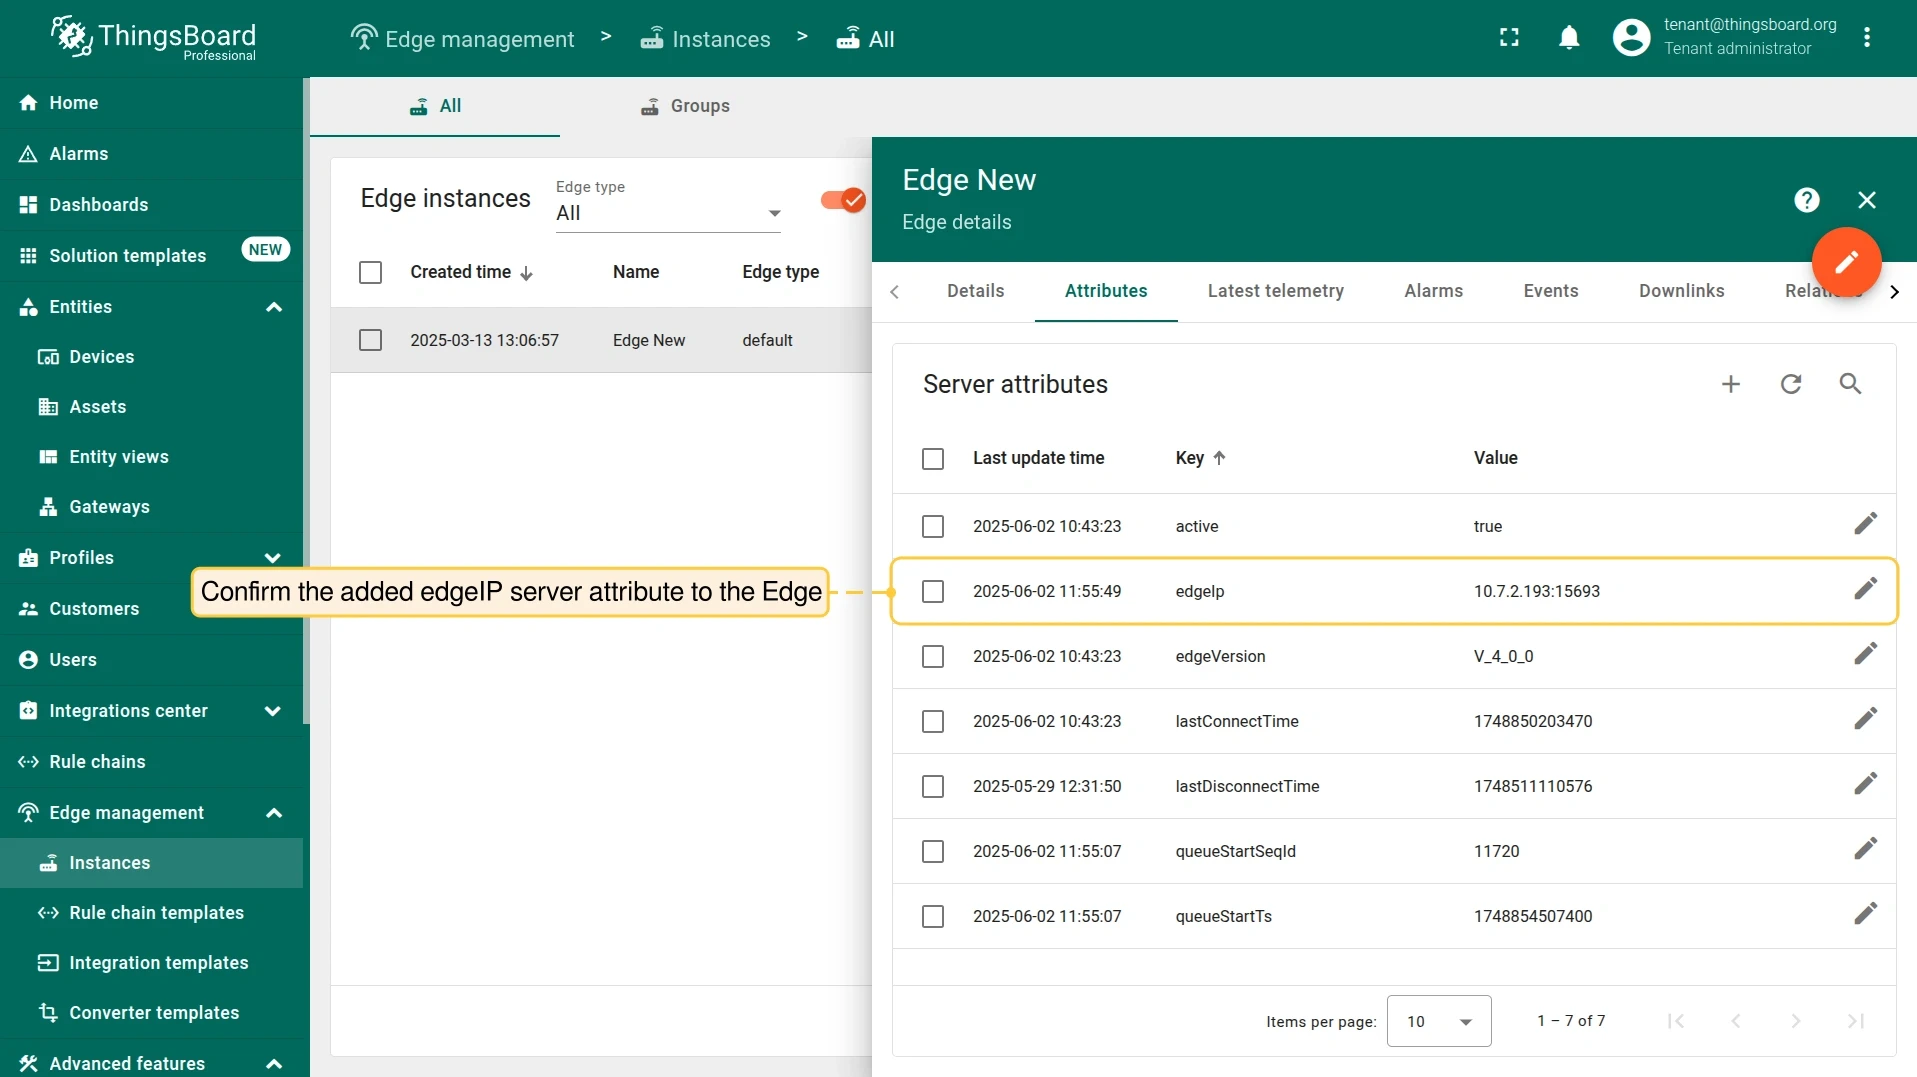
Confirm the
edgeIpserver attribute is listed on the Edge.
Assign integration to Edge
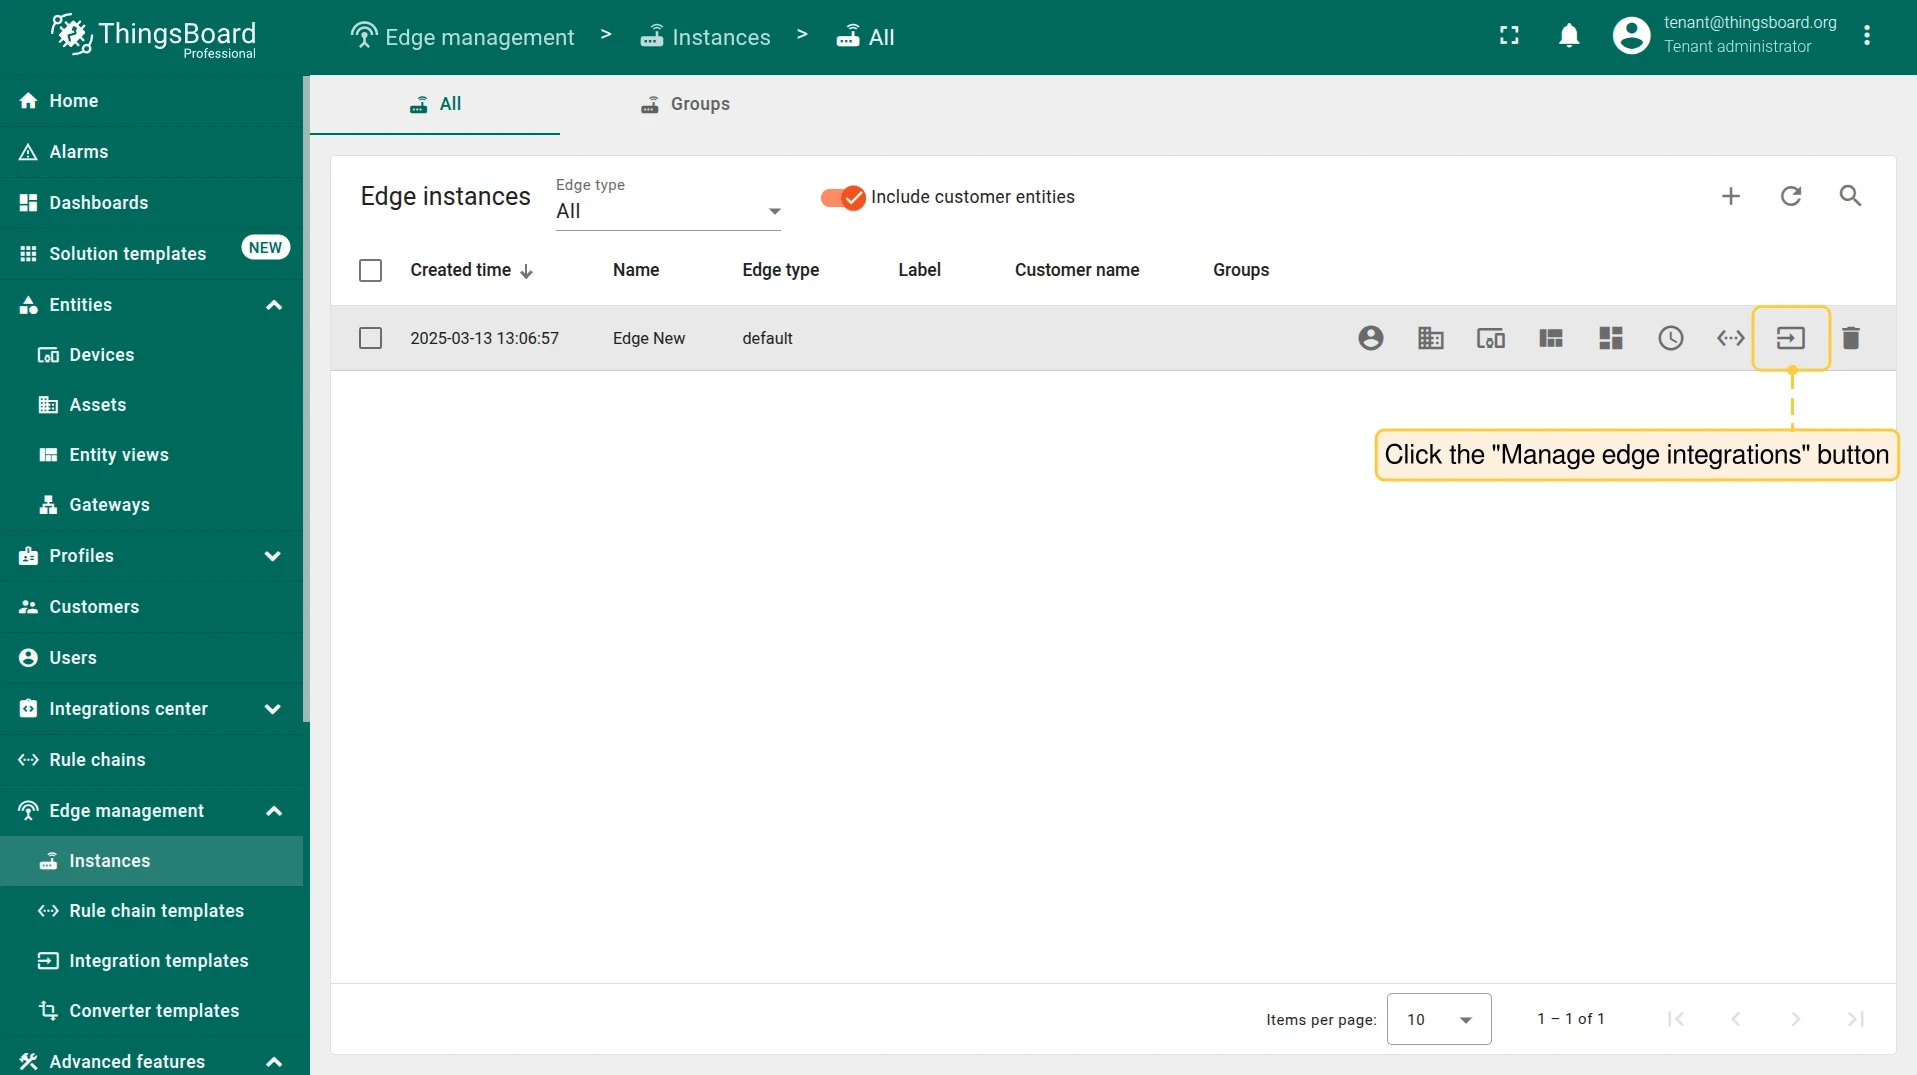
Section titled “Assign integration to Edge”-
Click the Manage edge integrations button on the Edge instance.
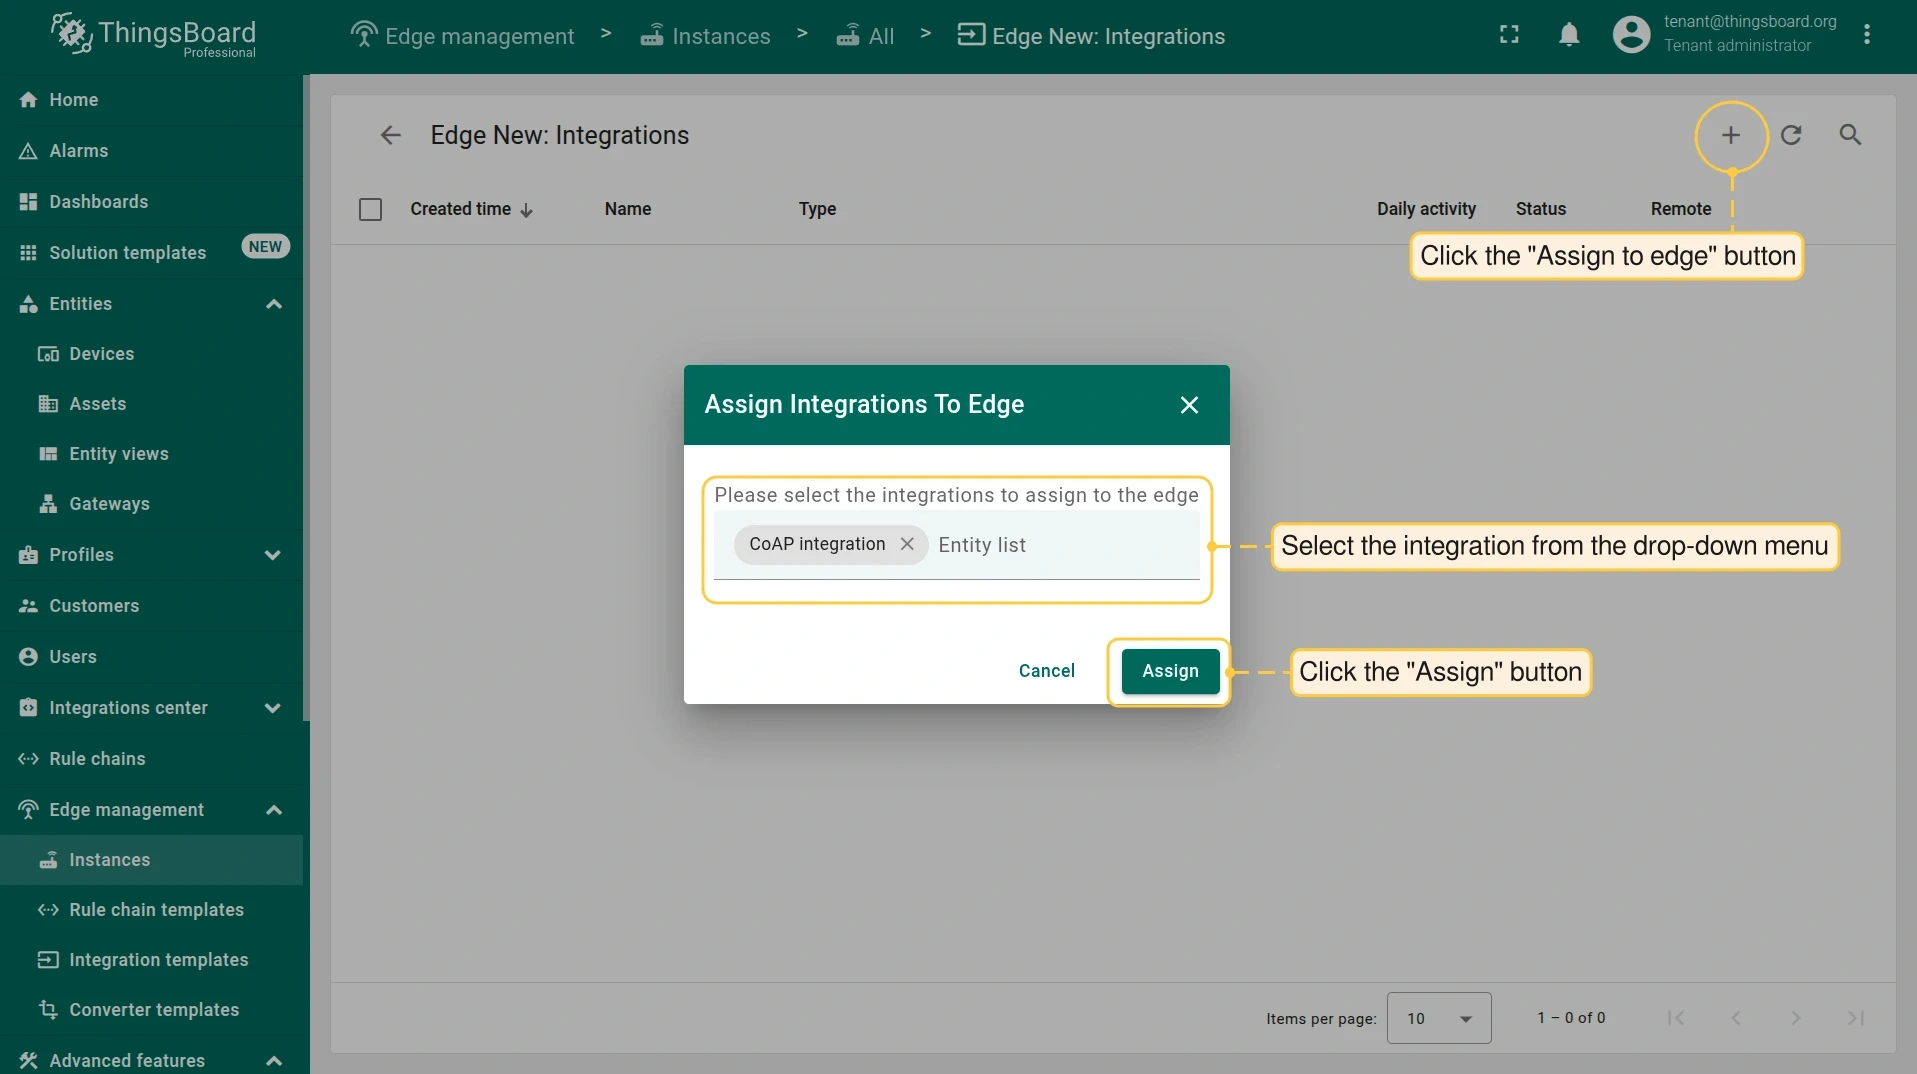
-
Click +, select the CoAP integration from the list, and click Assign.
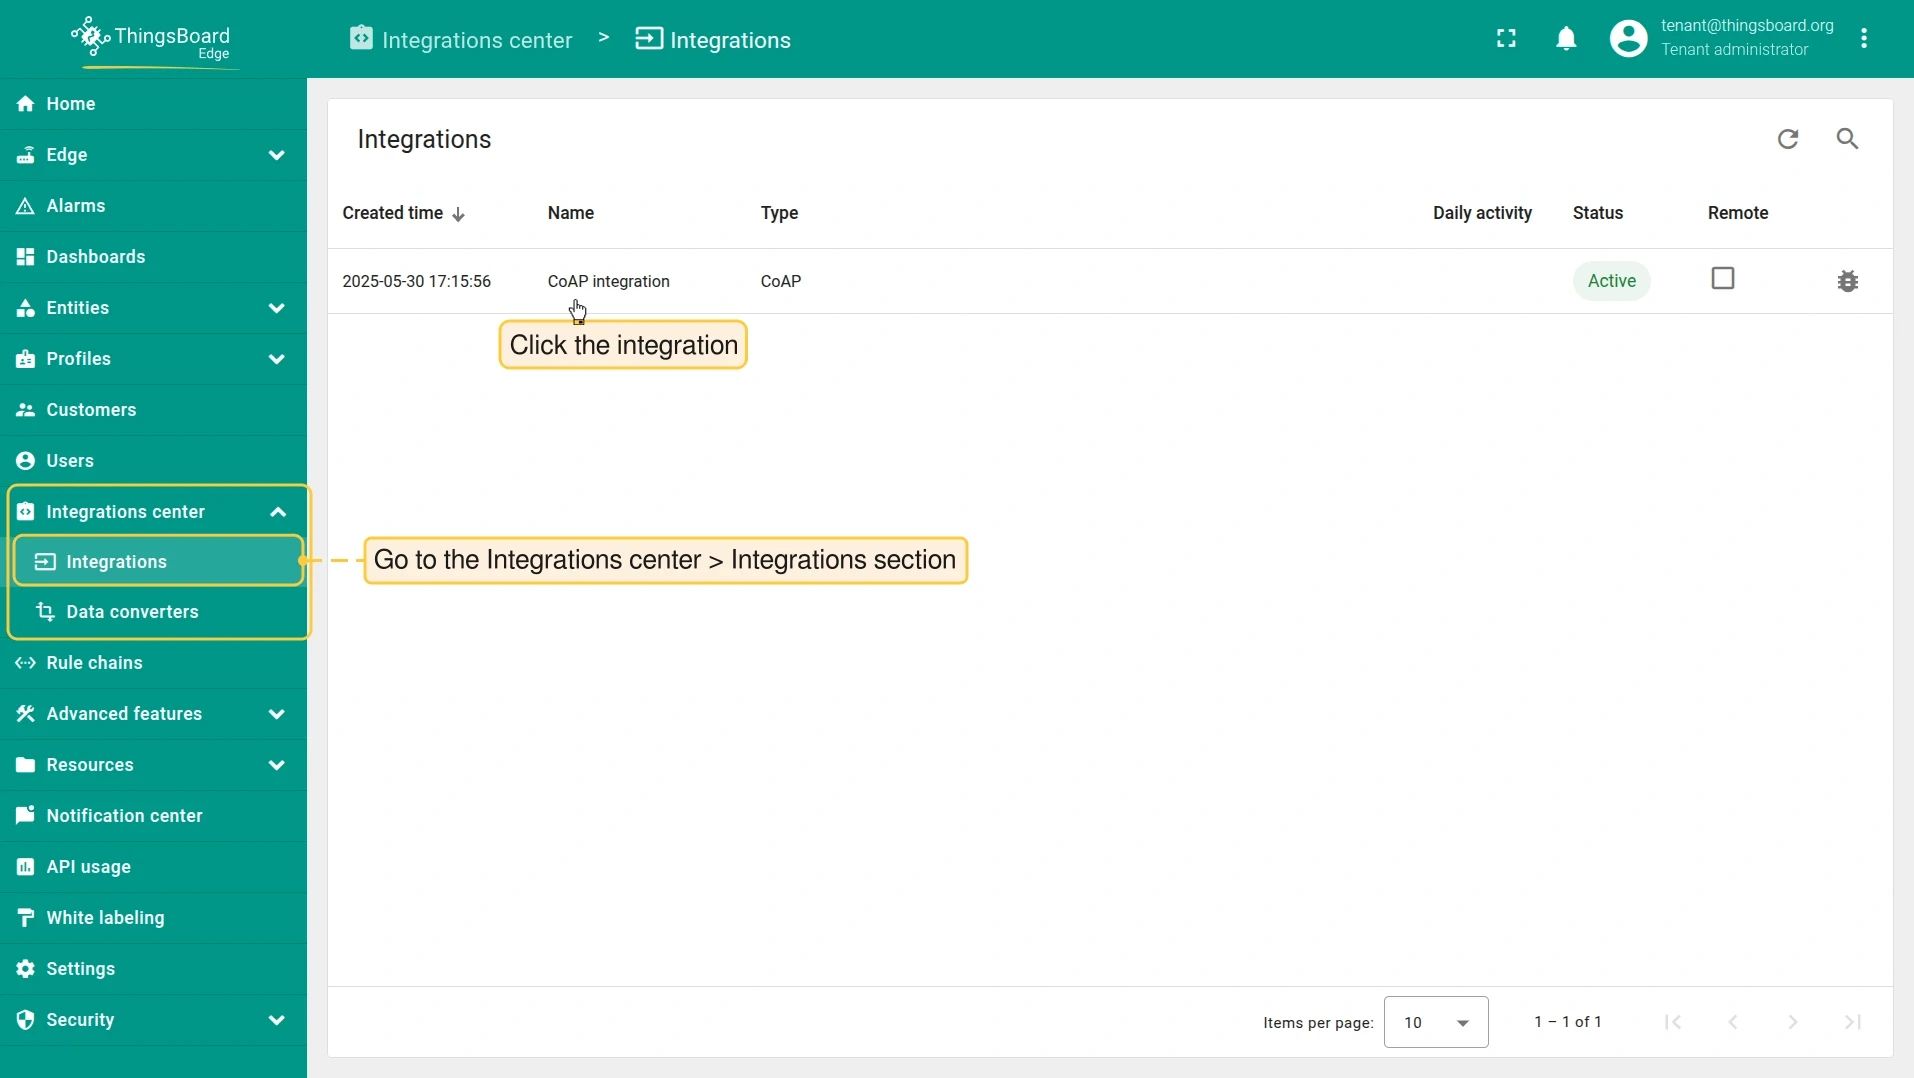
-
Log in to your ThingsBoard Edge instance. Go to Integration center > Integrations and click the CoAP integration to open its details.
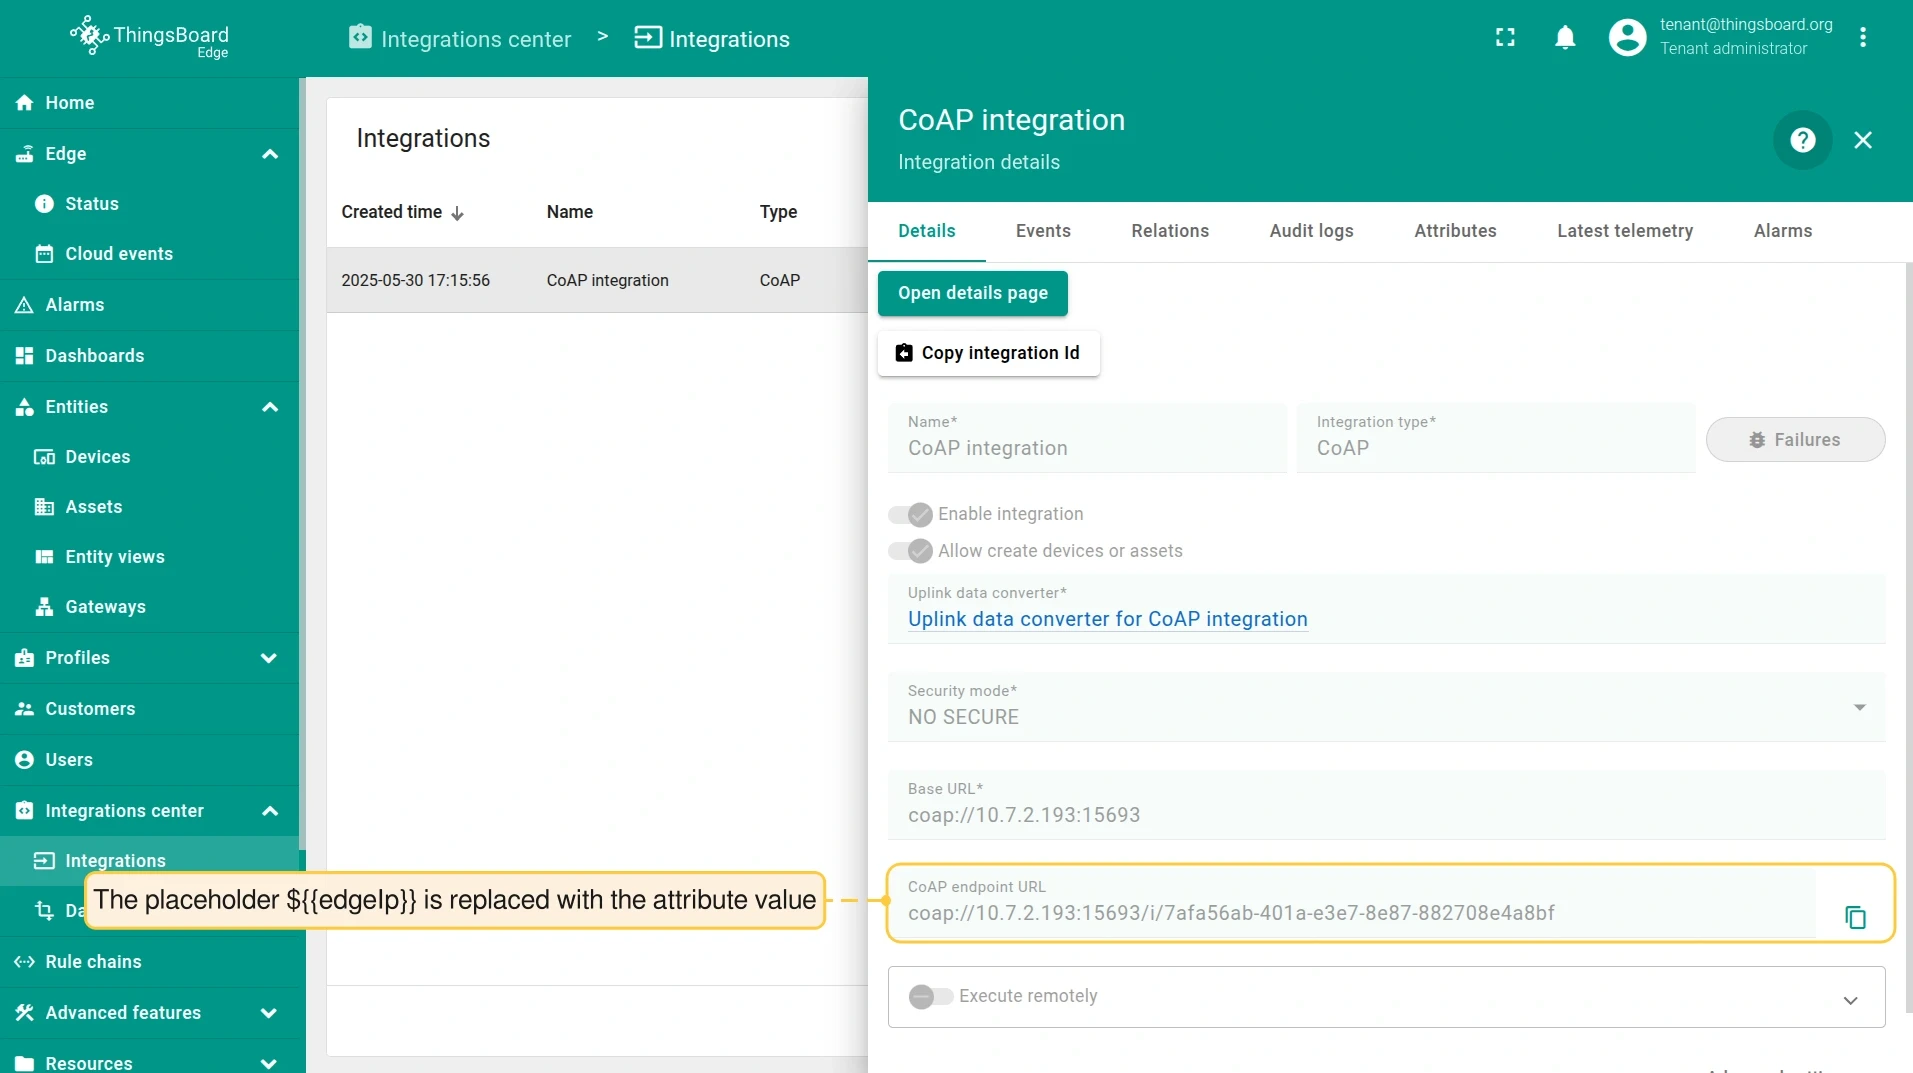
-
In the integration details, the
${{edgeIp}}placeholder is replaced with the Edge attribute value.
Send uplink message
Section titled “Send uplink message”Once the CoAP integration is assigned, the Edge CoAP server registers its resources and waits for device data.
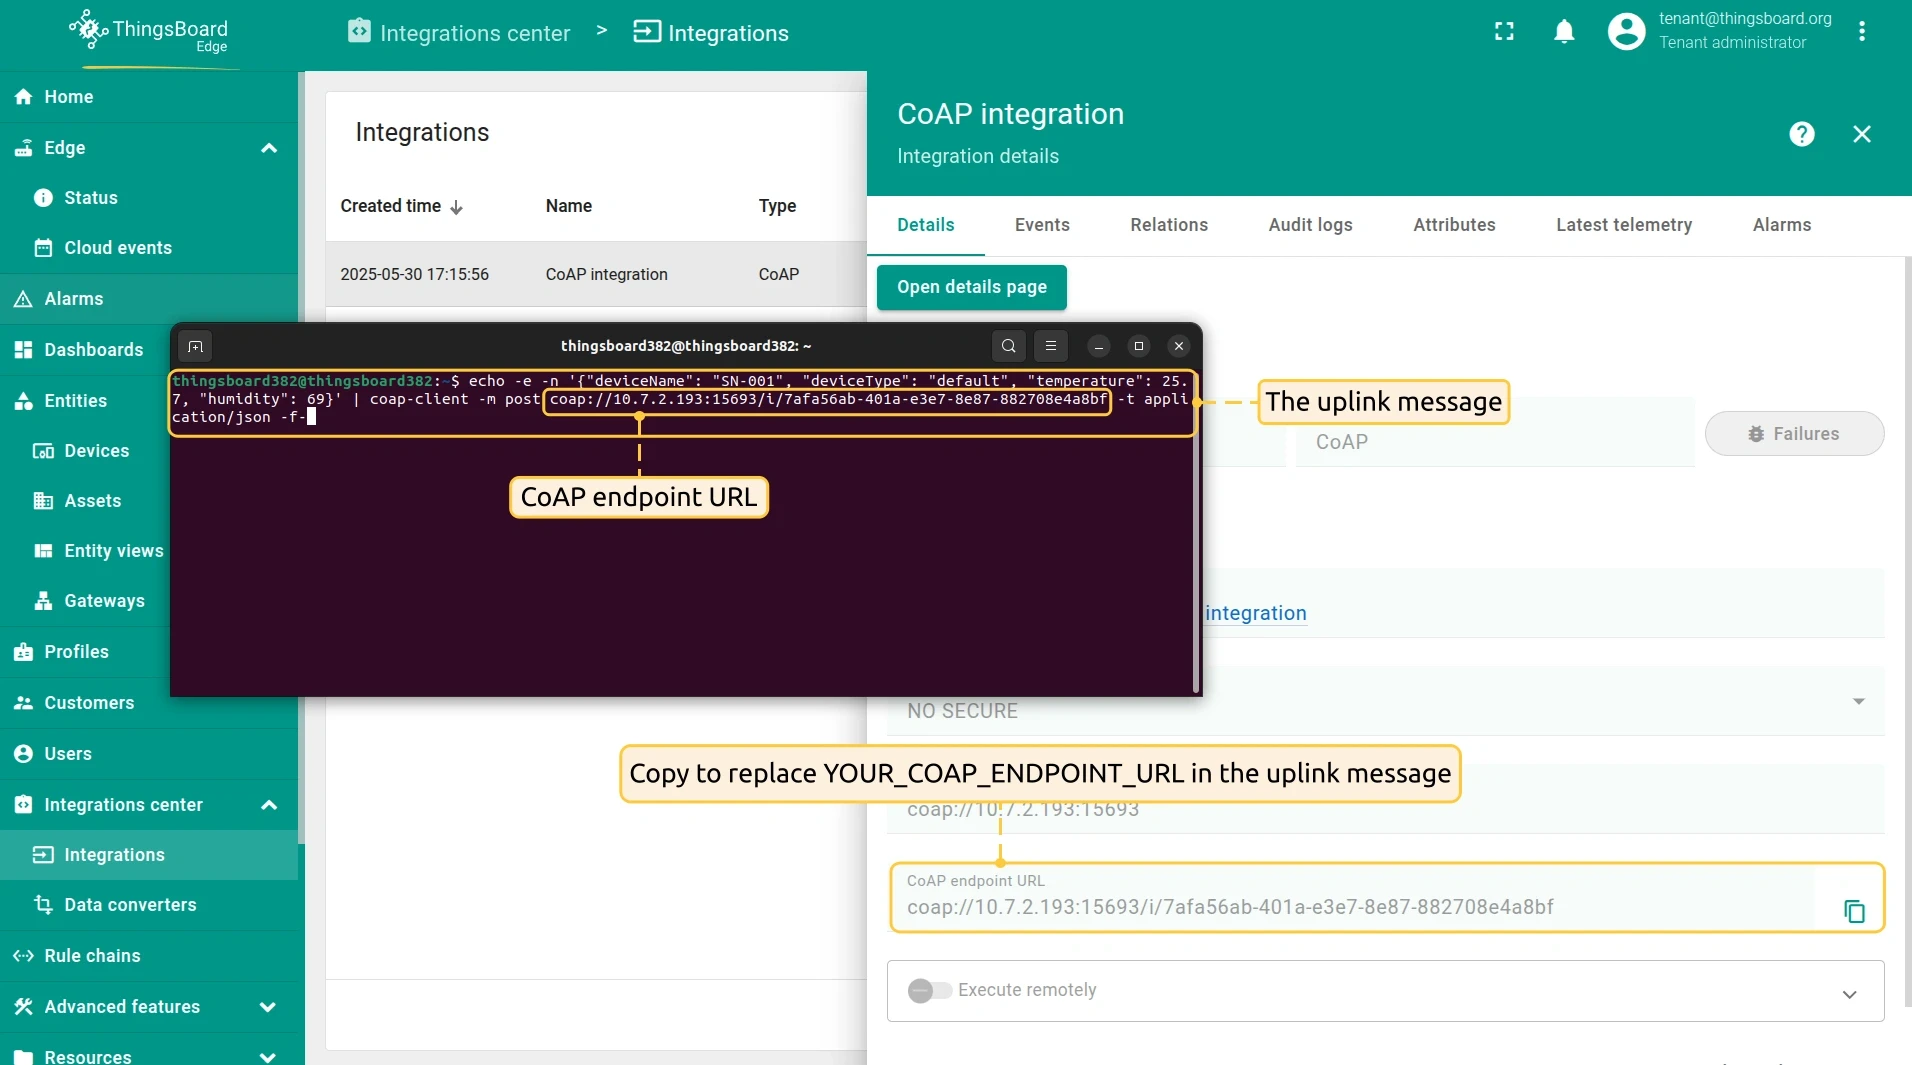
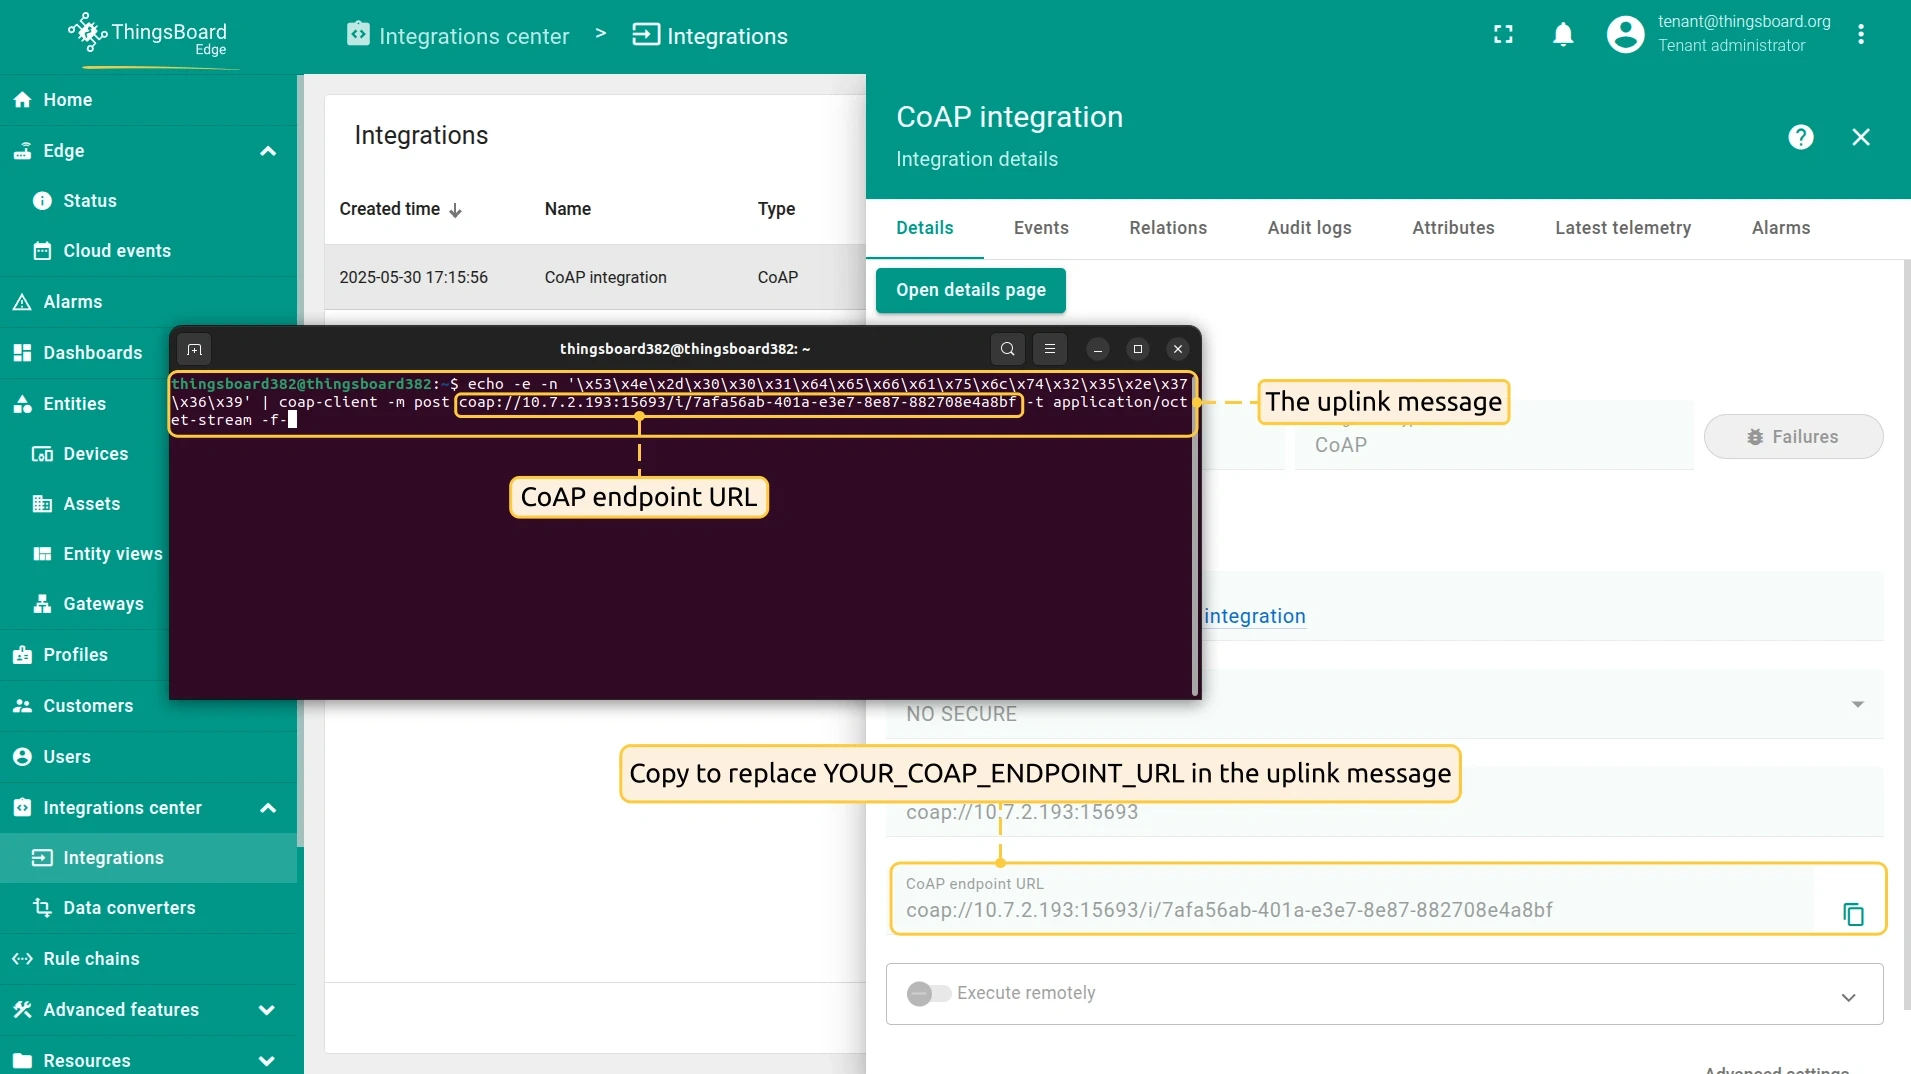
On the Edge, go to Integration center > Integrations, click the CoAP integration, and copy the CoAP endpoint URL. Use it in the commands below.
-
Send the uplink message. Replace
$YOUR_COAP_ENDPOINT_URLwith the copied endpoint URL:Terminal window echo -e 'SN-001,default,temperature,25.7,humidity,69' | coap-client -m post $YOUR_COAP_ENDPOINT_URL -t text/plain -f- -
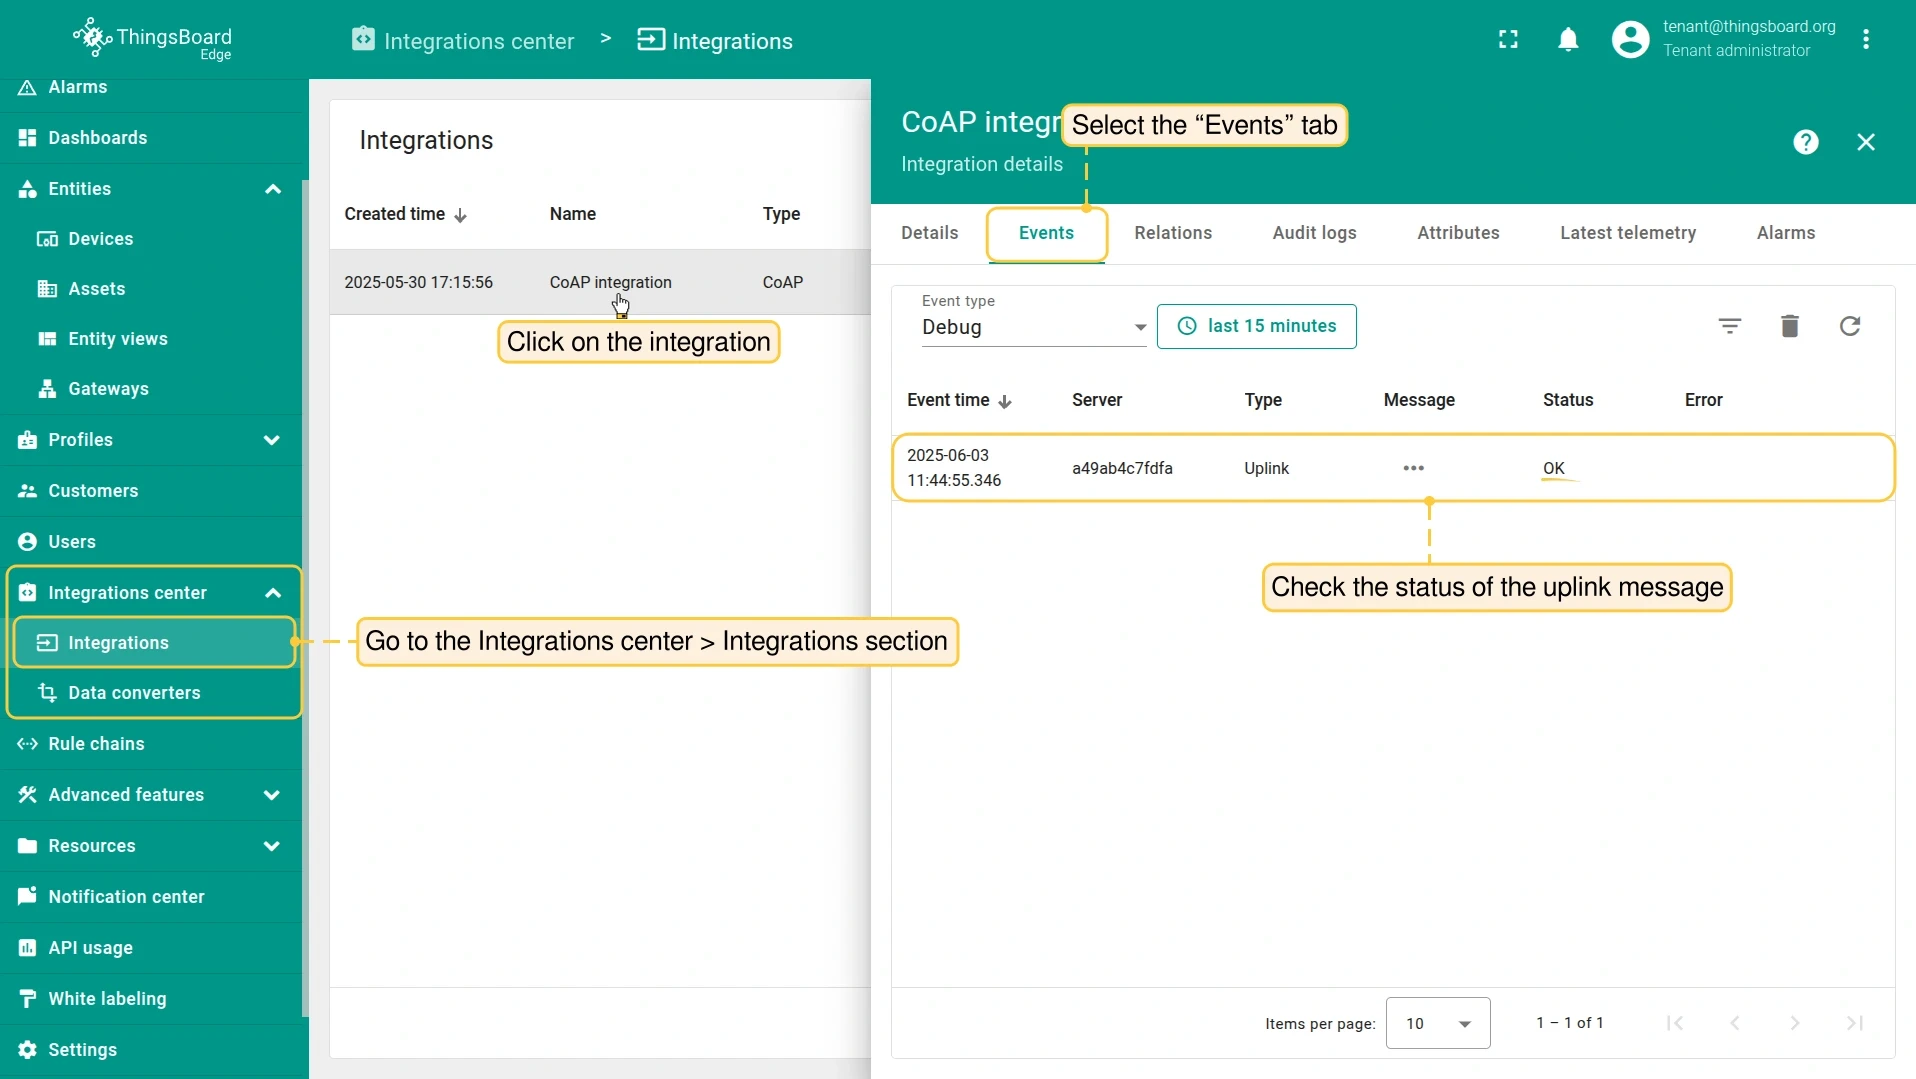
On the Edge, go to Integration center > Integrations, open the CoAP integration, and select the Events tab. The uplink message should appear with status OK.
-
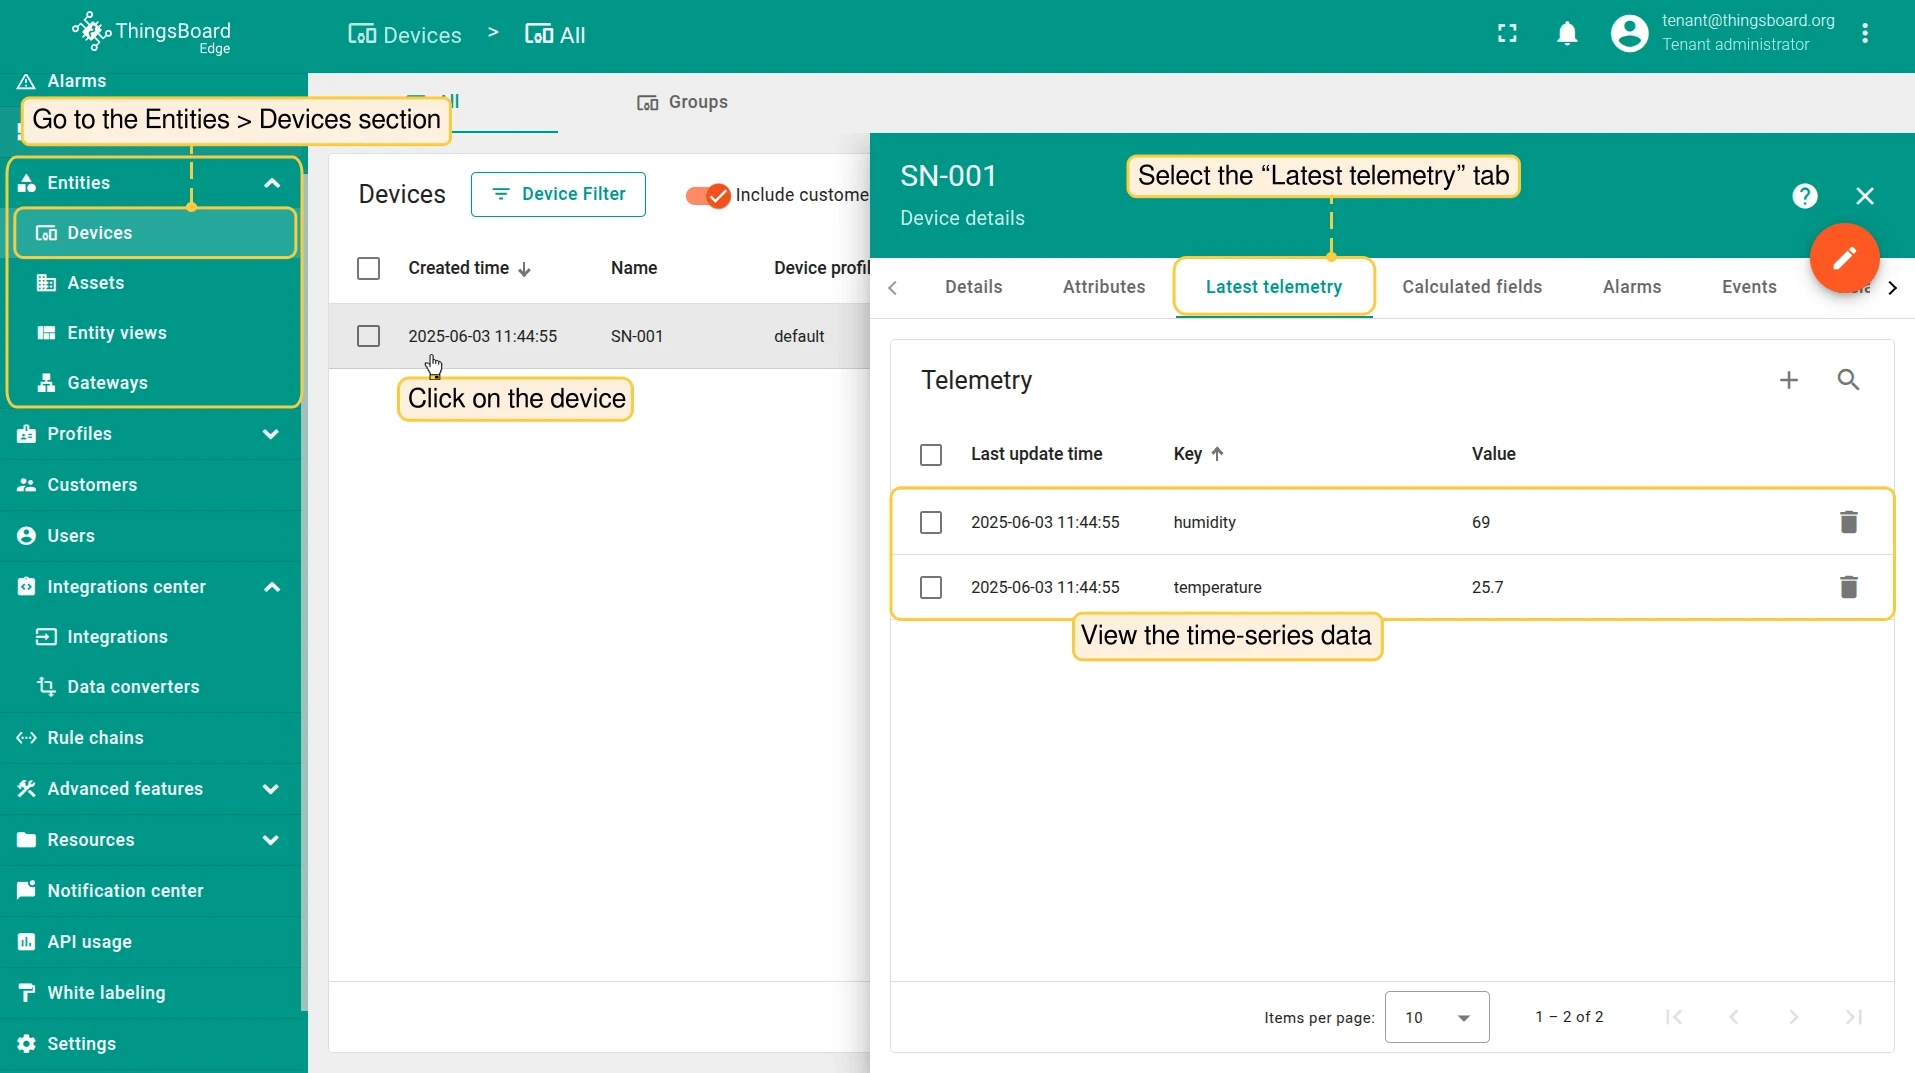
A new device is created automatically. Go to Entities > Devices, open SN-001, and select the Latest telemetry tab to see the received data.
-
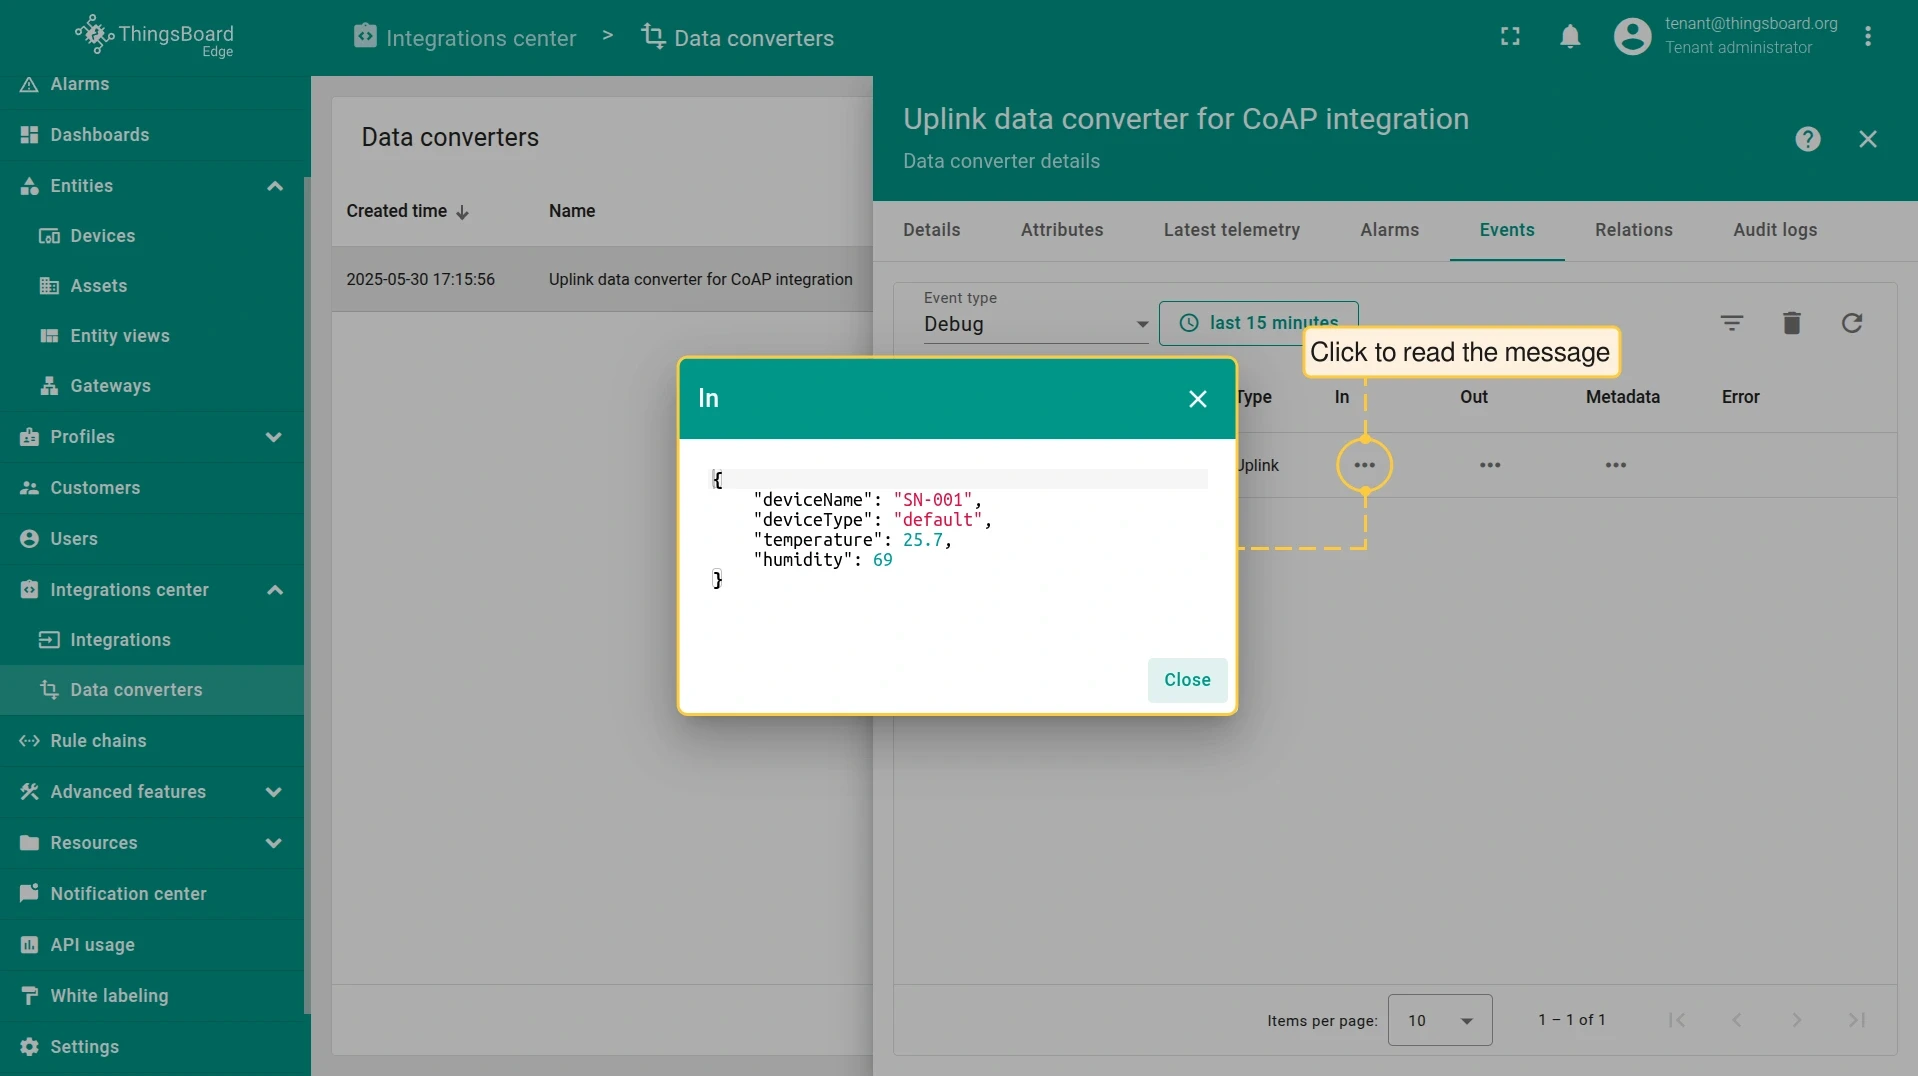
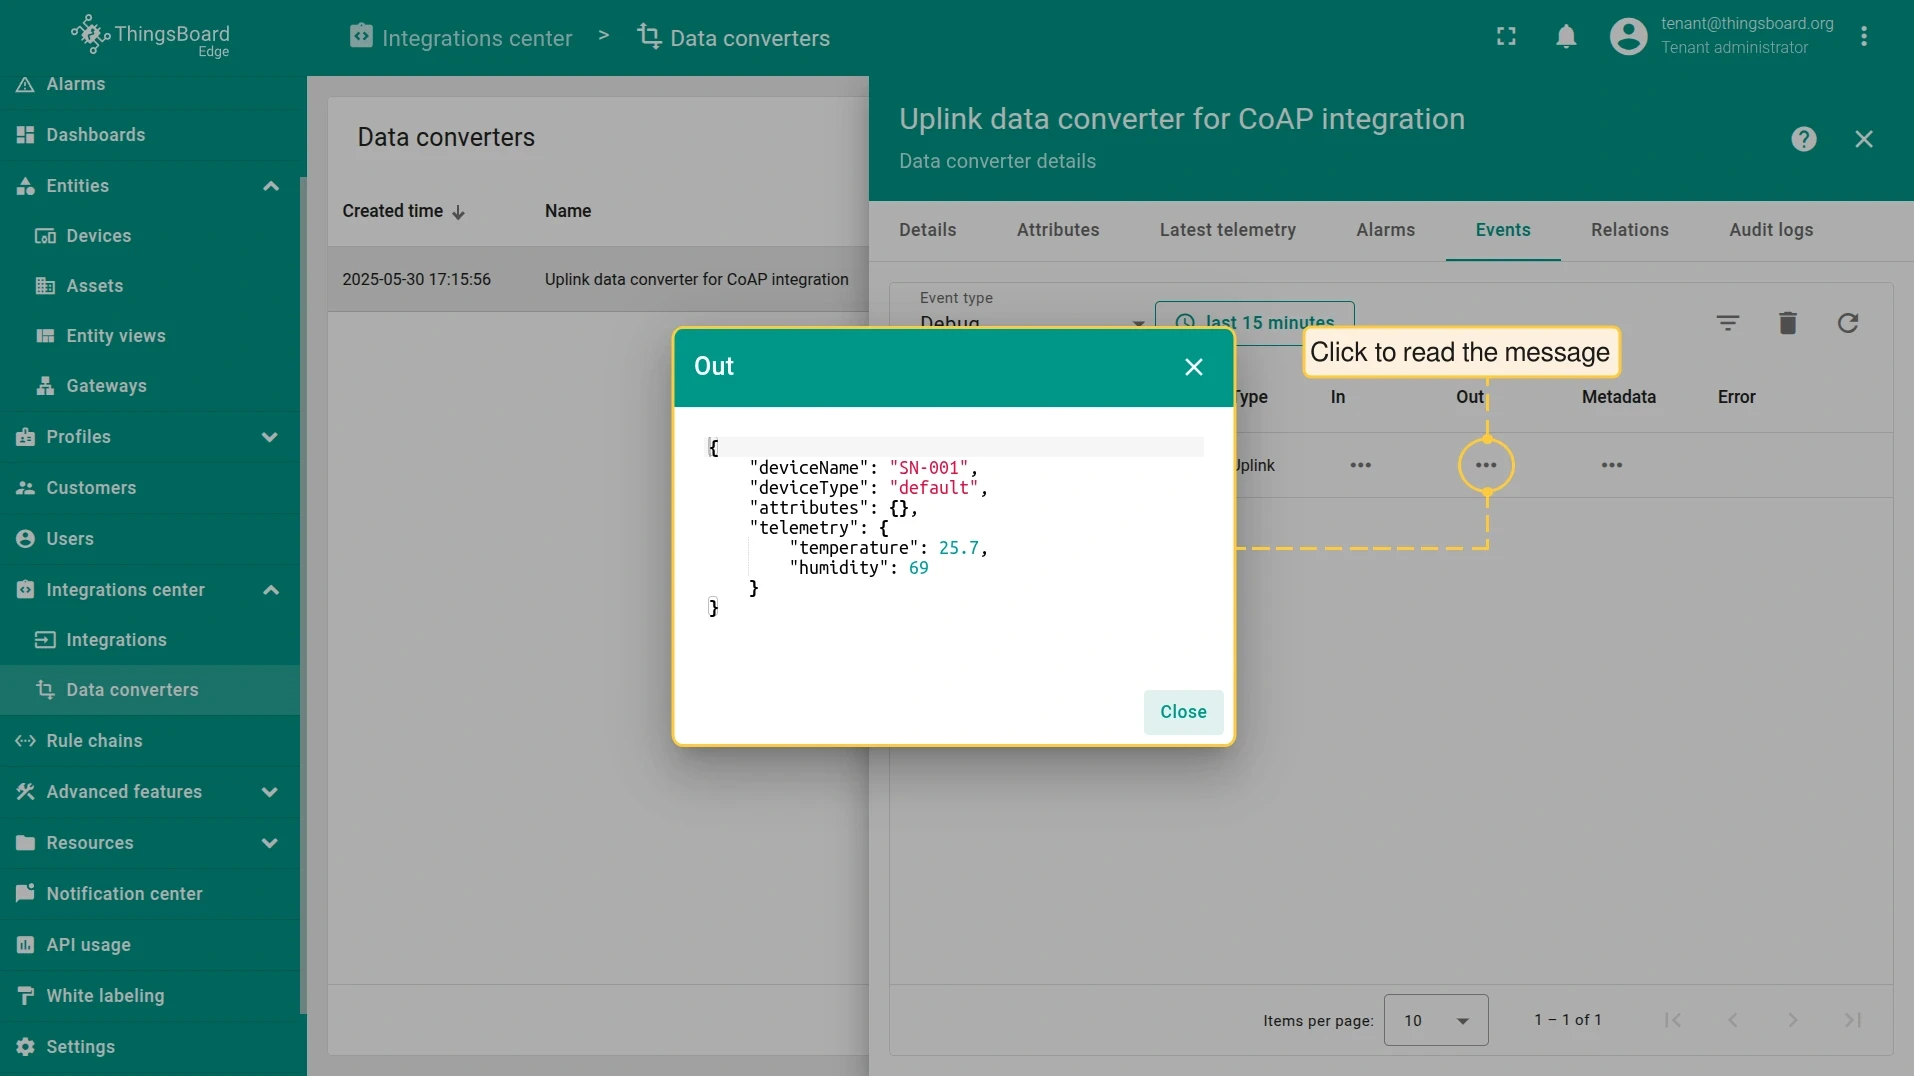
To see how the converter processed the message, go to Integration center > Data converters, open the Uplink converter, and select the Events tab.


-
Send the uplink message. Replace
$YOUR_COAP_ENDPOINT_URLwith the copied endpoint URL:Terminal window echo -e -n '{"deviceName": "SN-001", "deviceType": "default", "temperature": 25.7, "humidity": 69}' | coap-client -m post $YOUR_COAP_ENDPOINT_URL -t application/json -f- -
On the Edge, go to Integration center > Integrations, open the CoAP integration, and select the Events tab. The uplink message should appear with status OK.
-
A new device is created automatically. Go to Entities > Devices, open SN-001, and select the Latest telemetry tab to see the received data.
-
To see how the converter processed the message, go to Integration center > Data converters, open the Uplink converter, and select the Events tab.
-
Send the uplink message. Replace
$YOUR_COAP_ENDPOINT_URLwith the copied endpoint URL:Terminal window echo -e -n '\x53\x4e\x2d\x30\x30\x31\x64\x65\x66\x61\x75\x6c\x74\x32\x35\x2e\x37\x36\x39' | coap-client -m post $YOUR_COAP_ENDPOINT_URL -t application/octet-stream -f- -
On the Edge, go to Integration center > Integrations, open the CoAP integration, and select the Events tab. The uplink message should appear with status OK.
-
A new device is created automatically. Go to Entities > Devices, open SN-001, and select the Latest telemetry tab to see the received data.
-
To see how the converter processed the message, go to Integration center > Data converters, open the Uplink converter, and select the Events tab.
Was this helpful?