CoAP Integration
CoAP Integration connects ThingsBoard to constrained IoT devices that use the Constrained Application Protocol (CoAP) — a lightweight request/response protocol designed for low-power, low-bandwidth environments such as sensors, actuators, and embedded systems. Use it to bring telemetry from CoAP devices into ThingsBoard for monitoring and rule-based automation.
When to use CoAP Integration:
- Devices use CoAP (RFC 7252) — typically constrained MCUs, NB-IoT modules, or LwM2M-adjacent hardware.
- Firmware cannot support HTTP or MQTT due to memory or power constraints.
- The network is UDP-based or lossy and CoAP’s lightweight overhead is required.
- You need to bridge an existing CoAP server with ThingsBoard without re-flashing devices.
Architecture
Section titled “Architecture”
A device sends a CoAP message (POST or PUT) to the ThingsBoard CoAP endpoint. The uplink converter decodes the payload into telemetry and attributes, and the ThingsBoard Core Service stores the data, creating the device automatically on first contact when Allow create devices or assets is enabled. CoAP Integration does not currently support downlink.
Prerequisites
Section titled “Prerequisites”Before creating the integration, ensure:
- You have access to ThingsBoard PE or ThingsBoard Cloud with integration functionality enabled for your tenant.
- You have permissions to create integrations and data converters.
- You know the payload format your CoAP devices send.
In this tutorial, device SN-001 sends temperature and humidity readings to the CoAP Integration at coap://$YOUR_TB_HOST.
The integration accepts three payload types:
SN-001,default,temperature,25.7,humidity,69{ "deviceName": "SN-001", "deviceType": "default", "temperature": 25.7, "humidity": 69}Hex string:
\x53\x4e\x2d\x30\x30\x31\x64\x65\x66\x61\x75\x6c\x74\x32\x35\x2e\x37\x36\x39Byte layout:
| Bytes | Hex | Value |
|---|---|---|
| 0–5 | \x53\x4e\x2d\x30\x30\x31 | Device name: SN-001 |
| 6–12 | \x64\x65\x66\x61\x75\x6c\x74 | Device type: default |
| 13–16 | \x32\x35\x2e\x37 | Temperature: 25.7 |
| 17–18 | \x36\x39 | Humidity: 69 |
Create CoAP Uplink Data Converter
Section titled “Create CoAP Uplink Data Converter”The decoder function receives the raw CoAP message body as a payload byte array. It must return an object with at least deviceName and deviceType. Optionally, it can include telemetry (time-series measurements) and attributes (device properties) as flat key-value maps.
In addition to any integration-level metadata, the metadata object passed to the decoder contains CoAP option fields extracted from the request:
| Key | CoAP option |
|---|---|
Option:content-format | Content-Format option (e.g. application/json) |
Option:uri | Full request URI |
Option:location-path | Location-Path option, if present |
Option:location-query | Location-Query option, if present |
For the full decoder function reference — all input parameters and output fields — see Uplink data converter.
- Go to Integrations center ⇾ Data converters.
- Click + Add data converter ⇾ Create new converter.
In the Add data converter dialog:
- Converter type — leave Uplink (selected by default).
- Integration type — in the search field, enter
CoAPand select CoAP from the list. - Name — enter a converter name, for example
CoAP Uplink Converter. - Main decoding configuration — paste the decoder function from the appropriate tab below, then continue with step 7.
Select the tab matching your payload type:
/** Decoder **/
// decode payload to stringvar strArray = decodeToString(payload);var payloadArray = strArray.replaceAll("\"", "").split(',');
var telemetryPayload = {};for (var i = 2; i < payloadArray.length; i = i + 2) {    var telemetryKey = payloadArray[i];    var telemetryValue = parseFloat(payloadArray[i + 1]);    telemetryPayload[telemetryKey] = telemetryValue;}
// Result object with device attributes/telemetry datavar result = {    deviceName: payloadArray[0],    deviceType: payloadArray[1],    telemetry: telemetryPayload,    attributes: {}};
/** Helper functions 'decodeToString' and 'decodeToJson' are already built-in **/
return result;
/** Decoder **/
// decode payload to stringvar strArray = decodeToString(payload);var payloadArray = strArray.replace(/\"/g, "").replace(/\s/g, "").replace(/\\n/g, "").split(',');
var telemetryPayload = {};for (var i = 2; i < payloadArray.length; i = i + 2) { var telemetryKey = payloadArray[i]; var telemetryValue = parseFloat(payloadArray[i + 1]); telemetryPayload[telemetryKey] = telemetryValue;}
// Result object with device attributes/telemetry datavar result = { deviceName: payloadArray[0], deviceType: payloadArray[1], telemetry: telemetryPayload, attributes: {}};
/** Helper functions **/
function decodeToString(payload) { return String.fromCharCode.apply(String, payload);}
return result;The decoder expects a comma-separated string where position 0 is the device name, position 1 is the device type, and positions 2–N are alternating telemetry key/value pairs: deviceName,deviceType,key1,value1,key2,value2,...
To adapt this converter to your device:
- Change the separator by replacing
split(',')with your delimiter (e.g.split(';')orsplit('|')). - If the device name or type is at a different position, adjust the
payloadArray[0]/payloadArray[1]index. - If telemetry keys are fixed rather than embedded in the payload, replace the loop with explicit assignments:
telemetryPayload['temperature'] = parseFloat(payloadArray[2]);. - To extract attributes instead of telemetry, move fields from the
telemetrymap to theattributesmap.
/** Decoder **/
// decode payload to JSONvar data = decodeToJson(payload);
// Result object with device attributes/telemetry datavar result = {    deviceName: data.deviceName,    deviceType: data.deviceType,    attributes: {},    telemetry: {        temperature: data.temperature,        humidity: data.humidity    }};
/** Helper functions 'decodeToString' and 'decodeToJson' are already built-in **/
return result;
/** Decoder **/
// decode payload to JSONvar data = decodeToJson(payload);
// Result object with device attributes/telemetry datavar result = { deviceName: data.deviceName, deviceType: data.deviceType, attributes: {}, telemetry: { temperature: data.temperature, humidity: data.humidity }};
/** Helper functions **/
function decodeToString(payload) { return String.fromCharCode.apply(String, payload);}
function decodeToJson(payload) { var str = decodeToString(payload); var data = JSON.parse(str); return data;}
return result;The decoder parses the payload as a JSON object and maps fields directly to deviceName, deviceType, and telemetry keys.
To adapt this converter to your device:
- Replace
data.deviceName/data.deviceTypewith the actual field names your device sends (e.g.data.id,data.model). - Add or remove telemetry fields to match your sensor output:
pressure: data.pressure, co2: data.co2. - Move fields to
attributesif they represent device properties rather than time-series data (e.g.firmware: data.fw).
/** Decoder **/
// decode payload to stringvar payloadStr = decodeToString(payload);
var deviceName = payloadStr.substring(0, 6);var deviceType = payloadStr.substring(6, 13);
// Result object with device attributes/telemetry datavar result = {    deviceName: deviceName,    deviceType: deviceType,    attributes: {},    telemetry: {        temperature: parseFloat(payloadStr.substring(13, 17)),        humidity: parseFloat(payloadStr.substring(17, 19))    }};
/** Helper functions 'decodeToString' and 'decodeToJson' are already built-in **/
return result;
/** Decoder **/
// decode payload to stringvar payloadStr = decodeToString(payload);
var deviceName = payloadStr.substring(0, 6);var deviceType = payloadStr.substring(6, 13);
// Result object with device attributes/telemetry datavar result = { deviceName: deviceName, deviceType: deviceType, attributes: {}, telemetry: { temperature: parseFloat(payloadStr.substring(13, 17)), humidity: parseFloat(payloadStr.substring(17, 19)) }};
/** Helper functions **/
function decodeToString(payload) { return String.fromCharCode.apply(String, payload);}
function decodeToJson(payload) { var str = decodeToString(payload); var data = JSON.parse(str); return data;}
return result;The decoder converts the raw bytes to a string and reads device identity and sensor values from fixed byte offsets. This approach is typical for compact, bandwidth-constrained binary protocols.
To adapt this converter to your device:
- Adjust the
substring(start, end)offsets to match your device’s byte layout. - For integer fields stored as raw bytes (not ASCII digits), use
parseBytesToInt(payload, offset, length, bigEndian)instead ofparseFloat(payloadStr.substring(...)). For example:temperature: parseBytesToInt(payload, 13, 2, true) / 100.0. - If the device name or type is fixed rather than embedded in the payload, replace the
substringcalls with string literals. - Add more telemetry fields by reading additional byte ranges and adding them to the
telemetrymap.
- Optionally, click Test payload decoder to validate.
- Click Add.
Create CoAP Integration
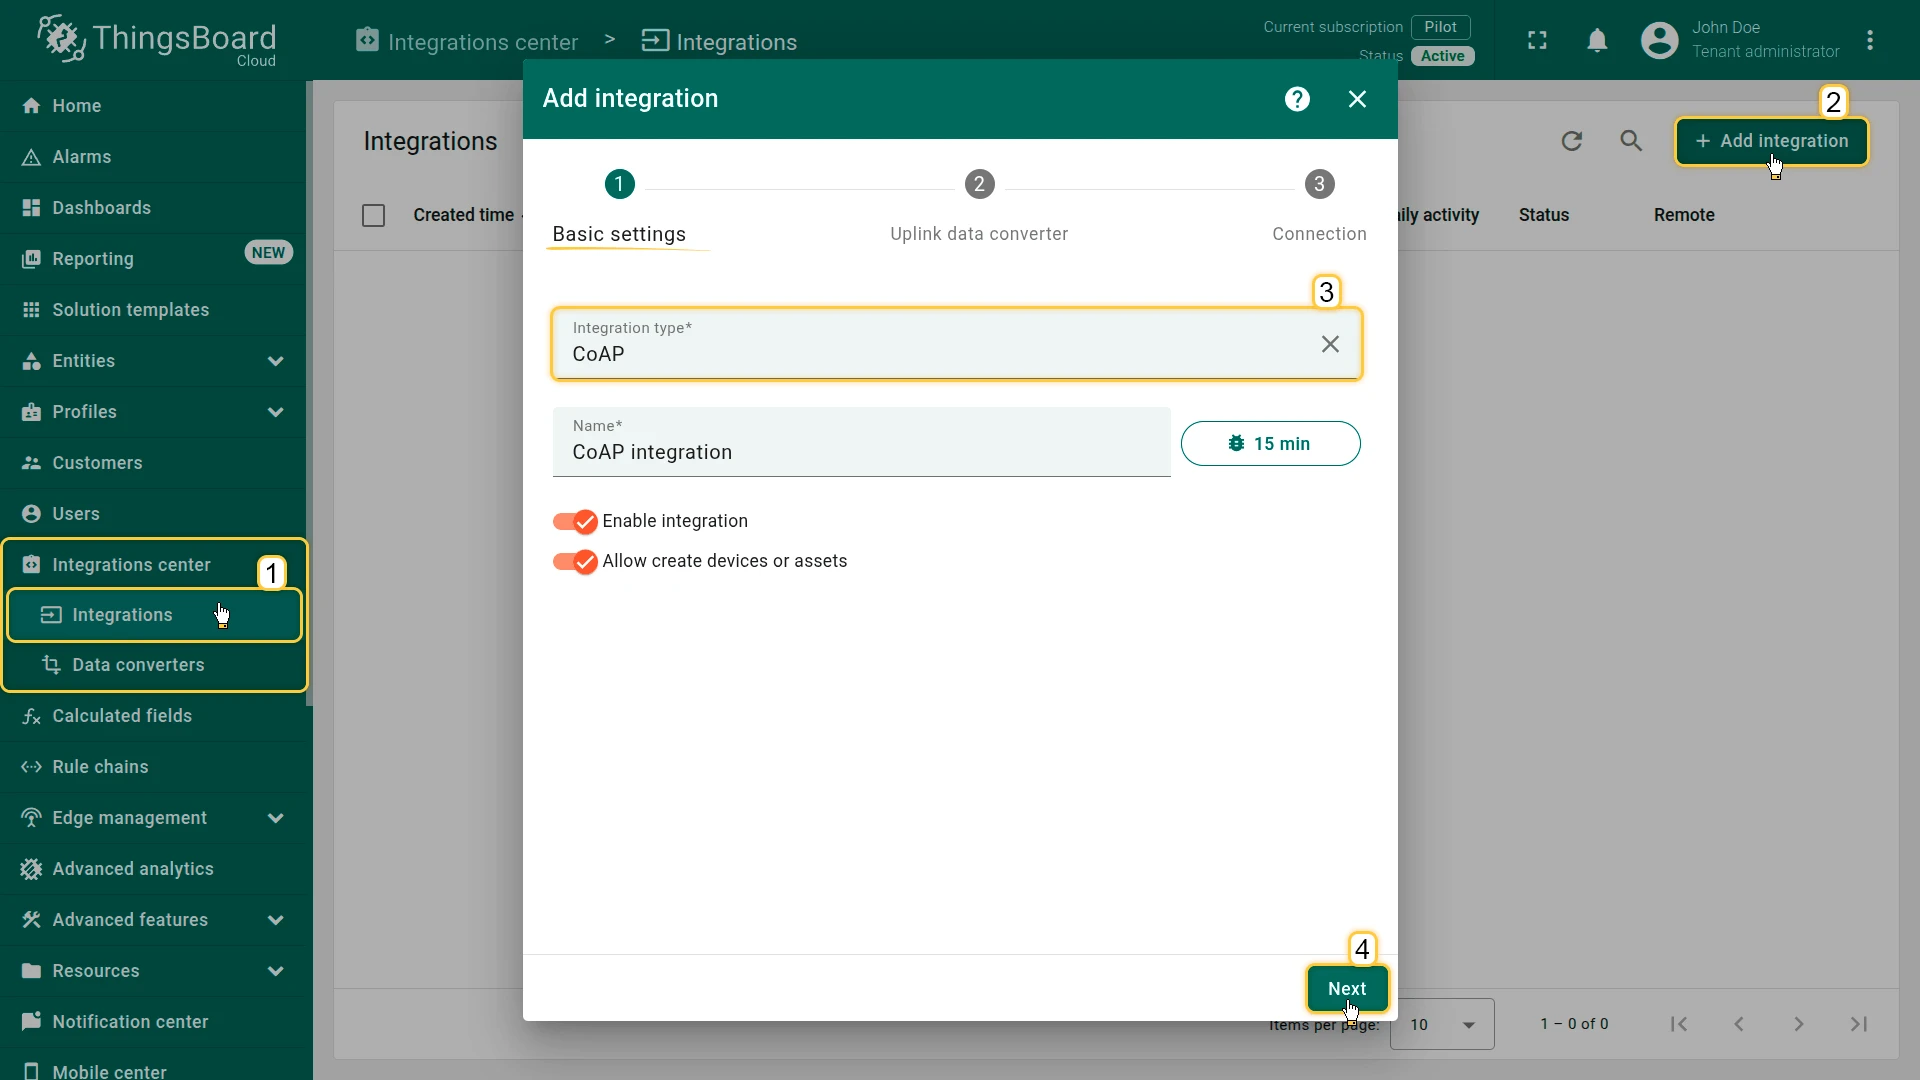
Section titled “Create CoAP Integration”- Go to Integrations center ⇾ Integrations and click + Add integration.
- Basic settings:
- Set integration type to CoAP.
- Leave Enable integration and Allow create devices or assets on so the device is created automatically on first data.
- Click Next.
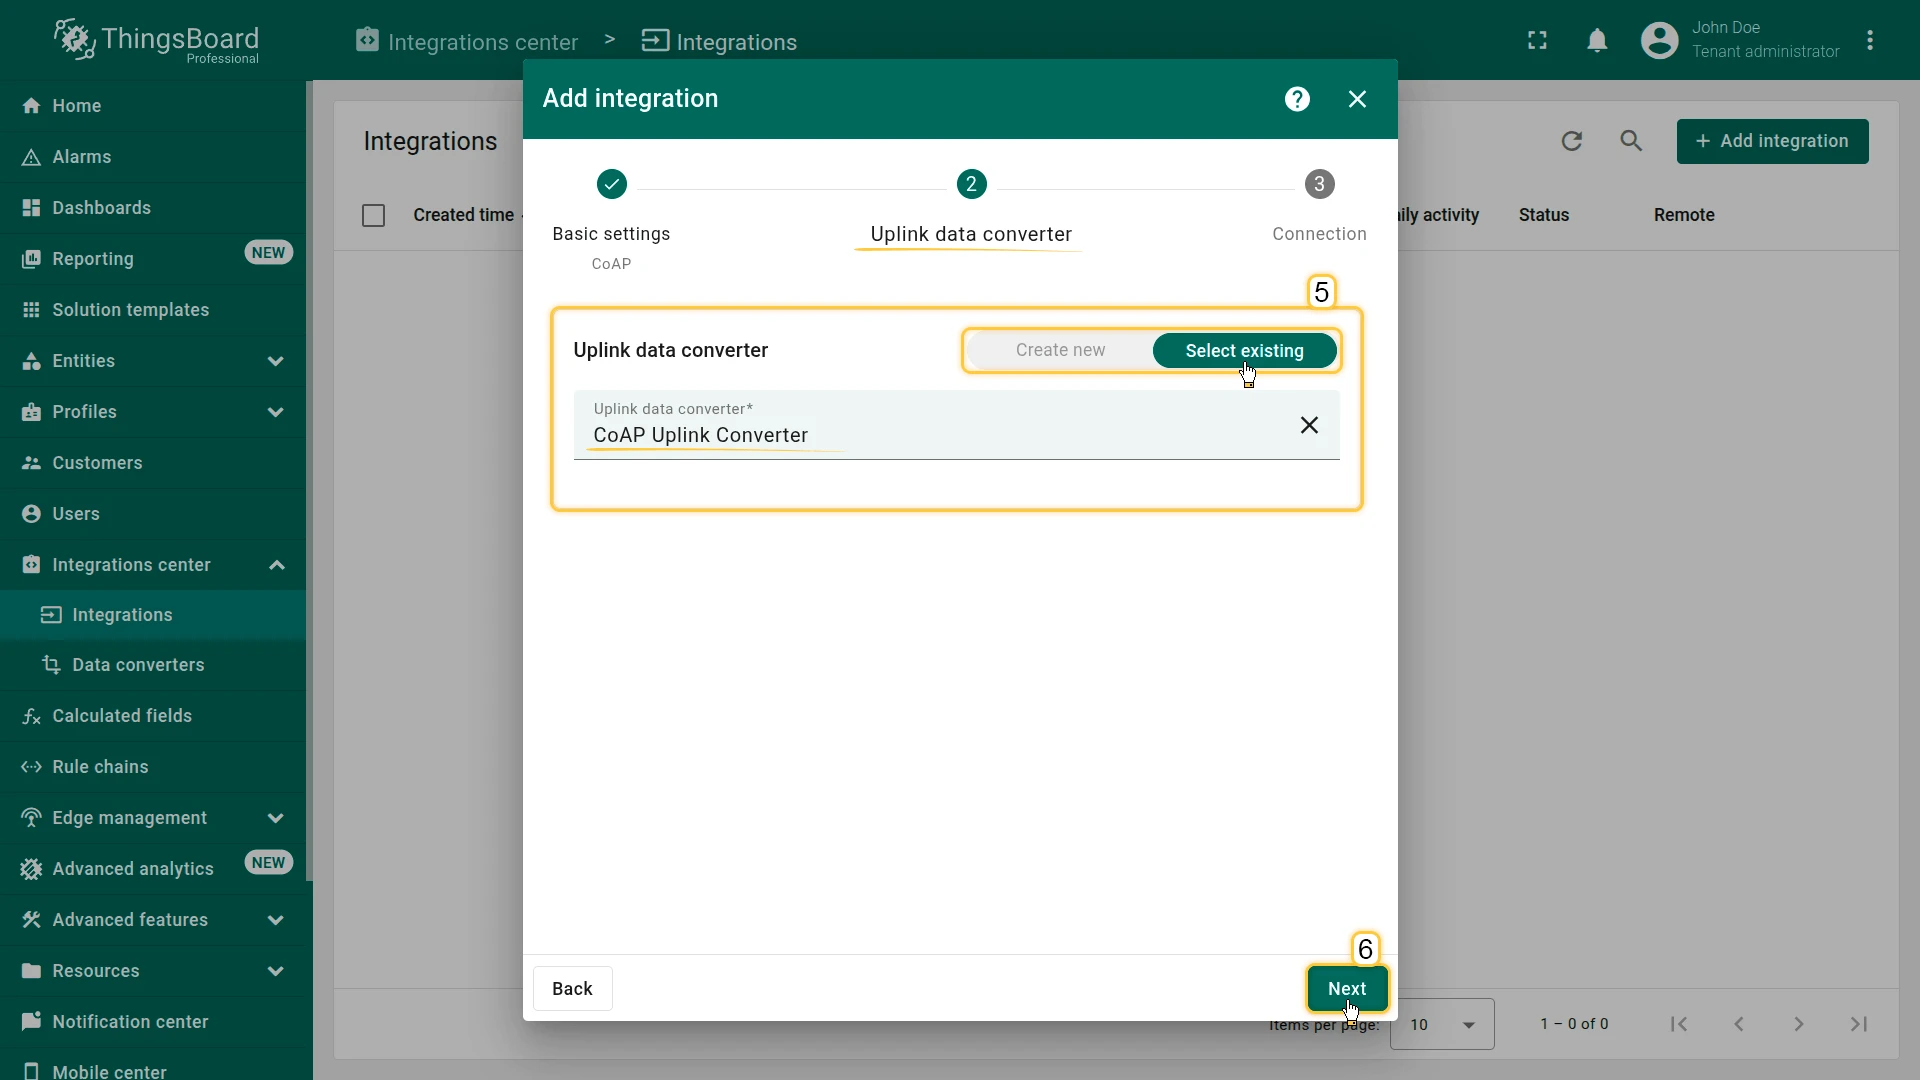
- Uplink data converter:
- Click Select existing and choose the CoAP Uplink Converter created in the previous step, or click Create new to define the decoder inline.
- Click Next.
- Connection:
- Select a Security mode — defaults to NO SECURE.
- The Base URL is pre-filled with your ThingsBoard host (e.g.
coap://my.thingsboard). Optionally, enter a Path to append to the base URL. - Copy the auto-generated CoAP endpoint URL — you will use it to send uplink messages.
- Click Add.

Connection Settings
Section titled “Connection Settings”Security Mode
Defines the transport security for the CoAP connection:
| Mode | Description |
|---|---|
| NO SECURE (default) | Plain CoAP over UDP — no encryption |
| DTLS | CoAP over DTLS 1.2 — encrypted |
| MIXED | Both plain and DTLS endpoints active simultaneously |
Both CON (Confirmable) and NON (Non-Confirmable) CoAP message types are supported in all modes. ThingsBoard acknowledges CON messages automatically.
For DTLS and MIXED modes, enable DTLS support in thingsboard.yml or set the following environment variables:
# Enable/disable DTLS 1.2 supportexport COAP_DTLS_ENABLED=true# Default CoAP DTLS bind portexport COAP_DTLS_BIND_PORT=5684# Path to the key store that holds the SSL certificateexport COAP_DTLS_KEY_STORE=coapserver.jks# Password used to access the key storeexport COAP_DTLS_KEY_STORE_PASSWORD=server_ks_password# Password used to access the keyexport COAP_DTLS_KEY_PASSWORD=server_key_password# Key aliasexport COAP_DTLS_KEY_ALIAS=serveralias# Skip certificate validity check for client certificatesexport TB_COAP_X509_DTLS_SKIP_VALIDITY_CHECK_FOR_CLIENT_CERT=falseBase URL / DTLS Base URL
The base address of the ThingsBoard CoAP endpoint. Pre-filled with your deployment host.
| Security mode | Field label | Example value |
|---|---|---|
| NO SECURE | Base URL | coap://my.thingsboard |
| DTLS | DTLS Base URL | coaps://my.thingsboard |
| MIXED | Base URL + DTLS Base URL | Both of the above |
Path
Optional. A URL path segment appended to the Base URL after the / separator. Leave empty to use the default routing. Each Base URL field has its own Path field.
Example: coap://my.thingsboard/my-path
CoAP Endpoint URL
Read-only, auto-generated from the Base URL, the optional Path, and the fixed routing segment /i/$INTEGRATION_ROUTING_KEY. The routing key (UUID) is assigned at creation time. Devices must POST or PUT to this URL. Click the copy icon next to the field to copy it to the clipboard.
Execute Remotely
When expanded, shows an Integration key and Integration secret — credentials that allow the integration to run as a separate process outside the ThingsBoard cluster (e.g., on a remote server or on-premises gateway). See Remote Integration for setup details.
Advanced settings
| Field | Description |
|---|---|
| Description | Optional free-text description of the integration. |
| Metadata | Optional key–value pairs injected into every message and accessible in converter scripts via the metadata object. Click Add to add a row. |
Test the Integration
Section titled “Test the Integration”After the integration is created, send a test uplink and confirm that ThingsBoard received the message, decoded it correctly, and provisioned the device.
Send Test Uplink
Section titled “Send Test Uplink”Once the integration is created, the CoAP server registers the endpoint and waits for incoming data. Send a test message using coap-client (part of libcoap) or any CoAP client that supports POST, replacing $YOUR_COAP_ENDPOINT_URL with the URL copied during setup:
echo -e 'SN-001,default,temperature,25.7,humidity,69' | coap-client -m post $YOUR_COAP_ENDPOINT_URL -t text/plain -f-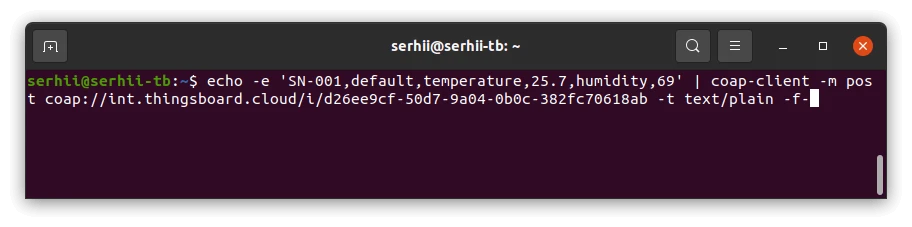
echo -e -n '{"deviceName": "SN-001", "deviceType": "default", "temperature": 25.7, "humidity": 69}' | coap-client -m post $YOUR_COAP_ENDPOINT_URL -t application/json -f-
echo -e -n '\x53\x4e\x2d\x30\x30\x31\x64\x65\x66\x61\x75\x6c\x74\x32\x35\x2e\x37\x36\x39' | coap-client -m post $YOUR_COAP_ENDPOINT_URL -t application/octet-stream -f-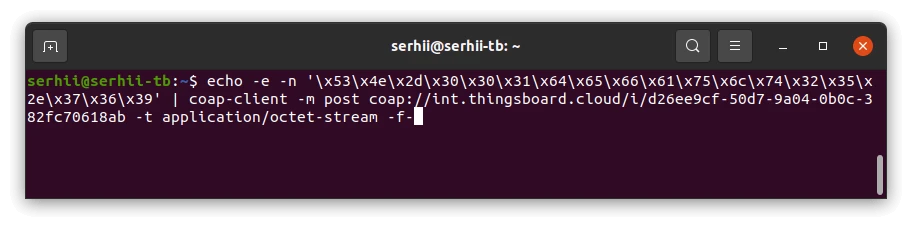
Verify Integration Events
Section titled “Verify Integration Events”Go to Integrations center ⇾ Integrations, open CoAP integration, and click the Events tab. Each successfully processed uplink appears as a row with status OK.
Verify Converter Events
Section titled “Verify Converter Events”To inspect converter processing, go to Integrations center ⇾ Data converters, click CoAP Uplink Converter, and open its Events tab:
- In — what the integration received (payload body)
- Out — what the converter returned
- Error — error text, if any
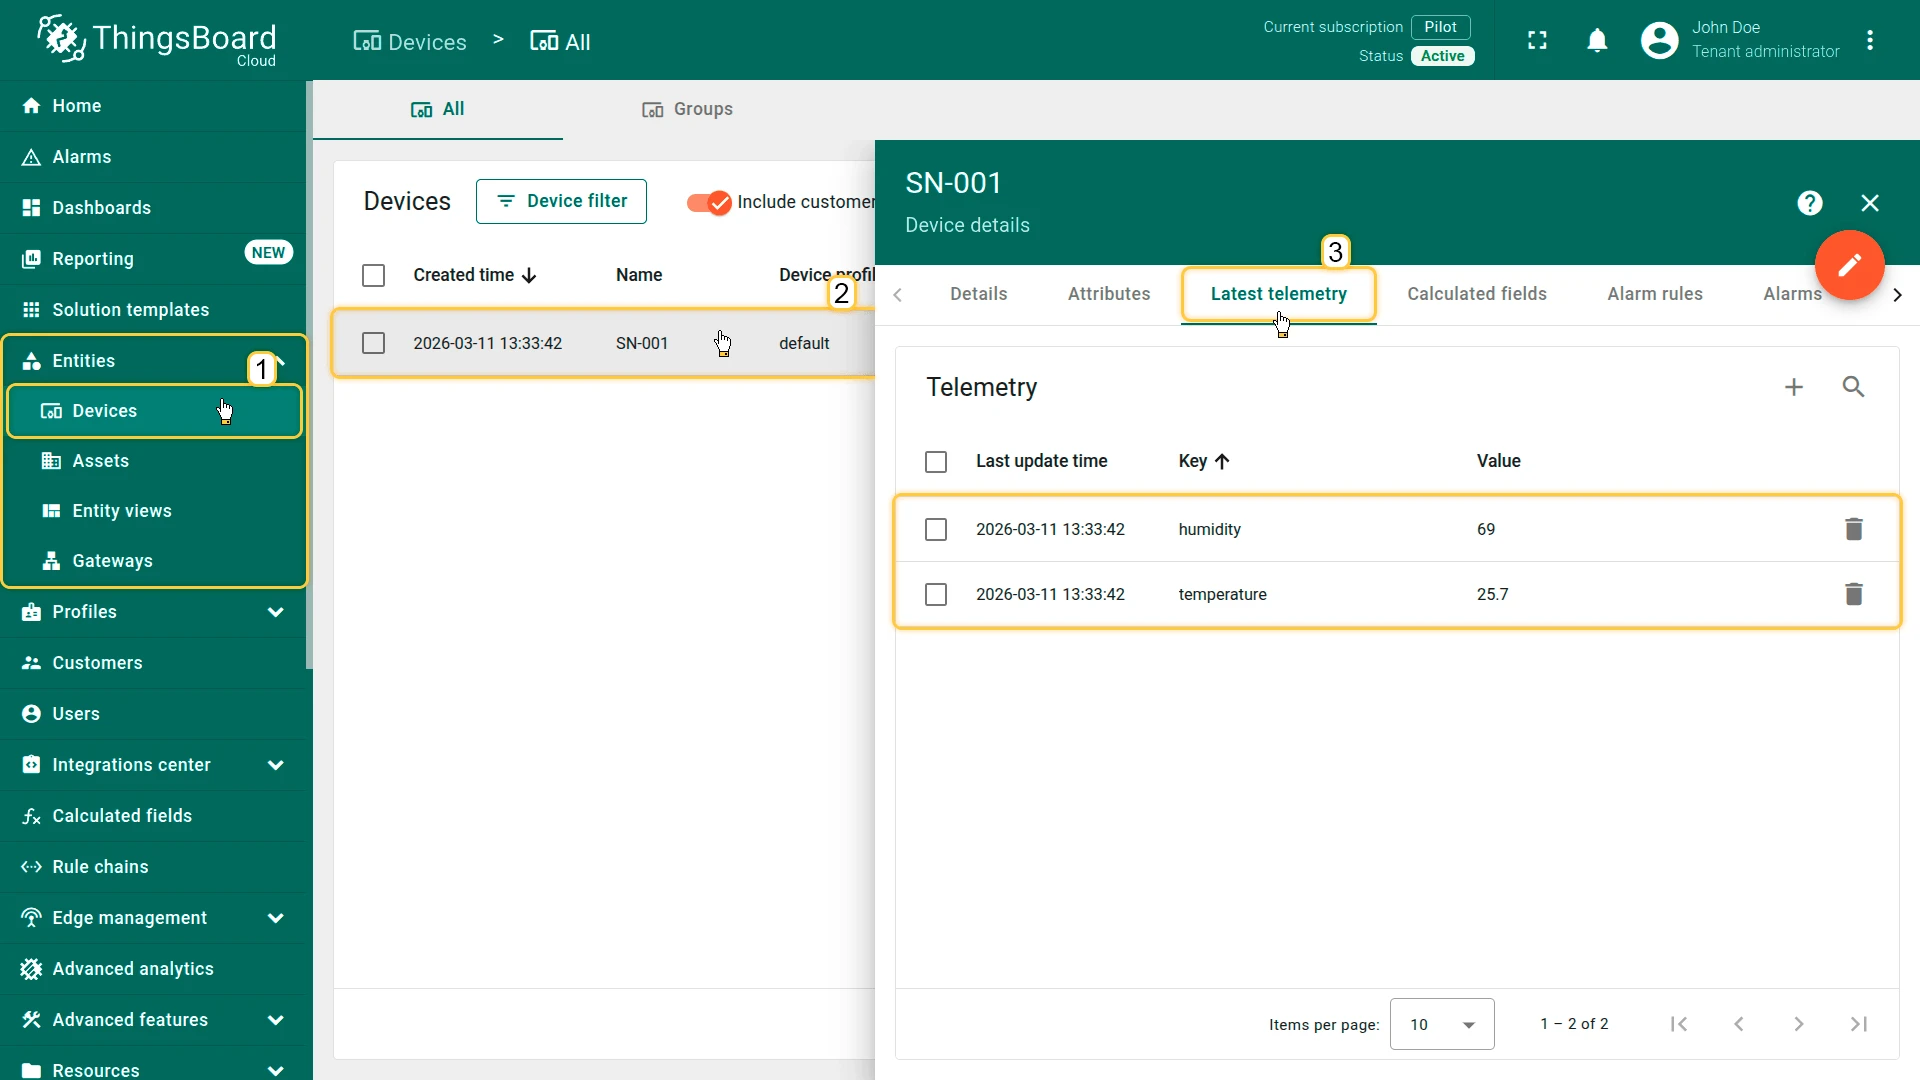
Verify Device Provisioning
Section titled “Verify Device Provisioning”Go to Entities ⇾ Devices. Device SN-001 is auto-created on the first uplink. Open the Latest Telemetry tab to confirm temperature = 25.7 and humidity = 69.
How to read Debug Events
- Go to Integrations center ⇾ Integrations, open your integration, and click the Events tab. Filter by Uplink.
- Click on an event to inspect:
- In — what the integration received: the raw CoAP payload body
- Out — what the converter returned: decoded device name, attributes, and telemetry
- Error — error text, if any
Troubleshooting
Section titled “Troubleshooting”| Symptom | Cause | Fix |
|---|---|---|
| No response / timeout | UDP packet lost or wrong endpoint URL | Verify the CoAP endpoint URL; check that UDP port 5683 (or 5684 for DTLS) is open; try a Confirmable (CON) request to distinguish from NON fire-and-forget |
4.05 Method Not Allowed | Device sent GET instead of POST or PUT | Ensure the device uses CoAP POST or PUT |
4.04 Not Found | Wrong integration ID in the URI | Copy the exact endpoint URL from the integration Connection settings |
4.00 Bad Request | Malformed or empty payload | Check payload encoding and format |
4.00 Bad Request — “No secure connection is not allowed” | Request arrived over a DTLS session but the integration endpoint is plain CoAP (no DTLS configured) | Enable DTLS on the integration, or send the request to the plain CoAP port (5683) without DTLS |
| Device not created | deviceName is empty or undefined | Check Debug Events → Out on the converter; ensure deviceName is resolved from the payload |
| Telemetry not saved | Converter returns {} or [] | Make sure telemetry contains at least one field |
Error in converter | JavaScript or TBEL exception | Open Events → Error on the converter and inspect the stack trace |
| Data present but timestamp is wrong | Device sends ts in seconds | Convert before assigning: ts: data.ts * 1000 |
| DTLS handshake fails | Security mode mismatch or DTLS not enabled server-side | Ensure Security mode is set to DTLS or MIXED in Connection settings; confirm COAP_DTLS_ENABLED=true in your deployment |
See Also
Section titled “See Also”- Integrations Overview — how ThingsBoard connects to external platforms and how uplink/downlink flow works
- Uplink Data Converter — full decoder function reference: input parameters, output fields, and scripting patterns
- Remote Integration — run the integration outside the ThingsBoard server to reach CoAP endpoints in a private network
- TBEL scripting reference — built-in functions and operators for writing converter scripts
- Rule Engine — how uplink messages are processed after the converter
Was this helpful?