REST
The REST Connector starts an HTTP(S) server on the gateway, creates API endpoints, and forwards incoming request data to ThingsBoard as device attributes and telemetry. It can also push data to external HTTP(S) APIs based on attribute updates and RPC commands received from ThingsBoard.
To enable this connector, add it to the connectors list in tb_gateway.json — see the
General Configuration reference.
Connector configuration: rest.json
Section titled “Connector configuration: rest.json”The connector reads its settings from a JSON file. Below is a full example with two mapping entries — the first uses a JSON converter with basic auth, the second uses a custom converter with anonymous auth:
{ "server": { "host": "127.0.0.1", "port": 5000, "SSL": false }, "mapping": [ { "endpoint": "/test_device", "HTTPMethods": ["POST"], "security": { "type": "basic", "username": "username", "password": "password" }, "converter": { "type": "json", "deviceInfo": { "deviceNameExpression": "Device ${name}", "deviceNameExpressionSource": "request", "deviceProfileExpressionSource": "constant", "deviceProfileExpression": "default" }, "attributes": [ { "key": "model", "type": "string", "value": "${sensorModel}" } ], "timeseries": [ { "key": "temperature", "type": "double", "value": "${temp}" }, { "key": "humidity", "type": "double", "value": "${hum}" }, { "key": "combine", "type": "string", "value": "${hum}:${temp}" } ] } }, { "endpoint": "/anon2", "HTTPMethods": ["POST"], "security": { "type": "anonymous" }, "converter": { "type": "custom", "deviceInfo": { "deviceNameExpression": "SuperAnonDevice", "deviceNameExpressionSource": "constant", "deviceProfileExpressionSource": "constant", "deviceProfileExpression": "default" }, "extension": "CustomRestUplinkConverter", "extensionConfig": { "key": "Totaliser", "datatype": "float", "fromByte": 0, "toByte": 4, "byteorder": "big", "signed": true, "multiplier": 1 } } } ], "requestsMapping": { "attributeRequests": [], "attributeUpdates": [], "serverSideRpc": [] }}Section “server”
Section titled “Section “server””Configures the HTTP(S) server the connector starts on the gateway.
| Parameter | Default | Description |
|---|---|---|
host | 127.0.0.1 | IP address or hostname of the server |
port | 5000 | Port to listen on |
SSL | true | Enable TLS |
security.cert | Path to the PEM certificate file | |
security.key | Path to the private key file |
{ "server": { "host": "127.0.0.1", "port": 5000, "SSL": true, "security": { "cert": "~/ssl/cert.pem", "key": "~/ssl/key.pem" } }}| Parameter | Default | Description |
|---|---|---|
host | 127.0.0.1 | IP address or hostname of the server |
port | 5000 | Port to listen on |
SSL | false | Disable TLS |
{ "server": { "host": "127.0.0.1", "port": 5000, "SSL": false }}Section “mapping”
Section titled “Section “mapping””An array of endpoint definitions. Each entry creates one HTTP endpoint on the gateway server, defines the allowed HTTP methods, the authorization scheme for incoming requests, and how to convert the request payload into ThingsBoard device data.
| Parameter | Default | Description |
|---|---|---|
endpoint | /test_device | URL path of the endpoint |
HTTPMethods | ["GET"] | Allowed HTTP methods (GET, POST, etc.) |
Subsection “security”
Section titled “Subsection “security””Per-endpoint authorization for incoming client requests.
The connector expects an Authorization: Basic <base64(username:password)> header on every request.
| Parameter | Default | Description |
|---|---|---|
type | basic | Authorization type |
username | username | Username |
password | password | Password |
{ "security": { "type": "basic", "username": "username", "password": "password" }}Example curl request with Basic auth:
curl -X POST http://127.0.0.1:5000/test_device \ -u username:password \ -H "Content-Type: application/json" \ -d '{"name": "SN-001", "sensorModel": "example"}'No authorization is required. Useful for testing or trusted internal networks.
| Parameter | Default | Description |
|---|---|---|
type | anonymous | Authorization type |
{ "security": { "type": "anonymous" }}Subsection “converter”
Section titled “Subsection “converter””Defines how the incoming request payload is converted to ThingsBoard device data.
The default converter. It parses a JSON (or multipart/form-data) request payload and maps
fields to device attributes and telemetry.
Device info parameters:
| Parameter | Default | Description |
|---|---|---|
deviceNameExpression | Device ${name} | Expression to build the device name; ${field} reads from the request payload |
deviceNameExpressionSource | request | request — read from payload; constant — treat expression as a fixed value |
deviceProfileExpressionSource | request | Same as above, but for the device profile |
deviceProfileExpression | default | Expression to resolve the device profile name |
Attributes and timeseries parameters:
Both sections share the same field structure:
| Parameter | Default | Description |
|---|---|---|
key | model / temperature | Key name in ThingsBoard |
type | string / double | Data type of the incoming value |
value | ${sensorModel} / ${temp} | JSON-path expression to extract the value from the request |
tsField | (Optional) JSON-path expression for a field that carries a datetime string; used as the telemetry timestamp | |
dayfirst | false | (Optional) When parsing tsField, treat the first number as the day (true) or month (false) |
yearfirst | false | (Optional) When parsing tsField, treat the first number as the year |
Multipart/form-data support:
You can send multipart/form-data requests without any extra configuration. The connector
merges all multipart fields into a single key-value object, so you can reference them exactly
the same way as with application/json.
The two requests below are equivalent:
curl -X POST http://127.0.0.1:5000/test_device \ -H "Content-Type: application/json" \ -u username:password \ -d '{ "name": "SensorA", "sensorModel": "TX100", "temp": 23.5, "hum": 56.2, "timestampField": "10.11.24 14:30:00.000" }'curl -X POST "http://127.0.0.1:5000/test_device" \ -u "username:password" \ -F 'name=SensorA' \ -F 'sensorModel=TX100' \ -F 'temp=23.5' \ -F 'hum=56.2' \ -F 'timestampField=10.11.24 14:30:00.000'Full mapping example:
{ "endpoint": "/test_device", "HTTPMethods": ["POST"], "security": { "type": "basic", "username": "username", "password": "password" }, "converter": { "type": "json", "deviceInfo": { "deviceNameExpression": "Device ${name}", "deviceNameExpressionSource": "request", "deviceProfileExpressionSource": "request", "deviceProfileExpression": "default" }, "attributes": [ { "key": "model", "type": "string", "value": "${sensorModel}" } ], "timeseries": [ { "key": "temperature", "type": "double", "value": "${temp}" }, { "key": "humidity", "type": "double", "value": "${hum}", "tsField": "${timestampField}", "dayfirst": true } ] }}You can also combine multiple request fields into a single value using expressions:
{ "key": "combine", "type": "string", "value": "${hum}:${temp}" }Use a custom converter when the request payload has a non-standard structure or requires
preprocessing before sending data to ThingsBoard. Pass any custom fields in extensionConfig
— they are forwarded to the converter class at initialization.
| Parameter | Default | Description |
|---|---|---|
type | custom | Converter type |
deviceNameExpression | SuperAnonDevice | Device name (when deviceNameExpressionSource is constant) |
deviceNameExpressionSource | constant | constant or request |
deviceProfileExpressionSource | constant | constant or request |
deviceProfileExpression | default | Device profile name |
extension | CustomRESTUplinkConverter | Name of the custom converter class |
extensionConfig | Configuration object passed to the converter on initialization |
{ "type": "custom", "deviceInfo": { "deviceNameExpression": "SuperAnonDevice", "deviceNameExpressionSource": "constant", "deviceProfileExpressionSource": "constant", "deviceProfileExpression": "default" }, "extension": "CustomRestUplinkConverter", "extensionConfig": { "key": "Totaliser", "datatype": "float", "fromByte": 0, "toByte": 4, "byteorder": "big", "signed": true, "multiplier": 1 }}Subsection “response”
Section titled “Subsection “response””Optional. Controls what HTTP response body the gateway returns to the client after processing the request. Three variants are supported:
1. Default — returns only an HTTP status code (no response body). No extra configuration needed.
2. Hardcoded response body — always returns the same static text:
| Parameter | Default | Description |
|---|---|---|
response.successResponse | OK | Body returned when the status is 200 |
response.unsuccessfulResponse | Error | Body returned when the status is not 200 |
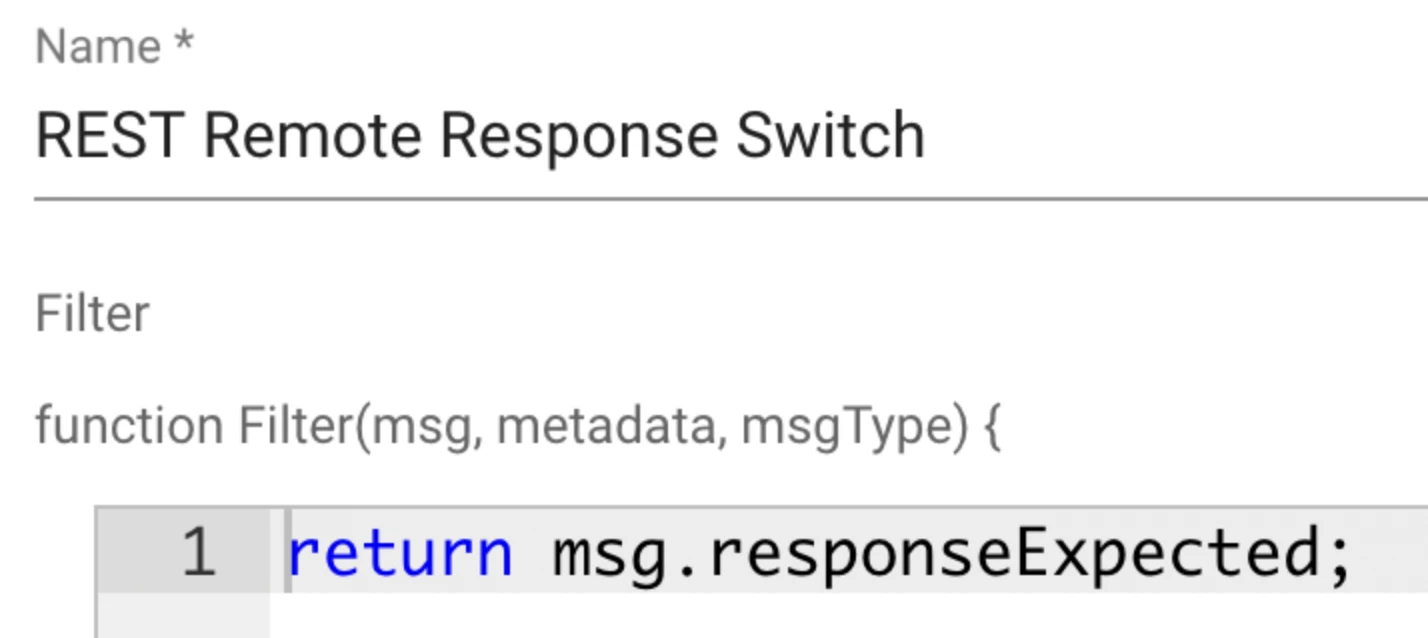
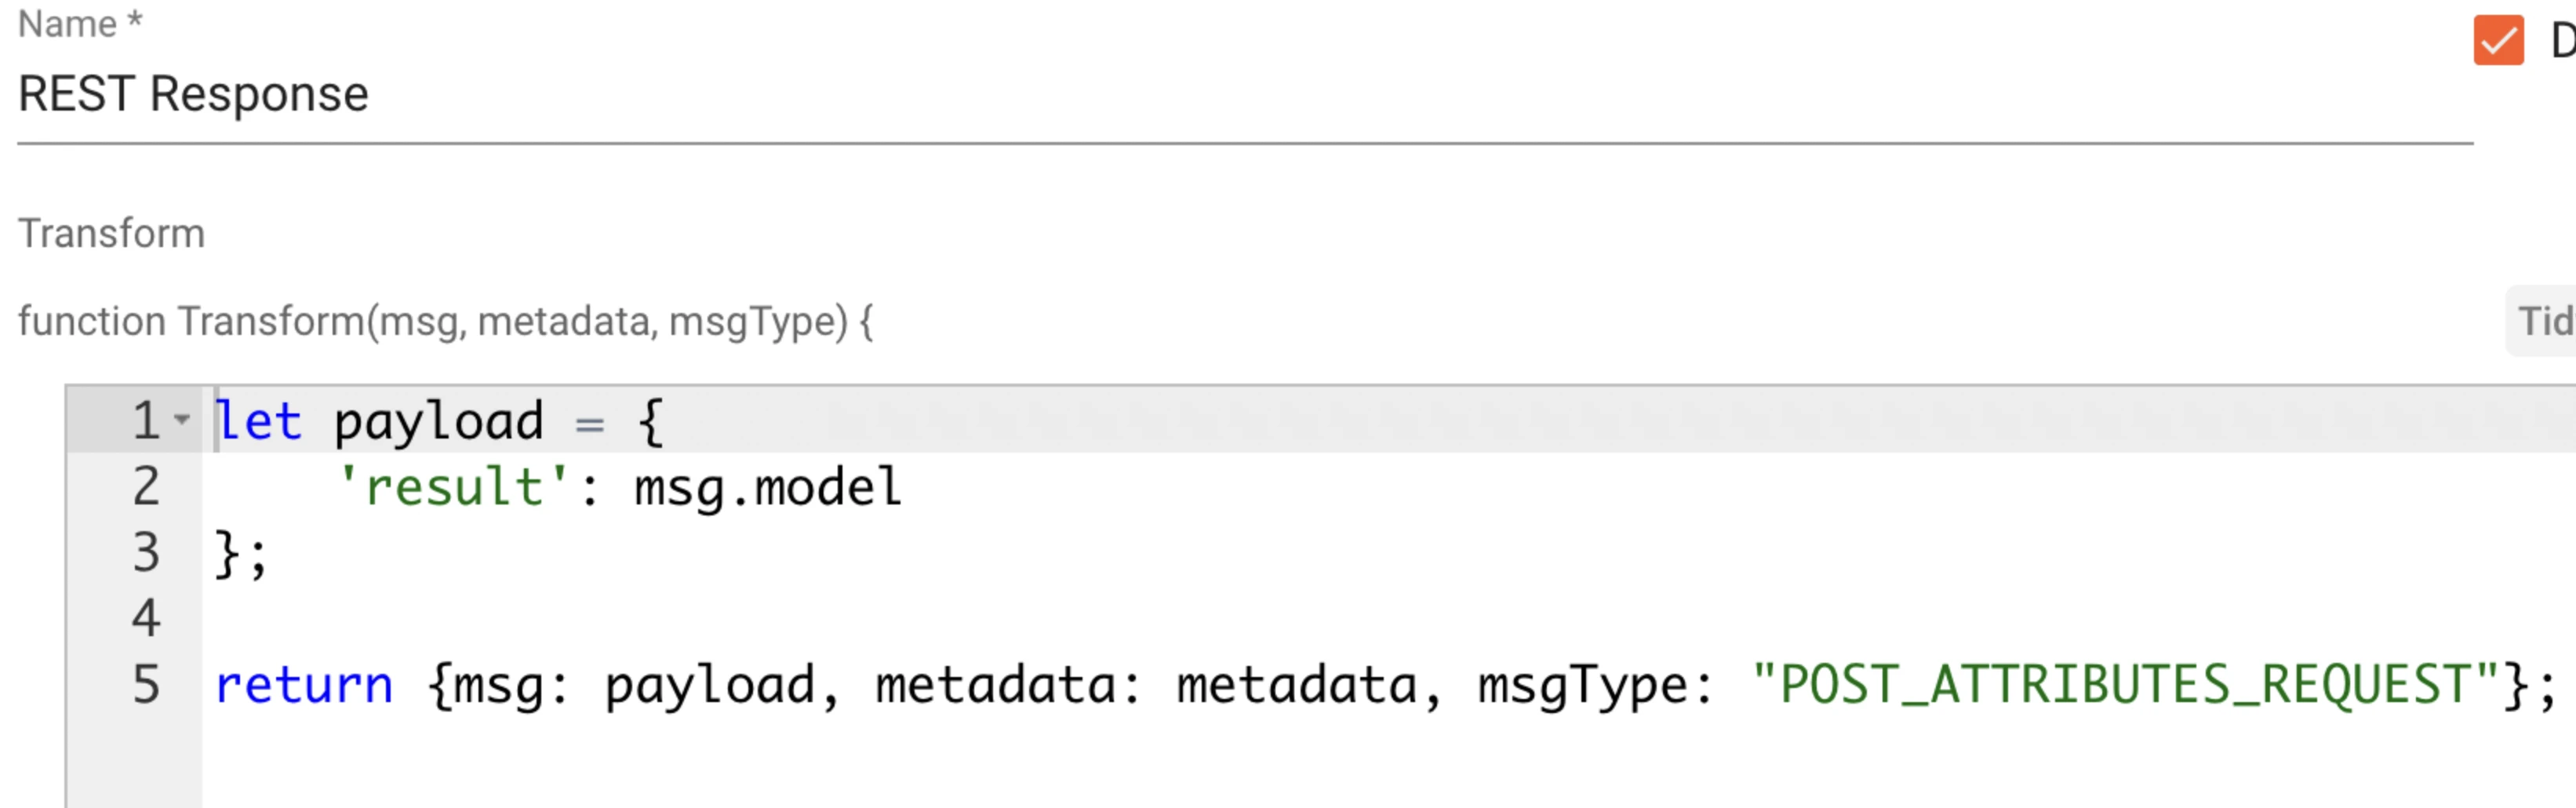
{ "endpoint": "/test_device", "HTTPMethods": ["POST"], "security": { "type": "anonymous" }, "converter": { "type": "json" }, "response": { "successResponse": "OK", "unsuccessfulResponse": "Error" }}3. Advanced — ThingsBoard rule chain response: the gateway forwards the request to ThingsBoard, waits for a rule chain to set a shared attribute, and returns that attribute value as the HTTP response.
| Parameter | Default | Description |
|---|---|---|
response.responseExpected | true | Enable advanced response mode |
response.timeout | 120 | Seconds to wait for the ThingsBoard response |
response.responseAttribute | result | Shared attribute name whose value is returned as the response body |
{ "endpoint": "/test_device", "HTTPMethods": ["POST"], "security": { "type": "anonymous" }, "converter": { "type": "json" }, "response": { "responseExpected": true, "timeout": 120, "responseAttribute": "result" }}To use the advanced response, configure a rule chain in ThingsBoard that sets the shared
attribute named in responseAttribute on the device:

Section “requestsMapping”
Section titled “Section “requestsMapping””Optional. Configures attribute requests, attribute updates, and server-side RPC handling.
Subsection “attributeRequests”
Section titled “Subsection “attributeRequests””Lets a device request its own client-side or shared attributes from ThingsBoard by sending an HTTP request to a dedicated endpoint on the gateway.
| Parameter | Default | Description |
|---|---|---|
endpoint | /sharedAttributes | URL path of the attribute request endpoint |
type | shared | Attribute type: shared or client |
HTTPMethods | ["POST"] | Allowed HTTP methods |
security.type | basic | Authorization type for this endpoint |
security.username | user | Username (for basic type) |
security.password | passwd | Password (for basic type) |
timeout | 10.0 | Request timeout in seconds |
deviceNameExpression | ${deviceName} | JSON-path expression to extract the device name from the request |
attributeNameExpression | ${attribute} | JSON-path expression to extract the attribute name from the request |
"attributeRequests": [ { "endpoint": "/sharedAttributes", "type": "shared", "HTTPMethods": ["POST"], "security": { "type": "anonymous" }, "timeout": 10.0, "deviceNameExpression": "${deviceName}", "attributeNameExpression": "${attribute}" }]To request multiple attributes in a single call, add multiple JSON-path expressions separated
by a comma in attributeNameExpression:
"attributeRequests": [ { "endpoint": "/sharedAttributes", "type": "shared", "HTTPMethods": ["POST"], "security": { "type": "anonymous" }, "timeout": 10.0, "deviceNameExpression": "${deviceName}", "attributeNameExpression": "${pduAttribute}, ${versionAttribute}" }]Subsection “attributeUpdates”
Section titled “Subsection “attributeUpdates””When a shared attribute is updated in ThingsBoard, the gateway sends an HTTP request to an external URL on the device.
| Parameter | Default | Description |
|---|---|---|
HTTPMethod | POST | HTTP method for the outgoing request |
SSLVerify | false | Verify the server’s SSL certificate |
httpHeaders | {"CONTENT-TYPE": "application/json"} | Additional HTTP headers |
security.type | basic | Security type: basic or anonymous |
security.username | user | Username (for basic type) |
security.password | passwd | Password (for basic type) |
timeout | 0.5 | Request timeout in seconds |
tries | 3 | Number of send retries |
allowRedirects | true | Follow HTTP redirects |
deviceNameFilter | .*REST$ | Regex filter on device name |
attributeFilter | data | Regex filter on attribute name |
requestUrlExpression | sensor/${deviceName}/${attributeKey} | Expression to build the target URL |
valueExpression | {"${attributeKey}":"${attributeValue}"} | Expression to build the request body |
"attributeUpdates": [ { "HTTPMethod": "POST", "SSLVerify": false, "httpHeaders": { "CONTENT-TYPE": "application/json" }, "security": { "type": "basic", "username": "user", "password": "passwd" }, "timeout": 0.5, "tries": 3, "allowRedirects": true, "deviceNameFilter": ".*REST$", "attributeFilter": "data", "requestUrlExpression": "sensor/${deviceName}/${attributeKey}", "valueExpression": "{\"${attributeKey}\":\"${attributeValue}\"}" }]Subsection “serverSideRpc”
Section titled “Subsection “serverSideRpc””Maps ThingsBoard RPC commands to outgoing HTTP requests sent to the device.
| Parameter | Default | Description |
|---|---|---|
deviceNameFilter | .* | Regex filter on device name |
methodFilter | echo | Regex filter on RPC method name |
requestUrlExpression | http://127.0.0.1:5001/${deviceName} | Expression to build the target URL |
responseTimeout | 1 | Seconds to wait for a response |
HTTPMethod | GET | HTTP method for the outgoing request |
valueExpression | ${params} | Expression to build the request body |
timeout | 0.5 | Request timeout in seconds |
tries | 3 | Number of send retries |
httpHeaders | {"CONTENT-TYPE": "application/json"} | Additional HTTP headers |
security.type | anonymous | Security type: basic or anonymous |
"serverSideRpc": [ { "deviceNameFilter": ".*", "methodFilter": "echo", "requestUrlExpression": "http://127.0.0.1:5001/${deviceName}", "responseTimeout": 1, "HTTPMethod": "GET", "valueExpression": "${params}", "timeout": 0.5, "tries": 3, "httpHeaders": { "Content-Type": "application/json" }, "security": { "type": "anonymous" } }, { "deviceNameFilter": ".*", "methodFilter": "no-reply", "requestUrlExpression": "sensor/${deviceName}/request/${methodName}/${requestId}", "HTTPMethod": "POST", "valueExpression": "${params.hum}", "httpHeaders": { "Content-Type": "application/json" } }]Every telemetry and attribute key also has a built-in GET and SET RPC method available
automatically. The required parameters are requestUrlExpression, responseTimeout,
HTTPMethod, and valueExpression. See the
Reserved RPC methods guide for details.
Was this helpful?