Installing ThingsBoard Edge using Docker (Linux, macOS)
This guide provides step-by-step instructions for running ThingsBoard Edge on Linux or macOS using Docker.
Prerequisites
Section titled “Prerequisites”To run ThingsBoard Edge, you need an active ThingsBoard Professional Edition account that supports Edge functionality.
You can use ThingsBoard Cloud or install a local ThingsBoard PE server.
Hardware requirements
Section titled “Hardware requirements”The hardware requirements for ThingsBoard Edge depend on the number of connected devices and platform interaction intensity.
| Workload | RAM | Description |
|---|---|---|
| Light | 1 GB | Fewer than 100 devices, minimal dashboard/device management usage |
| Heavy | 4 GB | 100+ devices or intense platform interactions |
Docker installation
Section titled “Docker installation”Install Docker CE and Docker Compose before continuing.
Deploy a new Edge instance
Section titled “Deploy a new Edge instance”To create a new Edge instance on your ThingsBoard Server:
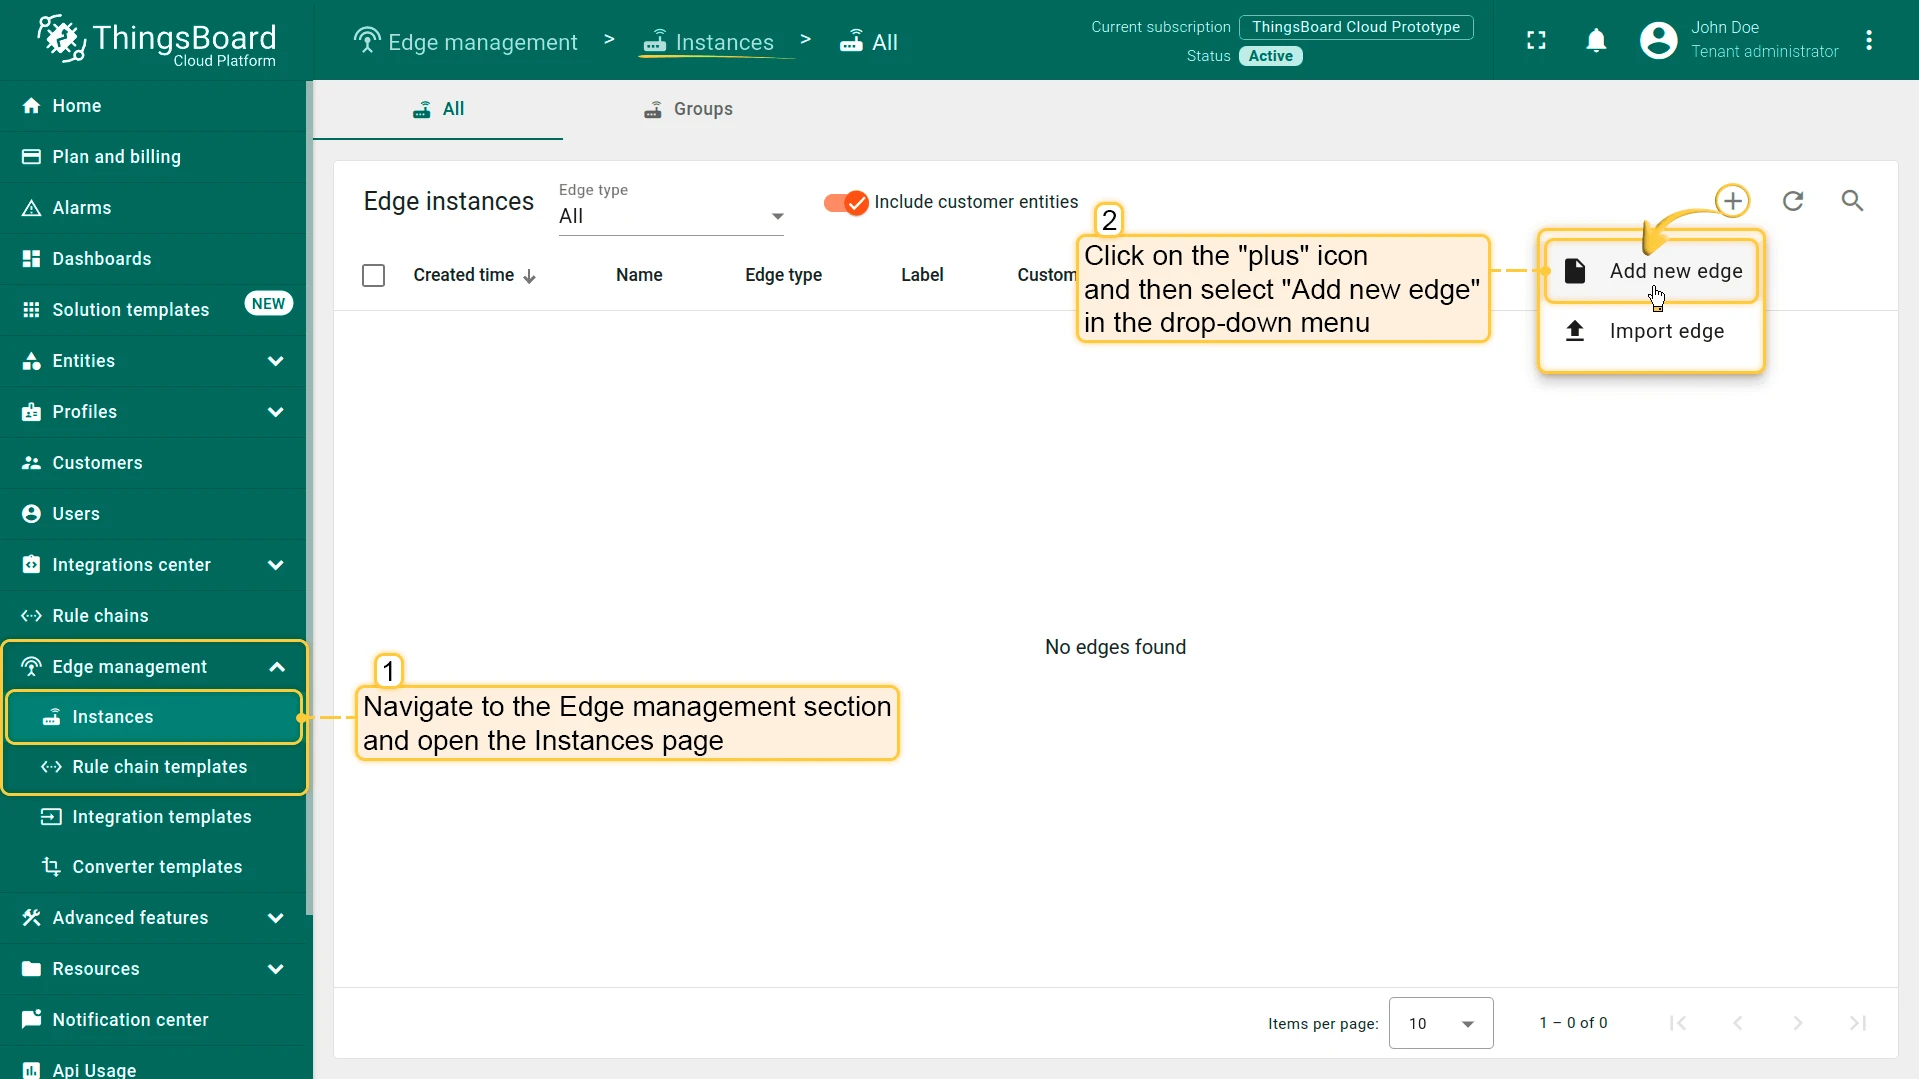
- Sign in to your ThingsBoard PE instance and go to Edge Management → Instances. Click Add (+) in the top-right corner and select Add new edge.
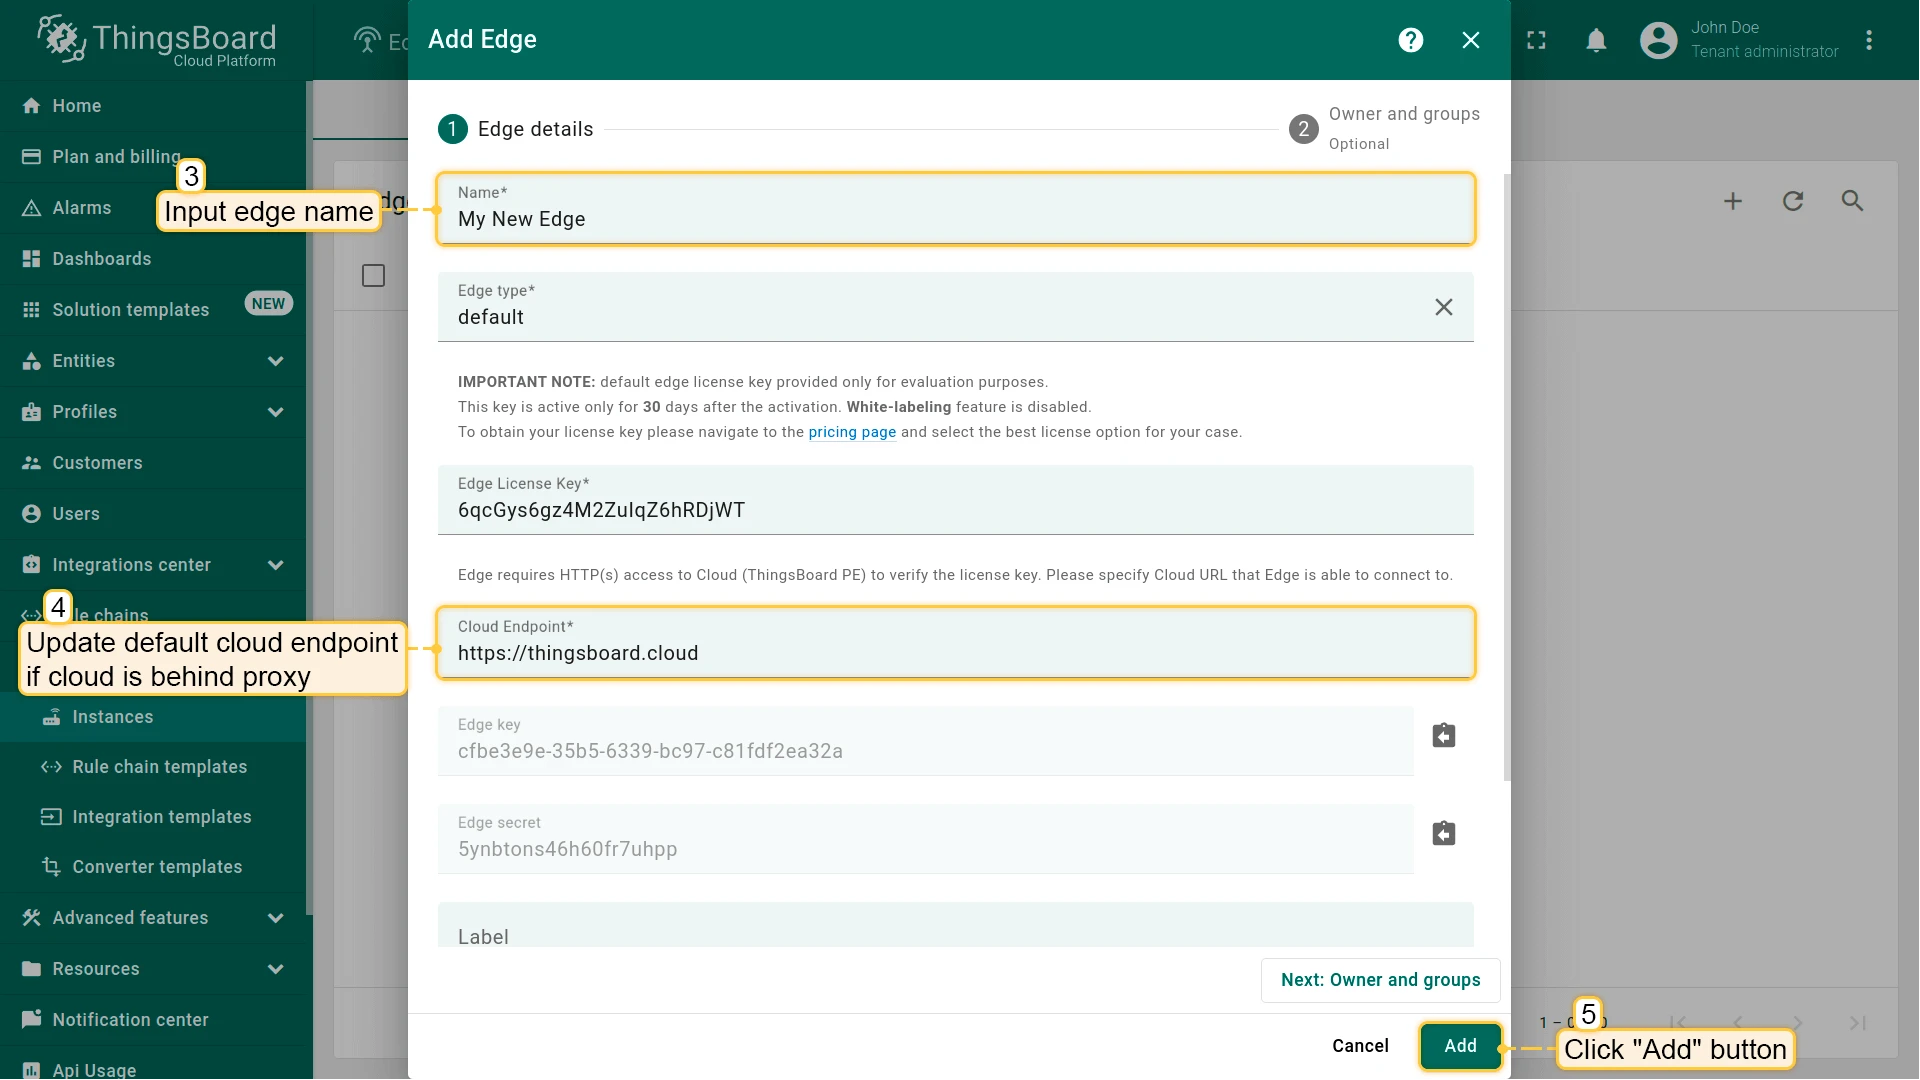
Enter a name for the Edge, like My New Edge.
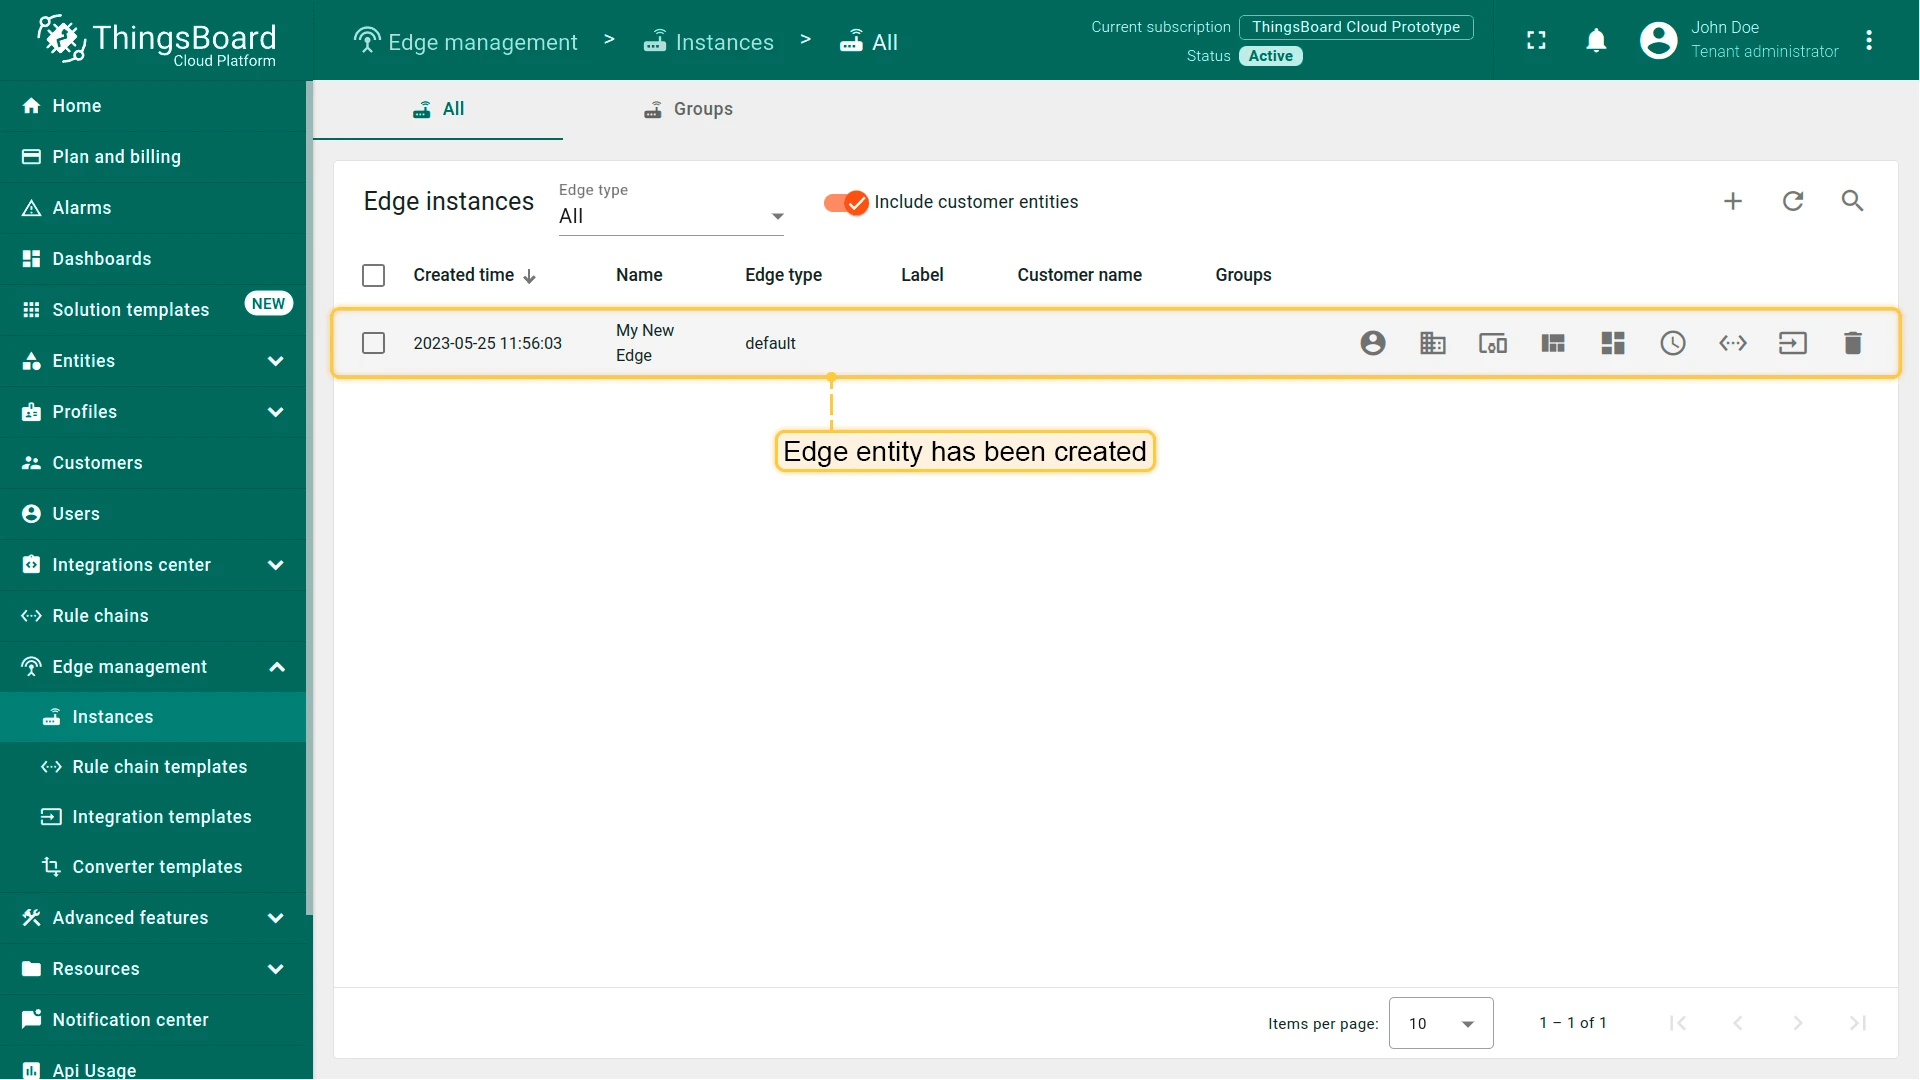
If needed, update the Cloud endpoint. If Edge runs in a Docker container, do not uselocalhost— use the IP address of the machine where ThingsBoard PE is hosted (e.g.,http://10.7.2.143:8080). If you use ThingsBoard Cloud, keep the default. Click Add.Your new Edge instance is created and appears at the top of the list.
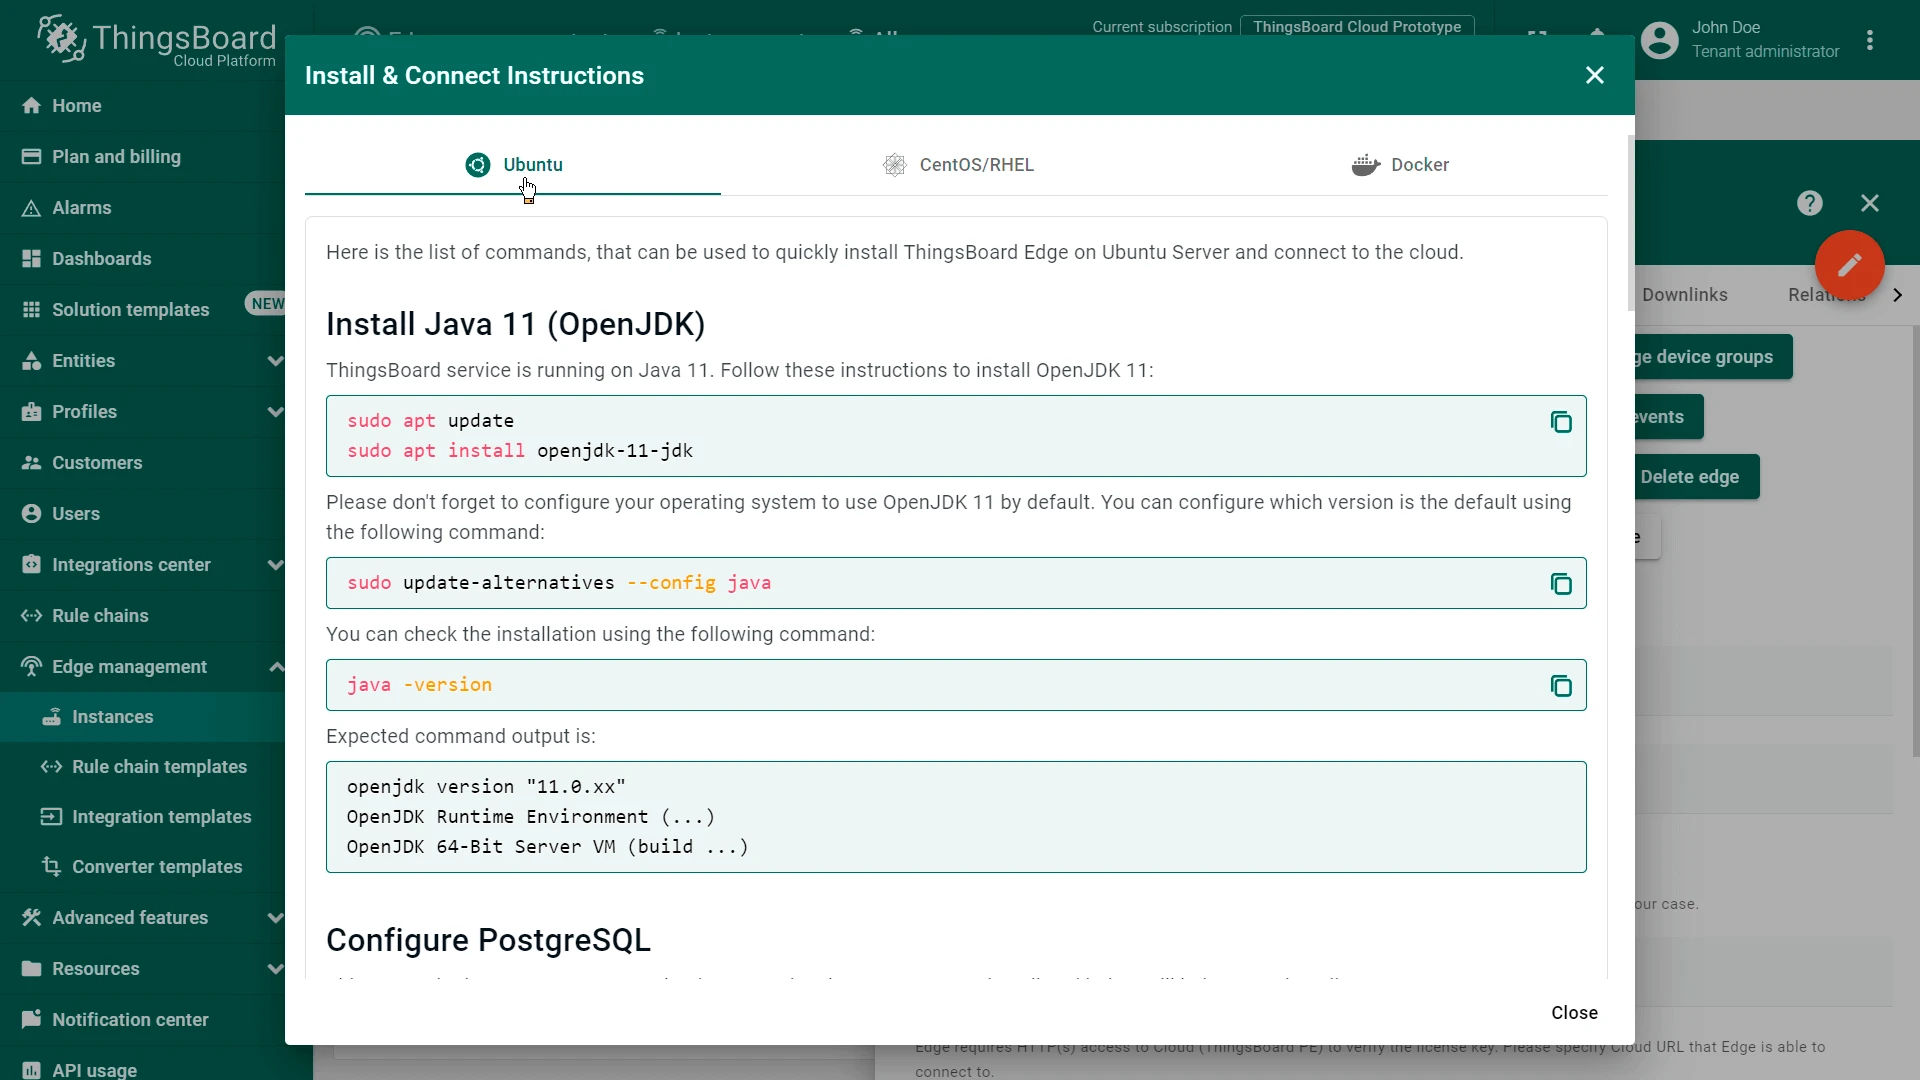
Guided installation using ThingsBoard Server instructions
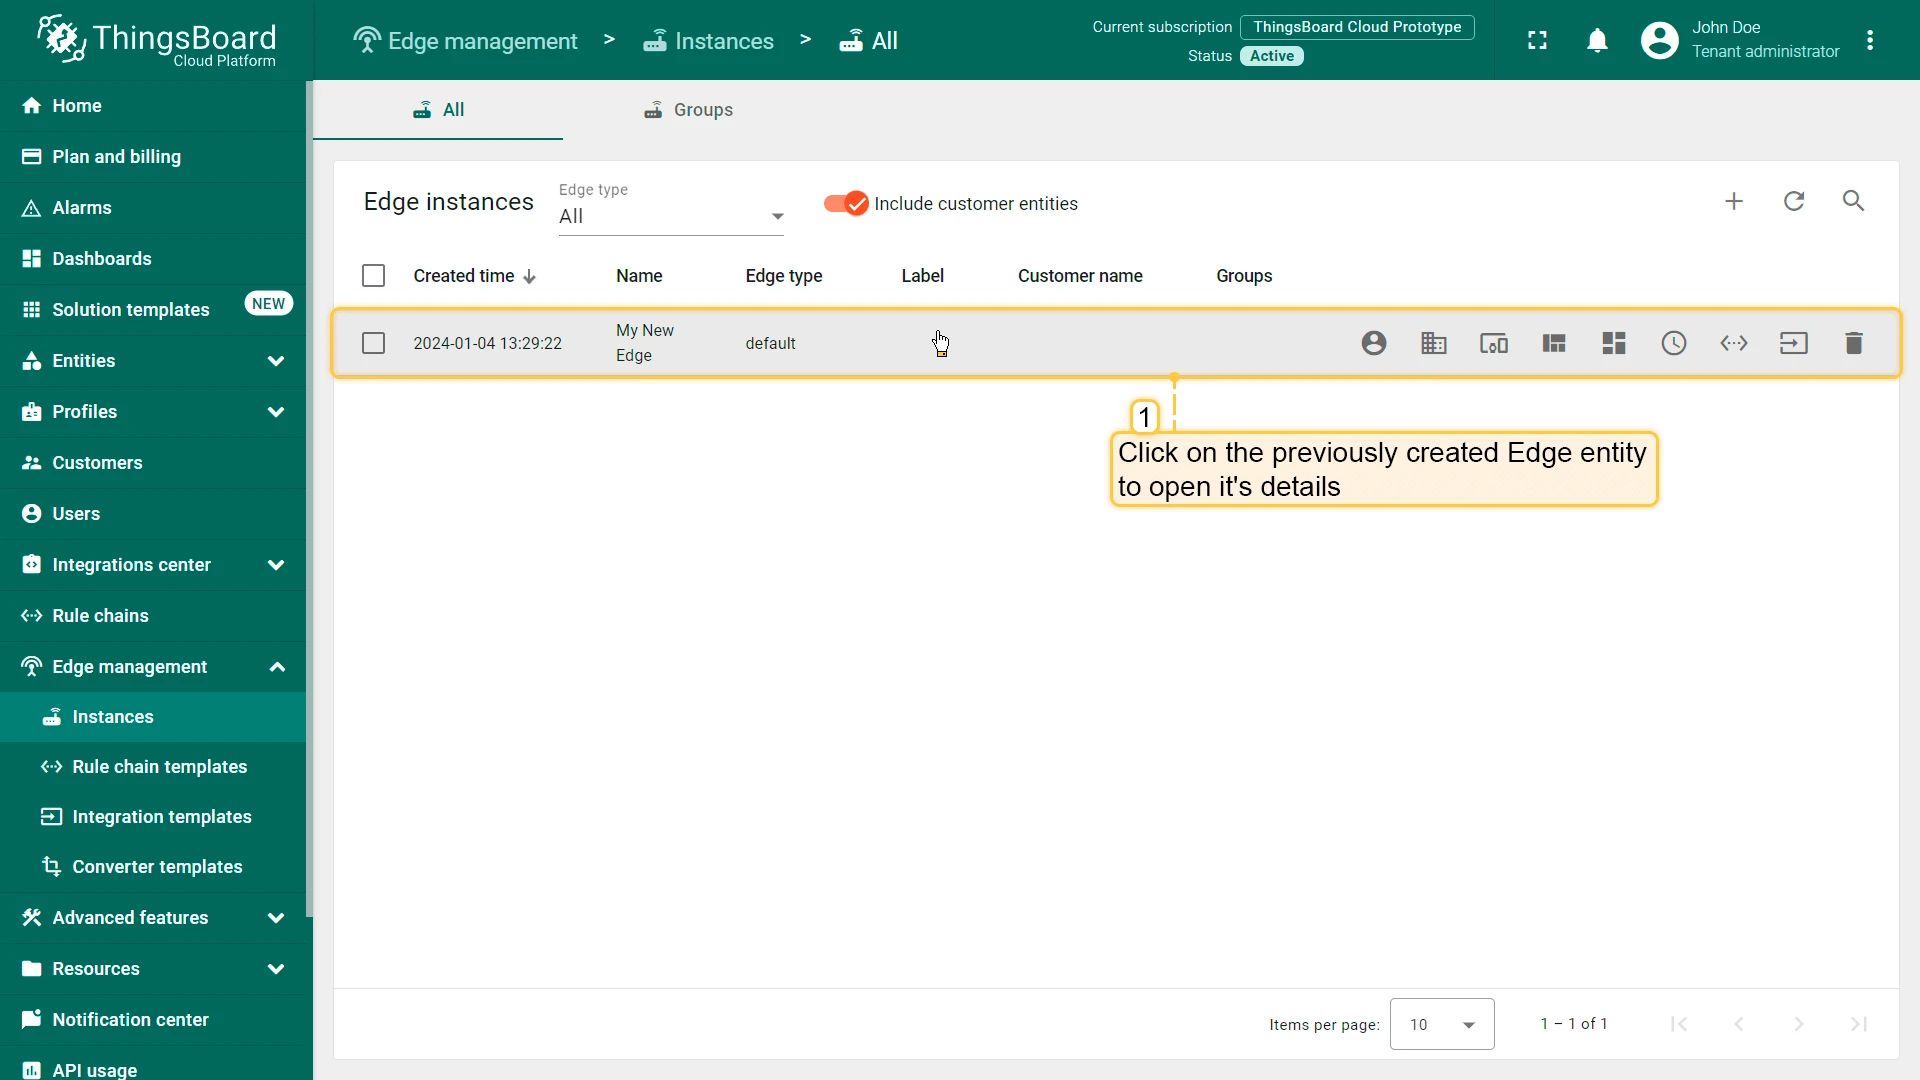
Section titled “Guided installation using ThingsBoard Server instructions”Once an Edge instance is created, the server generates pre-configured installation instructions containing the Edge credentials (Edge Key, Edge Secret, etc.). To access them:
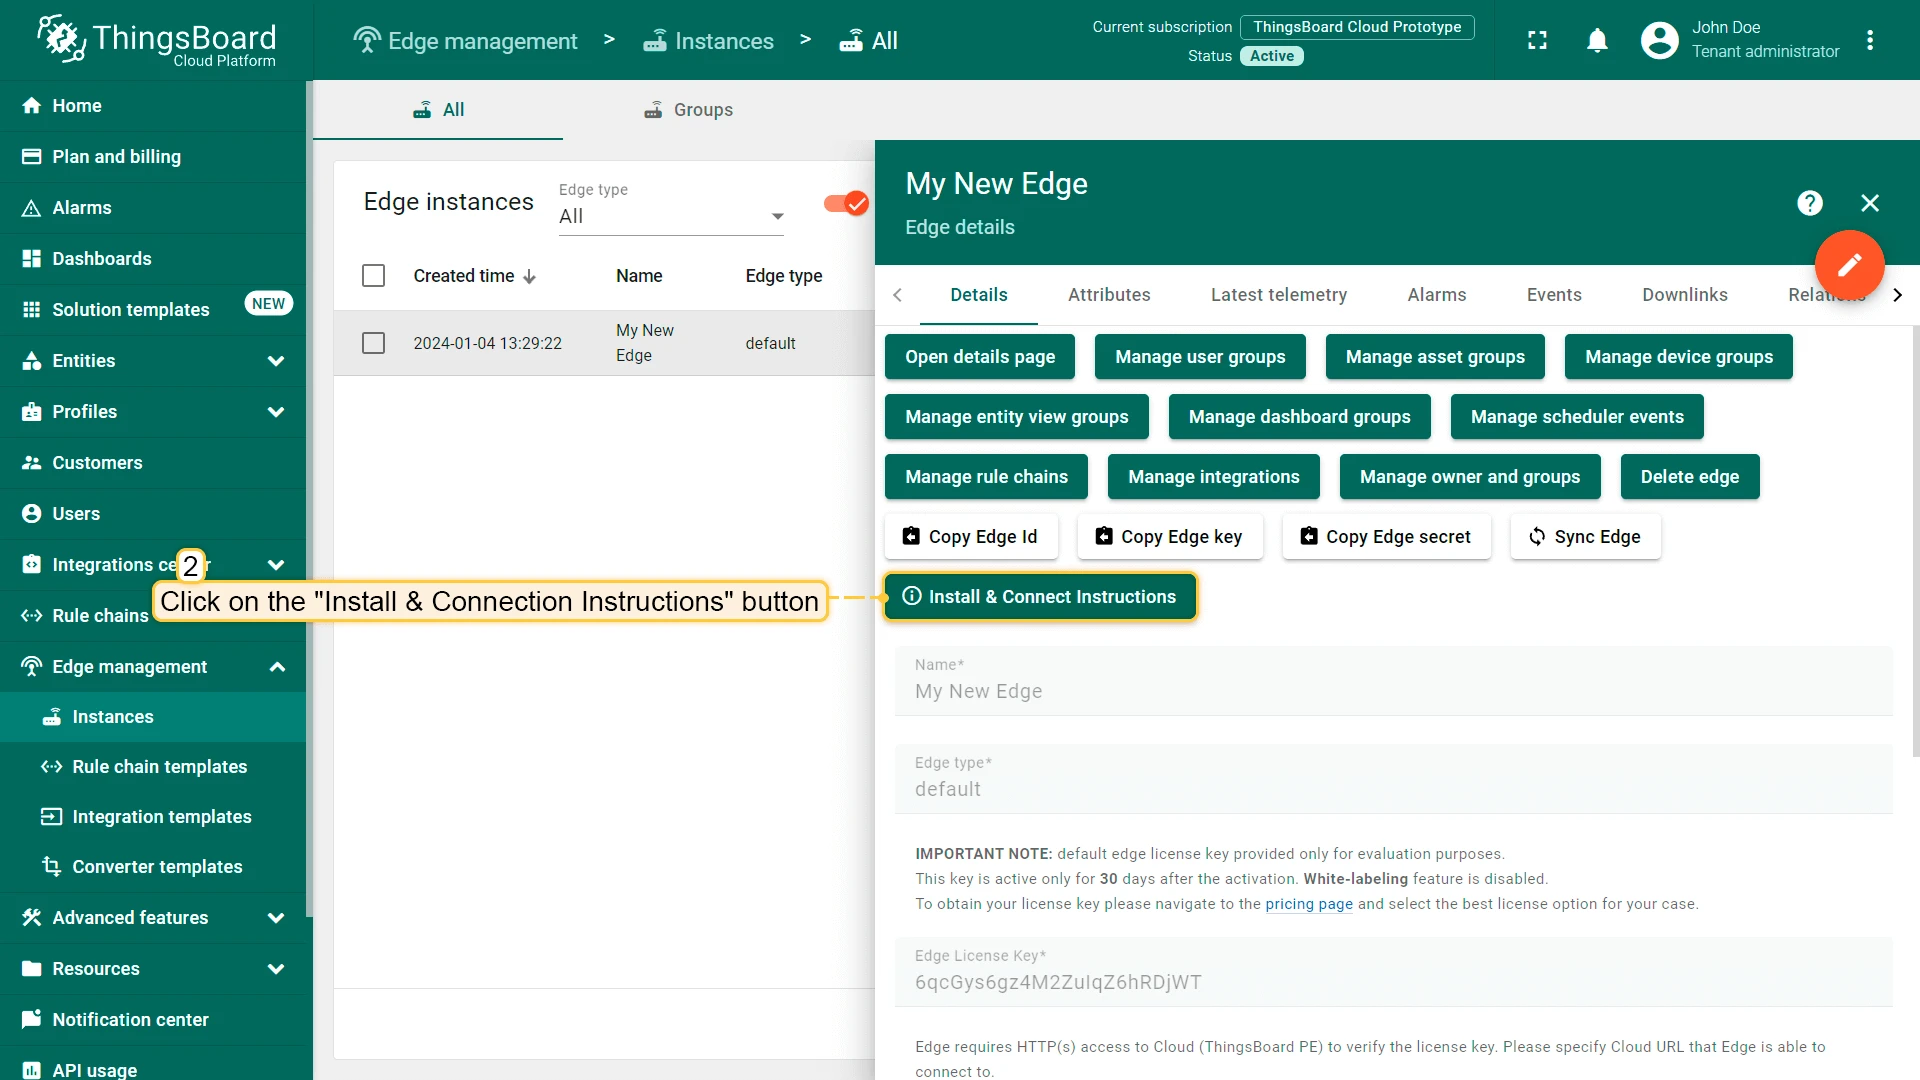
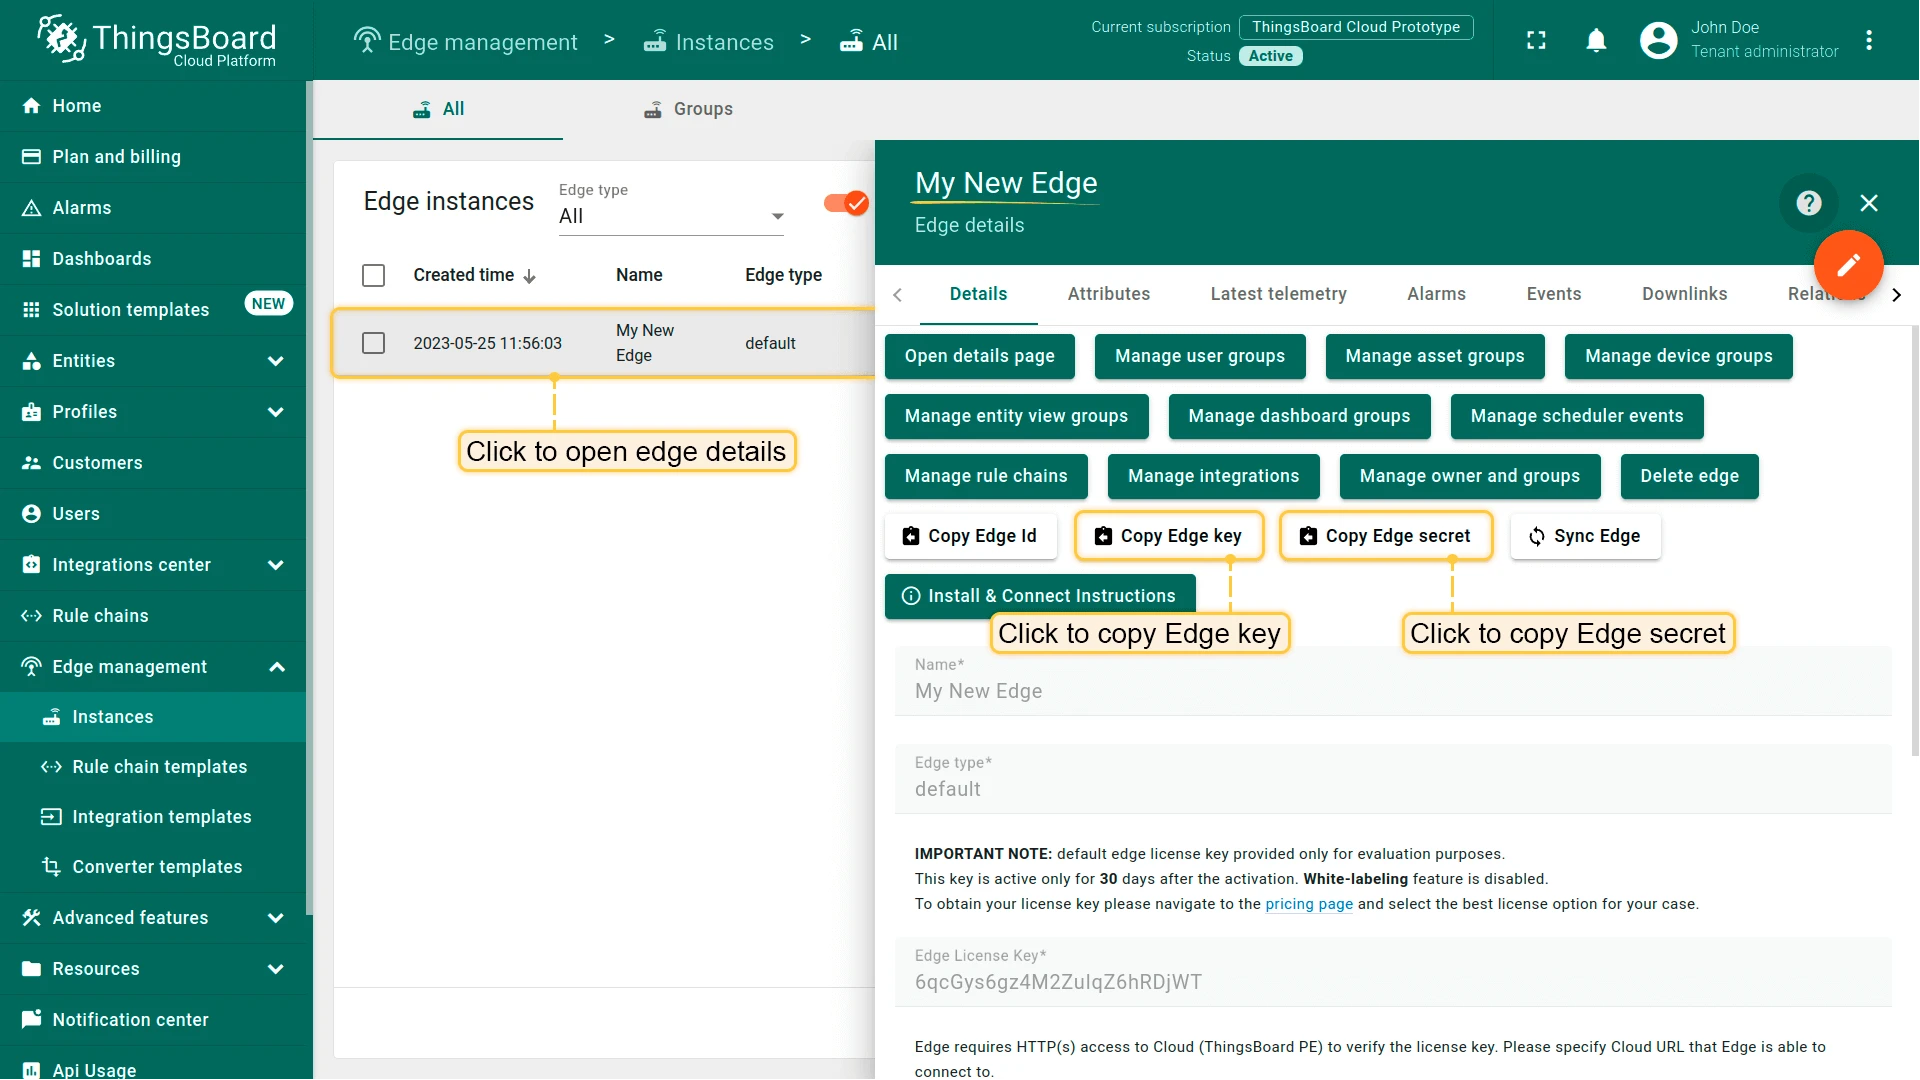
- Click the Edge entity to open its details.
- Click Install & Connection Instructions.
- Select the installation method and follow the instructions to install Edge and connect it to the server.
Manual installation and configuration
Section titled “Manual installation and configuration”If you are unable to use the guided instructions above, follow the steps below to install and configure Edge manually.
Step 1. Copy Edge credentials
Section titled “Step 1. Copy Edge credentials”In the Edge instance details panel, click Copy Edge Key and Copy Edge Secret. Store these values securely — you need them in the next step.
Step 2. Create the docker-compose.yml file
Section titled “Step 2. Create the docker-compose.yml file”ThingsBoard Edge supports different queue implementations. Choose the one that fits your deployment:
- In Memory: Built-in default. Suitable for development and PoC environments. Not recommended for production.
- Kafka: Recommended for production deployments.
- Hybrid: Combines PostgreSQL and Cassandra with Kafka. Recommended for 1M+ devices or high data ingestion rates (5000+ msg/sec).
Create the docker-compose.yml file based on your chosen queue:
services:  mytbedge:    restart: always    image: "thingsboard/tb-edge-pe:4.3.1.1EDGEPE"    ports:      - "8080:8080"      - "1883:1883"      - "5683-5688:5683-5688/udp"    environment:      SPRING_DATASOURCE_URL: jdbc:postgresql://postgres:5432/tb-edge      EDGE_LICENSE_INSTANCE_DATA_FILE: /data/instance-edge-license.data      CLOUD_ROUTING_KEY: PUT_YOUR_EDGE_KEY_HERE # e.g. 19ea7ee8-5e6d-e642-4f32-05440a529015      CLOUD_ROUTING_SECRET: PUT_YOUR_EDGE_SECRET_HERE # e.g. bztvkvfqsye7omv9uxlp      CLOUD_RPC_HOST: PUT_YOUR_CLOUD_IP # e.g. host.docker.internal, 192.168.1.1 or thingsboard.cloud      CLOUD_RPC_SSL_ENABLED: 'false' # set it to 'true' if you are connecting edge to thingsboard.cloud    volumes:      - tb-edge-data:/data      - tb-edge-logs:/var/log/tb-edge  postgres:    restart: always    image: "postgres:16"    ports:      - "5432"    environment:      POSTGRES_DB: tb-edge      POSTGRES_PASSWORD: postgres    volumes:      - tb-edge-postgres-data:/var/lib/postgresql/data
volumes:  tb-edge-data:    name: tb-edge-data  tb-edge-logs:    name: tb-edge-logs  tb-edge-postgres-data:    name: tb-edge-postgres-data
Apache Kafka is an open-source stream processing platform recommended for production deployments. It provides reliable message delivery, high throughput, and replay support — making it suitable for environments where data loss is unacceptable.
services: mytbedge: restart: always image: "thingsboard/tb-edge-pe:4.3.1.1EDGEPE" ports: - "8080:8080" - "1883:1883" - "5683-5688:5683-5688/udp" environment: SPRING_DATASOURCE_URL: jdbc:postgresql://postgres:5432/tb-edge EDGE_LICENSE_INSTANCE_DATA_FILE: /data/instance-edge-license.data CLOUD_ROUTING_KEY: PUT_YOUR_EDGE_KEY_HERE # e.g. 19ea7ee8-5e6d-e642-4f32-05440a529015 CLOUD_ROUTING_SECRET: PUT_YOUR_EDGE_SECRET_HERE # e.g. bztvkvfqsye7omv9uxlp CLOUD_RPC_HOST: PUT_YOUR_CLOUD_IP # e.g. host.docker.internal, 192.168.1.1 or thingsboard.cloud CLOUD_RPC_SSL_ENABLED: 'false' # set it to 'true' if you are connecting edge to thingsboard.cloud TB_QUEUE_TYPE: "kafka" TB_KAFKA_SERVERS: "kafka:9092" volumes: - tb-edge-data:/data - tb-edge-logs:/var/log/tb-edge extra_hosts: - "host.docker.internal:host-gateway" postgres: restart: always image: "postgres:16" ports: - "5432" environment: POSTGRES_DB: tb-edge POSTGRES_PASSWORD: postgres volumes: - tb-edge-postgres-data:/var/lib/postgresql/data kafka: restart: always image: bitnamilegacy/kafka:4.0 ports: - 9092 - 9093 #for Kraft environment: ALLOW_PLAINTEXT_LISTENER: "yes" KAFKA_CFG_LISTENERS: "INTERNAL://:9092,CONTROLLER://:9093" KAFKA_CFG_ADVERTISED_LISTENERS: "INTERNAL://kafka:9092" KAFKA_CFG_LISTENER_SECURITY_PROTOCOL_MAP: "INTERNAL:PLAINTEXT,CONTROLLER:PLAINTEXT" KAFKA_CFG_INTER_BROKER_LISTENER_NAME: "INTERNAL" KAFKA_CFG_AUTO_CREATE_TOPICS_ENABLE: "false" KAFKA_OFFSETS_TOPIC_REPLICATION_FACTOR: "1" KAFKA_TRANSACTION_STATE_LOG_MIN_ISR: "1" KAFKA_TRANSACTION_STATE_LOG_REPLICATION_FACTOR: "1" KAFKA_CFG_PROCESS_ROLES: "controller,broker" #KRaft KAFKA_CFG_NODE_ID: "0" #KRaft KAFKA_CFG_CONTROLLER_LISTENER_NAMES: "CONTROLLER" #KRaft KAFKA_CFG_CONTROLLER_QUORUM_VOTERS: "0@kafka:9093" #KRaft volumes: - kafka-data:/bitnamivolumes: tb-edge-data: name: tb-edge-data tb-edge-logs: name: tb-edge-logs tb-edge-postgres-data: name: tb-edge-postgres-data kafka-data: driver: localUses PostgreSQL for entity storage, Apache Cassandra for time-series data, and Apache Kafka as the message queue.
services: mytbedge: restart: always image: "thingsboard/tb-edge-pe:4.3.1.1EDGEPE" ports: - "8080:8080" - "1883:1883" - "5683-5688:5683-5688/udp" environment: SPRING_DATASOURCE_URL: jdbc:postgresql://postgres:5432/tb-edge EDGE_LICENSE_INSTANCE_DATA_FILE: /data/instance-edge-license.data CLOUD_ROUTING_KEY: PUT_YOUR_EDGE_KEY_HERE # e.g. 19ea7ee8-5e6d-e642-4f32-05440a529015 CLOUD_ROUTING_SECRET: PUT_YOUR_EDGE_SECRET_HERE # e.g. bztvkvfqsye7omv9uxlp CLOUD_RPC_HOST: PUT_YOUR_CLOUD_IP # e.g. 192.168.1.1 or thingsboard.cloud CLOUD_RPC_SSL_ENABLED: 'false' # set it to 'true' if you are connecting edge to thingsboard.cloud TB_QUEUE_TYPE: "kafka" TB_KAFKA_SERVERS: "kafka:9092" DATABASE_TS_TYPE: "cassandra" CASSANDRA_URL: "cassandra:9042" volumes: - tb-edge-data:/data - tb-edge-logs:/var/log/tb-edge extra_hosts: - "host.docker.internal:host-gateway" postgres: restart: always image: "postgres:16" ports: - "5432" environment: POSTGRES_DB: tb-edge POSTGRES_PASSWORD: postgres volumes: - tb-edge-postgres-data:/var/lib/postgresql/data kafka: restart: always image: bitnamilegacy/kafka:4.0 ports: - 9092 - 9093 #for Kraft environment: ALLOW_PLAINTEXT_LISTENER: "yes" KAFKA_CFG_LISTENERS: "INTERNAL://:9092,CONTROLLER://:9093" KAFKA_CFG_ADVERTISED_LISTENERS: "INTERNAL://kafka:9092" KAFKA_CFG_LISTENER_SECURITY_PROTOCOL_MAP: "INTERNAL:PLAINTEXT,CONTROLLER:PLAINTEXT" KAFKA_CFG_INTER_BROKER_LISTENER_NAME: "INTERNAL" KAFKA_CFG_AUTO_CREATE_TOPICS_ENABLE: "false" KAFKA_OFFSETS_TOPIC_REPLICATION_FACTOR: "1" KAFKA_TRANSACTION_STATE_LOG_MIN_ISR: "1" KAFKA_TRANSACTION_STATE_LOG_REPLICATION_FACTOR: "1" KAFKA_CFG_PROCESS_ROLES: "controller,broker" #KRaft KAFKA_CFG_NODE_ID: "0" #KRaft KAFKA_CFG_CONTROLLER_LISTENER_NAMES: "CONTROLLER" #KRaft KAFKA_CFG_CONTROLLER_QUORUM_VOTERS: "0@kafka:9093" #KRaft volumes: - kafka-data:/bitnami cassandra: restart: always image: cassandra:4.0 container_name: cassandra environment: CASSANDRA_CLUSTER_NAME: "Thingsboard Edge Cluster" CASSANDRA_KEYSPACE_NAME: "tb_edge" CASSANDRA_LOCAL_DATACENTER: "datacenter1" ports: - 9042:9042 volumes: - ./data/cassandra:/var/lib/cassandravolumes: tb-edge-data: name: tb-edge-data tb-edge-logs: name: tb-edge-logs tb-edge-postgres-data: name: tb-edge-postgres-data kafka-data: driver: localConfiguration parameters:
| Parameter | Description |
|---|---|
restart: always | ThingsBoard Edge automatically restarts on system reboot or failure |
8080:8080 | Maps local port 8080 to the container’s HTTP port |
1883:1883 | Maps local port 1883 to the container’s MQTT port |
5683-5688:5683-5688/udp | Maps local UDP ports 5683–5688 to the container’s CoAP and LwM2M ports |
thingsboard/tb-edge-pe:4.3.1.1EDGEPE | ThingsBoard Edge Docker image |
CLOUD_ROUTING_KEY | Your Edge key |
CLOUD_ROUTING_SECRET | Your Edge secret |
CLOUD_RPC_HOST | IP address or hostname of the ThingsBoard Server |
EDGE_LICENSE_INSTANCE_DATA_FILE | Path where the Edge PE license data file is stored — uses the same license as ThingsBoard PE |
CLOUD_RPC_SSL_ENABLED | Set to true to enable SSL for the Edge–server connection — required when connecting to ThingsBoard Cloud |
Step 3. Complete the installation
Section titled “Step 3. Complete the installation”In the directory containing the docker-compose.yml file, run:
docker compose up -d && docker compose logs -f mytbedgeOnce the service is running, open the Edge UI at http://localhost:8080.
Log in using your tenant credentials from ThingsBoard Server or ThingsBoard Cloud.
Step 4. Inspect logs, stop, and start
Section titled “Step 4. Inspect logs, stop, and start”To detach from the session terminal without stopping the container, press Ctrl+p then Ctrl+q.
To view ThingsBoard Edge logs:
docker compose logs -f mytbedgeTo stop the container:
docker compose stop mytbedgeTo start the container:
docker compose start mytbedgeTo stop and remove all containers, volumes, and networks:
docker compose down -vTo recreate and start all containers:
docker compose up -dTroubleshooting
Section titled “Troubleshooting”DNS issues
Section titled “DNS issues”If you observe errors related to DNS resolution, for example:
127.0.1.1:53: cannot unmarshal DNS messageConfigure your system to use Google Public DNS. For details, see the Linux and macOS instructions.
Was this helpful?