Overview
ThingsBoard offers two distinct deployment options: ThingsBoard Edge and ThingsBoard Cloud.
ThingsBoard Edge is designed specifically for local, distributed data processing, enabling data analysis and management directly at the source of data generation. This approach allows for local processing, storage, and immediate response to critical situations, even without a continuous connection to the central server. For more information, see the What is ThingsBoard Edge article.
In contrast, ThingsBoard Cloud is a fully managed, scalable, and fault-tolerant platform hosted in the cloud. The devices connected to the cloud transfer data over the internet. It is perfect for centralized data collection, processing, and management. For more information, see the What is ThingsBoard article.
The Key Differences Between Edge and Cloud
Although Edge is designed similarly to Cloud, the main difference lies in the location of data processing:
- Edge stores and processes data locally on the edge device.
- Cloud stores and processes data centrally in the cloud.
Connectivity requirements also differ:
- Devices connected to the Edge can operate over a local area network (LAN) without requiring cloud connectivity.
- Devices connected to the Cloud are require internet connectivity to communicate with the platform.
Cluster deployment refers to the deployment in a distributed architecture, where multiple nodes (instances) work together to ensure scalability, fault tolerance, and high availability.
- The older versions of Edge do not support cluster deployment. It is designed to operate, process and analyze data locally before synchronizing with the central ThingsBoard server.
- Starting with release 4.0 Edge supports clustering. Multiple Edge nodes can be clustered to provide high availability. If one node fails, the others can seamlessly continue to handle workloads.
- Cloud supports cluster deployment and is crucial for handling large-scale IoT applications with numerous devices and high data throughput.
Synchronization Architecture
ThingsBoard Edge and ThingsBoard Cloud communicate using the gRPC (Remote Procedure Call) protocol. This communication channel allows for efficient data synchronization between edge devices and the cloud server, enabling a seamless flow of messages while minimizing overhead and latency.
To optimize this process, messages are serialized using Protocol Buffers (ProtoBuf).
All messages sent from ThingsBoard Edge to ThingsBoard Cloud are stored in a local PostgreSQL table (cloud_event table) prior to transmission. Starting with the 3.9 release, these events can be stored in Kafka topics (in case Kafka is used as a queue). This allows ThingsBoard Edge to operate without connectivity to the Cloud. Once a connection is established, all messages in the local cloud_event/ts_cloud_event tables (or Kafka topic) are sent to the Cloud and marked as successfully transferred.
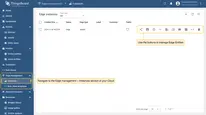
To view the list of messages transferred from the Cloud to the Edge, go to the Edge management > Instances section of your Cloud (Server), click on the Edge and select the “Downlinks” tab:
Force Synchronization Procedure
During a network outage, or some other communication problem ThingsBoard Edge could become out of sync from the Cloud. The Edge instance continues operating independently, collecting telemetry data, processing device events, and applying local rules. However, this data and state changes does not reach the Cloud, leading to inconsistencies.
To ensure that both the ThingsBoard Edge and Cloud are aligned to deliver accurate and efficient IoT functionality, the synchronisation process can be forced.
To force synchronization procedure, go to the Edge management > Instances section of your Cloud (Server), click on the Edge and then, click the “Sync Edge” button:
Entities Management
Most entities can be created on the Edge instance, except for Customers, and Users, entities. To enable the use of these entities on the Edge, these entities must be assigned to the Edge prior to use.
To assign specific entities to the Edge, log in to your Cloud and navigate to the Edge management > Instances section:
- The following entities and events can be managed:
- Make edge public: The edge and all its data will be accessible by others.
- Assign to customer: Link a specific customer entity to the Edge instance.
- Make edge private: The edge and all its data will not be accessible by others.
- Manage assets: Monitor and control assets (e.g., buildings, equipment, or other entities) at the Edge.
- Manage devices: Administer devices that are managed by the Edge.
- Manage entity views: Manage filtered views of entities (e.g., devices or assets) at the Edge to display specific subsets of data or contextual information. Read more about the Entity views in this article.
- Manage dashboards: Customize, and manage dashboards at the Edge.
- Manage rule chains: Create, configure, and manage rule chains specifically for the Edge.
- Delete: Remove the Edge and all related data.
Once an entity has been assigned to a specific Edge, it will be pushed to the Edge event queue. If the connection between the Edge and the Cloud is active, the assigned entity will be created on the Edge instantly. If the Edge instance is not connected to the Cloud, the entity will be created once the connection is established.
Edge Details
Additional information about the Edge and the latest events can be found on the “Edge Details” page. Go the Edge management > Instances section and click on the Edge:
- The “Details” tab contains general information, such as Edge ID, Edge key and Edge secret. You also can assign entities and force synchronization on this tab.
- The “Attributes” tab displays the latest attributes published to the server.
- The “Latest telemetry” tab displays the most recent telemetry records from your Edge.
- The “Alarms” tab displays the list of alarms.
- The “Events” tab displays various events related to the Edge.
- The “Downlinks” tab displays the list of messages transferred from the Cloud to the Edge.
- The “Relations” tab displays the records of other entities connected to the Edge.
- The “Audit logs” tab displays audit records to track user actions.
Edge Status Page
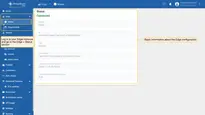
Basic information about the Edge configuration is provided on the Edge instance itself. To view this information, log in to your Edge instance and go to the Edge > Status section
- Status: Edge current status (Connected, Disconnected).
- Name: The name of the current Edge instance.
- ID: The identification code of the current Edge instance.
- Type: The "default" Edge type is by design.
- Routing Key: The Edge key used to install the instance.
- Last time connected to/disconnected from cloud: The date and time the instance is connected to/disconnected from Cloud. Displayed in a format YYYY-MM-DD H:Min:Sec.

Cloud Events
The Cloud Events page shows events that ThingsBoard Edge pushes to the Cloud. To view this information, log in to your Edge instance and go to the Edge > Cloud events section. The following information is displayed:
- Created time: The date and time the event is created and pushed to the Cloud. Displayed in a format YYYY-MM-DD H:Min:Sec.
- Action: The action pushed to the Cloud. Possible actions: Added, Deleted, Updated, Attributes Updated, Attributes Deleted, Timeseries Deleted, Timeseries Updated, RPC Call, Credentials Updated, Relation Add or Update, Relation Deleted, Relations Deleted, Alarm Ack, Alarm Clear, Attributes Request, Rule Chain Metadata Request, Relation Request, Credential Request.
- Entity type: The entity that created the event.
- Entity ID: The identification code of the entity.
- Status: Defines if the event has been pushed to the Cloud.
- Deployed: The event was pushed to the ThingsBoard server.
- Pending: The event is created on the ThingsBoard Edge, stored to the local database and will be pushed to the Cloud as soon as connection is restored.
- Data: Click to view the detailed information that was pushed to the Cloud.
By default, events are displayed for the last day. To set a different time period, click the “Time window” button at the top of the page.
Next Steps
-
Getting started guide - Provide quick overview of main ThingsBoard Edge features. Designed to be completed in 15-30 minutes:
-
Installation guides - Learn how to setup ThingsBoard Edge on various available operating systems and connect to ThingsBoard Server.
-
Edge Rule Engine:
-
Rule Chain Templates - Learn how to use ThingsBoard Edge Rule Chain Templates.
-
Provision Rule Chains from cloud to edge - Learn how to provision edge rule chains from cloud to edge.
-
- Security:
- gRPC over SSL/TLS - Learn how to configure gRPC over SSL/TLS for communication between edge and cloud.
-
Features:
-
Edge Status - Learn about Edge Status page on ThingsBoard Edge.
-
Cloud Events - Learn about Cloud Events page on ThingsBoard Edge.
-
-
Use cases:
-
Manage alarms and RPC requests on edge devices - This guide will show how to generate local alarms on the edge and send RPC requests to devices connected to edge:
-
Data filtering and traffic reduce - This guide will show how to send to cloud from edge only filterd amount of device data:
-
- Roadmap - ThingsBoard Edge roadmap.


