- Overview
- Prerequisites
- Step 1. Configure a Rule Chain for the Edge
- Step 2. Configure a Rule Chain for the Cloud
- Step 3. Subscribe to Device Attributes Change And Publish Device Attributes Message
- Step 4. Confirm the Results
- Next Steps
Overview
In ThingsBoard, device attributes are key-value pairs associated with devices. They are used to store configuration settings, metadata, or other relevant information.
Subscribing to device attributes enables clients to receive updates when these attributes change. The subscription methods vary based on the attribute type and the communication protocol used.
Attributes are categorized into three types:
- Server-side Attributes: Set and used exclusively by the server. Can be configured via User Interface (UI) or REST API.
- Shared Attributes: Devices can subscribe to updates to receive real-time notifications when the server modifies them. Can be configured via UI or REST API.
- Client-side Attributes: Set by the device and stored on the server. Can only be read via UI or REST API.
For more detailed information and examples, please refer to the ThingsBoard documentation on Working with IoT Device Attributes.
The following guide explains real-time, bidirectional communication between your device and the ThingsBoard Cloud via ThingsBoard Edge.
Prerequisites
- The ThingsBoard Cloud or locally hosted Server.
- The installed ThingsBoard Edge with network access.
- A Device capable of connecting to ThingsBoard Edge via MQTT, HTTP, or CoAP.
Step 1. Configure a Rule Chain for the Edge
To automatically route messages (data or attributes) from the device to the ThingsBoard Cloud, configure the rule chain for the ThingsBoard Edge:
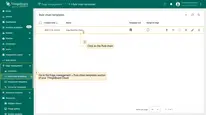
- Log in to the ThingsBoard Cloud and go to the Edge management > Rule chain templates section and click on the Rule chain assigned to your Edge instance.
- If you are using Edge 4.0 or later, stay in your Edge instance and go to the Rule chains section. To edit a rule chain, click the appropriate Rule Chain.
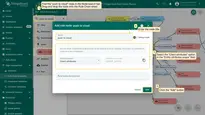
- On the Rule Chain edit page, in the Node search bar find the "push to cloud" node. It pushes messages from Edge to Cloud. Drag and drop the node onto the Rule Chain sheet. Then, in the "Add rule node" pop-up window enter the node title and select the "Client attributes" option in the "Entity attributes scope" field. Click the "Add" button to proceed.
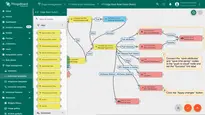
- Connect the “save attributes” node to the "push to cloud" node and set the "Success" link label. Click the “Apply changes” button in the Rule Chain sheet.
- If you are using Edge 4.0 or later, stay in your Edge instance and go to the Rule chains section. To edit a rule chain, click the appropriate Rule Chain.
Step 2. Configure a Rule Chain for the Cloud
To send back some attributes update message to the Edge, modify root rule chain on the cloud. Once the attribute update message will arrive to the edge you should see this message on the device.
- Go to the Rule Chains section, to modify the Rule Chain.
- On the Rule Chain edit page, in the Node search bar find the "script" node. It allows modification of message payload, metadata or message type with JavaScript. Drag and drop the node onto the Rule Chain sheet. Then, in the "Add rule node: script" pop-up window enter the node title and enter the script below. Click the "Add" button to proceed.
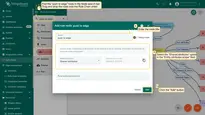
- On the Rule Chain edit page, in the Node search bar find the "push to edge" node. It pushes messages from Cloud to Edge. Drag and drop the node onto the Rule Chain sheet. Then, in the "Add rule node" pop-up window enter the node title and select the "Shared attributes" option in the "Entity attributes scope" field. Click the "Add" button to proceed.
- Connect the “save attributes” node to the "push to edge" node and set the "Success" link label. Click the “Apply changes” button in the Rule Chain sheet.
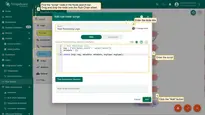
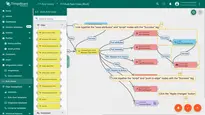
To rewrite and return received data back to Edge, add the following script into the “script” node:
1
2
3
4
5
// POST PROCESSING LOGIC
msg = {"attribute1_result": "value1_result"};
metadata = {};

return {msg: msg, metadata: metadata, msgType: msgType};
Step 3. Subscribe to Device Attributes Change And Publish Device Attributes Message
The procedure for subscribing to the Device Attribute Changes and subsequently publishing the Device Attributes Message depends on the protocol used. There are the most commonly used protocols for basic telemetry and attribute updates in IoT applications:
MQTT is a lightweight protocol commonly used for IoT communication. To facilitate communication with ThingsBoard Edge using MQTT, we recommend installing the MQTT Broker. This allows the device to publish telemetry or attribute messages and subscribe to topics for attribute updates. Subscribe to the Changes in Shared Device AttributesTo subscribe to shared device attribute changes, send the SUBSCRIBE message:
 Replace the $ACCESS_TOKEN with the actual access token of the device. To find the device access token, go to the Entities > Devices section and click on the device. On the “Device details” page, you can copy the token by clicking the “Copy access token” button. Publish Time-Series or Attribute Message.To publish client-side device attributes to the ThingsBoard Edge, send a PUBLISH message. You can publish the telemetry data:
You can also publish client-side attributes update using data from new-attributes-values.json file: |
HTTP is a general-purpose network protocol that can be used in IoT applications. HTTP protocol is TCP based and uses request-response model. Subscribe to the Changes in Shared Device AttributesTo subscribe to changes in shared device attributes, send a GET request to the following URL, with an optional ‘timeout’ parameter:
 Replace the $ACCESS_TOKEN with the actual access token of the device. To find the device access token, go to the Entities > Devices section and click on the device. On the “Device details” page, you can copy the token by clicking the “Copy access token” button. Execute the command:
Publish Time-Series or Attribute Message.To publish client-side device attributes to the ThingsBoard Edge, send a POST request to the following URL:
Publish client-side attributes update You can also publish client-side attributes update using data from new-attributes-values.json file: |
CoAP is a light-weight IoT protocol for constrained devices. CoAP protocol is UDP based, but similar to HTTP it uses request-response model. Subscribe to the Changes in Shared Device AttributesTo subscribe to changes in shared device attributes, send a GET request to the following URL:
 Replace the $ACCESS_TOKEN with the actual access token of the device. To find the device access token, go to the Entities > Devices section and click on the device. On the “Device details” page, you can copy the token by clicking the “Copy access token” button. Execute the command: Once shared attribute will be changed by one of the server-side components (REST API or Rule Chain) the client will receive the update. Publish Time-Series or Attribute Message.To publish client-side device attributes to the ThingsBoard Edge, send a POST request to the following URL:
Publish client-side attributes update using data from new-attributes-values.json file: |
Step 4. Confirm the Results
Confirm the received and pushed attributes:
- Once you have subscribed to attribute updates, you will receive updates as the attributes change. We have used the MQTT protocol as an example. The updates were received after new attributes were published.
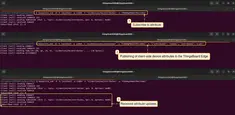
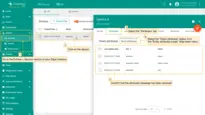
- To confirm if the attributes message is received on your Edge instance, go to the Entities > Devices section and click on the device. On the "Device details" page, select the "Attributes" tab and select the "Client attributes" option in the "Entity attributes scope" drop-down menu.
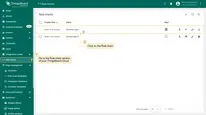
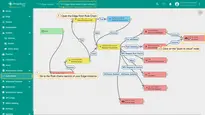
- To confirm if the attributes message is received and pushed to Cloud, go to the Rule chains section of your Edge instance and click on the Rule chain. Click on the "push to cloud" node.
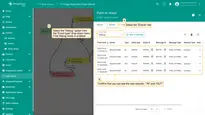
- On the "Push to cloud" page, select the "Events" tab. If you have debug mode enabled, select the "Debug" option in the "Event type" drop-down menu. You should see the new records - "IN" and "OUT", where the "IN" record defines the attributes received from the device, and the "OUT" record defines the attributes message pushed to the Cloud.
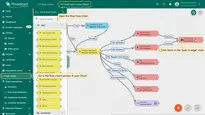
- To confirm if the attributes message is received on the Cloud and pushed back to the Edge, go to the Rule chains section of your Cloud and click on the Rule chain. Click twice on the "push to edge" node.
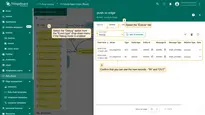
- On the "Push to edge" page, select the "Events" tab. If you have debug mode enabled, select the "Debug" option from the "Event type" drop-down menu. You should see two new records - "IN" and "OUT", where the "IN" record defines the attributes received from Edge, and the "OUT" record defines the attributes message pushed back to Edge.
Next Steps
-
Getting started guide - Provide quick overview of main ThingsBoard Edge features. Designed to be completed in 15-30 minutes:
-
Installation guides - Learn how to setup ThingsBoard Edge on various available operating systems and connect to ThingsBoard Server.
-
Edge Rule Engine:
-
Rule Chain Templates - Learn how to use ThingsBoard Edge Rule Chain Templates.
-
Provision Rule Chains from cloud to edge - Learn how to provision edge rule chains from cloud to edge.
-
- Security:
- gRPC over SSL/TLS - Learn how to configure gRPC over SSL/TLS for communication between edge and cloud.
-
Features:
-
Edge Status - Learn about Edge Status page on ThingsBoard Edge.
-
Cloud Events - Learn about Cloud Events page on ThingsBoard Edge.
-
-
Use cases:
-
Manage alarms and RPC requests on edge devices - This guide will show how to generate local alarms on the edge and send RPC requests to devices connected to edge:
-
Data filtering and traffic reduce - This guide will show how to send to cloud from edge only filterd amount of device data:
-
- Roadmap - ThingsBoard Edge roadmap.