- Overview
- Prerequisites
- Create converter and integration templates
- Configure the integration on the ChirpStack application
- Assign the integration to Edge
- Send an uplink message
- Next steps
Edge ChirpStack Integration is implemented similarly to the ChirpStack Integration. The only difference is how the integration is created and deployed. Before proceeding, refer to the ChirpStack Integration documentation.
Overview
ChirpStack is an open-source LoRaWAN Network Server which can be used to setup LoRaWAN networks. After integrating ChirpStack with ThingsBoard Edge, you can locally connect, process, and visualize device data at the edge, ensuring low-latency insights and offline capabilities.
To learn more, please see the integration diagram.

Prerequisites
- ThingsBoard Edge Professional Edition up and running.
- Install ChirpStack Network Server via Docker Compose or Ubuntu.
- Have a device connected to the network. Read how to connect the LoRaWAN device with ChirpStack.
Create converter and integration templates
Only the ThingsBoard Professional Edition creates converters and integration templates. So please use ThingsBoard Cloud or install your own platform instance to log in as a Tenant administrator.
Basic settings
To add the ChirpStack integration:
- Go to the Edge management > Integration templates section and click the “Add” button to add a new integration.
- Select the ChirpStack type and enter the integration name.
- Click the “Next” button.


Debug mode is extremely useful for development and troubleshooting. However, having it on all the time can significantly increase the disk space used by the database since all the debug data is stored there.
Therefore, starting from version 3.9, ThingsBoard stores all debug events for integrations only during the first 15 minutes. After that, only failure events are retained. These settings can be combined or completely disabled.
Uplink data converter
Uplink is necessary to convert the incoming data from the device into the required format for displaying them in ThingsBoard.
- Select the “Create new” tab
- Enter the Converter name
- The Main decoding configuration block:
- Select the Entity type (Device or Asset) from the drop down-menu and enter the entity name. The corresponding entity will be created as a result of the integration.
$eui is a placeholder that will automatically be replaced by the device’s unique identifier (e.g., 70B3D57ED003B6F5) from the Loriot (or ChirpStack, similar MQTT message) payload.
For example, if the device entity is named “Loriot Device $eui”, the created device name may look like “Loriot Device 70B3D57ED003B6F5”.
- Enter the script into the “function payloadDecoder” field. For the Edge version 3.9 and older, the following script can be used:

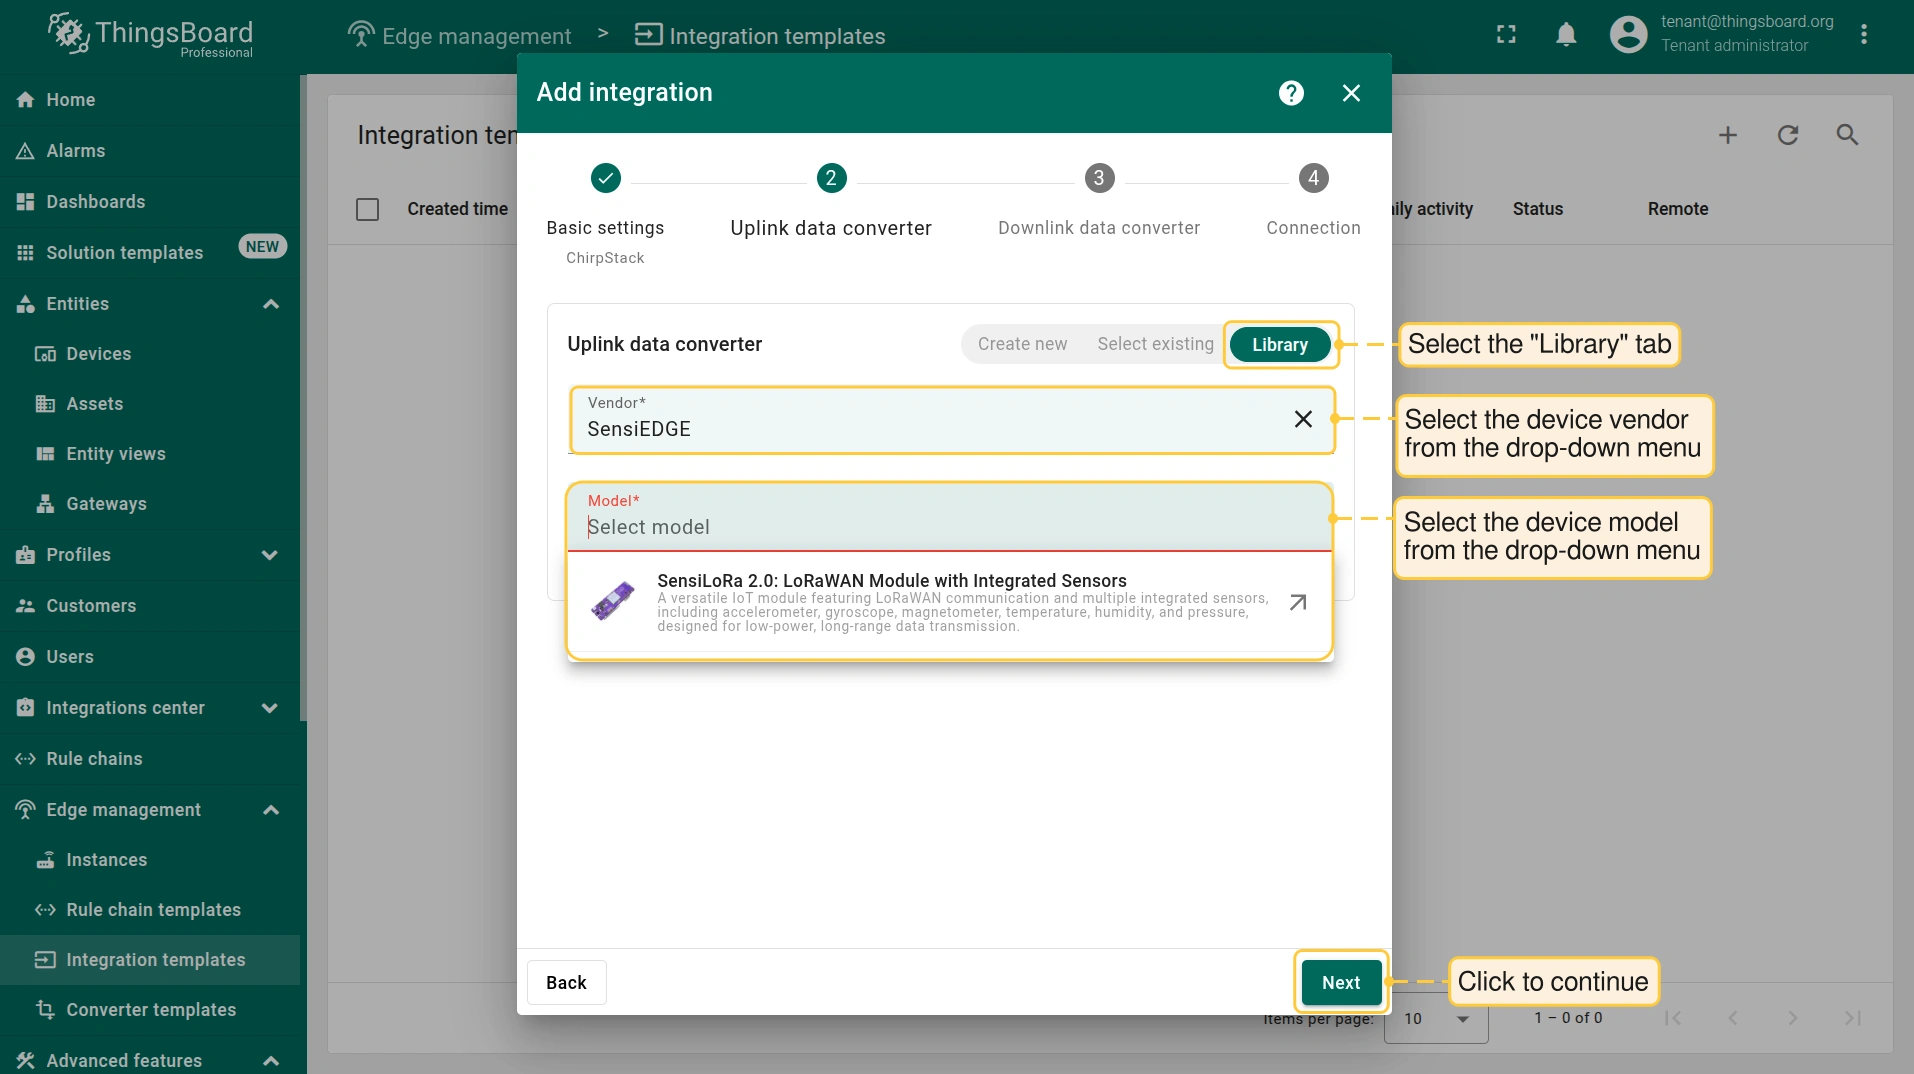
Starting with Edge version 4.0, you can:
- Select the “Library” tab, choose the Vendor and find the appropriate model in the “Model” from the drop-down menus.
- Or use the default script provided in the converter.

- The Advanced decoding parameters block:
- The “Device profile”, “Device label”, “Customer name”, and “Device group name” fields are not mandatory, and you can also use the $-pattern to fill them dynamically.
- In the Attributes and Telemetry sections specify the keys that should be interpreted as attributes and telemetry, respectively.
- In the Update only keys list section, define keys whose values will be saved to the database only if they have changed from the previous incoming message. This applies to both Attributes and Telemetry, helping optimize data storage.
- Click the “Next” button.

Downlink data converter (optional)
Configuring a Downlink data converter is optional and can be omitted if not required. To proceed without configuring the downlink converter, select the “Skip” tab and click the “Skip” button.

Connection
Before you proceed with the Connection configuration, create the Application server API Token at the ChirpStack UI.
- Open the ChirpStack UI at http://chipstack-server-ip:8080 (e.g., http://10.7.2.193:8080/) and login with your credentials.
- If the credentials are unmodified, use:
Username: admin
Password: admin
- If the credentials are unmodified, use:
- Go to the Tennant > API Keys section and click the “Add API Key” button.
- Enter the API key name and click the “Submit” button.
- Once the API key name is created, copy and paste it into the “Application server API Token” field in the ThingsBoard UI.


On the ThingsBoard UI, continue with the Connection configuration. Fill in the following fields:
- Base URL: Enter the URL in the format: http://edge-ip:edge-port (e.g., http://10.7.2.193:8080).
- HTTP endpoint URL: Copy to use it while configuring the ChirpStack application.
- Application server URL: Enter the address of the application server or the REST API service in the format: http://chipstack-server-ip:8090 (e.g., http://10.7.2.193:8090).
- Application server API Token: Paste the API Token obtained from the ChirpStack UI.
- Click the “Add” button.

Configure the integration on the ChirpStack application
To forward device data from ChirpStack to ThingsBoard, the ChirpStack Application Integration should be configured as well. Log in to the ChirpStack UI at http://chipstack-server-ip:8080 to proceed.
Add a device profile
Create a device profile before, before configuring the ChirpStack Application. Fill in the mandatory fields:
- Go to the Tenant > Device Profiles section and click the “Add device profile” button.
- On the “General” tab, fill in the following fields:
- Name: Enter the device profile name.
- Region: Enter the LoRaWAN regional parameters.
- MAC Version: The LoRaWAN MAC version the device uses.
- Regional parameters revision: Parameter set version for your region.
- ADR Algorithm: Adaptive Data Rate logic.
- Expect uplink interval (secs): Enter the number of seconds ChirpStack expects the device to send an uplink message.
- Click the “Submit” button.


Add integration
To configure an integration in the ChirpStack application:
- Go to the Tenant > Applications section and click the “Add application” button.
- Enter the application name and click the “Submit” button.
- Select the “Integrations” tab.
- Find the HTTP integration in the list and click the ”+” button to add it to the application.
- Paste the HTTP endpoint URL obtained at the Connection configuration step in the ThingsBoard UI.
- Click the “Submit” button.


Add the device
Once the integration is added, add the device:
- Select the “Devices” tab and click the “Add device” button.
- On the “Device” tab, enter the device name.
- Device EUI (EUI64): Enter the unique 64-bit (8-byte) identifier assigned to a LoRaWAN device.
- Select the byte order in which a DevEUI is represented or transmitted (MSB or LSB).
- Device profile: Select the device profile from the drop-down menu.
- Click the “Submit” button.


Add the gateway (optional)
In a testing environment, adding gateway can be omitted. However, the device itself will send data through the gateway. To add the gateway:
- Go to the Tenant > Gateways section and click the “Add gateways” button.
- Enter the gateway name, gateway ID and the number of seconds at which gateway is expected to send its statistics.


Assign the integration to Edge
Once the integration template is created and the ChirpStack Application Integration is configured, assign the integration template to the Edge instance:
- Go to the Edge management > Instances section and click the “Manage edge integrations” button.
- On the “Integration” page, click the “Assign to edge” button. In the “Assign the Integration to the Edge” pop-up window, select the integration from the drop-down menu and click the “Assign” button.
- To confirm the ChirpStack integration on the Edge, login to your ThingsBoard Edge instance and go to the Integrations center > Integrations section.


Send an uplink message
To simulate uplinks, use ChirpStack Device Simulator or manually send HTTP message to the ChirpStack Application Server.
The example of the HTTP message:
Where:
- deduplicationId: For testing purposes, you may generate any valid UUID v4. It’s used for simulation realism only and helps debug integrations that rely on it.
- tenantId: Replace the value with your ChirpStack tenant ID.
- applicationId: Replace the value with the ChirpStack Application ID.
- applicationName: Replace the value with the ChirpStack Application name.
- deviceProfileId: Replace the value with the ChirpStack device profile ID.
- deviceProfileName: Replace the value with the ChirpStack device profile name.
- devEui: Replace the value with the Device EUI you add in the ChirpStack device.
- gatewayId: Replace the value with the ChirpStack gateway ID.
- $YOUR_HTTP_ENDPOINT_URL: Replace it with the actual value obtained from the ThingsBoard integration.
In production environments, devices automatically send uplink messages at regular intervals or in response to events, without manual intervention.
After the message is sent, a new device will be created in the ThingsBoard Edge user interface.
- To view the received time-series data, go to the Entities > Devices section, click the device and select the “Latest telemetry” tab.


To view the received uplink message:
- Go to the Integrations center > Integrations section, click the ChirpStack integration and select the “Events” tab.

The received data can be viewed in the Uplink converter:
- Go to the Integrations center > Data converters section and click the Uplink converter.
- On the “Data converter details” page, select the “Events” tab.
- View the message details in the “In” and “Out” columns.


Next steps
-
Getting started guide - Provide quick overview of main ThingsBoard Edge features. Designed to be completed in 15-30 minutes:
-
Installation guides - Learn how to setup ThingsBoard Edge on various available operating systems and connect to ThingsBoard Server.
-
Edge Rule Engine:
-
Rule Chain Templates - Learn how to use ThingsBoard Edge Rule Chain Templates.
-
Provision Rule Chains from cloud to edge - Learn how to provision edge rule chains from cloud to edge.
-
- Security:
- gRPC over SSL/TLS - Learn how to configure gRPC over SSL/TLS for communication between edge and cloud.
-
Features:
-
Edge Status - Learn about Edge Status page on ThingsBoard Edge.
-
Cloud Events - Learn about Cloud Events page on ThingsBoard Edge.
-
-
Use cases:
-
Manage alarms and RPC requests on edge devices - This guide will show how to generate local alarms on the edge and send RPC requests to devices connected to edge:
-
Data filtering and traffic reduce - This guide will show how to send to cloud from edge only filterd amount of device data:
-
- Roadmap - ThingsBoard Edge roadmap.