Overview
Public dashboard configuration allows access to the dashboard without authentication, i.e., the dashboard can be viewed by anyone who has the URL link.
In ThingsBoard Edge, public dashboards work similarly to how they do on the ThingsBoard Server.
Edge-Specific Considerations:
-
Edge public dashboards remain available within the local network, even if the internet is unavailable or restricted.
- Edge public dashboards is accessible through the Edge’s local URL link. The public URL will typically be in the format:
1
http://Edge-IP:8080/dashboards/dashboard-id
-
Even if the connection to the ThingsBoard Server is lost, the public dashboard will continue to operate using real-time device data from the Edge.
- Edge will synchronize any updates or changes with the central ThingsBoard Server, once connectivity is restored.
Read more about Edge Dashboards creation and management here.
Read more about Dashboard widgets here.
Making Dashboard Group Public
Dashboard groups are managed on the ThingsBoard Server. The dashboard group must first be created on the ThingsBoard Server and then assigned to the ThingsBoard Edge instance.
- Log in to the ThingsBord Server, go to the Dashboards section, and select the "Groups" tab.
- To create a new dashboard group, click the "Add entity group" button.
- In the pop-up window, enter the group name and click the "Add" button.
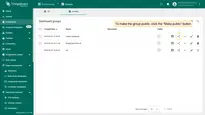
- To make the group public, click the "Make public" button.
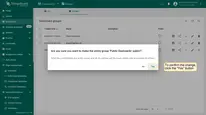
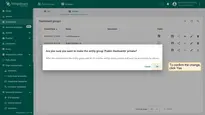
- To confirm the change, click the "Yes" button in the pop-up window. After confirmation, the dashboard group and all dashboards within it will be made public and accessible to others.
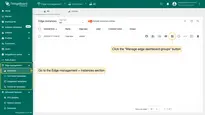
- Go to the Edge management > Instances section, and click the "Manage edge dashboard groups" button.
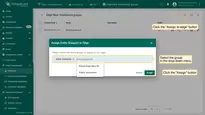
- On the Edge dashboard groups page, click the "Assign to edge" button. In the pop-up window, select the group and click the "Assign" button.
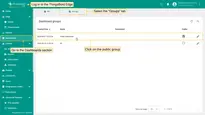
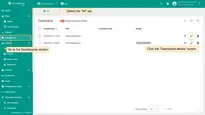
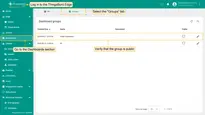
- Log in to the ThingsBord Edge, go to the Dashboards section, and select the "Groups" tab. Click on the public group.
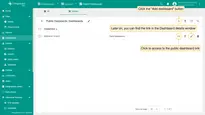
- To create and configure the dashboards within this group, click the "Add dashboard" button. All dashboards will be automatically set as public. To access to the public dashboard link, click the corresponding button.
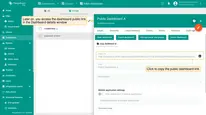
- You can also access the dashboard public link in the Dashboard details window. Note: the link is available only within the group.
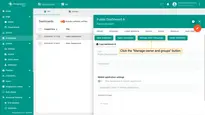
- To assign another dashboard to the Public group, select the "All" tab and click the "Dashboard details" button.
- On the Dashboard details page, click the "Manage owner and groups" button.
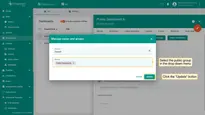
- In the pop-up window, select the group and click the "Update" button.
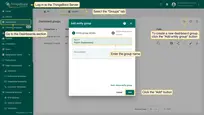
- To create a new dashboard group, click the "Add entity group" button.
- In the pop-up window, enter the group name and click the "Add" button.
Making Dashboard Group Private
- To make the dashboard group private, log in to the ThingsBord Server, go to the Dashboards section, and select the "Groups" tab. Click the "Make private" button.
- To confirm the change, click the "OK" button in the pop-up window.
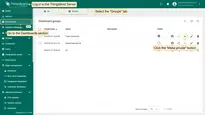
- To verify the change, go to the Dashboards section of the Edge instance, the "Groups" tab and update the page.
Next steps
-
Getting started guide - Provide quick overview of main ThingsBoard Edge features. Designed to be completed in 15-30 minutes:
-
Installation guides - Learn how to setup ThingsBoard Edge on various available operating systems and connect to ThingsBoard Server.
-
Edge Rule Engine:
-
Rule Chain Templates - Learn how to use ThingsBoard Edge Rule Chain Templates.
-
Provision Rule Chains from cloud to edge - Learn how to provision edge rule chains from cloud to edge.
-
- Security:
- gRPC over SSL/TLS - Learn how to configure gRPC over SSL/TLS for communication between edge and cloud.
-
Features:
-
Edge Status - Learn about Edge Status page on ThingsBoard Edge.
-
Cloud Events - Learn about Cloud Events page on ThingsBoard Edge.
-
-
Use cases:
-
Manage alarms and RPC requests on edge devices - This guide will show how to generate local alarms on the edge and send RPC requests to devices connected to edge:
-
Data filtering and traffic reduce - This guide will show how to send to cloud from edge only filterd amount of device data:
-
- Roadmap - ThingsBoard Edge roadmap.