- Prerequisites
- Create the integration and the converter templates
- Add the attribute to the Edge
- Assign the integration to the Edge.
- Send an uplink message
- Next steps
Edge CoAP Integration is implemented similarly to the CoAP Integration. The only difference is how the integration is created and deployed. Before proceeding, refer to the CoAP Integration documentation.
CoAP Integration allows streaming data from devices that use a CoAP protocol to connect to ThingsBoard Edge and converts payloads of these devices into the ThingsBoard Edge format.
To learn more, please review the integration diagram.

Prerequisites
This tutorial explains how to configure the CoAP integration with the NO SECURE security mode.
- To simulate a CoAP device, please install the coap-client. This utility simulates a CoAP client that connects to the CoAP integration.
1
2
sudo apt update
sudo apt install libcoap2-bin
- To verify that the coap-client utility is installed, run:
1
coap-client --version
- For example, consider a sensor that transmits temperature and humidity values periodically. The sensor device SN-001 publishes its temperature and humidity readings to the CoAP Integration at coap://10.7.3.0. Here, 10.7.3.0 represents the IP address of the ThingsBoard Edge within the local network. Replace this address with the actual IP of the relevant Edge instance in the target environment.
For demonstration purposes, it is assumed that the device can transmit data using three different payload types:
- The Text payload is:
1
SN-001,default,temperature,25.7,humidity,69
- The JSON payload is:
1
2
3
4
5
6
{
"deviceName": "SN-001",
"deviceType": "default",
"temperature": 25.7,
"humidity": 69
}
- The Binary payload (in HEX string):
1
\x53\x4e\x2d\x30\x30\x31\x64\x65\x66\x61\x75\x6c\x74\x32\x35\x2e\x37\x36\x39
Here is the description of the bytes in this payload:
- 0-5 bytes - \x53\x4e\x2d\x30\x30\x31: The device name. If we convert it to text, it is SN-001;
- 6-12 bytes - \x64\x65\x66\x61\x75\x6c\x74: The device type. If we convert it to text, it is default;
- 13-16 bytes - \x32\x35\x2e\x37: The temperature telemetry. If we convert it to text, it is 25.7;
- 17-18 bytes - \x36\x39: The humidity telemetry. If we convert it to text, it is 69;
The payload type selection should be based on the device’s capabilities and the intended use case.
Create the integration and the converter templates
Only the ThingsBoard Professional Edition creates converters and integration templates.
So please use ThingsBoard Cloud or install your own platform instance to log in as a Tenant administrator.
Basic settings
To add the CoAP integration:
- Go to the Edge management > Integration templates section and click the “plus” button to add a new integration.
- On the Basic settings step, select the Integration type and enter the Integration name in the corresponding fields. Enable Debug mode. Click the "Next" button.

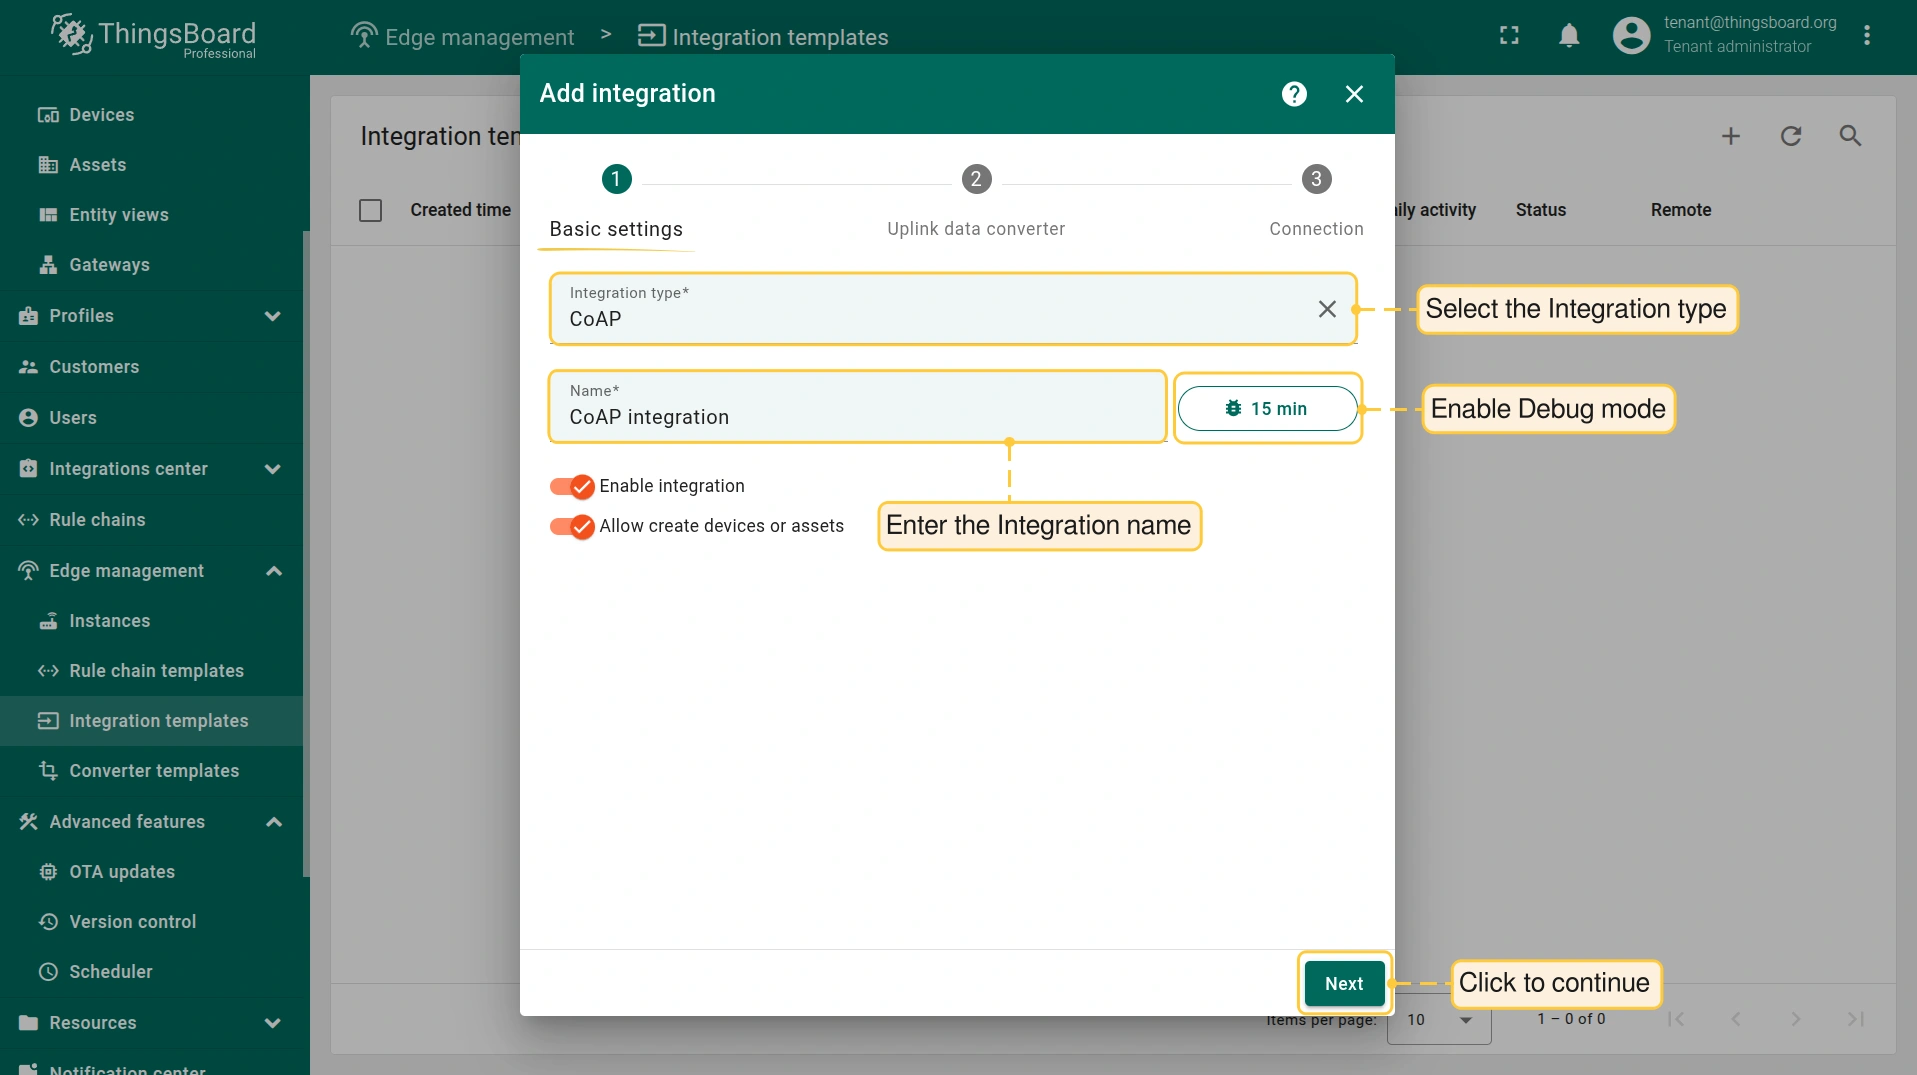
While Debug mode is very useful for development and troubleshooting, keeping it enabled in production can significantly increase database storage requirements, since all debug data is stored there.
We strongly recommend disabling Debug mode once debugging activities are complete.
Uplink data converter
The purpose of the decoder function is to parse the incoming data and metadata to a format that ThingsBoard can consume. deviceName and deviceType are required, while attributes and telemetry are optional. Attributes and telemetry are flat key-value objects. Nested objects are not supported.
For this example, use the code below.
One can use either TBEL (ThingsBoard expression language) or JavaScript to develop user defined functions. We recommend utilizing TBEL as it’s execution in ThingsBoard is much more efficient compared to JS.
Select the device payload type to for the decoder configuration:

If you want to develop functions using JavaScript, please use the text payload script for JS. |

If you want to develop functions using JavaScript, please use the JSON payload script for JS. |

If you want to develop functions using JavaScript, please use the binary payload script for JS. |
Connection
- Enter the IP address of your Edge instance (host) and the CoAP binding port in format
host:portas the Base URL. - Alternatively, use the placeholder ${{ATTRIBUTE_KEY}} substitute the integration field with an attribute value from a specific Edge entity. In this example, the placeholder ${{edgeIp}} is used for the Base URL.
- Click the “Add” button to create the integration.

Add the attribute to the Edge
After creating the converter and integration templates, the integration template can be assigned to the Edge instance.
Since the placeholder ${{edgeIp}} is used in the integration configuration, it is necessary to add the edgeIp attribute to the Edge instance first.
Use the IP address of the Edge instance and the CoAP binding port as the edgeIP attribute (e.g., 10.7.3.0:15683). Once the attribute is added, the integration can be assigned.
- Go to the Edge management > Instances section, click on the Edge instance to open the Edge details page and select the "Attributes" tab. To add a new server attribute to Edge, click the "Add" button (the + icon) .
- Enter the name of the attribute (i.g. "edgeIp") and use the Edge IP address and CoAP bind port in the following format: host:port. Then, click the "Add" button.
- Confirm the added "edgeIP" server attribute to the Edge.


Assign the integration to the Edge.
To assign the integration to the Edge, on the Edge management > Instances section:
- Click the "Manage edge integrations" button of the Edge entity.
- Click the "+" button in the top right of the corner. Specify your integration and click the "Assign" button to assign it to the Edge.
- Login to your ThingsBoard Edge instance and go to the Integrations center > Integrations section. You should see your integration. To open the "Integration details" window, click on it.
- In the "Integration details"" window, the ${{edgeIP}} placeholder will be replaced with the value of the attribute.


Send an uplink message
Once the CoAP Integration has been created, the CoAP server registers appropriate resources, and then it waits for data from the devices.
To send the uplink message:
- Log in to ThingsBoard Edge and go to the Integrations center > Integrations section.
- Click on the CoAP integration.
- Copy the CoAP endpoint URL and insert it into the uplink message.
Select the device payload type:
|
Send the uplink message:
To view the uplink message:
 After the message is sent, a new device is created. To view the created device and its data:
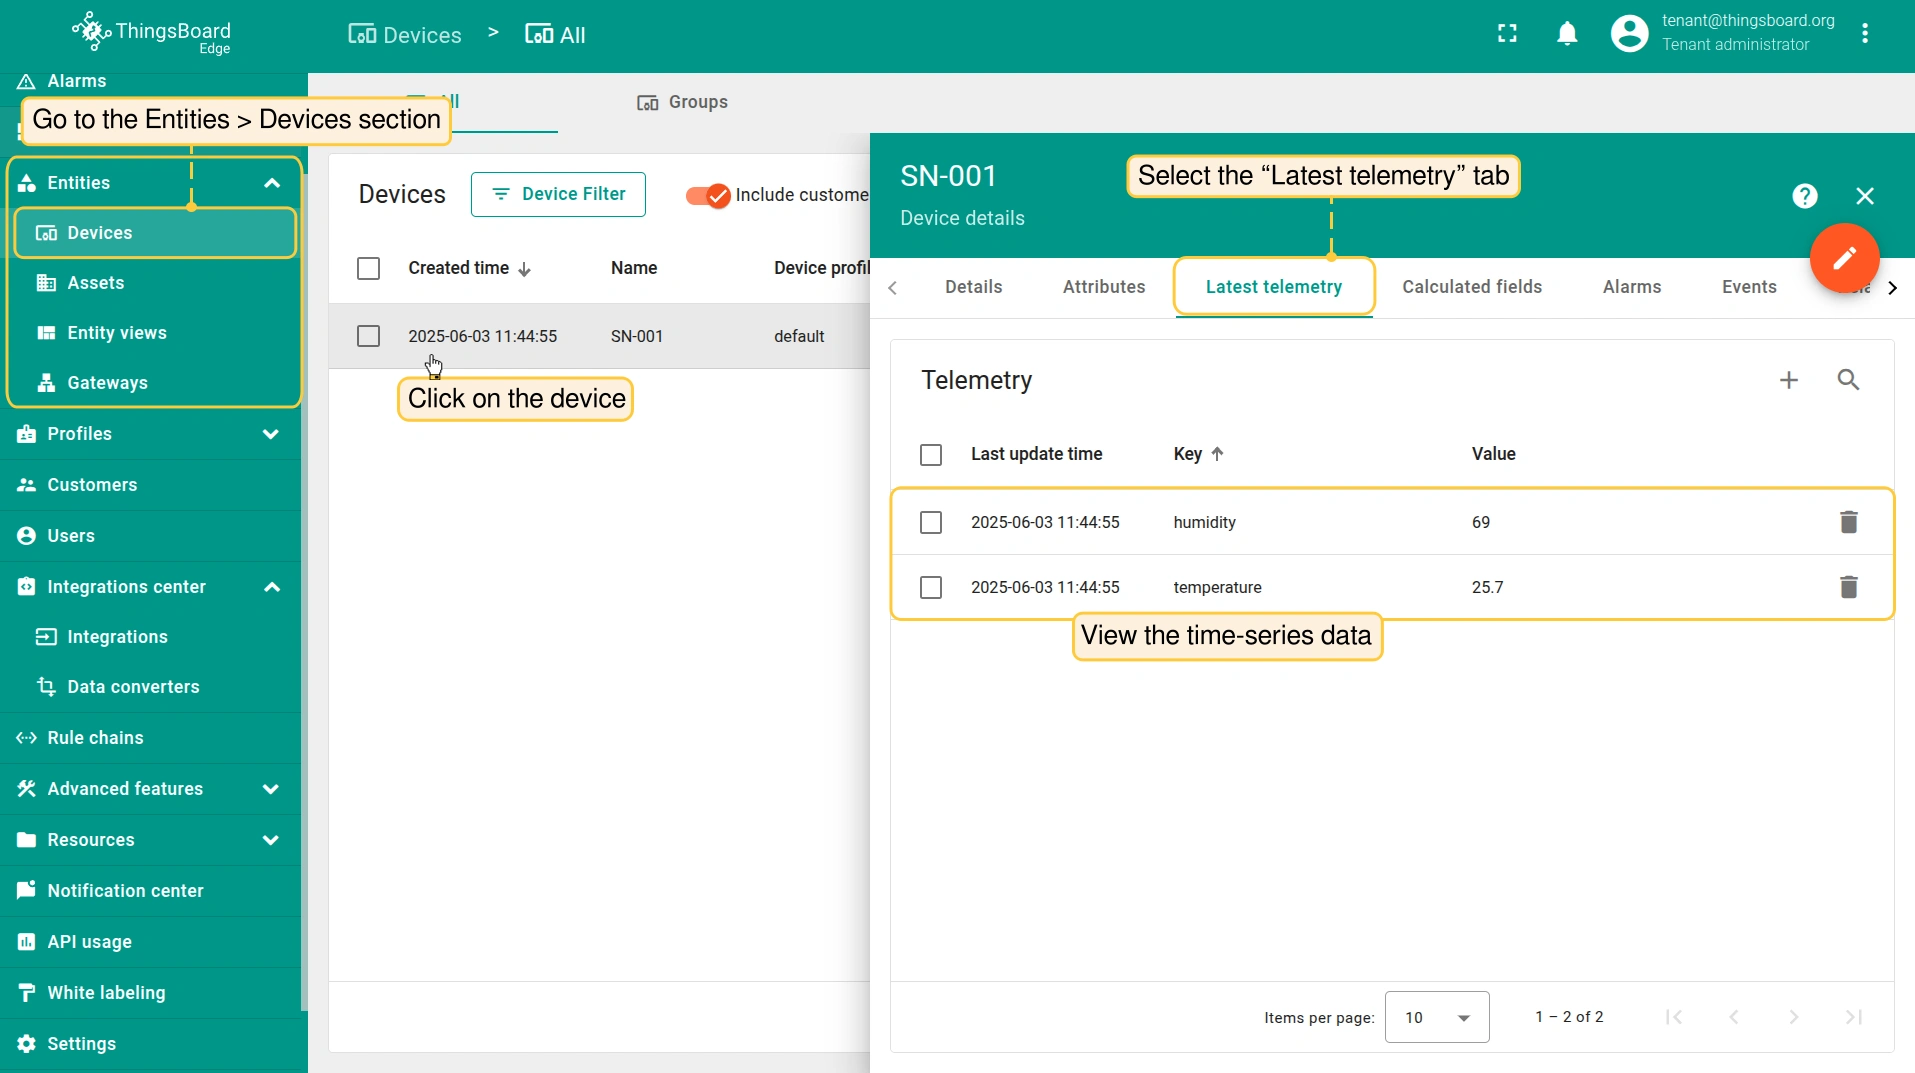 The received data can be viewed in the Uplink converter:
   |

|
Send the uplink message:
To view the uplink message:
After the message is sent, a new device is created. To view the created device and its data:
The received data can be viewed in the Uplink converter:
|

|
Send the uplink message:
To view the uplink message:
After the message is sent, a new device is created. To view the created device and its data:
The received data can be viewed in the Uplink converter:
|

Next steps
-
Getting started guide - Provide quick overview of main ThingsBoard Edge features. Designed to be completed in 15-30 minutes:
-
Installation guides - Learn how to setup ThingsBoard Edge on various available operating systems and connect to ThingsBoard Server.
-
Edge Rule Engine:
-
Rule Chain Templates - Learn how to use ThingsBoard Edge Rule Chain Templates.
-
Provision Rule Chains from cloud to edge - Learn how to provision edge rule chains from cloud to edge.
-
- Security:
- gRPC over SSL/TLS - Learn how to configure gRPC over SSL/TLS for communication between edge and cloud.
-
Features:
-
Edge Status - Learn about Edge Status page on ThingsBoard Edge.
-
Cloud Events - Learn about Cloud Events page on ThingsBoard Edge.
-
-
Use cases:
-
Manage alarms and RPC requests on edge devices - This guide will show how to generate local alarms on the edge and send RPC requests to devices connected to edge:
-
Data filtering and traffic reduce - This guide will show how to send to cloud from edge only filterd amount of device data:
-
- Roadmap - ThingsBoard Edge roadmap.