Connect your real device
This page shows how to connect a device that sends data directly to ThingsBoard over HTTP, MQTT, or CoAP. Your AI agent runs the commands, prepares what your device needs, and explains each step. What it prepares depends on the device:
- Firmware file: For a microcontroller board like ESP32. The agent lists what to install, like Arduino IDE and the libraries, and explains how to upload the file to the board.
- Script: For a board with an operating system like Raspberry Pi, or a device that runs scripts like a Shelly plug. The agent explains how to copy the script to the device and run it.
- Settings: For a device with built-in firmware like a router. The agent shows the settings and where to enter them on the device’s web page.
When the device is on, the agent checks that its data arrives in ThingsBoard. For a device that you program yourself, the agent gives you the connection settings.
To connect a device of a solution, deploy the solution to ThingsBoard first. For details, see Getting started. To connect a new device, ask the agent directly, like “Connect my ESP32”.
Connect with your AI agent
Section titled “Connect with your AI agent”The steps below continue the example from Getting started: they connect the office sensor that you created there. The sensor is an ESP32 board with an SCD41 sensor, which measures CO2, temperature, and humidity. For another device, the agent asks other questions and prepares other files, but the steps are the same.
-
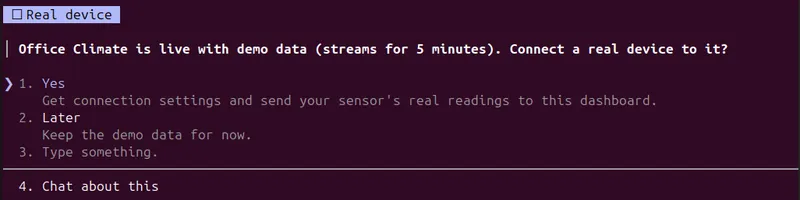
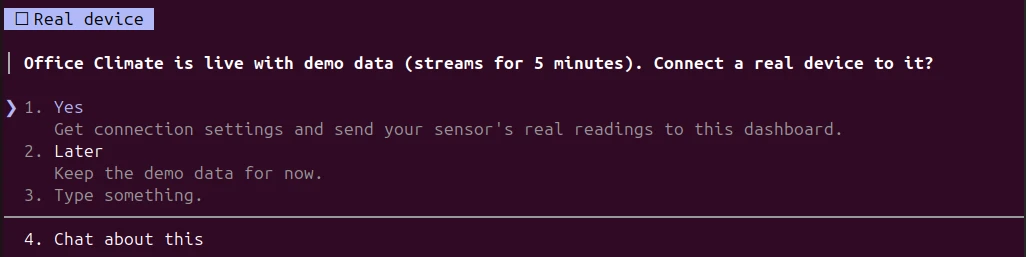
After the agent deploys a solution with devices, it asks: Connect a real device to it? Select Yes. If the solution has several devices, the agent asks which one to connect. You can also ask at any time: “How do I connect my sensor?” or “Connect my ESP32”.
-
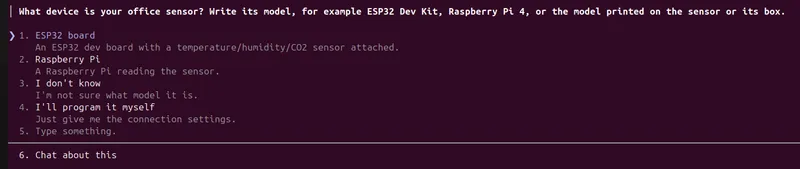
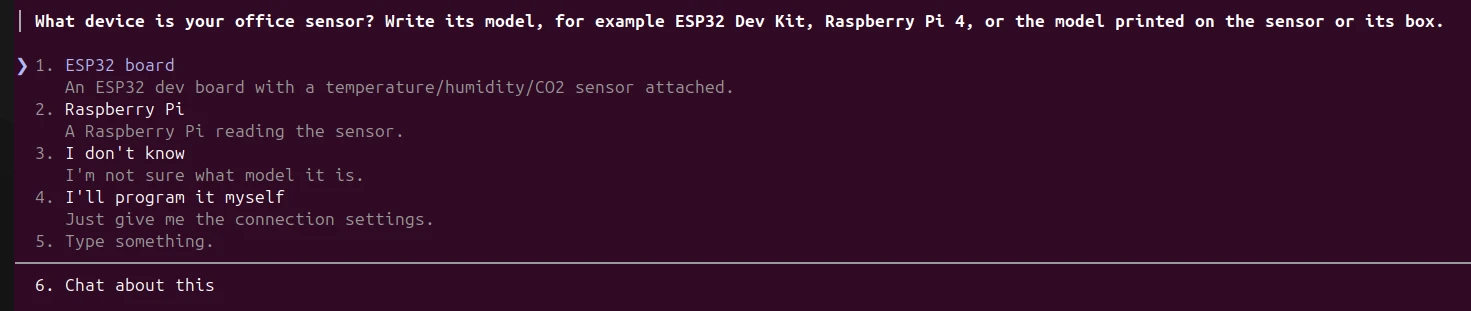
If you did not name the model, the agent asks what device it is: ESP32 board, Raspberry Pi, I don’t know, or I’ll program it myself. You can also type the model. To set up the device yourself, select I’ll program it myself and see Devices that you program yourself.
-
Answer the questions about your device. The agent asks one question at a time, and only what it needs to prepare the connection. For the ESP32, it asks which ESP32 board it is, which sensor is connected to it, and then the Wi-Fi network and its password. For the sensor, the agent suggests models that measure the keys of your solution, like SCD41 for CO2, temperature, and humidity.

If you are not sure about the board, select Not sure: most ESP32 boards work with the generic ESP32 Dev Kit V4. You can skip the Wi-Fi network or its password and type them into the file yourself. ESP boards need a 2.4 GHz Wi-Fi network.
A Raspberry Pi connects through its operating system, so it needs no Wi-Fi settings. For a new device that is not in your solution, the agent also asks for the device name, and for a router like Teltonika RUT955, it suggests the MQTT client ID, username, and password.
The office sensor exists already in ThingsBoard, so the agent creates nothing and writes the file for this device. For a new device, the agent first lists what it creates, like a device profile, the device, and its dashboard, and asks Create them?
-
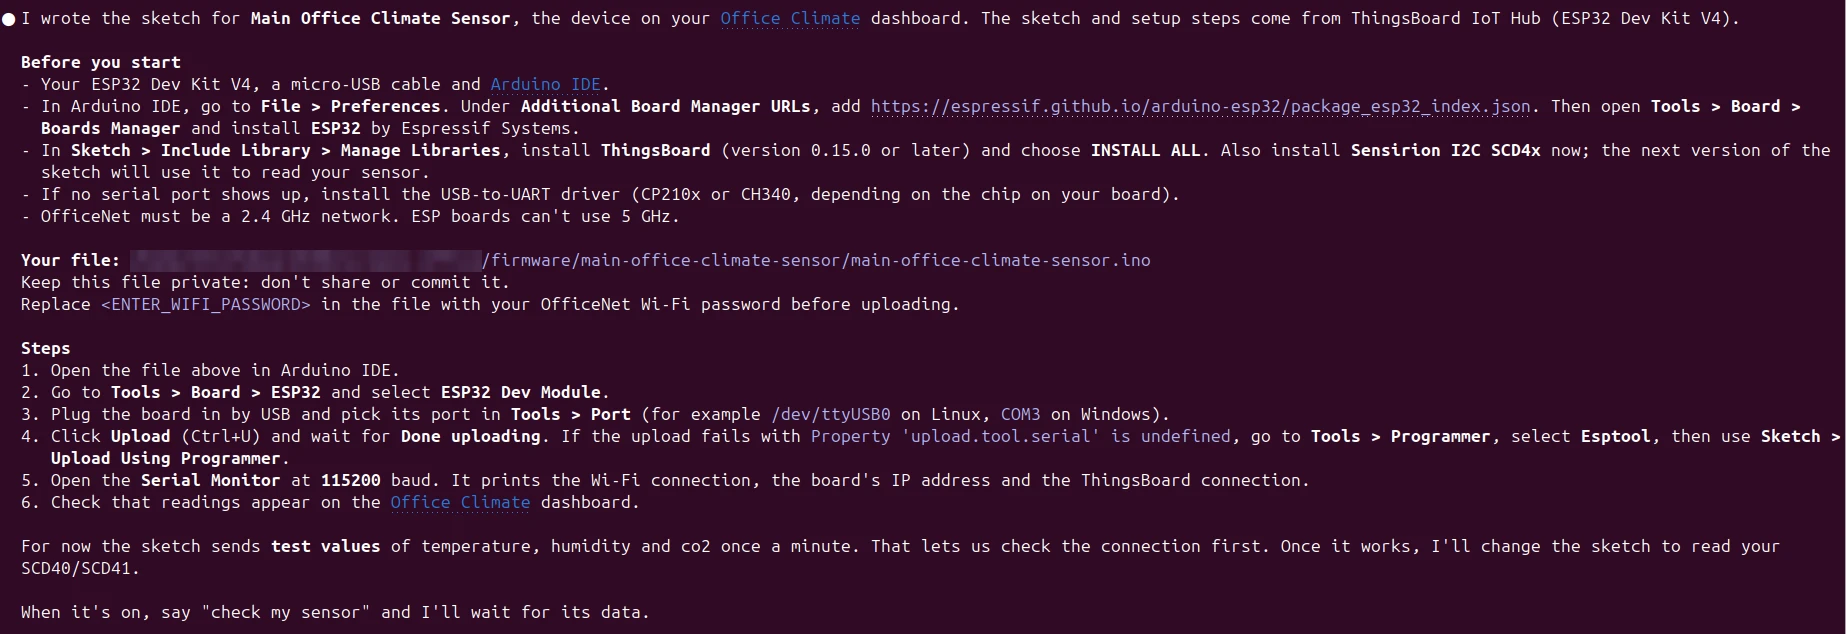
The agent shows what it prepared, in one message:
- Before you start: What to install, like Arduino IDE, the ESP32 board package, and the libraries.
- Your file: The path of the firmware file, an Arduino sketch for the ESP32, and the placeholders to replace in it, like the Wi-Fi password.
- Steps: How to open the file, select the board and port, and upload it, with every value filled in.
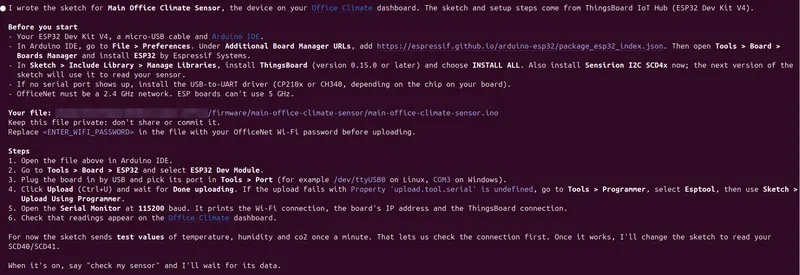
For a board with an operating system like Raspberry Pi, the agent writes a Python script and explains how to run it on the board. For a device with built-in firmware like a router, it shows the settings to enter on the device’s web page.
The file is in the
firmwarefolder of your project. It holds the access token of the device and can hold your Wi-Fi password, so git does not commit it. Don’t share the file. -
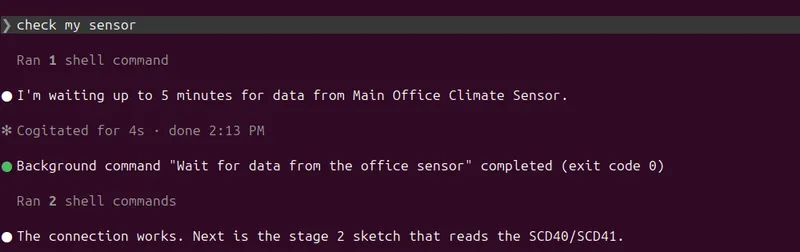
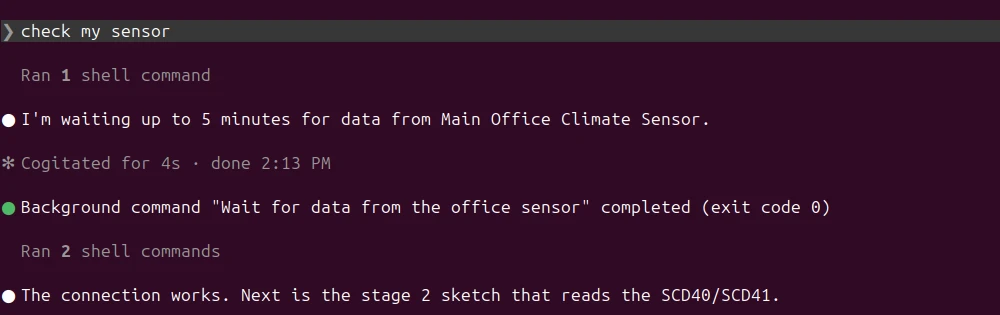
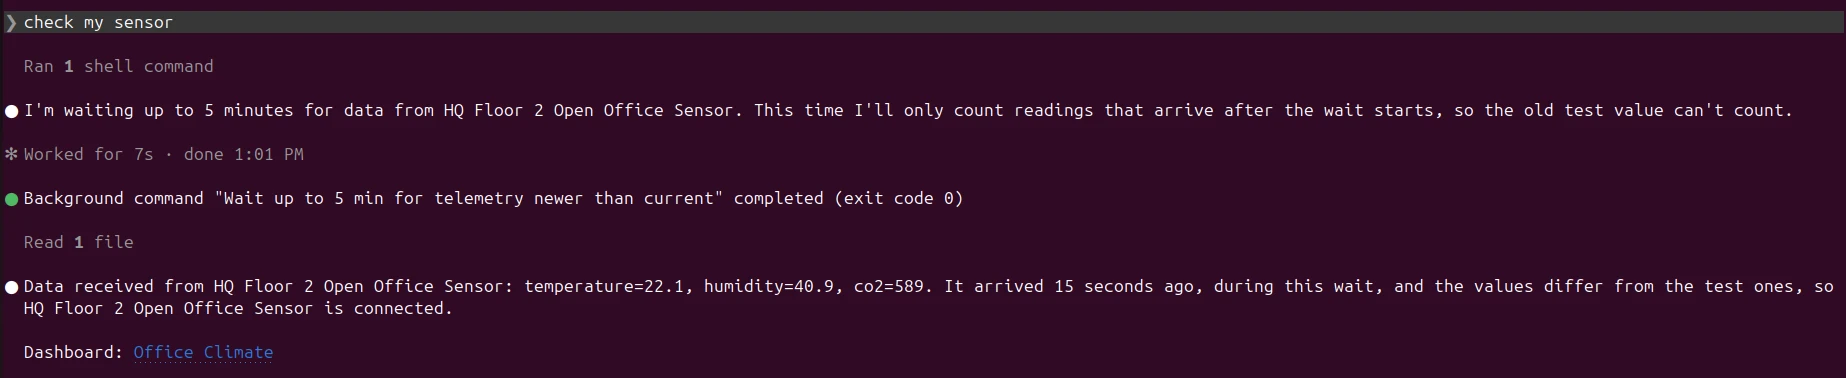
Follow the steps, turn the device on, and say “check my sensor”. The agent waits up to five minutes for its data. When the data arrives, it shows the values that it received.
-
The first file sends test values of
temperature,humidity, andco2, the keys of your solution, so you know that the board connects before you work with the sensor. When the test values arrive, the agent rewrites the file right away to read the SCD41 with its library and send the same keys. Upload the file again and say “check my sensor”. When the real values arrive, the agent confirms that the office sensor is connected and shows the link to the Office Climate dashboard.
The agent names the pins that the sketch reads, like SDA on GPIO 21 and SCL on GPIO 22, and the file has a comment that says where to change them. For the wiring, see the datasheet of the sensor.
If no data arrives within five minutes, the agent asks what to do: Check the connection, Wait 5 more minutes, or Stop. If the wait times out again, it checks the connection right away and tells you what to change. When the data has arrived and the solution has more devices, the agent offers to connect the next one.


The CLI connects one device at a time. To connect many devices at once, see Device provisioning.
Devices that you program yourself
Section titled “Devices that you program yourself”Select I’ll program it myself when the agent asks what device it is. The agent gives you the connection settings and sends a test value, so you know that ThingsBoard and the dashboard work before you start.
-
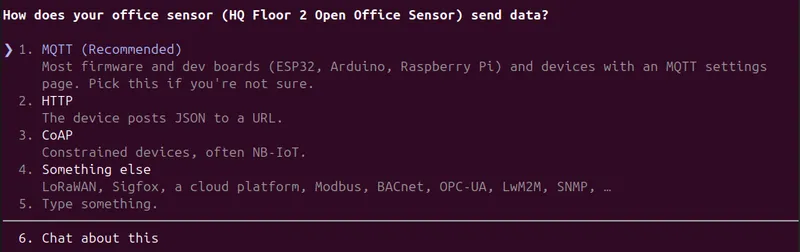
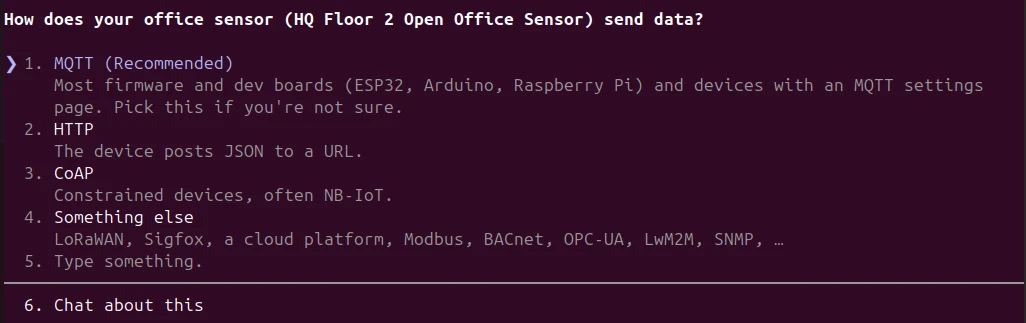
Select how your device sends data: MQTT, HTTP, or CoAP. If you are not sure, select MQTT. For LoRaWAN, Modbus, and other protocols, select Something else.
-
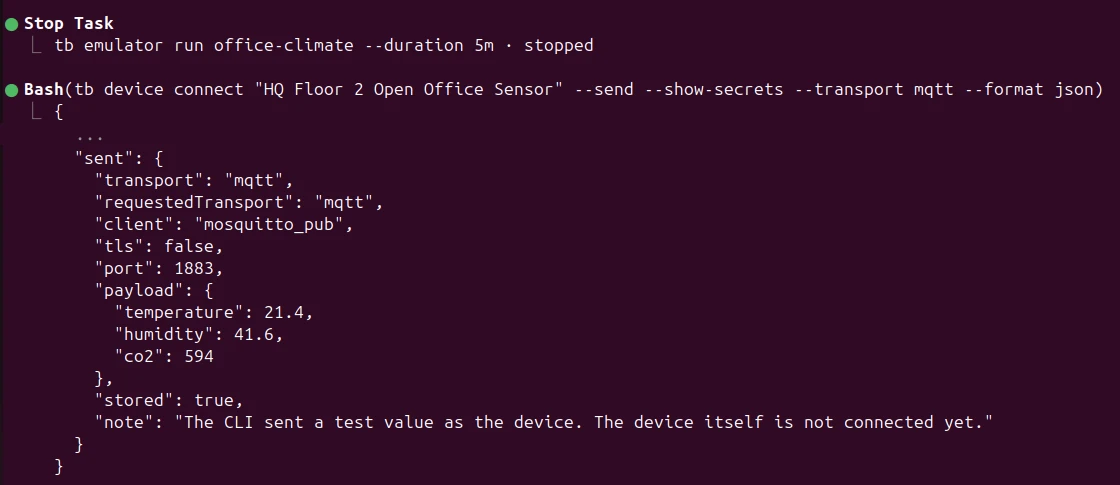
The agent sends a test value as the device over the transport that you selected. If your solution has an emulator, the test value uses its keys and values, so the dashboard shows realistic data. If the demo data stream is still running, the agent stops it first, so that the stream does not overwrite the test value. The dashboard now shows the test value. The device itself is not connected yet. For a device with an X.509 certificate, the agent sends no test value, because the CLI does not have the private key of the device.
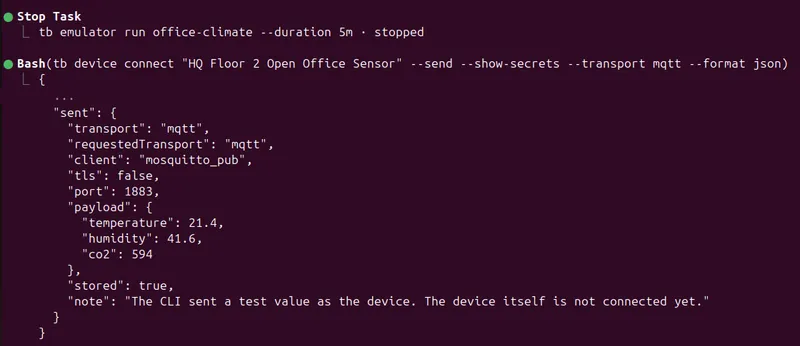
For MQTT and CoAP, the CLI uses
mosquitto_puborcoap-clientif they are installed on your computer. Otherwise, for a device with an access token, it sends the test value over HTTP and the agent tells you that MQTT or CoAP is not tested yet. A device with MQTT Basic credentials needsmosquitto_pub. -
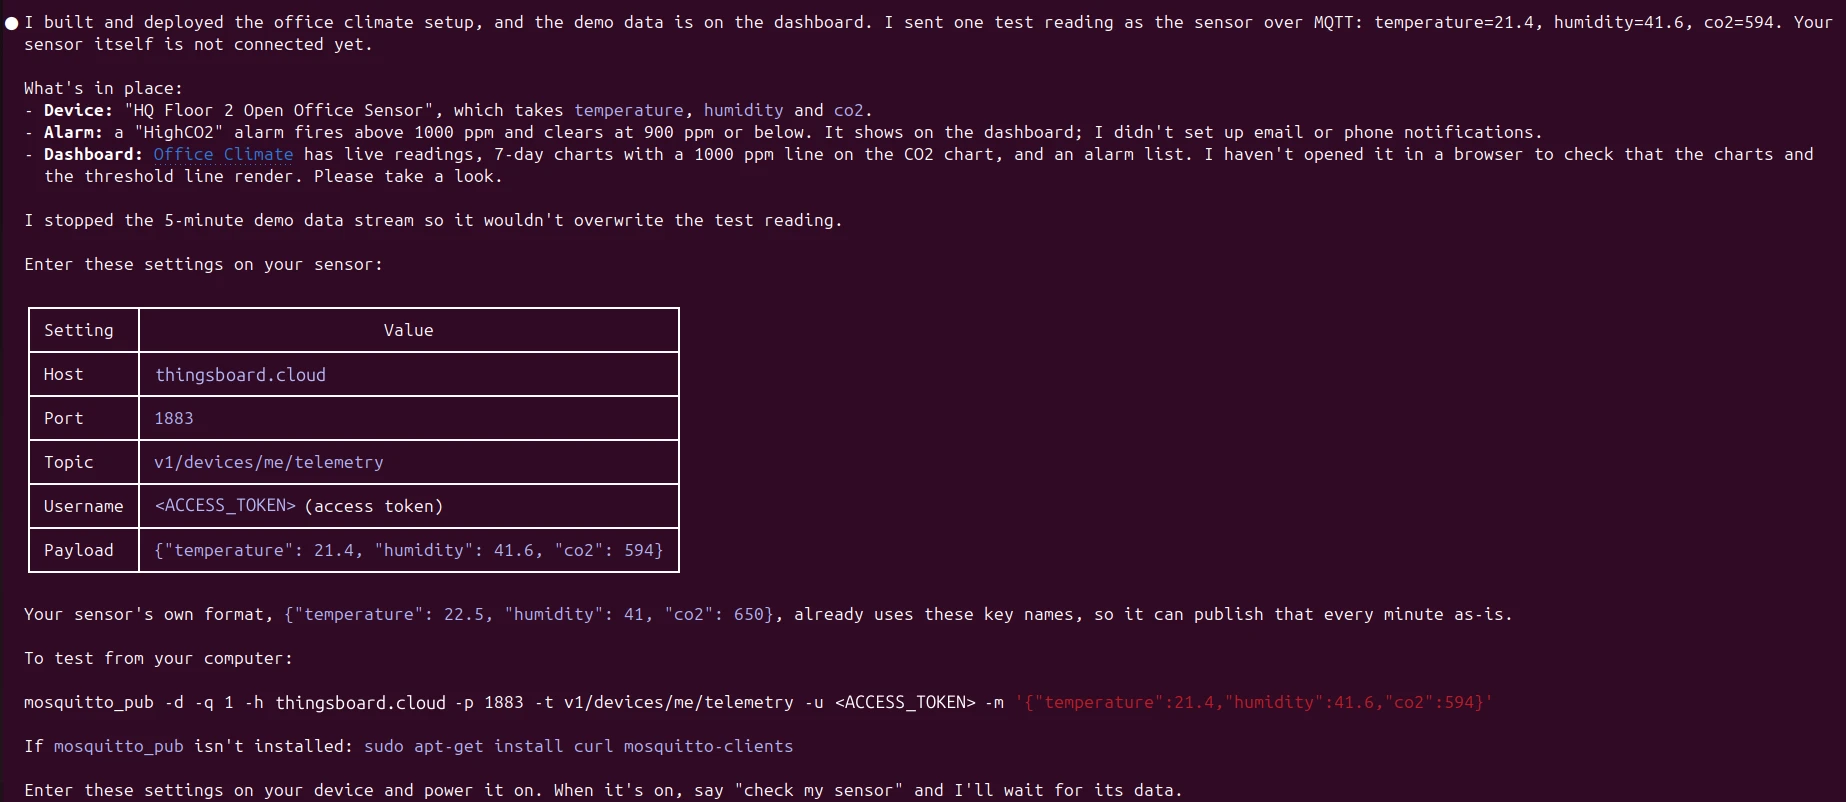
In the same message, the agent shows a table with the settings for your device, like the host, port, topic, and the access token, and a command to test from your computer. The payload in the table is the one that the agent sent. Enter the settings on the device and turn it on. This can take as long as you need. To see the settings again, say “show device settings”.
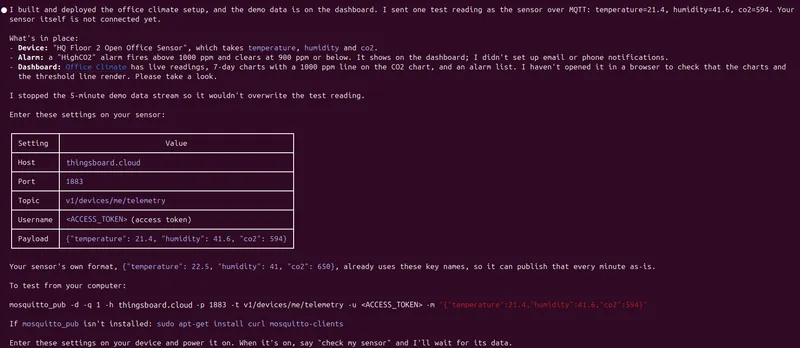
If the device has no dashboard yet, the agent offers one. Tell the agent which keys your device will send, like “temperature, humidity”, and it builds the dashboard right away. The key names in your firmware must match.
-
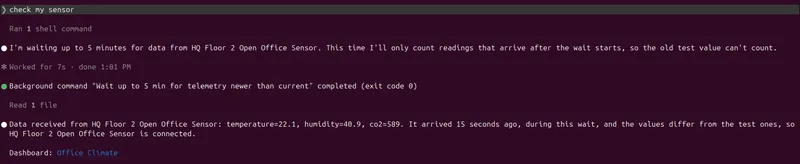
When the device is on, say “check my sensor”. The agent waits up to five minutes for its data.
-
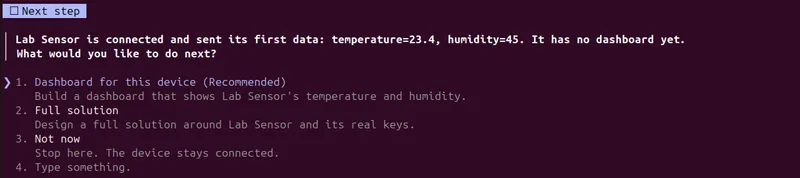
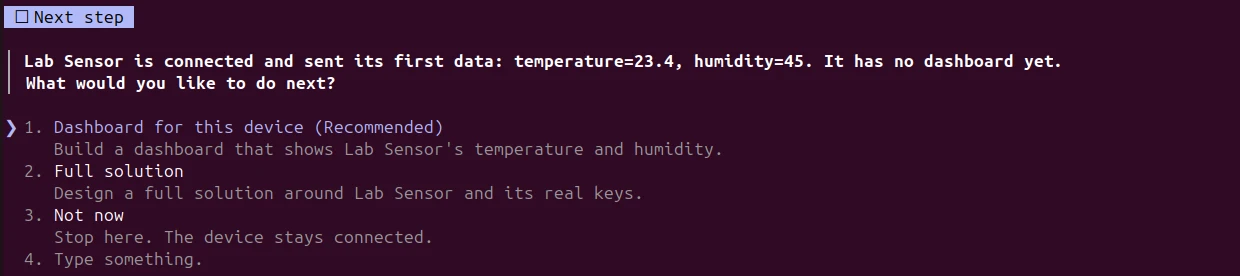
When the data arrives, the agent shows what to do next. If the device has no dashboard yet, it asks: Dashboard for this device builds a dashboard with the keys that the device sends, and Full solution designs a solution around the device and its real keys. If the dashboard does not show some of the keys that arrived, the agent offers to add them to it.
Connect from the terminal
Section titled “Connect from the terminal”You can get the connection settings and send a test value yourself, as in Devices that you program yourself.
-
Run
tb device connectwith the device name from your solution:Terminal window tb device connect "Office Sensor"The CLI shows the device, its profile, the credentials type, and the example payload. For a device with an access token, it then asks what to do: Send a test value over HTTP now or Show the commands to send it yourself.
-
Select Send a test value over HTTP now. The CLI sends the example payload as the device and shows the dashboard link:
OK Test value sent over HTTPS (port 443): humidity=41, temperature=22.5The CLI sent a test value as the device. The device itself is not connected yet.Office Dashboard: https://thingsboard.cloud/dashboards/all/<id>If the device has no dashboard, the output links the device page. The output ends with the commands for the next two steps.
-
Show the commands and the settings with the real credentials:
Terminal window tb device connect "Office Sensor" --show-secretsSelect Show the commands to send it yourself. The output has a
curlcommand for HTTP, amosquitto_pubcommand for MQTT, and acoap-clientcommand for CoAP, with a Docker variant for MQTT and CoAP and the command that installs the client on your OS. They contain the host, the credentials, and the example payload. Enter the same host and credentials on your device. -
Wait for data from the device:
Terminal window tb device connect "Office Sensor" --waitThe CLI shows the commands again, then waits up to five minutes. Use
--timeout <seconds>to change the time. When the data arrives, the CLI shows the result:Waiting up to 5 min for data from the device 'Office Sensor'. Press Ctrl+C to stop.OK Data received: humidity=41, temperature=22.5Office Dashboard: https://thingsboard.cloud/dashboards/all/<id>
The options work together. To send a test value without the question, add --send. To send it over MQTT or CoAP, add --transport. To send it and then wait for the device, run:
tb device connect "Office Sensor" --send --transport mqtt --waitChoose HTTP, MQTT, or CoAP
Section titled “Choose HTTP, MQTT, or CoAP”tb device connect shows the same transports as the Check connectivity dialog of the device in ThingsBoard. A device profile with the default transport gets HTTP, MQTT, and CoAP. A profile with the MQTT or CoAP transport gets its own transport. Use --transport to show one:
tb device connect "Office Sensor" --transport coap| Transport | Command | Install the client | Host and port |
|---|---|---|---|
| HTTP | curl |
Linux: sudo apt-get install curl; Windows and macOS have curl |
The URL of your CLI profile |
| MQTT | mosquitto_pub |
Linux: sudo apt-get install curl mosquitto-clients; macOS: brew install mosquitto |
The MQTT host of the server, port 1883 |
| CoAP | coap-client |
Ubuntu 24.04+ and Debian 12+: sudo apt install libcoap3-bin, older releases: libcoap2-bin; see also Install coap-client |
The CoAP host of the server, port 5683 |
libcoap3-bin has no plain coap-client, only coap-client-openssl, coap-client-gnutls, and coap-client-notls. The CLI finds the one that is installed and shows it in the command.
For MQTT and CoAP, the output also has a docker run command, except for a device with an X.509 certificate. It runs the client in the thingsboard/mosquitto-clients or thingsboard/coap-clients image, so you do not have to install it.
HTTP and CoAP need an access token. For a profile with the MQTT transport, the command uses the telemetry topic of the profile. For LwM2M, SNMP, and an MQTT profile with Sparkplug or the Protobuf payload, the CLI shows no commands and links to the docs. --wait works for them: it waits for telemetry from the device. For a Protobuf profile, --transport http shows the HTTP command.
Use TLS
Section titled “Use TLS”Add --tls to connect securely: HTTPS, MQTTS on port 8883, and CoAPs on port 5684:
tb device connect "Office Sensor" --transport mqtt --tls --show-secretsBefore the client command, the output has tb device server-cert, which downloads the server certificate to tb-server-ca.pem. The mosquitto_pub and coap-client-openssl commands use this file. Your device needs the same file. The Docker variant downloads the certificate itself.
With --tls, the HTTPS URL uses the default port 443. If your server serves HTTPS on another port, add --transport http --port <port>.
Change the host or port
Section titled “Change the host or port”The CLI gets the MQTT and CoAP hosts and ports from the device connectivity settings of the server, like the Check connectivity dialog. If the server has no settings for a transport, the CLI uses the host of your CLI profile. If your devices use a different host or port, like a load balancer or a port mapping, add --host and --port:
tb device connect "Office Sensor" --transport mqtt --host 192.168.1.20 --port 1884--port sets the port of the transport that you select with --transport. Without --transport, it sets both the MQTT and the CoAP port.
Credentials and secrets
Section titled “Credentials and secrets”The command hides the access token and the MQTT password by default. It shows <ACCESS_TOKEN> and <PASSWORD> instead. Add --show-secrets to see the real values. The access token is the device’s own credential, the same one that the Check connectivity dialog shows. The AI agent shows it in the settings table, because you enter it on the device.
| Credentials type | What the command shows |
|---|---|
| Access token | HTTP, MQTT, and CoAP commands; the token is part of the HTTP and CoAP URLs and the MQTT username |
| MQTT Basic | An MQTT command with the client ID, username, and password; --send uses mosquitto_pub |
| X.509 certificate | The files that the device needs and an MQTT command over TLS; --send is not available |
For an X.509 certificate, the device needs three files: the device certificate device-cert.pem, its private key device-key.pem, and the server certificate tb-server-ca.pem. For details, see X.509 certificate.
To change the credentials of a device, use tb device set-credentials. Run tb device set-credentials --help for the options.
Example payload
Section titled “Example payload”The CLI takes the keys and values of the example payload from these sources, in this order:
- The emulator of the device in your project.
- The latest telemetry of the device.
- The telemetry keys that other devices of the same device profile already send, with the value
0. The CLI skips this step for the default device profile. {"temperature": 25}, if there are no keys.
To send your own values, add --payload with a JSON object:
tb device connect "Office Sensor" --send --payload '{"temperature": 21.8, "humidity": 44}'Your device must send the same key names. If your device sends other names or nested JSON, see Start from a device payload.
Use the JSON output
Section titled “Use the JSON output”Add --format json to get the result as JSON. Scripts and AI agents use this format. The JSON contains the settings for the device, the commands, the example payload, and the dashboard links. The secrets are hidden in the JSON output too, unless you add --show-secrets. With --send and --wait, the JSON also contains the sent and received values.
tb device connect "Office Sensor" --format jsonOther ways to connect
Section titled “Other ways to connect”tb device connect covers devices that send data to ThingsBoard directly over HTTP, MQTT, or CoAP. For other devices, your AI agent tells you what to set up and links the guide:
| Your device | What to use |
|---|---|
| LoRaWAN, Sigfox, NB-IoT, or a device that already sends to a cloud platform or a message broker, like AWS IoT, Azure IoT Hub, Kafka, or Tuya | Integrations |
| Modbus, OPC-UA, BACnet, BLE, CAN, KNX, OCPP, a database, a serial port, or another protocol on a local network | IoT Gateway |
| LwM2M | LwM2M API |
| SNMP | SNMP API |
Troubleshooting
Section titled “Troubleshooting”The firmware file exists already
The agent doesn’t replace a file that exists, and it checks this before it creates anything in ThingsBoard. It asks whether to replace the file or to write the new one to another folder.
The firmware would connect to localhost
Your CLI profile points at localhost, and a board can’t reach it. The agent asks for the address of the ThingsBoard computer on your network, like 192.168.1.20, and writes the file again with this address.
No telemetry within five minutes
The error message shows the likely cause:
- The device is active: The device reaches the server. Check the topic or the URL and the payload format.
- ThingsBoard did not see the device connect: Check the access token first, then the host, the port, and the transport on the device. ThingsBoard does not show rejected connections. On MQTT,
not authorised(CONNACK 5) means a wrong token.
For LwM2M and SNMP devices, the message says what to check for them.
Run tb device status "Office Sensor" to see the activity and the latest telemetry of the device.
New telemetry arrived, but not from the device
Something else writes telemetry for this device, like tb emulator run. The CLI waits for data from the device itself. Stop the emulator, then send the data again.
The test value arrived, but the device sends nothing
The test value shows that ThingsBoard and the dashboard work. The problem is on the device side: check the settings on the device and its network connection.
The dashboard shows no new value
Check that the device sends the same key names that the dashboard shows. The Data received line lists the keys that arrived.
Unauthorized or not authorised
The command still contains <ACCESS_TOKEN> or <PASSWORD>, so curl gets HTTP 401 and mosquitto_pub gets “not authorised”. Run tb device connect with --show-secrets and copy the command again.
Was this helpful?