- JWT authentication overview
- Configure provider
- Next steps
In the same way as other ThingsBoard family products, TBMQ uses JWT (JSON Web Tokens) to securely represent claims between the API client (such as browsers and scripts) and the platform. JWT tokens serve as a mechanism to exchange information securely. When a user logs in, their credentials are exchanged for a pair of JWT tokens: an access token, which is used to authenticate API calls, and a refresh token, which is used to obtain a new access token once the original expires. These tokens contain essential information about the user’s identity and permissions, enabling secure communication with the platform. For more information, please refer to the Administration REST API documentation.
Starting from version 2.2.0, TBMQ also supports JWT-based authentication for MQTT clients as one of its pluggable MQTT authentication providers. This enables secure, flexible, and scalable identity verification without relying on static credentials like usernames or passwords. Instead, clients present a signed token that contains all the necessary authentication information, allowing integration with centralized identity systems and improving overall security.
JWT authentication overview
When a client connects using a JWT token, TBMQ performs a multistep validation process to verify the token, check its claims, and determine the client’s permissions.
The client includes a signed JWT token in the password field of the MQTT CONNECT packet.
TBMQ uses the configured verifier (HMAC-based, PEM, or JWKS) to validate the token’s signature. If the signature is valid, the broker proceeds to check the token’s claims. It validates:
exp(expiration) claim to ensure the token is not expirednbf(not before) claim to ensure the token is currently valid
Custom claim validations can also be configured — for example, requiring that specific claims match the client’s username or clientId.
TBMQ also supports extracting role-based authorization patterns and client type from token claims.
These values determine the client’s type (e.g., DEVICE or APPLICATION) and which topics they are allowed to publish or subscribe to.
The client is granted access only if the signature is valid and all required claims pass validation.
Currently, TBMQ performs JWT validation only at the time of connection. If the token expires after the connection is established, the client remains connected. This behavior may become configurable in a future release.
Configure provider
JWT authentication for MQTT clients is configured through the TBMQ user interface. This section explains how to configure signature verification, define optional authentication claim checks, set up dynamic client type classification, and manage authorization rules. Once the configuration is complete, you can enable the provider to start authenticating clients using JWT tokens.
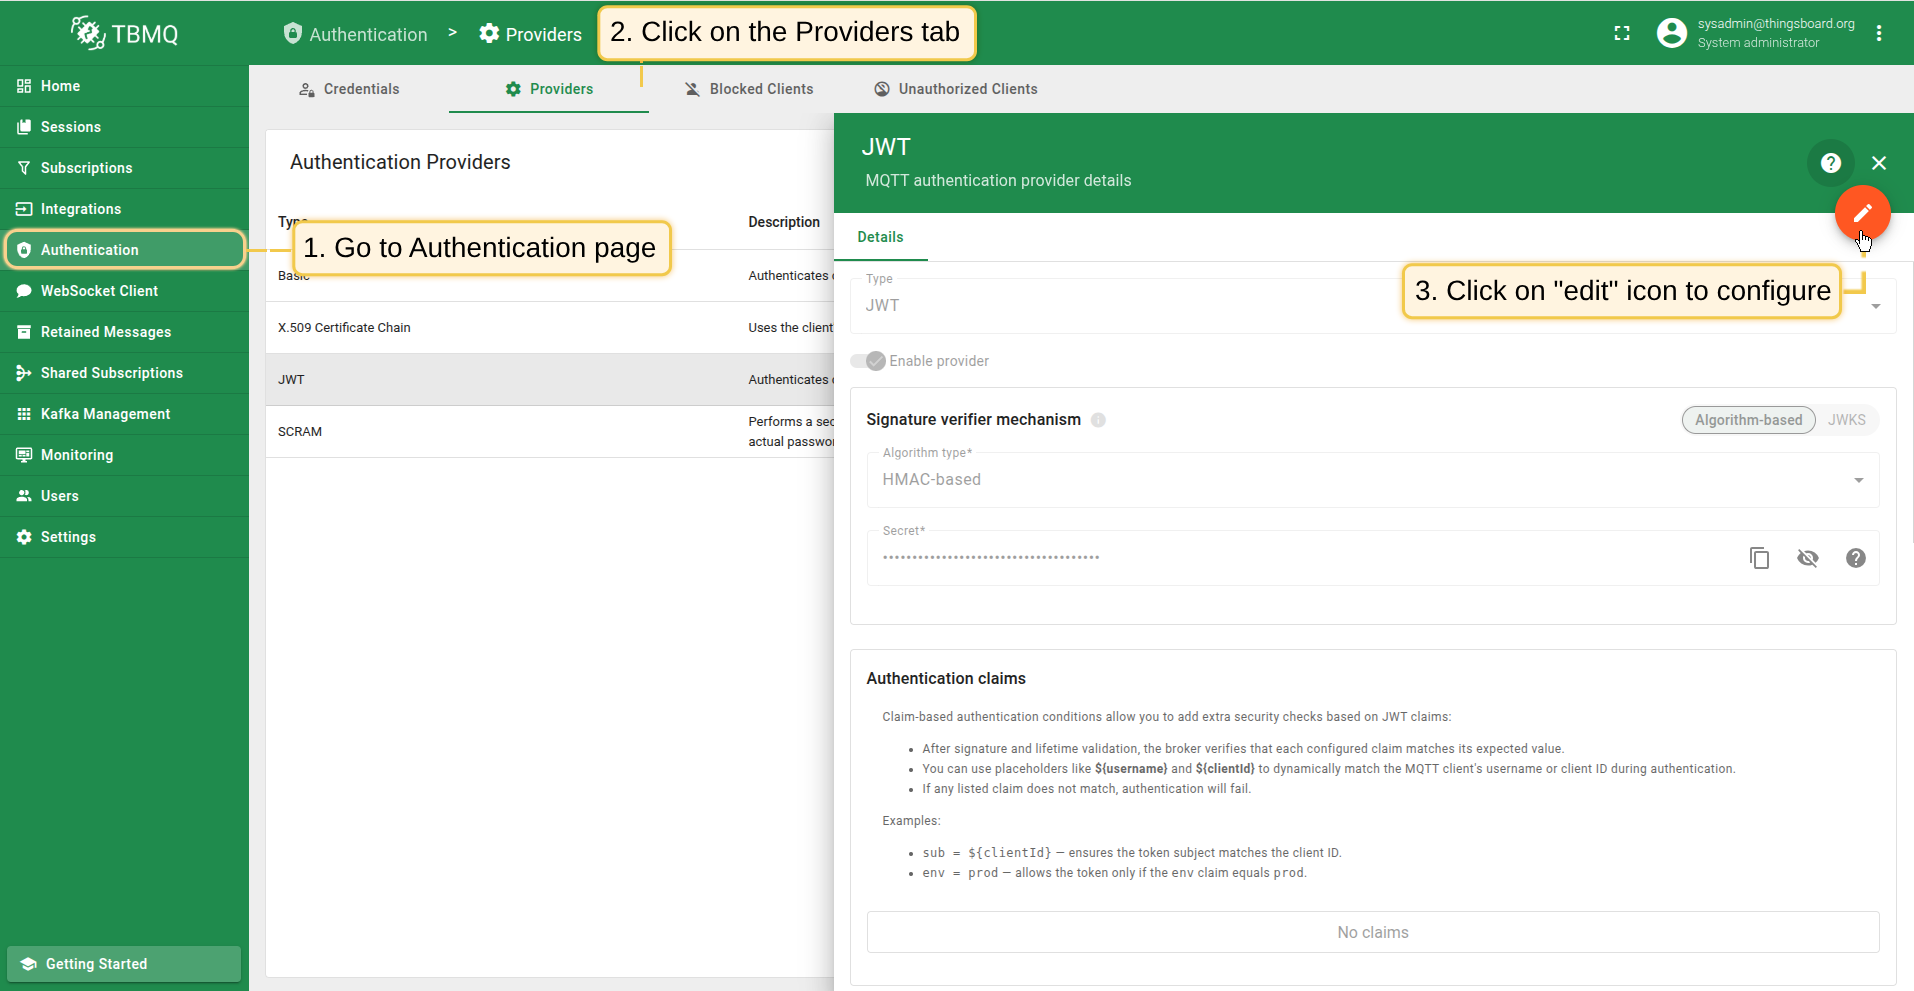
Signature verification
The Signature verifier mechanism determines how TBMQ validates the JWT token’s signature to ensure the token was issued by a trusted authority and hasn’t been tampered with. There are two options:
- Algorithm-based (HMAC or PEM) - uses preconfigured secret or public key to verify incoming tokens.
- JWKS (JSON Web Key Set) - dynamically fetch a list of public keys from a remote JWKS endpoint. This is commonly used with identity platforms that publish key sets (e.g., Auth0, AWS Cognito, Keycloak).
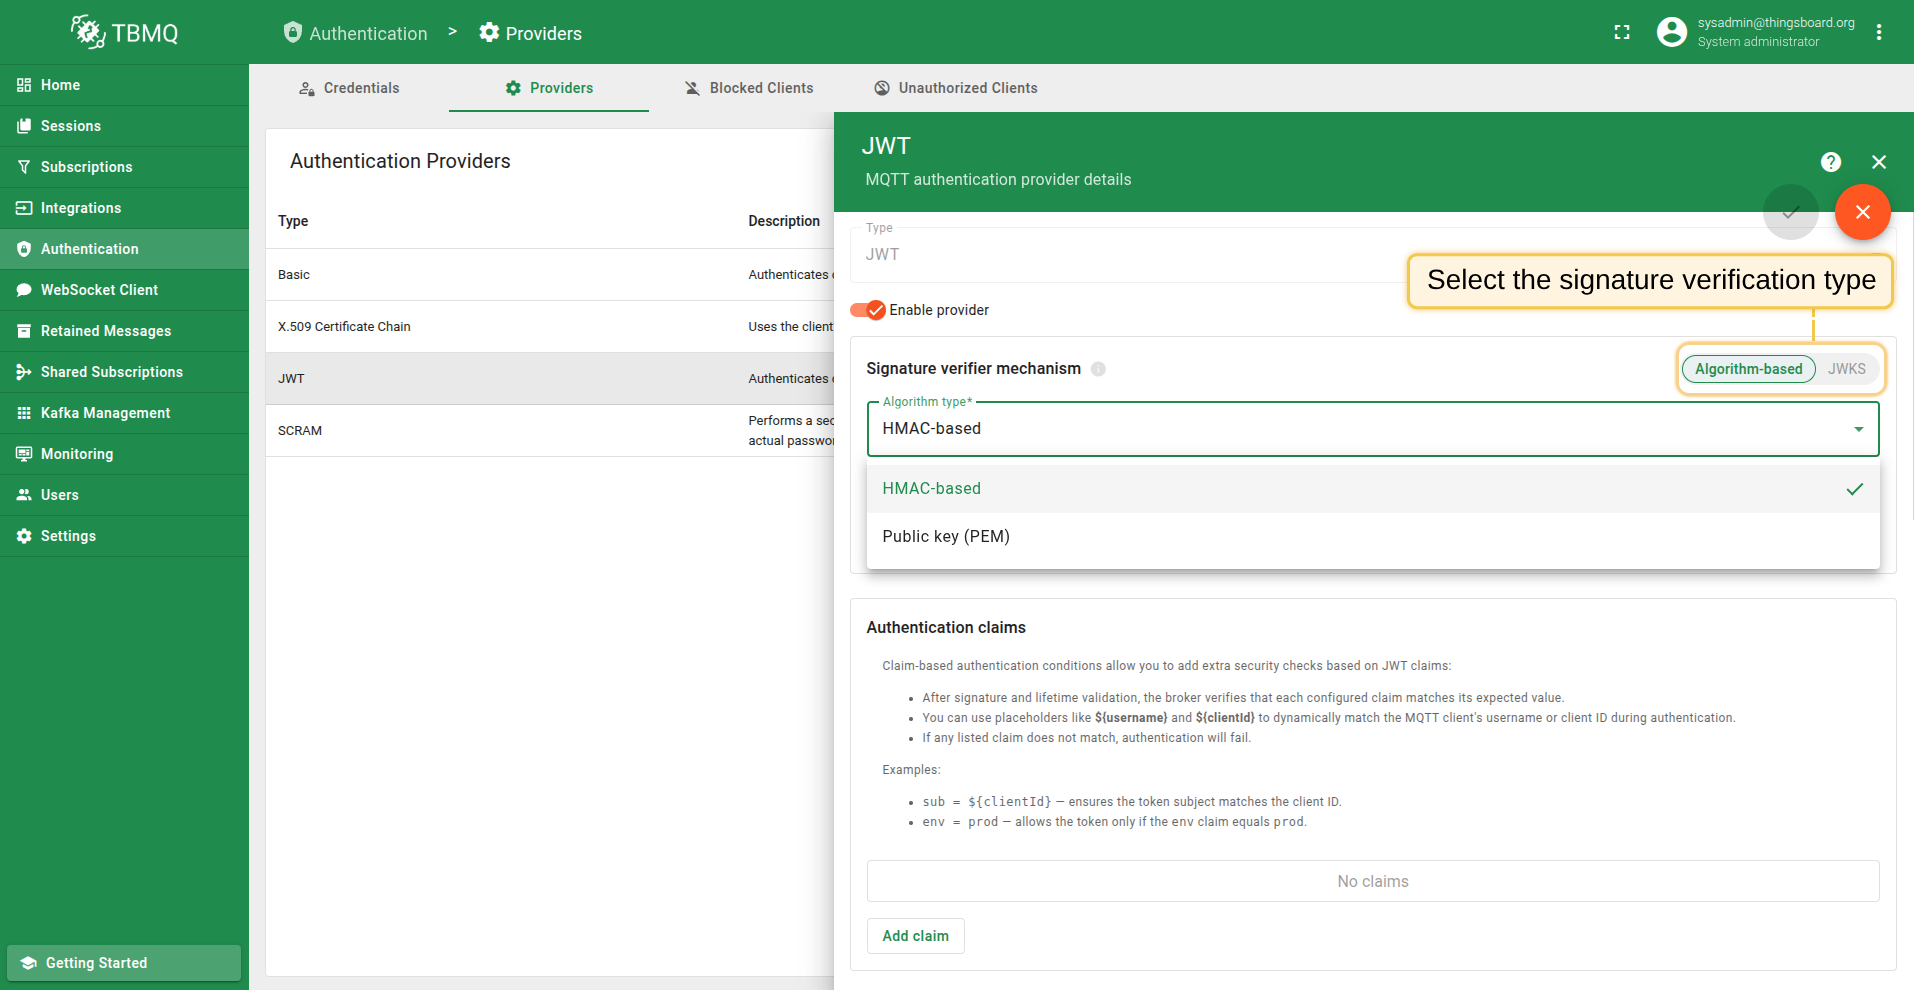
HMAC-based
HMAC is a symmetric algorithm that uses the same secret for both signing and verifying JWTs. This is often used in internal systems or when tokens are issued by a trusted service you control.
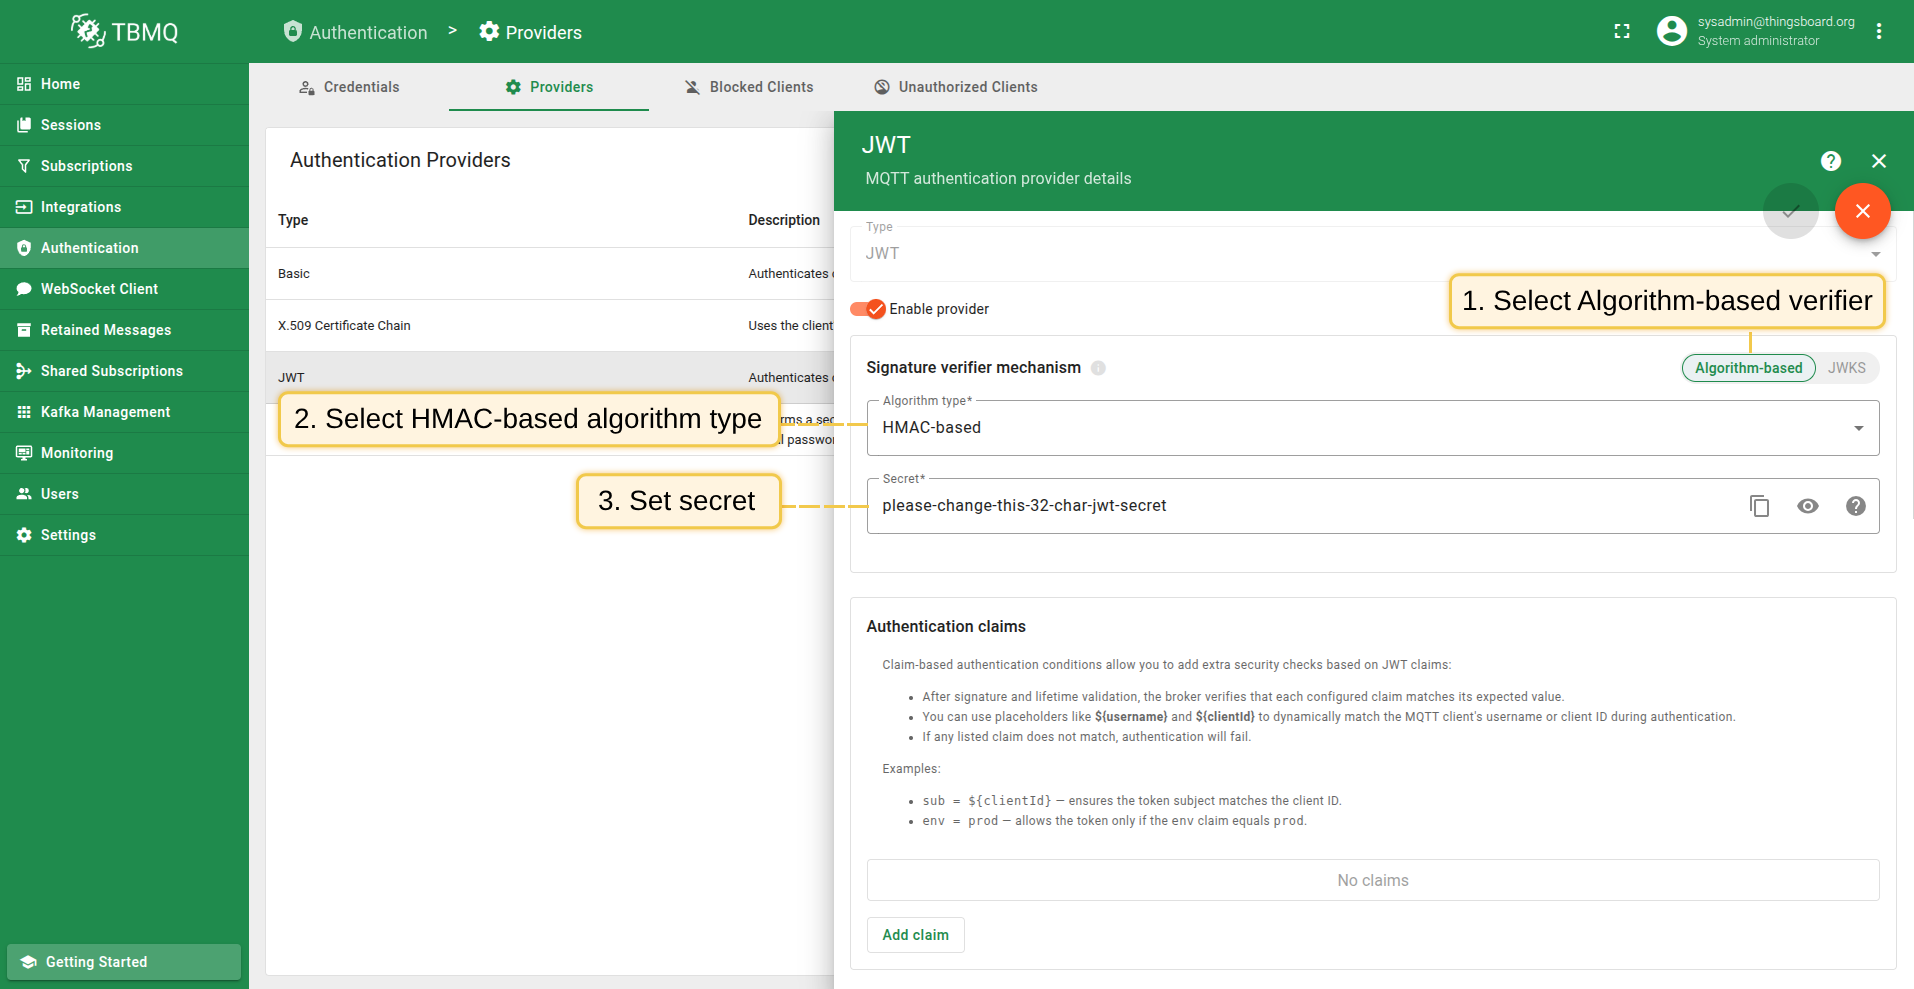
Supported all JWT-standard HMAC algorithms: HS256, HS384, HS512. The secret should match the one used to sign the tokens.
Public key (PEM)
Use this method if your JWTs are signed with an asymmetric private key. TBMQ will use the matching public key in PEM format to verify the signature.
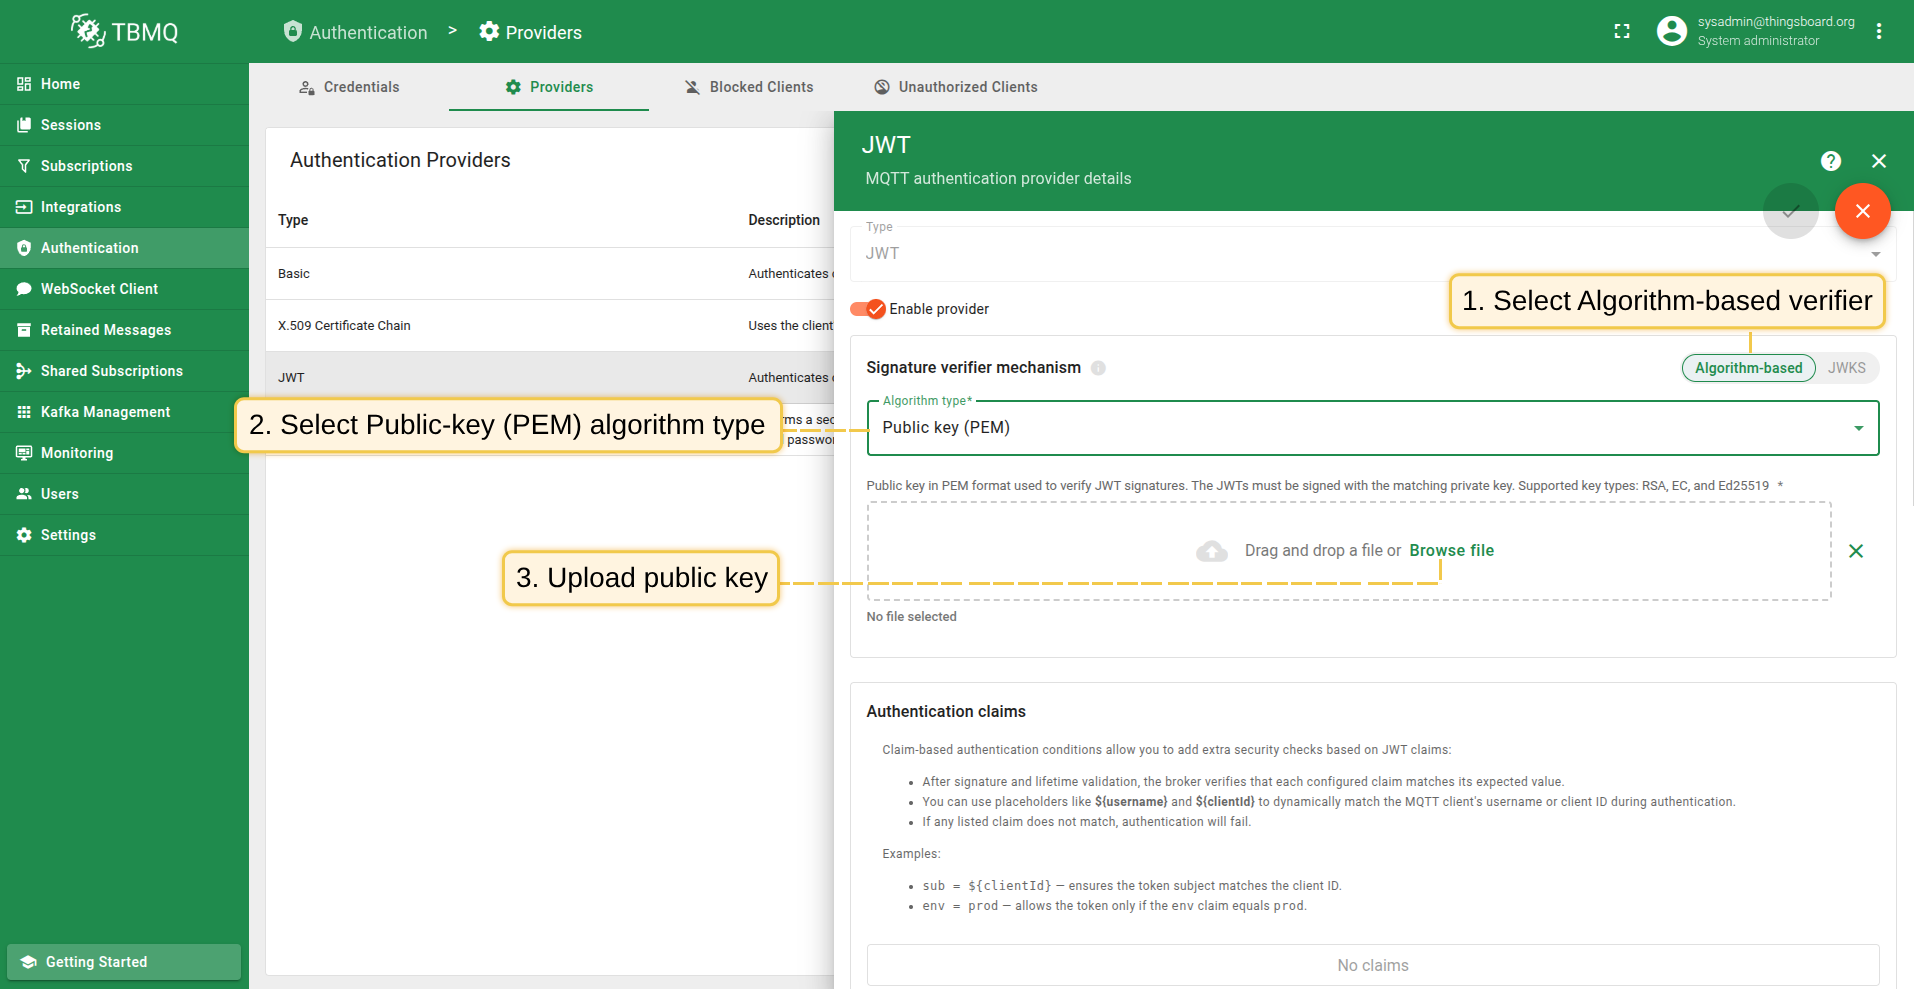
Supported key types: RSA, EC, and Ed25519. Make sure the uploaded key matches the private key used to sign the JWTs.
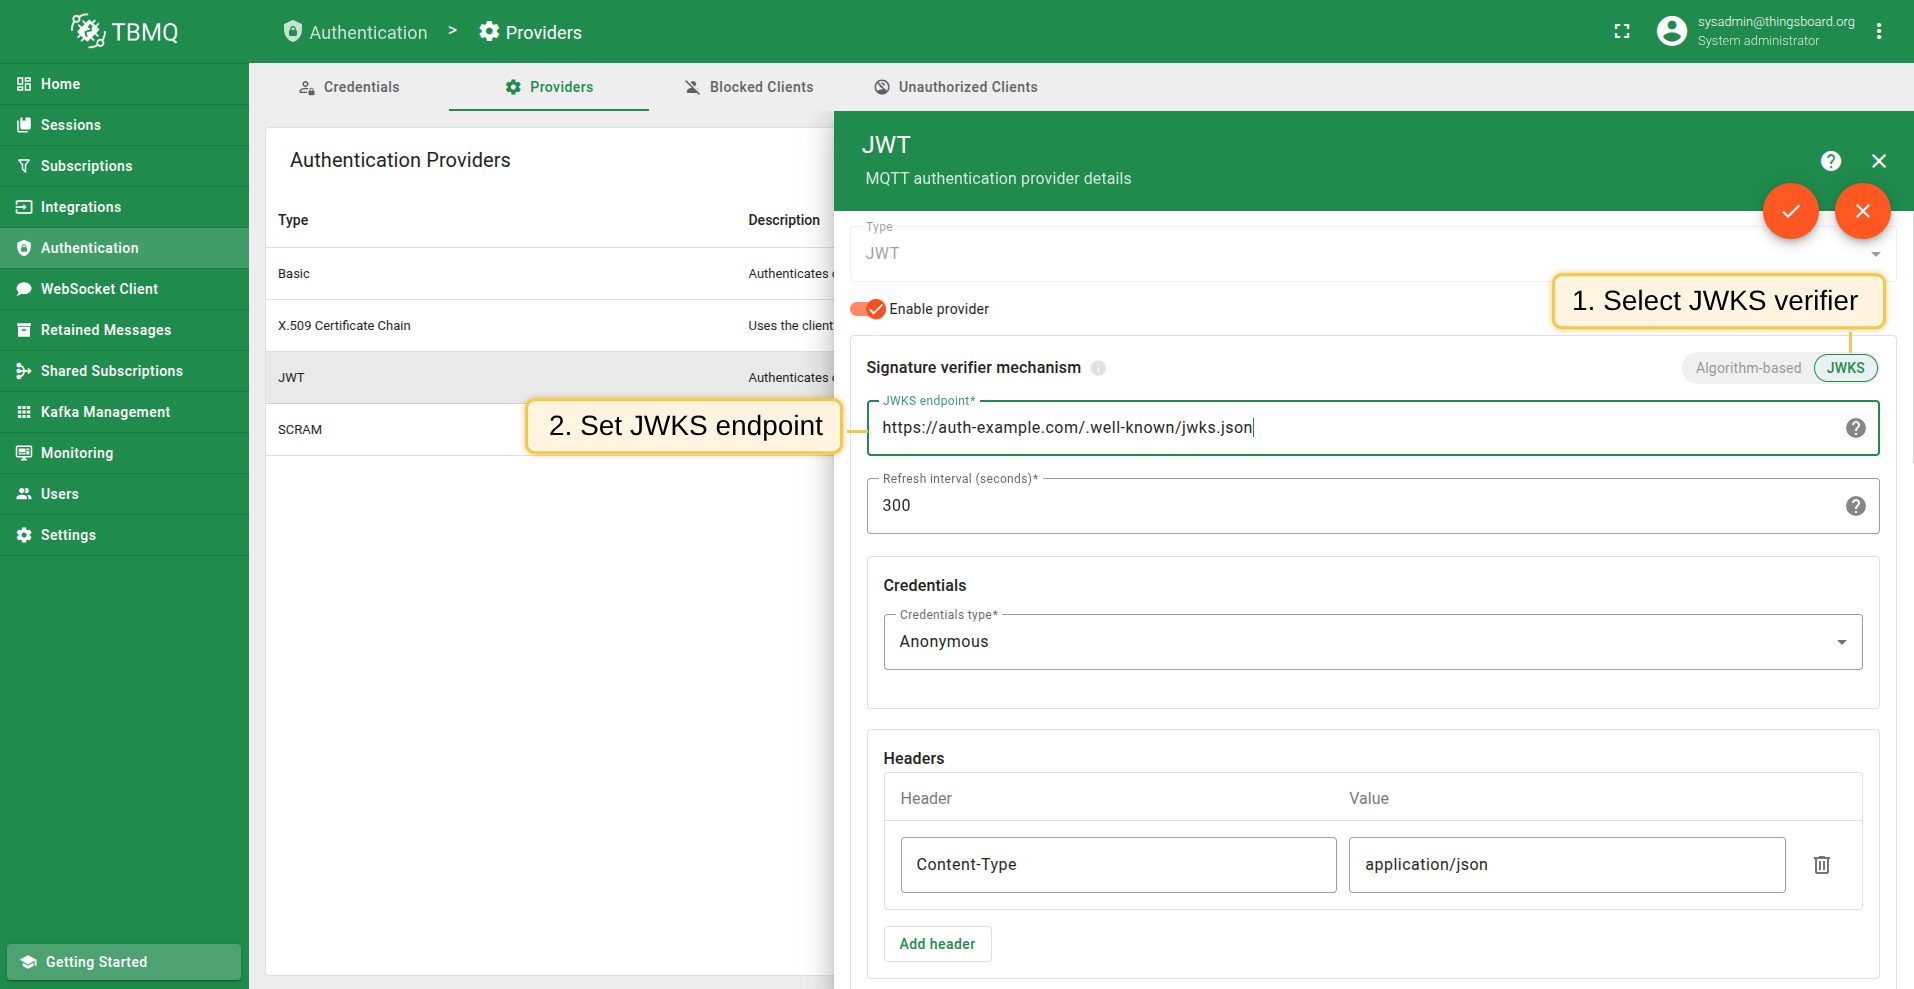
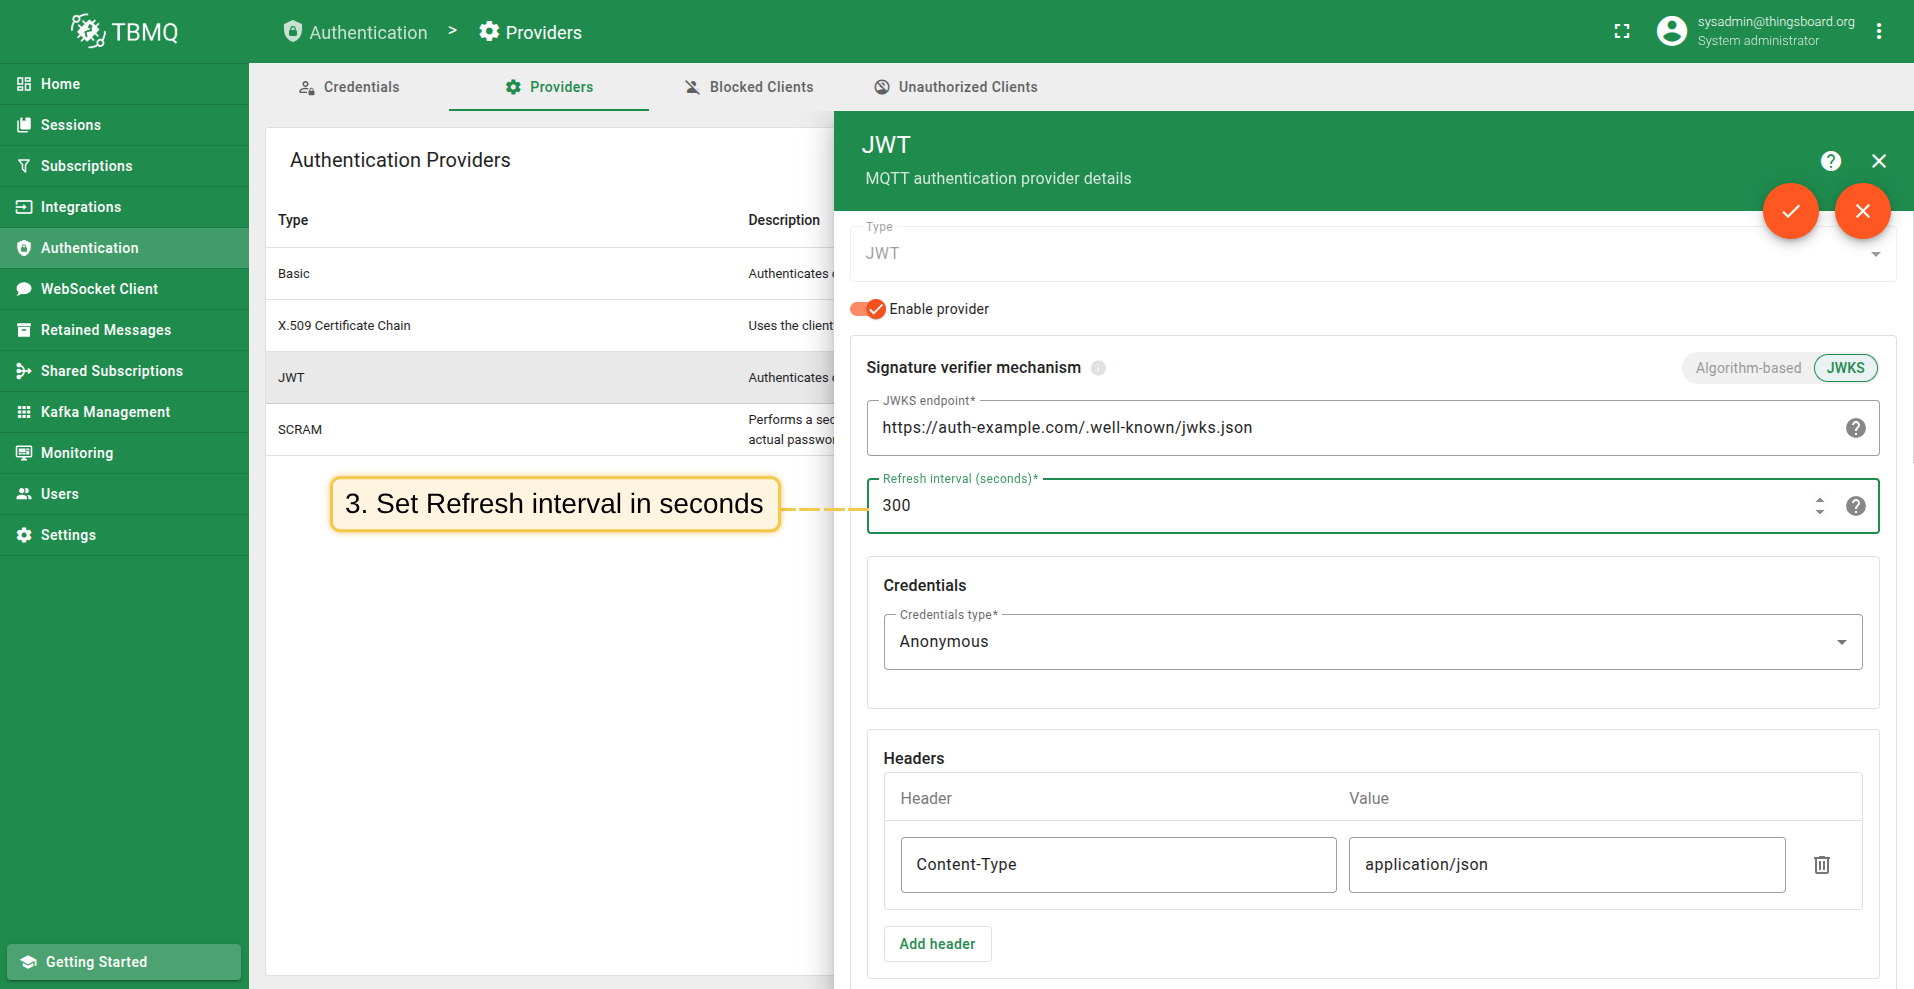
JWKS
JWKS (JSON Web Key Set) allows TBMQ to fetch a list of public keys from a remote endpoint. This is especially useful when using identity providers that rotate signing keys automatically. TBMQ will periodically download and cache keys from the endpoint and use them to verify incoming tokens.
JWT claims and access control flow
After the JWT token is successfully verified, TBMQ performs a multi-stage validation and classification process to determine if the client is allowed to connect, how it should be identified, and what topics it can access.
Standard Claim Validation
Before anything else, TBMQ checks a few standard claims embedded in the JWT:
exp(expiration) claim to ensure the token is not expirednbf(not before) claim to ensure the token is currently valid
If the token is expired or not yet valid, the client connection is rejected immediately. These checks happen automatically and do not require any configuration.
Authentication Claims (Optional)
You can define custom claim validation rules as key-value pairs, where each pair consists of:
- Claim – the name of the claim in the JWT
- Value – the expected value to compare against
If any listed claim does not match the actual value in the token, the client’s authentication will fail — even if the token’s signature is valid.
To support dynamic checks, you can use placeholders like ${username} and ${clientId}.
These will resolve to the MQTT client’s username or client ID at connection time.
This mechanism adds an extra layer of security by ensuring that the JWT is not only valid, but also intended for the specific MQTT client making the request.
To better understand how custom authentication claims work, consider the following example.
Three custom claims are configured for validation:
sub=${clientId}— ensures the token subject matches the MQTTclient IDmqtt_user=${username}— ensures the token was issued for the correct MQTTusernameenv=prod— enforces that the token is only valid in the production environment
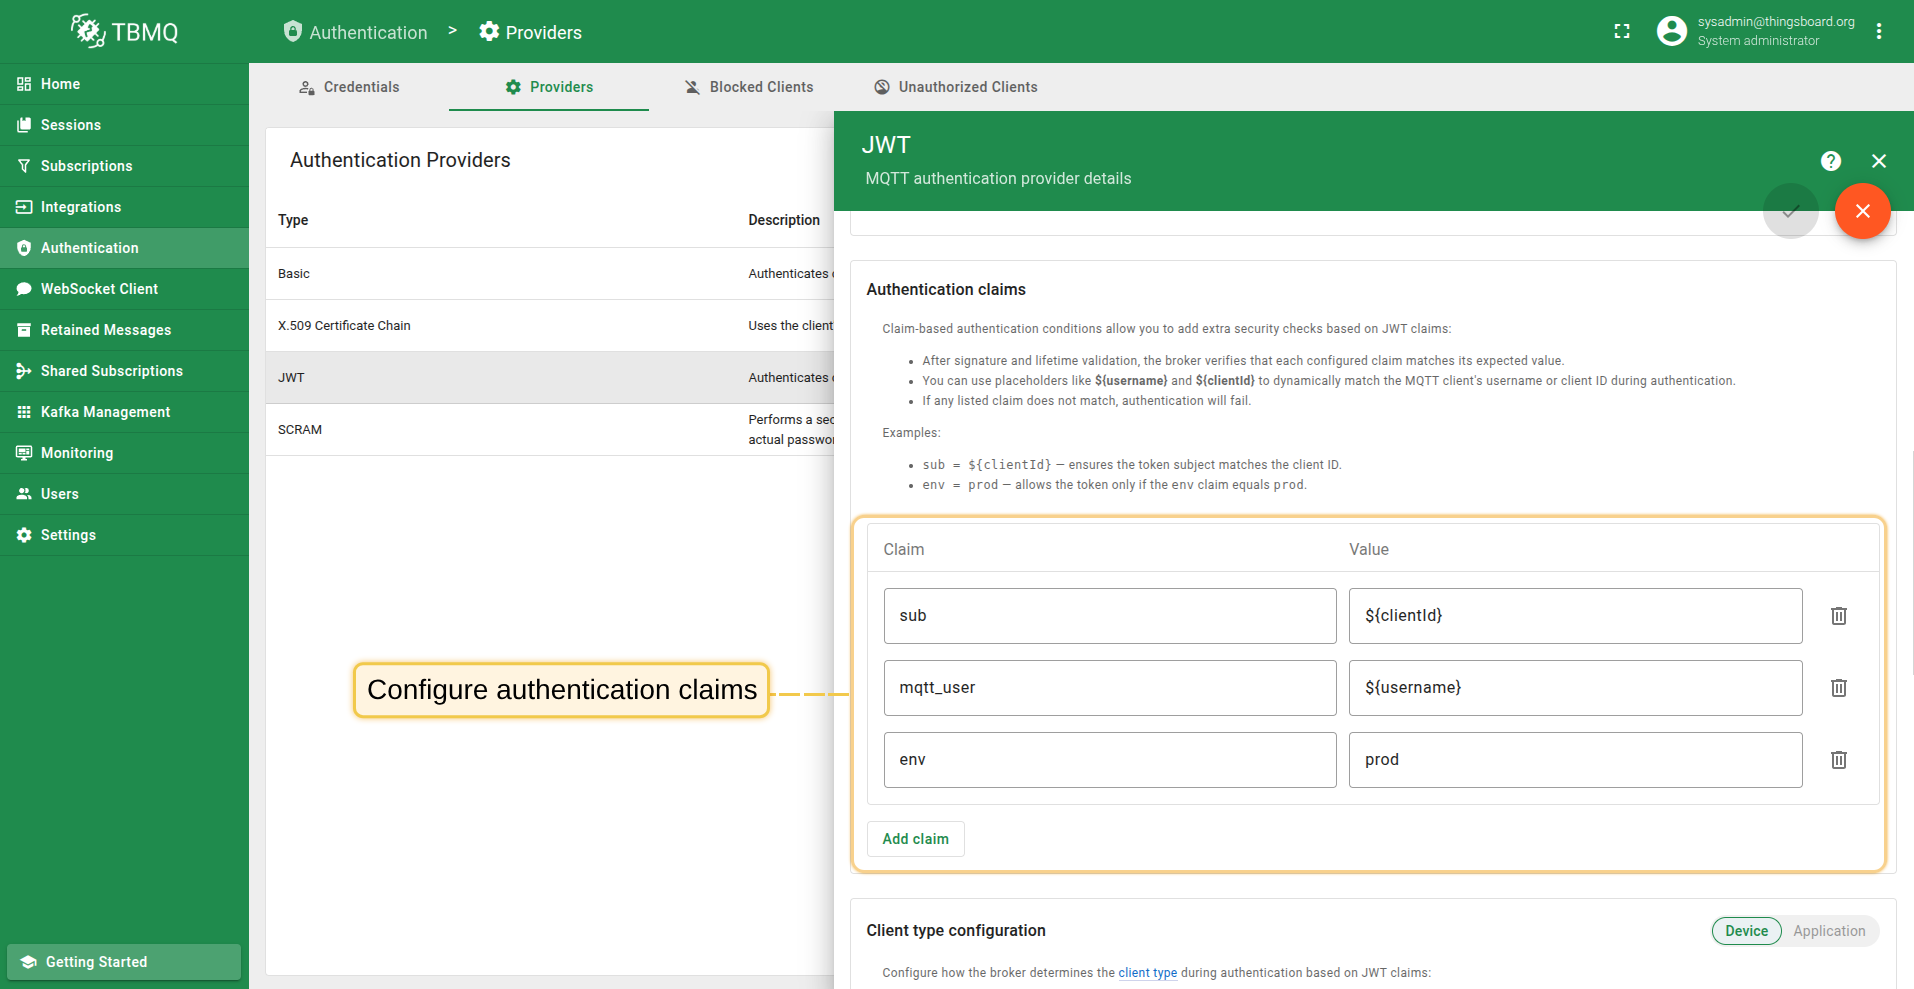
If any of these conditions fail, the authentication attempt will be rejected.
A MQTT client connects with username = thermostat-007 and client ID = client-007.
Also JWT from a password field includes these claims:
1
2
3
4
5
{
   "sub": "client-007",
   "mqtt_user": "thermostat-007",
   "env": "prod"
}
In this case:
submust match theclient IDmqtt_usermust match theusernameenvmust be exactlyprod
If all conditions are met, the client will be authenticated. If any condition fails, the connection will be rejected.
Client Type Configuration (Optional)
This section configures how the broker determines the client type during authentication. Either DEVICE or APPLICATION.
By default, all clients are assigned the type selected using the “Device / Application” toggle. You can optionally define one or more claim conditions. If all conditions match, TBMQ will assign the opposite client type. This allows you to classify clients dynamically during authentication.
To better understand how dynamic client type classification works, consider the following example.
Client type is set to DEVICE by default.
Also in the configuration defined a custom claim role with expected value app to compare against.
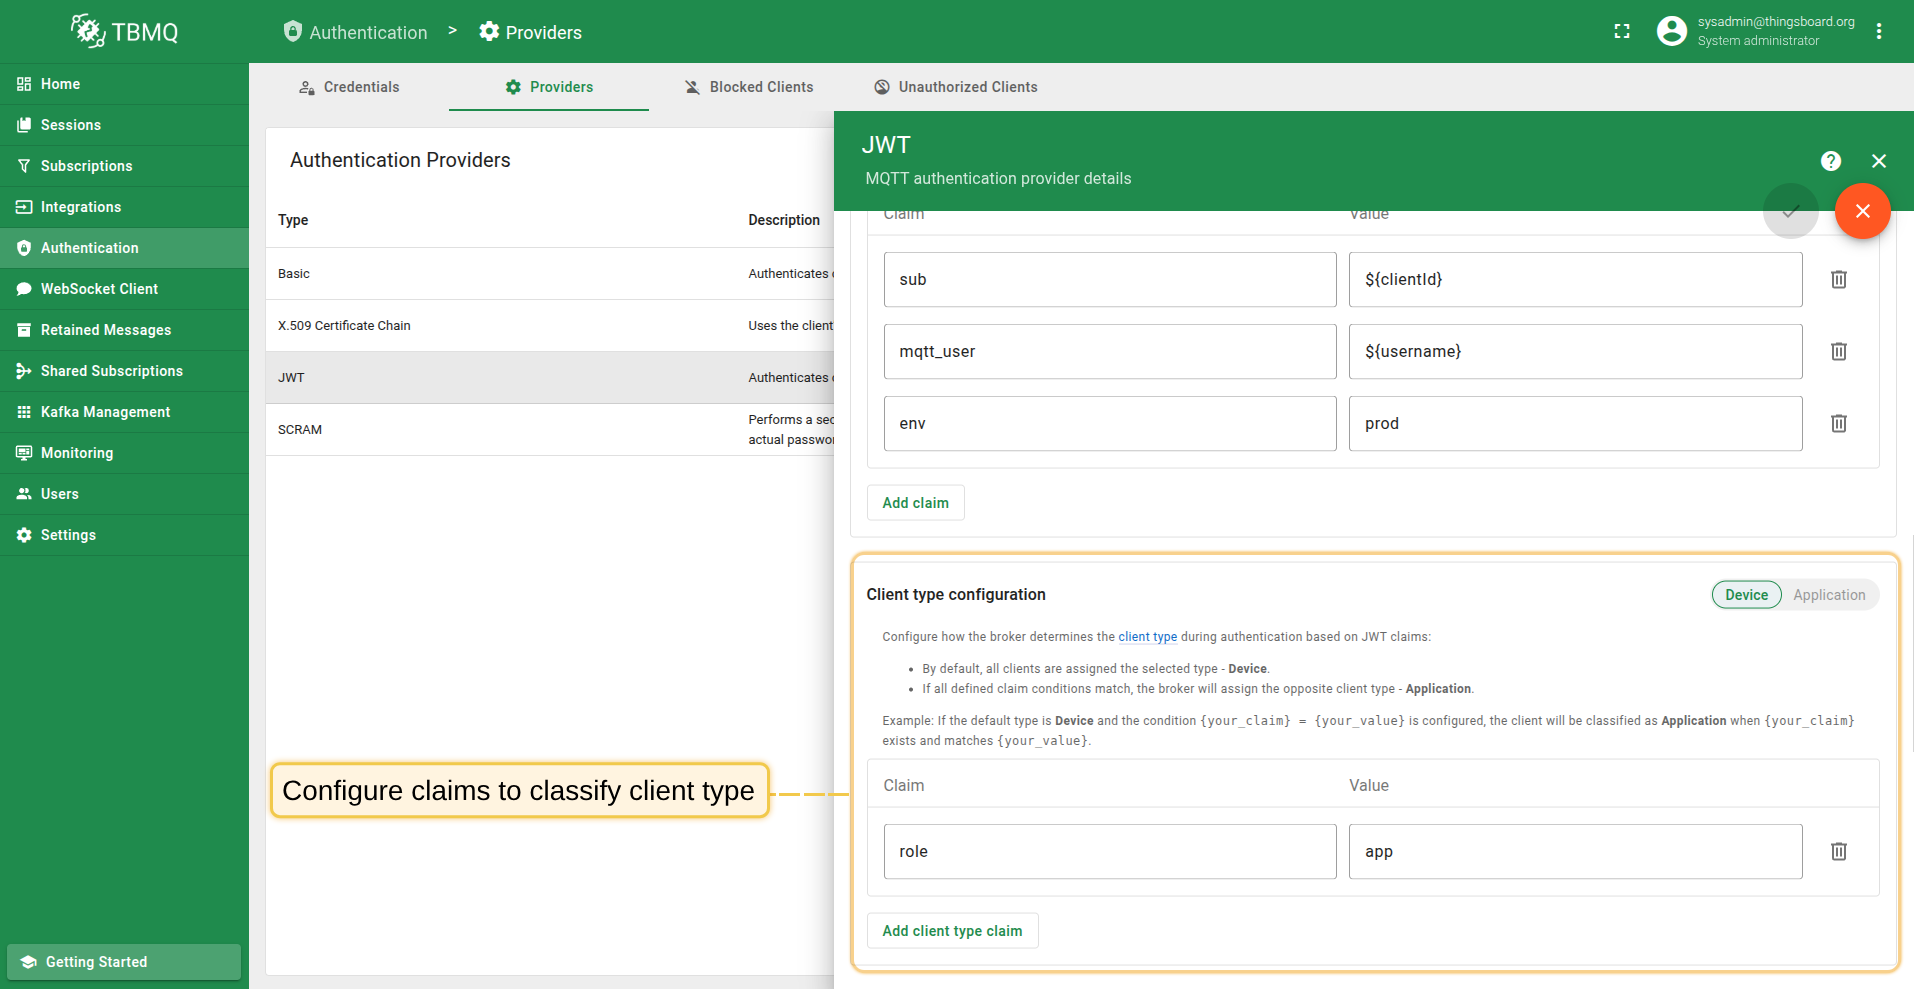
If MQTT client connects with JWT in the password field that includes this claim
and the value of it is app the MQTT client will be classified as APPLICATION.
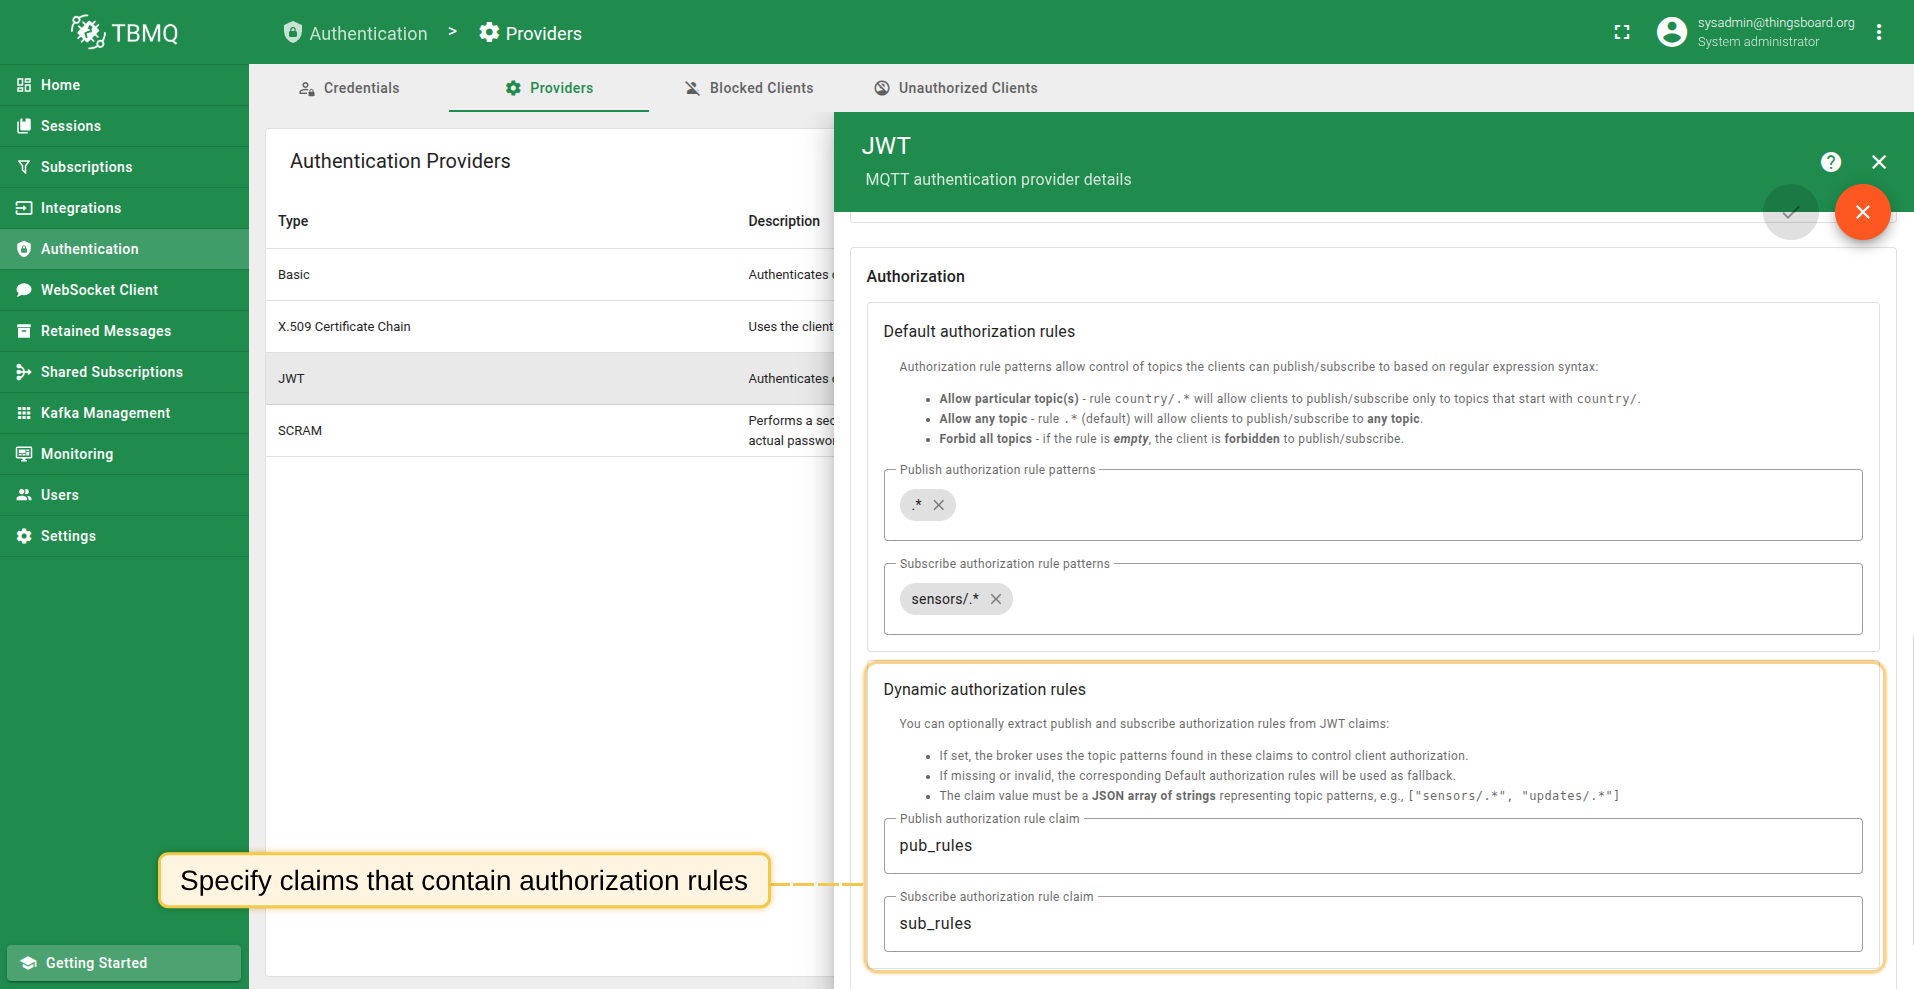
Authorization
After a client has successfully passed the validation and classification steps, TBMQ applies topic-level authorization rules to determine which topics the client is allowed to publish to and subscribe from.
For JWT-based clients, TBMQ supports two layers of regex-based authorization rules:
- Default authorization rules – manually configured sets of topic patterns defined in the provider settings.
- Dynamic authorization rules – lists of topic patterns extracted from JWT claims at runtime (if configured).
Default topic patterns can be defined separately for publishing and subscribing. These patterns use regular expressions and are always required. They also serve as a fallback if dynamic patterns are not configured or cannot be applied.
Examples of regex filters:
- Allow particular topic(s) - rule
country/.*will allow clients to publish/subscribe only to topics that start withcountry/. - Allow any topic - rule
.*(default) will allow clients to publish/subscribe to any topic. - Forbid all topics - if the rule is empty, the client is forbidden to publish/subscribe.
To enable dynamic authorization, specify the names of JWT claims that contain the publish and/or subscribe topic patterns (e.g., pub_rules, sub_rules). If configured, TBMQ will attempt to extract a list of topic patterns from these claims and apply them as the client’s effective authorization rules.
Dynamic claims must be definded as JSON array of strings. Each string will be treated as a topic pattern and compiled as a regular expression.
If the claim is missing or malformed, TBMQ gracefully falls back to the default rule for that direction. This fallback behavior is independent for publish and subscribe. You can use a dynamic rule for one and a default for the other.
To better understand how default and dynamic authorization rules work together, consider the following example.
The Default and Dynamic Authorization rules are configured as follows:
A client connects with a JWT that includes these claims:
1
2
3
4
{
  "pub_rules": ["devices/.*/data"],
  "sub_rules": ["sensors/.*", "alerts/.*"]
}
In this case:
- The
pub_rulesclaim overrides the default publish rule and restricts access todevices/.*/dataonly. - The
sub_rulesclaim extends the default subscribe rule by additionally allowingalerts/.*.
This demonstrates how dynamic rules can be used to customize access per client while still providing reliable fallbacks when needed.
Enable and save provider
Once you’ve completed the configuration, make sure to enable the JWT authentication provider by toggling the “Enable provider” switch at the top of the provider configuration page. Then click the “Apply changes” button to save your configuration.
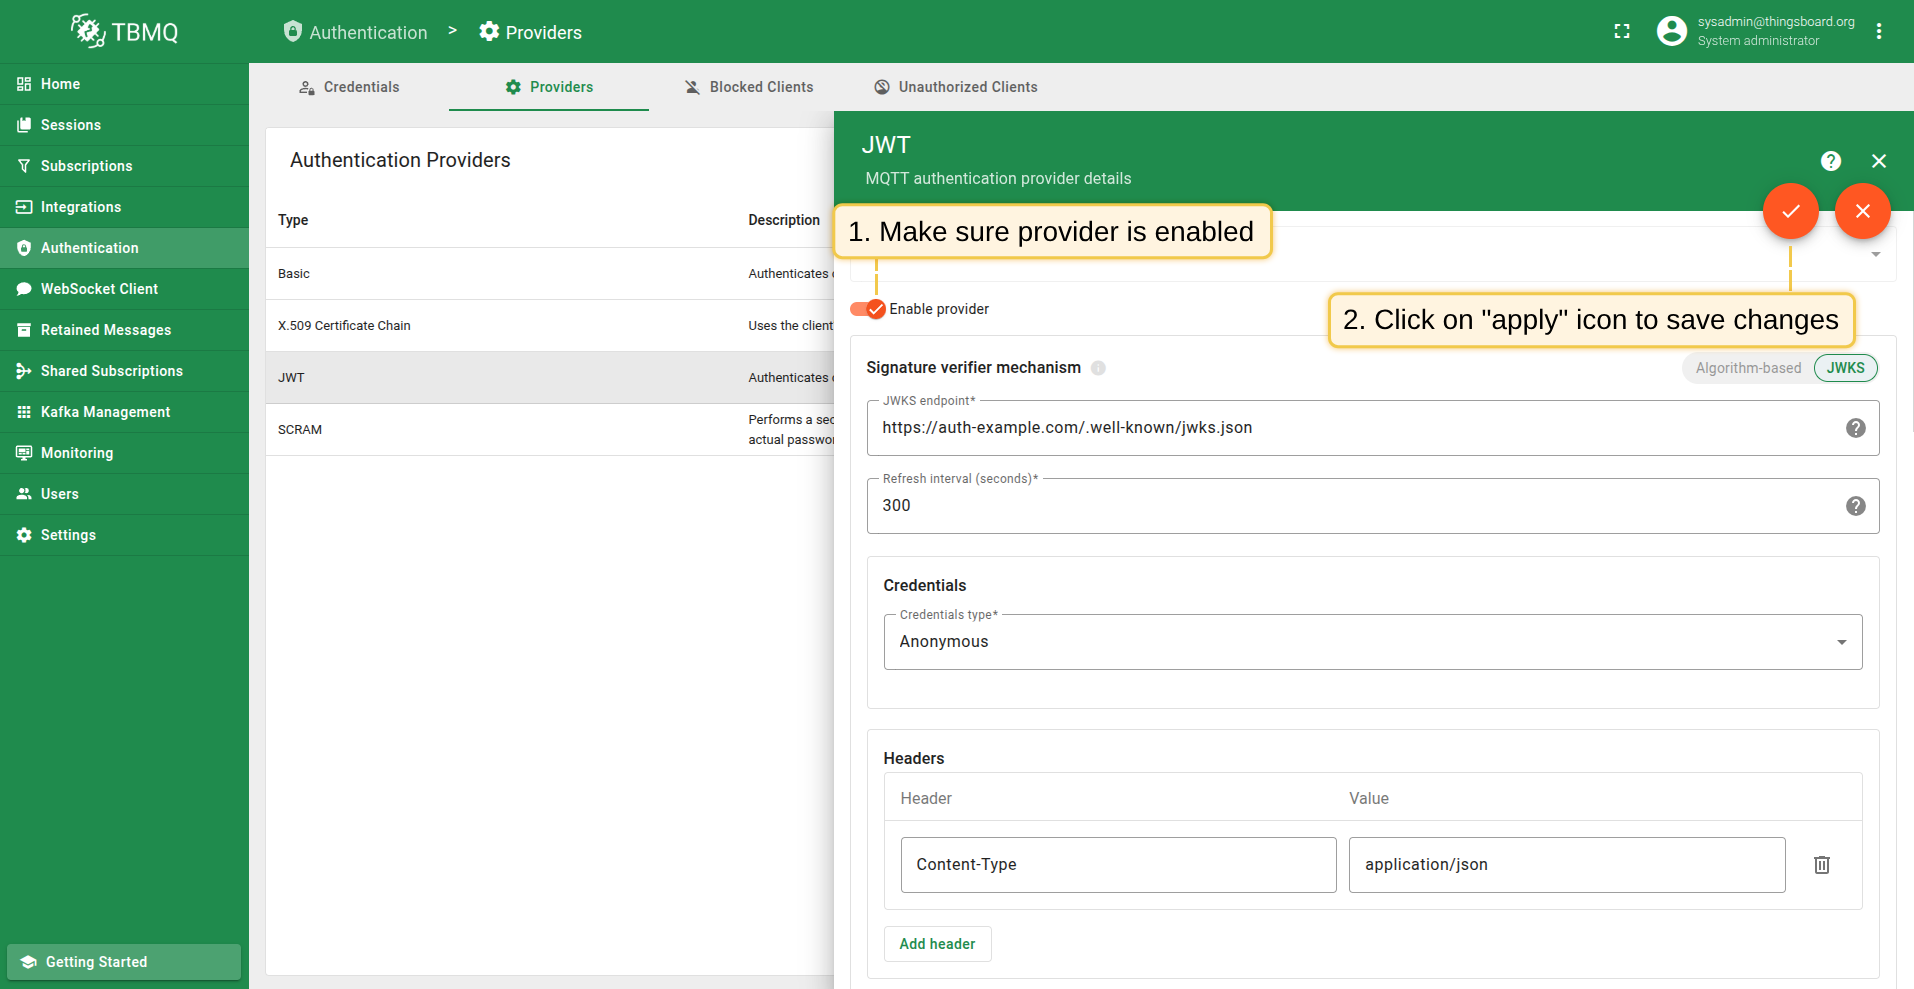
Once enabled, this provider will be used to authenticate any MQTT client that includes a JWT token in the password field during connection.
MQTT Example based on HMAC-based algorithm
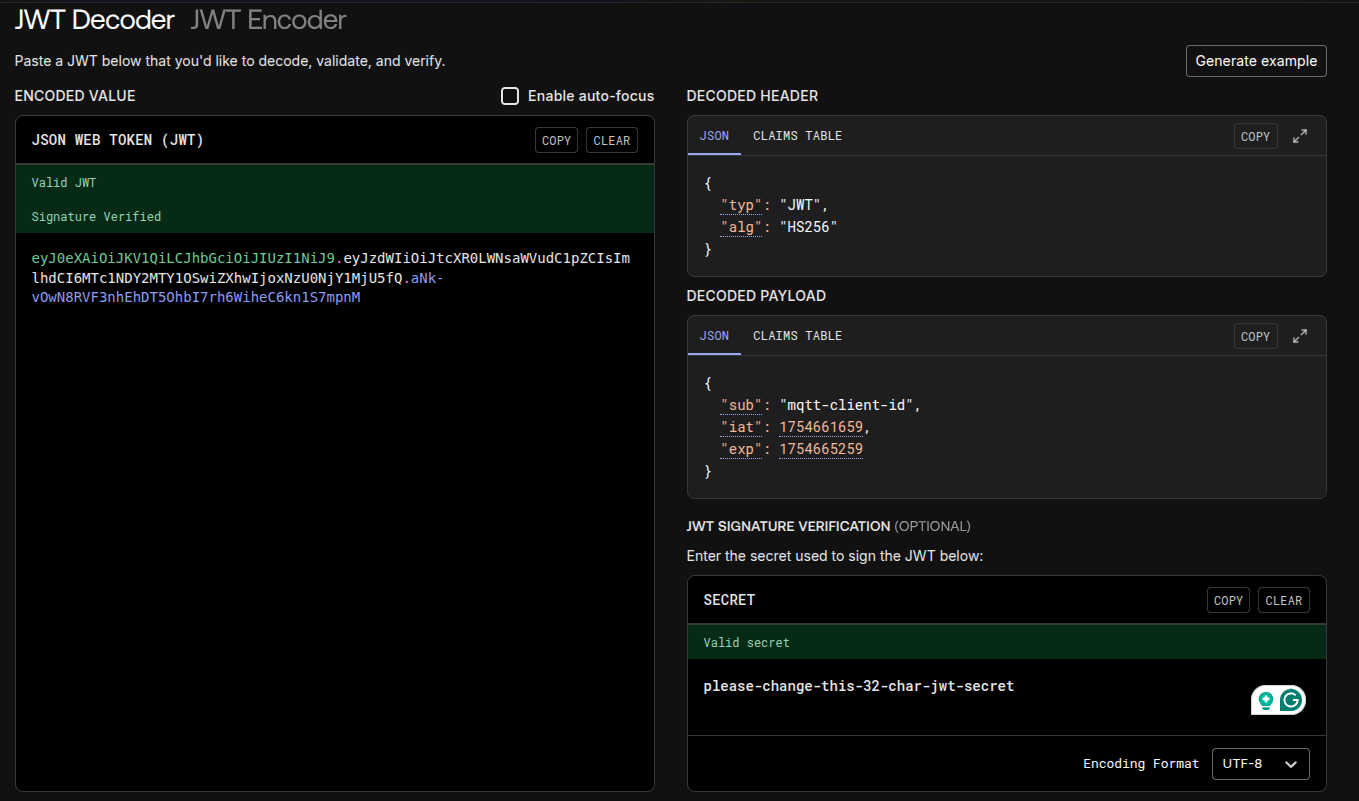
You need to have a valid JWT token, or you can generate it with any language that supports HS256 signing. Here’s a simple Python example.
Save the following script as generate_jwt.py and run it on your machine.
Run the script:
1
python3 generate_jwt.py
Example output:
1
eyJ0eXAiOiJKV1QiLCJhbGciOiJIUzI1NiJ9...
You can verify the token’s claims and signature using jwt.io.
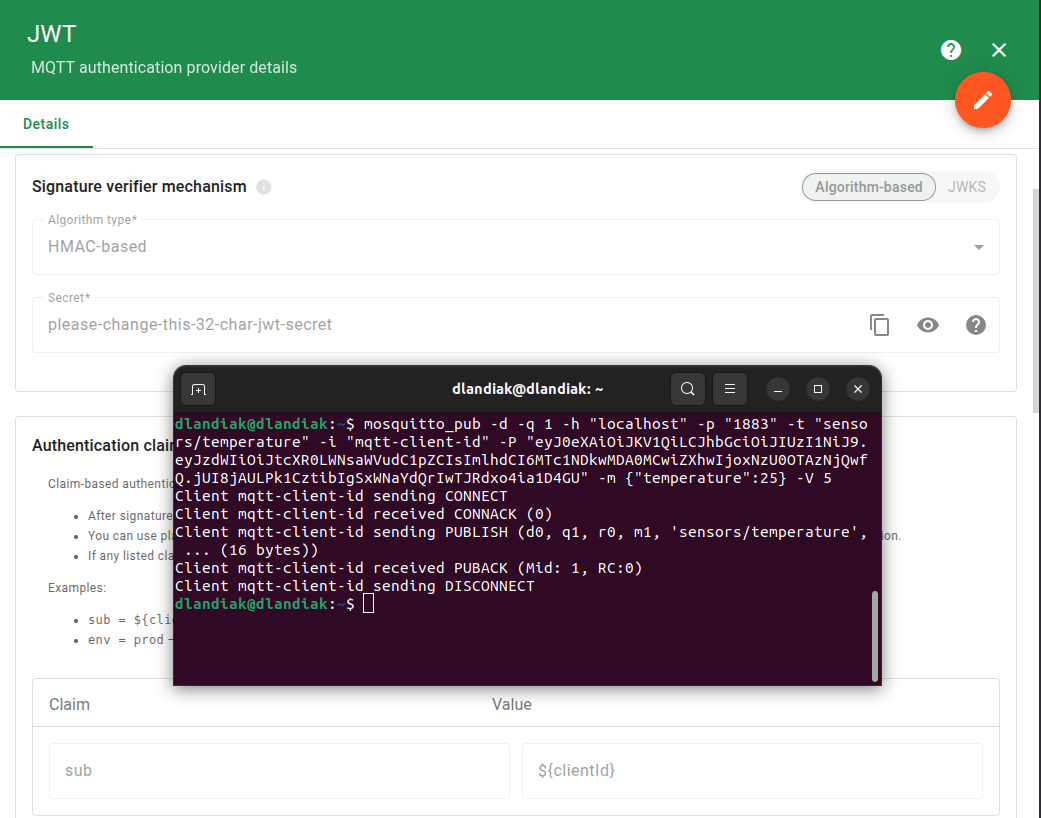
Below is an example of publishing a message using the mosquitto_pub client with JWT authentication over plain MQTT (no TLS):
1
mosquitto_pub -d -q 1 -h "YOUR_TBMQ_HOST" -p "1883" -t "sensors/temperature" -i "YOUR_CLIENT_ID" -P "YOUR_JWT_TOKEN" -m {"temperature":25} -V 5
Notes:
- YOUR_TBMQ_HOST – Hostname or IP of your TBMQ instance.
- YOUR_CLIENT_ID – Your client id. In our case, it should be equal to “mqtt-client-id” to pass the authentication claim check sub=${clientId} in the JWT provider.
- YOUR_JWT_TOKEN – The token generated with the Python script above.
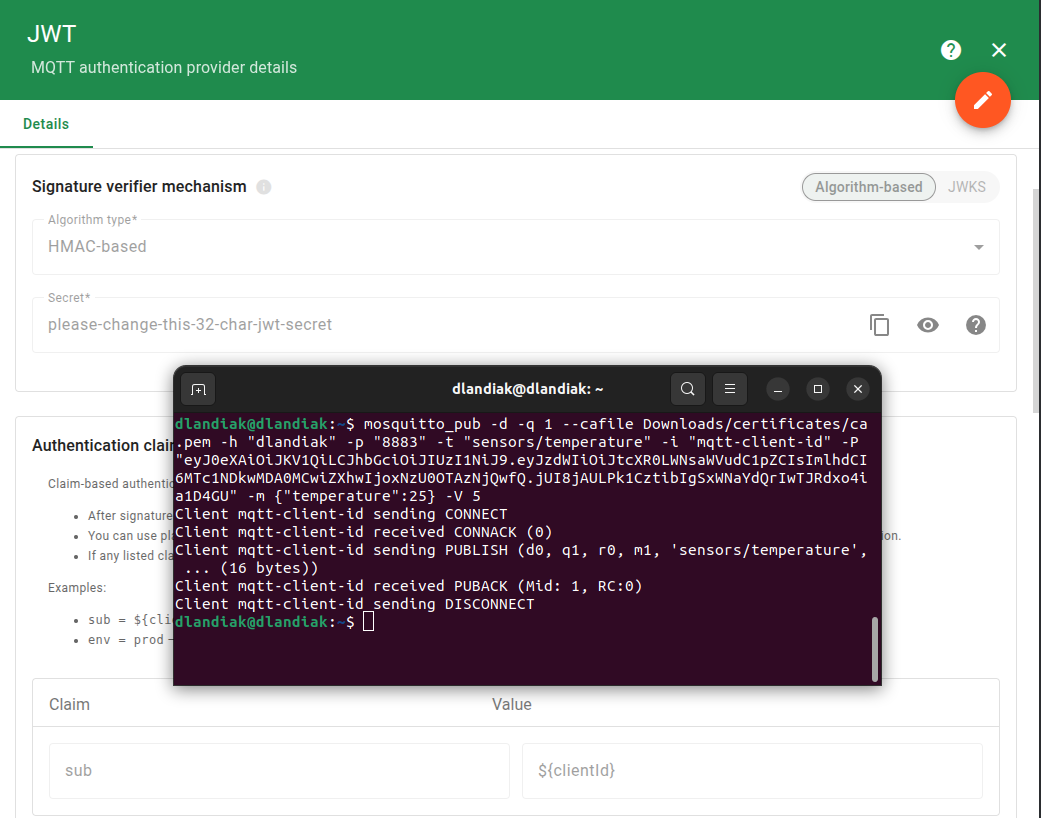
MQTTS Example based on HMAC-based algorithm
One-way TLS ensures your client verifies the server’s identity using its certificate. Follow the MQTT over SSL guide to provision a server certificate for TBMQ.
Here’s an example of connecting with JWT authentication over MQTTS (TLS):
1
mosquitto_pub -d -q 1 --cafile YOUR_PEM_FILE -h "YOUR_TBMQ_HOST" -p 8883 -t "sensors/temperature" -i "YOUR_CLIENT_ID" -P "YOUR_JWT_TOKEN" -m {"temperature":25} -V 5
Notes:
- YOUR_PEM_FILE – Path to your CA certificate file.
- YOUR_TBMQ_HOST – Hostname or IP of your TBMQ instance.
- YOUR_CLIENT_ID – Must match the
subclaim in the JWT payload. - YOUR_JWT_TOKEN – The token generated earlier.
Next steps
-
Getting started guide - This guide provide quick overview of TBMQ.
-
Installation guides - Learn how to set up TBMQ using Docker or deploy it in K8S environments on AWS, GCP, and Azure.
-
Configuration guide - Learn about TBMQ configuration files and parameters.
-
MQTT client type guide - Learn about TBMQ client types.
-
Integration with ThingsBoard - Learn about how to integrate TBMQ with ThingsBoard.