- X.509 authentication overview
- Configure provider
- Credentials matching
- Credentials ID
- Authorization
- Example
- Next steps
X.509 Certificate Chain Authentication is a widely used method for securing MQTT connections in enterprise environments and IoT deployments requiring strong identity verification. Instead of relying on a username and password, clients present a certificate during the TLS handshake, allowing the broker to authenticate them based on the Common Name (CN) certificate attribute.
X.509 authentication overview
With X.509 Certificate Chain Authentication, the client presents its certificate chain as part of the TLS handshake.
TBMQ extracts the Common Name (CN) from the client’s certificate, or any certificate in the chain to generate credentialsId and match it against the configured MQTT client credentials.
TBMQ supports two matching modes:
- Exact match — where the CN in the certificate must exactly match the configured pattern.
- Regular expression (regex) match — where the CN must match a regex pattern, allowing flexible matching for groups of certificates.
After a successful match, the client is authenticated. For performance and low-latency lookups, TBMQ caches credentials in Redis, while PostgreSQL ensures persistent storage.
The following sections explain provider configuration, credential matching, credentialsId generation, and how authorization is applied after successful authentication.
Configure provider
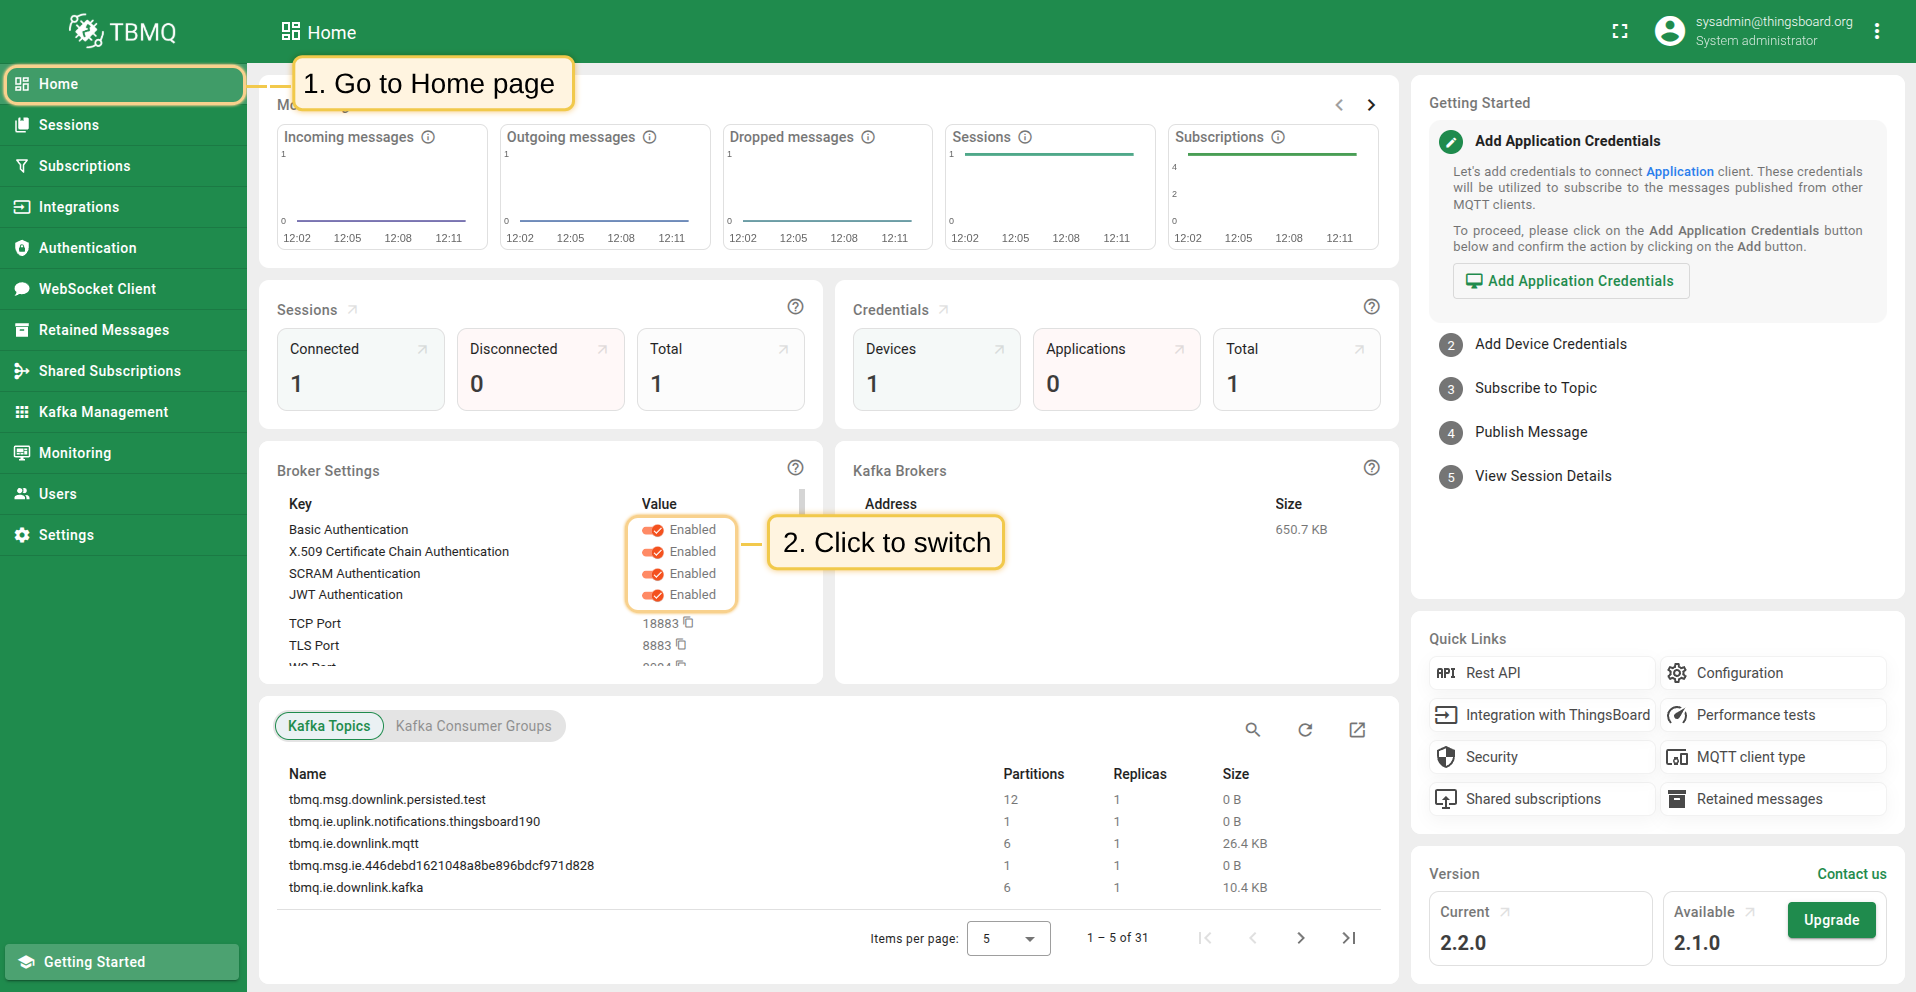
You can check the authentication provider status, enable or disable it directly from the TBMQ user interface, making it easy to manage authentication behavior without modifying configuration files or restarting the broker.
- On the Home page, in the Broker Settings card, you’ll find quick-toggle buttons for each available authentication provider. Click the button next to the desired provider to enable or disable it.
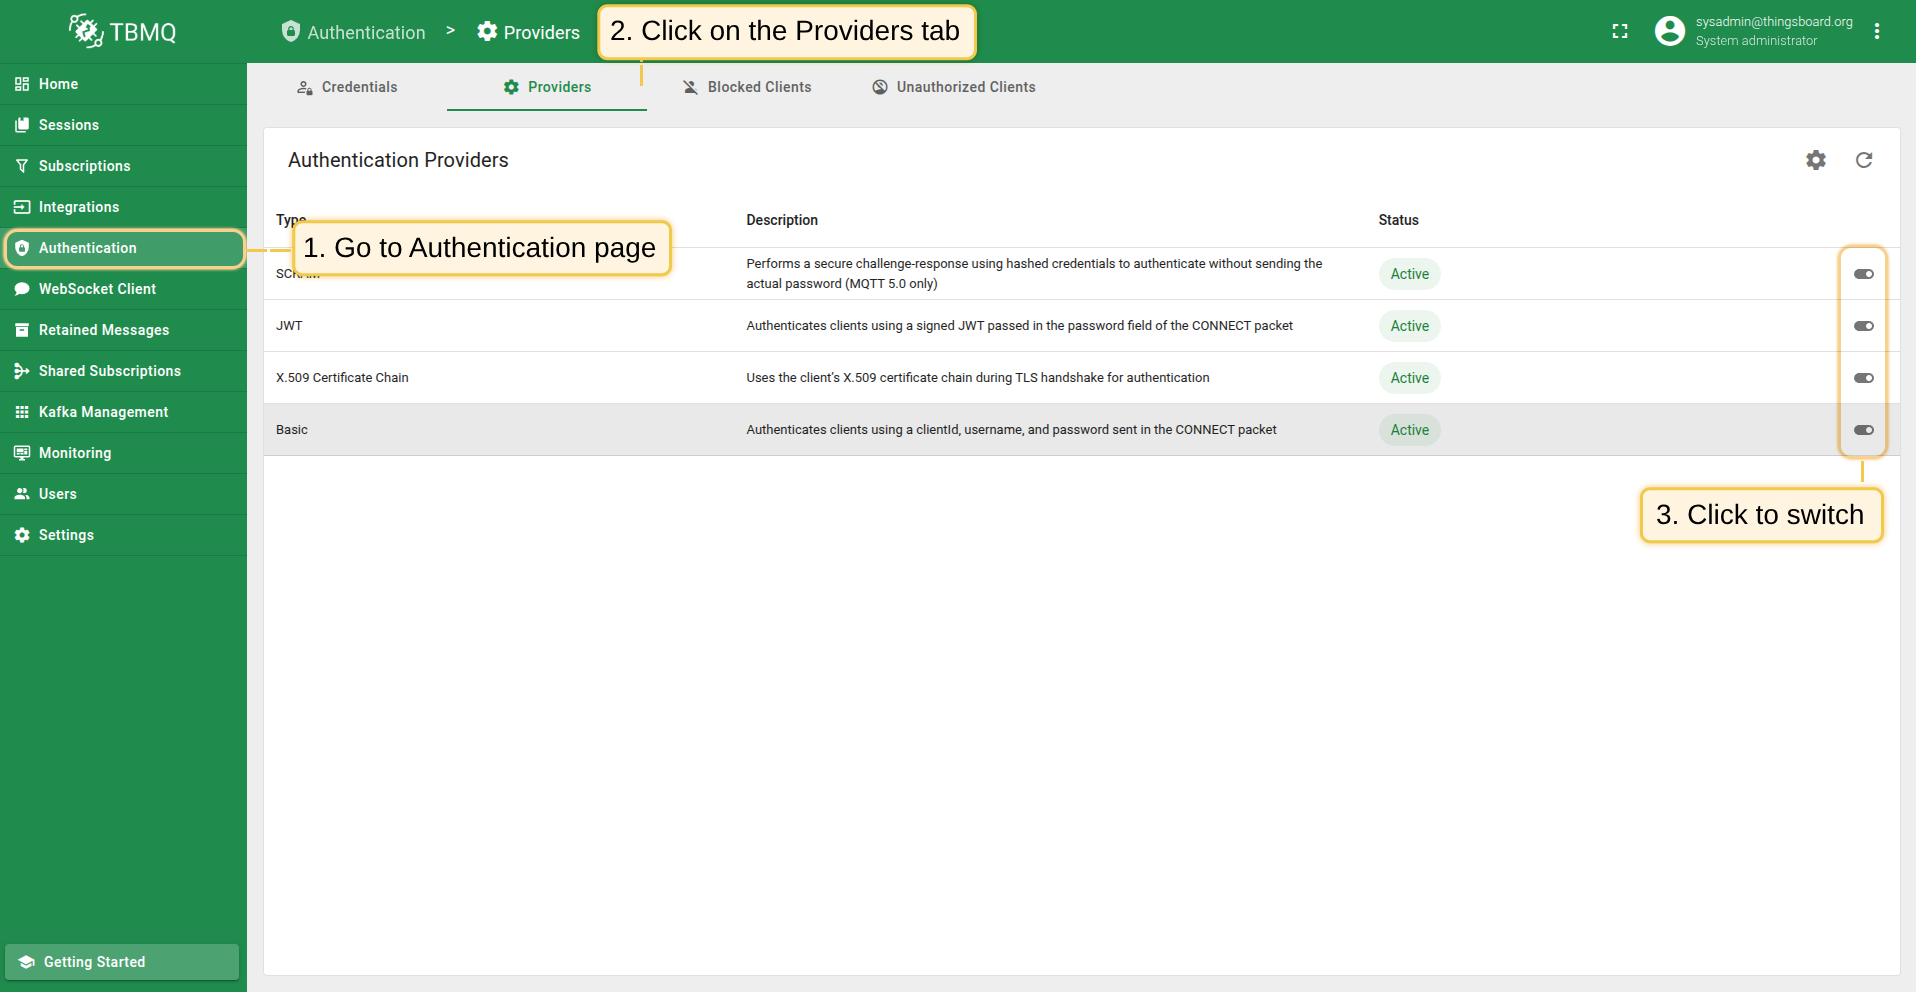
- On the Authentication Providers page, you have more control and visibility:
- You can enable or disable a provider directly from the table by clicking the Switch button in the corresponding row.
- For more detailed management, click on a provider to open its details page, where you can change the status or other parameters.

Skip certificate validity check for client certificates
The Skip certificate validity check for client certificates parameter in X.509 Certificate Chain Authentication controls whether the broker verifies the validity period of the client’s certificate during authentication.
- When
enabled, TBMQ skips the validation of the Not Before and Not After dates in the certificate, meaning expired or not-yet-valid certificates will still be accepted. - When
disabled, the broker enforces the standard validity checks, and authentication will fail if the certificate is expired or not yet valid.
This setting can be useful in testing or specific trust-controlled environments, but set it to true is not recommended for production deployments, as it weakens the certificate-based security model.
Credentials matching
The “X.509 Certificate Chain” credentials have a “Use certificate CN regex” option that controls how credentials are matched.
-
When “Use certificate CN regex” is disabled: the “Certificate common name (CN)” must exactly match the CN of the client’s certificate or, if present, one of the parent’s certificates in the chain. Authentication will fail if none of the certificates have an exactly matching CN.
-
“Use certificate CN regex” is enabled: the “Certificate common name (CN) matcher regex” must match the CN of the client’s certificate or, if present, one of the parent’s certificates in the chain. Authentication will fail if no certificate in the chain matches the regex.
Credentials ID
The generation of credentialsId is done as follows:
- credentialsId =
ssl|$CERTIFICATE_COMMON_NAME; - credentialsId =
ssl|$CERTIFICATE_COMMON_NAME_REGEX.
Where $CERTIFICATE_COMMON_NAME is the common name of the certificate from the chain, $CERTIFICATE_COMMON_NAME_REGEX is a regex-based string
that should be matched with the certificate’s CN from the chain.


Authorization
After the user has been authenticated, it is possible to restrict the client’s access to topics they can publish or subscribe to.
To provide flexible control over authorization rules, TBMQ uses regular expressions.
For example, to allow clients to publish or subscribe to all topics that begin with city/, an authorization rule should be created with the value city/.*.
For TLS type, authorization is configured using the authRulesMapping field of the corresponding MQTT Client Credentials. Here is a model of the credentials value:
1
2
3
4
5
{
    "certCnPattern": $certCnPattern,
    "certCnIsRegex": $certCnIsRegex,
    "authRulesMapping": $authRulesMapping
}
Where:
- $certCnPattern - the pattern for the common name that should be present in the certificate chain.
- $certCnIsRegex - option to control whether the common name (CN) pattern is treated as a regular expression (regex) for matching.
- $authRulesMapping - the mapping used to configure the access restrictions for different keywords.
For example,
1
2
3
4
5
6
7
8
9
10
{
    "example_1": {
        "pubAuthRulePatterns": ["example_pub_topic/.*"],
        "subAuthRulePatterns": ["example_sub_topic/.*"]
    },
    "example_2": {
        "pubAuthRulePatterns": [".*"],
        "subAuthRulePatterns": [".*"]
    }
}
This allows clients to connect with a certificate containing example_1 in its CN to publish only to topics that start with example_pub_topic/ and subscribe to topics that start with example_sub_topic/. Clients with a certificate containing example_2 are allowed to publish and subscribe to any topic.
Note: if either pubAuthRulePatterns or subAuthRulePatterns is set to null or an empty list ([]), the client will not be able to publish to or subscribe to any topics.

Example
X.509 Certificates are used to set up mutual (two-way) authentication for MQTT over TLS. The instructions below will describe how to connect MQTT client using X.509 Certificate to TBMQ.
In particular, there are two strategies that can be used for establishing connection between the client and TBMQ:
- X.509 Certificate chain.
Configure TBMQ to trust all client certificates from a specific trust anchor (intermediate certificate). This feature eliminates the need for manual certificate updates on each MQTT client credential when certificate rotation occurs. - X.509 Certificate.
Configure TBMQ to accept connections from the specific devices using pre-configured client certificates.
Step 1. Prepare your server and client certificate chainFollow the MQTT over SSL guide to provision server certificate if you are hosting your own TBMQ instance. Once provisioned, you should prepare a CA root certificate in pem format. This certificate will be used by MQTT clients to validate the server certificate. Save the CA root certificate to your working directory as “ca.pem”. Step 2. Generate Client certificate chainWe should generate a certificate chain with reasonable Common Names (CNs). We will use the intermediate certificate to sign certificates for our devices. For example, the certificate chain CNs might be the following:
Use the following commands to generate the self-signed private keys, certificate signing requests, and x509 certificates for each chain level. The commands are based on the OpenSSL tool, which is most likely already installed on your workstation: Step 2.1 Generate root certificate Generate the Root certificate and private key, use the following command. Don’t forget to put the correct CN when prompted: Sample output, referencing *company.com* as CNStep 2.2 Generate intermediate certificate To generate the intermediate key and certificate request, use the following command. Don’t forget to put the correct CN when prompted: Sample output, referencing *group.company.com* as CNTo generate the intermediate certificate, use the following command. Sample outputStep 2.3 Generate device certificate To generate the device key and certificate request, use the following command. Don’t forget to put the correct CN when prompted: Sample output, referencing device123.group.company.com as CNTo generate the device certificate, use the following command. Sample outputFinally, you need to concatenate certificates into a chain starting from the device certificate till the root. The output of the commands will be private keys and certificates for each level of chain. In the next steps we will use device key file deviceKey.pem and a chain of certificates chain.pem. Step 3. Provision Intermediate Public Key in MQTT Client CredentialsGo to TBMQ Web UI -> Authentication -> Credentials -> Create new or update exising one. Select X.509 Certificate Chain type, insert the CN of intermediateCert.pem file. Step 4. Trust the certificateFor the MQTT client to establish a secure TLS connection, the CA (Certificate Authority) that signed its certificate must be trusted.
If the certificate is issued by a well-known public CA, it is already trusted by default.
If both TBMQ and the clients use certificates issued by the same CA, no additional configuration is required.
If it is another private or internal CA, you must add the CA certificate ( Run the following command to import the CA certificate into the truststore. Step 5. Test the connectionExecute the following command to upload temperature readings to TBMQ using secure channel: Similar command for the self-signed server certificate: Don’t forget to replace YOUR_TBMQ_HOST with the host of your TBMQ instance. |
Step 1. Prepare your server and client certificateFollow the MQTT over SSL guide to provision server certificate if you are hosting your own TBMQ instance. Once provisioned, you should prepare a CA root certificate in pem format. This certificate will be used by MQTT clients to validate the server certificate. Save the CA root certificate to your working directory as “ca.pem”. Step 2. Generate Client certificateUse the following command to generate the self-signed private key and x509 certificate. The command is based on the openssl tool which is most likely already installed on your workstation: To generate the RSA based key and certificate, use: To generate the EC based key and certificate, use: The output of the command will be a private key file key.pem and a public certificate cert.pem. We will use them in next steps. Step 3. Provision Client Public Key in MQTT Client CredentialsGo to TBMQ Web UI -> Authentication -> Credentials -> Create new or update exising one. Select X.509 Certificate Chain type, insert the CN of cert.pem file. Step 4. Trust the certificateFor the MQTT client to establish a secure TLS connection, its certificate must be trusted.
If the certificate is signed by a well-known public CA, it is already trusted by default.
If it is a self-signed, import the client certificate ( Run the following command to import the certificate into the truststore. Step 5. Test the connectionExecute the following command to upload temperature readings to TBMQ using secure channel: Don’t forget to replace YOUR_TBMQ_HOST with the host of your TBMQ instance. |
Next steps
-
Getting started guide - This guide provide quick overview of TBMQ.
-
Installation guides - Learn how to set up TBMQ using Docker or deploy it in K8S environments on AWS, GCP, and Azure.
-
Configuration guide - Learn about TBMQ configuration files and parameters.
-
MQTT client type guide - Learn about TBMQ client types.
-
Integration with ThingsBoard - Learn about how to integrate TBMQ with ThingsBoard.