ThingsBoard System Administrator is able to configure a connection to a SMTP server that will be used to distribute activation and password reset emails to users.
Mail Server configuration
Following steps are required to configure Mail Server settings.
First, you must log in to your ThingsBoard instance WEB UI as a system administrator. Then, left click on the three dots in the top-right corner of the WEB UI and select “Profile”. Change ‘[email protected]’ to your email address. Now re-login as administrator again.

Now we need to configure SMTP server.
Starting from ThingsBoard 3.5.2 we have added mail settings templates for such providers: Google, Office 356, SendGrid. So users don’t have to fill in connection settings like SMTP server host, port and TLS configuration. If you want to change some setting use “Custom” SMTP provider type.
This guide provides examples of configuring SMTP server using Sendgrid, Gmail and Office 365. In your configuration you can use any other SMTP server.
Sendgrid configuration example
A SendGrid configuration is fairly simple and straightforward. First, you need to create SendGrid account. You can try it for free and the free plan is most likely enough for platform evaluation.
ㅤ1. Setup SendGrid configuration
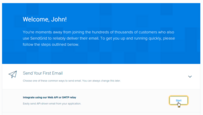
- Once you create your account, you will be forwarded to the welcome page. Click "Start" button;
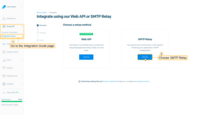
- Go to the "Email API" section -> "Integration Guide" page and choose a setup method - "SMTP Relay";
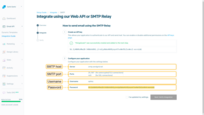
- Create an API key: enter the API key name and generate it.
ㅤ2. Setup ThingsBoard mail server settings
Now navigate to the “Settings” page -> “Mail Server” tab your ThingsBoard instance and fill in the form:
- Fill in the “Mail From” field;
- Select SMTP provider - SendGrid;
- Enter username: apikey;
- Enter password: previously generated password.
Click “Save” button.

ㅤ3. Send test email
Optional, you can receive test mail on your email. In case of error in configuration, you should receive a popup with the error log.
You can also complete verification on the SendGrid website.

Gmail configuration with basic authentication example
In order to use Gmail, you will need to enable two-step verification (this step is not mandatory, but it is highly recommended.) and generate an app password.
ㅤ1. Setup Google Account configuration
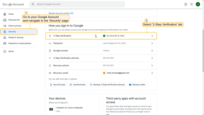
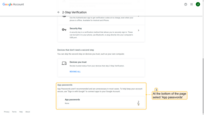
- Go to your Google Account and navigate to the "Security" page. Then select "2-Step Verification" tab;
- At the bottom of the page, select "App passwords";
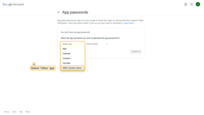
- Click on the "Select app" and select "Other" app in the drop-down menu;
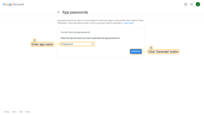
- Enter app name and click "Generate" button;
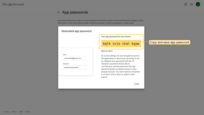
- Copy and save app password.
ㅤ2. Setup ThingsBoard mail server settings
Once this is ready, you should be able to set up mail server using the information below. Navigate to the “Settings” page -> “Mail Server” tab your ThingsBoard instance and fill in the form:
- Fill in the “Mail From” field;
- Select SMTP provider - Google;
- Enter your email as username;
- Leave basic authentication type;
- Enter previously copied app password.
Click “Save” button.

ㅤ3. Send test email
Optional, you can receive test mail on your email. In case of error in configuration, you should receive a popup with the error log.
Gmail configuration with OAuth2 authentication example
Starting from ThingsBoard 3.5.2 it is possible to use OAuth2 authorization for Gmail SMTP server. Using OAuth 2.0 protocol, user can do authentication by Gmail Web OAuth instead of inputting user and password directly in application. This way is more secure, but a little bit complex.
To use Gmail OAuth2 you need to create a project in Google Developers Console but first let’s set up ThingsBoard mail server settings.
ㅤ1. Setup ThingsBoard mail server settings
- In your ThingsBoard instance, go to the “Settings” page -> “Mail Server” tab;
- Fill in the “mail From” field;
- Select SMTP provider - “Google”;
- In the “Authentication” block, fill in username with email address you are going to use for sending mail from;
- Toggle the authentication type to OAuth2;
- Copy and save the “Redirect URI template”. It will be needed while set up Google project credentials.

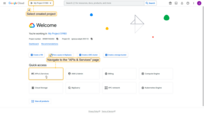
ㅤ2. Now let’s create a project in Google Developers Console
- Input “Project name” and “Location”. Then click “Create”. New project is created.
ㅤ3. Then you need to create credentials
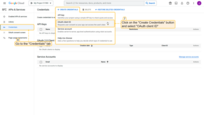
- Select created project and navigate to the "APIs & Services" page;
- Click on the "Credentials" tab, then click on the "Create Credentials" button and select "OAuth client ID";
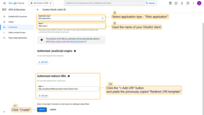
- In a "Create OAuth client ID" window select application type - "Web application" and input the name of your OAuth2 client. Then, in the "Authorized redirect URIs" section, click the "+ Add URI" button and paste the previously copied "Redirect URI template". Click "Create";
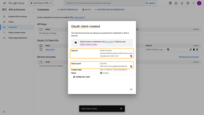
- Save created client ID and client secret for future steps.
ㅤ4. Complete ThingsBoard settings setup
Back to the Thingsboard portal and paste Client ID and Client secret from the previous steps into the appropriate fields. Click “Save”.

ㅤ5. Generate access token
Finally, we can get access token. For this click on the Generate access token and your browser will redirect you to provider login page. Please follow the steps in your browser and after acceptance we will automatically save Refresh Token and Access Token and redirect you back to ThingsBoard portal. If access token was successfully generated you will see status “generated”.

ㅤ6. Send test email
To check if everything works click “Send test email” button. Keep in mind that each time you change provider info system will drop refresh and access token and you will need to generate it again.
Office 365 configuration with OAuth2 authentication example
Starting from ThingsBoard 3.6 it is possible to use OAuth2 authorization for Office 365 SMTP server.
First, go to the “Azure directory” to save user principal name of user you want to use for mail sending (if not exists, please create or invite from external services):
- Sign in to the Azure portal and select Microsoft Entra ID;
- Select microsoft user and copy user principal name.
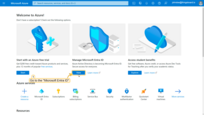
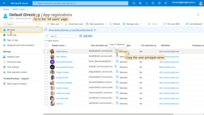
To use Office 365 OAuth2 you need to register an application in the Azure portal but first let’s set up ThingsBoard mail server settings.
ㅤ1. Setup ThingsBoard mail server settings:
- In your ThingsBoard instance, go to the “Settings” page -> “Mail Server” tab;
- Enter previously copied Microsoft user principal name (e.g. [email protected]);
- Select SMTP provider - “Office 365”;
- In the “Authentication” block, fill in username with microsoft user principal name (the same as you used for mail from);
- Toggle the authentication type to OAuth2;
- Copy and save the “Redirect URI template”. It will be needed while set up the Azure portal credentials.

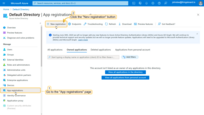
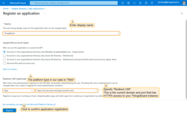
ㅤ2. Now let’s register an application in the Azure portal:
- Under the "Manage" section select the "App registrations" page, and click the "New registration" button;
- Enter a name for your application and paste the previously copied "Redirect URI template". Click the "Register" button;
- After application is created you can find "Client ID" and "Directory (tenant) ID" on "Overview" page. Save them for future steps.
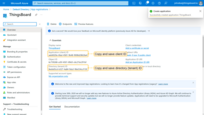
ㅤ3. Then you need to create a “Client secret”:
- Select "Certificates & secrets" > "Client secrets" > click "New client secret" button;
- Add a description for your client secret. Select an expiration for the secret or specify a custom lifetime. Click "Add";
- Save client secret value for future step.
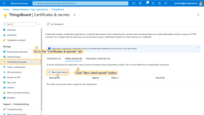
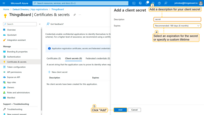
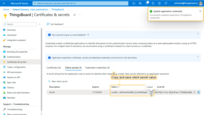
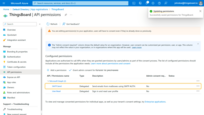
ㅤ4. To finish the authentication set up you need add API permissions for SMTP:
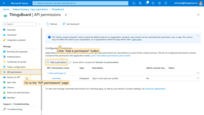
- In the Azure portal go to “API permissions” page and click “Add a permission” button;
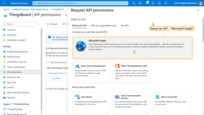
- Select an API - "Microsoft Graph";
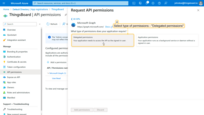
- Select type of permissions - "Delegated permissions";
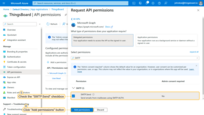
- Search and check the box “SMTP.Send” permission. Then click “Add permissions” button;
- Permissions is updated.
ㅤ5. Complete ThingsBoard settings setup:
Back to the ThingsBoard portal and paste Client ID, Client secret and Directory (tenant) ID from the previous steps into the appropriate fields. Click “Save”.

ㅤ6. Generate access token:
Finally, we can get access token. For this click on the “Generate access token” button and your browser will redirect you to provider login page. Please follow the steps in your browser and after acceptance we will automatically save Refresh Token and Access Token and redirect you back to ThingsBoard portal. If access token was successfully generated you will see status “generated”.

ㅤ7. Send test email:
To check if everything works click “Send test email” button. Keep in mind that each time you change provider info system will drop refresh and access token and you will need to generate it again.
Office 365 troubleshooting
If you see authentication errors while sending email (e.x. 5.7.3):
- Make sure SMTP settings are enabled for user. For this go to here. Then select user → Mail → Manage email apps → Authenticate SMTP (if enabled - disable and enable again);
- In Azure portal make sure Security defaults are disabled.
Next steps
-
Getting started guides - These guides provide quick overview of main ThingsBoard features. Designed to be completed in 15-30 minutes.
-
Data visualization - These guides contain instructions on how to configure complex ThingsBoard dashboards.
-
Data processing & actions - Learn how to use ThingsBoard Rule Engine.
-
IoT Data analytics - Learn how to use rule engine to perform basic analytics tasks.
-
Hardware samples - Learn how to connect various hardware platforms to ThingsBoard.
-
Advanced features - Learn about advanced ThingsBoard features.
