KPN Things Integration
KPN Things is an IoT platform provided by KPN, a Dutch telecommunications company, supporting a range of connectivity types — including LoRa, LTE-M, and mobile data. Use this integration to bring device data already routed through a KPN Things Flow into ThingsBoard for monitoring and rule-based automation — including sending commands back to those devices.
Architecture
Section titled “Architecture”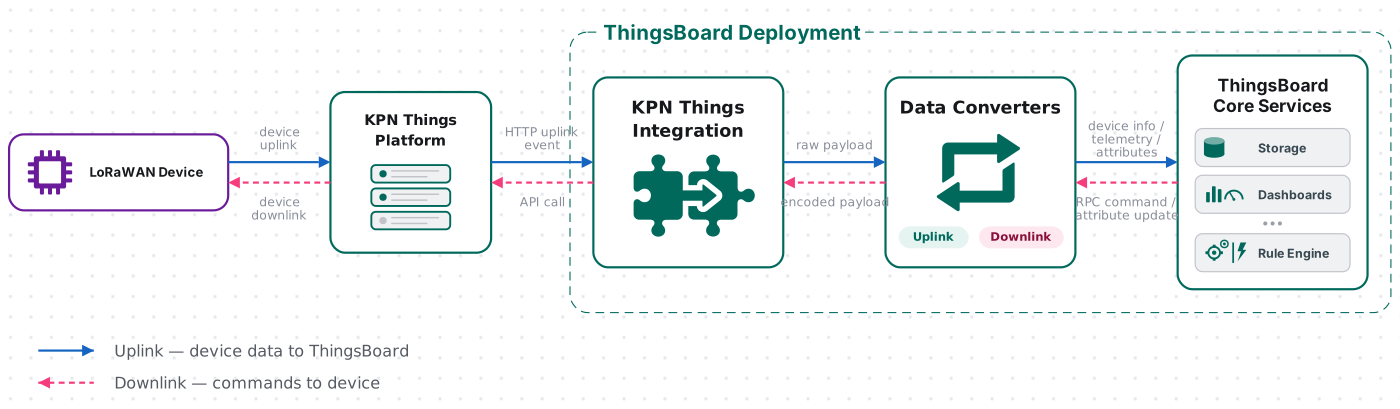
A device sends data through its assigned KPN Things Flow, which forwards it as SenML over HTTP to the integration’s endpoint. The uplink converter decodes the payload into telemetry and attributes, and the ThingsBoard Core Service stores the data, creating the device automatically on first contact. For downlink, the Rule Engine hands a message to the integration; the downlink converter encodes it, and ThingsBoard delivers it to the device through the KPN Things API.
Prerequisites
Section titled “Prerequisites”Before creating the integration, ensure:
- You have access to ThingsBoard Cloud with integration functionality enabled for your tenant.
- You have permissions to create integrations and data converters in ThingsBoard.
- You have a KPN Things portal account with administrative access.
- You have at least one IoT device created and registered in the KPN Things platform.
- Your device is linked to a Flow in KPN Things — devices must be assigned to a flow to send or receive data.
- Optional: For testing downlink functionality, you will need API credentials from KPN Things (see Obtain KPN Things API Credentials section).
Set Up the Integration in ThingsBoard
Section titled “Set Up the Integration in ThingsBoard”To set up the KPN Things integration, first create an uplink data converter to process incoming messages, then create and configure the integration.
Create the Uplink Data Converter
Section titled “Create the Uplink Data Converter”The uplink converter receives each HTTP message sent by KPN Things, parses the JSON payload, and returns a structured object that ThingsBoard uses to create or update a device and store its telemetry and attributes.
KPN Things pre-decodes device data to SenML format before forwarding it to ThingsBoard (enabled in the Enable Data Processing step). Because of this, the default converter passes the incoming JSON through without modification — no custom byte decoding is needed. You can extend it to rename fields, filter values, or derive additional attributes.
For the full decoder function reference — all input parameters and output fields — see Uplink data converter.
- Go to Integrations ⇾ Data converters.
- Click + Add data converter ⇾ Create new converter.
In the Add data converter dialog:
- Converter type — leave Uplink (selected by default).
- Integration type — in the search field, enter
KPNand select KPN Things from the list. - Name — enter a converter name, for example
KPN Things Uplink Converter. - Configure the decoder:
- The default decoder is pre-filled. Leave it unchanged for this guide.
By default the editor opens in TBEL; use the TBEL / JS toggle (upper right) to switch languages.
/** By default, we receive a message that is already correctly formatted.* But you can change the code for your purposes.*/return decodeToJson(payload);/** Decoder **//*By default, KPN Things sends a message that is already formattedaccording to the ThingsBoard uplink converter output structure.The JavaScript converter receives the payload as a byte array and parses it as JSON.*/var data = decodePayloadToJson(payload);return data;/** Helper functions **/function decodePayloadToString(payload) {var str = '';for (var i = 0; i < payload.length; i++) {str += String.fromCharCode(payload[i]);}return str;}function decodePayloadToJson(payload) {return JSON.parse(decodePayloadToString(payload));} - The default decoder is pre-filled. Leave it unchanged for this guide.
- Click Add.
Converter Input
ThingsBoard passes two variables to the decoder function:
| Variable | Type | Description |
|---|---|---|
payload |
byte array | The raw bytes of the HTTP request body sent by KPN Things. Call decodeToJson(payload) to parse it into a structured object. |
metadata |
object | Key-value map populated from HTTP request headers and the integration’s configured metadata (see Advanced settings in the integration). |
The decoded payload returned by decodeToJson(payload) has the following structure:
{ "deviceName": "urn:dev:DVNUUID:d74df9c0-c343-4879-9e4d-20483ff1b56d:", "deviceLabel": "My KPN Device", "deviceType": "DeviceSimulator(MobilePhoneapp)", "telemetry": [{ "ts": 1703251120000, "values": { "battery": "34.0", "temperature": 22.5 } }]}ThingsBoard reads deviceName to identify or create the device, deviceType to assign the device profile, and the telemetry array to store time-series data. To rename or filter fields before storage, transform these values in the decoder before returning.
Device Identifier
KPN Things identifies each device using a URN (Uniform Resource Name) as the deviceName. The URN follows the format:
urn:dev:DVNUUID:{UUID}:
For example: urn:dev:DVNUUID:d74df9c0-c343-4879-9e4d-20483ff1b56d:
On the first uplink, ThingsBoard creates a new device using this URN as its name. Subsequent messages from the same device update the existing device. The URN is stable for the lifetime of the device registration in KPN Things.
Create the KPN Things Integration
Section titled “Create the KPN Things Integration”- Go to Integrations ⇾ Integrations and click + Add integration.
- Basic settings:
- Set Integration type to KPN Things.
- Enable integration and Allow create devices or assets are on by default.
- Click Next.
- Uplink data converter:
- Click Select existing and choose the KPN Things Uplink Converter created in the previous step.
- Click Next.
- Downlink data converter:
- Click Skip — the downlink converter can be configured later if needed.
- Connection:
- Specify your Base URL.
- Copy the HTTP endpoint URL — you will need it when configuring the KPN Things destination.
- Click Add.
Connection Settings
Section titled “Connection Settings”Base URL
The base address of the ThingsBoard server, used to construct the HTTP endpoint URL. For ThingsBoard Cloud, this is https://thingsboard.cloud.
Destination Shared Secret
Optional secret token used to authenticate KPN Things requests arriving at ThingsBoard. Learn how to implement the shared secret.
HTTP Endpoint URL
Auto-generated endpoint for this integration. Paste this URL into the KPN Things ThingsBoard destination so that KPN Things forwards device uplink messages to ThingsBoard.
Allow Downlink
Enable to allow ThingsBoard to send commands back to devices via KPN Things. When toggled on, a Credentials section appears with two fields:
- API ID — the API key ID used to authenticate ThingsBoard against the KPN Things API
- API Key — the corresponding API secret key
Enable Security (Headers Filter)
Enable to restrict incoming requests to those carrying a specific HTTP header with a matching value. When toggled on, the section shows No headers filter — click Add to add a Header / Value row. Requests missing any listed header or carrying an incorrect value are rejected. Use this to validate the X-Things-Secret header generated by KPN Things — see Configure KPN Things Webhook Security.
Execute Remotely
When enabled, ThingsBoard generates an Integration key and Integration secret (both copyable) that allow the integration to run as a separate process outside the ThingsBoard cluster — useful when the integration must reach services not accessible from the ThingsBoard server.
Advanced Settings
- Description — optional free-text description for this integration
- Metadata — key-value pairs injected into every uplink message as
integrationMetadatain converter scripts; click Add to define entries
KPN Things Platform Setup
Section titled “KPN Things Platform Setup”With the ThingsBoard integration created and the HTTP endpoint URL in hand, set up your device and data routes in the KPN Things Portal. This section guides you through device creation, flow configuration, and destination setup.
Create and Register a Device
Section titled “Create and Register a Device”KPN Things supports multiple device types. For this guide, we use the Device Simulator (Web app) to test without physical hardware — no physical IoT device is required.
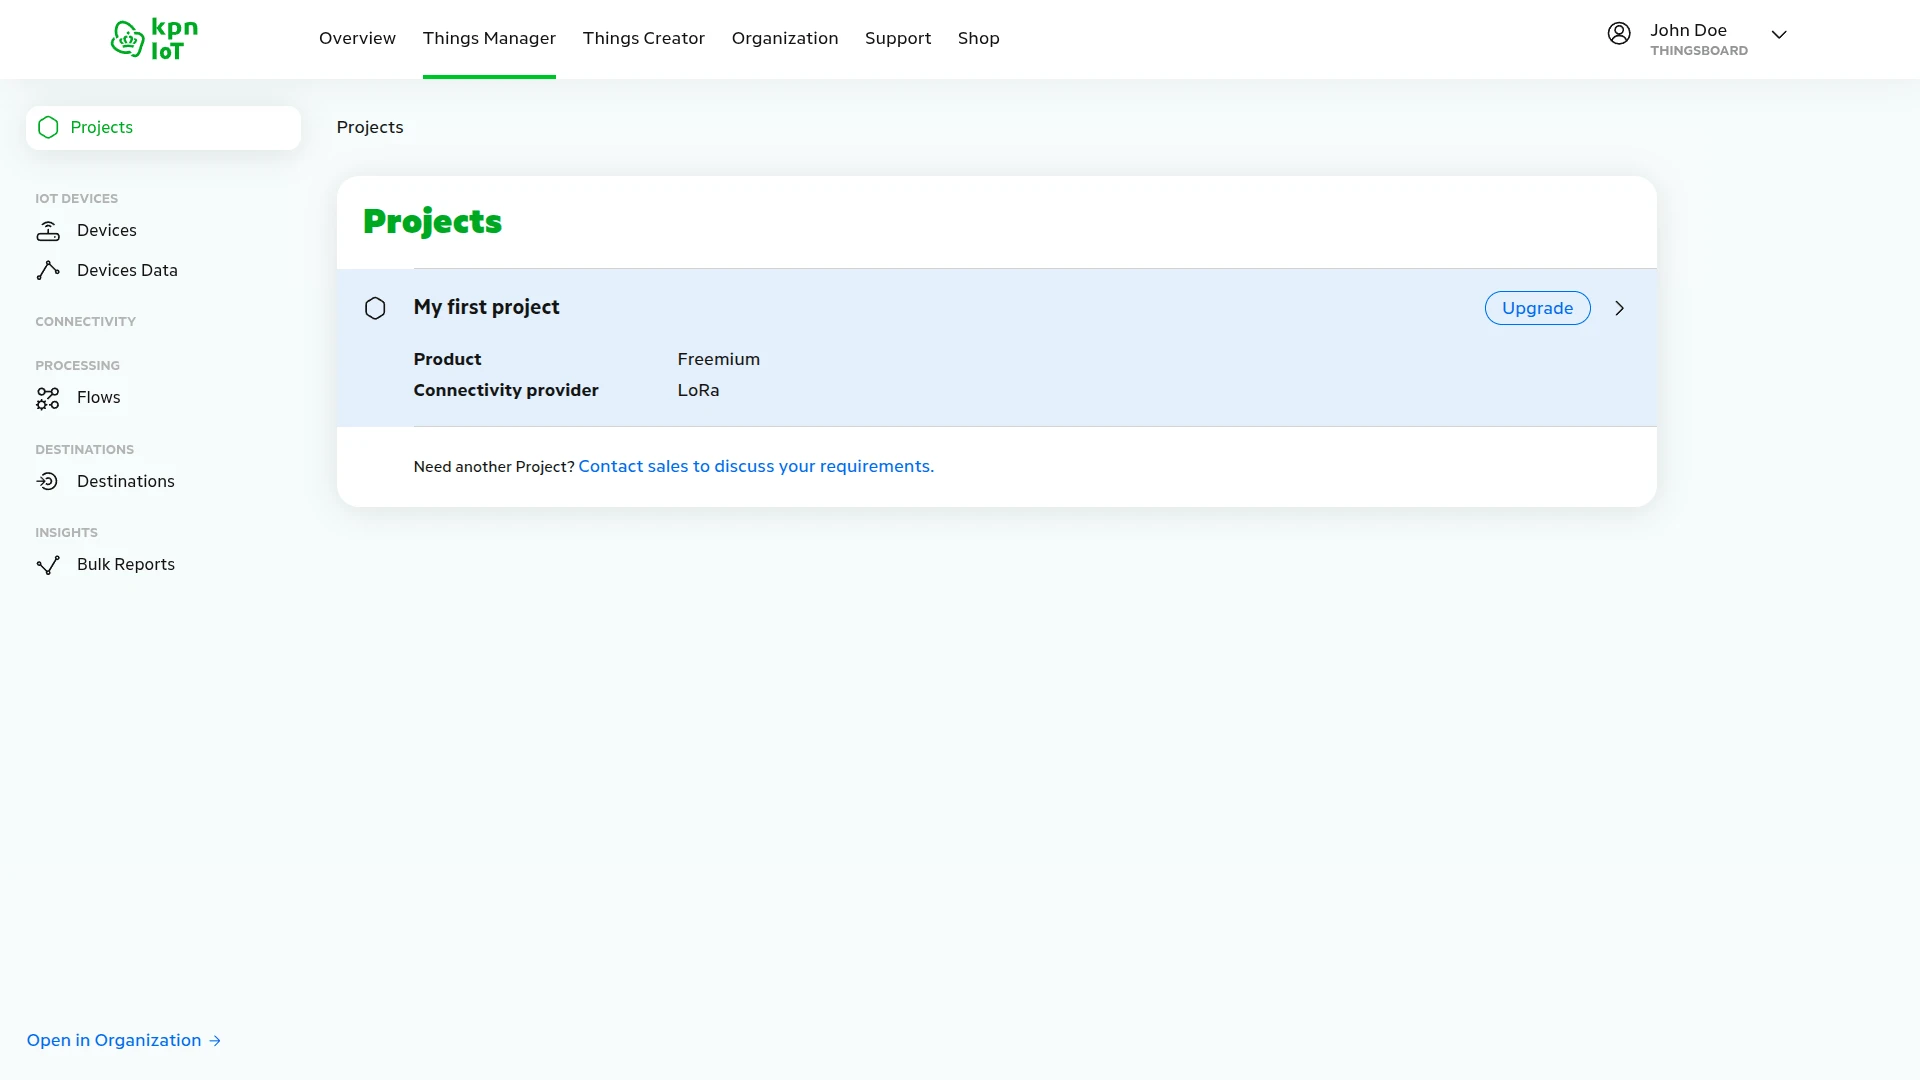
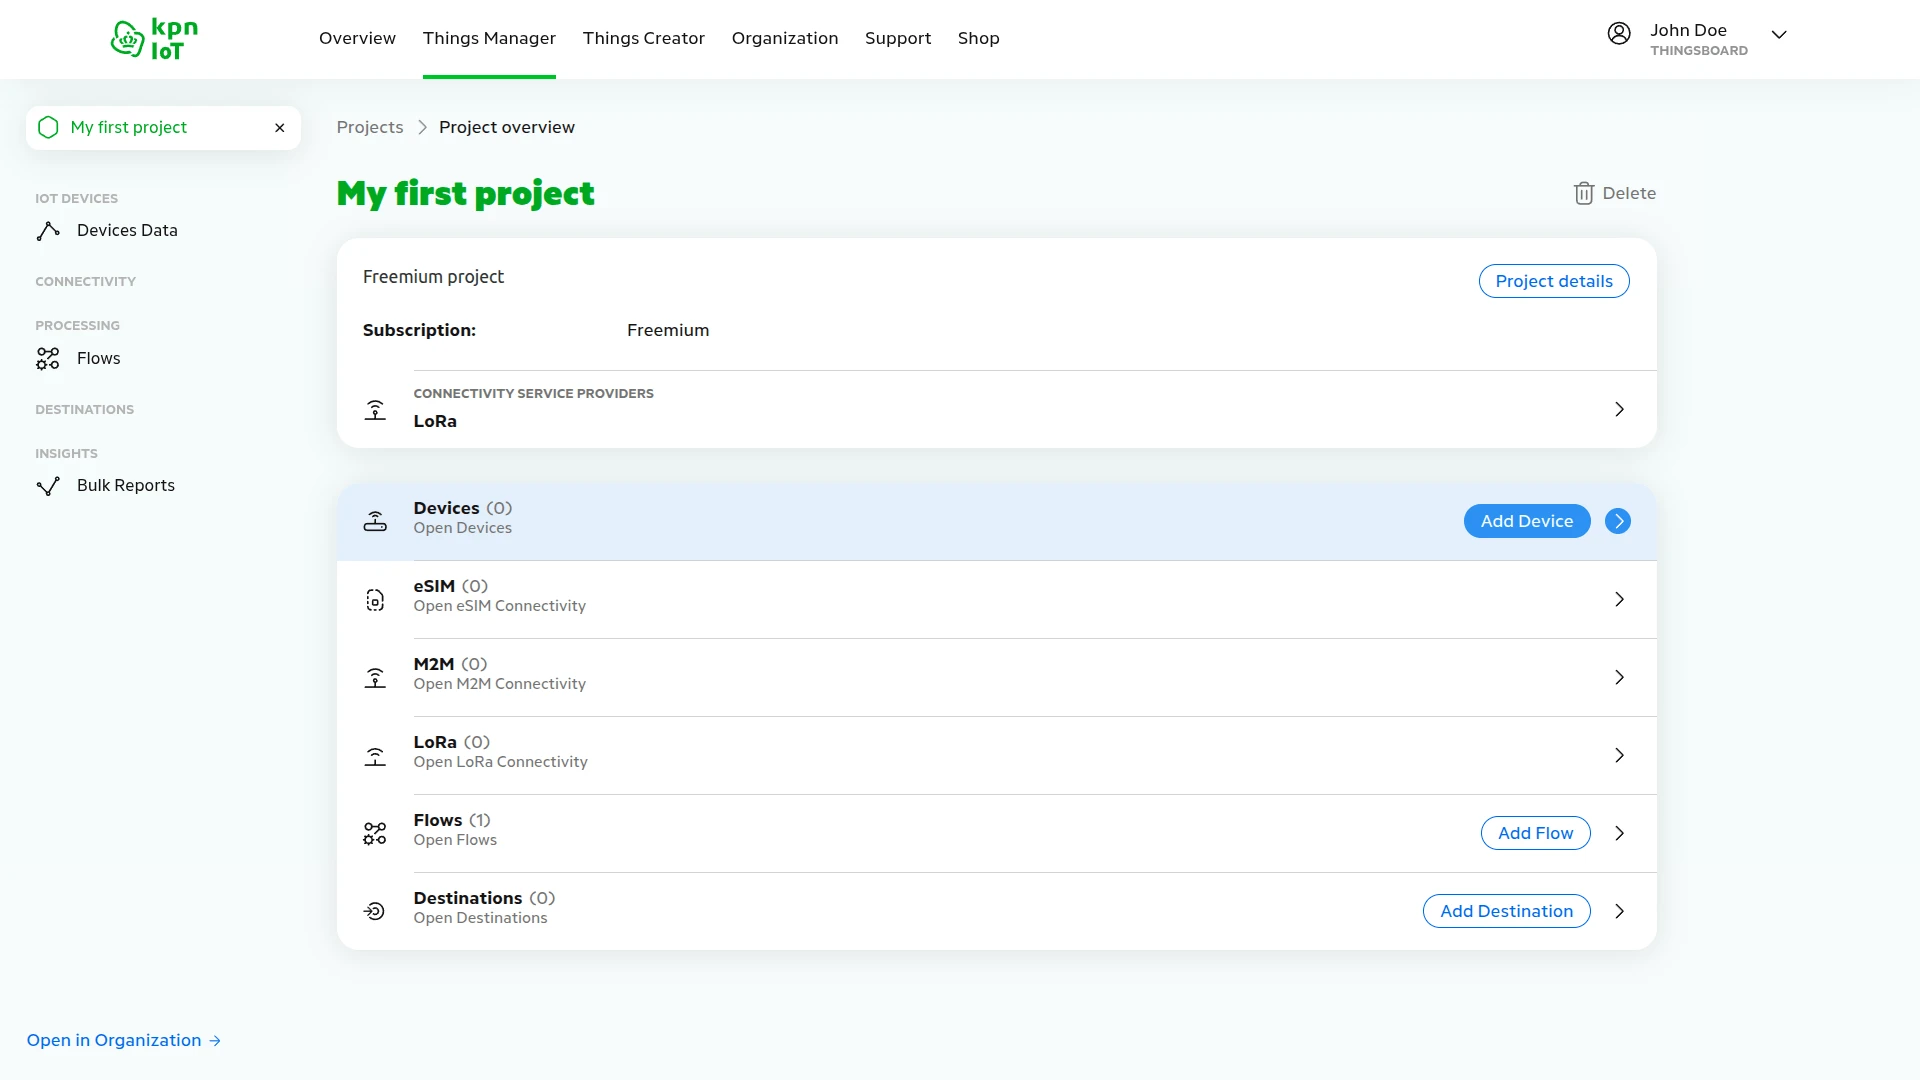
- Go to Things Manager and click My first project to open the project overview.
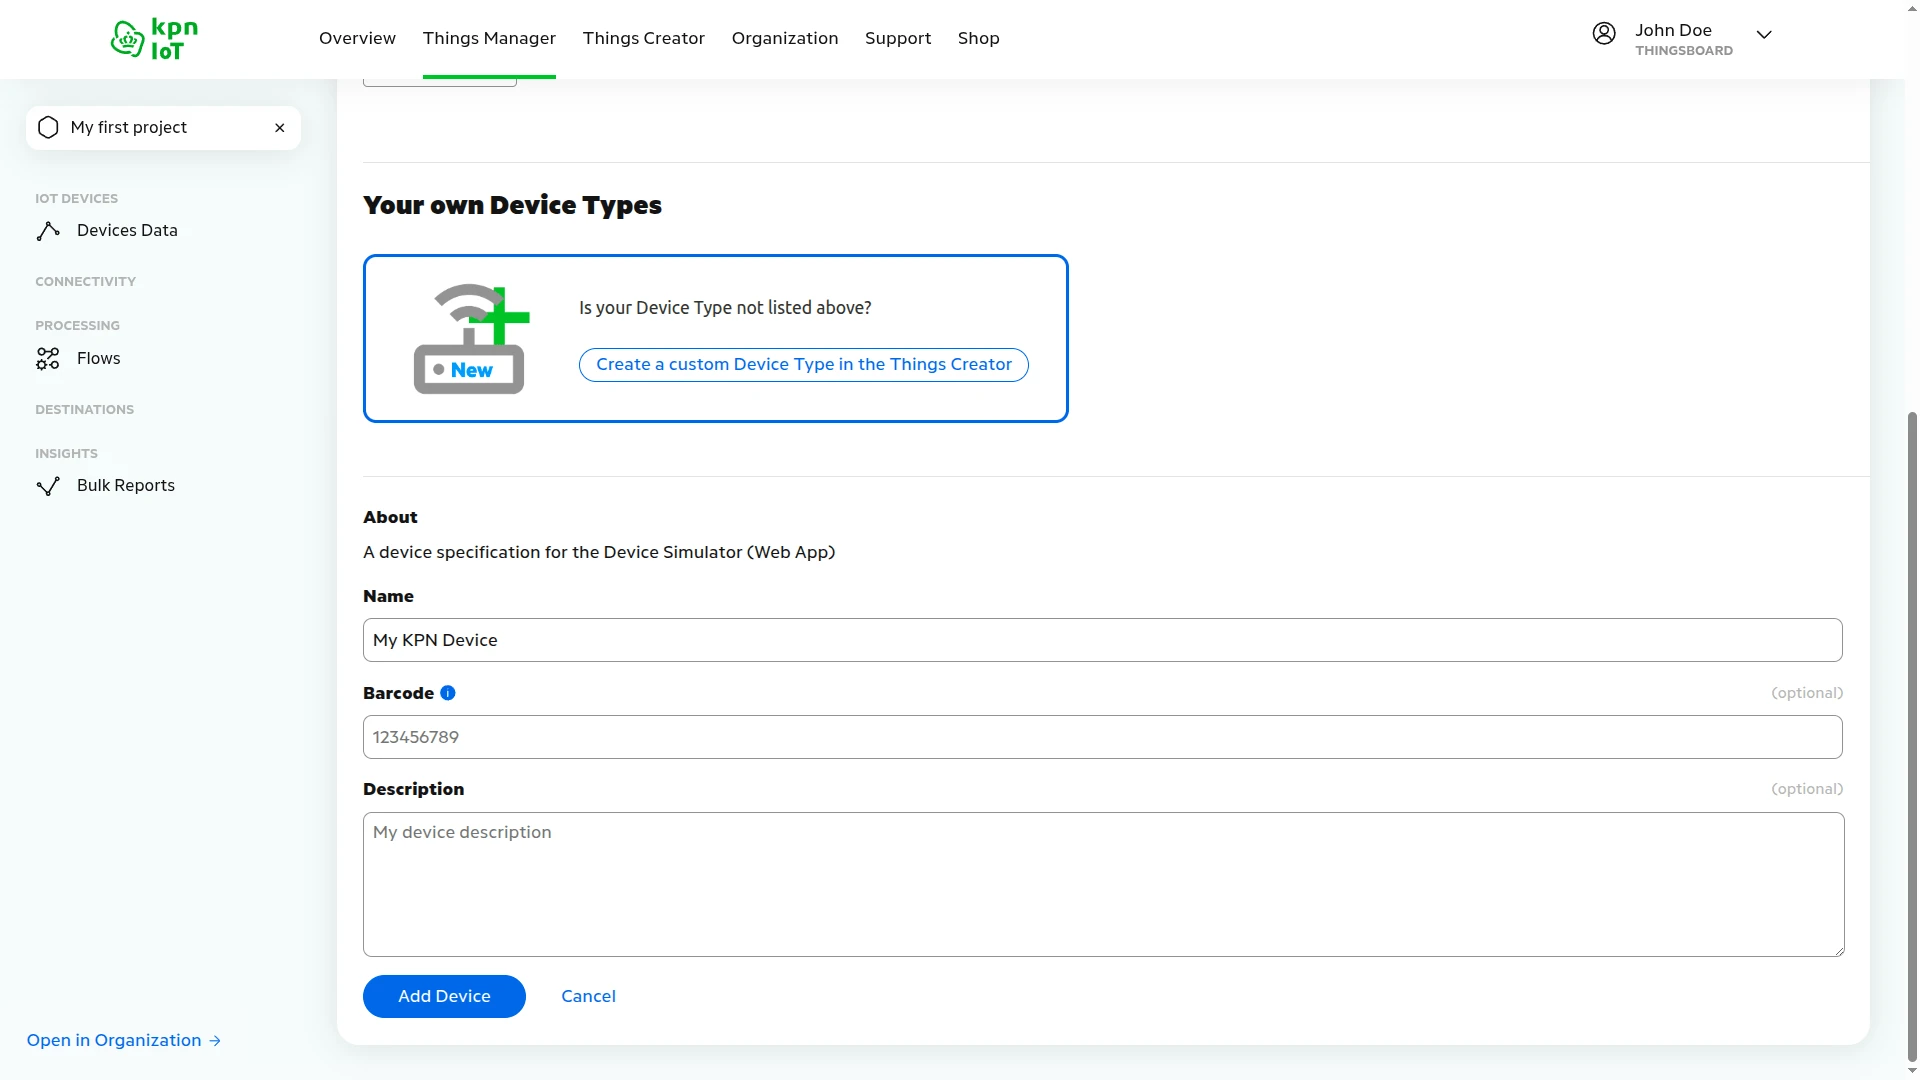
- In the Devices row, click Add Device.
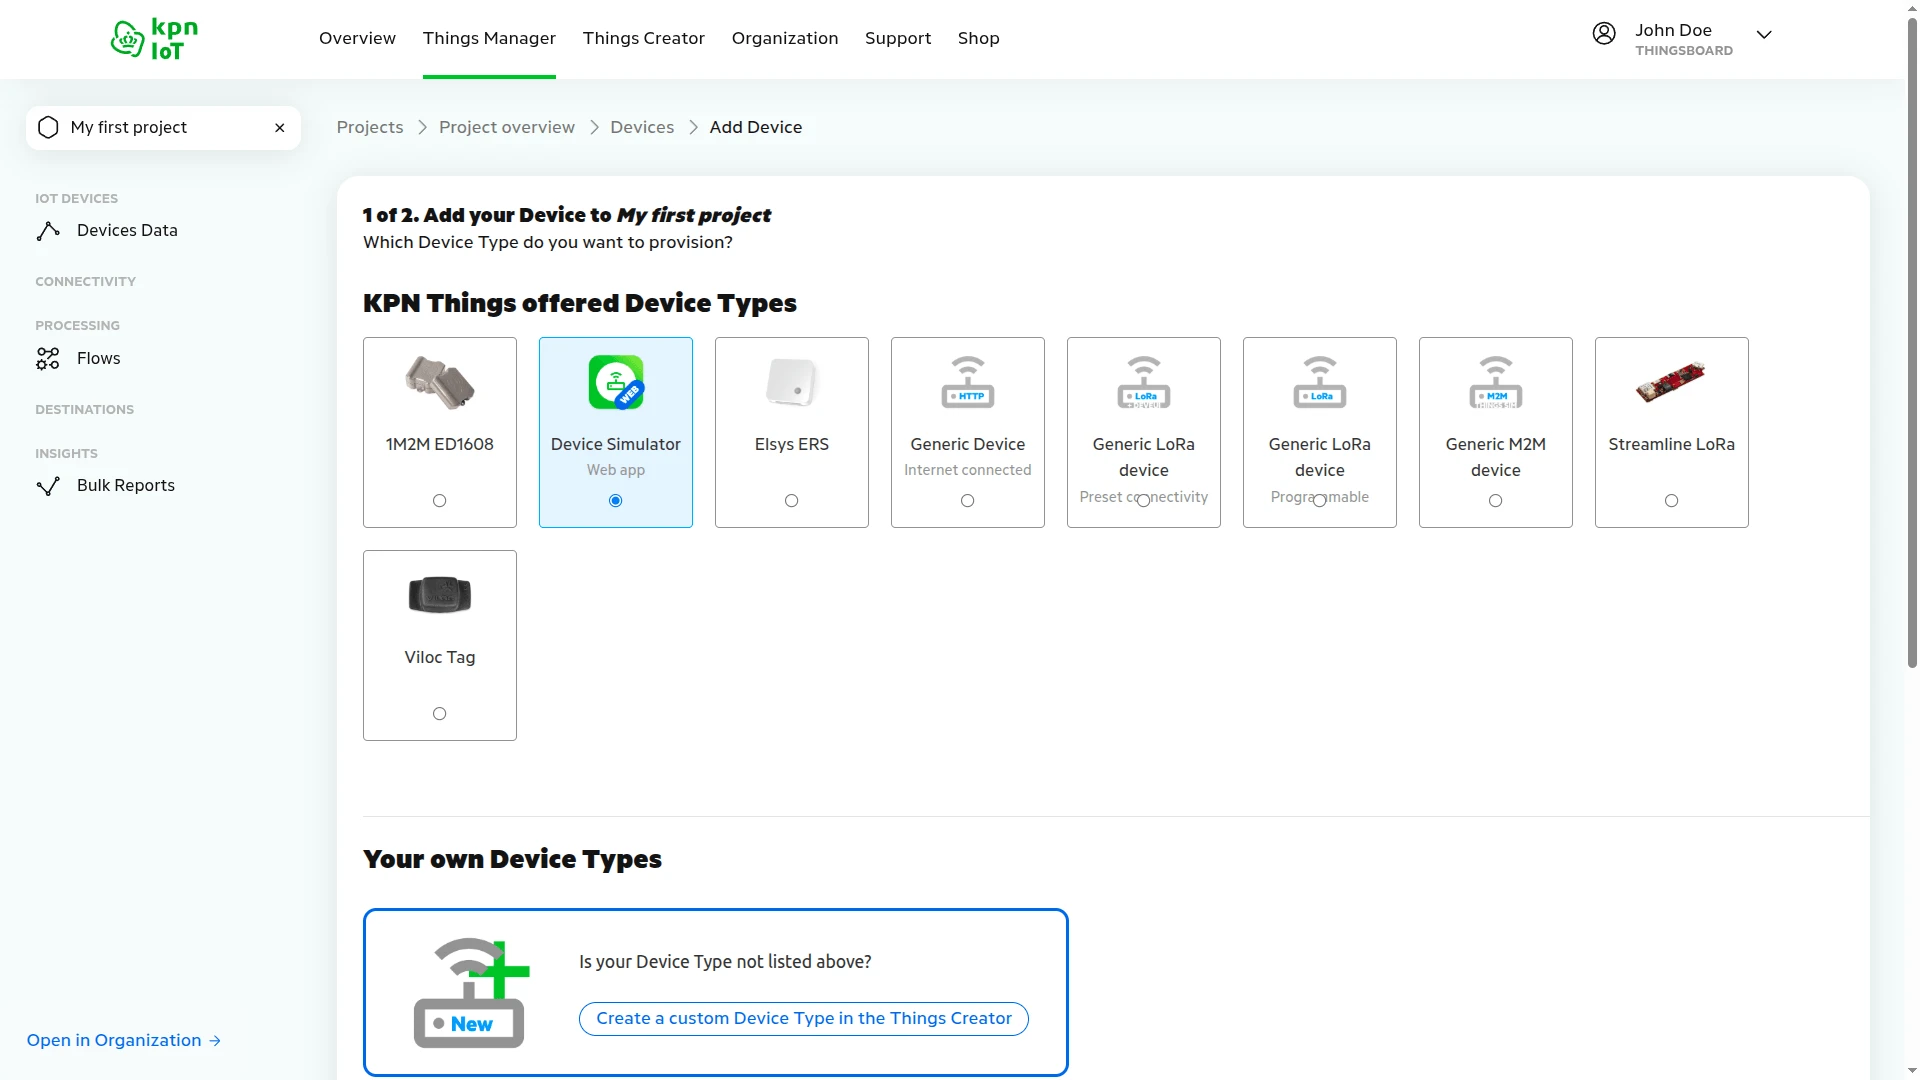
- Select your device type — for this guide, choose Device Simulator (Web app).
- Enter a device name — for example,
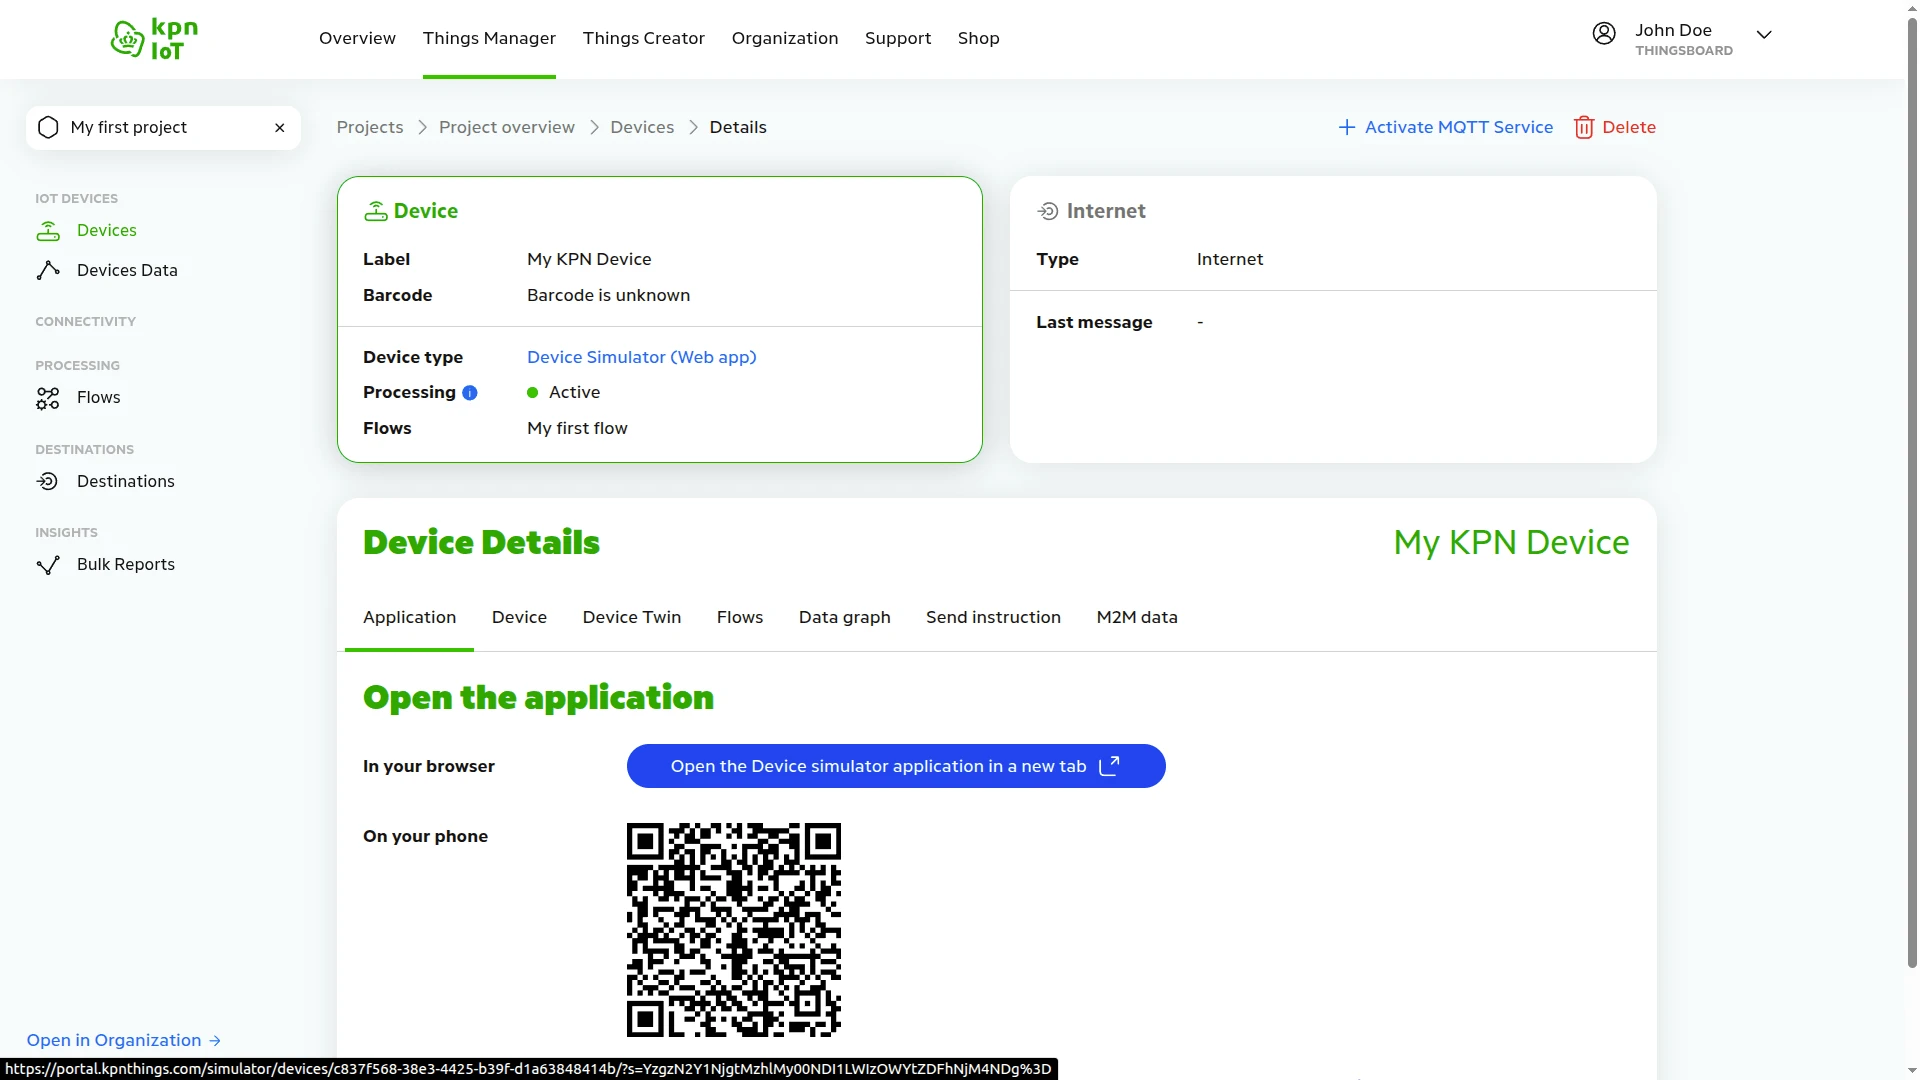
My KPN Device— and click Add Device. - The device is created — the KPN Internet Network is created toast confirms the setup. Use the browser link or scan the QR code to open the Device Simulator.
Create a Flow
Section titled “Create a Flow”Flows in KPN Things define how devices route their data. Each device must be assigned to a flow to send and receive data.
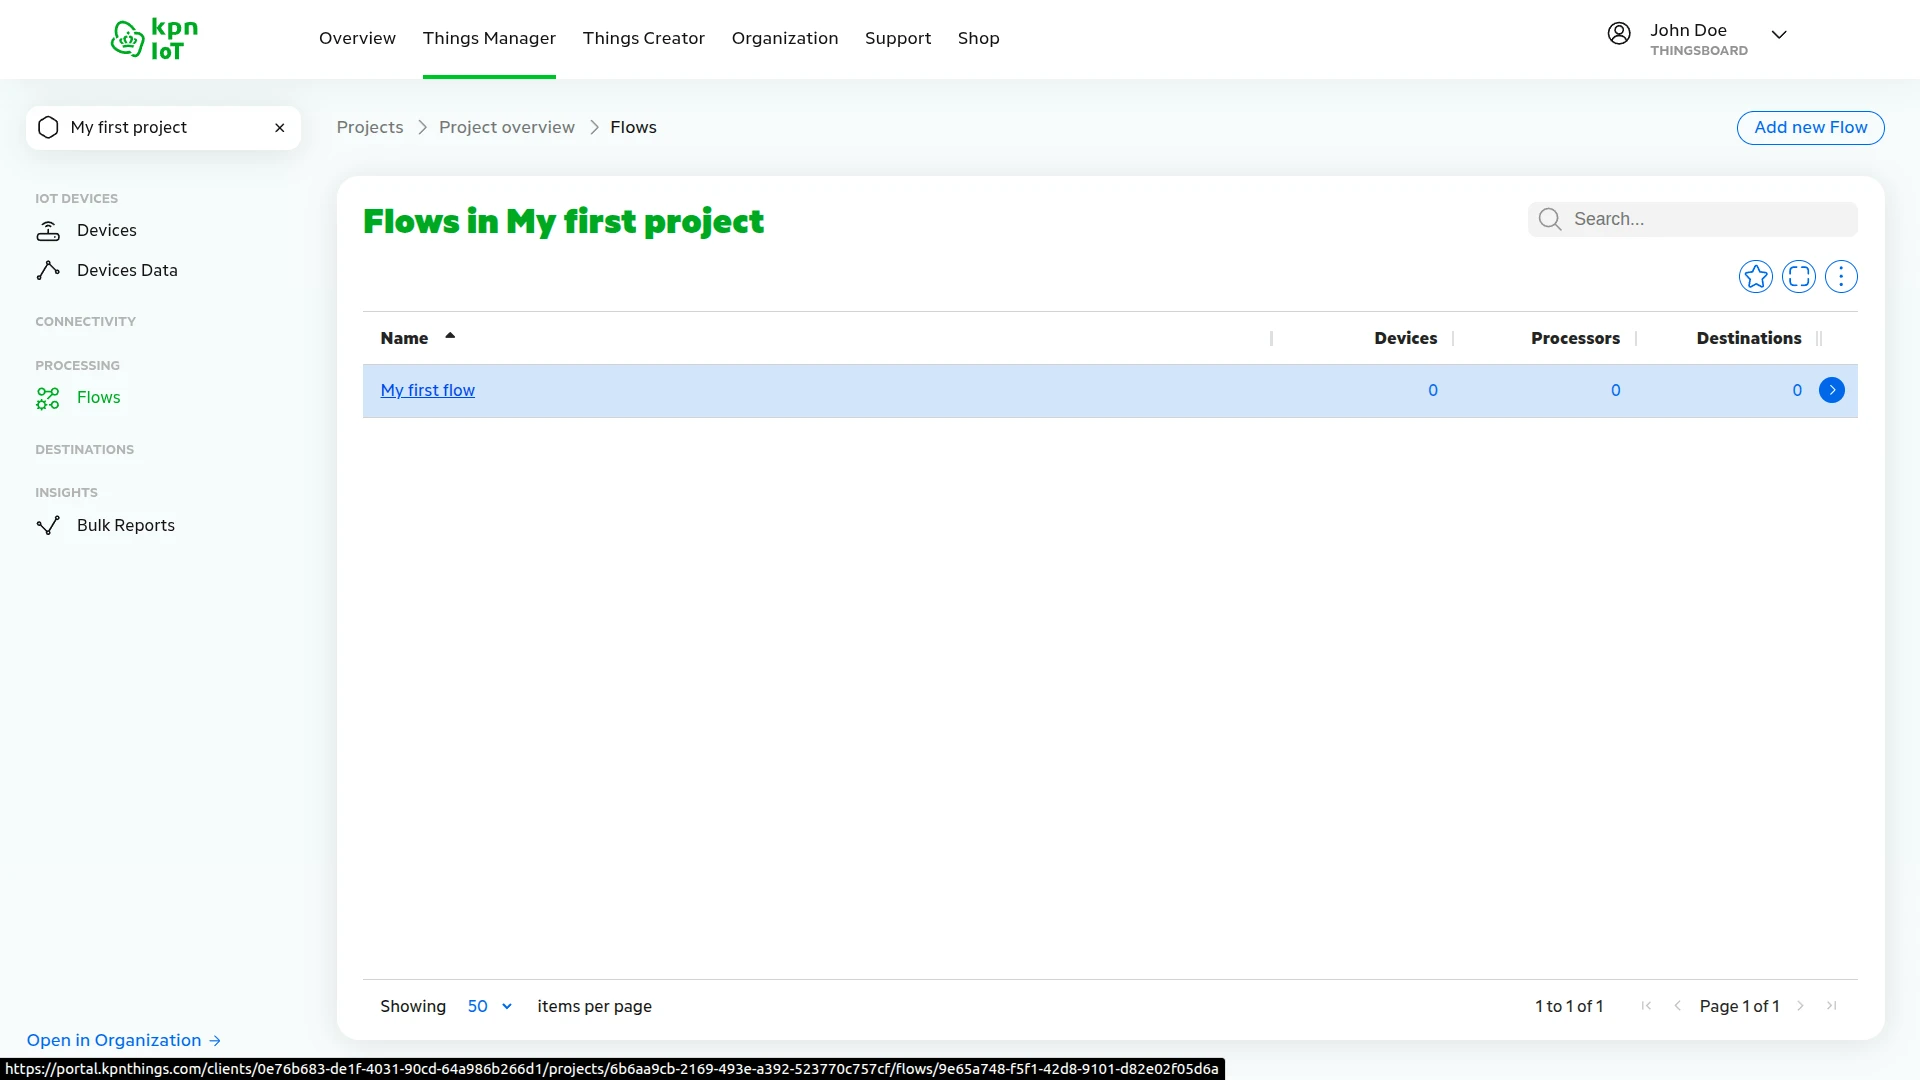
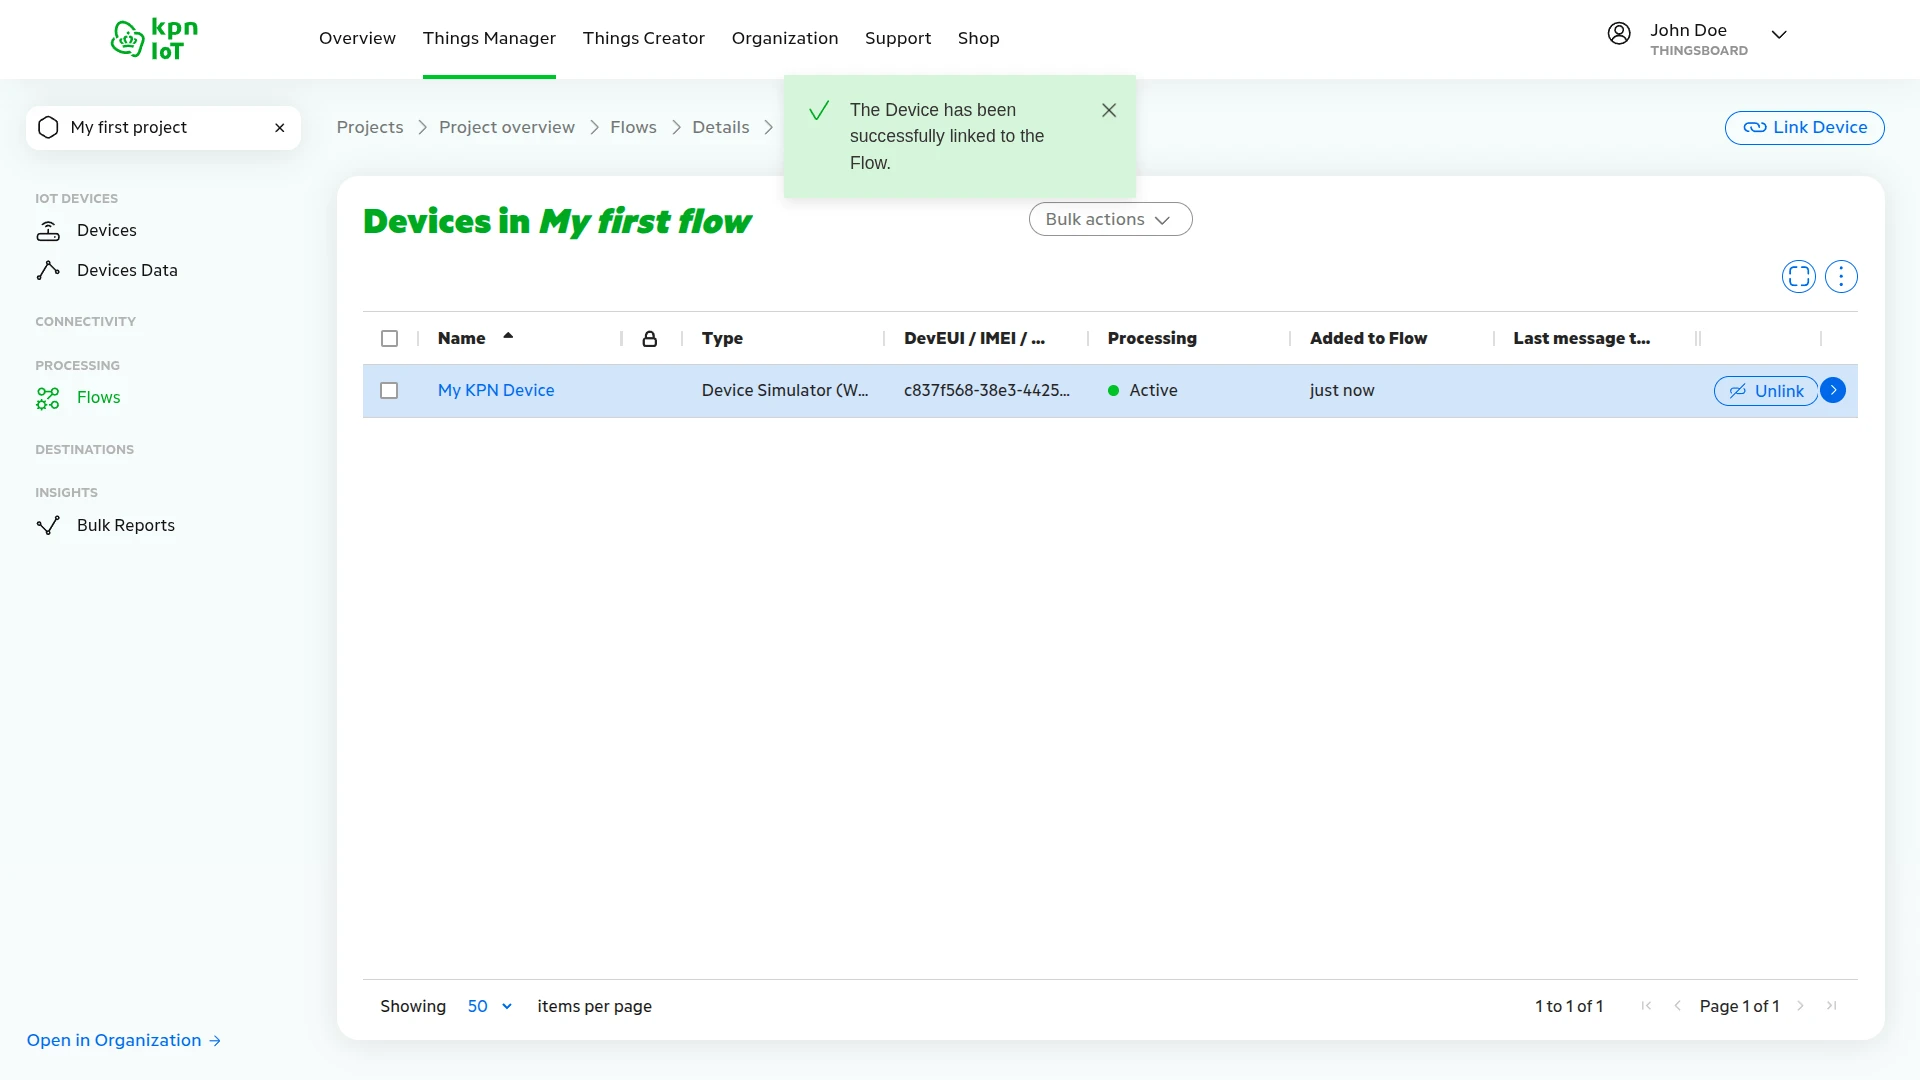
- Go to Flows in the left menu and click My first flow.
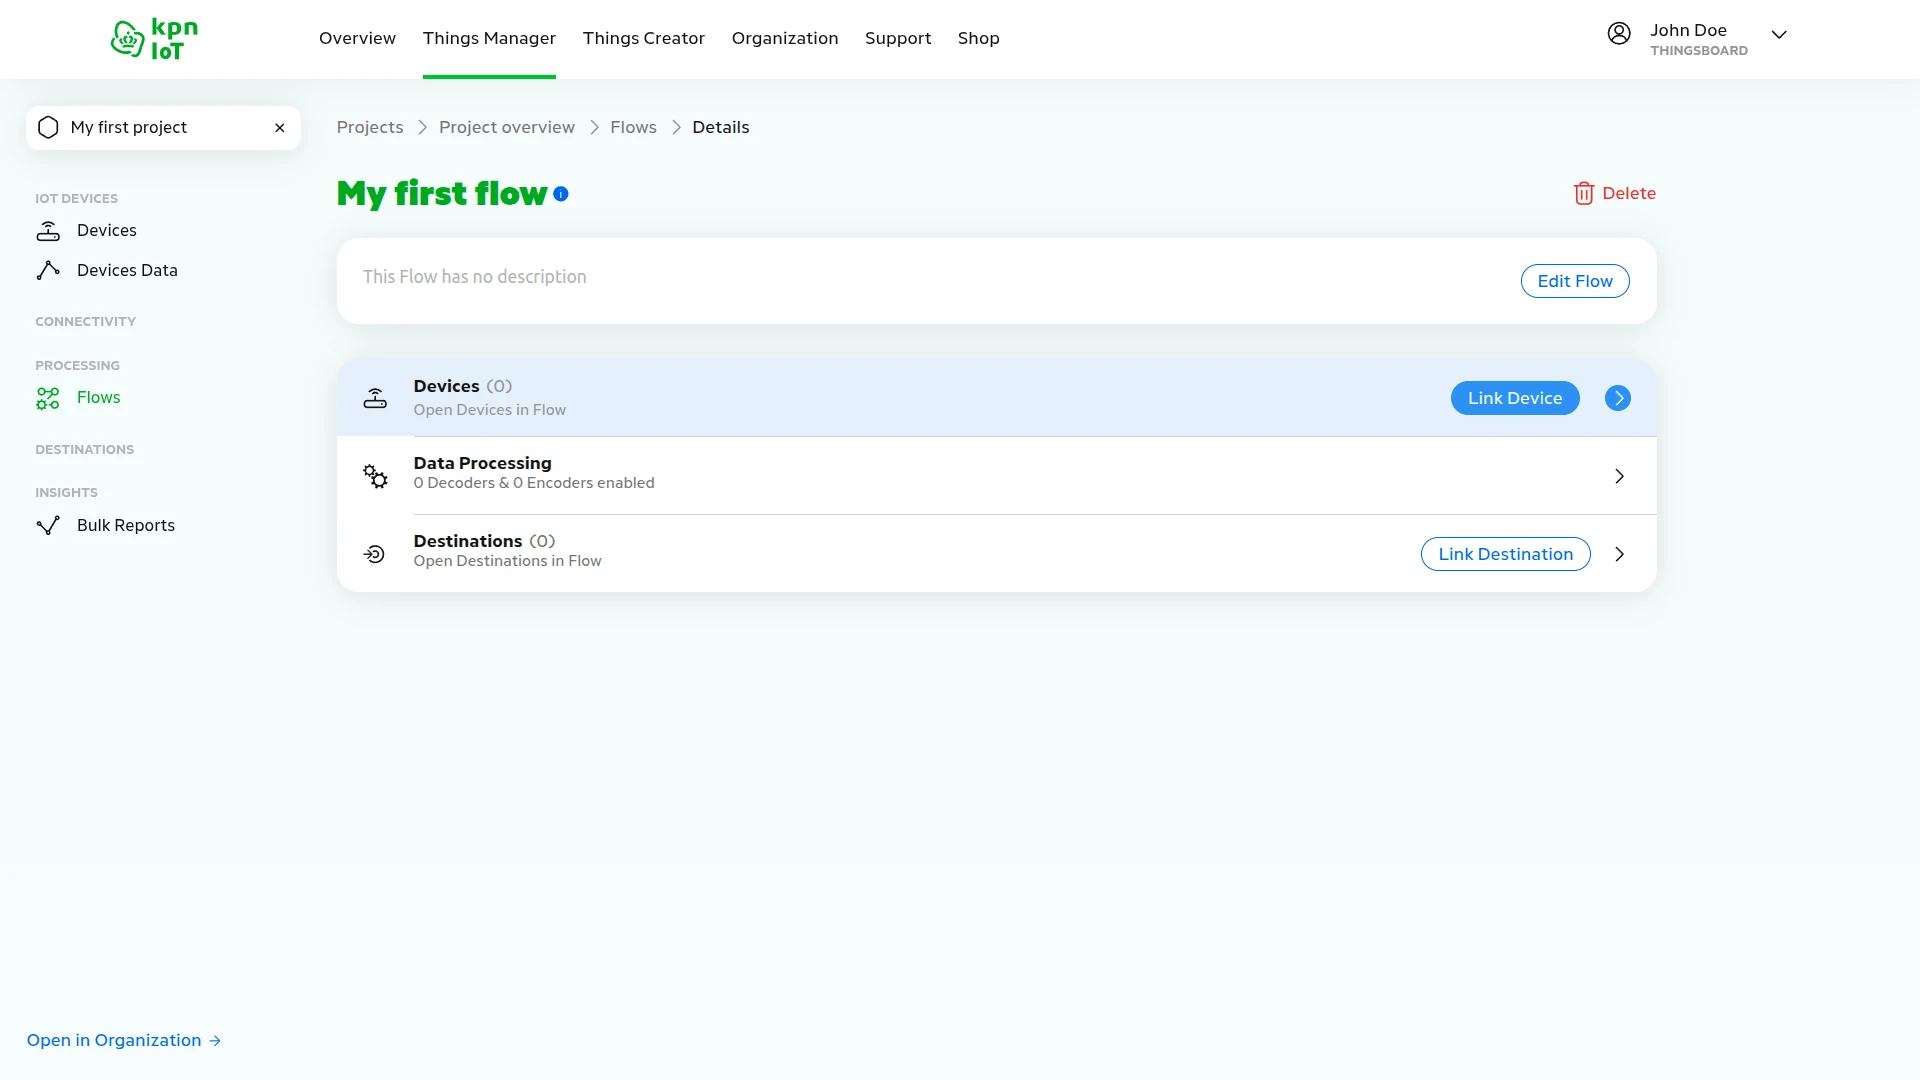
- In the Devices row, click Link Device.
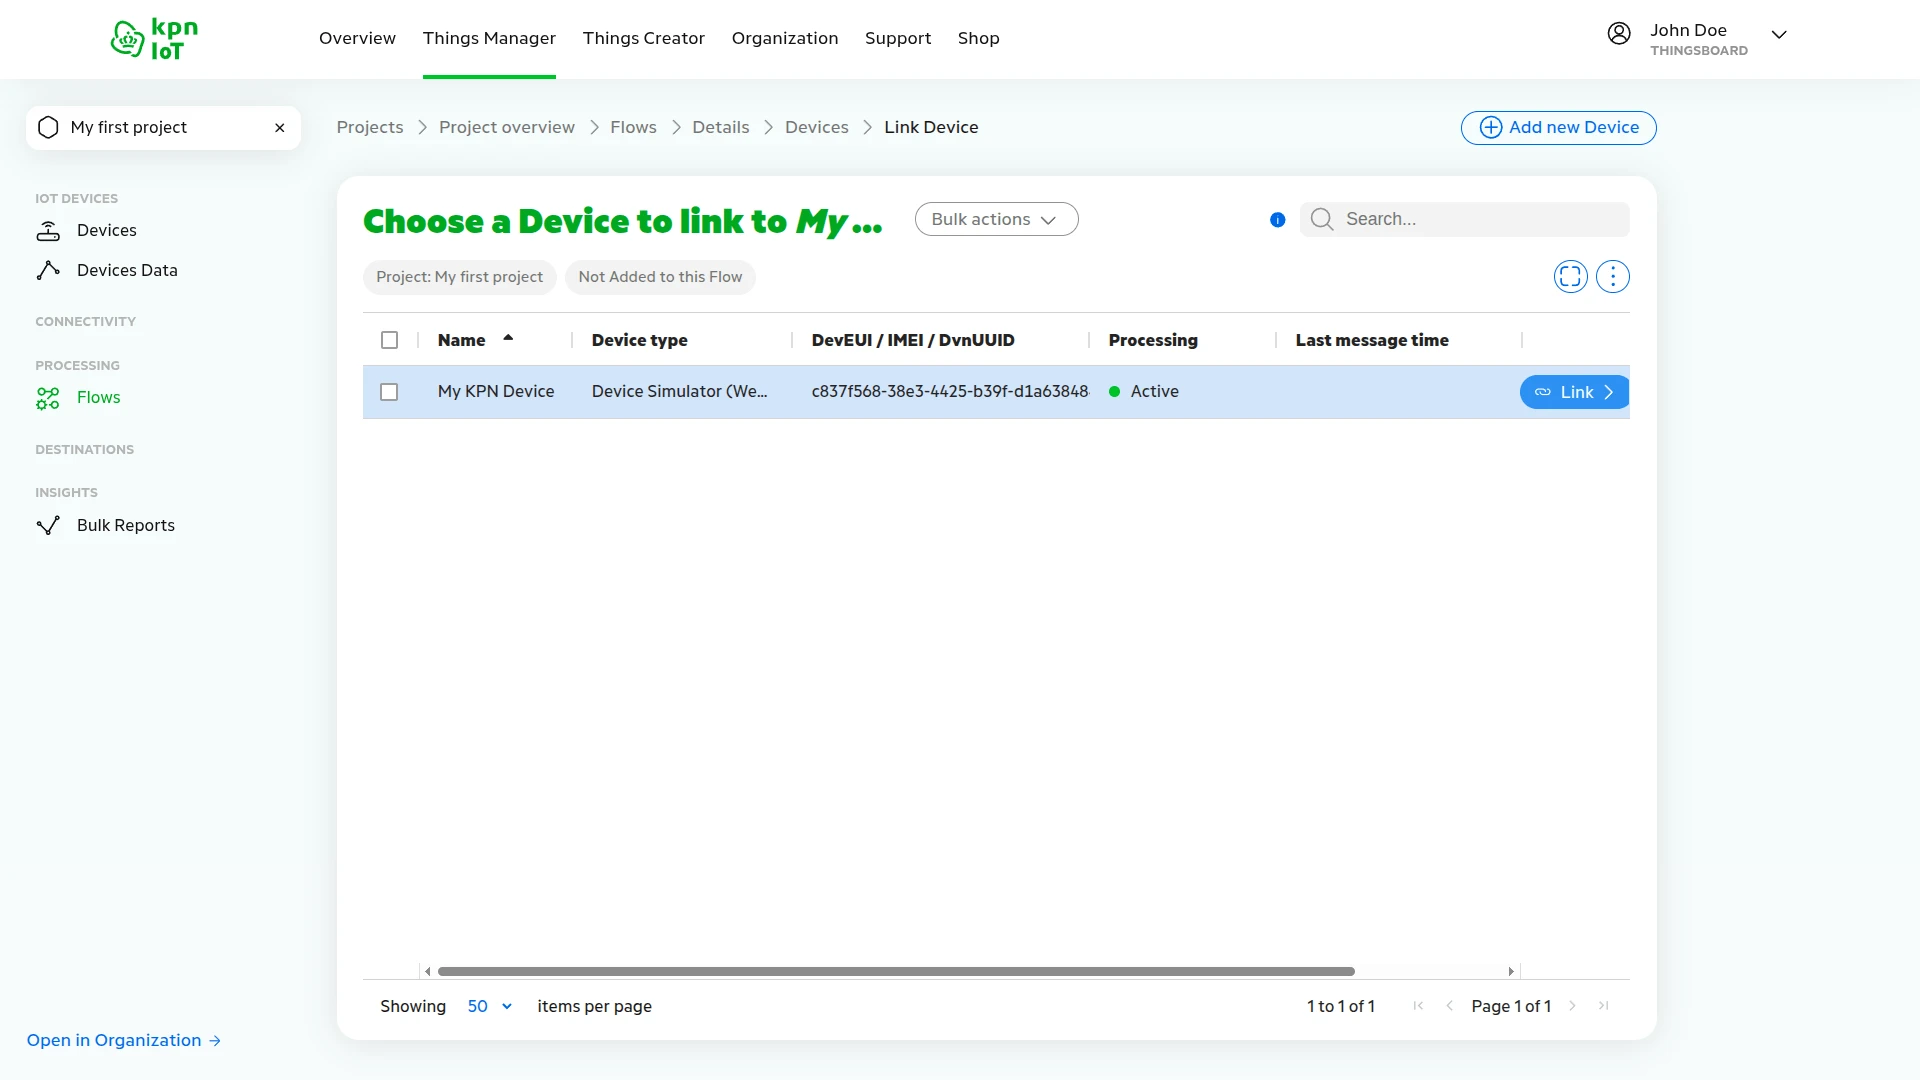
- Click Link next to the device you created.
- The device is successfully linked to the flow.
Enable Data Processing
Section titled “Enable Data Processing”For ThingsBoard to properly decode device payloads, enable the data processing decoder in KPN Things. This converts device-specific formats into standard SenML (Sensor Markup Language) that ThingsBoard understands.
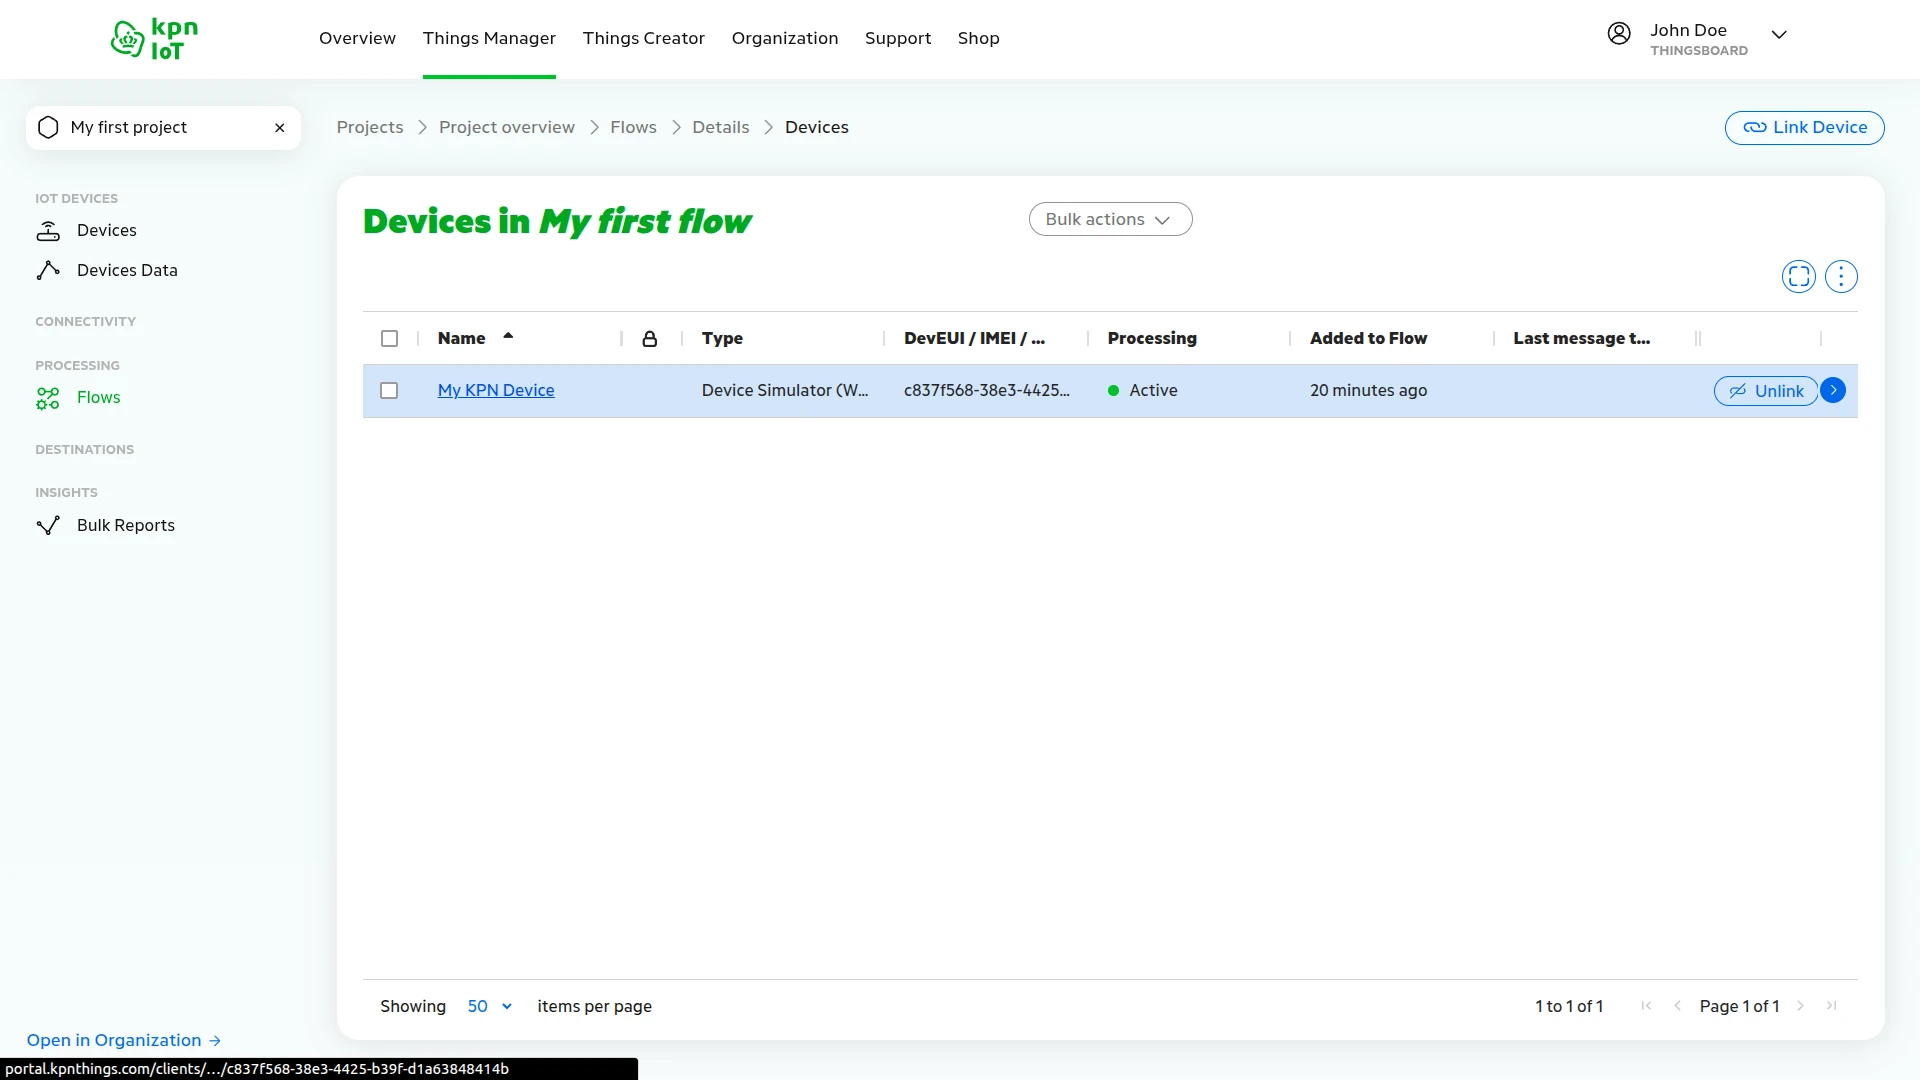
- In the Devices in My first flow list, click My KPN Device to open Device Details.
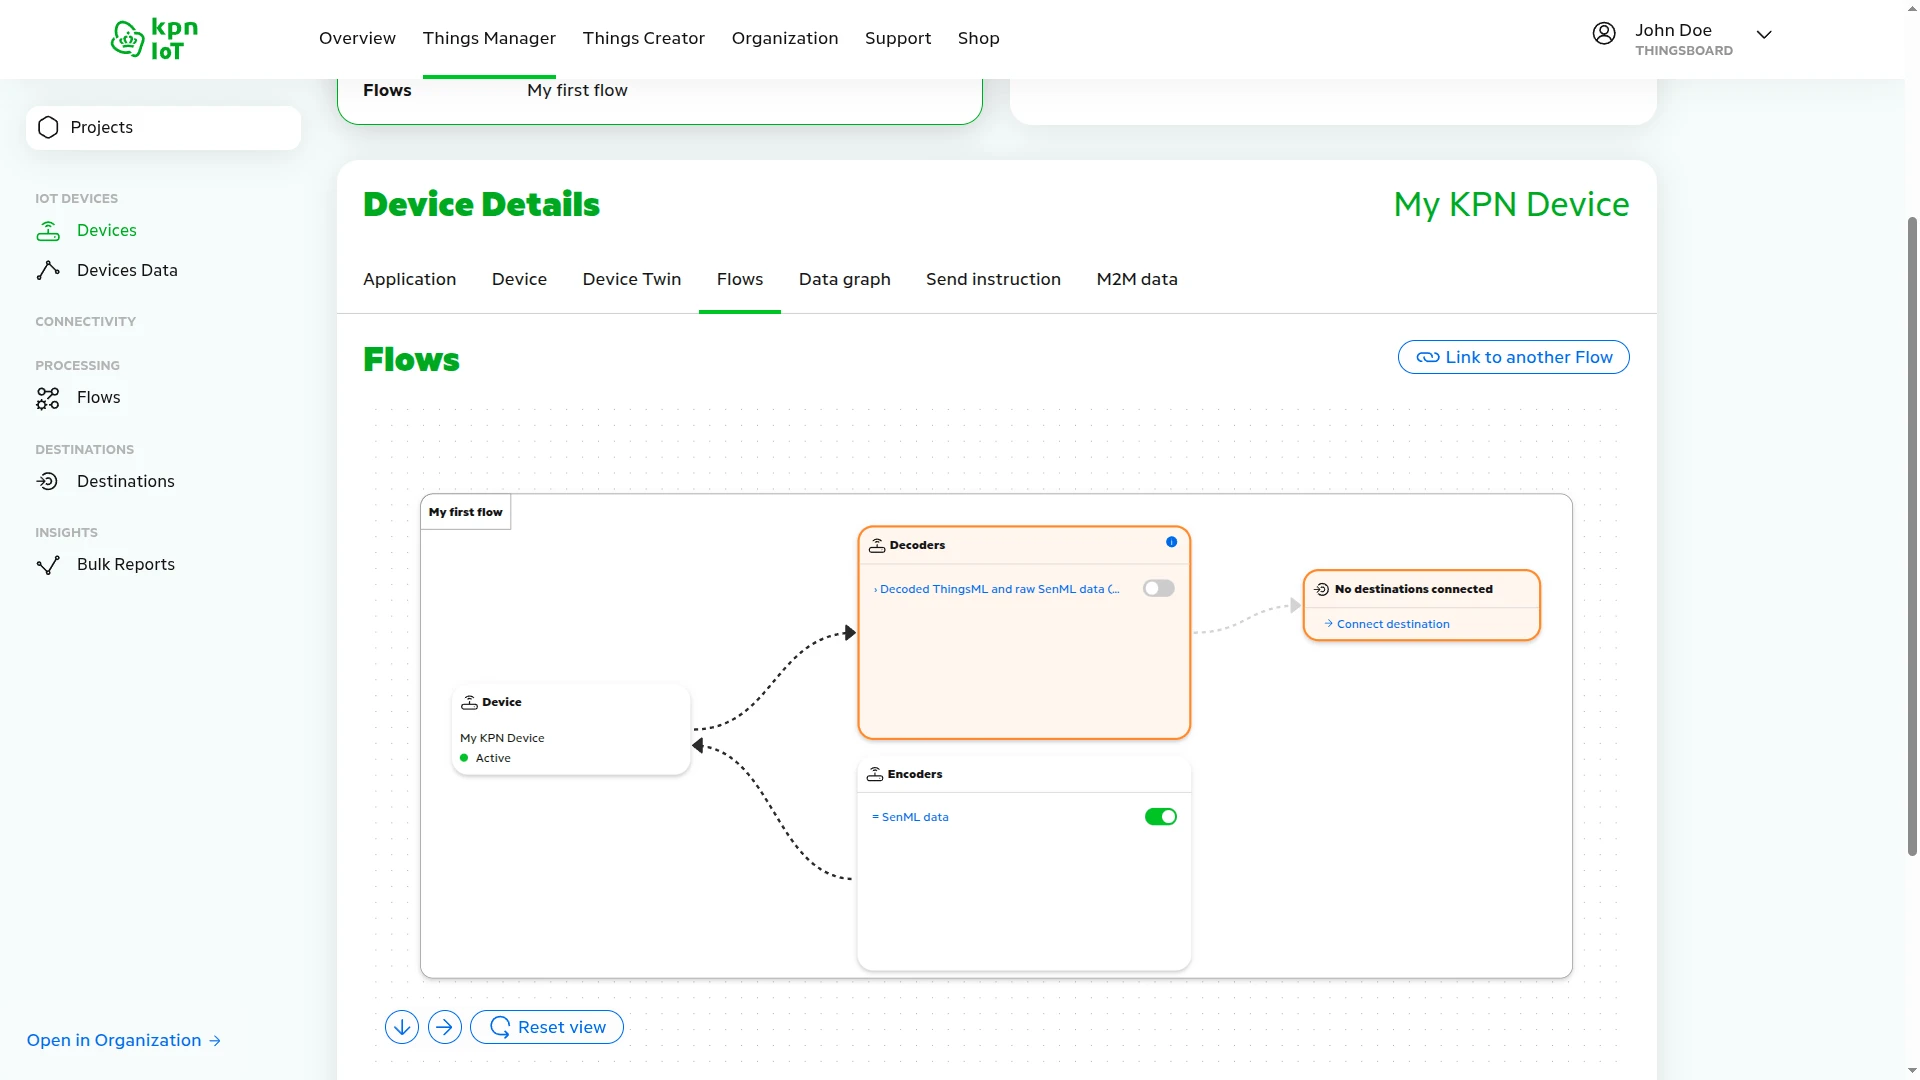
- Go to the Flows tab to view the flow diagram.
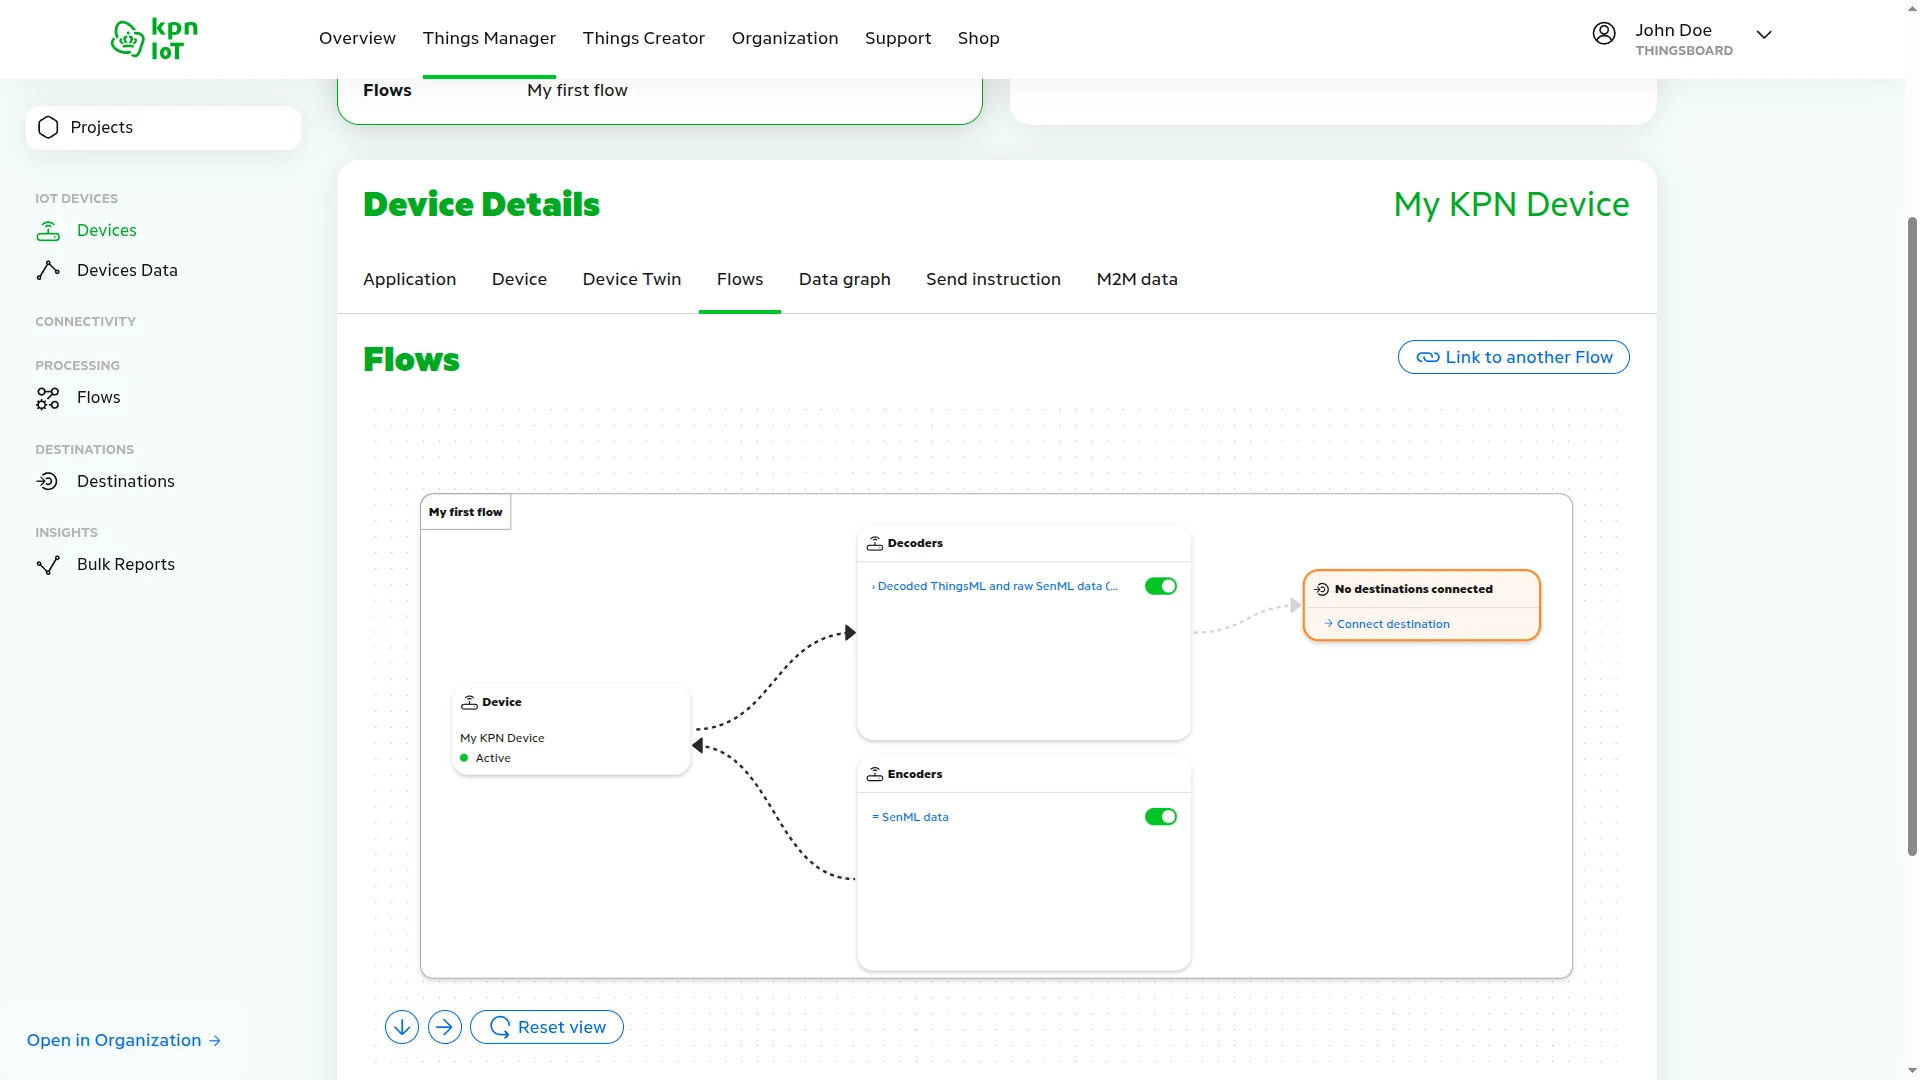
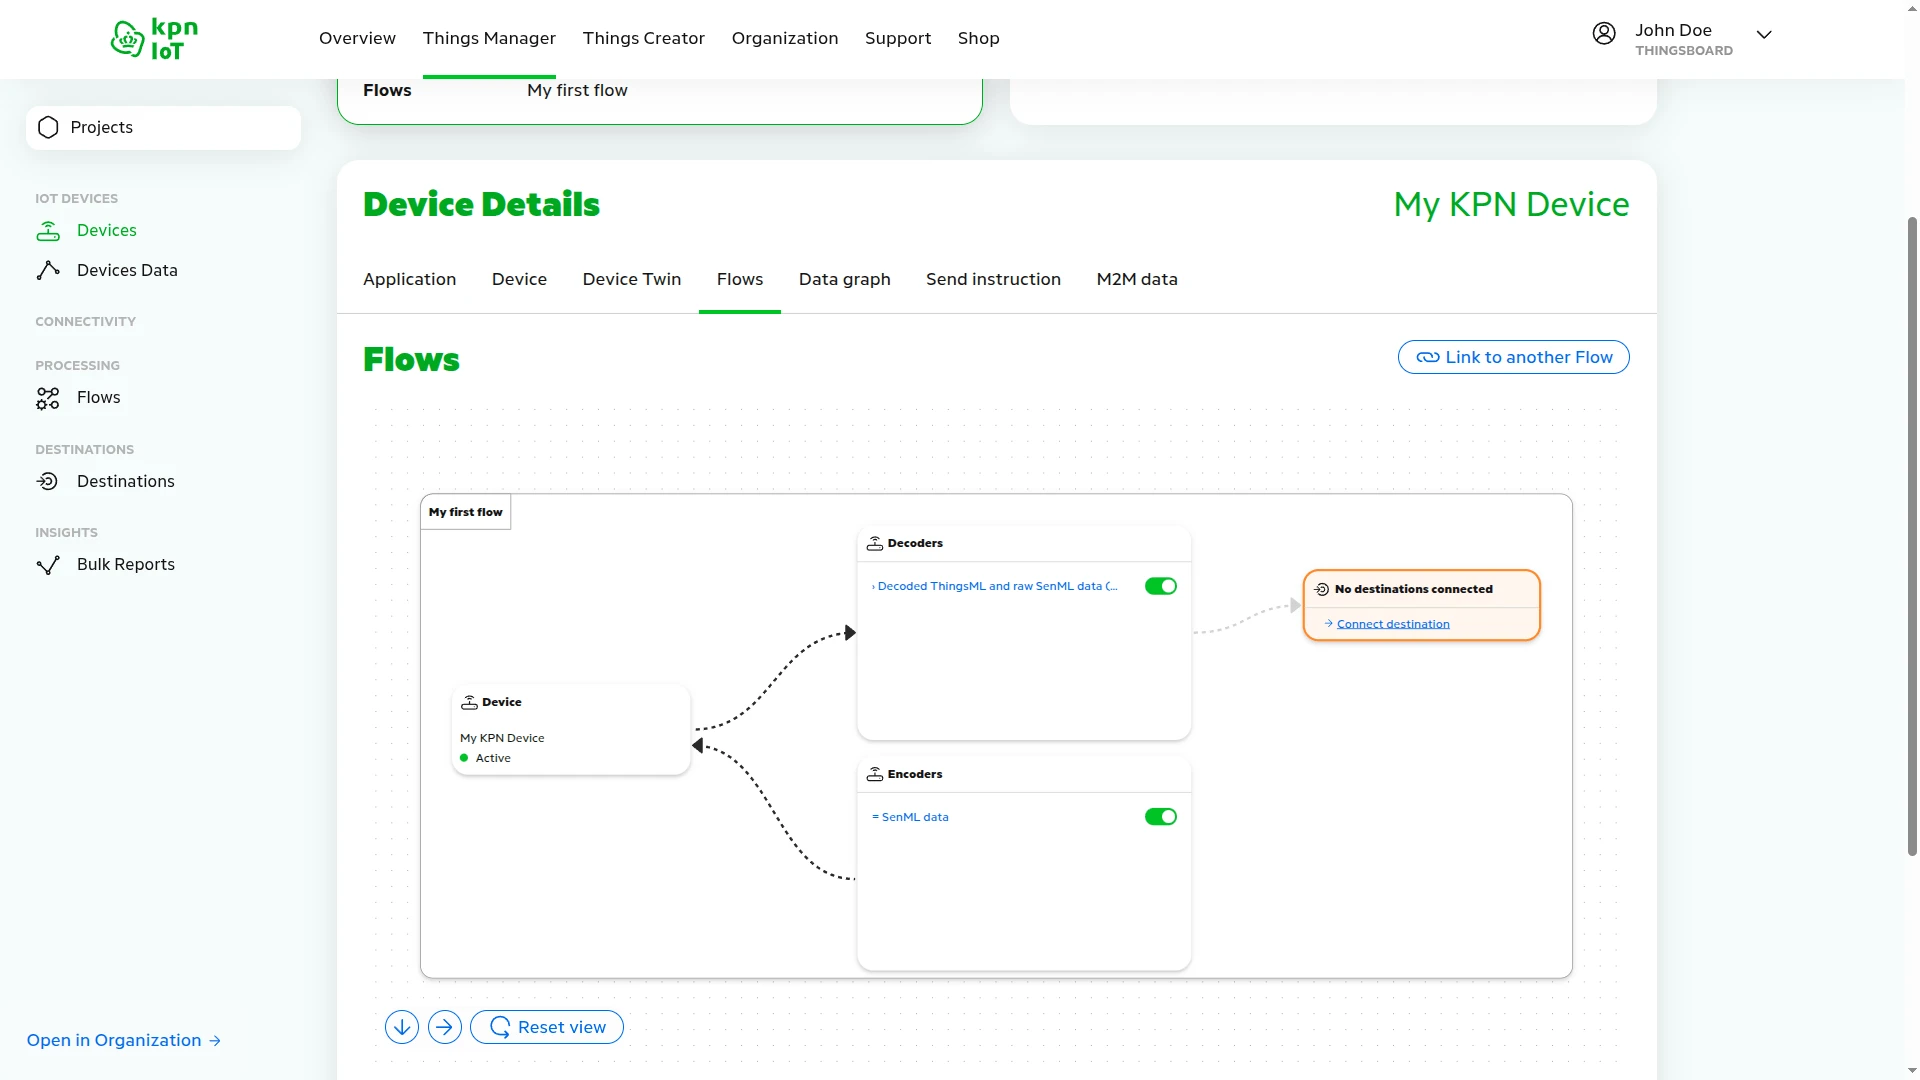
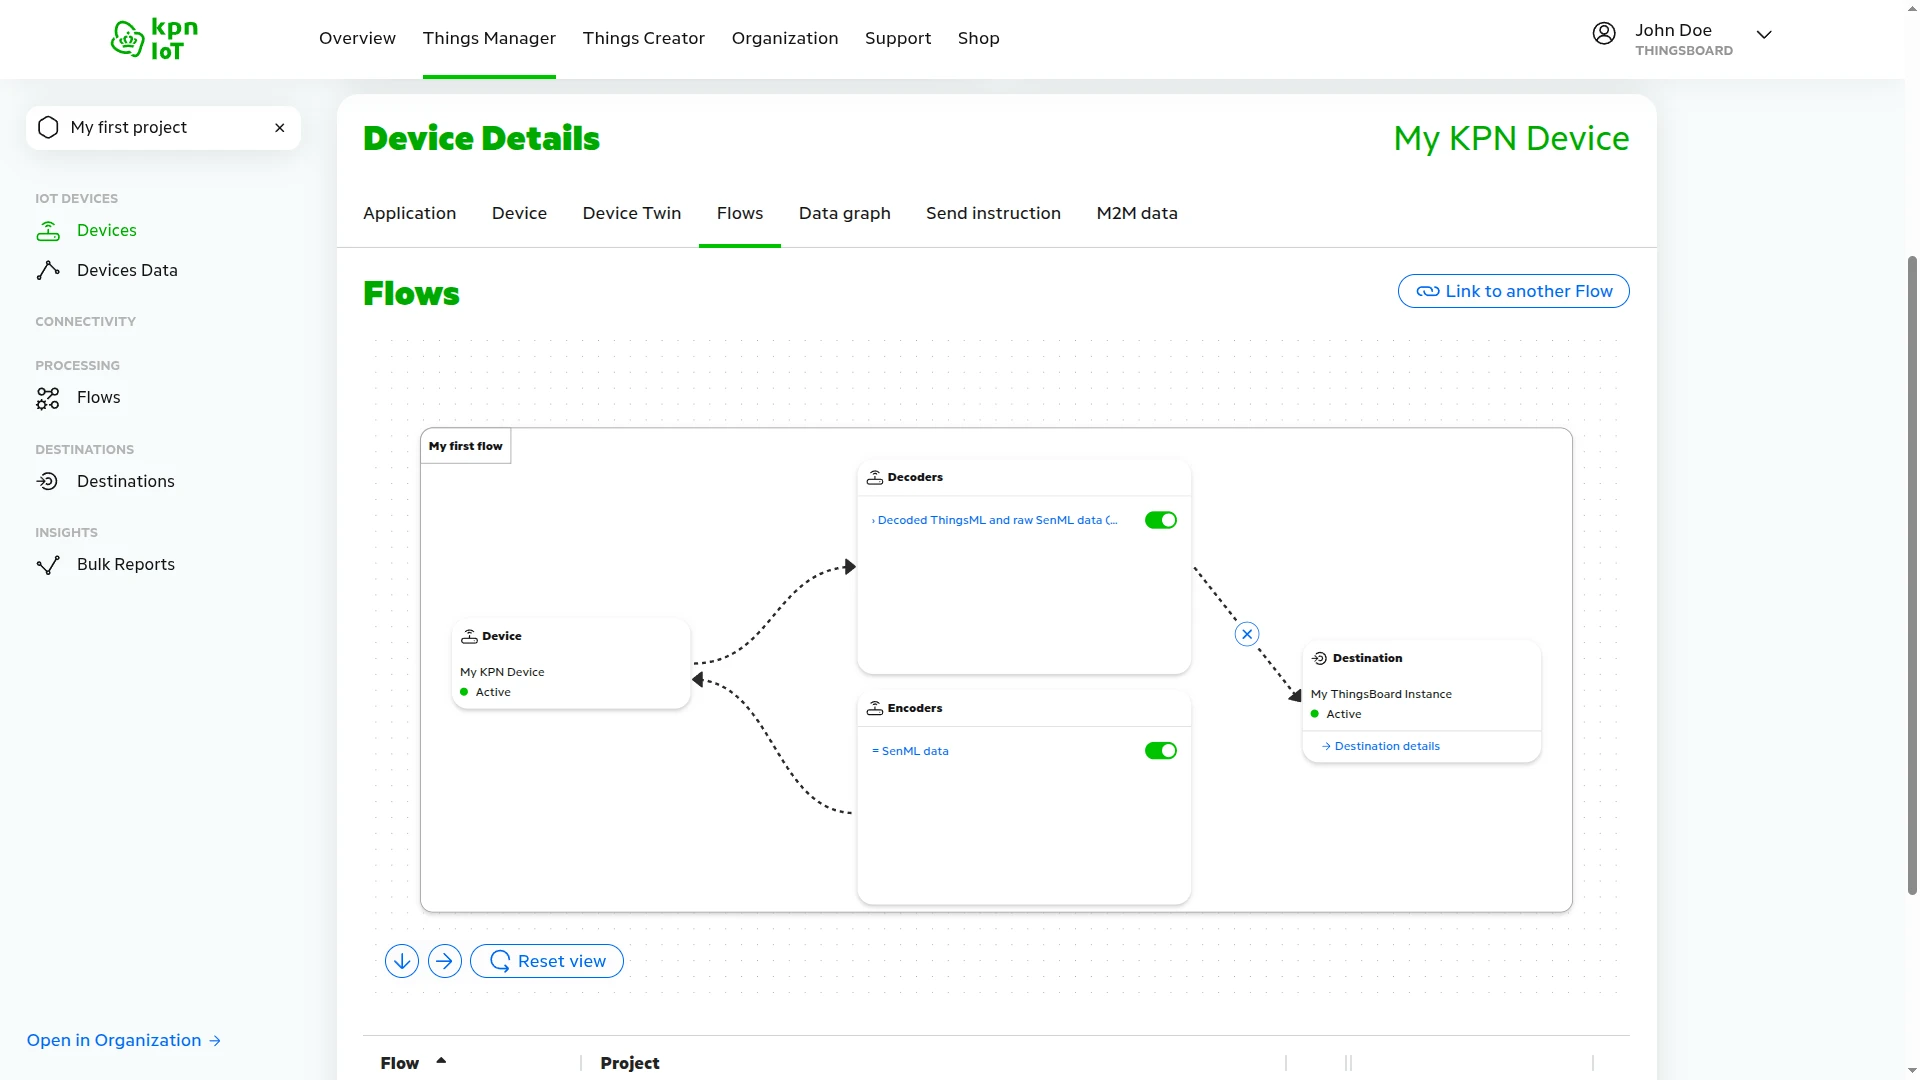
- In the Decoders section, enable the Decoded ThingsML and raw SenML data toggle. Changes are saved automatically.
Create a ThingsBoard Destination
Section titled “Create a ThingsBoard Destination”A destination in KPN Things specifies where to route device data. Create a ThingsBoard destination directly from the flow diagram — it will be linked to the flow automatically.
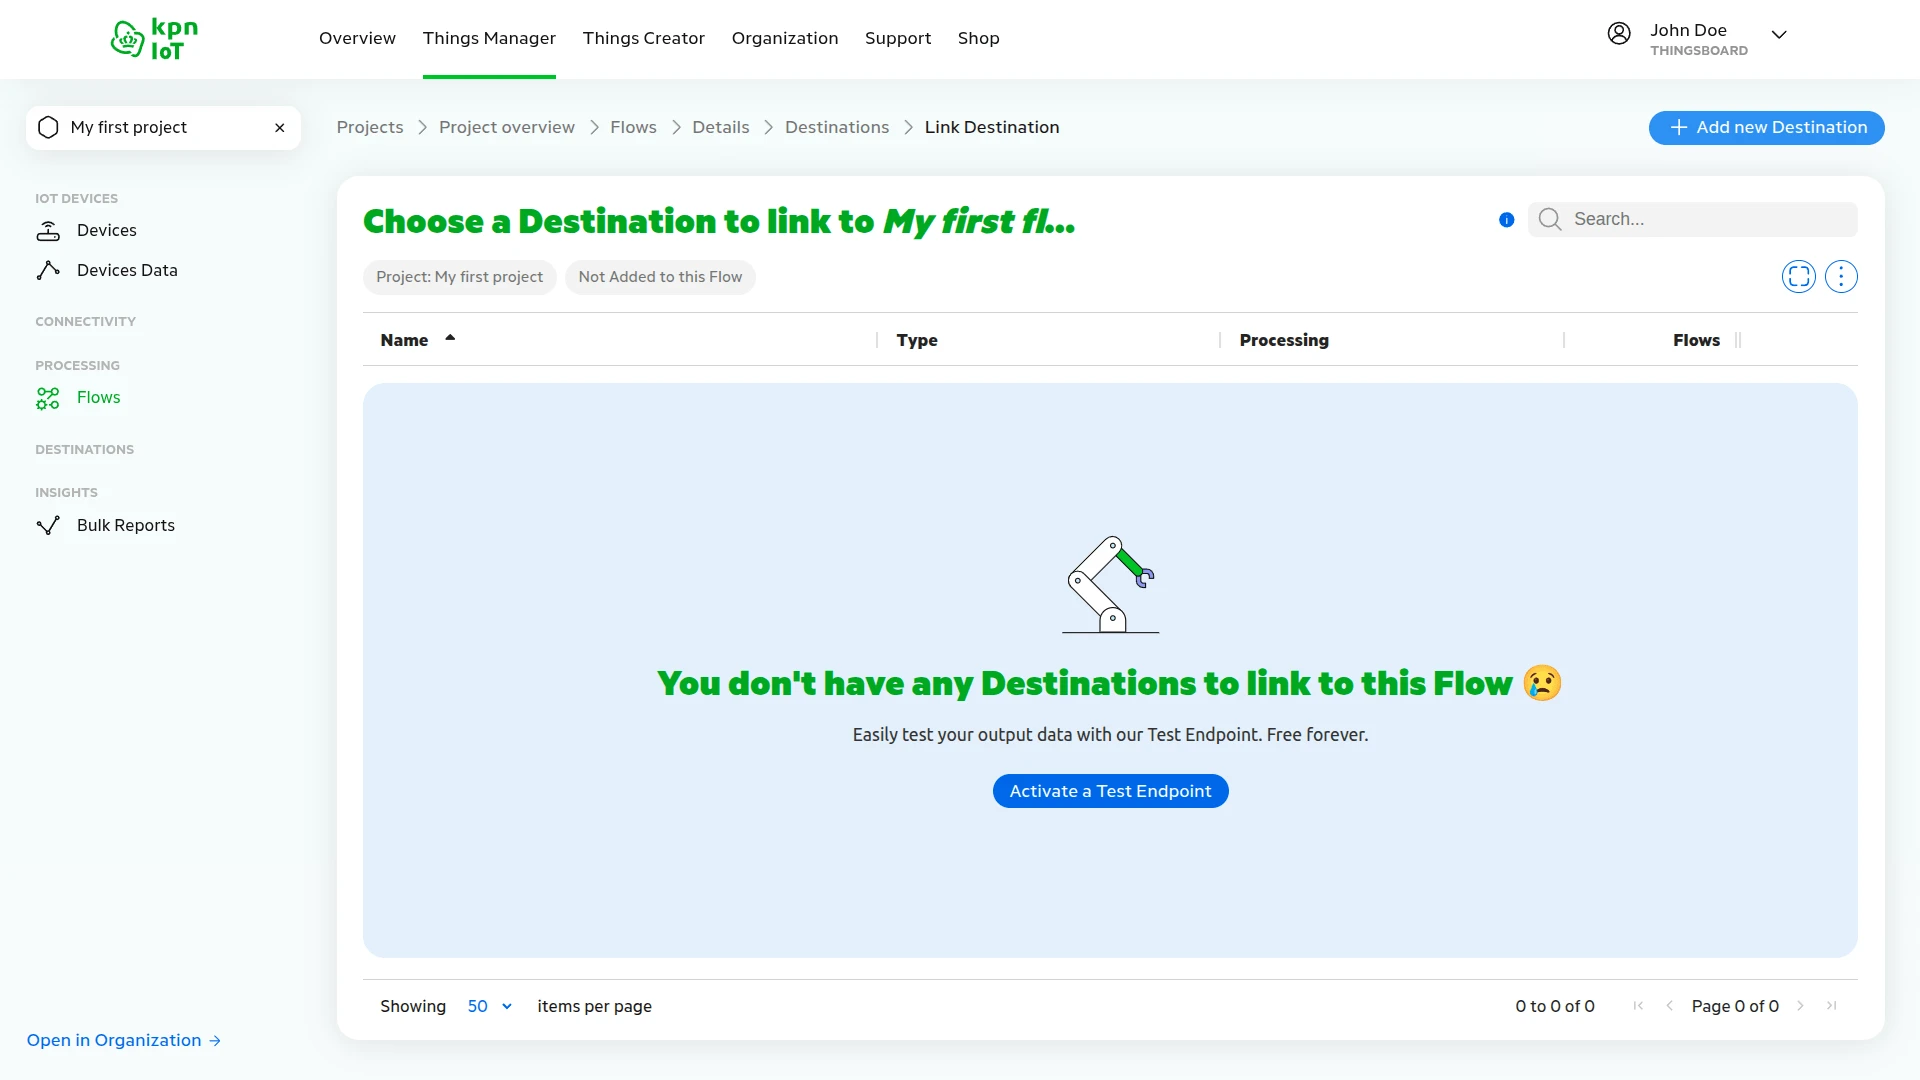
- On the Flows tab of My KPN Device, click Connect destination in the flow diagram.
- Click + Add new Destination — the destination list is empty.
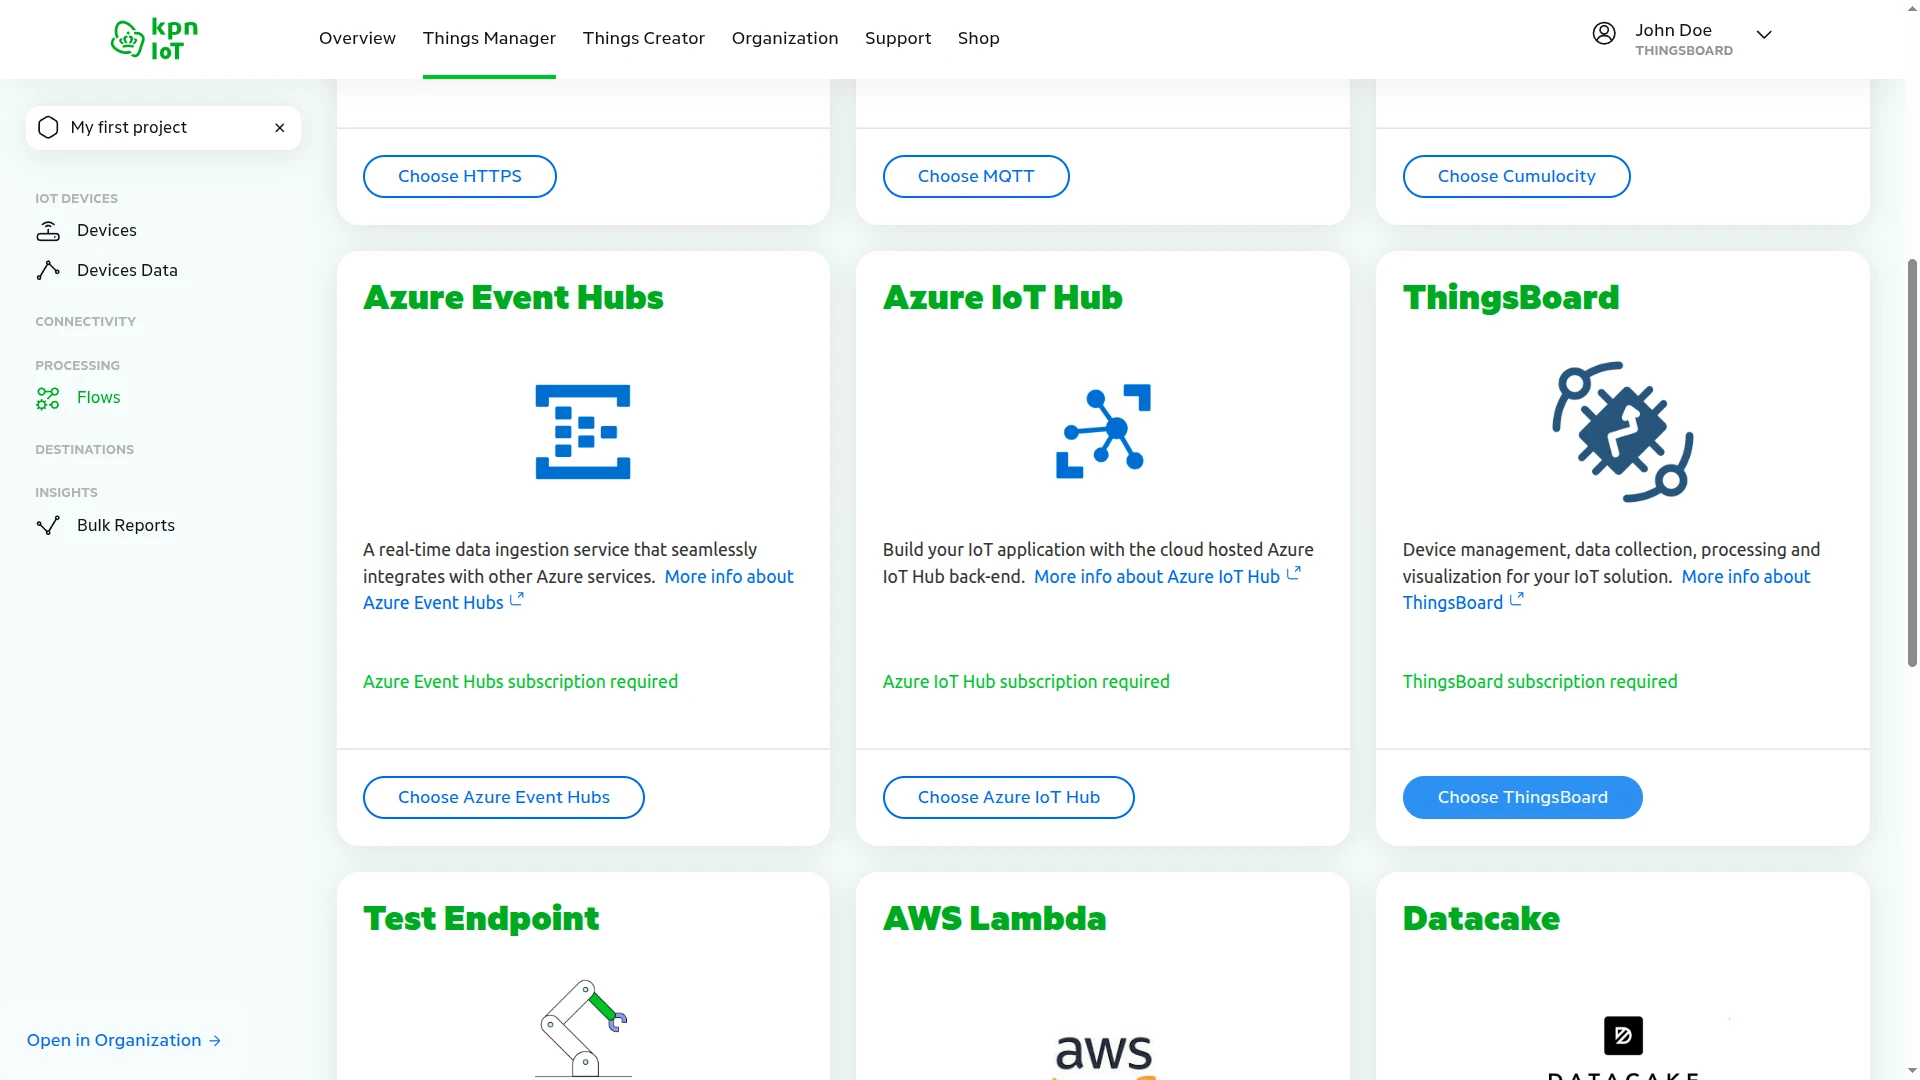
- Find ThingsBoard in the destination type grid and click Choose ThingsBoard.
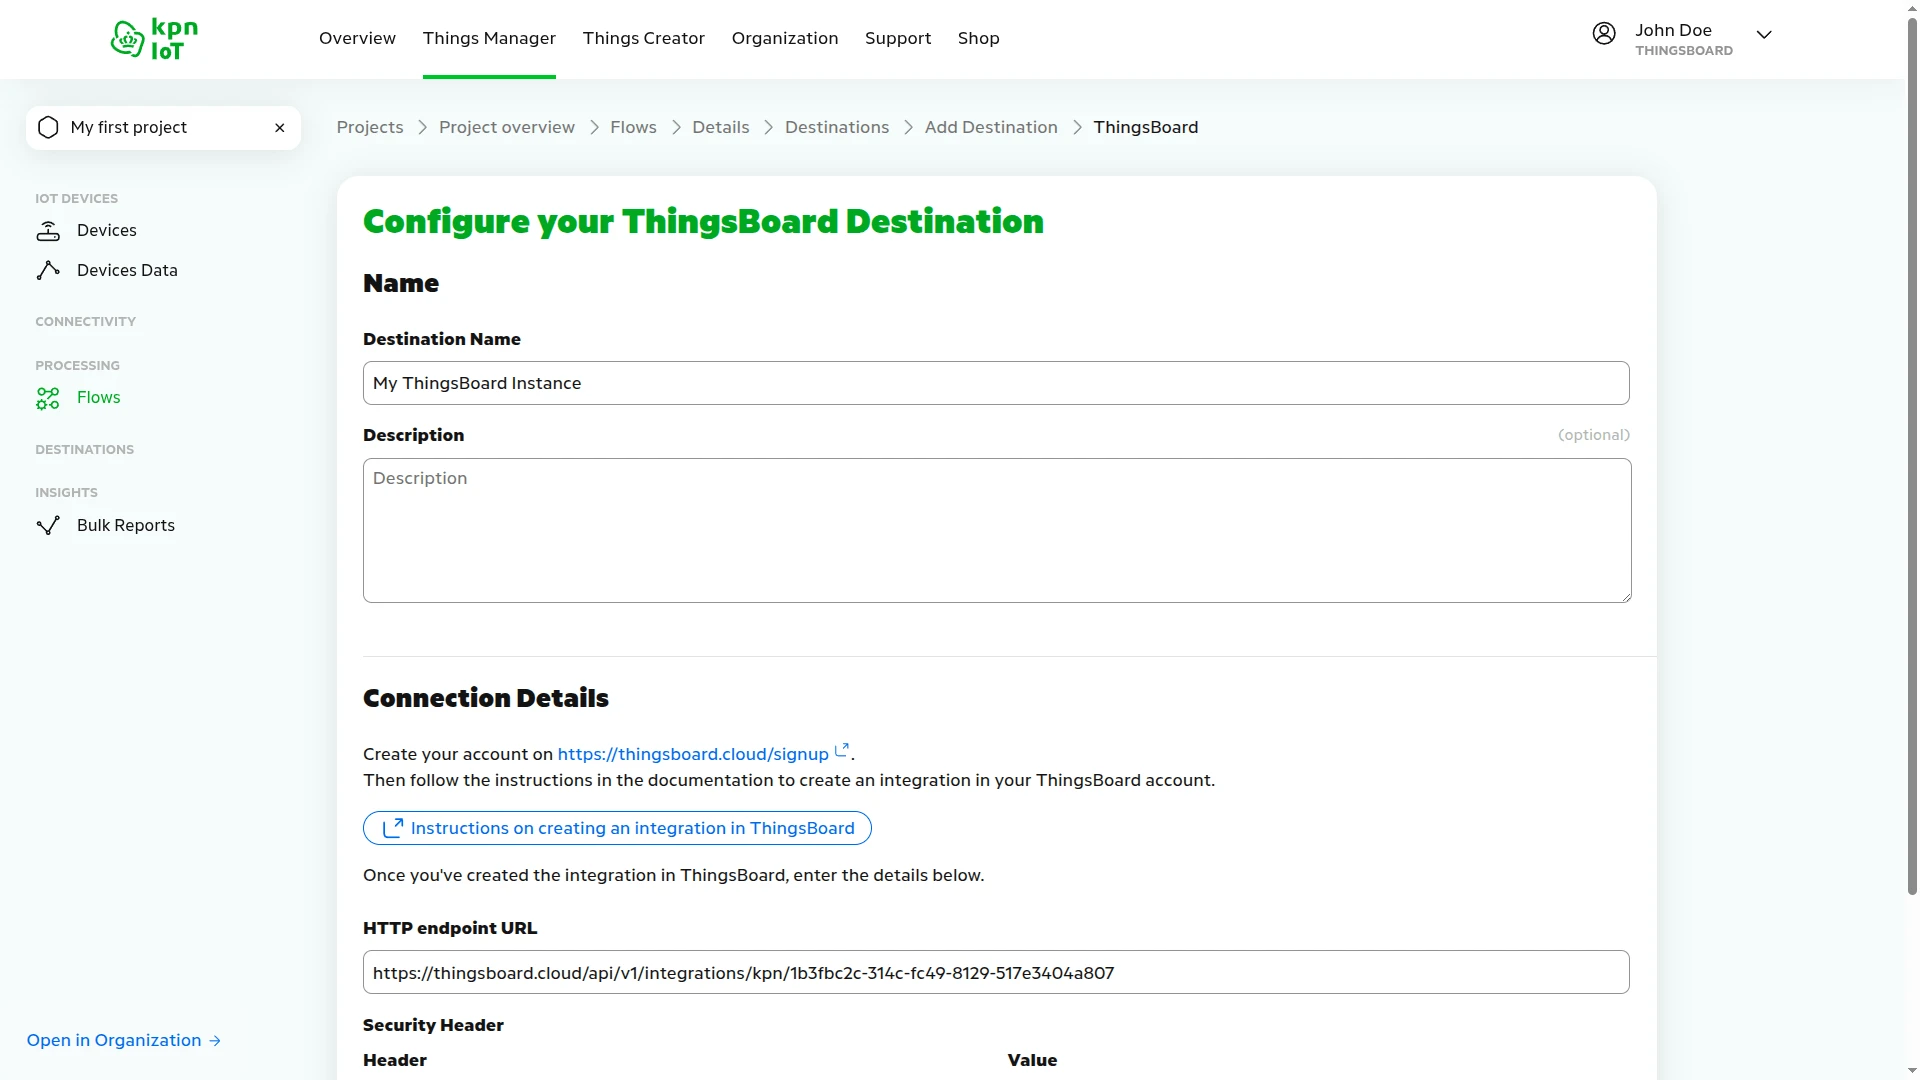
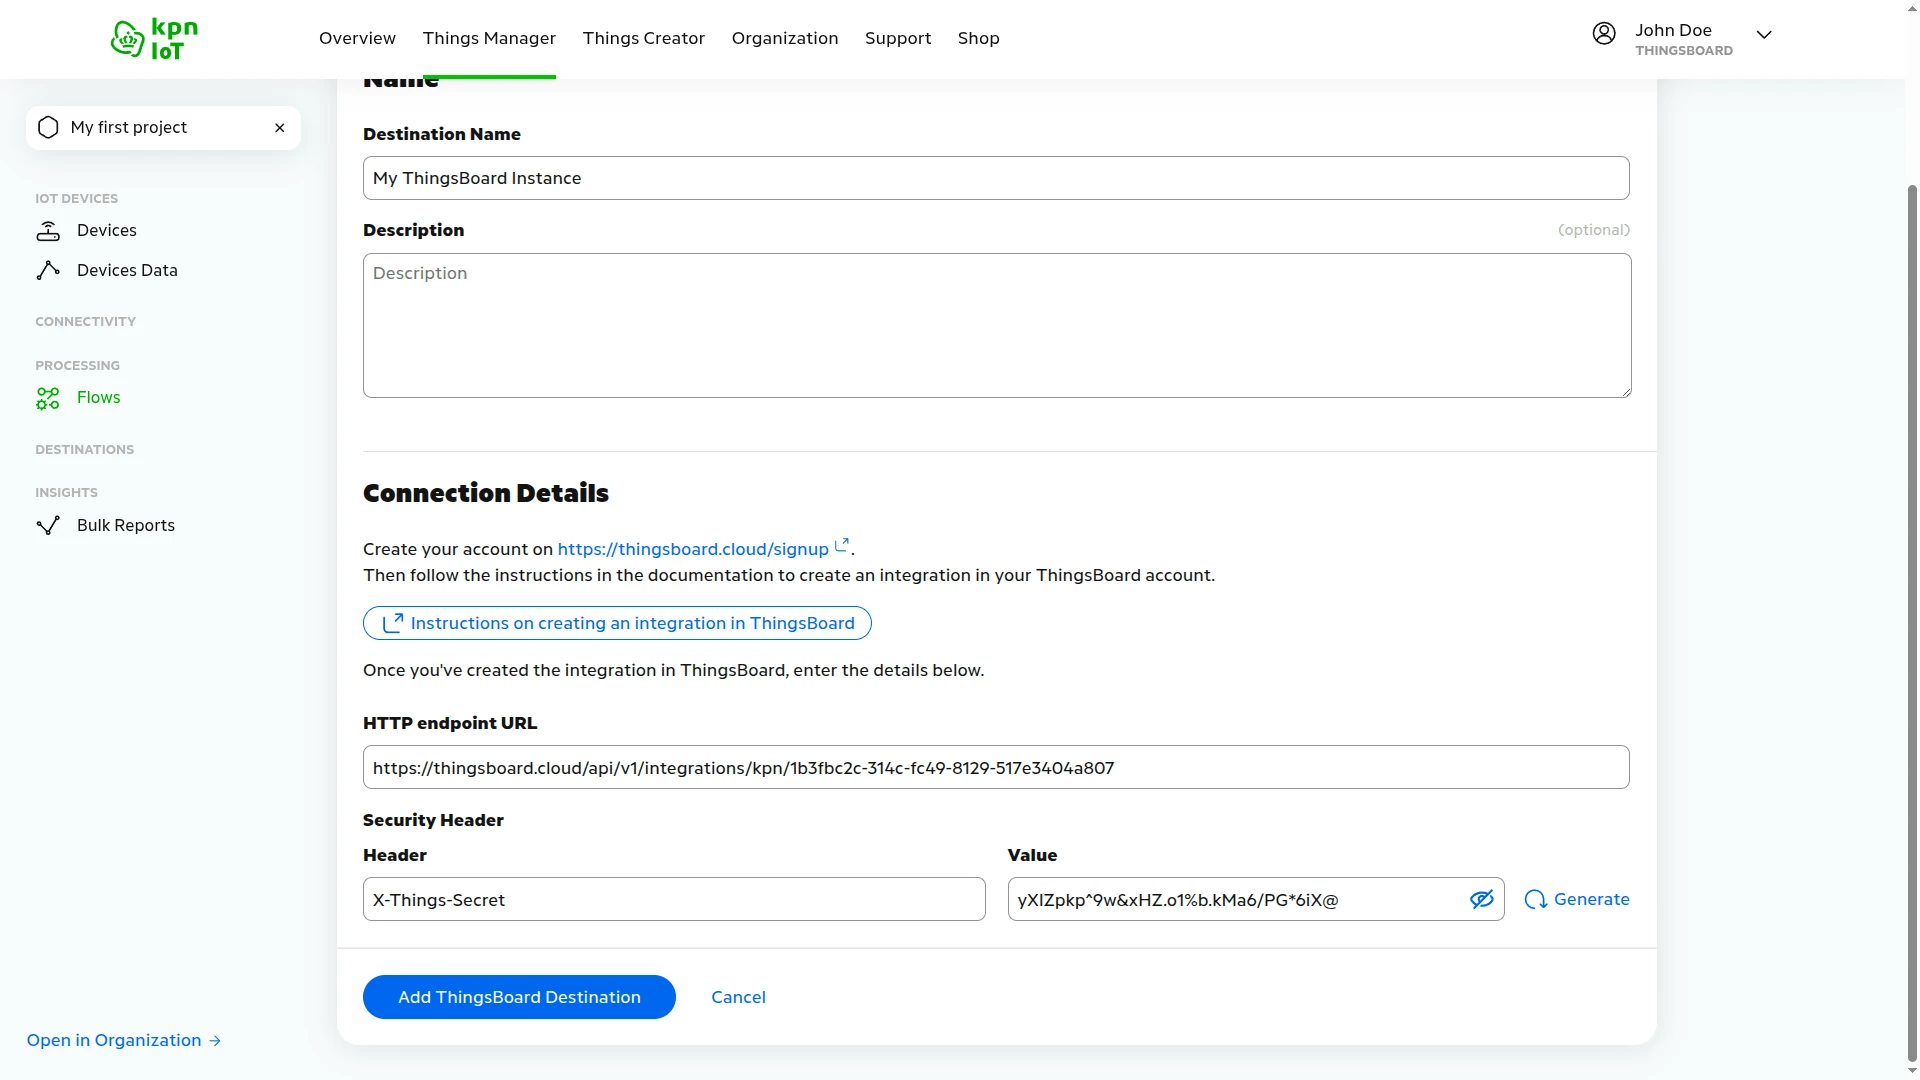
- Enter a Destination Name — for example,
My ThingsBoard Instance. - Fill in Connection Details:
- Paste the HTTP endpoint URL copied from the ThingsBoard integration.
- In the Security Header section, the Header is pre-filled as
X-Things-Secret— click Generate to create the token value. Save this value — you will need it when configuring the ThingsBoard integration security header.
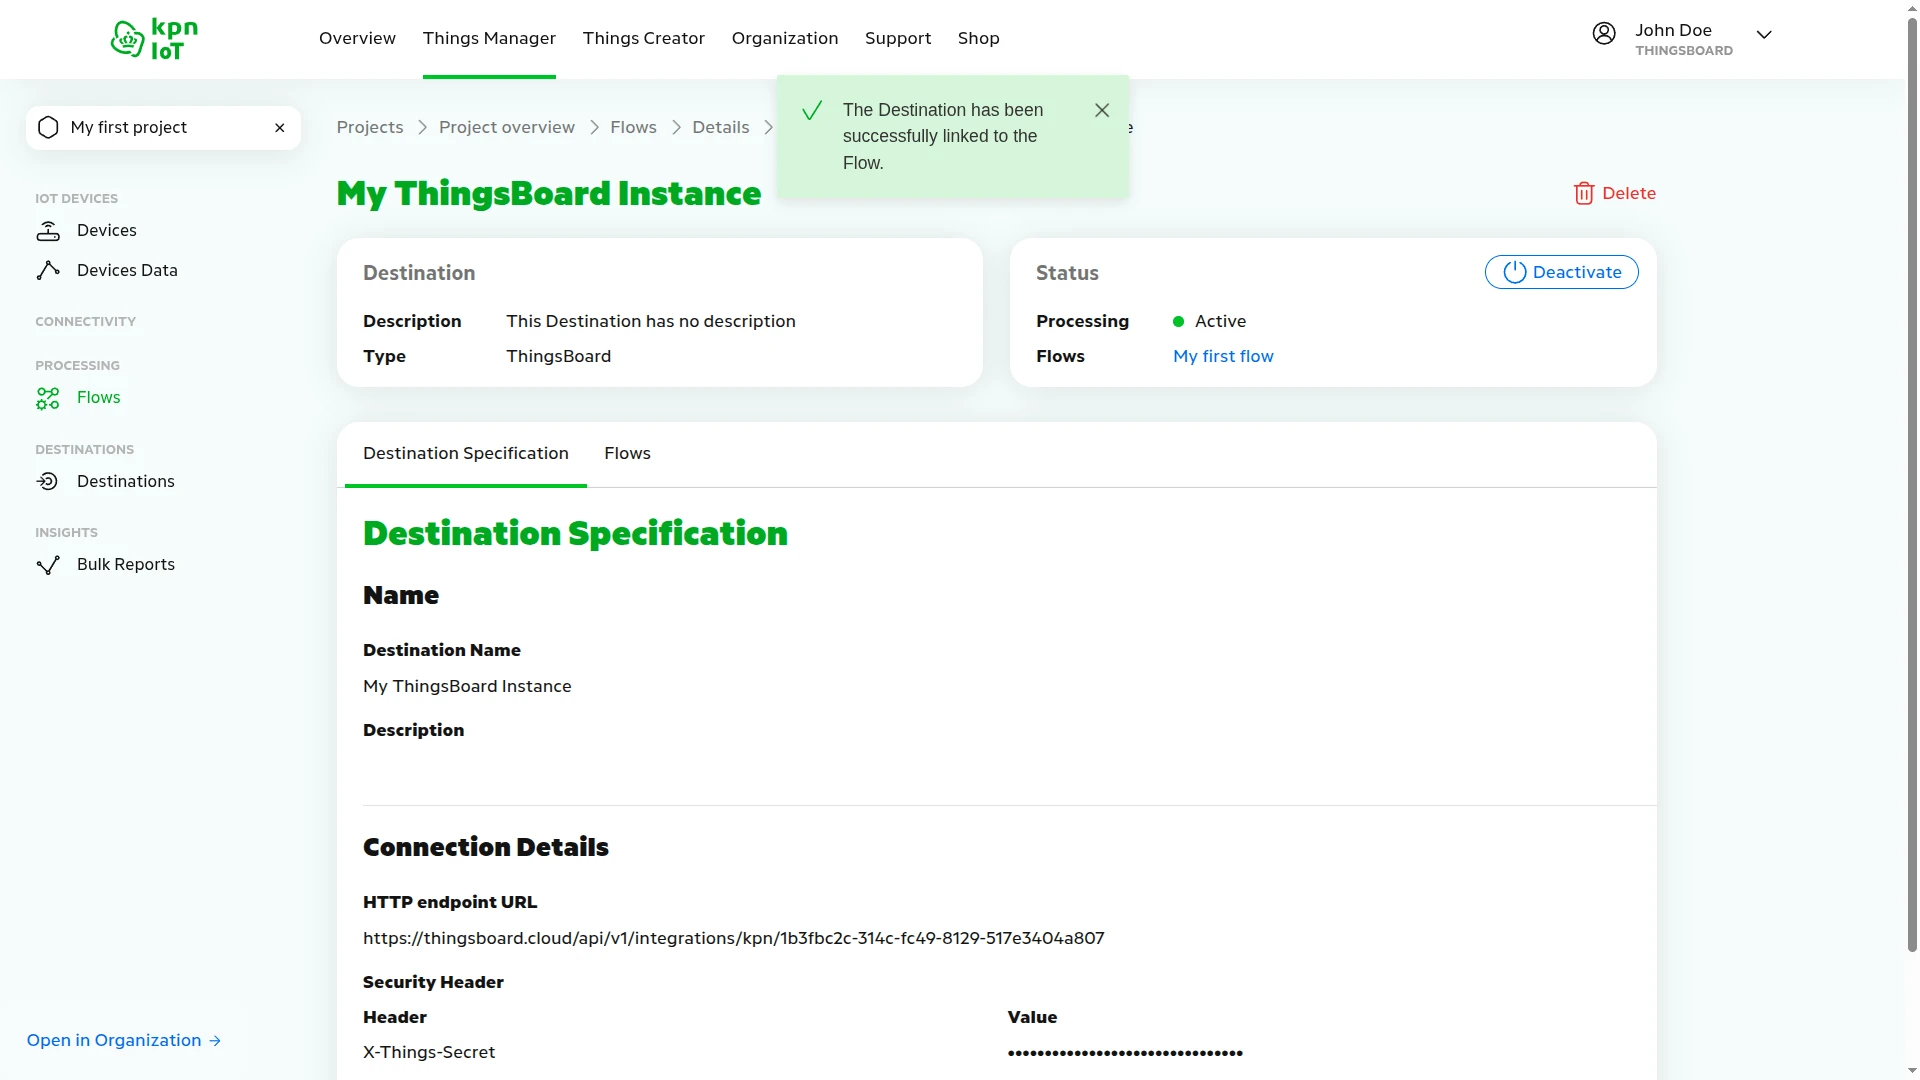
- Click Add ThingsBoard Destination — the destination is created and automatically linked to the flow.
- Return to the Flows tab of My KPN Device to verify the complete pipeline — the flow diagram now shows the device, the enabled decoder, and the active ThingsBoard destination all connected.
Configure KPN Things Webhook Security
Section titled “Configure KPN Things Webhook Security”To authenticate incoming messages from KPN Things, add the generated security header to your ThingsBoard integration. This prevents unauthorized devices from sending data to your integration.
- In ThingsBoard, go to Integrations ⇾ Integrations and open the KPN Things integration.
- Click the pencil icon to enter edit mode.
- Scroll to Enable security (Headers filter) and toggle it On.
- Click Add.
- In the Header field, enter
X-Things-Secret. - In the Value field, paste the security token generated in KPN Things (from the destination configuration earlier).
- Click Apply changes.
Test Uplink
Section titled “Test Uplink”After the integration is created, send a test uplink from the KPN Things Device Simulator and confirm that ThingsBoard received the message, decoded it correctly, and provisioned the device.
Send Test Uplink
Section titled “Send Test Uplink”Open the KPN Things Device Simulator web app in your internet browser to send a test message to ThingsBoard.
- In the KPN Things portal, open My KPN Device and go to the Application tab.
- Under Open the application, click Open the Device Simulator application in a new tab.
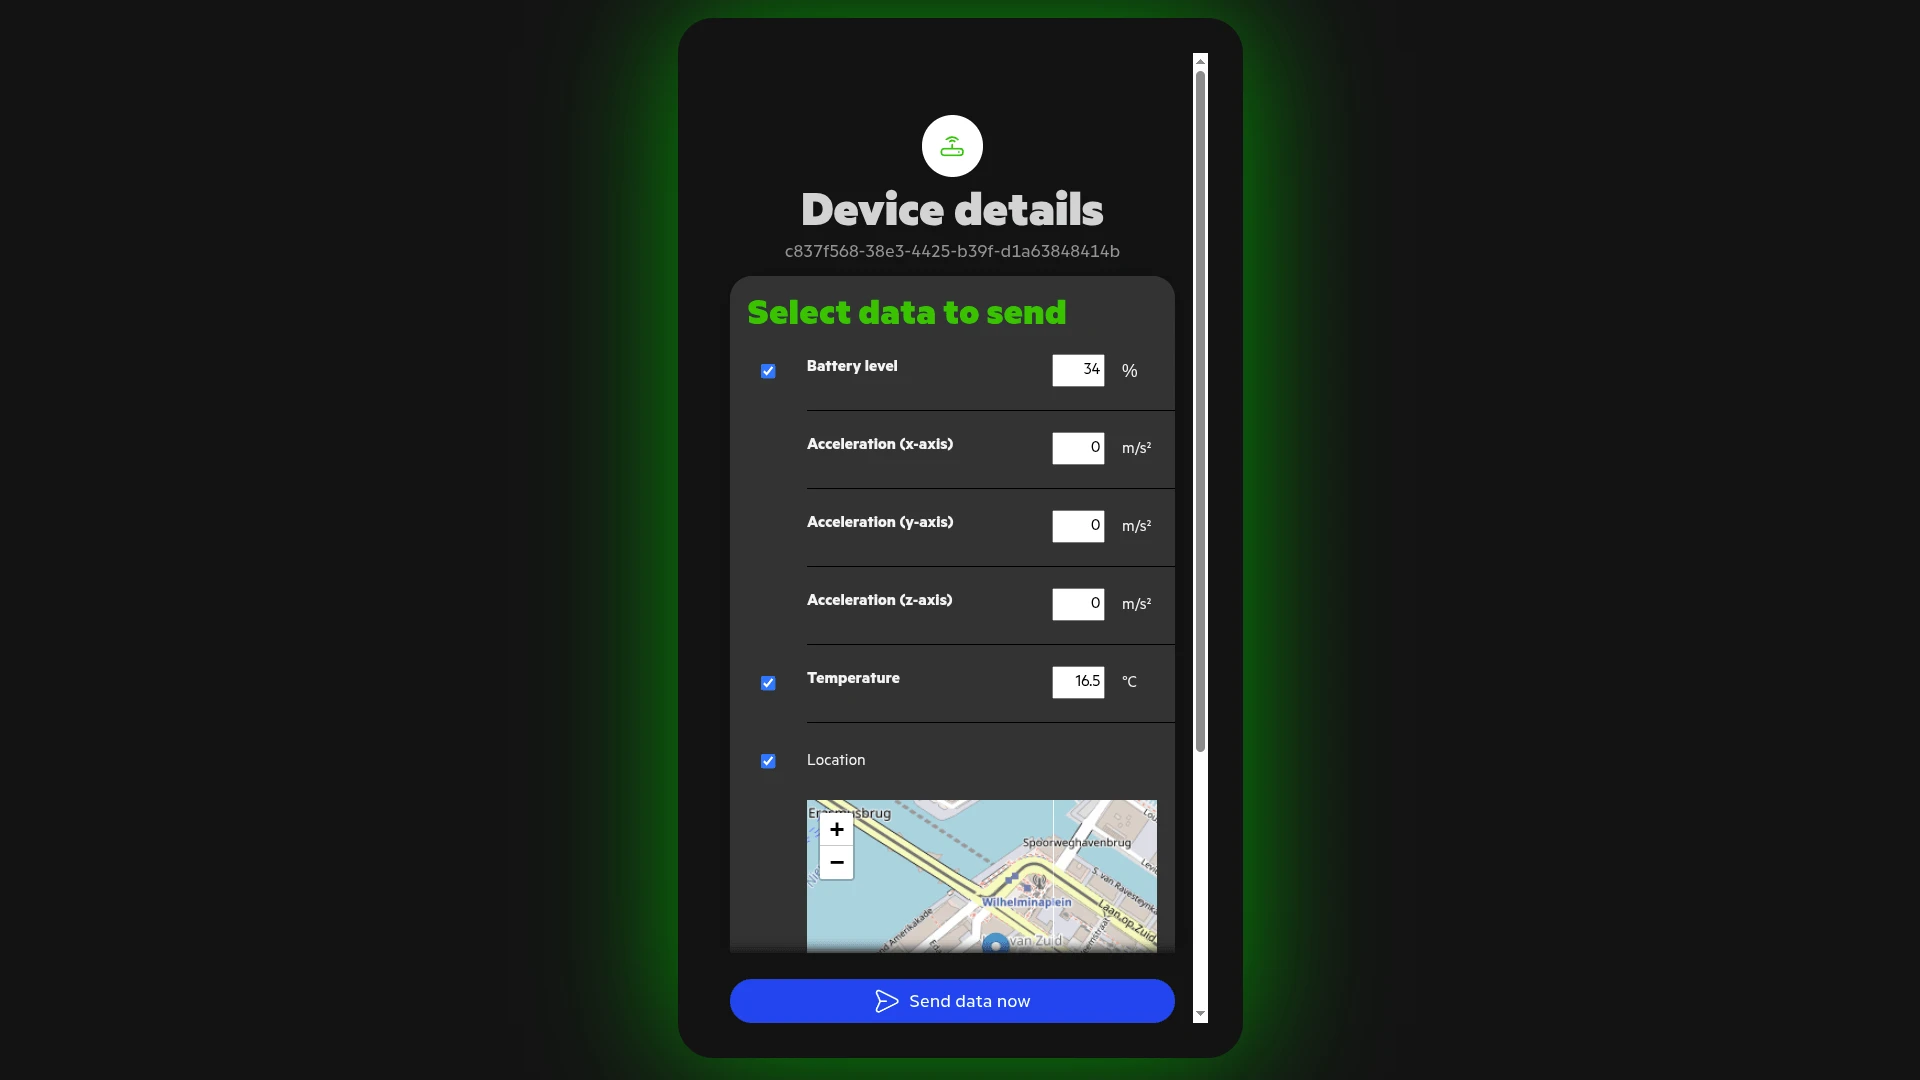
- In the Device Simulator, select the data to send — for example, enable Battery level, Temperature, and Location — and adjust the values if needed.
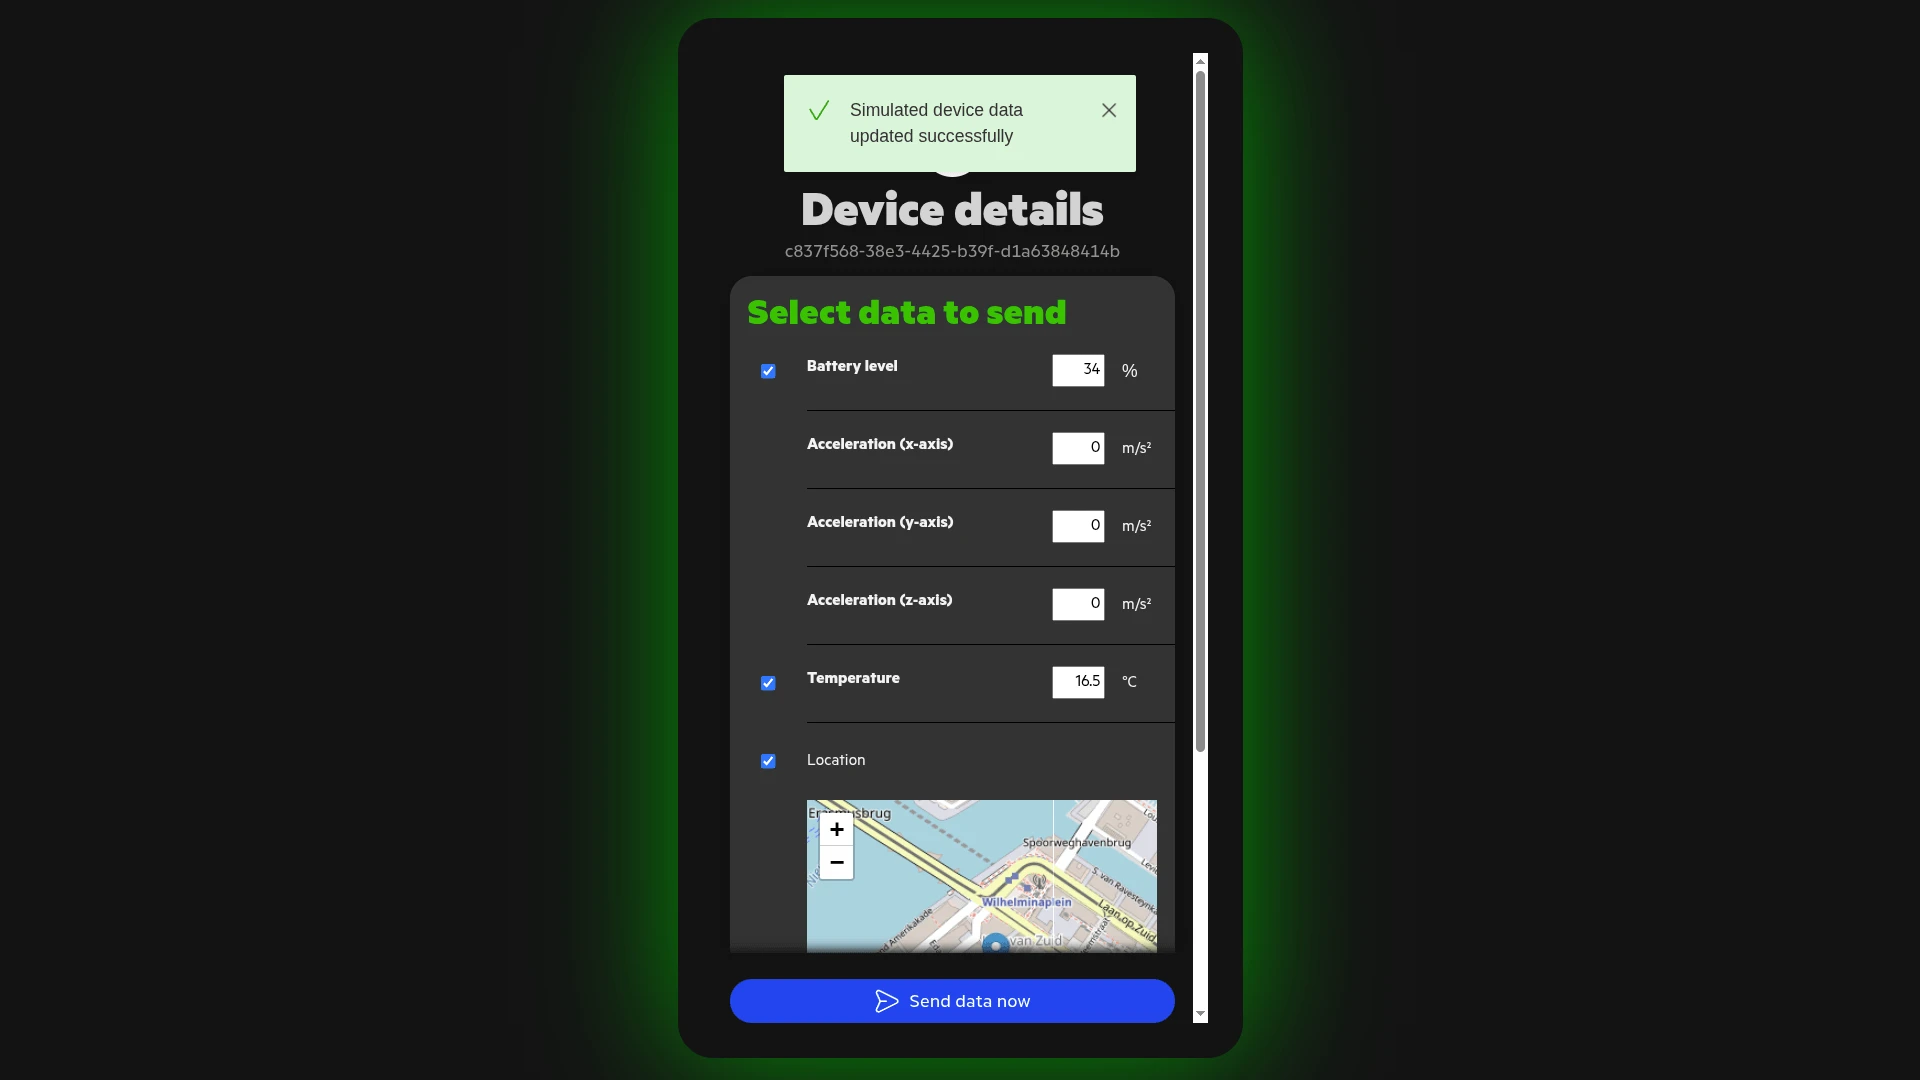
- Click Send data now. A Simulated device data updated successfully toast confirms the message was forwarded to ThingsBoard.
Verify Integration Events
Section titled “Verify Integration Events”Go to Integrations ⇾ Integrations, open the KPN Things integration, and click the Events tab. Each successfully processed uplink appears as a row with Type: Uplink and Status: OK.
Verify Converter Events
Section titled “Verify Converter Events”Go to Integrations ⇾ Data converters, open KPN Things Uplink Converter, and click the Events tab. Click an event row to inspect:
- In — the decoded JSON payload received from KPN Things:
deviceName,deviceLabel,deviceType, and atelemetryarray with values such asbattery,temperature,latitude,longitude, andorientation. - Out — the converter output passed to ThingsBoard. For the default pass-through converter the output is identical to the input.
- Metadata — HTTP request headers forwarded by KPN Things, including
x-things-secretandthings-message-token.
Verify Device Provisioning
Section titled “Verify Device Provisioning”Go to Devices & assets ⇾ Devices. ThingsBoard automatically provisions a new device using the identifier from the uplink payload as the device name on the first message received. Open the device and click the Latest Telemetry tab — you should see the values sent by the simulator, such as battery, temperature, latitude, longitude, and orientation.
Configure Downlink
Section titled “Configure Downlink”Downlink allows ThingsBoard to push commands to KPN Things devices. To enable it, obtain API credentials from the KPN Zakelijk portal, configure the integration for outbound calls, create a downlink converter, and wire up the Rule Chain.
Obtain KPN Things API Credentials
Section titled “Obtain KPN Things API Credentials”ThingsBoard needs API credentials to authenticate against the KPN Things API when sending downlink messages. Obtain these from the KPN Things portal:
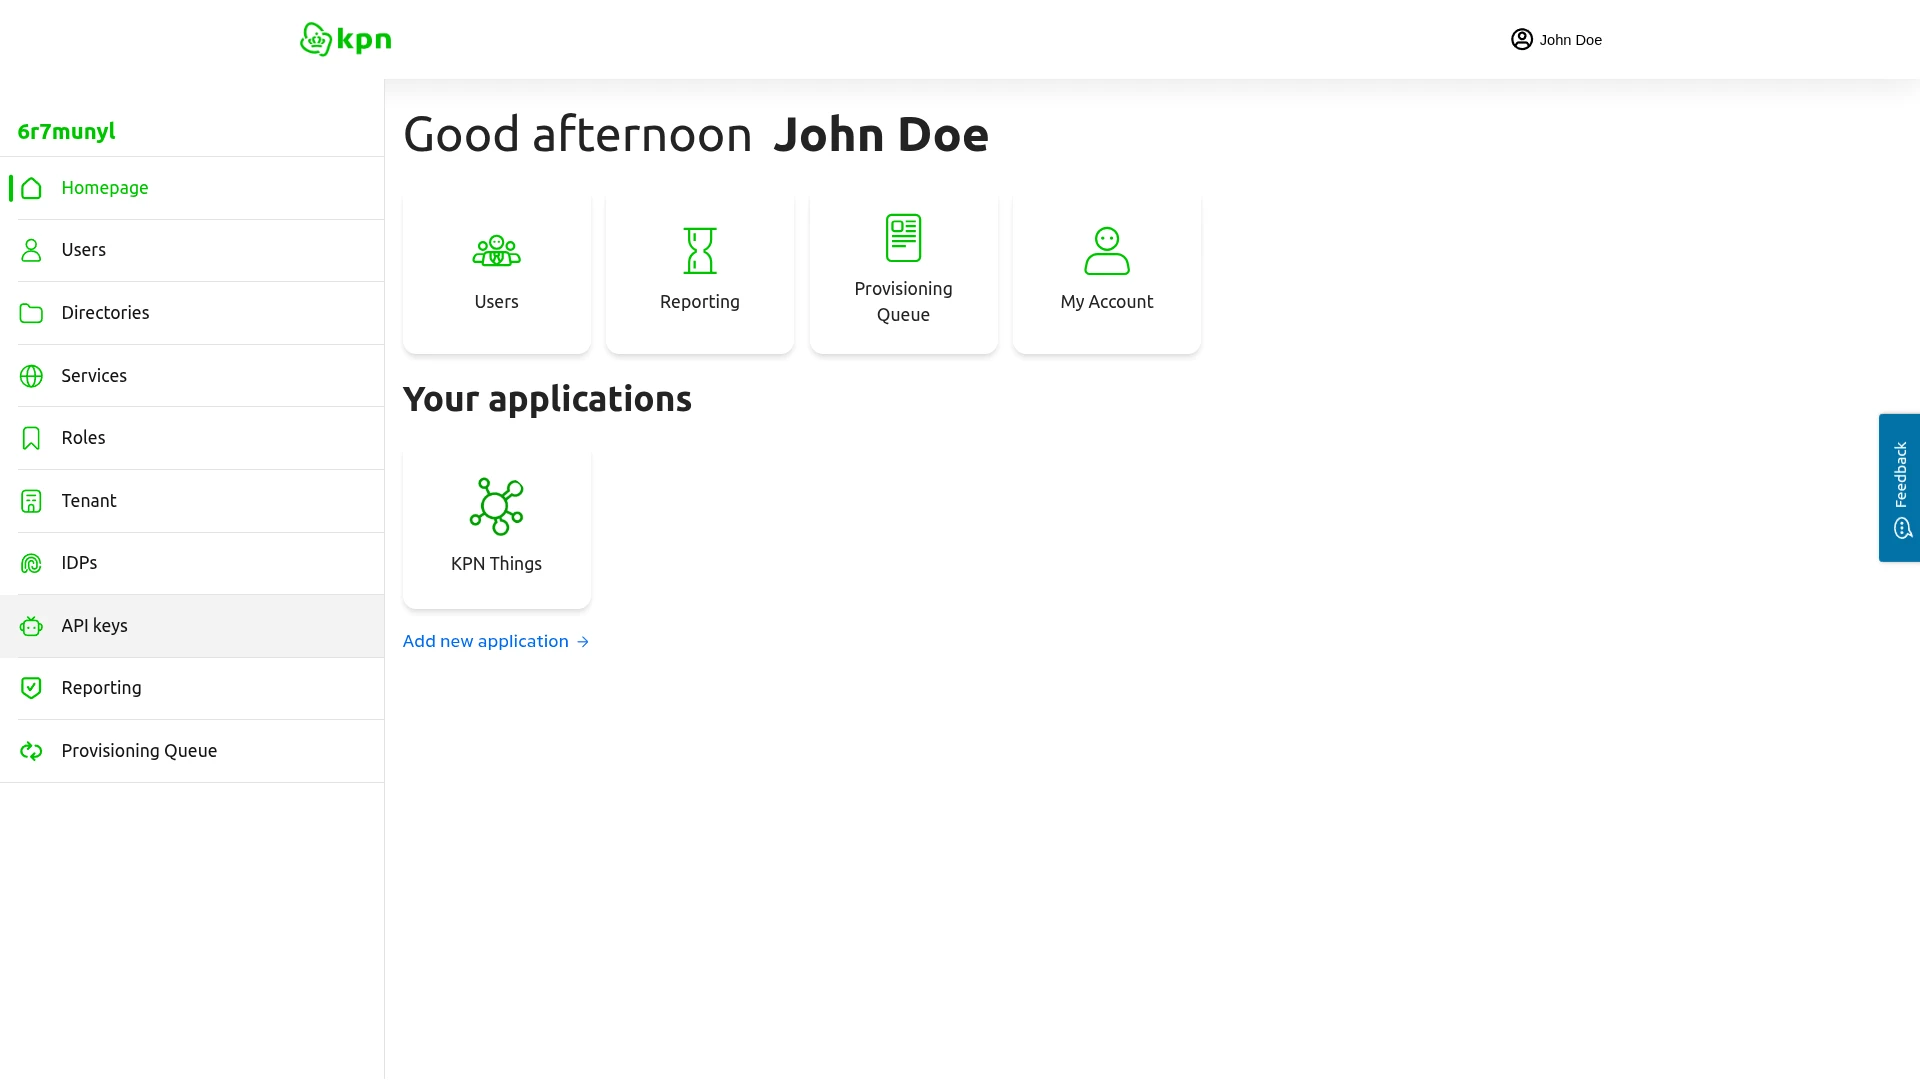
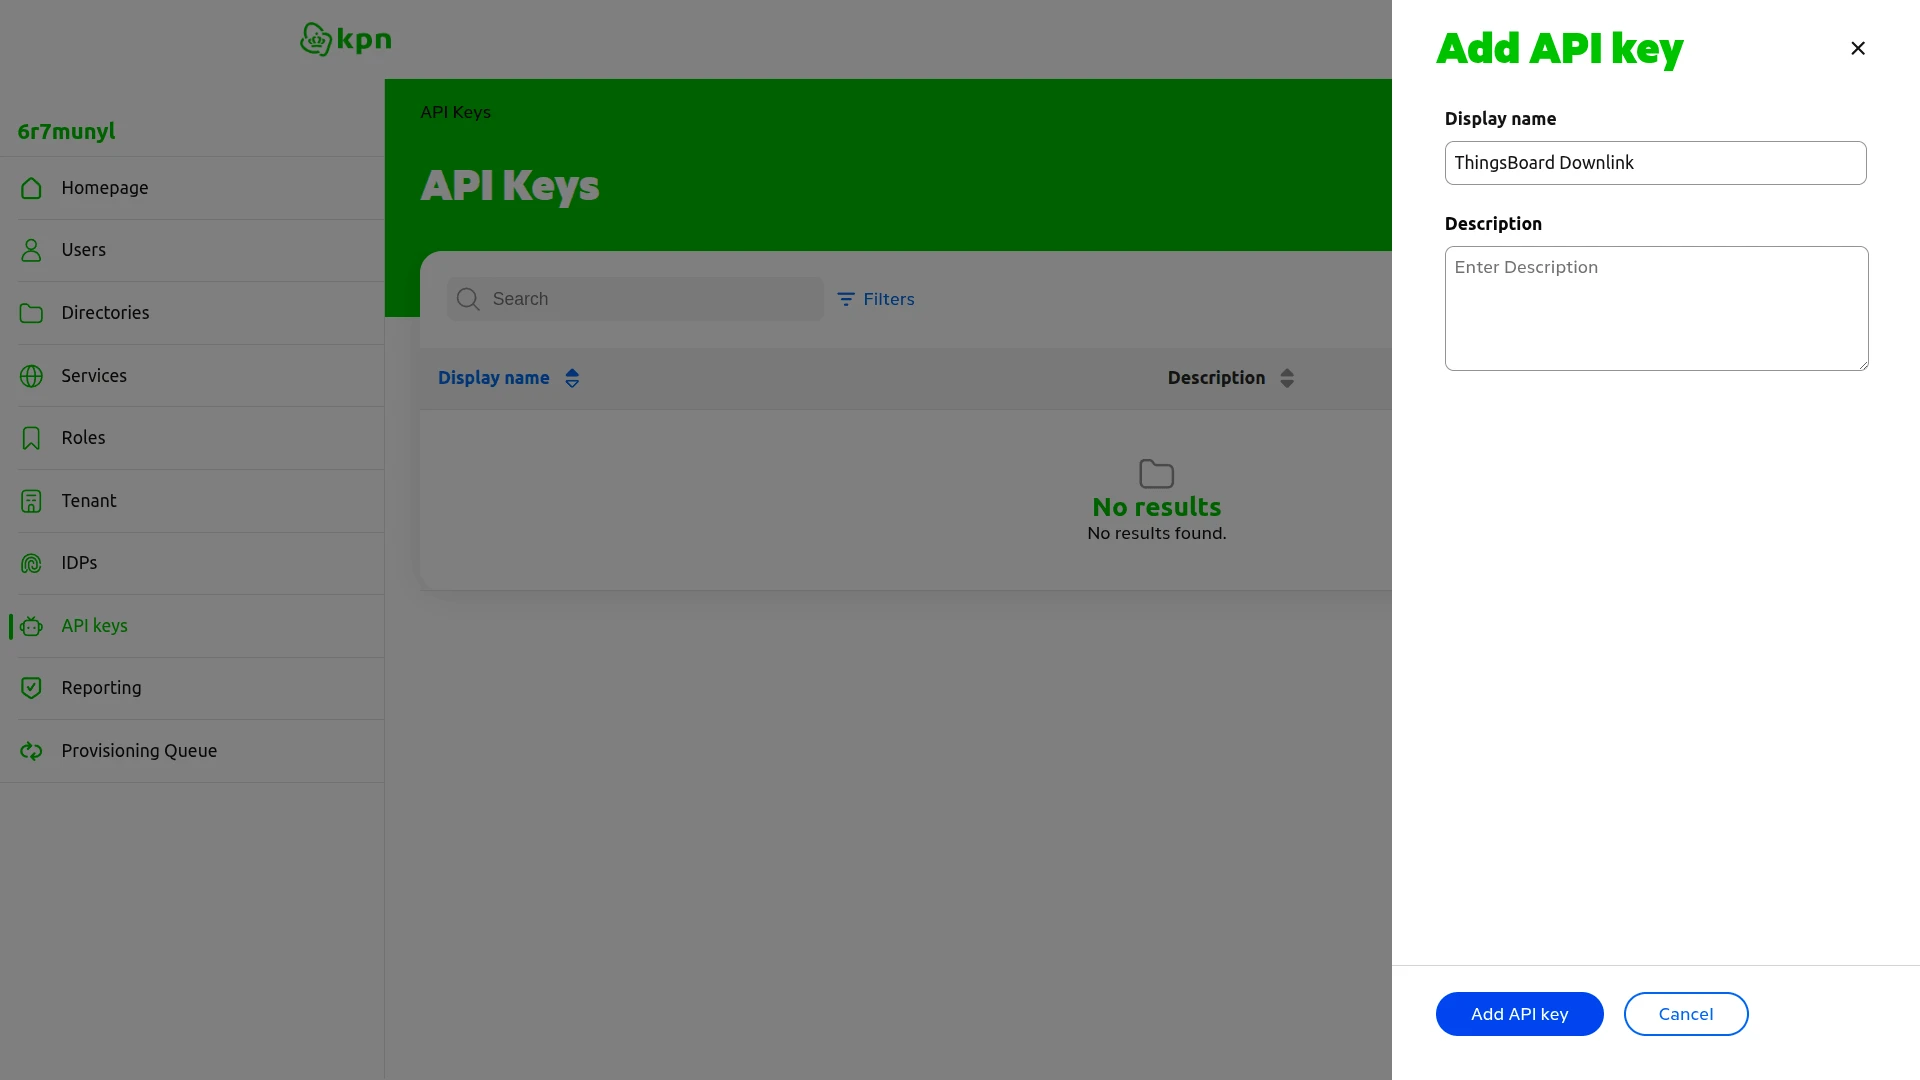
- Log in to KPN Zakelijk portal.
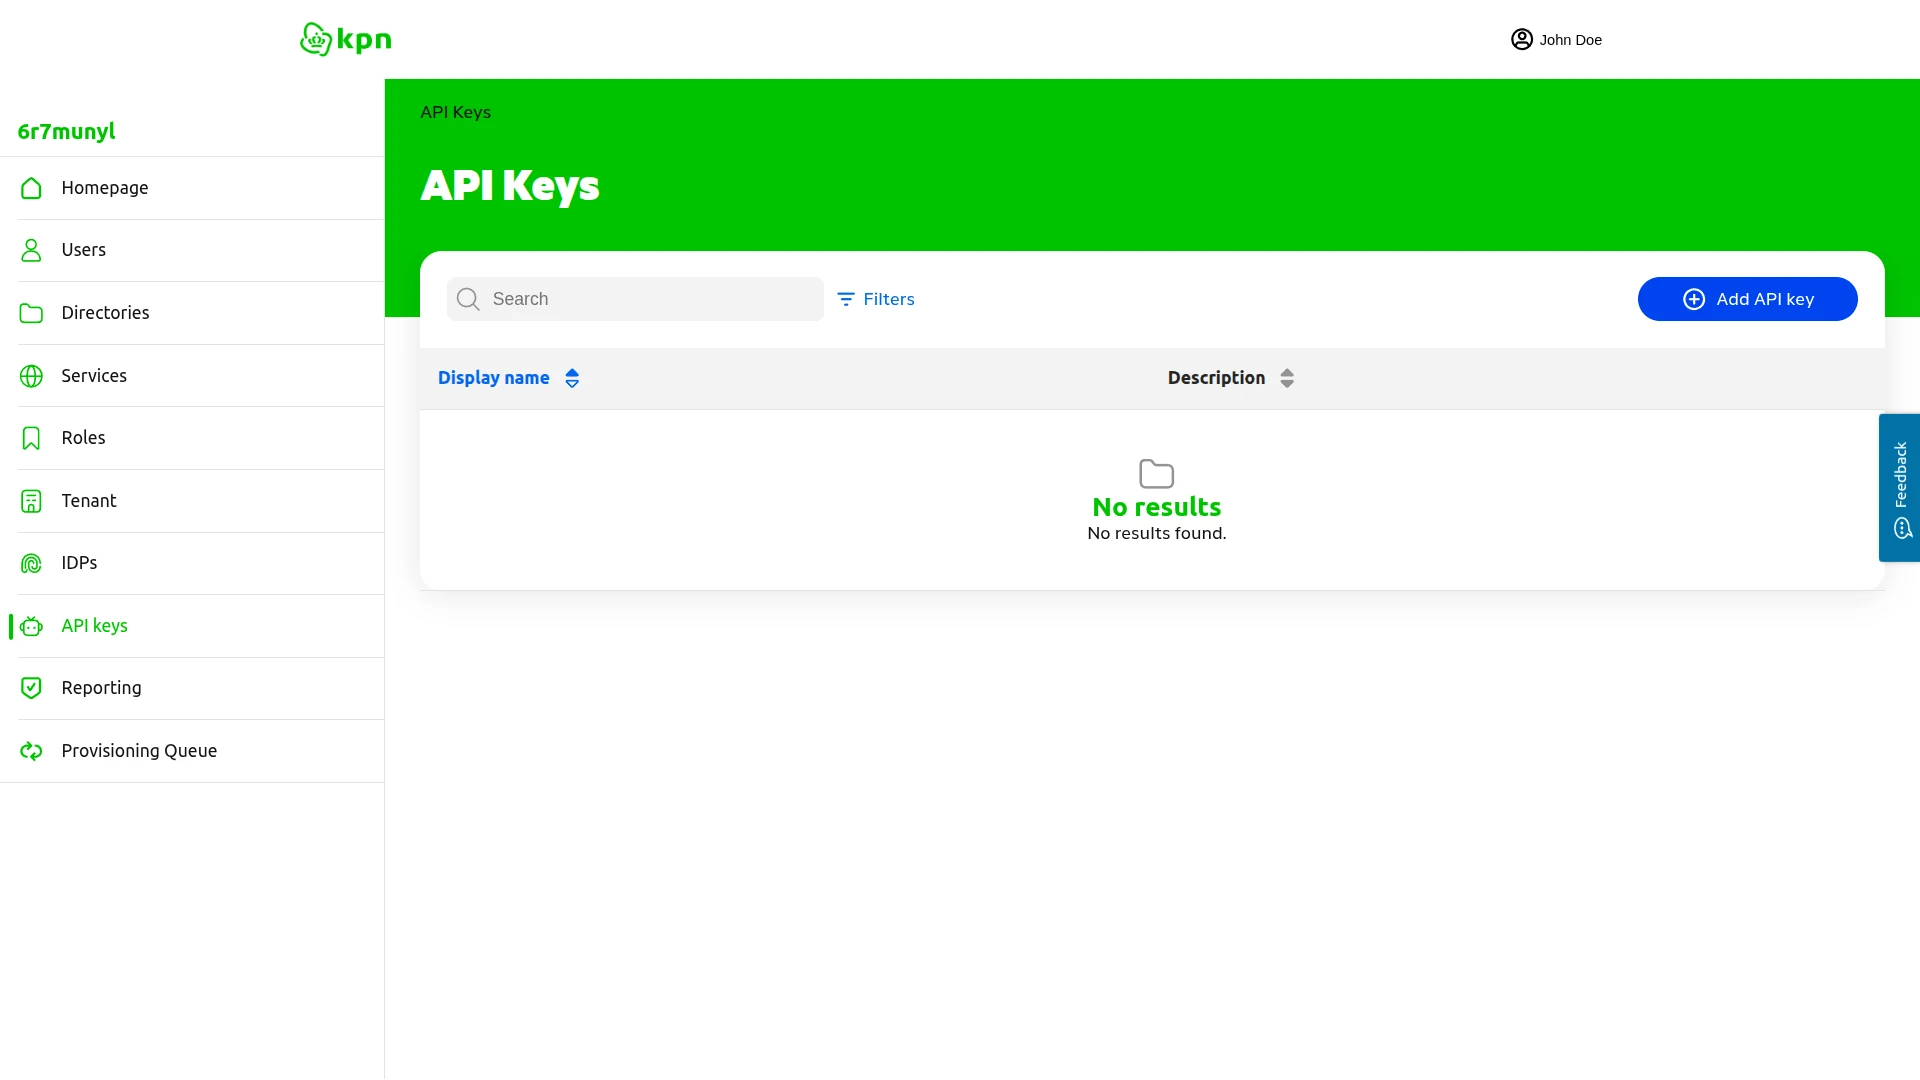
- In the left menu, click API keys.
- Click Add API key.
- Enter a display name (e.g.,
ThingsBoard Downlink). - Click Add API key.
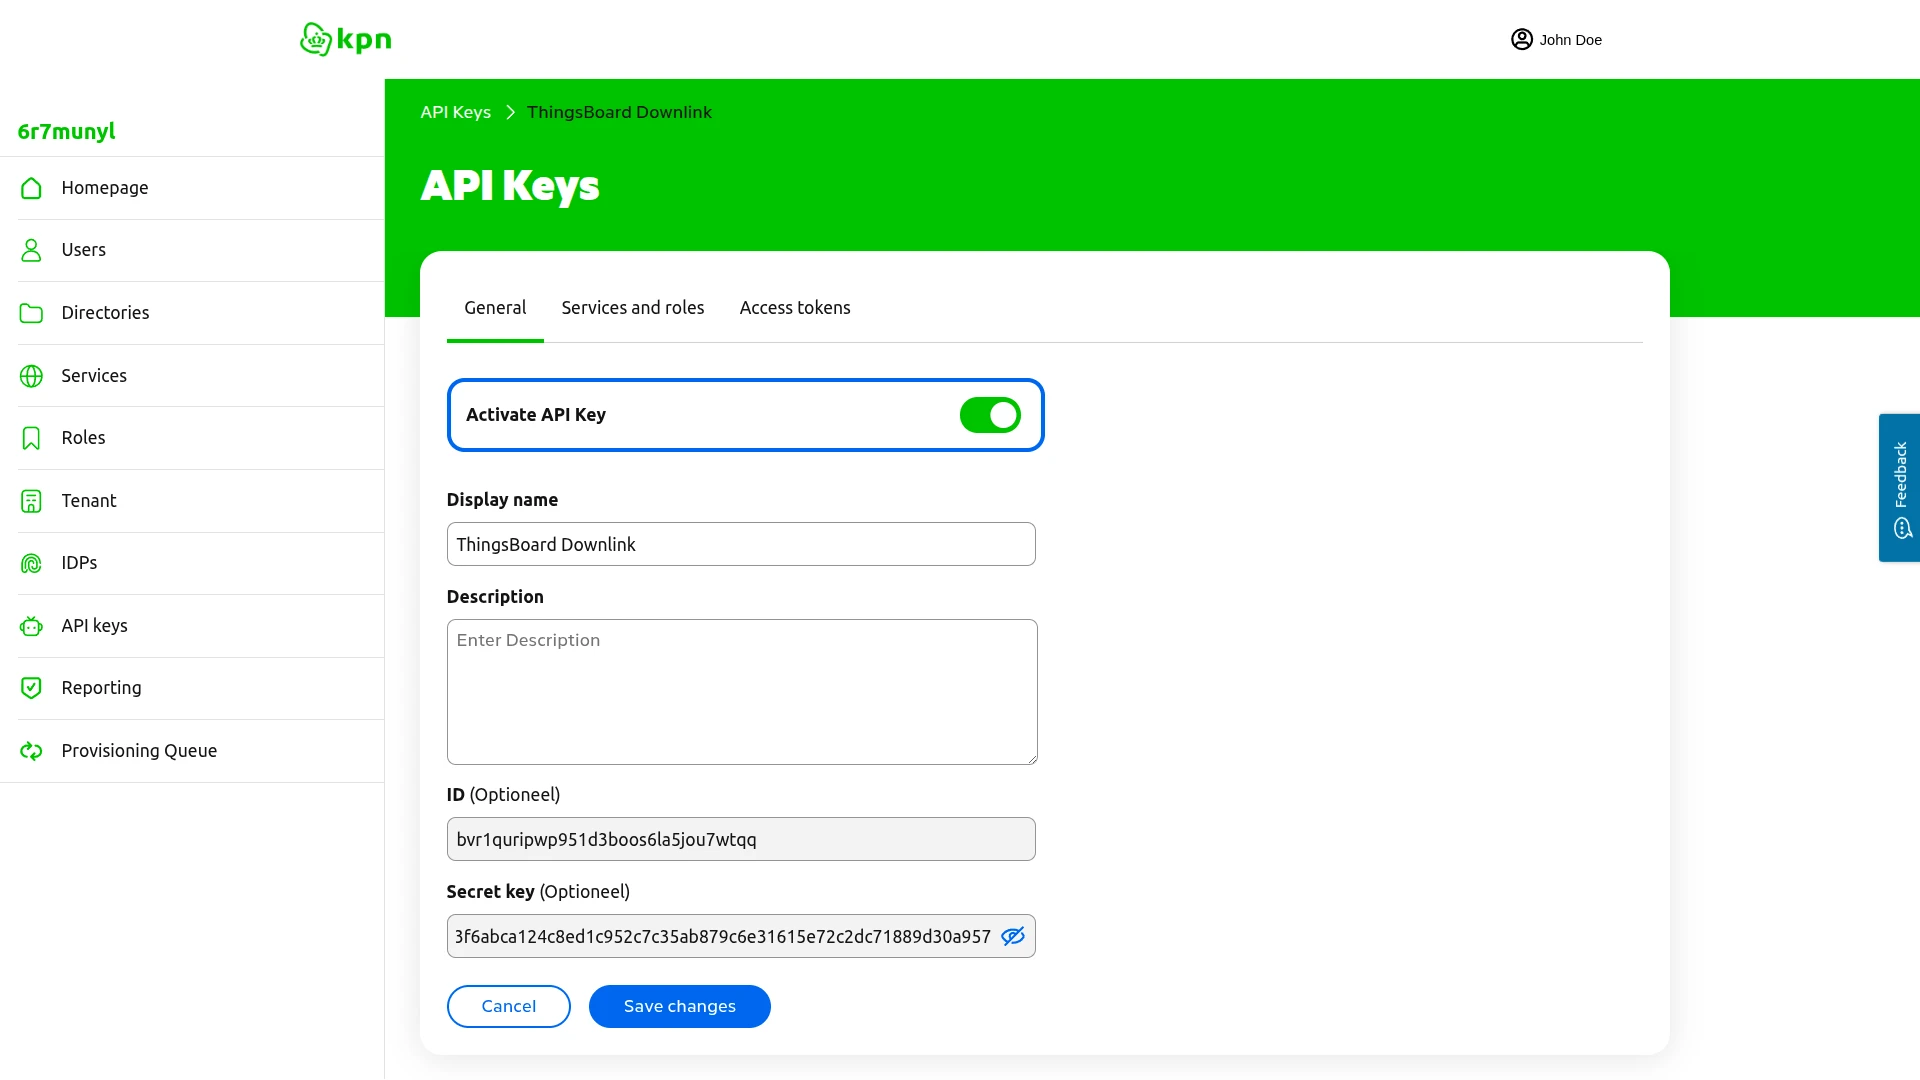
- Copy and save securely:
- ID (e.g.,
bvr1quripwp951d3boos6la5jou7wtqq) - Secret key (e.g.,
9ff04a263f6abca124c8ed131615e7…)
- ID (e.g.,
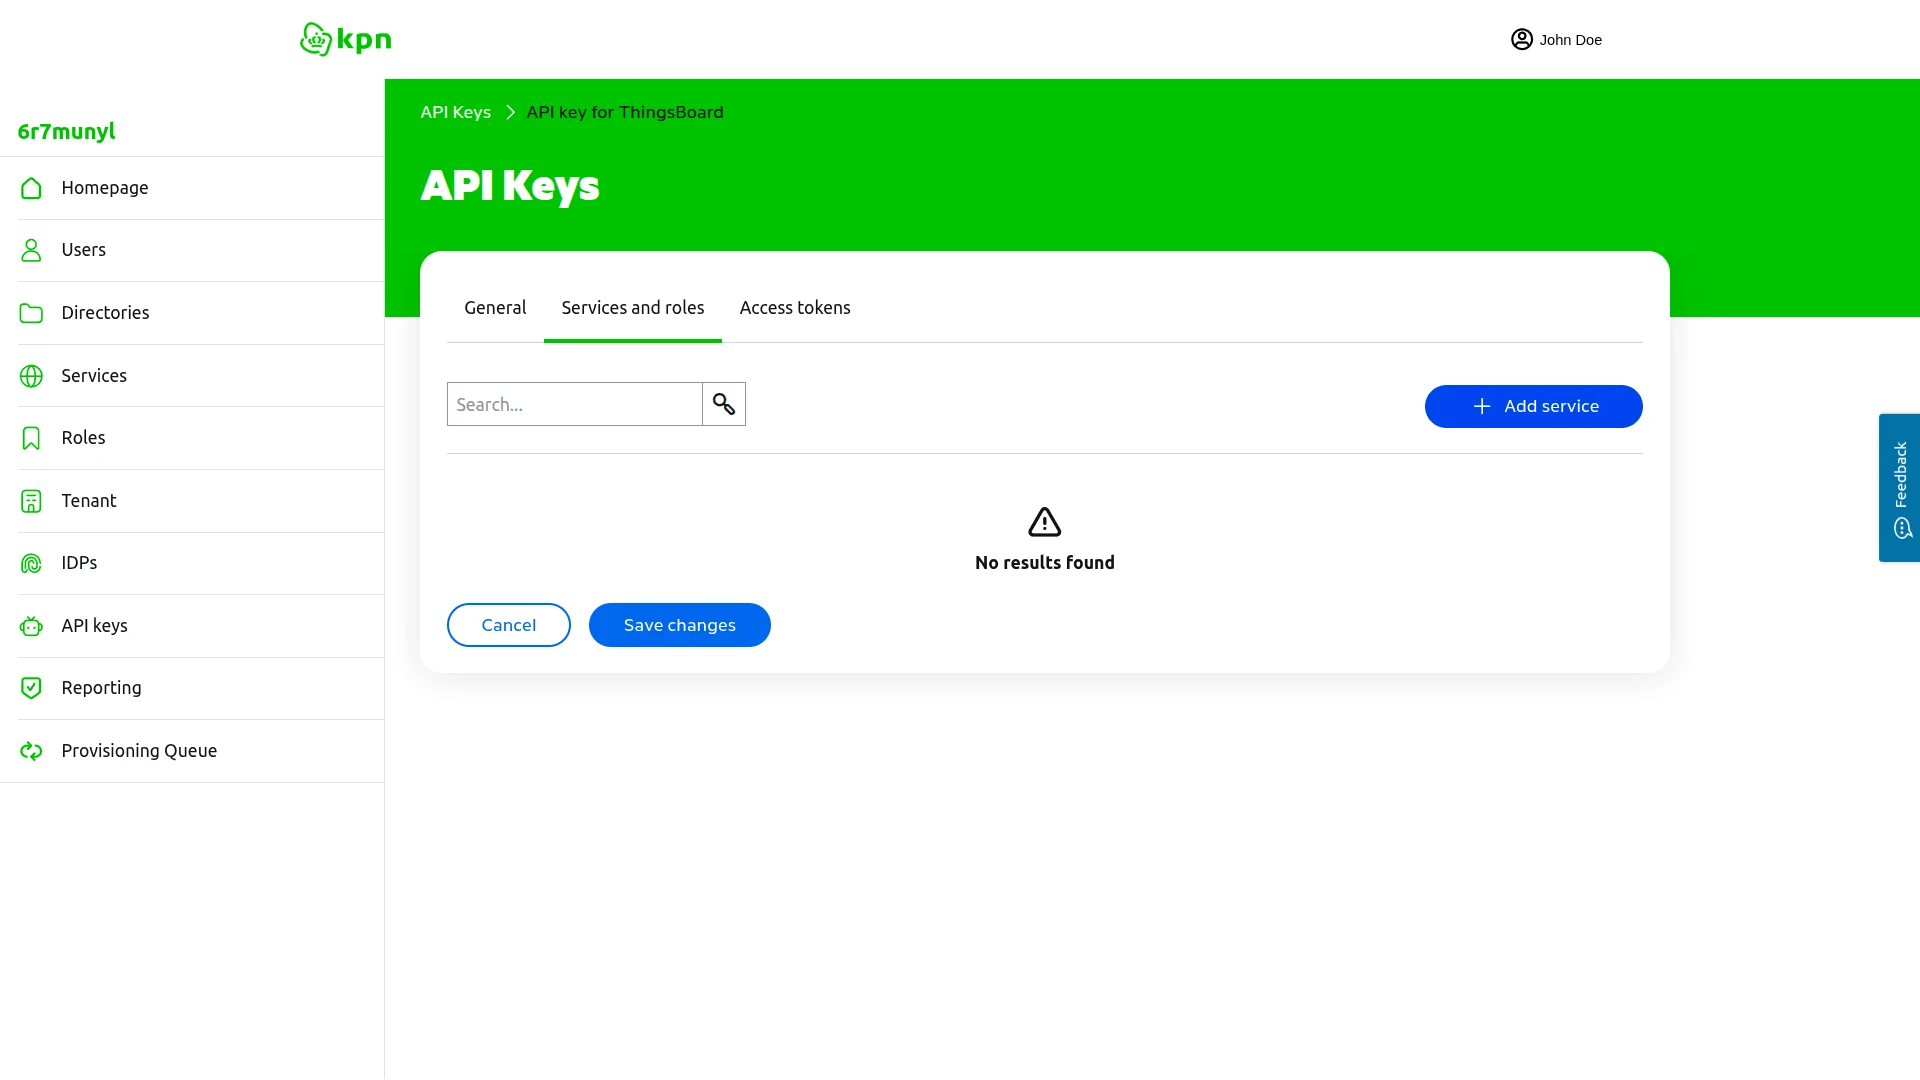
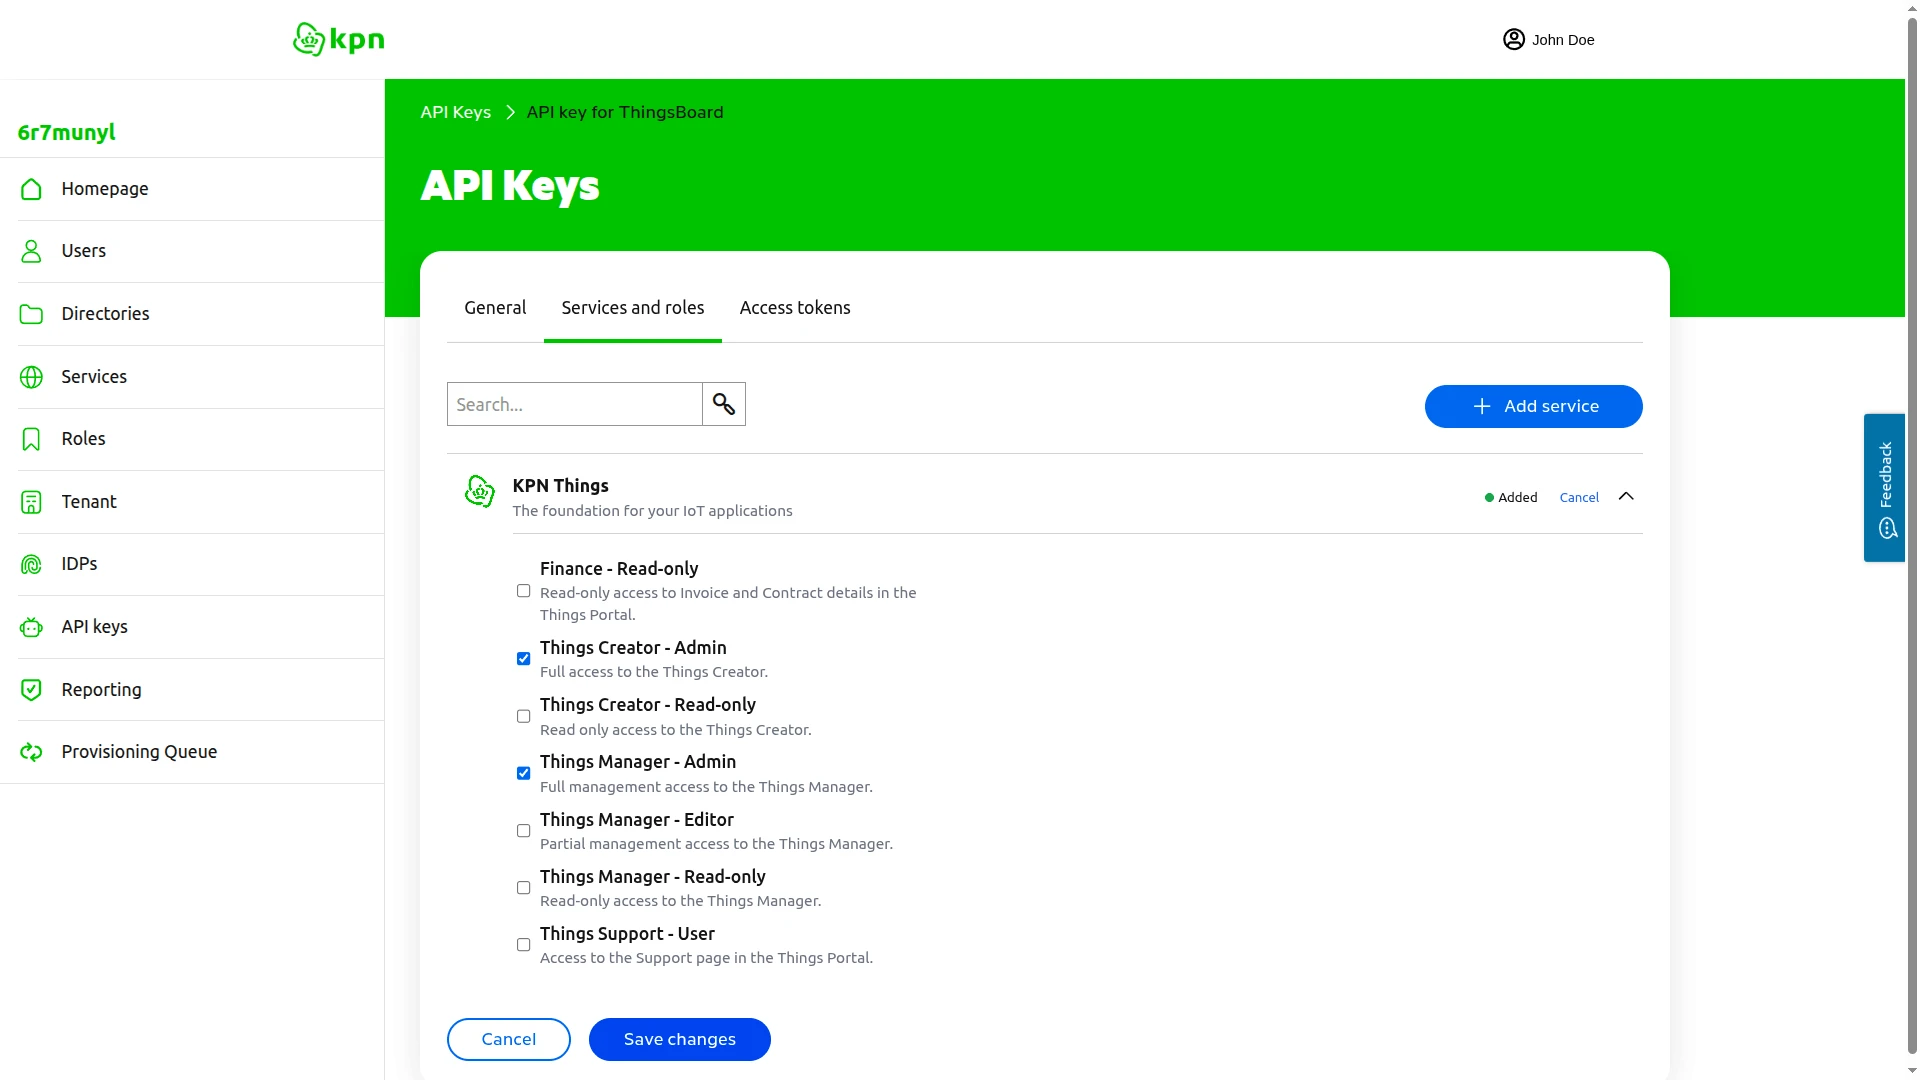
- Switch to the Services and roles tab and click Add service.
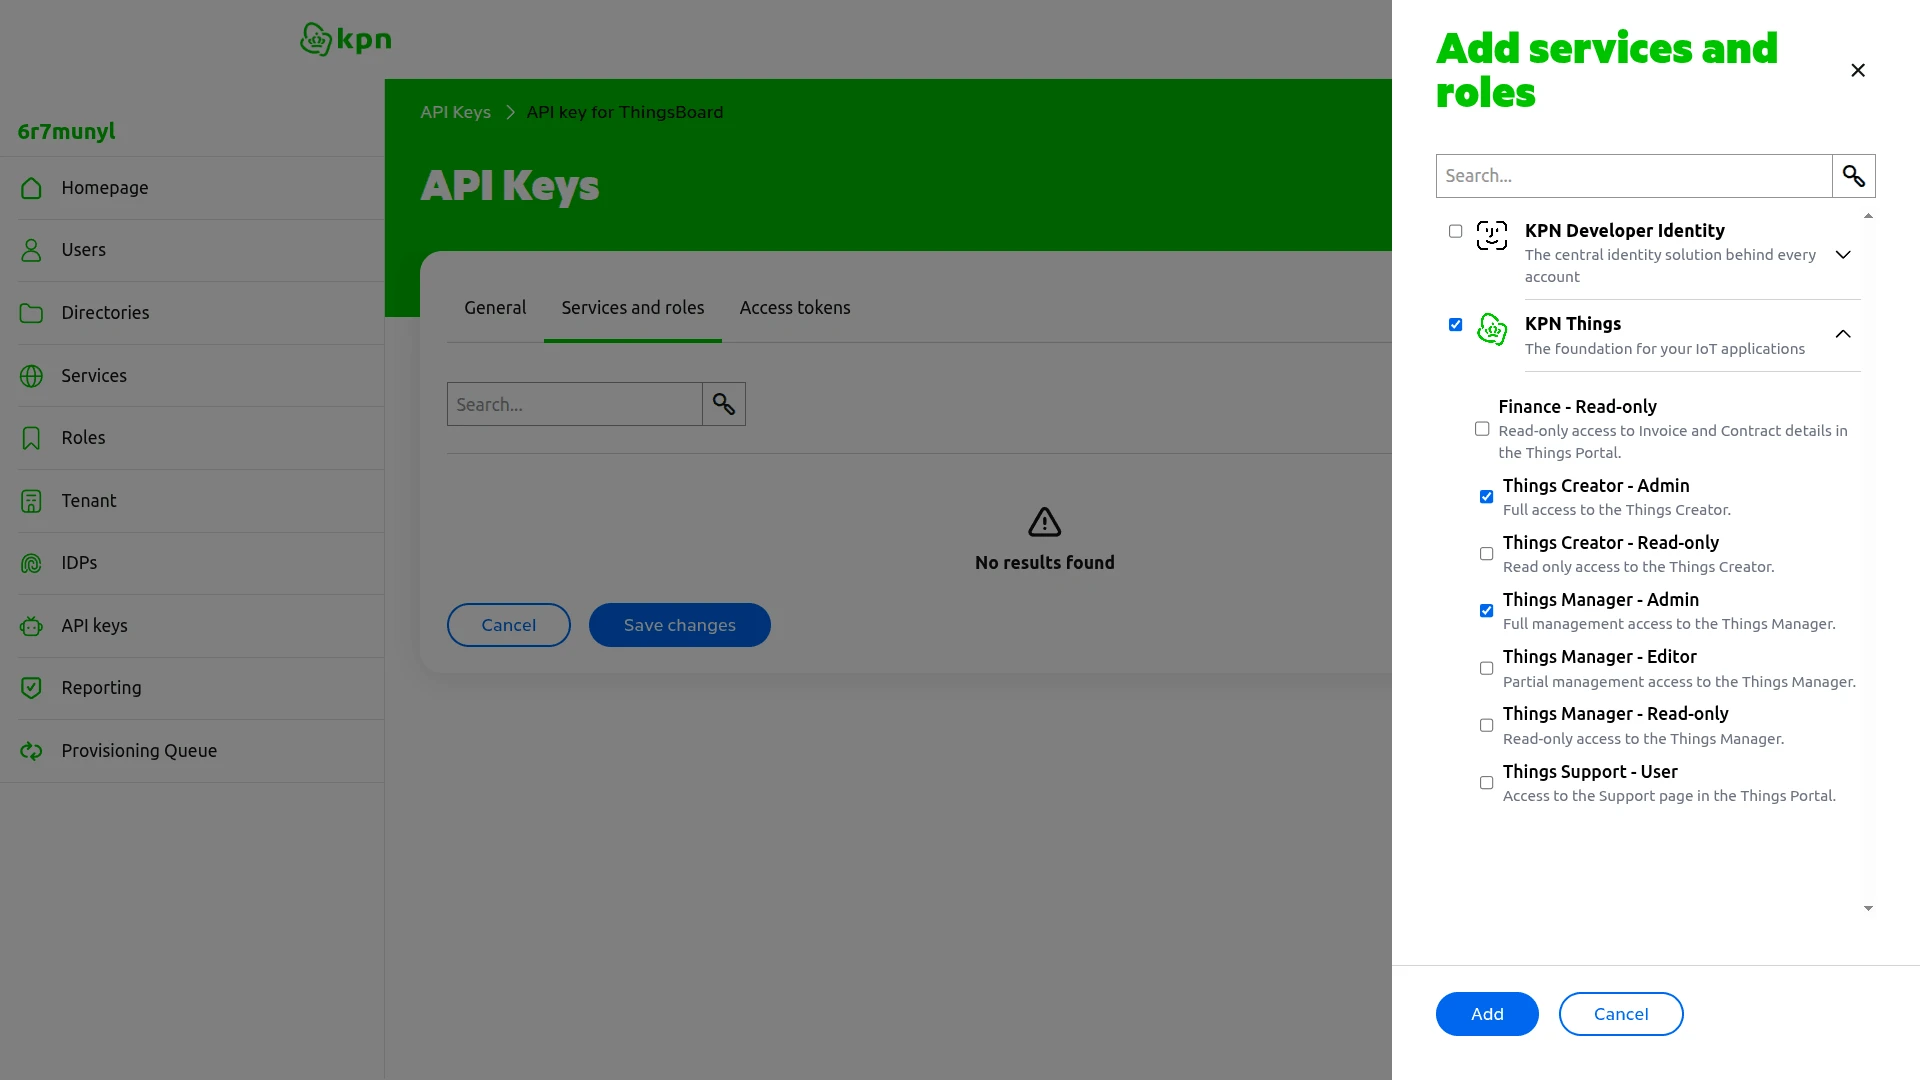
- Select KPN Things, then check Things Creator - Admin and Things Manager - Admin.
- Click Add, then click Save changes to apply the roles to the API key.
Configure API Credentials in ThingsBoard Integration
Section titled “Configure API Credentials in ThingsBoard Integration”Update the KPN Things integration with the API credentials:
- In ThingsBoard, go to Integrations ⇾ Integrations.
- Open the KPN Things integration and click the Edit icon.
- Scroll down to Allow downlink and toggle it On. Additional Credentials fields appear.
- In the Credentials section:
- API ID: Paste the ID from Step 1
- API Key: Paste the Secret key from Step 1
- Click Apply changes.
Create and Assign the Downlink Converter
Section titled “Create and Assign the Downlink Converter”The downlink converter transforms ThingsBoard commands into the SenML format that KPN Things expects.
The converter output must be a JSON object with the following structure:
{ "contentType": "JSON", "data": "[{\"bn\":\"urn:dev:DVNUUID:c837f568-38e3-4425-b39f-d1a63848414b:\",\"n\":\"temperature\",\"v\":25.0}]", "metadata": { "topic": "devices/urn:dev:DVNUUID:c837f568-38e3-4425-b39f-d1a63848414b:/downlink", "FPort": 1 }}| Field | Description |
|---|---|
contentType |
Encoding of the data field: TEXT, JSON, or BINARY. |
data |
SenML JSON array serialized as a string. Each entry contains a base name (bn) set to the device URN, a measurement name (n), and a value (v). |
metadata.topic |
KPN Things downlink topic constructed from the device URN. |
metadata.FPort |
Port identifier sent with the downlink instruction. For LoRaWAN devices this maps to the LoRa frame port; for other device types it may be ignored. |
For the full encoder function reference, see Downlink data converter.
- Go to Integrations ⇾ Integrations and open the KPN Things integration.
- Click the pencil icon to enter edit mode.
- In the Downlink data converter field, click Create new.
- Configure the converter:
- Name: Enter
KPN Things Downlink Converter - Script language: leave TBEL selected (recommended).
- Name: Enter
- In the converter editor, paste the encoder script below, and click Add.
- Click Apply changes.
/** Encoder **/
// Create an empty SenML pack for the downlink payload.var senmlPack = [];
// Get the device URN from metadata.// The deviceName must contain the full KPN Things device URN.var deviceUrn = metadata['deviceName'];
// Add the temperature value to the SenML pack if it is present in the message.if (msg.temperature != null) {    senmlPack.push({        "bn": deviceUrn,        "n": "temperature",        "v": parseFloat(msg.temperature)    });}
// Return the encoded downlink payload and metadata for the integration.var result = {    contentType: "JSON",    data: JSON.stringify(senmlPack),    metadata: {        topic: "devices/" + deviceUrn + "/downlink",        FPort: 1    }};
return result;Configure the Root Rule Chain
Section titled “Configure the Root Rule Chain”Configure the Root Rule Chain to forward device attribute updates to the KPN Things integration.
Two rule nodes are needed: an originator fields node that reads the device name from ThingsBoard and injects it into message metadata, and an integration downlink node that sends the message to the integration.
- Open Data processing ⇾ Rule Chains ⇾ Root Rule Chain.
- In the node panel, search for originator fields and drag it onto the canvas. Configure the node:
- Name — e.g.
Retrieve Device Name. - Under Originator fields mapping, set Source field to
Nameand Target key todeviceName. - Click Add.
- Name — e.g.
- In the node panel, search for integration downlink and drag it onto the canvas. Configure the node:
- Name — e.g.
Downlink to KPN Things. - Integration — select KPN Things integration.
- Click Add.
- Name — e.g.
- Connect the message type switch node to the originator fields node using the Attributes Updated relation.
- Connect the originator fields node to the integration downlink node using the Success relation.
- Click Apply changes.
Trigger a Downlink
Section titled “Trigger a Downlink”Trigger a downlink by adding a shared attribute to the device provisioned in Send Test Uplink:
- In ThingsBoard, go to Devices & assets ⇾ Devices.
- Select a KPN device.
- Go to the Attributes tab.
- Click + in the Shared attributes section.
- Add a test attribute:
- Key:
temperature - Type:
Integer - Value:
25
- Key:
- Click Add. The Rule Chain triggers and sends a downlink message to KPN Things.
Verify Downlink Delivery
Section titled “Verify Downlink Delivery”Check Integration Events
Go to Integrations ⇾ Integrations, open the KPN Things integration, and click the Events tab. A Downlink event confirms that ThingsBoard forwarded the message to KPN Things.
Check Downlink Converter Events
Go to Integrations ⇾ Data converters, open KPN Things Downlink Converter, and click the Events tab. Click an event row to inspect:
- In — the Rule Engine message received by the converter:
msgcontains the attribute payload andmetadata.deviceNamecarries the device URN injected by the originator fields node. - Out — the encoded SenML output sent to KPN Things: a JSON array with the device URN as base name and the temperature value.
- Metadata — integration and user context injected alongside the message.
Check Delivery on KPN Things
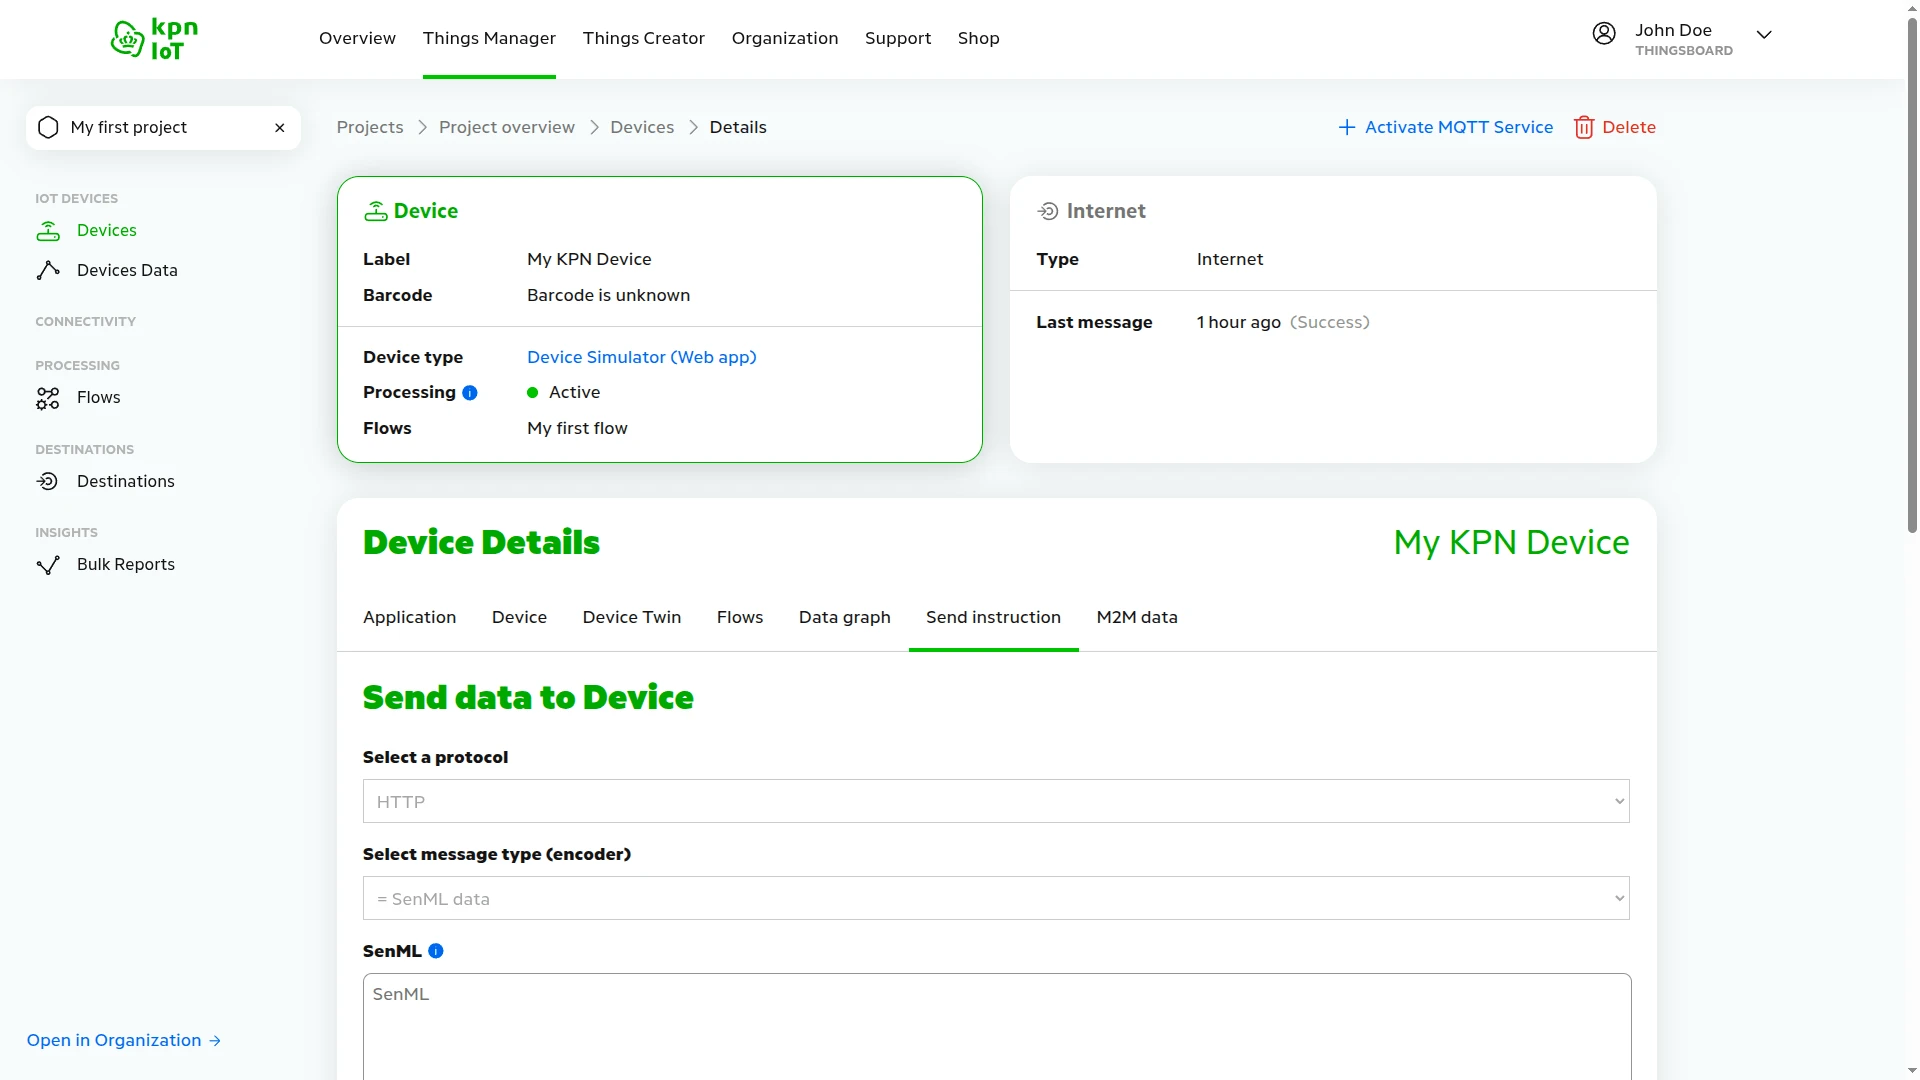
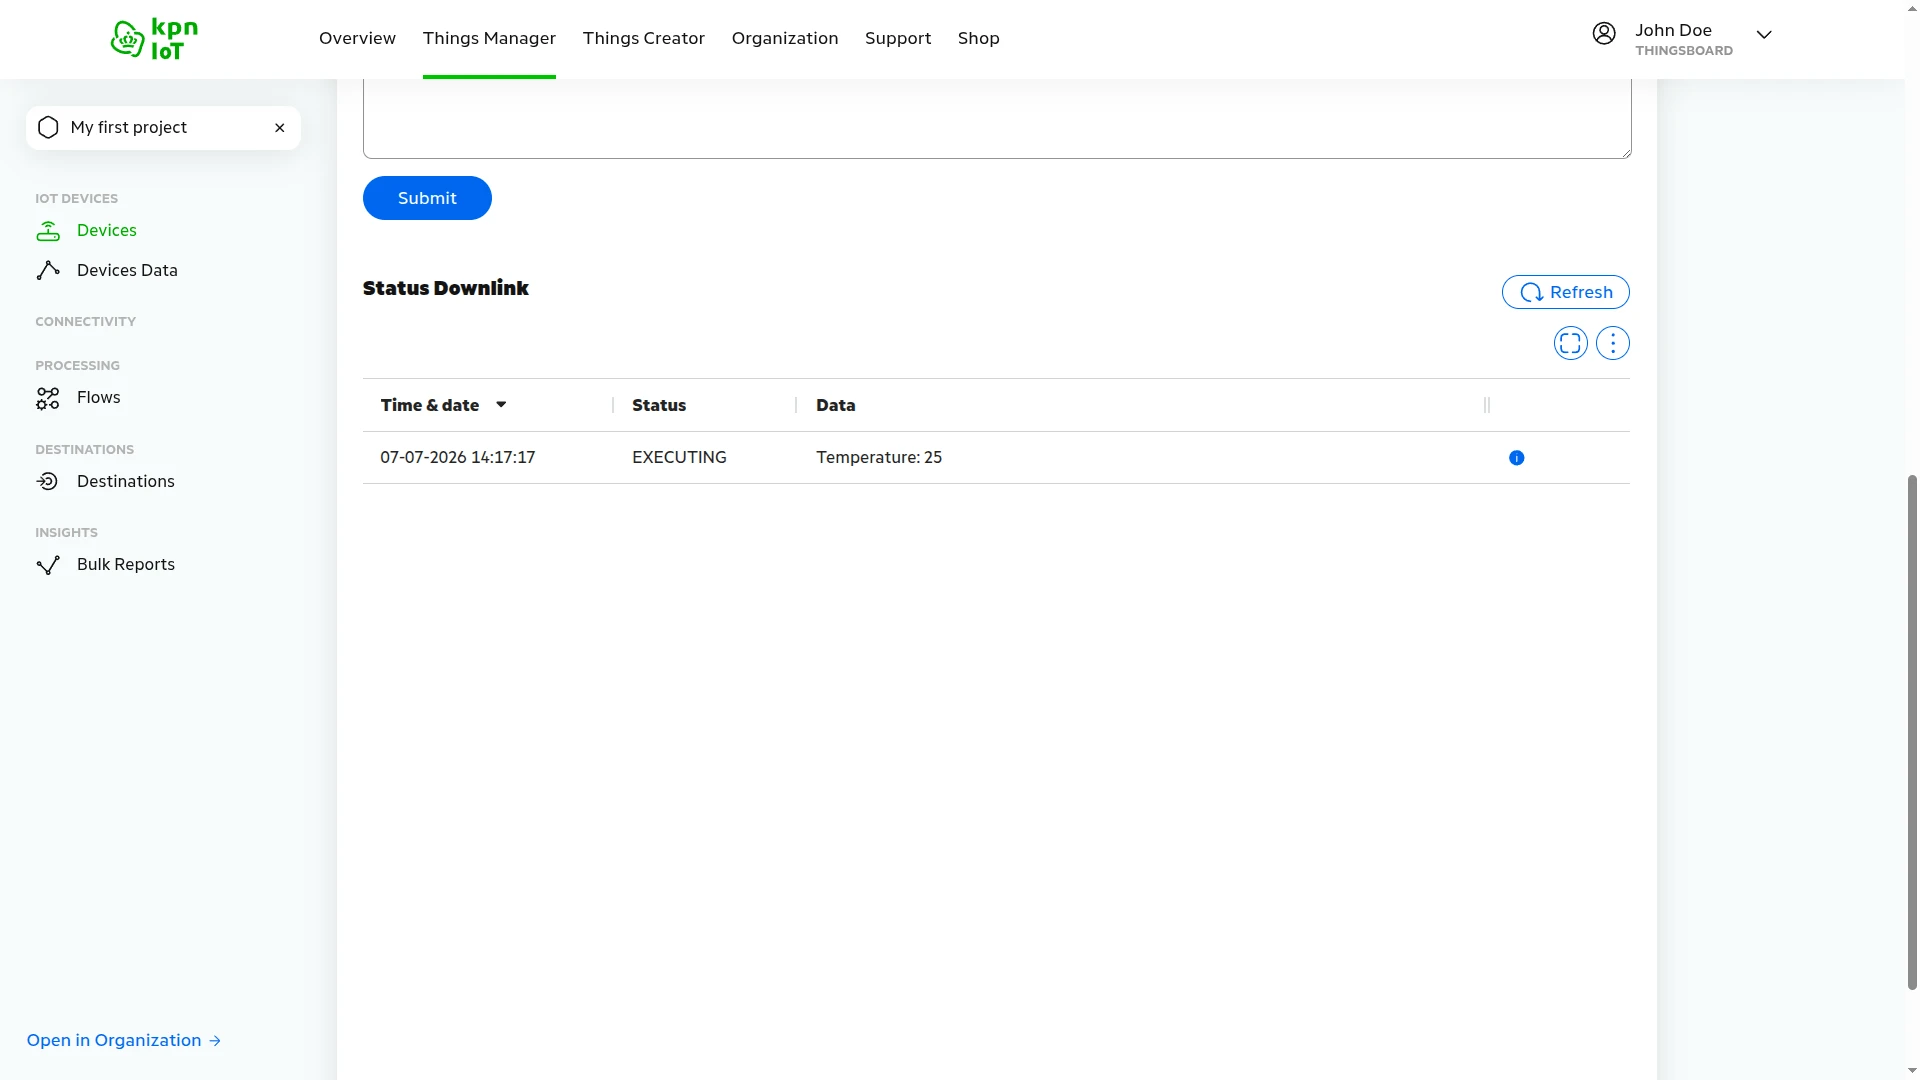
Open the KPN Things portal, navigate to Things Manager ⇾ Devices, and open your device. Click the Send instruction tab and scroll down to the Status Downlink section — the Temperature message with status EXECUTING confirms the downlink reached the device.
Troubleshooting
Section titled “Troubleshooting”This section covers the most common problems encountered when setting up and running the KPN Things integration. Each entry describes the symptom, the most likely cause, and the steps to resolve it.
No Uplinks in ThingsBoard
| Symptom | Cause | Fix |
|---|---|---|
| No events on the integration Events tab | KPN Things destination is not linked to the flow | In the KPN Things portal, open Flows ⇾ My first flow and confirm your ThingsBoard destination appears under Destinations. If it is missing, click Link Destination and link it. |
| No events on the integration Events tab | Device is not linked to the flow | Open Flows ⇾ My first flow ⇾ Devices and confirm your device appears. If it is missing, click Link Device. |
| No events on the integration Events tab | HTTP endpoint URL in the KPN Things destination is incorrect | Open the KPN Things destination configuration and confirm the endpoint URL matches the HTTP endpoint URL shown in the ThingsBoard integration settings. Copy-paste the value to avoid typos. |
| No events on the integration Events tab | Integration is disabled | Open the KPN Things integration in ThingsBoard, click the Edit icon, and confirm Enable integration is on. |
Uplink Received but Device Not Created
| Symptom | Cause | Fix |
|---|---|---|
| Event appears on the integration Events tab but no device in Devices & assets ⇾ Devices | Allow create devices or assets is disabled | Open the integration, click the Edit icon, and enable Allow create devices or assets in the Basic settings step. |
| Integration event shows an error | Uplink converter error | Go to Integrations ⇾ Data converters, open KPN Things Uplink Converter, and click the Events tab. Inspect the Error column of a recent event and fix the converter script accordingly. |
Device Created but No Telemetry
| Symptom | Cause | Fix |
|---|---|---|
| Device exists, Latest Telemetry tab is empty | Decoded ThingsML and raw SenML data decoder is not enabled in KPN Things | In the KPN Things portal, open your device, go to the Flows tab, and enable the Decoded ThingsML and raw SenML data toggle in the Decoders section. Without this, KPN Things forwards raw SenML fields instead of the structured JSON that ThingsBoard expects. |
Device exists, telemetry keys look like n, u, or bn |
Decoded ThingsML and raw SenML data decoder is not enabled in KPN Things | Same as above. When the decoder is off, raw SenML field names appear as telemetry keys instead of human-readable names such as temperature or battery. |
| Device exists, events appear, but no telemetry is stored | Uplink converter returns an unexpected structure | Open KPN Things Uplink Converter ⇾ Events and inspect the Out panel of a recent event. Confirm the output contains a telemetry array with the expected keys. If the converter was customized, compare it against the default pass-through script. |
Downlink Not Delivered
| Symptom | Cause | Fix |
|---|---|---|
| Downlink converter Events tab is empty after updating a shared attribute | Rule Chain is not configured | In the Root Rule Chain, confirm the message type switch node connects to the Retrieve Device Name (originator fields) node via the Attributes Updated relation, and that Retrieve Device Name connects to the Downlink to KPN Things (integration downlink) node via Success. |
| Converter is triggered but the downlink does not reach KPN Things | Allow downlink is off | Open the integration, click the Edit icon, and enable Allow downlink. |
| Converter is triggered but the downlink does not reach KPN Things | API credentials are wrong or missing the required roles | Open the integration in edit mode, expand Allow downlink, and verify the API ID and API Key match the credentials from the KPN Zakelijk portal. Confirm the API key has the Things Creator - Admin and Things Manager - Admin roles assigned under Services and roles. |
| Downlink converter Events tab shows an error | Converter script error | Open KPN Things Downlink Converter ⇾ Events, click a failed event, and fix the script based on the error message shown. |
Security Header Validation Failures
| Symptom | Cause | Fix |
|---|---|---|
| Integration events show authorization errors or uplinks stop after enabling the security filter | Header name or value does not match | Open the integration in edit mode, expand Enable security (Headers filter), and confirm the header name is exactly X-Things-Secret. The value must match the token from the KPN Things destination configuration character-for-character — copy-paste it rather than typing manually. |
| Security errors appear after reconfiguring the KPN Things destination | Destination token was regenerated | Clicking Generate again in the KPN Things destination issues a new token. Copy the new token and update the Value field in the Enable security (Headers filter) section of the ThingsBoard integration. |
How to Read Debug Events
- Go to Integrations ⇾ Integrations, open the KPN Things integration, and click the Events tab.
- Click an event row to inspect:
- In — the raw HTTP request body received from KPN Things before processing.
- Out — what the converter returned: device name, attributes, and telemetry values passed to ThingsBoard.
- Error — error text and stack trace, if processing failed.
Enable Debug mode on both the integration and the uplink converter to capture all incoming messages and conversion results. Starting from ThingsBoard 3.9, full debug events are stored only during the first hour — afterward, only error events are retained. Disable debug mode once the issue is identified.
See Also
Section titled “See Also”- Integrations Overview — how ThingsBoard connects to external platforms and how uplink/downlink flow works
- Uplink Data Converter — full decoder function reference: input parameters, output fields, and scripting patterns
- Downlink Data Converter — full encoder function reference: input parameters, output fields, and scripting patterns
- Remote Integration — run the integration outside the ThingsBoard server to reach KPN Things from a private network
- TBEL scripting reference — built-in functions and operators for writing converter scripts
- Rule Engine — how the Root Rule Chain routes shared attribute updates to the downlink converter
Was this helpful?