Azure Event Hub Integration
Azure Event Hub Integration connects ThingsBoard to the built-in Event Hub-compatible endpoint of Azure IoT Hub. ThingsBoard subscribes as a consumer group, reads device-to-cloud messages, and converts them into devices and telemetry via an uplink converter. For downlink, ThingsBoard sends cloud-to-device messages back to Azure IoT Hub devices using the Azure IoT Hub API.

Create IoT Hub in Azure
Section titled “Create IoT Hub in Azure”Create the IoT Hub resource
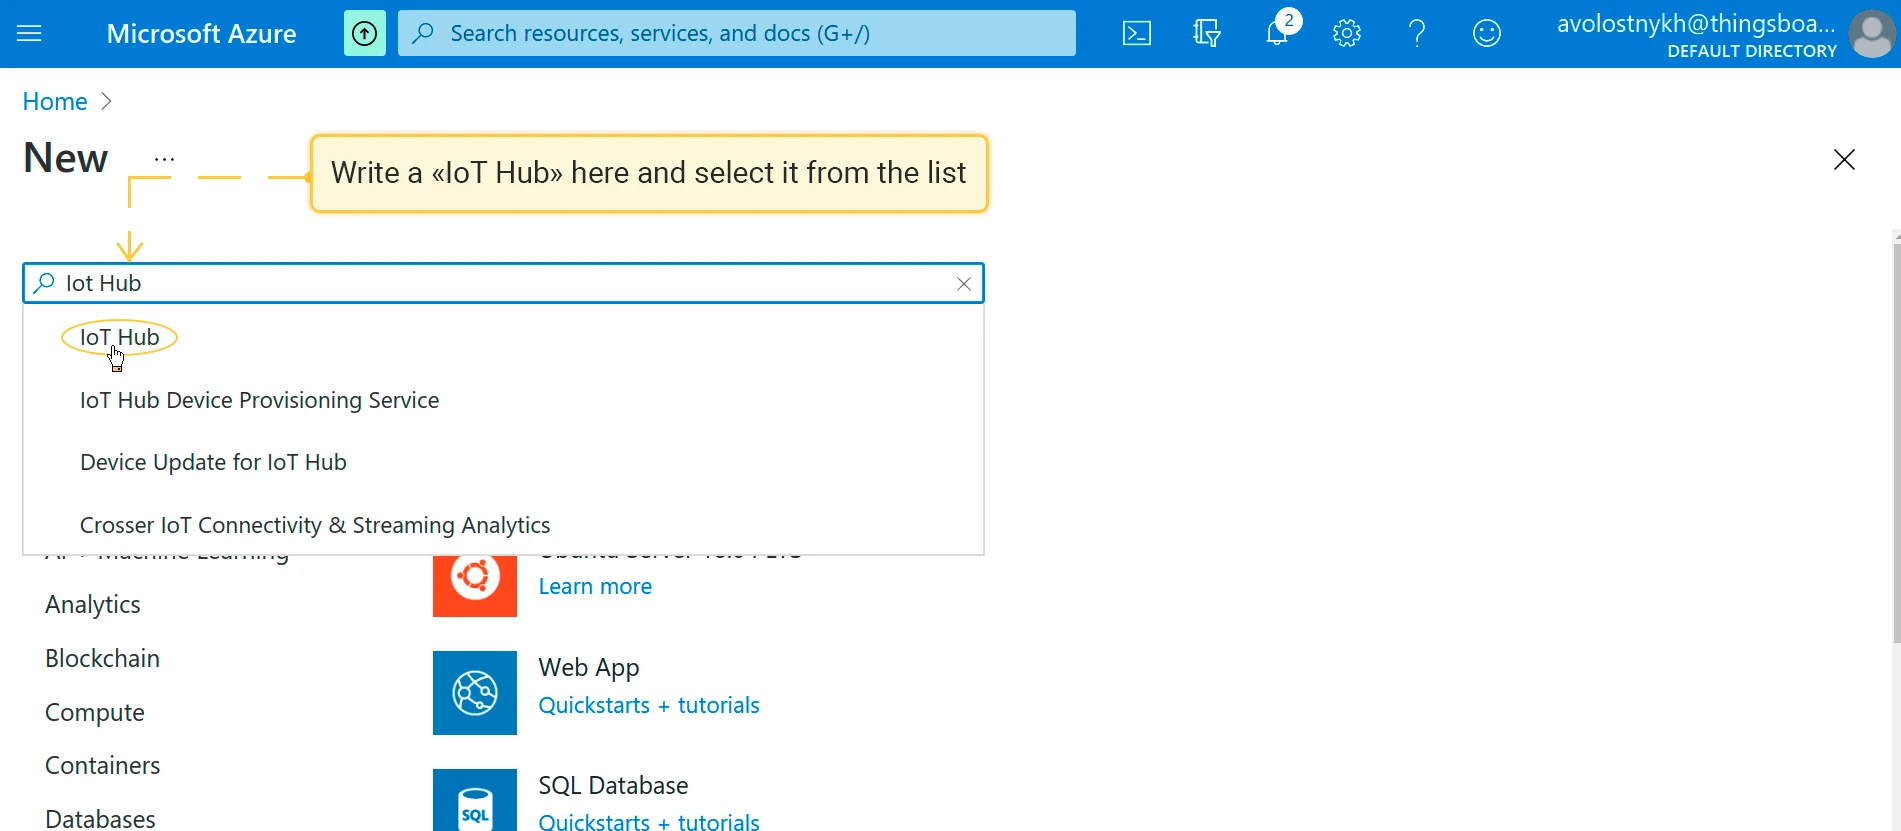
Section titled “Create the IoT Hub resource”- Sign in to the Azure portal and click Create a resource.
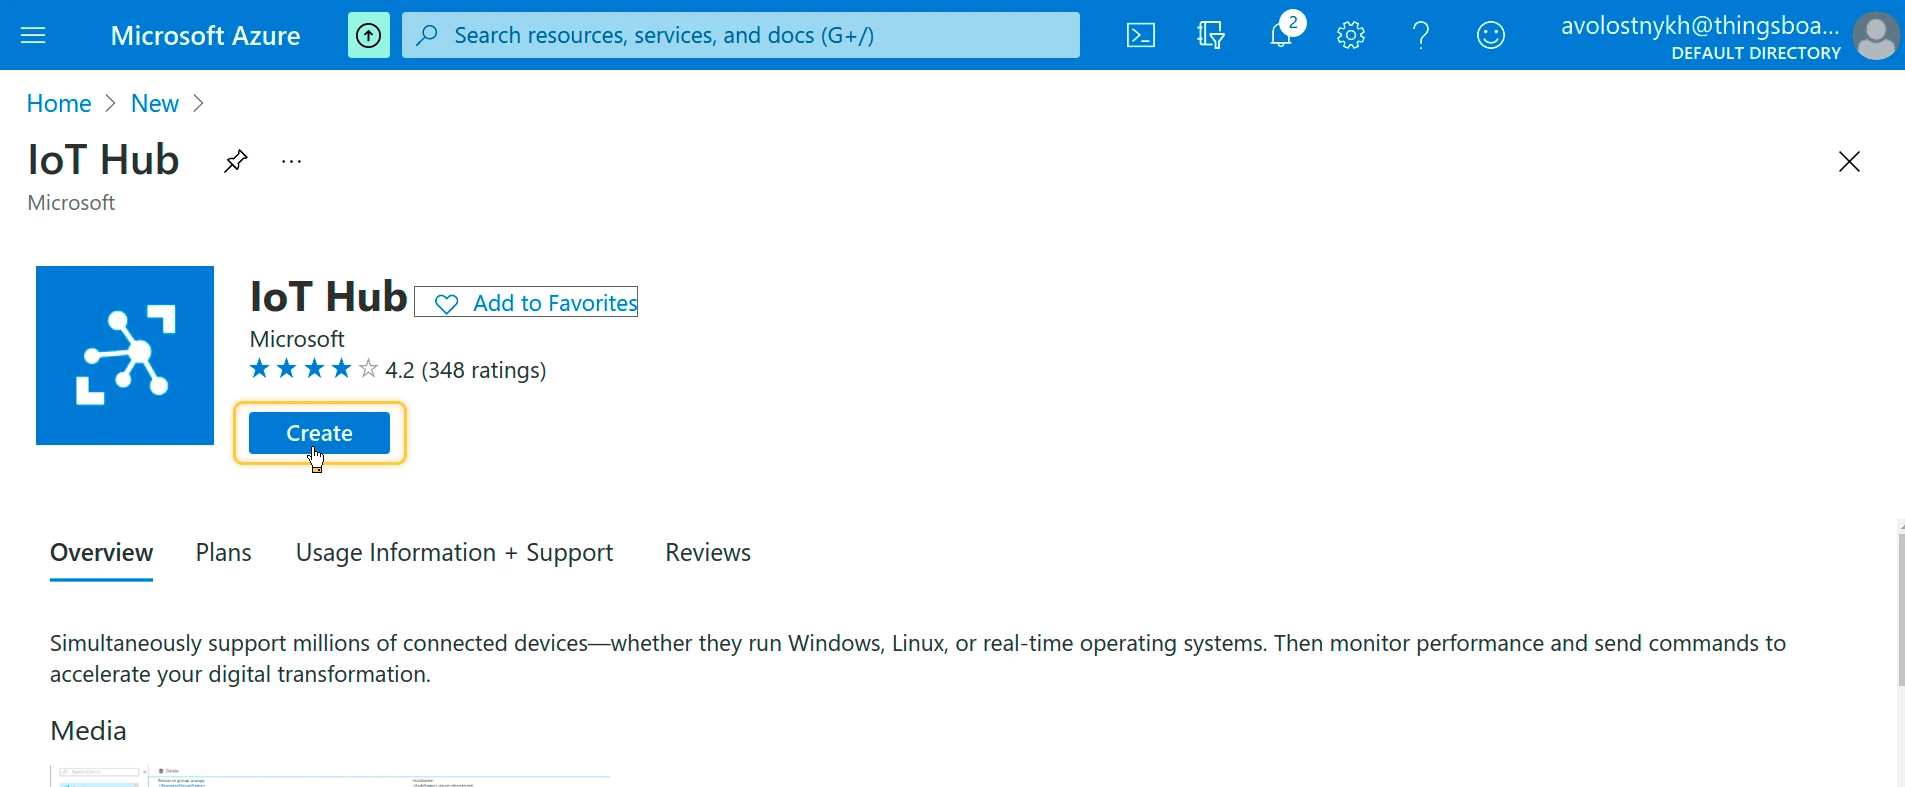
- Search for IoT Hub, select it from the list, and click Create.
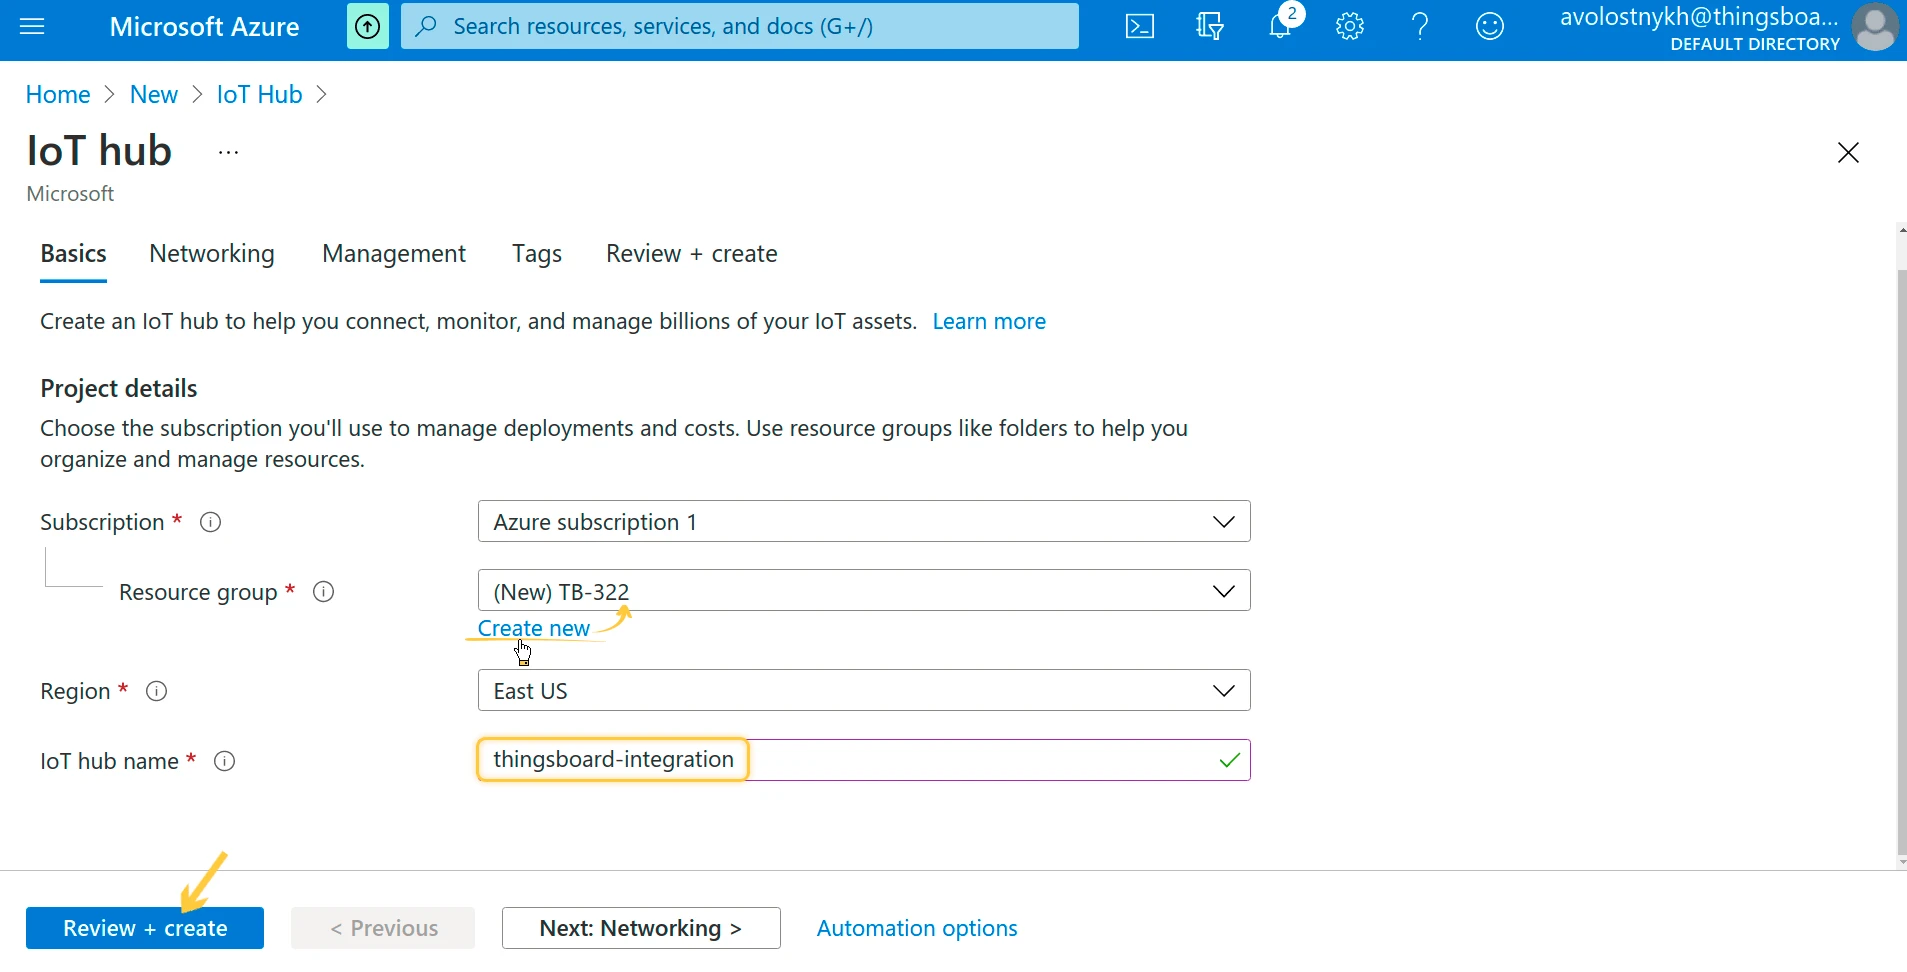
- On the Basics tab, click Create new to create a new resource group. Enter a resource group name and an IoT hub name.
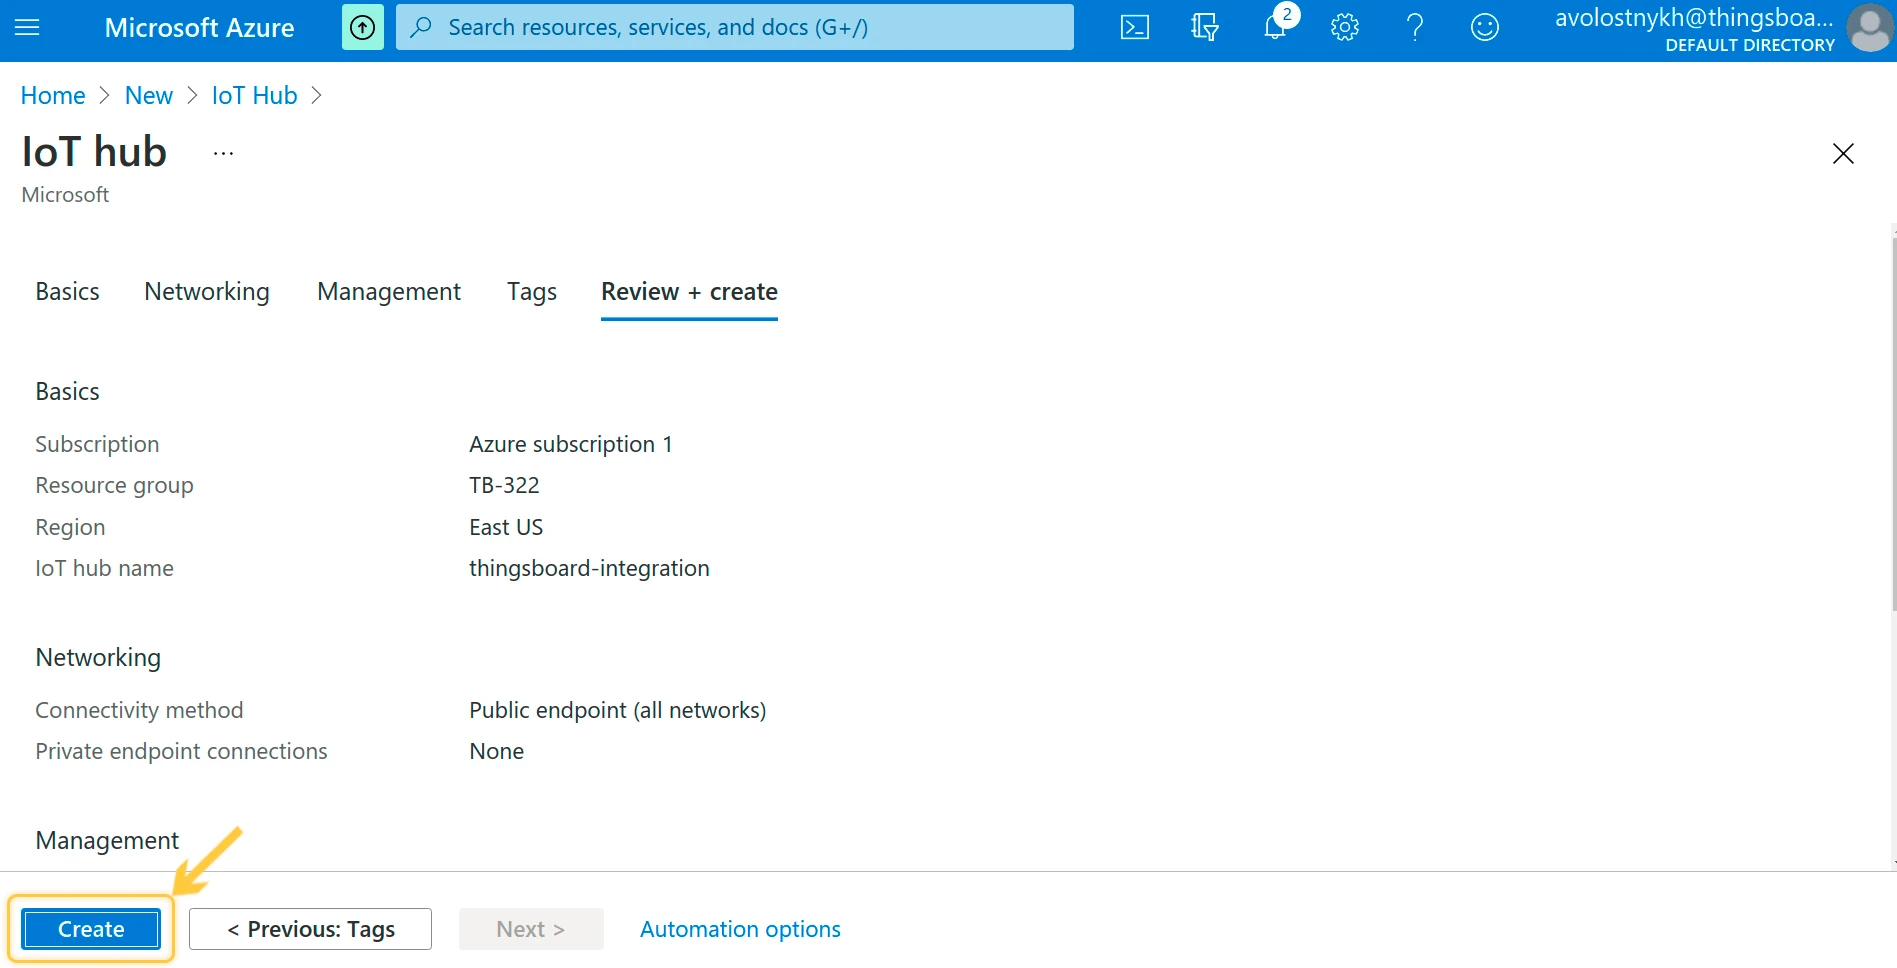
- Click Review + create, review the configuration, then click Create.
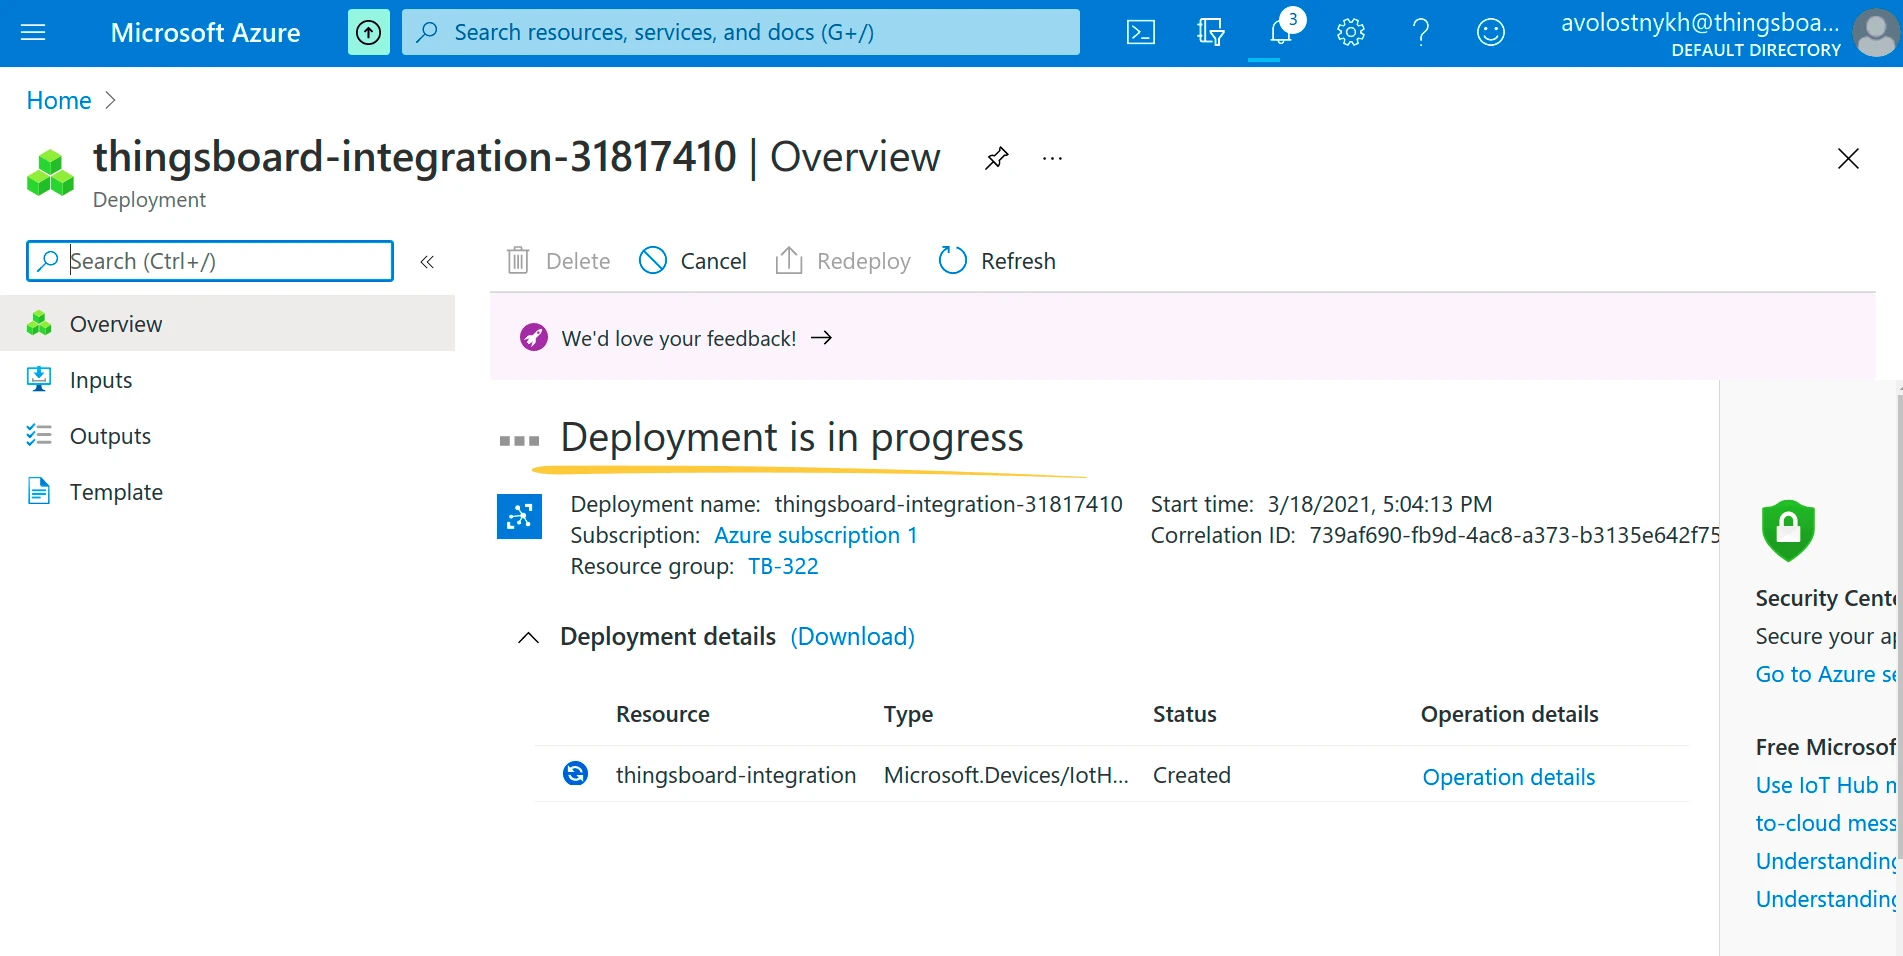
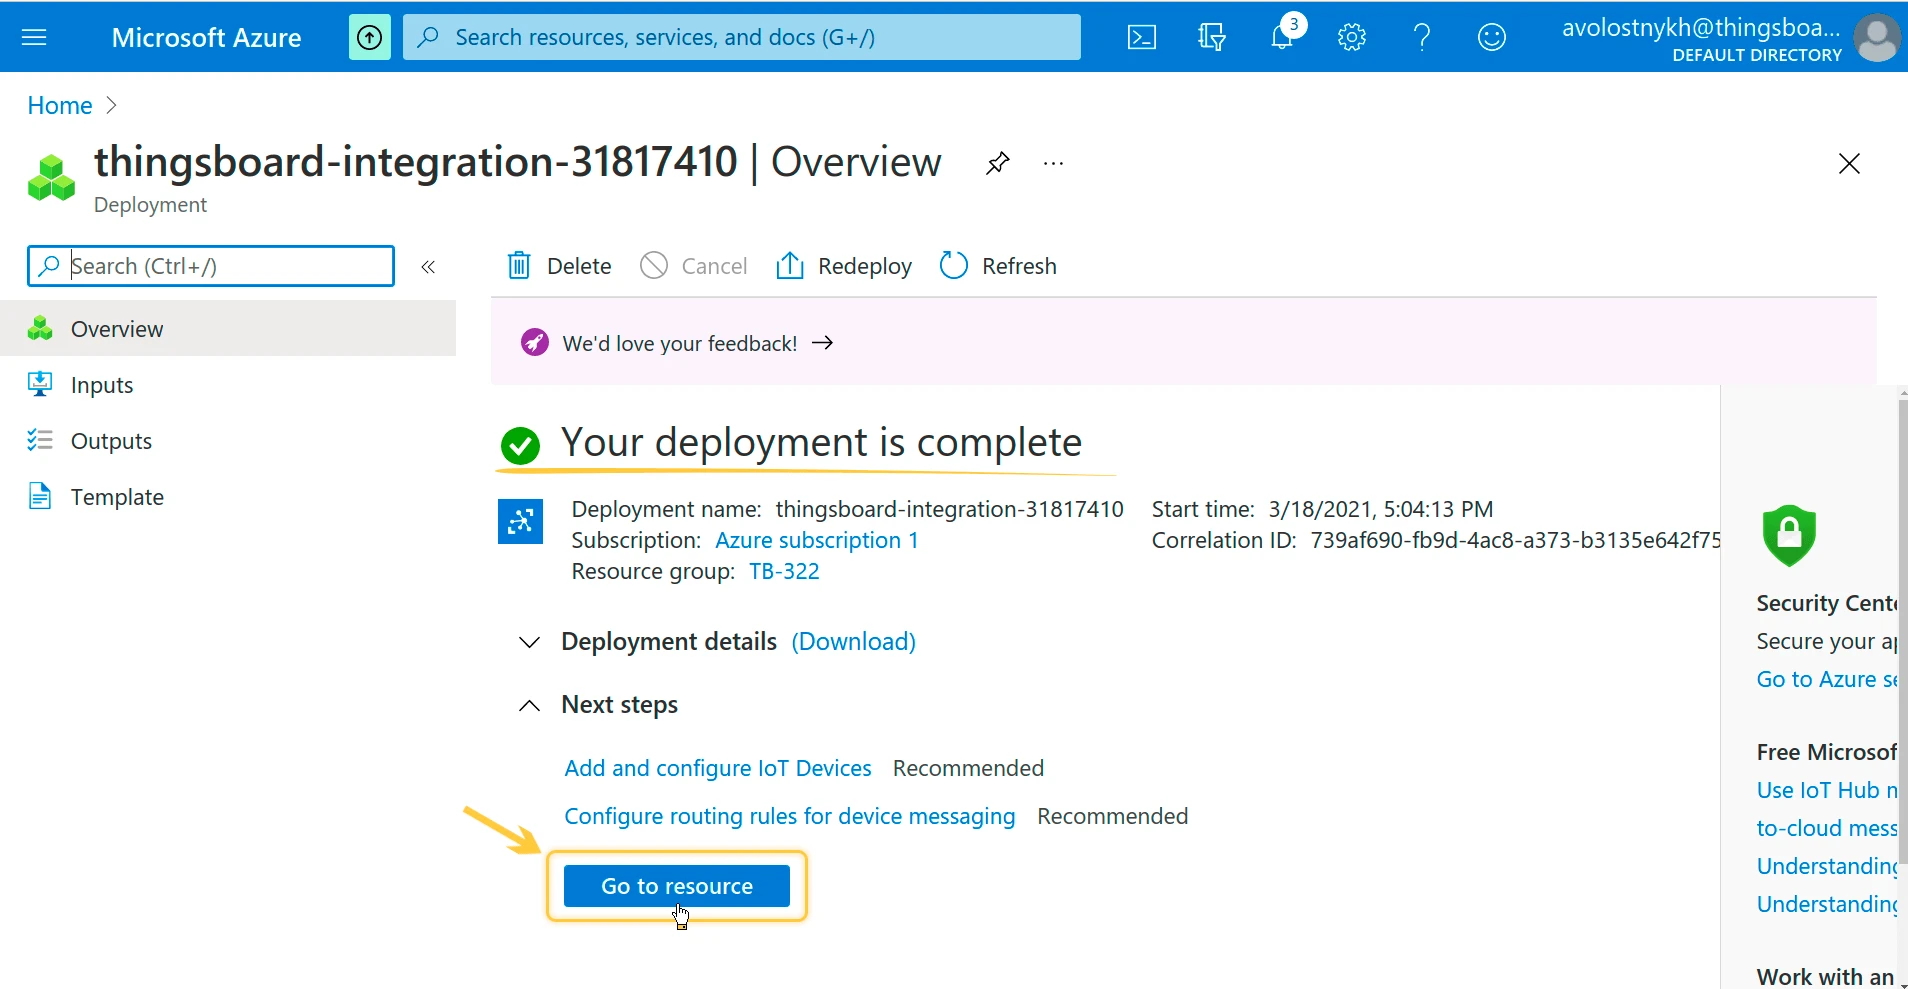
- Wait for the deployment to complete, then click Go to resource.

Create a device in the IoT Hub
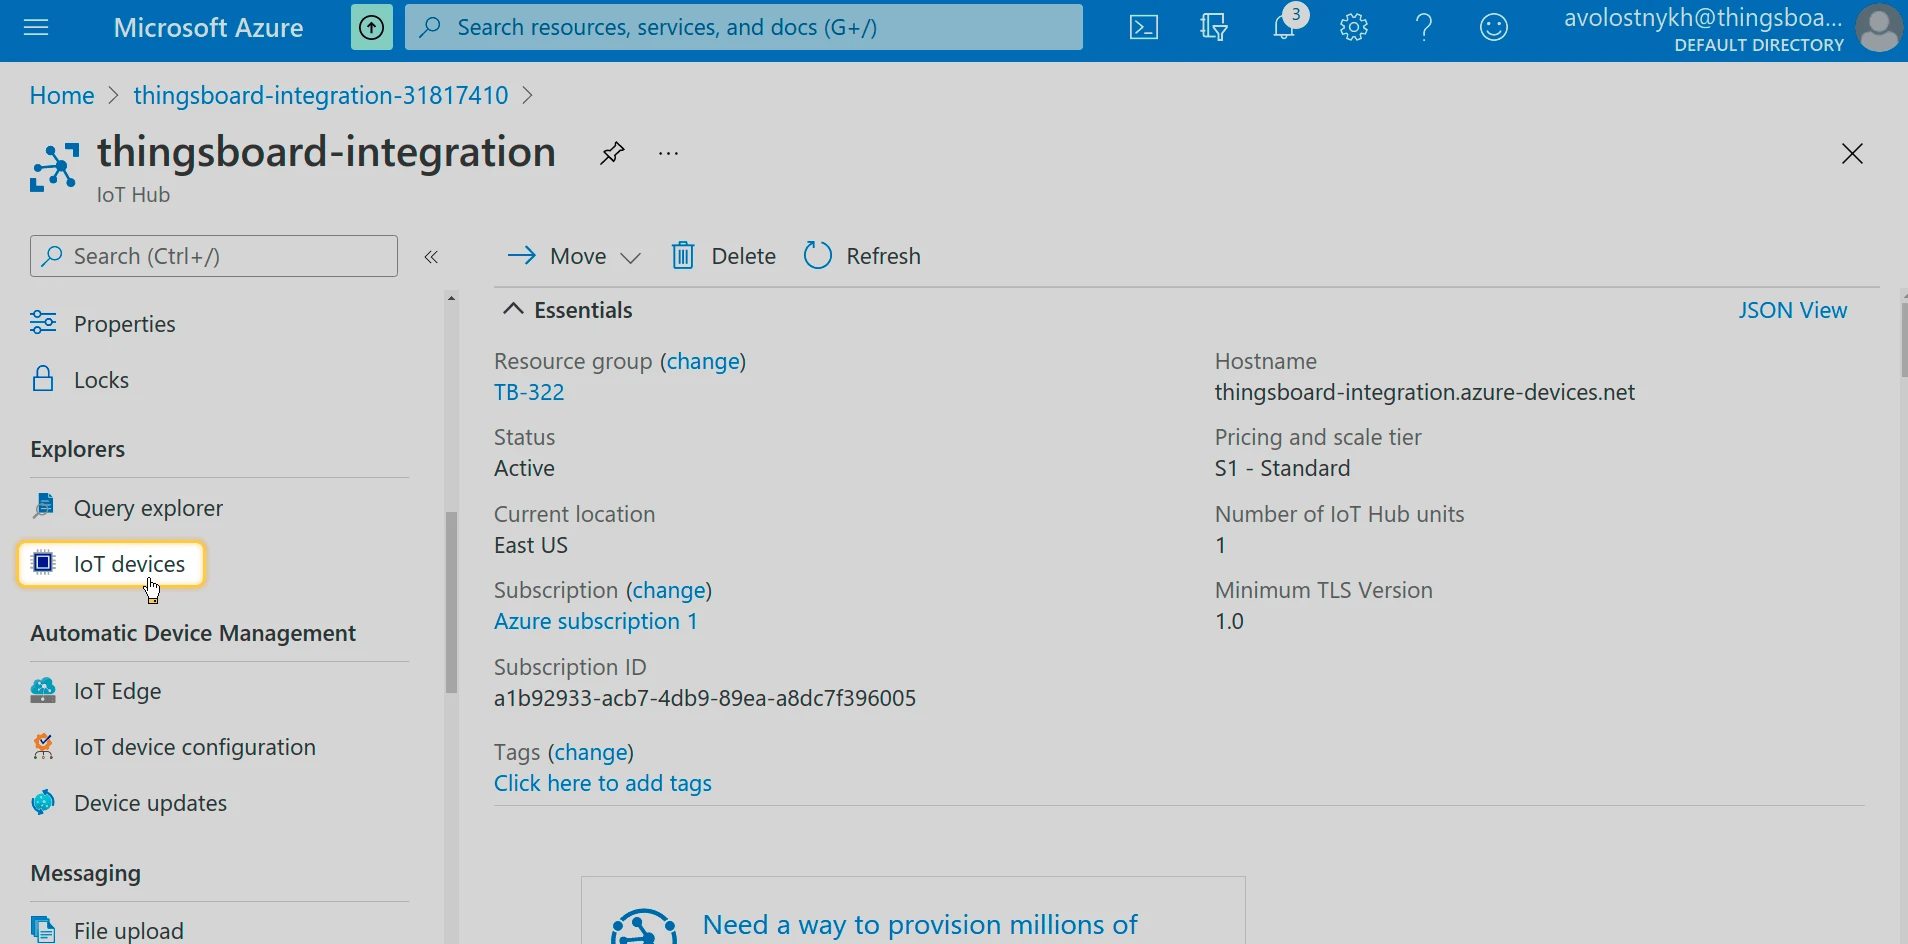
Section titled “Create a device in the IoT Hub”- In your IoT Hub resource, open IoT devices from the left menu.
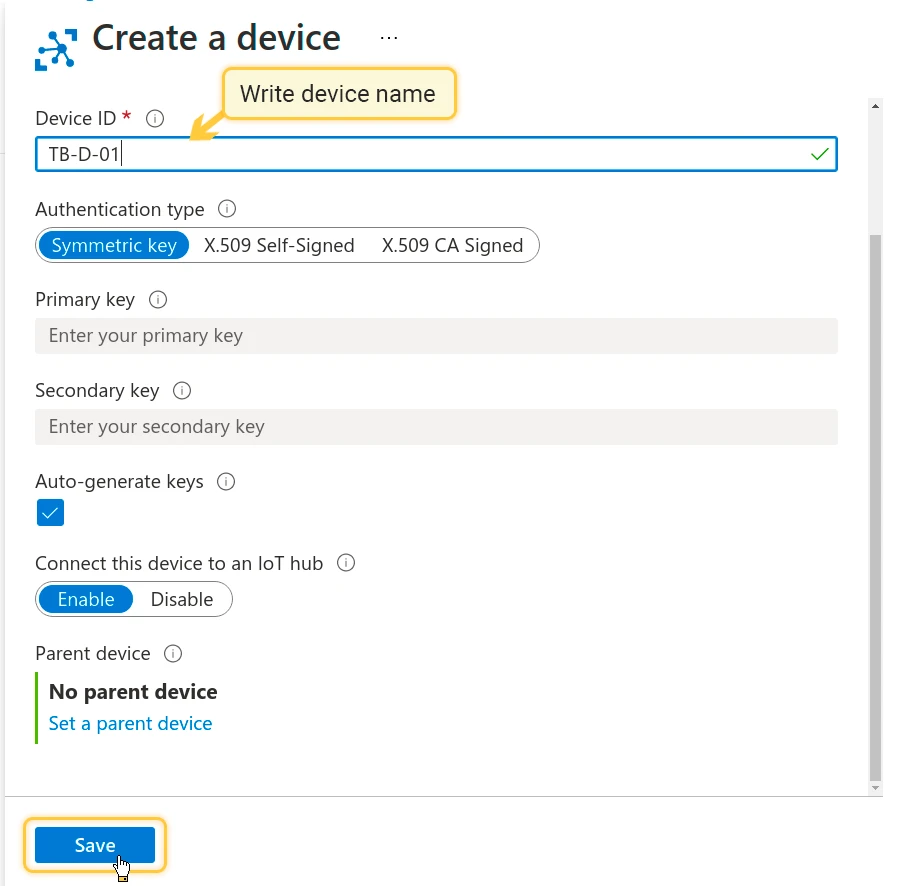
- Click + New.
- Enter a Device ID (e.g.
TB-D-01), leave Auto-generate keys checked, and click Save.

ThingsBoard integration setup
Section titled “ThingsBoard integration setup”Create an uplink converter
Section titled “Create an uplink converter”The uplink converter transforms incoming Azure Event Hub messages into the ThingsBoard format. Azure Event Hub uses a generic uplink converter.
Sample payload sent from the device:
{ "devName": "TB-D-01", "msg": { "temp": 42, "humidity": 77 }}The decoder reads devName to set the device name and extracts temp and humidity from the nested msg object as telemetry.
- Go to Integrations center ⇾ Data converters.
- Click + Add data converter ⇾ Create new converter.
- Set Converter type to Uplink and enter a name.
- Paste the decoder function below and click Add.
The decoder function used in this tutorial:
var data = decodeToJson(payload);var deviceName = data.devName;var deviceType = 'azure-event-hub-device';
var result = {    deviceName: deviceName,    deviceType: deviceType,    telemetry: {        temp: data.msg.temp,        humidity: data.msg.humidity    }};
return result;
var data = decodeToJson(payload);var deviceName = data.devName;var deviceType = 'azure-event-hub-device';
var result = { deviceName: deviceName, deviceType: deviceType, telemetry: { temp: data.msg.temp, humidity: data.msg.humidity }};
function decodeToString(payload) { return String.fromCharCode.apply(String, payload);}
function decodeToJson(payload) { var str = decodeToString(payload); var data = JSON.parse(str); return data;}
return result;To adapt this converter to your device:
- Different device name field — replace
data.devNamewith whichever field carries the device identifier in your payload. - Different telemetry fields — replace
tempandhumiditywith your actual sensor fields; add or remove entries as needed. - Flat payload — if your payload is not nested (no
msgobject), access fields directly:data.temperature,data.battery, etc. - Additional attributes — add an
attributes: {}block next totelemetryto store non-time-series data such as firmware version or hardware revision.
Create the integration
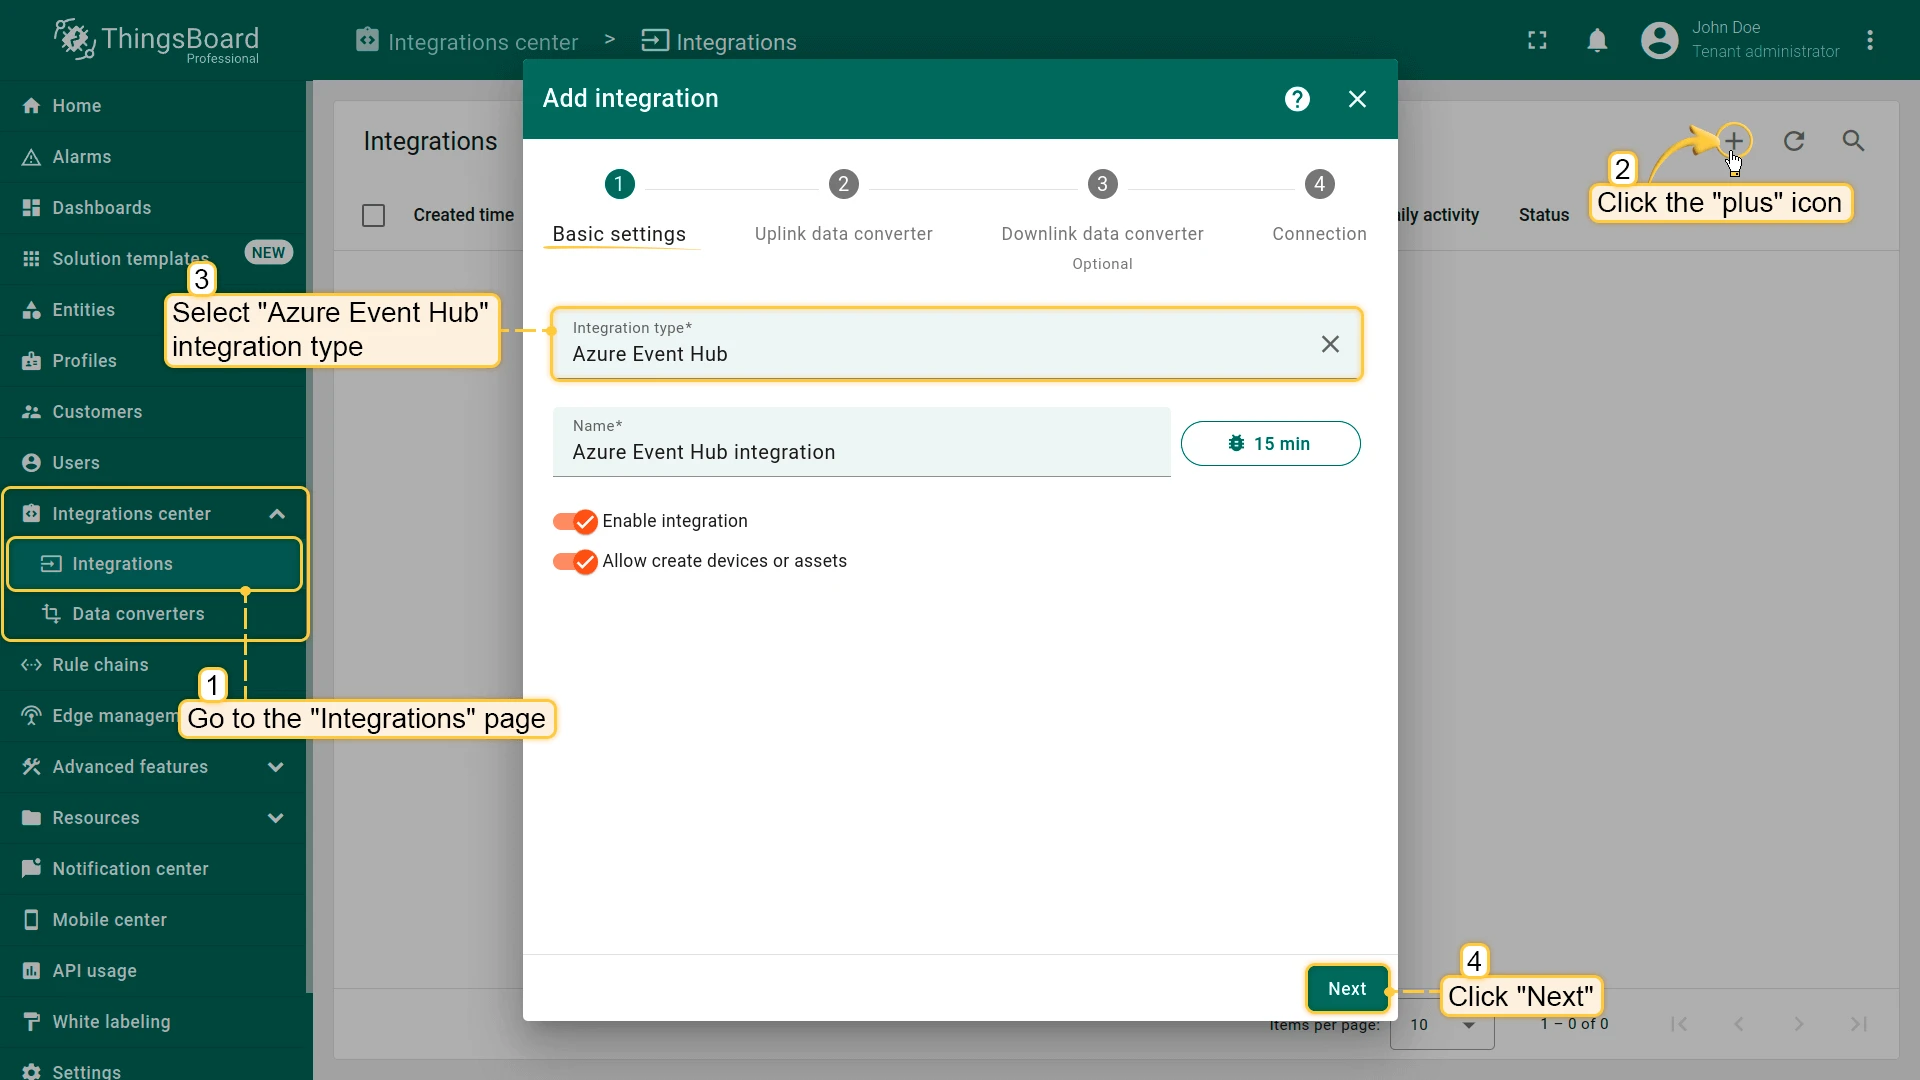
Section titled “Create the integration”- Go to Integrations center ⇾ Integrations and click + Add integration.
- Basic settings:
- Set Integration type to Azure Event Hub and enter a name.
- Click Next.
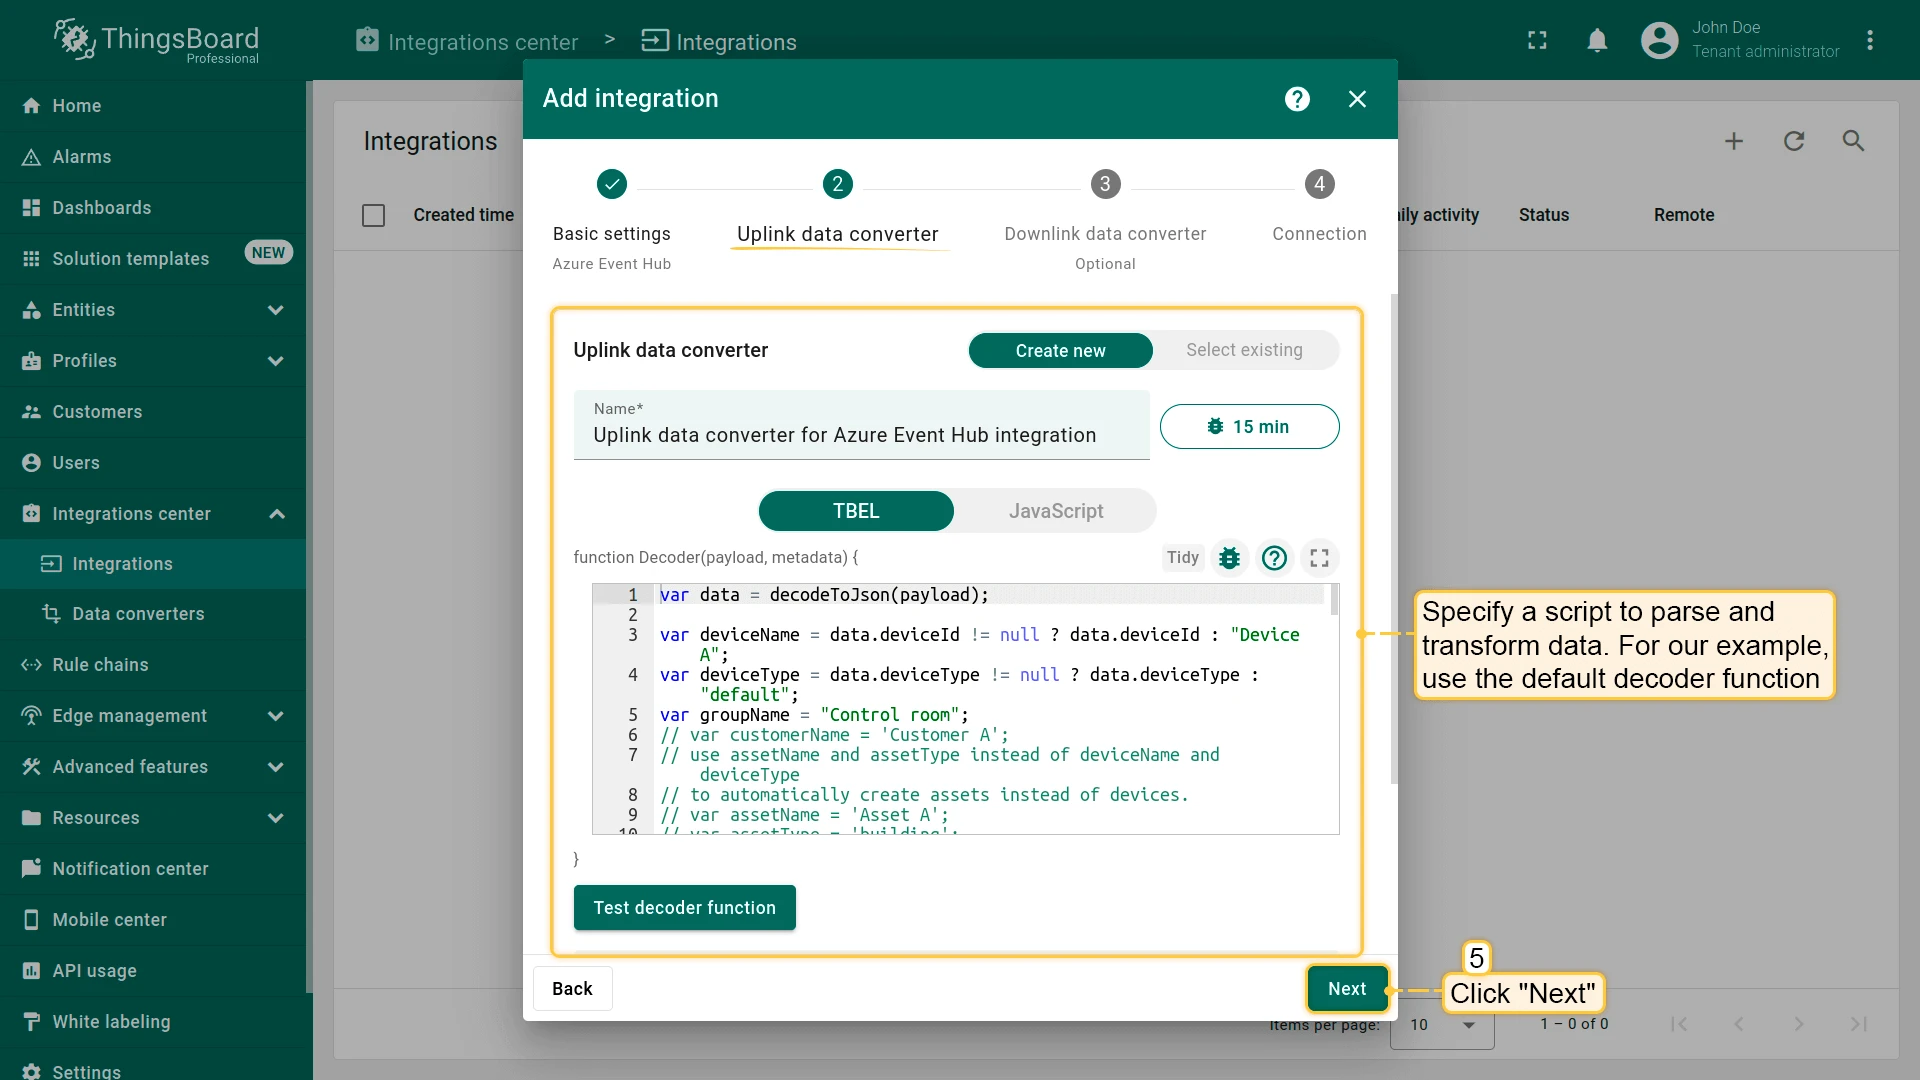
- Uplink data converter:
- Select existing — choose the previously created
Azure Event Hub Uplink Converterfrom the list. - Click Next.
- Select existing — choose the previously created
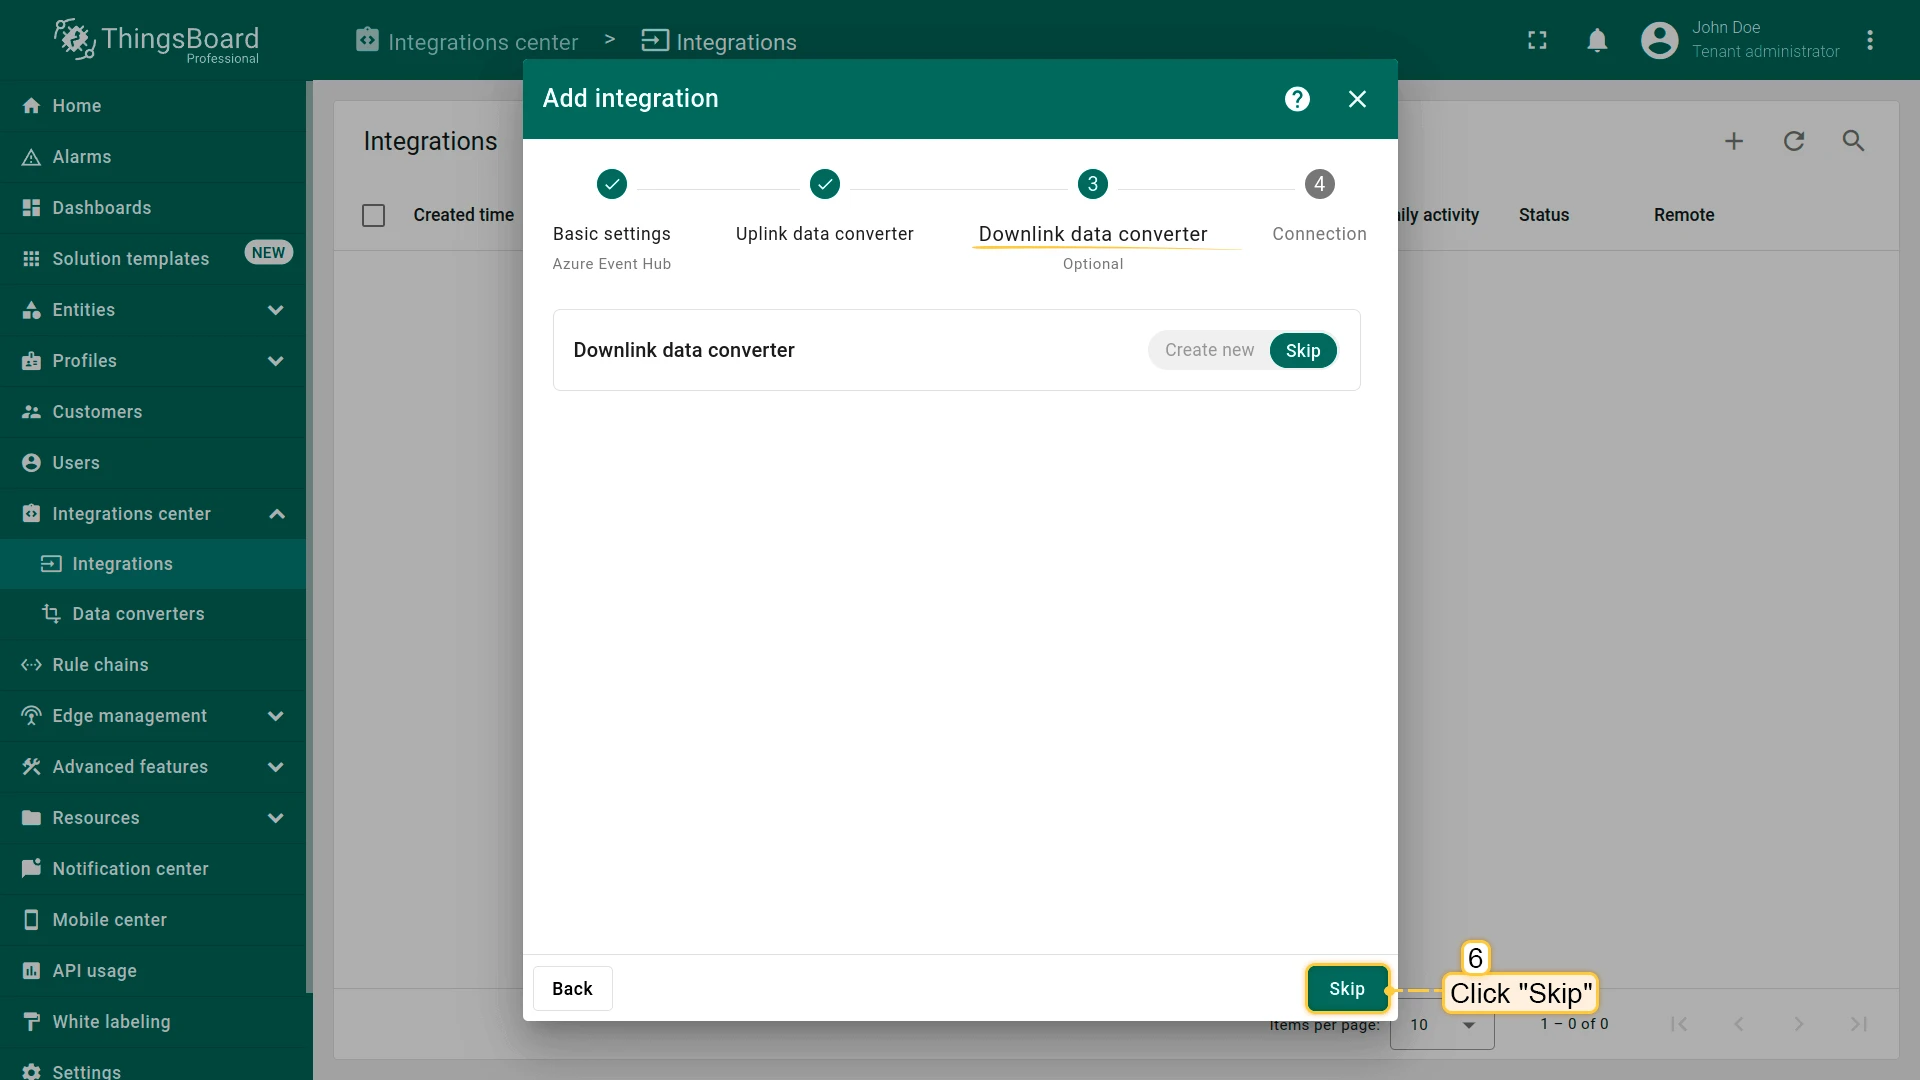
- Downlink data converter:
- Click Skip — the downlink converter can be added later.
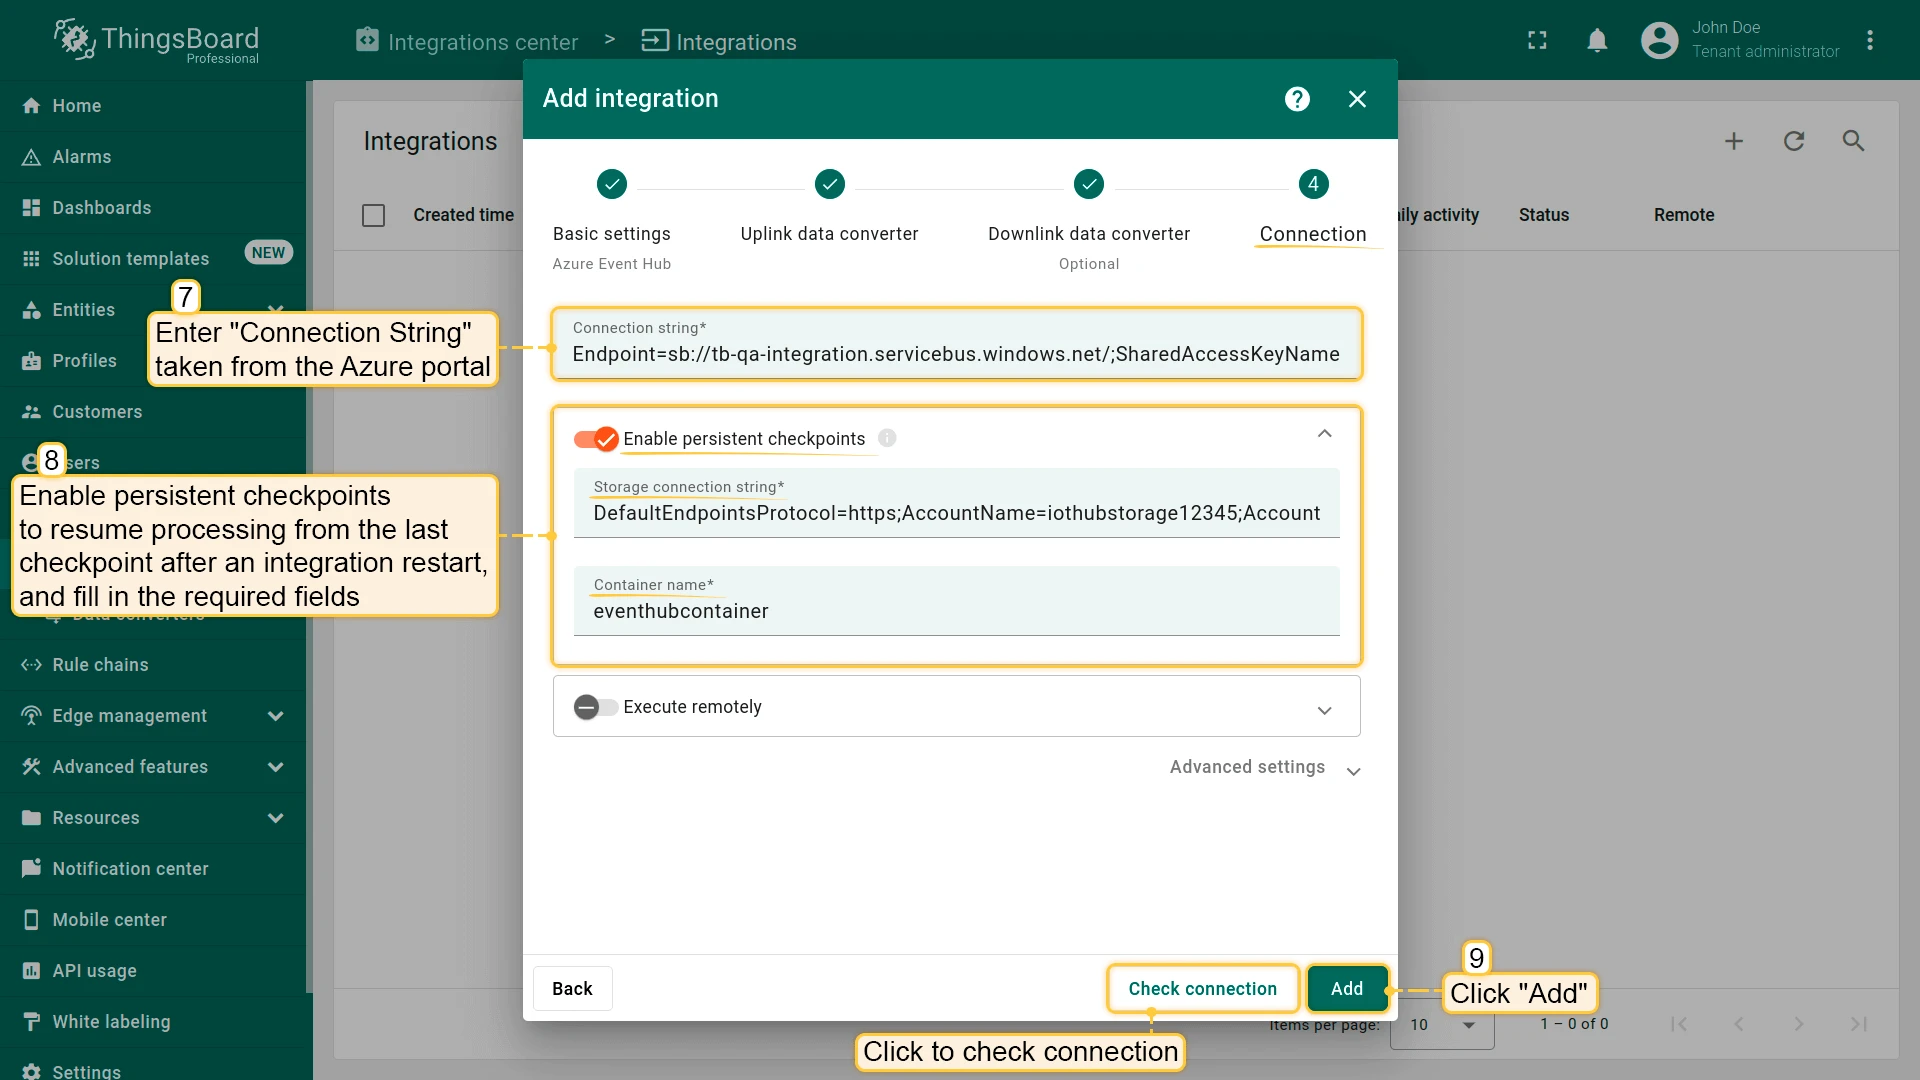
- Connection settings — fill in the following fields (see subsections below for where to find each value):
- Connection string — the Event Hub-compatible endpoint from your IoT Hub.
- Storage connection string — the connection string from your Azure Storage account. Used for checkpointing.
- Container name — the name of the Azure Blob Storage container used to store checkpoints.
- Optionally enable Persistent checkpoints to resume from the last processed event after a restart.
- Click Check connection to verify, then click Add.
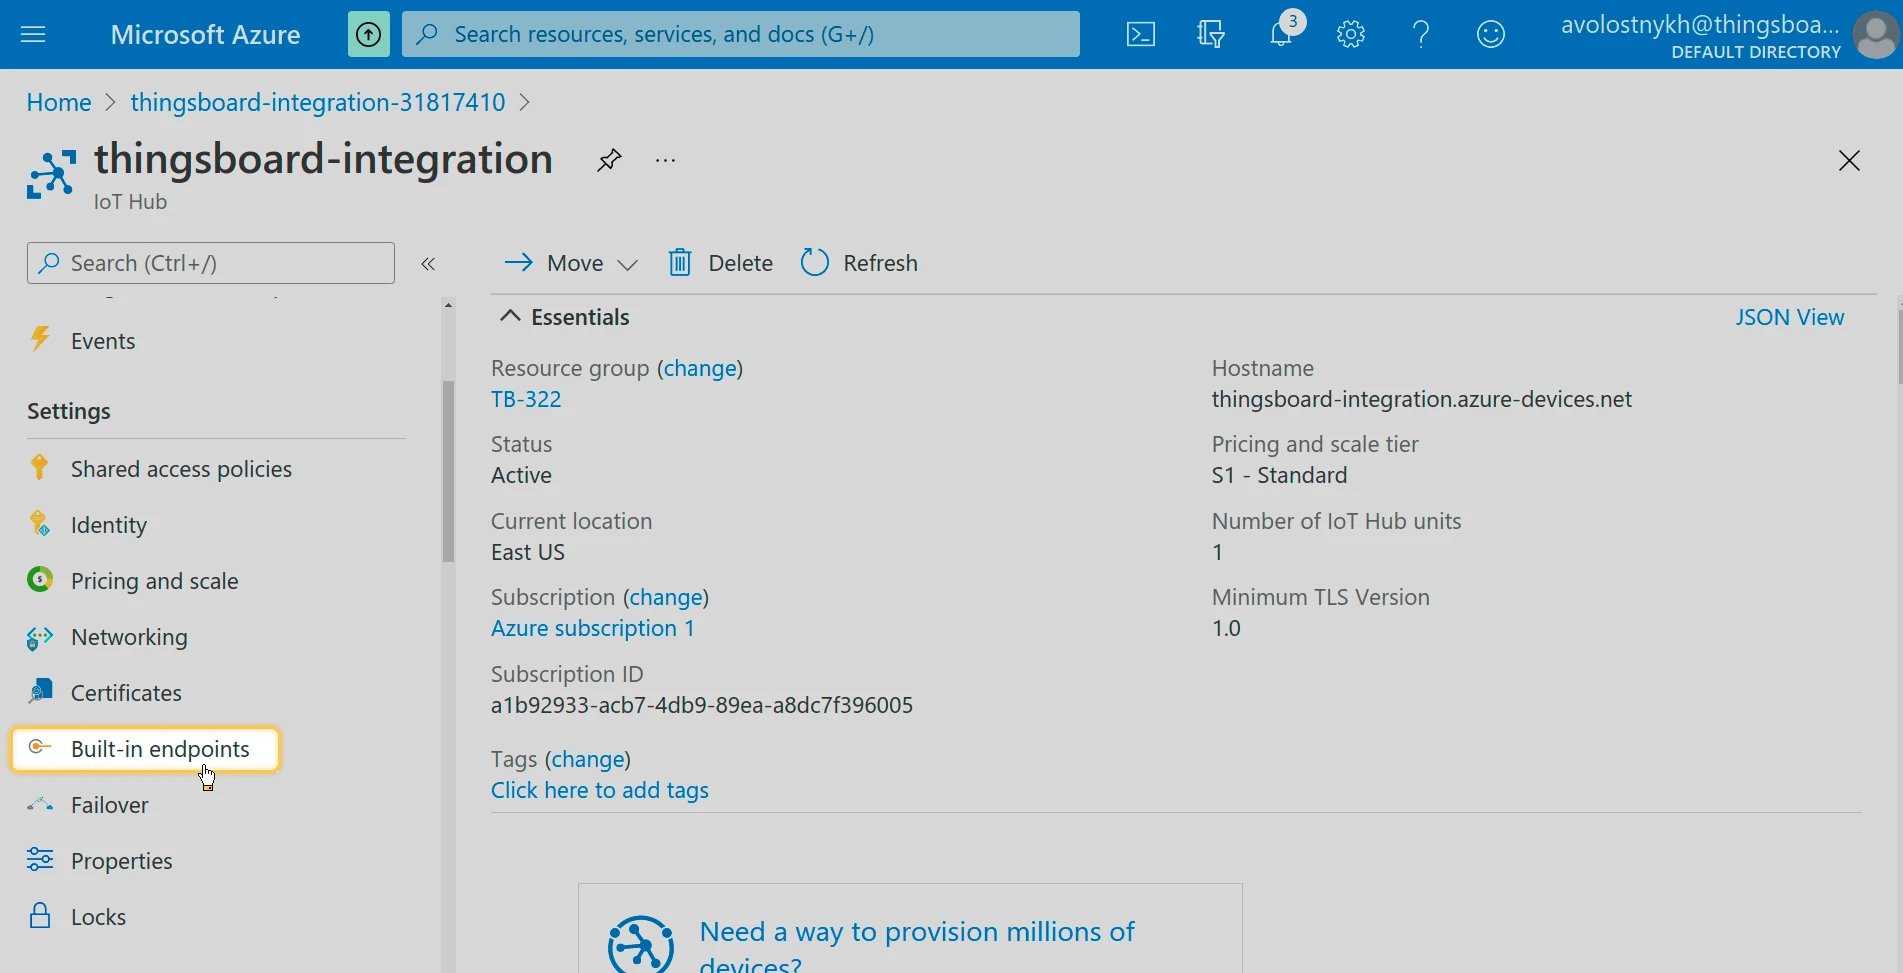
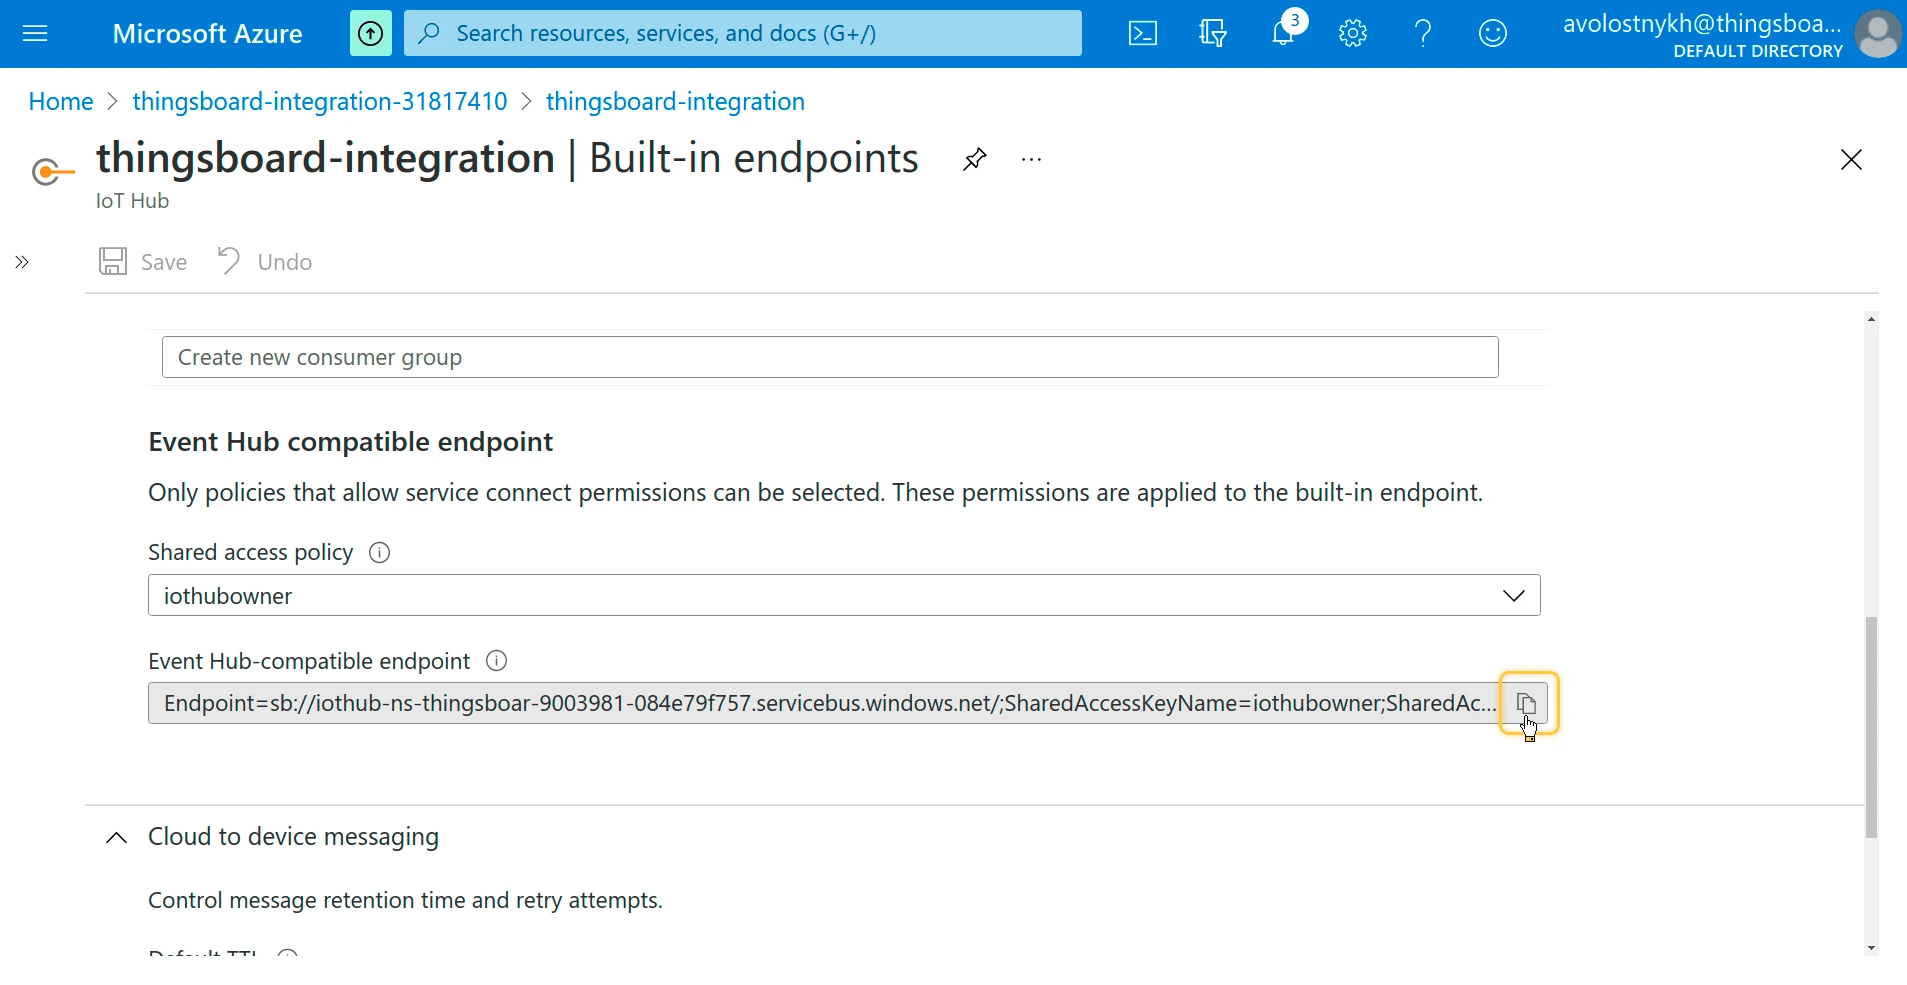
Find the Event Hub-compatible endpoint
Section titled “Find the Event Hub-compatible endpoint”- In your IoT Hub resource, go to Built-in endpoints.
- Under Event Hub-compatible endpoint, copy the full connection string and paste it into the Connection String field in ThingsBoard.
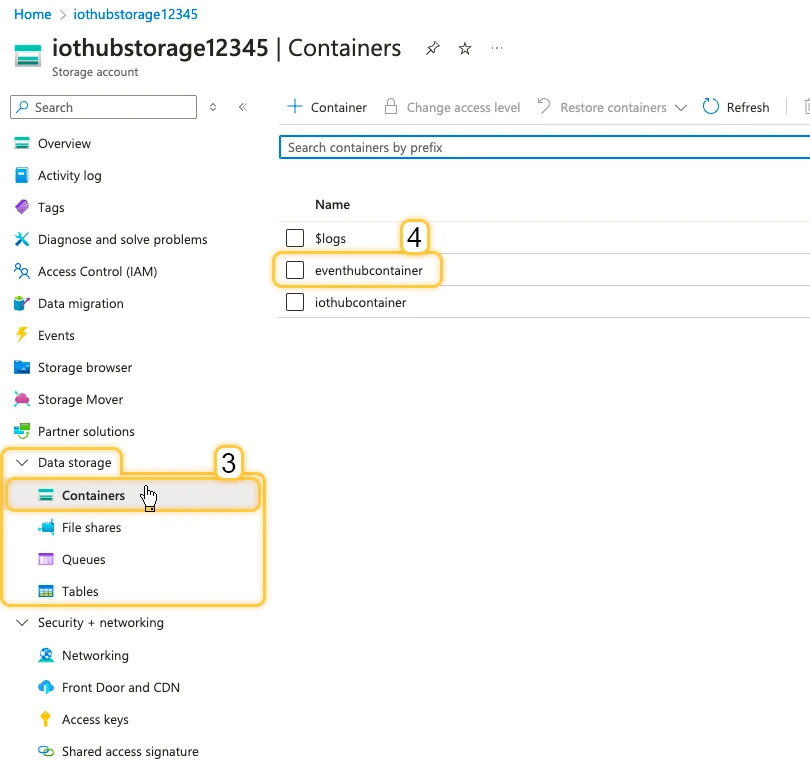
Find the storage connection string and container name
Section titled “Find the storage connection string and container name”ThingsBoard uses Azure Blob Storage to store consumer checkpoints — offsets that record which Event Hub messages have already been processed. This prevents duplicate processing when the integration restarts.
Container name
- In the Azure portal, navigate to Storage accounts and open your storage account.
- Go to Data storage ⇾ Containers and note the container name you want to use for checkpoints.
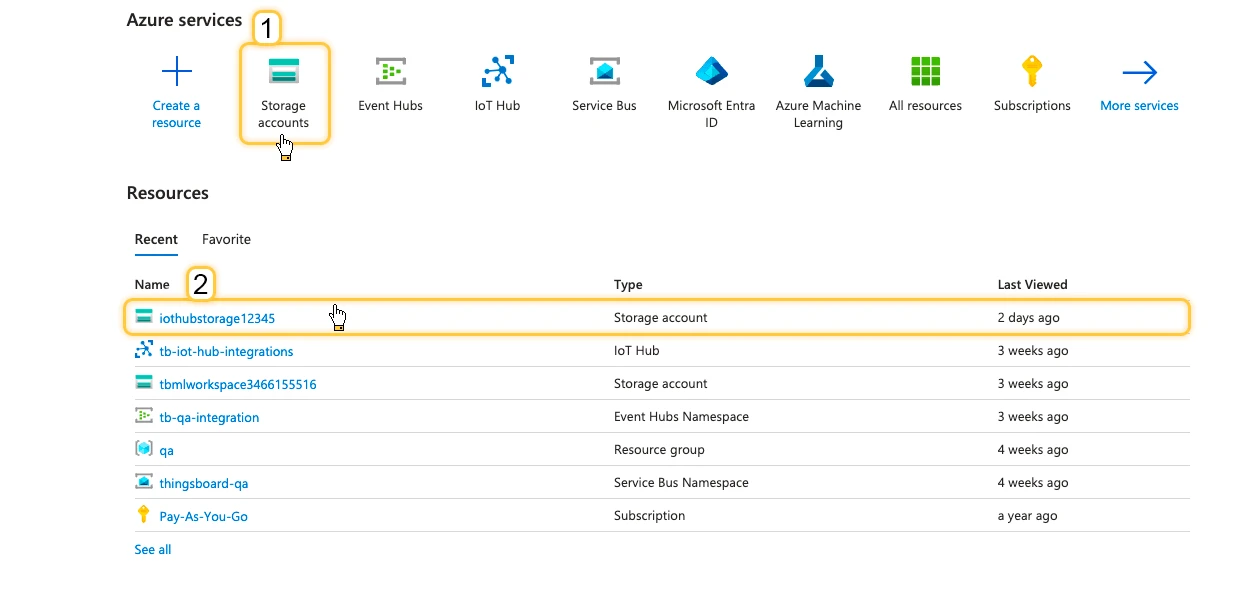
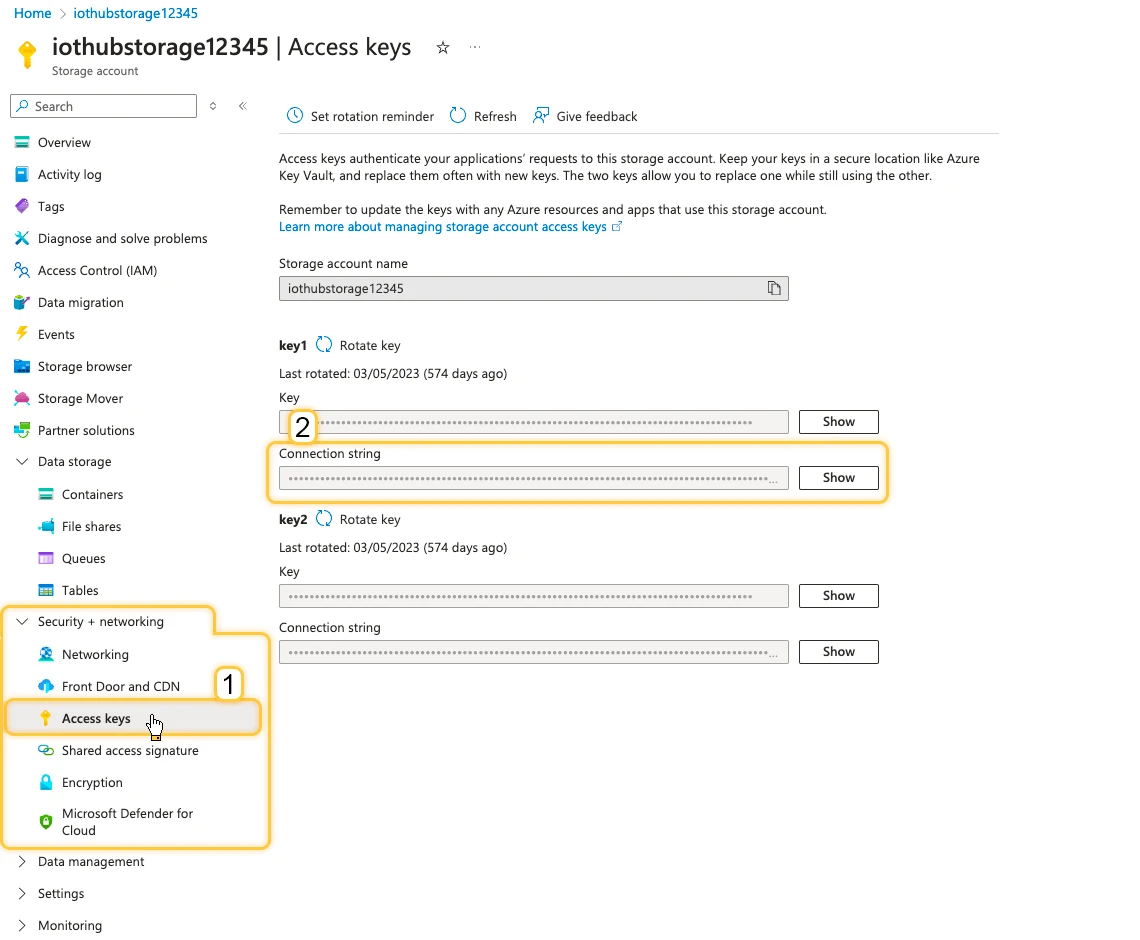
Connection string
Go to Security + networking ⇾ Access keys and copy the Connection string for key1.
Test uplink
Section titled “Test uplink”Use the Rule Engine to send a test message to Azure IoT Hub. Azure routes it to the built-in Event Hub endpoint, and ThingsBoard reads it back through the integration.
Configure the rule chain
Section titled “Configure the rule chain”- Open Rule Chains and open the Root Rule Chain in edit mode.
- Add a Generator node. Configure it with a name, set the Originator to Single entity ⇾ Integration ⇾ Azure Event Hub integration, and paste the generate function below.
var msg = {    devName: "TB-D-01",    msg: {        temp: 42,        humidity: 77    }};var metadata = { data: 40 };var msgType = "POST_TELEMETRY_REQUEST";
return { msg: msg, metadata: metadata, msgType: msgType };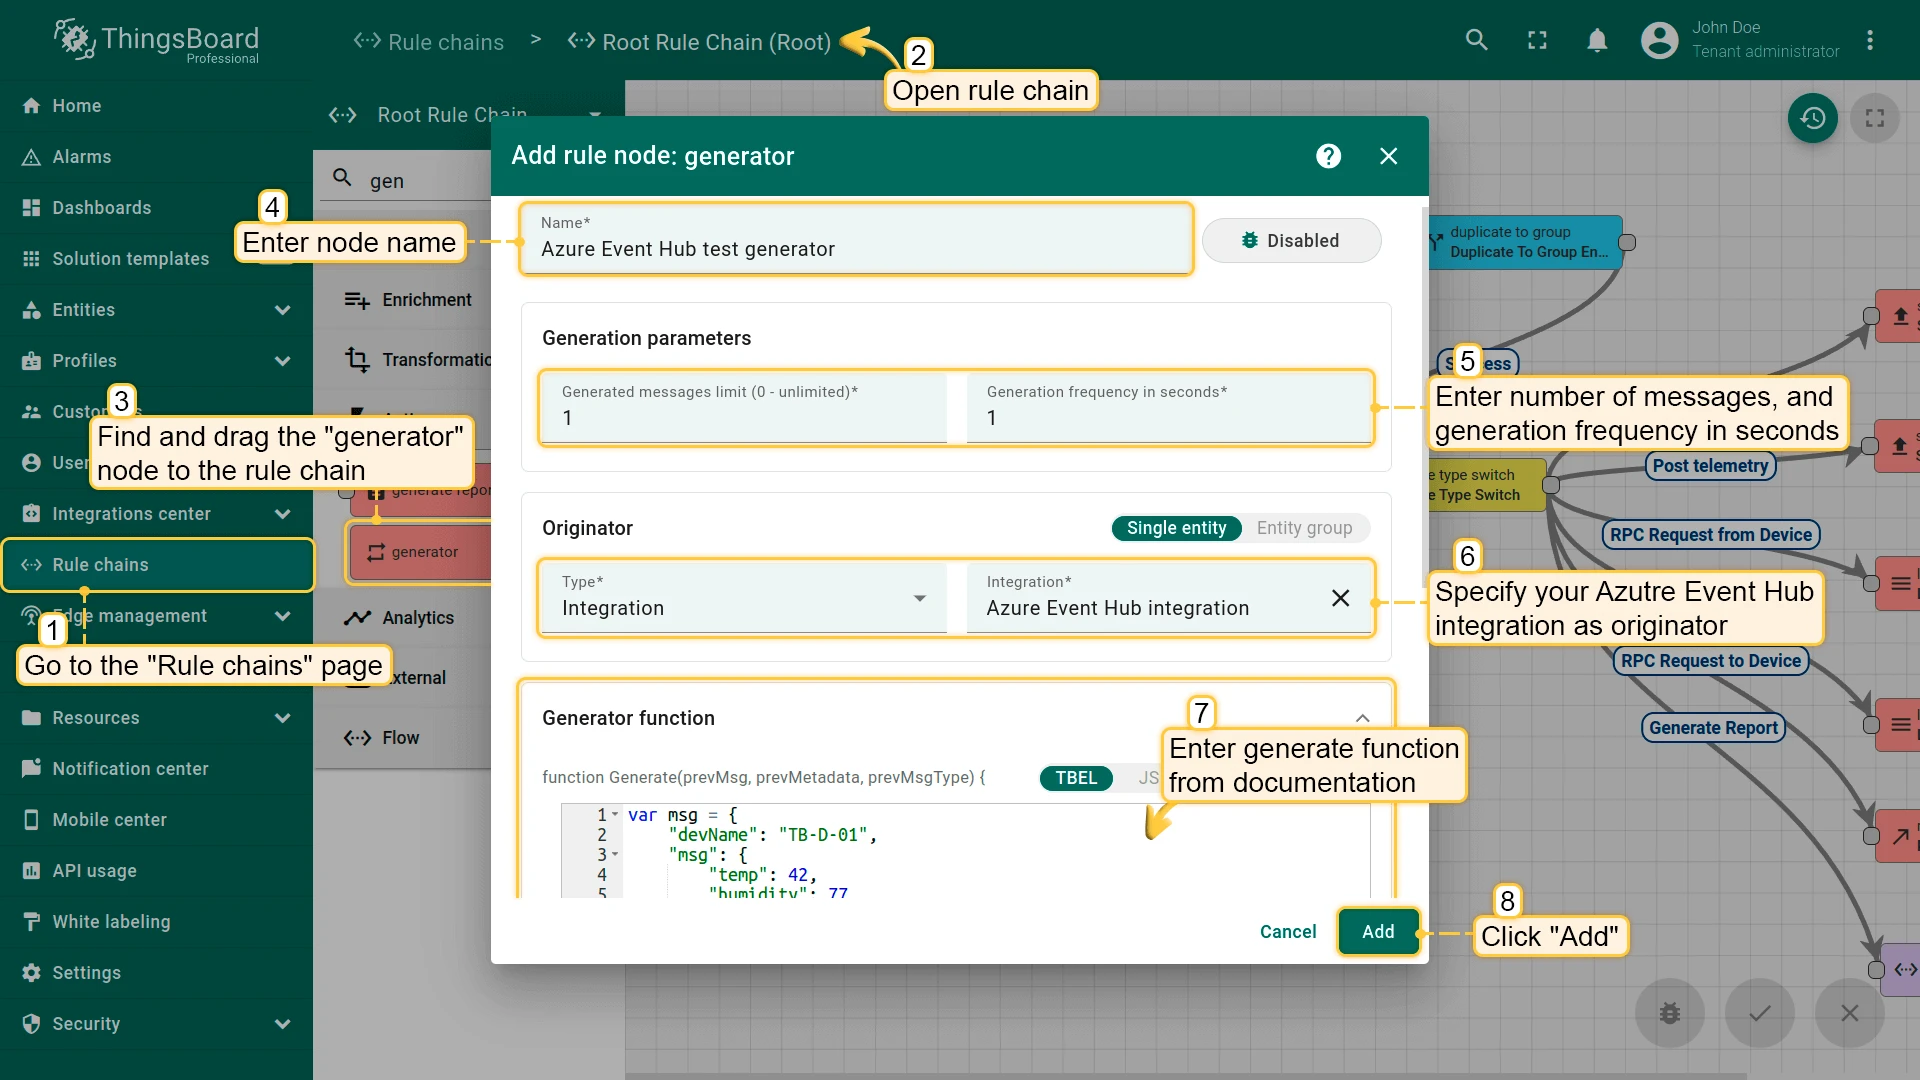
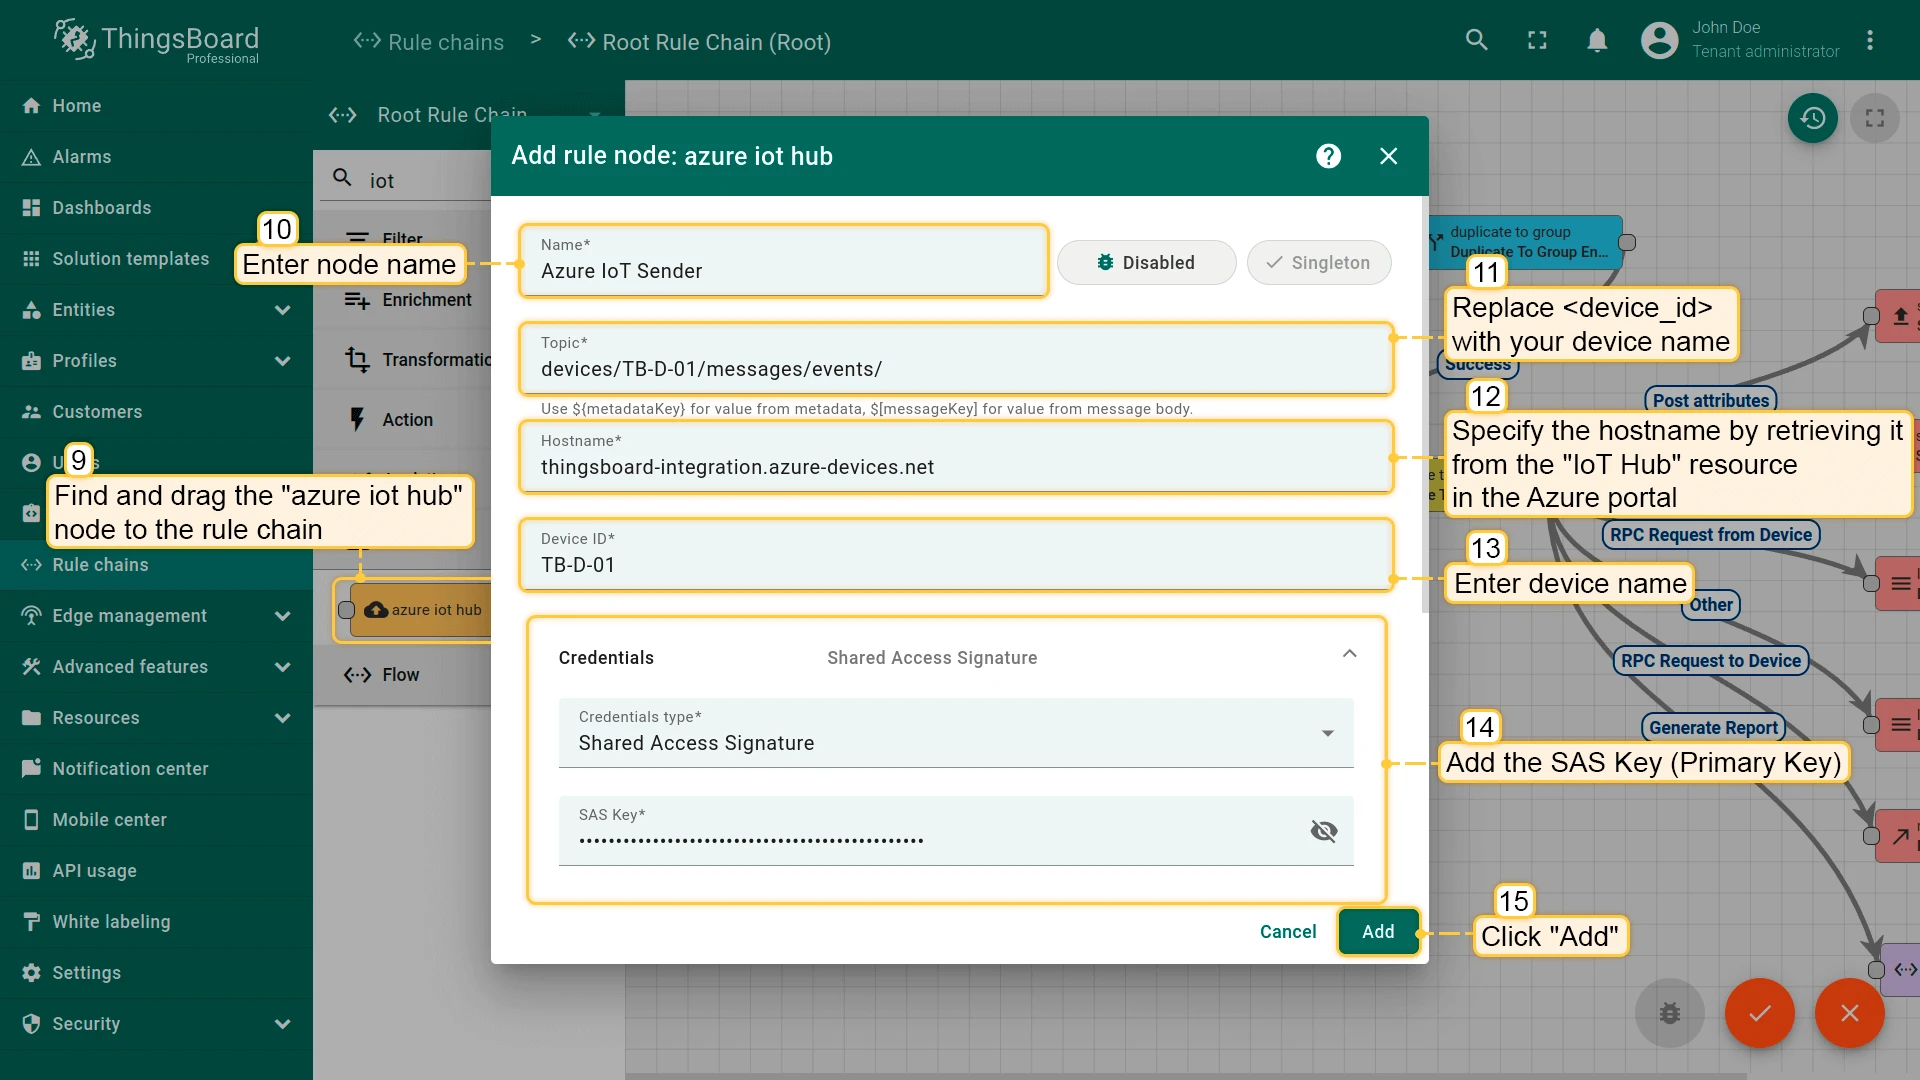
Add an Azure IoT Hub action node with the following settings:
- Topic —
devices/TB-D-01/messages/events/ - Hostname — your IoT Hub hostname (e.g.
thingsboard-integration.azure-devices.net) - Device ID —
TB-D-01 - Credentials — Shared Access Signature; SAS Key — the Primary key
- Topic —
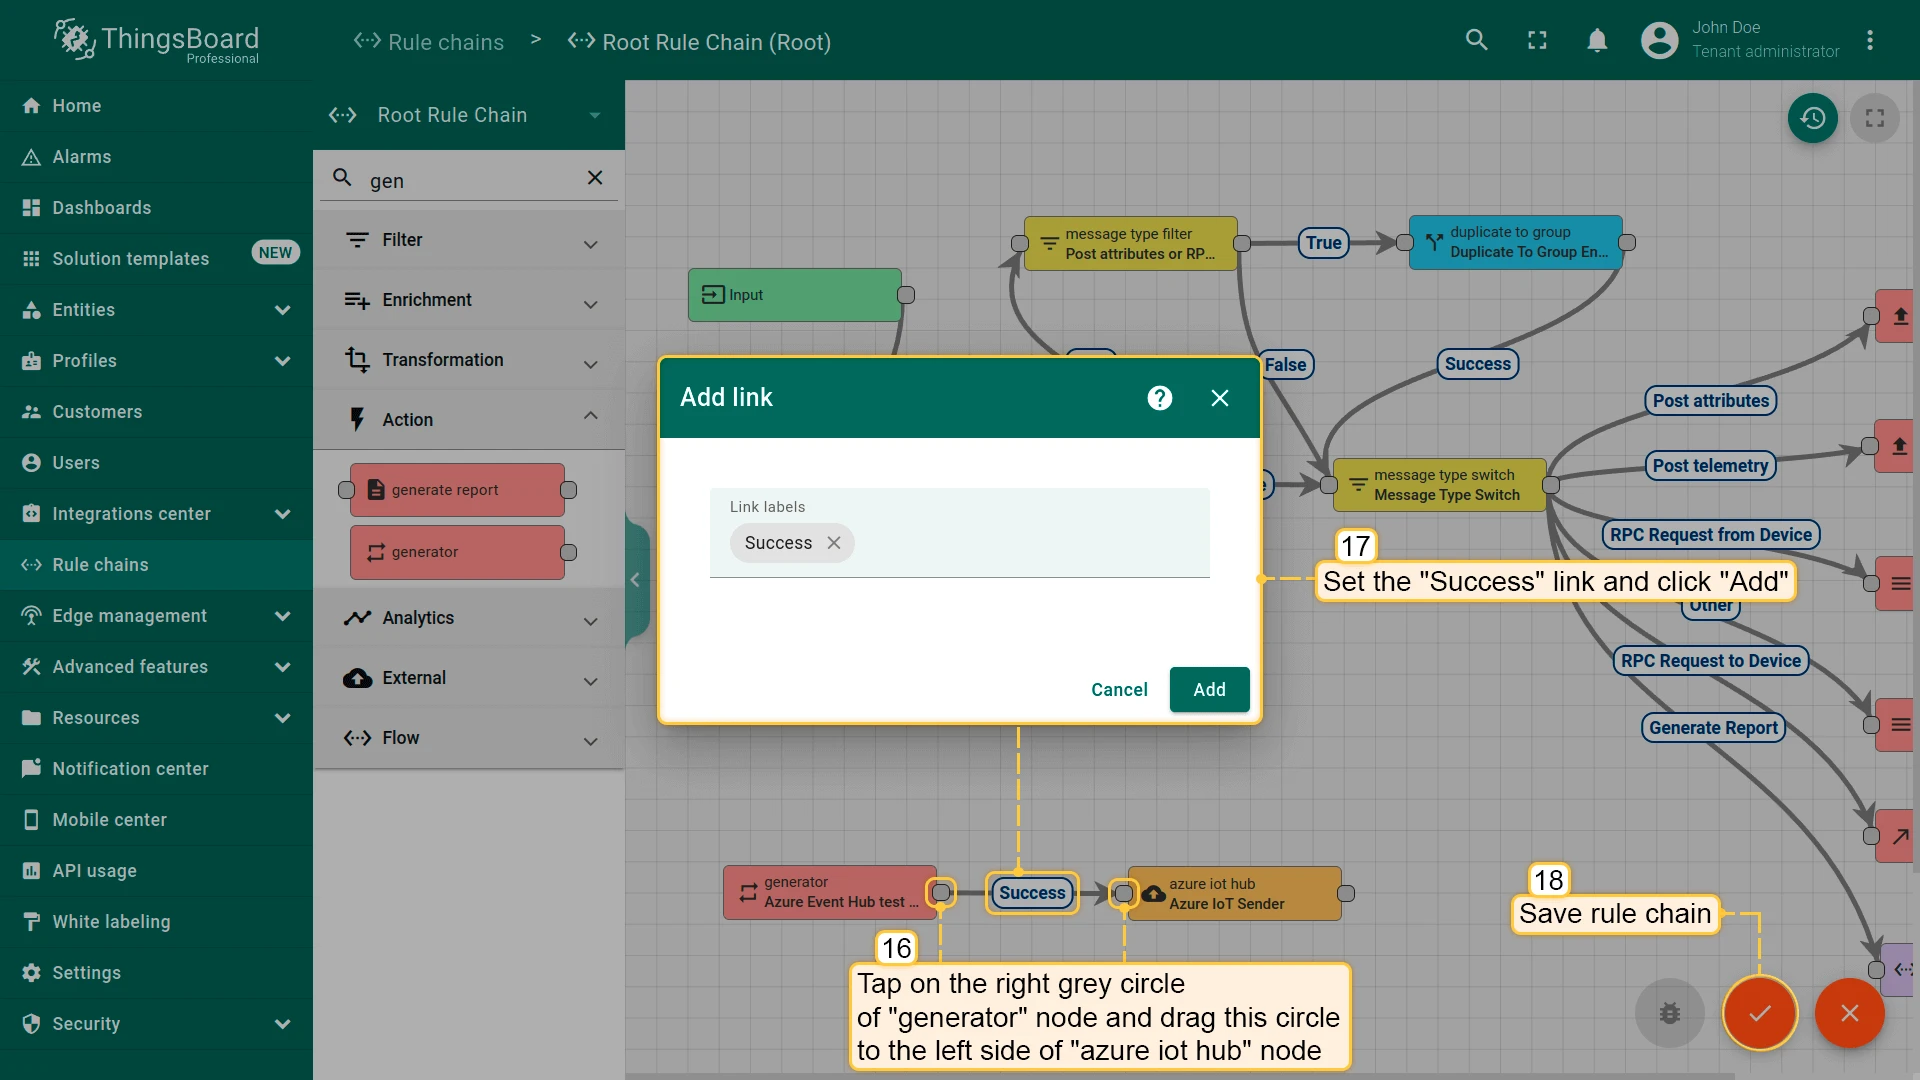
- Connect the Generator node to the Azure IoT Hub node using the Success relation.
- Click Apply changes to save the rule chain.
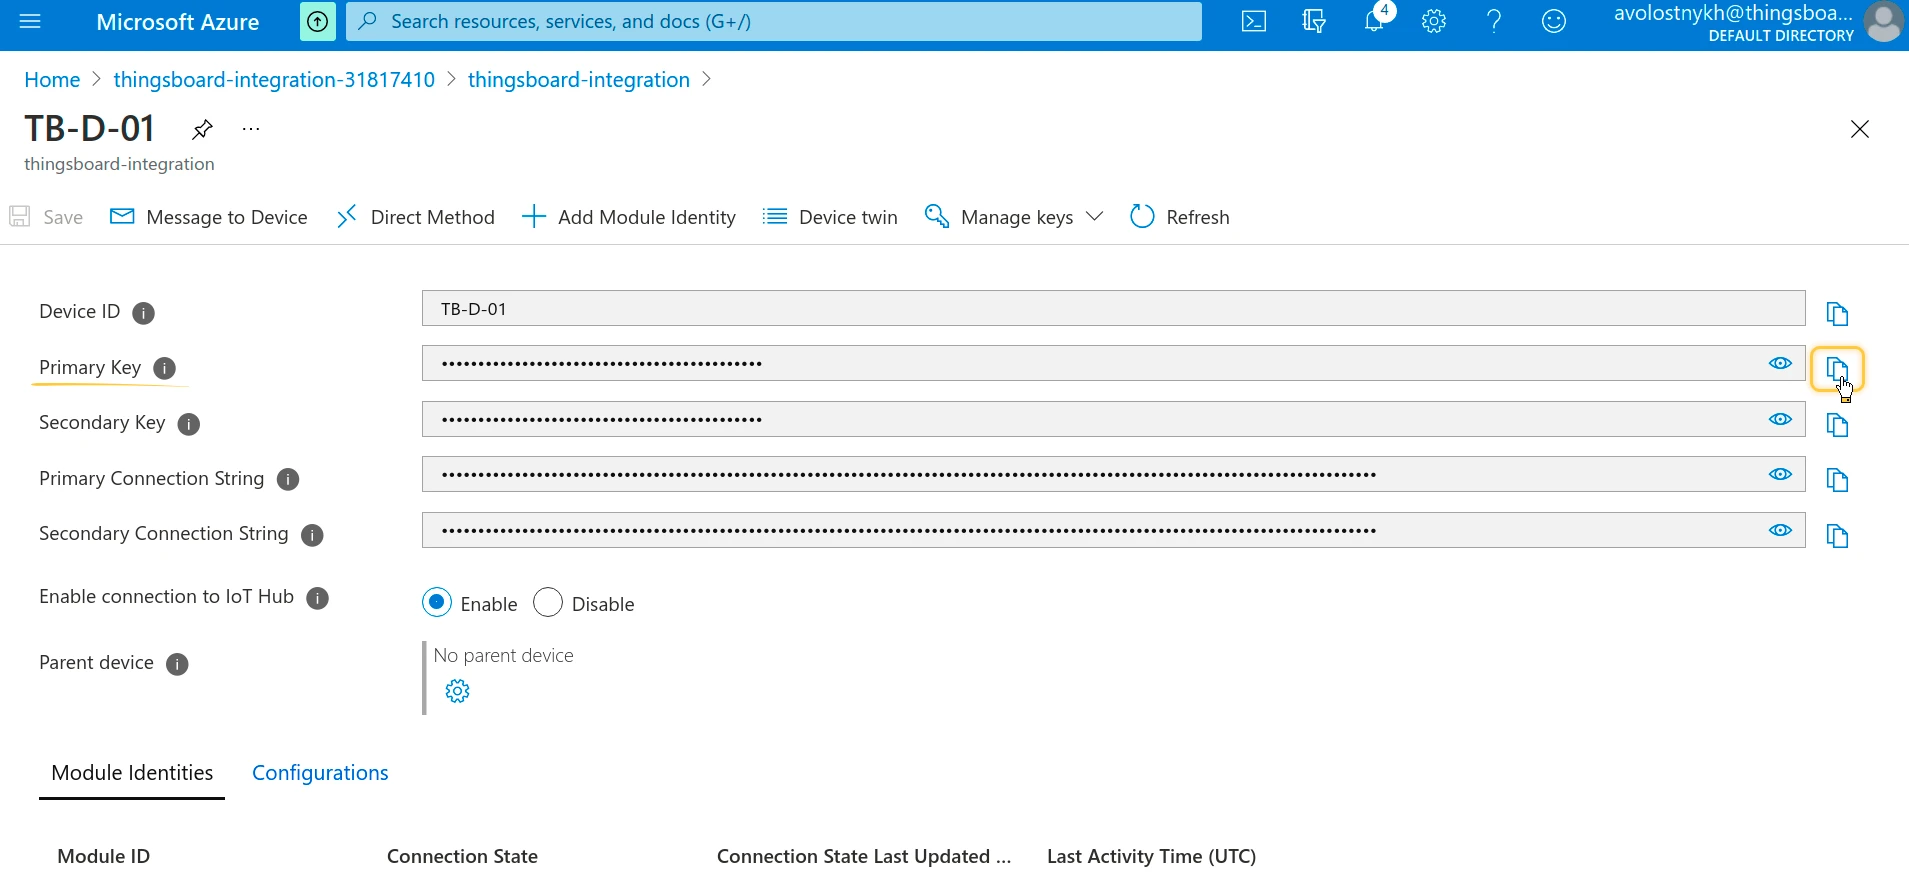
Find the device Primary key
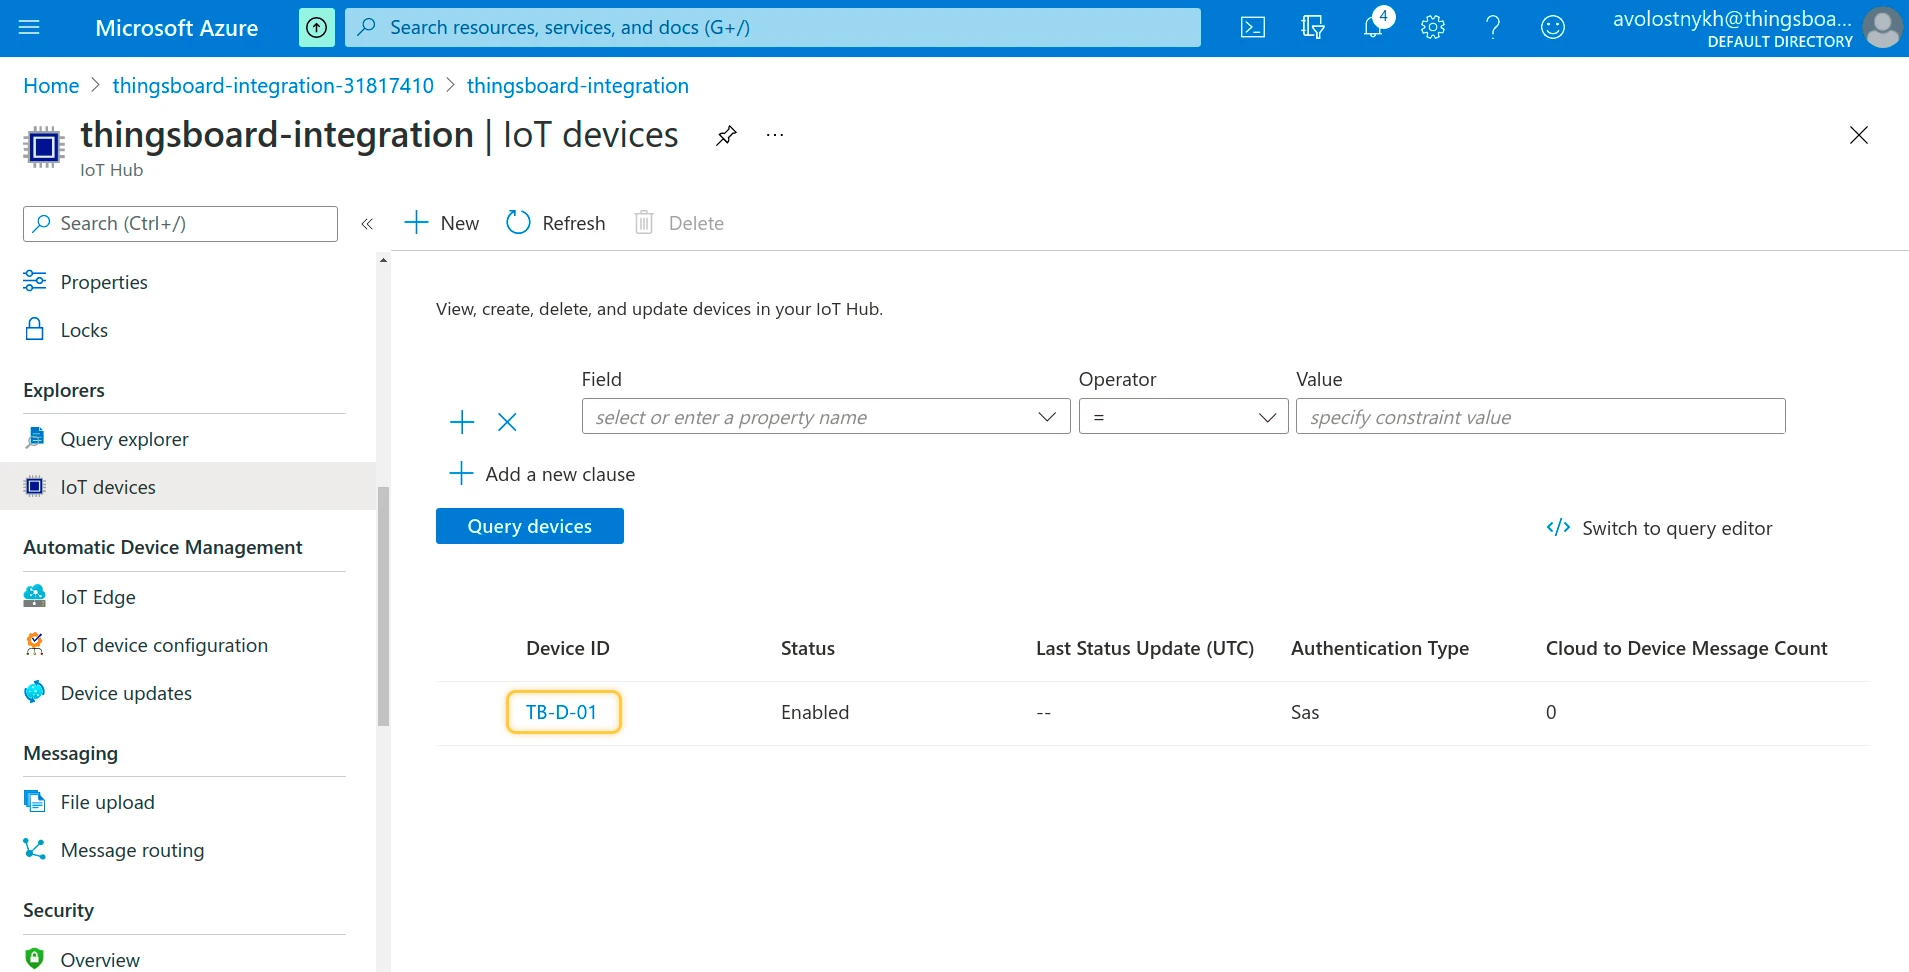
Section titled “Find the device Primary key”- In your IoT Hub resource, open IoT devices and click on device
TB-D-01. - Copy the Primary key value — use it as the SAS Key in the next step.
Verify uplink
Section titled “Verify uplink”Go to Integrations center ⇾ Integrations, open the Azure Event Hub integration, and check the Events tab — Uplink events with status OK confirm that data is flowing from Azure to ThingsBoard.
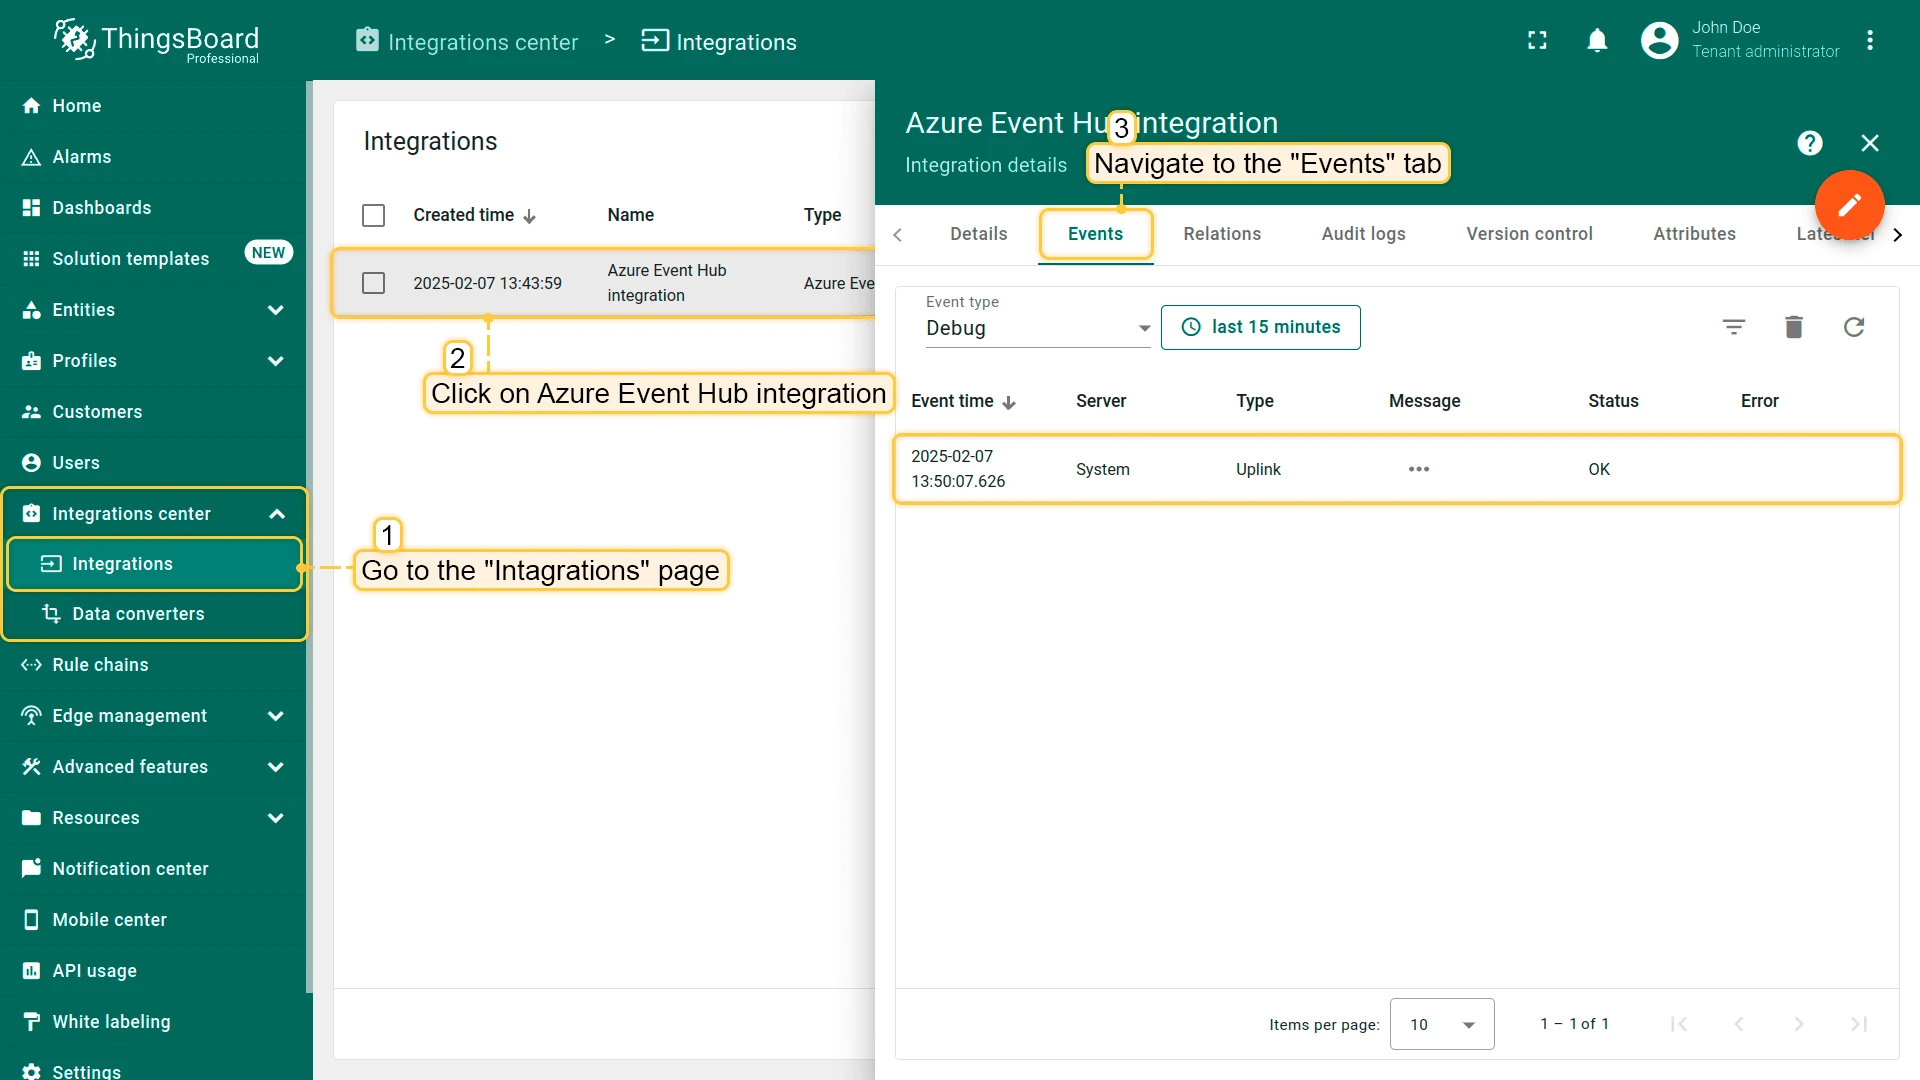
Go to Entities ⇾ Devices — a device named TB-D-01 is automatically created by the integration. Open it and check the Latest telemetry tab — you should see temp = 42 and humidity = 77.
Configure and test downlink
Section titled “Configure and test downlink”To send commands from ThingsBoard to Azure IoT Hub devices, three things must be in place: a downlink converter attached to the integration with the Event Hub-compatible name configured, and a Rule Chain node that forwards attribute changes to the integration.
Create a downlink converter
Section titled “Create a downlink converter”The downlink converter encodes ThingsBoard messages into the format required by the Azure IoT Hub cloud-to-device messaging API. For the full encoder reference, see Downlink data converter.
Expected output structure:
{ "contentType": "JSON", "data": "{\"down-att\": \"scm:55\"}", "metadata": { "deviceId": "TB-D-01" }}The result object must follow this format:
contentType— how data is encoded:TEXT,JSON, orBINARYdata— the serialized payload sent to the devicemetadata.deviceId— the Azure IoT Hub Device ID of the target device
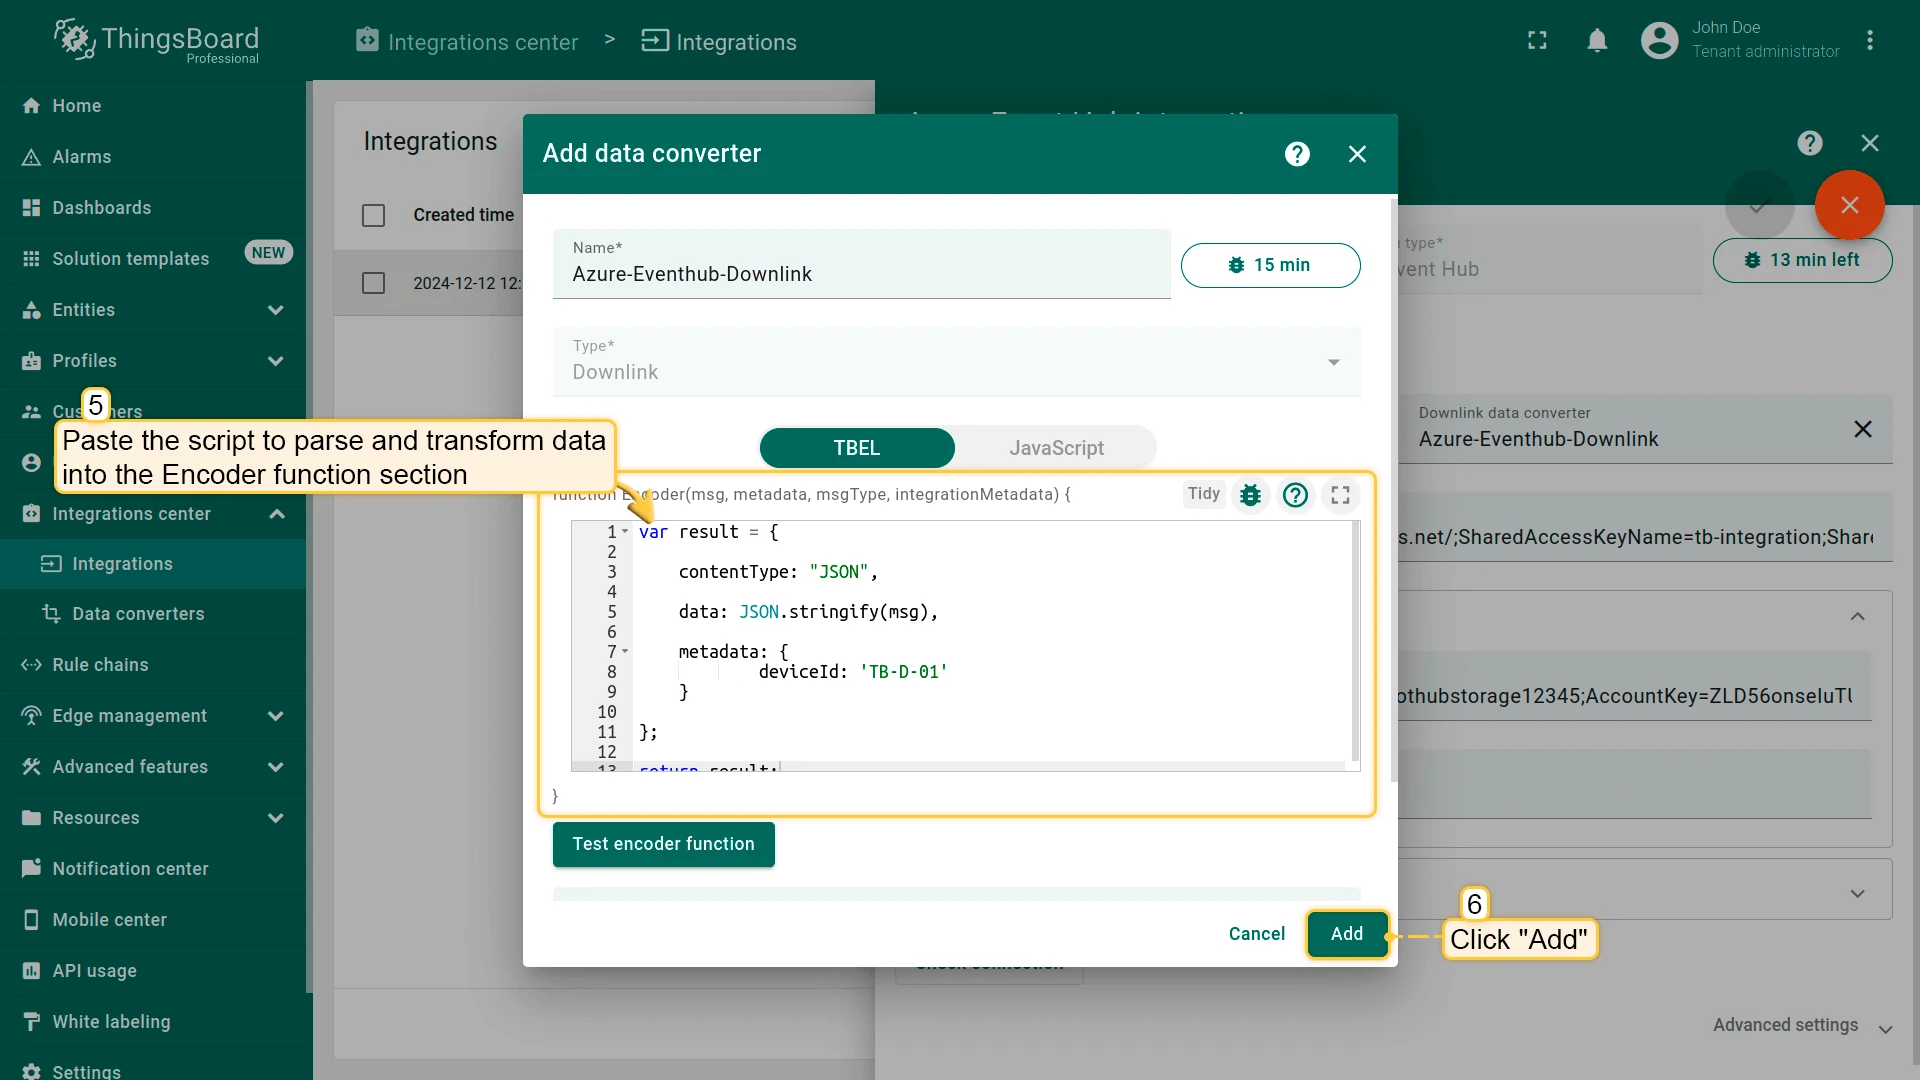
The encoder function used in this tutorial:
var result = { contentType: "JSON", data: JSON.stringify(msg), metadata: { deviceId: metadata.deviceName }};return result;var result = { contentType: "JSON", data: JSON.stringify(msg), metadata: { deviceId: metadata.deviceName }};return result;The encoder serializes the full ThingsBoard message (msg) as JSON. metadata.deviceName is automatically populated from the device context when the downlink is triggered from the device’s rule chain, and maps to the Azure IoT Hub Device ID.
To adapt this converter to your device:
- Specific fields only — replace
JSON.stringify(msg)with a selective object to send only the relevant command fields. - Fixed device target — replace
metadata.deviceNamewith a hardcoded Device ID if the downlink always targets the same device. - Binary payload — set
contentTypetoBINARYand encodedataaccordingly.
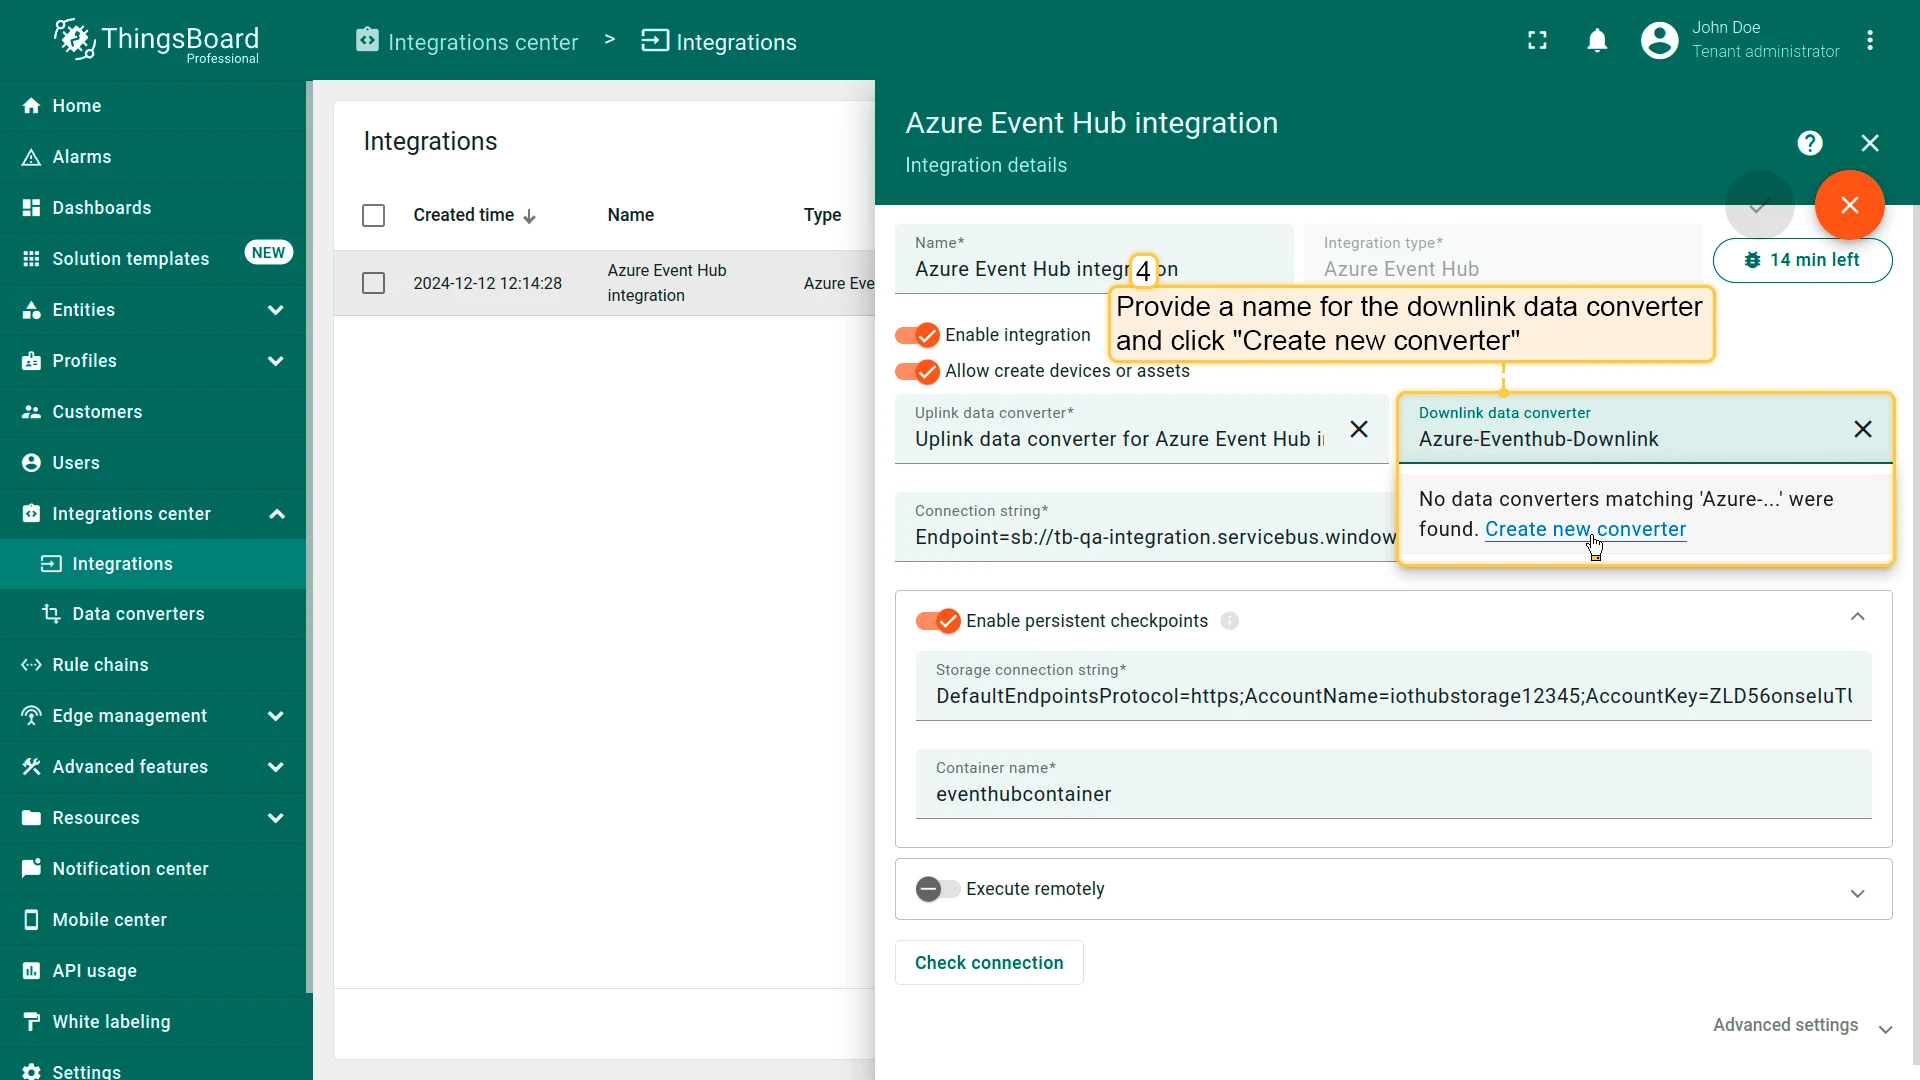
Add the downlink converter to the integration
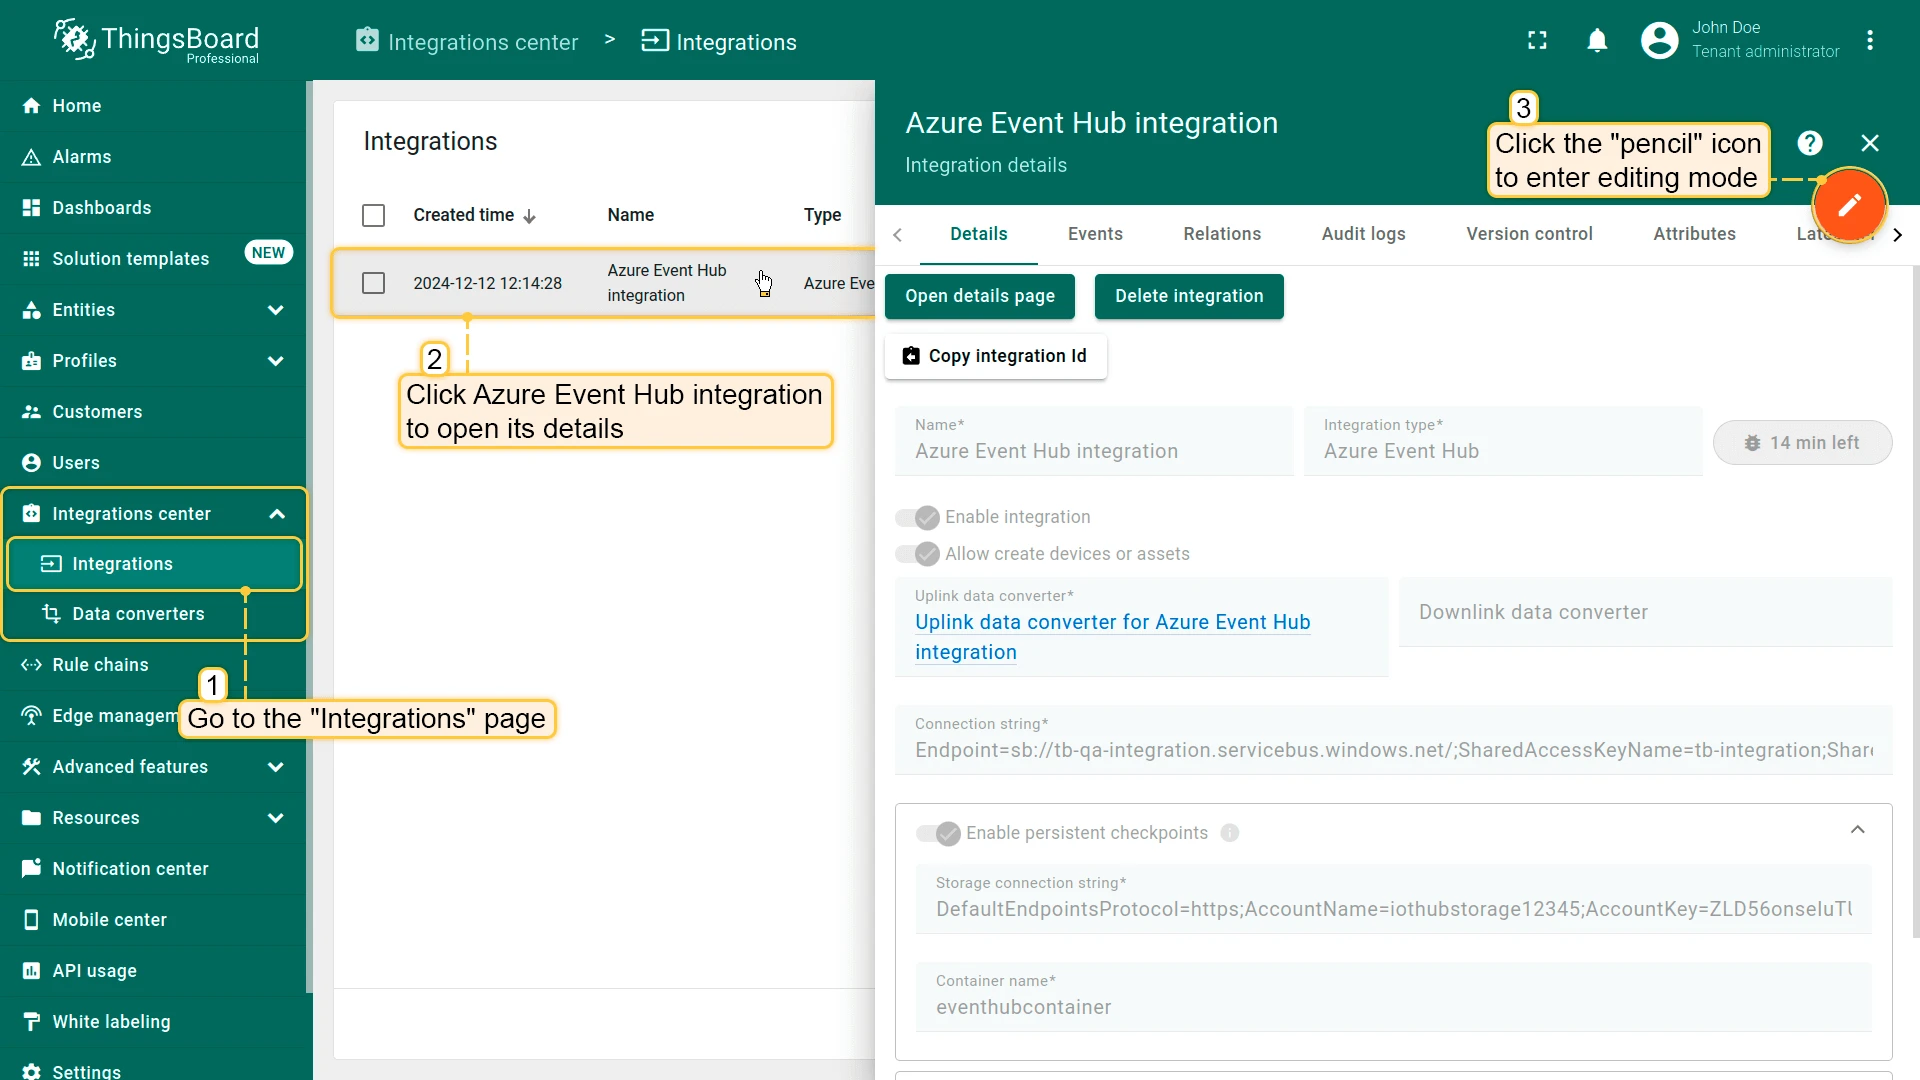
Section titled “Add the downlink converter to the integration”- Go to Integrations center ⇾ Integrations and open the Azure Event Hub integration.
- Click Toggle edit mode.
- In the Downlink data converter field, type a name and click Create new converter.
- Paste the encoder function from the section above in the editor and click Add.
- Scroll down to Advanced settings and enter the Event Hub-compatible name in the IoT Hub Name field.
- Click Apply changes to update the integration.
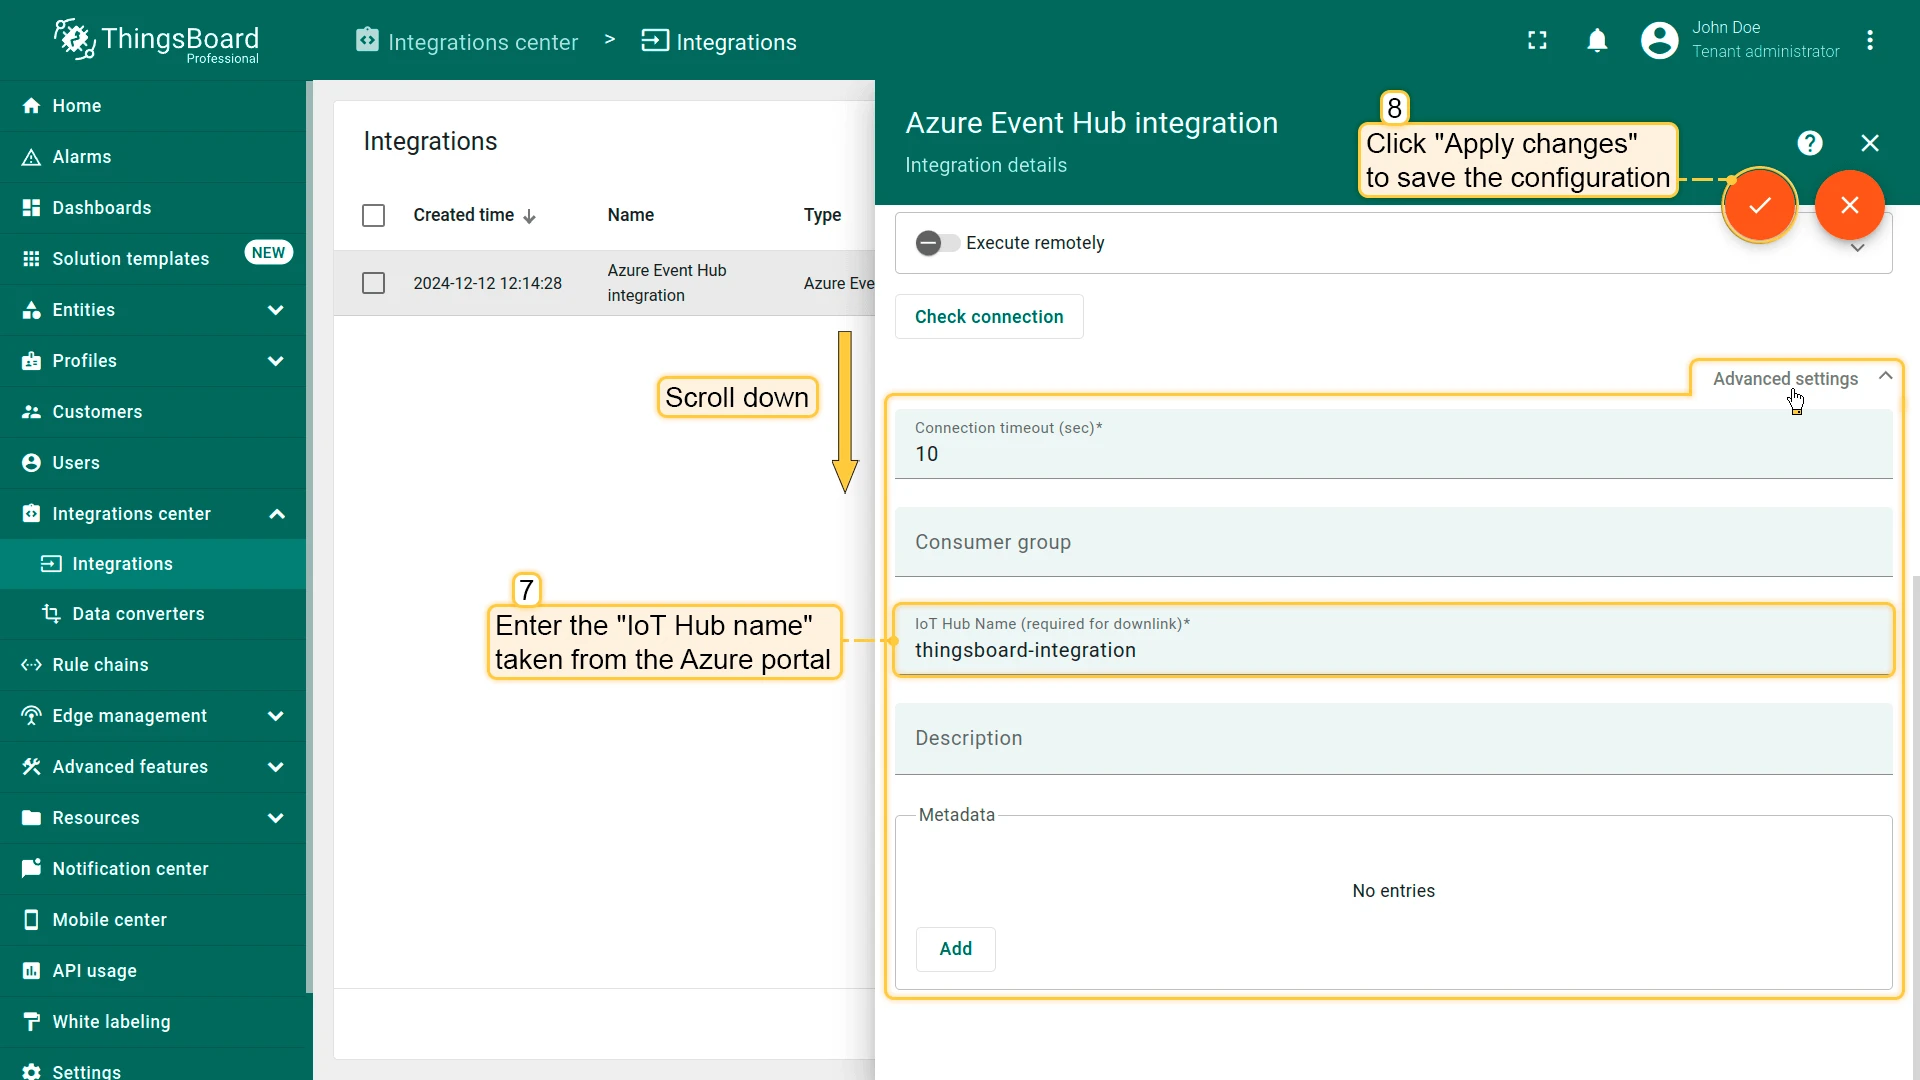
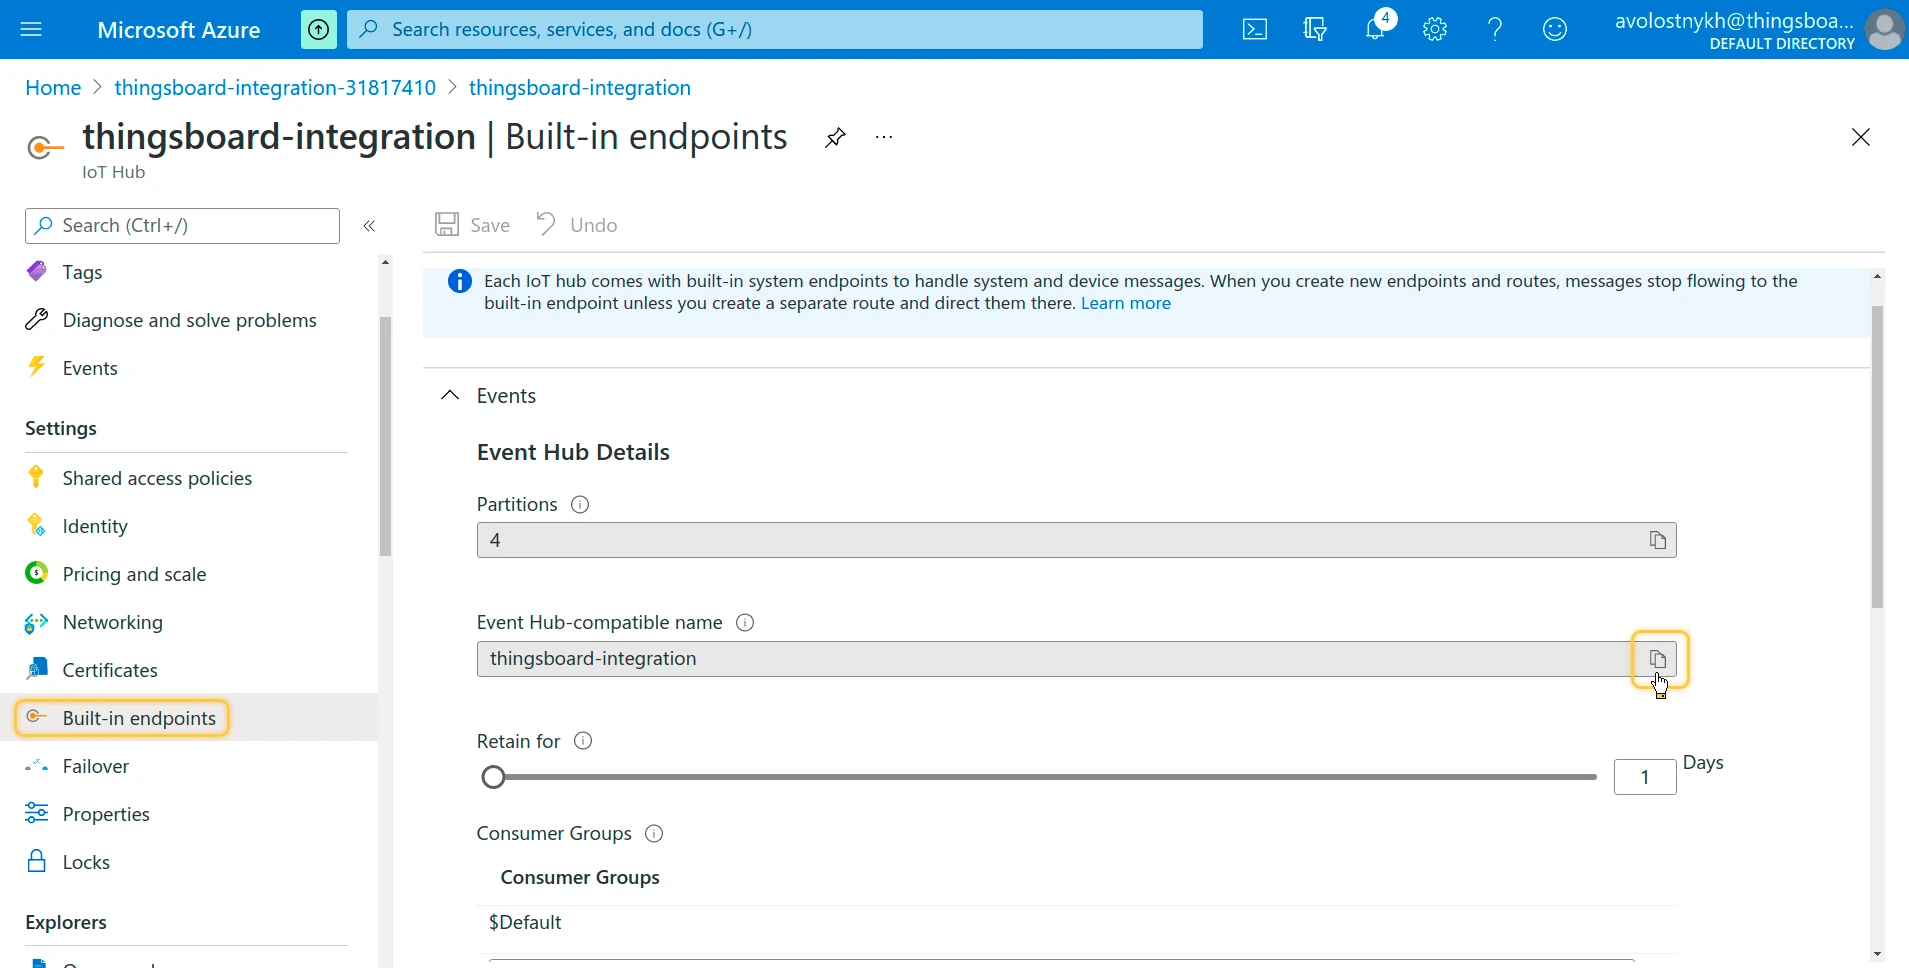
Find the Event Hub-compatible name
Section titled “Find the Event Hub-compatible name”- Open the Azure portal. In your IoT Hub resource, go to Built-in endpoints.
- Copy the Event Hub-compatible name — you will need it in the integration’s Advanced settings.
Configure the rule chain for downlinks
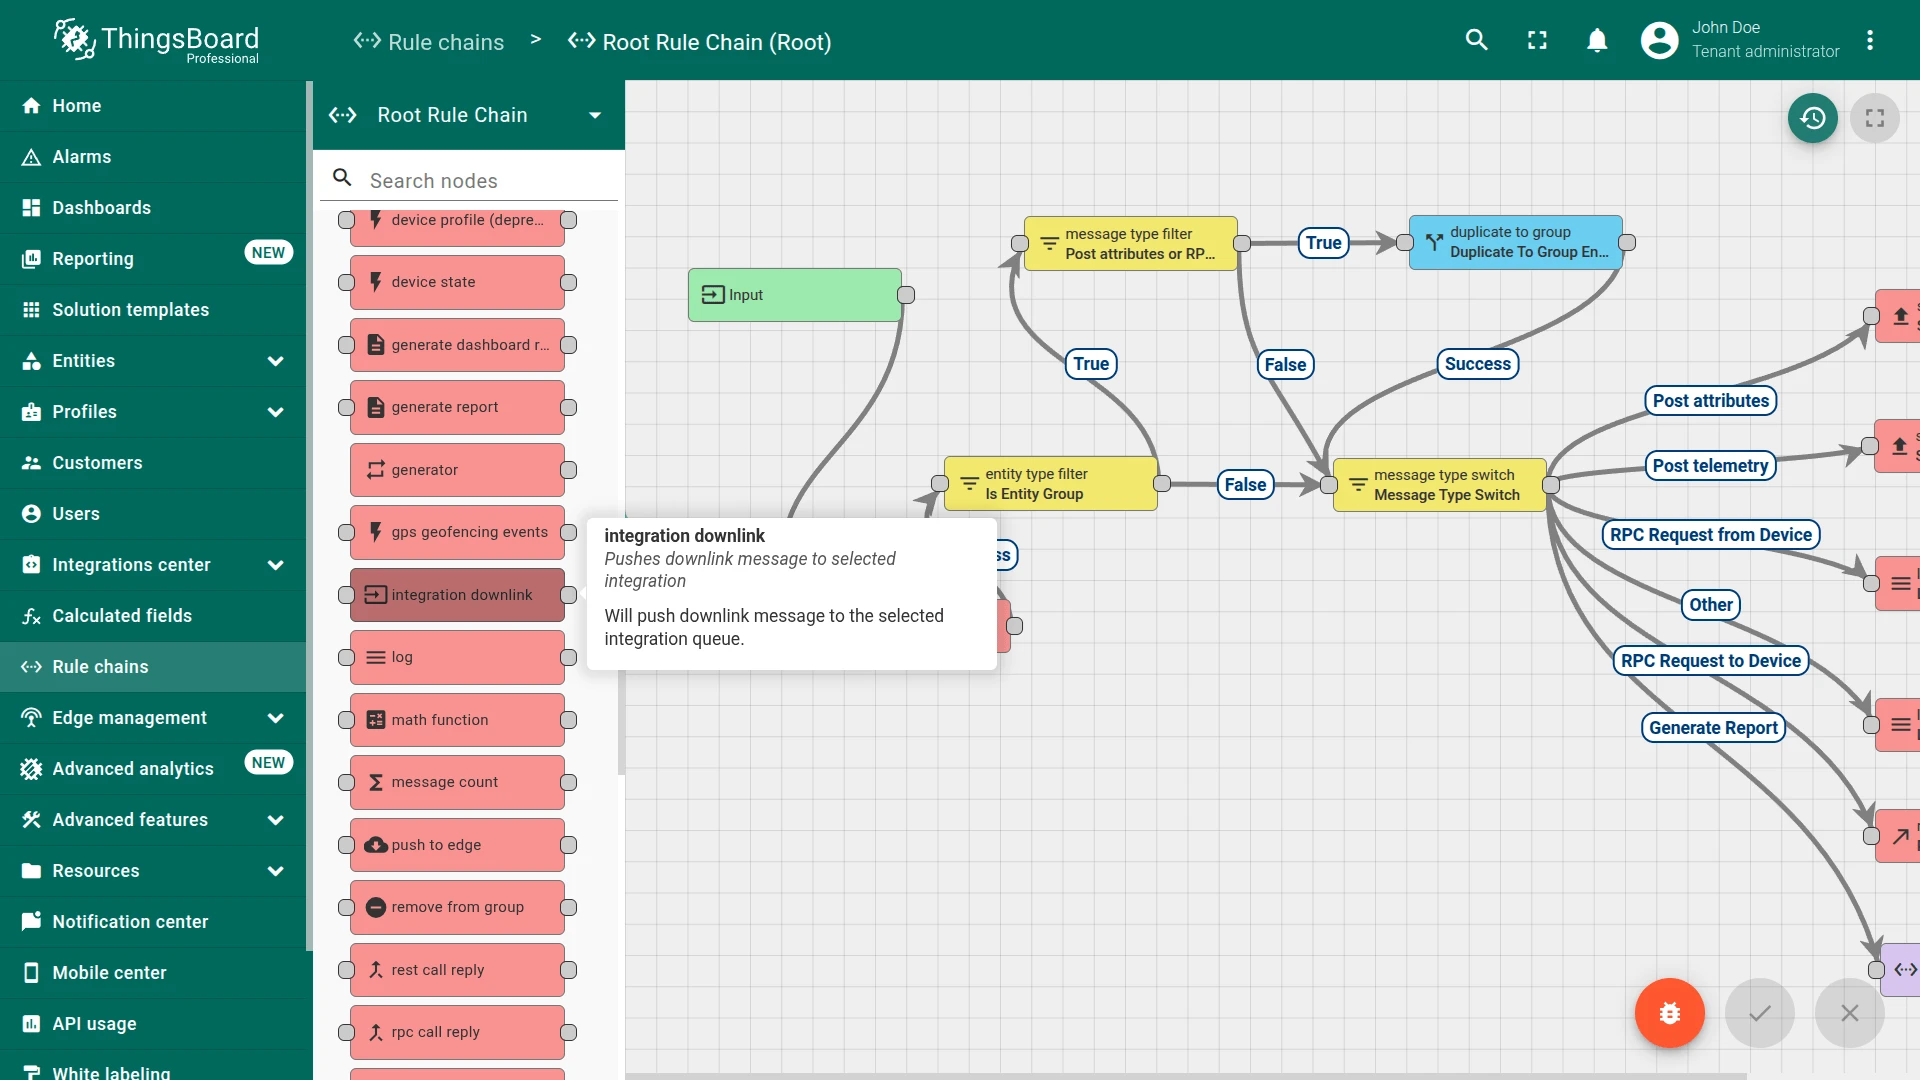
Section titled “Configure the rule chain for downlinks”- Open Rule Chains ⇾ Root Rule Chain and click the edit icon.
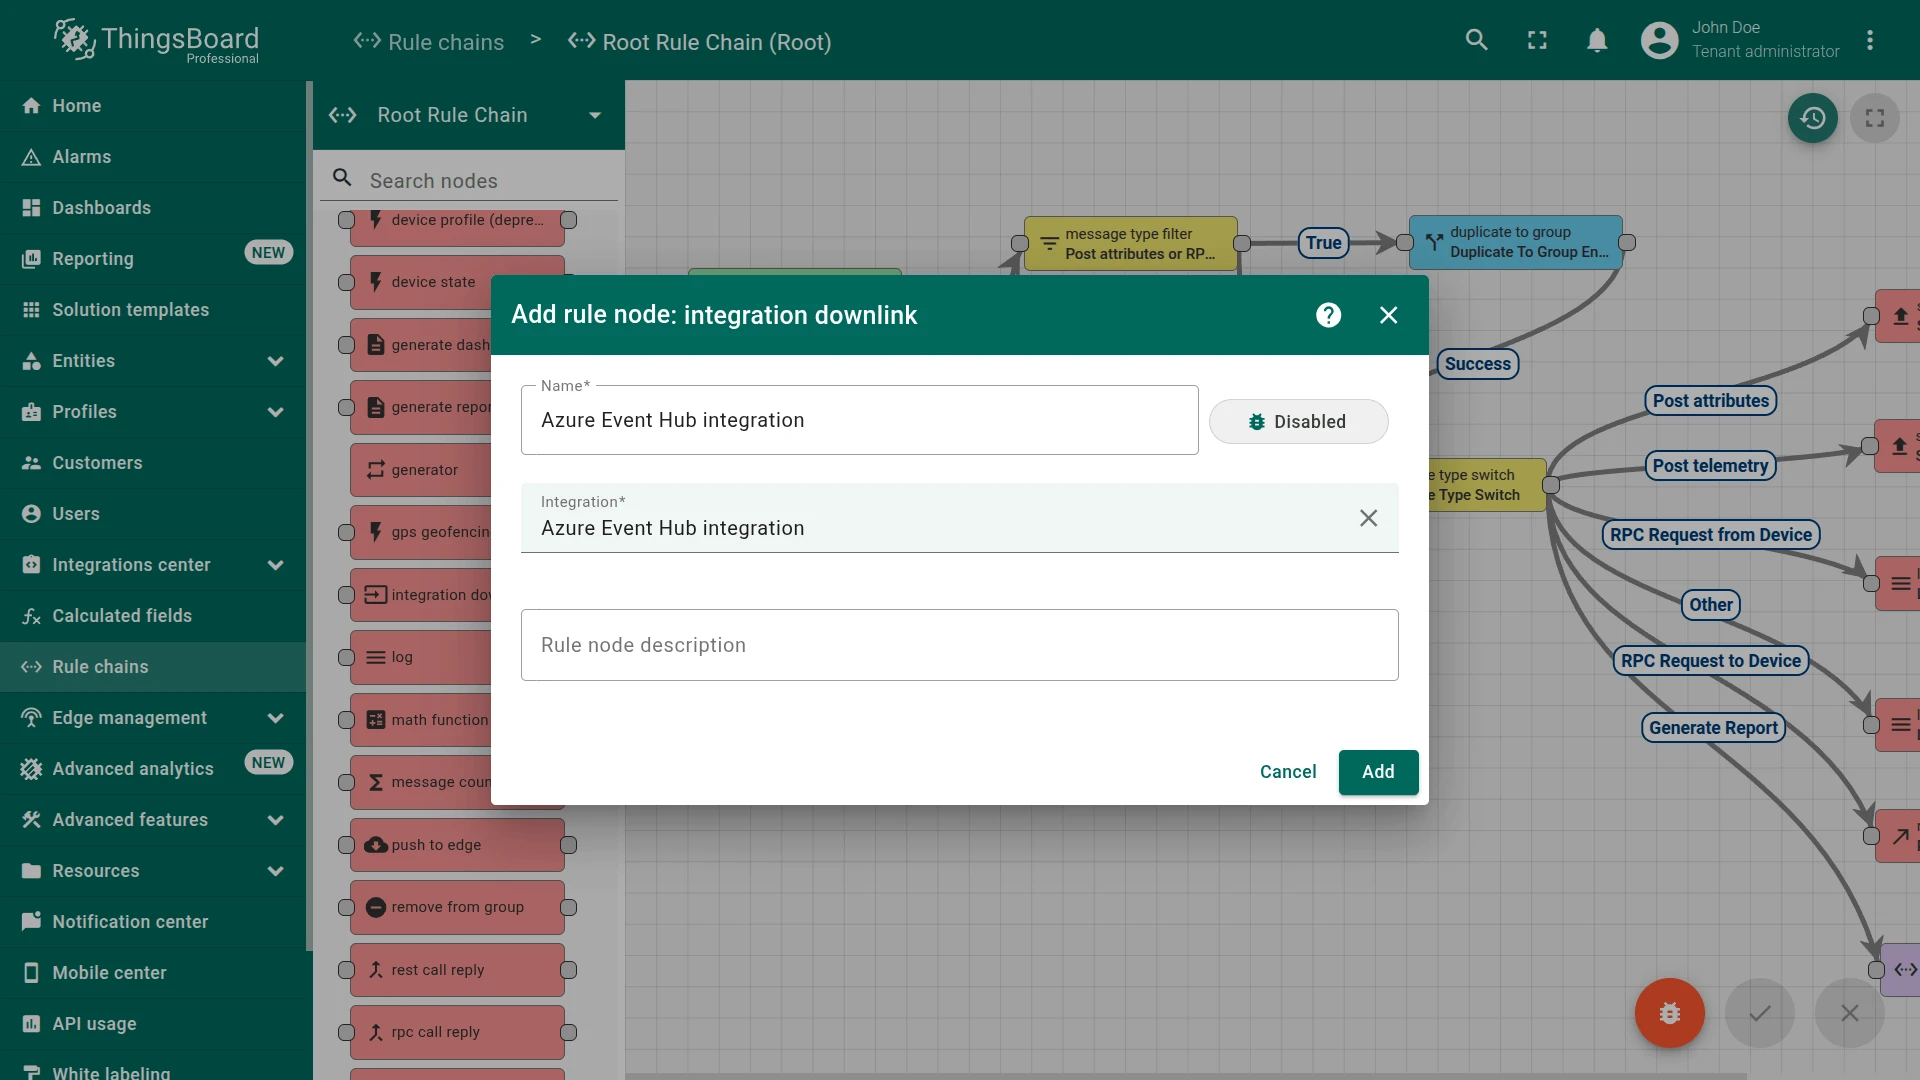
- Drag the Integration Downlink action node onto the canvas. Enter a name, select the Azure Event Hub integration, and click Add.
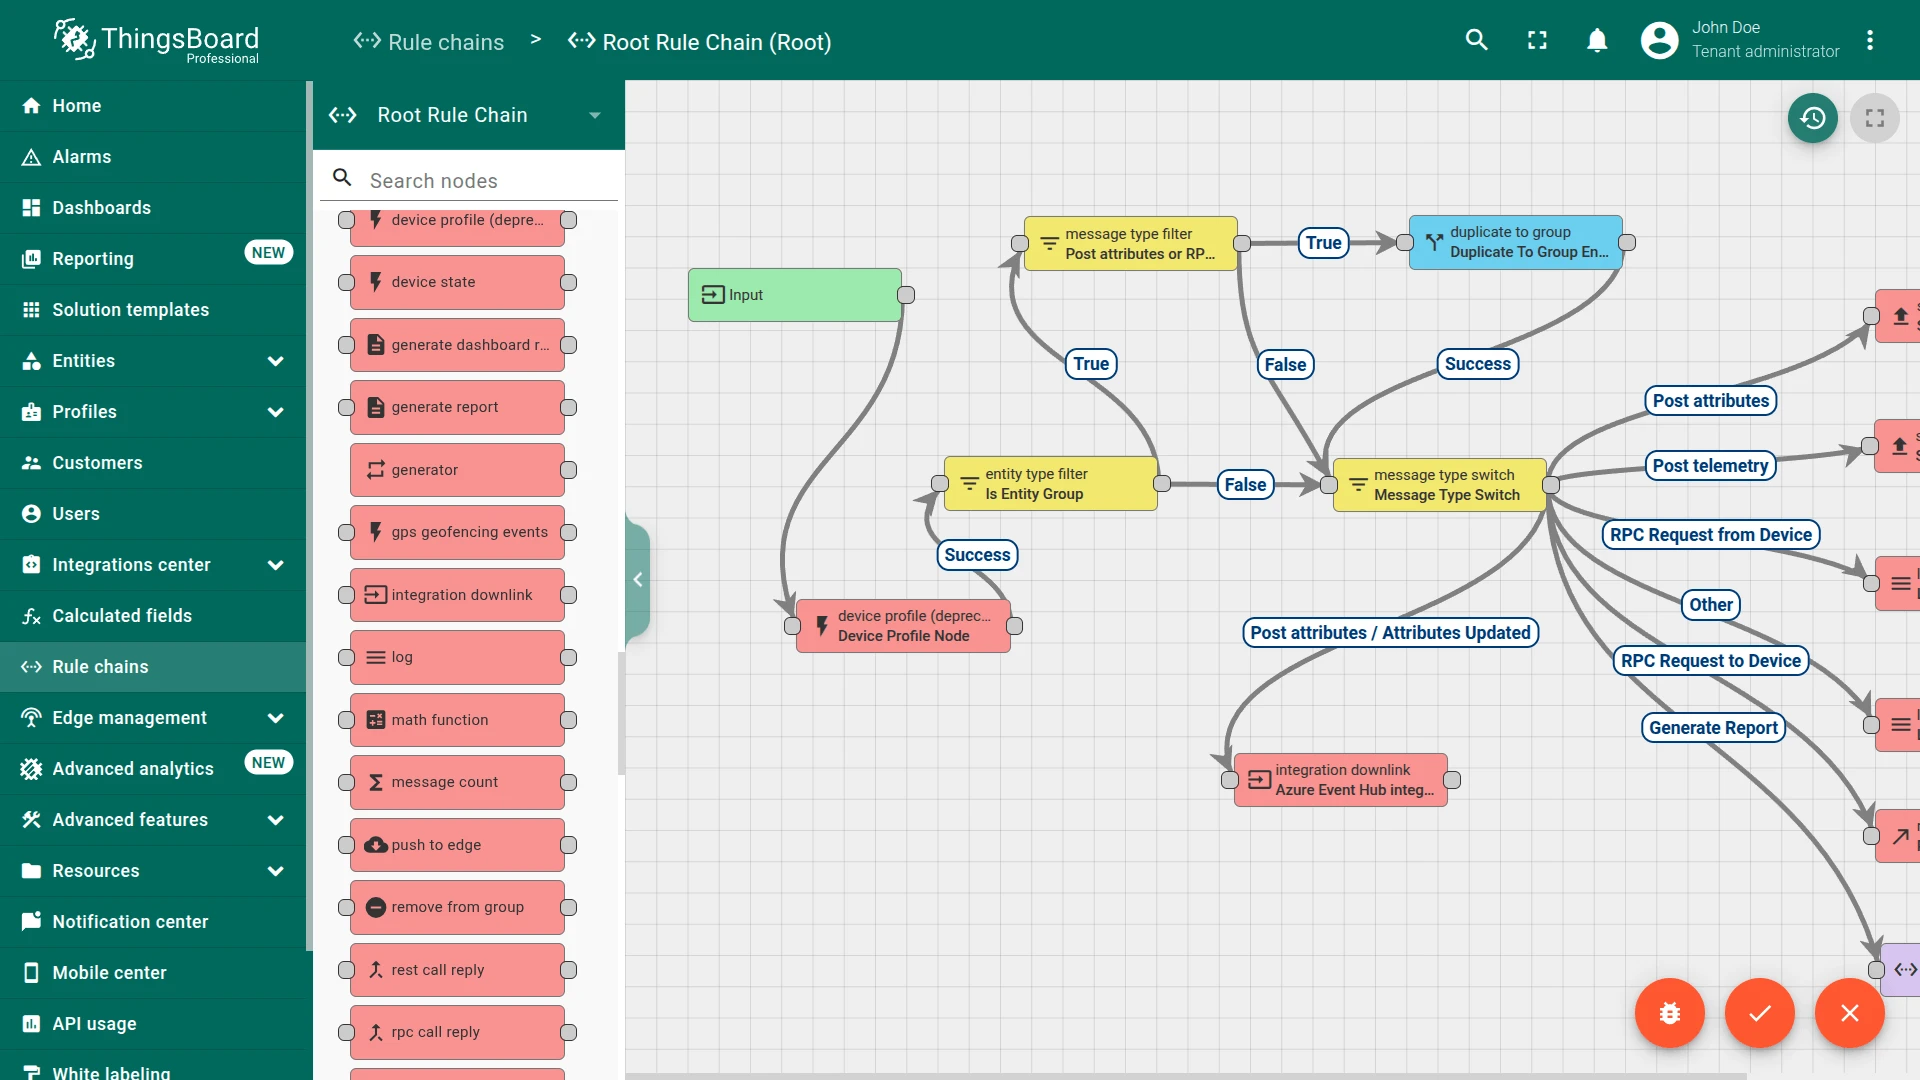
- Connect the Message Type Switch node to the Integration Downlink node using the Post attributes and Attributes Updated relations. These relations fire whenever a shared attribute is created or changed, triggering the downlink.
- Click Apply changes to save the rule chain.
Trigger a downlink via shared attribute
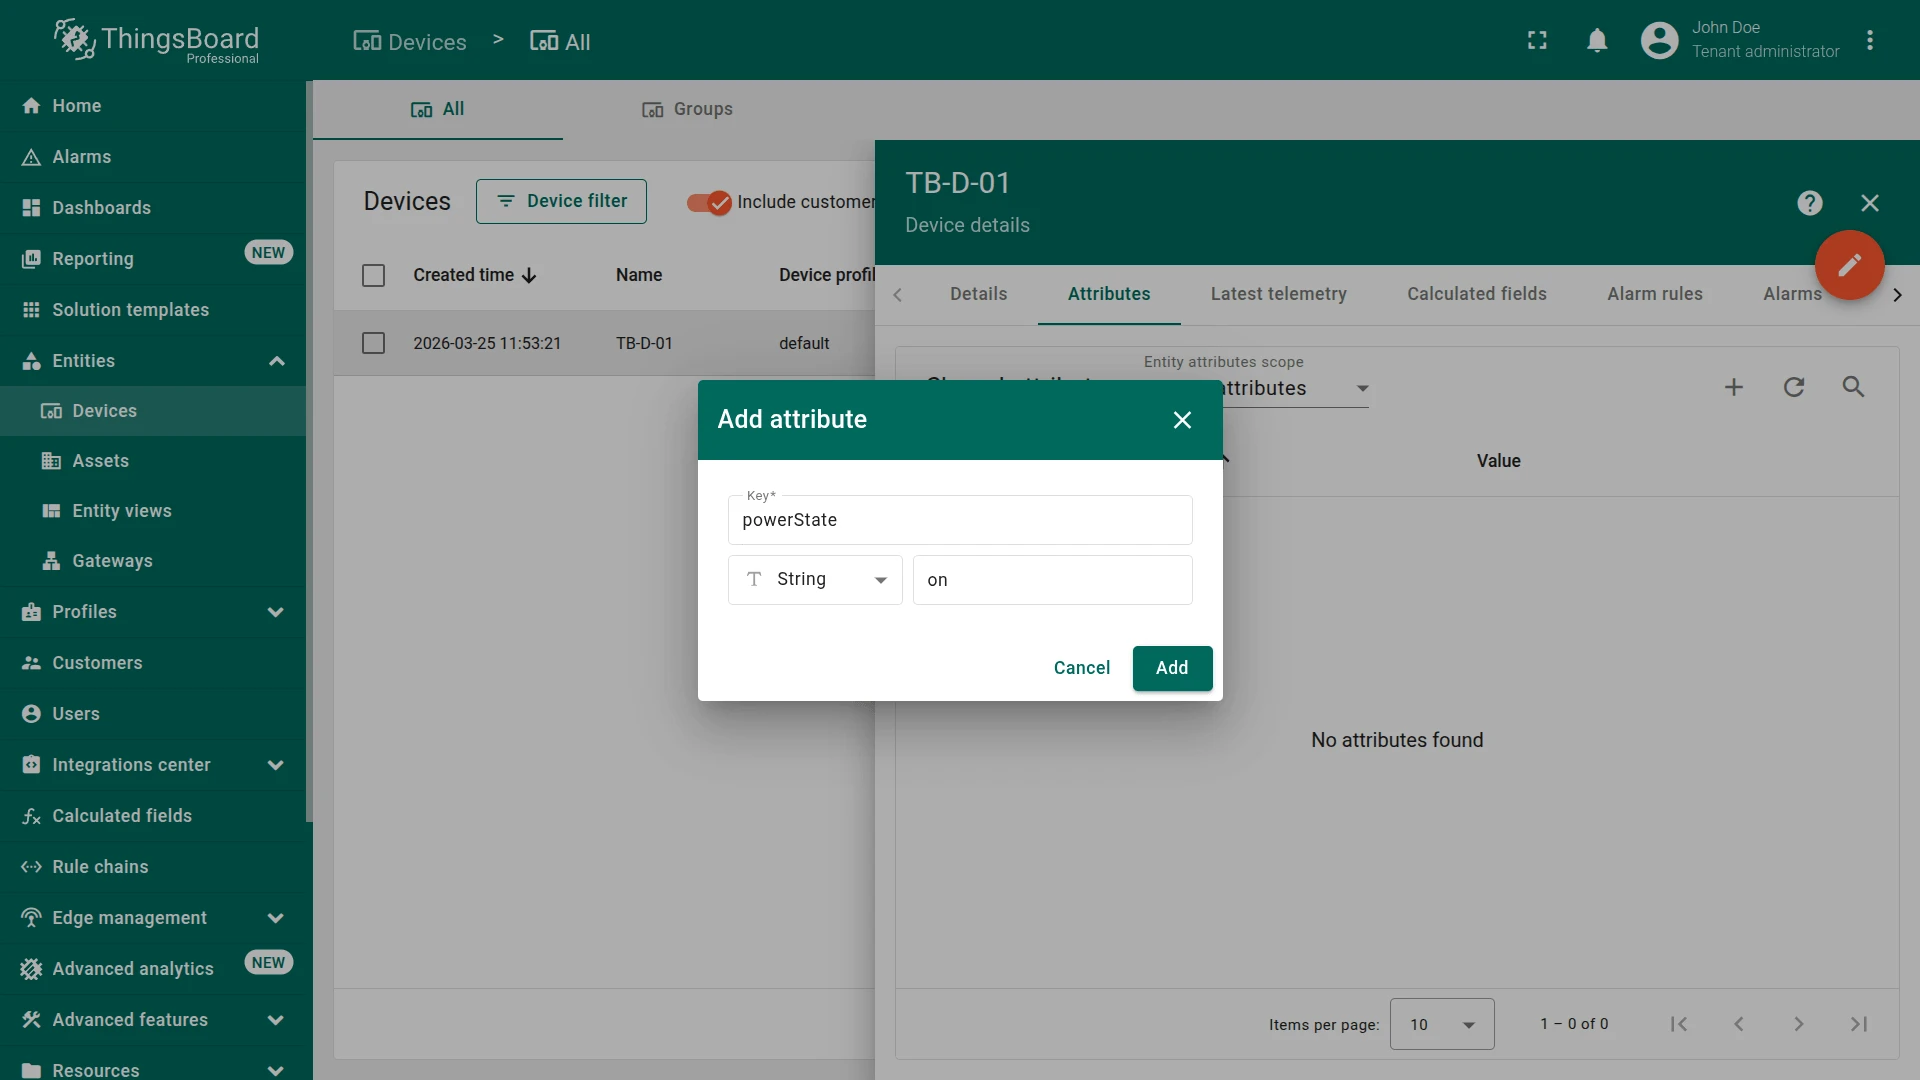
Section titled “Trigger a downlink via shared attribute”- Go to Entities ⇾ Devices, open device TB-D-01, and click the Attributes tab.
- Switch to Shared attributes and click + to add a new attribute.
- Enter the key (e.g.
powerState) and value (e.g.on), then click Add.
Adding the attribute fires the Attributes Updated relation in the rule chain, which routes the message to the Integration Downlink node and sends a cloud-to-device message to Azure IoT Hub device TB-D-01.
Verify the downlink
Section titled “Verify the downlink”Go to Integrations center ⇾ Integrations, open the Azure Event Hub integration, and check the Events tab for Downlink events with status OK. The message payload contains deviceId and the attribute key-value pair sent to the device.
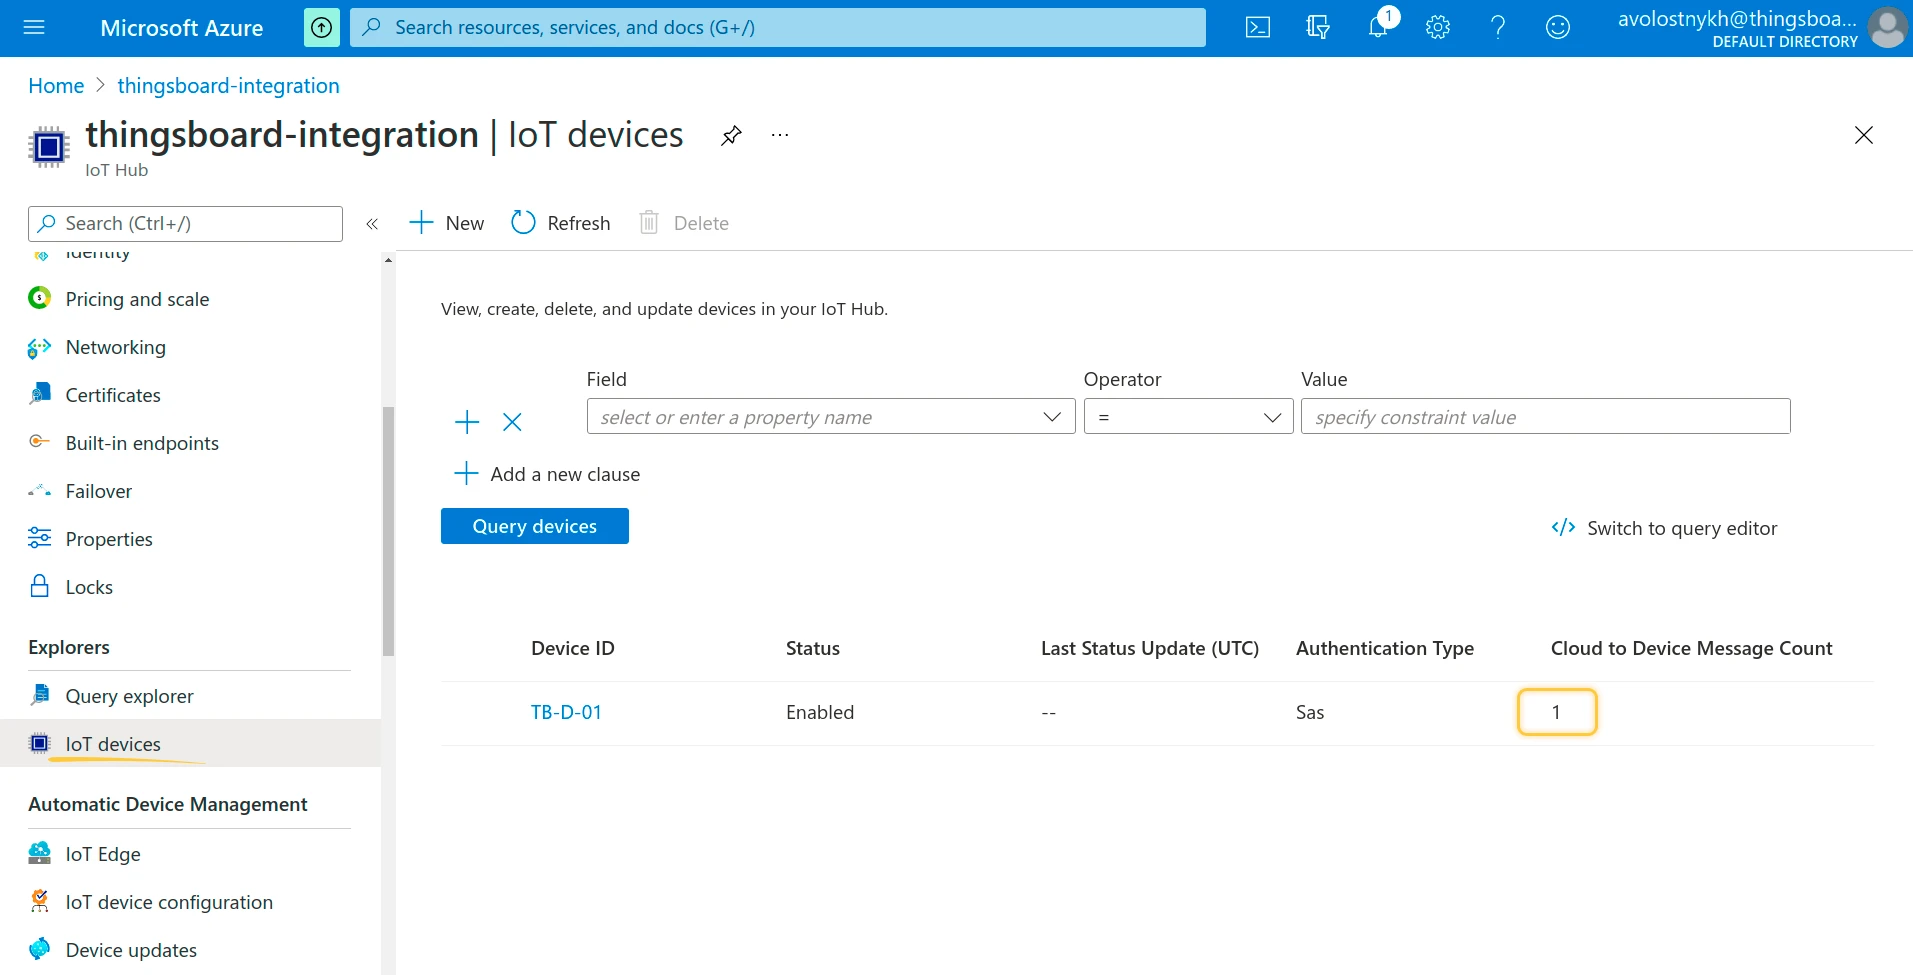
To confirm delivery on the Azure side, open your IoT Hub in the Azure portal, navigate to IoT devices, select device TB-D-01, and verify that the Cloud to Device Message Count has increased to 1.
See also
Section titled “See also”Was this helpful?