Tuya Integration
Tuya is an IoT platform that enables device manufacturers and solution providers to connect, manage, and control smart devices through the Tuya Cloud. The ThingsBoard Tuya integration subscribes to the Tuya Message Queue Service using your project credentials and receives device status reports in real time. It automatically creates ThingsBoard devices from the incoming data and, in the reverse direction, forwards RPC commands from ThingsBoard to Tuya devices via the Tuya Device Control API.
This guide walks through an end-to-end integration using a Tuya Smart Plug. A virtual Tuya device can also be used for testing.
Prerequisites
Section titled “Prerequisites”- A ThingsBoard PE account with permission to create integrations.
- A Tuya IoT Platform account.
- At least one Tuya device (physical or virtual).
- The Smart Life or Tuya Smart app installed and signed in on your mobile device.
Register the Smart Plug in the Tuya app
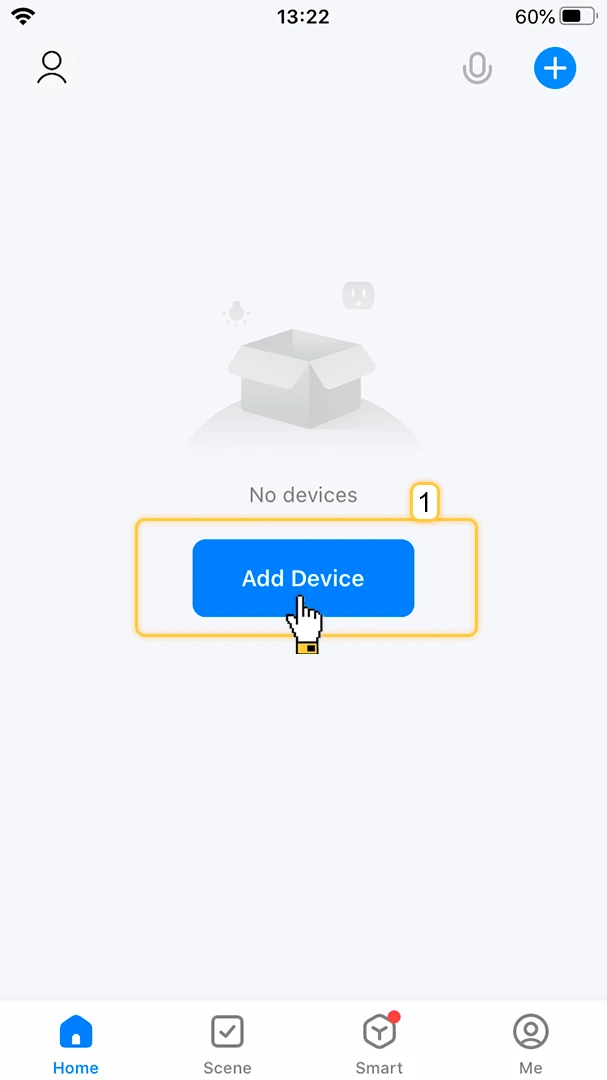
Section titled “Register the Smart Plug in the Tuya app”- Open the Smart Life (or Tuya Smart) app. Tap Add Device on the home screen.
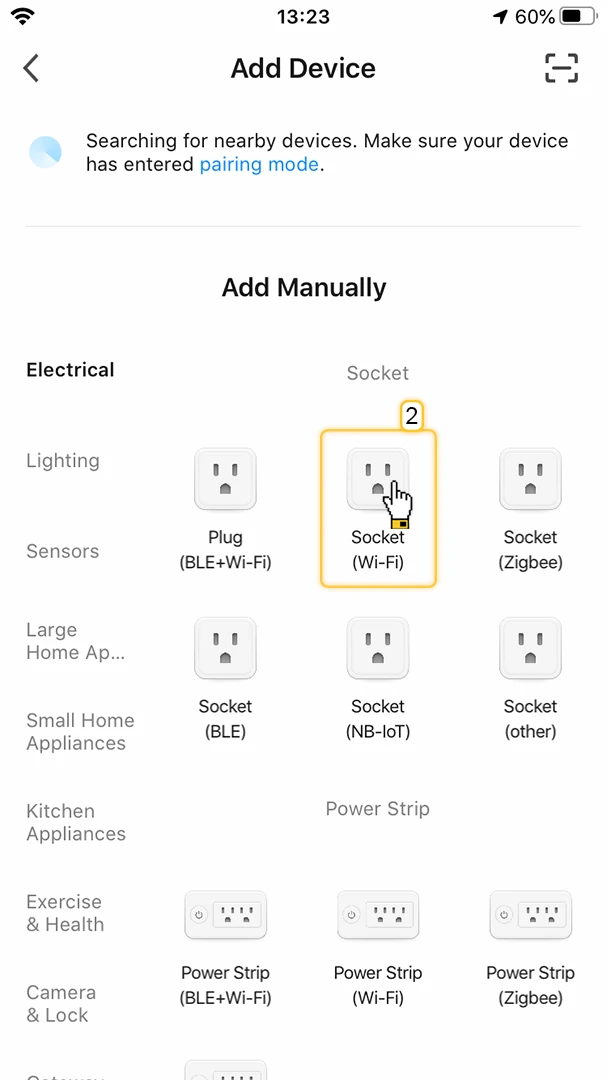
- Browse to the Electrical category and tap Socket (Wi-Fi).
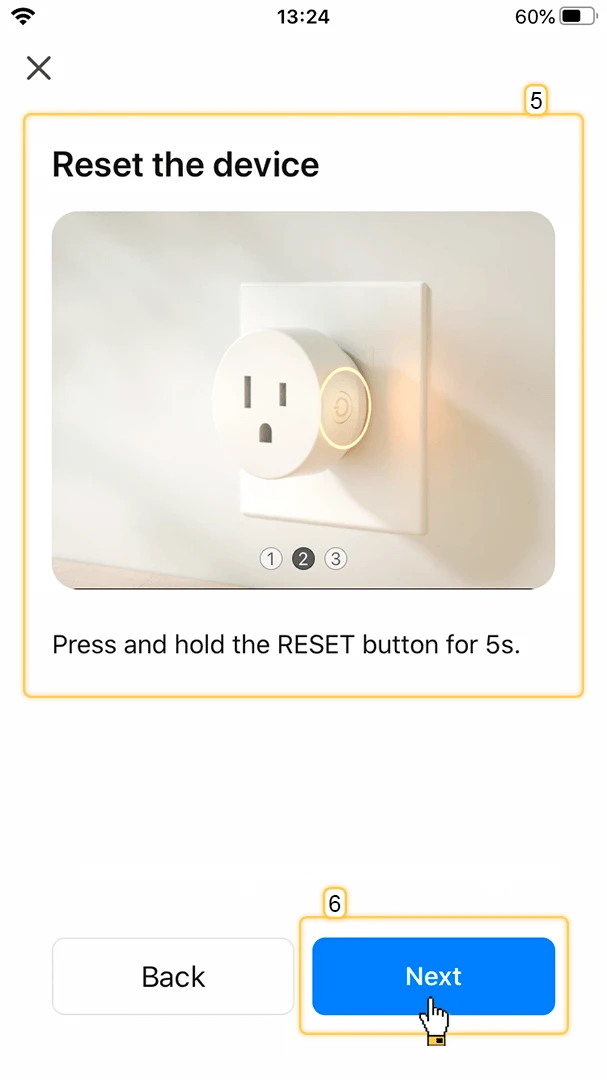
- Follow the on-screen reset instructions: power off the device for 10 seconds, then power it back on.
- Press and hold the RESET button for 5 seconds.
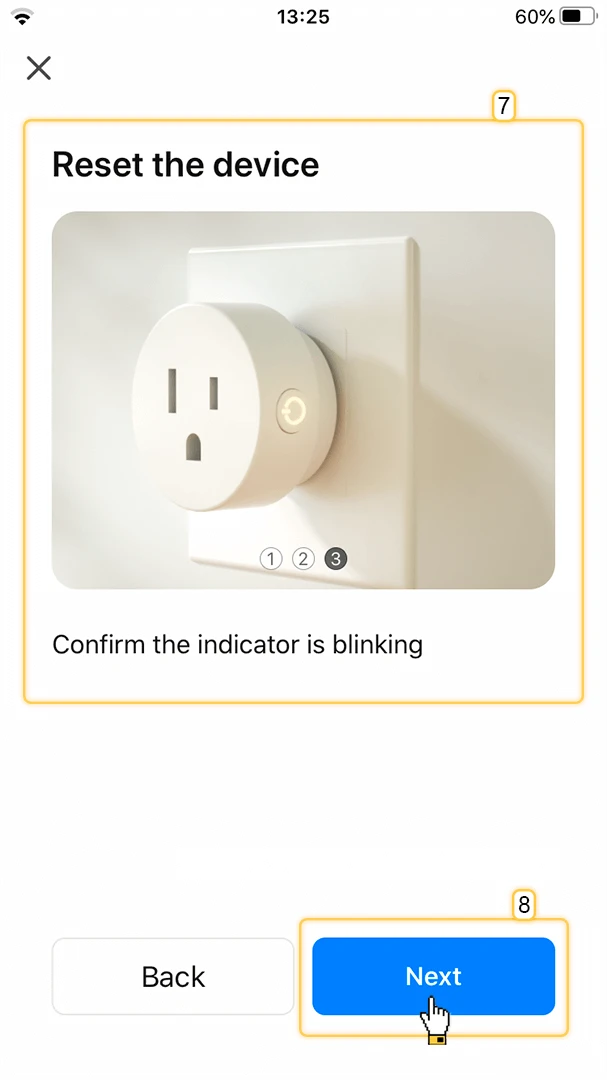
- Confirm the indicator light is blinking rapidly, then tap Next.
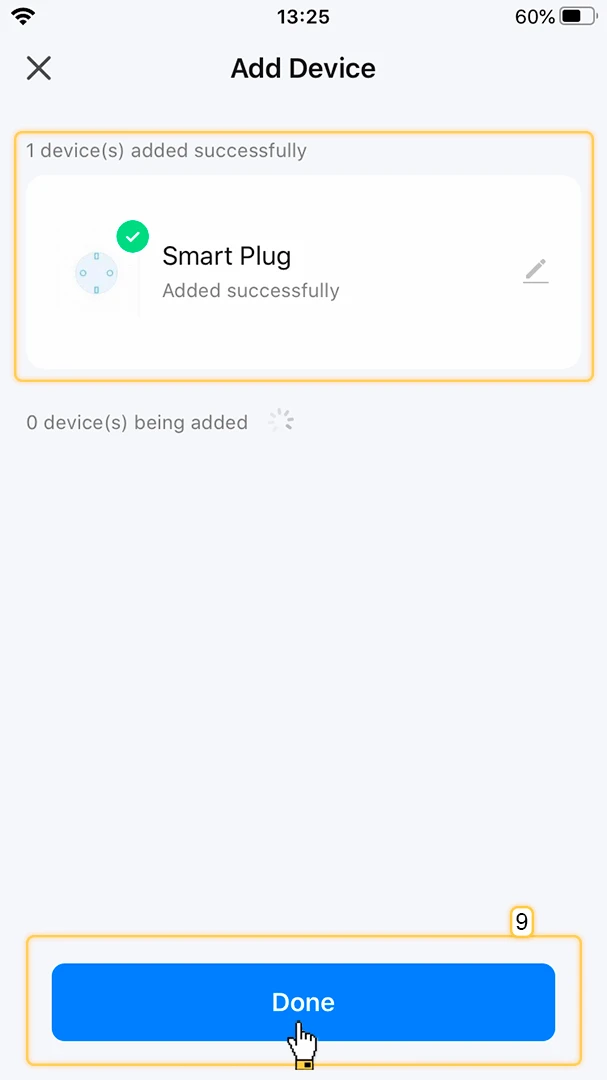
- Wait for the app to discover and add the device. Tap Done when the success screen appears.
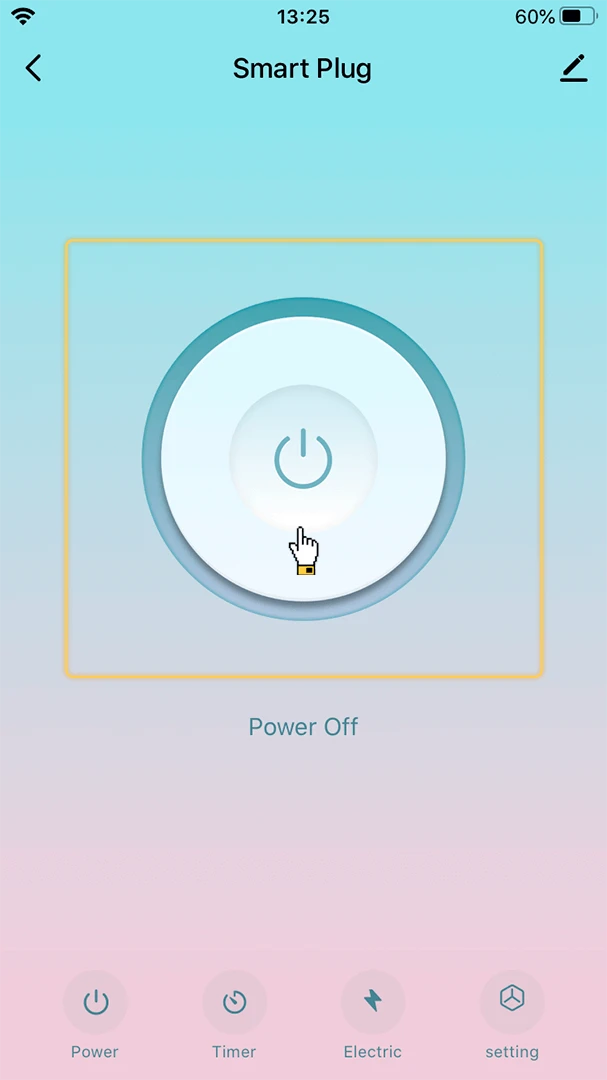
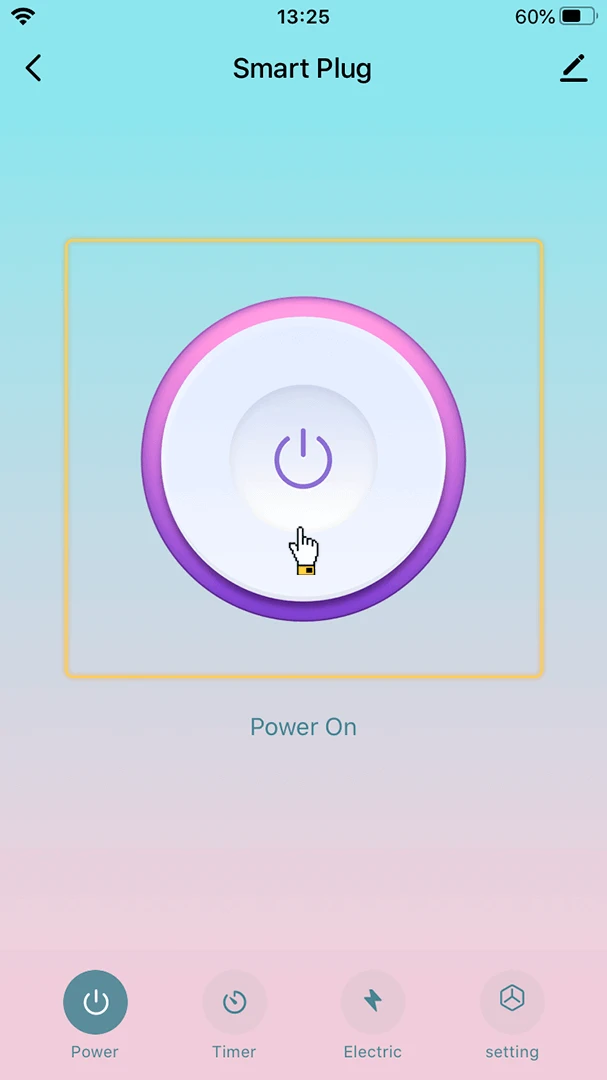
- Open the device card and tap the power button to verify the plug responds to commands.

Configure Tuya cloud
Section titled “Configure Tuya cloud”Create a cloud project
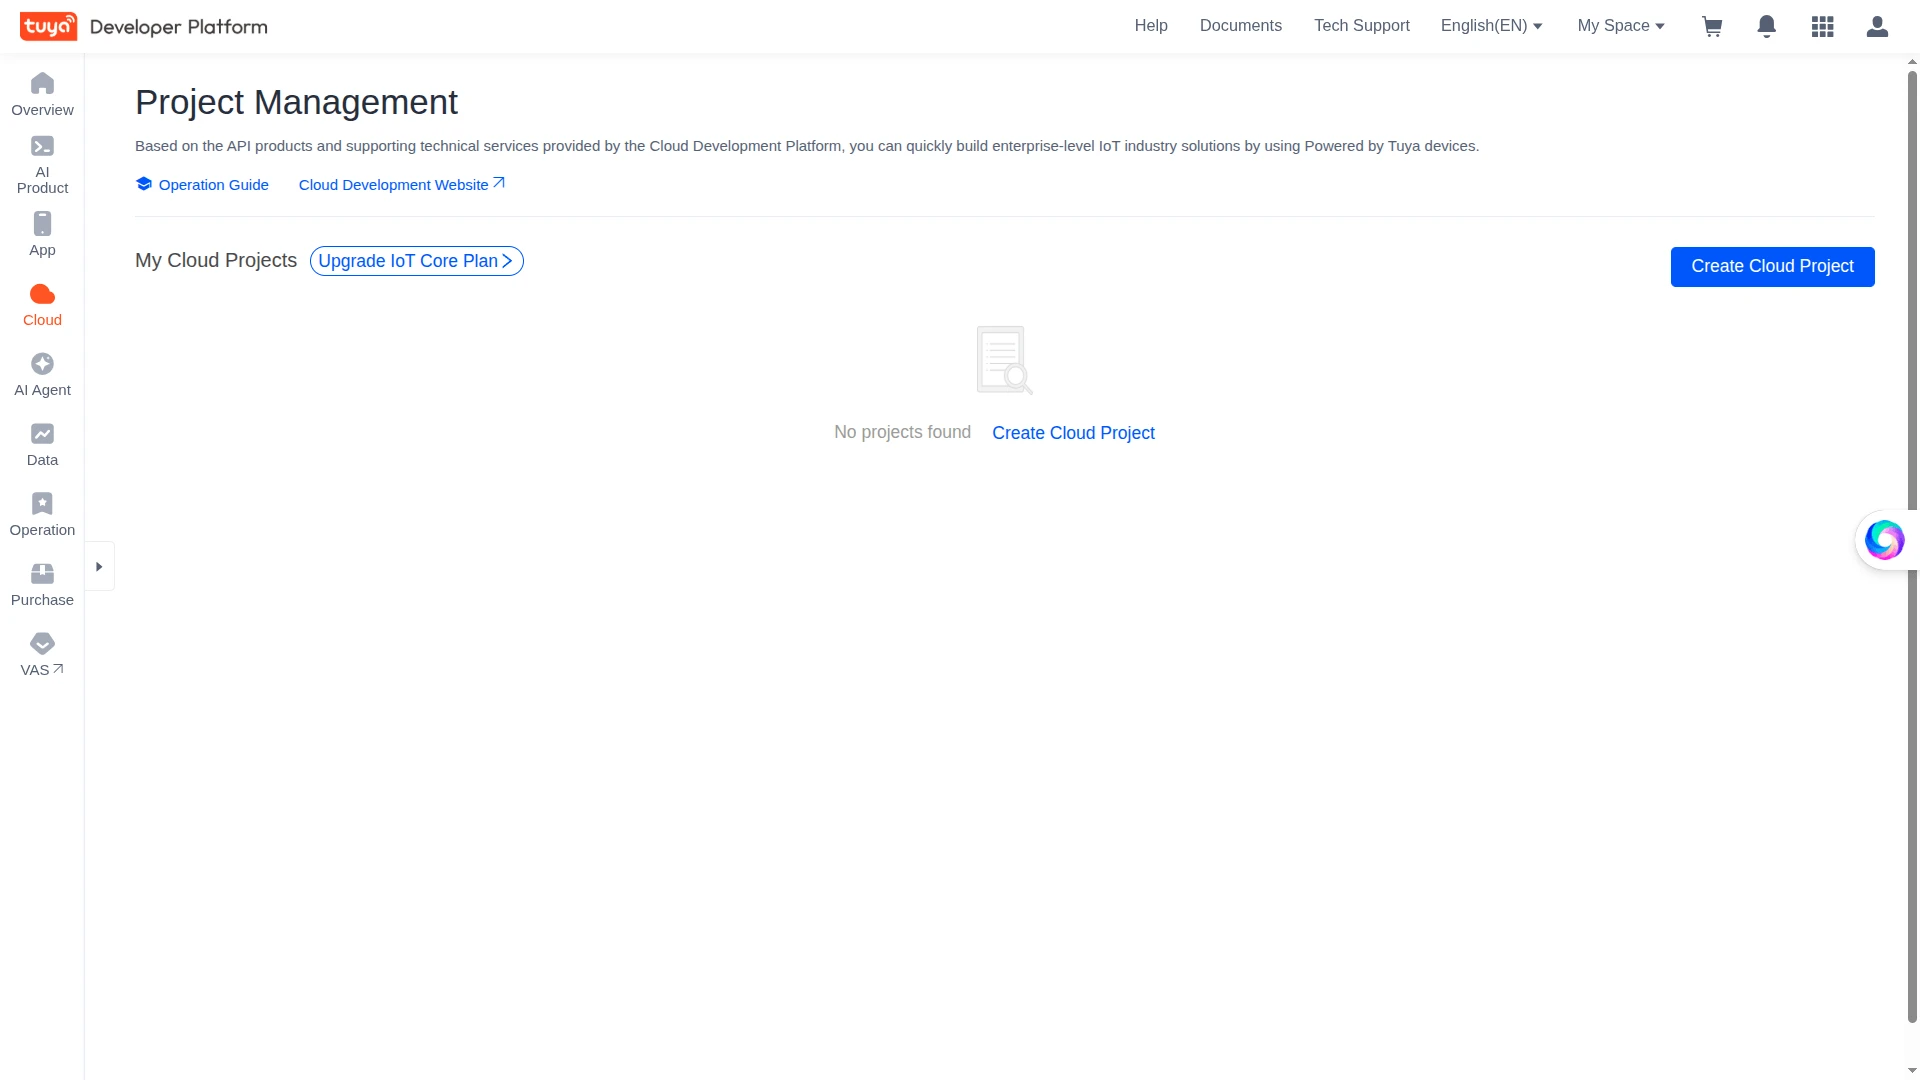
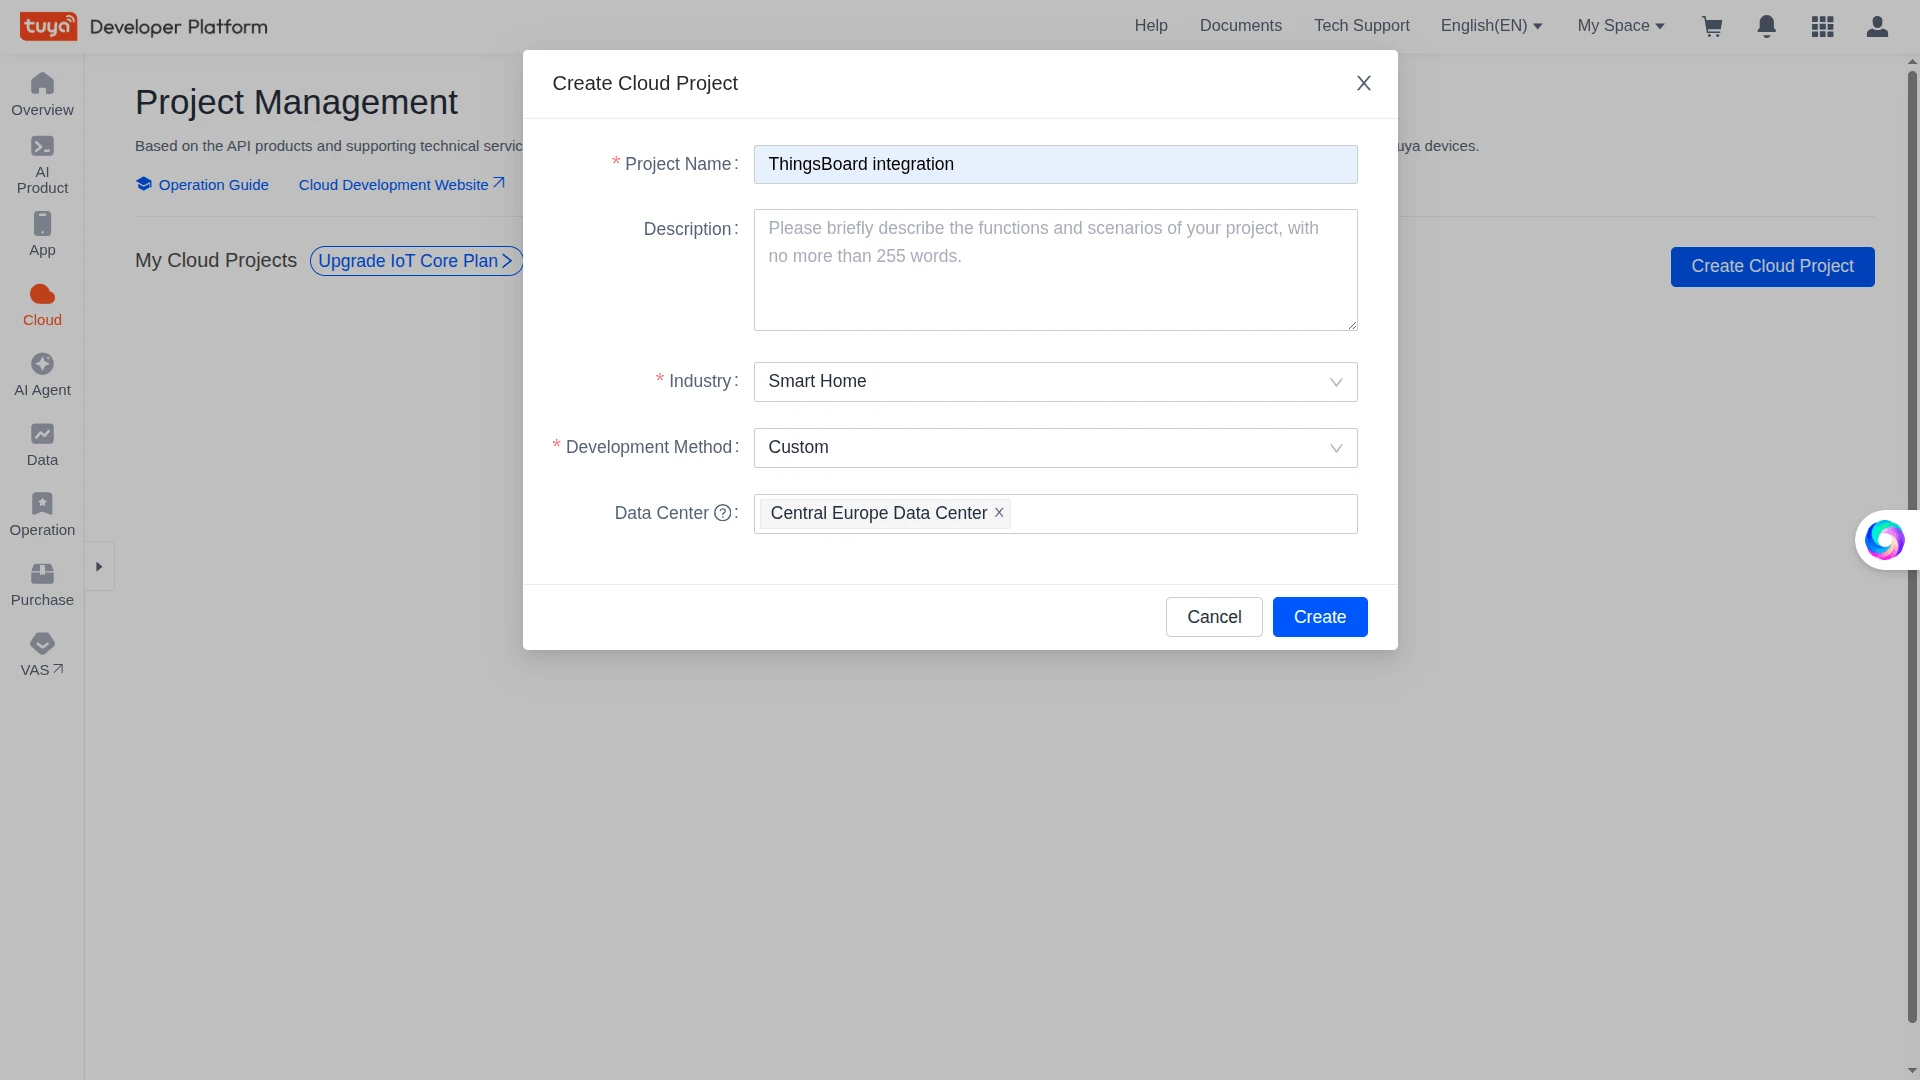
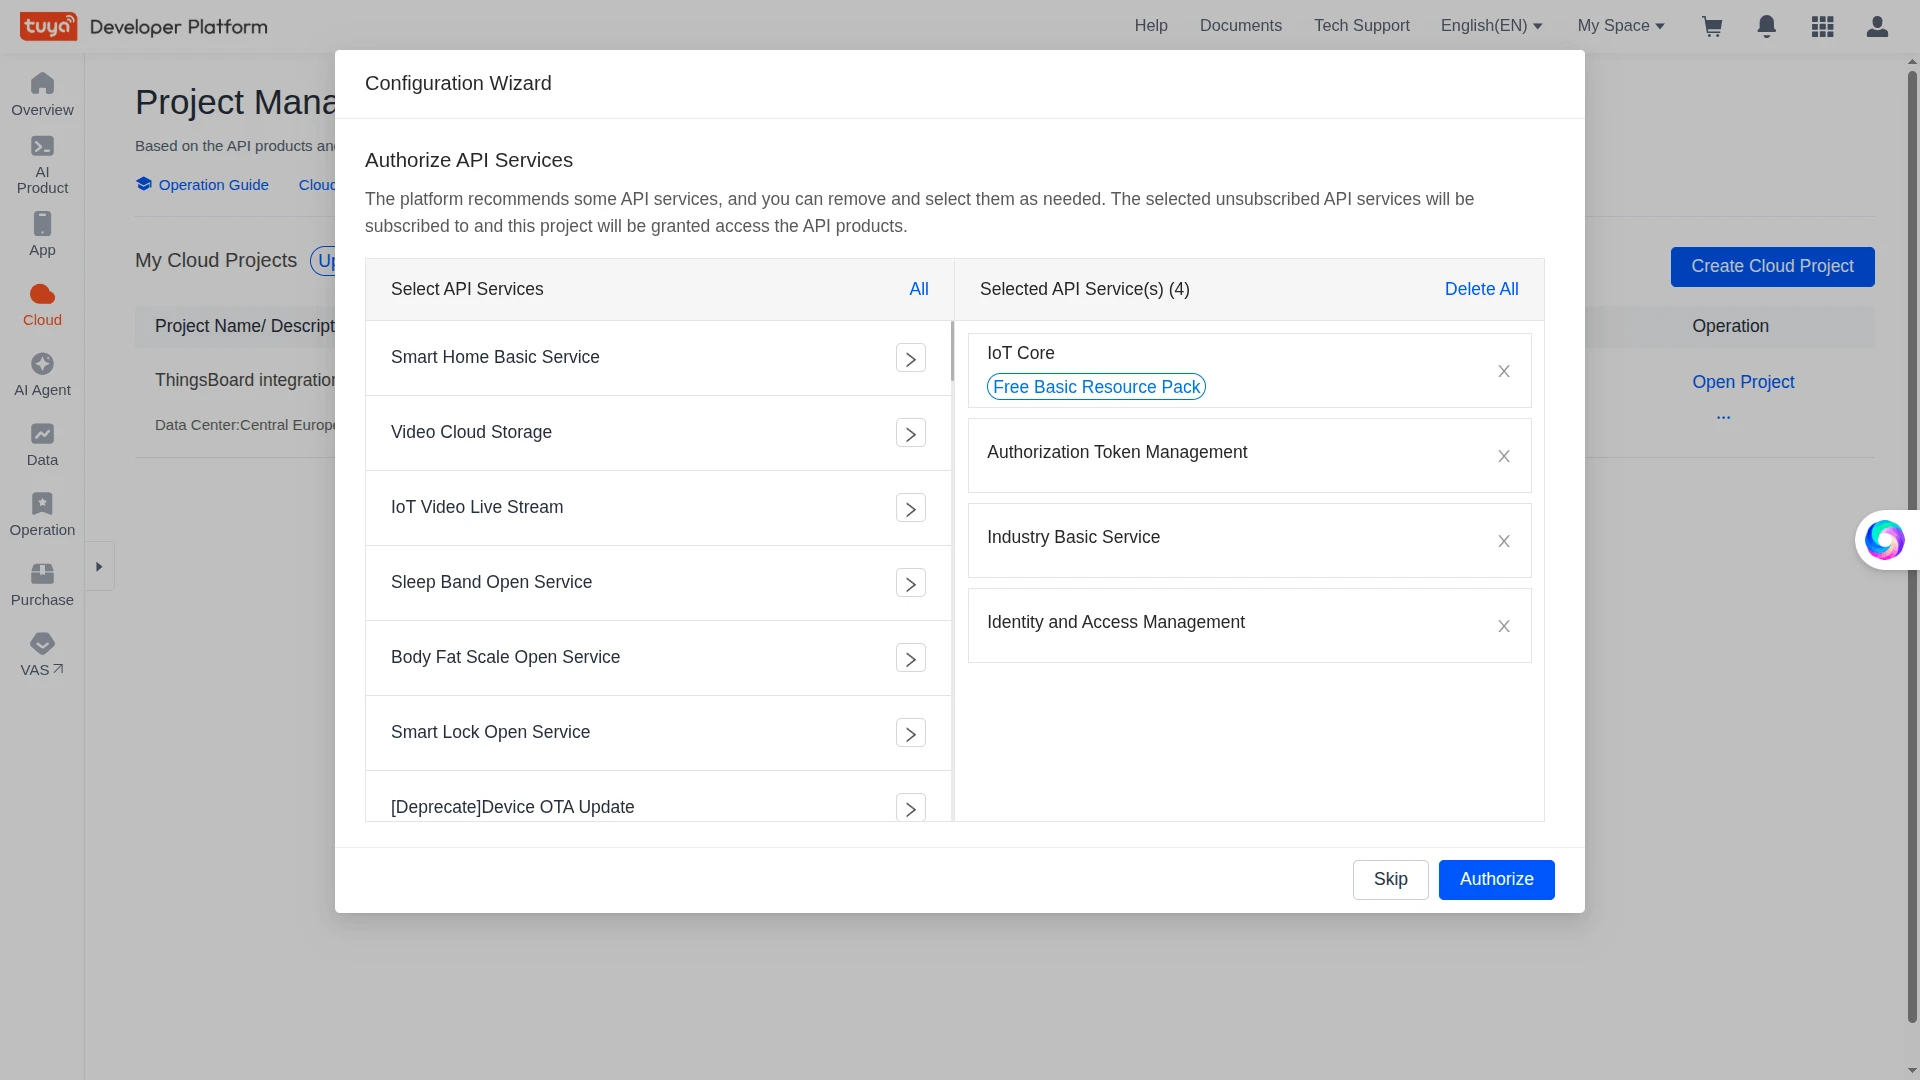
Section titled “Create a cloud project”- In the Tuya IoT Platform, go to Cloud ⇾ Project Management and click Create Cloud Project.
- Fill in the required fields in the pop-up window and click Create.
- In the Authorize API Services window, complete the settings and click Authorize.
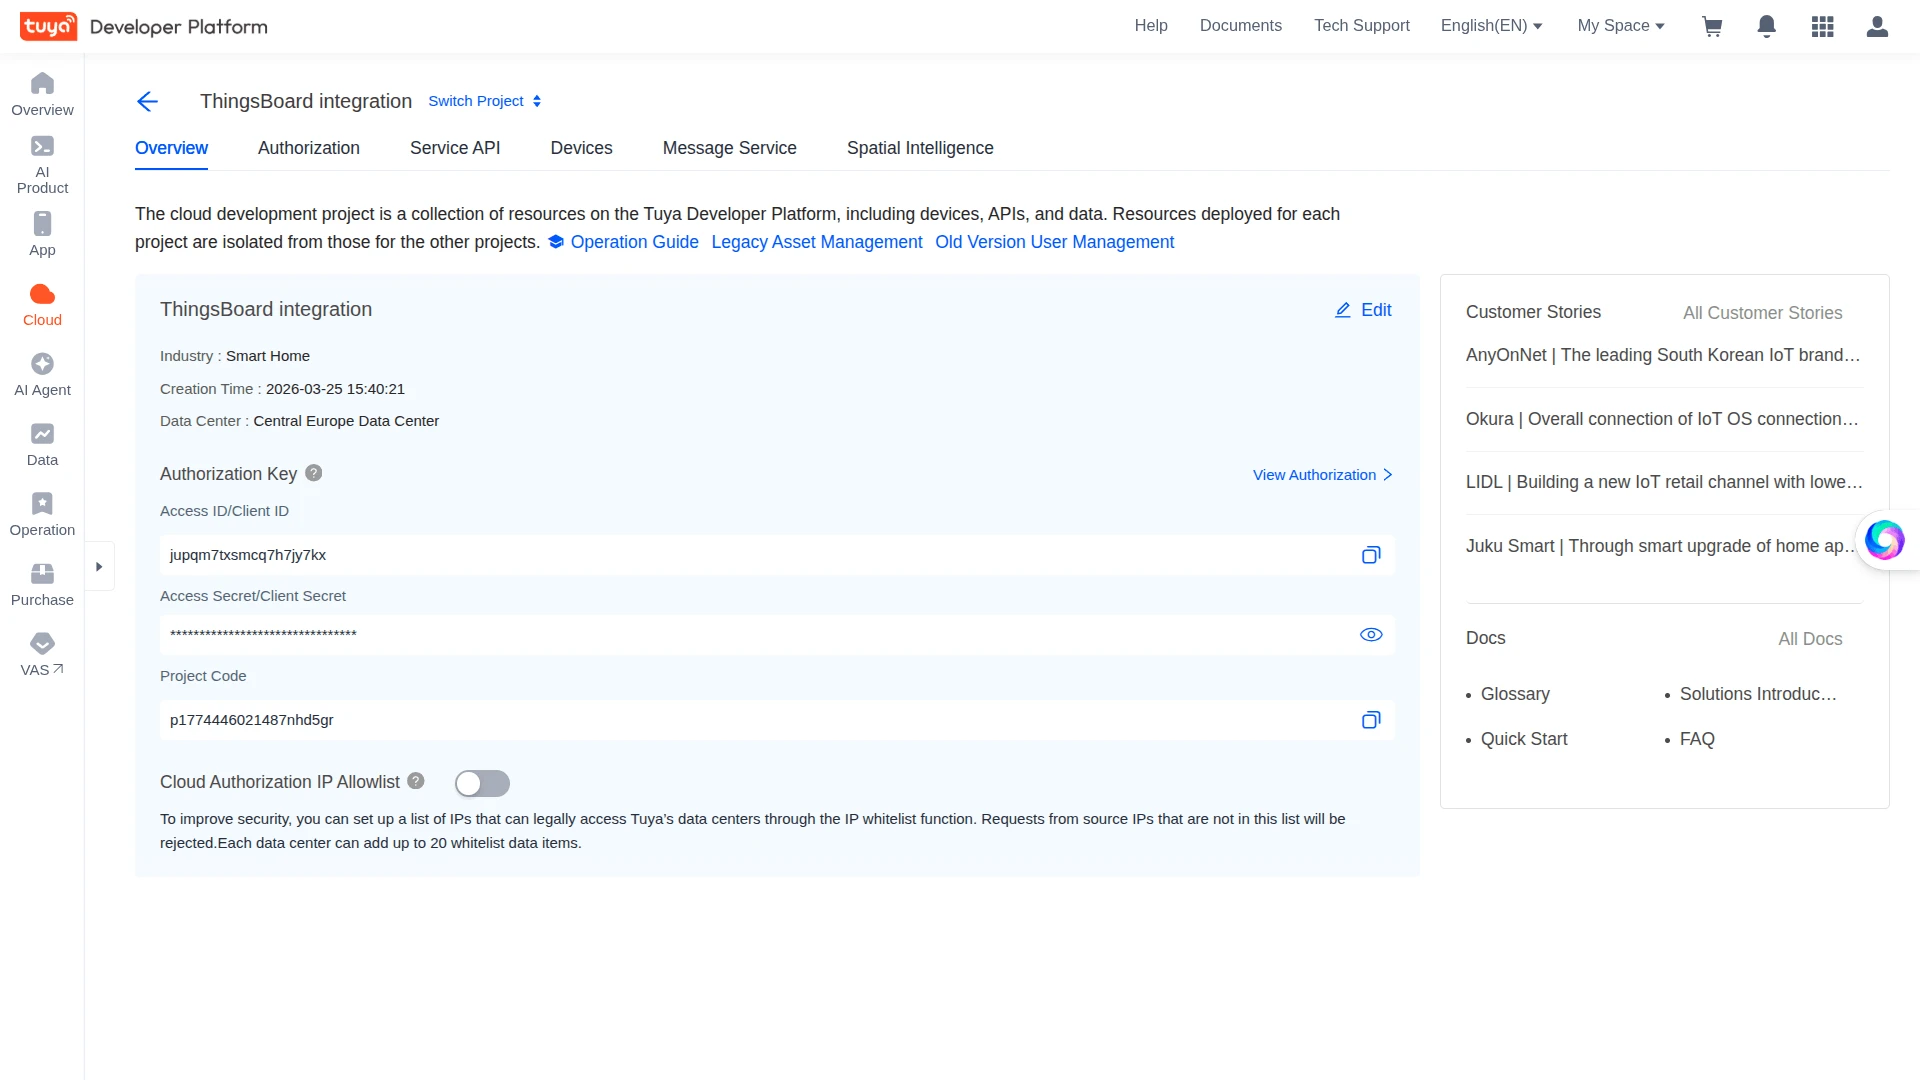
- Note the Access ID/Client ID and Access Secret/Client Secret — you will need them when creating the ThingsBoard integration.
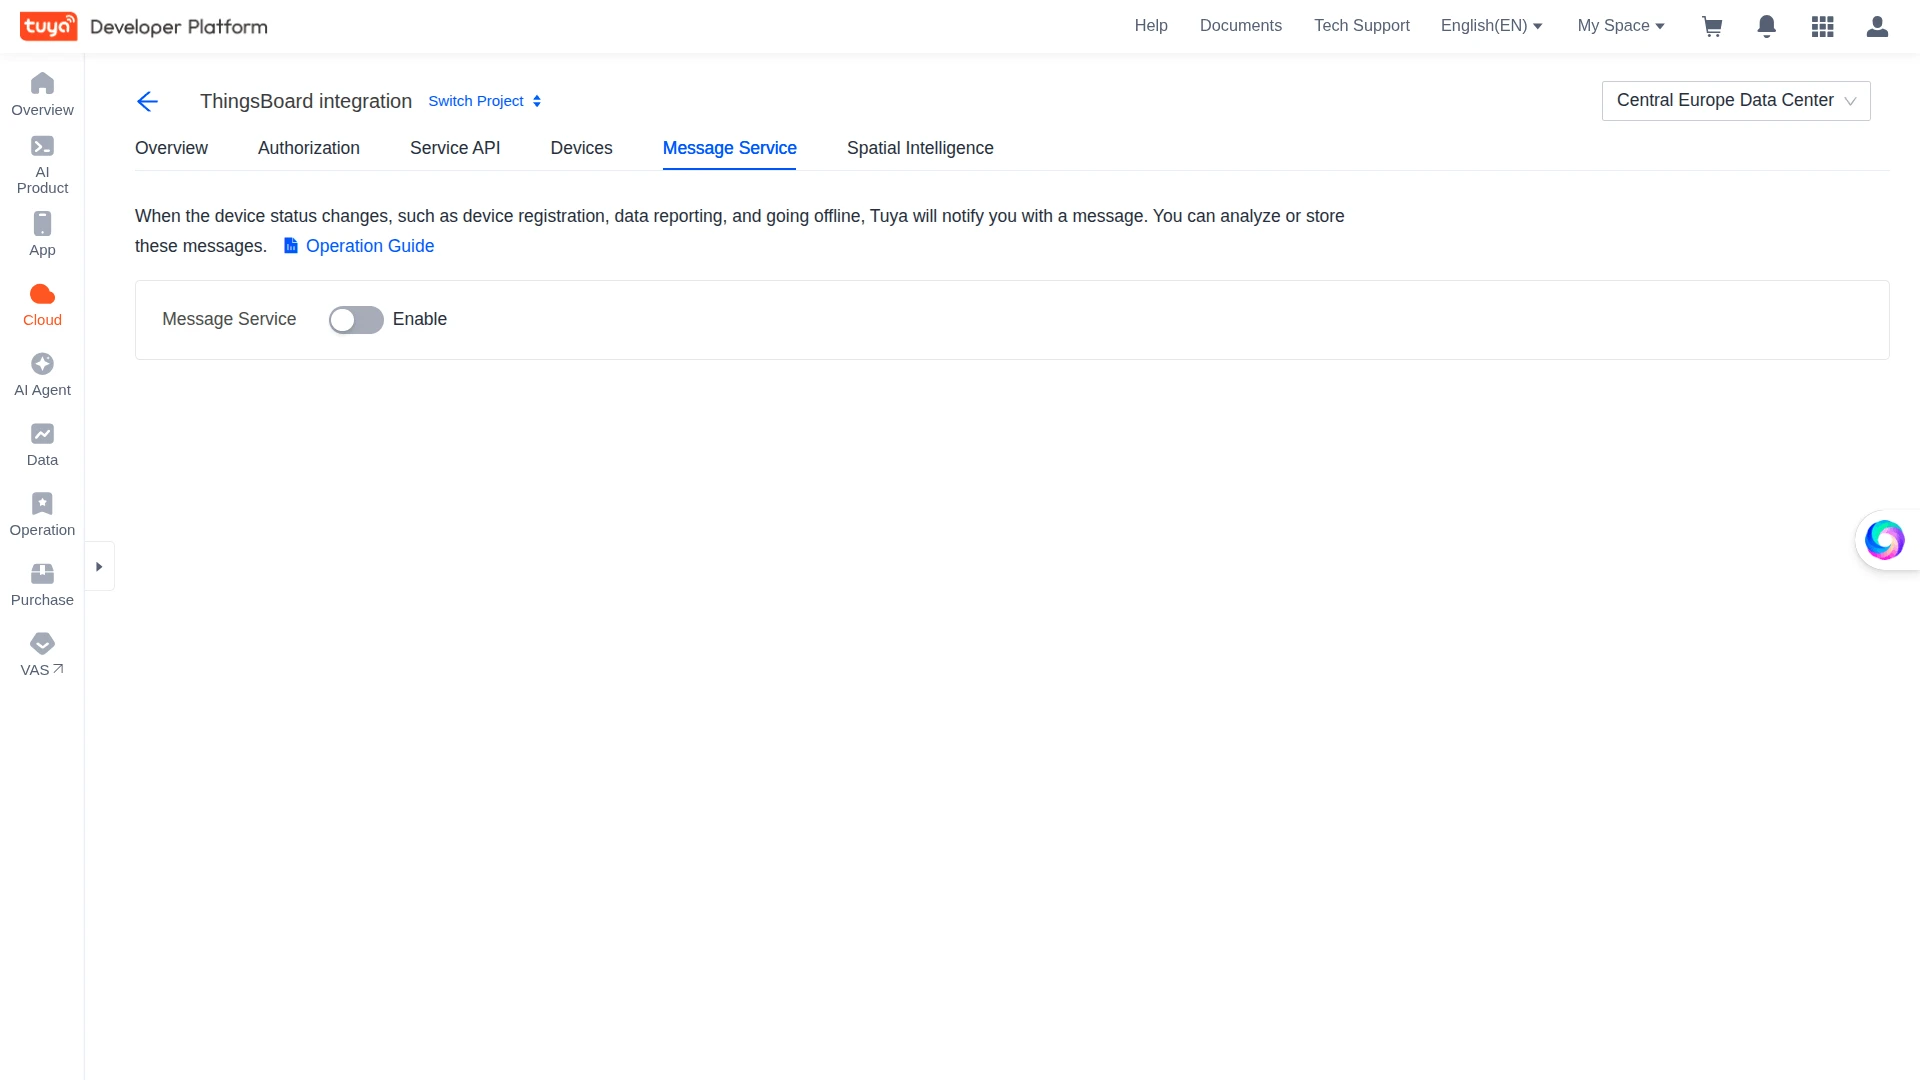
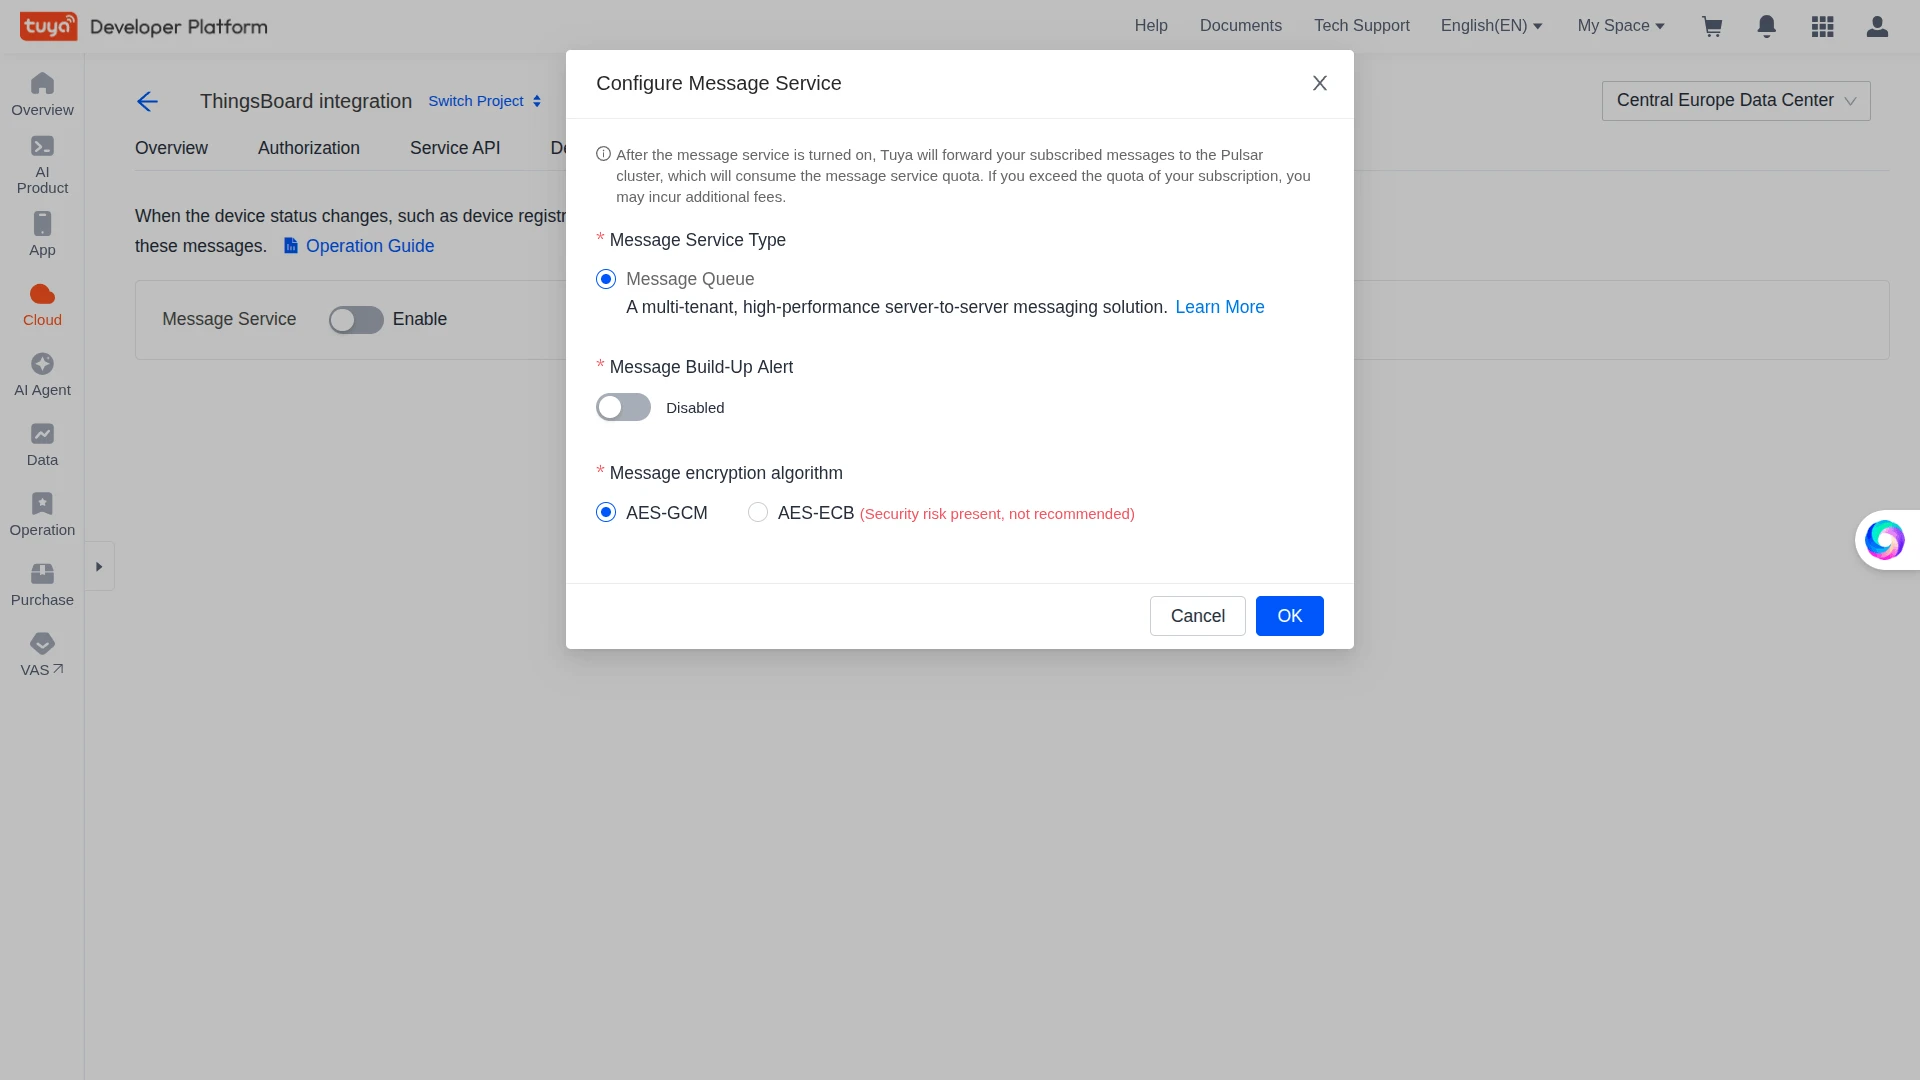
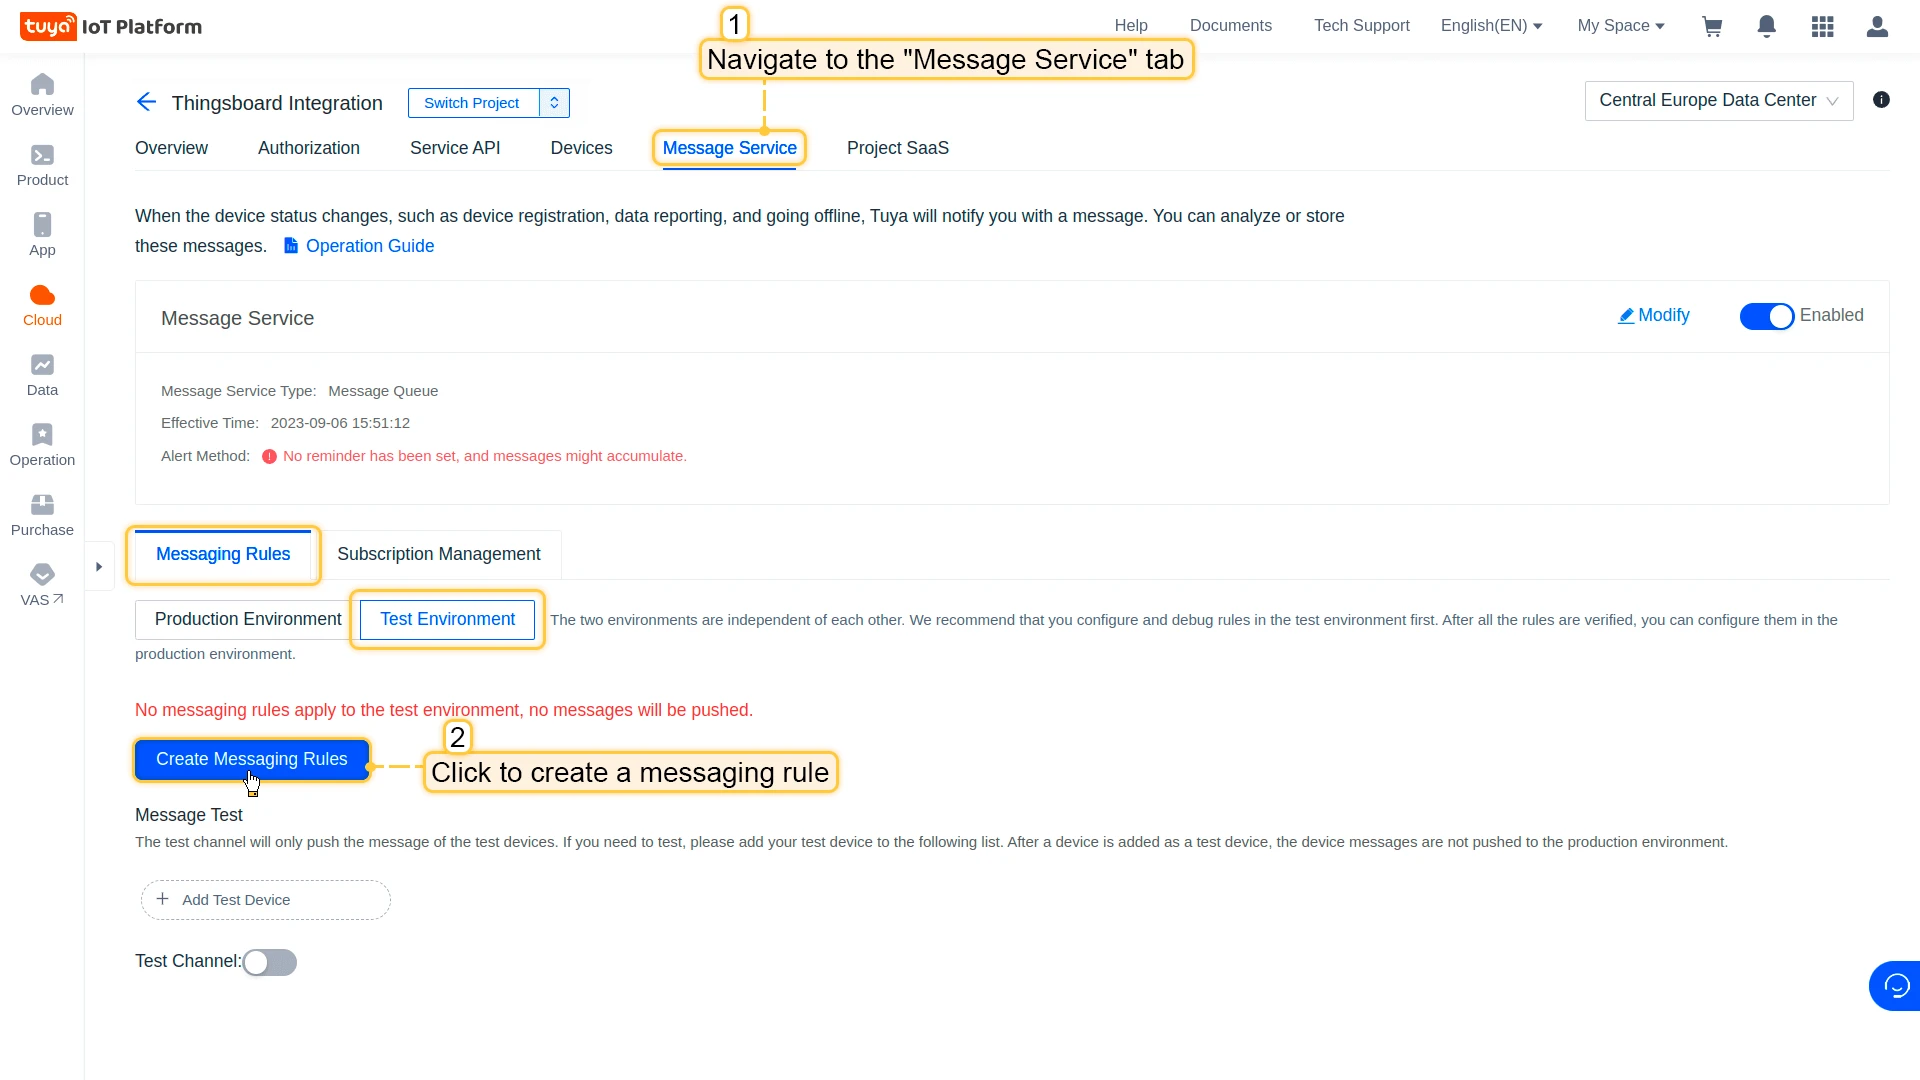
Enable the message service
Section titled “Enable the message service”The Tuya Message Service delivers real-time device status reports to the ThingsBoard integration via AMQP.
- In your cloud project, go to the Message Service tab and toggle Message Service on.
- In the pop-up, configure Message Service Type and Message encryption algorithm, then click Ok.
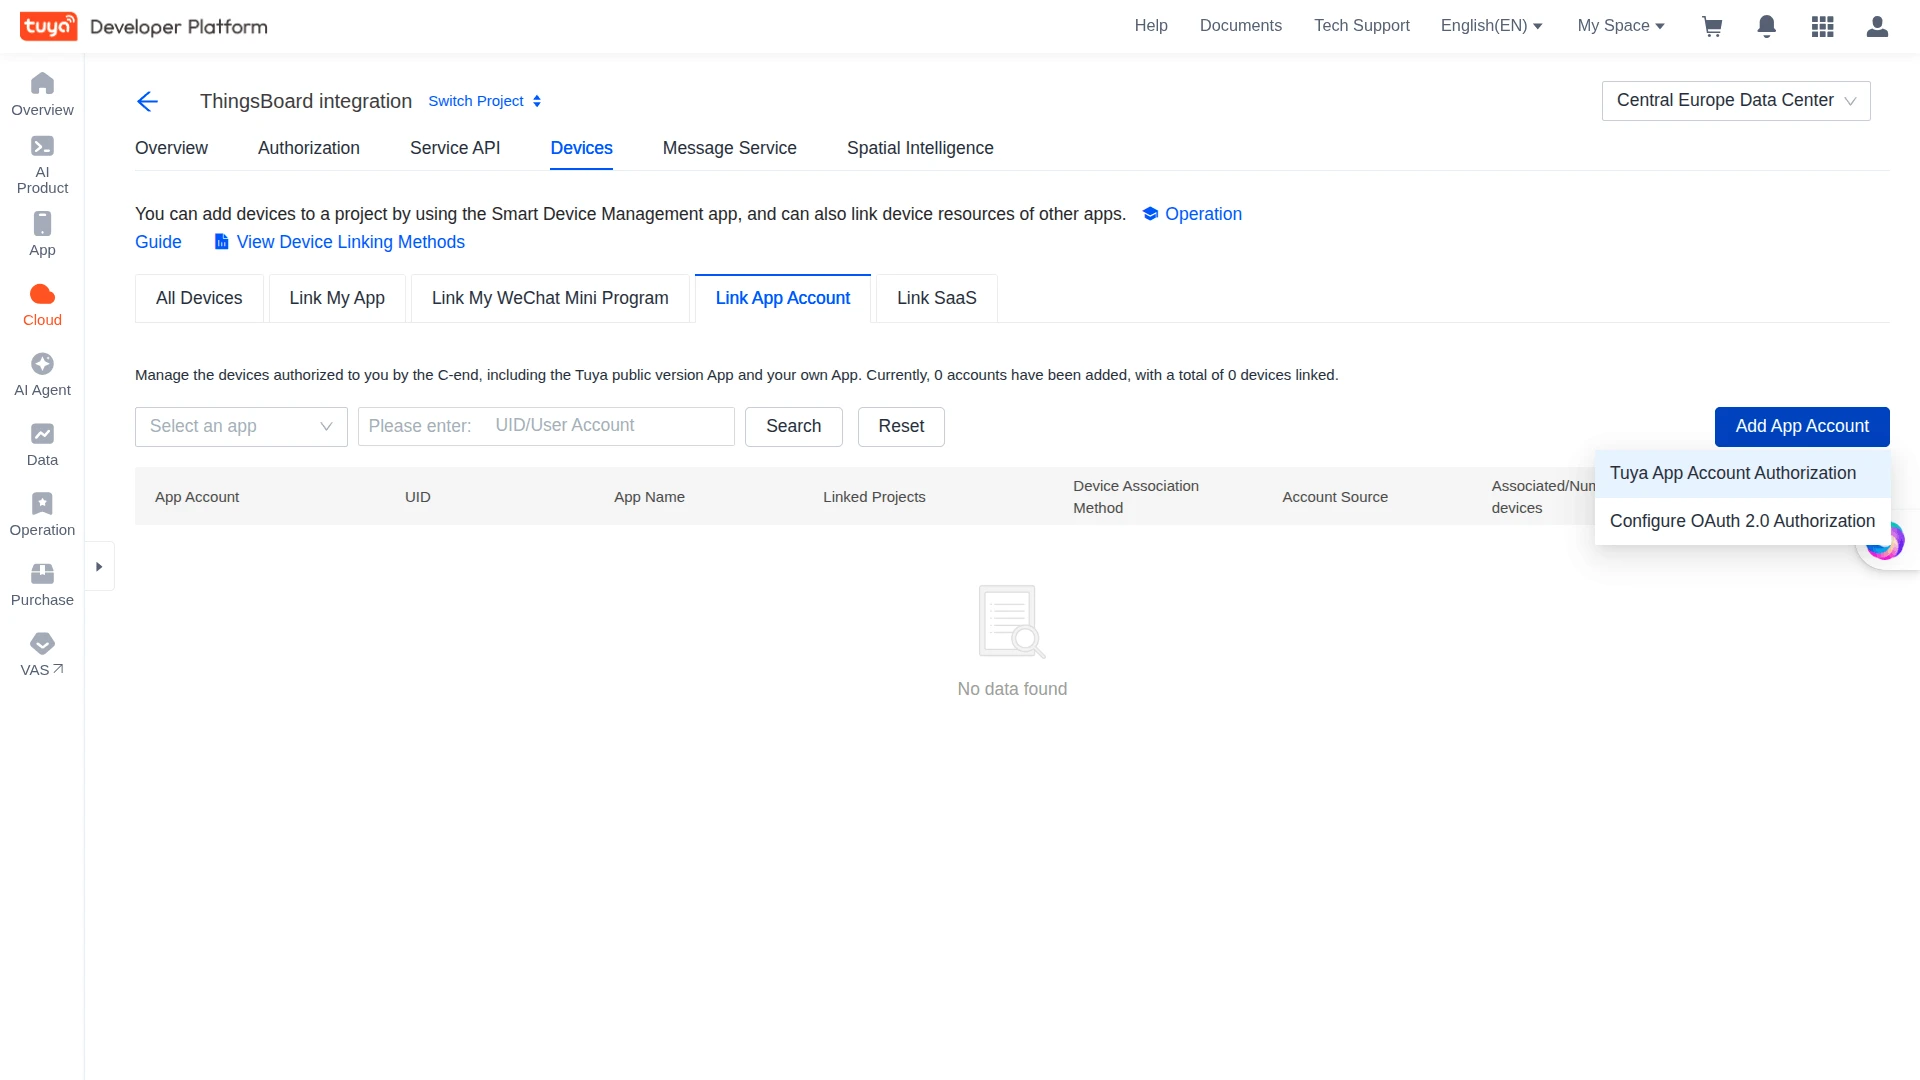
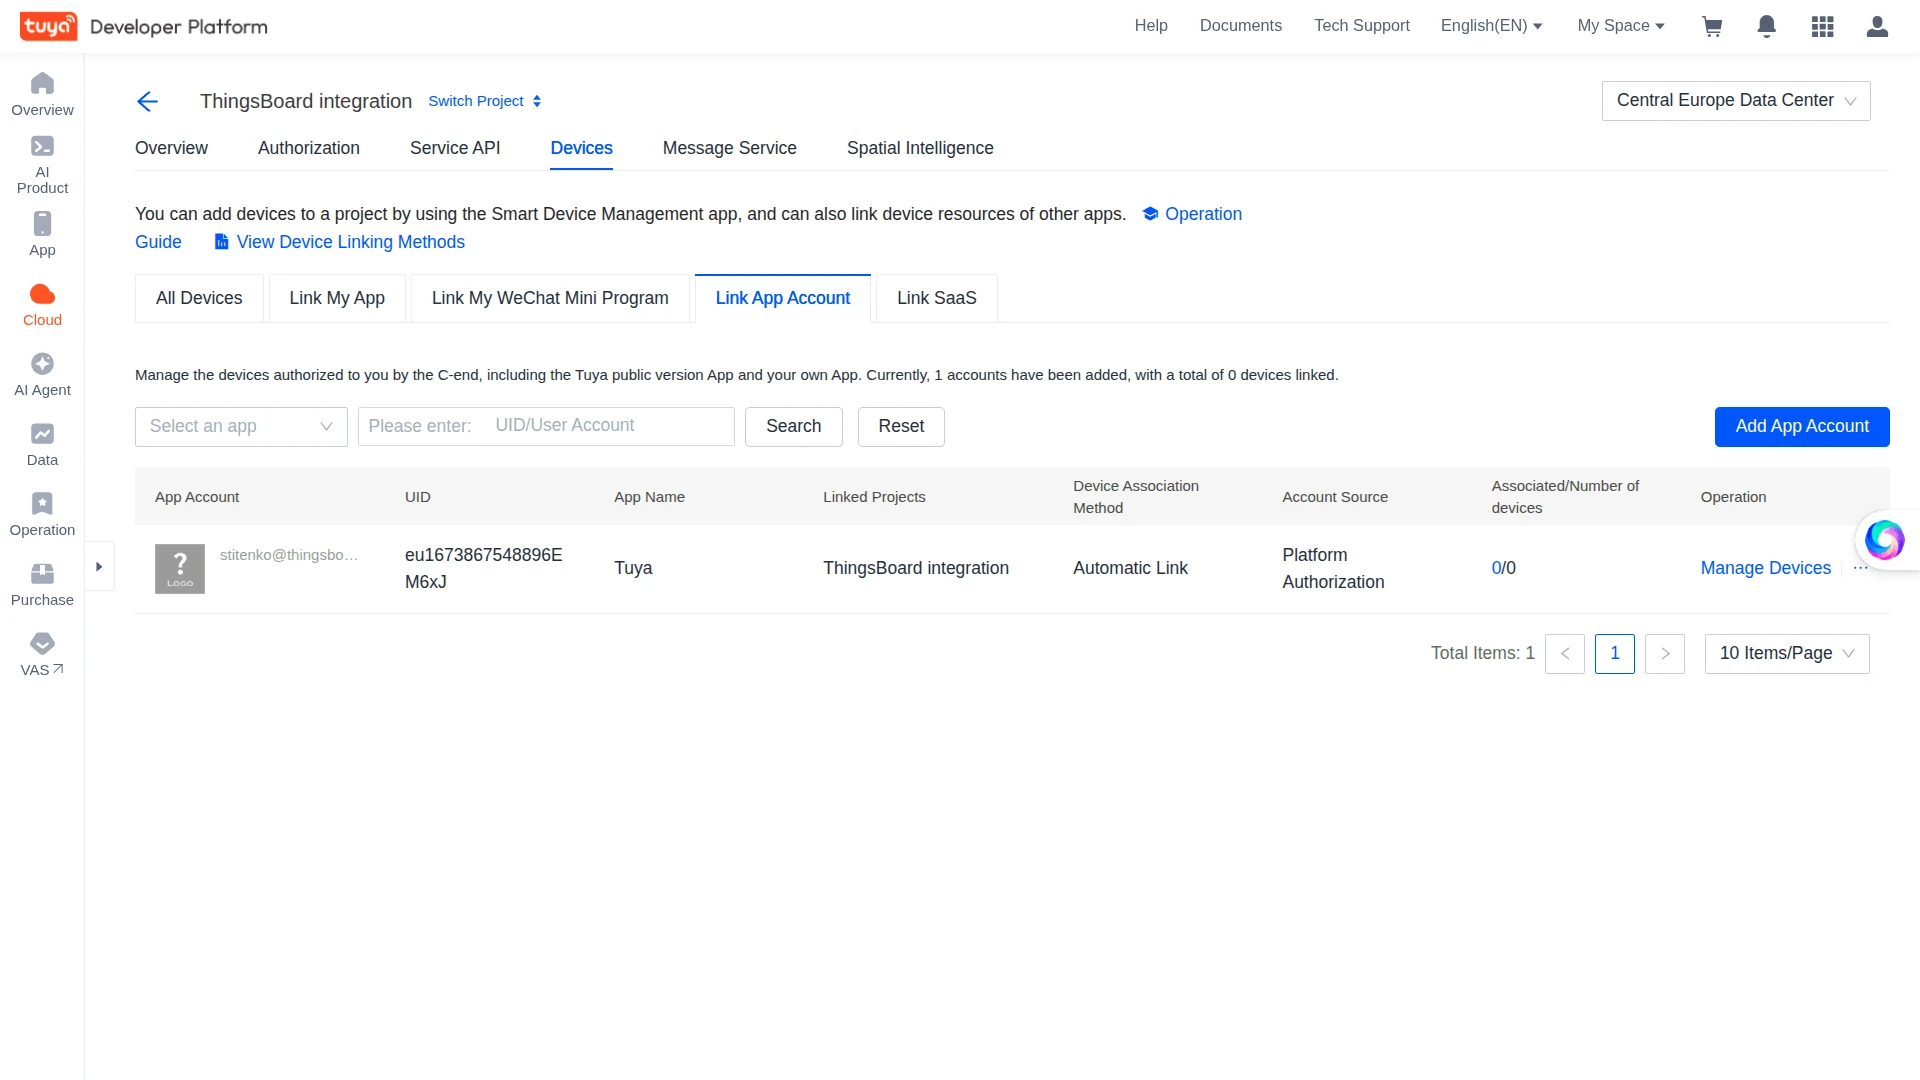
Link your Tuya app account
Section titled “Link your Tuya app account”You need to link your devices to this project using your Smart Life app account.
- Go to Cloud ⇾ Project Management, select your project, then navigate to Devices ⇾ Link App Account.
- Click Add App Account and select Tuya App Account Authorization.
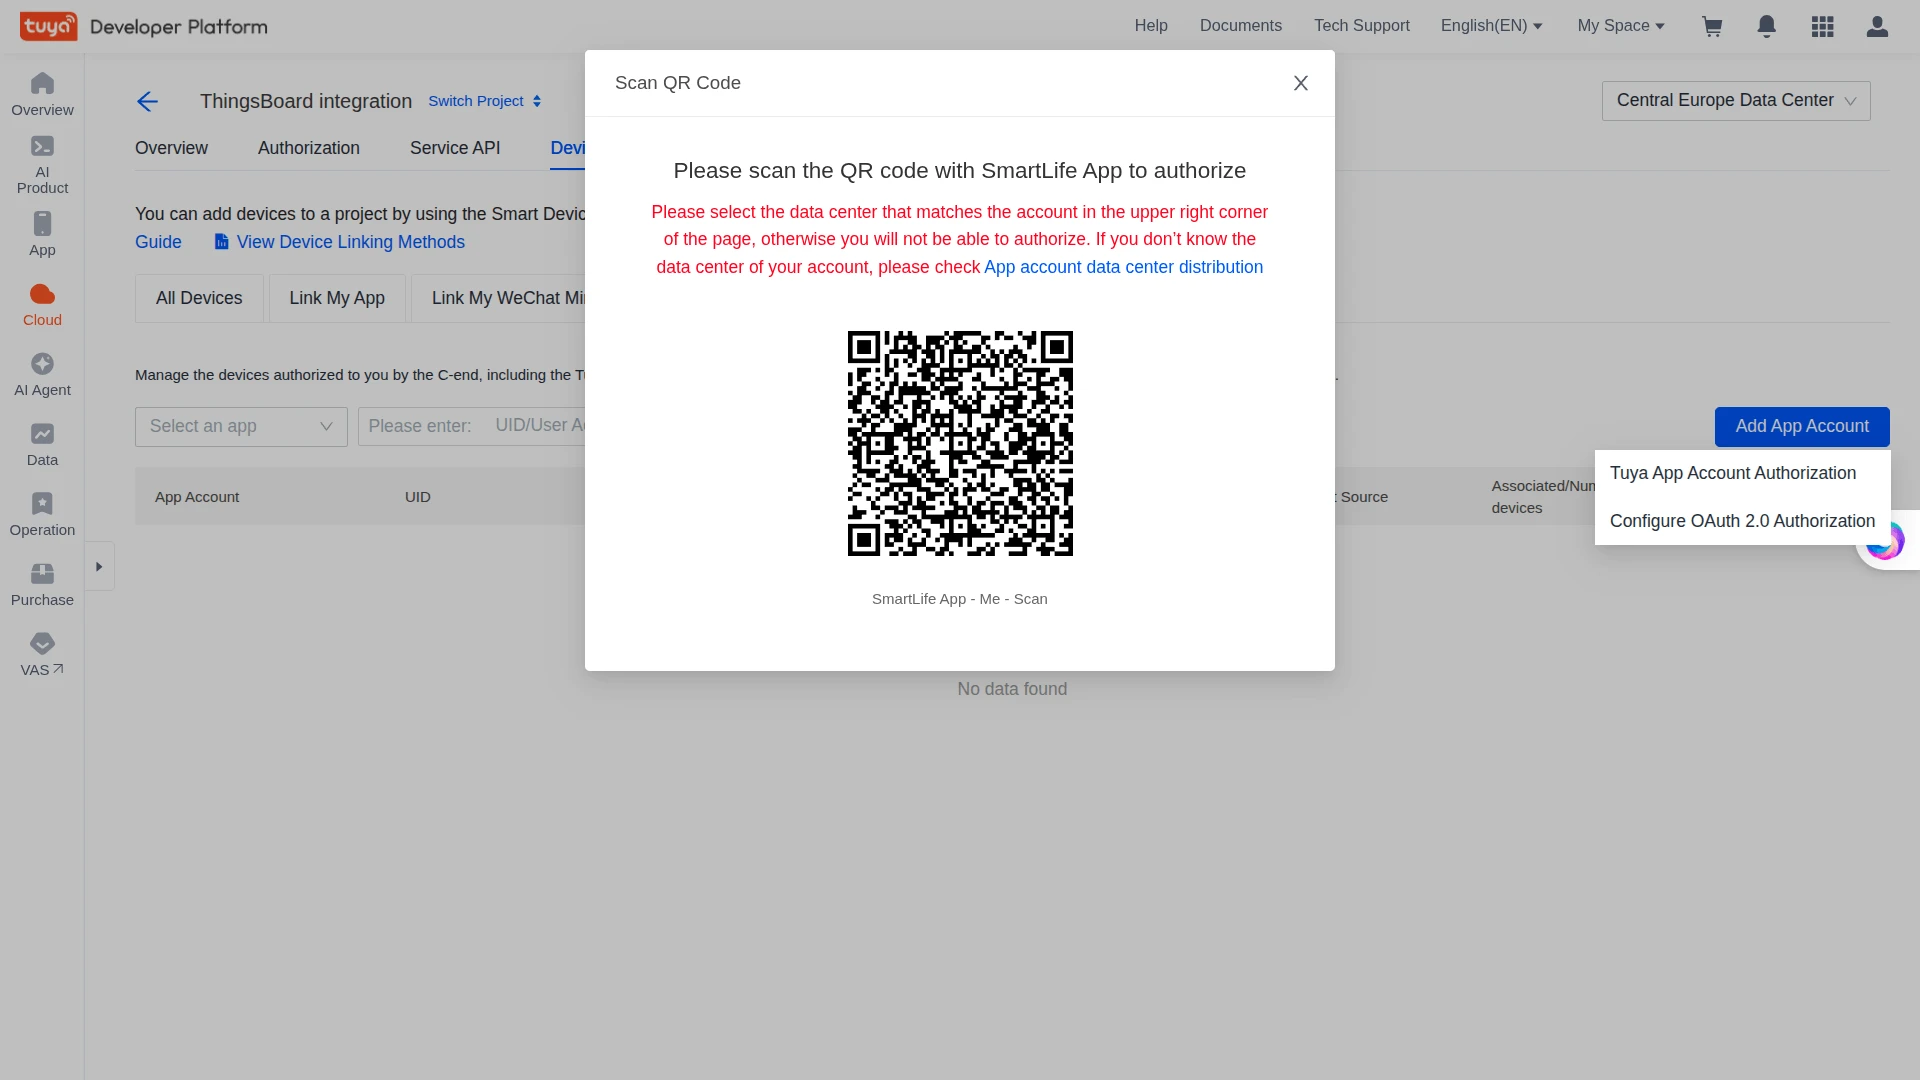
- Scan the QR code with the Smart Life app to authorize.
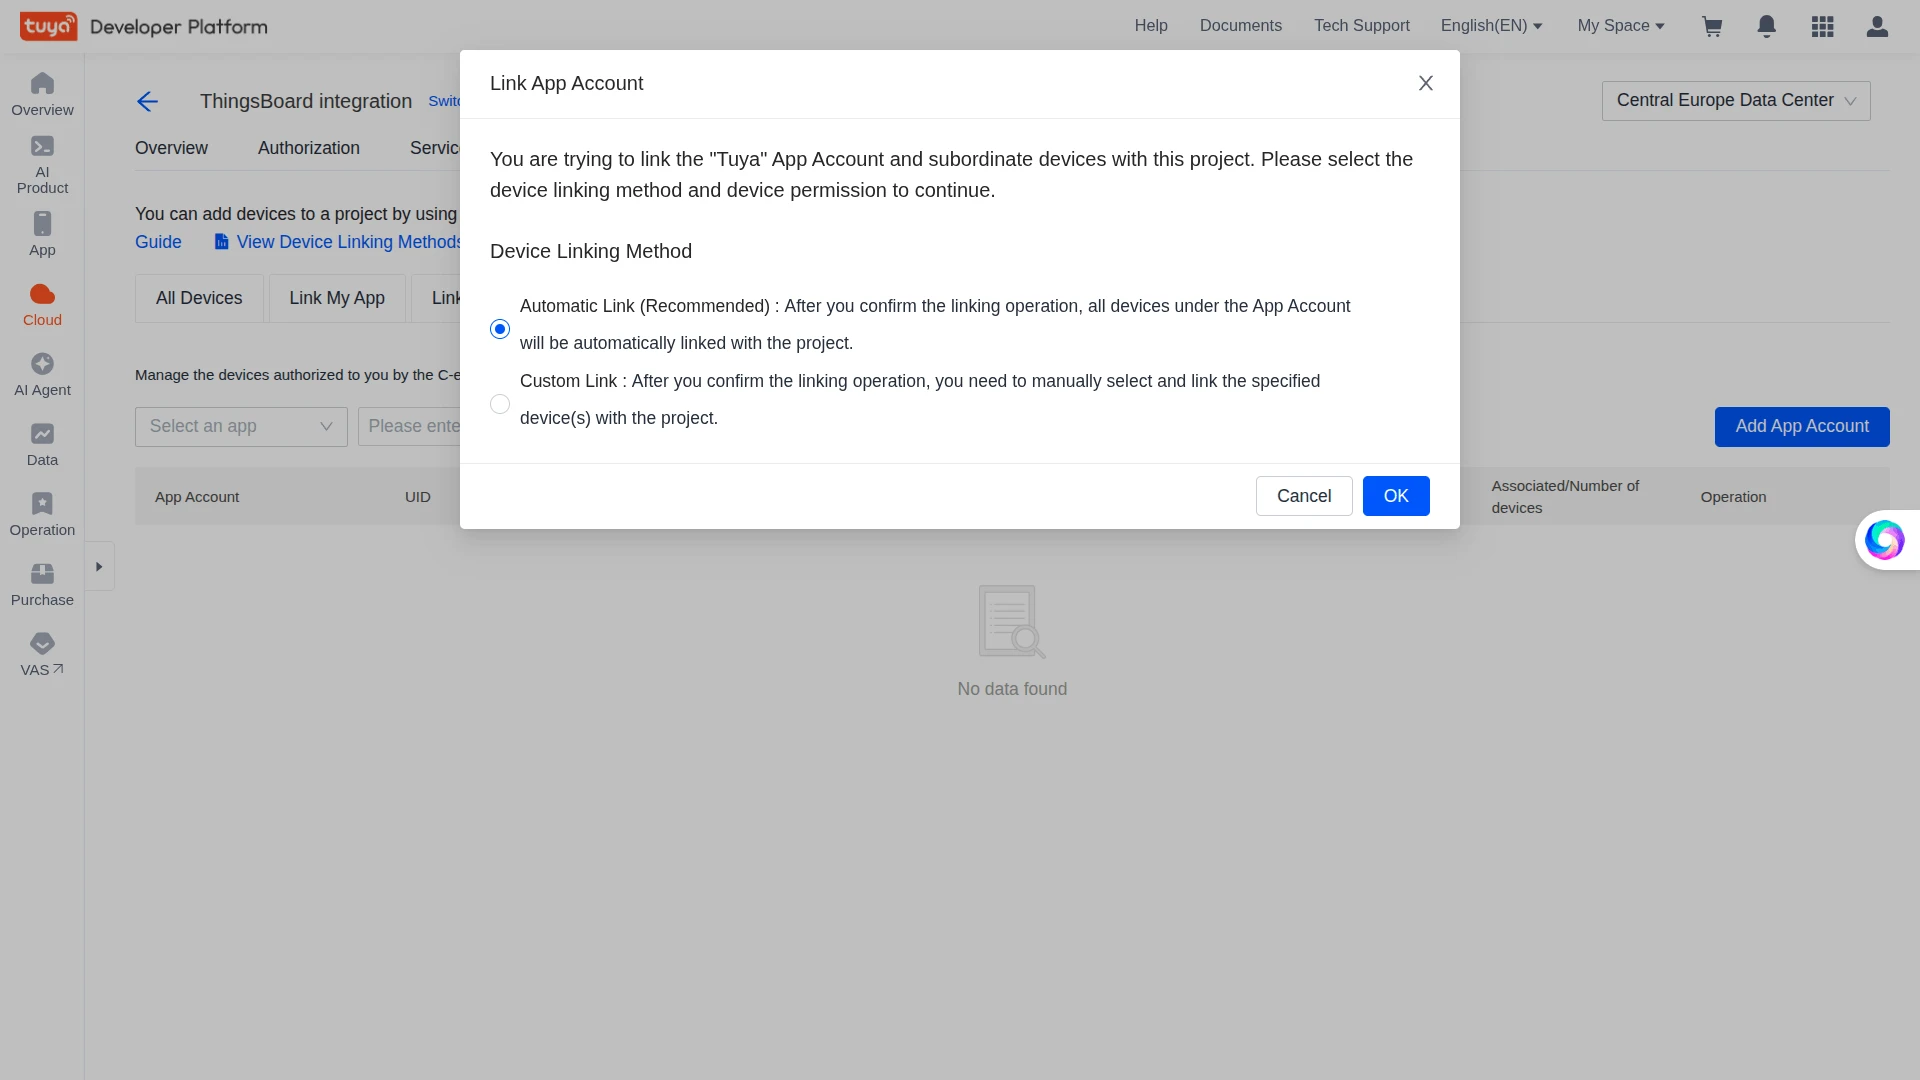
- In the pop-up, select Automatic Link and click Ok.
Your devices now appear under the All Devices tab of the project.
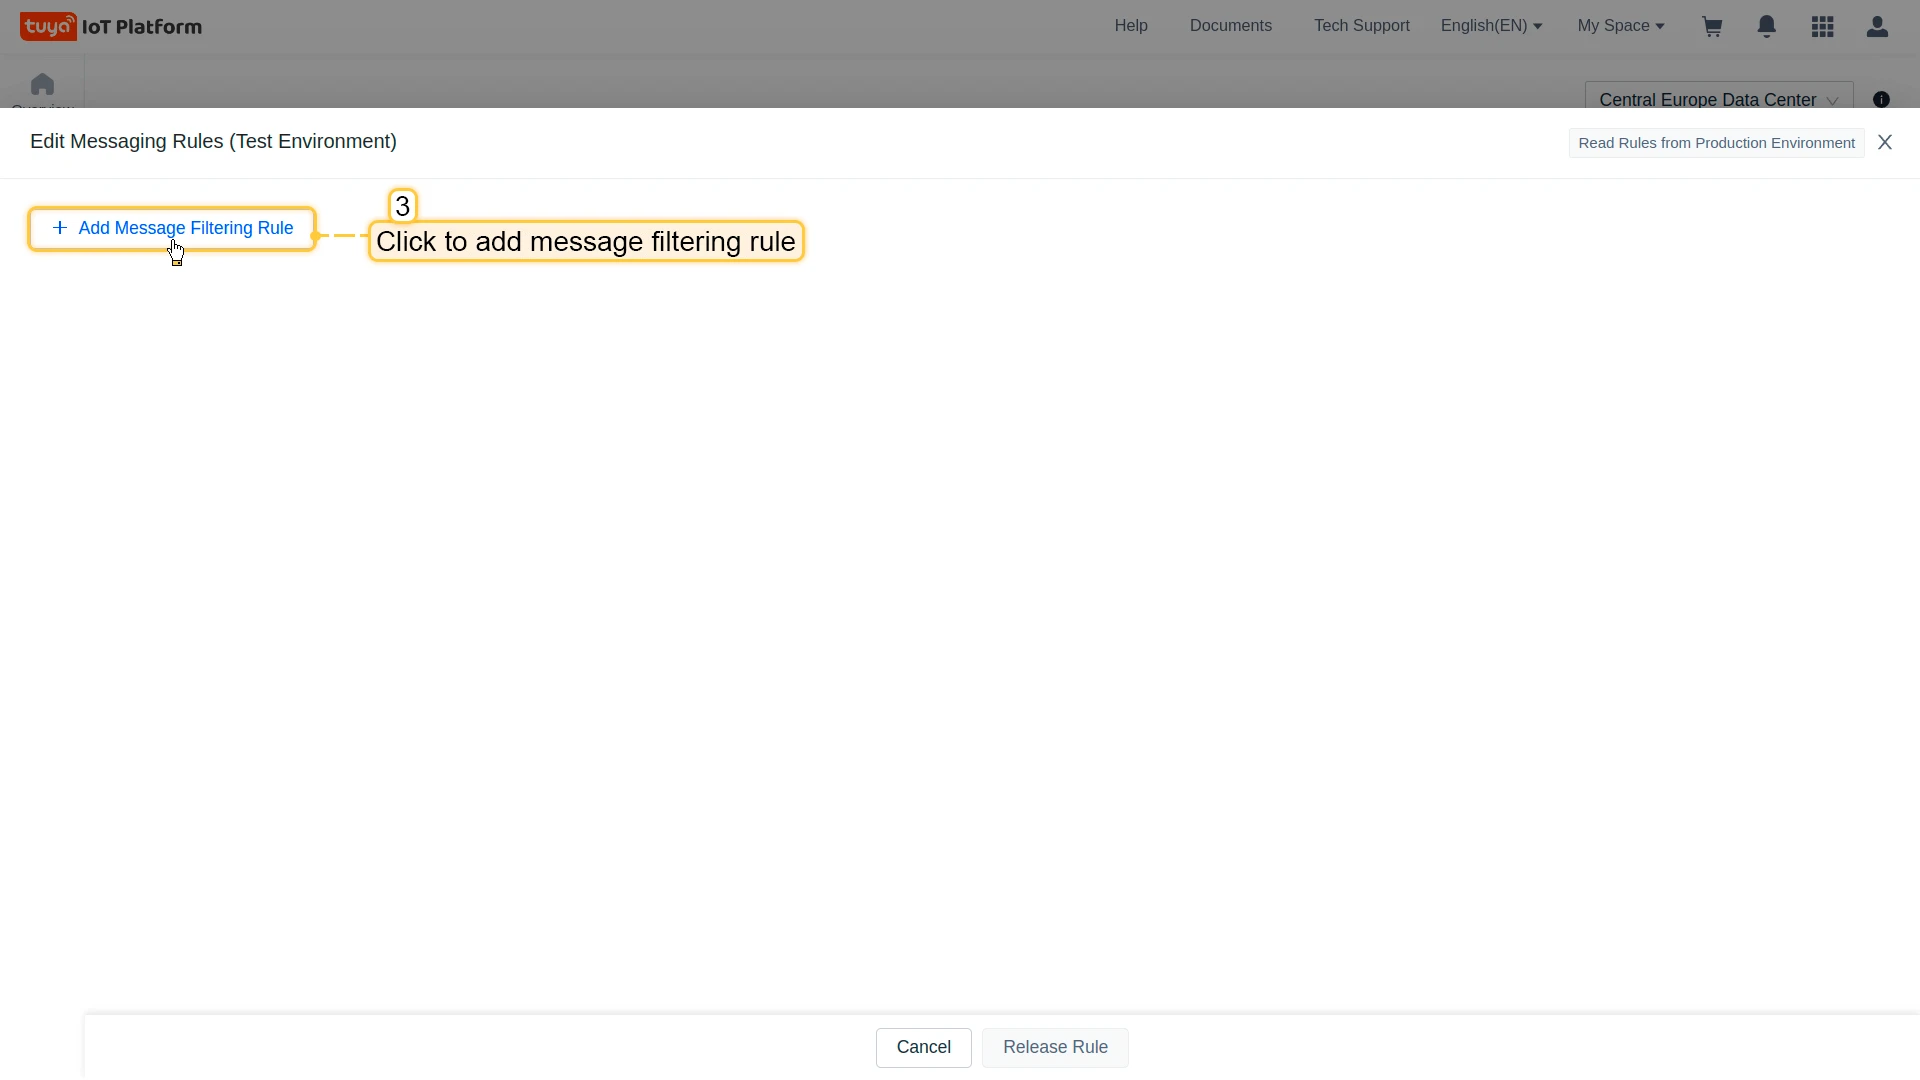
Create a messaging rule
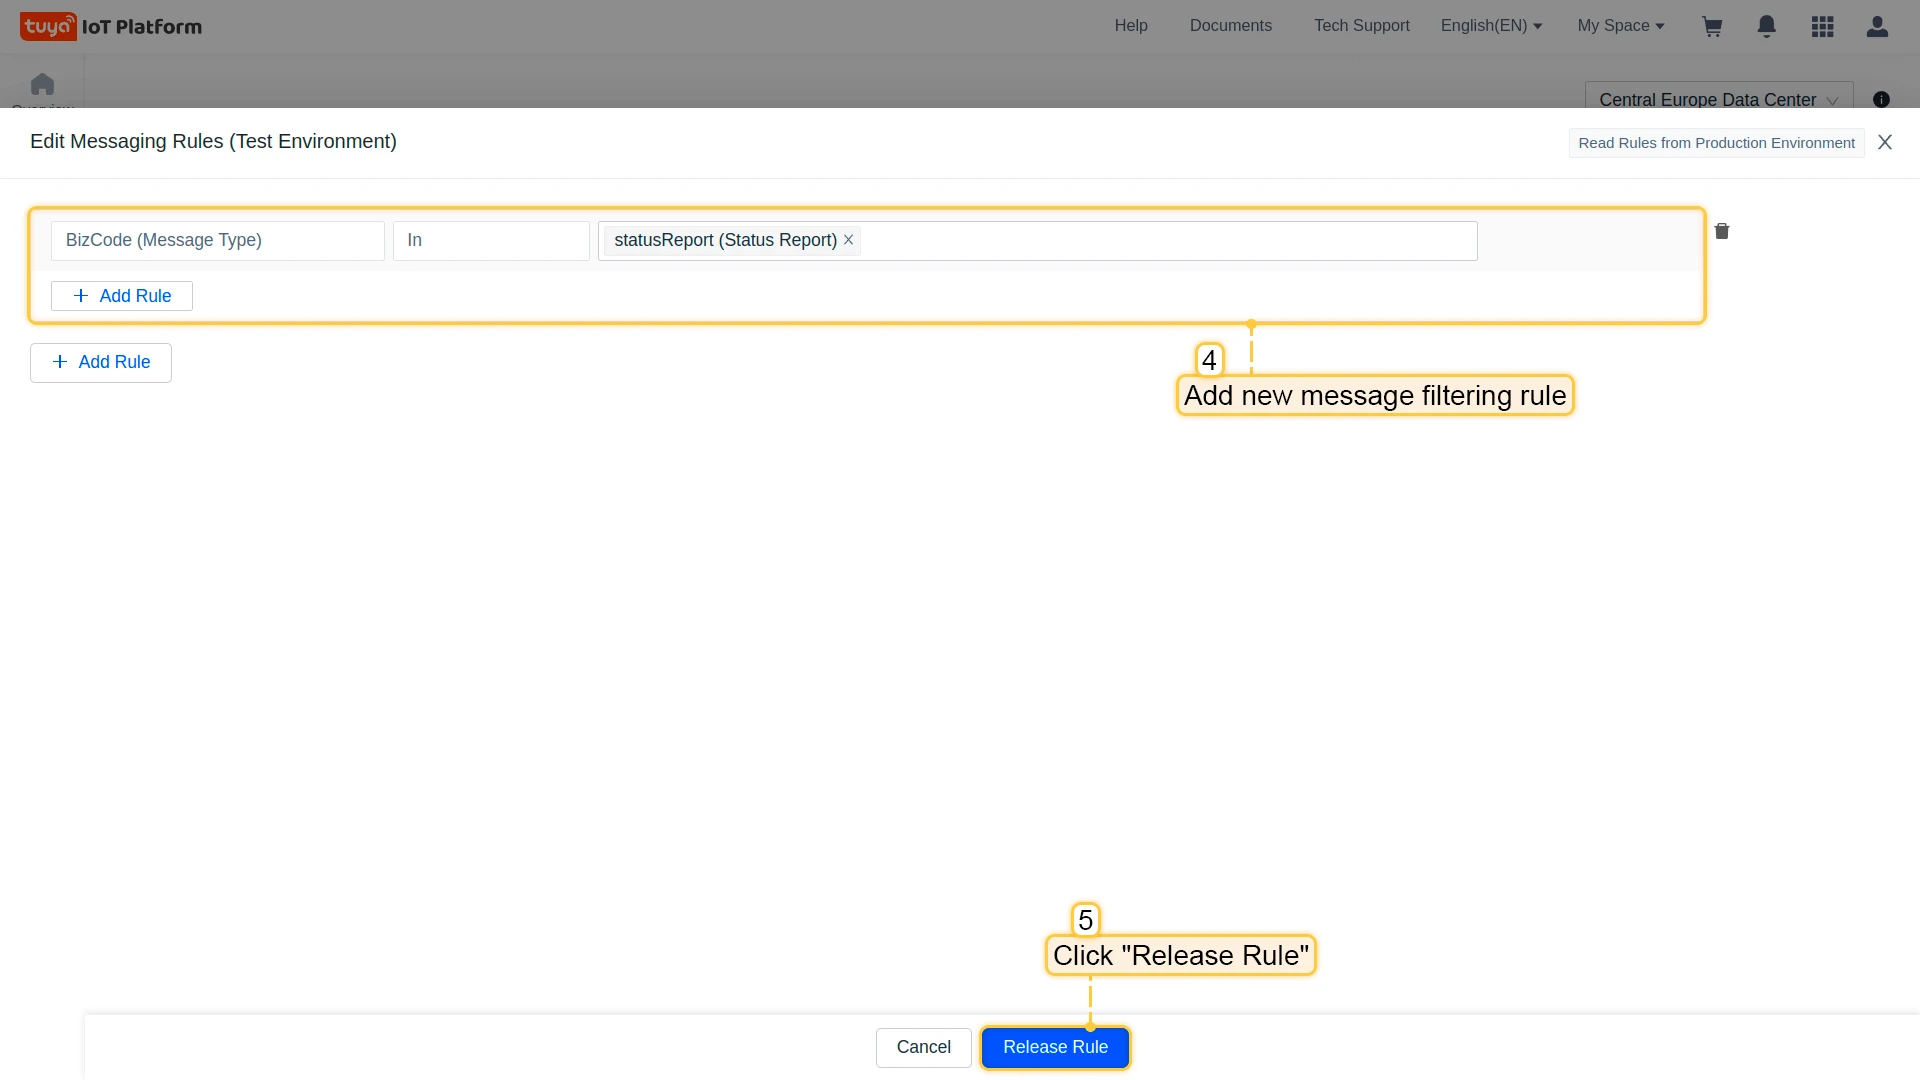
Section titled “Create a messaging rule”Enable a messaging rule so the project receives device status uplinks via statusReport.
- On the Message Service tab, click Create Messaging Rules.
- Click Add Message Filtering Rule.
- Select statusReport from the BizCode list and click Release Rule.
- Enable the rule.

ThingsBoard integration setup
Section titled “ThingsBoard integration setup”Create an uplink converter
Section titled “Create an uplink converter”The uplink converter decodes the Tuya statusReport payload. Tuya uses a generic uplink converter. It reads code/value pairs from the status array, applies unit scaling (cur_voltage and cur_power ÷ 10; cur_current ÷ 100), and maps the result to ThingsBoard telemetry. The device name comes from the devId field (or bizData.devId for some message types).
Download the uplink converter file:
The decoder function used in this tutorial:
/** Decoder **/
// decode payload to JSONvar data = decodeToJson(payload);
var deviceName = data.?bizData.?devId != null ? data.?bizData.?devId : data.?devId;var deviceType = 'Tuya device';
var telemetry = [];if (data.status != null) {    for (var i = 0; i < data.status.length; i++) {        var res = {};        var code = data.status[i].code;        var value = data.status[i].value;        if (code == "cur_voltage" || code == "cur_power") {            value = data.status[i].value / 10;        } else if (code == "cur_current") {            value = data.status[i].value / 100;        }        res[code] = value;        telemetry.push(res);    }} else {    telemetry = data;}
var result = {    deviceName: deviceName,    deviceType: deviceType,    attributes: {},    telemetry: telemetry};
/** Helper functions 'decodeToString' and 'decodeToJson' are already built-in **/
return result;
/** Decoder **/
// decode payload to JSONvar data = decodeToJson(payload);
var deviceName = data.devId;var deviceType = 'Tuya device';
var telemetry = [];if (data.status != null) { for (var i = 0; i < data.status.length; i++) { var res = {}; var code = data.status[i].code; var value = data.status[i].value; if (code == "cur_voltage" || code == "cur_power") { value = data.status[i].value / 10; } else if (code == "cur_current") { value = data.status[i].value / 100; } res[code] = value; telemetry.push(res); }} else { telemetry = data;}
var result = { deviceName: deviceName, deviceType: deviceType, attributes: {}, telemetry: telemetry};
/** Helper functions **/
function decodeToString(payload) { return String.fromCharCode.apply(String, payload);}
function decodeToJson(payload) { var str = decodeToString(payload); var data = JSON.parse(str); return data;}
return result;- Go to Integrations center ⇾ Data converters.
- Click + Add data converter ⇾ Import converter.
- Drag and drop the downloaded JSON file into the Import converter window and click Import.
Create a downlink converter
Section titled “Create a downlink converter”The downlink converter encodes ThingsBoard RPC messages into the Tuya Device Control API format. For the full encoder reference, see Downlink data converter. It maps msg.method to the Tuya command code and msg.params to the command value, with automatic string-to-boolean conversion for on/off commands. The target device is identified via metadata.deviceName.
Download the downlink converter file:
The encoder function used in this tutorial:
/** Encoder **/
var command = {};command["code"] = msg.method;if (msg.params == "false" || msg.params == "true") {    command["value"] = Boolean.valueOf(msg.params);} else {    command["value"] = msg.params;}
var result = {    contentType: "JSON",    data: JSON.stringify(command),    metadata: {        deviceId: metadata.deviceName    }};
return result;
/** Encoder **/
const command = { code: msg.method, value: msg.params === "false" || msg.params === "true" ? msg.params === "true" : msg.params};const result = { contentType: "JSON", data: JSON.stringify(command), metadata: { deviceId: metadata.deviceName }};return result;- Go to Integrations center ⇾ Data converters.
- Click + Add data converter ⇾ Import converter.
- Drag and drop the downloaded JSON file into the Import converter window and click Import.
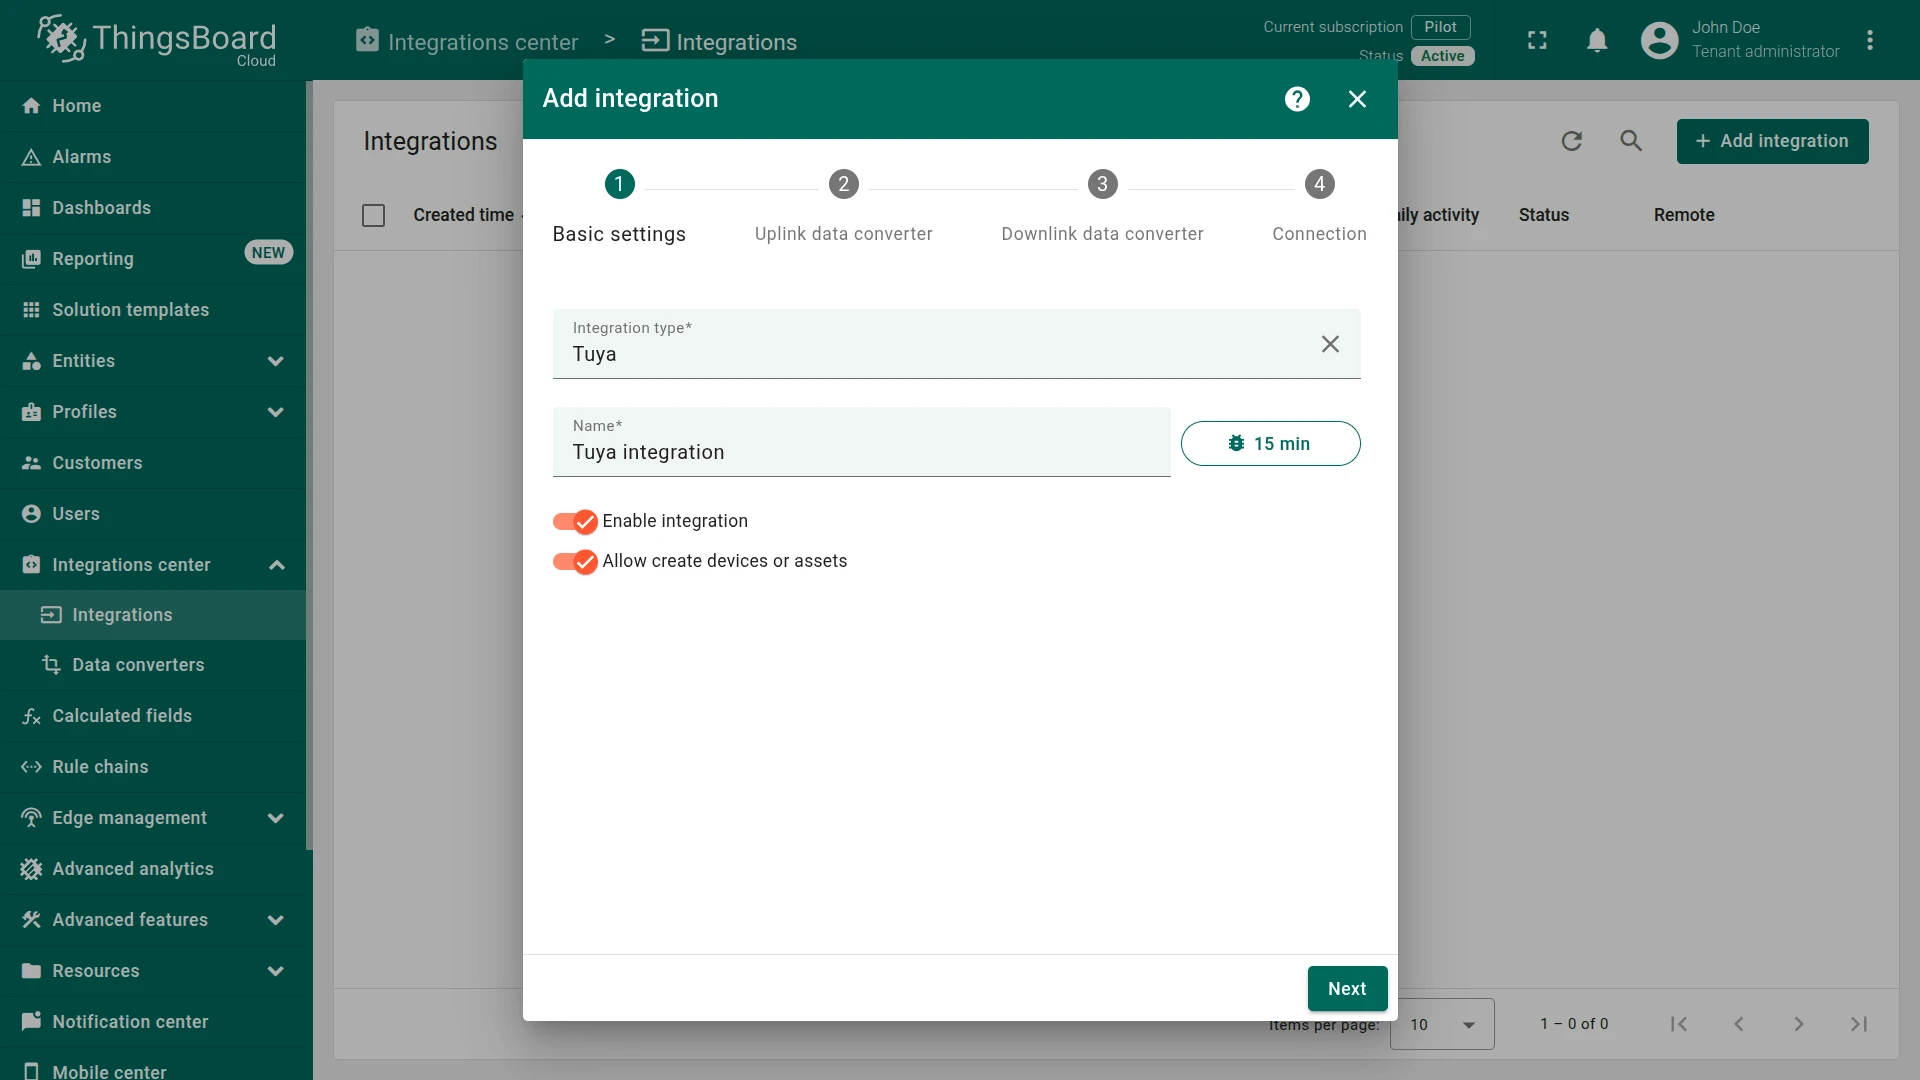
Create the Tuya integration
Section titled “Create the Tuya integration”- Go to Integrations center ⇾ Integrations and click + Add integration.
-
Basic settings:
- Set Integration type to Tuya.
- Enable integration and Allow create devices or assets are on by default.
- Click Next.
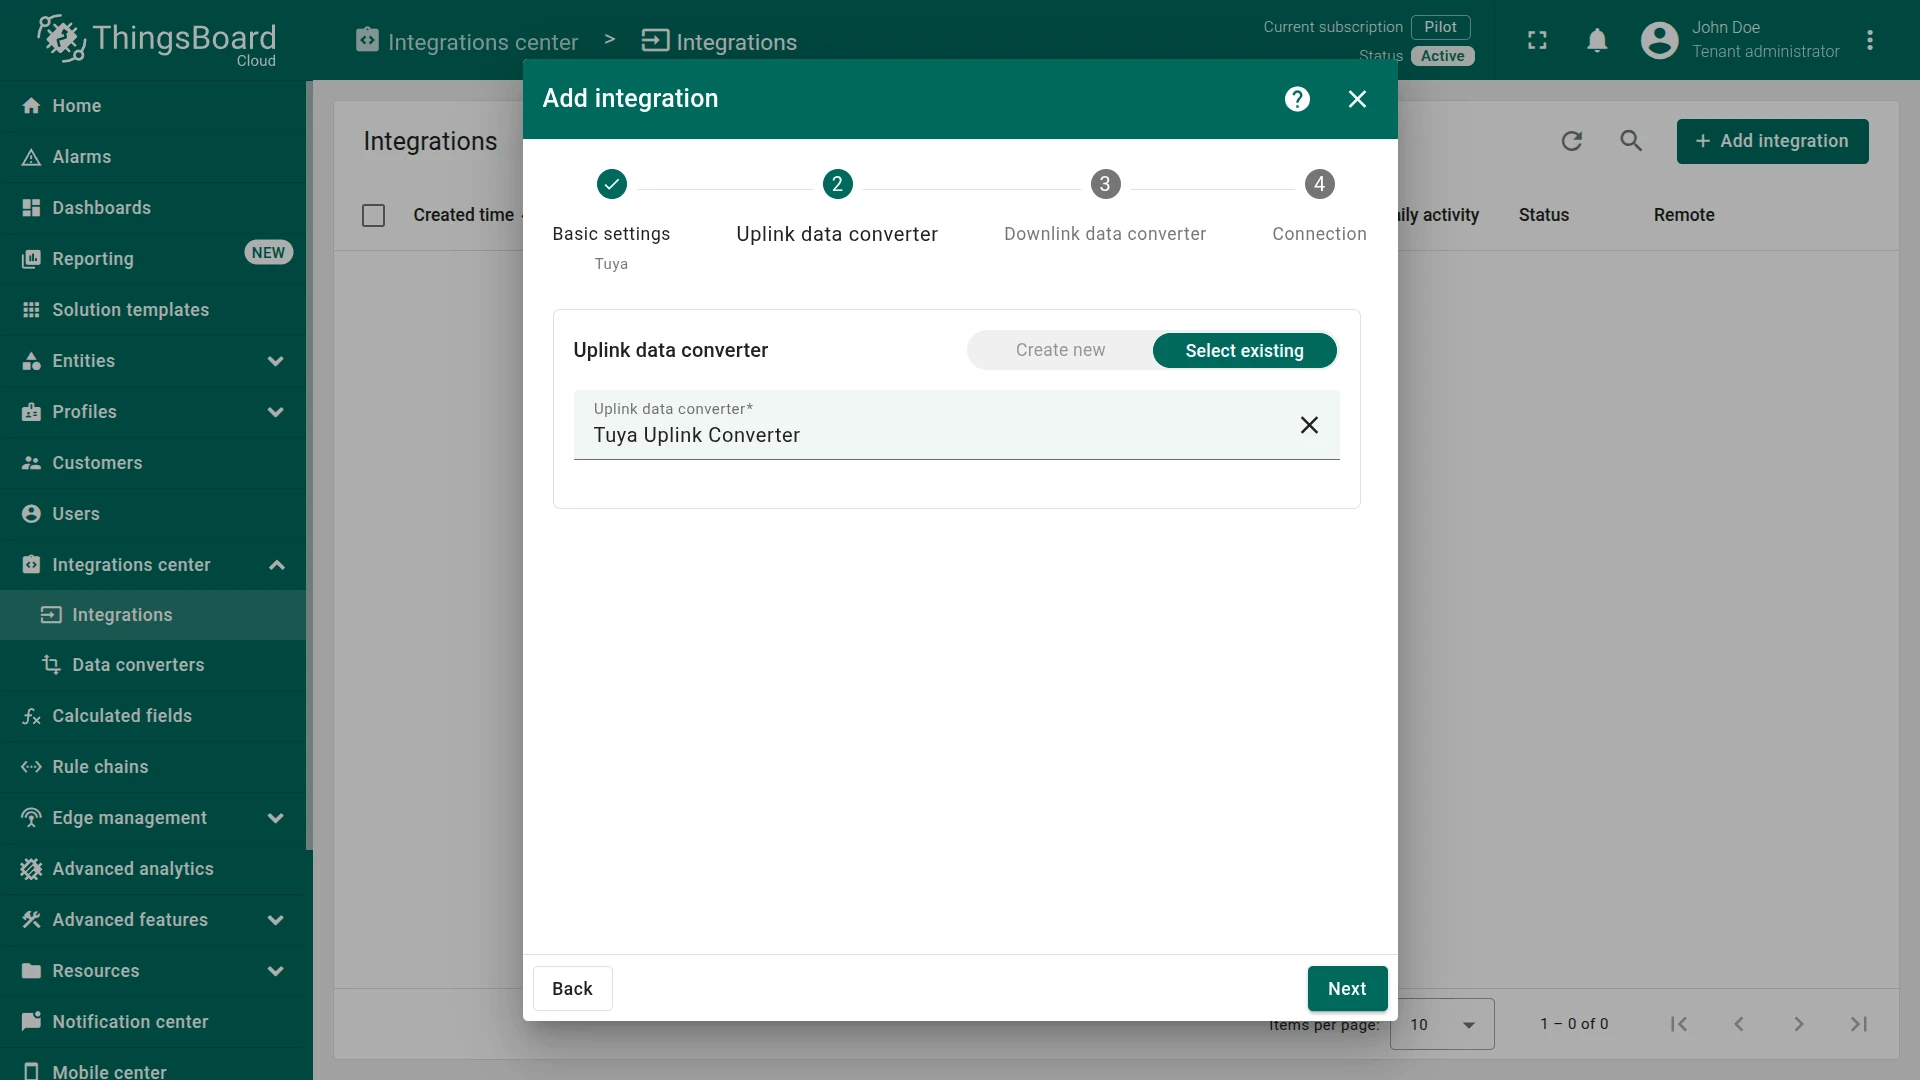
- Uplink data converter:
- Click Select existing and choose the previously created
Tuya Uplink Converter. - Click Next.
- Click Select existing and choose the previously created
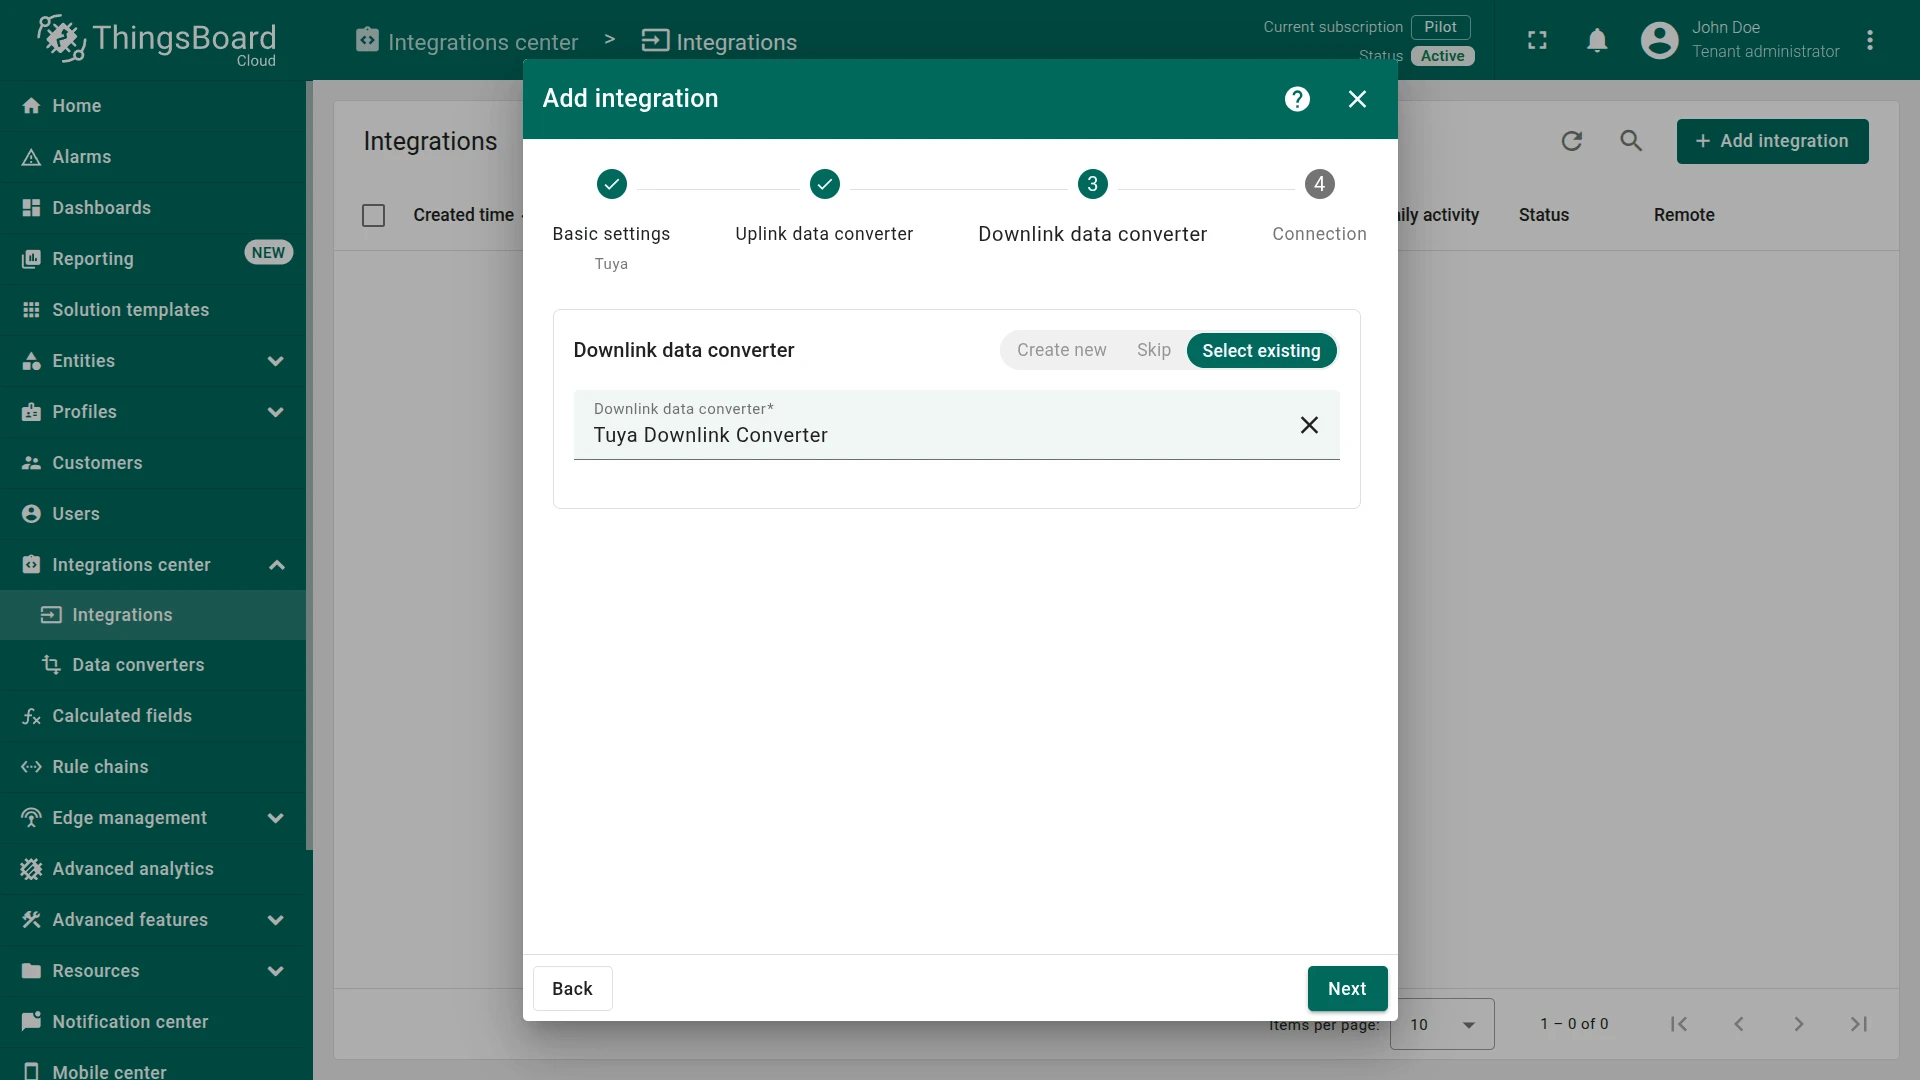
- Downlink data converter:
- Click Select existing and choose the previously created
Tuya Downlink Converter. - Click Next.
- Click Select existing and choose the previously created
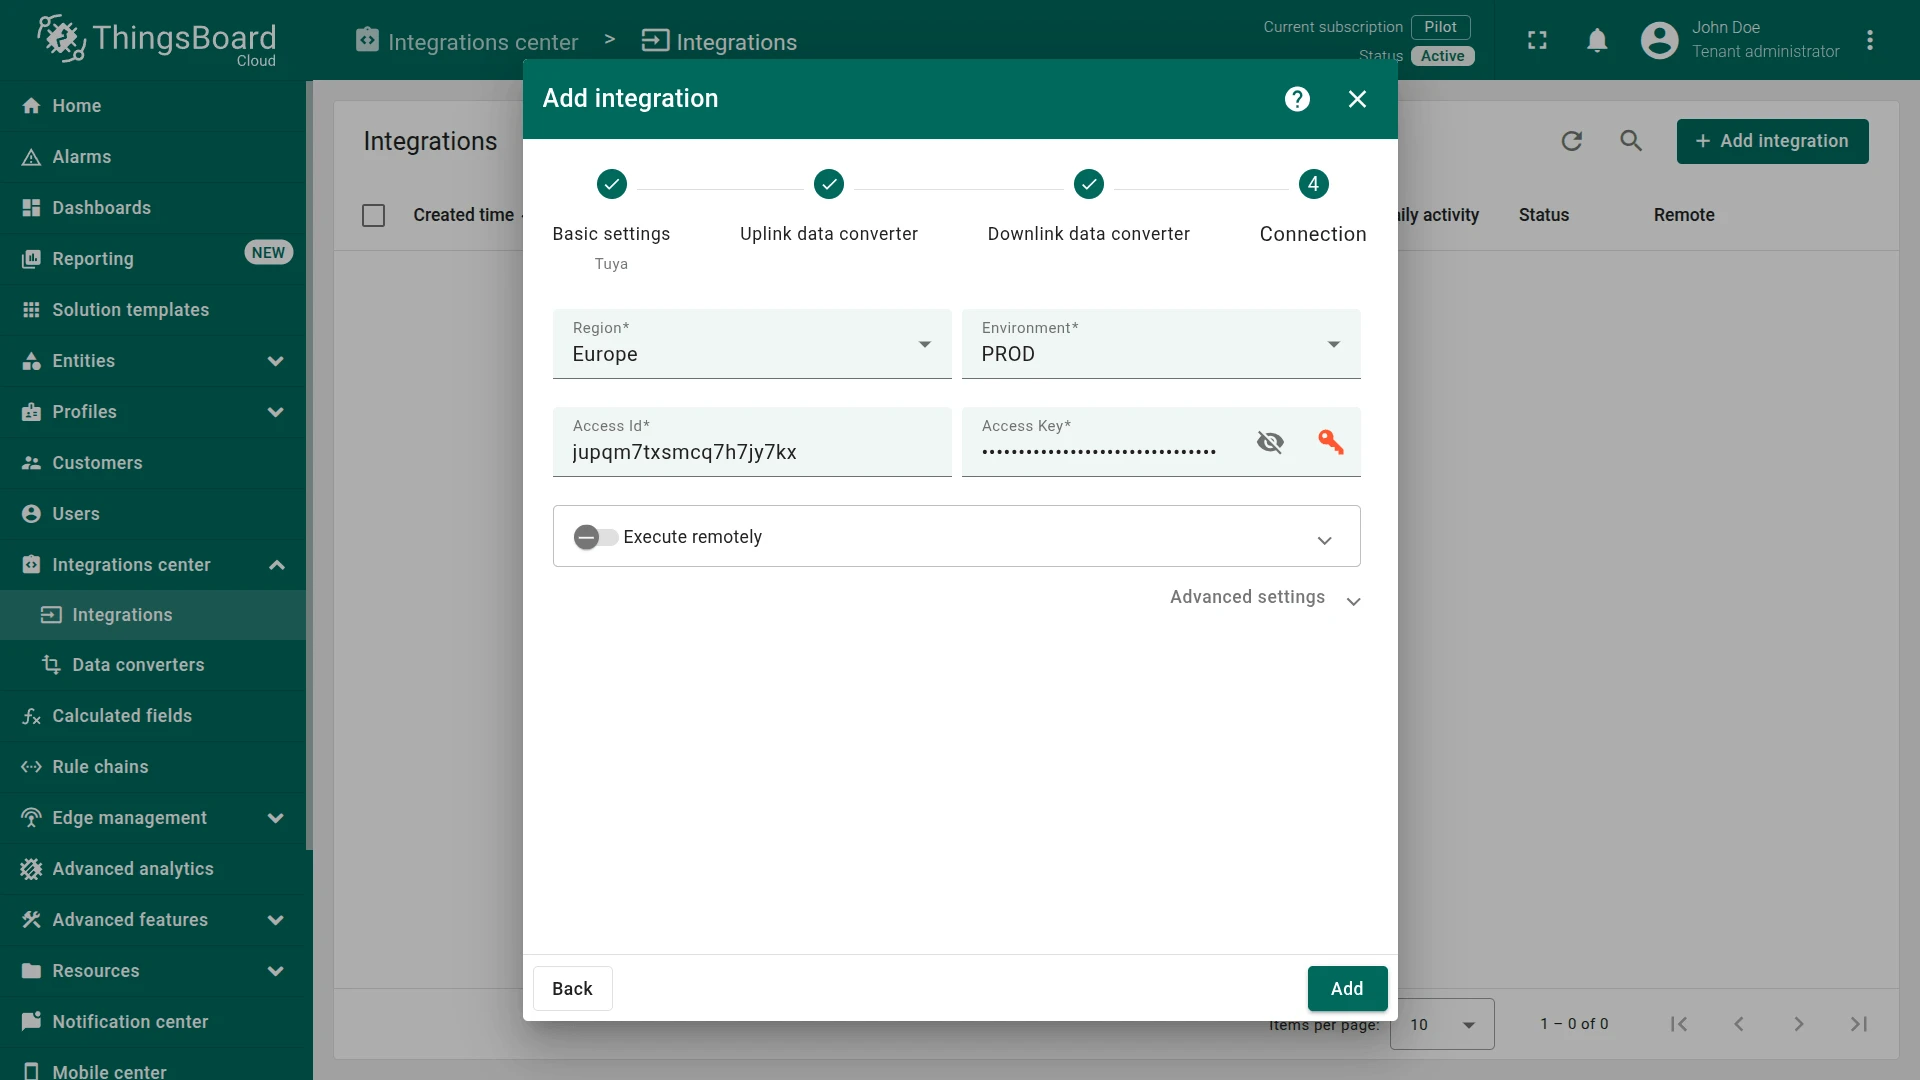
- Connection settings:
- Region — select the region matching your Tuya account.
- Environment — select PROD for a real physical device, or TEST for a virtual device.
- Access Id and Access Key — paste the Access ID/Client ID and Access Secret/Client Secret from your Tuya cloud project.
- Click Add to save the integration.
Configure the Root Rule Chain
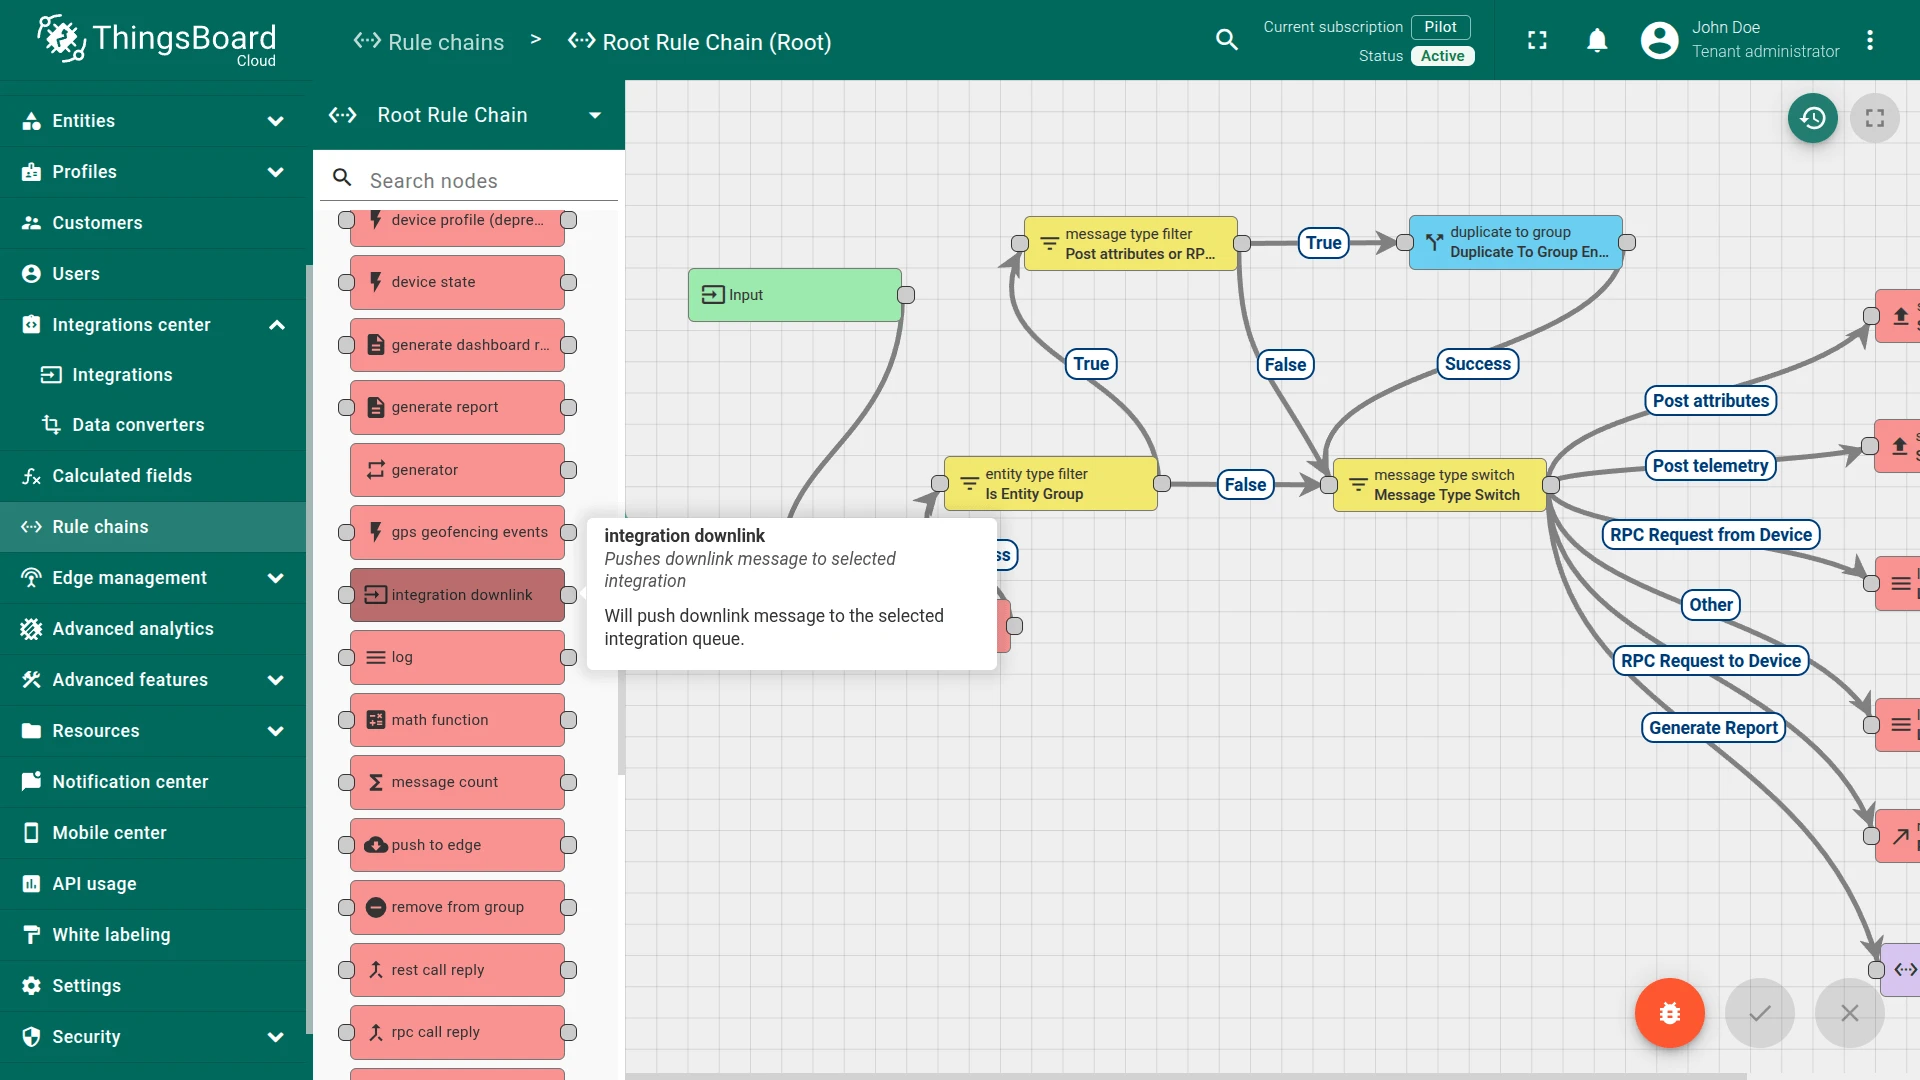
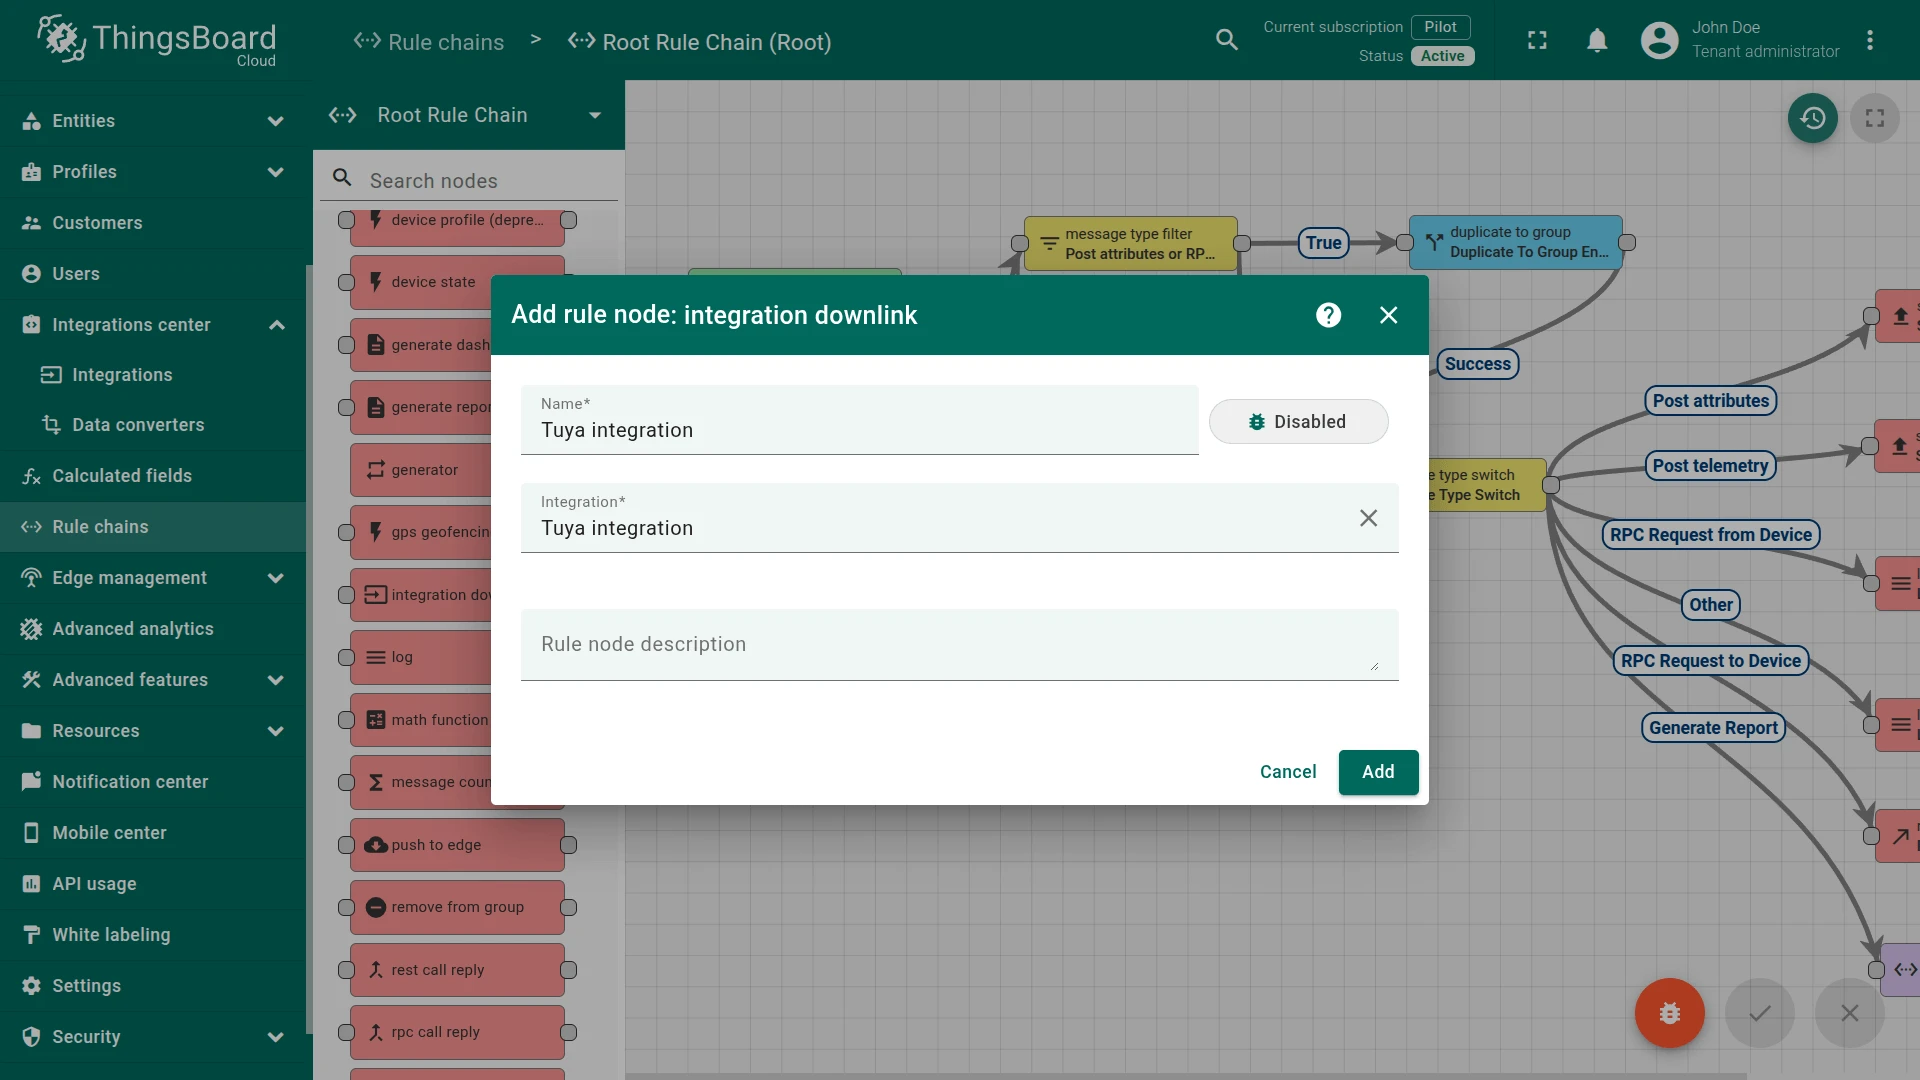
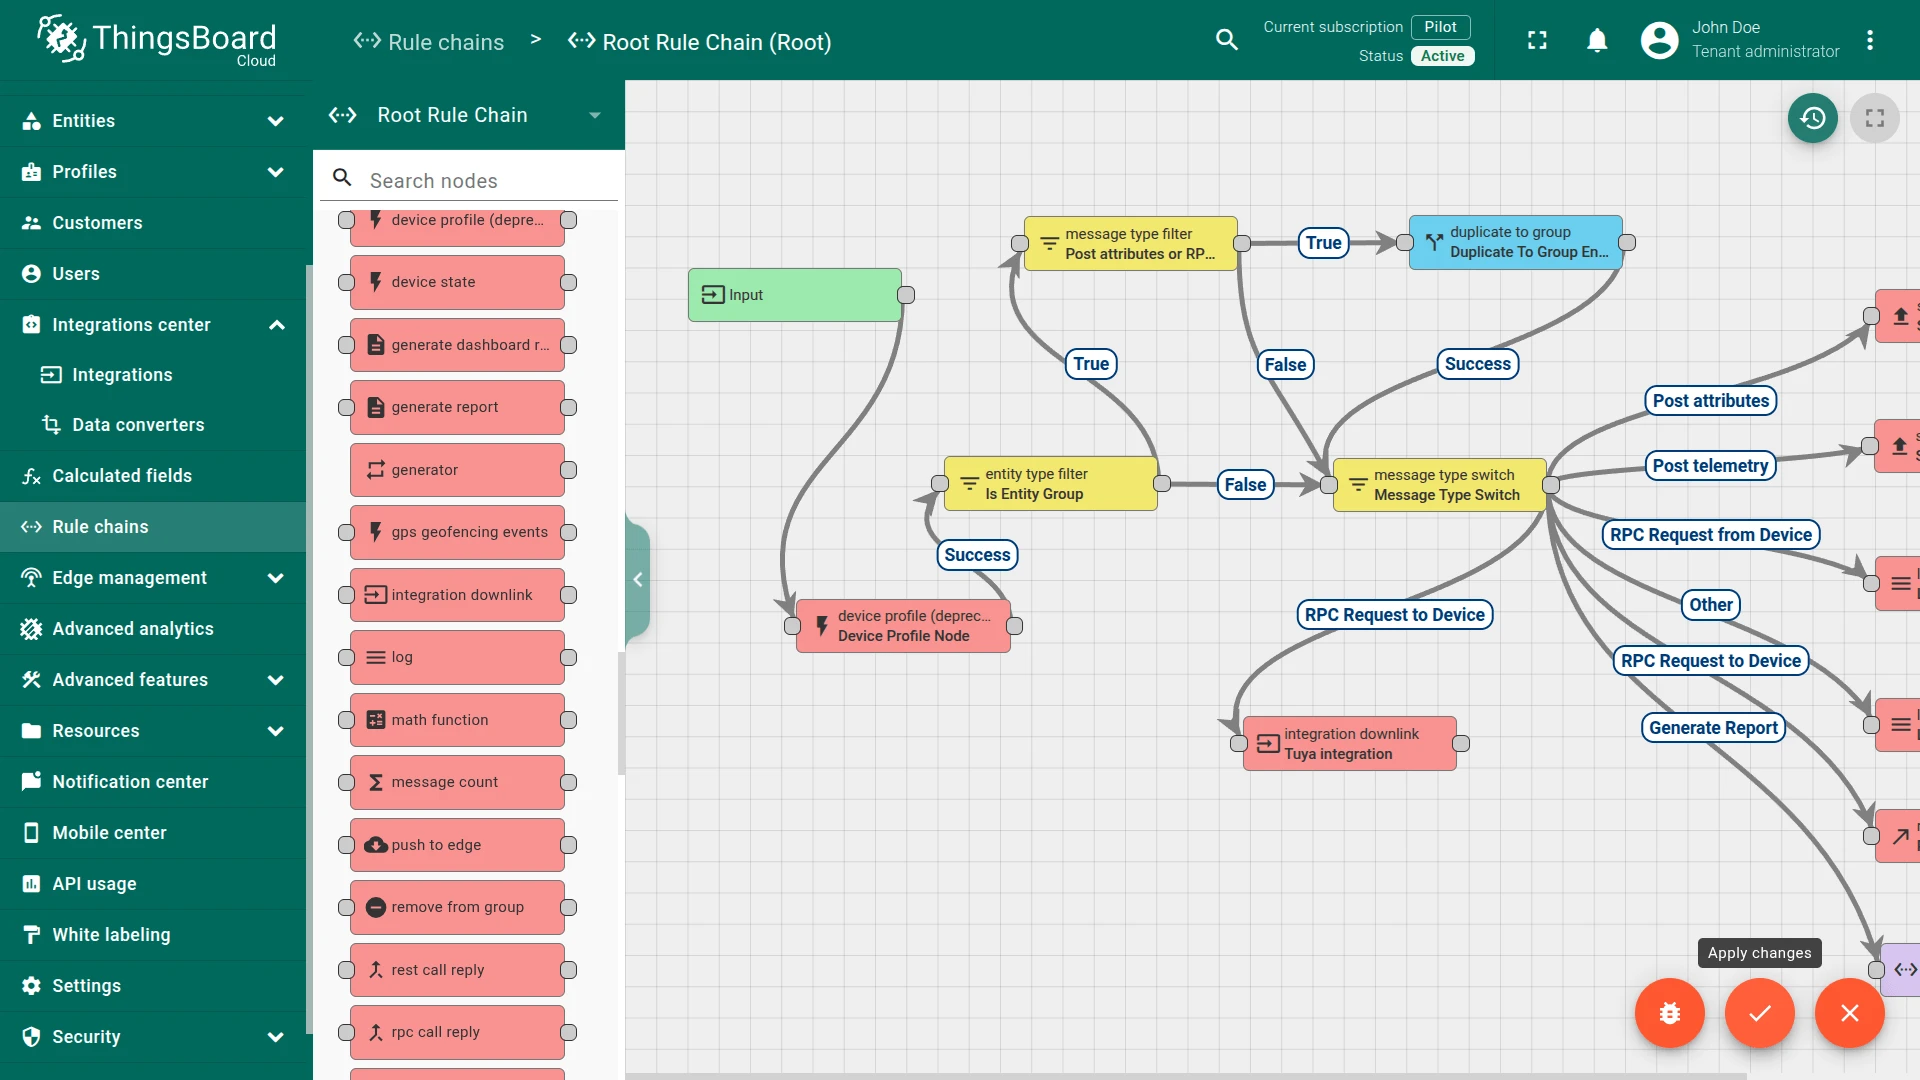
Section titled “Configure the Root Rule Chain”To forward RPC commands from ThingsBoard to Tuya devices, add an Integration Downlink node to the Root Rule Chain and connect it to the RPC Request to Device relation.
- Go to Rule chains and open the Root Rule Chain in edit mode.
- Find the Integration Downlink node in the node panel, drag it onto the canvas, enter a name (e.g.
Tuya integration), select the Tuya integration, and click Add. - Connect the Message Type Switch node to the Integration Downlink node using the RPC Request to Device relation.
- Click Apply changes to save the rule chain.
Verify the integration
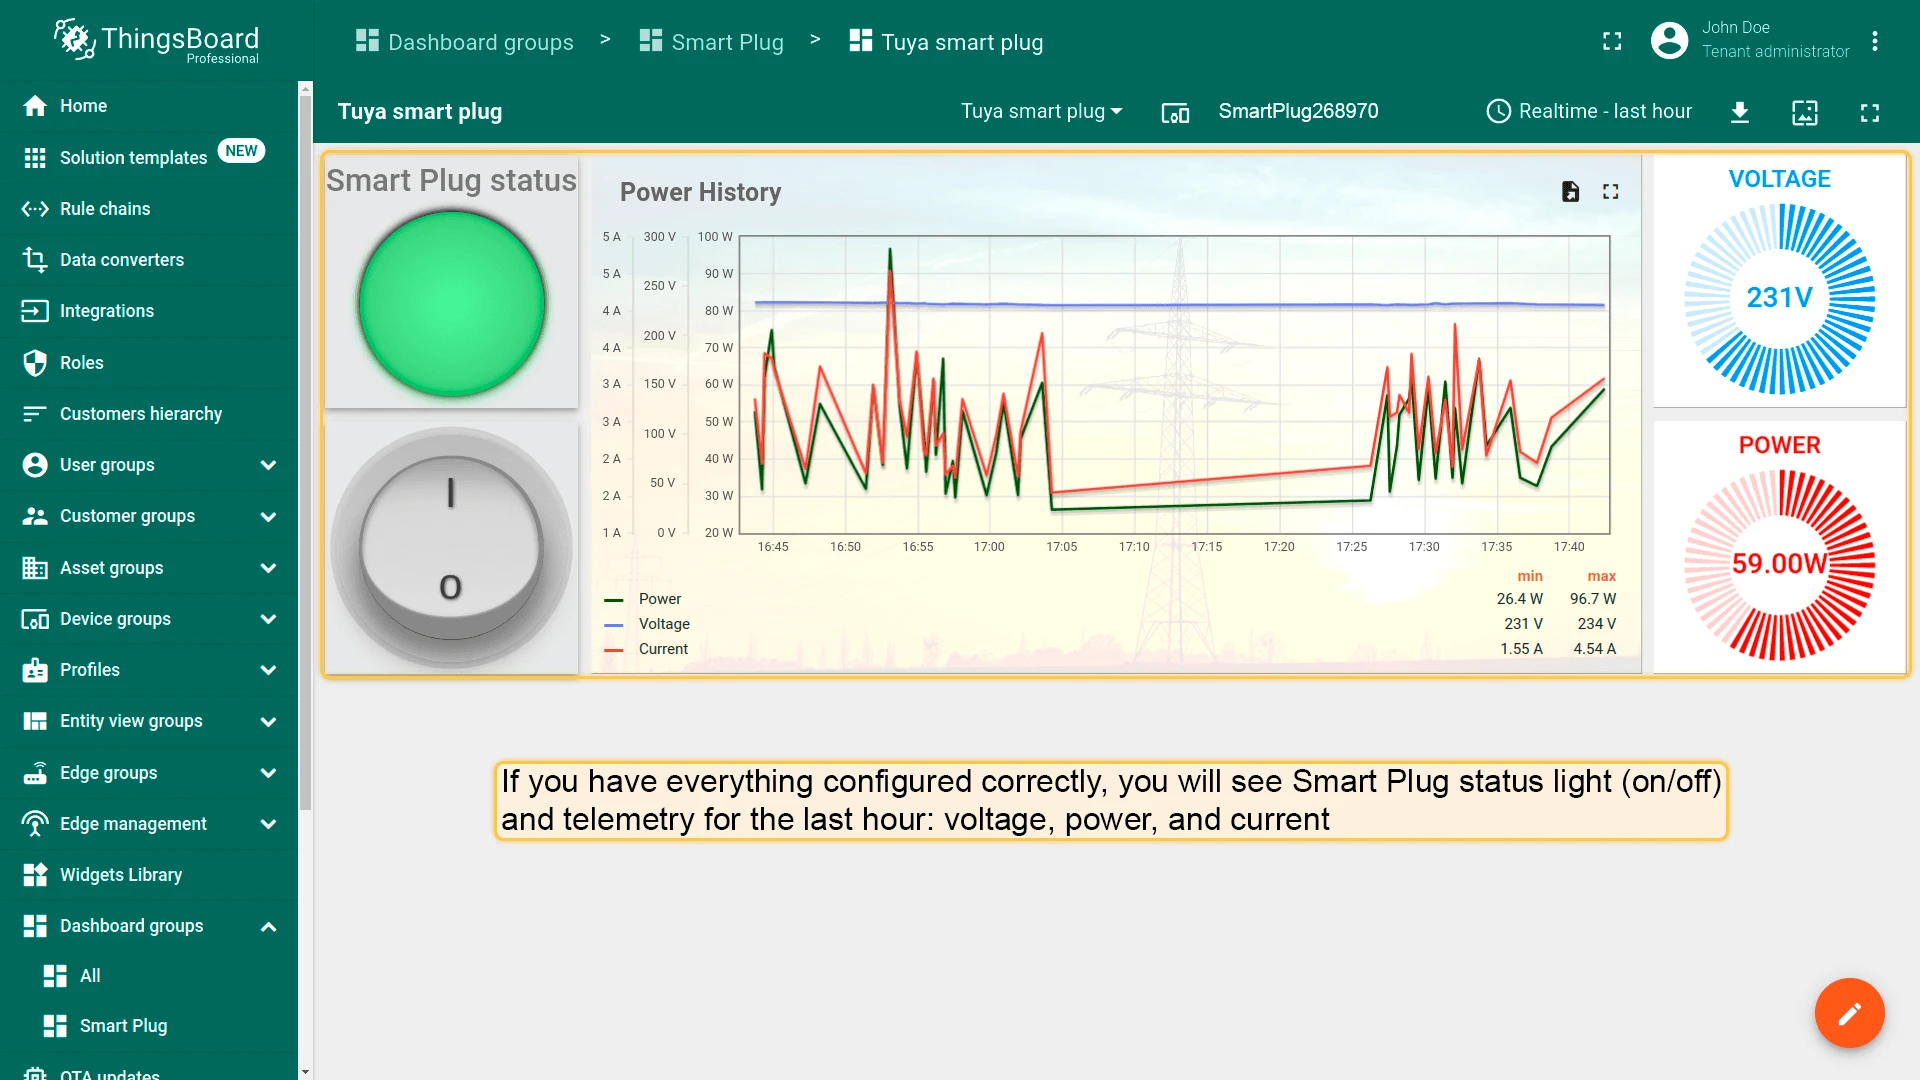
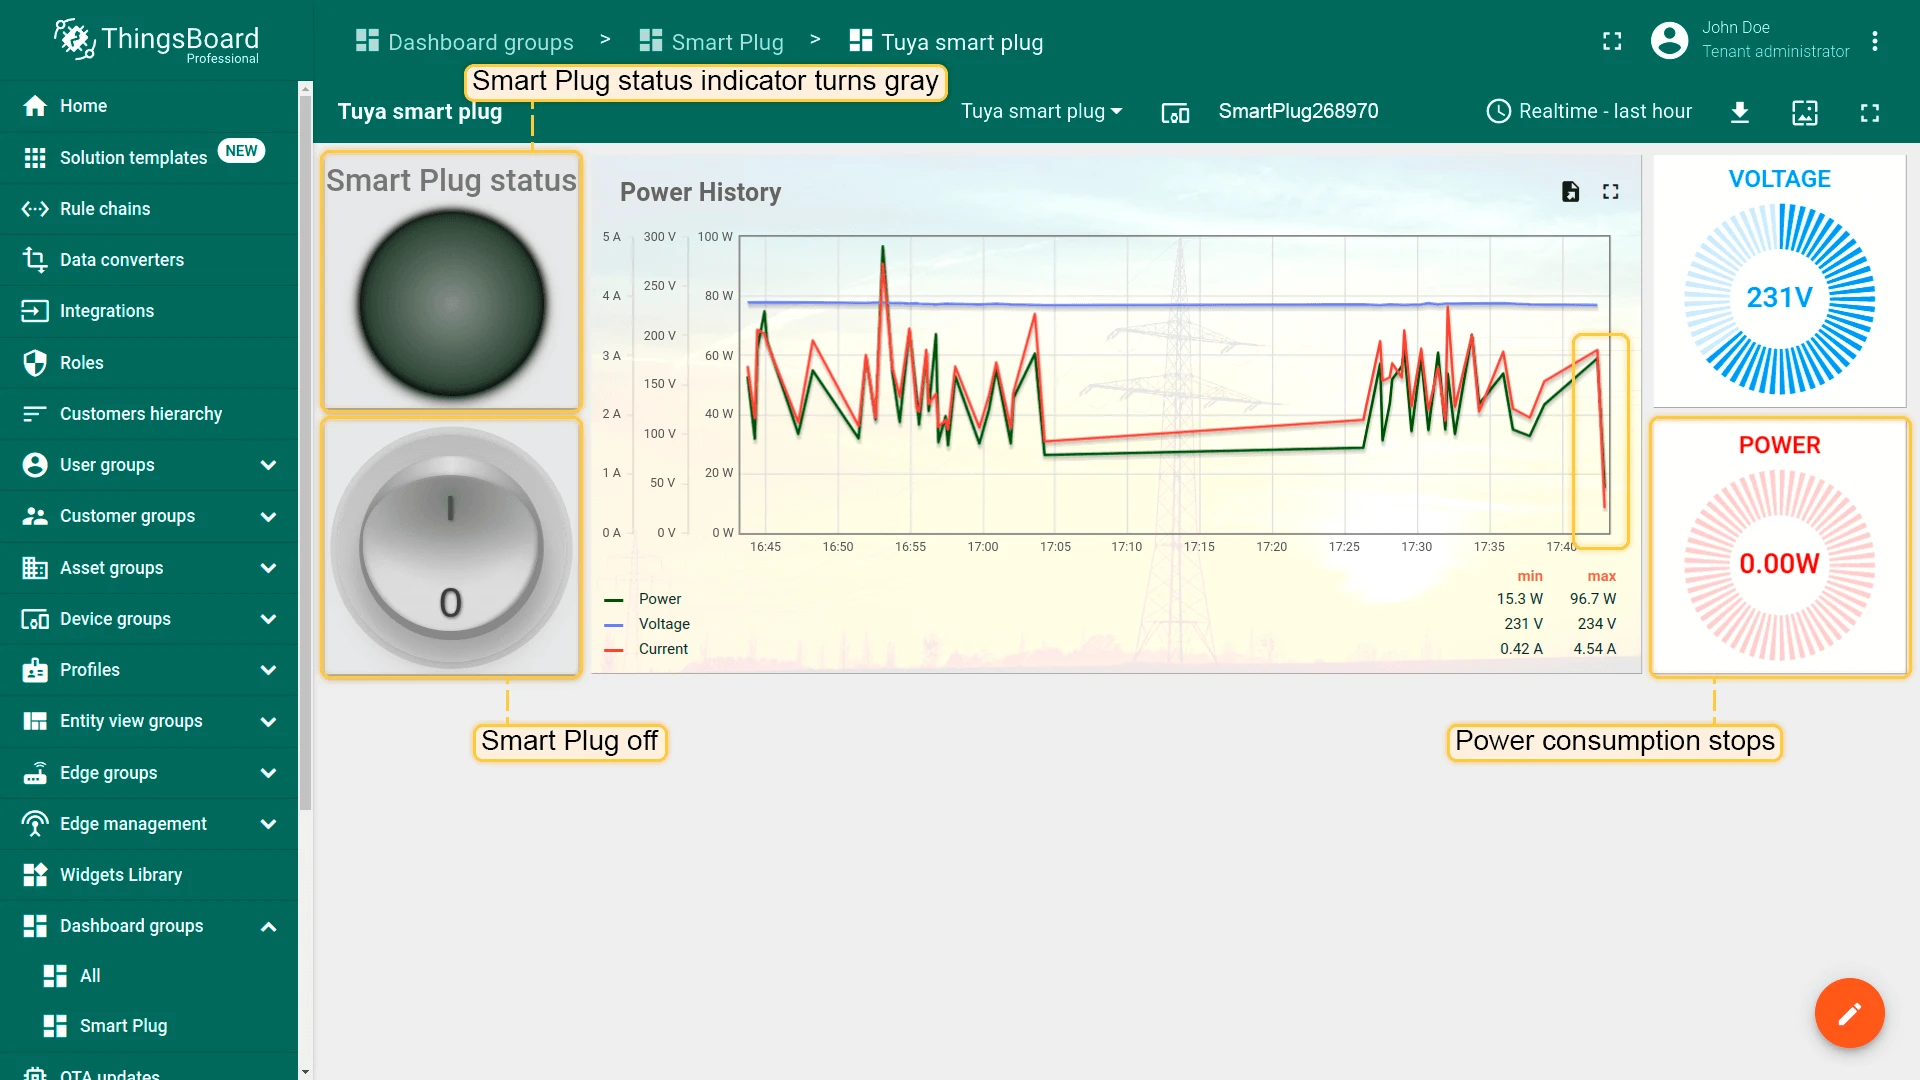
Section titled “Verify the integration”Disconnect your Smart Plug from power and reconnect it. The device sends an uplink statusReport message to Tuya, which forwards it to ThingsBoard through the integration. Go to Entities ⇾ Devices — a device named after the Tuya devId is automatically created with the latest telemetry.
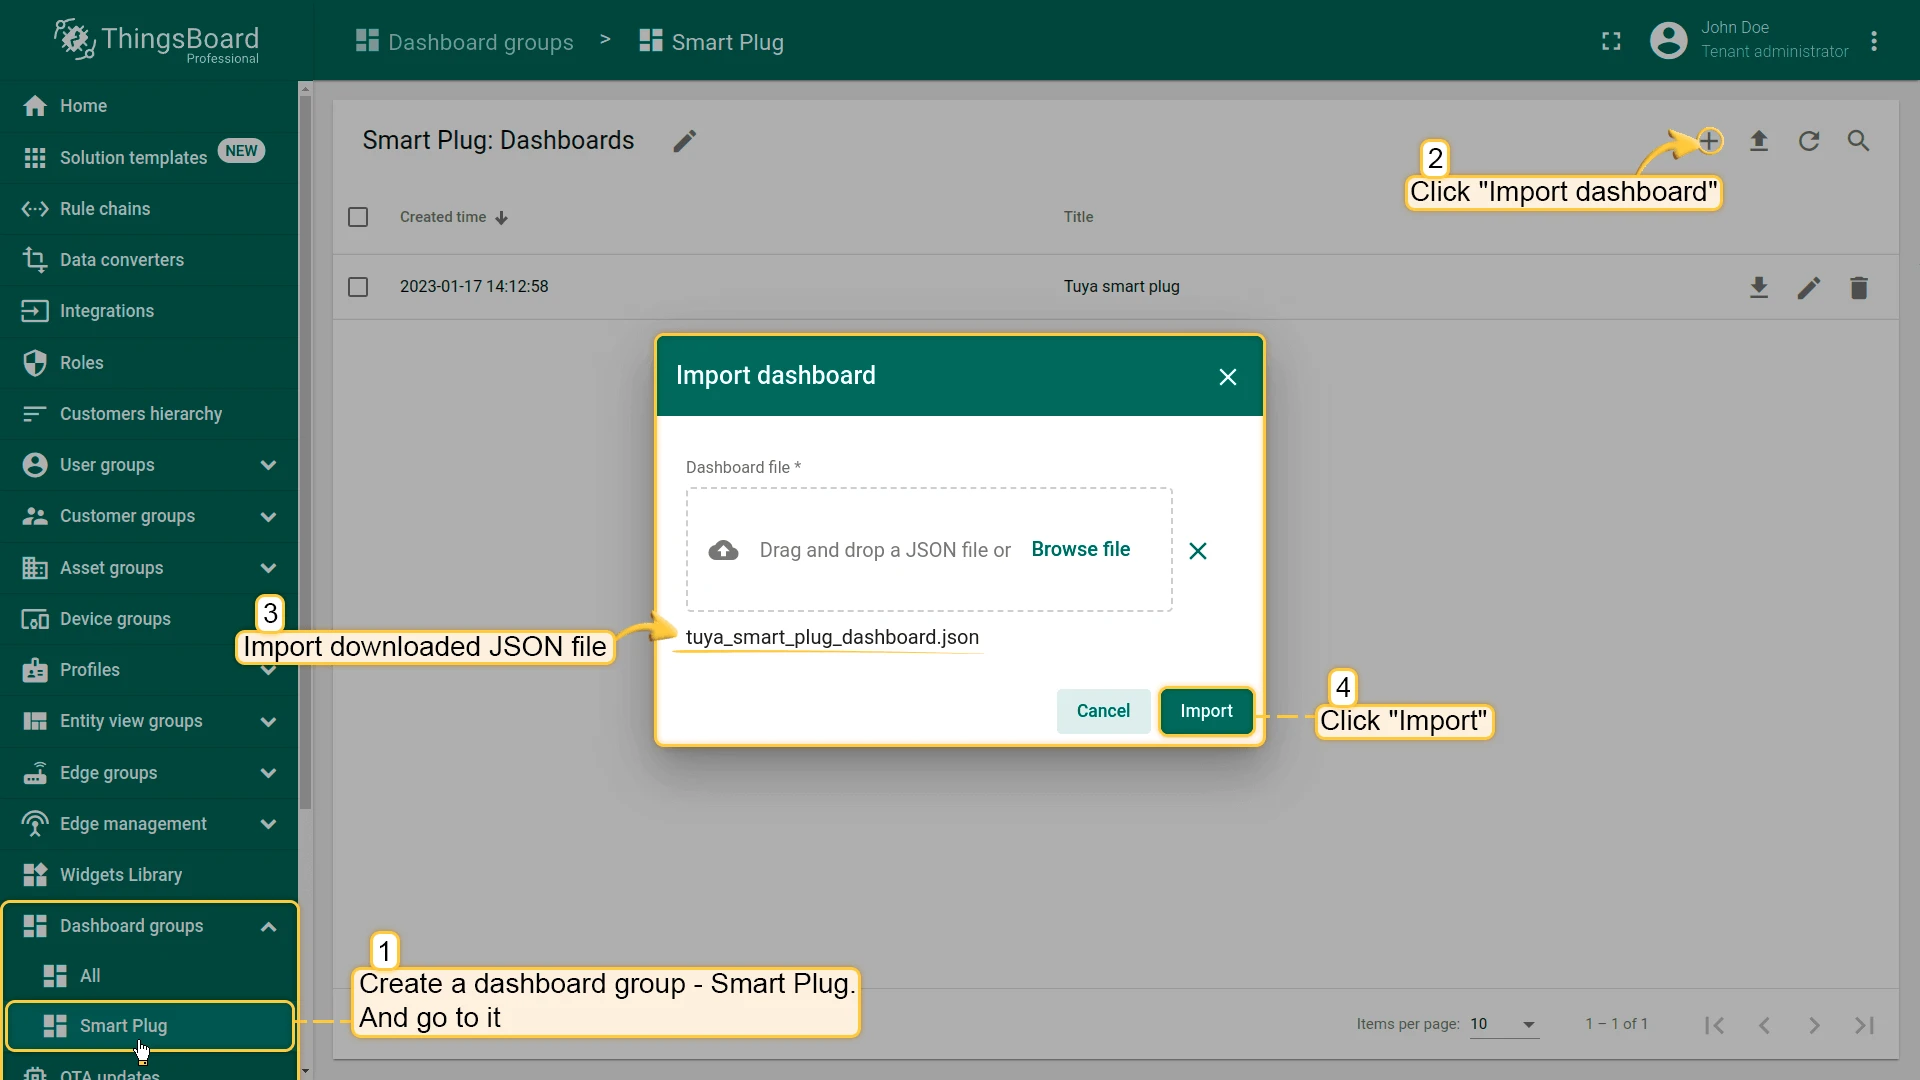
Tuya Smart Plug dashboard
Section titled “Tuya Smart Plug dashboard”Import the ready-made dashboard to visualize Smart Plug telemetry and send RPC commands.
- Download the dashboard: tuya_smart_plug_dashboard.json
- Go to Dashboards and click + ⇾ Import dashboard.
- Drop the downloaded JSON file into the import window and click Import.
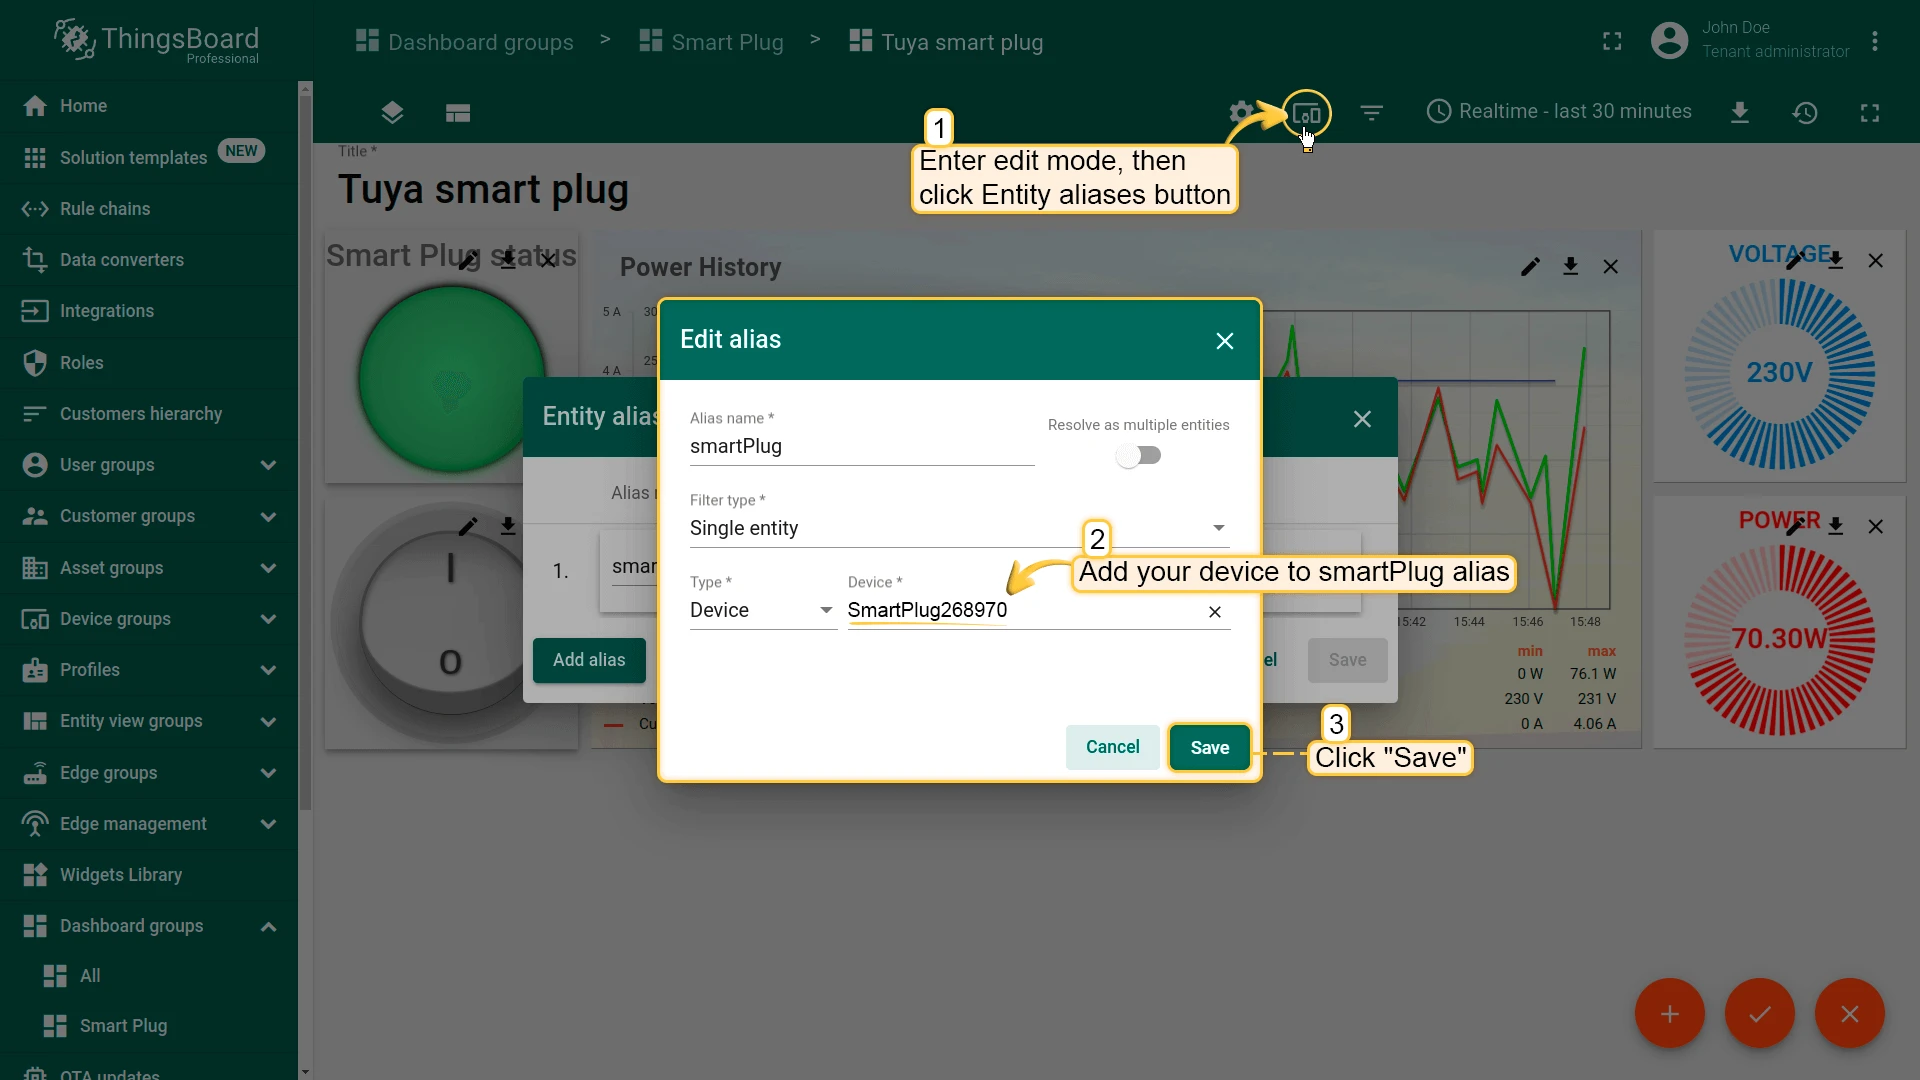
- Open the Tuya Smart Plug dashboard and enter Edit mode.
- Click Entity Aliases, set the
smartPlugalias to your provisioned device, and click Save. - Update the time series data keys in each widget to match the
codevalues reported by your device if the widgets show no data.

See also
Section titled “See also”Was this helpful?