- Overview
- Provision OTA package to ThingsBoard repository
- Firmware vs Software
- Assign OTA package to device profile
- Assign OTA package to device
- Update process
- Dashboard
- Assign OTA package to device group
- Scheduler
Overview
Since ThingsBoard 3.3, ThingsBoard allows you to upload and distribute over-the-air(OTA) updates to devices.
As a tenant administrator, you may upload firmware or software packages to the OTA repository.
Once uploaded, you may assign them to Device Profile or Device.
ThingsBoard will notify devices about the available update and provide a protocol-specific API to download the firmware.
The platform tracks status of the update and stores history of the updates.
As a platform user, you may monitor the update process using the dashboard.
Provision OTA package to ThingsBoard repository
Navigate to the “OTA Updates” menu item to list and upload OTA update packages. Each package consist of:
- Title - the name of your package. You can use different names for production and debug firmware/software.
- Version - the version of your package. Combination of the title and version must be unique in scope of a tenant.
- Device Profile - each package is compatible with one device profile. We track compatibility to prevent accidental updates of devices with incompatible firmware/software. Link to a device profile means that device that use this profile may be updated to the current package. However, the update is not triggered, until the user or script assigns the package to the device profile or device.
- Type - can be either Firmware or Software.
- Checksum algorithm - optional parameter, it is a short name of the checksum algorithm to use.
- Checksum - optional parameter, it’s a value of the file checksum. If no checksum provided by the user, server will use SHA-256 algorithm automatically.
- Description - optional text description of the firmware.
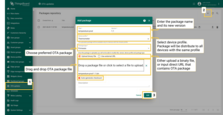
You can browse the provisioned packages as well as search them by title. Also, you are able to download and delete packages. To open package details, click the table row. Package details allow you to copy package ID and checksum. Also, Audit logs track information about users who provisioned the firmware.
All actions listed are also available via REST API.
Firmware vs Software
There is a very minor difference between FOTA and SOTA implementation inside ThingsBoard core. Many use-cases and applications will need to use FOTA only. However, LwM2M devices process FOTA and SOTA updates differently.
Assign OTA package to device profile
You may assign firmware/software to the device profile to automatically distribute the package to all devices that share the same profile. See screenshots below.
The device profile details will let you choose only compatible OTA update packages (see provisioning for more info). Device profile may be used by thousands of devices. Assignment of the firmware/software triggers the update process.
Assign OTA package to device
You may also assign firmware/software to specific device. See screenshots below.
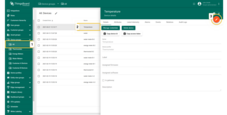
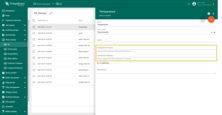
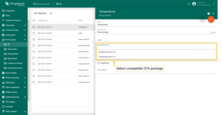
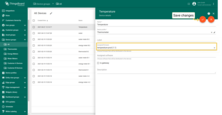
The firmware version assigned to the device will automatically overwrite firmware version that is assigned to the device profile.
For example, let’s assume you have Devices D1 and D2 that has Profile P1:
- If you assign package F1 to Profile P1 (via profile details UI or REST API), Devices D1 and D2 will be updated to F1.
- If you assign package F2 to Device D1 (via device details UI or REST API), Device D1 will be updated to F2.
- Subsequent assignment of the package F3 to the Profile P1 will affect only D2, since it has no specific firmware version assigned on the device level. So, D2 will be updated to F3, while D1 will continue to use F2.
Customers may choose available firmware and assign it to the devices that belong to them. However, customers can’t provision or manage firmware packages.
Update process
Assignment of the firmware/software to the device or device profile triggers the update process. ThingsBoard tracks the progress of the update and persists it to the device attributes.
Update progress may have one of the following states. The state of the update is stored as an attribute of the device and is used to visualize the update process on the dashboard.
QUEUED state
The very first state of the firmware/software update. Means that the notification about new firmware/software is queued but not yet pushed to the device. ThingsBoard queues the update notifications to avoid peak loads. The queue is processed with the constant pace. By default, it is configured to notify up to 100 device per minute. See configuration properties for more details.
INITIATED state
Means that the notification about firmware/software is fetched from queue and pushed to device. Under the hood, ThingsBoard converts notification to the update of the following shared attributes:
- fw(sf)_title - name of the firmware (software).
- fw(sf)_version - version of the firmware (software).
- fw(sf)_size - size of the firmware (software) file in bytes.
- fw(sf)_checksum - attribute that is used to verify integrity of the received file.
- fw(sf)_checksum_algorithm - the algorithm used to calculate file checksum.
Device is able to subscribe to shared attribute update using MQTT, HTTP, CoAP or LwM2M API.
Update states reported by the device
The remaining states are reported by the device firmware/software that is currently processing the update. We have prepared description of those states and sample applications for the most popular protocols written in python. Sample applications simulate behavior of the device firmware/software and may used as a reference for the implementation.
- DOWNLOADING - notification about new firmware/software update was received and device started downloading the update package.
- DOWNLOADED - device completed downloading of the update package.
- VERIFIED - device verified the checksum of the downloaded package.
- UPDATING - device started the firmware/software update. Typically is sent before reboot of the device or restart of the service.
- UPDATED - the firmware was successfully updated to the next version.
- FAILED - checksum wasn’t verified, or the device failed to update. See “Device failed” tab on the Firmware dashboard for more details.
Once the firmware/software is updated, ThingsBoard expect the device to send the following telemetry:
for firmware:
1
{"current_fw_title": "myFirmware", "current_fw_version": "1.2.3", "fw_state": "UPDATED"}
for software:
1
{"current_sw_title": "mySoftware", "current_sw_version": "1.2.3", "sw_state": "UPDATED"}
If the firmware/software update failed, ThingsBoard expect the device to send the following telemetry:
for firmware:
1
{"fw_state": "FAILED", "fw_error":  "the human readable message about the cause of the error"}
for software:
1
{"sw_state": "FAILED", "sw_error":  "the human readable message about the cause of the error"}
|
Execute the following command in terminal to install the HTTP and checksum libs: Enter the path to the client’s folder in terminal and execute the following command for ThingsBoard to get firmware example script: Download HTTP client example: http_firmware_client.py After getting the following messages
Firmware of the device is updated. To see its status, you should go to the firmware dashboard as it shows in the following paragraph. To find out about the firmware update, you need to make a request and subscribe to attributes. |
|
After, you should execute the following command to install the MQTT and checksum libs: Enter the path to the client’s folder and execute the following command for ThingsBoard to get firmware example script: Download MQTT client example: mqtt_firmware_client.py After getting the following messages,
Firmware of the device is updated. To see its status, you should go to the firmware dashboard as it shows in the following paragraph. To find out about the firmware update, you need to make a request and subscribe to attributes. |
Execute the following command in terminal to install the CoAP and checksum libs: Enter the path to the client’s folder in terminal and execute the following command for ThingsBoard to get firmware example script: Download CoAP client example: coap_firmware_client.py After getting the following messages
Firmware of the device is updated. To see its status, you should go to the firmware dashboard as it shows in the following paragraph. To find out about the firmware update, you need to make a request and subscribe to attributes. |
Dashboard
ThingsBoard provides the summary of the firmware/software update to monitor and track the firmware/software update status of your device, such as which devices are updating right now, any boot issues, and which ones have already been updated.
Firmware update monitoring dashboard
The dashboard is created automatically for each new tenant that you add to ThingsBoard. You can also download the dashboard JSON here and import it for existing tenants.
There you can see a list of all devices with full information about their firmware.
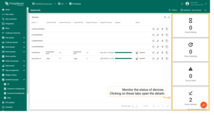
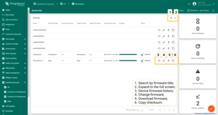
Click the “History of the firmware updates” button next to the device name to learn about the firmware update status of specific device.
Software update monitoring dashboard
The dashboard is created automatically for each new tenant that you add to ThingsBoard. You can also download the dashboard JSON here and import it for existing tenants.
There you can see a list of all devices with full information about their software.
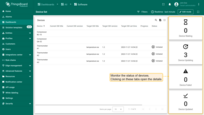
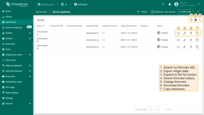
Assign OTA package to device group
Profession Editions gives you an opportunity to assign firmware/software to a specific device group for automatic distribution of the package to all devices that share the same group. See screenshots below.
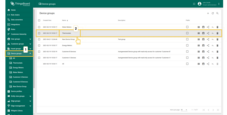
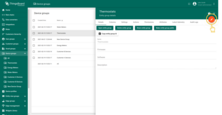
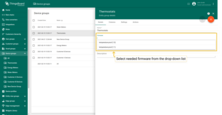
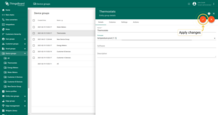
The device group details allow choosing only compatible OTA update packages
(see provisioning) for more info.
Assignment of the firmware/software triggers the update process.
The firmware version assigned specifically to the device will automatically overwrite firmware version that is assigned to the device group.
For example, let’s assume you have Devices A1, A2 and A3 that are in the same Device Group, but have different device profiles.
- Devices A1 and A2 have compatible device profiles, while Device A3 has incompatible one. When you assign the package to this device group, firmware/software will be updated only on Devices A1 and A2.
- If you update the package specifically on Device A2, Device A1 will stay not updated.
Scheduler
Scheduler allows you to set the exact date and time for an OTA package update. You can either observe scheduler events as a list, or see upcoming events in a calendar view.
-
To schedule an update, click the plus sign in the upper right corner of the screen to open a dialog window.
- In the Configuration tab of the opened dialog, enter the event name, from the drop-down menu select an event type (Software/Firmware update) and
choose an update target:
- If you need to schedule an update for Device, Device profile or Device group, from the drop-down menus, select an entity and needed OTA package.
- If you need to schedule an update for Devices group owner, from the drop-down menus, select the owner of the group, specific entity group that belongs to this owner, and the package that will be updated.
-
In the Schedule tab, choose your timezone, set the date and time when you’d like your entity to be updated. If you want to make it repeatable action, check the Repeat box. From the appeared drop-down menu, choose how often the update will be happening. When choosing Weekly updates, you should check the boxes on which days you want the update happen. Timer-based update allows you to set the frequency: hours, minutes or seconds, and numeric value. Also, you need to set the time when repetition will be finished.
- After setting up Configuration parameters and Schedule time, click the “Create” button. You are able to edit created scheduler events or delete them by clicking the corresponding buttons next to their names. In the Edit scheduler event dialog, you may configure Method and Params.
In the calendar, you are able to change its view type by choosing the preferred one in the drop-down menu. To edit or delete a scheduler event, click on it.


