Only Professional Edition supports Platform Integrations feature.
Use ThingsBoard Cloud or install your own platform instance.
- Prerequisites
- Add TCP integration
- Installing and running external TCP Integration
- Send uplink message
- Advanced usage: downlink
- Next steps
TCP Integration allows to stream data from devices which use a TCP transport protocol to ThingsBoard and converts payloads of these devices into the ThingsBoard format.
Please note TCP Integration can be started only as remote Integration. It could be started on the same machine, where TB instance is running, or you can start in on another machine, that has access over the network to the TB instance.
Please review the integration diagram to learn more.

Prerequisites
In this tutorial, we will use:
-
ThingsBoard Professional Edition instance — thingsboard.cloud;
- TCP Integration, running externally and connected to the cloud ThingsBoard PE instance;
- echo command which intended to display a line of text, and will redirect it’s output to netcat (nc) utility;
- netcat (nc) utility to establish TCP connections, receive data from there and transfer them;
Let’s assume that we have a sensor which is sending current temperature and humidity readings. Our sensor device SN-002 publishes it’s temperature and humidity readings to TCP Integration on 10560 port to the machine where TCP Integration is running.
For demo purposes we assume that our device is smart enough to send data in 3 different payload types:
You can select payload type based on your device capabilities and business cases:
In this case, the payload looks like this: |
In this case, the payload looks like this: |
In this case, the payload looks like this: Here is the description of the bytes in this payload:
|
Please note
On the machine, where TCP Integration is running, port 10560 must be opened for incoming connections - nc utility must be able to connect to TCP socket. In case you are running it locally, it should be fine without any additional changes.
Add TCP integration
1. Basic settings.
Go to the “Integrations” page of the “Integrations center” section. Click “plus” button to start adding new integration. Select type “TCP” integration and click “Next”;

2. Uplink data converter.
An uplink converter that is a script for parsing and transforming the data received by TCP integration to a format that ThingsBoard can consume. deviceName and deviceType are required, while attributes and telemetry are optional. attributes and telemetry are flat key-value objects. Nested objects are not supported.
Choose device payload type to for decoder configuration:
Now copy the following TBEL script:
|

Now copy the following TBEL script:
|

Now copy the following TBEL script:
|

NOTE
Although the Debug mode is very useful for development and troubleshooting, leaving it enabled in production mode may tremendously increase the disk space, used by the database, because all the debugging data is stored there. It is highly recommended to turn the Debug mode off when done debugging.
3. Downlink data converter.
At the step of adding a downlink converter, you can also select a previously created or create a new downlink converter. But for now, leave the “Downlink data converter” field empty. Click “Skip”;

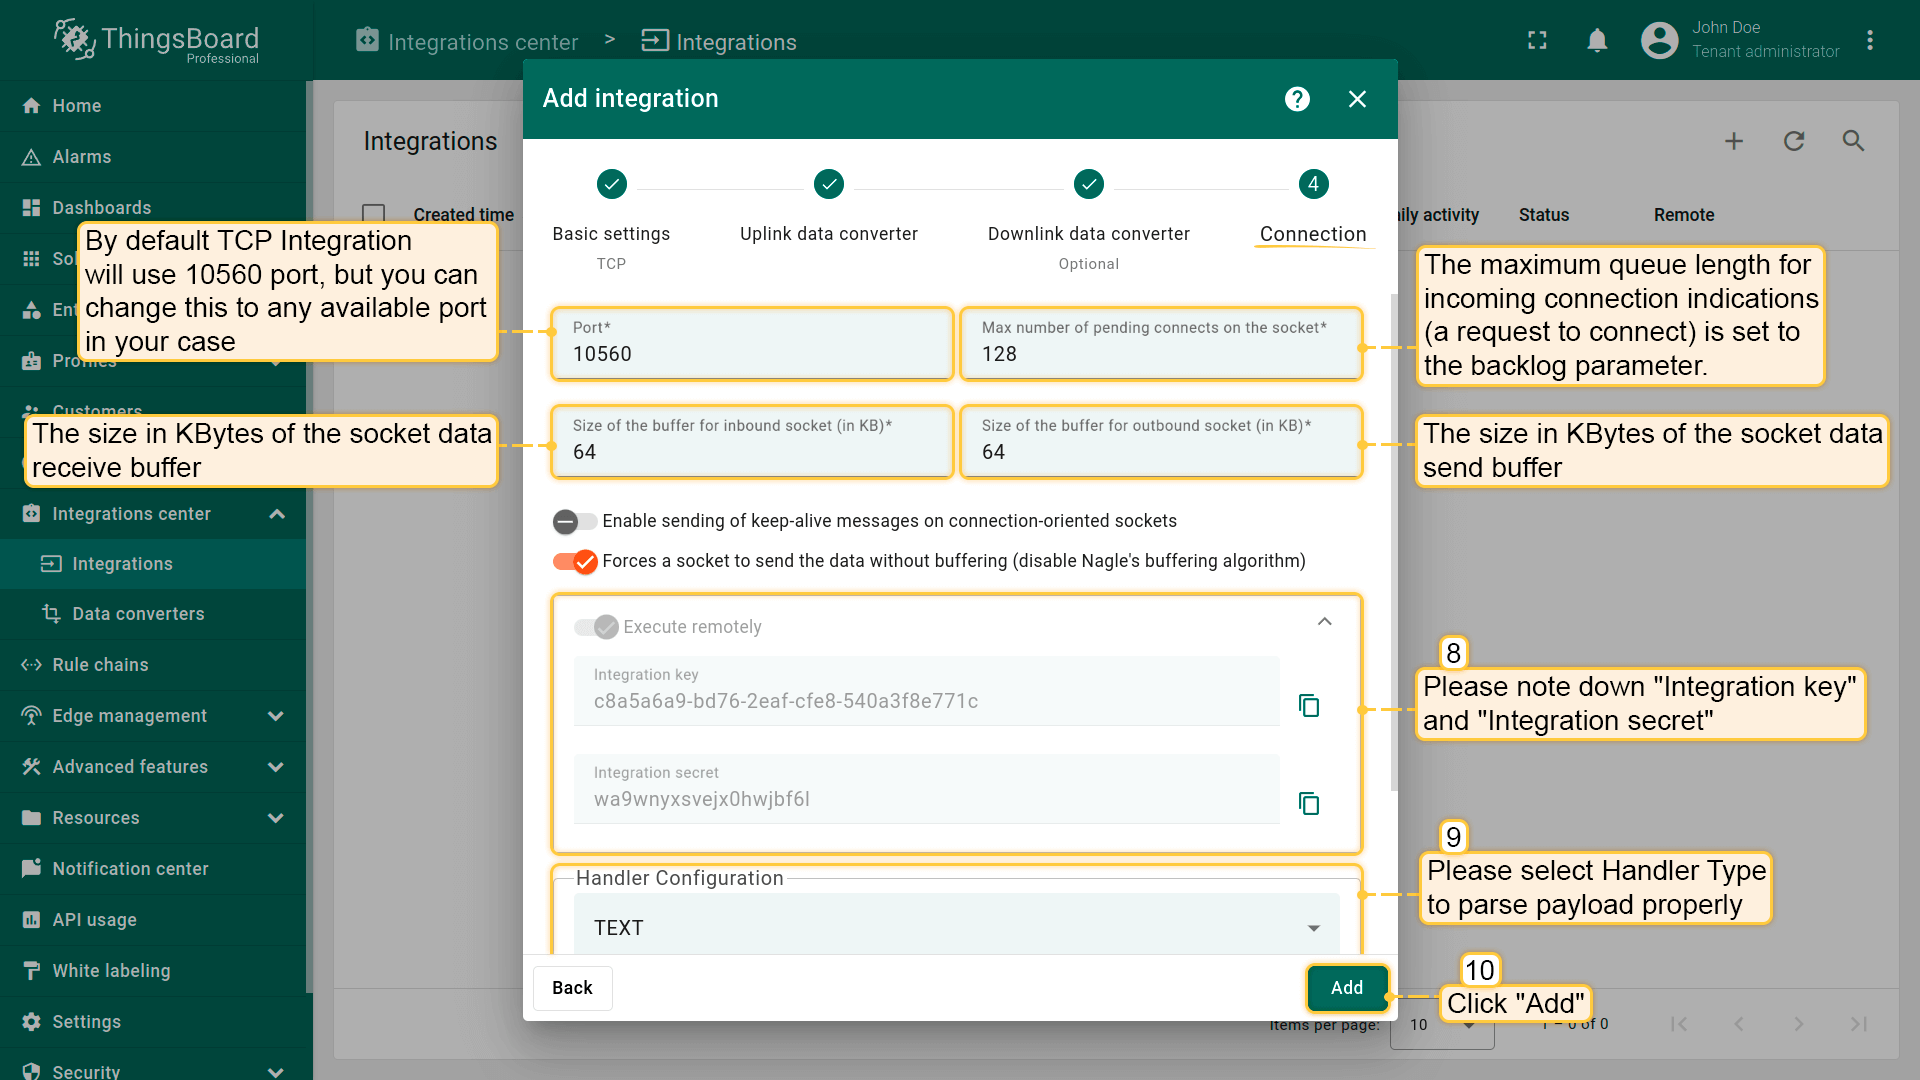
4. Connection.
As you mentioned earlier, “Execute remotely” option is checked and can not be modified - TCP Integration can be only remote type.
By default, TCP Integration will use 10560 port, but you can change this to any available port in your case.
Please note down Integration key and Integration secret - we will use these values later in the configuration on the remote TCP Integration itself.
Choose device payload type for Handler Configuration
To parse payload properly, please make sure that next values are set:
|

|


To parse payload properly, please make sure that next values are set:
|


We leave other options by default, but there is brief description of them:
- Max number of pending connects on the socket - The maximum queue length for incoming connection indications (a request to connect) is set to the backlog parameter. If a connection indication arrives when the queue is full, the connection is refused;
- Size of the buffer for inbound socket - the size in KBytes of the socket data receive buffer;
- Size of the buffer for outbound socket - the size in KBytes of the socket data send buffer;
- Enable sending of keep-alive messages on connection-oriented sockets - a flag indicating that probes should be periodically sent across the network to the opposing socket to keep the connection alive;
- Forces a socket to send the data without buffering (disable Nagle’s buffering algorithm) - disables Nagle’s algorithm on the socket which delays the transmission of data until a certain volume of pending data has accumulated.
Click “Add” to finish adding the TCP integration.
Installing and running external TCP Integration
Please refer to the remote integration guide and install TCP integration service locally or on separate machine.
Please use Integration key and Integration secret from the above section for your TCP Integration configuration.
Send uplink message
Once ThingsBoard TCP Integration has been created, the TCP server starts, and then it waits for data from the devices.
Choose device payload type to send uplink message
The command to send a message to the TCP server that is running on localhost (127.0.0.1) will look like this:
We can also send multiple messages in one string, separated by Message Separator (System Line Delimiter). Newline delimiter (\n) will be used to split payload into multiple messages. In this case, the command will look like this:
If you want to send a message back to the device using Downlink, the command will look like this:
For multiple messages in one string:
|


The command to send a message to the TCP server that is running on localhost (127.0.0.1) will look like this:
If you want to send a message back to the device using Downlink, the command will look like this:
|


The command to send a message to the TCP server that is running on localhost (127.0.0.1) will look like this:
If you want to send a message back to the device using Downlink, the command will look like this:
|


Going to the “Devices” page you should find a SN-002 device provisioned by the TCP integration. Click on the device, navigate to the “Latest telemetry” tab to see “temperature” key and its value (25.7) there.

If your payload contains “humidity” telemetry, you should see “humidity” key and its value (69) there as well.
Advanced usage: downlink
For sending downlink messages from the Thingsboard to the device, we need to define a downlink converter.
Add downlink converter
Let’s consider an example where we send an attribute update message. You can use our example of downlink converter, or write your own according to your configuration.
One can use either TBEL (ThingsBoard expression language) or JavaScript to develop user defined functions. We recommend utilizing TBEL as it’s execution in ThingsBoard is much more efficient compared to JS.
To add a downlink data converter to the TCP integration, follow these steps:
-
Go to the “Integrations” page, click TCP integration to open its details, and enter integration editing mode by clicking the “pencil” icon;
-
Enter a name for the downlink data converter and click “Create new converter”;
-
Paste the script to the encoder function section, and click “Add”;
-
Apply changes.

Go to the “Integrations” page, click TCP integration to open its details, and enter integration editing mode by clicking the “pencil” icon;

Enter a name for the downlink data converter and click “Create new converter”;

Paste the script to the encoder function section, and click “Add”;

Apply changes.
Optionally, configure Cache Size and Cache time to live in minutes - features, that helps to avoid memory leak when we are storing connections (able just for TCP downlink).
Cache Size - maximum size of messages for TCP client.
Cache time to live in minutes - time to storage messages.
Modify Root Rule Chain
When integration configured and ready to use, we need to go to the “Rule Chains” page and configure the “Root Rule Chain” so that “Attributes updated” messages is forwarded to the downlink data converter.
-
Open the “Root Rule Chain”, find the “integration downlink” node and drag it to the rule chain. Name it “TCP integration downlink”, specify TCP integration, and click “Add”;
-
After this steps, we need to tap on a right grey circle of rule node “message type switch” and drag this circle to left side of “integration downlink”, here lets choose Attributes Updated, tap “Add” and save Root Rule Chain.

Open the “Root Rule Chain”, find the “integration downlink” node and drag it to the rule chain. Name it “TCP integration downlink”, specify TCP integration, and click “Add”;

After this steps, we need to tap on a right grey circle of rule node “message type switch” and drag this circle to left side of “integration downlink”, here lets choose Attributes Updated, tap “Add” and save Root Rule Chain.
Test downlink
To test downlink, create some shared attribute on your device:
-
Go to the “Devices” page. Click your SN-002 device and navigate to the “Attributes” tab. Select the “Shared attributes” option, and click the “plus” icon;
-
Enter the attribute name, and its value (for example, the key name is “firmware”, value: “v1.1”) and click “Save”;

Go to the “Devices” page. Click your SN-002 device and navigate to the “Attributes” tab. Select the “Shared attributes” option, and click the “plus” icon;

Enter the attribute name, and its value (for example, the key name is “firmware”, value: “v1.1”) and click “Save”;

To receive a downlink message you need to set the timeout for responses -w60 (this option determines how long you will wait for a response) and send the uplink message again:
1
echo -e 'SN-002,default,temperature,25.7\nSN-002,default,humidity,69' | nc -w60 127.0.0.1 11560
You should get the following response from the ThingsBoard in the terminal:

Received data and data that was sent can be viewed in the downlink converter. In the “In” block of the “Events” tab, we see what data entered. The “Out” field displays messages to device.

Received data and data that was sent can be viewed in the downlink converter. In the “In” block of the “Events” tab, we see what data entered.

The “Out” field displays messages to device.
Note
When you use TCP integration, and your connection established for a long time, you will receive just one downlink message. All other will be saved on server side and will be sent on next uplink.
Next steps
-
Getting started guides - These guides provide quick overview of main ThingsBoard features. Designed to be completed in 15-30 minutes.
-
Data visualization - These guides contain instructions on how to configure complex ThingsBoard dashboards.
-
Data processing & actions - Learn how to use ThingsBoard Rule Engine.
-
IoT Data analytics - Learn how to use rule engine to perform basic analytics tasks.
-
Hardware samples - Learn how to connect various hardware platforms to ThingsBoard.
-
Advanced features - Learn about advanced ThingsBoard features.