Tuya Integration
The Tuya integration connects ThingsBoard to the Tuya IoT Platform (Tuya Cloud). Use it to bring telemetry from Tuya smart devices already registered in the Smart Life / Tuya Smart app into ThingsBoard for monitoring and rule-based automation — including sending commands back to those devices.
This guide walks through an end-to-end integration using a Tuya Smart Plug; a virtual Tuya device can also be used for testing.
Architecture
Section titled “Architecture”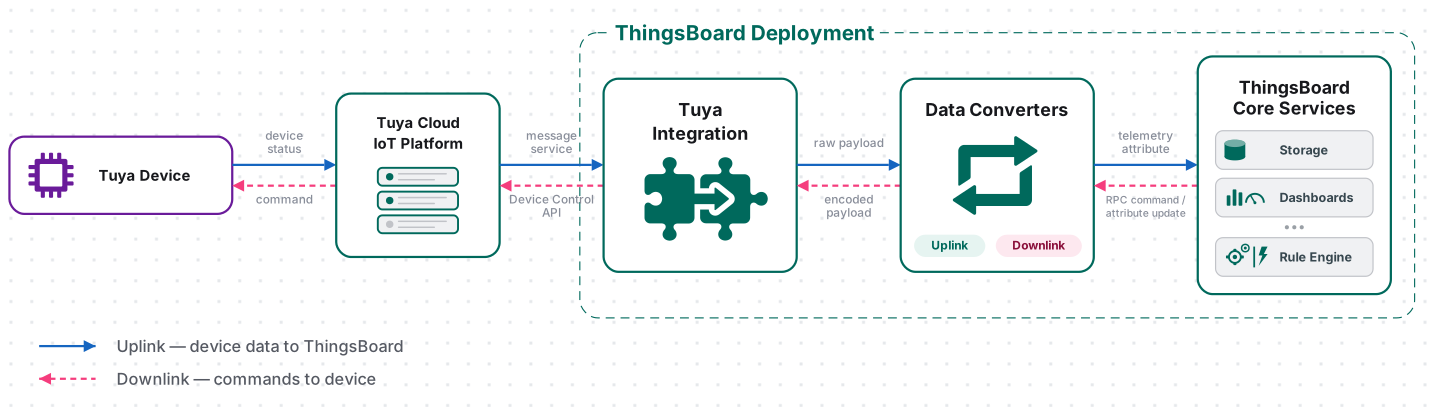
A Tuya device reports its status to Tuya Cloud over Wi-Fi. The integration subscribes to the Tuya Message Service with your project credentials and receives those status reports in real time over Tuya’s Pulsar-based message queue. The uplink converter decodes each report into telemetry and attributes, and the ThingsBoard Core Service stores the data, creating the device automatically on first contact. For downlink, the Rule Engine hands a message to the integration; the downlink converter encodes it, and ThingsBoard delivers it to the device through the Tuya Device Control API.
Prerequisites
Section titled “Prerequisites”Before creating the integration, ensure:
- You have access to ThingsBoard PE or ThingsBoard Cloud with integration functionality enabled for your tenant.
- You have permissions to create integrations and data converters.
- You have a Tuya IoT Platform account with at least one cloud project. If you do not have an account yet, follow the Create a Tuya IoT Platform Account step below.
- At least one Tuya device (physical or virtual) — for example, a Smart Plug — added in the Smart Life or Tuya Smart app and linked to your cloud project. If you haven’t added one yet, follow the Register the Smart Plug in the Tuya app step below.
Set Up Tuya
Section titled “Set Up Tuya”Register the Smart Plug in the Tuya App
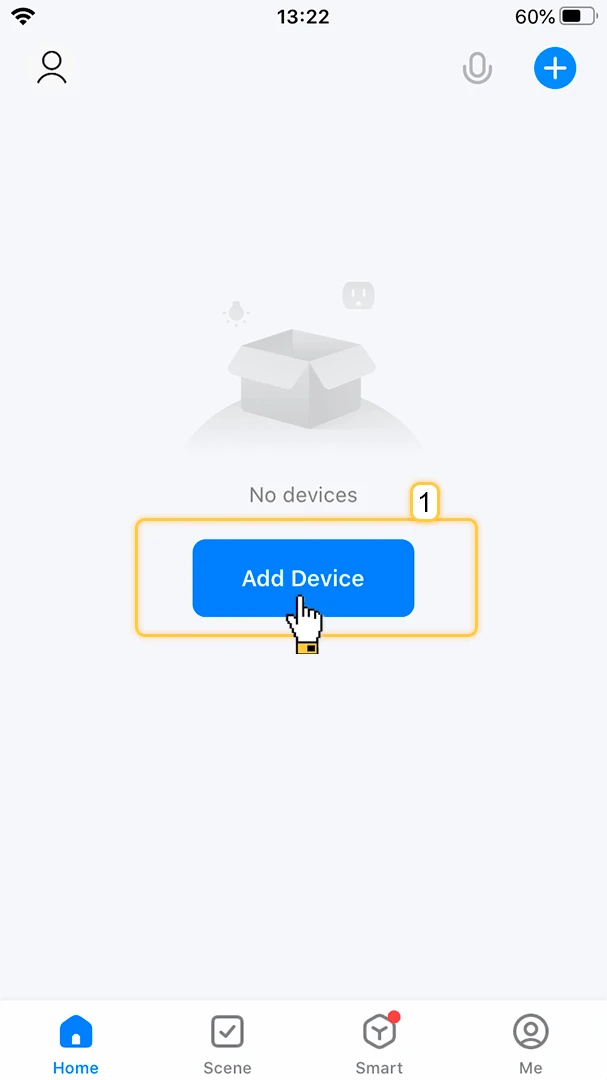
Section titled “Register the Smart Plug in the Tuya App”- Open the Smart Life (or Tuya Smart) app. Tap Add Device on the home screen.
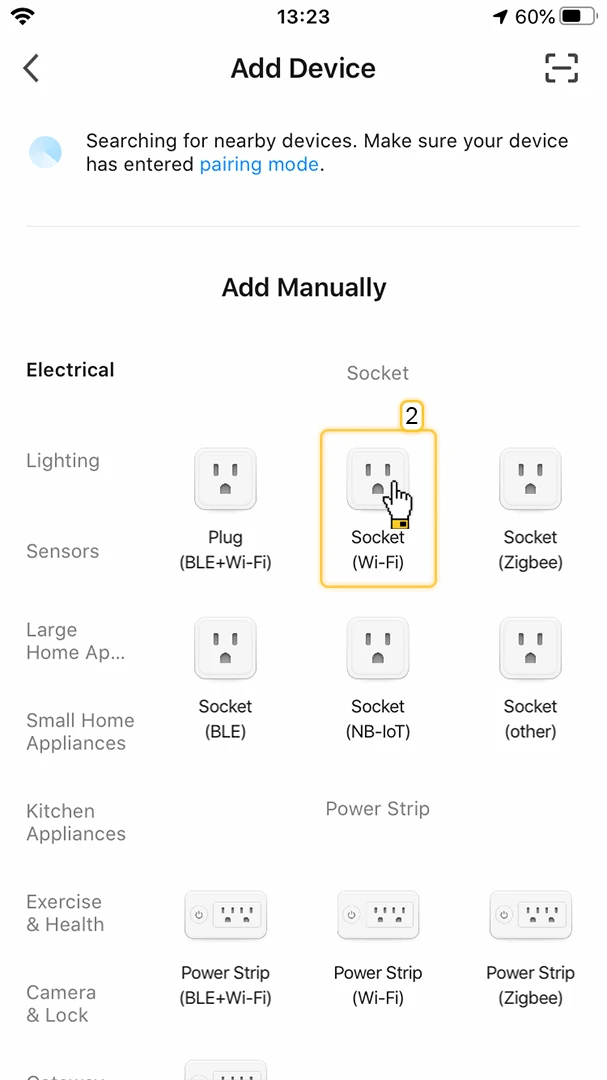
- Browse to the Electrical category and tap Socket (Wi-Fi).
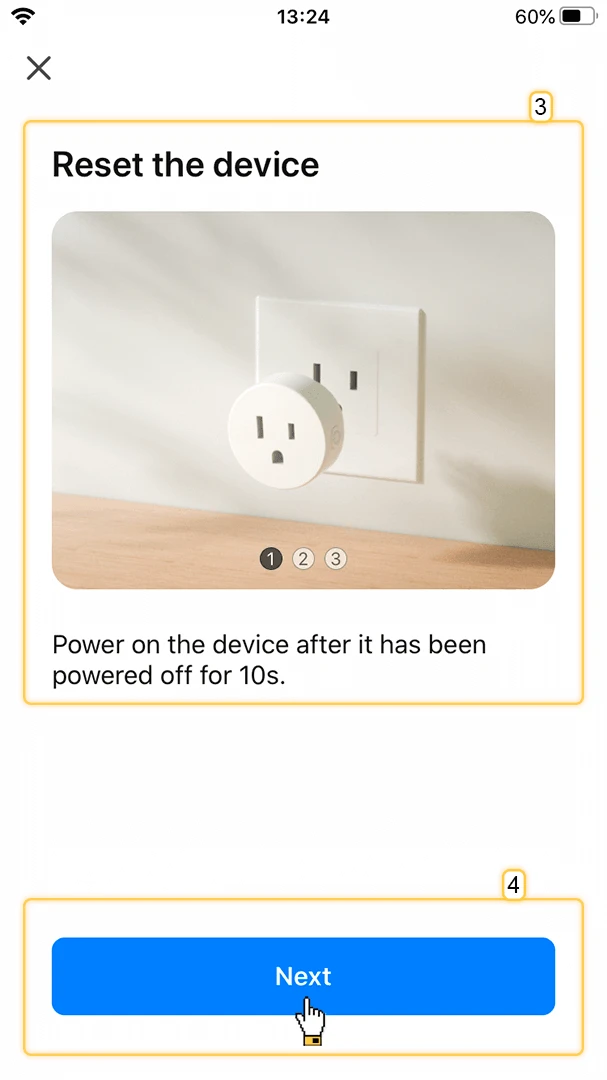
- Follow the on-screen reset instructions: power off the device for 10 seconds, then power it back on.
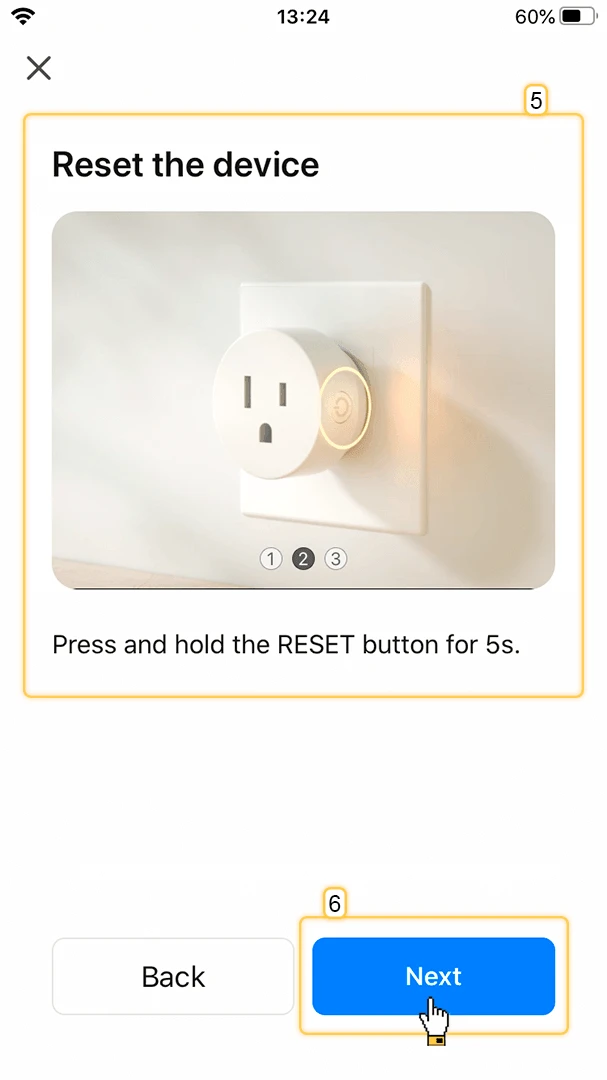
- Press and hold the RESET button for 5 seconds.
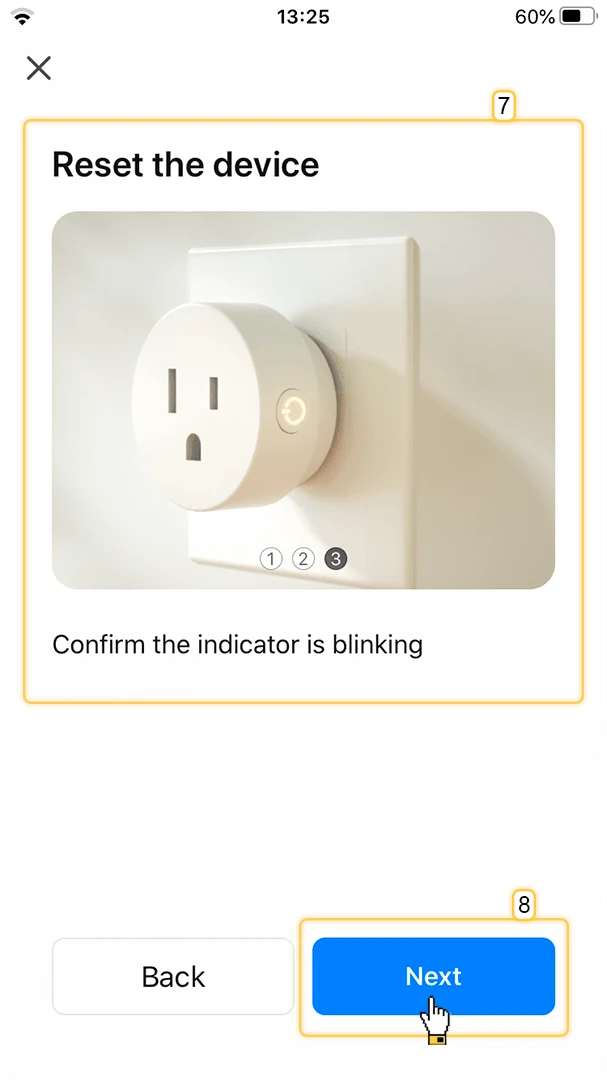
- Confirm the indicator light is blinking rapidly, then tap Next.
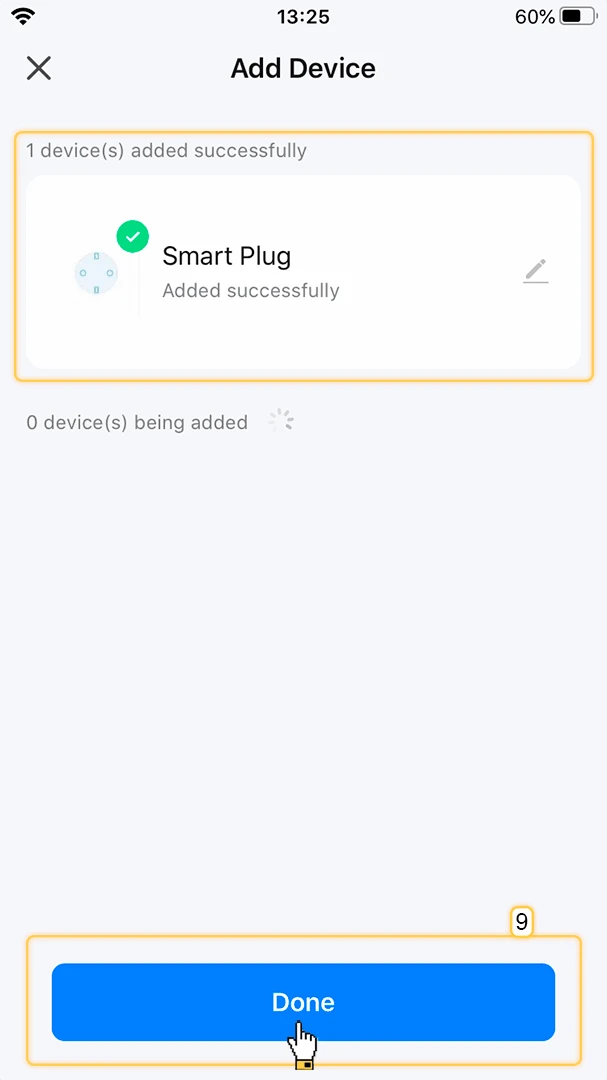
- Wait for the app to discover and add the device. Tap Done when the success screen appears.
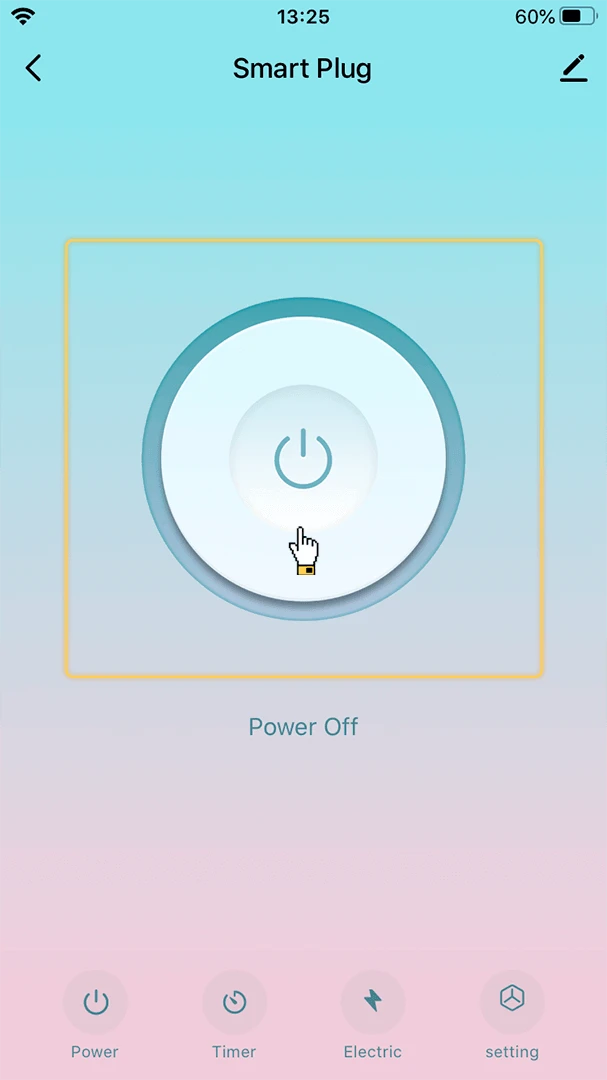
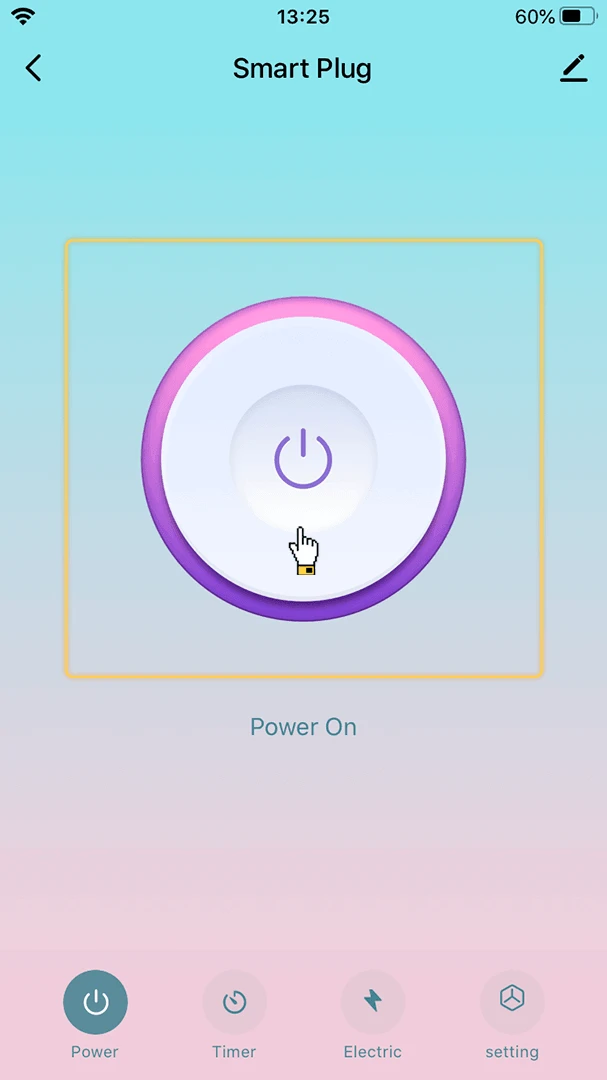
- Open the device card and tap the power button to verify the plug responds to commands.
Create a Tuya IoT Platform Account
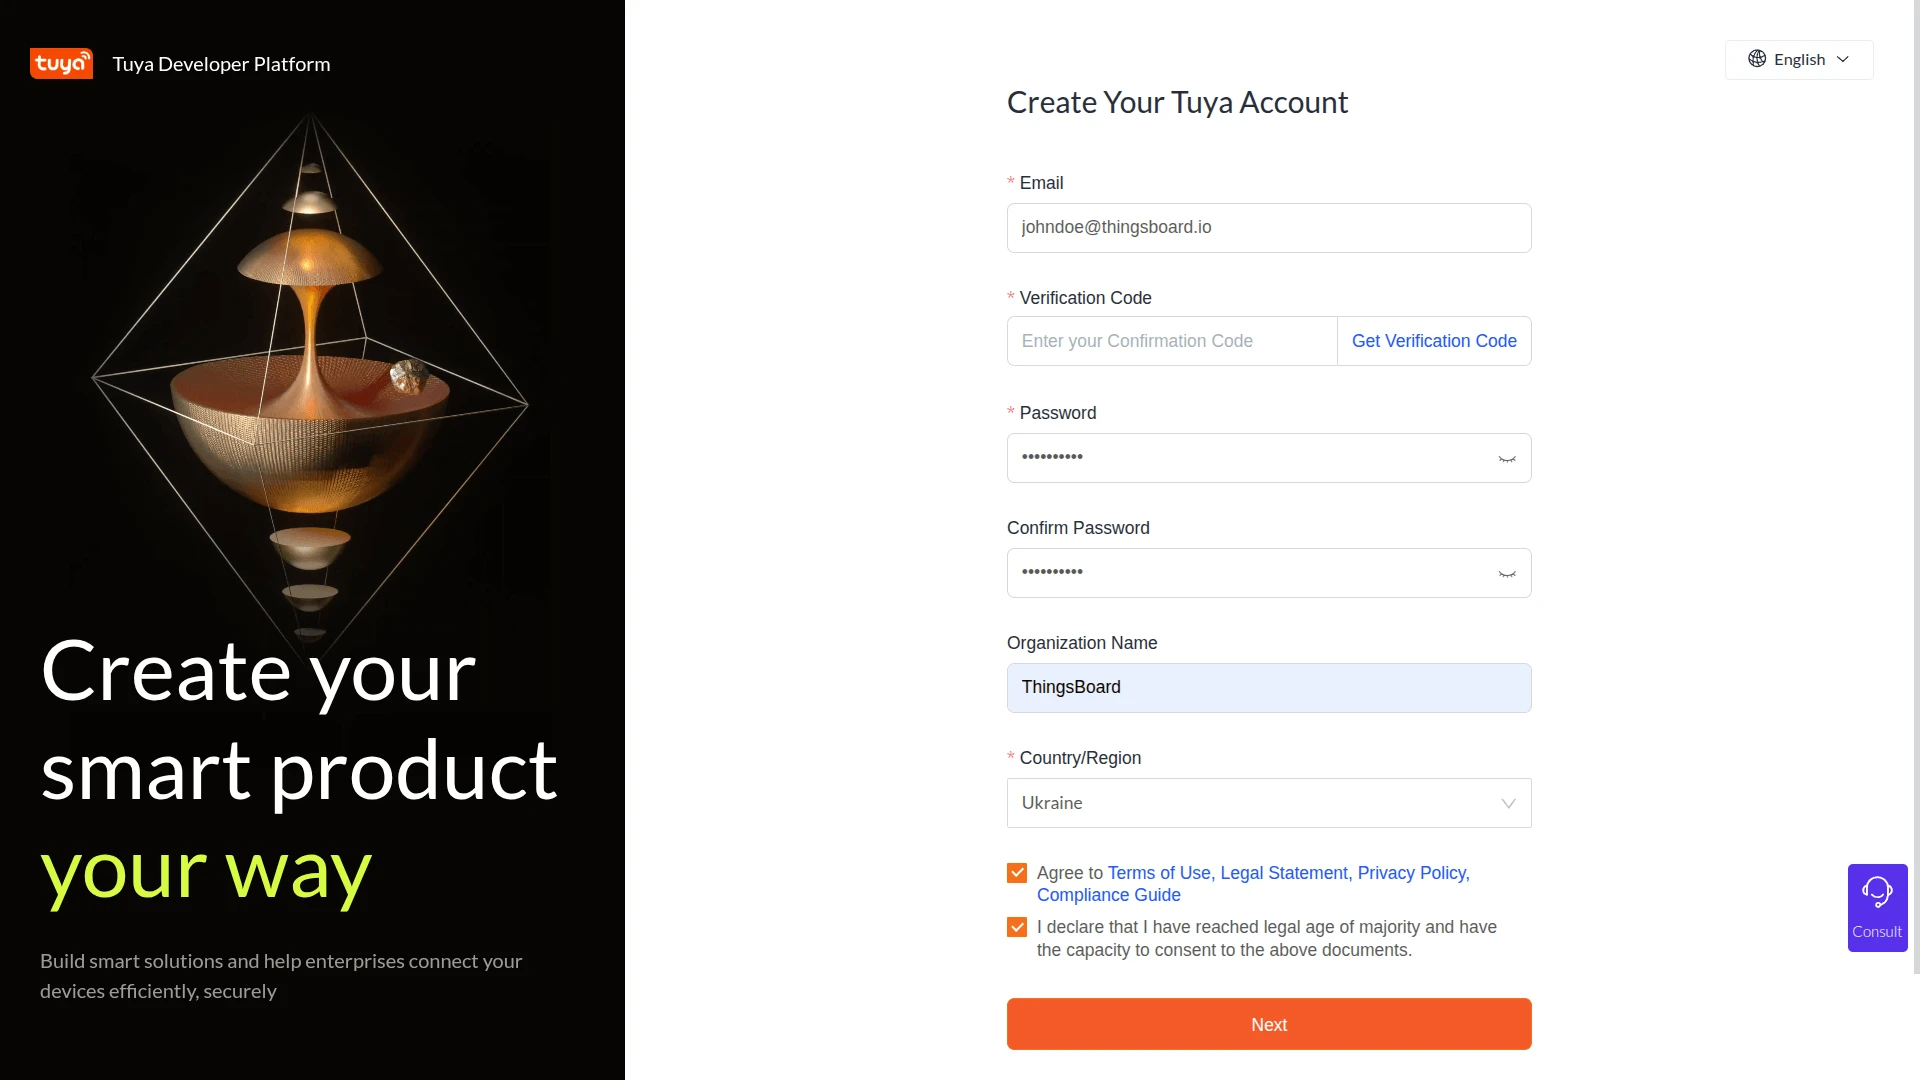
Section titled “Create a Tuya IoT Platform Account”- Go to the Tuya IoT Platform login page and click Sign Up.
- Fill in the registration form: Email, Verification Code (sent to your email), Password, Organization Name, and Country/Region, agree to the terms, then click Next.
- On success, you are redirected to the login page. Log in with your new account to open the Tuya IoT Platform dashboard.

Create a Cloud Project
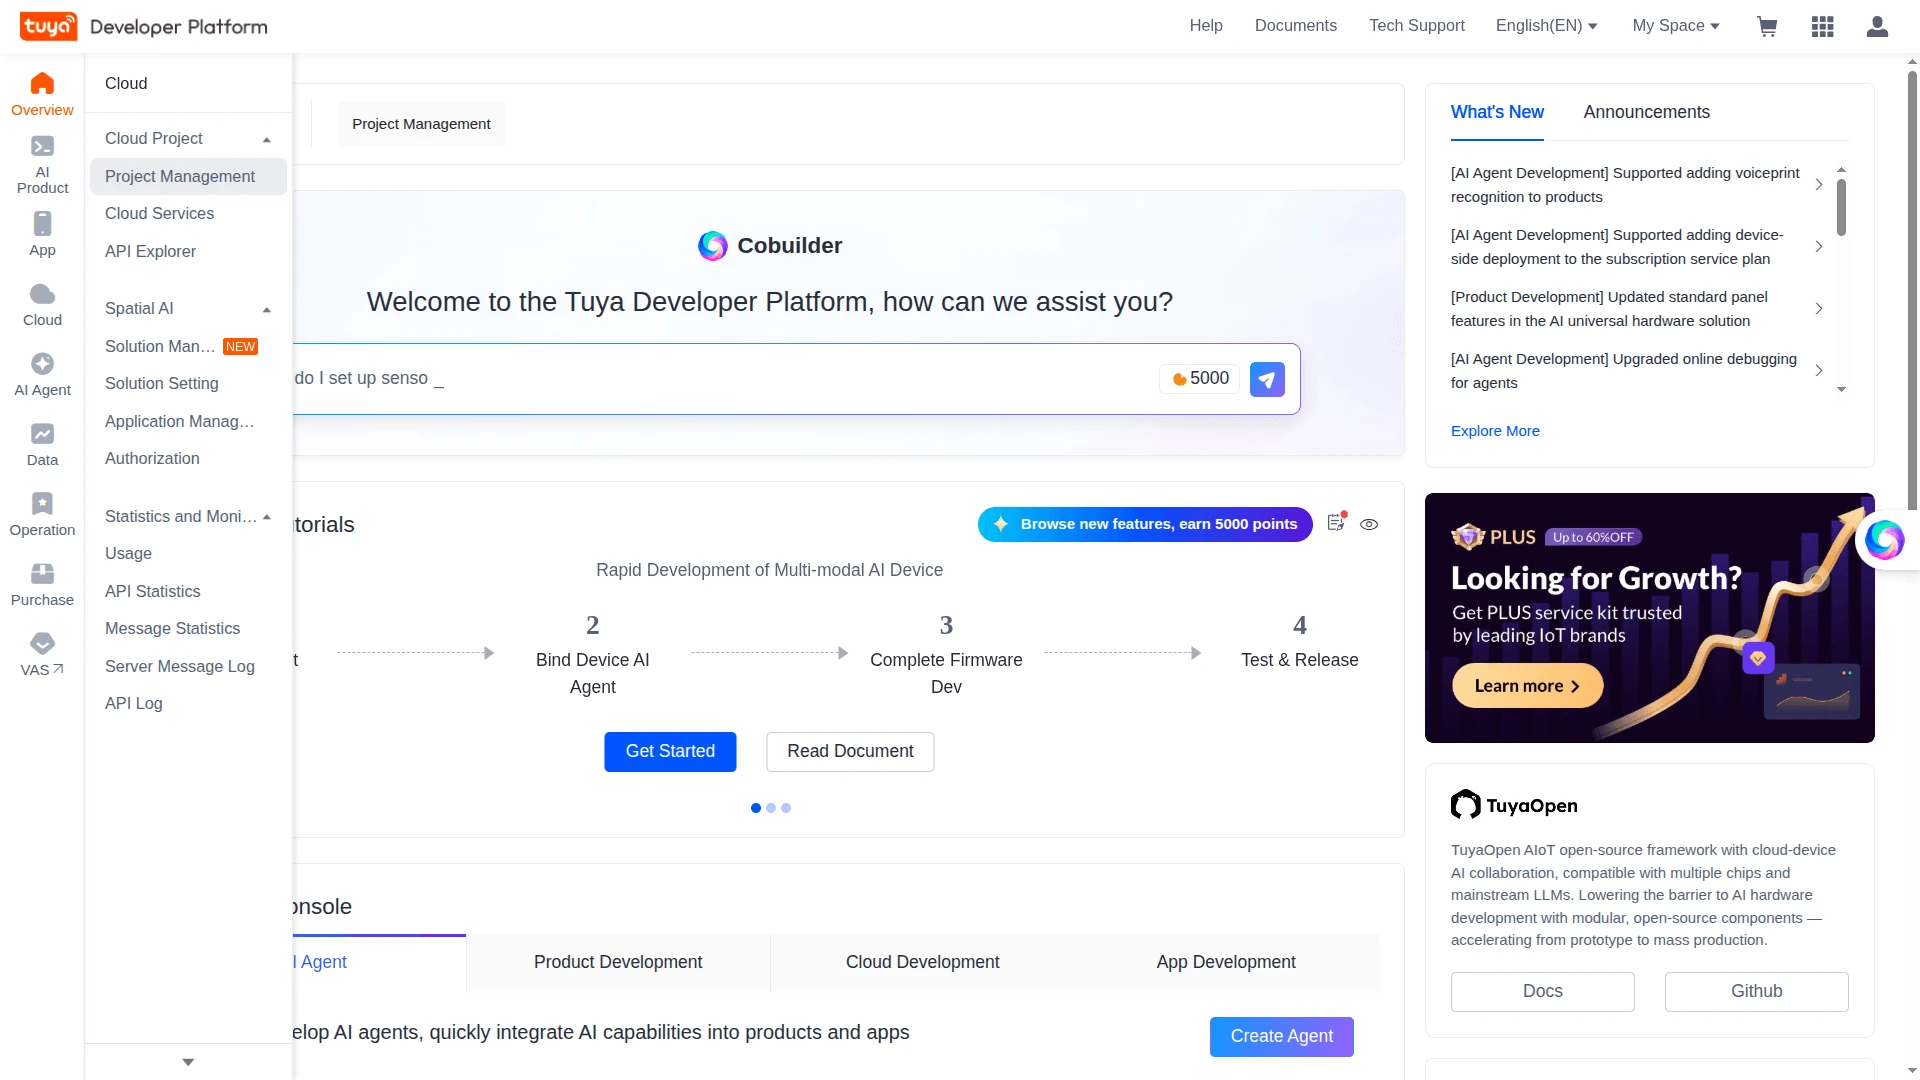
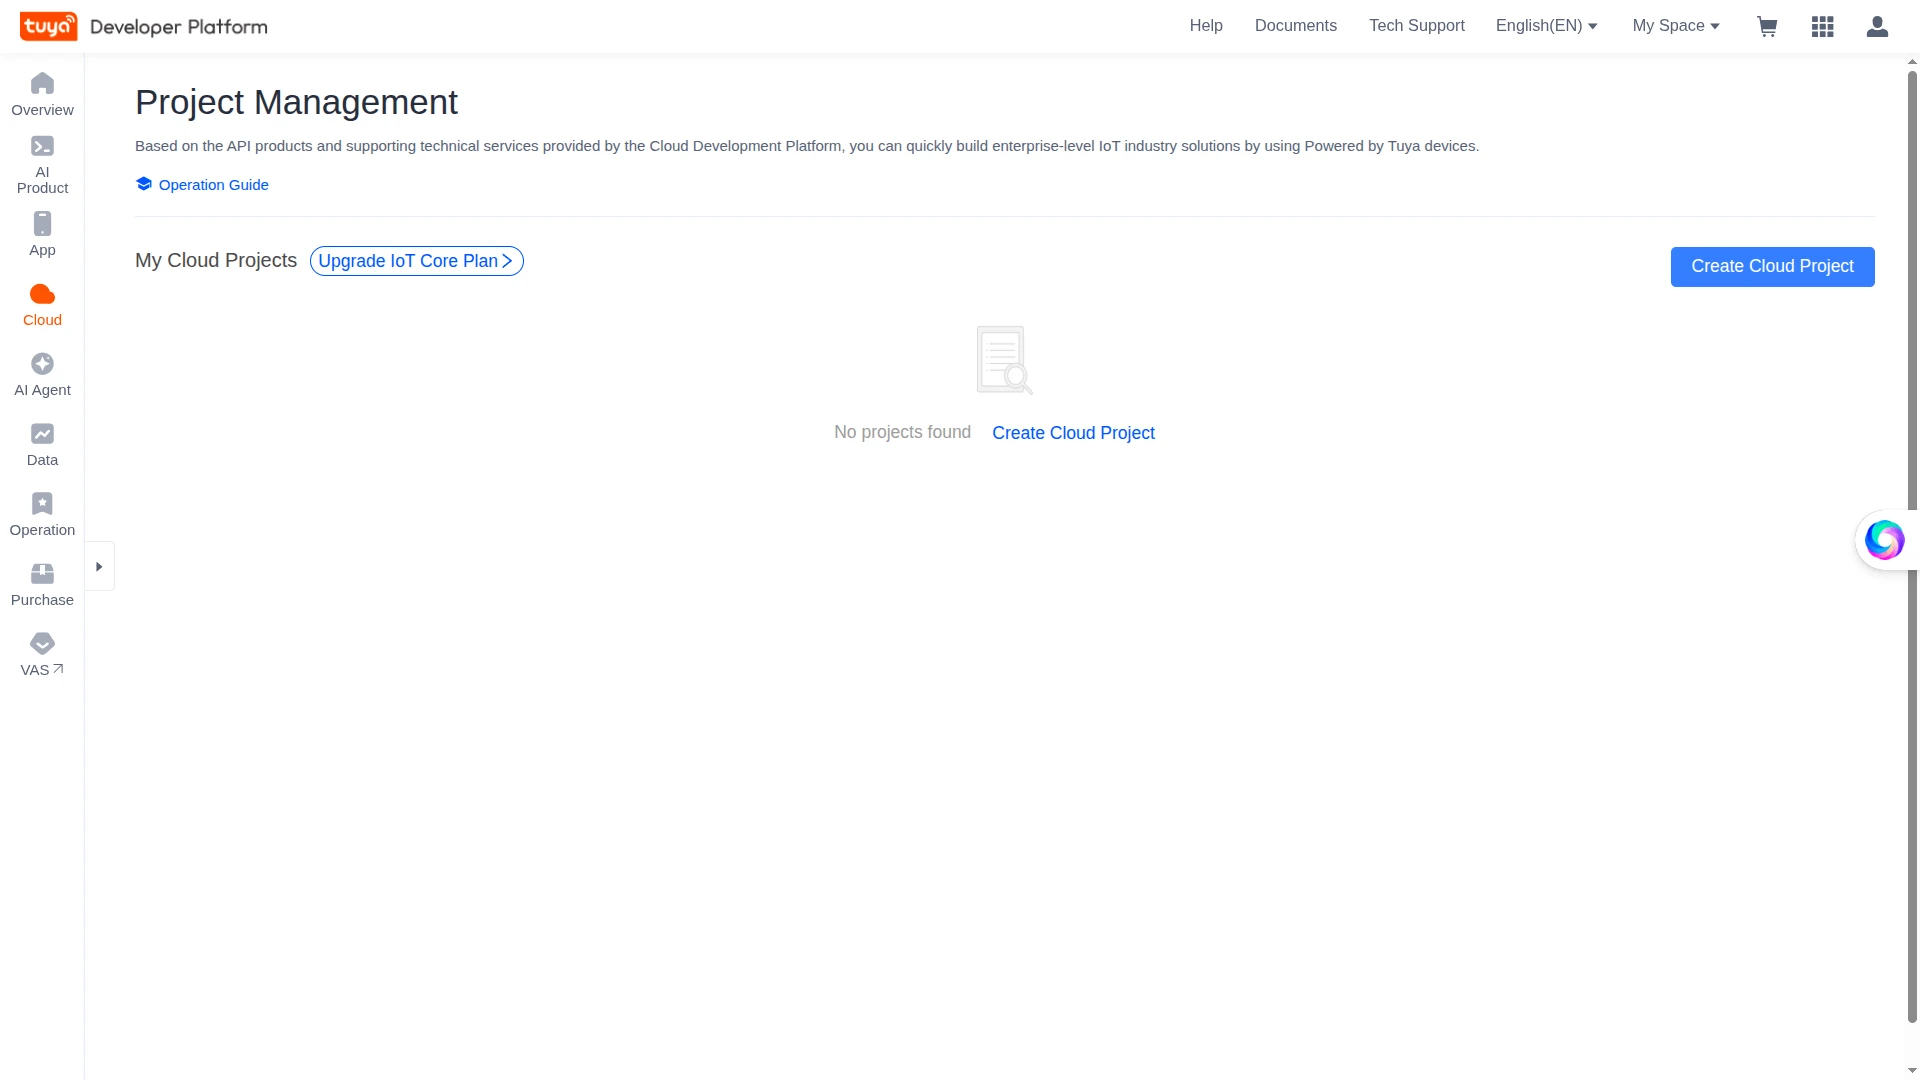
Section titled “Create a Cloud Project”- In the sidebar, go to Cloud ⇾ Cloud Project ⇾ Project Management.
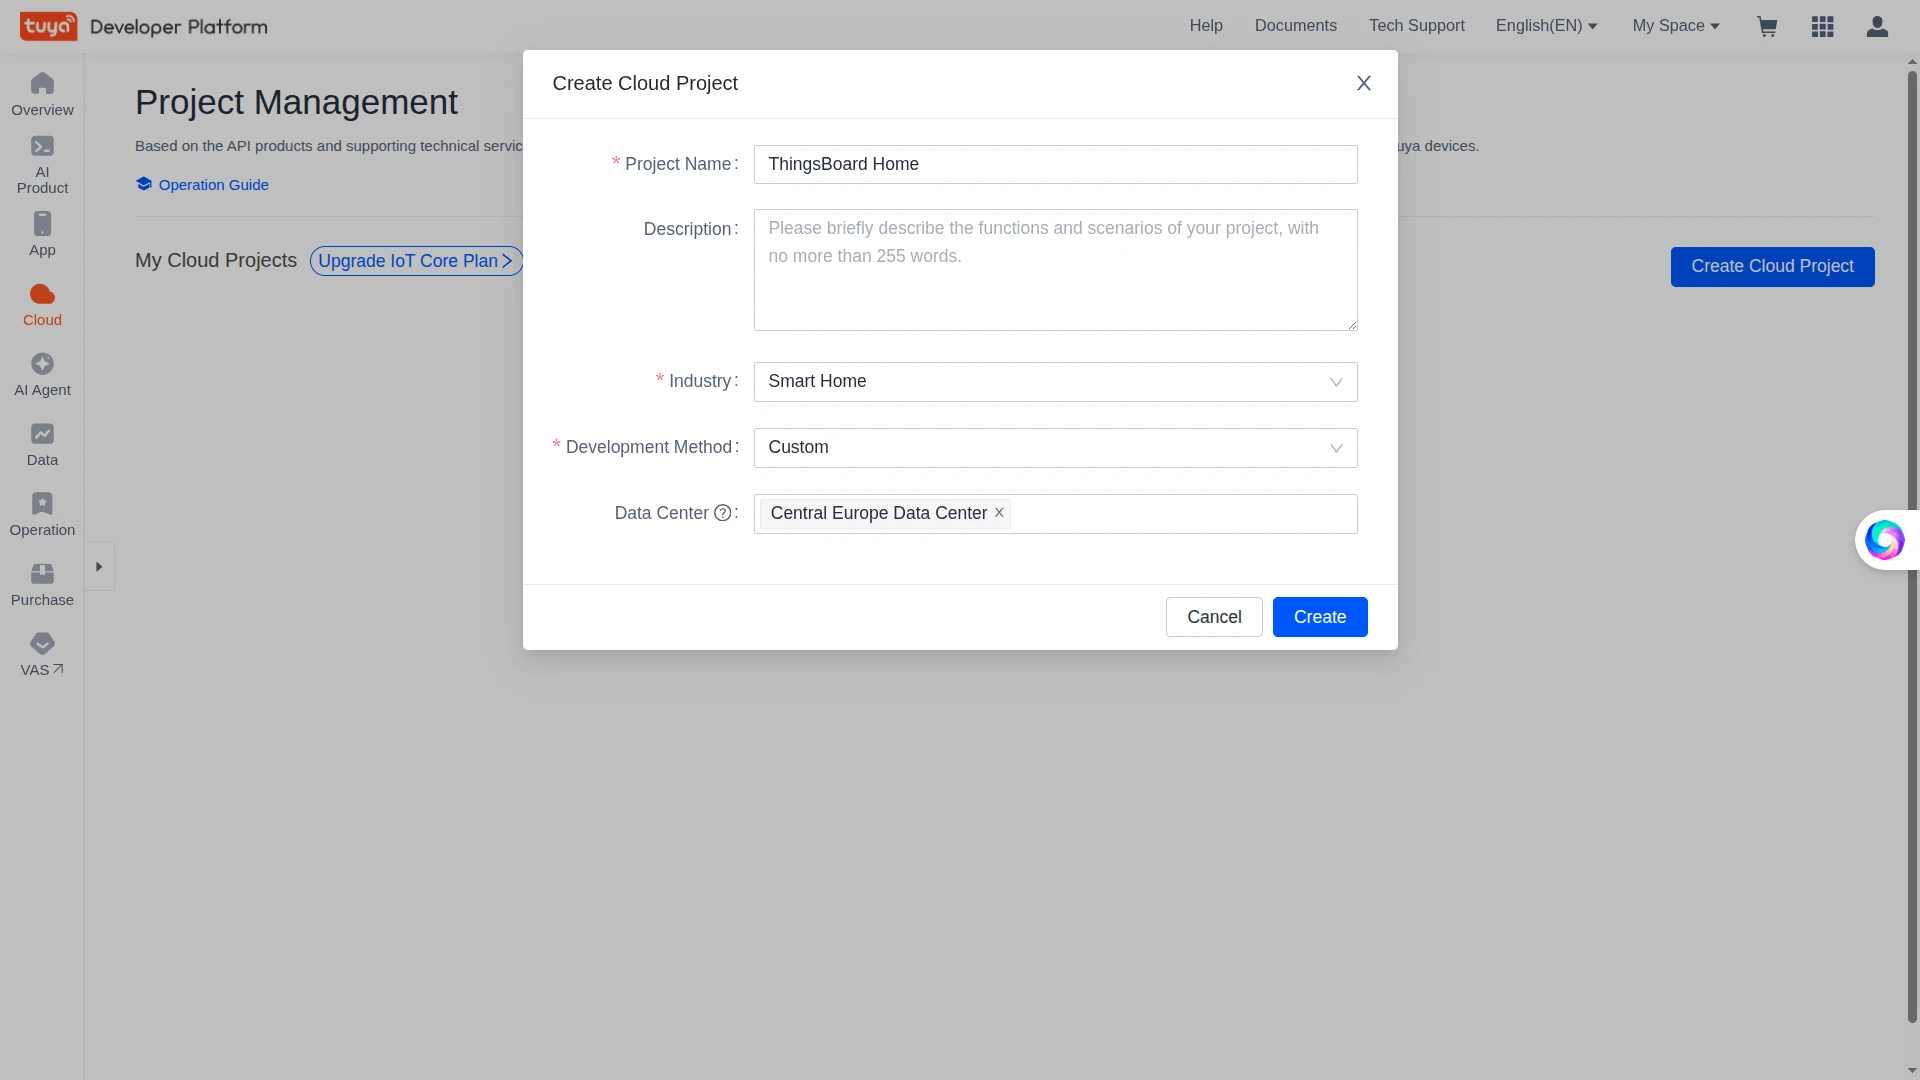
- Click Create Cloud Project. Enter a Project Name — e.g.
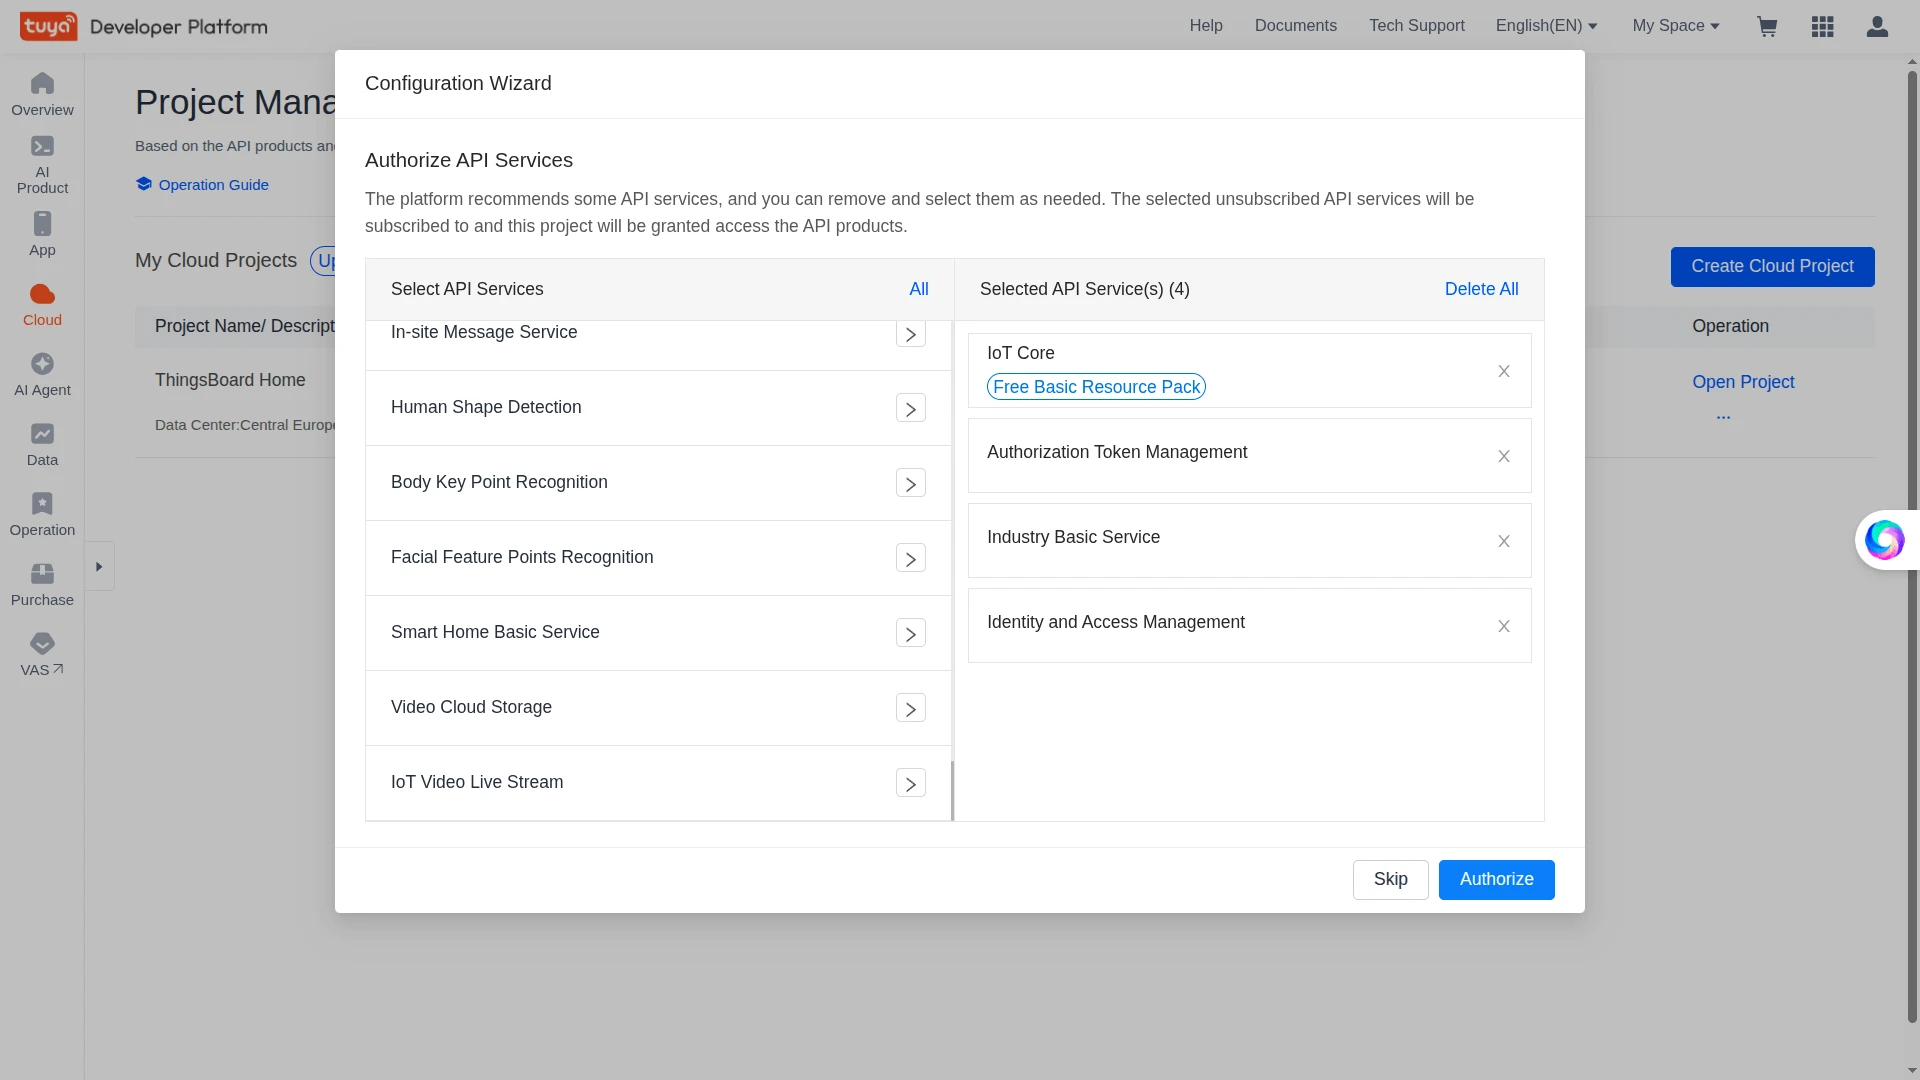
ThingsBoard— choose an Industry and Development Method (e.g. Custom), select your Data Center, and click Create. - On the Authorize API Services screen, review the recommended API services (IoT Core is required) and click Authorize.
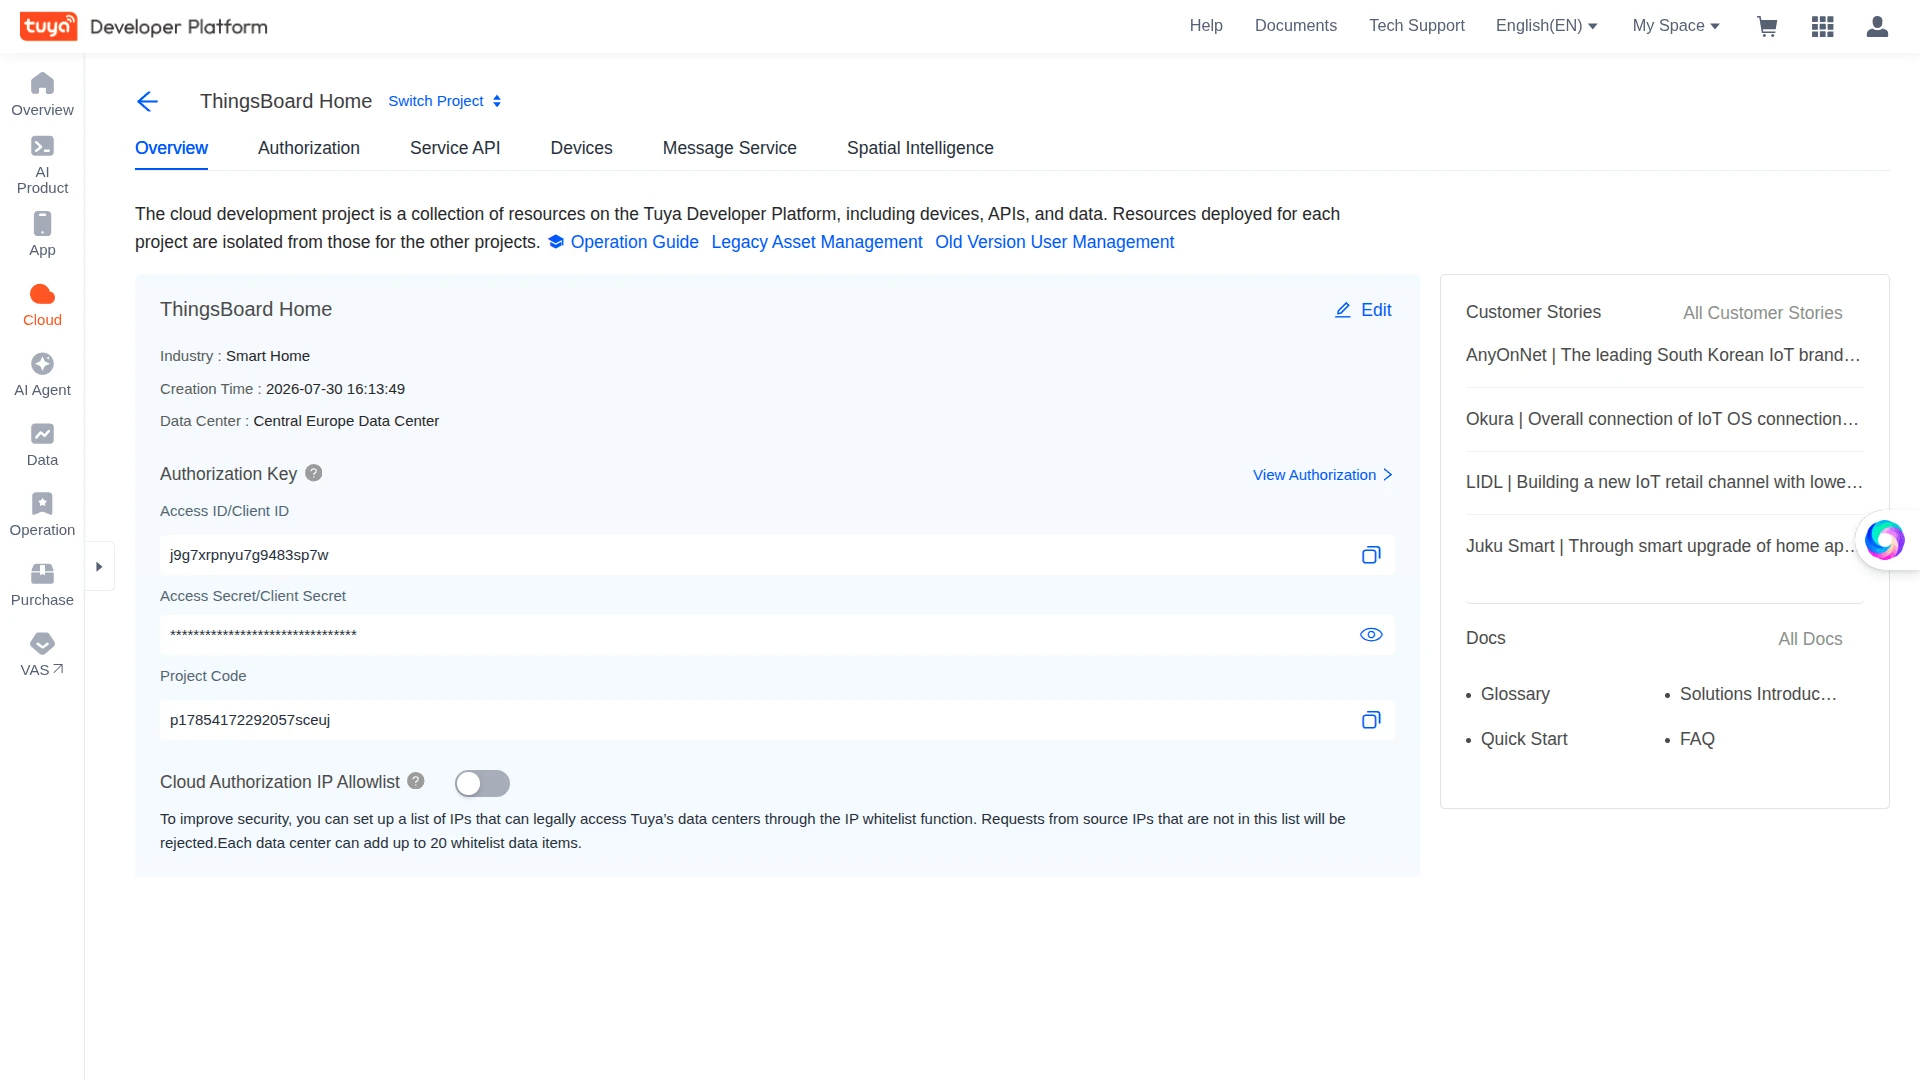
- On the project’s Overview page, note the Access ID/Client ID and Access Secret/Client Secret — you will need them when creating the ThingsBoard integration.
Enable the Message Service
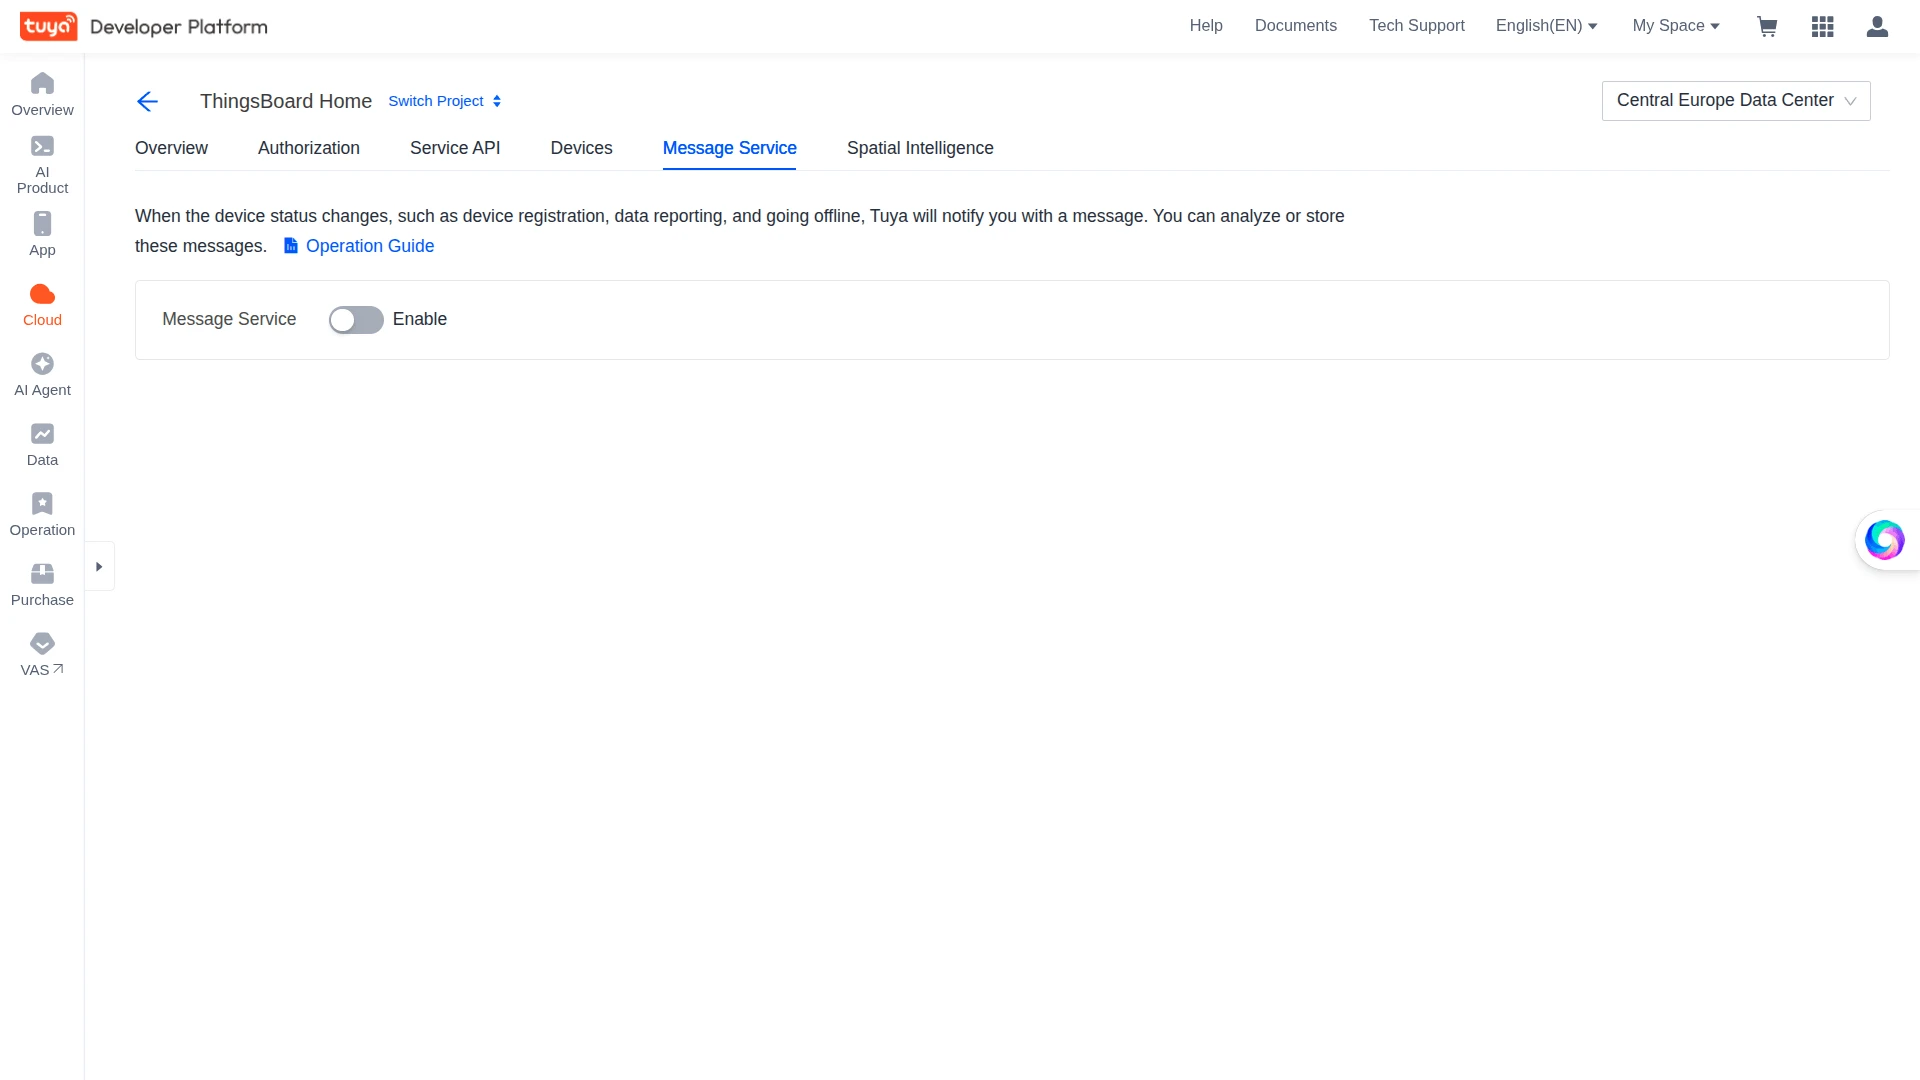
Section titled “Enable the Message Service”The Tuya Message Service pushes real-time device status reports to the ThingsBoard integration over Tuya’s Pulsar-based message queue. It must be enabled for uplinks to flow.
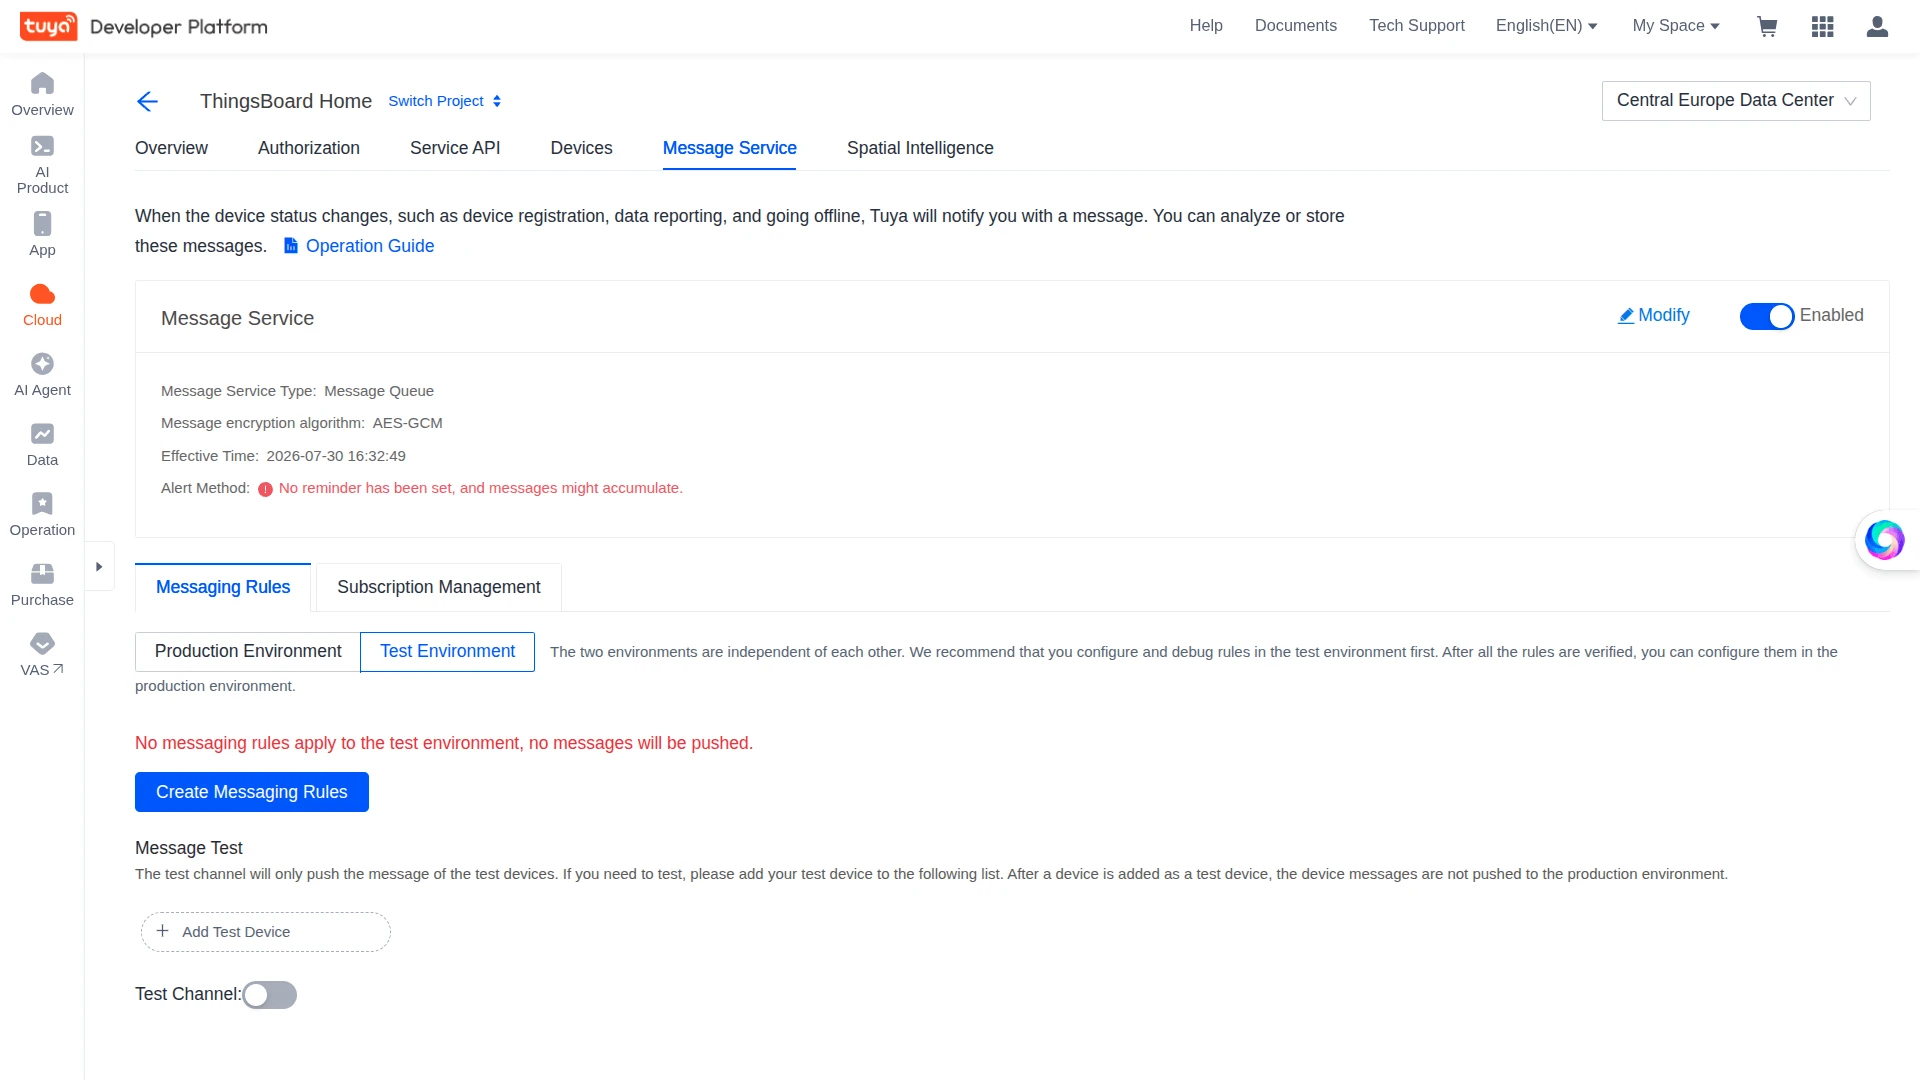
- In your cloud project, open the Message Service tab.
- Toggle Message Service on.
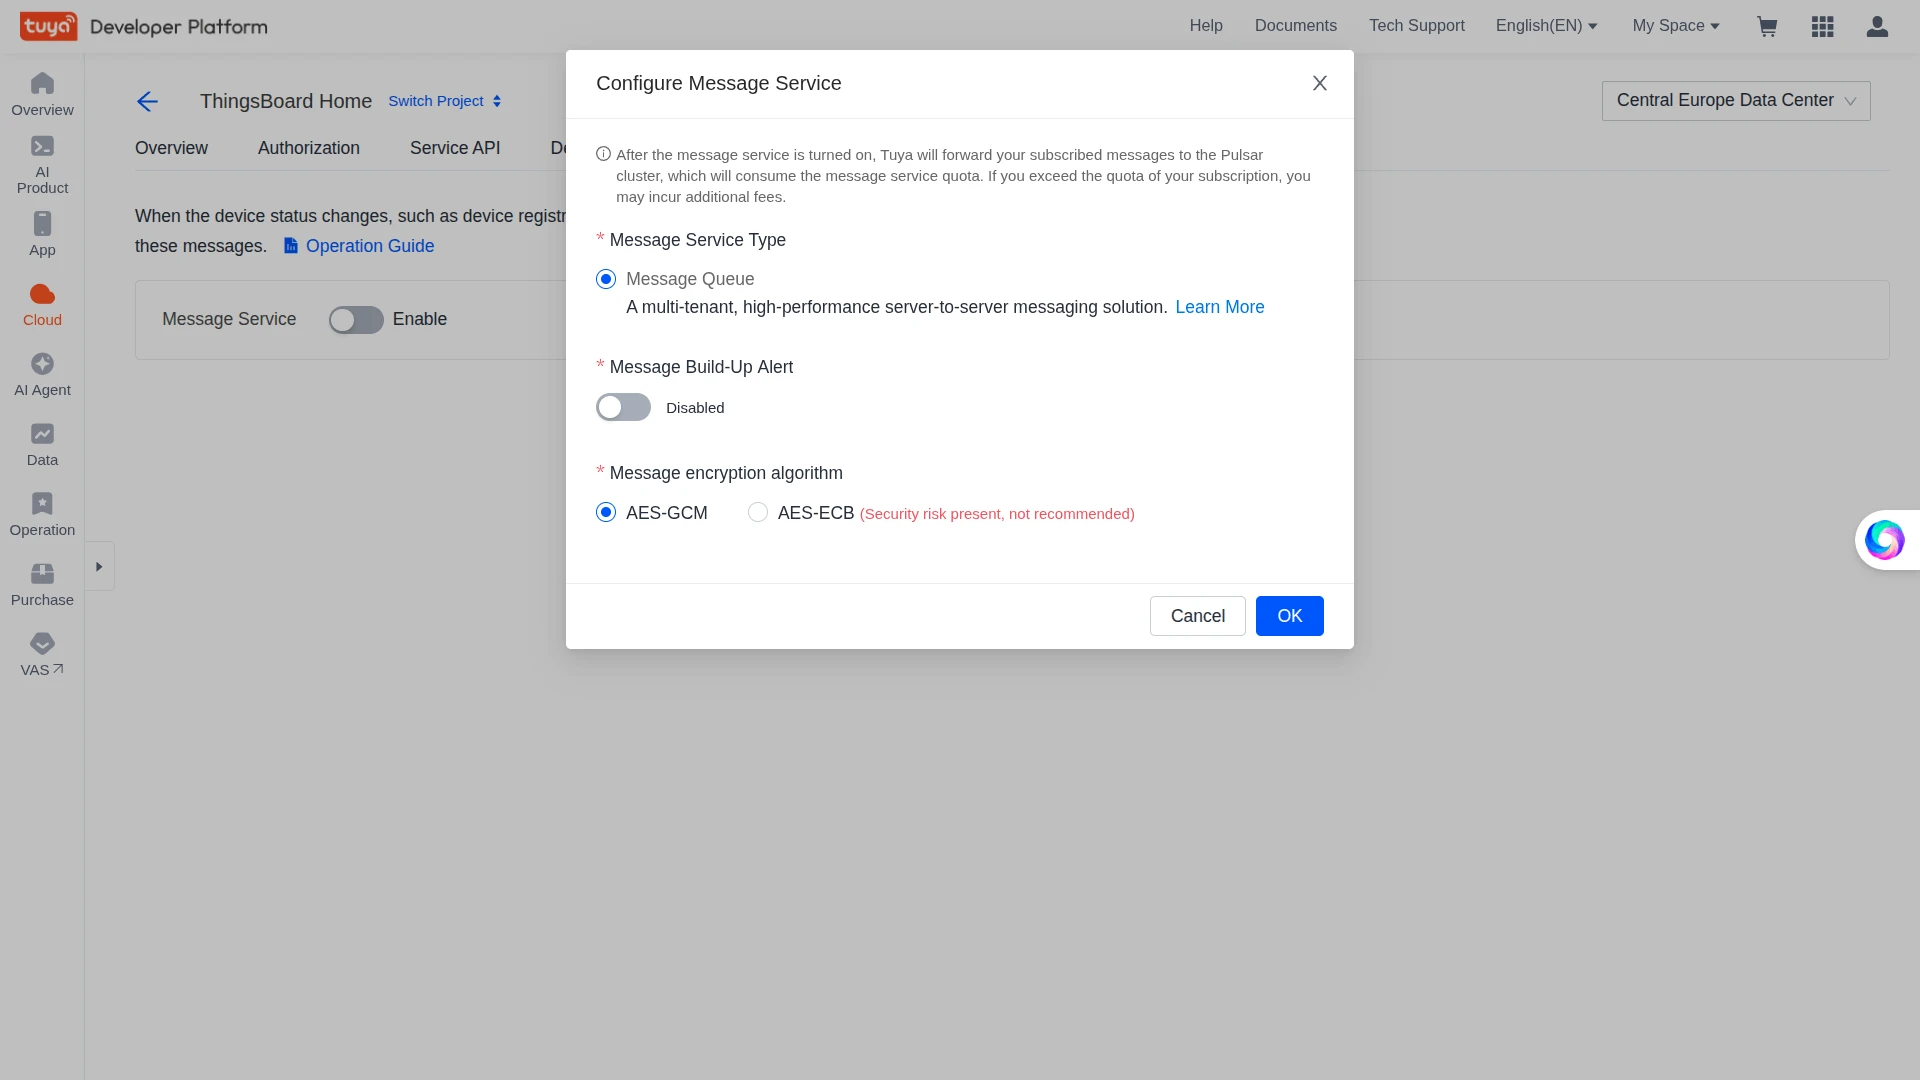
- In the Configure Message Service pop-up, select the Message Service Type and Message encryption algorithm, then click OK.
- The Message Service tab now shows the service as Enabled with your configured settings.
Configure Messaging Rules
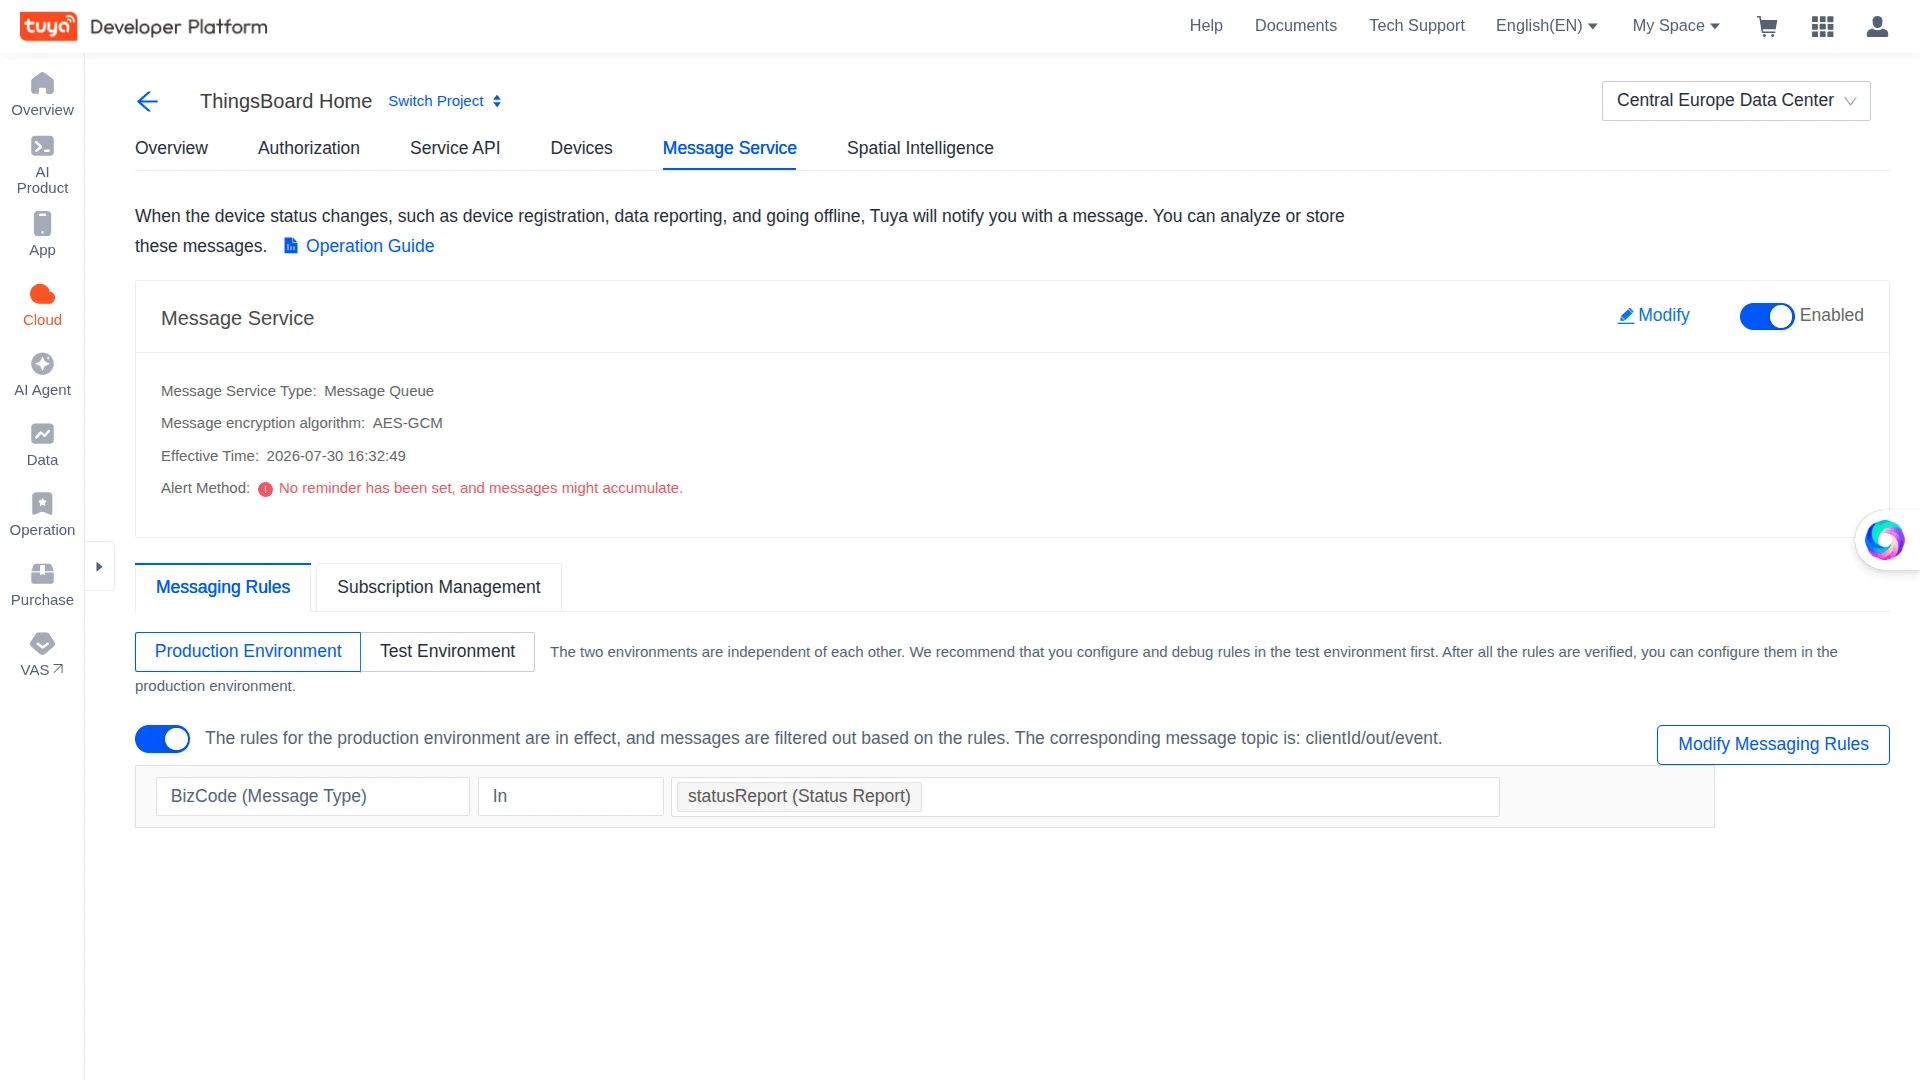
Section titled “Configure Messaging Rules”Enabling the Message Service is not enough on its own — you must also enable a messaging rule that tells Tuya which messages to push, and it must be enabled for the environment that matches your device and integration.
- In your cloud project, open Message Service ⇾ Messaging Rules.
- Select the tab that matches your setup — Production Environment for real devices (or Test Environment for test devices).
- Enable the rule toggle on the left. If it reads “The rules for the production environment are disabled, so all messages will not be pushed”, turn it on.
- Click Modify Messaging Rules and confirm BizCode includes
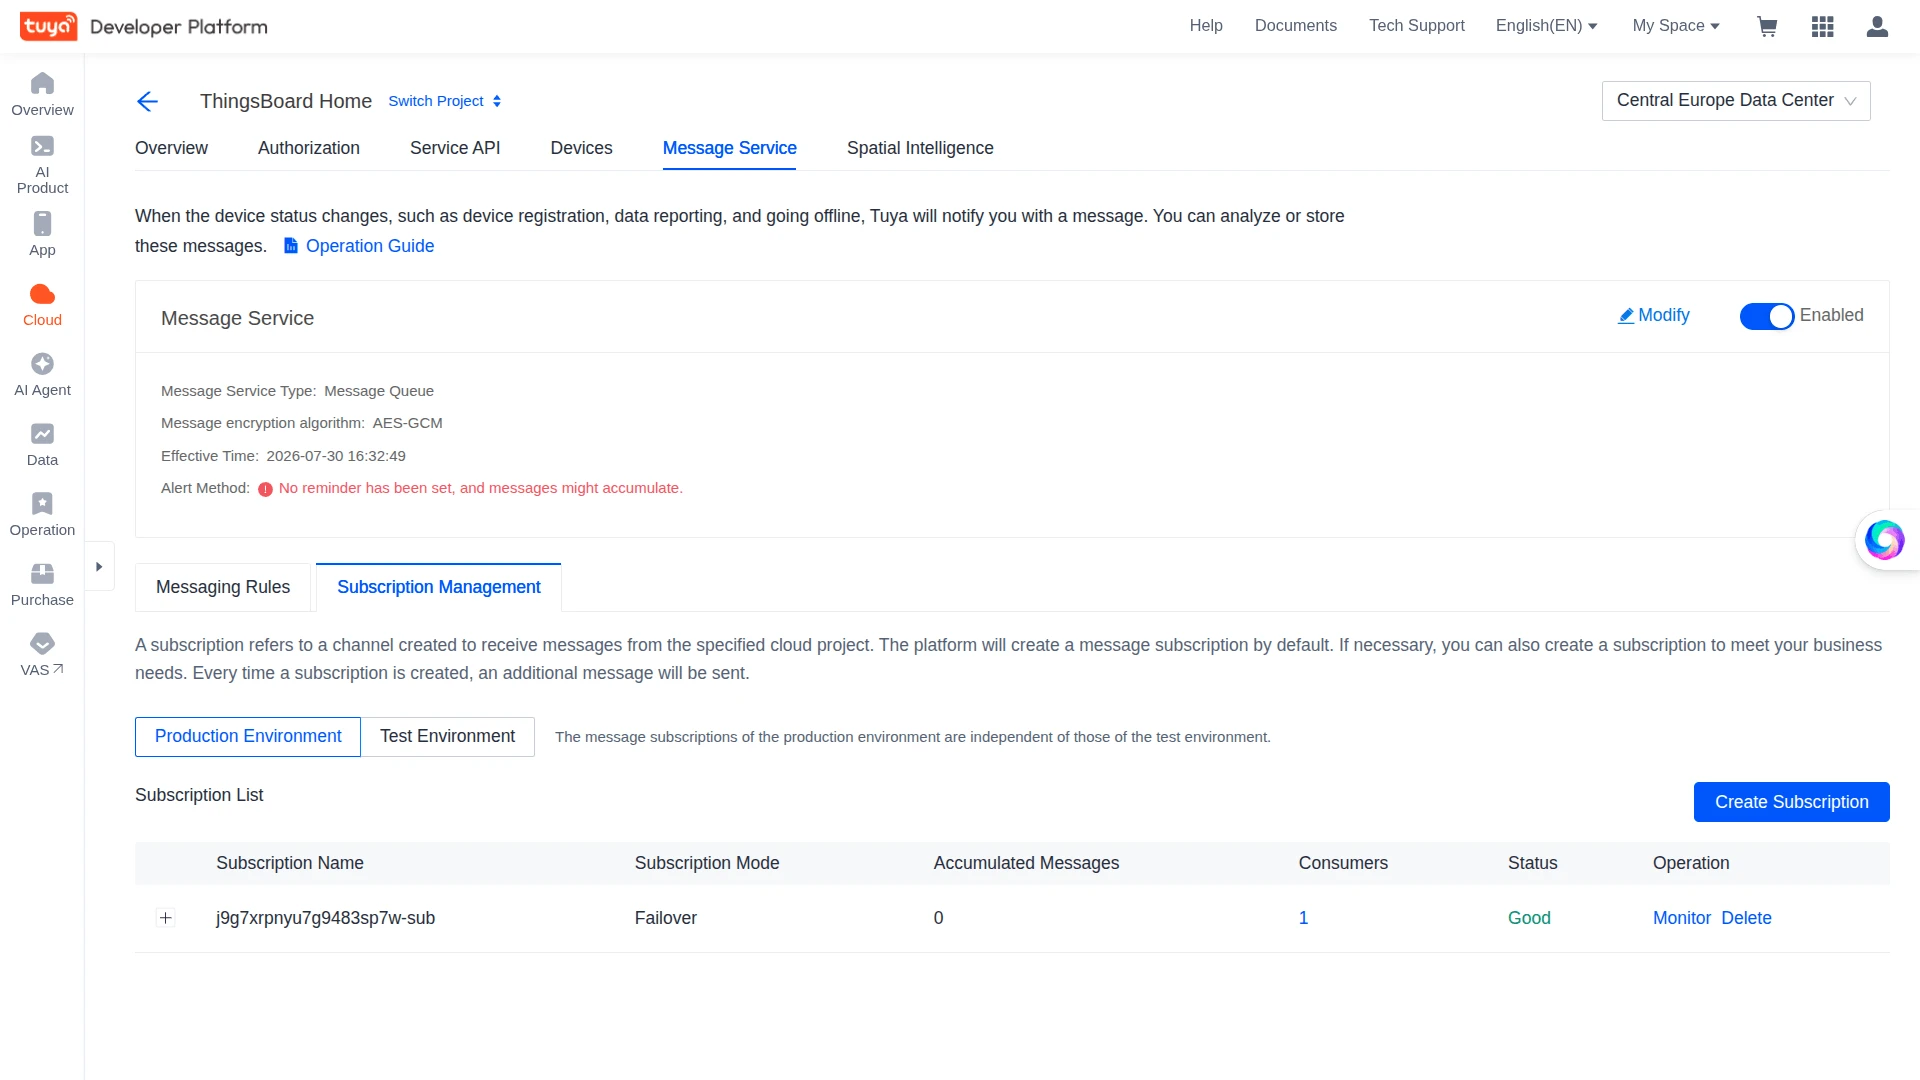
statusReport(Status Report) — optionally addonline/offline— then save. - Open Subscription Management ⇾ the matching environment and confirm a subscription exists with Status = Good (its name matches your Access ID, e.g.
<access-id>-sub).
Link Your Tuya App Account
Section titled “Link Your Tuya App Account”Linking your app account makes the devices from the Smart Life / Tuya Smart app available to the cloud project.
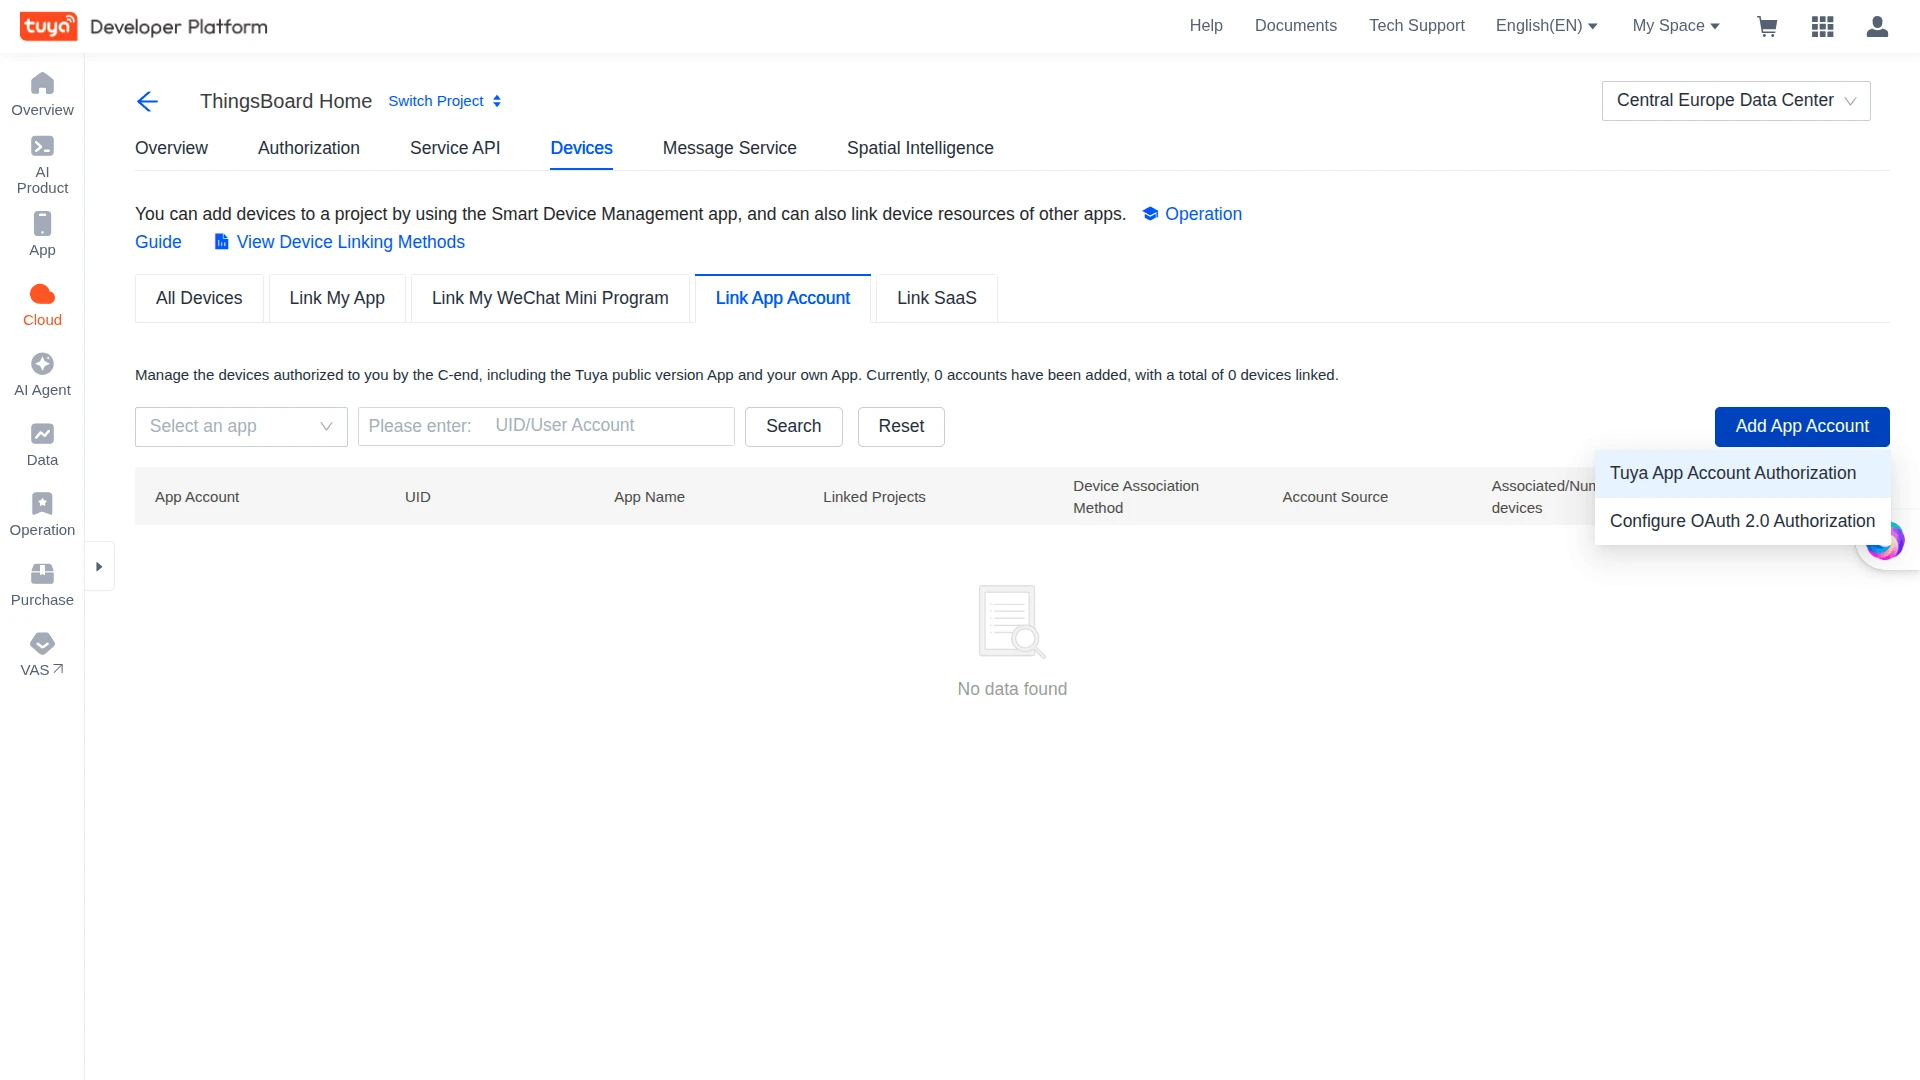
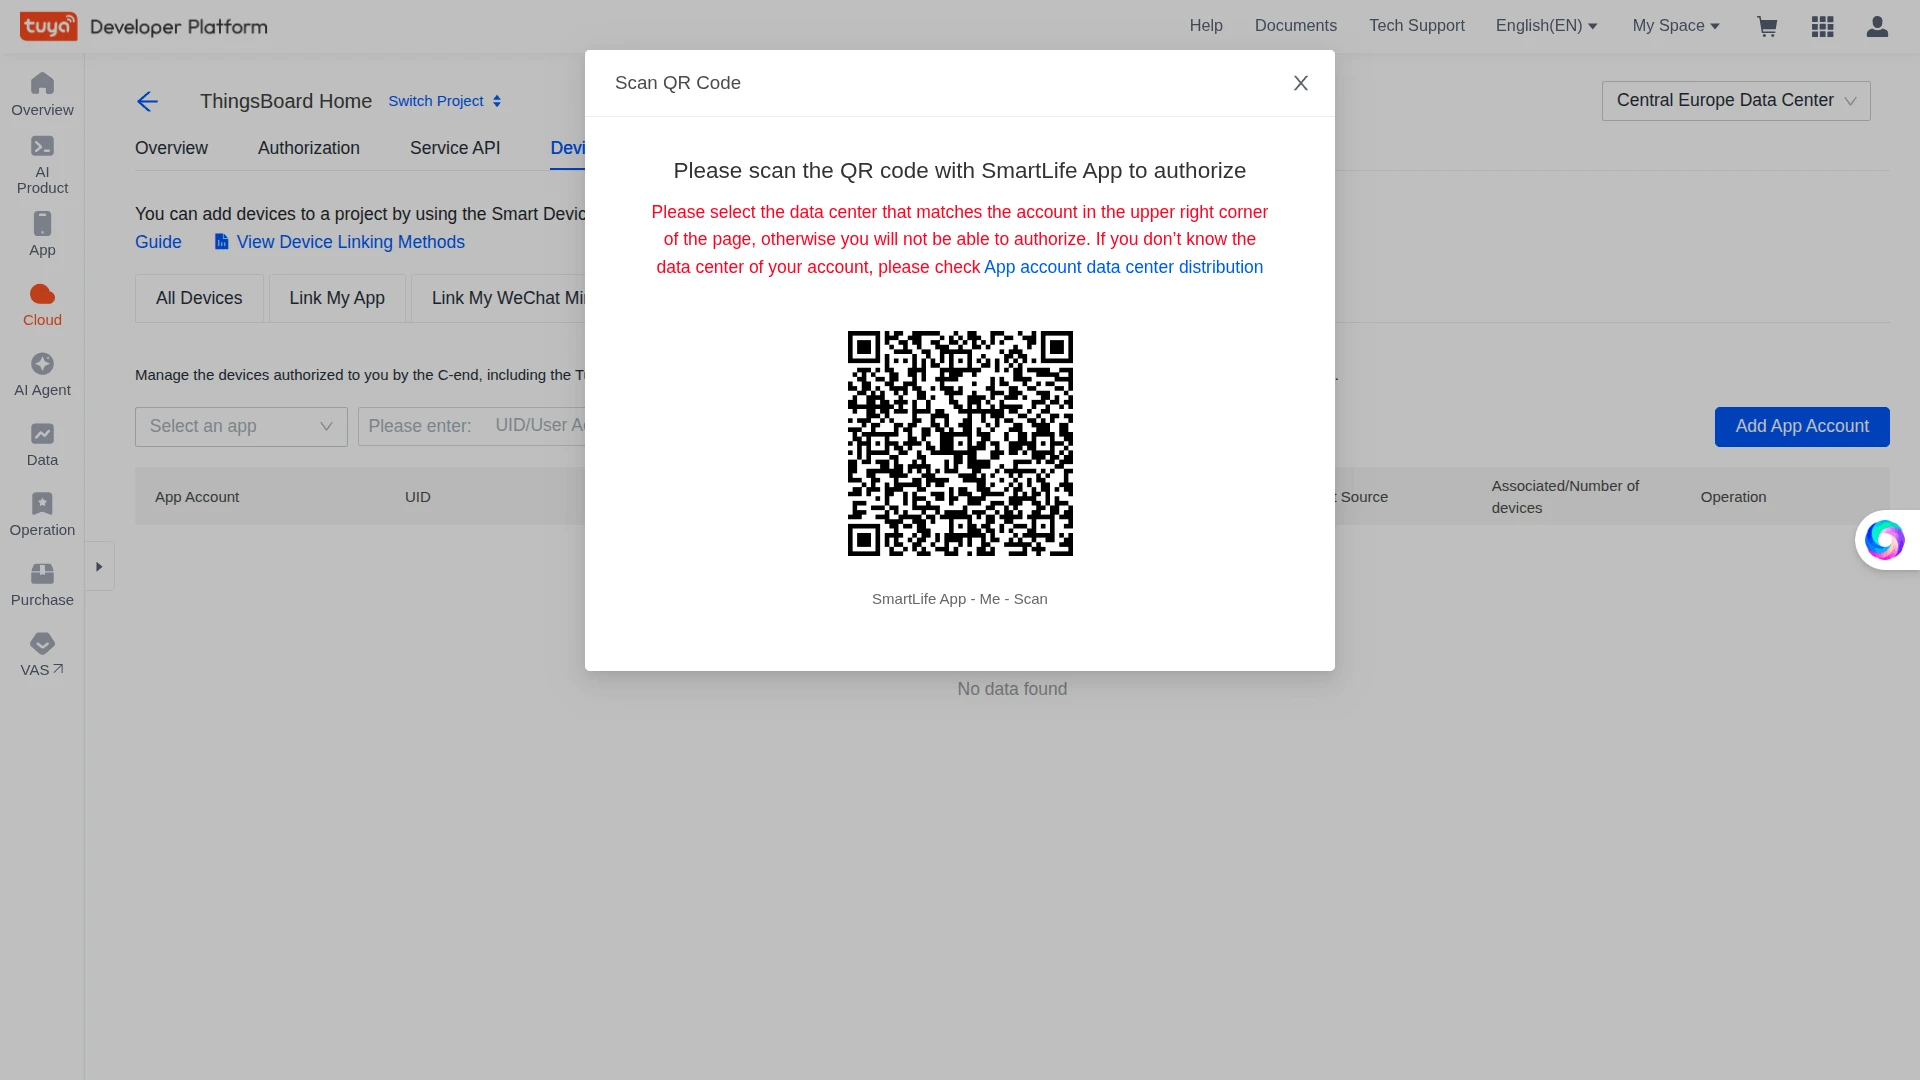
- Go to Devices ⇾ Link App Account and click Add App Account, then select Tuya App Account Authorization.
- Scan the QR code with the Smart Life (or Tuya Smart) app on your phone (Me ⇾ Scan).
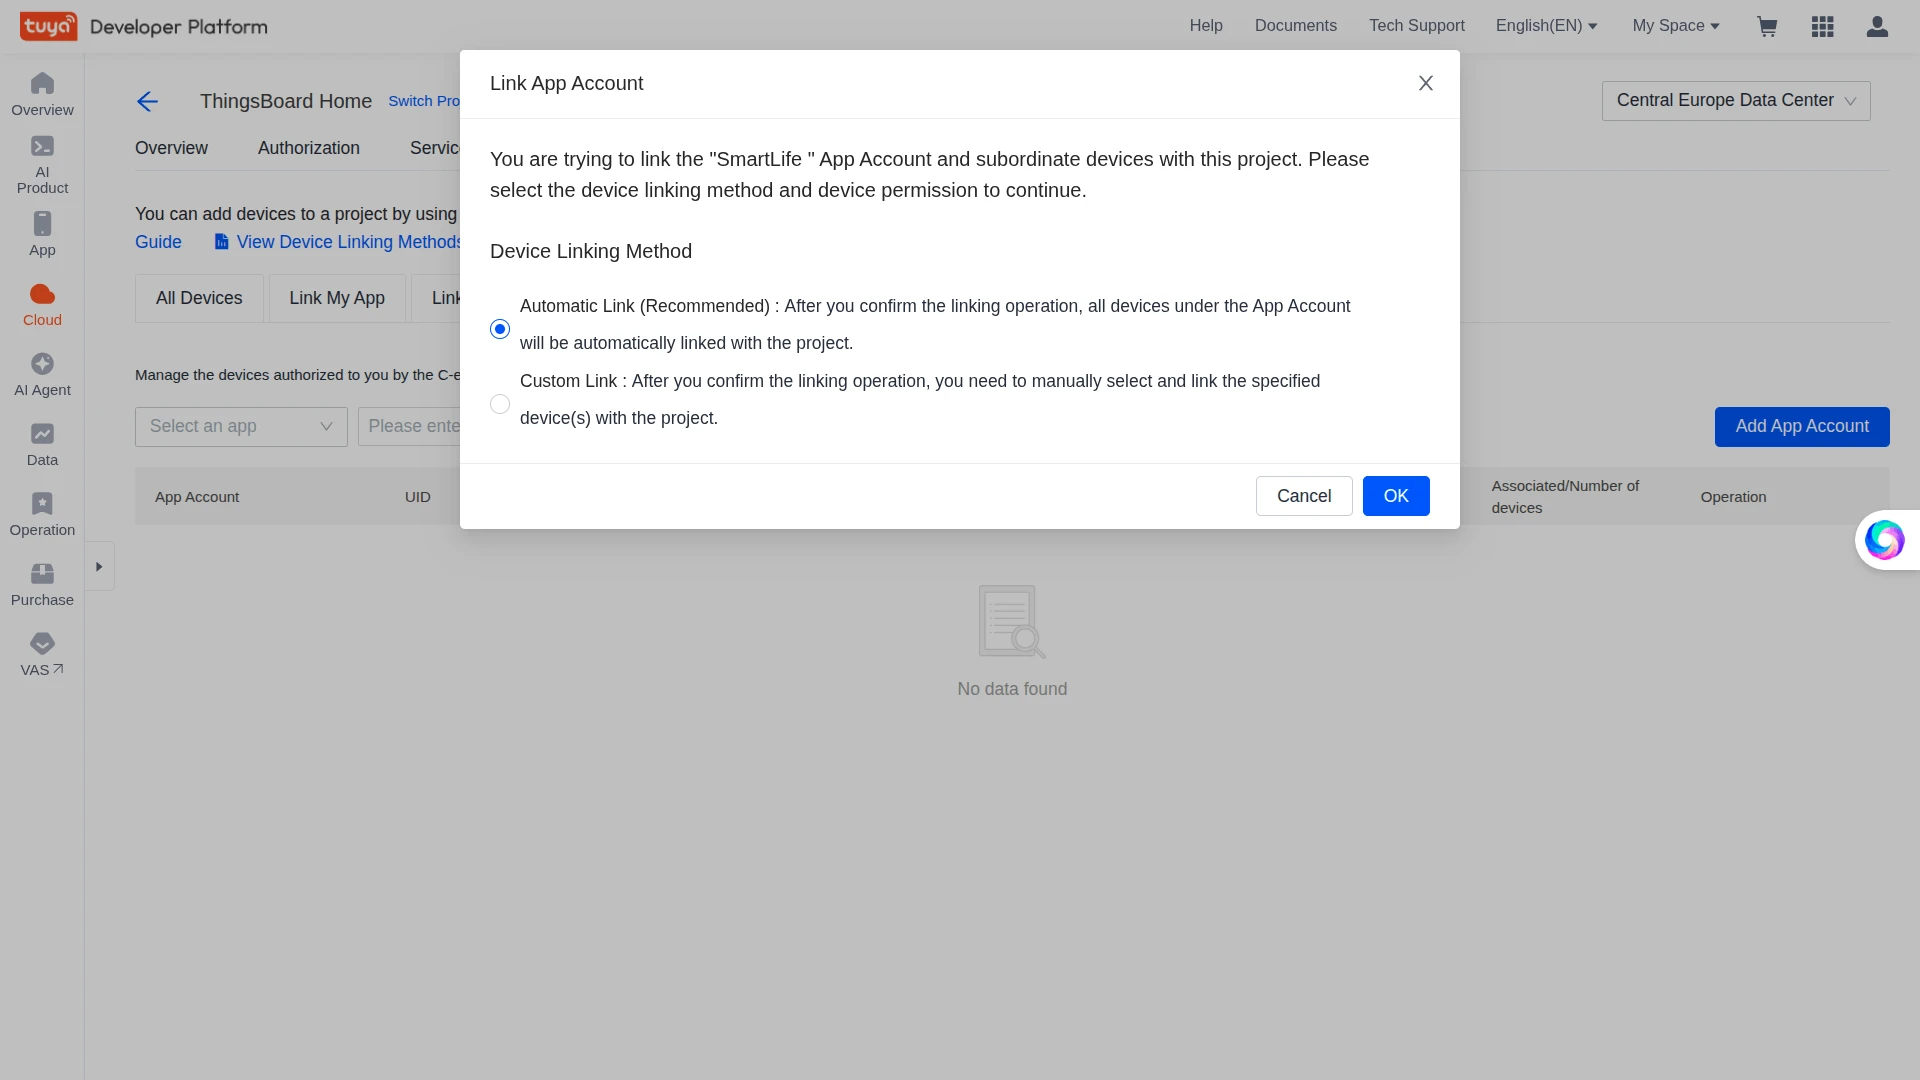
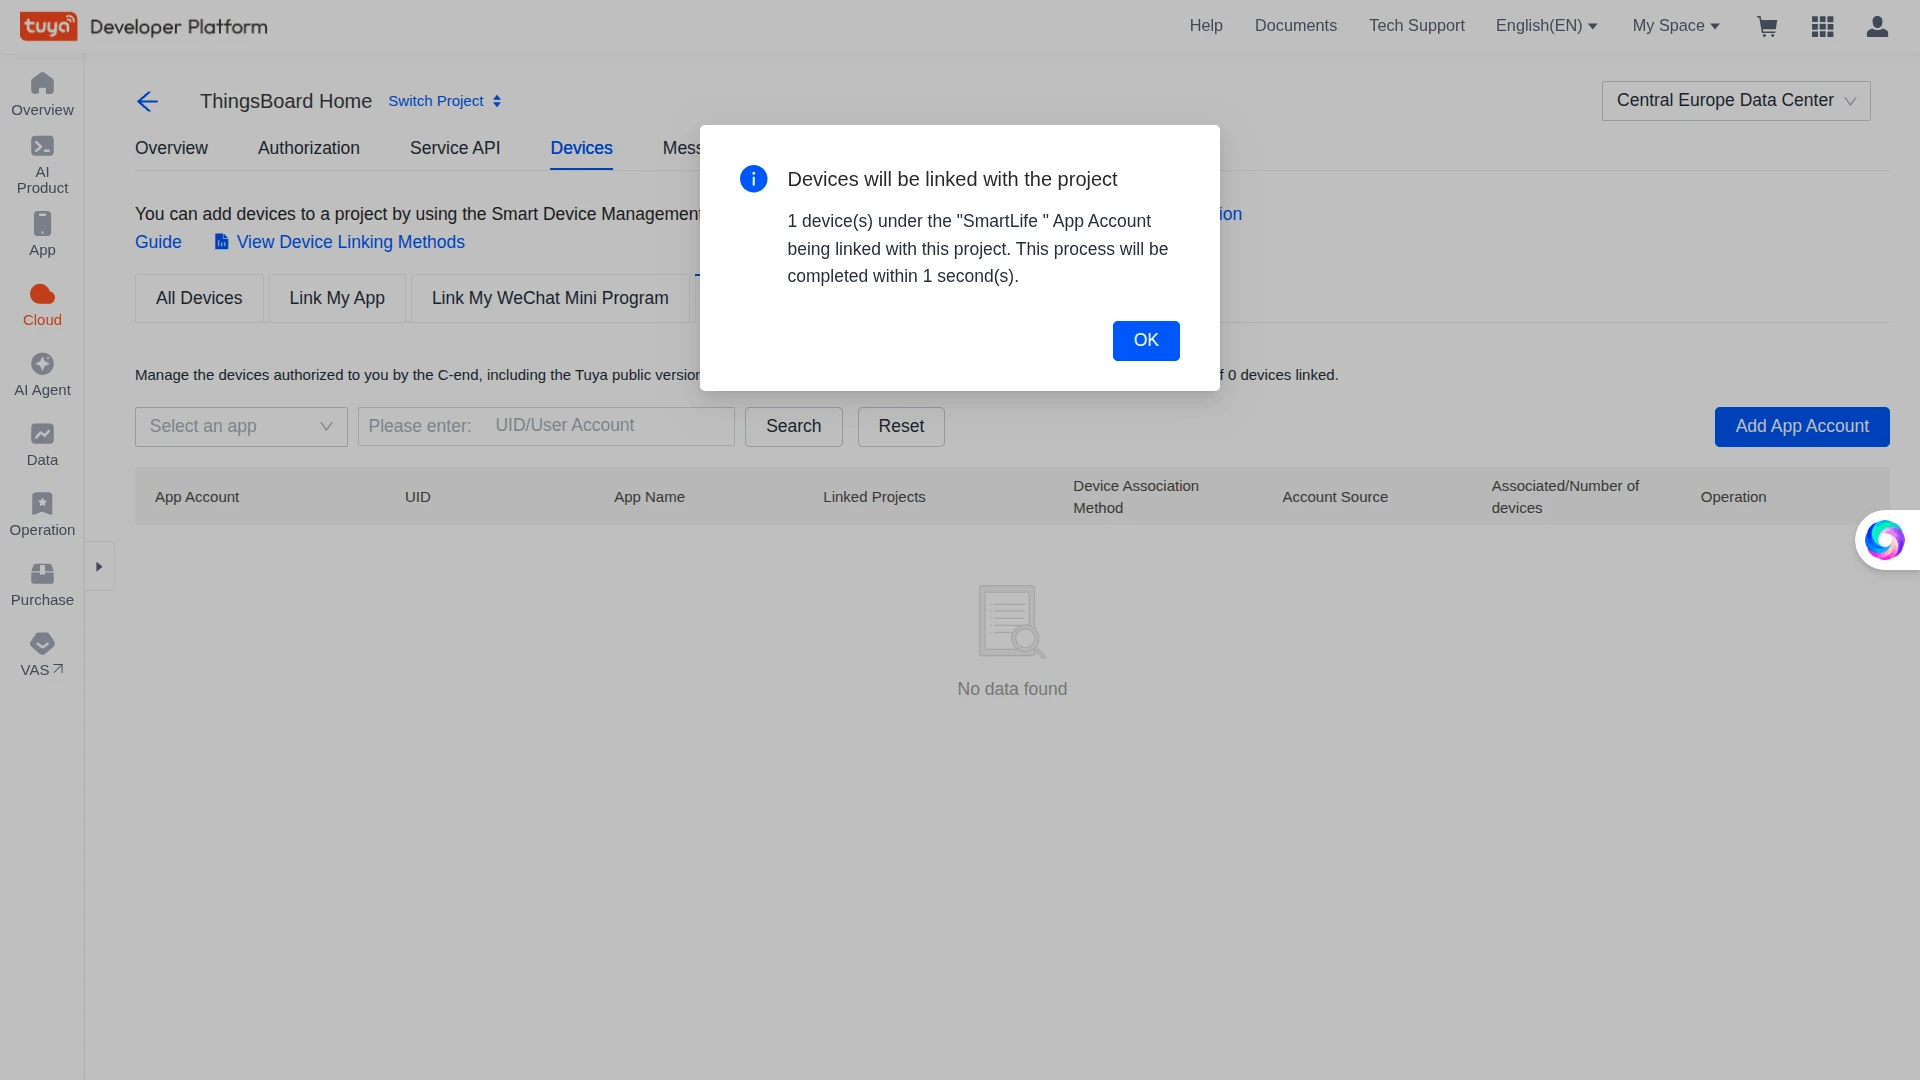
- In the Link App Account pop-up, select Automatic Link and click OK.
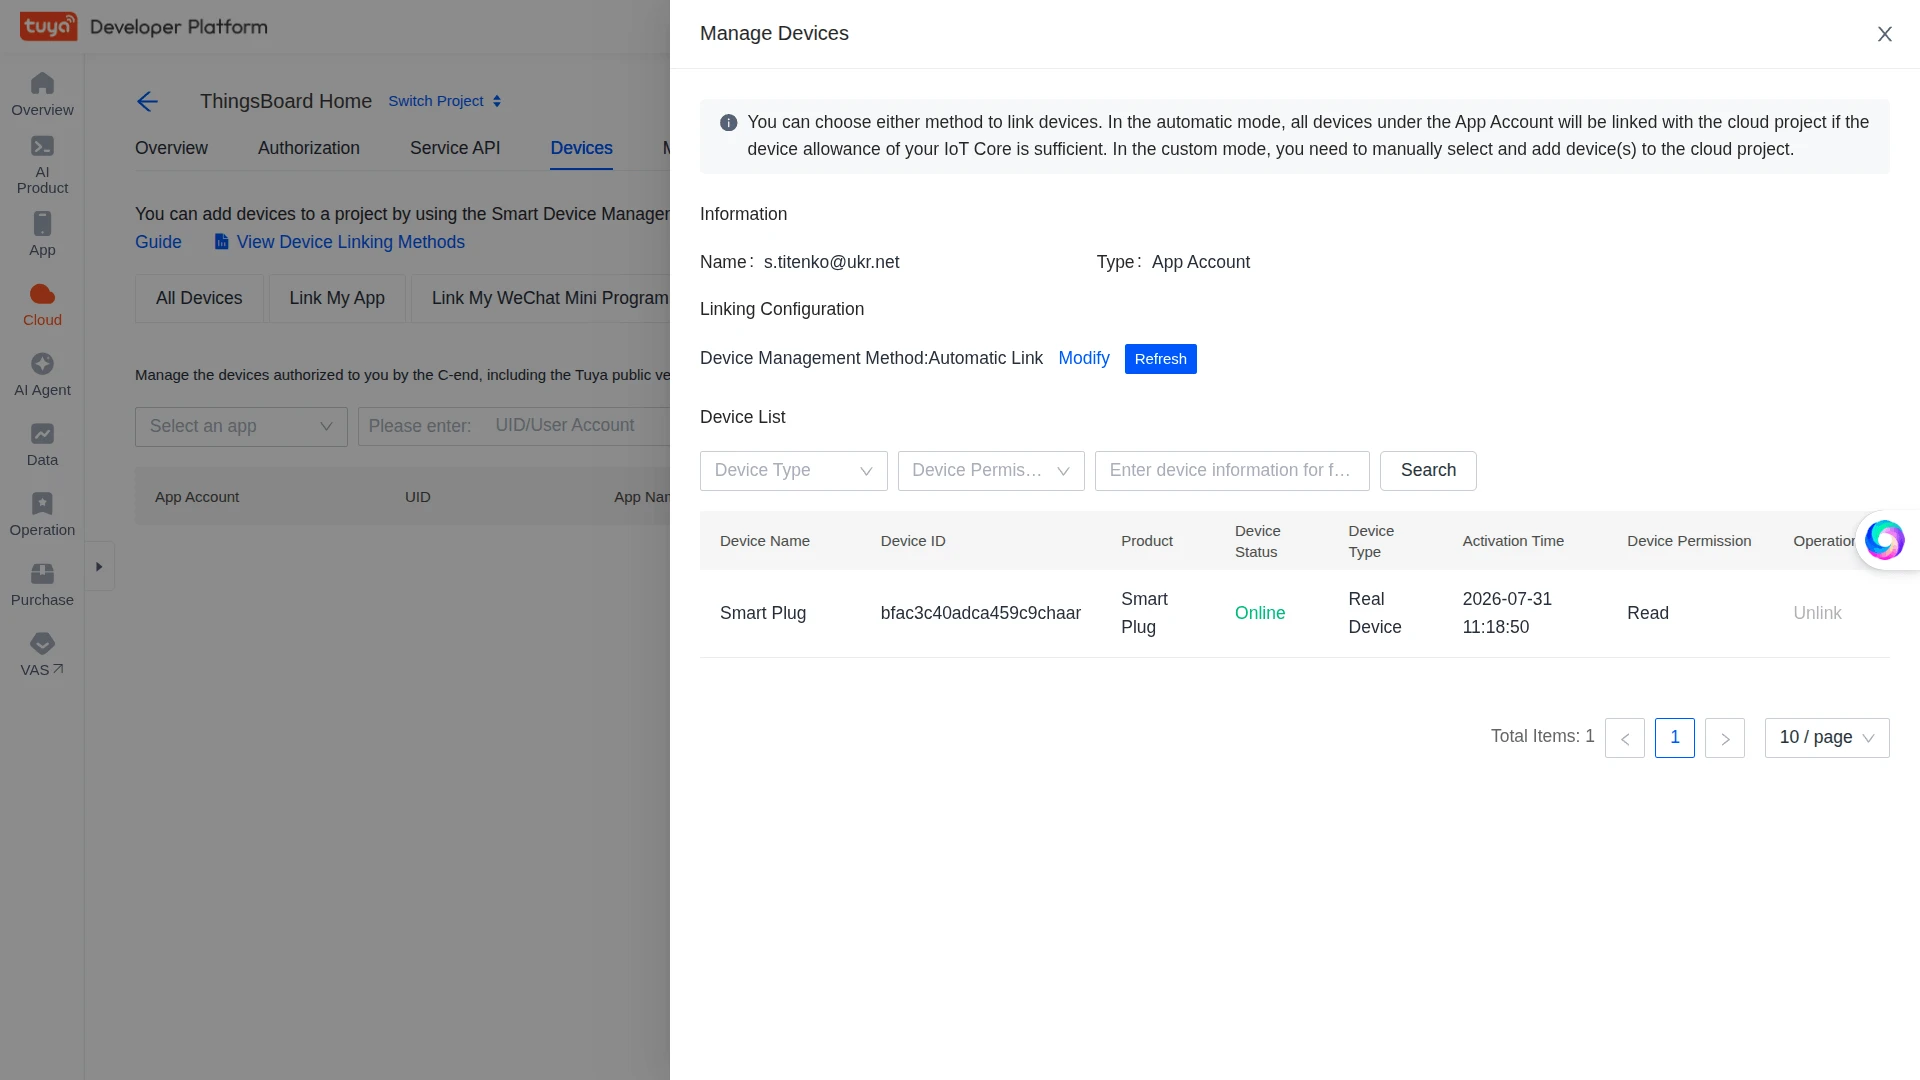
- Confirm the linking. Click Manage Devices on the linked app account row to verify — your Smart Plug appears in the Device List as Online.
Collect Connection Details
Section titled “Collect Connection Details”You will need these values when configuring the ThingsBoard integration connection settings.
- Access ID / Client ID and Access Secret / Client Secret — shown on the project Overview page under Authorization Key.
- Data Center — the region selected when creating the project (e.g. Central Europe). ThingsBoard uses it to connect to the correct Tuya endpoint.
Set Up the Integration in ThingsBoard
Section titled “Set Up the Integration in ThingsBoard”To set up the Tuya integration, first create an uplink data converter to decode incoming device status reports, then a downlink converter to encode outgoing commands, and finally the integration itself, which ties both converters to your Tuya cloud project credentials.
Create the Uplink Data Converter
Section titled “Create the Uplink Data Converter”The uplink converter receives each Tuya device status report, decodes it, and returns a structured object that ThingsBoard uses to create or update a device and store its telemetry and attributes.
For the full decoder function reference — all input parameters and output fields — see Uplink Data Converter.
The uplink converter decodes the Tuya statusReport payload. Tuya uses a generic uplink converter. It reads code/value pairs from the status array, applies unit scaling (cur_voltage and cur_power ÷ 10; cur_current ÷ 100), and maps the result to ThingsBoard telemetry. The device name comes from the devId field (or bizData.devId for some message types).
- Go to Integrations center ⇾ Data converters and click + Add data converter ⇾ Create new converter.
- Converter type — leave Uplink (selected by default).
- Integration type — in the search field, enter
Tuyaand selectTuyafrom the list. - Name — enter a converter name, for example
Tuya Uplink Converter. - Paste the decoder function below into the editor.
- Optionally click Test decoder function with the sample input further below to validate.
- Click Add.
The decoder function used in this tutorial:
/** Decoder **/
// Parse the incoming payload (byte array) into a JSON object.// decodeToJson is a built-in TBEL helper — no need to declare it.var data = decodeToJson(payload);// Some Tuya Message Service versions wrap the report under { data: {...} }.if (data.?data != null) {  data = data.data;}
// Resolve the device name.// Try bizData.devId first (present in some Tuya message types);// fall back to devId otherwise. The .? operator safely returns null// if an intermediate field is missing (won't throw an error).var deviceName = data.?bizData.?devId != null ? data.?bizData.?devId : data.?devId;
// Fixed device type — used to create the Device Profile in ThingsBoard.var deviceType = 'Tuya device';
// Array that will hold the telemetry (key-value pairs).var telemetry = [];
// Tuya's main data arrives in the status array. Make sure it exists.if (data.status != null) {  // Iterate over each element of the status array.  for (var i = 0; i < data.status.length; i++) {    var res = {};                       // temp object for a single data point    var code = data.status[i].code;     // parameter name, e.g. "cur_voltage"    var value = data.status[i].value;   // raw value from the device
    // Tuya sends some values as integers without a decimal point.    // Divide voltage and power by 10 to get real units (V, W).    if (code == "cur_voltage" || code == "cur_power") {      value = data.status[i].value / 10;    // Divide current by 100 (to get A).    } else if (code == "cur_current") {      value = data.status[i].value / 100;    }    res[code] = value;   // build a pair, e.g. { "cur_voltage": 231 }    telemetry.push(res);  // add it to the telemetry array  }} else {  // If there is no status array, return the payload as-is (fallback).  telemetry = data;}
// Build the result in the format ThingsBoard expects.var result = {  deviceName: deviceName,   // device is created/matched by this name  deviceType: deviceType,   // device profile  attributes: {},           // attributes (empty here)  telemetry: telemetry      // time-series data};
/** Helper functions 'decodeToString' and 'decodeToJson' are already built-in **/
return result;/** Decoder **/
// In JS the helpers are NOT built-in, so we declare them ourselves.// Convert a byte array into a string.function decodeToString(payload) { return String.fromCharCode.apply(String, payload);}
// Convert a byte array into JSON: first to a string, then parse it.function decodeToJson(payload) { var str = decodeToString(payload); var data = JSON.parse(str); return data;}
// Parse the incoming payload into a JSON object.var data = decodeToJson(payload);
// Device name: use bizData.devId if present, otherwise devId.// JS has no .? operator, so we check existence with && .var deviceName = (data.bizData && data.bizData.devId) ? data.bizData.devId : data.devId;
// Fixed device type (profile).var deviceType = 'Tuya device';
// Array for telemetry.var telemetry = [];
// Tuya data lives in the status array.if (data.status != null) { for (var i = 0; i < data.status.length; i++) { var res = {}; // a single data point var code = data.status[i].code; // parameter name var value = data.status[i].value; // raw value
// Unit scaling for the Smart Plug. if (code == "cur_voltage" || code == "cur_power") { value = data.status[i].value / 10; // voltage/power ÷10 } else if (code == "cur_current") { value = data.status[i].value / 100; // current ÷100 }
res[code] = value; // e.g. { "cur_power": 15 } telemetry.push(res); // add to the array }} else { telemetry = data; // fallback if status is missing}
// Result for ThingsBoard.var result = { deviceName: deviceName, deviceType: deviceType, attributes: {}, telemetry: telemetry};
return result;Converter Input
ThingsBoard passes two variables to the decoder function:
| Variable | Type | Description |
|---|---|---|
payload |
string / bytes | The Tuya status report body. Use decodeToJson(payload) to parse it. Depending on version it is either the data object directly, or the full message with the report nested under data — the example decoder handles both. |
metadata |
object | Message envelope from the Tuya Message Service: topic, t (timestamp, ms), integrationName, pv, sign, etc. |
Fields carried by the Tuya status report (data):
| Field | Description |
|---|---|
devId |
Tuya device ID, e.g. bfac3c40adca459c9chaar — used as the device identifier / name in ThingsBoard. |
productKey |
Tuya product key identifying the device model, e.g. iq9hwd2bjsdgqiby. |
dataId |
Unique ID of this status report. |
status |
Array of data points. Each entry has code, value, and t (ms); Tuya may also add a numeric alias key (e.g. "1": "true") that the decoder ignores. |
Smart Plug Status Example
The decoder keeps each Tuya DP code as the telemetry key and applies device-specific scaling:
| DP code | Telemetry key | Expression | Unit / Notes |
|---|---|---|---|
switch_1 |
switch_1 |
dp.value |
Boolean on/off |
cur_voltage |
cur_voltage |
dp.value / 10 |
Volts (raw ÷ 10) |
cur_power |
cur_power |
dp.value / 10 |
Watts (raw ÷ 10) |
cur_current |
cur_current |
dp.value / 100 |
Amps (raw ÷ 100) |
add_ele |
add_ele |
dp.value / 100 |
kWh — energy consumption, not instantaneous; whether it’s a running total or a per-interval delta varies by model, see below |
| any other code | same code | dp.value |
Passed through raw so nothing is lost |
The attribute productKey (device model key) is stored from data.productKey. deviceName is set to the raw devId — no prefix. If your device reports add_ele, make sure your decoder applies the same ÷ 100 scaling (you may need to add this branch to the JavaScript example above).
Example status report (real message from the Message Service):
{ "metadata": { "topic": "persistent://j9g7xrpnyu7g9483sp7w/out/event-partition-8", "protocol": "4", "t": "1785488626997", "integrationName": "Tuya integration", "pv": "2.0" }, "data": { "dataId": "000657E477596B12C80347616A03002A", "devId": "bfac3c40adca459c9chaar", "productKey": "iq9hwd2bjsdgqiby", "status": [ { "code": "cur_voltage", "t": 1785490000000, "value": 2086 }, { "code": "cur_power", "t": 1785490000000, "value": 142 }, { "code": "cur_current", "t": 1785490000000, "value": 63 } ] }}Example output:
{ "deviceName": "bfac3c40adca459c9chaar", "deviceType": "Tuya device", "attributes": { "productKey": "iq9hwd2bjsdgqiby" }, "telemetry": [ { "cur_voltage": 208.6 }, { "cur_power": 14.2 }, { "cur_current": 0.63 } ]}Adapt the Converter
- Friendly device name — do not change
deviceName(it must stay the TuyadevIdfor downlink). Set a Label on the device instead, or use anameattribute for display in widgets. - Different data points — add or change the
codebranches to match the DP codes your device reports; unknown codes are passed through raw. - Different scaling — adjust the divisor for each value (e.g. some models report
add_ele÷ 1000, or voltage without the ÷ 10 factor). Verify against Device Debugging / Instruction Set. - Rename keys / add attributes — if you prefer friendly keys (
voltageinstead ofcur_voltage), map them explicitly; add device info toattributes(e.g.productKey).
Create the Downlink Data Converter
Section titled “Create the Downlink Data Converter”To send commands from ThingsBoard to Tuya devices, configure a downlink converter and connect an Integration Downlink node in the Rule Chain.
The downlink converter encodes a ThingsBoard Rule Engine message into a Tuya Device Control API command. Before sending it, the integration validates the encoder output and rejects it unless the data payload contains one of:
Required in data |
Description |
|---|---|
commands array |
A list of { "code", "value" } entries — the standard Tuya Device Control format. |
code field |
A single command code with its value. |
| service RPC method | An RPC method name for service-style commands. |
This is ThingsBoard’s own validation on the encoder’s output, not a Tuya API requirement — internally, the integration always translates a valid data payload into Tuya’s commands array format before calling the Device Control API.
The integration targets the device automatically from the ThingsBoard device that originated the message (created on the first uplink), so you do not need to inject the Tuya device ID into the encoder. If the encoder returns an empty or malformed data, the downlink fails with “Downlink message format is not correct…”.
For the full encoder function reference, see Downlink Data Converter.
The tutorial encoder below maps msg.method to the Tuya command code and msg.params to the command value, with automatic string-to-boolean conversion for on/off commands. The target device is identified via metadata.deviceName.
- Go to Integrations center ⇾ Data converters and click + Add data converter ⇾ Create new converter.
- Converter type — select Downlink.
- Integration type — in the search field, enter
Tuyaand selectTuyafrom the list. - Name — enter a converter name, for example
Tuya Downlink Converter. - Paste the encoder function below into the editor.
- Click Add.
The encoder function used in this tutorial:
/** Encoder **/
// The command object we will send to the Tuya device.var command = {};
// msg.method — the RPC method name from ThingsBoard. Becomes the Tuya// command code, e.g. "switch_1", "bright_value", etc.command["code"] = msg.method;
// msg.params — the command value.// If it is the string "true"/"false", convert it to a real boolean// (needed for switches, e.g. turning the plug on/off).if (msg.params == "false" || msg.params == "true") {  command["value"] = Boolean.valueOf(msg.params);} else {// Otherwise pass it as-is (number, string, e.g. brightness level).  command["value"] = msg.params;}
// Build the result for the integration.var result = {  contentType: "JSON",                  // command body is JSON  data: JSON.stringify(command),        // serialize { code, value } to a string  metadata: {    deviceId: metadata.deviceName     // which device to send the command to  }};
return result;/** Encoder **/
// Build the command object.const command = { // Tuya command code = RPC method name from ThingsBoard. code: msg.method, // Command value: // if msg.params is "true"/"false", convert it to a boolean (true/false), // otherwise keep the value as-is. value: msg.params === "false" || msg.params === "true" ? msg.params === "true" : msg.params};
// Result to send through the integration.const result = { contentType: "JSON", // body is JSON data: JSON.stringify(command), // serialize { code, value } metadata: { deviceId: metadata.deviceName // target device }};
return result;Create the Tuya Integration
Section titled “Create the Tuya Integration”- Go to Integrations center ⇾ Integrations and click + Add integration.
-
Basic settings:
- Set Integration type to Tuya.
- Enable integration and Allow create devices or assets are on by default.
- Click Next.
- Uplink data converter:
- Click Select existing and choose the previously created
Tuya Uplink Converter. - Click Next.
- Click Select existing and choose the previously created
- Downlink data converter:
- Click Select existing and choose the previously created
Tuya Downlink Converter. - Click Next.
- Click Select existing and choose the previously created
- Connection settings:
- Region — select the region matching your Tuya account.
- Environment — select PROD for a real physical device, or TEST for a virtual device.
- Access Id and Access Key — paste the Access ID/Client ID and Access Secret/Client Secret from your Tuya cloud project.
- Click Add to save the integration.
Connection Settings
Section titled “Connection Settings”Region
The Tuya data center your cloud project belongs to (e.g. Europe, Western America, Eastern America, India, China). It must match the region selected when creating the project and the region where your devices are registered.
Access ID
The Access ID / Client ID from your Tuya cloud project Overview ⇾ Authorization Key.
Access Key
The Access Secret / Client Secret from the same Authorization Key section. Treat it as a credential and keep it secret.
Environment
| Value | Description |
|---|---|
| PROD | Use for real (physical) devices. |
| TEST | Use to connect a virtual device for testing before purchasing hardware. |
Execute Remotely
When enabled, ThingsBoard generates an Integration key and Integration secret. Use these credentials to run the integration as a separate remote process — useful when the integration must reach Tuya from a private network. See Remote Integrations for setup instructions.
Advanced Settings
| Parameter | Description |
|---|---|
| Description | Optional text description for this integration. |
| Metadata | Key-value pairs injected into every uplink message as integrationMetadata in converter scripts. |
Configure the Root Rule Chain
Section titled “Configure the Root Rule Chain”To forward RPC commands from ThingsBoard to Tuya devices, add an Integration Downlink node to the Root Rule Chain and connect it to the RPC Request to Device relation. The Rule Chain must route the trigger message (a shared-attribute update or RPC) to the integration so the downlink converter runs.
- Open Rule Chains ⇾ Root Rule Chain.
- In the node panel, search for integration downlink. The node appears under the Action category. Drag it onto the canvas.
- Configure the node:
- Name —
Downlink to Tuya. - Integration — select your Tuya integration.
- Click Add.
- Name —
- Connect the Message Type Switch node to the Downlink to Tuya node using the RPC Request to Device and Attributes Updated relations.
- Click Apply changes.
Test Uplink
Section titled “Test Uplink”Trigger an uplink from your Smart Plug and confirm that ThingsBoard receives, decodes, and stores the data correctly at each stage of the pipeline.
Send a Test Uplink
Section titled “Send a Test Uplink”Disconnect your Smart Plug from power and reconnect it (or toggle it in the Smart Life app). The device sends an uplink statusReport message to Tuya, which forwards it to ThingsBoard through the integration. Verify the data at each stage of the pipeline:
Verify Integration Events
Section titled “Verify Integration Events”Go to Integrations center ⇾ Integrations, open your Tuya integration, and open the Events tab. Each successfully processed uplink appears as a row with Type: Uplink and Status: OK.
Click the ⋮ icon in an Uplink event’s Message column to inspect the raw Tuya payload — the devId and the status array of code/value pairs.
Verify Converter Events
Section titled “Verify Converter Events”Go to Integrations center ⇾ Data converters, open your Tuya Uplink Converter, and open the Events tab. Each row is one conversion — click In to see the raw Tuya data passed to the converter, and Out to see the decoded telemetry and attributes it produced.
The same Events tab on your Tuya Downlink Converter confirms a command you send — for example, turning the plug off with the Round switch widget on the dashboard — actually reaches Tuya. Each row is one downlink; click In to see the RPC message ThingsBoard received, Out to see the Tuya command the encoder produced, and Metadata for the request envelope.
Verify Device Provisioning
Section titled “Verify Device Provisioning”Go to Entities ⇾ Devices — a device named after the Tuya devId is automatically created. Open it and check the Latest telemetry tab for the reported keys (e.g. cur_power, cur_voltage, cur_current, switch_1).
Test End-to-End with the Smart Plug Dashboard
Section titled “Test End-to-End with the Smart Plug Dashboard”Import the ready-made Tuya Smart Plug dashboard for a hands-on way to confirm both uplink and downlink are working, side by side:
- Time series chart and Simple neon gauge — display the voltage, power, and current telemetry the device reports (uplink).
- Led indicator — shows the socket’s on/off status from telemetry (uplink).
- Round switch — sends an on/off RPC command to the device through the rule chain you configured above (downlink).
- Download the dashboard: tuya_smart_plug_dashboard.json
- Go to Dashboards and click + Add dashboard ⇾ Import dashboard.
- Upload the
tuya_smart_plug_dashboard.jsonfile and click Import. - Open the Tuya smart plug dashboard and enter Edit mode.
- Click the Entity Aliases icon in the toolbar, click the pencil icon next to the
smartPlugalias, select your provisioned device, click Save, then click Save again in the lower-right corner to apply. - If widgets show no data, open the widget (pencil icon), go to the Datasource section, and update the data keys to match the
codevalues reported by your device.
Troubleshooting
Section titled “Troubleshooting”| Symptom | Likely cause | Fix |
|---|---|---|
| Integration connects, but no uplinks ever arrive | The messaging rule is enabled in the wrong environment | Confirm Environment in the ThingsBoard integration matches the Tuya channel — see Production vs Test environment. |
| Integration fails to connect, or authorization errors in Integration Events | Invalid or mismatched Access Id / Access Key / Region | Re-copy the Access ID/Client ID and Access Secret/Client Secret from the project Overview page, and confirm Region matches your project’s Data Center. |
| Subscription in Subscription Management shows a status other than Good | The subscription was created before the messaging rule was enabled, or the rule was later disabled | Re-check that the messaging rule is enabled for the matching environment, then refresh the subscription. |
| Downlink fails with “Downlink message format is not correct…” | The encoder returned an empty or malformed data payload |
See the ‘data’ must carry a command Aside — verify the attribute key or RPC params you’re sending actually reach msg. |
Downlink fails with IllegalArgumentException: Illegal character in path |
The device’s Name isn’t the raw Tuya devId (has a prefix or spaces) |
See Device name must equal the Tuya devId — fix the device name, and use Label instead for a friendly display name. |
| Command sent successfully, but the device doesn’t react | The code isn’t a writable DP for that device model |
Check Devices ⇾ your device ⇾ Device Debugging / Instruction Set in the Tuya IoT Platform for the correct writable code (e.g. switch vs switch_1). |
| No device is created in ThingsBoard after an uplink | Allow create devices or assets is disabled on the integration, or the converter’s deviceName output is empty |
Confirm the toggle is on in Basic settings, and check the converter’s Out event to see what deviceName it actually produced. |
See Also
Section titled “See Also”- Integrations Overview — how ThingsBoard connects to external platforms and how uplink/downlink flow works
- Uplink Data Converter — full decoder function reference: input parameters, output fields, and scripting patterns
- Downlink Data Converter — full encoder function reference: input parameters, output fields, and scripting patterns
- Remote Integration — run the integration outside the ThingsBoard server to reach Tuya Cloud from a private network
- Rule Engine — how the Root Rule Chain routes messages to the downlink converter
- TBEL scripting reference — built-in functions and operators for writing converter scripts
Was this helpful?