KPN Things Integration
KPN Things Integration receives device data from KPN Things, the IoT platform of the Dutch operator KPN, through a ThingsBoard destination in a KPN Things Flow. An uplink data converter transforms each message into device data, including telemetry and attributes. For downlink, ThingsBoard sends commands to the device through the KPN Things API.
Use KPN Things Integration when:
- Your devices connect through KPN Things, over LoRa, LTE-M, or mobile data, and KPN Things already decodes their data.
- You need to send commands from ThingsBoard to those devices, for example when a shared attribute changes.
Architecture
Section titled “Architecture”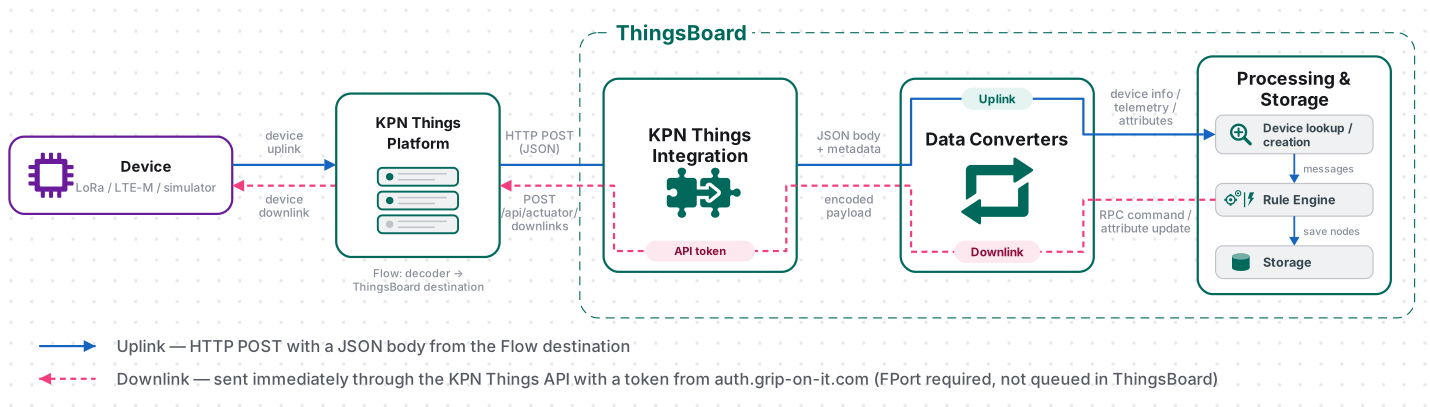
- Receive data. The device sends data to KPN Things. The Flow decodes it and its ThingsBoard destination sends it as an HTTP request with a JSON body to the integration endpoint.
- Check the request (optional). If you set a destination shared secret or a headers filter, the integration rejects requests that fail the check with
403 Forbidden. - Decode the payload. The uplink converter returns the device name, telemetry, and attributes. If Allow create devices or assets is on, ThingsBoard creates the device on its first message.
- Send a command (optional). The Rule Engine passes a message to the integration. The downlink converter encodes it, and ThingsBoard sends it right away to
POST https://api.kpnthings.com/api/actuator/downlinks?port={FPort}.
Prerequisites
Section titled “Prerequisites”- Access to ThingsBoard Cloud with integrations enabled for your tenant. The ThingsBoard endpoint must be reachable from the internet, because KPN Things calls it.
- Permission to create integrations and data converters, and to edit rule chains for downlink.
- A KPN Things portal account.
- For downlink: access to the KPN Zakelijk portal to create an API key.
Prepare KPN Things
Section titled “Prepare KPN Things”In KPN Things, a device sends data only through a Flow. The Flow decodes the data and passes it to its destinations. This guide uses the KPN Device Simulator as the device, so you can test the integration without hardware.
Here you create the device, link it to a Flow, and turn on decoding. The ThingsBoard destination comes later: it needs the integration endpoint, so you add it after creating the integration.
Create a Device
Section titled “Create a Device”Add a Device Simulator (Web app) device to your project. The Web app runs in a browser on your computer or phone and sends the measurements you select when you click a button.
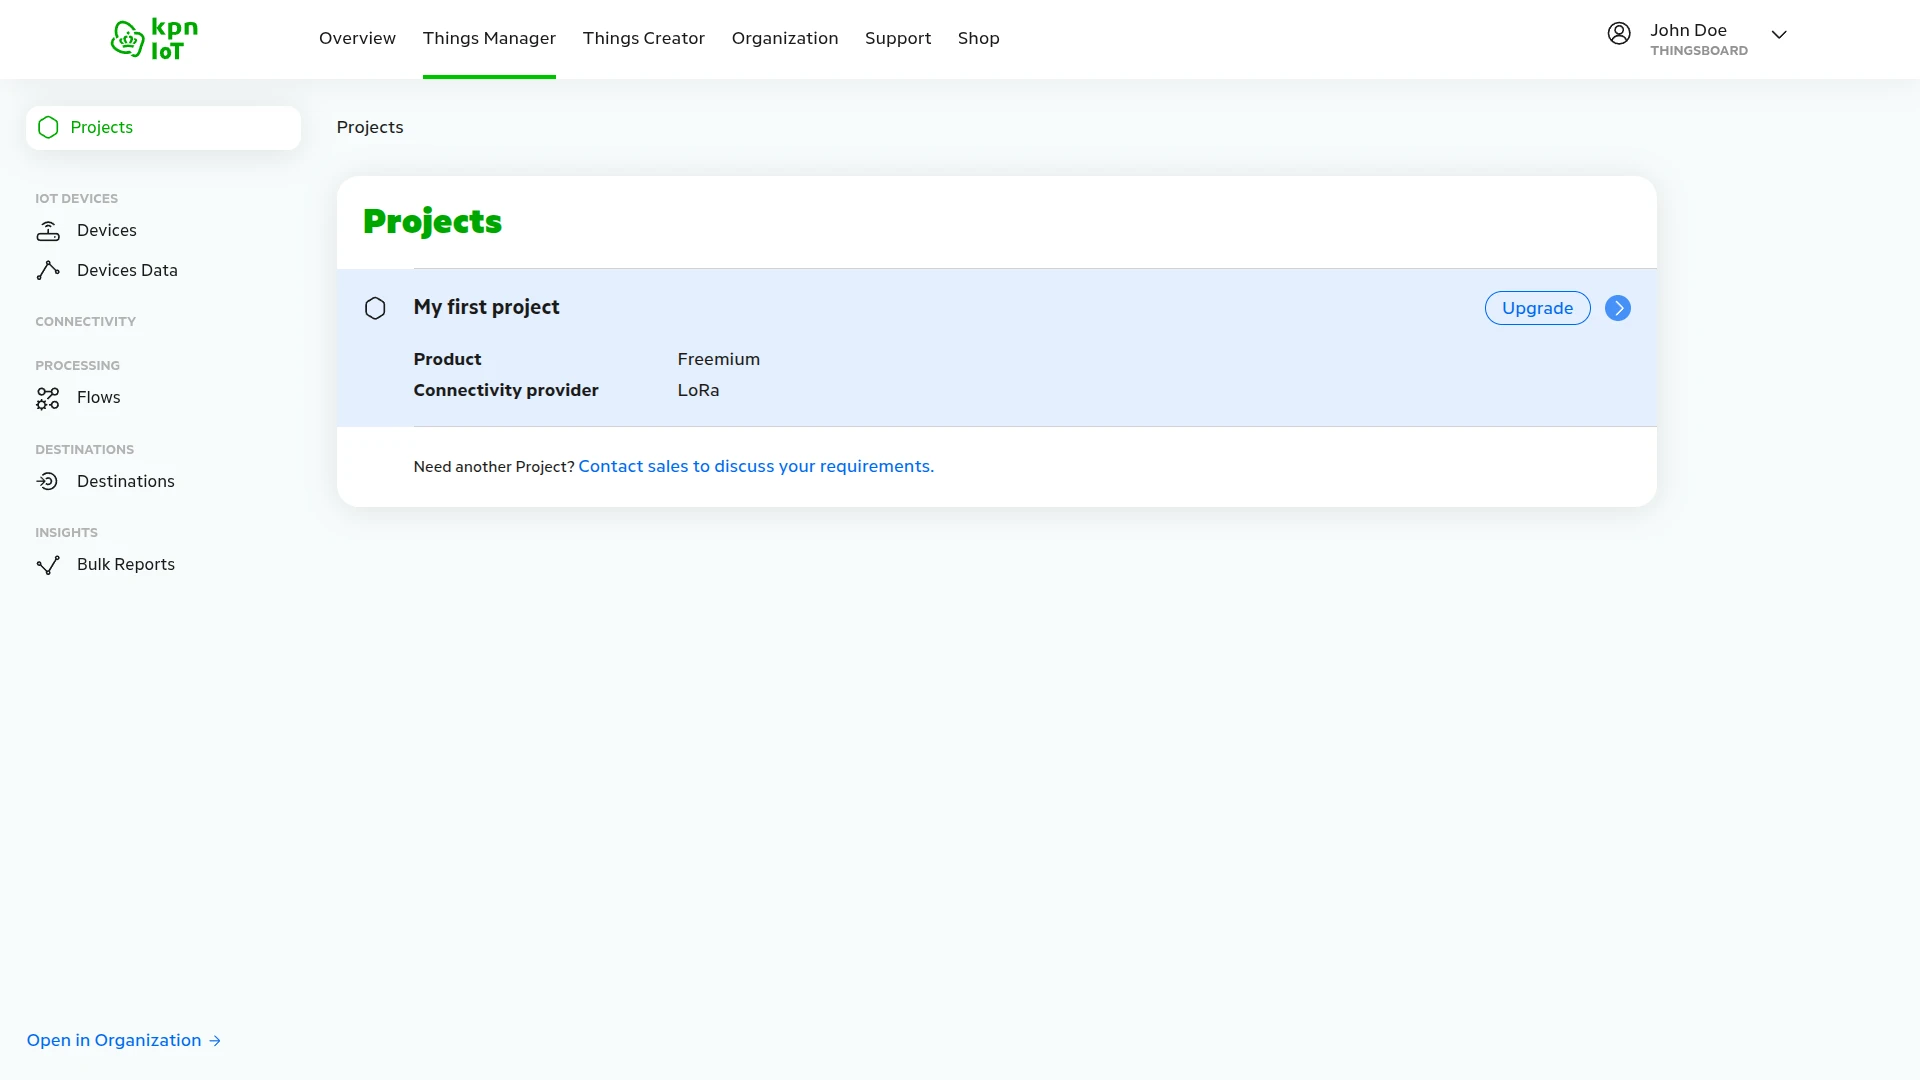
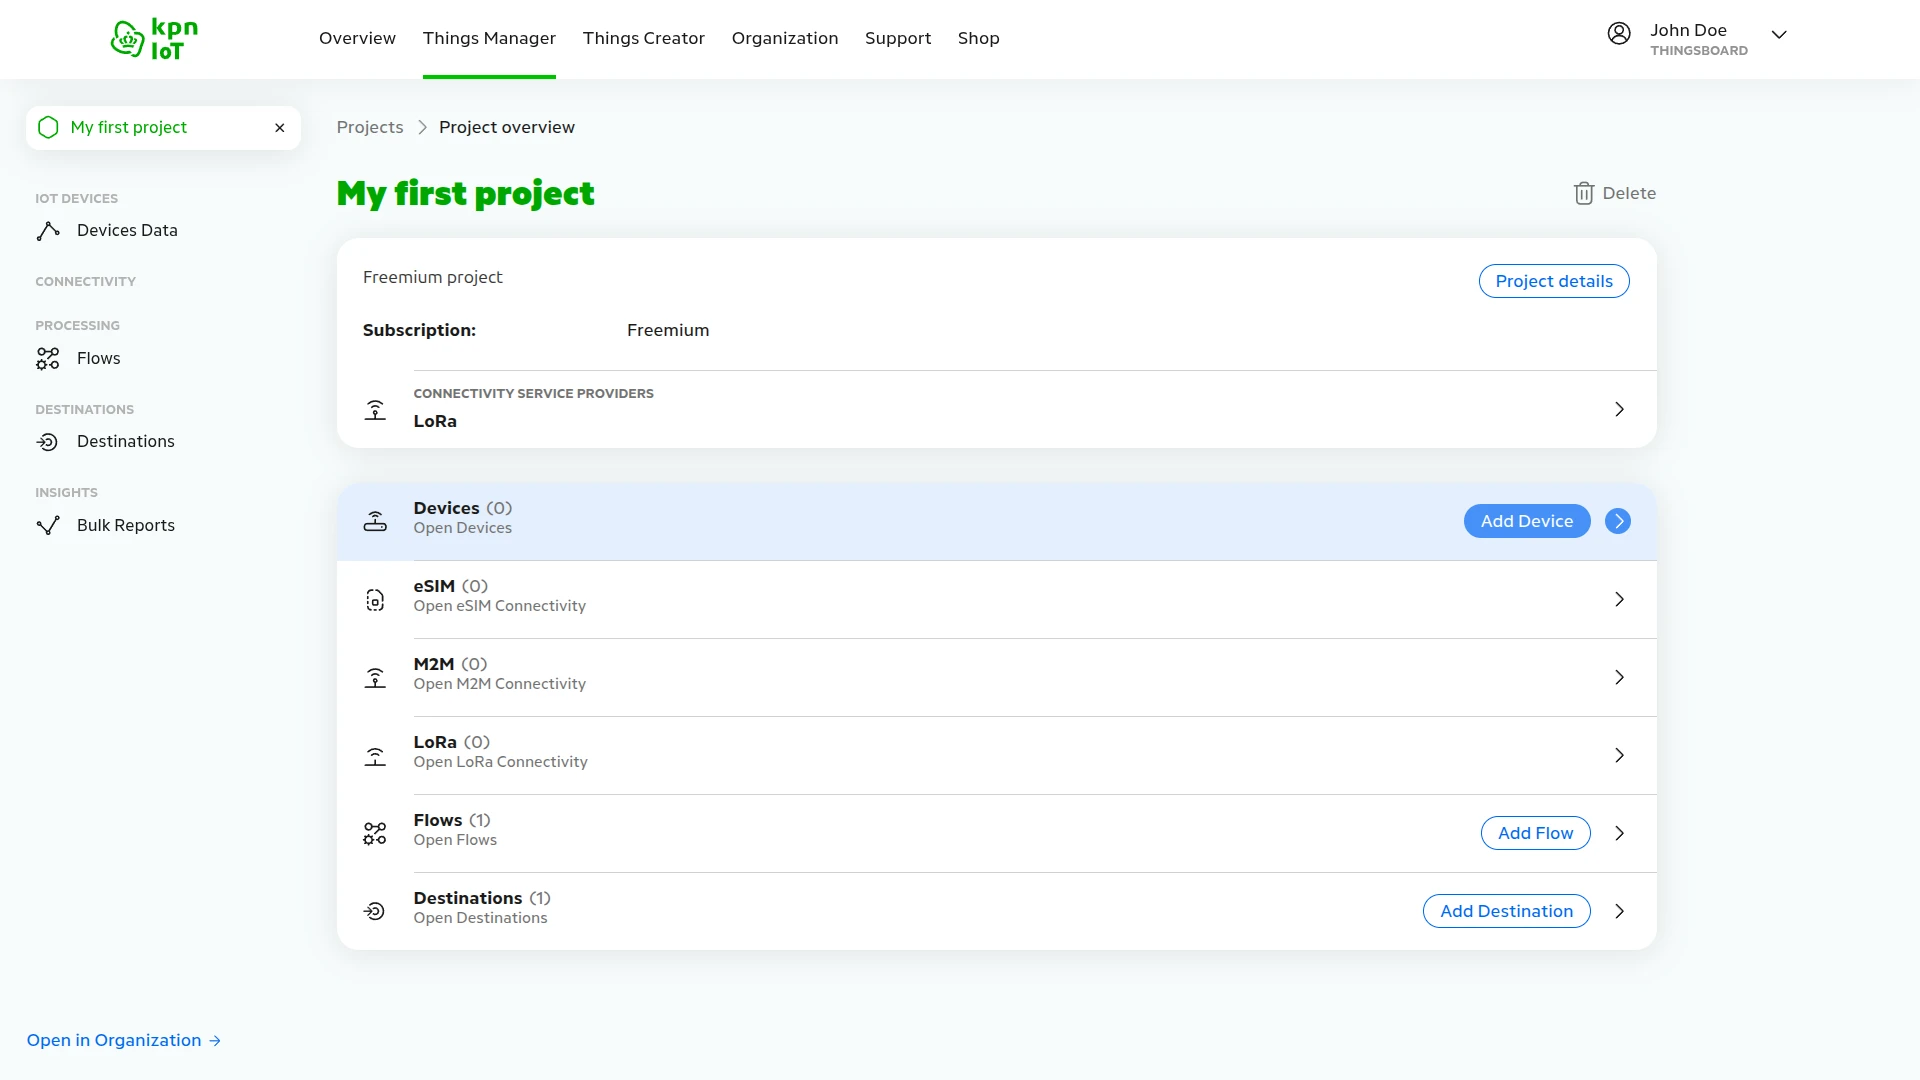
- In the KPN Things portal, open Things Manager and click My first project.
- In the Devices row, click Add Device.
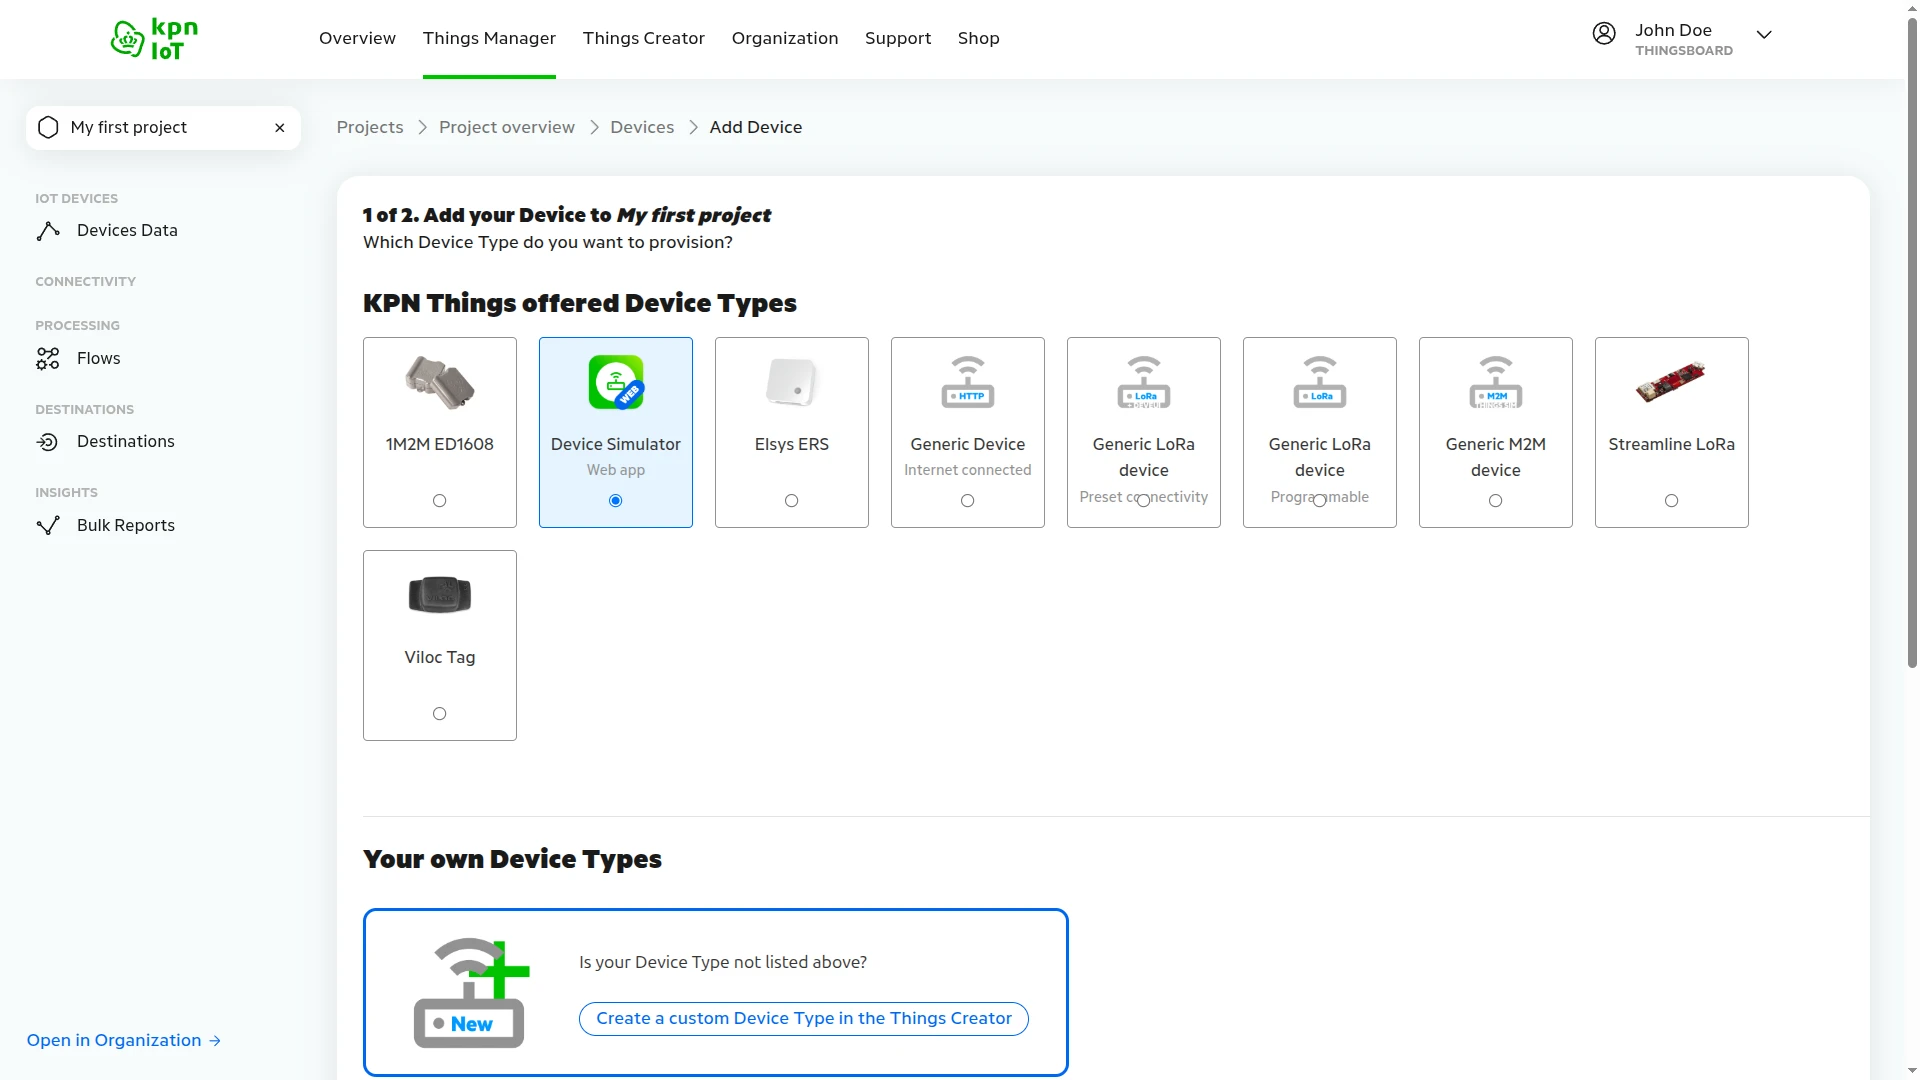
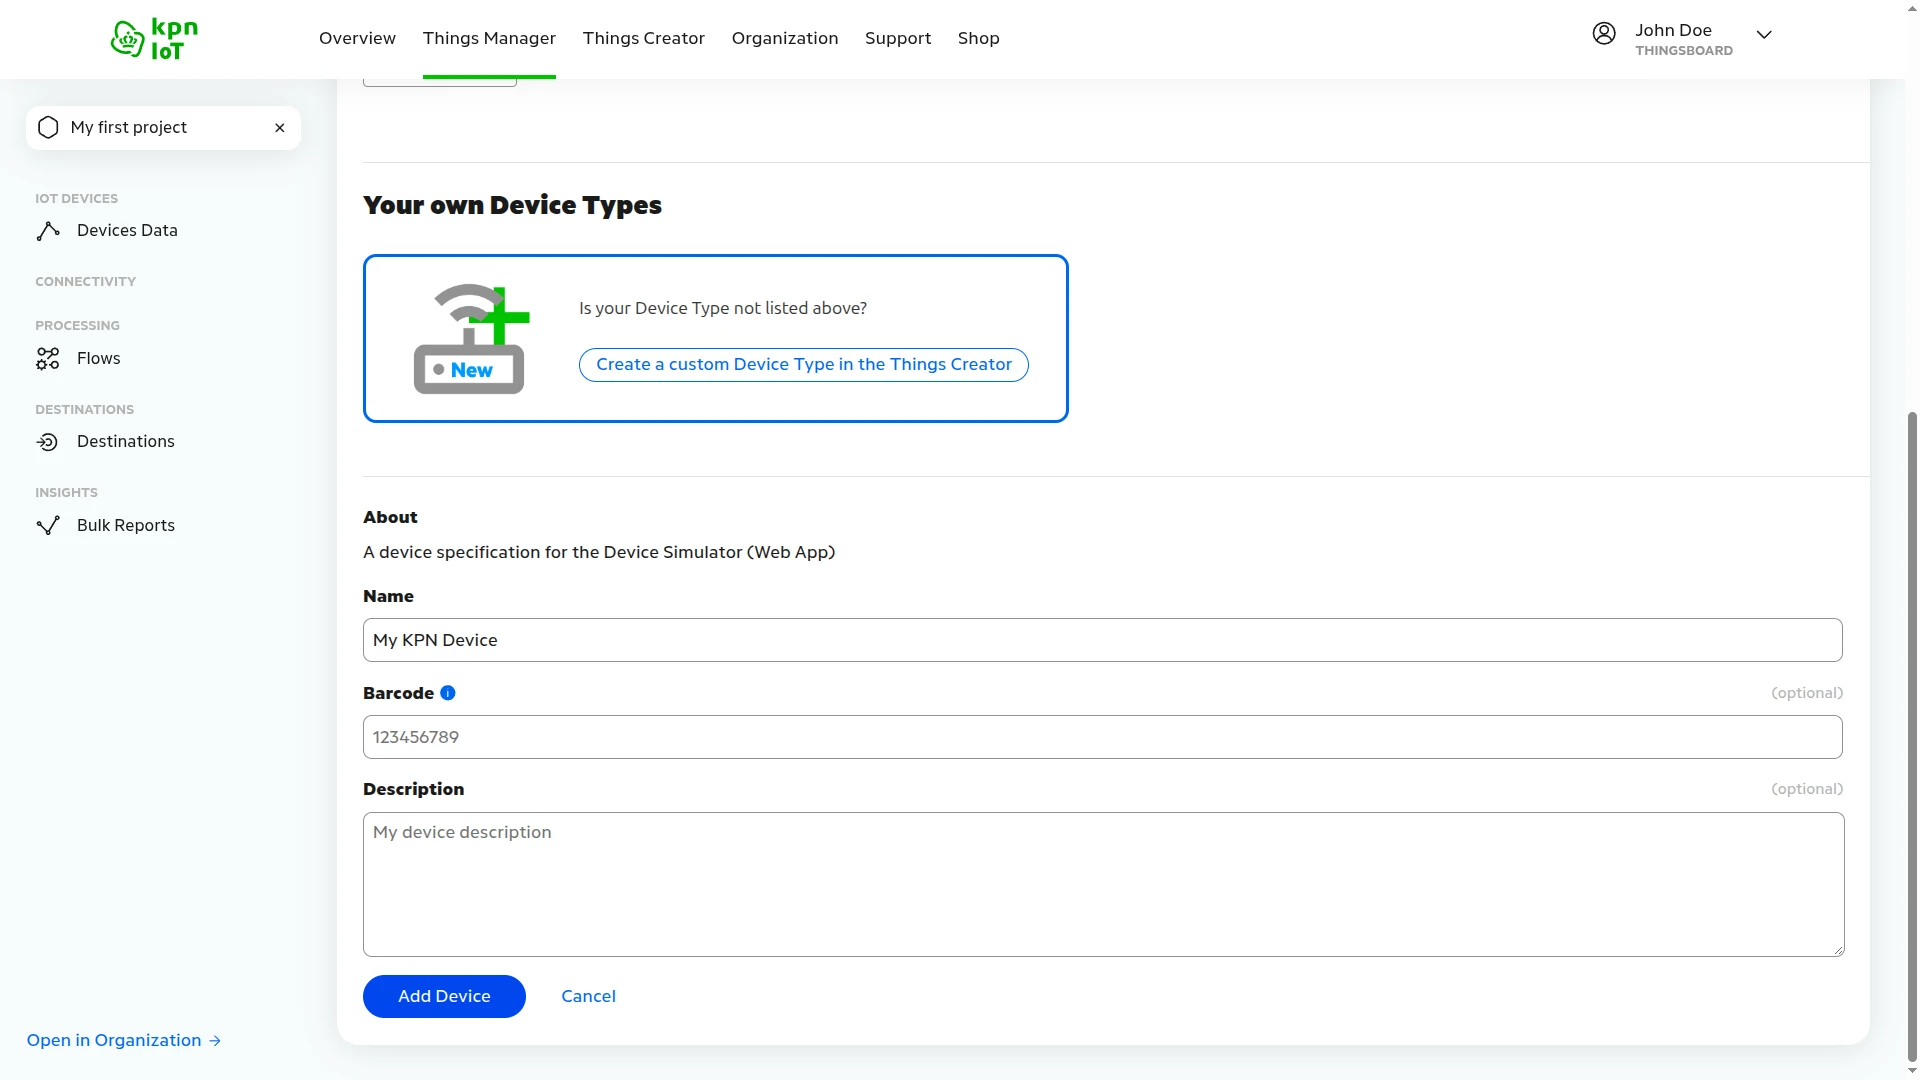
- Under KPN Things offered Device Types, select Device Simulator (Web app).
- Enter a Name, for example
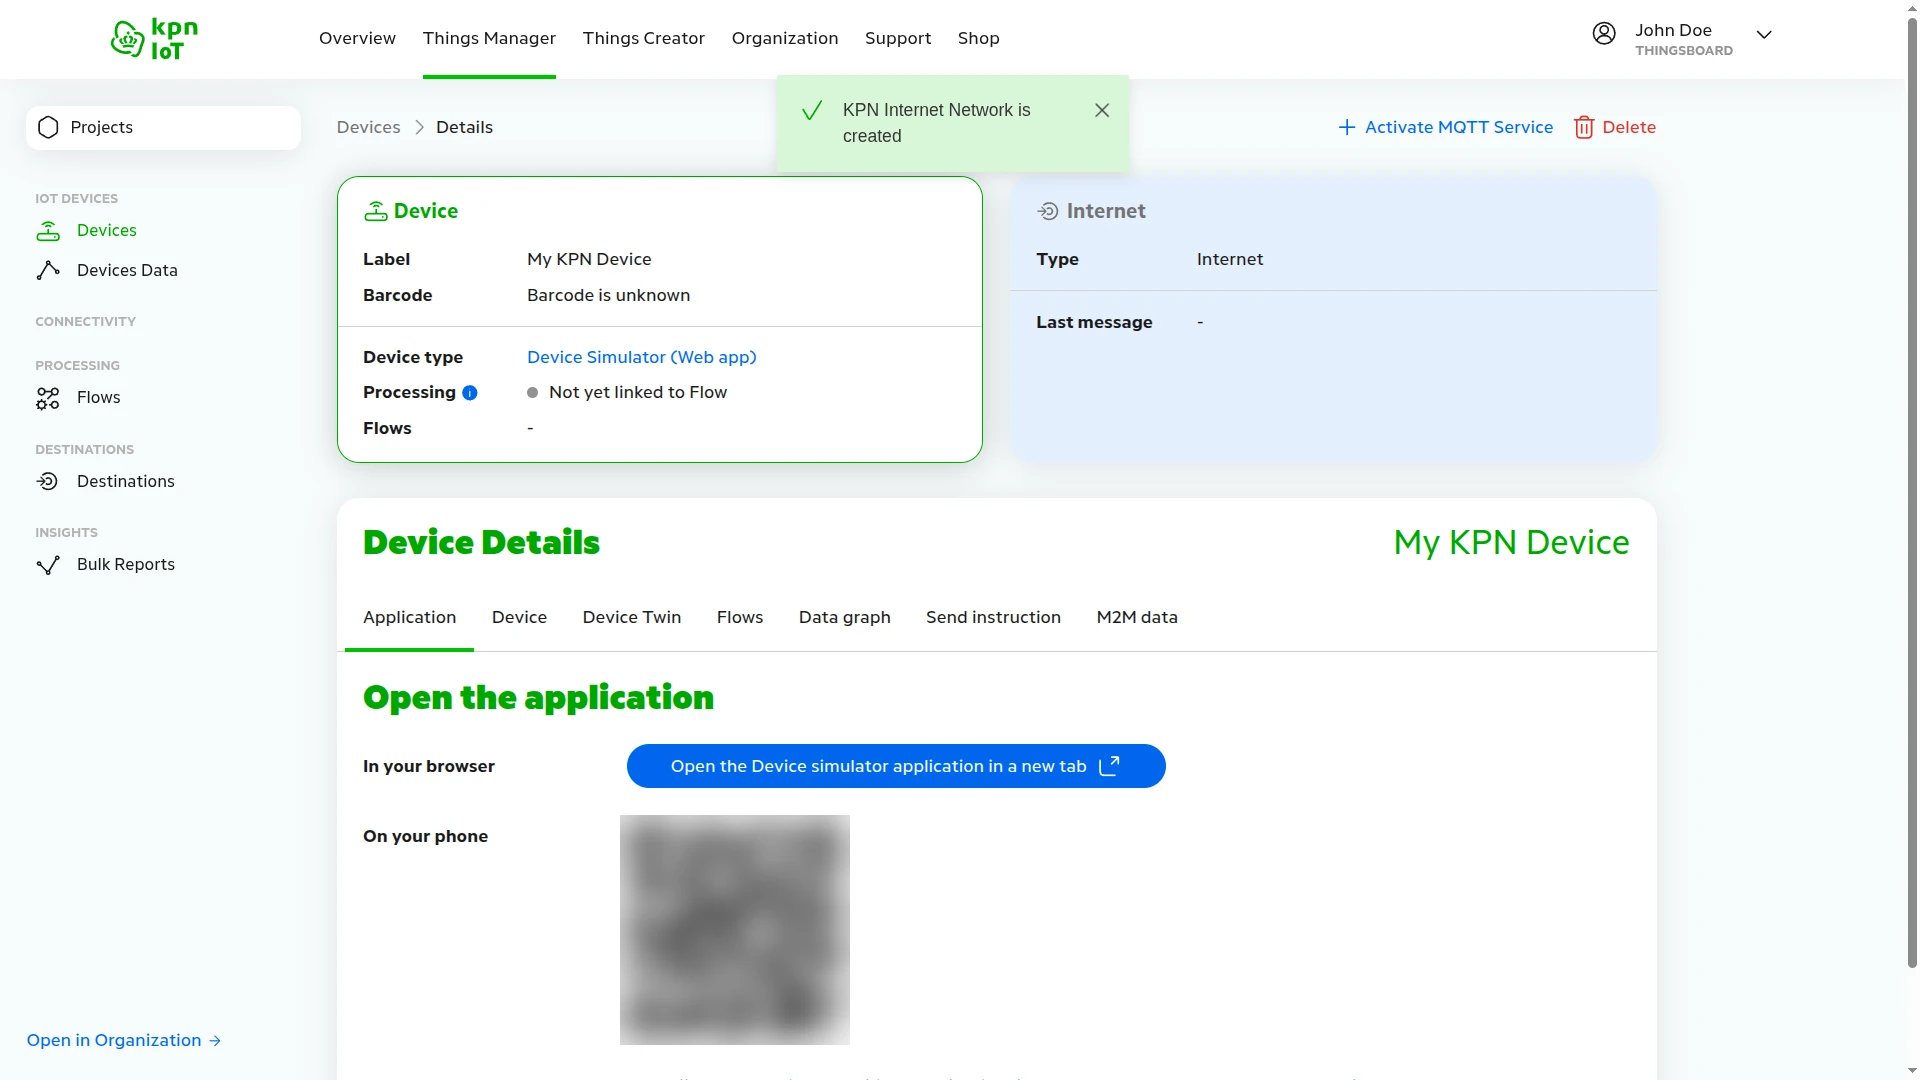
My KPN Device, and click Add Device. - The device page opens. Device type is Device Simulator (Web app), and Processing shows Not yet linked to Flow until you link the device to a Flow.
Link the Device to a Flow
Section titled “Link the Device to a Flow”Link the device to a Flow, so its data reaches the Flow’s decoder and destinations. If your project has no Flow yet, create one first.
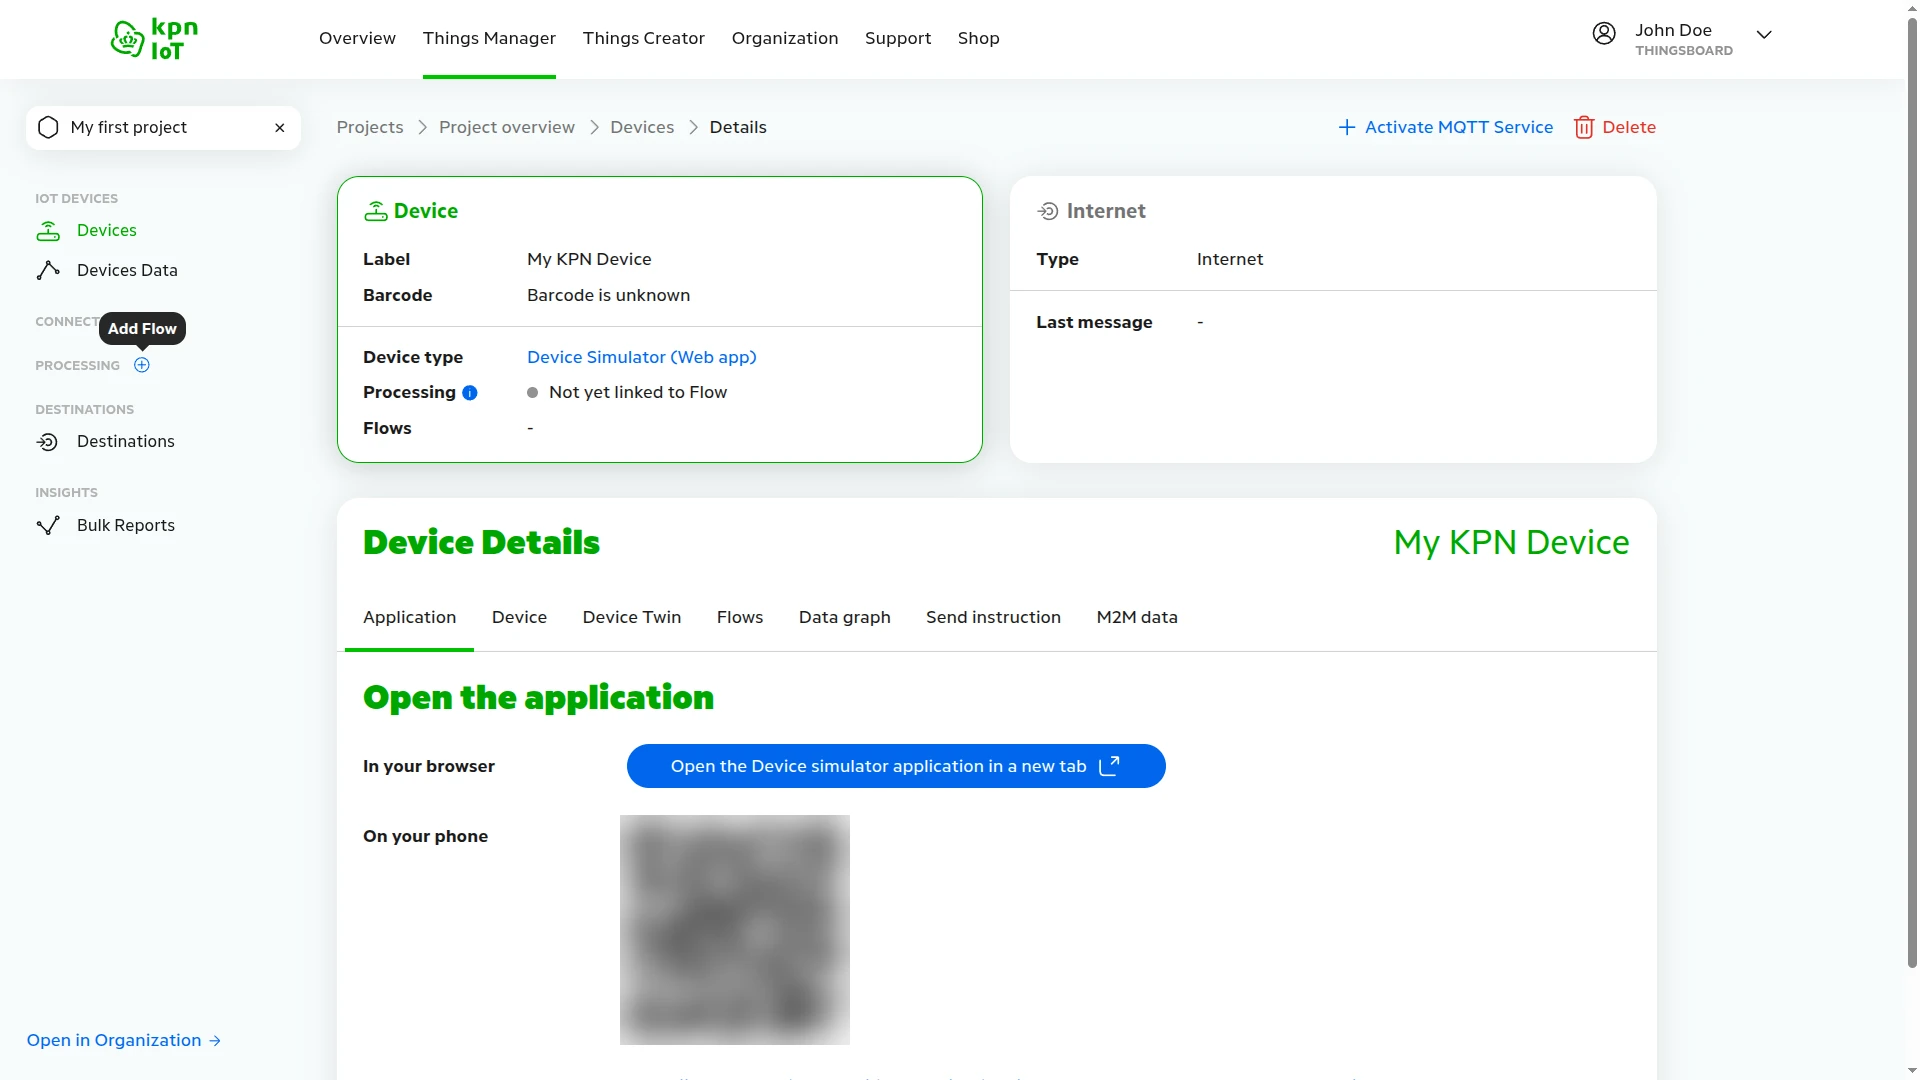
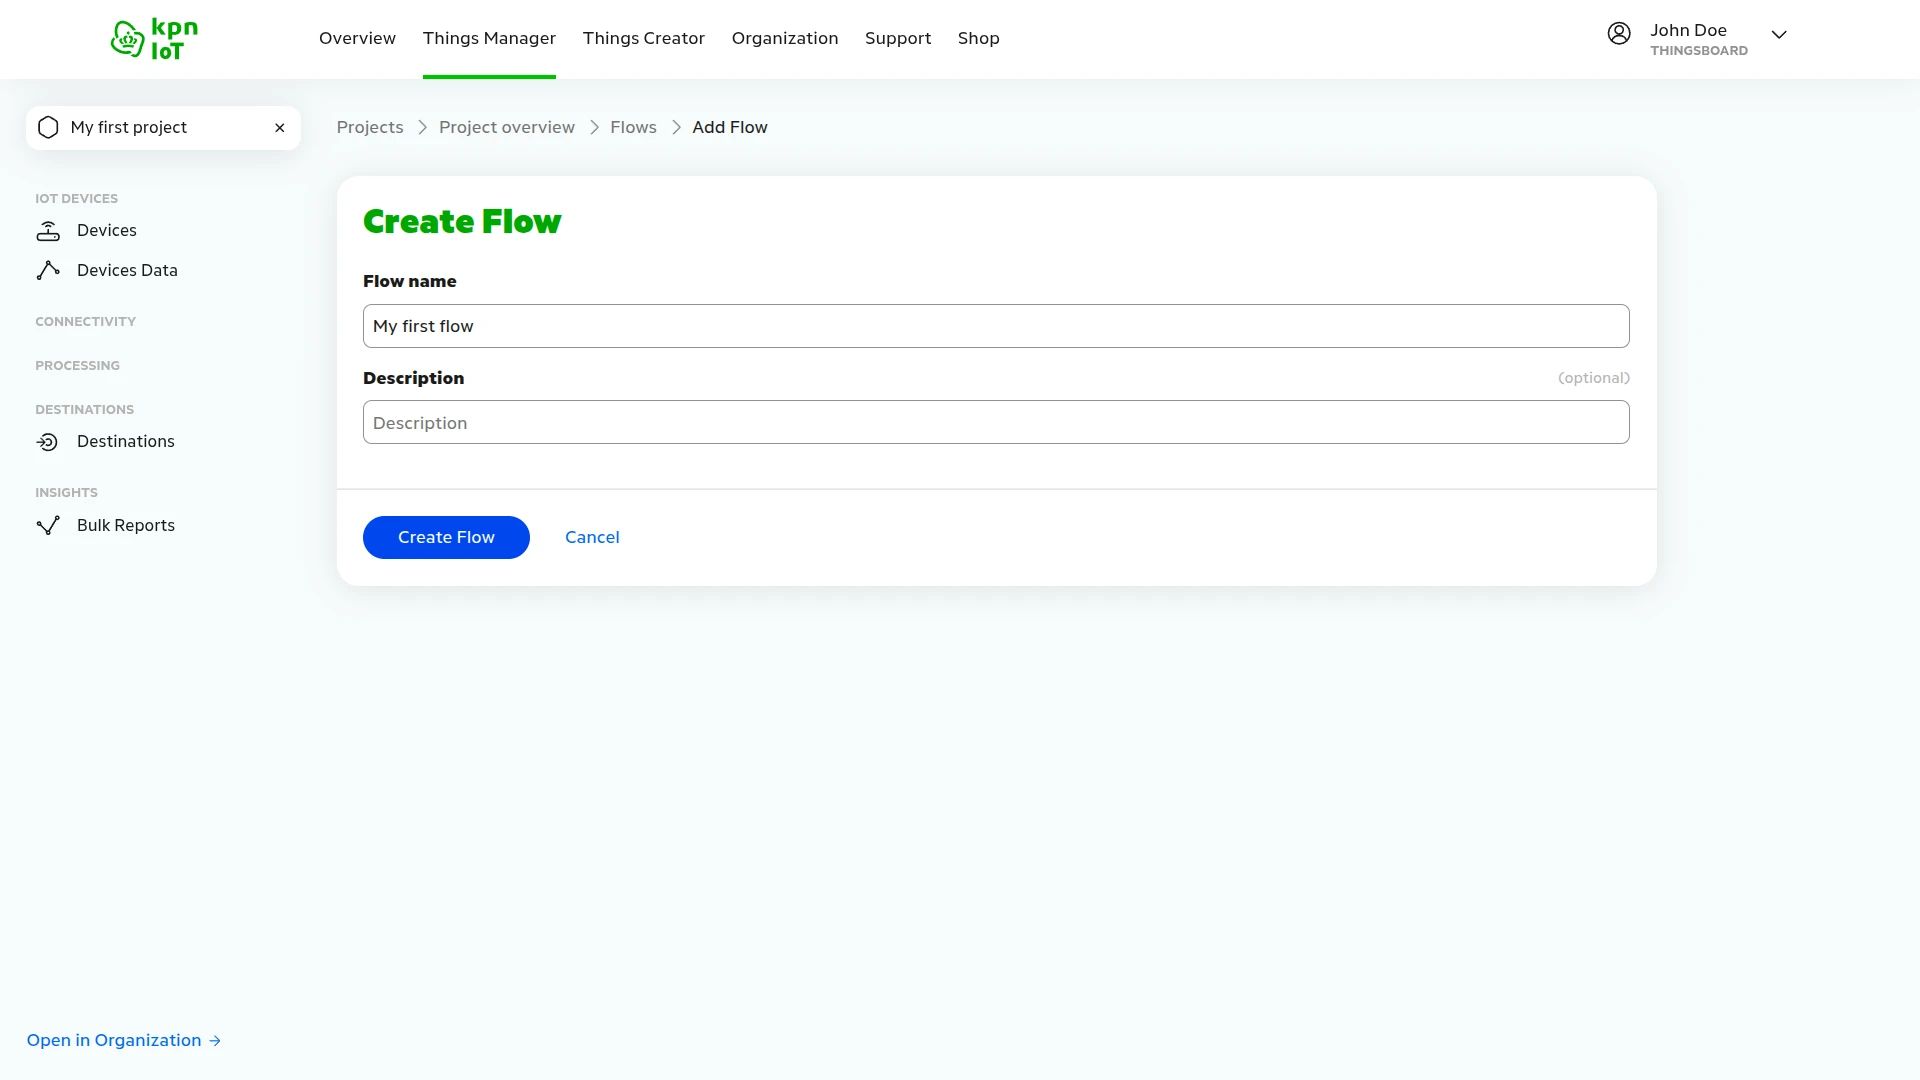
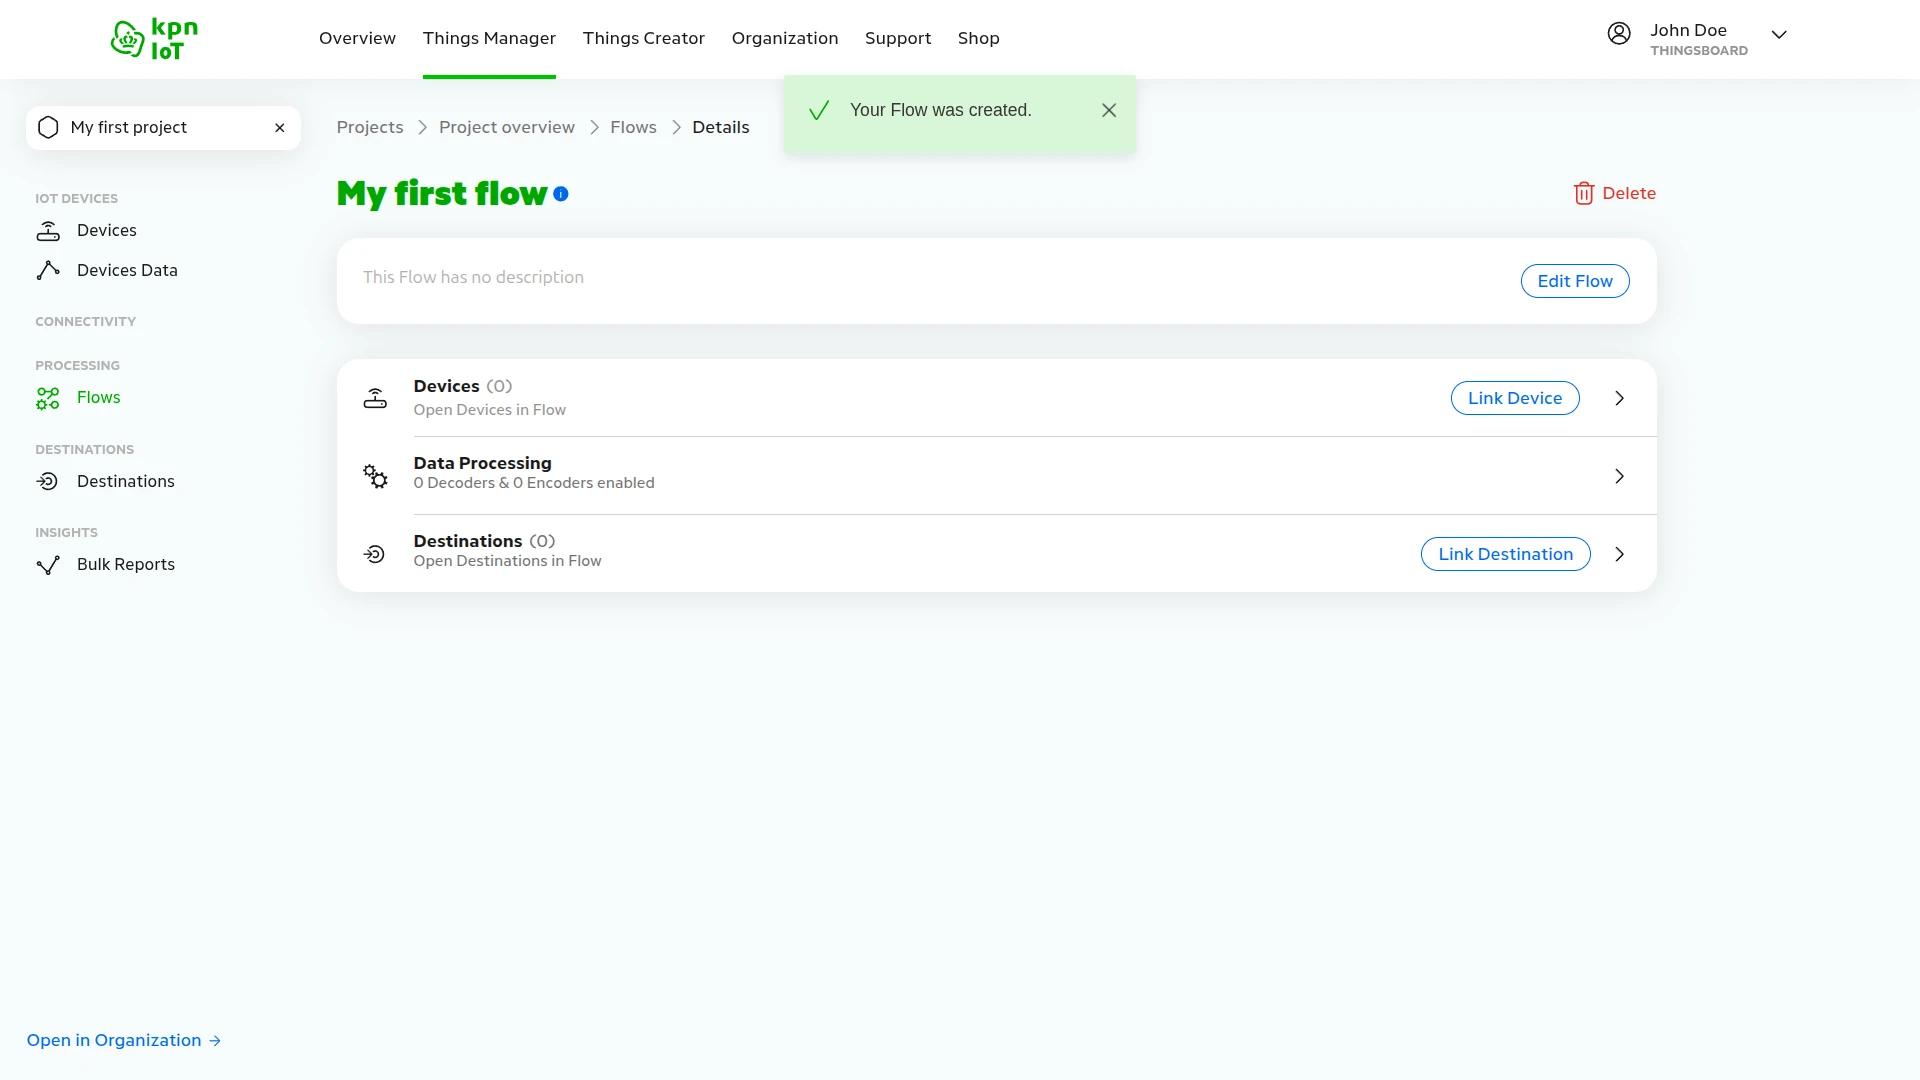
- Create a Flow. In the left menu, next to Processing, click + (Add Flow). Enter a Flow name, for example
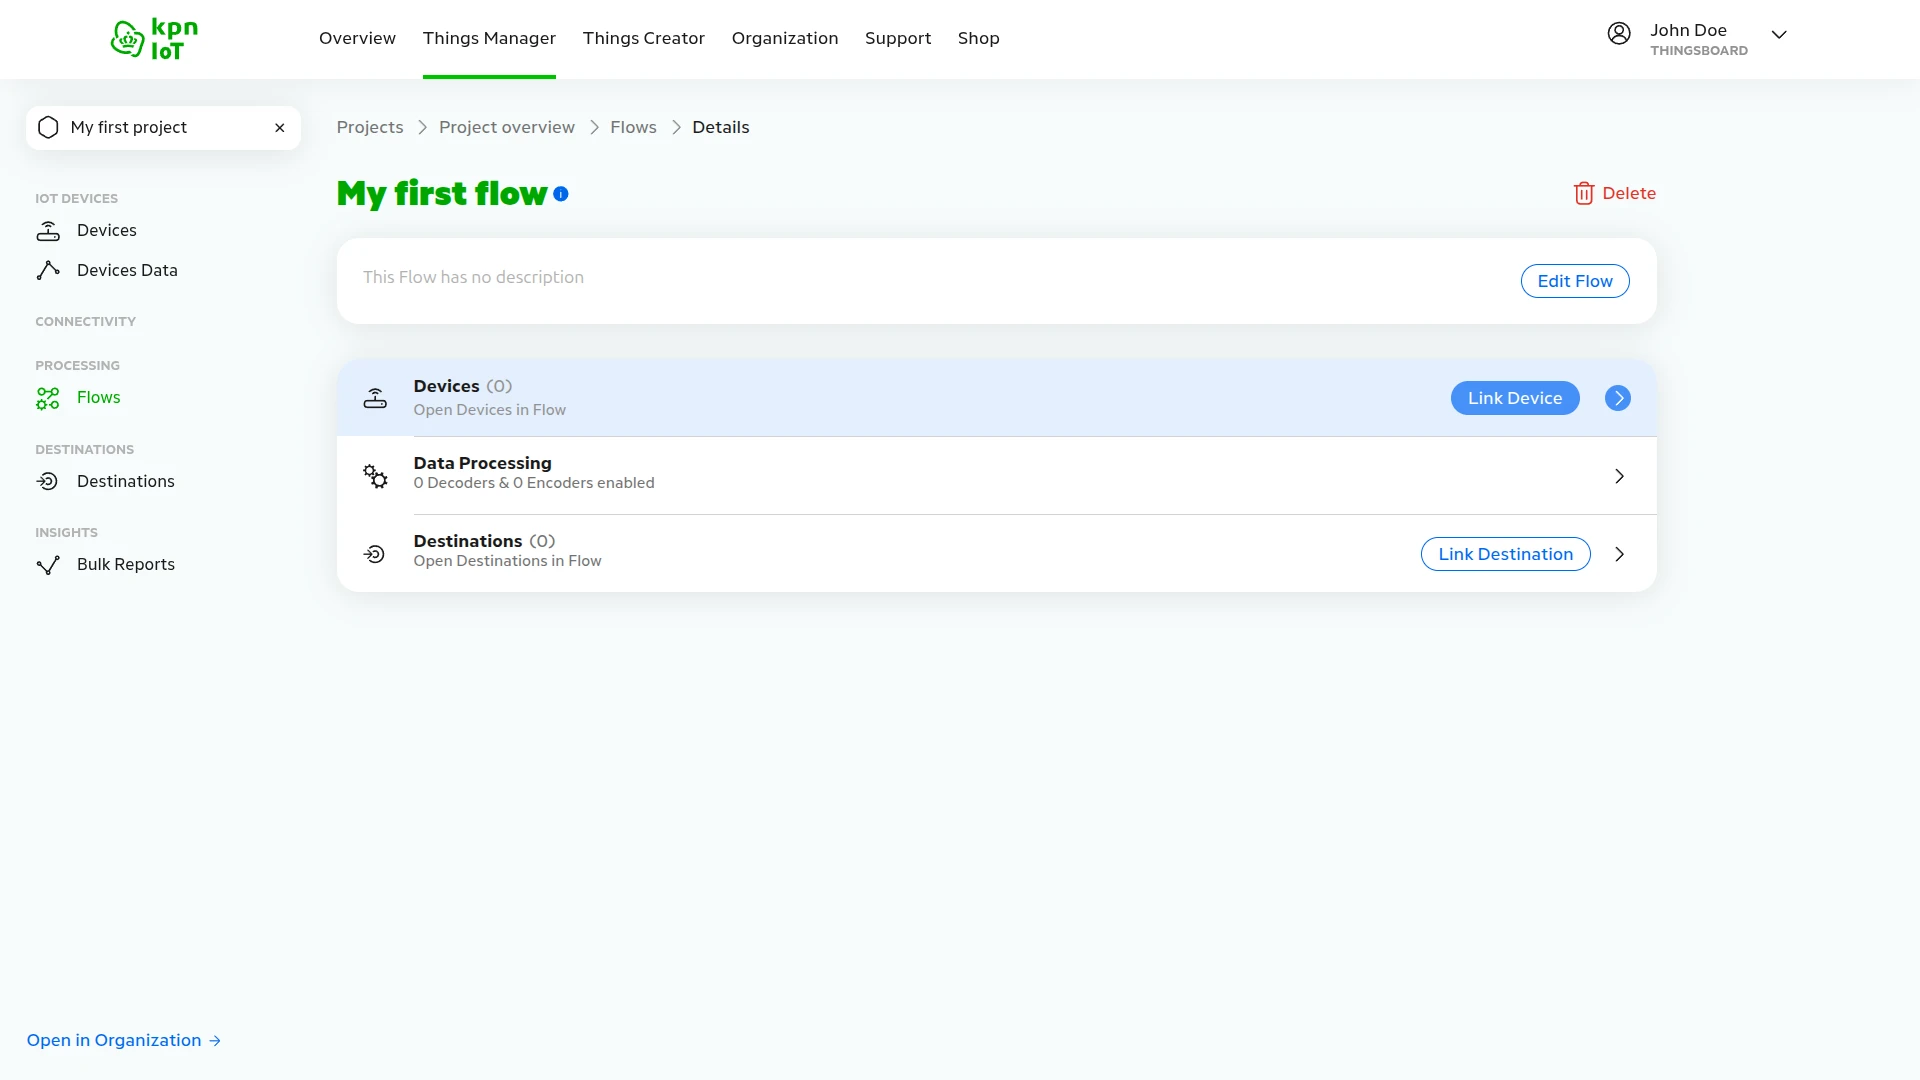
My first flow, and click Create Flow. The Flow page opens with the message Your Flow was created. If the project already has a Flow, open it from Flows in the left menu instead. - In the Devices row of the Flow, click Link Device.
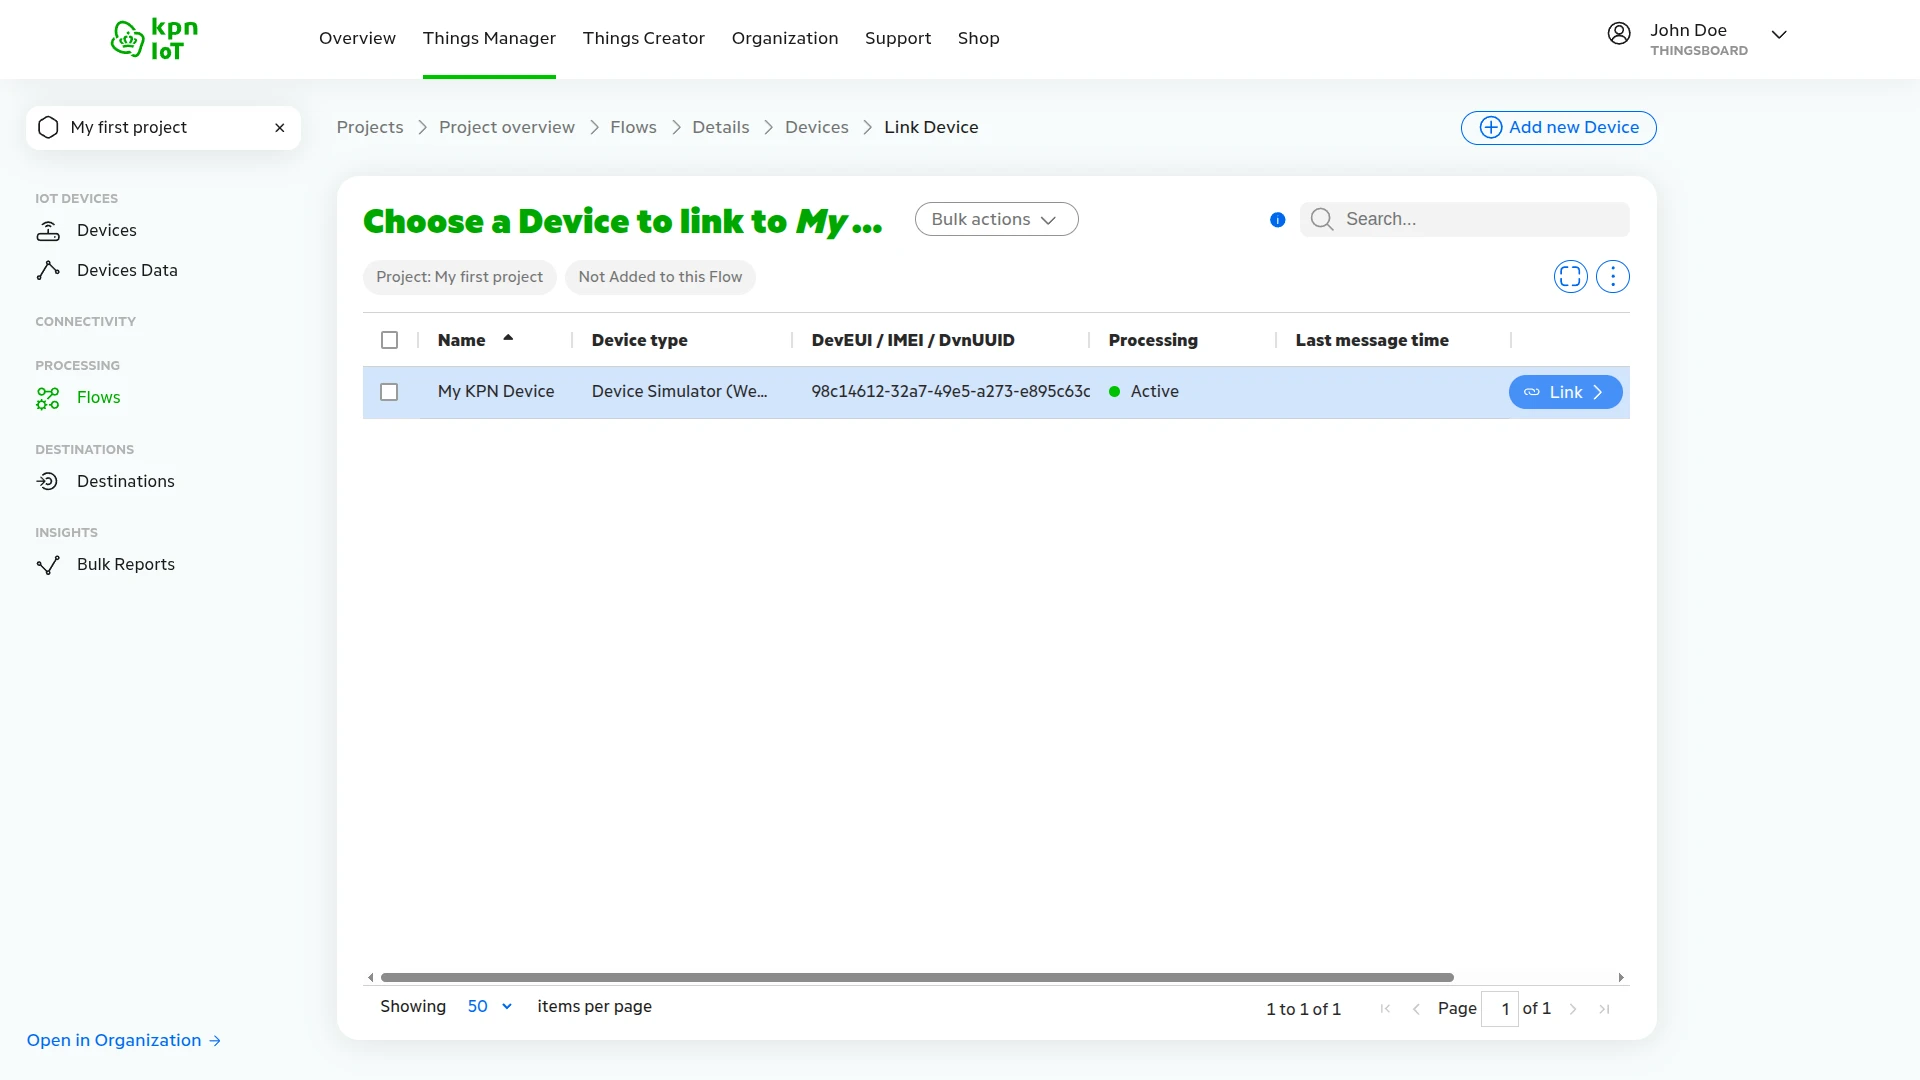
- Click Link next to
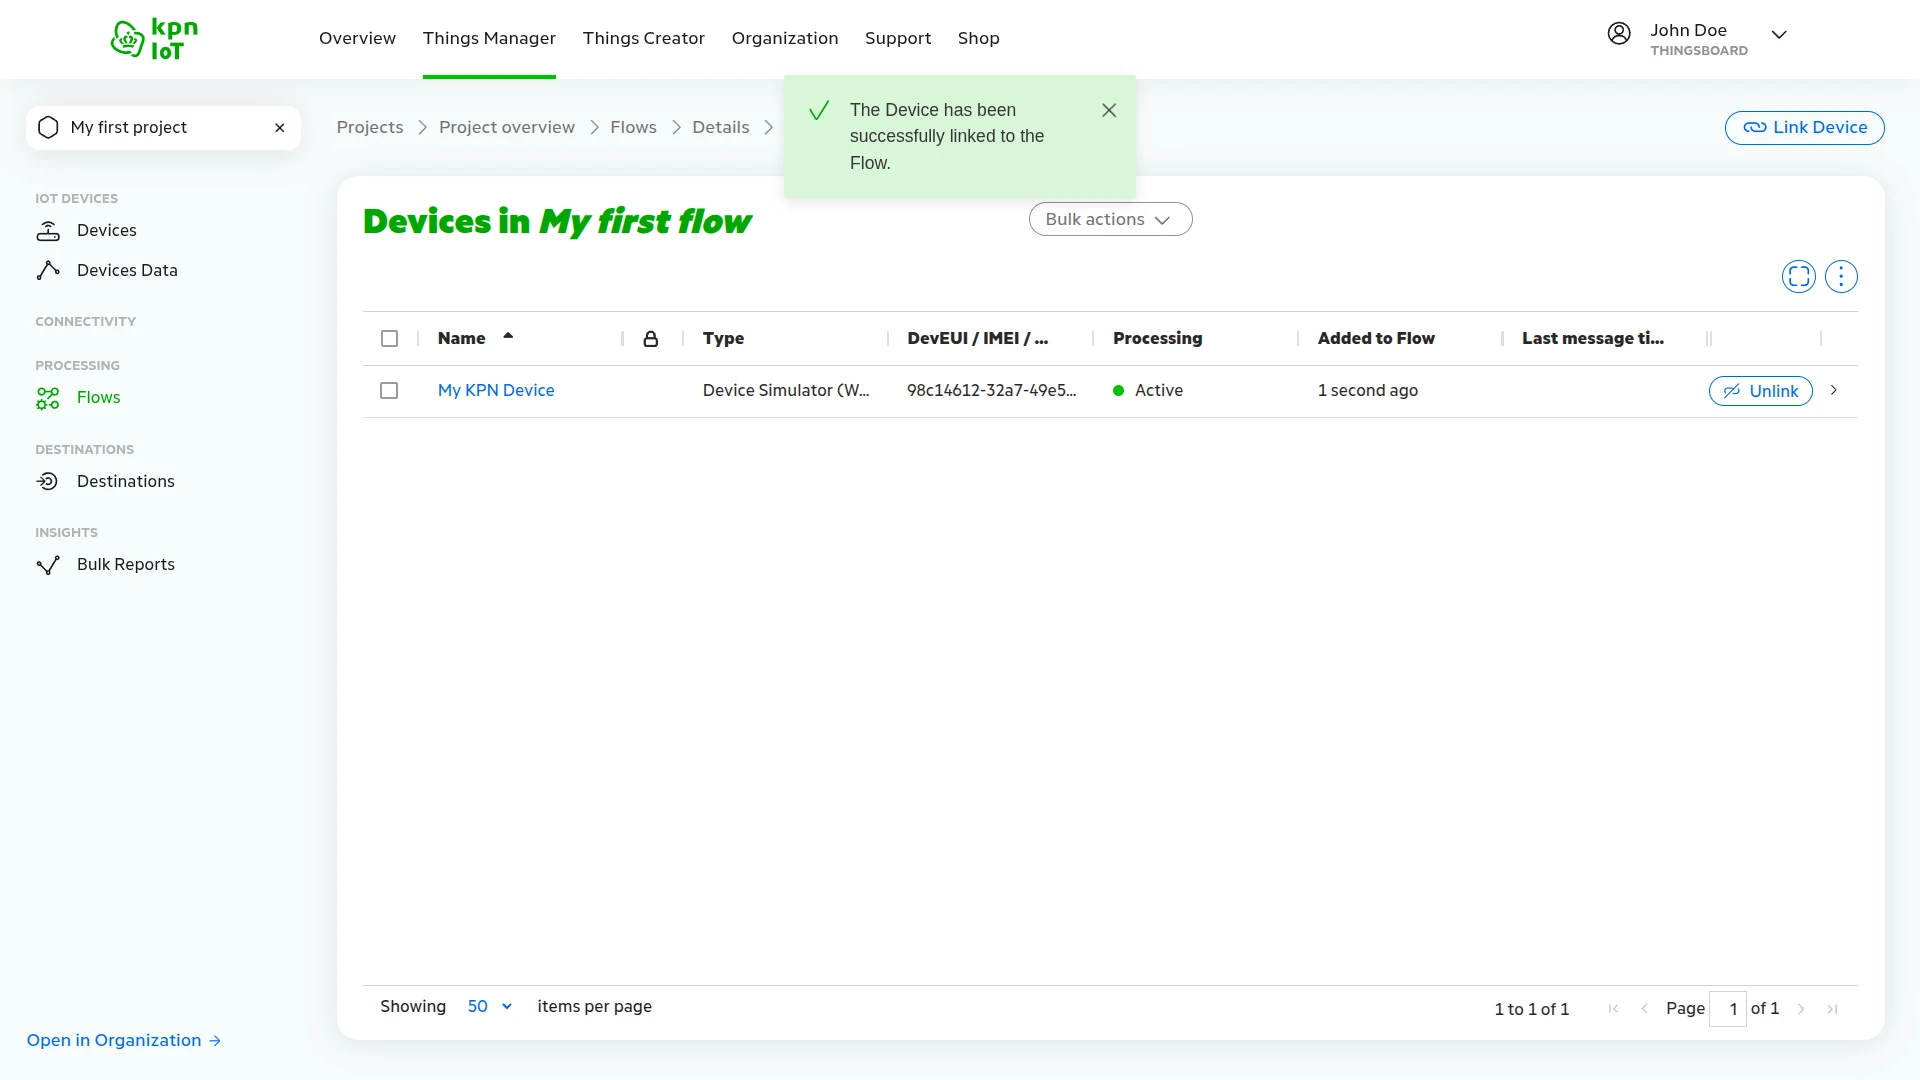
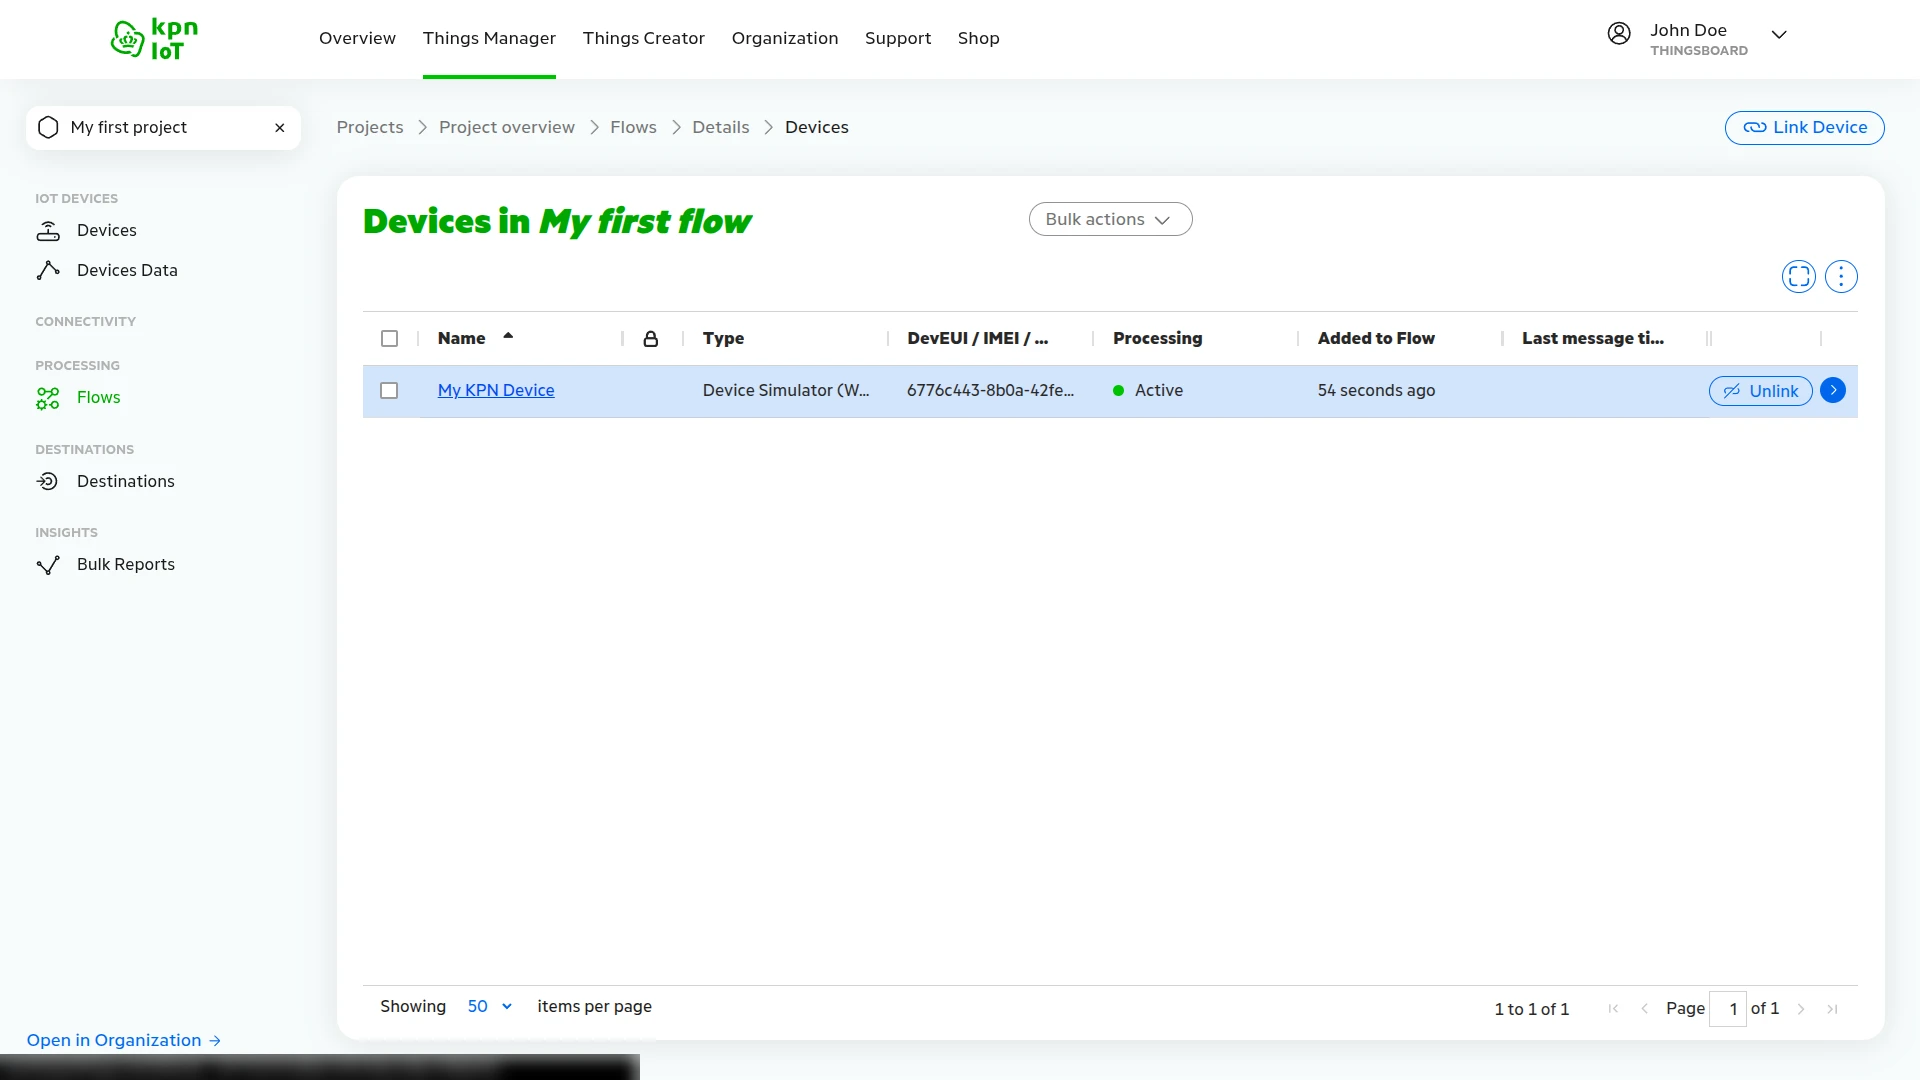
My KPN Device. The message The Device has been successfully linked to the Flow appears, and the device is listed in Devices in My first flow.
Enable Data Processing
Section titled “Enable Data Processing”The decoder in the Flow turns the device data into named values. Without it, ThingsBoard receives raw SenML records.
- In the Devices in My first flow list, click My KPN Device.
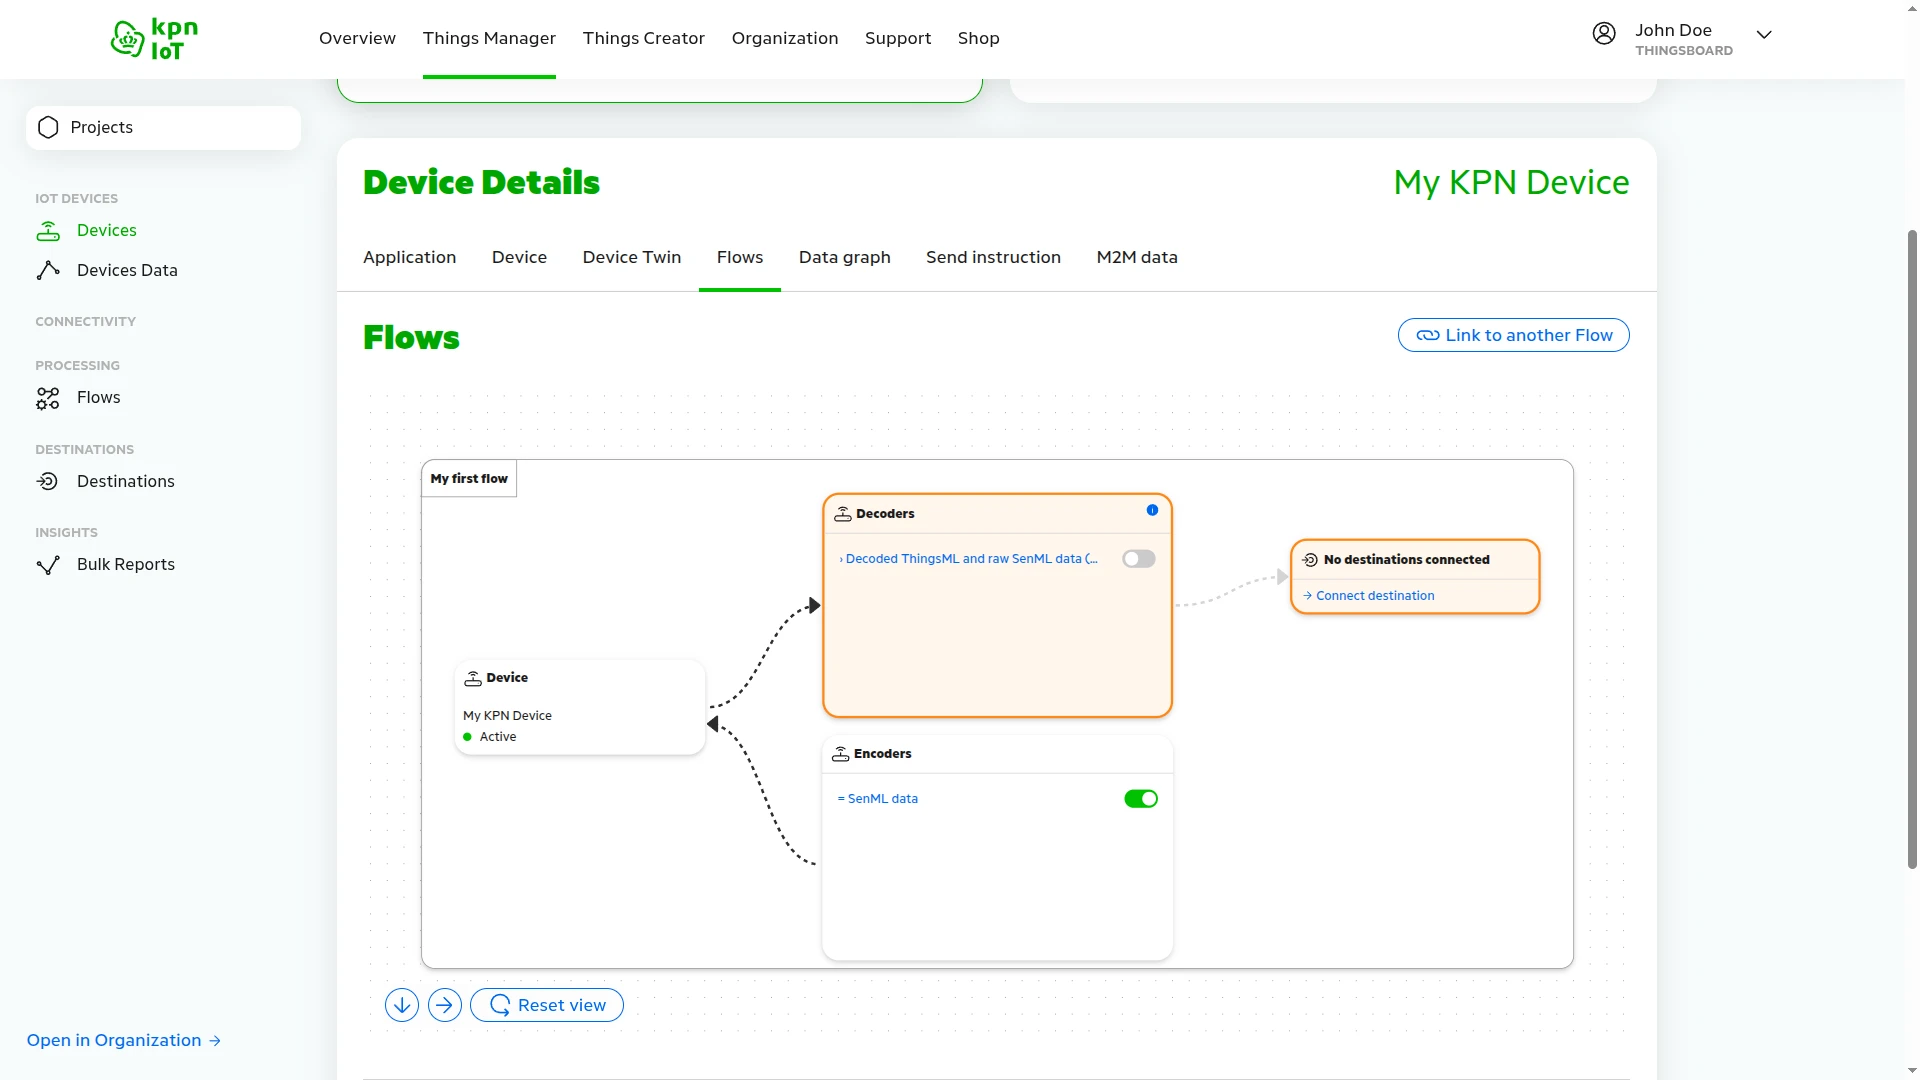
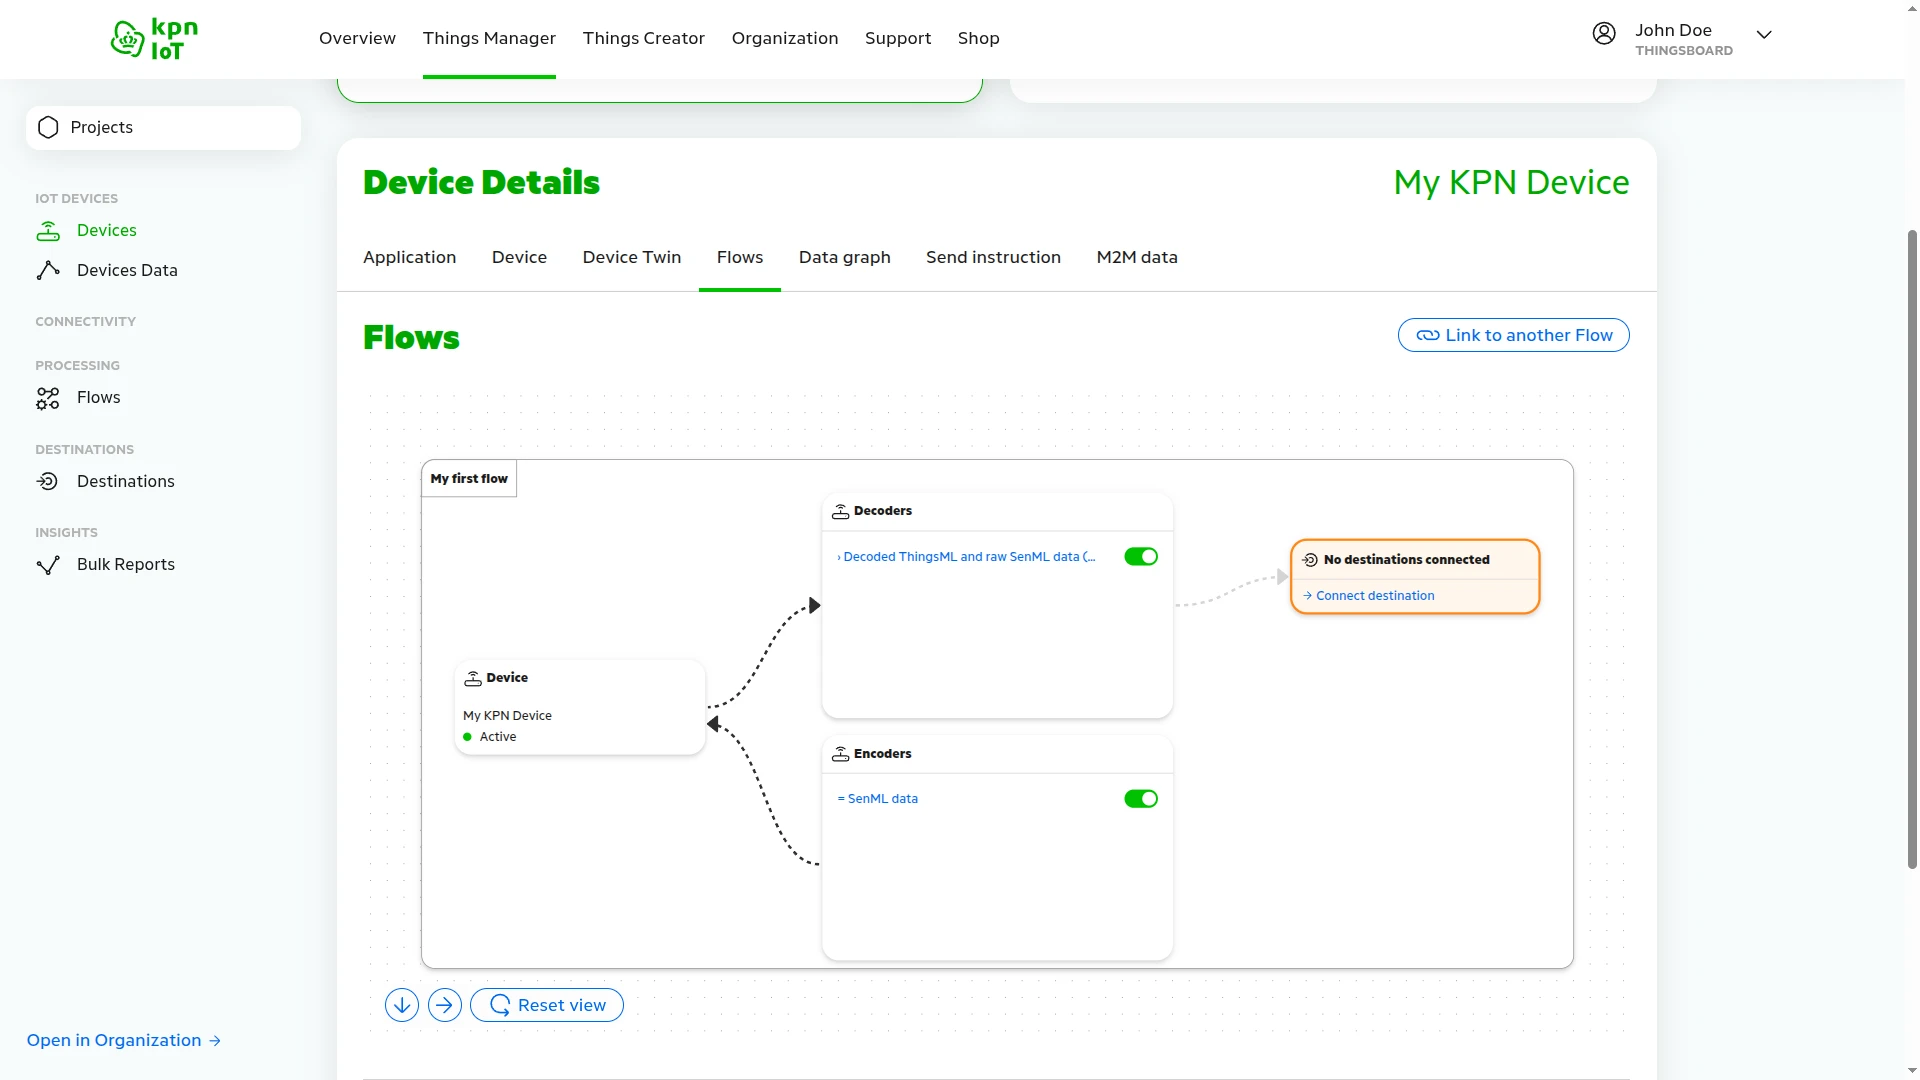
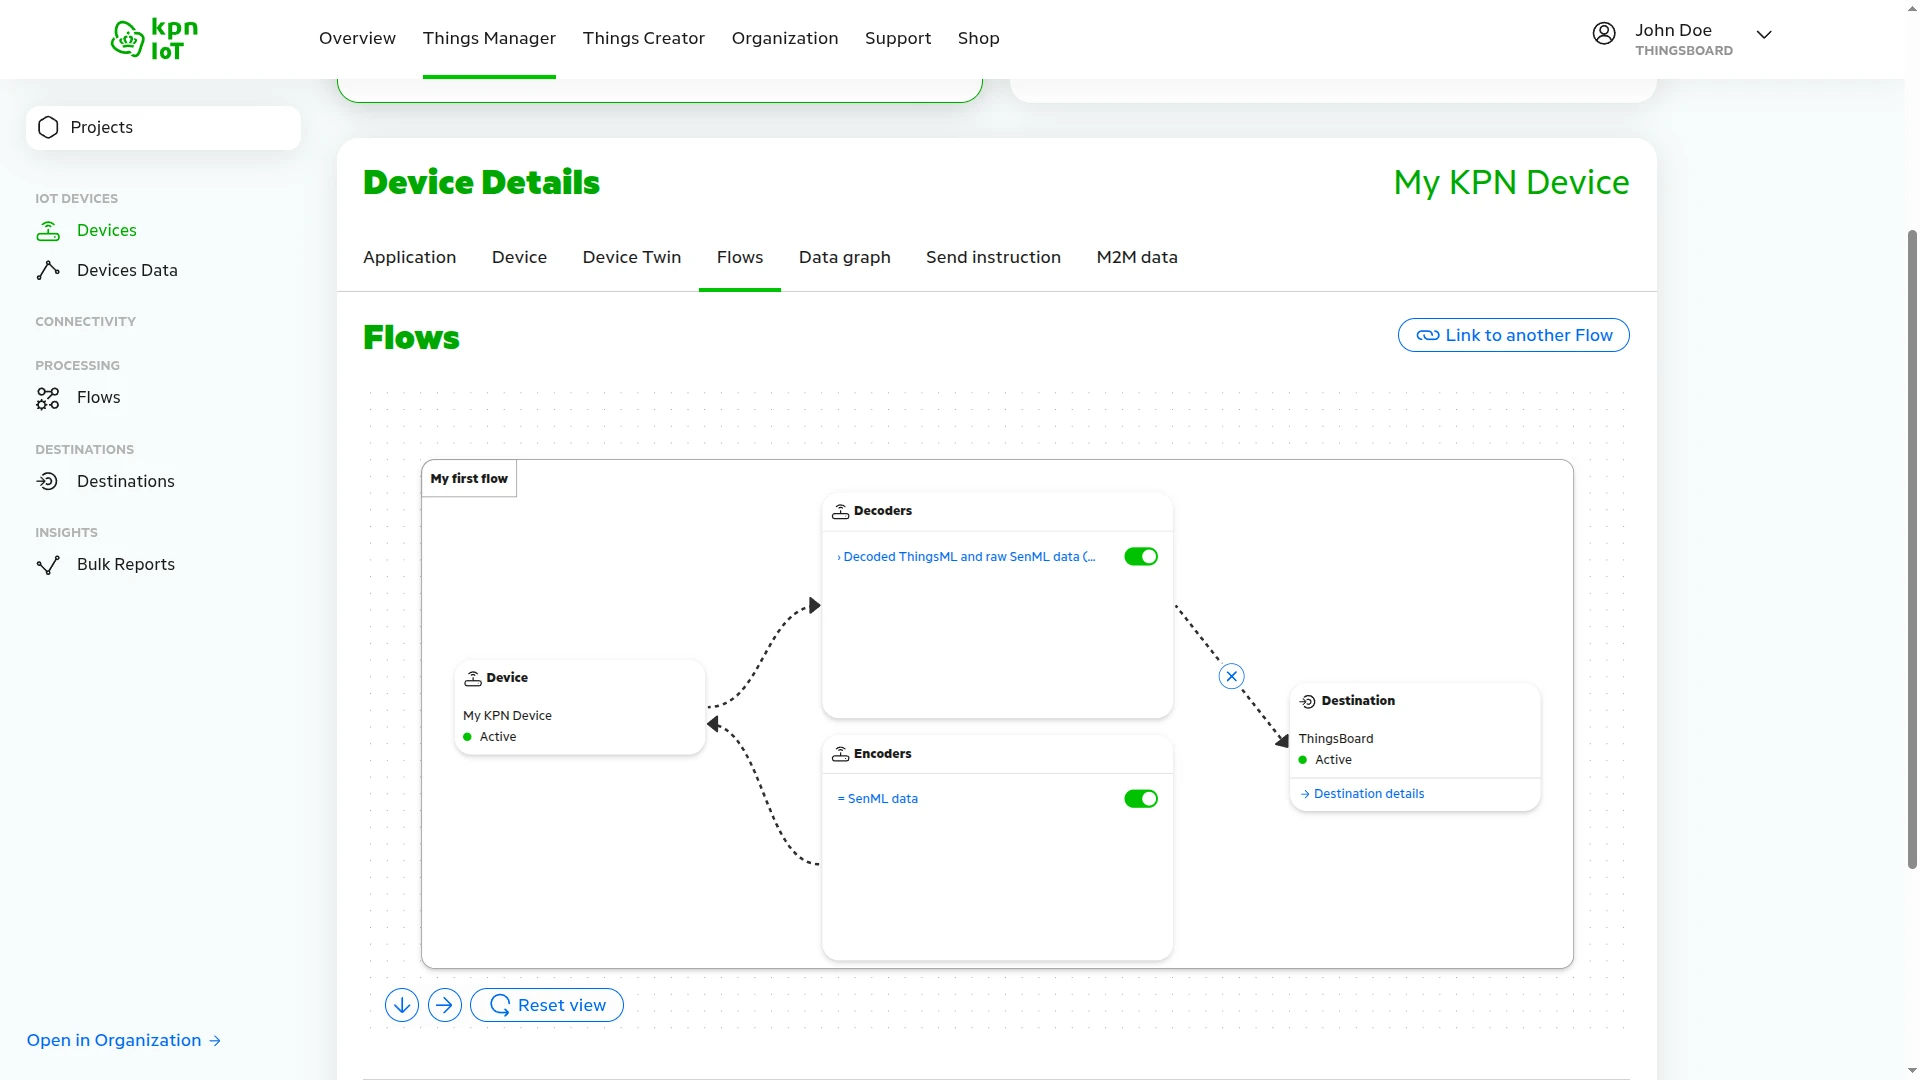
- Open the Flows tab. It shows the Flow as a diagram: the device, Decoders, Encoders, and destinations.
- In Decoders, turn on Decoded ThingsML and raw SenML data. The change is saved automatically. Leave the SenML data encoder in Encoders on: it is on by default, and downlink needs it.
Set Up KPN Things Integration
Section titled “Set Up KPN Things Integration”Create the uplink converter and the integration, then point a KPN Things destination at the integration endpoint.
Create the Uplink Data Converter
Section titled “Create the Uplink Data Converter”The uplink converter receives the request body as a byte array and returns the device data. KPN Things Integration uses the Generic converter: you write the decoder in TBEL or JavaScript. For converter types and the full decoder reference, see Uplink data converter.
The ThingsBoard destination sends the data already in the converter output format (see Decoder Inputs), so the default decoder returns the body unchanged.
-
Go to Integrations ⇾ Data converters and click + Add data converter ⇾ Create new converter.
-
Converter type — keep Uplink.
-
Integration type — select KPN Things.
-
Name — enter a name, for example
KPN Things Uplink Converter. -
Main decoding configuration — the TBEL editor opens with the KPN Things decoder below. Keep it. The TBEL / JS toggle switches to a generic JavaScript template that does not read the KPN Things body: if you use JavaScript, replace it with the decoder on the JavaScript tab.
/*By default, we receive a message that is already correctly formatted.But you can change the code for your purposes.*/return decodeToJson(payload);/** Decoder **/// The KPN Things body is already in the converter output format.return JSON.parse(String.fromCharCode.apply(String, payload));To adapt:
- Device name — the destination sends the KPN Things device URN as
deviceName. Setdata.deviceNameto another value, for exampledata.deviceLabel, to use a readable name. Downlink needs the URN, so store it as an attribute if you change the name. - Device profile —
deviceTypeholds the KPN Things device type, for exampleDevice Simulator (Web app). Set it to the name of the device profile you want. - Attributes — add an
attributesobject, for exampledata.attributes = { kpnLabel: data.deviceLabel };. - Group or customer — add
groupNameorcustomerNameto the result. - Update-only keys — for KPN Things, ThingsBoard pre-fills the Update only keys list in Advanced decoding parameters with
battery,DVNUUID, andDEVEUI. These keys are stored only when their value changes. Edit the list to match your keys.
- Device name — the destination sends the KPN Things device URN as
-
Click Test decoder function and check the result (see Test the Decoder).
-
Click Add.
Decoder Inputs
| Variable | Type | Content |
|---|---|---|
payload |
byte array | The request body sent by the ThingsBoard destination. |
metadata |
{[key: string]: string} |
integrationName, every request header as Header:<name> with the name in lowercase, and the key–value pairs from the integration’s Metadata field. The ThingsBoard destination sends Header:x-things-secret, Header:things-message-token, Header:things-client-id, and Header:things-plug-uuid, among others. |
With Decoded ThingsML and raw SenML data on, the body looks like this:
{ "deviceName": "urn:dev:DVNUUID:6776c443-8b0a-42fe-b8ca-d8a1cf880492:", "deviceLabel": "My KPN Device", "deviceType": "Device Simulator (Web app)", "telemetry": [{ "ts": 1792571305000, "values": { "battery": "87", "temperature": 23.6, "orientation": "0,0,0,0", "latitude": 51.9067285, "longitude": 4.490617 } }]}deviceName— the device URN in the formurn:dev:DVNUUID:{UUID}:. It stays the same for the lifetime of the device in KPN Things.deviceLabel— the device name in KPN Things. ThingsBoard stores it as the device label.deviceType— the device profile name. Without it, ThingsBoard uses thedefaultprofile.telemetry— one or more records with a timestamptsin milliseconds and the decodedvalues. Numeric strings such as"87"are stored as numbers.
Test the Decoder
Click Test decoder function below the editor. The dialog opens with a generic sample payload, with Payload content type set to JSON. Replace the payload with the body from Decoder Inputs and click Test. The Output panel shows the same object, because the default decoder returns the body unchanged:
{ "deviceName": "urn:dev:DVNUUID:6776c443-8b0a-42fe-b8ca-d8a1cf880492:", "deviceLabel": "My KPN Device", "deviceType": "Device Simulator (Web app)", "telemetry": [{ "ts": 1792571305000, "values": { "battery": "87", "temperature": 23.6, "orientation": "0,0,0,0", "latitude": 51.9067285, "longitude": 4.490617 } }]}Check that deviceName holds the URN and telemetry holds the expected keys. If the output is empty or shows an error, fix the decoder and test again.
Create the Integration
Section titled “Create the Integration”- Go to Integrations ⇾ Integrations and click + Add integration.
- Basic settings:
- Integration type — select KPN Things.
- Name — keep the default
KPN Things integrationor enter your own. - Enable integration and Allow create devices or assets — keep both on, so the device is created on its first message.
- Click Next.
- Uplink data converter:
- Click Select existing and choose
KPN Things Uplink Converter. - Alternatively, click Create new to write a decoder here.
- Click Next.
- Click Select existing and choose
- Downlink data converter:
- Click Skip. Add a downlink converter later if you need to send commands.
- Connection:
- Copy the HTTP endpoint URL. You need it for the KPN Things destination.
- Leave the other parameters at their defaults. See Connection Settings for details.
- Click Add.
Connection Settings
Section titled “Connection Settings”| Parameter | Default | Description |
|---|---|---|
| Base URL | Address of the ThingsBoard server you are signed in to, for example https://thingsboard.cloud |
Used to build the endpoint URL. Must be a public address. Required. |
| Destination shared secret | — | If set, every request must carry a Things-Message-Token header with the SHA-256 hash (hex) of the request body followed by this secret. Leave it empty for the ThingsBoard destination: it signs with a secret that KPN Things does not show. See Secure the Endpoint. |
| HTTP endpoint URL | — | Read-only. Format: {Base URL}/api/v1/integrations/kpn/{integrationKey}, where integrationKey is a UUID assigned at creation. Accepts JSON bodies only. |
| Allow downlink | Off | Shows the Credentials fields. See Configure Downlink. |
| API ID and API Key | — | In Allow downlink ⇾ Credentials. ID and secret key of a KPN API key. ThingsBoard exchanges them for an access token. Required when Allow downlink is on. |
| Enable security (Headers filter) | Off | Accepts only requests that carry every listed Header with the exact Value. See Secure the Endpoint. |
| Execute remotely | Off | Runs the integration as a separate process outside the ThingsBoard cluster. ThingsBoard generates an Integration key and Integration secret for it. KPN Things needs a public endpoint, so the standard setup keeps this off. See Remote Integration. |
| Description | — | In Advanced settings. Free-text description. |
| Metadata | — | In Advanced settings. Key–value pairs added to the metadata of every message from this integration. |
The integration answers 200 OK when the converter returned data, 204 No Content when it returned nothing, 400 Bad Request on a converter script error, and 403 Forbidden when the security check fails.
Create the ThingsBoard Destination
Section titled “Create the ThingsBoard Destination”A destination tells the Flow where to send device data. Create it from the device’s flow diagram, and KPN Things links it to the Flow.
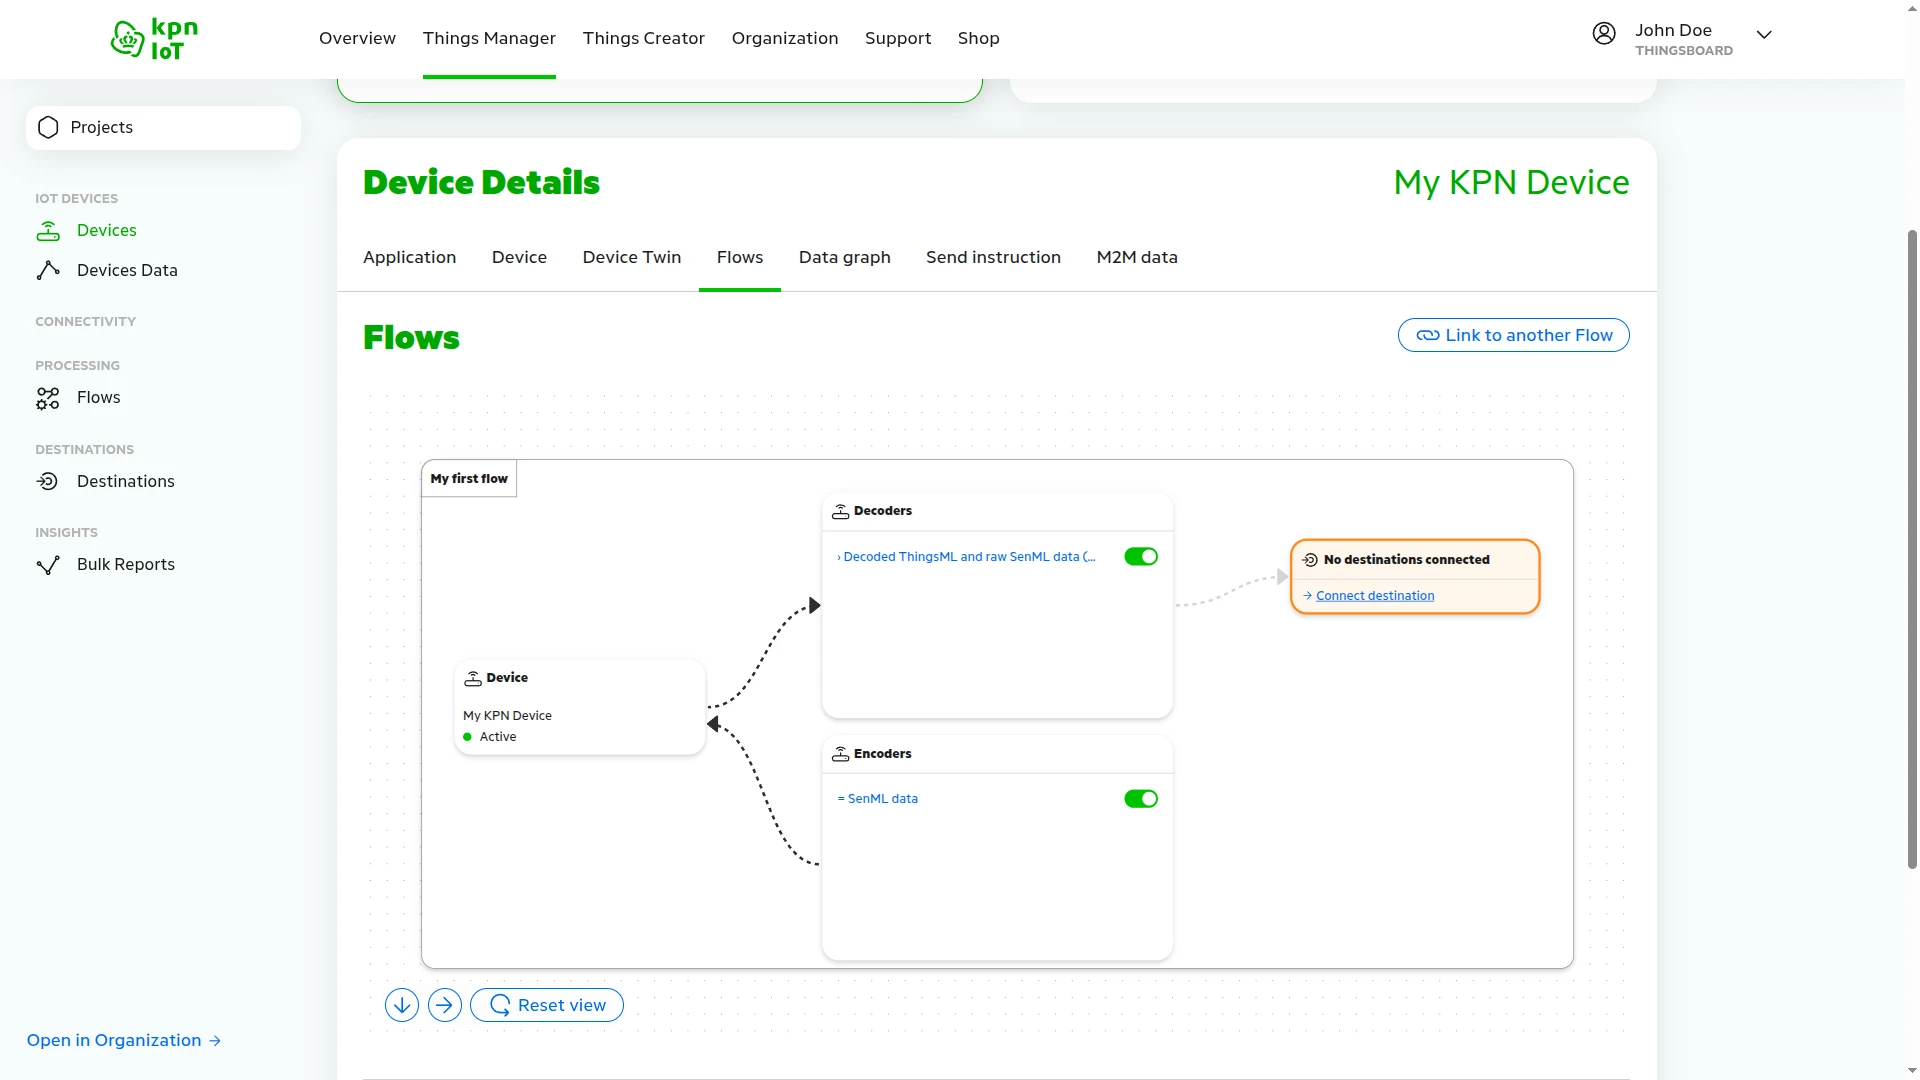
- On the Flows tab of My KPN Device, click Connect destination in the No destinations connected block.
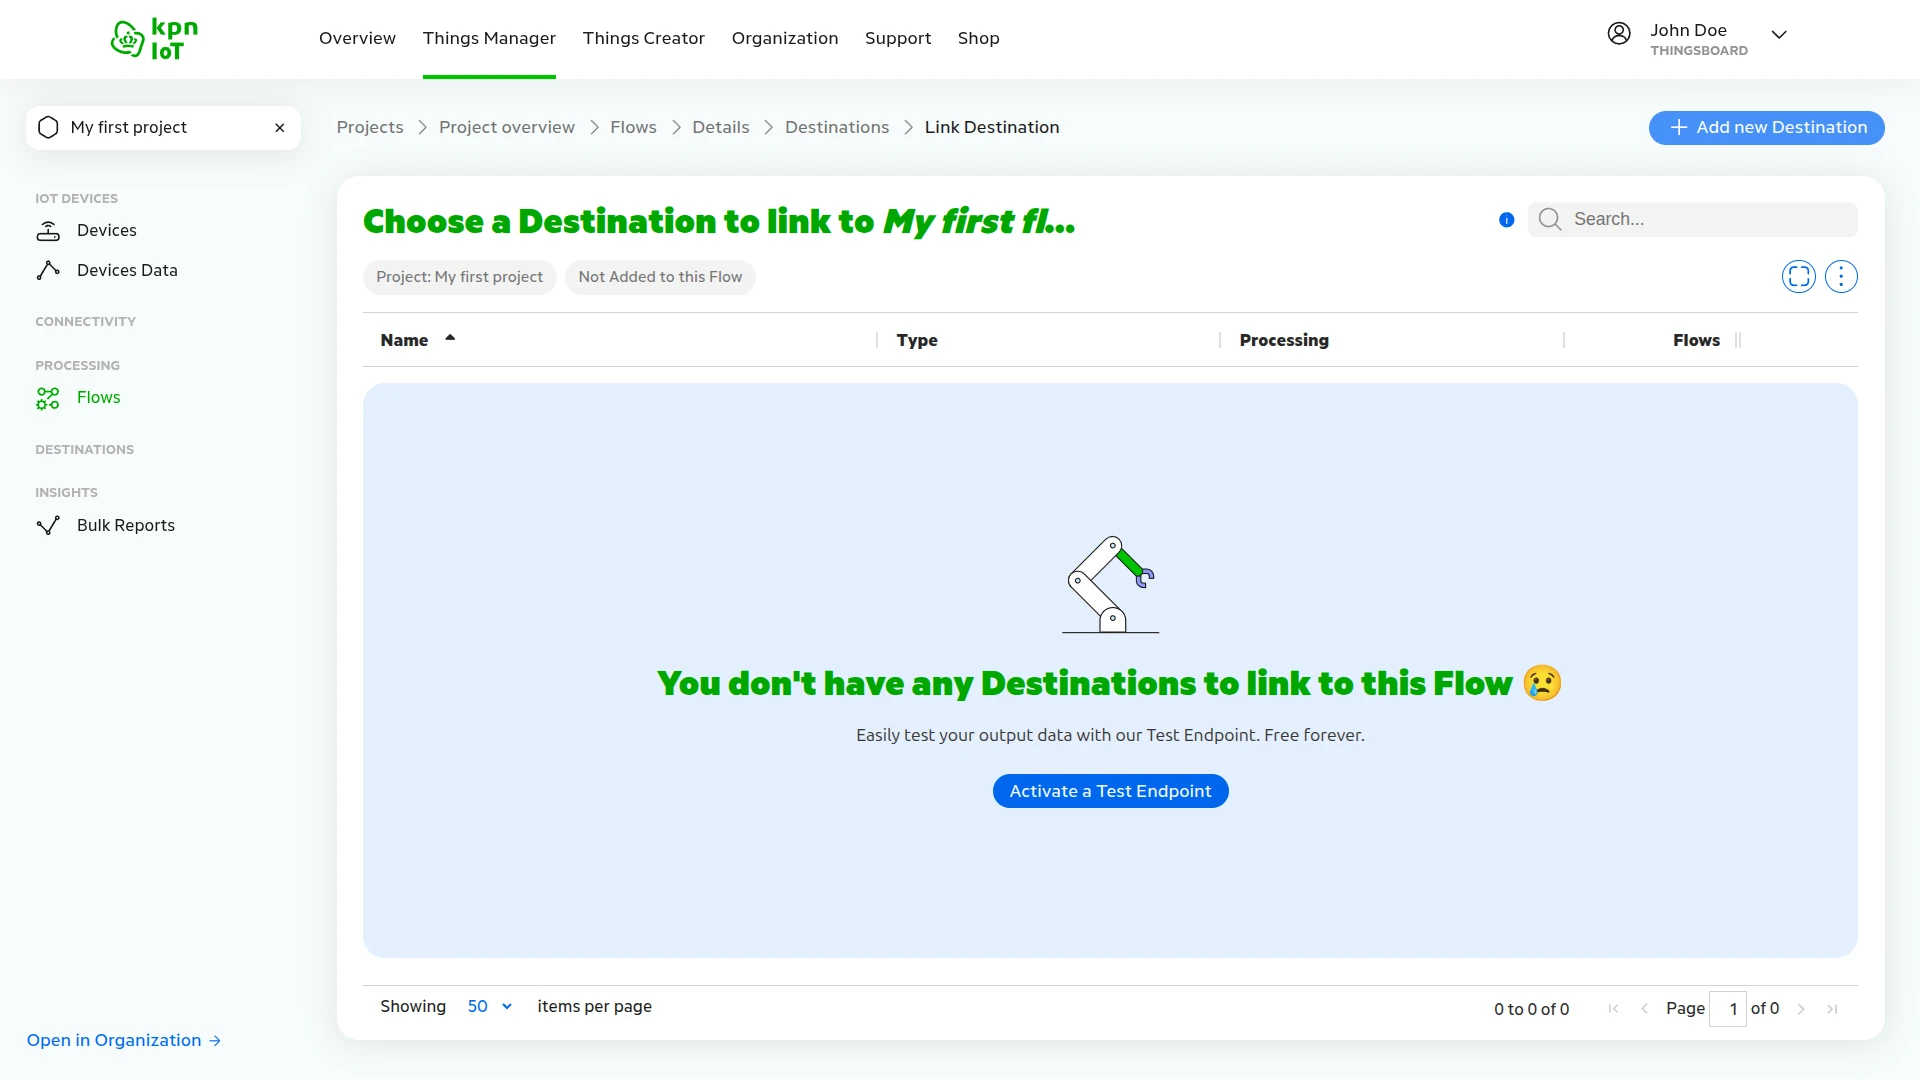
- The Choose a Destination to link page lists the destinations of the project. Click + Add new Destination.
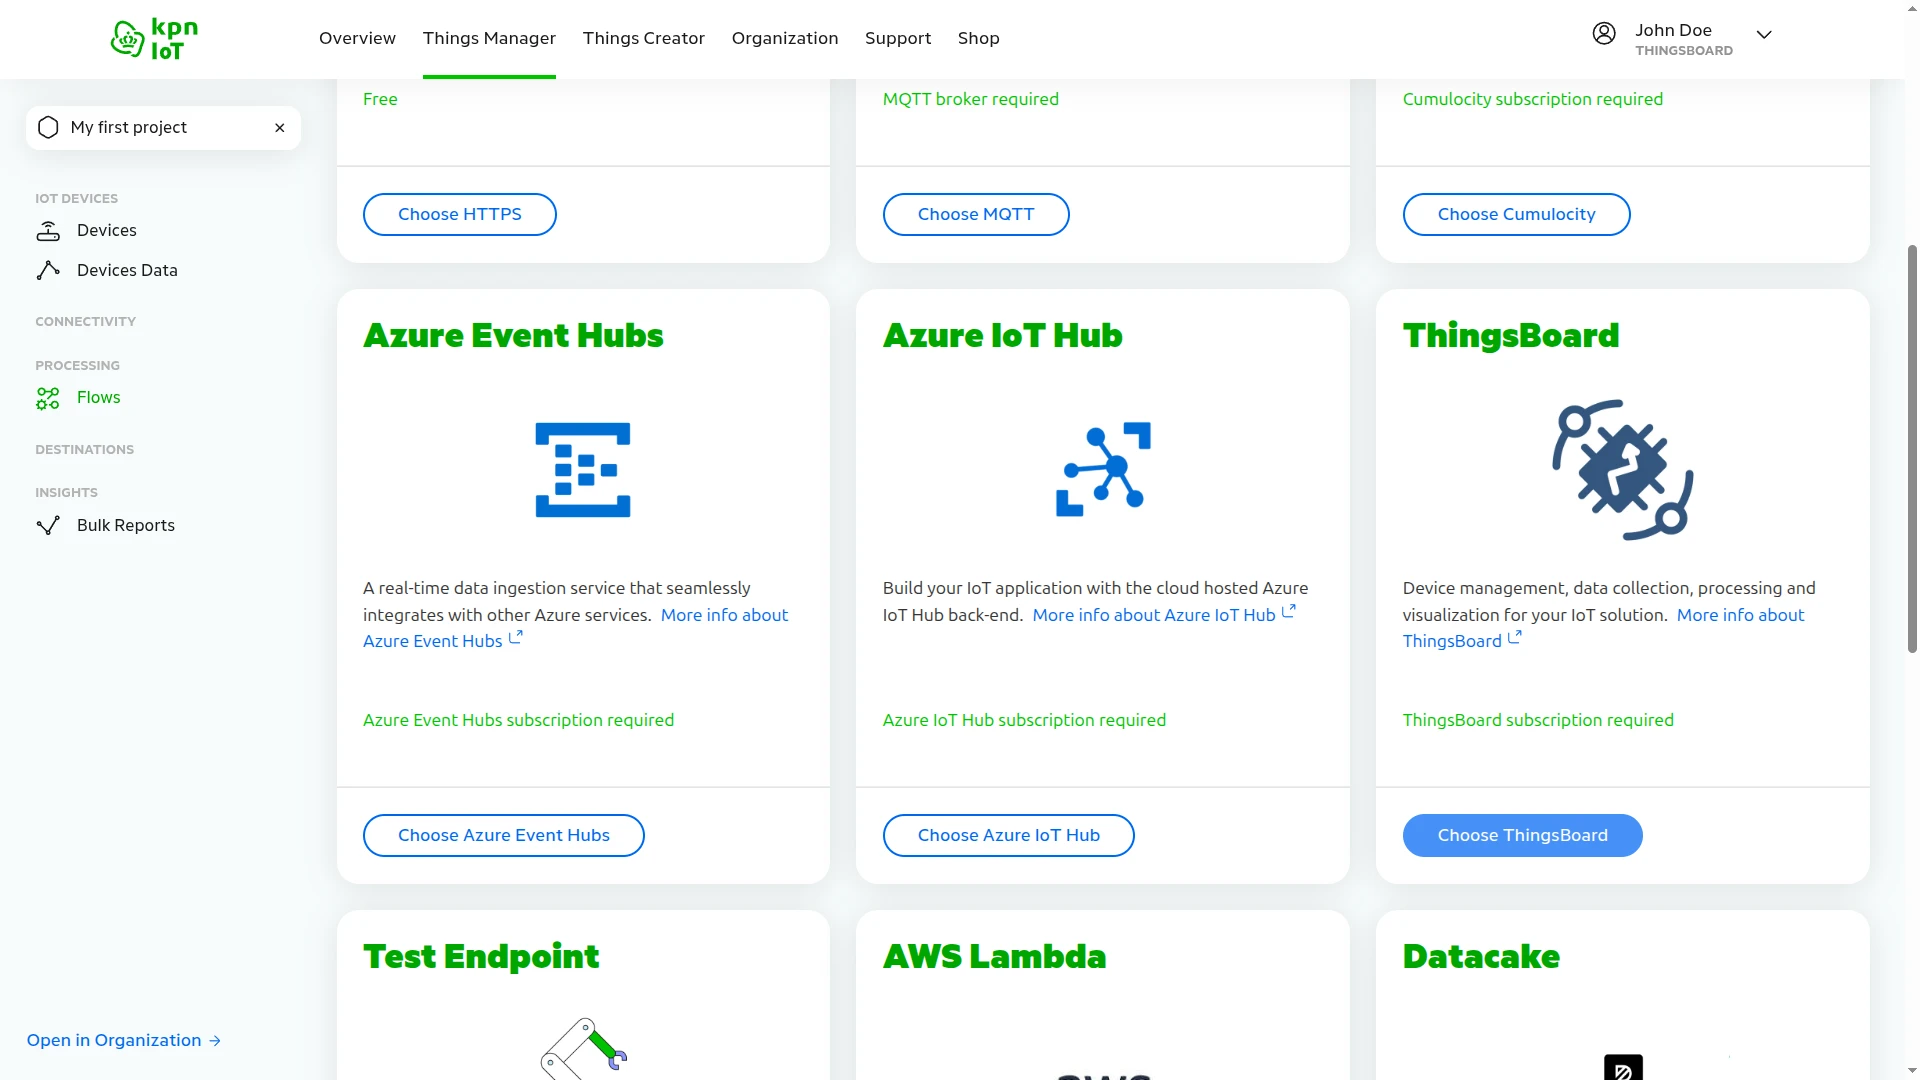
- Find ThingsBoard and click Choose ThingsBoard.
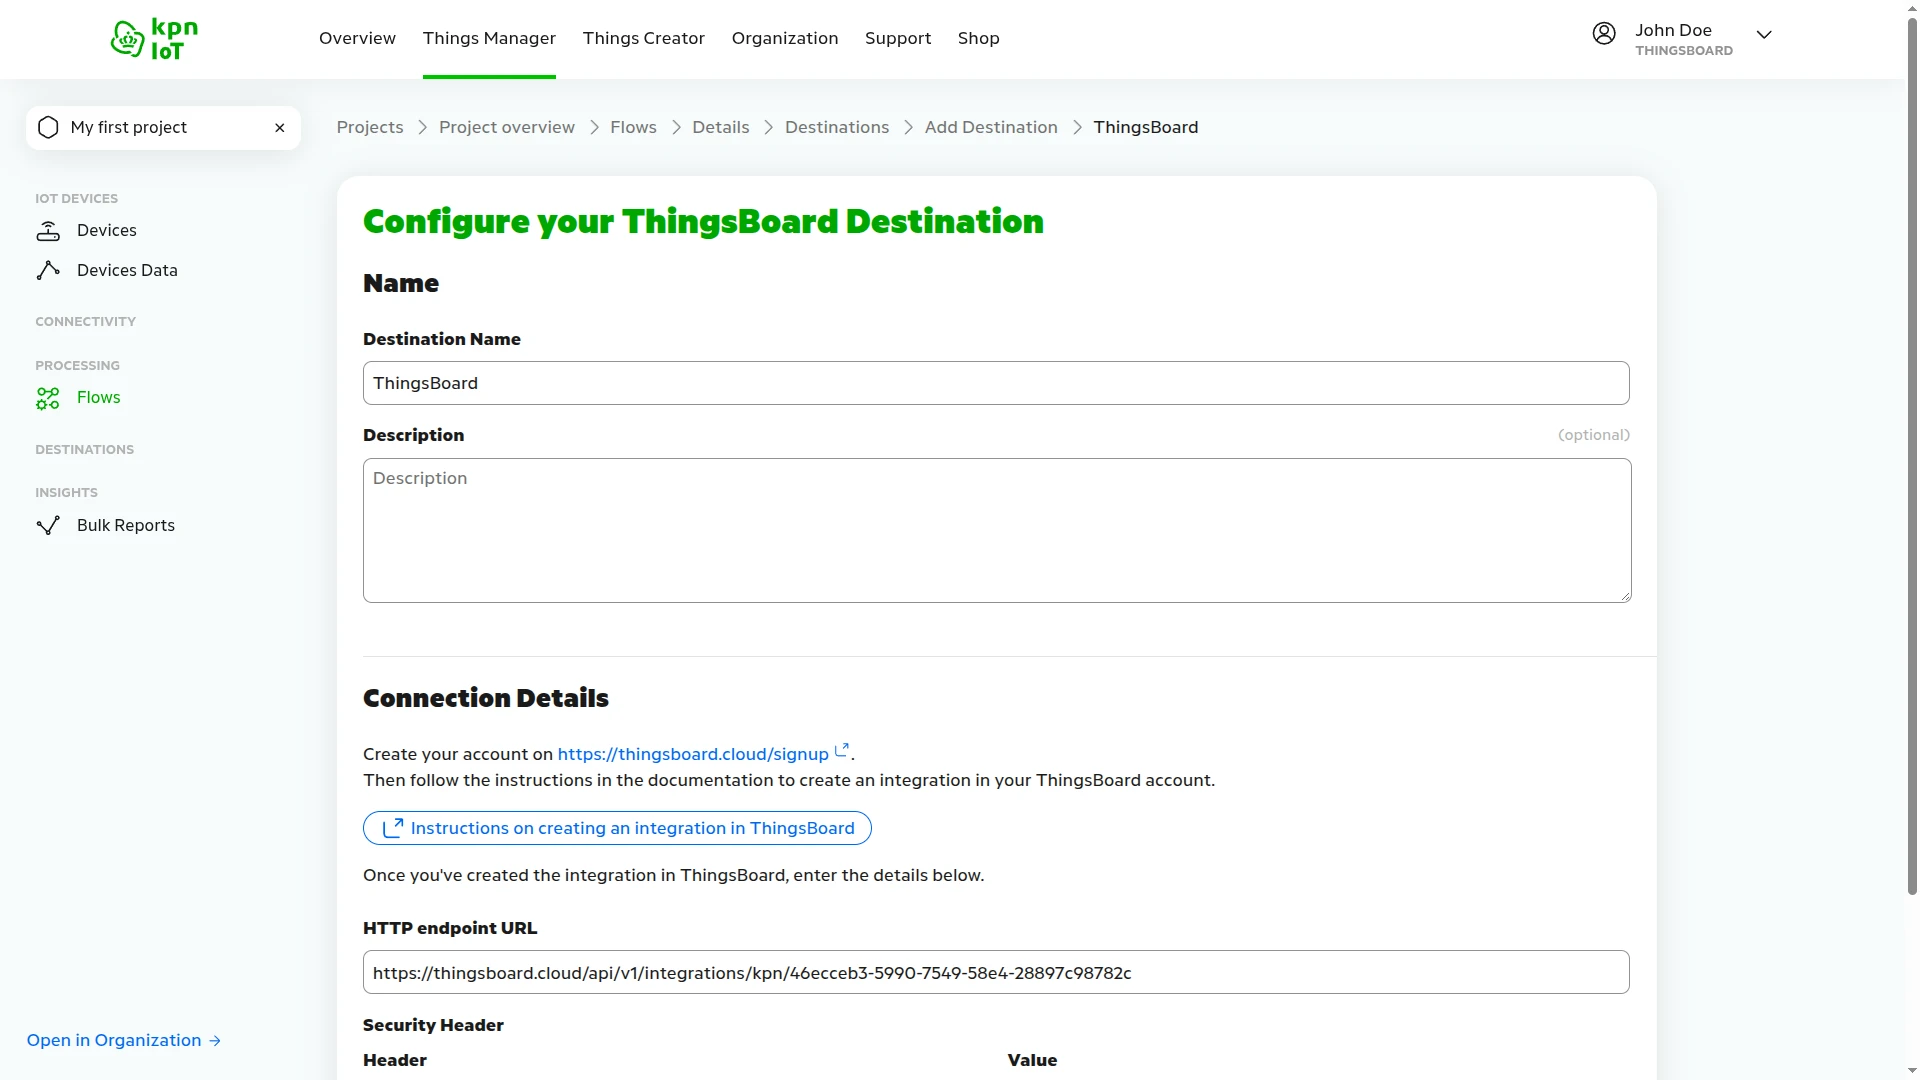
- Enter a Destination Name, for example
ThingsBoard. - Under Connection Details:
- HTTP endpoint URL — paste the HTTP endpoint URL of the integration.
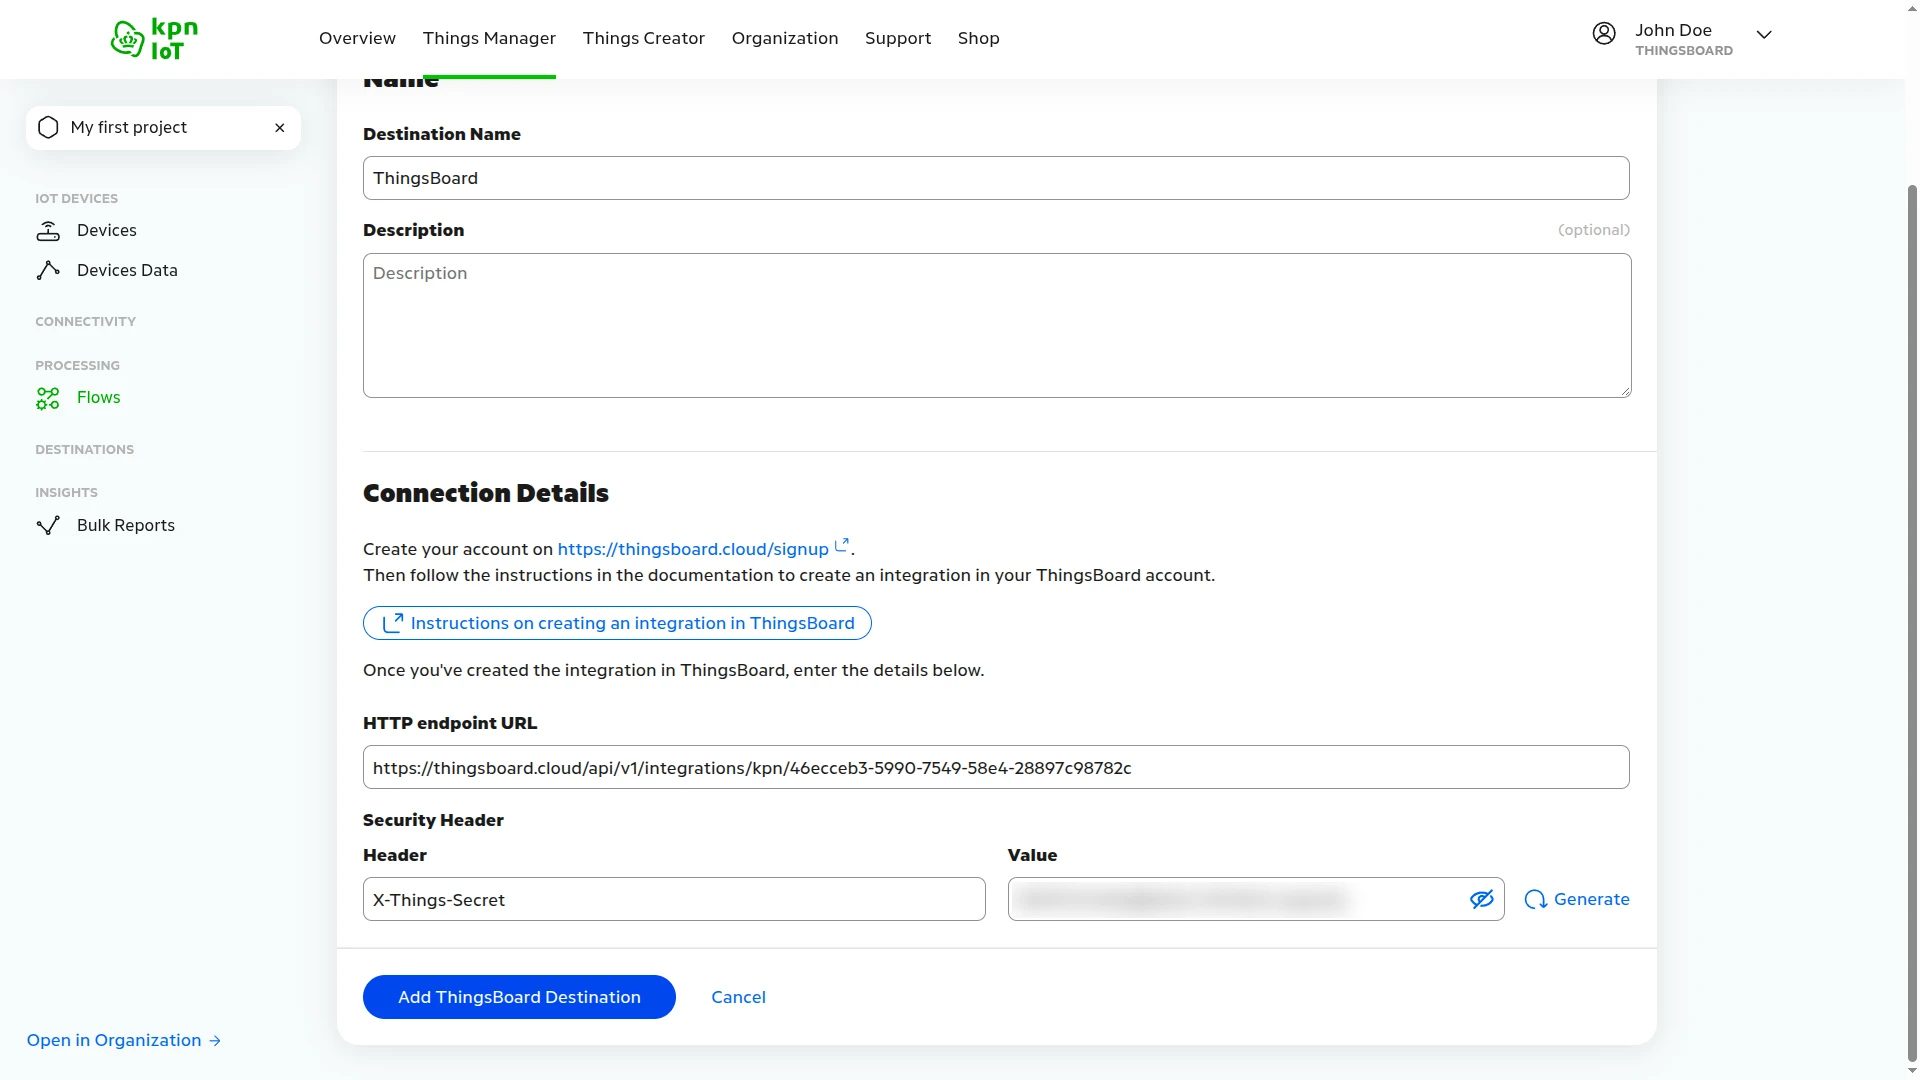
- Security Header — the Header is pre-filled with
X-Things-Secret. Click Generate to create the Value, or enter your own token. Copy the value for Secure the Endpoint. ThingsBoard checks this header only after you turn on the headers filter there. Until then, it accepts requests with any header value or none.
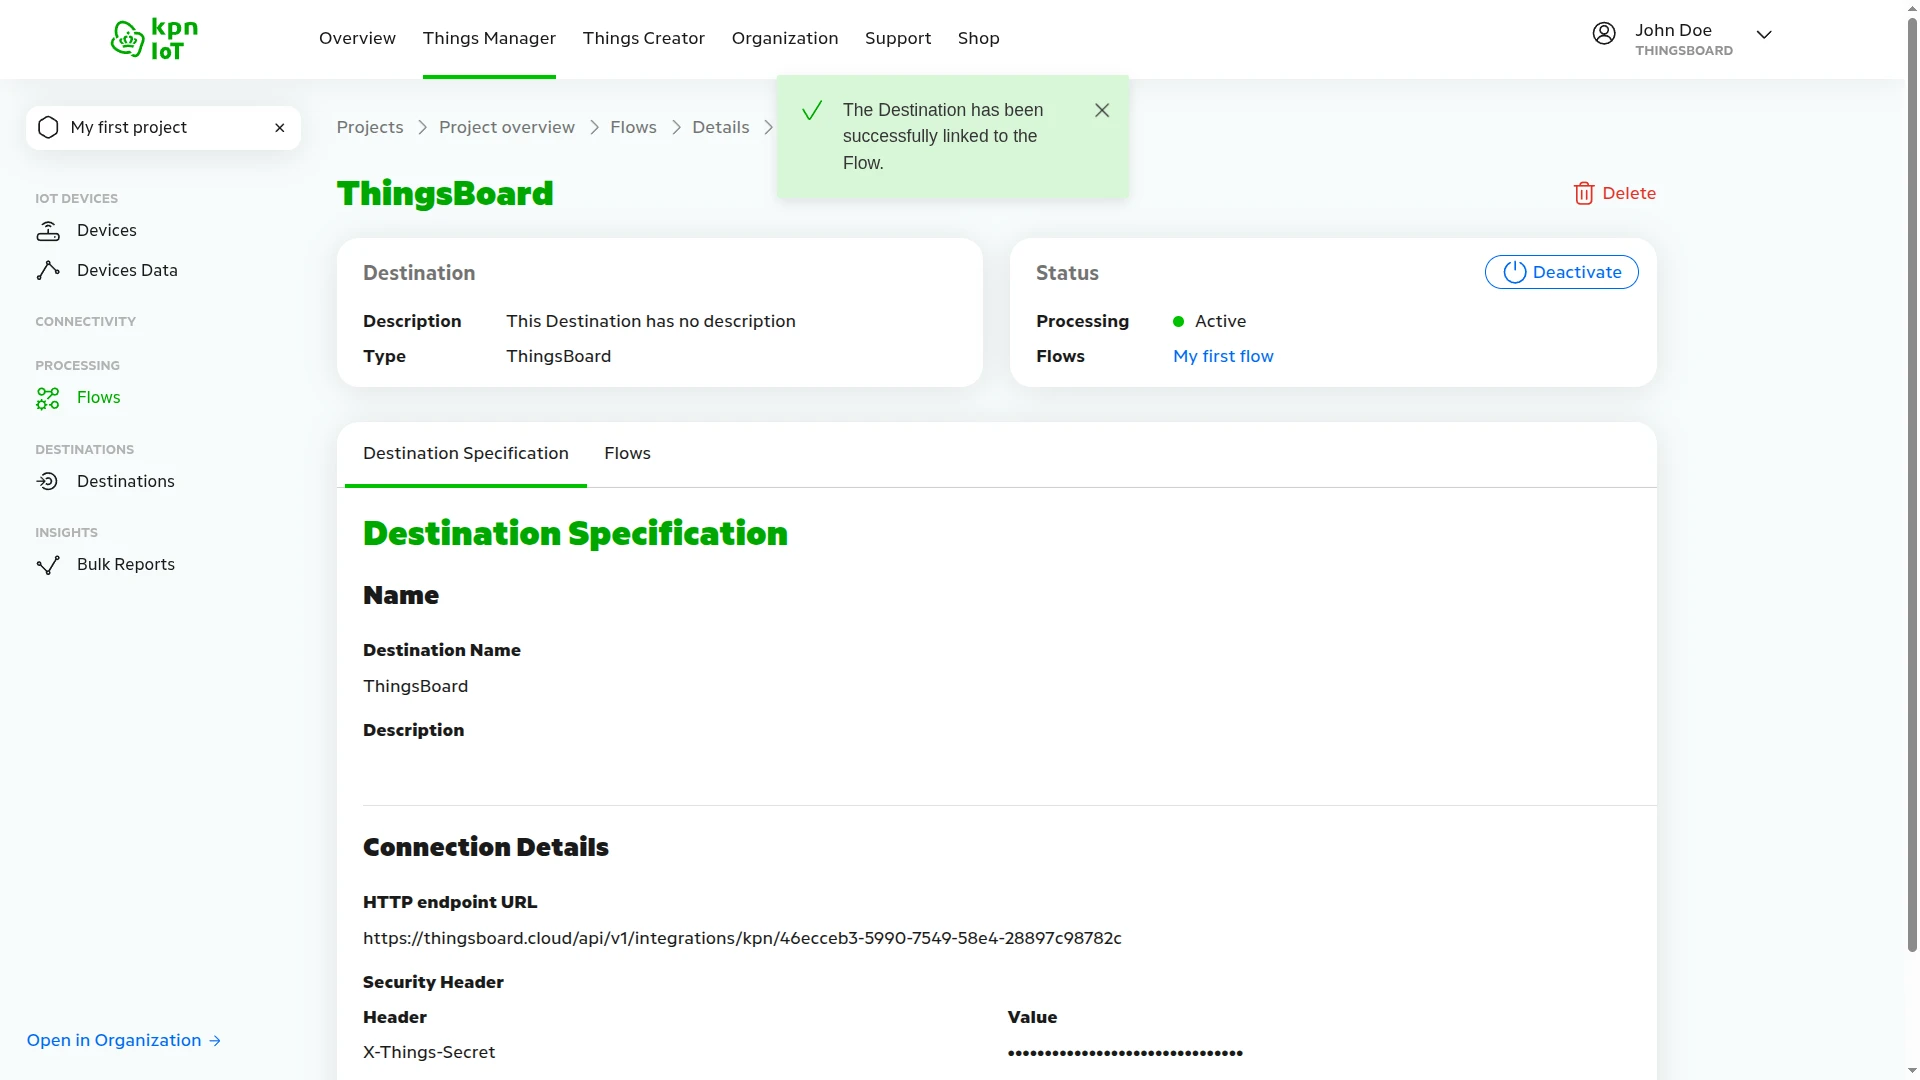
- Click Add ThingsBoard Destination. The destination page opens with the message The Destination has been successfully linked to the Flow. Processing is Active, and Flows shows My first flow.
- Open the Flows tab of My KPN Device again. The flow diagram shows the device, the decoder, and the active ThingsBoard destination.
Secure the Endpoint
Section titled “Secure the Endpoint”Anyone who knows the endpoint URL can send data to it. Check the X-Things-Secret header that the destination sends: the integration then rejects every request without the right value with 403 Forbidden, before the converter runs.
- In ThingsBoard, open the integration and click Toggle edit mode (pencil icon).
- Turn on Enable security (Headers filter).
- Click Add. Enter
X-Things-Secretas the Header and paste the generated value as the Value. A request must carry every header in the list. The value match is exact and case-sensitive. - Click Apply changes.
If you click Generate in the destination again, update the value in ThingsBoard too.
Every KPN Things destination also sends a Things-Message-Token header: the SHA-256 hash of the body followed by a shared secret. The ThingsBoard destination signs with a secret that KPN Things does not show, so leave Destination shared secret empty and use the headers filter. Destination shared secret is for destinations where you set the secret yourself, such as the generic HTTPS destination. ThingsBoard hashes the JSON body in compact form, without extra spaces or line breaks.
Test Uplink
Section titled “Test Uplink”Send data from the Device Simulator, then confirm that ThingsBoard decoded it and created the device.
Send a Test Uplink
Section titled “Send a Test Uplink”The Device Simulator is a web app that sends data as the KPN Things device.
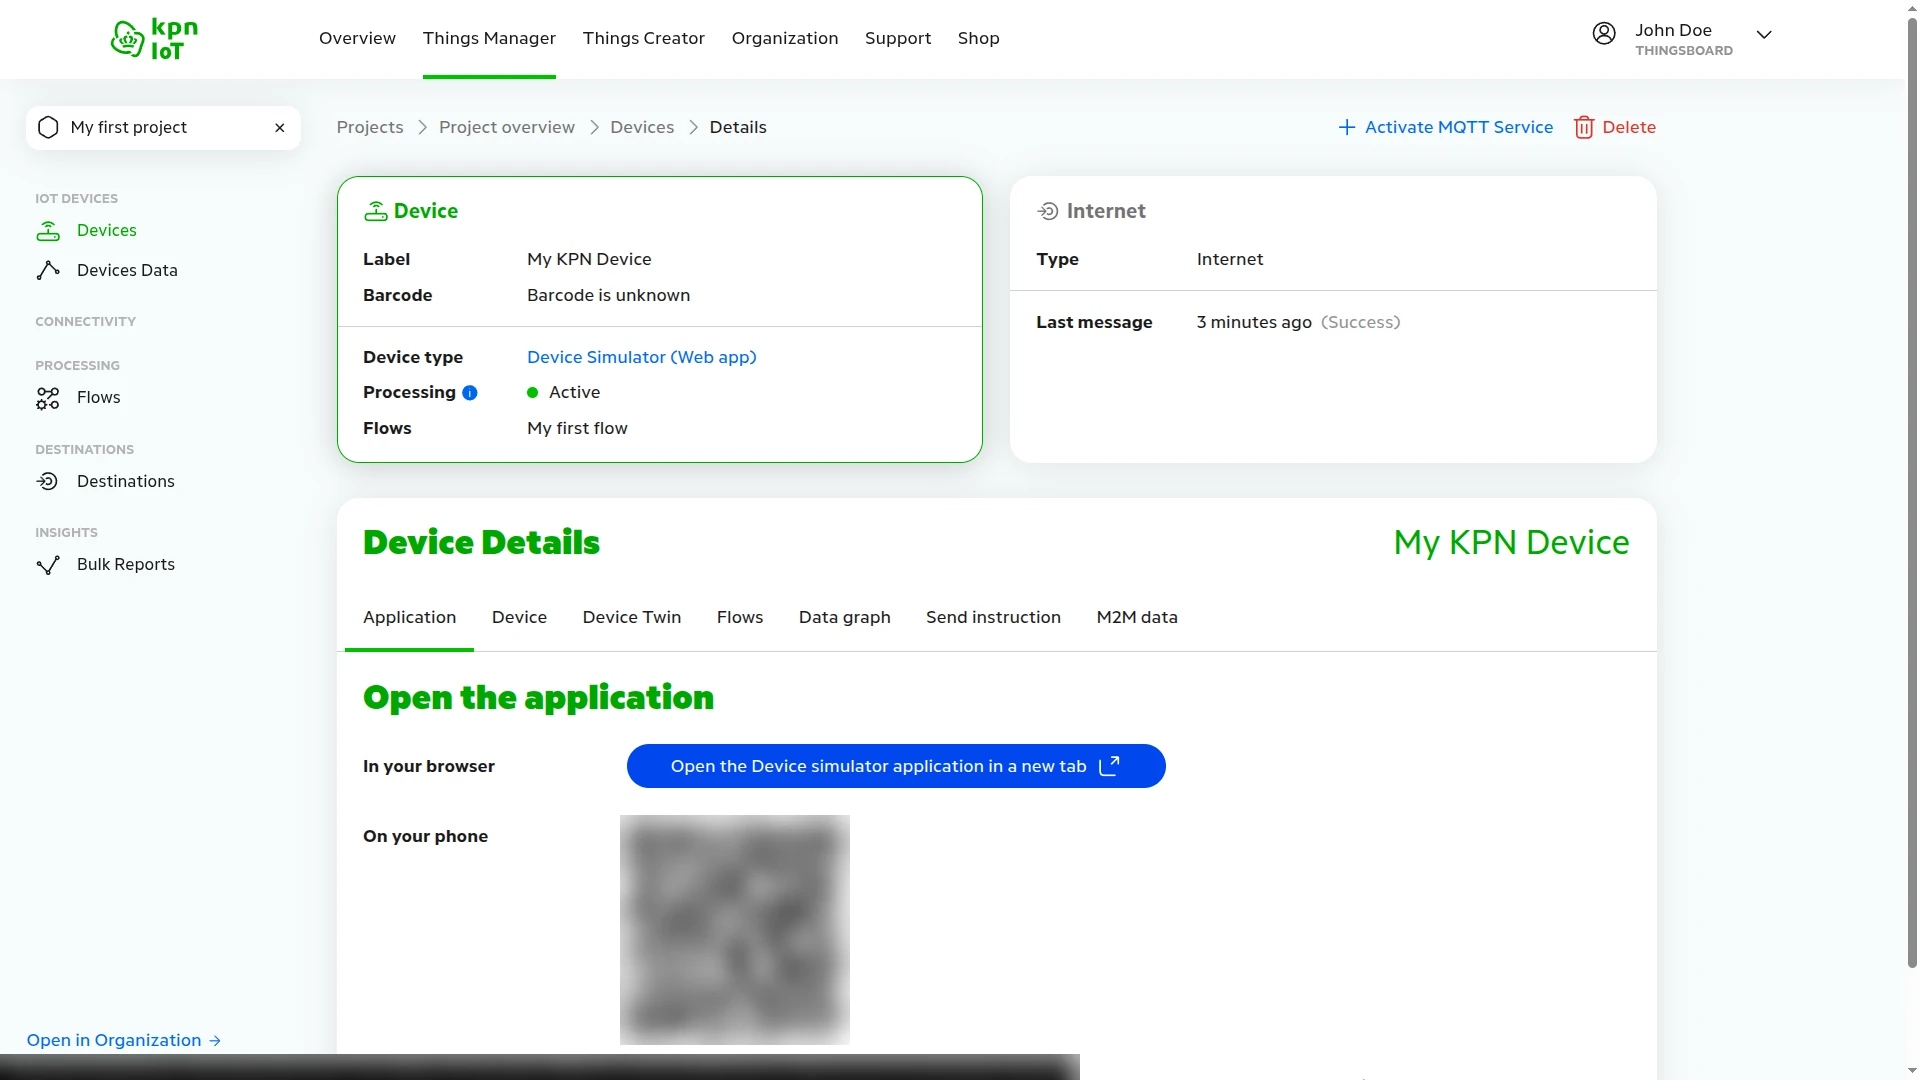
- In the KPN Things portal, open My KPN Device and go to the Application tab.
- Under Open the application, click Open the Device simulator application in a new tab.
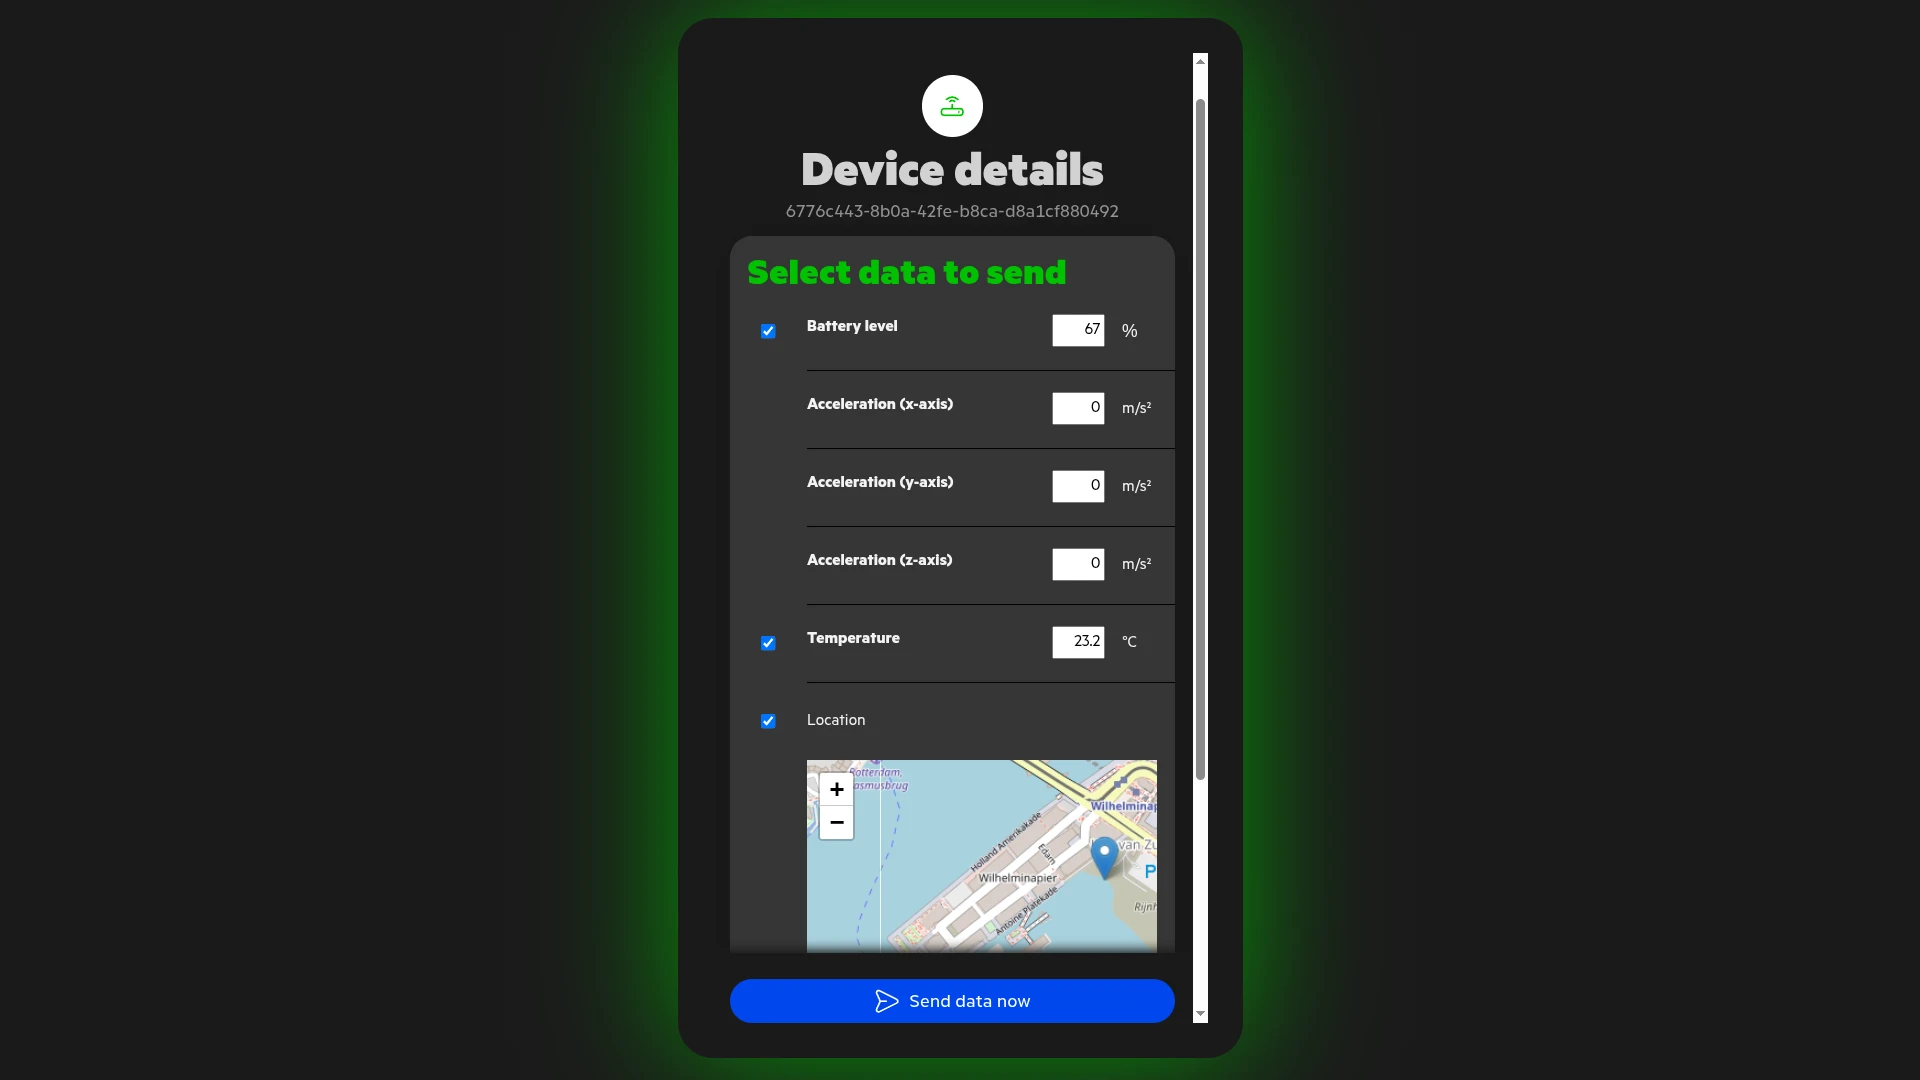
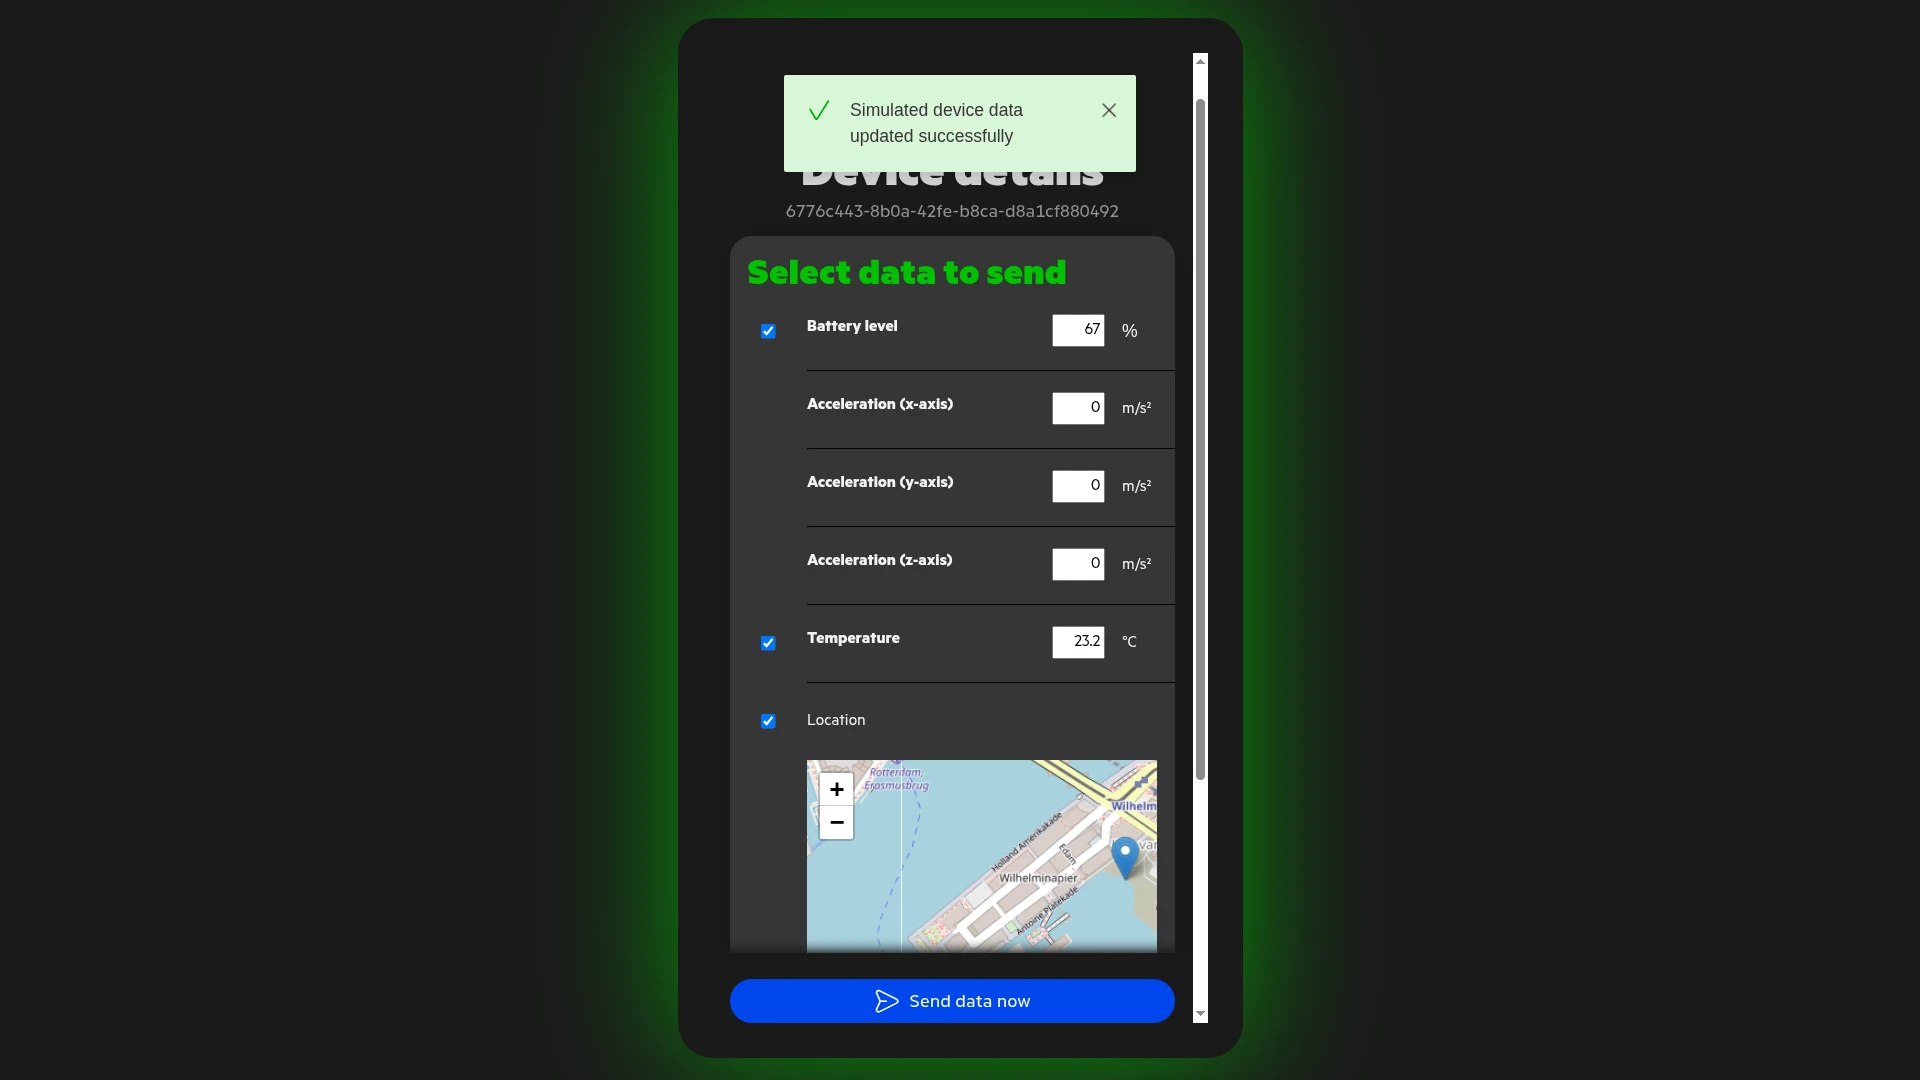
- Under Select data to send, select the data, for example Battery level, Temperature, and Location, and adjust the values if needed.
- Click Send data now. The Simulated device data updated successfully message appears.
Verify the Result
Section titled “Verify the Result”- Integration events — go to Integrations ⇾ Integrations, open the integration, and click the Events tab. The message appears as an event of type Uplink with status OK. Click
⋅⋅⋅in the Message column to see the body. - Converter events — open
KPN Things Uplink Converterin Integrations ⇾ Data converters and click the Events tab. In shows the body, Out shows the decoded result, and Metadata shows the integration name and the request headers, such asHeader:x-things-secret. - Device — go to Devices & assets ⇾ Devices. The integration has created a device named after the URN, for example
urn:dev:DVNUUID:6776c443-8b0a-42fe-b8ca-d8a1cf880492:, with the Device Simulator (Web app) profile and the labelMy KPN Device. Open it and check the values on the Latest telemetry tab:battery,temperature,orientation,latitude, andlongitude.
Configure Downlink
Section titled “Configure Downlink”ThingsBoard sends each downlink right away as a KPN Things API call. Nothing is queued in ThingsBoard: if the call fails, ThingsBoard records an error and drops the command.
For each downlink, the integration:
- Gets an access token from KPN with the API ID and API Key, and reuses it until 10 minutes before it expires.
- Sends the
dataof the encoder result toPOST https://api.kpnthings.com/api/actuator/downlinks?port={FPort}asapplication/json, with the token as aBearertoken.
The downlink converter turns a Rule Engine message into that body. For the full encoder reference, see Downlink data converter.
Create a KPN API Key
Section titled “Create a KPN API Key”The integration authenticates to the KPN Things API with an API key of your KPN organization.
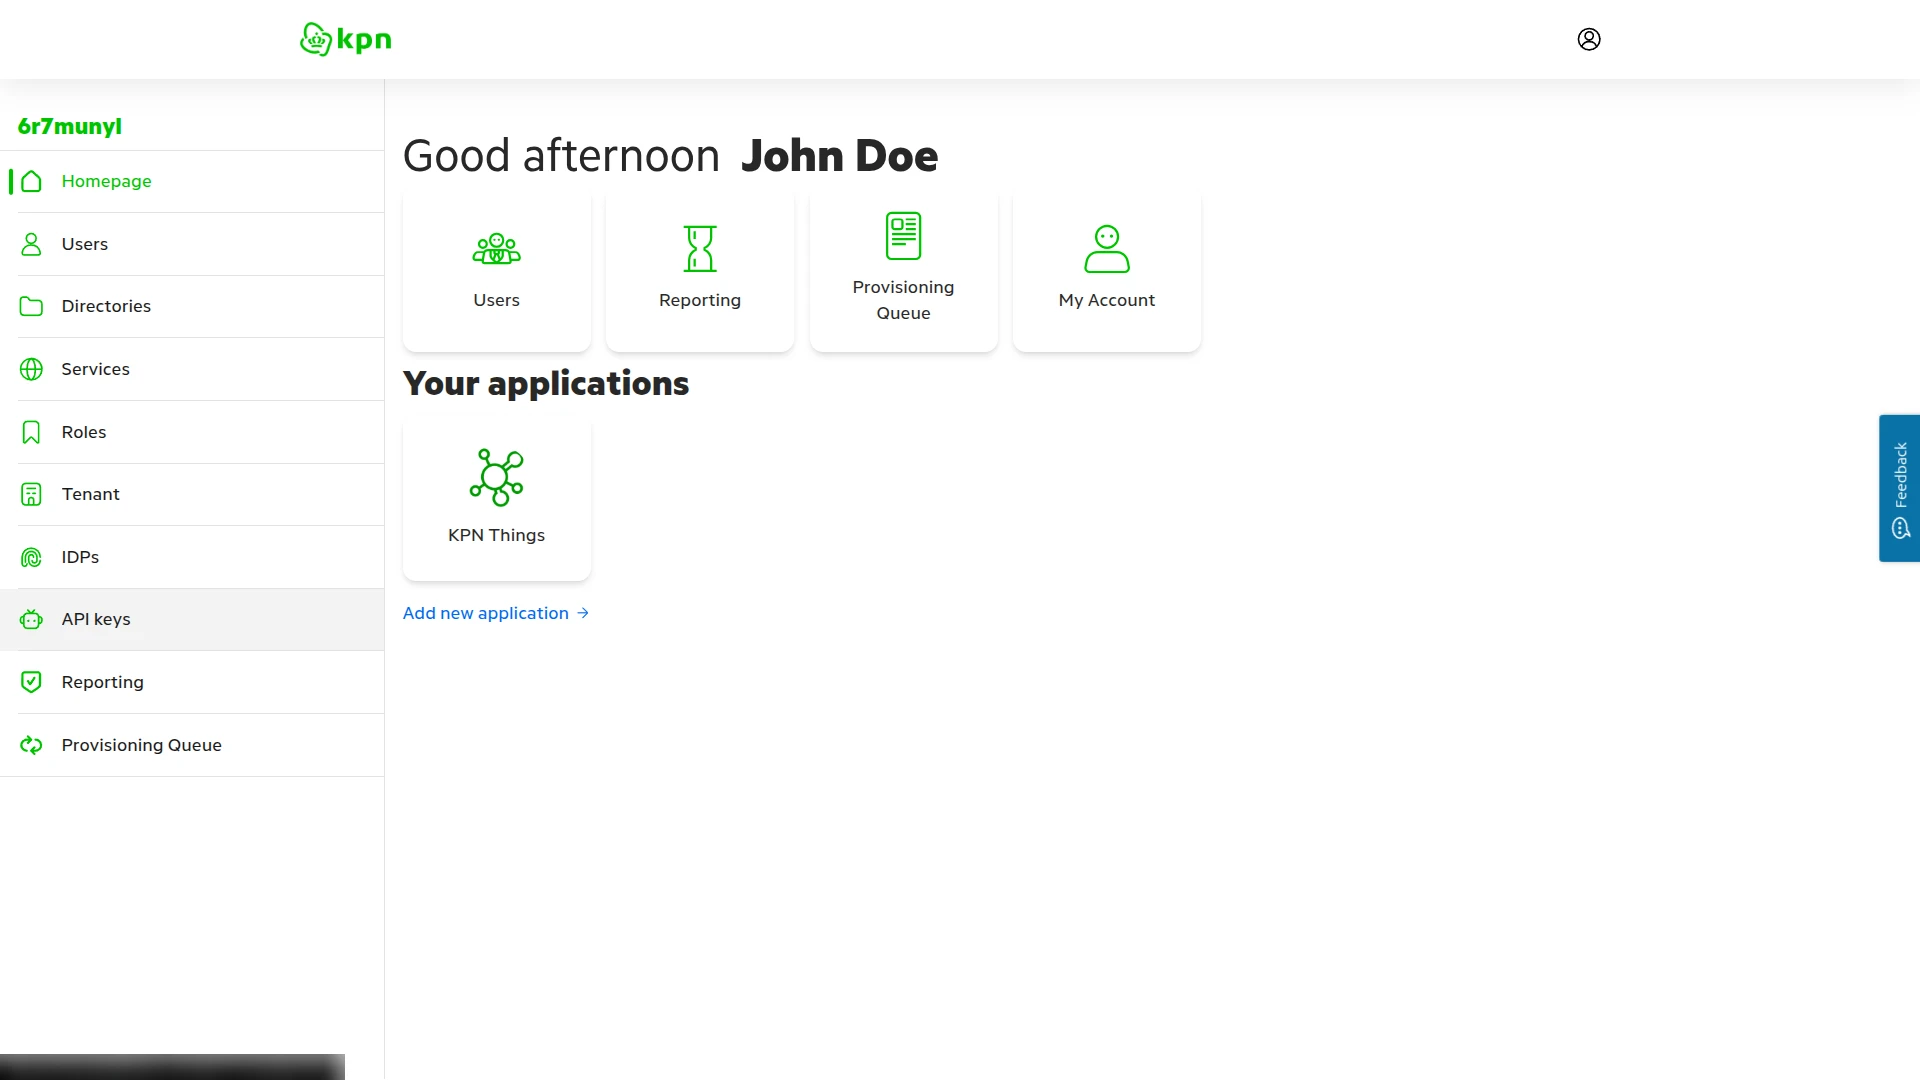
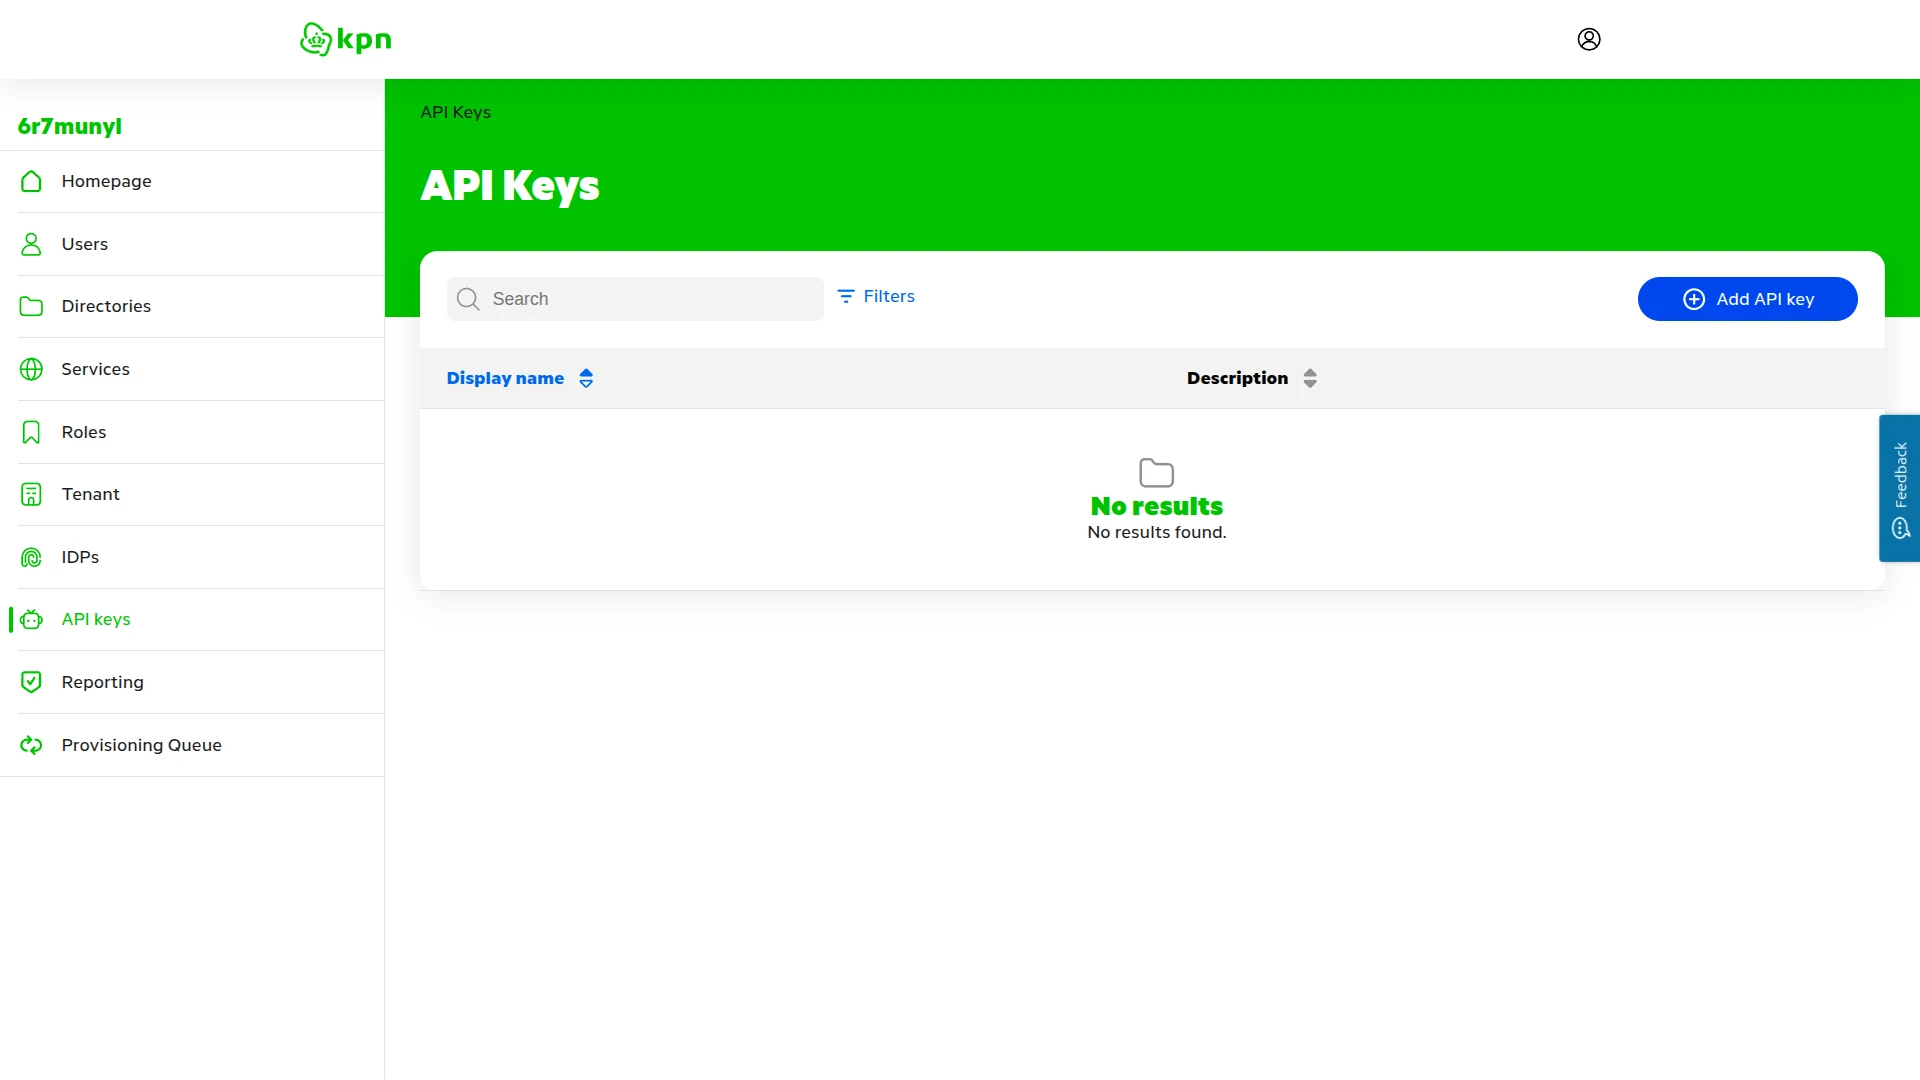
- Sign in to the KPN Zakelijk portal and click API keys in the left menu.
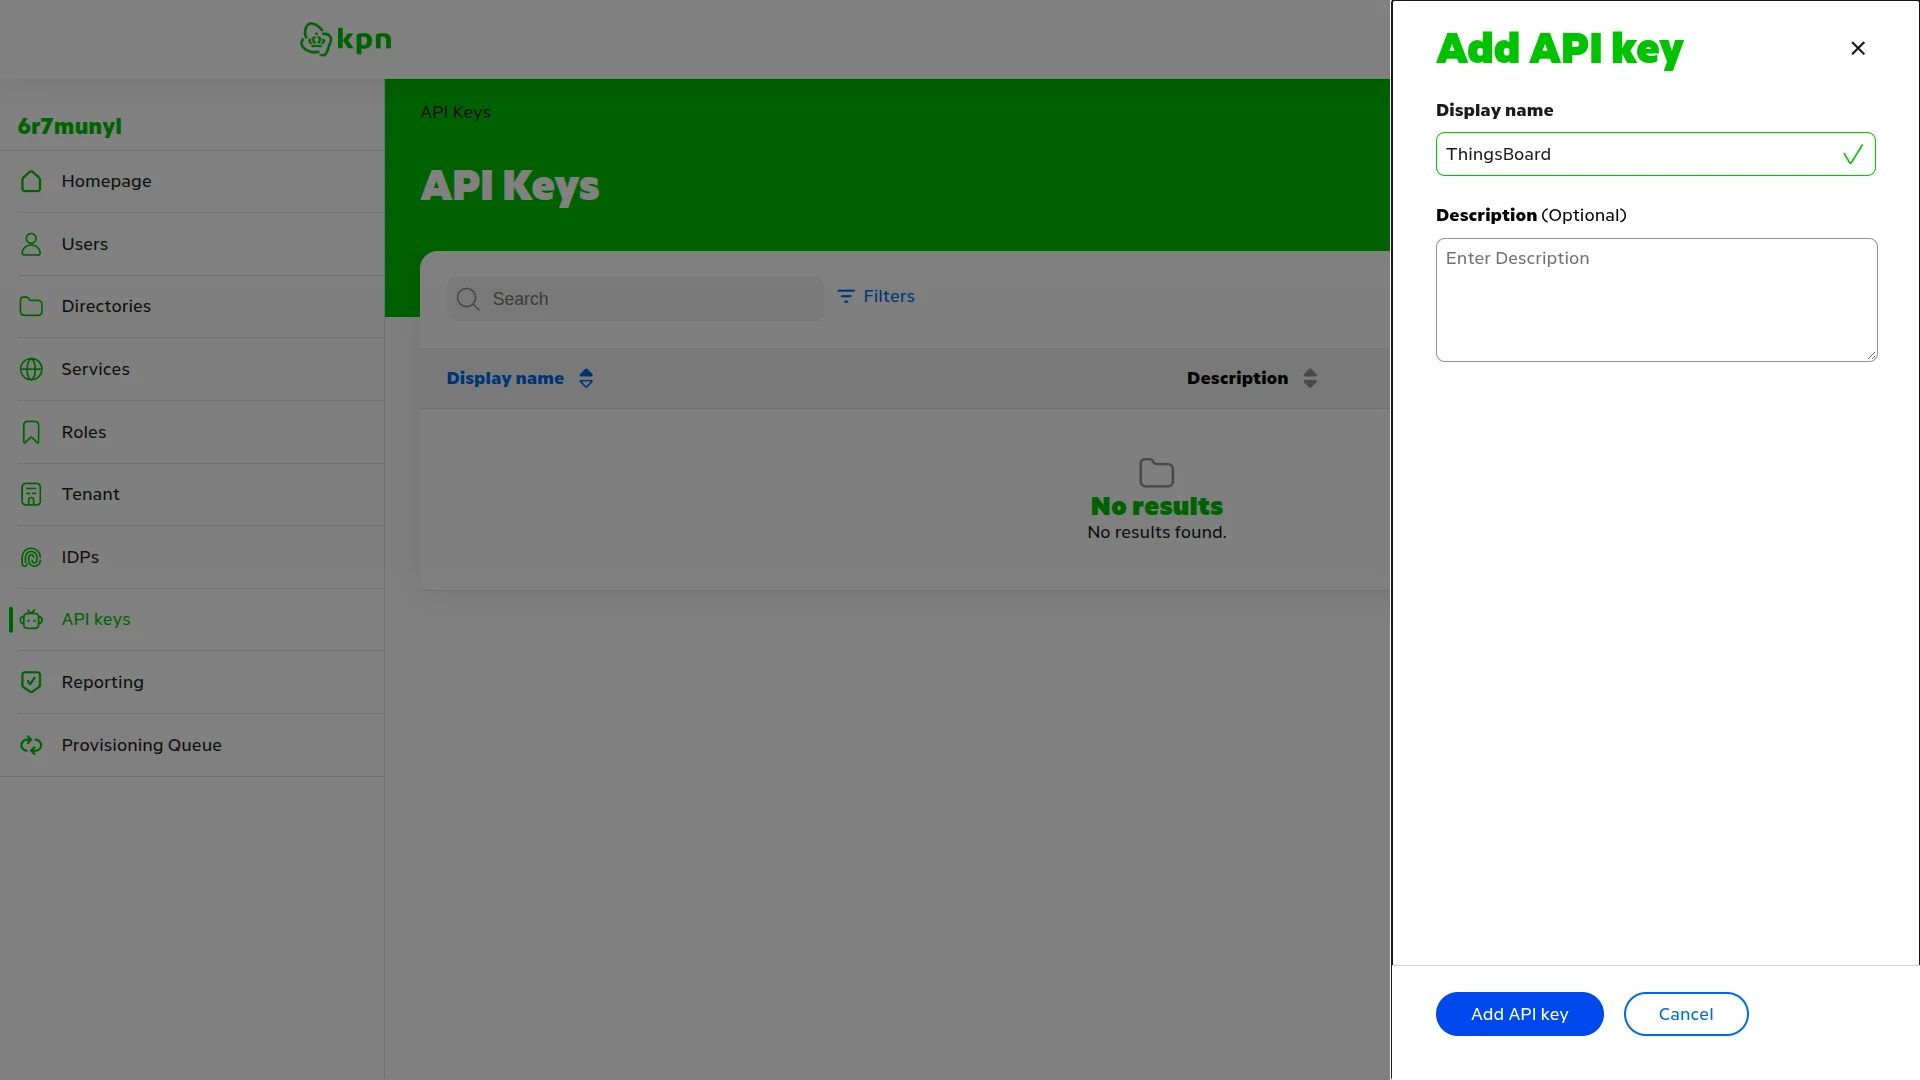
- Click Add API key.
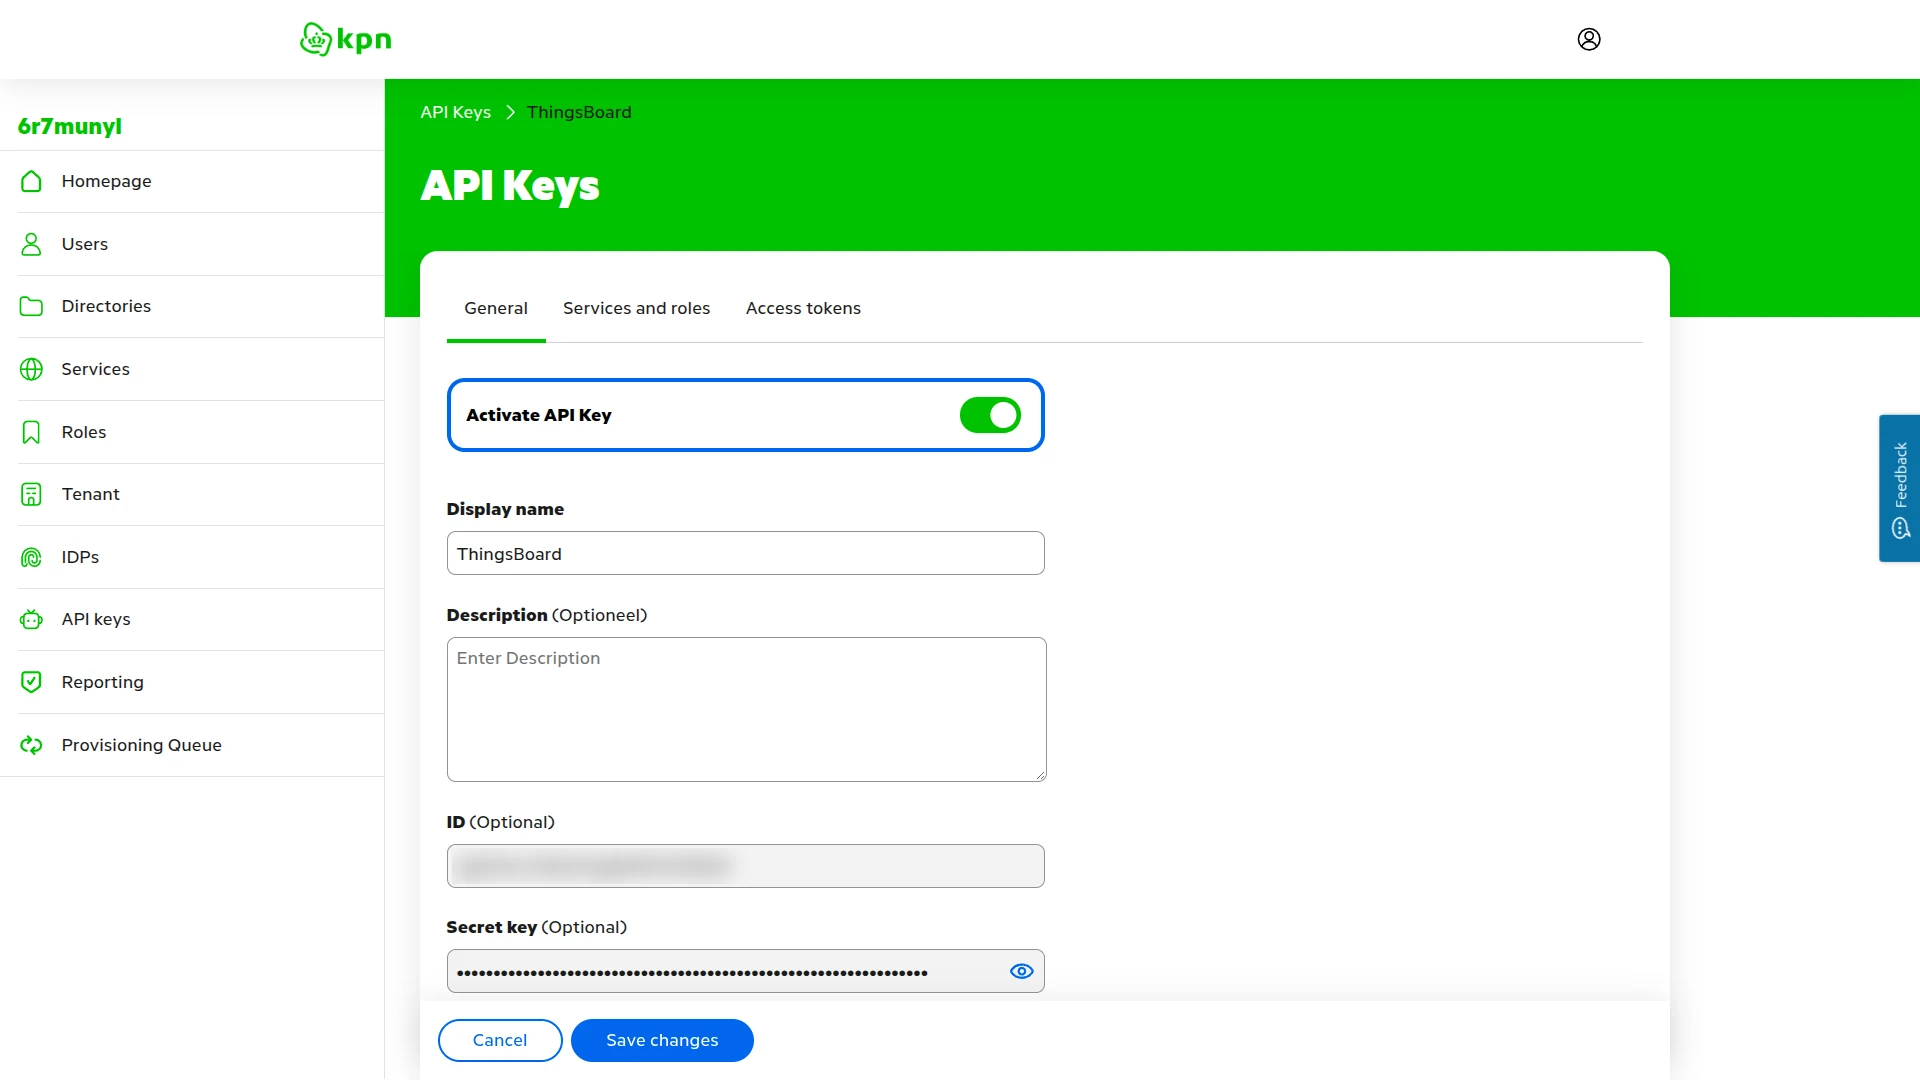
- Enter a Display name, for example
ThingsBoard, and click Add API key. - The General tab of the new key opens. Check that Activate API Key is on, and copy the ID and the Secret key. Click the eye icon to show the secret key.
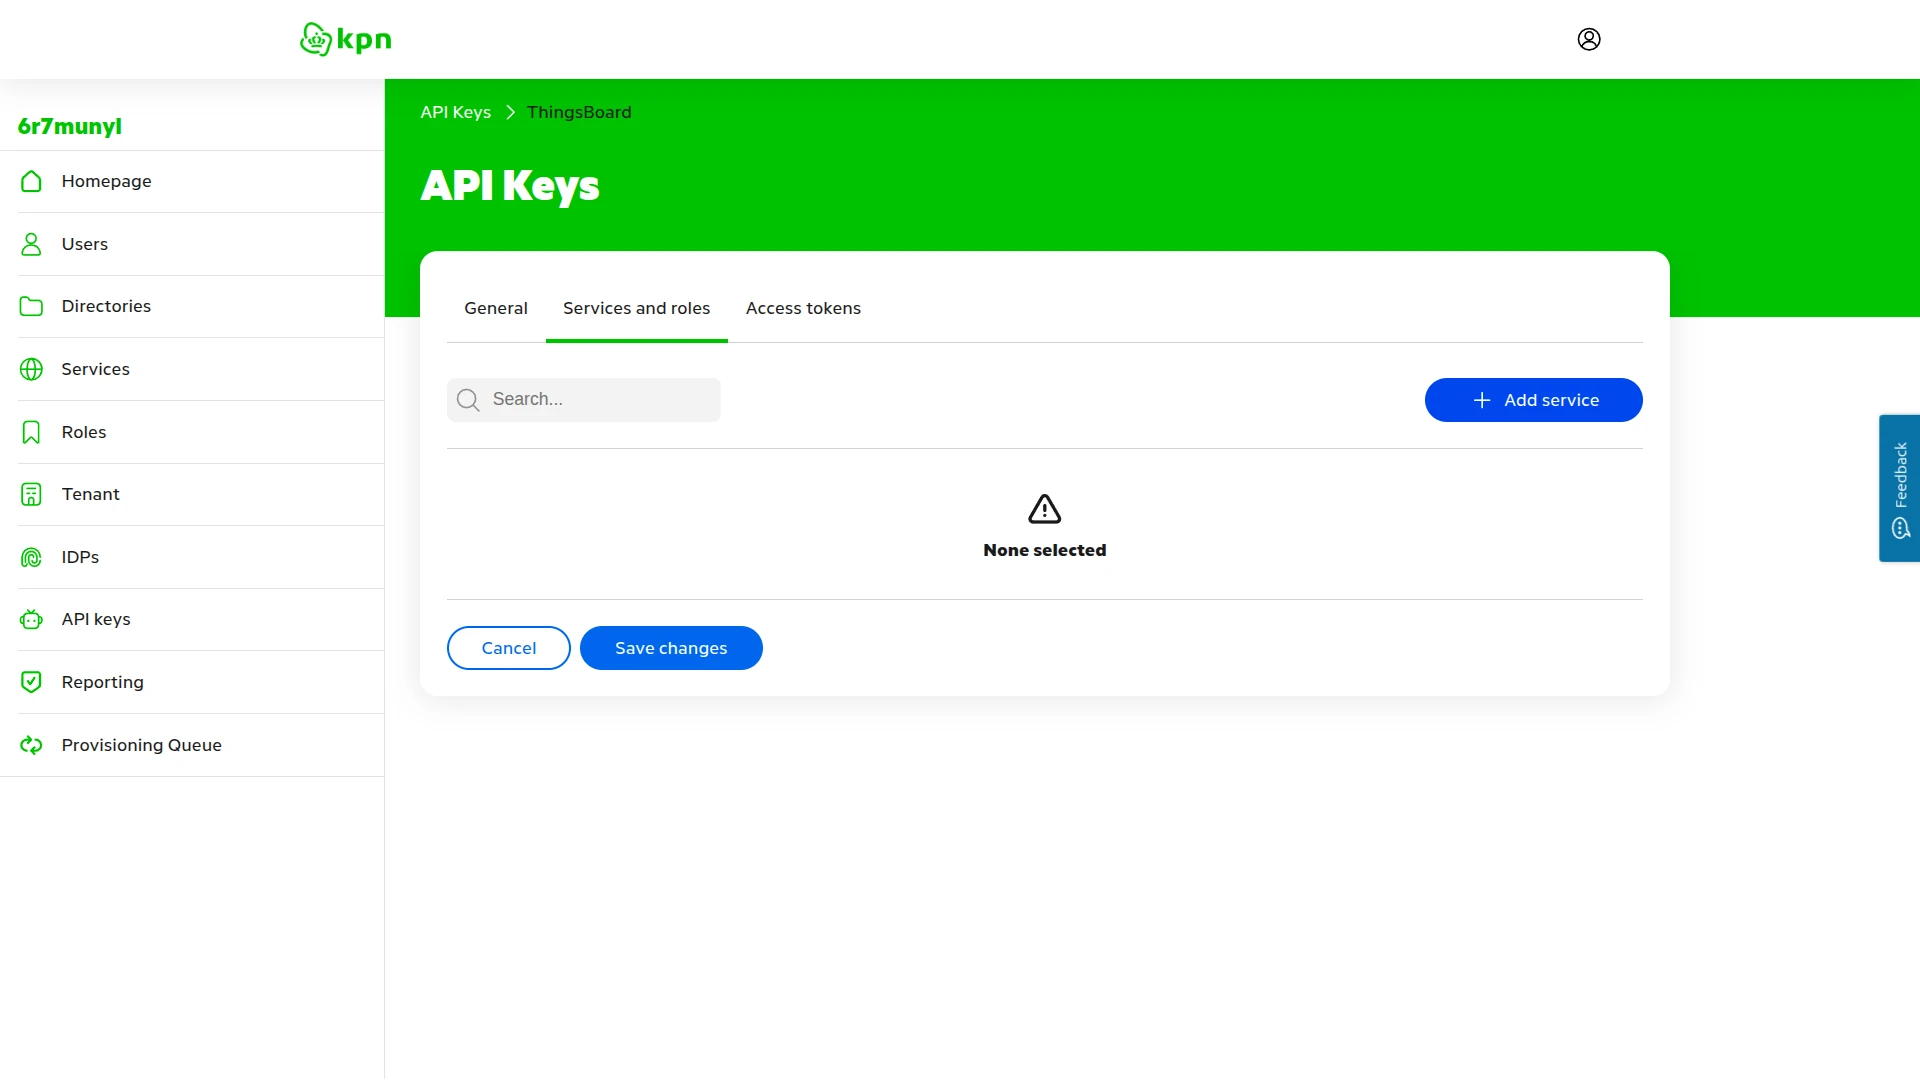
- Open the Services and roles tab and click Add service.
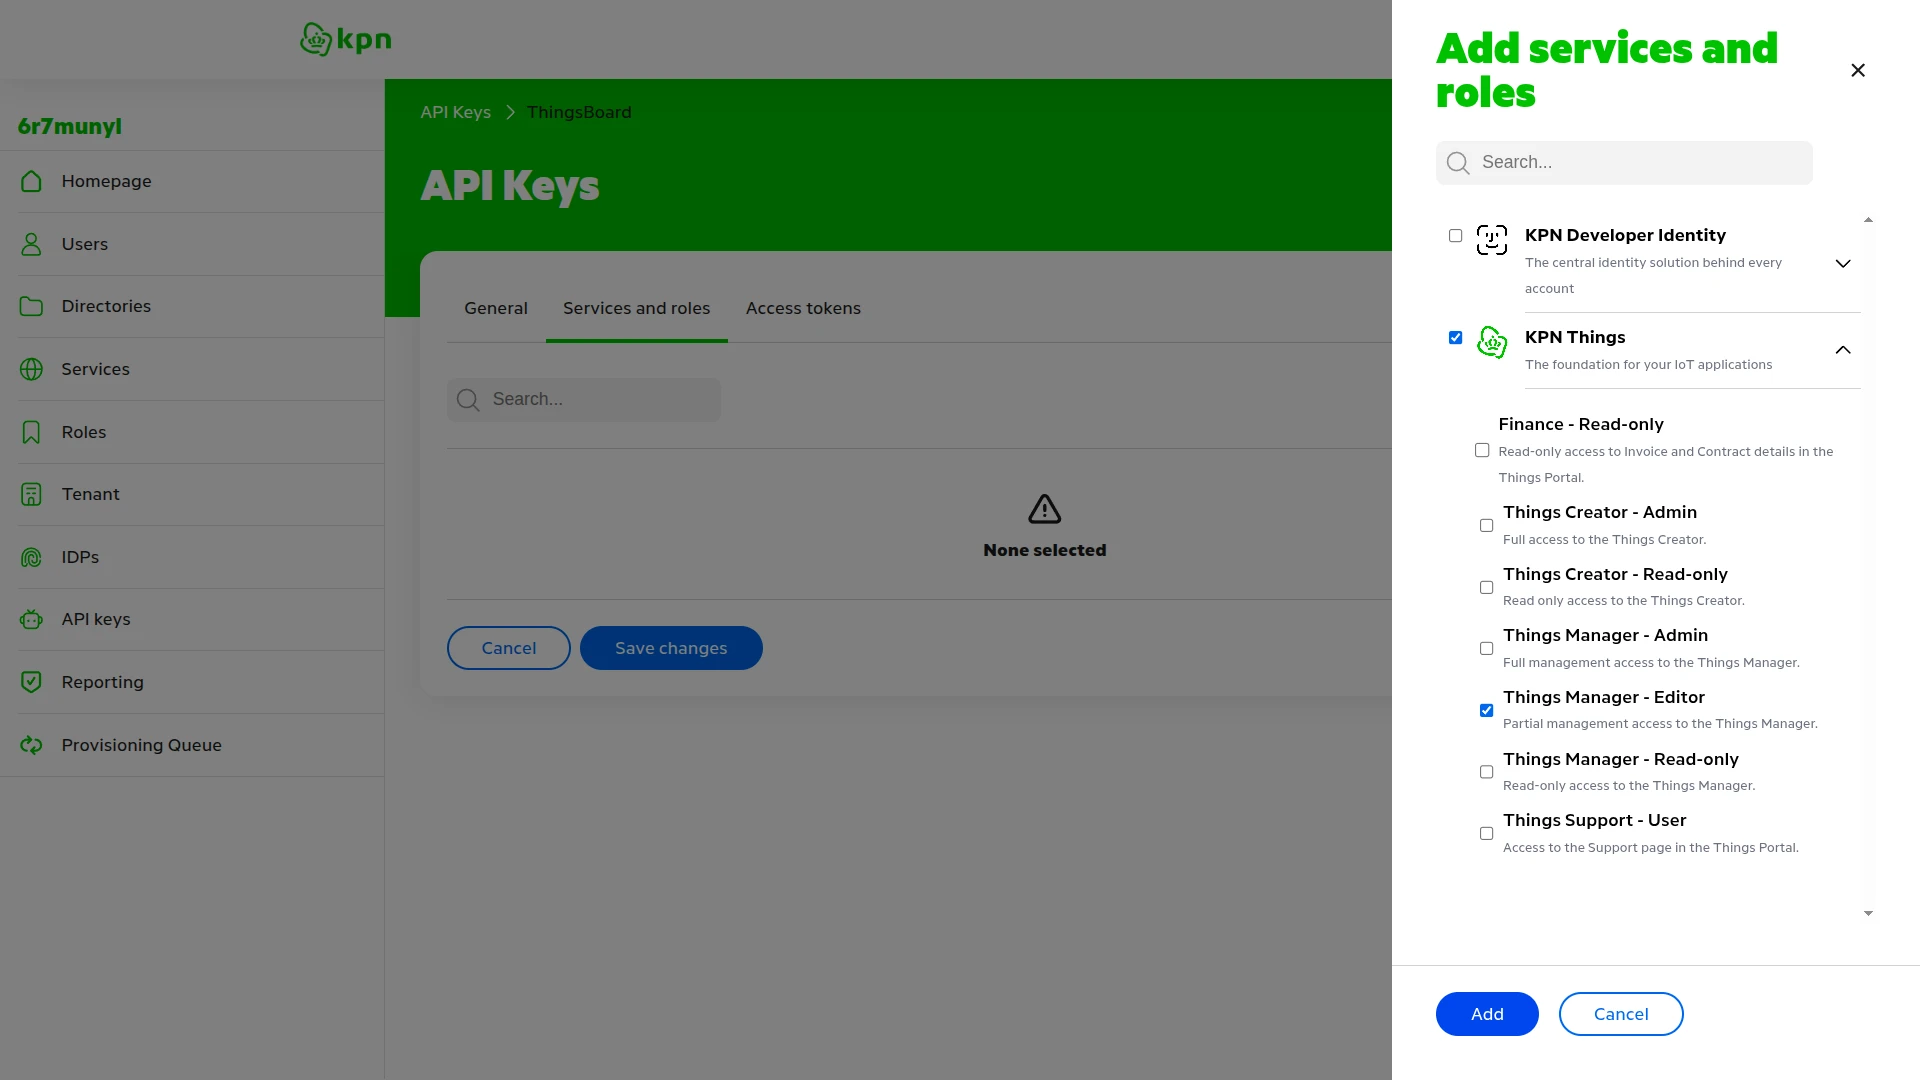
- Select KPN Things, then select the Things Manager - Editor role, and click Add. Select one role per service: if you select several, the lowest one applies.
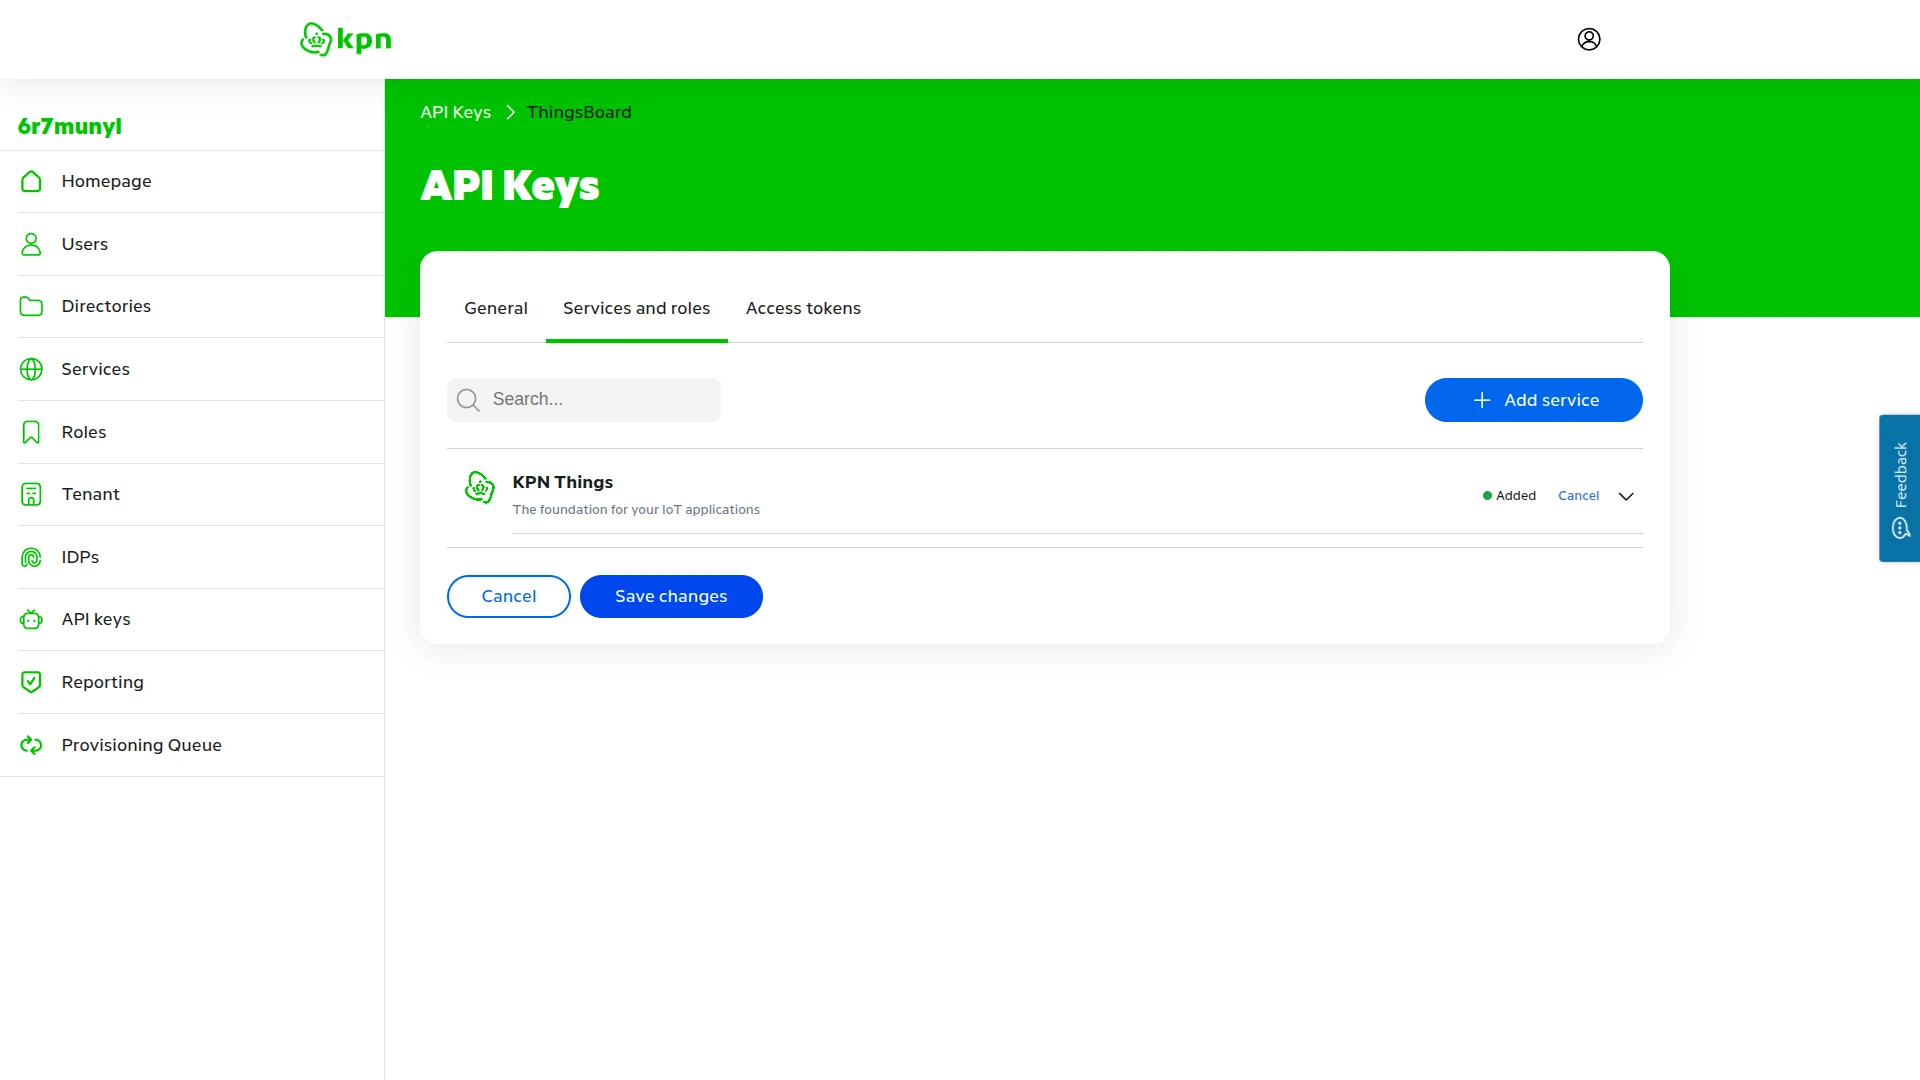
- KPN Things is listed with the status Added. Click Save changes.
Create and Assign the Downlink Converter
Section titled “Create and Assign the Downlink Converter”Add a downlink converter to the integration and turn on Allow downlink with the API key.
- Open the integration in Integrations ⇾ Integrations and click Toggle edit mode (pencil icon).
- In the Downlink data converter field, click Create new. The Downlink converter type and KPN Things integration type are preselected.
- Enter a name, for example
KPN Things Downlink Converter. - Main encoding configuration opens in TBEL with a generic encoder. It builds a JSON object from
temperatureUploadFrequencyandhumidityUploadFrequencyand sets an MQTTtopic, not the SenML records andFPortthat KPN Things needs. Replace it with the encoder below. For JavaScript, use the TBEL / JS toggle and the JavaScript tab. - To record downlink events, click the debug button next to the name, select All messages, and click Apply. Debug is off by default.
- Click Add.
- Enable downlink: turn on Allow downlink. Under Credentials, paste the ID into API ID and the Secret key into API Key.
- Click Apply changes.
Encoder used in this guide. It turns every key of the message into a SenML record, so it sends any shared attribute that the rule chain passes: numbers as v, booleans as vb, and other values as vs. A message with no keys produces no downlink.
/** Encoder **/
// KPN Things device URN. The rule chain adds it to the metadata as deviceName.var deviceUrn = metadata['deviceName'];
// One SenML record per key of the message, for example {"temperature": 25}.var senmlPack = [];foreach (element : msg.entrySet()) {    var value = element.value;    var record = { "bn": deviceUrn, "n": element.key };    if (value instanceof Boolean) {        record.vb = value;    } else if (value instanceof Number) {        record.v = value;    } else {        record.vs = "" + value;    }    senmlPack.add(record);}
// Nothing to send.if (senmlPack.size() == 0) {    return [];}
return {    contentType: "JSON",    data: JSON.stringify(senmlPack),    metadata: {        // Port sent as the "port" query parameter. Required.        // For LoRaWAN devices, use the port your device listens on. The simulator accepts any port.        FPort: 1    }};
/** Encoder **/
// KPN Things device URN. The rule chain adds it to the metadata as deviceName.var deviceUrn = metadata['deviceName'];
// One SenML record per key of the message, for example {"temperature": 25}.var senmlPack = [];Object.keys(msg).forEach(function (key) { var value = msg[key]; var record = { "bn": deviceUrn, "n": key }; if (typeof value === 'boolean') { record.vb = value; } else if (typeof value === 'number') { record.v = value; } else { record.vs = String(value); } senmlPack.push(record);});
// Nothing to send.if (senmlPack.length === 0) { return [];}
return { contentType: "JSON", data: JSON.stringify(senmlPack), metadata: { // Port sent as the "port" query parameter. Required. // For LoRaWAN devices, use the port your device listens on. The simulator accepts any port. FPort: 1 }};To check the encoder, click Test encoder function. Replace the Message with {"temperature": 25, "mode": "eco", "enabled": true} and click Test. The Output panel shows one SenML record per key, with bn set to the deviceName value from Metadata:
{ "contentType": "JSON", "data": "[{\"bn\":\"sensorA\",\"n\":\"temperature\",\"v\":25},{\"bn\":\"sensorA\",\"n\":\"mode\",\"vs\":\"eco\"},{\"bn\":\"sensorA\",\"n\":\"enabled\",\"vb\":true}]", "metadata": { "FPort": 1 }}With an empty message {}, the output is [], and nothing is sent.
The integration reads these fields from the encoder result:
| Field | Required | Description |
|---|---|---|
data |
Yes | Request body sent to KPN Things as is. Use a SenML array whose base name bn is the device URN. |
contentType |
Yes | JSON or TEXT. The body is always sent as application/json. |
metadata.FPort |
Yes | Port sent as the port query parameter. For LoRaWAN devices, the LoRaWAN port. Without it, the downlink fails with Cannot find FPort in metadata!. The integration also reads FPort from the Rule Engine message metadata and from the integration’s Metadata field. |
metadata.subCustomerId |
No | ID of a KPN sub-customer that owns the device. ThingsBoard requests access to the sub-customer once and sends the ID as the x-client-id header. |
To send only some keys, wrap the body of the loop in a condition, for example if (element.key == "temperature") { ... }. To send several downlinks from one message, return an array of results.
Configure the Root Rule Chain
Section titled “Configure the Root Rule Chain”The encoder needs the device URN. Add it to the metadata with an originator fields node, then pass the message to the integration.
- Go to Data processing ⇾ Rule chains and open the Root Rule Chain.
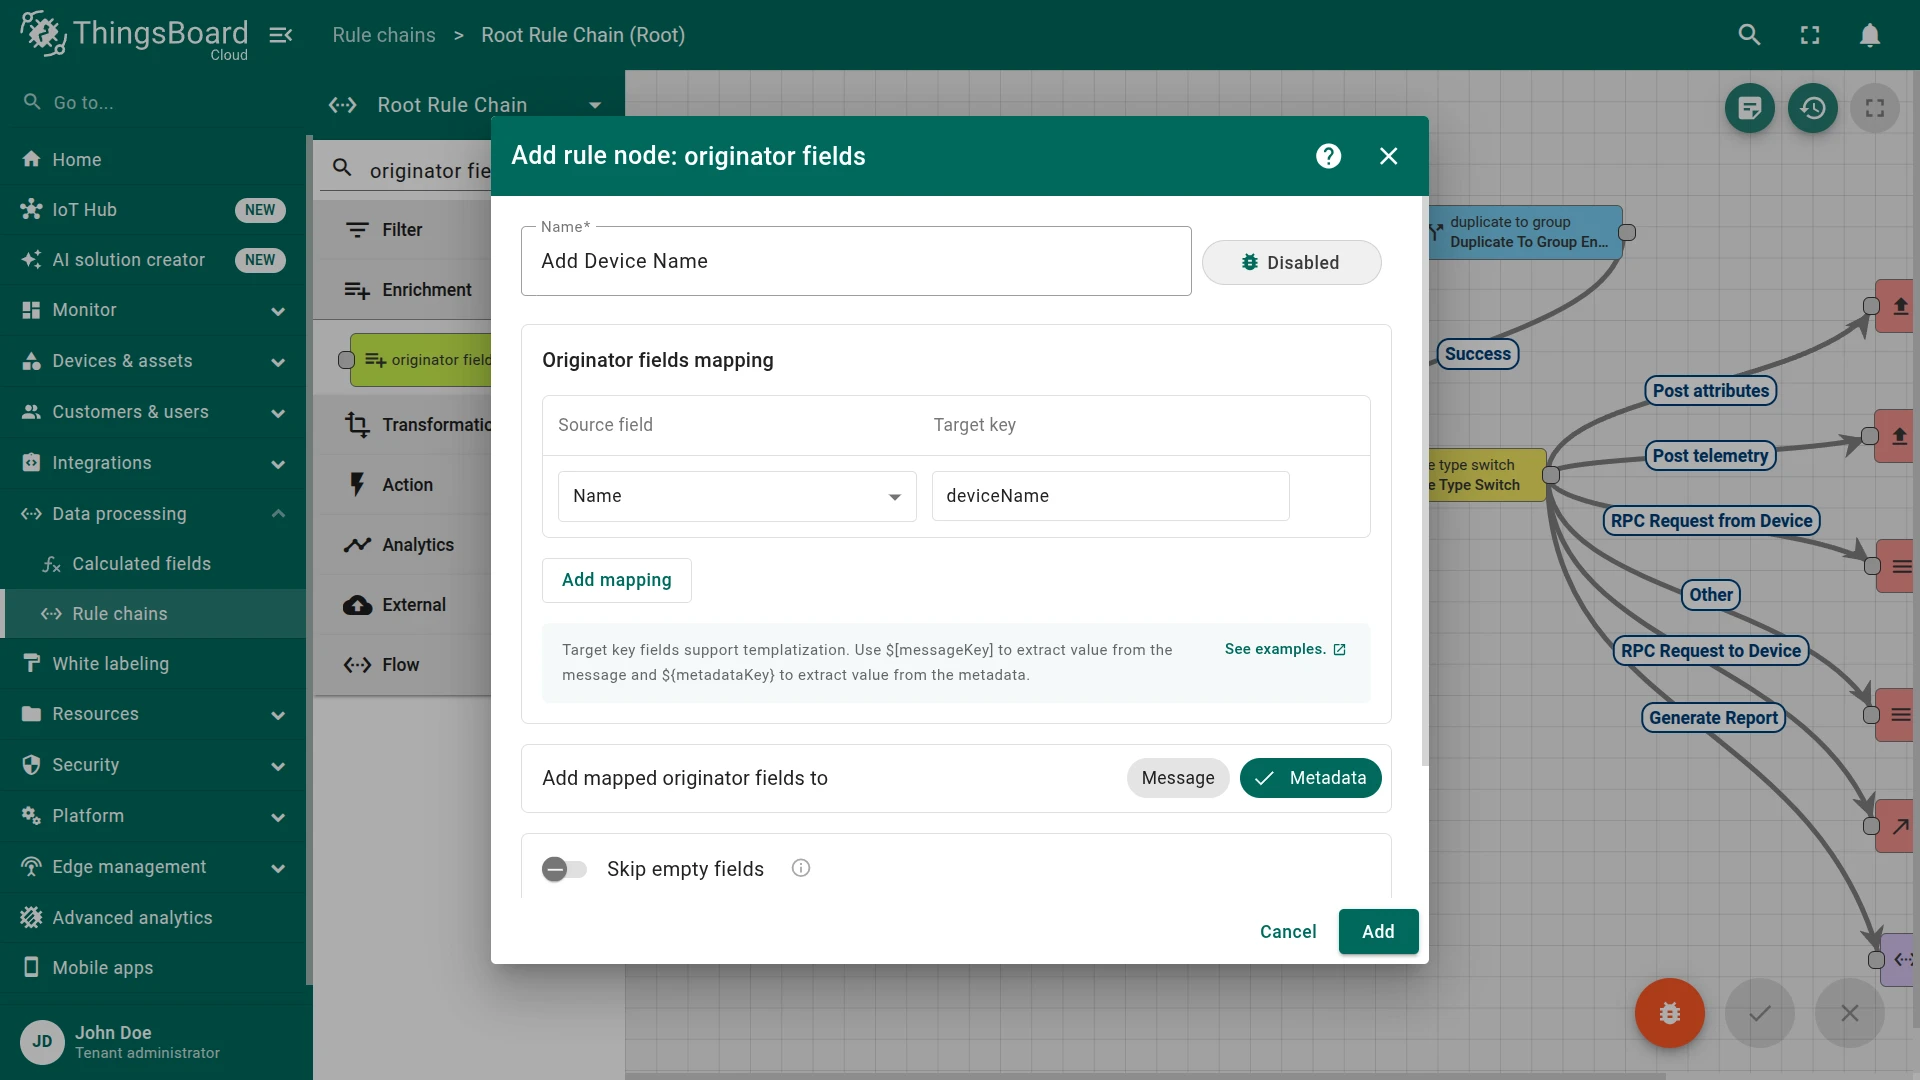
- From the Enrichment section, drag an originator fields node onto the canvas:
- Name — for example
Add Device Name. - Under Originator fields mapping, set Source field to
Nameand Target key todeviceName. - Add mapped originator fields to — keep Metadata.
- Click Add.
- Name — for example
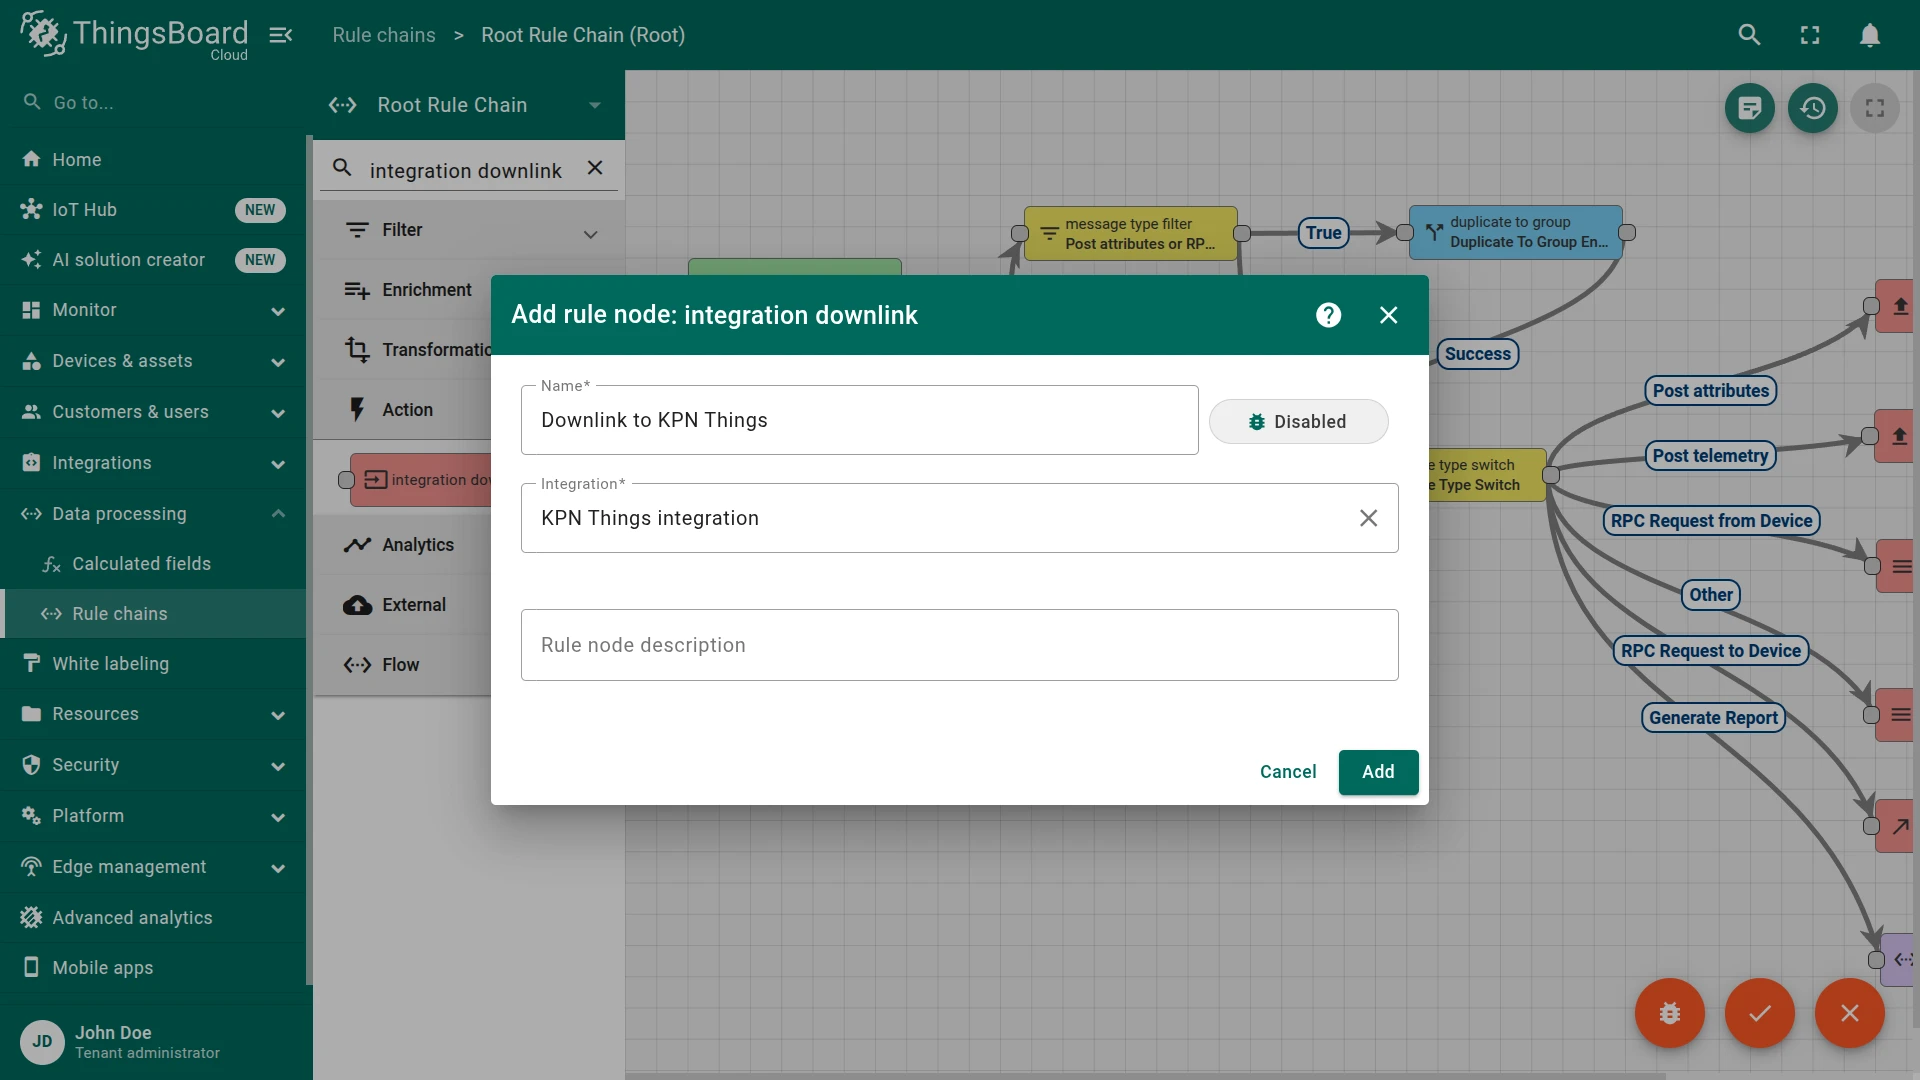
- From the Action section, drag an integration downlink node onto the canvas:
- Name — for example
Downlink to KPN Things. - Integration — select
KPN Things integration. - Click Add.
- Name — for example
- Connect the message type switch node to
Add Device Namewith the Attributes Updated relation. - Connect
Add Device NametoDownlink to KPN Thingswith the Success relation. - Click Apply changes.
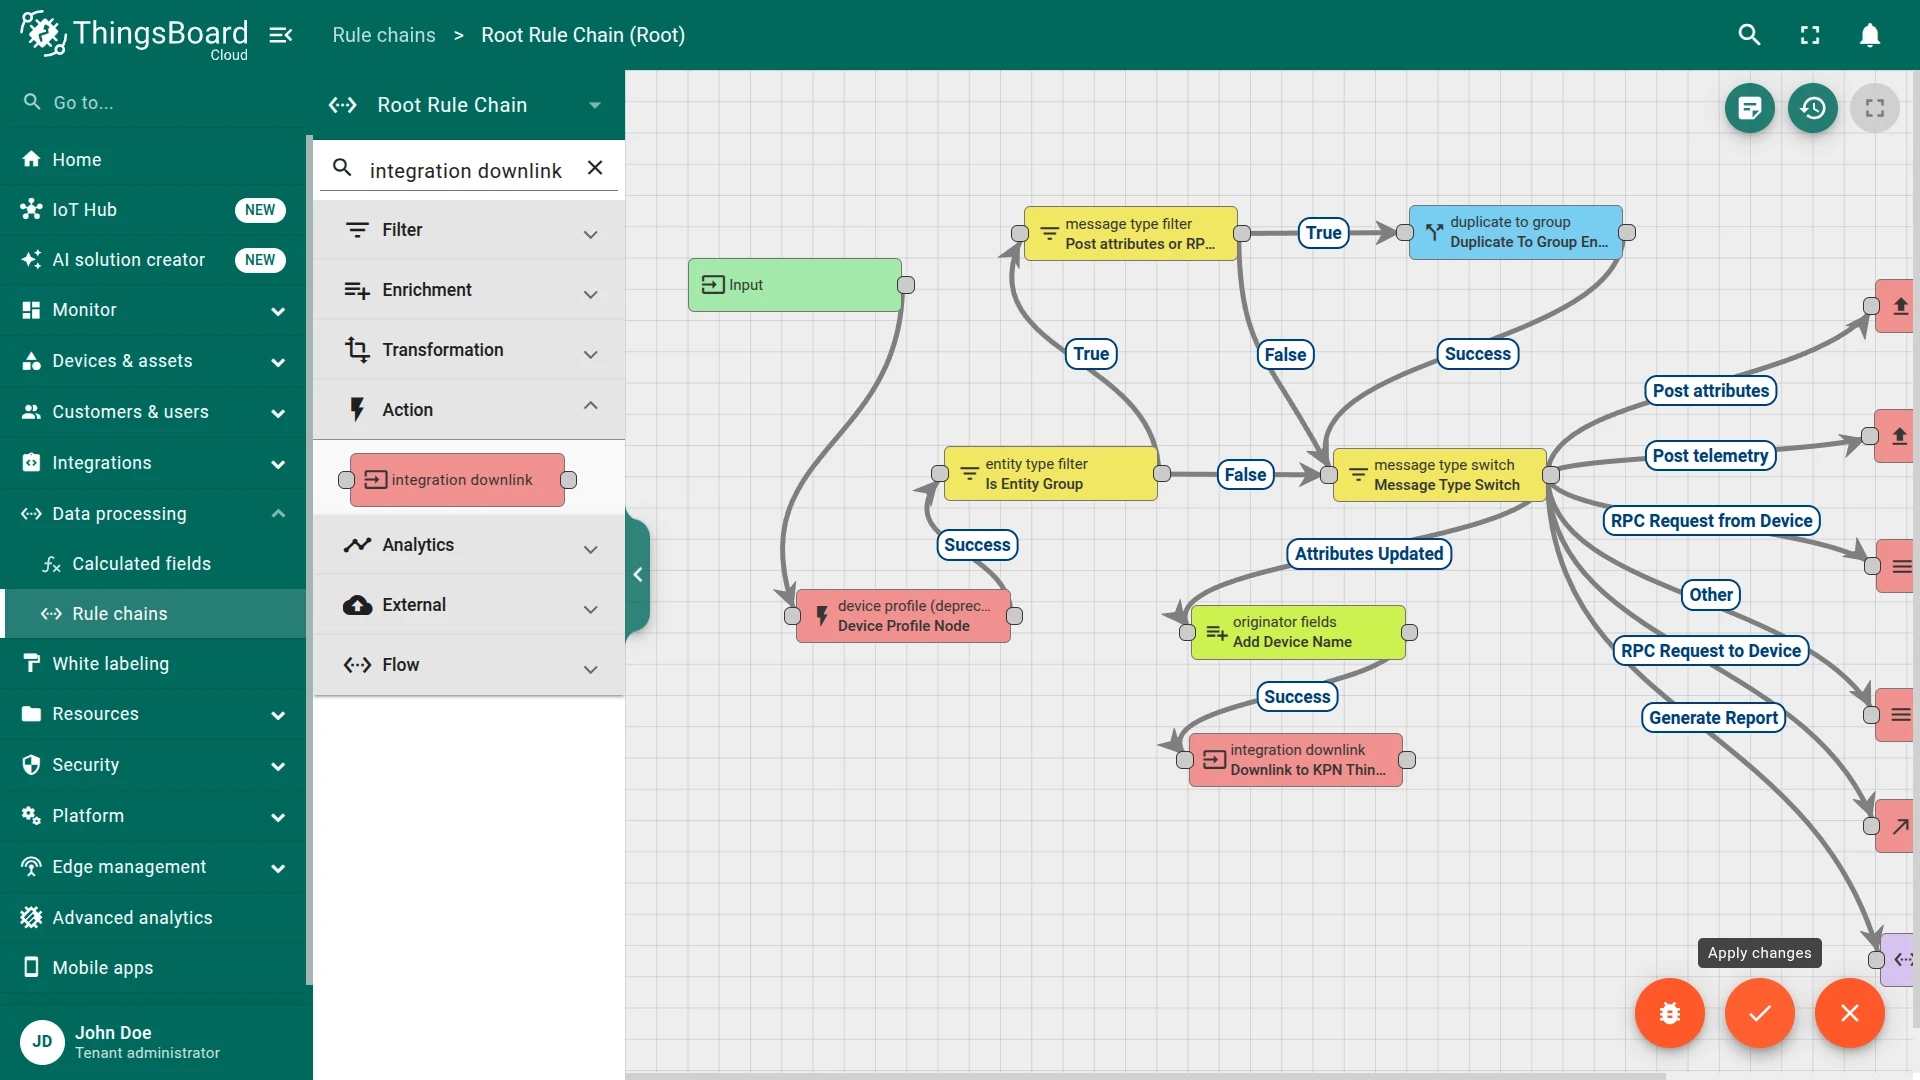
Test Downlink
Section titled “Test Downlink”- Go to Devices & assets ⇾ Devices and open the device created in Test Uplink.
- On the Attributes tab, select Shared attributes and click +.
- Enter Key
temperatureUploadFrequency, select the Integer type, enter Value60, and click Add.
Verify the Downlink
Section titled “Verify the Downlink”- Converter events — open
KPN Things Downlink Converterin Integrations ⇾ Data converters and click the Events tab. In shows the message{"temperatureUploadFrequency": 60}with the device URN asdeviceNamein its metadata. Out shows the SenMLdataandFPort. - Integration events — open the integration’s Events tab. Two events of status OK appear: Downlink: ATTRIBUTES_UPDATED for the message from the Rule Engine, and Downlink for the call to KPN Things, with the SenML
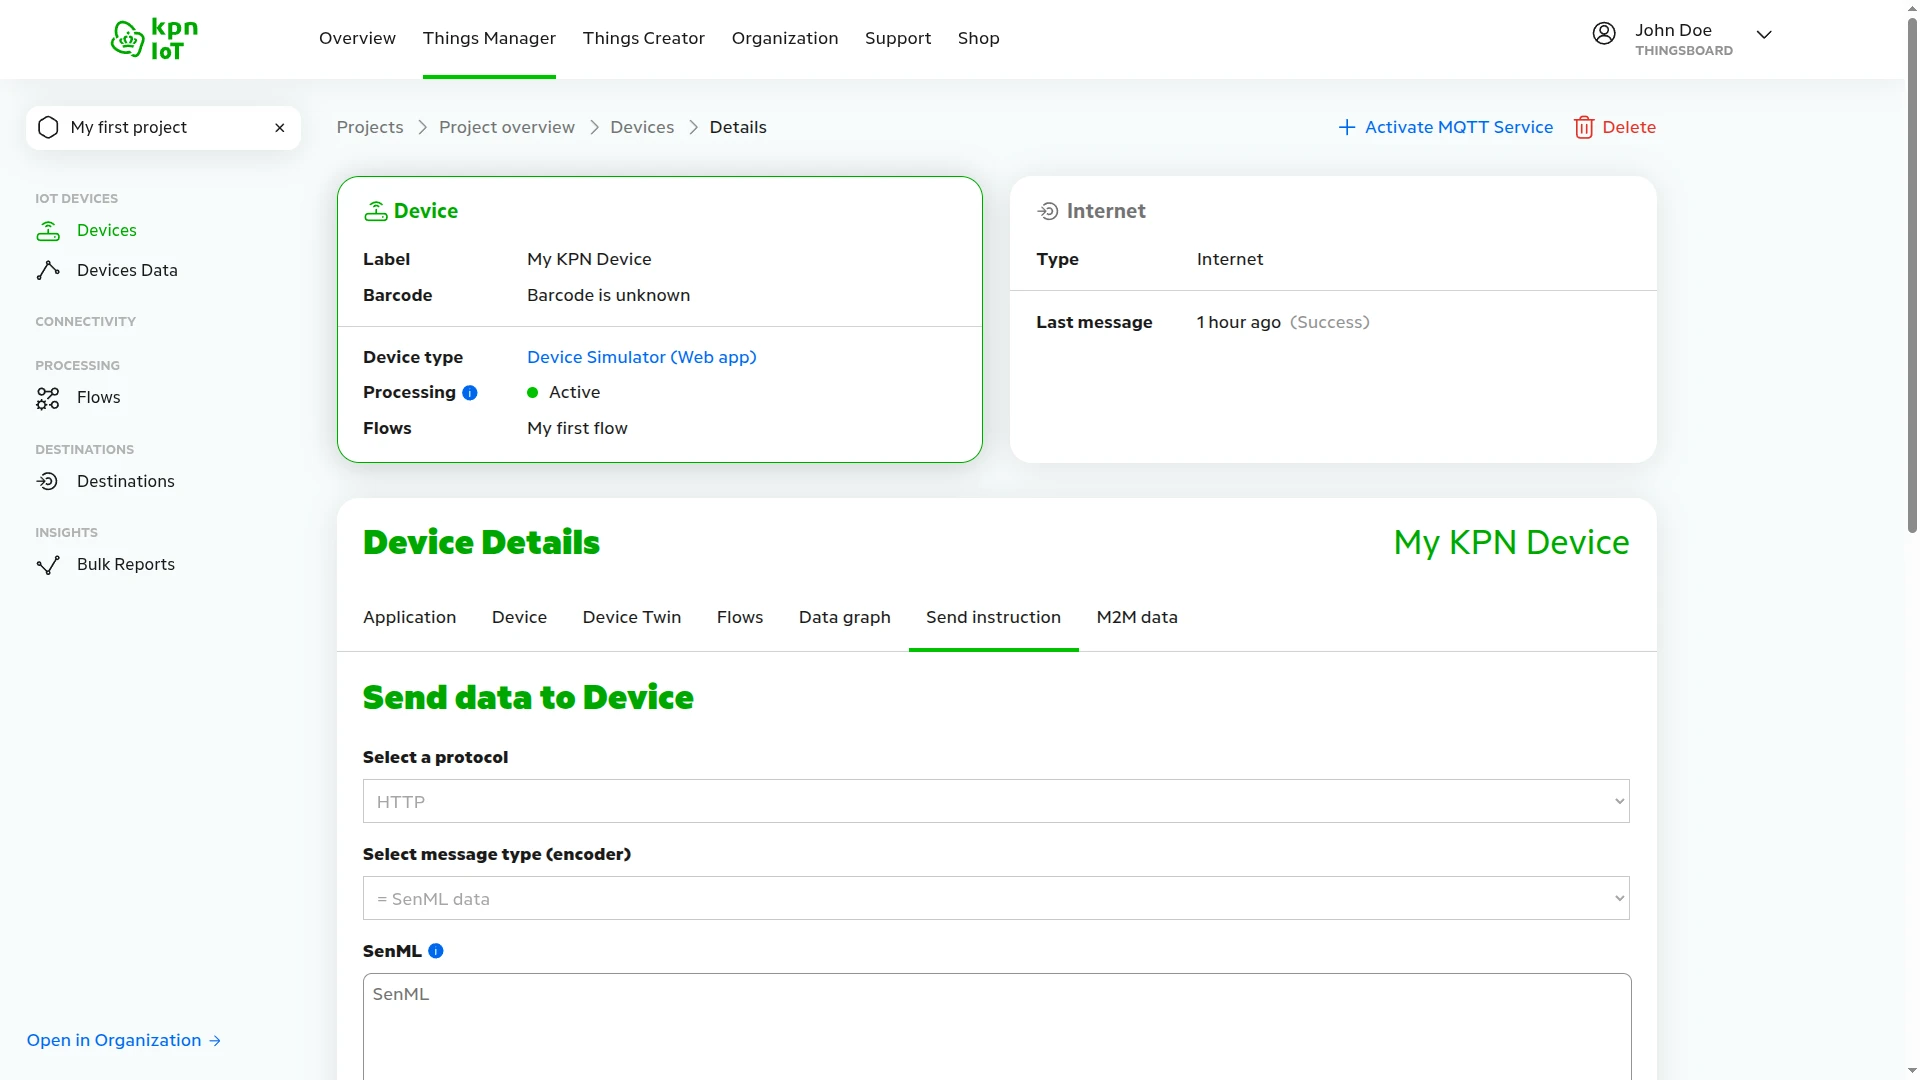
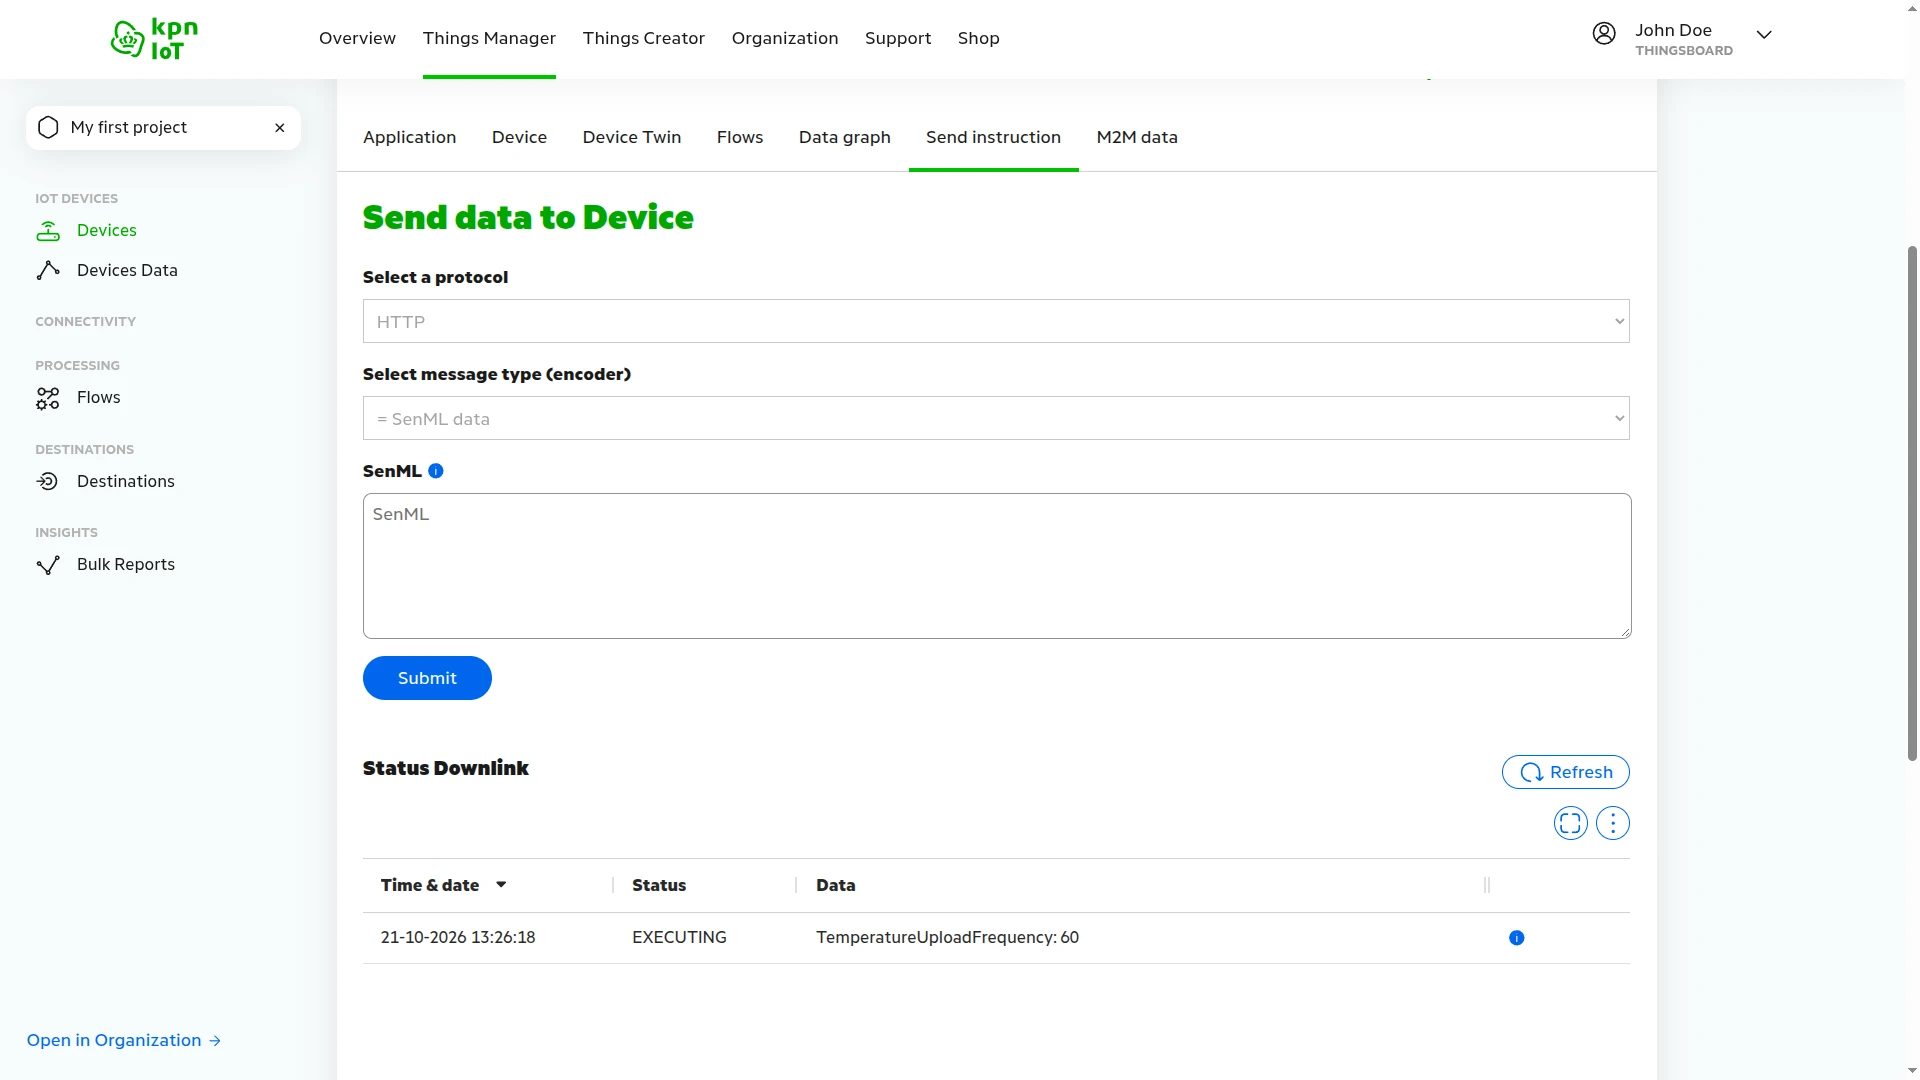
payloadandFPortin its message. A failed call appears with an error and the KPN Things response. - KPN Things — open the device in Things Manager ⇾ Devices, click the Send instruction tab, and scroll to Status Downlink. Click Refresh if the list is empty. The
TemperatureUploadFrequency: 60entry shows that KPN Things accepted the downlink. Its status is PENDING or EXECUTING. KPN Things sets it, not ThingsBoard.
Troubleshooting
Section titled “Troubleshooting”| Symptom | Cause | Fix |
|---|---|---|
| No events on the integration Events tab | The device or the destination is not linked to the Flow, the endpoint URL is wrong, or the integration is disabled. Or debug mode is off: it records events for 15 minutes after you turn it on. | Check that the device’s Flows tab shows the device, the decoder, and the active destination. Copy the HTTP endpoint URL again. Turn on Enable integration. Turn debug mode on again. |
| Uplink events with status FORBIDDEN, and no converter events | The X-Things-Secret value does not match the Headers filter. |
Copy the value from the destination again. If you clicked Generate again, update the value in ThingsBoard. |
| Same, with Destination shared secret set | The ThingsBoard destination signs the body with a secret that KPN Things does not show, so the Things-Message-Token hash never matches. |
Clear Destination shared secret and use the headers filter. |
| Uplink events with status ERROR | The decoder failed. | Check the Error column in the converter events and fix the decoder. |
Telemetry keys such as n, u, or bn |
Decoded ThingsML and raw SenML data is off. | Turn it on in the device’s Flows tab. |
| Device not created | Allow create devices or assets is off, or the decoder returns no deviceName. |
Turn the option on. Check Out in the converter events. |
Telemetry keys such as telemetry.0.values.battery, or a device named Unknown Device |
The JavaScript decoder is the generic template, which does not read the KPN Things body. | Use the TBEL decoder, or replace the JavaScript template with the decoder from this guide. |
| No downlink and no error | No downlink converter is assigned, the rule chain does not route attribute updates, or the encoder returned [] because the message had no keys. |
Assign the converter and check the Attributes Updated relation. Check Out in the downlink converter events. |
Downlink sent, but bn is empty or not the device URN |
The originator fields node is missing, or it adds the name to the message instead of the metadata. | Connect Add Device Name between the message type switch and the integration downlink node, with Add mapped originator fields to set to Metadata. |
Cannot find FPort in metadata! |
The encoder does not set metadata.FPort. |
Use the encoder from this guide, or add FPort to the integration’s Metadata. |
Downlink ERROR with 400 Bad Request on POST request for "https://auth.grip-on-it.com/api/v3/idp/oidc/token", for example Feature API Key does not exist anymore. |
The API ID or API Key is wrong, or the key was deleted or deactivated. | Copy the ID and Secret key again, and check that Activate API Key is on. A changed key takes effect only after the cached access token expires, up to 50 minutes later. To apply it right away, turn Enable integration off and on again. |
Downlink fails with 403 |
The API key lacks a KPN Things role, or it has several roles in KPN Things and the lowest one applies. | Under Services and roles, give the key one role in KPN Things: Things Manager - Editor or Things Manager - Admin. |
Downlink fails with 400 |
The body is not a SenML array, or bn is not the device URN. |
Check Out in the converter events. Keep the device name equal to the URN, or read the URN from an attribute. |
To read debug events, open the integration or converter, click Events, and select an event: In is the received data, Out is the converter result, and Error holds the error text.
See Also
Section titled “See Also”- Integrations overview — how integrations, converters, uplinks, and downlinks fit together.
- Uplink data converter — decoder inputs, output format, and scripting patterns.
- Downlink data converter — encoder reference.
- integration downlink node — route Rule Engine messages to an integration.
- originator fields node — add fields of the message originator, such as the device name, to the metadata.
- message type switch node — route messages by type, for example attribute updates.
- Remote Integration — run the integration outside the ThingsBoard cluster.
- TBEL — built-in functions and syntax for converter scripts.
- KPN Things Device Simulator Web app — add the simulator and send test data.
- KPN Things API — API keys and access tokens.
- KPN Things downlinks — the downlink API that the integration calls.
- KPN Things HTTPS destination — shared secret and the
Things-Message-Tokenheader.
Was this helpful?