- Overview
- ThingsBoard CE vs PE security features comparison
- Glossary
- Roles
- Solution example for smart buildings: separate user groups per facility
- Video tutorial
- Next steps
Overview
Identity access and management (IAM) is essential for today’s business security strategy. Many IAM systems use a method known as role-based access control (RBAC) to assign permissions for who can do what within specified IT resources.
Role-Based Access Control (RBAC) allows to create and grant advanced access by assigning a set of permissions. RBAC roles refer to the levels of access that users may have. Access to resources can be limited to specific operations, such as viewing, creating, writing, or deleting data. Similarly, you can restrict access to sensitive information, increasing business security.
ThingsBoard CE vs PE security features comparison
ThingsBoard Community Edition

ThingsBoard Community Edition supports a straight-forward security model with three main roles: System administrator, Tenant administrator, and Customer user. A system administrator is able to manage tenants, while a tenant administrator manages devices, dashboards, customers, and other entities that belong to a particular tenant. Customer user is able to view dashboards and control devices that are assigned to a specific customer. ThingsBoard Community Edition functionality is sufficient for a lot of simple use cases, especially building real-time end-user dashboards.
ThingsBoard Professional Edition

ThingsBoard Professional Edition brings much more flexibility in terms of user, customer, and role management. It is designed to cover use cases for businesses and enterprises with multiple user groups that have different permissions but may interact with the same devices and assets.
ThingsBoard supports the “recursive” customer hierarchy with tens of thousands of sub-customers. The root-level Owner is Tenant. Each Owner may have multiple Entity Groups, User Groups, and Customer Groups.
Since Customer Groups can contain multiple Customers, each Customer can also own his Entity Groups, User Groups, and Customer Groups (i.e. sub-customer groups).
The ThingsBoard Professional Edition security model support advanced RBAC for IoT applications and includes security features such as:
- ability to create a hierarchy of customers with multiple levels of sub-customers, independent users, and devices;
- ability to create roles with a flexible set of permissions;
- ability to assign roles to exact user groups;
- ability to grant specific permissions to particular user groups over precise device groups.
This document covers features that are exclusive to ThingsBoard Professional Edition. We will start with a glossary and will provide step-by-step examples of how to configure the most popular use cases.
Glossary
Tenant
A Tenant is a separate business-entity: an individual, or an organization that owns or produces devices and assets. A tenant can have multiple tenant administrator users and millions of customers.
Customer
A Customer can be a separate business-entity: an individual, or an organization that purchases or uses tenant devices and/or assets. Customer can also be a division within the Tenant organization. Customer can have multiple users, inner customers, and millions of devices and/or assets.
Customer Group
The Customer group is also an Entity Group. It has the same features as regular Entity Group, but we have a separate term for Customer Group to be able to easily distinct Customer Groups and all other Entity Groups.
User
Users are able to login to the ThingsBoard web interface, execute REST API calls, access devices, and assets if it’s allowed. The User is also an Entity in ThingsBoard.
User Group
A User group is also an Entity Group. It has the same features as regular Entity Group, but we have a separate term for User Group to be able to easily distinct User Groups and all other Entity Groups.
Entity
An Entity can be a device, asset, user, dashboard, entity view, etc. Any entity is managed by ThingsBoard. See entities and relations guide for more details.
Entity Group
Entity Groups are groups of entities of the same type, for example, Device Group or Asset Group. A single entity can simultaneously belong to multiple entity groups. For example, a thermostat device might belong to group “Thermostats”, which contains all devices, and a more specific group like “Thermostats with FW v1.2.3”.
Owner
Each Entity Group belongs to one owner. This can be either Tenant or Customer. Also, each Customer has only one owner. If the Customer Owner is a Tenant, it means that this is a top-level Customer. If the Customer owner is another Customer, it means that this is a sub-customer. There might be multiple levels of Customers in ThingsBoard.
Resource
Anything that has the secure APIs or represents a ThingsBoard Entity is a resource. Examples of Entities are listed in the Entity definition above. Groups of entities are also resources, for example, Device Group, Asset Group, Dashboard Group. Additional resources are white-labeling, audit logs, and admin settings.
Operation
Operations represent actions that you might perform over Resources. There are generic actions like “create”, “read”, “write”, “delete”, “add to group”, “remove from group”. There are also specific actions like “read/write credentials”.
Role
A Role contains a list of Resources and a list of allowed Operations for each of those resources. There are two Role types: Generic and Group.
There is a special resource “All” which is a shortcut to all available resource types.
There is also a special operation “All” that is a shortcut to all possible operations.
We will explain the differences between them later in this article.
Group Permissions Entity (GPE)
Group Permissions Entity is basically a mapping between User Group, Role, and optional Entity Group. See Generic roles and Group roles for more details.
Roles
Roles are sets of rights and permissions that determine what actions a user—or a user group—can perform in the system. They simplify permission management by letting administrators assign and adjust permissions for entire groups or for individual users.
A role maps each resource type to a list of allowed operations. You can find the full list of resource types in the Resources reference.
Let's use the diagram below to see how roles work.

- User group 1 with the Read device only role has access only to devices. They can view devices but cannot delete, edit, or add devices. They do not have access to any other object types.
- User group 2 has two roles: Read device only and Dashboards & widgets administrator. The Dashboards & widgets administrator role allows users to create, delete, and edit widgets and dashboards. Combined with Read device only, users can view data from the devices they're allowed to access and visualize that data on their dashboards.
- User group 3 with the Access to all resources role can create, edit, and delete all object types, such as devices, dashboards, assets, and customers.
In ThingsBoard Professional Edition, there are two role types: Generic and Group. Each type comes with its own permission model.
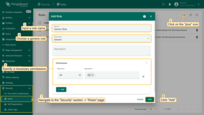
Creating a new role
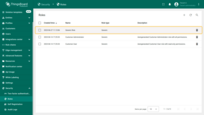
Open the Roles page of the Security section.
- Click the “plus” button in the top right corner.
- Enter the name
- Choose the role type:
- Generic - a reusable permission set that applies recursively within the scope where you assign it (Tenant / Customer / Sub-customer).
- Group — a permission set that you link to a specific entity group for a specific user group.
- Select the permissions (resource + allowed operations), then click “Save”.

Now let's look at each type of role separately.
Generic role
What is a Generic roles?
A Generic role is a set of permissions that applies recursively to all entities within a chosen scope — Tenant, Customer, or Sub-customer (including all descendants).
ThingsBoard uses a linking object called a Group Permission Entity (GPE) to assign a Generic role to a user group. The GPE binds who (the user group) to what (the scope) with which rights (the role's permissions).
Example
Let's look at an example to see how the generic role works depending on where it's assigned.
We have:
- Devices:
- Device A1 — at Tenant A level
- Device B1 — at Customer B level
- Users:
- Bob in Device Administrators group at Tenant A
- Alice in Device Administrators group at Customer B
Goal of the example:
- Grant Bob (Tenant A scope) permission to perform any operation on any entity under Customer A, including entities under Customer B and its sub-customers.
- Grant Alice (Customer B scope) permission to perform any operation on entities only within Customer B and its sub-customers.
Step 1 — Create the Generic role
- Create a Generic role with Resource: All and Operation: All.
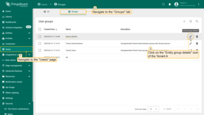
Step 2 — Assign Generic role to the Tenant user group (Bob)
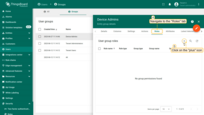
- Go to the “Users” page and navigate to the “Groups” tab.
- Open Entity group details for the “Device Admins” group of Tenant A.
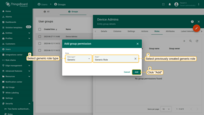
- Navigate to the “Roles” tab and click “+”.
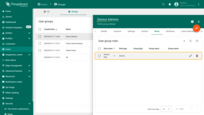
- Choose Role type: Generic, select the role you created, and click “Add”.
Bob (a member of this tenant-level group) can perform any operation on any entity that belongs to Tenant A, including entities under Customer A, Customer B, and their sub-customers.
Step 3 — Assign Generic role to the Customer user group (Alice)
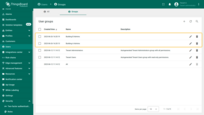
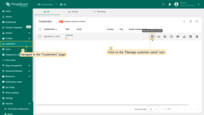
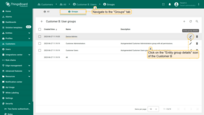
- Go to “Customers” page and click Manage customer users next to Customer B.
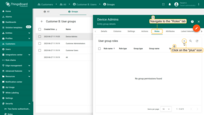
- Open the “Groups” tab and then Entity group details for Device Admins group.
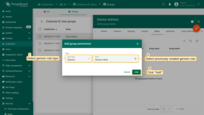
- Navigate to the “Roles” tab and click “+”.
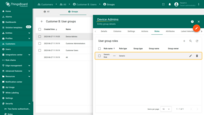
- Choose Role type: Generic, select the same role, and click “Add”.
Alice (a member of this Customer B group) can perform any operation on entities that belong only to Customer B and its sub-customers.
Verify access
Sign in as Bob:
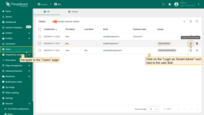
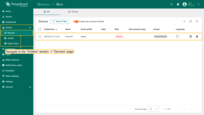
- Go to the "Users" page. Click "Login as Tenant Admin" icon next to Bob's account in the "Device Admins" group of Tenant A.
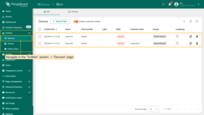
- Navigate to the "Entities" section -> "Devices" page. You should see two devices available to Bob: Device A1 and Device B1.
Now login as user Alice:
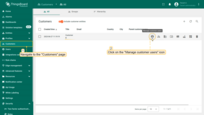
- Go to the "Сustomers" page of Tenant A. Then go to the "Manage customer users" page of Customer B.
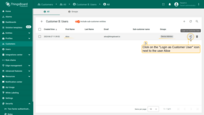
- Click "Login as Customer User" icon next to Alice account.
- Navigate to the "Entities" section -> "Devices" page. User Alice has access to only one device "Device B1".
Outcome
- Both Alice and Bob have access to Device B1.
- Only Bob has access to Device A1 (because his role is assigned at the tenant level).
Permissions
Please check out resource types and corresponding operations listed below.
| Resource | Operations | Description |
|---|---|---|
| All | “All”, “Add to Group”, “Assign to Tenant”, “Change Owner”, “Claim Device”, “Create”, “Delete”, “Impersonate”, “RPC Call”, “Read”, “Read Attributes”, “Read Credentials”, “Read Telemetry”, “Remove from Group”, “Share Group”, “Write”, “Write Attributes”, “Write Credentials”, “Write Telemetry” | By selecting the “All” resource, you grant permission to perform the selected operations on all entities owned by one owner. |
| API Usage State | “All”, “Read”, “Read Telemetry” | API Usage layout is in the main menu of the ThingsBoard platform. API Usage shows full statistics on the platform. Learn more about API Usage here. |
| Alarm | “All”, “Create”, “Read”, “Write” | Alarms are the platform messages with a specific severity that appear when alarm rules are not observed. You can grant permissions to view and manage alarms. Check out Alarms in more detail here. |
| Asset | “All”, “Change Owner”, “Create”, “Delete”, “Read”, “Read Attributes”, “Read Telemetry”, “Write”, “Write Attributes”, “Write Telemetry” | Assets - abstract IoT entities that may be related to other devices and assets. For example, factory, field, vehicle. To know more about the Assets check the article here. |
| Asset Group | “All”, “Add to Group”, “Create”, “Delete”, “Read”, “Read Attributes”, “Read Telemetry”, “Remove from Group”, “Share Group”, “Write”, “Write Attributes”, “Write Telemetry” | Multiple assets can be combined into an asset group. To know more about the entity groups check the article here. |
| Asset Profile | “All”, “Change Owner”, “Create”, “Delete”, “Read”, “Read Attributes”, “Read Telemetry”, “Write”, “Write Attributes”, “Write Telemetry” | Asset profile contains common settings for multiple assets. To know more about the asset profiles check the article here. |
| Audit Log | “All” and “Read” | Audit logs provide opportunity to track user actions. It is possible to log user actions related to main entities: assets, devices, dashboard, rules, etc. Check out the article about audit log here. |
| Billing | “All”, “Read” and “Write” | Billing information tab allows managing current payment method (credit or debit card details) and billing details such as company name and billing address used for invoicing. |
| Blob Entity | “All”, “Change Owner”, “Create”, “Delete”, “Read”, “Read Attributes”, “Read Telemetry”, “Write”, “Write Attributes”, “Write Telemetry” | Binary large object entity in the reporting feature, in order to store Dashboard states snapshots of different content types. Blob Entity information represents an object that contains base information about the blob entity (name, type, content type, etc.). Access to blob entity can be used for generating reports from the dashboard in .pdf, png, and jpeg formats. |
| Converter | “All”, “Change Owner”, “Create”, “Delete”, “Read”, “Read Attributes”, “Read Telemetry”, “Write”, “Write Attributes”, “Write Telemetry” | Data Converters is a part of the Platform Integrations feature. There are Uplink and Downlink data converters. The role is created with permissions for both of these converters. Check the article about data converters here. |
| Customer | “All”, “Change Owner”, “Create”, “Delete”, “Read”, “Read Attributes”, “Read Telemetry”, “Write”, “Write Attributes”, “Write Telemetry” | Customer is a separate business entity, individual, or organization that purchases or uses tenant devices and assets. Check out the information in more detail here. |
| Customer Group | “All”, “Add to Group”, “Create”, “Delete”, “Read”, “Read Attributes”, “Read Telemetry”, “Remove from group”, “Share group”, “Write”, “Write Attributes”, “Write Telemetry” | Tenant administrators can create customer groups and assign the role with specific permissions. The access to Customer or Customer Group level gives the possibility to seе the data available on the upper level. For example, these permissions could be useful for data aggregation. To know more about the entity groups check the article here. |
| Dashboard | “All”, “Change Owner”, “Create”, “Delete”, “Read”, “Read Attributes”, “Read Telemetry”, “Write”, “Write Attributes”, “Write Telemetry” | Dashboard is a visual display of the specific data. Dashboards display data from many entities: devices, assets, etc. Dashboards can be assigned to customers. Find out more information about a dashboards here. |
| Dashboard Group | “All”, “Add to Group”, “Create”, “Delete”, “Read”, “Read Attributes”, “Read Telemetry”, “Remove from Group”, “Share Group”, “Write”, “Write Attributes”, “Write Telemetry” | You can create several dashboards and unite them to Dashboard Group, for each entity you can create a role with permissions. To know more about the entity groups check the article here. |
| Device | “All”, “Assign to Tenant”, “Change Owner”, “Claim Devices”, “Create”, “Delete”, “RPC Call”, “Read”, “Read Attributes”, “Read Credentials”, “Read Telemetry”, “Write”, “Write Attributes”, “Write Credentials”, “Write Telemetry” | Devices are basic IoT entities that can produce telemetry data and handle RPC commands. For example, they can be sensors, actuators, switches and any other gauges. Find out more information about a device here. |
| Device Group | “All”, “Add to Group”, “Create”, “Delete”, “Read”, “Read Attributes”, “Read Telemetry”, “Remove from Group”, “Share Group”, “Write”, “Write Attributes”, “Write Telemetry” | Multiple devices can be combined into a device group. To know more about the entity groups check the article here. |
| Device Profile | “All”, “Change Owner”, “Create”, “Delete”, “Read”, “Read Attributes”, “Read Telemetry”, “Write”, “Write Attributes”, “Write Telemetry” | Device profile contains common settings for multiple devices. Find out more information about a device profile here. |
| Edge | “All”, “Change Owner”, “Create”, “Delete”, “Read”, “Read Attributes”, “Read Telemetry”, “Write”, “Write Attributes”, “Write Telemetry” | ThingsBoard Edge is an extension of the ThingsBoard platform designed for local data processing and device management in a distributed IoT environment. ThingsBoard Edge supports offline operation when there is no access to the cloud-based ThingsBoard server. Find out more information about Edge here. |
| Edge Group | “All”, “Add to Group”, “Create”, “Delete”, “Read”, “Read Attributes”, “Read Telemetry”, “Remove from Group”, “Share Group”, “Write”, “Write Attributes”, “Write Telemetry” | Multiple edge instances can be combined into an edge group. To know more about the entity groups check the article here. |
| Entity View | “All”, “Change Owner”, “Create”, “Delete”, “Read”, “Read Attributes”, “Read Telemetry”, “Write”, “Write Attributes”, “Write Telemetry” | Entity View is the ThingsBoard feature, which limits the degree of exposure of the device or asset telemetry and attributes to the customers. Learn more about Entity Views here. |
| Entity View Group | “All”, “Add to Group”, “Create”, “Delete”, “Read”, “Read Attributes”, “Read Telemetry”, “Remove from Group”, “Share Group”, “Write”, “Write Attributes”, “Write Telemetry” | Multiple entity views can be combined into an entity view group. To know more about the entity groups check the article here. |
| Group Permission | “All”, “Create”, “Delete”, “Read”, “Write” | Group permission is a mapping between user group, entity group (optional) and group role. In other words, it represents which permission user will have to entity group. For example: User group A has READ permission to device group B. |
| Integration | “All”, “Change Owner”, “Create”, “Delete”, “Read”, “Read Attributes”, “Read Telemetry”, “Write”, “Write Attributes”, “Write Telemetry” | Integration is the process of connecting and interacting ThingsBoard with other systems or devices to exchange and manage data. To know more about the Integrations check the article here. |
| Notification | “All”, “Create”, “Delete”, “Read”, “Write” | A notification is a message that informs users about specific events or updates. Each notification may be delivered using multiple delivery methods: Web, SMS, Email, or Slack. Learn more about notification here. |
| OTA package | “All”, “Change Owner”, “Create”, “Delete”, “Read”, “Read Attributes”, “Read Telemetry”, “Write”, “Write Attributes”, “Write Telemetry” | OTA Package is a heavy weight object that includes main information about the OTA Package and also data. It allows you to upload and distribute over-the-air(OTA) updates to devices. As a tenant administrator, you may upload firmware or software packages to the OTA repository. Learn more about OTA Package here. |
| Profile | “All”, “Read”, “Write”, “Create”, “Delete” | With these permissions, the user can edit their profile information and change the login password for their ThingsBoard instance. |
| Queue | “All”, “Change Owner”, “Create”, “Delete”, “Read”, “Read Attributes”, “Read Telemetry”, “Write”, “Write Attributes”, “Write Telemetry” | With these permissions, the user can edit a queue or create a new one, as well as choose the existing queue from the list. Learn more about queue here. |
| Resource | “All”, “Change Owner”, “Create”, “Delete”, “Read”, “Read Attributes”, “Read Telemetry”, “Write”, “Write Attributes”, “Write Telemetry” | The resource library allows you to store and organize files, providing efficient resource management and facilitating their reusability. |
| Role | “All”, “Change Owner”, “Create”, “Delete”, “Read”, “Read Attributes”, “Read Telemetry”, “Write”, “Write Attributes”, “Write Telemetry” | Roles in ThingsBoard define a set of permissions and access rights assigned to users to perform specific actions in the system. Roles allow limiting or granting access to functionality and data based on the user’s role. |
| Rule Chain | “All”, “Change Owner”, “Create”, “Delete”, “Read”, “Read Attributes”, “Read Telemetry”, “Write”, “Write Attributes”, “Write Telemetry” | Rule Chain in ThingsBoard is a sequence of rules and actions applied to data received from devices or other sources. Rule Chains automate data processing, enable decision-making based on specific conditions, and perform actions such as notifications, device state changes, and other operations. Rule Chains can be configured to process and route data for various purposes, simplifying the development and deployment of IoT logic in the ThingsBoard system. Learn more about rule chain here. |
| Scheduler Event | “All”, “Change Owner”, “Create”, “Delete”, “Read”, “Read Attributes”, “Read Telemetry”, “Write”, “Write Attributes”, “Write Telemetry” | Scheduler allows to schedule various types of events with flexible schedule configuration. Scheduler events page displays current configured scheduler events. Learn more about Scheduler Event here. |
| Tenant | “All”, “Change Owner”, “Create”, “Delete”, “Read”, “Read Attributes”, “Read Telemetry”, “Write”, “Write Attributes”, “Write Telemetry” | Thingsboard tenant is an individual user or organization that has a separate space to manage their devices and data within the ThingsBoard platform. Learn more about users here. |
| User | “All”, “Change Owner”, “Create”, “Delete”, “Read”, “Read Attributes”, “Read Telemetry”, “Write”, “Write Attributes”, “Write Telemetry” | User is an entity that can log in to the ThingsBoard web interface, execute REST API calls, access devices, assets and other entities if they have permissions to do so. Learn more about users here. |
| User Group | “All”, “Add to Group”, “Create”, “Delete”, “Read”, “Read Attributes”, “Read Telemetry”, “Remove from Group”, “Share Group”, “Write”, “Write Attributes”, “Write Telemetry” | User group is group of users of the same level with the same permissions. One user can simultaneously belong to several user groups. Multiple users can be combined into an user group. To know more about the entity groups check the article here. |
| Version Control | “All”, “Delete”, “Read”, “Write” | ThingsBoard Version Control service provides the ability to export and restore ThingsBoard Entities using Git. Learn more about Version Control here. |
| White Labeling | “All”, “Read”, “Write” | Permissions to white labeling allows to configure your company or product logo and color scheme in a short period of time. Learn more about White Labeling here. |
| Widget Type and Widget Bundle | “All”, “Create”, “Delete”, “Read”, “Write” | There are five widget types in ThingsBoard, each widget definition represents a specific type of widget. Widgets are grouped into widget bundles according to their purposes. To learn more about Widgets please read here. |
Group role
What is a Group role?
A group role defines a set of permissions for a specific user group over a specific entity group.
The link “who → to what → with which rights” is created via GPE (Group Permission Entry) — a join object between the user group, the entity group, and the group role.
Example
Let's consider an example to better understand how a group role works.
We have:
- User groups:
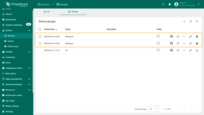
- “Building A Admins” (includes Alice)
- “Building B Admins” (includes Bob)
- Device groups:
- “Building A” (with Device A1)
- “Building B” (with Device B1)
Objective of this example:
- Grant Bob (Building B Admins) read/write permissions for devices in the “Building B” group, with no access to devices in the “Building A” group.
- Grant Alice (Building A Admins) read/write permissions for devices in the “Building A” group, with no access to devices in the “Building B” group.
Step 1 — Create the Group role
- Create a Group role with Read/Write operations (for devices/device groups).
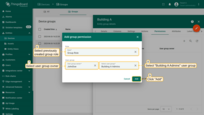
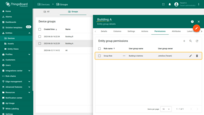
Step 2 — Assign the Group role to the "Building A" device group
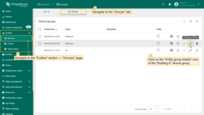
- Go to the “Devices” → “Groups” tab.
- Open Entity group details for “Building A”.
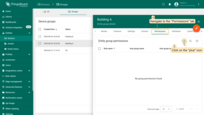
- In the “Permissions” tab, click “+”.
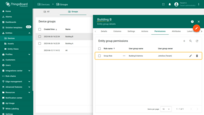
- Select the created role, set the Owner, choose user group “Building A Admins”, and click “Add”.
Permission assigned.
Step 3 — Assign the Group role to the "Building B" device group
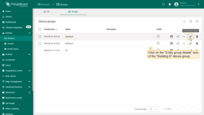
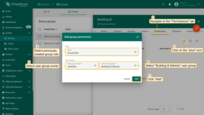
Repeat at the same for “Building B” device group:
- In “Building B” device group details → “Permissions” tab → click “+”.
- Select the same role, set Owner, choose user group “Building B Admins”, and click “Add”.
Permission assigned.
Verify access
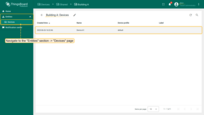
So, user Alice and all users in the group “Building A Admins” only have access to Device A1. Login as user Alice to verify this.
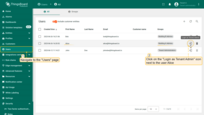
- Go to the “Users” page of Tenant A.
- Click “Login as Tenant Admin” icon next to Alice account.
- Open “Devices” page - you see only “Building A” group with Device A1 inside.
Same thing with user Bob. User Bob and all users in the group “Building B Admins” only have access to Device B1.
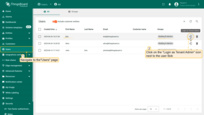
- Go to the “Users” page of Tenant A.
- Click “Login as Tenant Admin” icon next to Bob account.
- Open “Devices” page - you see only “Building B” group with Device B1 inside.
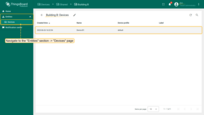
In this way, group roles allow you to flexibly manage access to resources at the group level, rather than at the level of individual users or individual devices.
Solution example for smart buildings: separate user groups per facility
Let's assume your solution manages commercial buildings.
Your main customer is a Building Manager that wants to monitor HVAC systems, electricity consumption, and other smart devices in the building.
The Building Manager may want to design and share some dashboards with the end-users - office workers.
Besides, your engineers responsible for the maintenance are interested in supervising the device’s state, for example, receive alerts when the battery level forgoes below certain thresholds.
To summarize those requirements in ThingsBoard terms, we should implement the following roles:
- Supervisors - read-only access to all devices’ telemetry in all the buildings, and the ability to create their custom dashboards, but no access to dashboards created by users from different user groups.
- Facility Managers - allows provisioning new devices for each facility, setup thresholds, manage users, and configure dashboards.
- End Users - allows having read-only access to the state of the facility where this user belongs to.
Let’s configure ThingsBoard to support this use case. The instructions below assume that you have logged in as a Tenant Administrator.
Supervisors
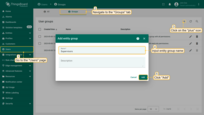
We will create a separate user group named “Supervisors”, a separate dashboard group “Supervisor Dashboards” and one dashboard. Our goal is to allow supervisors to manage dashboards in the “Supervisor Dashboards” group, but for all other entities in the system, they should have read-only access.
Let's start by creating a “Supervisor Dashboards” group:
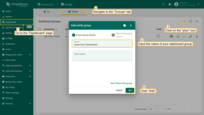
- Navigate to the “Groups” tab in the “Dashboards” page and click “plus” button to create new entity group;
- Input the name of your dashboard group. In our case, it’s “Supervisor Dashboards”. Click on the “Add” button;
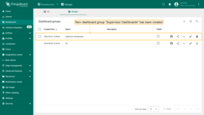
- New dashboard group “Supervisor Dashboards” has been created.
Next we should create two roles to implement this use case:
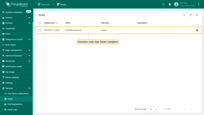
- “All Entities Read-only” - the generic role that will allow access to all entities’ data except device credentials.
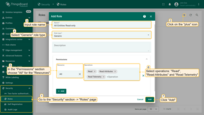
- Navigate to the “Security” section -> “Roles” page and click on the “+” sign at the top right of the screen;
- Input the role name - “All Entities Read-only”;
- Select role type - “Generic”;
- In the “Permissions” section select “All” for the “Resources”;
- select operations: “Read”, “Read Attributes” and “Read Telemetry”;
- Click on the lowest “Add” button, the one without a “+” sign.
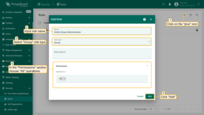
- “Entity Group Administrator” - the group role that allows all operations for the group.
- Again, click the “plus” icon in the upper right corner of the “Roles” page screen;
- Input the role name - “Entity Group Administrator”;
- Select role type - “Group”;
- In the “Permissions” section select “All” operations;
- Click on the “Add” button.
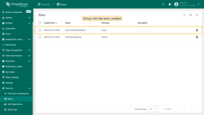
Now let’s assign those roles to the “Supervisors” group.
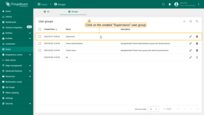
- Navigate to the “Users” page -> “Groups” tab and click on the “+” sign (Add entity group) at the top right of the screen;
- Input the name - “Supervisors”, then click on the “Add” button. The “Supervisors” user group is created. Click on it;
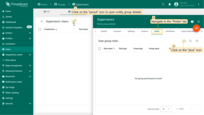
- Click on the “pencil” icon to open entity group details;
- Navigate to the “Roles” tab and click on the “plus” icon at the right top of the opened menu;
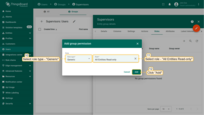
- Select role type - “Generic” and select previously created role - “All Entities Read-only”. Then, click “Add”;
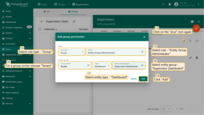
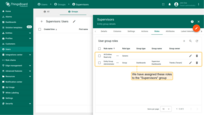
- Again press the “+” sign. This time select role type - “Group” and select role - “Entity Group Administrator”. For a group owner select “Tenant”, for a entity type select “Dashboard”, and select entity group - “Supervisor Dashboard”. Click “Add”. We have assigned these roles to the Supervisors group.
Facility Managers
We will create a separate customer entity for each building or group of buildings. We will add the Facility Manager user account to the default “Customer Administrators” user group which is automatically created for each customer. Now, as Facility Manager, we can log in, design dashboards, provision devices, and end-users.
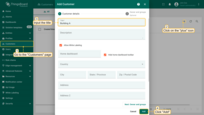
- Navigate to the “Customers” page and click on the “+” sign (Add customer) at the top right of the screen;
- Input the title “Building A” and click “Add”;
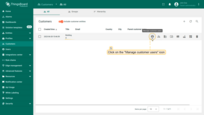
- Click on the “Manage customer users” icon opposite the “Building A” customer;
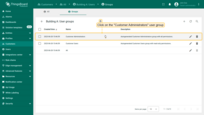
- Navigate to the “Groups” tab and click on the “Customer Administrators” user group;
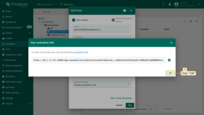
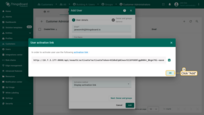
- Click on the “+” sign at the top right of the screen. Input email address, for instance, we can use [email protected], and click “Add”;
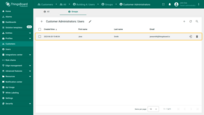
- In the opened window you can see the user activation link, click “OK”;
- Customer user Jane has been created.
End Users
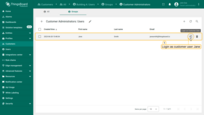
Let’s log in as customer user Jane Smith (created in a previous guide), Building A administrator, and create a dashboard.
- Login as customer user Jane Smith;
- Go to the “Dashboards” page, and click on the “plus” icon in the top right corner. Select “Create new dashboard”;
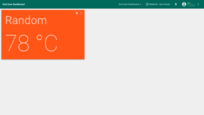
- Input dashboard name. For example, “End User Dashboard”. Click “Add” to create the dashboard;
- Open created dashboard and enter edit mode;
- Click “Add new widget” and select “Simple card” widget in “Cards” widgets bundle;
- In this example, we will generate random temperature values in the widget. In the “Datasources” section select the type as “Function” and the key as “Random”. Click “Add”;
- The widget has been created. Save the dashboard.
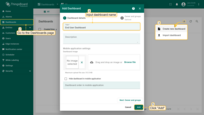
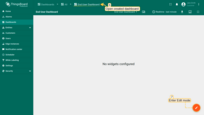
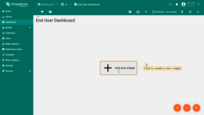
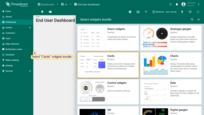
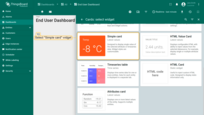
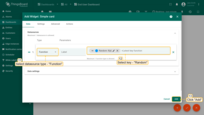
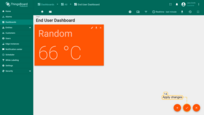
Now, let’s create a Read-only User. Let’s assume we want to assign “End User Dashboard” to him and make sure that this Dashboard will open full screen once the user is logged in. So, our read-only user will not have access to the administration panel to the left, since they are still not allowed to perform any server-side API calls, except read-only browsing the data.
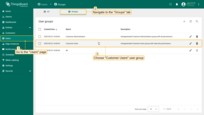
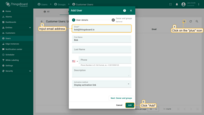
- Select “Customer Users” on the “Groups” tab of the “Users” page;
- Click “+” at the top right of the screen to add new user;
- Input email address, for example, we will use [email protected], then click “Add”;
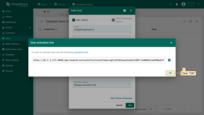
- In the opened window you can see the user activation link, click “OK”;
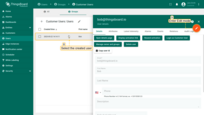
- Now, click on the created user;
- At the right top of the screen you shall see the “pen” icon. Click on it to enter edit mode;
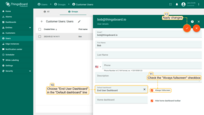
- Check the box “Always fullscreen” and choose “End User Dashboard” in the “Default dashboard” line. Then save changes;
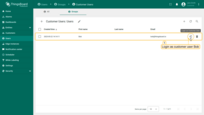
- Login as customer user Bob. Dashboard will open full screen. User Bob will not have access to the administration panel to the left. Bob is not allowed to perform any server-side API calls, only browsing the data.
Video tutorial
You can watch the video tutorial for step-by-step instructions on role-based access control.
Next steps
-
Getting started guides - These guides provide quick overview of main ThingsBoard features. Designed to be completed in 15-30 minutes.
-
Connect your device - Learn how to connect devices based on your connectivity technology or solution.
-
Data visualization - These guides contain instructions on how to configure complex ThingsBoard dashboards.
-
Data processing & actions - Learn how to use ThingsBoard Rule Engine.
-
IoT Data analytics - Learn how to use rule engine to perform basic analytics tasks.

