Particle Integration
Particle is an IoT cloud platform for connected devices. After integrating Particle with ThingsBoard, device events flow from the Particle Cloud to ThingsBoard via a webhook — and ThingsBoard can send RPC commands back to devices through the Particle Cloud function API.
Architecture
Section titled “Architecture”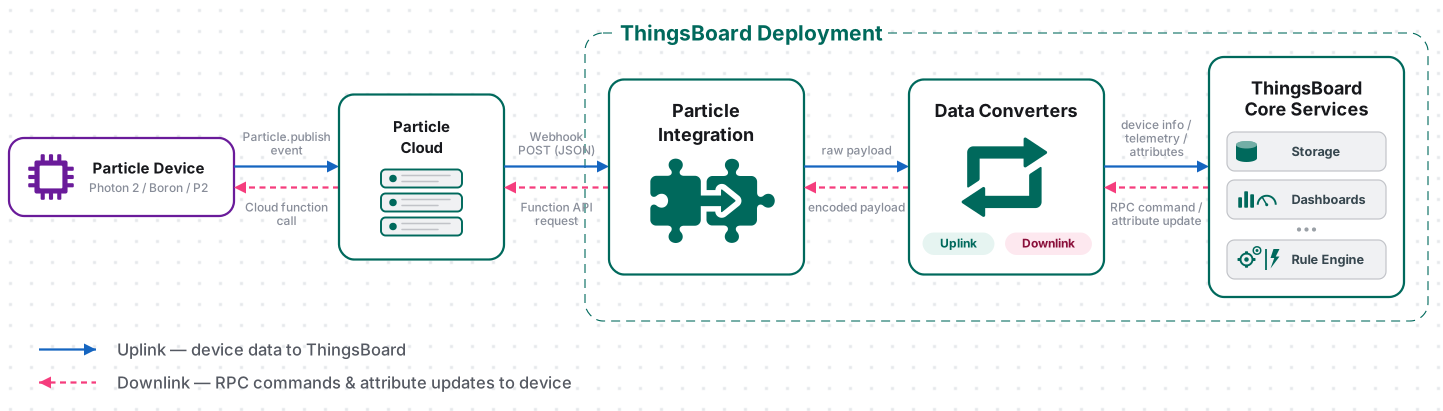
A Particle device publishes an event with Particle.publish(), and Particle Device Cloud delivers it to a webhook configured to match the event name. The webhook forwards the event — event name, event data, publish timestamp, and Particle Device ID (coreid) — as an HTTP POST to the integration’s endpoint. The uplink converter decodes the payload into telemetry and attributes, and the ThingsBoard Core Service stores the data, creating the device automatically on first contact using coreid as the device name. For downlink, the Rule Engine hands an RPC message to the integration; the downlink converter encodes it into a Particle Cloud function call, and ThingsBoard calls the Particle Cloud API to invoke the matching Particle.function() registered on the device.
Prerequisites
Section titled “Prerequisites”Before creating the integration, ensure:
- You have access to ThingsBoard Cloud with integration functionality enabled for your tenant.
- You have permissions to create integrations, data converters, and edit a Rule Chain if downlink is required.
- You have a Particle Console account.
- At least one Particle device is registered in your Particle account or product and is able to connect to Particle Device Cloud.
- The device firmware can publish an event with
Particle.publish(). - For downlink, the device firmware registers at least one
Particle.function()and you have a Particle access token that is authorized to call device functions. - The Particle CLI installed if you want to send downlink commands.
Prepare Particle for Integration
Section titled “Prepare Particle for Integration”Prepare the Particle device, publish a dedicated ThingsBoard event, and optionally create credentials for downlink.
Set Up a Particle Device
Section titled “Set Up a Particle Device”For an individual development device, use the current Particle Device Setup workflow. For a product fleet, use your existing Particle product provisioning and device-claiming process.
- Connect the Particle device to power and complete network setup for its supported connectivity type — Wi-Fi devices can use setup.particle.io, or cellular.
- Register or claim the device in the appropriate Particle sandbox or product.
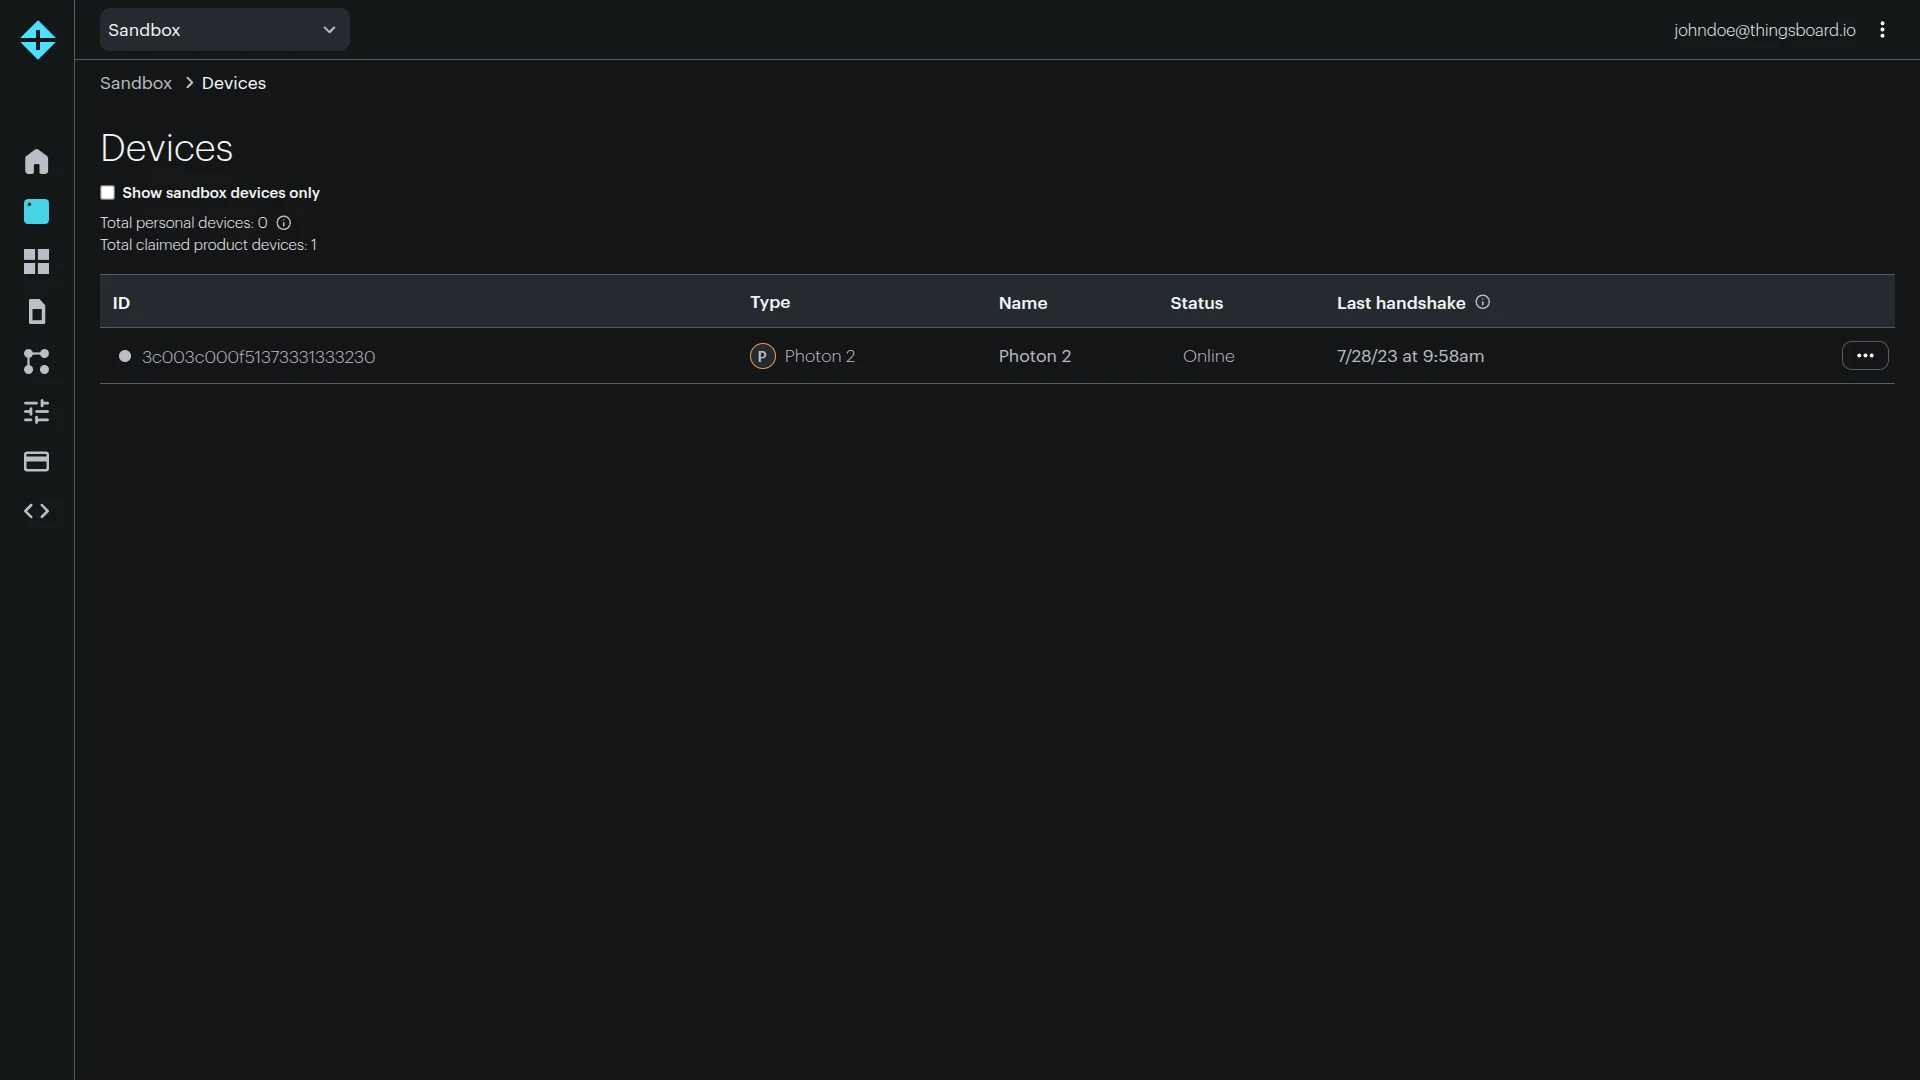
- Open the Particle Console ⇾ Devices and verify that the device appears in the device list.
- Note the device Device ID. Particle webhooks expose this value as
coreid; this guide uses it as the ThingsBoard device name. - Confirm that the device is online before testing telemetry or cloud functions.
Publish Telemetry from Device Firmware
Section titled “Publish Telemetry from Device Firmware”This tutorial uses the event prefix tb/ and the telemetry event name tb/telemetry. Particle webhook event filters are prefix-based, so a webhook configured for tb/ can later receive additional events such as tb/status or tb/location without creating another webhook.
Particle event names should contain only letters, numbers, underscores, dashes, and slashes. Do not use names beginning with particle or spark; these prefixes are reserved by Particle Device Cloud.
The telemetry payload in this tutorial is JSON and contains example values. Replace them with real sensor or application data in your firmware.
#include "Particle.h"
SYSTEM_THREAD(ENABLED);
unsigned long lastPublishMs = 0;const std::chrono::milliseconds publishPeriod = 30s;
void setup() {}
void loop() {  if (Particle.connected() &&    millis() - lastPublishMs >= publishPeriod.count()) {
    lastPublishMs = millis();
    // Replace these values with data from your sensors/application.    Variant data;    data.set("deviceType", Variant("Particle device"));    data.set("temperature", Variant(23.5));    data.set("humidity", Variant(60));    data.set("battery", Variant(87));
    Particle.publish("tb/telemetry", data);  }}
Particle Device OS 6.2 and later can encode structured Variant data as CBOR over the air. Particle Device Cloud converts it back to JSON for webhooks, reducing cellular/Wi-Fi payload size without changing the ThingsBoard webhook format.
#include "Particle.h"
SYSTEM_THREAD(ENABLED);
unsigned long lastPublishMs = 0;const std::chrono::milliseconds publishPeriod = 30s;
void setup() {}
void loop() {  if (Particle.connected() &&    millis() - lastPublishMs >= publishPeriod.count()) {
    lastPublishMs = millis();
    // Replace these values with data from your sensors/application.    char payload[160];    snprintf(payload, sizeof(payload),      "{\"deviceType\":\"Particle device\",\"temperature\":23.5,\"humidity\":60,\"battery\":87}");
    Particle.publish("tb/telemetry", payload);  }}
The Particle webhook will forward an event with fields similar to:
{ "event": "tb/telemetry", "data": "{\"deviceType\":\"Particle device\",\"temperature\":23.5,\"humidity\":60,\"battery\":98}", "coreid": "3c003c000f51373331333230", "published_at": "2026-08-10T12:04:33.940Z"}Prepare Credentials for Downlink
Section titled “Prepare Credentials for Downlink”Skip this section if you only need Particle ⇾ ThingsBoard uplink.
ThingsBoard downlink calls a Particle Cloud function through:
POST /v1/devices/{DEVICE_ID}/{FUNCTION}Particle requires an OAuth2 bearer access token for this API. The Call a function endpoint requires the devices.function:call scope.
For production integrations, prefer a Particle API user with the minimum required API scope instead of a broad personal user token. Particle API users can provide non-expiring, fine-grained credentials for back-end services.
For a quick sandbox test, you can create a user access token with the Particle CLI.
Install the CLI:
bash <( curl -sL https://particle.io/install-cli )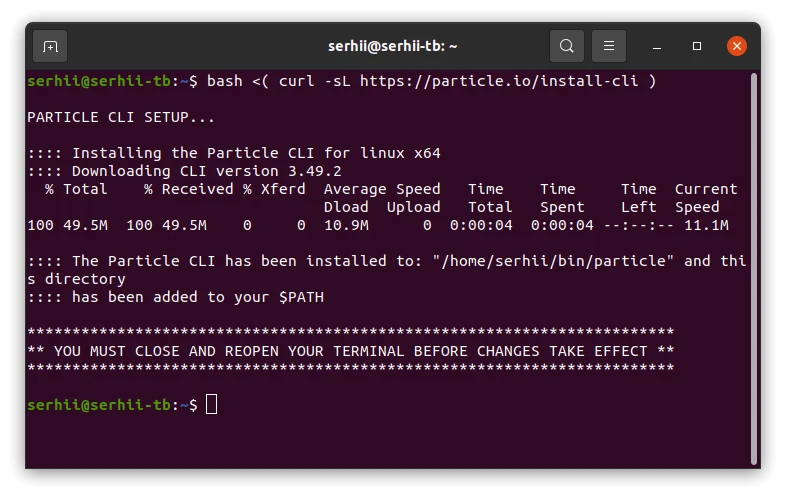
Then, according to official documentation, you will need to log in to your Particle account:
particle login
# Never-expiring token (recommended for integrations)particle token create --never-expires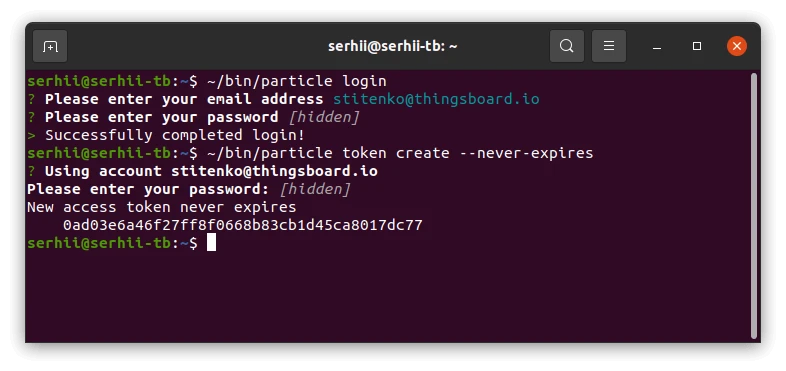
Set Up the Integration in ThingsBoard
Section titled “Set Up the Integration in ThingsBoard”To set up the Particle integration, first create an uplink data converter to process incoming messages, then create and configure the integration. If you need RPC downlink, also create the downlink converter and configure the Particle token when creating the integration.
Create the Uplink Data Converter
Section titled “Create the Uplink Data Converter”Particle uses a generic uplink converter. Each Particle event contains a coreid field (the device ID, used as the ThingsBoard device name), a data field (the event payload), and metadata such as published_at.
This tutorial uses:
- Particle
coreid⇾ ThingsBoarddeviceName. deviceTypefrom the event payload ⇾ ThingsBoard device type/profile identifier; defaults toParticle.- Particle
published_at⇾ telemetry timestamp. - All remaining event payload fields ⇾ telemetry.
- Particle Device ID and integration name ⇾ attributes (
particleDeviceId,integrationName).
- Go to Integrations ⇾ Data converters.
- Click + Add data converter ⇾ Create new converter.
- Converter type — keep Uplink.
- Integration type — select Particle.
- Name — enter
Particle Uplink Converter. - Paste the decoder shown below.
- Click Add.
The decoder function used in this tutorial:
/** Decoder **/
// Particle webhook bodyvar data = decodeToJson(payload);
// Particle event data must contain valid JSON.var eventData = decodeToJson(data.data);
var deviceName = data.coreid;var deviceType = eventData.deviceType != null ? eventData.deviceType : "Particle";var groupName = "Particle devices";
var timestamp = Date.now();if (data.published_at != null) {  timestamp = new Date(data.published_at).getTime();}
var attributes = {  integrationName: metadata["integrationName"],  particleDeviceId: data.coreid};
// Move known non-telemetry fields into attributes when present.if (eventData.firmwareVersion != null) {  attributes.firmwareVersion = eventData.firmwareVersion;}if (eventData.hardwareModel != null) {  attributes.hardwareModel = eventData.hardwareModel;}
// Exclude fields already used for device metadata/attributes.var excludeFromTelemetryList = [  "deviceType",  "deviceName",  "firmwareVersion",  "hardwareModel"];
var telemetry = toFlatMap(eventData, excludeFromTelemetryList, true);
return { deviceName: deviceName, deviceType: deviceType, groupName: groupName, attributes: attributes, telemetry: { ts: timestamp, values: telemetry }};/** Decoder **/
function decodeToString(bytes) { return String.fromCharCode.apply(String, bytes);}
function flatten(obj, result, excludeList, prefix) { prefix = prefix || ""; for (var key in obj) { if (excludeList.indexOf(key) !== -1) continue;
var value = obj[key]; var fullKey = prefix ? prefix + "." + key : key;
if (typeof value === "object" && value !== null && !Array.isArray(value)) { flatten(value, result, excludeList, fullKey); } else { result[fullKey] = value; } }}
var data = JSON.parse(decodeToString(payload));
var eventData = JSON.parse(data.data);
var deviceName = data.coreid;var deviceType = eventData.deviceType != null ? eventData.deviceType : "Particle";var groupName = "Particle devices";
var timestamp = Date.now();if (data.published_at != null) { timestamp = new Date(data.published_at).getTime();}
var attributes = { integrationName: metadata["integrationName"], particleDeviceId: data.coreid};
if (eventData.firmwareVersion != null) { attributes.firmwareVersion = eventData.firmwareVersion;}if (eventData.hardwareModel != null) { attributes.hardwareModel = eventData.hardwareModel;}
var excludeFromTelemetryList = [ "deviceType", "deviceName", "firmwareVersion", "hardwareModel"];
var telemetry = {};flatten(eventData, telemetry, excludeFromTelemetryList);
return { deviceName: deviceName, deviceType: deviceType, groupName: groupName, attributes: attributes, telemetry: { ts: timestamp, values: telemetry }};To adapt this converter to your device:
- Different telemetry schema — change the payload fields published by the firmware. All fields except those in
excludeFromTelemetryListare converted to telemetry. - Nested JSON —
toFlatMap/flattenconverts nested objects to flattened telemetry keys. - Device type — publish
deviceTypefrom firmware (for example,Photon 2,Muon,Tracker One, or your own product model), or replace the defaultParticlevalue in the converter. - Human-readable name — keep
deviceName = data.coreidwhen you need the default downlink flow. Store a human-readable name as an attribute instead of replacing the ThingsBoard device name. - Attributes — add firmware version, hardware model, serial number, or application metadata to
attributesand exclude those fields from telemetry. - Non-JSON event data — if your firmware publishes plain text instead of JSON, do not call
decodeToJson(data.data)/JSON.parse(data.data). Store the value directly, for example astelemetry.rawData. - Event-specific conversion — use
data.eventto apply different mappings for events such astb/telemetry,tb/status, andtb/location.
Create the Downlink Data Converter
Section titled “Create the Downlink Data Converter”Skip this section for an uplink-only integration.
The downlink converter translates a ThingsBoard RPC message into the command format expected by the ThingsBoard Particle integration. The integration then calls the Particle Cloud function whose name matches msg.method.
- Go to Integrations ⇾ Data converters.
- Click + Add data converter ⇾ Create new converter.
- Change Converter type to Downlink.
- Set Integration type to Particle.
- Enter the name
Particle Downlink Converter. - Paste the encoder below and click Add.
The encoder used in this tutorial:
/** Encoder **/
var command = {};command["method"] = msg.method;if (msg.params == "false" || msg.params == "true") {    command["params"] = Boolean.valueOf(msg.params);} else {    command["params"] = msg.params;}
var result = {    contentType: "JSON",    data: JSON.stringify(command),    metadata: {        deviceId: metadata.deviceName    }};
return result;/** Encoder **/
var command = {};command["method"] = msg.method;if (msg.params == "false" || msg.params == "true") { command["params"] = Boolean.valueOf(msg.params);} else { command["params"] = msg.params;}
var result = { contentType: "JSON", data: JSON.stringify(command), metadata: { deviceId: metadata.deviceName }};
return result;The metadata.deviceId is set to the ThingsBoard device name (which equals the Particle coreid) and is used by the integration to identify the target device when calling the Particle Cloud API.
The Particle device function accepts one string argument. Keep RPC parameters compact and encode complex parameters as a short string or JSON object only if your firmware and Device OS limits allow it.
Create the Particle Integration
Section titled “Create the Particle Integration”- Go to Integrations ⇾ Integrations and click + Add integration.
- Basic settings:
- Set integration type to Particle.
- Enter a Name for the integration, or keep the default
Particle integration. - Leave Enable integration and Allow create devices or assets on so the device is created automatically on first data.
- Click Next.
- Uplink data converter:
- Click Select existing and choose the Particle Uplink Converter created in the previous step.
- Alternatively, click Create new to define the decoder inline.
- Click Next.
- Downlink data converter:
- Click Select existing, choose the Particle Downlink Converter created in the previous step — or click Skip if you only need Particle ⇾ ThingsBoard uplink.
- Click Next.
- Connection settings:
- Note the HTTP endpoint URL displayed — you will paste it into the Particle Console webhook in the next section.
- Enable Allow downlink and paste the Particle access token you generated into the Token field.
- Click Add to create the integration.
Connection Settings
Section titled “Connection Settings”HTTP Endpoint URL
A unique ThingsBoard endpoint generated for this Particle integration. Configure the Particle webhook to send HTTPS POST requests to this URL.
Do not replace the endpoint with a generic ThingsBoard HTTP device API URL. The URL is specific to the Platform Integration and routes the webhook payload through the selected Particle uplink converter.
Allow Downlink
Enables the Particle integration to send converted ThingsBoard downlink messages to Particle Device Cloud.
If disabled, the integration still accepts Particle webhook uplink events, but ThingsBoard RPC messages cannot be forwarded through the Particle integration.
Token
A Particle OAuth2 access token used by ThingsBoard when calling the Particle Cloud API.
The token must be authorized to call a function on the target device. For API-user credentials, grant the minimum required devices.function:call scope. For sandbox testing, a user token created with the Particle CLI can be used.
Execute Remotely
If the Particle Integration wizard offers Execute remotely, enable it only when you intentionally run the integration as a separate Remote Integration process. For the normal cloud-to-cloud Particle workflow, the default server-side execution is sufficient because both ThingsBoard and Particle Device Cloud are reachable over the Internet.
Configure the Webhook in Particle Console
Section titled “Configure the Webhook in Particle Console”The webhook is the uplink transport between Particle Device Cloud and the ThingsBoard Particle integration. Create a Custom Webhook integration in the Particle Console that forwards matching events to the ThingsBoard integration endpoint.
Particle webhook Event name matching is prefix-based and case-sensitive. This guide uses tb/, which matches tb/telemetry, tb/status, tb/location, and any other event that begins with tb/.
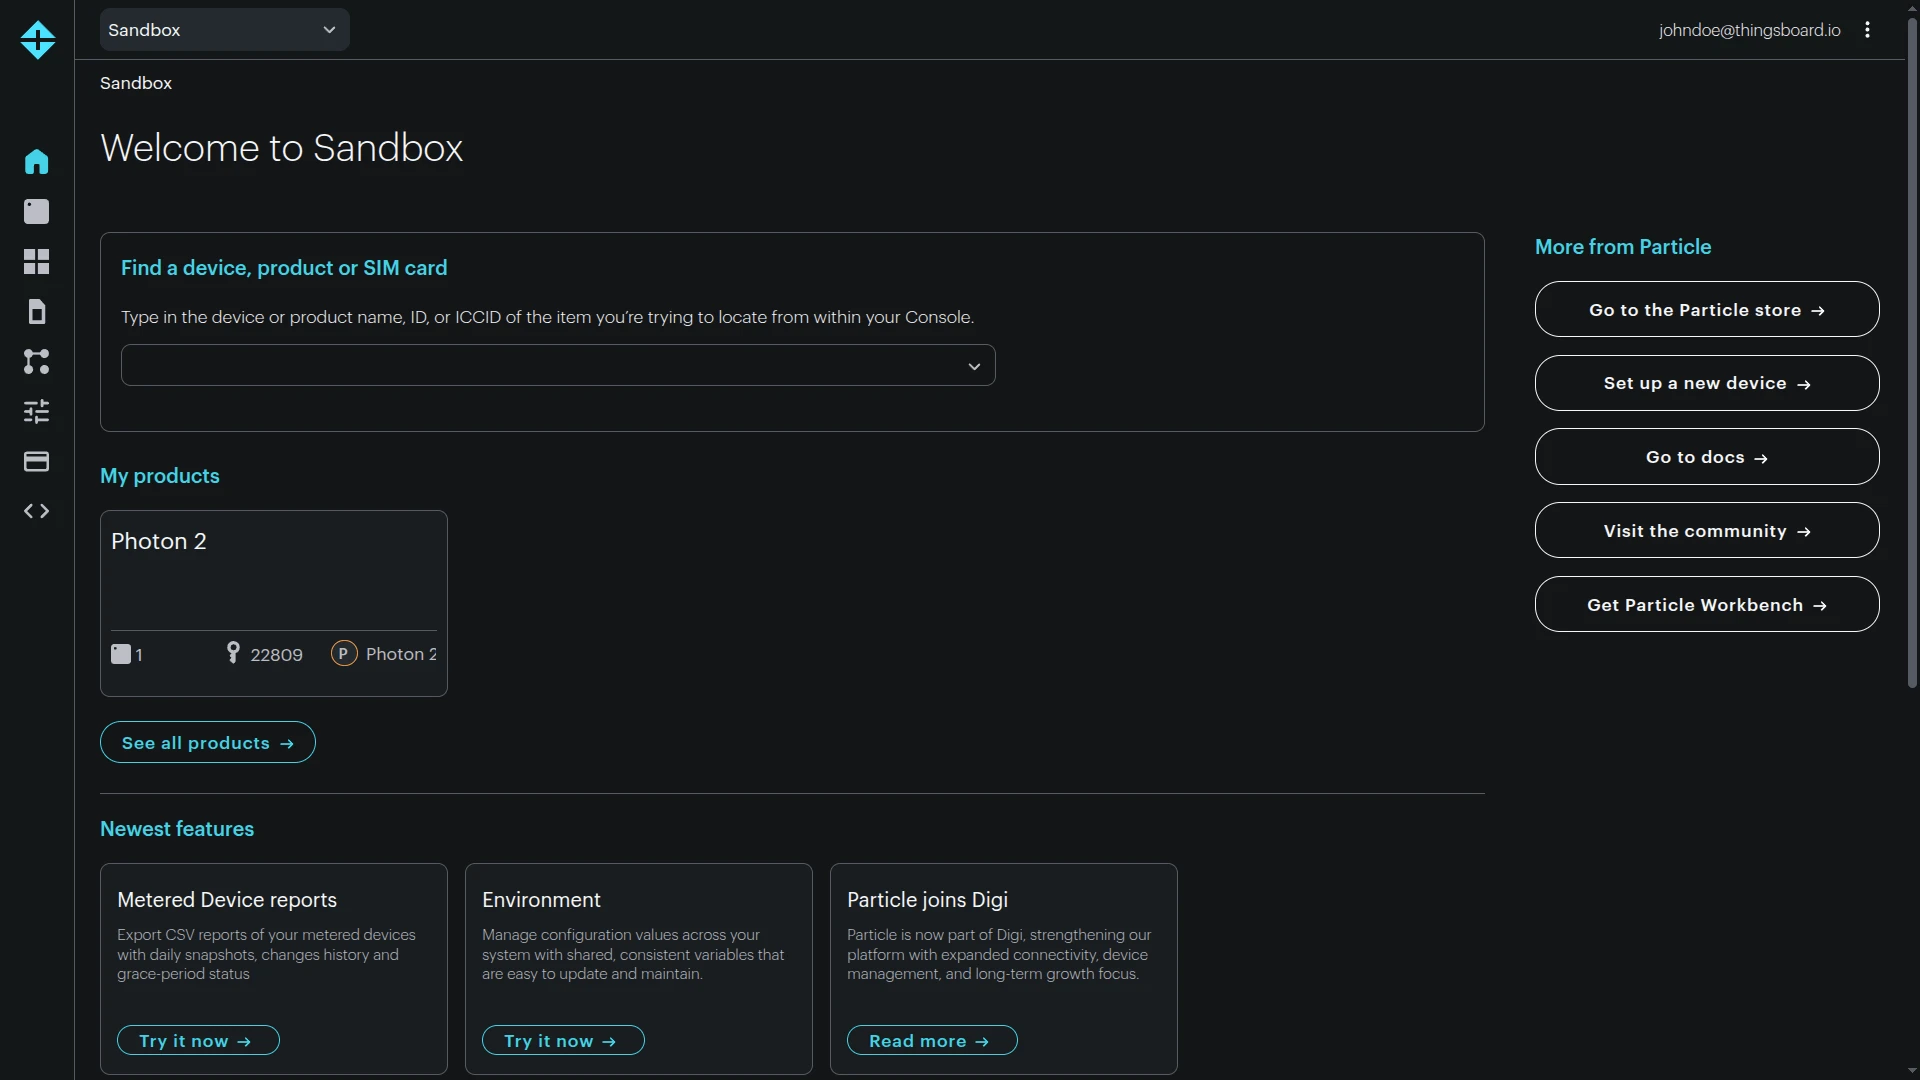
- Open Particle Console and open the sandbox, organization, or product that contains your device.
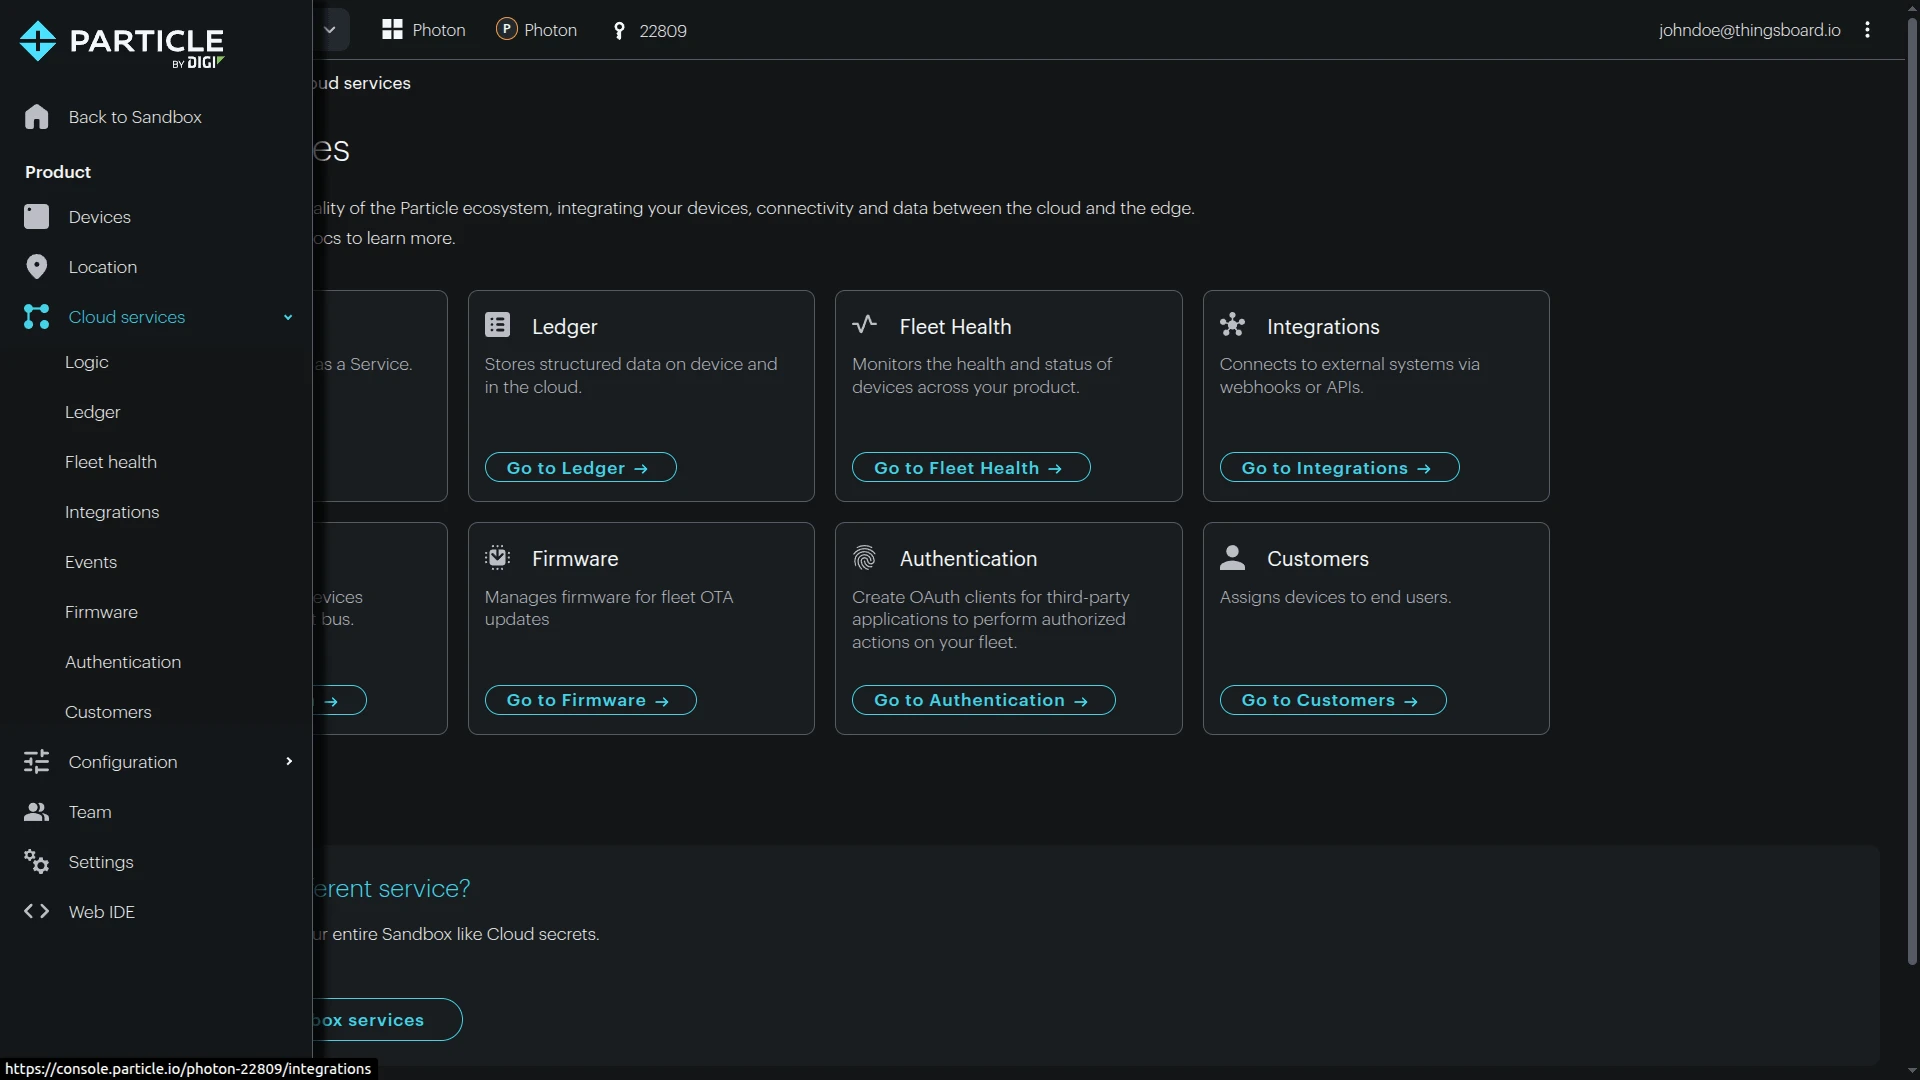
- In the left sidebar, open Cloud services, then click Go to Integrations.
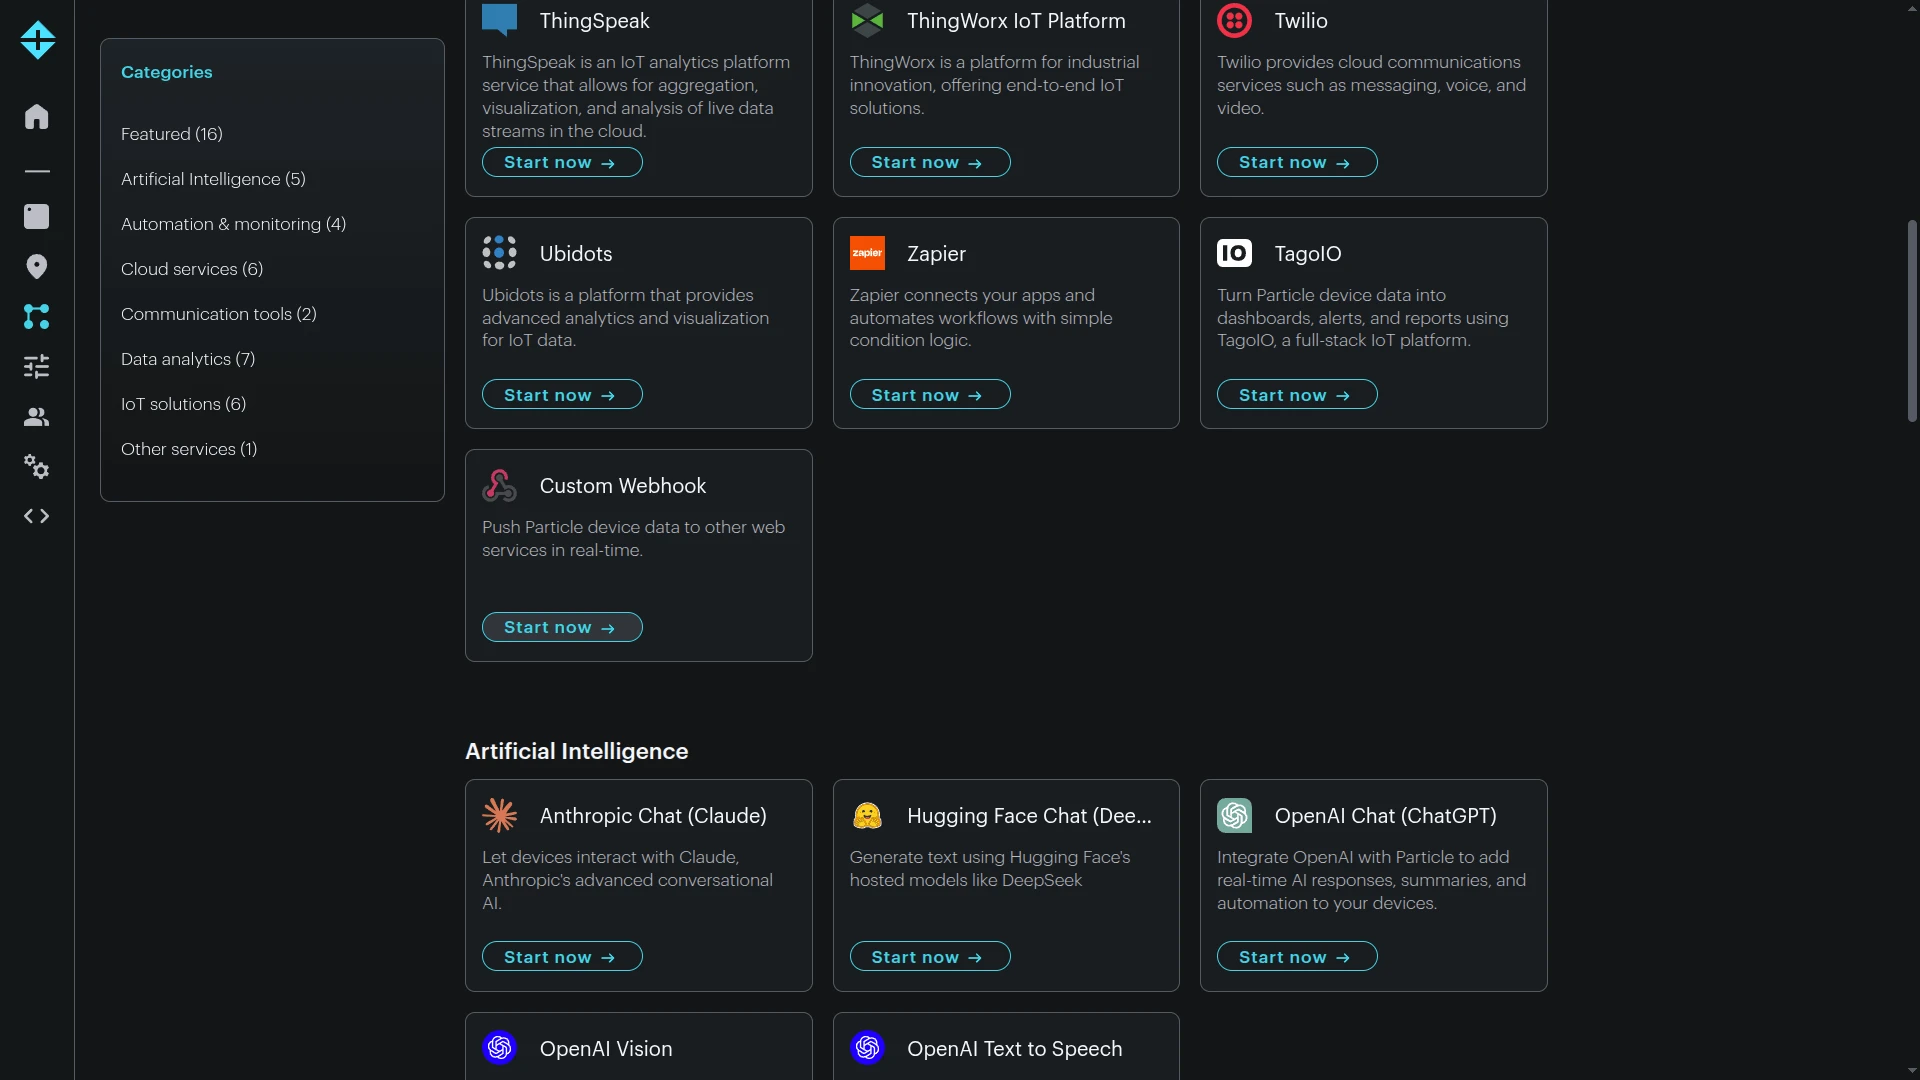
- In the integrations catalog, find and select Custom Webhook, then click Start now.
- On the Custom Webhook page (Webhook Builder tab), configure:
- Name — e.g.
ThingsBoard. - Event name — the Particle event name prefix your device publishes (e.g.
tb/). Only events matching this name trigger the webhook. - URL — paste the HTTP endpoint generated by the ThingsBoard Particle integration.
- Request type —
POST. - Request format —
JSON. - Leave Status enabled.
- Name — e.g.
- Click Enable integration.
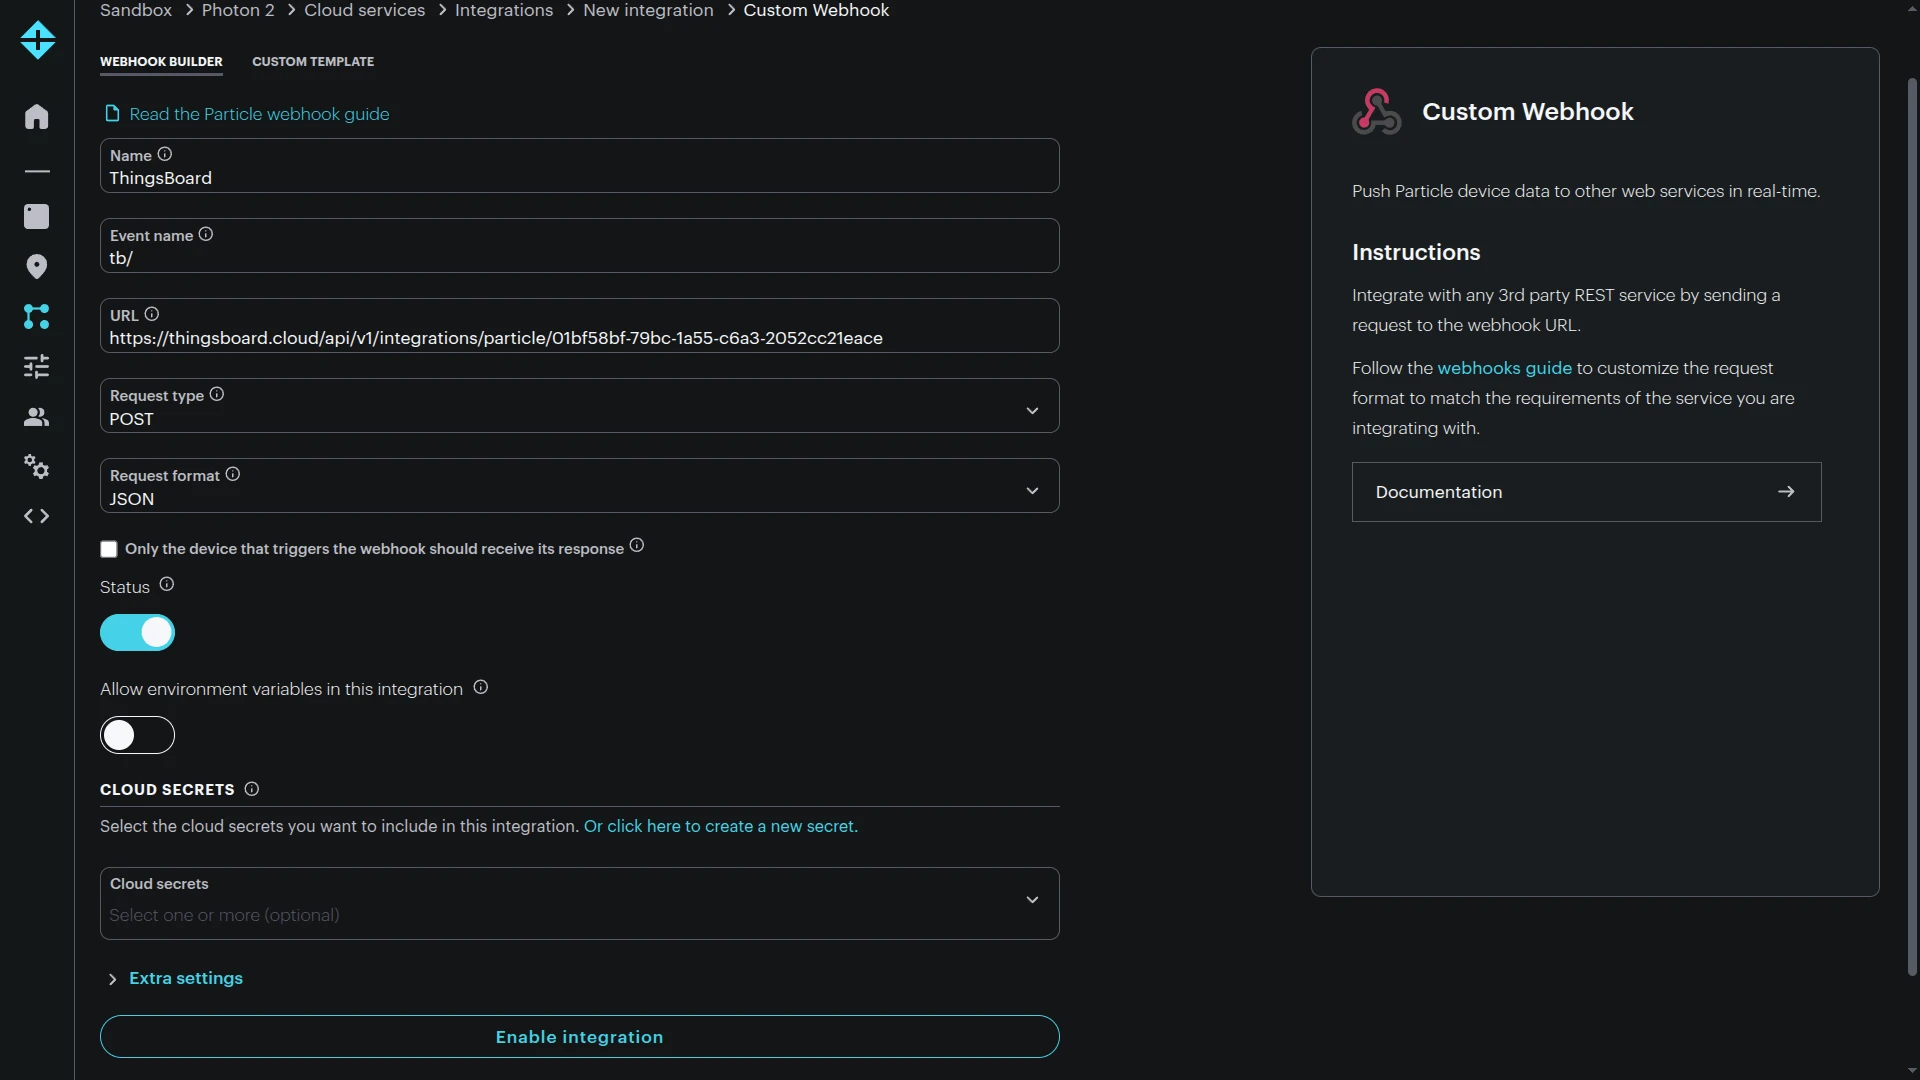
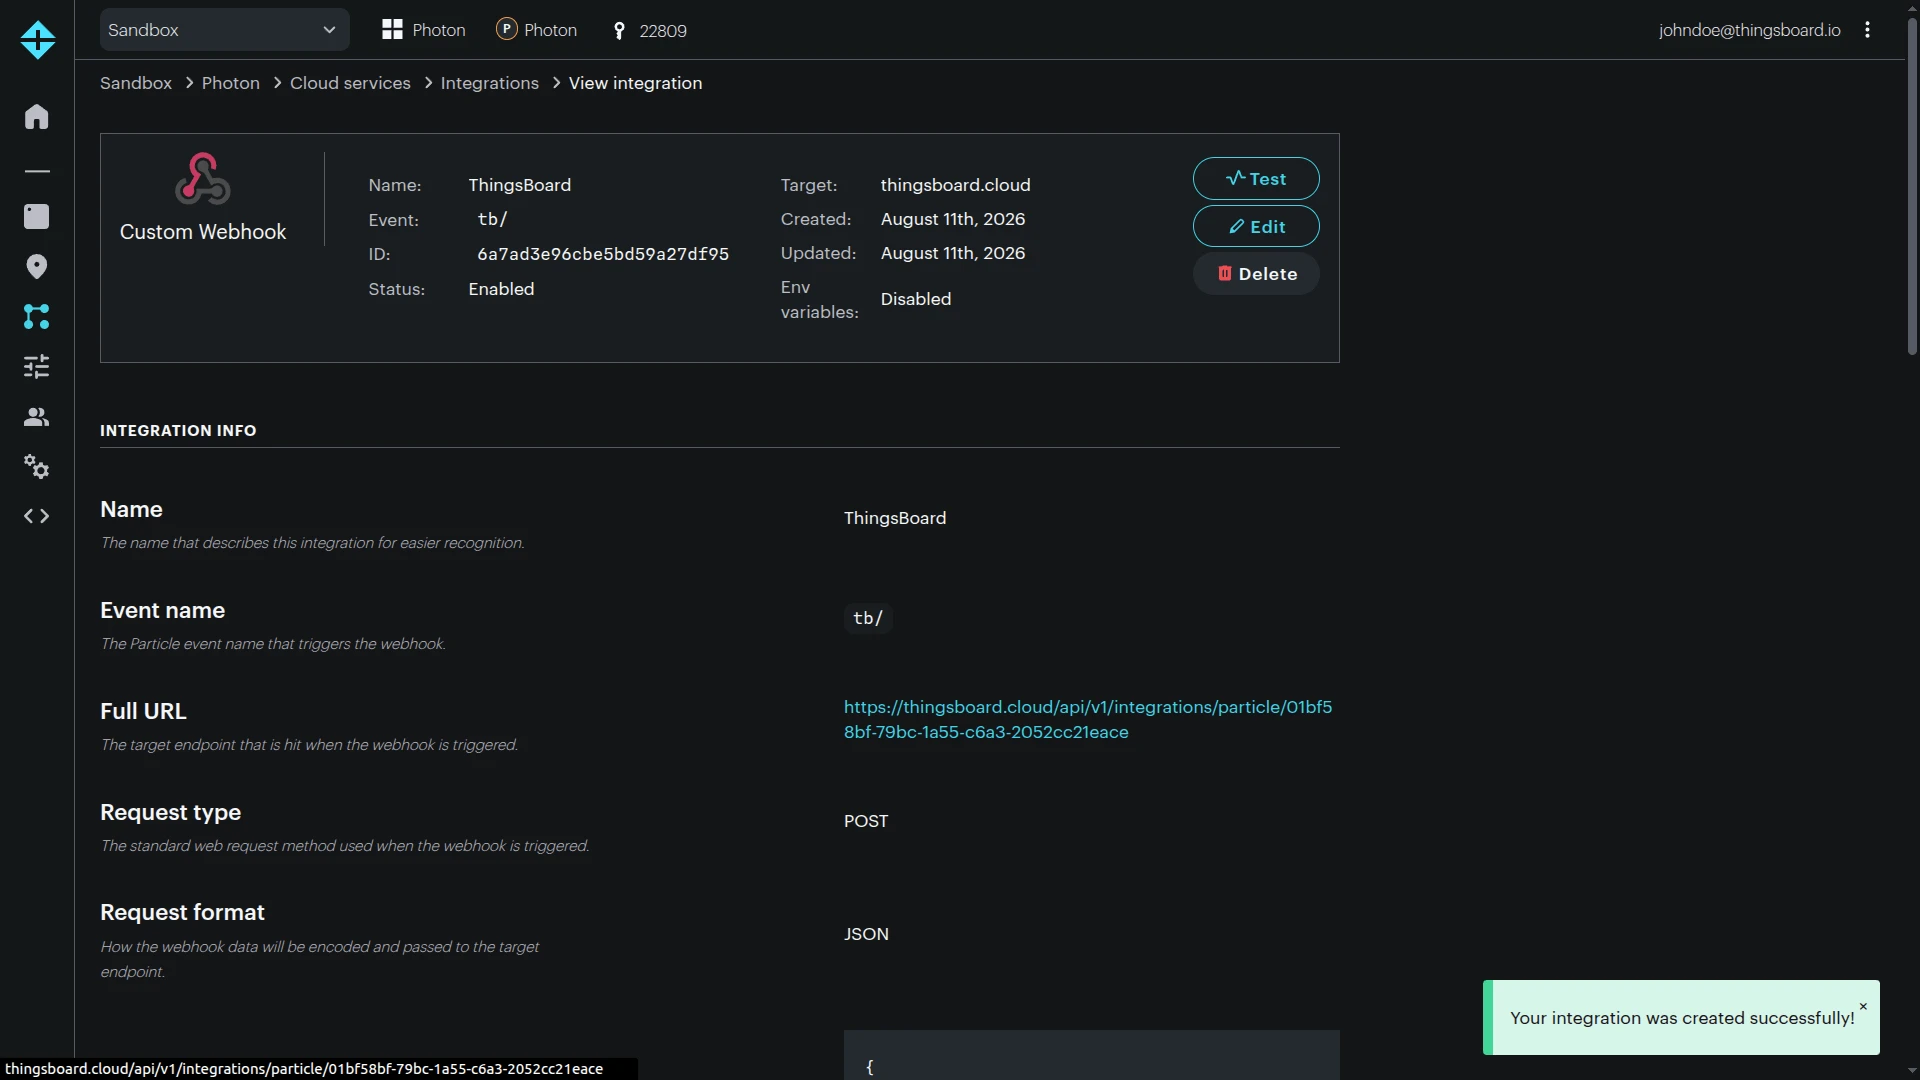
With the default Particle webhook data included, ThingsBoard receives the event name, event data, publish timestamp, and coreid required by the converter.
Test Uplink
Section titled “Test Uplink”For an end-to-end test, publish the event from a physical Particle device. This validates the device-to-cloud connection, webhook, ThingsBoard integration, converter, and automatic device provisioning in one flow.
Send Test Uplink
Section titled “Send Test Uplink”Flash the firmware example from Publish Telemetry From Device Firmware to your Particle device and wait for it to connect to Particle Device Cloud. The example publishes tb/telemetry approximately every 30 seconds while cloud-connected.
To trigger a test event without waiting, publish a Particle event from the CLI using the same event name you configured in the webhook:
particle publish tb/telemetry "{\"deviceType\":\"Particle device\",\"temperature\":23.5,\"humidity\":60,\"battery\":87}" --privateYou can confirm the event reached Particle Device Cloud on the device’s page in the Particle Console, under the Events tab.
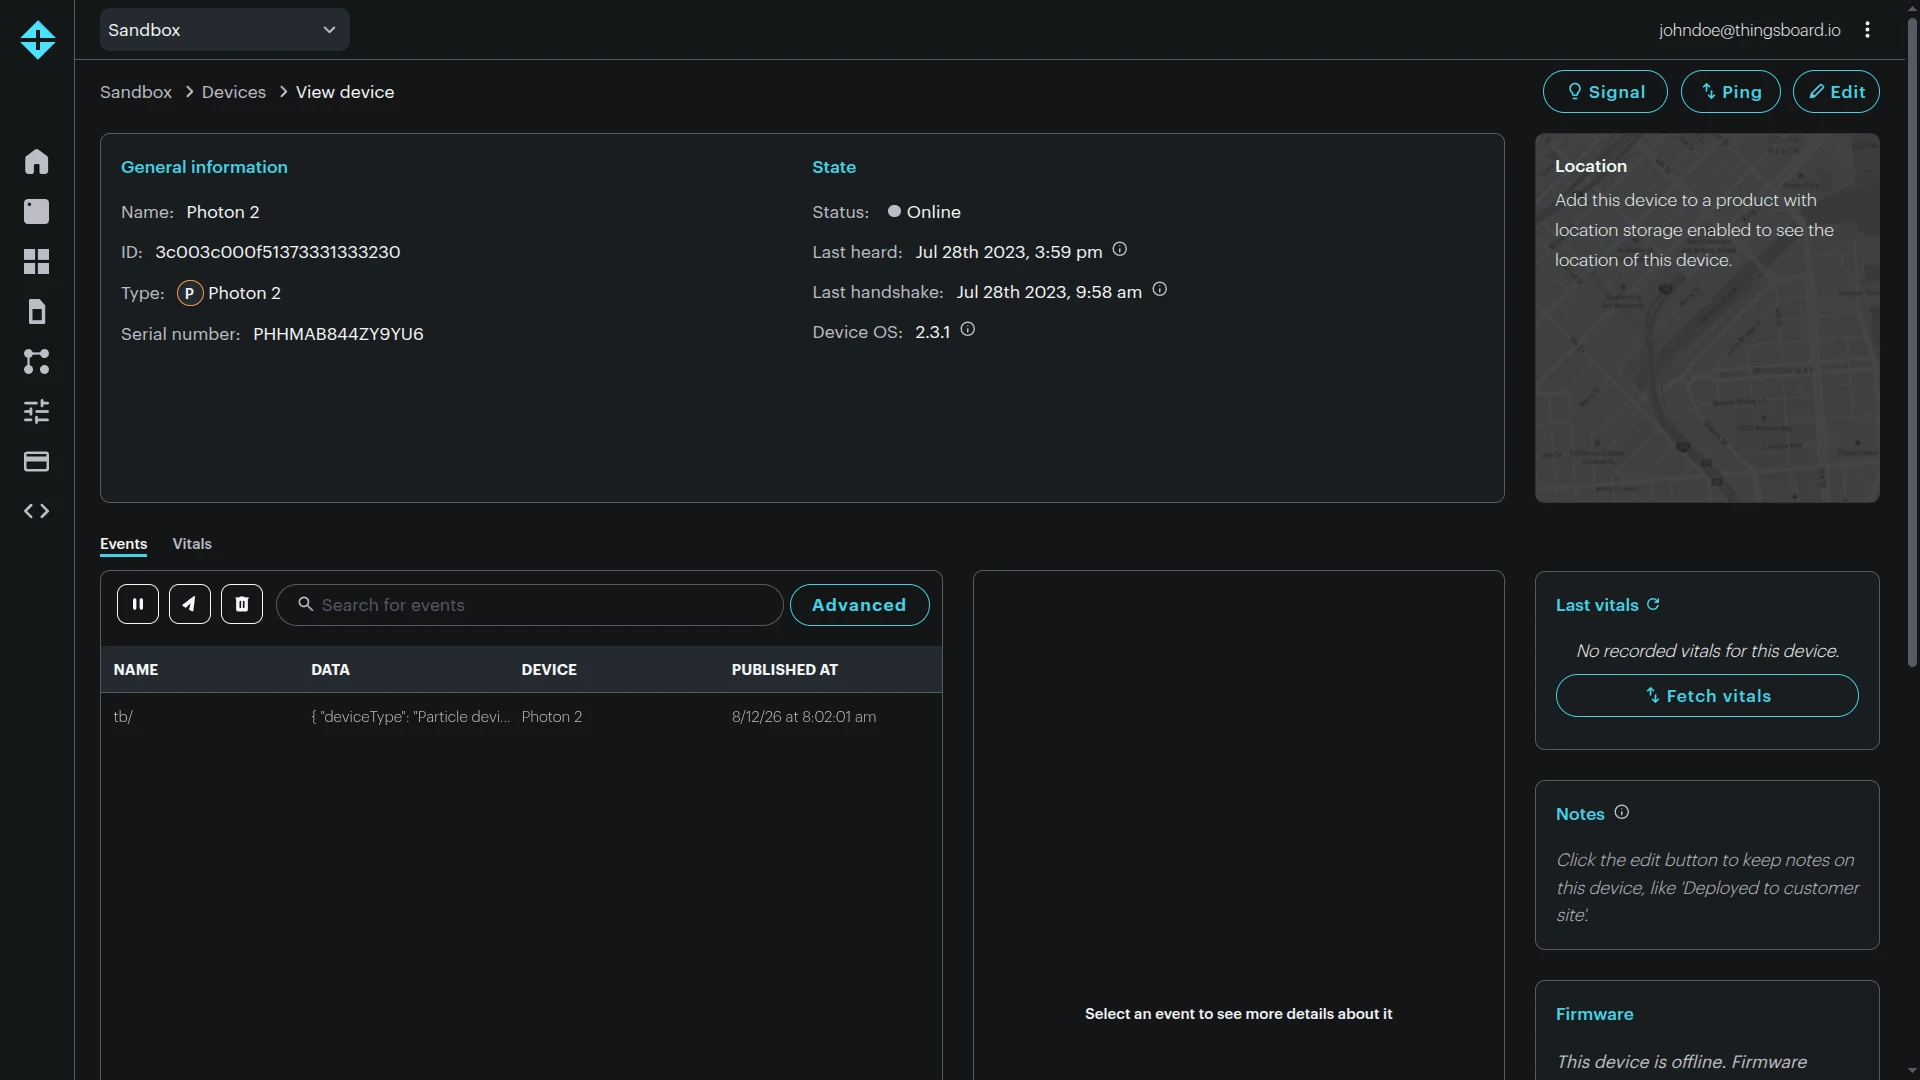
Alternatively, open the integration’s View integration page in the Particle Console and click Test. Enter the real ID of your Particle device and a valid JSON object in Event data, then click Run test to send the payload without needing a physical device online.
Example of event data:
{ "deviceType": "Particle device", "temperature": 23.5, "humidity": 60, "battery": 87 }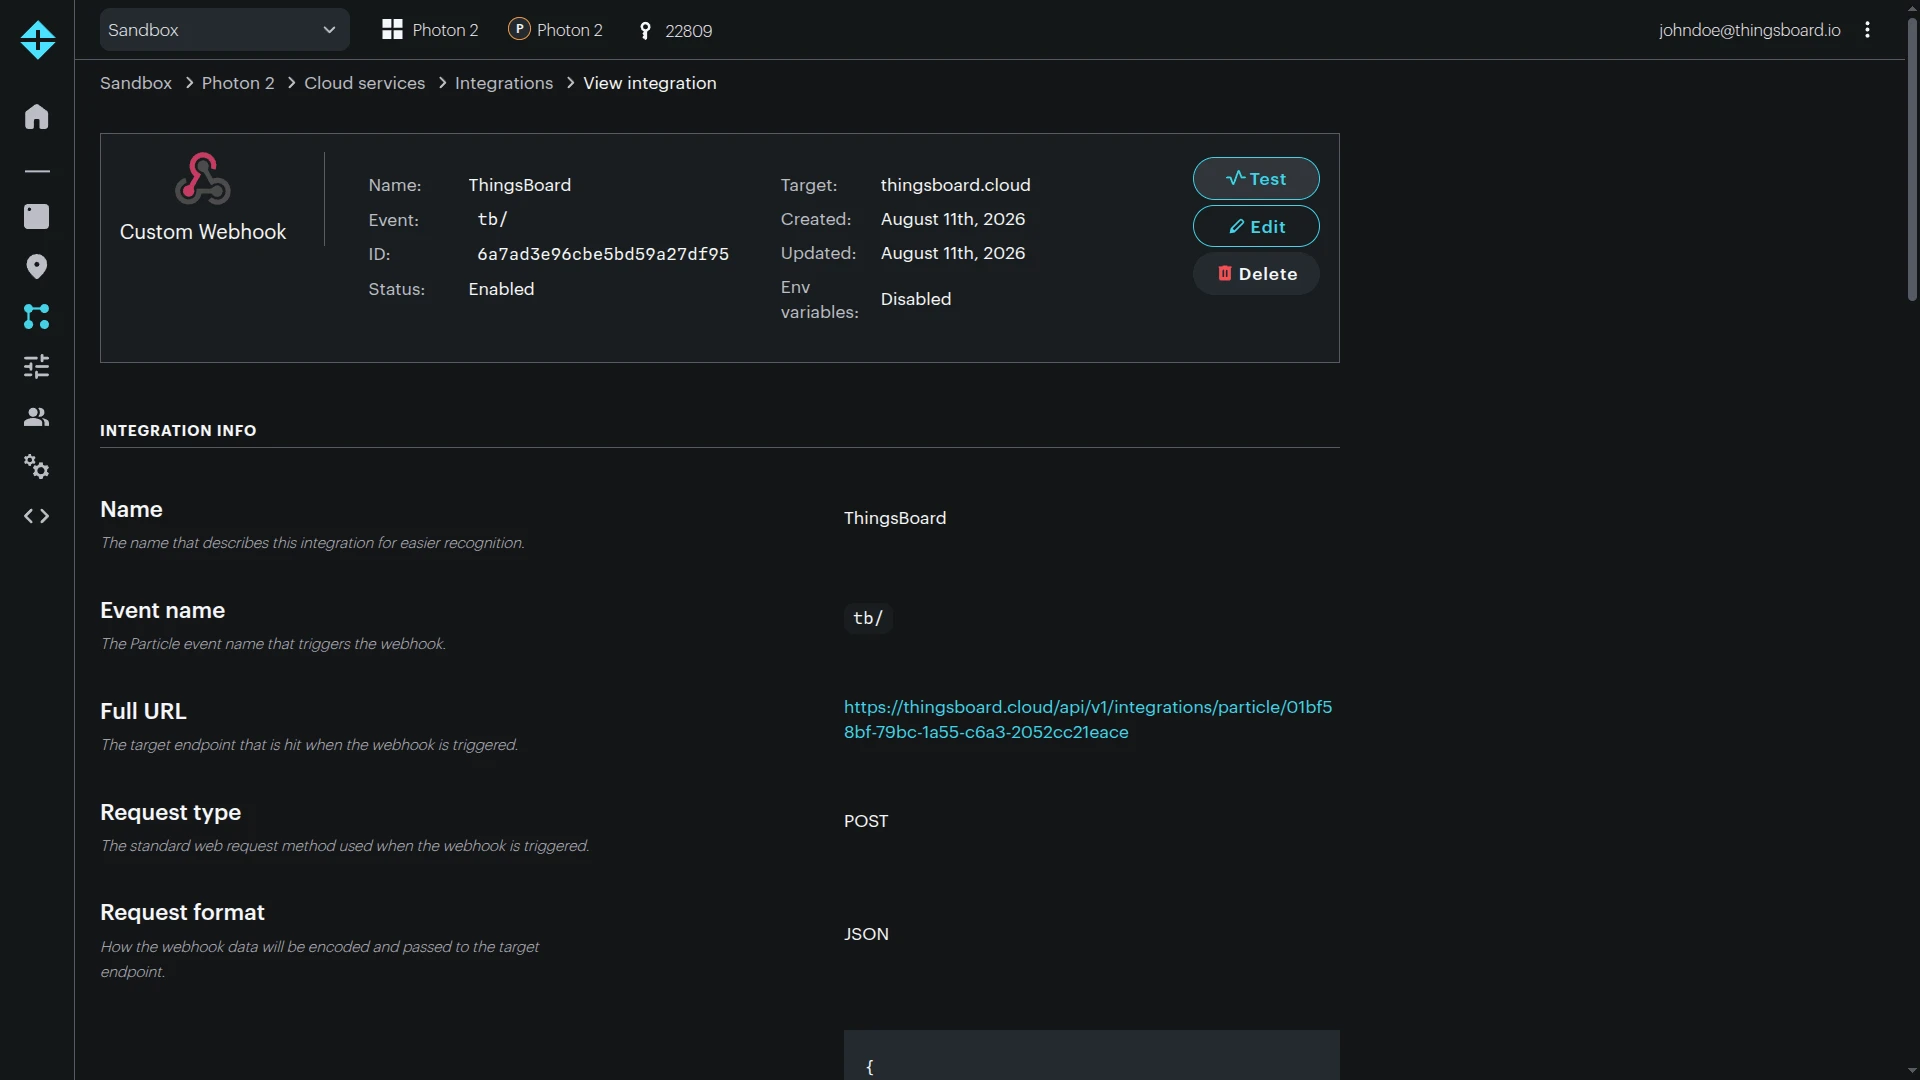
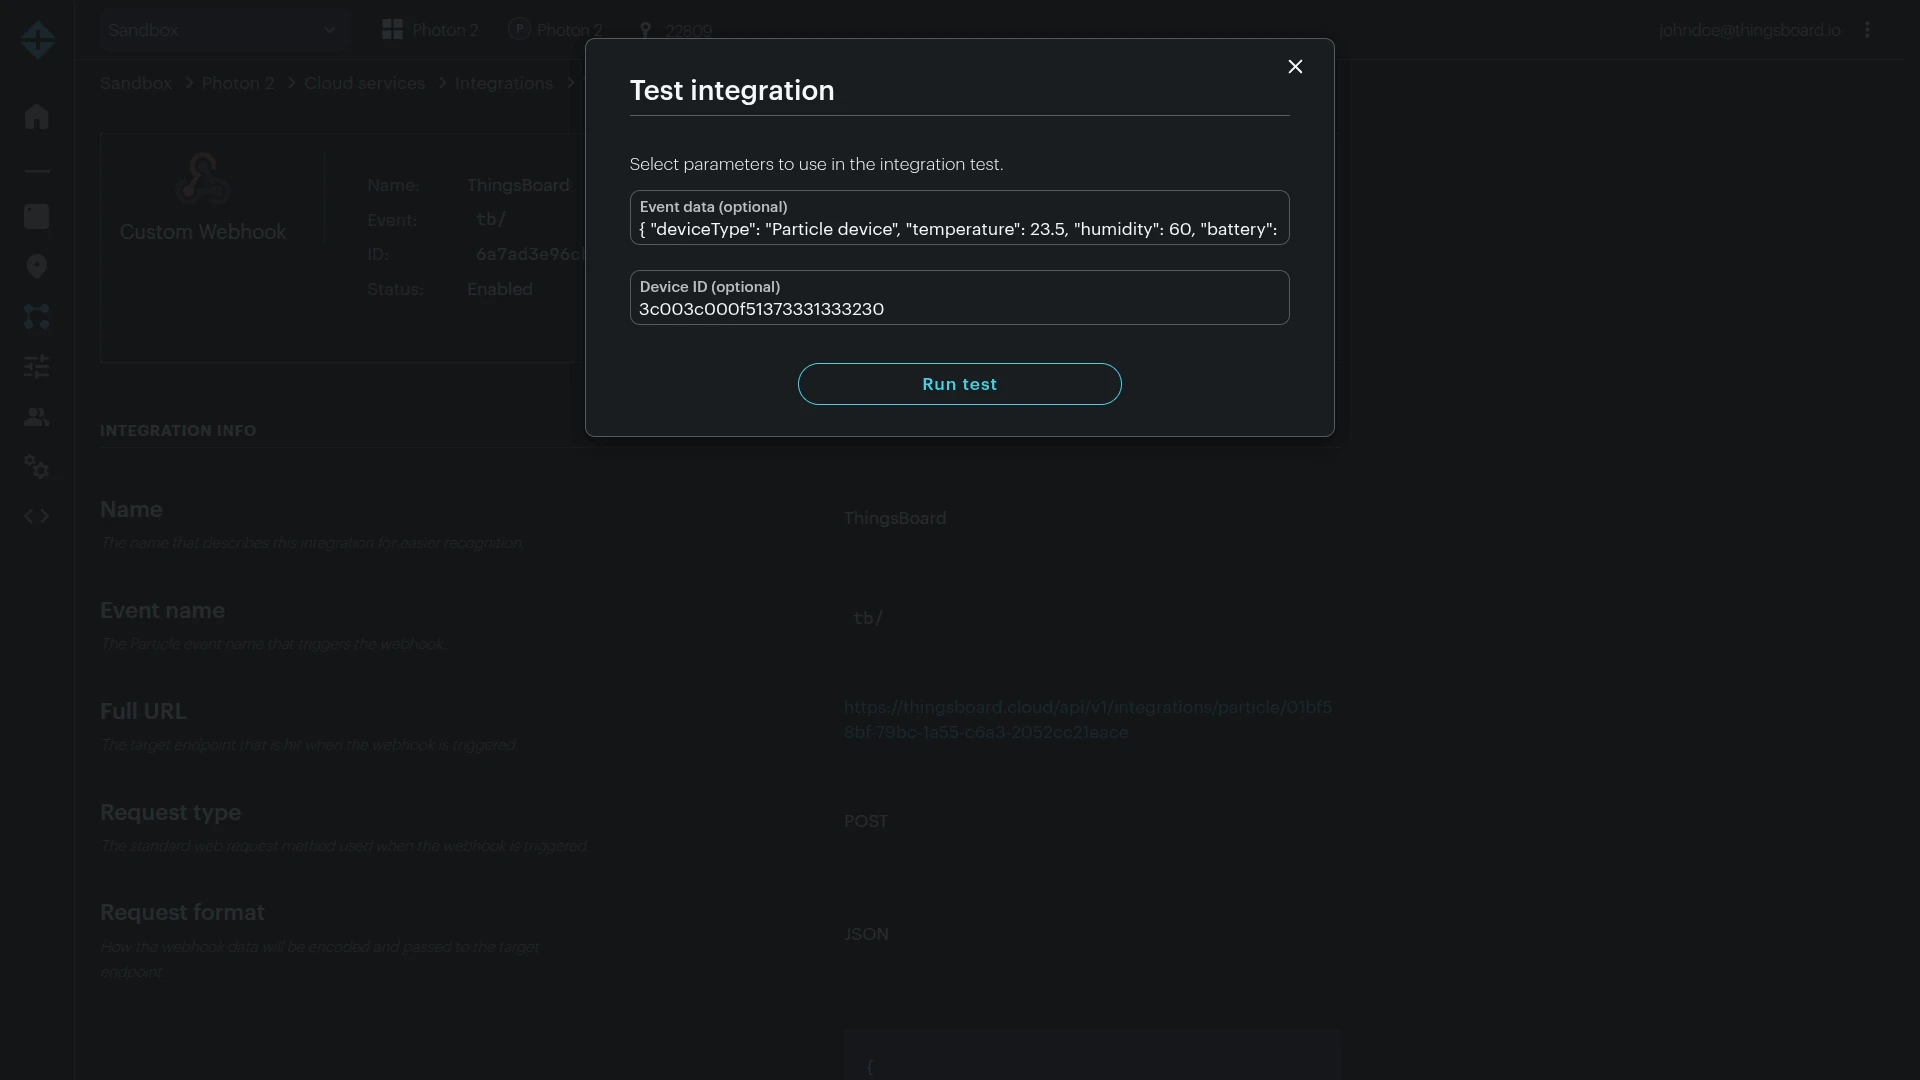
Once Particle Device Cloud sends the event, verify delivery on the ThingsBoard side.
Verify Integration Events
Section titled “Verify Integration Events”Go to Integrations ⇾ Integrations, open the Particle integration, and switch to the Events tab. An Uplink event with Status: OK confirms ThingsBoard received the webhook call; click the row to inspect the raw message.
Verify Converter Events
Section titled “Verify Converter Events”Go to Integrations ⇾ Data converters, open the Particle Uplink Converter, and switch to the Events tab. Click In to see the raw event the converter received, Out to see the decoded device name, attributes, and telemetry it produced, and Metadata to see the HTTP headers of the incoming webhook request.
Verify Device Provisioning
Section titled “Verify Device Provisioning”Once the webhook forwards an event to ThingsBoard, go to Devices & assets ⇾ Devices — the device is automatically provisioned using the Particle coreid as the device name, assigned the device profile matching the decoded deviceType, and placed in the Particle devices group. Open the device and check the Latest telemetry tab to confirm the values arrived, and the Attributes tab to confirm the integrationName and particleDeviceId set by the converter.
Send RPC Commands to a Particle Device
Section titled “Send RPC Commands to a Particle Device”Downlink uses ThingsBoard RPC ⇾ Rule Engine ⇾ Integration Downlink ⇾ Particle Cloud API ⇾ Particle.function().
The following example uses an LED only as an easy way to verify that the command reached a development board. Replace the GPIO and command handler with the actual control logic for your hardware.
Register a Particle Cloud Function
Section titled “Register a Particle Cloud Function”Flash firmware that registers a function in setup():
#include "Particle.h"
SYSTEM_THREAD(ENABLED);
int setOutput(String command);
void setup() {    pinMode(D7, OUTPUT);    digitalWrite(D7, LOW);
    Particle.function("setOutput", setOutput);}
void loop() {}
int setOutput(String command) {    if (command == "on") {        digitalWrite(D7, HIGH);        return 1;    }
    if (command == "off") {        digitalWrite(D7, LOW);        return 0;    }
return -1;}Configure the Root Rule Chain
Section titled “Configure the Root Rule Chain”- Go to Data processing ⇾ Rule chains and open the Root Rule Chain (or the rule chain used by the Particle device profile).
- Search the node panel for
Downlinkand drag the integration downlink node (under Action) onto the canvas. - In the Add rule node: integration downlink dialog, enter a Name such as
To Particle integration. - Set Integration to
Particle integration. - Click Add.
- Connect Message Type Switch to the integration downlink node using the RPC Request to Device relation.
- Click Apply changes.
Send an RPC Command from a Dashboard
Section titled “Send an RPC Command from a Dashboard”Create a control widget that sends on and off to the setOutput Particle cloud function.
- Open a dashboard, click Edit mode, then click + Add widget.
- In the Control widgets bundle, select Switch Control.
- On the Data tab, set Target device to Device and select the provisioned Particle device.
- Open the Appearance tab.
- Set Retrieve value using method to Don’t retrieve.
- Set RPC set value method to
setOutput. - Paste the following into the Convert value function field, then click Add:
return value ? "on" : "off";
- Save the dashboard and exit edit mode, then toggle the control.
The message path is:
RPC method: setOutputRPC params: "on" │ ▼Particle Downlink Converter │ ▼POST /v1/devices/{coreid}/setOutputAuthorization: Bearer <Particle token>arg=on │ ▼Particle.function("setOutput", ...)If the Particle device is online and the token has permission to call its function, the device callback is invoked.
Verify Downlink Delivery
Section titled “Verify Downlink Delivery”Use the following checks to trace the RPC command through the rule chain and downlink converter.
Verify Rule Node Events
- Open the Root Rule Chain, click the Integration Downlink node, and open its Details tab.
- Click the debug icon, enable Failures only (24/7) and All messages (15 min), then click Apply.
- Toggle the switch on the dashboard to send the RPC command.
- Open the node’s Events tab — an
IN/OUTpair with Relation Type: Success confirms the RPC reached the node. - Click Data or Metadata on the event to inspect the
method,params, and targetdeviceName.
Verify Converter Events
Go to Integrations ⇾ Data converters, open the Particle Downlink Converter, and switch to the Events tab. Click In to see the raw RPC message passed into the encoder, and Out to see the JSON payload and target device ID sent to the Particle Cloud API.
Additional checks:
- In Particle Console, open the device and verify that the registered
setOutputfunction is available when the device is online. - If using the LED example, confirm the output state changes.
- If the command fails with an authorization error, verify the token and its
devices.function:callpermission.
Troubleshooting
Section titled “Troubleshooting”| Symptom | Likely cause | Fix |
|---|---|---|
| Particle webhook does not trigger | Webhook event prefix does not match the published event | Confirm the webhook Event name is tb/ and the device publishes an event such as tb/telemetry. Matching is case-sensitive and prefix-based. |
| Device publish fails | Event name uses a reserved prefix | Do not publish events beginning with particle or spark; use a custom prefix such as tb/. |
Webhook shows hook-error |
Wrong/unreachable ThingsBoard endpoint | Copy the HTTP endpoint again from the Particle integration and verify the ThingsBoard instance is publicly reachable over HTTPS. |
| Integration receives a message but no ThingsBoard device is created | coreid is api |
Send the test event from physical device firmware. API/Console-generated events can identify the publisher as api and are ignored by this guide’s converter. |
| Integration receives a message but no ThingsBoard device is created | Automatic creation disabled | Enable Allow create devices or assets in the integration or create the matching ThingsBoard device manually. |
| Converter fails with JSON parse error | Particle event data is plain text or malformed JSON |
Publish valid JSON from firmware or modify the converter to map data.data directly to rawData. |
| Telemetry is stored as one string instead of separate keys | Converter stores Particle data without parsing it |
Parse data.data as JSON and map/flatten the decoded fields to telemetry. |
| Downlink returns unauthorized/forbidden | Missing, expired, revoked, or over-restricted Particle token | Verify the token. For API-user credentials, ensure devices.function:call is granted and the token can access the target device. |
| Downlink cannot find the Particle device | ThingsBoard device name is not the Particle Device ID | Keep the ThingsBoard device name equal to Particle coreid, or customize the downlink path to supply the real Particle Device ID in metadata. |
| Downlink function not found | RPC method does not match firmware function name | Ensure the RPC method exactly matches the key registered by Particle.function(). |
| Downlink reaches Particle but device does not react | Device offline or callback logic rejects the argument | Verify Particle Console reports the device online and check accepted function arguments in firmware. |
| Intermittent duplicate telemetry | Particle event/webhook redelivery | Make ingestion idempotent when duplicates matter; use event identifiers or application-level deduplication where required. |
| Events arrive out of order | Particle event delivery is best effort | Use published_at or an application sequence number to order data when strict ordering is required. |
See Also
Section titled “See Also”- Integrations Overview — ThingsBoard Platform Integrations concepts and data flow.
- Uplink Data Converter — decoder input/output reference and mapping patterns.
- Downlink Data Converter — encoder reference for Integration Downlink messages.
- Integration Downlink Rule Node — route ThingsBoard messages to a configured Platform Integration.
- TBEL — ThingsBoard Expression Language reference.
- Particle Webhooks — Particle Device Cloud webhook concepts.
- Particle Webhook Reference — event filters, default webhook fields, templates, and delivery behavior.
- Particle.publish() — publish events from Device OS firmware.
- Typed and Extended Publish — structured payloads and newer Device OS publish capabilities.
- Particle.function() — expose a device function through Particle Device Cloud.
- Particle Cloud API — device function endpoint and required API scope.
- Particle Access Tokens — user tokens, API users, and token security guidance.
- Particle Hardware Overview — current Particle hardware portfolio and lifecycle information.
Was this helpful?