Azure IoT Hub Integration
Azure IoT Hub is a managed cloud service that acts as a central message hub between IoT applications and the devices they manage. Azure IoT Hub Integration connects ThingsBoard to Azure IoT Hub over MQTT using the identity of a single registered device: it receives the messages addressed to that device, decodes them with an uplink converter, and stores the resulting telemetry and attributes in ThingsBoard.
Architecture
Section titled “Architecture”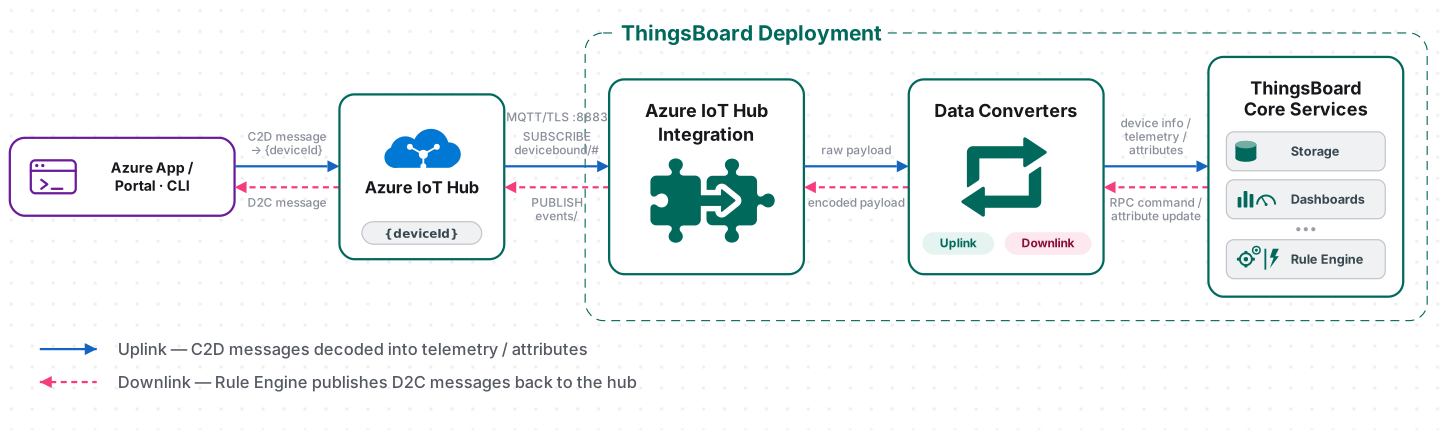
ThingsBoard connects to Azure IoT Hub as an MQTT client, authenticating with the Hostname, Device ID, and credentials of one device identity registered in the hub. It subscribes to the topic filter configured on the integration and receives every message the hub routes to that device; the uplink converter decodes each message into telemetry and attributes, and ThingsBoard provisions the target device automatically on the first message. If a downlink converter is configured, the Rule Engine can also push messages back through that same connection.
Prerequisites
Section titled “Prerequisites”Before creating the integration, ensure:
- You have access to ThingsBoard Cloud with integration functionality enabled for your tenant.
- You have permissions to create integrations and data converters.
- You have a Microsoft account with access to the Azure portal.
- You have an active Azure subscription — every Azure resource lives in a subscription, which links it to a billing account. See Microsoft’s Create a subscription documentation if you need to create one.
- Your account has permissions to create an IoT hub and register devices in that subscription.
- Outbound TCP port 8883 is open from the ThingsBoard server to
*.azure-devices.net.
Configure Azure IoT Hub
Section titled “Configure Azure IoT Hub”Prepare the hub and the device identity in the Azure portal before creating the integration in ThingsBoard.
Create an IoT Hub
Section titled “Create an IoT Hub”See Microsoft’s Create and manage Azure IoT hubs documentation for details.
- Sign in to the Azure portal and click + Create a resource.
- Search for IoT Hub and select it from the results, then click Create.
- On the Basics tab, select or create a Resource group, enter an IoT hub name (e.g.
tb-iot-hub), and choose a Region. - Review the Networking and Management settings according to your environment.
- Click Review + create.
- After validation succeeds, click Create.
- Wait for the deployment to finish, then click Go to resource.
- On the hub’s Overview page, copy the Hostname (e.g.
tb-iot-hub.azure-devices.net) — you will need it when creating the integration.
Microsoft requires an IoT Hub name to be globally unique and recommends selecting the tier according to the required features and message volume.
Register a Device
Section titled “Register a Device”The integration authenticates as a device identity registered in the hub. Register one dedicated to ThingsBoard rather than reusing a physical device’s identity — Azure allows only one active MQTT connection per identity. See Microsoft’s Create and manage device identities documentation for details.
- In your IoT hub, go to Device management ⇾ Devices and click + Add device.
- In Create a device, provide the information for your new device identity:
- Enter a Device ID (e.g.
tb-bridge-01) - Keep Authentication type set to Symmetric key
- For Symmetric key authentication, keep Auto-generate keys checked to have IoT Hub generate keys for your device
- Enter a Device ID (e.g.
- Click Save.
- Open the newly created device and copy its Primary key — this is the SAS key you will enter in ThingsBoard.
Required Connection Details
Section titled “Required Connection Details”Collect the values below before creating the ThingsBoard integration.
| Field | Value for this setup | Description |
|---|---|---|
| Hostname | tb-iot-hub.azure-devices.net — from the hub’s Overview page |
Azure IoT Hub hostname |
| Device ID | tb-bridge-01 |
the device identity registered in the hub |
| Credentials type | Shared Access Signature | authentication type for the MQTT connection |
| SAS Key | the device’s Primary key | copied when registering the device |
| Topic filter | devices/tb-bridge-01/messages/devicebound/# |
MQTT topic ThingsBoard subscribes to for incoming (cloud-to-device) messages |
Set Up the Azure IoT Hub Integration
Section titled “Set Up the Azure IoT Hub Integration”To set up the Azure IoT Hub integration, first create an uplink data converter to process incoming messages, then create and configure the integration.
Create the Uplink Data Converter
Section titled “Create the Uplink Data Converter”The uplink converter decodes incoming Azure IoT Hub messages and maps them to the ThingsBoard data model. Azure IoT Hub uses a generic uplink converter.
The decoder function receives:
payload— the raw message body as a UTF-8 byte arraymetadata—integrationNameand any key-value pairs configured in the integration’s Metadata settings Sample payload:
{ "devName": "T1", "msg": { "temp": 23.5, "humidity": 60 }}- Go to Integrations ⇾ Data converters.
- Click + Add data converter ⇾ Create new converter.
In the Add data converter dialog:
- Converter type — leave Uplink (selected by default).
- Integration type — in the search field, enter
Azure IoT Huband select Azure IoT Hub from the list. - Name — enter a converter name, for example
Azure IoT Hub Uplink Converter. - Main decoding configuration — a code editor with the function signature
function decoder(payload, metadata) {. Paste the decoder function shown below. By default the editor opens in TBEL; use the TBEL / JS toggle (upper right) to switch languages. - Click Add.
The decoder function used in this tutorial:
var data = decodeToJson(payload);var deviceName = data.devName;var deviceType = 'thermostat';
var result = {    deviceName: deviceName,    deviceType: deviceType,    telemetry: {        temperature: data.msg.temp,        humidity: data.msg.humidity    }};
return result;
var data = decodeToJson(payload);var deviceName = data.devName;var deviceType = 'thermostat';
var result = { deviceName: deviceName, deviceType: deviceType, telemetry: { temperature: data.msg.temp, humidity: data.msg.humidity }};
function decodeToString(payload) { return String.fromCharCode.apply(String, payload);}
function decodeToJson(payload) { var str = decodeToString(payload); var data = JSON.parse(str); return data;}
return result;To adapt this converter to your device:
- Different device name / type fields — replace
data.deviceNameanddata.deviceTypewith the field names your device actually sends (e.g.data.id,data.sensorType). - Timestamp — if your payload includes a Unix millisecond timestamp, name the field
ts; for an ISO 8601 string, name ittimestamp. If neither is present, the converter falls back to the server receive time automatically. - Telemetry fields — all JSON fields not listed in
excludeFromTelemetryListare mapped to telemetry automatically viatoFlatMap. Nested objects are flattened into dotted keys (e.g.battery.level), since telemetry and attribute values must be scalars. - Static attributes — add device properties from your payload to the
attributesobject, for examplefirmwareVersion: data.fw. - Assets instead of devices — uncomment
assetName/assetTypeand comment outdeviceName/deviceTypeto provision assets instead of devices. - Customer or group assignment — uncomment
customerNameorgroupNameand set the appropriate values to assign the device to a customer or device group.
Create the Azure IoT Hub Integration
Section titled “Create the Azure IoT Hub Integration”- Go to Integrations ⇾ Integrations and click + Add integration.
- Basic settings:
- Set Integration type to Azure IoT Hub.
- Enable integration and Allow create devices or assets are on by default.
- Click Next.
- Uplink data converter:
- Click Select existing and choose the previously imported
Azure IoT Hub Uplink Converterfrom the list. - Click Next.
- Click Select existing and choose the previously imported
- Downlink data converter:
- Leave empty and click Skip — the downlink converter can be added later if needed.
- Connection settings:
- Hostname — your Azure IoT Hub hostname (e.g.
tb-iot-hub.azure-devices.net). - Device ID — the device ID registered in Azure IoT Hub (e.g.
tb-bridge-01). - Credentials — select Shared Access Signature and enter the device SAS key. See Credentials for X.509 certificate options.
- Topic filter — MQTT topic to subscribe to (e.g.
devices/tb-bridge-01/messages/devicebound/#). See Topic filter for details.
- Hostname — your Azure IoT Hub hostname (e.g.
- Click Add to save the integration.
Credentials
Section titled “Credentials”Two authentication types are supported:
Shared Access Signature:
- SAS Key — the device SAS key from Azure IoT Hub. See symmetric key authentication.
- CA certificate file — Azure IoT Hub uses the Baltimore CyberTrust Root certificate for TLS. Leave this field empty to use the built-in default; upload a custom bundle only if required by your environment.
PEM (X.509):
- CA certificate file — Baltimore CyberTrust Root certificate is used by default.
- Certificate file — your device certificate.
- Private key file — the private key for the certificate.
- Private key password — optional password for the private key.
For X.509 CA-signed authentication, see the Microsoft documentation and the CACertificates instructions.
Connection Settings
Section titled “Connection Settings”Hostname
Your Azure IoT Hub hostname in the format {hub-name}.azure-devices.net. Find it in the Azure portal under IoT Hub ⇾ Overview.
Device ID
The device ID registered in Azure IoT Hub (e.g. tb-bridge-01). ThingsBoard authenticates to Azure IoT Hub as this device over MQTT on port 8883.
Credentials
Authentication type for the MQTT connection:
Shared Access Signature— authenticate using a device SAS key (symmetric key)PEM— authenticate using X.509 certificates
Topic Filter
The MQTT topic ThingsBoard subscribes to for incoming messages. The default format is devices/{deviceId}/messages/devicebound/#, which receives all cloud-to-device messages addressed to the registered device. The # wildcard matches any suffix, including lock tokens appended by Azure.
| Topic | Description |
|---|---|
devices/tb-bridge-01/messages/devicebound/# |
All cloud-to-device messages for device tb-bridge-01 |
See IoT Hub MQTT support for details.
Execute Remotely
When enabled, ThingsBoard generates an Integration key and Integration secret that allow the integration to run as a separate process outside the ThingsBoard cluster — useful when the IoT Hub endpoint is only reachable from a restricted network.
Advanced Settings
| Parameter | Default | Description |
|---|---|---|
| Protocol version | MQTT 3.1.1 |
MQTT protocol version. Azure IoT Hub requires MQTT 3.1.1. |
| Max bytes in message | 32368 |
Maximum message payload size in bytes. Messages exceeding this limit are dropped. |
| Connection timeout (sec) | 10 |
Seconds ThingsBoard waits for a broker response before marking the connection as failed. |
| Description | — | Optional text description for the integration. |
| Metadata | — | Key-value pairs injected into every message as integrationMetadata in the converter script. |
Test Uplink
Section titled “Test Uplink”Send Test Uplink
Section titled “Send Test Uplink”Send a cloud-to-device message to the registered device using the Azure portal or the Azure CLI.
- In your IoT hub, go to Device management ⇾ Devices and open device tb-bridge-01.
- Click Message to Device in the toolbar.
- Paste the JSON payload into the Message Body field.
- Click Send Message — a confirmation appears once the hub accepts it.
{ "devName": "T1", "msg": { "temp": 42, "humidity": 77 }}Requires the azure-iot extension. Replace tb-iot-hub and tb-bridge-01 with your hub name and Device ID if they differ:
az iot device c2d-message send \--hub-name tb-iot-hub \--device-id tb-bridge-01 \--data '{"devName":"T1","msg":{"temp":42,"humidity":77}}'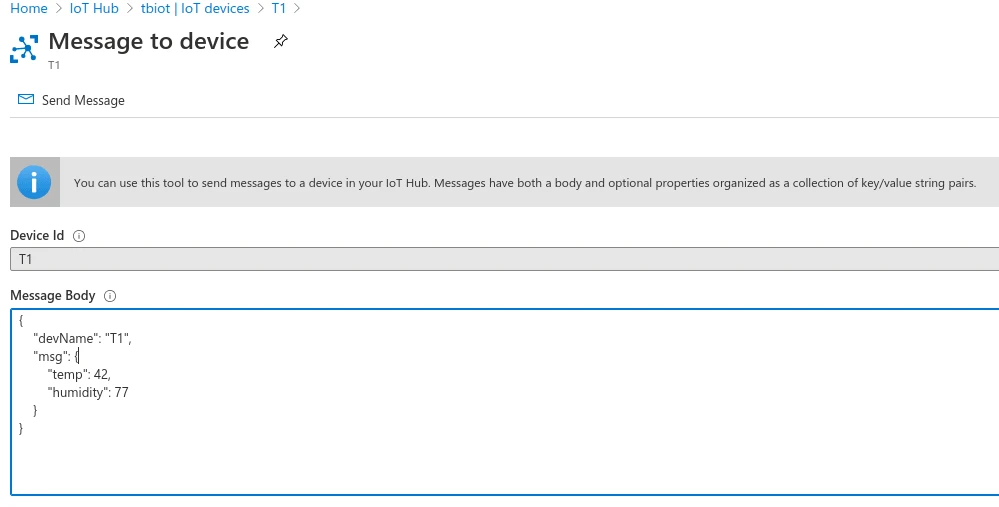
Verify Integration Events
Section titled “Verify Integration Events”Go to Integrations ⇾ Integrations, open the Azure IoT Hub integration, and check the Events tab. One Uplink event appears with status OK. Click … in the Message column to inspect the raw payload received from the hub.
Verify Converter Events
Section titled “Verify Converter Events”Go to Integrations ⇾ Data converters, click the uplink converter, and open its Events tab. Click … in the respective column to inspect each field:
- In — the raw payload passed to the converter.
- Out — the decoded result:
deviceName,deviceType,attributes, andtelemetry(temperature, humidity). - Metadata —
integrationNameand the MQTTtopicthe message arrived on.
Verify Device Provisioning
Section titled “Verify Device Provisioning”Go to Devices & assets ⇾ Devices. The device T1 is automatically provisioned on the first message. Open it and check the Latest telemetry tab — you should see temperature = 42 and humidity = 77.
Configure Downlink
Section titled “Configure Downlink”A downlink sends a Rule Engine message — an RPC command, a shared attribute update, or any other message you route to the integration — from ThingsBoard to Azure IoT Hub. The integration publishes it as a device-to-cloud message from the configured Device ID, where it lands on the hub’s built-in Events endpoint for an Azure-side consumer to read.
Create the Downlink Converter
Section titled “Create the Downlink Converter”The downlink converter encodes a Rule Engine message into the payload published to the hub. Azure IoT Hub uses a generic downlink converter.
The encoder function receives:
msg— the JSON message payload from the Rule EnginemsgType— the Rule Engine message type, e.g.RPC_CALL_FROM_SERVER_TO_DEVICEorATTRIBUTES_UPDATEDmetadata— key-value pairs with additional message data, includingdeviceNameintegrationMetadata— key-value pairs from the integration’s Metadata settings
- Go to Integrations ⇾ Data converters.
- Click + Add data converter ⇾ Create new converter.
- Converter type — switch the toggle to Downlink.
- Integration type — enter
Azure IoT Hubin the search field and select it from the list. - Name — enter a converter name, for example
Azure IoT Hub Downlink Converter. - Main encoding configuration — paste the encoder function shown below.
- Click Add.
// Encode downlink data from an incoming Rule Engine message// msg - JSON message payload// msgType - message type, e.g. 'ATTRIBUTES_UPDATED', 'RPC_CALL_FROM_SERVER_TO_DEVICE'// metadata - key/value pairs with additional message data// integrationMetadata - key/value pairs defined in the integration's metadata settings/** Encoder **/
var data = {deviceName: metadata.deviceName,ts: Date.now()};
if (msgType == 'RPC_CALL_FROM_SERVER_TO_DEVICE') {data.method = msg.method;data.params = msg.params;data.requestId = metadata.requestId;} else if (msgType == 'ATTRIBUTES_UPDATED' || msgType == 'POST_ATTRIBUTES_REQUEST') {data.method = 'setSharedAttributes';data.params = msg;} else {data.method = 'data';data.params = msg;}
// Result object with encoded downlink payloadvar result = {// downlink data content type: JSON, TEXT or BINARY (base64 format)contentType: 'JSON',// downlink datadata: JSON.stringify(data),// Optional metadata object presented in key/value formatmetadata: {}};
return result;// Encode downlink data from an incoming Rule Engine message// msg - JSON message payload// msgType - message type, e.g. 'ATTRIBUTES_UPDATED', 'RPC_CALL_FROM_SERVER_TO_DEVICE'// metadata - key/value pairs with additional message data// integrationMetadata - key/value pairs defined in the integration's metadata settings/** Encoder **/
var data = {deviceName: metadata.deviceName,ts: Date.now()};
if (msgType === 'RPC_CALL_FROM_SERVER_TO_DEVICE') {data.method = msg.method;data.params = msg.params;data.requestId = metadata.requestId;} else if (msgType === 'ATTRIBUTES_UPDATED' || msgType === 'POST_ATTRIBUTES_REQUEST') {data.method = 'setSharedAttributes';data.params = msg;} else {data.method = 'data';data.params = msg;}
// Result object with encoded downlink payloadvar result = {// downlink data content type: JSON, TEXT or BINARY (base64 format)contentType: 'JSON',// downlink datadata: JSON.stringify(data),// Optional metadata object presented in key/value formatmetadata: {}};
return result;Validate the encoder — click Test encoder function below the script, set Message type to ATTRIBUTES_UPDATED, set Message to {"powerState":"on"}, add deviceName = T1 under Metadata, and click Test. The Output tab shows:
{ "contentType": "JSON", "data": "{\"deviceName\":\"T1\",\"ts\":1755422164000,\"method\":\"setSharedAttributes\",\"params\":{\"powerState\":\"on\"}}", "metadata": {}}To adapt this converter to your consumer:
- Different envelope — replace the
dataobject with whatever structure the Azure-side consumer expects; onlycontentTypeanddataare required in the result. - Pass the payload through unchanged — return
data: JSON.stringify(msg)and drop the branching. - Non-JSON payload — set
contentTypetoTEXTfor a plain string, orBINARYwith a Base64-encoded string for raw bytes. - Extra message types — add branches for other Rule Engine message types you route to the integration.
Assign the Downlink Converter
Section titled “Assign the Downlink Converter”- Go to Integrations ⇾ Integrations and open the Azure IoT Hub integration.
- Click the pencil icon to enter edit mode.
- In the Downlink data converter field, select
Azure IoT Hub Downlink Converter. - Click Apply changes.
Configure the Root Rule Chain
Section titled “Configure the Root Rule Chain”The integration does not send anything on its own — a rule chain must forward messages to it.
- Go to Data processing ⇾ Rule chains and open the Root Rule Chain.
- In the node palette on the left, search for integration downlink (under Action) and drag it onto the canvas.
- In the Add rule node dialog, enter a Name (e.g.
Azure IoT Hub Downlink), select your Azure IoT Hub integration, and click Add. - Connect the node’s input to the Message Type Switch node’s Attributes Updated relation (or another relation for whatever message type should trigger a downlink).
- Click Apply changes.
Trigger a Downlink
Section titled “Trigger a Downlink”Device-to-cloud messages are not retained by the hub and cannot be viewed retroactively in the Azure portal — start monitoring the built-in endpoint before triggering the downlink.
- In a terminal, start the event monitor:
Terminal window az iot hub monitor-events --hub-name tb-iot-hub --device-id tb-bridge-01 - In ThingsBoard, go to Devices & assets ⇾ Devices and open
T1. - Open the Attributes tab, set the scope to Shared attributes, and click +.
- Enter key
powerState, keep type String, enter valueon, and click Add.
Adding the attribute generates an Attributes Updated message that reaches the integration downlink node. The encoded payload appears in the CLI output within a second or two:
{ "event": { "origin": "tb-bridge-01", "module": "", "interface": "", "component": "", "payload": "{\"deviceName\":\"T1\",\"ts\":1755422164000,\"method\":\"setSharedAttributes\",\"params\":{\"powerState\":\"on\"}}" }}Verify Downlink Delivery
Section titled “Verify Downlink Delivery”Check Downlink Converter Events
Go to Integrations ⇾ Data converters, open the downlink converter, and check its Events tab. Click … in the respective column to inspect each field:
- In — the Rule Engine message passed to the encoder.
- Out — the encoded result:
contentType,data, andmetadata.
Troubleshooting
Section titled “Troubleshooting”| Symptom | Likely cause | Fix |
|---|---|---|
| Integration status is not Active | Wrong Hostname | Confirm it matches the hub’s Hostname exactly, in the form {hub-name}.azure-devices.net. |
| Integration status is not Active | Wrong Device ID or SAS Key | Verify both against the device’s details page in the Azure portal; regenerate the key if unsure. |
| Integration status is not Active | Port 8883 blocked | Open outbound TCP 8883 to *.azure-devices.net, or run the integration remotely — see Remote Integration. |
| Integration connects, then drops repeatedly | Another client uses the same Device ID | Azure allows one MQTT connection per device identity. Register a dedicated identity for the integration. |
| Messages sent from Azure never arrive | Topic filter does not match | Azure appends a property bag to the topic — the filter must end with #, e.g. devices/tb-bridge-01/messages/devicebound/#. |
| Messages sent from Azure never arrive | Devices publish device-to-cloud telemetry | This integration receives cloud-to-device messages only. Use the Azure Event Hub Integration to read device telemetry. |
| Messages received but not decoded | Converter does not match the payload | Inspect Converter Events → In and adjust the decoder to the actual message format. |
| Large messages dropped | Max bytes in message limit | Raise the limit in Advanced settings, keeping the hub’s own 256 KB message ceiling in mind. |
| Device not created | Allow create devices or assets disabled | Open the integration, click the edit icon, and enable Allow create devices or assets. |
| Downlink produces no event | Rule chain never reaches the node | Check the relation feeding the integration downlink node and enable rule chain debug mode to trace the message. |
| Downlink encoded but nothing in Azure | Monitor started too late | Device-to-cloud messages are not retained — start az iot hub monitor-events before triggering the downlink. |
See Also
Section titled “See Also”- Integrations Overview — how ThingsBoard connects to external platforms and how uplink/downlink flow works
- Azure Event Hub Integration — ingest device-to-cloud telemetry from the hub’s built-in endpoint
- Uplink Data Converter — full decoder function reference: input parameters, output fields, and scripting patterns
- Downlink Data Converter — full encoder function reference
- Integration Downlink Rule Node — forward Rule Engine messages to an integration
- Remote Integration — run the integration outside the ThingsBoard server to reach a hub on a restricted network
- TBEL scripting reference — built-in functions and operators for writing converter scripts
- Rule Engine — how rule chains route messages to nodes like the Integration Downlink node
Was this helpful?