AWS IoT Integration
AWS IoT Integration connects ThingsBoard to AWS IoT Core, the managed MQTT broker of AWS. ThingsBoard connects as an MQTT client over mutual TLS and subscribes to the topics you configure. An uplink data converter transforms each message into device or asset data, including telemetry and attributes. ThingsBoard can also publish downlink messages to AWS IoT Core for devices to consume.
Use AWS IoT Integration when:
- Devices already publish to AWS IoT Core and you want their data in ThingsBoard without changing the firmware.
- One subscription must serve many devices: the converter resolves each device from the topic or the payload.
- You need to send commands to devices through AWS IoT Core.
Architecture
Section titled “Architecture”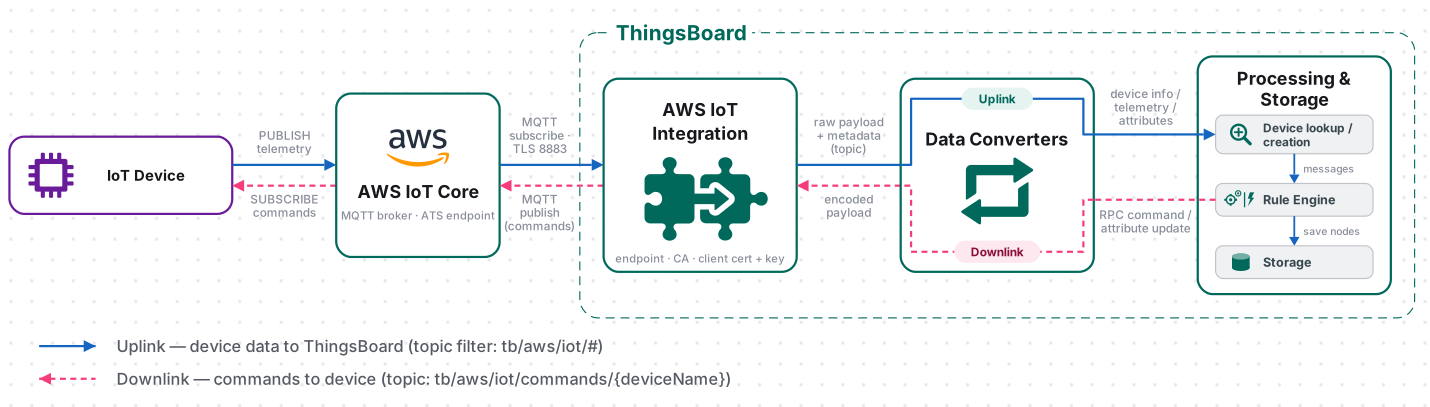
- Receive data. A device publishes a message to AWS IoT Core. The integration is subscribed to that topic and receives the message.
- Decode the payload. The uplink converter uses the payload and topic to identify the device or asset and extract attributes and telemetry.
- Process the message. ThingsBoard processes the converted data through the Rule Engine. If Allow create devices or assets is enabled, ThingsBoard creates an entity that does not exist yet.
- Send downlink data (optional). The Rule Engine passes a message to the integration. The downlink converter encodes it, and the integration publishes it to AWS IoT Core on the downlink topic.
Prerequisites
Section titled “Prerequisites”- Access to ThingsBoard Cloud with integrations enabled for your tenant.
- Permission to create integrations and data converters.
- An AWS account with permission to create AWS IoT policies, things, and certificates.
- Outbound TCP port
8883open from the ThingsBoard server (or the remote integration host) to AWS IoT Core.
Configure AWS IoT
Section titled “Configure AWS IoT”In the AWS IoT console, create a policy, a thing with a certificate, and copy the device data endpoint. ThingsBoard authenticates with the certificate and its private key, and verifies AWS IoT Core with the Amazon Root CA certificate.
Create a Policy
Section titled “Create a Policy”A policy lists the AWS IoT actions (Connect, Publish, Subscribe, Receive) that the certificate may perform. See AWS IoT Core policies.
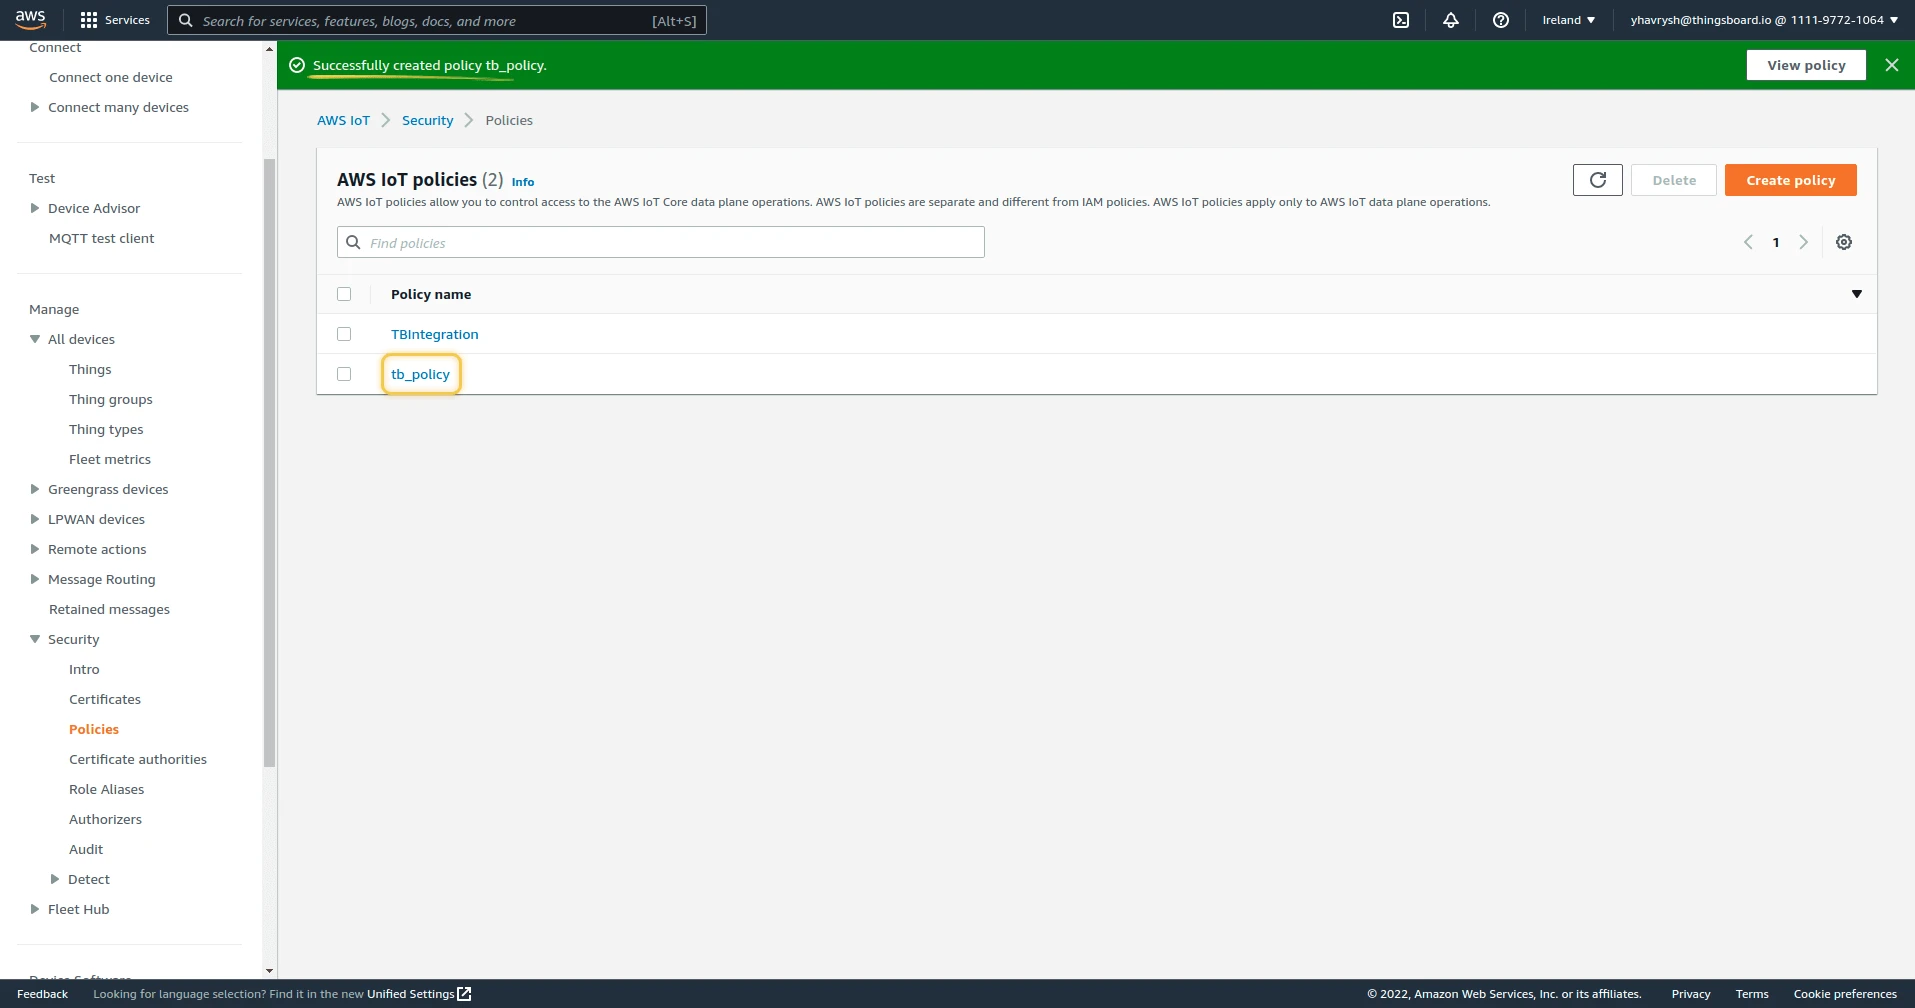
- Go to Security ⇾ Policies and click Create policy.
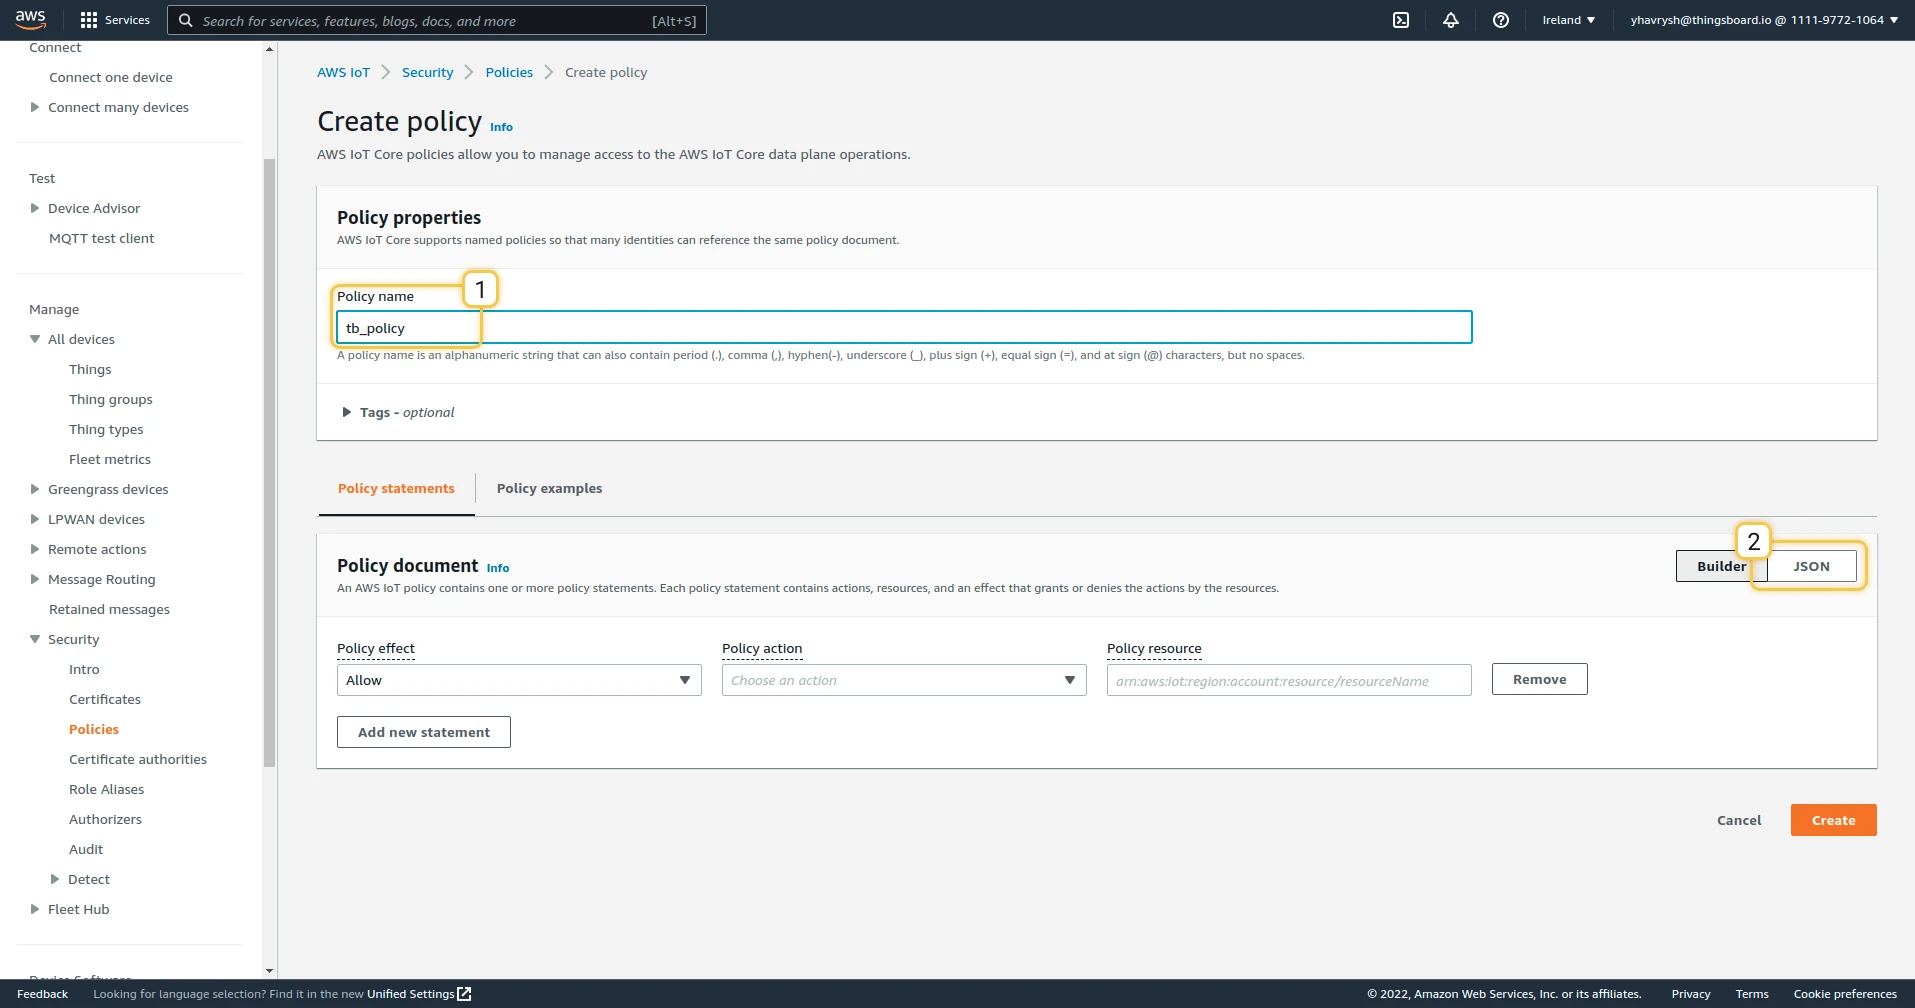
- Enter a Policy name, for example
tb_policy, and click JSON to open the JSON editor. - Paste the policy below. Replace
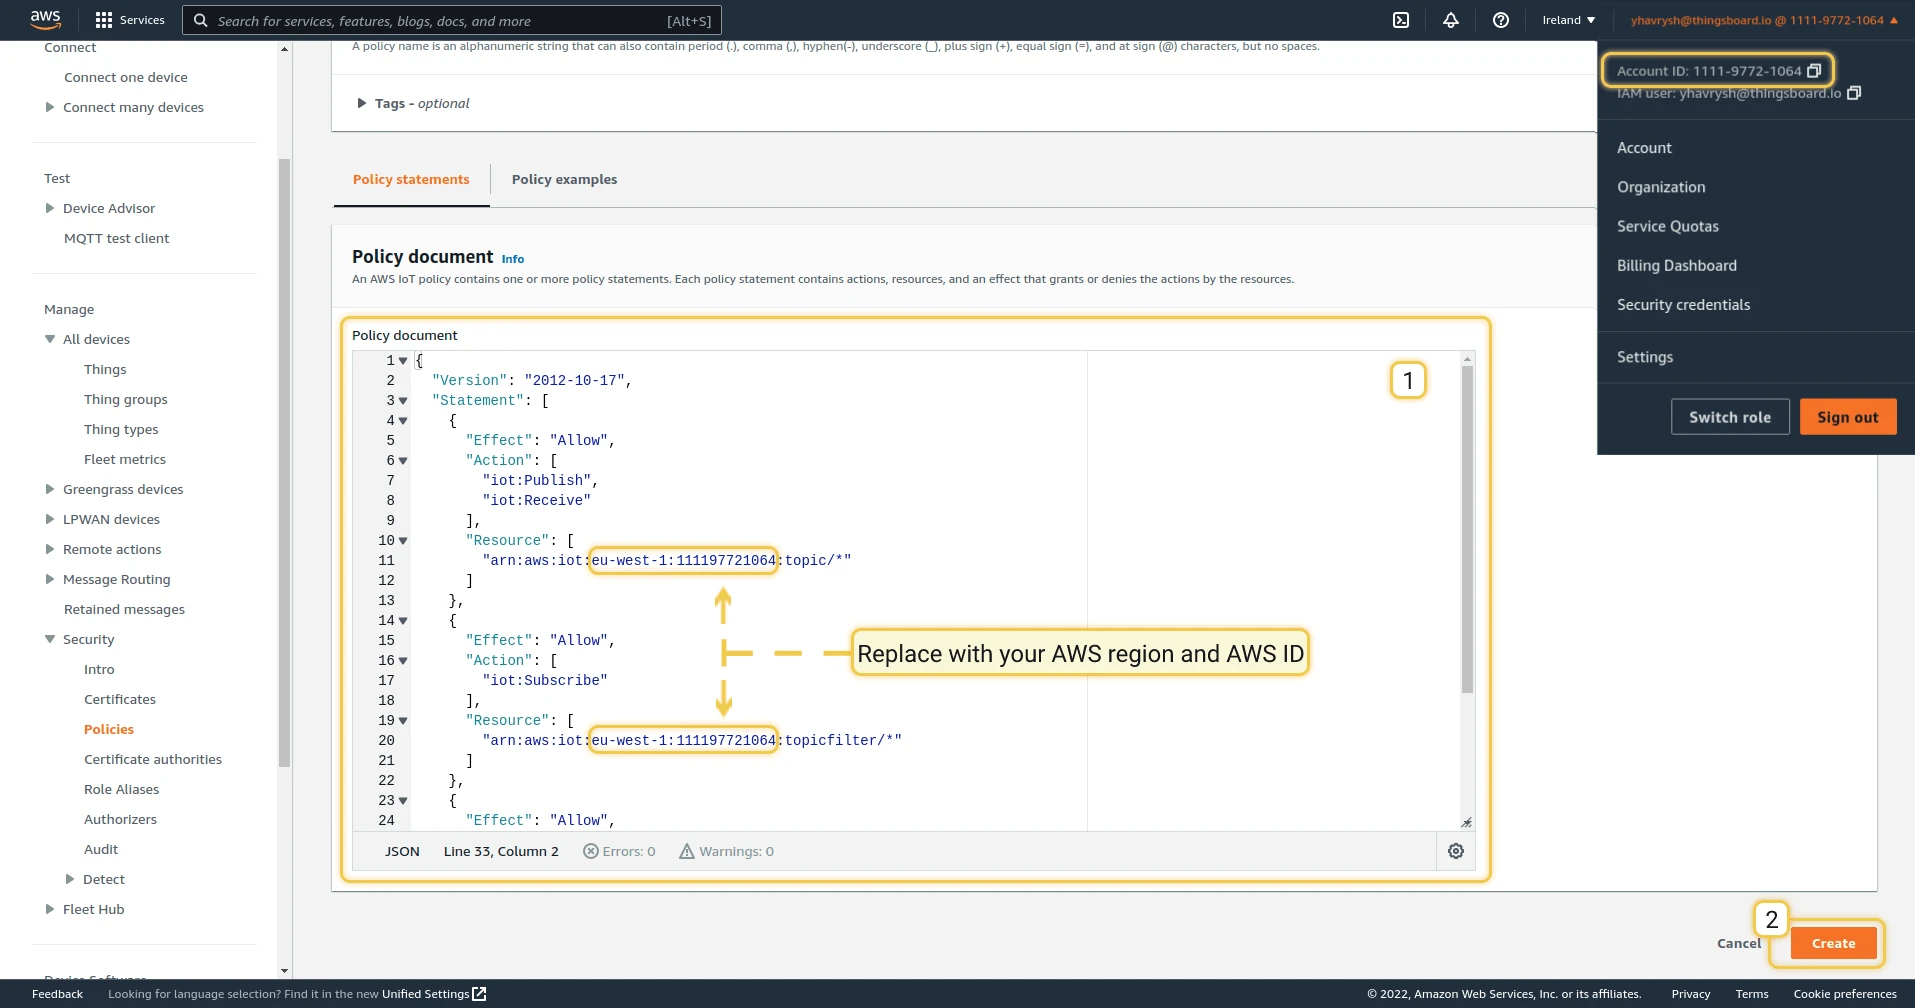
YOUR_REGIONandYOUR_AWS_IDwith your AWS Region and account ID, for exampleeu-west-1and111197721064. The Region also appears in the console URL:https://eu-west-1.console.aws.amazon.com. - Click Create.
{ "Version": "2012-10-17", "Statement": [ { "Effect": "Allow", "Action": ["iot:Publish", "iot:Receive"], "Resource": ["arn:aws:iot:YOUR_REGION:YOUR_AWS_ID:topic/*"] }, { "Effect": "Allow", "Action": ["iot:Subscribe"], "Resource": ["arn:aws:iot:YOUR_REGION:YOUR_AWS_ID:topicfilter/*"] }, { "Effect": "Allow", "Action": ["iot:Connect"], "Resource": ["arn:aws:iot:YOUR_REGION:YOUR_AWS_ID:client/*"] } ]}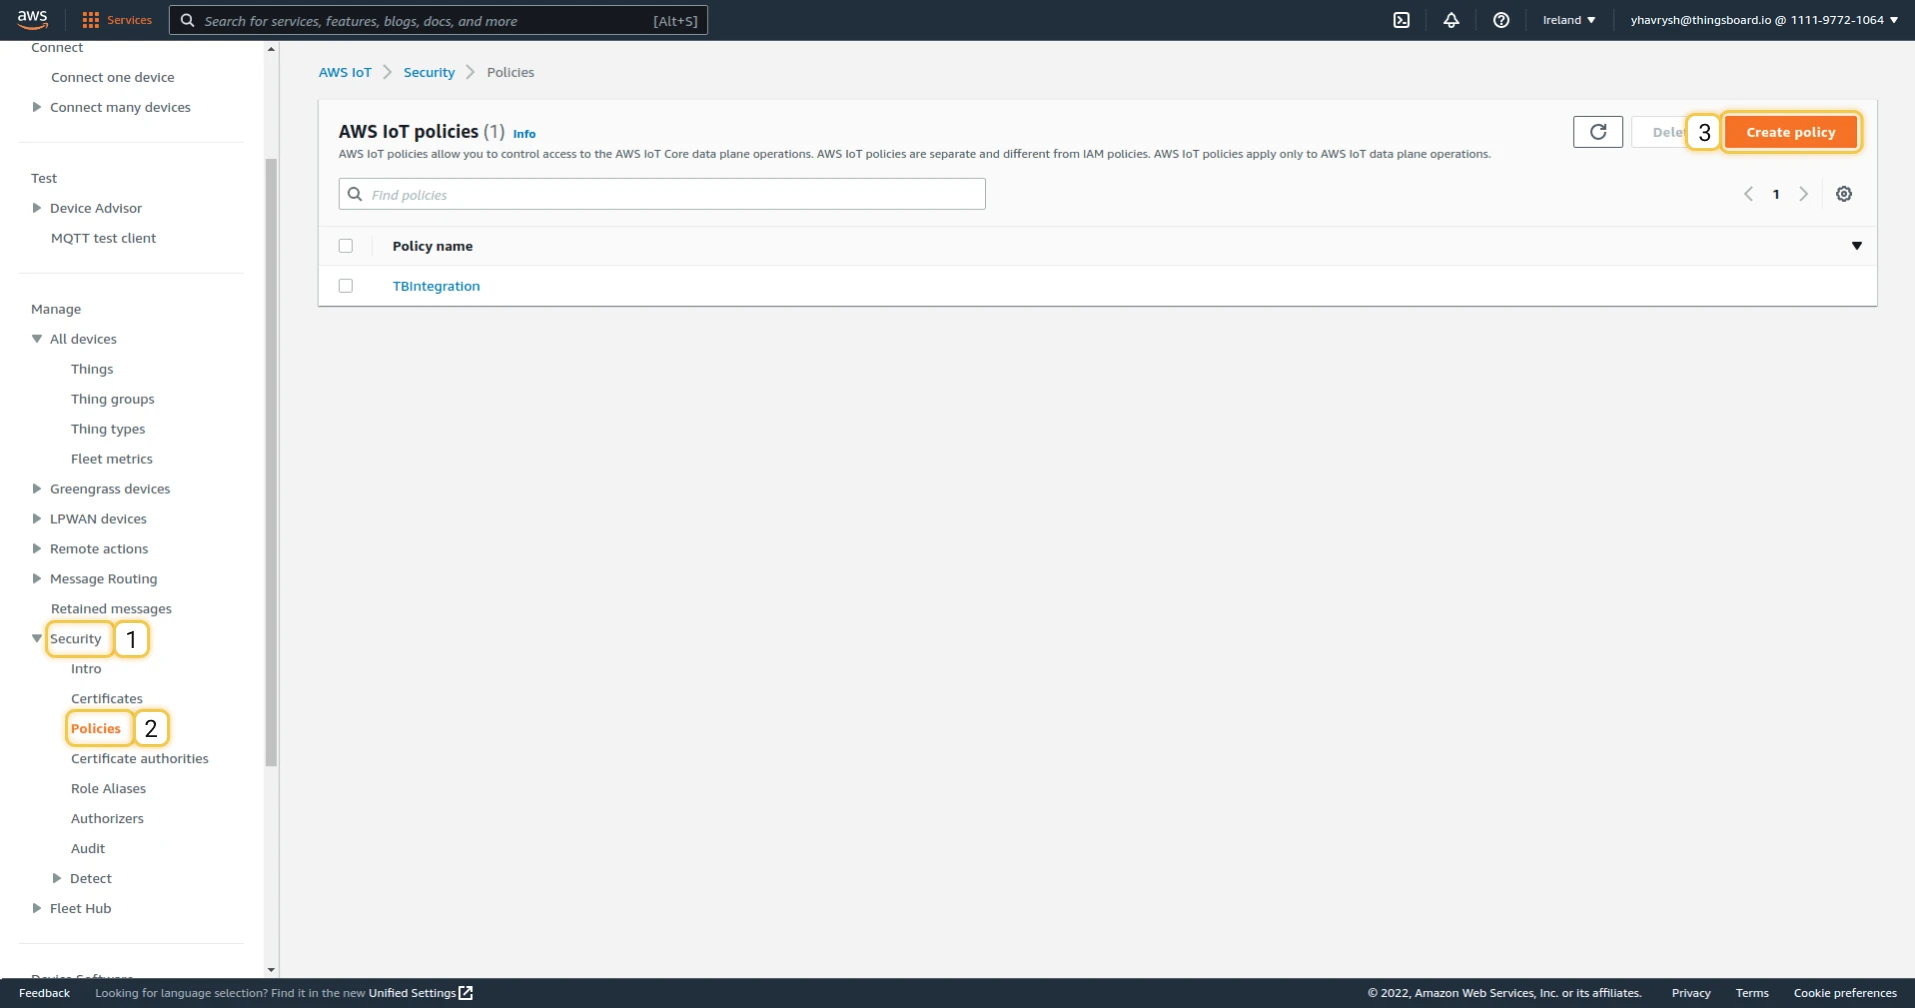
Create a Thing and Certificates
Section titled “Create a Thing and Certificates”A thing represents a device in AWS IoT. ThingsBoard connects with the certificate attached to it. See Create AWS IoT resources.
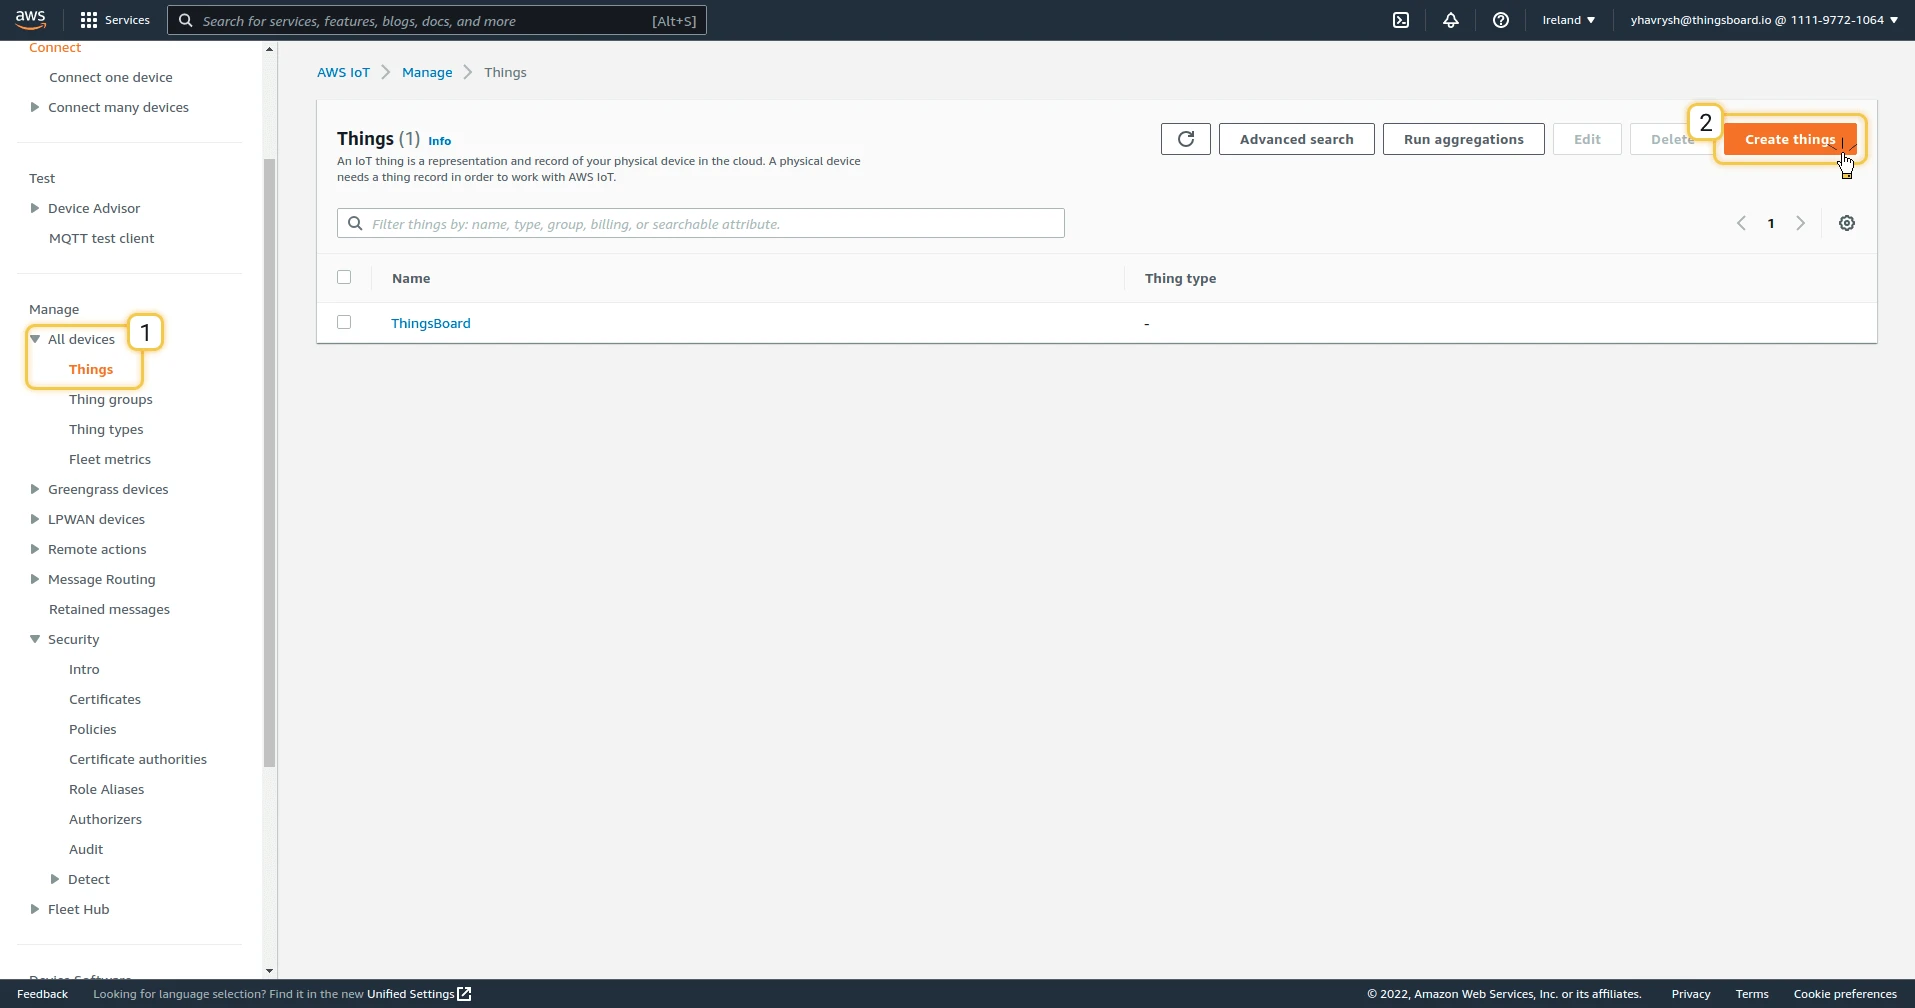
- Go to All devices ⇾ Things and click Create things.
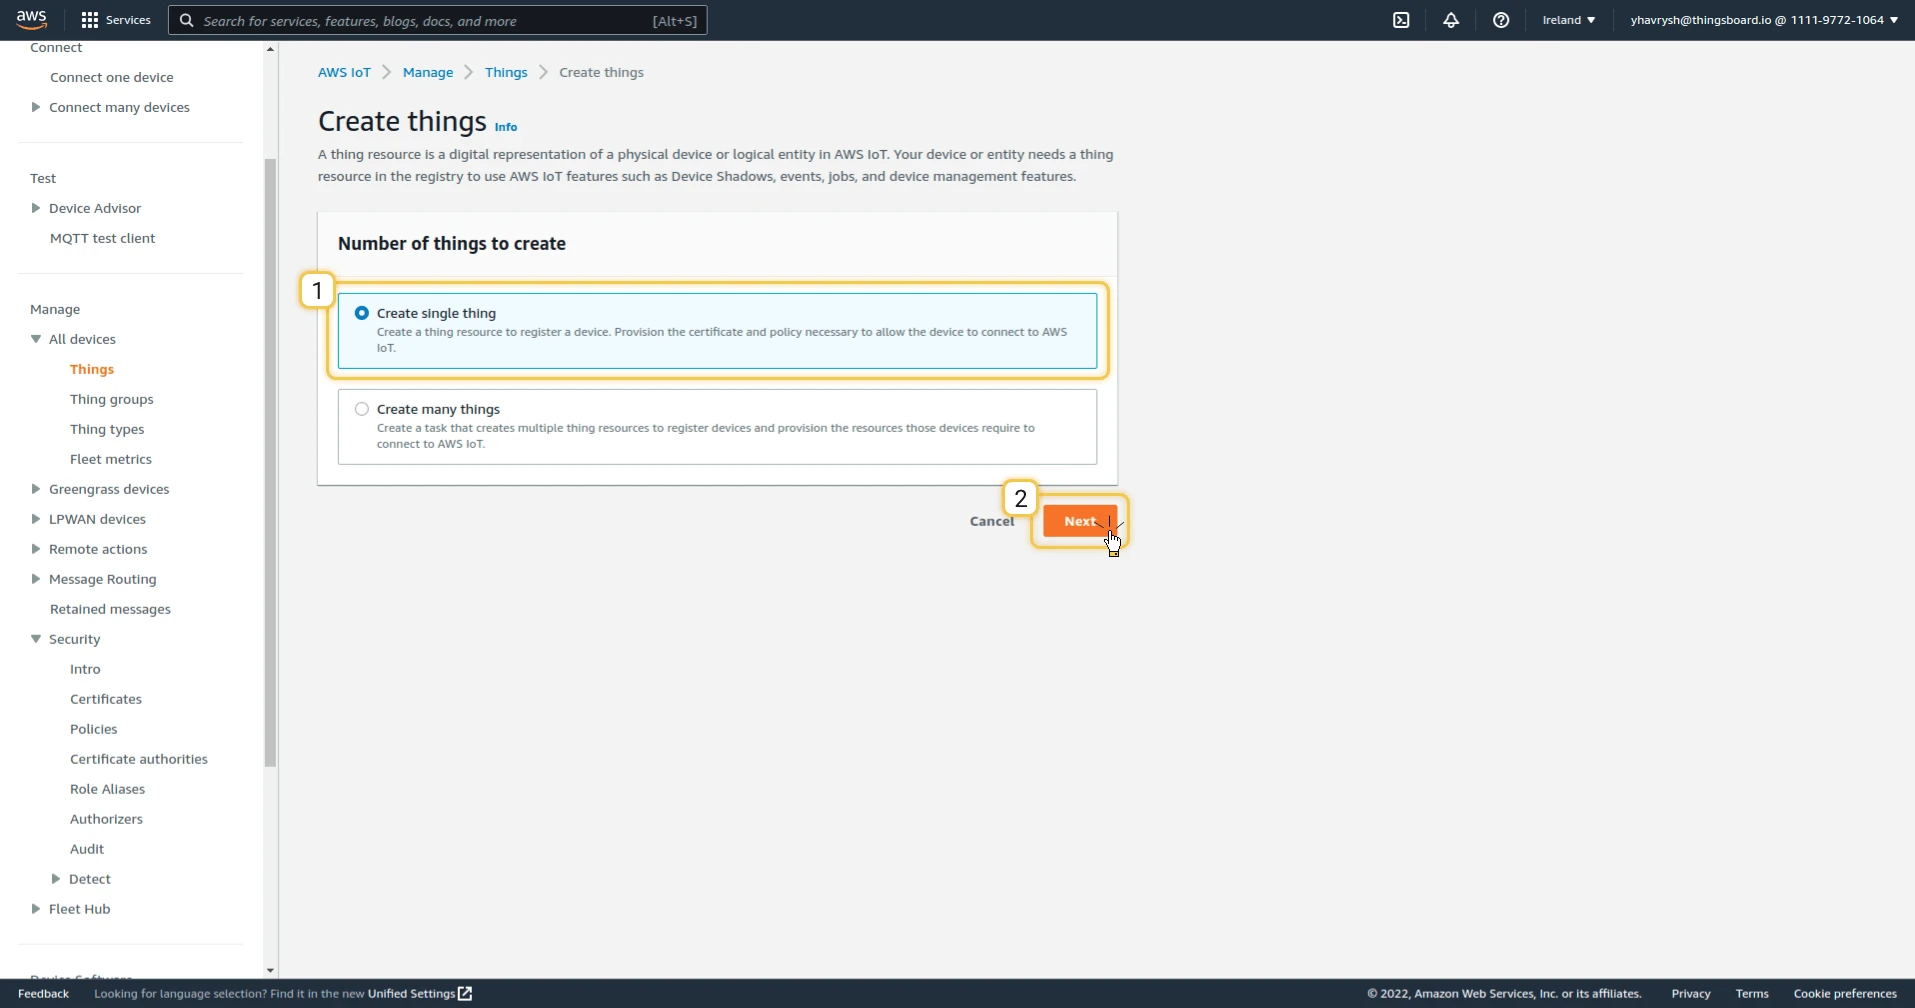
- Select Create single thing and click Next.
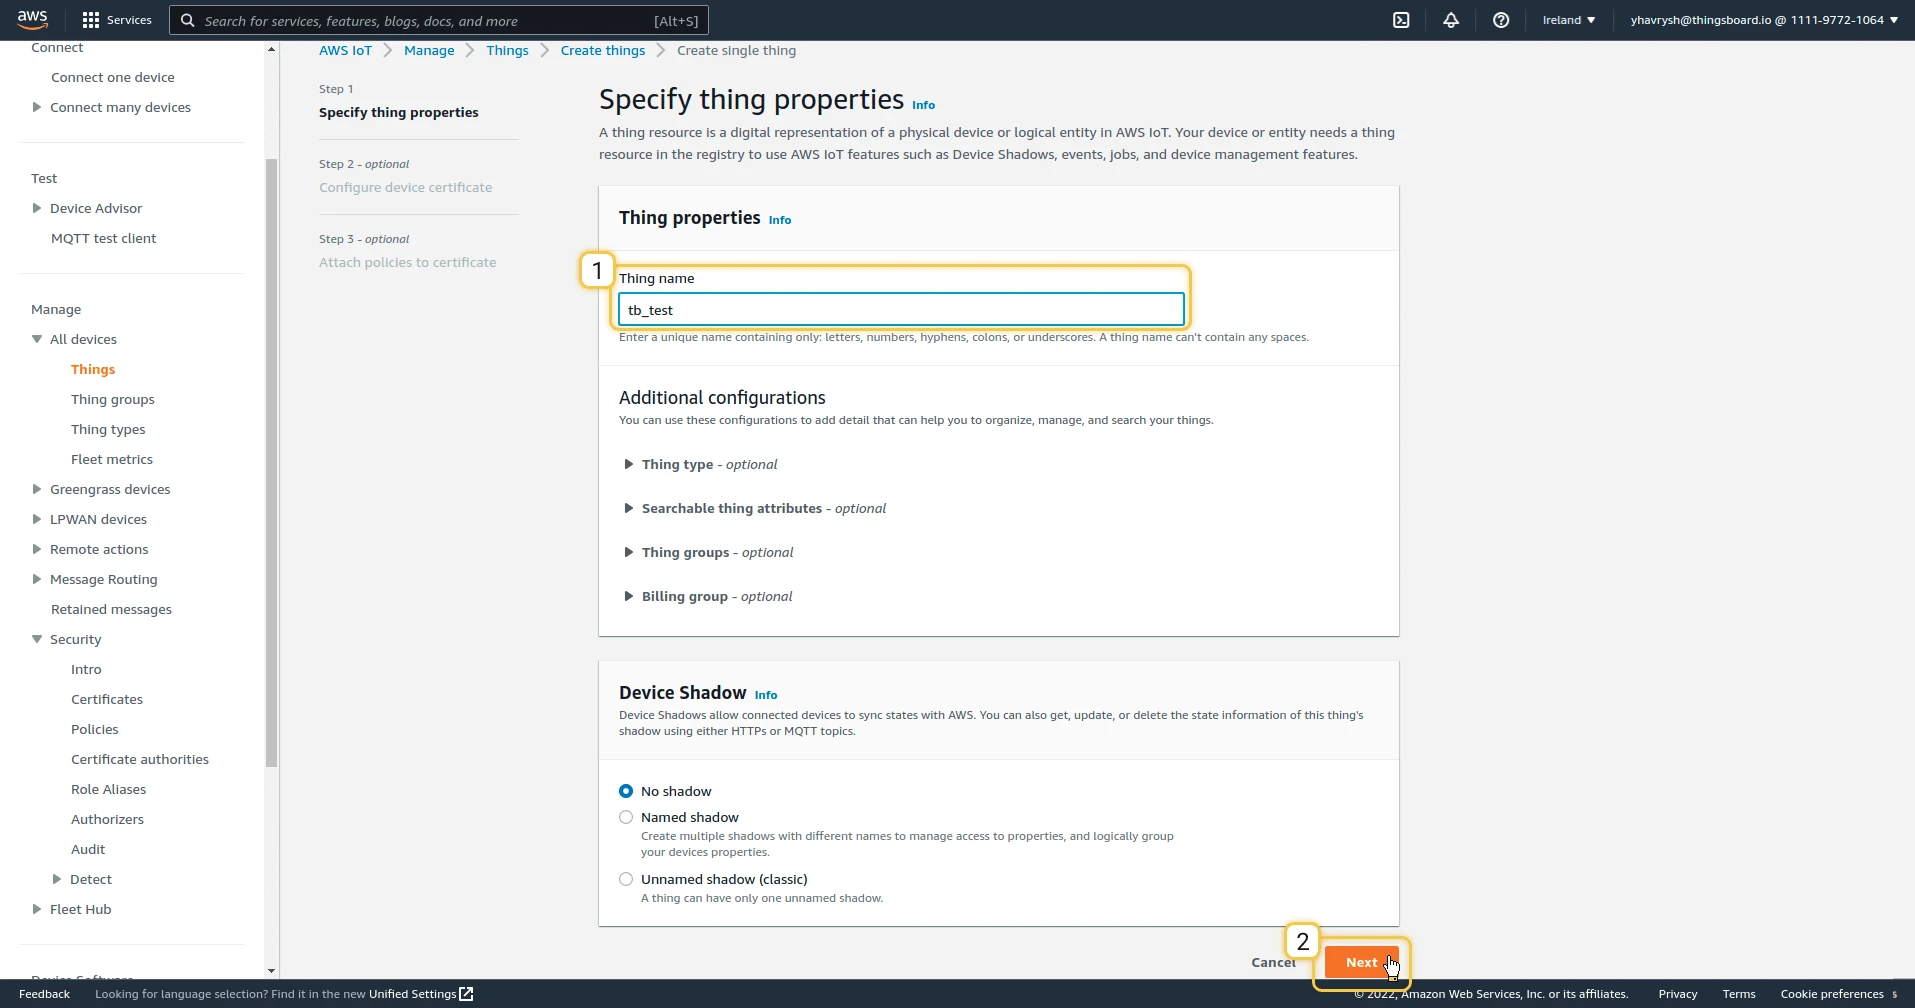
- Enter a Thing name, for example
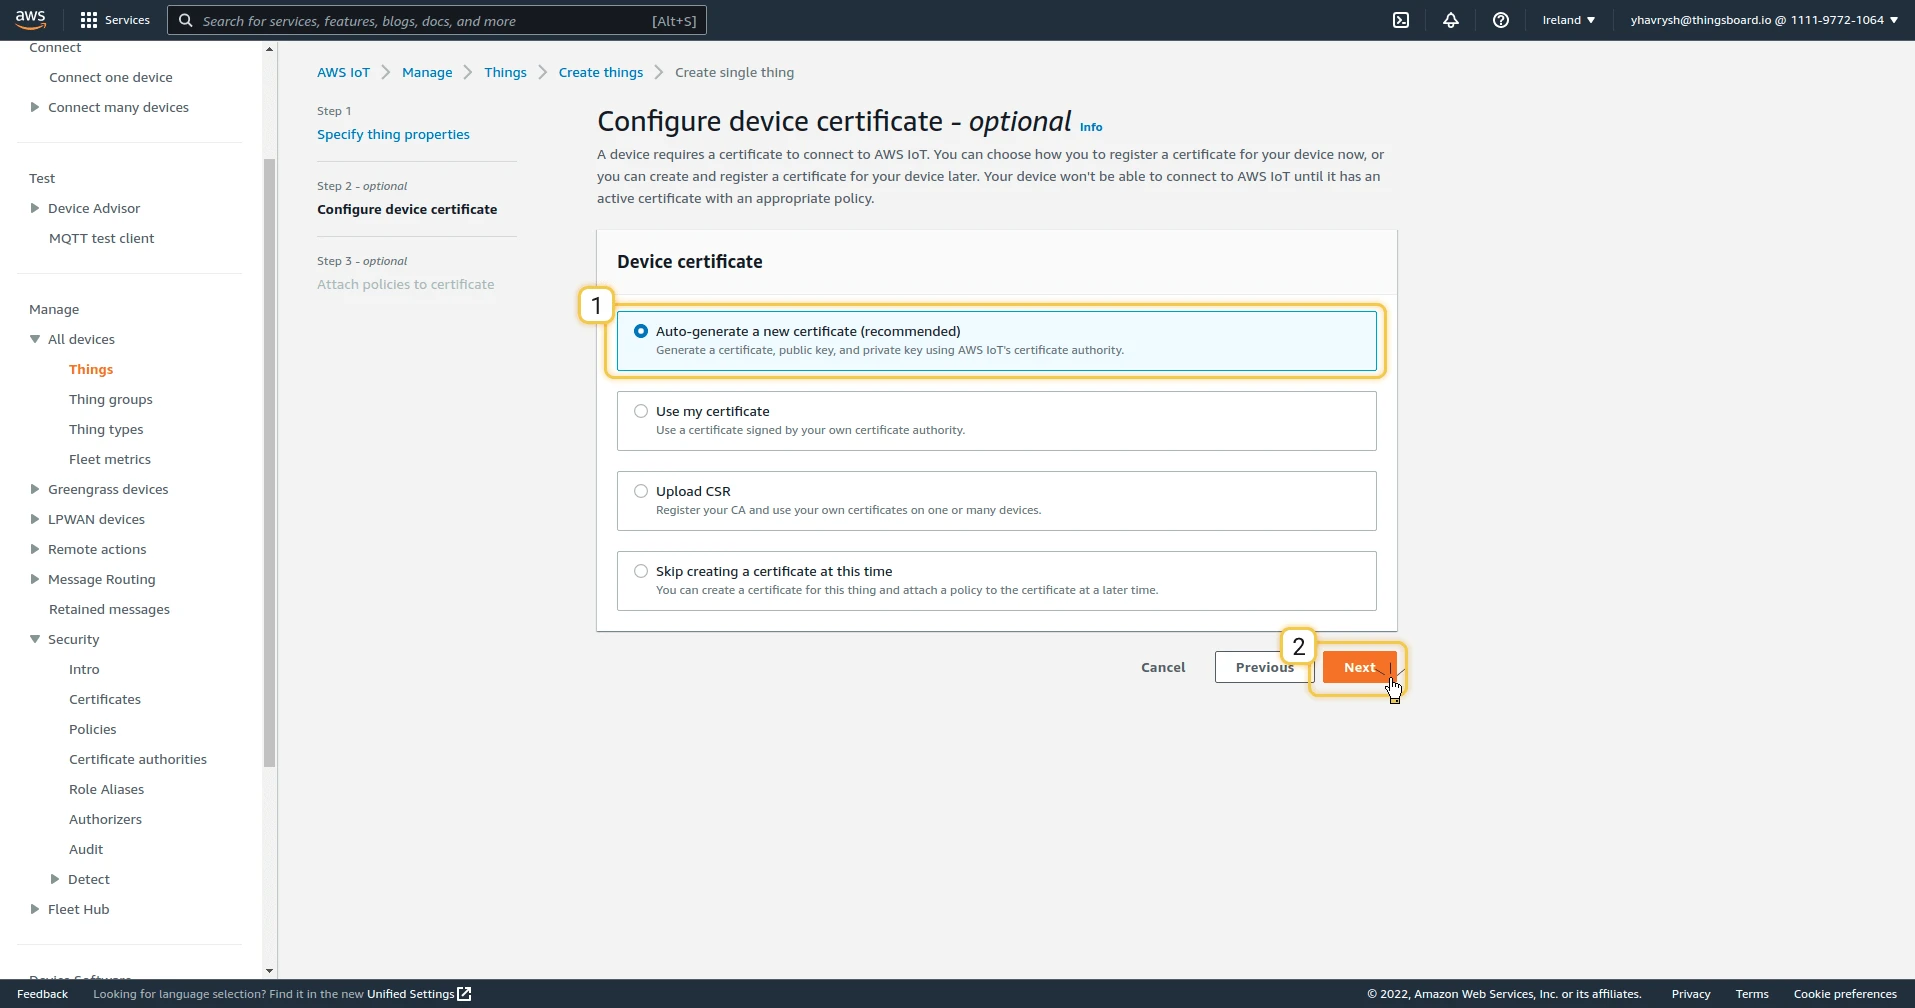
tb-bridge-01, and click Next. - Select Auto-generate a new certificate (recommended) and click Next.
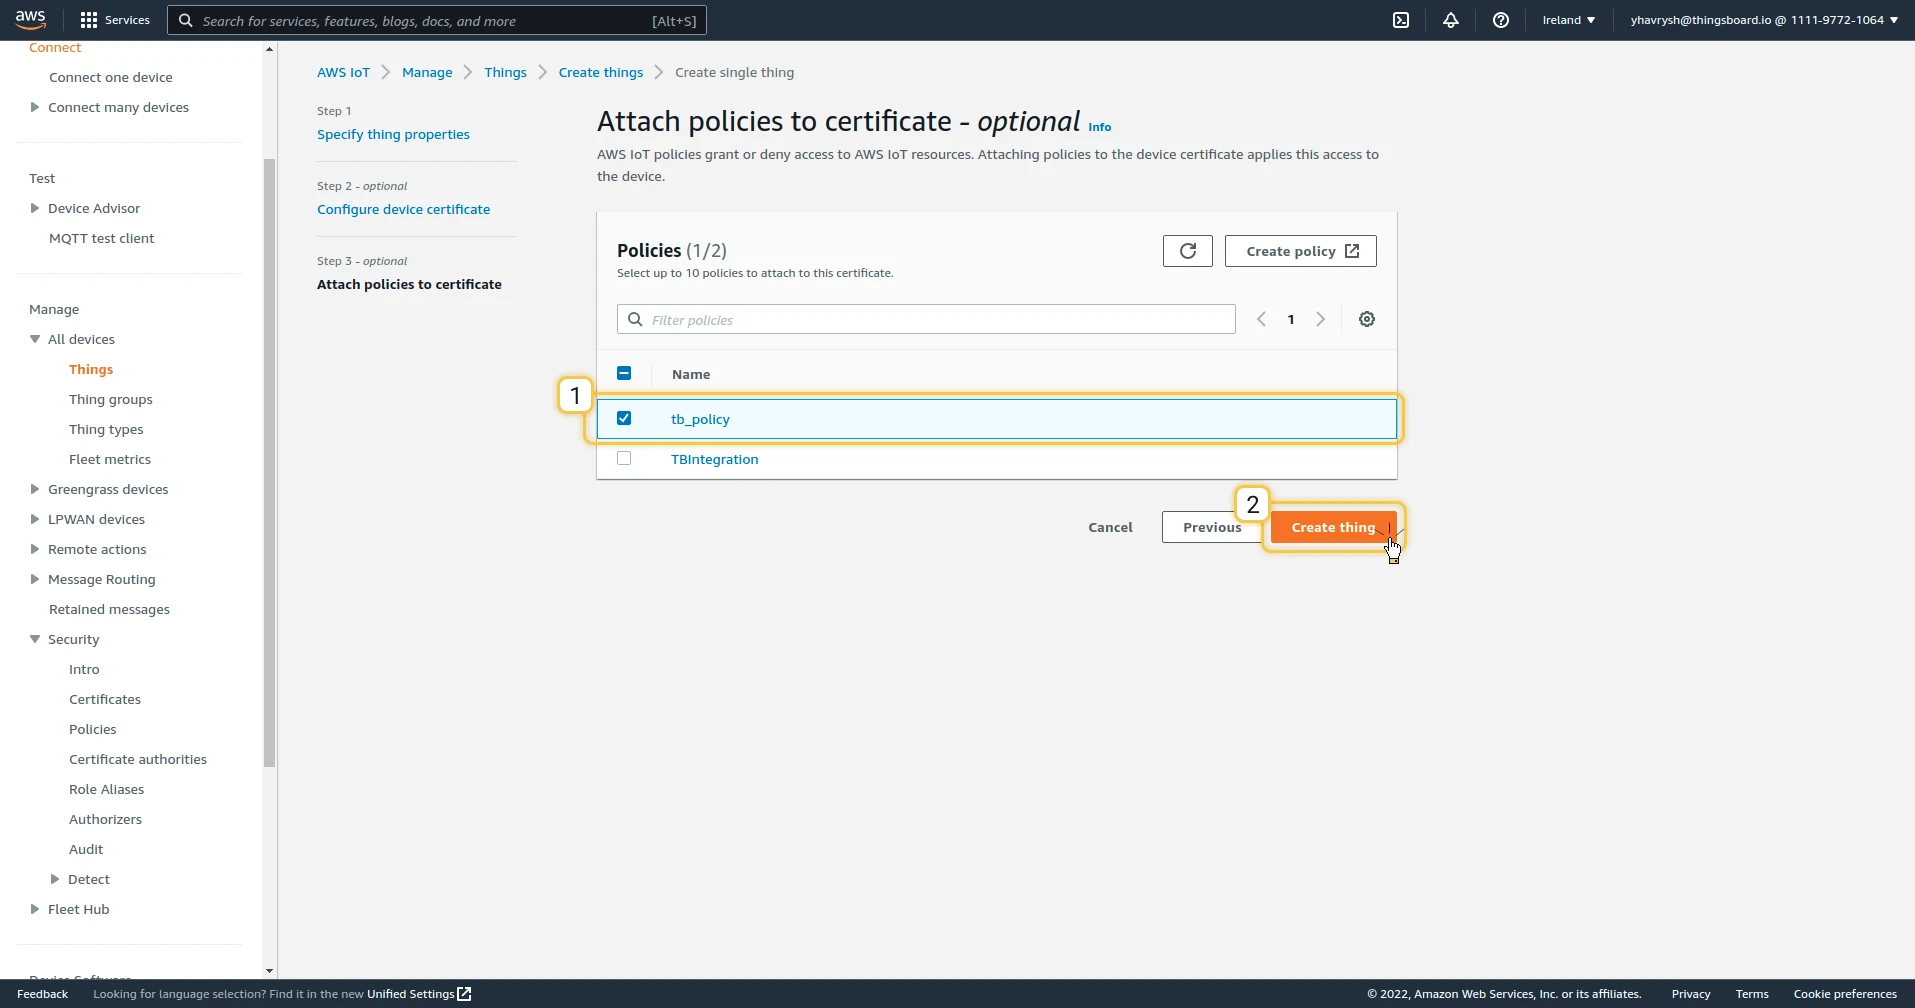
- Select the policy you created and click Create thing.
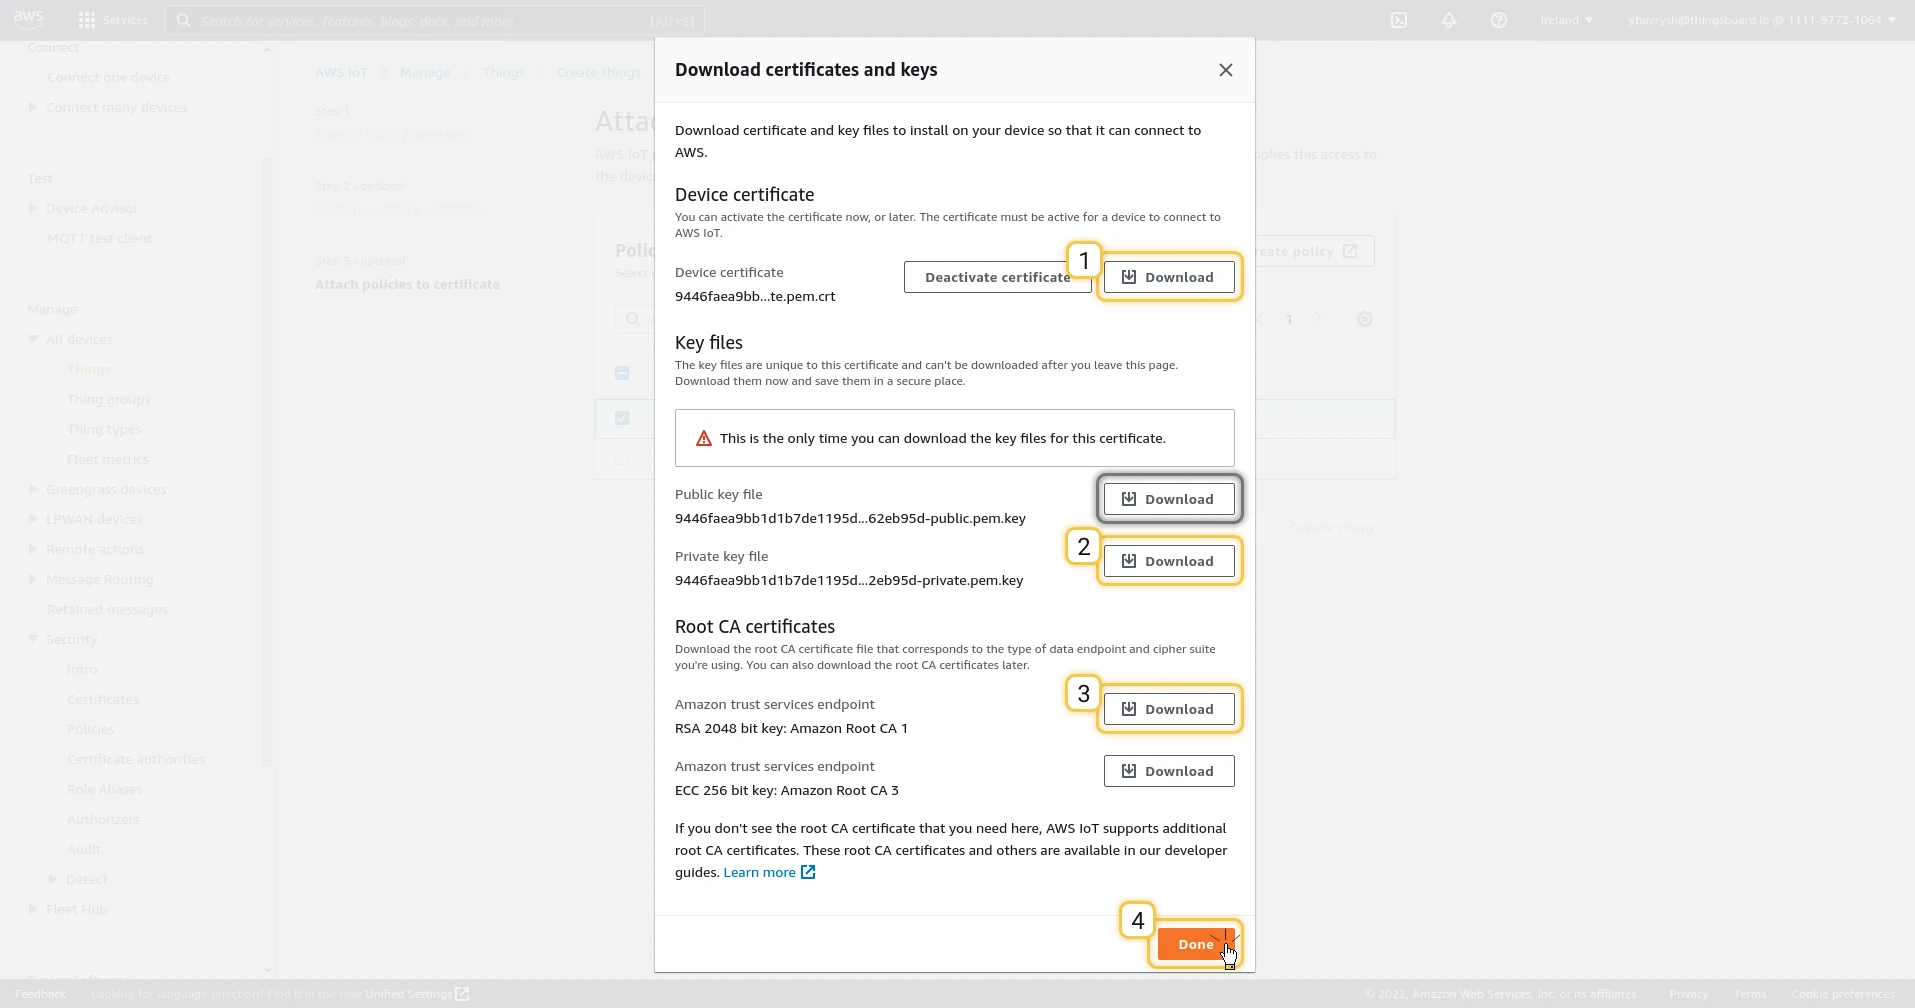
- Download three files:
- Device certificate (
*.pem.crt). - Private key file (
*-private.pem.key). - Amazon Root CA 1 (
AmazonRootCA1.pem).
- Device certificate (
- Click Done.
Get the Device Data Endpoint
Section titled “Get the Device Data Endpoint”The device data endpoint is the MQTT hostname of AWS IoT Core for your account and Region.
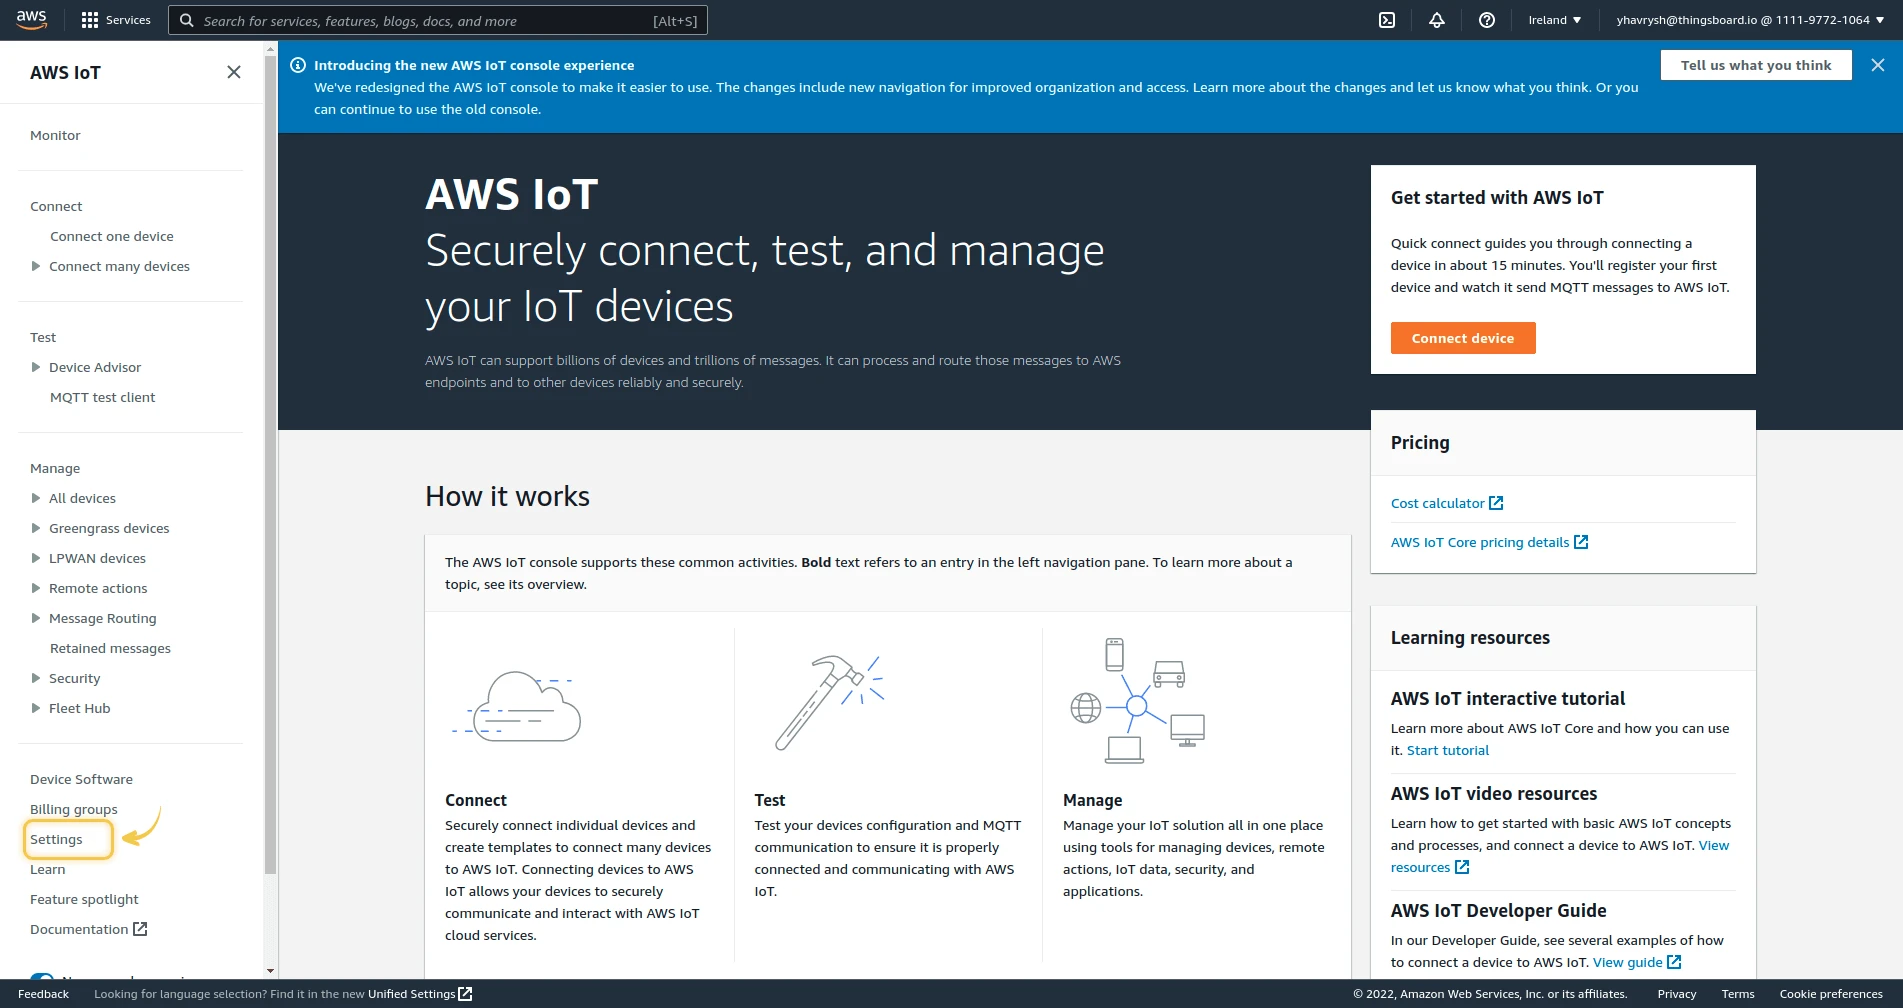
- Click Settings in the left menu of the AWS IoT console.
- Under Device data endpoint, copy the endpoint, for example
a2ljyhf3dvidme-ats.iot.us-east-1.amazonaws.com.
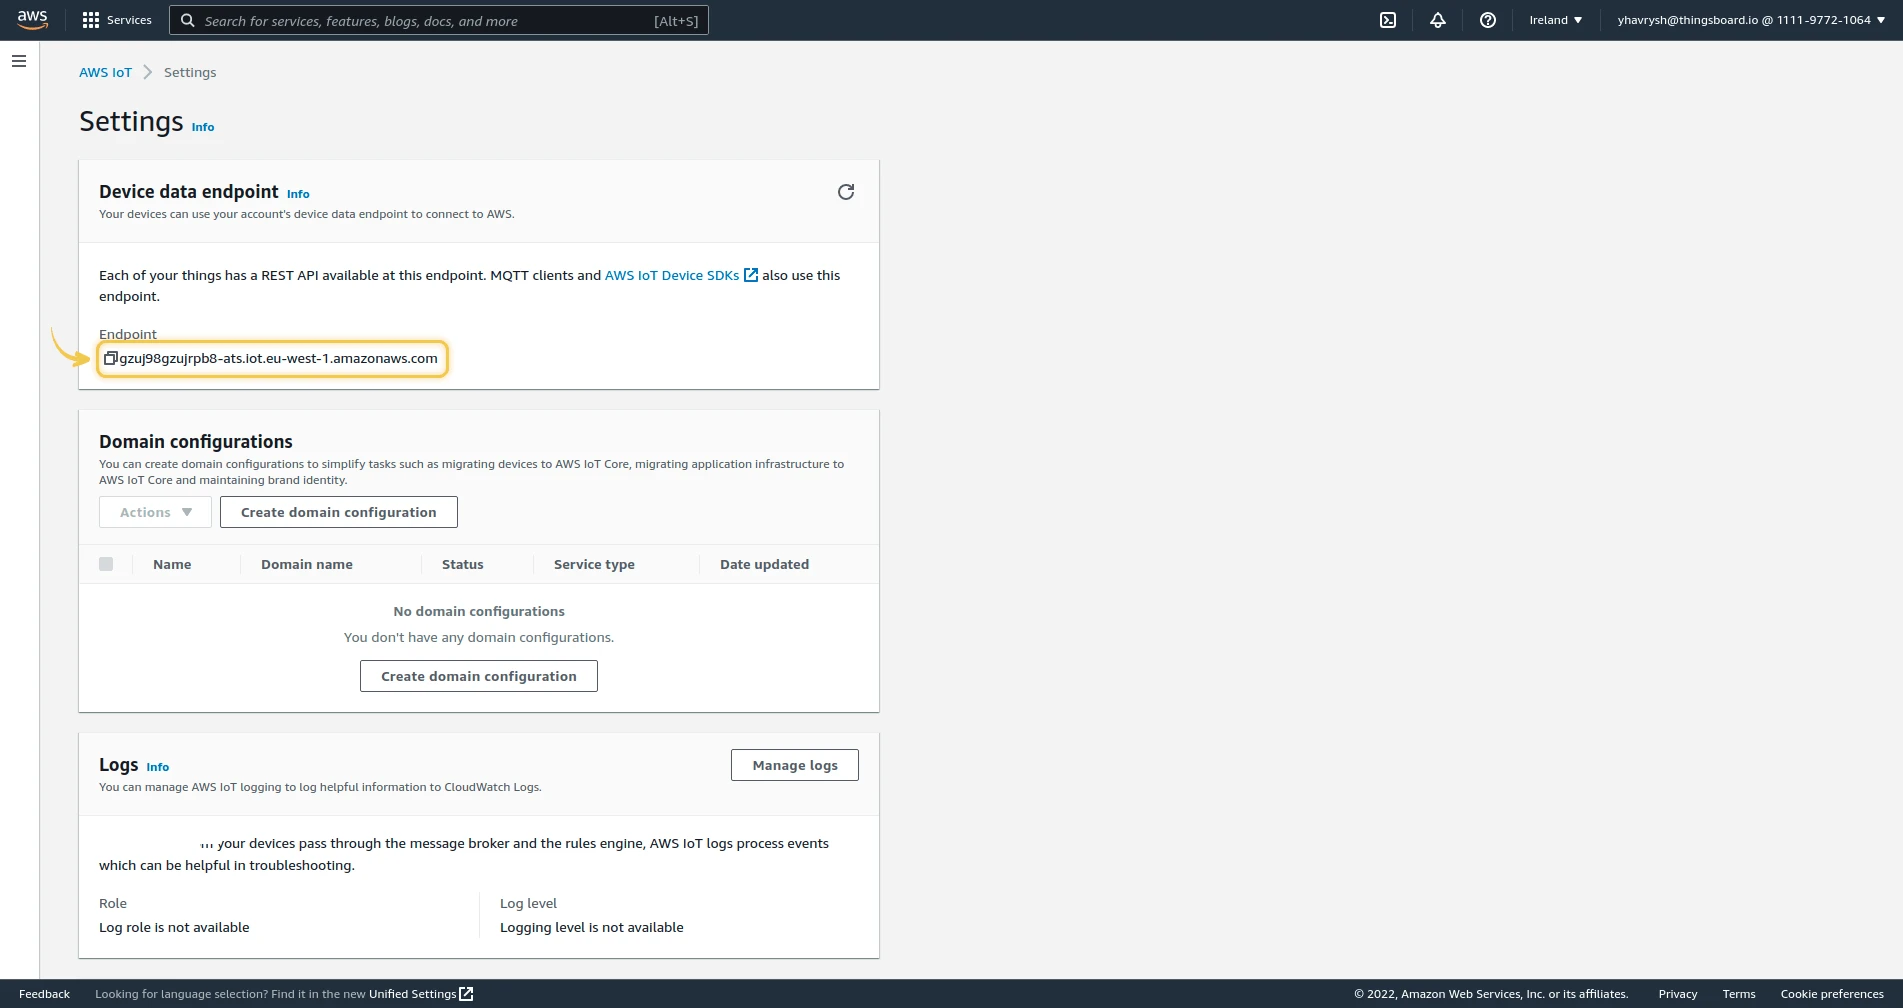
You now have everything the integration needs:
| Value | Example | Integration field |
|---|---|---|
| Device data endpoint | a2ljyhf3dvidme-ats.iot.us-east-1.amazonaws.com |
AWS IoT Endpoint |
| Amazon Root CA 1 | AmazonRootCA1.pem |
CA certificate file |
| Device certificate | *.pem.crt |
Certificate file |
| Private key | *-private.pem.key |
Private key file |
Set Up AWS IoT Integration
Section titled “Set Up AWS IoT Integration”Create the uplink converter, assign it to a new AWS IoT integration, and publish a test message.
Create the Uplink Data Converter
Section titled “Create the Uplink Data Converter”The uplink converter receives each MQTT message as a byte array plus its topic, resolves the target device, and returns its telemetry and attributes. AWS IoT Integration uses the Generic converter: you write the decoder in TBEL or JavaScript. For converter types and the full decoder reference, see Uplink data converter.
This guide uses a device that publishes to tb/aws/iot/sensors/freezer-432:
{ "ts": 1791901200000, "temperature": 25.3, "humidity": 62.8, "battery": 78.5, "fwVersion": "1.4.2", "location": { "latitude": 37.7749, "longitude": -122.4194 }}-
Go to Integrations ⇾ Data converters and click + Add data converter ⇾ Create new converter.
-
Converter type — keep Uplink.
-
Integration type — select AWS IoT.
-
Name — enter a name, for example
AWS IoT Uplink Converter. -
Main decoding configuration — the editor opens with the default AWS IoT template. Replace it with the decoder below. The decoder takes the device name and type from the last two topic segments (
.../{deviceType}/{deviceName}), so it works for any topic depth. The editor opens in TBEL; use the TBEL / JS toggle to switch to JavaScript.tb/aws/iot/sensors/freezer-432 // Device type and name are the last two topic segments:// ^^^^^^^ ^^^^^^^^^^// type namevar topicParts = metadata.topic.split("/");var n = topicParts.length;// Fall back to fixed values if the topic is too short.var deviceName = n > 0 ? topicParts[n - 1] : "AWS IoT Device";var deviceType = n > 1 ? topicParts[n - 2] : "default";// Decode the payload to a JSON object.var data = decodeToJson(payload);// Use the device timestamp if present; otherwise, the server time.var ts = data.ts != null ? data.ts : Date.now();// Device properties become attributes.var attributes = {fwVersion: data.fwVersion};if (data.location != null) {attributes.latitude = data.location.latitude;attributes.longitude = data.location.longitude;}// Measurements become telemetry.var telemetry = {temperature: data.temperature,humidity: data.humidity,battery: data.battery};return {deviceName: deviceName,deviceType: deviceType,attributes: attributes,telemetry: {ts: ts,values: telemetry}};tb/aws/iot/sensors/freezer-432 // Device type and name are the last two topic segments:// ^^^^^^^ ^^^^^^^^^^// type namevar topicParts = metadata.topic.split("/");var n = topicParts.length;// Fall back to fixed values if the topic is too short.var deviceName = n > 0 ? topicParts[n - 1] : "AWS IoT Device";var deviceType = n > 1 ? topicParts[n - 2] : "default";// Decode the payload to a JSON object.var data = decodeToJson(payload);// Use the device timestamp if present; otherwise, the server time.var ts = data.ts != null ? data.ts : Date.now();// Device properties become attributes.var attributes = {fwVersion: data.fwVersion};if (data.location != null) {attributes.latitude = data.location.latitude;attributes.longitude = data.location.longitude;}// Measurements become telemetry.var telemetry = {temperature: data.temperature,humidity: data.humidity,battery: data.battery};var result = {deviceName: deviceName,deviceType: deviceType,attributes: attributes,telemetry: {ts: ts,values: telemetry}};// Convert the byte array to a string.function decodeToString(payload) {return String.fromCharCode.apply(String, payload);}// Convert the byte array to a JSON object.function decodeToJson(payload) {return JSON.parse(decodeToString(payload));}return result;To adapt:
- Other topic structure — change the indexes in
topicParts[n - 1]andtopicParts[n - 2]. - Device name in the payload — use a payload field instead, for example
data.deviceId. - Other telemetry — add or remove keys in
telemetry, for examplepressure: data.pressure. - Other device properties — add them to
attributes, for examplemodel: data.model. - Update-only keys — in Advanced decoding parameters, add keys to the Update only keys list to store them only when their value changes, for example
fwVersion.
- Other topic structure — change the indexes in
-
Click Test decoder function and check the result (see Test the Decoder).
-
Click Add.
Decoder Inputs
The decoder signature is function decoder(payload, metadata): object | object[].
| Variable | Type | Content |
|---|---|---|
payload |
byte array | The MQTT message body. |
metadata |
{[key: string]: string} |
topic — the topic the message arrived on, for example tb/aws/iot/sensors/freezer-432. Also integrationName and the key–value pairs from the integration’s Metadata field. |
With a wildcard topic filter, topic holds the actual topic of the message, not the filter.
For field renaming, nested values, and non-JSON payloads, see Common scripting patterns.
Test the Decoder
Click Test decoder function below the editor. Set Payload content type to JSON, paste the sample payload, and add a Metadata row that simulates the topic:
| Key | Value |
|---|---|
topic |
tb/aws/iot/sensors/freezer-432 |
Click Test. The Output panel shows:
{ "deviceName": "freezer-432", "deviceType": "sensors", "attributes": { "fwVersion": "1.4.2", "latitude": 37.7749, "longitude": -122.4194 }, "telemetry": { "ts": 1791901200000, "values": { "temperature": 25.3, "humidity": 62.8, "battery": 78.5 } }}Without the topic row, the decoder fails: real messages always carry the topic, but the test dialog adds only integrationName.
Create the Integration
Section titled “Create the Integration”- Go to Integrations ⇾ Integrations and click + Add integration.
- Basic settings:
- Integration type — select AWS IoT.
- Name — enter a name, for example
AWS IoT integration. - Enable integration and Allow create devices or assets — keep both on, so the device is created on its first uplink.
- Click Next.
- Uplink data converter:
- Click Select existing and choose
AWS IoT Uplink Converter. - Alternatively, click Create new to write a decoder here.
- Click Next.
- Click Select existing and choose
- Downlink data converter:
- Click Skip. Add a downlink converter later if you need to send commands to devices.
- Connection:
- AWS IoT Endpoint — paste the device data endpoint.
- CA certificate file, Certificate file, Private key file — upload
AmazonRootCA1.pem, the*.pem.crtcertificate, and the*-private.pem.keykey. See Credentials. - Topic filters — replace the default
#withtb/aws/iot/#. - Leave the other parameters at their defaults. See Connection Settings for details.
- Click Add.
Connection Settings
Section titled “Connection Settings”ThingsBoard always connects to AWS IoT Core on port 8883 over TLS, with a clean session.
| Parameter | Description |
|---|---|
| AWS IoT Endpoint | Device data endpoint, in the form {prefix}-ats.iot.{region}.amazonaws.com. Required. |
| Credentials | Certificate files for mutual TLS. See Credentials. |
| Topic filters | One or more subscriptions, each with a Topic and QoS. Default: # with QoS 0. Click Add topic filter to add more. See Topic Filters. |
| Execute remotely | Runs the integration as a separate process outside the ThingsBoard cluster. ThingsBoard generates an Integration key and Integration secret for it. See Remote Integration. |
Advanced settings
| Parameter | Default | Description |
|---|---|---|
| Protocol version | MQTT 3.1.1 | MQTT 3.1, MQTT 3.1.1, or MQTT 5.0. AWS IoT Core supports 3.1.1 and 5.0. |
| Client ID | empty | Empty: an ID is generated. A custom ID must be unique — AWS IoT Core disconnects a client when another one connects with the same ID. |
| Max bytes in message | 32368 |
Maximum size of an incoming message, in bytes (1–256,000,000). AWS IoT Core itself limits messages to 128 KB. |
| Connection timeout (sec) | 10 |
Time to wait for AWS IoT Core to accept the connection (1–200). |
| Downlink topic pattern | ${topic} |
Topic for downlink messages. Each ${key} is replaced with the value of key from the downlink converter’s output metadata. |
| Description | — | Free-text description. |
| Metadata | — | Key–value pairs added to the metadata of every message from this integration. |
Credentials
Section titled “Credentials”AWS IoT Integration supports only certificate (PEM) credentials. Upload each file (Browse file) or take it from Secrets storage.
| Field | File |
|---|---|
| CA certificate file | AmazonRootCA1.pem. Verifies AWS IoT Core. |
| Certificate file | Device certificate, *.pem.crt. |
| Private key file | Private key, *-private.pem.key. |
| Private key password | Only for an encrypted key. Keys generated by AWS are not encrypted; leave it empty. |
The certificate must be Active and have the policy attached. See X.509 client certificates.
Topic Filters
Section titled “Topic Filters”The integration subscribes to all topic filters when it connects. Subscribe to a dedicated namespace rather than #, so the integration receives only ThingsBoard traffic.
| Wildcard | Matches | Example filter | Matching topics |
|---|---|---|---|
+ |
One level | tb/aws/iot/+/freezer-432 |
tb/aws/iot/sensors/freezer-432, tb/aws/iot/meters/freezer-432 |
# |
All remaining levels; must be last | tb/aws/iot/# |
tb/aws/iot/sensors/freezer-432, tb/aws/iot/meters/meter-01 |
| QoS | Name | Delivery |
|---|---|---|
0 |
At most once | No acknowledgment. A message may be lost. |
1 |
At least once | Acknowledged. A message may arrive twice. |
AWS IoT Core does not support QoS 2, so the integration does not offer it. See MQTT topics.
Test Uplink
Section titled “Test Uplink”Publish a message to AWS IoT Core, then confirm that ThingsBoard decoded it and created the device.
Send a Test Uplink
Section titled “Send a Test Uplink”Publish the sample payload to tb/aws/iot/sensors/freezer-432 with the AWS IoT MQTT test client or the AWS CLI.
- In the AWS IoT console, go to Test ⇾ MQTT test client and open the Publish to a topic tab.
- Enter the topic
tb/aws/iot/sensors/freezer-432. - Paste the sample payload into Message payload.
- Click Publish.
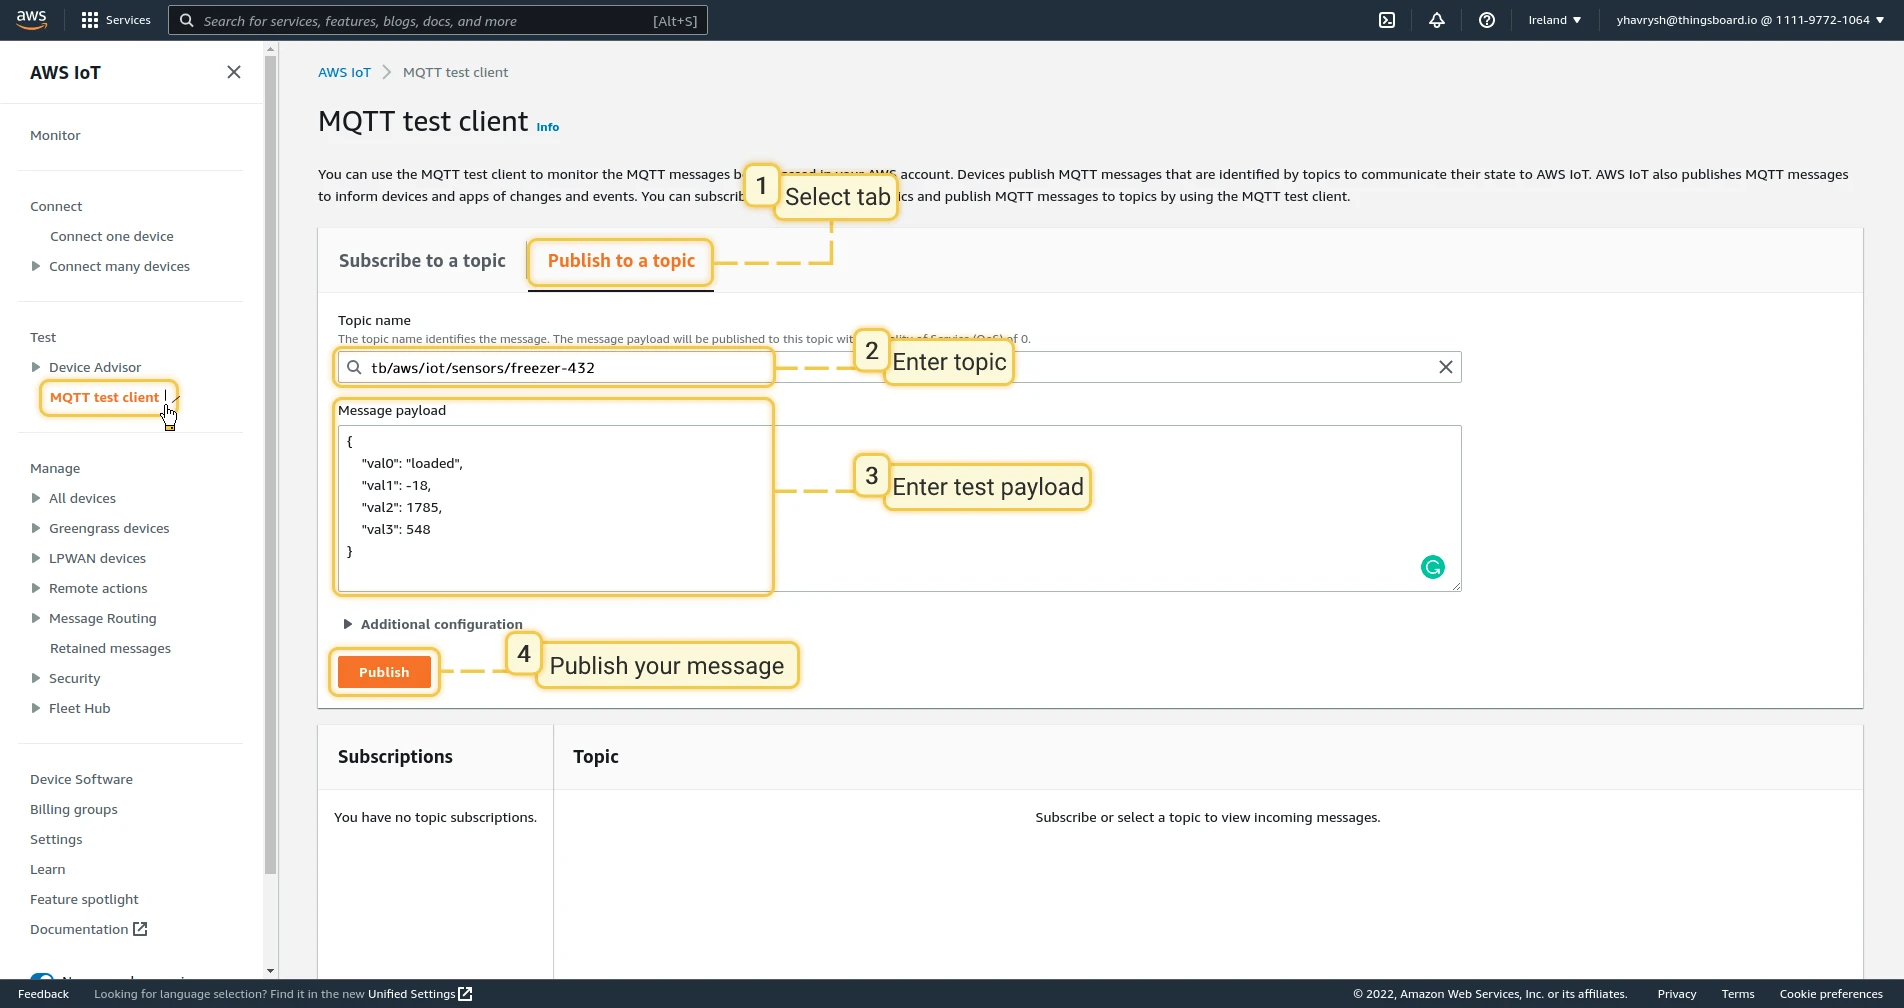
Run aws iot-data publish. Replace YOUR_ENDPOINT with the device data endpoint:
aws iot-data publish \ --endpoint-url "https://YOUR_ENDPOINT" \ --topic "tb/aws/iot/sensors/freezer-432" \ --cli-binary-format raw-in-base64-out \ --payload '{"ts":1791901200000,"temperature":25.3,"humidity":62.8,"battery":78.5,"fwVersion":"1.4.2","location":{"latitude":37.7749,"longitude":-122.4194}}'Verify the Result
Section titled “Verify the Result”- Integration events — go to Integrations ⇾ Integrations, open the integration, and click the Events tab. The uplink appears with status OK. Click
⋅⋅⋅in the Message column to see the topic and payload. - Converter events — open
AWS IoT Uplink Converterin Integrations ⇾ Data converters and click the Events tab. In shows the received payload, Out shows the decoded result, and Metadata shows the topic and integration name. - Device — go to Devices & assets ⇾ Devices. The integration has created freezer-432 with type sensors. Open it and confirm
temperature,humidity, andbatteryon the Latest telemetry tab, andfwVersion,latitude, andlongitudeon the Attributes tab.
Configure Downlink
Section titled “Configure Downlink”ThingsBoard publishes downlinks to AWS IoT Core when the Rule Engine routes a message to the integration — for example, after a shared attribute update. Downlinks are always published with QoS 1. The topic comes from the Downlink topic pattern: with the default ${topic}, it is the topic value in the downlink converter’s output metadata.
The downlink converter turns a Rule Engine message into an MQTT payload. For the full encoder reference, see Downlink data converter.
Create and Assign the Downlink Converter
Section titled “Create and Assign the Downlink Converter”The encoder returns:
contentType—JSON,TEXT, orBINARY.data— the payload to publish.metadata— values for the Downlink topic pattern placeholders, for exampletopic.
For RPC commands, msg.method and msg.params are available. msg.params is a string — use parseFloat(msg.params) or JSON.parse(msg.params) to get a number or an object.
- Open the integration in Integrations ⇾ Integrations and click Toggle edit mode (pencil icon).
- In the Downlink data converter field, click Create new. The Downlink converter type and AWS IoT integration type are preselected.
- Enter a name, for example
AWS IoT Downlink Converter. - In Main encoding configuration, replace the default encoder with the one below, or write your own.
- To record downlink events, click the debug icon next to the name, select All messages, and click Apply.
- Click Add, then Apply changes.
Encoder used in this guide (TBEL and JavaScript):
/** Encoder **/// Publish the ThingsBoard message as JSON to the device command topic.// metadata.topic is read by the integration when Downlink topic pattern is ${topic}.
var result = {  // Specify the downlink payload format: JSON, TEXT, or BINARY.  contentType: "JSON",
  // Serialize the incoming message and use it as the MQTT payload.  data: JSON.stringify(msg),
  // Build a per-device command topic in the same namespace as the uplink.  metadata: {    topic: 'tb/aws/iot/commands/' + metadata['deviceName']  }};
return result;
To adapt:
- Other payload — build the object the device expects instead of
msg, for example{ "interval": msg.temperatureUploadFrequency }. - Non-JSON payload — set
contentTypetoTEXTfor a plain string, orBINARYwith a Base64-encoded string. - Other message types — branch on
msgTypeto handle other Rule Engine message types.
Configure the Root Rule Chain
Section titled “Configure the Root Rule Chain”The encoder builds the topic from deviceName, so the rule chain first adds the device name to the message metadata.
- Go to Data processing ⇾ Rule chains and open the Root Rule Chain.
- From the Enrichment section, drag an originator fields node onto the canvas.
- Enter a Name (for example,
Retrieve device name) and map the source fields:- Name ⇾ deviceName
- Add mapped originator fields to ⇾ Metadata
- Click Add.
- Connect the message type switch node to the originator fields node with the Attributes Updated relation.
- From the Action section, drag an integration downlink node onto the canvas.
- Enter a Name (for example,
Downlink to AWS IoT integration), select your AWS IoT integration, and click Add. - Connect the originator fields node to the integration downlink node with the Success relation.
- Click Apply changes.
Test Downlink
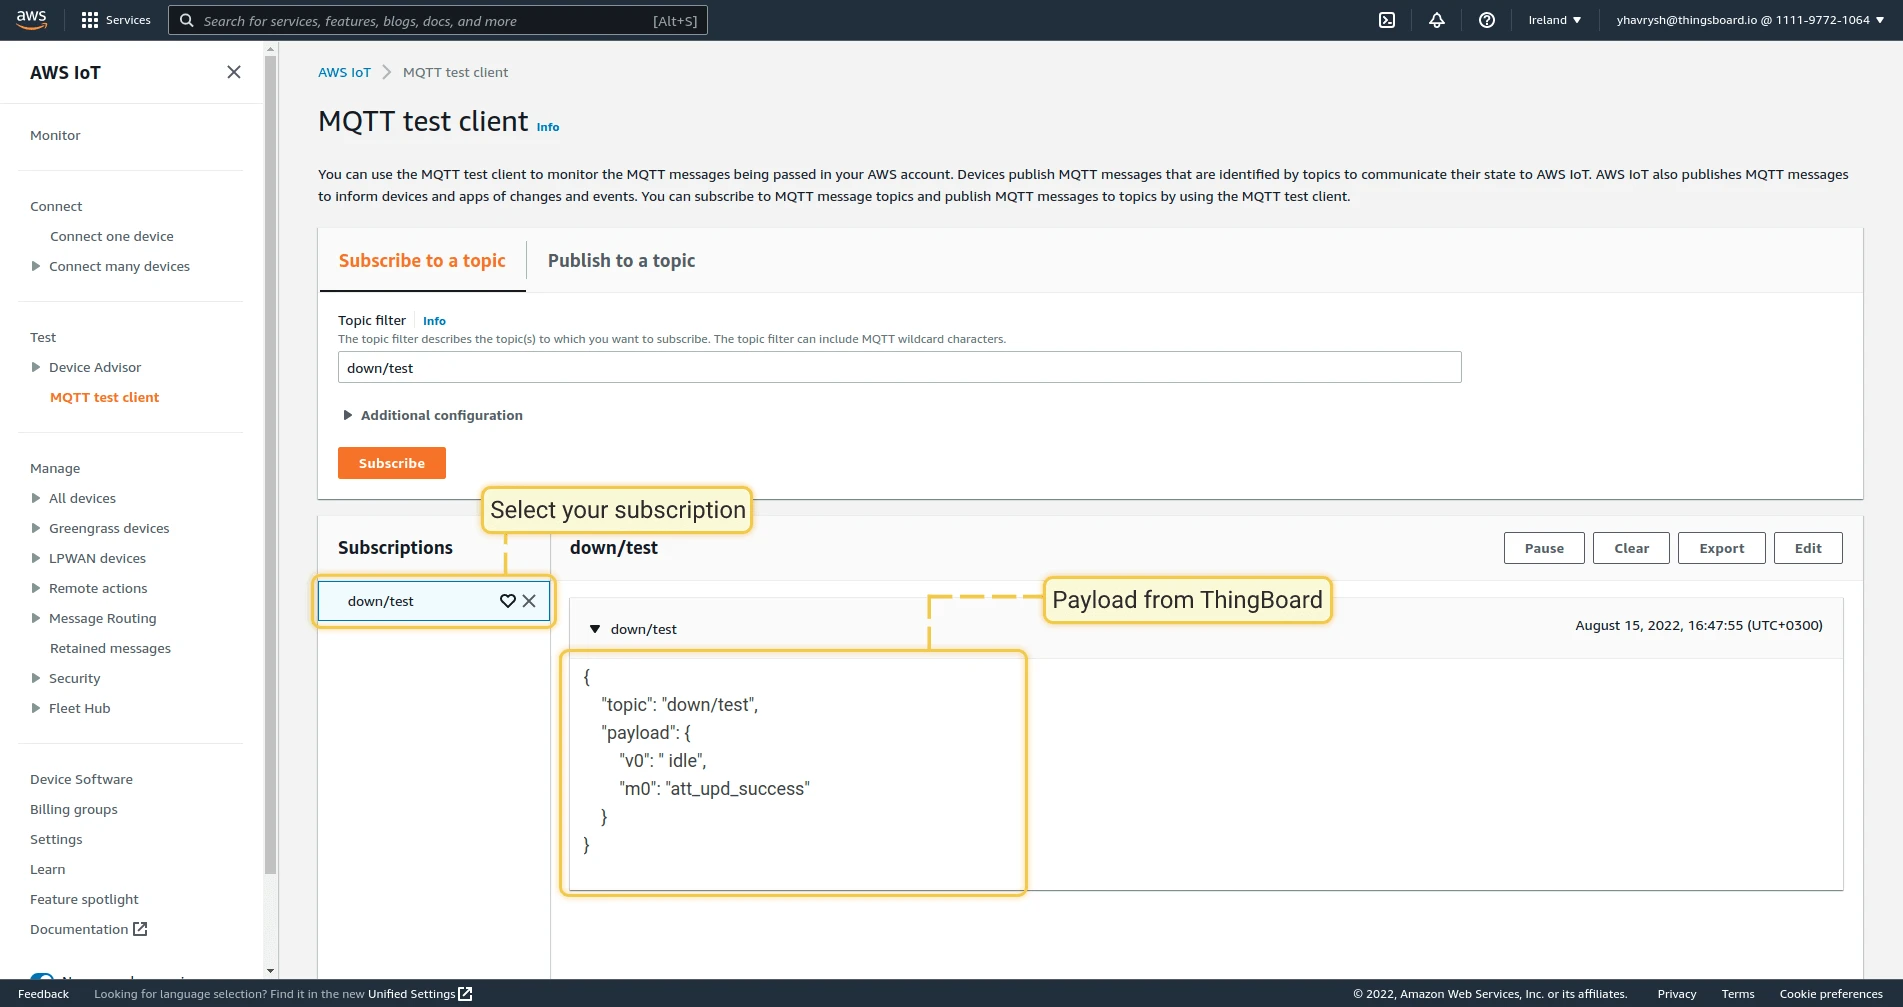
Section titled “Test Downlink”Subscribe to the command topic, then update a shared attribute to trigger a downlink.
- In the AWS IoT console, go to Test ⇾ MQTT test client, open the Subscribe to a topic tab, enter
tb/aws/iot/commands/#, and click Subscribe. - In ThingsBoard, go to Devices & assets ⇾ Devices, select
freezer-432, and open the Attributes tab. - Select Shared attributes and click +.
- Set Key to
temperatureUploadFrequency, Type to Integer, Value to60, and click Add. ThingsBoard publishes the downlink.
Verify the Downlink
Section titled “Verify the Downlink”-
AWS IoT console, MQTT test client — the
tb/aws/iot/commands/freezer-432topic shows the payload:{"temperatureUploadFrequency":60}
-
ThingsBoard, converter events — go to Integrations ⇾ Data converters, open the downlink converter, and select the Events tab. In shows the Rule Engine message, Out shows the encoded payload, and Metadata shows the topic and integration name.
Troubleshooting
Section titled “Troubleshooting”| Symptom | Cause | Fix |
|---|---|---|
| Integration is disconnected | Wrong AWS IoT Endpoint. | Copy the endpoint again from Settings ⇾ Device data endpoint. |
| Same, with correct endpoint | The certificate and private key do not belong together, or the CA file is wrong. | Upload the certificate and key downloaded for the same thing, and AmazonRootCA1.pem as the CA file. |
| Same, with correct files | The certificate is inactive or has no policy, or the policy denies iot:Connect. |
In the AWS IoT console, check that the certificate is Active and that the policy is attached and allows iot:Connect. |
| Same, on a self-hosted server | Outbound port 8883 is blocked. |
Open TCP 8883 to AWS IoT Core, or use a Remote Integration. |
| Connection keeps dropping | Another client uses the same Client ID. | Clear Client ID to get a generated one, or make it unique. |
| No messages received | No topic filter matches the published topic, or the policy denies iot:Subscribe or iot:Receive. |
Check the topic filters and the policy resources. tb/aws/iot/# matches tb/aws/iot/sensors/freezer-432. |
| Decoder error | The test or message has no topic, or the payload is not JSON. |
Open the converter’s Events tab and read the Error column. In the test dialog, add the topic metadata row. |
| Device not created | deviceName is empty or undefined. |
Check Out in the converter events. |
| Large messages missing | The message exceeds Max bytes in message. | Raise the limit in Advanced settings (AWS IoT Core allows up to 128 KB). |
| Downlink not received | The rule chain does not reach the integration downlink node, or the topic differs from the subscription. | Check the Root Rule Chain wiring and the topic in the integration’s Events. Check that the policy allows iot:Publish on that topic. |
Downlink topic ends in null or undefined |
The message metadata has no deviceName. |
Add the originator fields node before the integration downlink node. |
To read debug events, open the integration or converter, click Events, and select an event: In is the received data, Out is the converter result, and Error holds the error text.
See Also
Section titled “See Also”- Integrations overview — how integrations, converters, uplinks, and downlinks fit together.
- Uplink data converter — decoder inputs, output format, and scripting patterns.
- Downlink data converter — encoder reference.
- MQTT Integration — connect to any other MQTT broker.
- Remote Integration — run the integration outside the ThingsBoard cluster.
- Integration downlink node — forward Rule Engine messages to an integration.
- TBEL — built-in functions and syntax for converter scripts.
Was this helpful?