Kafka Integration
The Apache Kafka integration connects ThingsBoard to Apache Kafka message brokers. Use it to consume records that producers — devices, IoT platforms, connectivity providers, or your own applications — publish to Kafka topics, and bring them into ThingsBoard as telemetry and attributes for monitoring and rule-based automation — including publishing commands back to Kafka.
Architecture
Section titled “Architecture”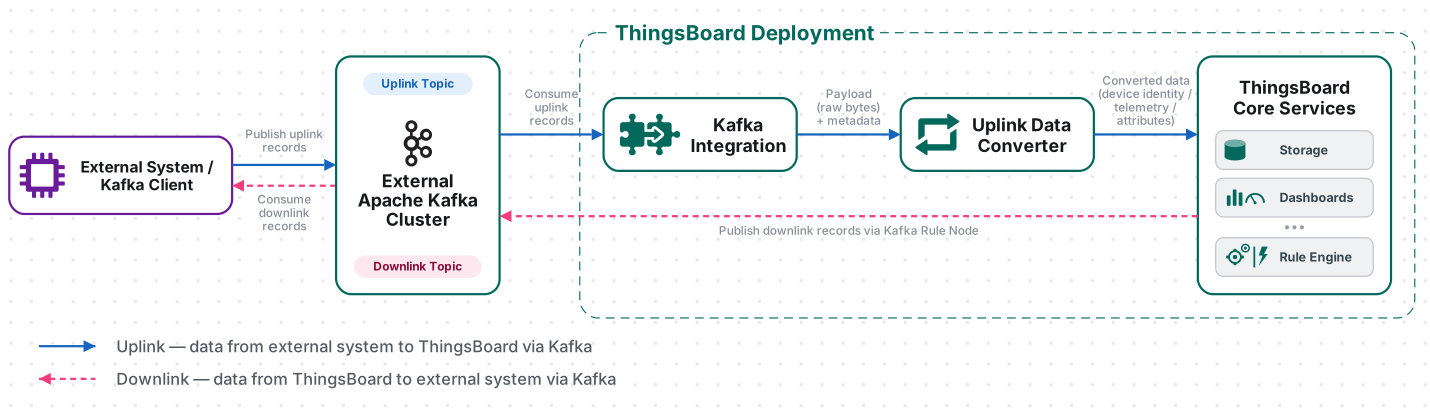
A producer publishes a record to a Kafka topic. The Kafka Integration, acting as a Kafka consumer, subscribes to the topic and polls the broker for new records. The uplink converter decodes the record value into telemetry and attributes, and the ThingsBoard Core Service stores the data, creating the device automatically on first contact. For downlink, the Rule Engine hands a message to a Kafka Rule Node, which publishes it to a separate Kafka topic; external consumers then read it. The Kafka Integration has no dedicated downlink converter.
Prerequisites
Section titled “Prerequisites”Before creating the integration, ensure:
- You have access to ThingsBoard Cloud with integration functionality enabled for your tenant.
- You have permissions to create integrations and data converters.
- You have a running Apache Kafka broker — either a local installation or a cloud-managed cluster such as Confluent Cloud. If you do not have a cluster yet, follow the Set Up Kafka step below.
Set Up Kafka
Section titled “Set Up Kafka”The Kafka Integration connects ThingsBoard to an existing Apache Kafka broker as a consumer. The steps below stand up a minimal single-node broker in KRaft mode (no ZooKeeper), which is enough to test the integration. If you use a managed cluster (Confluent Cloud, Amazon MSK, Aiven, Redpanda Cloud, and others), skip to Collect Connection Details and obtain the values from your provider instead.
Run a Single-Node Broker (KRaft)
Section titled “Run a Single-Node Broker (KRaft)”KRaft is Kafka’s built-in consensus protocol; since Kafka 4.0 it fully replaces ZooKeeper, so one process acts as both controller and broker. Kafka 4.x requires Java 17+, and formatting storage is a required, explicit step before the first start. The commands below were verified on Ubuntu with Kafka 4.3.1 — adjust the version and paths for your environment.
1. Install Java and download Kafka:
sudo apt updatesudo apt install -y openjdk-17-jre-headless curljava -version
cd /tmpcurl -fLO https://downloads.apache.org/kafka/4.3.1/kafka_2.13-4.3.1.tgzsudo tar -xzf kafka_2.13-4.3.1.tgz -C /optsudo ln -s /opt/kafka_2.13-4.3.1 /opt/kafkasudo chown -R "$USER":"$USER" /opt/kafka_2.13-4.3.1cd /opt/kafka
2. Initialize KRaft storage (run once per broker):
KAFKA_CLUSTER_ID="$(bin/kafka-storage.sh random-uuid)"bin/kafka-storage.sh format \ --standalone \ --cluster-id "$KAFKA_CLUSTER_ID" \ --config config/server.properties3. Start the broker:
bin/kafka-server-start.sh config/server.propertiesCreate the Uplink Topic
Section titled “Create the Uplink Topic”Create the uplink topic the integration will subscribe to (or enable Auto create topics in the integration to have ThingsBoard create it on subscribe). Run the command from the Kafka install directory (e.g. /opt/kafka):
bin/kafka-topics.sh --create \ --topic my-topic \ --bootstrap-server localhost:9092 \ --partitions 1 \ --replication-factor 1Verify it exists (optional):
bin/kafka-topics.sh --bootstrap-server localhost:9092 --listCollect Connection Details
Section titled “Collect Connection Details”Collect these values for the integration’s Connection step. For the single-node broker above, they are:
| Field | Value for this setup | Description |
|---|---|---|
| Group ID | you define, e.g. thingsboard-kafka-group |
Kafka consumer group name |
| Client ID | you define, e.g. thingsboard-kafka-client-01 |
consumer client identifier |
| Bootstrap servers | localhost:9092 (or the broker host IP) |
broker host:port address |
| Poll interval | 5000 |
poll frequency in milliseconds |
| Topics | my-topic |
comma-separated topic(s) to subscribe to |
Authentication for Secured Brokers
Section titled “Authentication for Secured Brokers”If the broker requires authentication — most managed and cloud brokers do — you also need credentials, typically a username/password or an API key/secret, together with the security protocol (e.g. SASL_SSL). These are entered under Advanced settings ⇾ Other properties as SASL/SSL parameters (see the Other Properties row under Connection Settings). For an open or local broker without authentication, no credentials are needed — leave these empty.
Set Up the Kafka Integration
Section titled “Set Up the Kafka Integration”To set up the Kafka integration, first create an uplink data converter to process incoming messages, then create and configure the integration.
Create the Uplink Data Converter
Section titled “Create the Uplink Data Converter”The uplink converter receives each consumed Kafka record, decodes the record value, and returns a structured object that ThingsBoard uses to create or update a device and store its telemetry and attributes. For the full decoder function reference — all input parameters and output fields — see Uplink Data Converter.
Kafka uses a generic uplink converter. These converters decode a JSON message received from a Kafka topic and transform it into the ThingsBoard integration data format.
- Go to Integrations ⇾ Data converters.
- Click + Add data converter ⇾ Create new converter.
In the Add data converter dialog:
- Converter type — leave Uplink (selected by default).
- Integration type — in the search field, enter
Kafkaand select Kafka from the list. - Name — enter a converter name, for example
Kafka Uplink Converter. - Main decoding configuration — a code editor with the function signature
function decoder(payload, metadata) {. Paste the decoder function shown below. By default the editor opens in TBEL; use the TBEL / JS toggle (upper right) to switch languages. - Click Add.
/** Decoder **/
// Decode the Kafka message payload into a JSON object.var payloadJson = decodeToJson(payload);
// Use the EUI value as the ThingsBoard device name.var deviceName = payloadJson.EUI;
// Assign the same device type to all devices created by this integration.var deviceType = 'Monitoring sensor';
// Build the object expected by the ThingsBoard integration.var result = {  deviceName: deviceName,  deviceType: deviceType,
  // No device attributes are extracted from the incoming message.  attributes: {},
  // Create a timestamped telemetry entry.  telemetry: {    // Use the timestamp provided in the Kafka message.    ts: payloadJson.ts,
    values: {      // Read the first byte from the hexadecimal data field.      Temperature: hexToInt(payloadJson.data.substring(0, 2)),
      // Read the second byte from the hexadecimal data field.      Humidity: hexToInt(payloadJson.data.substring(2, 4)),
      // Read the third byte from the hexadecimal data field.      Fan: hexToInt(payloadJson.data.substring(4, 6)),
      // Copy message metadata directly to telemetry.      Port: payloadJson.port,      Freq: payloadJson.freq,
      // Read the fourth byte from the hexadecimal data field.      Pressure: hexToInt(payloadJson.data.substring(6, 8)),
      // Copy signal strength and serial number to telemetry.      rssi: payloadJson.rssi,      serial: payloadJson.serial    }  }};
// Converts a hexadecimal string into an integer.function hexToInt(hex) {  return parseInt(hex, 16);}
/** Helper function 'decodeToJson' is already built-in **/
return result;/** Decoder **/
// Decode the Kafka message payload into a JSON object.var payloadJson = decodeToJson(payload);
// Use the EUI value as the ThingsBoard device name.var deviceName = payloadJson.EUI;
// Assign the same device type to all devices created by this integration.var deviceType = 'Monitoring sensor';
// Build the object expected by the ThingsBoard integration.var result = { deviceName: deviceName, deviceType: deviceType,
// No device attributes are extracted from the incoming message. attributes: {},
// Create a timestamped telemetry entry. telemetry: { // Use the timestamp provided in the Kafka message. ts: payloadJson.ts,
values: { // Read the first byte from the hexadecimal data field. Temperature: hexToInt(payloadJson.data.substring(0, 2)),
// Read the second byte from the hexadecimal data field. Humidity: hexToInt(payloadJson.data.substring(2, 4)),
// Read the third byte from the hexadecimal data field. Fan: hexToInt(payloadJson.data.substring(4, 6)),
// Copy message metadata directly to telemetry. Port: payloadJson.port, Freq: payloadJson.freq,
// Read the fourth byte from the hexadecimal data field. Pressure: hexToInt(payloadJson.data.substring(6, 8)),
// Copy signal strength and serial number to telemetry. rssi: payloadJson.rssi, serial: payloadJson.serial } }};
/** Helper functions **/
// Converts the incoming byte array into a UTF-8-compatible string.function decodeToString(payload) { return String.fromCharCode.apply(String, payload);}
// Converts the incoming byte array into a string and parses it as a JSON object.function decodeToJson(payload) { var str = decodeToString(payload); return JSON.parse(str);}
// Converts a hexadecimal string into an integer. Matches the TBEL tab —// both read a single byte (2 hex characters) at a time, so no byte-order// reversal is needed. If you extend this to multi-byte fields, decide on// endianness explicitly and keep both tabs consistent.function hexToInt(hex) { return parseInt(hex, 16);}
return result;Converter Input
ThingsBoard passes two variables to the decoder function:
| Variable | Type | Description |
|---|---|---|
payload |
byte array | The raw bytes of the Kafka record value. |
metadata |
object | Key-value map containing integrationName, any pairs configured in the integration’s Metadata settings, and likely Kafka-specific fields such as topic, partition, and offset (the same fields the outbound Kafka Rule Node adds to its own metadata — see Configure Downlink). Open the uplink converter’s Events tab and inspect a real Metadata panel to confirm exactly which fields your setup receives. |
JSON Payload Example
Apache Kafka does not impose an application-level schema on a record’s value. The value is stored as bytes and may contain JSON, Avro, Protobuf, plain text, or any other format selected by the producer.
This example models a typical IoT data flow in which a LoRaWAN Network Server, or an intermediate service, publishes device uplink events to Kafka. Therefore, the sample message contains LoRaWAN-related fields such as a device EUI, frame port, frequency, and RSSI rather than Kafka-specific fields.
Note that the field names and message structure used in this example are not defined by Kafka or standardized across all LoRaWAN Network Servers. Each producer may use a different schema, naming convention, nesting structure, or serialization format. Update the uplink converter and decoder to match the exact message format produced by your system.
In this example, the device 43T1YH-REE publishes a JSON record to Kafka. The sensor readings are encoded as a 4-byte hexadecimal string in the data field, and the incoming message is expected to contain the following fields:
{ "EUI": "43T1YH-REE", "ts": 1638876127000, "data": "3d1f0059", "port": 10, "freq": 24300, "rssi": -130, "serial": "230165HRT"}The data field must contain at least eight hexadecimal characters. Each pair of characters represents one telemetry value:
| Character positions | Telemetry key | Raw hex | Decoded value |
|---|---|---|---|
0–1 |
Temperature |
3d |
61 |
2–3 |
Humidity |
1f |
31 |
4–5 |
Fan |
00 |
0 |
6–7 |
Pressure |
59 |
89 |
The converter returns:
{ "deviceName": "43T1YH-REE", "deviceType": "Monitoring sensor", "attributes": {}, "telemetry": { "ts": 1638876127000, "values": { "Temperature": 61, "Humidity": 31, "Fan": 0, "Port": 10, "Freq": 24300, "Pressure": 89, "rssi": -130, "serial": "230165HRT" } }}In short:
deviceName: the value of theEUIfield;deviceType: the staticMonitoring sensordevice type;attributes: an empty object because the message does not contain attribute data;telemetry: timestamped telemetry values extracted from the message.
Create the Kafka Integration
Section titled “Create the Kafka Integration”- Go to Integrations ⇾ Integrations and click + Add integration.
- Basic settings:
- Set Integration type to Kafka.
- Enter a Name for the integration, or keep the default
Kafka integration. - Leave Enable integration and Allow create devices or assets on so a device is created automatically on first message.
- Click Next.
- Uplink data converter:
- Click Select existing and choose the Kafka Uplink Converter created above, or click Create new to define the decoder inline.
- Click Next.
- Connection:
- Fill in Group ID, Client ID, Bootstrap servers, Poll interval, and Topics — see Collect Connection Details for the values to use.
- Toggle Auto create topics if the topic does not exist yet.
- For a secured broker, expand Advanced settings and add SASL/SSL properties under Other properties.
- Click Add.
Connection Settings
Section titled “Connection Settings”| Parameter | Description |
|---|---|
| Group ID | A string you define; identifies the consumer group this integration belongs to (e.g. thingsboard-kafka-group). All instances sharing the same Group ID split the partition load, so each record is delivered to only one instance. |
| Client ID | A string you define; labels this consumer client for monitoring and logging (e.g. thingsboard-kafka-client-01). Must be unique per running consumer if you need to distinguish instances in Kafka metrics. |
| Bootstrap Servers | Comma-separated list of Kafka broker addresses in host:port format, e.g. localhost:9092. Used to establish the initial connection to the cluster. |
| Poll Interval | How often the integration polls Kafka for new records, in milliseconds. Default: 5000. |
| Topics | Comma-separated list of Kafka topics to subscribe to, e.g. my-topic. |
| Auto Create Topics | When enabled, ThingsBoard automatically creates any subscribed topics that do not already exist on the broker. |
| Other Properties | Additional Kafka consumer properties as key-value pairs. Use this for security configuration such as SASL/SSL when connecting to a secured broker. The exact keys and values depend on your broker/provider — consult its documentation. |
| Execute Remotely | When enabled, ThingsBoard generates an Integration key and Integration secret, letting the integration run as a separate process outside the ThingsBoard cluster — useful when it must reside in a DMZ or on an on-premises gateway. |
Test Uplink
Section titled “Test Uplink”Publish a test record to the topic the integration subscribes to, then optionally confirm it landed on the topic. Run the commands from the Kafka install directory (e.g. /opt/kafka).
Produce a Test Record
Section titled “Produce a Test Record”Use kafka-console-producer.sh to publish a test message. Replace localhost:9092 with your broker address and my-topic with your configured topic if they differ:
echo '{"EUI":"43T1YH-REE","ts":1638876127000,"data":"3d1f0059","port":10,"freq":24300,"rssi":-130,"serial":"230165HRT"}' | \ bin/kafka-console-producer.sh \ --bootstrap-server localhost:9092 \ --topic my-topic > /dev/null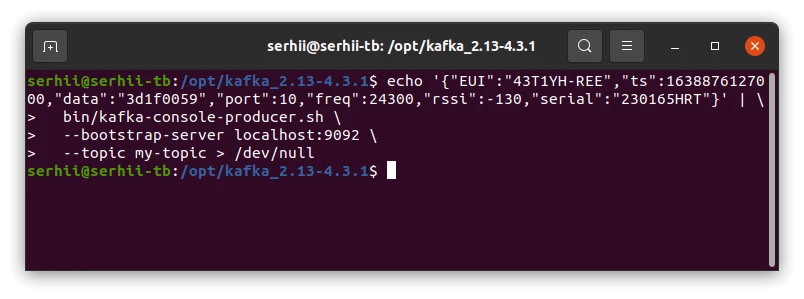
Verify the Record on the Topic (Optional)
bin/kafka-console-consumer.sh \ --bootstrap-server localhost:9092 \ --topic my-topic \ --from-beginningYou should see the record echoed back:
{"EUI":"43T1YH-REE","ts":1638876127000,"data":"3d1f0059","port":10,"freq":24300,"rssi":-130,"serial":"230165HRT"}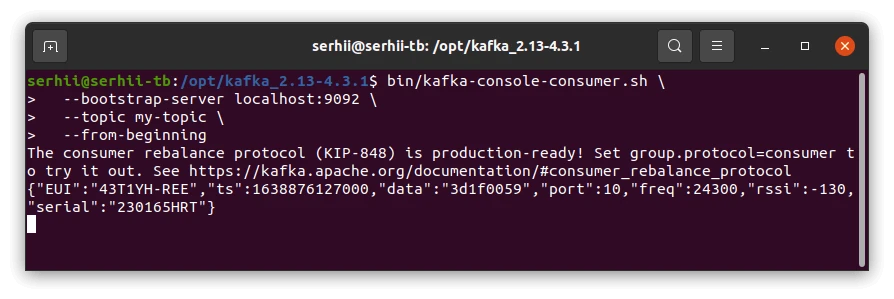
Verify Integration Events
Section titled “Verify Integration Events”Go to Integrations ⇾ Integrations, open Kafka integration, and click the Events tab. With Debug mode on, each consumed record appears as an event with Type: Uplink and Status: OK. Click the ⋮ icon in the Message column to inspect the raw record the integration received from Kafka.
Verify Converter Events
Section titled “Verify Converter Events”Go to Integrations ⇾ Data converters, open Kafka Uplink Converter, and click the Events tab. Click In to see the raw Kafka record the decoder received (EUI, ts, data, port, freq, rssi, serial), and Out to see the decoded deviceName, deviceType, attributes, and telemetry it produced.
Verify Device Provisioning
Section titled “Verify Device Provisioning”Go to Devices & assets ⇾ Devices — device 43T1YH-REE (Device profile: Monitoring sensor) is auto-created on the first record. Open it and check the Latest telemetry tab — you should see all 8 decoded keys: Temperature, Humidity, Fan, Port, Freq, Pressure, rssi, and serial.
Configure Downlink
Section titled “Configure Downlink”The Kafka Integration has no dedicated downlink converter. To publish messages from ThingsBoard back to Kafka, use the Kafka Rule Node in the Rule Engine. The node takes the message payload, publishes it as the Kafka record value, and on broker acknowledgment adds offset, partition, and topic to the message metadata.
The steps below test downlink entirely on the local setup — self-hosted ThingsBoard and the Kafka broker on the same machine. The idea: add a Kafka rule node that publishes to a separate downlink topic, then trigger it by updating a shared attribute on device 43T1YH-REE and confirm the value with a console consumer.
Prepare the Downlink Topic
Section titled “Prepare the Downlink Topic”Create the Downlink Topic
Run from the Kafka install directory (e.g. /opt/kafka):
bin/kafka-topics.sh --create \ --topic my-topic-downlink \ --bootstrap-server localhost:9092 \ --partitions 1 \ --replication-factor 1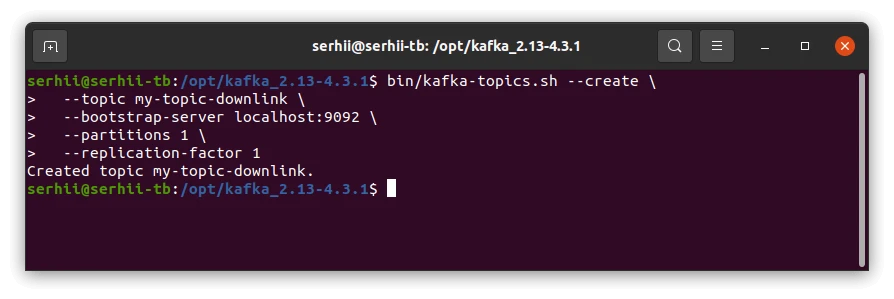
Start a Consumer on the Downlink Topic
In a second terminal, leave a consumer running so you can watch messages arrive:
bin/kafka-console-consumer.sh \ --bootstrap-server localhost:9092 \ --topic my-topic-downlink \ --from-beginning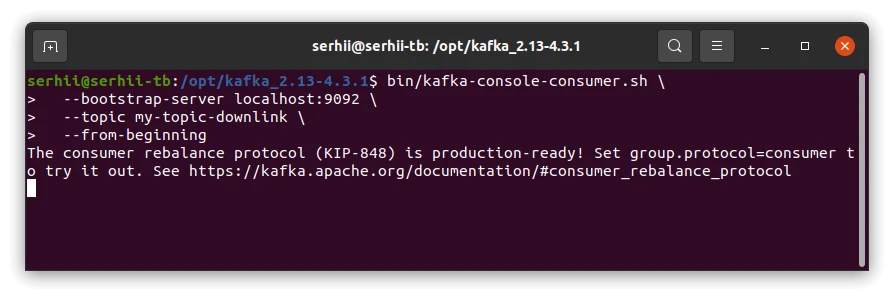
Configure the Root Rule Chain
Section titled “Configure the Root Rule Chain”Add and Configure the Kafka Rule Node
See the Kafka Rule Node reference for the full list of configuration options.
- Go to Data processing ⇾ Rule chains and open the Root Rule Chain (the chain that processes your device’s messages).
In the node palette on the left, search for kafka — it appears under the External category — and drag it onto the canvas. In the node dialog, set:
Field Value for this setup Name Kafka DownlinkTopic pattern my-topic-downlinkKey pattern (leave empty) Bootstrap servers localhost:9092Automatically retry times if fails 0(or default)Produces batch size in bytes 16384(default)Time to buffer locally (ms) default Client buffer max size in bytes default Number of acknowledgments default Other properties (leave empty — local PLAINTEXTbroker needs no auth)- Click Add. The Topic pattern supports templates (e.g.
${deviceType}-downlink), but a static name is fine for testing.
Wire the Node into the Rule Chain
The Kafka node publishes whatever message reaches it, so connect it to a message flow. For a quick end-to-end test, reuse the uplink you already have working:
- On the canvas, drag a connection from the Message Type Switch node to the new Kafka node.
- In the relation dialog, select the Attributes Updated label and confirm.
- Click Apply changes (top-right) to save the rule chain.
Now, whenever a shared attribute is updated on a device, its value is published to my-topic-downlink.
Trigger a Downlink
Section titled “Trigger a Downlink”Update a shared attribute on device 43T1YH-REE:
- Go to Devices & assets ⇾ Devices and open 43T1YH-REE.
- Open the Attributes tab and set the scope selector to Shared attributes.
- Click +, enter key
powerState, valueon(type String), and click Add.
The attribute update flows through the rule chain, and the Kafka node publishes it to the downlink topic.
Verify Delivery in Kafka
Section titled “Verify Delivery in Kafka”Switch to the consumer terminal from Start a Consumer on the Downlink Topic — the record should appear on my-topic-downlink:
{"powerState":"on"}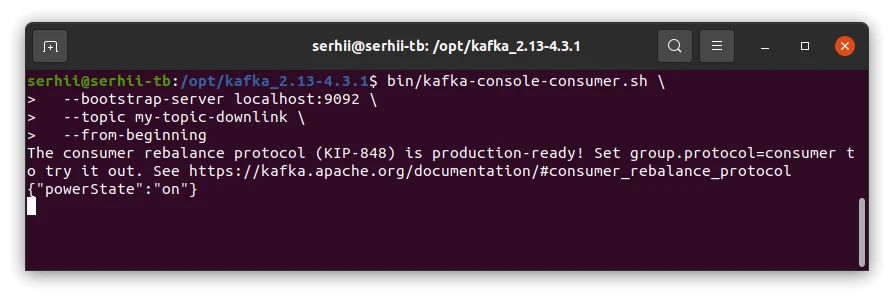
Verify Rule Node Events
Section titled “Verify Rule Node Events”Open the Root Rule Chain, click the Kafka Downlink node, and open its Events tab. Each trigger produces two events — an IN event (Relation Type: Attributes Updated) for the message entering the node, and an OUT event (Relation Type: Success) for the published record. Click Data on the OUT event to see the published payload (e.g. {"powerState":"on"}), and Metadata to see the publish result — offset, partition, topic, the attribute scope (SHARED_SCOPE), and the user who made the change.
Troubleshooting
Section titled “Troubleshooting”This section covers the most common problems encountered when setting up and running the Kafka integration. Each entry describes the symptom, the most likely cause, and the steps to resolve it.
No Records Consumed
| Symptom | Cause | Fix |
|---|---|---|
| No records consumed in ThingsBoard | Wrong Bootstrap servers | Open the integration and confirm the broker host:port values match your cluster. |
| No records consumed | Wrong Topics | Confirm the producer publishes to the same topic name configured in the integration. |
| No records consumed | Topic does not exist | Enable Auto create topics, or create the topic on the broker manually. |
| No records consumed | SASL/SSL misconfigured | For a secured broker, verify the Other properties entries (security protocol, SASL mechanism, credentials) match what your broker/provider requires. |
| No records consumed | Integration is disabled | Open the integration and confirm Enable integration is on. |
Record Consumed but Device Not Created
| Symptom | Cause | Fix |
|---|---|---|
| Record consumed, no device in ThingsBoard | Allow create devices or assets is disabled | Open the integration, click the pencil icon, and enable Allow create devices or assets in the Basic settings step. |
| Record consumed, no device in ThingsBoard | Converter returns an empty device name | Open the uplink converter Events tab and inspect the Out panel — confirm deviceName is present and non-empty. |
| Record consumed, converter shows error | TBEL or JavaScript exception in the decoder | Open the uplink converter Events tab, filter by Error, and inspect the stack trace. Common causes: wrong byte offset, malformed JSON, or undefined field. |
Downlink Not Published
| Symptom | Cause | Fix |
|---|---|---|
| Kafka Rule Node Events tab is empty | Rule chain path never reaches the node | Confirm the node is connected after the node that produces the outgoing message via the correct relation. |
| Runaway processing / message loop | Integration and Rule Node use the same topic | Point the Kafka Rule Node to a separate downlink topic. |
| Node runs but nothing on the broker | Wrong bootstrap servers or serializers | Open the node’s Events → Out panel and verify the topic, bootstrap servers, and serializers. |
| Authentication errors to a secured broker | Missing/invalid SASL/SSL properties | Add the required SASL/SSL entries to the node’s Other properties and verify the credentials against your broker/provider’s documentation. |
How to Read Debug Events
- Go to Integrations ⇾ Integrations, open Kafka integration, and click the Events tab.
- Click an event row to inspect:
- In — the raw record value received from Kafka before processing.
- Out — what the converter returned: device name, attributes, and telemetry values passed to ThingsBoard.
- Error — error text and stack trace, if processing failed. Enable Debug mode on the integration to capture all raw input/output events. Starting from ThingsBoard 3.9, full debug events are stored only during the first hour — afterwards, only error events are retained. Disable debug mode once the issue is identified.
See Also
Section titled “See Also”- Integrations Overview — how ThingsBoard connects to external platforms and how uplink/downlink flow works
- Uplink Data Converter — full decoder function reference: input parameters, output fields, and scripting patterns
- Kafka Rule Node — publish messages from the Rule Engine back to a Kafka topic (downlink)
- Remote Integration — run the integration outside the ThingsBoard server to reach a broker on a private network
- TBEL scripting reference — built-in functions and operators for writing converter scripts
- Rule Engine — how the rule chain routes messages to the Kafka Rule Node
Was this helpful?