AWS SQS Integration
AWS SQS Integration connects ThingsBoard to an Amazon SQS queue. ThingsBoard polls the queue, and an uplink data converter transforms each message into device or asset data, including telemetry and attributes. The integration is uplink-only.
Use AWS SQS Integration when:
- Devices, AWS IoT rules, AWS Lambda functions, or backend services already send data to an SQS queue.
- The queue must buffer data while ThingsBoard is unavailable: messages wait in the queue until the integration reads them.
- One queue carries data for many devices: the converter resolves each device from the message body.
Architecture
Section titled “Architecture”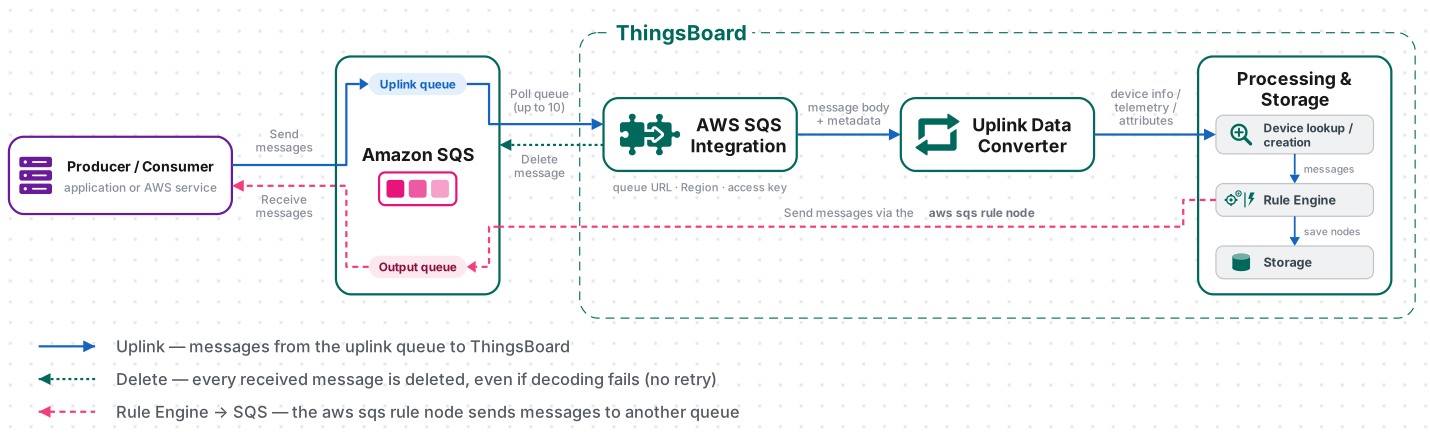
- Receive data. A producer sends a message to the queue. The integration requests up to 10 messages at a time.
- Decode the payload. The uplink converter receives the message body, identifies the device or asset, and extracts attributes and telemetry.
- Process the message. ThingsBoard processes the converted data through the Rule Engine. If Allow create devices or assets is enabled, ThingsBoard creates an entity that does not exist yet.
- Delete the message. The integration deletes each message from the queue after processing it.
To send data from ThingsBoard to an SQS queue, use the aws sqs rule node (see Send Data to AWS SQS).
Prerequisites
Section titled “Prerequisites”- Access to ThingsBoard Cloud with integrations enabled for your tenant.
- Permission to create integrations and data converters.
- An AWS account with permission to create SQS queues, IAM users, and IAM policies.
Prepare AWS SQS
Section titled “Prepare AWS SQS”Create a queue and an IAM user whose access key the integration uses.
Create a Queue
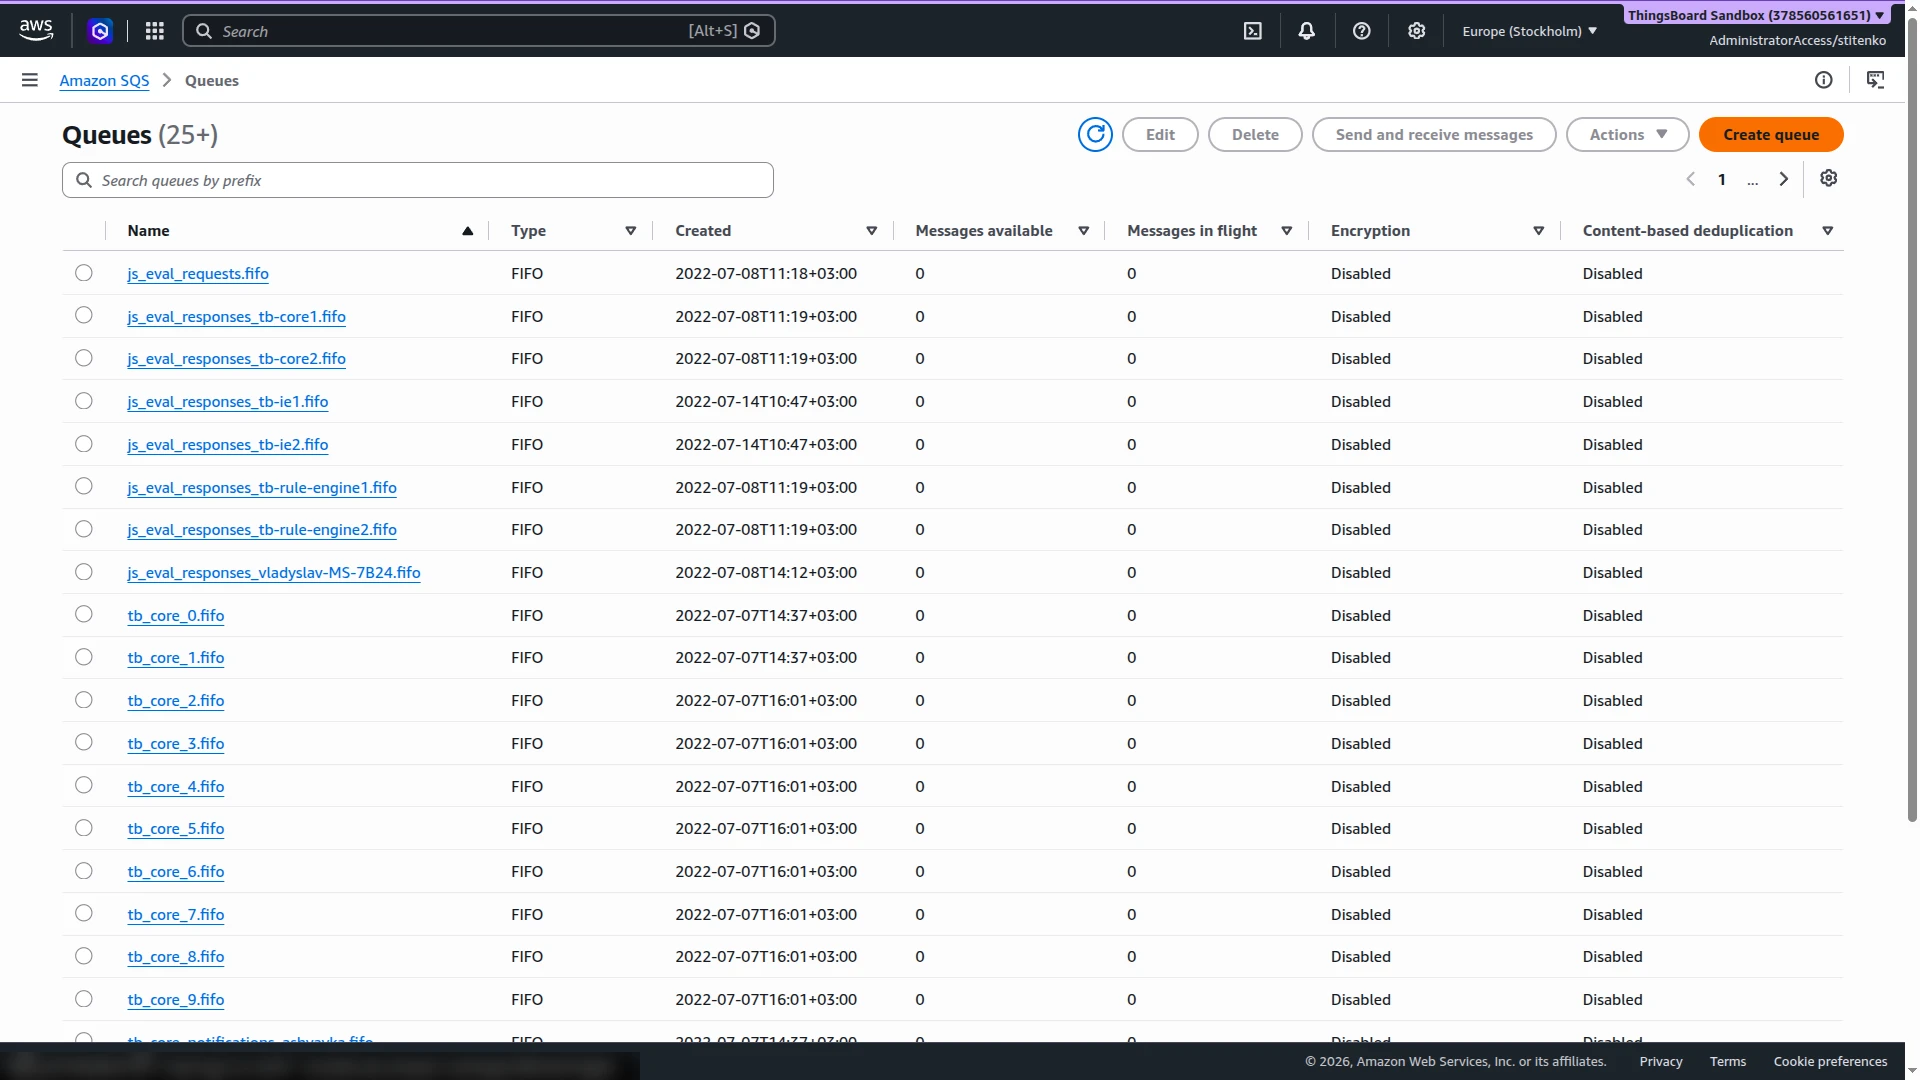
Section titled “Create a Queue”The SQS console shows only the queues of the selected Region. Check the Region in the top-right corner of the console before you start.
- Open the Amazon SQS console, select a Region, for example
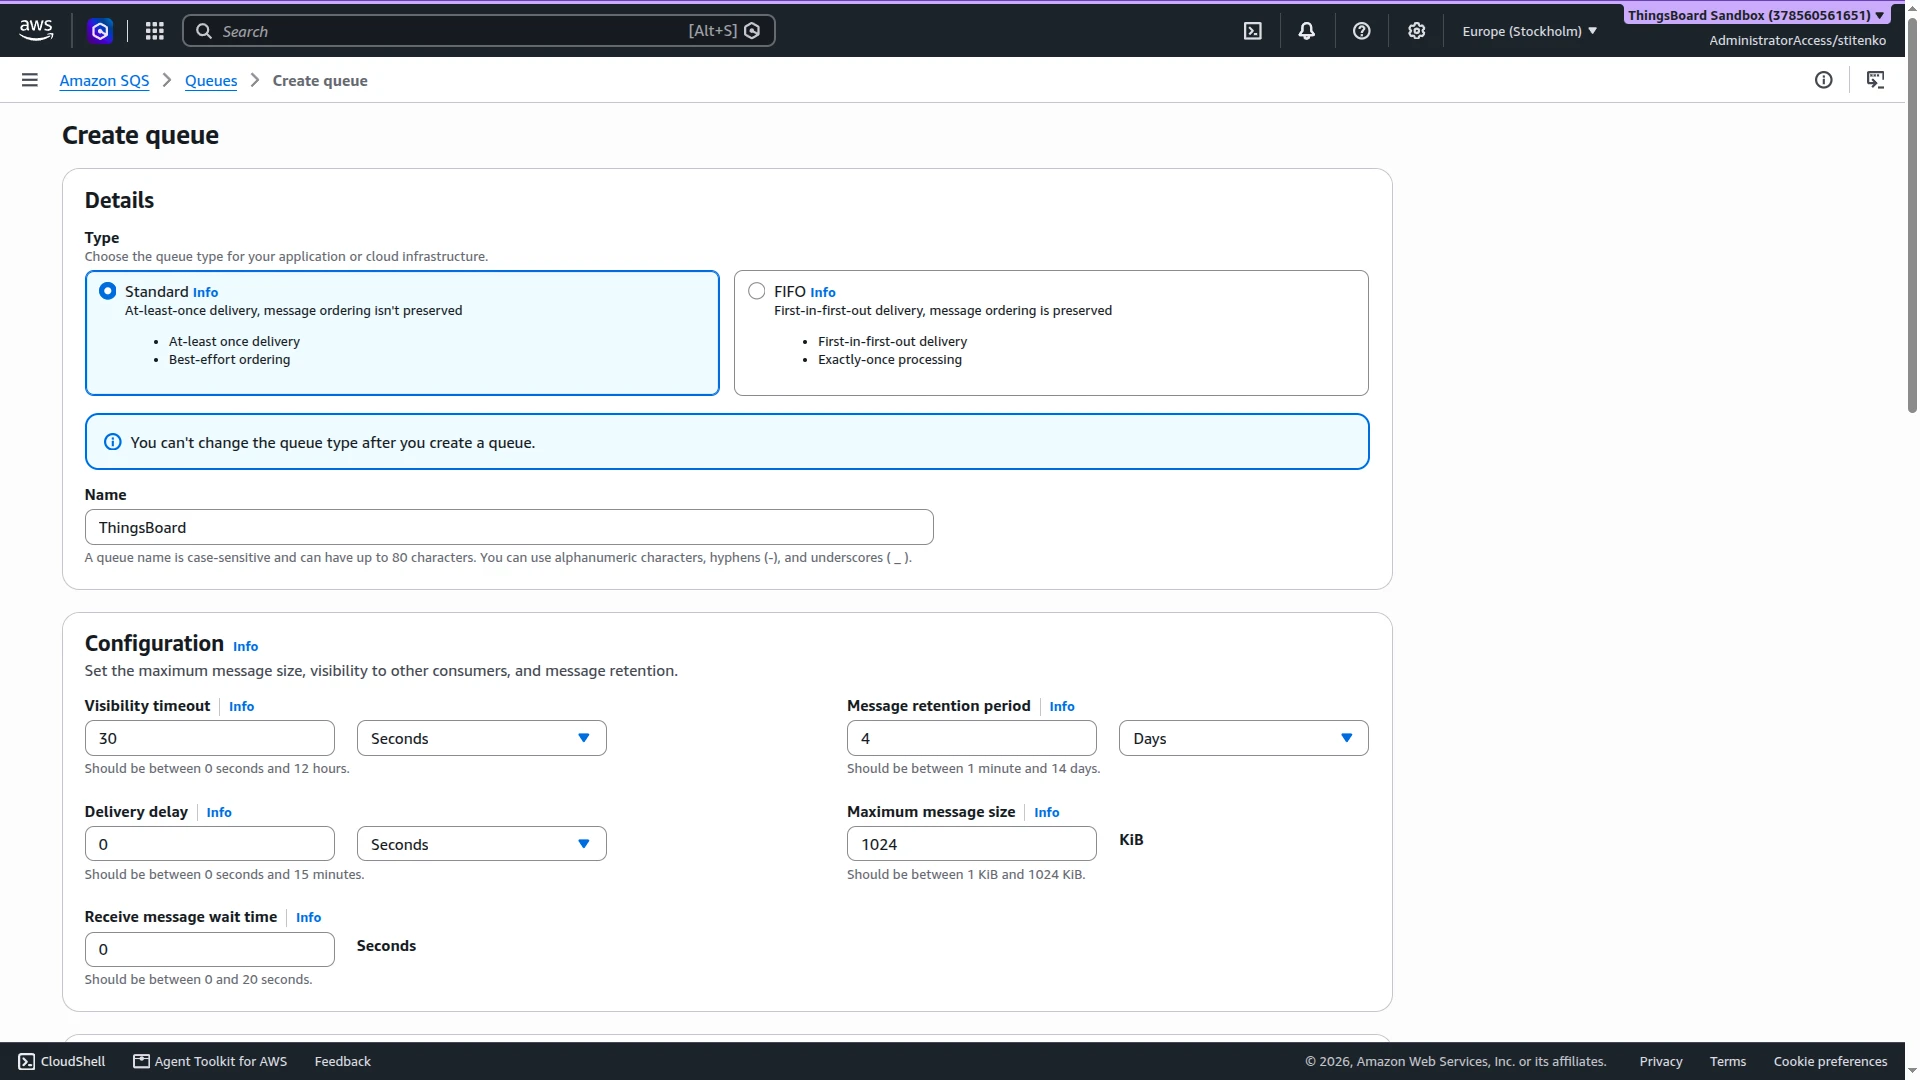
eu-north-1, and click Create queue. - Select the queue Type. You cannot change it after the queue is created.
- Standard — nearly unlimited throughput, at-least-once delivery, best-effort ordering.
- FIFO — first-in-first-out order and exactly-once processing. The name must end with
.fifo.
- Enter a Name, for example
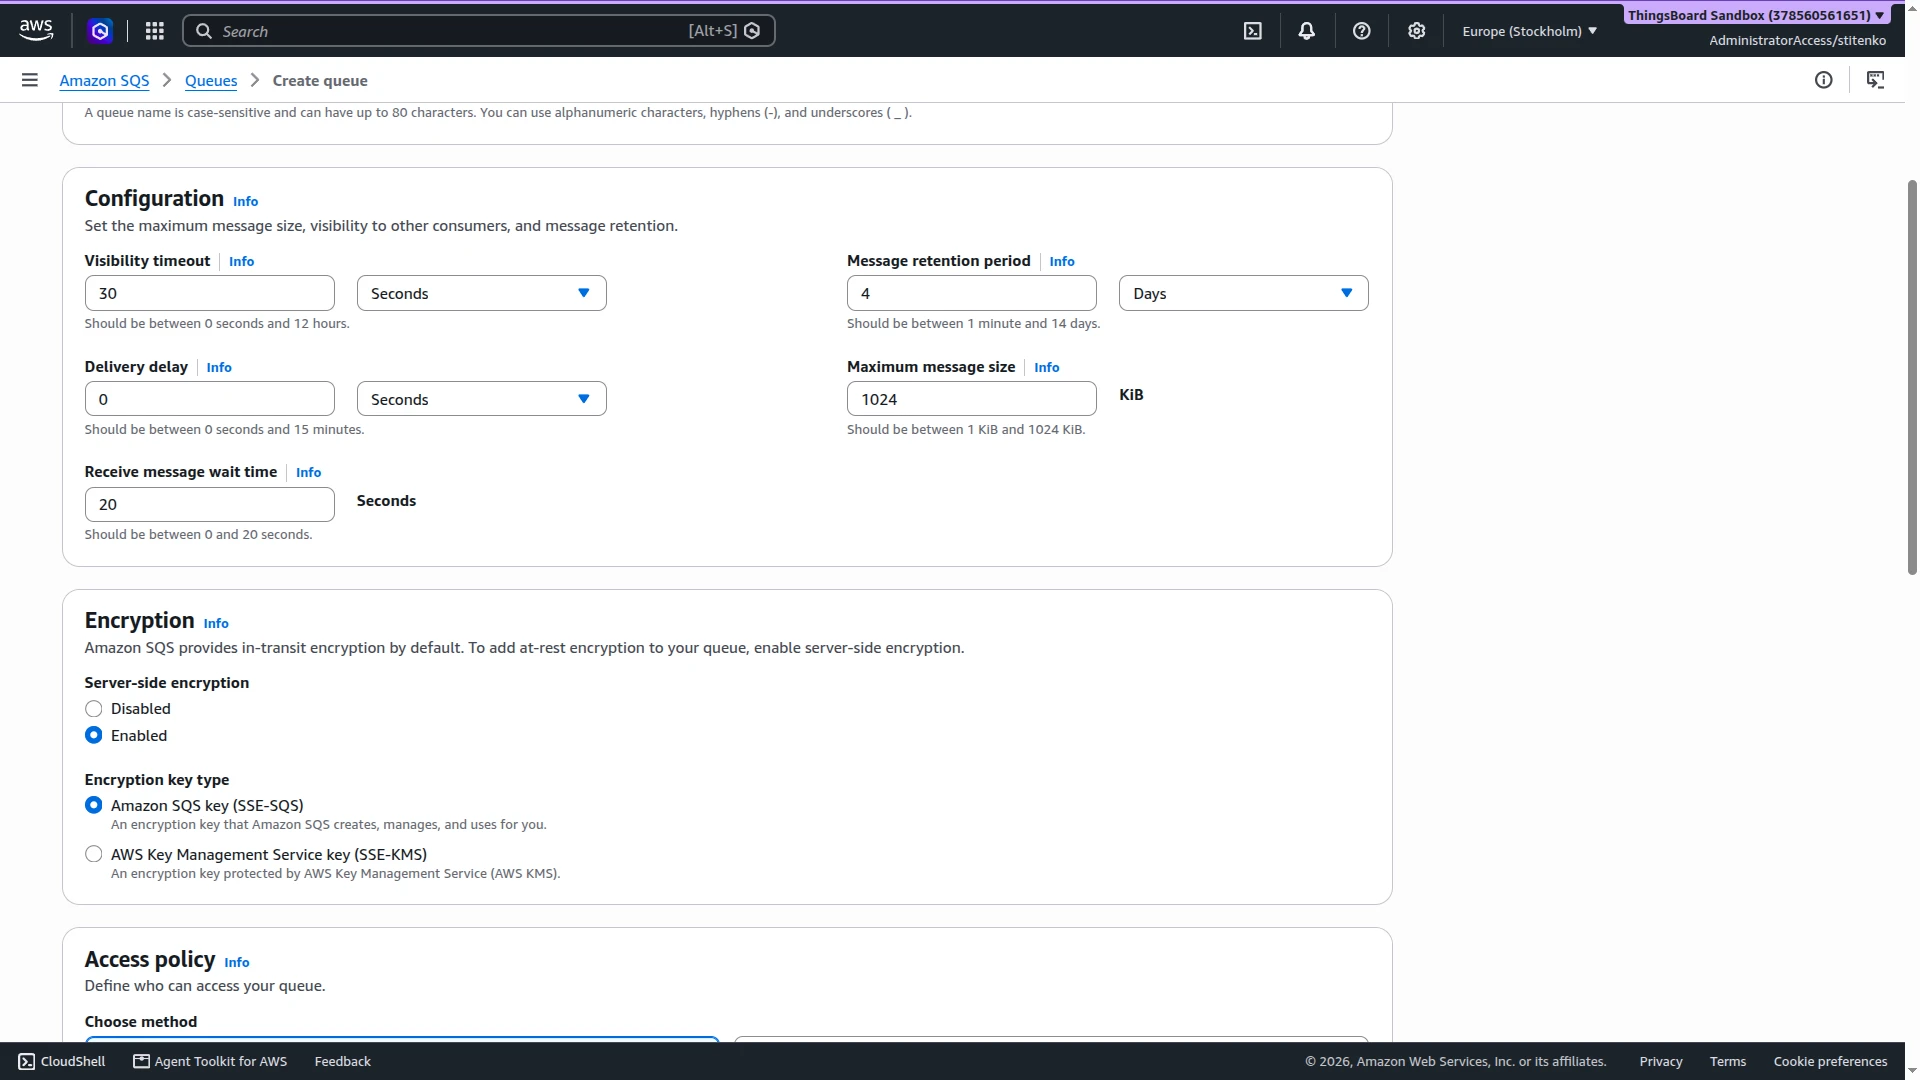
ThingsBoard. - Optional: in Configuration, set Receive message wait time to
20seconds. The default0makes every poll of an empty queue return at once; with20, the poll waits for messages, which reduces the number of requests. - In Encryption, keep Server-side encryption enabled with Amazon SQS key (SSE-SQS).
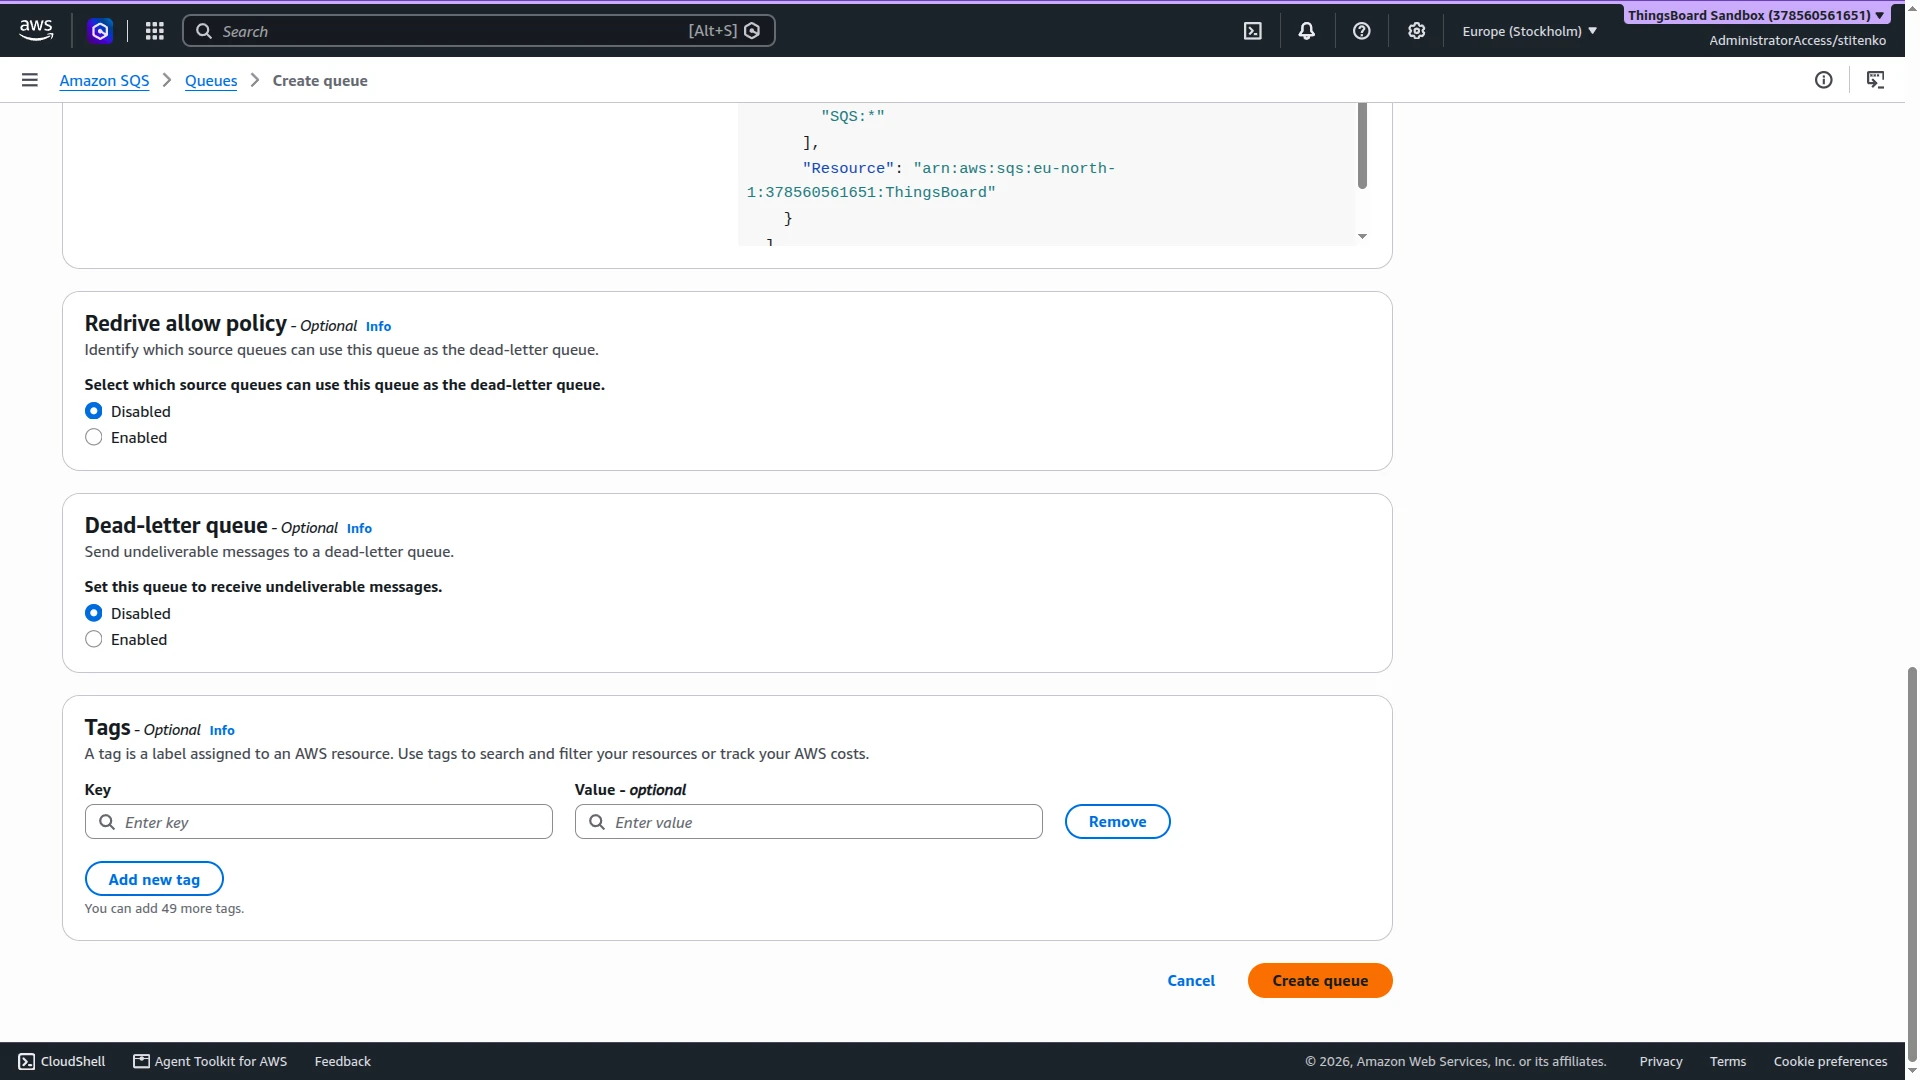
- Leave Access policy, Redrive allow policy, Dead-letter queue, and Tags at their defaults, and click Create queue.
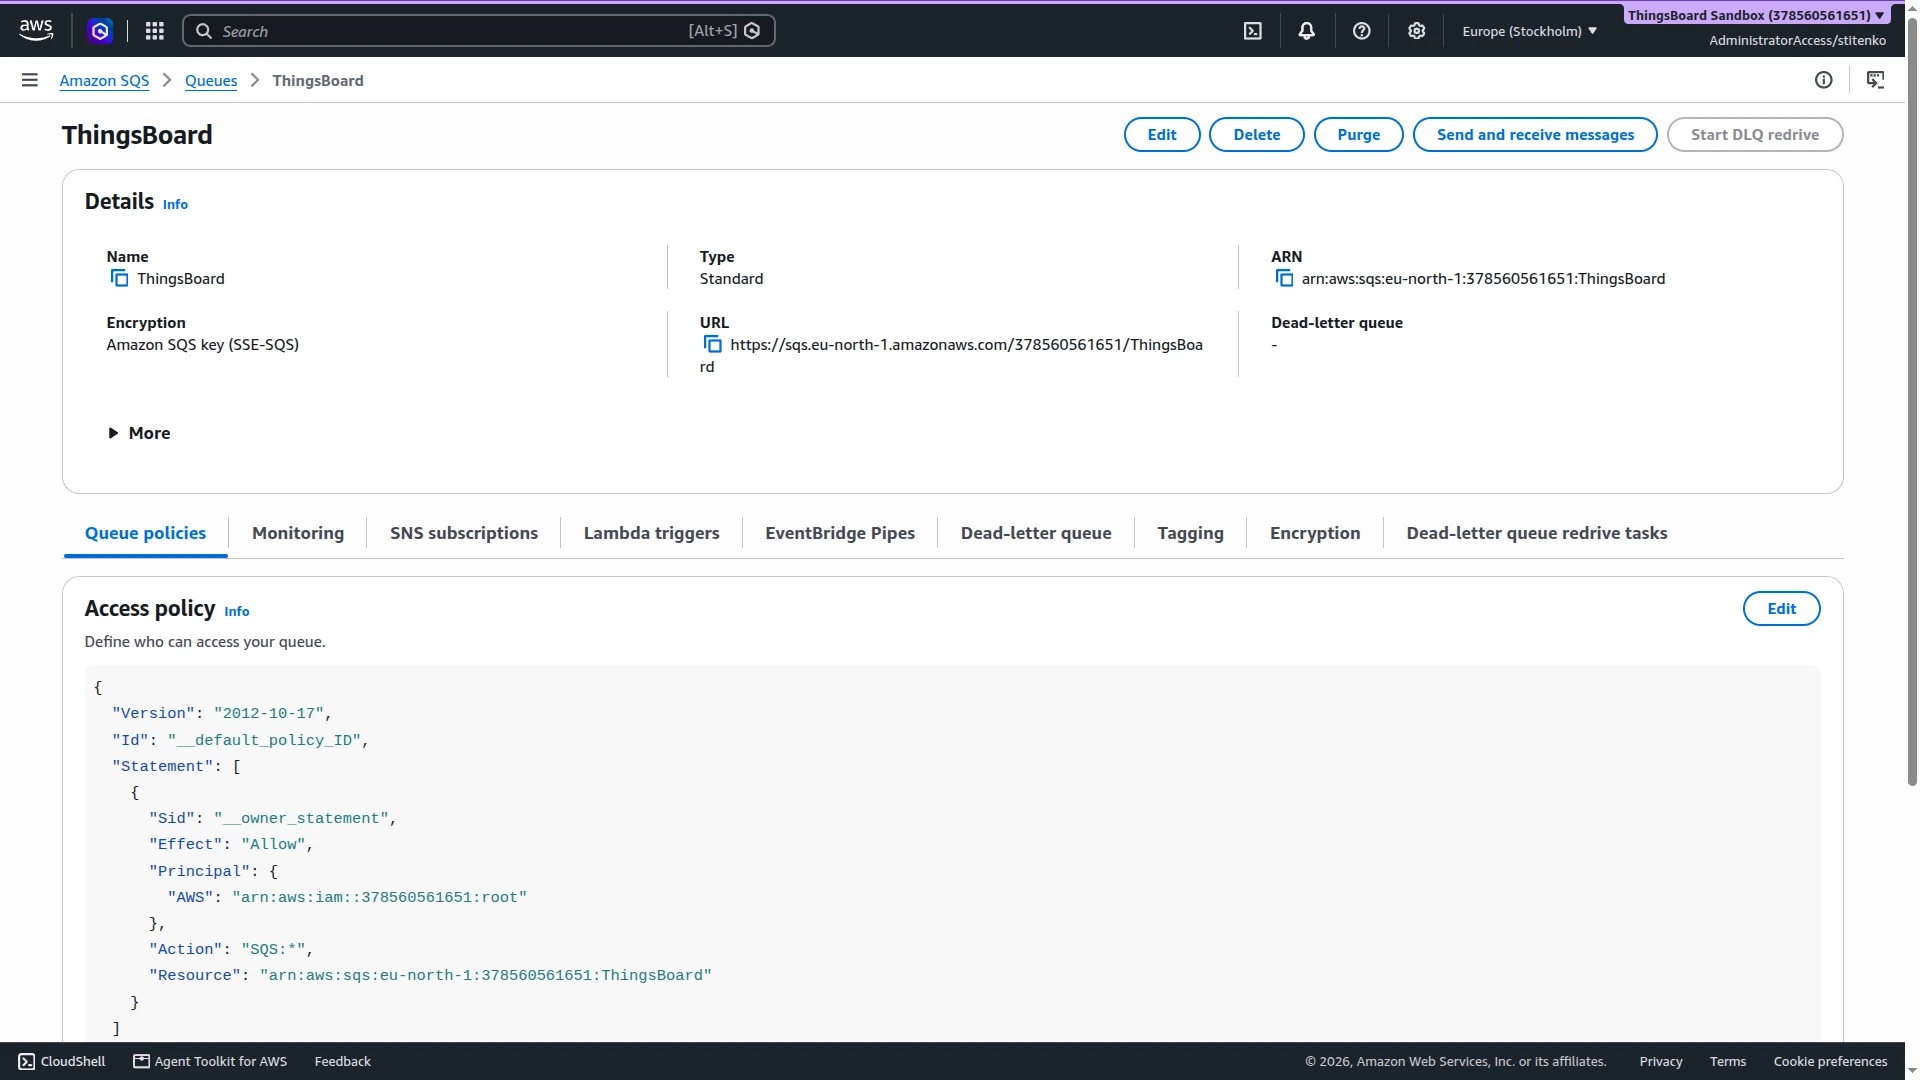
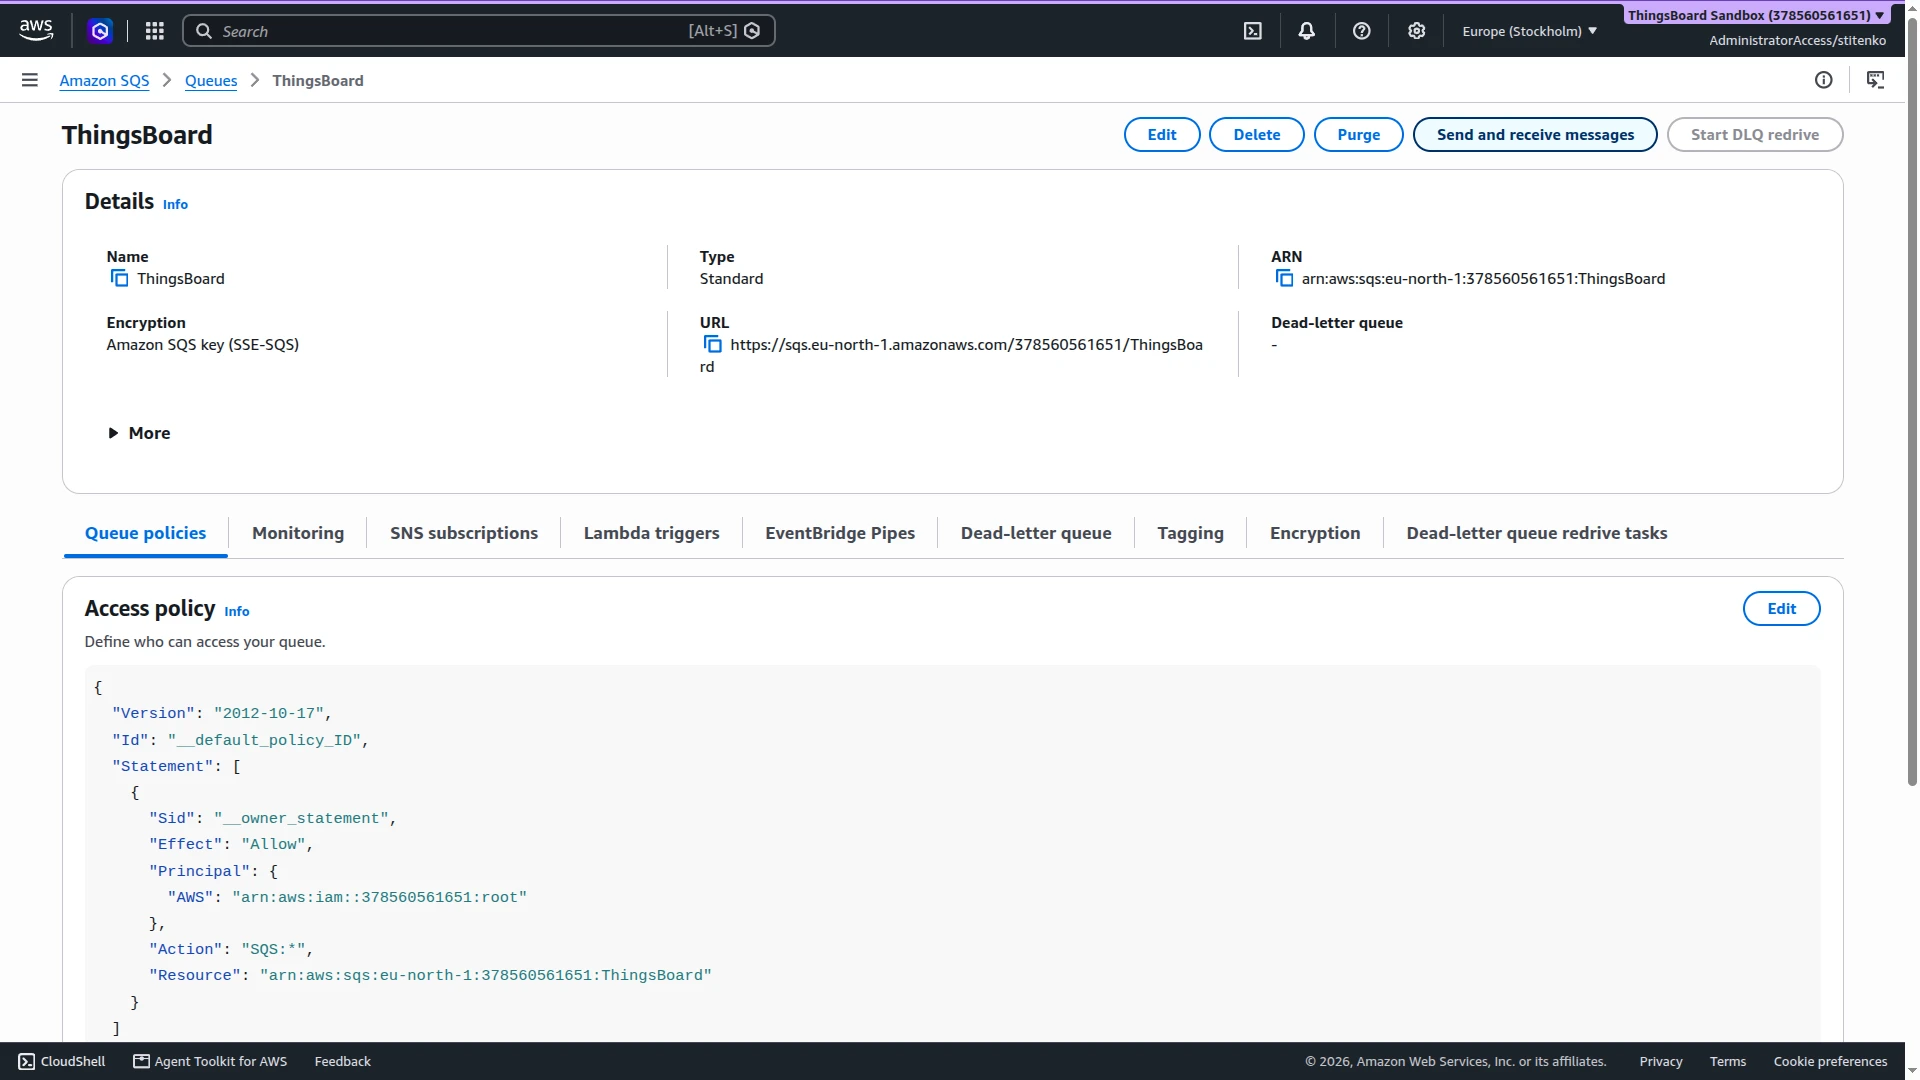
- On the queue page, copy the URL, for example
https://sqs.eu-north-1.amazonaws.com/378560561651/ThingsBoard, and the ARN for the IAM policy.
Create IAM Credentials
Section titled “Create IAM Credentials”The integration needs two actions on the queue: sqs:ReceiveMessage and sqs:DeleteMessage.
-
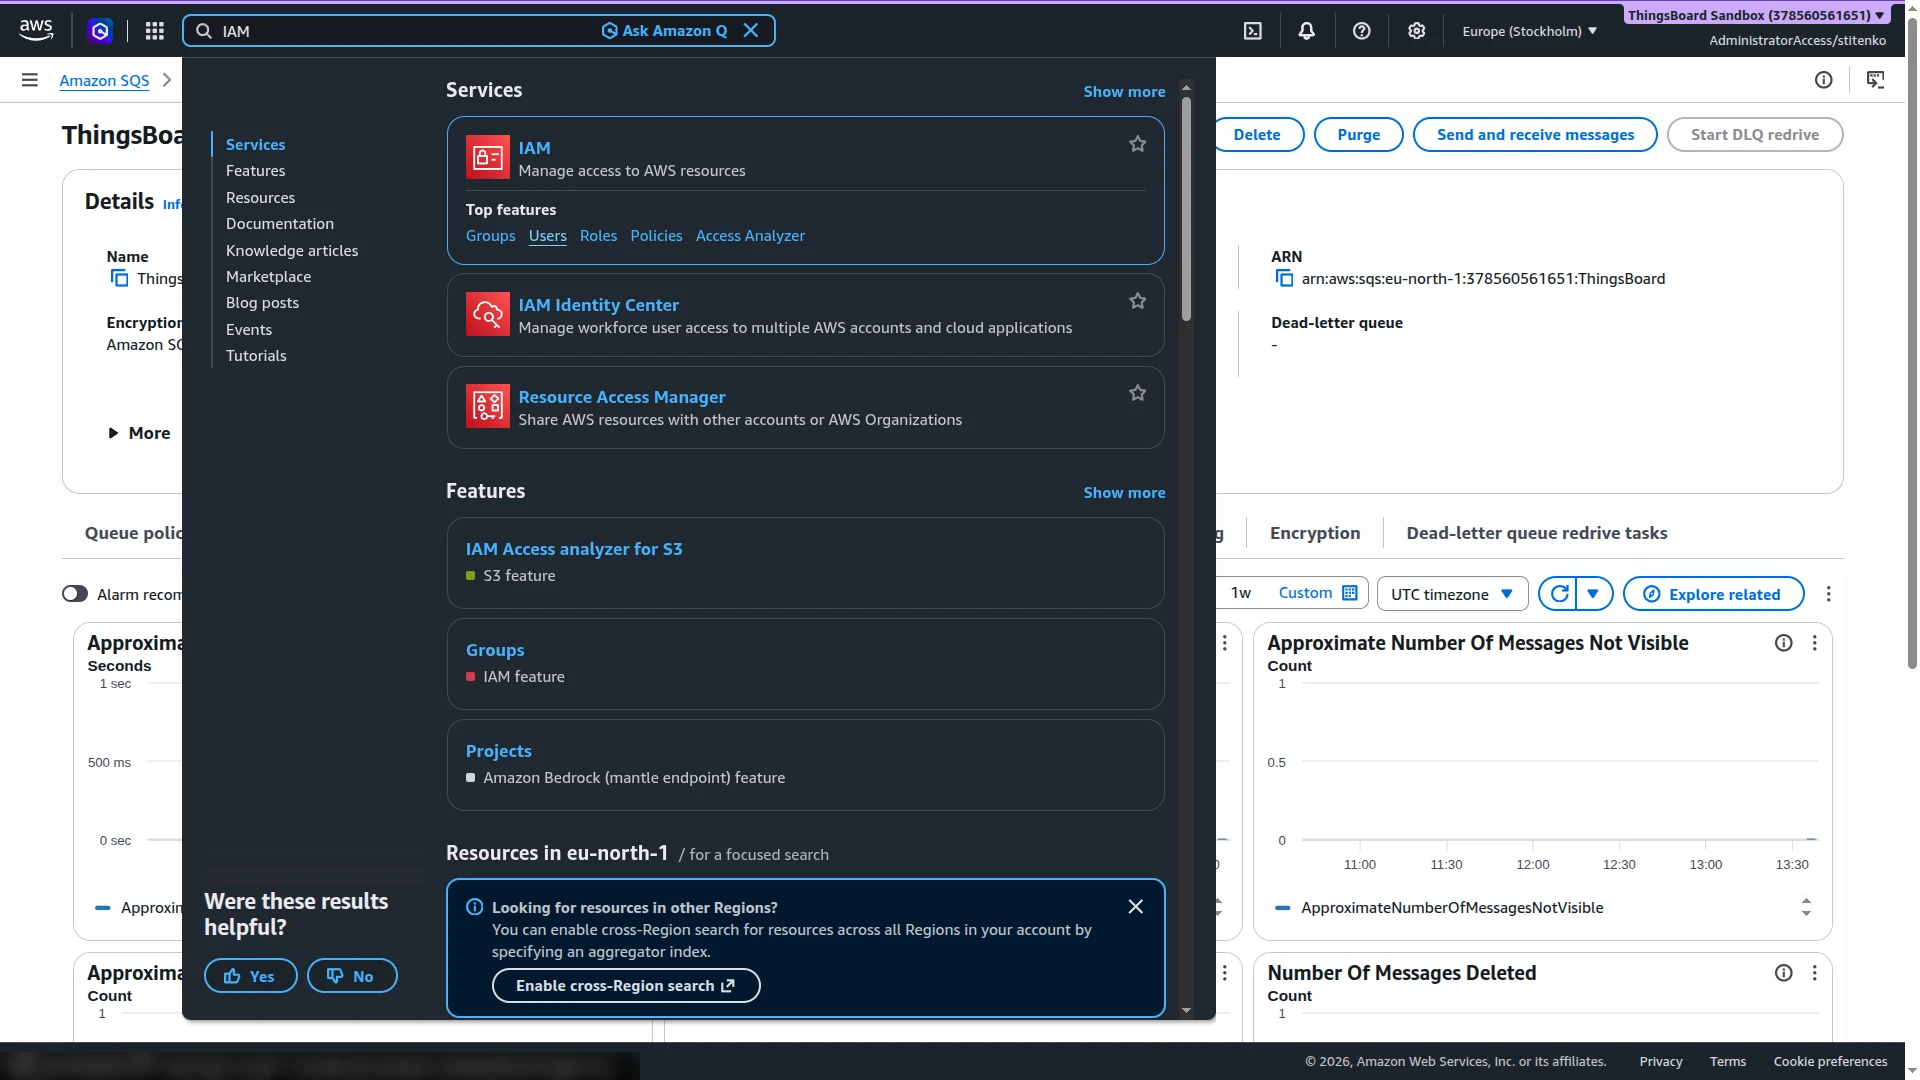
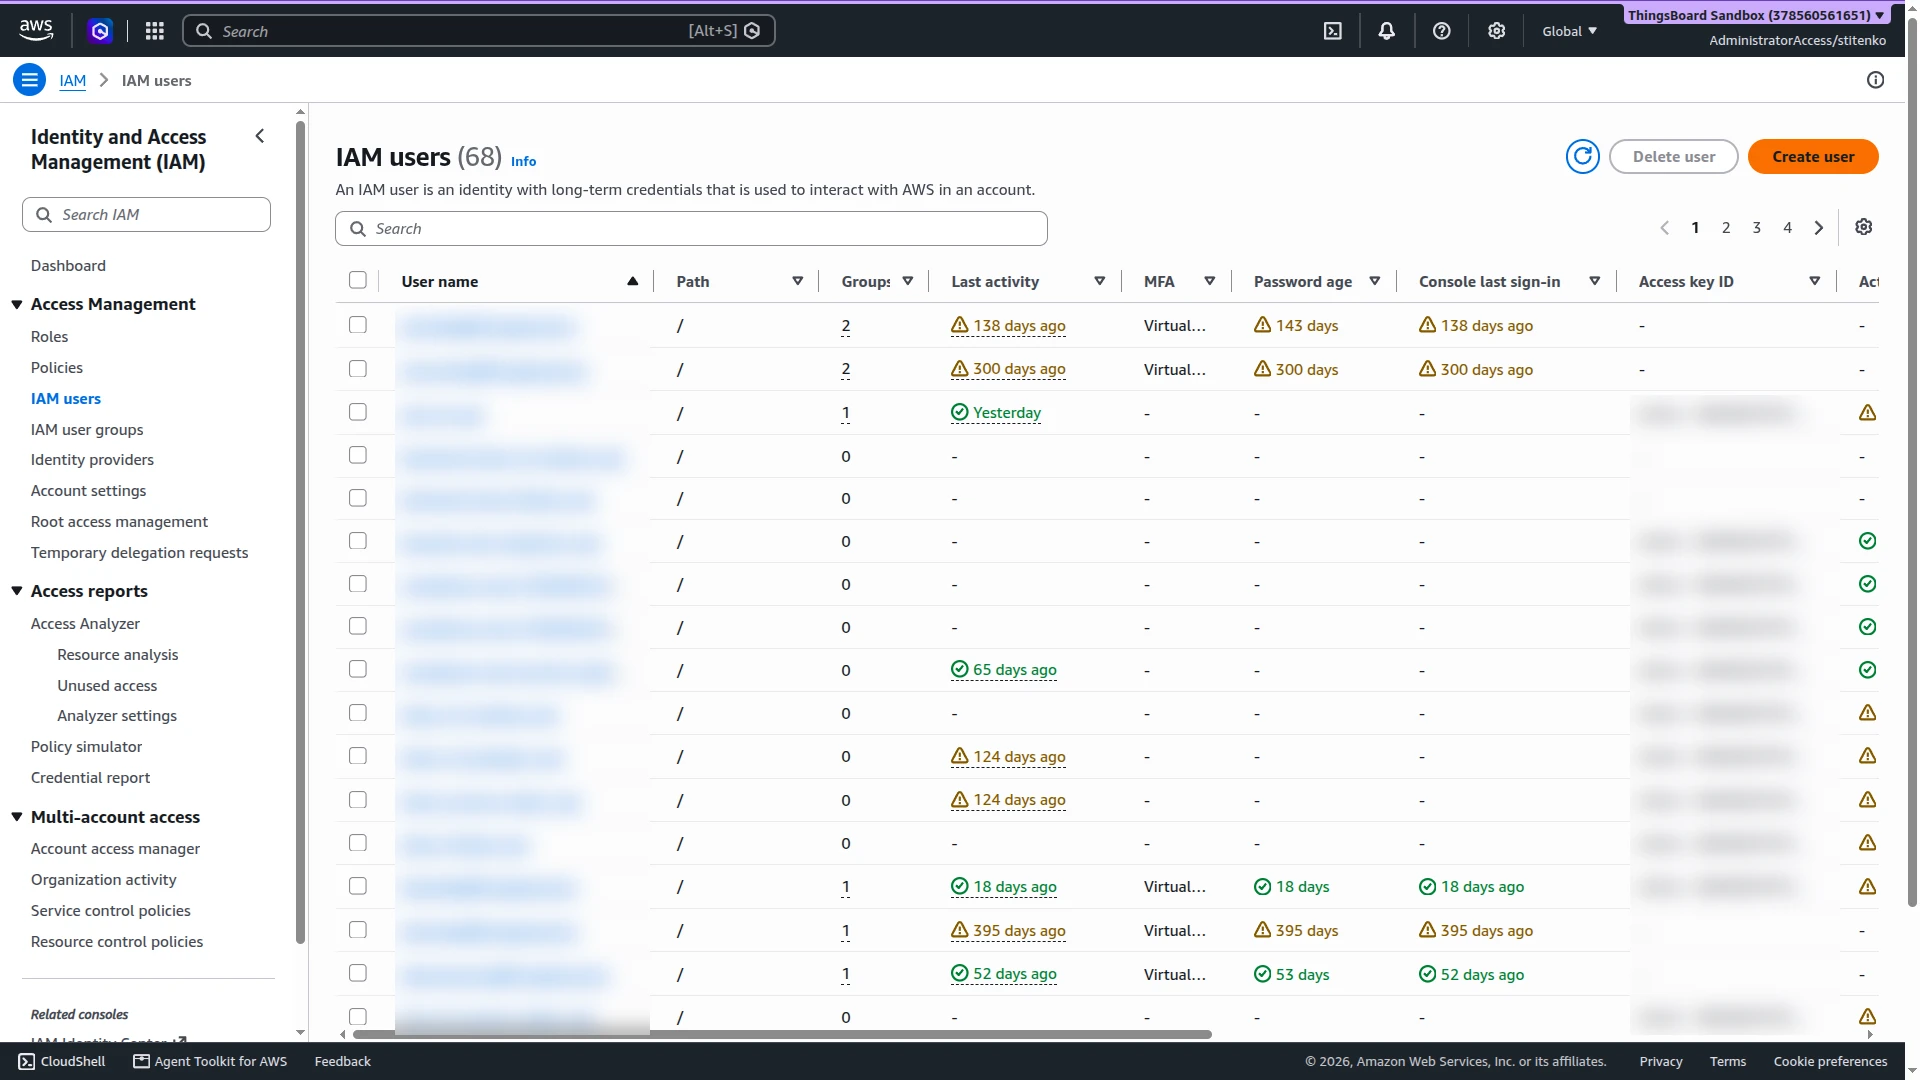
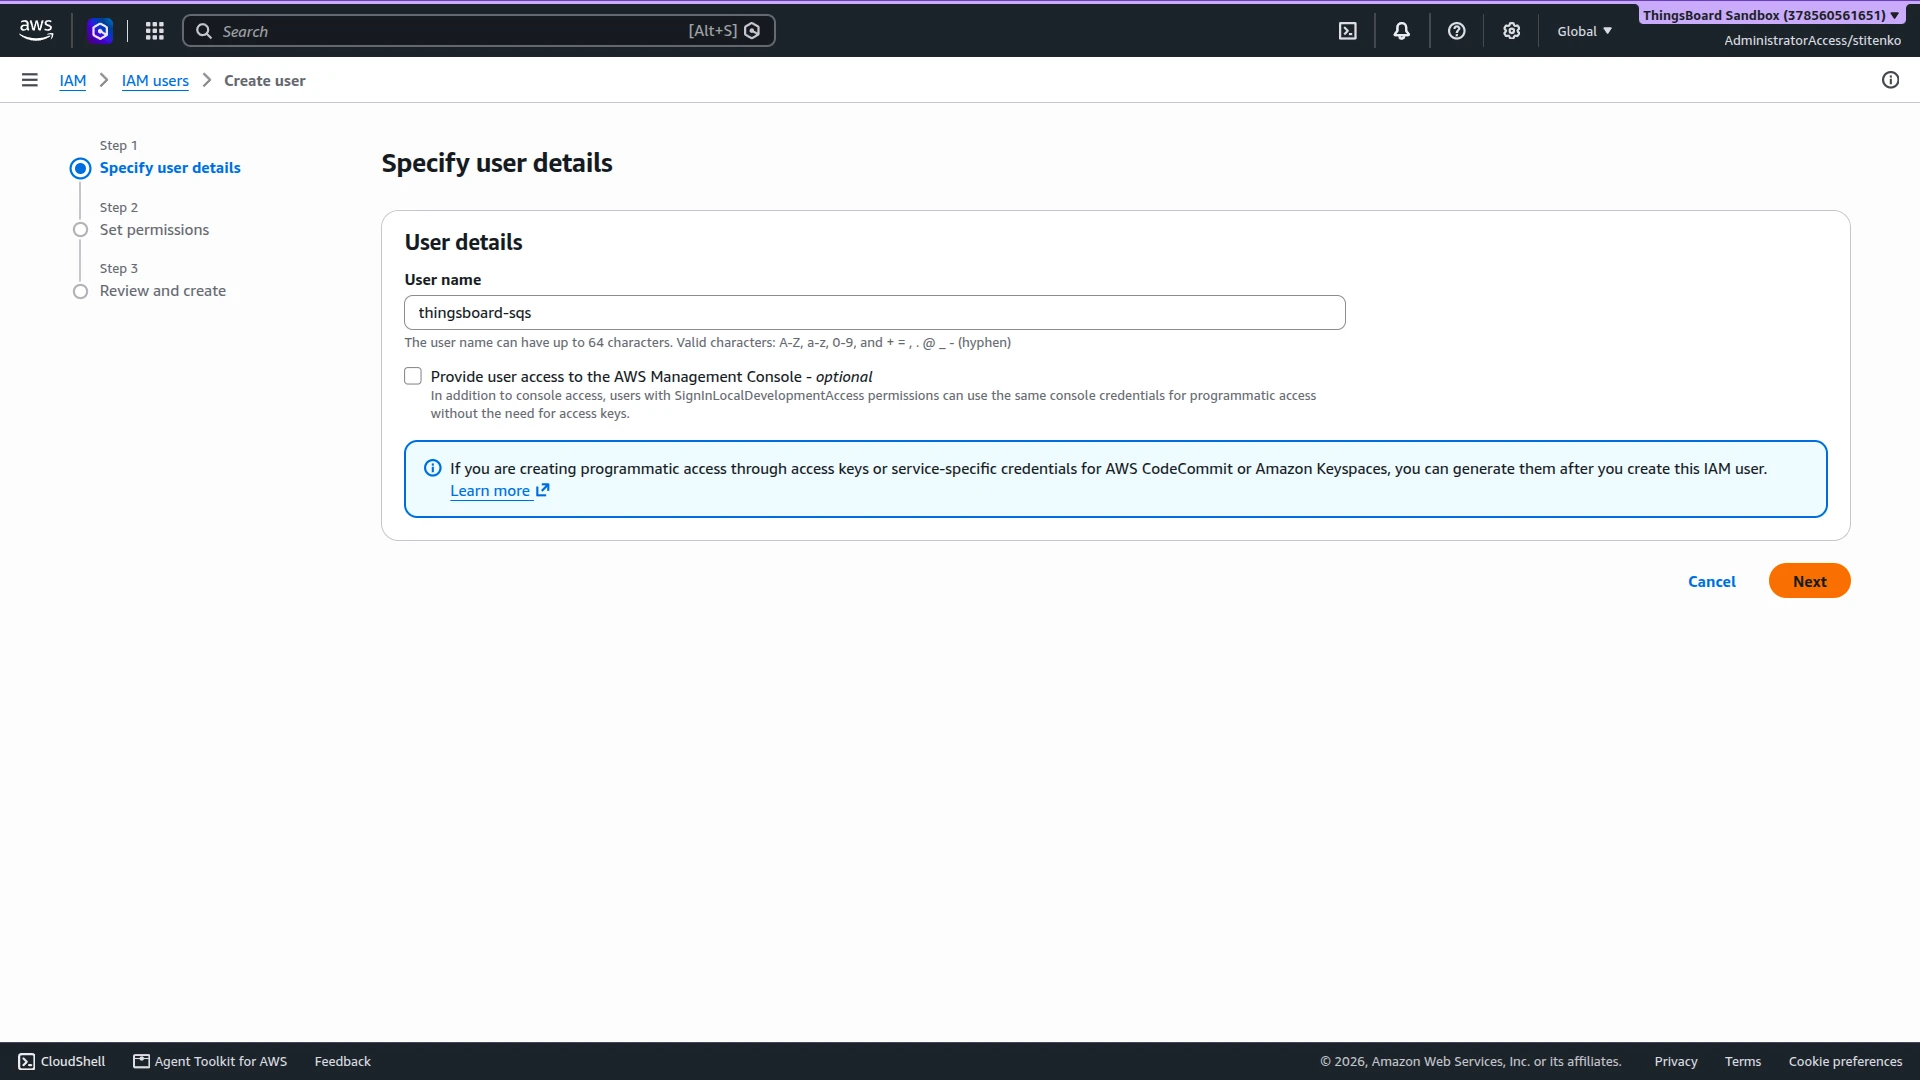
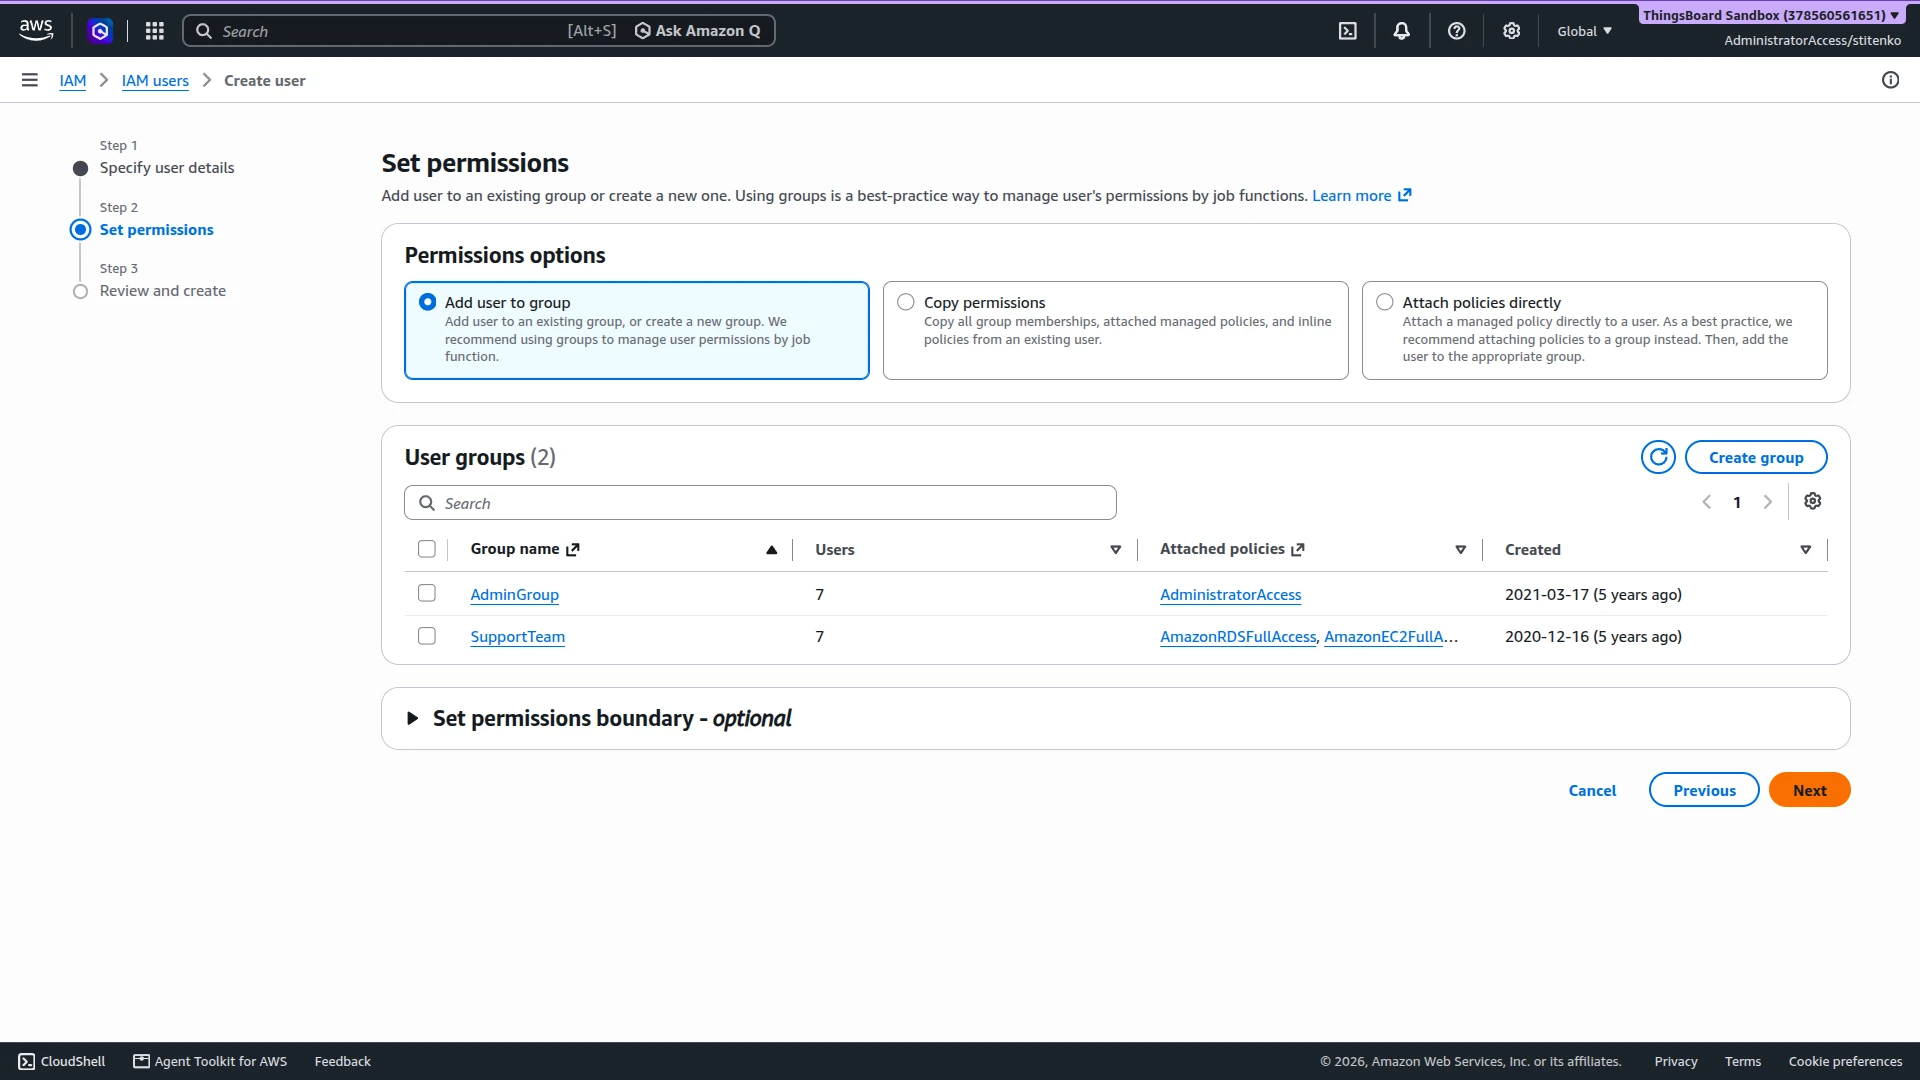
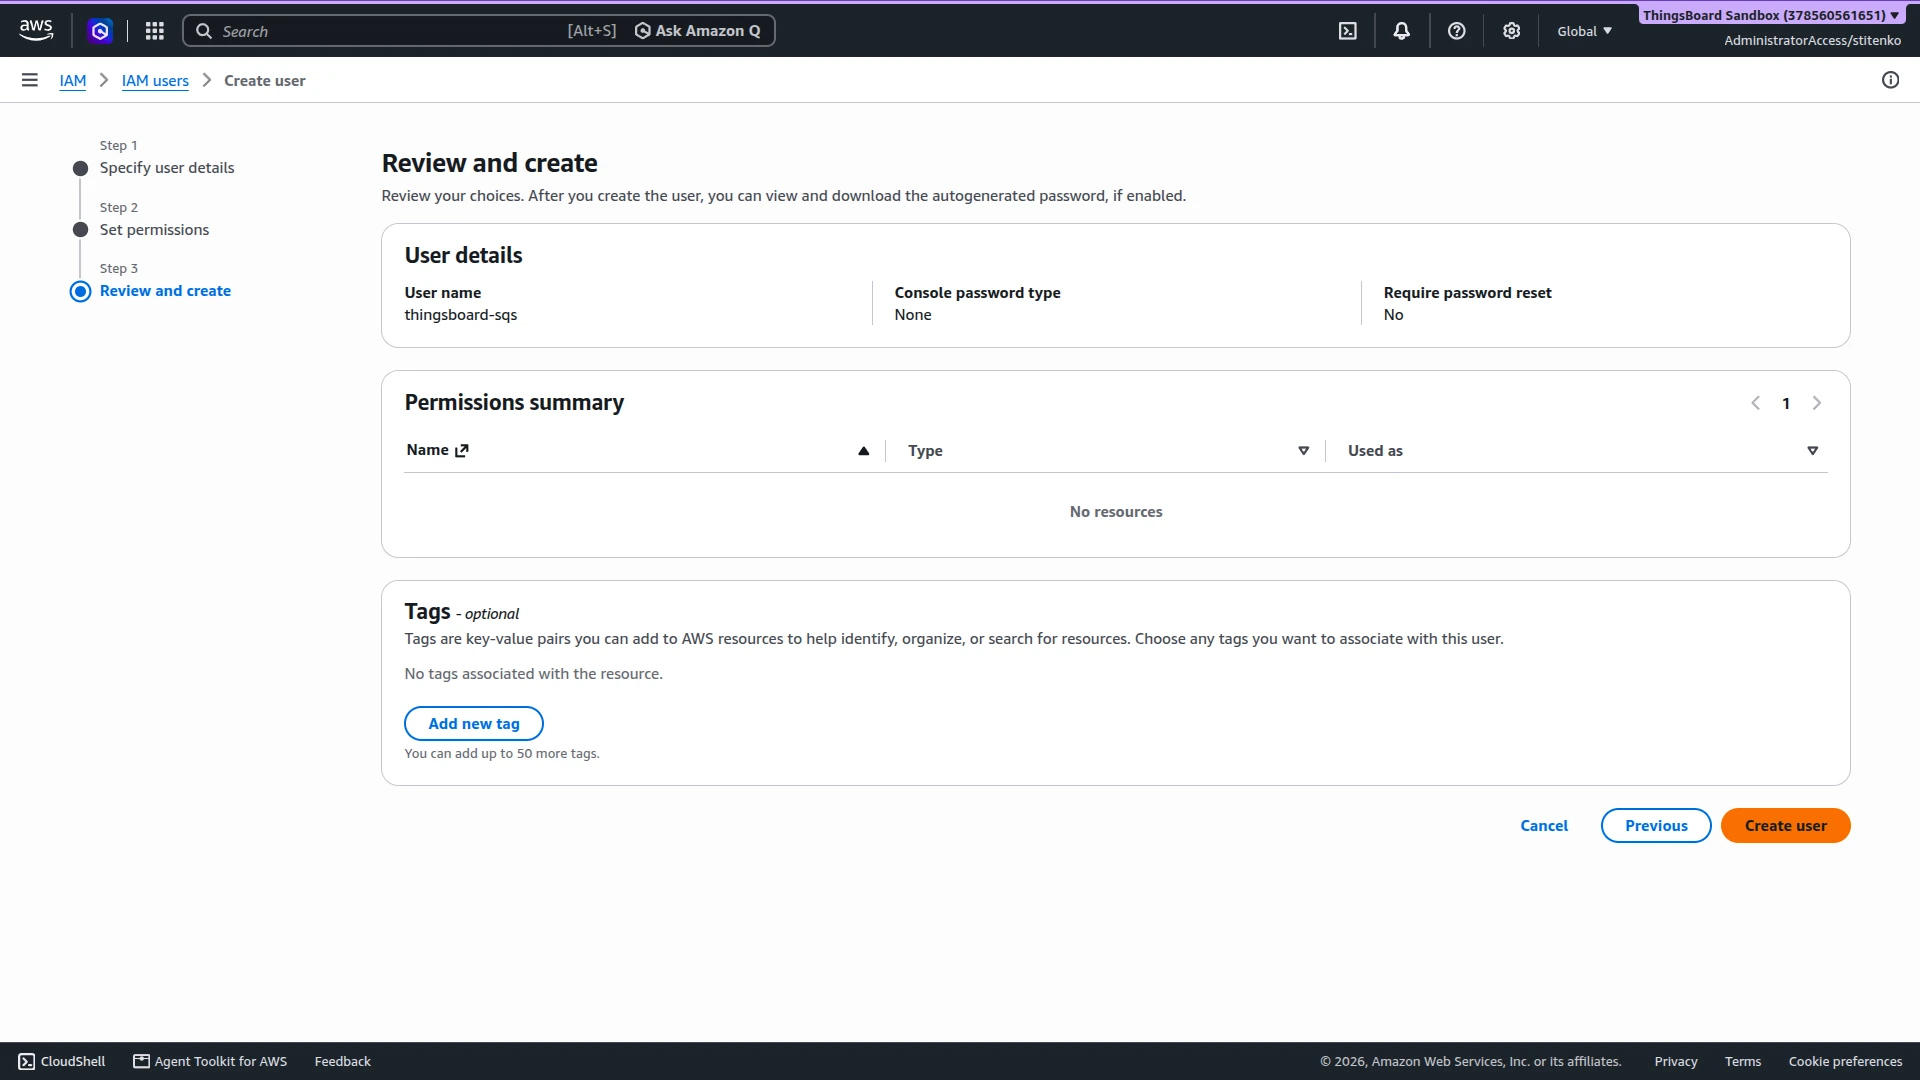
Create the user. In the AWS console, open IAM ⇾ IAM users and click Create user.
- Specify user details — enter a name, for example
thingsboard-sqs. Leave Provide user access to the AWS Management Console off: the integration needs only an access key. - Set permissions — select no group and no policy. The user gets only the policy from step 3.
- Review and create — click Create user.
- Specify user details — enter a name, for example
-
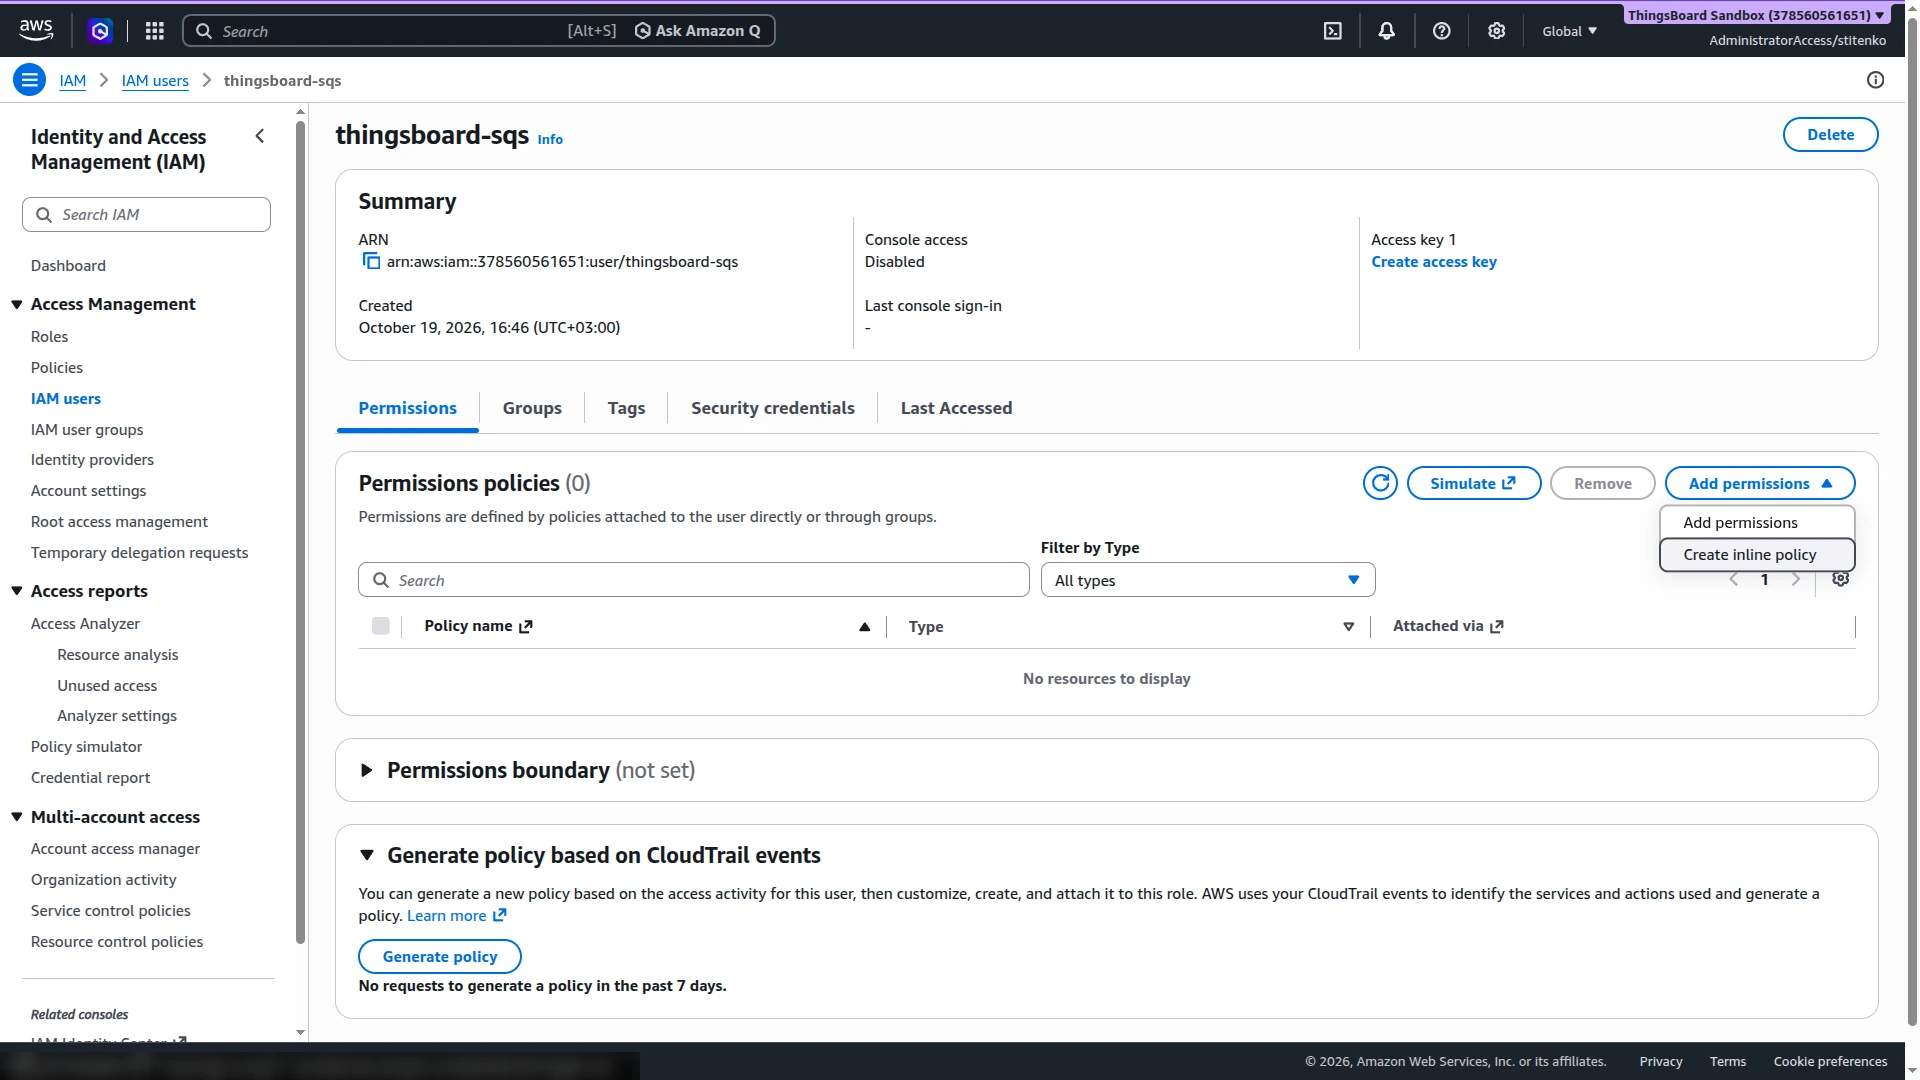
The page of the new user opens. On the Permissions tab, click Add permissions ⇾ Create inline policy.
-
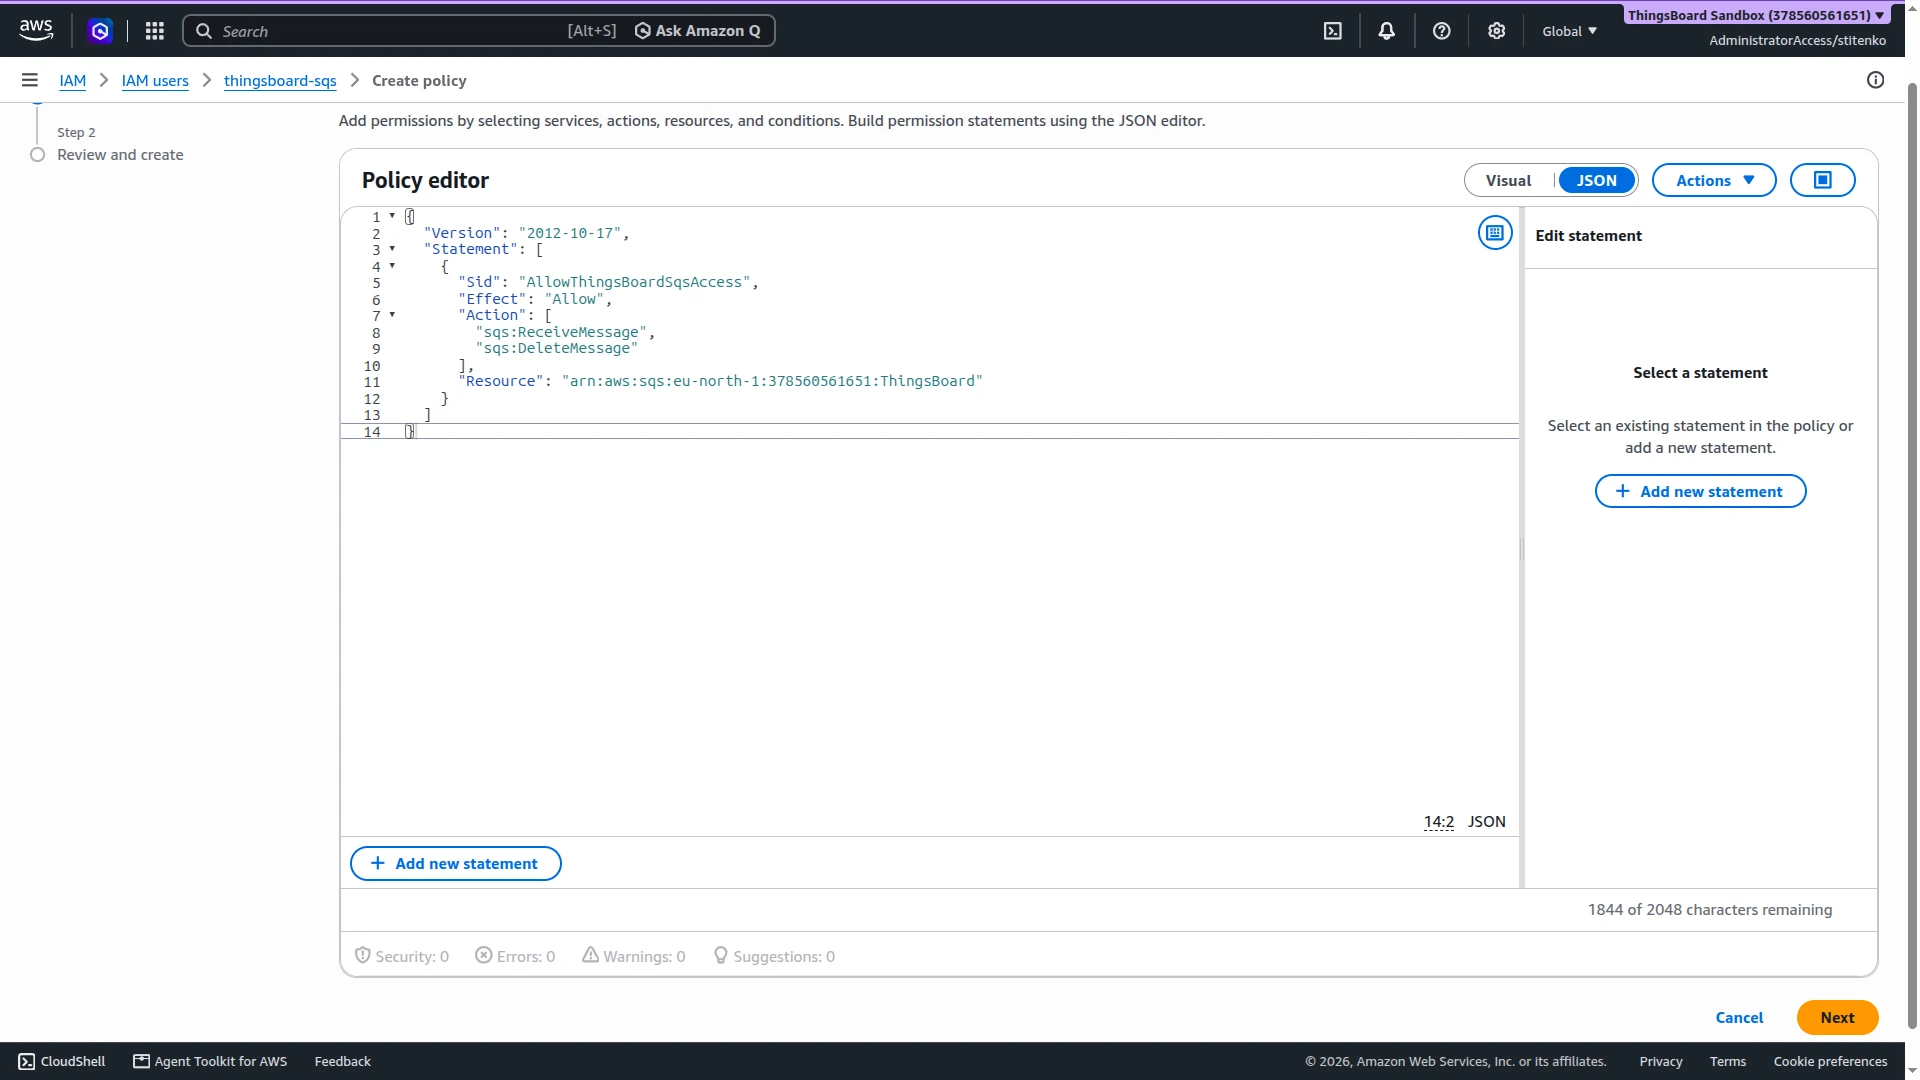
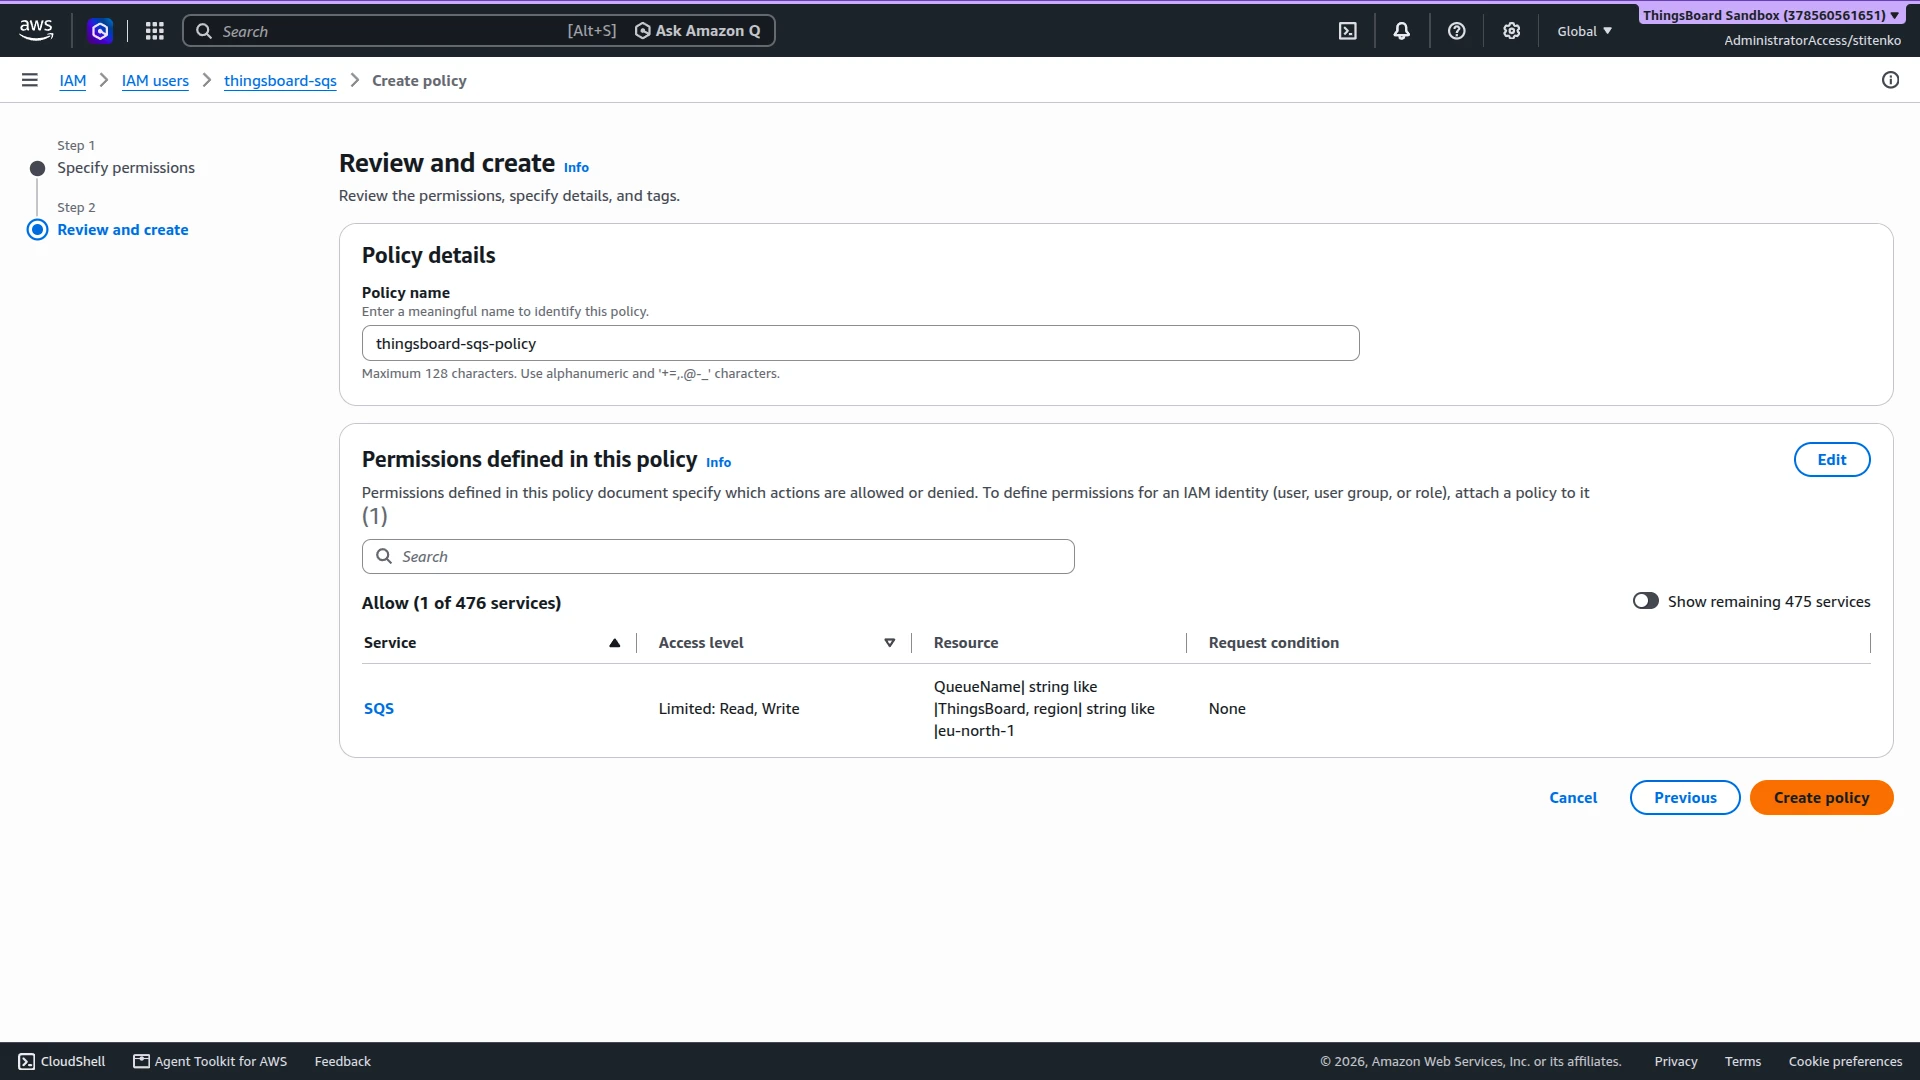
In the Policy editor, switch to JSON and replace the content with the policy below. Replace the queue ARN with the one you copied. Click Next, enter a Policy name, for example
thingsboard-sqs-policy, and click Create policy.{"Version": "2012-10-17","Statement": [{"Sid": "AllowThingsBoardSqsAccess","Effect": "Allow","Action": ["sqs:ReceiveMessage","sqs:DeleteMessage"],"Resource": "arn:aws:sqs:eu-north-1:378560561651:ThingsBoard"}]} -
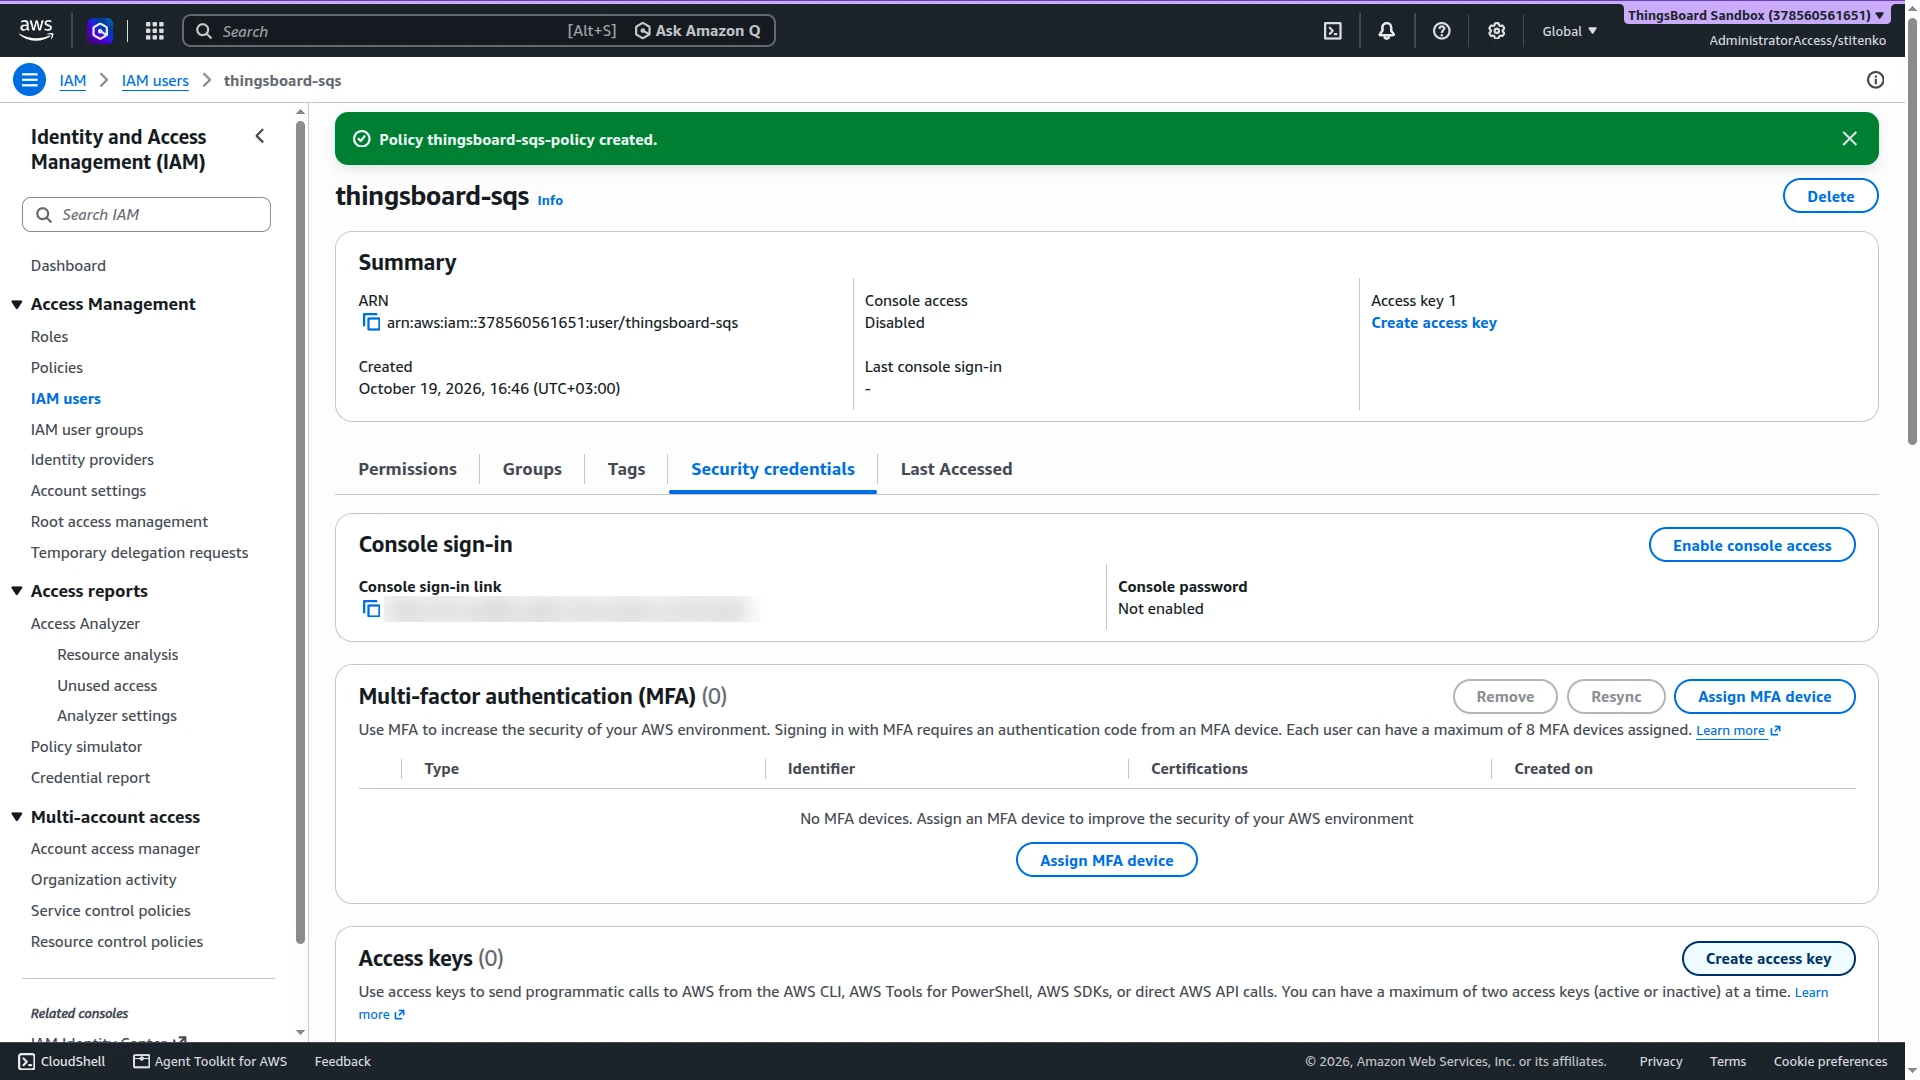
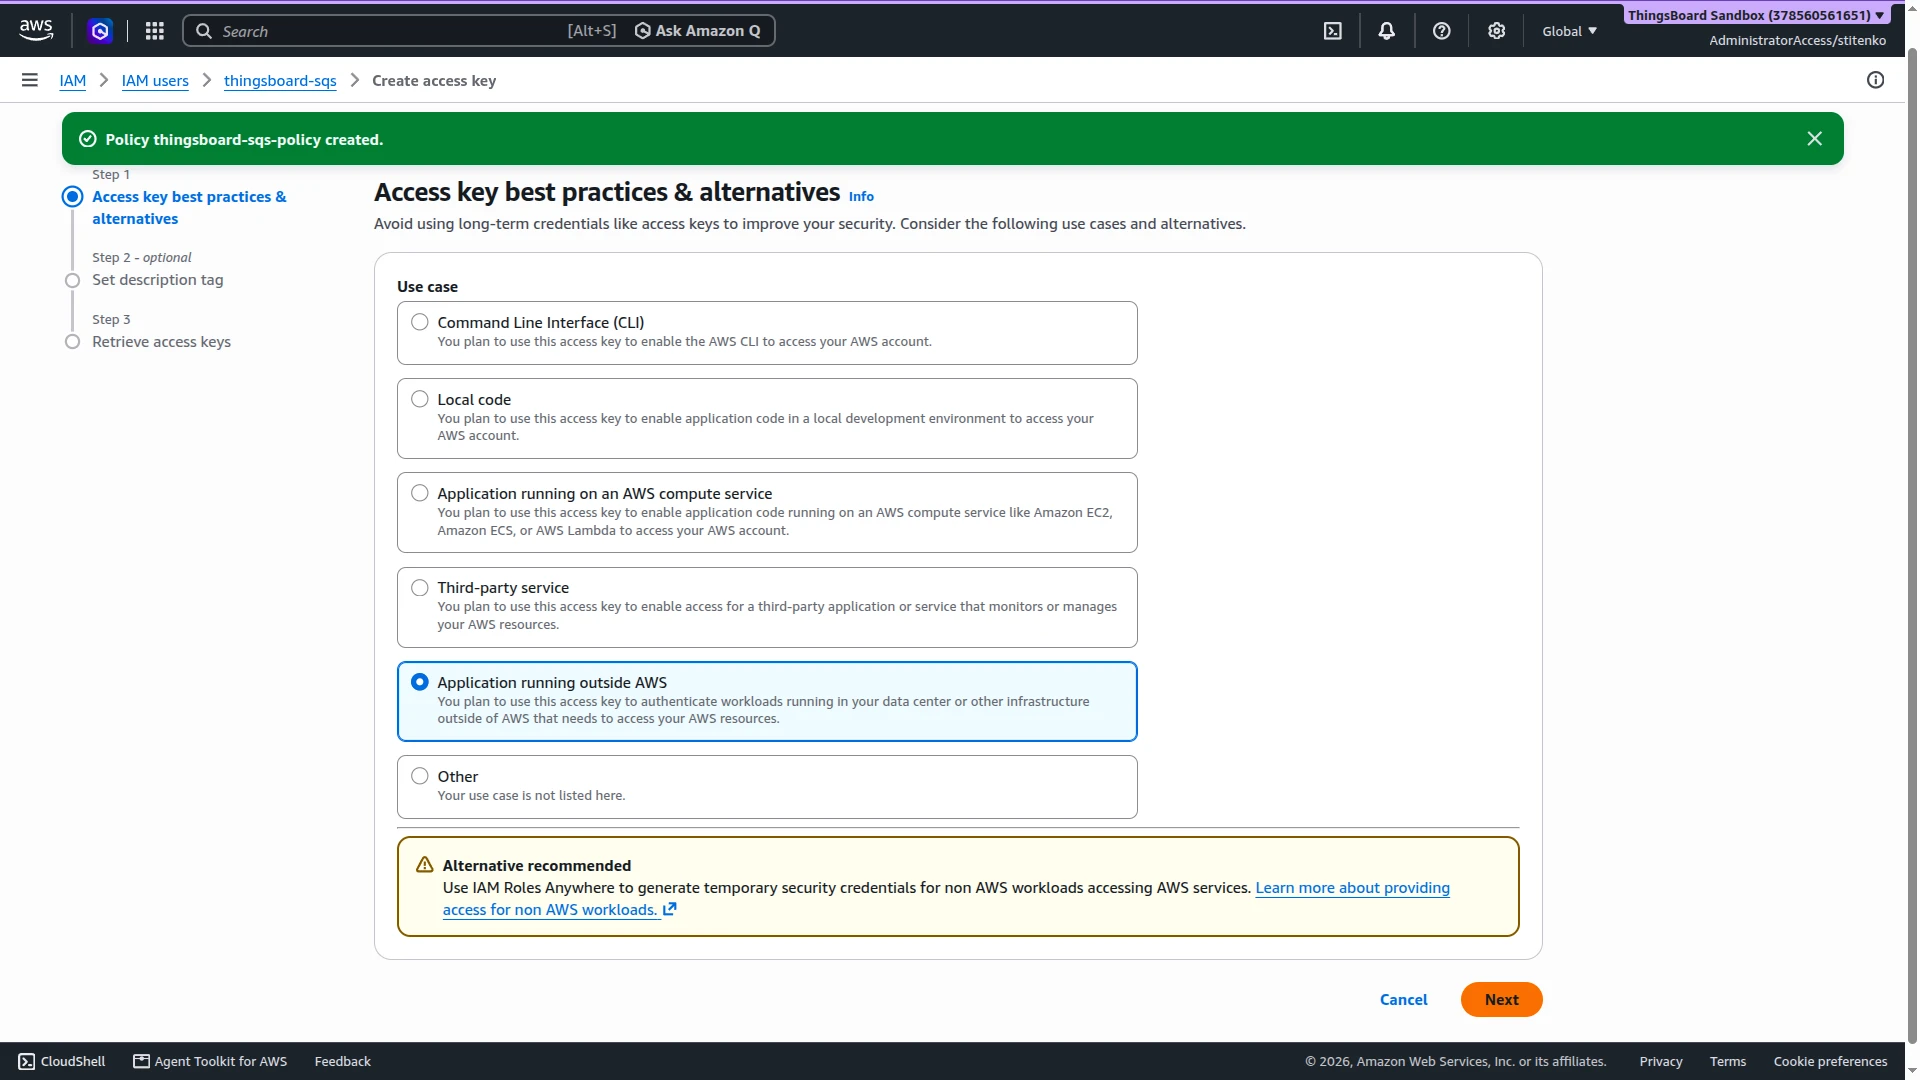
Open the Security credentials tab and click Create access key. Select Application running outside AWS and click Next. AWS recommends temporary credentials instead; the integration needs an access key, so continue.
-
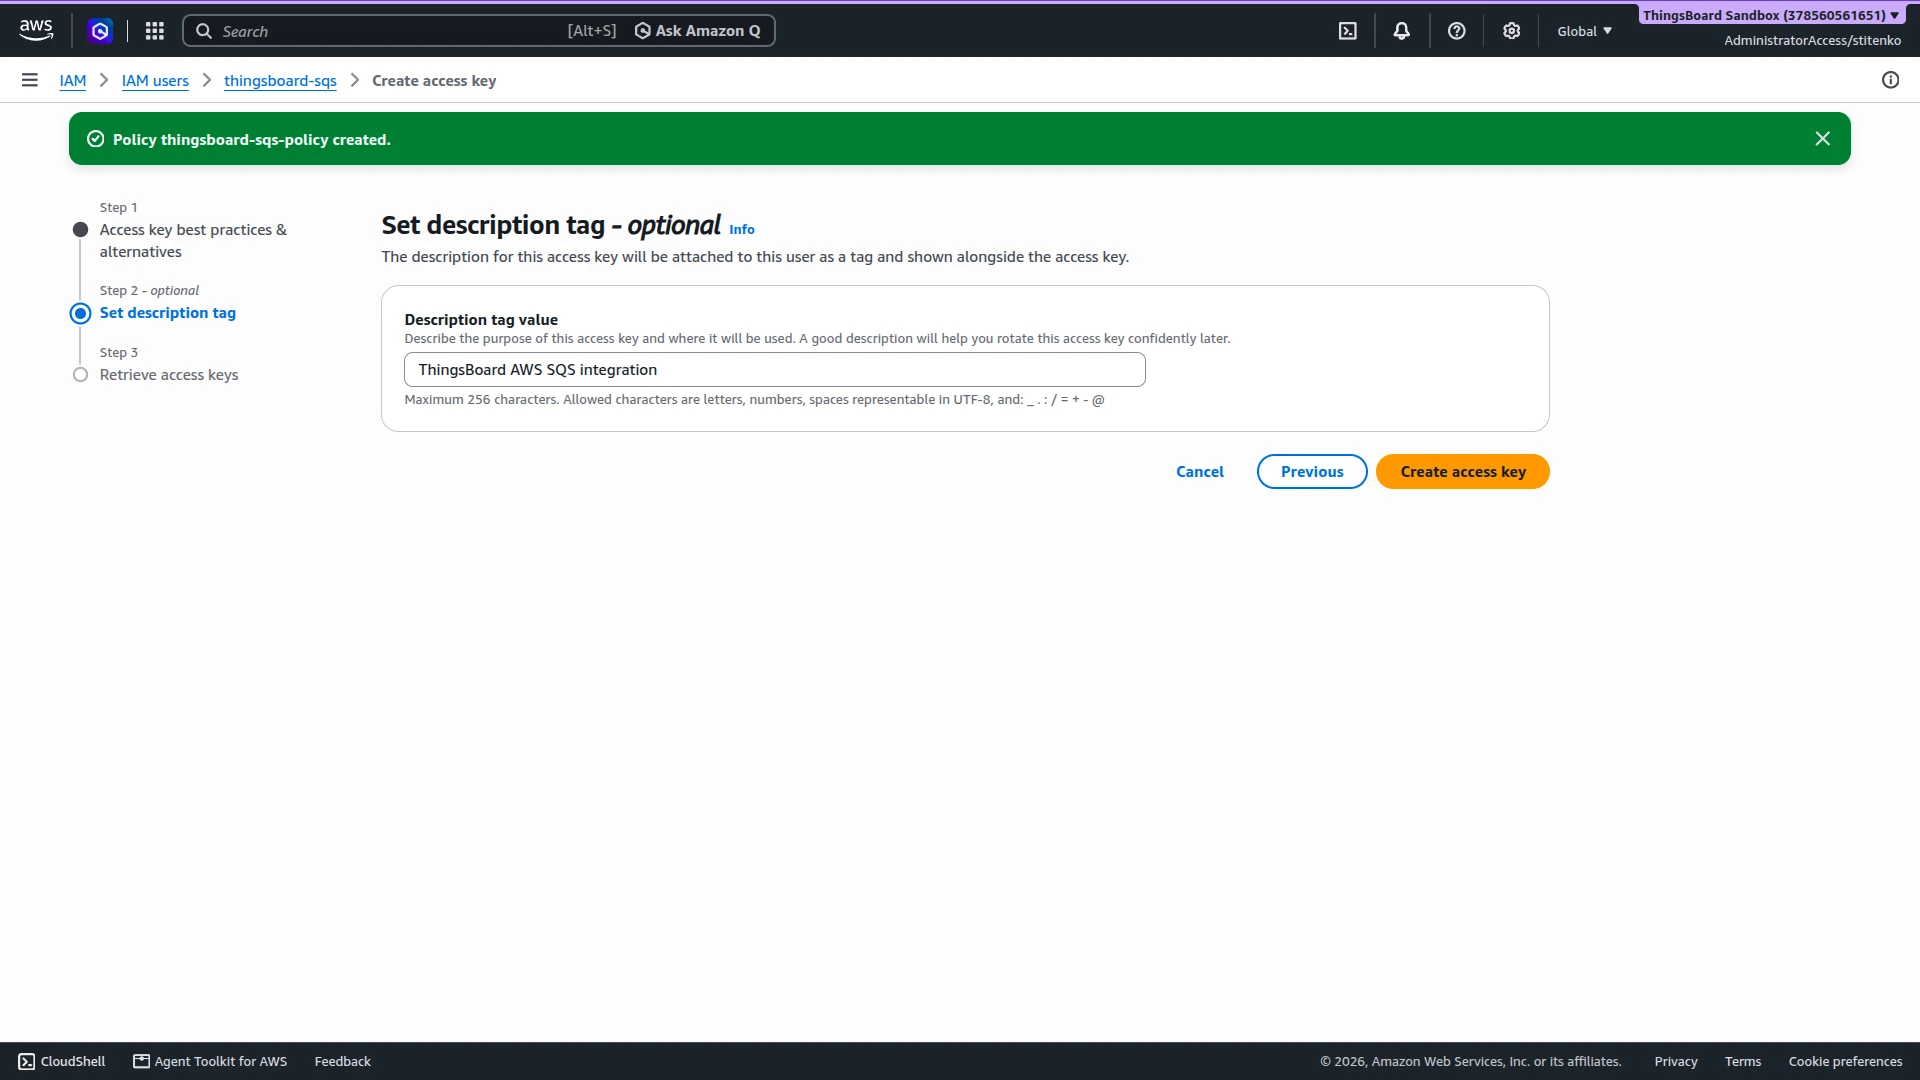
Optionally, enter a Description tag value, for example
ThingsBoard AWS SQS integration, and click Create access key. -
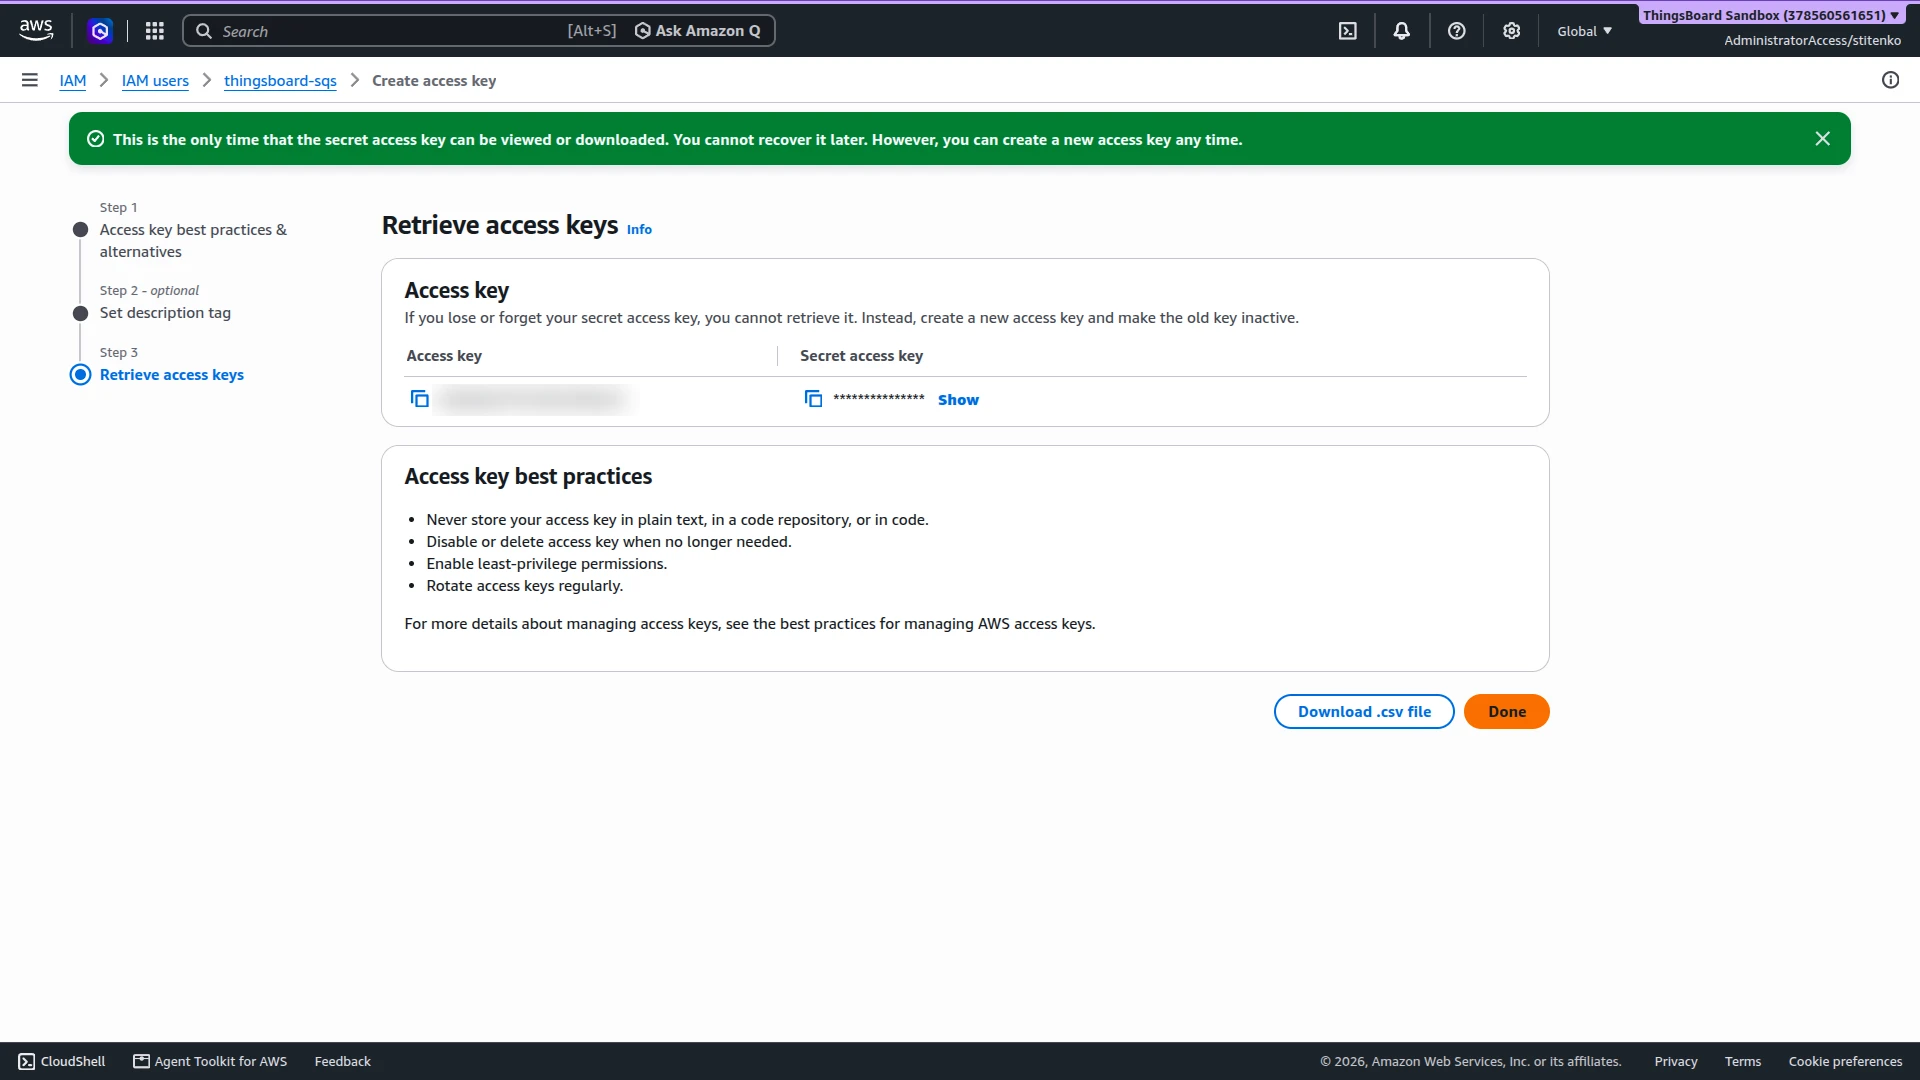
On Retrieve access keys, copy the Access key and the Secret access key, or click Download .csv file. AWS shows the secret only once. Then click Done.
Set Up AWS SQS Integration
Section titled “Set Up AWS SQS Integration”Create the uplink converter, assign it to a new AWS SQS integration, and send a test message.
Create the Uplink Data Converter
Section titled “Create the Uplink Data Converter”The uplink converter receives each message body as a byte array, resolves the target device, and returns its telemetry and attributes. AWS SQS Integration uses the Generic converter: you write the decoder in TBEL or JavaScript. For converter types and the full decoder reference, see Uplink data converter.
SQS does not define a message format. This guide uses the sample message that the Test decoder function dialog provides by default:
{ "deviceName": "Thermometer", "deviceType": "thermostat", "serialNumber": "SN-12345", "temperature": 25.5}-
Go to Integrations ⇾ Data converters and click + Add data converter ⇾ Create new converter.
-
Converter type — keep Uplink.
-
Integration type — select AWS SQS.
-
Name — enter a name, for example
AWS SQS Uplink Converter. -
Main decoding configuration — the editor opens with the default decoder below. Keep it for JSON messages: it takes the device name and type from
deviceNameanddeviceType, storesserialNumberas an attribute, and stores the other fields as telemetry. The timestamp comes fromts(Unix milliseconds) ortimestamp(ISO 8601); without them, the decoder uses the server time. The editor opens in TBEL; use the TBEL / JS toggle to switch to JavaScript.// Decode an uplink message from a buffer// payload - array of bytes// metadata - key/value object/** Decoder **/// decode payload to JSONvar data = decodeToJson(payload);// --- Device name and type ---var deviceName = data.deviceName != null ? data.deviceName : 'Unknown Device';var deviceType = data.deviceType != null ? data.deviceType : 'default';// var customerName = 'Customer C';// var groupName = 'thermostat devices';// use assetName and assetType instead of deviceName and deviceType// to automatically create assets instead of devices.// var assetName = 'Asset A';// var assetType = 'building';// --- Timestamp parsing ---var timestamp = -1;if (data.ts != null) {timestamp = data.ts;} else if (data.timestamp != null) {timestamp = new Date(data.timestamp).getTime();}if (timestamp == -1) {timestamp = Date.now();}// --- Telemetry and attributes ---var telemetry = {};// Keys from the payload that should be stored as attributes instead of telemetryvar attributeKeyList = ["serialNumber"];// Add the payload keys that match the attribute key list to attributesvar attributes = {};for (var i = 0; i < attributeKeyList.size(); i++) {var attributeKey = attributeKeyList[i];if (data[attributeKey] != null) {attributes[attributeKey] = data[attributeKey];}}// Keys to exclude from telemetry (device info, attributes and non-telemetry fields)var excludeFromTelemetryList = ["deviceName", "deviceType", "ts", "timestamp"];excludeFromTelemetryList.addAll(attributeKeyList);// Parse all remaining JSON fields as telemetrytelemetry.putAll(toFlatMap(data, excludeFromTelemetryList, true));// Result object with device attributes/telemetry datavar result = {deviceName: deviceName,deviceType: deviceType,// customerName: customerName,// groupName: groupName,// assetName: assetName,// assetType: assetType,};// Add attributes to the result only if at least one matching key was foundif (attributes.size() > 0) {result.put("attributes", attributes);}result.put("telemetry", {ts: timestamp,values: telemetry});/** Helper functions 'decodeToString', 'decodeToJson' and 'toFlatMap' are already built-in **/return result;// Decode an uplink message from a buffer// payload - array of bytes// metadata - key/value object/** Decoder **/// decode payload to JSONvar data = decodeToJson(payload);// --- Device name and type ---var deviceName = data.deviceName != null ? data.deviceName : 'Unknown Device';var deviceType = data.deviceType != null ? data.deviceType : 'default';// var customerName = 'Customer C';// var groupName = 'thermostat devices';// use assetName and assetType instead of deviceName and deviceType// to automatically create assets instead of devices.// var assetName = 'Asset A';// var assetType = 'building';// --- Timestamp parsing ---var timestamp = -1;if (data.ts != null) {timestamp = data.ts;} else if (data.timestamp != null) {timestamp = new Date(data.timestamp).getTime();}if (timestamp == -1) {timestamp = Date.now();}// --- Telemetry and attributes ---var telemetry = {};// Keys from the payload that should be stored as attributes instead of telemetryvar attributeKeyList = ["serialNumber"];// Add the payload keys that match the attribute key list to attributesvar attributes = {};for (var i = 0; i < attributeKeyList.length; i++) {var attributeKey = attributeKeyList[i];if (data[attributeKey] != null) {attributes[attributeKey] = data[attributeKey];}}// Keys to exclude from telemetry (device info, attributes and non-telemetry fields)var excludeFromTelemetryList = ["deviceName", "deviceType", "ts", "timestamp"].concat(attributeKeyList);// Parse all remaining JSON fields as telemetrytoFlatMap(data, telemetry, excludeFromTelemetryList);// Result object with device attributes/telemetry datavar result = {deviceName: deviceName,deviceType: deviceType,// customerName: customerName,// groupName: groupName,// assetName: assetName,// assetType: assetType,};// Add attributes to the result only if at least one matching key was foundif (Object.keys(attributes).length > 0) {result.attributes = attributes;}result.telemetry = {ts: timestamp,values: telemetry};/** Helper functions **/function decodeToString(payload) {return String.fromCharCode.apply(String, payload);}function decodeToJson(payload) {var str = decodeToString(payload);return JSON.parse(str);}function toFlatMap(obj, result, excludeList, prefix) {prefix = prefix || '';for (var key in obj) {if (excludeList.indexOf(key) !== -1) continue;var value = obj[key];var fullKey = prefix ? prefix + '.' + key : key;if (typeof value === 'object' && value !== null && !Array.isArray(value)) {toFlatMap(value, result, excludeList, fullKey);} else {result[fullKey] = value;}}}return result;To adapt:
- Device name in another field — replace
data.deviceName, for example withdata.id. - Other attributes — add keys to
attributeKeyList, for example"firmwareVersion". - Assets instead of devices — uncomment
assetNameandassetType, and use them in the result instead ofdeviceNameanddeviceType. - Customer or group — uncomment
customerNameorgroupNameand add it to the result.
- Device name in another field — replace
-
Click Test decoder function and check the result (see Test the Decoder).
-
Click Add. The converter appears in the list with type Uplink and integration type AWS SQS.
Decoder Inputs
The decoder signature is function decoder(payload, metadata): object | object[].
| Variable | Type | Content |
|---|---|---|
payload |
byte array | The message body, as compact JSON. |
metadata |
{[key: string]: string} |
integrationName and the key–value pairs from the integration’s Metadata field. SQS message attributes and the message ID are not passed. |
The message body must be JSON. A body that is a JSON-escaped string, for example "{\"temperature\":25.5}", is unescaped first. The integration parses the body before the decoder runs, so a body that is not JSON never reaches the decoder (see How the Integration Reads the Queue).
Built-in helpers:
| Function | Result |
|---|---|
decodeToJson(payload) |
Parses the bytes as JSON and returns an object. |
decodeToString(payload) |
Converts the bytes to a UTF-8 string. |
toFlatMap(obj, excludeKeys, flatNested) |
TBEL only. Returns a flat key–value map of obj, skipping excludeKeys. With flatNested set to true, nested objects become dot-separated keys. The JavaScript template defines its own toFlatMap(obj, result, excludeList), which writes into result. |
For field renaming, nested values, and other scripting patterns, see Common scripting patterns.
Test the Decoder
Click Test decoder function below the editor. Payload content type is set to JSON, and the Payload already holds the sample message. Click Test. The Output panel shows:
{ "deviceName": "Thermometer", "deviceType": "thermostat", "attributes": { "serialNumber": "SN-12345" }, "telemetry": { "ts": 1792418627360, "values": { "temperature": 25.5 } }}ts is the current time, because the payload has neither ts nor timestamp. Check that deviceName is set and telemetry.values holds the expected keys. If the output is empty or shows an error, fix the decoder and test again.
Create the Integration
Section titled “Create the Integration”The wizard has no downlink step, because the integration only reads the queue.
- Go to Integrations ⇾ Integrations and click + Add integration.
- Basic settings:
- Integration type — select AWS SQS.
- Name — keep the default
AWS SQS integrationor enter your own. - Enable integration and Allow create devices or assets — keep both on, so the device is created on its first message.
- Click Next.
- Uplink data converter:
- Click Select existing and choose
AWS SQS Uplink Converter. - Alternatively, click Create new to write a decoder here.
- Click Next.
- Click Select existing and choose
- Connection:
- SQS Queue URL — paste the queue URL.
- Region — replace the default
us-west-2with the Region of the queue, for exampleeu-north-1. - AWS access key Id and AWS secret access key — paste the Access key and the Secret access key of the IAM user.
- Leave Polling period in seconds at its default
5. See Connection Settings for details.
- Click Add.
Connection Settings
Section titled “Connection Settings”| Parameter | Default | Description |
|---|---|---|
| SQS Queue URL | — | Full queue URL, in the form https://sqs.{region}.amazonaws.com/{account-id}/{queue-name}. Required. |
| Polling period in seconds | 5 |
Pause after a poll that returns no messages. Minimum: 1. |
| Region | us-west-2 |
AWS Region code of the queue. Must match the Region in the queue URL. Required. |
| AWS access key Id and AWS secret access key | — | Access key of the IAM user. Required. |
| Execute remotely | Off | Runs the integration as a separate process outside the ThingsBoard cluster. ThingsBoard generates an Integration key and Integration secret for it. See Remote Integration. |
| Description | — | In Advanced settings. Free-text description. |
| Metadata | — | In Advanced settings. Key–value pairs added to the metadata of every message from this integration. |
How the Integration Reads the Queue
Section titled “How the Integration Reads the Queue”- Each poll requests up to 10 messages. While the queue returns messages, the integration polls again right away. After an empty response, it waits Polling period in seconds.
- A poll waits for messages as long as the queue’s Receive message wait time allows. With
0, it returns at once. - The integration deletes every message it has received, even when the decoder fails. Failed messages are not retried and do not reach a dead-letter queue. The integration’s Events tab shows them with status ERROR.
- A body that is not JSON stops the processing of the current batch. The integration deletes that message and records an ERROR event with a
JsonParseException; the messages after it in the batch are not processed and return to the queue after its Visibility timeout (30seconds by default), then arrive with the next poll.
Test Uplink
Section titled “Test Uplink”Send a message to the queue, then confirm that ThingsBoard decoded it and created the device.
Send a Test Uplink
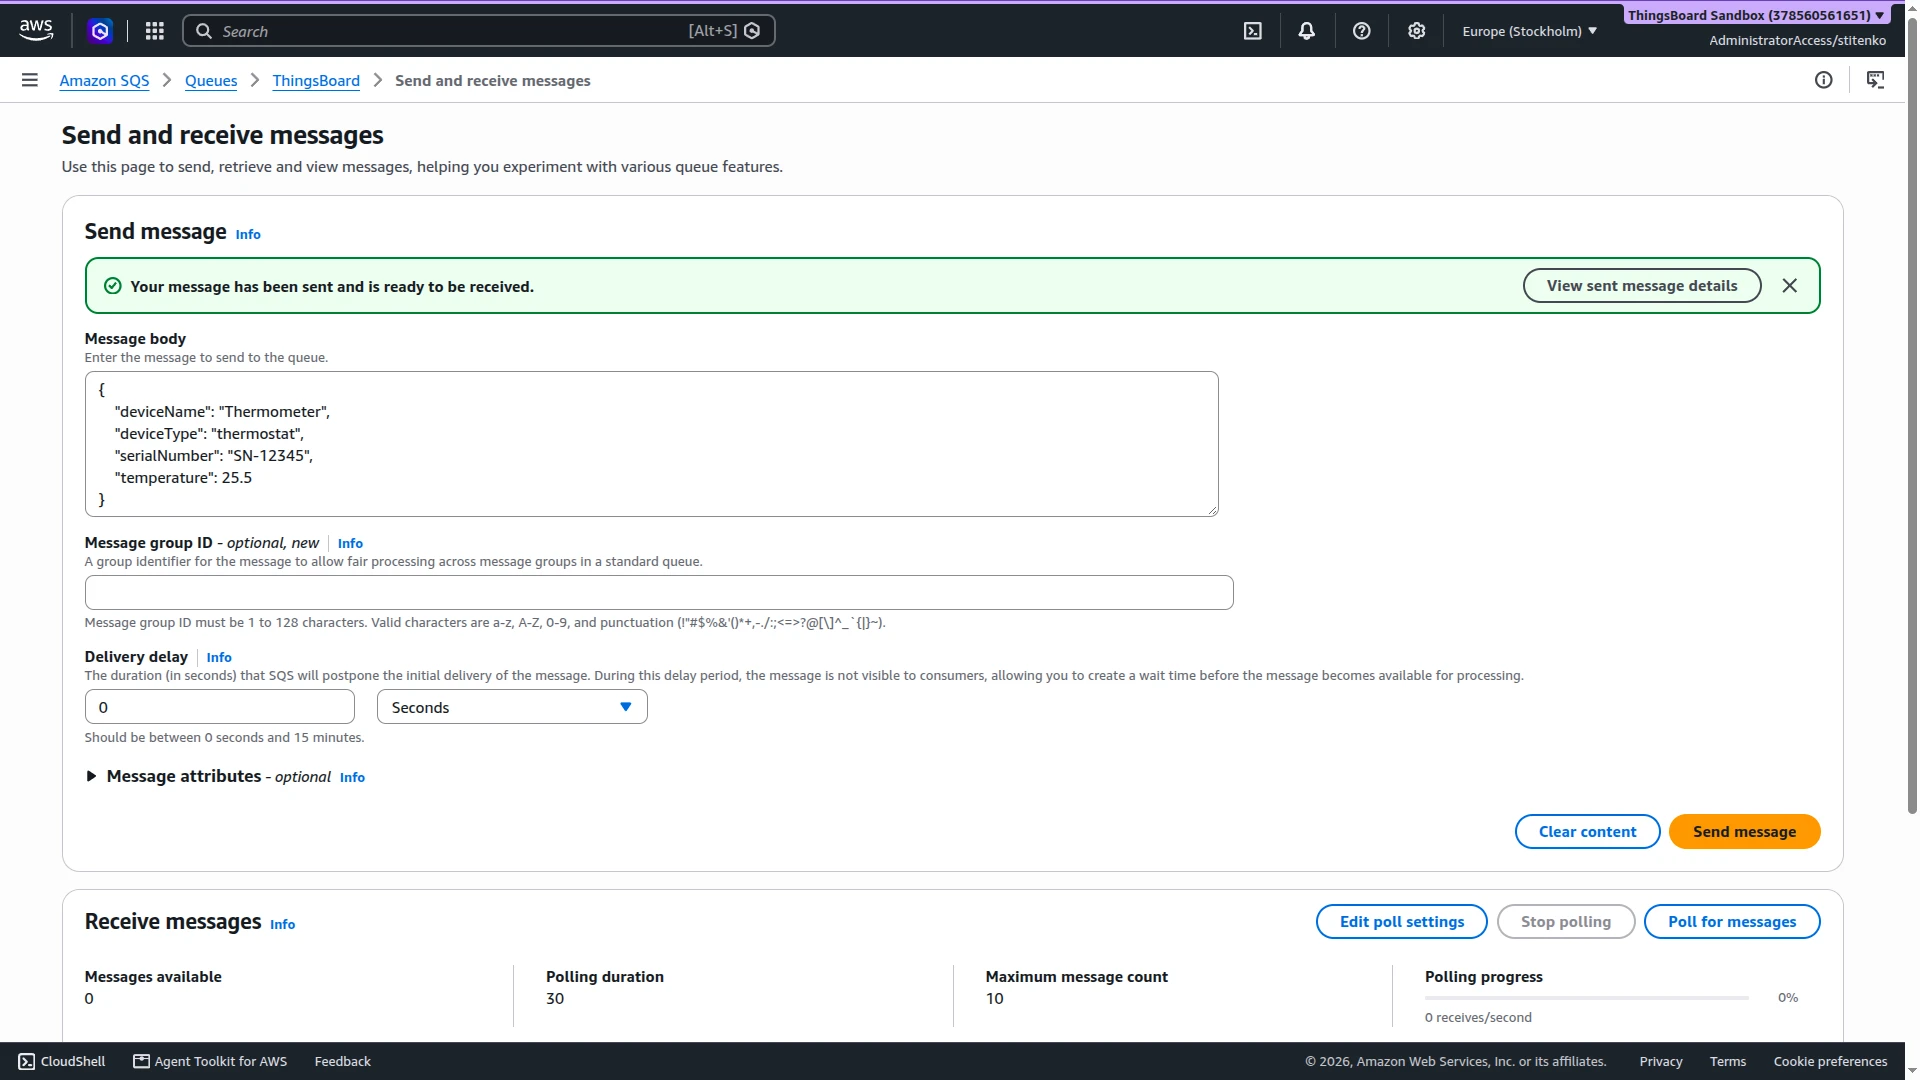
Section titled “Send a Test Uplink”Send this test message to the queue:
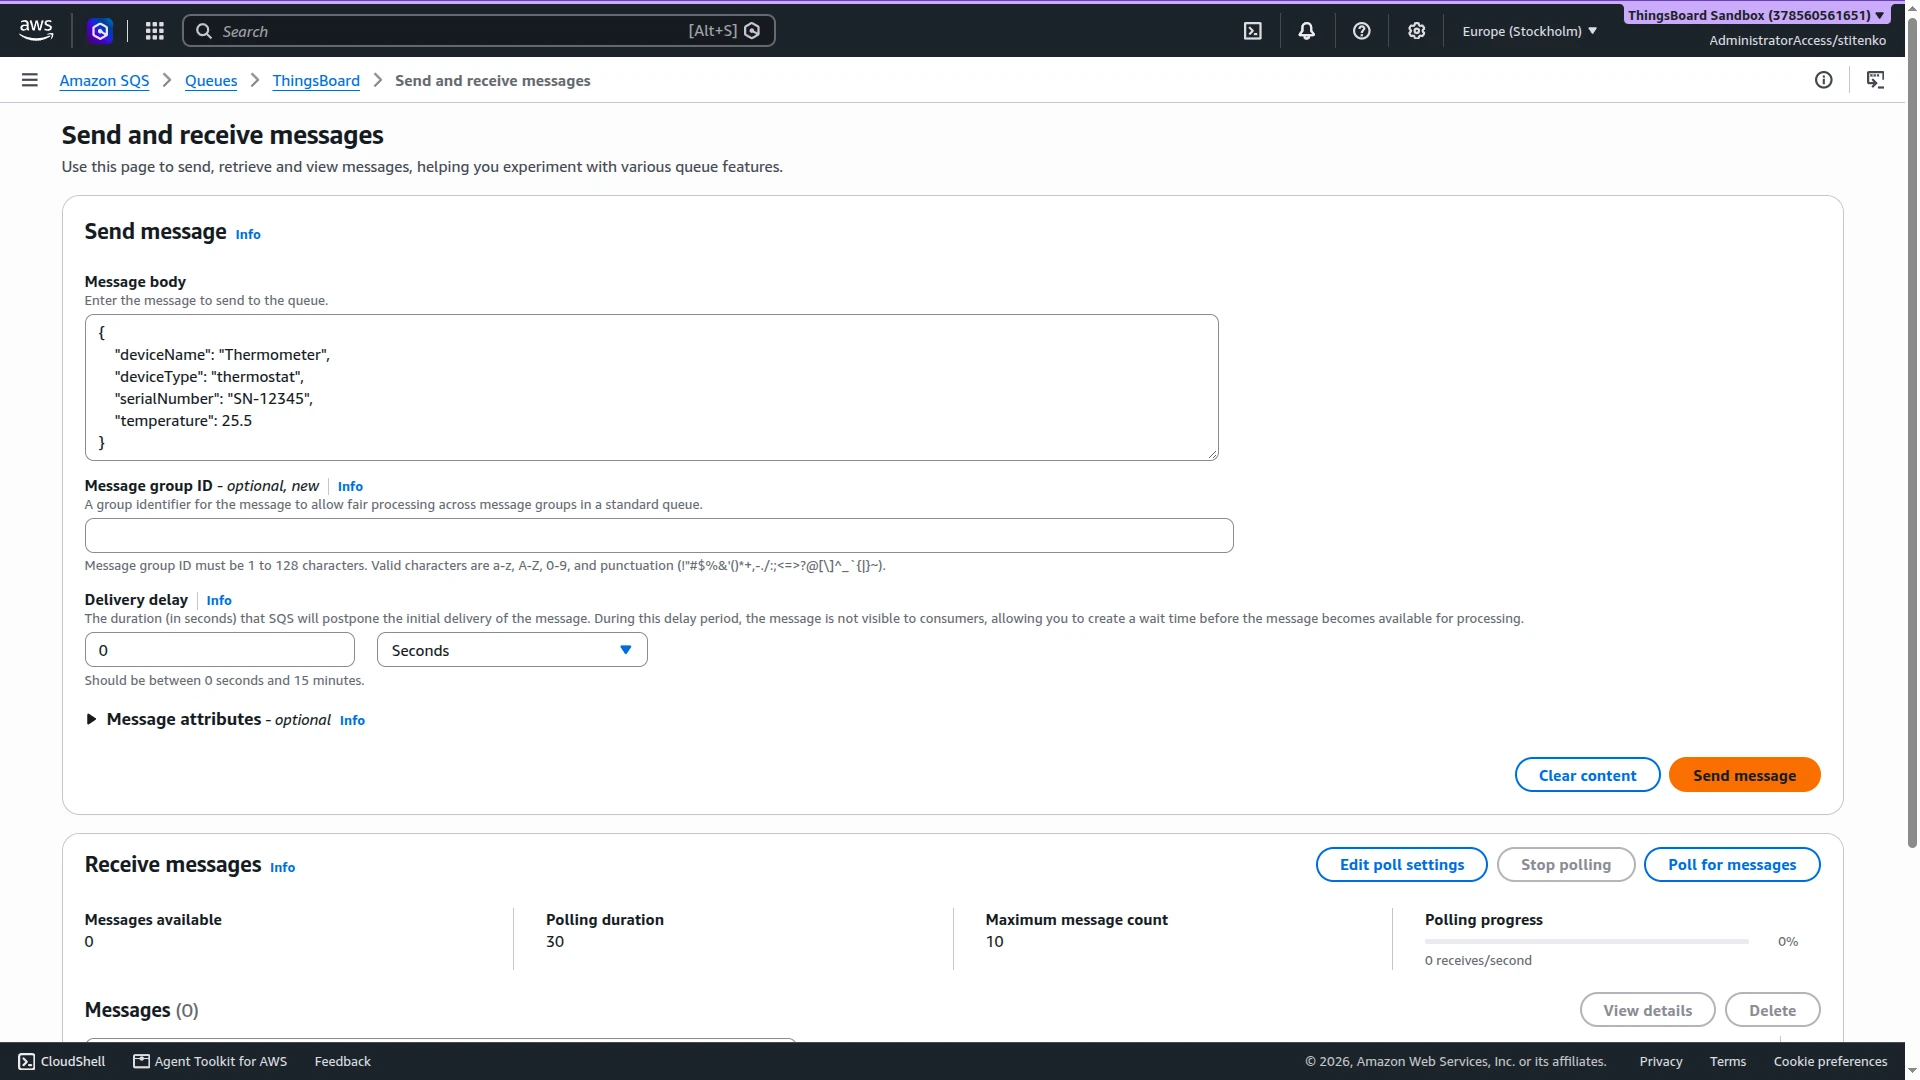
{ "deviceName": "Thermometer", "deviceType": "thermostat", "serialNumber": "SN-12345", "temperature": 25.5}- Open the queue in the Amazon SQS console and click Send and receive messages.
- Paste the message into Message body.
- Click Send message.
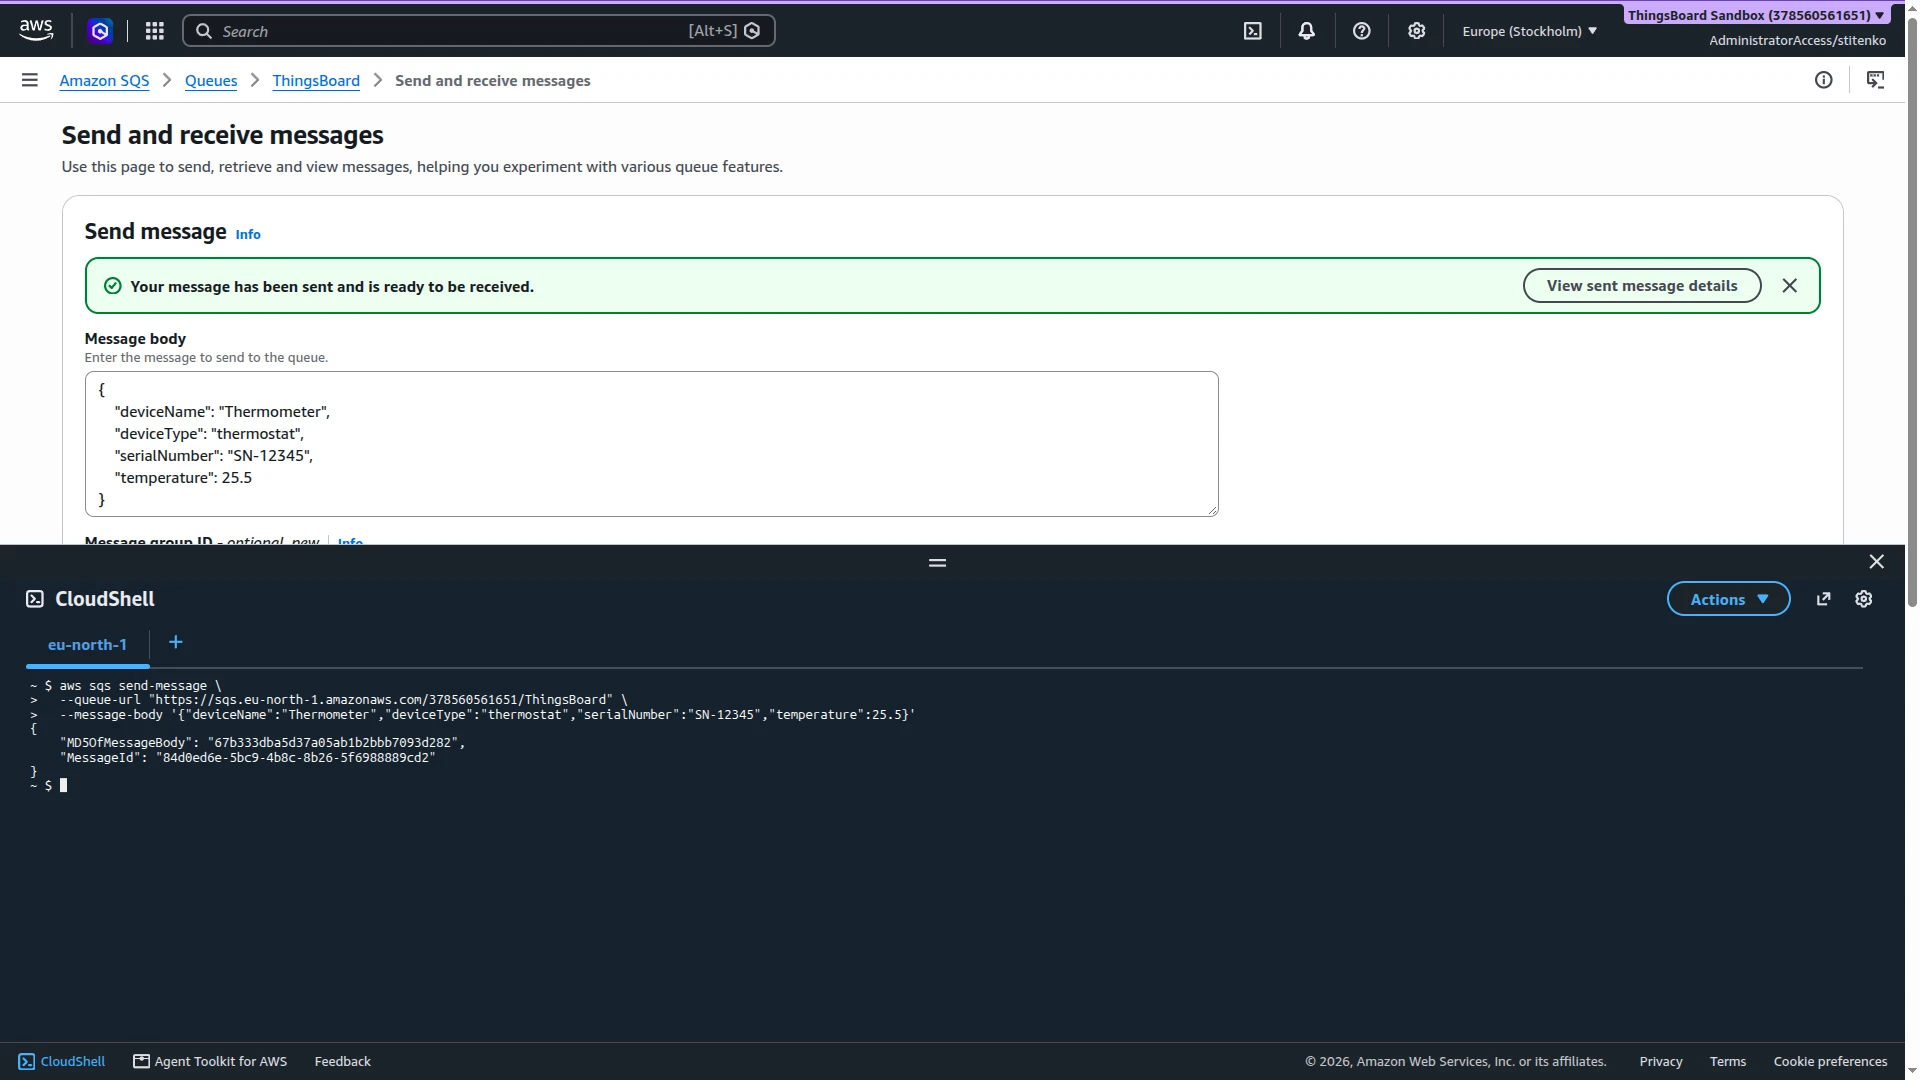
Run aws sqs send-message with your queue URL. AWS CloudShell has the AWS CLI installed and signed in: open it from the console toolbar in the Region of the queue.
aws sqs send-message \ --queue-url "https://sqs.eu-north-1.amazonaws.com/378560561651/ThingsBoard" \ --message-body '{"deviceName":"Thermometer","deviceType":"thermostat","serialNumber":"SN-12345","temperature":25.5}'The command returns MD5OfMessageBody and MessageId of the sent message.
For a FIFO queue, also pass --message-group-id, for example --message-group-id thermometers, and --message-deduplication-id unless content-based deduplication is on.
Verify the Result
Section titled “Verify the Result”- Integration events — go to Integrations ⇾ Integrations, open the integration, and click the Events tab. With Event type set to Debug, the message appears as an event of type Uplink with status OK. Click
⋅⋅⋅in the Message column to see the message body. - Converter events — open
AWS SQS Uplink Converterin Integrations ⇾ Data converters and click the Events tab. Click⋅⋅⋅in a column to open it: In shows the message body, Out shows the decoded result with theserialNumberattribute and thetemperaturetelemetry, and Metadata holds onlyintegrationName, for exampleAWS SQS integration. - Device — go to Devices & assets ⇾ Devices. The integration has created Thermometer with the
thermostatprofile. Open it and confirmserialNumber=SN-12345on the Attributes tab (Client attributes scope) andtemperature=25.5on the Latest telemetry tab. - Queue — in the SQS console, Messages available returns to
0.
Send Data to AWS SQS
Section titled “Send Data to AWS SQS”AWS SQS Integration has no downlink. To send data from ThingsBoard to SQS, add an aws sqs rule node to a rule chain. The node sends the message data as the SQS message body. On success, it adds messageId, requestId, messageBodyMd5, and, when the message has attributes, messageAttributesMd5 to the message metadata. On failure, it adds error. For all parameters, see the aws sqs node reference.
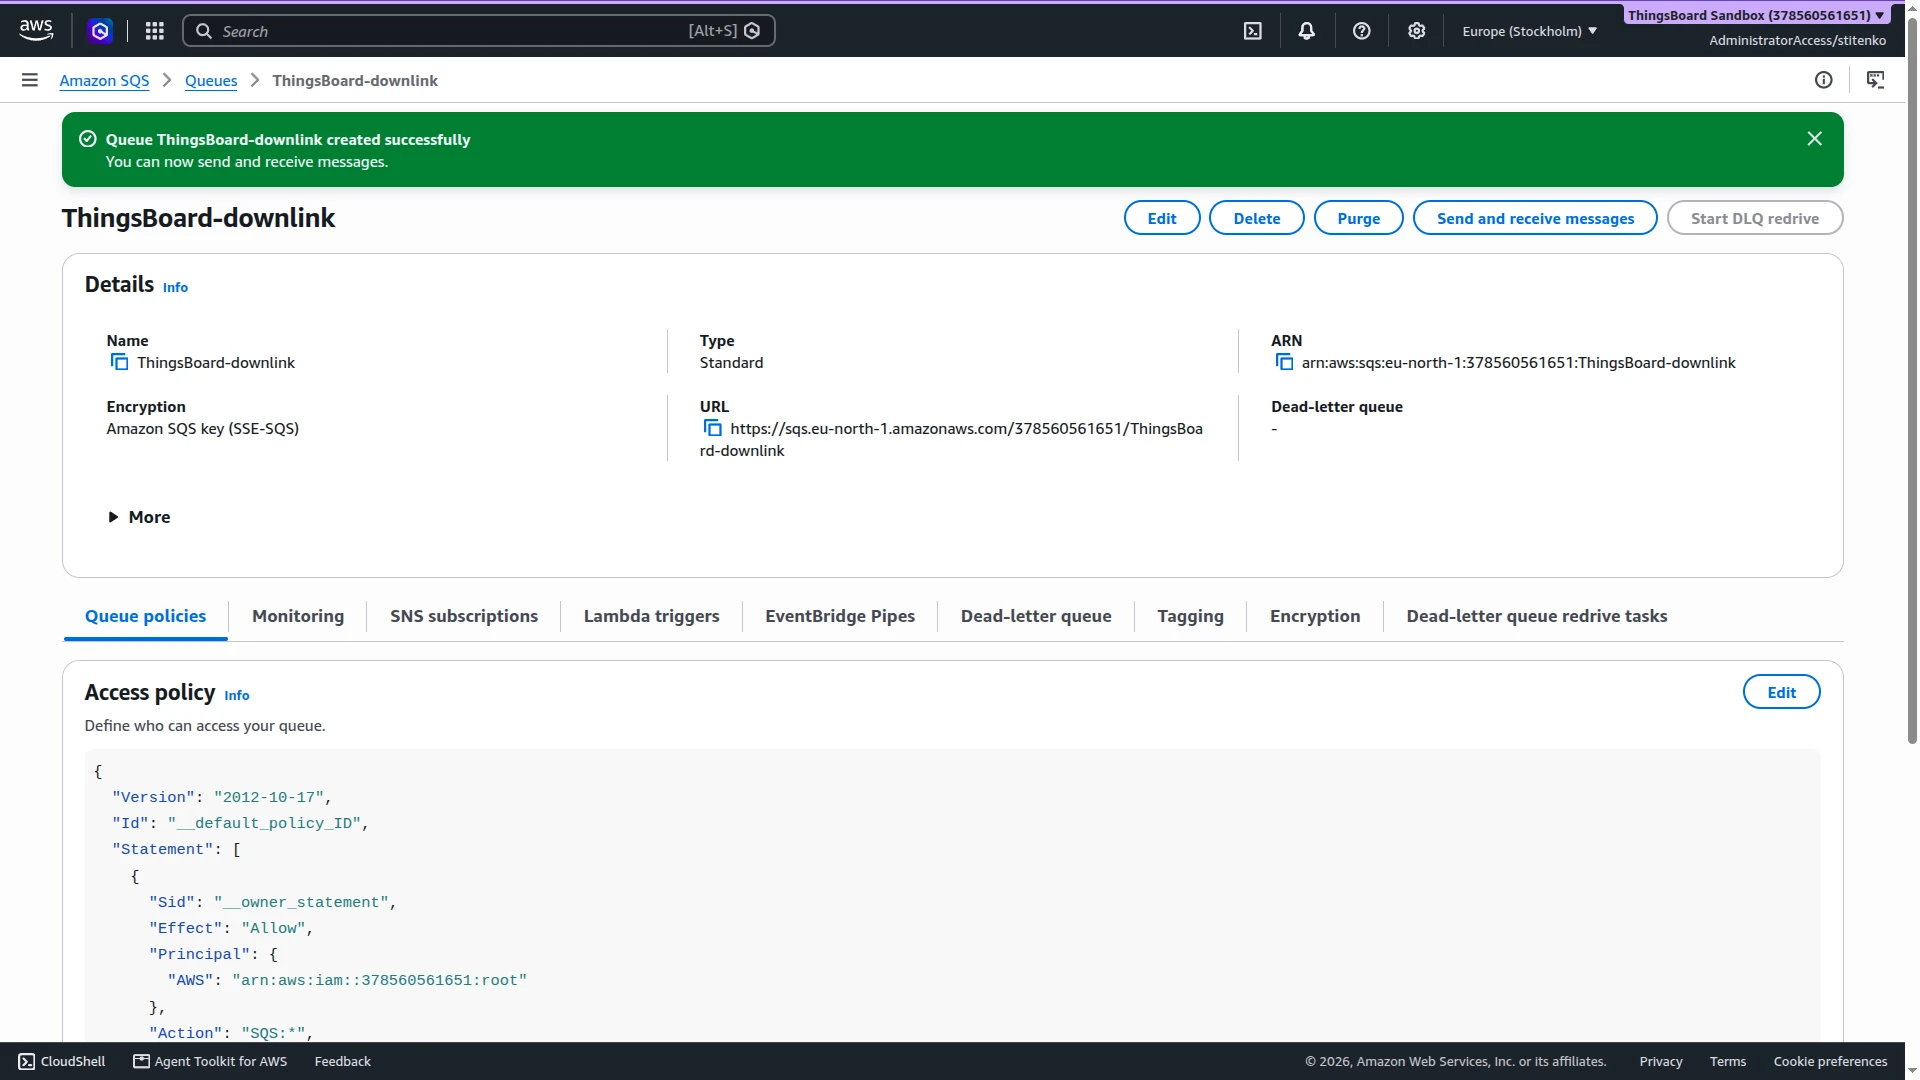
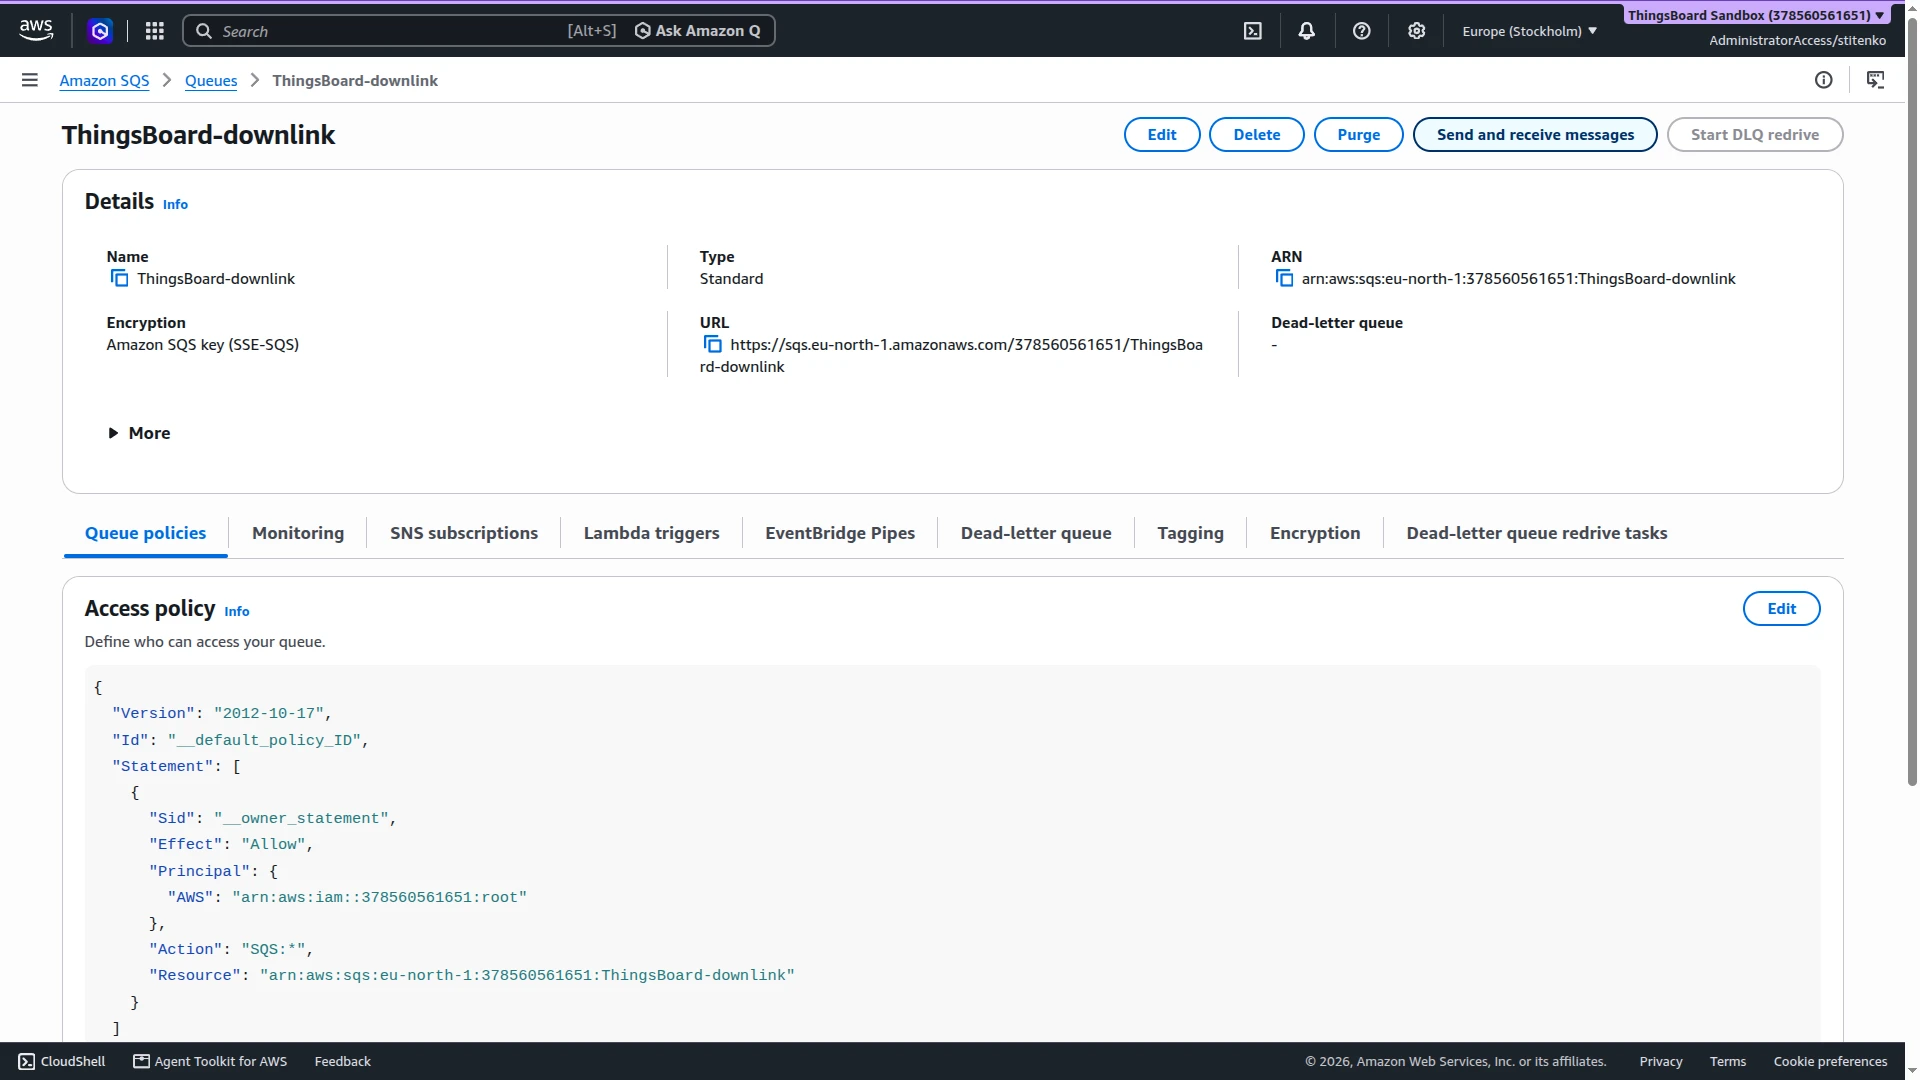
This section sends shared attribute updates of the device to a separate queue, ThingsBoard-downlink.
Prepare the Queue
Section titled “Prepare the Queue”- In the Amazon SQS console, create a Standard queue named
ThingsBoard-downlinkwith the default settings, as in Create a Queue. - Copy its URL and ARN.
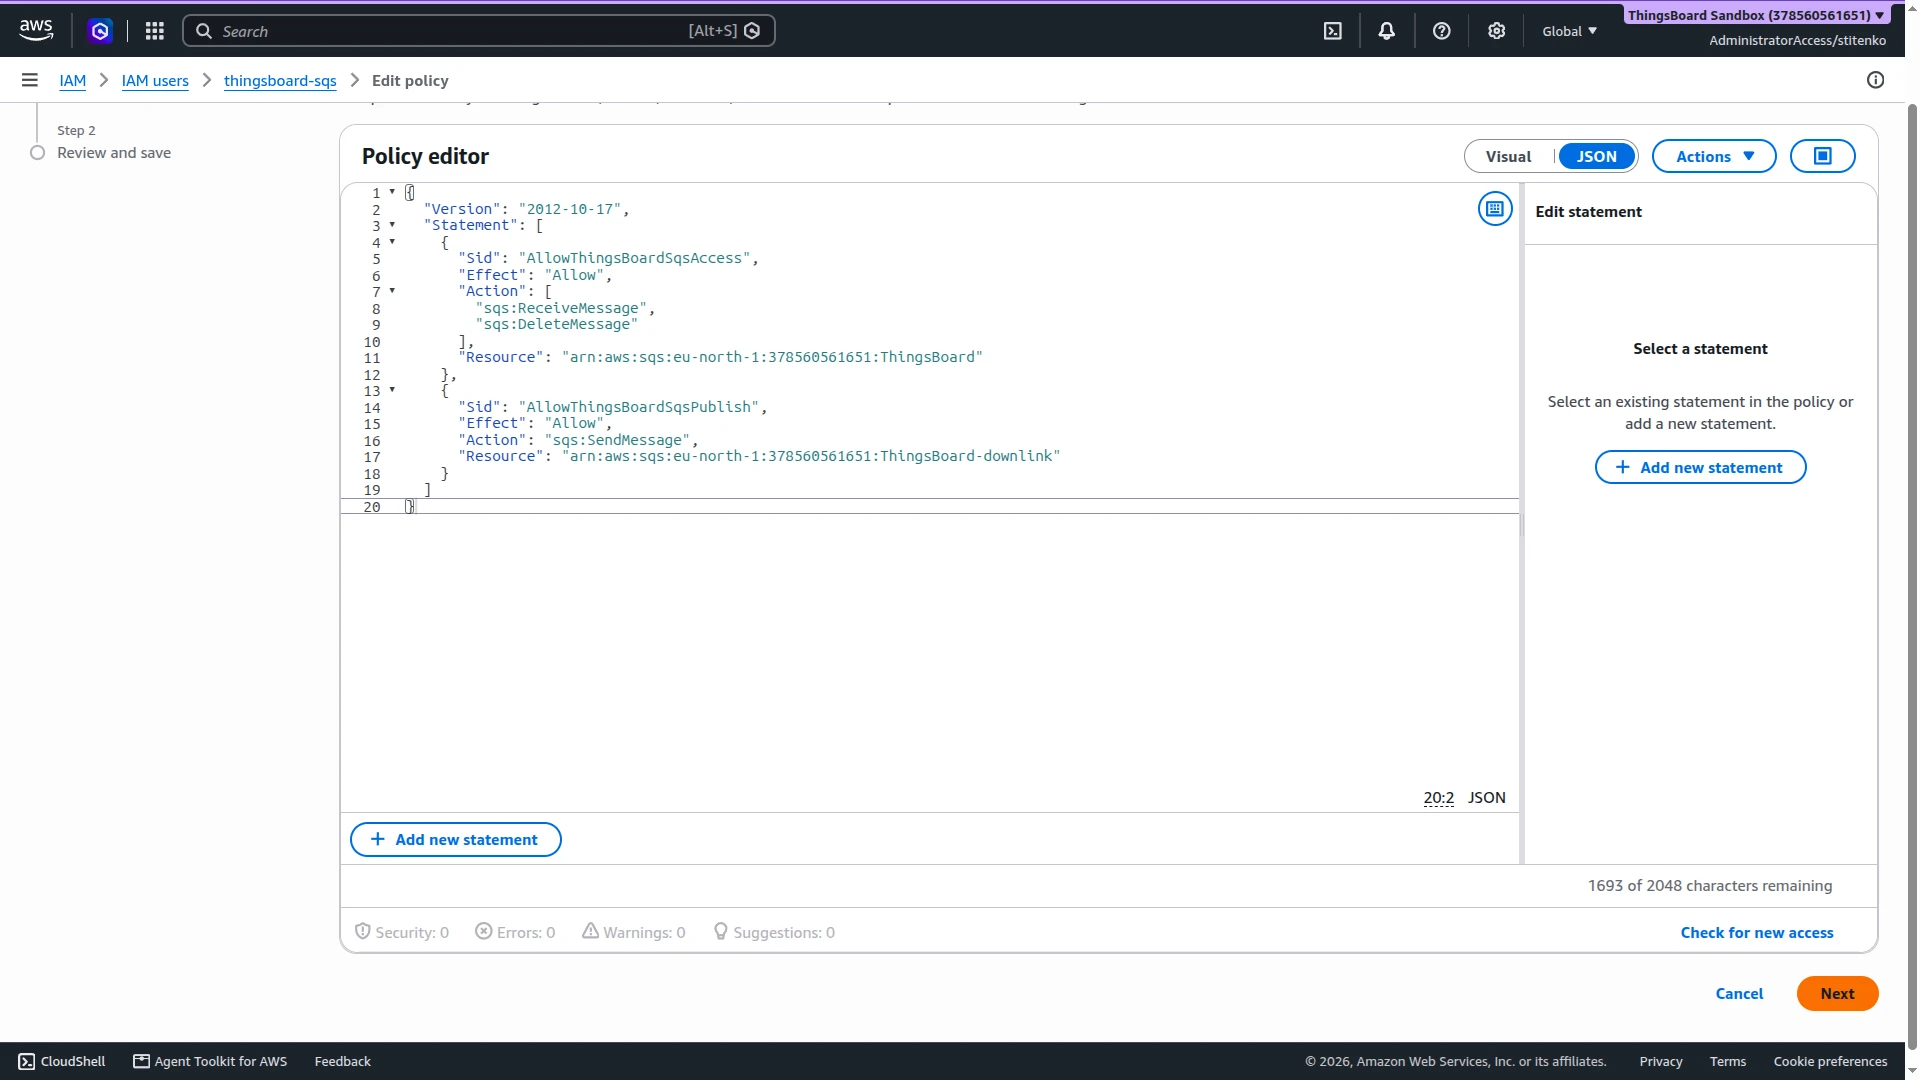
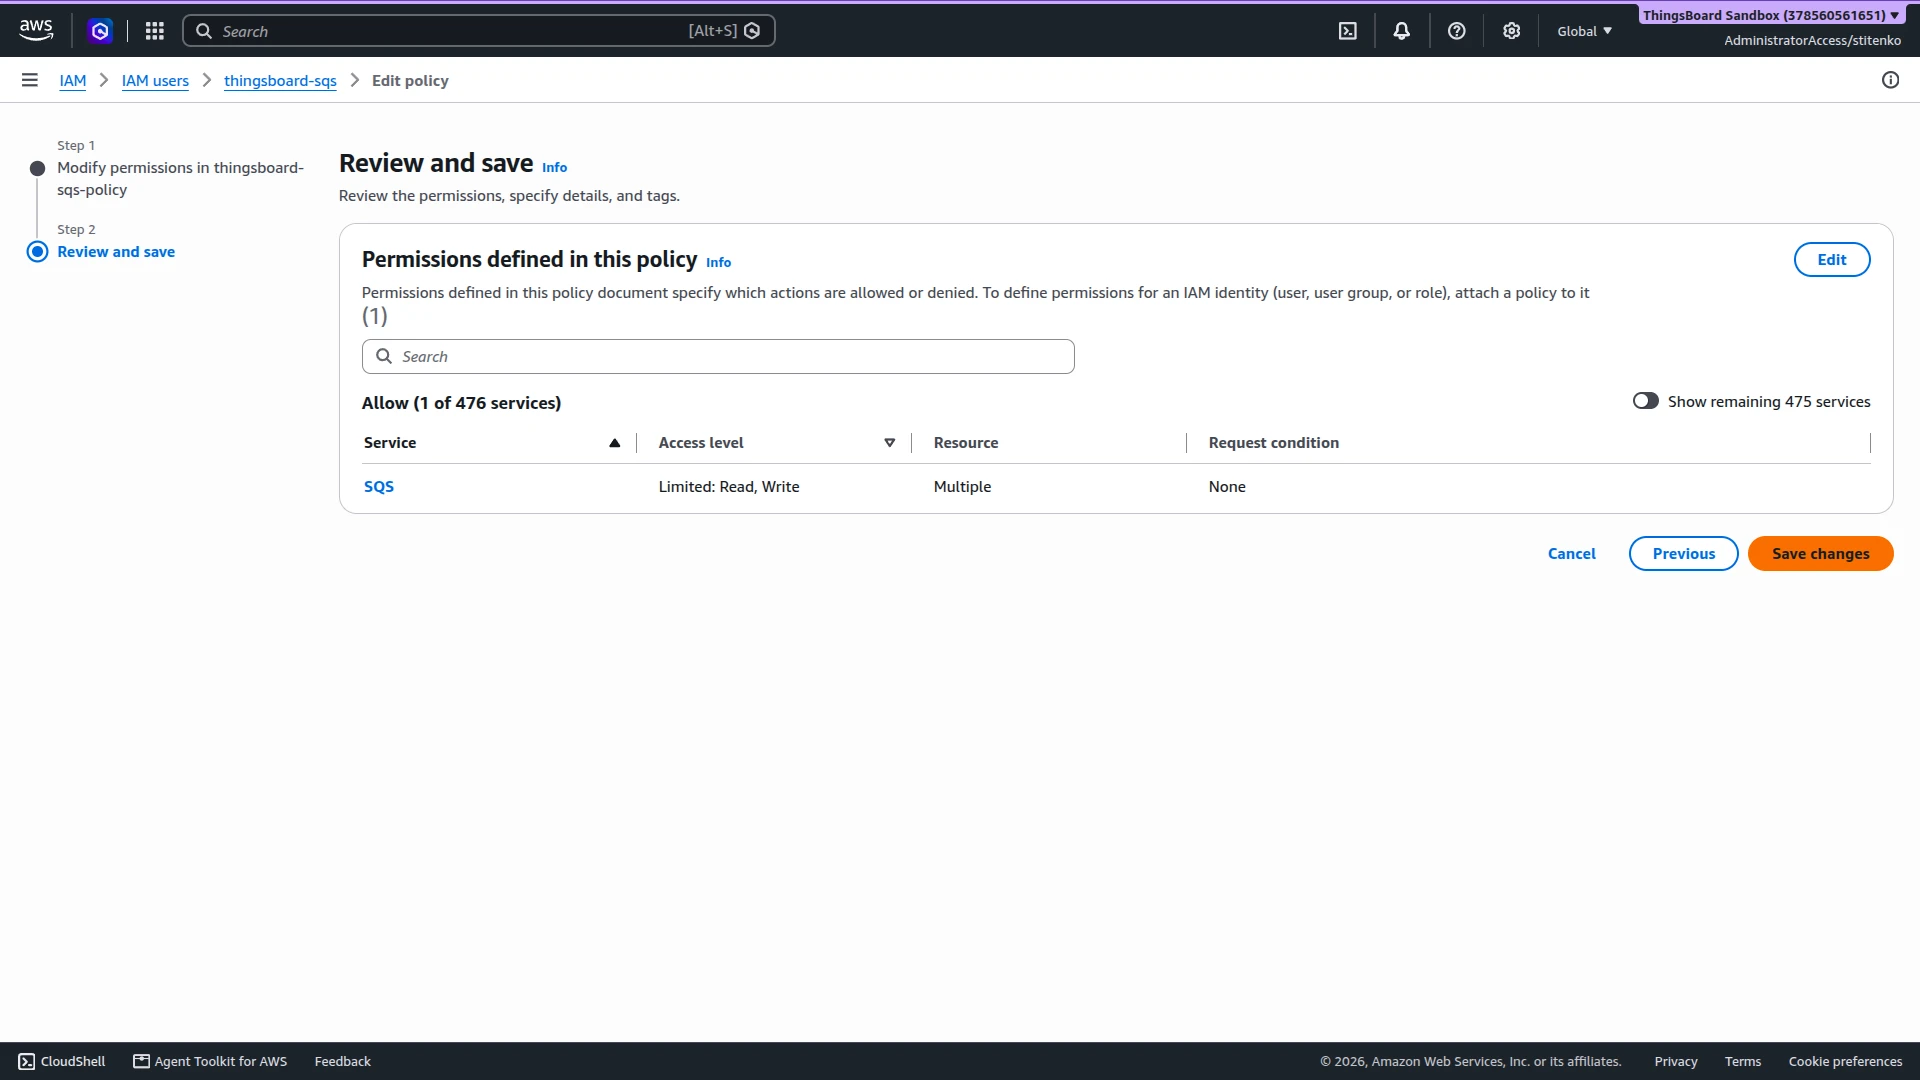
- Allow the IAM user to send to the queue. In IAM ⇾ IAM users, open
thingsboard-sqs, selectthingsboard-sqs-policyon the Permissions tab, click Edit, and add a second statement with your queue ARN:Click Next, then Save changes.{"Sid": "AllowThingsBoardSqsPublish","Effect": "Allow","Action": "sqs:SendMessage","Resource": "arn:aws:sqs:eu-north-1:378560561651:ThingsBoard-downlink"}
Configure the Root Rule Chain
Section titled “Configure the Root Rule Chain”The rule chain sends each shared attribute update to the queue. An originator fields node adds the device name to the message metadata, and an aws sqs node sends the message data as the SQS message body with the device name as a message attribute.
- Go to Data processing ⇾ Rule chains and open the Root Rule Chain.
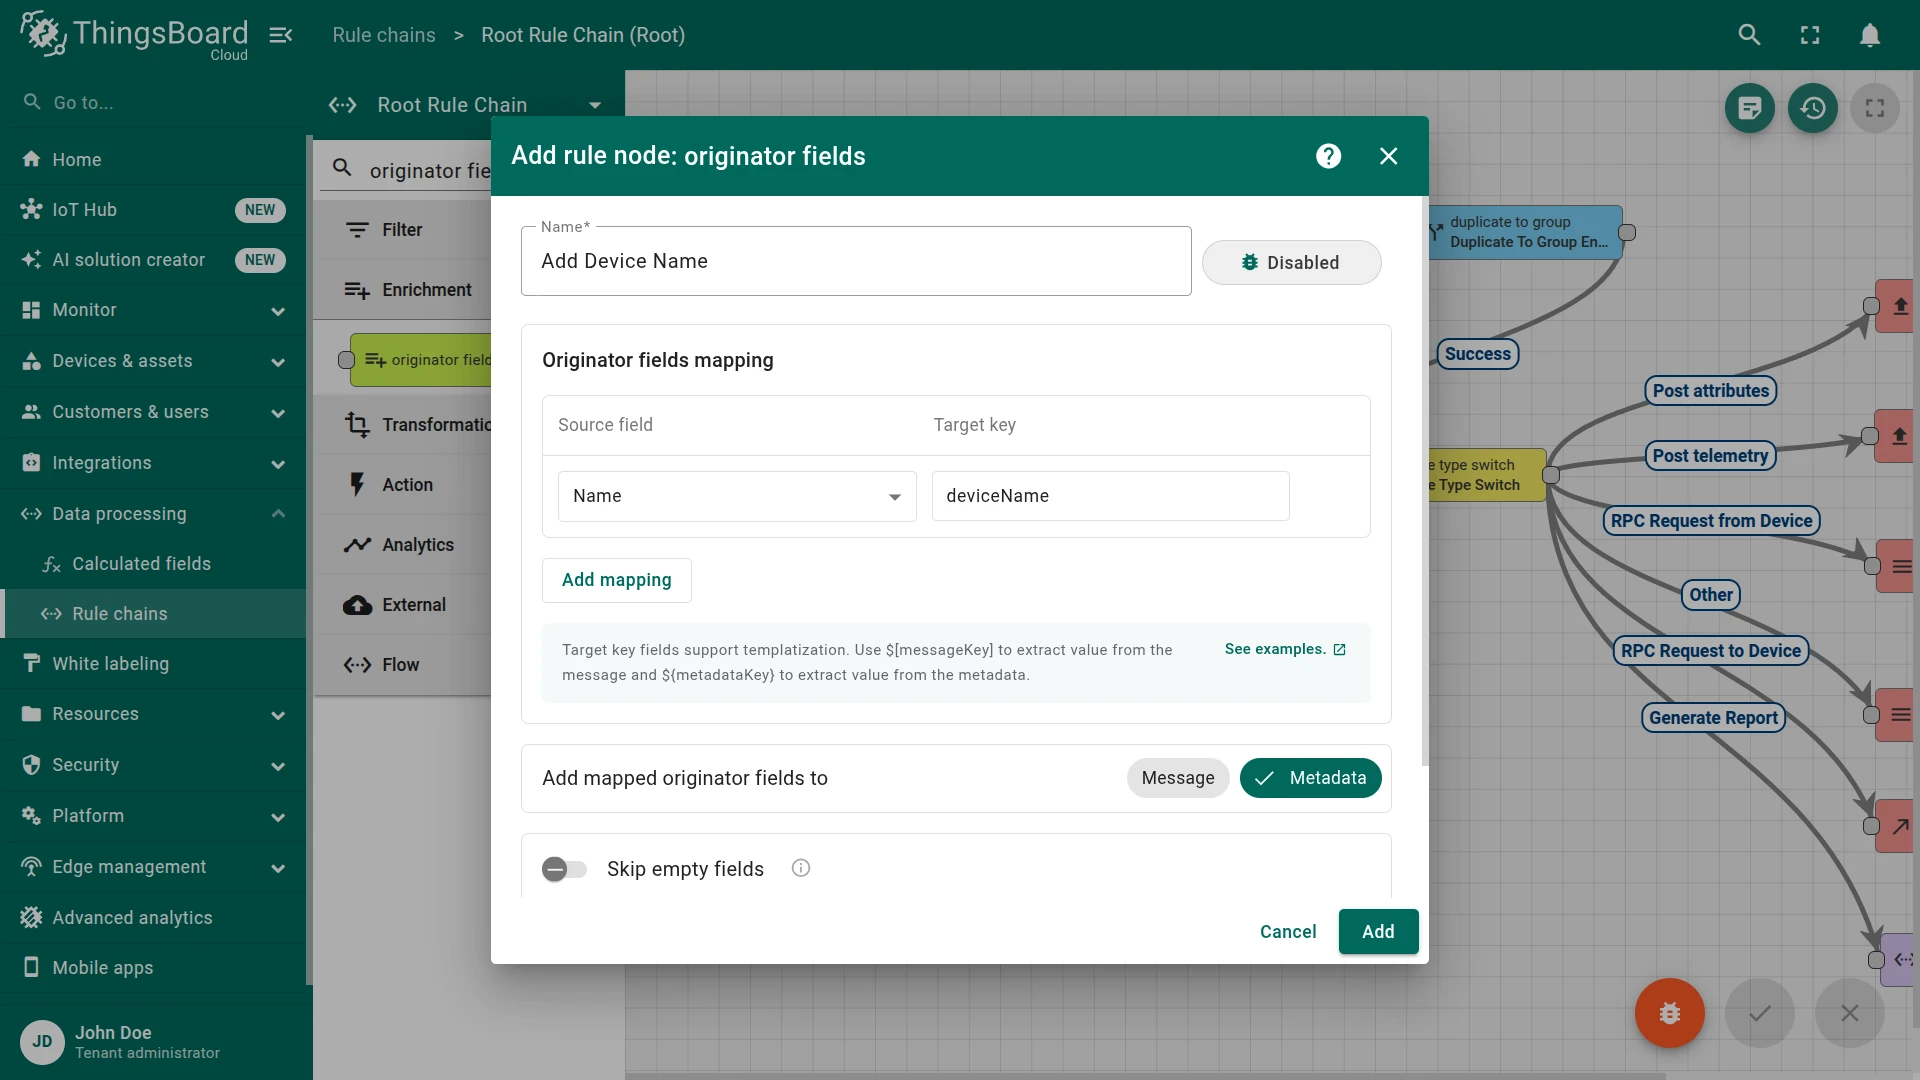
- From the Enrichment section, drag an originator fields node onto the canvas. Set:
- Name —
Add Device Name. - Originator fields mapping — Source field Name, Target key
deviceName. - Add mapped originator fields to — Metadata.
- Click Add.
- Name —
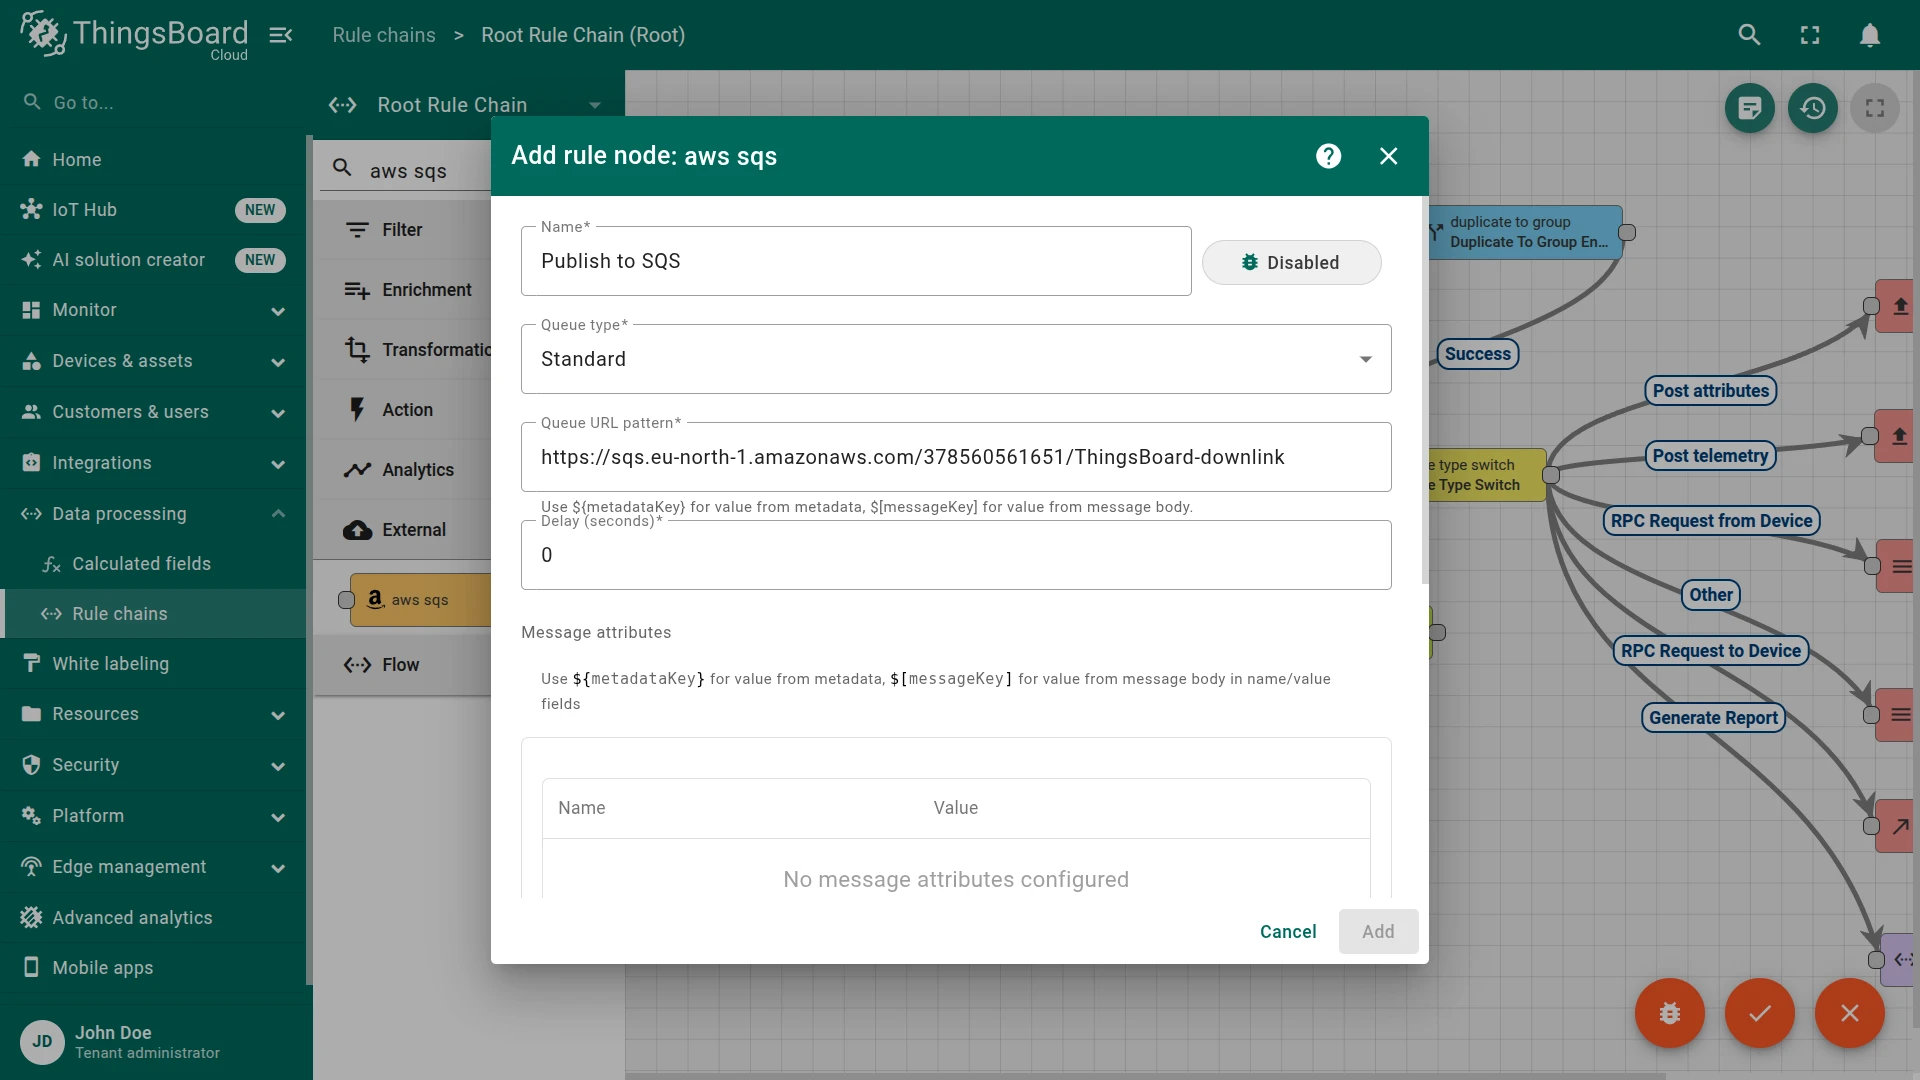
- From the External section, drag an aws sqs node onto the canvas. Set:
- Name —
Publish to SQS. - Queue type — Standard.
- Queue URL pattern — the URL of
ThingsBoard-downlink. The pattern also accepts${metadataKey}and$[messageKey]placeholders. - Delay (seconds) — keep
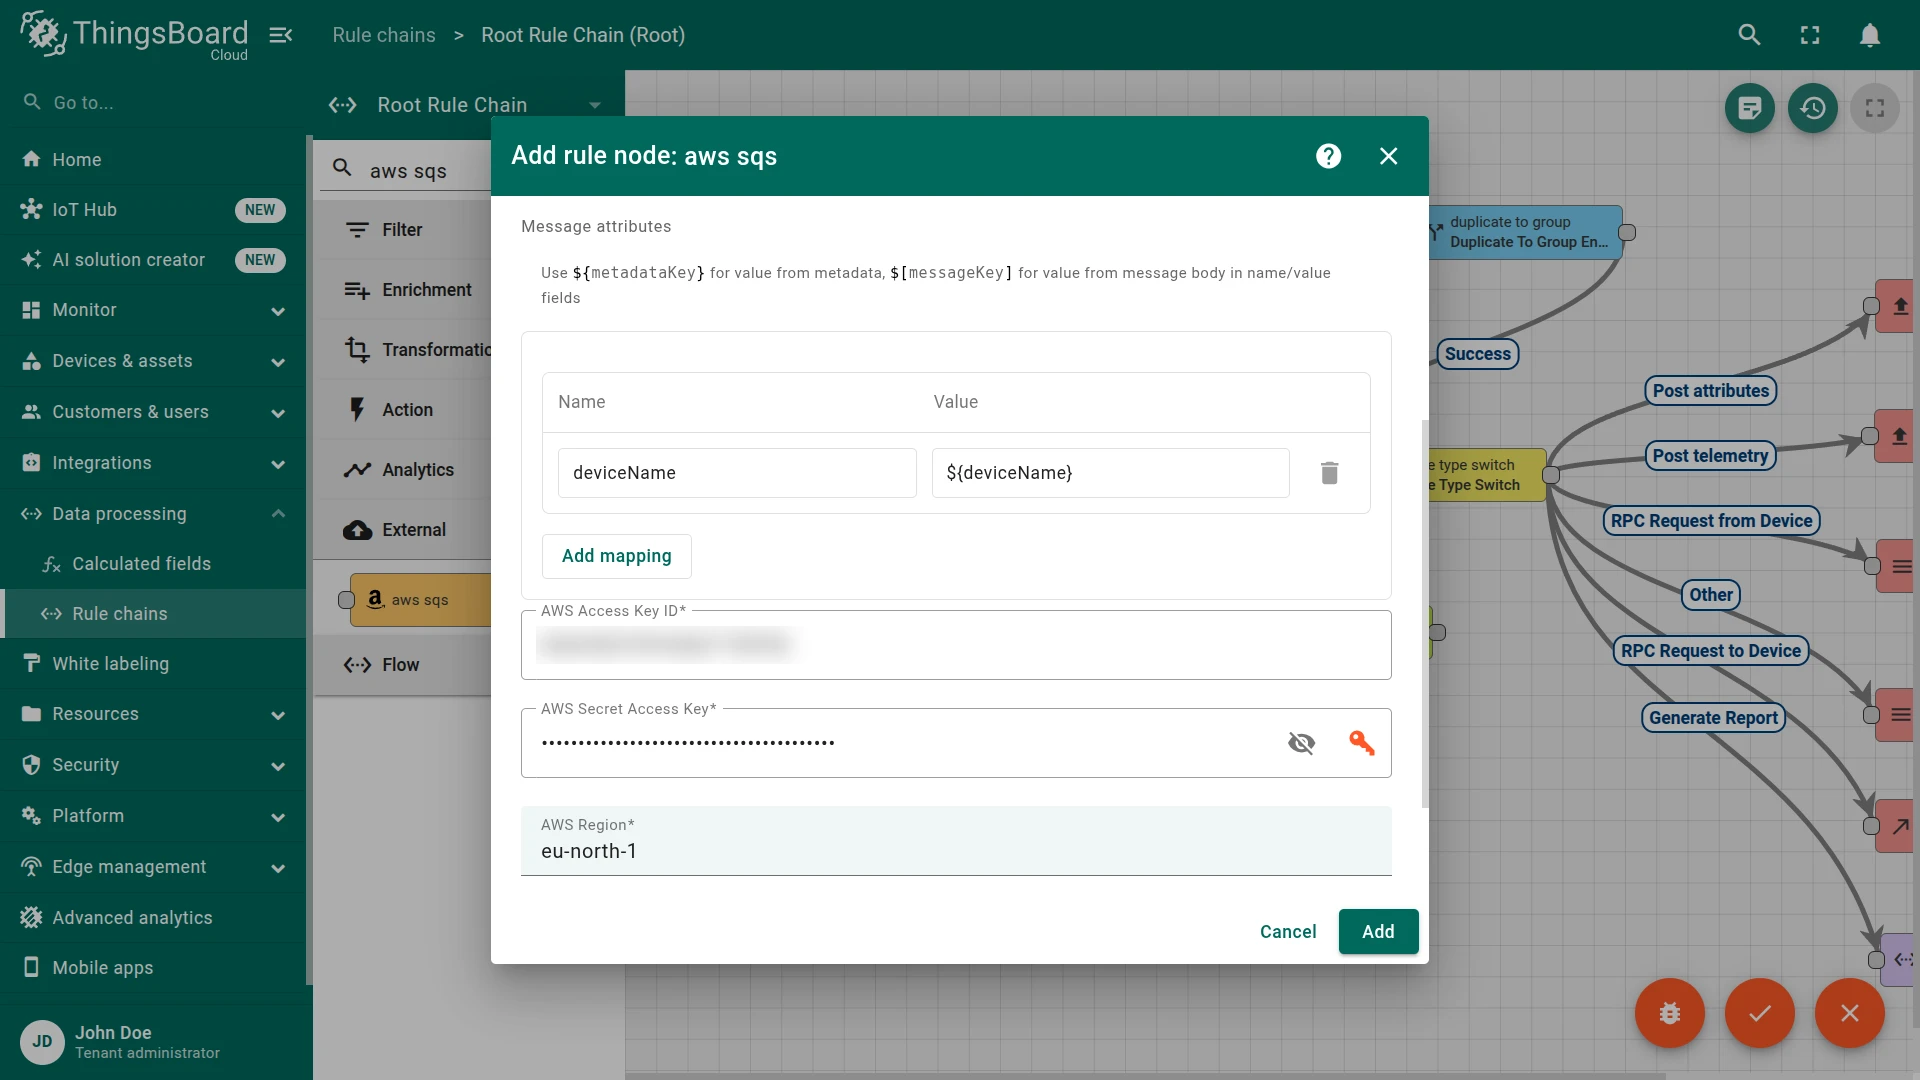
0. - Message attributes — click Add mapping and set Name to
deviceNameand Value to${deviceName}. - AWS Access Key ID and AWS Secret Access Key — the access key of
thingsboard-sqs. - AWS Region — replace the default
us-east-1with the Region of the queue, for exampleeu-north-1. - Click Add.
- Name —
- Connect the nodes:
- message type switch ⇾ Add Device Name with the Attributes Updated relation.
- Add Device Name ⇾ Publish to SQS with the Success relation.
- Click Apply changes.
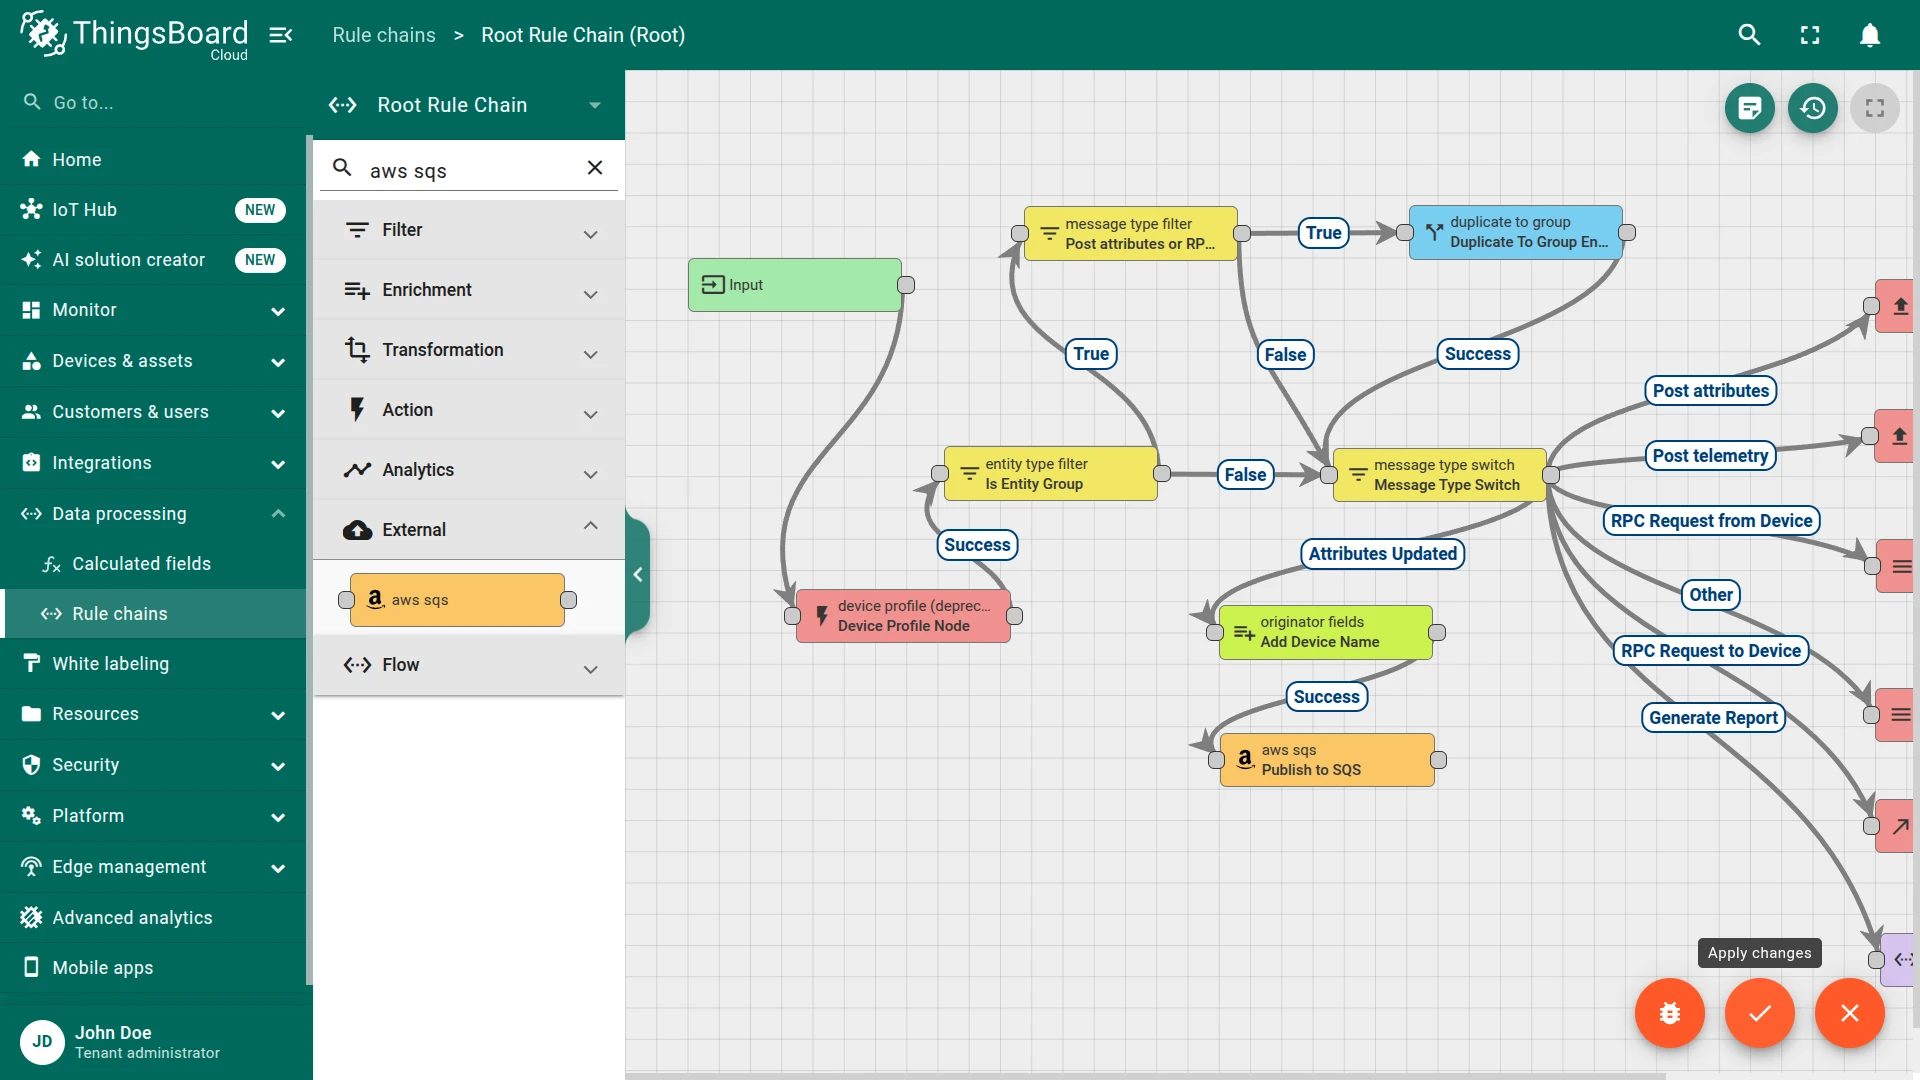
Message attribute names and values accept the same placeholders and are sent as attributes of type String. A placeholder whose key is not in the message is sent as written: without the originator fields node, the attribute value would be the text ${deviceName}.
Test Data Sending
Section titled “Test Data Sending”- Go to Devices & assets ⇾ Devices, select Thermometer, and open the Attributes tab.
- Select Shared attributes and click +.
- Set Key to
temperatureUploadFrequency, Type to Integer, Value to60, and click Add.
Verify Sending
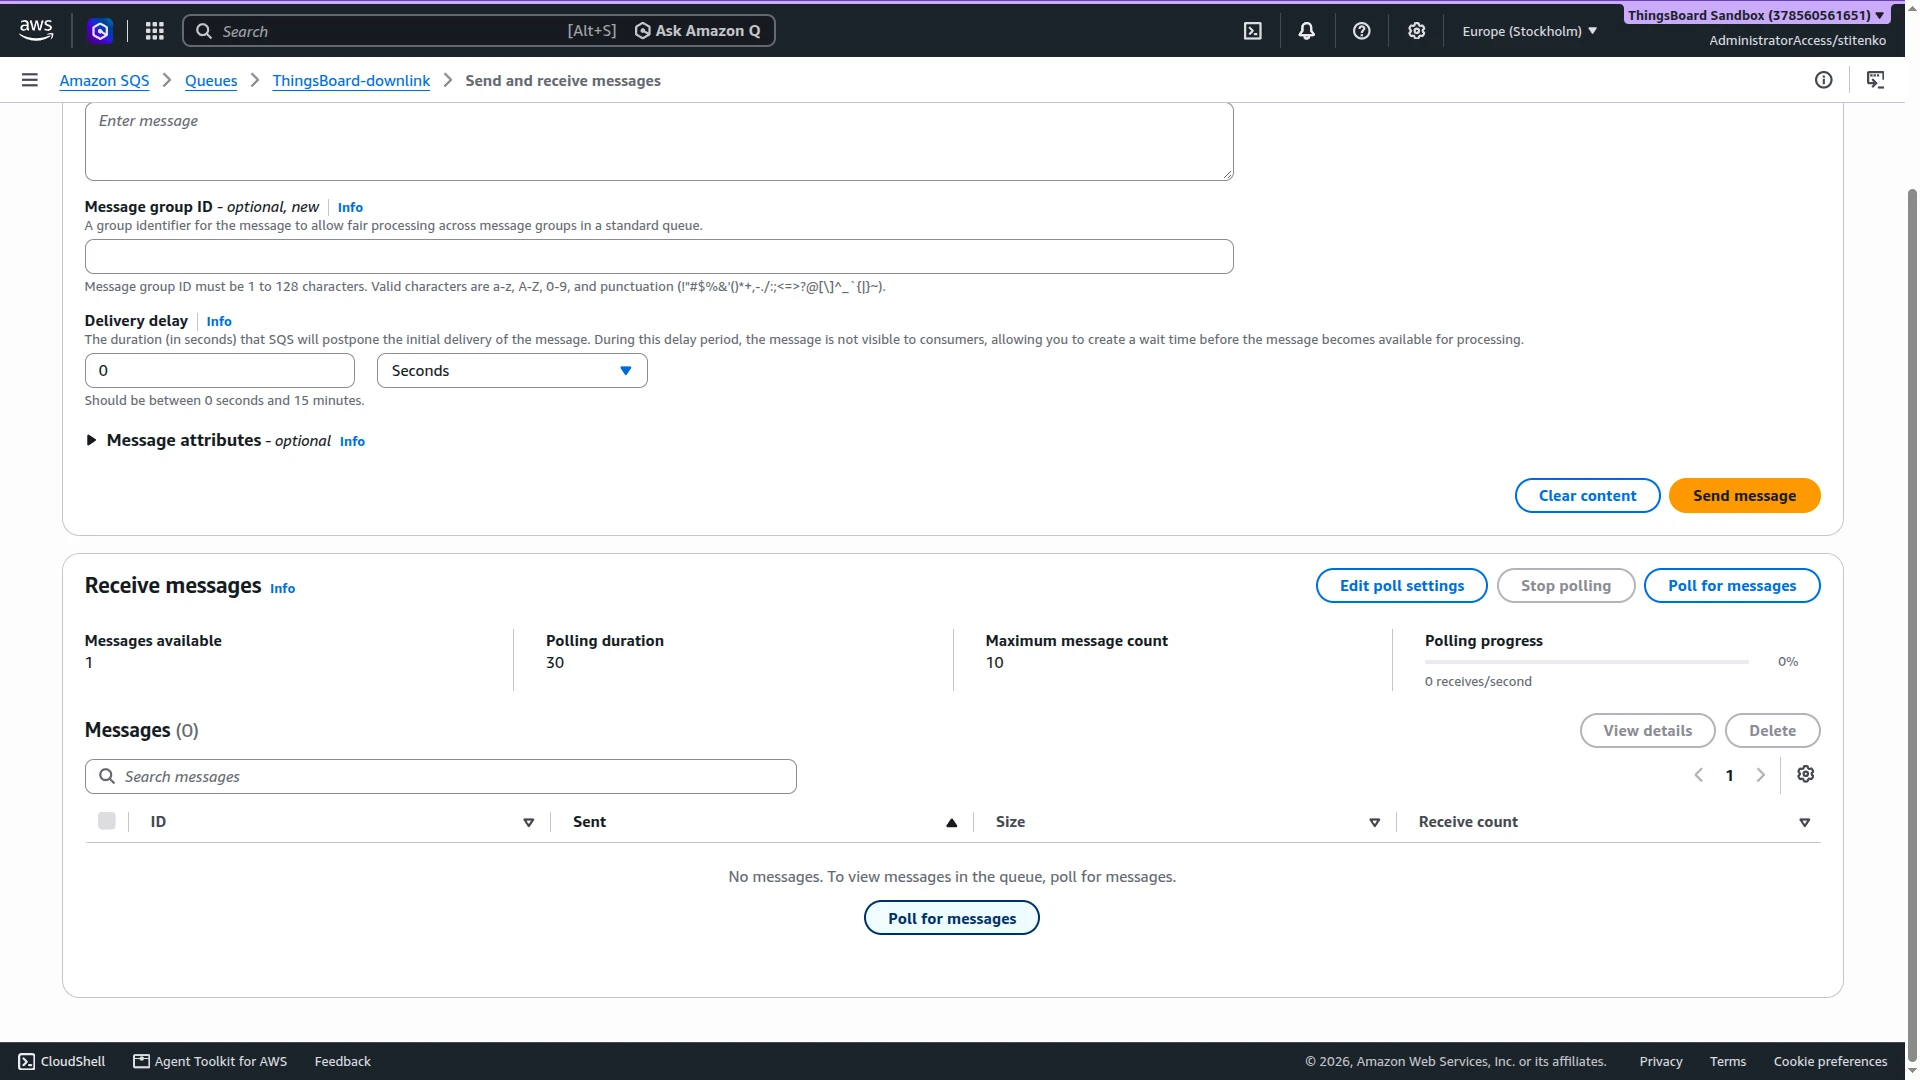
Section titled “Verify Sending”- Open
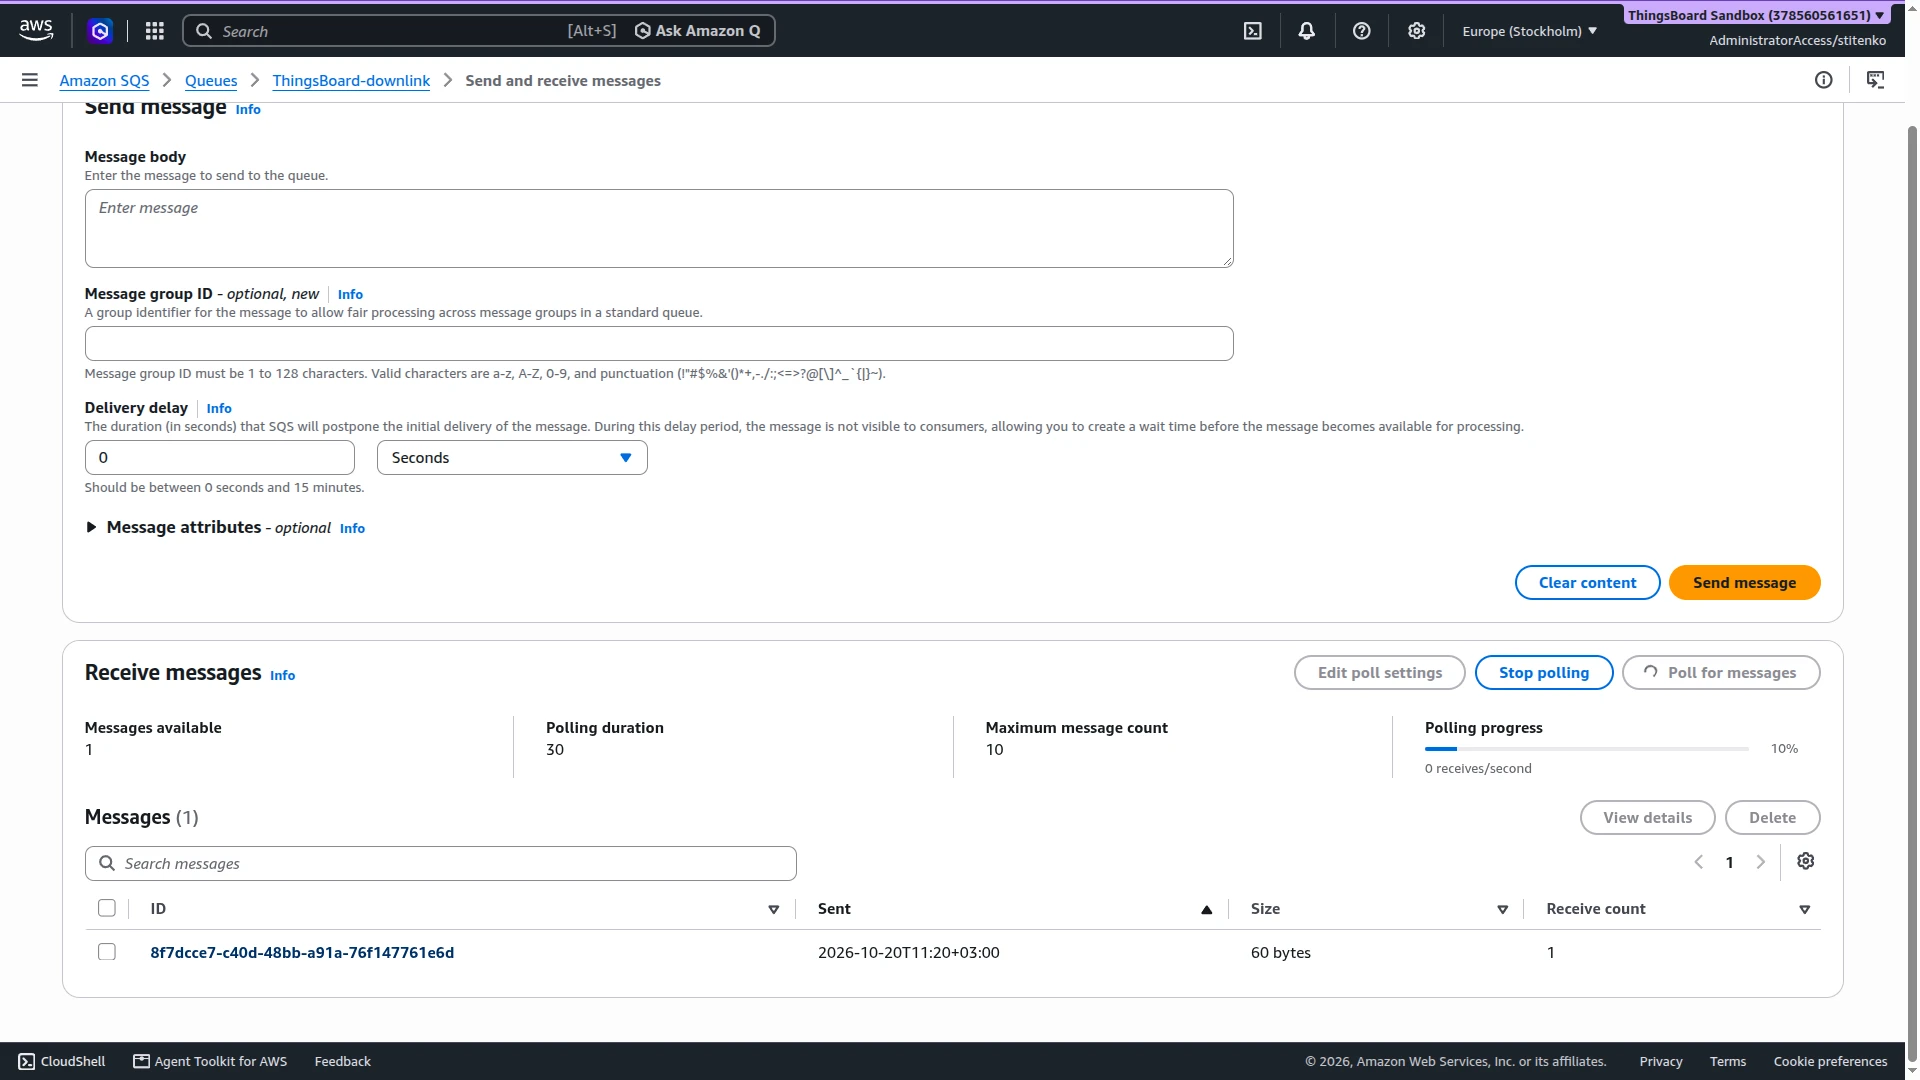
ThingsBoard-downlinkin the Amazon SQS console and click Send and receive messages. - Under Receive messages, click Poll for messages. The sent message appears in the Messages list.
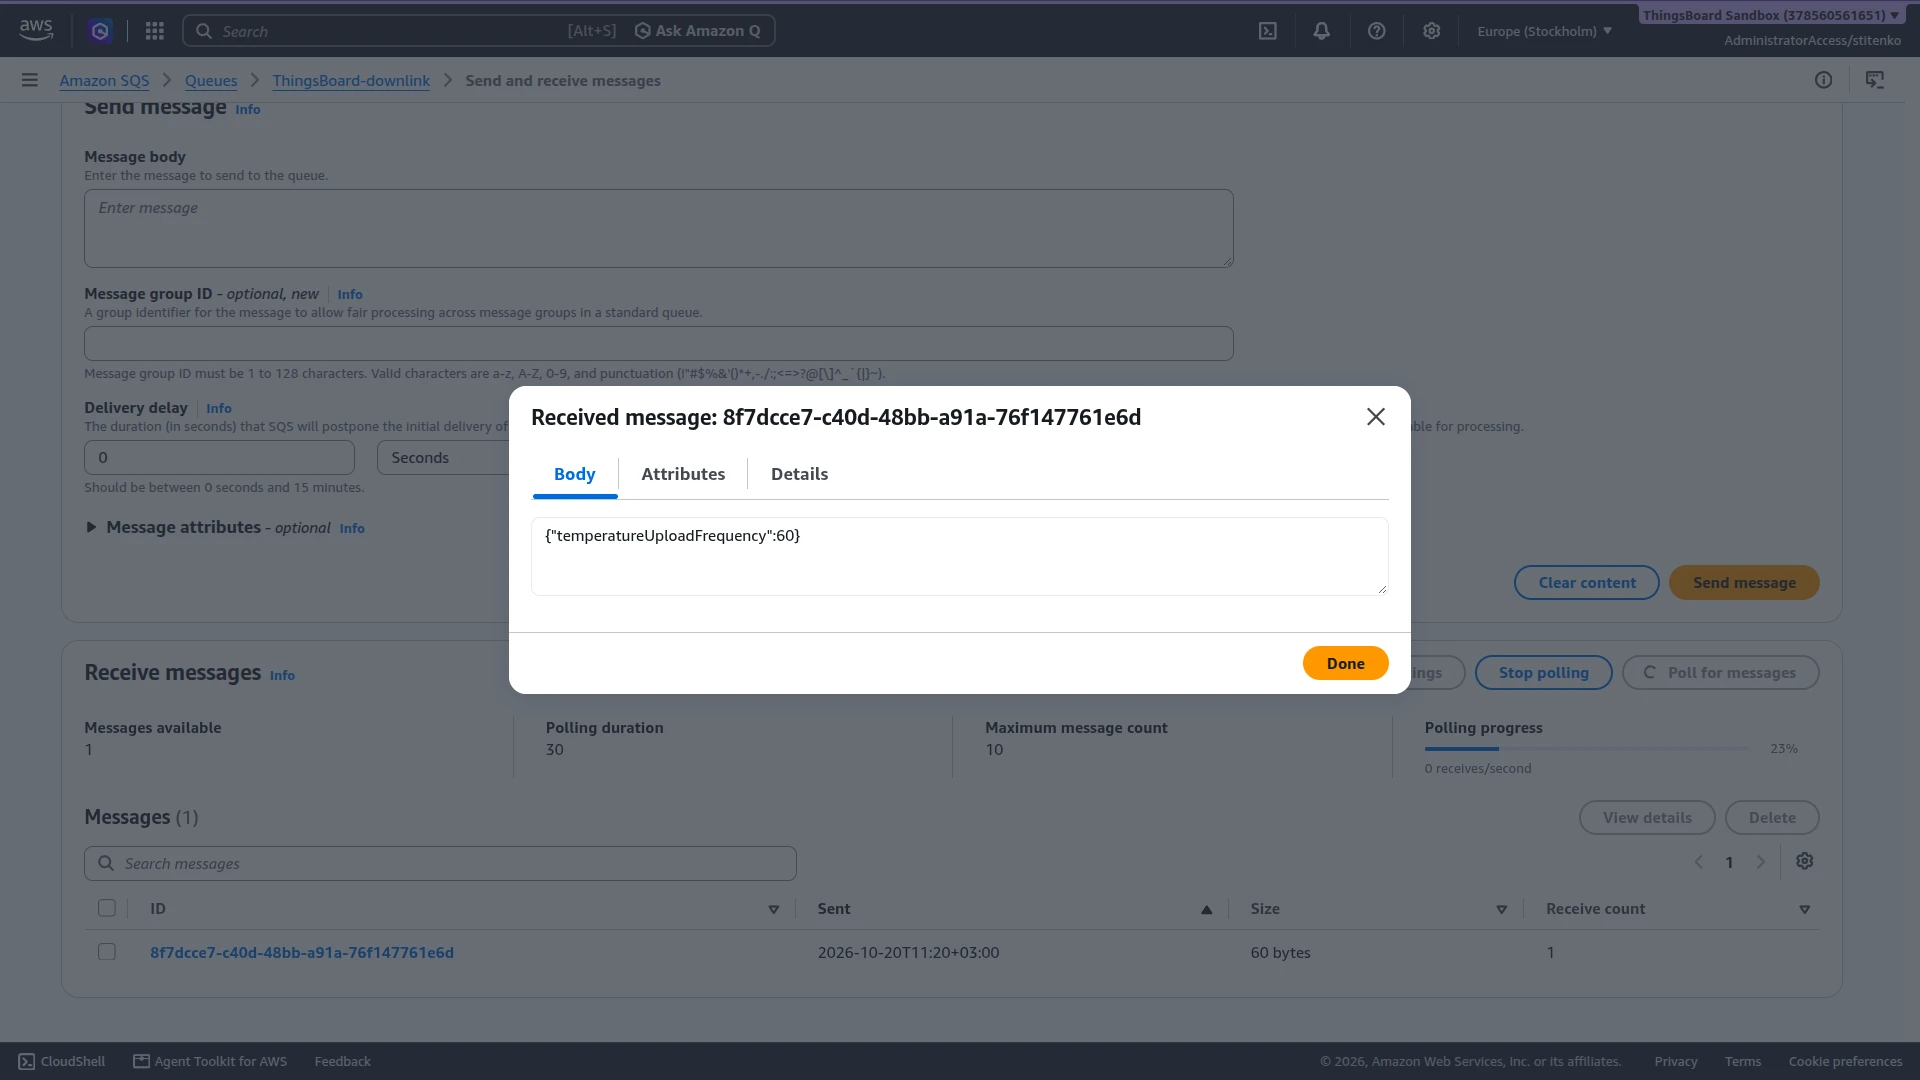
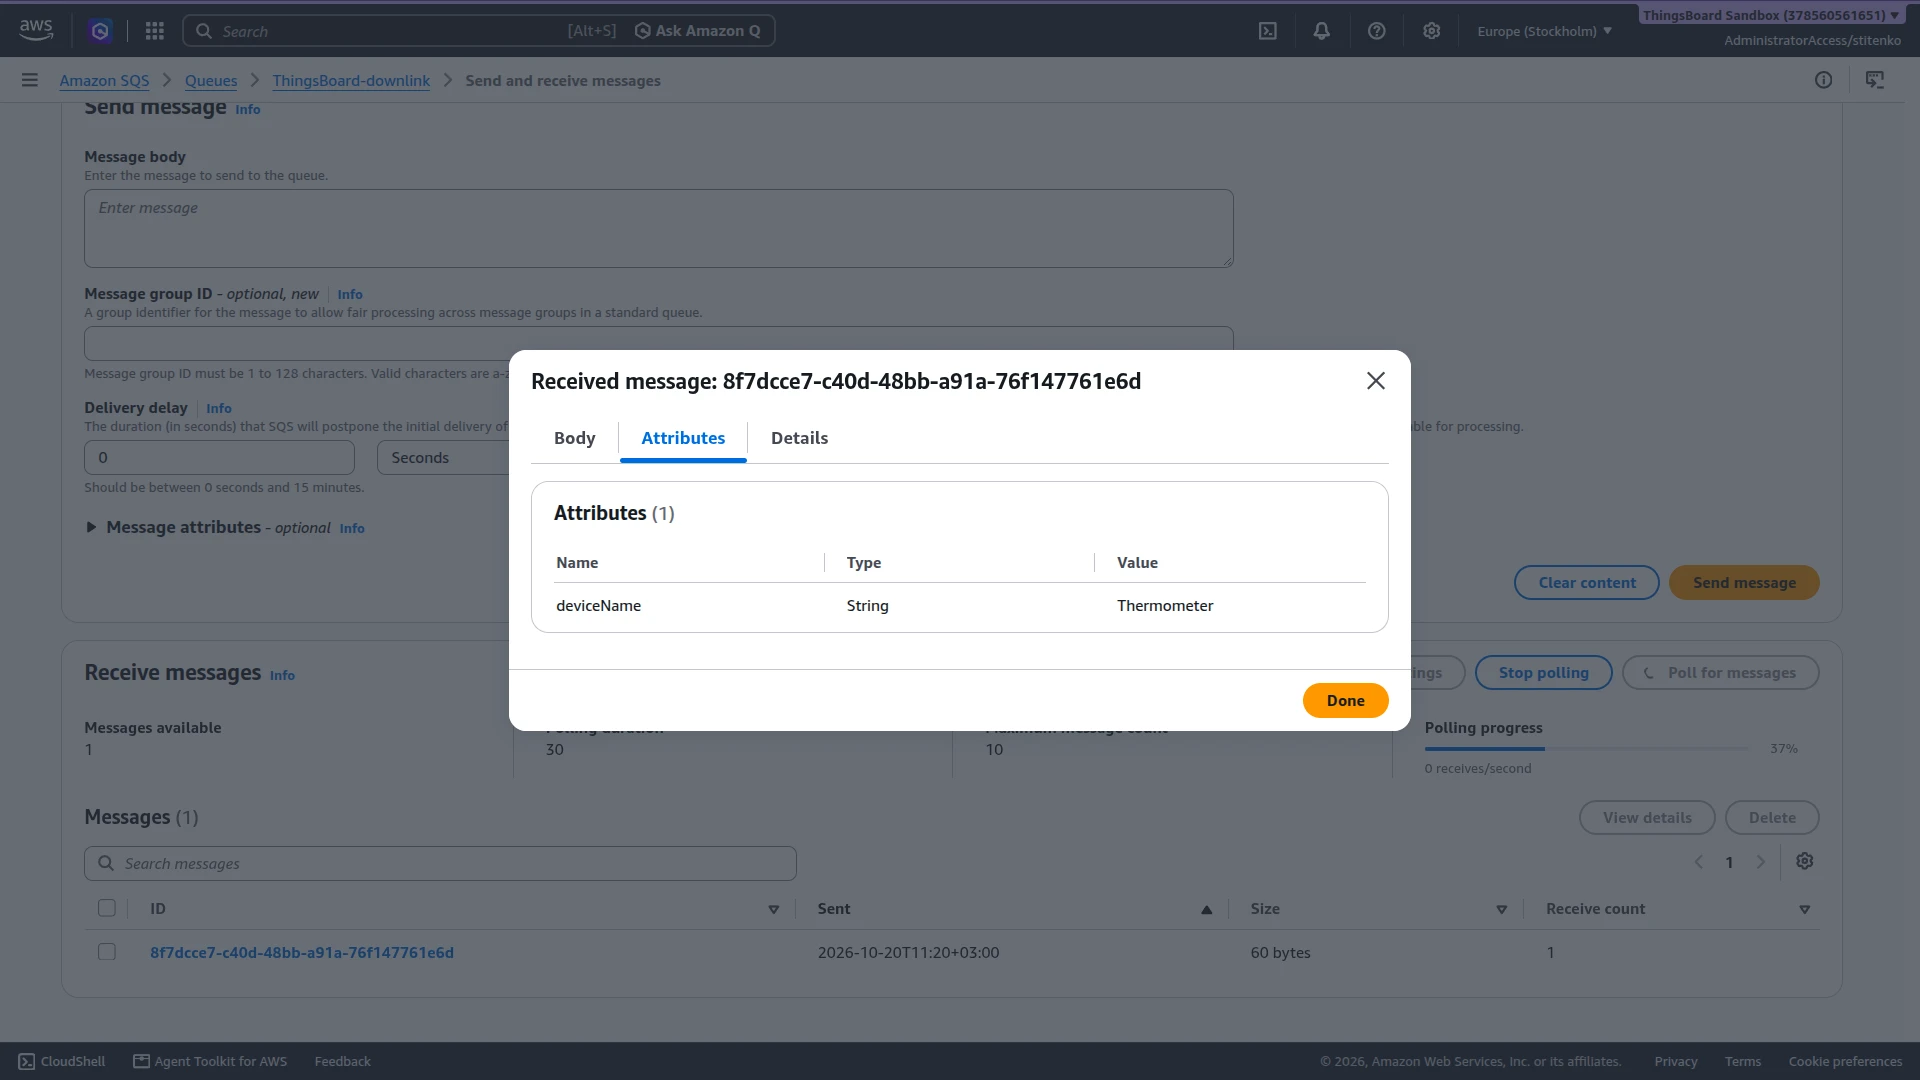
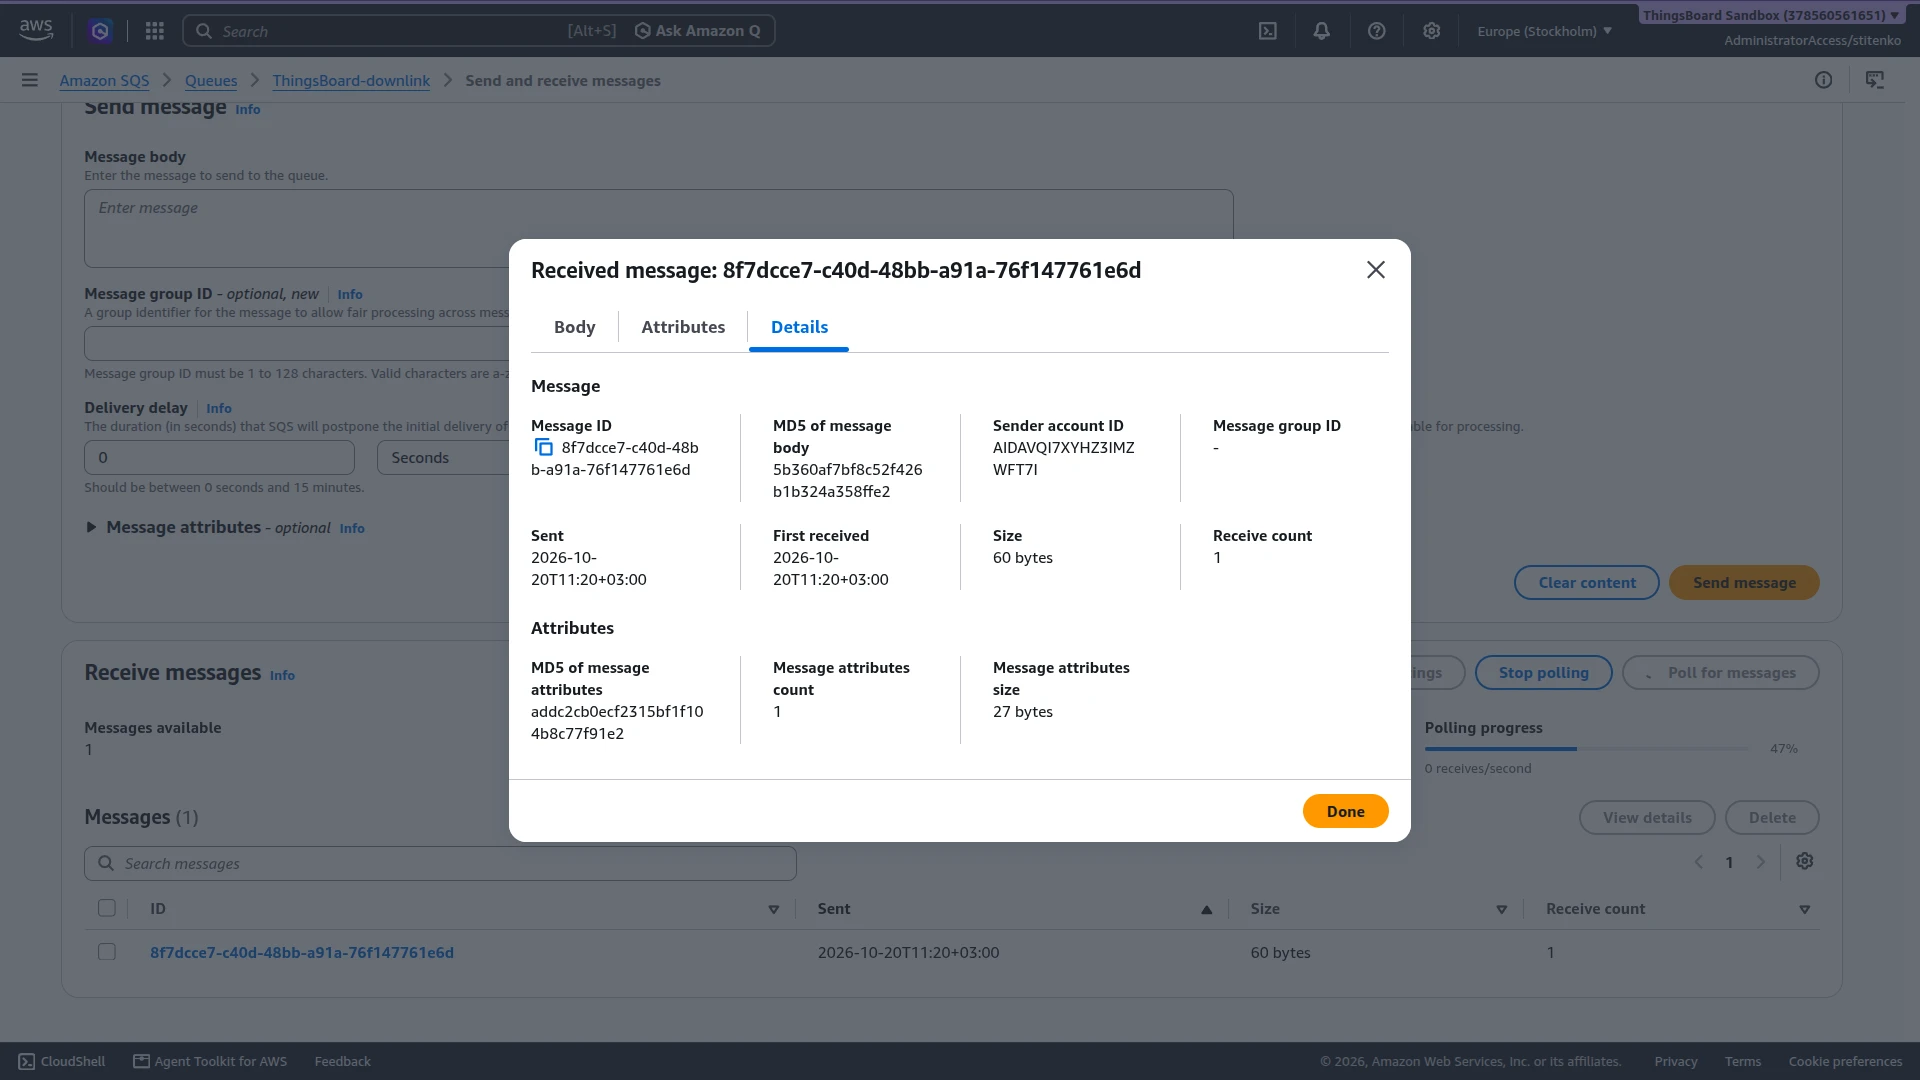
- Click the message ID to open it:
-
Body — the data of the Rule Engine message:
{"temperatureUploadFrequency":60} -
Attributes —
deviceNameof type String with the valueThermometer. -
Details — the Message ID. It matches
messageIdin the metadata that the aws sqs node adds on success.
-
- Click Done.
Troubleshooting
Section titled “Troubleshooting”| Symptom | Cause | Fix |
|---|---|---|
| ERROR events mentioning the queue | Wrong SQS Queue URL. | Copy the URL from the queue page again. |
ERROR events with AccessDenied |
The access key is wrong or inactive, or the policy does not allow sqs:ReceiveMessage and sqs:DeleteMessage on the queue. |
Check the access key and the queue ARN in the policy. For an SSE-KMS queue, allow kms:Decrypt. |
| Messages stay in the queue | The integration is disabled, or every poll fails. | Enable the integration and check its Events tab for errors. |
| Messages leave the queue, but no device appears | The decoder failed, or the body is not JSON. The integration deleted the messages anyway. | Check the Error column in the integration and converter events. Send JSON bodies only. |
| Some messages arrive about 30 seconds late | A message in the same batch had a body that is not JSON. The integration stopped the batch, and the remaining messages came back after the queue’s Visibility timeout. | Find the ERROR event with JsonParseException in the integration events and fix the producer so that it sends JSON only. |
| Device not created | deviceName is empty or undefined. |
Check Out in the converter events. |
| Data arrives with a delay | A long Polling period in seconds on a mostly empty queue. | Lower the polling period, or set the queue’s Receive message wait time to 20 seconds. |
The aws sqs node routes messages to Failure with AccessDenied in error |
The IAM user has no sqs:SendMessage on the target queue. |
Add the publish statement to the policy. |
A message attribute holds ${key} as text |
The key is not in the message metadata. | Add the key with an enrichment node, for example originator fields, or use a key that the message already has. |
| Messages consumed by another reader | Another consumer reads the same queue. SQS delivers each message to one consumer only. | Use a dedicated queue for ThingsBoard, or fan out with Amazon SNS to several queues. |
To read debug events, open the integration or converter, click Events, and select an event: In is the received data, Out is the converter result, and Error holds the error text.
See Also
Section titled “See Also”- Integrations overview — how integrations, converters, uplinks, and downlinks fit together.
- Uplink data converter — decoder inputs, output format, and scripting patterns.
- aws sqs node — send Rule Engine messages to an SQS queue.
- originator fields node — add fields of the message originator, such as the device name, to the message or its metadata.
- message type switch node — route messages by type, for example attribute updates.
- AWS Kinesis Integration — read records from a Kinesis data stream.
- Remote Integration — run the integration outside the ThingsBoard cluster.
- TBEL — built-in functions and syntax for converter scripts.
- Short and long polling — how Receive message wait time affects polling.
Was this helpful?