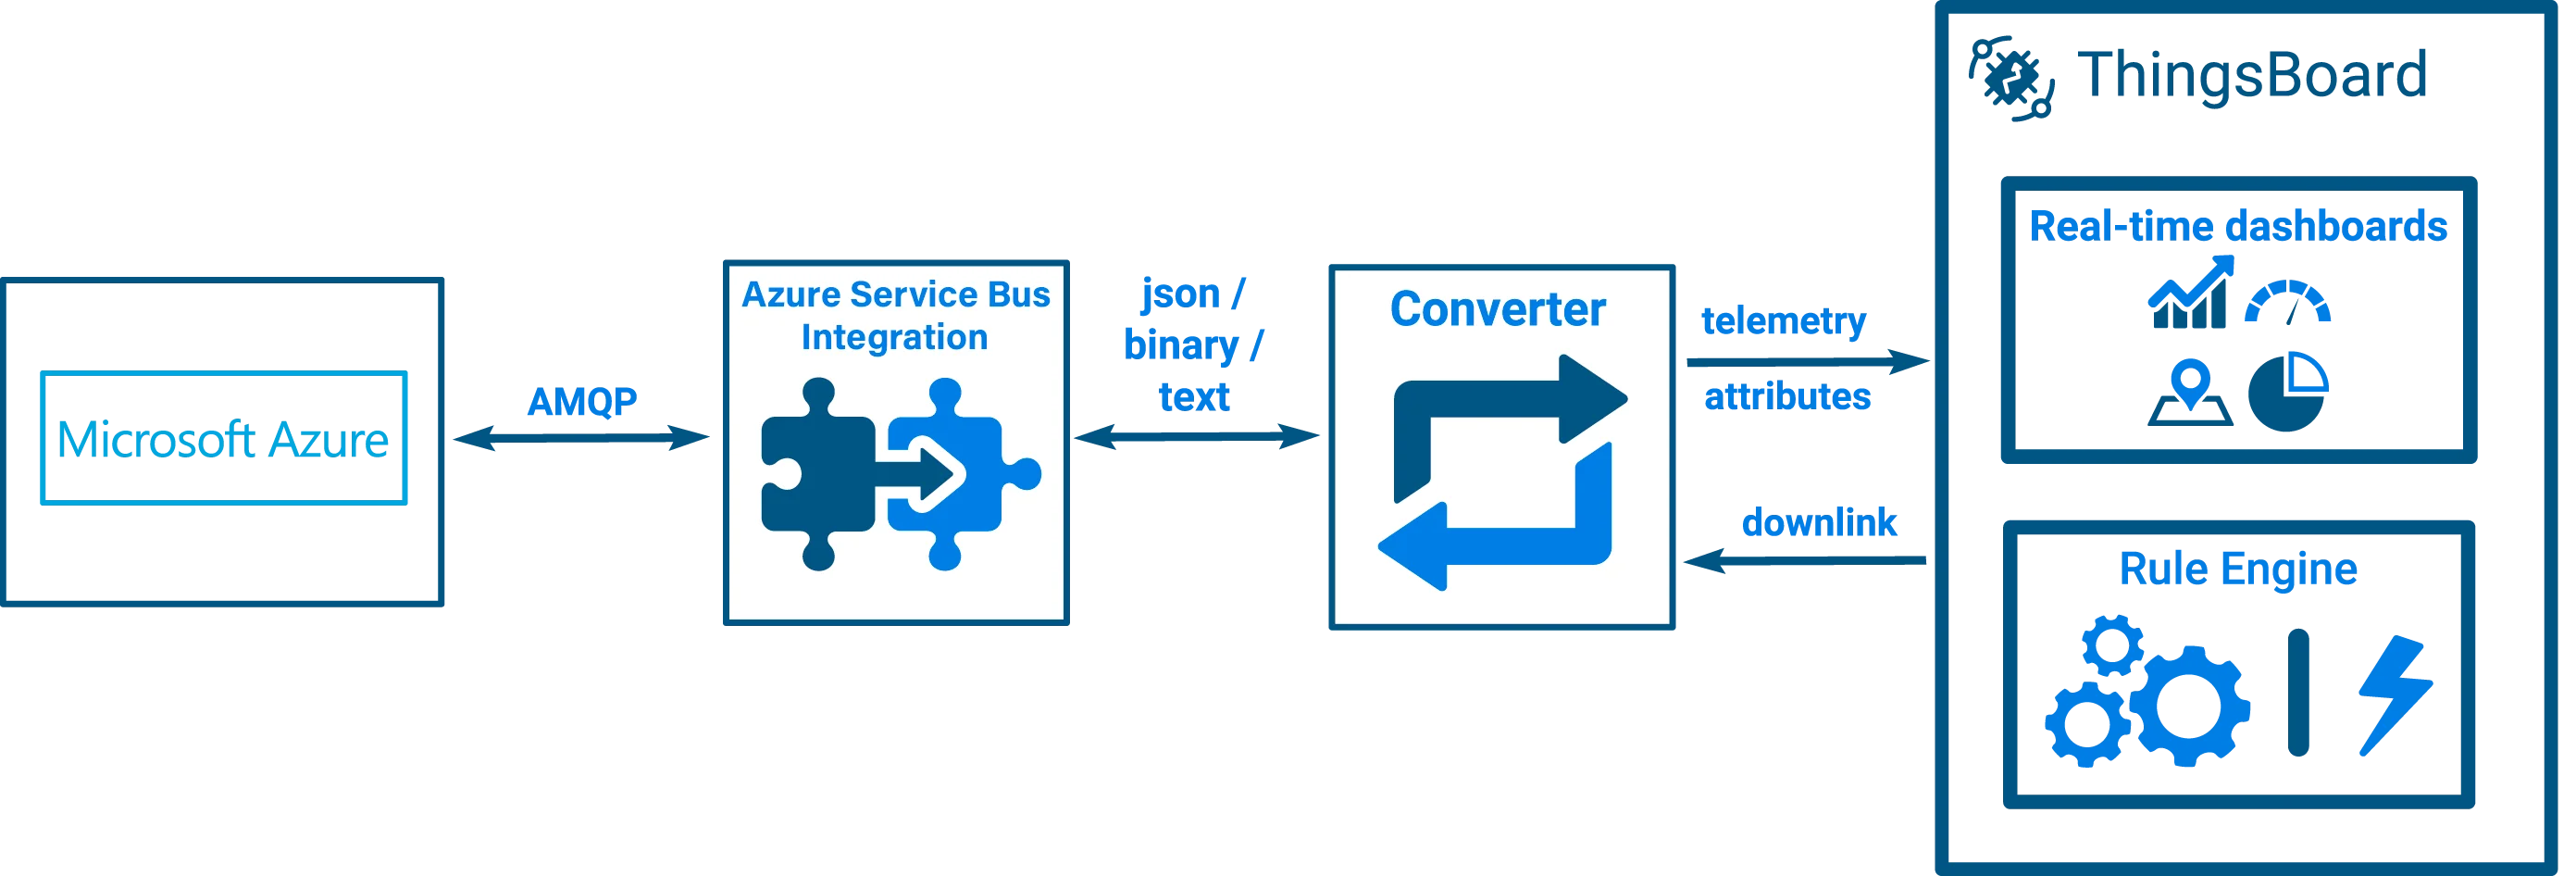
Azure Service Bus Integration
Azure Service Bus is a fully managed enterprise message broker from Microsoft that supports queues and publish/subscribe topics. The ThingsBoard Azure Service Bus integration subscribes to a topic on your Service Bus namespace, receives device messages, decodes them via an uplink converter, and stores telemetry and attributes in ThingsBoard. In the reverse direction, it encodes Rule Engine messages via a downlink converter and publishes them to a dedicated downlink topic.
Configure Azure Service Bus
Section titled “Configure Azure Service Bus”Before creating the integration in ThingsBoard, prepare the following in the Azure portal:
- Open your Service Bus namespace (or create one). A namespace is the scoping container for all messaging components and has a globally unique DNS name in the form
<namespace>.servicebus.windows.net. - Create a topic for uplink messages (e.g.
uplinktopic). Topics implement the publish/subscribe pattern — multiple subscribers can independently consume the same messages. - Create a subscription on that topic (e.g.
S1). Each subscription maintains its own independent copy of every message published to the topic, so ThingsBoard consumes messages without affecting other consumers. - Copy the connection string for the namespace — go to Settings ⇾ Shared access policies, open a policy (e.g.
RootManageSharedAccessKey), and copy the Primary Connection String. It has the formEndpoint=sb://<namespace>.servicebus.windows.net/;SharedAccessKeyName=<policy>;SharedAccessKey=<key>.
ThingsBoard integration setup
Section titled “ThingsBoard integration setup”Create an uplink converter
Section titled “Create an uplink converter”The uplink converter decodes incoming Azure Service Bus messages and maps them to the ThingsBoard data model. Azure Service Bus uses a generic uplink converter.
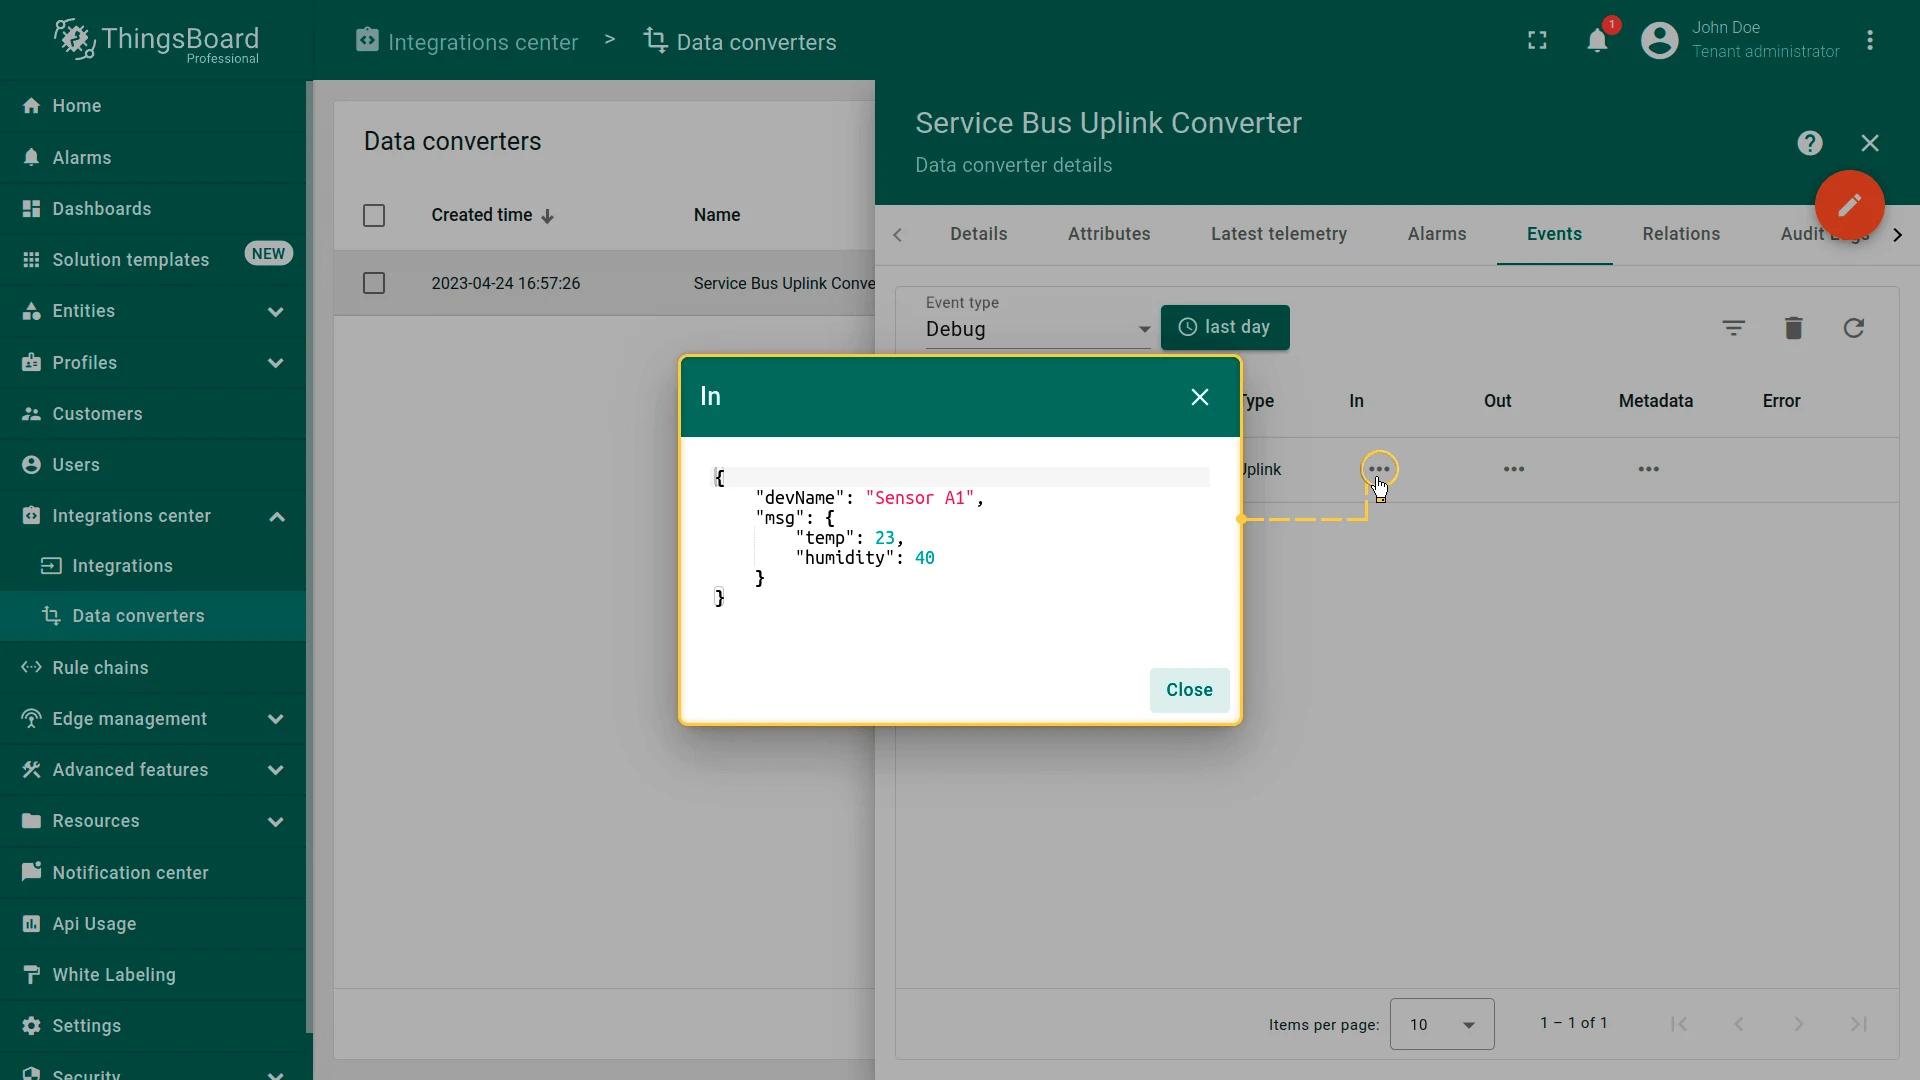
Sample input message:
{ "devName": "Sensor A1", "msg": { "temp": 23, "humidity": 40 }}The devName field maps to deviceName. The nested msg object provides temperature and humidity telemetry.
Import the uplink converter
- Download the uplink converter file:
- Go to Integrations center ⇾ Data converters.
- Click + Add data converter ⇾ Import converter.
- Drag and drop the downloaded JSON file into the Import converter window and click Import.
The decoder function used in this tutorial:
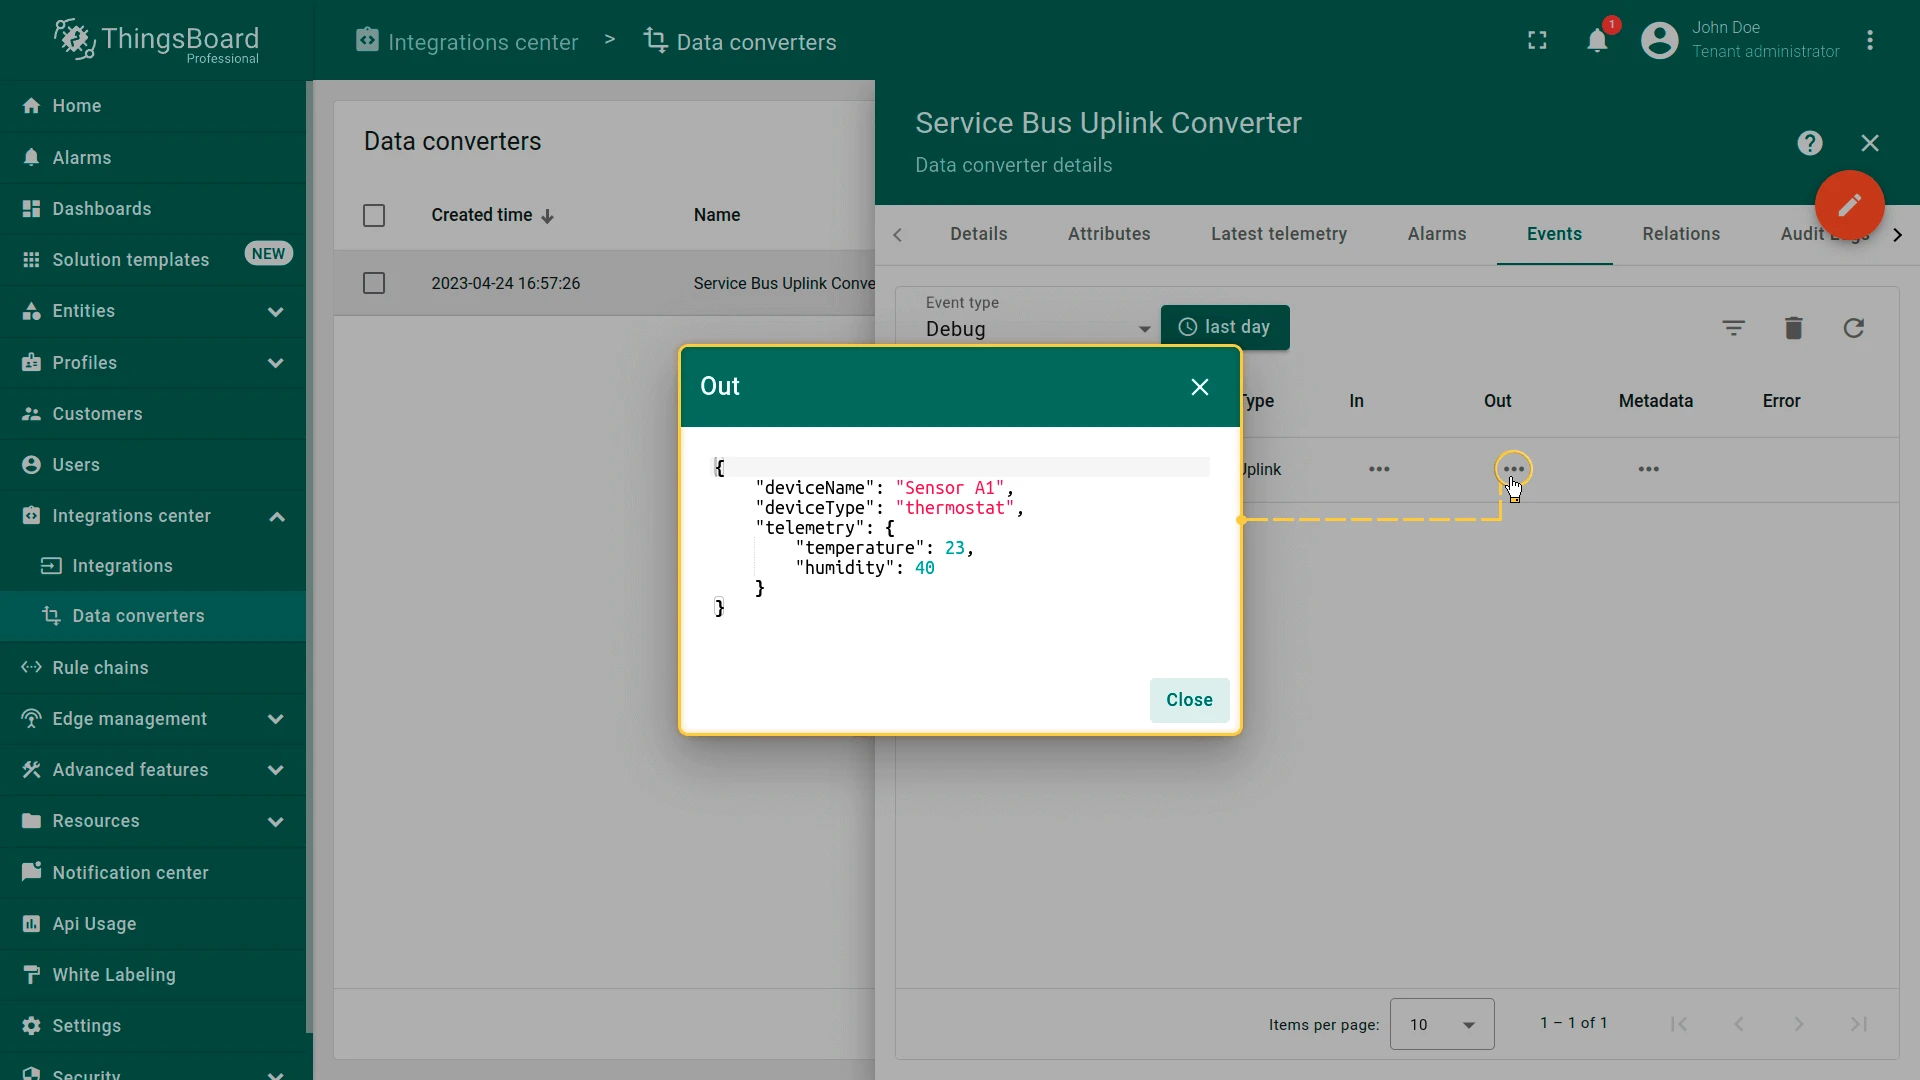
var data = decodeToJson(payload);var deviceName = data.devName;var deviceType = 'thermostat';
var result = {    deviceName: deviceName,    deviceType: deviceType,    telemetry: {        temperature: data.msg.temp,        humidity: data.msg.humidity    }};
return result;
var data = decodeToJson(payload);var deviceName = data.devName;var deviceType = 'thermostat';
var result = { deviceName: deviceName, deviceType: deviceType, telemetry: { temperature: data.msg.temp, humidity: data.msg.humidity }};
function decodeToString(payload) { return String.fromCharCode.apply(String, payload);}
function decodeToJson(payload) { var str = decodeToString(payload); var data = JSON.parse(str); return data;}
return result;Create the integration
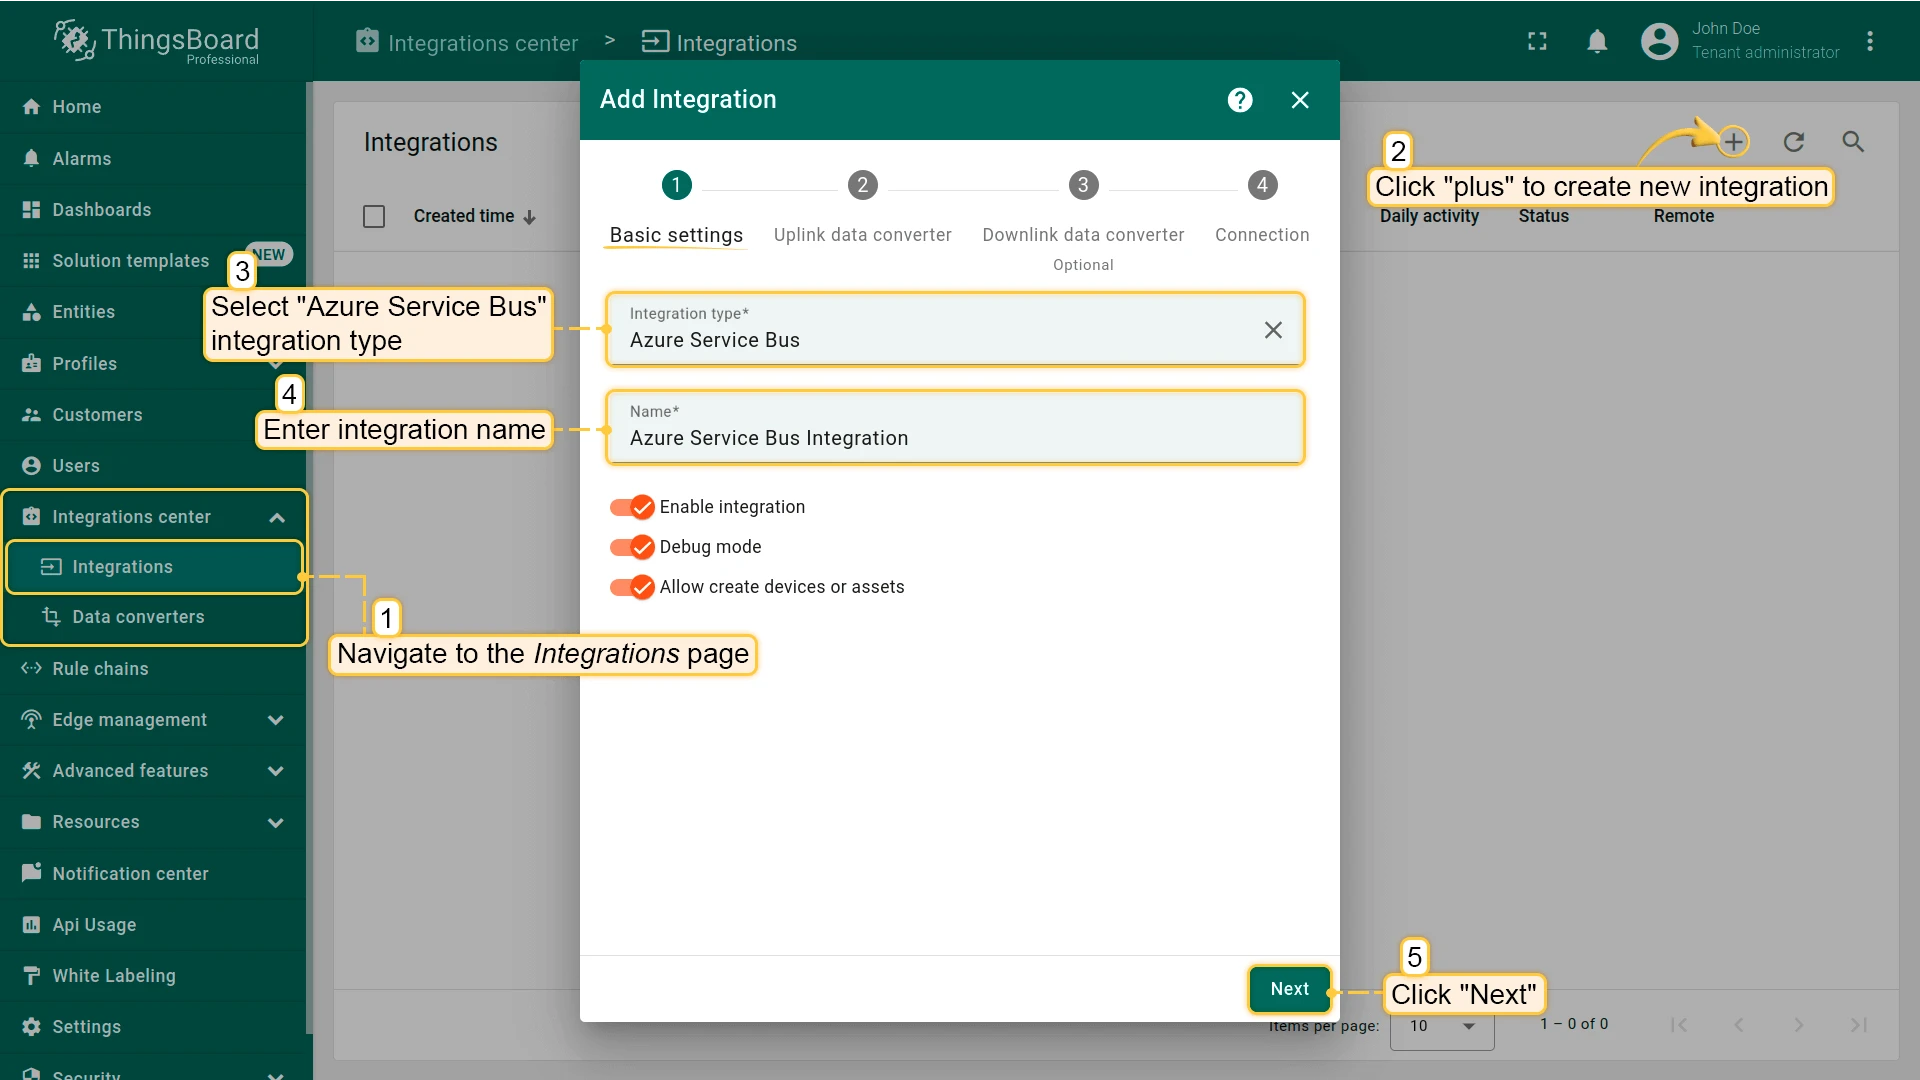
Section titled “Create the integration”- Go to Integrations center ⇾ Integrations and click + Add integration.
- Basic settings:
- Set Integration type to Azure Service Bus.
- Enter a name for the integration.
- Click Next.
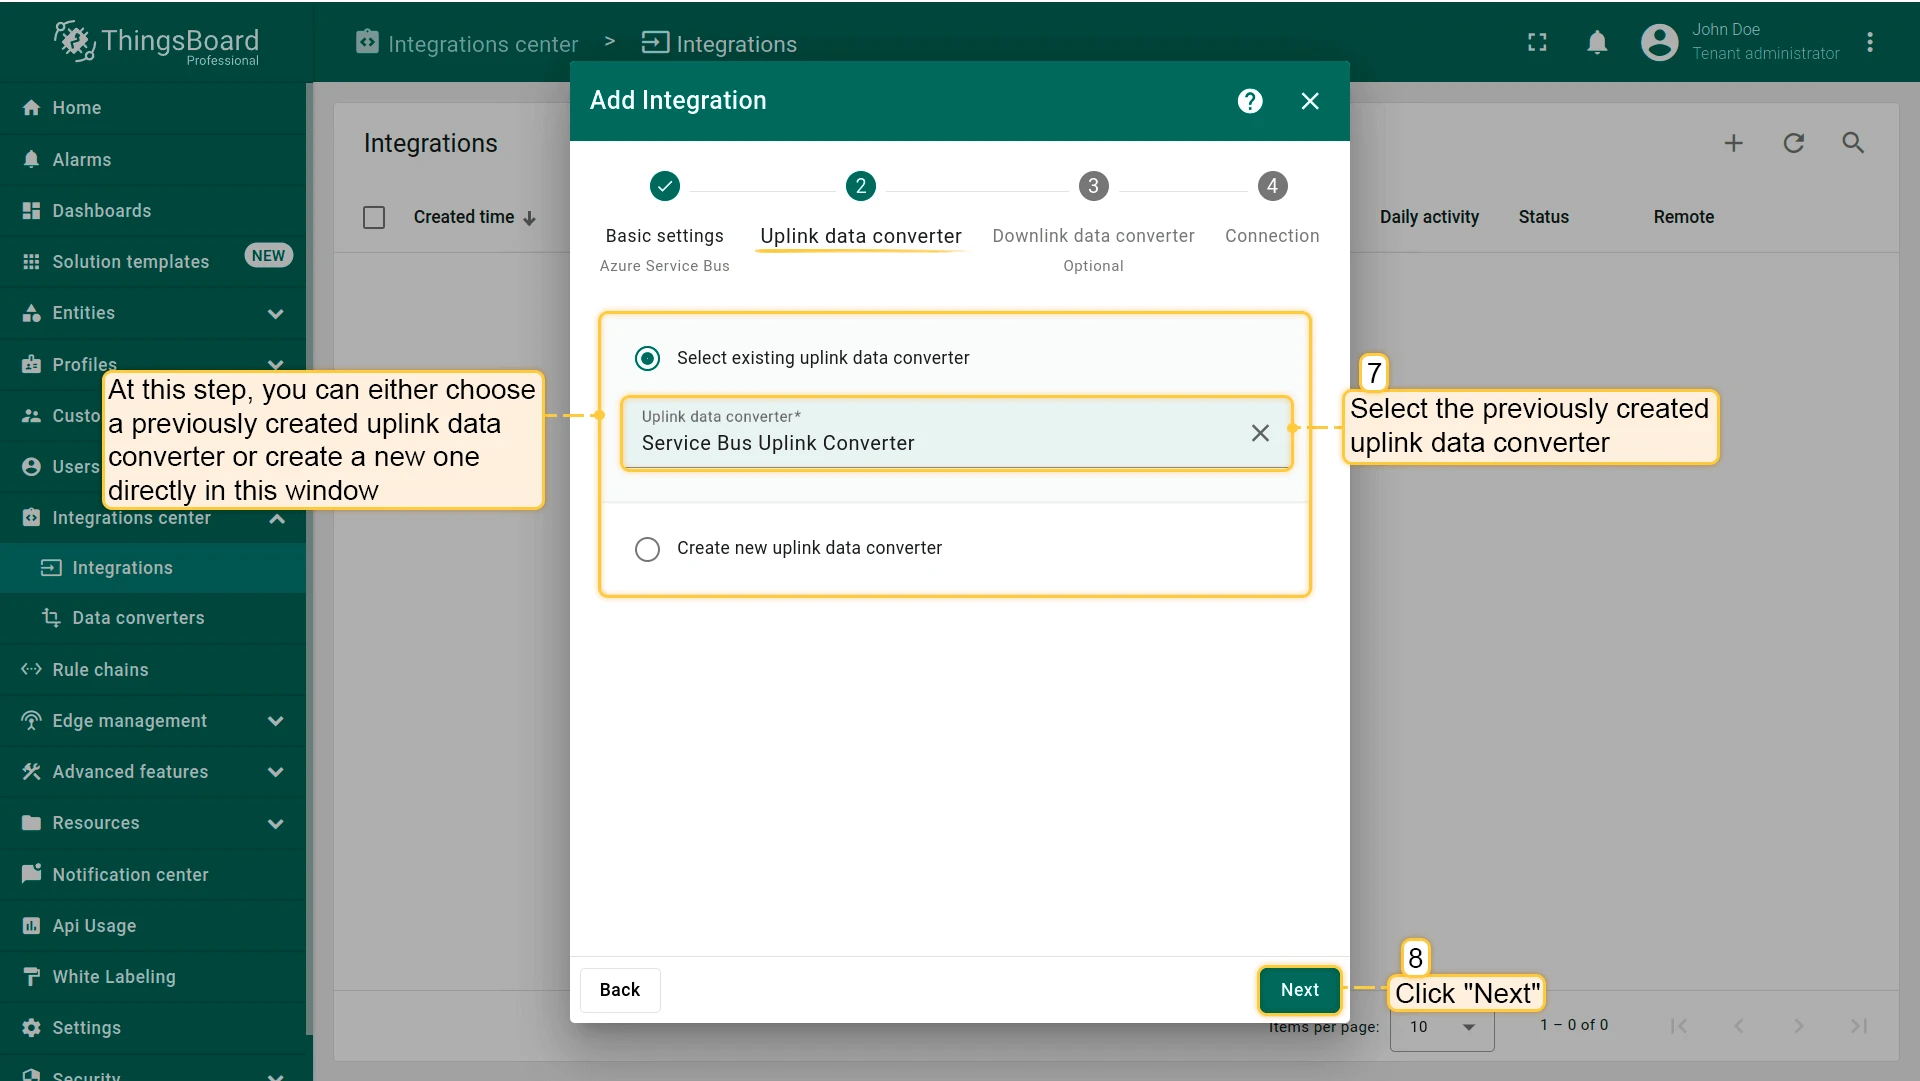
- Uplink data converter:
- Select existing — choose the previously created Azure Service Bus Uplink Converter from the list.
- Click Next.
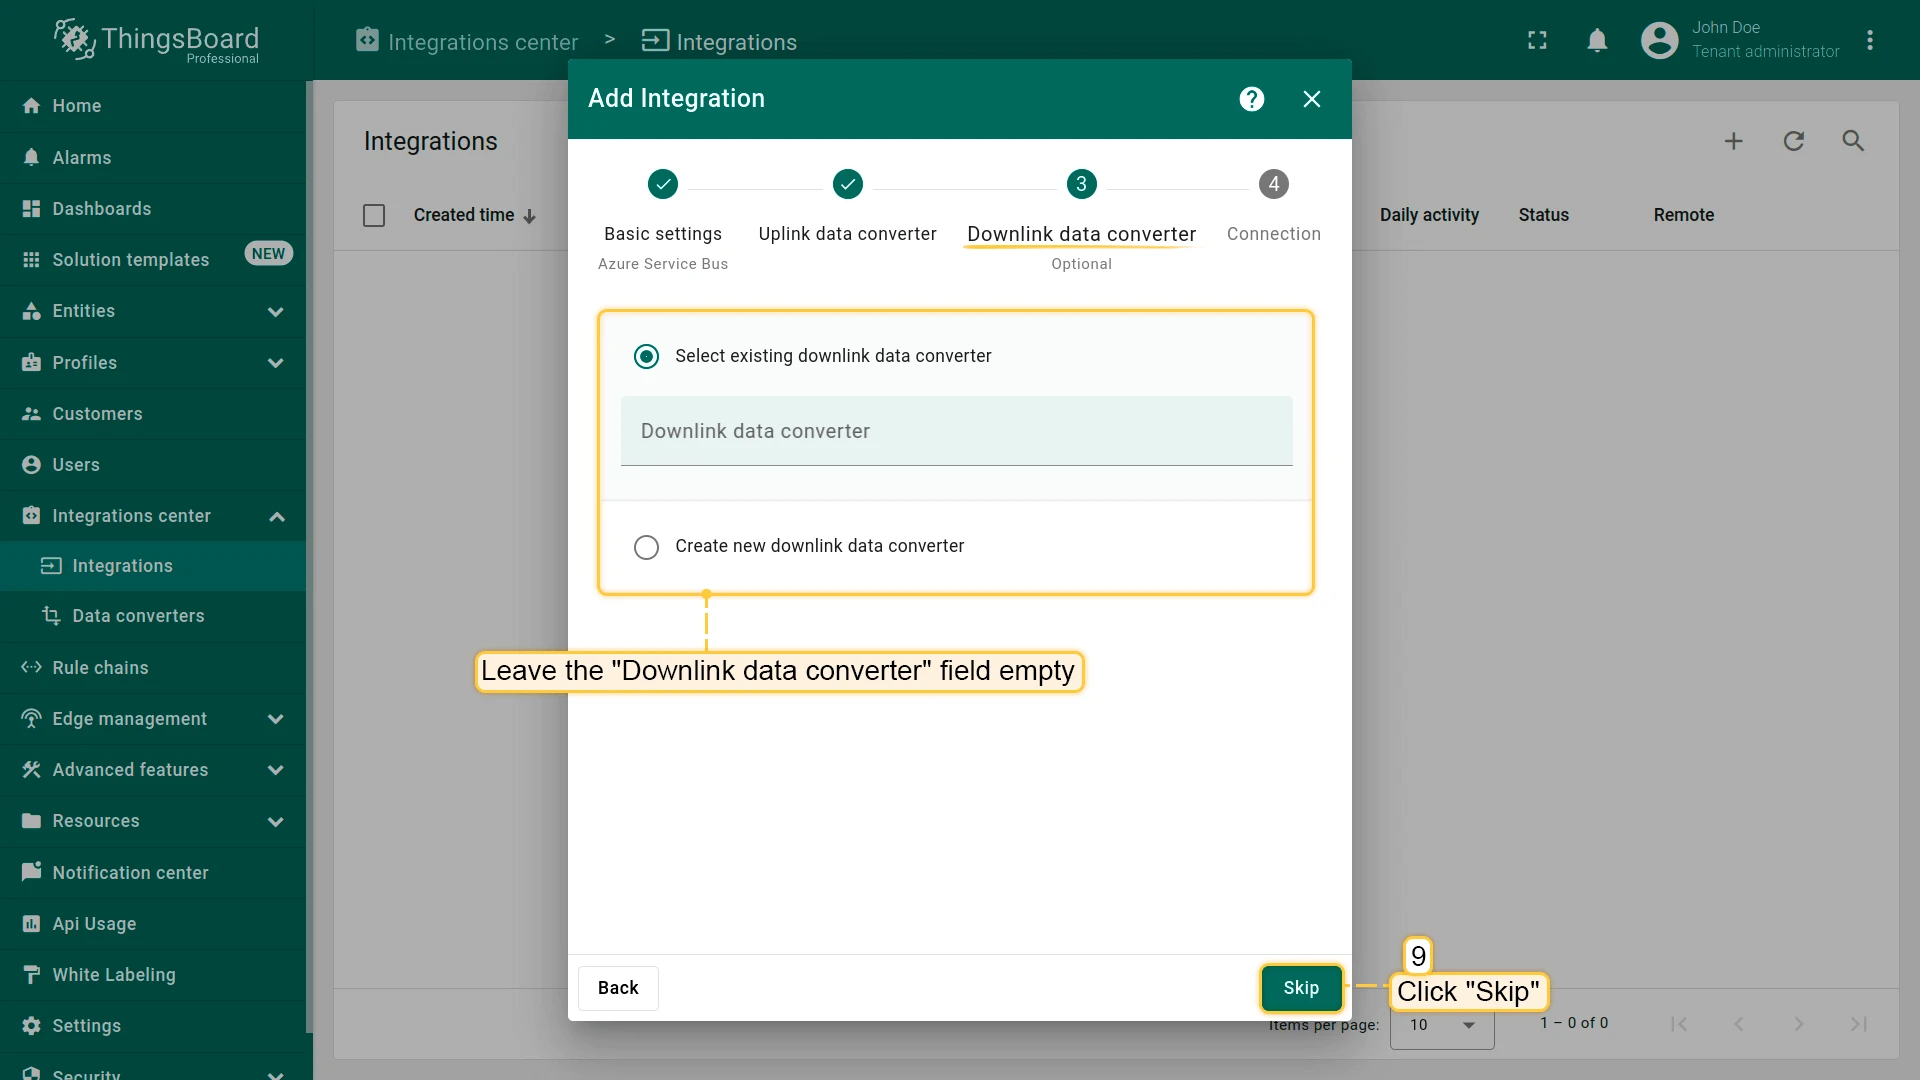
- Downlink data converter:
- Leave the field empty for now and click Skip.
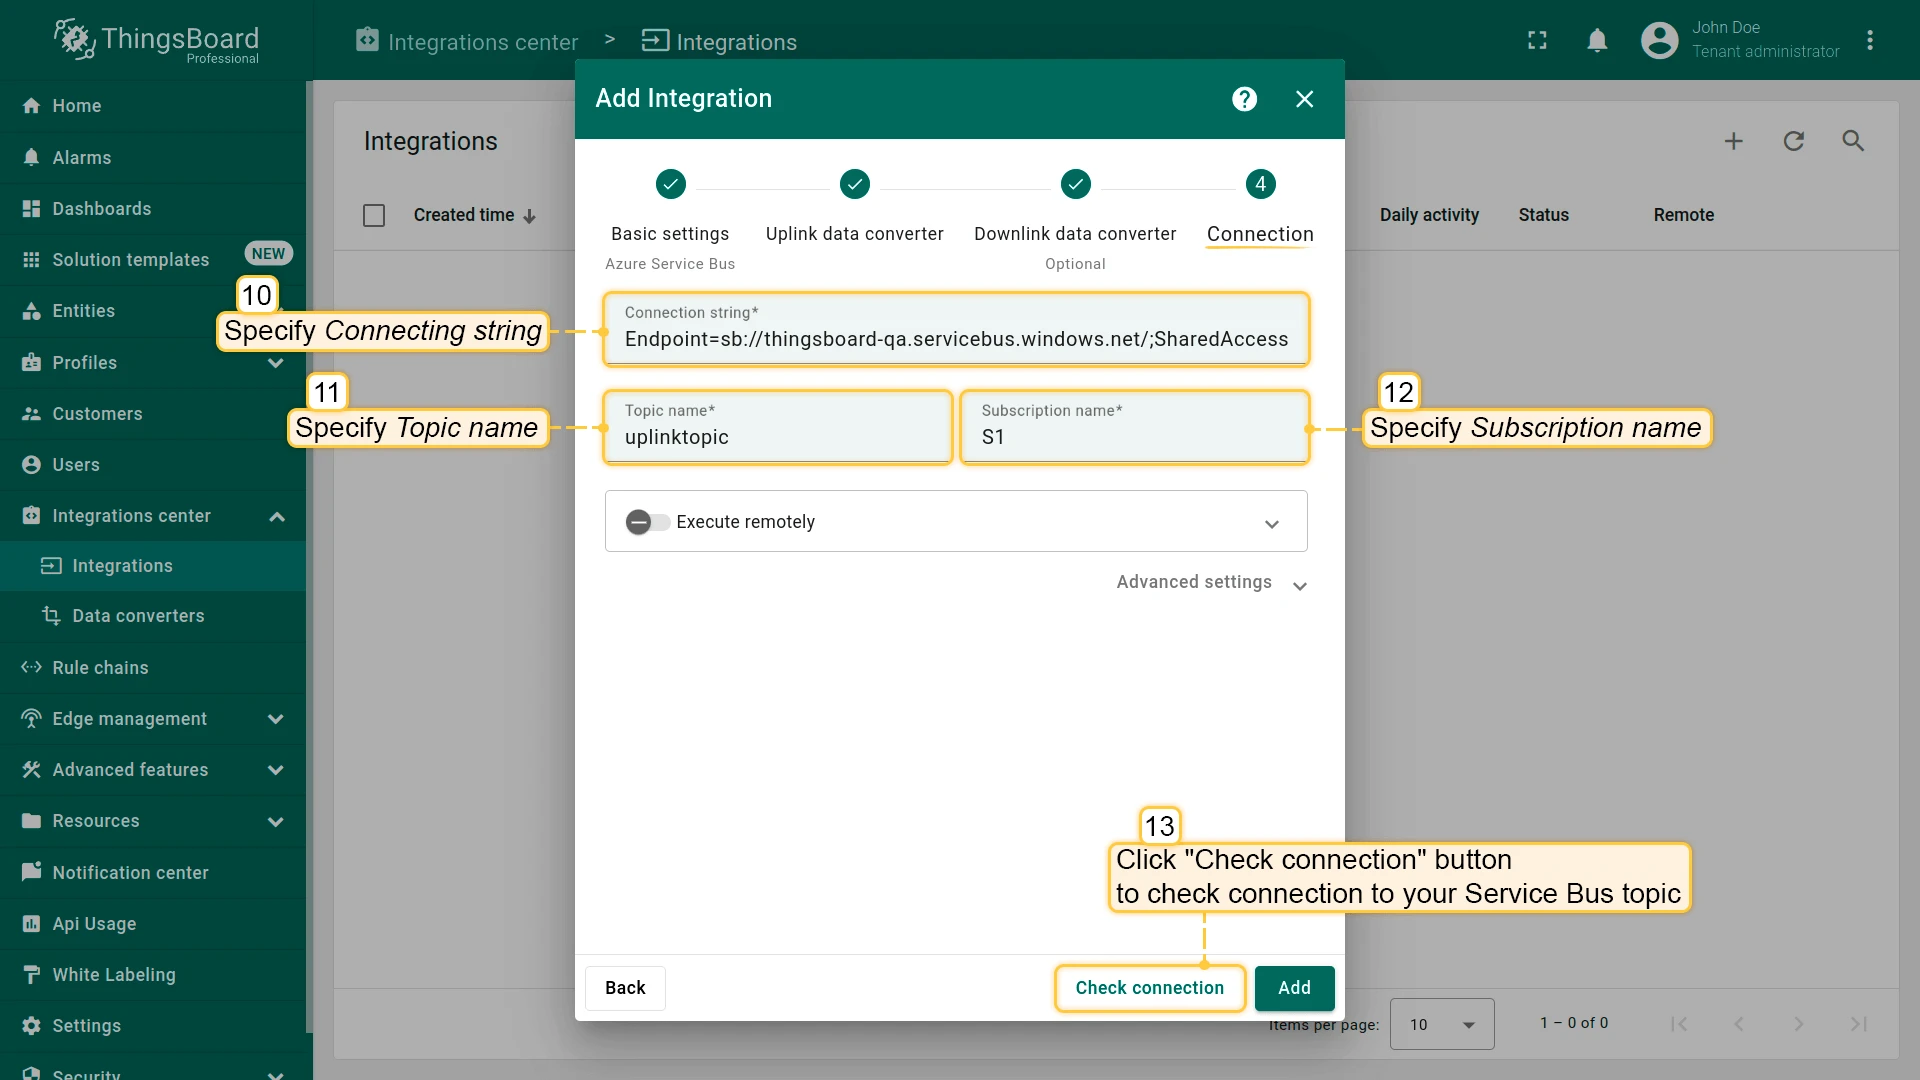
- Connection:
- Connection string — the namespace connection string from Azure.
- Topic name — the name of the uplink topic (e.g.
uplinktopic). - Subscription name — the name of the subscription on that topic (e.g.
S1).
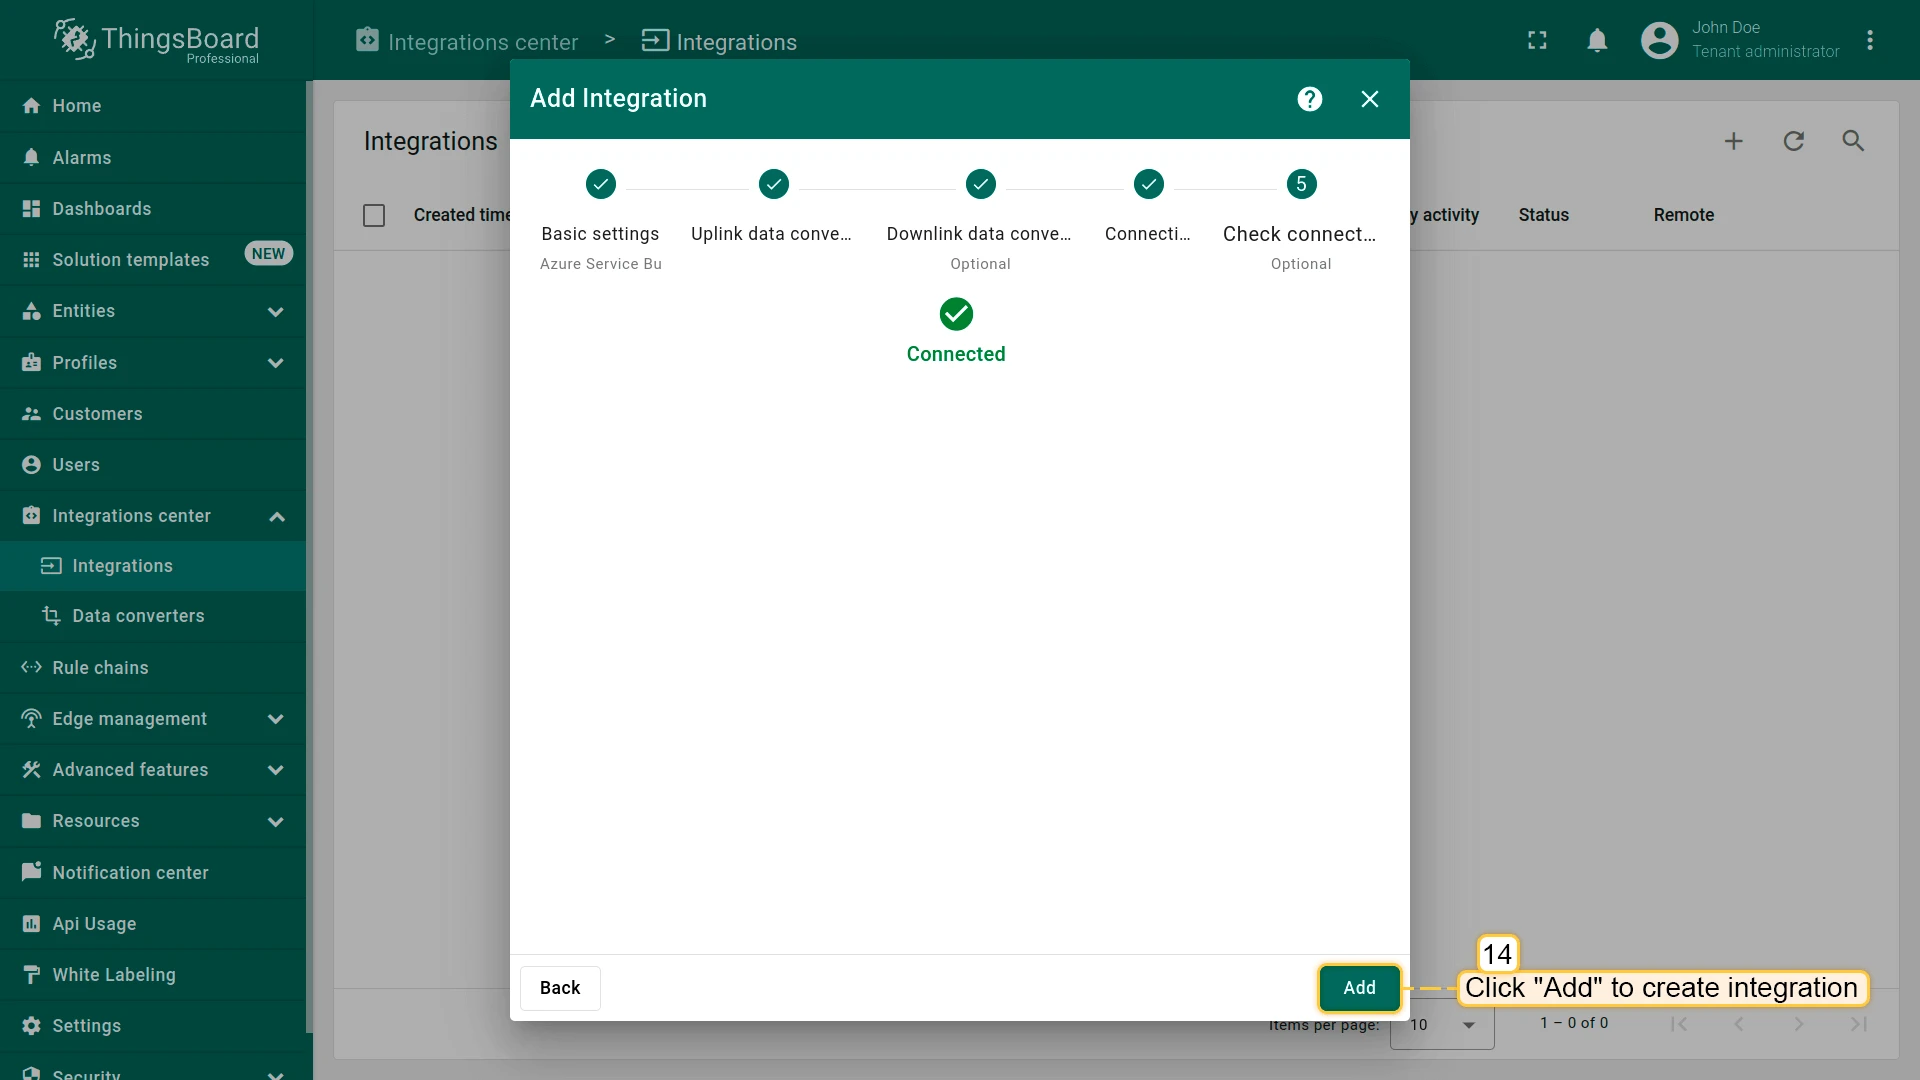
- Click Check connection to verify connectivity — the wizard shows Connected when successful.
- Click Add to save the integration.
Connection settings
Section titled “Connection settings”Connection string
The Azure Service Bus namespace connection string used to authenticate the integration. Found under Settings ⇾ Shared access policies in your namespace — copy the Primary Connection String of any policy that has Listen permission (e.g. RootManageSharedAccessKey). Format: Endpoint=sb://<namespace>.servicebus.windows.net/;SharedAccessKeyName=<policy>;SharedAccessKey=<key>.
Topic name
The name of the Azure Service Bus topic ThingsBoard subscribes to for uplink messages (e.g. uplinktopic).
Subscription name
The name of the subscription on the uplink topic that ThingsBoard consumes (e.g. S1). Each subscription receives an independent copy of every message published to the topic.
Execute remotely
When enabled, ThingsBoard generates an Integration key and Integration secret that allow the integration to run as a separate process outside the ThingsBoard cluster — useful when the Azure Service Bus endpoint is only reachable from a specific network.
Advanced settings
- Downlink connection string — the connection string for the namespace where the downlink topic resides (can be the same namespace as the uplink); requires
Sendpermission - Downlink topic name — the name of the Azure Service Bus topic ThingsBoard publishes downlink messages to (e.g.
downlinktopic) - Description — optional text description for this integration
- Metadata — key-value pairs injected into every uplink message as
integrationMetadatain converter scripts
Send a test uplink
Section titled “Send a test uplink”To test the integration, send a message to your Azure Service Bus topic using the Service Bus Explorer in the Azure portal:
- In the Azure portal, open your Service Bus namespace and navigate to the uplink topic (e.g.
uplinktopic). - Click Service Bus Explorer in the left menu.
- Click Send messages, set Content type to
application/json, and paste the payload below into the Message Body field. - Click Send.
{ "devName": "Sensor A1", "msg": { "temp": 23, "humidity": 40 }}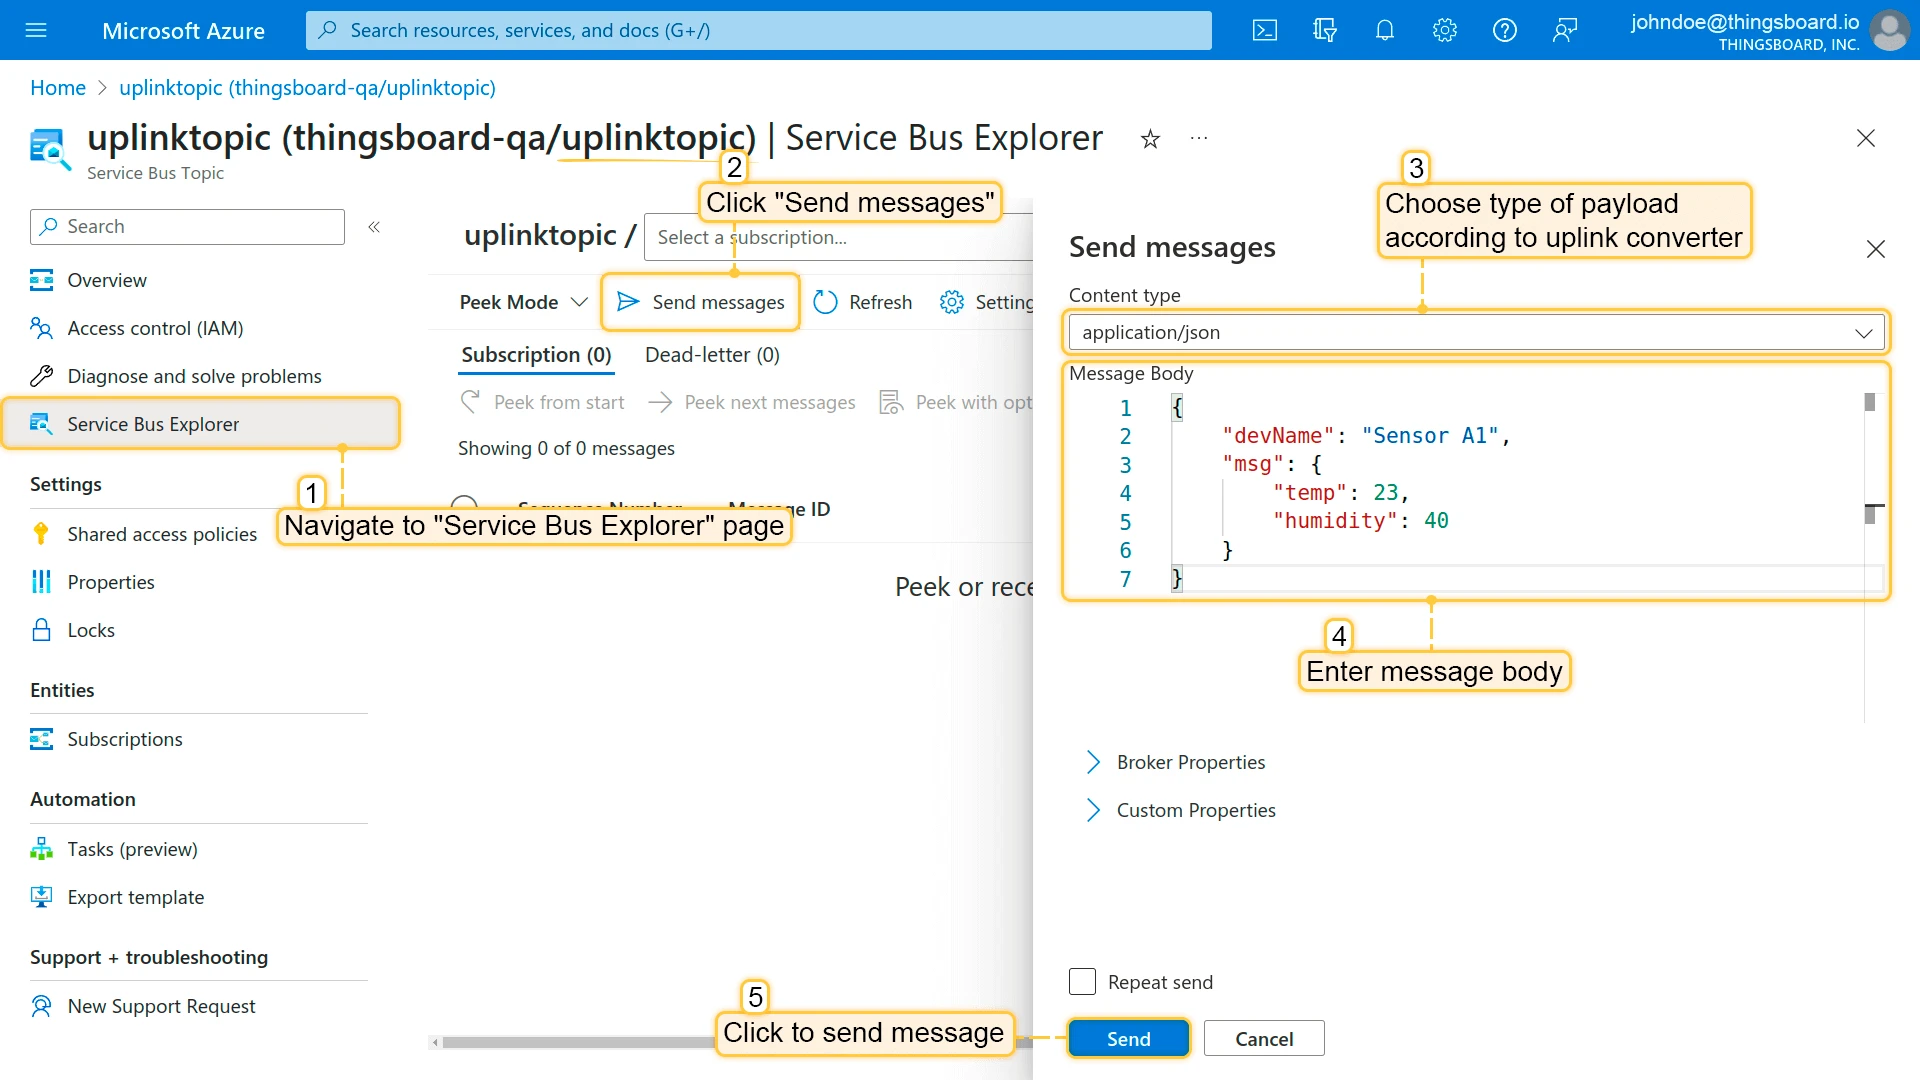
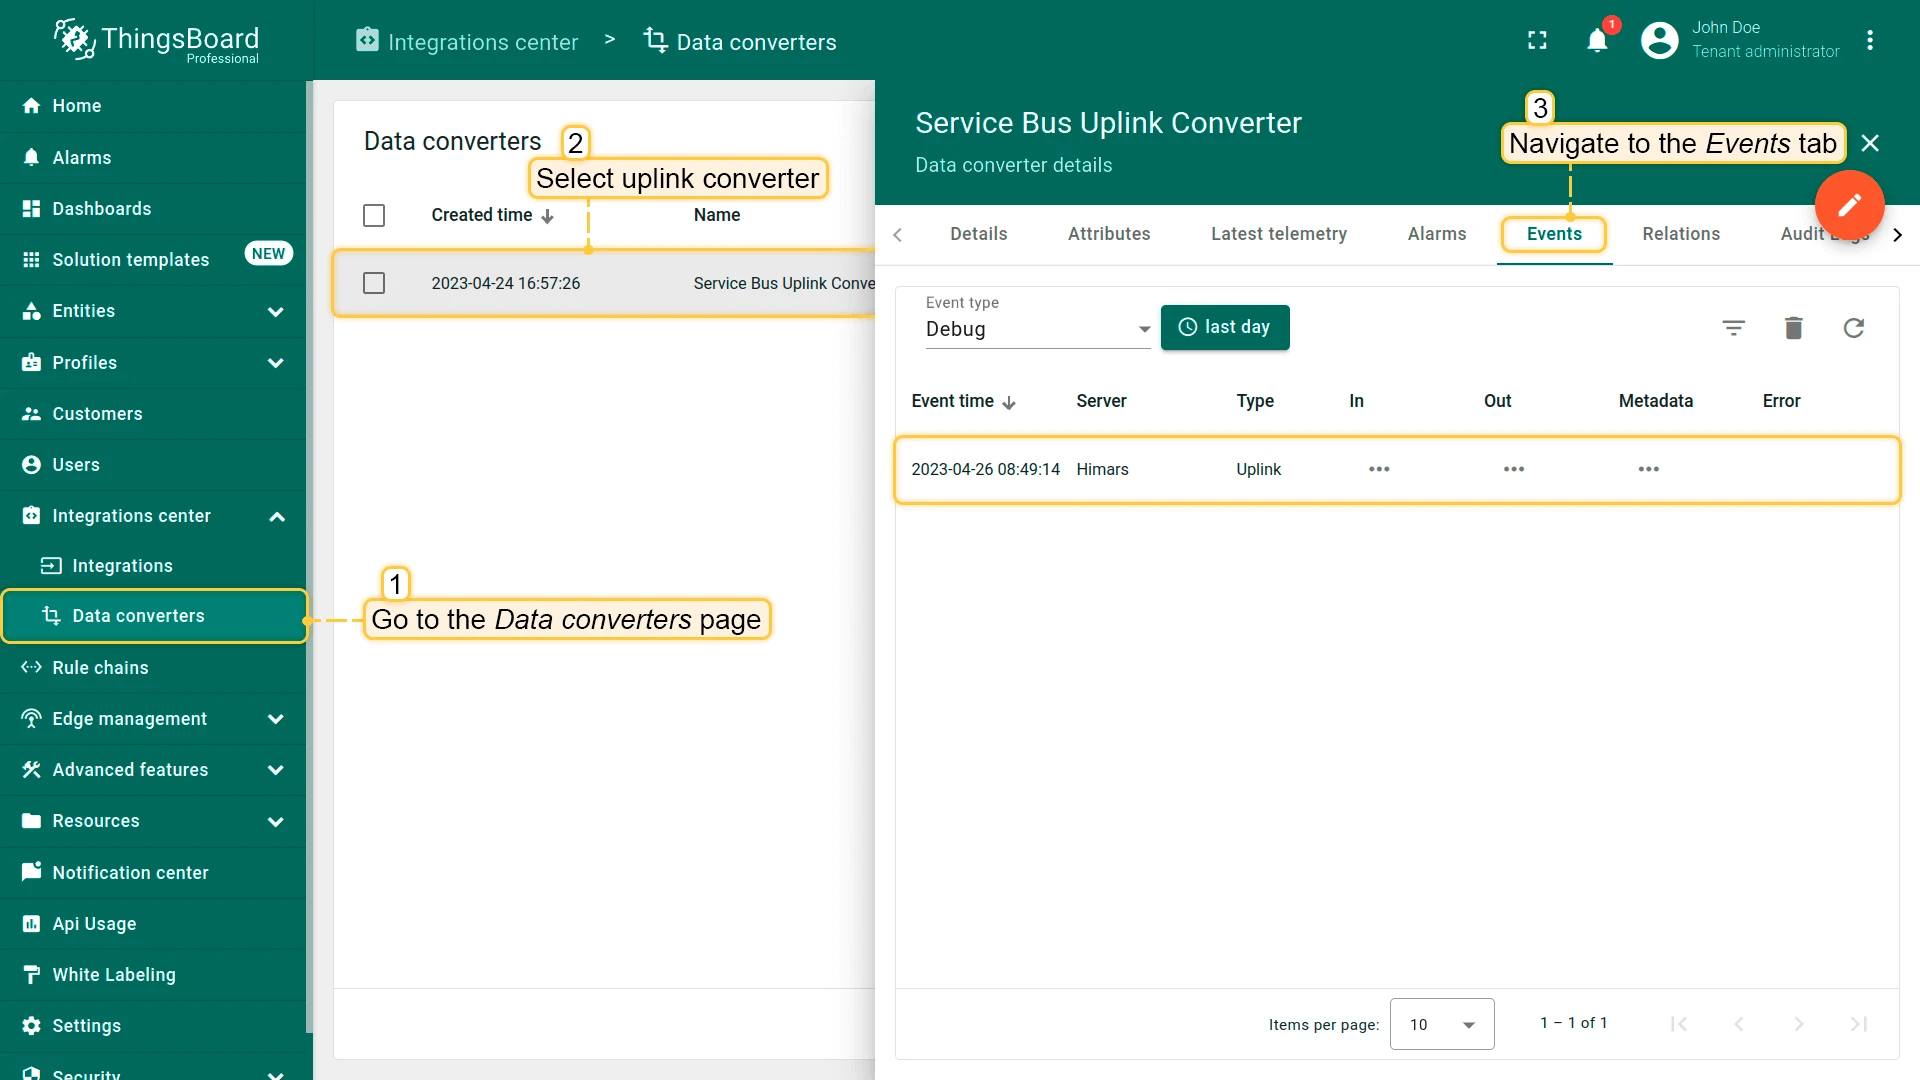
Verify the uplink in ThingsBoard
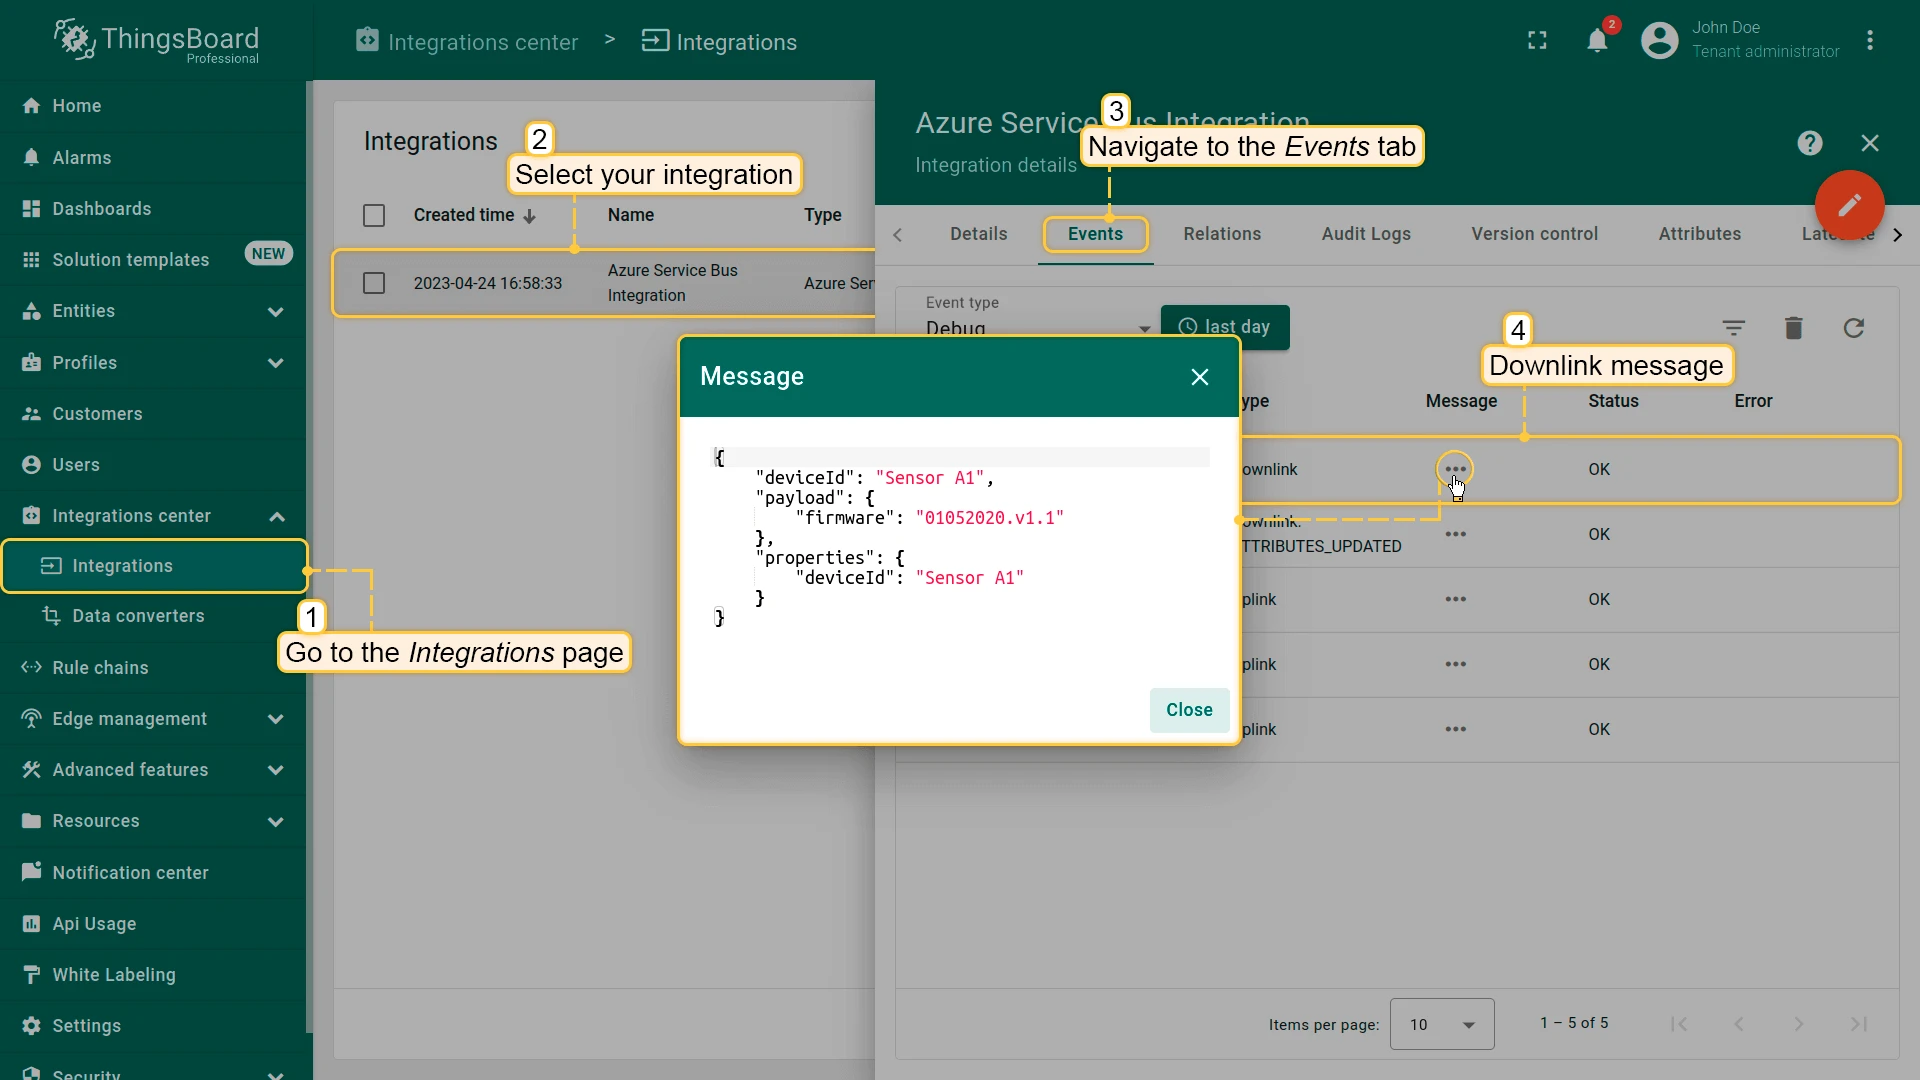
Section titled “Verify the uplink in ThingsBoard”Go to Integrations center ⇾ Integrations, open the Azure Service Bus integration, and check the Events tab — you should see an Uplink event confirming that ThingsBoard received and processed the message.
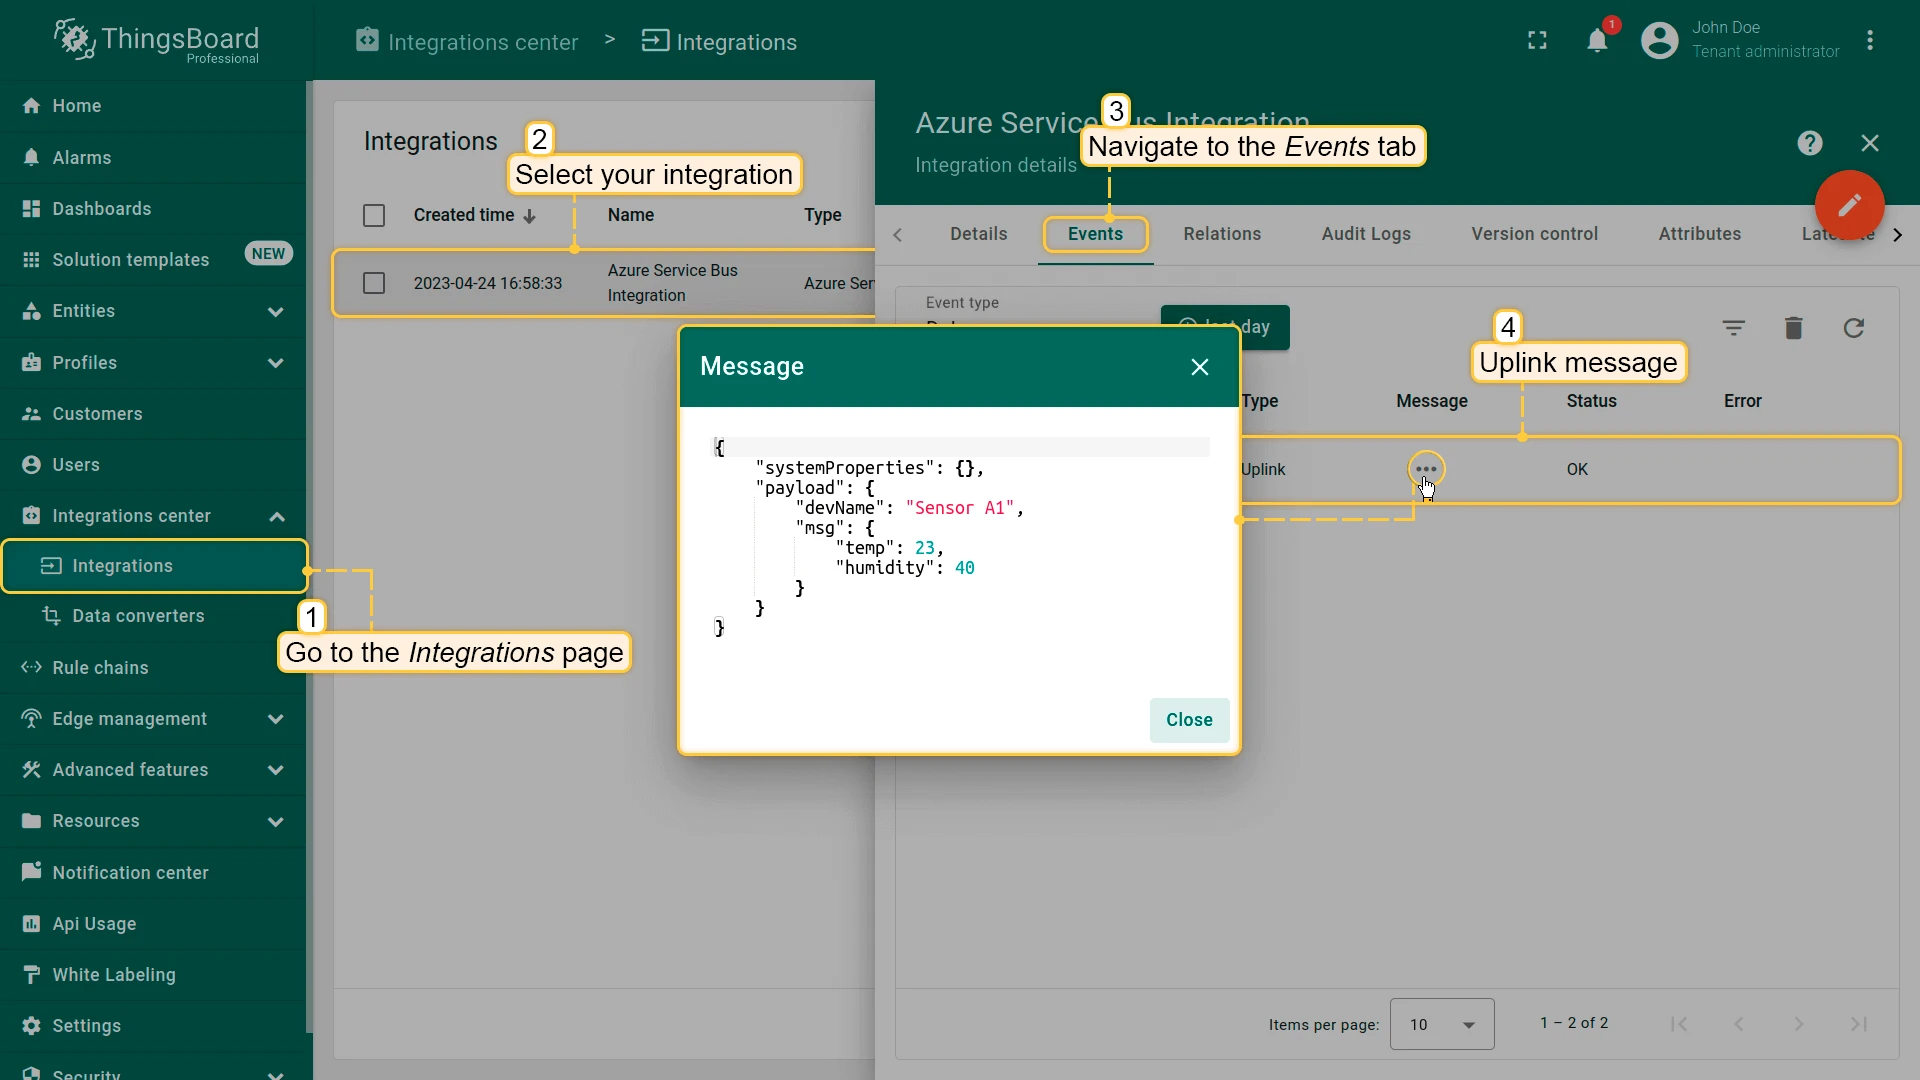
Received data can be viewed in the Uplink converter. In the In and Out blocks of the Events tab:
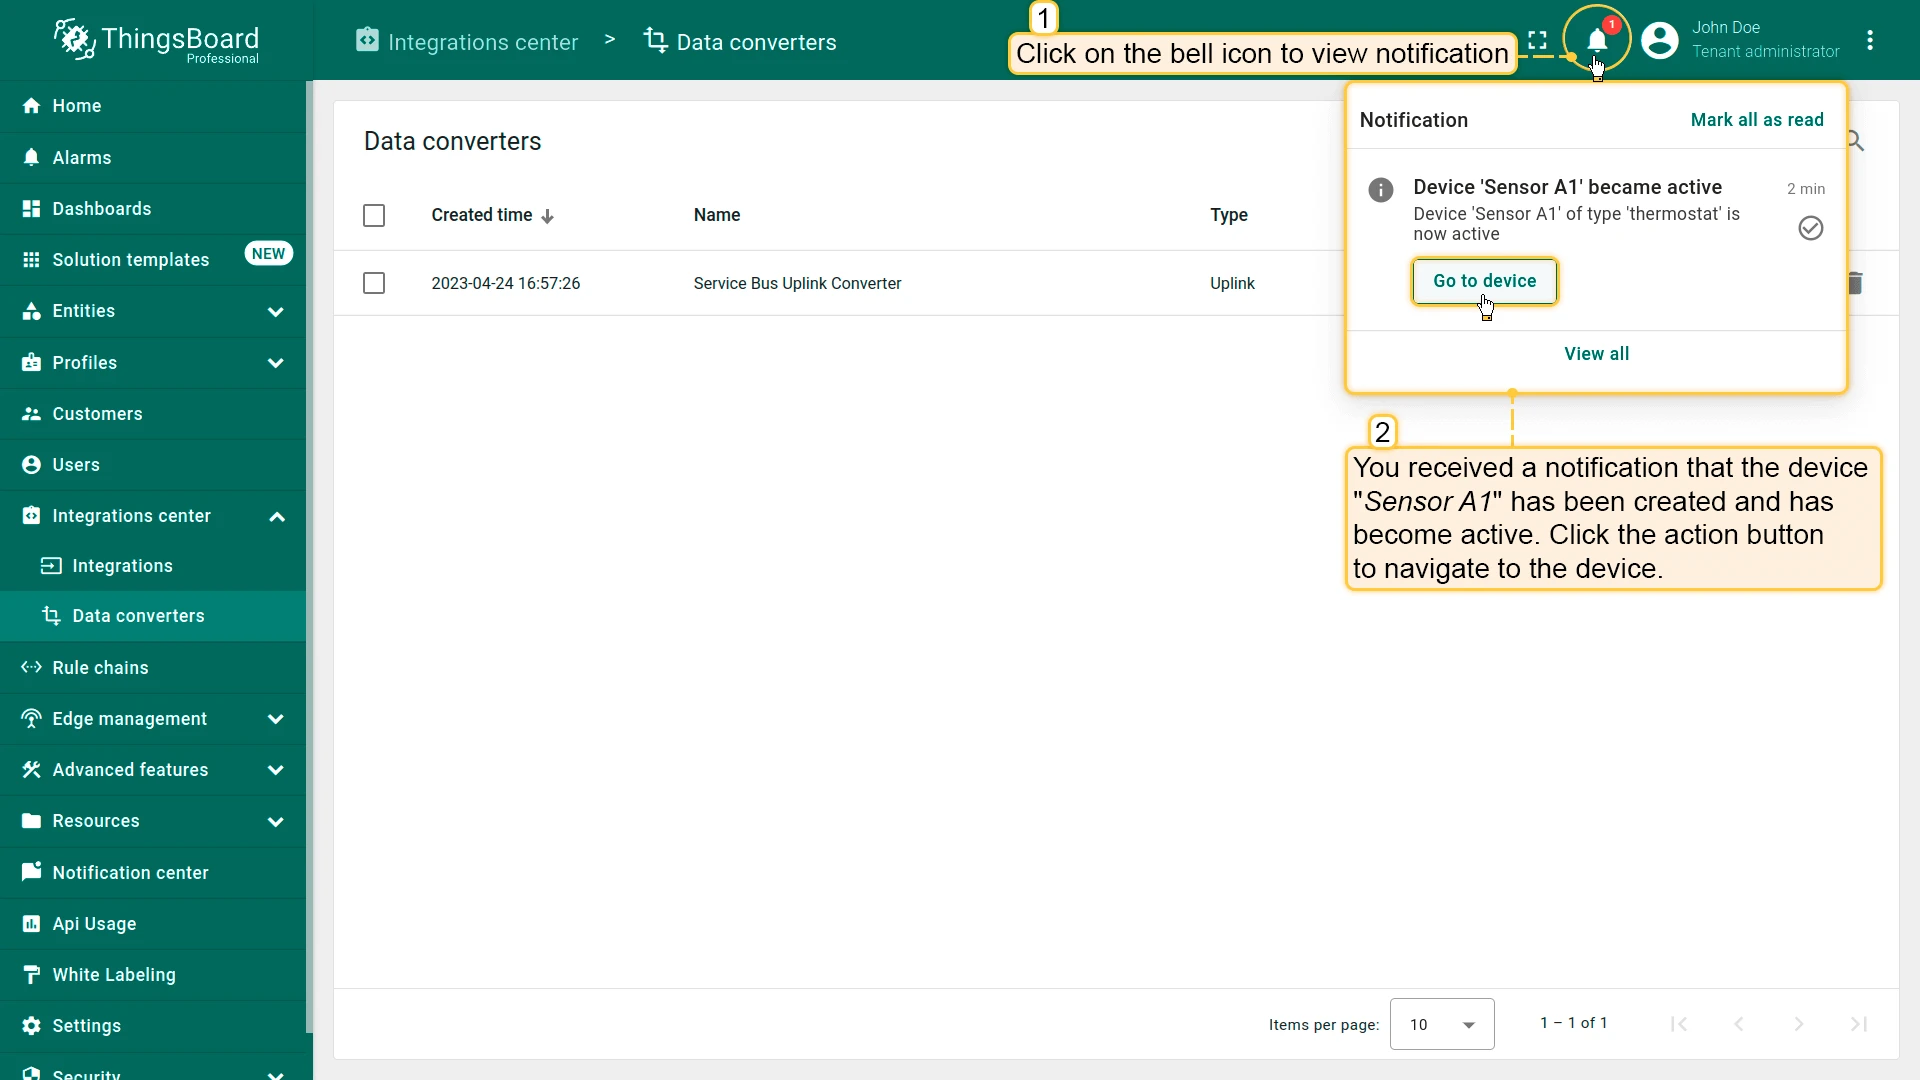
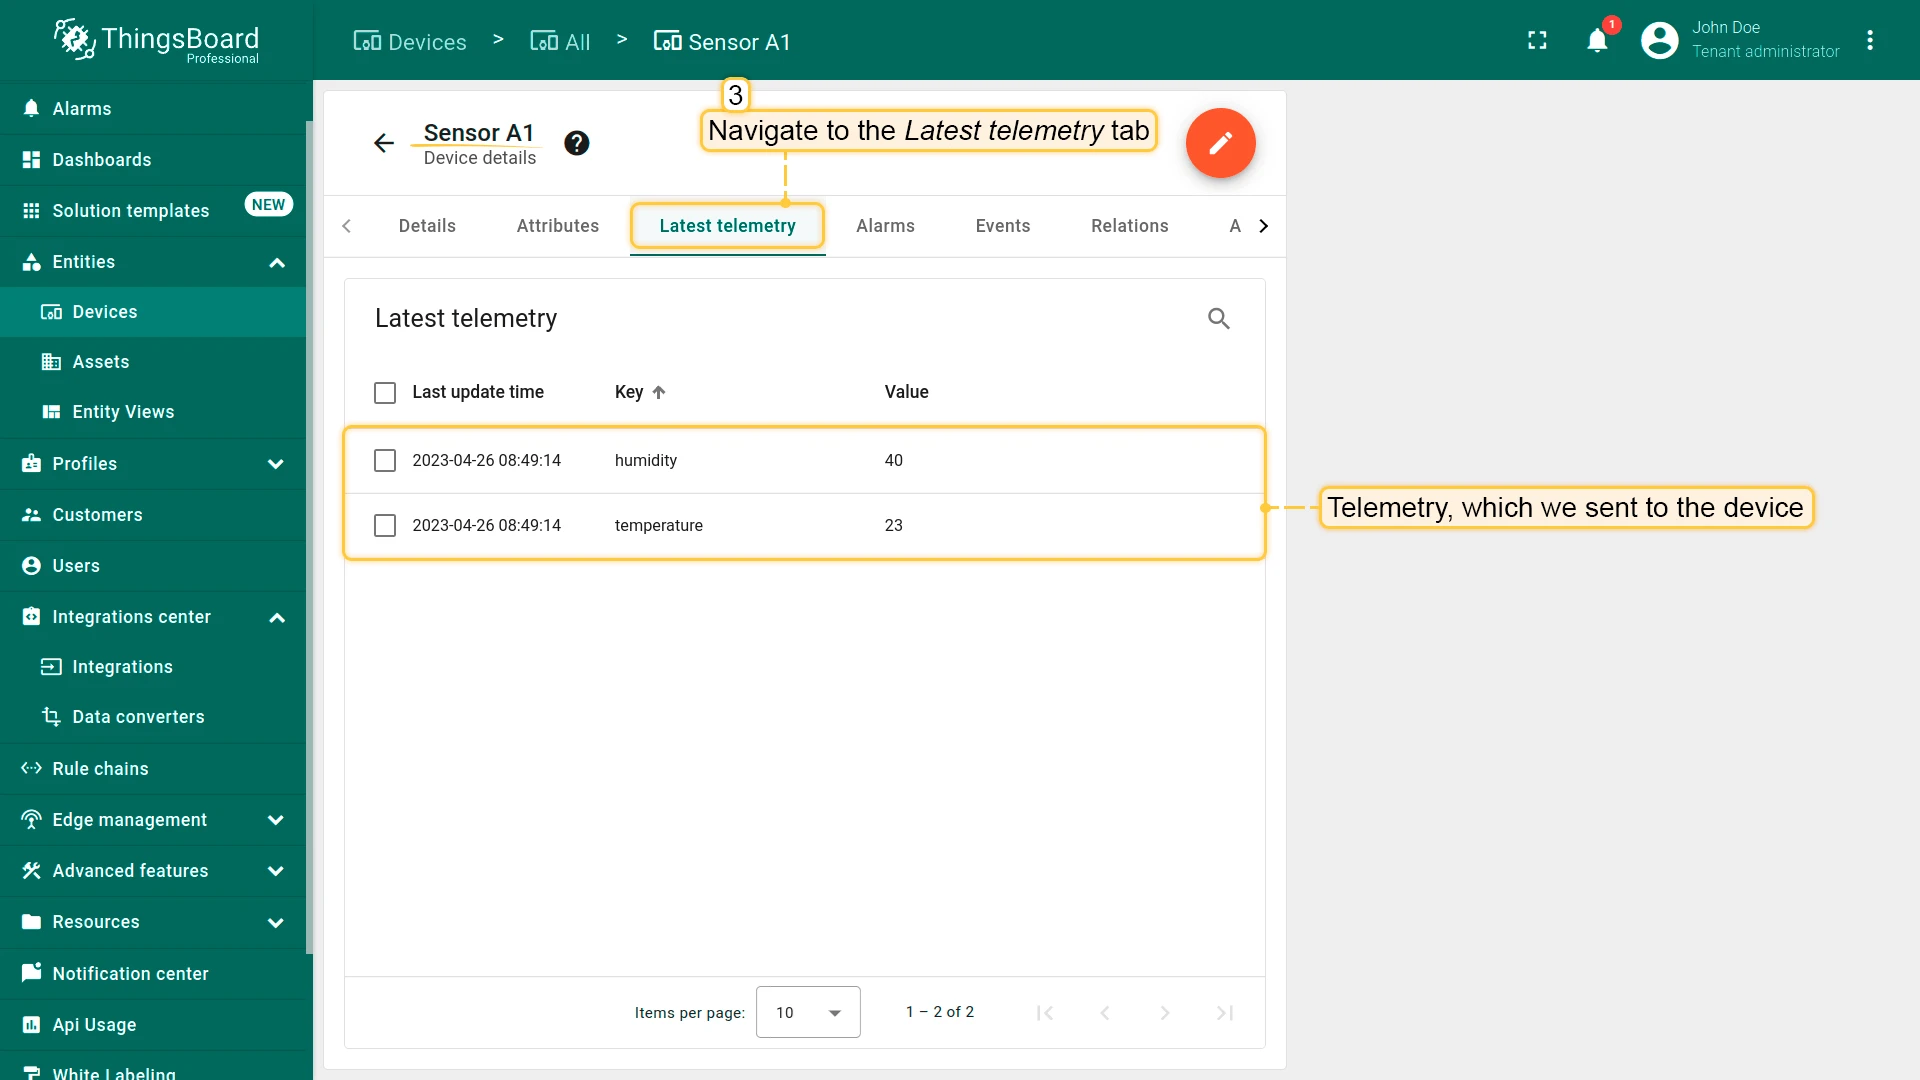
The device Sensor A1 is created automatically on the first uplink. Click the notification bell at the top — ThingsBoard notifies you that the device has become active. Go to Entities ⇾ Devices, open Sensor A1, and navigate to the Latest telemetry tab to verify the received values.
Configure downlink
Section titled “Configure downlink”To send messages from ThingsBoard back to Azure Service Bus, create a dedicated downlink topic in Azure, add a downlink converter, configure the integration’s advanced settings, and wire the Root Rule Chain to forward attribute updates.
Create the downlink converter
Section titled “Create the downlink converter”The downlink converter encodes Rule Engine messages into Azure Service Bus payloads. The output must include:
contentType— how data is encoded:TEXT,JSON, orBINARYdata— the payload to publish to the downlink topicmetadata.deviceId— identifier passed as a message property to route the message to the correct device
Import the downlink converter
- Download the downlink converter file:
- Go to Integrations center ⇾ Data converters.
- Click + Add data converter ⇾ Import converter.
- Drag and drop the downloaded JSON file into the Import converter window and click Import.
The encoder function used in this tutorial:
var result = {    contentType: "JSON",    data: JSON.stringify(msg),    metadata: {        deviceId: metadata.deviceName    }};
return result;
var result = { contentType: "JSON", data: JSON.stringify(msg), metadata: { deviceId: metadata.deviceName }};
return result;Attach the downlink converter and configure the downlink topic
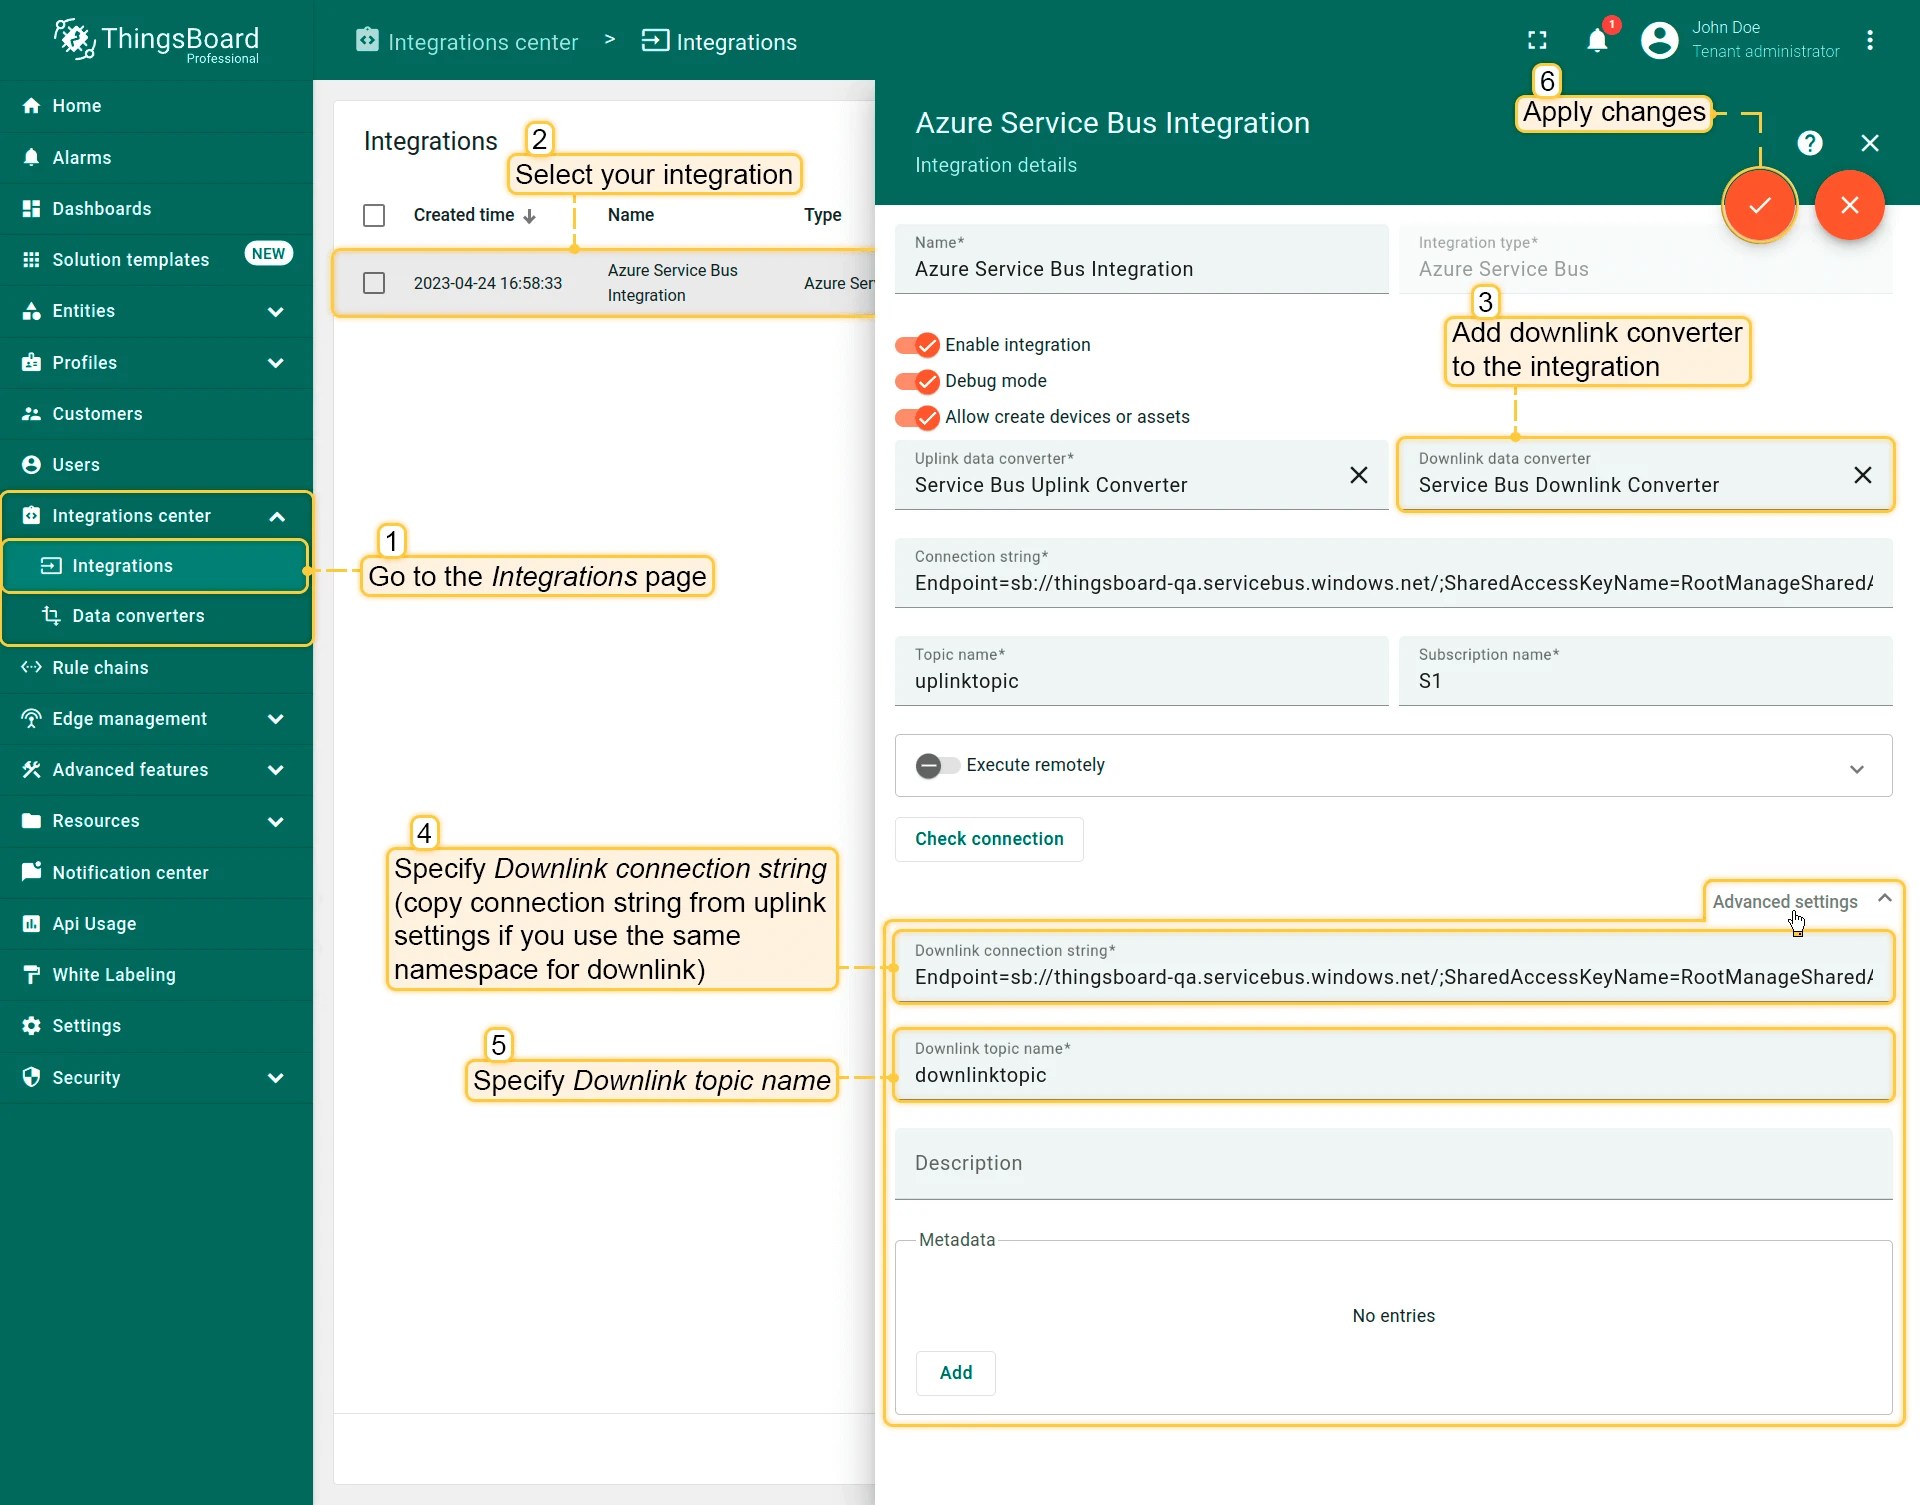
Section titled “Attach the downlink converter and configure the downlink topic”- Go to Integrations center ⇾ Integrations and open the Azure Service Bus integration.
- Click the edit (pencil) icon.
- In the Downlink data converter field, select
Service Bus Downlink Converter. - Expand Advanced settings and fill in:
- Downlink connection string — the namespace connection string (copy from the uplink settings if you use the same namespace)
- Downlink topic name — the name of the downlink topic (e.g.
downlinktopic)
- Click Apply changes.
Update the Root Rule Chain
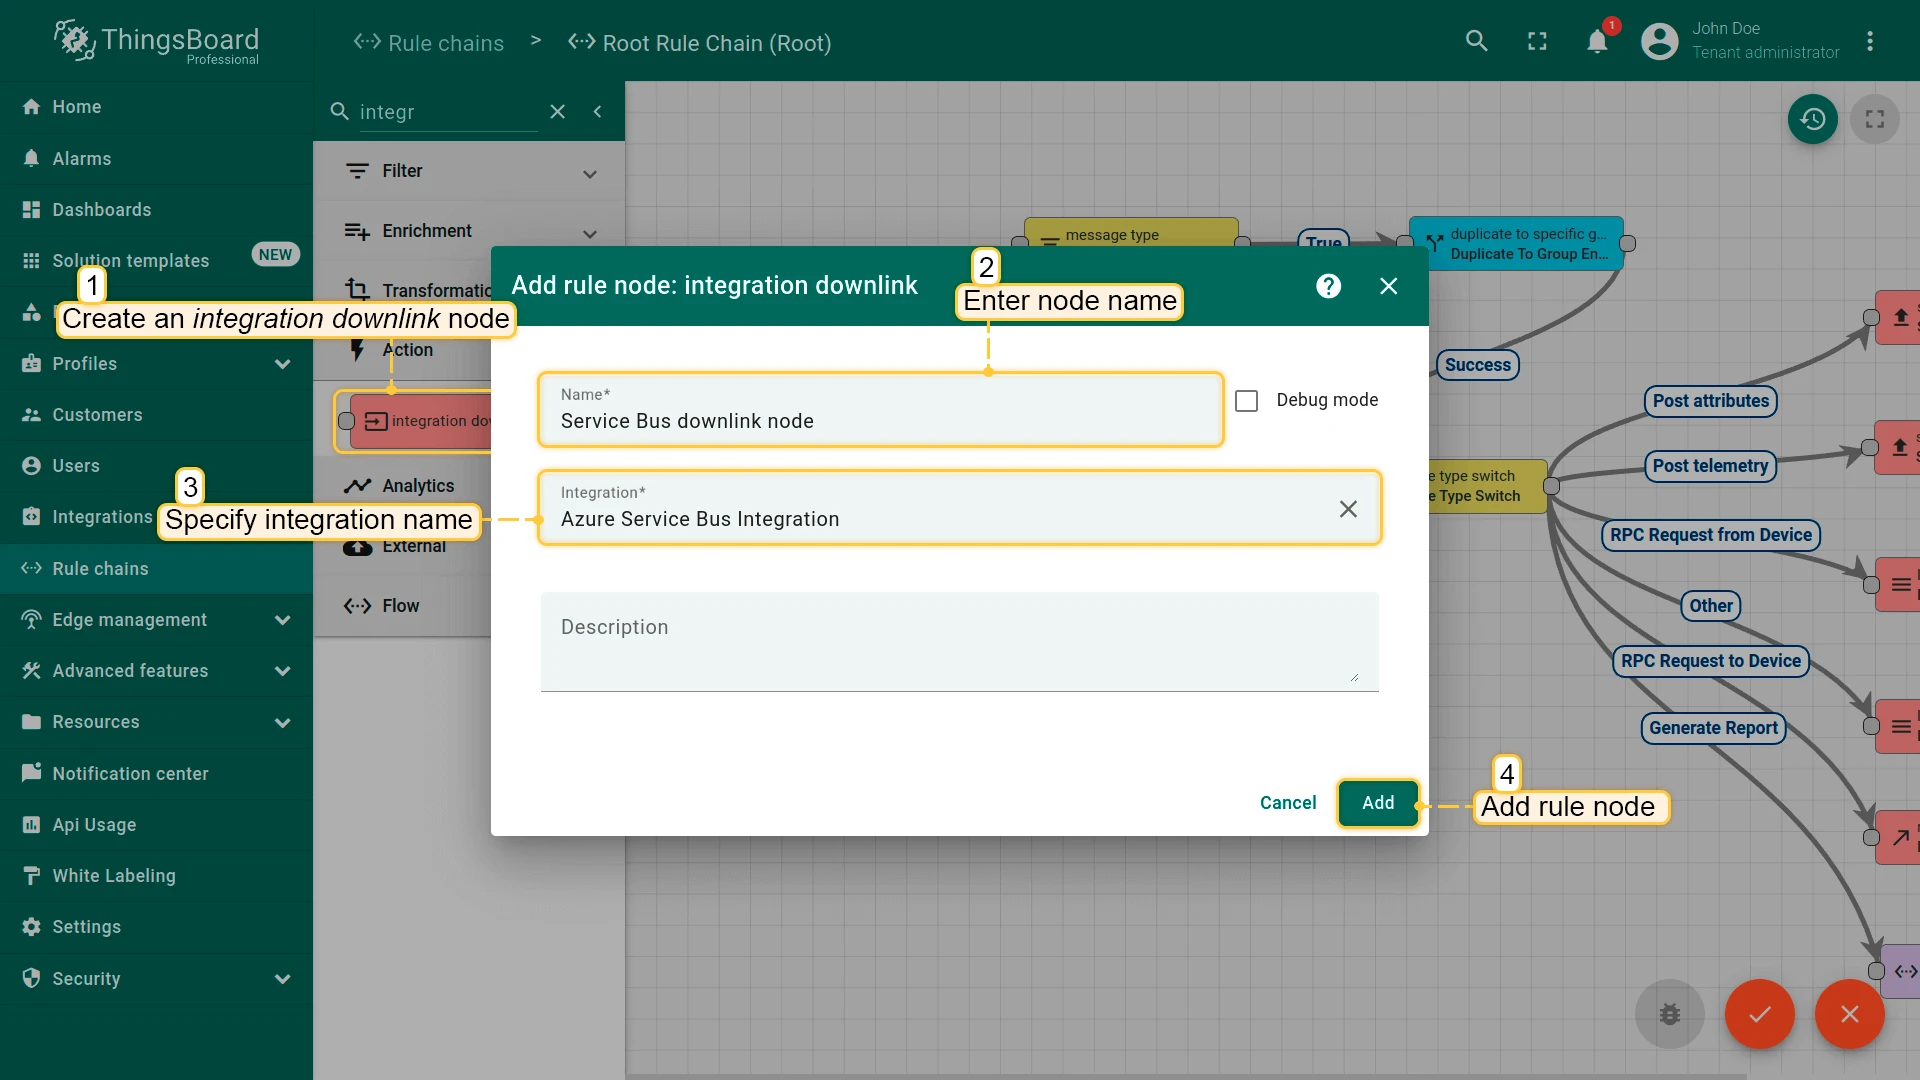
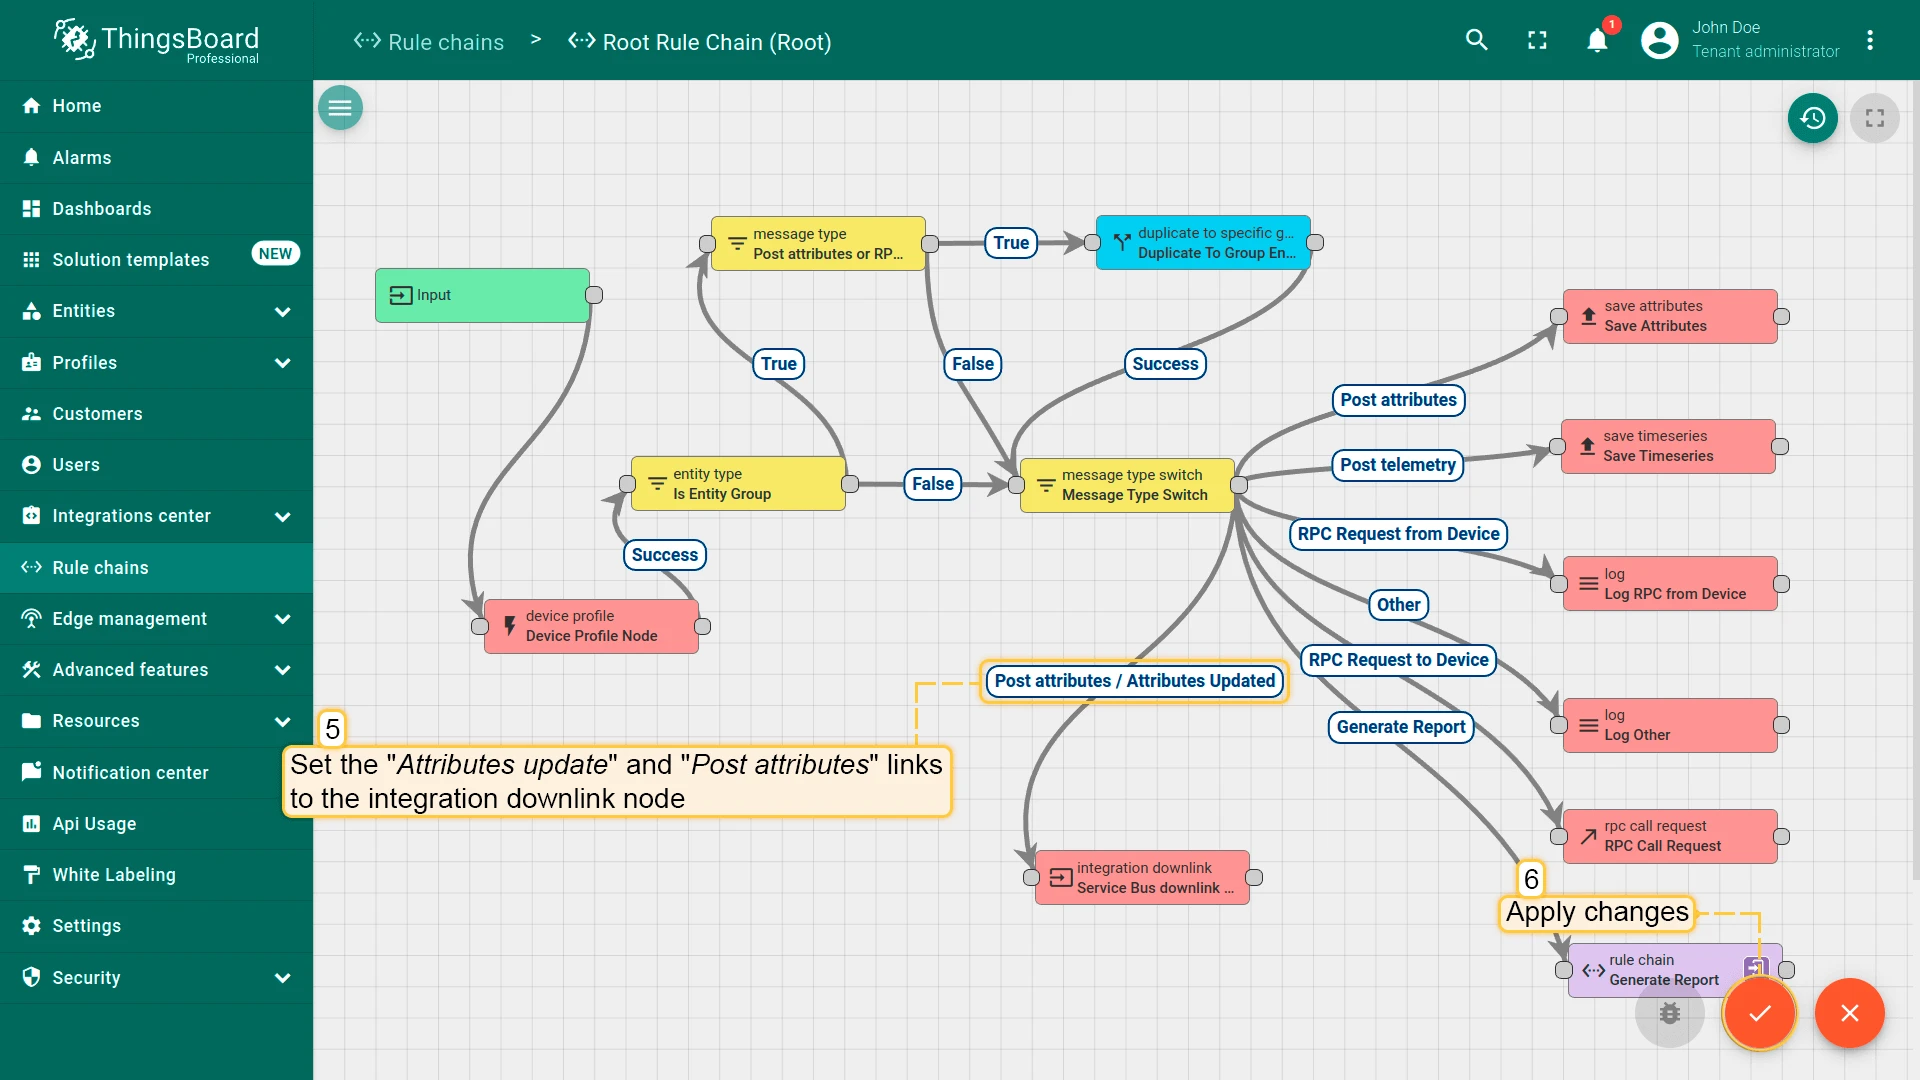
Section titled “Update the Root Rule Chain”Add an Integration Downlink node to the Root Rule Chain to forward attribute updates to Azure Service Bus.
- Go to Rule chains and open the Root Rule Chain. Click the edit icon.
- Find Integration Downlink in the node panel and drag it onto the canvas.
- In the Add rule node dialog, enter a name (e.g.
Service Bus downlink node), select Azure Service Bus Integration, and click Add. - Connect the Message Type Switch node to the Integration Downlink node using both the Post attributes and Attributes Updated relations.
- Click Apply changes.
Test the downlink
Section titled “Test the downlink”Trigger a downlink by adding a shared attribute to device Sensor A1:
- Go to Entities ⇾ Devices and open device
Sensor A1. - Navigate to the Attributes tab, switch to Shared attributes, and click +.
- Enter key
firmwareand value01052020.v1.1, then click Add.

Adding the attribute triggers the rule chain, which forwards the message to the Azure Service Bus integration. Go to Integrations center ⇾ Integrations, open the Azure Service Bus integration, and check the Events tab — a Downlink event appears with the payload sent to the downlink topic.
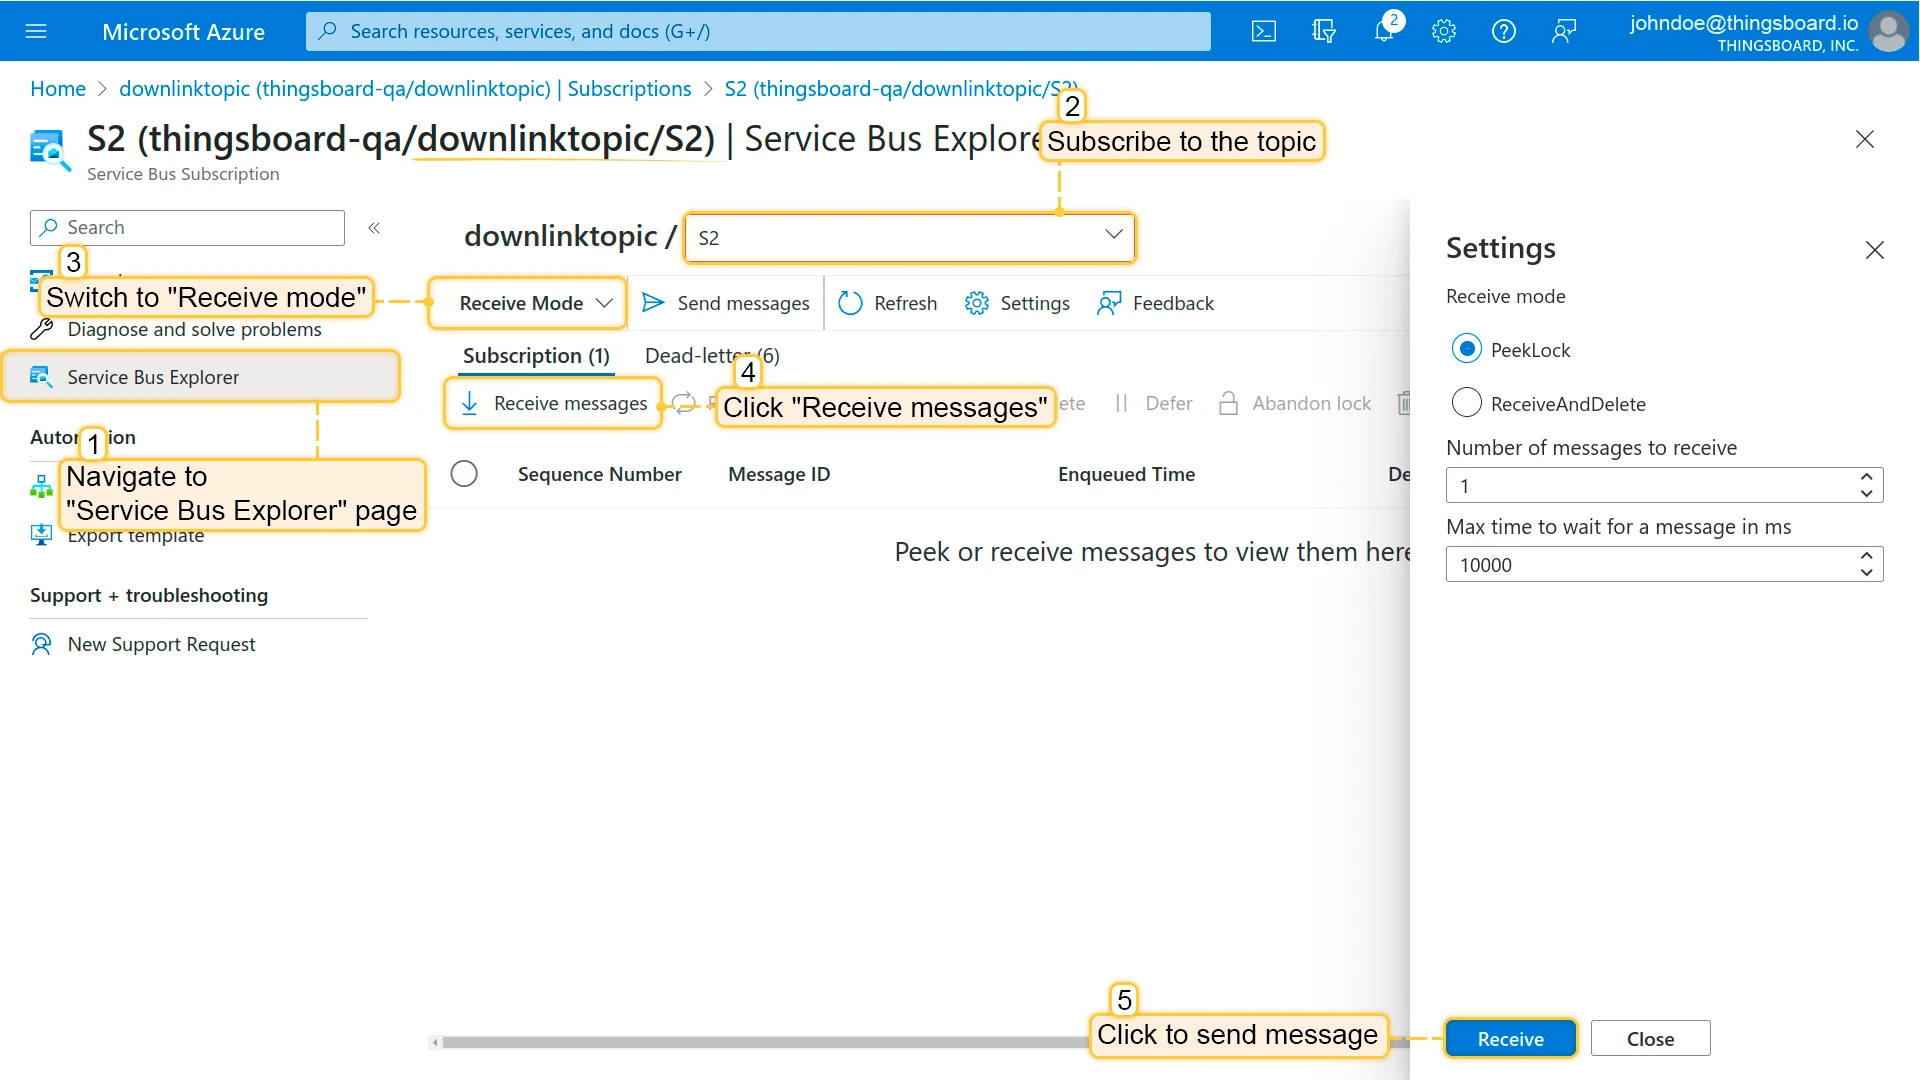
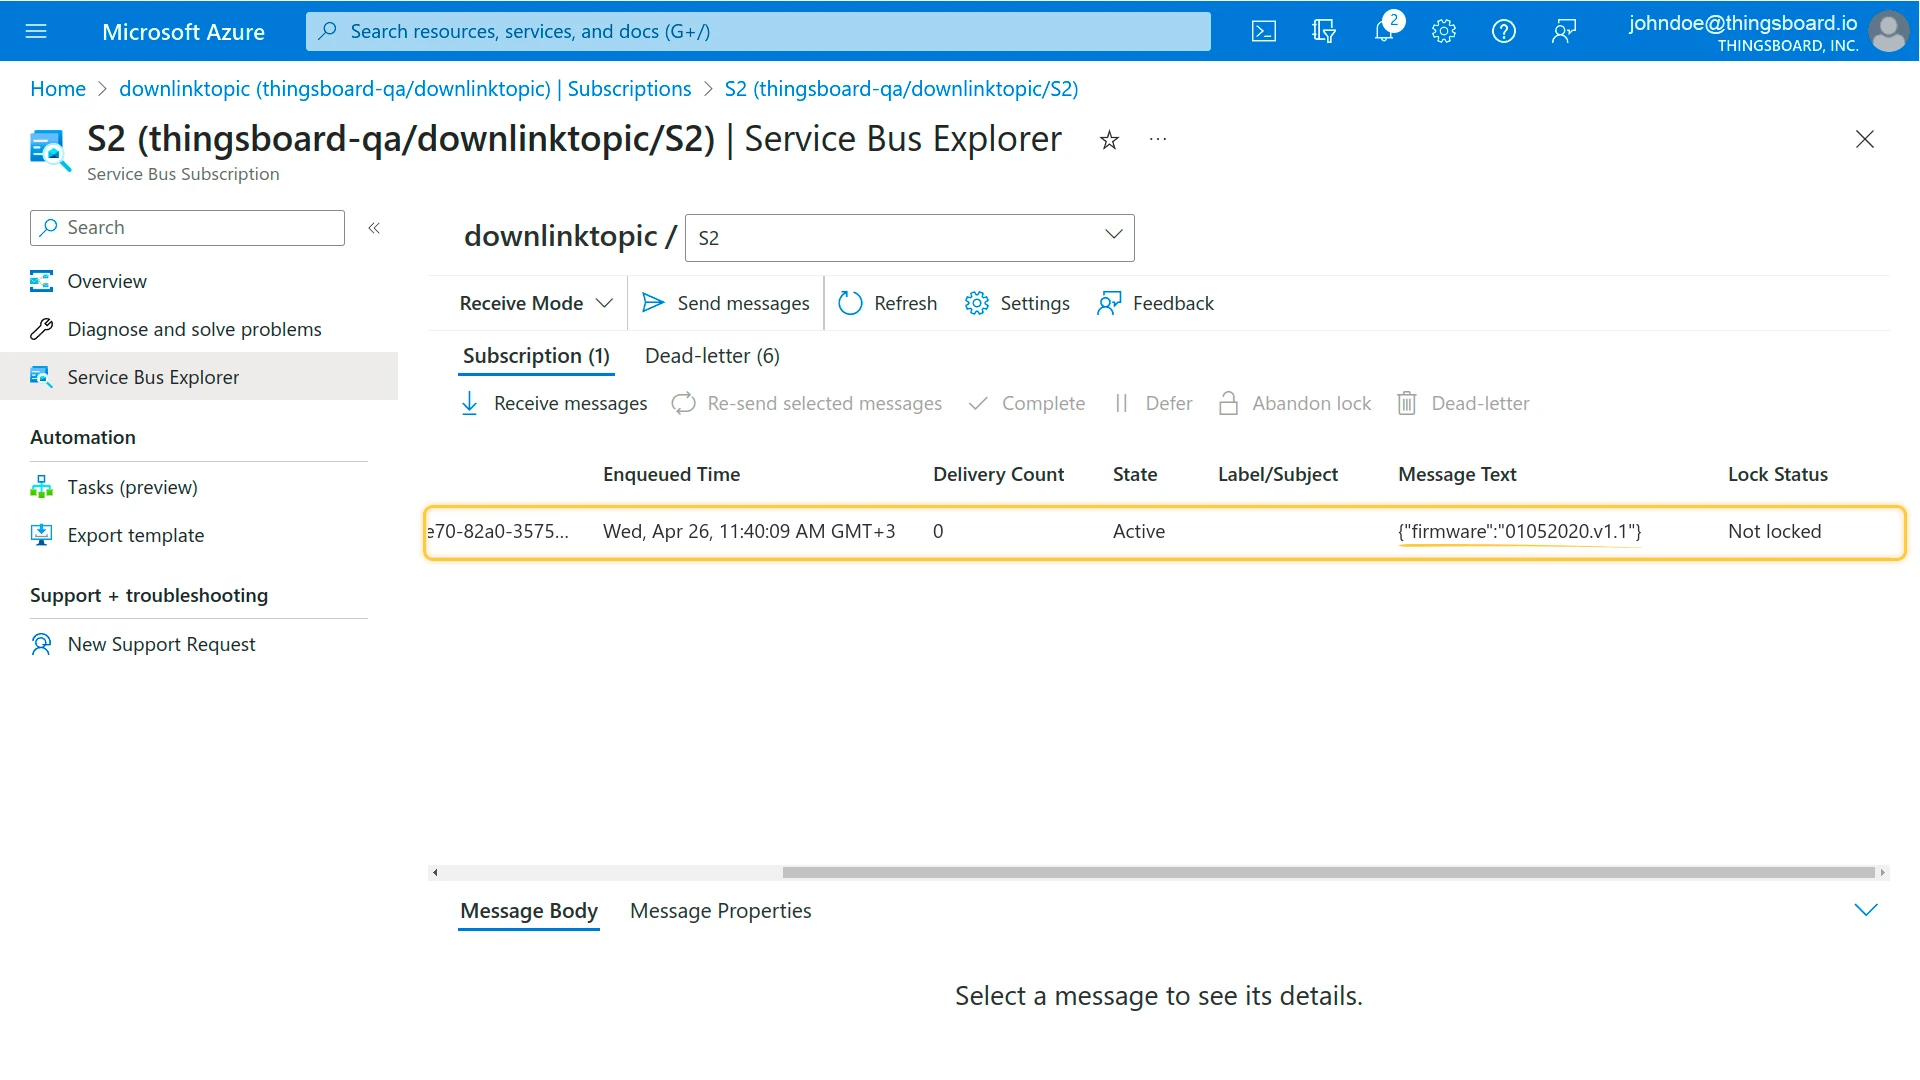
To confirm the message reached Azure Service Bus, open the Azure portal, navigate to the downlink topic subscription (e.g. downlinktopic / S2), and use Service Bus Explorer to receive messages:
See also
Section titled “See also”Was this helpful?