AWS Kinesis Integration
AWS Kinesis Data Streams is a managed service for collecting, processing, and analyzing data streams in real time. After integrating AWS Kinesis with ThingsBoard, you can process and visualize data from Kinesis streams in the ThingsBoard IoT platform.
AWS Kinesis setup
Section titled “AWS Kinesis setup”Install and configure AWS CLI
Section titled “Install and configure AWS CLI”Obtain AWS access keys. In the AWS console, go to IAM ⇾ Users, open your user, and go to the Security credentials tab. Under Access keys, click Create access key. Note down your Access Key ID, Secret Access Key, and your AWS region name — you will need all three below.
Install the AWS CLI. Follow the official AWS CLI installation guide for your operating system.
Configure your credentials:
aws configureEnter the values when prompted:
| Prompt | Value |
|---|---|
| AWS Access Key ID | Your access key ID |
| AWS Secret Access Key | Your secret access key |
| Default region name | e.g. us-east-1 |
| Default output format | e.g. json |
Verify the installation:
aws kinesis helpA list of available Kinesis commands is displayed. Press q to close.
Kinesis stream data format
Section titled “Kinesis stream data format”AWS Kinesis stores records as raw bytes. When sending data via the CLI with --data, the value is Base64-encoded automatically. ThingsBoard decodes Base64-encoded payloads to a UTF-8 string before passing them to the uplink converter.
Create demo streams
Section titled “Create demo streams”This tutorial uses two streams: one for incoming device data (uplink) and one for outgoing commands (downlink).
Create the uplink stream:
aws kinesis create-stream --stream-name my-thingsboard --shard-count 1aws kinesis describe-stream --stream-name my-thingsboardCreate the downlink stream:
aws kinesis create-stream --stream-name tb-test-downlink --shard-count 1aws kinesis describe-stream --stream-name tb-test-downlinkWait until StreamStatus shows ACTIVE before proceeding.
ThingsBoard integration setup
Section titled “ThingsBoard integration setup”Create an uplink converter
Section titled “Create an uplink converter”The uplink converter transforms incoming Kinesis records into the ThingsBoard data format. AWS Kinesis uses a generic uplink converter. Kinesis records arrive as raw bytes; ThingsBoard decodes them to a string and passes the result to the decoder as payload.
Sample payload:
{ "devName": "kitchen_thermostat", "devType": "thermostat", "temperature": 22}The devName field maps to deviceName, devType to deviceType, and temperature is stored as telemetry.
- Download the uplink converter file:
- Go to Integrations center ⇾ Data converters.
- Click + Add data converter ⇾ Import converter.
- Drag and drop the downloaded JSON file into the Import converter window and click Import.
The decoder function used in this tutorial:
var data = decodeToJson(payload);var deviceName = data.devName;var deviceType = data.devType;
var result = {    deviceName: deviceName,    deviceType: deviceType,    telemetry: {        temperature: data.temperature    }};
return result;
var data = decodeToJson(payload);var deviceName = data.devName;var deviceType = data.devType;
var result = { deviceName: deviceName, deviceType: deviceType, telemetry: { temperature: data.temperature }};
function decodeToString(payload) { return String.fromCharCode.apply(String, payload);}
function decodeToJson(payload) { var str = decodeToString(payload); var data = JSON.parse(str); return data;}
return result;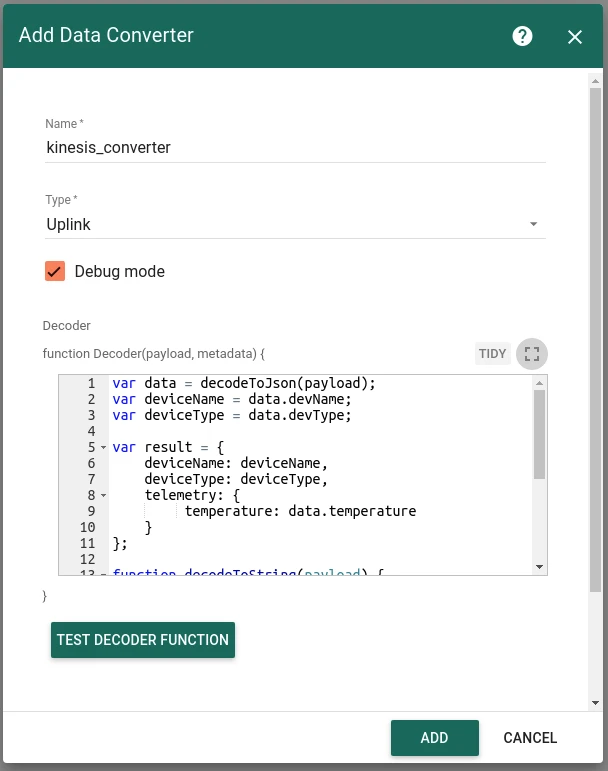
To adapt this converter to your device:
- Different field names — replace
data.devName,data.devType, anddata.temperaturewith the field names in your payload. - Additional telemetry — add more keys to the
telemetryobject (e.g.humidity: data.humidity). - Attributes — add an
attributeskey alongsidetelemetryto store static device properties. - Nested payload — if your record contains a nested JSON string in the
datafield, calldecodeToJson(data.data)to parse the inner object.
Create a downlink converter
Section titled “Create a downlink converter”The downlink converter encodes ThingsBoard commands into Kinesis-compatible messages. For the full encoder reference, see Downlink data converter. The encoder output must include:
contentType— how data is encoded:TEXT,JSON, orBINARYdata— the payload to write to the Kinesis streammetadata.streamName— the target Kinesis stream namemetadata.partitionKey— the partition key used to route the record to a shard
Expected output structure:
{ "contentType": "JSON", "data": "{\"devName\":\"kitchen_thermostat\",\"version\":\"0.11\"}", "metadata": { "streamName": "tb-test-downlink", "partitionKey": "1234" }}- Download the downlink converter file:
- Go to Integrations center ⇾ Data converters.
- Click + Add data converter ⇾ Import converter.
- Drag and drop the downloaded JSON file into the Import converter window and click Import.
The encoder used in this tutorial:
var data = {    devName: 'kitchen_thermostat',    version: msg.version};
var result = {    contentType: 'JSON',    data: JSON.stringify(data),    metadata: {        streamName: 'tb-test-downlink',        partitionKey: '123'    }};
return result;
var data = { devName: 'kitchen_thermostat', version: msg.version};
var result = { contentType: 'JSON', data: JSON.stringify(data), metadata: { streamName: 'tb-test-downlink', partitionKey: '123' }};
return result;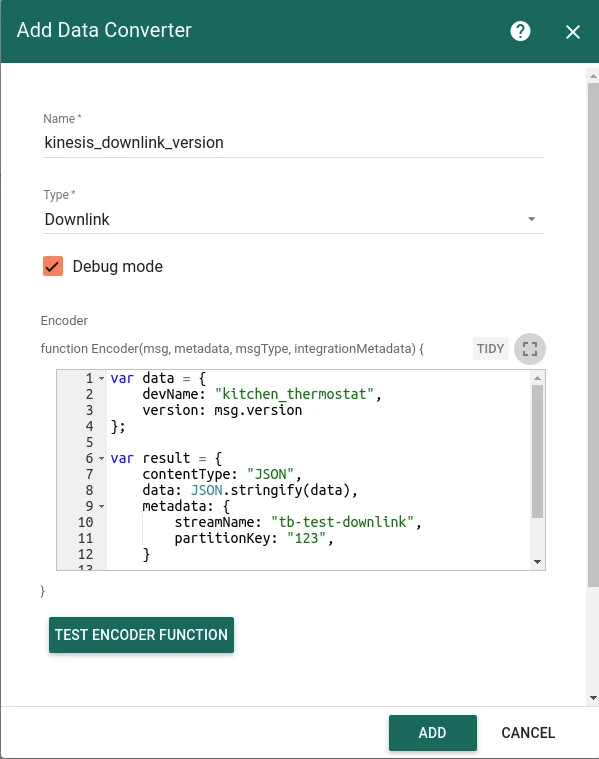
To adapt this encoder to your device:
- Different stream — replace
tb-test-downlinkinstreamNamewith your target Kinesis stream name. - Different partition key — replace
'123'with a meaningful partition key (e.g. device ID) to control which shard receives the record. - Different payload — replace
msg.versionwith whichever attribute or RPC parameter you want to forward.
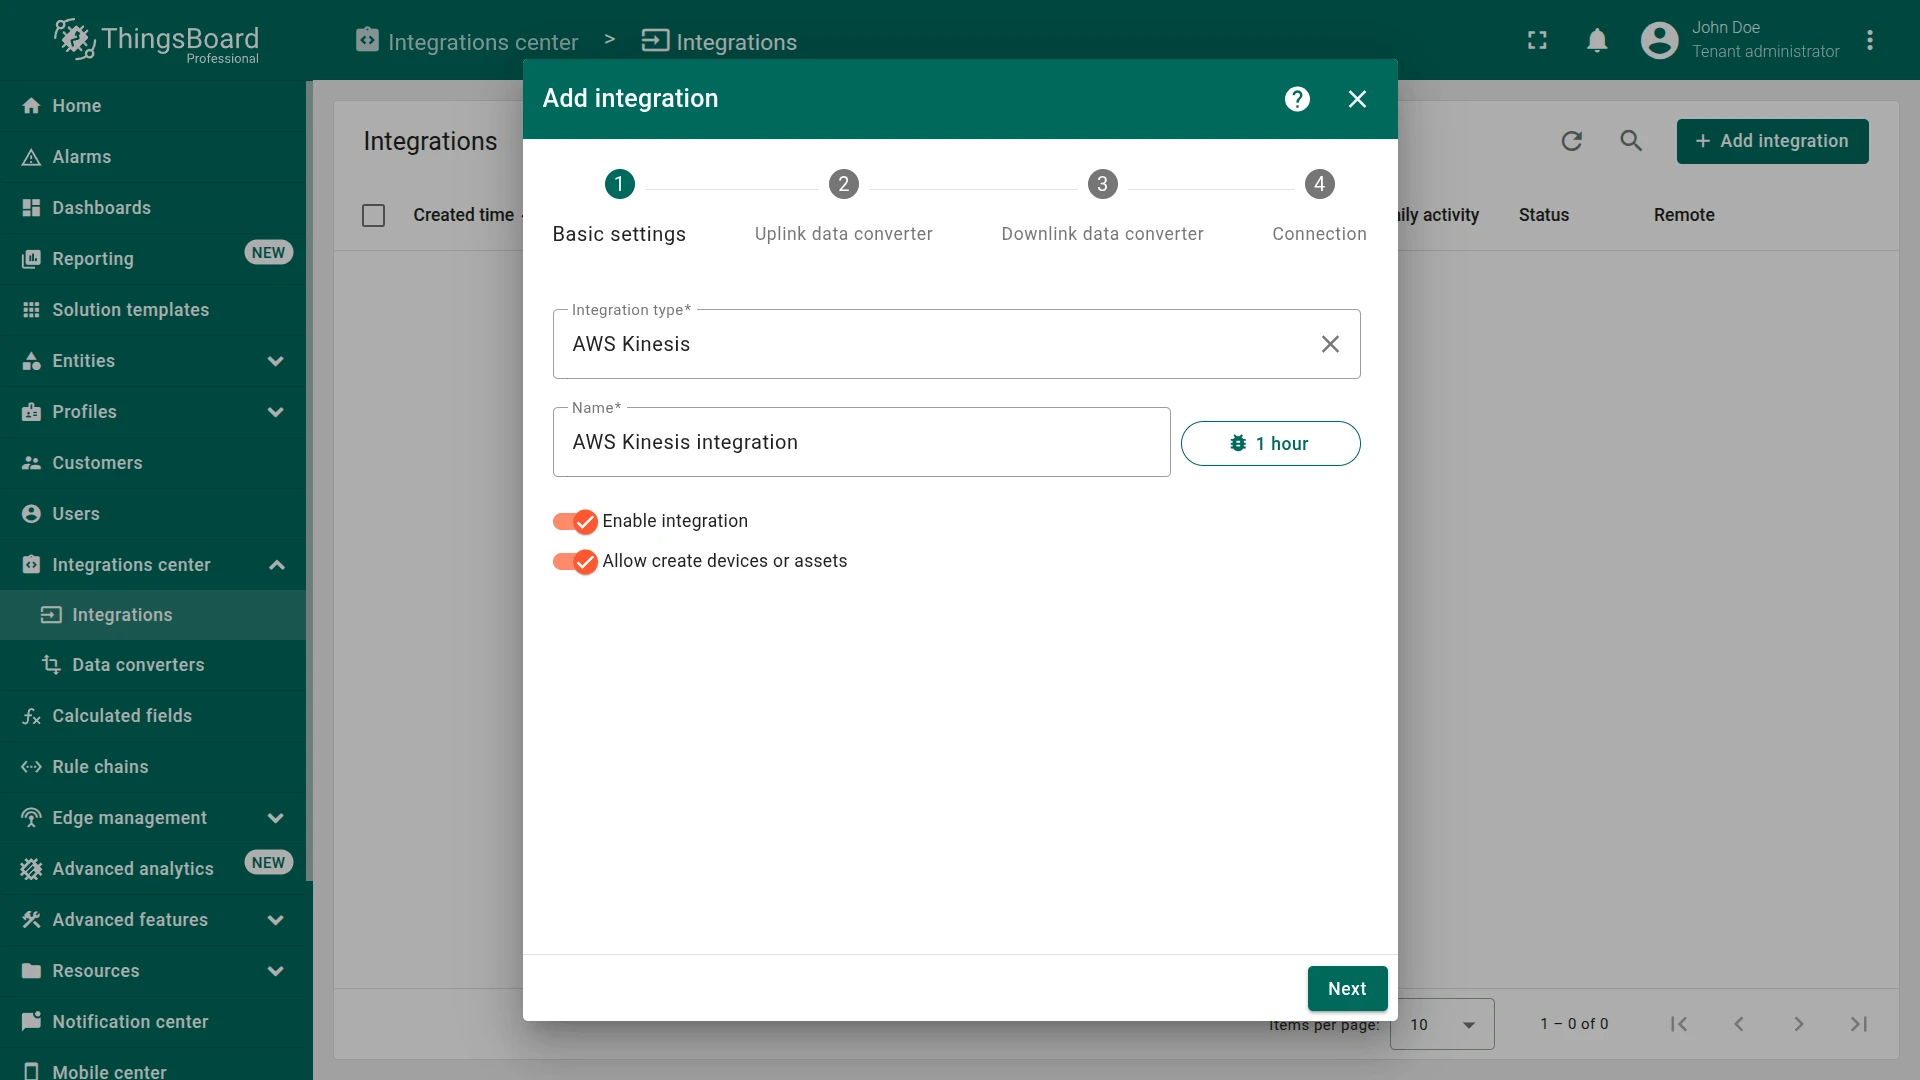
Create the integration
Section titled “Create the integration”- Go to Integrations center ⇾ Integrations and click + Add integration.
- Basic settings:
- Set Integration type to AWS Kinesis and enter a name (e.g.
AWS Kinesis integration). - Enable integration and Allow create devices or assets are on by default.
- Click Next.
- Set Integration type to AWS Kinesis and enter a name (e.g.
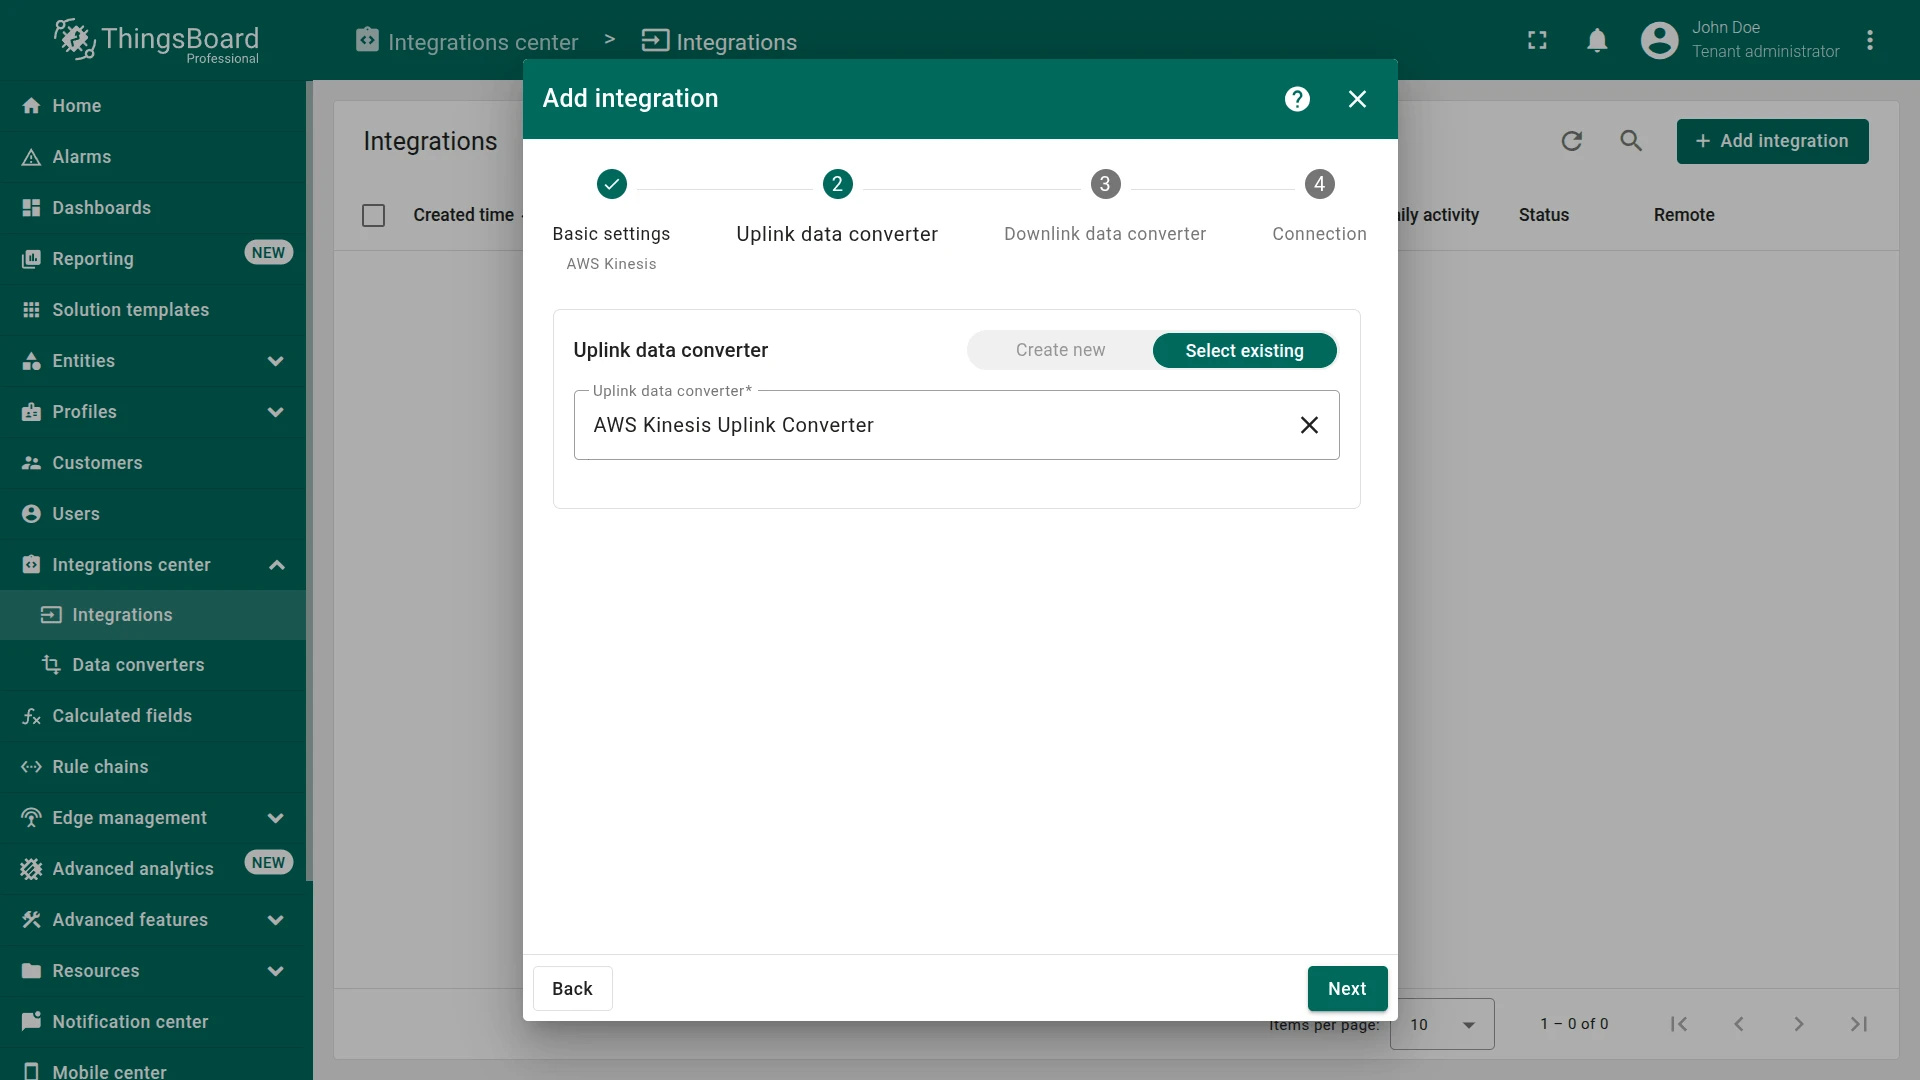
- Uplink data converter:
- Click Select existing and choose the previously imported
AWS Kinesis Uplink Converter. - Click Next.
- Click Select existing and choose the previously imported
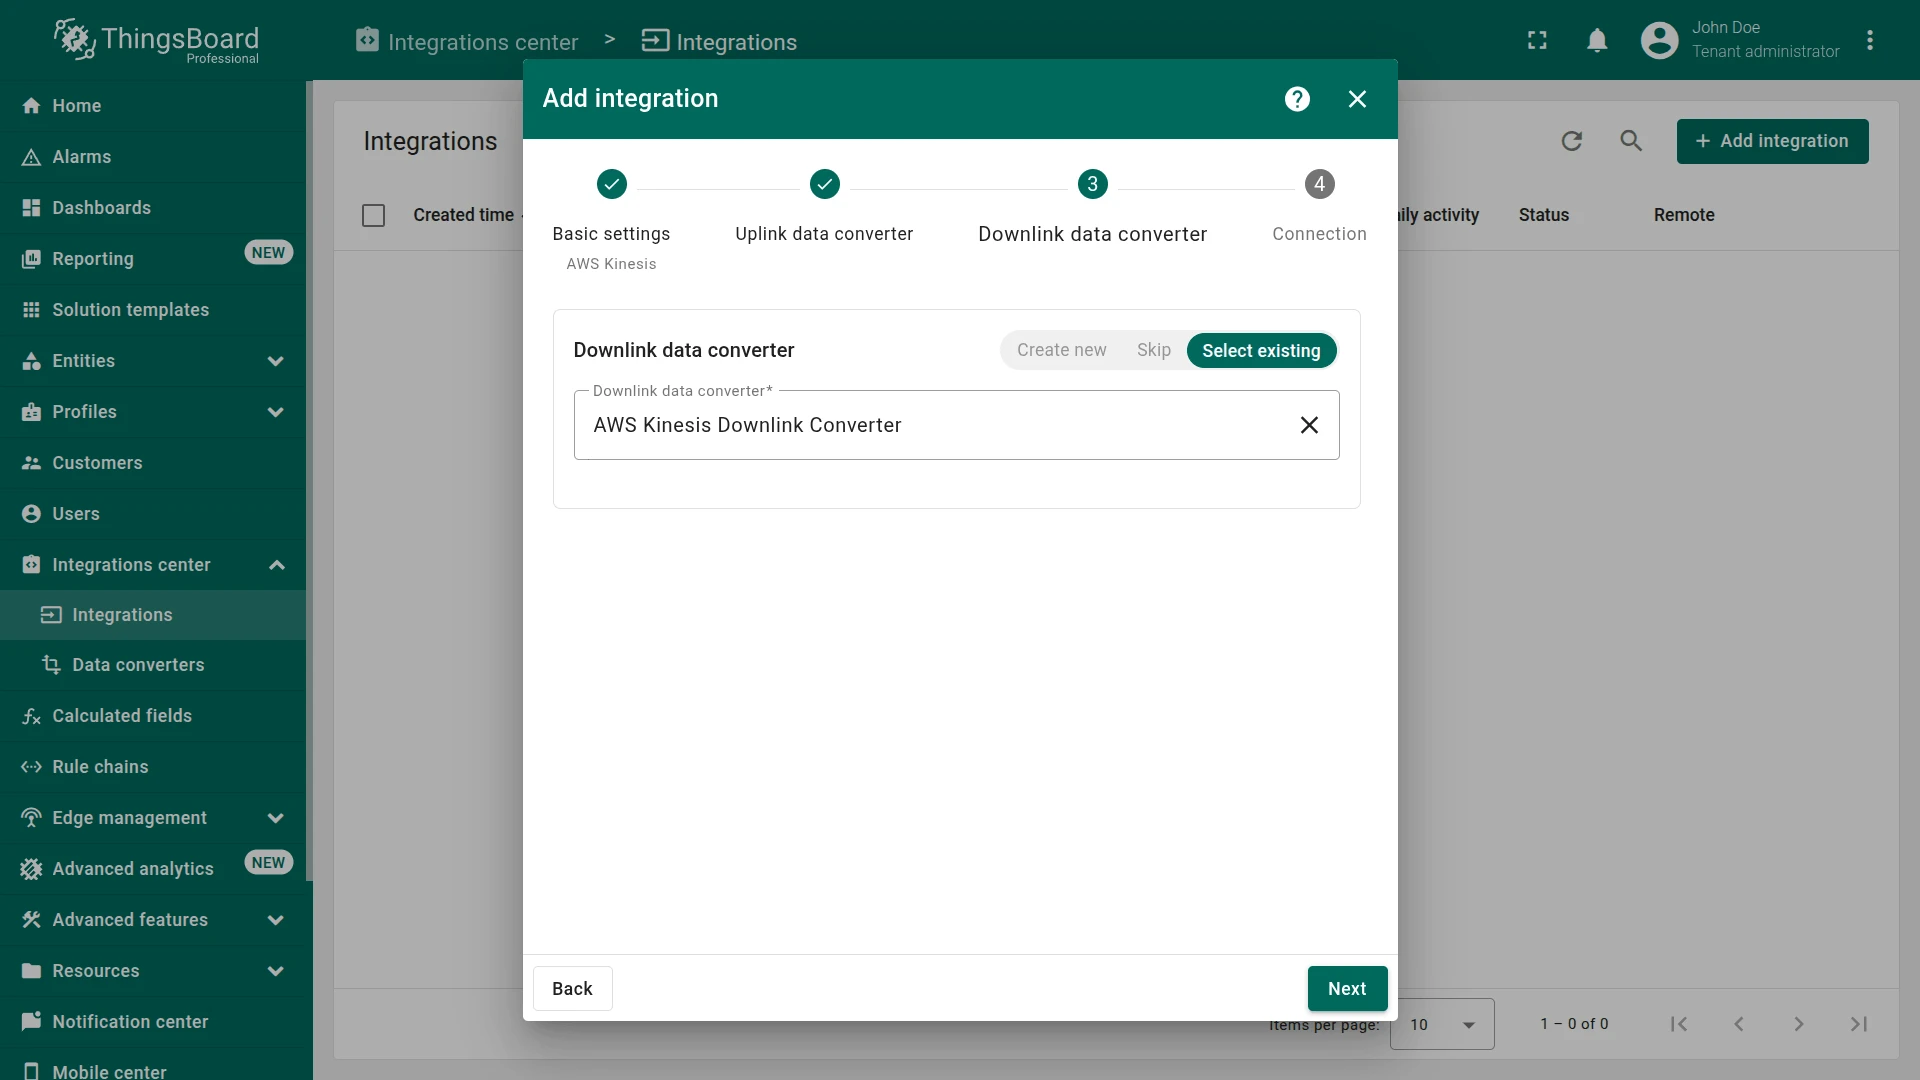
- Downlink data converter:
- Click Select existing and choose the previously imported
AWS Kinesis Downlink Converter. - Click Next.
- Click Select existing and choose the previously imported
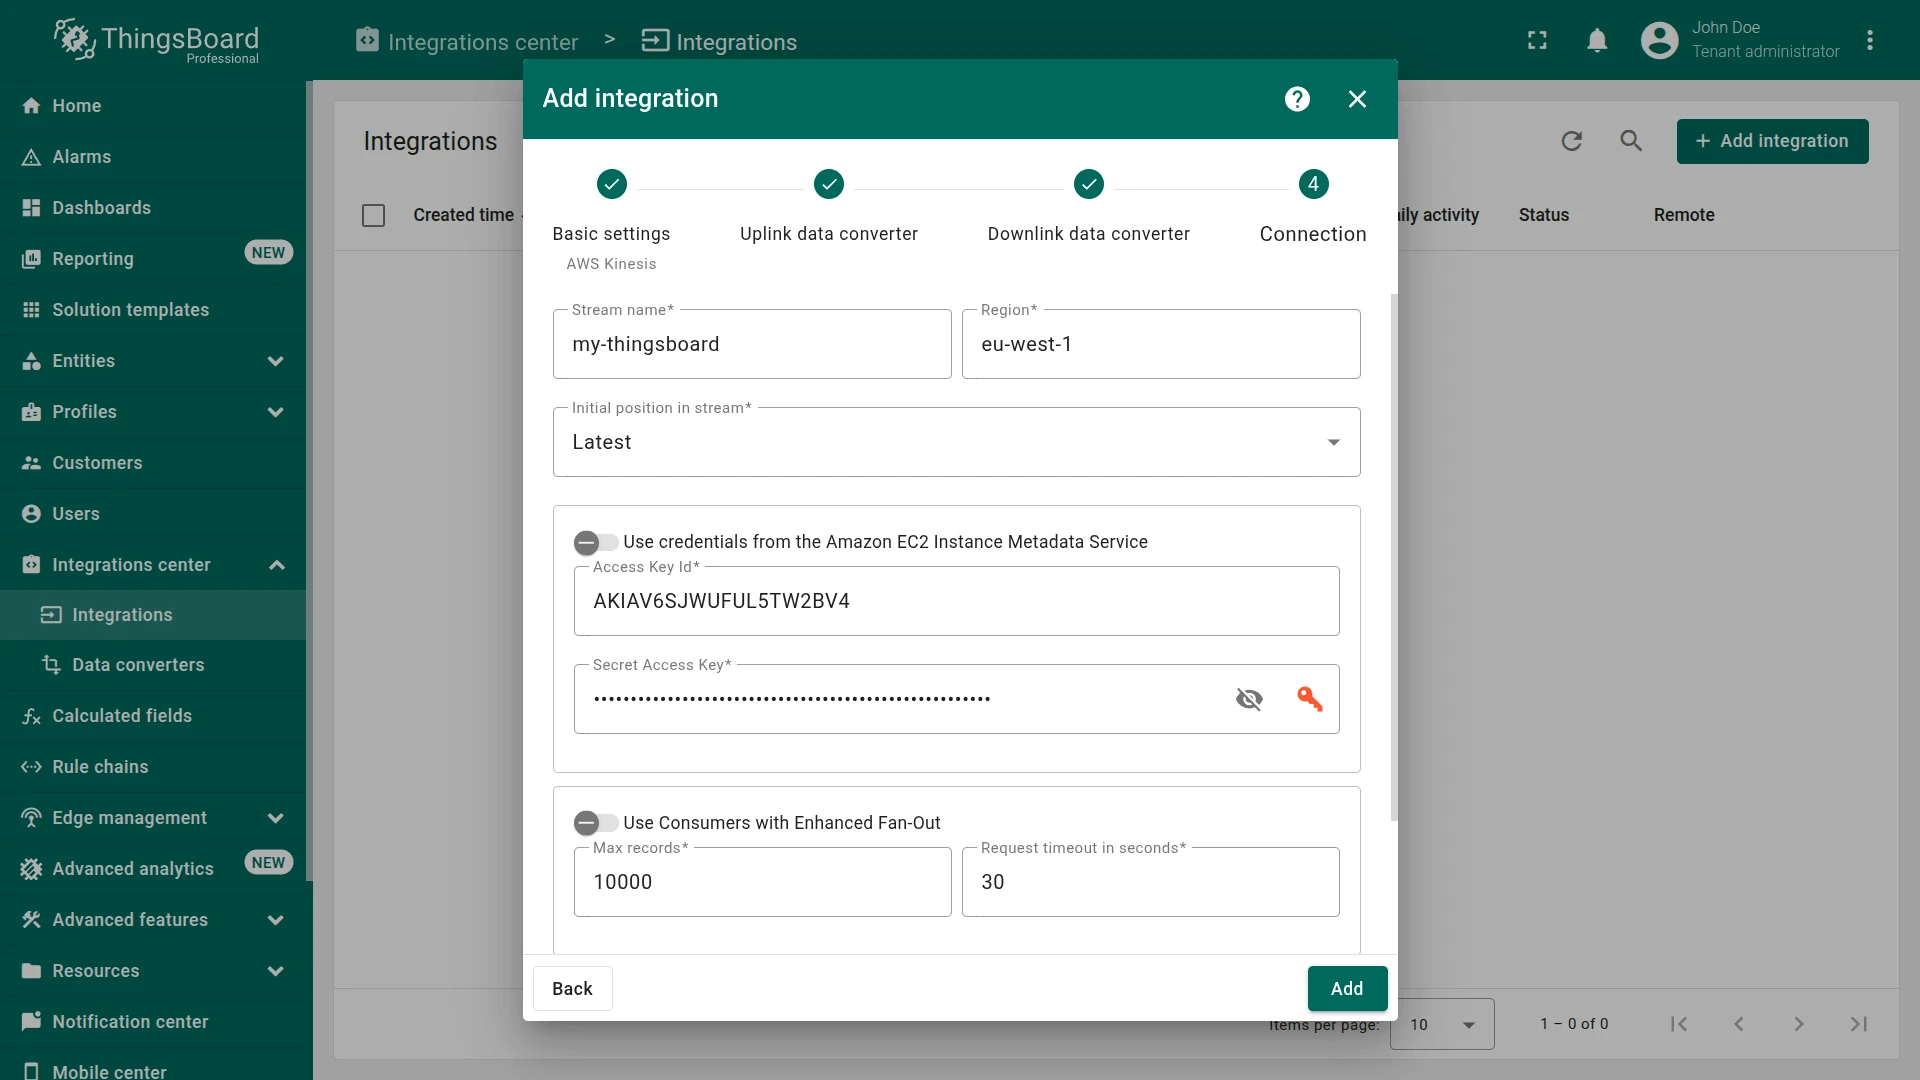
- Connection settings:
- Stream name —
my-thingsboard - Region — your AWS region (e.g.
eu-west-1) - Initial position in stream —
Latest(reads only new records; useTrim horizonto process all existing records first) - Access Key ID and Secret Access Key — your AWS IAM credentials
- Leave Use Consumers with Enhanced Fan-Out disabled for this tutorial.
- Read more about each parameter in Connection settings.
- Stream name —
- Click Add to save the integration.
Connection settings
Section titled “Connection settings”Stream name
The name of the AWS Kinesis stream ThingsBoard reads from for uplink messages (e.g. my-thingsboard). The stream must exist in your AWS account before the integration can connect.
Region
The AWS region where the stream is deployed (e.g. us-east-1, eu-west-1). Must match the region used when the stream was created.
Initial position in stream
Determines where in the stream ThingsBoard starts reading when the integration is first started or restarted without a saved checkpoint.
| Value | Description |
|---|---|
| Latest | Read only new records produced after the integration starts. Previously produced records are skipped. Use for live data ingestion. |
| Trim horizon | Read from the oldest available record in each shard. Use to process all existing data before switching to live ingestion. |
| At timestamp | Read from a specific point in time. An additional timestamp field appears when this option is selected. |
Use credentials from the Amazon EC2 Instance Metadata Service
When enabled, ThingsBoard retrieves AWS credentials automatically from the EC2 Instance Metadata Service (IMDS) instead of the static key fields. Enable this only when ThingsBoard is deployed on an EC2 instance with an attached IAM role that grants the required Kinesis permissions. When active, the Access Key ID and Secret Access Key fields are ignored.
Access Key ID
The AWS IAM access key ID used to authenticate API requests. The associated IAM user or role must have the following permissions on the stream:
kinesis:GetRecordskinesis:GetShardIteratorkinesis:DescribeStreamkinesis:ListShardskinesis:PutRecord(required for downlink)
Secret Access Key
The AWS IAM secret access key corresponding to the Access Key ID above.
Use Consumers with Enhanced Fan-Out
When enabled, ThingsBoard registers as an Enhanced Fan-Out (EFO) consumer, which receives records via a dedicated HTTP/2 push subscription at 2 MB/s per shard — independent of other consumers on the same shard. Without EFO, all standard consumers share a single 2 MB/s polling limit per shard. Recommended for high-throughput workloads or when multiple consumers read the same stream concurrently.
Enabling this option exposes two additional parameters:
| Parameter | Default | Description |
|---|---|---|
| Max records | 10000 | Maximum number of records to retrieve per request. AWS Kinesis caps this at 10,000 per GetRecords call. |
| Request timeout (sec) | 30 | Timeout in seconds for the SubscribeToShard HTTP/2 request. If the connection is not established within this period, it is retried. |
Execute remotely
When enabled, ThingsBoard generates an Integration key and Integration secret that allow the integration to run as a separate process outside the ThingsBoard cluster — useful when the Kinesis endpoint is only reachable from a restricted network.
Advanced settings
| Parameter | Default | Description |
|---|---|---|
| Application name | (stream name) | The Kinesis Client Library (KCL) application name. Used to identify the consumer and track per-shard checkpoints in a dedicated DynamoDB table. Defaults to the stream name if left empty. Set a unique name when multiple independent integrations consume the same stream. |
| Description | — | Optional text description for the integration. |
| Metadata | — | Key-value pairs injected into every uplink message as integrationMetadata in the converter script. |
Test uplink
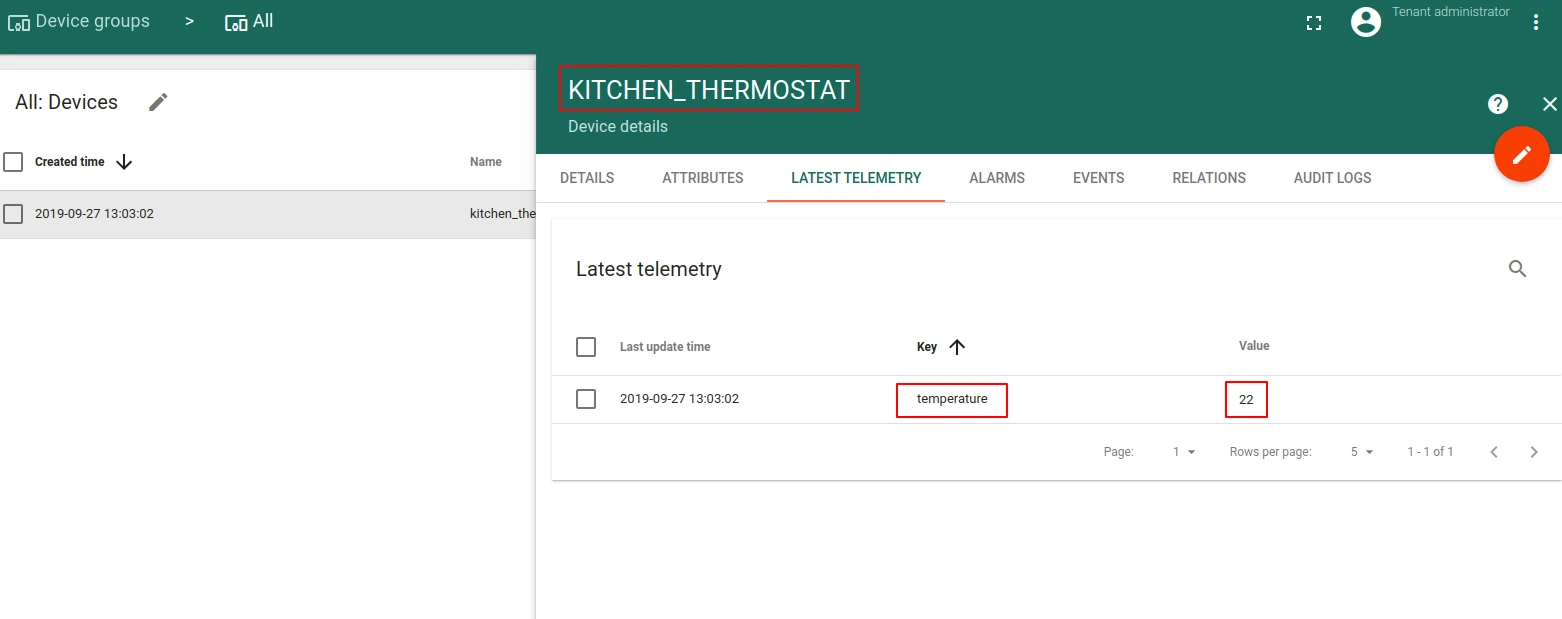
Section titled “Test uplink”Send a test record to the uplink stream using the AWS CLI:
aws kinesis put-record \ --stream-name my-thingsboard \ --partition-key 123 \ --data '{"devName": "kitchen_thermostat", "devType": "thermostat", "temperature": 22}'Go to Entities ⇾ Devices. The device kitchen_thermostat is automatically provisioned by the integration. Open it and check the Latest Telemetry tab — the temperature value should equal 22.
Configure and test downlink
Section titled “Configure and test downlink”Configure the Root Rule Chain
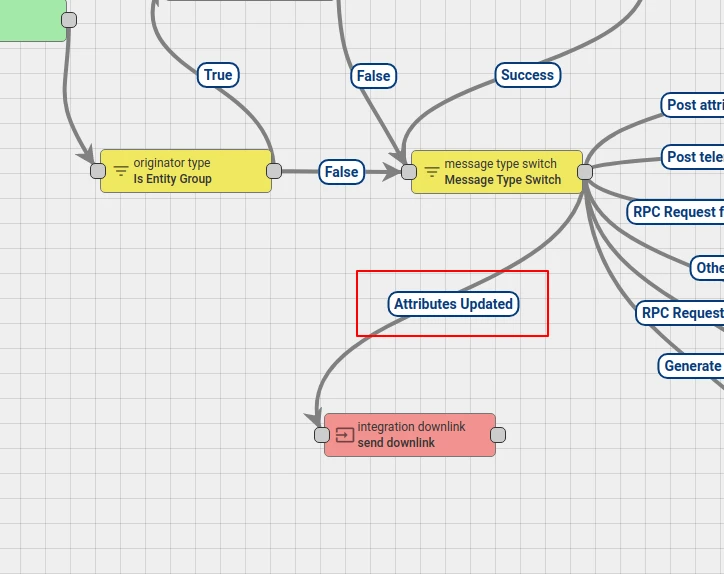
Section titled “Configure the Root Rule Chain”To route messages from ThingsBoard to the Kinesis downlink stream, connect the Integration Downlink node to the Root Rule Chain.
- Open Rule Chains ⇾ Root Rule Chain and click the edit icon.
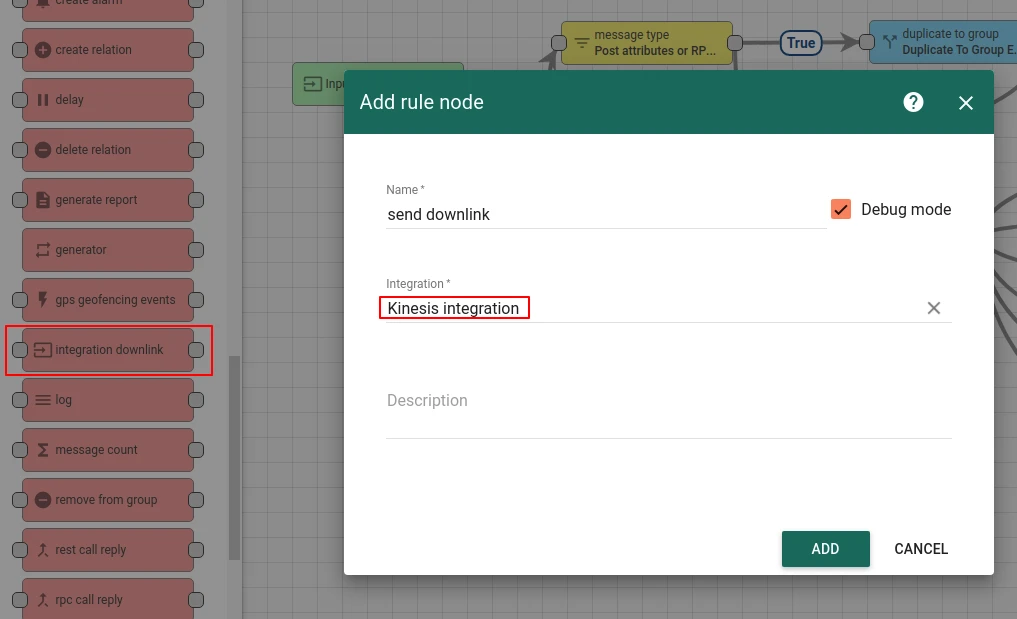
- Find the Integration Downlink node in the node panel, drag it onto the canvas, enter a name (e.g.
send downlink), select the AWS Kinesis integration, and click Add. - Connect the Message Type Switch node to the Integration Downlink node using the Attributes Updated relation type.
- Click Apply changes to save the rule chain.
Test the downlink
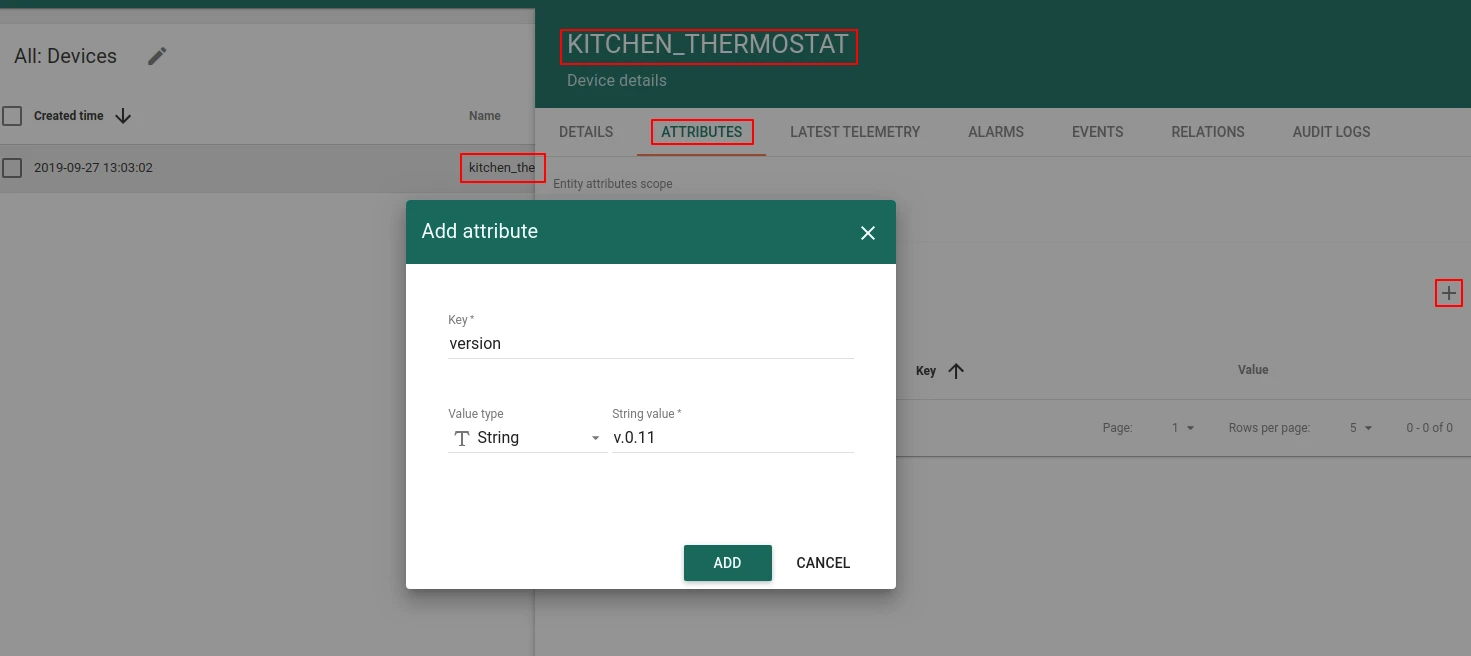
Section titled “Test the downlink”Trigger a downlink by adding a shared attribute to the provisioned device:
- Go to Entities ⇾ Devices and open
kitchen_thermostat. - Open the Attributes tab, switch to Shared attributes, and click +.
- Enter key
versionand valuev.0.11, then click Add.
Adding the attribute triggers the Attributes Updated rule chain relation, which routes the message to the Integration Downlink node. The downlink encoder writes a record to the tb-test-downlink stream.
To verify the record was written, get a shard iterator and read from the stream:
aws kinesis get-shard-iterator \ --shard-id shardId-000000000000 \ --shard-iterator-type TRIM_HORIZON \ --stream-name tb-test-downlinkUse the returned ShardIterator value in the following command:
aws kinesis get-records --shard-iterator <ShardIterator>Sample response:
{ "Records": [ { "Data": "eyJkZXZOYW1lIjoia2l0Y2hlbl90aGVybW9zdGF0IiwidmVyc2lvbiI6InYuMC4xMSJ9", "PartitionKey": "1234", "ApproximateArrivalTimestamp": 1569609612.27, "SequenceNumber": "49599912710236940383450082324919185009278025474345271298" } ], "NextShardIterator": "AAAAAAAAAAFQlgSyxBdpKxlRrocJCYT9YDrCi/vxl0sstJgg4CM+pttVsK4AjjQwJ/QJsags5vdpQdopaqk9aKefAUOWobgwHVaZvhI4tdkmHBr45uO0Hq9AxUlKDxfiYbM0qgN33+5SvGxU8gJBUihYFY4ydPWOWdVTf2lOxp0a9X6DFrjsUqwMXR9skLw8/lQkBmHVFBlFURPy+z/AMuYHga5mDch/", "MillisBehindLatest": 0}The Data field is Base64-encoded. Decoded, it contains:
{ "devName": "kitchen_thermostat", "version": "v.0.11"}See also
Section titled “See also”Was this helpful?