Particle Integration
Particle is an IoT cloud platform for connected devices. After integrating Particle with ThingsBoard, device events flow from the Particle Cloud to ThingsBoard via a webhook — and ThingsBoard can send RPC commands back to devices through the Particle Cloud function API.
Prerequisites
Section titled “Prerequisites”- A Particle Console account with at least one registered device.
- The Particle CLI installed if you want to send downlink commands.
Connect the Particle Photon
Section titled “Connect the Particle Photon”Follow the official Particle setup guide to connect your Photon to Wi-Fi and register it with the Particle Cloud. The device must be online before events can be forwarded to ThingsBoard.
- Power on your device. Plug the USB cable into a power source. The RGB LED blinks blue when the device is ready for setup. If it is not blinking blue, hold the SETUP button until it does.
- Connect to Wi-Fi. Go to setup.particle.io, click Setup a Photon, download
photonsetup.html, and open it in your browser to complete Wi-Fi configuration.
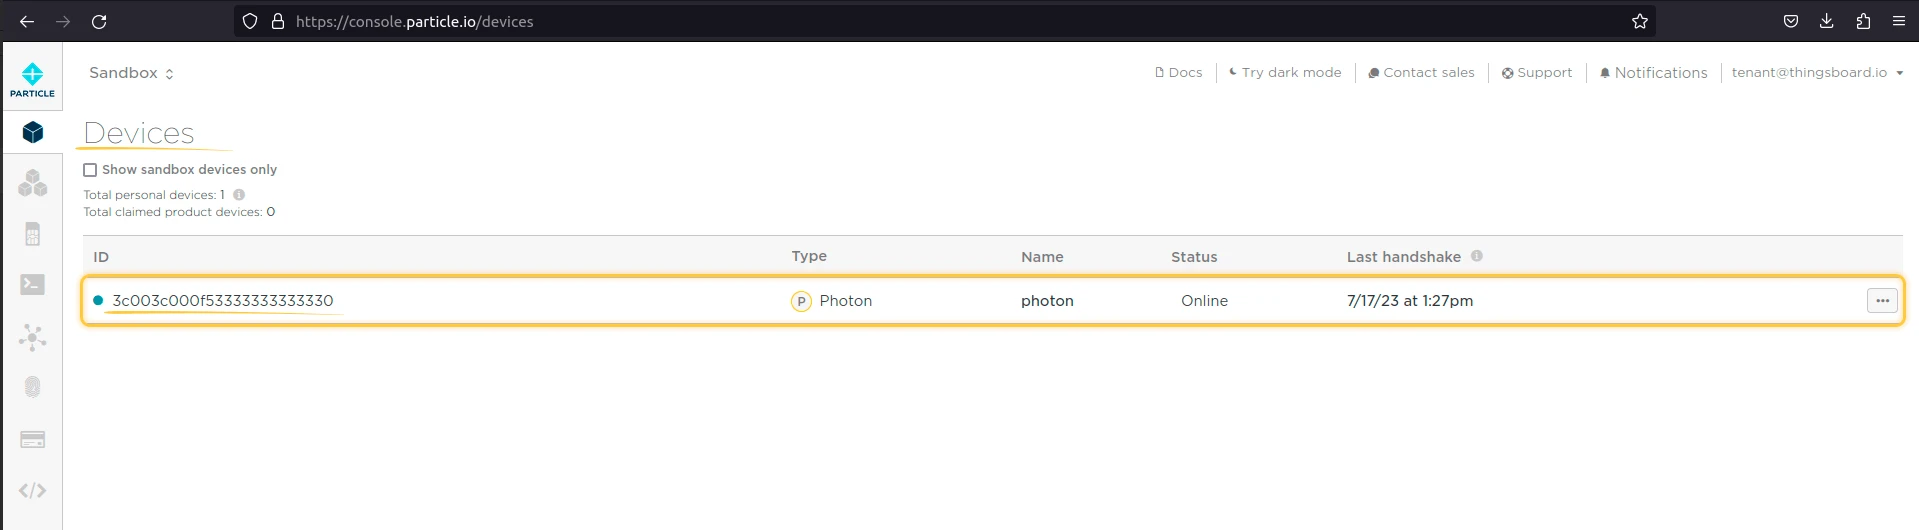
Once connected, the device appears in the Particle Console under Devices with Status: Online. Note the device ID (the coreid column) — the uplink converter uses it as the ThingsBoard device name.
ThingsBoard integration setup
Section titled “ThingsBoard integration setup”Create an uplink converter
Section titled “Create an uplink converter”The uplink converter parses incoming Particle event payloads and maps them to ThingsBoard telemetry and attributes. Particle uses a generic uplink converter. Each Particle event contains a coreid field (the device ID, used as the ThingsBoard device name), a data field (the event payload), and metadata such as published_at. The decoder stores online/offline events as a status attribute and all other event data as raw rawData telemetry.
- Go to Integrations center ⇾ Data converters
- Click + Add data converter ⇾ Create new converter.
- Ensure the type is Uplink.
- Enter a converter name (e.g.
Particle Uplink Converter). - Paste the decoder script and click Add.
The decoder function used in this tutorial:
/** Decoder **/
// decode payload to JSONvar data = decodeToJson(payload);if (data.coreid != "api") {    var deviceName = data.coreid;    var deviceType = 'Photon';    var groupName = 'Particle devices';
    var attributes = {        integrationName: metadata['integrationName']    };
    var telemetry = {};
    if (data.data == 'online' || data.data == 'offline') {        attributes.status = data.data;    } else {        telemetry.rawData = data.data;    }
    var result = {        deviceName: deviceName,        deviceType: deviceType,        groupName: groupName,        attributes: attributes,        telemetry: telemetry    };
    /** Helper functions 'decodeToString' and 'decodeToJson' are already built-in **/
    return result;}
/** Decoder **/
// decode payload to JSONvar data = decodeToJson(payload);if (data.coreid != "api") { var deviceName = data.coreid; var deviceType = 'Photon'; var groupName = 'Particle devices';
var attributes = { integrationName: metadata['integrationName'] };
var telemetry = {};
if (data.data == 'online' || data.data == 'offline') { attributes.status = data.data; } else { telemetry.rawData = data.data; }
var result = { deviceName: deviceName, deviceType: deviceType, groupName: groupName, attributes: attributes, telemetry: telemetry };
return result;}
/** Helper functions **/
function decodeToString(payload) { return String.fromCharCode.apply(String, payload);}
function decodeToJson(payload) { var str = decodeToString(payload); var data = JSON.parse(str); return data;}To adapt this converter to your device:
- Structured payload — if your device publishes JSON (e.g.
{"temp": 23.5, "humidity": 60}), parse it withdecodeToJson(data.data)and map individual fields to telemetry keys instead of storingrawData. - Different device name —
coreidis the Particle device ID (a hex string). To use a human-readable name, include a name field in the event data and extract it fromdata.dataafter parsing. - Additional attributes — add more keys to the
attributesobject (e.g. firmware version, hardware revision). - Event filtering — the
data.coreid != "api"check discards Particle Cloud API events that have no associated physical device.
Create a downlink converter
Section titled “Create a downlink converter”The downlink converter encodes outgoing ThingsBoard RPC messages into commands sent to your Particle device. For the full encoder reference, see Downlink data converter. via the Particle Cloud function API. It reads the RPC method and params from the incoming ThingsBoard message and forwards them to the registered Particle function on the device.
- Go to Integrations center ⇾ Data converters, click + Add data converter ⇾ Create new converter.
- Switch the type to Downlink.
- Enter a converter name (e.g.
Particle Downlink Converter). - Paste the encoder script and click Add.
The encoder used in this tutorial:
/** Encoder **/
var command = {};command["method"] = msg.method;if (msg.params == "false" || msg.params == "true") {    command["params"] = Boolean.valueOf(msg.params);} else {    command["params"] = msg.params;}
var result = {    contentType: "JSON",    data: JSON.stringify(command),    metadata: {        deviceId: metadata.deviceName    }};
return result;
/** Encoder **/
var command = {};command["method"] = msg.method;if (msg.params == "false" || msg.params == "true") { command["params"] = Boolean.valueOf(msg.params);} else { command["params"] = msg.params;}
var result = { contentType: "JSON", data: JSON.stringify(command), metadata: { deviceId: metadata.deviceName }};
return result;The metadata.deviceId is set to the ThingsBoard device name (which equals the Particle coreid) and is used by the integration to identify the target device when calling the Particle Cloud API.
Generate a Particle access token
Section titled “Generate a Particle access token”To allow ThingsBoard to call Particle Cloud device functions for downlink, generate an access token using the Particle CLI.
Install the CLI:
bash <( curl -sL https://particle.io/install-cli )Then, according to official documentation, you will need to log in to your Particle account:
particle login
Create an access token. Use the never-expires option for a long-lived integration token:
# Never-expiring token (recommended for integrations)particle token create --never-expires
# Token with default 90-day expirationparticle token create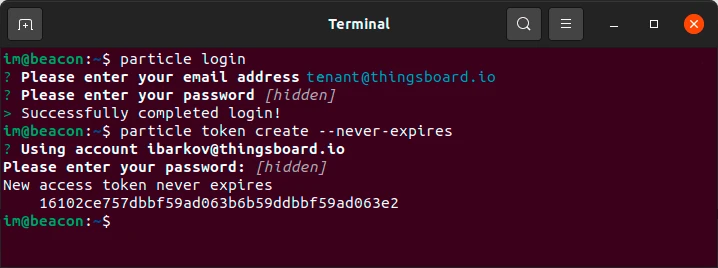
Save the token — you will need it in the next step.
Create the integration
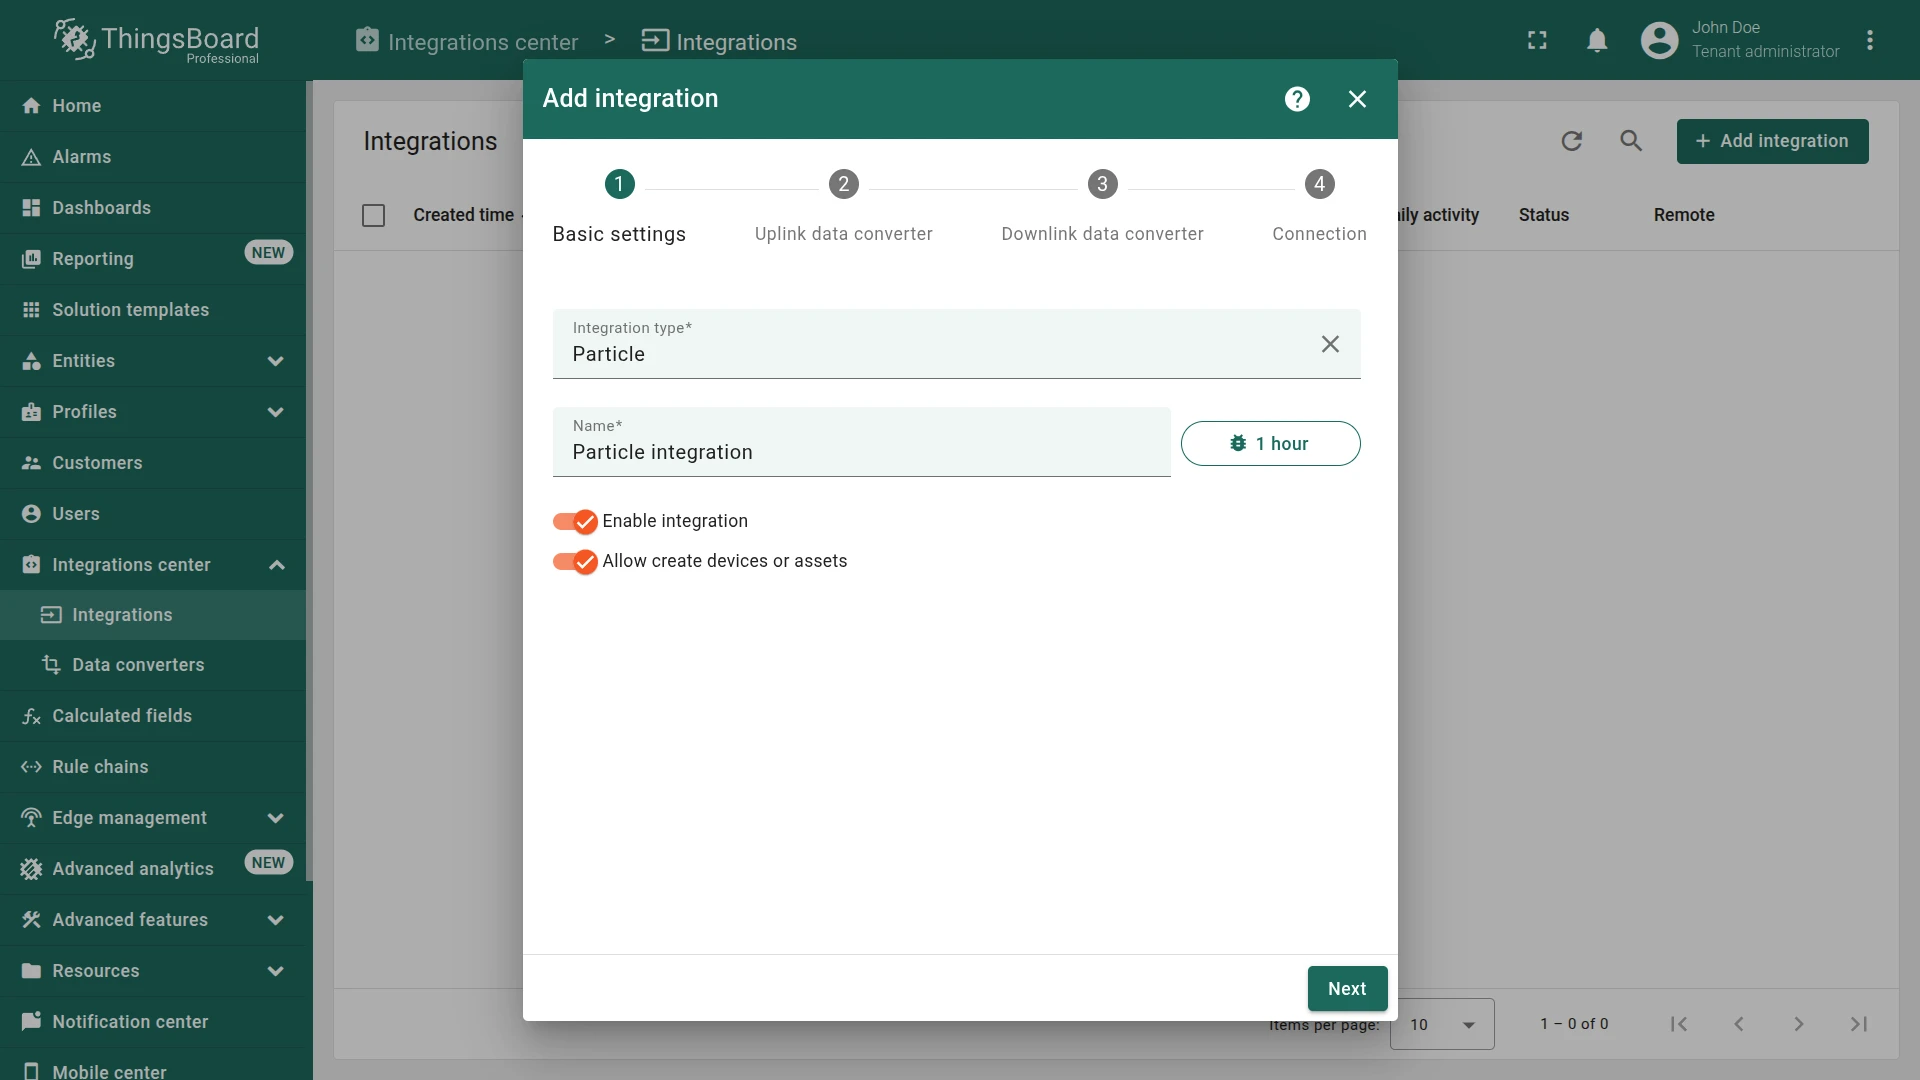
Section titled “Create the integration”- Go to Integrations center ⇾ Integrations and click + Add integration.
- Basic settings:
- Set Integration type to Particle.
- Enable integration and Allow create devices or assets are on by default.
- Click Next.
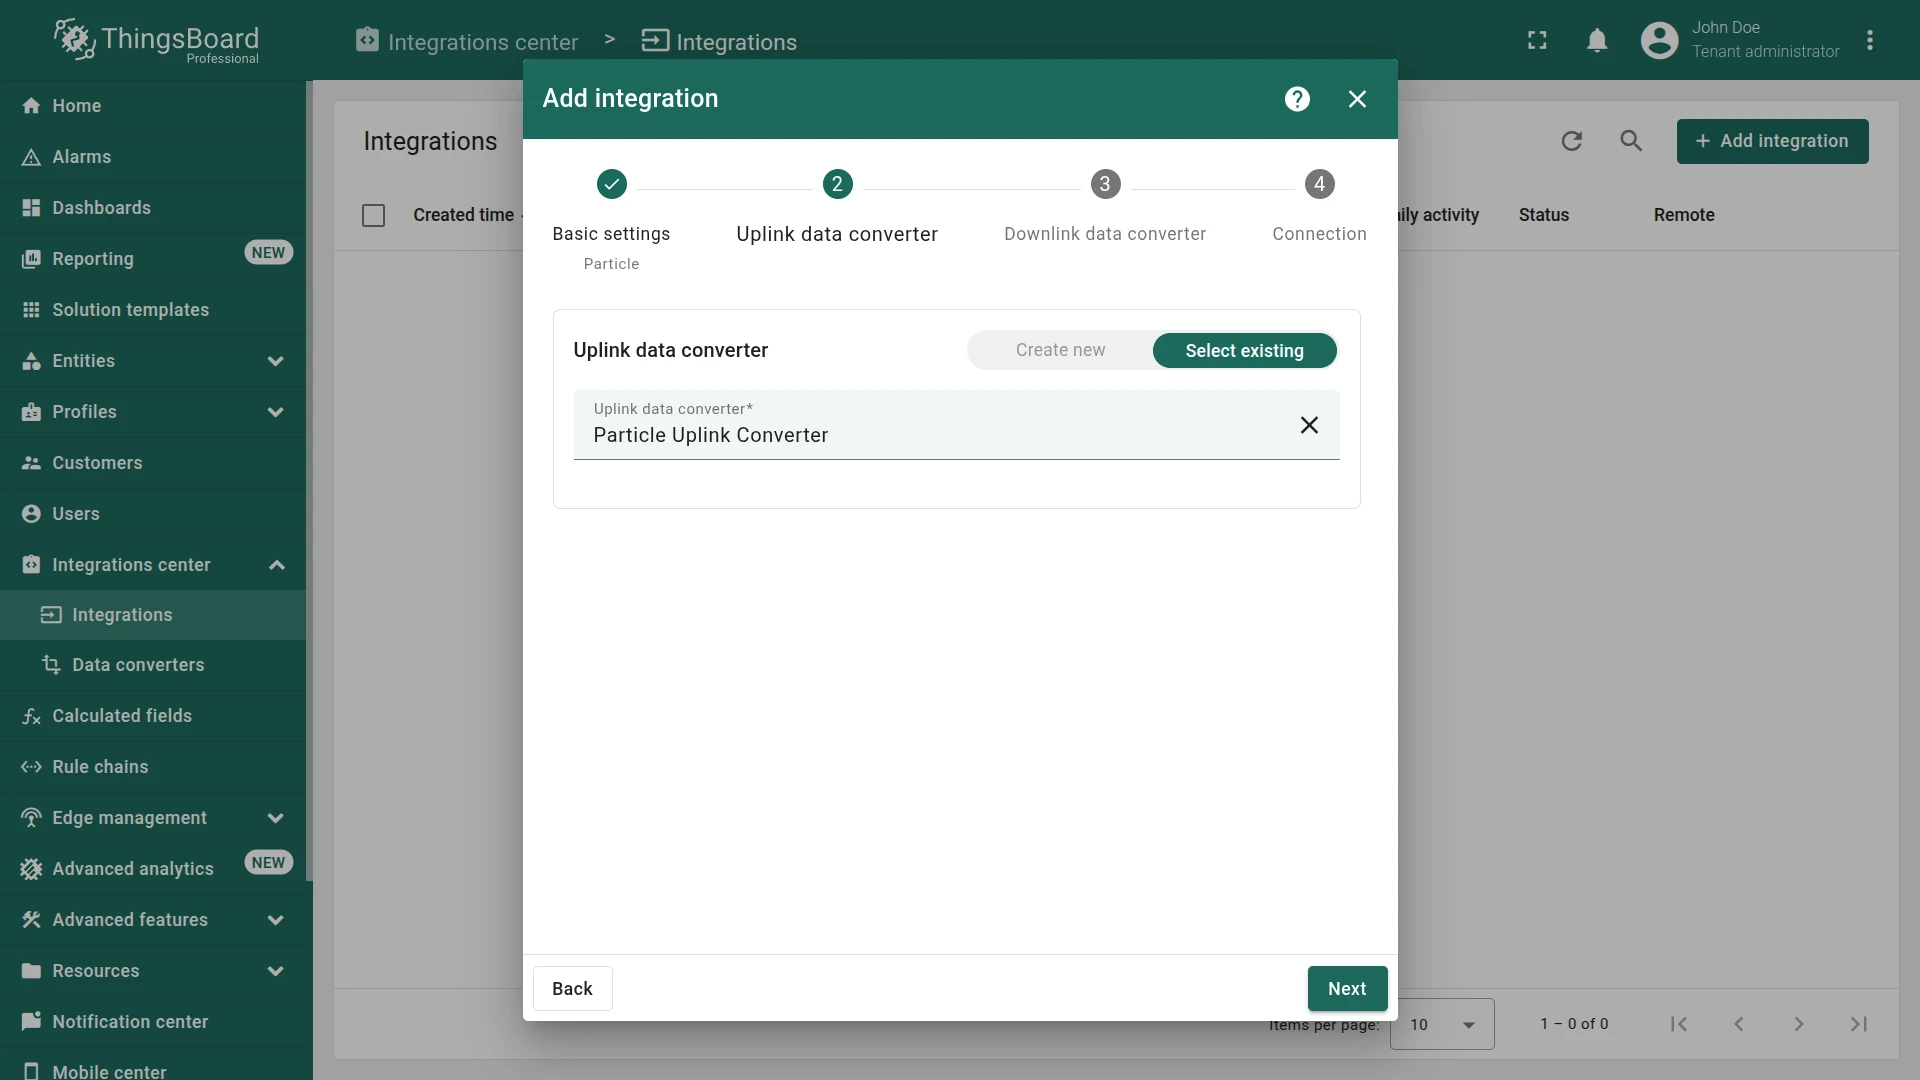
- Uplink data converter:
- Click Select existing, choose the previously created
Particle Uplink Converter. - Click Next.
- Click Select existing, choose the previously created
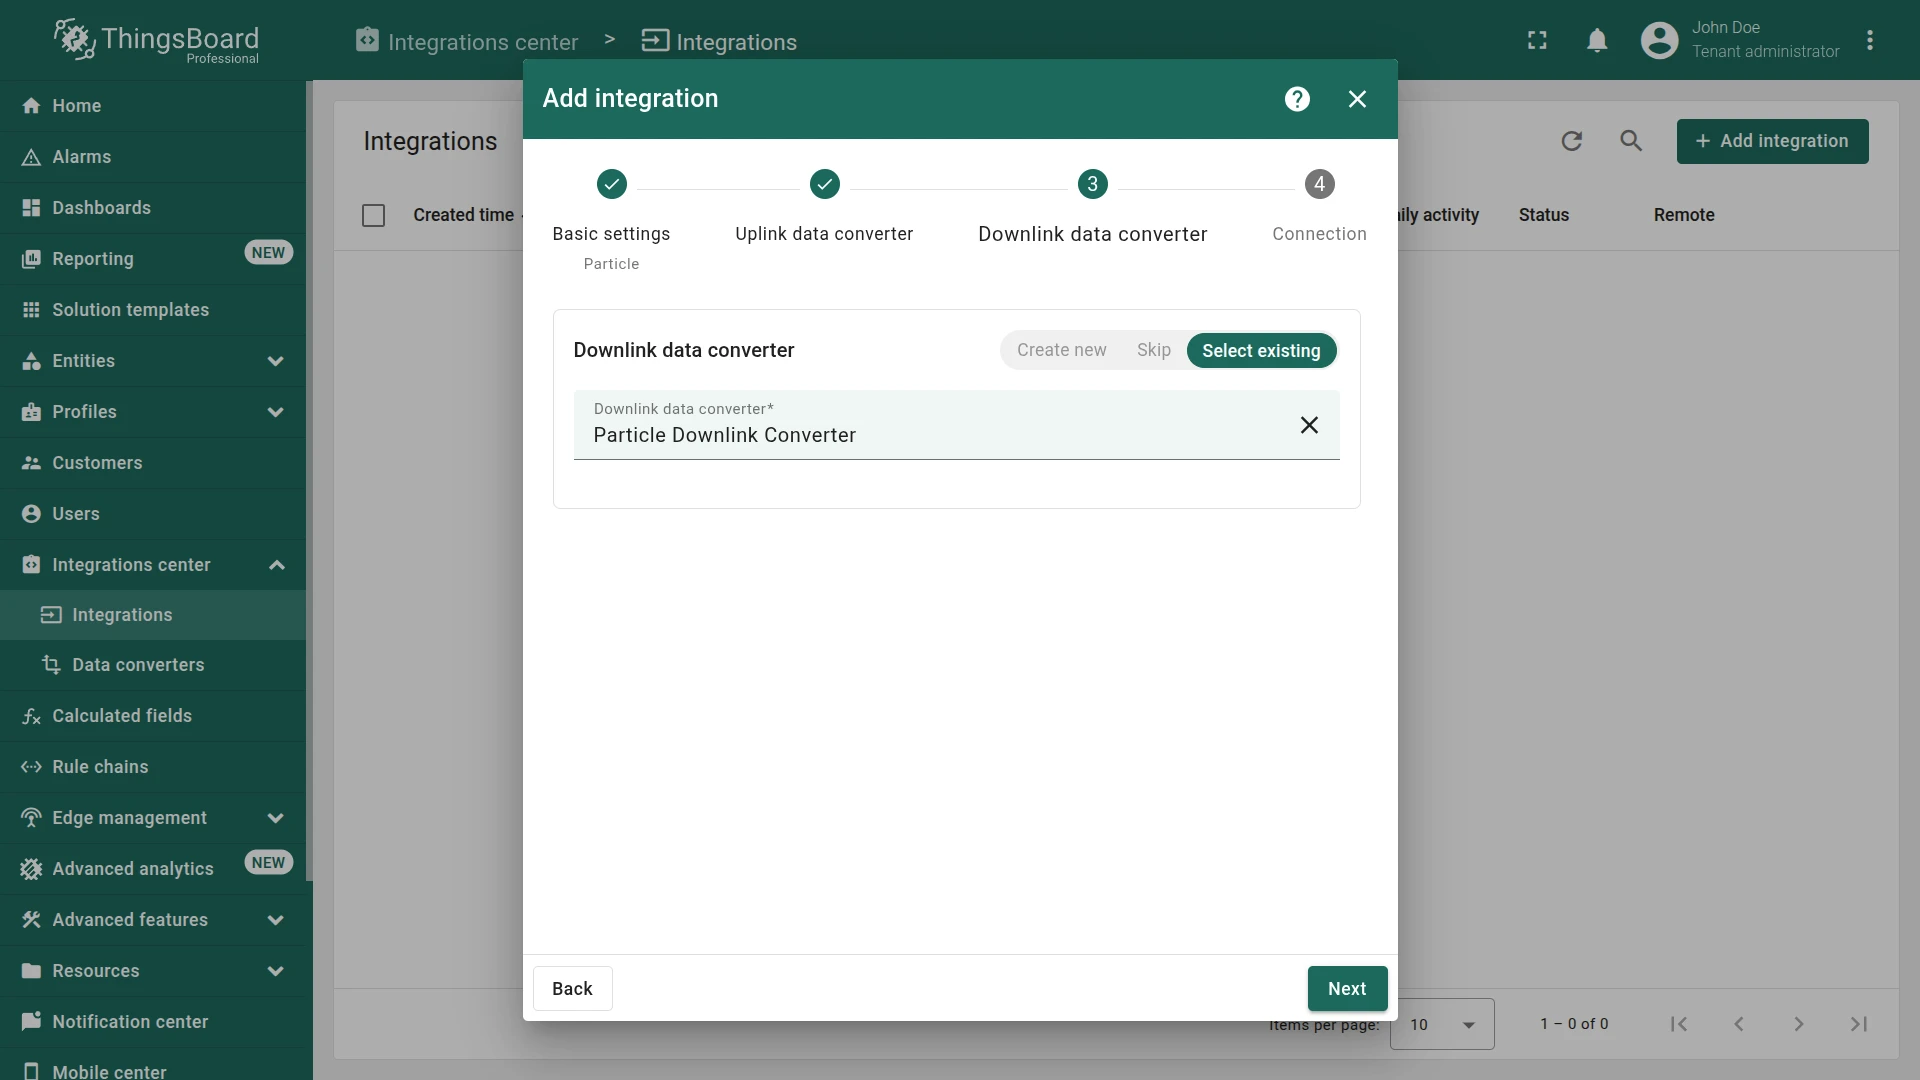
- Downlink data converter:
- Click Select existing, choose the previously created
Particle Downlink Converter. - Click Next.
- Click Select existing, choose the previously created
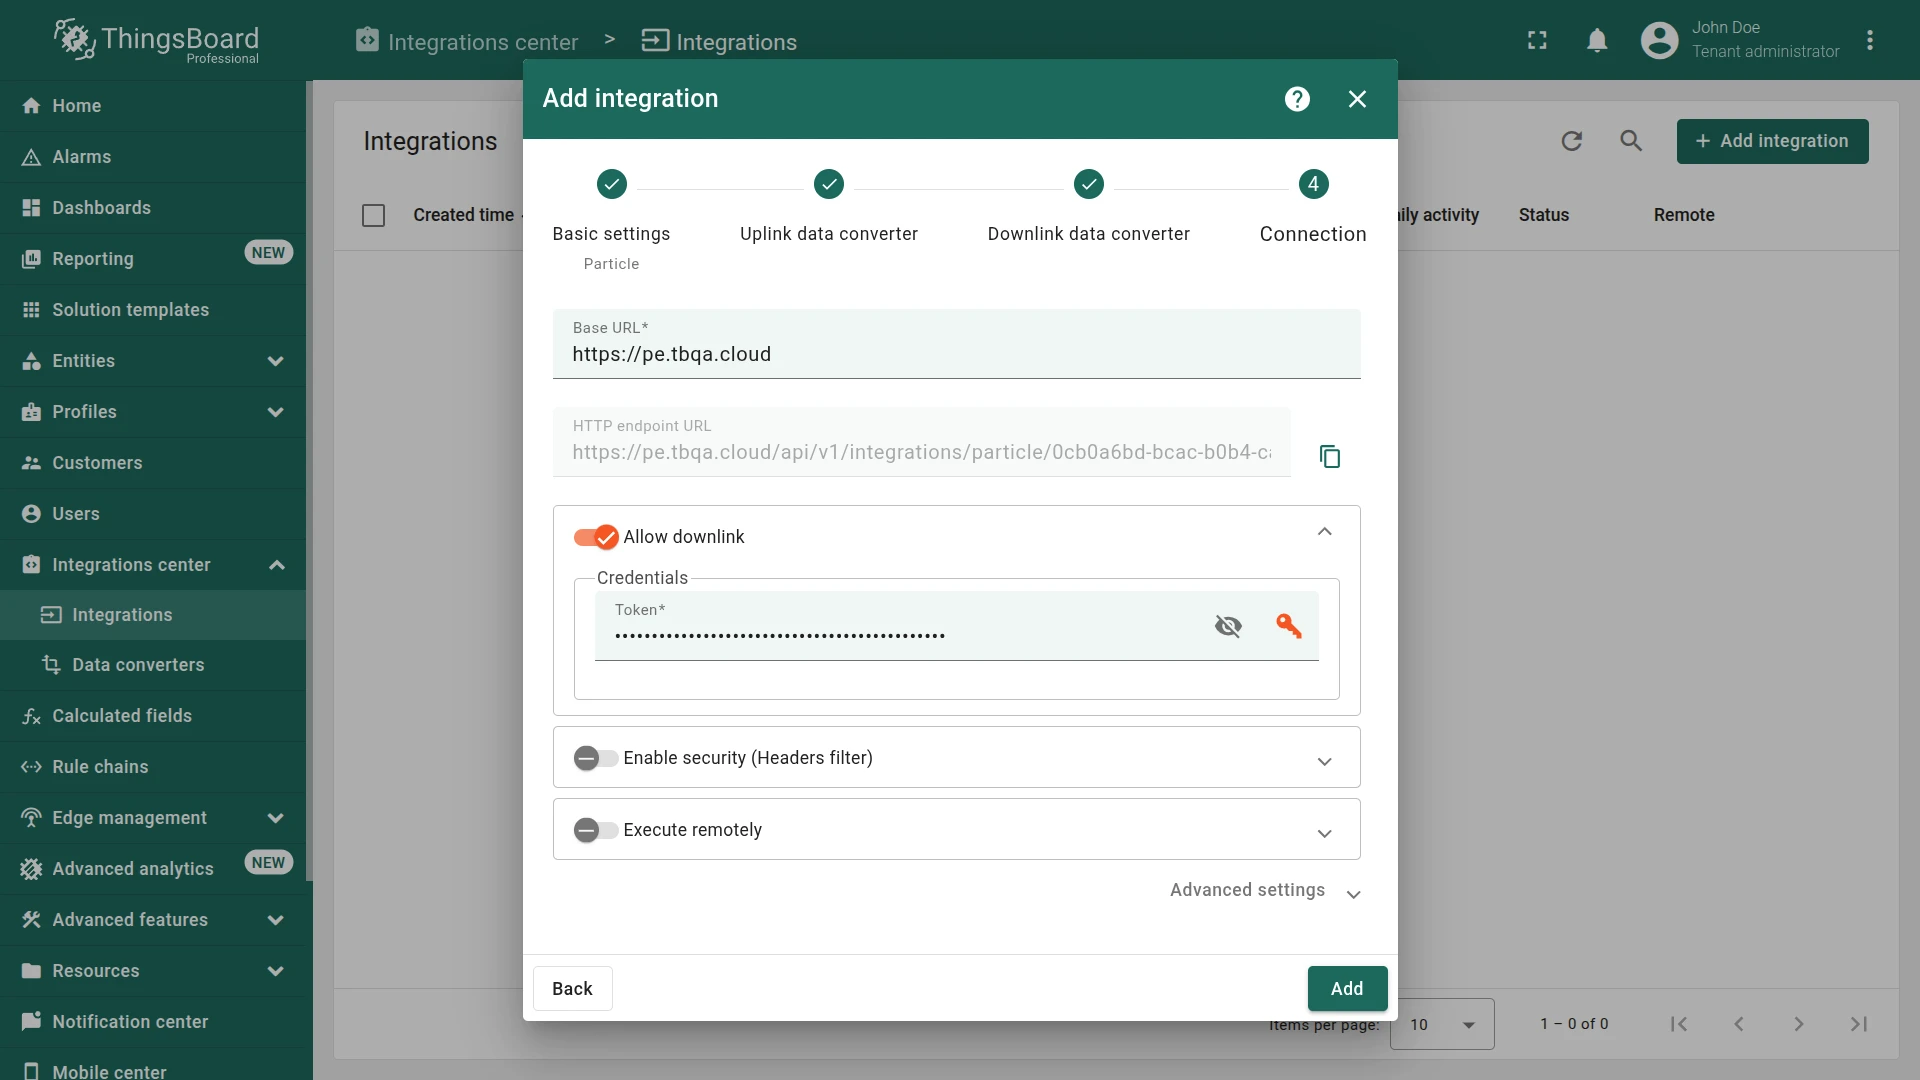
- Connection settings:
- Note the HTTP endpoint URL displayed — you will paste it into the Particle Console webhook in the next section.
- Enable Allow downlink and paste the Particle access token you generated into the Token field.
- Click Add to save the integration.
Configure webhook on Particle Console
Section titled “Configure webhook on Particle Console”To push device events from Particle Cloud to ThingsBoard, create a webhook in the Particle Console that forwards matching events to the ThingsBoard integration endpoint.
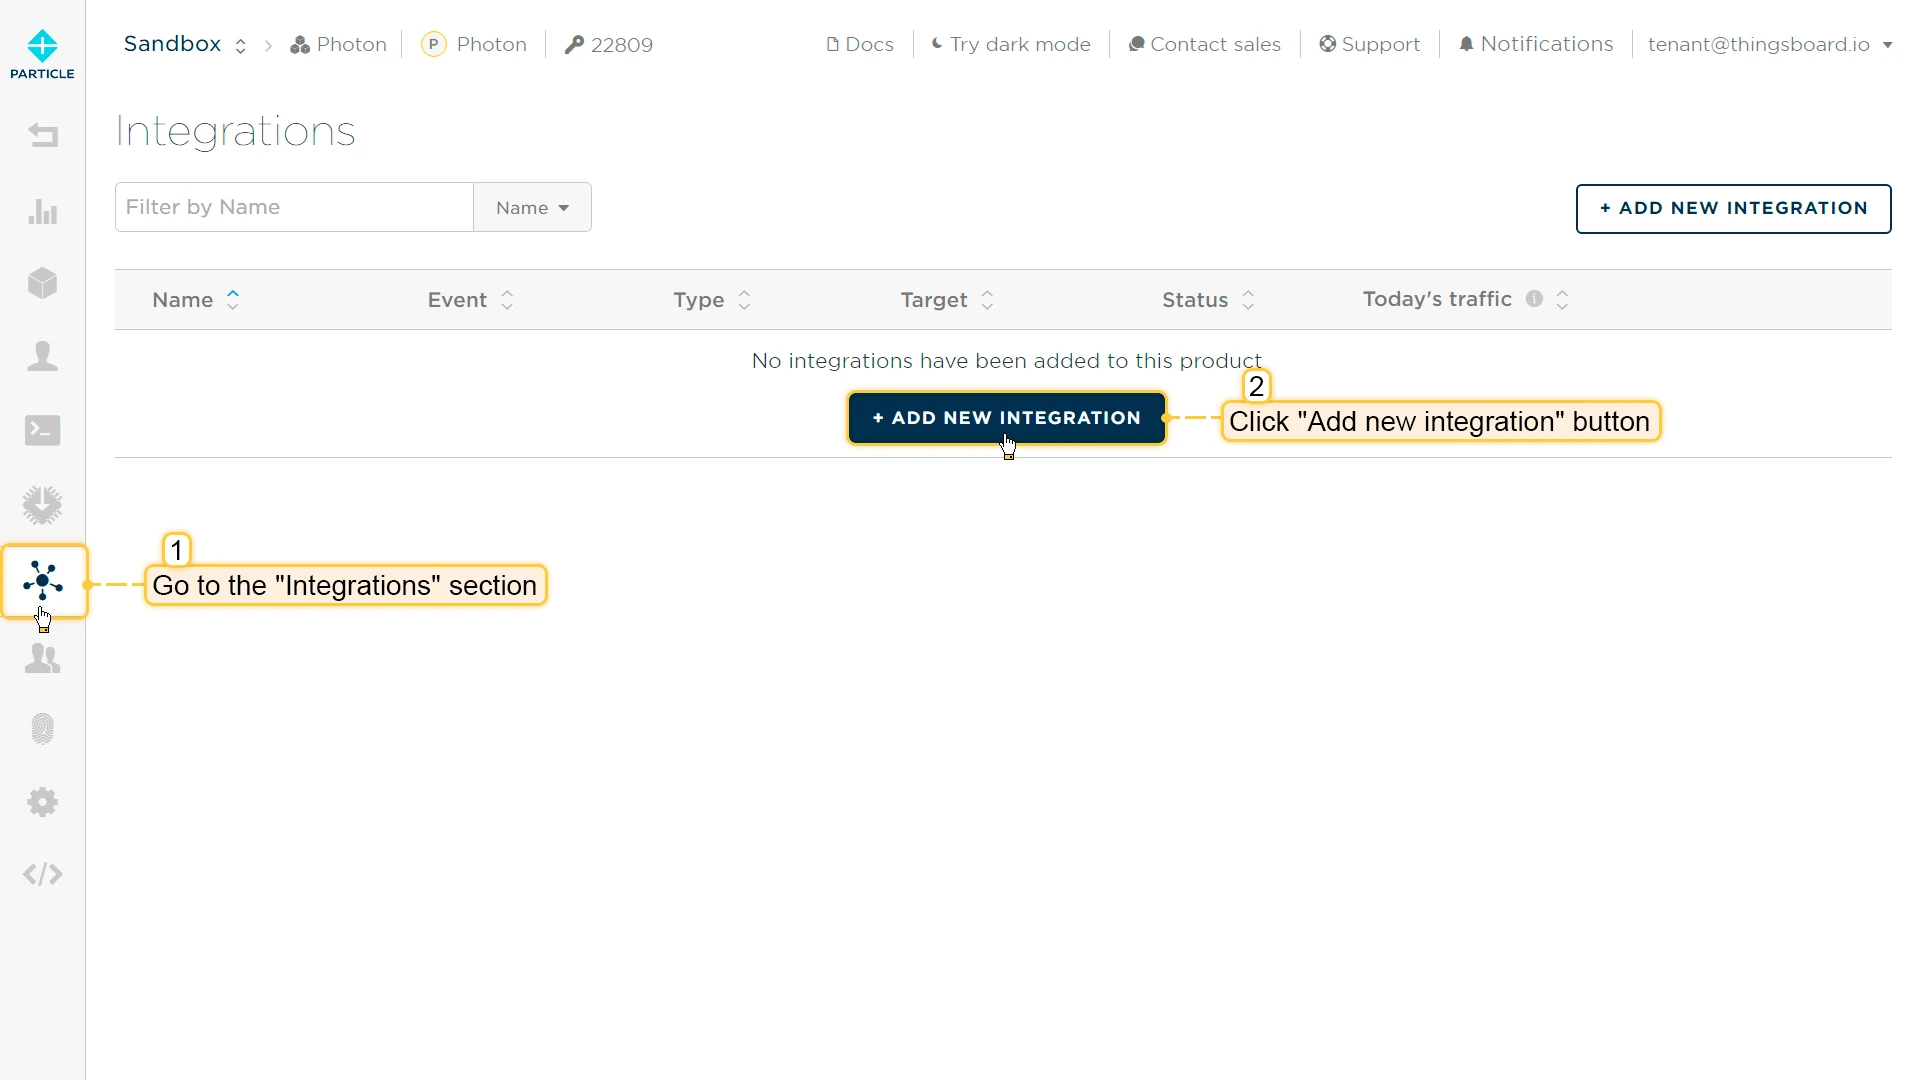
- In the Particle Console, open your product, go to Integrations, and click + Add New Integration.
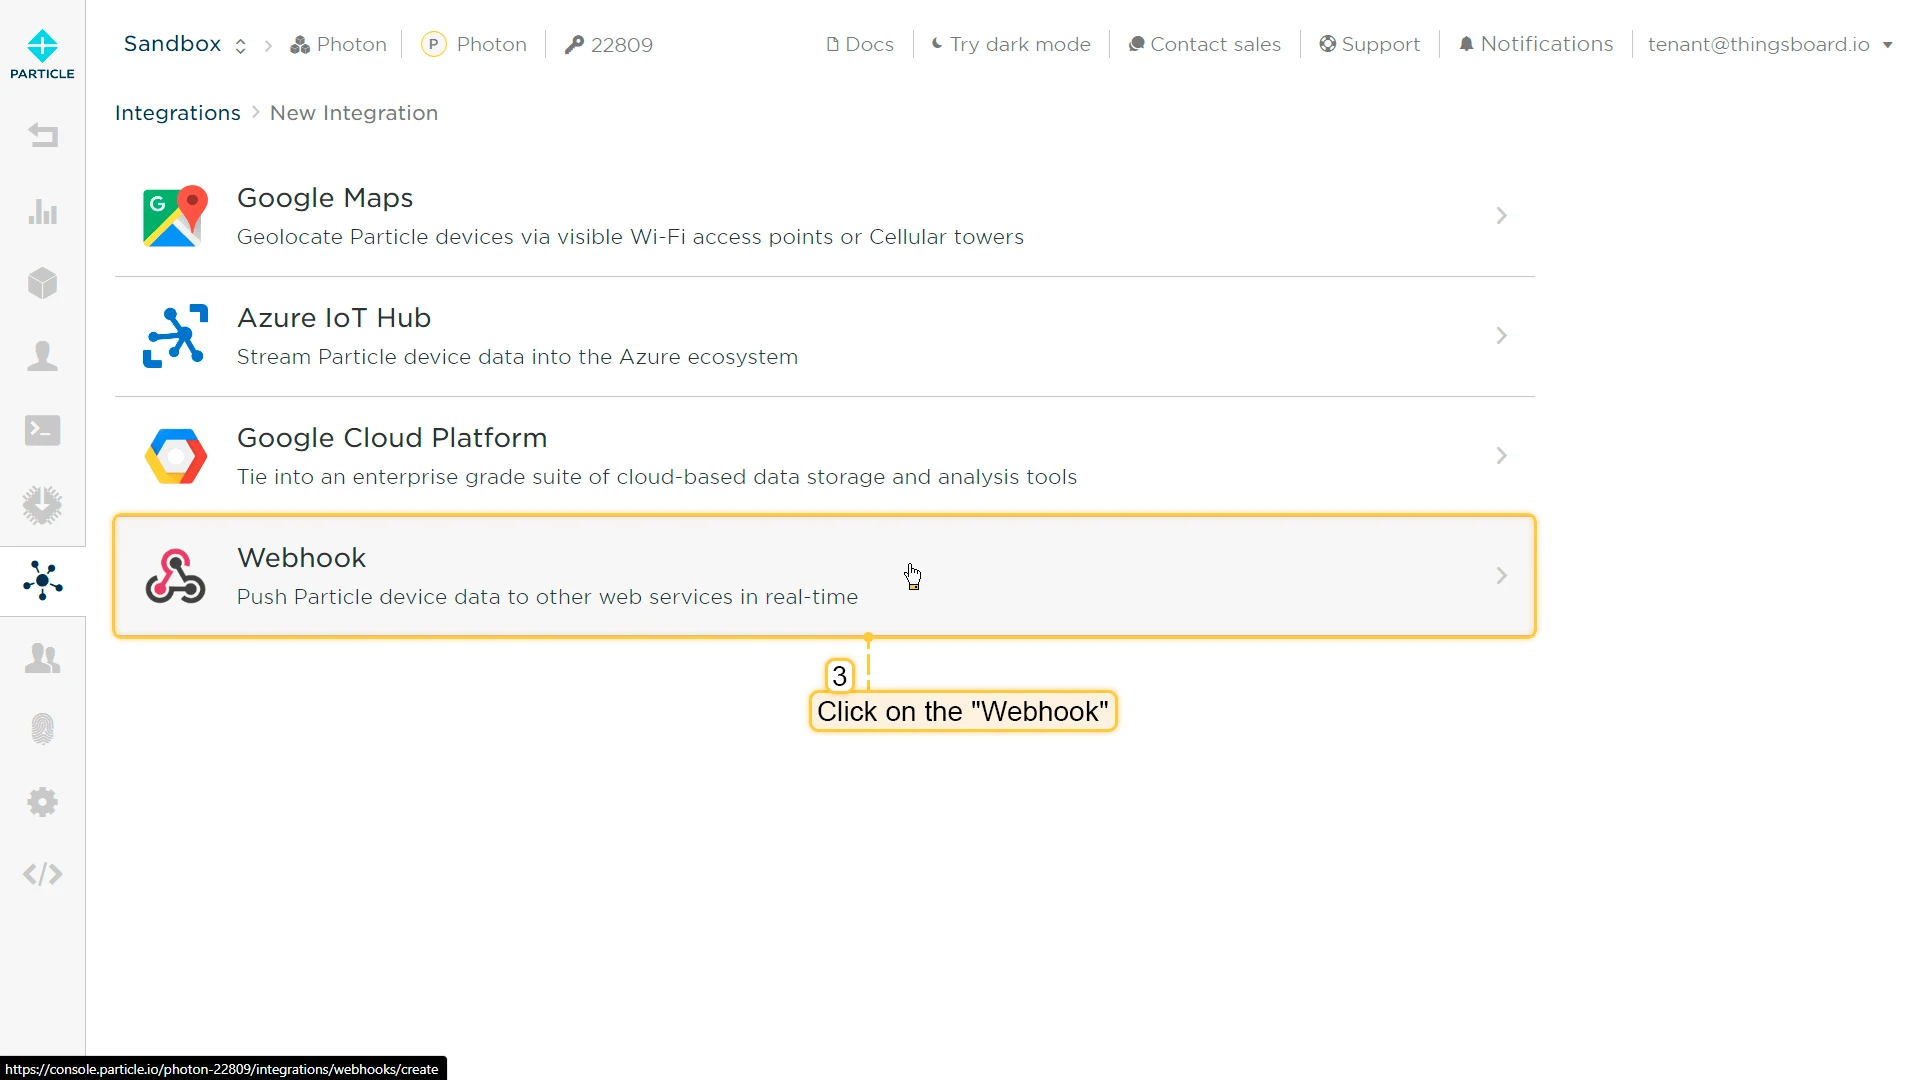
- Select Webhook from the integration type list.
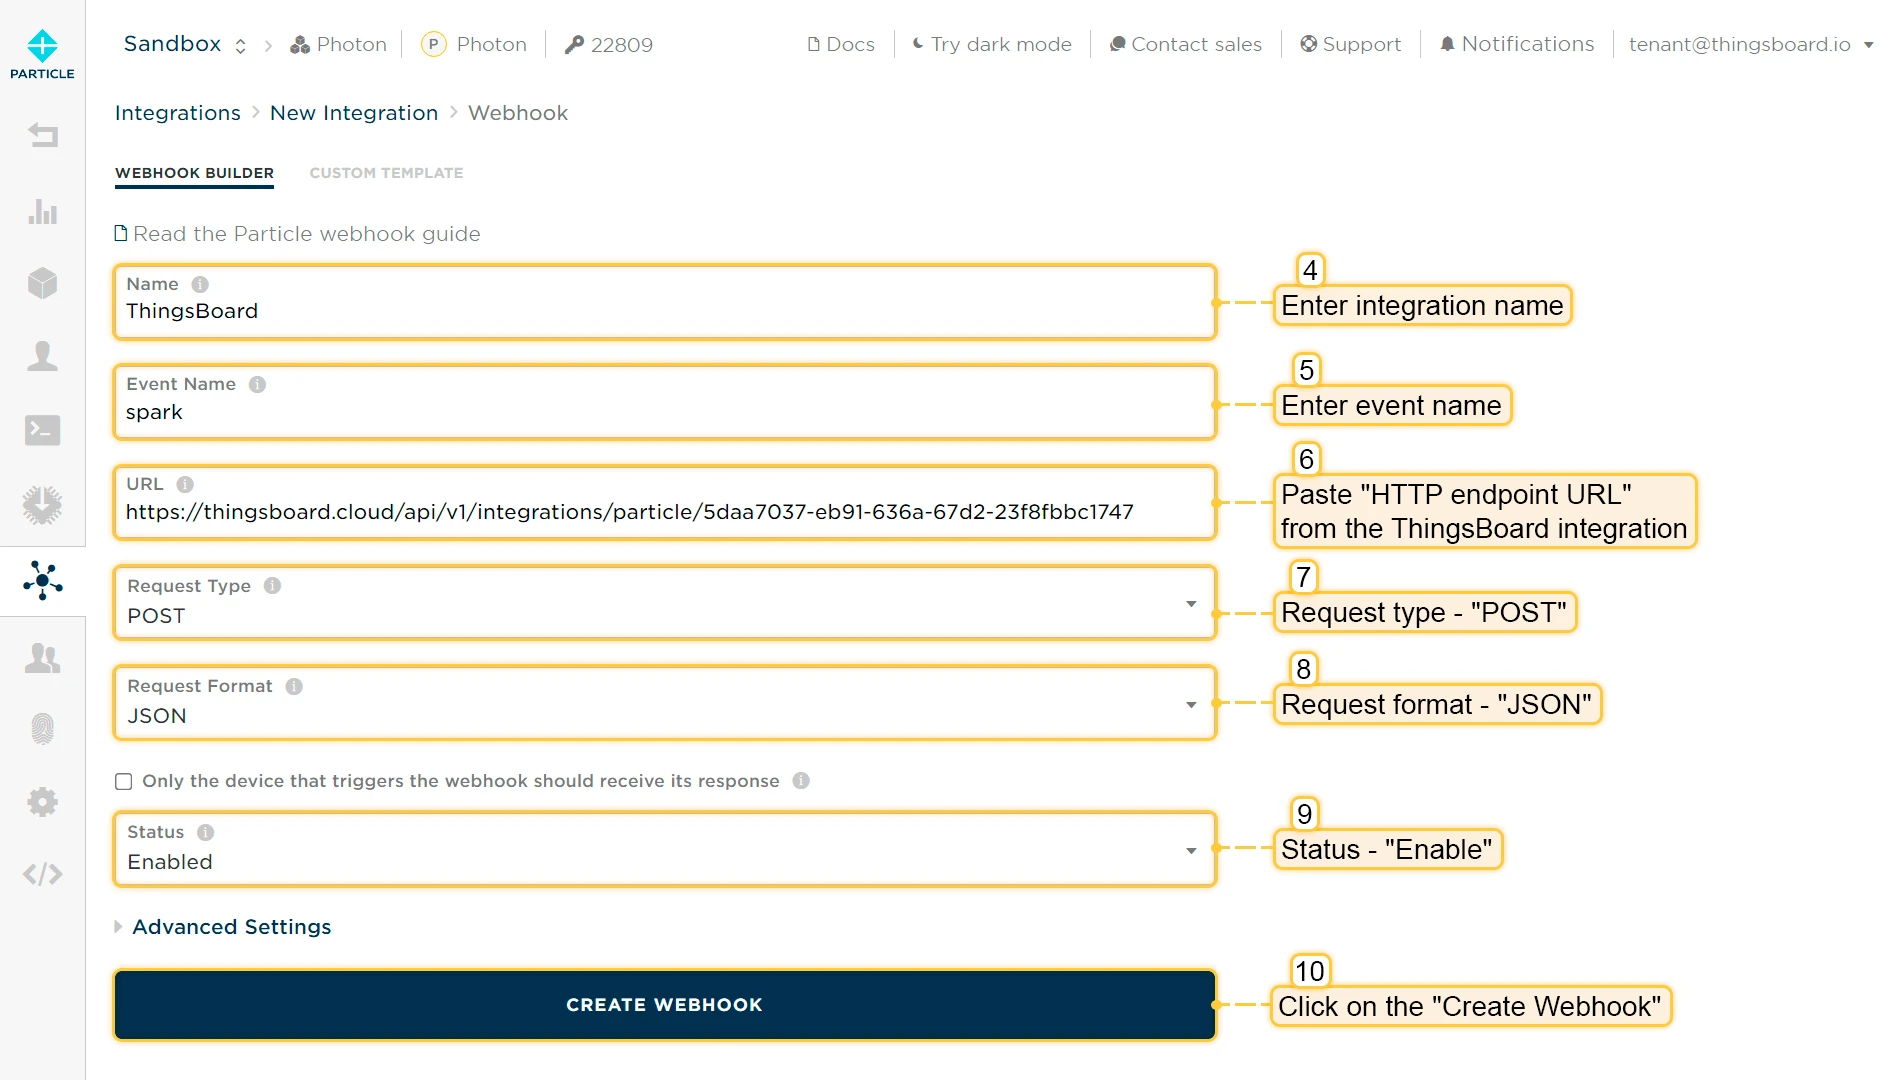
- Fill in the webhook form:
- Name — e.g.
ThingsBoard - Event Name — the Particle event name your device publishes (e.g.
spark). Only events matching this name trigger the webhook. - URL — paste the HTTP endpoint URL copied from the ThingsBoard integration Connection step.
- Request Type —
POST - Request Format —
JSON - Leave Status as
Enabled.
- Name — e.g.
- Click Create Webhook.
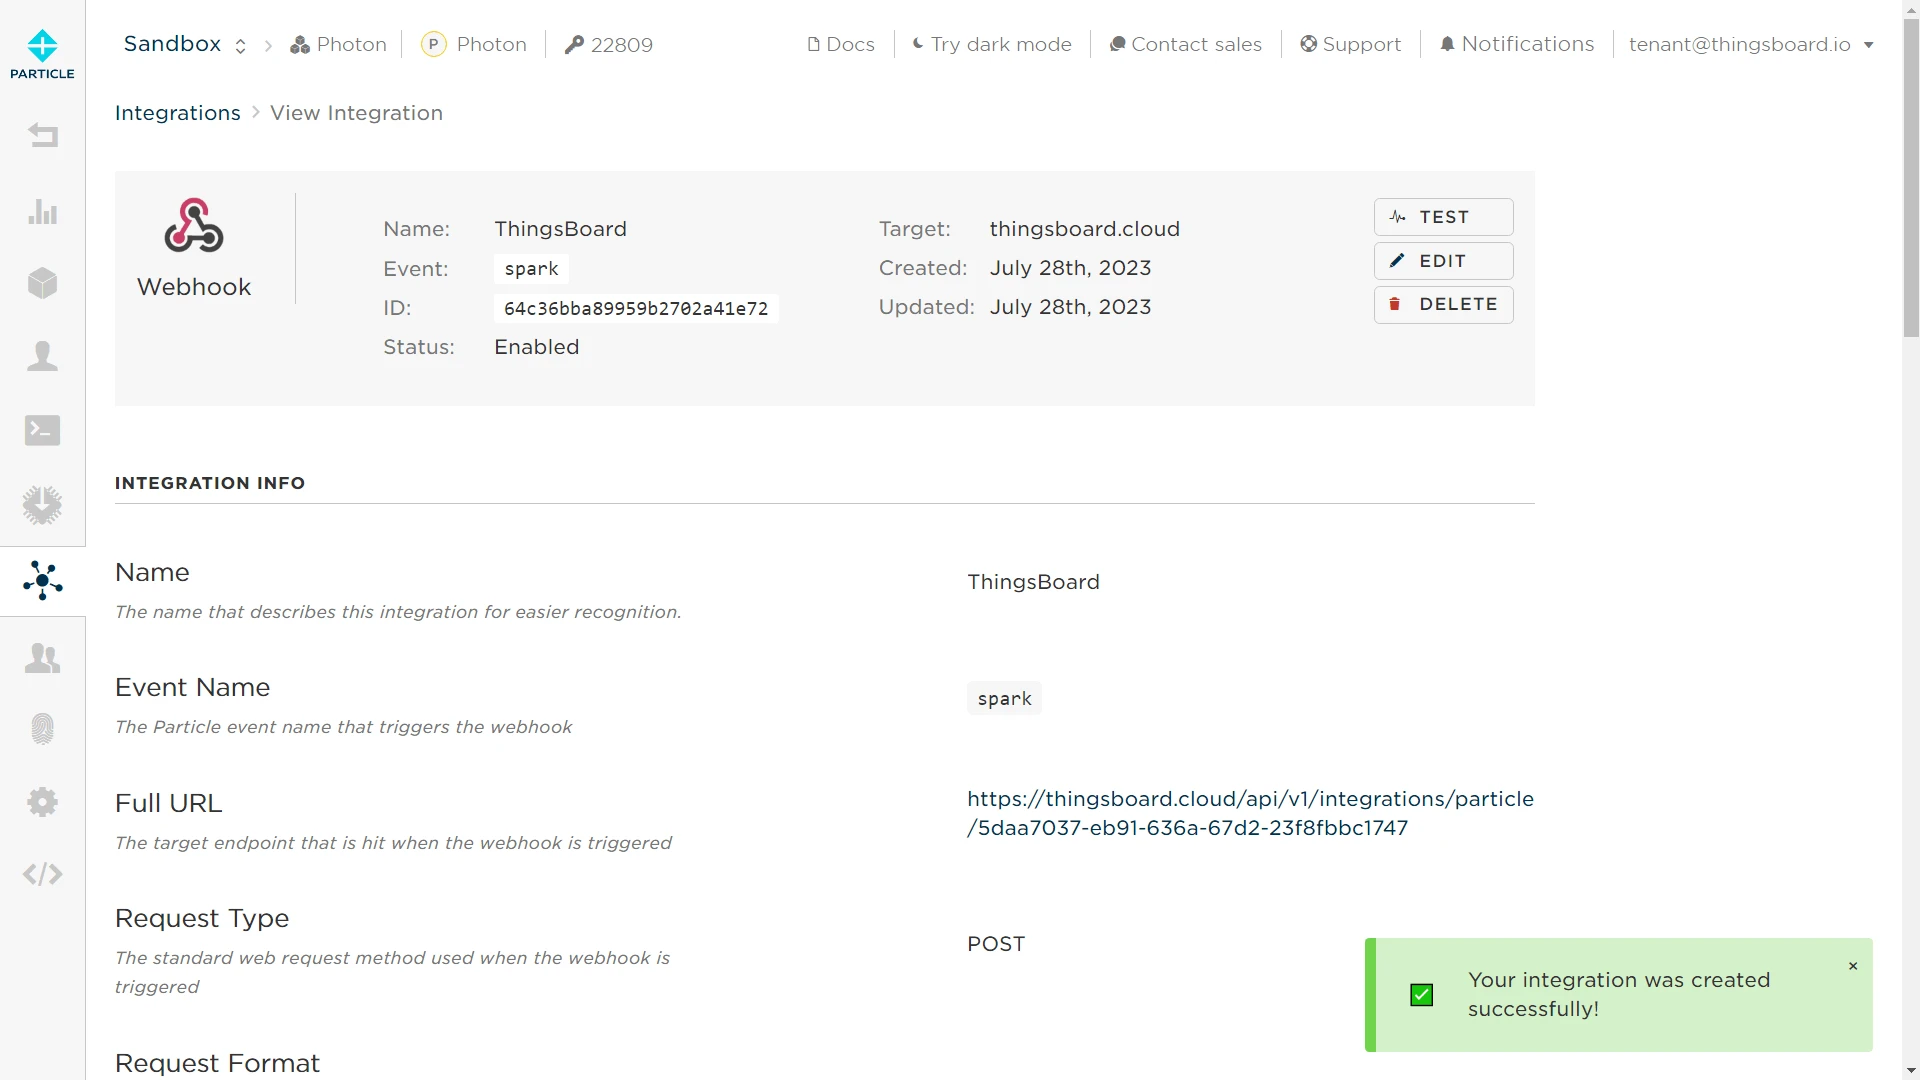
Test uplink
Section titled “Test uplink”To trigger a test event, publish a Particle event from the CLI using the same event name you configured in the webhook (e.g. spark):
particle publish spark "test data" --privateAlternatively, open the webhook in the Particle Console, go to Integrations, select the ThingsBoard webhook, and click Test to send a sample payload.
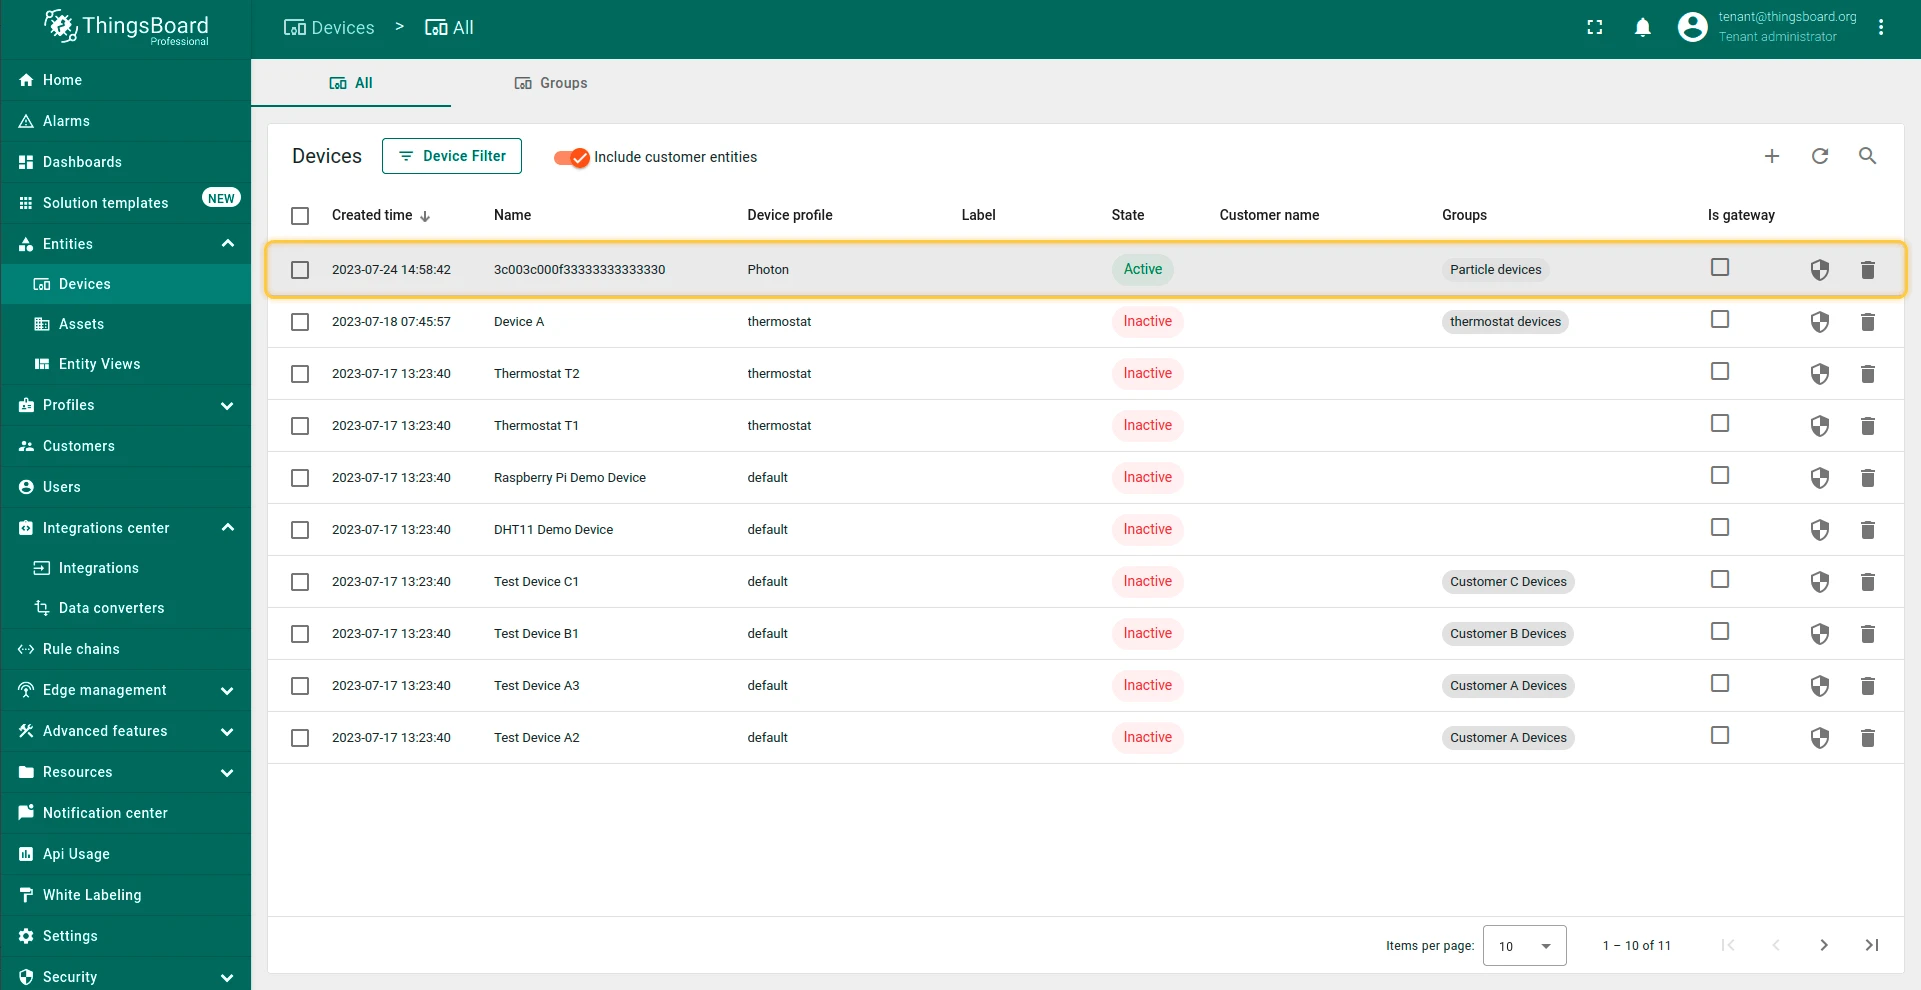
Once the webhook forwards an event to ThingsBoard, go to Entities ⇾ Devices — the device is automatically provisioned using the Particle coreid as the device name, assigned the Photon profile, and placed in the Particle devices group.
Test RPC control with a dashboard
Section titled “Test RPC control with a dashboard”Configure downlink via rule chain
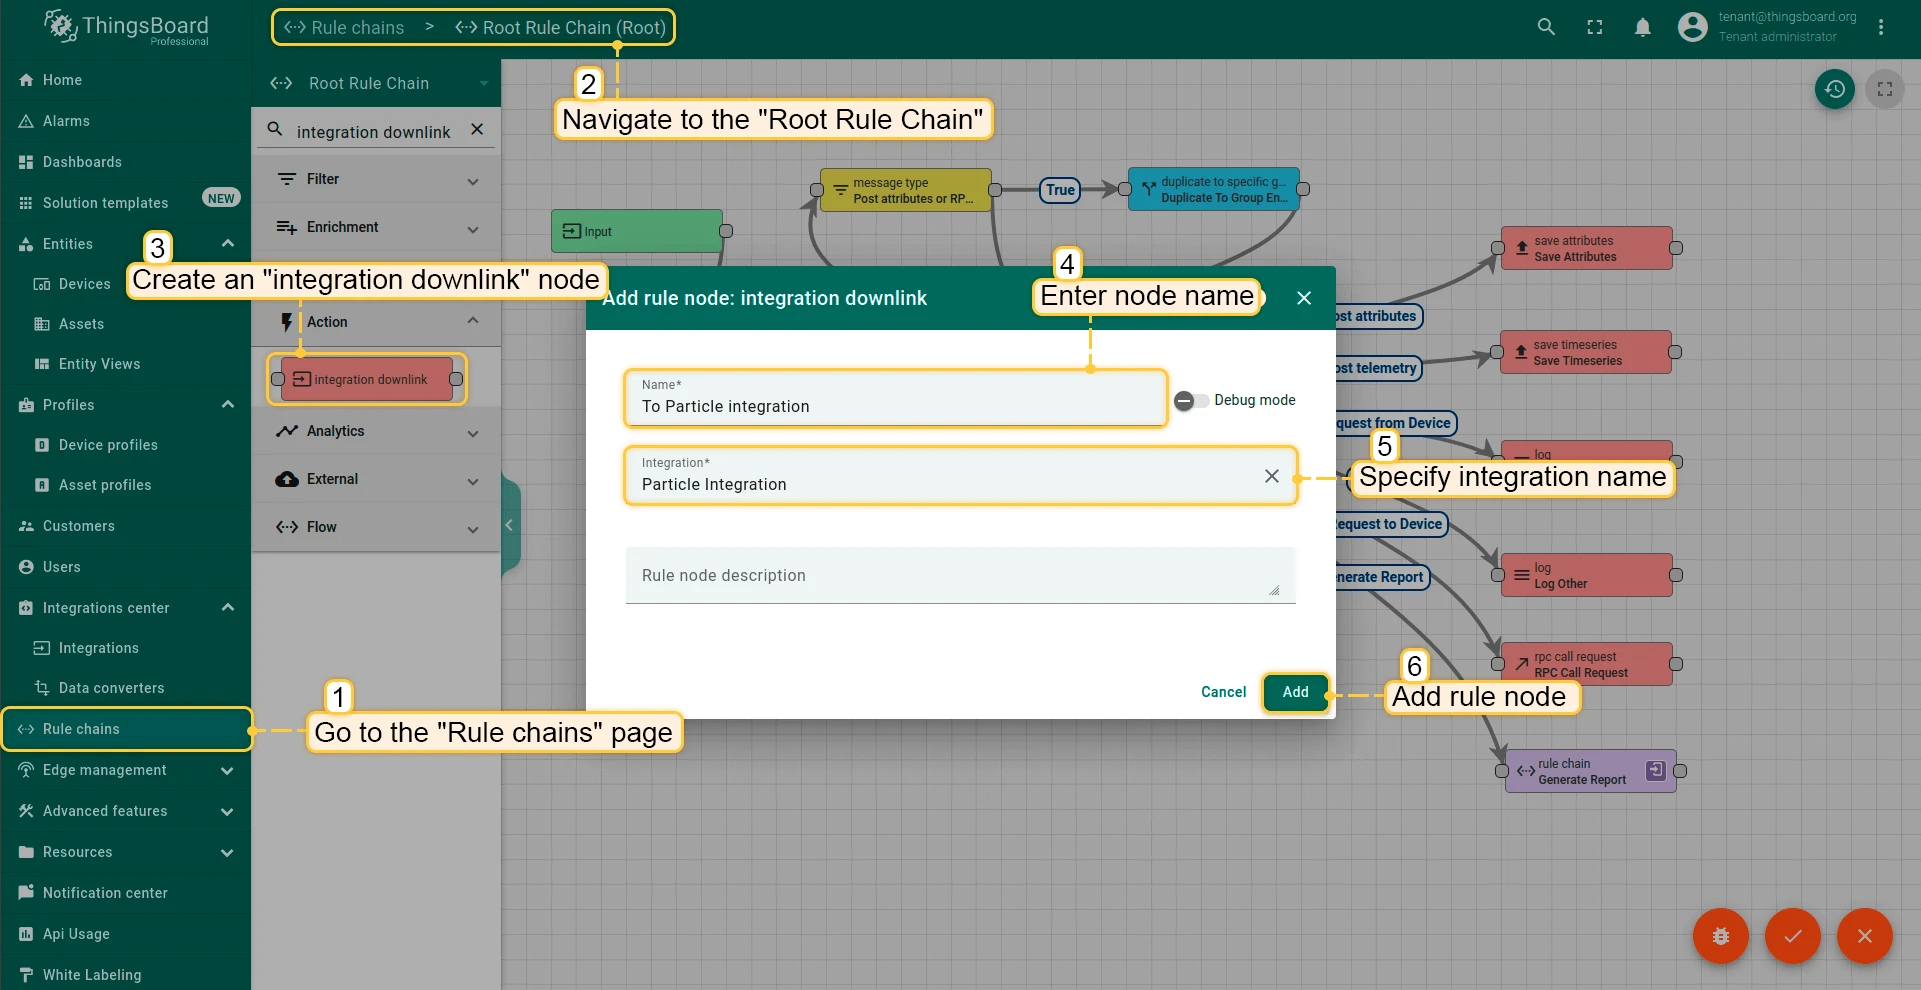
Section titled “Configure downlink via rule chain”To route RPC commands from ThingsBoard dashboards to your Particle device, connect the Integration Downlink node to the Root Rule Chain.
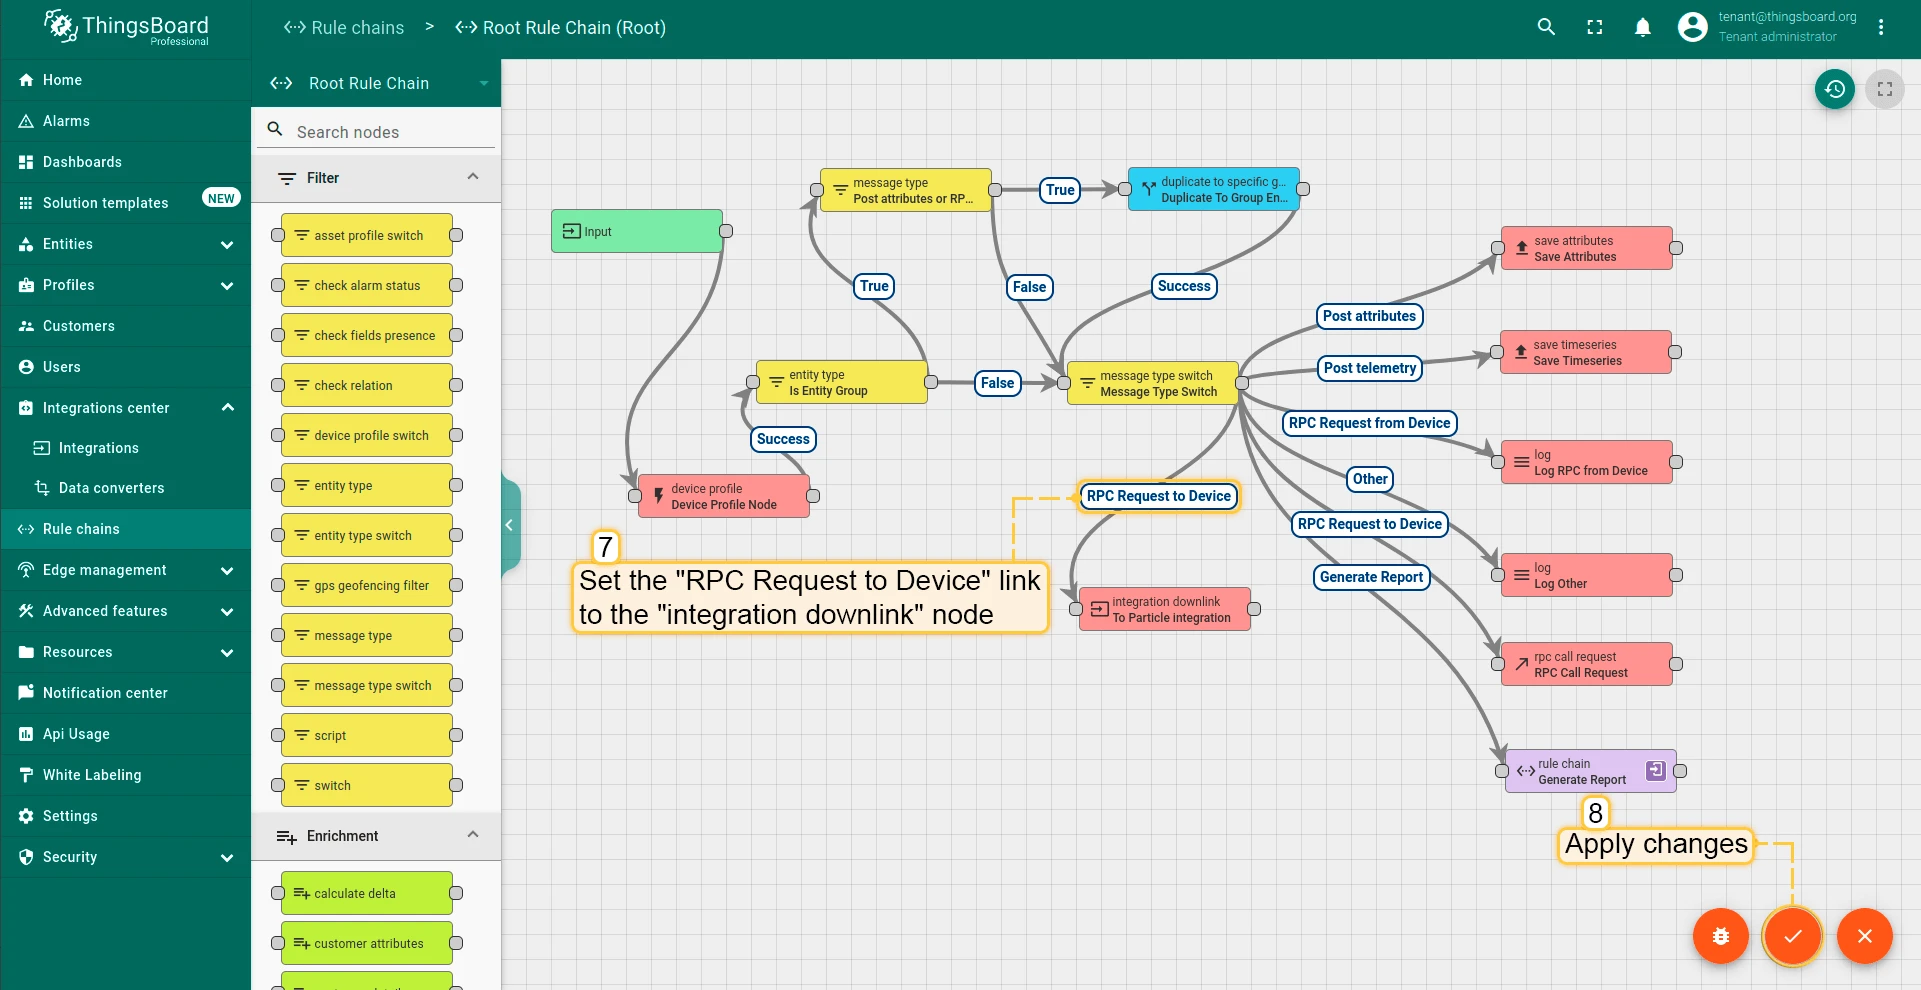
- Go to Rule chains and open the Root Rule Chain.
- Find the Integration Downlink node in the node panel, drag it onto the canvas, enter a name (e.g.
To Particle integration), select the Particle integration, and click Add. - Connect the Message Type Switch node to the Integration Downlink node using the RPC Request to Device relation type.
- Click Apply changes to save the rule chain.
Flash the Web-Connected LED example
Section titled “Flash the Web-Connected LED example”To test RPC commands, use the Web-Connected LED example from the Particle Web IDE. This firmware registers a Particle Cloud function called led that accepts on and off string arguments to control the onboard LED.
- Open the Particle Web IDE and click Web-Connected LED in the example apps list.
- Click Use this example to copy it to your apps.
- Click the flash (thunder) icon to compile and upload the firmware to your device.

Configure the dashboard switch widget
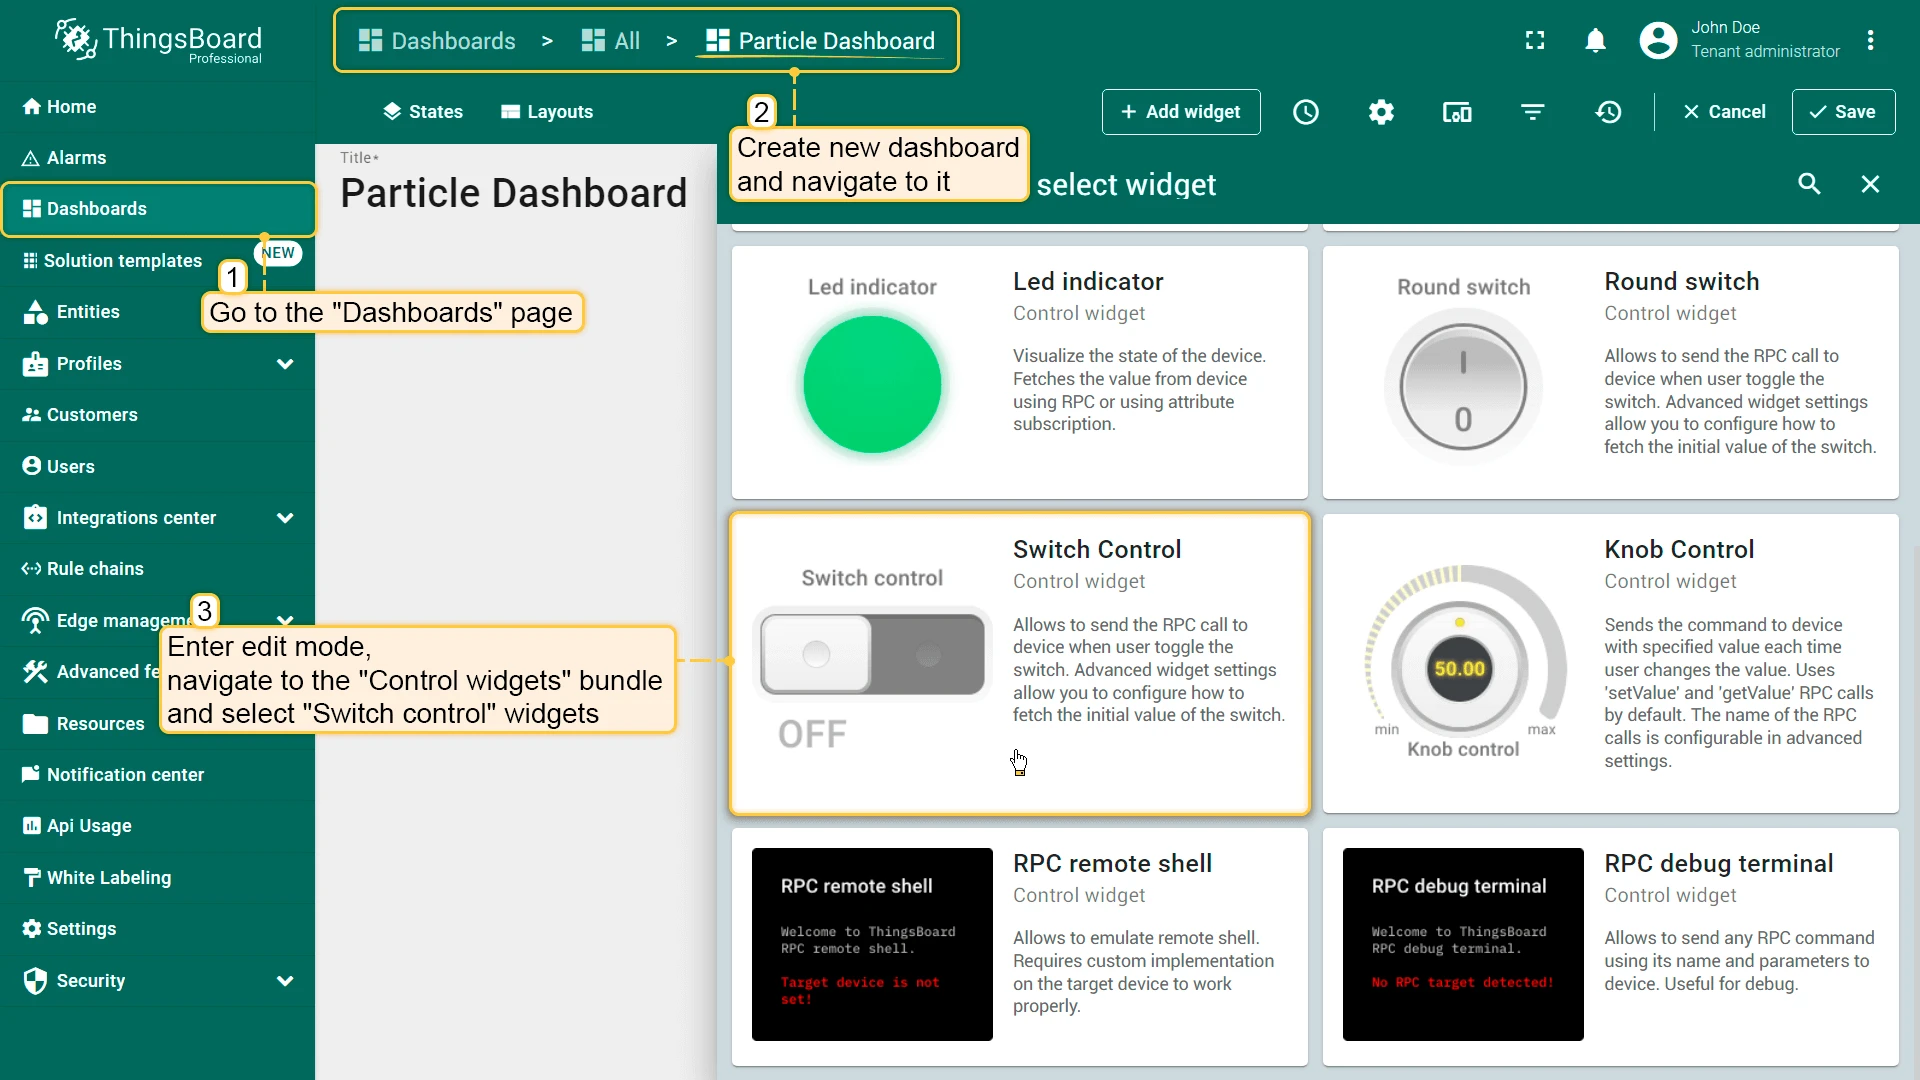
Section titled “Configure the dashboard switch widget”- Open an existing ThingsBoard dashboard or create a new one and enter Edit mode.
- Click Add widget ⇾ Control widgets ⇾ Switch Control to add the widget.
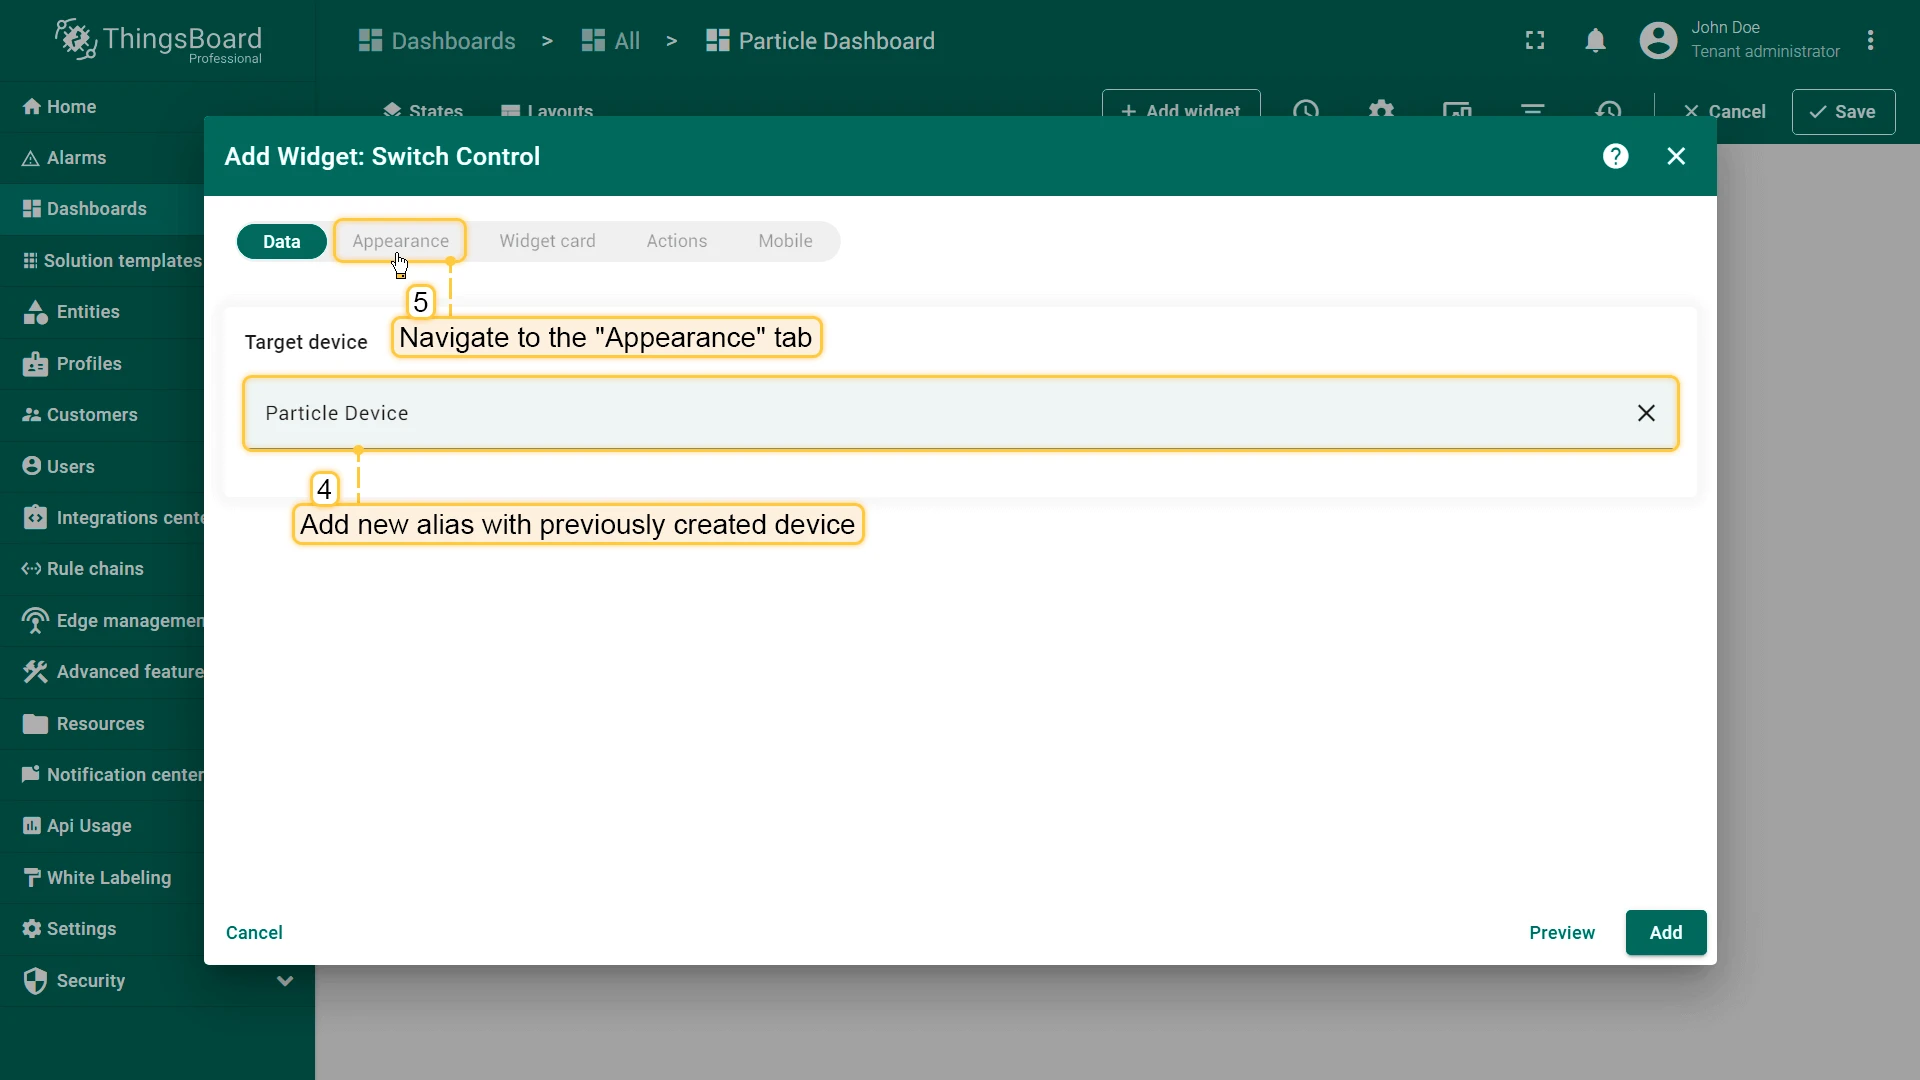
- On the Data tab, set Target device to your Particle device (create a new alias pointing to the provisioned device if needed).
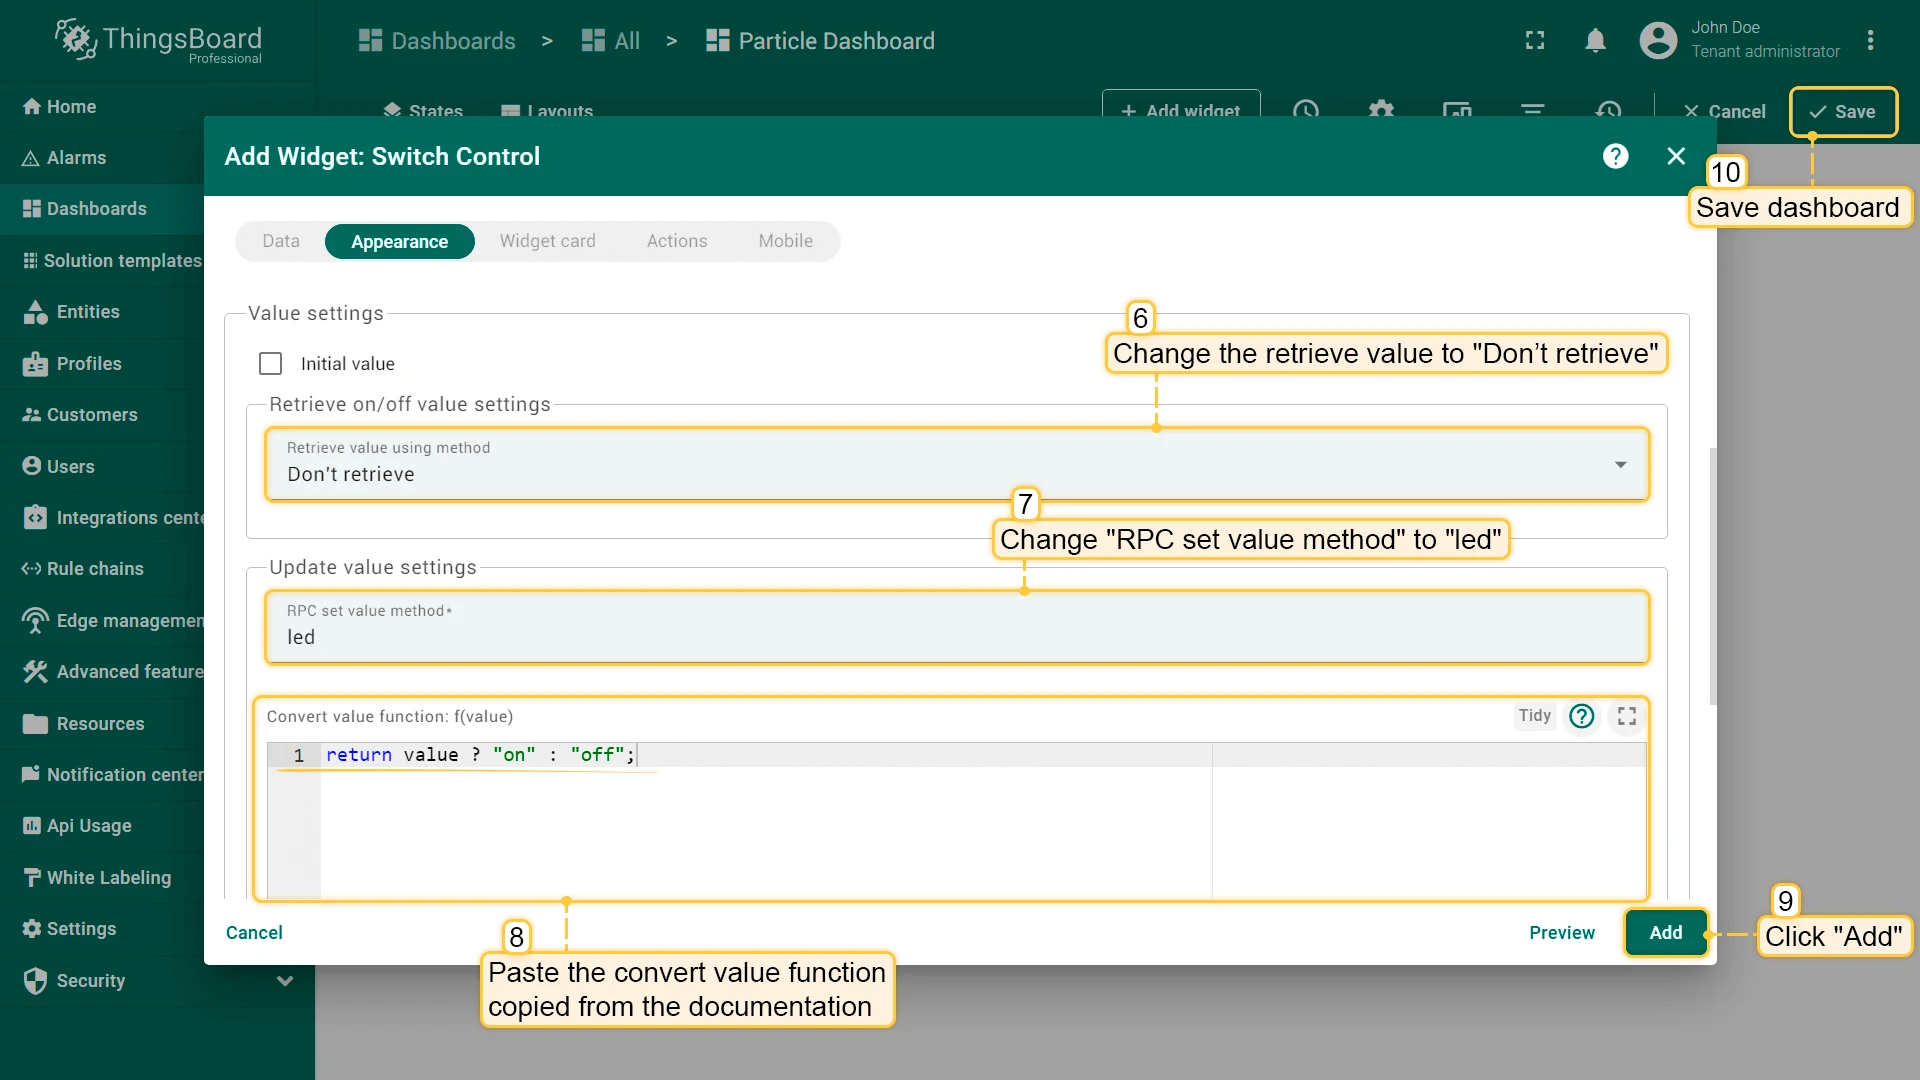
- Open the Appearance tab.
- Set Retrieve value using method to Don’t retrieve.
- Set RPC set value method to
led. - Paste the following into the Convert value function field:return value ? "on" : "off";
- Click Add to save the widget, then click Save to save the dashboard.
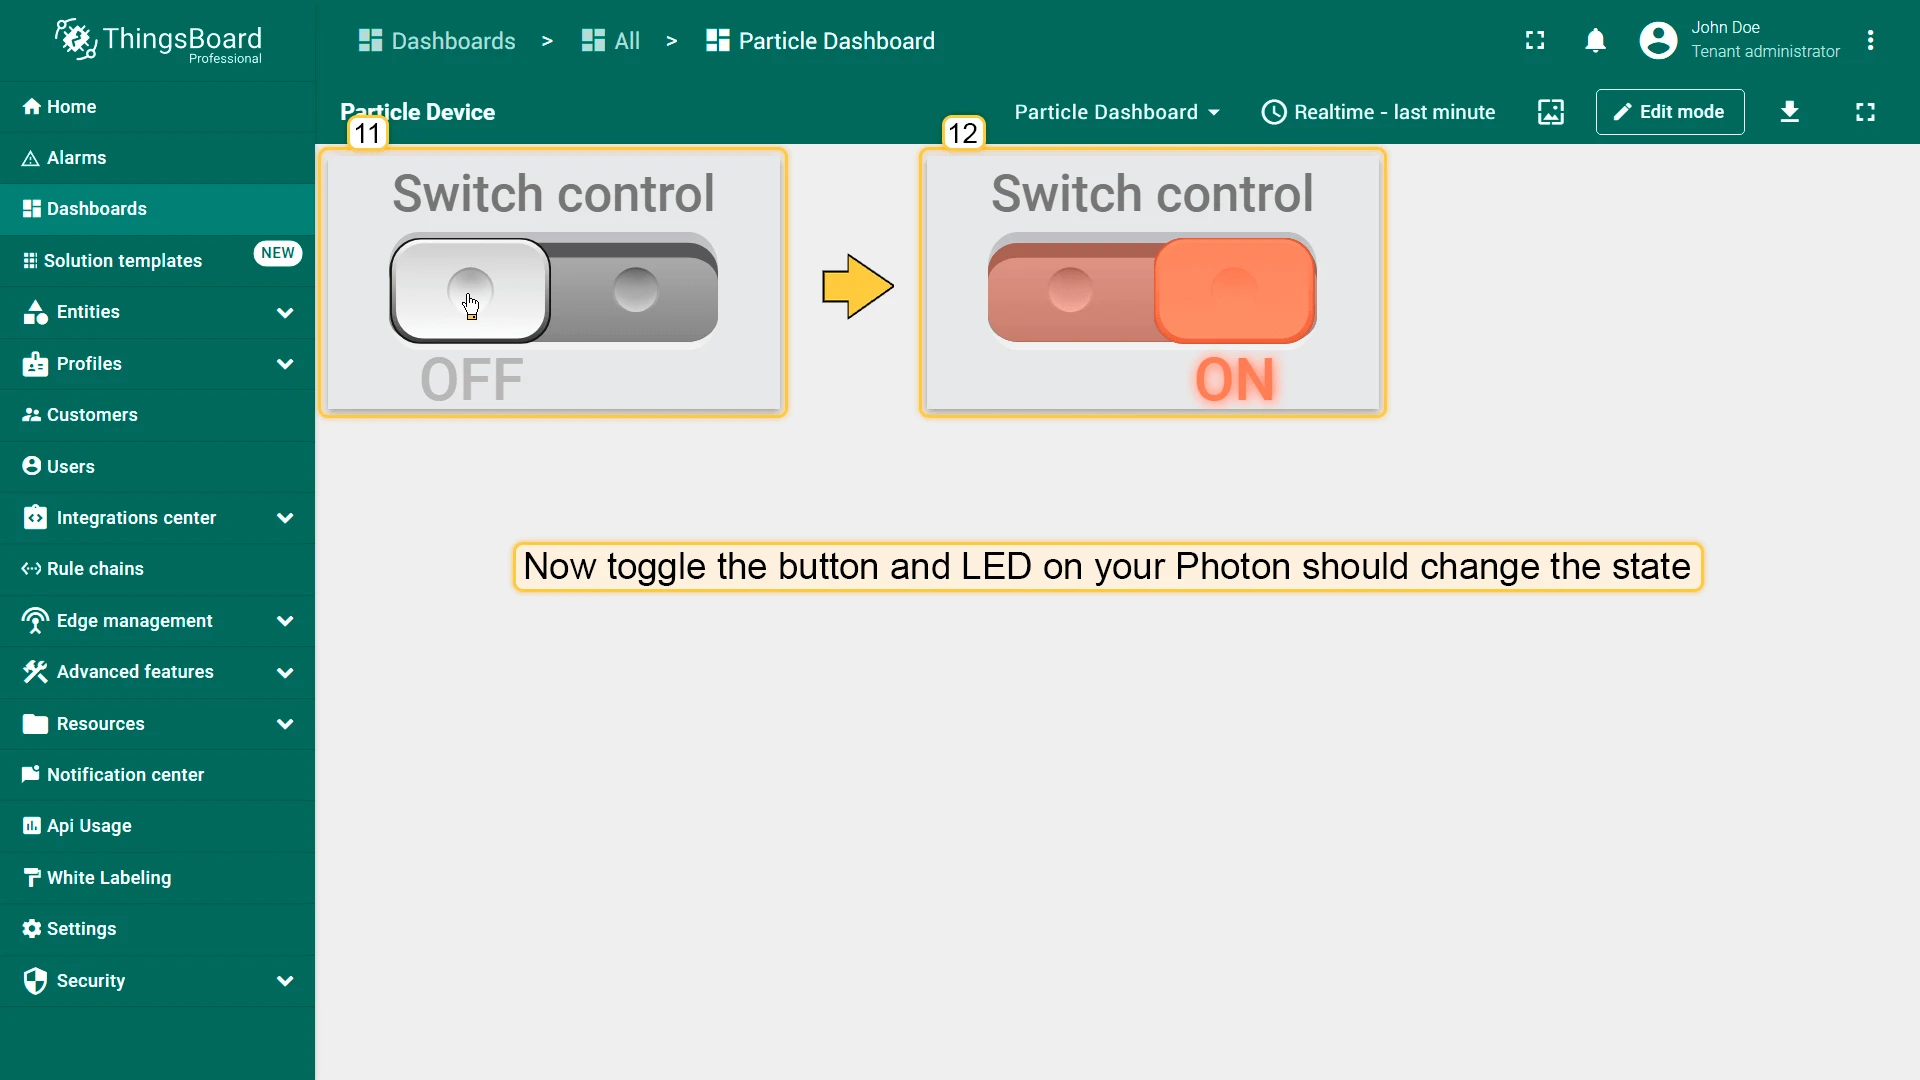
Toggle the switch on the dashboard. ThingsBoard sends a led RPC call with on or off to the Particle Cloud API, which forwards it to the registered led function on your Photon — the onboard LED changes state accordingly.
See also
Section titled “See also”Was this helpful?