Alarms
Alarms are generated when a monitored condition is met — for example, a temperature exceeding a threshold or a device going offline. ThingsBoard creates, updates, and clears alarms automatically based on the logic you define in alarm rules. Each alarm tracks the originator, severity, and lifecycle status so operators can triage issues efficiently.
When an alarm is created or cleared, the Notification center can deliver alerts through multiple channels — web UI, email, SMS, Slack, or Microsoft Teams. Configure notification rules to control which alarm events trigger notifications and who receives them.
Alarm Properties
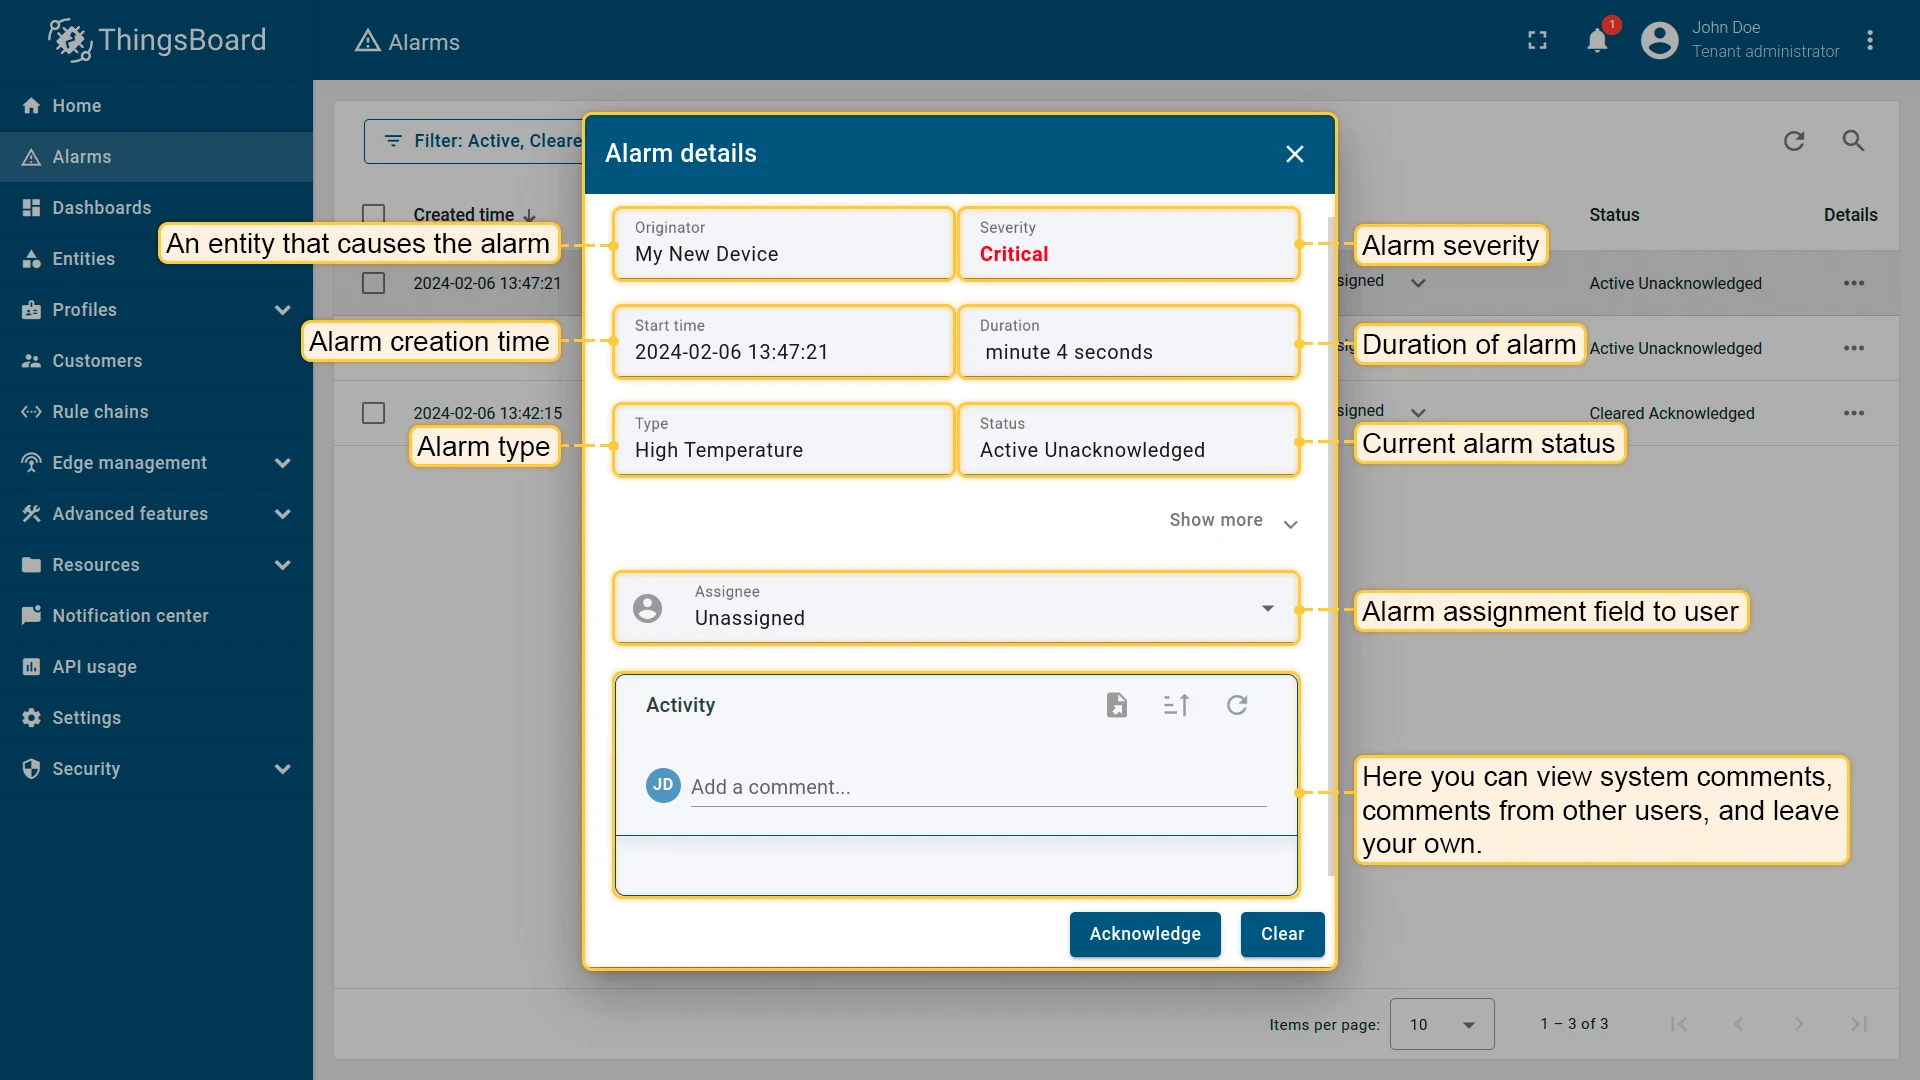
Section titled “Alarm Properties”Every alarm contains the following fields:
| Field | Description |
|---|---|
| Originator | The entity that triggered the alarm — a Device, Asset, or any other entity type. |
| Type | A string identifying the alarm category, such as High Temperature. Used together with the originator to enforce uniqueness. |
| Severity | One of five levels indicating how critical the condition is. See Alarm Severity. |
| Status | The current lifecycle state: active or cleared, acknowledged or not. See Alarm States. |
| Start Time | Timestamp when the alarm condition was first detected. This reflects the telemetry timestamp, not the server processing time. For example, if a sensor reports 105 °F at 12:05 but the platform processes the message at 12:08, the start time is 12:05. |
| End Time | Timestamp of the most recent event that matched the alarm condition. Updated continuously while the alarm remains active and the condition keeps firing. |
| Assignee | The user responsible for investigating and resolving the alarm. See Assignee. |
Alarm Uniqueness
Section titled “Alarm Uniqueness”An alarm is uniquely identified by its originator + type combination. ThingsBoard allows only one active alarm per combination at any time. If a new event matches an existing active alarm’s originator and type, the platform updates the existing alarm (e.g., escalates severity) instead of creating a duplicate. A new alarm with the same originator and type can only be created after the previous one is cleared.
Alarm States
Section titled “Alarm States”An alarm has two independent dimensions — active/cleared and acknowledged/unacknowledged — that combine into four possible states:

| State | Description |
|---|---|
| Active Unacknowledged | The condition is active and no user has acknowledged the alarm. |
| Active Acknowledged | The condition is active and a user has acknowledged the alarm. |
| Cleared Unacknowledged | The condition is no longer active, but the alarm has not been acknowledged. |
| Cleared Acknowledged | The condition is no longer active and the alarm has been acknowledged. |
Alarm Severity
Section titled “Alarm Severity”Severity indicates how critical the alarm condition is and helps operators prioritize their response.
| Level | Meaning |
|---|---|
| Critical | Requires immediate action — equipment failure, safety risks, or potential data loss. |
| Major | Significant issue that affects operation but is not immediately critical. |
| Minor | A less severe condition to monitor or address later. |
| Warning | A potential issue that does not yet affect normal operation. |
| Indeterminate | Severity cannot be determined, often due to incomplete or ambiguous data. |
Severity is set per trigger condition in the alarm rule. When an existing alarm is active and a new trigger fires at a higher severity, ThingsBoard upgrades the severity of the existing alarm rather than creating a new one.
Alarm Propagation
Section titled “Alarm Propagation”By default, an alarm is visible only on the entity that triggered it. Propagation extends that visibility up the entity hierarchy — for example, making an alarm from a Device visible on the Building Asset that contains it.

Propagation is configured per alarm rule. See the Alarm rules page for the available propagation options.
Assignee
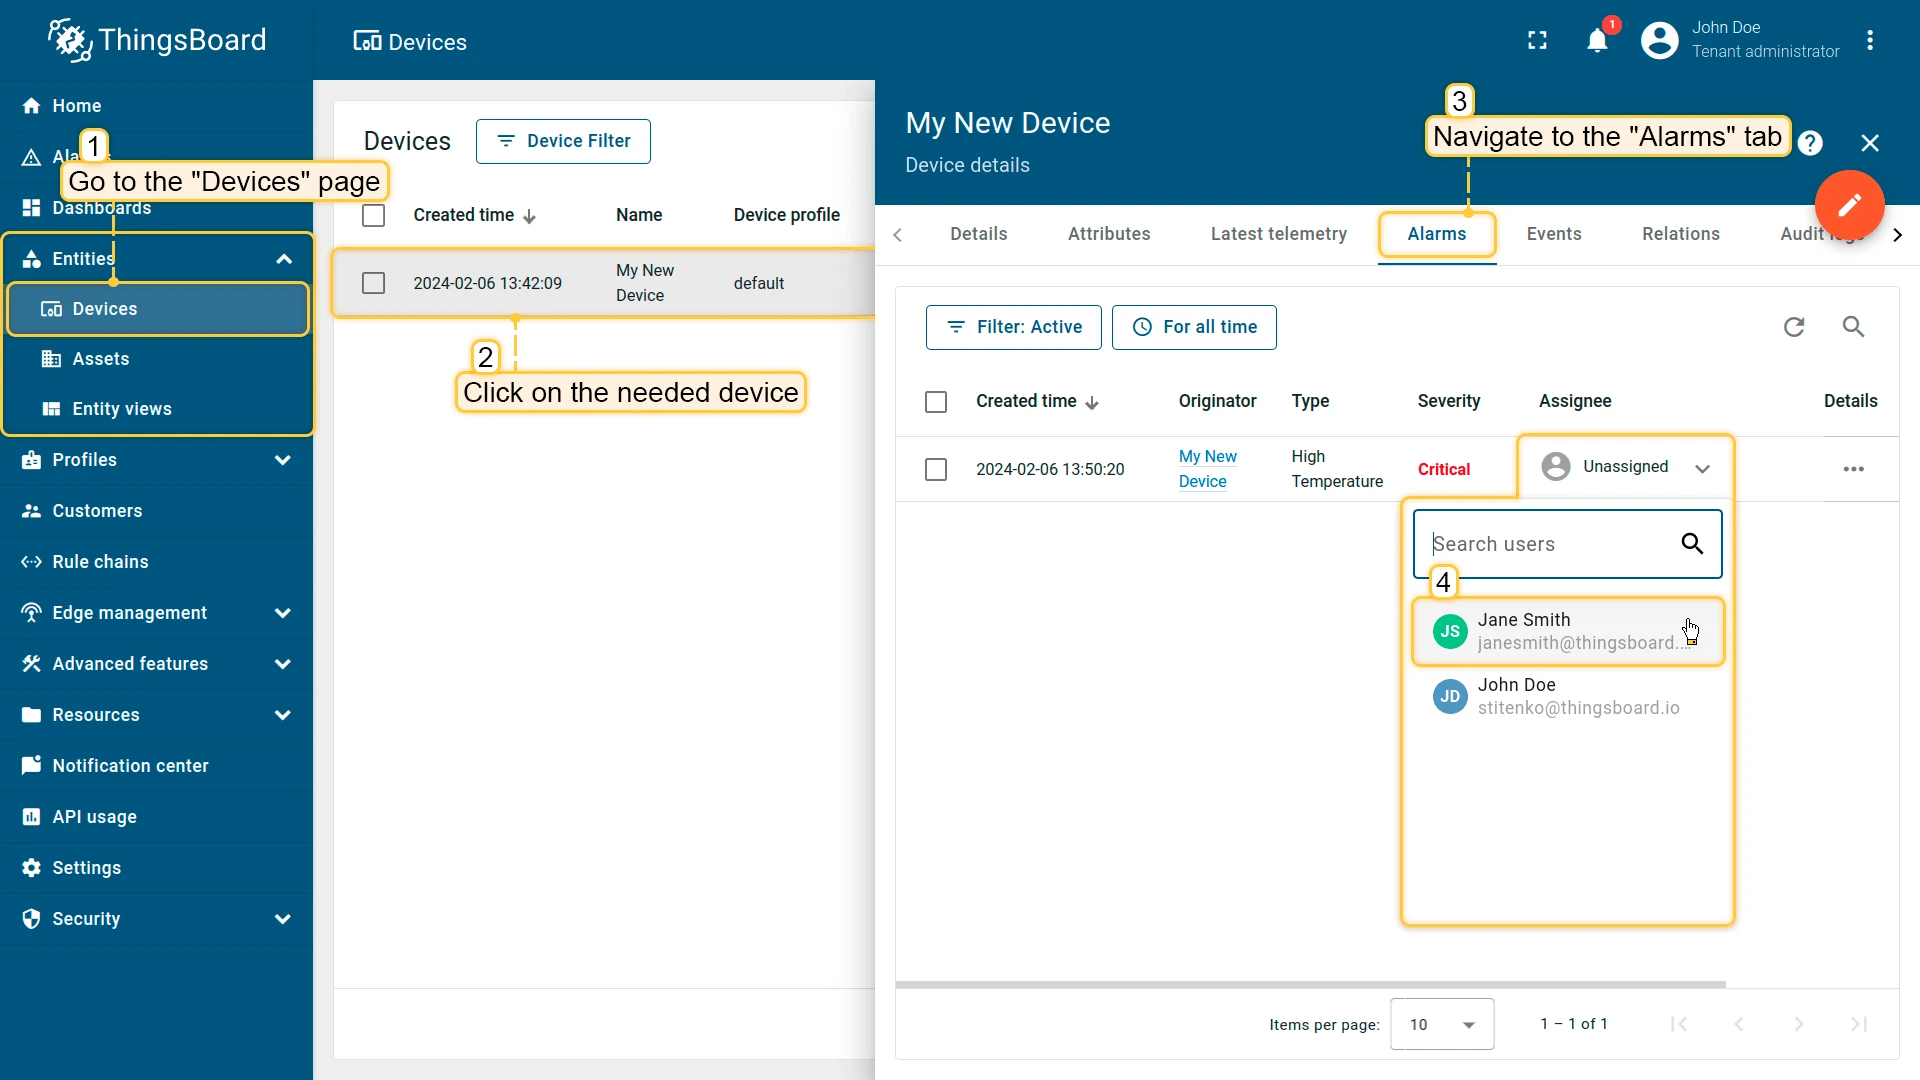
Section titled “Assignee”An alarm can be assigned to a specific user responsible for investigating and resolving it. The assignee is visible on the Alarms page, in alarm widgets, and on the entity’s Alarms tab.
To assign an alarm, click the Assignee dropdown on the alarm row and select a user.
Alarm Comments
Section titled “Alarm Comments”Each alarm has an Activity section where users and the system can leave comments:
- User comments — added manually by any user with access. Editable and deletable by the author.
- System comments — generated automatically when the alarm state changes (e.g., severity escalation, acknowledgment, assignment). Displayed with a gray background; read-only.
View and Manage Alarms
Section titled “View and Manage Alarms”Alarms Page
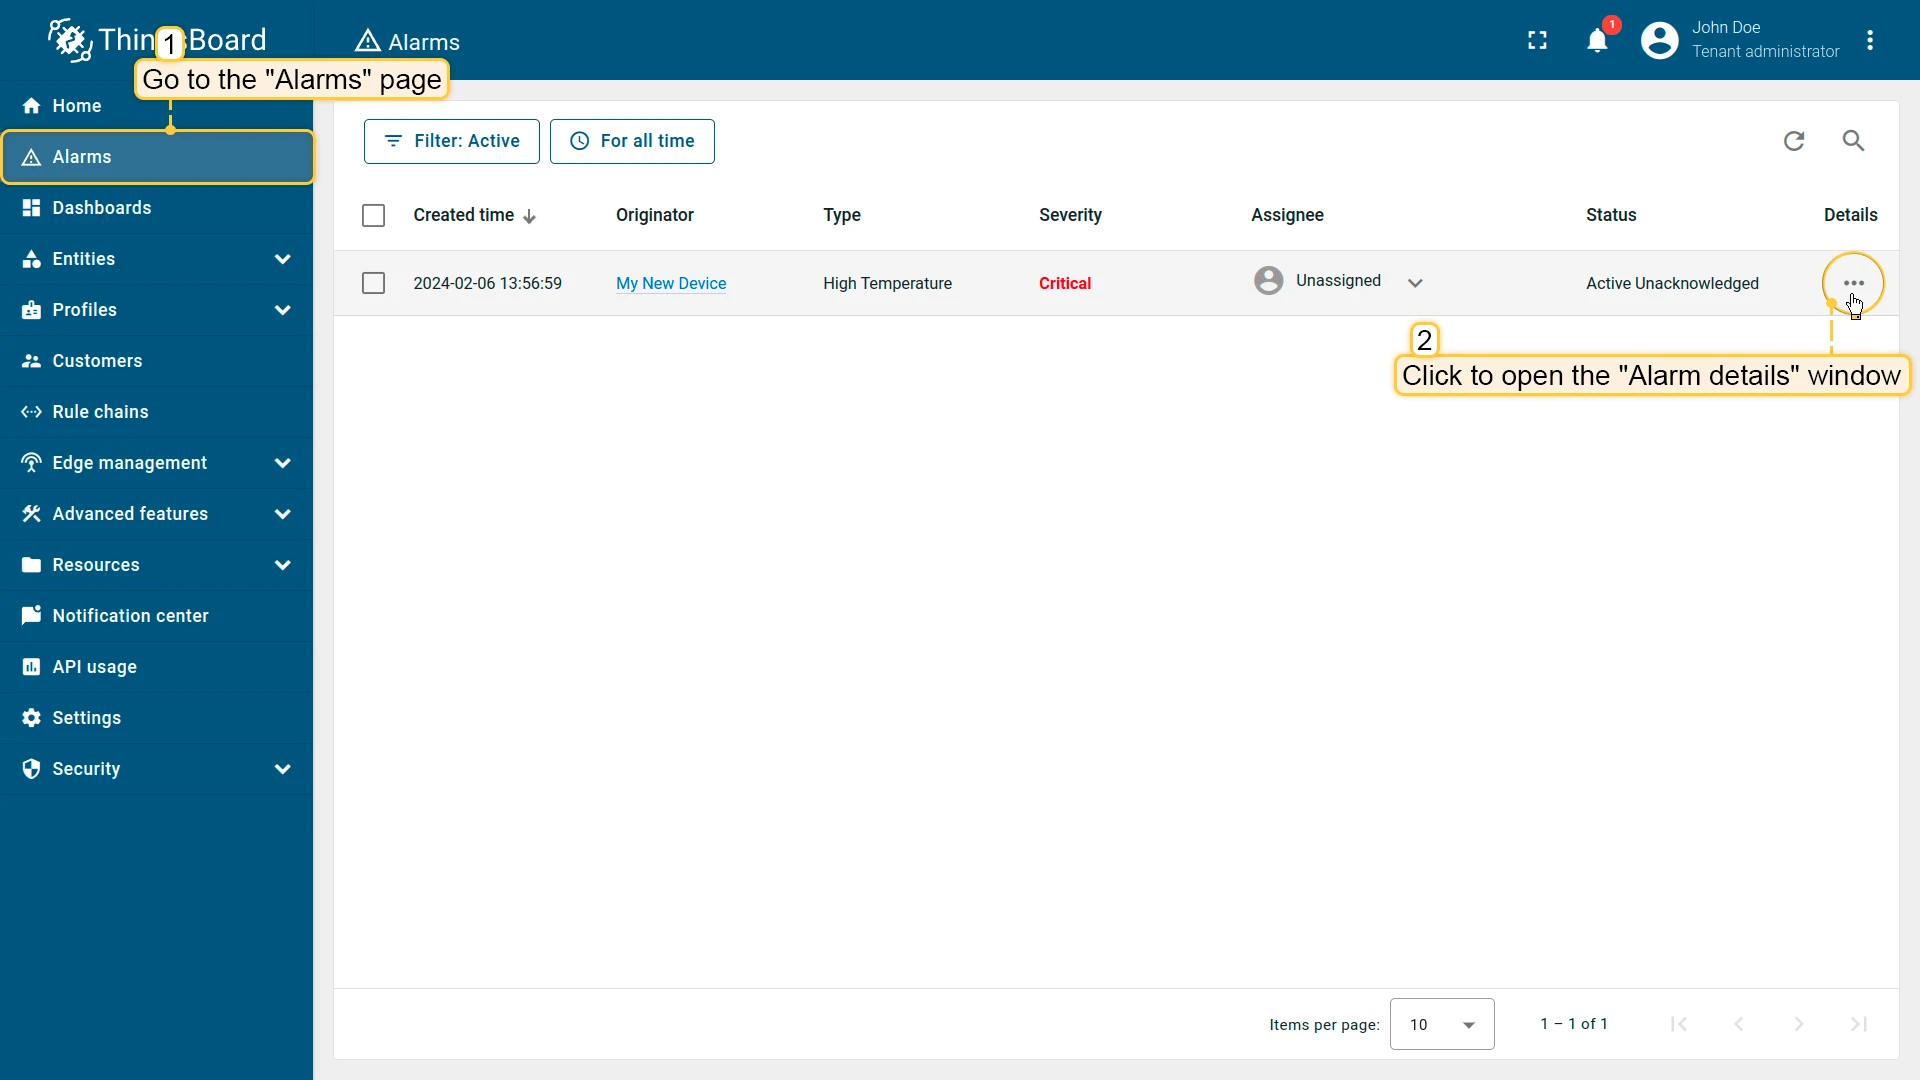
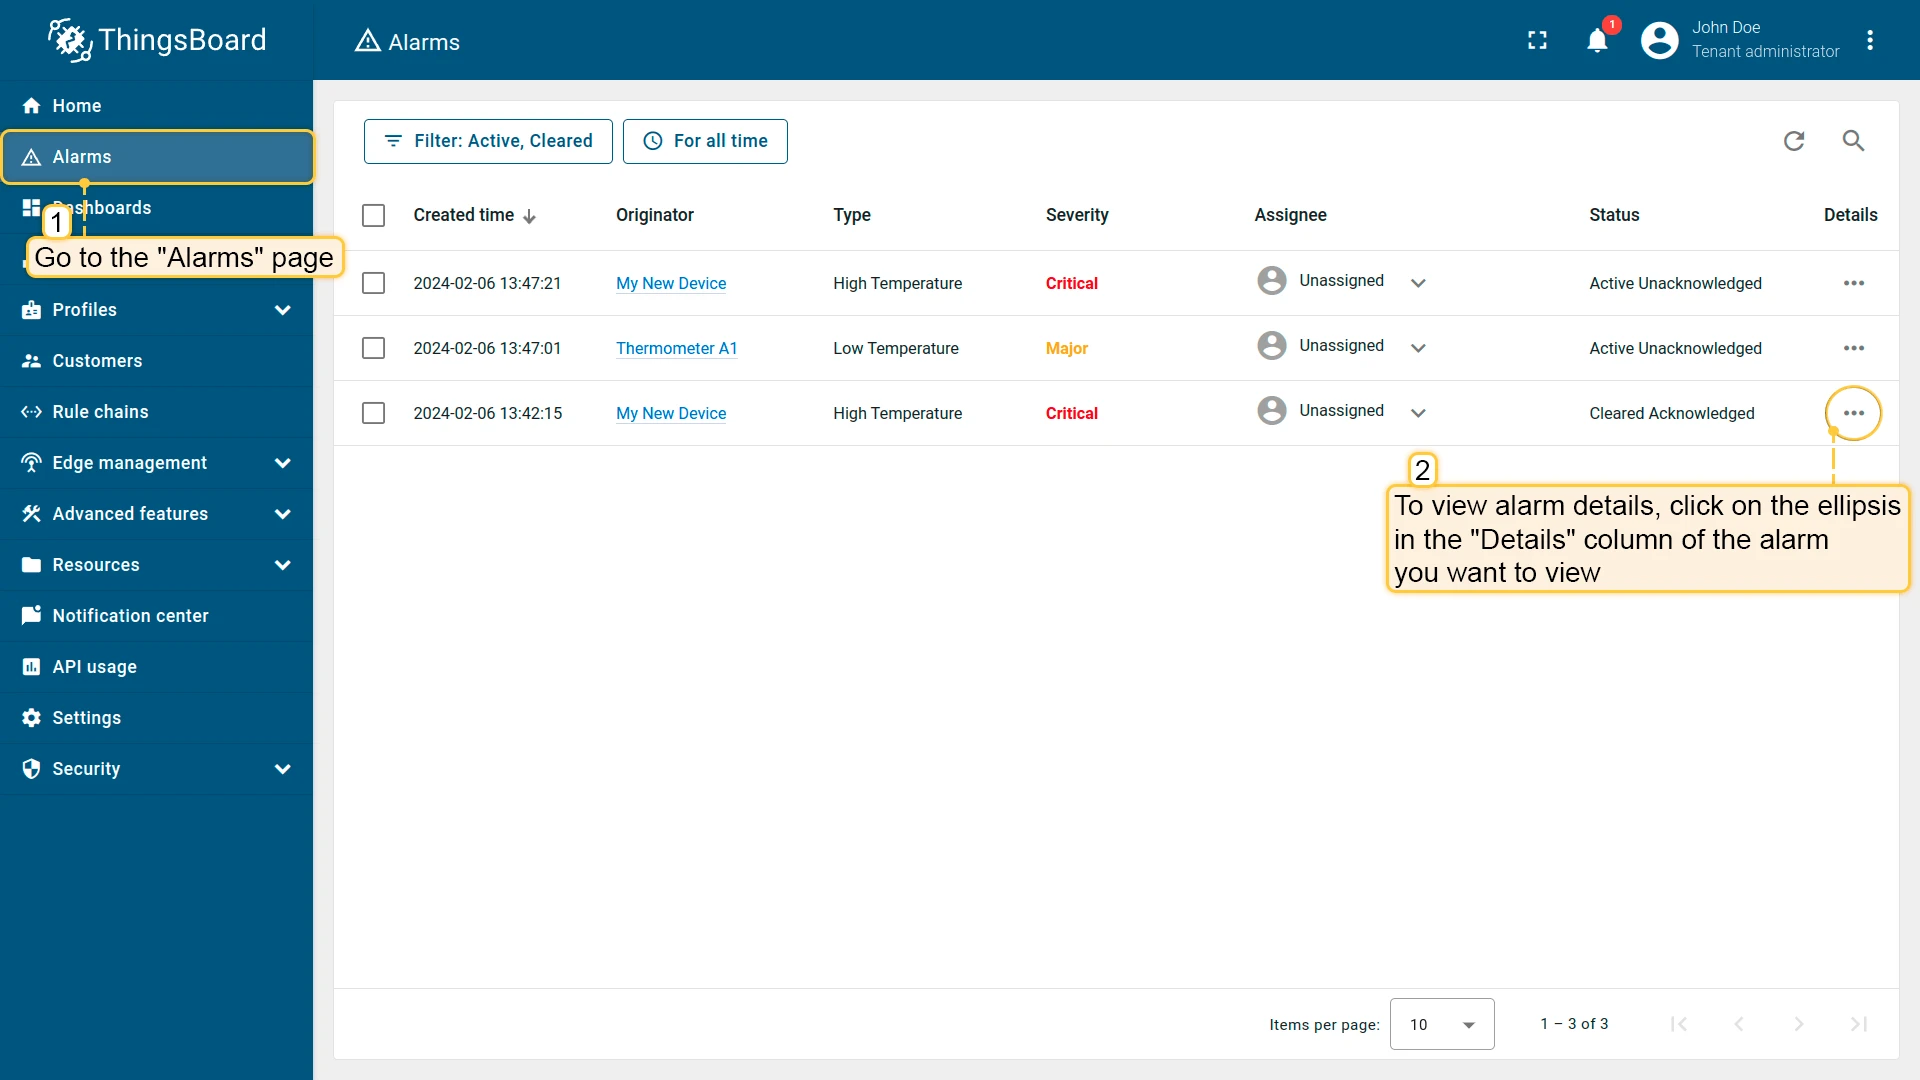
Section titled “Alarms Page”Go to Alarms in the left-hand menu to see all alarms within your scope. The table shows creation time, originator, type, severity, assignee, and status. Use the filter toolbar to filter by status and time range.
Click the ⋮ (details) icon on any alarm row to open the Alarm details dialog, which shows the full alarm record, assignee, and activity.
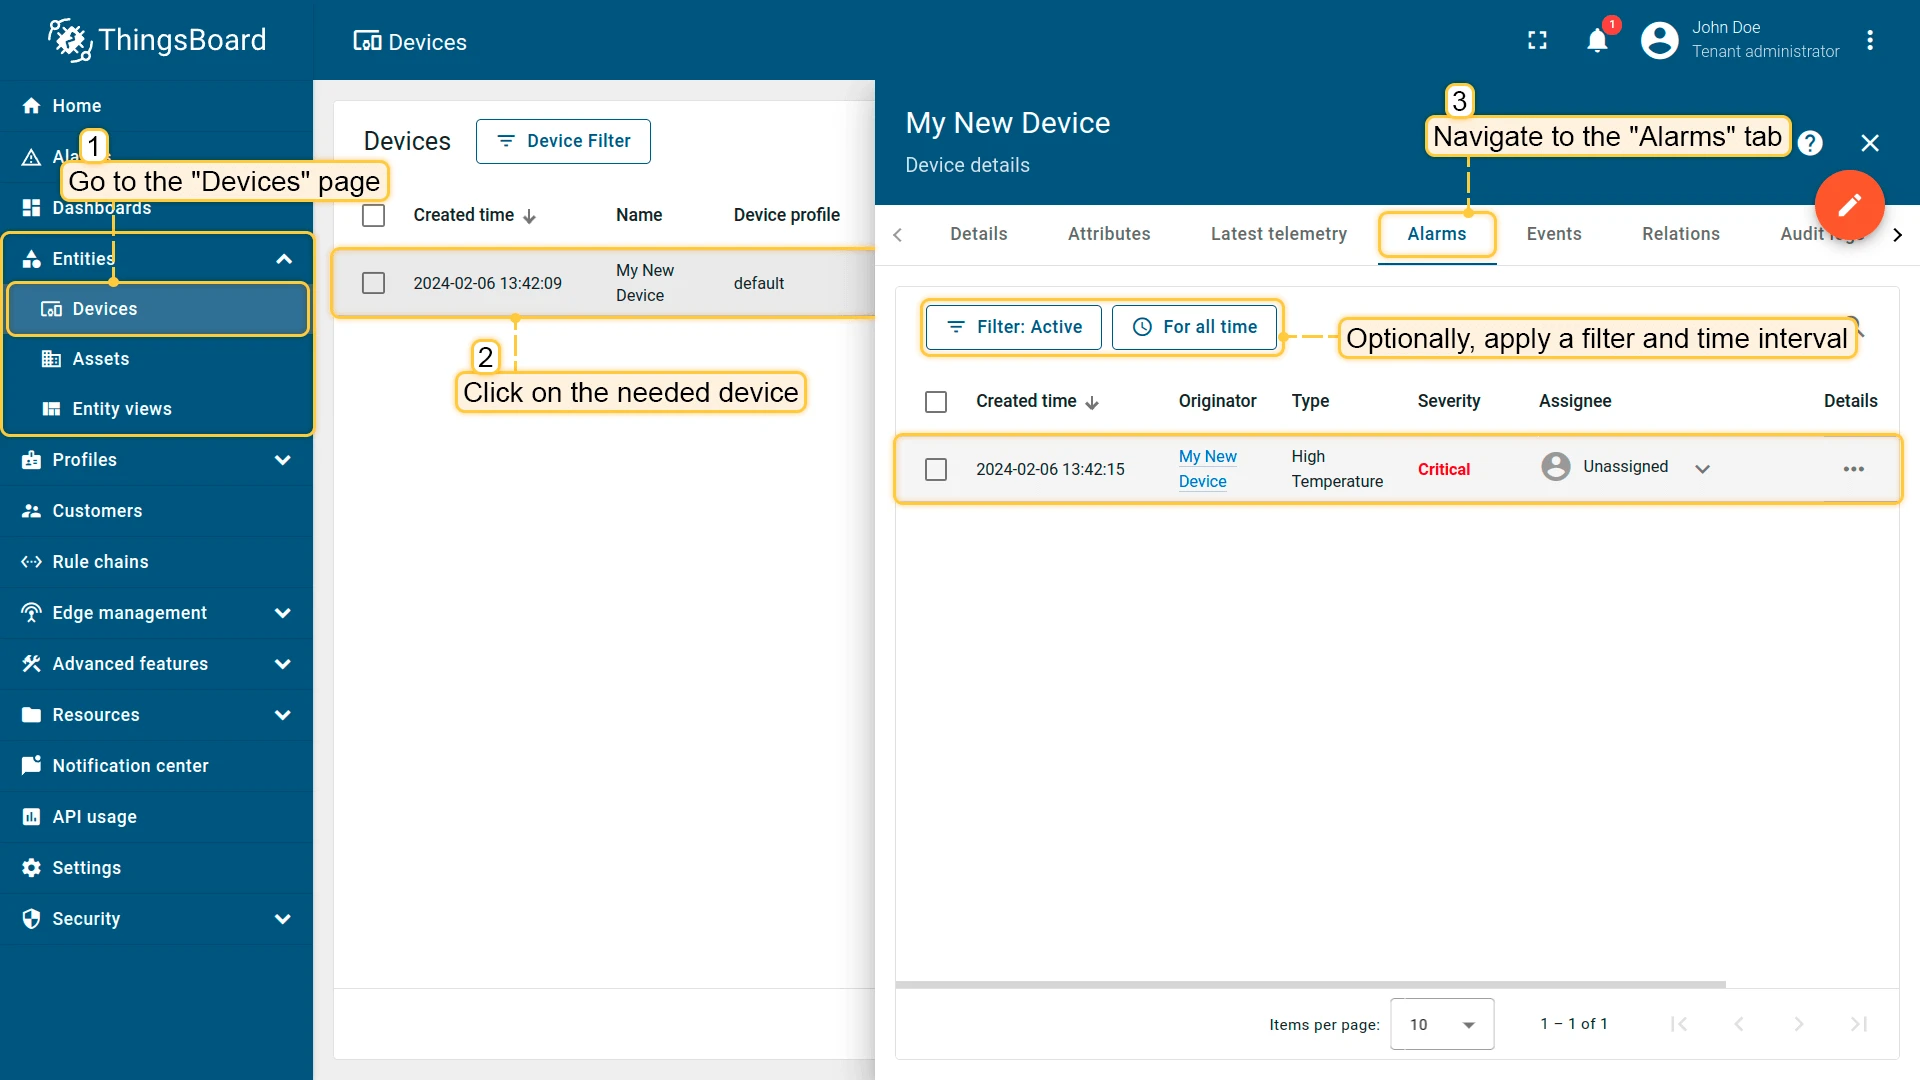
Entity Alarms
Section titled “Entity Alarms”To view alarms for a specific entity:
- Navigate to the relevant entity list (e.g., Entities ⇾ Devices).
- Click the entity name to open its details.
- Select the Alarms tab.
Acknowledge and Clear
Section titled “Acknowledge and Clear”- Acknowledge — marks the alarm as seen and records the acknowledgment time and the acknowledging user. The alarm condition may still be active.
- Clear — marks the alarm condition as resolved and records the clear time.
To acknowledge or clear an alarm, hover over the alarm row on the Alarms page or in an alarm widget and click the ✓ (Acknowledge) or ✕ (Clear) icon.
Via REST API
Section titled “Via REST API”Alarms can be created, queried, acknowledged, cleared, and deleted via the REST API. Authenticate with a JWT token in the X-Authorization header. Key endpoints include alarm search by originator, status filtering, and bulk operations.
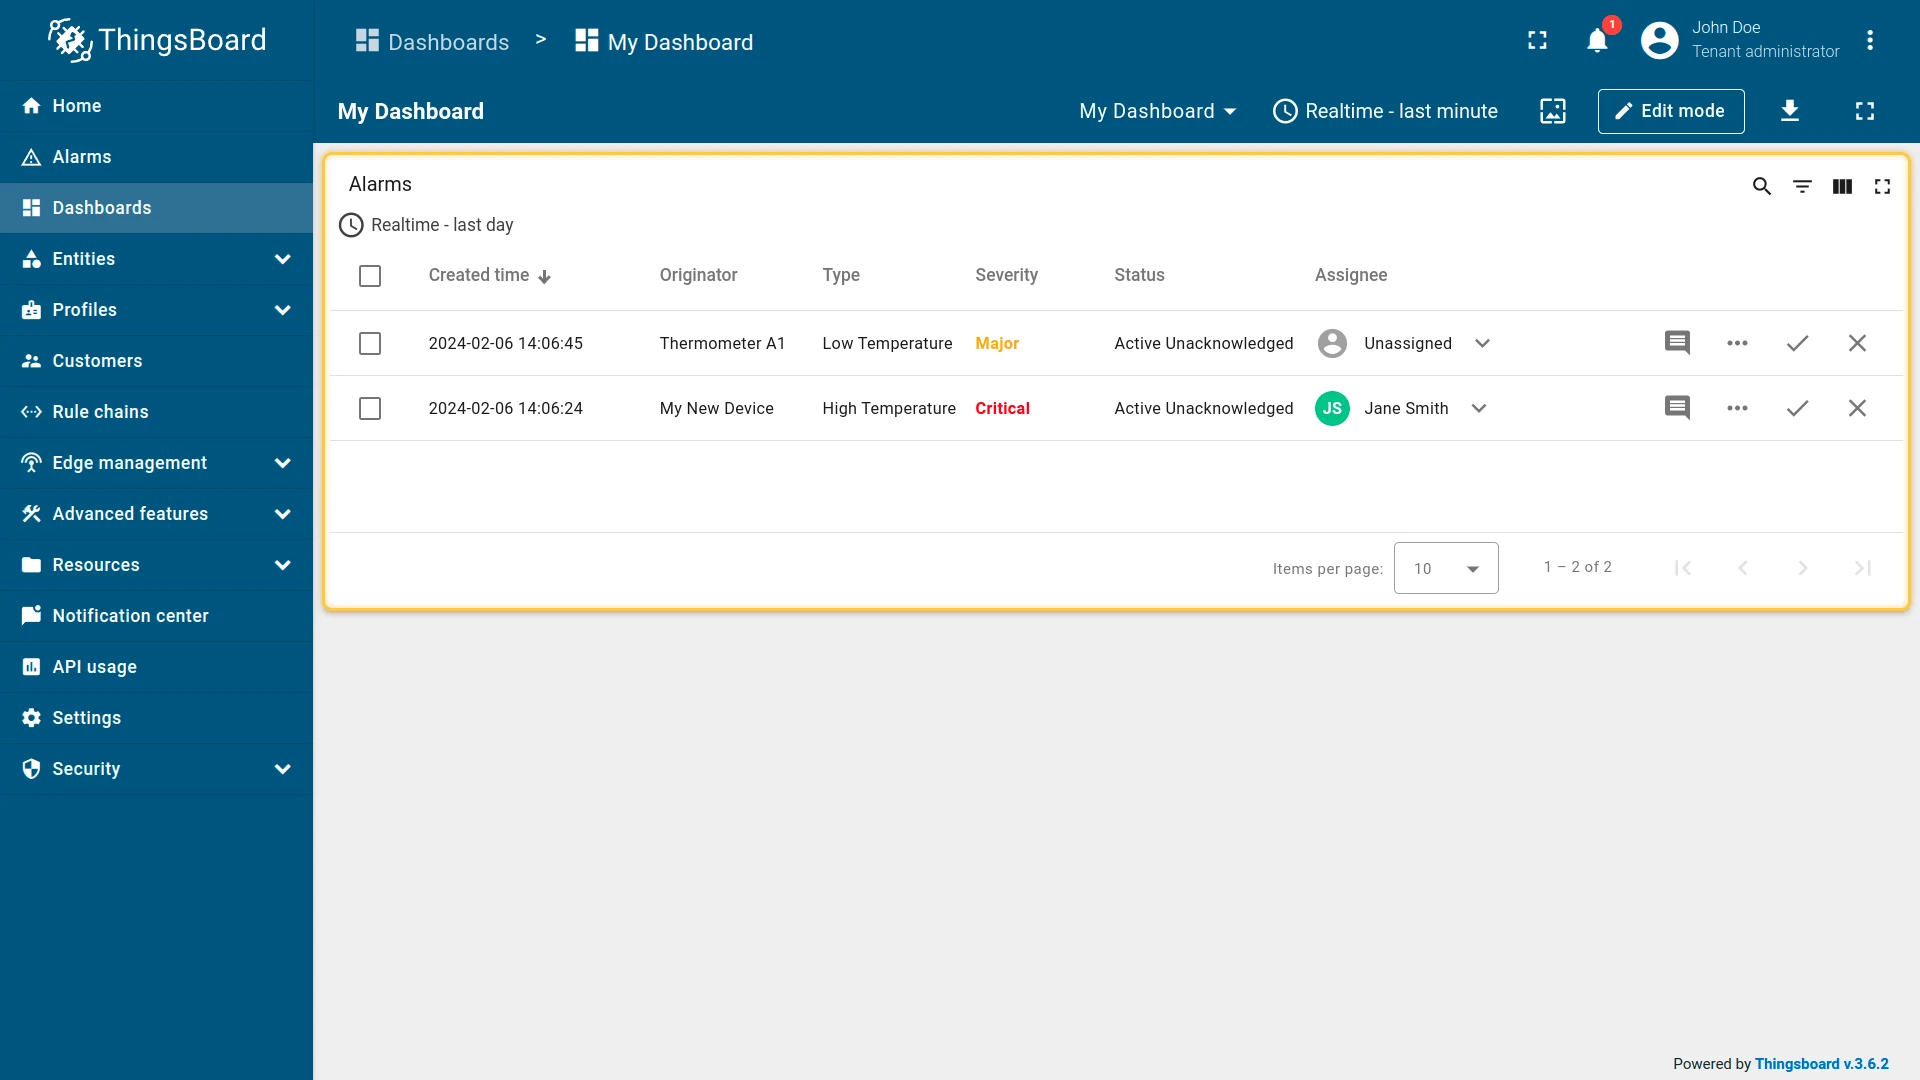
Alarm Widgets
Section titled “Alarm Widgets”Display alarms on dashboards using widgets from the Alarm widgets bundle:
- Alarms table — lists alarms for selected entities with filtering by status, severity, and time range.
- Alarms count — shows the number of alarms matching configurable filters.
What You Can Do with Alarms
Section titled “What You Can Do with Alarms”| Capability | Description | Guide |
|---|---|---|
| Define alarm conditions | Create rules that trigger alarms based on telemetry thresholds, inactivity, or repeated events | Alarm rules |
| Send notifications | Deliver alerts via email, SMS, Slack, or Teams when alarms are created or cleared | Notifications |
| Visualize on dashboards | Add alarm tables, counts, and duration charts to dashboards | Dashboards |
| Route in Rule Engine | React to alarm events with custom processing logic | Rule Engine |
| Manage via REST API | Create, query, acknowledge, clear, and delete alarms programmatically | REST API |
Was this helpful?