Notification Center
The Notification center is where you send, manage, and automate notifications. You can trigger notifications manually, via the REST API, or automatically in response to system events, with optional scheduling.

Notification Delivery Methods
Section titled “Notification Delivery Methods”- Web: Notifications appear inside the ThingsBoard web interface.
- Mobile app: Push notifications via the ThingsBoard Mobile Application. Requires mobile app setup and mobile settings enabled in ThingsBoard.
- SMS: Delivered via SMS. Works without internet access. Requires an SMS provider configured by a System Administrator.
- Email: Delivered to the recipient’s inbox. Requires an outgoing mail server configured by a System Administrator.
- Slack: Messages to Slack users or channels. Requires Slack settings.
- Microsoft Teams: Messages to a Teams channel. Requires a webhook URL.
Navigation
Section titled “Navigation”The Notification center is accessible from the left sidebar and provides the following options:
- Send notification: Send a one-off message manually to selected recipients.
- Inbox: View received notifications.
- Sent: View sent notifications and their delivery status.
- Recipients: Manage who receives notifications.
- Templates: Define notification content and delivery method.
- Rules: Configure triggers for automated notifications.

Automated Notifications
Section titled “Automated Notifications”To send notifications automatically in response to system events, configure three components:
- Recipients: Who receives the notification — platform users, Slack channels, Teams channels, etc.
- Templates: What is sent — message content and delivery method (Web, Email, Slack, etc.).
- Rules: When it is sent — the trigger event and filter conditions that activate the notification.
For end-to-end examples, see the Examples section below.
Configure Notifications with AI
Section titled “Configure Notifications with AI”Configure with AI lets you set up automated notifications by describing what you want in plain language, instead of manually creating a recipient group, a template, and a rule one by one. It’s powered by the AI Assistant available throughout ThingsBoard — see that guide for how to write effective prompts and how the Assistant works in general.
It’s useful whenever you know what should trigger a notification and who should get it, but don’t want to configure the recipient, template, and rule separately — for example:
- Setting up an alert for a device or asset condition, like going offline or inactive
- Notifying a group of users by email, Slack, or Microsoft Teams when a specific event occurs
- Creating a new notification template for an existing rule
- Adjusting an existing rule’s trigger, recipients, or template
Workflow
- On any tab of the Notification center, click Configure with AI to open the AI Assistant panel.
- Describe the notification you want in the chat — the trigger, the recipients, and the delivery method, e.g. “Create a notification rule that emails me when one of my devices becomes inactive.” Use the suggested prompts if you’re not sure where to start.
- The Assistant explains its plan, then proposes each change — such as creating a recipient group, a notification template, or a notification rule — as an approval card describing exactly what will happen. A single request can involve several such proposals in sequence.
- Click Approve on each proposal to apply it, Deny to skip it, or Approve all further actions to apply the rest of the plan without confirming each step individually.
- Review the Assistant’s summary of everything it set up, and keep the conversation open to refine the result — for example, asking it to restyle the template or adjust the recipients — instead of starting over.
Best Practices
- Describe the trigger, the recipients, and the delivery channel — let the Assistant create the recipient group, template, and rule to match.
- For an existing setup, name the rule or template you want changed so the Assistant edits it instead of creating a new one.
- For complex notification setups, build them up with a few focused prompts instead of one long request.
- Review each proposed change before approving, especially before using Approve all further actions.
Limitations
- Changes are proposed, not applied silently: each one needs your approval, unless you approve all further actions in that chat.
- A single request can create multiple resources — a recipient group, a template, and a rule — each as its own approval step; review all of them, not just the first.
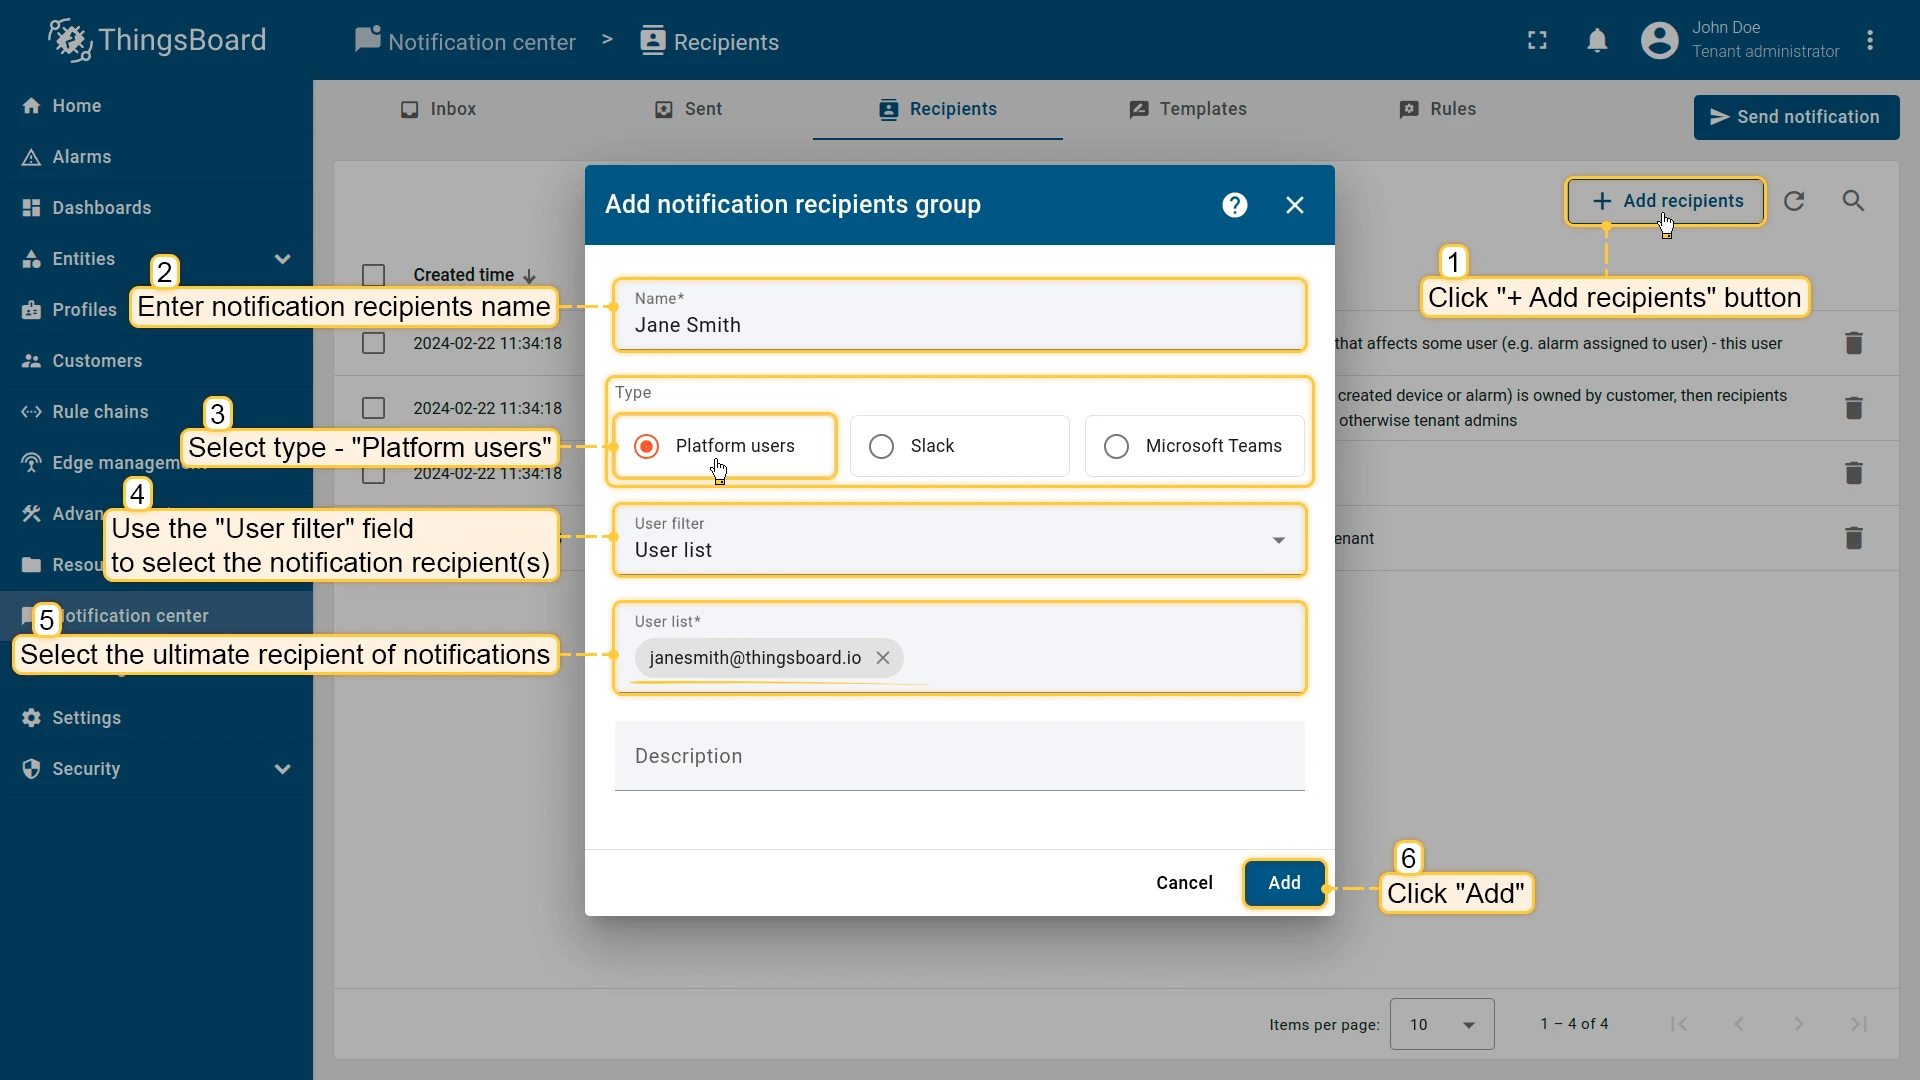
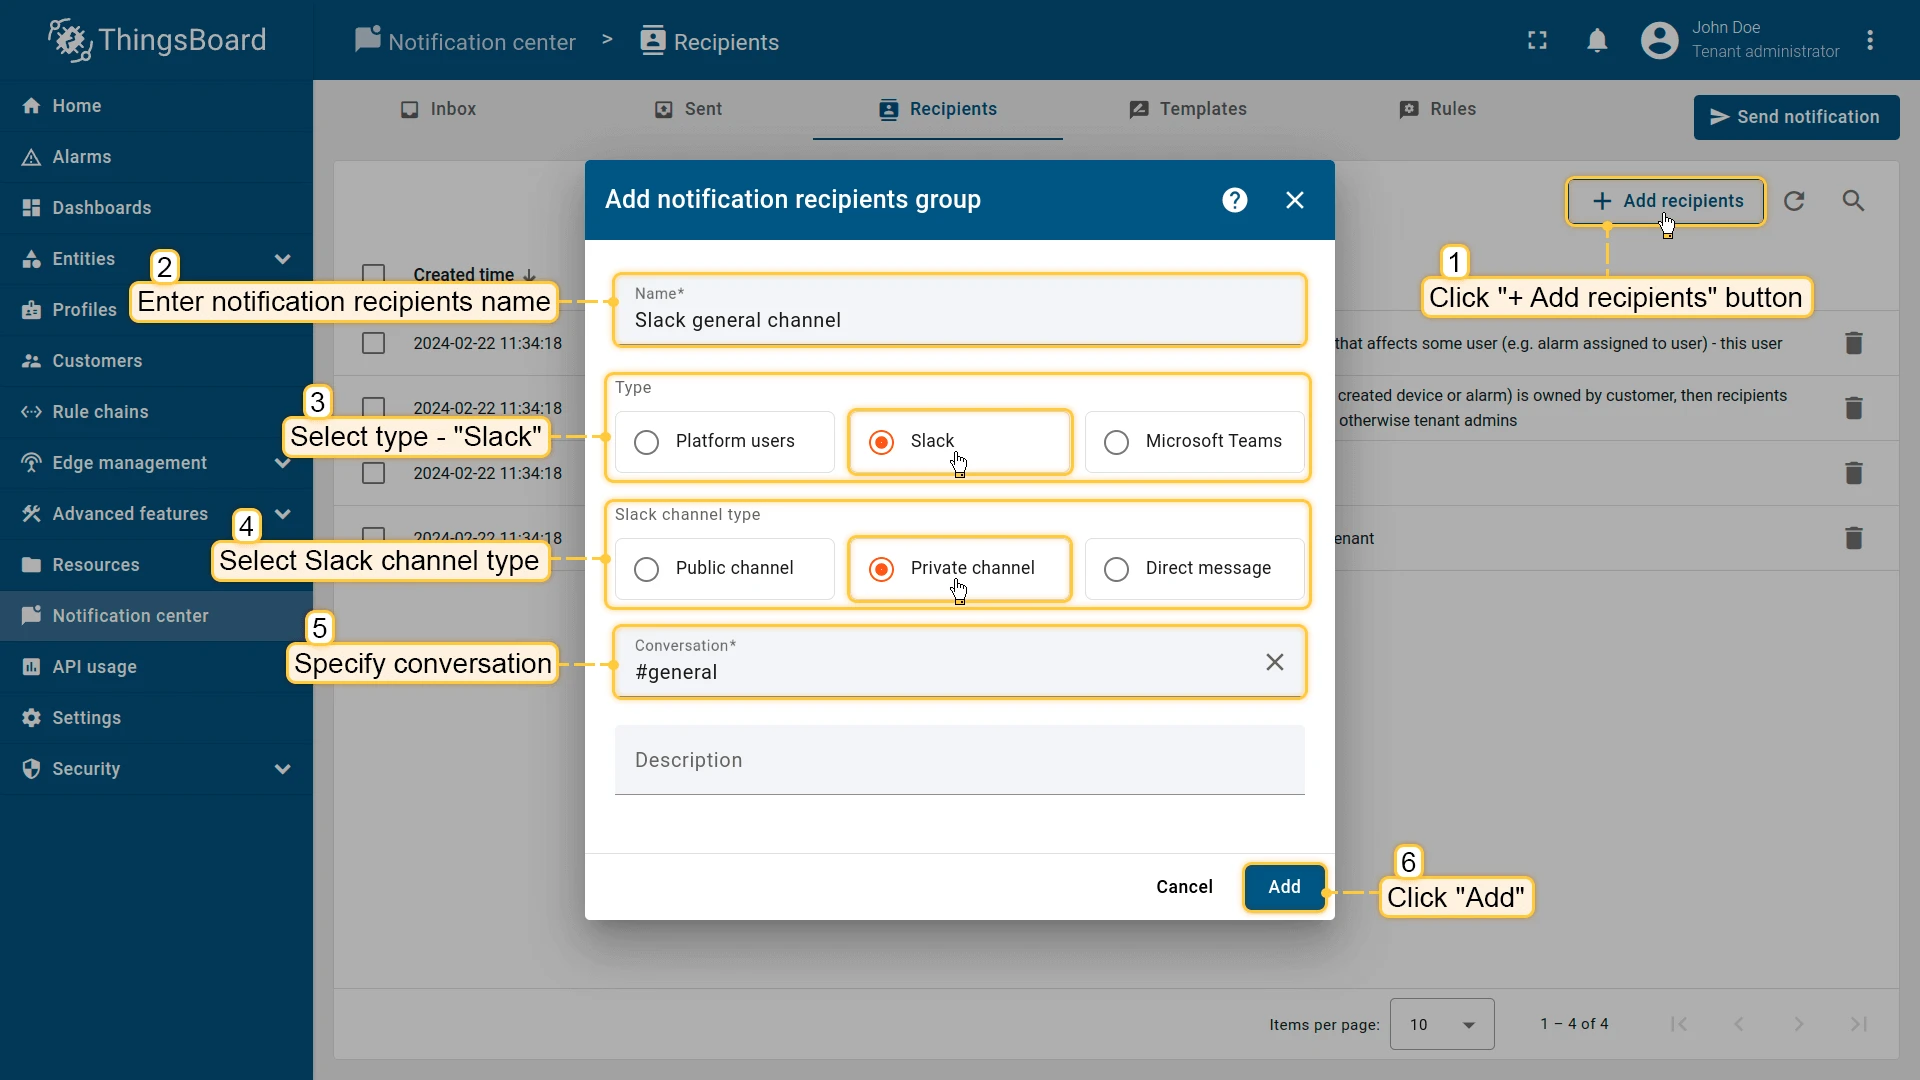
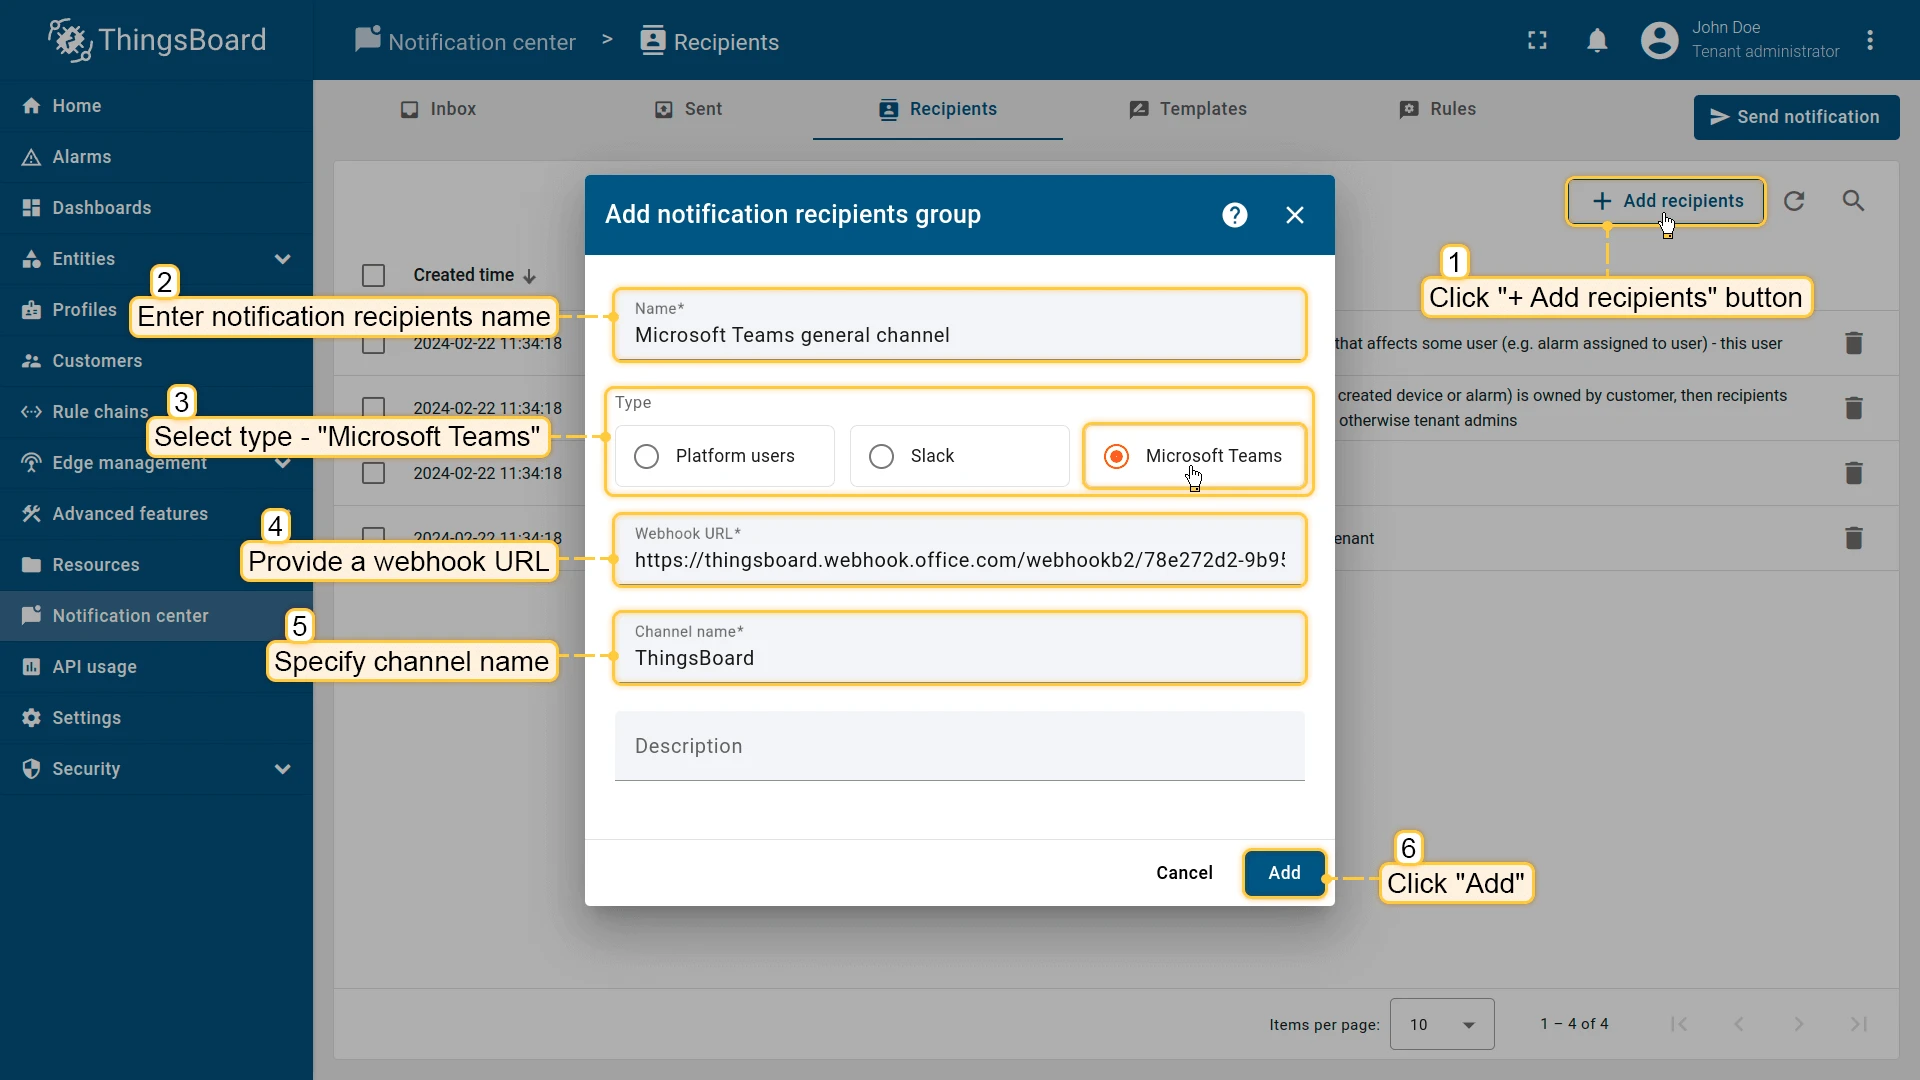
Recipients
Section titled “Recipients”The Recipients tab lists configured notification recipients.
To add one:
- Click + Add recipients.
- Enter a name for the recipients group.
- Select the notification type:
- Platform users – send notifications to ThingsBoard users. Select a user filter.
- Slack – send notifications to a Slack channel or direct message. Requires Slack settings configured first. Select the channel type and specify the conversation.
- Microsoft Teams – send notifications to a Teams channel. Requires a webhook URL. Enter the webhook URL and channel name.
- Configure the fields specific to the selected type.
- Click Add to create the recipients group.
You can also create recipients inline during the send wizard.
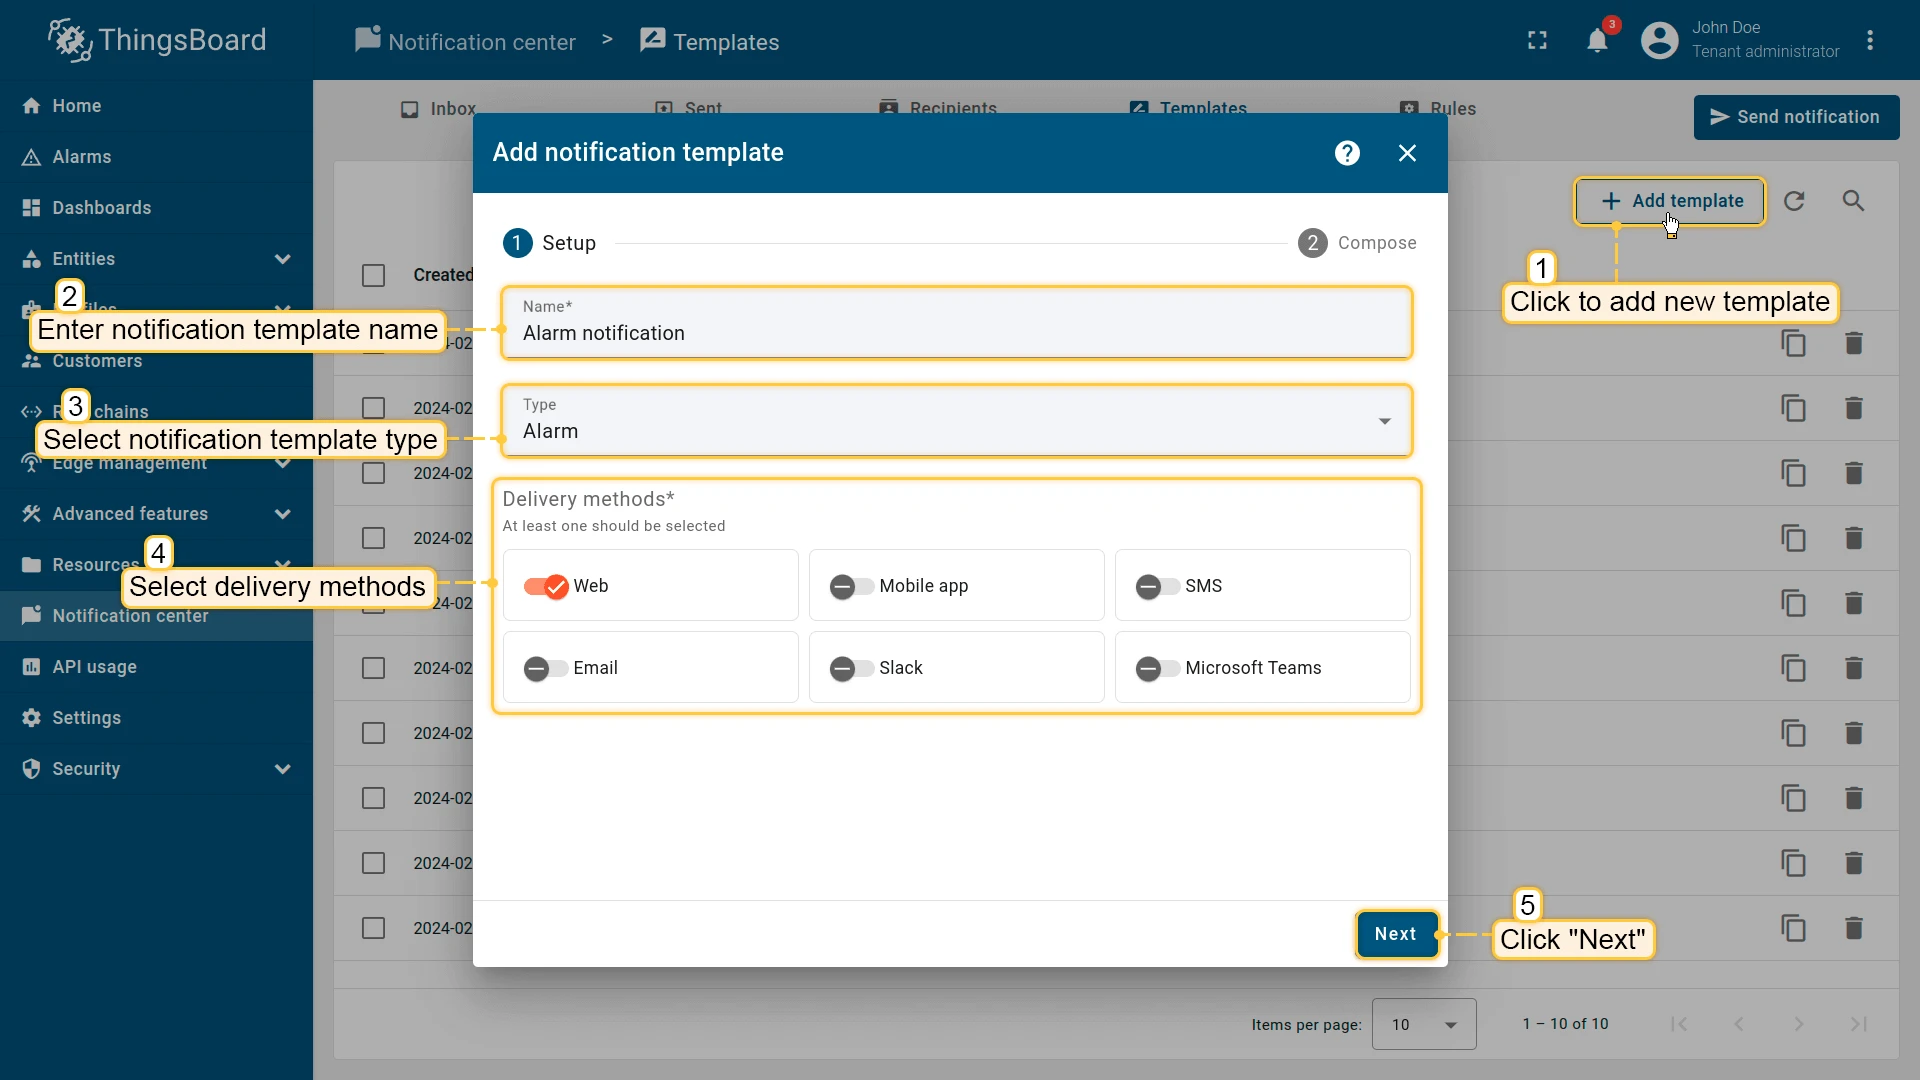
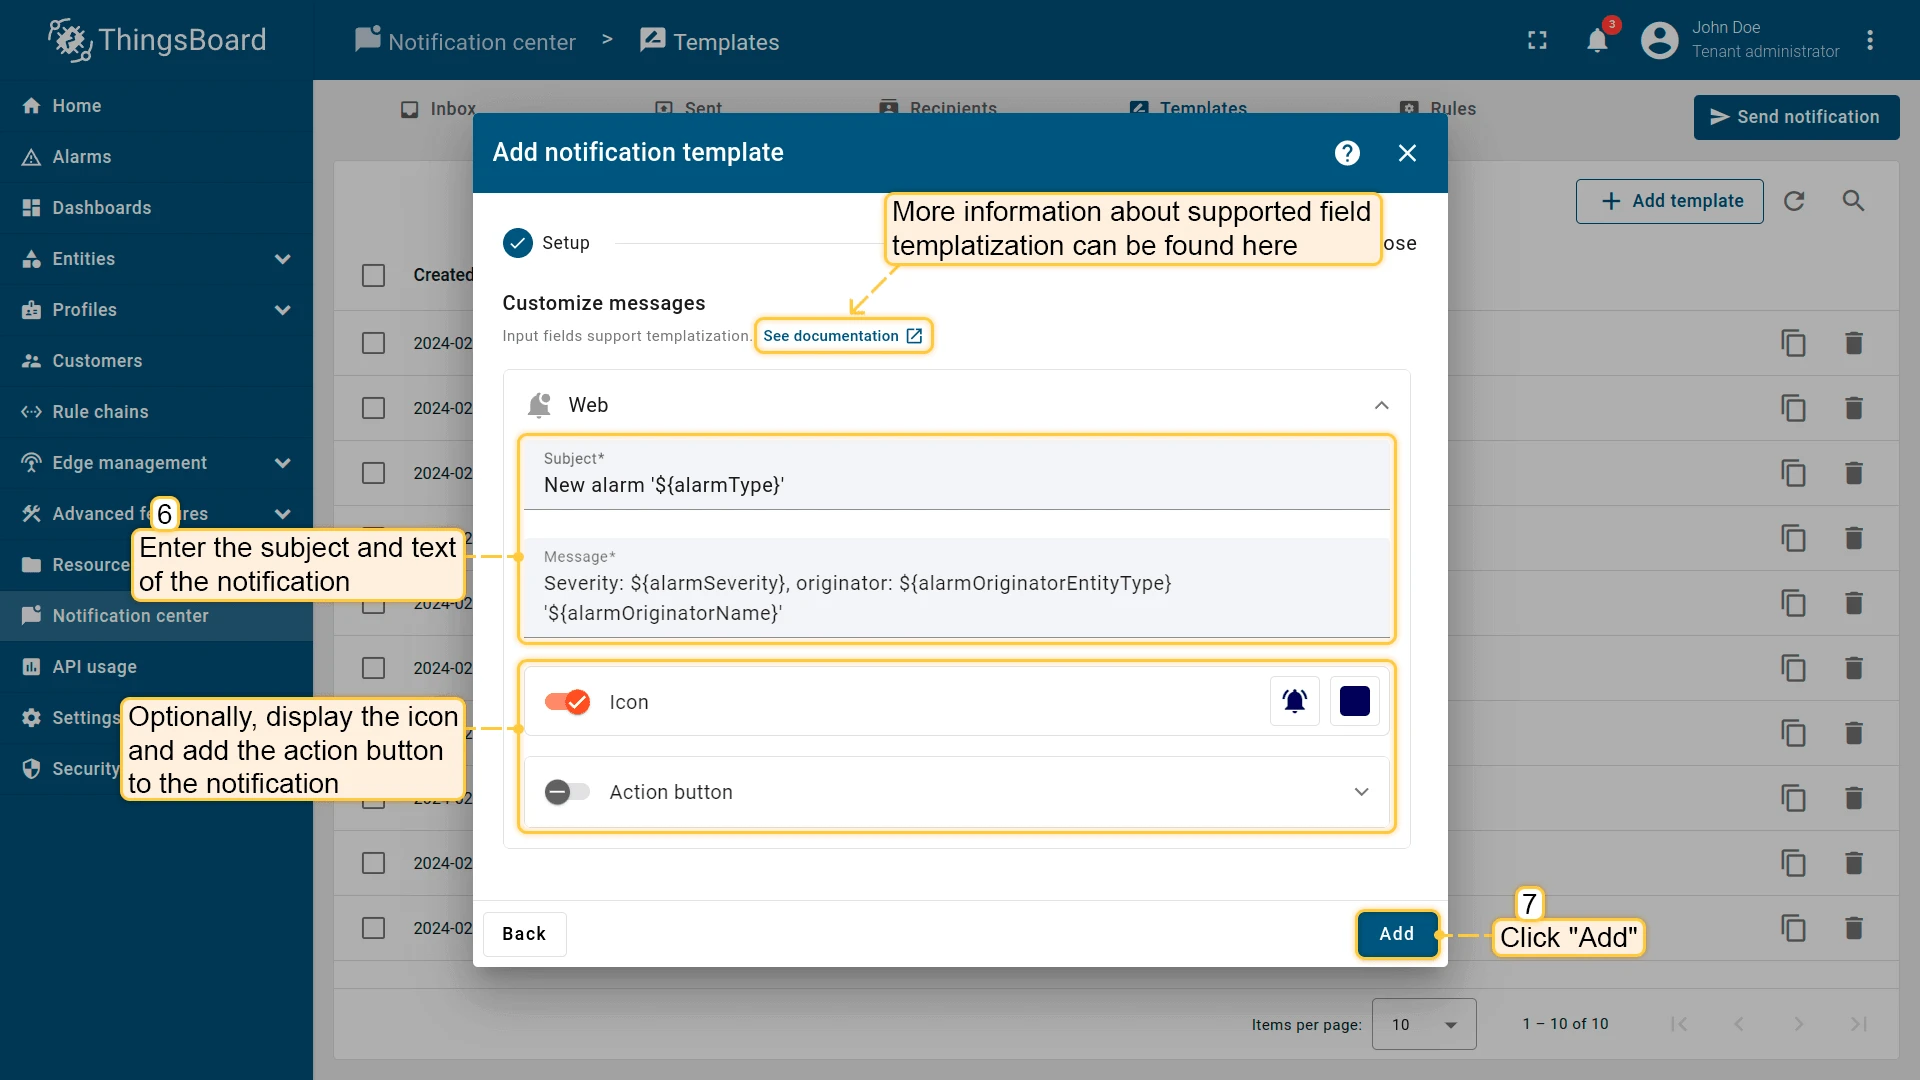
Templates
Section titled “Templates”Use the Templates tab to create and manage notification templates. Each template defines a set of delivery methods and message content per method.
- Click + Add template.
- Enter a template name and select the required type.
- Choose one or more delivery methods.
- Click Next to configure message content.
- For each selected delivery method, enter the subject (if applicable) and message.
- (Optional) Configure additional options such as icons, action buttons, or report attachments.
- Click Add to create the template.
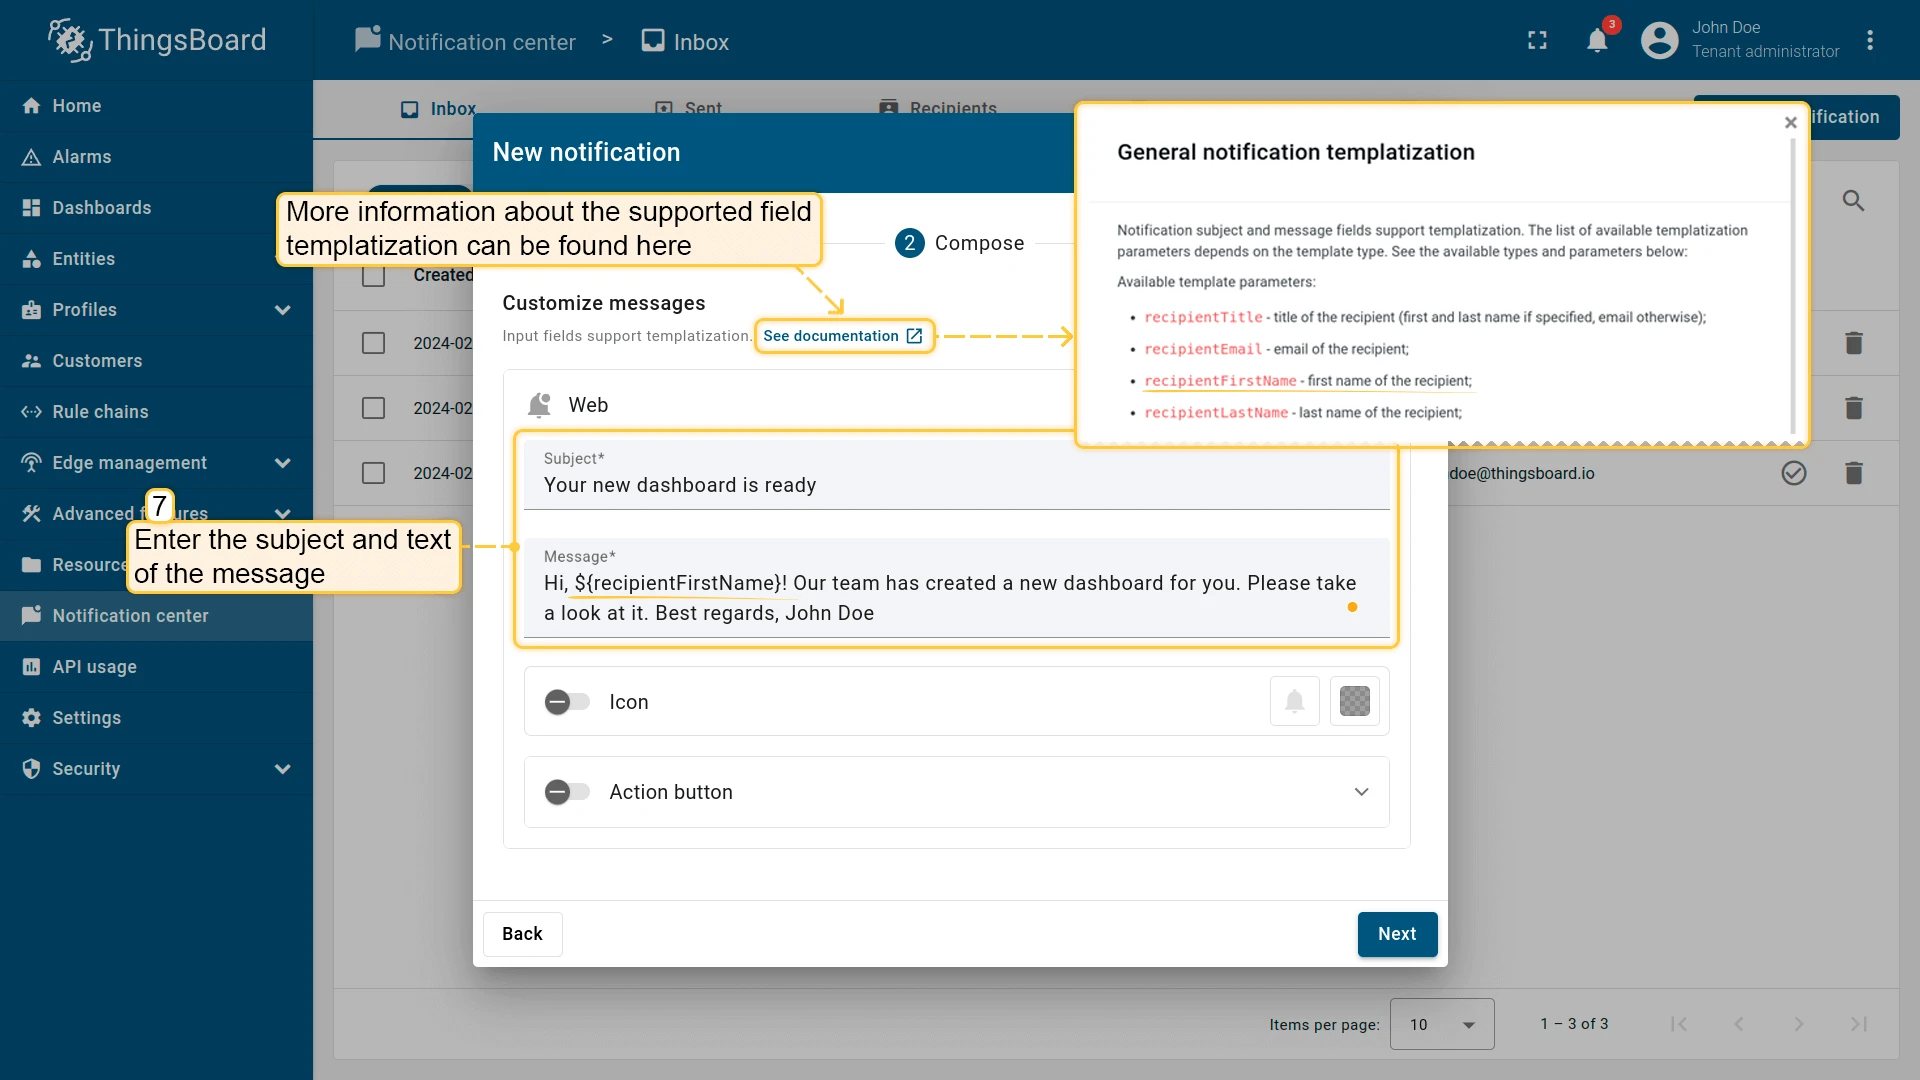
Templates support dynamic parameters wrapped in ${...}, like ${recipientFirstName}, with optional suffixes (upperCase, lowerCase, capitalize). See Notification template parameters for the full reference.

Template Types
Section titled “Template Types”The selected template type must match the rule trigger type. For example, an Alarm rule requires an Alarm template.
| Template type | Use case |
|---|---|
| General | Manual announcements, maintenance windows, broadcasts |
| Alarm | Device or asset alarms: creation, severity change, clearing |
| Device activity | Device goes online or offline |
| Entity action | Device, asset, or user created, updated, or deleted |
| Alarm comment | Team comments on active alarms |
| Alarm assignment | Alarm routed to an engineer |
| Rule engine lifecycle event | Rule chain or node fails to start |
| Rule node | Custom notifications built inside rule chains |
| Edge connection | Edge instance goes online or offline |
| Edge communication failure | Edge instance fails to communicate |
| Entities limit | Tenant nearing device or asset quota |
| API usage limit | Tenant nearing API call quota |
| New platform version | ThingsBoard upgrade available |
| Exceeded rate limits | API rate limit breached |
| Task processing failure | Background task processing fails |
| Resources shortage | Server resource shortage (CPU, RAM, storage) |
| Integration lifecycle event | Integration start/stop failures |
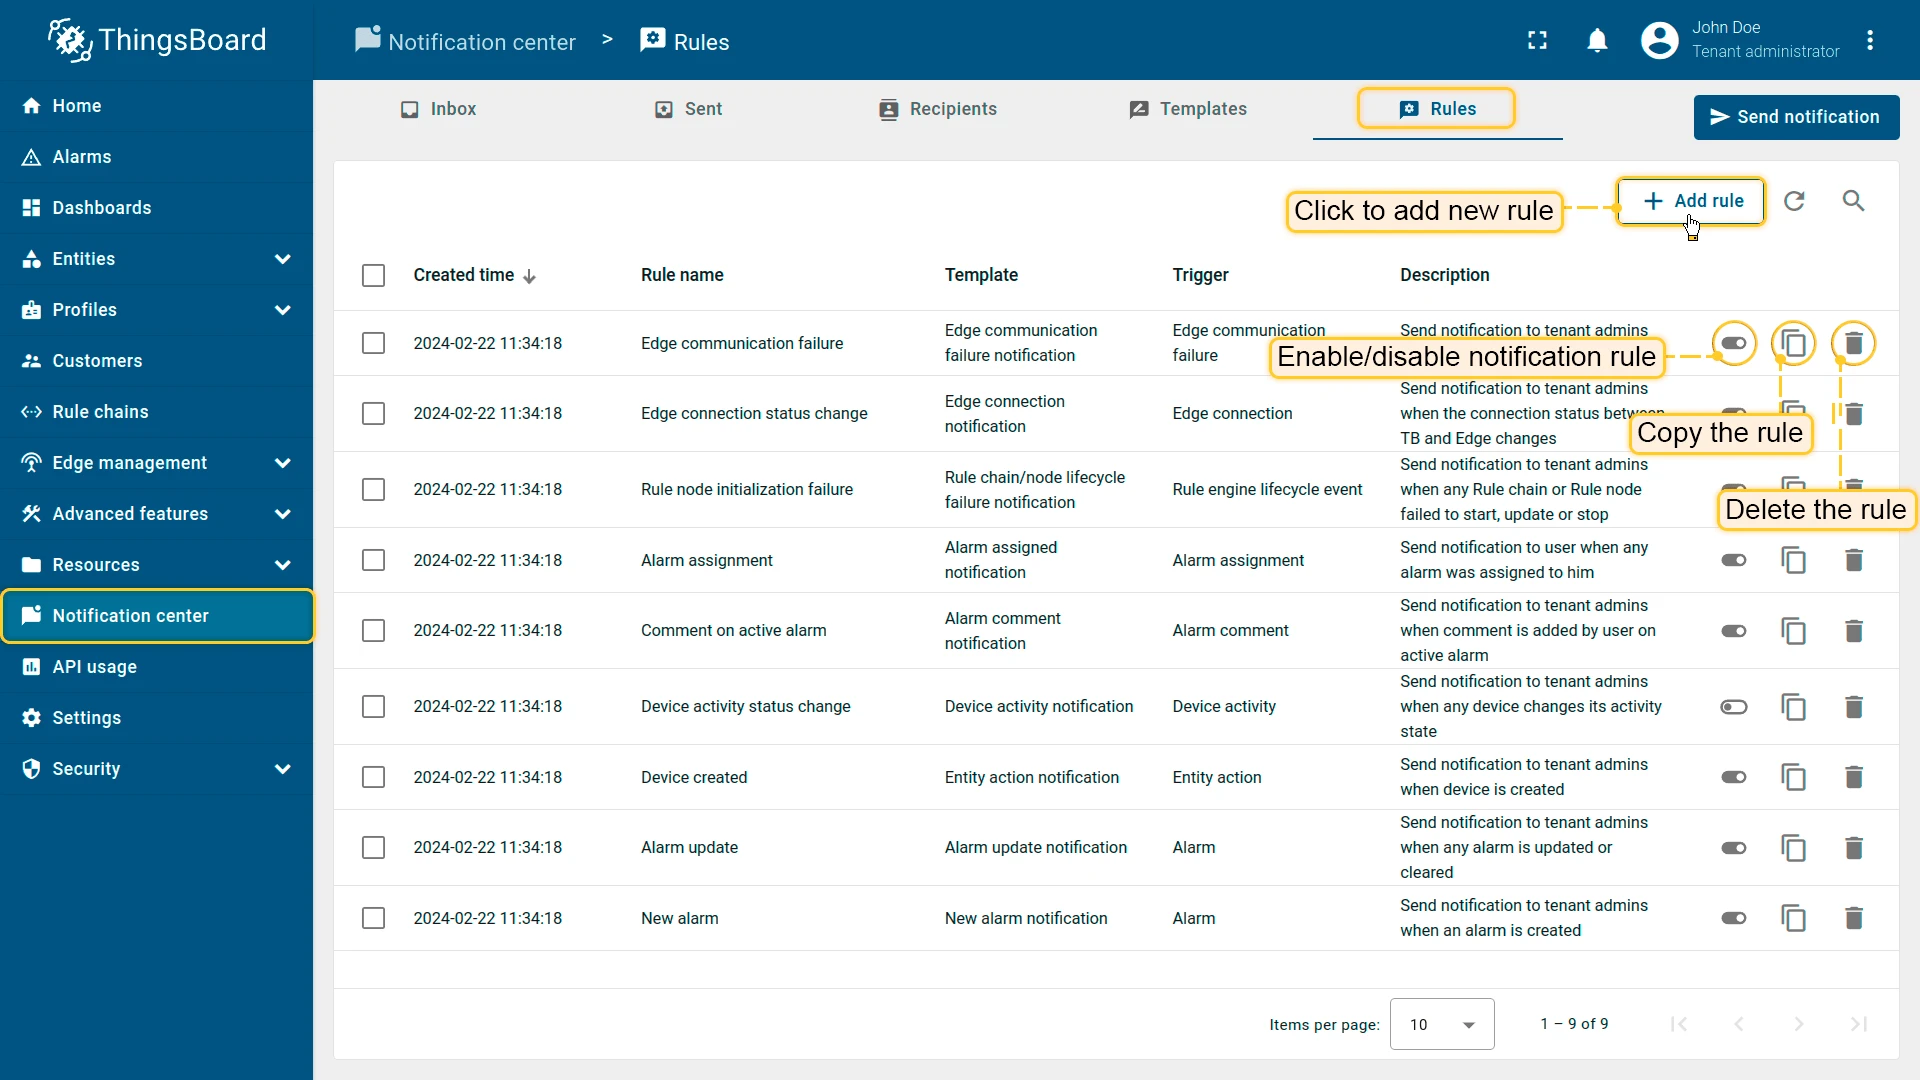
Notification rules automate delivery based on trigger events. Each rule connects a system event with a matching template and recipients.
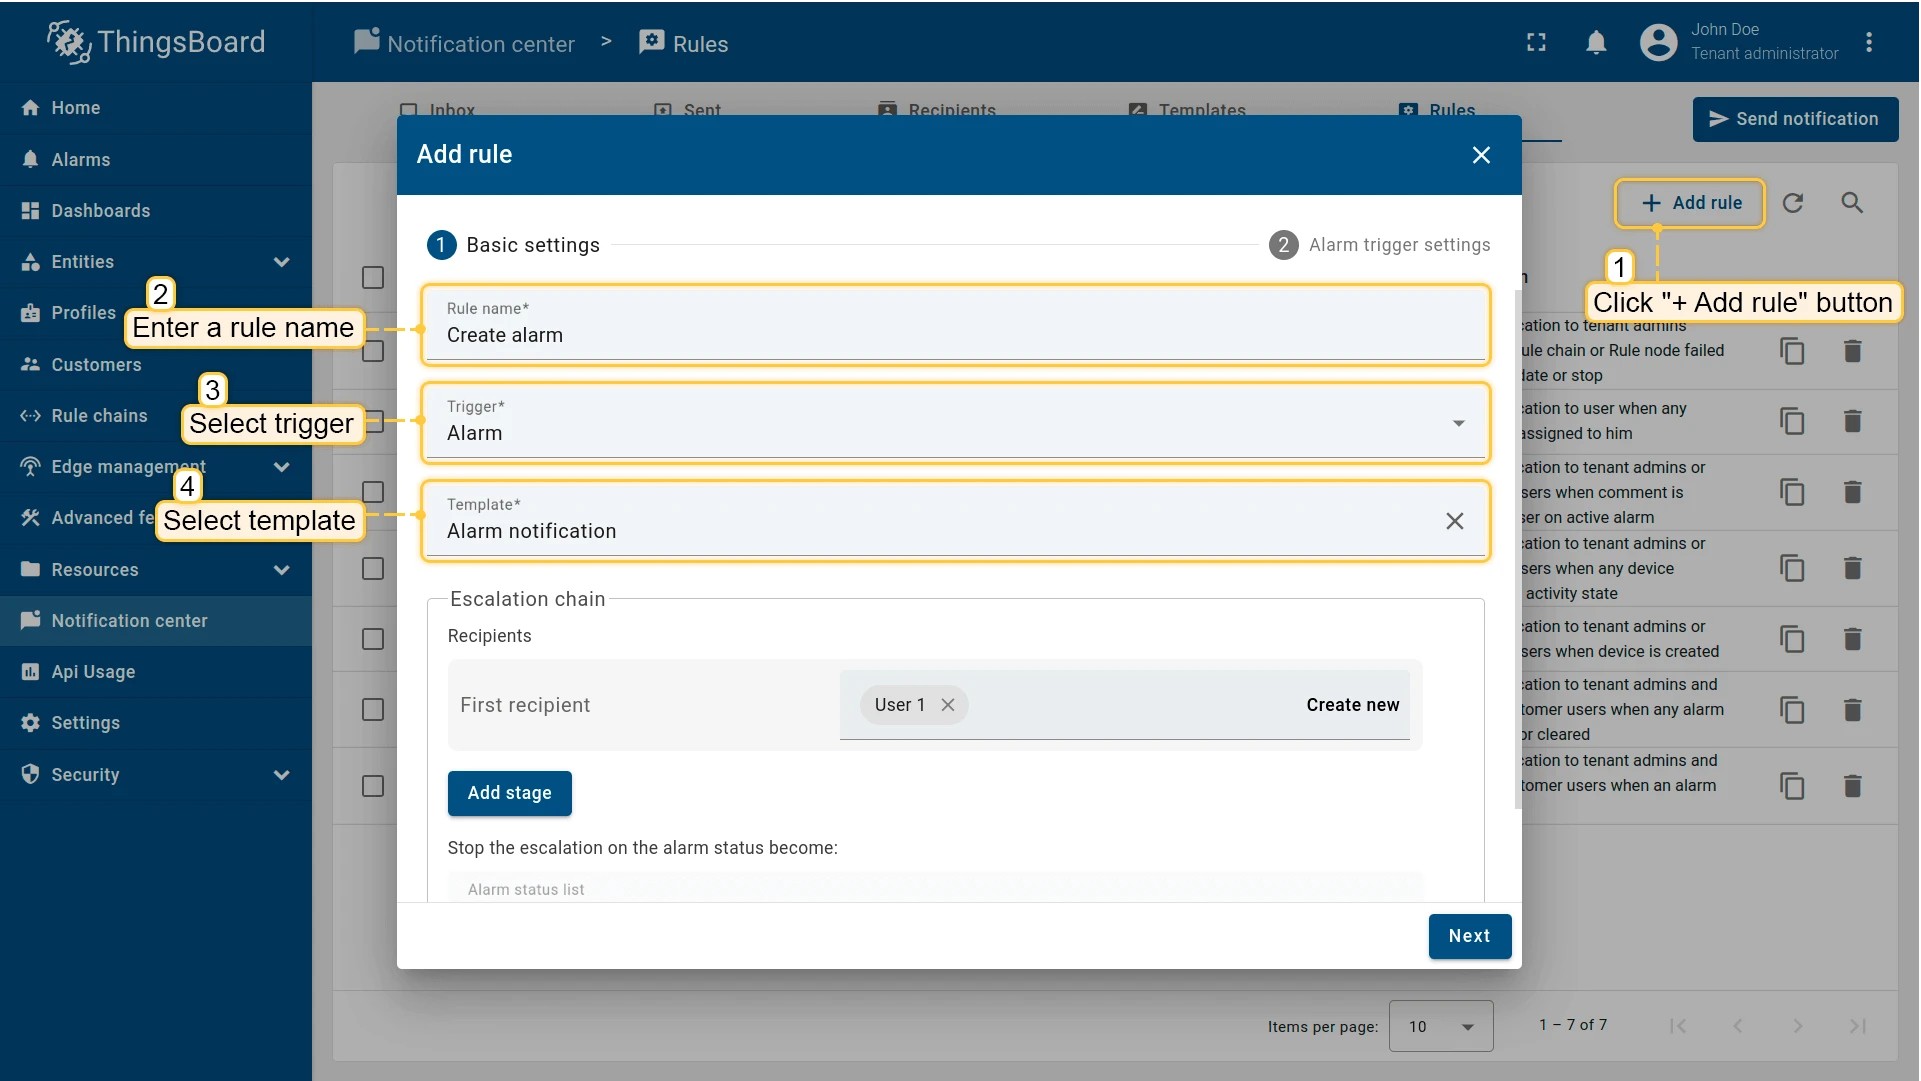
- Open the Rules tab and click + Add rule.
- Provide a rule name and select the required trigger type.
- Choose an existing template or create a new one.
- Add one or more recipients and click Next.
- Configure the trigger-specific settings and click Add to save the rule.
Rule Triggers
Section titled “Rule Triggers”| Trigger | Level | When it fires | Default rule name |
|---|---|---|---|
| Alarm | Tenant | Alarm created, acknowledged, cleared, severity changed, or deleted | New alarm, Alarm update |
| Device activity | Tenant | Device becomes active or inactive | — |
| Entity action | Tenant | Entity created, updated, or deleted | Device created |
| Alarm comment | Tenant | Comment added or updated on an alarm | Comment on active alarm |
| Alarm assignment | Tenant | Alarm assigned or unassigned | Alarm assignment |
| Rule engine lifecycle event | Tenant | Rule chain or node lifecycle event | Rule node initialization failure |
| Edge connection | Tenant | Edge connection status changes | Edge connection status change |
| Edge communication failure | Tenant | Edge communication failure | Edge communication failure |
| Integration lifecycle event | Tenant | Integration fails to start or stop | Integration start failure |
| Entities limit | System | Tenant approaching entity count limit | — |
| API usage limit | System | Tenant reaching API usage threshold | API feature disabled, API feature warning |
| New platform version | System | New ThingsBoard version released | New platform version |
| Exceeded rate limits | System | Rate limit exceeded | Per-tenant rate limits exceeded, Per-entity rate limits exceeded |
| Task processing failure | System | Background task processing fails | Task processing failure |
| Resources shortage | System | Server resource usage exceeds thresholds | Resources shortage |
Alarm Escalation Chain
Section titled “Alarm Escalation Chain”The Alarm trigger uses an escalation chain instead of a simple recipient list. You configure multiple recipient stages with delays between them:

If a recipient acknowledges or clears the alarm before the next stage’s delay expires, subsequent recipients do not receive the notification. Configure which alarm statuses stop the chain in the Stop escalation on the alarm status become field.
Manual Notifications
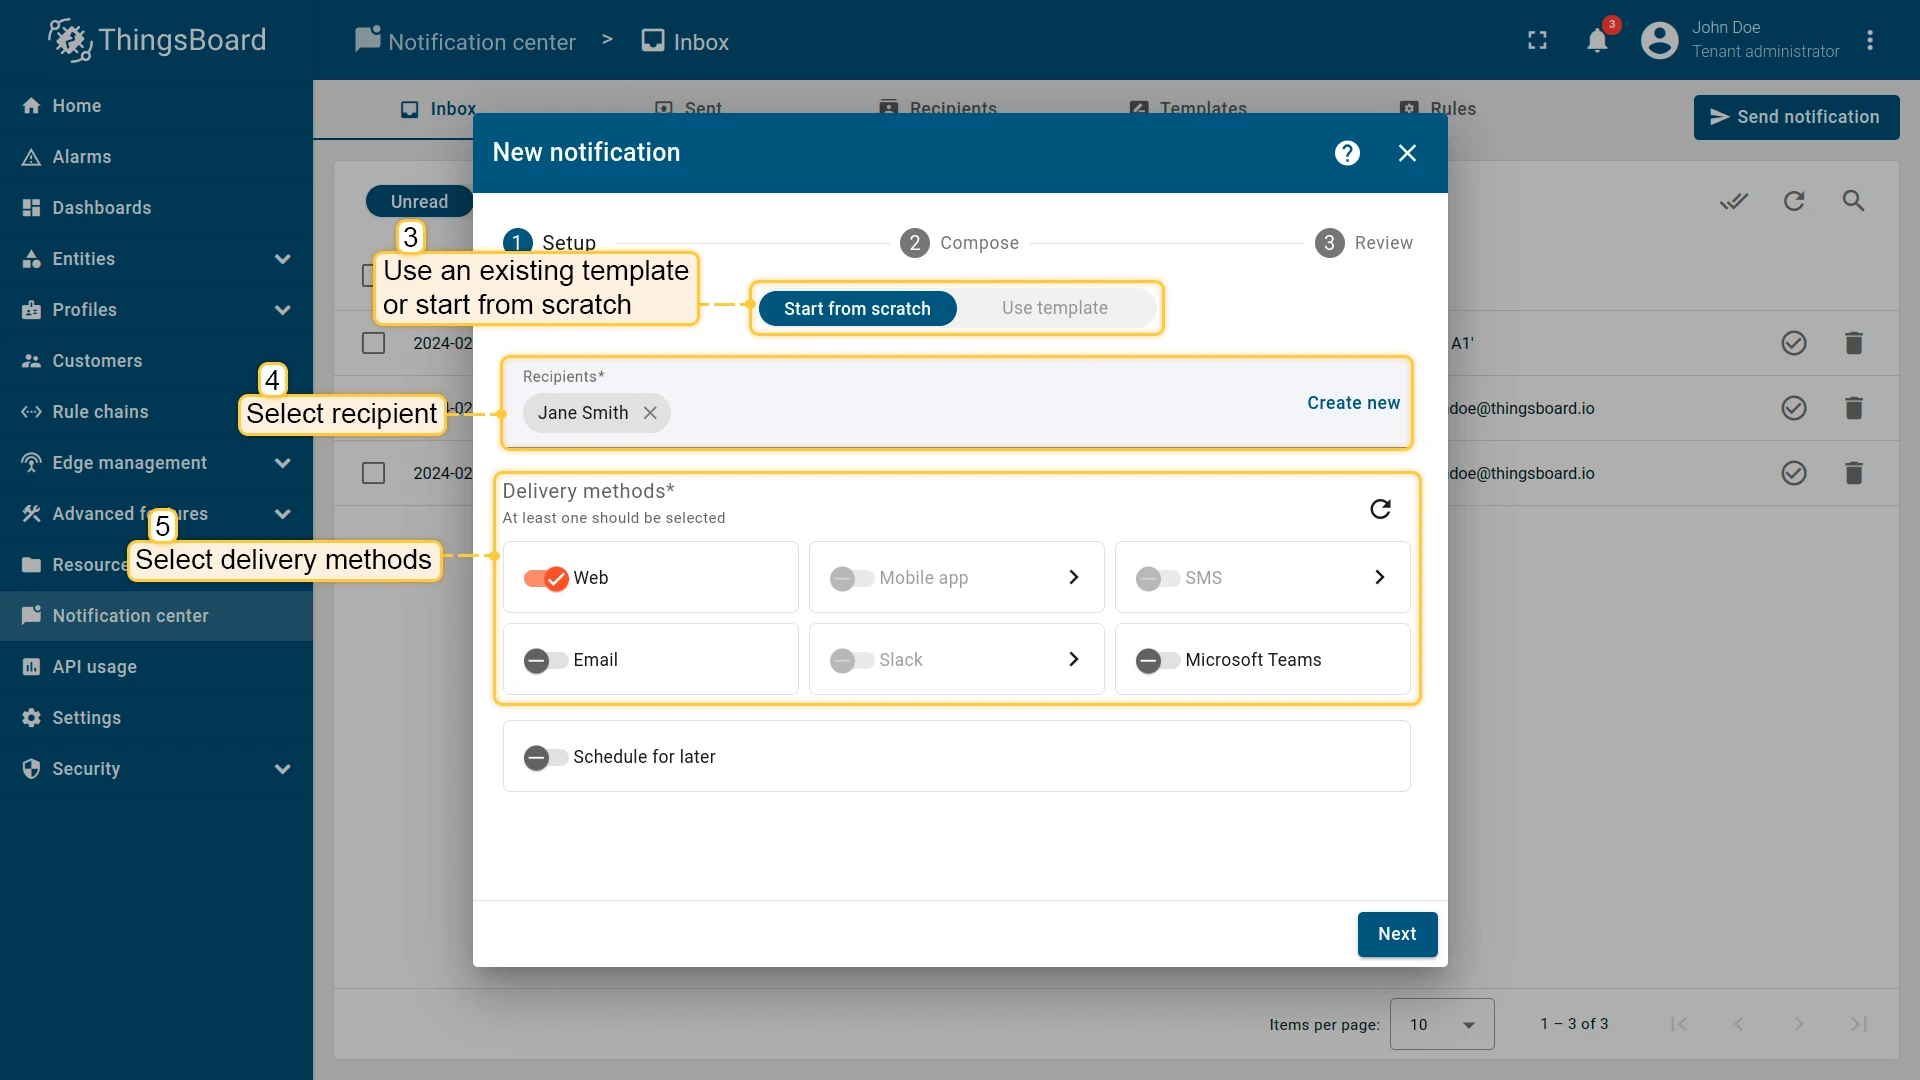
Section titled “Manual Notifications”Use Send notification to send a one-off message immediately or at a scheduled time — suited for announcements, maintenance alerts, and direct messages to specific users.
- Go to Notification center and click Send notification in the top-right corner.
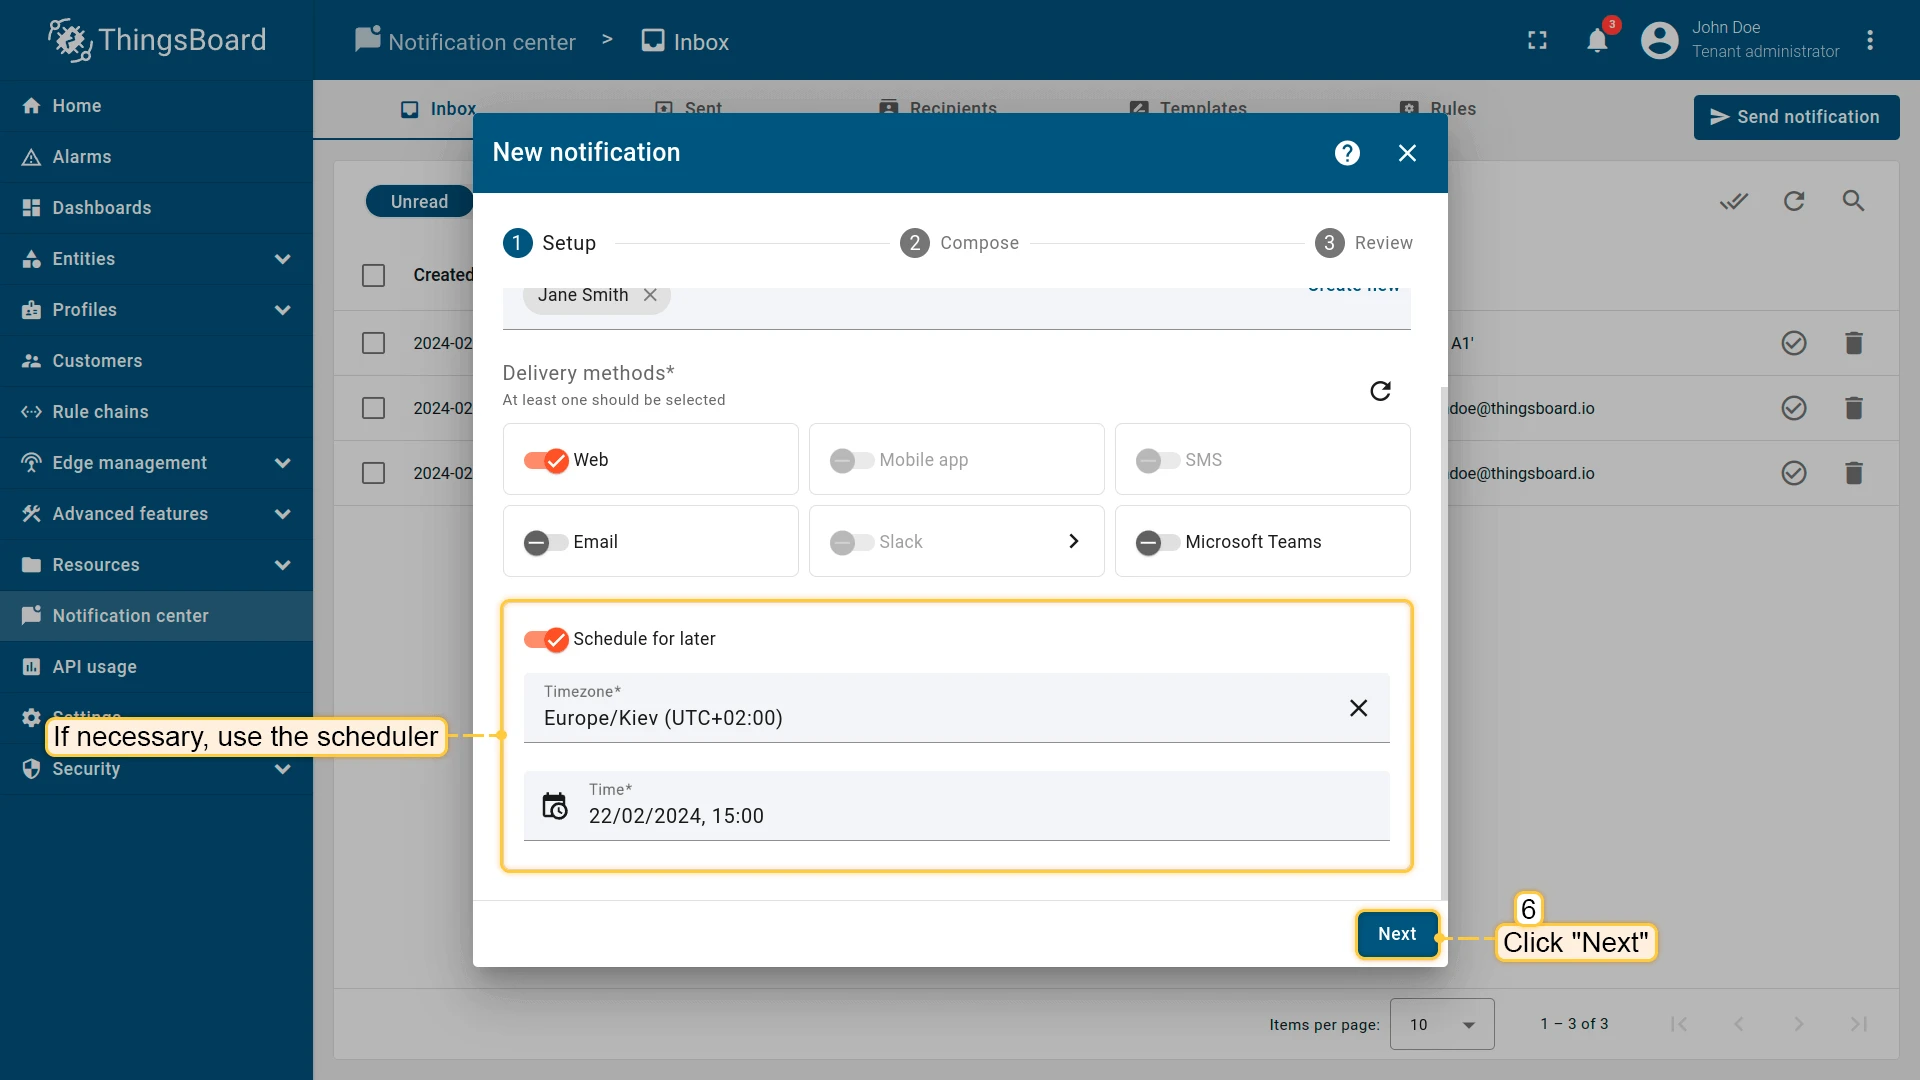
- Select recipients and delivery methods. Optionally schedule the notification. Click Next.
- Enter the subject and message for each delivery method. For Web notifications, optionally add an action button with a dashboard link or URL. Click Next.
- Review and click Send.

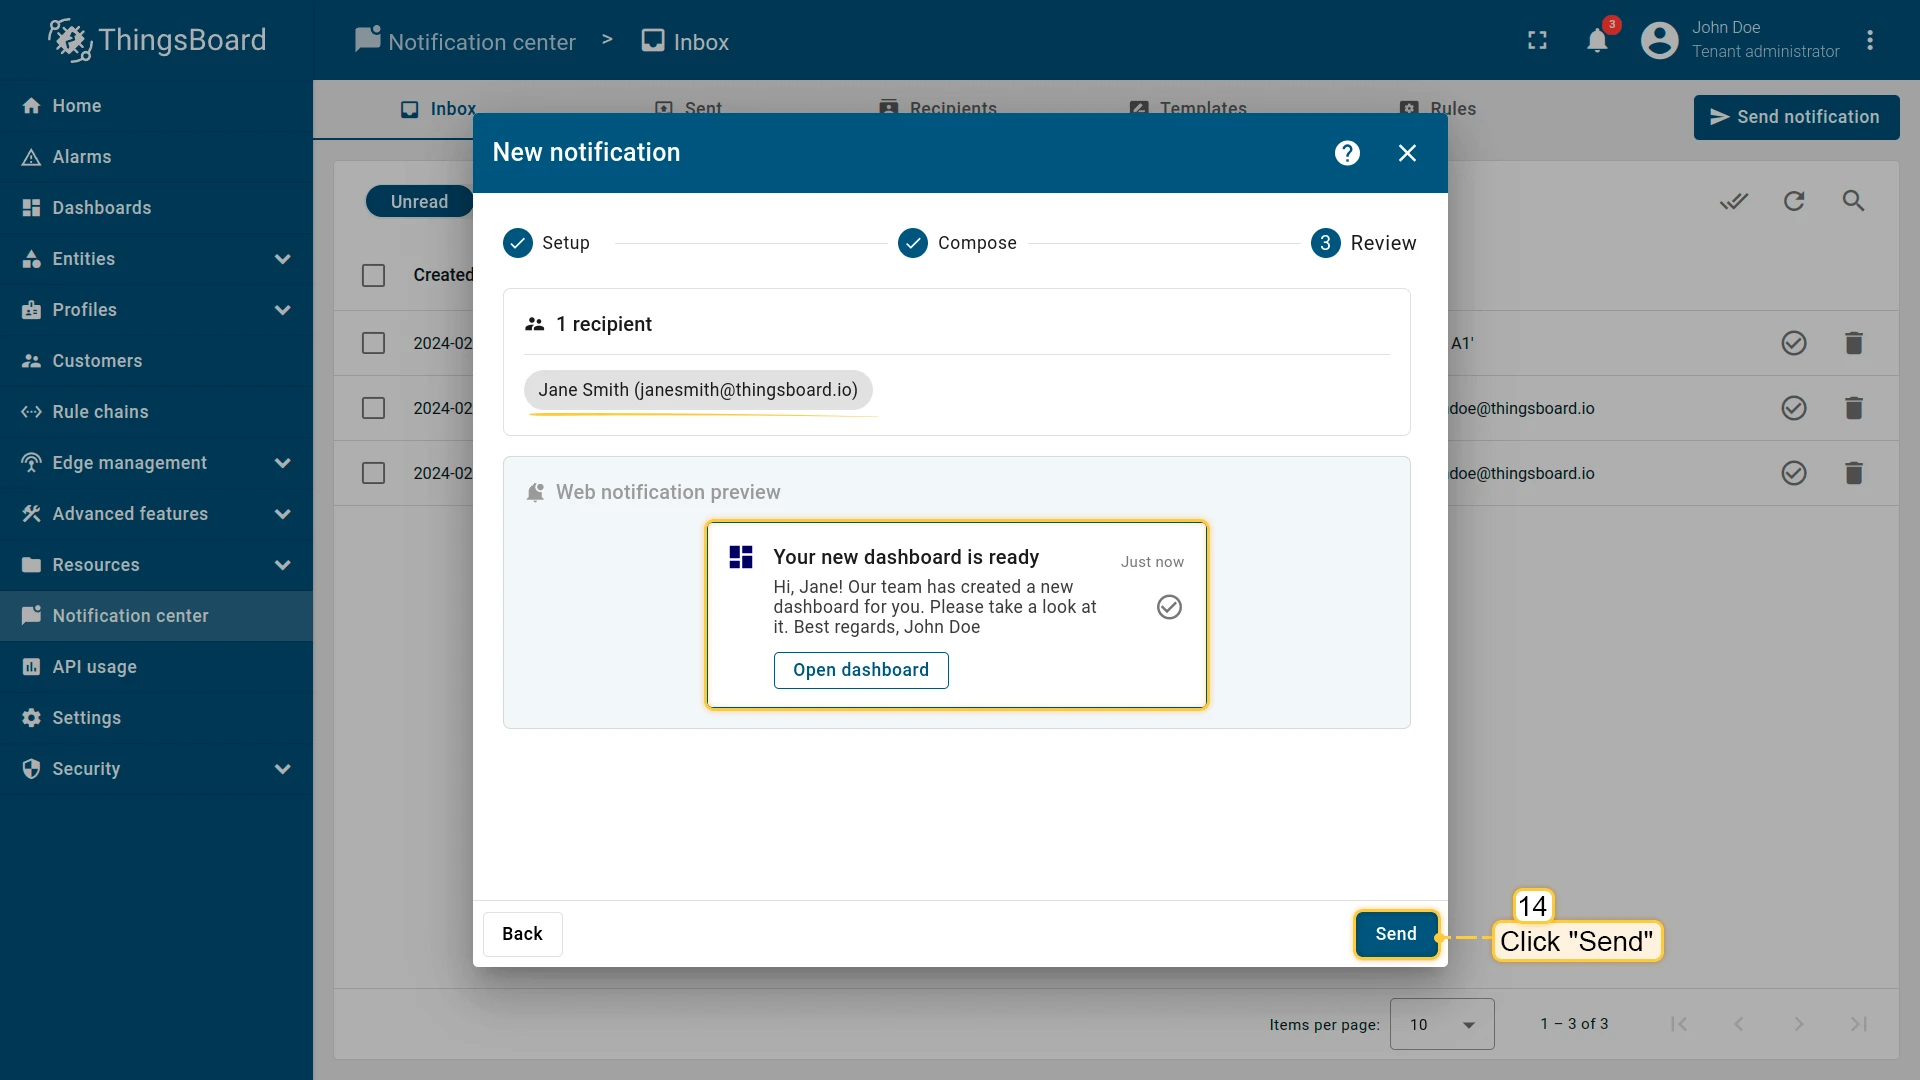
The recipient will receive the notification via the selected method.
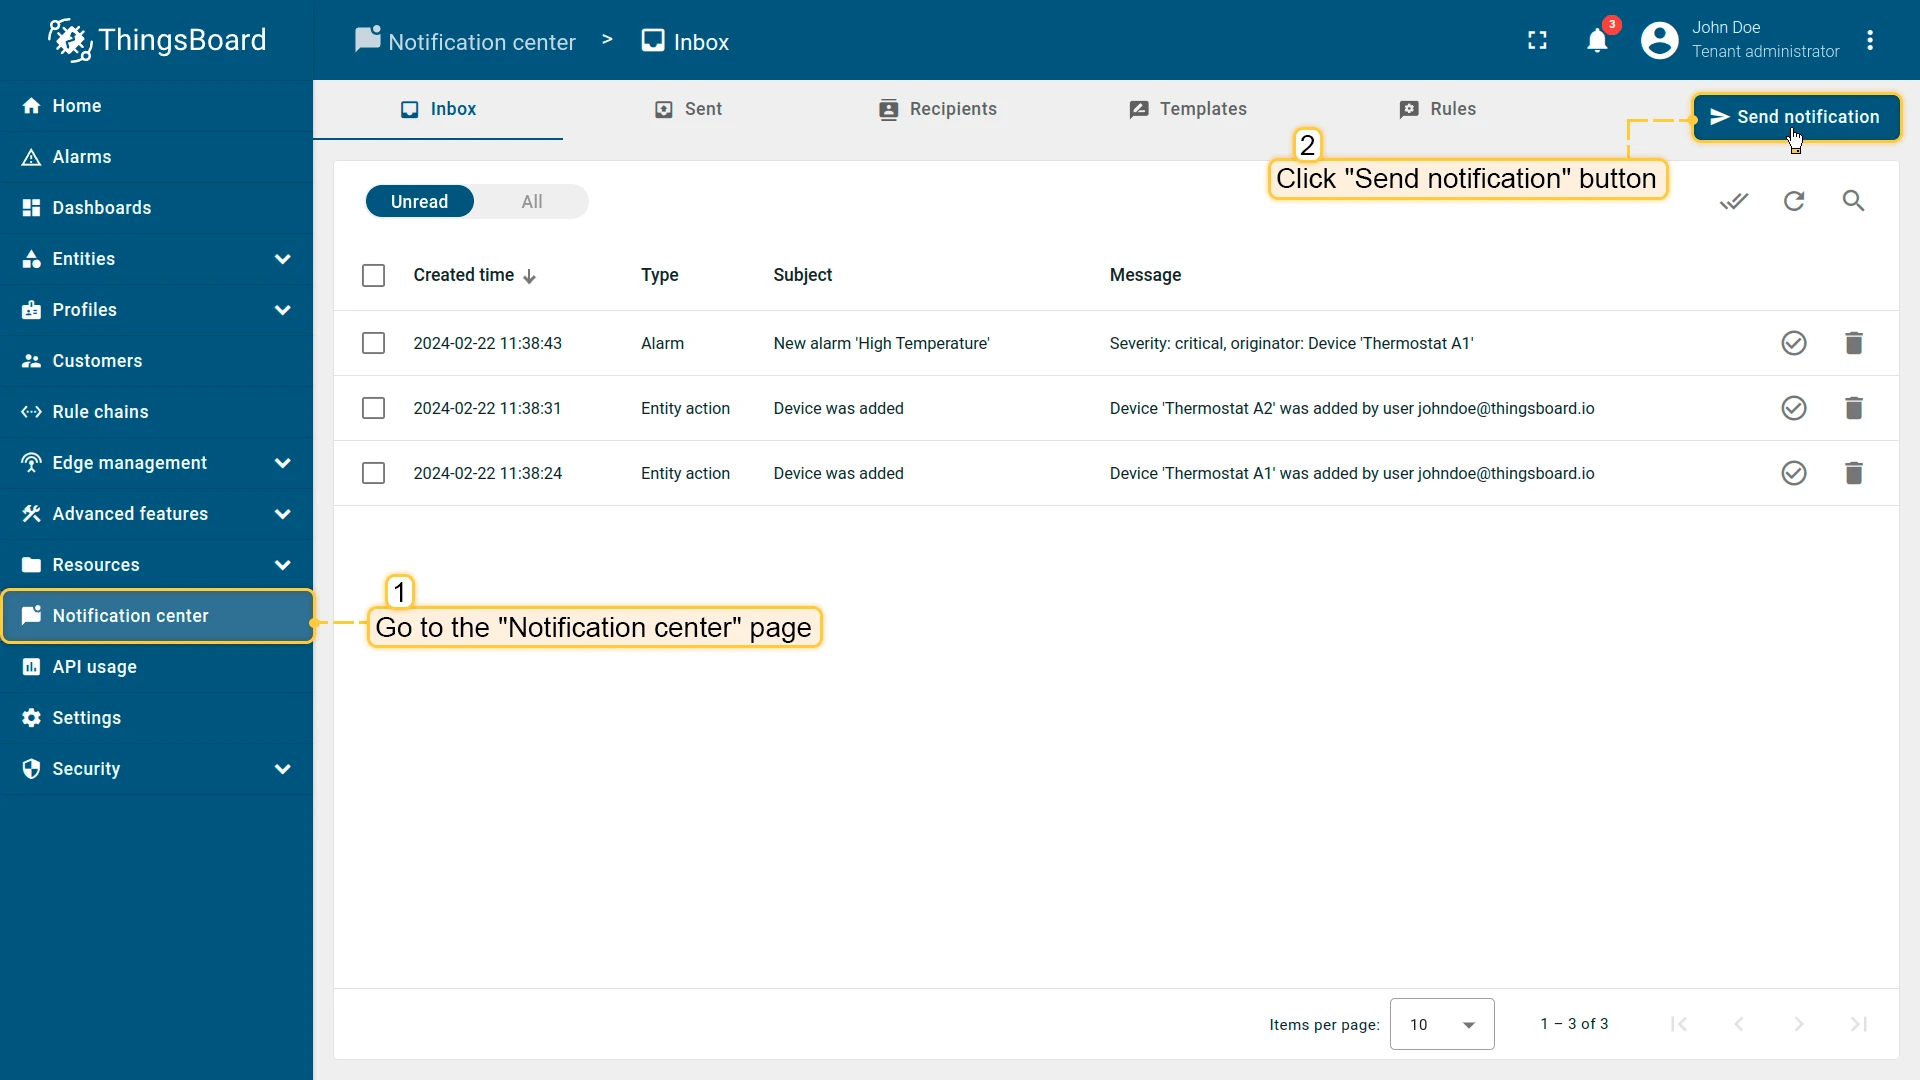
Viewing Notifications
Section titled “Viewing Notifications”The Inbox tab shows all notifications you have received. By default, only unread messages appear. Click All to view the full history.
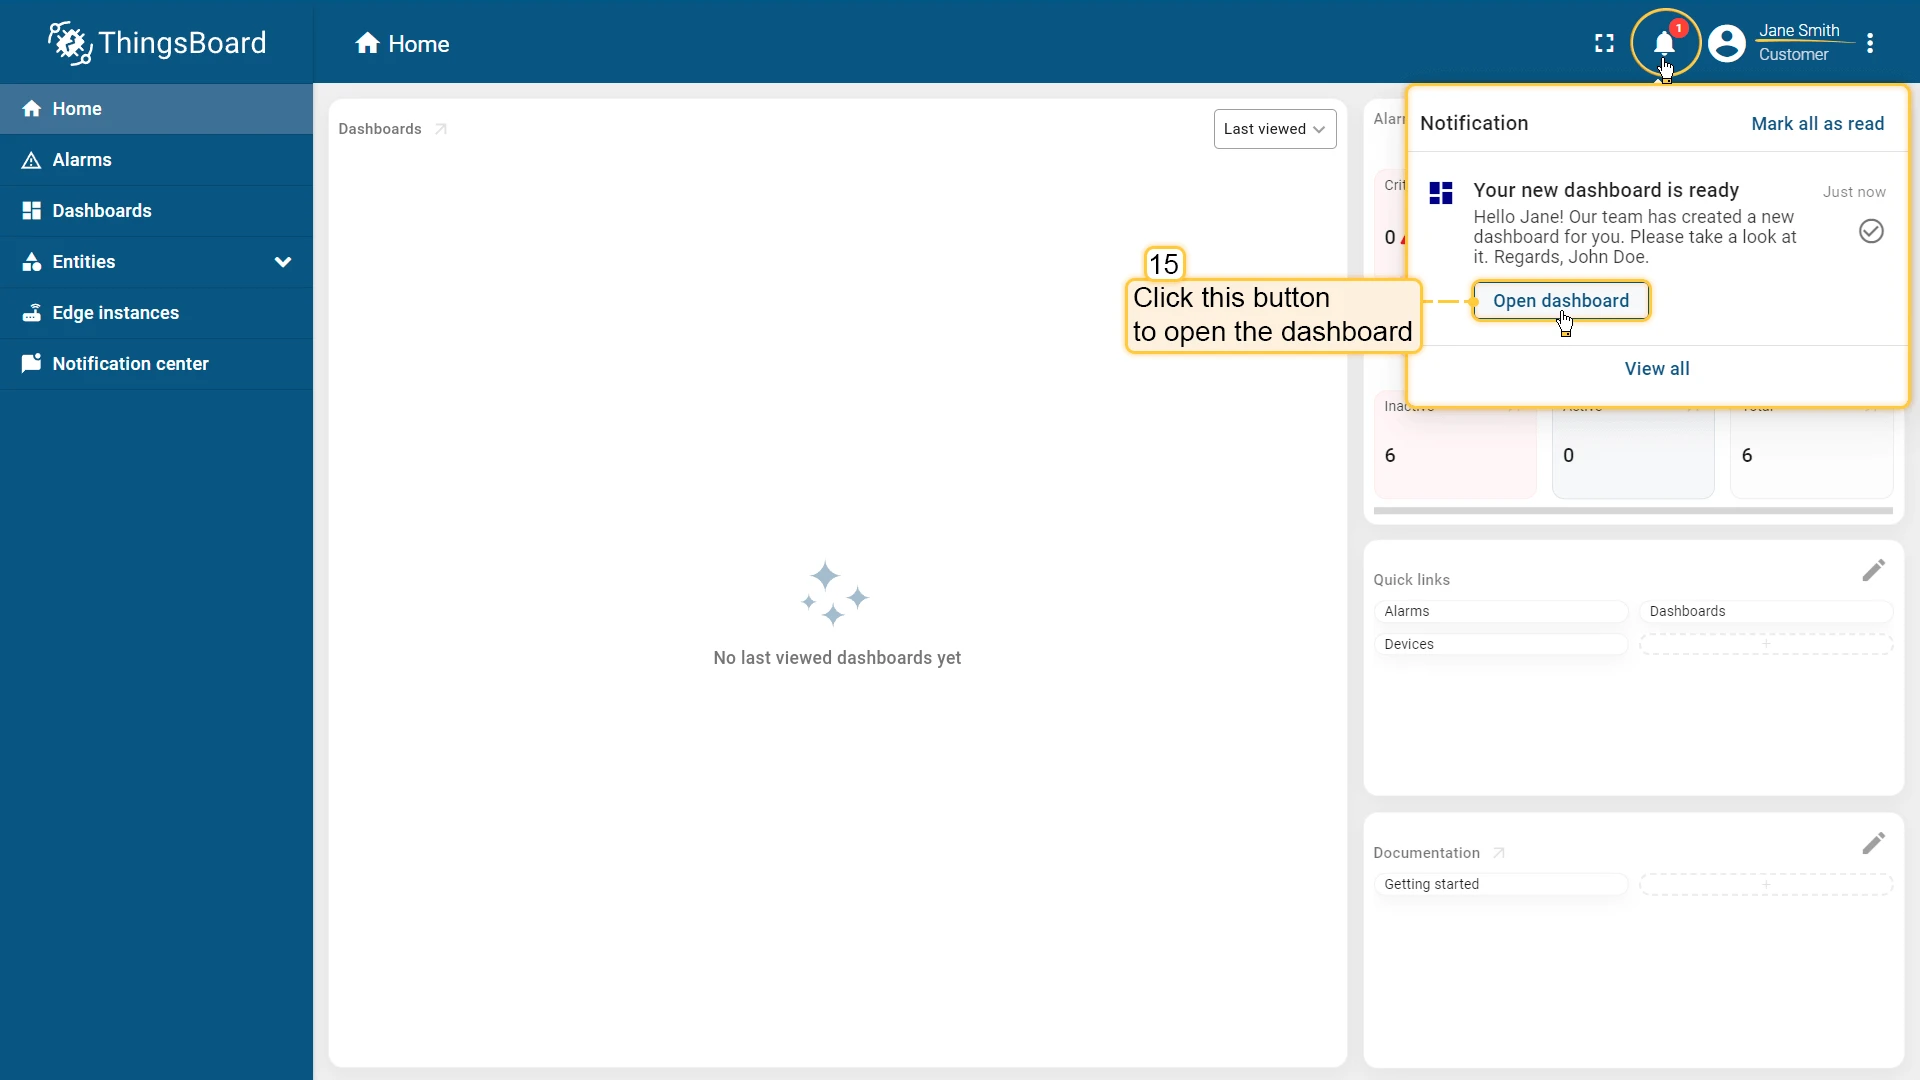
The bell icon in the top-right corner shows the unread count and provides quick access to recent notifications.
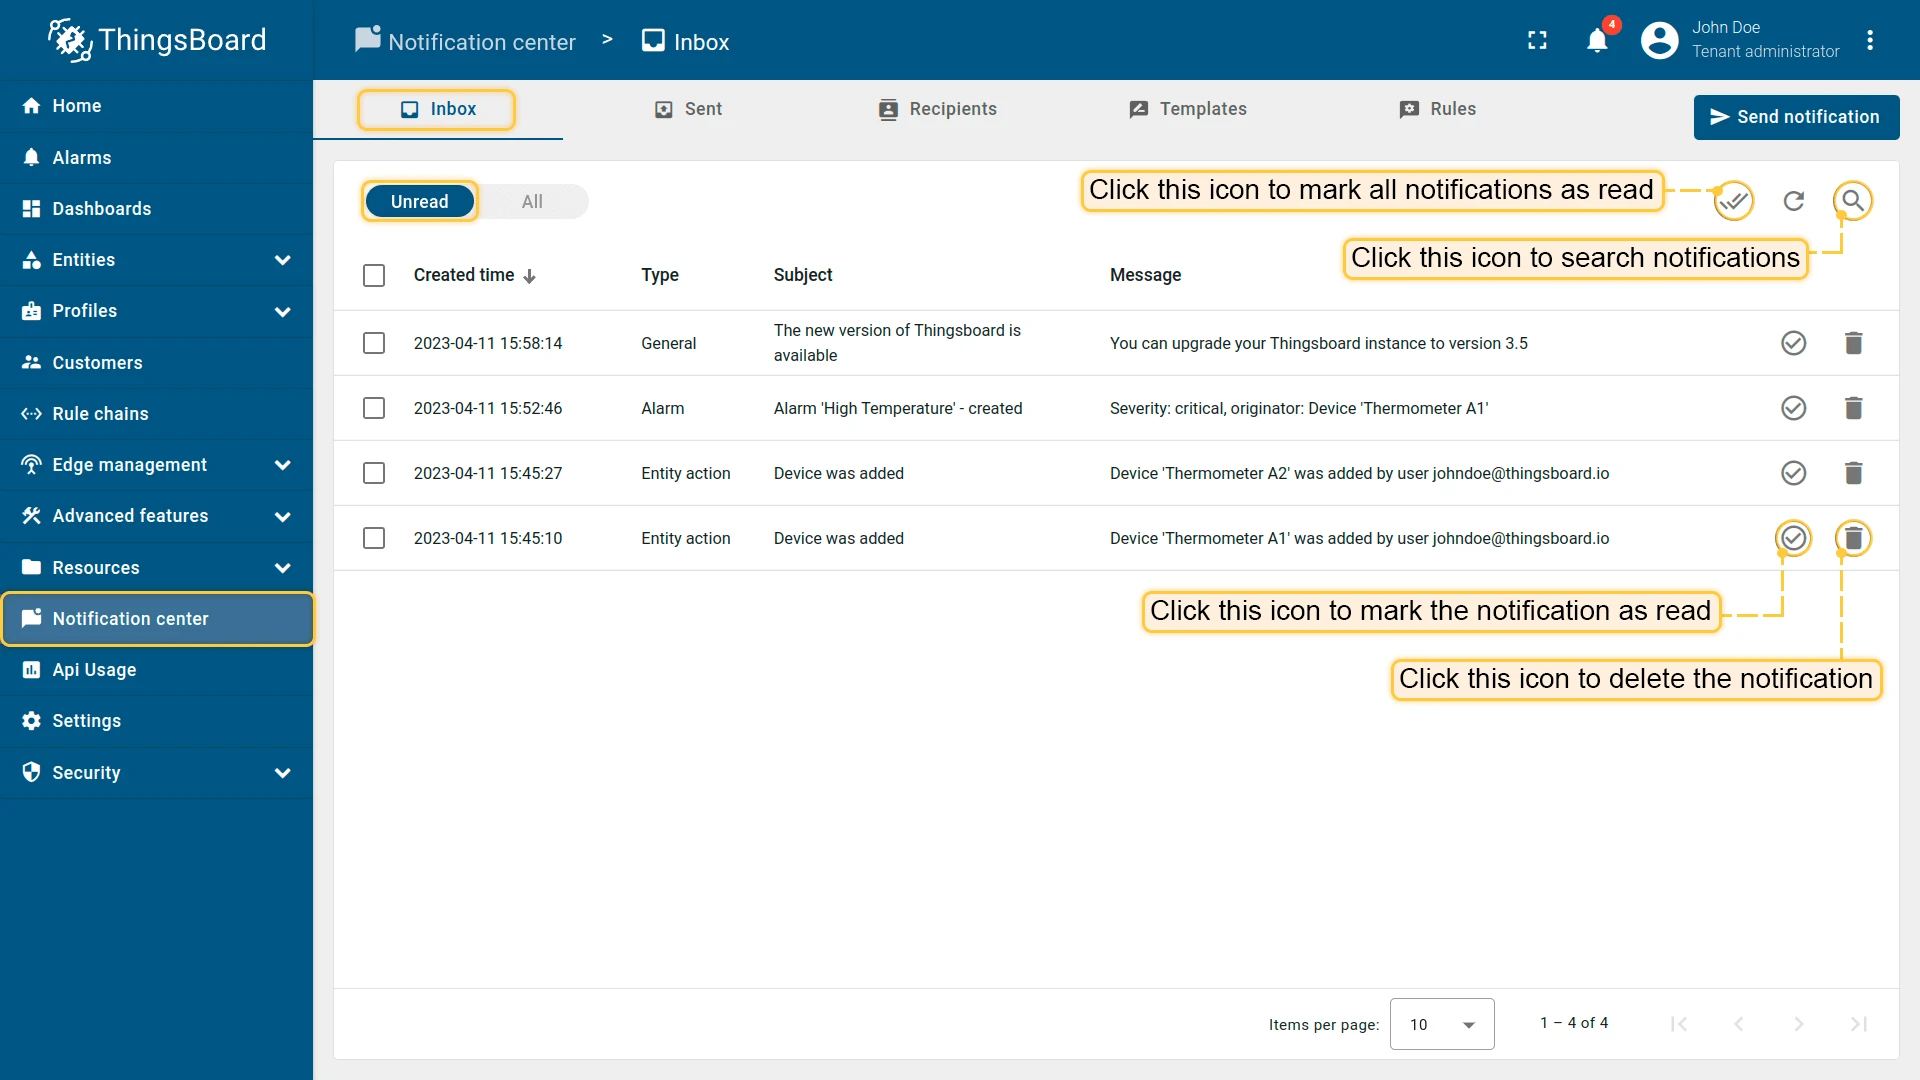
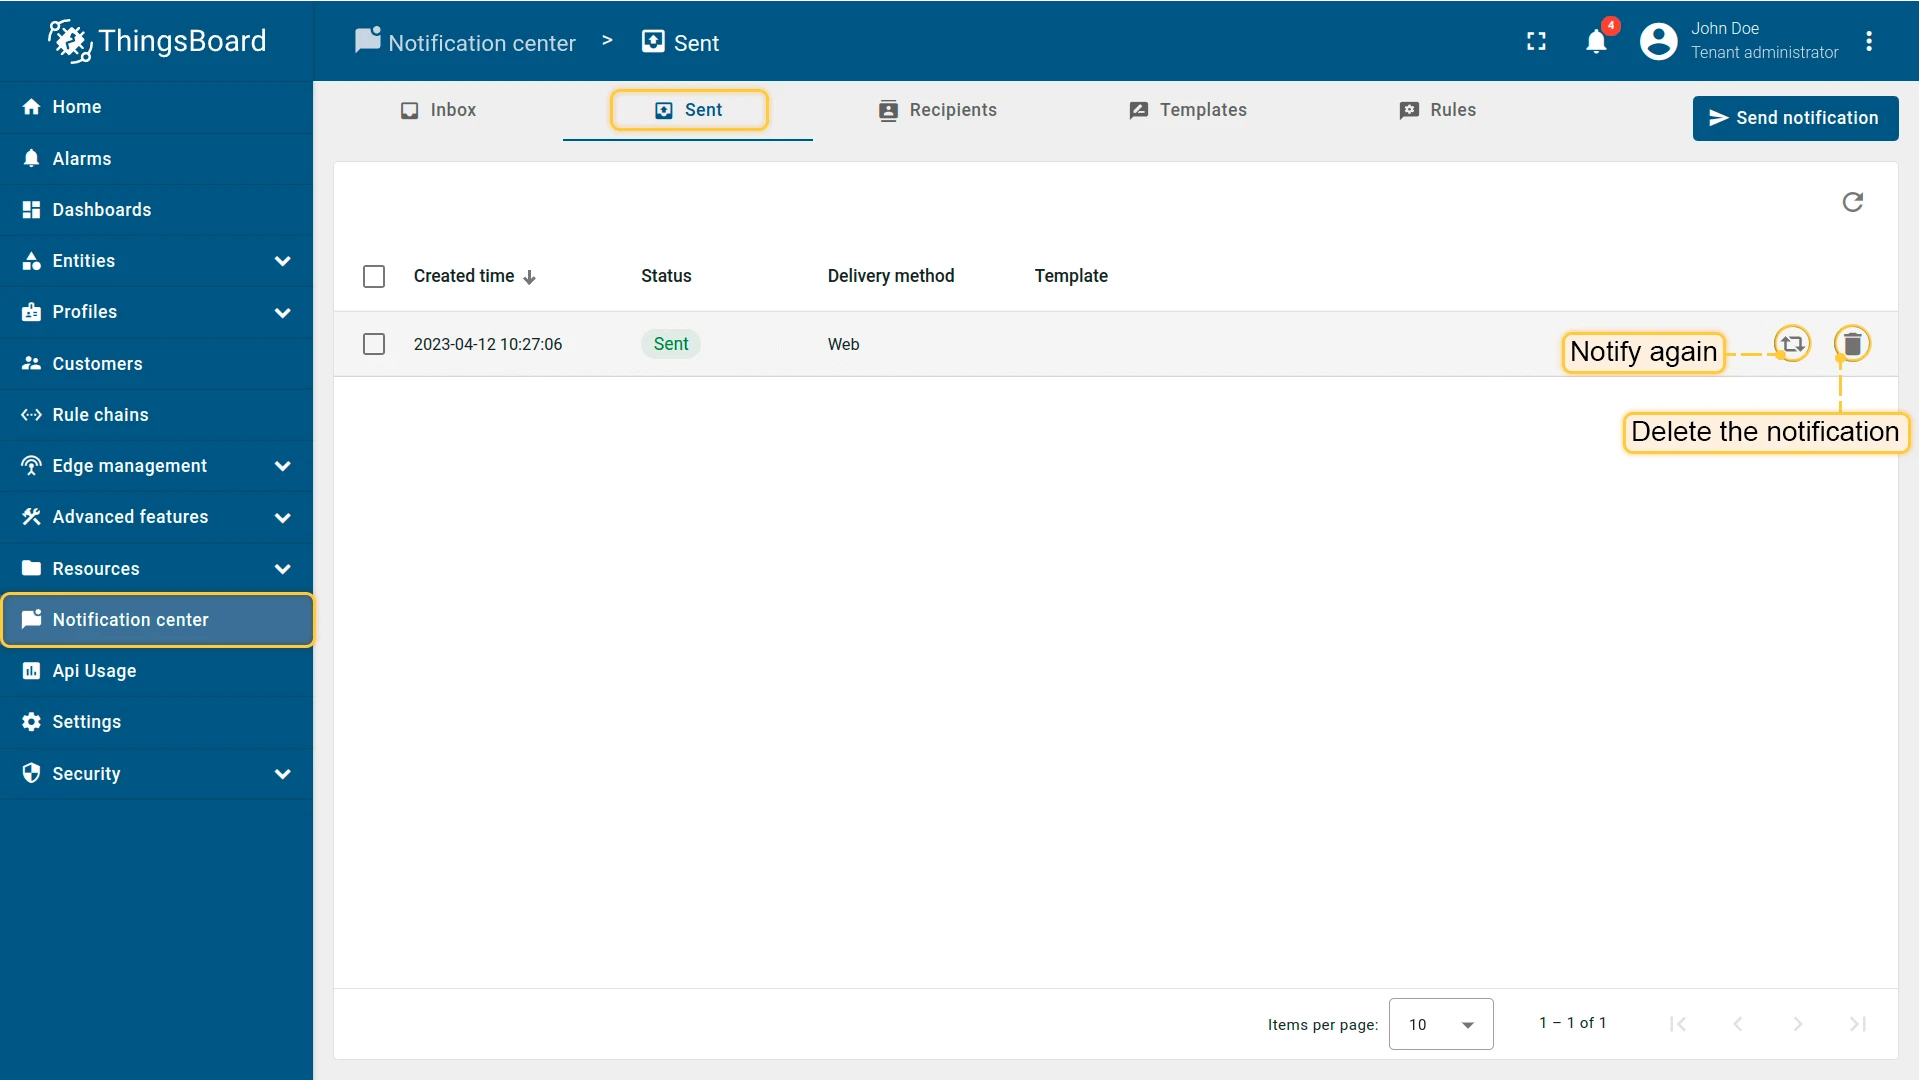
The Sent tab lists all notifications you have sent and their delivery status. Click Notify again to resend, or the delete icon to remove.
Examples
Section titled “Examples”The following recipes walk through the complete automated notification setup for specific delivery methods:
- Send Email on Alarm — configure email delivery when a device alarm is created.
- Send SMS on Alarm — send a text message when an alarm is triggered.
- Send Slack Message on Alarm — post a message to a Slack channel when an alarm is triggered.
- Send Mobile App Notification on Alarm — push a notification to the ThingsBoard mobile app when an alarm is triggered.
- Send Microsoft Teams Notification on Alarm — post a message to a Teams channel when an alarm is triggered.
Was this helpful?